

Partex PROMARK T-800 User Manual
CABLE I.D. PRINTER
User’s Guide
www.partex.eu
June 2012
Copyright ©2012 PARTEX MARKING SYSTEMS
ALL RIGHTS RESERVED
WWW.PARTEX.NU

Note
Regulations for this product CE Marking
- This product must not be used in residential areas.
- This product may cause interference if used in residential areas. Such use must be avoided unless the user takes
special measures to reduce electromagnetic emissions to prevent interference to the reception of radio and television broadcasts.
• The contents of this document may not be duplicated in whole or in part by any means without permission.
• The information in this document is subject to change without notice.
• In no event shall Nisca Corporation bear any responsibility for any direct or indirect damages arising from the
use of our product.
• In no event shall Nisca Corporation bear any responsibility for any direct or indirect damages resulting from
the improper use of our product by the customer, or from modifications or changes made to our product by
the customer.
• If you find any errors or omissions in this document, or if you have any questions concerning this document,
contact your nearest dealer.
• It is recommended that the data created and saved with this printer be stored in another storage device such
as the hard disk of the personal computer. (Use the included PC connection kit to back up the data.) We assume no responsibility for the loss caused by data disappearance due to a machine failure, repair, inspection,
or weak battery as well as the carry-over loss.
ATTENTION!!!
Use only the materials and settings recommended by Partex Marking Systems. Using other
materials could cause a damage to the printer and consequently, to the loss of the warranty.
Start
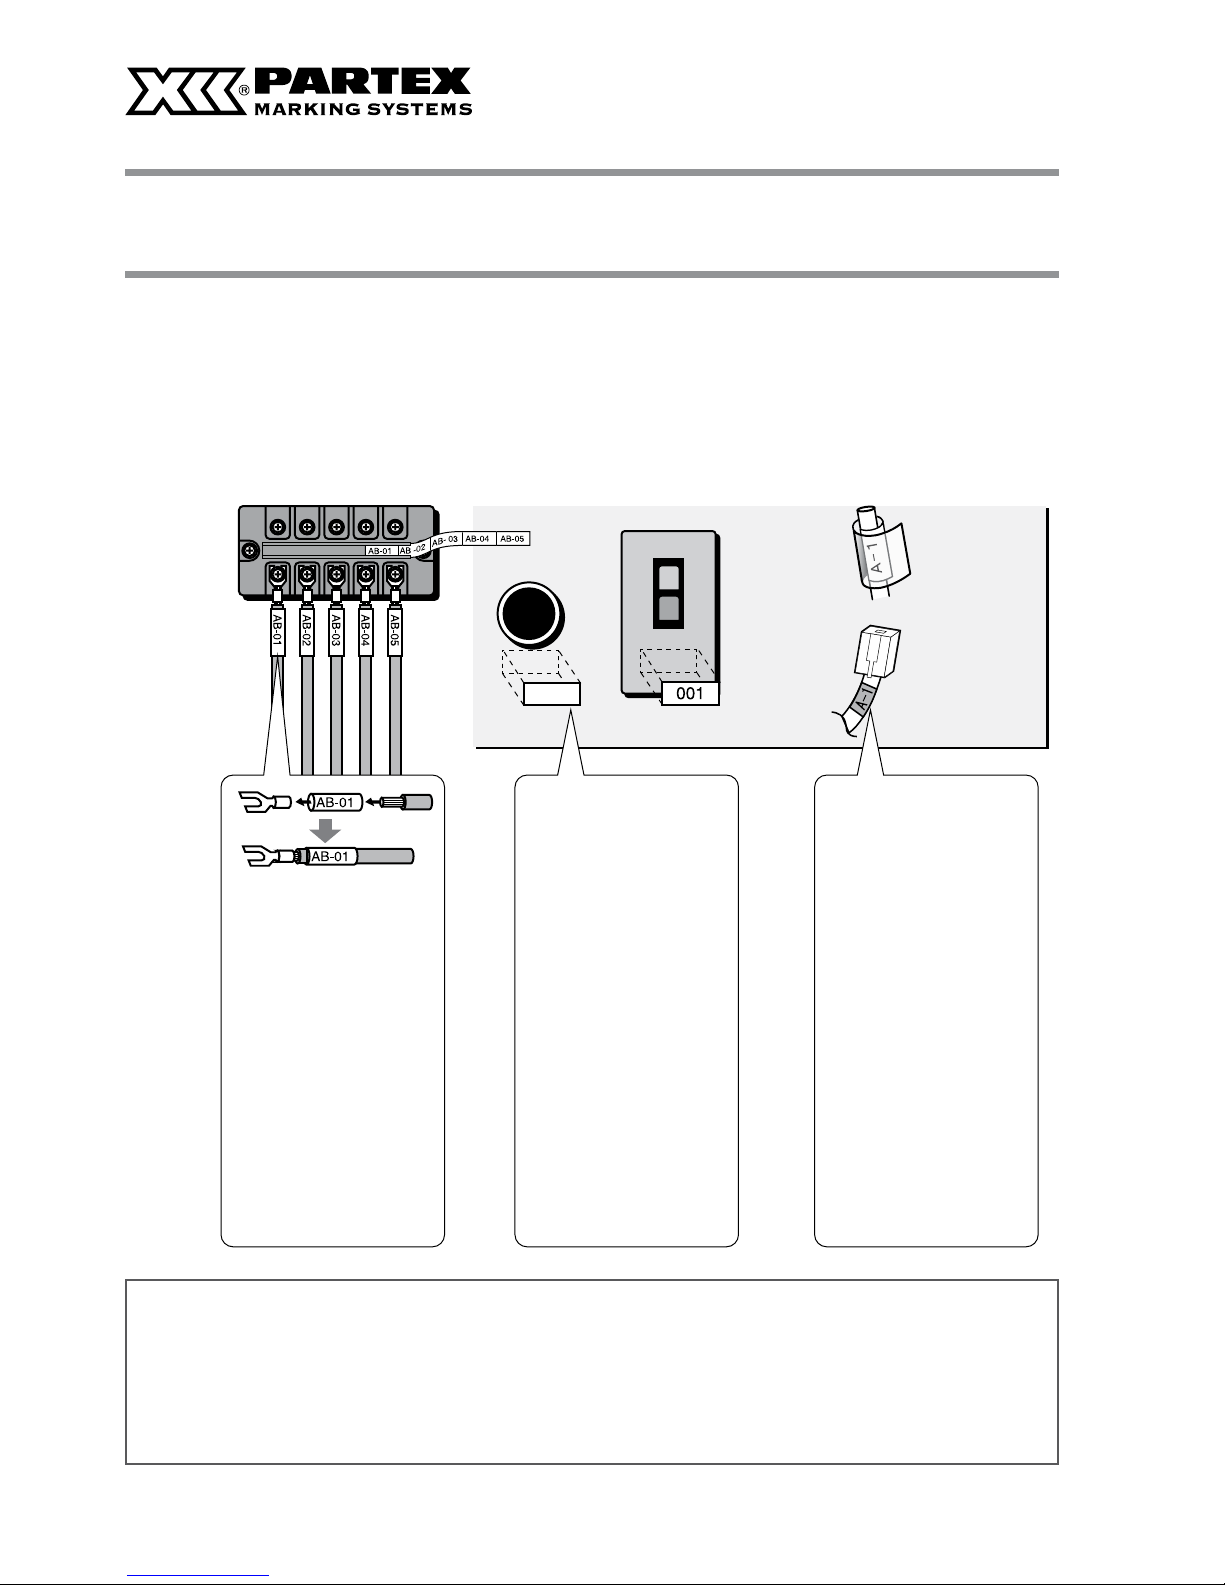
When you open a power distribution panel, you are confronted with an array of tightly packed terminals, circuit breakers,
and switches, and these myriad devices are connected by a maze of cables. If each device and cable is not clearly labeled
with a symbol or a number, maintenance can become a nightmare. In such electrical facilities, it is common practice to
use printed tube to identify cables and printed labels to identify switches. The printer is used to print such labels and tube.
We wish you successful work with the printer.
PROFESSIONAL PORTABLE PRINTER
OF PROFILES – PROMARK T-800
Tube
Label
Clear
laminate seal
Labeled with switch
name or number
Print of the profiles
for wires and cables.
T-800 prints on: PO profile
for the wires from 0.25 to
6.00 mm, their halogen-free
version POZ, halogen-free
heatshrinkable tubes PHZ,
PP profile which can be inserted in PT, PT+, PTC, PTZ+
holders, PM and PTM profile,
cable profile PO-068.
Clear marking system
Labels’ print
PROMARK T-800 also prints
on self-adhesive labels (provided separately). With the
labels of different width you
can mark connectors, valves, buttons or other components for cable cabinets.
Label with clear adhesive
lamination
Wrap around tape
with printable and
laminating layers
When applied after printing, the printing is covered
by plastic laminating film,
protecting the characters
from scratching. Adheres to
cables after they have been
connected.
THE PRODUCER’S WARRANTY
Use only the materials and settings recommended by Partex Marking Systems. Using other materials
could cause a damage to the printer and consequently, to the loss of the warranty.
For the list of markers for printing go to pages 142-145.
For the recommended font settings, go to page 154.

Main Features
Compact and easy to carry
In addition to being compact at 250 mm (W) x 300 mm (D) x 85 mm (H), the printer also has a lightweight design
(2kg), making it easy to transport to the site of electrical facilities. Overall, the printer greatly increases work efficiency.
Fast printing
When printing at fast speed, the printer can easily print 42 tube segments per minute.*
* When a tube is cut into to 20mm segments and five “3mm 100%” characters are printed in the half cutting.
(This feature is available only for printing on tube.)
Supports a variety of printing media
The printer can print on tube, label tape, heat shrink tube, wrap around tape, plate and 4mm I.D. strip. (To print on
other than commercially available tube and plate, a special cassette is needed.)
A wide variety of options provide excellent additional capability
The functionality of the printer can be expanded by installing a wide variety of options, including: the “Tube Warmer”, which facilitates printing in cold (5°C) environments; the “Tube Feeder”, which permits stable and precise
printing on tube that is fed from a reel.
Many functions not normally found in a hand-portable machine
Includes a variety of standard features such as adjustable character size, spacing and margins, and file saving capabilities that are hard to imagine in such a light-weight machine.
1
2
3
4
5

11
Contents
Contents
PART 1 Before You Begin (Preparation)
1.1 Names and Functions of Parts 18
Main Unit 18
LCD screen 20
Keyboard 22
1.2 Connecting the AC Adapter 24
1.3 Use the PC Connection Kit 26
Explanation of Symbols 4
Safety Precautions 5
Quick Guide to Using the Printer 12
PART 2 Basic Operations
2.1 Print na profilach PO/POZ,
PHZ and PHM CLEAR 28
Prep 1 Install cassettes 28
Prep 2 Insert tube 30
Prep 3 Turn the power switch on 31
Step 1 Input characters 32
Step 2 Print 35
2.2 Impression on the profiles unwrapped
from cassettes 36
Prep 1 Install cassettes 36
Prep 2 Turn the power switch on 39
Step 1 Input characters 40
Step 2 Print 42
2.3 Printing on Wrap around Tape 43
Prep 1 Installing cassettes 43
Prep 2 Install the wrap around tape guide 44
Prep 3 Turn the power switch on 45
Step 1 Input characters 46
Step 2 Print 46
2.4 Printing on Plates PP, PPA and PHZF 48
Prep 1 Install cassette 48
Prep 2 Insert plate 50
Prep 3 Turn the power switch on 51
Step 1 Input characters 52
Step 2 Print 55
PART 3 Character Input
3.1 Inputting Characters 58
Inputting characters 58
3.2 Inserting symbols, Polish diacritic
characters and Cyrillic alphabet 59
Inserting symbols and Polish diacritic
characters 59
Inserting Russian letters 60
3.3 Deleting Characters, Creating New
Pages, Moving the Cursor 61
Deleting or changing characters 61
Deleting all entered text data 62
Insert mode and overwrite mode 63
Creating a new page 64
Moving the cursor 65

2
PART 4 Advanced Operations
4.1 Changing the Characters and
the Number of Lines
68
Changing character size 68
Changing the spacing between
characters 69
Adding an underline to “6” and “9” 70
Adding a frame to characters 71
Printing on two lines or three lines 72
4.2 Editing Pages
74
Pages 74
Copying and pasting pages 75
Cutting and pasting pages 77
Inserting pages 79
Deleting pages 80
Dividing pages 81
Combining pages 83
4.3 Saving, Retrieving and Deleting
Character Data
85
Files and Folders 85
Saving character data 86
Loading character data 88
Deleting character data 90
Renaming a folder 92
4.4 Various Printing Functions
94
Printing count and printing range 94
Changing the printing orientation 97
Changing the length and the character
alignment 99
Printing a specific page multiple times
(Continuous Print) 103
Printing text with sequential numbers
(Numbering print) 105
Adjusting the printing start position
and vertical position 108
Printing centerlines 110
Printing with short pitch width 111
Printing result obtained by specifying
a character alignment mode and
a multiple line centering mode 112
Adjusting the printing density 113
Changing the printing speed 114
4.5 Changing the Cutting Method
115
Half cuts and full cuts 115
Turning off half cuts 115
Making a full cut after a specific
number of tube segments 117
4.6 Other Operations
118
Removing the print media 118
Changing the display contrast 120
Turning off sounds 121
Turning off clear tube reverse
PHM CLEAR 121
Restoring the initial settings 122
PART 5 Maintenance
5.1 If a Tube or Label Tape Becomes Jammed 124
Action to Take against Media Jam
(When the “Media JAM” message
is displayed) 124
Actions to Take against Other Jams
(When the “Media JAM” message
is not displayed) 126
When a Tube or Label Tape is Not
Ejected/Fed 128
5.2 What To Do If the Cutter Is Getting Blunt 130
Changing the cutting depth 130
Reducing the cutting speed 132
5.3 Replacing the Cutter 133
5.4 Replacing the Cassette 136
Replacing the ribbon cassette 136
Replacing a tube or the label
tape cassette 137
5.5 Maintenance 138
Cleaning the printe 138
Cleaning the transport rollers 138
Cleaning the print head 140
Cleaning/Replacing the tube cleaner
for attachment 140

33
Contents
PART 6 Appendices
6.1 Consumable Supplies and Options 142
Materials for printing 142
Optional elements 143
Accessories 146
6.2 Message List 147
6.3 Troubleshooting 149
6.4 List of Symbols 151
6.5 List of Function 152
6.6 Main Specifications 153
6.7 Recommended font settings 154
6.8 Warranty conditions 155

Note
POINTER
CAUTION
4
Explanation of Symbols
The meanings of the symbols that are used in this manual are explained below.
Symbol of warning
A precaution to be followed to use the printer in safe is written. Failure to follow it can result in fatal or
serious injury. Be sure to follow it.
Caution symbol
A precaution to be followed to use the printer in safe is written. Failure to follow it can result in an injury. Be
sure to follow it.
Annotation symbol
Supplementary information is provided to facilitate operation.
Reminder symbol
Supplementary information about the operational procedure is written.
Tip symbol
Signal useful tips.
For reference see page
Indicates a page that should be referenced in regards to a specific operation. Refer to the
information on that page.
Keyboard
Indicates a key that should be pressed on the keyboard.

55
Safety Precautions
Do not disassemble or modify the unit
Disassembling or modifying the unit could cause a fire or damage the unit.
Do not handle the power cord with wet hands
Do not attempt to plug in or unplug the AC adapter plug, etc., while your hands
are wet. Doing so could result in electric shock.
Do not place the unit in the vicinity of heating devices
Do not place the unit or the AC adapter cord in the vicinity of heating devices.
Doing so could cause the unit or the cord to melt, which could result in fire or
electric shock.
Keep away from paint thinner, etc.
Do not place the unit near alcohol, paint thinner, or other flammable solvents. The
solvents could come into contact with internal electric components and cause a
fire or electric shock.
Plug the power cord in securely
Be sure to plug the AC adapter plug into the power outlet securely. Failing to do
so could result in a fire or electric shock.
In order to ensure safe operation of the printer, be certain to observe the following safety precautions.
WARNING
The shape of the power plug varies according to country.

6
Always keep the AC plug clean
Clean the AC adapter plug periodically. If dust, dirt, soot, etc., is allowed to accumulate on the plug, the dust could absorb moisture, creating an insulation fault
that could cause a fire.
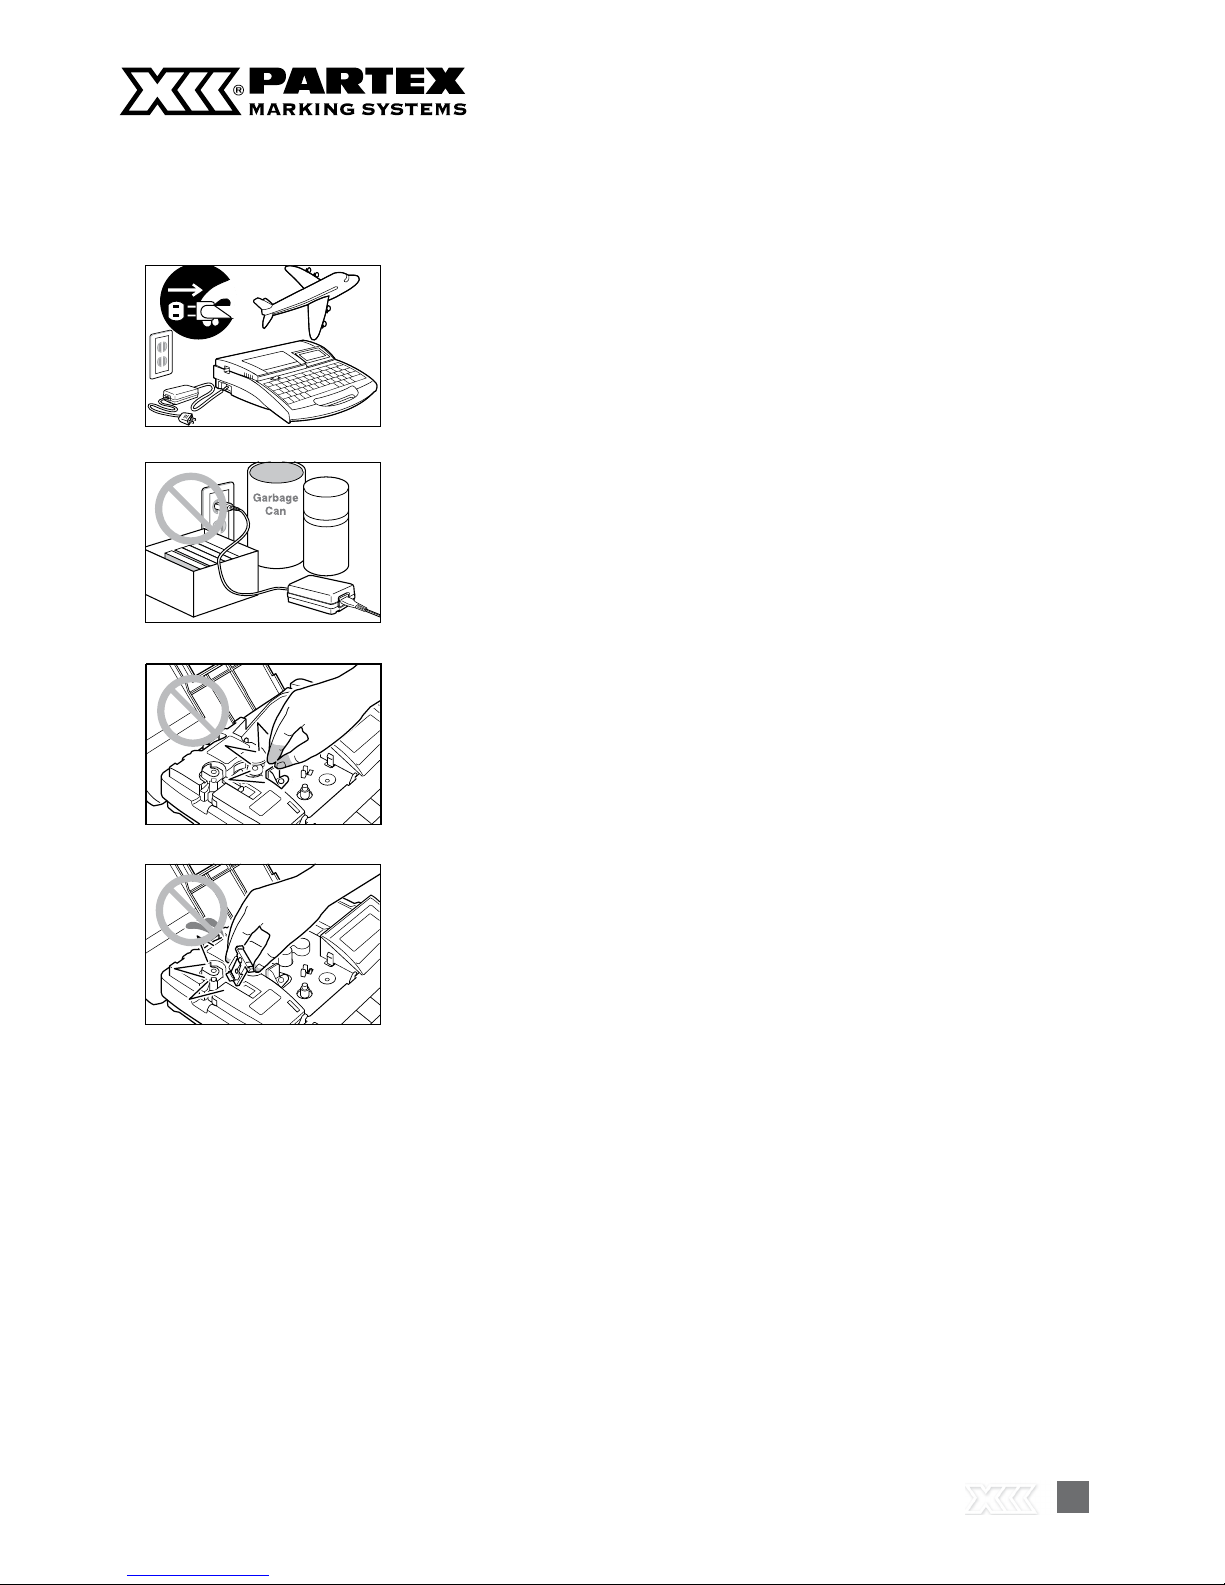
Do not continue to use the unit if an abnormality develops
If the unit begins to smoke or emit an unusual odor, turn the power switch off immediately, unplug the AC adapter plug from the power outlet, and then contact
your nearest dealer. Continuing to use the unit after an abnormal condition has
developed could result in fire or electric shock.
Do not connect to a multi-outlet adapter or extension cord
Do not connect this unit to a multi-outlet adapter or extension cord.
Doing so could result in fire or electric shock.
Do not power on with the power cord tied. It can cause fire or electrical shock.
Do not use sprays, etc., in the vicinity of the unit
Do not use flammable sprays in the vicinity of this unit. The spray could come into
contact with internal components of the unit, resulting in a fire or electric shock.
Do not clean with paint thinner, etc.
If it is necessary to wipe dirt off the unit, use gauze that has been dampened
with water and then thoroughly wrung out. Never use flammable solvents such
as alcohol, benzene or paint thinner. The solvents could come into contact with
internal electric components and cause a fire or electric shock.
Turn the unit off for cleaning
Before cleaning the unit, turn the power off and unplug the AC adapter from the
power outlet. Injury could result if the power switch is inadvertently left in the “ON”
position and the unit is put into operation.
77
Safety Precautions
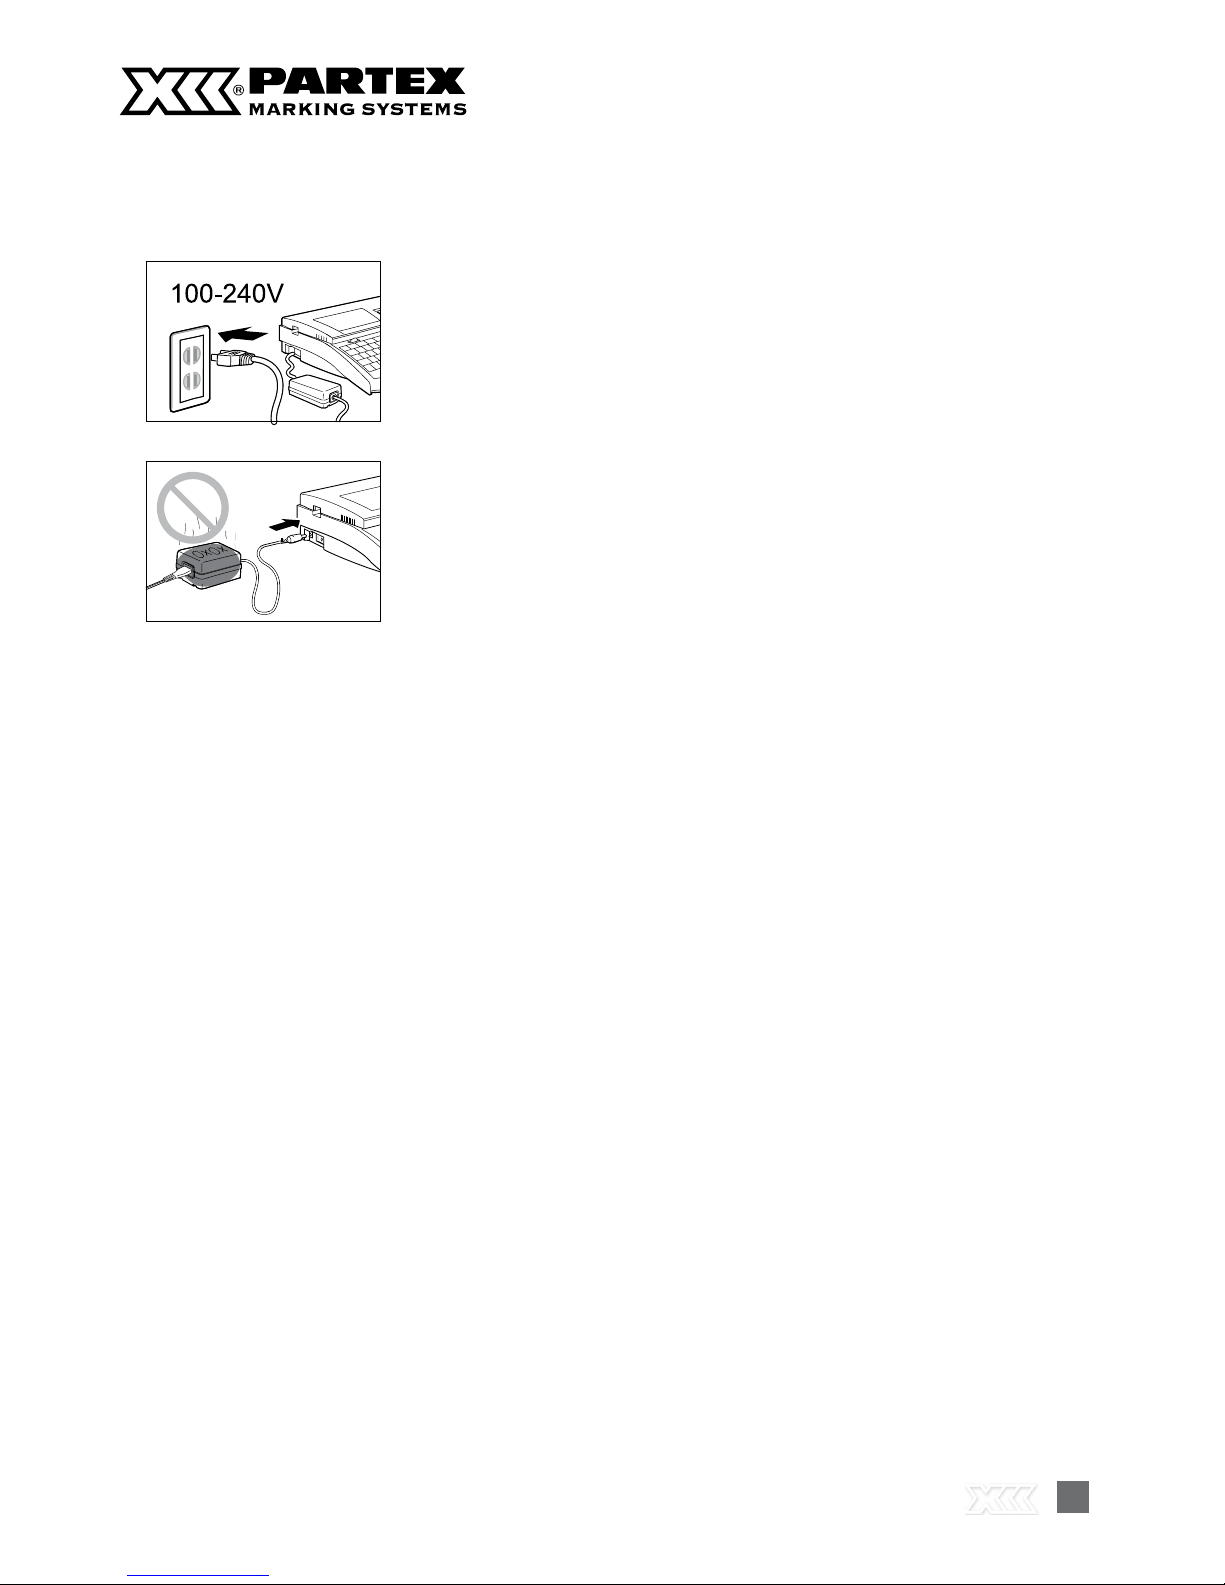
Use a 100-240V AC power supply
Use only at the indicated power voltage.
Use at voltage between 100 and 240V AC. If not, it may result in fire,
electrical shock or machine failure.
Do not use any AC adapter or cord other than the included one
Use only the included AC adapter (K30120) and cord. Using any AC adapter or
cord other than the included one can result in fire, electric shock, or printer failure.
Do not use the included AC adapter for any other product. Fire or electric shock
can result.
When it thunders at a short distance, remove the power plug from the outlet
When it thunders at a short distance, remove the power plug from the outlet. If not, it may result in fire, electric shock, or
machine failure.
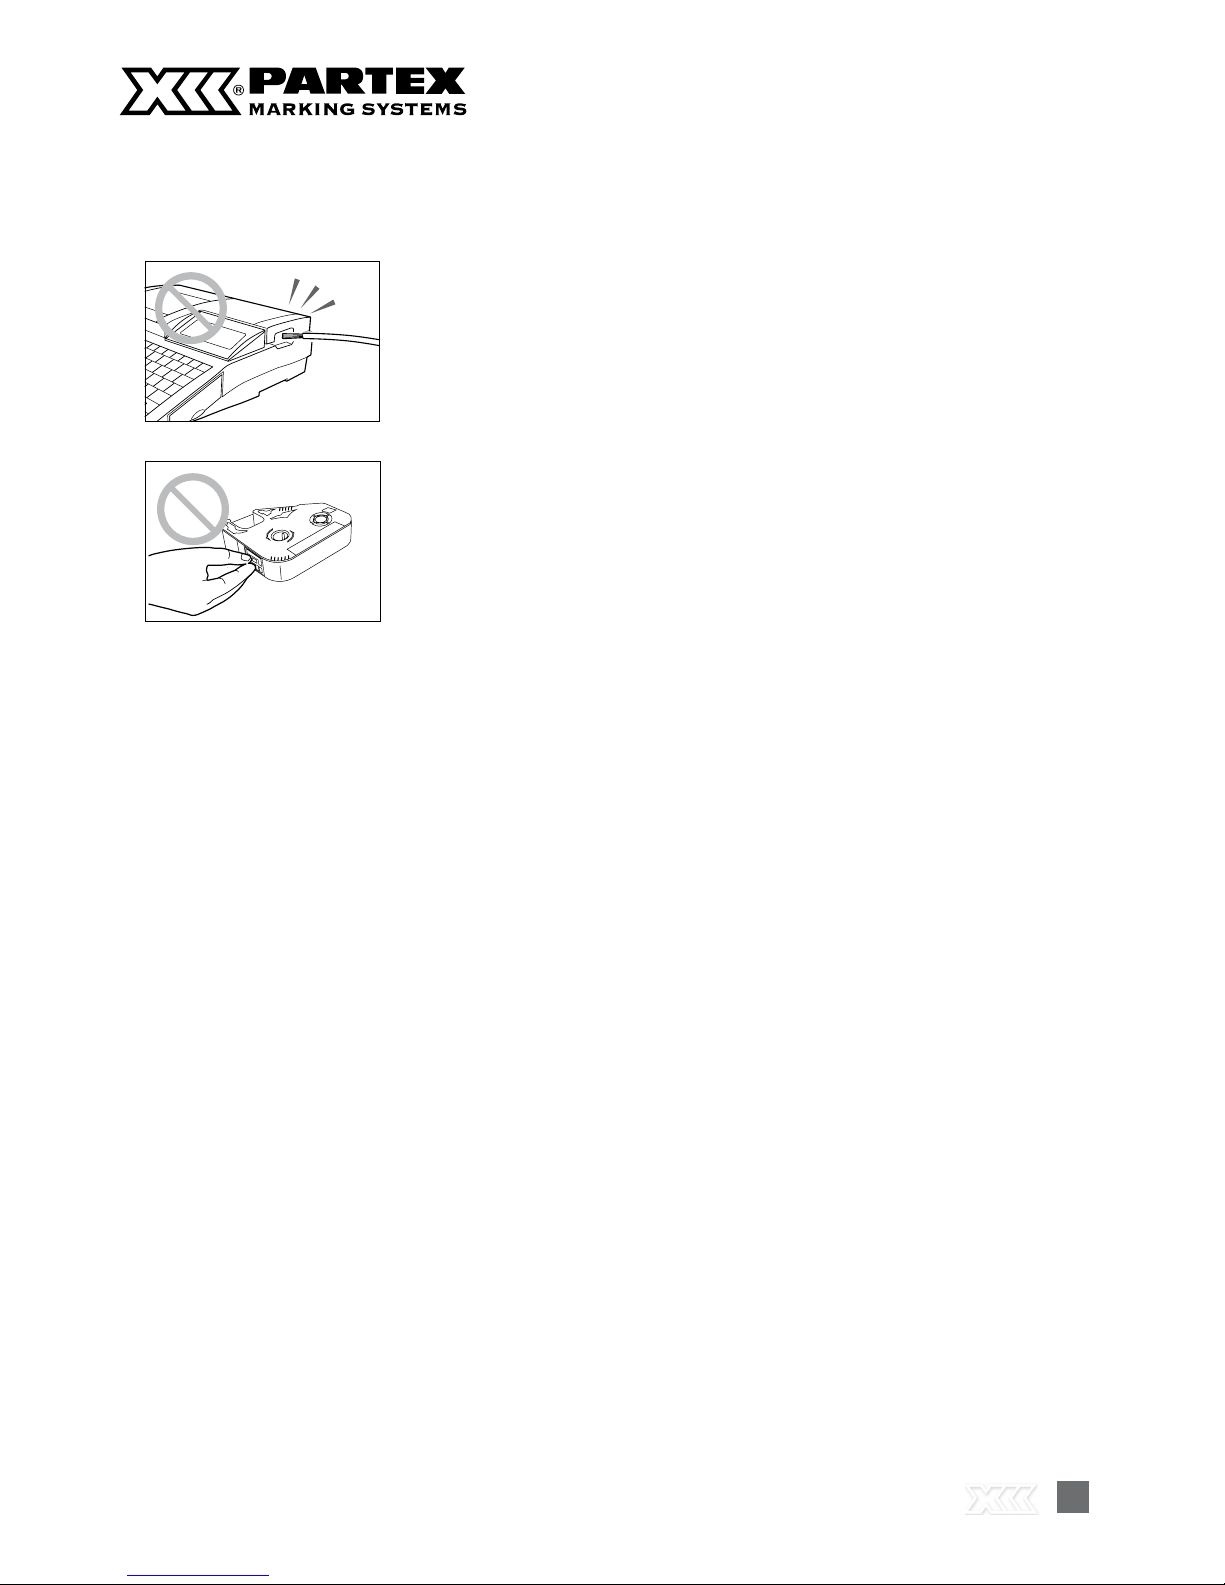
Do not damage the AC adapter and cord
Do not damage, pull excessively, or modify the AC adapter and cord. Do not place a heavy thing on the AC adapter
and cord. A short-circuit can be caused at the damaged portion, resulting in a fire or electric shock.
CAUTION
8
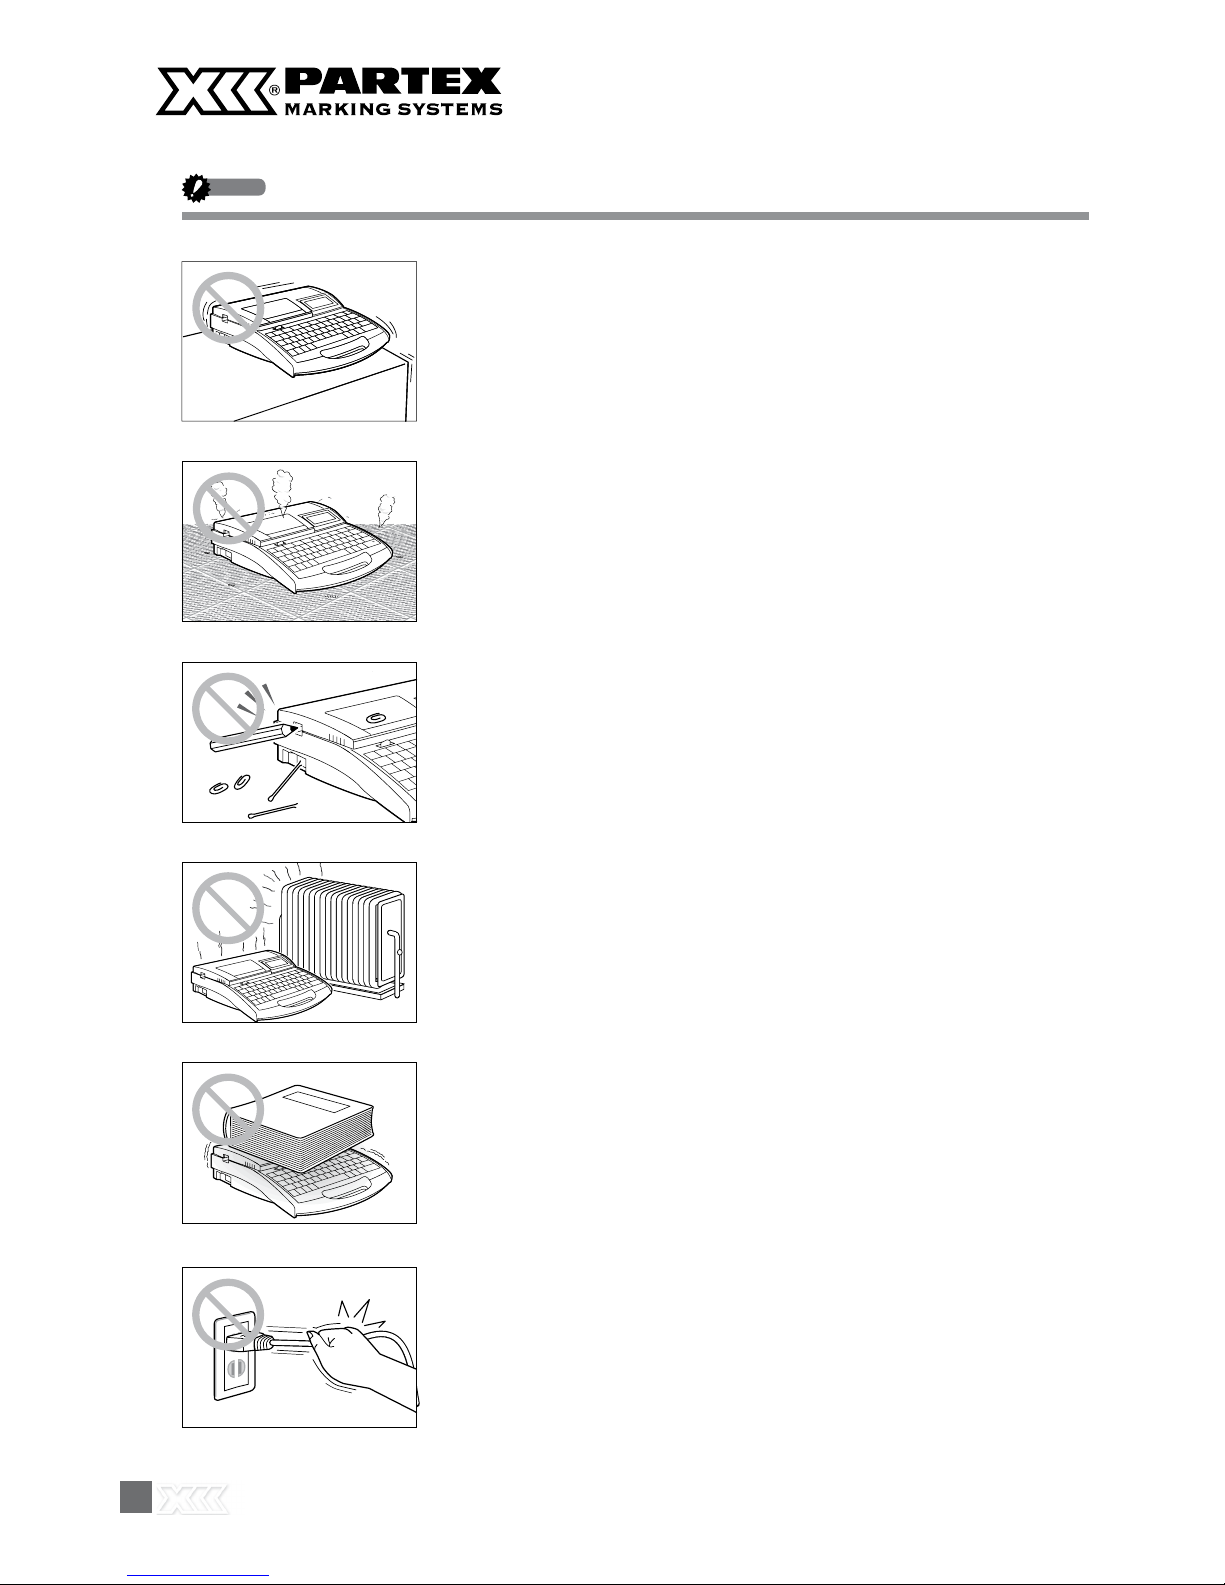
Do not place the unit on an unstable surface
Do not place the unit on an unstable surface or a surface that is subject to vibration. The unit could fall or tip over and cause injury.
Do not place the unit on a carpet
Do not place the unit directly on a rug or carpet. Fibers and dust from the carpet
can get inside of the unit and cause a fire.
Do not insert foreign objects inside the unit
Do not drop or insert foreign objects such as clips or staples in the opening for
the AC adapter, cutter section, or inside the printer. Otherwise it may cause fire,
electrical shock, machine failure, or injury.
Protect the unit from humidity and dust
Do not operate or store the unit in a hot and humid environment, in a dusty environment, in an area exposed to direct sunlight, or near an open flame. Doing so
could result in fire or electric shock.
Be sure to observe the storage and operating environment condition.
Operating environment: 15-32.5°C, RH 10-85%
Storage environment: 5-35°C, RH 10-90%
Do not place heavy objects or metal objects on the unit
Do not place heavy objects on the unit. Doing so could damage the unit.
Do not place metal objects such as accessories or containers such as cup containing water or fluid. Touching the electrical parts inside the printer can cause
short circuit and may result in fire or electrical shock.
Handle the AC adapter carefully
When unplugging the power cord from an outlet, grasp the plug itself; do not pull
on the cord. Pulling on the cord could damage the cord, which could result in fire
or electric shock. Furthermore, always be sure to turn the power switch on the unit
“OFF” before unplugging or plugging in the AC adapter.
Safety Precautions
99
Safety Precautions
Unplug the unit when not in use
If the machine will not be used for a long time, unplug the AC adapter from the
power outlet. Otherwise, electrical leakage may occur, and fire could result if dust
has accumulated.
Keep the area around the AC adapter clear
In order to allow you to unplug the AC adapter quickly in an emergency, do not
place other objects around the outlet. Inability to unplug the unit quickly in an
emergency could result in fire or electric shock.
Do not touch the print head
Do not touch the print head while it is printing or immediately after printing. Doing so could result in a burn.
Do not touch the cutter
This unit has a built-in cutter. To avoid injury, read this manual
thoroughly and handle the cutter carefully.
Keep small children away from the consumable
Always keep the consumable such as ribbon cassette, cleaner, etc., out of the reach of small children to avoid accidents.
Securely hold the handle of the printer
To avoid personal injury, securely hold the handle of the printer when carrying it.

10
Handle the unit gently
Do not subject the unit to strong impacts. Doing so could damage the unit.
Do not operate the keyboard roughly
Do not handle the keyboard roughly when typing. Rough handling could result in
damage to the unit.
Do not re-use ribbons or label tape
Do not attempt to re-use ribbons or label tape. Doing so could damage the unit.
Do not attempt to pull tube out
Do not pull on a tube or tape while printing is in progress. Doing so could result
in poor printing quality or malfunction.
Do not touch ink ribbon
To avoid poor printing results with oil on your skin or staining your hands, do not
touch ink ribbon.
Using only cassettes designed for this unit
Use only the specified types of ribbon cassettes, tube attachments, etc. Never try
to disassemble a cassette and install a new ribbon. Doing so can result in poor
printing quality or damage to the equipment.
1111
Safety Precautions
Do not feed wires into the unit
The purpose of this unit is to print on tube or labels. This unit cannot print directly on wires or cables, so do not attempt to feed wires or cables into the unit.
Doing so could result in damage to the unit.
Do not touch the connector (metal part)
Do not touch the connection terminal (metal part) of the cassette. Doing so
could cause an improper recognition of the cassette.
Do not leave the machine unused for a long time
Do not leave the printer in a sun-heated vehicle or any other extreme environment for an extended period.
12
Quick Guide to Using the Printer
This section explains the basic use of the printer for people who want to start using it quickly. Although the printer features
a wide variety of functions, this section explains only the most basic sequence of operations: installing accessories → turning
on the power → inputing characters → printing. Refer to the main body of this manual for more specific details on the functions
of the printer.
Installing Accessories
Cover
Remove the stopper and take up any slack in the ribbon. Push the cassette in until it clicks into the place.
Household power outlet
The shape of the power plug
varies according to country.
CAUTION
Do not touch the connector (metal part)
Do not hold the connection terminal (metal
part) of the cassette. Doing so could cause
an improper recognition of the cassette.
Check that the power switch is turned off.
1
Attach the AC adapter (K30120).
2
Open the cover.
Move this lever to the left, and then open the cover.
3
Install the ribbon cassette.
4
1313
Quick Guide to Using the Printer
Turn the power switch on.
Install the tube attachment.
Align the hooks on the tube attachment with the holes in the printer.
Push the tube attachment in until it clicks into the place.
Close the cover.
Close the cover completely so that it clicks shut.
Turn on the power switch.
Character input display appears after displaying the
ribbon cassette information.
Insert a tube.
Push the tube in until its tip touches the transport roller 2.
5
6
7
8
Transport roller 2
Insert the tube with the warp
oriented as shown in the figure. If the tube is inserted
in a wrong orientation, it can
jam and cause a feed error.
C
C-
C- 2
C- 2
C 2
C= 2
14
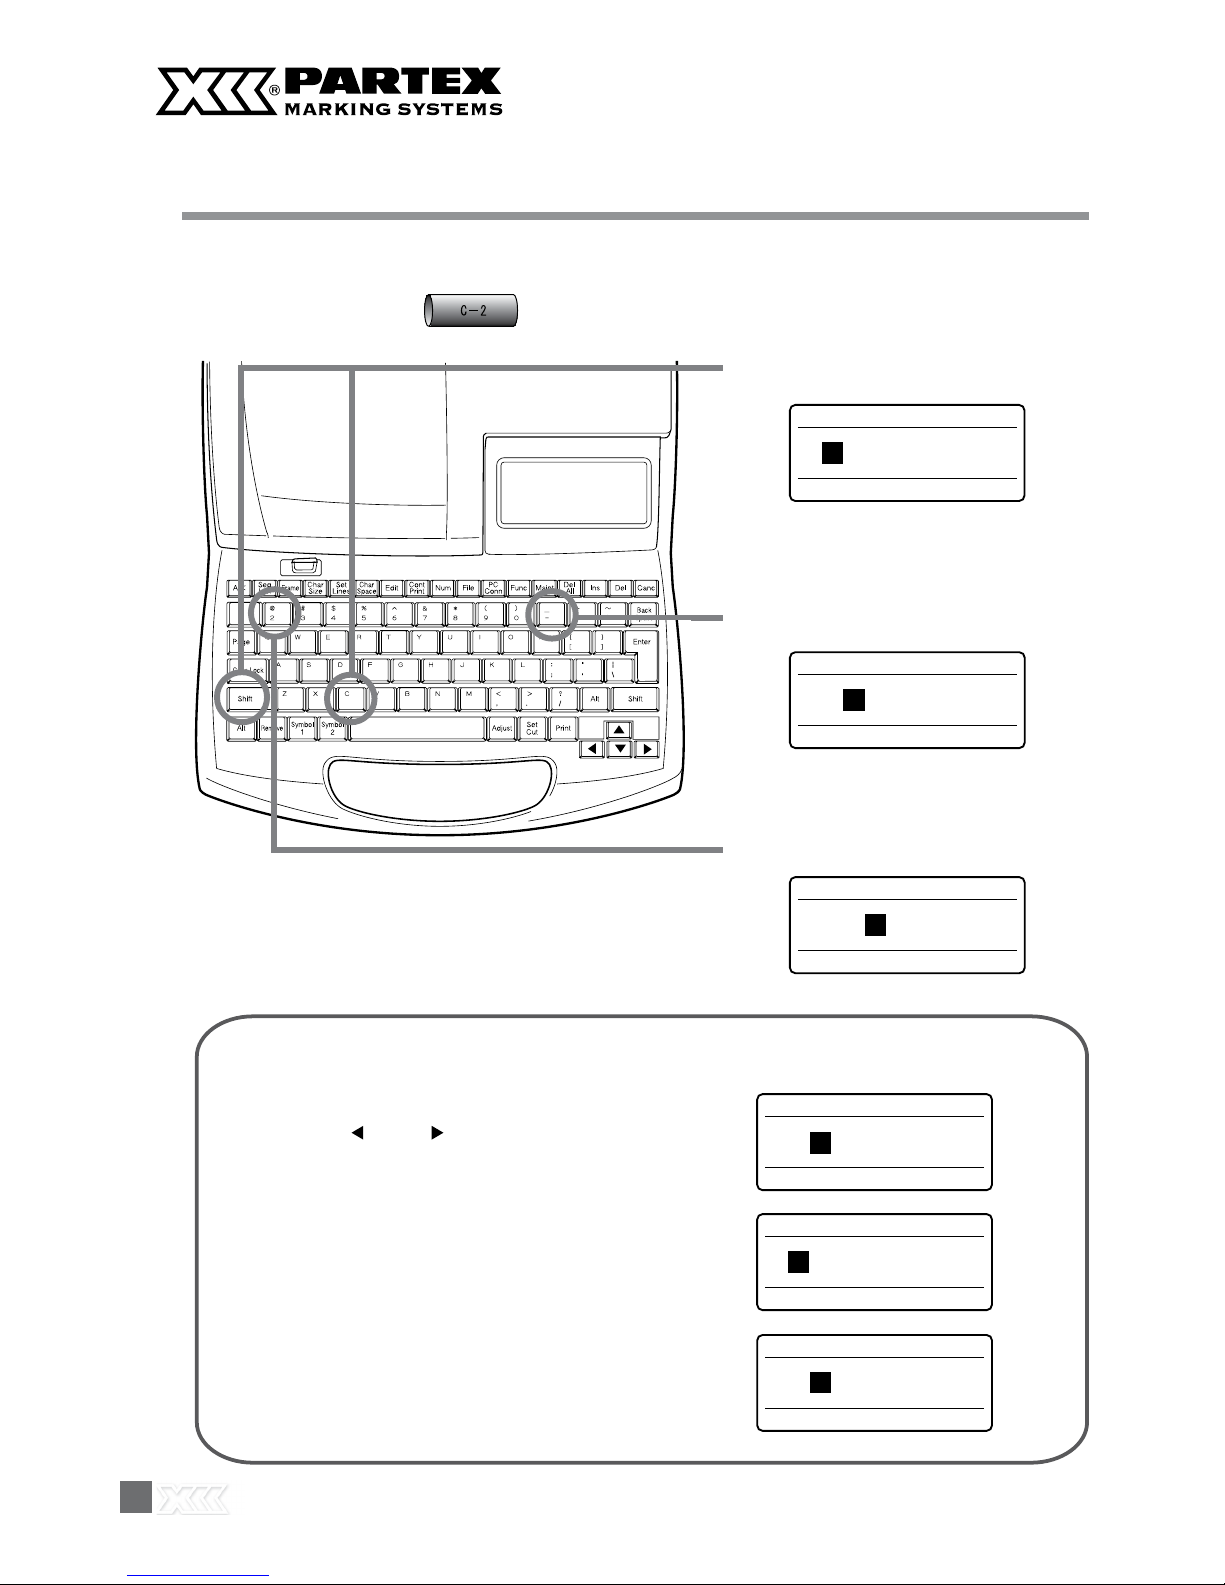
Inputting Characters
[[Example] Printing “C-2” on the profile PO-05.
If you accidentally input an incorrect character
ex. Although you meant to enter “C-2”, you entered “C=2” by mistake.
Printed results
While holding down [Shift],
press [C].
Press [-].
Press [2].
9
10
11
Press [ ] and [ ] and move the cursor box to
the position of the “2”.
1
Press [Back Space].
The “=” disappears.
2
Press [-].
3
1515
Quick Guide to Using the Printer
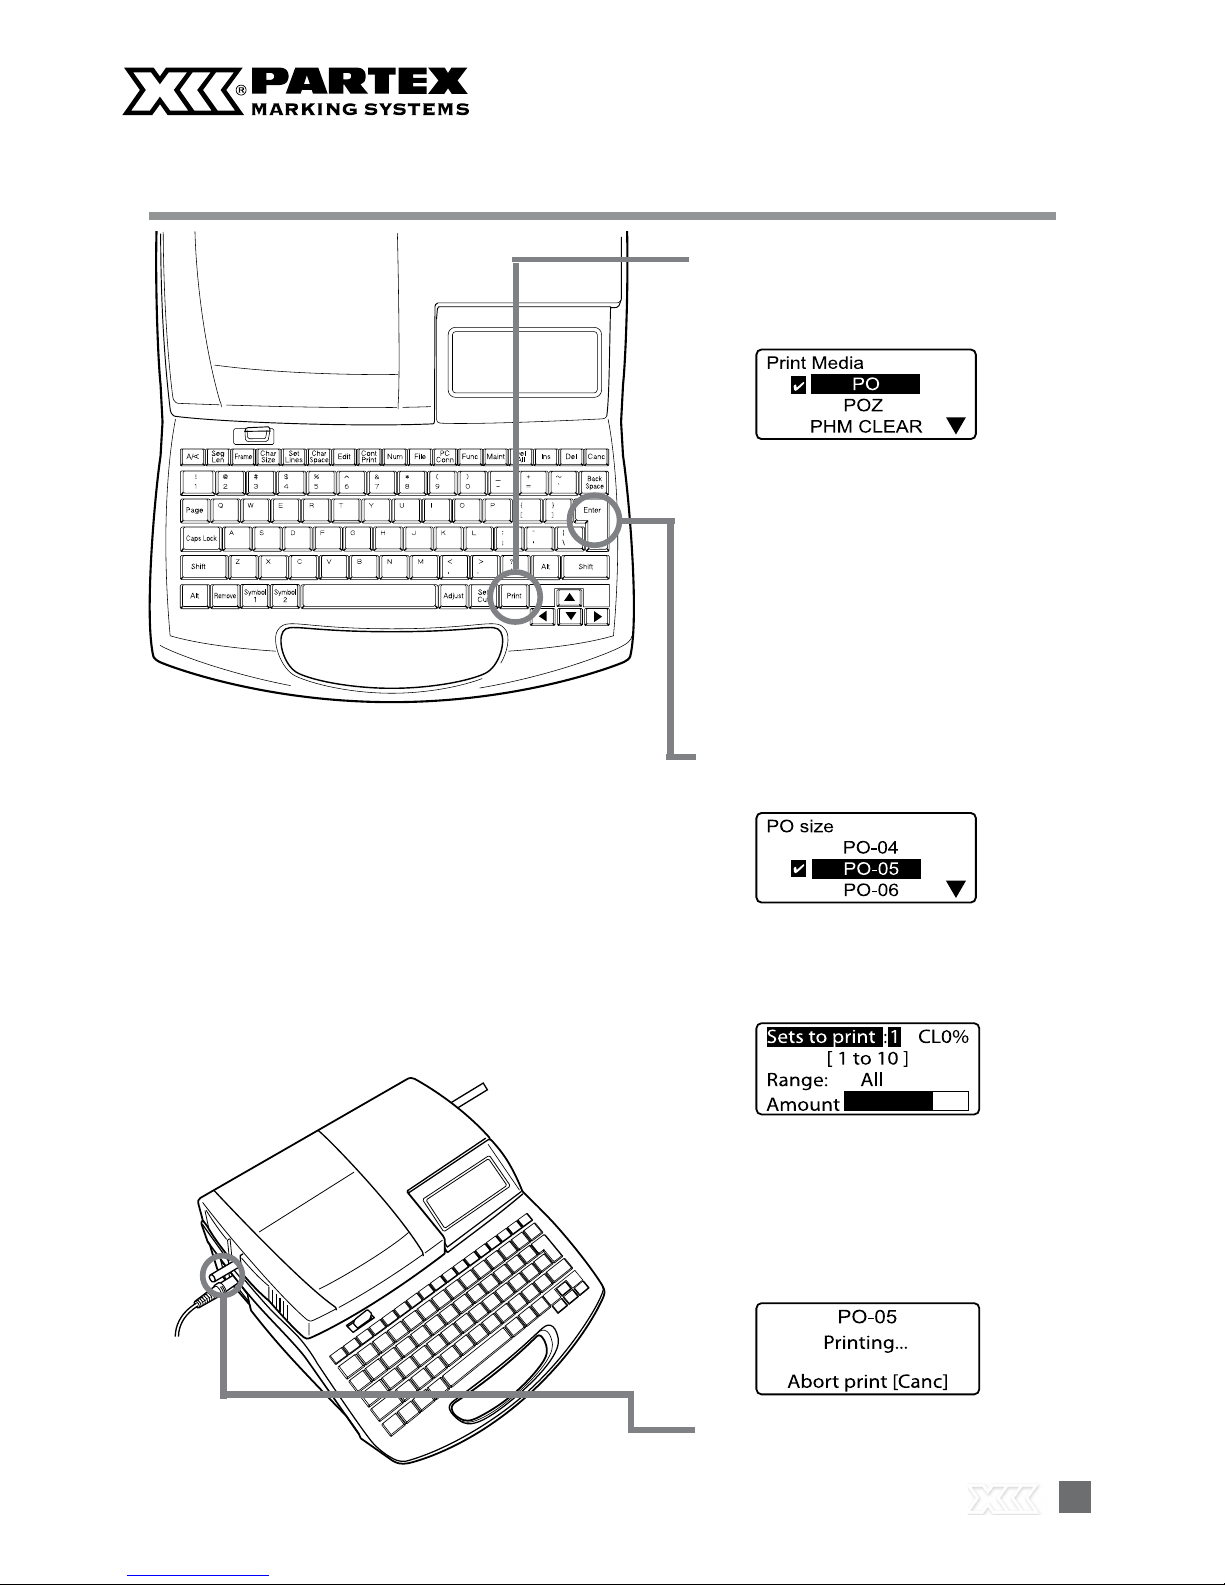
Printing
Press [Print].
Make sure that “Tube” is selected.
Press [Enter].
Make sure that size PO-05 is selected.
Press [Enter].
Make sure that “Sets to print” is “1”.
Press [Enter].
The tube is automatically fed into the
printer and printing begins. Once
printing is completed, the tube is cut
automatically.
“No ribbon cassette” is displayed if the
ribbon cassette is not installed. Install
the ribbon cassette.
“No ribbon information. No ribbon amount displayed. Press enter” is displayed
if the information cannot be read due
to the ribbon cassette failure and so
forth. If this message is displayed, follow
the instruction on the screen.
12
13
14
15
Take out the cut tube.
16


PART 1
Before You Begin
(Preparation)
This section describes preparations and
some things you should know before
entering characters.
1.1 Names and Functions of Parts 18
Main Unit 18
LCD screen 20
Keyboard 22
1.2 Connecting the AC Adapter 24
1.3 Use the PC Connection Kit 26
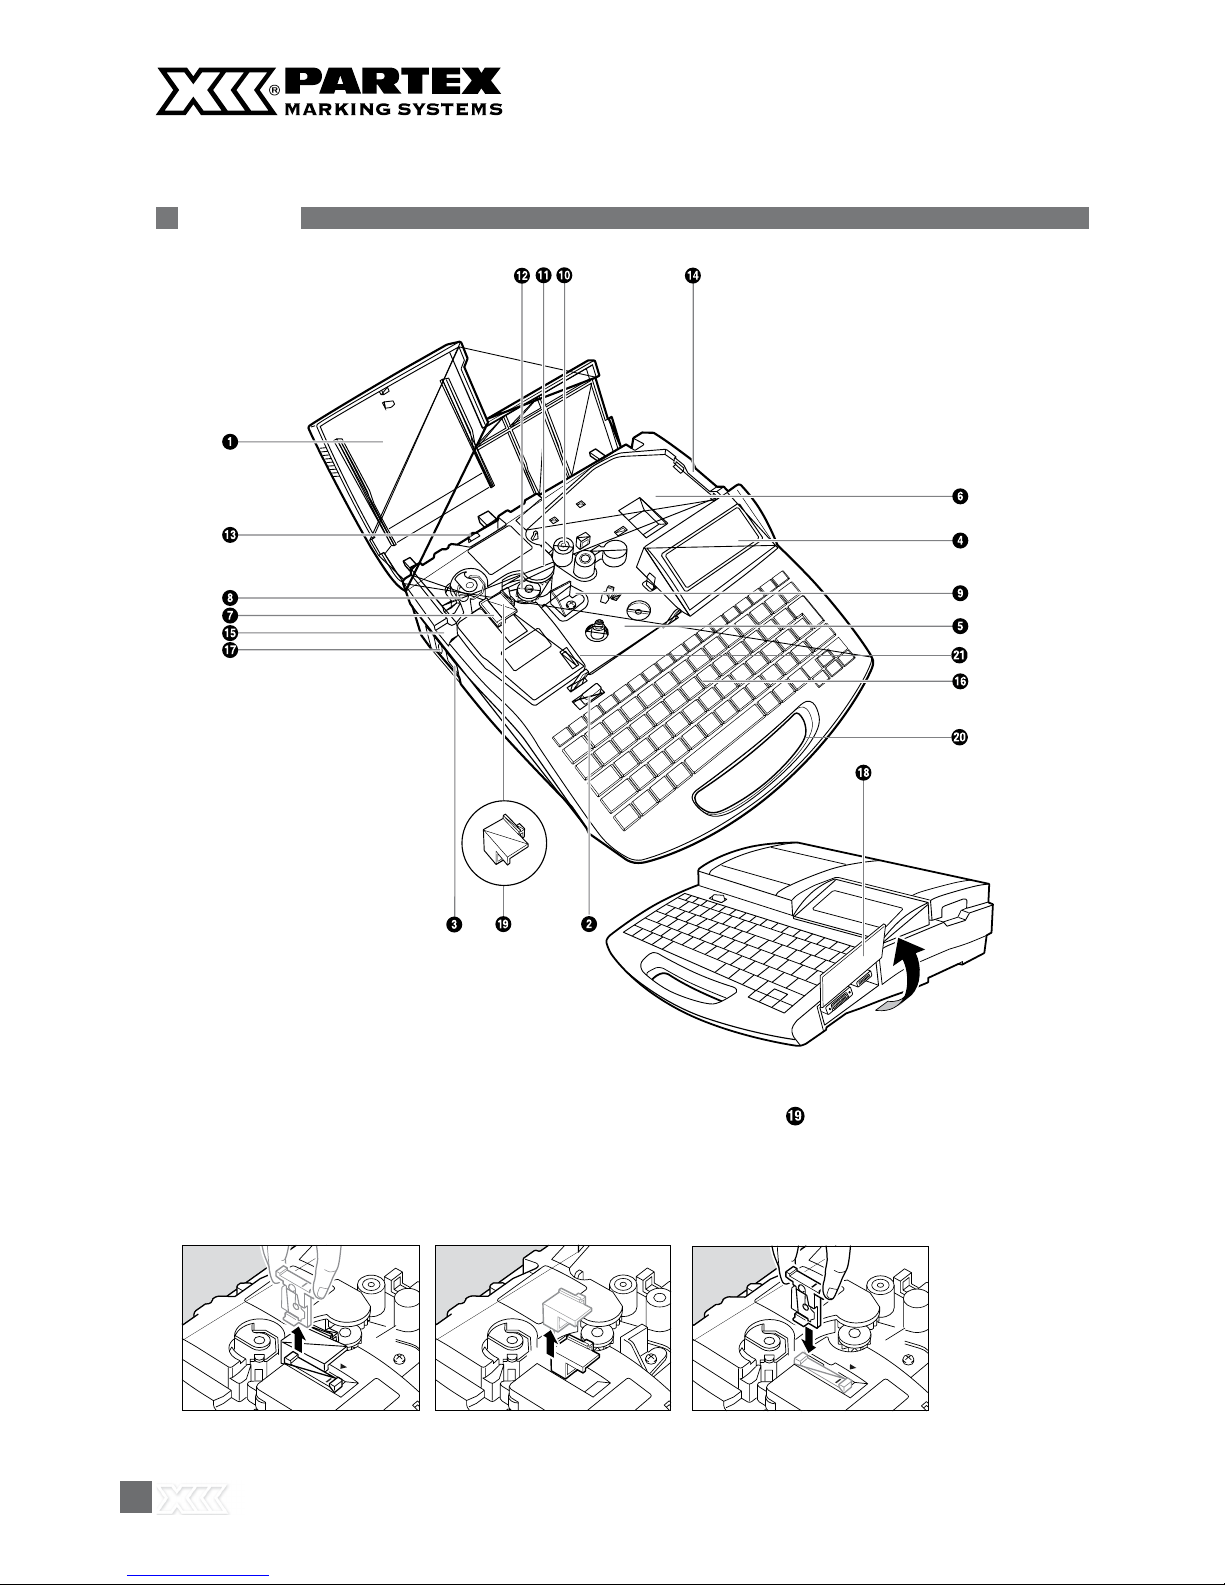
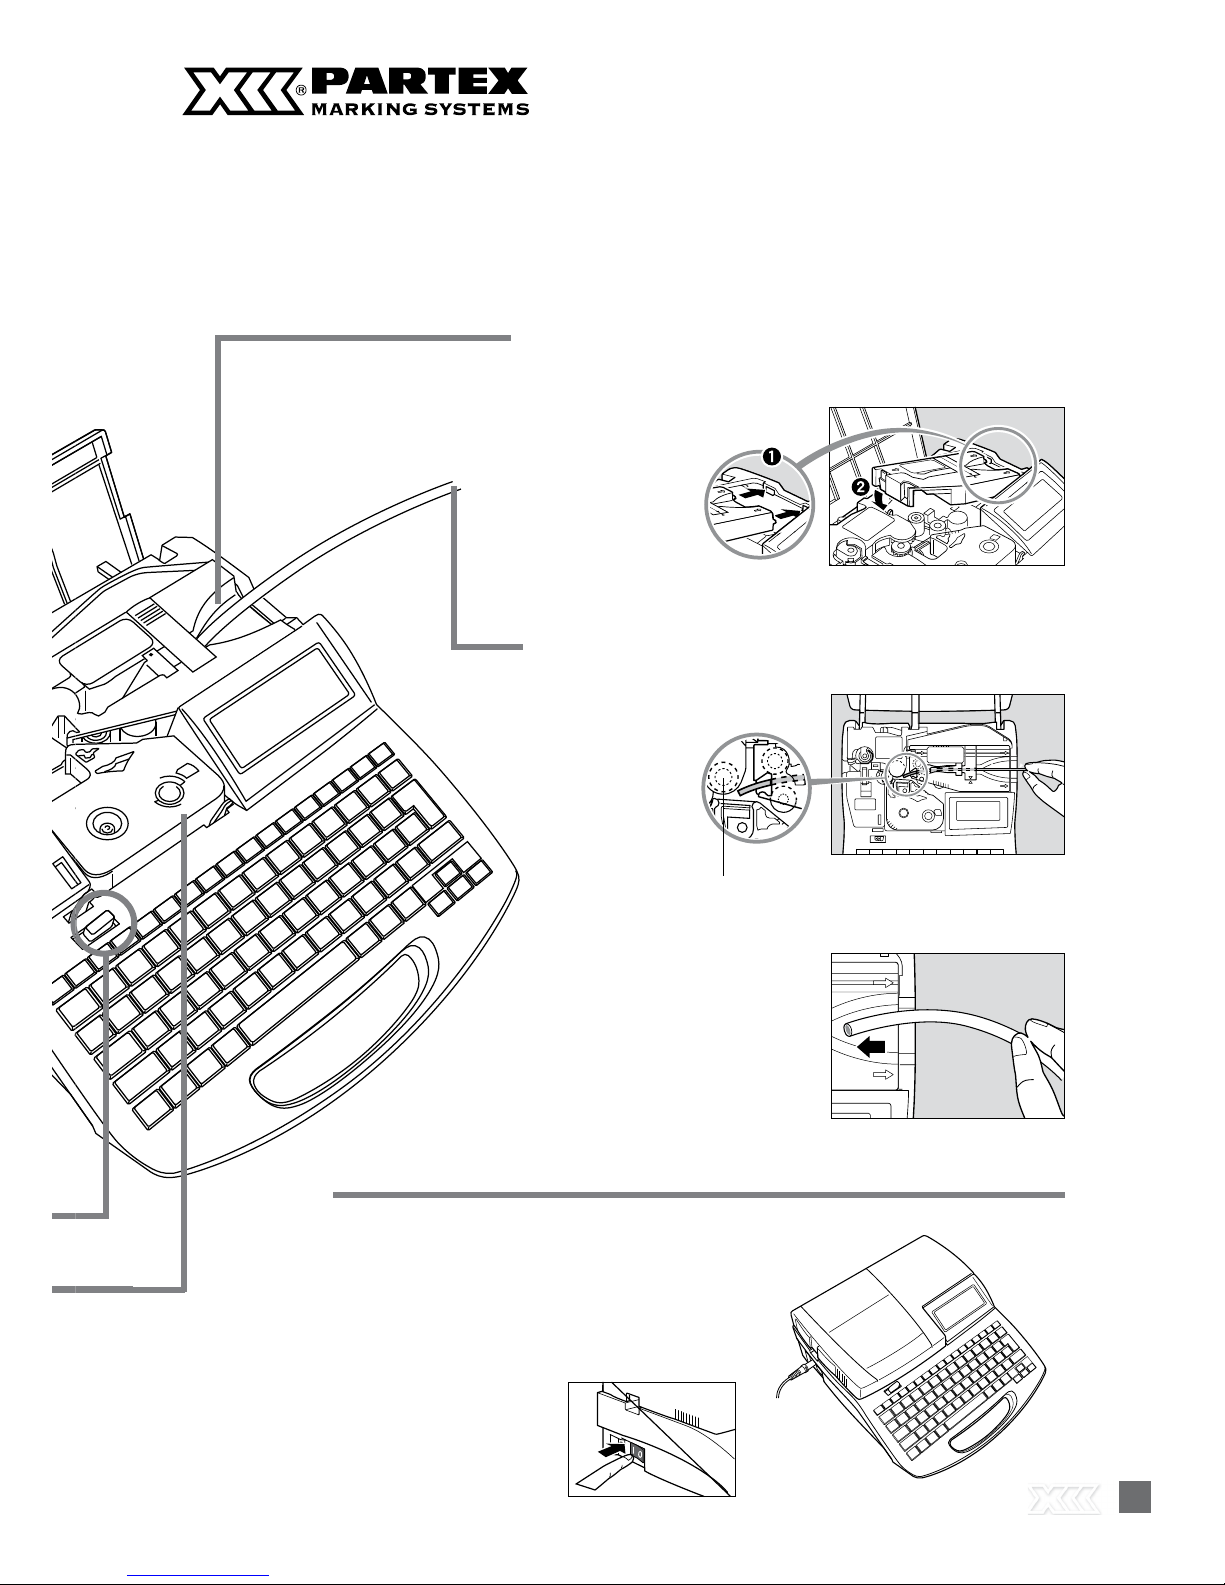
18
Main Unit
1.1 Names and Functions of Parts
*Removing the wrap around tape guide
In order to print on other media, remove the self-laminating label attachment. .
1. Pull out the cutter. 2. Pull out the wrap-around
tape guide.
3. Reinstall the cutter.

1919
Before You Begin PART 1
Cover
Open this cover when you need to load a cassette
or tube.
Cover release
Pull this lever to the left to open the cover.
Power switch
Use this switch to turn the power on and off. Flip the
switch to the “|” position to turn the power on, and
flip the switch to the “O” position to turn the power
off.
LCD screen
Displays text that has been input or the
information about settings.
Ribbon cassette holder
Place the ribbon cassette here.
Mounting location for attachment or printing media cassette
Mount the tube attachment or label tape cassette
here. The optional Tube Warmer also mounts here.
Cutter
The cutter cuts printing media automatically.
The cutter can be replaced.
Cutter receiver
This is the receiver for the cutter blade when cutting
printing media. When the cutter is replaced, the
cutter receiver is replaced at the same time.
Print head
This device prints by applying heat to a ribbon. As it
becomes very hot, not touch this device while printing is in progress or immediately after printing.
Transport roller 1
This roller feeds printing media to the print head.
Transport roller 2
This roller feeds printing media past the print head.
Rolka transportowa 3
This roller feeds printed printing media to the cutter.
Transport roller 3 release lever
Pull this lever to the right to release transport roller 3.
Use this lever when clearing jammed printing media.
Media intake
Insert tube or plate here (when attachment installed).
Outlet
Printed printing media emerge here.
Keyboard
Input text to be printed and data for settings through
this keyboard.
AC adapter connector
Connect the AC adapter cable here.
Interface cover
Open this cover to connect the USB cables of the PC
connection kit or/and the Tube Feeder (optional).
Wrap around tape guide
This guide is installed when printing on wrap around
tape. Remove it when printing to other media.
Handle
Hold this handle when carrying the printer.
Connector for ribbon cassette
This is to read out information of the ribbon cassette.
Do not touch and deform the connector.
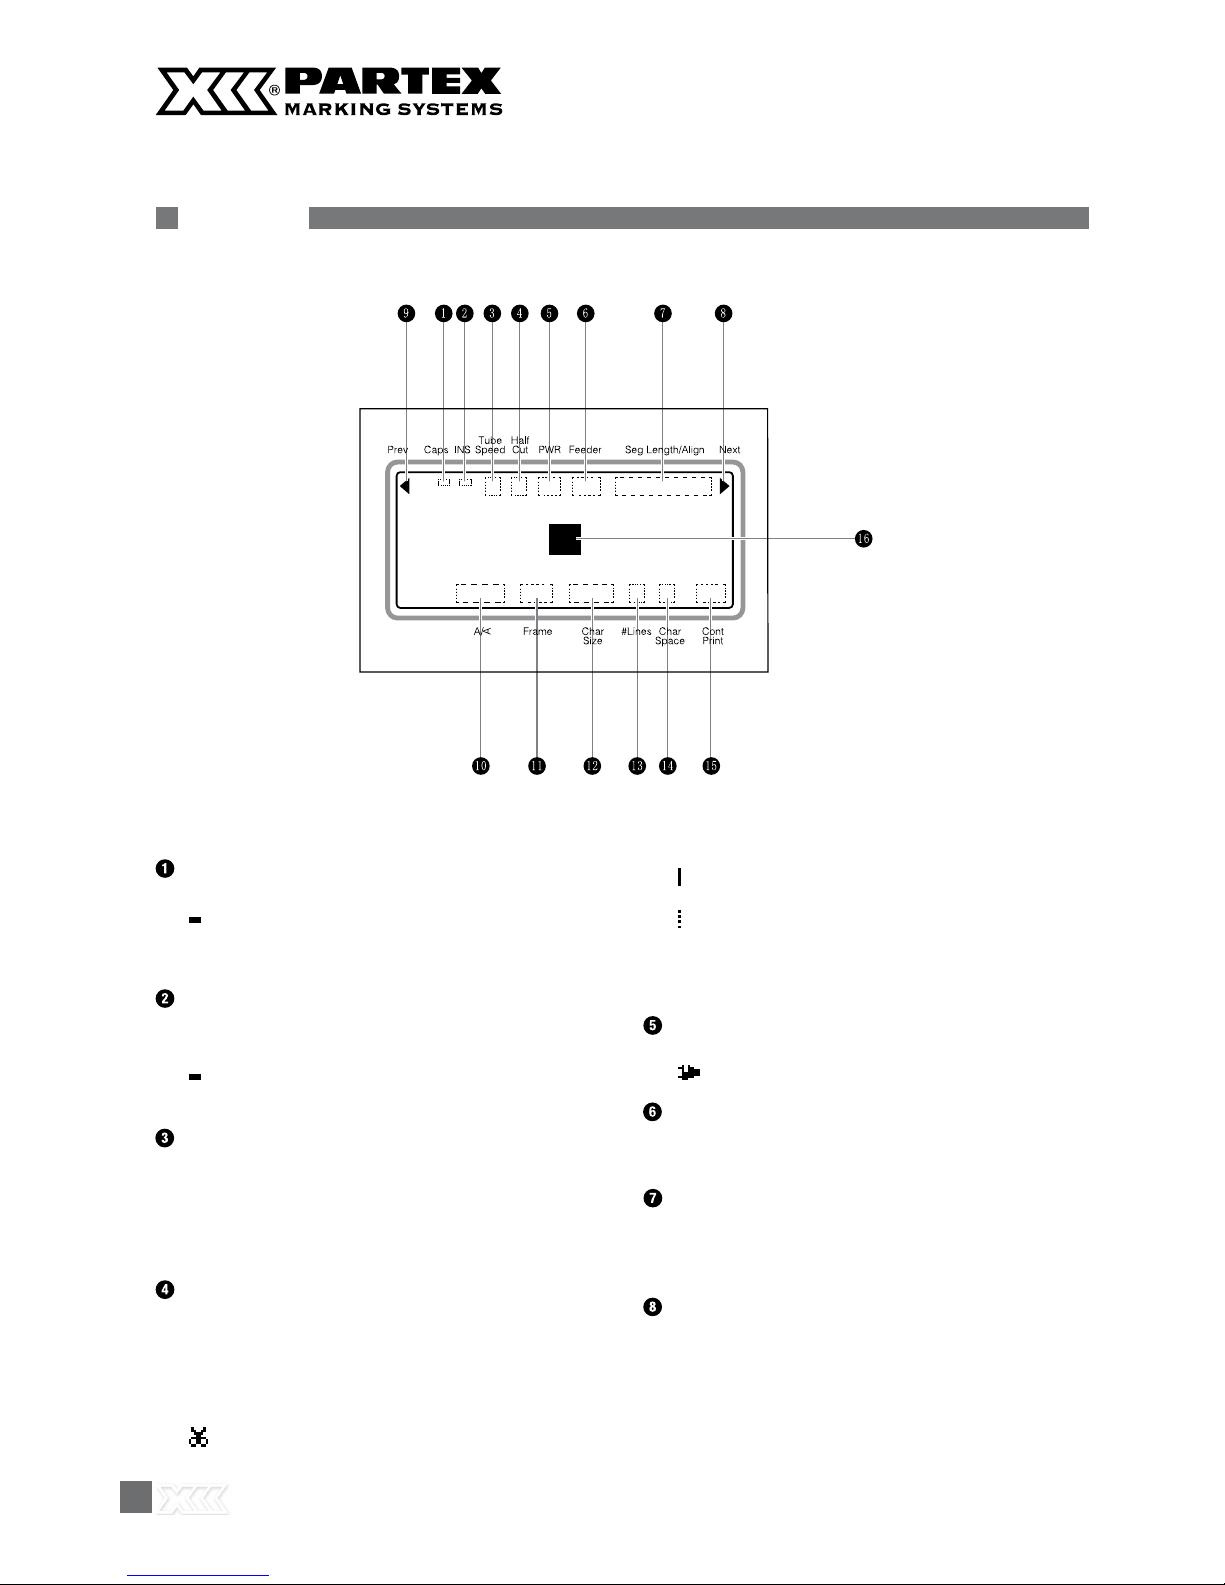
20
LCD screen
Caps Lock
Indicates whether the Caps Lock mode is active.
: Active, so all alphabetic characters are entered
in uppercase.
(no indication): Normal(inactive)
Insert/Overwrite mode indicator
Indicates which of the two input modes is selected:
insert mode or overwrite mode.
: Insert mode
(no indication): Overwrite mode
Printing speed indicator
Indicates which printing speed has been selected:
high, middle, or low.
H : High
M : Middle
L : Low
Half cutting mode indicator
Indicates the half cutting mode that was selected for
a single printing operation in which multiple tube segments or label tape are printed and then cut apart.
Note that the half cutting mode is selected by pressing [Set Cut]
: Half cut.
: Not half cut, but a solid line is printed showing
where to cut with scissors, etc.
: Not half cut, but a dotted line is printed sho-
wing where to cut with scissors, etc.
(No indication): Not half cut, and no cutting line
is printed.
Power indicator
Indicates that the AC adapter is properly connected.
:AC adapter
Tube Feeder
Indicates that the optional Tube Feeder has been installed.
Seg Length/Alignment/margin indicator
Indicates either “Seg Length”, the length of one tube
segment(or one label); “Alignment”, whether text is
centered or left-justified; or “margin”.
Next page indicator
Indicates that another page exists following the currently displayed page.

2121
Before You Begin PART 1
Previous page indicator
Indicates that another page exists prior to the currently
displayed page.
Printing orientation indicator
Indicates which printing orientation has been selected:
“horizontal/horizontal character”, “vertical/vertical character”, or “vertical/ horizontal character”.
H/H: Horizontal/horizontal character
V/V: Vertical/vertical character
V/H: Vertical/horizontal character
Frame indicator
Indicates the type of frame that has been selected to
print around text.
Character size indicator
Indicates the selected printing character size. When 50%
character size width is selected, “
■
” is displayed next to
the size.
Line number indicator
Indicates the number of lines selected for printing, either
one line, two lines or three lines.
Character spacing indicator
Indicates the selected character spacing.
N(Narrow): Standard character spacing
(no extra spacing)
M(Medium): Moderate character spacing
(approximately 0.5mm between characters)
W(Wide): Wide character spacing (approximately
1.0mm between characters)
Continuous printing indicator
Indicates for how many times (how many pages) the currently displayed character data will be printed.
Cursor
The cursor appears as a rectangle ( ■ ). Text is input at the
cursor position.
22
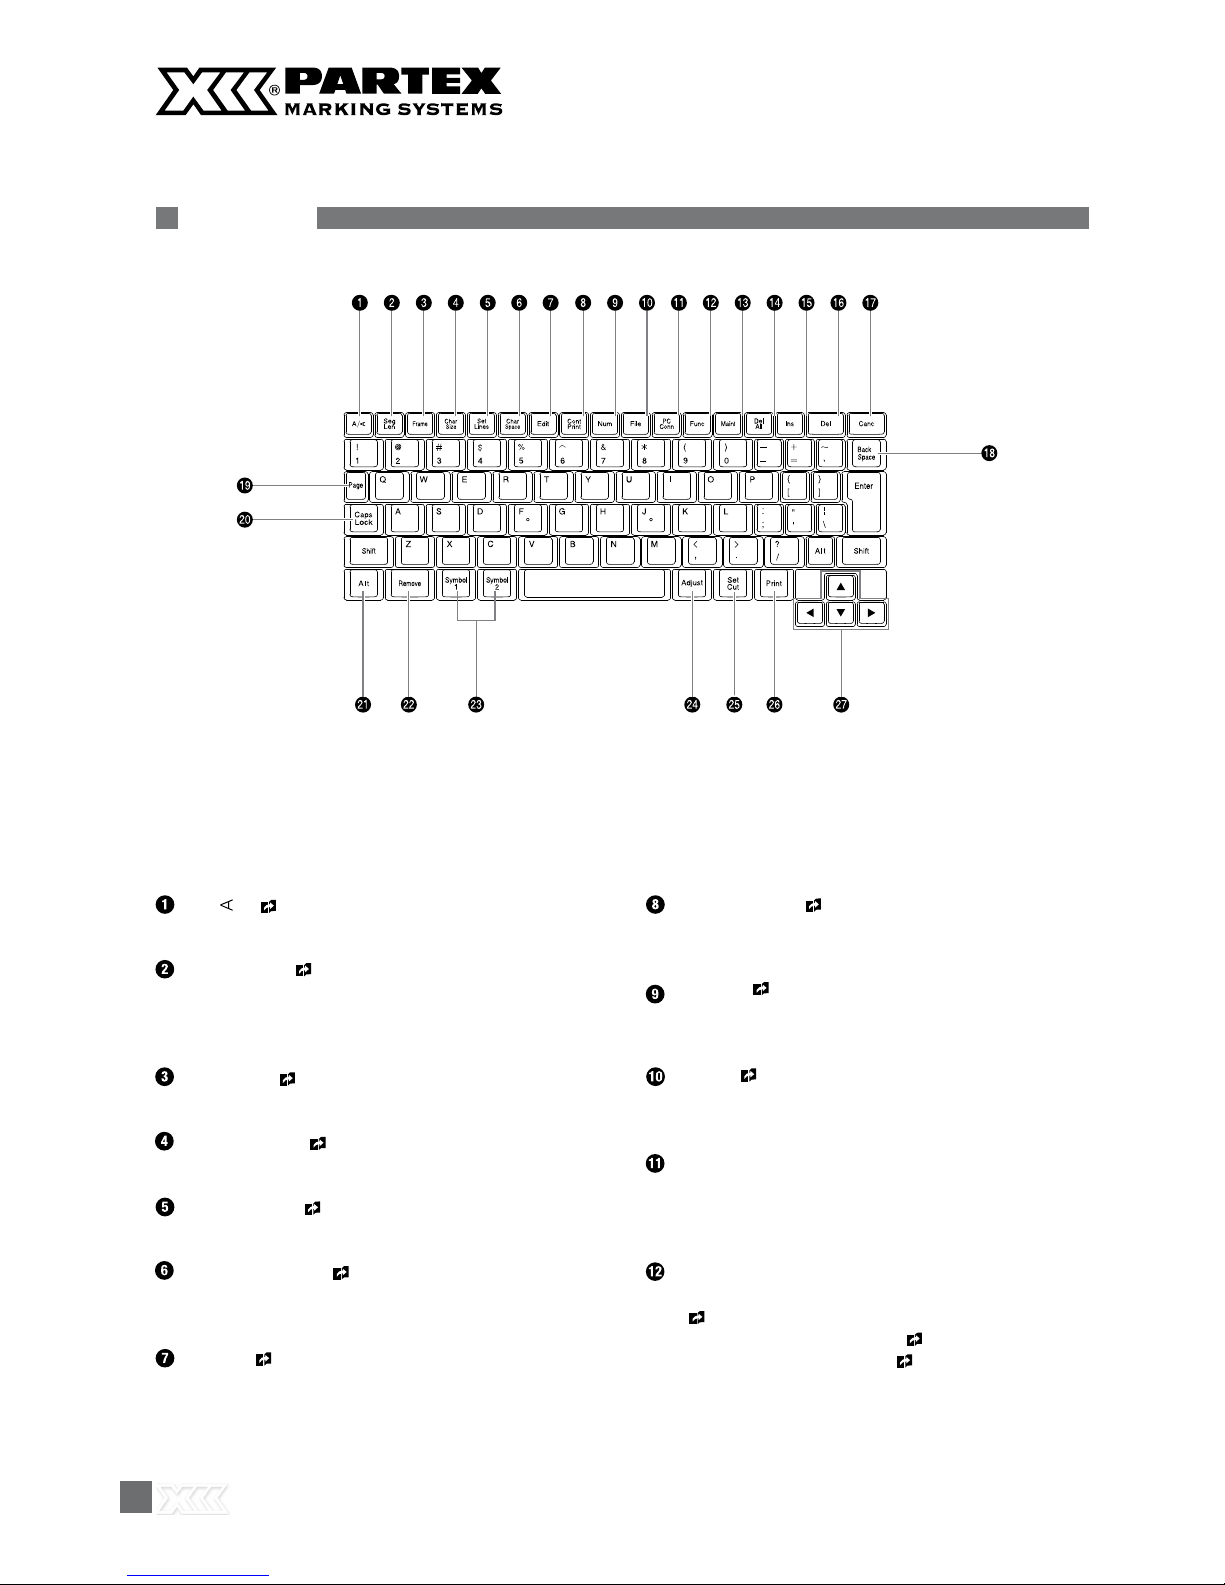
Keyboard
[A/
] ( page 97)
Use this key to change the printing orientation.
[Seg Len] ( page 111)
Use this key to change the cutting length (the length
of one tube or one label tape), the character alignment (left-justified or centered), and the margin.
[Frame] ( page 71)
Use this key to add a border around text.
[Char Size] ( page 68)
Use this key to change the character size.
[Set Lines] ( page 72)
Use this key to change the number of lines.
[Char Space] ( page 69)
Use this key to change the spacing between characters.
[Edit] ( page 74 to 84)
Use this key to insert, delete, copy, cut and paste pages.
[Cont Print] ( page 103)
Use this key to print a specific page multiple times
(continuous printing).
[Num] ( page 105)
Use this key to print numbered character data (numbered printing).
[File] ( strony od 85 do 93)
Use this key to save text data that has been input, and
to retrieve saved data.
[PC Conn]
Use this key when the printer is connected to the PC
using the USB cable contained in the PC connection
kit.
[Func]
Use this key to adjust the printing density
(
page 110 and 113 )
to select the printing speed (
page 114)
to set the operation sound (
page 121) and so
forth.

2323
Before You Begin PART 1
[Maint]
Use this key to feed a printing media forward or backward (
page 126), o replace the cutter ( page
131), to forcibly full cut a tube or label tape ( page
128), and so forth.
[Del All] ( page 62 and 119)
Use this key to delete all of the text data that is currently displayed, or to restore the initial settings.
[Ins] ( page 63)
Use this key to switch between insert mode and overwrite mode.
[Del]
Use this key to delete character data that has been
input. When this key is pressed, the character marked
by the cursor is deleted.
[Canc]
Use this key to return to the previous display in the setup display, or to cancel a printing operation. If the setup display is currently displayed, hold down the [Shift]
key while pressing the [Canc] key to return to the text
input display. To cancel the current printing operation
immediately, without waiting for the printing or cutting
operation to end, hold down this key until the printer
begins to beep.
[Back Space]
Use this key to delete character data that has been
input. Each time this key is pressed, the character that
precedes the cursor is deleted.
[Page]
Use this key to find out what page is currently being
displayed. The free memory capacity is also displayed
simultaneously.
[Caps Lock]
Press this key to switch character input between uppercase and lowercase.
[Alt]
To input symbols, use this key to select or delete characters.
[Remove] ( page 118)
Use this key to eject a printing media.
[Symbol 1] ,[Symbol 2] ( page 59)
Use this key to input symbols.
[Adjust]
Use this key to adjust the printing start position (
page 108), to adjust the depth and speed of
half cutting and full cutting ( page 130 and 132)
and so forth.
[Set Cut] ( page 116 and 117)
Use this key to select whether or not to use half cutting, and when to make a full cut.
[Print]
Use this key to print the entered text on a printing media.
Direction keys
Use these keys to make selections on the setup display
and in the menus, and to move the cursor on the text
input display. Also on the text input display, hold down
the [Shift] key while pressing these keys to jump either
one page back or one page ahead.
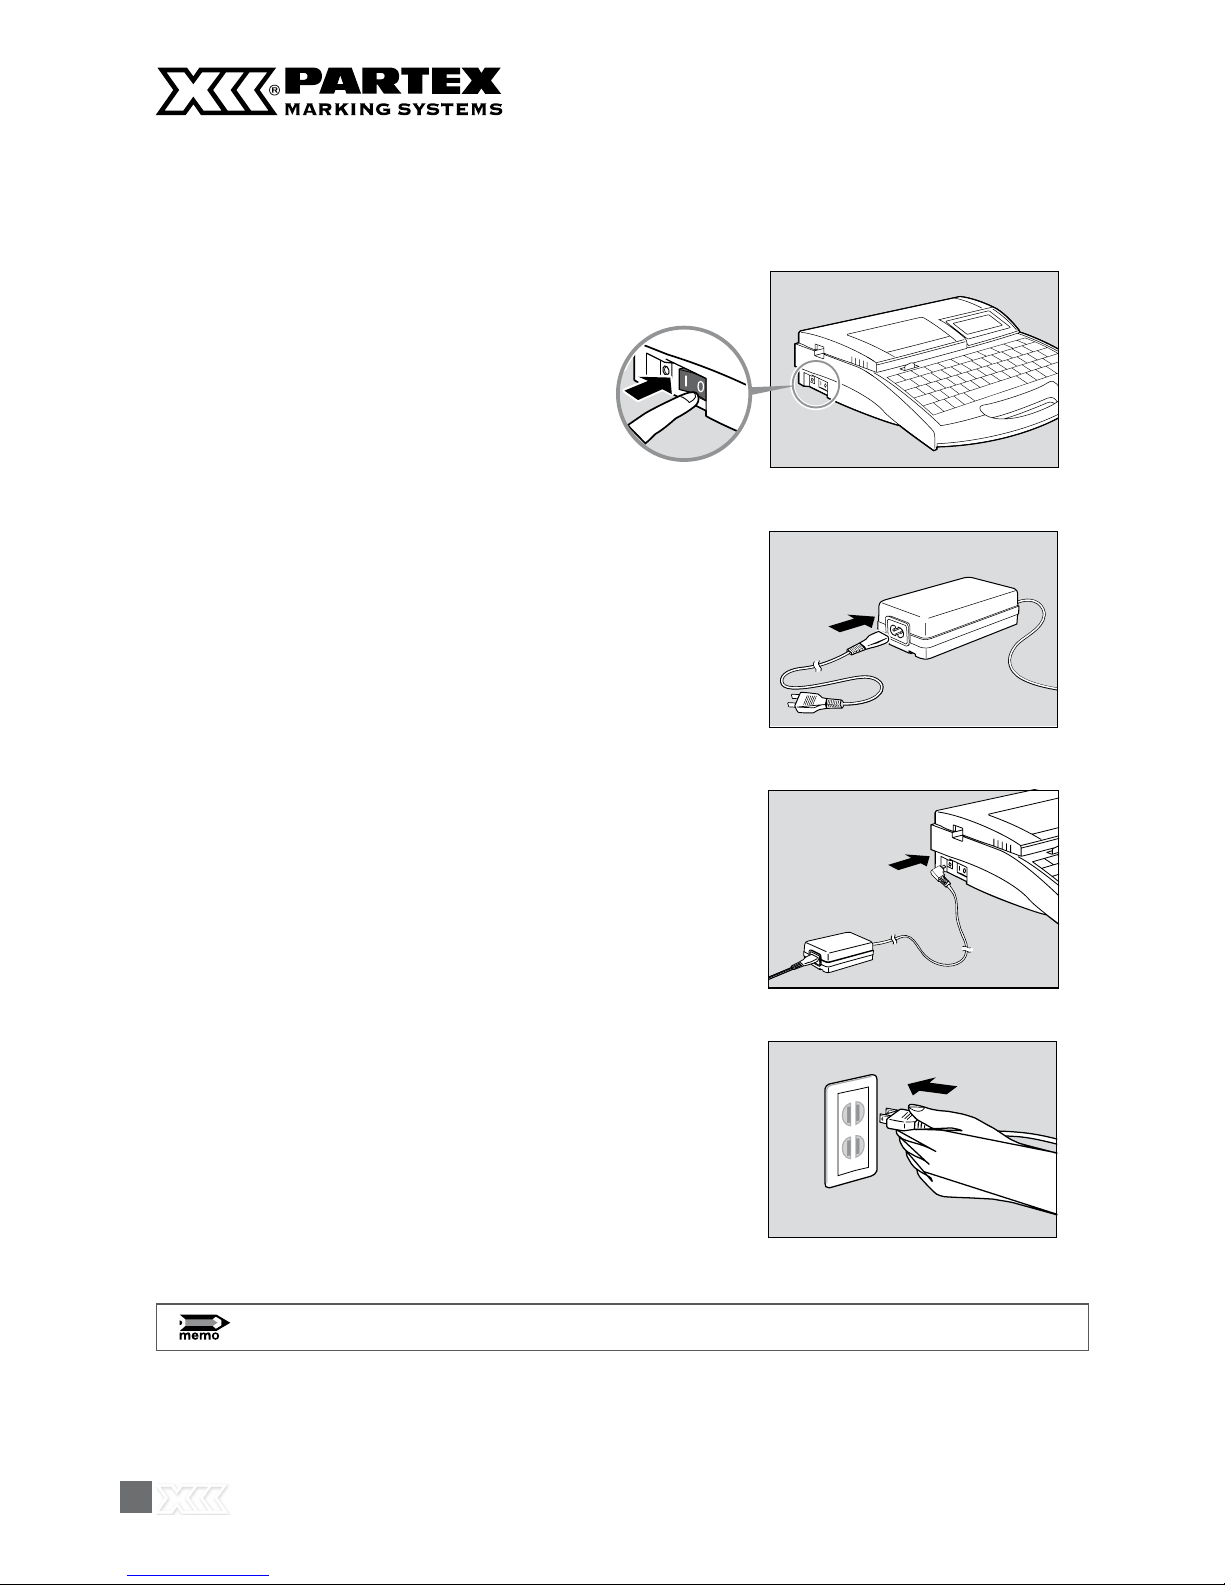
24
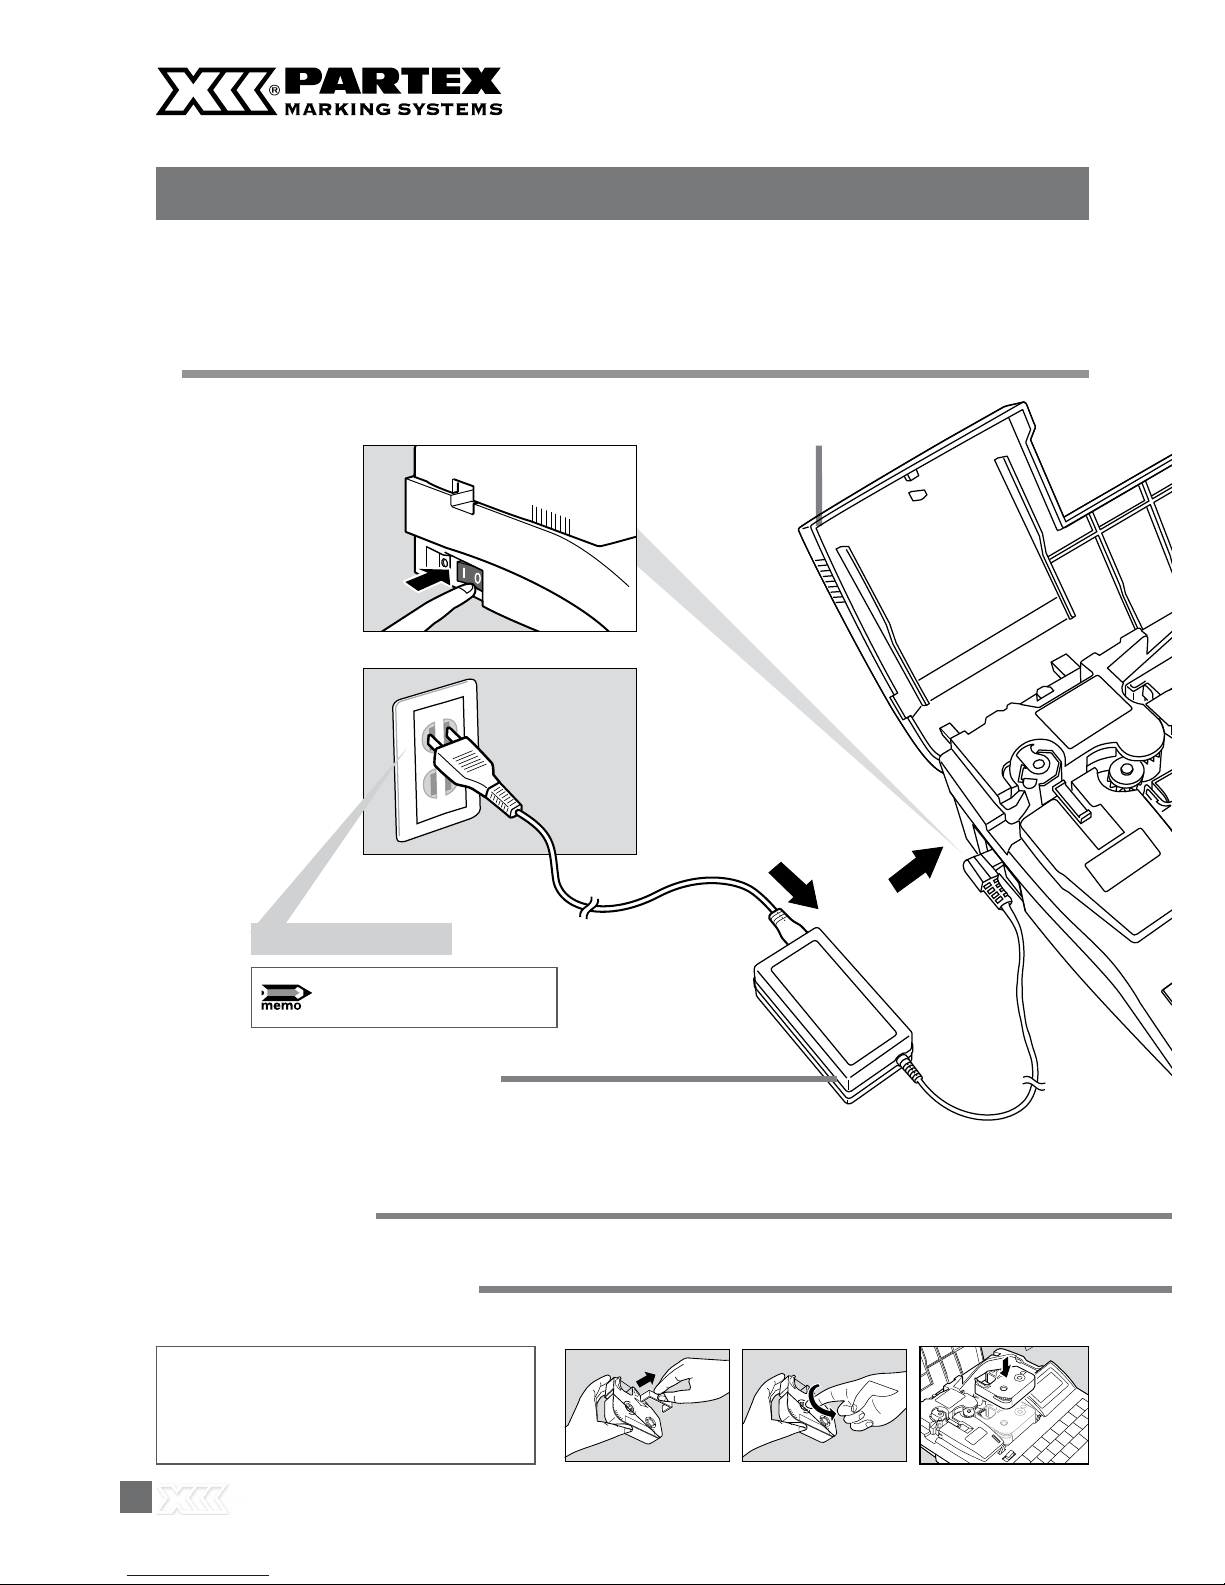
1.2 Connecting the AC Adapter
Make sure that the power switch is off.
1
Plug the power cord into the AC adapter (K30120).
Plug it in all the way.
2
Plug the AC adapter into the printer.
3
Plug the AC adapter power plug into a 100-240V power
outlet.
Plug it in all the way.
The shape of the power plug varies according to country.
4

25
Memory backup
battery low
Contact dealer.
Memory backup
battery exhausted.
Resetting memory.
Note
CAUTION
25
Before You Begin PART 1
Do not handle the power cord with wet hands
Do not plug in or unplug the AC adapter while your hands are wet. Doing so could result in electric
shock.
Do not connect to a multi-outlet adapter or extension cord
Do not connect this unit to a multi-outlet adapter or extension cord. Doing so could result in fire or
electric shock. Do not power on with the power cord tied. It can cause fire or electrical shock.
Push the plug in all the way
Push the AC adapter power plug all of the way into the power outlet. Failure to do so could result in
fire or electric shock.
Do not use any AC adapter or cord other than the included one
Never use any other AC adaptor or cord than the included one. Using it can result in fire, electric
shock, or printer failure. Do not use the included AC adapter for any other product. Fire or electric
shock can result.
Use a 100-240V AC power supply
Use at voltage between 100 and 240V AC. If not, it may result in fire, electrical shock or machine failure.
When it thunders at a short distance, remove the power plug from the outlet
When it thunders at a short distance, remove the power plug from the outlet. If not, it may result in fire,
electric shock, or machine failure.
Do not damage the AC adapter and cord
Do not damage, pull excessively, or modify the AC adapter and cord. Do not place a heavy thing on
the AC adapter and cord. A short-circuit can be caused at the damaged portion, resulting in a fire
or electric shock.
Handle the AC adapter carefully
When unplugging the power cord from an outlet, grasp the plug itself; do not pull on the cord. Pulling
on the cord could damage it, which could result in injury, fire or electric shock.
Keep the area around the AC adapter clear
In order to allow you to unplug the AC adapter quickly in an emergency, do not place other objects
around the outlet. An inability to unplug the unit quickly in an emergency could result in fire or electric
shock.
About the memory backup battery
If the memory backup battery starts become weak, the message shown below is displayed when the printer is turned on. If
you continue to use the printer without replacing the battery, the
memory backup battery will become completely dead, and the
next time that the printer is turned off all data and settings will
be lost. If this message appears, be sure to contact your dealer.
If the memory backup battery becomes completely dead, the
message shown below is displayed when the printer is turned
on. If this message appears, be sure to contact your dealer. If
you continue to use the printer without replacing the battery, the
printer may operate incorrectly.
After reading this message, press
any key to continue.
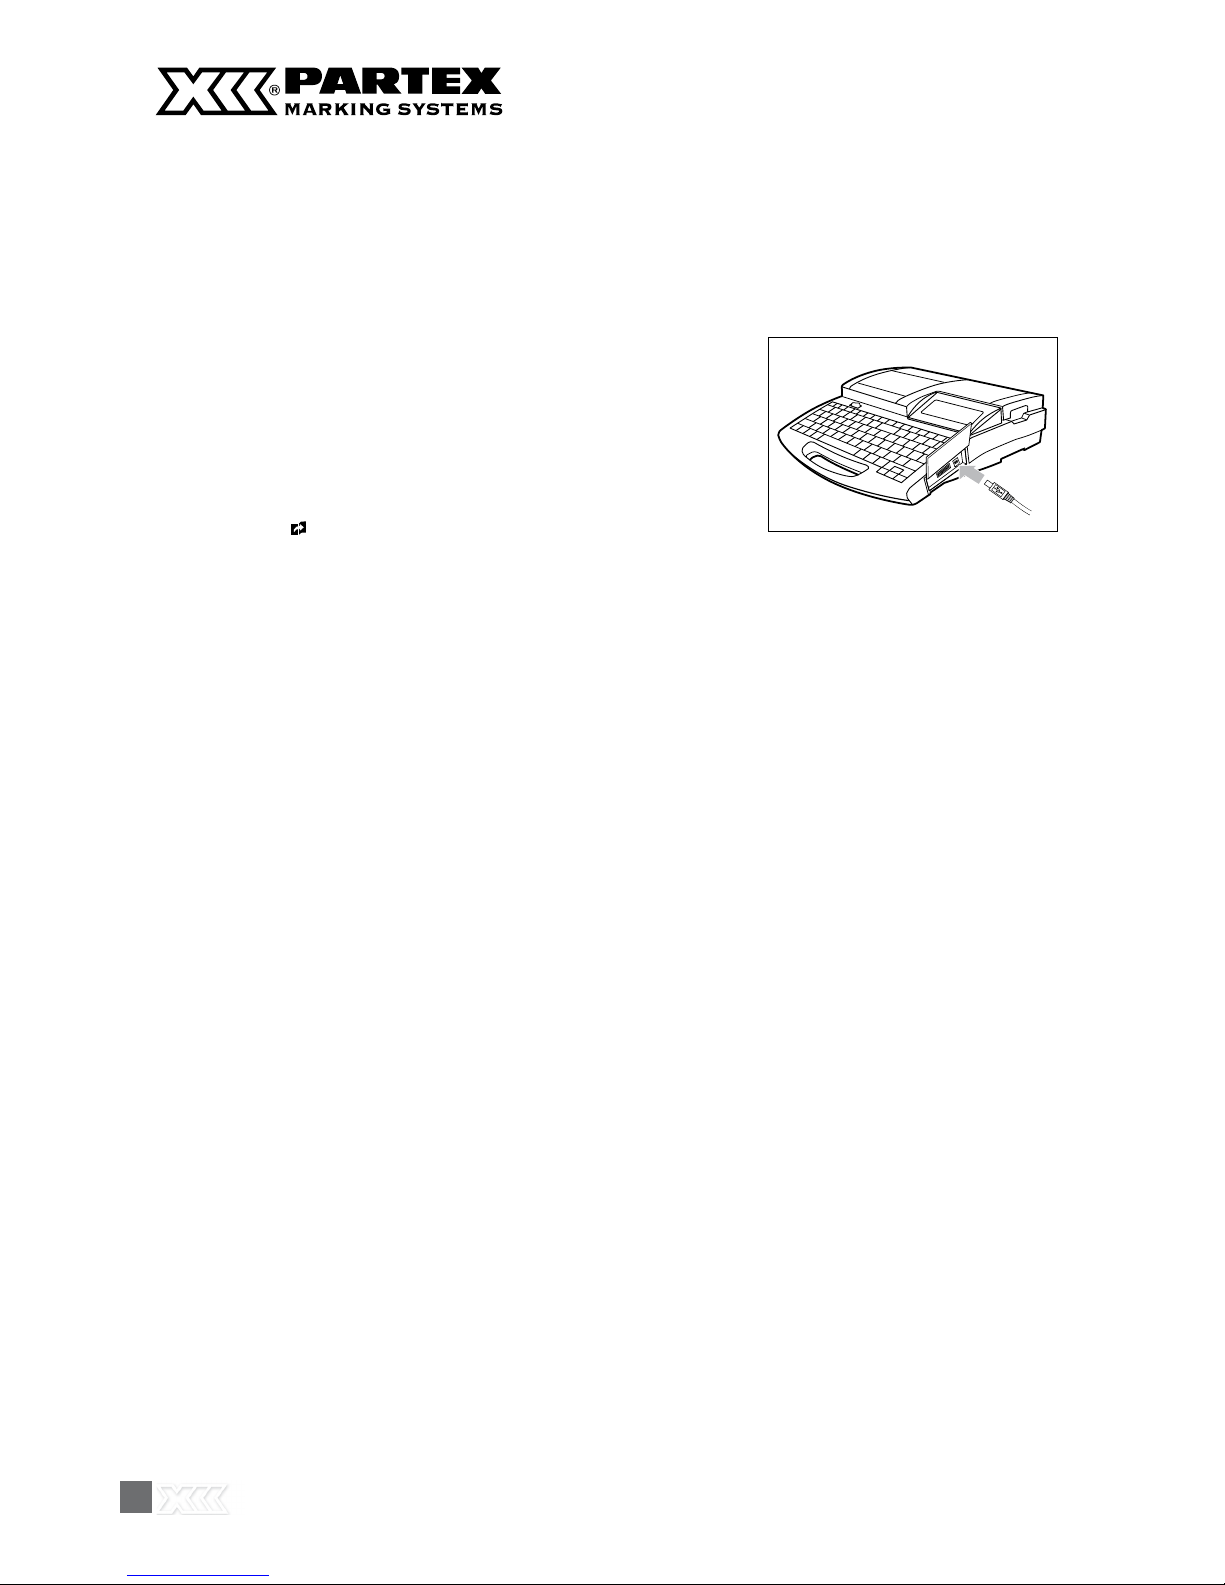
26
1.3 Use the PC Connection Kit
Connect the printer to the PC using the included USB
cable.
Insert the type-B (square) plug of the USB cable in the USB socket
on the printer, and insert the other plug of the USB cable in the
USB socket on the PC.
* You may have to adjust the segment length for each printing
media. For more details, refer to Note, “Adjusting the segment
length” (
page 101).
1
Install the printer diver and application in the PC in advance.
For details on how to use the PC connection kit, refer to “Application Software for M-1 ProIV”
and the printer driver contained in the included Software CDROM.
To use the PC connection kit, connect the printer to the PC as shown.
 Loading...