

PARRY MSB9, MSF12, MSB15, MSF18, MSB18 Instructions For Installation, Safe Operation And Maintenance
...
INSTRUCTION REF: IN132
ISSUE No. 3
DATE 24.04.09
Page 1 of 5
TELEPHONE: SERVICE (44) 01332 875665
FAX: SERVICE (44) 01332 875536
1
· INSTALLATION INSTRUCTIONS
· SAFETY INSTRUCTIONS
· USER INSTRUCTIONS
COMBINATION DISPLAY AND
SERVERY UNITS
MODEL: MSB9, MSF9, MSB12, MSF12,
MSB15, MSF15, MSB18 and MSF18

INSTRUCTION REF: IN132
ISSUE No. 3
DATE 24.04.09
Page 2 of 5
TELEPHONE: SERVICE (44) 01332 875665
FAX: SERVICE (44) 01332 875536
2
OPERATING THE CABINET
1. Plug machine in to power supply. The red indicator light will show to indicate
power to the unit.
2. Turn the cabinet dial to the required setting, the right hand side green lamp will
show indicating power to the element, this will extinguish when the desired
temperature is reached.
This procedure will be repeated automatically as the thermostat maintains a constant
temperature.The cabinet temperature is shown on the digital display on the fascia
When loading the machine please leave some space around the rack to give good
airflow, never cover racks with tin foil, otherwise the efficiency of the machine will be
reduced.
OPERATING THE QUARTZ LAMP GANTRY
Units which have a quartz lamp gantry, have two mains power cables.
1. Ensure both of the power cables are plugged in to the mains and turned on
2. To turn on the lamp gantry use the on/off switch labelled lamp, on the fascia.
OPERATING THE BAIN MARIES
If the unit has a bain marie it can be used either wet or dry.
Please note that if the bain marie is being used wet, please ensure the drain tap is
closed before filling the bain marie tank with water.
1. For initial heat up turn bain marie dial to the high setting until the green light
extinguishes (dry approx 15 mins, wet approx 60 mins)
2. The green lamp will illuminate showing there is power to the element, this will
not extinguish on this setting
3. After this period turn the control to the desired heat setting, The green lamp will
extinguish when the desired temperature is reached. This procedure will be
repeated automatically as the simmerstat maintains a constant temperature.
4. Place the hot food into the containers and replace the cover.
INSTRUCTION REF: IN132
ISSUE No. 3
DATE 24.04.09
Page 3 of 5
TELEPHONE: SERVICE (44) 01332 875665
FAX: SERVICE (44) 01332 875536
3
Customers are asked to note that the bigger the bain marie the longer it will take
to heat up. The bain marie will heat up faster if used dry. On the 1800mm unit, if
used wet the heat up time is expected to be around two hours. This process can
be sped up by filling the bain marie with hot water.
CLEANING
Before cleaning any electrical unit always isolate the power supply.
1. Remove the containers, empty debris and clean in hot soapy water.
2. With the containers removed wipe down the machine with a soft cloth, do not
use abrasive materials.
3. Stainless steel cleaners maybe used and cleaning instructions on the product
must be adhered to.
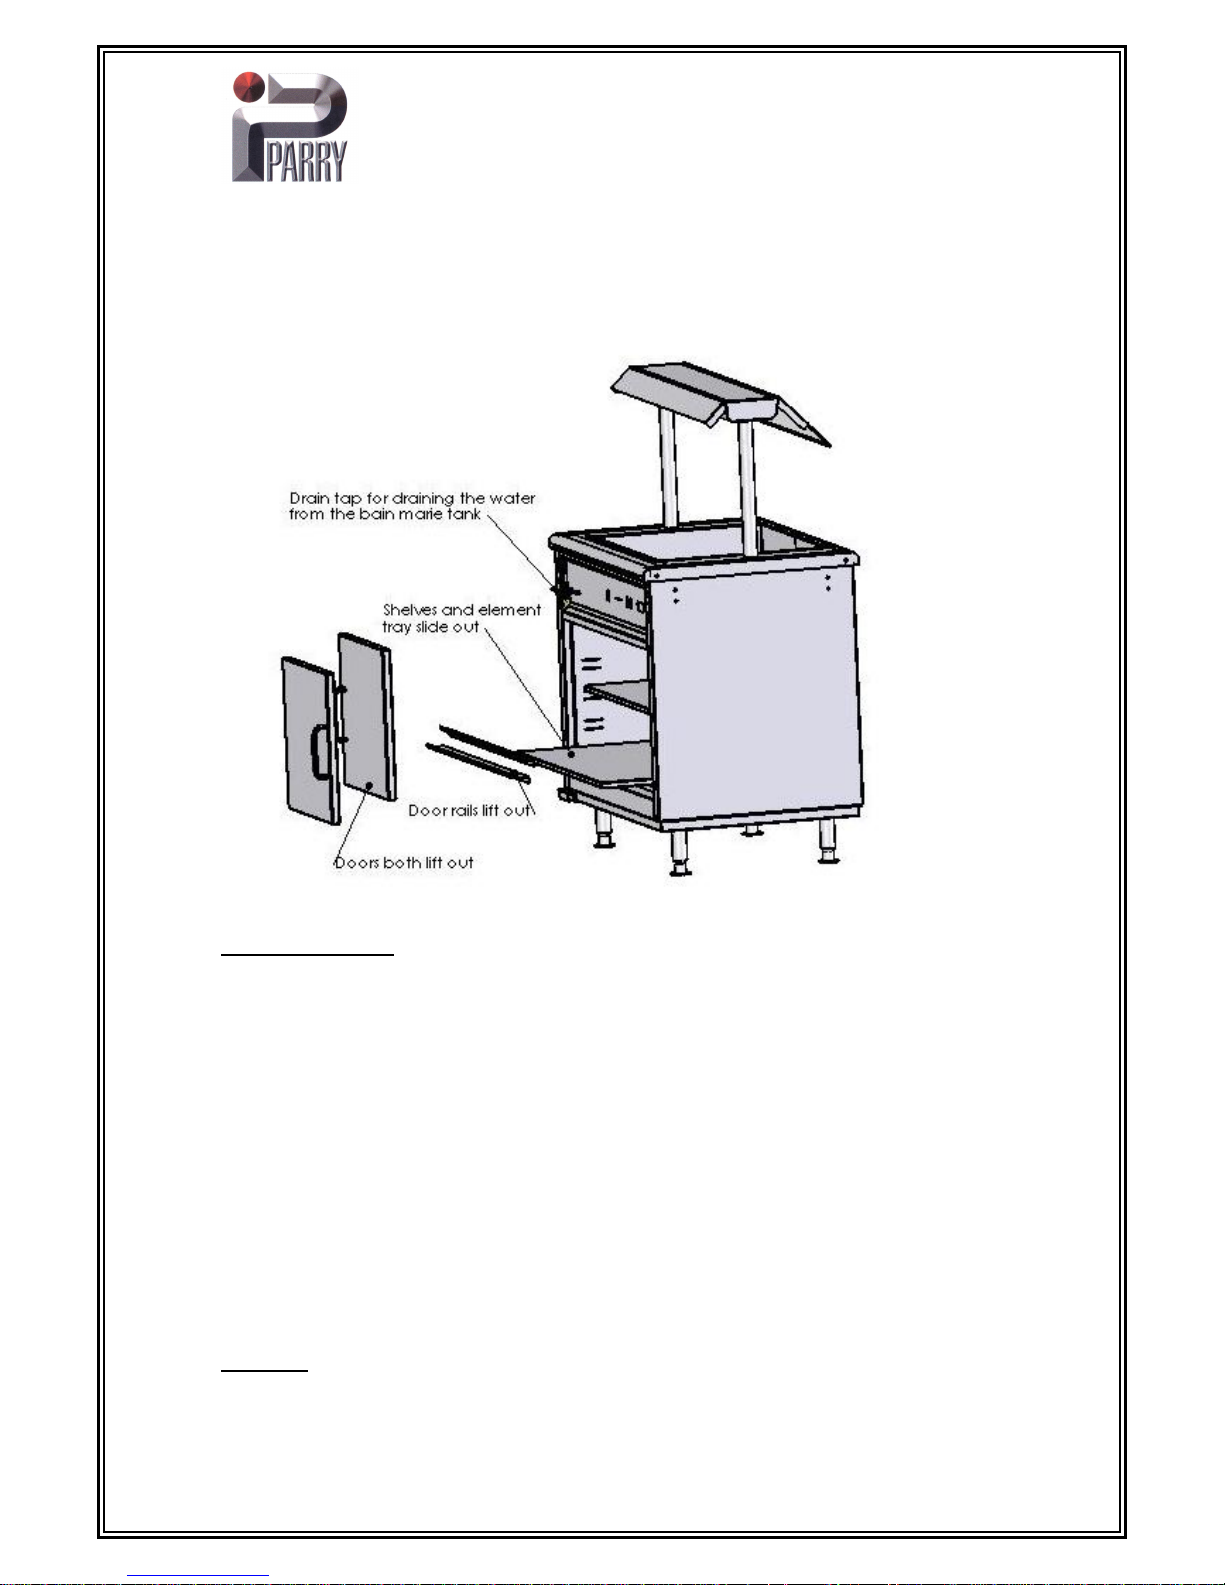
4. To clean inside the cabinet, the doors can be removed. Simply take hold of the
handle on the door and supporting the other side of the door lift the door
upward until the bottom of the door clears the bottom rail of the cabinet. Then
tilt the door so the bottom of the door comes forward, this allows the door to
slide down and away from the unit
5. The two bottom door rails can be easily lifted out to wipe down.
6. The inner shelves and element cover can be removed when both doors have
been taken out. Please note that the element cover must be replaced before
attempting to use the unit.
7. The drain tap on the front of the fascia can be used to drain the bain marie
tank.
Let the unit cool down before attempting to clean
INSTRUCTION REF: IN132
ISSUE No. 3
DATE 24.04.09
Page 4 of 5
TELEPHONE: SERVICE (44) 01332 875665
FAX: SERVICE (44) 01332 875536
4
FAULT FINDING
The most common fault is that the unit is not connected to with the mains supply, and
so the mains lamp will not illuminate, in this circumstance please try the following
before calling for service assistance.
1. Check unit is plugged into mains supply and the socket is switched on.
2. Check the fuse in the plug.
3. Try a different socket
4. If the unit has been permanently connected to a fused switch, ask a qualified
electrician or competent person to check the connections.
One of the above may cure your fault, if not contact your distributor
RATING
MSF9 – 1.5KW, 6.25A, 240V MSB9 – 3KW, 12.5A, 240V
MSF9G – 2.1KW, 8.75A. 240V MSB9G – 3.6KW, 15A, 240V
MSF12 – 1.5KW, 6.25A, 240 V MSB12 - 3KW, 12.5A, 240V
INSTRUCTION REF: IN132
ISSUE No. 3
DATE 24.04.09
Page 5 of 5
TELEPHONE: SERVICE (44) 01332 875665
FAX: SERVICE (44) 01332 875536
5
MSF12G – 2.4KW, 10A, 240V MSB12G – 3.9KW, 16.25A, 240V
MSF15 – 1.5KW, 6.3A, 240 V MSB15 – 4.3KW, 18A, 240V
MSF15G – 2.7KW, 11.3A, 240V MSB15G – 5.5KW, 23A, 240V
MSF18 – 1.5KW, 6.3A, 240 V MSB18 – 4.3KW, 18A, 240V
MSF18G – 3KW, 10.5A, 240V MSB18G – 5.3KW, 22.1A, 240V
Parry Catering recognises our obligations to the EU DIRECTIVE covering the waste
disposal of electrical and electronic equipment (WEEE), Parry Catering are committed
to this policy in order to help conserve the environment.
At the end of this unit’s life you MUST dispose of it in an approved manner. You
MUST not discard the unit or place it in the refuse bin.
You have several options:
a) Take the unit to an approved WEEE scheme company, there will be one in
your area.
b) Take the unit to an approved waste disposal site; many sites are
managed by your local authority.
c) Contact the unit’s manufacturer, importer or their agent the contact
details will be on the unit.
There will probably be a charge for this service which will depend on the physical
location of the unit and size you will be given a collection price for a curb side
collection based on commercial rates prevailing at the time.
It should be noted that the unit to be collected should be suitably packed and sealed
to prevent dangerous gases and fluids from escaping. The condition of the unit must
also be clean to comply with health and safety regulations.
 Loading...