

Page 1
User Guide
English
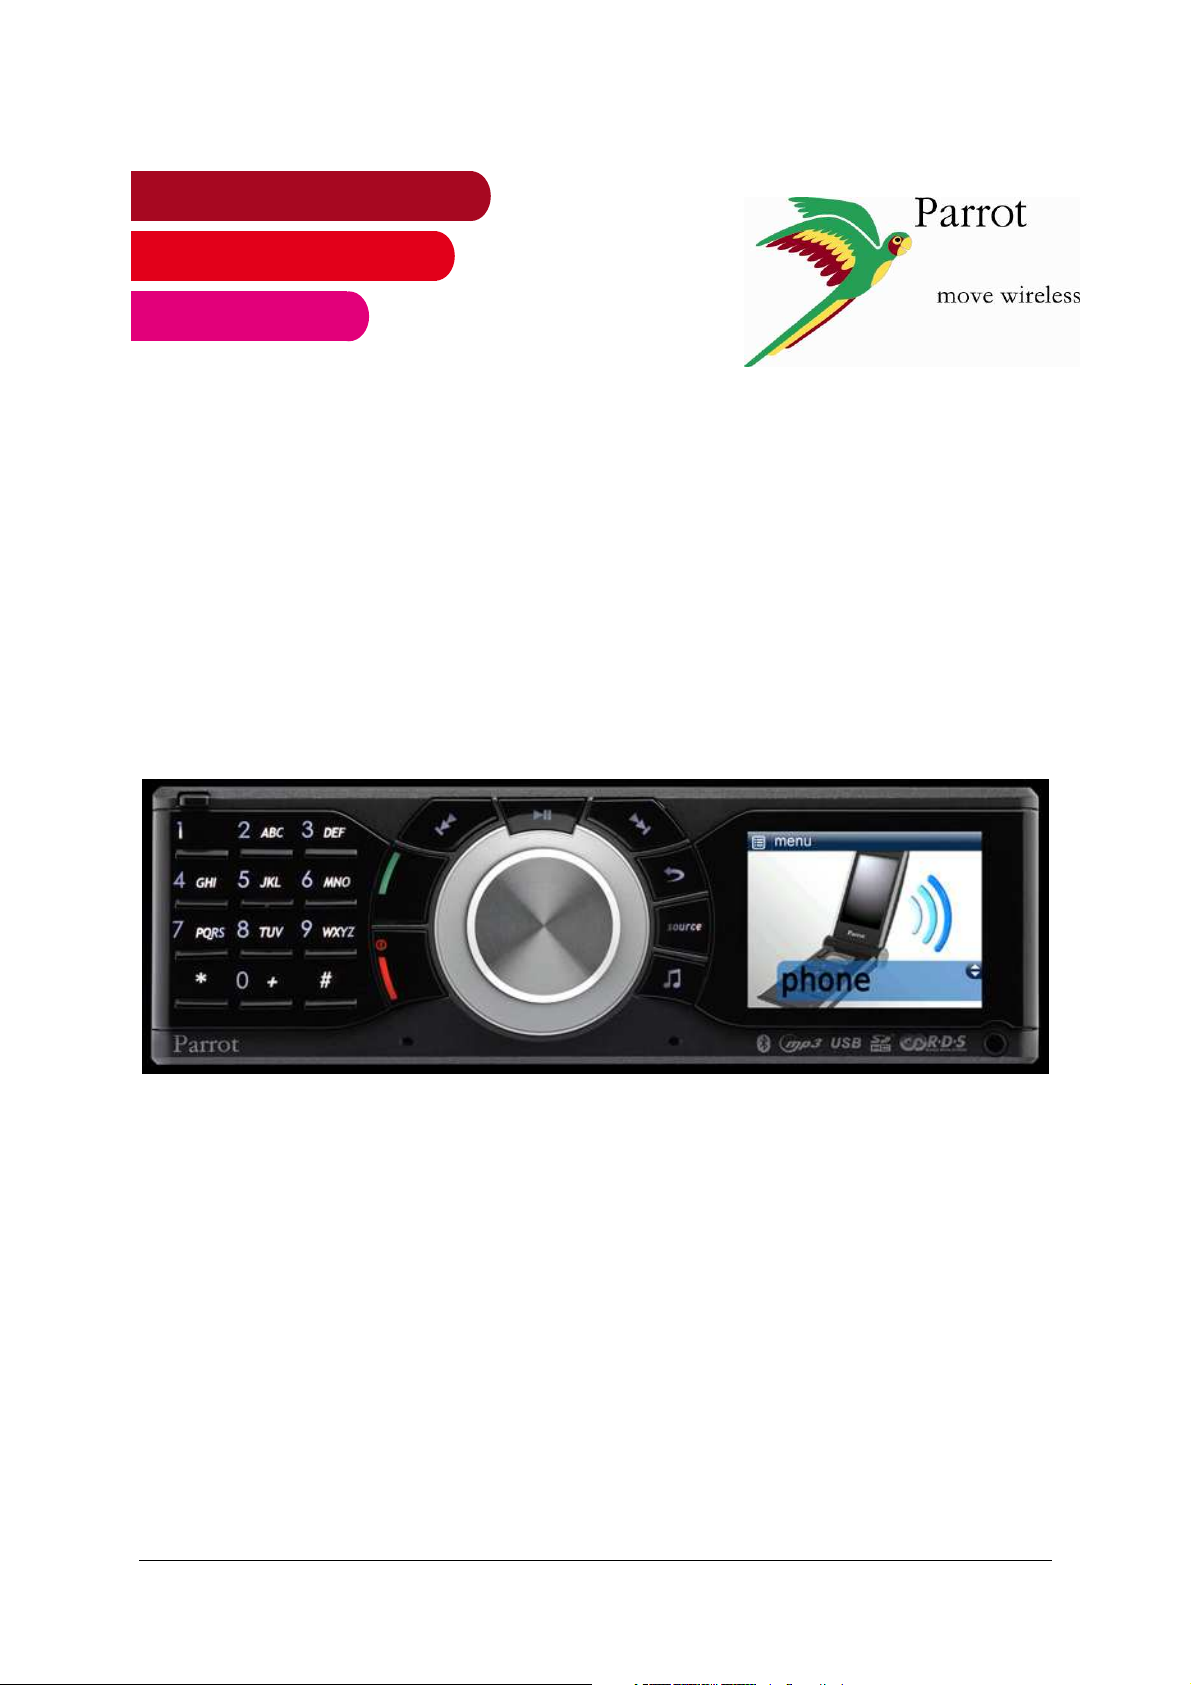
Parrot RK8200
Parrot RK8200 - User Guide
1
Page 2

Table of Contents
Introduction ......................................................................................................................... 4
Kit content ........................................................................................................................... 4
Using the Parrot RK8200 for the 1st time............................................................................ 5
Using the antitheft system ................................................................................................. 5
Installing the PARROT RK8200 .......................................................................................... 6
Navigating through the menus ........................................................................................... 8
Customizing your Parrot RK8200 ...................................................................................... 9
• Changing the brightness...................................................................................................... 9
• Changing the display color ................................................................................................ 10
• Changing the wallpaper ..................................................................................................... 10
• Customizing the wallpaper ................................................................................................ 10
• Select the display mode of the cover .............................................................................. 10
Connecting a phone via Bluetooth® ..................................................................................12
Pairing your phone with the Parrot RK8200 ......................................................................12
Connecting your phone to the PARROT RK8200 ..............................................................12
Disconnecting your phone from the Parrot RK8200..........................................................13
Using the Telephony function ............................................................................................14
Synchronization of the phonebook ...................................................................................14
Receiving a call .................................................................................................................14
Making a call.....................................................................................................................14
Using the Parrot RK8200 during a call ..............................................................................15
Using the redial function ...................................................................................................16
Using the speed dialing function .......................................................................................16
• Associating a number to a contact .................................................................................. 16
• Deleting a speed dialing entry .......................................................................................... 16
Using the voice recognition function .................................................................................16
Parrot RK8200 - User Guide
2
Page 3

• Recording keywords........................................................................................................... 16
• Recording voice tags ......................................................................................................... 17
Using the Music Function ..................................................................................................18
Using the Audio Streaming function .................................................................................18
Using the internal memory of the Parrot RK8200 ..............................................................18
Using the Parrot RK8200 with an external source.............................................................19
Using the Parrot RK8200 with an audio cable ..................................................................21
Using the Radio Function .................................................................................................21
• Saving a radio station ......................................................................................................... 22
• Changing the radio settings .............................................................................................. 22
Adjusting the audio effects ...............................................................................................22
• Using the Virtual Super Bass effect ................................................................................. 22
• Using the equalizer ............................................................................................................. 23
• Using the automatic volume control ................................................................................ 23
• Controlling the balance ...................................................................................................... 23
• Activate the Repetition / Random options ...................................................................... 23
Technical Specification ......................................................................................................24
Interface............................................................................................................................24
Display ..............................................................................................................................24
Audio ................................................................................................................................24
Tuner ................................................................................................................................24
Telephony .........................................................................................................................24
Sound ...............................................................................................................................24
Troubleshooting .................................................................................................................26
Parrot RK8200 - User Guide
3
Page 4

Introduction
The Bluetooth® technology enables voice and data to be sent via a short-distance radio
link. It allows several electronic devices to communicate with each other, particularly
phones and hands-free kits. Parrot is drawing on its long years of experience in signal
processing and voice recognition technology to offer a car stereo with a built-in hands-free
kit with superior audio quality during calls.
The Parrot RK8200 is an FM/AM RDS car stereo, featuring all the connections required for
digital and analogue music. It is also a Bluetooth hands-free kit boasting sophisticated
telephony functions. Completely built into the vehicle's audio system, music and
conversations are reproduced over the vehicle's speakers for maximum listening quality. A
car stereo has never provided so many connections: specific iPod connector, port for a
USB flash drive and USB MP3 player, SD card reader and a line-in socket for analogue
sources. The Parrot RK8200 also plays files sent by Bluetooth (compatible with Bluetooth
stereo A2DP) from a Bluetooth mobile phone or player. Over 300 MP3 tracks can be stored
in its internal memory.
Kit content
The kit contains:
• A Parrot RK8200
• A carrying case for faceplate
• An USB / Mini USB cable
• Release keys
• A fitting screw with a rubber cap
Parrot RK8200 - User Guide
4
Page 5
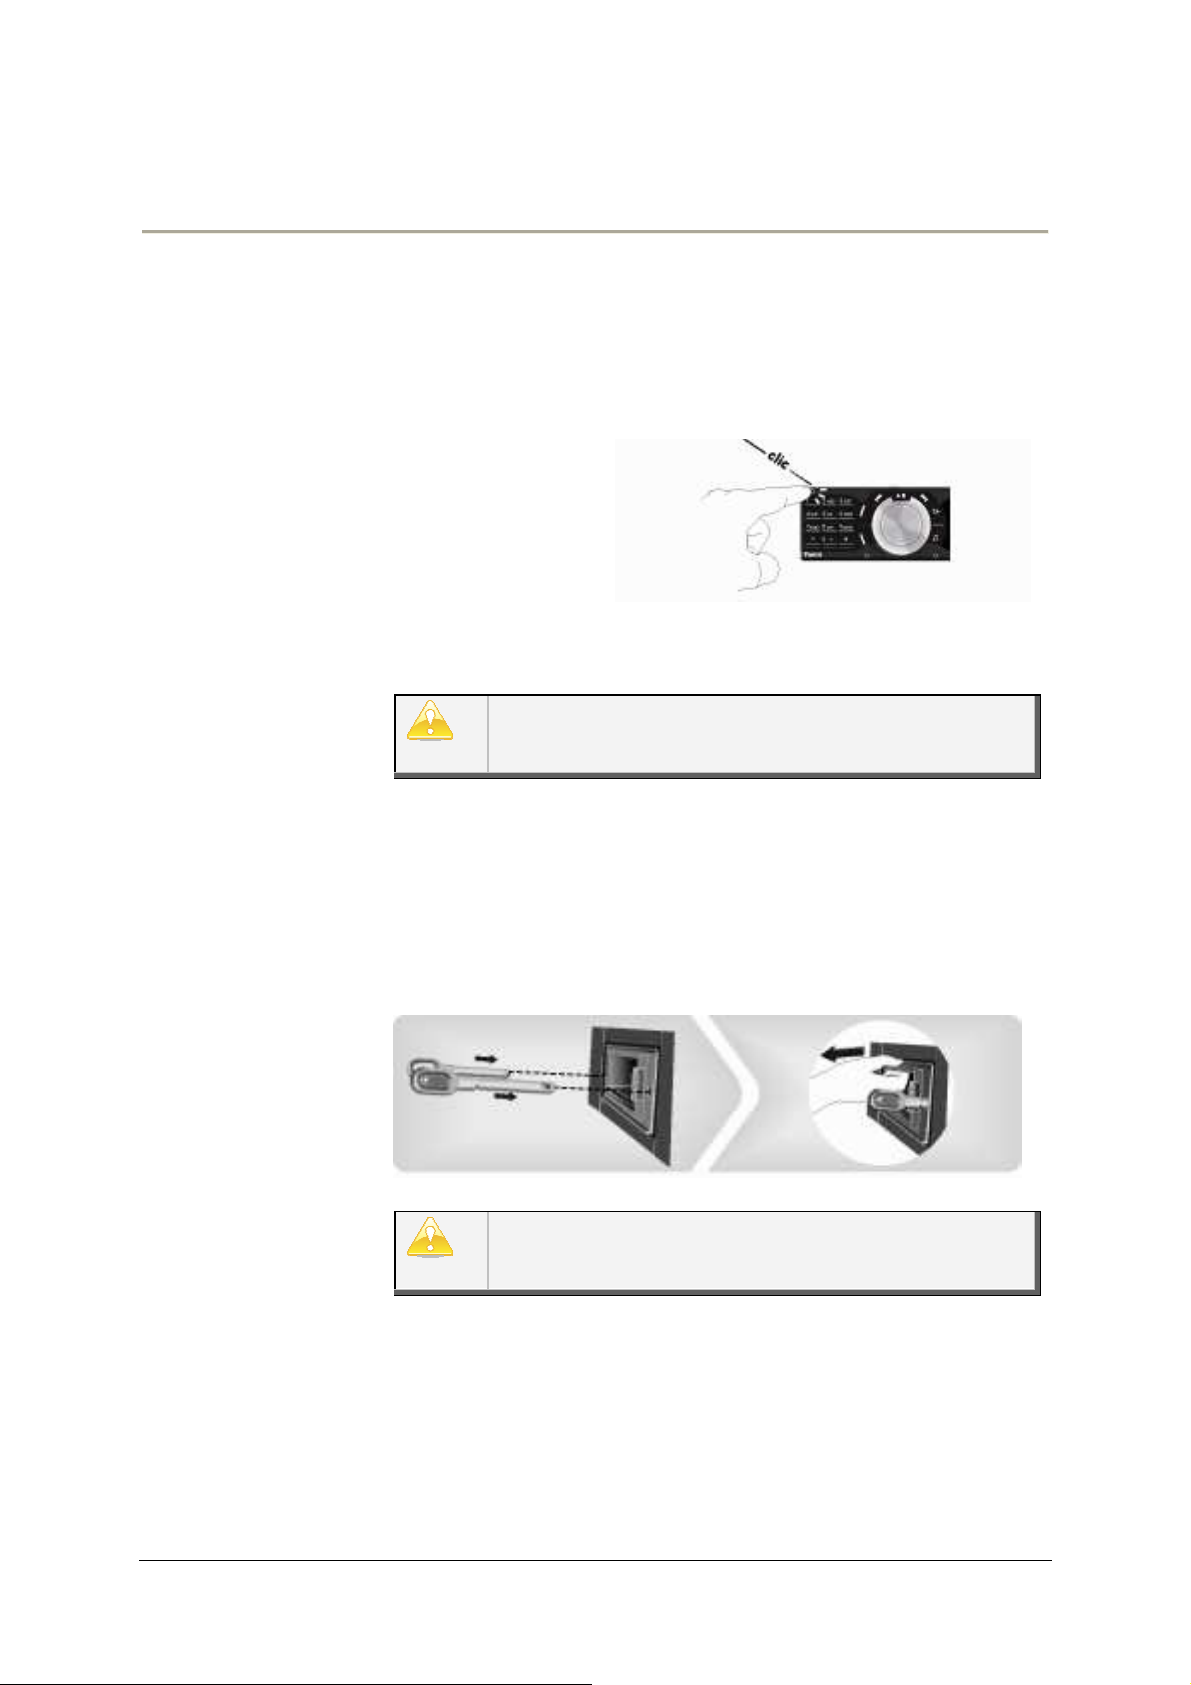
To avoid any risk of theft, do not forget to remove the face
plate of
•
To remove the
Insert the keys into the appropriate holes until they
Using the Parrot RK8200 for the 1st time
Using the antitheft
system
your Parrot RK8200 when you leave your vehicle. Without this
front, the Parrot RK8200 cannot be used.
faceplate, press
the eject button in
the top left.
• To replace the faceplate, put it in front of the car stereo and
push it.
Make sure not to push the screen during the faceplate
installation.
• To remove the entire car stereo:
1. Remove the car stereo’s faceplate.
2.
remain stuck.
3. Pull the device towards you.
To properly save the Parrot RK8200 parameters, make sure
the device is turned off before removing the face plate.
Parrot RK8200 - User Guide
5
Page 6
Installing the
PARROT RK8200
We advise our customers to have the Parrot RK8200 fitted
by a professional.
1. Get you previous car stereo out of the dash.
► Refer to your previous car stereo user guide or contact your
car dealer for more information.
2. Insert the mounting bracket and fix it into the dashboard using
the bracket mounting tabs.
3. Pull the ends of the wires out of the dashboard through the
mounting bracket.
4. Connect the audio and power connectors to the connectors of
your Parrot RK8200.
► If this connection is impossible, you have to obtain an ISO
cable to adapt your car radio to the ISO connectors of the Parrot
RK8200. Consult our website www.parrotshopping.com for more
information.
5. Compare the Parrot RK8200 antenna connector to the antenna
connector of your vehicle.
► If an adapter is necessary, contact your car dealer for more
information.
6. Check the polarity of your car radio. To do so, turn the ignition
off once the Parrot RK8200 is installed: the message “Goodbye!”
must be displayed.
- If it is the case, you can skip to step 7.
- If it is not the case, it is necessary to inverse the positions of the
red and yellow wires. Indeed, the red wire of the power cable
must be connected to the permanent 12V, the yellow wire to the
12V ignition and the black wire to the ground. This can be done
simply by reversing both terminal spade tags located on the
Parrot wiring.
Do not connect the yellow wire to the permanent 12V,
otherwise you can cause the vehicle battery to go flat.
7. Slide the car stereo into the mounting bracket and attach the
faceplate.
Parrot RK8200 - User Guide
6
Page 7
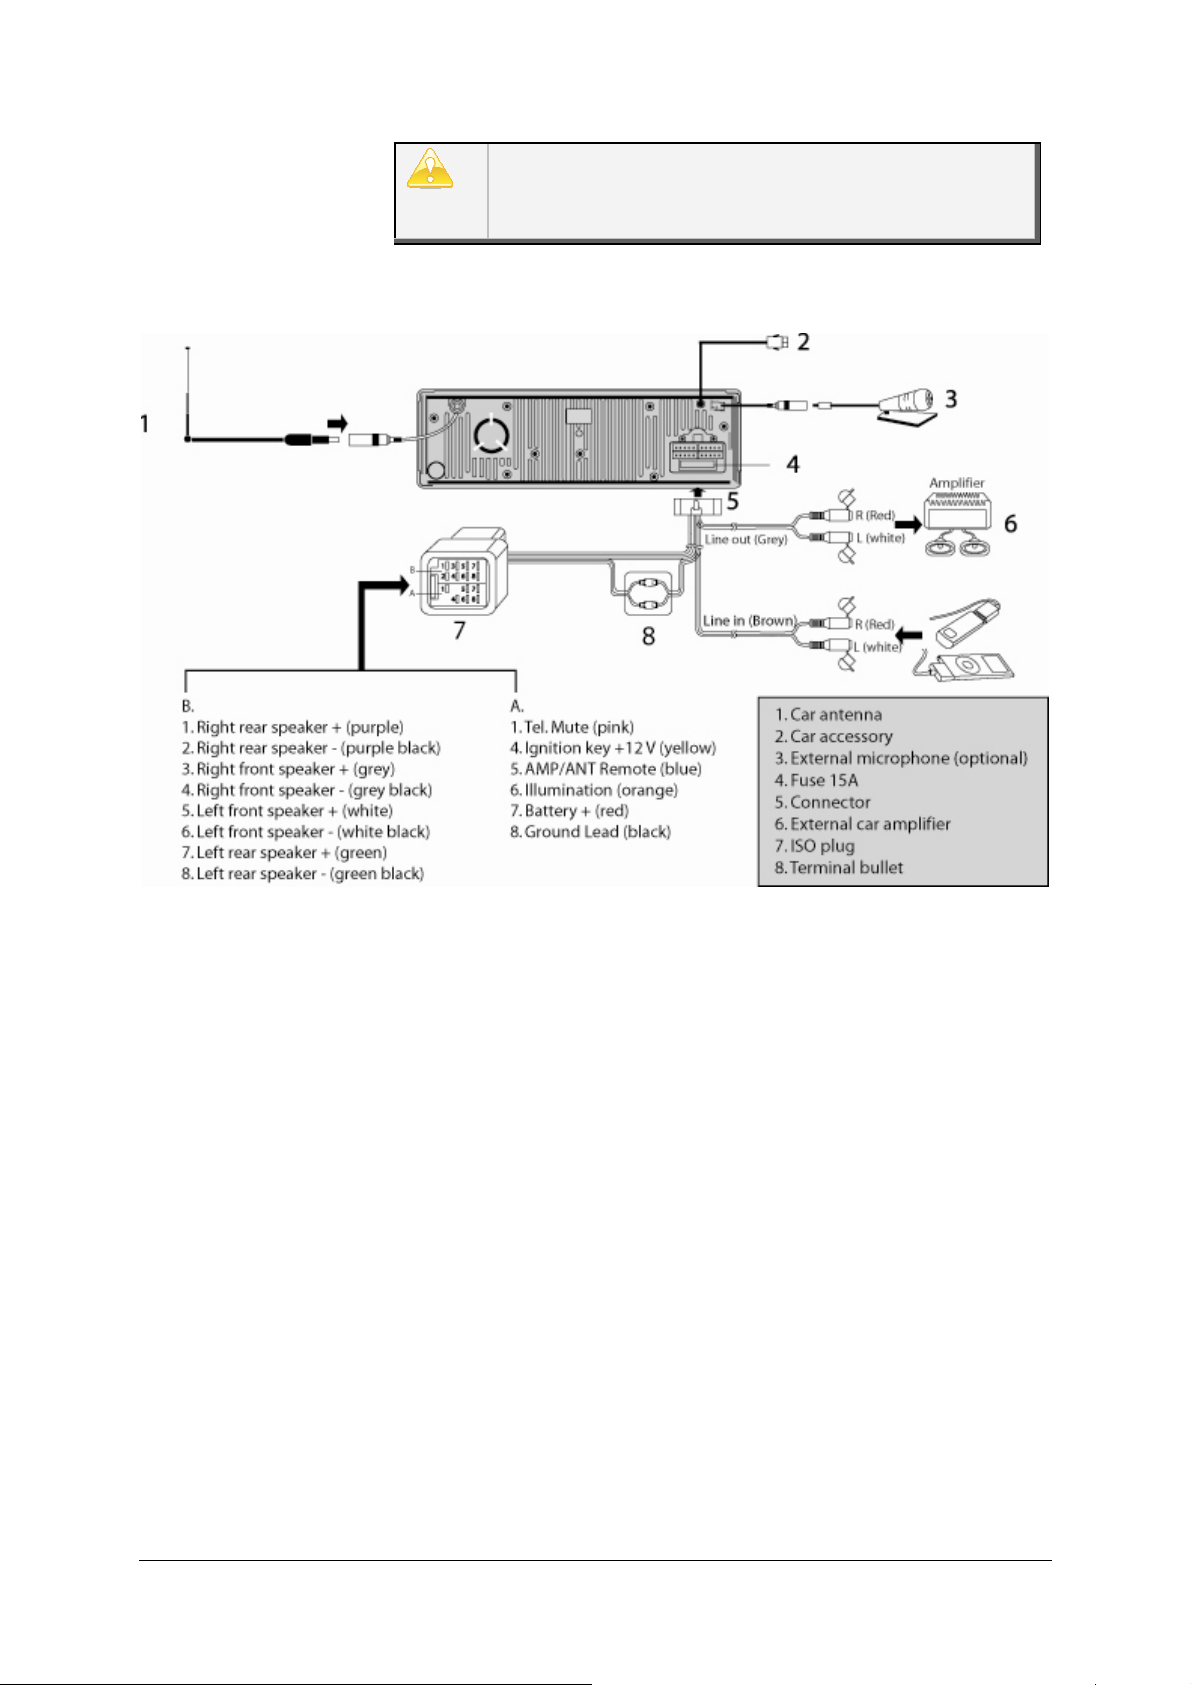
The microphone located on the lower edge of the faceplate
may be obstructed because of the design of your
dashboard. In that case, you may need an external
microphone.
Parrot RK8200 - User Guide
7
Page 8
Navigating
through the
menus
• Menu structure
Phonebook: this menu allows you to access your contacts if your
mobile phone has the automatic synchronization function. If it is
not the case, you have to send your contacts from your phone to
the kit by selecting Phone > Receive contacts.
This menu is only available if you have connected a phone to
the Parrot RK8200.
Internal memory: this menu allows you to access the music files
stored into the Parrot RK8200 internal memory. Refer to the
« Using the internal memory of the Parrot RK8200 » section for
further information.
This menu is only available if you have stored music files in the
Parrot RK8200.
Radio: this menu allows you to access different radio frequencies
you can listen to (FM1, FM2, FM3, and AM) and to modify the
settings.
Auxiliary input: this menu allows you to select the front line in or
the back line in depending on the connection you want to use.
Bluetooth Audio: this menu allows you to access the list of the
A2DP compatible devices previously paired with the Parrot
RK8200. It also allows you to search for new devices to use the
Audio Streaming function.
Audio effects: this menu allows you to adjust the audio settings
(Virtual Bass, Equalizer, Balance…).
Phone: this menu allows you to access the different settings of the
Phone function, such as voice tags recording, contacts
management, speed dialing function, etc.
This menu is only available if you have connected a phone to
the Parrot RK8200.
Settings: this menu allows you to change settings such as the
language, the display, the ringtones, etc.
Parrot RK8200 - User Guide
8
Page 9
Buttons
Functions
The Parrot RK8200 allows you to customize the display of the screen
• Browsing through the menus
Navigate through the menus
Short press: Enter the main
menu / confirm the selection
Go back to previous menu
Select the source of your audio
files.
► Refer to the Using the
Music function section for
further information.
Customizing
your Parrot
RK8200
Enter the audio effects menu
by changing some parameters.
• Changing the brightness
1. From the main menu, select Settings > Display > Brightness.
2. Increase or decrease the brightness using the jog wheel.
3. Press the jog wheel to confirm.
► Refer to the Adjusting the
audio effects for further
information.
Short press: Exit the menu
Long press: Turn the Parrot
RK8200 in standby mode
> You can press the
Parrot RK8200 - User Guide
key to go back to main menu.
9
Page 10

• Changing the display color
1. From the main menu, select Settings > Display > Theme.
2. Select a color using the jog wheel.
3. Press the jog wheel to confirm.
> You can press the key to go back to main menu.
• Changing the wallpaper
1. From the main menu, select Settings > Display > Wallpaper.
2. Use the jog wheel to select a wallpaper from the selection
proposed by default.
3. Press the jog wheel to confirm.
> You can press the key to go back to main menu.
• Customizing the wallpaper
It is possible to send a photo to the Parrot RK8200 and use it as
wallpaper. To do so :
1. Ensure that the Parrot RK8200 is visible to all Bluetooth® devices.
To do so, select Settings > Bluetooth > Visibility.
2. From the main menu, select Settings > Display > Wallpaper.
3. Select Customize > Add.
> « Waiting for picture » is displayed on your Parrot RK8200.
4. From your Bluetooth device (PC, mobile phone…), send the photo
via Bluetooth to the Parrot RK8200.
► Refer to the user guide of your device for further information about
sending photos via Bluetooth.
• Select the display mode of the cover
You can visualize the sleeve of the album you are listening if it is
included in the audio file.
Parrot RK8200 - User Guide
10
Page 11

If no picture is included in the tags of your audio files, you can
add a picture in .jpg format in the corresponding folder If
various pictures are in this folder, the Parrot RK8200 displays
primarily the cover.jpg one.
1. From the main menu, select Settings > Display > Cover.
2. Select the desired display mode using the jog wheel.
3. Press the jog wheel to confirm.
> You can press the key to go back to main menu.
Parrot RK8200 - User Guide
11
Page 12
If you are using your
phone with the Parrot RK8200 for the first
lect
If it is the first time you are using your phone with the Parrot
Connecting a phone via Bluetooth®
If it is the first time you use this phone with the Parrot RK8200, you have to pair both
devices. The pairing process is only required once. You will then only have to connect the
Parrot RK8200 with your phone before using the telephony function.
Pairing your phone
with the Parrot
RK8200
time:
Ensure that the frame is visible to all Bluetooth devices. To
do so, select Settings > Bluetooth > Visibility.
1. From your phone, search for Bluetooth peripherals.
> The Bluetooth peripherals list is displayed.
► Refer to your phone user guide for more information.
2. When the search is complete, select « Parrot RK8200 ».
3. Enter « 0000 » when the PIN Code is required.
> « Pairing successful » is displayed on the Parrot RK8200.
> You can now connect both devices.
You can pair until 10 devices. If you pair an 11th one, a “full
memory” message is displayed on the Parrot RK8200. To
pair another device, you have to release memory by
removing one of your paired devices. To do so, se
Settings > Bluetooth > Paired devices.
Connecting your
phone to the
Parrot RK8200
►
RK8200, refer to the Pairing your phone with the Parrot RK8200
section.
If you are using a phone you already paired with the Parrot
RK8200:
1. Press the jog wheel to access the main menu, then select
Settings > Bluetooth > Connect Phone or press the jog wheel for
2 seconds if you are in inactive mode.
> The list of the devices paired with the Parrot RK8200 is
displayed.
Parrot RK8200 - User Guide
12
Page 13

You also can connect your phone by selecting Bluetooth
If you want to disconnect your phone from the Parrot RK8200
:
Audio and selecting directly your device in the list. The listed
phones are those which are compatible with the A2DP service.
For further information, refer to the user guide of your phone.
2. Select the device you want to use and press the jog wheel.
> Both devices are connected.
> You can now use the telephony function of the Parrot RK8200
or send music files via Bluetooth.
► Refer to the Using the telephony function section for more
information.
If there are various phones already paired with the Parrot
RK8200 in the vehicle, you can select the device with which
the connection will be established by default. To do so :
1. Select Settings > Bluetooth > Paired devices
2. Select the device you want to connect by default.
3. Select the Preferred option.
Disconnecting
your phone from
the Parrot RK8200
1. Press the jog wheel to enter the main menu and select
Settings > Bluetooth > Paired devices.
2. Select your phone.
3. Select the Disconnect option.
You can also delete this phone from the paired phones list. To
do so, select the Delete option.
Parrot RK8200 - User Guide
13
Page 14
Bluetooth
A pop
-
up is displayed on the screen of the Parrot RK8200 to
•
If the contact you want to call is in the phonebook of the phone
Using the Telephony function
Before using your Parrot RK8200 telephony function, you first have to connect both devices.
If you are using this device for the first time, you will have to pair both devices before
connecting them.
►Refer to the Connecting a phone via Bluetooth section for more information.
Synchronization of
the phonebook
Receiving a call
With some
synchronized in the kit’s memory. If your phone doesn’t support
automatic synchronization, you can also use the Object Push
function of your phone to send contacts from your mobile to the
car kit via Bluetooth. To do so:
1. From the main menu, select Phone > Receive contacts.
> « Waiting for contact » is displayed on the screen of the Parrot
RK8200.
2. Refer to your phones’ user guide for more information about
sending contacts via Object Push.
You can then associate a picture to all your contacts. To do so:
1. Press the jog wheel then select Phone > Contacts
inform you of an incoming call.
management.
2. Select the contact then press the jog wheel.
3. Select Pictures > Add picture.
4. Follow the prompts given by the Parrot RK8200.
phones, the phonebook is automatically
• Press the key to accept this call. Then, press the key to
end the call.
• Press the key to reject this call.
Making a call
connected to the Parrot RK8200:
Parrot RK8200 - User Guide
14
Page 15

You first have to synchronize the phonebook of the mobile
During a call, you can
:
phone on the Parrot RK8200’s memory.
► Refer to the Synchronization of the phonebook section
for further information.
1. Press the jog wheel to enter the main menu and select
Phonebook.
> You access the phonebook of the connected phone.
2. Select the contact and press the jog wheel or the key to
make the call.
You can also use the numerical pad of the Parrot RK8200 to
browse your agenda more rapidly.
• If the contact you want to call is not in the phonebook of the
phone connected to the Parrot RK8200, stop your vehicle in an
appropriate place, then :
1. Dial your contact phone number using your phone or the
numerical pad of the Parrot RK8200.
Using the Parrot
RK8200 during a
call
2. Press the key to make the call.
> The call is automatically in hands-free mode.
• To make a call via voice recognition function:
1. Press the key to launch the voice recognition mode.
2. Say the name of the contact you want to call.
> The call is automatically realized.
► Refer to the Using the voice recognition function for
further information.
- Transfer an ongoing call to your phone (if you want to
leave your vehicle for example): to do so, press the key.
Press again the key to exit the discreet mode.
- Mute the microphone: to do so, press the key.
- Adjust the volume: to do so, use the jog wheel.
- Send DTMF (to manage your voice mail for example). To
do so, use the numerical pad of your Parrot RK8200.
Parrot RK8200 - User Guide
15
Page 16

Using the redial
To call the last number dialed via the Parrot RK82
00, hold down the
The Parrot RK8200 allows you to assign a key of the numerical pad
•
function
Using the speed
dialing function
key for 2 seconds.
> The call is automatically initiated.
to one of your contact to facilitate the calls to this contact.
To realize the call using the speed dialing function, hold down the
numerical key associated to the contact you want to call.
First, you have to connect your phone to the kit to record the
speed dialing entries for your contacts.
► Refer to the Connecting your phone to the Parrot
RK8200 section for further information.
• Associating a number to a contact
1. Press the jog wheel to enter the main menu then select Phone >
Speed dialing.
2. Select a number using the jog wheel.
> The list of your contacts is displayed.
3. Select the contact to which you want to associate a number using
the jog wheel.
> A confirmation message is displayed on the screen.
Using the voice
recognition
function
4. Press the key to confirm or the key to cancel the process
and go back to the main menu.
• Deleting a speed dialing entry
1. Press the jog wheel to enter the main menu then select Phone >
Speed dialing.
2. Select the number you want to delete with the jog wheel.
> A confirmation message is displayed on the screen.
3. Press the key to confirm or the key to cancel the process
and go back to the main menu.
Recording keywords
The Parrot RK8200 allows you to record the keywords: “general”,
“mobile”, “work”, “home”, and “other”. These keywords allow you to
choose the phone number to call if the contact has more than one
Parrot RK8200 - User Guide
16
Page 17

phone number. To record the keywords
:
1. Press the jog wheel and select Phone > Voice commands >
Keywords.
2. Select the keyword you want to record and press the jog wheel to
start recording.
3. Follow the prompts given by the Parrot RK8200.
- You will have to record each keyword twice to obtain a
better recognition.
- Record the keywords with a monotonous voice to improve
the voice recognition feature efficiency.
• Recording voice tags
The Parrot RK8200 also allows you to add a voice tag to a contact.
To do so:
First, you have to connect your phone to the Parrot RK8200
to record voice tags for your contacts.
► Refer to the Connecting your phone to the Parrot
RK8200 section for further information.
1. Press the jog wheel to enter the menu and select Phone >
Contact management.
2. Select the contact then press the jog wheel.
3. Select the Add voice tag option to start recording.
4. Follow the prompts given by the Parrot RK8200.
Parrot RK8200 - User Guide
17
Page 18

Using the Music Function
1.
Press the jog wheel to access the main me
nu and select
The Parrot RK8200 has an internal memory of 1GB. You can use this
Press the key repeatedly to select the source of your music files.
Using the Audio
Streaming
function
Bluetooth Audio.
> The list of the devices paired with the Parrot RK8200 and
compatible with the audio streaming function is displayed.
> If the device you want to use is already in this list, go directly to
step 5.
2. If you are using a device that has not been already paired with the
Parrot RK8200, select the Search option.
> The list of the available Bluetooth peripherals is displayed.
3. Select your device and press the jog wheel.
4. Enter “0000” on your phone/audio player when you are prompted
to do so.
5. Select your device and press the jog wheel.
> You can now start playing the track on your phone / audio player.
> The sound comes through the speakers of your vehicle.
Depending on the model of your phone, the connection with
the Parrot RK8200 may only be possible from your phone
menu.
Using the internal
memory of the
Parrot RK8200
internal memory to store music files. To do so:
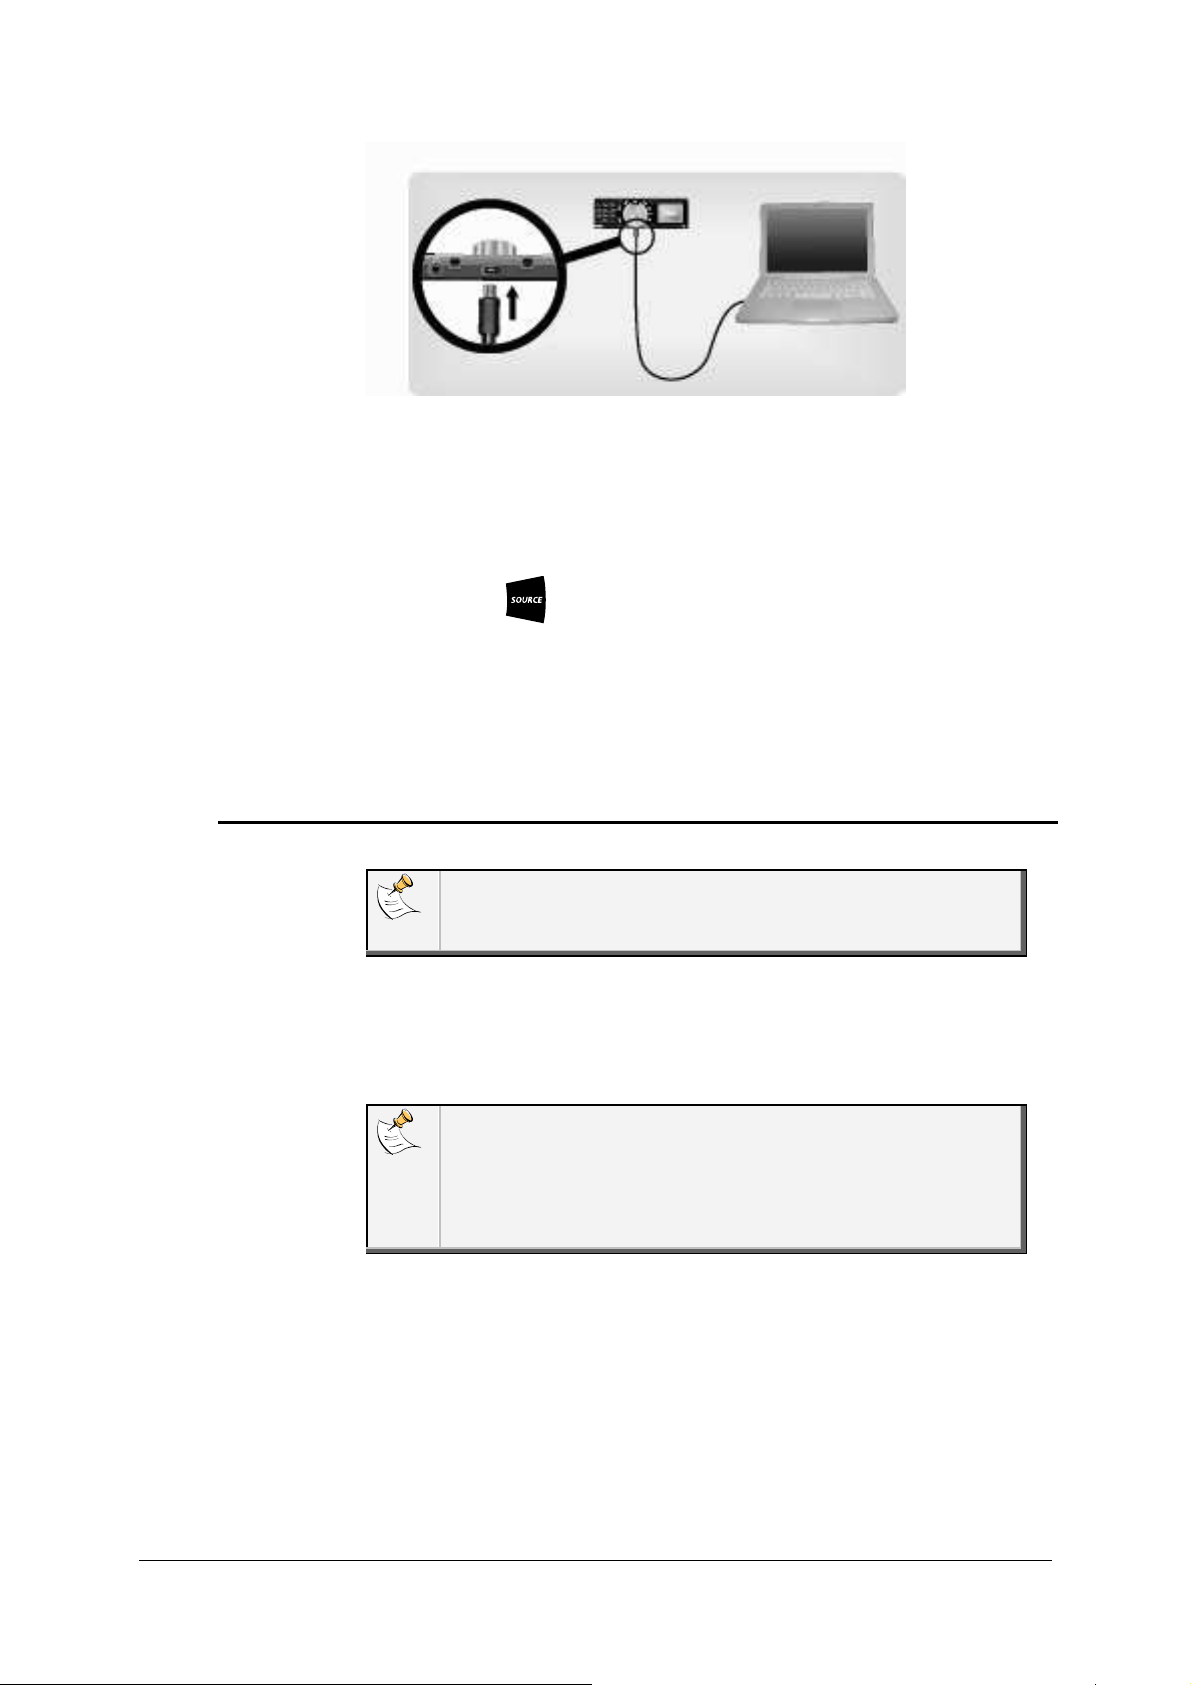
1. Connect the Parrot RK8200 to your computer using the provided
USB/mini USB cable.
Parrot RK8200 - User Guide
18
Page 19
Using the Parrot
RK8200 with an
external source
2. Copy your music files in MP3 or WMA formats as if it was an USB
flash drive.
To get to the music files stored in the internal memory of the Parrot
RK8200 :
1. Press the key repeatedly to select the Internal Memory
contents.
2. Use the jog wheel to browse the internal memory of the Parrot
RK8200 and press the jog wheel to enter a directory or start
playback of the selected music file.
The USB cable and the docking cable for iPod are located
behind the removable faceplate. Use this place for your iPod or
mass storage peripheral.
1. Connect your external source to the Parrot RK8200.
• Use the USB cable if your peripheral is an MP3 player or an
USB key.
If you connect an iPhone to the Parrot RK8200, the following
message may be displayed: «This accessory is not made to
work with iPhone. Would you like to turn on airplane mode to
reduce audio interference? ». In that case, do not select any
option: the message disappears automatically after a few
seconds.
• Use the docking cable for iPod if your peripheral is an iPod.
Parrot RK8200 - User Guide
19
Page 20

• Insert the SD card into the appropriate slot.
We advise you to switch off your Parrot RK8200 before
inserting or removing an SD card.
2. Depending on the available peripherals, press the key
repeatedly to select:
• USB to listen to the music files stored in the USB mass
storage peripheral.
• iPod to listen to the music files stored in an iPod.
• SD to listen to the music files stored in the SD card.
3. Press the jog wheel to access the content of the selected source.
• If the tags of your audio files are correctly defined or if the
device connected to the Parrot RK8200 is an iPod, select one
of these classification features: playlist, artist, album, songs,
genres and years, and press the jog wheel.
• If the tags of your audio files are not defined:
a. Select Browse by directory.
b. Press the jog wheel to play the selected music file.
If your Parrot is connected to an iPod and an USB flash drive,
the iPod is priority: you only can browse your iPod content.
Parrot RK8200 - User Guide
20
Page 21

The Parrot RK8200 allows you to listen to music files from another
Using the Parrot
RK8200 with an
audio cable
type of audio player such as a CD player. To do so:
1. Connect your audio player using a Jack/Jack cable (not provided)
into the jack socket on the front of the faceplate.
You can also use the Line In connector located at the back of
the Parrot RK8200. To do so:
1. From the main menu, select Auxiliary input.
2. Select Back line in with the jog wheel depending on the
connection you want to use.
2. Press the key repeatedly to access the Line In source.
3. Launch the playback from your audio player.
> The sound is directly streamed through the speakers of your
vehicle.
Using the Radio
function
You can press the key to choose the back or front line
connection.
1. Press the key repeatedly to select Tuner.
2. Select the desired radio station. To do so:
• Press the keys to select a radio station
manually.
• Hold down the keys to tune to the next
available radio station.
• If you have already saved the radio station:
a. Press the key.
b. Use the numerical pad of the Parrot RK8200 to select
the radio station associated to the number.
You also can directly use the numerical keypad of the Parrot
RK8200 to select a saved radio station. To do so, associate your
keypad to the Tuner mode by selecting Tuner > Settings >
Keypad use.
Parrot RK8200 - User Guide
21
Page 22

•
Saving a radio station
The Parrot RK8200
allows you to change some audio settings
.
To do
1. Press the key and select Store New.
2. Select a place and press the jog wheel to confirm.
Adjusting the
audio effects
You also can press the key then hold down a number
from the numerical pad of the Parrot RK8200 to save a radio
station.
• Changing the radio settings
The Parrot RK8200 allows you to change the following settings.
- Auto store: seek automatically and store the 12 radio
stations with the highest RF level in the current band.
- RDS scan: activate / deactivate the RDS scan which allows
to change automatically the frequency of the current radio
station when the signal becomes too weak.
- Traffic alert: activate / deactivate the traffic alert which
allows to activate the Radio source when the current station
starts broadcasting traffic information.
- FM step: select the FM step (50 or 100 kHz.)
- Activate AM: activate / deactivate the AM frequencies.
To change the settings :
1. Enter the main menu and select Radio > Settings.
2. Change the settings using the jog wheel.
so, press the key or select the Audio effects option.
• Using the Virtual Super Bass effect
The VS Bass effect allows you to amplify the low frequencies.
To activate it, press the key and select the virtual super bass
option.
You can change the settings of this effect by selecting Audio
effect > Settings> Vsb preferences.
Parrot RK8200 - User Guide
22
Page 23

• Using the equalizer
The equalizer allows you to adjust the low, medium and high
frequencies depending on your preferences. To activate it, press the
key and select the Equalizer option.
You can choose between 6 default presets to adapt the frequencies
to the music style you are listening to. If you don’t find one
corresponding to your preferences, you also can create your own
preset during the playback of a track. To do so, press the key
and select Settings > Preferences Eq. > Customize. Then, use the
jog wheel to modify the frequencies.
• Using the automatic volume control
The automatic volume control option allows you to adapt the volume
depending on the surrounding noise. To activate it, press the
key and select the automatic volume control option.
• Controlling the balance
You can change the balance settings. To do so, press the key
and select the Balance option. Then, use the jog wheel to adjust it.
• Activate the Repetition / Random options
To launch the random playback of the music files or activate the
repetition, press the key then select Settings then Repetition
or Random.
The iPod settings are priority to those of the Parrot RK8200.
Parrot RK8200 - User Guide
23
Page 24

2.4-inch TFT screen with 262 144
colors
Phone information
4x45W amplifier with 20
-
bit DAC
FM and AM bands (PO and GO), RDS
Automatic phonebook
synchronization
Full duplex and echo cancel
lation
Bluetooth v1.2
Technical Specification
Interface
Display
Audio
Tuner
Telephony
Sound
Bluetooth
12-key numeric keypad
8 control buttons + 1 rotary button
Phonebook, caller names and numbers
Playlist, album cover, artist and title
Minimal impedance of 4 ohms
Line-out socket for external amplifiers
48 recordable stations (presets)
Digital & analogue connections:
Specific iPod and USB connector
SD card reader
Analogue jack line-in socket at the front
Analogue RCA line-in socket at the back
Complete call records
Number of contacts: total of 8 000
Voice recognition
Speech synthesis of the names in the phonebook (TTS)
Parrot DCBM noise reduction
Double microphone built into the faceplate
Automatic detection of the speaker's position
Bluetooth stereo (A2DP) compatible
Transmission through the vehicle's speakers
Profiles supported:
HSP 1.0 (Headset Profile)
HFP 0.96 / 1.0 / 1.5 (Hands Free Profile)
A2DP (Advanced Audio Distribution Profile)
AVRCP (Audio Video Remote Control Profile)
OPP (Object Push Profile)
Parrot RK8200 - User Guide
24
Page 25

PBAP (Phone Book Access Profile)
Parrot P5+ (32 bits) @ 208 MHz
Dimensions
Processor
SYNC
Maximum range: 10 meters
Pairing by PIN code, maximum of 10 devices
Updates via USB
• Faceplate
Height = 59 mm
Width = 189 mm
Depth = 29 mm
Weight = 132 g
• Unit
Height = 58 mm
Width = 180 mm
Depth = 174 mm
Weight = 1038 g
Memory: Flash = 1 GB
RAM = 128 Mbits
Parrot RK8200 - User Guide
25
Page 26

Troubleshooting
Pro
blems Solutions
My Parro
t RK8200
does not find
Check that the Parrot RK8200 is not connected to your USB
Is it possible to connect an USB
Yes it is, but make sure this device can be stored in the
When I use my iPod with my Parrot
If your iP
od does not work anymore, reset the device by
I can’t connect my phone to the
Tr
y to connect your phone to the Parrot RK8200 directly from
An error message is displayed
When you connect an iPhone to the Parrot RK
8200, the
The message “full memory” is
You can pair
up to
10 devices to the Parrot RK8200. If you
It is difficult to hear me when I
The dashboard of your vehicle may obstruct the Parrot
I can’t turn on my Parrot RK8200.
the content of my USB flash drive.
external hard disk to the Parrot
RK8200?
RK8200, my device is blocked.
Parrot RK8200 by Bluetooth from
the kit.
Check the cables and the adapter used to install the Parrot
RK8200. To do so, refer to the « Installing the Parrot
RK8200 » of this user guide.
flash drive and to an iPod/iPhone at the same time. If it is the
case, disconnect your iPod/iPhone to access the content of
your USB flash drive.
internal location behind the faceplate.
pressing simultaneously the Menu key and the central key of
your iPod. Refer to the user guide of your iPod for further
information.
the phone. Refer to the user guide of your phone for further
information.
when I connect my iPhone to the
Parrot RK8200.
displayed on my Parrot RK8200
when I try to pair my phone.
make or receive calls on my Parrot
RK8200.
following message may be displayed on your iPhone: « This
accessory is not made to work with iPhone. Would you like to
turn on airplane mode to reduce audio interference? ». If it is
the case, do not select any of the 2 options: the message
disappears after several minutes.
pair an 11th device, the Parrot RK8200 displays “full memory”.
To pair a new device, you have to release memory. To do so,
select Settings > Bluetooth > Paired devices.
RK8200 microphone located on the lower edge of the
faceplate. An external microphone may be necessary.
Parrot RK8200 - User Guide
26
Page 27

If you have any other type of problem, not detailed in this section, please contact our hotline
from Monday to Friday between 9am and 6 pm (GMT+1) by mail hot-line@parrot.com or by
phone:
Europe: [+33] (0) 1 48 03 60 69 (Spoken languages: English, French, Spanish and German)
Italy: [+39] 02 59 90 15 97
Spain: [+34] 902 404 202
UK: [+44] (0)870 112 5872
Germany: 0900 172 77 68
USA: [+1] (877) 9 PARROT (toll free)
China: [+ 86] (0)2164 601 944
Parrot RK8200 - User Guide
27
 Loading...