

Page 1

BY
QUICK START
GUIDE
ユーザーガイド
Page 2

“I WOULD LIKE TO PAY TRIBUTE TO PARROT
FOR DARING TO THINK THAT THIS WONDER OF
TECHNOLOGY COULD BE CURLED UP INSIDE
A BEAUTIFUL SHOWCASE. EVEN THOUGH
THE MOST IMPORTANT THING WILL STILL BE
THE PHOTO OF THE DOG OR FAVOURITE AUNTIE,
IT WAS A GOOD MOVE SURROUNDING THIS
COLLECTION OF SOUVENIRS WITH AN EYE-
CATCHING FLOURISH THAT GOES BEYOND MERE
PRACTICALITY. STORAGE FANS WILL BE THE
MOST VULNERABLE TO THE CHARMS OF THIS
OBJECT, WHICH WILL OVERCOME ANY
PROBLEMS OF ARRANGING PHOTO SOUVENIRS.
I WILL FILL THIS SCREEN WITH PHOTOS OF
MY CHILDREN AND FRIENDS, AND I WILL
PLACE IT NEATLY ON MY DESK.”
ANDRÉE PUTMAN
catalogue_piste 1:Mise en page 1 24/01/2008 18:17 Page 2
Page 3

3
Diagrams:
Recommendation........................
Installation...................................
Sending pictures.........................
English.............................................
日本語..............................................
Technical Specification...................
General Information........................
p.4
p.6
p.7
p.9
p.15
p.22
p.23
Index
Page 4
4
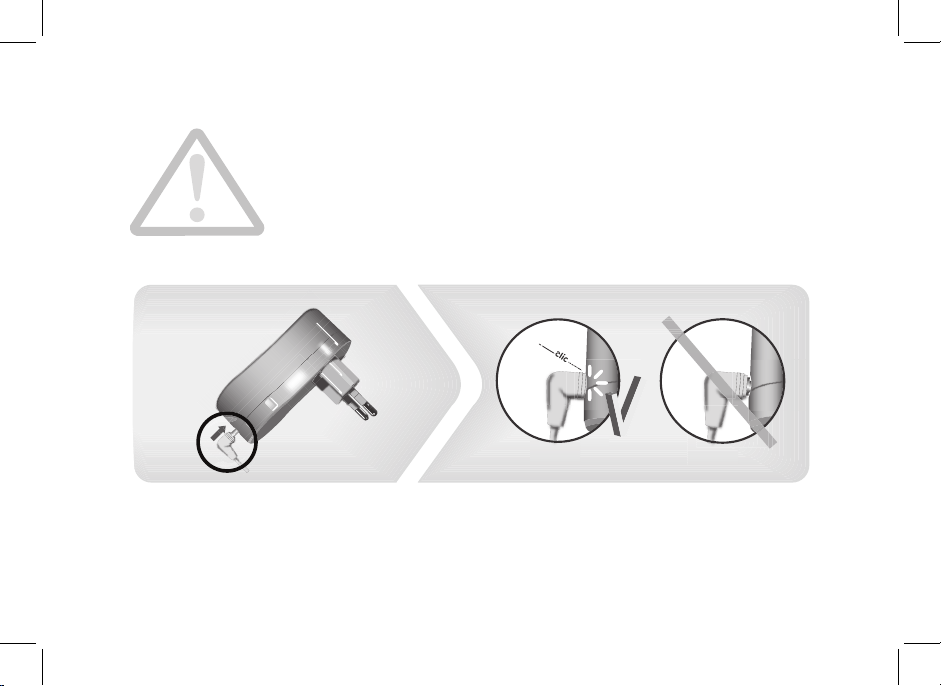
In order to avoid any display problem, make sure the power lead
connector is fully plugged into the transformer.
注:表示エラーを避けるため、電源コードが変圧器に正しく接続
されているか確認してください。
Page 5
5
2
5
1
1
4
Page 6
6
1
2
3
- Installation
- フレームの設置
Page 7

7
5
4
PIN code :
0000
- Sending pictures
-フレームに写真を送る
Page 8

8
Page 9
9
English
This simplified guide of the Parrot Digital Frame by Andrée
Putman gives you the main instructions to easily use this
product. For more information, refer to the our website
www.parrot.com.
Index
Using the frame for the 1st time
Installing the frame
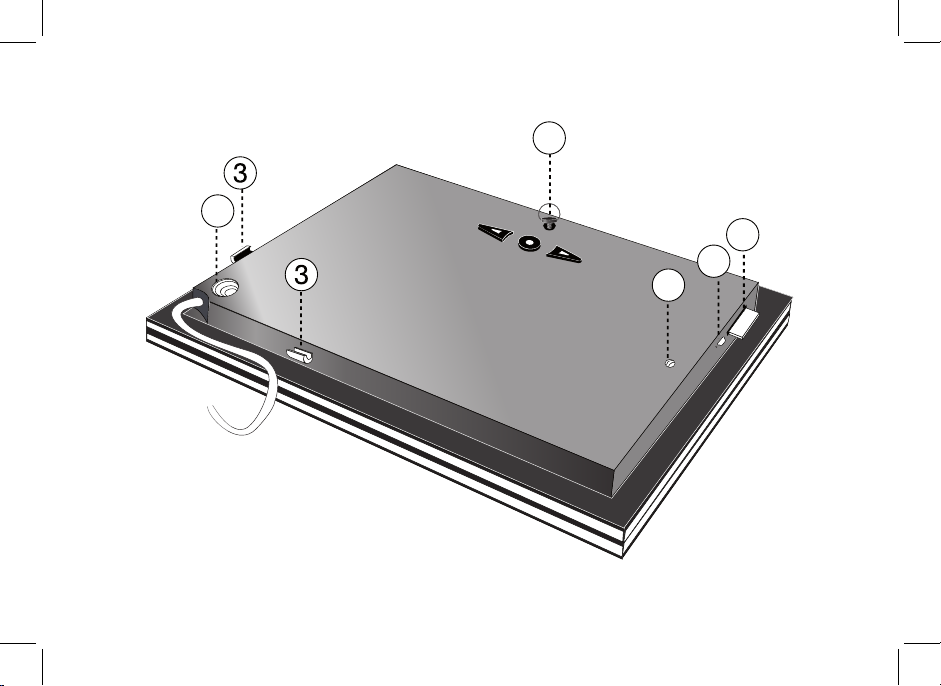
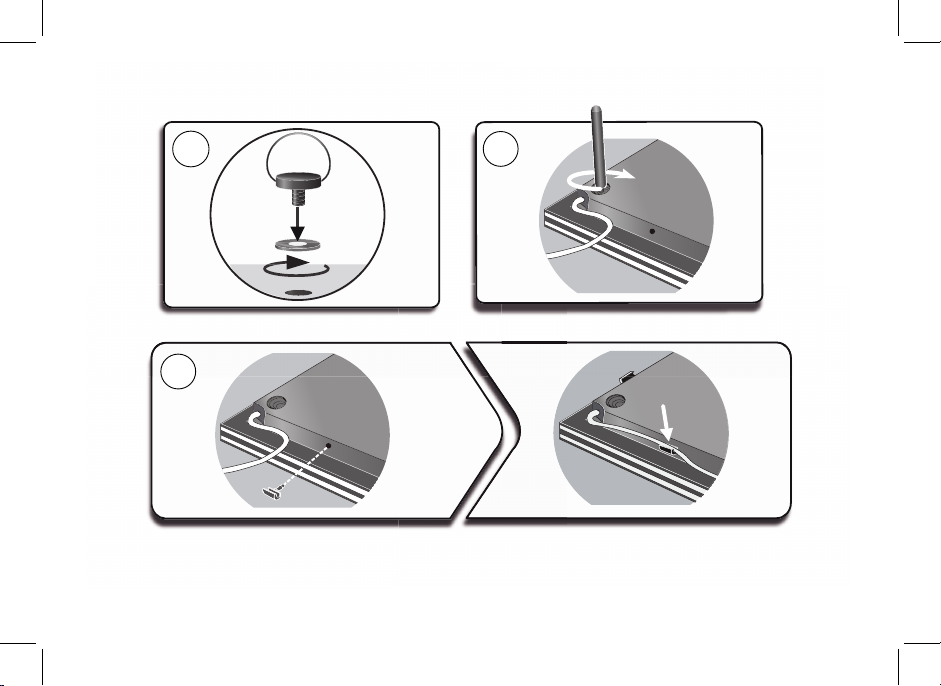
1. Screw the metal rod into the back of the frame.
> If you rotate the frame, the photo displayed turns to
match the new position of the Parrot Frame by
Andrée Putman.
2. Connect the power cable connector to the transformer
and plug it into an electrical socket.
> The frame automatically switches on.
3. Choose the language to be used.
Using the frame for the 1st time.........................
Installing of the frame....................................................
Scrolling through the menus.........................................
Pairing the frame with your phone................................
Sending pictures to the frame.............................
Sending pictures from a Phone or PDA
via Bluetooth ® ..............................................................
Sending pictures from a Computer via Bluetooth.......
Sending pictures via USB..............................................
Transferring pictures using a memory card.................
Managing the pictures.........................................
Picture Display Order.....................................................
Deleting pictures............................................................
Choosing and Creating a Slideshow.............................
09
09
10
10
11
11
11
11
12
12
12
13
13
In order to avoid any display problem, make sure
the power lead connector is fully plugged into the
transformer.
The frame can also be hung on the wall. In this case,
screw the hook into the back, insert the provided
clips into the slots and run the power lead through
the clips.
Page 10

10
Scrolling through the menus
Pairing the frame with your phone
1. Ensure that the frame is visible to all Bluetooth® devices.
To do so, select Settings > Bluetooth > Visibility.
2. Activate the Bluetooth feature on your phone / computer
(refer to your phone’s or computer’s user guide or visit
the Support heading on our website at www.parrot.com
for further information).
3. Search for Bluetooth devices on your phone / computer.
4. Select «Putman Frame» in the list of Bluetooth devices pro
posed by your phone / computer.
5. On your phone / computer, enter the code «0000».
> Your two devices are now paired.
You can scroll through the menus using the buttons on
the back of the frame. To access the main menu, press
the button
on the back of the frame.
: Move left or up, depending on the frame’s
orientation. It can also be used to select the
previous photo.
: Move right or down, depending on the frame’s
orientation. It can also be used to select the next
photo.
: Enters the selected menu or selects a photo.
The
icon takes you back to the previous menu or
exits the menus.
Depending on the model of your phone / computer,
this phase might be optional. However, it will enable
you to send your photos to the frame more quickly.
Page 11

11
Sending pictures to the frame
Sending pictures from a Phone or PDA via Bluetooth
1. Ensure that the frame is visible to all Bluetooth devices. To
do so, select Settings > Bluetooth > Visibility.
2. Make sure the Bluetooth feature is activated on
your phone or PDA.
3. On your phone/PDA, go to the Pictures menu. Select
a picture and choose «Send via Bluetooth». Your device
starts searching for Bluetooth peripherals.
4. Once the search has finished, select «Putman Frame».
5. If your device prompts you to enter a code, type «0000».
> The picture is then sent to the Parrot Frame by Andrée
Putman.
> During transmission, the Bluetooth icon appears on the
screen and the picture is displayed.
Several pictures can be sent at a time, though this
feature will depend on your device.
Sending pictures from a Computer via Bluetooth
(Windows, Linux)
1. Ensure that the frame is visible to all Bluetooth devices. To
do so, select Settings > Bluetooth > Visibility.
2. Activate the Bluetooth feature on your computer.
3. Right-click on the picture that you wish to send and
choose «Send via Bluetooth».
> Your PC will search for any nearby
Bluetooth peripherals.
4. Select «Putman Frame».
5. Type «0000» if your PC prompts you to enter a code.
> During transmission, the Bluetooth icon appears on the
screen and the picture is displayed.
It is also possible to send pictures from a Mac.
Sending pictures via USB
1. Connect the frame to your PC with the USB cable.
> The computer detects a new device.
2. Copy your JPEG or GIF pictures to the frame.
3. Disconnect the cable from the frame.
> The pictures are automatically saved.
4. Repeat the procedure if you wish to transfer new pictures.
The Putman Frame features 10 Mb of storage
space: to save space, remember to resize your pictures before copying them to the internal memory.
Otherwise transfer your pictures and disconnect
the cable when the «memory full» message is
displayed. Then reconnect the cable and transfer
the remaining pictures.
Page 12

12
Transferring pictures using a memory card
1. Insert the memory card into the appropriate slot.
> The JPEG and GIF pictures stored on the memory card
are displayed.
> You can now navigate through the memory card content
using the
buttons.
2. Select the
icon. Select one of the following
options as required:
- Copy current picture
- Copy selected pictures (in this case, you must select
the pictures that you wish to copy by using the
and buttons, select the icon and then
confirm your choice)
- Copy all pictures
3. Confirm your choice.
> The selected photos are resized and copied to the
internal memory.
If you wish to switch back to the internal memory,
select the
icon.
Managing the pictures
Picture Display Order
1. Access the main menu of the Parrot Frame by Andrée
Putman and then select the Arrange the pictures menu.
> Your pictures are displayed as thumbnails.
The display may run over several pages: holding
down one of the
buttons will allow you to
scroll through the previous and next pages. Simply
release the button to stop scrolling.
2. Select the picture with the buttons and then
press the
button on the back of the frame to
confirm your choice.
> The selected photo is placed at the top of the screen
on the frame and a cursor indicates the photo’s position in
the album.
3. Press the
buttons to change the photo’s position.
You can change its position in all the pages of your album.
4. Once the cursor is in the position where you want to place
the image, press the
button.
Page 13

13
Deleting pictures
Access the main menu of the frame and then select the
icon.
The Delete menu provides you with the following options:
- Delete this picture: Deletes the
displayed picture.
- Delete these pictures: Deletes the
selected images.
- Delete all pictures: Deletes all pictures on the
internal memory.
Choosing and Creating a Slideshow
• The Parrot Frame by Andrée Putman features ve
slideshows: a default slideshow with all the photos in the
internal memory, three user-definable customised
slideshows and an SD card slideshow.
• Once the slideshow has been selected, you can enable /
disable or configure it.
• The following options are available for creating
a slideshow:
- Picture choice: use the
and buttons to
select the photos for your slides how. The selected
photos are marked with a tick (not available for the
default slideshow).
- Timer: defines the slideshow display time.
- Picture order: used to define the order in
which the photos are displayed in the slideshow
(not available for the default slideshow).
- Random: arranges the photos in the slideshow
at random.
- Delete slideshow: resets the slideshow (the
selected images will no longer be part of the
slideshow, but they will not be deleted from
the frame’s memory).
- Transition: defines the transition effect between the
photos in your slideshow.
Page 14

14
Page 15

15
日本語
はじめてフレームを使用する
フレームを設置する
1.
フレームの裏面に金属棒を取り付けます。
> メモ:フレームの向きを変えると、写真は
それ に合わせて自動的に回転します。
2. 電源プラグを変圧器に差込み、変圧器をコンセン
トに接続してください。
> フレームに自動的に電源が入ります。
表示エラーを避けるため、電源コードが変
圧器に正しく接続されているか確認してく
ださい。
3. フレームで使用する言語を選んでください。
フレームは壁に掛けることもできます。この
場合、壁の引っ掛けをフレームの裏面に取り
付け、クリップを適切な位置に挿入し、そこ
に電源コードを滑り込ませてください。
はじめてフレームを使用する.............
フレームを設置する..................
メニュー画面を見る..................
フレームを電話機と通信可能にする....
フレームに写真を送る...................
Bluetoothを経由して電話機 /
PDAから写真を送る..................
Bluetooth (Windows, Linux)を経由し
てPCから写真を送る..................
USB経由で画像を送る ................
メモリーカードを使ってフレームを使
用する..............................
画像を整理する.........................
画像の表示順序を決める..............
画像を削除する......................
スライドショーを選択・作成する......
設定を変更する.........................
時刻の調整..........................
明るさを調整する....................
スタンバイモードをプログラムする....
15
15
16
16
17
17
17
18
18
18
18
19
19
20
20
20
20
Page 16

16
メニュー画面を見る
フレームを電話機と通信可能にする
メモ:お使いの電話機またはコンピュータ
の機種によっては、このステップはオプシ
ョンとなります。この機能を使うと、あな
たの写真をフレームにより速く送ることが
できます。
1.すべてのBluetooth®搭載ツールがフレームPutman
を検知できるよう、フレームの調整を行ってくだ
さい。調整するには、調節 > Bluetooth > 鮮明度
.
を選択してください。
2.
お使いの電話機 / コンピュータのBluetooth
機能 をONにしてください。(お使いの電話機の
説明書をご参照いただくか、当社ウェブサイト
www.parrot.comのサポートページをご覧くださ
い)。
3. お使いの電話機 / コンピュータから、Bluetooth
近接検知を行ってください。
4. お使いの電話機 / コンピュータによって検知さ
れたBluetooth機器リストから、フレームPutman
を選択してください。
5.
お使いの電話機 / コンピュータに、コード
「0000」を入力してください。
>これで2つの機器は通信可能となります。
フレームの裏面にあるボタンを使って、メニュ
ー画面を見る事ができます。メインメニューに
アクセスするには、フレーム裏面の
ボタン
を押してください。
: フレームの向きによって、左側または上
部にあるボタンです。このボタンを使っ
て、前の写真を選択することもできます。
: フレームの向きによって、右側または下
部にあるボタンです。このボタンを使っ
て、次の写真を選択することもできます。
: 選択したメニューにアクセスしたり、写真
を選択することができます。
アイコン
を使うと、前のメニューに戻った
り、メニューを終了することができます。
Page 17

17
フレームに写真を送る
Bluetoothを経由し
て電話機 / PDAから写真を送る
1. すべてのBluetooth搭載ツールがフレームPutman
を検知できるよう、フレームの調整を行って
ください。調整するには、調節 > Bluetooth >
鮮 明度を選択してください。
2.お使いの電話機 / PDAのBluetooth機能をONにし
てください。
3.電話機 / PDAの画像メニューから画像を一つ選
び、「Bluetoothで送信する」を選択してくださ
い。
> お使いの機器がBluetooth近接検知を開始しま
す。
4.検知が完了したら、「フレームPutman」を選択し
てください。
5.コード入力が必要な場合は、「0000」と入力して
ください。
> フレームへ画像が送られます。
> 画像の転送中は、画像が少しずつ表示されて
いきます。画面上にBluetoothアイコンが表示
されます。
お使いの機種によっては、一度に複数の画像
を送信することができます。
Bluetooth (Windows, Linux)
を経由してPCから写真を送る
1.すべてのBluetooth搭載ツールがフレームPutman
を検知できるよう、フレームの調整を行ってくだ
さい。調整するには、調節 > Bluetooth > 鮮明
度を選択してください。
2.お使いのコンピュータのBluetooth 機能をONに
してください。
3.送信したい画像を右クリックして、「Bluetooth
経由で送信する」を選択してください。
>PCが周辺のBluetooth近接検知を開始します。
4. 「フレームPutman」を選択してください。
5.お使いのPCにコード入力が必要な場合は、
「0000」と入力してください。
>画像の転送中は画面にBluetoothアイコンが表示
され、画像が少しずつ表示されていきます。
Page 18

18
USB経由で画像を送る
1.USBケーブルを使って、フレームをコンピュータ
に接続してください。
> コンピュータが新しい周辺機器の検知を行い
ます。
2.JPEGまたはGIF形式の画像を、写真フレームにコ
ピーしてください。
3.ケーブルをフレームから外してください。
> フレームが自動的に画像を保存します。
4.新しい画像を転送したい場合は、この操作を繰
り返してください。
写真の送信は10Moまで可能です。画像を転送
し、「メモリーがいっぱいです」というメッ
セージが表示されたらケーブルを外してくだ
さい。内部メモリーがいっぱいになるまで、
この操作を繰り返してください。残量を増や
したい場合は、内部メモリーにコピーする前
に、あらかじめ転送する画像のサイズを変更
することもできます。
メモリーカードを使ってフレームを使用する
1.メモリーカードを適切な場所にセットしてくだ
さい。
メモリーカードに保存されているJPEGまたはGIF
形式の画像が表示されます。
>
ボタンを使って、メモリーカードの中身
を見ることができます。
2. アイコンを選択してください。希望に応じ
て、以下のオプションを選択してください:
- 現在の画像をコピーする
- 選択した画像をコピーする (
ボタンお
よび
, ボタンを使って、コピーする画像を選択
してください。
アイコンを選択した後、選択を決
定してください)。
- すべての画像をコピーする
3.選択を決定してください。
> 選択した写真のサイズが変更され、内部メモリ
ーにコピーされます。
内部メモリーを確認したい場合、
アイコ
ンを選択してください。
.
Page 19

19
画像を整理する
画像の表示順序を決める
1.フレームのメインメニューから、画像を整理す
る
を選択してください。
> 画像がミニサイズで表示されます。
メモ:複数のページで表示されます。
ボタンのいずれかを押し続けると、前のペー
ジまたは次のページを続けて表示することが
できます。 ボタンを離すと、ページの切り
替えを止めることができます。
2. ボタンを使って画像を選択した後、フレ
ーム裏面の
ボタンを押して、選択を決定して
ください。
> 選択した写真はフレーム画面上部に移動し、
あなたのアルバムの中の写真の位置がカーソル
で示されます。
3.
ボタンを押して写真の位置を変更すること
ができます。アルバム中のすべてのページで、こ
の位置を変えることができます。
4. 画像を配置したい場所にカーソルが移動した
ら、 ボタンを押してください。
画像を削除する
メインメニューから、
アイコンを選択してくださ
い。サブメニュー 削除 から、以下のオプションを
選択することができます:
- 現在の画像を削除する:表示中の画像を削除
します。
- 複数の画像を削除する:選択した画像を削除
します。
- すべての画像を削除する: 内部メモリーにあ
るすべての画像を削除します。
スライドショーを選択・作成する
• フレームPutmanには、5つのスライドショーが
あります:内部メモリーにあるすべての写真で構
成されるデフォルトのスライドショー、3種類の設
定可能なスライドショー 、SDカードのスライドシ
ョー。
• スライドショーを選択したら、それを有効 / 無
効にしたり、設定することができます。
•
スライドショーの内容は、以下の項目をお選びい
ただけます:
- 画像を選択する: ボタンおよび タ
ンを使って、スライドショーを構成する写真
を選択します。選択した写真には印が付けら
れます (デフォルトのスライドショーではな
し)。
Page 20

20
- プリセット表示時間 :スライドショーを表示
する時間を決めます。
- 整理: スライドショーを構成する写真の表示
順 序を決めることができます(デフォルトの
スライドショーではなし)。
- ランダム・モード: スライドショーを構成す
る写真をランダムに配置します。
-
スライドショーの削除: スライドショーの構
成を初期化します(選択した画像はこれ以降ス
ライドショーに含まれませんが、フレームか
らは削除されません)。
- トランジション:スライドショーの写真と写
真の間のトランジション効果を決めます。
設定を変更する
時刻の調整
ボタンを押した後 時間 を選択してください。
以下のオプションが表示されます:
- 調整 : . ボタンを使って、時刻を調整
してください。
ボタンを押して決定してく
ださい。
-
表示: 時刻表示をONまたはOFFにします。
- 形式:時刻表示モードを選択することができ
ます。
明るさを調整する
1. ボタンを押した後 明るさ を選択してくださ
い。
2. ボタンを使って、画面の明るさを調整し
てください。
.
3. ボタンを押して決定してください。
Page 21

21
スタンバイモードをプログラムする
ボタンを押した後 スタンバイモードを選択して
ください。以下のオプションから一つ選択すること
ができます:
- 自動:スタンバイモードへの移行は、フレ
ー ム上の照明センサーに応じてプログラムさ
れます。
- プリセット時間: このオプションでは、画面
に電源を入れる時間帯を決めることができま
す。
- マニュアル:スタンバイモードに移行します
Page 22

22
Technical specification
65%
55˚C
720 x 480 pixels
64 Mo
219 x 174 x 25 mm
- Input: 100- 240 V~, 50-60 Hz, 0.2 A
- Output: 12Vdc, 1.2A
0000
FTP, OPP, BIP
SD, micro SD, mini SD, SDHC,
mini SDHC MMC, MMC plus, MMC
mobile, MMC micro (with adapter)
695 g
7’’
Page 23

23
Warranty
Without prejudice of legal warranty,
Parrot products are warranted during
1 year from the date of purchase for
defects in materials and workmanship,
provided that no deterioration to the
product has been made, and upon
presentation of proof of purchase
(date of purchase, location of sale and
product serial number) to the retailer or
Parrot directly.
Warranty does not cover: upgrading of
the software items of the Parrot products with Bluetooth® cell phones for
compatibility purpose, data recovery,
deterioration of the external aspect
due to normal use of the product,
any damage caused by accident,
misuse, misapplication, or non-Parrot
products. Parrot is not responsible
for storage, loss or damaged to data
during transit or repair.
Any product wrongfully declared to be
defective will be returned to sender
and inspection, process and carriage
costs will be invoiced to him.
Correct disposal of This Product
(Waste Electrical & Electronic
Equipment)
(Applicable in the European
Union and other European
countries with separate collection
systems).
This marking shown on the product
or its literature, indicates that it
should not be disposed with other
household wastes at the end of its
working life. To prevent possible harm
to the environment or human health
from uncontrolled waste disposal,
please separate this from other types
of wastes and recycle it responsibly
to promote the sustainable reuse of
material resources.
Household users should contact either
the retailer where they purchased this
product, or their local government
office, for details of where and how
they can take this item for environmentally safe recycling. Business users
should contract their supplier and the
terms and conditions of the purchase
contract. This product should not be
mixed with other commercial wastes
for disposal.
Modifications
The explanations and specifications
in this guide are given for information
purposes only and may be modified
without prior notice. They are deemed
to be correct at time of going to press.
The utmost care has been taken when
writing this guide,as part of the aim to
provide you with accurate information.
However, Parrot shall not be held
responsible for any consequences
arising from any errors or omissions
in the guide, nor for any damage
or accidental loss of data resulting
directly or indirectly from the use of the
information herein. Parrot reserves the
right to amend or improve the product
design or user guide without any
restrictions and without any obligation
to notify users. As part of our ongoing
concern to upgrade and improve our
products, the product that you have
General Information
Page 24

24
purchased may differ slightly from the
model described in this guide.
If so, a later version of this guide might
be available in electronic format at Parrot’s website at www.parrot.com.
FCC Compliance Statement
This device complies with part 15 of
the FCC rules. Operation is subject to
the following two conditions:
(1). this device may not cause harmful
interference, and
(2). this device must accept any
interference received, including
interference that may cause unde
sired operation.
Note: The manufacturer is not responsible for any radio or tv interference
caused by unauthorized modifications
to this equipment. Such modifications
could void the user’s authority to
operate the equipment.
This equipment has been tested and
found to comply with the limits for a
Class B digital device, pursuant to
Part 15 of the FCC Rules. These limits
are designed to provide reasonable
protection against harmful interference
in a residential installation. This equipment generates, uses and can radiate
radio frequency energy and, if not
installed and used in accordance with
the instructions, may cause harmful
interference to radio communications.
However, there is no guarantee that
interference will not occur in a particular installation. If this equipment does
cause harmful interference to radio
or television reception, which can be
determined by turning the equipment
off and on, the user is encouraged to
try to correct the interference by one or
more of the following measures:
- Reorient or relocate the
receiving antenna.
- Increase the separation between the
equipment and receiver.
- Connect the equipment into an outlet
on a circuit different from that to
which the receiver is connected.
- Consult the dealer or an experienced
radio/TV technician for help.
Declaration of Conformity
We, Parrot S.A. of 174 quai
de Jemmapes, 75010 Paris,
France, declare under our
sole responsibility that our product, the
Parrot Digital Photo frame by Putman
to which this declaration relates is in
conformity with appropriate standards
EN 300328, EN 301489-17, IEC
60950 following the provision of Radio
Equipment and Telecommunication
Equipment directive, with requirements
covering EMC directive 89/336/EEC
and Low Voltage directive 73/23/EEC.
Identification N. 394 149 496 R.C.S.
PARIS
Parrot S.A.
Protection and personal safety
Carefully read the user guide and
follow the indicated procedure when
setting up the device. Do not dismantle
or open the device and do not touch
the electronic components or the
drivers. Do not attempt to dismantle or
modify either of the speakers.
Never introduce any metal object to
Page 25

25
avoid the risks of electric shocks,
fire, short circuits or dangerous
emissions. If your device shows signs
of faulty operation, call the approved
Parrot technical support centre or
an approved retailer. Never leave the
frame exposed to rain or chemical
products; do not place them in a damp
area or where they are likely to be
splashed with water. Never place your
device on a recipient containing any
type of liquid, which might seep inside
the device. Doing so will reduce the
risks of electric shocks, short circuits,
fire and injury.
Copyrights
Copyright © 2007 Parrot. All rights
reserved. The total or even partial
reproduction, transmission or storage
of this guide in any form or by any
process whatsoever (electronic,
mechanical, photocopy, recording or
otherwise) is strictly prohibited without
prior consent from Parrot.
Licences
The Bluetooth ® word mark and logos
are owned by the Bluetooth SIG, Inc.
and any use of such marks by Parrot
S.A. is under license.
Other trademarks and trade names are
those of their respective owners.
Bluetooth QDID :
B013783, B012423, B013838
Important safety instructions
1. This apparatus shall not be exposed
to dripping or splashing and no object
filled with liquid, such as vases, shall
be placed on the apparatus.
2. The AC/DC adaptor which provides
disconnection from mains supply
shall remain readily operable. Unplug
this apparatus when unused for long
periods of time.
3. Read these instructions
4. Keep these instructions
5. Heed all warnings
6. Follow all instructions
7. Do not use this apparatus near
water.
8. Clean only with dry cloth.
9. Do not block any ventilation ope
nings. Install in accordance with the
manufacturer’s instructions.
10. Do not install near any heat as
radiators. Heat registers, stoves
or other apparatus (including ampli
fiers) that produce heat.
11. Do not defeat the safety purpose
of the polarized or grounding type
plug. A polarized plug has two blades
with one wider than the other. A grounding type plug has two blades and a
third grounding prong. The wide blade
or the third prong are provided for your
safety. If the provided plug does not fit
into your outlet, consult an electrician
for replacement of the obsolete outlet.
The exclamation point within
an equilateral triangle is in-
tended to alert the user to the
presence of important operating and
maintenance (servicing) instructions
in the literature accompanying the
product.
Page 26

26
12. Only use attachments/accessories
specified by the manufacturer.
13. Unplug this apparatus during lightning storms or when unused for long
periods of time.
14. WARNING: To reduce the risk of
fire or electric shock, do not expose
this apparatus to rain or moisture and
objects filled with liquids, such as
vases, should not be placed on this
apparatus.. This apparatus is designed
for indoor use only.
Do not expose the Parrot digital frame
by Putman system to outside temperatures below 5°C or above 55°C. The
system could be damaged or the cabinet warped. Avoid placing the system
near a source of heat or exposing it to
sunlight (even through a window).
Similarly, excessively low temperatures and humidity could damage the
device.
Page 27

FCC ID : RK XAP
Hotline
Our hotline is at your disposal from Monday to Friday between 9 am and 6 pm (GMT + 1)
Hot-line@parrot.com
Italy : [+39] 02 59 90 15 97
Spain : [+34] 902 404 202
UK : [+44] (0)870 112 5872
Germany : 0900 1727768
USA : [+1] (877) 9 Parrot (toll free)
Hong Kong : [+852] 2736 1169
France : 01 48 03 60 69
Europe : [+33] 1 48 03 60 69 (Spoken languages : French, English, Spanish and German)
Page 28

www.parro t.com
 Loading...