

ParkZone PKZU1280 User Manual
Ultra Micro
Mini Vapor
®
Instruction Manual / Bedienungsanleitung
Manuel d’utilisation / Manuale di Istruzioni
NOTICE
All instructions, warranties and other collateral documents are subject to change at the sole
discretion of Horizon Hobby, Inc. For up-to-date product literature, visit
www.horizonhobby.com and click on the support tab for this product.
Meaning of Special Language:
The following terms are used throughout the product literature to indicate various levels of
potential harm when operating this product:
NOTICE: Procedures, which if not properly followed, create a possibility of physical
property damage AND little or no possibility of injury.
CAUTION: Procedures, which if not properly followed, create the probability of physical
property damage AND a possibility of serious injury.
WARNING: Procedures, which if not properly followed, create the probability of property
damage, collateral damage and serious injury OR create a high probability of
superfi cial injury.
WARNING: Read the ENTIRE instruction manual to become familiar with the features of the
product before operating. Failure to operate the product correctly can result in damage to the
product, personal property and cause serious injury.
This is a sophisticated hobby product. It must be operated with caution and common sense and
requires some basic mechanical ability. Failure to operate this Product in a safe and responsible
manner could result in injury or damage to the product or other property. This product is not
intended for use by children without direct adult supervision. Do not attempt disassembly, use with
incompatible components or augment product in any way without the approval of Horizon Hobby,
Inc. This manual contains instructions for safety, operation and maintenance. It is essential to read
and follow all the instructions and warnings in the manual prior to assembly, setup or use in order to
operate correctly and avoid damage or serious injury.
Age Recommendation: Not for children under 14 years. This is not a toy.
2
EN
Welcome to an exciting new world of fl ying possibilities. Bedrooms, conference rooms, garages,
basements, break rooms, offi ces–all can be transformed into aerial RC playgrounds with the Ultra
Micro Series Mini Vapor®. Its small size, negligible mass and proportional 3-channel control will let you
confi dently fl y almost anywhere indoors without worrying about damage to it or the furniture.
Before you start exploring your new found fl ying opportunities, however, you must take some time to
read this manual. It contains important information about some of the aircraft’s wind limitations, DSM2®/
DSMX® technology, battery charging and much more. You’ll also fi nd a handy troubleshooting guide. It’s
all here to make sure your fi rst fl ight, and every one after, is the best it can be.
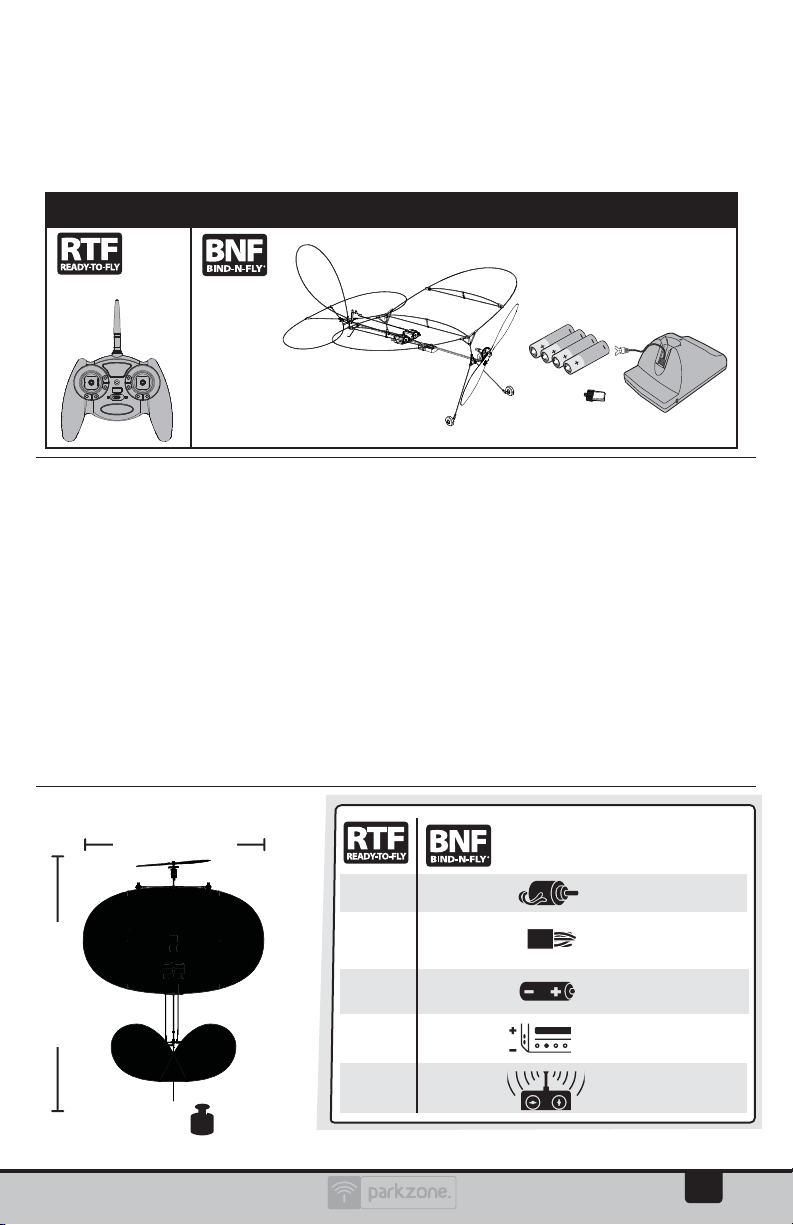
Box Contents
Includes
Table of Contents
Charging the Battery ...................................................4
Charging Warnings .......................................................5
Installing Transmitter Batteries .................................6
Transmitter and Receiver Binding ............................6
Installing the Flight Battery and Arming the ESC 7
Prefl ight Checklist ........................................................7
Digital Trims ...................................................................8
Dual Rate Function .......................................................8
Transmitter Control ......................................................8
Control Direction Test ..................................................9
Reverse Controls ........................................................ 10
Control Centering ..................................................... 10
Settings for Control Horns ....................................... 10
Control Rates .............................................................. 11
Specifi cations
8.7 in (220mm)
Installed Installed
Installed Installed
Included Included
11.8 in (299mm)
.31 oz (8.7 g)
Included Included
Included
Adjusting Center of Gravity (CG) ............................ 11
Motor Service ............................................................. 12
Flying Tips and Repairs ............................................. 13
Additional Safety Precautions and Warnings ..... 14
Post Flight Checklist .................................................. 14
Troubleshooting Guide ............................................ 15
Limited Warranty ....................................................... 16
Warranty and Service Information ........................ 18
FCC Information ......................................................... 19
Compliance Information for the European Union 19
Replacement Parts .................................................... 72
Optional Parts and Accessories .............................. 73
Parts Contact Information ....................................... 73
6mm Brushed Motor
Super Lite DSMX®
RX/ESC/Servos
(PKZU1252)
Battery: 30mAh 3.7
25C Li-Po
Charger: 1S 3.7V Li-Po
Battery Charger
Needed to
Complete
DSM2/DSMX 4-Channel
Transmitter
To register your product online, go to www.parkzone.com
EN
3
Charging the Battery
Your aircraft comes with a 1S 3.7V DC Li-Po
battery charger and 1S 3.7V 30mAh 25C
Li-Po battery. Refer to the charging warnings. It is
recommended to charge the battery pack while
you are inspecting the aircraft. The fl ight
battery will be required to confi rm proper
aircraft operation in future steps.
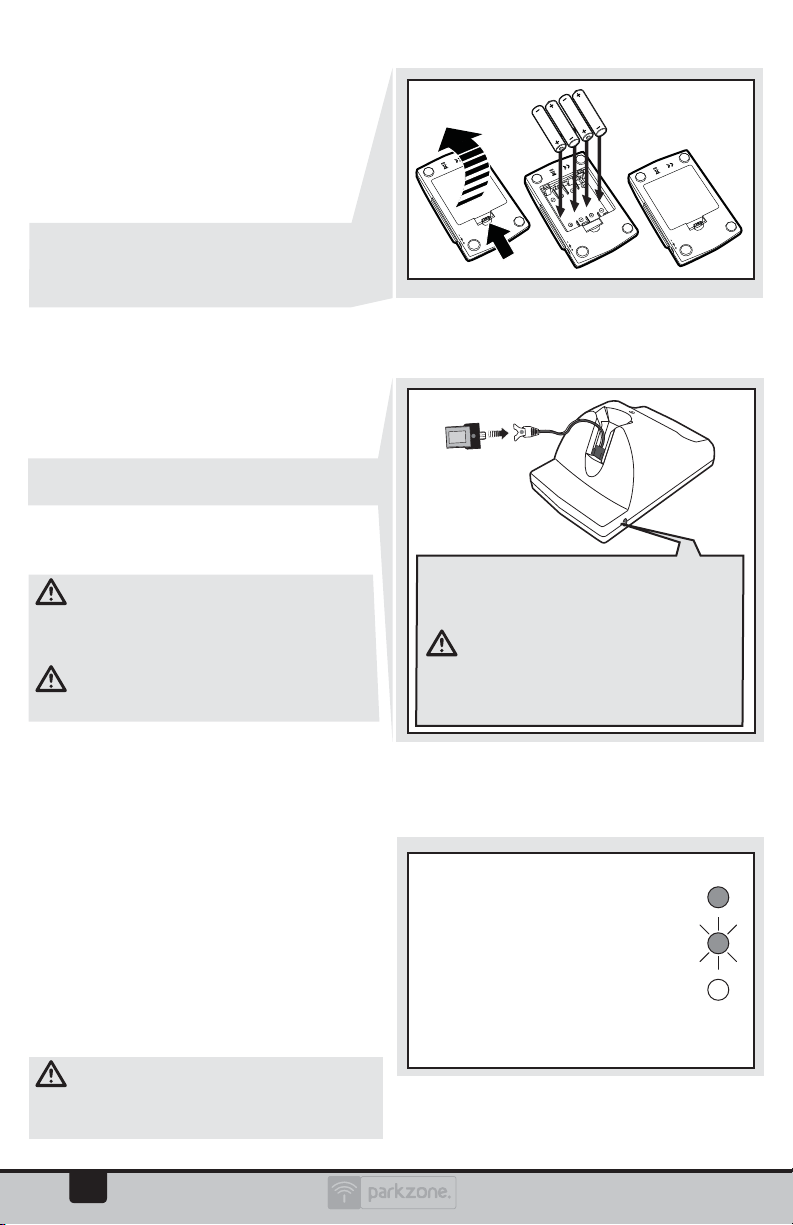
Remove the cover on the bottom of the
charger and install four of the included AA
batteries, noting proper polarity. Replace the
cover after the AA batteries are installed.
Battery Charging Process
NOTICE: Charge only batteries that are cool to the
touch and are not damaged. Look at the battery
to make sure it is not damaged e.g., swollen, bent,
broken or punctured.
1. Connect the fl ight battery to the charger
connector, noting proper polarity.
2. Always disconnect the fl ight battery from
the charger immediately upon completion of
charging.
CAUTION: Only use the included charger
specifi cally designed to charge this Li-Po battery.
Failure to do so could result in fi re, causing injury
or property damage.
CAUTION: Never exceed the recommended
charge rate.
Purchase the optional AC to 6V DC 1.5 amp
Power Supply (EFLC1005) to charge your
battery pack without AA batteries.
CAUTION: Only use an E-fl ite® 6V
power supply (EFLC1005) with this charger.
DO NOT use a 12V power supply or property
damage and injury could occur.
LED Indications
When you make the connection successfully, the
LED on the charger turns solid red, indicating
charging has begun.
Charging a fully discharged (not overdischarged) 30mAh battery takes approximately
15–20minutes. As the battery nears full charge,
the LED begins to blink. The intervals between
blinks will increase as the battery comes closer to
full charge.
When the LED blinks approximately every 20
seconds, the battery is ready to be removed.
However, the battery can be left charging until the
LED completely goes out for a maximum charge.
CAUTION: Once charging is complete,
immediately remove the battery. Never leave a
battery connected to the charger.
4
EN
CHARGING (Solid Red)........................
READY (Blinking 20 sec. intervals) .........
MAX CHARGE
If the LED stays ON when the fl ight battery is
removed, the AA batteries in the charger are
low.
(off ) ...............................

Charging Warnings
The Battery Charger (EFLC1002) included with your
aircraft has been designed to safely charge the
Li-Po battery.
CAUTION: All instructions and warnings
must be followed exactly. Mishandling of Li-Po
batteries can result in a fi re, personal injury and/or
property damage.
• By handling, charging or using the included
Li-Po battery, you assume all risks associated
with lithium batteries.
• If at any time the battery begins to balloon or
swell, discontinue use immediately. If charging
or discharging, discontinue and disconnect.
Continuing to use, charge or discharge a battery
that is ballooning or swelling can result in fi re.
• Always store the battery at room temperature
in a dry area for best results.
• Always transport or temporarily store the
battery in a temperature range of 40–120º F
(5–49° C). Do not store the battery or model in a
car or direct sunlight. If stored in a hot car, the
battery can be damaged or even catch fi re.
• Always charge batteries away from
fl ammable materials.
• Always inspect the battery before charging.
• Always disconnect the battery after charging,
and let the charger cool between charges.
• Always constantly monitor the temperature
of the battery pack while charging.
• ONLY USE A CHARGER SPECIFICALLY DESIGNED
TO CHARGE LI-PO BATTERIES. Failure to charge
the battery with a compatible charger may
cause a fi re resulting in personal injury and/or
property damage.
• Never discharge Li-Po cells to below 3V
under load.
• Never cover warning labels with hook and
loop strips.
• Never leave charging batteries unattended.
• Never charge batteries outside
recommended levels.
• Never charge damaged batteries.
• Never attempt to dismantle or alter the charger.
• Never allow minors to charge battery packs.
• Never charge batteries in extremely hot or
cold places (recommended between 40–120° F
or (5–49° C) or place in direct sunlight.
Low Voltage Cutoff (LVC)
When a Li-Po battery is discharged below 3V per
cell, it will not hold a charge. The aircraft’s ESC
protects the fl ight battery from over-discharge
using Low Voltage Cutoff (LVC). Before the battery
charge decreases too much, LVC removes power
supplied to the motor. Power to the motor quickly
decreases and increases, showing that some
battery power is reserved for fl ight control and
safe landing.
When the motor power pulses, land the aircraft
immediately and recharge the fl ight battery.
Disconnect and remove the Li-Po battery from the
aircraft after use to prevent trickle discharge. Fully
charge your Li-Po battery before storing it. During
storage, make sure the battery charge does not fall
below 3V per cell.
For your fi rst fl ights, set your transmitter timer or
a stopwatch to 5 minutes. Adjust your timer for
longer or shorter fl ights once you have fl own the
model. Flights of 6 minutes or more are achievable
if using proper throttle management.
NOTICE: Repeated fl ying to LVC will damage the
battery.
EN
5
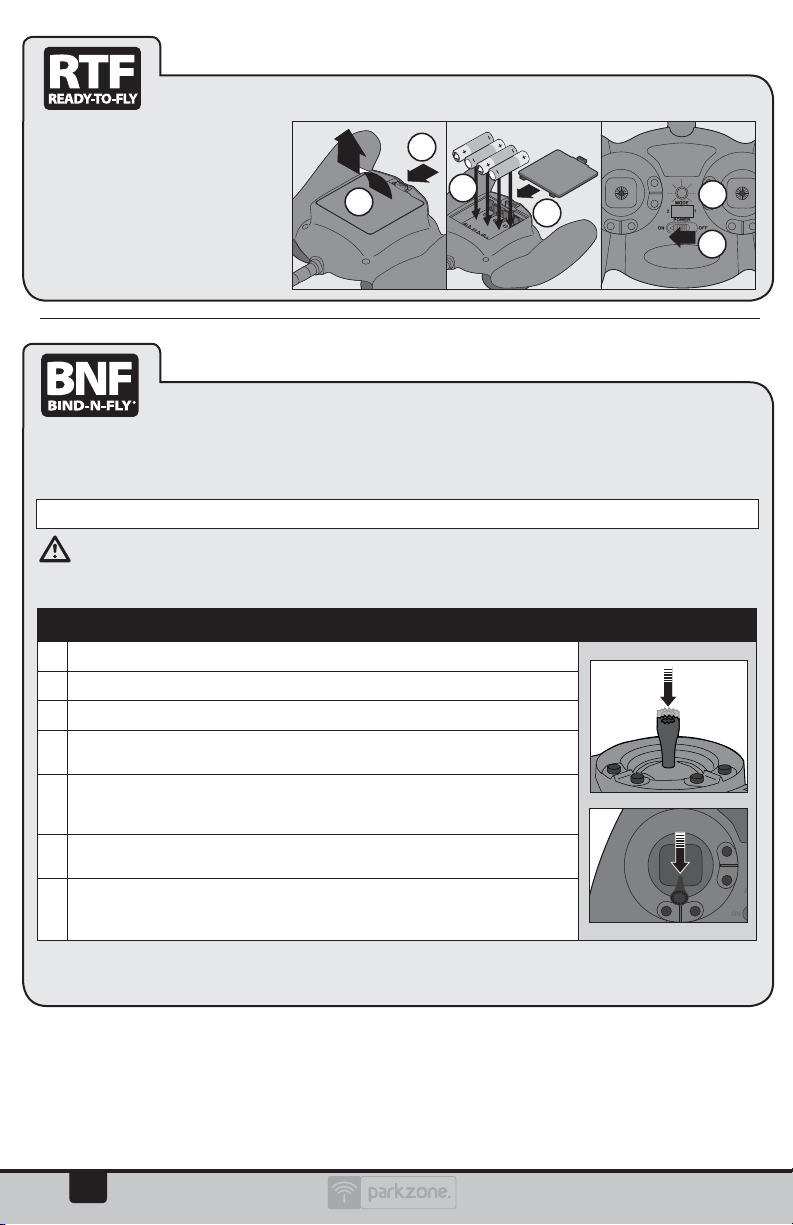
Installing Transmitter Batteries
Your ParkZone® 4-channel DSM2/
DSMX RTF transmitter comes prebound to the aircraft.
Remove the cover, install four of the
included batteries (noting proper
polarity) and reinstall the cover.
2
1
3
6
4
5
Transmitter and Receiver Binding
Binding is the process of programming the receiver of the control unit to recognize the GUID (Globally
Unique Identifi er) code of a single specifi c transmitter. You need to ‘bind’ your chosen Spektrum™ DSM®
technology equipped aircraft transmitter to the receiver for proper operation.
For a list of compatible DSM2®/DSMX® transmitters, please visit www.bindnfl y.com.
CAUTION: When using a Futaba® transmitter with a Spektrum DSM module, you must reverse the
throttle channel and rebind. Refer to your Spektrum module manual for binding and failsafe instructions.
Refer to your Futaba transmitter manual for instructions on reversing the throttle channel.
Binding Procedure Reference Table
9
1. Refer to your transmitter’s unique instructions for binding to a receiver.
2. Make sure the fl ight battery is disconnected from the aircraft.
3. Ensure the transmitter is powered OFF
4. Connect the fl ight battery to the aircraft. The receiver LED will begin to fl ash
(typically after 5 seconds).
5. Put your transmitter into bind mode. If you are using the transmitter that is
supplied with the RTF version, push the left control stick vertically into the
case (until it clicks) while powering ON the transmitter.
6. Make sure the transmitter controls are at neutral and the throttle is in the
low position.
7. After 5 to 10 seconds, the receiver status LED will become solid, indicating
that the receiver is bound to the transmitter. If the LED does not turn solid,
refer to the Troubleshooting Guide at the end of the manual.
5
6
For subsequent fl ights, power on the transmitter for 5 seconds before connecting the
fl ight battery.
6
EN
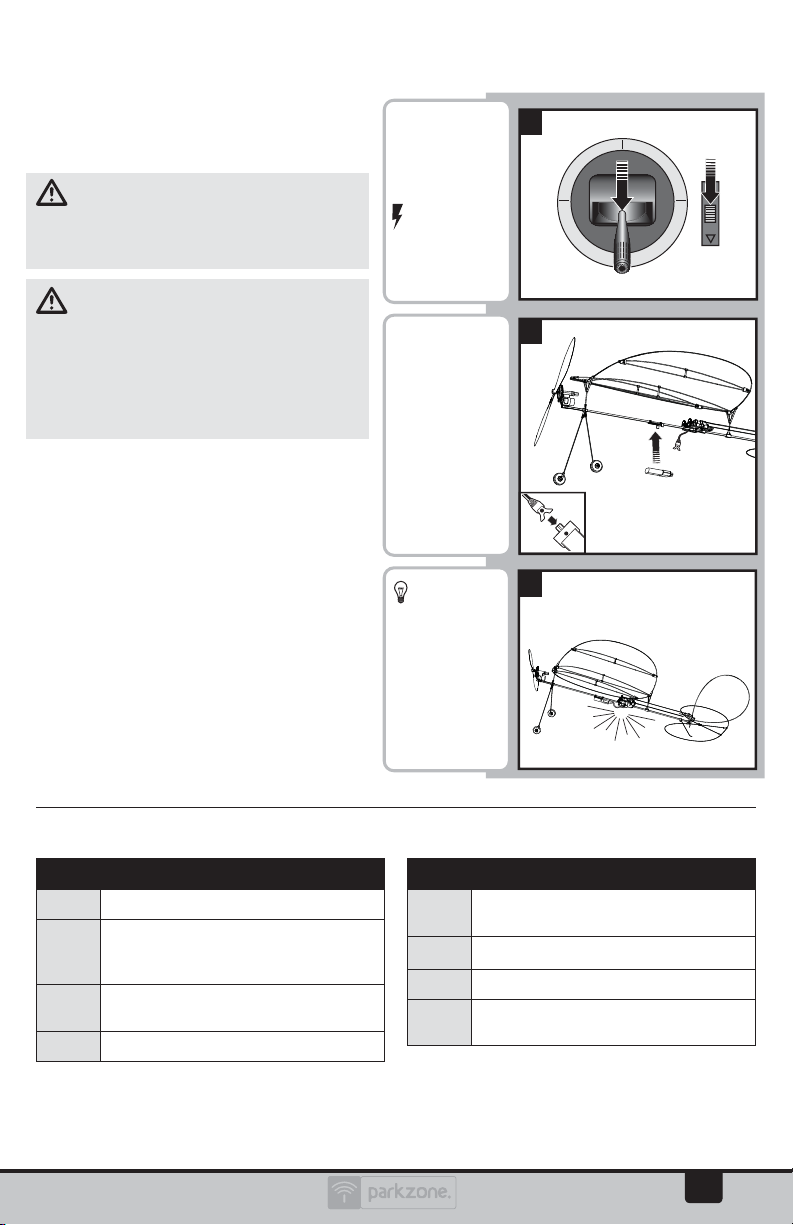
Installing the Flight Battery and Arming the ESC
Arming the ESC also occurs after binding
as previously described, but subsequent
connection of a fl ight battery requires the
following steps.
CAUTION: Always keep hands away
from propeller. When armed, the motor will
turn the propeller in response to any throttle
movement.
CAUTION: Always disconnect the Li-Po
battery from the aircraft receiver when not
fl ying to avoid over-discharging the battery.
Batteries discharged to a voltage lower than
the lowest approved voltage may become
damaged, resulting in loss of performance and
potential fi re when batteries are charged.
Lower throttle
and throttle
trim to lowest
settings.
Power ON
the Trans mitter, then
wait 5
seconds
Secure the
battery to the
hook and loop
strip on the
battery holder.
Connect the
battery to the
ESC, noting
proper polarity.
1
2
Prefl ight Checklist
9
1. Charge the fl ight battery.
2. Install the fl ight battery in the
aircraft (once it has been fully
charged).
3. Bind the aircraft to the transmitter
(BNF only).
4. Make sure the linkages move freely.
Continuous
LED
9
5. Perform the Control Direction Test
with the transmitter.
6. Adjust the center of gravity.
7. Find a safe and open area.
8. Plan fl ight appropriate for fl ying
location.
3
EN
7
 Loading...