

Page 1

ParkZone® products are distributed exclusively by
Horizon Hobby, Inc.
4105 Fieldstone Road
Champaign, IL 61822
© 2008 Horizon Hobby, Inc.
Horizon Hobby UK
Units 1-4, Ployters Road
Staple Tye
Harlow, Essex
CM187NS
United Kingdom
Horizon Hobby Deutschland GmbH
Otto Hahn Str. 9a
25337 Elmshorn
Germany
Multiple Patents Pending
DSM and DSM2 are trademarks or registered trademarks of Horizon Hobby, Inc.
The Spektrum trademark is used with permission of Bachmann Industries, Inc.
www.parkzone.com
12353.1
Page 2
2
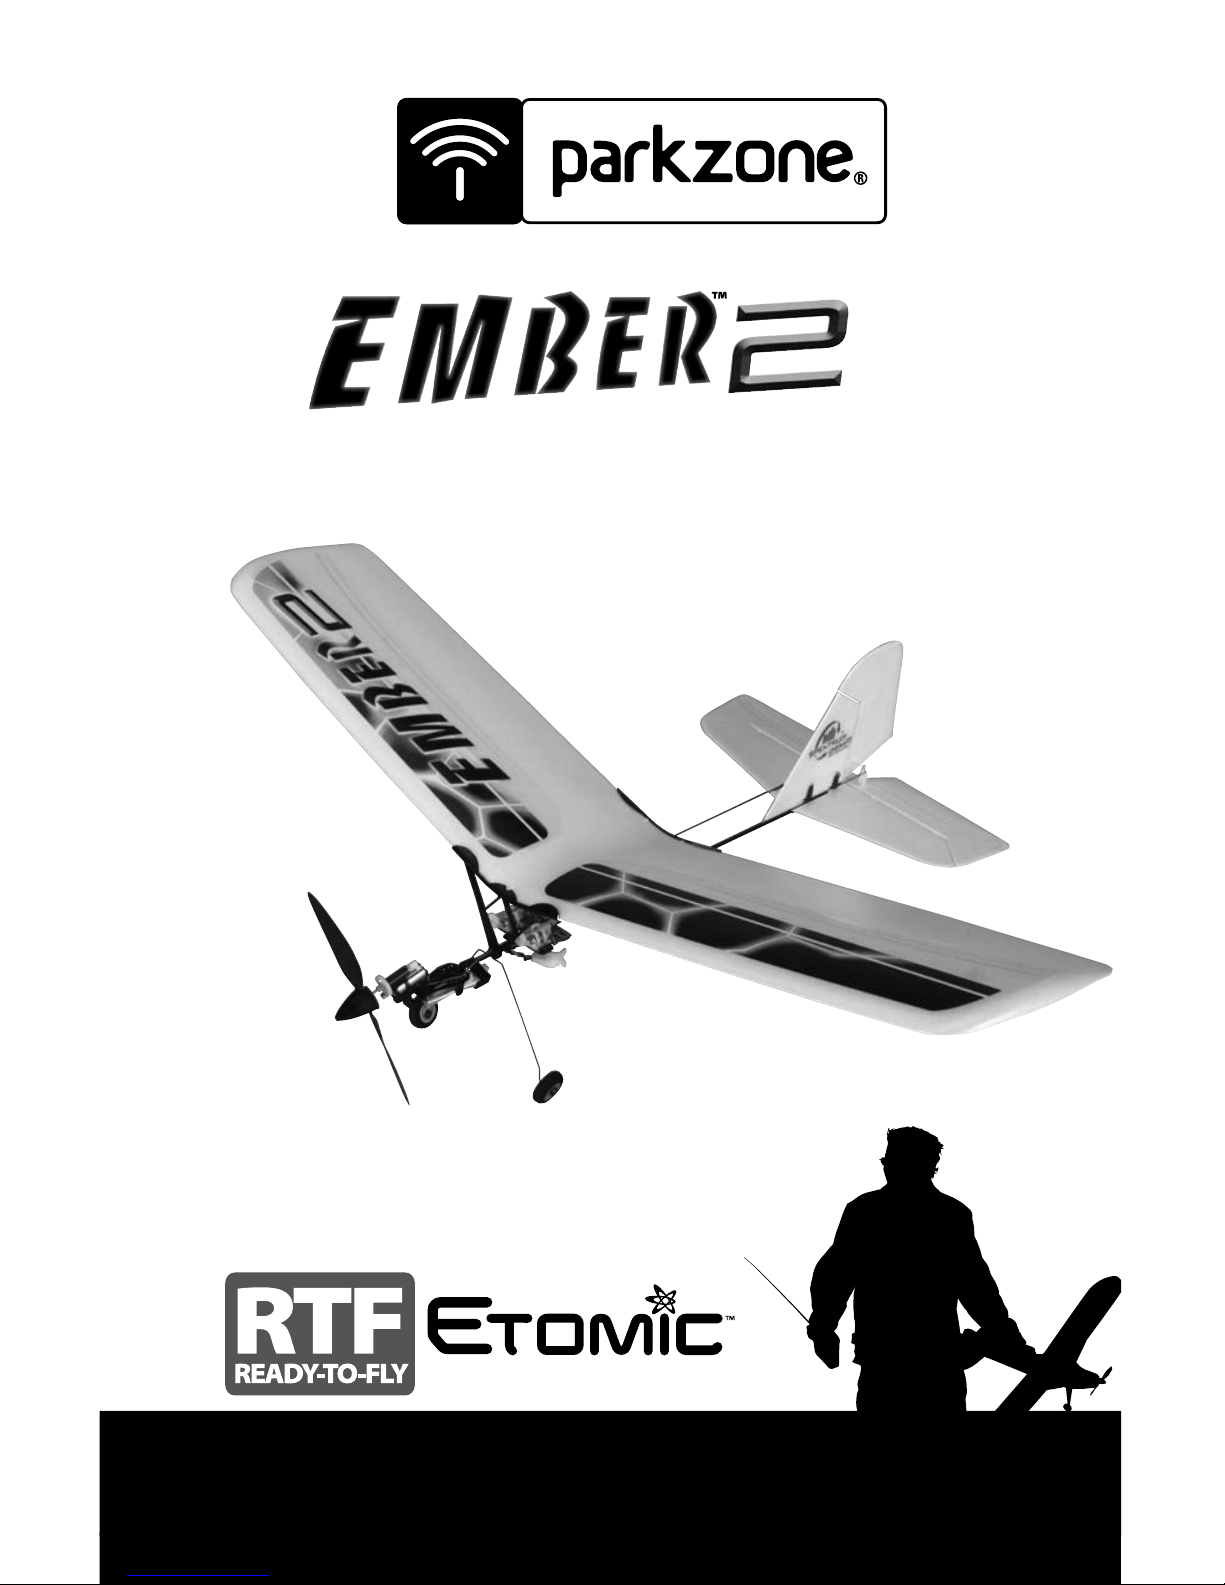
RTF
Instruction Manual
Transmitter: PKZ 4-channel with Spektrum 2.4GHz
DSM2 technology
Battery: 3.7V 70mAh Li-Po
Wingspan: 16.5 in (420mm)
Length: 13.25 in (335mm)
Flying Weight: 0.7 oz (20 g)
MICRO FLYERS, MAXIMUM FUN.
Page 3

1
Congratulations on your purchase of the ParkZone
®
Ember 2 RTF
airplane. ParkZone’s Etomic
™
family of innovative ultra-micro yers
makes micro ight a reality for everyone. Proportional, multi-channel,
2.4GHz Spektrum
™
DSM2™ radio technology provides precise control for
amazing, ready-to-y indoor fun. Your Ember 2 comes pre-assembled
with everything needed to get you in the air—all in one box. You only
need to charge the ight battery prior to your rst ight. In as little as 30
minutes, you can be ready to y.
This means you can spend your time rening your ying instead of your
building skills. Your ParkZone Ember 2 will allow you to perform many
aerobatic maneuvers, all in an area the size of half a basketball court.
We at ParkZone are committed to giving you the most enjoyable ight
experience possible. In order to have a safe and successful ight, we ask
that you do not y until you have read these instructions thoroughly. To
learn more about DSM2 radio technology, and how to get the most of
your Ember 2 transmitter, please visit www.bindnfly.com
Your Ember 2 features the latest in ultra sub-micro technology,
including a 2.4GHz Spektrum DSM2 fully proportional 3–channel radio
system with full control of throttle, rudder and elevator. Your Ember 2
also comes complete with the latest in lightweight electronic speed
control technology, two linear servos, a 3.7V 70mAh Li-Po ight battery
and a convenient charger.
Ember™ 2 RTF
Introduction
Page 4
2
Warning
Though your ParkZone Ember 2 comes ready to y, this aircraft is for
experienced RC pilots only and is not a toy. It can cause serious bodily
harm and damage to property.
FCC Statement
This device complies with part 15 of the FCC rules. Operation is subject
to the following two conditions: (1) This device may not cause harmful
interference, and (2) this device must accept any interference received,
including interference that may cause undesired operation.
Caution
Changes or modications not expressly approved by the party
responsible for compliance could void the user’s authority to operate the
equipment.
Instructions for Disposal of WEEE by Users in the
European Union
This product must not be disposed of with other waste. Instead,
it is the user’s responsibility to dispose of their waste equipment
by handing it over to a designated collections point for the
recycling of waste electrical and electronic equipment. The
separate collection and recycling of your waste equipment at the time of
disposal will help to conserve natural resources and ensure that it is
recycled in a manner that protects human health and the environment.
For more information about where you can drop off your waste
equipment for recycling, please contact your local city ofce, your
household waste disposal service or where you purchased the product.
This product contains a radio transmitter with wireless technology which
has been tested and found to be compliant with the applicable
regulations governing a radio transmitter in the 2.400 GHz to 2.4835 GHz
frequency range.
The associated regulatory agencies of the following countries recognize
the noted certications for this product as authorized for sale and use:
Austria Belgium Canada
Denmark France Finland
Germany Italy Netherlands
Spain Sweden UK
USA
Page 5
3
It is important that you only charge the included 3.7V 70mAh
Li-Po battery (PKZ3001) with the included 1S 3.7V DC Li-Po Charger
(PKZ3240). Attempting to charge the battery using another Li-Po charger
or non-Li-Po compatible charger could result in serious damage. Please
familiarize yourself thoroughly with the Battery Warnings and Guidelines
section before continuing.
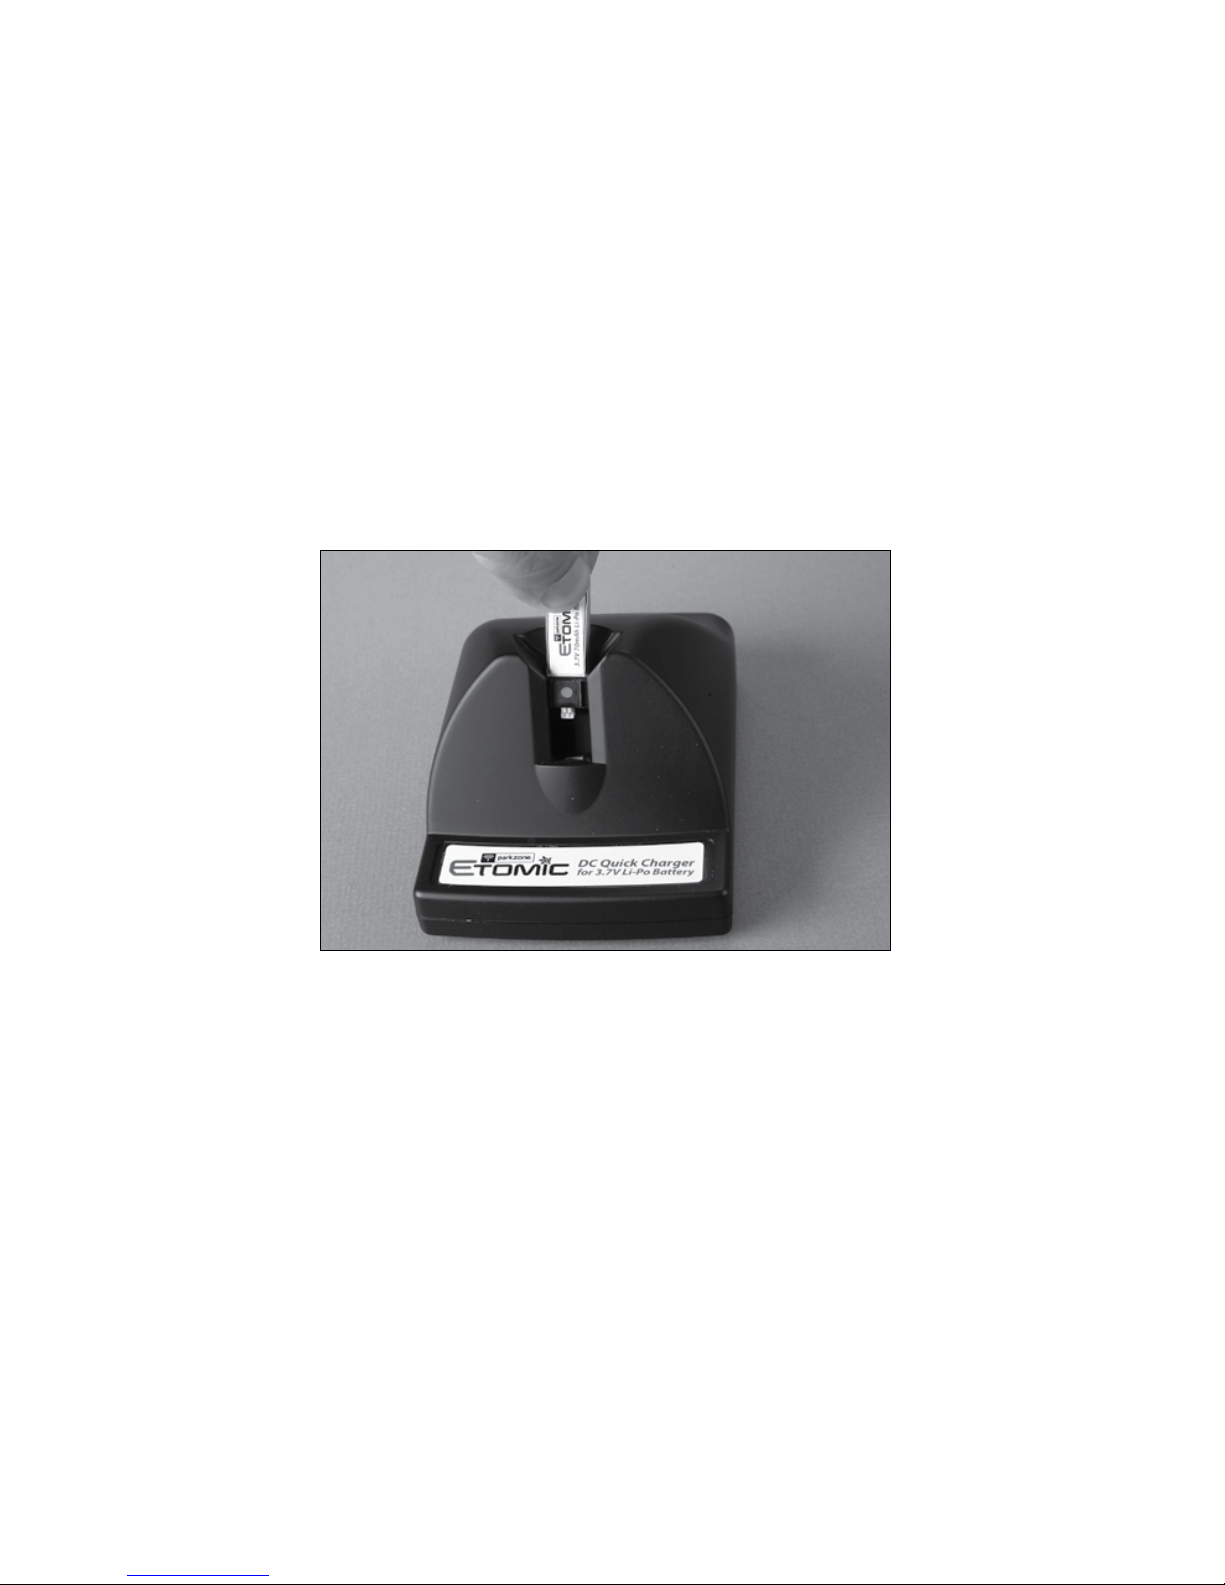
To charge your ParkZone 3.7V 70mAh battery:
1. Install four of the included AA batteries in the charger base, noting
proper polarity.
2. Slide the battery into the charge slot on the charger.
3. Gently press the battery into the charging jack in the bottom of the
slot. The LED light on the base will turn solid red.
4. A nearly depleted battery will charge in approximately 20 minutes.
5. As the battery nears fully charged, the LED will begin to blink.
When fully charged, the LED will blink once every 20 seconds.
6. You can expect to be able to charge the ight battery about 15–20
times before it will become necessary to replace the four AA
batteries. Replacing with alkaline batteries will provide more
charge cycles.
Note: The Li-Po battery included with your Ember 2 will arrive
partially charged. For this reason the initial charge may only take
10–15 minutes.
Step 1 – Charging the Aircraft Battery
Page 6
4
Installing the Transmitter Batteries
Your ParkZone Ember 2 aircraft comes with a fully proportional 4+
channel radio system that includes digital trims.
1. Insert the 4 AA batteries that are included with the package into
the transmitter.
2. Turn the switch on to ensure the batteries have been installed
correctly. When the batteries are installed correctly, the LED on the
transmitter should glow brightly. When the transmitter makes a
repeated “beep” sound, it is time to replace the transmitter
batteries.
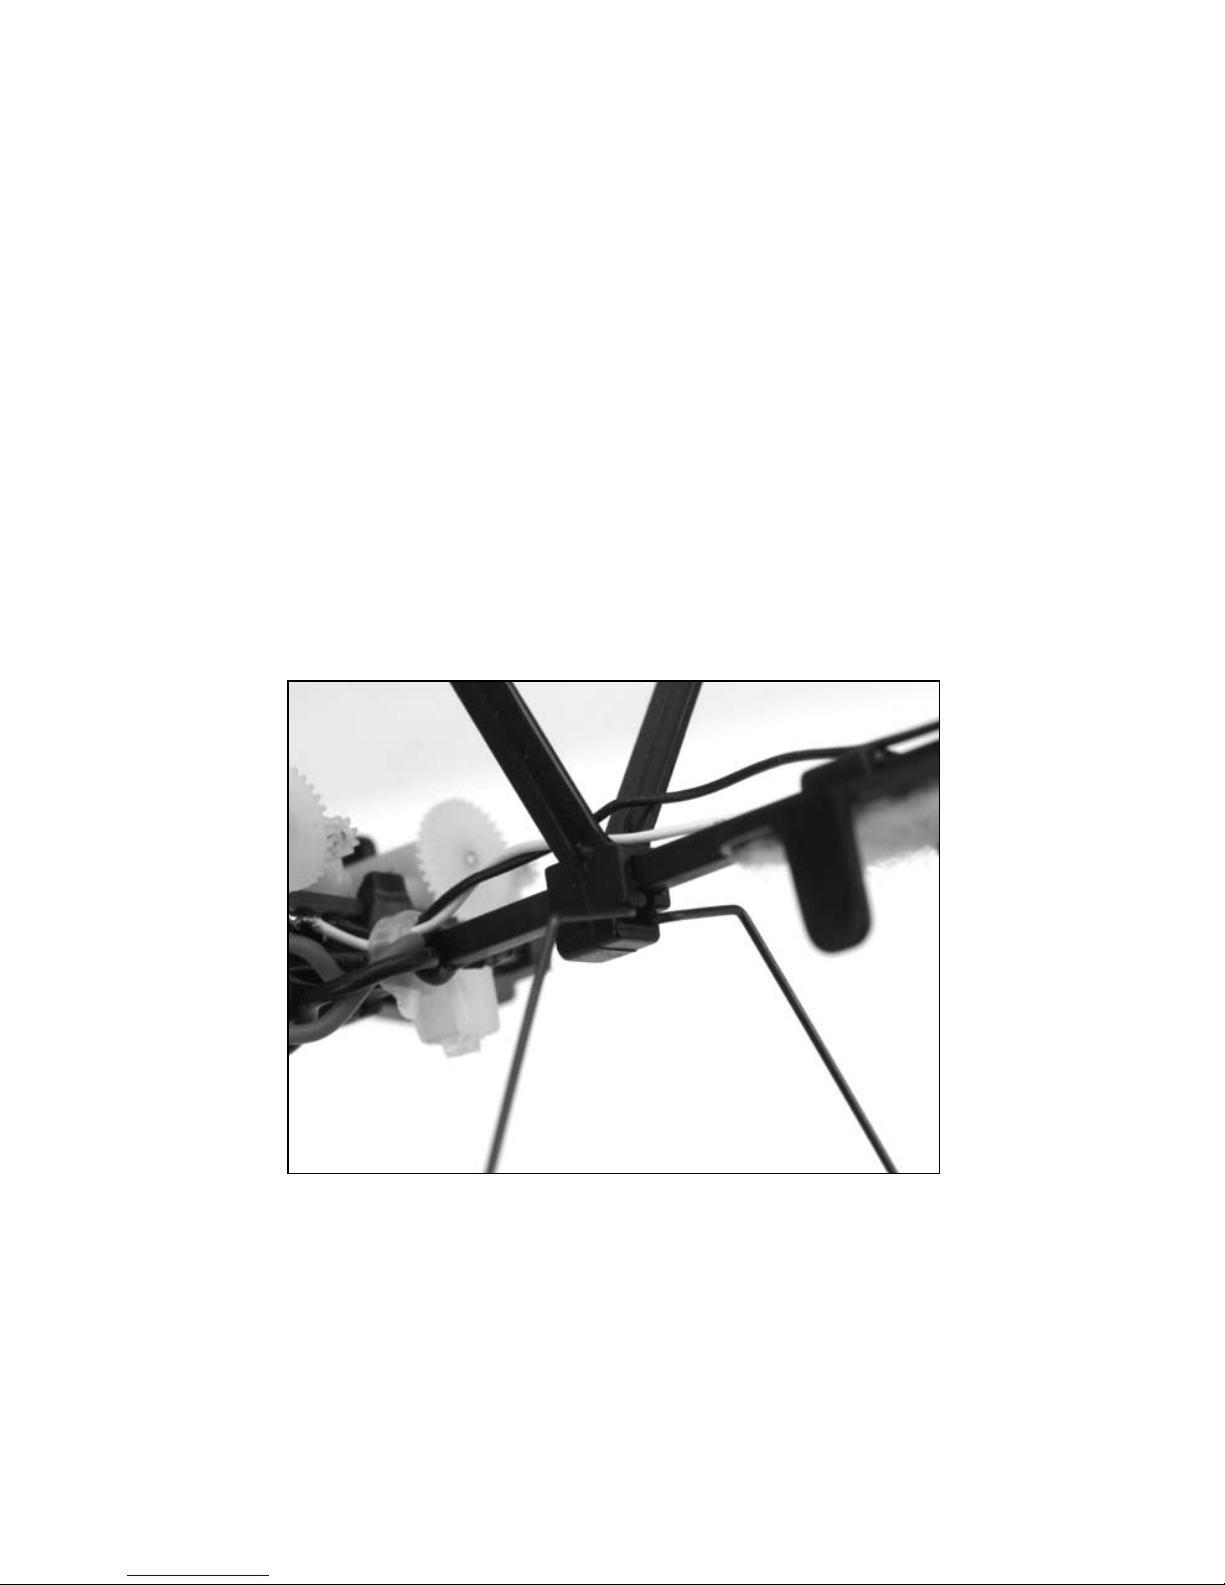
Installing the Landing Gear
Attach the main landing gear by sliding the gear into the lower slot
located on the front wing mount.
Step 2 – Functional Tests
Page 7

5
Installing the Flight Battery
Once the Li-Po battery has been fully charged, it’s ready to be installed in
the Ember 2.
Install the battery in the Ember 2 by pressing it to the battery tray with
the label facing downward and the connector oriented toward the back
of the airplane.
Note: Be sure to press the battery against the battery tray so the
battery is secured by the hook and loop material.
Page 8
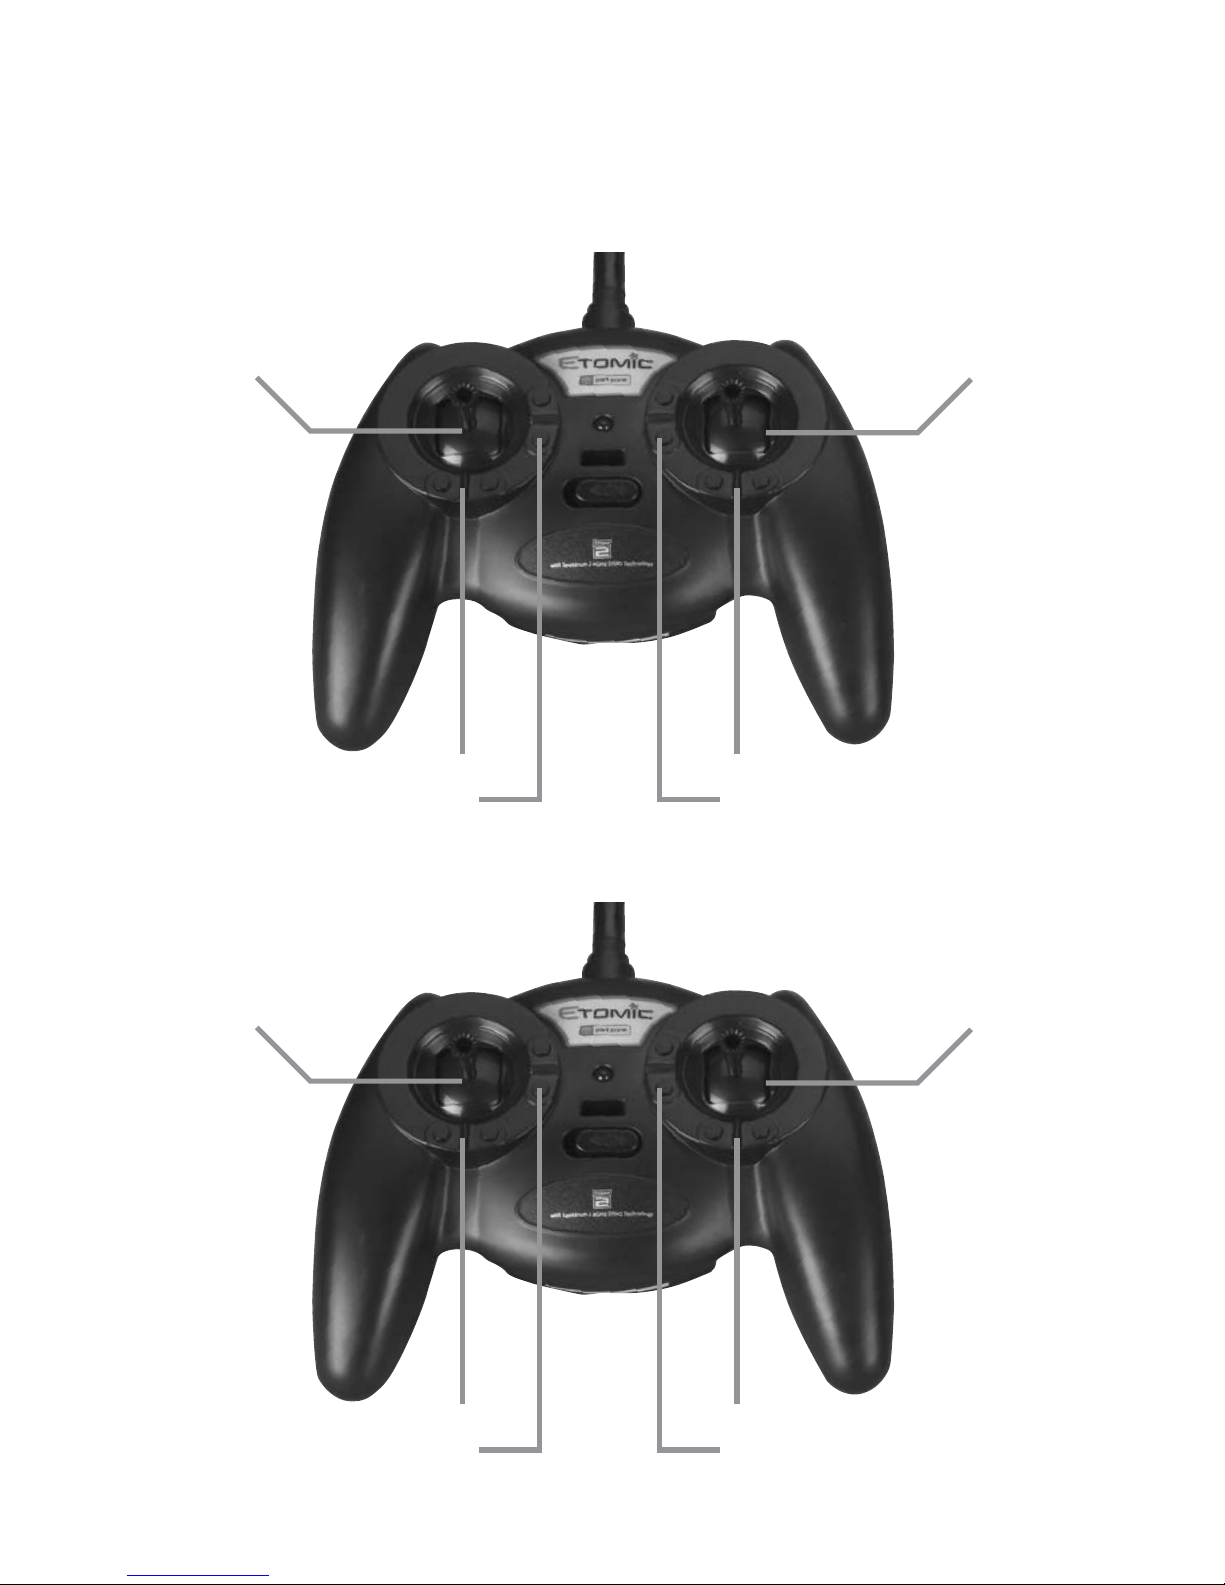
6
Transmitter Control Identification
Note: Each time before you fly you should ALWAYS turn the
transmitter on before connecting the flight battery to the ESC unit.
After each flight, be sure that you always disconnect the flight battery
from the ESC unit before powering the transmitter off.
Mode 2
Mode 1
Rudder/Throttle
Functions
Rudder/Elevator
Functions
Throtlle Trim Buttons
Elevator Trim Buttons
Elevator Trim Buttons
Throttle Trim Buttons
Aileron Trim Buttons
Aileron Trim Buttons
Aileron/Elevator
Functions
Aileron/Throttle
Functions
Rudder Trim Buttons
Rudder Trim Buttons
Page 9
7
Flight Control Test
Warning: Keep everything clear of the propeller before starting the
control test in the event that you accidentally turn on the motor.
1. Be certain that the throttle stick is down in the “Off” position.
2. Turn the transmitter on rst and lower the throttle stick completely.
Then, plug the battery into the battery lead of the ESC unit.
Note: The connectors on the battery and battery lead are keyed
to prevent reverse polarity connection. However, if you force them
together in the wrong orientation and with the wrong polarity it is still
possible to damage the battery and/or ESC unit.
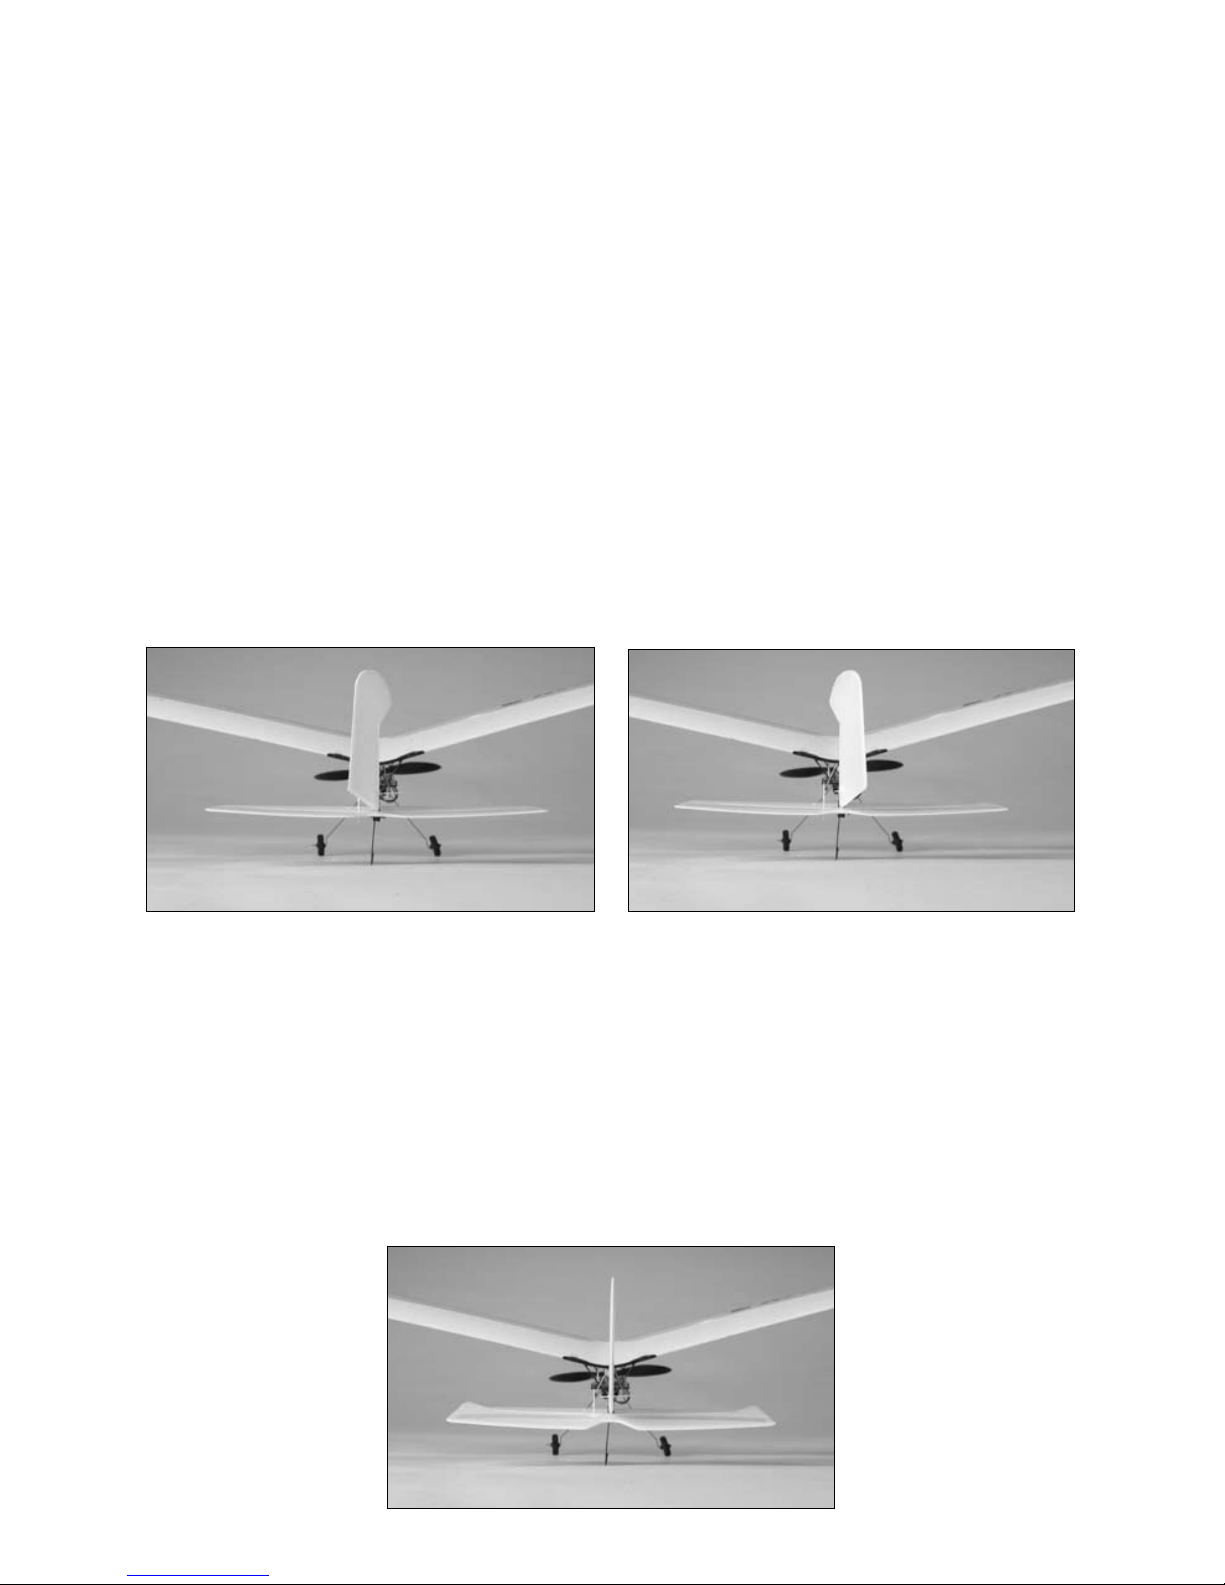
3. Move the aileron stick left and right to check yaw control. The
rudder should move to the left when the stick is pushed left and
the rudder should move to the right when the stick is pushed right
when viewing the Ember 2 from the back.
Note: For most aircraft, the aileron stick is used for primary turning
control. For the Ember 2, the rudder provides turning control and is
therefore commanded by the aileron stick.
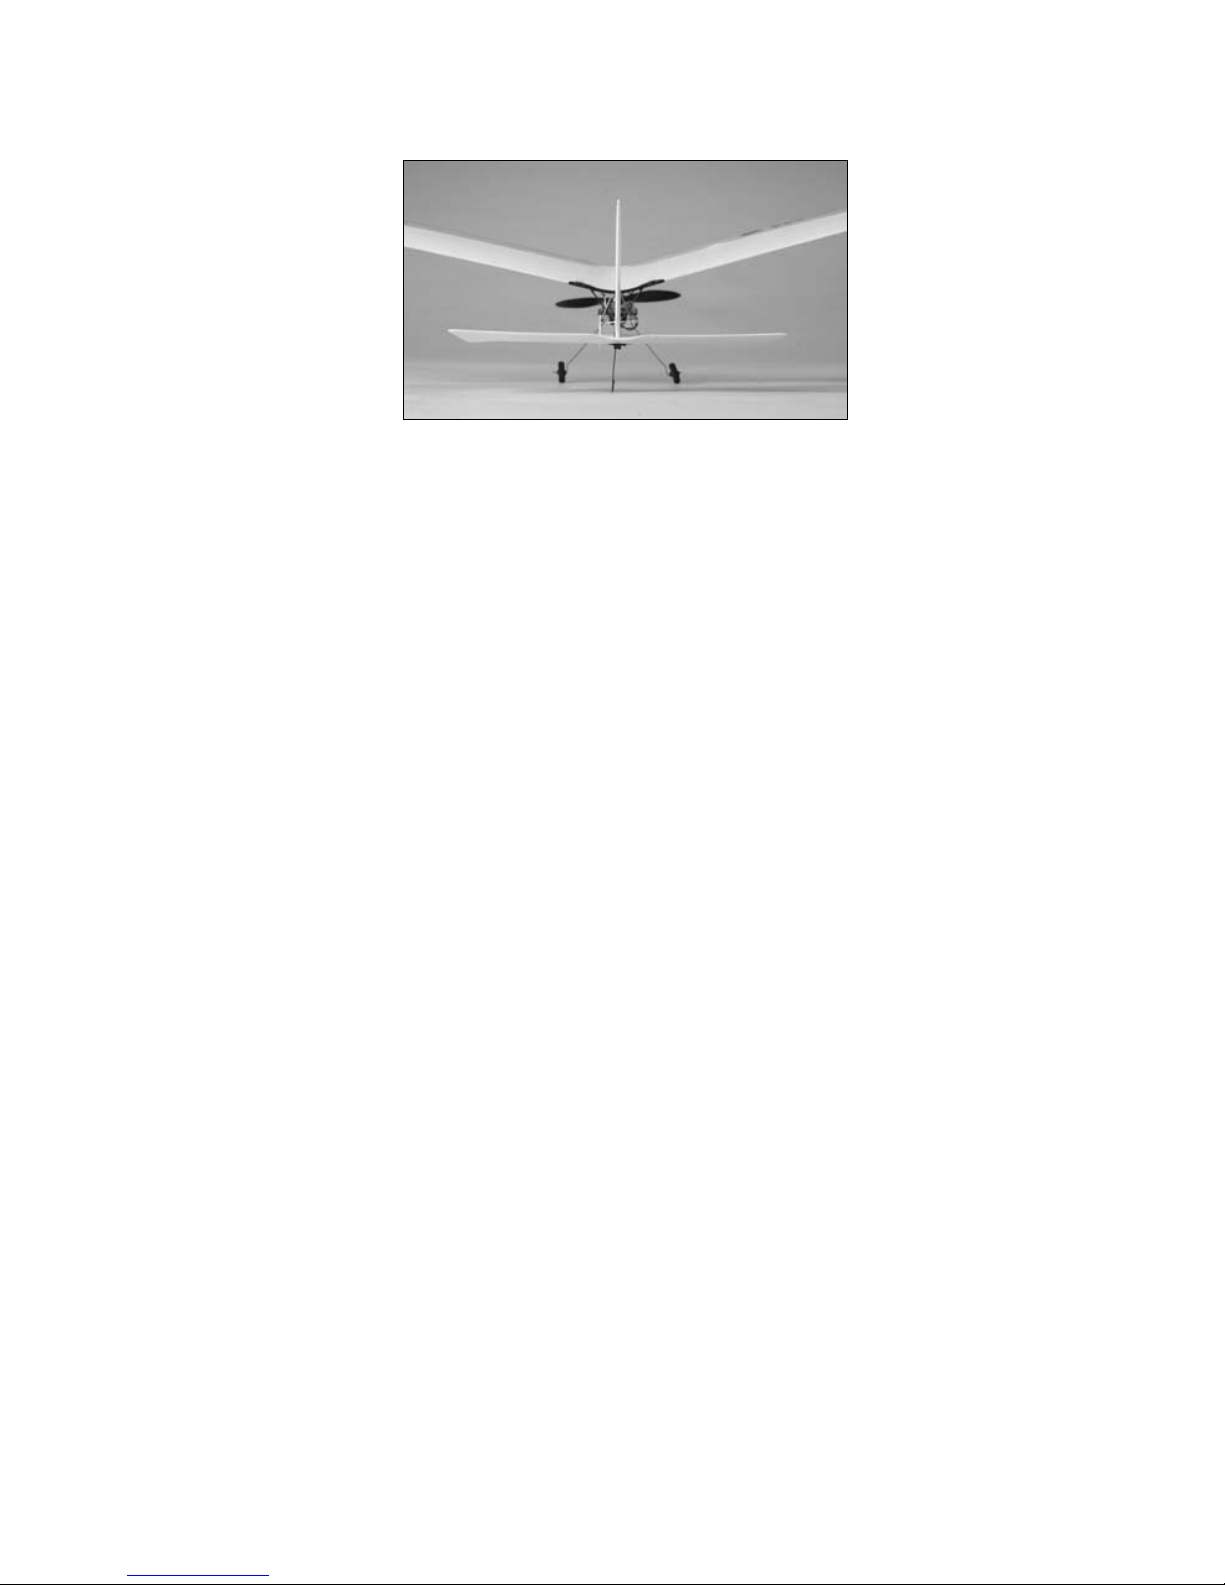
4. Move the elevator stick on the transmitter forward and aft to
check elevator pitch control. When the stick is pushed forward,
the elevator should move down when viewing the Ember 2 from
the back.
Shown with aileron stick pushed to the left.
Shown with aileron stick pushed to the right.
Page 10
8
5. With the elevator stick pulled back, the elevator should move
upward.
If at any time during the test the controls respond in the opposite
direction, it may be necessary to reverse/change the direction of
operation of the ight controls. Please see the section labeled
Reversing Flight Controls located in the back of this manual.
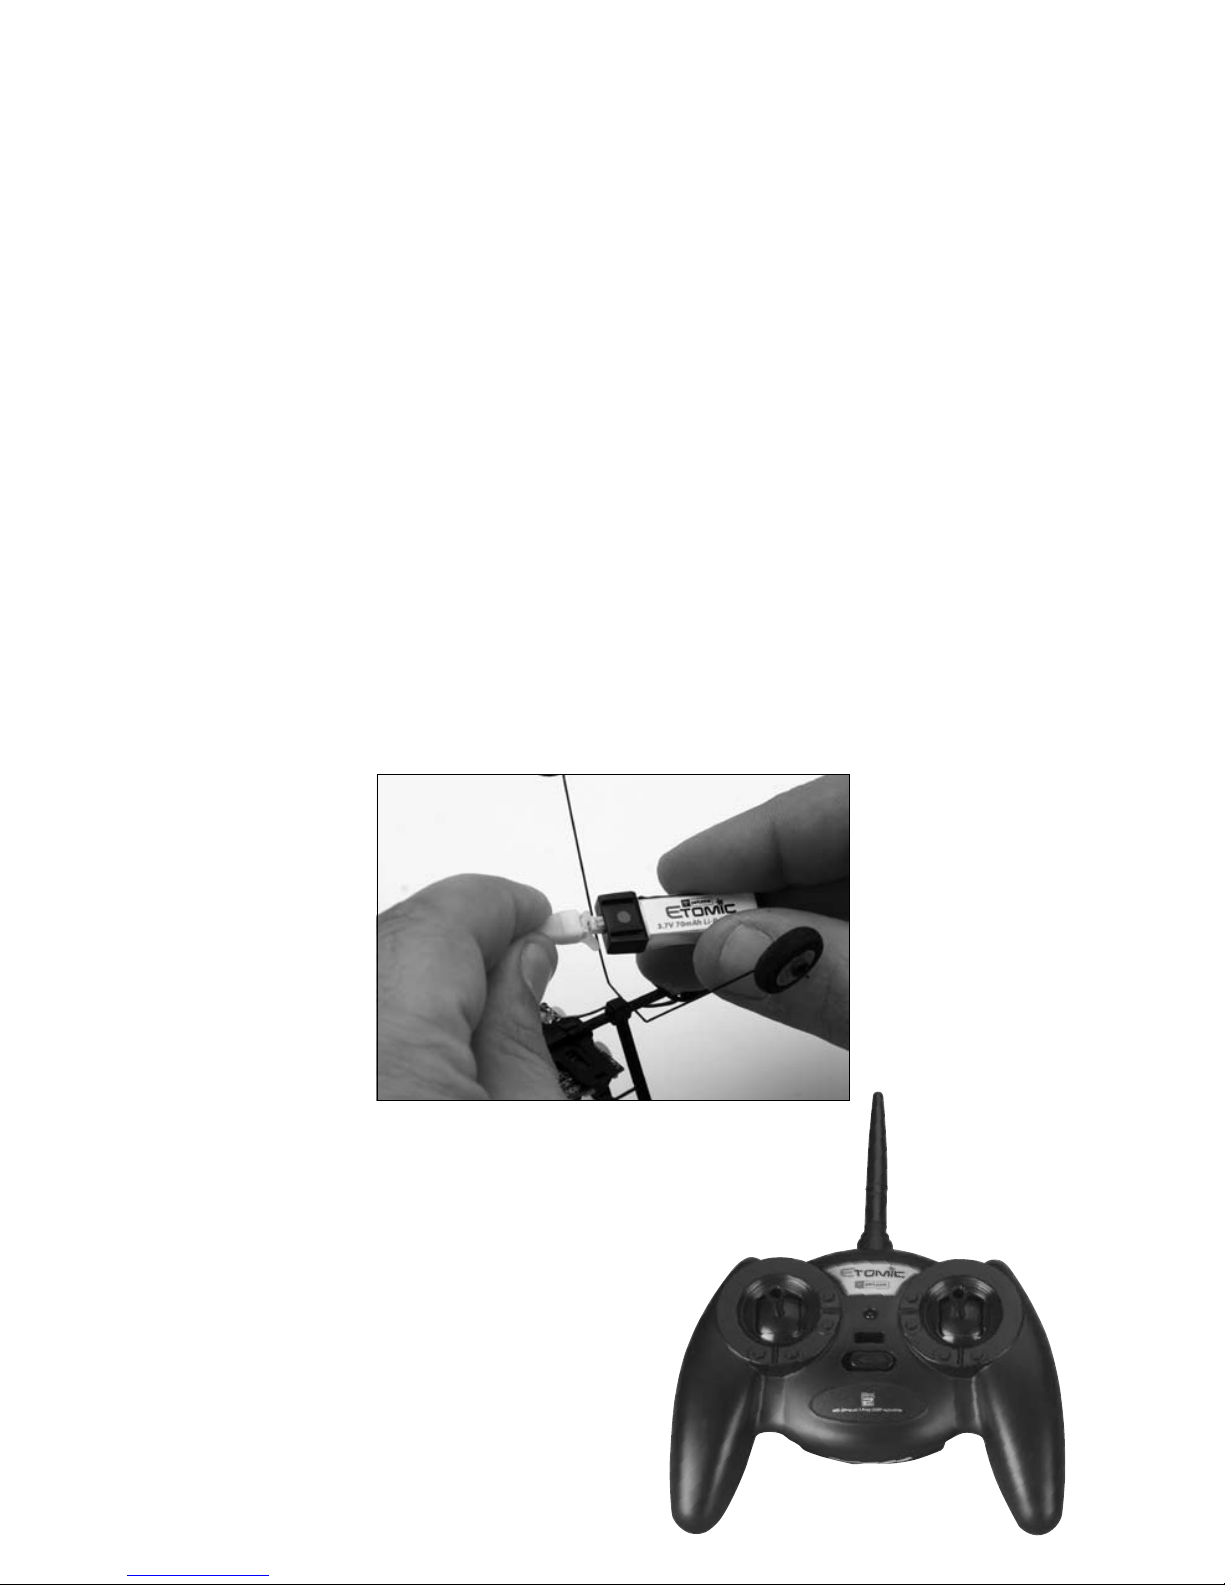
Note: It is very important to make sure that the control surfaces
(rudder and elevator) are at 0 degrees, or neutral, when the surface
control sticks are centered.
Page 11
9
Making Adjustments to the Control Surfaces
1. Any changes necessary to bring both the rudder and elevator to
neutral (zero degrees) when the right transmitter stick is centered
should be possible using the digital trim buttons.
2. If you nd this is not the case, do not y until this has
been corrected.
3. If corrections are needed, you may have to adjust the length of the
pushrod by gently stretching or pinching the bend in the control
wire as necessary. You can also achieve more control by
changing the hole on the control horn that the pushrod connects
to. We suggest you y it rst as it comes from the factory and then
only move “in” one hole at a time.
Motor Test
1. Make sure the throttle stick is down in the “Off” position.
2. Turn on the transmitter.
3. Plug the ight battery into the white lead in the fuselage. This must
be done carefully to avoid accidentally reversing the polarity and
causing damage to the ESC and battery.
4. Secure the ight battery. Gently press the
battery pack against the hook and loop material
on the underside of the fuselage.
5. Advance the throttle forward and
the propeller should spin at a high
speed.
Caution: Make sure that you
keep everything away from the
propeller at all times.
Page 12

10
You may notice there is quite a bit of down thrust when looking at the
prop/prop shaft. This is intentional and is not a sign of damage.
Adult Supervision Required
Warning: Keep everything clear of the propeller and hold the plane
securely. A moving propeller can cause severe injury.
You will need two people to perform the range test: one to hold the plane
and the other to give transmitter input.
Warning: The person holding the plane should hold it in a way that
prevents the propeller from coming into contact with any part of their
clothing or body.
1. One person holds the transmitter while the other person walks 30
paces away with the airplane.
2. Be sure the throttle is in the “Off” position.
3. Turn the transmitter on.
4. Plug the airplane battery into the fuselage.
5. As soon as the throttle is advanced, the propeller should spin
quickly.
6. As the rst person moves the transmitter controls, the other
person watches to ensure the airplane’s motor and tail controls
operate smoothly.
Step 3 – Range Test
Page 13

11
Selecting a Flying Site
Always choose a wide-open space for ying your ParkZone Ember 2.
It is ideal for you to y in an indoor location with a oor area of 40’x40’
and a minimum ceiling height of 20 feet. We suggest that rst ights are
done in a larger area, such as a basketball court or gymnasium.
If you choose to make your ights outdoors, the conditions MUST be
COMPLETELY CALM. The Ember 2 weighs less than 1 ounce and can
easily be blown away. If you choose to y outdoors, remember to always
keep the plane upwind from you to avoid yaways.
Make certain that you do not y near trees, buildings or other areas that
can restrict your view or interfere with your ying.
Seek Assistance from an Experienced Radio Control Pilot
VERY IMPORTANT
The 3-channel control system is designed for the experienced radio
control pilot and is not intended for the rst time ier. It is best to
have HobbyZone Zone 2 experience. First-time pilots of the ParkZone
Ember 2 should seek the assistance of an experienced RC pilot. Crash
damage is not covered under the warranty.
1. Make certain that the aircraft battery is fully charged.
2. Turn on the transmitter.
3. Plug in the aircraft battery.
4. Test the motor and surface controls.
5. While holding the transmitter in one hand, push the throttle stick to
full throttle (up) with your thumb.
6. Launch using light force. Keep the wings level. Do not throw it up
or down. Point it level (parallel) with the ground when releasing.
Step 4 – Flying your Ember 2
Step 5 – Hand Launching the Ember 2
Page 14

12
Step 6 – Runway Takeoff
1. Prior to attempting a runway takeoff, you should have had several
successful ights of hand launching the Ember 2.
2. Make certain the aircraft battery is fully charged.
3. Turn on the transmitter.
4. Plug in the aircraft battery.
5. Stand behind the Ember 2. Make certain you are on a smooth
surface such as concrete or wood.
6. Apply full throttle and adjust the left stick so that you keep your
Ember 2 on its intended path.
7. If the battery is fully charged, you should be able to lift off the
ground in a few feet. As you notice the back of the plane
beginning to lift a bit off the ground, apply some “up” elevator by
pulling back on the right stick. Do not give too much “up” elevator,
or you can cause the airplane to enter into a stall.
Page 15

13
Step 7 – Flying
1. After launching, your Ember 2 will climb at full throttle. Keep the
throttle full on until you have reached a safe altitude. At this same
time, make sure that you are continuing to keep the airplane
directed on its intended path.
2. Make right and left adjustments as necessary to keep the plane
headed on its intended path. After you have reached 4-6 feet of
altitude, you can begin to make the directional changes that you
desire.
3. Remember—the Ember 2 is a small, lightweight aircraft. Do not
allow the plane to get too far away from you. When the plane is
farther away from you it is harder to see and could cause you to
lose orientation.
4. Avoid holding the stick full right or left for more than two seconds,
as this will cause the plane to enter a spiral and could threaten your
Ember 2.
5. Do not try to climb too fast by pulling all the way back on the stick
(up elevator), or your plane may enter into a stall. Instead, climb by
giving small amounts of elevator.
6. Damage/bends to the wings or tail can greatly affect ight control.
Repair or replace the damaged parts immediately.
Sharp Turns
In order to make a sharper turn, move the stick in the desired direction
and add some up elevator (pull back on the stick). The plane will make a
sharper banking turn.
Note: With the throttle set at low or off (gliding), the plane will not
turn as fast as when you are flying at or near full throttle.
Rudder Trim
If the model wants to constantly turn one direction, use the digital trim
buttons to correct. Your Ember 2 should y straight with the control stick
at neutral. Always make trim changes in one-click intervals.
Page 16

14
Step 8 – Throttle Adjustment
Step 9 – Using Elevator
1. Climb to an altitude of 6-12 feet with full throttle.
2. To achieve and maintain a level “cruising” altitude, reduce the
power by moving the throttle stick down to approximately 50%.
The throttle stick is proportional, so you can add or reduce throttle
in small increments as needed to maintain the desired altitude.
3. To reduce altitude, reduce throttle.
4. To increase altitude, increase throttle.
Your Ember 2 is equipped with a third channel for elevator (pitch control).
Pulling back on the stick provides up elevator. This allows for shorter
takeoffs, better ares for landing, better climb rates and more effective
turns. Pulling back too far on the elevator, however, will cause the
airplane to enter a stall, causing the nose of the airplane to drop.
To avoid crashing from a stall, always maintain enough altitude to
recover.
Just after a stall has occurred, the nose of the airplane will fall and the
plane will look like it is diving. To pull out of a stall, simply pull back
slowly on the elevator stick once your Ember 2 has built up airspeed.
Remember, pulling back too quickly or for too long will once again cause
the airplane to enter a stall. Effectively avoiding and recovering from
stalls requires experience. Always seek the help of an experienced radio
control pilot if you are not familiar with pitch control. Failure to do so
could result in a crash and signicant damage to your airplane.
Elevator Trim
If the Ember 2 wants to go up or down, use the elevator digital trim buttons next to the control stick to correct. The model should y straight
with the control stick at neutral and should have a steady, shallow climb
at full throttle.
Page 17

15
Step 10 – Landing Your Ember 2
When you begin to notice that your Ember 2 no longer climbs well under
full power (normally after approximately 10-15 minutes), the battery is
getting low and it is time to land. Bring in your aircraft toward the
desired landing spot. Gradually reduce throttle (as well as giving a small
amount of down elevator if you choose) to reach an altitude of
approximately 4 feet. At this point, reduce even more throttle and your
Ember 2 should glide in softly for a landing.
Note: Your Ember 2 should be landed on a smooth surface (such as
concrete or wood) so that the landing gear can work effectively.
Expert Tip: As you get better and more experienced at flying,
try adding a bit of “up” elevator just prior to landing to “flare” the
plane. With some practice, your landings should become smooth
and on target.
Warning: Do not attempt to catch the airplane or injury may occur.
Remember, there is a spinning propeller on the front of the plane that
can cause injury! Also, remember to cut power to the motor right
before you land to prevent damage to the propeller.
Page 18

16
Reference Information
Binding process
The 2.4GHz DSM2 receiver in the Ember 2 uses a unique binding
operation to link your transmitter with your receiver. Please note that your
radio system has been bound for you already. Should you need to
replace a transmitter or your aircraft, you will need to perform the binding
process as detailed below.
When using a DSM2 transmitter that is a different design than the
Ember 2 transmitter, please refer to your transmitter’s manual for detailed
binding instructions to be used in step 4 below. Conrm that ATV travels
on your DSM2 transmitter are not exceeding 100% prior to binding your
transmitter to the Ember 2.
1. Conrm that the ight battery is fully charged.
2. Conrm that the ight battery is disconnected from the receiver/
ESC unit and the transmitter is turned off.
3. Plug the ight battery into the receiver/ESC unit. After 5 seconds
the LED on the receiver/ESC unit will begin ashing.
4. After verifying that the LED is ashing on the receiver/ESC unit,
turn the transmitter power on while pressing in on the left stick.
(You will here a ‘click’ when you press on the end of the stick.)
Release the stick.
5. If you entered bind mode correctly, you will see a solid LED
approximately 5-10 seconds later on the receiver/ESC unit.
You should now be bound to the transmitter and have full control
and function.
Additional Smartbind™ Information
Prior to each ight, you should ensure that you power on your transmitter and wait about 5 seconds before you plug in the ight battery into
the receiver/ESC unit. Doing this allows time for the transmitter to scan
and secure two open frequencies. If the ight battery is plugged in too
quickly and the link is missed, it may cause the receiver to inadvertently
enter bind mode. If this occurs simply leave the transmitter on and then
disconnect and reconnect receiver power (ight battery).
Should you encounter any problems, repeat the binding process again. If
problems continue, call the Horizon Support Team at 1-877-504-0233.
Page 19

17
Reversing Flight Controls
Should the Ember 2’s electronic components be used in another aircraft,
you may nd it necessary to reverse the operation of ight control surfaces. Reversing the rudder and aileron operation can be accomplished
by following the steps below:
1. Be certain that the battery is unplugged from the aircraft and the
transmitter is turned off.
2. Push down on the digital trim button for the surface you would like
to reverse.
a. Top elevator trim button – elevator normal
b. Bottom elevator trim button – elevator reverse
c. Left rudder trim button – rudder normal
d. Right rudder trim button – rudder reverse
3. Continue holding the desired digital trim button down and turn the
transmitter on.
4. Hold the digital trim buttons down for approximately ve seconds
until tones are heard, conrming the selection.
5. Connect the ight battery and complete the ight control test,
conrming that all surfaces are operating in the correct direction.
Center of Gravity Location
It is very important to conrm the ParkZone Ember 2 is properly balanced prior to ying. The Ember 2 should balance at 37mm (+/- 2mm)
behind the leading edge of the wing with the battery tray centered.
Replacing the Prop Shaft
You may nd that you need to replace the prop shaft in the gearbox
should it become damaged. To replace the prop shaft:
1. Gently grasp the white nylon nut located at the back of the prop
shaft to prevent it from turning.
2. While holding the nylon nut, rotate the spur gear in a clockwise
direction. The prop shaft will thread out of the nut.
3. Gently pull on the spur gear and prop shaft will slide out of the
gear box.
4. Thread the prop and spinner on to the new prop shaft by holding
the spur gear and turning the prop in a clockwise direction.
Page 20

18
5. Slide the new prop shaft back into the gear box.
6. Place the nylon nut on the back of the prop shaft. Spin the prop
and spur gear in a counter-clockwise direction. The nylon nut will
thread onto the prop shaft.
7. While holding the nylon nut in place, gently turn the spur gear
counter-clockwise to ensure the nut is snug.
Transmitter Dual Rate Function
The ParkZone 4+ channel 2.4GHz DSM2 transmitter included with the
Ember 2 features dual rate capability. The default setting is high rate. To
access the low rate function, simply press IN on the right gimbal. The
LED light on the transmitter face will begin to blink, alerting you that the
transmitter is on low rate. To return to high rate, simply push in again on
the right gimbal.
Increasing control throws
As you become more comfortable with ying the Ember 2, you may wish
to increase the control throws for even more maneuverability.
To increase the control throw, gently remove the pushrod from the control
horn. It is recommended to increase control throw by installing the pushrod in closer to the surface one hole position at a time until you reach the
desired control throw.
Page 21

19
Warranty Period:
Exclusive Warranty- Horizon Hobby, Inc., (Horizon) warranties that the Products
purchased (the “Product”) will be free from defects in materials and
workmanship at the date of purchase by the Purchaser.
Limited Warranty
(a) This warranty is limited to the original Purchaser (“Purchaser”) and is not
transferable. REPAIR OR REPLACEMENT AS PROVIDED UNDER THIS
WARRANTY IS THE EXCLUSIVE REMEDY OF THE PURCHASER. This
warranty covers only those Products purchased from an authorized Horizon
dealer. Third party transactions are not covered by this warranty. Proof of
purchase is required for warranty claims. Further, Horizon reserves the right to
change or modify this warranty without notice and disclaims all other warranties,
express or implied.
(b) Limitations- HORIZON MAKES NO WARRANTY OR REPRESENTATION,
EXPRESS OR IMPLIED, ABOUT NON-INFRINGEMENT, MERCHANTABILITY OR
FITNESS FOR A PARTICULAR PURPOSE OF THE PRODUCT. THE
PURCHASER ACKNOWLEDGES THAT THEY ALONE HAVE DETERMINED THAT
THE PRODUCT WILL SUITABLY MEET THE REQUIREMENTS OF THE
PURCHASER’S INTENDED USE.
(c) Purchaser Remedy- Horizon’s sole obligation hereunder shall be that Horizon
will, at its option, (i) repair or (ii) replace, any Product determined by Horizon
to be defective. In the event of a defect, these are the Purchaser’s exclusive
remedies. Horizon reserves the right to inspect any and all equipment involved
in a warranty claim. Repair or replacement decisions are at the sole discretion of
Horizon. This warranty does not cover cosmetic damage or damage due to acts
of God, accident, misuse, abuse, negligence, commercial use, or modication of
or to any part of the Product. This warranty does not cover damage due to
improper installation, operation, maintenance, or attempted repair by anyone
other than Horizon. Return of any goods by Purchaser must be approved in
writing by Horizon before shipment.
Damage Limits:
HORIZON SHALL NOT BE LIABLE FOR SPECIAL, INDIRECT OR
CONSEQUENTIAL DAMAGES, LOSS OF PROFITS OR PRODUCTION OR
COMMERCIAL LOSS IN ANY WAY CONNECTED WITH THE PRODUCT,
WHETHER SUCH CLAIM IS BASED IN CONTRACT, WARRANTY, NEGLIGENCE,
OR STRICT LIABILITY. Further, in no event shall the liability of Horizon exceed
the individual price of the Product on which liability is asserted. As Horizon has
no control over use, setup, nal assembly, modication or misuse, no liability
shall be assumed nor accepted for any resulting damage or injury. By the act of
use, setup or assembly, the user accepts all resulting liability.
If you as the Purchaser or user are not prepared to accept the liability associated
with the use of this Product, you are advised to return this Product immediately
in new and unused condition to the place of purchase.
Law: These Terms are governed by Illinois law (without regard to conict of law
principals).
Page 22

20
Safety Precautions:
This is a sophisticated hobby Product and not a toy. It must be operated with
caution and common sense and requires some basic mechanical ability. Failure
to operate this Product in a safe and responsible manner could result in injury or
damage to the Product or other property. This Product is not intended for use by
children without direct adult supervision. The Product manual contains
instructions for safety, operation and maintenance. It is essential to read and
follow all the instructions and warnings in the manual, prior to assembly, setup
or use, in order to operate correctly and avoid damage or injury.
Questions, Assistance, and Repairs:
Your local hobby store and/or place of purchase cannot provide warranty
support or repair. Once assembly, setup or use of the Product has been started,
you must contact Horizon directly. This will enable Horizon to better answer your
questions and service you in the event that you may need any assistance. For
questions or assistance, please direct your email to
[email protected], or call 877.504.0233 toll free to speak to a
service technician.
Inspection or Repairs
If this Product needs to be inspected or repaired, please call for a Return
Merchandise Authorization (RMA). Pack the Product securely using a shipping
carton. Please note that original boxes may be included, but are not designed to
withstand the rigors of shipping without additional protection. Ship via a carrier
that provides tracking and insurance for lost or damaged parcels, as Horizon is
not responsible for merchandise until it arrives and is accepted at our facility. A
Service Repair Request is available at www.horizonhobby.com on the “Support”
tab. If you do not have internet access, please include a letter with your
complete name, street address, email address and phone number where you
can be reached during business days, your RMA number, a list of the included
items, method of payment for any non-warranty expenses and a brief summary
of the problem. Your original sales receipt must also be included for warranty
consideration. Be sure your name, address, and RMA number are clearly written
on the outside of the shipping carton.
Warranty Inspection and Repairs
To receive warranty service, you must include your original sales receipt verifying
the proof-of-purchase date. Provided warranty conditions have been met, your
Product will be repaired or replaced free of charge. Repair or replacement
decisions are at the sole discretion of Horizon Hobby.
Non-Warranty Repairs
Should your repair not be covered by warranty the repair will be completed and
payment will be required without notication or estimate of the expense unless
the expense exceeds 50% of the retail purchase cost. By submitting the item
for repair you are agreeing to payment of the repair without notication.
Repair estimates are available upon request. You must include this request
with your repair. Non-warranty repair estimates will be billed a minimum of ½
hour of labor. In addition you will be billed for return freight. Please advise us of
your preferred method of payment. Horizon accepts money orders and cashiers
checks, as well as Visa, MasterCard, American Express, and Discover cards. If
you choose to pay by credit card, please include your credit card number and
Page 23

21
expiration date. Any repair left unpaid or unclaimed after 90 days will be
considered abandoned and will be disposed of accordingly. Please note:
non-warranty repair is only available on electronics and model engines.
United States:
Electronics and engines requiring inspection or repair should be shipped to the
following address:
Horizon Service Center
4105 Fieldstone Road
Champaign, Illinois 61822
All other products requiring warranty inspection or repair should be shipped to
the following address:
Horizon Support Team
4105 Fieldstone Road
Champaign, Illinois 61822
Please call 877-504-0233 or e-mail us at [email protected]
with any questions or concerns regarding this product or warranty.
United Kingdom:
Electronics and engines requiring inspection or repair should be shipped to one
of the following address:
Horizon Hobby UK
Units 1-4 Ployters Rd
Staple Tye
Harlow, Essex
CM18 7NS
United Kingdom
Please call +44 1279 641 097 or e-mail us at [email protected] with any
questions or concerns regarding this product or warranty.
Germany:
Electronics and engines requiring inspection or repair should be shipped to one
of the following address:
Horizon Technischer Service
Otto Hahn Str. 9a
25337 Elmshorn
Germany
Please call +49 4121 46199 66 or e-mail us at [email protected] with
any questions or concerns regarding this product or warranty.
Page 24

22
Replacement Parts
Make sure that you keep your Ember 2 ying. Replacement parts are
available at your local hobby shop or from Horizon Hobby
(www.horizonhobby.com). Please try your local hobby shop rst. By
supporting them, they will be there when you need them.
Item #: Description:
PKZ3001 3.7V 70mAh Li-Po Battery: Etomic
PKZ3102 Prop w/Spinner: Ember 2, Citabria
PKZ3206 Main Gear Set; Ember/2
PKZ3207 Tail Gear Set: Ember/2
PKZ3220 Main Wing: Ember/2
PKZ3222 Pushrods: Ember/2
PKZ3224 Empennage or Tail Surfaces w/Accessories: Ember/2
PKZ3227 Gearbox w/o Motor: Ember/2
PKZ3240 Charger: Etomic
PKZ3267 Bare Fuselage: Ember/2
PKZ3316 Main Motor: Vapor/Ember 2
PKZ3341 Transmitter, 2.4GHz w/Spektrum DSM2: Etomic
PKZ3351 Receiver: Vapor/Ember 2
PKZ3403 Decal Sheet: Ember 2
PKZ3461 Fuse/Elect, Motor, Rx: Ember 2
Register your product and receive ParkZone
updates at www.parkzone.com
 Loading...