

Page 1
PRS-3 OS-1, PRS-3 OS-2,
PRS-4 OS-1, PRS-4 OS-2,
PRS-4W-1 and PRS-4W-2
Park Tool Co.
PRS-3 OS-1 Deluxe Single Arm Repair Stand
(with 100-3C Adjustable Linkage Clamp)
PRS-3 OS-2 Deluxe Single Arm Repair Stand
(with 100-3D Micro Adjust Clamp)
#130 Steel Base for PRS-3 OS-1 and PRS-3 OS-2
Repair Stands (optional)
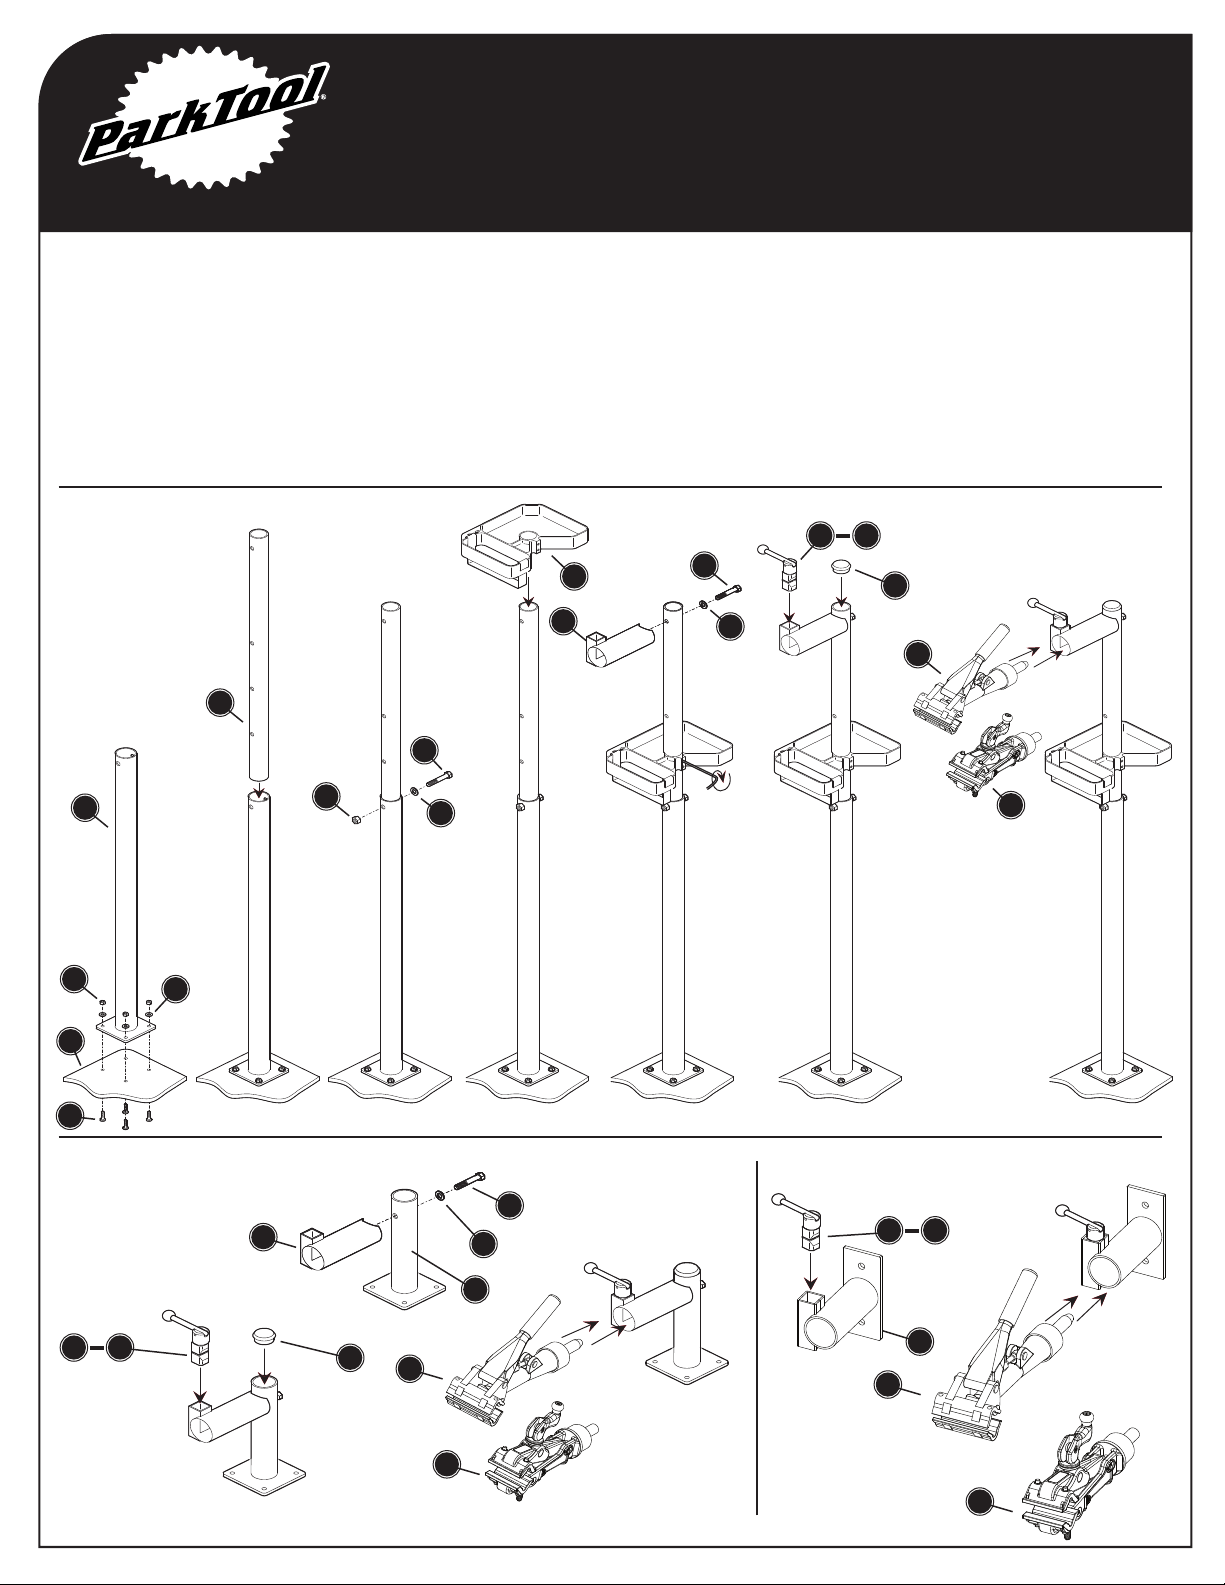
Assembly of PRS-3 OS-1 and PRS-3 OS-2
5115 Hadley Ave. N., St. Paul, MN 55128 (USA) www.parktool.com
16
20
3
17
PRS-4 OS-1 Deluxe Bench Mount Repair Stand
(with 100-3C Adjustable Linkage Clamp)
PRS-4 OS-2 Deluxe Bench Mount Repair Stand
(with 100-3D Micro Adjust Clamp)
PRS-4W-1 Deluxe Wall Mount Repair Stand
(with 100-3C Adjustable Linkage Clamp)
PRS-4W-2 Deluxe Wall Mount Repair Stand
(with 100-3D Micro Adjust Clamp)
10
4
12
11
13
1
OR
18
22
21
23
24
25
Assembly of PRS-4 OS-1 and PRS-4 OS-2
3
10
4
11
1
19
14
13
12
2
Assembly of PRS-4W-1 and PRS-4W-2
10
4
15
1
2
OR
OR
2
Page 2

PRS-3 OS-1, PRS-3 OS-2,
PRS-4 OS-1, PRS-4 OS-2,
PRS-4W-1 and PRS-4W-2
Park Tool Co.
NOTES
• The clamp of the repair stand can be rotated 360 degrees,
allowing easy access to any component of the bike. To
adjust the rotational angle of the clamp, loosen the locking
lever (#9) of the lock block assembly, rotate the clamp to
the desired position, and re-tighten the lever to lock the
clamp.
• Some bike manufacturers recommend not clamping
thin-walled or carbon fiber frames. Consult manufacturer
for suggested clamping location.
• To avoid damage to finish, clean tube before clamping.
• The two clamping jaws each have a recess to provide
clearance for cables. Make sure any brake or shift cables
are in one of the recesses before clamping.
PRS-3 OS-1 Deluxe Montageständer
(mit 100-3C Justierbare Hebel-Halteklaue)
5115 Hadley Ave. N., St. Paul, MN 55128 (USA) www.parktool.com
• When clamping heavy bikes in the repair stand, loosen
locking lever (#9) on lock block assembly and remove
clamp from stand. Secure clamp to the bike, then use
both hands to lift the bike (with the clamp attached). Slide
clamp back into the stand and tighten locking lever to secure.
• Keeping the front of the bike slightly lower than the back
will help prevent the front wheel and handlebars from
flopping and hitting the frame’s top tube. A Park Tool HBH-2
Handlebar Holder should be used to prevent handlebar
flopping if the bike is being rotated in the repair stand.
• For bolting the PRS-3 OS-1 or PRS-3 OS-2 directly to the
floor, use the Park Tool FP-2 Floor Plate (sold separately).
PRS-4 OS-2 Deluxe Montagearm
(mit 100-3D Micro-Adjust Profi-Halteklaue)
PRS-3 OS-2 Deluxe Montageständer
(mit 100-3D Micro-Adjust Profi-Halteklaue)
#130 Stahl-Bodenplatte für PRS-3 OS-1 und PRS-3
OS-2 Deluxe Montageständer (optional)
PRS-4 OS-1 Deluxe Montagearm
(mit 100-3C Justierbare Hebel-Halteklaue)
HINWEISE:
• Die Halteklaue des Montageständers kann um 360°
gedreht werden, so dass das Fahrrad bequem an jeder
Stelle bearbeitet werden kann. Lösen Sie zur Einstellung
den Verschlusshebel der Fixiereinheit (#9), drehen Sie die
Halteklaue in die gewünschte Position und fixieren Sie den
Hebel wieder.
• Einige Rahmenhersteller warnen vor dem Klemmen dünnwandiger oder aus Carbonfasern bestehender Rahmen.
Klären Sie mit dem Hersteller geeignete Klemmbereiche
oder verwenden Sie im Zweifelsfall die ISC-4 SitzrohrInnenklemme von Park Tool.
• Reinigen Sie den Rahmen vorher im Klemmbereich zur
Vermeidung von Lackschäden.
• Beide Klemmbacken der Halteklaue verfügen über Aussparungen für Züge. Beachten Sie die Lage der Züge vor
dem Schließen der Halteklaue.
PRS-4W-1 Deluxe Montagearm f. Wandbefestigung
(mit 100-3C Justierbare Hebel-Halteklaue)
PRS-4 OS-2 Deluxe Montagearm f. Wandbefestigung
(mit 100-3D Micro-Adjust Profi-Halteklaue)
• Erleichtern Sie sich das Fixieren schwerer Fahrräder im
Montageständer indem Sie nach Lösen des Fixierhebels
(#9) die Halteklaue aus dem Montageständer entfernen
und direkt an das stehende Fahrrad klemmen. Heben Sie
anschließend das Fahrrad mit beiden Händen an und
schieben Sie den Halteklauenschaft in die Ständeraufnahme. Drehen Sie das Fahrrad in die gewünschte Arbeitsposition und fixieren Sie den Hebel.
• Eine in Fahrtrichtung leicht abfallende Position des
Fahrrads im Montagständer verhindert das Umschlagen
von Lenker und Vorderrad. Beim Drehen des Fahrrads im
Ständer empfiehlt sich der Einsatz des HBH-2 Lenker-Haltebügels.
• Verwenden Sie für die permanente Bodenmontage der
Ständermodelle PRS-3 OS-1 und PRS-3 OS-2 die FP-2
Bodenbefestigung (als Zubehör lieferbar).
Page 3

PRS-3 OS-1, PRS-3 OS-2,
PRS-4 OS-1, PRS-4 OS-2,
PRS-4W-1 and PRS-4W-2
Park Tool Co.
PRS-3 OS-1 Pied de Réparation Professionnel Deluxe
(avec Pince à Réglage Manuel 100-3C)
PRS-3 OS-2 Pied de Réparation Professionnel Deluxe
(avec Pince 100-3D Micro Ajust)
#130 Plaque Acier pour Pieds PRS-3 OS-1 et
PRS-3 OS-2 (en option)
PRS-4 OS-1 Pied de Réparation Deluxe pour Établi
(avec Pince à Réglage Manuel 100-3C)
A NOTER :
• La pince offre une rotation à 360° permettant de rendre
chaque partie du vélo accessible. Pour ajuster l’angle de
rotation de la pince il suffit de desserrer le levier (#9),
tourner la pince et puis bloquer avec le même levier.
• Certains fabricants déconseillent l’utilisation d’une pince
avec des tubes étirés ou en carbone. Contacter le fabricant
pour définir le meilleur endroit où saisir le cadre.
• Pour éviter de rayer le cadre bien essuyer le tube avant de
le saisir.
• Les deux garnitures de remplacement ont des encoches
pour le passage des câbles. Bien positionner les câbles
avant de serrer la pince.
5115 Hadley Ave. N., St. Paul, MN 55128 (USA) www.parktool.com
PRS-4 OS-2 Pied de Réparation Deluxe pour Établi
(avec Pince 100-3D Micro Ajust)
PRS-4W-1 Pied de Réparation Deluxe pour Fixation
Mural (avec Pince à Réglage Manuel 100-3C)
PRS-4W-2 Pied de Réparation Deluxe pour Fixation
Mural (avec Pince 100-3D Micro Ajust)
• Pour travailler sur des vélos particulièrement lourds, dévisser le levier de blocage (#9) et retirer la pince du pied.
Fixer la pince sur le vélo, puis avec deux mains soulever le
vélo, glisser la pince dans le pied et bloquer avec le levier
de serrage.
• En maintenant l’avant du vélo un peu plus bas que l’arrière
la roué et le guidon seront plus stable. Si le vélo doit
tourner sur le pied il est recommandé d’utiliser l’outil de
blocage du guidon HBH-2.
• Pour fixer le pied PRS-3 OS-1 ou PRS-3 OS-2 directement
au sol, utiliser la plaque de fixation sol FP-2 (en option).
PRS-3 OS-1 Soporte de Reparación de un Brazo DeLuxe
(con Mordaza Ajustable 100-3C)
PRS-3 OS-2 Soporte de Reparación de un Brazo DeLuxe
(con Mordaza de Microajuste 100-3D)
#130 Base de Acero para Soportes de Reparación
PRS-3 OS-1 y PRS-3 OS-2 (Opcional)
PRS-4 OS-1 Soporte de Banco para Reparación DeLuxe
(con Mordaza Ajustable 100-3C)
NOTAS :
• Las mordazas del soporte de reparación pueden rotar
360 grados, para facilitar el acceso a cualquier componente de la bicicleta. Para ajustar el ángulo de rotación
de la mordaza, afloje la palanca de seguro (#9), rote la
mordaza a la posición deseada y apriete nuevamente
para asegurar la mordaza.
• Algunos fabricantes de bicicletas no recomiendan colocar
tubos de paredes delgadas o de fibra de carbono. Consulte al fabricante para que le sugiera un lugar de donde
sujetarla.
• Para evitar daños en el terminado, limpie el tubo antes
de colocarlo.
• Las dos mandíbulas de la mordaza tienen un canal para
los cables. Asegúrese que los forros de frenos y cables
estén dentro de estos canales antes de colocarlo.
PRS-4 OS-2 Soporte de Banco para Reparación DeLuxe
(con Mordaza de Microajuste 100-3D)
PRS-4W-1 Soporte de Pared para Reparación DeLuxe
(con Modaza Ajustable 100-3C)
PRS-4W-2 Soporte de Pared para Reparación DeLuxe
(con Modaza de Microajuste 100-3D)
• Cuando necesite colocar bicicletas pesadas en el soporte
de reparación, afloje la palanca del seguro (#9) y retire la
mordaza del soporte. Asegure la mordaza a la bicicleta,
utilizando ambas manos alcé la bicicleta (con la mordaza
puesta) y coloque el conjunto en el soporte volviendo a
asegurar la palanca.
• Mantenga el frente de la bicicleta ligeramente mas baja
que la parte trasera para evitar que la rueda delantera y
el manubrio giren y golpeen el tubo superior. El HBH-2
Sujetador de manubrio, es utilizado para prevenir que
el manubrio se mueva y pueda girarse la bicicleta en el
soporte de reparación.
• Para atornillar el PRS-3 OS-1 o el PRS-3 OS-2 directamente al piso utilicé el plato para piso FP-2 de Park Tool
(se vende por separado).
Page 4
PRS-3 OS-1, PRS-3 OS-2,
PRS-4 OS-1, PRS-4 OS-2,
PRS-4W-1 and PRS-4W-2
Park Tool Co.
1
5115 Hadley Ave. N., St. Paul, MN 55128 (USA) www.parktool.com
9
8
10
7
11
6
12
18
5
4
3
13
16
15
14
20
19
21
22
2
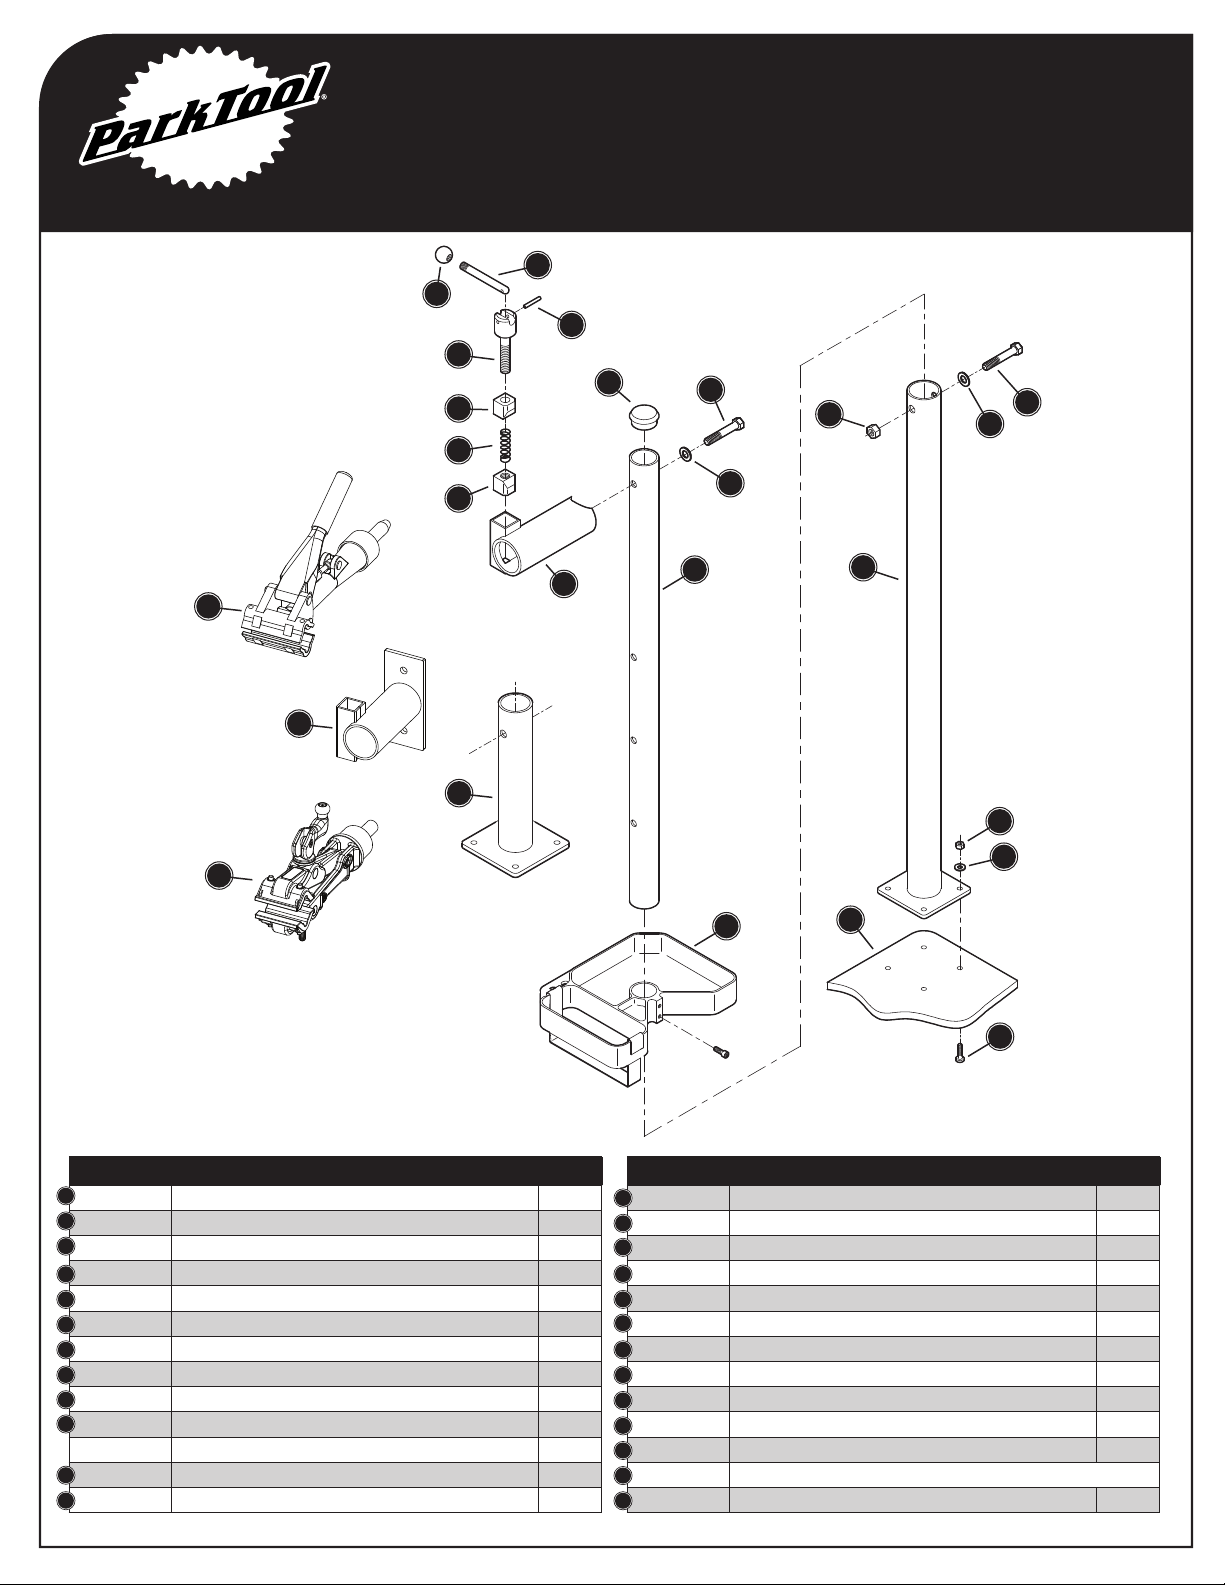
Part No. Description
1
100-3C Adjustable Linkage
2
100-3D Micro Adjust Clamp
3
124A Horizontal Tube 1
4
113S Threaded Lock Block 1
5
115S Spring 1
6
114S Unthreaded Lock Block 1
7
112S Lock Block Bolt Assembly 1
8
110 S Ball Knob 2
9
111S Locking Lever 1
10
109S Spring Pin 5/32” x 1-1/4” 1
180 Lock Block Assembly
11
179A End Cap 1
12
128B Bolt 7/16 - 14 x 2-1/2” 4
©2013 Park Tool Co. / PARK TOOL® and the color BLUE are registered trademarks of Park Tool Co.
(PRS-3 OS-1, PRS-4-1, PRS-4W-1 only)
(PRS-3 OS-2, PRS-4-2, PRS-4W-2 only)
(includes items 4 through 10)
Qty.
1
1
1
23
17
24
25
Part No. Description
13
128-3 Washer 7/16” 1
14
182A Bench Support
15
196-4 Wall Mount Weldment
16
125A Upright 1
17
105 Work Tray
18
128-5 Hex Nut 7/16 - 14 1
19
128-3 Washer 7/16” 1
20
128B Bolt 7/16” - 14 x 2-1/2” 1
21
125B Base Support 1
22
131S Nut 1/4 - 20 4
23
132S Washer 1/4” 4
24
130 Base
25
133S Button Head Cap Screw 1/4 - 20 x 7/8” 4
(PRS-4 OS-1 and PRS-4 OS-2 only)
(PRS-4W-1 and PRS-4W-2 only)
(PRS-3 OS-1 and PRS-3 OS-2 only)
1
Sold Separately
Qty.
1
1
08/13
 Loading...