

Parkside Performance PWSAP 20-Li B2 Operation And Safety Notes Translation Of The Original Instructions
CORDLESS ANGLE GRINDER 20 V
PWSAP 20‑Li B2
CORDLESS ANGLE
GRINDER 20 V
Operation and safety notes
Translation of the original instructions
AKU KUTNA BRUSILICA 20 V
Upute za posluživanje i za Vašu sigurnost
Prijevod originalnih uputa
АКУМУЛАТОРЕН
ЪГЛОШЛАЙФ 20 V
Инструкции за обслужване и безопасност
Превод на оригиналната инструкция
ΕΠΑΝΑΦΟΡΤΙΖΌΜΕΝΟΣ
ΓΩΝΙΑΚΌΣ ΤΡΟΧΌΣ 20 V
Υποδείξεις χειρισμού και ασφαλείας
Μετάφραση του πρωτοτύπου των οδηγιών χρήσης
AKU UGAONA BRUSILICA
20 V
Napomene o upotrebi i bezbednosti
Prevod originalnog uputstva
IAN 322689_1901
AKKU‑
WINKELSCHLEIFER 20 V
Bedienungs- und Sicherheitshinweise
Originalbetriebsanleitung

GB/CY Operation and safety notes Page 5
HR Upute za posluživanje i za Vašu sigurnost Stranica 29
RS Napomene o upotrebi i bezbednosti Strana 53
BG Инструкции за обслужване и безопасност
GR/CY Υποδείξεις χειρισμού και ασφαλείας Σελίδα
DE/AT/CH Bedienungs- und Sicherheitshinweise Seite
Страница
78
104
128
A
1 2
3 4
5
14
13
12
B
15
5
C
18
6
7
8
9
10
11
5
19
17
20
21
16
BATTERY COMPATIBLE WITH ALL DEVICES OF THE SERIES
“PARKSIDE X 20 V TEAM“
PUNJIVA BATERIJA KOMPATIBILNA JE SA SVIM UREĐAJIMA IZ SERIJE
„PARKSIDE X 20 V TEAM“
AKUMULATOR JE KOMPATIBILAN SA SVIM UREĐAJIMA SERIJE
„PARKSIDE X 20 V TEAM“
АКУМУЛАТОРНАТА БАТЕРИЯ Е СЪВМЕСТИМА С ВСИЧКИ УРЕДИ ОТ
СЕРИЯТА „PARKSIDE X 20 V TEAM“
ΜΠΑΤΑΡΙΑ ΣΥΜΒΑΤΗ ΜΕ ΟΛΕΣ ΤΙΣ ΣΥΣΚΕΥΕΣ ΤΗΣ ΣΕΙΡΑΣ
«PARKSIDE X 20 V TEAM»
AKKU KOMPATIBEL MIT ALLEN GERÄTEN DER SERIE
„PARKSIDE X 20 V TEAM“
20V max.
18V
D E
F G
H I
c
b
a
J K
3.
2.
1.

Warnings and symbols used .......................................... Page 6
Introduction............................................................ Page 6
Intended use............................................................ Page 6
Scope of delivery........................................................ Page 7
Parts description......................................................... Page 7
Technical data .......................................................... Page 7
Safety instructions..................................................... Page 9
General power tool safety warnings ......................................... Page 9
Grinder safety warnings................................................... Page 12
Angle grinder warnings ................................................... Page 12
Vibration and noise reduction .............................................. Page 17
Behaviour in emergency situations........................................... Page 18
Residual risks ........................................................... Page 18
Battery charger safety warnings ............................................ Page 19
Before first use......................................................... Page 20
Accessories ............................................................ Page 20
Operation.............................................................. Page 20
Attaching/removing the battery pack ........................................ Page 20
Checking the battery pack charging level ..................................... Page 20
Charging the battery pack................................................. Page 20
Attaching/removing the auxiliary handle ..................................... Page 21
Adjusting the guard ...................................................... Page 21
Changing the guard...................................................... Page 22
Attaching/removing the accessory tool .......................................Page 22
Switching on and off ..................................................... Page 23
Trial run ............................................................... Page 24
Working instructions .................................................. Page 24
Grinding............................................................... Page 24
Wire brushing .......................................................... Page 24
Abrasive cutting ......................................................... Page 24
Cleaning and care ..................................................... Page 25
Cleaning............................................................... Page 25
Maintenance ........................................................... Page 25
Repair................................................................. Page 25
Storage ............................................................... Page 25
Transportation .......................................................... Page 26
Disposal................................................................ Page 26
Warranty .............................................................. Page 26
EC declaration of conformity .......................................... Page 28
5 GB/CY
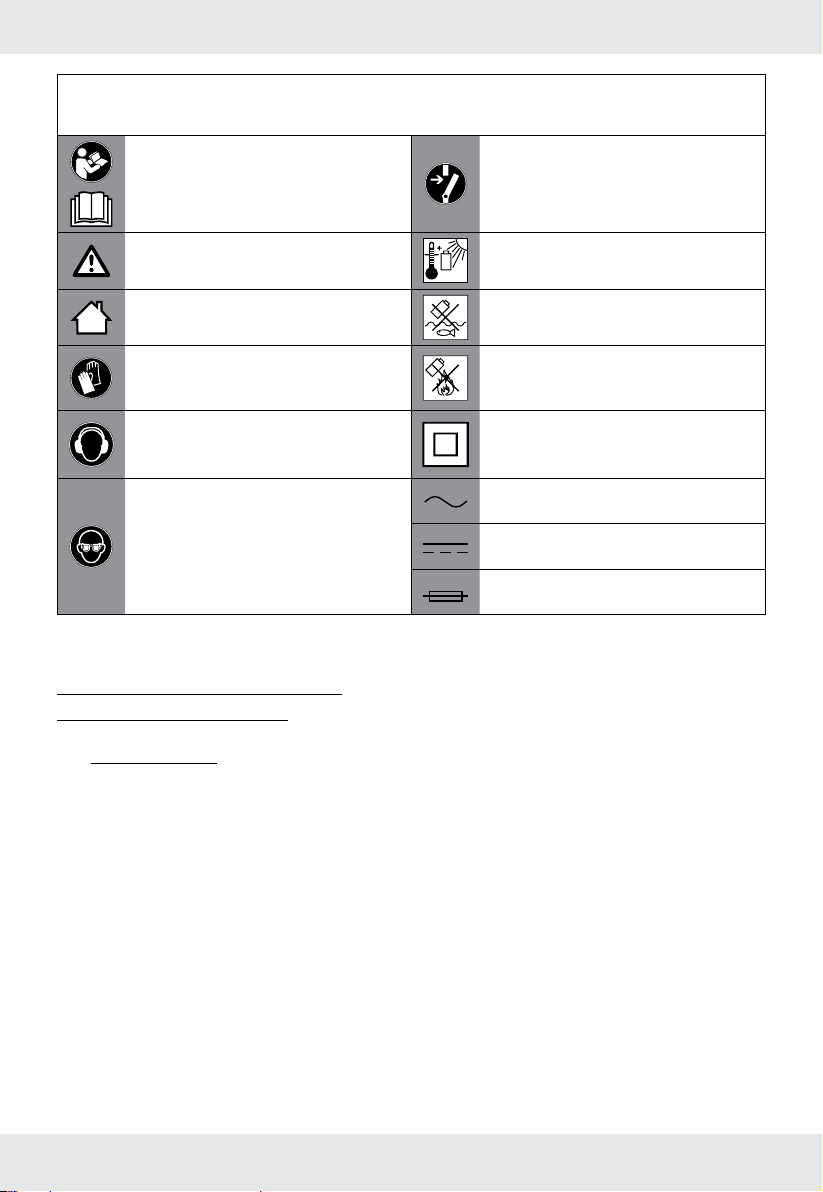
Warnings and symbols used
The following warnings are used in this instruction manual, on the packaging and on the rating label:
Switch the product off and remove
Read the instruction manual.
Follow the warnings and safety notes!
Use in dry indoor rooms only.
Wear protective gloves! Protect the battery pack from fire.
Wear hearing protection! Protection class II (double insulation)
the battery pack before replacing
attachments, cleaning and when not
in use.
Protect the battery pack against heat
and continuous intense sunlight.
max. 45°C
Protect the battery pack against water
and moisture.
Alternating current
Wear eye protection!
CORDLESS ANGLE GRINDER
20 V PWSAP 20‑Li B2
Introduction
We congratulate you on the purchase of your
new product. You have chosen a high quality
product. The instructions for use are part of the
product. They contain important information
concerning safety, use and disposal. Before using
the product, please familiarise yourself with all
of the safety information and instructions for use.
Only use the product as described and for the
specified applications. If you pass the product on
to anyone else, please ensure that you also pass
on all the documentation with it.
Direct current
T3.15A
Fuse
Intended use
This cordless angle grinder (hereinafter “product”
or “power tool”) is designed for
¾ abrasive cutting-off,
¾ grinding metal/concrete/tiles without the use
of water, and
¾ wire brushing metal.
The product is not intended for any other types
of applications (e.g. grinding with unsuitable
grinding tools, grinding with a coolant solution,
grinding or cutting hazardous materials such as
asbestos).
6 GB/CY
The product is not intended for sanding and
polishing.
Cut-off grinding: A separate guard must
be installed for this task. The guard can
be ordered via our customer service
(article number HG03642).
Always use the correct accessory tools according
to the intended use! Observe the technical
requirements of this product (see “Technical
data“) when purchasing and using accessory
tools!
Any other use or modification of the product
are considered improper use and can result in
hazards such as death, life-threatening injuries
and damage. The manufacturer is not liable
for any damages caused by improper use. The
product is not intended for commercial use or for
any other use.
Scope of delivery
Parts description
Figure A:
Spindle lock button
1
Auxiliary handle threads
2
On/off switch
3
Grip handle
4
Battery pack
5
Auxiliary handle (with chuck key storage)
6
Chuck key
7
Guard for grinding
8
Directional arrow (on the guard)
9
Spindle
10
Backing flange
11
Locking flange (with tightening tab)
12
Cover with clamp
13
Directional arrow (on the angle grinder)
14
Figure B:
Battery pack
5
Release button for battery pack
15
button (charging level)
16
Charging level LEDs (red/orange/green)
17
WARNING!
m
u The product and the packaging are not
children’s toys! Children must not play with
plastic bags, sheets and small parts! There
is a danger of choking and suffocation!
1 x Cordless angle grinder 20 V
PWSAP 20-Li B2
1 x Auxiliary handle
1 x Guard for grinding (pre-installed) *
1 x Chuck key (stored in the auxiliary handle)
1 x Battery pack PAP 20 A3
1 x Rapid battery charger PLG 20 B1
1 x Carrying case
1 x Instruction manual
* Guard for cutting is not supplied and can be
ordered via our customer service.
Figure C:
Battery charger (rapid battery charger)
18
Power cord with power plug
19
Charging control LED – Green
20
Charging control LED – Red
21
Not illustrated:
Carrying case
22
Technical data
Cordless angle grinder PWSAP 20‑Li B2
Rated voltage: 20 V
Rated speed n: 10000 min
Accessory tool diameter: Ø 125 mm
Wheel thickness: max. 8 mm
Spindle thread: M14
–1
7 GB/CY

Battery pack PAP 20 A3
Type: Lithium-Ion
Rated voltage: 20 V
max.
Capacity: 4 Ah
Energy value: 72 Wh
Number of cells: 10
Rapid battery charger PLG 20 B1
Input:
Rated voltage: 230–240 V∼
Rated frequency: 50 Hz
Rated power: 120 W
Output:
Rated voltage: 21.5 V
Charging current: 4.5 A
Protection class:
Fuse (internal):
II /
3.15 A /
Charging time:
¾ Battery type PAP 20 A3, 4.0 Ah (supplied):
60 minutes
¾ Battery type PAP 20 A1, 2.0 Ah
(available separately): 45 minutes
Recommended ambient temperature:
While charging: +4 to +40 °C
During operation: +4 to +40 °C
During storage: +20 to +26 °C
Noise emission value
The measured values have been determined in
accordance with EN 60745. The A-rated noise
level of the power tool is typically as follows:
Sound pressure level L
Uncertainty K
pA
Sound power level L
Uncertainty K
WA
: 81.6 dB(A)
pA
: 3 dB
: 92.6 dB(A)
WA
: 3 dB
Vibration emission value
Vibration total values (triaxial vector sum)
determined according to EN 60745:
Main handle:
Hand/arm vibration a
: 4.27 m/s²
h,AG
Uncertainty K: 1.5 m/s²
Auxiliary handle:
Hand/arm vibration a
: 5.31 m/s²
h,AG
Uncertainty K: 1.5 m/s²
The values apply for the work mode surface
grinding. Other applications may have different
vibration emission values.
WARNING!
m
Wear ear protection!
NOTE
u The declared vibration total value and
the declared noise emission value have
been measured in accordance with a
standard test method and may be used for
comparing one tool with another.
u The declared total vibration value and the
declared noise emission value may also
be used for a preliminary assessment of
exposure.
8 GB/CY
WARNING!
m
u The vibration and noise emissions during
actual use of the power tool can differ
from the declared values depending on
the manner in which the tool is used,
especially what kind of workpiece is
processed.
Try to minimise exposure to vibration and
noise. Examples of measures to reduce
vibration include wearing gloves when
using the tool and limiting working time. All
parts of the operating cycle must be taken
into account (e.g. times when the power
tool is switched off and when it is running
idle in addition to the trigger time).
Safety instructions
Save all warnings and instructions for
future reference.
The term “power tool” in the warnings refers to
your mains-operated (corded) power tool or
battery-operated (cordless) power tool.
Work area safety
1) Keep work area clean and well
lit. Cluttered or dark areas invite accidents.
2) Do not operate power tools in
explosive atmospheres, such as in
the presence of flammable liquids,
gases or dust. Power tools create sparks
which may ignite the dust or fumes.
3) Keep children and bystanders
away while operating a power
tool. Distractions can cause you to lose
control.
General power tool safety
warnings
WARNING!
m
u Read all safety warnings and
all instructions. Failure to follow the
warnings and instructions may result in
electric shock, fire and/or serious injury.
Electrical safety
1) Power tool plugs must match the
outlet. Never modify the plug in any
way. Do not use any adapter plugs
with earthed (grounded) power
tools. Unmodified plugs and matching
outlets will reduce risk of electric shock.
9 GB/CY

2) Avoid body contact with earthed
or grounded surfaces, such as
pipes, radiators, ranges and
refrigerators. There is an increased risk
of electric shock if your body is earthed or
grounded.
3) Do not expose power tools to rain
or wet conditions. Water entering a
power tool will increase the risk of electric
shock.
4) Do not abuse the cord. Never use
the cord for carrying, pulling or
unplugging the power tool. Keep
cord away from heat, oil, sharp
edges or moving parts. Damaged or
entangled cords increase the risk of electric
shock.
5) When operating a power tool
outdoors, use an extension cord
suitable for outdoor use. Use of a
cord suitable for outdoor use reduces the risk
of electric shock.
6) If operating a power tool in a
damp location is unavoidable, use
a residual current device (RCD)
protected supply. Use of an RCD
reduces the risk of electric shock.
Personal safety
1) Stay alert, watch what you are
doing and use common sense when
operating a power tool. Do not use
a power tool while you are tired or
under the influence of drugs, alcohol
or medication. A moment of inattention
while operating power tools may result in
serious personal injury.
2) Use personal protective
equipment. Always wear eye
protection. Protective equipment such as
dust mask, non-skid safety shoes, hard hat,
or hearing protection used for appropriate
conditions will reduce personal injuries.
3) Prevent unintentional starting.
Ensure the switch is in the off‑
position before connecting to power
source and/or battery pack, picking
up or carrying the tool. Carrying
power tools with your finger on the switch or
energising power tools that have the switch
on invites accidents.
4) Remove any adjusting key or
wrench before turning the power
tool on. A wrench or a key left attached to
a rotating part of the power tool may result
in personal injury.
10 GB/CY

5) Do not overreach. Keep proper
footing and balance at all times. This
enables better control of the power tool in
unexpected situations.
6) Dress properly. Do not wear loose
clothing or jewellery. Keep your
hair, clothing and gloves away from
moving parts. Loose clothes, jewellery or
long hair can be caught in moving parts.
7) If devices are provided for the
connection of dust extraction and
collection facilities, ensure these are
connected and properly used. Use
of dust collection can reduce dust-related
hazards.
Power tool use and care
1) Do not force the power tool. Use
the correct power tool for your
application. The correct power tool will
do the job better and safer at the rate for
which it was designed.
2) Do not use the power tool if the
switch does not turn it on and
off. Any power tool that cannot be
controlled with the switch is dangerous and
must be repaired.
3) Disconnect the plug from the
power source and / or the battery
pack from the power tool before
making any adjustments, changing
accessories, or storing power
tools. Such preventive safety measures
reduce the risk of starting the power tool
accidentally.
4) Store idle power tools out of the
reach of children and do not allow
persons unfamiliar with the power
tool or these instructions to operate
the power tool. Power tools are
dangerous in the hands of untrained users.
5) Maintain power tools. Check for
misalignment or binding of moving
parts, breakage of parts and any
other condition that may affect
the power tool’s operation. If
damaged, have the power tool
repaired before use. Many accidents
are caused by poorly maintained power
tools.
6) Keep cutting tools sharp and
clean. Properly maintained cutting tools
with sharp cutting edges are less likely to
bind and are easier to control.
11 GB/CY
7) Use the power tool, accessories
and tool bits etc. in accordance
with these instructions, taking into
account the working conditions and
the work to be performed. Use of
the power tool for operations different from
those intended could result in a hazardous
situation.
Battery tool use and care
1) Recharge only with the charger
specified by the manufacturer. A
charger that is suitable for one type of
battery pack may create a risk of fire when
used with another battery pack.
2) Use power tools only with
specifically designated battery
packs. Use of any other battery packs may
create a risk of injury and fire.
3) When battery pack is not in use,
keep it away from other metal
objects, like paper clips, coins,
keys, nails, screws or other small
metal objects, that can make a
connection from one terminal to
another. Shorting the battery terminals
together may cause burns or a fire.
4) Under abusive conditions, liquid
may be ejected from the battery;
avoid contact. If contact accidentally
occurs, flush with water. If liquid
contacts eyes, additionally seek
medical help. Liquid ejected from the
battery may cause irritation or burns.
Service
1) Have your power tool serviced by
a qualified repair person using only
identical replacement parts. This will
ensure that the safety of the power tool is
maintained.
Grinder safety warnings
WARNING!
m
u Dust from materials such as lead paint,
some types of wood, and metal can be
harmful to your health.
u Contact with or inhaling this type of
dust can present a danger to the user or
persons nearby.
WARNING!
m
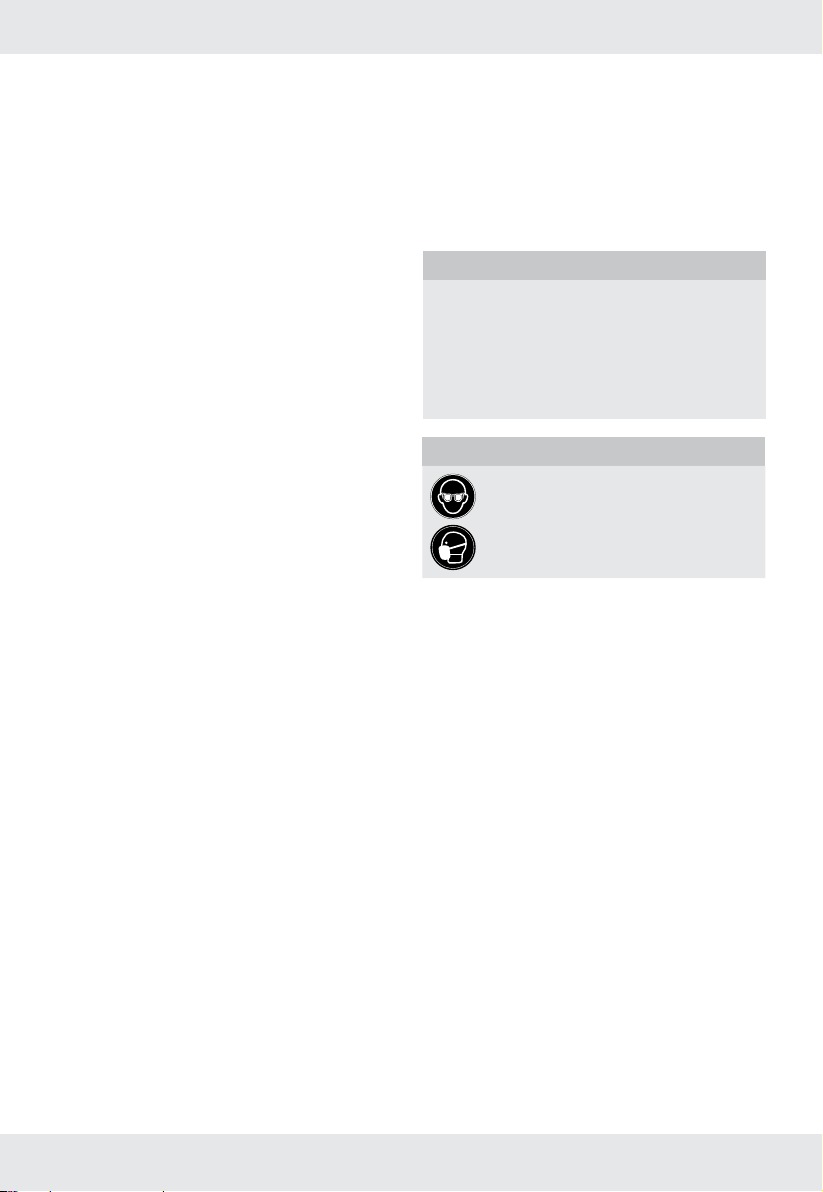
Wear safety glasses and a dust mask!
Angle grinder warnings
Safety warnings common for grinding,
wire brushing and abrasive cutting‑off
1) This power tool is intended for
use as a grinder, wire brush and
abrasive cutting machine. Follow all
safety instructions, instructions for
use, illustrations and data included
with the device. Failure to heed the
following instructions can result in electric
shock, fire and / or serious injury.
12 GB/CY

2) Operations such as sanding and
polishing are not recommended to
be performed with this power tool.
Operations for which the power tool was not
designed may create a hazard and cause
personal injury.
3) Do not use accessories which
are not specifically designed
and recommended by the tool
manufacturer. Just because the accessory
can be attached to your power tool, it does
not assure safe operation.
4) The rated speed of the accessory
must be at least equal to the
maximum speed marked on the
power tool. Accessories running faster
than their rated speed can break and fly
apart.
5) The outside diameter and the
thickness of your accessory must be
within the capacity rating of your
power tool. Incorrectly sized accessories
cannot be adequately guarded or controlled.
6) Threaded mounting of accessories
must match the grinder spindle
thread. For accessories mounted
by flanges, the arbour size hole of
the accessory must fit the locating
diameter of the flange. Accessories that
do not match the mounting hardware of the
power tool will run out of balance, vibrate
excessively and may cause loss of control.
7) Do not use a damaged accessory.
Before each use inspect the
accessory such as abrasive wheels
for chips and cracks, backing pad
for cracks, tear or excess wear,
wire brush for loose or cracked
wires. If power tool or accessory
is dropped, inspect for damage or
install an undamaged accessory.
After inspecting and installing an
accessory, position yourself and
bystanders away from the plane
of the rotating accessory and run
the power tool at maximum no‑
load speed for 1 minute. Damaged
accessories will normally break apart during
this test time.
8) Wear personal protective
equipment. Depending on
application, use face shield, safety
goggles or safety glasses. As
appropriate, wear dust mask,
hearing protectors, gloves
and workshop apron capable
of stopping small abrasive or
workpiece fragments. The eye
protection must be capable of stopping flying
debris generated by various operations. The
dust mask or respirator must be capable
of filtrating particles generated by your
operation. Prolonged exposure to high
intensity noise may cause hearing loss.
13 GB/CY

9) Keep bystanders a safe distance
away from work area. Anyone
entering the work area must wear
personal protective equipment.
Fragments of workpiece or of a broken
accessory may fly away and cause injury
beyond immediate area of operation.
10) Hold the power tool by insulated
gripping surfaces only, when
performing an operation where
the cutting tool may contact hidden
wiring. Contact with a “live” wire will also
make exposed metal parts of the power tool
“live” and could give the operator an electric
shock.
11) Never lay the power tool down
until the accessory has come to a
complete stop. The spinning accessory
may grab the surface and pull the power
tool out of your control.
12) Do not run the power tool while
carrying it at your side. Accidental
contact with the spinning accessory could
snag your clothing, pulling the accessory into
your body.
13) Regularly clean the power tool’s
air vents. The motor’s fan will draw
the dust inside the housing and excessive
accumulation of powdered metal may cause
electrical hazards.
14) Do not operate the power tool near
flammable materials. Sparks could
ignite these materials.
15) Do not use accessories that require
liquid coolants. Using water or other
liquid coolants may result in electrocution or
shock.
Further safety instructions for all
operations – Kickback and related
warnings
Kickback is a sudden reaction to a pinched or
snagged rotating wheel, backing pad, brush or
any other accessory. Pinching or snagging causes
rapid stalling of the rotating accessory which in
turn causes the uncontrolled power tool to be
forced in the direction opposite of the accessory’s
rotation at the point of the binding.
For example, if an abrasive wheel is snagged or
pinched by the workpiece, the edge of the wheel
that is entering into the pinch point can dig into
the surface of the material causing the wheel to
climb out or kick out. The wheel may either jump
toward or away from the operator, depending on
direction of the wheel’s movement at the point of
pinching. Abrasive wheels may also break under
these conditions.
Kickback is the result of power tool misuse and/or
incorrect operating procedures or conditions and
can be avoided by taking proper precautions as
given below.
14 GB/CY

1) Maintain a firm grip on the power
tool and position your body and
arm to allow you to resist kickback
forces. Always use auxiliary handle,
if provided, for maximum control
over kickback or torque reaction
during start‑up. The operator can control
torque reactions or kickback forces, if proper
precautions are taken.
2) Never place your hand near the
rotating accessory. Accessory may
kickback over your hand.
3) Do not position your body in the
area where power tool will move
if kickback occurs. Kickback will propel
the tool in direction opposite to the wheel’s
movement at the point of snagging.
4) Use special care when working
corners, sharp edges etc. Avoid
bouncing and snagging the
accessory. Corners, sharp edges or
bouncing have a tendency to snag the
rotating accessory and cause loss of control
or kickback.
5) Do not attach a saw chain
woodcarving blade or toothed
saw blade. Such blades create frequent
kickback and loss of control.
Specific safety instructions for grinding
and abrasive cutting
1) Use only wheel types that are
recommended for your power tool
and the specific guard designed for
the selected wheel. Wheels for which
the power tool was not designed cannot be
adequately guarded and are unsafe.
2) The grinding surface of centre
depressed wheels must be mounted
below the plane of the guard lip.
An improperly mounted wheel that projects
through the plane of the guard lip cannot be
adequately protected.
3) The guard must be securely
attached to the power tool and
positioned for maximum safety,
so the least amount of wheel is
exposed towards the operator. The
guard helps to protect the operator from
broken wheel fragments, accidental contact
with wheel and sparks that could ignite
clothing.
4) Wheels must be used only for
recommended applications. For
example: do not grind with the side
of cut‑off wheel. Abrasive cut-off wheels
are intended for peripheral grinding, side
forces applied to these wheels may cause
them to shatter.
15 GB/CY

5) Always use undamaged wheel
flanges that are of correct size and
shape for your selected wheel.
Proper wheel flanges support the wheel thus
reducing the possibility of wheel breakage.
Flanges for cut-off wheels may be different
from grinding wheel flanges.
6) Do not use worn down wheels from
larger power tools. Wheel intended
for larger power tool is not suitable for the
higher speed of a smaller tool and may
burst.
Additional safety warnings specific for
abrasive cutting‑off operations
1) Do not “jam” the cut‑off wheel or
apply excessive pressure. Do not
attempt to make an excessive depth
of cut. Overstressing the wheel increases
the loading and susceptibility to twisting
or binding of the wheel in the cut and the
possibility of kickback or wheel breakage.
2) Do not position your body in line
with and behind the rotating wheel.
When the wheel, at the point of operation, is
moving away from your body, the possible
kickback may propel the spinning wheel and
the power tool directly at you.
3) When wheel is binding or when
interrupting a cut for any reason,
switch off the power tool and hold
the power tool motionless until the
wheel comes to a complete stop.
Never attempt to remove the cut‑off
wheel from the cut while the wheel
is in motion otherwise kickback
may occur. Investigate and take corrective
action to eliminate the cause of wheel
binding.
4) Do not restart the cutting operation
in the workpiece. Let the wheel
reach full speed and carefully re‑
enter the cut. The wheel may bind, walk
up or kickback if the power tool is restarted
in the workpiece.
5) Support panels or any oversized
workpiece to minimize the risk of
wheel pinching and kickback. Large
workpieces tend to sag under their own
weight. Supports must be placed under the
workpiece near the line of cut and near the
edge of the workpiece on both sides of the
wheel.
6) Use extra caution when making a
“pocket cut” into existing walls or
other blind areas. The protruding wheel
may cut gas or water pipes, electrical wiring
or objects that can cause kickback.
16 GB/CY

Additional safety instructions for wire
brushing operations – Safety warnings
specific for wire brushing operations
1) Be aware that wire bristles are
thrown by the brush even during
ordinary operation. Do not
overstress the wires by applying
excessive load to the brush. The wire
bristles can easily penetrate light clothing
and/or skin.
2) If the use of a guard is
recommended for wire brushing,
do not allow any interference of
the wire wheel or brush with the
guard. Wire wheel or brush may expand
in diameter due to work load and centrifugal
forces.
Additional angle grinder warnings
1) Only use grinding wheels where the
indicated rotational speed is at least as high
as what has been specified on the name
plate of the product.
2) Carry out a visual inspection of the grinding
wheel before use. Do not use any damaged
or deformed wheels. Replace any damaged
or worn wheels.
3) Make sure that the sparks produced by
grinding do not present a danger, e.g. reach
people or ignite flammable substances.
4) Always wear safety goggles, safety gloves,
respiratory protection and ear protection
when grinding.
5) Never keep the fingers between the wheel
and spark protection or in close proximity
to the protective hoods. There is a risk of
crushing.
6) The rotating parts of the product cannot be
covered due to functional reasons. Therefore,
proceed cautiously and hold the workpiece
firmly in order to avoid slipping which could
cause your hands to come into contact with
the wheel.
7) The workpiece gets hot during grinding. Do
not touch the machined area, allow it to cool
down. There is a risk of burning. Do not use
coolants or the like.
8) Do not work with the product, if you are tired
or have consumed alcohol or tablets. Always
have a break on time.
9) Turn off the product and, before doing any
servicing, remove the battery pack.
Vibration and noise reduction
To reduce the impact of noise and vibration
emission, limit the time of operation, use lowvibration and low-noise operating modes as well
as wear personal protective equipment.
Take the following points into account to minimise
the vibration and noise exposure risks:
¾ Only use the product as intended by its
design and these instructions.
¾ Ensure that the product is in good condition
and well maintained.
17 GB/CY

¾ Use correct accessory tools for the product
and ensure they are in good condition.
¾ Keep tight grip on the handles / grip surface.
¾ Maintain this product in accordance with
these instructions and keep it well lubricated
(where appropriate).
¾ Plan your work schedule to spread any high
vibration tool use across a longer period of
time.
Behaviour in emergency
situations
Familiarise yourself with the use of this product by
means of this instruction manual. Memorise the
safety warnings and follow them to the letter. This
will help to prevent risks and hazards.
¾ Always be alert when using this product,
so that you can recognise and handle risks
early. Fast intervention can prevent serious
injury and damage to property.
¾ Switch the product off and disconnect it from
the mains if there are malfunctions. Have the
product checked by a qualified professional
and repaired, if necessary, before you
operate it again.
Residual risks
Even if you are operating this product in
accordance with all the safety requirements,
potential risks of injury and damage remain. The
following dangers can arise in connection with the
structure and design of this product:
¾ Health defects resulting from vibration
emission if the product is being used over
long periods of time or not adequately
managed and properly maintained.
¾ Injuries and damage to property due to
broken accessory tools or the sudden impact
of hidden objects during use.
¾ Danger of injury and property damage
caused by flying objects.
NOTE
u This product produces an electromagnetic
field during operation! This field may
under some circumstances interfere with
active or passive medical implants! To
reduce the risk of serious or fatal injury, we
recommend persons with medical implants
to consult their doctor and the medical
implant manufacturer before operating this
product!
18 GB/CY

Battery charger safety
warnings
¾ This appliance can be used
by children aged from 8 years
and above and persons with
reduced physical, sensory
or mental capabilities or
lack of experience and
knowledge if they have
been given supervision or
instruction concerning use of
the appliance in a safe way
and understand the hazards
involved.
Children shall not play with the
appliance.
Cleaning and user
maintenance shall not be made
by children without supervision.
¾ Do not charge non-
rechargeable batteries.
Disregarding this instruction is
hazardous.
¾ If the supply cord is damaged,
it must be replaced by the
manufacturer, its service agent
or similarly qualified persons in
order to avoid a hazard.
¾ Protect the electrical parts
against moisture. Do not
immerse such parts in water
or other liquids to avoid
electrical shock. Never hold
the appliance under running
water. Pay attention to the
instructions provided for
cleaning, maintenance and
repair.
¾ The appliance is suitable for
indoor use only.
¾ ATTENTION! This charger is
only designed for charging the
battery pack types:
Parkside 20 V
battery pack
PAP 20 A1 2 Ah 5 cells
PAP 20 A2 3 Ah 10 cells
PAP 20 A3 4 Ah 10 cells
¾ An up-to-date list of battery
compatibility can be found at
www.lidl.de/akku.
19 GB/CY
Before first use
Accessories
To operate this product safely and correctly, the
following accessories, i.e. tools and accessory
tools, are necessary:
¾ Grinding wheel
¾ Abrasive cutting wheel
¾ Guard for cutting
¾ Cross tip screwdriver
¾ Wire brush
Accessories and accessory tools are available
through your authorised dealer. When buying
always consider the technical requirements of this
product (see “Technical data”).
If you are not certain, ask a qualified specialist
and get advice from your trusted dealer.
NOTE
u This instruction manual contains
information and suggestions for several
accessory tools and their uses. The
accessory tools depicted are not included
in the shipment (see “Scope of delivery”),
but are meant to indicate additional
possibilities for using this product.
Operation
Attaching/removing the
battery pack
¾ Removing the battery pack: Press the
battery pack release button
battery pack
¾ Attaching the battery pack: Align the
battery pack
into it. Ensure it clicks noticeably in place.
The battery pack can only be inserted into
the product in one direction.
(Fig. D).
5
to the handle and slide it
5
. Remove the
15
Checking the battery pack
charging level
(Fig. B)
¾ Check battery pack charge level: Press the
16 button. The charging level LEDs 17
light up:
LED
17
Red / orange / green Maximum
Red / orange Medium
Red Low
Charging level
Charging the battery pack
(Fig. C)
WARNING!
m
u Do not use accessories not recommended
by Parkside. This may result in electric
shock or fire.
Suitable battery packs and chargers
Battery
pack:
Charger:
20 GB/CY
Parkside 20 V battery pack
PAP 20 A1, PAP 20 A2, PAP 20 A3
Parkside 20 V charger PLG 20 A1,
PLG 20 A2, PLG 20 B1, PLG 20 A3
NOTE
u The battery pack
any time without reducing the life.
u Interrupting the charging process does not
damage the battery pack
¾ Charge the battery pack
operation when it is at medium or low
charging level.
may be charged at
5
.
5
before
5

¾ The charging control LEDs (green 20 and
red
) indicate the status of the charger 18
21
and the battery pack
LED Status
Red LED lights up Battery pack
Green LED lights up Battery pack fully
Green and red LED
flashing
Red LED flashing Battery pack too
Green LED lights up
(without battery pack)
¾ Insert the battery pack
.
18
¾ Connect the power cord with power plug
of the charger
¾ When the battery pack
Remove the battery pack from the charger
. Then disconnect the power cord with
18
power plug
socket.
18
of the charger from the
19
:
5
charges
charged
Battery pack
defective
cold or too warm
Charger ready
into the charger
5
to the socket.
is fully charged:
5
Attaching/removing the
auxiliary handle
(Fig. E)
NOTE
u The product may only be operated with
the auxiliary handle
6
fitted.
19
Adjusting the guard
(Fig. F)
WARNING!
m
Before adjusting the guard for grinding
: Switch the product off. Remove
8
the battery pack
to prevent the product from starting
unintentionally. Let the product cool
down before making any adjustments!
CAUTION! RISK OF INJURY!
m
Wear protective gloves. Be careful
when handling the guard for grinding
as there is a pinching hazard
8
between the guard and the wheel.
NOTE
u The product must only be operated with
the guard mounted.
¾ Adjust the guard for grinding
any sparks or detached parts cannot hit
either the user or any bystanders.
¾ The guard for grinding
positioned such that the sparks cannot ignite
combustible parts, including those in the
surroundings.
¾ Turn the guard for grinding
required position. The clamp must engage in
one of the guard’s notches.
5
8
from the product
such that
8
must also be
to the
8
¾ Screw the auxiliary handle
on the type of work, to the left (a), right (b)
or on the top (c) of the product using the
auxiliary handle threads
, depending
6
.
2
21 GB/CY
Changing the guard
NOTE
u For cut-off grinding, you must disassemble
the supplied guard for grinding
for grinding work and fit a separately
available guard for cutting-off work.
u This guard must be suitable for cutting-off
work and can be ordered via our customer
service (article number HG03642).
8
¾ Reinsert backing flange
and locking flange
order.
NOTE
u A chuck key
auxiliary handle
used (in addition to the tightening tab) to
loosen or tighten the locking flange
is stored inside the
7
, accessory tool
11
: Proceed in reverse
12
. The chuck key can be
6
12
.
WARNING!
m
Before changing the guard for grinding
: Switch the product off. Remove
8
the battery pack
to prevent the product from starting
unintentionally. Let the product cool
down before making any adjustments!
¾ Press and hold the spindle lock button
Lift up and rotate the tightening tab in a
counter-clockwise direction. Release the
spindle lock button (Fig. G).
¾ Remove the current accessory tool (if
applicable) and the backing flange
(Fig. H).
¾ Loosen the cover with clamp’s
until the guard for grinding
removed. It is not necessary to remove the
screws (Fig. I).
¾ Insert a new guard. The clamp must engage
in one of the guard’s notches. Retighten the
3 screws.
¾ Check whether the guard can be adjusted
(Fig. F).
from the product
5
3 screws
13
can be
8
11
.
1
.
Attaching/removing the
accessory tool
WARNING!
m
Always switch the product off, remove
the battery pack
product cool down before making any
adjustments!
CAUTION! RISK OF INJURY!
m
u Keep your hands away from the accessory
tool when the product is in operation.
CAUTION! RISK OF INJURY!
m
u After the product has been switched off,
the accessory tool continues moving for
some time. Do not touch the accessory tool
and do not attempt to brake it.
WARNING!
m
u Never press the spindle lock button
whilst the spindle
u The arrow direction on the accessory tool
must be aligned with the directional arrow
(
or 14).
9
and let the
5
is rotating!
10
1
22 GB/CY
CAUTION! RISK OF INJURY!
m
u Only use accessory tools recommended
by the manufacturer. Using other
accessory tools and other accessories can
represent a risk of injury for you.
u Only use accessory tools, which bear
information about the manufacturer, type
of binding, dimension and permitted
number of revolutions.
u Only use accessory tools where the
printed rotational speed is at least as high
as what has been specified on the product
marking.
u Do not use any broken, cracked, or
otherwise damaged accessories.
u Only use flawless accessory tools.
u Ensure that the accessory tool dimensions
match those of the product.
u Never re-drill a locating hole which is too
small to make it larger.
u Never use separate bushings or adaptors
in order to make wheels with a hole that is
too large fit the product.
u Support plates or workpieces to reduce
the risk of kickback from a jammed wheel.
Large workpieces may bend under their
own weight. The workpiece must be
supported on both sides of the wheel, near
the wheel as well as at the edge.
¾ Release the locking flange
hold the spindle lock button
and rotate the tightening tab in a counterclockwise direction. Release the spindle lock
button (Fig. G).
¾ If applicable, remove the current accessory
tool.
¾ Mount the desired accessory tool onto the
backing flange
¾ Press and hold the spindle lock button
Lift up the tightening tab. Thread the locking
flange
the tightening tab to tighten the accessory
tool securely. Push down the tightening tab.
Release the spindle lock button.
in a clockwise direction. Use
12
(Fig. H).
11
: Press and
12
. Lift up
1
1
Switching on and off
CAUTION! RISK OF INJURY!
m
Always wear protective gloves when
handling or working with the product.
CAUTION! RISK OF INJURY!
m
u Always hold the product with both hands
while working (Fig. J).
CAUTION! RISK OF INJURY!
m
u Keep your hands away from the accessory
tool when the product is in operation.
.
CAUTION! RISK OF INJURY!
m
u After the product has been switched off,
the accessory tool continues moving for
some time. Do not touch the accessory tool
and do not attempt to brake it.
23 GB/CY
CAUTION! HEALTH RISK!
m
u Never work on materials containing
asbestos. Asbestos is considered
carcinogenic.
¾ Switching on: Push the rear part of the
on/off switch
(Fig. K, 1&2).
Continuous operation: Tilt the front part
of the on/off switch
engages (Fig. K, 3).
¾ Switching off: Press the rear part of the
on/off switch
off position.
down and slide it forward.
3
downwards until it
3
so that it snaps back into its
3
Trial run
NOTE
u Always carry out a no-load trial run before
starting work and after every accessory
tool replacement. Switch the product off
immediately if the accessory tool is not
running smoothly, if considerable vibration
occurs or if you hear abnormal noises.
Working instructions
Grinding
WARNING!
m
u Never use a cutting wheel for grinding!
¾ Hold the product at a 10 to 15° angle for
easy handling and smooth grinding results.
¾ Apply the grinding wheel to the work surface
with a light, steady pressure for maximum
grinding efficiency. It should never be
necessary to force the product. The weight of
the product applies adequate pressure.
¾ Excessive pressure will overload the motor,
slow the grinding action, put dangerous
stress on the grinding wheel and causes
breakage.
¾ Move the product back and forth steadily.
Wire brushing
WARNING!
m
u Do not use a brush that is damaged,
or which is out of balance. Use of a
damaged brush could increase potential
for injury from contact with broken brush
wires.
¾ Avoid applying too much pressure which
causes over bending of wires, leading to
premature breakage.
¾ Work with moderate feed, suited to the
material being worked.
¾ Avoid bouncing and snagging the wire
brush, especially when working corners,
sharp edges etc. This can cause loss of
control and kick-back.
Abrasive cutting
WARNING!
m
u Never use grinding wheels for cutting!
When using a cutting wheel, the guard for
cutting must be used when operating the
power tool.
24 GB/CY
¾ Only use tested, fibre reinforced cutting or
grinding wheels.
¾ Always work at a low forward speed. Apply
only moderate pressure to the workpiece.
¾ Always use up (conventional) milling. This
will prevent loss of the product when it leaves
the cut.
Cleaning and care
WARNING!
m
Always switch the product off, remove
the battery pack
product cool down before performing
inspection, maintenance and cleaning
work!
and let the
5
Cleaning
¾ Never allow fluids to get into the product.
¾ The product must always be kept clean, dry
and free from oil or grease. Remove debris
from it after each use and before storage.
¾ Regular and proper cleaning will help ensure
safe use and prolong the life of the product.
¾ Clean the product with a dry cloth. Use a
soft brush for areas that are hard to reach.
¾ In particular clean the air vents after every
use with a cloth and soft brush.
¾ The vents must always be clear.
NOTE
u Do not use chemical, alkaline, abrasive
or other aggressive detergents or
disinfectants to clean this product as they
might be harmful to its surfaces.
Maintenance
¾ The product is maintenance-free.
¾ Before and after each use, check the product
and accessories (e.g. accessory tools) for
wear and damage. If required, exchange
them for new ones as described in this
instruction manual. Observe the technical
requirements (see “Technical data”).
Repair
This product does not contain any parts that can
be repaired by the user. Contact an authorised
service centre or a similarly qualified person to
have it checked and repaired.
Storage
¾ Switch the product off.
¾ Clean the product as described above.
¾ Store the product and its accessories in a
dark, dry, frost-free, well-ventilated place.
¾ Always store the product in a place that is
inaccessible to children. The ideal long term
storage (longer than 3 months) temperature
is between +20 and +26 °C.
¾ Store the product in its case
¾ Grinding wheels must be dry and stored
upright, and should never be stacked.
22
.
25 GB/CY
Battery pack advice
¾ Only store the battery pack
charged. The battery pack should be
charged to 40 to 60 % (red and orange LED
in the charge indicator
storing for extended periods.
¾ Check the battery pack
every 3 months when storing for extended
periods. Recharge as necessary.
partially
5
light up) before
17
charge about
5
Transportation
¾ Switch the product off.
¾ Transport the product in its carrying case
¾ Protect the product from any heavy impact
or strong vibrations which may occur during
transportation in vehicles.
¾ Secure the product to prevent it from slipping
or falling over.
Disposal
The packaging is made entirely of recyclable
materials, which you may dispose of at local
recycling facilities.
Observe the marking of the packaging
materials for waste separation, which
are marked with abbreviations (a) and
numbers (b) with following meaning:
1 – 7: plastics / 20 – 22: paper and
fibreboard / 80 – 98: composite
materials
The product and packaging materials
are recyclable, dispose of it separately
for better waste treatment.
The Triman logo is valid in France only.
Contact your local refuse disposal
authority for more details of how to
dispose of your worn-out product.
To help protect the environment, please
dispose of the product properly when
it has reached the end of its useful
life and not in the household waste.
Information on collection points and
their opening hours can be obtained
from your local authority.
Faulty or used batteries / rechargeable batteries
must be recycled in accordance with Directive
2006/66/EC and its amendments. Please return
the batteries / rechargeable batteries and / or
the product to the available collection points.
.
22
Environmental damage
through incorrect disposal of
the batteries / rechargeable
batteries!
Before disposal: Remove the battery pack from
the product.
Warranty
The product has been manufactured to strict
quality guidelines and meticulously examined
before delivery. In the event of product defects
you have legal rights against the retailer of this
product. Your legal rights are not limited in any
way by our warranty detailed below.
The warranty for this product is 5 years from the
date of purchase. Should this product show any
fault in materials or manufacture within 5 years
from the date of purchase, we will repair or
replace it – at our choice – free of charge to you.
The warranty period begins on the date of
purchase. Please keep the original sales receipt
in a safe location. This document is required as
your proof of purchase. This warranty becomes
void if the product has been damaged, or used or
maintained improperly.
26 GB/CY
The warranty applies to defects in material
or manufacture. This warranty does not cover
product parts subject to normal wear, thus
possibly considered consumables (e. g. batteries)
or for damage to fragile parts, e. g. switches,
rechargeable batteries or glass parts.
The warranty for the battery pack is 1 year from
the date of purchase.
Service
Service Great Britain
Tel.: 0800 404 7657
E-Mail: owim@lidl.co.uk
Service Cyprus
Tel.: 8009 4409
E-Mail: owim@lidl.com.cy
Warranty claim procedure
To ensure quick processing of your case, please
observe the following instructions:
Please have the till receipt and the item number
(e.g. IAN 123456_7890) available as proof of
purchase.
You will find the item number on the type plate,
an engraving on the front page of the instructions
(bottom left), or as a sticker on the rear or bottom
of the appliance.
If functional or other defects occur, please contact
the service department listed either by telephone
or by e-mail.
You can return a defective product to us free
of charge to the service address that will be
provided to you. Ensure that you enclose the proof
of purchase (till receipt) and information about
what the defect is and when it occurred.
Serbian mark of conformity
27 GB/CY

EC declaration of conformity
28 GB/CY

Korištene upozoravajuće napomene i simboli......................Stranica 30
Uvod .................................................................Stranica 30
Uvjeti korištenja .......................................................Stranica 30
Sadržaj isporuke ......................................................Stranica 31
Opis dijelova .........................................................Stranica 31
Tehnički podaci .......................................................Stranica 31
Sigurnosne upute ....................................................Stranica 33
Opće sigurnosne napomene za električne alate ..............................Stranica 33
Sigurnosne napomene za brusilice ........................................Stranica 36
Sigurnosne napomene za kutne brusilice....................................Stranica 36
Smanjenje vibracija i zvukova ............................................Stranica 41
Ponašanje u slučaju opasnosti ............................................Stranica 42
Ostali rizici...........................................................Stranica 42
Sigurnosne smjernice za punjače..........................................Stranica 43
Prije prve uporabe ..................................................Stranica 44
Dodatna oprema ......................................................Stranica 44
Korištenje ............................................................Stranica 44
Uklanjanje/umetanje baterijskog modula ...................................Stranica 44
Provjera stanja napunjenosti baterijskog modula..............................Stranica 44
Punjenje baterijskog modula .............................................Stranica 44
Stavljanje/skidanje dodatne ručke ........................................Stranica 45
Namještanje zaštitnog poklopca ..........................................Stranica 45
Zamjena zaštitne ploče .................................................Stranica 46
Umetanje/vađenje opreme ..............................................Stranica 46
Uključivanje i isključivanje ...............................................Stranica 47
Probni rad ...........................................................Stranica 48
Upute za rad.........................................................Stranica 48
Brušenje . . . . . . . . . . . . . . . . . . . . . . . . . . . . . . . . . . . . . . . . . . . . . . . . . . . . . . . . . . . . . Stranica 48
Žičane četke..........................................................Stranica 48
Rezanje brušenjem.....................................................Stranica 48
Čišćenje i njega ......................................................Stranica 49
Čišćenje .............................................................Stranica 49
Održavanje ..........................................................Stranica 49
Popravak ............................................................Stranica 49
Skladištenje ..........................................................Stranica 49
Transport ............................................................Stranica 50
Zbrinjavanje .........................................................Stranica 50
Jamstvo ..............................................................Stranica 50
EC Izjava o sukladnosti ..............................................Stranica 52
29 HR

Korištene upozoravajuće napomene i simboli
U ovim uputama za uporabu, na pakiranju i na tipskoj pločici korištene su sljedeće upozoravajuće
napomene:
Prije zamjene pribora, čišćenja te ako ga
Pročitajte upute za uporabu.
ne upotrebljavate, isključite proizvod i
izvadite baterijski modul.
Pazite na upozorenja i sigurnosne
napomene!
Proizvod upotrebljavajte samo u suhim
prostorijama.
Nosite zaštitne rukavice! Zaštitite baterijski modul od vatre.
Nosite zaštitu sluha! Razred zaštite II (dvostruka izolacija)
Nosite zaštitne naočale!
AKU KUTNA BRUSILICA 20 V
PWSAP 20-Li B2
Uvod
Čestitamo vam na kupnji novog proizvoda.
Ovom kupnjom odlučili ste se za visokokvalitetan
proizvod. Uputa za uporabu je sastavni dio ovog
proizvoda. Ona sadrži važne upute o sigurnosti,
uporabi i uklanjanju otpada. Prije upotrebe
proizvoda upoznajte se sa svim njegovim
uputama za korištenje i sigurnosnim uputama.
Koristite ovaj proizvod u skladu s navedenim
uputama te u navedene svrhe. Ukoliko proizvod
dajete nekoj drugoj osobi, predajte toj osobi
također i sve upute.
Zaštitite baterijski modul od topline i
trajnog, jakog sunčevog svjetla.
maks. 45 °C
Zaštite baterijski modul od vode i vlage.
Izmjenična struja
Istosmjerna struja
T3.15A
Fini osigurač
Uvjeti korištenja
Ova baterijska kutna brusilica (u nastavku:
„proizvod“ ili „električni alat”) predviđena je za
¾ Rezanje brušenjem,
¾ suho brušenje metala/betona/keramike i
¾ žičano četkanje
metala.
Proizvod nije predviđen za druge primjene
(npr. Brušenje neprikladnim brusnim alatima,
brušenje s rashlađivačima, brušenje ili rezanje
opasnih materijala poput azbesta) koje nisu ovdje
navedene.
30 HR

Ovaj proizvod nije prikladan za brušenje brusnim
papirom ni poliranje.
Rezanje brušenjem: Za taj zadatak mora se
ugraditi poseban zaštitni poklopac. Zaštitni
poklopac može se naručiti preko naše Korisničke
službe (kataloški broj HG03642).
Opremu uvijek koristite u skladu s namjenom! Pri
kupnji i uporabi opreme uvijek obratite pažnju na
tehničke specifikacije proizvoda (vidi poglavlje
„Tehnički podatci“).
Druge uporabe ili izmjene proizvoda smatraju se
nenamjenskima i mogu uzrokovati rizike kao što su
opasnost po život, ozljede i oštećenja. Proizvođač
ne preuzima nikakvu odgovornost za štete nastale
od nenamjenske uporabe. Ovaj proizvod nije
namijenjen za komercijalnu ili drugu uporabu.
Opis dijelova
Slika A:
Tipka za blokadu vretena
1
Navoj dodatne ručke
2
Prekidač za uključivanje/isključivanje
3
Ručka
4
Baterijski modul
5
Dodatna ručka (s prostorom za držanje
6
steznog ključa)
Stezni ključ
7
Zaštitni poklopac za radove brušenja
8
Strelica smjera okretanja (na zaštitnom
9
poklopcu)
Vreteno
10
Potporna prirubnica
11
Stezna prirubnica (s pričvrsnim jezičkom)
12
Pokrov sa stezaljkom
13
Strelica smjera okretanja (na kutnoj brusilici)
14
Sadržaj isporuke
UPOZORENJE!
m
u Proizvod i ambalažni materijal nisu
igračke! Djeca se ne smiju igrati plastičnim
vrećicama, folijama ni sitnim dijelovima!
Postoji opasnost od gutanja i gušenja!
1 x Aku kutna brusilica 20 V PWSAP 20-Li B2
1 x Dodatna ručka
1 x Zaštitni poklopac za radove brušenja
(prethodno ugrađen) *
1 x Stezni ključ (nalazi se u dodatnoj ručki)
1 x Baterijski modul PAP 20 A3
1 x Punjač za brzo punjenje PLG 20 B1
1 x Kućište za prenošenje
1 x Upute za uporabu
* Zaštitni poklopac za brušenje i rezanje nije
isporučen i može se naručiti preko naše
Korisničke službe.
Slika B:
Baterijski modul
5
Tipka za deblokadu baterijskog modula
15
Tipka (razina punjenja)
16
LED lampice stanja napunjenosti (crvena/
17
narančasta/zelena)
Slika C:
Punjač (uređaj za brzo punjenje)
18
Priključni kabel s mrežnim utikačem
19
LED lampica za kontrolu punjenja – Zelena
20
LED lampica za kontrolu punjenja – Crvena
21
Nije na slici:
Kućište za prenošenje
22
Tehnički podaci
Baterijska kutna
brusilica
Nazivni napon: 20 V
Nazivni broj okretaja n: 10000 min
Promjer opreme: Ø 125 mm
Debljina ploče: maks. 8 mm
Navoj vretena: M14
PWSAP
20-Li B2
–1
31 HR

Baterijski modul PAP 20 A3
Tip: Litij-ion
Nazivni napon: 20 V
maks.
Kapacitet: 4 Ah
Energetska vrijednost: 72 Wh
Broj ćelija baterije: 10
Punjač za brzo punjenje PLG 20 B1
Ulaz:
Nazivni napon: 230–240 V∼
Nazivna frekvencija: 50 Hz
Nazivni napon: 120 W
Izlaz:
Nazivni napon: 21,5 V
Struja punjenja: 4,5 A
Razred zaštite:
Osigurač (interni):
II /
3,15 A /
Vrijeme punjenja:
¾ Baterijski tip PAP 20 A3, 4,0 Ah
(isporučeno): 60 minuta
¾ Baterijski tip PAP 20 A1, 2,0 Ah
(dostupno zasebno): 45 minuta
Preporučena okolna temperatura:
Tijekom punjenja: +4 do +40 °C
Tijekom rada: +4 do +40 °C
Tijekom skladištenja: +20 do +26 °C
Vrijednosti emisije buke
Izmjerene vrijednosti utvrđene su sukladno normi
EN 60745. Standardna procijenjena razina buke
A električnog alata:
Razina zvučnog tlaka L
Nesigurnost K
: 3 dB
pA
Razina zvučnog tlaka L
Nesigurnost K
WA
: 81,6 dB(A)
pA
: 92,6 dB(A)
WA
: 3 dB
Vrijednosti emisije vibracija
Ukupne vrijednosti vibracija (zbroj vektora triju
smjerova), utvrđeno prema normi EN 60745:
Glavna ručka:
Vibracija šake/ruke a
: 4,27 m/s²
h,AG
Nesigurnost K: 1,5 m/s²
Dodatna ručka:
Vibracija šake/ruke a
: 5,31 m/s²
h,AG
Nesigurnost K: 1,5 m/s²
Navedene vrijednosti odnose se na površinsko
brušenje. Druge primjene mogu dovesti do
drugačijih vrijednosti emisija vibracija.
UPOZORENJE!
m
Nosite zaštitu sluha!
NAPOMENA
u Navedena ukupna vrijednost vibracija i
navedena vrijednost emisije buke izmjereni
su prema normiranom postupku provjere
i mogu se koristiti za uspoređivanje
električnog alata s nekim drugim.
u Navedena ukupna vrijednost vibracija i
navedena vrijednost emisija buke mogu
se koristiti i za prethodnu procjenu
opterećenja.
32 HR

UPOZORENJE!
m
u Emisije vibracija i buke mogu tijekom
stvarne uporabe električnog alata
odstupati od navedenih vrijednosti, ovisno
o načinu uporabe električnog alata, a
posebice o vrsti obratka.
Opterećenje vibracijama i buku pokušajte
održati čim manjima. Primjer mjera
koje služe za smanjenje opterećenja
vibracijama jesu nošenje rukavica pri
uporabi alata i ograničenje vremena rada.
Pritom u obzir valja uzeti sve dijelove
radnog ciklusa (primjerice vremena
u kojima je električni alat isključen te
vremena u kojima je uključen, ali radi bez
opterećenja).
Sigurnosne upute
Opće sigurnosne napomene
za električne alate
UPOZORENJE!
m
u Pročitajte sve sigurnosne
napomene i upute. Propusti u
pridržavanju sigurnosnih napomena i
uputa mogu uzrokovati električni udar,
požar i/ili teške ozljede.
Sve sigurnosne savjete u i upute čuvajte
na sigurnom mjestu radi buduće
uporabe.
Pojam „električni alat“, koji se upotrebljava
u sigurnosnim napomenama, odnosi se na
električne alate koji rade na mrežni pogon (s
mrežnim kabelom) kao i na električne alate s
pogonom na punjive baterije (bez mrežnog
kabela).
Sigurnost na mjestu rada
1) Mjesto rada održavajte urednim
i dobro osvijetljenim. Nered ili
neosvijetljena područja rada mogu
uzrokovati nesreće.
2) Električnim alatom nemojte
raditi u prostorima ugroženima
eksplozivnom atmosferom u kojima
se nalaze zapaljive tekućine, plinovi
ili prašine. Električni alati stvaraju iskre
koje mogu zapaliti prašinu ili pare.
3) Djecu i ostale osobe držite podalje
tijekom uporabe električnog
alata. Ako se dekoncentrirate, možete
izgubiti kontrolu nad električnim alatom.
Električna sigurnost
1) Priključni utikač električnog
alata mora odgovarati u utičnicu.
Utikač se ne smije mijenjati ni na
koji način. Zajedno s električnim
alatima sa zaštitnim uzemljenjem
nemojte upotrebljavati adapterske
utikače. Nepromijenjeni utikači i
odgovarajuće utičnice smanjuju opasnost od
električnog udara.
33 HR

2) Izbjegavajte dodir tijela s
uzemljenim površinama kao što su
površine cijevi, grijanja, štednjaka
i hladnjaka. Ako vam je tijelo uzemljeno,
postoji povećana opasnost od električnog
udara.
3) Električne alate držite podalje od
kiše ili vlage. Prodiranje vode u električni
alat povećava opasnost od električnog
udara.
4) Kabel nemojte upotrebljavati za
nošenje i vješanje električnog alata
niti za povlačenje utikača iz utičnice.
Kabel držite podalje od vrućine,
ulja, oštrih bridova ili pokretljivih
dijelova uređaja. Oštećeni ili zapetljani
kabeli povećavaju opasnost od električnog
udara.
5) Ako s električnim alatom radite na
otvorenom, upotrebljavajte samo
produžne kabele koji su prikladni
za eksterijere. Uporaba produžnog
kabela prikladnog za eksterijere smanjuje
opasnost od električnog udara.
6) Ako nije moguće izbjeći rad
električnog alata u vlažnoj okolini,
upotrijebite zaštitnu sklopku od
struje kvara. Uporaba zaštitne sklopke
od struje kvara smanjuje opasnost od
električnog udara.
Sigurnost ljudi
1) Uvijek budite oprezni, pazite što
radite i budite razumni pri radu
električnim alatom. Električni alat
nemojte upotrebljavati ako niste
koncentrirani ili ste umorni odnosno
ako ste pod utjecajem droga,
alkohola ili lijekova. Već samo jedan
trenutak nepažnje pri uporabi električnog
alata može uzrokovati ozbiljne ozljede.
2) Nosite osobnu zaštitnu opremu te
uvijek i zaštitne naočale. Nošenje
osobne zaštitne opreme kao što su maska za
prašinu, protuklizne zaštitne cipele, zaštitna
kaciga ili zaštita sluha, ovisno o vrsti i
primjeni električnog alata, smanjuje opasnost
od ozljeda.
3) Izbjegavajte slučajno puštanje u
rad. Prije nego što električni alat
priključite na naponsko napajanje
i/ili punjivu bateriju, prije nego što
ga uzmete ili nosite, uvjerite se da
je isključen. Ako su vam pri nošenju
električnog alata prsti na sklopci ili ako je
uređaj već uključen kad ga priključujete na
naponsko napajanje, postoji opasnost od
nesreće.
4) Prije nego što uključite električni
alat, uklonite alat za namještanje
ili francuski ključ. Alat ili ključ, koji se
nalazi u rotirajućem dijelu uređaja, može
uzrokovati ozljede.
34 HR

5) Izbjegavajte neobično držanje
tijela. Pobrinite se za sigurno
stajanje i u svakom trenutku
održavajte ravnotežu. Tako
možete bolje kontrolirati električni alat u
neočekivanim situacijama.
6) Nosite prikladnu odjeću. Nemojte
nositi široku odjeću niti nakit. Kosu,
odjeću i rukavice držite podalje
od pokretljivih dijelova. Lepršava
odjeća, nakit ili duga kosa mogu se uhvatiti u
pokretljive dijelove.
7) Ako je moguće montirati naprave
za usisavanje i skupljanje prašine,
uvjerite se da su priključene i da se
ispravno upotrebljavaju. Uporaba
usisavača može smanjiti ugrozu od prašine.
Uporaba električnog alata i rukovanje
njime
1) Nemojte preopteretiti uređaj.
Upotrebljavajte električni alat koji
je namijenjen za vaše radove. S
odgovarajućim električnim alatom radit
ćete bolje i sigurnije u navedenom području
snage.
2) Nemojte upotrebljavati električni
alat s oštećenom sklopkom. Električni
alat koji se više ne može uključiti ili isključiti
opasan je i valja ga popraviti.
3) Prije nego što obavljate
namještanja na uređaju, mijenjate
dijelove pribora ili odlažete
uređaj, izvucite utikač iz utičnice i/
ili uklonite punjivu bateriju. Ova
mjera opreza sprečava slučajno pokretanje
električnog alata.
4) Električne alate čuvajte izvan
dohvata djece. Nemojte dopustiti
da električni alat upotrebljavaju
osobe koje nisu upoznate s njime ili
koje nisu pročitale upute. Električni su
alati opasni ako ih upotrebljavaju neiskusne
osobe.
5) Oprezno njegujte električne alate.
Provjerite rade li pokretljivi dijelovi
besprijekorno i da nisu prikliješteni,
jesu li dijelovi slomljeni ili oštećeni
tako da je ugrožena funkcija
električnog alata. Prije uporabe
uređaja organizirajte popravak
oštećenih dijelova. Loše održavanje
električnih alata uzrok je mnogih nesreća.
6) Alate za rezanje održavajte oštrima
i čistima. Pomno njegovani alati za
rezanje s oštrim reznim bridovima manje se
zaglavljuju i lakši su za vođenje.
35 HR

7) Električni alat, pribor, opremu itd.
upotrebljavajte u skladu s ovim
uputama. Pritom u obzir uzmite
radne uvjete i radnju koju valja
obaviti. Uporaba električnih alata za
primjene drukčije od predviđenih može
uzrokovati opasne situacije.
Servis
1) Popravljanje električnog alata
prepustite samo kvalificiranom
stručnom osoblju koje će to obaviti
samo s originalnim rezervnim
dijelovima. Tako ćete osigurati trajnu
sigurnost električnog alata.
Uporaba baterijskog alata i rukovanje
njime
1) Punjive baterije punite samo
punjačima koje preporučuje
proizvođač. Kod punjača koji je
prikladan za određenu vrstu punjivih baterija
postoji opasnost od požara ako se koristi s
drugim punjivim baterijama.
2) Za električne alate upotrijebite
samo predviđene punjive
baterije. Uporaba drugih punjivih baterija
može izazvati ozljede i opasnost od požara.
3) Punjivu bateriju koju ne koristite
držite dalje od uredskih spajalica,
kovanica, ključeva, čavala, vijaka ili
drugih sitnih metalnih predmeta koji
bi mogli prouzročiti premošćivanje
kontakata. Kratki spoj između kontakata
punjive baterije može izazvati opekline ili
požar.
4) Kod pogrešne uporabe može doći
do curenja tekućine iz punjive
baterije. Izbjegnite kontakt s njom.
U slučaju nehotičnog kontakta
isperite vodom. Ako tekućina
dospije u oči, potražite dodatnu
liječničku pomoć. Tekućina koja curi iz
punjive baterije može izazvati iritacije kože
ili opekline.
Sigurnosne napomene za
brusilice
UPOZORENJE!
m
u Prašine materijala poput olovnih premaza,
nekih vrsta drveta i metala mogu biti štetne
za zdravlje.
u Dodir ili udisanje tih prašina može ugroziti
osobu koja rukuje alatom ili osobe u
blizini.
UPOZORENJE!
m
Nosite zaštitne naočale i masku za
zaštitu od prašine!
Sigurnosne napomene za
kutne brusilice
Zajedničke sigurnosne napomene za
brušenje, radove sa žičanim četkama i
brušenje i rezanje
1) Ovaj električni alat treba koristiti
kao brusilicu, čeličnu četku i stroj
za odvajanje brušenjem. Uzmite u
obzir sve sigurnosne napomene,
upute, slike i podatke isporučene
s uređajem. Ako ne budete slijedili
navedene upute, može doći do strujnog
udara, požara i/ili teških ozljeda.
36 HR

2) Ovaj električni alat nije prikladan
za brušenje brusnim papirom ni
poliranje. Primjene za koje nije predviđen
električni alat mogu uzrokovati opasnosti i
ozljede.
3) Nemojte upotrebljavati pribor koji
proizvođač nije specijalno predvidio
i preporučio za električni alat. Čak i
kao se pribor može učvrstiti na vaš električni
alat, to ne jamči sigurnu primjenu.
4) Dopušteni broj okretaja radnog
alata mora biti najmanje
jednak najvišem broju okretaja
navedenom na radnom alatu. Pribor
koji se vrti brže od dopuštene brzine može
se slomiti i odletjeti.
5) Vanjski promjer i debljina opreme
moraju odgovarati veličini
vašeg električnog alata. Pogrešno
dimenzionirani radni alat ne može se
dovoljno zaštititi ili kontrolirati.
6) Radni alati s navojnim umetkom
moraju točno odgovarati navoju
brusnog vretena. Kod radnih alata
koji se montiraju s prirubnicom,
promjer rupe radnog alata mora
odgovarati promjeru prihvata
prirubnice. Radni alat, koji ne
pristaje točno na električni alata, vrti se
neravnomjerno, snažno vibrira i može
izazvati gubitak kontrole.
7) Nemojte rabiti oštećen radni alat.
Prije svake primjene radnog alata
provjerite sljedeće: eventualne
razbijene dijelove ili pukotine
na brusnim pločicama, pukotine,
znakove istrošenosti ili jakog
trošenja na brusnim diskovima,
labavih ili slomljenih žica na žičanim
četkama. Ako električni alat ili radni
alat padne, provjerite je li oštećen
ili upotrijebite neoštećeni radni
alat. Ako ste opremu provjerili i
primijenili, vi i druge osobe u blizini
budite izvan ravnine rotirajuće
opreme i ostavite uređaj da radi
1 minutu na maksimalni broj
okretaja. Oštećeni radni alati uglavnom se
lome unutar tog vremena testiranja.
8) Nosite osobnu zaštitnu opremu.
Ovisno o primjeni koristite se
štitnikom čitavog lica, štitnicima
za oči ili zaštitnim naočalama. Ako
je potrebno, nosite masku protiv
prašine, zaštitu sluha, zaštitne
rukavice ili posebnu pregaču koja
će vas zaštititi od malih čestica
izbrušenog materijala i čestica
materijala. Zaštitnim naočalama zaštitite
oči od stranih tijela koja lete uokolo, koja
mogu nastati pri raznim primjenama. Maska
protiv prašine ili maska za zaštitu dišnih
putova mora filtrirati prašinu nastalu tijekom
primjene. Ako ste dugo izloženi glasnoj buci,
možete izgubiti sluh.
37 HR

9) Pazite da su druge osobe na
sigurnoj udaljenosti od vašeg
radnog područja. Svatko tko uđe u
radno područje mora nositi osobnu
zaštitnu odjeću. Odlomljeni komadići
obratka ili slomljenog radnog alata mogu
izletjeti i uzrokovati ozljede i izvan izravnog
radnog područja.
10) Električni alat držite samo za
izolirane ručke dok izvodite radove
kod kojih radni alat može udariti
u skrivene strujne vodove. Kontakt
vodljivim vodom može metalne dijelove
uređaja staviti pod napon i dovesti do
električnog udara.
11) Nikada nemojte odlagati električni
uređaj prije nego se potpuno
zaustavi. Radni alat koji se okreće može
doći u kontakt s podlogom na kojoj je uređaj
odložen, pa pritom možete izgubiti kontrolu
nad električnim alatom.
12) Nemojte poganjati električni alat
dok ga nosite. Vaša odjeća može dovesti
do slučajnog kontakta s rotirajućim radnim
alatom i mogli biste se njime probosti.
13) Redovito čistite ventilacijske otvore
vašeg električnog alata. Ventilator
motora uvlači prašinu u kućište i velika
nakupina metalne prašine može uzrokovati
električne opasnosti.
14) Električni alat nemojte
upotrebljavati u blizini zapaljivih
materijala. Iskre mogu zapaliti te
materijale.
15) Nemojte koristiti radne alate koji
zahtijevaju tekuća rashladna
sredstva. Korištenje vode ili drugih tekućih
rashladnih sredstava može dovesti do
strujnog udara.
Dodatne sigurnosne napomene za sve
primjene – odskakanje i odgovarajuće
sigurnosne napomene:
Odskakanje je iznenadna reakcija opreme koji
se zakači ili blokira tijekom vrtnje (to se može
dogoditi kod rezne ploče, brusne ploče, brusnog
tanjura, žičane četke, itd.), pri čemu dolazi do
iznenadnog zaustavljanja rotirajuće opreme.
Pritom dolazi do nekontroliranog ubrzavanja
električnog alata u suprotnom smjeru radnog
alata na mjestu blokade.
Ako se brusna ploča zakači ili blokira unutar
obratka, rub brusne ploče koji ulazi u obradak
može se zaglaviti i pritom može doći do loma
brusne ploče ili povratnog trzaja. Brusna ploča
tada će se usmjeriti prema rukovatelju ili dalje od
njega, ovisno o smjeru okretanja ploče na mjestu
blokade. Pritom može doći do loma i kod brusnih
ploča.
Trzaj je posljedica pogrešne ili neispravne
uporabe električnog alata. To se može spriječiti
prikladnim mjerama opreza opisanima u
nastavku.
38 HR

1) Električni alat držite snažno i
stavite tijelo i ruke u položaj u
kojem lako možete neutralizirati
sile povratnog trzaja. Uvijek
koristite dodatnu ručku ako postoji
da biste maksimalno kontrolirali
sile povratnog trzaja ili reakcijske
momente kod pokretanja. Rukovatelj
može prikladnim mjerama opreza uspješno
savladati sile povratnog trzaja i reakcijske
sile.
2) Šaku nikada ne stavljajte blizu
rotirajućih radnih alata. U suprotnom
bi radni alat u slučaju trzaja mogao prijeći
preko vaše šake.
3) Svojim tijelom izbjegavajte područje
u kojem se električni alat kreće u
slučaju trzaja. Trzaj potiskuje električni
alat u smjeru suprotnom od smjera kretanja
brusnog diska na mjestu blokade.
4) U području kutova, oštrih bridova
itd. radite posebno oprezno.
Spriječite da radni alat udari o
obrađivani predmet i da se zaglavi.
Rotirajući radni alat ima tendenciju da se
zaglavi u kutovima, na oštrim bridovima ili
kada udari o nešto. To dovodi do slabije
kontrole ili povratnog trzaja.
5) Nemojte koristiti lančani ni
nazubljeni list pile. Ako radni alati često
uzrokuju povratni trzaj ili gubitak kontrole na
električnim alatom.
Posebne sigurnosne napomene za
brušenje i razdvajanje brušenjem
1) Upotrebljavajte isključivo brusna
tijela i pripadajući zaštitni poklopac
odobren za vaš električni alat. Brusna
tijela, koja nisu predviđena za električni alat,
ne mogu se dovoljno zaštititi te su stoga
nesigurna.
2) Zakrivljene brusne ploče moraju se
montirati tako da njihova brusna
ploha ne viri preko ravnine ruba
zaštitnog poklopca. Nepravilno
montirana brusna ploča koja viri preko
ravnine ruba zaštitnog poklopca ne može se
pokriti u dovoljnoj mjeri.
3) Zaštitni poklopac valja sigurno
postaviti na električni alat i
namjestiti tako da se postigne
maksimalni stupanj sigurnosti, tj. da
najmanji mogući dio brusnog tijela
bude otvoreno usmjeren prema
rukovatelju. Zaštitni poklopac pomaže da
se rukovatelja zaštiti od odlomljenih komada,
slučajnog kontakta s brusnim tijelima i iskri
koje mogu zapaliti odjeću.
4) Brusna tijela smiju se primjenjivati
samo u preporučenim područjima
primjene. Primjer: Nikada nemojte
brusiti primjerice bočnom površinom
razdvojne pločice. Rezni diskovi
namijenjeni su za skidanje materijala rubom
diska. Ta se brusna tijela mogu slomiti uslijed
bočnog djelovanja sile na njih.
39 HR

5) Uvijek upotrebljavajte neoštećenu
steznu prirubnicu ispravne veličine
i oblika za brusni disk koji ste
odabrali. Prikladne prirubnice podupiru
brusni disk te tako smanjuju opasnost od
loma brusnog diska. Prirubnice za razdvojne
pločice mogu se razlikovati od prirubnica za
ostale brusne pločice.
6) Nemojte koristiti istrošene brusne
ploče većih električnih alata. Brusne
ploče većih električnih alata nisu predviđene
za manje električne alate i mogu se prelomiti.
Posebne sigurnosne napomene za
rezanjem brušenjem
1) Izbjegavajte blokadu razdvojnih
pločica ili preveliku silu pritiskanja.
Nemojte preduboko zarezivati.
Preopterećenje razdvojne pločice povećava
njezino trošenje i tendenciju k iskrivljavanju ili
blokiranju, a time i mogućnost trzaja ili loma
brusnog tijela.
2) Izbjegavajte područje ispred i iza
rotirajućeg reznog diska. Kada
razdvojnu pločicu u obrađivanom predmetu
gurate od sebe, u slučaju trzaja električni
alat s rotirajućom pločicom može se izravno
ubrzano kretati prema vama.
3) Ako se rezna ploča zaglavi ili
prekinete rad, isključite uređaj
i držite ga mirno dok se ploča
ne zaustavi. Nikada nemojte
pokušavati iz reza izvući razdvojnu
pločicu koja se još vrti jer bi moglo
doći do trzaja. Ustanovite i uklonite uzrok
zaglavljivanja.
4) Električni uređaj nemojte ponovno
uključivati sve dok se nalazi u
obrađivanom predmetu. Prije nego
što oprezno nastavite s rezanjem,
razdvojna pločica mora postići
svoj puni broj okretaja. Pločice bi
se u suprotnom mogle zakvačiti, iskočiti iz
obrađivanog predmeta ili izazvati trzaj.
5) Kako biste smanjili rizik od trzaja
uslijed zaglavljenog reznog diska,
poduprite ploču ili veliki obrađivani
predmet. Veliki komadi obrađivanog
predmeta mogu se saviti pod vlastitom
težinom. Obrađivani predmet valja
poduprijeti na objema stranama diska i to u
blizini reza kao i na bridu.
6) Budite posebno oprezni kod
„rezova u obliku džepa“ koji se
rade na postojećim zidovima ili
drugim područjima u koja nemate
uvid. Razdvojna pločica koja ulazi
pri zarezivanju vodova za plin ili vodu,
električnih vodova ili drugih objekata može
izazvati trzaj.
40 HR

Dodatne sigurnosne napomene za
radove sa žičanim četkama – posebne
sigurnosne napomene za rad žičanim
četkama
1) Imajte na umu da žičane četke
gube komade žice čak i tijekom
uobičajene uporabe. Žice nemojte
preopteretiti prevelikom silom
pritiskanja. Izbačeni komadi žice mogu
vrlo lako prodrijeti kroz tanku odjeću i/ili
kožu.
2) Ako se preporučuje zaštitni
poklopac, spriječite kontakt
zaštitnog poklopca i žičane četke.
Četke za tanjure i lonce mogu pritiskom ili
centrifugalnim silama povećati svoj promjer.
Dodatne sigurnosne napomene za
kutne brusilice
1) Upotrijebite samo brusne ploče, čiji je otisnut
broj okretaja barem onoliko visok kao onaj
koji se navodi na tipskoj pločici proizvoda.
2) Prije uporabe provjerite brusnu ploču.
Nemojte koristiti oštećene ni deformirane
ploče. Zamijenite istrošenu ploču.
3) Pazite na to da kod brušenja iskre ne
izazovu opasnost, npr. da ne pogode osobe
ili zapale zapaljive tvari.
4) Kod brušenja uvijek nosite zaštitne naočale,
sigurnosne rukavice, zaštitu disanja i zaštitu
sluha.
5) Prste nikada nemojte stavljati između ploče
i zaštite od iskrenja niti blizu zaštitnih
poklopaca. Postoji opasnost od uklještenja.
6) Rotirajući dijelovi proizvoda ne mogu se
pokriti iz funkcionalnih razloga. Stoga
postupajte oprezno i dobro zaštitite obradak
kako bi se izbjeglo klizanje pri čemu bi vaše
ruke mogle doći u kontakt s brusnom pločom.
7) Obradak se brušenjem zagrijava. Nemojte
hvatati na obrađenom mjestu, nego
pričekajte da se rashladi. Postoji opasnost
od opekline. Nemojte koristiti rashlađivače ni
slična sredstva.
8) Nemojte raditi s proizvodom kada ste umorni
ili nakon uzimanja alkohola ili tableta. Uvijek
koristite pravovremenu radnu stanku.
9) Isključite proizvod i prije svih radova skinite
punjivu bateriju s uređaja.
Smanjenje vibracija i
zvukova
Ograničite vrijeme uporabe, upotrebljavajte
načine rada s vrlo malo vibracija i zvukova i
nosite osobnu zaštitnu opremu kako biste smanjili
utjecaj vibracija i zvukova.
Sljedeće mjere pomažu u smanjivanju rizika
uvjetovanih vibracijama i zvukovima:
¾ Proizvod upotrebljavajte samo u skladu s
njegovom namjenskom uporabom i kako je
opisano u ovim uputama.
¾ Pobrinite se da je proizvod besprijekoran i
dobro održavan.
41 HR

¾ Upotrebljavajte ispravnu opremu za ovaj
proizvod te se uvjerite da je besprijekorna.
¾ Proizvod čvrsto i sigurno držite za ručke/
drške.
¾ Proizvod održavajte u skladu s uputama te
se pobrinite za dovoljno podmazivanje (ako
je primjenjivo).
¾ Tijek rada planirajte tako da je uporaba
proizvoda s visokom vrijednošću vibracija
raspodijeljena tijekom duljeg vremena.
Ponašanje u slučaju
opasnosti
Pomoću ovih uputa za uporabu upoznajte se s
uporabom ovih proizvoda. Proučite sigurnosne
napomene te ih se obvezno pridržavajte. To
pomaže u izbjegavanju rizika i opasnosti.
¾ Uvijek budite oprezni pri uporabi ovoga
proizvoda kako biste pravovremeno uočili
opasnosti i kako biste mogli djelovati. Brze
intervencije mogu spriječiti teške ozljede i
materijalnu štetu.
¾ Isključite proizvod u slučaju neispravnosti
i izvadite baterijski modul. Prije ponovnog
puštanja u pogon neka ga provjeri
kvalificirani stručnjak te ga po potrebi
popravi.
Ostali rizici
Čak i ako propisno rukujete ovim proizvodom,
ostaje potencijali rizik za ozljede i materijalnu
štetu. U vezi s konstrukcijom i izvedbom ovoga
proizvoda mogu se između ostaloga pojaviti
sljedeće opasnosti:
¾ Štete po zdravlje, koje su uzrokovane
emisijama vibracija, ako se proizvod
upotrebljava tijekom duljeg vremena, ako se
nepropisno vodi i održava.
¾ Ozljede i materijalna šteta uzrokovana
neispravnim reznim alatima ili naglim udarom
skrivenog objekta tijekom uporabe.
¾ Opasnost od ozljeda i materijalna šteta
uzrokovana objektima u letu.
NAPOMENA
u Ovaj proizvod tijekom rada stvara
elektromagnetsko polje! To polje može
pod određenim uvjetima ugroziti rad
aktivnih ili pasivnih medicinskih implantata!
Kako bi se smanjila opasnost od ozbiljnih
ili smrtonosnih ozljeda, preporučujemo
da se osobe s medicinskim implantatima
prije rukovanja proizvodom posavjetuju
sa svojim liječnikom i proizvođačem
medicinskog implantata!
42 HR

Sigurnosne smjernice za
punjače
¾ Uređaj smiju koristiti djeca
od 8 godina te osobe s
ograničenim psihičkim,
osjetilnim ili mentalnim
sposobnostima ili osobe bez
iskustva i/ili znanja kada
su pod nadzorom ili ako
su upoznati s uputama o
sigurnom korištenju kao i s
potencijalnim opasnostima.
Djeca se ne smiju igrati
uređajem.
Djeca ne smiju čistiti niti
održavati uređaj bez nadzora.
¾ Nemojte puniti baterije koje
se ne mogu puniti. Kršenje
ove napomene uzrokovat će
opasnosti.
¾ Ukoliko je priključni kabel
oštećen, proizvođač ili njegova
služba za kupce ili slična
kvalificirana osoba mora ga
zamijeniti kako bi se izbjegla
ugroženost.
¾ Zaštitite električne dijelove od
vlage. Nikada ne uranjajte
proizvod u vodu ni druge
tekućine kao biste spriječili
strujni udar. Nikada ne držite
uređaj pod tekućom vodom.
Slijedite upute za čišćenje,
održavanje i popravak.
¾ Ovaj uređaj prikladan je
isključivo za uporabu u
zatvorenom prostoru.
¾ PAŽNJA! Ovaj punjač je
prikladan samo za punjenje
baterijskih modula sljedećih
tipova:
Parkside 20 V
Baterijski modul
PAP 20 A1 2 Ah 5 ćelija
PAP 20 A2 3 Ah 10 ćelija
PAP 20 A3 4 Ah 10 ćelija
¾ Najnoviji popis kompatibilnih
baterija pronađite na
www.lidl.de/akku.
43 HR

Prije prve uporabe
Dodatna oprema
Za sigurnu i propisnu uporabu ovoga proizvoda
između ostaloga su potrebni sljedeći dijelovi
pribora kao što su npr. alat i oprema:
¾ Brusna ploča
¾ Rezni disk
¾ Zaštitni poklopac za brušenje i rezanje
¾ Križni odvijač
¾ Žičana četka
Alat i opremu dobit ćete u specijaliziranoj
trgovini. Pri nabavi uvijek obratite pažnju
na tehničke specifikacije ovoga proizvoda
(vidi poglavlje „Tehnički podatci“).
Ako niste sigurni, pitajte kvalificiranog stručnjaka
i dopustite da vas vaš specijalizirani trgovac
posavjetuje.
NAPOMENA
u U ovim ćete uputama za uporabu pronaći
informacije i napomene o raznoj opremi i
područjima primjene. Spomenuta oprema
nije nužno dio isporuke (pogledajte
poglavlje „Sadržaj isporuke“), nego
prikazuje mogućnosti primjene proizvoda.
UPOZORENJE
m
u Nemojte koristiti pribor koji nije preporučio
Parkside. To može izazvati strujni udar ili
požar.
Odgovarajući baterijski moduli i punjači
Baterijski
modul:
Punjač:
Parkside 20 V baterijski modul
PAP 20 A1, PAP 20 A2, PAP 20 A3
Parkside 20 V punjač PLG 20 A1,
PLG 20 A2, PLG 20 B1, PLG 20 A3
Korištenje
Uklanjanje/umetanje
baterijskog modula
¾ Uklanjanje baterijskog modula:
Pritisnite gumb za otpuštanje baterijskog
modula
(sl. D).
¾ Umetanje baterijskog modula:
Poravnajte baterijski modul
umetnite je. Uvjerite se da je uskočio na svoje
mjesto.
Baterijski modul može se umetnuti samo u
jednom smjeru u proizvod.
. Uklonite baterijski modul 5
15
s ručkom i
5
Provjera stanja napunjenosti
baterijskog modula
(Sl. B)
¾ Provjera stanja napunjenosti baterijskog
modula: Pritisnite tipku
LED lampice stanja napunjenosti
LED
17
Crvena /
narančasta /
zelena
Crvena /
narančasta
Crvena Nisko
16. Zasvijetlit će
:
17
Stanje napunjenosti
Maksimum
Srednje
Punjenje baterijskog modula
(Sl. C)
NAPOMENA
u Baterijski modul
bilo koje vrijeme bez skraćivanja vijeka
trajanja.
u Prekid postupka punjenja ne oštećuje
baterijski modul
možete puniti u
5
.
5
44 HR
¾ Napunite baterijski modul
ako je napunjenost srednja ili niska.
5
prije uporabe

¾ LED lampice za kontrolu punjenja (zelena
i crvena 21) obavještavaju vas o statusu
20
punjača
LED Status
Svijetli crveni LED Punjenje
Svijetli zeleni LED Baterijski je
Trepere zeleni i crveni
LED
Treperi crveni LED Baterijski je modul
Svijetli zeleni LED (bez
baterijskog modula)
¾ Umetnite baterijski modul
¾ Priključni kabel s mrežnim utikačem
punjača
¾ Kada je baterijski modul
napunjen: Izvadite baterijski modul iz
punjača
priključnog kabela
i baterijskog modula 5:
18
baterijskog
modula
modul potpuno
napunjen
Kvar baterijskog
modula
prehladan ili
prevruć
Punjač je spreman
u punjač 18.
5
ukopčajte u utičnicu.
18
potpuno
5
. Uvijek izvucite mrežni utikač
18
punjača iz utičnice.
19
19
Namještanje zaštitnog
poklopca
(sl. F)
UPOZORENJE!
m
Prije prilagođavanja zaštitnog
poklopca za radove brušenja
Isključite proizvod. Izvadite baterijski
modul
spriječili nehotično pokretanje
proizvoda. Prije prilagodbe ostavite
proizvod da se ohladi!
OPREZ! OPASNOST OD OZLJEDE!
m
Nosite zaštitne rukavice. Oprezno
rukujte zaštitnim poklopcem pri
obavljanju radova brušenja
postoji opasnost od uklještenja između
zaštitnog poklopca i ploče.
NAPOMENA
u Proizvod se smije koristiti samo s
montiranim zaštitnim poklopcem.
iz proizvoda kako biste
5
:
8
jer
8
Stavljanje/skidanje dodatne
ručke
(sl. E)
NAPOMENA
u Proizvod se smije koristiti samo s
montiranom dodatnom ručkom
¾ Zavrnite dodatnu ručku
rada na navoju dodatne ručke
desno (b) ili gore (c) na proizvodu.
6
.
6
ovisno o načinu
lijevo (a),
2
¾ Namjestite zaštitni poklopac za radove
brušenja
ne mogu pogoditi korisnika ni osobe u
okruženju.
¾ Položaj zaštitnog poklopca kod radova
brušenja
mogu zapaliti zapaljive dijelove, čak ni one
u okruženju.
¾ Okrenite zaštitni poklopac za radove
brušenja
se mora uglaviti u jedan od žljebova na
zaštitnom poklopcu.
tako da iskre ili odvojeni dijelovi
8
treba biti takav da iskre ne
8
u potreban položaj. Stezaljka
8
45 HR

Zamjena zaštitne ploče
NAPOMENA
u Kod brušenja i rezanja morate skinuti
isporučeni zaštitni poklopac za radove
brušenja
za brušenje i rezanje koji se zasebno
naručuje.
u Taj zaštitni poklopac mora biti
prikladan za rezanje brušenjem i treba
ga naručiti preko Korisničke službe
(kataloški broj HG03642).
UPOZORENJE!
m
Prije zamjene zaštitnog poklopca
za radove brušenja
proizvod. Izvadite baterijski modul
nehotično pokretanje proizvoda. Prije
prilagodbe ostavite proizvod da se
ohladi!
i montirati zaštitni poklopac
8
: Isključite
8
iz proizvoda kako biste spriječili
5
¾ Ponovno umetnite zaštitnu prirubnicu
opremu i steznu prirubnicu
obrnutim redoslijedom.
NAPOMENA
u U dodatnoj ručki
ključ
. Stezni ključ može se (uz pričvrsni
7
jezičak) upotrijebiti za otpuštanje ili
pritezanje stezne prirubnice
6
: Postupite
12
smješten je stezni
.
12
Umetanje/vađenje opreme
UPOZORENJE!
m
Prije podešavanja isključite proizvod,
izvadite baterijski modul
se ohladi!
OPREZ! OPASNOST OD OZLJEDE!
m
u Tijekom rada proizvoda držite ruke dalje
od opreme.
i pustite da
5
11
,
¾ Pritisnite i držite tipku za blokadu vretena
. Podignite pričvrsni jezičak i okrenite ga
1
suprotno kazaljci na satu. Otpustite tipku za
blokadu vretena (sl. G).
¾ Izvadite opremu (ako je montirana) i
potpornu prirubnicu
¾ Otpustite 3 vijka poklopca
bude mogao skinuti zaštitni poklopac za
radove brušenja
vijke (sl. I).
¾ Postavite novi zaštitni poklopac. Stezaljka
se mora uglaviti u jedan od žljebova na
zaštitnom poklopcu. Dobro zategnite 3 vijka.
¾ Provjerite može li se namjestiti zaštitni
poklopac (sl. F).
46 HR
(sl. H).
11
dok se ne
13
. Nije potrebno otpustiti
8
OPREZ! OPASNOST OD OZLJEDE!
m
u Nakon isključivanja proizvoda, oprema
se pomiče još neko vrijeme. Nemojte
dodirivati opremu koja se pomiče i
nemojte je kočiti.
UPOZORENJE!
m
u Nikada nemojte pritiskati tipku za blokadu
vretena
u Smjer strelice na opremi mora se
podudarati sa strelicom smjera okretanja
(
9
dok se okreće vreteno 10!
1
ili 14).

OPREZ! OPASNOST OD OZLJEDE!
m
u Koristite samo zamjenske dijelove koje
preporučuje proizvođač opreme. Uporaba
opreme i drugog pribora može izazvati
opasnosti.
u Upotrijebite samo opremu koja sadrže
podatke o proizvođaču, načinu spajanja,
dimenziji i dozvoljenom broju okretaja.
u Upotrijebite samo opremu, čiji je otisnut
broj okretaja barem onoliko visok kao onaj
koji se navodi na tipskoj pločici proizvoda.
u Nemojte koristiti odlomljenu, izbočenu ili
na bilo koji drugi način oštećenu opremu.
u Upotrijebite samo potpuno ispravnu
opremu.
u Uvjerite se da dimenzije opreme
odgovaraju proizvodu.
u Nemojte naknadno bušiti premaleni
prihvatni provrt na opremi.
u Nemojte koristiti odvojene redukcijske
čahure ni adaptere kako biste prilagodili
ploče s većom rupom.
u Kako biste smanjili rizik od trzaja uslijed
zaglavljene razdvojne pločice, poduprite
ploču ili veliki obrađivani predmet. Veliki
komadi obrađivanog predmeta mogu se
saviti pod vlastitom težinom. Obrađivani
predmet valja poduprijeti na objema
stranama pločice i to u blizini razdvojnog
reza kao i na bridu.
¾ Otpustite vijak
za blokadu vretena
jezičak i okrenite ga suprotno kazaljci na
satu. Otpustite tipku za blokadu vretena
(sl. G).
¾ Po potrebi izvadite već montirani radni alat.
¾ Umetnite novu opremu na potpornu
prirubnicu
¾ Učvršćenje opreme: Pritisnite i držite tipku
za blokadu vretena
jezičak. Okrećite steznu prirubnicu
smjeru kazaljke na satu. Otpustite tipku za
blokadu vretena.
: Pritisnite i držite tipku
12
. Podignite pričvrsni
1
(sl. H).
11
. Podignite pričvrsni
1
12
u
Uključivanje i isključivanje
OPREZ! OPASNOST OD OZLJEDE!
m
Uvijek nosite zaštitne rukavice dok
rukujete ili radite s proizvodom.
OPREZ! OPASNOST OD OZLJEDE!
m
u Tijekom rada stalno držite proizvod
objema rukama (sl. J).
OPREZ! OPASNOST OD OZLJEDE!
m
u Tijekom rada proizvoda držite ruke dalje
od opreme.
OPREZ! OPASNOST OD OZLJEDE!
m
u Nakon isključivanja proizvoda, oprema
se pomiče još neko vrijeme. Nemojte
dodirivati opremu koja se pomiče i
nemojte je kočiti.
47 HR

OPREZ! OPASNOST PO ZDRAVLJE!
m
u Ne smije se obrađivati materijal koji sadrži
azbest. Azbest je kancerogeni materijal.
¾ Uključivanje: Pritisnite stražnji dio
prekidača za uključivanje/isključivanje
prema dolje i gurnite ga naprijed
(sl. K, 1&2).
Trajni rad: Nagnite prekidač za
uključivanje/isključivanje
tako da se uglavi (sl. K, 3).
¾ Isključivanje: Pritisnite stražnji dio
prekidača za uključivanje/isključivanje
tako da se ponovno uglavi u položaju za
isključivanje.
prema dolje
3
Probni rad
NAPOMENA
u Prije prvog rada i nakon svake zamjene
opreme izvršite probni hod bez
opterećenja. Odmah isključite proizvod
ako oprema radi neravnomjerno, ako se
pojave veće vibracije ili ako se čuje jaka
buka.
Upute za rad
Brušenje
¾ Brusnu ploču držite s laganim, ravnomjernim
pritiskom na radnu površinu kako biste
postigli maksimalni učinak brušenja. Nikada
ne biste smjeli primjenjivati prekomjernu silu
pri rukovanju proizvodom. Težina proizvoda
3
proizvodi dovoljan pritisak.
¾ Preveliki pritisak opterećuje motor, usporava
brušenje, vrši opasan pritisak na brusnu
ploču i uzrokuje oštećenja.
¾ Proizvod pomičite ravnomjerno prema
naprijed i natrag.
Žičane četke
3
UPOZORENJE!
m
u Nemojte koristiti četku koja je oštećena
ili necentrirana. Uporaba oštećene četke
može povećati opasnost od kontakta s
oštećenim žicama četke.
¾ Izbjegavajte primjenjivati preveliki pritisak,
jer biste time previše savili žice i uzrokovali
prijevremeno oštećenje.
¾ Radite s umjerenim potiskom koji odgovara
obrađivanom dijelu.
¾ Izbjegavajte odskakivanje i kidanje žica
četke, posebice kod obrađivanja kutova,
oštrih bridova, itd. To može uzrokovati
gubitak kontrole i povratni trzaj.
UPOZORENJE!
m
u Nikada nemojte koristiti ploču za rezanje
da biste brusili!
¾ Proizvod držite pod kutom od 10 do 15° da
biste lako rukovali i postigli dobar rezultat
brušenja.
48 HR
Rezanje brušenjem
UPOZORENJE!
m
u Za rezanje nikada nemojte koristiti ploče
za grubu obradu! Proizvod se smije
koristiti s pločom za rezanje i brušenje
samo s montiranim zaštitnim poklopcem za
rezanje i brušenje.

¾ Smiju se koristiti samo provjerene rezne ili
brusne ploče pojačane vlaknima.
¾ Radite uglavnom s malim pomacima prema
naprijed. Primijenite umjereni pritisak na
obradak.
¾ Uvijek radite u suprotnom smjeru kako
proizvod ne bi nekontrolirano iskočio iz reza.
Čišćenje i njega
UPOZORENJE!
m
Prije obavljanja radova inspekcije,
održavanja i čišćenja isključite
proizvod, izvadite baterijski modul
pustite da se ohladi!
i
5
Čišćenje
¾ Pripazite da tekućine nikada ne uđu u
unutrašnjost proizvoda.
¾ Proizvod uvijek održavajte čistim, suhim i bez
ulja i masti za podmazivanje. Nakon svake
uporabe i prije skladištenja uklonite prašinu.
¾ Redovito propisno čišćenje pomaže u
sigurnoj uporabi i produljuje vijek trajanja
proizvoda.
¾ Proizvod čistite suhom krpom. Za teško
dostupna mjesta upotrebljavajte meku četku.
¾ Krpom i mekom četkom uklonite posebno
prljavštinu i prašinu s ventilacijskih otvora.
¾ Ventilacijski otvori moraju uvijek biti slobodni.
NAPOMENA
u Za čišćenje proizvoda ne upotrebljavajte
nikakva kemijska, lužnata, maziva niti
druga agresivna sredstva za čišćenje ili
dezinfekciju jer mogu oštetiti površine.
Održavanje
¾ Proizvod ne zahtijeva održavanje.
¾ Prije i nakon svake uporabe proizvod i
dijelove pribora (npr. opremu) provjerite
na istrošenost i oštećenja. Po potrebi
ih zamijenite novima kako je opisano
u ovim uputama za uporabu. Pritom se
uvijek pridržavajte tehničkih zahtjeva
(vidi poglavlje „Tehnički podatci“).
Popravak
U unutrašnjosti proizvoda ne nalaze se dijelovi
koje bi korisnik mogao popraviti. Obratite se
kvalificiranom stručnjaku kako biste organizirali
provjeru i popravak proizvoda.
Skladištenje
¾ Isključite proizvod.
¾ Proizvod očistite kako je prethodno opisano.
¾ Proizvod i njegov pribor čuvajte na tamno,
suhom i dobro prozračenom mjestu
zaštićenom od smrzavanja.
¾ Proizvod uvijek čuvajte na djeci
nedostupnom mjestu. Optimalna temperatura
dugotrajnog skladištenja (dulje od
3 mjeseca) jest između +20 i +26 °C.
¾ Proizvod spremite u kućište za prenošenje
.
22
¾ Brusne ploče moraju biti suhe i biti
skladištene u uspravnom položaju, nikada
naslagane jedna na drugu.
49 HR

Napomene za baterijski modul
¾ Spremite baterijski modul
djelomično napunjen. Razina napunjenosti
treba biti od 40 do 60 % tijekom duljeg
razdoblja skladištenja (svijetli su crvena i
narančasta LED lampica stanja punjenja
¾ Tijekom duljeg skladištenja otprilike svaka
3 mjeseca provjerite stanje napunjenosti
baterijskog modula
samo
5
. Po potrebi napunite.
5
Transport
¾ Isključite proizvod.
¾ Proizvod transportirajte u kućištu za
prenošenje
¾ Proizvod zaštitite od udaraca i snažnih
vibracija koje se često javljaju pri transportu
u vozilima.
¾ Proizvod osigurajte od klizanja i prevrtanja.
22
.
Zbrinjavanje
Ambalaža se sastoji od ekološki neškodljivih
materijala koje možete zbrinuti na lokalnim
mjestima za reciklažu.
Uvažavajte obilježavanje ambalaže za
odvajanje otpada, ono je obilježeno
s kraticama (a) i brojevima (b) sa
slijedećim značenjem: 1 – 7: plastika /
20 – 22: papir I karton / 80 – 98:
miješani materijali.
Proizvod i ambalaža se mogu
reciklorati, zbrinite ih odvojeno za bolje
obrađivanje otpada.
Triman-Logo važi samo za Francusku.
O mogućnostima zbrinjavanja
dotrajalog proizvoda možete se
raspitati kod vaše općinske ili gradske
uprave.
Zbog zaštite okoliša ne bacajte dotrajali
proizvod u kućni otpad, već ga predajte
stručnom zbrinjavanju. Informacije
o mjestima za sakupljanje otpada i
njihovom radnom vremenu možete
).
17
Oštećene ili potrošene baterije / punjive baterije
se moraju reciklirati u skladu s Direktivom
2006/66/EZ i njenim izmjenama. Vratite
baterije / punjive baterije i / ili proizvod putem
ponuđenih ustanova za sakupljanje otpada.
Izvadite baterije / punjive baterije iz proizvoda
prije zbrinjavanja otpada.
dobiti pri Vašem nadležnom općinskom
uredu.
Štete za okoliš zbog krivog
zbrinjavanja baterija / punjivih
baterija!
Jamstvo
Proizvod se brižno izrađuje prema strogim
smjernicama kvalitete i prije isporuke savjesno
ispituje. U slučaju nedostataka na ovom
proizvodu, na raspolaganju imate zakonska prava
protiv prodavača tog uređaja. Vaša zakonska
prava ovim našim jamstvom koje je predstavljeno
u nastavku, ostaju netaknuta.
Za ovaj proizvod dobivate jamstvo u trajanju
od 5 godine od datuma kupnje. Jamstveni rok
počinje s datumom kupovine. Molimo dobro
sačuvajte originalan račun s blagajne. To je
dokumentacija kao dokaz kupovine koji će se
zahtijevati.
Ako u razdoblju od 5 godine od datuma
kupovine ovog proizvoda nastane kakva greška
na materijalu ili tvornočka greška, proizvod ćemo
– prema našem izboru – besplatno popraviti ili
zamijeniti. Ovo jamstvo se poništava, kada se
proizvod ošteti, nestručno koristi ili ne održava.
50 HR

Jamstvo vrijedi za nedostatke na materijalu ili
tvorničke pogreške. Ovo jamstvo se ne proteže
na dijelove proizvoda, koji podliježu normalnom
trošenju i stoga se mogu smatrati kao normalni
potrošni dijelovi (npr. baterije) ili za oštećenja
na krhkim dijelovima, npr. prekidaču, punjivim
baterijama ili takvi, koji su izrađeni od stakla.
Na baterijski modul dobivate 1 godinu jamstva
od dana kupnje.
Postupak u slučaju koji je pokriven
jamstvom
Kako biste osigurali brzu obradu svojeg zahtjeva,
molimo vas da slijedite sljedeće upute:
Za sve upite pripremite račun i broj artikla
(npr. IAN 123456_7890) kao dokaz o kupnji.
Broj artikla možete naći na tipskoj pločici, na
gravuri, na naslovnoj stranici vaših uputa (dolje
lijevo) ili na naljepnici na stražnjoj ili donjoj strani.
Ukoliko nastanu greške u funkcioniranju ili
drugi kvarovi, kontaktirajte najprije u nastavku
navedeno odjeljenje servisa putem telefona ili
e-maila.
Servis
Servis Hrvatska
Tel.: 0800 777 999
E-Mail: owim@lidl.hr
Srpska oznaka sukladnosti
Otkriven kao neispravan proizvod, možete ga
onda poslati na spomenutu adresu servisa bez
poštarine za vas, s dokazom o kupnji (račun) i
opisom kakav je kvar i kada je nastao.
51 HR

EC Izjava o sukladnosti
52 HR

Korišćena upozorenja i simboli ......................................Strana 54
Uvod .................................................................. Strana 54
Predviđena namena.....................................................Strana 54
Obim isporuke . . . . . . . . . . . . . . . . . . . . . . . . . . . . . . . . . . . . . . . . . . . . . . . . . . . . . . . . . Strana 55
Opis delova ...........................................................Strana 55
Tehnički podaci ........................................................Strana 55
Bezbednosne napomene .............................................Strana 57
Opšte bezbednosne napomene tokom korišćenja električnih alata................. Strana 57
Bezbednosne napomene za brusilice .......................................Strana 60
Bezbednosne napomene za ugaone brusilice................................. Strana 60
Smanjenje vibracija i buke................................................Strana 65
Ponašanje u hitnim slučajevima ............................................Strana 66
Zaostale opasnosti......................................................Strana 66
Bezbednosne napomene za punjač ........................................Strana 67
Pre prve upotrebe ....................................................Strana 68
Dodatna oprema .......................................................Strana 68
Korišćenje............................................................. Strana 68
Vađenje/Stavljanje akumulatorskog paketa ..................................Strana 68
Provera stanja napunjenosti akumulatorskog paketa............................Strana 68
Punjenje akumulatorskog paketa ...........................................Strana 68
Stavljanje/skidanje pomoćne ručke.........................................Strana 69
Podešavanje štitnika.....................................................Strana 69
Promena štitnika ........................................................ Strana 70
Stavljanje/vađenje priključne opreme .......................................Strana 70
Uključivanje i isključivanje ................................................Strana 71
Probni rad ............................................................Strana 72
Napomene za rad ....................................................Strana 72
Brušenje . . . . . . . . . . . . . . . . . . . . . . . . . . . . . . . . . . . . . . . . . . . . . . . . . . . . . . . . . . . . . . Strana 72
Žičane četke...........................................................Strana 72
Brusno rezanje .........................................................Strana 72
Čišćenje i održavanje .................................................Strana 73
Čišćenje ..............................................................Strana 73
Održavanje ...........................................................Strana 73
Popravka .............................................................Strana 73
Skladištenje ...........................................................Strana 73
Transport .............................................................Strana 74
Odlaganje ............................................................Strana 74
Garancija i garantni list .............................................. Strana 75
EC izjava o usaglašenosti.............................................Strana 77
53 RS

Korišćena upozorenja i simboli
U ovom uputstvu za korišćenje, na ambalaži i na tipskoj pločici koriste se sledeća upozorenja:
Isključite proizvod i izvadite iz njega
Pročitajte uputstvo za korišćenje.
Pridržavajte se upozorenja i
bezbednosnih napomena!
Koristite proizvod samo u suvim
prostorijama.
Nosite zaštitne rukavice! Zaštitite akumulatorski paket od vatre.
Nosite zaštitu za uši! Klasa zaštite II (dvostruka izolacija)
Nosite zaštitne naočare!
akumulatorski paket pre zamene
dodatne opreme, čišćenja i kada ne
koristite proizvod.
Zaštitite akumulatorski paket od toplote i
dugotrajne, jake sunčeve svetlosti.
maks. 45 °C
Zaštitite akumulatorski paket od vode i
vlage.
Naizmenična struja
Jednosmerna struja
T3.15A
Osigurač
AKU UGAONA BRUSILICA 20 V
PWSAP 20-Li B2
Uvod
Čestitamo vam na kupovini vašeg novog
proizvoda. Tako ste se odlučili za visokokvalitetan
proizvod. Uputstvo za upotrebu je deo ovog
proizvoda. Sadrži važna bezbednosna uputstva,
uputstva za upotrebu i odlaganje. Pre korišćenja
proizvoda upoznajte se sa svim uputstvima za
rikovanje i bezbednost. Koristite proizvod samo
onako kako je opisano i za navedene oblasti
primene. Predajte sve dokumente prilikom
isporuke proizvoda trećem licu.
54 RS
Predviđena namena
Ova akumulatorska ugaona brusilica (u daljnjem
tekstu „proizvod“ ili „električni alat“) namenjena
je za
¾ brusno rezanje,
¾ suvo brušenje metala/betona/pločica i
¾ četkanje žicom metala.
Proizvod nije predviđen da se koristi u druge
namene (npr. brušenje neprikladnim brusnim
alatom, brušenje rashladnim sredstvom, brušenje
ili rezanje opasnih materija poput azbesta) osim u
ovde opisane.

Proizvod nije pogodan za brušenje brusnim
papirom i poliranje.
Brusno rezanje: Za ovaj zadatak potrebno je
instalirati jedan poseban štitnik. Štitnik može da se
naruči preko naše korisničke službe (šifra artikla
HG03642).
Uvek koristite priključnu opremu u skladu sa
predviđenom namenom! Prilikom kupovine i
korišćenja priključne opreme uvek se pridržavajte
tehničkih zahteve za ovaj proizvod (videti
„Tehnički podaci“).
Drugačija upotreba ili modifikacija proizvoda
se smatra neodgovarajućom i može voditi do
opasnosti kao što su smrt, povreda i materijalna
šteta. Proizvođač nije odgovoran za oštećenja
izazvana nenamenskom upotrebom. Ovaj
proizvod nije namenjen za komercijalnu ili drugu
vrstu upotrebe.
Obim isporuke
UPOZORENJE!
m
u Proizvod i ambalažni materijal nisu
igračka za decu! Deci nije dozvoljeno da
se igraju najlonskim kesama, folijama i
sitnim delovima! Od njih preti opasnost od
davljenja i gušenja!
1 x Aku ugaona brusilica 20 V
PWSAP 20‑Li B2
1 x Pomoćna ručka
1 x Štitnik za brušenje (predinstalirani) *
1 x Ključ stezne glave (smešten u pomoćnoj
ručki)
1 x Akumulatorski paket PAP 20 A3
1 x Brzi punjač PLG 20 B1
1 x Kofer za transport
1 x Uputstvo za korišćenje
* Štitnik za brusno rezanje nije obuhvaćen
isporukom i može da se naruči preko naše
korisničke službe.
Opis delova
Slika A:
Dugme za zaključavanje osovine
1
Navoj pomoćne ručke
2
Prekidač za uključivanje/isključivanje
3
Ručka
4
Akumulatorski paket
5
Pomoćna ručka (sa skladištem za ključ za
6
zatezanje)
Ključ stezne glave
7
Štitnik za brušenje
8
Strelica za pravac (na štitniku)
9
Osovina
10
Potporna prirubnica
11
Zatezna prirubnica (sa jezičkom za
12
zatezanje)
Poklopac sa klemom
13
Strelica za pravac (na ugaonoj brusilici)
14
Slika B:
Akumulatorski paket
5
Dugme za oslobađanje akumulatorskog
15
paketa
Dugme (nivo punjenja)
16
LED‑ovi stanja napunjenosti (crveno/
17
narandžasto/zeleno)
Slika C:
Punjač (brzi punjač)
18
Priključni kabl sa mrežnim utikačem
19
LED indikator punjenja – Zeleni
20
LED indikator punjenja – Crveni
21
Nema slike:
Kofer za transport
22
Tehnički podaci
Akumulatorska ugaona
brusilica
Nominalni napon: 20 V
Nominalni broj obrtaja n: 10000 min
Prečnik priključne opreme: Ø 125 mm
Debljina diska: maks. 8 mm
Navoj osovine: M14
PWSAP
20-Li B2
–1
55 RS

Akumulatorski paket PAP 20 A3
Tip: litijum‑jonski
Nominalni napon: 20 V
maks.
Kapacitet: 4 Ah
Energetska vrednost: 72 Wh
Broj ćelija u bateriji: 10
Brzi punjač PLG 20 B1
Ulaz:
Nominalni napon: 230–240 V∼
Nominalna frekvencija: 50 Hz
Nominalna snaga: 120 W
Izlaz:
Nominalni napon: 21,5 V
Struja punjenja: 4,5 A
Klasa zaštite:
Osigurač (unutrašnji):
II /
3,15 A /
Vreme punjenja:
¾ Tip akumulatora PAP 20 A3, 4,0 Ah
(isporučeni): 60 minuta
¾ Tip akumulatora PAP 20 A1, 2,0 Ah
(posebno dostupan): 45 minuta
Preporučena temperatura okoline:
Za vreme punjenja: od +4 do
+40 °C
Za vreme korišćenja: od +4 do
+40 °C
Za vreme skladištenja: od +20 do
+26 °C
Vrednosti emisije vibracija
Ukupne vrednosti vibracija (vektorski zbir tri
pravca), određene u skladu sa EN 60745:
Glavna ručka:
Vibracija ruke/šake a
: 4,27 m/s²
h,AG
Neizvesnost K: 1,5 m/s²
Dodatna ručka:
Vibracija ruke/šake a
: 5,31 m/s²
h,AG
Neizvesnost K: 1,5 m/s²
Navedene vrednosti se odnose na površinsko
brušenje. Ostala primena može dovesti do
različitih vrednosti emisije vibracija.
UPOZORENJE!
m
Nosite zaštitu za uši!
NAPOMENA
u Deklarisana ukupna vrednost vibracija
i deklarisana vrednost emisije buke
mereni su u skladu sa standardizovanom
procedurom ispitivanja i mogu se koristiti
za poređenje jednog električnog alata sa
drugim.
u Navedena ukupna vrednost vibracija i
navedena vrednost emisije buke mogu
da se koriste i za preliminarnu procenu
opterećenja.
Vrednost emisije buke
Izmerene vrednosti su određene u skladu
sa EN 60745. Nivo buke električnog alata
procenjen sa „A“ tipično iznosi:
Nivo zvučnog pritiska L
Neizvesnost K
: 3 dB
pA
Nivo zvučne snage L
Neizvesnost K
56 RS
WA
: 81,6 dB(A)
pA
: 92,6 dB(A)
WA
: 3 dB

UPOZORENJE!
m
u Emisije vibracija i buke tokom stvarnog
korišćenja električnog alata mogu da
odstupaju od deklarisanih vrednosti, u
zavisnosti od načina na koji se koristi
električni alat, posebno od vrste predmeta
koji se obrađuje.
Pokušajte da umanjite uticaj vibracije i
buke koliko je god to moguće. Možete
da smanjite uticaj vibracije tako što ćete
nositi rukavice prilikom korišćenja alata i
ograničiti vreme rada. U tom slučaju treba
uzeti u obzir sve delove radnog ciklusa (na
primer, vreme tokom kojeg je električni alat
isključen i tokom kojeg je uključen, ali radi
bez opterećenja).
Bezbednosne
napomene
Opšte bezbednosne
napomene tokom korišćenja
električnih alata
UPOZORENJE!
m
u Pročitajte sve
bezbednosne napomene
i smernice. Nepridržavanje
bezbednosnih napomena i smernica može
dovesti do strujnog udara, požara i/ili
teške povrede.
Sačuvajte sve bezbednosne napomene i
propise da biste ih koristili u budućnosti.
Pojam „električni alat“ koji se koristi u
bezbednosnim napomenama odnosi se na
električne alate priključene na električnu mrežu
(sa kablom za napajanje) ili na električne alate
na baterije (bez kabla za napajanje).
Bezbednost na radnom mestu
1) Održavajte područje rada u
čistom stanju i imajte dobro
osvetljenje. Nered ili neosvetljeno
područje rada mogu voditi do nesreće.
2) Nemojte da radite sa električnim
alatom u potencijalno eksplozivnom
okruženju gde se nalaze zapaljive
tečnosti, gasovi ili prašina. Električni
alati proizvode varnice koje mogu da zapale
prašinu ili isparenja.
3) Deca i druge osobe nek se nalaze
podalje dok koristite električni
alat. Odvraćanje pažnje može voditi do
gubitka kontrole nad električnim alatom.
Zaštita od strujnog udara
1) Utikač električnog alata mora da
odgovara utičnici. Nije dozvoljeno
menjati utikač na bilo koji način.
Nemojte da koristite adaptere za
utikače kod električnih alata sa
uzemljenjem. Neizmenjeni utikači i
odgovarajuće utičnice smanjuju opasnost od
strujnog udara.
57 RS

2) Izbegavajte dodir tela sa
uzemljenim površinama kao što su
cevi, grejači, peći i frižideri. Postoji
povećana opasnost od električnog udara
ako je vaše telo uzemljeno.
3) Držite električni alat dalje od kiše
ili vlage. Prodor vode u električni alat
povećava opasnost od strujnog udara.
4) Nemojte neispravno koristiti kabl
tako što ćete podizati električni
aparat, povlačiti ili izvlačiti utikač
iz utičnice. Držite kabl dalje
od toplote, ulja, oštrih ivica ili
pokretnih delova aparata. Oštećeni
ili zamršeni kablovi povećavaju rizik od
strujnog udara.
5) Kada radite sa električnim alatom
na otvorenom, koristite samo
produžni kabl koji je pogodan
za spoljašnju upotrebu. Korišćenje
produžnog kabla koji je pogodan za
spoljašnju upotrebu umanjuje opasnost od
strujnog udara.
6) Ako je neizbežno korišćenje
električnog alata u vlažnom
okruženju, koristite uređaj za
rezidualnu struju. Korišćenje uređaja
za rezidualnu struju smanjuje opasnost od
električnog udara.
Bezbednost osoba
1) Budite oprezni, obratite pažnju
na ono što radite i koristite zdrav
razum dok radite električnim
alatom. Nemojte koristiti električni
alat ako ste umorni ili ako ste
pod uticajem droge, alkohola
ili lekova. Trenutak nemara prilikom
korišćenja električnog alata može dovesti do
ozbiljnih povreda.
2) Nosite ličnu zaštitnu opremu i uvek
nosite zaštitne naočare. Nošenjem
lične zaštitne opreme, kao što su maska za
prašinu, zaštitne cipele koje ne klize, šlem ili
zaštitu za uši, odgovarajuće vrsti i upotrebi
električnog alata, smanjujete opasnost od
povrede.
3) Izbegavajte nenamerno pokretanje.
Vodite računa da električni alat
bude isključen pre nego što
ga priključite na struju i/ili na
akumulator kada ga podižete ili
nosite. Ako vam je prst na prekidaču dok
nosite električni alat ili ako priključite uređaj
na napajanje dok je uređaj uključen, to
može voditi do nesreće.
4) Uklonite priključnu opremu ili
ključeve pre nego što uključite
električni alat. Alat ili ključ koji se
nalazi u rotirajućem delu uređaja može
prouzrokovati povrede.
58 RS

5) Izbegavajte neuobičajeni položaj
tela. Obezbedite bezbedan položaj
i u svakom trenutku održavajte
ravnotežu. Tako ćete moći u
neočekivanim situacijama bolje upravljati
električnim alatom.
6) Nosite odgovarajuću odeću.
Nemojte nositi labavu odeću ili
nakit. Držite kosu, odeću i rukavice
dalje od pokretnih delova. Pokretni
delovi mogu da uhvate labavu odeću, nakit
ili dugu kosu.
7) Ako je moguće instalirati opremu
za usisavanje i sakupljanje prašine,
proverite da li je ona priključena i
da li se pravilno koristi. Korišćenje
usisivača za prašinu može da smanji
opasnost koja nastaje od prašine.
Korišćenje električnog alata i njegovo
rukovanje
1) Nemojte preopterećivati uređaj. Za
svoj posao koristite odgovarajući
električni alat. Sa pravim električnim
alatom radite bolje i bezbednije u
navedenom opsegu snage.
2) Nemojte koristiti električni alat čiji
je prekidač neispravan. Električni
alat koji se više ne može uključiti ili isključiti
opasan je i mora se popraviti.
3) Izvucite utikač iz utičnice i/ili
uklonite bateriju pre podešavanja,
promene delova dodatne opreme
ili skladištenja alata. Ove mere
predostrožnosti sprečavaju slučajno
pokretanja električnog alata.
4) Čuvajte nekorišćeni električni
alat van domašaja dece. Nemojte
dozvoliti da električni alat koriste
osobe koje nisu upoznate sa
njim ili koje nisu pročitale ovo
uputstvo. Električni alati su opasni kada ih
koriste osobe koje nemaju iskustva.
5) Pažljivo održavajte električne
alate. Proverite da li pokretni
delovi ispravno funkcionišu i da
li se zaglavljuju, da li su delovi
pokvareni ili oštećeni u toj meri da
je funkcionisanje električnog alata
oštećeno. Pre korišćenja uređaja
dajte na popravku oštećene
delove. Mnoge nesreće nastaju usled loše
održavanih električnih alata.
6) Rezne alate održavajte u oštrom i
čistom stanju. Pažljivo održavani rezni
alati sa oštrim reznim ivicama manje se
zaglavljuju i lakše je upravljati njima.
59 RS

7) Koristite električni alat, dodatnu
opremu, priključnu opremu, itd., u
skladu sa ovim uputstvom. Uzmite
u obzir uslove rada i aktivnosti koje
treba obaviti. Korišćenje električnih alata
u drugu, osim u predviđenu namenu, može
voditi do opasnih situacija.
Korišćenje akumulatorskog alata i
njegovo rukovanje
1) Akumulatore punite samo
punjačima koje preporučuje
proizvođač. Punjač koji je odgovarajuć
za određeni tip akumulatora može
izazvati požar kada se koristi sa drugim
akumulatorima.
2) Koristite samo odgovarajuće
akumulatore u električnim
alatima. Korišćenje drugih vrsta
akumulatora može prouzrokovati povrede ili
požar.
3) Nekorišćeni akumulator držite dalje
od spajalica, novčića, ključeva,
eksera, zavrtnjeva ili drugih sitnih
metalnih predmeta koji bi mogli
da premoste kontakte. Kratak spoj
između kontakata baterije može dovesti do
opekotina ili požara.
4) Ako se nepravilno koristi, iz
akumulatora može da curi tečnost.
Izbegavajte kontakt sa njom.
Ako dođe do slučajnog kontakta,
isperite vodom. Ako vam tečnost
dospe u oči, potražite dodatnu
medicinsku pomoć. Iscurela tečnosti iz
akumulatora može da izazove iritaciju kože
ili opekotine.
Servisiranje
1) Vaš električni alat treba da
popravlja samo kvalifikovano
osoblje i samo koristeći originalne
rezervne delove. Ovim se obezbeđuje
bezbednost električnog alata.
Bezbednosne napomene za
brusilice
UPOZORENJE!
m
u Prašina od materijala kao što su boje koje
sadrže olovo, neke vrste drveta i metala
može biti štetna po zdravlje.
u Dodir sa ovom prašinom ili njeno udisanje
može predstavljati opasnost za korisnika ili
osobe koje se nalaze u blizini.
UPOZORENJE!
m
Nosite zaštitne naočare i masku za
prašinu!
Bezbednosne napomene za
ugaone brusilice
Uobičajene bezbednosne napomene
za brušenje, rad sa žičanim četkama i
brusno rezanje
1) Ovaj električni alat koristi se u vidu
brusilice, žičane četke i mašine za
brusno rezanje. Pridržavajte se svih
bezbednosnih napomena, smernica,
prikaza i podataka koje dobijate
sa uređajem. Ako ne poštujete sledeće
smernice, to može dovesti do strujnog udara,
požara i/ili ozbiljnih povreda.
60 RS

2) Ovaj električni alat nije pogodan
za brušenje brusnim papirom i
poliranje. Upotreba za koju električni alat
nije namenjen može prouzrokovati opasnosti
i povrede.
3) Nemojte koristiti nikakvu dodatnu
opremu koja nije posebno
dizajnirana za ovaj električni alat
i koju proizvođač ne preporučuje.
Samo zato što opremu možete da priključite
na električni alat ne garantuje bezbednu
upotrebu.
4) Dozvoljena brzina obrtaja na
priključnoj opremi mora biti toliko
velika kao što je maksimalna brzina
navedena na električnom alatu.
Oprema koja se okreće brže od dozvoljenog
može da se slomi i nekontrolisano izleti.
5) Spoljašnji prečnik i debljina
priključne opreme moraju
odgovarati datim dimenzijama
električnog alata. Nepravilno izmerenu
priključnu opremu nije moguće adekvatno
zaštititi ili kontrolisati.
6) Priključna oprema sa navojnim
umetkom mora tačno da odgovara
navoju osovine brusilice. Za
priključnu opremu koja se montira
pomoću prirubnice, prečnik
rupe priključne opreme mora da
odgovara prečniku prihvatnice.
Priključna oprema koja ne naleže tačno na
električni alat, neujednačeno se okreće,
veoma jako vibrira i može voditi do gubitka
kontrole.
7) Nemojte koristiti oštećenu
priključnu opremu. Pre svake
upotrebe pregledajte priključnu
opremu, da li ima odlomljenih
komada i pukotina na brusnim
diskovima, da li ima pukotina,
pohabanosti ili jake istrošenosti
na brusnim pločama, da li ima
labavih ili slomljenih žica na žičanim
četkama. Ako električni alat ili
priključna oprema padne, proverite
da li ima oštećenja ili koristite neki
neoštećeni alat. Nakon što proverite
i podesite priključnu opremu, budite
vi i osobe u blizini izvan rotacione
ravni priključne opreme i ostavite
uređaj da radi punom brzinom
1 minut. Oštećena priključna oprema se
obično pokida za ovo vreme testiranja.
8) Nosite ličnu zaštitnu opremu. U
zavisnosti od primene, koristite
potpunu zaštitu za lice, zaštitu
za oči ili zaštitne naočare. Ako je
potrebno, nosite masku za prašinu,
zaštitu za uši, zaštitne rukavice ili
posebnu kecelju koja može da vas
zaštiti od malih brusnih čestica i
čestica materijala. Trebalo bi da oči
zaštitite od letećih stranih tela koja nastaju
usled različite primene. Maska za prašinu ili
respiratorna maska mora da filtrira prašinu
koja nastaje tokom korišćenja uređaja. Ako
ste dugo izloženi velikoj buci, možda ćete
doživeti gubitak sluha.
61 RS

9) Vodite računa da druge osobe
ostanu na bezbednoj udaljenosti od
radnog područja. Svako ko kroči u
radno područje mora da nosi ličnu
zaštitnu opremu. Fragmenti radnog
komada ili slomljeni komadići priključne
opreme mogu da odlete i prouzrokuju
povrede čak i izvan direktnog radnog
područja.
10) Prilikom izvođenja radova tokom
kojih priključna oprema može da
pogodi električne vodove držite
električni alat samo za izolovane
površine za hvatanje. Kontakt sa
vodovima pod naponom može preneti
napon na metalne delove uređaja i dovesti
do strujnog udara.
11) Nikada nemojte isključiti električni
alat pre nego što se priključna
oprema u potpunosti ne zaustavi.
Priključna oprema koja se okreće može
doći u dodir sa površinom, što može
prouzrokovati da izgubite kontrolu nad
električnim alatom.
12) Nemojte ostaviti da električni alat i
dalje radi dok ga nosite. Vašu odeću
može slučajno da uhvati priključna oprema
koja se okreće i priključna oprema može da
se zarije u vaše telo.
13) Redovno čistite otvore za ventilaciju
na vašem električnom alatu.
Ventilator motora uvlači prašinu u kućište, a
veliko nakupljanje metalne prašine može da
prouzrokuje opasnost od strujnog udara.
14) Nemojte koristiti električni alat blizu
zapaljivih materijala. Varnice mogu da
zapale ove materijale.
15) Nemojte koristiti priključnu opremu
koja zahteva tečno rashladno
sredstvo. Korišćenje vode ili drugih tečnih
rashladnih sredstava može izazvati strujni
udar.
Sledeće bezbednosne napomene se
odnose na sve primene – povratni
udar i odgovarajuće bezbednosne
napomene:
Povratni udar je iznenadna reakcija kada zapne
ili zablokira rotirajuća priključna oprema poput
brusnog diska, brusne ploče, žičane četke,
itd. Zapinjanje ili zaglavljenje vodi do naglog
zaustavljanja rotirajuće priključne opreme.
Kao rezultat toga, nekontrolisani električni alat
se ubrzava suprotno smeru rotacije priključne
opreme na mestu blokiranja.
Ako npr. brusni disk u radnom komadu zapne ili
se blokira, ivica brusnog diska koja ulazi u radni
komad može da zapne i na taj način pokvari
brusni disk ili dovede do povratnog udara. Zatim
se brusni disk pomera u pravcu korisnika ili
suprotno od njega, u zavisnosti od pravca rotacije
diska u odnosu na mesto blokiranja. Tom prilikom
brusni disk može da se slomi.
Povratni trzaj nastaje usled nepravilne ili pogrešne
upotrebe električnog alata. To se može sprečiti
odgovarajućim merama predostrožnosti, kao što
je opisano u daljnjem tekstu.
62 RS

1) Čvrsto držite električni alat i
dovedite svoje telo i ruke u položaj
u kojem možete da apsorbujete silu
povratnog udara. Uvek koristite
pomoćnu ručku, ako je ima, da biste
imali najveću moguću kontrolu nad
silom povratnog udara ili reakcijom
obrtnog momenta. Rukovalac može da
kontroliše sile povratnog udara i reakcione
sile odgovarajućim merama predostrožnosti.
2) Nikada nemojte približiti ruku
priključnoj opremi koja se vrti.
Priključna oprema može kod povratnog
trzaja da dođe u dodir sa vašom rukom.
3) Sklonite svoje telo iz područja u
koje električni alat može dospeti
tokom povratnog trzaja. U slučaju
povratnog trzaja električni alat će skočiti u
pravcu koji je suprotan u odnosu na kretanje
brusnog diska na mestu zaglavljivanja.
4) Budite naročito pažljivi oko uglova,
oštrih ivica, itd. Sprečite odskakanje
priključne opreme sa radnog
komada ili njegovo zaglavljivanje.
Priključna oprema koja se vrti obično se
zaglavljuje kod uglova, oštrih ivica ili kada
odskoči. To vodi do gubitka kontrole ili
povratnog udara.
5) Nemojte koristiti lančane ili zubne
testere. Takva priključna oprema često
dovodi do povratnog udara ili gubitka
kontrole nad električnim alatom.
Posebne bezbednosne napomene za
brušenje i brusno rezanje
1) Koristite samo brusne ploče koje
su odobrene za vaš električni alat i
štitnik koji je predviđen za te brusne
ploče. Brusne ploče koje nisu predviđene
za električni alat ne mogu biti u dovoljnoj
meri zaštićene i nisu bezbedne.
2) Centralno fiksirani brusni diskovi
moraju se tako montirati da se
njihova brusna površina ne nalazi
izvan ravni ivice štitnika. Nepravilno
postavljeni brusni disk, koji se proteže
izvan ravni štitnika, nije moguće zaštititi na
odgovarajući način.
3) Štitnik mora biti čvrsto pričvršćen
na električni alat i postavljen za
maksimalnu bezbednost tako da
prema korisniku bude izložen
najmanji mogući deo brusne ploče.
Štitnik pomaže da zaštitite korisnika od
fragmenata, slučajnog kontakta sa brusnom
pločom, kao i od varnica koje mogu da
zapale odeće.
4) Brusne ploče je dozvoljeno koristiti
samo za moguću primenu za koju
se preporučuju. Na primer: Nikada
nemojte brusiti bočnom površinom
reznog diska. Rezni diskovi su namenjeni
za uklanjanje materijala ivicom diska. Vršenje
bočne sile na ove brusne ploče može da ih
slomi.
63 RS

5) Uvek koristite neoštećene spojne
prirubnice odgovarajuće veličine
i oblika za brusni disk koji ste
odabrali. Odgovarajuća prirubnica drži
brusni disk, čime se smanjuje opasnost od
lomljenja brusnog diska. Prirubnice za rezne
diskove mogu da se razlikuju od prirubnica
za druge brusne diskove.
6) Nemojte da koristite istrošene
brusne diskove od većih električnih
alata. Brusni diskovi za veće električne
alate nisu dizajnirani za veće brzine manjih
električnih alata i mogu da se slome.
Daljnje posebne bezbednosne
napomene za brusno rezanje
1) Izbegavajte zaglavljivanje reznih
diskova ili vršenje prekomernog
pritiska. Nemojte praviti preterano
duboke rezove. Preopterećenje reznog
diska povećava njegovo naprezanje i postaje
podložniji zapinjanju ili zaglavljivanju usled
čega može doći do povratnog trzaja ili
lomljenja brusne ploče.
2) Izbegavajte područje ispred i iza
rotirajućeg reznog diska. Kada
pomerate rezni disk dalje od sebe na
radnom komadu, u slučaju povratnog trzaja
električni alat sa rotirajućim diskom može da
skoči direktno na vas.
3) Ako je rezni disk zaglavljen ili ako
prestanete sa radom, isključite
uređaj i držite čvrsto dok se disk ne
zaustavi. Nikada nemojte vaditi iz
proreza rezni disk koji se još uvek
vrti. Utvrdite i ispravite uzrok zaglavljivanja.
4) Nemojte ponovo uključivati
električni alat dok se nalazi u
radnom komadu. Pustite da rezni
disk najpre dostigne puni broj
obrtaja pre nego što nastavite sa
sečenjem. U suprotnom, disk može da
zapne, odskoči sa radnog komada ili dovede
do povratnog trzaja.
5) Obezbedite potporu za ploče ili
velike radne komade da biste
smanjili opasnost od povratnih
trzaja usled zaglavljivanja reznog
diska. Veliki radni komadi mogu da se
saviju pod sopstvenom težinom. Radni
komad mora biti zaštićen sa obe strane
diska, kako u blizini linije rezanja tako i na
ivici.
6) Budite naročito oprezni kod
„džepova“ u postojećim zidovima ili
kod drugih nepreglednih područja.
Uronjeni rezni disk može kod presecanja
gasovoda ili vodovoda, električnih vodova ili
drugih predmeta izazvati povratni trzaj.
64 RS

Dodatne bezbednosne napomene za
rad sa žičanim četkama – Posebne
bezbednosne napomene za rad sa
žičanim četkama
1) Imajte na umu da žičana četka čak
i tokom normalne upotrebe gubi
delove žice. Nemojte opterećivati
žice prekomernim pritiskom. Leteći
komadi žice lako mogu da probiju tanku
odeću i/ili kožu.
2) Ako se preporučuje štitnik, sprečite
da se štitnik i žičana četka dodiruju.
Tanjiraste i čašaste četke mogu usled pritiska
i centrifugalne sile da povećaju svoj prečnik.
Dodatne bezbednosne napomene za
ugaone brusilice
1) Koristite samo brusne diskove na kojima
je štampana brzina okretanja koja je u
najmanjoj meri veća od navedene na tipskoj
pločici proizvoda.
2) Pre korišćenja vizuelno pregledajte
brusni disk. Nemojte koristiti oštećene ili
deformisane diskove. Zamenite istrošeni disk.
3) Vodite računa da varnice koje nastaju
prilikom brušenja ne predstavljaju opasnost,
npr. za osobe koje se tamo nađu ili zapaljive
materijale.
4) Prilikom brušenja uvek koristite zaštitne
naočare, zaštitne rukavice, zaštitu za disajne
puteve i zaštitu za uši.
5) Nikada nemojte držati prste između diska
i zaštite od varnica ili blizu štitnika. Preti
opasnost od drobljenja.
6) Rotirajuće delove proizvoda nije moguće
pokriti iz funkcionalnih razloga. Zato budite
oprezni i dobro pričvrstite radni komad da
ne dođe do proklizavanja, što bi moglo
dovesti do toga da vaše ruke dođu u dodir
sa brusnim diskom.
7) Radni komad postaje vruć tokom brušenja.
Nemojte dodirivati radnu površinu, ostavite
je da se ohladi. Preti opasnost od opekotina.
Nemojte koristiti rashladno sredstvo ili slično.
8) Nemojte raditi sa proizvodom kada ste
umorni ili nakon što pijete alkohol ili tablete.
Uvek imajte pravovremenu pauzu na radu.
9) Isključite proizvod i izvadite bateriju iz
uređaja pre obavljanja bilo kojih radova.
Smanjenje vibracija i buke
Ograničite vreme korišćenja, koristite režim
niske vibracije i niske buke, i nosite ličnu zaštitnu
opremu da biste smanjili efekte vibracija i buke.
Sledeće mere pomažu u ublažavanju opasnosti
vezanih za vibracije i buku:
¾ Koristite proizvod samo u skladu sa
njegovom predviđenom namenom i kao što
je opisano u ovom uputstvu.
¾ Vodite računa da proizvod bude ispravno i
dobro održavan.
65 RS

¾ Koristite odgovarajuću priključnu opremu
za ovaj proizvod i uverite se da je u
besprekornom stanju.
¾ Čvrsto držite proizvod za ručke/rukohvat.
¾ Održavajte proizvod u skladu sa uputstvima
i obezbedite adekvatno podmazivanje (ako
je primenljivo).
¾ Planirajte tok svog rada tako da korišćenje
proizvoda sa velikom vibracijom bude
raspoređeno tokom dužeg vremenskog
perioda.
Ponašanje u hitnim
slučajevima
Upoznajte se sa uputstvom za korišćenje
ovog proizvoda. Zapamtite ove bezbednosne
napomene i obavezno ih se pridržavajte. To
pomaže u izbegavanju rizika i opasnosti.
¾ Uvek budite pažljivi tokom korišćenja ovog
proizvoda da biste na vreme prepoznali
opasnosti i preduzeli nešto. Brzom
intervencijom možete izbeći ozbiljne povrede
i materijalnu štetu.
¾ Kod neispravnog funkcionisanja odmah
isključite proizvod i izvadite akumulatorski
paket. Dajte da proizvod pregleda
kvalifikovani stručnjak, i ako je potrebno da
ga popravi, pre nego što ponovo počnete da
ga koristite.
Zaostale opasnosti
Čak i ako pravilno koristite ovaj proizvod,
postoji potencijalna opasnost od povreda i
nastanka materijalne štete. U vezi sa dizajnom i
konstrukcijom ovog proizvoda mogu se pojaviti
sledeće opasnosti, koje uključuju, ali se ne
ograničavaju na sledeće:
¾ Šteta po zdravlje koja nastaje usled emisije
vibracija, u slučaju da se proizvod duže
vreme koristi, da se ne koristi pravilno i da se
ne održava.
¾ Telesna povreda i materijalna šteta koje
mogu nastati usled neispravnog reznog alata
ili naglog udarca o skriveni predmet tokom
korišćenja.
¾ Telesna povreda i materijalna šteta mogu
nastati od letećih predmeta.
NAPOMENA
u Ovaj proizvod tokom rada stvara
elektromagnetno polje! Pod određenim
okolnostima, ovo polje može uticati na
aktivne ili pasivne medicinske implantate!
Da bi se smanjila opasnost od ozbiljnih ili
smrtonosnih povreda, pre nego što koriste
proizvod, preporučujemo da se osobe sa
medicinskim implantatima konsultuju sa
svojim lekarem i proizvođačem medicinskih
implantata!
66 RS

Bezbednosne napomene za
punjač
¾ Ovaj uređaj mogu da koriste
deca uzrasta od 8 i više
godina, kao i osobe sa
smanjenim fizičkim, čulnim
ili mentalnim sposobnostima
ili osobe kojima nedostaje
iskustva i znanja, pod uslovom
da su pod nadzorom ili da su
im data uputstva kako se ovaj
uređaj može bezbedno koristiti
i ako razumeju uključene
opasnosti.
Deci nije dozvoljeno da se
igraju sa ovim uređajem.
Čišćenje i održavanje od
strane korisnika ne smeju da
vrše deca bez nadzora.
¾ Nemojte puniti baterije koje
nisu punjive. Neuzimanje u
obzir ovih napomena vodi do
opasnosti.
¾ Ako je priključni kabl ovog
proizvoda oštećen, da bi
se izbegla opasnost od
povrede potrebno je da
ga zameni proizvođač ili
njegova korisnička služba,
ili neka druga odgovarajuće
kvalifikovana osoba.
¾ Zaštitite električne delove od
vlage. Nemojte ih utapati u
vodu ili druge tečnosti, da
biste izbegle strujni udar.
Nikada nemojte držati uređaj
ispod tekuće vode. Uzmite
u obzir uputstva za čišćenje,
održavanje i popravku.
¾ Ovaj uređaj je namenjen samo
za korišćenje u zatvorenom.
¾ PAŽNJA! Ovaj punjač
je isključivo namenjen za
punjenje akumulatorskih
paketa sledećeg tipa:
Parkside 20 V
Akumulatorski paket
PAP 20 A1 2 Ah 5 ćelija
PAP 20 A2 3 Ah 10 ćelija
PAP 20 A3 4 Ah 10 ćelija
¾ Aktuelni spisak kompatibilnih
baterija može da se nađe na
www.lidl.de/akku.
67 RS

Pre prve upotrebe
Dodatna oprema
Da biste bezbedno i pravilno upotrebili ovaj
proizvod, potrebna je sledeća dodatna oprema,
kao npr. alat i priključna oprema:
¾ Brusni disk
¾ Disk za brusno rezanje
¾ Štitnik za brusno rezanje
¾ Krstasti odvijač
¾ Žičana četka
Alat i priključna oprema dostupni su u
specijalizovanim radnjama. Prilikom kupovine
uvek se pridržavajte tehničkih zahteve za ovaj
proizvod (videti „Tehnički podaci“).
U slučaju da ste nesigurni, pitajte kvalifikovanog
stručnjaka i zatražite savet specijaliste.
NAPOMENA
u Ovo uputstvo za korišćenje sadrži
informacije i napomene za korišćenje
različite priključne opreme i njihovu
primenu. Navedena priključna oprema nije
uključena u obim isporuke (videti „Obim
isporuke“), već samo pokazuje moguću
primenu ovog proizvoda.
UPOZORENJE
m
u Nemojte koristiti dodatnu opremu koju
Parkside ne preporučuje. To može dovesti
do strujnog udara ili požara.
Odgovarajući akumulatorski paketi i
punjač
Akumulatorski
paket:
Punjač:
Parkside 20 V akumulatorski
paket PAP 20 A1, PAP 20 A2,
PAP 20 A3
Parkside 20 V punjač
PLG 20 A1, PLG 20 A2,
PLG 20 B1, PLG 20 A3
Korišćenje
Vađenje/Stavljanje
akumulatorskog paketa
¾ Vađenje akumulatorskog paketa:
Pritisnite dugme za oslobađanje
akumulatorskog paketa
akumulatorski paket
¾ Stavljanje akumulatorskog paketa:
Poravnajte akumulatorski paket
ručkom i gurnite je unutra. Vodite računa da
primetno klikne na svoje mesto.
Akumulatorski paket može da se umetne u
proizvod samo u jednom smeru.
15
(sl. D).
5
. Izvadite
5
sa
Provera stanja napunjenosti
akumulatorskog paketa
(sl. B)
¾ Provera stanja napunjenosti akumulatorskog
paketa: Pritisnite dugme
stanja napunjenosti
LED
17
Crveno /
narandžasto /
zeleno
Crveno /
narandžasto
Crveno Mala
17
Stanje napunjenosti
Maksimalno
Srednje
16. LED‑ovi
svetle:
Punjenje akumulatorskog
paketa
(sl. C)
NAPOMENA
u Akumulatorski paket
bilo kom trenutku bez skraćenja njegovog
veka trajanja.
u Prekid procesa punjenja ne oštećuje
akumulatorski paket
¾ Napunite akumulatorski paket
korišćenja ako je stanje njegovog punjenja
srednje ili nisko.
možete puniti u
5
.
5
pre
5
68 RS

¾ LED‑indikatori punjenja (zelena 20 i crvena
) obaveštavaju o statusu punjača 18 i
21
akumulatorskog paketa
LED Stanje
Svetli crveni LED Akumulatorski
Svetli zeleni LED Akumulatorski
Trepte zeleni i crveni
LED
Crveni LED trepti Akumulatorski
Svetli zeleni LED
(bez akumulatorskog
paketa)
¾ Stavite akumulatorski paket
¾ Stavite priključni kabl sa mrežnim utikačem
punjača 18 u utičnicu.
19
¾ Kada je akumulatorski paket
napunjen: Izvadite akumulatorski paket iz
punjača
punjača sa mrežnim utikačem
. Zatim izvucite priključni kabl
18
:
5
paket se puni
paket je potpuno
napunjen
Akumulatorski
paket je
neispravan
paket je suviše
hladan ili suviše
topao
Punjač je spreman
u punjač 18.
5
potpuno
5
iz utičnice.
19
Stavljanje/skidanje pomoćne
ručke
(sl. E)
NAPOMENA
u Proizvod se može koristiti samo sa
montiranom pomoćnom ručkom
.
6
Podešavanje štitnika
(sl. F)
UPOZORENJE!
m
Pre podešavanja štitnika za brušenje
: Isključite proizvod. Izvadite
8
akumulatorski paket
da biste sprečili nenamerno pokretanje
proizvoda. Ostavite da se proizvod
ohladi pre nego što sprovedete
podešavanja!
OPREZ! OPASNOST OD POVREDE!
m
Nosite zaštitne rukavice. Pazite pri
rukovanju štitnikom za brušenje
postoji opasnost od drobljenja između
štitnika i diska.
NAPOMENA
u Proizvodom možete da upravljate samo
ako je montiran štitnik.
¾ Podesite štitnik za brušenje
varnice ili odvojeni delovi ne udare ni
korisnika ni osobe koje se nalaze u blizini.
¾ Položaj štitnika za brušenje
takav da se varnicom zapaljivi delovi, čak i
ako leže uokolo, ne zapale.
¾ Okrenite štitnik za brušenje
položaj. Klema mora da se zakači za jednu
od reza na štitniku.
iz proizvoda
5
tako da
8
mora biti
8
u željeni
8
jer
8
¾ Zavrnite pomoćnu ručku
pomoćne ručke
sa leve (a), desne (b) ili gornje (c) strane
proizvoda.
koji odgovara navoju
2
na navoj
6
69 RS

Promena štitnika
NAPOMENA
u Za brusno rezanje morate da demontirate
priloženi štitnik za brušenje
štitnik za brusno rezanje koji je posebno
dostupan.
u Ovaj štitnik mora da bude pogodan
za brusno rezanje i može da se naruči
preko naše korisničke službe (šifra artikla
HG03642).
i montirate
8
¾ Ponovo umetnite potpornu prirubnicu
priključnu opremu i zateznu prirubnicu
Postupite po obrnutom redosledu.
NAPOMENA
u U pomoćnoj ručki
stezne glave
da se koristi (zajedno sa jezičkom za
zatezanje) za olabavljenje ili zatezanje
zatezne prirubnice
je smešten ključ
6
. Ključ stezne glave može
7
.
12
11
12
,
:
UPOZORENJE!
m
Pre zamene štitnika za brušenje
: Isključite proizvod. Izvadite
8
akumulatorski paket
da biste sprečili nenamerno pokretanje
proizvoda. Ostavite da se proizvod
ohladi pre nego što sprovedete
podešavanja!
¾ Pritisnite i zadržite dugme za zaključavanje
osovine
i okrenite ga u smeru suprotnom kretanju
kazaljke na satu. Olabavite dugme za
zaključavanje osovine (sl. G).
¾ Uklonite priključnu opremu (ako je
montirana) i potpornu prirubnicu
¾ Olabavite 3 zavrtnja sa poklopca sa klemom
13
da se ukloni. Zavrtnje nije potrebno olabaviti
(sl. I).
¾ Postavite novi štitnik. Klema mora da se
zakači za jednu od reza na štitniku. Ponovo
dobro zategnite 3 zavrtnja.
¾ Proverite da li se može podesiti štitnik (sl. F).
. Podignite jezičak za zatezanje
1
sve dok štitnik za brušenje 8 ne može
iz proizvoda
5
11
(sl. H).
Stavljanje/vađenje priključne
opreme
UPOZORENJE!
m
Isključite proizvod, izvadite
akumulatorski paket
proizvod ohladi pre nego što izvršite
bilo kakva podešavanja!
OPREZ! OPASNOST OD POVREDE!
m
u Držite ruke dalje od priključne opreme dok
je proizvod u pogonu.
OPREZ! OPASNOST OD POVREDE!
m
u Nakon isključivanja proizvoda, priključna
oprema se još neko vreme pomera.
Nemojte dodirivati priključnu opremu koja
se pomera i ne zaustavljajte je.
UPOZORENJE!
m
u Nemojte nikada aktivirati dugme za
zaključavanje osovine
i dalje okreće!
10
u Smer strelice na priključnoj opremi mora
da se podudara sa smerom strelice za
pravac okretanja (
i ostavite da se
5
, dok se osovina
1
ili 14).
9
70 RS

OPREZ! OPASNOST OD POVREDE!
m
u Koristite samo priključnu opremu koju
preporučuje proizvođač. Korišćenje
druge priključne opreme i ostalog pribora
može za vas da predstavlja opasnost od
povreda.
u Koristite samo priključnu opremu koja
sadrži podatke o proizvođaču, vrsti
povezivanja, dimenzijama i dozvoljenom
broju obrtaja.
u Koristite samo priključnu opremu na kojoj
je štampana brzina okretanja koja je u
najmanjoj meri veća od navedene na
tipskoj pločici proizvoda.
u Nemojte koristiti slomljenu, napuklu ili na
drugi način oštećenu priključnu opremu.
u Koristite samo priključnu opremu koja je
bez nedostataka.
u Proverite da li dimenzije priključne opreme
odgovaraju proizvodu.
u Nemojte ponovo bušiti rupu‑vođicu za
priključnu opremu ako je rupa premala.
u Nemojte koristiti zasebne reduktore ili
adaptere da biste postavili diskove sa
velikom rupom.
u Zaštitite ploče ili radni komad da
biste izbegli opasnost od povratnog
udara usled zaglavljivanja diska. Veliki
radni komadi mogu da se saviju pod
sopstvenom težinom. Radni komad mora
biti zaštićen sa obe strane diska, kako u
blizini reznog diska tako i na ivici.
¾ Olabavite zateznu prirubnicu
i zadržite dugme za zaključavanje osovine
. Podignite jezičak za zatezanje i okrenite
1
ga u smeru suprotnom kretanju kazaljke na
satu. Olabavite dugme za zaključavanje
osovine (sl. G).
¾ Ako je potrebno, uklonite već instaliranu
priključnu opremu.
¾ Umetnite novu priključnu opremu u potpornu
prirubnicu
¾ Obezbedite priključnu opremu: Pritisnite i
zadržite dugme za zaključavanje osovine
. Podignite jezičak za zatezanje. Okrenite
1
zateznu prirubnicu
kazaljke na satu. Olabavite dugme za
zaključavanje osovine.
11
(sl. H).
12
u smeru kretanja
: Pritisnite
12
Uključivanje i isključivanje
OPREZ! OPASNOST OD POVREDE!
m
Uvek nosite zaštitne rukavice kada
rukujete proizvodom i radite njime.
OPREZ! OPASNOST OD POVREDE!
m
u Tokom rada uvek čvrsto držite proizvod sa
obe ruke (sl. J).
OPREZ! OPASNOST OD POVREDE!
m
u Držite ruke dalje od priključne opreme dok
je proizvod u pogonu.
OPREZ! OPASNOST OD POVREDE!
m
u Nakon isključivanja proizvoda, priključna
oprema se još neko vreme pomera.
Nemojte dodirivati priključnu opremu koja
se pomera i ne zaustavljajte je.
71 RS

OPREZ! OPASNOST PO ZDRAVLJE!
m
u Nije dozvoljeno obrađivanje materijala
koji sadrže azbest. Smatra se da je azbest
kancerogen.
¾ Uključivanje: Pritisnite nadole zadnji kraj
prekidača za uključivanje/isključivanje
gurnite ga prema napred (sl. K, 1 i 2).
Neprekidan rad: Nagnite nadole prednji
kraj prekidača za uključivanje/isključivanje
dok se ne zaključa (sl. K, 3).
3
¾ Isključivanje: Pritisnite zadnji kraj
prekidača za uključivanje/isključivanje
tako da skoči nazad u položaj isključeno.
Probni rad
NAPOMENA
u Sprovedite probni rad bez opterećenja pre
prvih radova i nakon promene priključne
opreme. Odmah isključite proizvod ako
priključna oprema neravnomerno radi, ako
postoje značajne vibracije ili ako se čuje
abnormalan zvuk.
Napomene za rad
Brušenje
UPOZORENJE!
m
u Nikada nemojte koristiti rezni disk za
brušenje!
¾ Držite proizvod pod uglom od 10 do 15°
za lako rukovanje i dobre rezultate brušenja.
¾ Ravnomerno pritisnite brusni disk na radnu
površinu za maksimalnu efikasnost brušenja.
Nikada nije potrebno da proizvod koristite
primenjujući veću silu. Težina proizvoda
stvara dovoljan pritisak.
¾ Preveliki pritisak opterećuje motor, usporava
i
3
proces brušenja, vrši opasan pritisak na
brusni disk i uzrokuje oštećenja.
¾ Ravnomerno pomerajte proizvod napred‑
nazad.
Žičane četke
3
UPOZORENJE!
m
u Nemojte koristiti četku koja je oštećena ili
nije balansirana. Korišćenje oštećene četke
može da poveća verovatnoću nastanka
povreda usled kontakta sa slomljenim
žicama četke.
¾ Izbegavajte da vršite prevelik pritisak jer on
previše savija žice i dovodi do prevremenog
oštećenja.
¾ Radite sa umerenim pohranjivanjem u skladu
sa materijalom koji se obrađuje.
¾ Izbegavajte poskakivanje i kidanje žičane
četke, naročito kada radite na uglovima,
oštrim ivicama, itd. To može dovesti do
gubitka kontrole i povratnog udara.
Brusno rezanje
UPOZORENJE!
m
u Nikada nemojte koristiti brusne diskove
za sečenje! Za brusno rezanje sme da
se koristi proizvod sa diskom za brusno
rezanje na koji je montiran štitnik.
72 RS

¾ Mogu se koristiti samo testirani, sa vlaknima
ojačani rezni ili brusni diskovi.
¾ Uvek radite blago pomerajući unapred. Na
radni komad vršite samo umereni pritisak.
¾ Uvek radite u suprotnom smeru, na taj način
proizvod neće biti nekontrolisano izbačen
iz reza.
NAPOMENA
u Nemojte koristiti hemijska, alkalna,
abrazivna ili druga agresivna sredstva
za čišćenje ili dezinfekciju da biste očistili
proizvod, jer time možete da oštetite
površinu.
Čišćenje i održavanje
UPOZORENJE!
m
Isključite proizvod, izvadite
akumulatorski paket
proizvod ohladi, pre nego što izvršite
bilo kakav pregled, održavanje ili
čišćenje!
i ostavite da se
5
Čišćenje
¾ Vodite računa da nikakva tečnost ne prodre
u unutrašnjost proizvoda.
¾ Održavajte proizvod čistim, suvim i bez
mrlja od ulja ili masti. Uklonite prašinu nakon
svakog korišćenja i pre skladištenja.
¾ Redovno pravilno čišćenje omogućuje
bezbedno korišćenje i produžava životni vek
proizvoda.
¾ Čistite proizvod suvom krpom. Za teško
dostupna mesta koristite mekanu četku.
¾ Krpom i mekom četkom uklonite tvrdokornu
prljavštinu i prašinu iz ventilacionog otvora.
¾ Otvori za ventilaciju moraju uvek biti
slobodni.
Održavanje
¾ Proizvod ne zahteva nikakvo održavanje.
¾ Pre i nakon svake upotrebe pregledajte da
li su proizvod i dodatna oprema (kao što je
priključna oprema) pohabani i oštećeni. Ako
je potrebno, zamenite ih novima, kao što
je opisano u ovom uputstvu za korišćenje.
Pridržavajte se tehničkih zahteva (videti
„Tehnički podaci“).
Popravka
U unutrašnjosti ovog proizvoda se ne nalaze
nikakvi delovi koje bi korisnik mogao da popravi.
Stupite u kontakt sa kvalifikovanim stručnjakom da
biste pregledali i popravili proizvod.
Skladištenje
¾ Isključite proizvod.
¾ Očistite proizvod kao što je gore opisano.
¾ Čuvajte proizvod i njegovu dodatnu opremu
na mračnom, suvom, od rđe zaštićenom i
dobro provetrenom mestu.
¾ Uvek čuvajte proizvod na mestu koje je
nedostupno za decu. Optimalna temperatura
za dugotrajno odlaganje (duže od
3 meseca) nalazi se u opsegu između +20 i
+26 °C.
¾ Čuvajte proizvod u koferu za transport
¾ Brusni diskovi moraju biti suvi i skladišteni
uspravno, nikada naslagani.
22
.
73 RS

Napomene za akumulatorski paket
¾ Čuvajte akumulatorski paket
u delimično napunjenom stanju. Tokom
dugotrajnog skladištenja stanje napunjenosti
mora da se nalazi u opsegu od 40 do
60 % (svetle crveni i narandžasti LED stanja
napunjenosti
¾ Tokom dužeg perioda skladištenja, proverite
stanje napunjenosti akumulatorskog paketa
približno na svaka 3 meseca. Napunite
5
po potrebi.
17
).
5
samo
Transport
¾ Isključite proizvod.
¾ Transportujte proizvod u koferu za transport
.
22
¾ Zaštitite proizvod od udaraca i jakih vibracija
koje se javljaju naročito tokom transporta u
vozilima.
¾ Obezbedite proizvod od klizanja i
prevrtanja.
Odlaganje
Pakovanje se sastoji od ekološki prihvatljivih
materijala koje možete odlagati na lokalnim
mestima za reciklažu.
Obratite pažnju na označavanje
materijala za pakovanje pri odvajanju
otpada, koji je označen skraćenicama
(a) i brojevima (b) sa sledećim
značenjem: 1 – 7: plastika / 20 – 22:
papir i karton / 80 – 98: mešavine.
Proizvod i materijali za pakovanje se
mogu reciklirati, odvojeno ih odložite
radi bolj obrade otpada.
Logotip‑Triman važi samo za Francusku.
Mogućnosti za uklanjanje iskorišćenog
proizvoda možete saznati u vašoj
opštinskoj ili gradskoj upravi.
U interesu zaštite životne sredine
nemojte bacati vaš proizvod kada
je iskorišćen kućnom otpadu, nego
ga ponesite na odgovarajuće mesto
za odlaganje otpada. Informacije o
mestima za sakupljanje i njihovom
radnom vremenu možete dobiti u vašoj
lokalnoj administraciji.
Neispravne ili istrošene baterije / akumulatori
se moraju dati na reciklažu shodno smernici
2006/66/EG i njenim izmenama. Vratite
baterije / akumulatore i / ili proizvod na
navedene depoe.
Štete po okolinu pogrešnim
odlaganjem baterija /
akumulatora!
Pre odlaganja proizvoda uklonite baterije /
pakovanje baterija iz proizvoda.
Lidl i proizvođač nisu u mogućnosti da garantuju
obezbeđivanje servisiranja i dostupnost rezervnih
delova nakon isteka garantog perioda/ perioda
saobraznosti. Ukoliko za tim bude potrebe,
putem naše Službe za potrošače možete proveriti
dostupnost rezervnih delova i opcije za popravku.
Hvala na razumevanju.
Kako izjaviti reklamaciju?
Molimo Vas:
¾ da pozovete korisnički servis:
0800‑300‑180
¾ pošaljete e‑mail na:
owim@lidl.rs
¾ posetite najbližu Lidl prodavnicu.
Da bismo osigurali najbržu asistenciju, molimo da
sačuvate fiskalni račun i date ga na uvid prilikom
izjavljivanja reklamacije.
74 RS

GARANCIJA I GARANTNI LIST
Poštovani,
Ovim putem Vas upoznajemo sa Vašim pravima
i obavezama koje proističu iz Zakona o zaštiti
potrošača, a u pogledu ostvarivanja prava iz
garancije.
Ova garancija ni na koji način ne utiče, niti
isključuje prava koja kupac ima u skladu sa
važećim Zakonom o zaštiti potrošača po
osnovu zakonske odgovornosti prodavca za
nesaobraznost robe ugovoru koja traje 2 godine
od dana kada je roba predata kupcu.
Davalac garancije ovom izjavom preuzima
obavezu da kupcima svojih aparata, a pod
uslovima definisanim u ovoj izjavi, obezbedi:
¾ besplatno otklanjanje kvarova u garantnom
roku, koji bi nastali kod uobičajene upotrebe
ili zbog grešaka u proizvodnji i materijalu, ili
¾ zamenu aparata, u garantnom roku
predviđenim ovom garancijskom izjavom, u
slučaju da opravka nije moguća, ili
¾ ako otklanjanje kvara nije moguće, kupac
ima pravo da zahteva od prodavca povrat
novca.
Ukupan rok garancije je 5 godine.
Garantni rok počinje da važi od datuma kupovine
proizvoda, odnosno od prijema istog od strane
kupca, a što se dokazuje fiskalnim računom.
Garancija važi na teritoriji Republike Srbije.
Kupac može da izjavi reklamaciju usmeno u
nekom od prodajnih objekata Lidl Srbija KD,
odnosno telefonom, pisanim putem ili elektronskim
putem na kontakte kompanije Lidl Srbija KD, uz
dostavu fiskalnog računa na uvid.
U cilju ispravnog funkcionisanja proizvod se koristi
u skladu sa njegovom namenom i Uputstvom za
upotrebu.
Na zahtev kupca, koji je izjavljen u garantnom
roku, prodavac će izvršiti otklanjanje kvarova i
nedostataka na proizvodu u roku predviđenom
Zakonom.
Garantni uslovi:
Pre obraćanja prodavcu za tehničku pomoć,
potrebno je proveriti ispravnost instalacije i ostalih
potrebnih uslova naznačenih u Uputstvu za
upotrebu.
Kupac je dužan da prodavcu preda sve
pripadajuće delove proizvoda koje je preuzeo u
trenutku kupovine.
Popravke u roku garancije:
Garancija važi počev od dana kada je roba
predata kupcu, a na osnovu fiskalnog odsečka.
U istom periodu davalac garancije, odnosno
prodavac je u obavezi da otkloni sve tehničke
kvarove bez naknade, u zakonskom roku.
Garancija ne važi u sledećim
slučajevima:
1. Ukoliko prodavcu uz aparat nije priložen
fiskalni račun sa datumom prodaje.
2. Ukoliko je kvar prouzrokovan udarom groma,
strujnim udarom ili sličnim delovanjem spoljne
sile na sam uređaj (požar, poplava, naponski
udar...).
3. Ukoliko su nastali kvarovi i oštećenja na
uređaju posledica delovanja spoljnih uticaja,
kao što su: velika vlaga, previsoka i suviše
niska temperatura (pucanje cevi usled
smrzavanja, oštećenja gumenih delova,
rđanje, itd.)
4. Ukoliko proizvod nije korišćen u skladu sa
Uputstvom za upotrebu.
5. Ukoliko je proizvod pokušalo da popravi
treće neovlašćeno lice.
6. Ukoliko proizvod nije korišćen u skladu sa
namenom.
7. Ukoliko je čišćenje i održavanje uređaja
urađeno protivno Uputstvu za upotrebu.
8. Ukoliko je proizvod korišćen u profesionalne
svrhe.
75 RS

Naziv proizvoda: Aku ugaona brusilica 20 V
Model: HG05465
IAN / Serijski broj:
322689_1901
Proizvođač: OWIM GmbH & Co. KG
Stiftsbergstraße 1
74167 Neckarsulm
Nemačka
Davalac
garancije‑uvoznik:
Lidl Srbija KD
Prva južna radna 3
22330 Nova Pazova
Republika Srbija
Tel. 0800‑300‑180
E‑mail: kontakt@lidl.rs
Datum predaje
robe potrošaču:
datum sa fiskalnog računa
Uvozi i stavlja u
promet:
Lidl Srbija KD
Prva južna radna 3
22330 Nova Pazova
Republika Srbija
Tel. 0800‑300‑180
E‑mail: kontakt@lidl.rs
Za ovaj akumulatorski paket dobijate 1 godinu
garancije od datuma kupovine.
Servis
Servis Srbija
Tel.: 0800‑300‑180
E‑Mail: owim@lidl.rs
Srpska oznaka usaglašenosti
Postupak garancije
Da biste osigurali brzo obradu vašeg slučaja,
molimo vas da pratite sledeća uputstva:
Molimo vas da priložite račun i broj artikla (npr.
IAN 123456_7890) kao dokaz o kupovini.
Broj artikla ćete naći na tipskoj pločici, kao
gravuru na prednjoj strani uputstva (dole levo) ili
kao nalepnicu na zadnjoj ili donjoj strani uređaja.
Ukoliko dođe do funkcionalnih ili drugih
nedostataka, molimo vas da kontaktirate službu
za pomoć telefonom ili e‑mailom.
Neispravan proizvod možete vratiti besplatno na
adresu servisa koju ste dobili. Uverite se da ste
priložili dokaz o kupovini (dok ga ne dobijete)
i informacije o tome šta je kvar i kada se to
dogodilo.
76 RS

EC izjava o usaglašenosti
77 RS

Използвани предупредителни указания и символи ............ Страница 79
Увод ............................................................... Страница 79
Употреба по предназначение . . . . . . . . . . . . . . . . . . . . . . . . . . . . . . . . . . . . . . . . . Страница 79
Обем на доставката ................................................Страница 80
Описание на частите ................................................ Страница 80
Технически данни ...................................................Страница 80
Указания за безопасност . . . . . . . . . . . . . . . . . . . . . . . . . . . . . . . . . . . . . . . . . Страница 82
Общи указания за безопасност за електрически инструменти ..............Страница 82
Инструкции за безопасност при шлайфане.............................. Страница 85
Указания за безопасност за ъглошлайф ................................ Страница 85
Намаляване на вибрациите и шума.................................... Страница 90
Поведение при злополуки ............................................ Страница 91
Остатъчни рискове.................................................. Страница 91
Указания за безопасност за зарядни устройства ......................... Страница 92
Преди първата употреба......................................... Страница 93
Принадлежности.................................................... Страница 93
Работа ............................................................. Страница 93
Изваждане/поставяне на акумулаторен пакет........................... Страница 93
Проверка на състоянието на зареждане на акумулаторния пакет ........... Страница 93
Зареждане на акумулаторен пакет ....................................Страница 93
Поставяне/премахване на допълнителната дръжка....................... Страница 94
Настройване на предпазителя ........................................ Страница 94
Смяна на предпазителя.............................................. Страница 95
Поставяне/изваждане на работен инструмент........................... Страница 95
Включване и изключване............................................. Страница 96
Пробно пускане .................................................... Страница 97
Указания за работа............................................... Страница 97
Шлайфане ........................................................ Страница 97
Работа с телена четка ...............................................Страница 97
Абразивно рязане .................................................. Страница 97
Почистване и грижи............................................... Страница 98
Почистване ........................................................ Страница 98
Поддръжка ........................................................Страница 98
Ремонт ............................................................Страница 98
Съхранение ....................................................... Страница 98
Транспортиране ....................................................Страница 99
Изхвърляне........................................................Страница 99
Гаранция ..........................................................Страница 99
ЕО Декларация за съответствие.................................. Страница 103
78 BG

Използвани предупредителни указания и символи
В това ръководство за употреба, върху опаковката и върху табелата за тип се използват
следните предупредителни указания:
Изключвайте продукта и го отделяйте
Прочетете ръководството за
употреба.
Обърнете внимание на
предупрежденията и указанията за
безопасност!
Използвайте продукта само в сухи
закрити помещения.
Носете предпазни ръкавици! Пазете акумулаторния пакет от огън.
Носете защита за слуха! Клас на защита II (двойна изолация)
Носете защитни очила!
от акумулаторния пакет преди смяна
на принадлежности, почистване и
когато той не се използва.
Пазете акумулаторния пакет от
горещина и от продължителна, силна
макс. 45°C
слънчева светлина.
Пазете акумулаторния пакет от вода
и влага.
Променлив ток
Постоянен ток
T3.15A
Миниатюрен предпазител
АКУМУЛАТОРЕН ЪГЛОШЛАЙФ
20 V PWSAP 20-Li B2
Увод
Поздравяваме Ви с покупката на този нов
продукт. Вие избрахте висококачествен
продукт. Ръководството за експлоатация е част
от този продукт. То съдържа важни указания
за безопас¬ност, употреба и изхвърляне.
Преди употребата на продукта се запознайте
с всички инструкции за обслужване и
безопасност. Използвайте продукта само
съгласно описанието и за посочените области
на употреба. Когато предавате продукта на
трети лица, предавайте заедно с него и всички
документи.
Употреба по
предназначение
Този акумулаторен ъглошлайф (наричан
по–долу „продукт“ или „електрически
инструмент“) е предназначен за
¾ абразивно рязане,
¾ сухо шлайфане на метал/бетон/плочки и
¾ телени четки от метали.
Продуктът не е предназначен да се използва
за други употреби (например, шлайфане
с неподходящи абразивни инструменти,
шлайфане с охлаждаща течност, шлайфане
или рязане на опасни материали, като азбест),
както е описано тук.
79 BG

Продуктът не е подходящ за шлифоване с
шкурка и полиране.
Абразивно рязане: За тази цел трябва да
се монтира допълнителен предпазител.
Предпазителят може да бъде поръчан от
нашата сервизна служба (номер на артикул
HG03642).
Винаги използвайте работни инструменти,
отговарящи на употребата по предназначение!
При закупуването и употребата на работни
инструменти съблюдавайте техническите
изисквания на продукта (вижте „Технически
данни“).
Други начини на употреба или изменения
на продукта се считат за употреба не по
предназначение и могат да доведат до
рискове като опасност за живота, наранявания
и повреди. Производителят не поема
отговорност за възникнали щети в резултат
на неправилна употреба. Продуктът не е
предназначен за професионална употреба
или за други области на приложение.
Обем на доставката
ПРЕДУПРЕЖДЕНИЕ!
m
u Продуктът и опаковъчните материали не
са детска играчка! Децата не бива да
играят с найлонови торбички, фолио и
дребни части! Съществува опасност от
поглъщане и задушаване!
1 x Акумулаторен ъглошлайф 20 V
PWSAP 20‑Li B2
1 x допълнителна дръжка
1 x предпазител за шлифоване
(предварително монтиран) *
1 x ключ за затягане (съхраняван в
допълнителната дръжка)
1 x Акумулаторен пакет PAP 20 A3
1 x Бързо зарядно устройство PLG 20 B1
1 x Куфар за носене
1 x Ръководство за употреба
* Предпазител за рязане няма да бъде
доставен, но може да бъде поръчан от
нашата сервизна служба.
Описание на частите
Фигура A:
Бутон за блокиране на шпиндела
1
Резба на допълнителна дръжка
2
Превключвател за включване/изключване
3
Ръкохватка
4
Акумулаторен пакет
5
Допълнителна дръжка (с място за
6
съхранение на ключ за затягане)
Ключ за затягане
7
Предпазител за шлифоване
8
Стрелка за посока на въртене (върху
9
предпазителя)
Шпиндел
10
Опорен фланец
11
Затягащ фланец (с език за закрепване)
12
Капак със скоба
13
Стрелка за посока на въртене (върху
14
ъглошлайфа)
Фигура B:
Акумулаторен пакет
5
Бутон за освобождаване на
15
акумулаторния пакет
Бутон (състояние на зареждане)
16
Светодиоди за състояние на зареждане
17
(червен/оранжев/зелен)
Фигура C:
Зарядно устройство (бързо зарядно
18
устройство)
Свързващ проводник с мрежов щепсел
19
Светодиод за контрол на заряда – Зелен
20
Светодиод за контрол на заряда – Червен
21
Без изображение:
Куфар за носене
22
Технически данни
Акумулаторен
ъглошлайф
Номинално напрежение: 20 V
Номинални обороти n: 10000 min
Диаметър на работен
инструмент: Ø 125 мм
Дебелина на диска: макс. 8 мм
Резба на шпиндела: M14
PWSAP
20-Li B2
–1
80 BG

Акумулаторен пакет PAP 20 A3
Тип: Литиево‑йонен
Номинално напрежение: 20 V
макс.
Капацитет: 4 Ah
Енергийна стойност: 72 Wh
Брой акумулаторни клетки: 10
Бързо зарядно
PLG 20 B1
устройство
Вход:
Номинално напрежение: 230–240 V∼
Номинална честота: 50 Hz
Номинална мощност: 120 W
Изход:
Номинално напрежение: 21,5 V
Ток за зареждане: 4,5 A
Клас на защита:
Предпазител (вътрешен):
II /
3,15 A /
Време за зареждане:
¾ Акумулаторен пакет тип PAP 20 A3, 4,0 Ah
(включен в доставката): 60 минути
¾ Акумулаторен пакет тип PAP 20 A1, 2,0 Ah
(предлага се отделно): 45 минути
Препоръчителна околна
температура:
По време на зареждане: +4 до +40 °C
По време на работа: +4 до +40 °C
По време на съхранение: +20 до +26 °C
Стойности на шумови емисии
Измерените стойности са определени съгласно
EN 60745. Оцененото с A ниво на шум на
електрическия инструмент в типичния случай
възлиза на:
Ниво на звуково налягане L
Неопределеност K
: 3 dB
pA
Ниво на звукова мощност L
Неопределеност K
: 3 dB
WA
: 81,6 dB(A)
pA
: 92,6 dB(A)
WA
Стойности на емисии на вибрации
Общи стойности на вибрации (векторна
сума от трите посоки), определени съгласно
EN 60745:
Основна дръжка:
Вибрации ръка–рамо a
: 4,27 m/s²
h,AG
Неопределеност K: 1,5 m/s²
Допълнителна дръжка:
Вибрации ръка–рамо a
: 5,31 m/s²
h,AG
Неопределеност K: 1,5 m/s²
Посочените стойности се отнасят за
повърхностно шлайфане. Други приложения
може да имат различни стойности на емисиите
на вибрации.
ПРЕДУПРЕЖДЕНИЕ!
m
Носете защита за слуха!
УКАЗАНИЕ
u Посочената обща стойност на емисии
на вибрации и посочената стойност
на шумови емисии са измерени по
стандартен метод на изпитване и могат
да бъдат използвани за сравнение на
един електрически инструмент с друг.
u Посочената обща стойност на вибрации
и посочената стойност на шумови
емисии могат да бъдат използвани
също и за предварително оценяване на
натоварването.
81 BG

ПРЕДУПРЕЖДЕНИЕ!
m
u Емисиите на вибрации и шумовите
емисии по време на действителната
употреба на електрическия инструмент
могат да се различават от посочените
стойности, в зависимост от начина,
по който електрическият инструмент
се използва, особено от вида на
обработвания детайл.
Опитайте се да поддържате
натоварването от вибрации и шум
възможно най‑минимално. Примерни
мерки за намаляване на натоварването
от вибрации са носенето на ръкавици
при употребата на инструмента и
ограничаване на времето на работа.
При това трябва да се вземат под
внимание всички части на работния
цикъл (например времената, през които
електрическият инструмент е изключен,
както и тези, в които той е включен, но
работи без натоварване).
Указания за
безопасност
Общи указания за
безопасност за електрически
инструменти
ПРЕДУПРЕЖДЕНИЕ!
m
u Прочетете всички
указания за безопасност
и инструкции. Пропуски при
спазването на указанията за
безопасност и инструкциите могат да
предизвикат токов удар, пожар и/или
тежки наранявания!
Запазете всички указания за
безопасност и инструкции за бъдещи
справки.
Използваният в инструкциите за безопасност
термин електроинструмент се отнася за
електрически задвижваните инструменти
(със захранващ кабел) за акумулаторните
електроинструменти (без мрежов кабел).
Безопасност на работното място
1) Поддържайте Вашето работно
пространство чисто и добре
осветено. Безпорядъкът или
неосветените работни пространства могат
да доведат до злополуки.
2) Не работете с електрическия
инструмент във взривоопасна
среда, в която се намират
запалими течности, газове или
прахове. Електрическите инструменти
създават искри, които могат да
възпламенят праха или изпаренията.
3) Дръжте деца и други лица далеч
по време на използване на
електрическия инструмент. При
разсейване можете да загубите контрол
върху електрическия инструмент.
Безопасност при работа с
електрически ток
1) Щепселът за свързване на
електрическия инструмент трябва
да отговаря на контакта. Щепселът
не бива да се променя по никакъв
начин. Не използвайте адаптерни
щепсели заедно с електрически
инструменти с предпазно
заземяване. Непроменени щепсели и
подходящи контакти намаляват риска от
токов удар.
82 BG

2) Избягвайте телесен контакт
със заземени повърхности като
тръби, отоплителни тела, печки
и хладилници. Съществува повишен
риск от токов удар, когато Вашето тяло е
заземено.
3) Пазете електрическите
инструменти от дъжд или
влага. Проникването на вода в
електрически инструмент повишава риска
от токов удар.
4) Не използвайте кабела, за да
носите или окачвате електрическия
инструмент или за да извадите
щепсела от контакта. Пазете
кабела от горещина, масло, остри
ръбове и от движещи се части на
уреда. Повредени или оплетени кабели
увеличават риска от токов удар.
5) Когато работите с електрически
инструмент на открито,
използвайте само удължаващи
кабели, които са подходящи и за
употреба на открито. Използването
на подходящ за употреба на открито
удължаващ кабел намалява риска от
токов удар.
6) Когато употребата на
електрическия инструмент
във влажна среда не
може да бъде избегната,
използвайте дефектнотокова
защита. Използването на
дефектнотокова защита намалява риска
от токов удар.
Безопасност за хората
1) Бъдете внимателни, обръщайте
внимание на това, което
правите, и подхождайте разумно
към работата с електрически
инструмент. Не използвайте
електрически инструменти,
когато сте изморени или сте под
влиянието на упойващи вещества,
алкохол или медикаменти. Момент
невнимание при използването на
електрическия инструмент може да доведе
до сериозни наранявания.
2) Носете лични предпазни средства и
винаги предпазни очила. Носенето
на лични предпазни средства, като
противопрахова маска, устойчиви на
хлъзгане предпазни обувки, предпазна
каска или антифони, в зависимост от
вида и употребата на електрическия
инструмент, намалява риска от
наранявания.
3) Избягвайте неволно включване.
Уверете се, че електрическият
инструмент е изключен,
преди да го свържете към
електрозахранването и/или
акумулатора, преди да го вземете
или носите. Ако при носенето на
електрическия инструмент държите пръста
си върху превключвателя или свържете
към електрозахранването включен уред,
това може да доведе до злополуки.
4) Отстранявайте инструментите за
настройка или гаечните ключове,
преди да включите електрическия
инструмент. Инструмент или ключ,
намиращ се във въртяща се част от уреда,
може да доведе до наранявания.
83 BG

5) Избягвайте неправилна стойка
на тялото. Осигурете си стабилен
стоеж и постоянно пазете
равновесие. Така можете по‑добре да
контролирате електрическия инструмент в
неочаквани ситуации.
6) Носете подходящо облекло. Не
носете широки дрехи или накити.
Дръжте косата, облеклото и
ръкавиците си далеч от движещи
се части. Широки дрехи, накити или
дълги коси могат да бъдат захванати от
движещи се части.
7) Ако можете да инсталирате
оборудване за изсмукване и
събиране на прах, се уверете,
че те са свързани и използвани
правилно. Използването на устройство
за изсмукване на прах може да намали
вредите за здравето поради прах.
Употреба и боравене с електрическия
инструмент
1) Не претоварвайте уреда.
Използвайте подходящия за
Вашата работа електрически
инструмент. С подходящия
електрически инструмент работите по‑
добре и по‑сигурно в посочените граници
на работните му характеристики.
2) Не използвайте електрически
инструмент, чийто прекъсвач е
повреден. Електрически инструмент,
който вече не може да се включва или
изключва, е опасен и трябва да бъде
ремонтиран.
3) Извадете щепсела от контакта и/
или отстранете батерията, преди
да правите настройки по апарата,
да сменяте принадлежности или
да оставите уреда. Тази мярка за
безопасност предотвратява неволното
стартиране на електрическия инструмент.
4) Съхранявайте електрически
инструменти, които не се
използват, на недостъпно за
деца място. Не позволявайте
използване на електрическия
инструмент от лица, които не са
запознати с него или не са прочели
тези инструкции. Електрическите
инструменти са опасни, ако се използват
от неопитни лица.
5) Поддържайте електрическите
инструменти старателно.
Проверявайте дали движещите се
части функционират безупречно
и не заяждат, дали няма счупени
или така повредени части, че да
нарушават функционирането
на електрическия инструмент.
Ремонтирайте повредените части
преди използване на уреда. Много
злополуки са причинени от лошо
поддържани електрически инструменти.
6) Поддържайте режещите
инструменти наточени и
чисти. Грижливо поддържаните режещи
инструменти с остри режещи ръбове се
заклинват по‑малко и се водят по‑лесно.
84 BG

7) Използвайте електрическия
инструмент, принадлежностите,
работните инструменти и т.н.
съгласно тези инструкции. При това
вземайте под внимание условията
на работа и дейността, която
трябва да се извърши. Употребата на
електрически инструменти за различни от
предвидените приложения може да доведе
до опасни ситуации.
Употреба и боравене с акумулаторния
инструмент
1) Зареждайте акумулаторните
батерии само със зарядни
устройства, които са препоръчани
от производителя. Зарядно
устройство, което е подходящо за
определен тип батерия, може да причини
пожар, когато се използва с други
батерии.
2) В електрическите инструменти
използвайте само предвидените
за целта акумулаторни
батерии. Използването на други
акумулаторни батерии може да доведе до
наранявания и опасност от пожар.
3) Дръжте акумулаторната батерия,
която не се използва, далеч
от кламери, монети, ключове,
пирони, винтове или други малки
метални предмети, които биха
могли да причинят късо съединение
на контактите. Късо съединение между
контактите на акумулаторната батерия
може да доведе до изгаряния или пожар.
4) При неправилна употреба от
акумулаторната батерия може
да излезе течност. Избягвайте
контакт с нея. При случаен
контакт изплакнете с вода. Ако
течността попадне в очите,
потърсете допълнителна лекарска
помощ. Излизащата течност от
акумулаторната батерия може да доведе
до раздразнения на кожата или изгаряния.
Сервиз
1) Ремонти по електрическия
инструмент следва да се
извършват само от квалифицирани
специалисти и само с оригинални
резервни части. Така се гарантира,
че безопасността на електрическия
инструмент ще се запази.
Инструкции за безопасност
при шлайфане
ПРЕДУПРЕЖДЕНИЕ!
m
u Прахът от материали като например
съдържаща олово боя, някои дървесни
видове и метали, може да бъде вреден.
u Контактът със или вдишването на тези
видове прах може да представлява
опасност за оператора или за хората в
близост.
ПРЕДУПРЕЖДЕНИЕ!
m
Носете защитни очила и
прахозащитна маска!
Указания за безопасност за
ъглошлайф
Общи инструкции за безопасност при
шлифоване, работа с телени четки,
полиране и абразивно рязане
1) Този електрически инструмент
трябва да се използва като
машина за шлифоване, работа
с телени четки и машина за
абразивно рязане. Спазвайте
всички инструкции за безопасност,
указания, илюстрации и данни,
които получавате с уреда. Ако не
спазвате следните указания, може да се
стигне до токов удар, пожар и / или тежки
травми.
85 BG

2) Този електрически инструмент
не е подходящ за шлифоване с
шкурка и полиране. Употреби, за
които електрическият инструмент не
е проектиран, може да предизвикат
опасности и травми.
3) Не използвайте принадлежности,
които не са предвидени и
препоръчани специално за този
електрически инструмент от
производителя. Дори да можете
да прикачите аксесоар към Вашия
електрически инструмент, това не
гарантира безопасната употреба.
4) Допустимите обороти на
използвания работен инструмент
трябва да са поне толкова
високи, колкото посочените
върху електрическия инструмент
максимални обороти.
Принадлежности, който се въртят по‑бързо
от допустимото, може да да се счупят и да
се разлетят наоколо.
5) Външният диаметър и дебелината
на работния инструмент, който се
поставя, трябва да съответстват на
размерите на Вашия електрически
инструмент. Грешно измерени работни
инструменти не могат да бъдат достатъчно
защитени и контролирани.
6) Работните инструменти с вложка за
резба трябва да се поберат точно
върху резбата на шлифовъчния
шпиндел. При работни
инструменти, монтирани с помощта
на фланец, диаметърът на отвора
на работния инструмент трябва
да съответства на диаметъра
за монтаж на фланеца. Работни
инструменти, които не прилягат точно на
електрическия инструмент и се въртят
неравномерно, вибрират много силно и
може да доведат до загуба на контрол.
7) Не използвайте повредени
работни инструменти. Преди всяко
използване, проверете работните
инструменти, като шлифовъчни
дискове, за разтрошаване и
пукнатини, шлифовъчни тарелки
за пукнатини, износване или
силно изхабяване, телени четки
за свободни или счупени нишки.
В случай, че електрическият
инструмент или работният
инструмент падне, проверете,
дали е повреден, или използвайте
неповреден инструмент. Ако сте
проверили и използвате работния
инструмент, придържайте себе си и
близките хора извън равнината на
въртящия се уред, и го оставете да
работи за 1 минута с максимална
скорост. Повредените работони
инструменти обикновено прекъсват за
този тестов интервал.
8) Носете лични предпазни средства.
В зависимост от приложението,
използвайте маски за лице,
защита за очи или предпазни
очила. При необходимост,
да се носи дихателна маска,
шлемофони, предпазни ръкавици
или престилка, която може да Ви
предпази от малките абразивни
частици на материала. Очите трябва
да са защитени от хвърчащи наоколо
чужди тела, генерирани от съответната
употреба. Противопраховата маска
или респиратора трябва да филтрират
появилият се в процеса на работа прах.
Ако се излагате на продължителен силен
шум, това може да доведе до загуба на
слуха.
86 BG

9) Уверете се, че страничните лица са
на безопасно разстояние от зоната
на работа. Всеки, който влезе в
работна зона трябва да носи лични
предпазни средства. Фрагменти от
заготовката или от повреден работен
инструмент може да излетят и да причинят
наранявания извън зоната на работа.
10) Дръжте електрическия инструмент
само за изолираните повърхности
при извършване на операции,
при които работният инструмент
може да попадне на скрити
електропроводници. Контактът с
проводник под напрежение може да
зареди и металните части на уреда и да
предизвика токов удар.
11) Никога не оставяйте електрическия
инструмент, преди използвания
работният инструмент да е
спрял окончателно. Въртящият се
работен инструмент може да влезе в
контакт с опорната повърхност, което
да предизвика загуба на контрол над
електрическия инструмент.
12) Не оставяйте електрическия
инструмент да работи, докато
го носите. Облеклото Ви може да
се захване от въртящия се работен
инструмент, и инструментът да пробие
тялото Ви.
13) Редовно почиствайте
вентилационните отвори на
електрическия инструмент.
Вентилаторът на двигателя привлича прах
в корпуса, а силното акумулиране на
метален прах може да създаде опасност
за токов удар.
14) Не използвайте електрическия
инструмент в близост до
леснозапалими материали. Искрите
може да подпалят тези материали.
15) Не използвайте работни
инструменти, които изискват течни
охлаждащи средства. Използването
на вода или други течни охлаждащи
течности може да доведе до токов удар.
Допълнителни инструкции за
безопасност за обща употреба —
обратен тласък и подходящи мерки за
безопасност:
Обратният тласък е внезапната реакция на
засичащ или блокиращ въртящ се работен
инструмент, при което шлифовъчния диск,
тарелка, телена четка и др. засичат или
блокират и причиняват рязко спиране на
въртящия се работен инструмент. Това
ускорява неконтролируемия електрически
инструмент в посока, срещуположна на
посоката на въртене на работния инструмент в
точката на блокажа.
Например, при блокиране или закачане на
шлифовъчния диск в заготовката, ръба на
шлифовъчния диск може да захване детайла
и по този начин да разруши колело или да
предизвика обратен тласък. Шлифовъчния
диск след това се премества към оператора
или навън, в зависимост от посоката на
въртене на диска на мястото на блокаж. При
това шлифовъчните дискове могат и да се
счупят.
Обратният тласък е резултат от неправилно
или погрешно използване на електрическия
инструмент. Това може да се предотврати като
се вземат предпазни мерки, както е описано
по‑долу.
87 BG

1) Дръжте електрическия инструмент
здраво и позицията на тялото и
ръката в положение, при което
можете да контролирате силата
на обратния тласък. Винаги
използвайте допълнителната
дръжка, ако е осигурена, за да
имате максимален контрол върху
обратния тласък или реакционния
момент по време на стартиране.
Чрез подходящи предпазни мерки,
операторът може да контролира
възвратния ход и реакционните сили.
2) Никога не поставяйте ръката си
в близост до въртящи се работни
инструменти. Използваният работен
инструмент може да се премести над
ръката Ви при обратен тласък.
3) Избягвайте да навлизате в
сектора, в който се придвижва
електрическия инструмент при
обратен тласък. Обратният тласък
премества електрическия инструмент в
посока противоположна на движението на
шлифовъчния диск в проблемната точка.
4) Работете много предпазливо
в ъглите, острите ръбове и т.н.
Избягвайте отскачането на
работните инструменти назад
и заклещването им. Въртящите се
работни инструменти имат склонност да
се накланят в ъгли, остри ръбове или при
сблъсък, да се заклещват. Това води до
загуба на контрол или обратен тласък.
5) Да не се използват вериги или
назъбен режещ диск. При употреба
на такива работни инструменти създават
често обратен тласък и загуба на контрол
над електрическия инструмент.
Специални инструкции за безопасност
при шлифоване и абразивно рязане
1) Използвайте само шлифовъчни
компоненти, одобрени за
използване с Вашия електрическия
инструмент и предпазен капак,
предназначен за този шлифовъчен
компонент. Шлифовъчни компоненти,
които не са предвидени за същия
електрически инструмент, не са
достатъчно адекватни и поради това са
несигурни.
2) Въртящите се шлифовъчни дискове
трябва да бъдат монтирани така,
че шлифовъчната повърхност
да не излиза над равнината на
ръба на предпазителя. Неправилно
монтиран шлифовъчен диск, който
се подава зад равнината на ръба на
предпазителя, не може да бъде предпазен
адекватно.
3) Предпазният капак трябва да
бъде здраво прикрепен към
електрическия инструмент и да
бъде гарантирано най-високо
ниво на сигурност, така, че наймалката възможна част от диска
да е изложена към оператора.
Предпазният капак помага да защитите
оператора от счупени фрагменти от
диска, случаен контакт с шлифовъчния
компонент и искри, които могат да
възпламенят облеклото.
4) Шлифовъчните компоненти
трябва да се използват само
за препоръчаните сектори на
приложение. Например: Никога
не шлифовайте със страничната
повърхност на режещ диск.
Режещите дискове са предназначени за
отстраняване на материал с ръба на
диска. Странично приложената сила към
тези шлифовъчни компоненти може да ги
разруши.
88 BG

5) Винаги използвайте неповредени
опъващи фланци, които са с
правилния размер и форма
за избрания от шлифовъчен
диск. Подходящият фланец подкрепя
шлифовъчния диск и този начин се
намалява опасността за счупване
на шлифовъчния диск. Фланците за
режещите дискове могат да бъдат
различни от фланците за другите
шлифовъчни дискове.
6) Не използвайте износени
шлифовъчни дискове от поголеми електрически инструменти.
Шлифовъчни дискове, предназначени за
по‑големи електрически инструменти не са
удачни за работа с по‑висока скорост на
по‑малък инструмент и може да се счупят.
Допълнителни специални инструкции
за безопасност при абразивно рязане
1) Избягвайте блокирането на
режещи дискове или твърде
високото контактно налягане.
Не правете прекалено големи
разрези. Претоварването на режещия
диск увеличава натоварването
и податливостта към усукване
или накланяне, и по този начин и
възможността за обратен тласък или
разрушаване на диска.
2) Избягвайте зоната пред и
зад въртящия се режещ диск.
Ако отдалечите режещия диск в
обработваемото изделие от себе си, в
случай на обратен тласък, електрическият
инструмент, заедно с въртящия се диск,
може да да се придвижи директно до Вас.
3) Когато режещият диск се заклещи
или когато прекъсвате работата,
изключете уреда и го задръжте,
докато дискът спре да се върти.
Никога не се опитвайте да
издърпате още работещ режещ
диск от разреза, тъй като това
ще доведе до обратен тласък.
Установете и отстранете причината за
заклещването.
4) Не включвайте повторно
електрическия инструмент,
докато се намира в заготовката.
Първо оставете режещия диск
да достигне пълните си обороти,
преди да продължите предпазливо
разреза. В противен случай, диска може
да се заклещи, да изскочи от заготовката
или да предизвика обратен тласък.
5) Поддържайте панелите или
големите заготовки, за да
избегнете риска от обратен тласък
поради заклещен режещ диск.
Големите заготовки могат да се огънат от
собственото си тегло. Заготовката трябва
да бъде поддържана от двете страни на
диска, както близо до разреза, така и в
края.
6) Бъдете особено предпазливи при
„джобни разрези“ в съществуващи
стени и други слепи зони. При рязане
на газо‑ ВИК‑ или електропроводи или
други обекти, стърчащият режещ диск
може да предизвика обратен тласък.
89 BG

Допълнителни инструкции за
безопасност за работа с телени
четки — специални инструкции за
безопасност за работа с телени четки
1) Обърнете внимание на това, че
при обичайна употреба телената
четка губи телени нишки. Не
претоварвайте телените нишки
чрез твърде висока сила на натиск.
Отделящите се парченца тел лесно могат
да проникнат през тънко облекло.
2) В случай, че се препоръчва
предпазен капак, предотвратете
възможността за контакт на
капака с телената четка. Дисковите и
тарелковите четки може да се разширяват
в диаметър поради натоварването и
центробежните сили.
Допълнителни инструкции за
безопасност за ъглошлайф
1) Използвайте само шлифовъчни дискове,
чиято скорост на въртене е поне толкова
висока, колкото е посочената на типовата
табелка на продукта.
2) Използвайте шлифовъчния диск след като
сте извършили визуална проверка. Не
използвайте увредени или деформирани
дискове. Сменяйте износените дискове.
3) Уверете се, че отделяните при шлайфане
искри не създават предпоставки за
опасност, напр. да попаднат върху хора
или да възпламенят запалими субстанции.
4) При шлайфане винаги носете защитни
очила, предпазни ръкавици, средства за
дихателна защита и антифони.
5) Никога не дръжте пръстите си между
диска и предпазителя за искри или близо
до предпазителите. Съществува опасност
от премазване.
6) Въртящите се части на продукта не могат
да бъдат покрити по функционални
причини. Затова внимавайте и добре
осигурявате детайла, за да избегнете
плъзгане, което може да доведе до
контакт на ръцете Ви с шлифовъчния диск.
7) Детайлът се нагорещява при шлайфане.
Не докосвайте обработената зона,
оставете я да изстине. Съществува
опасност от изгаряне. Не използвайте
охлаждащи течности или подобни.
8) Не работете с продукта, когато сте
уморени или след употреба на алкохол
и лекарства. Винаги си правете почивка
навреме.
9) Изключете продукта и извадете батерията
от уреда, преди да извършвате всякакво
обслужване.
Намаляване на вибрациите
и шума
Ограничавайте времето на употреба,
използвайте режими на работа със слаби
вибрации и шум и носете лични предпазни
средства, за да намалите вредните влияния на
вибрациите и шума.
Следните мерки спомагат за намаляване на
свързаните с вибрациите и шума рискове:
¾ Използвайте продукта само съгласно
неговото предназначение и според
описанието в тези инструкции.
¾ Уверявайте се, че продуктът е в изрядно
състояние и добре поддържан.
90 BG

¾ Използвайте правилните работни
инструменти за този продукт и се
уверявайте, че те са в изрядно състояние.
¾ Хващайте здраво продукта за
ръкохватките/повърхностите за хващане.
¾ Поддържайте продукта съгласно
инструкциите и осигурявайте достатъчно
смазване (ако е приложимо).
¾ Планирайте Вашата работа така,
че използването на продукти с
висока стойност на вибрациите да е
разпределено в продължителен период от
време.
Поведение при злополуки
Запознайте се с използването на този продукт
с помощта на това ръководство за употреба.
Запомнете указанията за безопасност и
задължително ги спазвайте. Това спомага за
избягване на рискове и опасности.
¾ Винаги бъдете внимателни при
употребата на този продукт, за да
можете своевременно да разпознаете
опасностите и да действате. Бързата
намеса може да предотврати тежки
наранявания и материални щети.
¾ При неизправно функциониране
изключвайте незабавно продукта и
изваждайте акумулаторния пакет. Давайте
го на квалифициран специалист за
проверка и евентуален ремонт, преди
отново да го използвате.
Остатъчни рискове
Дори и да работите с този продукт съгласно
предписанията, остава потенциален риск
от телесни повреди и материални щети.
Между другото, следните опасности могат
да възникнат във връзка с конструкцията и
изпълнението на този продукт:
¾ Увреждане на здравето в резултат от
емисиите на вибрации, ако продуктът се
използва продължително време или не се
използва или поддържа правилно.
¾ Телесни наранявания и материални
щети, предизвикани от дефектни режещи
инструменти или от внезапен удар в скрит
предмет по време на употребата.
¾ Опасност от нараняване и материални
щети, причинени от летящи предмети.
УКАЗАНИЕ
u По време на експлоатацията този
продукт създава електромагнитно поле!
При определени обстоятелства това
поле може да наруши функционирането
на активни или пасивни медицински
импланти! За да се намали опасността
от сериозни или смъртоносни
наранявания, препоръчваме на лица с
медицински импланти да се консултират
със своя лекар и с производителя на
медицинския имплант, преди продуктът
да бъде използван!
91 BG

Указания за безопасност за
зарядни устройства
¾ Този уред може да се
използва от деца на 8 или
повече години, както и от
лица с намалени физически,
сензорни или интелектуални
способности или липса
опит и познания, ако те са
под надзор или са били
инструктирани относно
безопасната употреба
на уреда и разбират
произтичащите от това
опасности.
Деца не бива да играят с
уреда.
Почистване и поддръжка
от страна на потребителя
не бива да се извършват от
деца без наблюдение.
¾ Не зареждайте батерии
за еднократна употреба.
Неспазването на това
указание води до опасности.
¾ Ако свързващият проводник
се повреди, той трябва
да бъде заменен от
производителя, неговата
сервизна служба или
подобно квалифицирано
лице, за да се избегнат
опасности.
¾ Пазете електрическите
части от влага. Никога не ги
потапяйте във вода или други
течности, за да избегнете
токов удар. Никога не дръжте
уреда под течаща вода.
Съблюдавайте инструкциите
за почистване, поддръжка и
ремонт.
¾ Уредът е предназначен
само за употреба в закрити
помещения.
¾ ВНИМАНИЕ! Това зарядно
устройство е подходящо за
зареждане на акумулаторни
пакети само от следните
типове:
Parkside 20 V
Акумулаторен пакет
PAP 20 A1 2 Ah
PAP 20 A2 3 Ah
PAP 20 A3 4 Ah
5 клетки
10 клетки
10 клетки
¾ Актуален списък на
съвместимите батерии
можете да намерите на
www.lidl.de/akku.
92 BG

Преди първата употреба
Принадлежности
За безопасната и правилна употреба на
този продукт са необходими, между другото,
следните принадлежности, като напр.
инструменти и работни инструменти:
¾ шлифовъчен диск
¾ абразивен режещ диск
¾ предпазител за рязане
¾ Кръстата отвертка
¾ телена четка
Инструменти и работни инструменти можете
да намерите в специализираните магазини.
При закупуването винаги съблюдавайте
техническите изисквания на този продукт
(вижте „Технически данни“).
При съмнения попитайте квалифициран
специалист и се консултирайте с Вашия
специализиран търговец.
УКАЗАНИЕ
u В това ръководство за употреба ще
откриете информация и указания
за различни работни инструменти
и техните области на приложение.
Изобразените работни инструменти не
са задължително включени в обема на
доставка (вижте „Обем на доставката“),
а само показват възможностите за
употреба на този продукт.
Работа
Изваждане/поставяне на
акумулаторен пакет
¾ Изваждане на акумулаторен
пакет: Натиснете бутона за
освобождаване на акумулаторния пакет
. Извадете акумулаторния пакет 5
15
(фиг. D).
¾ Поставяне на акумулаторен пакет:
Изравнете акумулаторния пакет
дръжката и го вкарайте в нея. Уверете се,
че той е щракнал осезаемо.
Акумулаторният пакет може да бъде
поставен в продукта само в едната
посока.
с
5
Проверка на състоянието
на зареждане на
акумулаторния пакет
(Фиг. B)
¾ Проверете състоянието на зареждане на
акумулаторния пакет: Натиснете бутона
16. Светодиодите за състояние на
зареждане
Светодиод
Червен / оранжев /
зелен
Червен / оранжев Средно
Червено Ниско
светват:
17
17
Състояние на
зареждане
Максимално
ПРЕДУПРЕЖДЕНИЕ
m
u Не използвайте принадлежности, които
не са препоръчани от Parkside. Това
може да доведе до токов удар или
пожар.
Подходящи акумулаторни пакети и
зарядни устройства
Акумулаторен
пакет:
Зарядно
устройство:
Акумулаторен пакет Parkside 20 V
PAP 20 A1, PAP 20 A2, PAP 20 A3
Зарядно устройство Parkside 20 V
PLG 20 A1, PLG 20 A2, PLG 20 B1,
PLG 20 A3
Зареждане на
акумулаторен пакет
(Фиг. C)
УКАЗАНИЕ
u Можете да зареждате акумулаторния
пакет
съкращава живота му.
u Прекъсване на процеса на зареждане
не вреди на акумулаторния пакет
¾ Преди употребата заредете
акумулаторния пакет
със средно или ниско състояние на
зареждане.
по всяко време, без това да
5
, ако той е
5
.
5
93 BG

¾ Светодиодите за контрол на заряда
(зелен
информация за състоянието на зарядното
устройство
5
Светодиод Състояние
Червен
светодиод свети
Зелен светодиод
свети
Зелен и червен
светодиод мигат
Червен
светодиод мига
Зелен светодиод
свети (без
акумулаторен
пакет)
¾ Поставете акумулаторния пакет
зарядното устройство
¾ Свържете свързващия проводник
с мрежов щепсел
устройство
¾ Когато акумулаторният пакет
е напълно зареден: Извадете
акумулаторния пакет от зарядното
устройство
контакта свързващия проводник с мрежов
щепсел
и червен 21) дават
20
и на акумулаторния пакет
18
:
19
с контакта.
18
. След това изключете от
18
на зарядното устройство.
19
Акумулаторният пакет
се зарежда
Акумулаторният пакет
е напълно зареден
Дефектен
акумулаторен пакет
Прекалено студен
или прекалено горещ
акумулаторен пакет
Зарядното устройство
е в готовност
в
5
.
18
на зарядното
5
Поставяне/премахване на
допълнителната дръжка
(фиг. E)
УКАЗАНИЕ
u Продуктът трябва да се използва само
с монтирана допълнителна дръжка
¾ В зависимост от начина на работа завийте
допълнителната дръжка
на допълнителна дръжка
отдясно (b) или отгоре (c) на продукта.
за резбата
6
отляво (a),
2
Настройване на
предпазителя
(фиг. F)
ПРЕДУПРЕЖДЕНИЕ!
m
Преди да настроите предпазителя за
шлифоване
Извадете акумулаторния пакет
от продукта, за да предотвратите
нежелано стартиране на продукта.
Оставете продукта да изстине, преди
да извършите настройването!
ПРЕДПАЗЛИВОСТ! ОПАСНОСТ ОТ
m
НАРАНЯВАНЕ!
Носете предпазни ръкавици. Бъдете
предпазливи, когато боравите
с предпазителя за шлифоване
, тъй като съществува опасност
8
от премазване на пръстите между
предпазителя и диска.
УКАЗАНИЕ
u Продуктът трябва да се използва само
с монтиран предпазител.
¾ Настройте предпазителя за шлифоване
така, че летящи искри или отделени
8
частици да не могат да ударят
потребителя или стоящите наоколо лица.
¾ Положението на предпазителя за
шлифоване
такова, че летящите искри да не
възпламенят запалими части, дори и тези
наоколо.
¾ Завъртете предпазителя за шлифоване
в желаното положение. Скобата
.
6
8
трябва да се закрепи в един от прорезите
на предпазителя.
: Изключете продукта.
8
трябва също да бъде
8
5
94 BG

Смяна на предпазителя
УКАЗАНИЕ
u За абразивно рязане трябва да
премахнете осигурения предпазител
за шлифоване
отделно предлагащ се предпазител за
абразивно рязане.
u Този предпазител трябва да е
подходящ за рязане и може да бъде
поръчан от нашата сервизна служба
(номер на артикул HG03642).
и да монтирате
8
¾ Поставете отново опорния фланец
, работния инструмент и затягащия
11
фланец
последователност.
УКАЗАНИЕ
u В допълнителната дръжка
поставен ключ за затягане
за затягане може да се използва
(в допълнение на езика за закрепване)
за разхлабване и затягане на
затягащия фланец
: Действайте в обратна
12
.
12
е
6
7
. Ключът
ПРЕДУПРЕЖДЕНИЕ!
m
Преди да смените предпазителя за
шлифоване
Извадете акумулаторния пакет
от продукта, за да предотвратите
нежелано стартиране на продукта.
Оставете продукта да изстине, преди
да извършите настройването!
¾ Натиснете и задръжте бутона за
блокиране на шпиндела
езика за закрепване и го завъртете
в посока, обратна на часовниковата
стрелка. Освободете бутона за
блокиране на шпиндела (фиг. G).
¾ Премахнете работния инструмент (ако е
монтиран) и опорния фланец
¾ Разхлабете 3–те болта на капака със
скоба
шлифоване
е необходимо да изваждате болтовете
(фиг. I).
¾ Поставете новия предпазител. Скобата
трябва да се закрепи в един от прорезите
на предпазителя. Отново затегнете 3–те
винта.
¾ Проверете дали предпазителят може да
бъде настройван (фиг. F).
, докато предпазителят за
13
: Изключете продукта.
8
. Повдигнете
1
(фиг. H).
11
не може да се извади. Не
8
5
Поставяне/изваждане на
работен инструмент
ПРЕДУПРЕЖДЕНИЕ!
m
Изключвайте продукта, изваждайте
акумулаторния пакет
продукта да се охлади, преди да
извършвате настройки!
ПРЕДПАЗЛИВОСТ! ОПАСНОСТ ОТ
m
НАРАНЯВАНЕ!
u Дръжте ръцете си далеч от работния
инструмент, когато продуктът работи.
ПРЕДПАЗЛИВОСТ! ОПАСНОСТ ОТ
m
НАРАНЯВАНЕ!
u След изключването на продукта
работният инструмент продължава
да се движи още известно време.
Не докосвайте движещия се работен
инструмент и не го спирайте.
ПРЕДУПРЕЖДЕНИЕ!
m
u Никога не натискайте бутона за
блокиране на шпиндела
на въртене на шпиндела
u Посоката на стрелката на работния
инструмент трябва да съвпада със
стрелката за посока на въртене (
).
14
и оставяйте
5
, по време
1
!
10
9
или
95 BG

ПРЕДПАЗЛИВОСТ! ОПАСНОСТ ОТ
m
НАРАНЯВАНЕ!
u Използвайте само препоръчани от
производителя работни инструменти.
Използването на други работни
инструменти и други принадлежности
може да доведе до опасност от
нараняване.
u Използвайте само работни
инструменти, върху които има
информация за производителя, начин
на свързване, размери и допустимите
обороти.
u Използвайте само работни
инструменти, чиято скорост на въртене
е поне толкова висока, колкото са
посочените обороти на типовата
табелка на продукта.
u Не използвайте счупени, напукани
или повредени по друг начин работни
инструменти.
u Използвайте само работни инструменти
в безупречно състояние.
u Уверявайте се, че размерите на
работните инструменти са подходящи за
продукта.
u Никога не разширявате твърде малък
отвор за прикрепване на работен
инструмент.
u Никога не използвайте отделни
редуциращи втулки или адаптери, за да
пригодите за употреба дискове с по–
големи дупки.
u Поддържайте панелите или големите
заготовки, за да избегнете риска от
обратен тласък поради заклещен
режещ диск. Големите заготовки
могат да се огънат от собственото
си тегло. Заготовката трябва да
бъде поддържана от двете страни на
режещия диск, както близо до разреза,
така и в края.
¾ Разхлабете затягащия фланец
: Натиснете и задръжте бутона за
12
блокиране на шпиндела
езика за закрепване и го завъртете
в посока, обратна на часовниковата
стрелка. Освободете бутона за
блокиране на шпиндела (фиг. G).
¾ Ако е необходимо, премахнете вече
монтиран работен инструмент.
¾ Поставете новия работен инструмент
върху опорния фланец
¾ Осигуряване на работния инструмент:
Натиснете и задръжте бутона за
блокиране на шпиндела
езика за закрепване. Навийте затягащия
фланец
стрелка. Освободете бутона за
блокиране на шпиндела.
по посока на часовниковата
12
. Повдигнете
1
(фиг. H).
11
. Повдигнете
1
Включване и изключване
ПРЕДПАЗЛИВОСТ! ОПАСНОСТ ОТ
m
НАРАНЯВАНЕ!
Винаги носете предпазни ръкавици,
когато боравите или работите с
продукта.
ПРЕДПАЗЛИВОСТ! ОПАСНОСТ ОТ
m
НАРАНЯВАНЕ!
u Винаги дръжте здраво продукта с двете
си ръце по време на работа (фиг. J).
ПРЕДПАЗЛИВОСТ! ОПАСНОСТ ОТ
m
НАРАНЯВАНЕ!
u Дръжте ръцете си далеч от работния
инструмент, когато продуктът работи.
ПРЕДПАЗЛИВОСТ! ОПАСНОСТ ОТ
m
НАРАНЯВАНЕ!
u След изключването на продукта
работният инструмент продължава
да се движи още известно време.
Не докосвайте движещия се работен
инструмент и не го спирайте.
96 BG

ПРЕДПАЗЛИВОСТ! ОПАСНОСТ ЗА
m
ЗДРАВЕТО!
u Не обработвайте материал, съдържащ
азбест. Азбестът се счита за
канцерогенен.
¾ Включване: Натиснете задната част
на превключвателя за включване/
изключване
напред (фиг. K, 1 и 2).
Продължителна употреба:
Наклонете предната част на
превключвателя за включване/
изключване
застопори (фиг. K, 3).
¾ Изключване: Натиснете задната
част на превключвателя за включване/
изключване
изключена позиция.
надолу и го плъзнете
3
надолу, докато не се
3
, докато за да се върне в
3
Пробно пускане
УКАЗАНИЕ
u Преди започване на работа и след
всяка смяна на работен инструмент
извършвайте пробно пускане без
натоварване. Изключете незабавно
продукта, ако работният инструмент
се движи eксцентрично, възникват
значителни вибрации или се чуват
необичайни шумове.
Указания за работа
Шлайфане
¾ Използвайте шлифовъчния диск с лек
равномерен натиск към работната
повърхност за максимална ефективност
при шлайфане. Не бива никога да
се налага да използвате продукта с
повишено усилие. Тежестта на продукта
прилага достатъчно натиск.
¾ Твърде силният натиск претоварва мотора,
забавя процеса на шлайфане, причинява
опасен натиск върху шлифовъчния диск и
води до повреди.
¾ Местете продукта равномерно напред и
назад.
Работа с телена четка
ПРЕДУПРЕЖДЕНИЕ!
m
u Не използвайте четка, която е
повредена или разбалансирана.
Използването на повредена четка може
да увеличи вероятността от нараняване
поради контакт със счупени телени
нишки от четката.
¾ Не прилагайте твърде много натиск, което
причинява изкривяване на телените нишки
и води до преждевременна повреда.
¾ Работете с равномерно движение върху
материала за обработка.
¾ Не удряйте и не разкъсвайте телената
четка особено при обработване на ъгли,
остри ръбове и т.н. Това може да причини
загуба на контрол и обратен тласък.
Абразивно рязане
ПРЕДУПРЕЖДЕНИЕ!
m
u Никога не използвайте режещ диск за
шлайфане!
¾ Дръжте продукта под ъгъл от 10 до 15°
за лесно боравене и добри резултати при
шлайфане.
ПРЕДУПРЕЖДЕНИЕ!
m
u Никога не използвайте шлифовъчни
дискове за рязане! Продуктът с
абразивен режещ диск трябва да се
използва само с монтиран предпазител
за рязане.
97 BG

¾ Винаги използвайте само тествани,
подсилени с нишки дискове за рязане или
шлифовъчни дискове.
¾ Винаги работете на бавна скорост.
Прилагайте само равномерен натиск
върху детайла.
¾ Винаги работете в обратна посока, така
продуктът няма да причини неконтролиран
натиск извън разреза.
Почистване и грижи
ПРЕДУПРЕЖДЕНИЕ!
m
Изключвайте продукта, изваждайте
акумулаторния пакет
продукта да се охлади, преди да
извършвате работи по инспекция,
поддръжка или почистване!
и оставяйте
5
Почистване
¾ Внимавайте да не попадат течности във
вътрешността на продукта.
¾ Винаги поддържайте продукта чист, сух и
без масло или грес. Отстранявайте прах
след всяка употреба и преди съхранение.
¾ Редовното правилно почистване спомага
за осигуряването на безопасна употреба
и удължава живота на продукта.
¾ Почиствайте продукта със суха кърпа. За
труднодостъпните места използвайте мека
четка.
¾ Отстранявайте замърсяванията и праха
специално от вентилационните отвори с
кърпа и мека четка.
¾ Вентилационните отвори трябва винаги да
са свободни.
УКАЗАНИЕ
u Не използвайте химически, алкални,
абразивни или други агресивни
почистващи или дезинфекциращи
средства за почистване на продукта,
тъй като те могат да повредят неговите
повърхности.
Поддръжка
¾ Продуктът не изисква обслужване.
¾ Проверявайте продукта и
принадлежностите (напр. работните
инструменти) за износване и повреди
преди и след всяка употреба. При нужда
ги подменяйте с нови, както е описано в
това ръководство за употреба. При това
съблюдавайте техническите изисквания
(вижте „Технически данни“).
Ремонт
Във вътрешността на продукта няма части,
които могат да бъдат ремонтирани от
потребителя. Обърнете се към квалифициран
специалист, за да провери продукта и при
нужда да го ремонтира.
Съхранение
¾ Изключете продукта.
¾ Почистете продукта, както е описано
по‑горе.
¾ Съхранявайте продукта и неговите
принадлежности на тъмно, сухо,
незамръзващо и добре проветрявано
място.
¾ Винаги съхранявайте продукта на
недостъпно за деца място. Оптималната
температура за продължително
съхранение (повече от 3 месеца) е между
+20 и +26 °C.
¾ Съхранявайте продукта в куфара за
носене
¾ Шлифовъчните дискове трябва винаги да
са сухи и да се съхраняват изправени, а
не един върху друг.
22
.
98 BG

Указания за акумулаторния пакет
¾ Съхранявайте акумулаторния пакет
само в частично заредено състояние. По
време на по‑продължителен период на
съхранение състоянието на зареждане
трябва да е от 40 до 60 % (червен и
оранжев светодиод за състоянието на
зареждане
¾ По време на по‑продължително
съхранение на всеки 3 месеца
проверявайте състоянието на зареждане
на акумулаторния пакет
заредете допълнително.
да светят).
17
. При нужда
5
Транспортиране
¾ Изключете продукта.
¾ Транспортирайте продукта в куфара за
носене
¾ Пазете продукта от удари и силни
вибрации, каквито възникват особено при
транспортиране в превозни средства.
¾ Осигурявайте продукта срещу пързаляне
и преобръщане.
22
.
Изхвърляне
Опаковката е изработена от екологични
материали, които може да предадете в
местните пунктове за рециклиране.
За разделното събиране на
отпадъците съблюдавайте
маркировката на опаковъчните
материали, те са маркирани
със съкращения (а) и цифри (б)
със следното значение: 1 – 7:
пластмаси / 20 – 22: хартия и
картон / 80 – 98: композитни
материали.
Продуктът и опаковъчните материали
могат да бъдат рециклирани,
изхвърляйте ги разделно за по‑добро
третиране на отпадъците.
Triman‑логото важи само за Франция.
Относно възможностите за
отстраняване на излезлия от
употреба продукт като отпадък се
информирайте от Вашата общинска
или градска управа.
В интерес на опазването на околната
5
Дефектните или изтощени батерии /
акумулаторни батерии подлежат на
рециклиране съгласно Директива 2006/66/
EО и нейните изменения. Предавайте
батериите / акумулаторнит батерии и / или
продукта в пунктовете за рециклиране.
Преди отстраняване като отпадък извадете
батериите / комплекта акумулаторни батерии
от продукта.
среда не изхвърляйте излезлия от
употреба продукт заедно с битовите
отпадъци, а го предайте за правилно
рециклиране. За събирателните
пунктове и тяхното работно време
можете да се информирате от
местната управа.
Щети върху околната
среда поради неправилно
обезвреждане на батериите /
акумулаторните батерии!
Гаранция
Уважаеми клиенти, за този уред получавате
5 години гаранция от датата на покупката.
В случай на несъответствие на продукта с
договора за продажба Вие имате законно
право да предявите рекламация пред
продавача на продукта при условията и
в сроковете, определени в чл.112‑115*
от Закона за защита на потребителите.
Вашите права, произтичащи от посочените
разпоредби, не се ограничават от нашата
по‑долу представена търговска гаранция и
независимо от нея продавачът на продукта
отговаря за липсата на съответствие на
потребителската стока с договора за
продажба съгласно Закона за защита на
потребителите.
99 BG
 Loading...