

Parkside Performance PABSP 20-LI A1 Operation And Safety Notes Translation Of The Original Instructions
CORDLESS DRILLDRIVER 20 V PABSP 20-LI A1
CORDLESS DRILLDRIVER 20 V
Operation and Safety Notes
Translation of the original instructions
AKUMULATORSKI VRTALNI
VIJAČNIK 20 V
Navodila za upravljanje in varnostna opozorila
Prevod originalnega navodila za uporabo
AKUMULÁTOROVÝ VŔTACÍ
SKRUTKOVAČ 20 V
Pokyny pre obsluhu a bezpečnostné pokyny
Preklad pôvodného návodu na použitie
IAN 289749
AKKUS FÚRÓ-CSAVAROZÓ 20 V
Kezelési és biztonsági utalások
Eredeti használati utasítás fordítása
AKU VRTACÍ ŠROUBOVÁK 20 V
Pokyny pro obsluhu a bezpečnostní pokyny
Překlad původního návodu k používání
AKKU-BOHRSCHRAUBER 20 V
Bedienungs- und Sicherheitshinweise
Originalbetriebsanleitung

GB Operation and Safety Notes Page 5
HU Kezelési és biztonsági utalások Oldal 16
SI Navodila za upravljanje in varnostna opozorila Stran 27
CZ Pokyny pro obsluhu a bezpečnostní pokyny Strana 39
SK Pokyny pre obsluhu a bezpečnostné pokyny Strana 50
DE / AT / CH Bedienungs- und Sicherheitshinweise Seite 61
3 21
4
5
6
13
12
11
10
A B
9
16
14
15
C D
4
7
8
9
9
11 9
E
F
1
10
G H
2
I J
3
K L
5
2
3
4
M
7

List of pictograms used ........................................................................................................ Page 6
Introduction ................................................................................................................................... Page 6
Intended use ........................................................................................................................................ Page 6
Description of the parts ....................................................................................................................... Page 6
Included items .....................................................................................................................................Page 6
Technical details .................................................................................................................................. Page 7
General power tool safety warnings ..................................................................... Page 7
Safety guidelines for cordless screw drivers......................................................................................Page 9
Safety guidelines for battery chargers ............................................................................................... Page 10
Before use ....................................................................................................................................... Page 10
Charging the battery pack .................................................................................................................Page 10
Attaching / Disconnecting the battery pack to / from the product ...................................................Page 11
Checking the battery level .................................................................................................................. Page 11
Changing insert tools .......................................................................................................................... Page 11
Torque selection ring / drill setting .....................................................................................................Page 11
2-Speed gearbox ................................................................................................................................ Page 11
Use ........................................................................................................................................................ Page 12
Switching on and off ........................................................................................................................... Page 12
Adjusting the rotational speed ...........................................................................................................Page 12
Changing the rotational direction ...................................................................................................... Page 12
Tips and tricks ...................................................................................................................................... Page 12
Maintenance and cleaning ............................................................................................... Page 13
Disposal ............................................................................................................................................ Page 13
Service ............................................................................................................................................... Page 14
Warranty claim procedure ................................................................................................................. Page 14
Warranty ......................................................................................................................................... Page 14
Translation of original conformity declaration ............................................... Page 14
5 GB
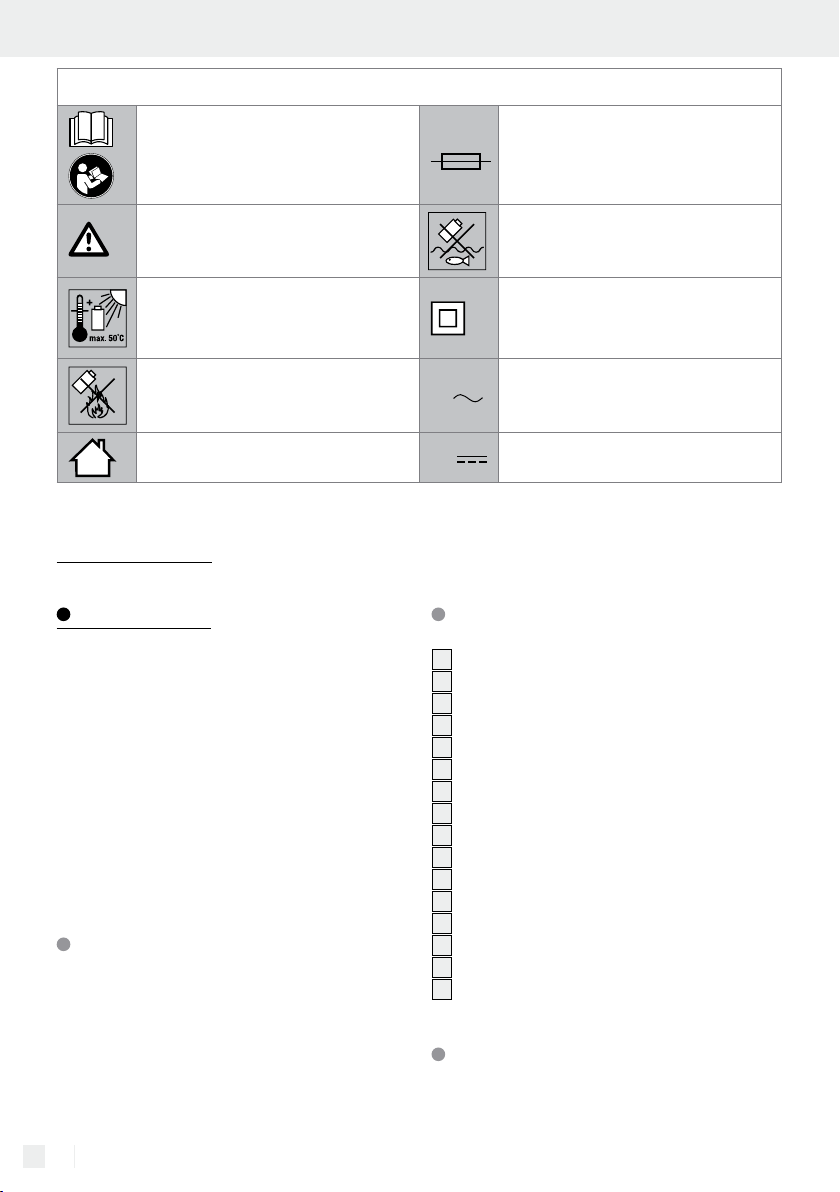
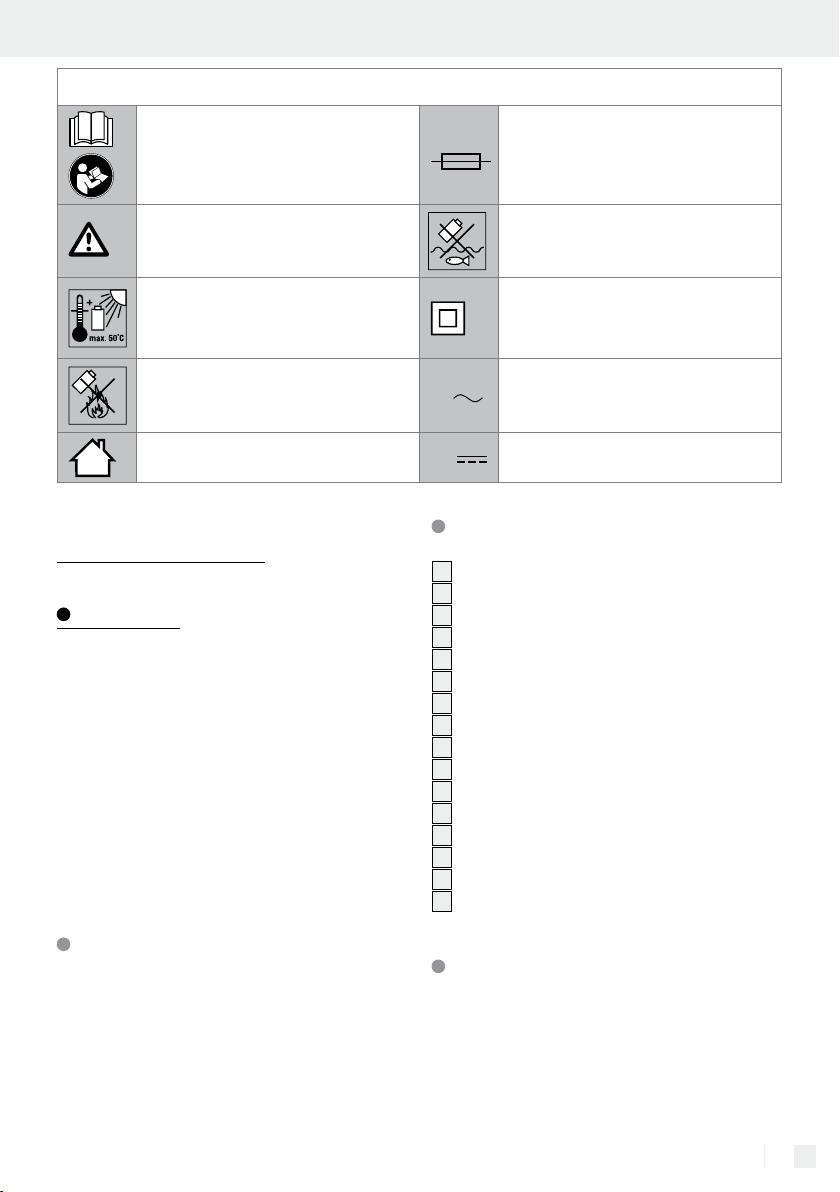
List of pictograms used
Read the instruction manual.
Follow the warnings and safety notes!
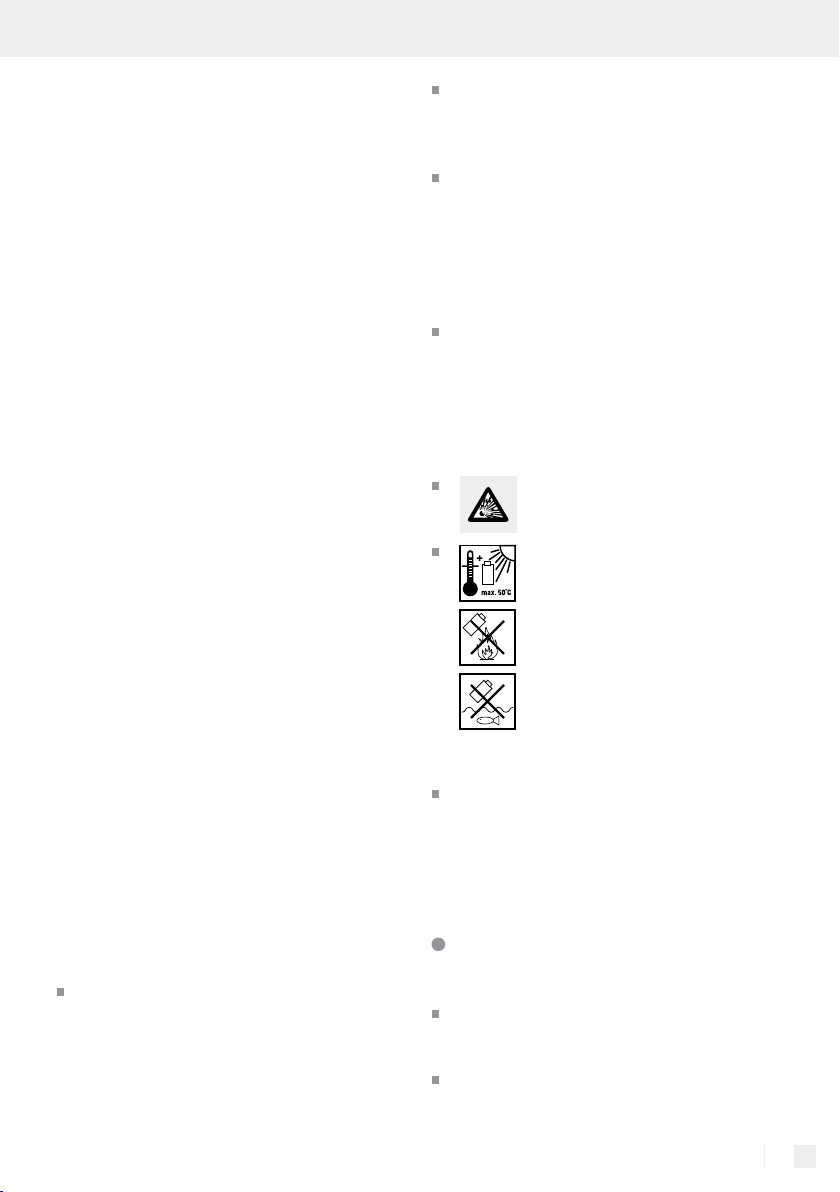
Protect the rechargeable battery
from heat and sunlight
Protect the rechargeable battery
from fire
Use in dry indoor rooms only.
Cordless Drilldriver 20V
PABSP 20-Li A1
Introduction
We congratulate you on the purchase of your new
product. You have chosen a high quality product.
The instructions for use are part of the product.
They contain important information concerning
safety, use and disposal. Before using the product,
please familiarise yourself with all of the safety information and instructions for use. Only use the
product as described and for the specified applications. If you pass the product on to anyone else,
please ensure that you also pass on all the documentation with it.
Intended use
This product is designed for screwing and drilling
into wood, metal and plastic materials. Use the
product only as per described and for the applications be specified. Any other usages of or modification of the tool are deemed to be improper use and
it carries significant risk of accidents and personal
injury. The manufacturer accepts no responsibility
6 GB
T3.15 A
V
V
for damage(s) that is caused by misuse. This product is not intended for commercial use.
Fuse
Protect the rechargeable battery
from water and moisture
Protection class II (double insulation)
Volt (alternating current)
Volt (direct current)
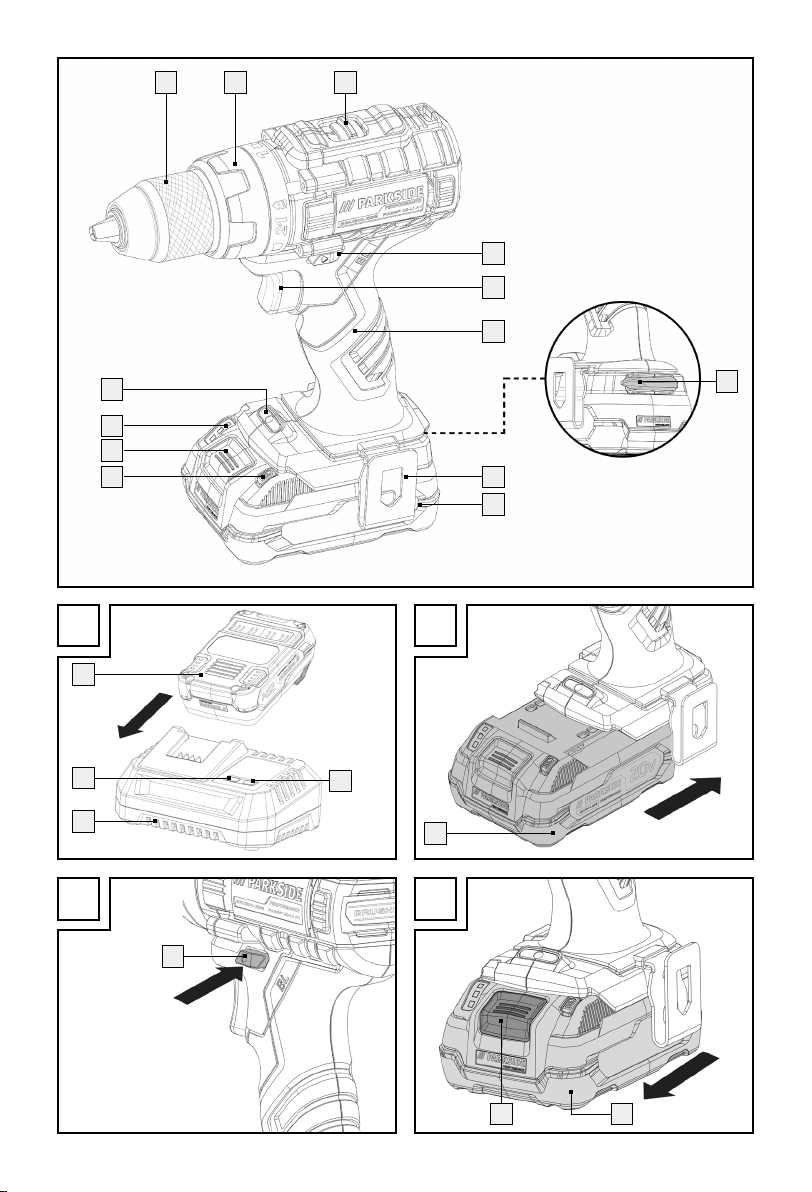
Description of the parts
1
Keyless chuck
2
Torque selection ring
3
Gear speed selector
4
Rotational direction switch / lock
5
On / Off switch / speed control
6
Soft grip handle
7
Magnetic bit holder
8
Belt clip
9
Battery pack
10
Battery level button
11
Release button
12
Battery level indication light
13
LED work light
14
Fast charger
15
Charge status LED – Green
16
Charge status LED – Red
Included items
1 cordless drilldriver 20V PABSP 20-Li A1
1 battery pack PABSP 20-Li A1-1
1 charger PABSP 20-Li A1-2
1 carry case
1 set of operating instruction
Technical details
Cordless drill: PABSP 20-Li A1
Rated voltage: 20 V
Rated idle speed: 1st gear: n0 0–500 rpm
2nd gear: n
Chuck clamping
range: max. Ø 13 mm
Max. drill diameter: Steel: 13 mm
Wood: 38 mm
Battery: PABSP 20-Li-A1-1
Type: LITHIUM ION
Cells: 5
Rated voltage: max. 20 V
Capacity: 2.5 Ah
Charger: PABSP 20-Li A1-2
INPUT
Rated voltage: 100–240 V
Rated frequency: 50–60 Hz
Rated input: 95 W
OUTPUT
Rated voltage: 14,4 - 20 V
Rated current: 4 A
Charging time: Approx. 45 min
(2.5 Ah battery pack)
Approx. 90 min (5.0 Ah
battery pack)
Protection class: II /
0–2000 rpm
0
~
(Double insulation)
Wear hearing protection.
Vibration emission value:
Total vibration values (vector total of three directions) determined in accordance with EN 60745:
Screwing: Vibration emission value a
0.69 m / s
2
Uncertainty K = 1.5 m / s
:
h
2
Drilling in metal: Vibration emission value
a
: 1.534 m / s2
h, D
Uncertainty K = 1.5 m / s
2
Note: The vibration level specified in these instructions has been measured in accordance with the
standardised measuring procedure specified and
can be used to make equipment comparisons. The
specified vibration emission value can also be used
to make an initial exposure estimate.
The vibration level varies in accordance with the use of the power tool and may
be higher than the value specified in these instructions in some cases. Regular use of the electric tool
in such a way may cause the user to underestimate
the vibration. Try to keep the vibration loads as low
as possible. Measures to reduce the vibration load
are, e.g. wearing gloves and limiting the working
time. Wherein all states of operation must be included (e.g. times when the power tool is switched
off and times where the power tool is switched on
but running without load). General power tool
safety warnings Read all safety warnings and all
instructions. Failure to follow the warnings and
instructions may result in electric shock, fire and /
or serious injury.
Noise emission value:
Noise measurement value determined in accordance
with EN 60745. The A-rated noise level of the
power tool is typically as follows:
Sound pressure level:
Uncertainty K: K
Sound power level:
Uncertainty K: K
= 73.8 dB(A)
= 3 dB
= 84.8 dB(A)
= 3 dB
General power tool safety
warnings
Read all safety warnings
and all instructions. Failure to follow the war-
nings and instructions may result in electric shock,
fire and / or serious injury.
Save all warnings and instructions for
future reference. The term “power tool” in the
7 GB

warnings refers to your mains-operated (corded)
power tool or battery operated (cordless) power
tool.
1. Work area safety
a) Keep work area clean and well lit.
Cluttered or dark areas invite accidents.
b) Do not operate power tools in explo-
sive atmospheres, such as in the presence of flammable liquids, gases or
dust. Power tools create sparks which may ig-
nite the dust or fumes.
c) Keep children and bystanders away
while operating a power tool. Distractions can cause you to lose control.
2. Electrical safety
a) Power tool plugs must match the out-
let. Never modify the plug in any
way.Do not use any adapter plugs
with earthed (grounded) power tools.
Unmodified plugs and matching outlets will
reduce risk of electric shock.
b) Avoid body contact with earthed or
grounded surfaces, such as pipes,
radiators, ranges and refrigerators.
There is an increased risk of electric shock if
your body is earthed or grounded.
c) Do not expose power tools to rain or
wet conditions. Water entering a power
tool will increase the risk of electric shock.
d) Do not abuse the cord. Never use the
cord for carrying, pulling or unplugging the power tool. Keep cord away
from heat, oil, sharp edges or moving
parts. Damaged or entangled cords increase
the risk of electric shock.
e) When operating a power tool out-
doors, use an extension cord suitable
for outdoor use.
Use of a cord suitable for outdoor use reduces
the risk of electric shock.
f) If operating a power tool in a damp
location is unavoidable, use a residual current device (RCD) protected
supply.
Use of an RCD reduces the risk of electric
shock.
3. Personal safety
a) Stay alert, watch what you are doing
and use common sense when operating a power tool. Do not use a power tool
while you are tired or under the influence of
drugs, alcohol or medication. A moment of inattention while operating power tools may result in serious personal injury.
b) Use personal protective equipment.
Always wear eye protection. Protective
equipment such as dust mask, non-skid safety
shoes, hard hat, or hearing protection used for
appropriate conditions will reduce personal injuries.
c) Prevent unintentional starting. Ensure
the switch is in the off-position before
connecting to power source and / or
battery pack, picking up or carrying
the tool. Carrying power tools with your fin-
ger on the switch or energising power tools
that have the switch on invites accidents.
d) Remove any adjusting key or wrench
before turning the power tool on. A
wrench or a key left attached to a rotating part
of the power tool may result in personal injury.
e) Do not overreach. Keep proper foot-
ing and balance at all times. This enables better control of the power tool in
unexpected situations.
f) Dress properly. Do not wear loose
clothing or jewellery. Keep your hair,
clothing and gloves away from moving parts. Loose clothes, jewellery or long
hair can be caught in moving parts.
g) If devices are provided for the connec-
tion of dust extraction and collection
facilities, ensure these are connected
and properly used.
Use of dust collection can reduce dust-related
hazards.
4. Power tool use and care
a) Do not force the power tool. Use the
correct power tool for your
8 GB
application. The correct power tool will do
the job better and safer at the rate for which it
was designed.
b) Do not use the power tool if the
switch does not turn it on and off. Any
power tool that cannot be controlled with the
switch is dangerous and must be repaired.
c) Disconnect the plug from the power
source and / or the battery pack from
the power tool before making any
adjustments, changing accessories or
storing power tools. Such preventive
safety measures reduce the risk of starting the
power tool accidentally.
d) Store idle power tools out of the
reach of children and do not allow
persons unfamiliar with the power
tool or these instructions to operate
the power tool. Power tools are dangerous
in the hands of untrained users.
e) Maintain power tools. Check for mis-
alignment or binding of moving parts,
breakage of parts and any other condition that may affect the power
tool’s operation. If damaged, have
the power tool repaired before use.
Many accidents are caused by poorly maintained power tools.
f) Keep cutting tools sharp and clean.
Properly maintained cutting tools with sharp
cutting edges are less likely to bind and are
easier to control.
g) Use the power tool, accessories and
tool bits, etc. in accordance with these
instructions, taking into account the
working conditions and the work to
be performed. Use of the power tool for
operations different from those intended could
result in a hazardous situation.
5. Battery tool use and care
Recharge only with the charger speci-
fied by the manufacturer. A charger that
is suitable for one type of battery pack may
create a risk of fire when used with another
battery pack
Use power tools only with specifically
designated battery packs. Use of any
other battery packs may create a risk of injury
and fire.
When battery pack is not in use, keep
it away from other metal objects, like
paper clips, coins, keys, nails, screws
or other small metal objects, that can
make a connection from one terminal
to another. Shorting the battery terminals to-
gether may cause burns or a fire.
Under abusive conditions, liquid may
be ejected from the battery; avoid
contact. If contact accidentally occurs,
flush with water. If liquid contacts
eyes, additionally seek medical help.
Liquid ejected from the battery may cause irritation or burns.
CAUTION! RISK OF EXPLO-
SION! Never charge non-rechargeable batteries!
Protect the rechargeable battery
from heat, for example from continuous exposure to sunlight, fire, water
and moisture. There is a risk of explosion.
6. Service
Have your power tool serviced by a
qualified repair person using only
identical replacement parts. This will
ensure that the safety of the power tool is
maintained.
Safety guidelines for cordless
screw drivers
Use auxiliary handle(s), if supplied
with the tool. Loss of control can cause per-
sonal injury.
Hold power tool by insulated grip-
ping surfaces, when performing an
9 GB
operation where the cutting accessory may contact hidden wiring.
Cutting accessory contacting a “live” wire may
make exposed metal parts of the power tool
“live” and could give the operator an electric
shock.
Hold power tool by insulated grip-
ping surfaces, when performing an
operation where the fastener may
contact hidden wiring. Fasteners contact-
ing a “live” wire may make exposed metal
parts of the power tool “live” and could give
the operator an electric shock.
Safety guidelines for
battery chargers
This product can be used by
children aged from 8 years and
above and persons with reduced
physical, sensory or mental capabilities or lack of experience and
knowledge if they have been
given supervision or instruction
concerning use of the product in
a safe way and understand the
hazards involved. Children shall
not play with the product.
Cleaning and user maintenance
shall not be made by children
without supervision.
Do not charge non-rechargeable
batteries. Disregarding this instruction may be hazardous.
If the supply cord is damaged, it
must be replaced by the manufacturer, its service agent or similarly
qualified persons in order to avoid
a hazard.
Protect the electrical parts against
moisture. Do not immerse such
parts in water or other liquids to
avoid electrical shock. Never hold
the product under running water.
Pay attention to the instructions
provided for cleaning, maintenance and repair.
The charger is suitable for indoor
use only.
This charger is only designed for
charging the battery pack type:
Parkside Performance 20 V
battery
To avoid potential risks, damaged mains cables
should be replaced by the manufacturer or the manufacturer’s customer
service department or a similarly
qualified person.
Before use
Charging the battery pack
CAUTION! Always pull out the plug of
charger before removing or connecting the battery
9
pack
to the charger.
Never charge the battery pack 9 when the
ambient temperature is below 10°C or above
40°C.
Connect the battery pack 9 to the fast
14
charger
(see Fig. A).
10 GB
Insert the power plug into the socket. The green
charge status LED
15
glows up for a second,
immediately, it turns off, at the same time red
charge status LED
ing operations, only red charge status LED
16
glows up. During charg-
16
keeps glowing up.
The green charge status LED 15 lights up while
red charge status LED
16
turns off that the
charging process is completed
Red LED flashes Battery defect
Green LED flashes Battery too cold or too
warm.
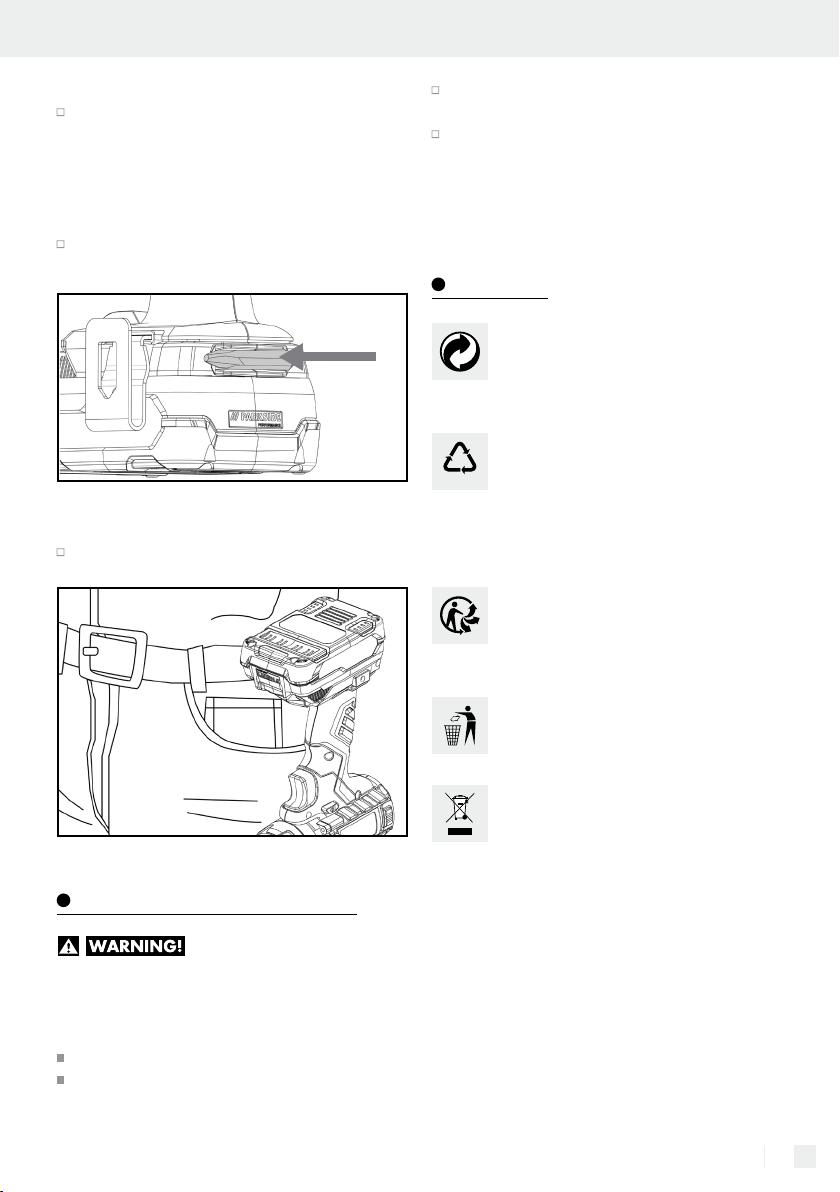
Attaching / Disconnecting t he
battery pack to / from the
product
Inserting the battery pack:
Push the rotational direction switch / lock 4
into the middle position (lock) (see Fig.C).
Push and allow battery pack 9 into the tool’s
connection slots completely and be clicked to it
(see Fig. B).
Removing the battery pack:
Press the release button 11 downward and
remove the battery pack
9
(see Fig. D).
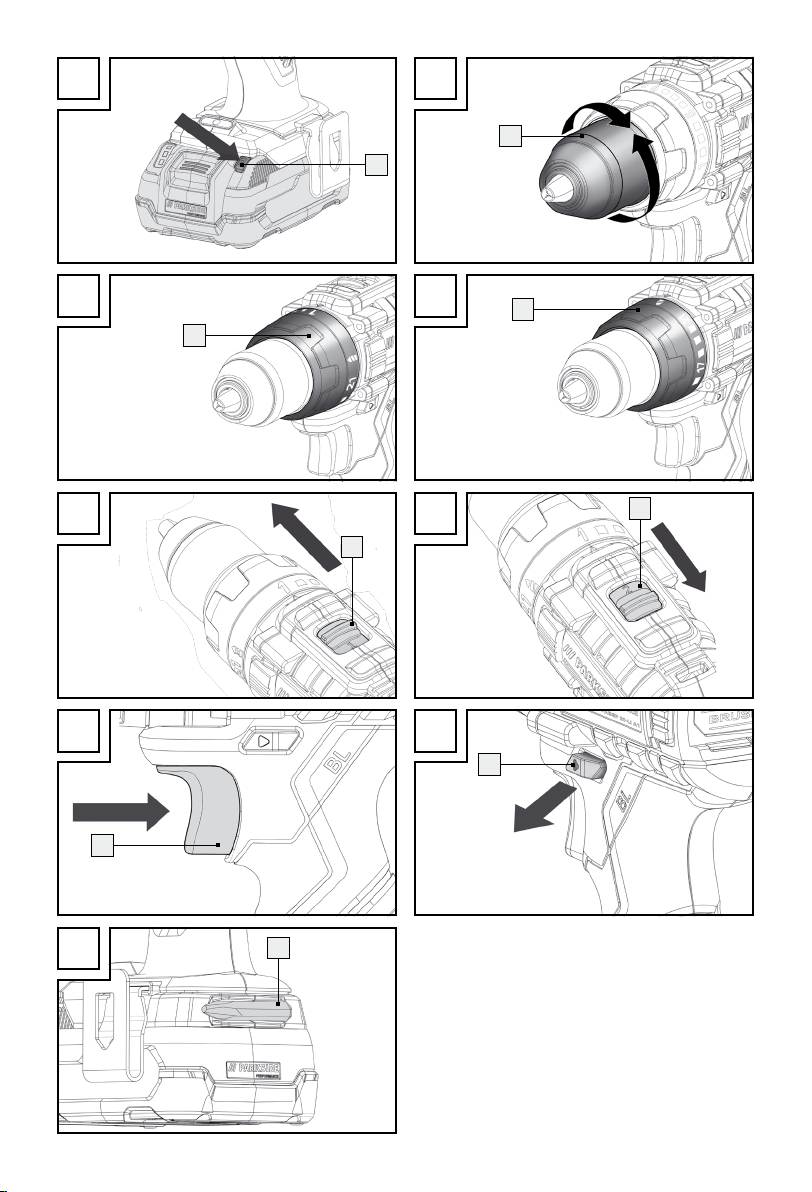
Checking the battery level
Press the battery level button 10 to check the
charge level of the battery pack (see Fig. E).
The status / remaining charge will be shown
on the battery level indication lights
3 RED lights glow = maximum charge level
2 RED lights glow = medium charge level
1 RED lights glows = low charge level
12
.
that the chuck
anti-clockwise
1
can be opened by turning it in
direction .
After desired tool has been attached and tightened
it by turning the chuck in clockwise
direction .
The spindle lock is automatically released when the
motor starts turning when pressing down On / Off
5
switch
.
Torque selection ring /
drill setting
Torque can be set by using the torque selection
2
ring
(see Fig. G).
Select a low level for small screw or driving
into soft materials
Select a high level for large / long screws or
hard materials or removing screws.
Select the drill setting for drilling works by set-
ting the torque selection ring
position
(see Fig. H).
2
to to the drill
2-Speed gearbox
CAUTION! Only operate the gear speed
selector
stopped rotation. Otherwise the product
can be damaged
First gear – gear speed selector
position 1 (see Fig. I).
This setting is suitable for all screwing jobs.
Second gear – gear speed selector
to position 2.
This setting is more suitable for drilling works (see
Fig. J).
3
when the tool is completely
3
is switched to
3
is switched
Changing insert tools
CAUTION! Battery pack 9 must be removed
from tool prior to changing any insert tools.
Tool has a fully automatic spindle lock (see Fig. F).
When the motor is stopped, the gear train locks so
11 GB
Use
Switching on and off
Switching on:
To start the tool, press the On / Off switch 5
and keep it pressed (see Fig. K). LED work light
13
lights up when the On / Off switch 5 is
depressed lightly or fully. It illuminates the work
area in low lighting condition.
Switching off:
Release the On / Off switch 5 to switch off
the tool
Note: LED work light
10s right after tool is switched off (On / Off switch
5
is released)
13
will keep on for about
Adjusting the rotational speed
Before operation, check whether the screw or
drill bit is correctly positioned, i.e. centred in
the drill chuck.
Screw bits are labelled according to their
dimensions and their shape. If you are uncertain, always check whether the bit fits tightly in
the screw head without any free play.
Torque:
Smaller screws / bits can be damaged if you
set the torque or rotational speed too high.
Hard screw joints (in metal):
Particularly high torques occur, for example, in
metal screw joints made using drive sockets.
Select a low rotational speed.
Soft screw joints (e.g. in soft wood):
Again, use a low rotational speed, to avoid
e.g. damaging the surface of the wood upon
contact with the screw head. Use a countersink.
The On / Off switch 5 has a variable speed control function. By pressing it lightly yields a low
speed. Increase pressure increases the speed
(see Fig. K).
Note: The integrated motor brake ensures rapid
stoppage.
Changing the rotational
direction
Change the direction of rotation by pressing
the rotational direction switch
left or right (see Fig. L).
When the rotary direction switch 4 is in the
middle position, the on / off switch is locked.
4
toward the
Tips and tricks
Tip! This symbol indicates
proper behaviour!
When drilling in wood, metal and other
materials, observe the following:
Use a high speed for drill bits with small diame-
ter and a low speed for drill bits with large diameter.
Select a low speed for hard materials and a
high speed for soft materials.
Secure or fasten the workpiece in a clamp or
vice (if possible).
Mark the spot where you want to drill using a
centre punch or nail. Select a low rotational
speed when starting.
Pull the rotating drill bit from the hole
repeatedly to remove dust and chips and clear
the hole.
Drilling in metal:
Use a metal drill (HSS). For optimum results,
cool the drill bit with cutting oil. Metal drill bits
can also be used to drill into plastics. Start with
a 3 mm diameter drill bit and then increase the
size until the desired hole diameter is achieved.
12 GB
Drilling in wood:
Use a wood drill with a lathe centre; for deep
holes, use an auger bit; for large-diameter
holes, use a Forstner bit. Small screws can be
screwed directly into soft wood.
On-board bit storage:
Drill bit and screw bit can be stored here
temporarily
Belt clip:
The belt clip allows the tool to be hooked on
belt or pocket as shown.
The product must always be kept clean, dry
and free from oil or grease.
If a lithium-ion battery is to be stored for an
extended period, the charge level should be
checked regularly. The optimum charge level is
between 50% and 80%. The optimum storage
environment is cool and dry.
Disposal
The packaging is made entirely of recyclable materials, which you may dispose
of at local recycling facilities. The Green
Dot is not valid for Germany.
Observe the marking of the packaging
b
materials for waste separation, which
a
are marked with abbreviations (a) and
numbers (b) with following meaning:
1–7: plastics / 20–22: paper and fibreboard / 80–98: composite materials.
The product and packaging materials
are recyclable, dispose of it separately
for better waste treatment. The Triman
logo is valid in France only.
Maintenance and cleaning
RISK OF INJURY! Always
switch the product off and remove the battery before carrying out any work on the product.
The product is maintenance-free.
Never allow liquids to get into the product
Use a soft, dry cloth to clean the housing.
Never use petrol, solvents or cleansers which
can damage plastic.
Contact your local refuse disposal authority for more details of how to dispose of your worn-out product.
To help protect the environment, please
dispose of the product properly when it
has reached the end of its useful life and
not in the household waste. Information
on collection points and their opening
hours can be obtained from your local
authority.
Remove the battery from the unit before disposal.
Faulty or used batteries / rechargeable batteries
must be recycled in accordance with Directive
2006 / 66 / EC and its amendments. Please
return the batteries / rechargeable batteries and /
or the product to the available collection points.
13 GB
Environmental damage through
incorrect disposal of the batteries /
rechargeable batteries!
Batteries / rechargeable batteries may not be disposed of with the usual domestic waste. They may
contain toxic heavy metals and are subject to hazardous waste treatment rules and regulations. The
chemical symbols for heavy metals are as follows:
Cd = cadmium, Hg = mercury, Pb = lead. That is why
you should dispose of used batteries / rechargeable
batteries at a local collection point.
Service
Have your product repaired at the service cen-
tre or an electrician, using only original manufacturer parts. This will maintain the safety of
this product.
Always have a plug or power cord replaced
by the product manufacturer or its service centre. This will maintain the safety of this product.
Warranty claim procedure
To ensure quick processing of your case, please
observe the following instructions:
Please have the till receipt and the item number
(e.g. IAN 123456) available as proof of purchase. You will find the item number on the type
plate, an engraving on the front page of the instructions (bottom left), or as a sticker on the rear or bottom of the appliance.
If functional or other defects occur, please contact
the service department listed either by telephone or
by e-mail.
You can return a defective product to us free of
charge to the service address that will be provided
to you. Ensure that you enclose the proof of
purchase (till receipt) and information about what
the defect is and when it occurred.
Service Great Britain
Tel.: 0871 5000 720
(£ 0.10 / Min.)
E-Mail: owim@lidl.co.uk
IAN 289749
Warranty
The product has been manufactured to strict quality
guidelines and meticulously examined before delivery. In the event of product defects you have legal
rights against the retailer of this product. Your legal
rights are not limited in any way by our warranty
detailed below.
The warranty for this product is 5 years from the
date of purchase. Should this product show any
fault in materials or manufacture within 5 years
from the date of purchase, we will repair or replace it – at our choice – free of charge to you.
The warranty period begins on the date of purchase.
Please keep the original sales receipt in a safe
location. This document is required as your proof of
purchase. This warranty becomes void if the product has been damaged, or used or maintained
improperly.
The warranty applies to defects in material or
manufacture. This warranty does not cover product
parts subject to normal wear, thus possibly considered consumables (e.g. batteries) or for damage to
fragile parts, e.g. switches, rechargeable batteries
or glass parts.
The warranty for this rechargeable battery is
1 year from the date of purchase.
Translation of original
conformity declaration
We, OWIM GmbH & Co. KG, Stiftsbergstraße 1,
DE-74167 Neckarsulm, GERMANY, hereby declare under our sole responsibility that the product:
14 GB

Cordless Drilldriver 20V PABSP 20-Li A1, Model
No.: HG02731, Version: 08 / 2017, to which this
declaration refers, complies with the standards /
normative documents of 2006 / 42 / EC,
2014 / 30 / EU, 2011 / 65 / EU,
2014 / 35 / EU.
Applied harmonised standards:
EN 60745-1 / A11:2010
EN 60745-2-1:2010
EN 60745-2-2:2010
EN 60335-1 / A11:2014
EN 60335-2-29 / A2:2010
EN 62233:2008
EN 55014-1 / A2:2011
EN 55014-2: 2015
EN 61000-3-2:2014
EN 61000-3-3:2013
EN 50581:2012
Serial number: IAN 289749
Tobias König
Division Manager / Responsible for documentation
OWIM GmbH & Co. KG, Stiftsbergstraße 1, DE74167 Neckarsulm, GERMANY
Neckarsulm, 12.01.2017
The declaration of conformity can also be viewed at:
www.owim.com.
The object of the declaration described above
satisfies the provisions of Directive 2011 / 65 / EU of
the European Parliament and the Council of 8 June
2011 on limiting the use of certain harmful substances in electrical and electronic appliances.
15 GB

Az alkalmazott piktogramok jelmagyarázata .............................................Oldal 17
Bevezető .........................................................................................................................................Oldal 17
Rendeltetésszerű használat ...............................................................................................................Oldal 17
Alkatrészleírás ....................................................................................................................................Oldal 17
A csomag tartalma .............................................................................................................................Oldal 17
Műszaki adatok .................................................................................................................................Oldal 18
Elektromos szerszámokra vonatkozó általános
biztonsági tudnivalók .........................................................................................................Oldal 18
Biztonsági tudnivalók az akkus csavarhúzóhoz ..............................................................................Oldal 21
Biztonsági utasítások töltőkészülékekhez .........................................................................................Oldal 21
Az üzembe helyezés előtt ................................................................................................Oldal 22
Akku-csomag töltése (lásd A ábra) ...................................................................................................Oldal 22
Az akku-csomag behelyezése / kivétele ...........................................................................................Oldal 22
Akku-állapot ellenőrzése ...................................................................................................................Oldal 22
Szerszámok cseréje / használata......................................................................................................Oldal 22
Forgatónyomaték- előválasztás / fúrásszint ......................................................................................Oldal 23
2-sebességes váltó .............................................................................................................................Oldal 23
Üzembehelyezés .....................................................................................................................Oldal 23
Be- és kikapcsolás ..............................................................................................................................Oldal 23
Fordulatszám beállítása .....................................................................................................................Oldal 23
Forgásirány átkapcsolása .................................................................................................................Oldal 23
Tippek és trükkök ................................................................................................................................Oldal 23
Karbantartás és tisztítás ...................................................................................................Oldal 24
Mentesítés .....................................................................................................................................Oldal 25
Szerviz ..............................................................................................................................................Oldal 25
Garanciális ügyek lebonyolítása ......................................................................................................Oldal 25
Garancia .........................................................................................................................................Oldal 26
Az eredeti Megfelelőségi Nyilatkozat fordítása .........................................Oldal 26
16 HU
Az alkalmazott piktogramok jelmagyarázata
Olvassa el a Használati utasítást.
Tartsa be a figyelmeztető és
biztonsági utasításokat!
Óvja az akkut a közvetlen napsugárzástól.
Óvja az akkut a tűztől.
Csak száraz beltérben használható.
Akkus fúró-csavarozó
20 V PABSP 20-Li A1
Bevezető
Gratulálunk új termékének vásárlása alkalmából.
Ezzel a döntésével vállalatunk értékes terméke
mellett döntött. A használati utasítás ezen termék
része. A biztonságra, a használatára és a megsemmisítésre vonatkozó fontos tudnivalókat tartalmazza.
A termék használata előtt ismerje meg az összes
használati és biztonsági tudnivalót. A terméket
csak a leírtak szerint és a megadott felhasználási
területeken alkalmazza. A termék harmadik személy számára való továbbadása esetén kézbesítse
vele annak a teljes dokumentációját is.
T3.15 A
V
V
Finombiztosíték
Óvja a készüléket a víztől és a
nedvességtől.
II. érintésvédelmi osztály (kettős szigetelés)
Volt (váltóáram)
Volt (egyenáram)
Alkatrészleírás
1
tokmány (kulcs nélkül)
2
fordulatnyomaték- előválasztó
3
sebességváltó
4
forgásirány-átkapcsoló/retesz
5
BE-/Kikapcsoló/fordulatszám-szabályozás
6
puha fogantyú
7
mágneses bitfej-tartó
8
övtartó
9
akku-csomag
10
akku-gomb
11
kioldógomb
12
akku-állapotjelző lámpa
13
LED-munkalámpa
14
gyorstöltő
15
töltöttségi állapot-LED – zöld
16
töltöttségi állapot-LED – piros
Rendeltetésszerű használat
Ez a termék fába, műanyagba, fémbe és műanyagba
csavarozható. Minden más jellegű használat vagy
a termék megváltoztatása nem rendeltetésszerűnek
minősül és rendkívül balesetveszélyes. A rendeletetésétől eltérő használatból eredő károkért a gyártó
nem vállal felelősséget. Nem közületi felhasználásra készült.
A csomag tartalma
1 akkus fúró-csavarozó 20 V PABSP 20-Li A1
1 akku-csomag PABSP 20-Li A1-1
1 töltőberendezés PABSP 20-Li A1-2
1 hordtáska
1 használati útmutató
17 HU
Műszaki adatok
Akkus
csavarhúzó: PABSP 20-Li A1
Mérési feszültség: 20 V
Üresjárat mért
fordulatszáma: 1. menet: n
2. menet: n
tokmány befogási
kapacitás: max. Ø 13 mm
Max. furóátmérő: acél: 13 mm
fa: 38 mm
0–500 min-1,
0
0–2000 min
0
Viseljen fülvédőt.
Rezgéskibocsátási érték:
Rezgés-összértékek (három irány vektoriális öszszege) az EN 60745 szerint megállapítva:
Csavarozás: rezgéskibocsátási érték a
-1
0,69 m / s
bizonytalanság K = 1,5 m / s
Fúrás fémba: rezgéskibocsátási érték a
1,534 m / s
bizonytalanság K = 1,5 m/s
:
2
2
h
h, D
2
:
2
Akku: PABSP 20-Li A1-1
Típus: LITHIUM-IONEN
cellák: 5
mérési feszültség: max. 20 V
kapacitás: 2,5 Ah
Töltőberendezés: PABSP 20-Li A1-2
BEMENET/Input
Névleges feszültség: 100 –240 V
~
Névleges frekvencia: 50–60 H z
Névleges teljesítmény:
95 W
KIMENET/Output
Névleges feszültség: 14,4–20 V
Névleges
áramerősség: 4 A
Töltési idő: kb. 45 min
(2,5 Ah akku-csomag)
kb. 90 min
(5,0 Ah akku-csomag)
Érintésvédelmi
osztály: II /
(kettős szigetelés)
Zajkibocsátási érték:
A zajértékek az EN 60745-nek megfelelően kiszámítva. Az elektromos gépek A-súlyozott hangnyomásszintje jellemzően az alábbi:
Hangnyomásszint
Bizonytalansági tényező K: K
Hangteljesítményszint:
Bizonytalansági tényező K: K
= 73,8 dB (A)
= 3 dB
= 84,8 dB (A)
= 3 dB
Megjegyzés: Az ebben az utasításban megadott
rezgésszintet egy szabványos mérési eljárásnak
megfelelően mérték és a készülékek összehasonlítására felhasználható. A megadott rezgés -kibocsátás értéke a veszélyeztetettség mértékének bevezető
becslésére is használható.
A rezgésszint az elektromos készülék felhasználásának a módjától függően
változhat és az értéke egyes esetekben az ebben
az utasításban megadott értékeket túllépheti. A rezgésterhelést alá lehet becsülni, ha az elektromos
szerszámot rendszeresen ilyen módon használják.
Próbálja meg a rezgések általi terhelést a lehető
legalacsonyabb szinten tartani.
A rezgések általi terhelés csökkentésére alkalmas
például a szerszám használata során a kesztyű viselése és a munkaidő korlátozása. Ennél az üzemi
ciklus minden elemét figyelembe kell venni (például,
azon időket, amelyek során a készülék ki van
kapcsolva, és azokat is, ahol a gép ugyan be van
kapcsolva, de terhelés nélkül jár).
Elektromos szerszámokra
vonatkozó általános
biztonsági tudnivalók
Olvassa el
biztonsági tudnivalókat és utasításokat!
A biztonsági tudnivalók és utasítások betartásánál
elkövetett mulasztások áramütéseket, tűz kitörését
és / vagy súlyos sérüléseket okozhatnak.
az összes
18 HU
Őrizze meg a jövő számára a biztonsági
tudnivalókat és utasításokat!

A biztonsági tudnivalókban alkalmazott „elektromos szerszám“ fogalom a hálózatról üzemeltetett
elektromos szerszámokra (hálózati kábellel) és Akkukkal üzemeltetett elektromos szerszámokra (hálózati kábelek nélküli) vonatkozik.
1. A munkahely biztonsága
a) Tartsa a munka környékét tisztán és
jól megvilágítva. Rendetlenség és kivilágí-
tatlan munkakörnyezet balesetekhez vezethet.
b) Ne dolgozzon a készülékkel robba-
násveszélyes környezetben, amelyben
gyúlékony folyadékok, gázak vagy
porok találhatók. Az elektromos készülé
kek
szikrákat hoznak létre, amelyek a porokat vagy
a gőzöket meggyújthatják.
c) Tartsa a gyerekeket és más személye-
ket is az elektromos szerszámok
használata közben távol. Ha a figyelme
elterelődik elveszítheti a készülék feletti uralmát.
2. Elektromos biztonsága
a) Az elektromos készülék (ill. a hálózati
egység) hálózati dugójának illeszked
nie
kell a konnektorba. A dugót semmilyen
módon sem szabad megváltoztatni.
Ne alkalmazzon adapterdugót védőf
deléses készülékekkel együtt. Változat
öl-
lan
és találó dugaljzatok csökkentik az áramütés
veszélyét.
b) Kerülje el a testrészeinek a földelt
felületekkel, mint pld. csövekkel, fűtőtestekkel, tűzhelyekkel és hűtőszekrényekkel való érintkezését. Az áramütés
veszélye nagyobb, ha a teste földelve van.
c) Tartsa a készüléket esőtől vagy ned-
vességtől távol. Víznek a készülékbe való
behatolása megnöveli az áramütés kockázatát.
d) Ne használja a készülék kábelét a
rendeltetésétől eltérően a készülék
hordozására, felakasztására, vagy a
hálózati dugónak a dugaljzatból való
kihúzására. Tartsa a kábelt hőtől, olajtól, éles szélektől, vagy mozgásban
levő készülékrészektől távol. Sérült, vagy
összekuszálodott kábelek növelik az áramütés
kockázatát.
e) Ha egy ekektromos készülékkel a
szabadban dolgozik, csak olyan hoszszabbító kábeleket használjon, amelyek külterületre is engedélyezettek.
A külterületre engedélyezett kábel alkalmazása
csökkenti az áramütés kockázatát.
f) Ha az elektromos szerszámnak nedves
környezetben való üzemeltetése nem
kerülhető el, alkalmazzon hibaáram
védőkapcsolót. A hibaáram védőkapcsoló
alkalmazása csökkenti az áramütés kockázatát.
3. Személyek biztonsága
a) Egy elektromos szerszámmal való
munka végzése során legyen mindig
figyelmes, ügyeljen arra, amit tesz és
járjon el mindig meggondoltan. Ne
használja a készüléket ha fáradt, vagy
ha drogok, alkohol, vagy orvosságok
hatása alatt áll. A készülék használata köz-
ben már egy pillanat figyelmetlenség is komoly
sérülésekhez vezethet.
b) Viseljen személyi védőfelszereléseket
és mindig védőszemüveget. A személyi
védőfelszereléseknek mint pld. porvédő álarcnak,
csúszásbiztos cipőnek, védősisaknak vagy hallásvédőnek az elektromos szerszám alkalmazásának a módja és alkalmazása szerinti viselése,
csökkenti a sérülések veszélyét.
c) Kerülje el a nem szándékos üzembe-
vételt. Kerülje a nem szándékos üzembevételt. Bizonyosodjon meg róla, hogy
az elektromos szerszám ki van kapcsolva mielőtt azt az áramforráshoz
és / vagy az akkuhoz csatlakoztatja,
felemeli vagy hordozza.
Ha a készülék hordozása közben az ujját a
BE- / KI-kapcsolón tartja, vagy a készülék be
van kapcsolva, az balesetekhez vezethet.
d) Mielőtt a készüléket bekapcsolná,
távolítsa el a beállító szerszámokat,
vagy csavarkulcsokat. Egy forgásban
levő készülékrészben található szerszám vagy
kulcs sérülésekhez vezethet.
e) Kerülje el a szokatlan testartásokat.
Gondoskodjon róla, hogy biztosan
álljon és mindenkor tartsa meg az
19 HU

egyensúlyát. Ezáltal, különösen a váratlan
szituációk előállása esetén, a készüléket jobban ellenőrizheti.
f) Viseljen megfelelő ruházatot. Ne vi-
seljen laza ruházatot, vagy ékszereket.
Tartsa a haját, a ruházatát és a kesztyűjét távol a mozgó részektől. A laza
ruházatot, az ékszereket, vagy a hosszú hajat a
mozgásban levő részek elkaphatják.
g) Ha porelszívó vagy felfogó berendezé-
seket szereltek fel, bizonyosodjon meg
róla, hogy azok csatlakoztatva vannak
e és hogy az alkalmazásuk helyes e.
Ezeknek a berendezéseknek az alkalmazása
csökkenti a porok általi veszélyeztetéseket.
4. Az elektromos szerszámokkal való
gondos járás és azok gondos használata
a) A készüléket ne terhelje túl. A munká-
jához használja az arra a célra való
elektromos szerszámot.
A találó elektromos szerszámmal a megadott
teljesítménytarto
sabban dolgo
mányban jobban és biztonságo-
zik.
b) Ne használjon olyan elektromos szer-
számot, amelynek a kapcsolója hibás.
Egy elektromos szerszám, amelyet nem lehet beés kikapcsolni veszélyes és azt meg kell javíttatni.
c) Mielőtt a készülék beállításait elvégzi,
tartozékrészeket cserél vagy a készüléket elteszi, húzza ki a csatlakozó
dugót a csatlakozó dugaljzatból és /
vagy távolítsa el az akkut. Ez az óvin-
tézkedés meggátolja az elektromos szerszám
véletlenszerű beindítását.
d) Tárolja a nem használatban levő
elek-tromos készülékeket a gyerekek
hatótávolságán kívül. Ne hagyja,
hogy a készüléket olyan személyek
haszn
álják, akik a készülék használa-
tába
n nem jártasok, vagy ezeket az
utasításokat nem olvasták el. Az elekt-
romos szerszámok veszélyesek, ha tapasztalatlan személyek használják.
e) Ápolja gondosan a készüléket. Elle-
nőrizze, hogy a mozgó
készülékrészek kifogástalanul működnek e, nem akadnak e, részek
nem törtek e el, vagy nem érte azokat olyan károsodás, amely a készülék működését
befolyásolja. A készülék használata
előtt javíttassa meg a megkárosodott
részeket. Sok baleset oka az elektromos
szerszámok rosszul végzett karbantartása.
f) Tartsa a vágószerszámokat élesen és
tisztán. Az éles vágószélekkel rendelkező
gondosan ápolt vágószerszámok kevésbbé
szorulnak be és könnyebb azoknak vezetni.
g) Alkalmazza az elektromos szerszámot,
a tartozékokat, a betétszerszámokat
stb. Ennek az utasításnak megfelelően
és úgy, ahogy azokat ennek a speciális
készüléknek azt előírták. Eközben vegye figyelembe a munkafeltételeket
és az elvégzendő tevékenységet. Az
elektromos szerszámoknak az előírt alkalmazásoktól eltérő használata veszélyes helyzetekhez vezethet.
5. Akkumulátorral működő eszközök
használata és ápolása
Kizárólag a gyártótól származó,
vagy az általa ajánlott töltővel töltse
az akkumulátort. Egy meghatározott akku-
hoz használható töltő másik akkumulátorral
való használata tűzveszélyes.
Csak a hozzátartozó akku-csomaggal
használja az elektromos szerszámot.
Másik akku-csomag használata sérüléshez és
tűzestehez vezethet.
Tartsa távol az akku-csomagot olyan
fémtárgyaktól, mint gémkapocs, érmék, kulcsok, szögek, csavarok, amikor nem használja. Az akkumulátor
pólusai között kapcsolatot hozhat létre és így
égési sérülésekhez vagy tűzesethez vezet.
Amennyiben az akku-csomag kedve-
zőtlen időjárási viszonyok között lesz
használva vagy tárolva, úgy folyadék léphet ki belőle. Kerülje a vele
való érintkezést. Amennyiben a folyadék szembe kerül, keresse fel az
20 HU
orvosát. Az elemből kilépő folyadék bőrirritációhoz vagy égési sérülésekhez vezet.
VIGYÁZAT! ROBBANÁSVE-
SZÉLY! Sohase töltse fel a nem feltölthető elemeket.
Óvja az akkut hőtől, pl. tartós nap-
sütéstől is, tűztől, víztől és nedvességtől. Robbanásveszély áll fenn.
6. Szervíz
A készüléket csak képzett szakembe-
rekkel és csak eredeti alkatrészekkel
javíttassa. Ezáltal garantálja, hogy készü-
léke biztonságossága megmaradjon.
Biztonsági tudnivalók az
akkus csavarhúzóhoz
Használjon a kiegészítő fogantyúkat,
amennyiben ezeket a csomagban találhatók. Egy pillanatnyi figyelmetlenség is
komoly sérülésekhez vezethet.
Amikor olyan munkákat végez, ame-
lyeknek folyamán a bevetett szerszám
a rejtett elektromos vezetékeket eltalálhatja, akkor a szerszámnak csak a
szigetelt fogófelületeit fogja meg.
Egy elektromos áramot vezető kábellel történő
érintkezés a fém termékrészeket is feszültség
alá helyezheti és az áramütéshez vezethet.
Amikor olyan munkákat végez, ame-
lyeknek folyamán a bevetett szerszám a rejtett elektromos
vezetékeket eltalálhatja, akkor a
szerszámnak csak a szigetelt fogófelületeit fogja meg. Egy elektromos áramot
vezető vezetékkel történő érintkezés a fém-szerszámrészeket is feszültség alá helyezheti és az
áramütéshez vezethet.
Biztonsági utasítások
töltőkészülékekhez
A terméket 8 éves kor feletti
gyermekek, valamint korlátozott
fizikai, érzékszervi vagy szellemi
képességgel élő vagy nem megfelelő tapasztalattal és tudással
rendelkező személyek csak felügyelet mellett, illetve a termék
biztonságos használatára vonatkozó felvilágosítás és a lehetséges veszélyek megértése után
használhatják. Gyermekek nem
játszhatnak a termékkel.
Az üzemeltető által végzendő
tisztítást és karbantartást gyermekek felügyelet nélkül nem
végezhetik.
Soha ne töltse fel a nem feltölt-
hető elemeket. Ezek figyelmen
kívül hagyása veszélyes reakciókhoz vezethet.
Ha a vezeték sérült, az kizáró-
lag a gyártó vagy annak a szervizén keresztül szerezhető be.
Ezek figyelmen kívül hagyása
veszélyes reakciókhoz vezethet.
Óvja az elektromos alkatrésze-
ket a nedvességtől. Soha ne
merítse a készüléket vízbe, vagy
más folyadékba, különben áramütés veszélye áll fenn! Sohase
21 HU
tartsa a terméket folyó víz alá.
Ügyeljen feltétlenül a tisztítás,
ápolás, karbantartás tudnivalóira.
A töltő csak beltéri használatra
alkalmas.
Ez a töltő csak PABSP 20-Li A1-1
akkutípushoz használható.
Ha ennek a terméknek a hálózati
vezetéke megsérült, a veszélyeztetések elkerülése végett azt a gyártónak,
a vevőszolgálatának, vagy egy hasonlóan szakképzett személynek
kell kicserélni.
Az üzembe helyezés előtt
Akku-csomag töltése
(lásd A ábra)
VIGYÁZAT! Mindig húzza ki a hálózati csat-
lakozót, mielőtt az akku- csomagot
a töltőberendezésből ill. mielőtt visszahelyezi
azt.
Soha ne töltse az akku- csomagot 9, ha a
környezeti hőmérséklet 10 °C alatt, vagy 40 C°
felett van.
Tegye az akku-csomagot 9 a gyorstöltő- be-
rendezésbe
Dugja a hálózati csatlakozót a konnektorba.
A zöld LED-töltöttségi állapotjelző LED
másodpercre felvillan, majd kialszik. Azután a
piros töltöttségi állapot-LED
tési folyamat ideje alatt csak a piros töltöttségi
állapot-LED
Amikor a töltés befejeződött, a zöld töltöttségi
állapot-LED
pot-LED
A piros LED villog Az akku elromlott
14
(lásd A ábra).
16
világít.
15
világít és a piros töltöttségi álla-
16
kialszik.
9
kiveszi
15
16
kigyullad. A töl-
egy
A zöld LED villog Az akku túl hideg vagy
meleg.
Az akku-csomag
behelyezése/kivétele
Az akku-csomag behelyezése:
Tegye a forgásirány-váltókapcsolót 4 közé-
pállásba (retesz) (lásd C ábra).
Dugja az akku-csomagot 9 a csatlakozó mé-
lyedésébe, amíg az egy kattanással be
nem akad (ld. B ábra).
Az akku-csomag kivétele:
Nyomja meg a kioldógombot 11 és vegye
ki az akku-csomagot
9
(lásd D ábra).
Akku-állapot ellenőrzése
Az akku állapotának ellenőrzéséhez nyomja
meg az Akku-gombot
ábra). Az állapotot, ill. a maradék- teljesítményt
az akku állapotjelző lámpa
képpen jelzi:
3 piros lámpa = maximális töltöttség
2 piros lámpa = közepes töltöttség
1 piros lámpa = alacsony töltöttség
10
gombot (lásd E
12
a következő-
Szerszámok cseréje/
használata
VIGYÁZAT! Az akku-csomagot 9 el kell
távolítani a termékből, mielőtt a szerszámot
kicserélné.
A termék automatikus tengelyzárral rendelkezik
(ld. F ábra). A motor leállásakor a hajtókar lezáródik, így a tokmány
tes irányba való csavarással
Miután betette a kívánt szerzsámot, azt a tokmány
óramutató járásával megegyező irányú elcsavarásával rögzítheti
tikusan feloldásra kerül, amikor a motort a BE-/KI
-kapcsoló gombbal
1
óramutató járásával ellenté-
kinyitható.
rögzítheti. A tengelyzár automa-
5
beindítja.
22 HU

Forgatónyomaték-
előválasztás/fúrásszint
A forgóerőt a forgatónyomaték előválasztóval 2
állíthatja be (lásd G ábra).
Kis csavarokhoz, ill. lágyabb munkaanyaghoz
válasszon alacsonyabb szintet.
Válasszon magasabb szintet a nagy csavarok-
hoz, keményebb munkaanyaghoz, ill. a csavarok kitekeréséhez.
Fúráshoz válassza azt a fúrásszintet, melyben
a forgatónyomatékot
lítja (lásd H ábra).
2
a fúrás helyzetbe ál-
2-sebességes váltó
A termék kikapcsolásához engedje el a
BE- / KI-kapcsolót
Tudnivaló: A LED-munkalámpa
kikapcsolás ill. a KI-BE- kapcsoló elendegése után
még 10 másodpercet világít
5
.
13
a termék
5
.
Fordulatszám beállítása
A BE- / KI-kapcsoló 5 egy változtatható sebességszabályzóval rendelkezik. A BE-Ki-kapcsoló
gyenge megnyomásával a termék alacsony fordulatszámon fut. Erősödő nyomással nő a fordulatszám (lásd K ábra).
Tudnivaló: A beépített motorfék gondoskodik
a gyors leállásról.
5
VIGYÁZAT! Csak akkor állítsa a sebességvál-
3
tót
amikor a termék leállt. Ellenkező esetben
a termék károsodhat.
1. sebességben - A sebességváltó
ben található (ld. I-ábra).
Ez a beállítás minden csavarozási munkához
alkalmas.
2. sebességben - A sebességváltó
található.
Ez a beállítás minden csavarozási munkához
alkalmas (J ábra).
3
1. helyzet-
3
2. helyzetben
Üzembehelyezés
Be- és kikapcsolás
Bekapcsolás:
A termék üzembevételéhez nyomja meg és
tartsa lenyomva a BE-/KI kapcsolót
K ábra). A LED-munkalámpa
teljesen benyomott BE-/KIkapcsoló gombnál
5
világít. Bevilágítja a munkaterületet a ked-
vezőtlen fényviszonyok esetén.
5
(lásd
13
enyhén, vagy
Forgásirány átkapcsolása
A forgásirány változtatásához nyomja át a for-
gásirány- átkapcsolót
L ábra).
Ha a forgásirány-váltó 4 középállásban van,
A Be-/Ki-kapcsoló blokkolva van.
4
jobbra, ill. balra (lásd
Tippek és trükkök
Tipp! Így jár el helyesen.
Használat előtt ellenőrizze, hogy a csavar-, ill.
fúrófeltét helyesen lett-e feltéve, tehát hogy a
fúróagy közepén van-e.
A csavar-feltéteket méretük és formájuk jel-
lemzi. Ha bizonytalan, akkor próbálja ki először ki, hogy a hegy holtjáték nélkül ül-e
a csavarfejben.
Kikapcsolás:
23 HU

Forgatónyomaték:
A kisebb csavarok/fejek megsérülhetnek,
ha túl magas forgatónyomatékot, ill. túl
magas fordulatot állít be.
Kemény csavarozás (fémben):
Különösen magas forgatónyomatékok keletkez-
nek pl.fémcsavarozásoknál való tűzőkulcs-feltét
használata során. Válasszon alacsony fordulatszámot.
Lágy csavarozás (pl. puhafában):
Ilyenkor is alacsony fordulatszámon csavaroz-
zon, hogy ne károsítsa pl. a fafelületet a fém
csavarfejjel való találkozásnál. Használjon egy
süllyesztőt.
Fába, fémbe és más anyagokba történő
csavarozás során feltétlenül tartsa szem
előtt:
Kisebb fúrókeresztmetszetnél magasabb és na-
gyobb fúrókeresztmetszetnél alacsonyabb fordulatszámot alkalmazzon.
Kemény anyagoknál alacsony fordulatszámot,
lágy anyagoknál magas fordulatszámot válaszszon.
Biztosítsa, vagy rögzítse (ha lehetséges)
a munkadarabot egy satuba.
Jelölje meg a fúrandó helyet egy pontozóval,
vagy egy tűvel. A befúráshoz használjon alacsony fordulatszámot.
A forgó fúrót többször húzza ki a furatból for-
gács, vagy a por eltávolításához és annak átszellőztetéséhez.
Fúrás fémbe:
Használjon fémfúrót (HSS). A legjobb ered-
mény eléréséhez olajjal kellene hűtenie a fúrót.
A fémfúrót műanyag fúrásához is használhatja.
Furjon elő egy Ø 3 mm fúróval és úgy közelítsen a kívánt furatátmérő felé.
Fúrás fába:
Központi megvezetésű fafúrót, azaz „csigafú-
rót“ használjon a mély furatokhoz, a nagy
furat-keresztmetszethez pedig forsztner- fúrót.
Kis csavarokat puhafába furat előfúrása nélkül
közvetlenül is becsavarozhat.
Bit-fej rögzítés:
Itt fúró- vagy csavarfejek rögzíthetők.
Övtartó:
Az övtartóval a termék az ábrázolt módon az övre
vagy a nadrágzsebre akasztható.
Karbantartás és tisztítás
SÉRÜLÉSVESZÉLY!
Mielőtt a terméken munkát végezne, kapcsolja ki
a terméket és vegye ki az akkut. A termék nem igényel karbantartást.
Folyadéknak nem szabad a termék belsejébe
jutni.
A burkolat tisztításához egy száraz kendőt
használjon. Soha ne használjon benzint,
oldószert, vagy olyan tisztítót, ami kikezdi a
műanyagot.
A termék mindig legyen tiszta, száraz és
olaj- vagy kenőanyagmentes.
Amennyiben egy lítium ionos akkumulátort
hosszabb ideig tárol, ellenőrizze rendszeresen
24 HU

annak töltöttségi állapotát. Az optimális töltöttségi állapot 50 % és 80 % között van.
Az optimális tárolási környezet hűvös és száraz.
Mentesítés
A csomagolás környezetbarát anyagokból készült, amelyeket a helyi újrahasznosító helyeken adhat le ártalmatlanítás
céljából. A zöld pont Nématországra
nem érvényes.
Környezeti károk az elemek /
akkuk hibás megsemmisítése
következtében!
Az elemeket / akkukat nem szabad a háziszemétbe
dobni. Mérgező hatású nehézfémeket tartalmazhatnak és ezért különleges kezelést igénylő hulladéknak
számítanak. A nehézfémek vegyjelei a következők:
Cd = kadmium, Hg = higany, Pb = ólom. Ezért az
elhasznált elemeket / akkukat egy közösségi
gyűjtőhelyen adja le.
A hulladék elkülönítéséhez vegye figye-
b
lembe a csomagolóanyagon található
a
jelzéseket. Ezek rövidítéseket (a) és számokat (b) tartalmaznak a következő jelentéssel: 1–7: műanyagok / 20–22:
papír és karton / 80–98: kötőanyagok.
A termék és a csomagolóanyagok
újrahasznosíthatóak, semmisítse meg
ezeket elkülönítve a jobb hulladékkezelés érdekében. A Triman-logó csak
Franciaországra vonatkozik.
A kiszolgált termék megsemmisítési
lehetőségeiről lakóhelye illetékes
önkormányzatánál tájékozódhat.
A környezete érdekében, ne dobja a
kiszolgált terméket a háztartási szemétbe,
hanem adja le szakszerű ártalmatlanításra.
A gyűjtőhelyekről és azok nyitvatartási
idejéről az illetékes önkormányzatnál
tájékozódhat.
A megsemmisítés előtt vegye ki az akkut a
készülékből.
A hibás vagy elhasznált elemeket / akkukat a
2006/66/EK irányelv és módosításai értelmében
újra kell hasznosítani. Szolgáltassa vissza az elemeket / akkukat és / vagy a terméket az ajánlott
gyűjtőállomásokon keresztül.
Szerviz
A termék javításával csak a szervizt, vagy
elektronikai szakembert bízzon meg és csak
eredeti alkatrészekkel végeztessen. Így biztosítható a termék biztonságának megőrzése.
A dugó, vagy a vezeték cseréjét mindig a termék
gyártójval, vagy annak ügyfélszolgálatával végeztesse. Így biztosítható a termék biztonságának megőrzése.
Garanciális ügyek
lebonyolítása
Ügyének gyors elintézhetősége céljából, kérjük
kövesse az alábbi útmutatást:
Kérjük, kérdések esetére készítse elő a pénztárblokkot és a cikkszámot (pl. IAN 123456) a vásárlás
tényének az igazolására.
Kéjük, hogy a cikkszámot olvassa le a típustábláról,
a gravírozásból, az Útmutató címoldaláról (balra
lent), illetve a hátoldalon, vagy a termék alján található matricáról.
Amennyiben működési hibák, vagy egyéb hiányosság lépne fel, előszöris vegye fel a kapcsolatot a
következőkben megnevezett szervizek egyikével
telefonon, vagy e-mailen.
A hibásnak ítélt terméket ezután a vásárlást igazoló
blokk, valamint a hiba leírásának és keletkezési
idejének mellékelésével díjmentesen postázhatja
az Önnel közölt szervizcímre.
25 HU

Szerviz Magyarország
Tel.: 0640 102785
E-mail: owim@lidl.hu
IAN 289749
felelősségünk tudatában kijelentjük, hogy a Akkus
fúró-csavarozó 20 V PABSP 20-Li A1, Modell-sz.:
HG02731, változat: 08 / 2017, amelyre ezen
nyilatkozat vonatkozik, megfelel a 2006 / 42 / EK,
2014 / 30 / EU, 2011 / 65 / EU, 2014/35/EU
jogszabálynak/ jogszabályszerű iratnak.
Garancia
A terméket szigorú minőségi előírások betartásával
gondosan gyártottuk, és szállítás előtt lelkiismeretesen ellenőriztük. Ha a terméken hiányosságot
tapasztal, akkor a termék eladójával szemben
törvényes jogok illetik meg Önt. Ezeket a törvényes
jogokat a következőkben ismertetett garancia vállalásunk nem korlátozza.
A termékre 5 év garanciát adunk a vásárlás dátumától számítva. A garanciális idő a vásárlás dátumával
kezdődik. Kérjük, jól őrizze meg a pénztári blokkot.
Ez a bizonylat szükséges a vásárlás tényének az
igazolásához.
Ha a termék vásárlásától számított 5 éven belül
anyag- vagy gyártási hiba merül fel, akkor a választásunk szerint a terméket ingyen megjavítjuk vagy
kicseréljük. A garancia megszűnik, ha a terméket
megrongálták, nem szakszerűen kezelték vagy
tartották karban.
A garancia az anyag- vagy gyártáshibákra vonatkozik. A garancia nem terjed ki azokra a termékrészekre, melyek normál kopásnak vannak kitéve és
ezért fogyóeszköznek tekinthetők (pl. elemek), vagy
a törékeny részekre sérülésére, pl. kapcsolók, akkuk,
vagy üvegből készült részek.
Alkalmazott összehangolt szabványok
EN 60745-1/A11:2010
EN 60745-2-1:2010
EN 60745-2-2:2010
EN 60335-1/A11:2014
EN 60335-2-29/A2:2010
EN 62233:2008
EN 55014-1/A2:2011
EN 55014-2:2015
EN 61000-3-2:2014
EN 61000-3-3:2013
EN 50581:2012
Sorozatszám: IAN 289749
Tobias König
Ágazati vezető/A dokumentumért felelős
OWIM GmbH & Co. KG, Stiftsbergstraße 1,
DE-74167 Neckarsulm, NÉMETORSZÁG
Neckarsulm, 12.01.2017
A megfelelőségi nyilatkozat a
www.owim.com oldalon található.
A készülékre 1 év garanciát adunk a vásárlás dátumától számítva.
Az eredeti Megfelelőségi
Nyilatkozat fordítása
MI, az OWIM GmbH & Co. KG, Stiftsbergstraße
1, DE-74167 Neckarsulm, NÉMETORSZÁG,
26 HU
A nyilatkozat fönt leírt tárgya megfelel az
Európai Parlament és Tanács 2011/65/EU számú,
2011. június 8-án hatályba lépett, az elektromos
készülékekben felhasznált bizonyos veszélyes
anyagokról szóló rendeletnek.

Legenda uporabljenih piktogramov ...................................................................... Stran 28
Uvod ................................................................................................................................................... Stran 28
Predvidena uporaba .......................................................................................................................... Stran 28
Opis delov .......................................................................................................................................... Stran 28
Obseg dobave ................................................................................................................................... Stran 28
Tehnični podatki ................................................................................................................................. Stran 29
Splošna varnostna navodila za električno orodje ..................................... Stran 29
Varnostni napotki za vrtalni vijačnik ................................................................................................. Stran 32
Varnostni napotki za polnilne naprave............................................................................................. Stran 32
Pred začetkom obratovanja .......................................................................................... Stran 33
Polnjenje akumulatorske baterije ...................................................................................................... Stran 33
Vstavljanje / odstranjevanje akumulatorske baterije ........................................................................ Stran 33
Preverjanje stanja akumulatorja ........................................................................................................ Stran 33
Zamenjava / vstavljanje orodja ......................................................................................................... Stran 33
Izbira vrtilnega momenta / stopnje vrtanja ....................................................................................... Stran 33
Menjalnik z 2 prestavama ................................................................................................................ Stran 34
Začetek uporabe ..................................................................................................................... Stran 34
Vklop in izklop .................................................................................................................................... Stran 34
Nastavljanje števila vrtljajev .............................................................................................................. Stran 34
Preklop smeri vrtenja .......................................................................................................................... Stran 34
Nasveti in zvijače ............................................................................................................................... Stran 34
Vzdrževanje in čiščenje ...................................................................................................... Stran 35
Odstranjevanje ......................................................................................................................... Stran 35
Servis ................................................................................................................................................. Stran 36
Postopek pri uveljavljanju garancije ................................................................................................. Stran 36
Prevod originalne izjave o skladnosti .................................................................. Stran 37
Garancijski list ........................................................................................................................... Stran 38
27 SI

Legenda uporabljenih piktogramov
Preberite navodilo za uporabo.
Upoštevajte opozorila in
varnostne napotke!
Akumulator zaščitite pred vročino in
neposrednimi sončnimi žarki.
Akumulator zaščitite pred požarom.
Primeren le za uporabo v suhih, notranjih prostorih.
Akumulatorski vrtalni vijačnik
20 V PABSP 20-Li A1
Uvod
Iskrene čestitke ob nakupu vašega novega izdelka.
Odločili ste se za zelo kakovosten izdelek. To navodilo za uporabo je sestavni del tega izdelka. Vsebuje pomembna navodila za varnost, uporabo in
odstranitev. Preden začnete izdelek uporabljati, se
seznanite z vsemi navodili za uporabo in varnostnimi napotki. Izdelek uporabljajte samo tako,
kot je opisano, in samo za navedena področja
uporabe. Če izdelek odstopite novemu lastniku,
mu zraven izročite tudi vse dokumente.
Predvidena uporaba
T3.15 A
V
V
Fina varovalka
Akumulator zaščitite pred vodo in
vlago.
Zaščitni razred II (dvojna izolacija)
Volt (izmenični tok)
Volt (enosmerni tok)
Opis delov
1
Vrtalna glava (brez ključa)
2
Izbira vrtilnega momenta
3
Izbirno stikalo za prestave
4
Stikalo za preklop smeri vrtenja / blokado
5
Vklopno-izklopno stikalo / regulacija števila vrtljajev
6
Mehki ročaj
7
Magnetno držalo za nastavke
8
Držalo za na pas
9
Akumulatorska baterija
10
Tipka za akumulator
11
Tipka za sprostitev
12
Lučka za stanje akumulatorja
13
LED delovna lučka
14
Hitri polnilnik
15
Statusna LED lučka za polnjenje – zelena
16
Statusna LED lučka za polnjenje – rdeča
Ta izdelek je primeren za vijačenje in vrtanje v les,
kovino in plastiko. Kakršna koli drugačna uporaba
ali sprememba izdelka ni v skladu z določili in
predstavlja znatno nevarnost nesreč. Za poškodbe,
nastale zaradi nepredvidene uporabe, proizvajalec ne prevzema odgovornosti. Ni namenjen za
poslovno uporabo.
28 SI
Obseg dobave
1 akumulatorski vrtalni vijačnik 20 V PABSP 20-Li A1
1 akumulatorska baterija PABSP 20-Li A1-1
1 polnilnik PABSP 20-Li A1-2
1 nosilni kovček
1 navodilo za uporabo

Tehnični podatki
Akumulatorski
vrtalni vijačnik: PABSP 20-Li A1
Standardna napetost: 20 V
Izmerjeno število
vrtljajev v prostem
teku: 1. prestava: n
2. prestava: n
Območje vpenjanja
vrtalne glave: maks. Ø 13 mm
Maks. premer
svedra: jeklo: 13 mm,
les: 38 mm
Akumulator: PABSP 20-Li A1-1
Tip: LITIJ IONSKI
Celice: 5
Standardna
napetost: maks. 20 V
Zmogljivost: 2,5 Ah
Polnilnik: PABSP 20-Li A1-2
VHOD/Input
Nazivna napetost: 100–240 V
Nazivna frekvenca: 50–60 Hz
Nazivna moč: 95 W
OUTPUT/izhod
Nazivna napetost: 14,4–20 V
Nazivni tok: 4 A
Čas polnjenja: pribl. 45 min
(2,5 Ah akumulatorska baterija)
pribl. 90 min
(5,0 Ah akumulatorska baterija)
Zaščitni razred: II /
(dvojna izolacija)
0–500 min-1,
0
0–2000 min
0
~
Nosite opremo za zaščito sluha.
Emisijska vrednost nihanja:
Skupna vrednost nihanja (vektorska vsota treh
smeri) določena skladno z EN 60745:
Vijaki: emisijska vrednost nihanja a
-1
0,69 m / s
2
negotovost K = 1,5 m / s
Vrtanje v kovino: vrednost emisije tresljajev a
1,534 m / s
2
negotovost K = 1,5 m/s
Napotek: Nivo nihanja, naveden v teh navodilih, je
bil merjen skladno z merilnim postopkom, normiranem
po standardu, in se ga lahko uporablja za primerjavo naprav. Navedeno vrednost emisije tresljajev
lahko uporabite tudi za uvodno oceno izpostavitve.
Nivo nihanja se bo spreminjal skladno z uporabo električnega orodja in
lahko v nekaterih primerih leži nad vrednostjo, navedeno v teh navodilih. Kadar se električno orodje
redno uporablja na tak način, bi nihajno obremenitev lahko podcenili. Poskusite ohraniti obremenitev
zaradi vibracij čim nižjo. Najboljši ukrep za zmanjšanje obremenitve zaradi vibracij je nošnja rokavic
med uporabo orodja in omejitev delovnega časa.
Pri tem je treba upoštevati vse deleže obratovalnega cikla (npr. čase, med katerimi je električno
orodje izklopljeno, in tiste, med katerimi je sicer
vklopljeno, vendar deluje brez obremenitve).
Splošna varnostna navodila
za električno orodje
:
h
2
:
h, D
2
Vrednost emisije hrupa:
Izmerjena vrednost za hrup, ugotovljena v skladu
z EN 60745. Raven hrupa električnega orodja,
ocenjena z A, običajno znaša:
Raven zvočnega tlaka:
Negotovost K: K
Raven zvočne moči:
Negotovost K: K
= 73,8 dB (A)
= 3 dB
= 84,8 dB (A)
= 3 dB
Preberite varnostna
opozorila in navodila! Neupoštevanje varnostnih opozoril in navodil lahko vodi do povzročitve
električnega udara, požara in / ali hudih poškodb.
Vsa varnostna opozorila in navodila
shranite za uporabo v prihodnje!
V varnostnih navodilih uporabljeni pojem »električno
orodje« se nanaša na električno orodje na omrežni
pogon (s kablom za priključitev na omrežje) in na
29 SI

električno orodje na akumulatorski pogon (brez
kabla za priključitev na omrežje).
1. Varnost na delovnem mestu
a) Delovno območje naj bo vedno čisto
in dobro osvetljeno. Nered in neosvetljena
delovna področja so lahko vzrok za nezgode.
b) Z orodjem ne delajte v okolici, kjer
obstaja nevarnost eksplozije in v
kateri se nahajajo vnetljive tekočine,
plini
ali prah. Električna orodja proizvajajo
iskri
ce, ki bi lahko povzročile vžig prahu ali pare.
c) Poskrbite, da bodo otroci in druge
osebe med uporabo električnega
orod
ja dovolj oddaljene od mesta
upora
be.
Če vaša pozornost ni v celoti
usmerjena na
delo, lahko izgubite nadzor
nad orodjem.
2. Električna varnost
a) Priključni vtič električnega orodja
(oz. napajalnika) mora ustrezati
električni vtičnici. Vtiča v nobenem
primeru ne smete spreminjati. Skupaj
z ozemljenimi stroji ne uporabljajte
dodatnih nastavkov vtiča. Originalen
nespremenjen vtič in ustrezna vtičnica zmanjšata tveganje električnega udara.
b) Preprečite telesni stik z ozemljenimi
površinami, kot so cevi, grelci, štedilniki in hladilniki. Obstaja povečano tvega-
nje električnega udara, če je vaše telo
ozemljeno.
c) Preprečite stik orodja z vodo ali
vlago. Vdor vode v električno orodje poveča
tveganje električnega udara.
d) Kabla ne uporabljajte za nošenje
orodja, za obešanje orodja ali za
vlečenje vtiča iz vtičnice. Kabel
zavarujte pred vročino, olji, ostrimi
robovi ali gibljivim delom orodja.
Poškodovani ali
tveganje električne
zavozlani kabli povečajo
ga udara.
e) Kadar z električnim orodjem delate
na prostem, uporabljajte samo električne podaljške, ki so primerni in namenjeni uporabi na prostem. Uporaba
električnega podaljška, ki je izdelan za uporabo
na prostem, zmanjša tveganje električnega
udara.
f) Če se uporabi električnega orodja
v vlažnem okolju ne da izogniti,
uporabljajte zaščitno stikalo za okvarni tok. Uporaba zaščitnega stikala za
okvarni tok zmanjša tveganje električnega
udara.
3. Varnost oseb
a) Ves čas bodite pozorni, pazite, kaj
delate in pri delu z električnim orodjem ravnajte razumno. Orodja ne
uporabljajte, če ste utrujeni ali če ste
pod vplivom droge, alkohola ali
zdravil.
Trenutek nepozornosti med uporabo orodja
lahko povzroči resne poškodbe.
b) Vedno uporabljajte osebno zaščitno
opremo in vedno zaščitna očala. Uporaba osebne zaščitne opreme kot so maska za
prah, delovni čevlji z zaščito proti drsenju, zaščitna čelada ali zaščita sluha, odvisno od načina uporabe električnega orodja, zmanjšuje
tveganje nastanka poškodb.
c) Preprečite nenameren vklop naprave.
Prepričajte se, ali je električno orodje
izklopljeno, preden ga priključite na
napajanje in / ali akumulator, ga dvignete ali nosite. Če imate pri nošenju na-
prave prst na stikalu za VKLOP / IZKLOP ali je
naprava vklopljena, to lahko vodi do povzročitve nesreč.
d) Pred vklopom orodja odstranite vsa
orodja, ki jih potrebujete za nastavitve in vse vijačne ključe. Orodje ali ključ
v vrtečem se delu orodja bi lahko povzročil poškodbe.
e) Izogibajte se abnormalni telesni drži.
Skrbite za varno stojišče in pazite na
ravnotežje. Na ta način lahko napravo, še
posebno v nepričakovanih situacijah, bolje
kontrolirate.
f) Oblečeni bodite v primerna oblačila.
Ne nosite širokih oblačil ali nakita.
Poskrbite, da v bližino vrtečih se
30 SI

delov stroja ne pridejo lasje, oblačila
in rokavice. Ohlapna oblačila, nakit ali
dolgi lasje bi se lahko ujeli v premikajoče se
dele.
g) Kadar je vgrajena oprema za odse-
savanje ali prestrezanje prahu, se
prepričajte, da je oprema priključena in pravilno uporabljena. Upo-
raba opreme zmanjša ogrožanje zaradi prahu.
4. Skrbno ravnanje in uporaba
električnega orodja
a) Naprave ne preobremenjujte. Za
vaše delo uporabljajte za to namenjeno električno orodje. Z ustreznim
električnim orodjem boste v določenem
območju zmogljivosti delali bolje in bolj varno.
b) Ne uporabljajte električnega orodja,
čigar stikalo je defektno. Električno
orod
je, ki se ne da več vklopiti ali izklopiti, je
nevarno in ga je treba dati v popravilo.
c) Preden izvajate nastavitve na nap-
ravi, zamenjujete dele opreme ali
napravo daste iz rok, izvlecite električni vtič iz vtičnice in / ali odstranite
akumulator. Ti previdnosti ukrepi prepreču-
jejo nenameren zagon električnega orodja.
d) Neuporabljano električno orodje
hranite zunaj dosega otrok. Osebam,
ki z napravo niso seznanjene ali niso
prebrale teh navodil, uporabe naprave
ne dovolite. Električno orodje je ne-
varno, če ga uporabljajo neizkušene osebe.
e) Napravo skrbno negujte. Kontroli-
rajte, če premikajoči se deli naprave
brezhibno delujejo in se ne zatikajo,
če so deli naprave odlomljeni ali poškodovani, ter da delovanje naprave
ni ovirano. Poškodovane dele dajte
pred ponovno uporabo naprave v popravilo. Vzrok za mnoge nesreče je slabo
vzdrževano električno orodje.
f) Poskrbite, da bodo rezalna orodja
vedno ostra in čista. Skrbno vzdrževana
rezalna orodja z ostrimi rezili se ne zatikajo in
so lažje vodljiva.
g) Električna orodja, dodatno opremo,
nastavke itd. uporabljajte v skladu z
navodili za uporabo in na način, ki je
predpisan posebej za ta specialni tip
stroja. Vedno upoštevajte delovne
pogoje in vrsto dela, ki ga želite opraviti. Uporaba električnih orodij v namene, ki
se razlikujejo od namenov, ki jih je predvidel
proizvajalec, lahko povzroči nastanek nevarnih
situacij.
5. Uporaba in nega akumulatorske
naprave
Akumulator polnite le s polnilnikom,
ki ga priporoča proizvajalec. Polnilnik,
ki je primeren za določeni akumulator, lahko
privede do tveganja za požar, če ga uporabite
z drugim akumulatorjem.
Električna orodja uporabljajte le z za
to označenimi akumulatorskimi baterijami. Uporaba drugih akumulatorskih bate-
rij lahko privede do telesnih poškodb in
požara.
Če akumulatorske baterije ne uporab-
ljate, je ne približujte kovinskim predmetom, kot so pisarniške sponke,
kovanci, ključi, žeblji, vijaki itd. Ti lahko
vzpostavijo povezavo med poli akumulatorjev
in s tem privedejo do opeklin ali požara.
Če akumulatorsko baterijo uporab-
ljate ali hranite pri neugodnih pogojih, lahko pride do izstopa tekočine.
Izogibajte se stiku z njo. Če pride tekočina v stik z očmi, poiščite zdravniško pomoč. Tekočina iz akumulatorja lahko
privede do draženja kože ali opeklin.
PREVIDNO! NEVARNOST EK-
SPLOZIJE! Baterij, ki niso predvidene za polnjenje, nikoli ne polnite.
Akumulator zaščitite pred vročino,
npr. pred trajnim sončnim obsevanjem, ognjem, vodo in vlago.
Obstaja nevarnost eksplozije.
31 SI

6. Servis
Električno orodje dajte v popravilo
samo kvalificiranemu strokovnemu
osebju, ki mora izvesti popravilo
samo z uporabo originalnih nadomestnih delov. S tem se zagotovi, da ostane
varnost električnega orodja zagotovljena.
Varnostni napotki
za vrtalni vijačnik
Uporabljajte dodatne ročaje, če so
dobavljeni skupaj z izdelkom. Izguba
nadzora lahko privede do telesnih poškodb.
Kadar izvajate delovne operacije, pri
katerih uporabljeno električno orodje
lahko zadene ob skrito električno napeljavo ali lastni priključni kabel,
držite izdelek samo na izoliranih površinah za prijemanje.
Stik z vodnikom, ki je pod napetostjo, lahko
premosti napetost na kovinske dele izdelka in
povzroči udar električnega toka.
Kadar izvajate delovne operacije, pri
katerih vijak lahko zadene ob skrito
električno napeljavo, napravo držite
samo na izoliranih površinah za prijemanje. Kontakt vijaka z vodnikom, ki je pod
napetostjo, lahko premosti napetost na kovinske dele naprave in povzroči udar električnega toka.
Varnostni napotki za
polnilne naprave
Izdelek lahko uporabljajo otroci
od 8. leta naprej ter osebe z
zmanjšanimi fizičnimi, čutilnimi
ali duševnimi sposobnostmi ali
osebe s pomanjkanjem izkušenj
in/ali znanja, če so pod
nadzorom ali če so bili poučeni
o varni uporabi izdelka in razumejo nevarnosti, do katerih
lahko pride med uporabo. Otroci se ne smejo igrati z izdelkom.
Čiščenja in vzdrževanja, ki ga
mora izvajati uporabnik, ne
smejo izvajati otroci brez nadzora.
Baterij, ki niso predvidene za
polnjenje, nikoli ne polnite. Neupoštevanje lahko privede do nevarnih situacij.
Če je napeljava poškodovana,
jo sme zamenjati le proizvajalec
ali njegov servisni zastopnik.
Neupoštevanje lahko privede
do nevarnih situacij.
Zaščitite električne sestavne dele
pred vlago. Ustreznih delov ne
potapljajte v vodo ali druge tekočine, saj obstaja nevarnost
udara električnega toka! Izdelka
nikoli ne držite pod tekočo
vodo. Upoštevajte napotke za
čiščenje, nego in vzdrževanje.
Polnilnik je predviden samo za
uporabo v notranjih prostorih.
Ta polnilna naprava je primerna
le za vrsto akumulatorja
PABSP 20-Li A1-1.
32 SI

Če je napeljava izdelka za priključitev na
omrežje poškodovana, jo mora zamenjati proizvajalec ali njegova servisna služba ali podobno usposobljena
oseba, da ne pride do nevarnosti.
Pred začetkom obratovanja
Polnjenje akumulatorske
baterije (glejte sl. A)
PREVIDNO! Preden odstranite ali vstavite
akumulatorsko baterijo
pravo, vedno izvlecite omrežni vtič.
Akumulatorske baterije 9 nikoli ne polnite,
če je temperatura okolice pod 10 °C ali nad
40 °C.
Vstavite akumulatorsko baterijo 9 v hitri
polnilnik
Omrežni vtič vstavite v vtičnico. Zelena sta-
tusna LED lučka
nato ugasne. Nato zasveti rdeča statusna LED
lučka
samo rdeča statusna LED lučka
Ko je postopek polnjenja zaključen, sveti ze-
lena statusna LED lučka
LED lučka
Rdeča LED lučka utripa Akumulator je
okvarjen
Zelena LED lučka utripa Akumulator je
premrzel ali pretopel.
14
(glejte sl. A).
16
. Med postopkom polnjenja nato sveti
16
ugasne.
9
iz/v polnilno na-
15
zasveti za eno sekundo in
16
.
15
in rdeča statusna
Odstranjevanje akumulatorske baterije:
Pritisnite gumb za sprostitev 11 in odstranite
akumulatorsko baterijo
9
(glejte sl. D).
Preverjanje stanja akumulatorja
Za preverjanje stanja akumulatorja pritisnite
tipko za akumulator
preostala moč je s tremi lučkami stanja akumu-
12
latorja
3 rdeče lučke = povsem napolnjeno
2 rdeči lučki = srednja napolnjenost
1 rdeča lučka = nizka napolnjenost
prikazana kot sledi:
10
(glejte sl. E). Stanje oz.
Zamenjava/vstavljanje orodja
PREVIDNO! Akumulatorsko baterijo 9 je
treba odstraniti iz izdelka, preden zamenjate
orodje.
Izdelek ima povsem samodejno blokado vretena
(gl. sl. F). V primeru zaustavitve motorja se komponente pogonske enote zablokirajo, tako da boste
lahko vpenjalno glavo
Ko vstavite želeno orodje, ga lahko zategnete z vrtenjem vpenjalne glave v desno
tena se sproži samodejno, če zaženete motor s
pritiskom na vklopno-izklopno stikalo
1
odprli z vrtenjem v levo .
. Blokada vre-
5
.
Izbira vrtilnega momenta /
stopnje vrtanja
Moč vrtenja lahko nastavite prek izbire vrtilnega
momenta
2
(glejte sl. G).
Vstavljanje/odstranjevanje
akumulatorske baterije
Vstavljanje akumulatorske baterije:
Prestavite stikalo za preklop smeri 4
v sredinski položaj (blokada) (glejte sl. C).
Pritisnite akumulatorsko baterijo 9 v priključni
vdolbini, da se slišno zaskoči (gl. sl. B).
Izberite nizko stopnjo za manjše vijake oz.
pri vijačenju v mehke materiale.
Visoko stopnjo izberite za velike vijake, trde
materiale oz. pri odvijanju vijakov.
Za vrtanje izberite stopnjo vrtalnika, tako da
izbiro vrtilnega momenta
v položaj za vrtanje
2
premaknete
(glejte sl. H).
33 SI

Menjalnik z 2 prestavama
Preklop smeri vrtenja
PREVIDNO! Izbirno stikalo za prestave 3
pritisnite šele, ko je izdelek ustavljen. V nasprotnem primeru se lahko izdelek poškoduje.
1. prestava - Izbirno stikalo za prestave
položaju 1 (gl. sl. I).
Ta nastavitev je primerna za vsa vijačenja.
2. prestava - Izbirno stikalo za prestave
položaju 2.
Ta nastavitev je primerna za vsa vrtanja (sl. J).
3
3
je v
je v
Začetek uporabe
Vklop in izklop
Vklop:
Za začetek uporabe izdelka pritisnite vklopno-
-izklopno stikalo
K). LED delovna lučka
povsem pritisnjenem vklopno-izklopnem stikalu
5
. Pri neugodnih svetlobnih razmerah
osvetljuje delovno območje.
Izklop:
Za izklop izdelka izpustite vklopno-izklopno sti-
5
kalo
.
Napotek: LED delovna lučka
ližno 10 s po izklopu izdelka oz. po izpustitvi vklopno-izklopnega stikala
5
in ga zadržite (glejte sl.
13
sveti pri rahlo ali
13
sveti še prib-
5
.
Nastavljanje števila vrtljajev
Zamenjajte smer vrtenja, tako da pritisnete
stikalo za preklop smeri vrtenja
levo (glejte sl. L).
Če je stikalo za smer vrtenja 4 v sredinskem
položaju, je stikalo za vklop/izklop blokirano.
4
v desno oz.
Nasveti in zvijače
Nasvet! Tako
ravnate pravilno.
Pred uporabo preverite, ali je vijačni oz. vrtalni
nastavek pravilno nameščen, to pomeni, ali je
usredinjen v vrtalni glavi.
Vijačni nastavki so označeni glede na njihove
mere in obliko. Če niste prepričani, najprej
preizkusite, ali se nastavek v vijačni glavi ne
more premikati.
Vrtilni moment:
Manjši vijaki/nastavki se lahko poškodujejo, če
nastavite prevelik vrtilni moment oz. preveliko
število vrtljajev.
Trdi primer vijaka (v kovini):
Posebej visoki vrtilni momenti nastanejo npr. pri
kovinskih vijačnih spojih z uporabo nastavkov
nasadnih ključev. Izberite manjše število vrtljajev.
Mehki primer vijaka (npr. v mehkem lesu):
Tudi tukaj vijačite z manjšim številom vrtljajev,
da npr. pri stiku z vijačno glavo iz kovine ne
boste poškodovali lesene površine. Uporabite
globilnik.
Vklopno-izklopno stikalo 5 ima nastavljivo regulacijo hitrosti. Z rahlim pritiskom na vklopno-izklopno
5
stikalo
S povečanjem pritiska se poveča število vrtljajev
(glejte sl. K).
Napotek: Vgrajena zavora motorja skrbi za hitro
ustavitev.
34 SI
deluje izdelek z nizkim številom vrtljajev.
Pri vrtanju v les, kovino in druge materiale
obvezno upoštevajte:
Pri manjšem premeru svedra uporabite večje
število vrtljajev, pri večjem premeru pa manjše
število vrtljajev.
Pri trdih materialih uporabite manjše število
vrtljajev, pri mehkem materialu pa večje število
vrtljajev.

Zavarujte ali pritrdite (če je mogoče) obdelova-
nec v vpenjalno napravo.
Označite mesto, na katerem boste vrtali,
s točkalom ali žebljem. Za začetek vrtanja
uporabite manjše število vrtljajev.
Vrteči sveder večkrat povlecite iz izvrtine, da
boste odstranili ostružke ali izvrtanine in jo
prezračili.
Vrtanje v kovino:
Uporabite sveder za kovino (HSS). Za naj-
boljše rezultate bi morali sveder hladiti z oljem
za rezila. Svedre za kovino lahko uporabite
tudi za vrtanje v umetno maso. Najprej vrtajte
s svedrom premera Ø 3 mm, nato pa se približajte želenemu premeru svedra.
Držalo za na pas:
Z držalom za na pas lahko izdelek obesite na
hlačni žep, kot je prikazano.
Vrtanje v les:
Uporabite sveder za les s centrirno konico, za
globlje izvrtine uporabite »kačji sveder«, za
večje premere svedra pa gozdarski sveder.
Majhne vijake v mehkem lesu je mogoče neposredno priviti brez predvrtanja.
Pritrditev nastavka na izdelek:
Tukaj lahko začasno pritrdite nastavke za vrtanje in
vijačenje.
Vzdrževanje in čiščenje
NEVARNOST TELESNIH
POŠKODB! Pred vsemi deli na izdelku le-tega
izklopite in odstranite akumulator.
Izdelek ne potrebuje vzdrževanja.
V notranjost izdelka ne smejo priti tekočine.
Za čiščenje ohišja uporabljajte suho krpo. Ni-
koli ne uporabljajte bencina, topil ali čistil, ki
načenjajo umetno maso.
Izdelek mora biti vedno čist, suh in na njem ne
sme biti olja ali masti za mazanje.
Če litij-ionskega akumulatorja dlje časa ne upo-
rabljate, je treba redno preverjati stanje napolnjenosti. Optimalno stanje napolnjenosti je
med 50 in 80 %. Optimalna klima za skladiščenje je hladna in suha.
Odstranjevanje
Embalaža je narejena iz okolju primernih materialov, ki jih lahko oddate za
recikliranje na lokalnih zbirališčih
odpadkov. Zelena točka ne velja za
Nemčijo.
35 SI

Upoštevajte oznake embalažnih
b
materialov za ločevanje odpadkov, ki so
a
označene s kraticami (a) in številkami (b)
z naslednjim pomenom: 1–7: umetne
mase / 20–22: papir in karton / 80–98:
vezni materiali.
Izdelek in materiale embalaže je
mogoče reciklirati; za lažjo obdelavo
odpadkov jih odstranite ločeno. Logotip
Triman velja samo za Francijo.
O možnostih odstranjevanja odsluženega izdelka se lahko pozanimate pri
svoji občinski ali mestni upravi.
Servis
Vaš izdelek naj popravi servisna delavnica ali
električar z uporabo originalnih nadomestnih
delov. S tem bo zagotovljeno, da se bo varnost
izdelka ohranila.
Zamenjavo vtiča ali omrežne napeljave
prepustite proizvajalcu izdelka ali njegovi servisni službi. S tem bo zagotovljeno, da se bo
varnost izdelka ohranila.
Postopek pri uveljavljanju
garancije
Ko je vaš izdelek dotrajan, ga zaradi
varovanja okolja ne odvrzite med gospodinjske odpadke, temveč ga oddajte
na ustreznem zbirališču tovrstnih odpadkov. O zbirnih mestih in njihovih delovnih časih se lahko pozanimate pri svoji
pristojni občinski upravi.
Preden napravo zavržete, iz nje odstranite
akumulator.
Pokvarjene ali iztrošene baterije / akumulatorje je
treba reciklirati v skladu z Direktivo 2006/66/ES
in njenimi spremembami. Baterije / akumulatorje
in / ali izdelek vrnite na ponujenih zbirnih mestih.
Škoda na okolju zaradi
napačnega odstranjevanja
baterij / akumulatorjev!
Baterij / akumulatorjev ni dovoljeno odstraniti skupaj z gospodinjskimi odpadki. Vsebujejo lahko strupene težke kovine in so podvržene določbam za
ravnanje z nevarnimi odpadki. Kemični simboli
težkih kovin so naslednji: Cd = kadmij, Hg = živo
srebro, Pb = svinec. Zato iztrošene baterije / akumulatorje oddajte na komunalnem zbirnem mestu.
Za zagotovitev hitre obdelave vašega primera vas
prosimo, da sledite naslednjim napotkom:
Prosimo, da za vsa vprašanja pripravite račun in
številko izdelka (npr. IAN 123456) kot
dokazilo o nakupu.
Številko izdelka najdete na identifikacijski ploščici,
gravuri, naslovni strani v navodilih (spodaj levo) ali
na nalepki na hrbtni ali spodnji strani.
Če pride do napačnega delovanja ali drugih pomanjkljivosti, se obrnite najprej na v nadaljevanju
navedeni servisni oddelek po telefonu ali prek
e-pošte.
Izdelek, označen kot okvarjen, lahko nato brez poštnine pošljete na navedeni naslov servisa, zraven
pa priložite potrdilo o nakupu (blagajniški račun) in
navedite, za kakšno pomanjkljivost gre in kdaj je
nastala.
Servis Slovenija
Tel.: 080 080 917
E-Mail: owim@lidl.si
IAN 289749
36 SI

Prevod originalne
izjave o skladnosti
Mi, OWIM GmbH & Co. KG, Stiftsbergstraße 1,
DE-74167 Neckarsulm, NEMČIJA, izjavljamo na
lastno odgovornost, da je izdelek: Akumulatorski
vrtalni vijačnik 20 V PABSP 20-Li A1, št. modela:
HG02731, različica: 08 / 2017, na katerega se
nanaša ta izjava, skladen s standardi/
normativnimi dokumenti direktiv 2006 / 42 / ES,
2014 / 30 / EU, 2011 / 65 / EU, 2014/35/EU.
Uporabljeni harmonizirani standardi:
EN 60745-1/A11:2010
EN 60745-2-1:2010
EN 60745-2-2:2010
EN 60335-1/A11:2014
EN 60335-2-29/A2:2010
EN 62233:2008
EN 55014-1/A2:2011
EN 55014-2:2015
EN 61000-3-2:2014
EN 61000-3-3:2013
EN 50581:2012
Serijska številka: IAN 289749
omejitve uporabe določenih nevarnih snovi v električnih in elektronskih napravah.
Tobias König
Področni vodja / Odgovorni za dokumentacijo
OWIM GmbH & Co. KG, Stiftsbergstraße 1, DE74167 Neckarsulm, NEMČIJA
Neckarsulm, 12.01.2017
Izjavo o skladnosti najdete na spletni strani:
www.owim.com.
Zgoraj opisani predmet Izjave izpolnjuje
predpise Direktive 2011/65/EU Evropskega parlamenta in Sveta z dne 8. junija 2011 glede
37 SI

Pooblaščeni serviser:
OWIM GmbH & Co. KG
Stiftsbergstraβe 1
DE-74167 Neckarsulm
NEMČIJA
Servisna telefonska številka: 00386 (0) 80 28 60
Garancijski list
1.
S tem garancijskim listom OWIM GmbH &
Co. KG, Stiftsbergstraβe 1, DE-74167 Neckarsulm
NEMČIJA jamčimo, da bo izdelek v garancijskem
roku ob normalni in pravilni uporabi brezhibno
deloval in se zavezujemo, da bomo ob izpolnjenih spodaj navedenih pogojih odpravili morebitne pomanjkljivosti in okvare zaradi napak v
materialu ali izdelavi oziroma po svoji presoji
izdelek zamenjali ali vrnili kupnino.
2. Garancija je veljavna na ozemlju Republike
Slovenije.
3. Garancijski rok za proizvod je 5 leta od datuma izročitve blaga. Datum izročitve blaga je
razviden iz računa.
4. Kupec je dolžan okvaro javiti pooblaščenemu
servisu oziroma se informirati o nadaljnjih postopkih na zgoraj navedeni telefonski številki.
Svetujemo vam, da pred tem natančno preberete navodila o sestavi in uporabi izdelka.
5. Kupec je dolžan pooblaščenemu servisu predložiti garancijski list in račun, kot potrdilo in dokazilo o nakupu ter dnevu izročitve blaga.
Na akumulator dajemo 1 leto garancije od datuma nakupa.
6.
,
7. Vzroki za okvaro oziroma nedelovanje
8. Jamčimo servisiranje in rezervne dele za mini-
9. Obrabni deli oz. potrošni material so izvzeti iz
10. Vsi potrebni podatki za uveljavljanje garancije se
11. Ta garancija proizvajalca ne izključuje
V primeru, da proizvod popravlja nepooblaščen
servis ali oseba, kupec ne more uveljavljati zahtevkov iz te garancije.
izdelka morajo biti lastnosti stvari same in ne
vzroki, ki so zunaj proizvajalčeve oziroma prodajalčeve sfere. Kupec ne more uveljavljati
zahtevkov iz te garancije, če se ni držal priloženih navodil za sestavo in uporabo izdelka
ali če je izdelek kakorkoli spremenjen ali nepravilno vzdrževan.
malno dobo, ki je zahtevana s strani zakonodaje.
garancije.
nahajajo na dveh ločenih dokumentih
(garancijski list, račun).
pravic potrošnika, ki izhajajo iz odgovornosti prodajalca za napake na blagu.
i
Prodajalec:
Lidl Slovenija d.o.o. k.d., Pod lipami 1, SI-1218 Komenda
38 SI

Legenda použitých piktogramů ............................................................................... Strana 40
Úvod ................................................................................................................................................. Strana 40
Použití ke stanovenému účelu..........................................................................................................Strana 40
Popis dílů .......................................................................................................................................... Strana 40
Obsah dodávky ............................................................................................................................... Strana 40
Technické údaje ............................................................................................................................... Strana 41
Všeobecné bezpečnostní pokyny pro elektrické nástroje ................Strana 41
Bezpečnostní pokyny pro vrtací šroubovák ................................................................................... Strana 44
Bezpečnostní pokyny pro nabíječky ............................................................................................... Strana 44
Před uvedením do provozu..........................................................................................Strana 45
Nabíjení sady akumulátorů ............................................................................................................. Strana 45
Vložení a vyjmutí sady akumulátorů ............................................................................................... Strana 45
Kontrola stavu akumulátoru .............................................................................................................Strana 45
Vložení / výměna nástroje ............................................................................................................... Strana 45
Předvolba točivého momentu / Stupeň vrtání ................................................................................. Strana 45
2stupňová převodovka ....................................................................................................................Strana 45
Uvedení do provozu ...........................................................................................................Strana 46
Zapínání a vypínání ......................................................................................................................... Strana 46
Nastavení otáček ............................................................................................................................. Strana 46
Přepnutí směru otáčení .....................................................................................................................Strana 46
Tipy a triky ........................................................................................................................................ Strana 46
Údržba a čištění ...................................................................................................................... Strana 47
Zlikvidování ...............................................................................................................................Strana 47
Servis ............................................................................................................................................... Strana 48
Postup v případě uplatňování záruky ............................................................................................. Strana 48
Záruka ............................................................................................................................................Strana 48
Překlad originálu prohlášení o konformitě ....................................................Strana 48
39 CZ

Legenda použitých piktogramů
Přečtěte si návod kobsluze.
Dbejte na výstrahy a bezpečnostní
upozornění!
Chraňte baterii před vysokými teplotami a přímým slunečním zářením.
Chraňte baterii před požárem.
Určeno pouze kpoužití ve vnitřních
suchých prostorách.
Aku vrtací šroubovák 20 V
PABSP 20-Li A1
Úvod
Blahopřejeme Vám ke koupi nového výrobku.
Rozhodli jste se pro kvalitní produkt. Návod kobsluze je součástí tohoto výrobku. Obsahuje důležité
pokyny pro bezpečnost, použití a likvidaci. Před
použitím výrobku se seznamte se všemi pokyny
k obsluze a bezpečnostními pokyny. Používejte
výrobek jen popsa ným způsobem a na uvedených
místech. Při předání výrobku třetí osobě předejte
i všechny podklady.
Použití ke stanovenému účelu
T3.15 A
V
V
Pojistka
Chraňte baterii před vodou a vlhkostí.
Ochranná třída II (dvojitá izolace)
Volt (střídavý proud)
Volt (stejnosměrný proud)
Popis dílů
1
Sklíčidlo (bez klíče)
2
Předvolba krouticích momentů
3
Přepínač rychlostí
4
Přepínač směru otáčení / blokování
5
Vypínač / regulace směru otáček
6
Měkká rukojeť
7
Magnetický držák bitů
8
Uchycení kopasku
9
Balíček akumulátorů
10
Tlačítko akumulátoru
11
Odblokovací tlačítko
12
Kontrolka stavu baterie
13
Pracovní svítilna s LED
14
Rychlonabíječka
15
Stavová kontrolka LED – zelená
16
Kontrolka stavu nabíjení LED – červená
Tento výrobek je vhodný ke šroubování a vrtání
do dřeva, kovů a plastů. Jakékoli jiné použití nebo
úprava přístroje je vrozporu spředpokládaným
použitím a skrývá značné nebezpečí zranění. Výrobce neručí za škody vzniklé jiným použitím než
kpopsanému účelu. Není určen k živnostenskému
využití.
40 CZ
Obsah dodávky
1 Aku vrtací šroubovák 20 V PABSP 20-Li A1
1 Balíček akumulátorů PABSP 20-Li A1-1
1 Nabíječka PABSP 20-Li A1-2
1 Kufřík
1Návod kobsluze

Technické údaje
Akumulátorový vrtací šroubovák:
PABSP 20-Li A1
Jmenovité napětí: 20 V
Jmenovité otáčky
na prázdno: 1. převodový stupeň: n
0–500 min
stupeň: n
-1
, 2. převodový
0–2000 min
0
Rozsah upínání
sklíčidla: max. Ø 13 mm
Max. průměr
vrtáku: Ocel: 13 mm
Dřevo: 38 mm
Akumulátor: PABSP 20-Li A1-1
Typ: LITHIUM IONTOVÝ
Počet článků: 5
Jmenovité napětí: max. 20 V
Kapacita: 2,5 Ah
Nabíječka: PABSP 20-Li A1-2
VSTUP / Input
Jmenovité napětí: 100–240 V
~
Jmenovitá frekvence: 50 / 60 Hz
Jmenovitý výkon: 95 W
OUTPUT / výstup
Jmenovité napětí: 14,4–20 V
Jmenovitý proud: 4 A
Doba nabíjení: cca 45 min (2,5 Ah sada
akumulátorů)
cca 90min (5,0 Ah sada
akumulátorů)
Ochranná třída: II /
(dvojitá izolace)
Hodnota emise hluku:
Naměřené hodnoty hluku zjištěny podle EN
60745. Hladina akustické intenzity, filtr A, pro
elektrické nářadí je:
Hladina akustického tlaku:
Nepřesnost K: K
= 3 dB
Hladina akustického výkonu:
Nepřesnost K: K
= 3 dB
= 73,8 dB (A)
= 84,8 dB (A)
0
-1
Používejte ochranu sluchu.
Hodnota emise vibrací:
Celkové hodnoty vibrací (vektorový součet třech
směrů) byly zjištěny podle EN 60745:
Šroubování: Hodnota emise vibrací a
0,69 m / s
2
Nepřesnost K = 1,5 m / s
Vrtání do kovu: Hodnota emise vibrací a
1,534 m / s
2
Nepřesnost K = 1,5 m/s
:
h
2
:
h, D
2
Upozornění: Hladina vibrací uvedená vtomto
návodu kobsluze byla měřena postupem vsouladu se standardizovanou zkouškou popsanou
vnormě a může se použít pro srovnávání přístrojů.
Hodnotu emise vibrací je možné použít k počátečnímu posouzení jejich vyloučení.
Hladina vibrací se mění podle
použití elektrického nástroje a může vmnohých případech přesahovat hodnotu udanou vtěchto návodech. Zátěž vibracemi by mohla být podceněna,
používá-li se elektrického nástroje pravidelně tímto
způsobem. Snažte se minimalizovat zatížení vibracemi. Příkladná opatření pro minimalizování zatížení vibracemi jsou nošení rukavic při používání
nástroje a zkrácení pracovní doby. Přitom je nutné
vzít vúvahu všechny části provozního cyklu (např. i
doby, kdy je elektrické zařízení vypnuto a doby,
kdy je sice zapnuto, ale běží naprázdno).
Všeobecné bezpečnostní
pokyny pro elektrické
nástroje
Přečtěte si všechny
pečnostní pokyny a návody! Zanedbání
při dodržování bezpečnostních pokynů a návodů
mohou způsobit úraz elektrickým proudem, požár
a / nebo těžká poranění.
Uschovejte všechny bezpečnostní pokyny
a návody pro budoucnost!
Pojem „elek
trický nástroj“ uvedený v bezpečnost
pokynech se vztahuje na elektrické nástroje napájené
bez-
ních
41 CZ

ze sítě (se sˇiťovým ka
napájené
akumulátorem (bez síťového kabelu).
belem) a na elektrické nástroje
1. Bezpečnost na pracovišti
a) Svou pracovní oblast udržujte tak,
aby byla čistá a dobře osvětlená. Ne-
pořádek a neosvětlené pracovní oblasti mohou
vést k úrazům.
b) Nepracujte se zařízením v okolí
ohroženém výbuchem, v němž se nacházejí kapaliny, plyny nebo prachy.
Elektrické nástroje vyrábějí jiskry, které mohou
zapálit prach nebo páry.
c) Elektrické nástroje během používání
chraňte před dětmi a jinými osobami.
Při rozptýlení byste mohli ztratit kontrolu nad
zařízením.
2. Elektrická bezpečnost
a) Síťová zástrčka elektrického nástroje
(
resp síťového adaptéru) musí být
v
hodná pro zásuvku. Zástrčka se nesmí žádným způsobem změnit. Nepoužívejte zástrčky s adaptérem
společně a
uzemněním.
se zařízeními sochranným
Nezměněné zástrčky a lícující
zásuvky snižují riziko úrazu elektrickým proudem.
b) Vyhněte se tělesnému kontaktu s
uzemněnými povrchy, jako jsou potr
ubí, topení, sporáky a chladničky.
Existuje zvýšené riziko úrazu elektrickým
proudem, je-li vaše tělo uzemněno.
c) Zařízení chraňte před deštěm nebo
vlhkem. Vniknutí vody do elektrického zařízení zvyšuje riziko úrazu elektrickým proudem.
d) Kabel nepoužívejte knestano venému
účelu jako je nošení zařízení, pověšení nebo vytáhnutí zástrčky ze zásuvky. Chraňte kabel před horkem,
olejem, ostrými hranami nebo se pohybujícími díly zařízení. Poškozené nebo
zapletené kabely zvyšují riziko úrazu elektrickým
proudem.
e) Při práci selektrickým nástrojem
venku použijte jen prodlužovací kabely, které jsou povoleny pro vnější
oblast. Použití prodlužovacího kabelu
povoleného pro vnější oblast snižuje riziko
úrazu elektrickým proudem.
f) Nelze-li se vyhnout provozu elektric-
kého nástroje ve vlhkém okolí, použijte ochranný spínač proti chybnému
proudu. Použití ochranného spínače proti
chybnému
proudu snižujte riziko úrazu elektrickým
proudem.
3. Bezpečnost osob
a)
Buďte neustále pozorní, dbejte na to,
c
o činíte a dejte se s rozumem do
práce s elektrickým nástrojem. Nikdy
nepoužívejte zařízení, jste-li unaveni
nebo pod vlivem drog, alkoholu a
léků. Už okamžik nepozornosti při použití
zařízení může vést kzávažným poraněním.
b)
Noste osobní ochranné vybavení a
v
ždy ochranné brýle. Nošení osobního
ochranného vybavení, jako je maska proti prachu, protiskluzná bezpečnostní obuv, ochranná
přilba nebo ochrana proti sluchu, vzávislosti
na druhu a použití elektrického nástroje, zmenšuje riziko poranění.
c) Zabraňte nechtěnému uvedení do
provozu. Zabraňte nechtěnému uvedení do provozu. Přesvědčte se před
připojením elektrického přístroje na
přívod elektrického proudu, zvednutím
nebo nošením, že je vypnutý. Máte-li při
nošení zařízení prst na spínači ZAP / VYP nebo
je zařízení zapnuto, může dojít k úrazům.
d) Před zapnutím zařízení odstraňte na-
stavovací nářadí nebo šroubováky.
Nástroj nebo šroubovák, který se nachází v
rotujícím dílu zařízení může způsobit poranění.
e) Vyhněte se neobvyklému držení
hlavy. Pečujte vždy o bezpečnou
stabilní polohu a udržujte neustále
rovnováhu.
Tím můžete zařízení zejména vneočekávaných
situacích lépe kontrolovat.
f) Noste vhodný oděv. Nenoste volný
oděv nebo šperky. Chraňte vlasy,
oděv a rukavice před pohyblivými
díly. Volný oděv, šperk nebo vlasy mohou
být zachyceny samopohyblivými díly.
42 CZ

g) Jsou-li namontována zařízení k vysá-
vání a zachycování prachu, ujistěte
se, že jsou tato připojena a správně
použita. Správné použití těchto zařízení sni-
žuje ohrožení prachem.
4. Pečlivé zacházení selektrickými
nástroji a jejich použití
a) Zařízení nepřetěžujte. Pro práci pou-
žijte ktomu určených elektrických
nástrojů. S vhodným elektrickým nástrojem
pracujete lépe a bezpečněji v udaném výkonnostním rozsahu.
b) Nepoužívejte elektrický nástroj,
jehož vypínač je defektní. Elektrický
nástroj, který nelze zapínat a vypínat, je
nebezpečný a musí se opravit.
c) Vytáhněte zástrčku ze zásuvky a /
nebo odstraňte akumulátor, předtím
než provedete nastavení zařízení,
vyměníte díly příslušenství nebo zařízení odložíte. To opatření zabrání neuvědo-
mělému spuštění elektrospotřebiče.
d) Nepoužité elektrické nástroje skla-
dujte tak, aby byly z dosahu dětí.
Zařízení nenechejte používat osobami, které s ním nejsou seznámeny
nebo které si nepřečetly tyto návody.
Elektrické nástroje
jsou nebezpečné, používají-
li je nezkušené osoby.
e) Ošetřujte zařízení s pečlivostí. Zkont-
rolujte, fungují-li pohyblivé díly zařízení a neuvázly-li, jsou-li díly zlomené
nebo poškozené, takže je funkce zařízení ohrožena. Před použitím zařízení nechejte poškozené díly
opravit. Příčina mnohých úrazů tkví ve
špatně udržovaných elektrických nástrojích.
f) Udržujte řezací nástroje ostré a čisté.
Pečlivě ošetřované řezací nástroje s ostrými
řeznými hranami neuvíznou tak často a lze je
snadněji vést.
g) Použijte elektrické nástroje, příslu-
šens
tví, náhradní nástroje atd. podle
těch
to návodů a tak, jak je pro tento
speciální typ nástroje předepsáno.
Přitom přihlédněte k pracovním pod-
mínkám a prováděné činnosti.
Použití elektrických nástrojů pro jiná než určená
použití může vést k nebezpečným situacím.
5. Použití a péče oakumulátorem napájené přístroje
Nabíjejte akumulátor pouze nabíječ-
kou, kterou doporučil výrobce. Nabí-
ječka, která je vhodná pro určitý akumulátor,
může způsobit nebezpečí požáru, pokud je používána sjiným akumulátorem.
Používejte elektrické nástroje pouze
suvedenou sadou akumulátorů. Použití jiné sady akumulátorů může vést kpožárů
a úrazům.
Chraňte nepoužívanou sadu akumu-
látorů před kovovými předměty, jako
jsou kancelářské svorky, mince, klíče,
hřebíky, šrouby apod. Tyto předměty mo-
hou vyvolat spojení mezi póly akumulátorů
snásledným nebezpečím úrazu nebo požáru.
Pokud používáte nebo skladujete
sadu akumulátorů za nevhodných
podmínek, může dojít kúniku kapalin. Zabraňte kontaktu. Pokud kapalina vnikne do očí, vyhledejte lékaře.
Kapalina zakumulátorů může způsobit podráždění pokožky nebo popálení.
POZOR! NEBEZPEČÍ VÝBU-
CHU! Baterie, které nejsou určeny
kdobíjení, nikdy znovu nenabíjejte.
Chraňte akumulátor před horkem,
např. dlouhotrvajícím slunečním zářením, ohněm, vodou a vlhkem.
Hrozí nebezpečí výbuchu.
6. Servis
Nechte výrobek opravovat jen kvali-
fikovaným odborným personálem a
jen soriginálními náhradními díly.
Zajistíte tím zachování jeho bezpečnosti.
43 CZ

Bezpečnostní pokyny pro
vrtací šroubovák
Používejte rukojeti a madla, pokud
byly dodány spolu svýrobkem. Ztráta
kontroly může způsobit úraz.
Držte výrobek na izolovaných plo-
chách, zejména při pracích, při kterých může nástroj zasáhnout skrytá
vedení elektrického proudu.
Kontakt selektrickým vodičem může způsobit
vedení elektrického proudu i přes kovové díly
výrobku a zapříčinit zásah elektrickým proudem.
Držte výrobek za izolované plochy,
obzvlášť, jestliže pracujete v místech
kde může šroub zasáhnout vedení
elektrického proudu. Kontakt s šroubu s
vodičem proudu může způsobit vedení elektrického proudu i přes kovové díly výrobku a zapříčinit zásah elektrickým proudem.
Bezpečnostní pokyny
pro nabíječky
Tento výrobek mohou používat
děti od 8 let, osoby se sníženými
fyzickými, smyslovými nebo duševními schopnosti nebo snedostatečnými zkušenostmi a
znalostmi, jestliže budou pod
dohledem nebo byly poučeny
obezpečném používání výrobku
a chápou nebezpečí, která
zjeho používání vyplývají.
Svýrobkem si děti nesmí hrát.
Děti nesmí provádět čištění a
údržbu, příslušející uživateli,
bez dozoru.
Baterie, které nejsou určeny
kdobíjení, nikdy znovu nenabíjejte. Nedodržení tohoto pokynu
může vést knebezpečným
situacím.
Pokud je vodič poškozen, smí jej
vyměnit pouze výrobce nebo
jeho servisní technik. Nedodržení tohoto pokynu může vést
knebezpečným situacím.
Chraňte elektrické součásti před
vlhkostí. Neponořujte příslušné
díly do vody nebo jiných kapalin, vopačném případě hrozí nebezpečí zasažení elektrickým
proudem! Nikdy nedržte výrobek pod tekoucí vodou. Dodržujte pokyny kčištění, ošetřování
a opravám.
Nabíječka je určena výhradně
kpoužití ve vnitřních prostorách.
Tato nabíječka je vhodná pouze
pro akumulátory typu
PABSP 20-Li A1-1.
Poškozený přívodní kabel tohoto výrobku musí
vyměnit výrobce nebo servis anebo
podobně kvalifikovaná osoba, aby
se předešlo ohrožení elektrickým
proudem.
44 CZ

Před uvedením do provozu
Vložení / výměna nástroje
Nabíjení sady akumulátorů
(viz obr. A)
POZOR! Před nasazování nebo vyjímáním
akumulátorového balíčku
9
znabíječky vy-
táhněte zástrčku ze sítě.
Nenabíjejte akumulátorový balíček 9 při
teplotách pod 10 °C nebo nad 40 °C.
Nasaďte akumulátorový balíček 9 do rychlo-
nabíječky
14
(viz obr. A).
Zastrčte síťovou zástrčku do zásuvky. Zelená
kontrolka LED stavu nabíjení
15
se na vteřinu
rozsvítí a následně zhasne. Potom svítí červená
LED kontrolka nabíjení
pouze červená LED kontrolka nabíjení
16
. Během nabíjení svítí
16
.
Jakmile je nabíjení dokončeno, svítí zelená
kontrolka LED stavu nabíjení
kontrolka LED stavu nabíjení LED
15
a červená
16
zhasne.
Červená LED bliká, akumulátor je vadný
Zelená kontrolka LED bliká, akumulátor
je příliš studený nebo teplý.
Vložení a vyjmutí sady
akumulátorů
Vložení sady akumulátorů:
Přepněte přepínač směru otáčení 4 do střední
polohy (blokování) (viz obr. C).
Zatlačte sadu akumulátorů 9 do přípojky tak,
abyste slyšeli cvaknutí (viz obr. B).
Vyjmutí sady akumulátorů:
Stiskněte odblokovací tlačítko 11 a vyjměte
sadu akumulátorů
9
(viz obr. D).
Kontrola stavu akumulátoru
Pro kontrolu stavu akumulátoru stiskněte tlačítko
akumulátoru
jící výkon je indikován kontrolkami LED stavu
akumulátoru
3červené kontrolky = maximální nabití
2červené kontrolky = střední nabití
1 červená kontrolka = nízký stav nabití
10
(viz obr. E). Stav nebo zbýva-
12
následujícím způsobem:
POZOR! Dříve, než vyměníte nástroje, musíte
zvýrobku odstranit sadu akumulátorů
9
.
Výrobek je vybaven plně automatickou aretaci
vřetene (viz obr. F). Za klidu motoru je blokována
hnací větev, a tím je možné otevřít sklíčidlo
otáčením proti směru hodinových ručiček
1
.
Jakmile vložíte požadovaný nástroj, můžete jej
upnout otáčením sklíčidla ve směru hodinových
ručiček
jakmile stisknutím tlačítka vypínače
. Aretace sklíčidla se automaticky uvolní,
5
spustíte motor.
Předvolba točivého
momentu / Stupeň vrtání
Sílu můžete nastavit pomocí předvolby krouticího
momentu
2
(viz obr. G).
Na malé šrouby nebo při šroubování do
měkkých materiálů nastavte nízký stupeň.
Na velké šrouby, tvrdé nástroje nebo při
vyšroubování šroubů nastavte vyšší stupeň.
Kvrtání vyberte stupeň vrtání přepnutím před-
volby krouticího momentu
(viz obr. H).
2
do polohy vrtání
2stupňová převodovka
POZOR! Přepínač rychlostních stupňů 3 po-
užijte teprve až výrobek stojí. Jinak hrozí poškození výrobku.
Rychlost 1 - přepínač rychlostních stupňů
vpoloze 1 (viz obr. I).
Toto nastavení je vhodné pro všechny způsoby
šroubování.
Rychlost 2 - přepínač rychlostních stupňů
vpoloze 2
Toto nastavení je vhodné pro všechny vrtací práce
(obr. J).
3
je
3
je
45 CZ

Uvedení do provozu
Zapínání a vypínání
Zapnutí:
Kuvedení výrobku do provozu stiskněte vypí-
5
nač
a podržte jej stisknutý (viz obr. K). LED
pracovní světlo
stisknutém vypínači
prostor při nevhodných světelných poměrech.
Vypnutí:
Kvypnutí výrobku uvolněte vypínač 5.
Upozornění: Pracovní svítidlo LED
ještě 10s po vypnutí výrobku nebo po uvolnění tlačítka vypínače
13
svítí při lehce nebo úplně
5
. Světlo osvítí pracovní
5
.
13
svítí asi
Nastavení otáček
Vypínač 5 je vybaven variabilní regulací otáček.
Při mírném stisknutí vypínače
nízké otáčky. Se zvyšujícím se tlakem zvyšujete
otáčky (viz obr. K).
Upozornění: Integrovaná brzda motoru zajistí
rychlé zastavení.
5
běží výrobek na
Přepnutí směru otáčení
Směr otáčení přístroje vpravo nebo vlevo mů-
žete měnit zatlačením přepínače směru otáček
4
doleva nebo doprava (viz obr. L).
Jestliže je přepínač směru otáčení 4 ve
střední poloze, pak je vypínač blokován.
zkontrolujte zda je bit ve šroubovací hlavě usazen bez vůle.
Krouticí moment:
Menší šrouby / bity mohou být poškozeny,
pokud nastavíte příliš vysoký krouticí moment
nebo příliš vysoké otáčky.
Šroubování za těžkých podmínek
(do kovu):
Mimořádně vysoké krouticí momenty vznikají
např. při spojování kovu pomocí šroubů snástrčnými šroubovacími nástavci. Nastavte nízké
otáčky.
Šroubování za lehkých podmínek
(např. měkké dřevo):
Také zde šroubujte za nízkých otáček tak,
abyste např. nepoškodili povrch dřeva při kontaktu shlavou kovového šroubu. Nepoužívejte
záhlubníky.
Při vrtání do dřeva, kovu a jiných
materiálů vždy pamatujte:
Vpřípadě malých průměrů otvorů používejte
vysoké otáčky a uotvorů svelkým průměrem
nízké otáčky.
Vpřípadě tvrdých materiálů používejte nízké
otáčky, vpřípadě měkkých materiálů vysoké otáčky.
Zajistěte nebo upevněte (pokud je to možné)
obrobek do upínacího zařízení.
Označte důlčíkem nebo jehlou místo, ve kterém
chcete vrtat. Knavrtání otvoru použijte nízkých
otáček.
Opakovaně vytahujte rotující vrták zvrtaného
otvoru tak, abyste odstranili špony nebo prach
po vrtání a abyste do otvoru přivedli vzduch.
Tipy a triky
Tip! Takto
postupujete správně.
Před použitím zkontrolujte, zda je šroubovací
nebo vrtací nástavec správně nasazen, tzn.
vystředěný ve sklíčidle.
Šroubovací bity jsou označeny podle rozměrů
a tvaru. Pokud si nejste jisti, vždy nejprve
46 CZ
Vrtání do kovu:
Používejte vrtáky do kovu (sonačením HSS).
Kdosažení nejlepších výsledků chlaďte vrták
řezným olejem. Vrtáky do kovů můžete používat i kvrtání plastů. Nejprve vrtejte vrtákem
oØ 3mm a postupně zvětšujte na požadovaný průměr.

Vrtání do dřeva:
Používejte vrták do dřeva se středicím hrotem,
kvrtání hlubokých otvorů používejte tzv. „hadovité vrtáky”, pro velké průměry vrtaných otvorů používejte forstnerův vrták. Malé šrouby
můžete do měkkého dřeva navrtávat přímo i
bez předvrtání otvoru.
Přístroj musí být vždy čistý, suchý a bez oleje
nebo mazacích tuků.
Při delším skladováním lithium-Ionen akumulátoru
se musí pravidelně kontrolovat jeho stav nabití.
Optimální nabití je mezi 50 % a 80 %. Pro skladování je optimální chladné a suché klima.
Upevnění bitů kvýrobku:
Zde můžete dočasně upínat vrtací a šroubovací bity.
Uchycení kopasku:
Pomocí uchycení kopasku můžete výrobek připnout kopasku nebo ke kapse na kalhotech tak, jak
je vidět na obrázku.
Zlikvidování
Obal se skládá zekologických materiálů,
které můžete zlikvidovat prostřednictvím
místních sběren recyklovatelných materiálů. Zelený bod neplatí pro Německo.
Při třídění odpadu se řiďte podle ozna-
b
čení obalových materiálů zkratkami (a)
a
a čísly (b), s následujícím významem:
1–7: umělé hmoty / 20–22: papír
a lepenka / 80–98: složené látky.
Výrobek a obalové materiály jsou recyklovatelné, zlikvidujte je odděleně pro
lepší odstranění odpadu. Logo Triman
platí jen pro Francii.
O možnostech likvidace vysloužilých
zařízení se informujte u správy vaší obce
nebo města.
Vzájmu ochrany životního prostředí vysloužilý výrobek nevyhazujte do domovního odpadu, ale předejte k odborné
likvidaci. O sběrnách a jejich otevíracích
hodinách se můžete informovat u příslušné správy města nebo obce.
Údržba a čištění
NEBEZPEČÍ ZRANĚNÍ! Před
všemi pracemi na výrobku musíte výrobek nejdříve
vypnout a vyjmout akumulátor.
Výrobek nevyžaduje údržbu.
Dovnitř výrobku se nesmí dostat žádné kapaliny.
Na čištění tělesa používejte suchý hadr. Nepo-
užívejte benzín, rozpouštědla nebo čističe
působící agresivně na umělou hmotu.
Před odstraněním do odpadu vyjměte akumulátor z
výrobku.
Vadné nebo vybité baterie resp. akumulátory se
musí, podle směrnice 2006/66/ES a jejích
příslušných změn, recyklovat. Baterie, akumulátory
i výrobek odevzdejte zpět do nabízených sběren.
47 CZ

Ekologické škody v důsledku
chybné likvidace baterií /
akumulátorů!
Servis česká republika
Tel.: 800 143 873
E-Mail: owim@lidl.cz
Baterie / akumulátory se nesmí zlikvidovat v
domácím odpadu. Mohou obsahovat jedovaté
těžké kovy a musí se zpracovávat jako zvláštní odpad. Chemické symboly těžkých kovů: Cd = kadmium, Hg = rtuť, Pb = olovo. Proto odevzdejte
opotřebované baterie / akumulátory u komunální
sběrny.
Servis
Opravy nechte provádět jen servis nebo
elektrikáře a jen originálními náhradními díly.
Tím je zajištěno, že zůstane bezpečnost
výrobku zachována.
Výměnu zástrčky přívodního kabelu nechte
provádět jen výrobce nebo jeho servis.
Tím je zajištěno, že zůstane bezpečnost
výrobku zachována.
Postup v případě
uplatňování záruky
Pro zajištění rychlého zpracování Vašeho
případu se řiďte následujícími pokyny:
Pro všechny požadavky si připravte pokladní
stvrzenku a číslo artiklu (např. IAN 123456) jako
doklad o zakoupení.
Číslo artiklu najdete na typovém štítku, gravuře,
titulní stránce návodu (vlevo dole) nebo na
nálepce na zadní nebo spodní straně.
V případě poruch funkce nebo jiných závad
nejdříve kontaktujte, telefonicky nebo e-mailem,
v následujícím textu uvedené servisní oddělení.
Výrobek registrovaný jako vadný potom můžete
s přiloženým dokladem o zakoupení (pokladní
stvrzenkou) a údaji k závadě a kdy k ní došlo,
bezplatně zaslat na adresu servisu, která Vám byla
sdělena.
IAN 289749
Záruka
Výrobek byl vyroben s nejvyšší pečlivostí podle
přísných kvalitativních směrnic a před odesláním
prošel výstupní kontrolou. V případě závad máte
možnost uplatnění zákonných práv vůči prodejci.
Vaše práva ze zákona nejsou omezena naší níže
uvedenou zárukou.
Na tento artikl platí 5 záruka od data zakoupení. Záruční lhůta začíná od data zakoupení. Uschovejte
si dobře originál pokladní stvrzenky. Tuto stvrzenku
budete potřebovat jako doklad o zakoupení.
Pokud se do 5 let od data zakoupení tohoto
výrobku vyskytne vada materiálu nebo výrobní
vada, výrobek Vám – dle našeho rozhodnutí –
bezplatně opravíme nebo vyměníme. Tato záruka
zaniká, jestliže se výrobek poškodí, neodborně použil
nebo neobdržel pravidelnou údržbu.
Záruka platí na vady materiálu a výrobní vady.
Tato záruka se nevztahuje na díly výrobku podléhající opotřebení (např. na baterie), dále na poškození křehkých, choulostivých dílů, např. vypínačů,
akumulátorů nebo dílů zhotovených ze skla.
Na akumulátor se vztahuje 1letá záruka od data
zakoupení.
Překlad originálu prohlášení
o konformitě
My, firma OWIM GmbH & Co. KG, Stiftsbergstraße 1, DE-74167 Neckarsulm, NĚMECKO,
prohlašujeme na vlastní zodpovědnost, že výrobek:
Aku vrtací šroubovák 20 V PABSP 20-Li A1, model
č.: HG02731, verze: 08 / 2017, na který s toto
prohlášení vztahuje, odpovídá normám a
48 CZ

normativním dokumentům 2006 / 42 / ES,
2014 / 30 / EU, 2011 / 65 / EU, 2014/35/EU.
Aplikované harmonizující normy:
EN 60745-1/A11:2010
EN 60745-2-1:2010
EN 60745-2-2:2010
EN 60335-1/A11:2014
EN 60335-2-29/A2:2010
EN 62233:2008
EN 55014-1/A2:2011
EN 55014-2:2015
EN 61000-3-2:2014
EN 61000-3-3:2013
EN 50581:2012
Sériové číslo: IAN 289749
Tobias König
Oblastní manažer/ Zodpovědný za dokumenty
OWIM GmbH & Co. KG, Stiftsbergstraße 1,
DE-74167 Neckarsulm, NĚMECKO
Neckarsulm, 12.01.2017
Prohlášení o konformitě najdete také na:
www.owim.com.
Výše popsaný předmět prohlášení splňuje
předpisy ve směrnici 2011/65/EU Evropského
parlamentu a Rady z 8.června 2011 o omezení použití určitých nebezpečných látek v elektrických a
elektronických přístrojích.
49 CZ

Legenda použitých piktogramov ............................................................................ Strana 51
Úvod ................................................................................................................................................. Strana 51
Používanie v súlade s určeným účelom .......................................................................................... Strana 51
Popis častí ......................................................................................................................................... Strana 51
Obsah dodávky ............................................................................................................................... Strana 51
Technické údaje ............................................................................................................................... Strana 52
Všeobecné bezpečnostné pokyny pre elektrické nástroje ............... Strana 52
Bezpečnostné upozornenia pre vŕtačku ......................................................................................... Strana 55
Bezpečnostné upozornenia pre nabíjačky .....................................................................................Strana 55
Pred uvedením do prevádzky ................................................................................... Strana 56
Nabíjanie akumulátorového bloku ................................................................................................. Strana 56
Vložiť / vybrať akumulátorový blok .................................................................................................Strana 56
Kontrola stavu akumulátorovej batérie ........................................................................................... Strana 56
Výmena / nasadenie nástrojov ........................................................................................................Strana 56
Predvoľba točivého momentu / Stupeň vŕtania .............................................................................. Strana 57
2-stupňový prevod ........................................................................................................................... Strana 57
Uvedenie do prevádzky ................................................................................................. Strana 57
Za- a vypnutie ...................................................................................................................................Strana 57
Nastavenie počtu otáčok ................................................................................................................ Strana 57
Prepínanie smeru otáčania .............................................................................................................. Strana 57
Tipy a triky ........................................................................................................................................ Strana 57
Údržba a čistenie ................................................................................................................... Strana 58
Likvidácia ..................................................................................................................................... Strana 59
Servis ............................................................................................................................................... Strana 59
Postup v prípade poškodenia v záruke .......................................................................................... Strana 59
Záruka ............................................................................................................................................Strana 60
Preklad originálneho konformitného prehlásenia .................................. Strana 60
50 SK

Legenda použitých piktogramov
Prečítajte si návod na obsluhu.
Rešpektujte výstražné a
bezpečnostné upozornenia!
Chráňte akumulátorovú batériu pred
horúčavou a priamym slnečným
žiarením.
Chráňte akumulátorovú batériu pred
ohňom.
Vhodné len na prevádzku v suchých
vnútorných priestoroch.
Akumulátorový vŕtací skrutkovač
20 V PABSP 20-Li A1
Úvod
Blahoželáme Vám ku kúpe Vášho nového výrobku.
Rozhodli ste sa pre veľmi kvalitný výrobok. Návod na
obsluhu je súčasťou tohto výrobku. Obsahuje dôležité upozornenia týkajúce sa bezpečnosti, používania
a likvidácie. Skôr ako začnete výrobok používať,
oboznámte sa so všetkými pokynmi k obsluhe a
bezpečnosti. Výrobok používajte iba v súlade s
popisom a v uvedených oblastiach používania. V
prípade postúpenia výrobku ďalším osobám odovzdajte aj všetky dokumenty patriace k výrobku.
Používanie v súlade
s určeným účelom
Tento výrobok je vhodný pre šróbovanie a vŕtanie
do dreva, kovu a plastov. Akékoľvek iné použitie
alebo zmena výrobku je v rozpore s určením a
predstavuje značné nebezpečenstvá úrazu.
Výrobca nepreberá ručenie za škody vzniknuté
používaním, ktoré je v rozpore s určeným účelom.
Nevhodné na priemyselné používanie.
T3.15 A
V
V
Jemná poistka
Chráňte akumulátorovú batériu pred
vodou a vlhkosťou.
Trieda ochrany II (dvojitá izolácia)
Volt (striedavý prúd)
Volt (jednosmerný prúd)
Popis častí
1
Upínadlo vrtáka (bez kľúčov)
2
Predvoľba točivého momentu
3
Voliaci spínač prevodového stupňa
4
Prepínanie smeru otáčania/blokovanie
5
Za- / vypínač / regulátor počtu otáčok
6
Soft-hmat
7
Magnetický držiak bitov
8
Držiak na opasok
9
Akumulátorový blok
10
Akumulátorové tlačidlo
11
Odblokovacie tlačidlo
12
Ukazovateľ stavu akumulátorovej batérie
13
LED pracovná lampa
14
Rýchlonabíjačka
15
LED stavu nabitia – zelená
16
LED stavu nabitia – červená
Obsah dodávky
1 akumulátorový vŕtací skrutkovač 20 V
PABSP 20-Li A1
1 akumulátorový blok PABSP 20-Li A1-1
1 nabíjačka PABSP 20-Li A1-2
1 prenosný kufrík
1 návod na používanie
51 SK

Technické údaje
Akumulátorová
vŕtačka PABSP 20-Li A1
Dimenzačné
napätie: 20 V
Menovitý počet
voľnobežných
otáčok: 1. chod: n
2. chod: n
Rozsah upínania
upínadla vrtáka: max. Ø 13 mm
Max. priemer
vŕtania: oceľ: 13 mm
drevo: 38 mm
Akumulátorová
batéria: PABSP 20-Li A1-1
Typ: LÍTIUM-IÓNOVÁ
Články: 5
Dimenzačné
napätie: max. 20 V
Kapacita: 2,5 Ah
Nabíjačka: PABSP 20-Li A1-2
VSTUP / Input
Sieťové napätie: 100–240 V
Menovitá
frekvencia: 50/60 Hz
Menovitý výkon: 95 W
VÝSTUP/Output
Menovité napätie: 14,4–20 V
Menovitý prúd: 4 A
Doba nabíjania: cca. 45 min
(2,5 Ah akumulátorový blok)
cca. 90 min
(5,0 Ah akumulátorový blok)
Trieda ochrany: II /
Emisná hodnota hluku:
Nameraná hodnota hluku stanovená podľa EN
60745. Stanovená hladina hluku elektrického prístroja triedy A má nasledujúce typické hodnoty:
Hladina akustického tlaku:
Odchýlka K: K
= 3 dB
Hladina akustického výkonu:
Odchýlka K: K
52 SK
= 3 dB
0–500 min-1,
0
0–2000 min-1
0
~
(dvojitá izolácia)
= 73,8 dB (A)
= 84,8 dB (A)
Noste ochranu sluchu.
Emisná hodnota vibrácií:
Celkové hodnoty pre vibrácie (vektorový súčet
troch smerov) zistené v súlade s normou EN
60745:
Skrutky: Emisná hodnota vibrácií
a
: 0,69 m / s
h
Odchýlka K = 1,5 m / s
Vŕtanie do kovu: Emisná hodnota vybrácií
a
: 1,534 m / s
h, D
Odchýlka K = 1,5 m/s
2
2
2
2
Poznámka: Hladina vibrácií uvedená v tomto
návode je meraná podľa normovaného meracieho
postupu a môže byť použitá pre porovnávanie prístrojov. Zadaná emisná hodnota oscilácií môže byť
použitá i pre úvodné vyhodnotenie prerušenia.
Hladina vibrácií sa zmení
podľa použitého elektrického prístroja a v niektorých prípadoch môže byť vyššia ako hodnota stanovená v týchto pokynoch. Môže dôjsť k
podceneniu vibračnej záťaže, ak sa elektrické náradie bežne používa týmto spôsobom. Pokúste sa
udržiavať vibračné zaťaženie čo možno najnižšie.
Príkladným opatrením pre zníženie vibračnej záťaže je nosenie rukavíc pri používaní prístroja a
ohraničenie pracovného času. Zohľadnite pritom
všetky fázy prevádzkového cyklu (napríklad časy, v
ktorých je elektroprístroj vypnutý a časy, kedy je
síce zapnutý, ale beží bez zaťaženia).
Všeobecné bezpečnostné
pokyny pre elektrické
nástroje
Prečítajte si všetky
bezpečnostné pokyny a predpisy!
Nedbanlivosť pri dodržiavaní bezpečnostných
pokynov a predpisov môže zapríčiniť zásah
elektrickým prúdom, požiar a / alebo ťažké úrazy.

Uschovajte všetky bezpečnostné
pokyny a predpisy pre prípad použitia
v budúcnosti!
Pojem „elektrické náradie“ používaný v bezpečnostných pokynoch Sa vzťahuje na elektrické náradie napájané zo siete (so sieťovým káblom) a na
elektrické náradie napájané z akumulátorov (bez
sieťového kábla).
1. Bezpečnosť pracovného miesta
a) Svoje pracovné miesto udržiavajte
čisté a zabezpečte dobré osvetlenie.
Neporiadok aneosvetlené pracovné oblasti
môžu viesť k úrazom.
b) S prístrojom nepracujte vprostredí
ohrozenom výbuchom, vktorom sa
nachádzajú horľavé kvapaliny,
plyny alebo prach. Elektrické náradie vytvára
iskry, ktoré môžu zapáliť prach alebo výpary.
c) Počas používania elektrického nára-
dia zamedzte prístup deťom ainým
osobám. Odvrátenie pozornosti môže zna-
menať stratu kontroly nad zariadením.
2. Elektrická bezpečnosť
a) Sieťová zástrčka elektrického prí-
stroja (príp. sieťového dielu) musí
byť vhodná pre zásuvku. Sieťovú
zástrčku nesmiete nijako upravovať.
Nepoužívajte adaptéry spolu sprístrojmi vybavenými ochranným
uzemnením. Neupravované sieťové zástrčky
a vhodné zásuvky znižujú riziko zásahu elektrickým prúdom.
b) Zabráňte telesnému kontaktu suzem-
nenými povrchmi, napr. u rúr, vykurovacích zariadení, sporákov a
chladničiek. Ak je vaše telo uzemnené, exis-
tuje zvýšené riziko zásahu elektrickým prúdom.
c) Prístroj chráňte pred dažďom alebo
vlhkosťou. Vniknutie vody do elektrického
prístroja zvyšuje riziko zásahu elektrickým
prúdom.
d) Kábel nepoužívajte na nosenie ave-
šanie prístroja, alebo na vyťahovanie sieťovej zástrčky zo zásuvky.
Kábel chráňte pred vysokými
teplotami, olejom, ostrými hranami
alebo pohybujúcimi sa časťami prístroja. Poškodené alebo zamotané káble zvy-
šujú riziko zásahu elektrickým prúdom.
e) Ak pracujete s elektrickým náradím
vonku, používajte iba také predlžovacie káble, ktoré sú schválené aj
pre exteriéry. Používanie predlžovacieho
kábla vhodného pre exteriéry znižuje riziko zásahu elektrickým prúdom.
f) Ak sa nedá zabrániť prevádzke
elektrického prístroja vo vlhkom
prostredí, použite ochranný vypínač
proti chybnému prúdu. Použitie tohto
vypínača znižuje riziko zásahu elektrickým
prúdom.
3. Bezpečnosť osôb
a) Buďte vždy opatrní, dávajte pozor
na to, čo robíte akpráci selektrickým náradím pristupujte s rozvahou.
Prístroj nepoužívajte vtedy, ak ste
unavení, alebo ak ste pod vplyvom
drog, alkoholu či medikamentov. Je-
diný moment nepozornosti pri používaní prístroja môže viesť kzávažným poraneniam.
b) Noste osobný ochranný výstroj
avždy používajte ochranné okuliare. Nosenie osobného ochranného výstroja,
ako je respirátor, protišmyková bezpečnostná
obuv, ochranná prilba alebo ochrana sluchu,
vzávislosti od druhu apoužitia elektrického
náradia, znižuje riziko poranení.
c) Zabráňte neúmyselnému uvedeniu do
prevádzky. Uistite sa, že je elektrický
prístroj vypnutý, skôr ako ho budete
zapájať do zdroja prúdu a / alebo na
akumulátorovú batériu, chytať alebo
prenášať. Ak máte pri prenose prístroja prst
na spínači ZAP / VYP alebo je prístroj zapnutý,
môže to viesť k nehodám.
d) Skôr než prístroj zapnete, odstráňte
nastavovacie náradie alebo skrutkový kľúč. Náradie alebo kľúč, ktorý sa
nachádza votáčajúcej sa časti prístroja, môže
viesť k poraneniam.
53 SK

e) Zabráňte neprirodzenému držaniu
tela. Zabezpečte si stabilný postoj
a vždy udržiavajte rovnováhu. Takto
môžete mať prístroj najmä v nečakaných
situáciách lepšie pod kontrolou.
f) Noste vhodný odev. Nenoste široké
oblečenie alebo ozdoby. Vlasy, oblečenie arukavice držte čím ďalej od
pohybujúcich sa častí. Voľné oblečenie,
ozdoby alebo dlhé vlasy sa môžu zachytiť do
pohybujúcich sa častí.
g) Keď montujete zariadenia na odsá-
vanie a zachytávanie prachu, uistite
sa, či sú napojené asprávne používané. Použitie týchto zariadení znižuje ohro-
zenia prachom.
4. Bezpečná manipulácia a používanie
elektrických nástrojov
a) Prístroj nepreťažujte. Pre svoju
prácu
používajte len vhodné elektrické
nástro
je. Pomocou vhodného elektrického
nástroja pracujete lepšie a bezpečnejšie vuvedenej pracovnej oblasti.
b) Nepoužívajte žiadny elektrický ná-
stroj, ktorého prepínač je poškodený. Elektrický nástroj, ktorý nie je možné
zapnúť alebo vypnúť, je nebezpečný a musí
byť opravený.
c) Vytiahnite zástrčku zo zásuvky a /
alebo vyberte akumulátor pred vykonaním nastavení na náradí, výmenou príslušenstva alebo odložením
náradia. Toto bezpečnostné opatrenie za-
braňuje neúmyselnému spusteniu elektrického
náradia.
d) Nepoužívané elektrické nástroje
uschovajte mimo dosahu detí.
nesmú používať osoby,
Prístroj
ktoré nie sú s
nimi oboznámené alebo ktoré nečítali tieto pokyny. Elektrické nástroje sú ne-
bezpečné, ak ich používajú neskúsené osoby.
e) O prístroj sa dôkladne starajte. Kon-
trolujte, či bezchybne fungujú pohyblivé časti prístroja a či nie sú
zaseknuté, či nie sú zlomené niektoré
časti alebo poškodené tak, že
negatívne ovplyvňujú funkčnosť prístroja. Pred používaním prístroja musia byť poškodené časti opravené.
Príčinou mnohých úrazov je práve zlá údržba
elektrických nástrojov.
f) Rezné nástroje udržiavajte ostré a
čisté. Starostlivo ošetrované rezné nástroje s
ostrými reznými hranami sa menej zasekávajú
a dajú sa ľahšie viesť.
g) Elektrické náradie, príslušenstvo,
vkladané nástroje, atď. používajte
v súlade s týmito pokynmi a tak, ako
je to predpísané pre tento špeciálny
typ prístroja. Pritom zohľadnite pracovné podmienky a vykonávanú
činnosť. Používanie elektrického náradia na
iné než vyhradené účely môže viesť k nebezpečným situáciám.
5. Používanie a údržba prístroja s akumulátorovým pohonom
Akumulátorovú batériu nabíjajte iba
nabíjačkou, ktorú odporúča výrobca.
Nabíjačka, ktorá je vhodná pre určitú akumulátorovú batériu, môže viesť k riziku požiaru, ak
je používaná s inou akumulátorovou batériou.
Elektroprístroje používajte iba s aku-
mulátorovým blokom označeným pre
tento účel. Používanie iného akumulátoro-
vého bloku môže viesť k poraneniam a požiaru.
Držte akumulátorový blok vzdialený
od objektov z kovu ako sú kancelárske spinky, mince, kľúče, klince,
skrutky atď., ak ho nepoužívate. Tieto
by mohli vytvoriť spojenie medzi pólmi akumulátorovej batérie a tým viesť k popáleninám
alebo požiaru.
Ak je akumulátorový blok používaný
alebo skladovaný za nevhodných
podmienok, môže z neho vytekať
kvapalina. Zabráňte kontaktu s ňou.
Ak sa kvapalina dostala do kontaktu
s očami, vyhľadajte lekára. Kvapalina
batérie môže viesť k podráždeniu kože alebo
popáleninám.
54 SK

POZOR! NEBEZPEČENSTVO
EXPLÓZIE! Nenabíjateľné batérie
nikdy nenabíjajte.
Chráňte akumulátorovú batériu pred
horúčavou, napr. i pred trvalým slnečným žiarením, ohňom, vodou a
vlhkosťou. Hrozí nebezpečenstvo explózie.
6. Servis
Opravu Vášho elektronáradia smie
vykonávať iba kvalifikovaný odborný personál a možno pritom používať iba originálne náhradné diely.
Tým sa zabezpečí zachovanie bezpečnosti
elektroprístroja.
Bezpečnostné upozornenia
pre vŕtačku
Použite dodatočné rukoväte, ak sú
dodané s produktom. Strata kontroly
môže spôsobiť poranenia.
Ak vykonávate práce, pri ktorých
môže vložený nástroj naraziť na
skryté elektrické vedenie alebo na
vlastný sieťový kábel, držte výrobok
za izolované plochy rukoväte.
Kontakt s vedením, ktoré je pod napätím, môže
uviesť pod napätie aj kovové časti prístroja a
viesť k zásahu elektrickým prúdom.
Uchopte prístroj na izolovaných
plochách rukoväte, ak vykonávate
práce, pri ktorých môže skrutka naraziť na skryté elektrické vedenia. Kon-
takt skrutky s vedením, ktoré je pod napätím,
môže uviesť pod napätie aj kovové časti náradia a viesť k zásahu elektrickým prúdom.
Bezpečnostné
upozornenia pre
nabíjačky
Tento výrobok môžu používať
deti od 8 rokov, ako aj osoby
so zníženými psychickými,
senzorickými alebo duševnými
schopnosťami alebo s nedostatkom skúseností a vedomostí, ak
sú pod dozorom, alebo ak boli
poučené ohľadom bezpečného
používania výrobku, a ak porozumeli nebezpečenstvám spojeným s jeho používaním. Deti sa s
výrobkom nesmú hrať.
Čistenie a údržbu prístroja ne-
smú vykonávať deti bez dozoru.
Nedobíjateľné batérie nikdy ne-
nabíjajte. Nerešpektovanie
môže viesť k nebezpečným
situáciam.
Ak je vedenie tohto svietidla po-
škodené, môže ho nahradiť iba
výrobca alebo jeho servisný zástupca. Nerešpektovanie môže
viesť k nebezpečným situáciam.
Chráňte elektrické časti pred vlh-
kosťou. Neponárajte príslušné
časti do vody alebo iných kvapalín, inak vzniká nebezpečenstvo zásahu elektrickým prúdom!
Výrobok nikdy nedržte pod tečúcou vodou. Rešpektujte pokyny
55 SK

týkajúce sa čistenia, starostlivosti
a údržby.
Nabíjačka je vhodná iba na po-
užívanie v interiéri.
Táto nabíjačka je vhodná iba
pre typ akumulátorovej batérie
PABSP 20-Li A1-1.
Vložiť/vybrať
akumulátorový blok
Vložiť akumulátorový blok:
Umiestnite prepínač smeru otáčania 4 do
strednej polohy (blokovanie) (pozri obr. C).
Zatlačte akumulátorový blok 9 do pripojova-
cích prehĺbenín, až kým kliknutím počuteľne nezapadne (p. obr. B).
Ak je sieťový
prívod tohto produktu poškodený,
musí ho vymeniť výrobca, jeho
zákaznícka služba alebo osoba s
podobnou kvalifikáciou, aby sa zabránilo možným rizikám.
Pred uvedením do prevádzky
Nabíjanie akumulátorového
bloku (pozri obr. A)
POZOR! Pred vybratím resp. vložením akumu-
látorového bloku
nite sieťovú zástrčku.
Nikdy nenabíjajte akumulátorový blok 9, ak
je teplota okolia pod 10 °C alebo nad 40 °C.
Vložte akumulátorový blok 9 do rýchlonabí-
14
jačky
Zastrčte sieťovú zástrčku do zásuvky. Zelená
LED kontrolka nabíjania
zsvieti a potom zhasne. Potom sa rozsvieti červená LED kontrolka nabíjania
procesu nabíjania teraz svieti červená LED kontrolka nabíjania
Keď je stav nabíjania ukončený, svieti zelená
LED-kontrolka
zhasne.
Červená LED bliká Akumulátorová batéria
je defektná
Zelená LED bliká Akumulátorová batéria je
príliš studená alebo teplá.
(pozri obr. A).
9
z nabíjačky vždy vytiah-
15
sa na sekundu ro-
16
. Počas
16
.
15
a červená LED-kontrolka 16
Vybrať akumulátorový blok:
Stlačte odblokovacie tlačidlo 11 a vyberte
akumulátorový blok
9
(pozri obr. D).
Kontrola stavu
akumulátorovej batérie
Pre skontrolovanie stavu akumulátorovej baté-
rie stlačte tlačidlo akumulátorovej batérie
(pozri obr. E). Stav príp. zvyškový výkon je zobrazený pomocou LED zobrazujúcich stav aku-
mulátorovej batérie
3 červené svietidlá = maximálne nabitie
2 červené svietidlá = stredné nabitie
1 červené svietidlo = nízke nabitie
12
nasledujúco:
10
Výmena / nasadenie nástrojov
POZOR! Pred výmenou nástrojov je nutné
vybrať akumulátorový blok
Výrobok má plneautomatické aretovanie hriadeľa
(p. obr. F). Pri nečinnosti motora je pohonné lano
zablokované, aby ste mohli otvoriť upínadlo vrtáka
1
otáčaním proti smeru hodinových ručičiek .
Po nasadení želaného nástroja ho môžete pevne
upnúť otáčaním upínadla vrtáka v smere hodinových ručičiek
uvoľní, keď stlačením ZA- / VYPÍNAČA
tujete motor.
. Aretácia hriadeľa sa automaticky
9
z výrobku.
5
naštar-
56 SK

Predvoľba točivého
momentu / Stupeň vŕtania
Otáčavú silu môžete nastaviť pomocou predvoľby
točivého momentu
Zvoľte nižší stupeň pre malé skrutky resp.
skrutky pre mäkké materiály.
Zvoľte vysoký stupeň pre veľké skrutky, tvrdé
materiály resp. pre vyšróbovanie skrutiek.
Vyberte stupeň vŕtania pre vŕtacie práce tak,
že predvoľbu točivého momentu
do vŕtacej pozície
2
(pozri obr. G).
(pozri obr. H).
2
umiestnite
Poznámka: LED pracovné svietidlo 13 svieti ešte
asi 10 s po vypnutí výrobku resp. po pustení
ZA- / VYPÍNAČA
5
.
Nastavenie počtu otáčok
ZA-/ VYPÍNAČ 5 disponuje meniteľným regulátorom rýchlosti. Pri jemnom stlačení ZA- / VYPÍNAČA
5
beží výrobok s nízkymi otáčkami. Rastúcim tlakom sa zvyšuje počet otáčok (p. obr. K).
Poznámka: Integrovaná motorová brzda zaistí
rýchle zastavenie.
2-stupňový prevod
POZOR! Spínač pre voľbu prevodového
3
stupňa
vil. Inak hrozí poškodenie výrobku.
Prevod 1 - Spínač pre voľbu prevodového stupňa
3
sa nachádza v polohe 1 (p. obr. I).
Toto nastavenie je vhodné pre všetky šróbovacie
práce.
Prevod 2 - Spínač pre voľbu prevodového stupňa
3
sa nachádza v polohe 2.
Toto nastavenie je vhodné pre všetky vŕtacie práce.
(obr. J).
stlačte až vtedy, keď výrobok zasta-
Uvedenie do prevádzky
Za- a vypnutie
Zapnutie:
Pre uvedenie výrobku do prevádzky stlačte
ZA- / VYPÍNAČ
obr. K). LED pracovné svietidlo
jemnom alebo úplnom stlačení ZA-/VYPÍNAČA
priaznivých svetelných podmienkach.
Vypnutie:
Pre vypnutie výrobku pustite ZA- / VYPÍNAČ 5.
5
a držte ho stlačený (pozri
13
svieti po
5
. Osvetlí pracovnú oblasť pri ne-
Prepínanie smeru otáčania
Smer otáčania zmeníte tak, že prepínač smeru
otáčania
(pozri obr. L).
Ak sa prepínač smeru otáčania 4 nachádza
v stredovej polohe, je za-/vypínač zablokovaný.
4
pretlačíte doprava resp. doľava
Tipy a triky
Tip! Takto postupujete
správne.
Pred prevádzkou skontrolujte, či je skrutkový
alebo vŕtací nástavec správne upevnený, tzn.
či sedí centrálne v upínadle vrtáka.
Skrutkové bity sú označené ich rozmermi a
tvarmi. Ak ste si neistí, najskôr vyskúšajte, či bit
pevne prilieha v hlave skrutky.
Otáčavý moment:
Menšie skrutky / bity sa môžu poškodiť, ak na-
stavíte príliš vysoký otáčavý moment resp. príliš
vysoký počet otáčok.
Tvrdé šróbovanie (do kovu):
Mimoriadne vysoké otáčavé momenty vznikajú
napr. pri kovových skrutkových spojoch pri použití
nástrčných klúčov. Zvoľte nižší počet otáčok.
57 SK

Mäkké šróbovanie (napr. do mäkkého
dreva):
Aj tu šróbujte s nízkym počtom otáčok, aby ste
napr. nepoškodili povrch dreva pri kontakte s
hlavicou skrutky z kovu. Použite záhlbník.
Pri vŕtaní do dreva, kovu a iných
materiálov bezpodmienečne zohľadnite:
Pri menšom priemere vrtáka použite vysoký
počet otáčok a pri väčšom priemere vrtáka
nízky počet otáčok.
Pri tvrdých materiáloch zvoľte nízky počet
otáčok, pri mäkkom materiáli vysoký počet
otáčok.
Zaistite alebo upevnite (ak je to možné)
obrábaný predmet do upínacieho zariadenia.
Označte miesto, na ktorom má byť vŕtané,
pomocou jamkovača alebo klinca. Pre
navŕtanie zvoľte nižší počet otáčok.
Otáčajúcu sa vŕtačku viackrát vytiahnite
z vŕtaného otvoru, aby ste odstránili piliny
alebo vrtnú múčku a prevetrali ju.
Vŕtanie do kovu:
Použite kovový vrták (HSS). Pre optimálne
výsledky by ste mali vrták chladiť rezným
olejom. Kovové vrtáky môžete používať
i na vŕtanie do plastov. Najskôr zavŕtajte
vrtákom s Ø 3 mm a priblížte sa želanému
priemeru vŕtania.
Vŕtanie do dreva:
Použite vrták na drevo s centrovacím otvorom,
pre hlboké vrty použite „hadovitý vrták”, pre
väčšie priemery vŕtania Forstnerov vrták. Malé
skrutky v mäkkom dreve môžete priamo zatočiť
aj bez predvŕtania.
Upevnenie bitu na výrobok:
Tu je možné dočasne upevniť vŕtacie a skrutkové bity.
Držiak na opasok:
Pomocou držiaka na opasok môže byť výrobok
upevnený na opasku alebo vrecku nohavíc ako je
zobrazené.
Údržba a čistenie
NEBEZPEČENSTVO
PORANENIA! Pred každou prácou na výrobku
vypnite výrobok a vyberte akumulátorovú batériu.
Výrobok si nevyžaduje údržbu.
Do vnútra výrobku sa nesmie dostať žiadna
kvapalina.
Na čistenie schránky používajte suchú han-
dričku. Nikdy nepoužívajte benzín, rozpúšťadlá alebo čistiace prostriedky, ktoré sú
agresívne voči plastom.
Produkt musí byť vždy čistý, suchý a zbavený
oleja alebo mazacích tukov.
Ak je lítium-iónová akumulátorová batéria dlhší
čas uskladnená, je potrebné pravidelne kontrolovať stav nabitia. Optimálny stav nabitia je
medzi 50 % a 80 %. Optimálne prostredie na
uskladnenie je chladné a suché.
58 SK

Likvidácia
Obal pozostáva z ekologických materiálov, ktoré môžete odovzdať na miestnych recyklačných zberných miestach.
Označenie Grüne Punkt (Zelený bod)
neplatí pre Nemecko.
Všímajte si prosím označenie obalových
b
materiálov pre triedenie odpadu, sú
a
označené skratkami (a) a číslami (b) s
nasledujúcim významom: 1–7: Plasty /
20–22: Papier a kartón / 80–98:
Spojené látky.
Výrobok a obalové materiály sú
recyklovateľné, zlikvidujte ich oddelene
pre lepšie spracovanie odpadu. TrimanLogo platí iba pre Francúzsko.
nimi ako s nebezpečným odpadom. Chemické
značky ťažkých kovov sú nasledovné: Cd = kadmium, Hg = ortuť, Pb = olovo. Opotrebované batérie / akumulátorové batérie preto odovzdajte v
komunálnej zberni.
Servis
Opravami produktu poverte len servisné praco-
visko alebo elektroodborníka a použite len originálne náhradné diely. Tým ostane zaistená
bezpečnosť produktu.
Výmenou zástrčky alebo sieťového vedenia po-
verte vždy výrobcu produktu alebo jeho zákaznícky servis. Tým ostane zaistená bezpečnosť
produktu.
O možnostiach likvidácie opotrebovaného výrobku sa môžete informovať na
Vašej obecnej alebo mestskej správe.
Ak výrobok doslúžil, v záujme ochrany
životného prostredia ho neodhoďte do
domového odpadu, ale odovzdajte na
odbornú likvidáciu. Informácie o zberných miestach a ich otváracích hodinách
získate na Vašej príslušnej správe.
Pred likvidáciou vyberte akumulátorovú batériu z
prístroja.
Defektné alebo použité batérie / akumulátorové
batérie musia byť odovzdané na recykláciu podľa
smernice 2006/66/ES a jej zmien. Batérie / akumulátorové batérie a / alebo výrobok odovzdajte
prostredníctvom dostupných zberných stredísk.
Nesprávna likvidácia batérií /
akumulátorových batérií ničí
životné prostredie!
Batérie / akumulátorové batérie sa nesmú likvidovať
spolu s domovým odpadom. Môžu obsahovať jedovaté ťažké kovy a je potrebné zaobchádzať s
Postup v prípade
poškodenia v záruke
Pre zaručenie rýchleho spracovania Vašej požiadavky dodržte prosím nasledujúce pokyny:
Pre všetky otázky majte pripravený pokladničný
doklad a číslo výrobku (napr. IAN 123456) ako
dôkaz o kúpe.
Číslo výrobku nájdete na typovom štítku, gravúre,
na prednej strane Vášho návodu (dole vľavo)
alebo ako nálepku na zadnej alebo spodnej strane.
Ak sa vyskytnú funkčné poruchy alebo iné
nedostatky, najskôr telefonicky alebo e-mailom
kontaktujte následne uvedené servisné oddelenie.
Produkt označený ako defektný potom môžete s
priloženým dokladom o kúpe (pokladničný lístok) a
uvedením, v čom spočíva nedostatok a kedy sa vyskytol, bezplatne odoslať na Vám oznámenú adresu servisného pracoviska.
Servis slovensko
Tel.: 0850 232001
E-pošta: owim@lidl.sk
IAN 289749
59 SK

Záruka
Tento výrobok bol dôkladne vyrobený podľa prísnych akostných smerníc a pred dodaním svedomito
testovaný. V prípade nedostatkov tohto výrobku Vám
prináležia zákonné práva voči predajcovi produktu.
Tieto zákonné práva nie sú našou nižšie uvedenou
zárukou obmedzené.
Na tento produkt poskytujeme 5-ročnú záruku od
dátumu nákupu. Záručná doba začína plynúť dátumom kúpy. Starostlivo si prosím uschovajte originálny pokladničný lístok. Tento doklad je potrebný
ako dôkaz o kúpe.
Ak sa v rámci 5 rokov od dátumu nákupu tohto
výrobku vyskytne chyba materiálu alebo výrobná
chyba, výrobok Vám bezplatne opravíme alebo vymeníme – podľa nášho výberu. Táto záruka zaniká,
ak bol produkt poškodený, neodborne používaný
alebo neodborne udržiavaný.
Použité harmonizované normy:
EN 60745-1/A11:2010
EN 60745-2-1:2010
EN 60745-2-2:2010
EN 60335-1/A11:2014
EN 60335-2-29/A2:2010
EN 62233:2008
EN 55014-1/A2:2011
EN 55014-2:2015
EN 61000-3-2:2014
EN 61000-3-3:2013
EN 50581:2012
Sériové číslo: IAN 289749
Poskytnutie záruky sa vzťahuje na chyby materiálu
a výrobné chyby. Táto záruka sa nevzťahuje na
časti produktu, ktoré sú vystavené normálnemu opotrebovaniu, a preto ich je možné považovať za
opotrebovateľné diely (napr. batérie) alebo na poškodenia na rozbitných dieloch, napr. na spínači,
akumulátorových batériach alebo častiach, ktoré sú
zhotovené zo skla.
Na akumulátorovú batériu máte záruku 1 rok od
dátumu kúpy.
Preklad originálneho
konformitného prehlásenia
My, OWIM GmbH & Co. KG, Stiftsbergstraße 1,
DE-74167 Neckarsulm, NEMECKO, prehlasujeme
vo výlučnej zodpovednosti, že výrobok: Akumulátorový vŕtací skrutkovač 20 V PABSP 20-Li A1, model
č.: HG02731, verzia: 08 / 2017, na ktorý sa vzťahuje toto prehlásenie, je v súlade s normami / normatívnymi dokumentami 2006 / 42 / ES,
2014 / 30 / EÚ, 2011 / 65 / EÚ, 2014/35/EÚ.
Tobias König
Vedúci oddelenia /Zodpovedný za dokumenty
OWIM GmbH & Co. KG, Stiftsbergstraße 1,
DE-74167 Neckarsulm, NEMECKO
Neckarsulm, 12.01.2017
Konformitné prehlásenie nájdete i na:
www.owim.com.
Vyššie popísaný predmet prehlásenia spĺňa predpisy smernice 2011/65/EÚ Európskeho parlamentu a Rady z 8. júna 2011 o obmedzení
používania určitých nebezpečných látok v elektrických a elektronických zariadeniach.
60 SK

Legende der verwendeten Piktogramme ........................................................... Seite 62
Einleitung ......................................................................................................................................... Seite 62
Bestimmungsgemäße Verwendung .................................................................................................... Seite 62
Teilebeschreibung ............................................................................................................................... Seite 62
Lieferumfang ........................................................................................................................................ Seite 62
Technische Daten ................................................................................................................................ Seite 63
Allgemeine Sicherheitshinweise für Elektrowerkzeuge ......................... Seite 63
Sicherheitshinweise für Bohrschrauber ..............................................................................................Seite 66
Sicherheitshinweise für Ladegeräte .................................................................................................... Seite 66
Vor der Inbetriebnahme ....................................................................................................Seite 67
Akku-Pack laden .................................................................................................................................. Seite 67
Akku-Pack einsetzen / entnehmen ...................................................................................................... Seite 67
Akkuzustand prüfen ............................................................................................................................Seite 67
Werkzeuge wechseln / einsetzen ......................................................................................................Seite 68
Drehmomentvorwahl / Bohrstufe ........................................................................................................ Seite 68
2-Gang Getriebe ................................................................................................................................Seite 68
Inbetriebnahme ......................................................................................................................... Seite 68
Ein- und Ausschalten ...........................................................................................................................Seite 68
Drehzahl einstellen .............................................................................................................................. Seite 68
Drehrichtung umschalten ....................................................................................................................Seite 69
Tipps und Tricks ................................................................................................................................... Seite 69
Wartung und Reinigung ..................................................................................................... Seite 70
Entsorgung ..................................................................................................................................... Seite 70
Service ............................................................................................................................................... Seite 71
Abwicklung im Garantiefall ................................................................................................................ Seite 71
Garantie ........................................................................................................................................... Seite 71
Original-Konformitätserklärung ................................................................................. Seite 72
61 DE/AT/CH

Legende der verwendeten Piktogramme
Lesen Sie die
Bedienungsanleitung.
Warn- und Sicherheitshinweise
beachten!
Schützen Sie den Akku vor Hitze und
direkter Sonneneinstrahlung.
Schützen Sie den Akku vor Feuer.
Nur für den Betrieb im trockenen
Innenbereich geeignet.
Akku-Bohrschrauber 20 V
PABSP 20-Li A1
Einleitung
Wir beglückwünschen Sie zum Kauf Ihres neuen
Produkts. Sie haben sich damit für ein hochwertiges
Produkt entschieden. Die Bedienungsanleitung ist
Teil dieses Produkts. Sie enthält wichtige Hinweise
für Sicherheit, Gebrauch und Entsorgung. Machen
Sie sich vor der Benutzung des Produkts mit allen
Bedien- und Sicherheitshinweisen vertraut. Benutzen
Sie das Produkt nur wie beschrieben und für die angegebenen Einsatzbereiche. Händigen Sie alle Unterlagen bei Weitergabe des Produkts an Dritte mit aus.
Bestimmungsgemäße
Verwendung
Dieses Produkt eignet sich zum Schrauben und
Bohren in Holz, Metall und Plastik. Jede andere
Verwendung oder Veränderung des Produkts gilt
als nicht bestimmungsgemäß und birgt erhebliche
Unfallgefahren. Für aus bestimmungswidriger Verwendung entstandene Schäden übernimmt der
62 DE/AT/CH
T3.15 A
V
V
Hersteller keine Haftung. Nicht für den gewerblichen
Einsatz bestimmt.
Feinsicherung
Schützen Sie den Akku vor Wasser
und Feuchtigkeit.
Schutzklasse II (Doppelisolierung)
Volt (Wechselstrom)
Volt (Gleichstrom)
Teilebeschreibung
1
Bohrfutter (ohne Schlüssel)
2
Drehmomentvorwahl
3
Gangwahlschalter
4
Drehrichtungsumschalter / Sperre
5
EIN- / AUS-Schalter / Drehzahlregulierung
6
Soft-Handgriff
7
magnetische Bit-Halterung
8
Gürtelhalterung
9
Akku-Pack
10
Akku-Taste
11
Entriegelungstaste
12
Akkuzustandsleuchte
13
LED-Arbeitsleuchte
14
Schnellladegerät
15
Ladestatus-LED – grün
16
Ladestatus-LED – rot
Lieferumfang
1 Akku-Bohrschrauber 20 V PABSP 20-Li A1
1 Akku-Pack PABSP 20-Li A1-1

1 Ladegerät PABSP 20-Li A1-2
1 Tragekoffer
1 Bedienungsanleitung
Technische Daten
Akku-Bohrschrauber: PABSP 20-Li A1
Bemessungsspannung: 20 V
Bemessungs-Leerlaufdrehzahl: 1. Gang:
n
0–500 min-1,
0
2. Gang:
n
0–2000 min
0
Bohrfutterspannbereich: max. Ø 13 mm
Max. Bohrdurchmesser: Stahl: 13 mm
Holz: 38 mm
Akku: PABSP 20-Li A1-1
Typ: LITHIUM-IONEN
Zellen: 5
Bemessungsspannung: Max. 20 V
Kapazität: 2,5 Ah
Ladegerät:
PABSP 20-Li A1-2
EINGANG / Input
Nennspannung: 100–240 V
Nennfrequenz: 50–60 Hz
Nennleistung: 95 W
OUTPUT / Ausgang
Nennspannung: 14,4–20 V
Bemessungsstrom: 4 A
Ladezeit: ca. 45 min
(2,5 Ah Akku-Pack)
ca. 90 min
(5,0 Ah Akku-Pack)
Schutzklasse: II /
(Doppelisolierung)
Geräuschemissionswert:
Messwert für Geräusch ermittelt entsprechend
EN 60745. Der A-bewertete Geräuschpegel des
Elektrowerkzeugs beträgt typischerweise:
Schalldruckpegel:
Unsicherheit K: K
Schallleistungspegel:
Unsicherheit K: K
= 73,8 dB (A)
= 3 dB
= 84,8 dB (A)
= 3 dB
-1
~
Tragen Sie einen Gehörschutz.
Schwingungsemissionswert:
Schwingungsgesamtwerte (Vektorsumme dreier
Richtungen) ermittelt entsprechend EN 60745:
Schrauben: Schwingungsemissionswert a
0,69 m / s
2
Unsicherheit K = 1,5 m / s
:
h
2
Bohren in Metall: Schwingungsemissionswert
a
: 1,534 m / s2
h, D
Unsicherheit K = 1,5 m / s
2
Hinweis: Der in diesen Anweisungen angegebene
Schwingungspegel ist entsprechend einem genormten
Messverfahren gemessen worden und kann für den
Gerätevergleich verwendet werden. Der angegebene
Schwingungsemissionswert kann auch zu einer einleitenden Einschätzung der Aussetzung verwendet
werden.
Der Schwingungspegel wird
sich entsprechend dem Einsatz des Elektrowerkzeugs
verändern und kann in manchen Fällen über dem in
diesen Anweisungen angegebenen Wert liegen.
Die Schwingungsbelastung könnte unterschätzt
werden, wenn das Elektrowerkzeug regelmäßig in
solcher Weise verwendet wird. Versuchen Sie, die
Belastung durch Vibrationen so gering wie möglich
zu halten. Beispielhafte Maßnahmen zur Verringerung der Vibrationsbelastung sind das Tragen von
Handschuhen beim Gebrauch des Werkzeugs und
die Begrenzung der Arbeitszeit. Dabei sind alle
Anteile des Betriebszyklus zu berücksichtigen
(beispielweise Zeiten, in denen das Elektrowerkzeug abgeschaltet ist, und solche, in denen es
zwar eingeschaltet ist, aber ohne Belastung läuft).
Allgemeine
Sicherheitshinweise
für Elektrowerkzeuge
Lesen Sie alle Sicherheitshinweise und Anweisungen. Versäumnisse
bei der Einhaltung der Sicherheitshinweise und
Anweisungen können elektrischen Schlag, Brand
und / oder schwere Verletzungen verursachen.
63 DE/AT/CH

Bewahren Sie alle Sicherheitshinweise
und Anweisungen für die Zukunft auf.
Der in den Sicherheitshinweisen verwendete Begriff
„Elektrowerkzeug“ bezieht sich auf netzbetriebene
Elektrowerkzeuge (mit Netzkabel) und auf akkubetriebene Elektrowerkzeuge (ohne Netzkabel).
1. Arbeitsplatz-Sicherheit
a) Halten Sie Ihren Arbeitsbereich sau-
ber und gut beleuchtet. Unordnung und
unbeleuchtete Arbeitsbereiche können zu
Unfällen führen.
b) Arbeiten Sie mit dem Elektrowerkzeug
nicht in explosionsgefährdeter Umgebung, in der sich brennbare Flüssigkeiten, Gase oder Stäube befinden.
Elektrowerkzeuge erzeugen Funken, die den
Staub oder die Dämpfe entzünden können.
c) Halten Sie Kinder und andere Personen
während der Benutzung des Elektrowerkzeugs fern. Bei Ablenkung können Sie
die Kontrolle über das Gerät verlieren.
2. Elektrische Sicherheit
a) Der Anschlussstecker des Elektro-
werkzeuges muss in die Steckdose
passen. Der Stecker darf in keiner
Weise verändert werden.
Verwenden Sie keine Adapterstecker
gemeinsam mit schutzgeerdeten
Elektrowerkzeugen.
Unveränderte Stecker und passende Steckdosen
verringern das Risiko eines elektrischen Schlages.
b) Vermeiden Sie Körperkontakt mit
geerdeten Oberflächen, wie von Rohren
Heizungen, Herden und Kühlschränken.
Es besteht ein erhöhtes Risiko durch elektrischen
Schlag, wenn Ihr Körper geerdet ist.
c) Halten Sie Elektrowerkzeuge von
Regen oder Nässe fern. Das Eindringen
von Wasser in ein Elektrogerät erhöht das Risiko
eines elektrischen Schlages.
d) Zweckentfremden Sie das Kabel nicht,
um das Elektrowerkzeug zu tragen,
aufzuhängen oder um den Stecker
aus der Steckdose zu ziehen. Halten
Sie das Kabel fern von Hitze, Öl,
scharfen Kanten oder sich bewegenden
Geräteteilen. Beschädigte oder verwickelte
Kabel erhöhen das Risiko eines elektrischen
Schlages.
e) Wenn Sie mit einem Elektrowerkzeug
im Freien arbeiten, verwenden Sie nur
Verlängerungskabel, die auch für den
Außenbereich zugelassen sind. Die An-
wendung eines für den Außenbereich geeigneten
Verlängerungskabels verringert das Risiko eines
elektrischen Schlages.
f) Wenn der Betrieb des Elektrowerk-
zeuges in feuchter Umgebung nicht
vermeidbar ist, verwenden Sie einen
Fehlerstromschutzschalter.
Der Einsatz eines Fehlerstromschutzschalters
vermindert das Risiko eines elektrischen Schlages.
3. Sicherheit von Personen
a) Seien Sie stets aufmerksam, achten
Sie darauf, was Sie tun und gehen Sie
mit Vernunft an die Arbeit mit einem
Elektrowerkzeug. Benutzen Sie kein Elektro-
werkzeug, wenn Sie müde sind oder unter dem
Einfluss von Drogen, Alkohol oder Medikamenten
stehen. Ein Moment der Unachtsamkeit beim
Gebrauch des Elektrowerkzeuges kann zu
ernsthaften Verletzungen führen.
b) Tragen Sie persönliche Schutzaus-
rüstung und immer eine Schutzbrille.
Das Tragen persönlicher Schutzausrüstung wie
Staubmaske, rutschfeste Sicherheitsschuhe,
Schutzhelm oder Gehörschutz, je nach Art und
Einsatz des Elektrowerkzeuges, verringert das
Risiko von Verletzungen.
,
c) Vermeiden Sie eine unbeabsichtigte
Inbetriebnahme.
Vergewissern Sie sich, dass das Elektro-
werkzeug ausgeschaltet ist, bevor Sie
es an die Stromversorgung und / oder
den Akku anschließen, es aufnehmen
oder tragen.
Wenn Sie beim Tragen des Elektrowerkzeuges
den Finger am Schalter haben oder das Gerät
bereits eingeschaltet an die Stromversorgung
anschließen, kann dies zu Unfällen führen.
64 DE/AT/CH

d) Entfernen Sie Einstellwerkzeuge oder
Schraubenschlüssel, bevor Sie das
Elektrowerkzeug einschalten. Ein Werk-
zeug oder Schlüssel, der sich in einem drehenden Geräteteil befindet, kann zu Verletzungen
führen.
e) Vermeiden Sie eine abnormale
Körperhaltung.
Sorgen Sie für einen sicheren Stand
und halten Sie jederzeit das Gleichgewicht. Dadurch können Sie das Elektrowerkzeug
in unerwarteten Situationen besser kontrollieren.
f) Tragen Sie geeignete Kleidung. Tragen
Sie keine weite Kleidung oder Schmuck.
Halten Sie Haare, Kleidung und Handschuhe fern von sich bewegenden
Teilen. Lockere Kleidung, Schmuck oder lange
Haare können von sich bewegenden Teilen
erfasst werden.
g) Wenn Staubabsaug- und -auffangein-
richtungen montiert werden können,
vergewissern Sie sich, dass diese angeschlossen sind und richtig verwendet
werden. Die Verwendung einer Staubab-
saugung kann Gefährdungen durch Staub
verringern.
4. Verwendung und Behandlung des
Elektrowerkzeugs
a) Überlasten Sie das Gerät nicht. Ver-
wenden Sie für Ihre Arbeit das dafür
bestimmte Elektrowerkzeug. Mit dem
passenden Elektrowerkzeug arbeiten Sie besser
und sicherer im angegebenen Leistungsbereich.
b) Benutzen Sie kein Elektrowerkzeug,
dessen Schalter defekt ist. Ein Elektrowerkzeug, das sich nicht mehr ein- oder ausschalten lässt, ist gefährlich und muss repariert
werden.
c) Ziehen Sie den Stecker aus der Steck-
dose und / oder entfernen Sie den
Akku, bevor Sie Geräteeinstellungen
vornehmen, Zubehörteile wechseln
oder das Gerät weglegen. Diese Vor-
sichtsmaßnahme verhindert den unbeabsichtigten
Start des Elektrowerkzeuges.
d) Bewahren Sie unbenutzte Elektro-
werkzeuge außerhalb der Reichweite
von Kindern auf.
Lassen Sie Personen das Gerät nicht benutzen,
die mit diesem nicht vertraut sind oder diese
Anweisungen nicht gelesen haben. Elektro-
werkzeuge sind gefährlich, wenn sie von unerfahrenen Personen benutzt werden.
e) Pflegen Sie Elektrowerkzeuge mit
Sorgfalt.
Kontrollieren Sie, ob bewegliche Teile
einwandfrei funktionieren und nicht
klemmen, ob Teile gebrochen oder so
beschädigt sind, dass die Funktion
des Elektrowerkzeuges beeinträchtigt
ist. Lassen Sie beschädigte Teile vor
dem Einsatz des Gerätes reparieren.
Viele Unfälle haben ihre Ursache in schlecht
gewarteten Elektrowerkzeugen.
f) Halten Sie Schneidwerkzeuge scharf
und sauber. Sorgfältig gepflegte Schneidwerkzeuge mit scharfen Schneidkanten verklemmen sich weniger und sind leichter zu
führen.
g) Verwenden Sie Elektrowerkzeug,
Zubehör, Einsatzwerkzeuge usw.
entsprechend diesen Anweisungen.
Berücksichtigen Sie dabei die Arbeitsbedingungen und die auszuführende Tätigkeit. Der Gebrauch von Elektrowerkzeugen für andere als
die vorgesehenen Anwendungen kann zu gefährlichen Situationen führen.
5. Verwendung und Pflege des
akkubetriebenen Geräts
Laden Sie den Akku nur mit dem Lade-
gerät, das vom Hersteller empfohlen
wird. Ein Ladegerät, welches für einen be-
stimmten Akku geeignet ist, kann zu einem
Brandrisiko führen, wenn es mit einem anderen
Akku verwendet wird.
Verwenden Sie Elektrowerkzeuge nur
mit dafür ausgezeichneten Akku-Packs.
Die Verwendung anderer Akku-Packs kann zu
Verletzungen und Feuer führen.
Halten Sie den Akku-Pack von Objekten
a
us Metall wie Büroklammern, Münzen
,
65 DE/AT/CH

Schlüsseln, Nägeln Schrauben etc.
fern, wenn Sie ihn nicht verwenden.
Diese könnten eine Verbindung zwischen den
Polen des Akkus erzeugen und somit zu Verbrennungen oder einem Feuer führen.
Wird der Akku-Pack unter widrigen
Bedingungen verwendet oder gelagert,
kann Flüssigkeit austreten. Vermeiden
Sie den Kontakt damit. Falls die Flüssigkeit mit den Augen in Berührung kommt
suchen Sie einen
kann zu Hautirritationen
führen.
VORSICHT! EXPLOSIONSGE-
FAHR! Laden Sie nicht aufladbare
Batterien niemals auf.
Schützen Sie den Akku vor Hitze,
z. B. auch vor dauernder Sonneneinstrahlung, Feuer, Wasser und Feuchtigkeit. Es besteht Explosionsgefahr.
6. Service
Lassen Sie Ihr Elektrowerkzeug nur
von qualifiziertem Fachpersonal und
nur mit Original-Ersatzteilen reparieren.
Damit wird sichergestellt, dass die Sicherheit
des Elektrowerkzeugs erhalten bleibt.
Arzt auf. Batterieflüssigkeit
oder Verbrennungen
Sicherheitshinweise für
Bohrschrauber
Verwenden Sie zusätzliche Griffe,
wenn diese mit dem Produkt geliefert
werden. Ein Kontrollverlust kann zu Verlet-
zungen führen.
Halten Sie das Produkt an den isolier-
ten Griffflächen, wenn Sie Arbeiten
ausführen, bei denen das Einsatzwerkzeug verborgene Stromleitungen treffen kann.
Der Kontakt mit einer spannungsführenden
Leitung kann auch metallene Produktteile unter
Spannung setzen und zu einem elektrischen
Schlag führen.
Halten Sie das Gerät an den isolierten
Griffflächen, wenn Sie Arbeiten ausführen, bei denen die Schraube verborgene Stromleitungen treffen kann.
Der Kontakt der Schraube mit einer spannungsführenden Leitung kann auch metallene Geräte-
,
teile unter Spannung setzen und zu einem
elektrischen Schlagführen.
Sicherheitshinweise für
Ladegeräte
Dieses Produkt kann von Kindern
ab 8 Jahren und darüber sowie
von Personen mit verringerten
physischen, sensorischen oder
mentalen Fähigkeiten oder Mangel
an Erfahrung und Wissen benutzt
werden, wenn sie beaufsichtigt
oder bezüglich des sicheren Gebrauchs des Produkts unterwiesen
wurden und die daraus resultierenden Gefahren verstehen.
Kinder dürfen nicht mit dem
Produkt spielen.
Die vom Betreiber vorzunehmende
Reinigung und Instandhaltung
darf ohne Überwachung nicht
von Kindern ausgeführt werden.
Laden Sie nicht aufladbare
Batterien niemals auf. Nichtbeachtung kann zu gefährlichen
Situationen führen.
66 DE/AT/CH

Wenn die Leitung beschädigt ist,
darf sie nur durch den Hersteller
oder seinen Servicevertreter ersetzt
werden. Nichtbeachtung kann
zu gefährlichen Situationen führen.
Schützen Sie die elektrischen
Bauteile vor Feuchtigkeit. Tauchen
Sie die entsprechenden Teile nicht
in Wasser oder andere Flüssigkeiten, ansonsten besteht Stromschlaggefahr! Halten Sie das
Produkt niemals unter fließendes
Wasser. Beachten Sie die Hinweise
zu Reinigung, Pflege und Instandhaltung.
Das Ladegerät ist nur für den
Gebrauch in Innenräumen vorgesehen.
Dieses Ladegerät ist nur für die
Aufladung des Akkupacks Parkside
Performance 20 V vorgesehen.
Wenn die
Netzanschlussleitung dieses Produkts
beschädigt wird, muss sie durch den
Hersteller oder seinen Kundendienst
oder eine ähnlich qualifizierte Person
ersetzt werden, um Gefährdungen
zu vermeiden.
Vor der Inbetriebnahme
Akku-Pack laden (siehe Abb. A)
VORSICHT! Ziehen Sie immer den Netzstecker,
bevor Sie den Akku-Pack
nehmen bzw. in dieses einsetzen.
Laden Sie den Akku-Pack 9 nie, wenn die
Umgebungstemperatur unterhalb 10 °C oder
oberhalb 40 °C liegt.
Stecken Sie den Akku-Pack 9 in das Schnell-
16
.
14
(siehe Abb. A).
16
ladegerät
Stecken Sie den Netzstecker in die Steckdose.
Die grüne Ladestatus-LED
Sekunde auf und erlischt dann. Dann leuchtet
die rote Ladestatus-LED
Ladevorgangs leuchtet nur die rote LadestatusLED
Wenn der Ladevorgang beendet ist, leuchtet
die grüne Ladestatus-LED
Ladestatus-LED
Rote LED blinkt Akku ist defekt
Grüne LED blinkt Akku ist zu kalt oder warm.
9
15
16
auf. Während des
15
erlischt.
aus dem Ladegerät
leuchtet für eine
und die rote
Akku-Pack einsetzen /
entnehmen
Akku-Pack einsetzen:
Bringen Sie den Drehrichtungsumschalter 4 in
Mittelstellung (Sperre) (siehe Abb. C).
Drücken Sie den Akku-Pack 9 in die Anschluss-
vertiefungen, bis dieser mit einem Klickgeräusch
einrastet (s. Abb. B).
Akku-Pack entnehmen:
Drücken Sie die Entriegelungstaste 11 und ent-
nehmen Sie den Akku-Pack
9
(siehe Abb. D).
Akkuzustand prüfen
Drücken Sie zum Prüfen des Akkuzustands die
Akku-Taste
bzw. die Restleistung wird anhand der AkkuZustandsleuchten
3 rote Leuchten = maximale Ladung
10
(siehe Abb. E). Der Zustand
12
wie folgt angezeigt:
67 DE/AT/CH

2 rote Leuchten = mittlere Ladung
1 rote Leuchte = niedrige Ladung
Gang 1 - Der Gangwahlschalter 3 befindet sich in
Position 1 (s. Abb. I).
Diese Einstellung eignet sich für alle Schraubarbeiten.
Werkzeuge wechseln /
einsetzen
VORSICHT! Der Akku-Pack 9 muss aus dem
Produkt entfernt werden, bevor Sie die Werk-
zeuge wechseln.
Das Produkt hat eine vollautomatische Spindelarretierung (s. Abb. F). Bei Stillstand des Motors wird der
Antriebsstrang verriegelt, so dass Sie das Bohrfutter
1
durch Drehen gegen den Uhrzeigersinn
öffnen können.
Nachdem Sie das gewünschte Werkzeug eingesetzt
haben, können Sie dieses durch Drehen des Bohrfutters im Uhrzeigersinn
festspannen. Die
Spindelarretierung löst sich automatisch, wenn Sie
durch Betätigung des EIN- / AUS-Schalters
5
den
Motor starten.
Drehmomentvorwahl /
Bohrstufe
Die Drehkraft können Sie über die Drehmomentvor-
2
wahl
einstellen (siehe Abb. G).
Wählen Sie eine niedrige Stufe für kleine
Schrauben bzw. das Schrauben in weiche
Werkstoffe.
Wählen Sie eine hohe Stufe für große Schrauben,
harte Werkstoffe, bzw. beim Herausdrehen von
Schrauben.
Wählen Sie für Bohrarbeiten die Bohrstufe,
indem Sie die Drehmomentvorwahl
Bohr-Position
bringen (siehe Abb. H).
2
in die
2-Gang Getriebe
Gang 2 - Der Gangwahlschalter
3
befindet sich in
Position 2.
Diese Einstellung eignet sich für alle Bohrarbeiten
(Abb. J)
Inbetriebnahme
Ein- und Ausschalten
Einschalten:
Drücken Sie zur Inbetriebnahme des Produkts
den EIN- / AUS-Schalter
5
und halten Sie ihn
gedrückt (siehe Abb. K). Die LED-Arbeits-
13
leuchte
gedrücktem EIN- / AUS-Schalter
leuchtet bei leicht oder vollständig
5
. Sie leuchtet den Arbeitsbereich bei ungünstigen Lichtverhältnissen aus.
Ausschalten:
Lassen Sie zum Ausschalten des Produkts den
EIN- / AUS-Schalter
Hinweis: Die LED-Arbeitsleuchte
5
los.
13
leuchtet noch
etwa 10 s nach dem Ausschalten des Produkts bzw.
nach dem Loslassen des EIN- / AUS-Schalters
5
.
Drehzahl einstellen
Der EIN- / AUS-Schalter 5 verfügt über eine variable
Geschwindigkeitsregelung. Bei leichtem Druck auf
den EIN- / AUS-Schalter
niedriger Drehzahl. Mit zunehmendem Druck erhöht
sich die Drehzahl (siehe Abb. K).
Hinweis: Die integrierte Motorbremse sorgt für
einen schnellen Stillstand.
5
läuft das Produkt mit
VORSICHT! Betätigen Sie den Gangwahl-
schalter
3
erst, wenn das Produkt stillsteht.
Ansonsten droht Beschädigung des Produkts.
68 DE/AT/CH

Drehrichtung umschalten
Wechseln Sie die Drehrichtung, indem Sie den
Drehrichtungsumschalter
links durchdrücken (siehe Abb. L).
Befindet sich der Drehrichtungsumschalter 4
in der Mittelstellung, ist der Ein / Aus-Schalter
blockiert.
4
nach rechts bzw.
Tipps und Tricks
Wählen Sie bei harten Materialien eine niedrige
Drehzahl, bei weichem Material eine hohe
Drehzahl.
Sichern oder befestigen Sie (wenn möglich)
das Werkstück in einer Spannvorrichtung.
Markieren Sie die Stelle, an der gebohrt werden
soll mit einem Körner oder einem Nagel. Wählen
Sie zum Anbohren eine niedrige Drehzahl.
Ziehen Sie den drehenden Bohrer mehrmals
aus dem Bohrloch, um Späne oder Bohrmehl
zu entfernen und es zu lüften.
Tipp! So verhalten Sie sich
richtig.
Überprüfen Sie vor dem Betrieb, ob der Schraub-
bzw. Bohreinsatz korrekt angebracht ist, d. h.
zentriert im Bohrfutter sitzt.
Schraub-Bits sind mit ihren Maßen und der
Form gekennzeichnet. Falls Sie sich unsicher
sind, probieren Sie immer zuerst aus, ob das
Bit ohne Spiel im Schraubenkopf sitzt.
Drehmoment:
Kleinere Schrauben / Bits können beschädigt
werden, wenn Sie ein zu hohes Drehmoment
bzw. eine zu hohe Drehzahl einstellen.
Harter Schraubfall (in Metall):
Besonders hohe Drehmomente entstehen z. B.
bei Metallverschraubungen unter Verwendung
von Steckschlüsseleinsätzen. Wählen Sie eine
niedrige Drehzahl.
Weicher Schraubfall (z. B. in Weichholz):
Schrauben Sie auch hier mit geringer Drehzahl,
um z. B. die Holzoberfläche beim Kontakt mit
dem Schraubenkopf aus Metall nicht zu beschädigen. Verwenden Sie einen Senker.
Bohren in Metall:
Verwenden Sie Metallbohrer (HSS). Für beste
Ergebnisse sollten Sie den Bohrer mit Schneidöl
kühlen. Metallbohrer können Sie auch zum
Bohren in Kunststoff verwenden. Bohren Sie
zunächst mit einem Ø 3 mm Bohrer vor und
nähern Sie sich dem gewünschten Bohrdurchmesser.
Bohren in Holz:
Verwenden Sie einen Holzbohrer mit Zentrier-
spitze, für tiefe Bohrungen verwenden Sie einen
„Schlangenbohrer”, für große Bohrerdurchmesser
einen Forstnerbohrer. Kleine Schrauben in weichem Holz können Sie auch ohne Vorbohren
direkt eindrehen.
Bit-Befestigung am Produkt:
Hier können Bohr- und Schraub-Bits zeitweise
befestigt werden.
Beim Bohren in Holz, Metall und andere
Materialien unbedingt berücksichtigen:
Benutzen Sie bei kleinem Bohrerdurchmesser
eine hohe Drehzahl und bei großem Bohrerdurchmesser eine niedrige Drehzahl.
Gürtelhalterung:
Mit der Gürtelhalterung kann das Produkt wie
dargestellt am Gürtel oder an der Hosentasche
eingehakt werden.
69 DE/AT/CH

Wartung und Reinigung
VERLETZUNGSGEFAHR!
Schalten Sie vor allen Arbeiten am Produkt das
Produkt aus und entnehmen Sie den Akku.
Das Produkt ist wartungsfrei.
Es dürfen keine Flüssigkeiten in das Innere des
Produkts gelangen.
Verwenden Sie zum Reinigen des Gehäuses
ein trockenes Tuch. Verwenden Sie niemals
Benzin, Lösungsmittel oder Reiniger, die Kunststoff angreifen.
Das Produkt muss stets sauber, trocken und frei
von Öl oder Schmierfetten sein.
Soll ein Lithium-Ionen-Akku längere Zeit gelagert
werden, muss regelmäßig der Ladezustand
kontrolliert werden. Der optimale Ladezustand
liegt zwischen 50 % und 80 %. Das optimale
Lagerungsklima ist kühl und trocken.
folgender Bedeutung: 1–7: Kunststoffe /
20–22: Papier und Pappe / 80–98:
Verbundstoffe.
Das Produkt und die Verpackungsmaterialien sind recycelbar, entsorgen
Sie diese getrennt für eine bessere Abfallbehandlung. Das Triman-Logo gilt nur
für Frankreich.
Möglichkeiten zur Entsorgung des ausgedienten Produkts erfahren Sie bei Ihrer
Gemeinde- oder Stadtverwaltung.
Werfen Sie Ihr Produkt, wenn es ausgedient hat, im Interesse des Umweltschutzes
nicht in den Hausmüll, sondern führen
Sie es einer fachgerechten Entsorgung
zu. Über Sammelstellen und deren Öffnungszeiten können Sie sich bei Ihrer
zuständigen Verwaltung informieren.
Nehmen Sie den Akku vor Entsorgung aus dem
Gerät heraus.
Defekte oder verbrauchte Batterien / Akkus müssen
gemäß Richtlinie 2006 / 66 / EG und deren Änderungen recycelt werden. Geben Sie Batterien /
Akkus und / oder das Produkt über die angebotenen
Sammeleinrichtungen zurück.
Umweltschäden durch falsche
Entsorgung der Bat terien / Akkus!
Entsorgung
Die Verpackung besteht aus umweltfreundlichen Materialien, die Sie über
die örtlichen Recyclingstellen entsorgen
können. Der Grüne Punkt gilt nicht für
Deutschland.
Beachten Sie die Kennzeichnung der
b
Verpackungsmaterialien bei der Abfall-
a
trennung, diese sind gekennzeichnet mit
Abkürzungen (a) und Nummern (b) mit
70 DE/AT/CH
Batterien / Akkus dürfen nicht über den Hausmüll
entsorgt werden. Sie können giftige Schwermetalle
enthalten und unterliegen der Sondermüllbehandlung. Die chemischen Symbole der Schwermetalle
sind wie folgt: Cd = Cadmium, Hg = Quecksilber,
Pb = Blei. Geben Sie deshalb verbrauchte Batterien /
Akkus bei einer kommunalen Sammelstelle ab.

Service
Lassen Sie Ihr Produkt von der Servicestelle
oder einer Elektrofachkraft und nur mit OriginalErsatzteilen reparieren. Damit wird sichergestellt, dass die Sicherheit des Produkts erhalten
bleibt.
Lassen Sie den Austausch des Steckers oder
der Netzleitung immer vom Hersteller des
Produkts oder seinem Kundendienst ausführen.
Damit wird sichergestellt, dass die Sicherheit
des Produkts erhalten bleibt.
Abwicklung im Garantiefall
Um eine schnelle Bearbeitung ihres Anliegens zu
gewährleisten, folgen Sie bitte den folgenden
Hinweisen:
Bitte halten Sie für alle Anfragen den Kassenbon
und die Artikelnummer (z. B. IAN 123456) als
Nachweis für den Kauf bereit.
Die Artikelnummer entnehmen Sie bitte dem
Typenschild, einer Gravur, auf dem Titelblatt
ihrer Anleitung (unten links) oder als Aufkleber auf
der Ruck- oder Unterseite.
Sollten Funktionsfehler oder sonstige Mangel auftreten kontaktieren Sie zunächst die nachfolgend
benannte Serviceabteilung telefonisch oder per
E-Mail.
Ein als defekt erfasstes Produkt können Sie dann
unter Beifügung des Kaufbelegs (Kassenbon) und
der Angabe, worin der Mangel besteht und wann
er aufgetreten ist, für Sie portofrei an die Ihnen mitgeteilte Service-Anschrift übersenden.
Service Deutschland
Tel.: 0800 5435 111 (kostenfrei aus dem
dt. Festnetz / Mobilfunknetz)
E-Mail: owim@lidl.de
Service Schweiz
Tel.: 0842 665566 (0,08 CHF / Min.,
Mobilfunk max. 0,40 CHF / Min.)
E-Mail: owim@lidl.ch
IAN 289749
Garantie
Das Produkt wurde nach strengen Qualitätsrichtlini
sorgfältig produziert und vor Anlieferung gewissenhaft geprüft. Im Falle von Mängeln dieses Produkts
stehen Ihnen gegen den Verkäufer des Produkts
gesetzliche Rechte zu. Diese gesetzlichen Rechte
werden durch unsere im Folgenden dargestellte
Garantie nicht eingeschränkt.
Sie erhalten auf dieses Produkt 5 Jahre Garantie
ab Kaufdatum. Die Garantiefrist beginnt mit dem
Kaufdatum. Bitte bewahren Sie den Original-Kassenbon gut auf. Diese Unterlage wird als Nachweis für
den Kauf benötigt.
Tritt innerhalb von 5 Jahren ab dem Kaufdatum
dieses Produkts ein Material- oder Fabrikationsfehler
auf, wird das Produkt von uns – nach unserer Wahl –
für Sie kostenlos repariert oder ersetzt. Diese Garanti
verfällt, wenn das Produkt beschädigt, nicht sachgemäß benutzt oder gewartet wurde.
Die Garantieleistung gilt für Material- oder
Fabrikationsfehler. Diese Garantie erstreckt sich
nicht auf
gesetzt
schleißteile angesehen werden können oder für
Beschädigungen an zerbrechlichen Teilen, z. B.
Schalter, Akkus oder die aus Glas gefertigt sind.
Sie erhalten auf den Akku 1 Jahr Garantie ab Kaufdatum.
Produktteile, die normaler Abnutzung aus-
sind (z. B. Batterien) und daher als Ver-
en
e
Service Österreich
Tel.: 0820 201 222 (0,15 € / min)
E-Mail: owim@lidl.at
71 DE/AT/CH

Original-
Konformitätserklärung
Wir, OWIM GmbH & Co. KG, Stiftsbergstraße 1,
DE-74167 Neckarsulm, DEUTSCHLAND,
erklären in alleiniger Verantwortung, dass das
Produkt: Akku-Bohrschrauber 20 V PABSP 20-Li A1,
Modell-Nr.: HG02731, Version: 08 / 2017, auf
das sich diese Erklärung bezieht, mit den
Normen / normativen Dokumenten der
2006 / 42 / EG, 2014 / 30 / EU, 2011 / 65 / EU,
2014/35/EU übereinstimmt.
Angewandte harmonisierte Normen:
EN 60745-1 / A11:2010
EN 60745-2-1:2010
EN 60745-2-2:2010
EN 60335-1 / A11:2014
EN 60335-2-29 / A2:2010
EN 62233:2008
EN 55014-1 / A2:2011
EN 55014-2:2015
EN 61000-3-2:2014
EN 61000-3-3:2013
EN 50581:2012
Seriennummer: IAN 289749
Der zuvor beschriebene Gegenstand der Erklärung
erfüllt die Vorschriften der Richtlinie 2011/65/EU
des Europäischen Parlaments und des Rates vom
8. Juni 2011 zur Beschränkung der Verwendung
bestimmter gefährlicher Stoffe in Elektro- und
Elektronikgeräten.
Tobias König
Bereichsleiter / Dokumentenverantwortlicher
OWIM GmbH & Co. KG, Stiftsbergstraße 1,
DE-74167 Neckarsulm, DEUTSCHLAND
Neckarsulm, 12.01.2017
Die Konformitätserklärung finden Sie auch
unter: www.owim.com.
72 DE/AT/CH

OWIM GmbH & Co. KG
Stiftsbergstraße 1
DE-74167 Neckarsulm
GERMANY
Model no.: HG02731
Version: 08 / 2017
Last Information Update · Információk állása
Stanje informacij · Stav informací · Stav
informácií · Stand der Informationen: 09 / 2017
Ident.-No.: HG02731092017-4
IAN 289749
 Loading...