

Parkside 290768, PKS 1500 A2 Operating And Safety Instructions Manual
IAN 290768
MITRE SAW PKS 1500 A2
IE
BE
GB
DK
NI
NL
KAPP- UND GEHRUNGSSÄGE
Bedienungs- und Sicherheitshinweise
Originalbetriebsanleitung
DE AT CH
AFKORTER- EG GERINGSSAV
Brugs- og sikkerhedsanvisninger
Oversættelse af den originale driftsvejledning
DK
MITRE SAW
Operating and Safety Instructions
Translation of Original Operating Manual
GB IE NI
BE
SCIE DE COUPE ET A ONGLET
Consignes d‘utilisation et de sécurité
Traduction du manuel d’origine
FR
AFKORT- EN VERSTEKZAAG
Gebruiks- en veiligheidsvoorschriften
Vertaling van de originele gebruikshandleiding
NL BE
CY
ΦΑΛΤΣΟΠΡΙΟΝΟ
Οδηγίες χειρισμού και ασφαλείας
Μετάφραση του πρωτοτύπου των οδηγιών χρήσ ης
GR
GB / IE / NI Operation and Safety Notes Page 01
GR / CY Οδηγίες χειρισμού και ασφαλείας Σελίδα 12
DK Brugs- og sikkerhedsanvisninger Side 25
FR / BE Instructions d‘utilisation et consignes de sécurité Page 36
NL / BE Bedienings- en veiligheidsinstructies Pagina 49
DE / AT / CH Bedienungs- und Sicherheitshinweise Seite 60
Before reading, unfold the page containing the illustrations and familiarise yourself with all functions of the device.
GB IE NI
Klappen Sie vor dem Lesen die Seite mit den Abbildungen aus und machen Sie sich anschließend mit allen Funktionen des Gerätes vertraut.
DE AT CH
Før du læser, vend begge sidene med billeder frem og bliv bekendt med alle apparatets funktioner.
DK
Avant de lire le mode d‘emploi, ouvrez la page contenant les illustrations et familiarisez-vous ensuite avec toutes les fonctions de l‘appareil.
FR BE
Vouw vóór het lezen de pagina met de afbeeldingen open en maak u vertrouwd met alle functies van het apparaat.
NL BE
Πριν ξεκινήσετε την ανάγνωση, ανοίξτε τη σελίδα με τις εικόνες και εξοικειωθείτε με όλες τις λειτουργίες της συσκευής.
GR
CY
GB IE NI
Read and follow the operating and safety instructions before you start working with this power tool!
GR CY
Πριν θέσετε τη συσκευή σε λειτουργία, διαβάσ τε και τηρείτε τις οδηγίες χειρισμού και τις υποδείξεις ασφαλείας!
DK IE
Før start drifts- og sikkerhedsinstruktioner, læse og observere!
FR BE
Avant la mise en service, lisez le mode d’emploi et les consignes de sécurité et respectez-les!
NL BE
Vóór ingebruikneming de handleiding en de veiligheidsvoorschriften lezen en in acht nemen!
DE AT CH
Vor Inbetriebnahme Bedienungsanleitung und Sicherheitshinweise lesen und beachten!
GB IE NI
Wear safety goggles!
GR CY
Να φοράτε προστατευτικά γυαλιά!
DK IE
Brug sikkerhedsbriller!
FR BE
Portez des lunettes de protection!
NL BE
Draag een veiligheidsbril!
DE AT CH
Schutzbrille tragen!
GB IE NI
Important! Risk of injury! Never reach into the running saw blade!
GR CY
Προσοχή! Κίνδυνος τραυματισμού! Μην τοποθετείτε τα χέρια σας στην περιοχή της κινούμε νης λάμας πριονιού!
DK IE
Vigtigt! Fare for kvæstelse! Hold hænderne borte fra den roterende savklinge!
FR BE
Attention, risque de blessure! Ne touchez pas la lame de scie lorsqu’elle est en mouvement!
NL BE
Let op ! Risico een verwonding op te lopen! Niet in het draaiende zaagblad grijpen!
DE AT CH
Achtung! Verletzungsgefahr! Nicht in das laufende Sägeblatt greifen!
GB IE NI
Attention! Laser beam
GR CY
Προσοχή
! Ακτινοβολία λέιζερ
DK IE
Vigtigt! Laserstråling
FR BE
Attention! Rayon laser
NL BE
Let op! Laserstraling
DE AT CH
Achtung! Laserstrahlung
GB IE NI
Protection class II (double insulation)
GR CY
Κλάση προστασίας II (Διπλή απομόνωση)
DK IE
Beskyttelsesklasse II (Dobbelt isolering)
FR BE
Classe de protection II (Double isolation)
NL BE
Beschermklasse II (Dubbele isolatie)
DE AT CH
Schutzklasse II (Doppelisolierung)
GB IE NI
Wear ear-muffs!
GR CY
Να φοράτε προστασία ακοής!
DK IE
Brug høreværn!
FR BE
Porter une protection de l’ouïe!
NL BE
Gehoorbeschermer dragen!
DE AT CH
Gehörschutz tragen!
GB IE NI
Wear a breathing mask!
GR CY
Σε περίπτωση εκπομπής σκόνης, να φοράτε προστασία αναπνοής!
DK IE
Brug støvmaske!
FR BE
En cas de dégagement de poussière!
NL BE
Bij het vrijkomen van stof!
DE AT CH
Bei Staubentwicklung Atemschutz tragen!
10
17
14
15
16
1
3
2
4
5
6
7
8
9
10
11
12
13
Fig. 1
19
19
18
18
Fig. 1.2
Fig. 1.3
27a
27b
27
Fig. 1.3
Fig. 2
20
21
Fig. 2
Fig. 3
24
23
25
22
Fig. 3
Fig. 1.1
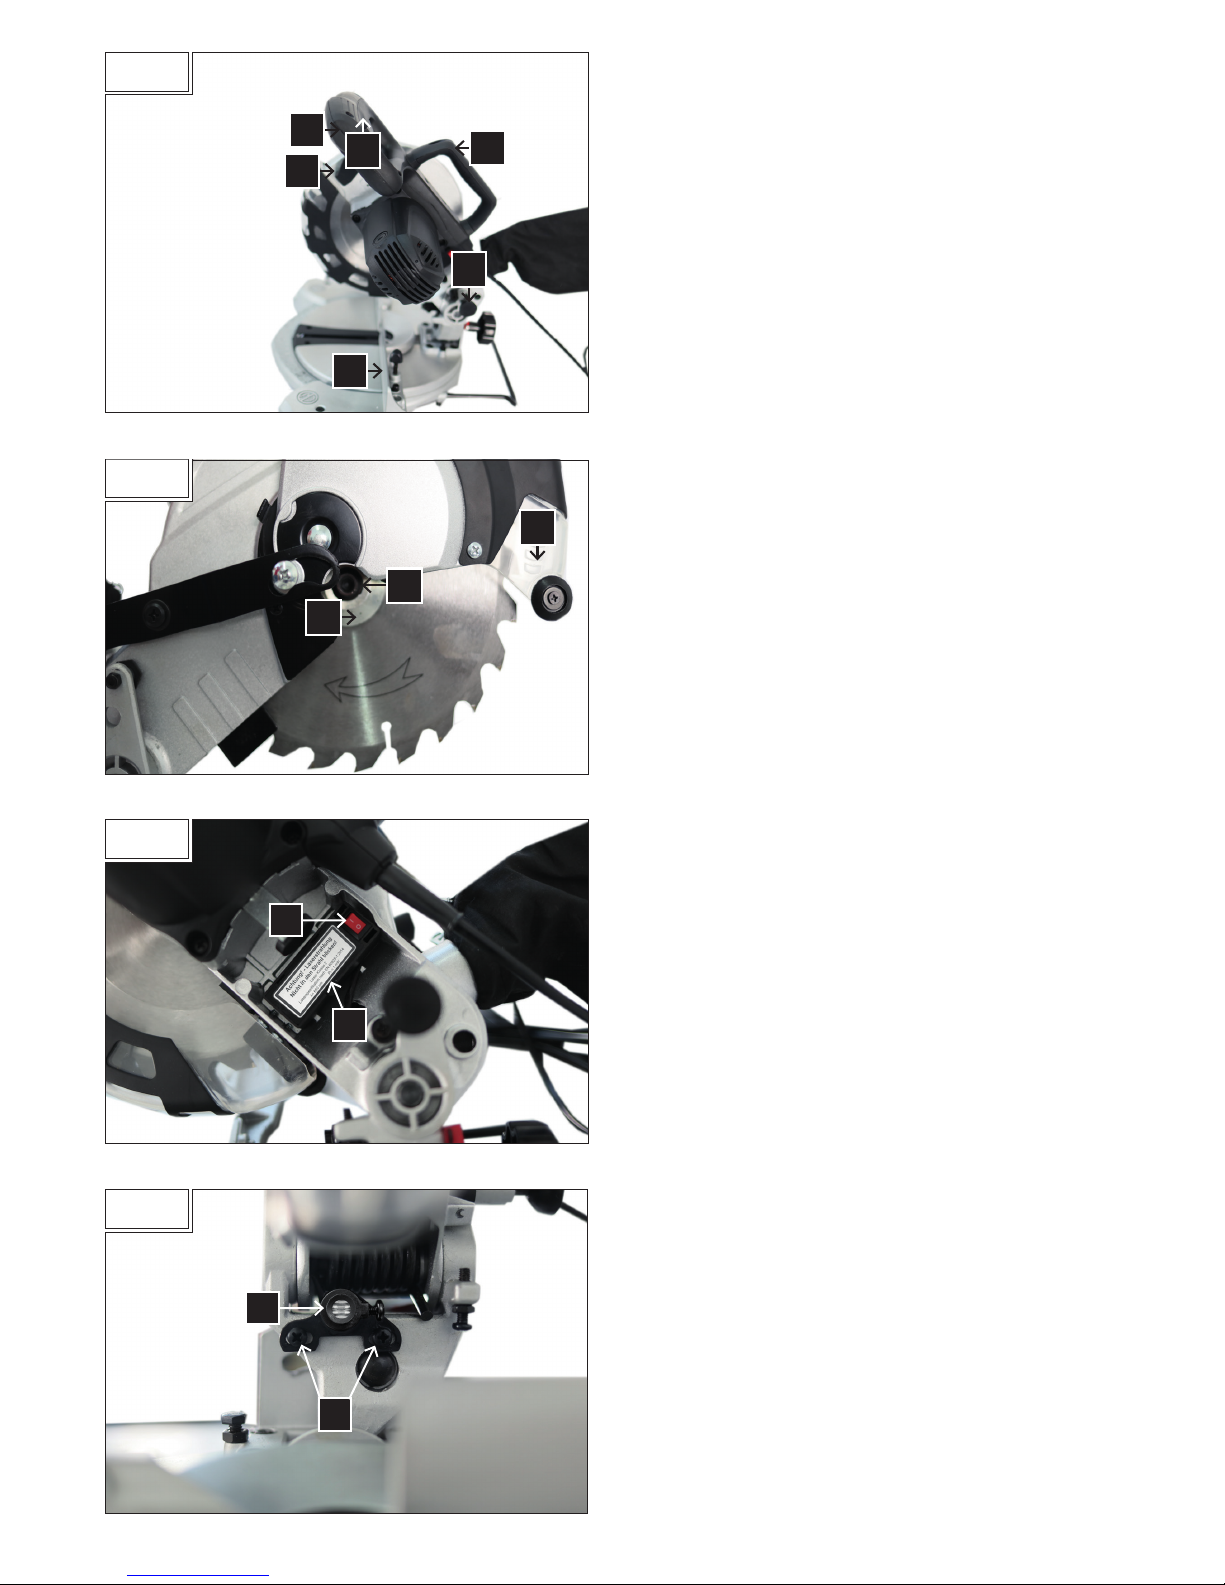
Fig. 5
28
29
6
2
3
27
26
1
34
Fig. 4
Fig. 5
Fig. 7
32
31
Fig. 7
Fig. 6
30
33
Fig. 6

GB/IE/NI
1
Table of contents:
Page:
Introduction 2
Proper use 3
Important information 3
Additional safety instructions 4
Residual risks 6
Assembly 6
Commissioning 6
Area of application 7
Settings 7
Working instructions 7
Electrical connection 8
Accessories 9
Maintenance 9
Disposal 9
Troubleshooting 10
Guarantee Certificate 11
Declaration of conformity 72

GB/IE/NI
2
Introduction
MANUFACTURER:
scheppach
Fabrikation von Holzbearbeitungsmaschine GmbH
Günzburger Straße 69
D-89335 Ichenhausen
NOTE:
According to the applicable product liability laws, the manufacturer of the device does not assume liability for damages
to the product or damages caused by the product that occurs
due to:
• Improper handling,
• Non-compliance of the operating instructions,
• Repairs by third parties, not by authorized service technicians,
• Installation and replacement of non-original spare parts,
• Application other than specified,
• A breakdown of the electrical system that occurs due to
the non-compliance of the electric regulations and VDE
regulations 0100, DIN 57113 / VDE0113.
WE RECOMMEND:
Read through the complete text in the operating instructions
before installing and commissioning the device. The operating instructions are intended to help the user to become
familiar with the machine and take advantage of its application possibilities in accordance with the recommendations.
The operating instructions contain important information
on how to operate the machine safely, professionally and
economically, how to avoid danger, costly repairs, reduce
downtimes and how to increase reliability and service life of
the machine.
In addition to the safety regulations in the operating instructions, you have to meet the applicable regulations that apply
for the operation of the machine in your country. Keep the
operating instructions package with the machine at all times
and store it in a plastic cover to protect it from dirt and moisture. Read the instruction manual each time before operating
the machine and carefully follow its information. The machine
can only be operated by persons who were instructed concerning the operation of the machine and who are informed
about the associated dangers. The minimum age requirement
must be complied with.
In addition to the safety notes contained in the present operating instructions and the special regulations of your country,
the generally recognized technical rules for the operation of
machines must be observed.
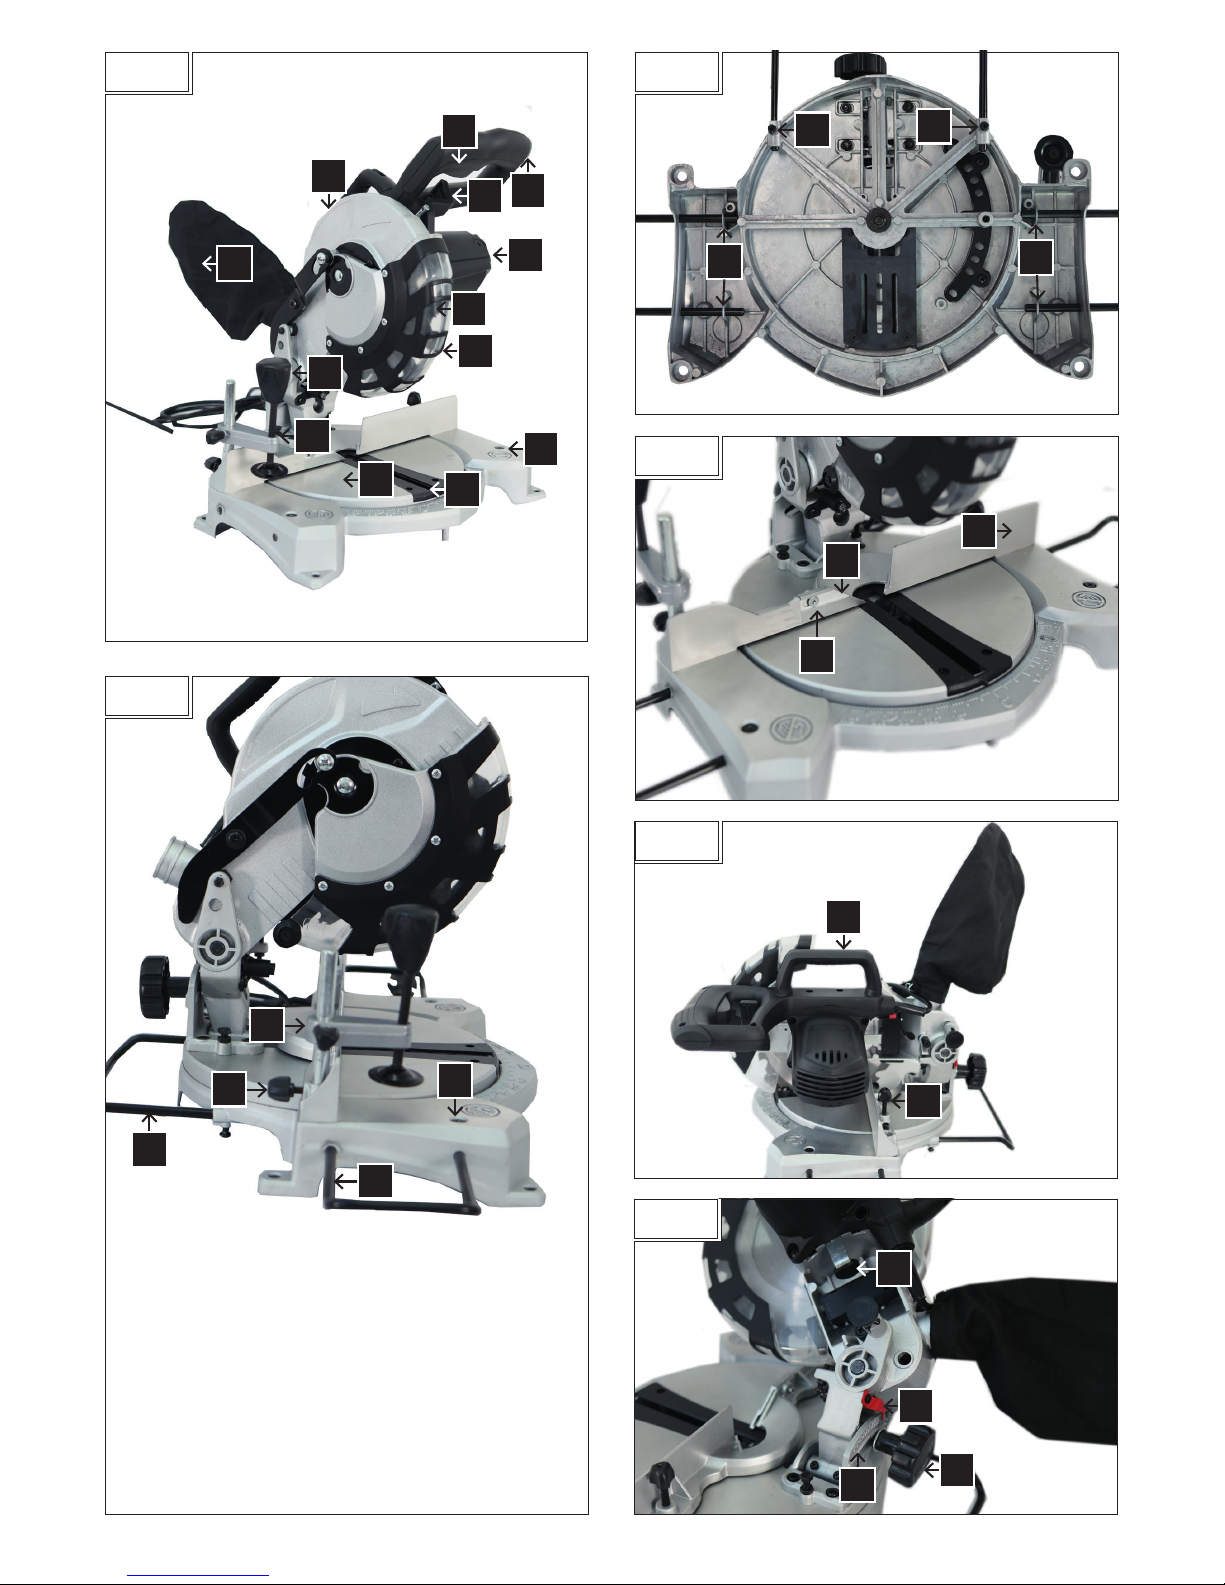
Legend of Fig. 1
1 Start button
2 Handle
3 Locking lever
4 Motor
5 Saw blade
6 Moving saw blade guard
7 Base
8 Table insert
9 Rotary table
10 Workpiece clamp
11 Housing / base joint
12 Dust bag
13 Stationary saw blade guard
PKS 1500 A2
Scope of delivery
Mitre saw
Dust bag
Workpiece clamp
Tool for changing the saw
blade – 6mm Allen key
Tool for stop rail – 3mm Allen
key
2 work piece supports
Support stand
2 batteries (AAA)
2 carbon brushes
Operating instructions
Technical Data
Dimensions L x W x
H mm
690 x 550 x 440
Rotary table ø mm
385 x 150
Table height mm
55
Saw blade Ø mm
210/30/2,6/1,6
Number of teeth
48
Speed rpm
5000
Cutting speed m/s
55
Pivot range
2 x 45°
Tilt angle
45°
Double mitre
45° x 45°
left
Catch positions
45°, 30°, 22, 5°, 15°, 0°,
15°, 22, 5°, 30°, 4 5°
Weight kg
7,7
Cross-cutting data
Max. cut depth
90 °/45°
60 / 35 mm
90°/90°
120 x 60 mm
90 °/45°
80 x 60 mm
45°/90 °
120 x 35 mm
45°/45°
80 x 35 mm
Drive
Motor V~/Hz
220-240 / 50
Rated input W
S1 1200W
S6 25%* 1500W
Technical changes reserved!

GB/IE/NI
3
*S6, continuous operation periodic duty.
Identical duty cycles with a period at load followed by a
period at no load. Running time 10 minutes; duty cycle is
25% of the running time.
The work piece must have a minimum
height of 3mm and a minimum width of 10
mm. Make sure that the workpiece is always secured with the clamping device.
Information about noise development
The noise levels of this machine during operation are as
follows:
LpA: 99.6dB(A) K=3dB(A)
LwA: 112.6dB(A) K=3dB(A)
Warning: Noise can have serious effects on your health.
If the machine noise exceeds 85 dB (A), please wear suitable
hearing protection. If the electrical connection is defective,
the power can fail when starting the machine. This could influence other machines (e.g. blinking lamps). If the electrical
power corresponds to Zmax < 0.27, such disruptions should
not occur. (However, if they do, inform your specialist dealer).
• The specified vibration emission value has been measured according to a standardised testing procedure and
can be used for comparison of one electric tool with
another;
• The specified vibration emission value can also be used
for an initial assessment of the load.
Proper use
The mitre saw is used for the cutting of wood and plastic,
according to the machine size.
Warning! The supplied saw blade is only intended for
the sawing of wood! Do not use this blade for the sawing
of plastic!
The saw is not suitable for the cutting of firewood.
The machine may only be used in the intended manner.
Only suitable saw blades may be used for the machine.
The use of any type of cutting wheels is prohibited.
An element of the intended use is also the observance of
the safety instructions, as well as the assembly instructions
and operating information in the operating manual.
Persons who operate and maintain the machine must be
familiar with the manual and must be informed about potential dangers.
Any use beyond this is improper. The user/operator, not the
manufacturer, is responsible for damages or injuries of any
type resulting from this.
In addition, the applicable accident prevention regulations
must be strictly observed.
Other general occupational health and safety-related rules
and regulations must be observed.
The liability of the manufacturer and resulting damages are
excluded in the event of modifications of the machine.
Despite use as intended, specific risk factors cannot be
entirely eliminated. Due to the design and layout of the machine, the following risks remain:
• Contact with the saw blade in the non-covered saw
area.
• Reaching into the running saw blade (cutting injury).
• Kick-back of workpieces and workpiece parts.
• Saw blade breakage.
• Ejection of faulty carbide parts of the saw blade.
• Hearing damage when the necessary hearing protection
is not used.
• Harmful emissions of wood dusts during use in enclosed
areas.
Please observe that our equipment was not designed with
the intention of use for commercial or industrial purposes.
We assume no guarantee if the equipment is used in commercial or industrial applications, or for equivalent work.
Important information
Attention! The following basic safety measures must be
observed when using electric tools for protection against
electric shock, and the risk of injury and fire. Read all these
notices before using the electric tool and keep the safety
instructions for later reference.
Safe work
1 Keep the work area orderly
– Disorder in the work area can lead to accidents.
2 Take environmental influences into account
– Do not expose electric tools to rain.
– Do not use electric tools in a damp or wet environment.
– Make sure that the work area is well-illuminated.
– Do not use electric tools where there is a risk of fire or
explosion.
3 Protect yourself from electric shock
– Avoid physical contact with earthed parts (e.g. pipes,
radiators, electric ranges, cooling units).
4 Keep other persons away
– Do not allow other persons, especially children, to
touch the electric tool or the cable. Keep them away
from your work area.
– The operating person must be at least 18 years of
age; trainees must be at least 16 years, however only
under supervision.
5 Securely store unused electric tools
– Unused electric tools should be stored in a dry, el-
evated or closed location out of the reach of children.
6 Do not overload your electric tool
– They work better and more safely in the specified
output range.
7 Use the correct electric tool
– Do not use low-output electric tools for heavy work.
– Do not use the electric tool for purposes for which it
is not intended. For example, do not use handheld
circular saws for the cutting of branches or logs.
– Do not use the electric tool to cut firewood.
8 Wear suitable clothing
– Do not wear wide clothing or jewellery, which can
become entangled in moving parts.
– When working outdoors, anti-slip footwear is recom-
mended.
– Tie long hair back in a hair net.

GB/IE/NI
4
9 Use protective equipment
– Wear protective goggles.
– Wear a mask when carrying out dust-creating work.
10 Connect the dust extraction device
– If connections for dust extraction and a collecting de-
vice are present, make sure that they are connected
and used properly.
– Operation in enclosed areas is only permitted with a
suitable extraction system.
11 Do not use the cable for purposes for which it is not
intended
– Do not use the cable to pull the plug out of the outlet.
Protect the cable from heat, oil and sharp edges.
12 Secure the workpiece
– Use the clamping devices or a vice to hold the
workpiece in place. In this manner, it is held more
securely than with your hand.
– An additional support is necessary for long work-
pieces (table, trestle, etc.) in order to prevent the
machine from tipping over.
– Always press the workpiece firmly against the work-
ing plate and stop in order to prevent bouncing and
twisting of the workpiece.
13 Avoid abnormal posture
– Make sure that you have secure footing and always
maintain your balance.
– Avoid awkward hand positions in which a sudden
slip could cause one or both hands to come into
contact with the saw blade.
14 Take care of your tools
– Keep cutting tools sharp and clean in order to be
able to work better and more safely.
– Follow the instructions for lubrication and for tool
replacement.
– Check the connection cable of the electric tool regu-
larly and have it replaced by a recognised specialist
when damaged.
– Check extension cables regularly and replace them
when damaged.
– Keep the handle dry, clean and free of oil and
grease.
15 Pull the plug out of the outlet
– Never remove loose splinters, chips or jammed wood
pieces from the running saw blade.
– During non-use of the electric tool or prior to mainte-
nance and when replacing tools such as saw blades,
bits, milling heads.
16 Do not leave a tool key inserted
– Before switching on, make sure that keys and adjust-
ing tools are removed.
17 Avoid inadvertent starting
– Make sure that the switch is switched off when plug-
ging the plug into an outlet.
18 Use extension cables for outdoors
– Only use approved and appropriately identified
extension cables for use outdoors.
– Only use cable reels in the unrolled state.
19 Remain attentive
– Pay attention to what you are doing. Remain sensible
when working. Do not use the electric tool when you
are distracted.
20 Check the electric tool for potential damage
– Protective devices and other parts must be carefully in-
spected to ensure that they are fault-free and function
as intended prior to continued use of the electric tool.
– Check whether the moving parts function faultlessly
and do not jam or whether parts are damaged. All
parts must be correctly mounted and all conditions
must be fulfilled to ensure fault-free operation of the
electric tool.
– The moving protective hood may not be fixed in the
open position.
– Damaged protective devices and parts must be
properly repaired or replaced by a recognised
workshop, insofar as nothing different is specified in
the operating manual.
– Damaged switches must be replaced at a customer
service workshop.
– Do not use any faulty or damaged connection cables.
– Do not use any electric tool on which the switch can-
not be switched on and off.
21 ATTENTION!
– Exercise elevated caution for double mitre cuts.
22 ATTENTION!
– The use of other insertion tools and other accessories
can entail a risk of injury.
23 Have your electric tool repaired by a qualified electrician
– This electric tool conforms to the applicable safety
regulations. Repairs may only be performed by an
electrician using original spare parts. Otherwise accidents can occur.
Additional safety instructions
1 Safety precautions
– Warning! Do not use damaged or deformed saw
blades.
– Replace a worn table insert.
– Only use saw blades recommended by the manufac-
turer which conform to EN 847-1.
– Make sure that a suitable saw blade for the material
to be cut is selected.
– Wear suitable personal protective equipment. This
includes:
– Hearing protection to avoid the risk of becoming
hearing impaired,
– Respiratory protection to avoid the risk of inhaling
harmful dust,
– Wear gloves when handling saw blades and
rough materials. Carry saw blades in a container
whenever practical.
– Wear goggles. Sparks generated during work
or splinters, chippings and dust coming from the
device can lead to loss of eyesight.
– Connect a dust collecting device to the electric tool
when sawing wood. The emission of dust is influenced, among other things, by the type of material
to be processed, the significance of local separation
(collection or source) and the correct setting of the
hood/guide plates/guides.
– Do not use saw blades made of high-speed alloy
steel (HSS steel).
GB/IE/NI
5
2 Maintenance and repair
– Pull out the mains plug for any adjustment or repair
tasks.
– The generation of noise is influenced by various
factors, including the characteristics of saw blades,
condition of saw blade and electric tool. Use saw
blades which were designed for reduced noise development, insofar as possible. Maintain the electric
tool and tool attachments regularly and if necessary,
initiate repairs in order to reduce noise.
– Report faults on the electric tool, protective devices
or the tool attachment to the person responsible for
safety as soon as they are discovered.
3 Safe work
– Only use saw blades for which the maximum permis-
sible speed is not lower than the maximum spindle
speed of table saws and which are suitable for the
material to be cut.
– Make sure that the saw blade does not touch the
rotary table in any position by pulling out the mains
plug and rotating the saw blade by hand in the 45°
and 90° position. If necessary, readjust the saw
head.
– When transporting the electric tool, only use the
transport devices. Never use the protective devices
for handling or transport.
– Make sure that the lower part of the saw blade is cov-
ered during transport, e.g. by the protective device.
– Be sure to only use spacers and spindle rings speci-
fied by the manufacturer as suitable for the intended
purpose.
– The floor around the machine must be level, clean
and free of loose particles, such as chips and cutting
residues.
– Do not remove any cutting residues or other parts of
workpieces from the cutting zone while the machine
is running with unprotected saw blade and the saw
unit is not at rest.
– Make sure that the machine is always secured on a
workbench or a table if at all possible.
– Support long workpieces (e.g. with a roller table) to
prevent them sagging at the end of a cut.
Warning! This electric tool generates an electromagnetic
field during operation. This field can impair active or passive
medical implants under certain conditions. In order to prevent
the risk of serious or deadly injuries, we recommend that persons with medical implants consult with their physician and
the manufacturer of the medical implant prior to operating
the electric tool.
SAFETY INSTRUCTIONS FOR THE HANDLING
OF SAW BLADES
1 Only use insertion tools if you have mastered their use.
2 Observe the maximum speed. The maximum speed
specified on the insertion tool may not be exceeded. If
specified, observe the speed range.
3 Observe the motor / saw blade direction of rotation.
4 Do not use any insertion tools with cracks. Sort out
cracked insertion tools. Repairs are not permitted.
5 Clean grease, oil and water off of the clamping surfaces.
6 Do not use any loose reducing rings or bushes for the
reducing of holes on saw blades.
7 Make sure that fixed reducer rings for securing the
insertion tool have the same diameter and have at least
1/3 of the cutting diameter.
8 Make sure that fixed reducer rings are parallel to each other.
9 Handle insertion tool with caution. They are ideally
stored in the originally package or special containers.
Wear protective gloves in order to improve grip and to
further reduce the risk of injury.
10 Prior to the use of insertion tools, make sure that all
protective devices are properly fastened.
11 Prior to use, make sure that the insertion tool meets
the technical requirements of this electric tool and is
properly fastened.
12 Only use the supplied saw blade for cutting wood,
never for the processing of metals.
13 Warning! Never use the saw to cut other than the
determined materials.
14 Only use the saw if the protective devices are functio-
nal, in good condition and in the intended position.
15 Ensure that the workpiece is always clamped at the
saw table.
16 Before each sawing operation, make sure that the
machine is secure.
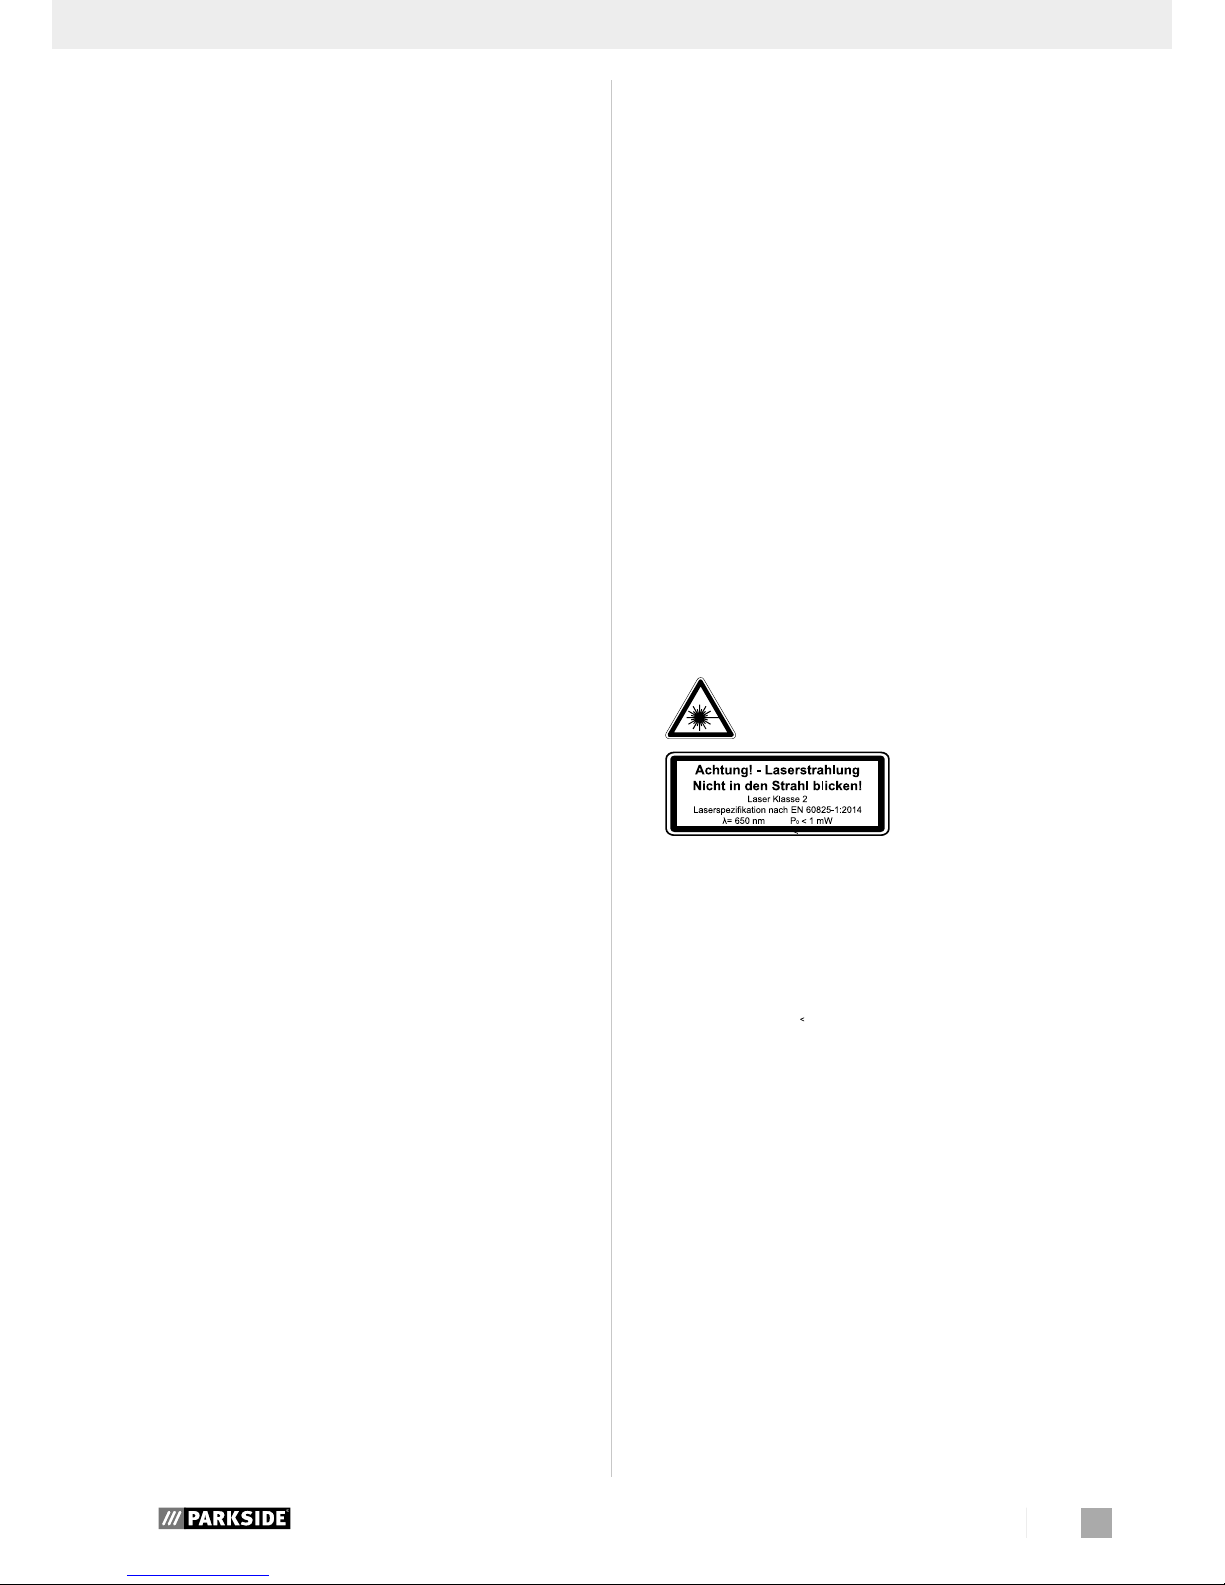
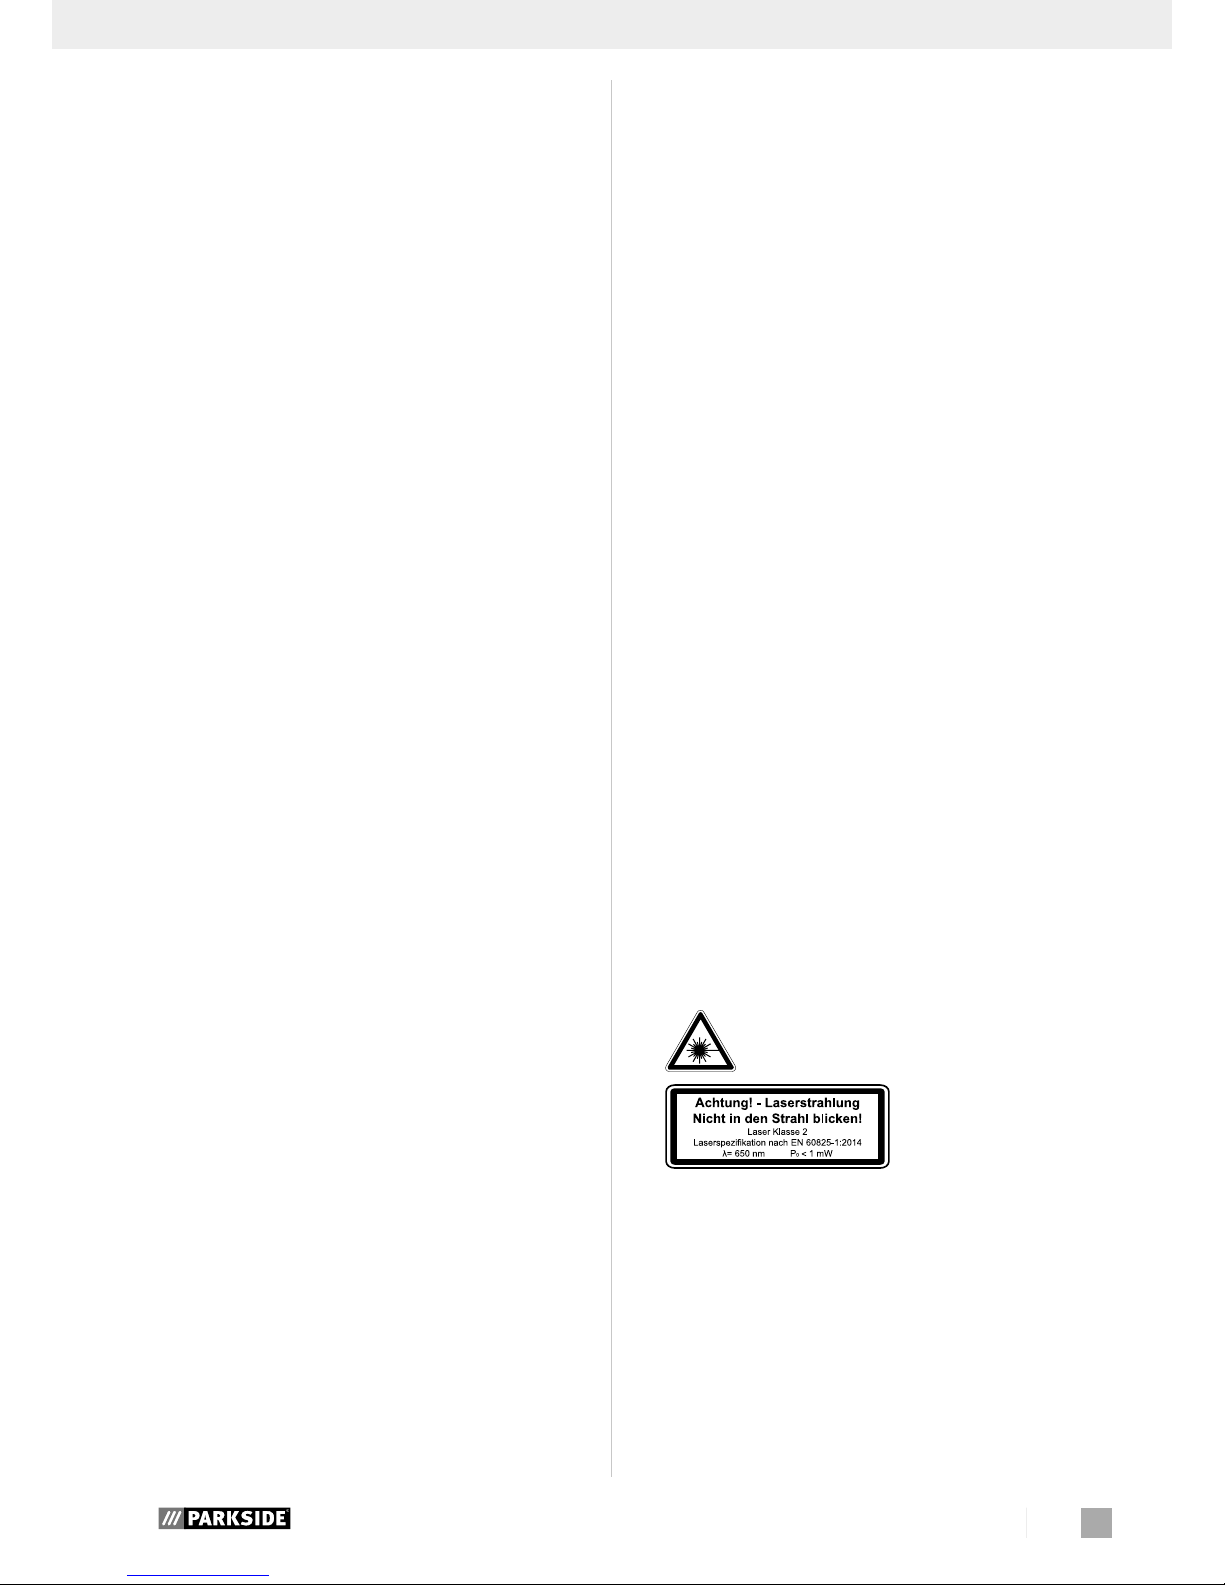
Attention: Laser radiation
Do not stare into the beam
Class 2 laser
Protect yourself and you environment from
accidents using suitable precautionary
measures!
• Do not look directly into the laser beam with unprotected
eyes.
• Never look into the path of the beam.
• Never point the laser beam towards reflecting surfaces
and persons or animals. Even a laser beam with a low
output can cause damage to the eyes.
• Caution - methods other than those specified here can
result in dangerous radiation exposure.
• Never open the laser module. Unexpected exposure to
the beam can occur.
• If the mitre saw is not used for an extended period of
time, the batteries should be removed.
• The laser may not be replaced with a different type of laser.
• Repairs of the laser may only be carried out by the laser
manufacturer or an authorised representative.
Safety instructions for handling batteries
1 Always make sure that the batteries are inserted with
the correct polarity (+ and –), as indicated on the
battery.
2 Do not short-circuit batteries.
3 Do not charge non-rechargeable batteries.
4 Do not overcharge batteries!

GB/IE/NI
6
5 Do not mix old and new batteries or batteries of dif-
ferent types or manufacturers! Replace an entire set of
batteries at the same time.
6 Immediately remove used batteries from the device and
dispose of them properly! Do not dispose batteries with
household waste. Defective or used batteries must be
recycled according to Directive 2006/66 / EC.
Give back batteries and / or the device has been offered to the collective facilities. About disposal facilities
you can inform by your municipal or city government.
7 Do not allow batteries to heat up!
8 Do not weld or solder directly on batteries!
9 Do not dismantle batteries!
10 Do not allow batteries to deform!
11 Do not throw batteries into fire!
12 Keep batteries out of the reach of children.
13 Do not allow children to replace batteries without
supervision!
14 Do not keep batteries near fire, ovens or other sources
of heat. Do not use batteries in direct sunlight or store
them in vehicles in hot weather.
15 Keep unused batteries in the original packaging
and keep them away from metal objects. Do not mix
unpacked batteries or toss them together! This can
lead to a short-circuit of the battery and thus damage,
burns or even the risk of fire.
16 Remove batteries from the equipment when it will not
be used for an extended period of time, unless it is for
emergencies!
17 NEVER handle batteries that have leaked without
appropriate protection. If the leaked fluid comes into
contact with your skin, the skin in this area should be
rinsed off under running water immediately. Always
prevent the fluid from coming into contact with the
eyes and mouth. In the event of contact, please seek
immediate medical attention.
18 Clean the battery contacts and corresponding con-
tacts in the device prior to inserting the batteries.
Residual risks
The machine has been built according to the
state of the art and the recognised technical
safety requirements. However, individual
residual risks can arise during operation.
• Health hazard due to electrical power, with the use of
improper electrical connection cables.
• Furthermore, despite all precautions having been met,
some non-obvious residual risks may still remain.
• Residual risks can be minimised if the “Important information”, „Additional safety instructions“ and the „Proper
use“ are observed along with the whole of the operating
instructions.
• Do not load the machine unnecessarily: excessive pressure when sawing will quickly damage the saw blade,
which results in reduced output of the machine in the processing and in cut precision.
• When cutting plastic material, please always use clamps:
the parts which should be cut must always be fixed between the clamps.
• Avoid accidental starting of the machine: the operating button may not be pressed when inserting the plug in an outlet.
• Use the tool that is recommended in this manual. In doing so, your mitre saw provides optimal performance.
• Hands may never enter the processing zone when the
machine is in operation.
• Release the handle button and switch off the machine
prior to any operations.
Assembly
WARNING! For you own safety, only insert
the mains plug in an outlet when all assembly steps have been completed and you
have read and understood the safety and
operating instructions.
Lift the saw out of the packaging and place it on your work
bench. (Positioning of the saw on the work bench - see the
next page under „POSITIONING / WORK STATION“)
Installation of the dust bag (fig. 2)
• Squeeze together the metal ring on the chip bag (12)
and attach it to the outlet opening in the motor area.
Assembling the work piece clamping de-
vice (fig. 1.1)
• Loosen the locking screw (17) and attach the work piece
clamping device (10) to the left or right of the fixed saw bench.
• Afterwards, retighten the locking screws (17).
Assembling the work piece supports (fig.
1.1 – 1.2)
• Loosen the cross-head screw (14) and guide the work
piece support through the specified hole on the side of
the fixed saw bench.
• Make sure that the work piece support (15) is also
guided through the two plates (19) on the underneath.
• Afterwards, retighten the cross-head screw (14).
• Repeat this process on the other side.
Assembling the support stand (fig. 1.1 – 1.2)
• Loosen the cross-head screws (18) on the underneath of
the saw and guide the support stand (16) through the
specified holes on the back of the saw.
• Afterwards, retighten the cross-head screws (18).
Commissioning
Prior to commissioning, observe the safety
instructions in the operating instructions.
REMOVAL FROM THE PACKAGING
Remove the machine from its package, which protects it during
transport, without damaging the package in order to be able to
use it later for transporting the mitre saw for long-term storage.
MOVING
Since the mitre saw is relatively small and light, its location
can be easily changed, even by a single person. After locking the locking knob (26 - Fig. 4) in the bottom position, lift
the mitre saw by the handle (34 - Fig. 4).
GB/IE/NI
7
TRANSPORT
If the machine must be transported, carry it by the handle
(34 - Fig. 4) and place it in the original packaging in which
it was supplied. In the process, make sure that it is correctly
positioned in the package (see arrows on the package).
If possible, the load should be fixed with ropes or securing
belts in order to prevent shifting during the transport or parts
of the load from falling down.
POSITIONING/WORK STATION
Position the machine on a work bench or on a flat base so
that the machine is supported as stably as possible.
The equipment must be set up where it can stand secure, i.e.
it should be bolted to a workbench, a universal base frame
or similar. When working with the machine, ergonomic factors must be considered; the ideal height of the work table or
the base is reached when the base surface or the upper work
surface is 90 to 95 cm above the ground. The positioning of
the machine must provide for at least 80 cm of clearance in
all directions and in order to allow for cleaning and repair
work as well as necessary adjustments in observance of
safety conditions and with sufficient room to manoeuvre.
CAUTION: Position the machine in a zone which is suitable in respect to the environmental conditions and lighting.
Never forget that the general environmental conditions play
an extremely important role in accident prevention.
CONNECTION TO THE POWER SUPPLY
Make sure that the socket is in a good condition. We would
like to remind you that the power supply must be connected
to a magnetic-thermal circuit breaker which protects all lines
from short-circuits and overloading.
Area of application
Intended application possibilities
The machine cuts:
• Wood and materials similar to wood
• Plastic
Unintended application possibilities
The machine is not suitable for:
• Ferritic materials, steel and cast iron, as well as other material types which are not listed, particularly food.
• Mitre saw without guard.
• Materials larger than the specified cutting data:
90°/90°/
120 x 60 mm
90°/45°
80 x 60 mm
45°/90°
120 x 35 mm
45°/45°
80 x 35 mm
Settings
CROSS-CUTTING
ATTENTION: Before carrying out the following adjust-
ments, please check whether the motor of the machine is
switched off.
Pivoting the table plate (Fig. 2)
The mitre saw can be pivoted left and right with the rotary table.
Exact angle adjustment is possible on the basis of the scale.
The angle can be precisely and quickly adjusted from 0° to
45° with locking positions at 15°, 22.5° and 30°.
To pivot the rotary table, loosen the set screw (21) and
rotate the unit using the handle (20) until the desired angle is
reached. Then secure it with the set screw (21).
Tilt of the saw unit (Fig. 3)
The saw unit can be tilted at an angle of up to 45°.
Loosen the handle (23) on the rear side of the machine and
tilt the unit to the desired angle position according to the
scale. The angle can be set on the basis of the scale (24) using the pointer (25). Then the handle must be re-tightened.
Working instructions
After you have carried out all the tasks described above, you
can begin working.
ATTENTION: Always keep your hands away from the cutting zone and never attempt to reach in while cutting.
FIXING A WORKPIECE
Clamp the work piece on the work table with the workpiece
clamp (10 - Fig 1) in order to fix it in place.
Cross-cutting (Fig. 1, 1.3, 4)
Attention! For 90° mitre cuts, the moveable stop rail
(27a) must be fixed in the inner position.
• Open the set screw (27b) on the moveable stop rail
(27a) with an Allen key and push the moveable stop rail
(27a) inwards.
• The moveable stop rail (27a) must be locked in a position far enough from the inner position that the distance
between the stop rail (27a) and the saw blade (5) is no
more than 8 mm.
• Before making the cut, check that no collision could occur
between the stop rail (27a) and the saw blade (5).
• Secure the locking lever (27b) again.
• Pressing the machine head lightly downwards and removing
the locking bolt (26) from the motor bracket at the same time
disengages the saw from the lowest position. Swing the machine head up until the release lever (3) latches into place.
• Lift the saw unit by the handle (2) until it locks in place in
the top position.
• Lock the material with the clamping device (10) on the
fixed saw table to prevent the material from moving during the cutting operation.
• Press the workpiece evenly on the stop strips (27); make sure that
you hand remains outside the cutting area of the saw blade.
• With your right hand on the handle (2), press the locking lever (3) so that the unit can also be pivoted downward.
• The motor starts when the start button (1) is pressed.
• Slowly bring the saw blade down to the workpiece and
cut through it with moderate pressure.
• When the cutting operation is completed, move the machine head back to its upper (home) position and release
the ON/OFF button (1).

GB/IE/NI
8
Attention! The machine executes an upward stroke automatically due to the return spring, i.e. do not release the handle (2)
after completing the cut; instead allow the machine head to
move upwards slowly whilst applying light counter pressure.
Mitre cut 0°- 45° (Fig. 1, 1.3, 3)
The crosscut saw can be used to make mitre cuts of 0° 45° in relation to the work face.
Important! To make miter cuts (inclined saw head), the
adjustable stop rail (27a) must be fixed at the outer position.
• Open the set screw (27b) for the adjustable stop rail
(27a) with an Allen key and push the adjustable stop rail
outwards.
• The adjustable stop rail (27a) must be fixed far enough in
front of the innermost position that the distance between
the stop rail (27a) and the saw blade (5) amounts to a
maximum of 8 mm.
• Before making a cut, check that the stop rail (27a) and
the saw blade (5) cannot collide.
• Secure the locking lever (27b) again.
• Move the machine head to the top position.
• Fix the rotary table (9) in the 0° position.
• Loosen the set screw (23) and use the handle (2) to angle
the machine head to the left, until the pointer (25) indicates the desired angle measurement on the scale (24).
• Re-tighten the fixing screw (23).
• Cut as described in section “Cross-cutting”.
Mitre cut 0°- 45° and turntable 0°- 45°
The crosscut saw can be used to make mitre cuts to the left
of 0°- 45° in relation to the work face and, at the same
time, 0° - 45° to the left or 0° - 45° to the right in relation
to the stop rail (double mitre cut).
Important! To make miter cuts (inclined saw head), the
adjustable stop rail (27a) must be fixed at the outer position.
• Open the set screw (27b) for the adjustable stop rail
(27a) with an Allen key and push the adjustable stop rail
outwards.
• The adjustable stop rail (27a) must be fixed far enough in
front of the innermost position that the distance between
the stop rail (27a) and the saw blade (5) amounts to a
maximum of 8 mm.
• Before making a cut, check that the stop rail (27a) and
the saw blade (5) cannot collide.
• Secure the locking lever (27b) again.
• Move the machine head to its upper position.
• Release the rotary table (9) by loosening the set screw (23).
• Using the handle (2), set the rotary table (9) to the desired angle.
• Retighten the set screw (23) in order to secure the rotary table.
• Undo the locking screw (23) and use the handle (2) to
tilt the machine head to the left until it coincides with the
required angle value.
• Retighten the fixing screw (23).
• Cut as described in section “Cross-cutting”.
Saw blade replacement (Fig. 5)
• Pull out the mains plug.
• Place the saw unit in „cross-cutting“ position
• Unlock the moving saw blade guard (6) by pressing the
locking lever (3 - Fig. 1); in the process, raise the saw
blade guard so that the saw blade is free.
• Actuate the spindle lock (22 - Fig. 3).
• Loosen the saw blade fastening screw (28) - (Atten-
tion: left-handed thread).
• Remove the screw (28) and saw blade flange (29).
• Carefully remove the saw blade (risk of injury from the
saw blade teeth).
• Place a new saw blade on the inner saw blade flange. In the
process, observe the rotational direction of the saw blade.
• Fit the outer saw blade flange and firmly tighten the screw.
• Move the saw blade guard back to the correct position.
Replacing laser batteries (Fig. 6)
• Remove the laser battery cover (30). Remove the 2 batteries.
• Replace both batteries with the same or an equivalent
type. Make sure that they are inserted with the same polarity as the used batteries.
• Close the battery cover.
Switch ON / switch OFF the laser (Fig. 6)
To switch on: Move the ON/OFF (33) switch of the
laser (34) to the “1” position. A laser line is projected onto
the material you wish to process, providing an exact guide
for the cut.
To switch off: Move the ON/OFF switch of the laser
to the “0” position.
Adjusting the laser (Fig. 7)
If the laser (31) ceases to indicate the correct cutting line, you
can readjust the laser. To do so, open the screws (32) and set
the laser by moving sideways to that the laser beam strikes the
teeth of the saw blade (5).
Electrical connection
The electrical motor installed is connected
and ready for operation. The connection
complies with the applicable VDE and DIN
provisions. The customer‘s mains connection as well as the extension cable used
must also comply with these regulations.
Important information
In the event of an overloading the motor will switch itself
off. After a cool-down period (time varies) the motor can
be switched back on again.
Damaged electrical connection cable
The insulation on electrical connection cables is often damaged.
This may have the following causes:
• Passage points, where connection cables are passed
through windows or doors.
• Kinks where the connection cable has been improperly
fastened or routed.
• Places where the connection cables have been cut due
to being driven over.
• Insulation damage due to being ripped out of the wall outlet.
• Cracks due to the insulation ageing.
GB/IE/NI
9
• In the event of service work, personal protective equipment must always be work (protective goggles and
gloves).
• Remove saw dust and chips regularly by cleaning the
cutting zone and support surfaces.
We recommend using a suction tool or brush.
ATTENTION: Do not use compressed air!
Check the saw blade from time to time: If problems arise
with the blade, it must be ground by a specialist or replaced, depending on the condition.
DECOMMISSIONING OF THE MACHINE
After the machine is decommissioned it can be disposed of
with normal industrial waste.
Disposal
The packaging is wholly composed of
environmentally-friendly materials that can
be disposed of at a local recycling centre.
Contact your local refuse disposal authority
for more details of how to dispose of your
worn out electrical devices.
Such damaged electrical connection cables must not be used
and are life-threatening due to the insulation damage.
Check the electrical connection cables for damage regularly. Make sure that the connection cable does not hang
on the power network during the inspection.
Electrical connection cables must comply with the applicable VDE and DIN provisions. Only use connection cables
with the marking „H 07 RN“.
The printing of the type designation on the connection cable is mandatory.
AC motor
• The mains voltage must be 230 V
~
• Extension cables up to 25 m long must have a cross-section of 1.5 mm2.
Connections and repairs of electrical equipment
may only be carried out by an electrician.
Please provide the following information in the event of any
enquiries:
• Type of current for the motor
• Machine data - type plate
• Machine data - type plate
Accessories
SAW DUST EXTRACTION
The mitre saw is equipped with an extraction port to which
an extraction system can be connected. Alternatively, a dust
bag can also be attached.
The hose of the extraction system is fastened on the extraction port with a clamp. We recommend emptying the bag or
container from time to time and cleaning the filter.
The air speed of the suction system must be at least 30
metres per second.
Maintenance
If personnel qualified for unusual maintenance tasks or repairs must be obtained
during of after the warranty period, please
always contact a service point recommended by us or contact the manufacturer.
Warning! Prior to any adjustment, maintenance or
service work disconnect the mains power plug!
• Only perform repair, maintenance and cleaning work
as well as the correction of malfunctions with the drive
switched off as a basic rule.
• All protective and safety equipment must be reassembled
immediately after repair, maintenance is completed.
NORMAL SERVICE TASKS
Normal service tasks can also be performed by untrained
personnel and are all described in the preceding sections
and in this chapter.
• The mitre saw must not be lubricated, because it always
cuts dry surfaces; all moving machine parts are selflubricating.

GB/IE/NI
10
Troubleshooting
Fault Possible cause Remedy
Motor does not work. Motor, cable or plug defective, fuses burnt. Arrange for inspection of the machine by a specialist.
Never repair the motor yourself. Danger! Check fuses
and replace as necessary.
The motor starts up slowly
and does not reach
operating speed.
Voltage too low, coils damaged, capacitor burnt. Contact the utility provider to check the voltage. Arrange
for inspection of the motor by a specialist. Arrange for
replacement of the capacitor by a specialist.
Motor makes excessive
noise.
Coils damaged, motor defective. Arrange for inspection of the motor by a specialist.
The motor does not reach
its full power.
Circuits in the network are overloaded (lamps,
other motors, etc.).
Do not use any other equipment or motors on the same
circuit.
Motor overheats easily. Overloading of the motor, insufficient cooling of
the motor.
Avoid overloading the motor while cutting, remove dust
from the motor in order to ensure optimal cooling of the
motor.
Reduced cutting power
when sawing.
Saw blade too small (ground too much). Readjust end stop of the saw unit.
Saw cut is rough or wavy. Saw blade dull, tooth shape not appropriate for
the material thickness.
Resharpen saw blade and/or use suitable saw blade.
Workpiece pulls away
and/or splinters.
Excessive cutting pressure and/or saw blade not
suitable for use.
Insert suitable saw blade.

GB/IE/NI
11
GUARANTEE CERTIFICATE
Dear Customer,
All of our products undergo strict quality checks to ensure that they reach you in perfect condition. In the unlikely event that your device
develops a fault, please contact our service department at the address shown on this guarantee card. Of course, if you would prefer to
call us then we are also happy to offer our assistance under the service number printed below. Please note the following terms under which
guarantee claims can be made:
• These guarantee terms cover additional guarantee rights and do not affect your statutory warranty rights. We do not charge you for this
guarantee.
• Our guarantee only covers problems caused by material or manufacturing defects, and it is restricted to the rectification of these defects
or replacement of the device. Please note that our devices have not been designed for use in commercial, trade or industrial applications. Consequently, the guarantee is invalidated if the equipment is used in commercial, trade or industrial applications or for other
equivalent activities. The following are also excluded from our guarantee: compensation for transport damage, damage caused by
failure to comply with the installation/assembly instructions or damage caused by unprofessional installation, failure to comply with the
operating instructions (e.g. connection to the wrong mains voltage or current type), misuse or inappropriate use (such as overloading
of the device or use of non-approved tools or accessories), failure to comply with the maintenance and safety regulations, ingress of
foreign bodies into the device (e.g. sand, stones or dust), effects of force or external influences (e.g. damage caused by the device being
dropped) and normal wear resulting from proper operation of the device.
The guarantee is rendered null and void if any attempt is made to tamper with the device.
• The guarantee is valid for a period of 3 years starting from the purchase date of the device. Guarantee claims should be submitted
before the end of the guarantee period within two weeks of the defect being noticed. No guarantee claims will be accepted after the
end of the guarantee period. The original guarantee period remains applicable to the device even if repairs are carried out or parts are
replaced. In such cases, the work performed or parts fitted will not result in an extension of the guarantee period, and no new guarantee
will become active for the work performed or parts fitted. This also applies when an on-site service is used.
• In order to assert your guarantee claim, please send your defective device postage-free to the address shown below. Please enclose
either the original or a copy of your sales receipt or another dated proof of purchase. Please keep your sales receipt in a safe place, as
it is your proof of purchase. It would help us if you could describe the nature of the problem in as much detail as possible. If the defect is
covered by our guarantee then your device will either be repaired immediately and returned to you, or we will send you a new device.
Of course, we are also happy offer a chargeable repair service for any defects which are not covered by the scope of this guarantee or for
units which are no longer covered. To take advantage of this service, please send the device to our service address.
Service-Hotline:
+800 4003 4003
(0,00 €/Min.)
Service-Email (GB/IE/NI):
lidl.service.gb@scheppach.com
lidl.service.ie@scheppach.com
lidl.service.ni@scheppach.com
Service address (GB/IE/NI):
GreatStar Europe
Unit 55 Romsey Industrial Estate, Romsey
Hampshire SO51 0HR

GR/CY
12
Περιεχόμενα: Σελίδα:
εισαγωγή 13
Ενδεδειγμένη χρήση 14
Σημαντικές υποδείξεις 14
Πρόσθετες υποδείξεις ασφαλείας 16
Υπολειπόμενοι κίνδυνοι 18
Θέση σε λειτουργία 19
Συναρμολόγηση 19
Πεδίο χρήσης 20
Ρυθμίσεις 20
Υποδείξεις εργασίας 20
Σύνδεση στο ηλεκτρικό ρεύμα 21
Αξεσουάρ 21
Συντήρηση 21
Απόσυρση 22
Αντιμετώπιση προβλημάτων 22
Εγγύηση 24
Δήλωση συμμόρφωσης 72
GR/CY
13
εισαγωγή
ΚΑΤΑΣΚΕΥΑΣΤΉΣ:
scheppach
Fabrikation von Holzbearbeitungsmaschine GmbH
Günzburger Straße 69
D-89335 Ichenhausen
ΣΥΜΒΟΥΛΉ,
Σύμφωνα με την υφιστάμενη νομοθεσία περί ευθύνης προϊόντος, ο κατασκευαστής αυτής της συσκευής δεν ευθύνεται για ζημιές που προκύπτουν από ή
σε σχέση με αυτή τη συσκευή σε περίπτωση:
• ανάρμοστου χειρισμού,
• μη συμμόρφωσης με τις οδηγίες χρήσης,
• επισκευών από τρίτους, μη εξουσιοδοτημένων
εξειδικευμένων εργατών,
• εγκατάστασης και αντικατάστασης μη-αυθεντικών ανταλλακτικών,
• ανάρμοστης χρήσης,
• βλαβών του ηλεκτρικού συστήματος λόγω της
μη συμμόρφωσης με τις ηλεκτρικές προδιαγραφές και τους κανονισμούς VDE0100, DIN 57113 /
VDE 0113.
ΣΥΣΤΑΣΕ Ι Σ:
Διαβάστε ολόκληρο το κείμενο των οδηγιών
λειτουργίας πριν από τη συναρμολόγηση και τη λειτουργία της συσκευής. Αυτές οι οδηγίες λειτουργίας
προορίζονται να σας διευκολύνουν να εξοικειωθείτε
με τη συσκευή σας και να χρησιμοποιήσετε όλες τις
δυνατότητες για τις οποίες προορίζεται. Οι οδηγίες
λειτουργίας περιέχουν σημαντικές σημειώσεις για
το πώς να εργαστείτε με ασφάλεια, κατάλληλα και
οικονομικά με τη μηχανή σας και πώς να αποφύγετε
κινδύνους, να εξοικονομήσετε δαπάνες επισκευής,
να μειώσετε το χρόνο διακοπής και να αυξήσετε την
αξιοπιστία και τη διάρκεια ζωής της μηχανής. Εκτός
από τους κανονισμούς ασφάλειας που περιλαμβάνονται στο παρόν, πρέπει εν πάση περιπτώσει να
συμμορφωθείτε με τους εφαρμοστέους κανονισμούς
της χώρας σας όσον αφορά στη λειτουργία της
μηχανής. Τοποθετήστε τις οδηγίες λειτουργίας σε
ένα διαφανή πλαστικό φάκελο ώστε να τις προστατεύσετε από ρύπους και υγρασία και αποθηκεύστε
τις κοντά στη μηχανή. Οι οδηγίες πρέπει να διαβαστούν και να τηρούνται προσεκτικά από κάθε
χειριστή πριν από την εκκίνηση της εργασίας. Μόνο
τα πρόσωπα που έχουν εκπαιδευθεί ως προς τη
χρήση της μηχανής και έχουν ενημερωθεί για τους
σχετικούς κινδύνους και απειλές έχουν την άδεια
να χρησιμοποιήσουν τη μηχανή. Η απαραίτητη
ελάχιστη ηλικία πρέπει να πληρείται. Εκτός από τις
σημειώσεις ασφάλειας που περιλαμβάνονται στις
παρούσες οδηγίες λειτουργίας και τους ιδιαίτερους
κανονισμούς της χώρας σας, πρέπει να τηρούνται
οι γενικά αναγνωρισμένοι τεχνικοί κανόνες για τη
λειτουργία ξυλουργικών μηχανών. Δεν αναλαμβάνουμε καμία ευθύνη για ατυχήματα ή ζημιές που θα
προκύψουν από μη τήρηση αυτών των οδηγιών και
των υποδείξεων ασφαλείας.
Λεζάντα της εικ. 1
1. Κουμπί εκκίνησης
2. Χειρολαβή
3. Μοχλός ασφάλισης
4. Μοτέρ
5. Λάμα πριονιού
6. Προστατευτικό λάμας πριονιού, κινητό
7. Βάση
8. Ένθετο τραπεζιού
9. Στρεφόμενο τραπέζι
10. Σφιγκτήρας τεμαχίων εργασίας
11. Άρθρωση, περίβλημα / βάση
12. Σακούλα συλλογής πριονιδιών
13. Προστατευτικό λάμας πριονιού, σταθερό
PKS 1500 A2
Αντικείμενο παράδοσης
Φαλτσοπρίονο
Σακούλα συλλογής
πριονιδιών
Σφιγκτήρας
τεμαχίων εργασίας
Εργαλείο για
αντικατάσταση
λάμας πριονιού -
κλειδί άλεν 6 mm
Εργαλείο για
ρυθμιζόμενου
οδηγού - κλειδί άλεν
3 mm
2 υποστηρίγματα
τεμαχίου εργασίας
Βάση στήριξης
2 ψήκτρες άνθρακα
2 μπαταρίες (AAA)
Οδηγίες χειρισμού
Τεχνικά δεδομένα
Διαστάσεις κατασκευής Μ
x Π x Υ mm
690 x 550 x 440
ø Στρεφόμενο τραπέζι mm 385 x 150
Ύψος τραπεζιού mm 55
Λάμα πριονιού ø mm
210/30/2,6/1,6 WZ
48
Αριθμός στροφών 1/min 5000
Ταχύτητα κοπής m/s 55
Εύρος στροφής 2 x 45°
Γωνία κλίσης 45°
Διπλή λοξή κοπή 45° x 45° links
Θέσεις συγκράτησης
45°, 30°, 22,5°, 15°,
0°, 15°, 22,5°, 30°,
45°
Βάρος kg 7,7
Δεδομένα λειτουργίας κοπής
μέγ. βάθος κοπής
90°/45°
60 / 35 mm
90°/90° 120 x 60 mm
90°/45° 80 x 60 mm
45°/90° 120 x 35 mm
45°/45° 80 x 35 mm
Μονάδα κίνησης
V~/Hz του μοτέρ 220-240 / 50
Κατανάλωση ισχύος W
S1 1200W
S6 25%* 1500W

GR/CY
14
Με την επιφύλαξη τεχνικών τροποποιήσεων!
* Τρόπος λειτουργίας S6, αδιάλειπτη περιοδική λει-
τουργία. Η λειτουργία αποτελείται από ένα χρονικό
διάστημα εκκίνησης, ένα χρονικό διάστημα με σταθερό φορτίο και ένα χρονικό διάστημα λειτουργίας
χωρίς φορτίο. Ο κύκλος δραστηριότητας είναι 10
λεπτά, η σχετική διάρκεια ενεργοποιημένης κατάστασης είναι 25% του κύκλου δραστηριότητας.
Το τεμάχιο εργασίας πρέπει να έχει τουλάχιστον
ύψος 3 mm και πλάτος 10 mm.
Προσέχετε το τεμάχιο εργασίας να στερεώνεται
πάντα με τη διάταξη σύσφιξης.
Πληροφορίες σχετικά με την εκπομπή θορύβου
Οι τιμές στάθμης θορύβου αυτού του μηχανήματος
κατά τη διάρκεια λειτουργίας του είναι οι εξής:
LpA: 99.6dB(A) K=3dB(A)
LwA: 112.6dB(A) K=3dB(A)
Προειδοποίηση: Ο θόρυβος μπορεί να έχει σοβαρές επιπτώσεις στην υγεία σας. Αν ο θόρυβος του
μηχανήματος υπερβαίνει τα 85 dB (A), να φοράτε κατάλληλη προστασία ακοής. Σε περίπτωση
προβλήματος στην ηλεκτρική σύνδεση, μπορεί να
υπάρξει πτώση της τάσης κατά την εκκίνηση του
μηχανήματος. Αυτό μπορεί να επηρεάσει άλλα
μηχανήματα (π.χ. αναβοσβήσιμο φώτων). Αν η
ηλεκτρική ισχύς αντιστοιχεί σε Zmax < 0,27, δεν θα
πρέπει να προκύψουν τέτοια προβλήματα. (Αν ναι,
απευθυνθείτε στο συνεργαζόμενο εξειδικευμένο
κατάστημα).
• Η αναφερόμενη τιμή εκπομπών κραδασμών έχει
μετρηθεί σύμφωνα με πρότυπη διαδικασία ελέγχου και μπορεί να χρησιμοποιηθεί για τη σύγκριση ενός ηλεκτρικού εργαλείου με ένα άλλο.
• Η αναφερόμενη τιμή εκπομπών κραδασμών μπορεί να χρησιμοποιηθεί και για μια πρώτη αξιολόγηση της καταπόνησης.
Ενδεδειγμένη χρήση
Το φαλτσοπρίονο εξυπηρετεί στο κόψιμο ξύλων
και πλαστικού, ανάλογα με το μέγεθος της μηχανής.
Προειδοποίηση! Η λάμα πριονιού που συμπεριλαμβάνεται προορίζεται αποκλειστικά για την
κοπή ξύλου! Μην τον χρησιμοποιείτε για την κοπή
πλαστικού!
Η μηχανή να χρησιμοποιείται μόνο για το σκοπό
για τον οποίο προορίζεται. Κάθε πέραν τούτου
χρήση δεν είναι ενδεδειγμένη. Για ζημιές ή τραυματισμούς παντός είδους που οφείλονται σε μη ενδεδειγμένη χρήση ευθύνεται ο χρήστης / χειριστής
και όχι ο κατασκευαστής.
Επιτρέπεται μόνο η χρήση πριονοδίσκων κατάλληλων για τη μηχανή. Απαγορεύεται η χρήση διαχωριστικών δίσκων παντός είδους.
Αναπόσπαστο μέρος της ενδεδειγμένης χρήσης
είναι και η τήρηση των υποδείξεων ασφαλείας, κα-
θώς και η οδηγία συναρμολόγησης και οι υποδείξεις χειρισμού στην οδηγία χρήσης.
Τα άτομα που χειρίζονται τη μηχανή, πρέπει να είναι εξοικειωμένα με το χειρισμό της και να ενημερωθούν για ενδεχόμενους κινδύνους. Πέραν τούτου να τηρούνται αυστηρά οι διατάξεις πρόληψης
ατυχημάτων.
Να ακολουθούνται επίσης και οι άλλοι γενικοί κανόνες ιατρικής εργασίας και τεχνικής ασφάλειας.
Τροποποιήσεις στη μηχανή αποκλείουν την ευθύνη
του κατασκευαστή από τις ζημιές που προκύπτουν
από τη χρήση αυτή. Παρ΄όλη την ενδεδειγμένη χρήση δεν μπορούν να αποκ λειστούν τελείως ορισμένοι κίνδυνοι.
Εξαιτίας της κατασκευής και της δομής της μηχανής δεν αποκ λείονται τα εξής:
• Επαφή με τον πριονοδίσκο στο ακάλυπτο τμήμα
της.
• Επέμβαση στον κινούμενο πριονοδίσκο (τραυματισμός από αιχμηρό αντικείμενο)
• Εκσφενδονισμός κατεργαζόμενων αντικειμένων
ή τμημάτων τους.
• Θραύση πριονόδισκου.
• Εκσφενδονισμός ελαττωματικών τμημάτων
σκληρού μετάλλου του πριονοδίσκου.
• Βλάβη της ακοής όταν δεν χρησιμοποιούνται οι
απαιτούμενες ωτοασπίδες.
• Επιβλαβείς για την υγεία εκπομπές σκόνης ξύλου κατά τη χρήση σε κλειστούς χώρους.
Παρακαλούμε να προσέξετε, πως οι συσκευές μας
δεν έχουν κατασκευαστεί για επαγγελματική, βιοτεχνική και βιομηχανική χρήση. Δεν αναλαμβάνουμε καμμία εγγύηση, εάν η συσκευή χρησιμοποιηθεί σε βιοτεχνίες ή βιομηχανίες ή σε παρόμοιες
εργασίες.
Σημαντικές υποδείξεις
Προσοχή! Κατά τη χρήση ηλεκτρικών εργαλείων
πρέπει να τηρείτε τα εξής βασικά μέτρα ασφαλείας, για προστασία από ηλεκτροπληξία και από
κίνδυνο τραυματισμού και φωτιάς. Διαβάστε όλες
αυτές τις υποδείξεις πριν χρησιμοποιήσετε αυτό το
ηλεκτρικό εργαλείο και φυλάξτε καλά τις υποδείξεις
ασφαλείας.
Ασφάλεια κατά την εργασία
1 Να κρατάτε τη θέση εργασίας πάντα τακτική.
– Μία όχι τακτική θέση εργασία προακελί κινδύ-
νους ατυχημάτων.
2 Να λάβετε υπόψη τις επιδράσεις του περιβάλ-
λοντος
– Μην εκθέτετε ηλεκτρικές συσκευές σε βροχή.
– Ποτέ μη χρησιμοποιείτε τα ηλεκτρικά εργαλεία
σε υγρό περιβάλλον.
– Φροντίστε για καλό φωτισμό.
– Μη χρησιμοποιείτε ηλεκτρικά εργαλεία σε
περιβάλλον όπου υπάρχει κίνδυνος φωτιάς και
έκρηξης.

GR/CY
15
3 Προστατέψτε τον εαυτό σας από ηλεκτροπληξία
– Να αποφεύγετε κάθε επαφή του σώματος
με γειωμένα εξαρτήματα, για παράδειγμα με
σωλήνες, καλοριφέρ, εστίες, ψυγεία.
4 Να κρατάτε μακριά τα παιδιά!
– Μην αφήνετε άλλα άτομα να έρχονται σε
επαφή με το εργαλείο ή το καλώδιο, κρατάτε
τα μακριά από την περιοχή εργασίας.
– Ο χειριστής πρέπει να είναι τουλάχιστον 18
ετών, εκπαιδευμένος τουλάχιστον 16 ετών,
ωστόσο μόνο υπό επίβλεψη.
5 Nα φυλάγετε τα εργαλεία σας σε ασφαλές μέρος
– Όταν δεν χρησιμοποιείτε τα εργαλεία, να τα
φυλάγετε σε στεγνό χώρο που κλειδώνεται,
μακριά από παιδιά.
6 Μην υπερφορτώνετε τα εργαλεία σας
– Εργάζεστε καλύτερα και ασφαλέστερα στο
αναφερόμενο πεδίο ισχύος.
7 Να χρησιμοποιείτε το σωστό εργαλείο
– Μη χρησιμοποιείτε αδύναμες μηχανές ή συ-
σκευές για βαριές εργασίες.
– Μη χρησιμοποιείτε τα εργαλεία για σκοπούς
και εργασίες για τους οποίους δεν προορίζονται, π.χ. μη χρησιμοποιείτε ένα δισκοπρίονο
χεριού για να κόψετε δέντρα ή χοντρά κλαδιά.
– Μη χρησιμοποιείτε το ηλεκτρικό εργαλείο για
την κοπή καυσόξυλων.
8 Να φοράτε πάντα τον κατάλληλο ρουχισμό
εργασίας
– Μη φοράτε φαρδιά ρούχα ή κοσμήματα. Θα
μπορούσαν να πιαστούν από κινούμενα
τμήματα.
– Σε εργασίες στο ύπαιθρο συνιστώνται λαστι-
χένια γάντια και αντιολισθητικά παπούτσια.
– Εάν έχετε μακριά μαλλιά να φοράτε ένα δίχτυ.
9 Να χρησιμοποιείτε εξοπλισμό προστασίας
– Να φοράτε προστατευτικά γυαλιά.
– Σε εργασίες όπου παράγεται σκόνη να φορά-
τε μάσκα προστασίας της αναπνοής.
10 Συνδέστε το σύστημα αναρρόφησης σκόνης
– Εάν υπάρχουν συστήματα για τη σύνδεση
συσκευών αναρρόφησης της σκόνης, σιγουρευτείτε πως είναι συνδεδεμένα και χρησιμοποιούνται.
– Η λειτουργία σε κλειστούς χώρους επιτρέπε-
ται μόνο με κατάλληλη εγκατάσταση απορρόφησης της σκόνης.
11 Μην χρησιμοποιείτε το καλώδιο για άλλο
σκοπό
– Μη μεταφέρετε το καλώδιο κρατώντας από
αυτό τη συσκευή, και μη το χρησιμοποιείτε
για να τραβήξετε το βύσμα από την πρίζα. Να
προστατεύετε το καλώδιο από ψηλές θερμοκρασίες, λάδι και αιχμηρά αντικείμενα.
12 Να ασφαλίζετε το εργαλείο
– Να χρησιμοποιείτε συστήματα συγκράτησης
ή μία μέγγενη για τη συγκράτηση του κατεργαστέου αντικειμένου. Έτσι συγκρατιέται
ασφαλέστερα παρά με το χέρι σας και σας
επιτρέπεται ο χειρισμός της μηχανής με δύο
χέρια.
– Για τεμάχια εργασίας μεγάλου μήκους απαι-
τείται ένα πρόσθετο υποστήριγμα (τραπέζι,
τρίποδο κλπ.), για την αποφυγή ανατροπής
του μηχανήματος.
– Να πιέζετε πάντα το τεμάχιο εργασίας σταθε-
ρά πάνω στην πλάκα εργασίας και τον οδηγό
για να αποφύγετε μετακίνηση ή κακή ευθυγράμμιση του τεμαχίου εργασίας.
13 Αποφεύγετε μη κανονική στάση του σώματος
– Να φροντίζετε για ασφαλή στήριξη και να
διατηρείτε πάντα την ισορροπία σας.
– -Να αποφεύγετε αδέξιες θέσεις των χεριών
στις οποίες λόγω ξαφνικής ολίσθησης μπορεί
το ένα ή και τα δύο χέρια να έρθουν σε επαφή με τη λάμα πριονιού.
14 Να περιποιήστε τα εργαλεία σας
– Να διατηρείτε τα εργαλεία σας ακονισμένα
και καθαρά για να μπορείτε να εργάζεστε
καλύτερα και ασφαλέστερα.
– Να ακολουθείτε τις προδιαγραφές συντή-
ρησης και τις υποδείξεις για αλλαγή του
εργαλείου.
– Να ελέγχετε τακτικά το βύσμα και το καλώδιο
και σε περίπτωση ελαττωμάτων να αντικαθίστανται από αναγνωρισμένο και ειδικευμένο
τεχνίτη.
– Να ελέγχετε τακτικά το καλώδιο επέκτασης
(μπαλαντέζα) που να αντικαθίσταται εάν
είναι ελαττωματικό.
– Να διατηρείτε τις χειρολαβές στεγνές και
ελεύθερες από λάδια και λίπη.
15 Να αφαιρείτε το φις από την πρίζα
– Ποτέ μην αφαιρείτε θραύσματα, πριονίδια
ή σφηνωμένα τεμάχια ξύλου ενώ κινείται η
λάμα πριονιού.
– Όταν δεν χρησιμοποιείτε το ηλεκτρικό εργα-
λείο, πριν τη συντήρηση και κατά την αλλαγή
εργαλείων όπως π.χ. λάμας πριονιού, τρυπανιού, φρέζας.
16 Μην αφήνετε επάνω στη συσκευή κλειδιά εργα-
λείων
– Πριν την ενεργοποίηση να ελέγχετε, εάν
έχουν απομακρυνθεί τα κ λειδιά και εργαλεία
ρύθμισης.
17 Να αποφεύγετε αθέλητη έναρξη λειτουργίας
– Να βεβαιώνεστε ότι ο διακόπτης είναι απε-
νεργοποιημένος κατά τη σύνδεση του φις
στην πρίζα.
18 Να χρησιμοποιείτε καλώδιο επέκτασης κατάλ-
ληλο για εξωτερικό χώρο
– Σε εξωτερικούς χώρους να χρησιμοποιείτε
καλώδιο επέκτασης που είναι εγκεκριμένο
και κατάλληλα επισημασμένο για αυτή τη
χρήση.
– Να χρησιμοποιείτε μπαλαντέζες μόνον αφού
έχετε ξετυλίξει πλήρως το καλώδιο.
19 Να είστε προσεκτικοί
– Προσέχετε κάθε σας ενέργεια. Να εκτελείτε
τις εργασίες βάσει της λογικής. Μη χρησιμοποιείτε το ηλεκτρικό εργαλείο όταν δεν έχετε
αυτοσυγκέντρωση.

GR/CY
16
20 Να ελέγχετε τη συσκευή σας για ενδεχόμενες
βλάβες
– Πριν από περαιτέρω χρήση του εργαλείου
να ελέγχονται προσεκτικά τα συστήματα
ασφαλείας ή ελαφρά ελαττωματικά τμήματα
για την άψογη λειτουργία τους σύμφωνα με
το σκοπό για τον οποίο προορίζονται.
– Ελέγξτε εάν λειτουργούν άψογα και δεν
μπλοκάρουν όλα τα κινούμενα τμήματα ή
εάν ορισμένα τμήματα έχουν ζημιές. Όλα τα
τμήματα πρέπει να ίναι σωστά τοποθετημένα ώστε να εξασφαλίζεται η ασφάλεια της
συσκευής.
– Δεν επιτρέπεται η στερέωση του κινητού
καλύμματος προστασίας στην ανοικτή θέση.
– Τα ελαττωματικά συστήματα ασφαλείας
και τα ελαττωματικά εξαρτήματα πρέπει να
επισκευάζονται ή να αντικαθίστανται σωστά
από αναγνωρισμένο εξειδικευμένο συνεργείο
εάν δεν αναφέρεται κάτι διαφορετικό στις
Οδηγίες χρήσης.
– Οι ελαττωματικοί διακόπτες να αντικαθίστα-
νται σε συμβεβλημένο συνεργείο.
– Δεν επιτρέπεται η στερέωση του κινητού
καλύμματος προστασίας στην ανοικτή θέση.
– Μη χρησιμοποιείτε εργαλεία, στα οποία ο
διακόπτης δεν ενεργοποιείται και δεν απενεργοποιείται.
21 ΠΡΟΣΟΧΉ!
– Για διπλές λοξές κοπές απαιτείται ιδιαίτερη
προσοχή.
22 ΠΡΟΣΟΧΉ!
– Η χρήση άλλων προσαρτημάτων εργαλείων
και άλλων αξεσουάρ μπορεί να οδηγήσει σε
κίνδυνο τραυματισμού σας.
23 Αναθέτετε τις επισκευές του ηλεκτρικού σας
εργαλείου σε εξειδικευμένο ηλεκτρολόγο
– Αυτό το εργαλείο ανταποκρίνεται στις
σχετικές διατάξεις ασφαλείας. Οι επισκευές
επιτρέπεται να εκτελούνται μόνο από ειδικευμένους ηλεκτρολόγους, διαφορετικά δεν
αποκλείονται τραυματισμοί του χειριστή.
Πρόσθετες υποδείξεις ασφαλείας
1 Προφυλάξεις ασφαλείας
– Προειδοποίηση! Μη χρησιμοποιείτε λάμες
πριονιού που έχουν υποστεί ζημιά ή παραμορφωθεί.
– Να αντικαθιστάτε το ένθετο τραπεζιού όταν
έχει φθαρεί.
– Να χρησιμοποιείτε μόνο λάμες πριονιού που
συνιστά ο κατασκευαστής, οι οποίες συμμορφώνονται με το πρότυπο EN 847-1.
– Προσέχετε να επιλέγετε λάμα πριονιού που
είναι κατάλληλη για το υλικό που πρόκειται
να κόψετε.
– Να φοράτε κατάλληλο ατομικό εξοπλισμό
προστασίας. Σε αυτόν περιλαμβάνονται:
– Προστασία της ακοής για τη μείωση του
κινδύνου πρόκλησης βαρηκοΐας,
– Μην απομακρύνετε υπολείμματα κοπής ή
άλλα μέρη του τεμαχίου εργασίας από την
περιοχή κοπής, εφόσον το μηχάνημα είναι
σε λειτουργία με τη λάμα πριονιού χωρίς
προστασία και η μονάδα πριονιού δεν
βρίσκεται ακόμα σε κατάσταση ηρεμίας.
– Να φοράτε γάντια κατά το χειρισμό λεπί-
δων πριονιού και υλικών με τραχιά επιφάνεια. Όταν είναι εφικτό, να μεταφέρετε τις
λεπίδες πριονιού μέσα σε μια θήκη.
– Να φοράτε προστατευτικά γυαλιά. Οι
σπινθήρες που παράγονται κατά την
εργασία ή τα θραύσματα, τα πριονίδια και
οι σκόνες που εξέρχονται από τη συσκευή
μπορούν να προκαλέσουν απώλεια της
όρασης.
– Κατά την κοπή ξύλου να συνδέετε το ηλεκτρι-
κό εργαλείο σε μια διάταξη κατακράτησης της
σκόνης. Η απελευθέρωση σκόνης επηρεάζεται μεταξύ άλλων από τον τύπο του προς
επεξεργασία υλικού (απόκτηση ή πηγή), τη
σπουδαιότητα του τοπικού διαχωρισμού και
τη σωστή ρύθμιση καλυμμάτων/ εκτροπέων/
οδηγών.
– Μη χρησιμοποιείτε λεπίδες πριονιού από
χάλυβα υψηλής ταχύτητας (χάλυβα HSS).
2 Συντήρηση και επισκευή
– Πριν από οποιαδήποτε εργασία ρύθμισης και
συντήρησης να αποσυνδέετε το φις από την
πρίζα.
– Η παραγωγή θορύβου επηρεάζεται από διά-
φορους παράγοντες, μεταξύ των οποίων από
την υφή της λάμας πριονιού και την κατάσταση της λάμας πριονιού και του ηλεκτρικού εργαλείου. Όταν είναι εφικτό, να χρησιμοποιείτε
λάμες πριονιού κατασκευασμένες για μείωση
της παραγωγής θορύβου, να συντηρείτε τακτικά το ηλεκτρικό εργαλείο και τα προσαρτήματα εργαλείων και να τα επισκευάζετε όταν
χρειάζεται, ώστε να μειώνεται ο θόρυβος.
– Να αναφέρετε αμέσως στο άτομο που είναι
υπεύθυνο για την ασφάλεια, τυχόν βλάβες
στο ηλεκτρικό εργαλείο, τις προστατευτικές
διατάξεις ή στο προσάρτημα εργαλείου, αμέσως μόλις τις ανακαλύπτετε.
3 Ασφάλεια κατά την εργασία
– Να χρησιμοποιείτε μόνο λάμες πριονιού των
οποίων ο μέγιστος επιτρεπόμενος αριθμός
στροφών είναι μεγαλύτερος ή ίσος με το
μέγιστο αριθμό στροφών της ατράκτου του
επιτραπέζιου πριονιού και οι οποίες είναι
κατάλ ληλες για το υλικό που πρόκειται να
κόψετε.
– Να βεβαιώνεστε ότι η λάμα πριονιού δεν αγ-
γίζει σε καμία θέση το στρεφόμενο τραπέζι,
αφαιρώντας το φις από την πρίζα και στρέφοντας με το χέρι τη λάμα πριονιού στη θέση
45° και στη θέση 90°. Αν χρειάζεται, ρυθμίστε
πάλι την κεφαλή του πριονιού.
GR/CY
17
– Για τη μεταφορά του ηλεκτρικού εργαλείου να
χρησιμοποιείτε μόνο τις διατάξεις μεταφοράς.
Ποτέ μη χρησιμοποιήσετε τις προστατευτικές
διατάξεις για χειρισμό ή μεταφορά του μηχανήματος.
– Να προσέχετε κατά τη διάρκεια της μεταφο-
ράς το κάτω μέρος της λάμας πριονιού να
είναι καλυμμένο, παραδείγματος χάριν από
την προστατευτική διάταξη.
– Να προσέχετε να χρησιμοποιείτε μόνο δα-
κτυλίους απόστασης και δακτυλίους ατράκτου, που είναι κατάλληλοι για το σκοπό που
αναφέρει ο κατασκευαστής.
– Το δάπεδο στον περίγυρο του μηχανήματος
πρέπει να είναι επίπεδο και οριζόντιο, καθαρό και απαλλαγμένο από χαλαρά σωματίδια,
όπως π.χ. πριονίδια και υπόλοιπα κοπής.
– Η θέση εργασίας πρέπει να είναι πάντα
πλευρικά και όχι στην ευθεία της λάμας
πριονιού
– Μην απομακρύνετε υπολείμματα κοπής ή
άλλα μέρη του τεμαχίου εργασίας από την
περιοχή κοπής, εφόσον το μηχάνημα είναι σε
λειτουργία και η μονάδα πριονιού δεν βρίσκεται ακόμα σε κατάσταση ηρεμίας.
– Προσέχετε το μηχάνημα, όταν είναι εφικτό να
είναι στερεωμένο πάντα σε πάγκο εργασίας
ή σε ένα τραπέζι.
– Στερεώνετε τα μεγάλου μήκους τεμάχια
εργασίας για να αποτρέψετε ανατροπή τους
στο τέλος της διαδικασίας κοπής (π.χ. βάσεις
εκτύλιξης ή βάση στήριξης με κύλινδρο).
Προειδοποίηση! Αυτό το ηλεκτρικό εργαλείο
παράγει ηλεκτρομαγνητικό πεδίο κατά τη διάρκεια
της λειτουργίας του. Αυτό το πεδίο υπό ορισμένες
περιστάσεις μπορεί να επηρεάσει ενεργά ή παθητικά ιατρικά εμφυτεύματα. Για να μειώσετε τον
κίνδυνο σοβαρών ή θανατηφόρων τραυματισμών,
συνιστούμε σε άτομα με ιατρικά εμφυτεύματα να
συμβουλεύονται το γιατρό τους και τον κατασκευαστή του ιατρικού εμφυτεύματος, πριν το χειρισμό
του ηλεκτρικού εργαλείου.
ΥΠΟΔΕΙΞΕΙΣ ΑΣΦΑΛΕΙΑΣ ΓΙΑ ΤΟ ΧΕΙΡΙΣΜΟ ΤΩΝ
ΛΑΜΩΝ ΠΡΙΟΝΙΟΥ
1 Να χρησιμοποιείτε προσαρτήματα όταν είστε
εξοικειωμένος με το χειρισμό τους.
2 Να τηρείτε τον περιορισμό του μέγιστου αριθ-
μού στροφών. Δεν επιτρέπεται η υπέρβαση
του μέγιστου αριθμού στροφών που αναφέρεται πάνω στο προσάρτημα. Αν αναφέρεται, να
τηρείτε την περιοχή αριθμού στροφών.
3 Να τηρείτε την κατεύθυνση περιστροφής του
μοτέρ και της λάμας πριονιού.
4 Μη χρησιμοποιήσετε οποιοδήποτε προσάρτη-
μα παρουσιάζει ρωγμές. Να αποσύρετε από
τη χρήση οποιοδήποτε προσάρτημα εργασίας
παρουσιάζει ρωγμές. Δεν επιτρέπεται επισκευή.
5 Να καθαρίζετε τις επιφάνειες σύσφιξης από
βρομιές, γράσα, λάδια και νερό.
6 Μη χρησιμοποιείτε δακτυλίους ή χιτώνια
μείωσης για τη μείωση της διαμέτρου οπών σε
δισκοπρίονα.
7 Να προσέχετε ώστε οι σταθεροί δακτύλιοι
μείωσης για την ασφάλιση ενός προσαρτήματος εργασίας να έχουν την ίδια διάμετρο και
τουλάχιστον το 1/3 της διαμέτρου κοπής.
8 Να βεβαιώνεστε ότι οι στερεωμένοι δακτύλιοι
μείωσης είναι παράλληλοι μεταξύ τους.
9 Να χειρίζεστε με προσοχή τα προσαρτήματα
εργασίας. Να τα διατηρείτε καλύτερα στην
αρχική συσκευασία ή σε ειδικές θήκες. Να
φοράτε προστατευτικά γάντια, για βελτιωμένη
ασφάλεια λαβής και μειωμένο κίνδυνο τραυματισμού.
10 Πριν τη χρήση των προσαρτημάτων εργασίας
να βεβαιώνεστε ότι όλες οι προστατευτικές
διατάξεις είναι σωστά στερεωμένες.
11 Να βεβαιώνεστε πριν τη χρήση, ότι το χρησι-
μοποιούμενο προσάρτημα εργασίας συμμορφώνεται με τις τεχνικές απαιτήσεις αυτού του
ηλεκτρικού εργαλείου και είναι σωστά στερεωμένο.
12 Να χρησιμοποιείτε τη συμπεριλαμβανόμενη
λάμα πριονιού μόνο για εργασίες κοπής σε
ξύλο, ποτέ για επεξεργασία μετάλλων.
13 Προειδοποίηση! Μην χρησιμοποιείτε το πριόνι
ποτέ για κοπή υλικών διαφορετικών από τα
προβλεπόμενα.
14 Χρησιμοποιείτε το πριόνι μόνον αν οι προστα-
τευτικές διατάξεις είναι λειτουργικές, σε καλή
κατάσταση και στην προβλεπόμενη θέση τους.
15 Προσέχετε να στερεώνετε πάντα καλά το τε-
μάχιο εργασίας στο τραπέζι του πριονιού.
16 Πριν από κάθε διαδικασία κοπής, προσέχετε
το μηχάνημα να στηρίζεται με ασφάλεια.
Προσοχή :
Ακτινοβολία λέιζερ
Μη κοιτάζετε στην ακτίνα
Κατηγορία λέιζερ 2
Προστατέψτε τον εαυτό σας και το περιβάλλον
με κατάλληλα μέτρα προστασίας από κινδύνους
ατυχημάτων!
• Μη κοιτάζετε χωρίς προστασία ματιών απευθείας στην ακτίνα λαίζηερ.
• Μη κοιτάζετε άμεσα στην διαδρομή της ακτίνας.
• Μη τείνετε την ακτίνα λαίηζερ ποτέ σε αντανακλούσες επιφάνειες, σε πρόσωπα ή ζώα. Ακόμη
και ακτίνα λέιζερ χαμηλής ισχύος μπρορεί να
προκαλέσει βλάβες στα μάτια.

GR/CY
18
• Προσοχή - εάν εκτελούνται άλλες από τις μεθόδους που αναφέρονται εδώ, δεν αποκλείεται
επικίνδυνη έκθεση σε ακτινοβολία.
• Ποτέ μην ανοίγετε το μοντούλ του λέιζερ.
• Εάν το λέιζερ δεν χρησιμοποιηθεί για μεγαλύτερο χρονικό διάστημα, αφαιρέστε τις μπαταρίες.
• Όταν δεν χρησιμοποιείτε το δισκοπρίονο για μεγάλο χρονικό διάστημα, πρέπει να αφαιρείτε τις
μπαταρίες.
• Το λέιζερ δεν επιτρέπεται να αντικατασταθεί με
μονάδα λέιζερ άλλου τύπου.
• Επισκευές στο λέιζερ επιτρέπεται να πραγματοποιούνται μόνο από τον κατασκευαστή του λέιζερ ή από εξουσιοδοτημένο αντιπρόσωπο.
Υποδείξεις ασφαλείας για το χειρισμό μπαταριών
1 Να προσέχετε πάντα οι μπαταρίες να τοπο-
θετούνται με τη σωστή πολικότητα (+ και -),
σύμφωνα με τις ενδείξεις πάνω στην κάθε
μπαταρία.
2 Μη βραχυκυκ λώνετε τις μπαταρίες.
3 Μη φορτίζετε μη επαναφορτιζόμενες μπαταρίες.
4 Μην αποφορτίζετε υπερβολικά τις μπαταρίες!
5 Μη χρησιμοποιείτε μαζί παλιές και καινούργιες
μπαταρίες ή μπαταρίες διαφορετικού τύπου ή
κατασκευαστή! Να αντικαθιστάτε ταυτόχρονα
όλες τις μπαταρίες ενός σετ.
6 Να αφαιρείτε χωρίς καθυστέρηση τις εξαντλη-
μένες μπαταρίες από τη συσκευή και να τις
απορρίπτετε με σωστό τρόπο! Μην απορρίπτετε
μπαταρίες στα οικιακά απορρίμματα. Οι ελαττωματικές ή χρησιμοποιημένες μπαταρίες πρέπει
να ανακυκλώνονται σύμφωνα με την Οδηγία
2006/66/ΕΚ. Παραδώστε τις μπαταρίες και / ή τη
συσκευή στο τέλος της ζωής τους στις προσφερόμενες εγκαταστάσεις περισυλλογής. Σχετικά
με τις διαθέσιμες δυνατότητες τελικής διάθεσης
των αποβλήτων μπορείτε να πληροφορηθείτε
από τις αρχές της κοινότητας ή της πόλης σας.
7 Μη θερμαίνετε τις μπαταρίες!
8 Μη κάνετε συγκολλήσεις απευθείας πάνω στις
μπαταρίες!
9 Μην αποσυναρμολογείτε τις μπαταρίες!
10 Μην παραμορφώνετε τις μπαταρίες!
11 Μην πετάτε τις μπαταρίες σε φωτιά!
12 Να κρατάτε τις μπαταρίες μακριά από παιδιά.
13 Μην επιτρέπετε σε παιδιά την αντικατάσταση
μπαταριών χωρίς επιτήρηση!
14 Μη φυλάσσετε τις μπαταρίες κοντά σε φωτιά,
τζάκι ή άλλες πηγές θερμότητας. Μην εκθέτετε
τις μπαταρίες σε άμεση ηλιακή ακτινοβολία και
μην τις χρησιμοποιείτε ή τις αποθηκεύετε σε
οχήματα όταν ο καιρός είναι ζεστός.
15 Να διατηρείτε τις μη χρησιμοποιούμενες μπα-
ταρίες στην αρχική συσκευασία και να τις κρατάτε μακριά από μεταλλικά αντικείμενα. Μην
αναμιγνύετε τις αποσυσκευασμένες μπαταρίες
και μην τις έχετε ανακατωμένες! Με αυτό τον
τρόπο μπορεί να προκληθεί βραχυκύκλωμα
των μπαταριών, με αποτέλεσμα ζημιές, εγκαύματα ή ακόμα και κίνδυνο πυρκαγιάς.
16 Να αφαιρείτε τις μπαταρίες από τη συσκευή
όταν αυτή δεν χρησιμοποιείται για παρατεταμένο χρονικό διάστημα, εκτός από περιπτώσεις έκτακτης ανάγκης!
17 Μην πιάνετε ΠΟΤΕ χωρίς κατάλ ληλη προ-
στασία μπαταρίες που έχουν παρουσιάσει
διαρροή. Αν το υγρό που έχει διαρρεύσει έλθει
σε επαφή με το δέρμα, θα πρέπει να ξεπλύνετε την επηρεαζόμενη περιοχή του δέρματος
με τρεχούμενο νερό. Αποτρέπετε οπωσδήποτε την επαφή του υγρού με τα μάτια και το
στόμα. Σε μια τέτοια περίπτωση, επισκεφθείτε
άμεσα γιατρό.
18 Πριν την τοποθέτηση των μπαταριών, να
καθαρίζετε τις επαφές των μπαταριών και τις
αντίστοιχες επαφές της συσκευής.
Υπολειπόμενοι κίνδυνοι
Το μηχάνημα είναι κατασκευασμένο σύμφωνα
με την τελευταία λέξη της τεχνολογίας και βάσει
των αναγνωρισμένων τεχνικών κανόνων ασφαλείας. Ωστόσο, κατά την εργασία μπορεί να προκύψουν μεμονωμένοι υπολειπόμενοι κίνδυνοι.
• Διακινδύνευση για την υγεία από ηλεκτρικό ρεύμα σε περίπτωση χρήσης ακατάλ ληλων καλωδίων ρεύματος.
• Επιπλέον, μπορεί παρά όλες τις λαμβανόμενες
προφυλάξεις να προκύψουν μη προφανείς υπολειπόμενοι κίνδυνοι.
• Οι υπολειπόμενοι κίνδυνοι μπορούν να ελαχιστοποιηθούν όταν τηρούνται οι «Σημαντικές
υποδείξεις», οι «Πρόσθετες υποδείξεις ασφαλείας» και η «Προβλεπόμενη χρήση», καθώς και οι
οδηγίες χειρισμού στο σύνολό τους.
• Μην καταπονείτε άσκοπα το μηχάνημα: η πολύ
ισχυρή πίεση κατά την κοπή προξενεί γρήγορα
ζημιά στη λάμα πριονιού, πράγμα που προκαλεί
υποβάθμιση της απόδοσης του μηχανήματος κατά την επεξεργασία και μειωμένη ακρίβεια κοπής.
• Κατά την κοπή πλαστικών υλικών να χρησιμοποιείτε πάντα σφιγκτήρες: τα εξαρτήματα που
πρόκειται να κοπούν πρέπει πάντα να στερεώνονται ανάμεσα στους σφιγκτήρες.
• Αποφεύγετε αθέλητη θέση σε λειτουργία του μηχανήματος: κατά την εισαγωγή του φις στην πρίζα δεν επιτρέπεται να είναι πατημένο το μπουτόν λειτουργίας.
• Να χρησιμοποιείτε το εργαλείο που συνιστάται
στο παρόν εγχειρίδιο. Έτσι απολαμβάνετε πάντα
τη μέγιστη απόδοση από το δισκοπρίονό σας.
• Τα χέρια δεν επιτρέπεται να εισέρχονται στη
ζώνη επεξεργασίας, όταν είναι σε λειτουργία το
μηχάνημα. Πριν πραγματοποιήσετε οποιεσδήποτε εργασίες, αφήστε το μπουτόν της λαβής και
απενεργοποιήστε το μηχάνημα.

GR/CY
19
Θέση σε λειτουργία
Πριν τη θέση σε λειτουργία να τηρείτε τις υποδείξεις ασφαλείας που περιλαμβάνονται στις
οδηγίες χειρισμού.
ΑΠΟΜΑΚΡΥΝΣΉ ΤΉΣ ΣΥΣΚΕΥΑΣΙΑΣ
Αφαιρέστε το μηχάνημα από το κουτί του, το οποίο
το προφύλασσε κατά τη διάρκεια της μεταφοράς,
χωρίς να του προξενήσετε ζημιά. Θα μπορούσε να
είναι πάλι χρήσιμο αργότερα, για μια παρατεταμένη
διαδικασία μεταφοράς του δισκοπρίονου ή για μακροπρόθεσμη αποθήκευσή του μηχανήματος.
ΜΕΤΑΚΙΝΉΣΉ
Επειδή το δισκοπρίονο είναι σχετικά μικρό και
ελαφρύ, μπορεί να μετακινηθεί εύκολα, ακόμα και
από μόνο ένα άτομο. Αρκεί, αφού ασφαλίσετε τη
λαβή ασφάλισης (26 - εικ. 4) στην κατώτατη θέση,
να ανυψώσετε το δισκοπρίονο πιάνοντάς το από τη
χειρολαβή (34 - εικ. 4).
ΜΕΤΑΦΟΡΑ
Σε περίπτωση που χρειάζεται να μεταφερθεί το
μηχάνημα, πιάστε το από τη χειρολαβή (34 - εικ. 4)
και τοποθετήστε το μέσα στην αρχική συσκευασία.
Όταν το κάνετε αυτό προσέξτε να τοποθετηθεί στη
σωστή θέση (βλέπε βέλος πάνω στο κουτί).
Στερεώστε το φορτίο με σχοινιά ή με ιμάντες ασφαλείας, ώστε να μην μετακινείται κατά τη μεταφορά
και να μην πέφτουν μέρη του φορτίου.
ΤΟΠΟΘΕΤΉΣΉ/ΘΕΣΉ ΕΡΓΑΣΙΑΣ
Τοποθετήστε το μηχάνημα πάνω σε έναν πάγκο
εργασίας ή πάνω σε μια επίπεδη βάση, ώστε η στήριξη του μηχανήματος να είναι όσο το δυνατόν πιο
ευσταθής.
Προσέχετε ώστε το μηχάνημα, όταν είναι εφικτό, να
είναι στερεωμένο πάντα σε πάγκο εργασίας ή σε ένα
τραπέζι.
Το μηχάνημα πρέπει να εγκαθίσταται με σταθερότητα δηλ. πάνω σε πάγκο εργασίας, βιδώνετέ το στο
πλαίσιο βάσης ή σε άλλο πρόσφορο στήριγμα. Για το
σκοπό αυτό χρησιμοποιείτε τις οπές που υπάρχουν
στη βάση του μηχανήματος.
Κατά την εργασία με το μηχάνημα πρέπει να λαμβάνονται υπόψη οι εργονομικοί παράγοντες. Το
ιδανικό ύψος του τραπεζιού εργασίας ή της βάσης
επιτυγχάνεται όταν η επιφάνεια βάσης ή η πάνω
βάση εργασίας βρίσκεται 90 έως 95 cm πάνω από το
δάπεδο. Η τοποθέτηση του μηχανήματος πρέπει να
γίνει με τέτοιο τρόπο ώστε να υπάρχει ελεύθερος χώρος τουλάχιστον 80 cm προς όλες τις κατευθύνσεις
γύρω από το μηχάνημα. Έτσι μπορούν να πραγματοποιηθούν οι εργασίες καθαρισμού και συντήρησης,
καθώς και οι απαραίτητες ρυθμίσεις με τήρηση των
προϋποθέσεων ασφαλείας και με επαρκή χώρο
κίνησης.
ΠΡΟΣΟΧΉ: Εγκαταστήστε το μηχάνημα σε μια ζώνη
στην οποία είναι κατάλληλες οι συνθήκες περιβάλλοντος και ο φωτισμός. Μην ξεχνάτε ποτέ ότι οι
γενικές συνθήκες περιβάλλοντος κατά την εργασία
παίζουν εξαιρετικά σημαντικό ρόλο στην πρόληψη
των ατυχημάτων.
ΣΥΝΔΕΣΗ ΣΤΟ ΔΙΚΤΥΟ ΡΕΥΜΑΤΟΣ
Η πρίζα πρέπει να βρίσκεται σε καλή κατάσταση.
Θα θέλαμε να σας υπενθυμίσουμε ότι πρέπει πριν
την εγκατάσταση ρεύματος δικτύου να υπάρχει
συνδεδεμένη μια μαγνητοθερμική διάταξη προστασίας, η οποία προστατεύει όλους τους αγωγούς από
βραχυκυκλώματα και υπερφορτώσεις.
Συναρμολόγηση
ΠΡΟΕΙΔΟΠΟΙΉΣΉ! Για τη δική σας ασφάλεια,
συνδέστε το φις σε πρίζα μόνον αφού έχετε
ολοκληρώσει όλα τα βήματα συναρμολόγησης
και έχετε διαβάσει και κατανοήσει τις υποδείξεις
ασφαλείας και τις οδηγίες λειτουργίας.
Ανυψώστε και αφαιρέστε το πριόνι από τη συσκευασία και τοποθετήστε το πάνω στον πάγκο εργασίας
σας. (Τοποθέτηση του πριονιού πάνω στον πάγκο
εργασίας - βλέπε επόμενη σελίδα στην ενότητα
«ΤΟΠΟΘΕΤΗΣΗ / ΘΕΣΗ ΕΡΓΑΣΙΑΣ»)
Εγκατάσταση της σακούλας σκόνης (εικ. 2)
• Πιέστε τα πτερύγια του μεταλλικού δακτυλίου
του σάκου συλλογής πριονιδιού (12) και τοποθετήστε το σάκο στο άνοιγμα εξαγωγής στην
περιοχή του μοτέρ.
Συναρμολόγηση του σφιγκτήρα τεμαχίων εργασίας (εικ. 1.1)
• Λασκάρετε τη βίδα στερέωσης (17) και συναρμολογήστε το σφιγκτήρα τεμαχίου εργασίας (10)
αριστερά ή δεξιά στο σταθερό τραπέζι πριονιού.
• Κατόπιν σφίξτε πάλι τη βίδα στερέωσης (17).
Συναρμολόγηση των στηριγμάτων τεμαχίου
εργασίας (εικ. 1.1 - 1.2)
• Λασκάρετε τη σταυρόβιδα (14) και περάστε το
στήριγμα τεμαχίου εργασίας μέσα από την προβλεπόμενη οπή πλευρικά στο σταθερό τραπέζι
πριονιού.
• Προσέξτε το στήριγμα τεμαχίου εργασίας (15) να
περάσει και από τις δύο θηλιές (19) στην κάτω
πλευρά.
• Κατόπιν σφίξτε πάλι καλά τη σταυρόβιδα (14).
• Επαναλάβετε τη διαδικασία και στην άλλη πλευρά.
Συναρμολόγηση της βάσης στήριξης (εικ. 1.1 -
1.2)
• Λασκάρετε τις σταυρόβιδες (18) στην κάτω πλευρά του πριονιού και περάστε τη βάση στήριξης
(16) μέσα από τις προβλεπόμενες οπές στην
πίσω πλευρά του πριονιού.
• Κατόπιν σφίξτε πάλι τις σταυρόβιδες (18).
 Loading...