

Parkside 275647, PBS 600 B1 Original Instructions Manual

IAN 275647
BELT SANDER PBS 600 B1
BELT SANDER
Translation of the original instructions
BANDSLIP
Översättning av bruksanvisning i original
NAUHAHIOMAKONE
Alkuperäisen käyttöohjeen käännös
BANDSCHLEIFER
Originalbetriebsanleitung
JUOSTINIS ŠLIFUOKLIS
Naudojimo instrukcijos originalo vertimas
SZLIFIERKA TASMOWA
Tłumaczenie oryginalnej instrukcji obsługi

GB / IE Translation of the original instructions Page 1
FI Alkuperäisen käyttöohjeen käännös Sivu 11
SE Översättning av bruksanvisning i original Sidan 21
PL Tłumaczenie oryginalnej instrukcji obsługi Strona 31
LT Naudojimo instrukcijos originalo vertimas Seite 43
DE / AT / CH Originalbetriebsanleitung Seite 53
Before reading, unfold the page containing the illustrations and familiarise yourself with all functions of
the device.
Käännä ennen lukemista kuvallinen sivu esiin ja tutustu seuraavaksi laitteen kaikkiin toimintoihin.
Vik ut bildsidan och ha den till hands när du läser igenom anvisningarna och gör dig bekant med
apparatens / maskinens funktioner.
Przed przeczytaniem proszę rozłożyć stronę z ilustracjami, a następnie proszę zapoznać się z wszystkimi
funkcjami urządzenia.
Prieš skaitydami atsiverskite lapą su paveikslėliais ir susipažinkite su visomis prietaiso funkcijomis.
Klappen Sie vor dem Lesen die Seite mit den Abbildungen aus und machen Sie sich anschließend mit allen
Funktionen des Gerätes vertraut.
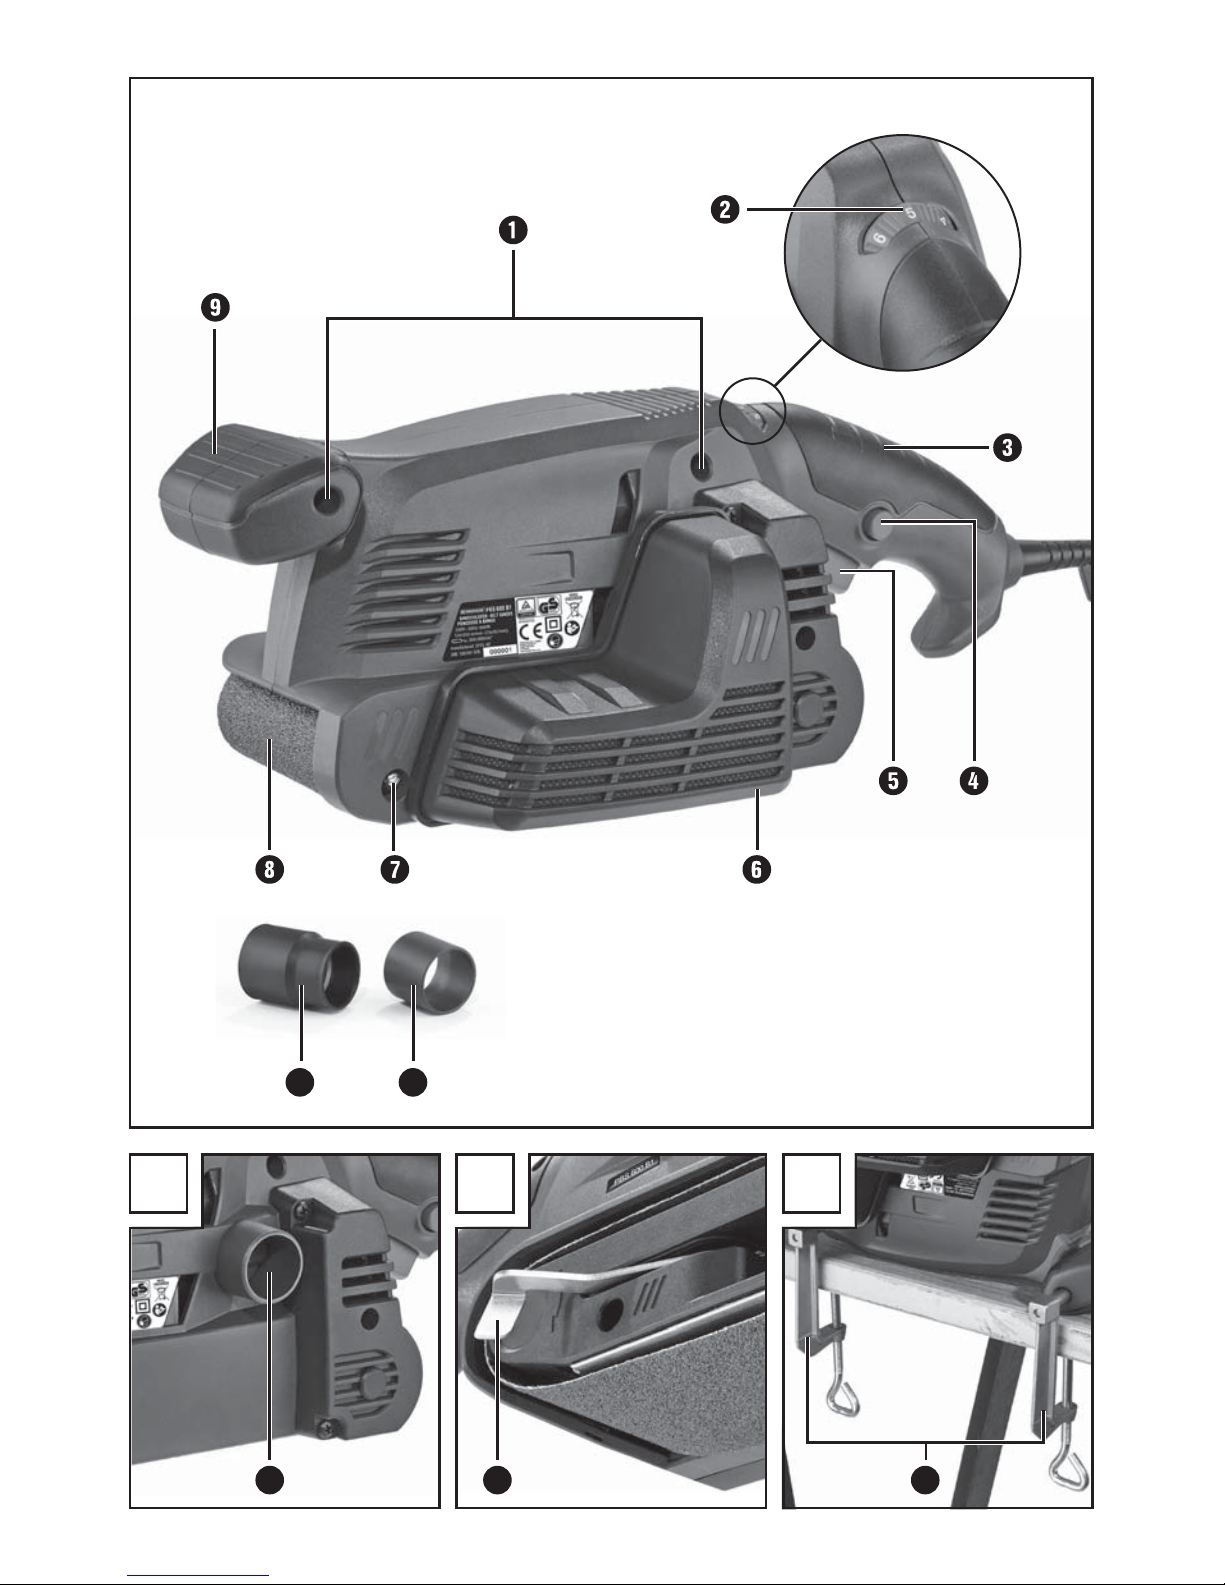
A B C
10 11
13 1412

GB│IE
│
1 ■
PBS 600 B1
Contents
Introduction ......................................................2
Intended use ................................................................ 2
Depicted components ......................................................... 2
Package contents ............................................................ 2
Technical data .............................................................. 2
General Power Tool Safety Warnings ................................3
1. Work area safety .......................................................... 3
2. Electrical safety ........................................................... 3
3. Personal safety ............................................................ 4
4. Power tool use and care .................................................... 4
5. Service .................................................................. 5
Appliance-specific safety instructions for grinders ................................... 5
Operation .......................................................5
Tensioning/replacing the abrasive belt ........................................... 5
Working procedures .......................................................... 6
Dust extraction .............................................................. 6
Operation .......................................................7
Switching on and off ......................................................... 7
Selecting speed and abrasive belt ............................................... 7
Stationary work ............................................................. 8
Tips and tricks ............................................................... 8
Maintenance and cleaning ..........................................8
Disposal .........................................................8
Warranty ........................................................9
Service ..........................................................9
Importer ........................................................9
Translation of the original Conformity Declaration .....................10

■ 2 │ GB
│
IE
PBS 600 B1
BELT SANDER PBS 600 B1
Introduction
Congratulations on the purchase of your new appliance. You have selected a high-quality product. The
operating instructions are part of this product. They
contain important information on safety, usage and
disposal. Before using the product, please familiarise
yourself with all operating and safety instructions.
Use the product only as described and for the
specified areas of application. Please also pass on
these operating instructions to any future owner.
Intended use
The belt sander is designed for dry surface sanding
of wood, plastic, metal and plaster and painted
surfaces depending on the sandpaper used. The
appliance may only be used for dry sanding. Please
note that you need to use appropriate sandpapers
with different grains for working different materials,
and that the machine speed must also be adapted
to the material. The appliance is not intended for
commercial use. Any other uses of or modification to
the machine is deemed to be improper and carries
the risk of serious personal injury. The manufacturer
accepts no responsibility for damage(s) attributable
to misuse.
Depicted components
Openings for screw clamps
Setting wheel for belt speed
Handle (rubberised grip)
Locking button for ON/OFF switch
ON/OFF switch
Dust box
Adjusting screw for belt tracking
Abrasive belt
Additional handle (rubberised grip)
External extraction adapter
Reducer
Adapter fitting
Clamping lever for abrasive belt
Screw clamp
Package contents
1 belt sander PBS 600 B1
1 abrasive belt (grain size 80)
1 dust box
1 extraction adapter and reducer (for external dust
extraction)
2 screw clamps
1 set of operating instructions
Technical data
Rated voltage: 230 V ∼ 50 Hz
(alternating current)
Rated power consumption: 600 W
Idling belt speed: 170–250 m / min
Rated idling speed:
n0 360–560 rpm
Abrasive belt: 75 x 457 mm
Protection class: II /
(double insulation)
Noise emission value:
Noise measurement value determined in accordance with EN 60745. The A-rated noise level of
the power tool is typically as follows:
Sound pressure level: L
pA
= 87.29 dB (A)
Uncertainty: K
pA
= 3 dB
Sound power level: LWA = 98.29 dB (A)
Uncertainty: KWA = 3 dB
Wear hearing protection!
Total vibration value:
Total vibration values (vector total of three directions) determined in accordance with EN 60745:
Vibration emission value: a
h
= 1.901 m/s
2
Uncertainty K = 1.5 m/s
2

GB│IE
│
3 ■
PBS 600 B1
NOTE
► The vibration level specified in these instructions
has been measured in accordance with the
standardised measuring procedure specified
in EN 60745 and can be used to make equipment comparisons. The specified vibration emission value can also be used to make an initial
exposure estimate. The vibration emission level
varies depending on the use of the power tool
and may be higher than the value specified in
these instructions in some cases. Regular use of
the electric tool in such a way may cause the
user to underestimate the vibration.
WARNING!
► For an accurate estimate of the vibration load
during a specific working period, the periods
during which the appliance is switched off or is
running but not actually being used must also
be taken into consideration. This can significantly reduce the vibration load over the total
working period.
General
Power Tool
Safety Warnings
WARNING!
► Read all safety warnings and all instructions.
Failure to follow the warnings and instructions
may result in electric shock, fire and/or serious
injury.
Save all warnings and instructions for future
reference.
The term "power tool" in the warnings refers to your
mains-operated (corded) power tool or batteryoperated (cordless) power tool.
1. Work area safety
a) Keep work area clean and well lit. Cluttered
or dark areas invite accidents.
b) Do not operate power tools in explosive atmo-
spheres, such as in the presence of flammable
liquids, gases or dust. Power tools create sparks
which may ignite the dust or fumes.
c) Keep children and bystanders away while
operating a power tool. Distractions can cause
you to lose control.
2. Electrical safety
a) Power tool plugs must match the outlet. Never
modify the plug in any way.
Do not use any adapter plugs with earthed
(grounded) power tools. Unmodified plugs
and matching outlets will reduce risk of electric
shock.
b) Avoid body contact with earthed or grounded
surfaces, such as pipes, radiators, ranges and
refrigerators. There is an increased risk of elec-
tric shock if your body is earthed or grounded.

■ 4 │ GB
│
IE
PBS 600 B1
c) Do not expose power tools to rain or wet con-
ditions. Water entering a power tool will increase
the risk of electric shock.
d) Do not abuse the cord. Never use the cord
for carrying, pulling or unplugging the power
tool. Keep cord away from heat, oil, sharp
edges or moving parts Damaged or entangled
cords increase the risk of electric shock.
e) When operating a power tool outdoors, use
an extension cord suitable for outdoor use.
Use of a cord suitable for outdoor use reduces
the risk of electric shock.
f) If operating a power tool in a damp location
is unavoidable, use a residual current device
(RCD) protected supply. Use of an RCD reduces
the risk of electric shock.
3. Personal safety
a) Stay alert, watch what you are doing and use
common sense when operating a power tool.
Do not use a power tool while you are tired or
under the influence of drugs, alcohol or medication. A moment of inattention while operating
power tools may result in serious personal injury.
b) Use personal protective equipment. Always
wear eye protection. Protective equipment such
as dust mask, non-skid safety shoes, hard hat, or
hearing protection used for appropriate conditions will reduce personal injuries.
c) Prevent unintentional starting. Ensure the switch
is in the off-position before connecting to power
source and/or battery pack, picking up or
carrying the tool. Carrying power tools with your
finger on the switch or energising power tools that
have the switch on invites accidents.
d) Remove any adjusting key or wrench before
turning the power tool on. A wrench or a key
left attached to a rotating part of the power tool
may result in personal injury.
e) Do not overreach. Keep proper footing and
balance at all times. This enables better control
of the power tool in unexpected situations.
f) Dress properly. Do not wear loose clothing or
jewellery. Keep your hair, clothing and gloves
away from moving parts. Loose clothes, jew-
ellery or long hair can be caught in moving parts.
g) If devices are provided for the connection of
dust extraction and collection facilities, ensure
these are connected and properly used. Use of
dust collection can reduce dust-related hazards.
4. Power tool use and care
a) Do not force the power tool. Use the correct
power tool for your application. The correct
power tool will do the job better and safer at
the rate for which it was designed.
b) Do not use the power tool if the switch does
not turn it on and off. Any power tool that cannot be controlled with the switch is dangerous
and must be repaired.
c) Disconnect the plug from the power source
and/or the battery pack from the power tool
before making any adjustments, changing accessories, or storing power tools. Such prevent-
ive safety measures reduce the risk of starting the
power tool accidentally.
d) Store idle power tools out of the reach of chil-
dren and do not allow persons unfamiliar with
the power tool or these instructions to operate
the power tool. Power tools are dangerous in
the hands of untrained users.
e) Maintain power tools. Check for misalignment
or binding of moving parts, breakage of parts
and any other condition that may affect the
power tool’s operation. If damaged, have the
power tool repaired before use. Many acci-
dents are caused by poorly maintained power
tools.
f) Keep cutting tools sharp and clean. Properly
maintained cutting tools with sharp cutting edges
are less likely to bind and are easier to control.
g) Use the power tool, accessories and tool bits
etc. in accordance with these instructions, taking into account the working conditions and
the work to be performed. Use of the power
tool for operations different from those intended
could result in a hazardous situation.
GB│IE
│
5 ■
PBS 600 B1
5. Service
a) Have your power tool serviced by a qualified
repair person using only identical replacement parts. This will ensure that the safety of
the power tool is maintained.
Appliance-specific safety instructions
for sanders
■ Only hold the appliance using the insulated
handle surfaces, as the abrasive belt can
damage its own power cable. Contact with a
live wire may apply voltage to exposed metal
parts of the power tool and could give the operator an electric shock.
WARNING!
■ Dusts from materials such as leaded paint,
some types of wood and metal can be harmful
to your health.
■ Contact with or inhalation of these dusts can
represent a health hazard for the person
operating the appliance and other people
in the vicinity.
■ Wear safety goggles and a protective dust
mask!
Operation
Tensioning/replacing the abrasive belt
WARNING – RISK OF INJURY!
■ Always remove the power plug from the wall
socket before carrying out any work.
1. Loosen the clamping appliance for the abrasive
belt by swivelling the clamping lever
completely out (see Fig. B). The abrasive belt
can now be removed.
2. Now attach a new abrasive belt
or one
suitable for another material or with a different
grain size.
IMPORTANT: The direction of the arrows on
the inside of the abrasive belt and on the
appliance housing must match.
3. Push the clamping lever back to its original
position.
Manually adjusting the abrasive belt
:
If the abrasive belt does not run centrally after
switching on, you will have to adjust the belt tracking
manually.
♦ To do this, turn the adjusting screw
on the
front roller until the abrasive belt runs
centrally.
IMPORTANT: It is imperative to ensure that
the abrasive belt does not rub against the
housing. Check the belt tracking regularly,
and readjust it using the adjusting screw if
necessary.
■ 6 │ GB
│
IE
PBS 600 B1
Working procedures
A lower sanding pressure is sufficient:
■ apply minimal sanding pressure when working.
The own weight of the belt sander own weight
is sufficient for good sanding performance. This
method further allows you to reduce wear on the
abrasive belt
, and the surface of your work-
piece will be smoother.
Removal and surface:
■ The abrasive performance and the surface
quality are determined by the belt speed and
the grain size of the abrasive belt
(see also
Section "Selecting speed and abrasive belt").
Sanding process:
■ Switch the appliance on, place it on the work-
piece and work with a moderate forward movement. Run the sander in parallel and overlapping
sanding motions over the workpiece. Only sand
in the direction of the grain to avoid transverse
scratches. After completing the task, lift the appliance from the workpiece and then switch it off.
NOTE
► Always hold the appliance firmly with two
hands while working.
Dust extraction
WARNING! EXPLOSION HAZARD!
■ In environments with an explosive dust / air
mixture, please use a specially-designed
extraction appliance.
RISK OF FIRE DUE TO FLYING SPARKS!
When sanding metals do not use dust extraction (dust box
or vacuum cleaner).
■ Materials containing asbestos may not be pro-
cessed. Asbestos is a known carcinogen.
WARNING! RISK OF FIRE!
■ Working with power tools that have a dust col-
lection box or can be connected to a vacuum
cleaner via the vacuum cleaner adapter causes
a risk of fire! In unfavourable conditions, e.g.
when sparks are flying while sanding metal or
metal residues in wood, wood dust in the dust
box (or in the vacuum cleaner dust bag) can
spontaneously ignite. This is a particular risk
if the wood dust is mixed with paint residues
or other chemicals and the workpiece has
become hot after being worked for a long
time. Therefore, do not allow the workpiece to
overheat and always empty the dust box or the
dust bag of the vacuum cleaner before taking a
break from work.
■ Ensure that your workplace is adequately
ventilated.
■ Observe the regulations applicable in your
country regarding the materials to be worked.
■
Wear a dust mask.
Dust extraction using the dust box
:
♦ Press the dust box
into the notch provided
for this purpose on the side of the appliance
with the adapter fitting .

GB│IE
│
7 ■
PBS 600 B1
Dismantling / removing the dust box :
♦ Pull the dust box
off the appliance.
Connect the external extraction adapter
(with reducer
):
♦ Push the external extraction adapter
onto the
adapter fitting .
If necessary, use the reducer by pushing it
onto the external extraction adapter .
♦ Push the hose from a suitable dust extraction
device (e.g. a workshop vacuum cleaner) onto
the external extraction adapter
(with the
reducer if necessary).
Removal:
♦ Pull the vacuum cleaner hose off the reducer.
♦ Pull the external extraction adapter
(with the
reducer if necessary) off.
Operation
Switching on and off
During operation, you can choose between instantaneous and continuous operation.
Switching to instantaneous operation:
♦ Press the ON/OFF switch
.
Switching off instantaneous operation:
♦ Release the ON/OFF switch
.
Switching to continuous operation:
♦ Press the ON/OFF switch
, keep it pressed in
and then press the locking button .
Switching off continuous operation:
♦ Press the ON/OFF switch
and release it.
Selecting speed and abrasive belt
You can use the setting wheel for belt speed to
select the speed even if the appliance is running.
The optimum belt speed is dependent on the workpiece or material to be processed. Determine the
correct speed by carrying out practical tests. The
table below contains recommended values to help
you with your investigations.
Workpiece / sector Softwood
Coarse sanding (grain) 60
Fine sanding (grain) 240
Rotation speed
preselection
high (5–6)
Workpiece / sector Hardwood
Coarse sanding (grain) 60
Fine sanding (grain) 180
Rotation speed
preselection
high (5–6)
Workpiece / sector Chipboard
Coarse sanding (grain) 60
Fine sanding (grain) 150
Rotation speed
preselection
high (5–6)
Workpiece / sector Removing paint/
varnish
Coarse sanding (grain) 60
Fine sanding (grain) ––
Rotation speed
preselection
high (5–6)
Workpiece / sector Whetting paints
Coarse sanding (grain) 150
Fine sanding (grain) 320
Rotation speed
preselection
low (1–2)
■ 8 │ GB
│
IE
PBS 600 B1
Workpiece / sector De-rusting steel
Coarse sanding (grain) 40
Fine sanding (grain) 120
Rotation speed
preselection
medium / high (3–4)
Workpiece / sector Plastics
Coarse sanding (grain) 120
Fine sanding (grain) 240
Rotation speed
preselection
low / medium (2–3)
Workpiece / sector Nonferrous metals
(e.g. aluminium)
Coarse sanding (grain) 80
Fine sanding (grain) 150
Rotation speed
preselection
medium / high (3–4)
Stationary work
♦ Turn the power tool over as shown in Figure C
and place it on a stable worktop.
♦ Insert two screw clamps
into the opening is
provided and use them to clamp the power
tool tight.
Tips and tricks
■ Never work on wood and metal using the same
abrasive belt .
■ Ripped or torn abrasive belts can damage the
workpiece. For this reason, replace abrasive
belts regularly.
■ Only store abrasive belts in a hanging position
since they are made unusable by creases etc.
Maintenance and cleaning
WARNING! RISK OF INJURY! Switch
the appliance off and remove the
power plug before starting any work
on the appliance.
The belt sander is maintenance-free.
■ Always clean the appliance directly after
finishing work.
■ For cleaning the housing use a dry cloth, under
no circumstances should you use detergents,
solvents or abrasive cleaners.
Emptying / cleaning the dust box
:
♦ Pull the dust box
off the appliance.
♦ First, open the dust box
by removing the lid.
Empty the dust box completely by tapping it
and then replace the dust box on the appliance again.
♦ Ensure ventilation openings are always free.
♦ Remove any adhering swarf with a brush.
Disposal
The packaging is made from environment-
ally friendly material and can be disposed
of at your local recycling plant.
Do not dispose of power tools in
your normal household waste!
European Directive 2012/19/EU requires that wornout power tools be collected separately and recycled
in an environmentally compatible manner.
Your local community or municipal authorities can
provide information on how to dispose of the wornout appliance.

GB│IE
│
9 ■
PBS 600 B1
Warranty
This appliance is provided with a 3-year warranty
valid from the date of purchase. The appliance has
been manufactured with care and inspected meticulously prior to delivery.
Please retain your receipt as proof of purchase. In
the event of a warranty claim, please contact your
Customer Service unit by telephone. This is the only
way to guarantee free return of your goods.
NOTE
► The warranty only covers claims for material
and manufacturing defects, not for transport
damage, worn parts or damage to fragile
components such as buttons or rechargeable
batteries.
This appliance is intended solely for private use and
not for commercial purposes. The warranty shall be
deemed void in cases of misuse or improper handling, use of force and modifications/repairs which
have not been carried out by one of our authorised
Service centres.
Your statutory rights are not restricted by this warranty. The warranty period is not prolonged by repairs effected under the warranty. This also applies
to replaced and repaired components.
Any damage and defects present at the time of
purchase must be reported immediately after unpacking, but no later than two days after the date
of purchase.
Repairs carried out after expiry of the warranty
period shall be subject to charge.
Service
WARNING!
■ Have the power tool repaired by the Service
centre or a qualified electrician and only
using genuine replacement parts. This will
ensure that the safety of the appliance is
maintained.
WARNING!
■ Always ensure that the power plug or the
mains cable is replaced only by the manufacturer of the appliance or by an approved
customer service provider. This will ensure
that the safety of the appliance is maintained.
NOTE
► Note: Replacement parts not listed (such as
carbon brushes, switches, dust box) can be
ordered via our service hotline.
Service Great Britain
Tel.: 0871 5000 720 (£ 0.10/Min.)
E-Mail: kompernass@lidl.co.uk
IAN 275647
Service Ireland
Tel.: 1890 930 034
(0,08 EUR/Min., (peak))
(0,06 EUR/Min., (off peak))
E-Mail: kompernass@lidl.ie
IAN 275647
Importer
KOMPERNASS HANDELS GMBH
BURGSTRASSE 21
44867 BOCHUM
GERMANY
www.kompernass.com

■ 10 │ GB
│
IE
PBS 600 B1
Translation of the original
Conformity Declaration
We, KOMPERNASS HANDELS GMBH, documents officer: Mr. Semi Uguzlu, BURGSTR. 21,
44867 BOCHUM, Germany, hereby declare that
this product complies with the following standards,
normative documents and the EC directives:
Machinery Directive
(2006/42/EC)
EMC (Electromagnetic Compatibility)
(2014/30/EU)
RoHS Directive
(2011/65/EU)
Applied harmonised standards:
EN 60745-1:2009+A11
EN 60745-2-4:2009+A11
EN 55014-1:2006+A1+A2
EN 55014-2:1997+A1+A2
EN 61000-3-2:2014
EN 61000-3-3:2013
Type designation of machine:
Belt sander PBS 600 B1
Year of manufacture: 02 - 2016
Serial number: IAN 275647
Bochum, 20.01.2016
Semi Uguzlu
- Quality Manager The right to effect technical changes in the context
of further development is reserved.

FI
│
11 ■
PBS 600 B1
Sisällysluettelo
Johdanto .......................................................12
Määräystenmukainen käyttö ..................................................12
Laitteen osat ...............................................................12
Toimitussisältö .............................................................. 12
Tekniset tiedot .............................................................. 12
Sähkötyökaluja koskevia yleisiä turvallisuusohjeita ...................13
1. Työpaikan turvallisuus ..................................................... 13
2. Sähköturvallisuus ......................................................... 13
3. Henkilöiden turvallisuus .................................................... 14
4. Sähkötyökalun käyttö ja käsittely .............................................14
5. Huolto ................................................................. 15
Laitekohtaisia turvallisuusohjeita hiomakoneille .................................... 15
Käyttöönotto ....................................................15
Hiomanauhan kiristäminen/vaihtaminen ......................................... 15
Työskentelyohjeet ...........................................................16
Pölynpoisto ................................................................ 16
Käyttö .........................................................17
Päällekytkentä ja sammuttaminen ...............................................17
Pyörimisnopeus ja hiomanauhan valinta ......................................... 17
Työskentely kiinteässä paikassa ................................................18
Vinkkejä ja ohjeita .......................................................... 18
Huolto ja puhdistus ...............................................18
Hävittäminen ...................................................19
Takuu ..........................................................19
Huolto .........................................................20
Maahantuoja ...................................................20
Alkuperäisen vastaavuusvakuutuksen käännös ......................20

■ 12 │ FI
PBS 600 B1
NAUHAHIOMAKONE
PBS 600 B1
Johdanto
Onnittelut uuden laitteen hankinnasta. Olet valinnut
laadukkaan tuotteen. Käyttöohje on osa tätä tuotetta.
Se sisältää turvallisuutta, käyttöä ja hävittämistä
koskevia tärkeitä ohjeita. Tutustu ennen tuotteen
käyttöä kaikkiin käyttö- ja turvallisuusohjeisiin. Käytä tuotetta vain kuvatulla tavalla ja vain mainittuihin
käyttötarkoituksiin. Kun luovutat tuotteen eteenpäin,
liitä mukaan kaikki tuotetta koskevat asiakirjat.
Määräystenmukainen käyttö
Nauhahiomakone on tarkoitettu - hiomapaperista
riippuen - puun, muovin, metallin ja kitin sekä lakattujen pintojen kuivahiontaa. Laitetta saa käyttää
vain kuivahiontaan. Huomioi, että eri materiaalien
työstössä tarvitaan karkeudeltaan erilaisia hiomapapereita, ja että pyörimisnopeus on sovitettava
kulloisellekin materiaalille sopivaksi. Laitetta ei ole
tarkoitettu kaupalliseen käyttöön. Koneen muunlainen käyttö tai muutosten tekeminen koneeseen on
määräysten vastaista ja siihen liittyy huomattava
tapaturmavaara. Valmistaja ei ota mitään vastuuta
määräystenvastaisesta käytöstä aiheutuneista vahingoista.
Laitteen osat
Puristimille tarkoitetut reiät
Nauhan pyörimisnopeuden säätöpyörä
Käsikahva (kuminen tartuntapinta)
Virtakytkimen lukitusnappi
Virtakytkin
Pölynkeruulaatikko
Nauhan kulun säätöruuvi
Hiomanauha
Lisäkahva (kuminen tartuntapinta)
Liitäntä ulkopuolista pölynpoistoa varten
Supistuskappale
Adapteriliitäntä
Hiomanauhan kiristysvipu
Puristimet
Toimitussisältö
1 nauhahiomakone PBS 600 B1
1 hiomanauha (raekoko 80)
1 pölynkeruulaatikko
1 pölynpoistoadapteri ja supistuskappale
(ulkopuolista pölynpoistoa varten)
2 puristinta
1 käyttöohje
Tekniset tiedot
Nimellisjännite: 230 V ∼ 50 Hz
(vaihtovirta)
Nimellisteho: 600 W
Nauhan nopeus
tyhjäkäynnillä: 170–250 m / min
Nimellispyörimisnopeus
tyhjäkäynnillä:
n0 360–560 min
-1
Hiomanauha: 75 x 457 mm
Suojausluokka: II /
(Kaksoiseristys)
Melupäästö:
Meluarvot on mitattu standardin EN 60745
mukaan. Sähkötyökalun tyypillinen A-painotettu
melutaso:
Äänenpainetaso: L
pA
= 87,29 dB (A)
Epävarmuus: K
pA
= 3dB
Äänitehotaso: LWA = 98,29 dB (A)
Epävarmuus: KwA = 3dB
Käytä kuulosuojaimia!
Tärinäarvo yhteensä:
Tärinäaltistuksen kokonaisarvot (kolmen suunnan
vektorisumma) laskettuna standardin EN 60745
mukaisesti:
Tärinäaltistusarvo: a
h
= 1,901 m/s
2
Epävarmuus K = 1,5 m/s
2

FI
│
13 ■
PBS 600 B1
OHJE
► Näissä ohjeissa ilmoitettu tärinäaltistus on
mitattu standardissa EN 60745 normitetulla
mittausmenetelmällä, ja sitä voidaan käyttää
laitevertailuun. Ilmoitettua tärinäaltistusarvoa
voidaan käyttää myös altistuksen suuntaa
antavaan arviointiin. Tärinäaltistus muuttuu
sähkötyökalun käytön mukaan ja saattaa
joissain tapauksissa ylittää tässä ohjeessa
mainitun arvon. Tärinäaltistusta saatetaan
aliarvioida, jos sähkötyökalua käytetään
säännöllisesti tällaisella tavalla.
VAROITUS!
► Tärinäaltistuksen tarkka arvioiminen tietyn työ-
ajan kuluessa edellyttää myös niiden aikojen
huomioimista, jolloin laite on sammutettuna
tai käynnissä, mutta ei todellisessa käytössä.
Tämä saattaa vähentää merkittävästi kokonaistyöskentelyajan tärinäaltistusta.
Sähkötyökaluja
koskevia yleisiä
turvallisuusohjeita
VAROITUS!
► Lue kaikki turvallisuusohjeet ja muut ohjeet.
Turvallisuusohjeiden ja muiden ohjeiden laiminlyönti voi aiheuttaa sähköiskun, tulipalon
ja/tai vakavia loukkaantumisia.
Säilytä kaikki turvallisuusohjeet ja muut
ohjeet myöhempää käyttöä varten.
Turvallisuusohjeissa käytetty käsite ”sähkötyökalu”
koskee sekä verkkokäyttöisiä sähkötyökaluja (varustettu virtajohdolla) että akkukäyttöisiä sähkötyökaluja (ilman virtajohtoa).
1. Työpaikan turvallisuus
a) Pidä työskentelyalue puhtaana ja huolehdi
hyvästä valaistuksesta. Epäjärjestys ja valaise-
mattomat työskentelyalueet saattavat johtaa
onnettomuuksiin.
b) Älä käytä sähkötyökalua räjähdysalttiissa
ympäristöissä, joissa on helposti syttyviä
nesteitä, kaasuja tai pölyä. Sähkötyökaluilla
työskenneltäessä syntyy kipinöintiä, joka voi
sytyttää pölyn tai höyryt.
c) Pidä lapset ja muut henkilöt poissa sähkötyö-
kalun lähettyviltä työskentelyn aikana. Voit
helposti menettää laitteen hallinnan, jos tarkkaavaisuutesi häiriintyy.
2. Sähköturvallisuus
a) Sähkötyökalun pistokkeen on sovittava pis-
torasiaan. Pistoketta ei saa muuttaa millään
tavalla. Älä käytä adapteripistokkeita suojamaadoitettujen sähkötyökalujen kanssa.
Muuttamaton pistoke ja sopivat pistorasiat
vähentävät sähköiskun vaaraa.
b) Vältä kehokontaktia maadoitettujen pintojen,
kuten putkien, lämpöpattereiden, liesien ja
jääkaappien kanssa. Sähköiskun vaara on
tavallista suurempi, jos kehosi on maadoitettu.

■ 14 │ FI
PBS 600 B1
c) Suojaa sähkötyökaluja sateelta ja kosteudelta.
Veden pääsy sähkölaitteeseen lisää sähköiskun
vaaraa.
d) Älä käytä virtajohtoa väärin sähkötyökalun
kantamiseen tai ripustamiseen, äläkä irrota
pistoketta pistorasiasta vetämällä virtajohdosta. Pidä johto loitolla kuumuudesta, öljystä,
terävistä reunoista ja laitteen liikkuvista osista. Vaurioitunut tai kietoutunut virtajohto lisää
sähköiskun vaaraa.
e) Jos työskentelet sähkötyökalulla ulkona, käytä
ainoastaan jatkojohtoa, jonka käyttö on sallittu
myös ulkona. Ulkokäyttöön soveltuvan jatkojoh-
don käyttö pienentää sähköiskun vaaraa.
f) Jos sähkötyökalun käyttöä kosteassa ympäris-
tössä ei voida välttää, on käytettävä vikavirtakytkintä. Vikavirtakytkimen käyttö pienentää
sähköiskun vaaraa.
3. Henkilöiden turvallisuus
a) Ole aina tarkkaavainen, keskity siihen, mitä
olet tekemässä, ja toimi harkiten työskennellessäsi sähkötyökalun kanssa. Älä käytä sähkötyökalua, jos olet väsynyt tai huumausaineiden, alkoholin tai lääkeaineiden vaikutuksen
alaisena. Pienikin tarkkaavaisuuden herpaantu-
minen voi sähkötyökalua käytettäessä aiheuttaa
vakavia loukkaantumisia.
b) Käytä henkilökohtaista suojavarustusta ja aina
suojalaseja. Henkilökohtaisten turvavarusteiden,
kuten pölyltä suojaavan hengityssuojaimen, liukumattomien turvajalkineiden, suojakypärän tai
kuulosuojainten, käyttö aina sähkötyökalun tyypin
ja käytön mukaisesti vähentää loukkaantumisriskiä.
c) Varo käynnistämästä sähkötyökalua vahingos-
sa. Varmista, että sähkötyökalu on kytketty
pois päältä, ennen kuin liität sen sähköverkkoon ja/tai kiinnität akun, otat sähkötyökalun
käteen tai kannat sitä. Tapaturmat ovat mahdol-
lisia, jos sormesi on laitetta kantaessasi virtakytkimellä tai jos laite on jo kytketty päälle liittäessäsi
sen sähköverkkoon.
d) Poista kaikki säätötyökalut ja kiintoavaimet
ennen sähkötyökalun käynnistämistä. Laitteen
pyörivässä osassa oleva työkalu tai avain voi
aiheuttaa loukkaantumisia.
e) Vältä työskentelyä epätavallisessa asennos-
sa. Huolehdi tukevasta asennosta ja säilytä
tasapaino koko ajan. Näin pystyt yllättävissä
tilanteissa hallitsemaan sähkötyökalua paremmin.
f) Käytä soveltuvaa vaatetusta. Älä käytä löysiä
vaatteita tai koruja. Pidä hiukset, vaatetus ja
käsineet poissa liikkuvien osien lähettyviltä.
Löysä vaatetus, korut tai pitkät hiukset voivat
jäädä kiinni liikkuviin osiin.
g) Jos käytät pölynpoisto- ja pölynkeruulaitteita,
varmista, että ne on liitetty laitteeseen ja että
niitä käytetään oikein. Pölynpoistolaitteen
käyttäminen voi vähentää pölyn aiheuttamia
vaaroja.
4. Sähkötyökalun käyttö ja käsittely
a) Älä ylikuormita laitetta. Käytä kulloiseenkin
työhön soveltuvaa sähkötyökalua. Sopivalla
sähkötyökalulla työskentely on tehokkaampaa
ja turvallisempaa ohjeistetulla tehoalueella
työskenneltäessä.
b) Älä käytä sähkötyökalua, jonka kytkin on
viallinen. Sähkötyökalu, jota ei voi enää kytkeä
päälle tai pois päältä, on vaarallinen ja vaatii
korjausta.
c) Irrota pistoke pistorasiasta ja/tai poista akku,
ennen kuin teet säätöjä laitteeseen, vaihdat
lisävarusteita tai asetat laitteen sivuun. Tällä
varotoimella estetään sähkötyökalun tahaton
käynnistyminen.
d) Säilytä käyttämättömät sähkötyökalut lasten
ulottumattomissa. Älä anna laitetta sellaisten
henkilöiden käyttöön, jotka eivät osaa käyttää laitetta tai eivät ole lukeneet näitä ohjeita.
Sähkötyökalut ovat vaarallisia kokemattomien
henkilöiden käsissä.
FI
│
15 ■
PBS 600 B1
e) Hoida sähkötyökaluja huolellisesti. Varmista,
että liikkuvat osat toimivat moitteettomasti eivätkä juutu kiinni ja ettei mikään osa ole murtunut tai vahingoittunut niin, että sähkötyökalun toiminta häiriintyy. Korjauta vaurioituneet
osat ennen laitteen käyttöä. Moni tapaturma
johtuu huonosti huolletuista sähkötyökaluista.
f) Pidä terät terävinä ja puhtaina. Huolella hoi-
detut ja leikkuureunoiltaan terävät leikkuuterät
eivät juutu niin helposti kiinni, ja niiden käyttö
on helpompaa.
g) Käytä sähkötyökaluja, lisätarvikkeita, käyttö-
työkaluja jne. tässä annettujen ohjeiden mukaisesti. Huomioi tällöin työskentelyolosuhteet
ja suoritettava tehtävä. Sähkötyökalujen käyttö
muussa kuin niille tarkoitetussa käyttötarkoituksessa voi aiheuttaa vaaratilanteita.
5. Huolto
a) Anna sähkötyökalu vain pätevän ammattihen-
kilöstön korjattavaksi ainoastaan alkuperäisiä
varaosia käyttäen. Näin voidaan taata sähkö-
työkalun turvallinen toiminta myös korjauksen
jälkeen.
Laitekohtaisia turvallisuusohjeita
hiomakoneille
■ Tartu laitteeseen eristetyistä kahvapinnoista,
sillä hiomanauha
voi osua laitteen omaan
virtajohtoon. Jännitteellisen johdon vaurioittami-
nen voi johtaa jännitteen laitteen metalliosiin ja
aiheuttaa sähköiskun.
VAROITUS!
■ Lyijypitoisen maalin, joidenkin puulaatujen,
mineraalien ja metallin kaltaisten materiaalien
pölyt saattavat olla terveydelle haitallisia.
■ Tällaisten pölyjen koskettaminen tai hengittä-
minen voi olla vaaraksi käyttäjän tai lähellä
olevien henkilöiden terveydelle.
■ Käytä suojalaseja ja pölysuojanaamaria!
Käyttöönotto
Hiomanauhan kiristäminen/
vaihtaminen
VAROITUS! LOUKKAANTUMISVAARA
■ Irrota pistoke pistorasiasta aina ennen nauha-
hiomakoneelle suoritettavia töitä.
1. Avaa hiomanauhan kiristys kääntämällä kiristysvipu
kokonaan ulos (ks. kuva B). Hioma-
nauha on irrotettavissa.
2. Aseta nyt uusi hiomanauha
paikoilleen tai
vaihda hiomanauha, jos haluat työstää toista
materiaalia tai tarvitset karkeudeltaan erilaista
hiomapaperia.
TÄRKEÄÄ: Hiomanauhan sisäpuolella ja
laitteen rungossa olevien nuolten on osoitettava samaan suuntaan.
3. Paina kiristysvipu takaisin alkuasentoonsa.
Säädä hiomanauhaa
manuaalisesti:
Jos hiomanauha ei käynnistämisen jälkeen kulje
keskellä, nauhan kulkua on tarvittaessa säädettävä
manuaalisesti.
♦ Pyöritä etummaisen rullan säätöruuvia
, kunnes
hiomanauha kulkee keskellä.
TÄRKEÄÄ: Pidä ehdottomasti huoli siitä, ettei
hiomanauha hio laitteen runkoa. Tarkista
nauhan kulku säännöllisesti ja säädä sitä tarvittaessa säätöruuvilla .
■ 16 │ FI
PBS 600 B1
Työskentelyohjeet
Pieni hiontapaine riittää:
■ Työstä pienellä hiontapaineella. Nauhahioma-
koneen oma paino riittää hyvän hiomajäljen
saamiseen. Näin työskentelemällä ehkäiset
lisäksi hiomanauhan
kulumista ja saat hiotta-
vasta pinnasta sileämmän.
Hiontateho ja hiottu pinta:
■ Hiontateho ja hiotun pinnan laatu riippuvat
hiomanauhan nopeudesta ja hiomapaperin
karkeudesta
(ks. kohta ”Pyörimisnopeus ja
hiomanauhan valinta”).
Hiominen:
■ Aseta käynnistetty laite työstettävälle kappaleel-
le ja työskentele kohtalaisella syötöllä. Hio aina
samansuuntaisesti ja niin, että hiontalinjat menevät hieman lomittain. Hio vain syiden suuntaisesti välttääksesi häiritsevät, poikittaiset hiontajäljet.
Nosta laite työstön jälkeen työkappaleelta ja
sammuta laite vasta sen jälkeen.
OHJE
► Pidä työstön aikana aina molemmin käsin
kiinni laitteesta.
Pölynpoisto
VAROITUS! RÄJÄHDYSVAARA!
■ Kun työstetään materiaaleja, joissa syntyy
räjähdysaltista pölyä/höyryjä, on käytettävä
erityisesti tarkoitukseen sopivaa pölynpoistolaitetta.
KIPINÖISTÄ AIHEUTUVA PALOVAARA! Älä
käytä pölynpoistolaitetta (pölynkeruulaatikko
tai pölynimuri), kun hiot metallia.
■ Asbestipitoisen materiaalin työstäminen on kiel-
letty. Asbestia pidetään syöpää aiheuttavana
aineena.
VAROITUS! PALOVAARA!
■ Työskenneltäessä sähkölaitteilla, joissa on
pölynkeruulaatikko tai jotka voidaan yhdistää
pölynpoistoliitännällä pölynimuriin, on olemassa palovaara! Epäsuotuisissa olosuhteissa,
esim. kipinöiden lentäessä, metallia tai puussa
olevia metallijäämiä hiottaessa, laitteen pölypussissa (tai pölynimurin pölypussissa) oleva
puupöly voi syttyä palamaan itsestään. Näin
voi käydä etenkin silloin, kun puupölyyn on
sekoittunut lakanjäämiä tai muita kemiallisia
aineita, ja hiottava kappale on pitkän työskentelyn jälkeen kuuma. Vältä siksi ehdottomasti
hiottavan kappaleen ja laitteen ylikuumenemista ja tyhjennä laitteen pölynkeruulaatikko tai
pölynimurin pölypussi aina työskentelytauoilla.
■ Huolehdi hyvästä tuuletuksesta työpaikalla.
■ Noudata maassasi voimassa olevia, työstettä-
vää materiaalia koskevia ohjeita.
■
Käytä pölyltä suojaavaa hengityssuojaa.
Pölynpoisto pölynkeruulaatikolla
:
♦ Paina pölynkeruulaatikko
sille tarkoitettuun
hakaliitokseen adapteriliitännän puolisella
sivulla.

FI
│
17 ■
PBS 600 B1
Pölynkeruulaatikon irrottaminen:
♦ Vedä pölynkeruulaatikko
irti laitteesta.
Ulkoisen pölynpoistolaitteen adapterin
(supistuskappale
) liittäminen:
♦ Työnnä ulkoisen pölynpoistolaitteen adapteri
adapteriliitäntään . Käytä tarvittaessa supistuskappaletta ja työnnä se ulkoisen pölynpoistolaitteen adapteriin .
♦ Työnnä hyväksytyn pölynpoistolaitteen ( esim.
tehdaspölynimurin) letku ulkoisen pölynpoistolaitteen adapteriin
. Käytä tarvittaessa supis-
tuskappaletta .
Irrottaminen:
♦ Irrota letku pölynpoistolaitteesta.
♦ Irrota ulkoisen pölynpoistolaitteen adapteri
ja siinä mahdollisesti oleva supistuskappale .
Käyttö
Päällekytkentä ja sammuttaminen
Voit valita nauhahiomakoneen lyhytaikaisen käytön
ja kestokäytön välillä.
Lyhytaikaisen käytön käynnistäminen:
♦ Paina virtakytkintä
.
Lyhytaikaisen käytön sammuttaminen:
♦ Vapauta käynnistyskytkin
.
Kestokäytön käynnistäminen:
♦ Paina virtakytkintä
, pidä sitä painettuna ja
paina lukitusnappia .
Kestokäytön sammuttaminen:
♦ Paina virtakytkintä
ja vapauta se jälleen.
Pyörimisnopeus ja hiomanauhan
valinta
Nauhan nopeuden säätöpyörällä voit valita
pyörimisnopeuden myös laitteen käydessä. Ihanteellinen nauhan nopeus riippuu kulloinkin työstettävästä kappaleesta ja/tai materiaalista. Määritä
kulloinkin parhaiten soveltuva pyörimisnopeus
kokeilemalla. Seuraavassa taulukossa on esitetty
ohjeelliset arvot, jotka helpottavat sopivan nopeuden löytämistä.
Työstettävä materiaali /Työvaihe
Pehmeä puu
Karkeahionta (raekoko) 60
Viimeistelyhionta
(raekoko)
240
Pyörimisnopeuden
esivalinta:
suuri (5–6)
Työstettävä materiaali /Työvaihe
Kova puu
Karkeahionta (raekoko) 60
Viimeistelyhionta
(raekoko)
180
Pyörimisnopeuden
esivalinta:
suuri (5–6)
Työstettävä materiaali /Työvaihe
Lastulevyt
Karkeahionta
(raekoko)
60
Viimeistelyhionta
(raekoko)
150
Pyörimisnopeuden
esivalinta:
suuri (5–6)
 Loading...