

Page 1

IAN 115720
FILE BELT SANDER PBF 400 A1
BANDFEILE
Bedienungs- und Sicherheitshinweise
Originalbetriebsanleitung
FILE BELT SANDER
Operation and Safety Notes
Translation of the original instructions
ЛЕНТОВА ПИЛА
Инструкции за обслужване и безопасност
Превод на оригиналното ръководство за
експлоатация
Page 2

GB Operation and Safety Notes Page 5
BG Инструкции за обслужване и безопасност Страница 13
DE / AT / CH Bedienungs- und Sicherheitshinweise Seite 23
Before reading, unfold both pages containing illustrations and familiarise yourself with all functions of the
device.
Преди да прочетете отворете двете страници с фигурите и след това се запознайте с всички
функции на уреда.
Klappen Sie vor dem Lesen die beiden Seiten mit den Abbildungen aus und machen Sie sich anschließend
mit allen Funktionen des Gerätes vertraut.
Page 3

9
8
7
1 2 398
5
10
11
13
12
B
9
A
14
4
x 10
6
Page 4
C
D E
F G
915
516
12
8 13
Page 5

5 GB
Introduction
Intended use ........................................................................................................................................ Page 6
Features ...............................................................................................................................................Page 6
Scope of delivery ................................................................................................................................ Page 6
Technical Data ....................................................................................................................................Page 6
General power tool safety warnings
1. Work area safety............................................................................................................................Page 7
2. Electrical safety ............................................................................................................................... Page 7
3. Personal safety ................................................................................................................................ Page 7
4. Power tool use and care ................................................................................................................ Page 8
5. Service ............................................................................................................................................. Page 8
Safety instructions for band files ........................................................................................................Page 8
Start-up
Installing the grinding frame ............................................................................................................... Page 9
Changing the grinding frame ............................................................................................................. Page 9
Clamping / changing the abrasive belt .............................................................................................Page 10
Dust extraction .....................................................................................................................................Page 10
Operation
Switching on and off ........................................................................................................................... Page 10
Selecting the speed and abrasive belt ..............................................................................................Page 11
Tips and tricks ...................................................................................................................................... Page 11
Maintenance and Cleaning .............................................................................................. Page 11
Service centre ..............................................................................................................................Page 11
Warranty ......................................................................................................................................... Page 11
Disposal ............................................................................................................................................ Page 12
Translation of the original declaration of conformity /
Manufacturer ............................................................................................................................... Page 12
Table of contents
Page 6
6 GB
Introduction
File belt sander PBF 400 A1
Q
Introduction
We congratulate you on the purchase of your new
device. You have chosen a high quality product.
The instructions for use are part of the product. They
contain important information concerning safety,
use and disposal. Before using the product, please
familiarise yourself with all of the safety information
and instructions for use. Only use the unit as described and for the specified applications. If you pass
the product on to anyone else, please ensure that
you also pass on all the documentation with it.
Intended use
The band file is designed for filing, particularly hard
to reach areas, of wood, plastic, metal and filler, as
well as painted surfaces. Be sure to use different
grits for working on the different materials and to
also adjust the speed according to the material. The
device is not intended for commercial use. Any other
uses, and / or modifications to the tool are considered improper use and may result in serious hazards.
The manufacturer is not liable for any damages
caused by improper use.
Features
1
Speed control
2
Locking button
3
Handle
4
ON / OFF switch
5
Dust bag
6
Side handle
7
Mounting and adjusting screw
8
Grinding frame, large
9
Clamping lever
10
Extraction adapter
11
Abrasive belt
12
Grinding frame, small
13
Grinding frame, angled
14
Spring
15
Front roller
16
Adapter connection
Scope of delivery
1 File belt sander PBF 400 A1
5 Abrasive belts for metal, wood, 8 x 455 mm
(2 x 60 grit, 2 x 80 grit, 1 x 120 grit)
5 Abrasive belts for metal, wood, 13 x 455 mm
(2 x 60 grit, 2 x 80 grit, 1 x 120 grit)
1 Dust bag
1 Extraction adapter (for external dust collection)
1 Straight frame, 8 mm
1 Straight frame, 13 mm
1 Angled frame, 13 mm
1 Carrying case
1 Set of instructions for use
Technical Data
File belt sander PBF 400 A1
Rated voltage: 230 V∼ 50 Hz
Rated power input: 400 W
Idle speed: n
0
2350–3600 rpm
Idle belt speed: 1070–1650 m / min
Abrasive belt: 8 x 455 mm and 13 x 455 mm
Protection class: II /
Noise and vibration data:
Measured sound value determined according to
EN ISO 4871. The A-rated noise levels of the electrical power tool are typically at:
Sound pressure level L
pA
: 82 dB(A)
Sound power level L
WA
: 93 dB(A)
Uncertainty K: 3 dB
Wear ear protection!
The total vibration (vector sum of three directions) is
calculated in accordance with EN 60745:
Vibration emission value: a
h
= 4.0 m / s
2
Uncertainty K = 1.5 m / s
2
Page 7
7 GB
Introduction / General power tool safety warnings
Note: The vibration emission value specified in these
instructions was measured in accordance with an
EN 60745 standardised measurement procedure
and can be used to compare tools. The vibration
emission value specified can also serve as a preliminary assessment of the exposure.
Different uses of the power tool
give rise to different vibration emission values and
in many cases they may exceed the values specified
in these instructions. It is easy to underestimate the
vibration load if the power tool is used regularly in
particular circumstances.
Try to keep the vibration loads as low as possible.
Measures to reduce the vibration load are, e.g.
wearing gloves during use and limiting the working
time. All states of operation must be included (e.g.
times when the power tool is switched off and times
where the power tool is switched on but running
without load).
General power tool
safety warnings
Read all safety
warnings and all instructions.
Failure to follow the warnings and instructions may result in electric shock, fire and / or
serious injury.
Save all warnings and instructions for
future reference.
The term “power tool” in the warnings refers to your
mains-operated (corded) power tool or battery-operated (cordless) power tool.
1. Work area safety
a) Keep work area clean and well lit.
Cluttered or dark areas invite accidents.
b) D
o not operate power tools in explosive
atmospheres, such as in the presence
of flammable liquids, gases or dust.
Power tools create sparks which may ignite the
dust or fumes.
c) Keep children and bystanders away
while operating a power tool. Distractio
ns
can cause you to lose control.
2. Electrical safety
a) Power tool plugs must match the outlet.
Never modify the plug in any way. Do
not use any adapter plugs with earthed
(grounded) power tools. Unmodified plug
s
and matching outlets will reduce risk of electric
shock.
b) Avoid body contact with earthed or
grounded surfaces, such as pipes,
radiators, ranges and refrigerators.
There is an increased risk of electric shock if
your body is earthed or grounded.
c) Do not expose power tools to rain or
wet conditions. Water entering a power tool
will increase the risk of electric shock.
d) Do not abuse the cord. Never use the
cord for carrying, pulling or unplugging
the power tool. Keep cord away from
heat, oil, sharp edges or moving parts.
Damaged or entangled cords increase the risk
of electric shock.
e)
When operating a power tool outdo
ors,
use an extension cord suitable for outdoor use. Use of a cord suitable for outdoor
use reduces the risk of electric shock.
f) If operating a power tool in a damp
location is unavoidable, use a residual
current device (RCD) protected supply.
Use of an RCD reduces the risk of electric shock.
3. Personal safety
a) Stay alert, watch what you are doing
and use common sense when operating a power tool. Do not use a power
tool while you are tired or under the
influence of drugs, alcohol or medication. A moment of inattention while operating
power tools may result in serious personal injury.
b) Use personal protective equipment.
Always wear eye protection. Protective
Page 8

8 GB
General power tool safety warnings
equipment such as dust mask, non-skid safety
shoes, hard hat, or hearing protection used for
appropriate conditions will reduce personal injuries.
c) Prevent unintentional starting. Ensure
the switch is in the off-position before
connecting to power source and / or
battery pack, picking up or carrying
the tool. Carrying power tools with your fing
er
o
n the switch or energising power tools that hav
e
the switch on invites accidents.
d) Remove any adjusting key or wrench
before turning the power tool on. A
wrench or a key left attached to a rotating part
of the power tool may result in personal injury.
e) Do not overreach. Keep proper foot-
ing and balance at all times. This enables
better control of the power tool in unexpected
situations.
f) Dress properly. Do not wear loose
clothing or jewellery. Keep your hair,
clothing and gloves away from moving parts. Loose clothes, jewellery or long
hair can be caught in moving parts.
g) If devices are provided for the connec-
tion of dust extraction and collection
facilities, ensure these are connected
and properly used. Use of dust collection
can reduce dust-related hazards.
4. Power tool use and care
a) Do not force the power tool. Use the
correct power tool for your applica
tion.
The correct power tool will do the job better
and safer at the rate for which it was designed.
b) Do not use the power tool if the switch
does not turn it on and off. Any power
tool that cannot be controlled with the switch is
dangerous and must be repaired.
c) Disconnect the plug from the power
source and / or the battery pack from
the power tool before making any adjustments, changing accessories, or
storing power tools. Such preventive safety
measures reduce the risk of starting the power
tool accidentally.
d) Store idle power tools out of the reach
of children and do not allow persons
unfamiliar with the power tool or these
instructions to operate the power tool.
Power tools are dangerous in the hands of untrained users.
e) Maintain power tools. Check for mis-
alignment or binding of moving parts,
breakage of parts and any other condition that may affect the power tool’s
operation. If damaged, have the power
tool repaired before use. Many accidents
are caused by poorly maintained power tools.
f) Keep cutting tools sharp and clean.
Properly maintained cutting tools with sharp
cutting edges are less likely to bind and are
easier to control.
g) Use the power tool, accessories and
tool bits etc. in accordance with these
instructions, taking into account the
working conditions and the work to
be performed. Use of the power tool for
operations different from those intended could
result in a hazardous situation.
5. Service
a) Have your power tool serviced by a
qualified repair person using only
iden-
tical replacement parts. This will ensure
that the safety of the power tool is maintained.
Safety instructions
for band files
Hold the device by the insulated han-
dle surfaces as the sanding belt could
strike the device’s own mains lead.
Damaging a live wire could result in the metal
parts of the device also becoming live and
could lead to an electric shock.
DANGER OF FIRE FROM FLYING SPARKS!
Sanding metal creates flying sparks. For this
reason, always make sure that nobody is placed
in any danger and that there are no inflammable
materials near the working area.
Page 9
9 GB
General power tool safety warnings / Start-up
When undertaking prolonged sanding of wood,
and in particular when working on materials
that give rise to dusts that are hazardous to
health, the sander must be connected to a
suitable external dust extraction device.
Ensure that there is adequate ventilation when
working on plastic, paint, varnish etc.
The band file is designed for dry grinding wood,
plastic, metal and filler, as well as painted surfaces. Only use the device for dry grinding.
Do not sand materials containing asbestos.
Asbestos is a known carcinogen.
Sanding e.g. lead paint,
some types of wood and metal can release
harmful / toxic dust. Touching or breathing in
these dusts can present a danger to the user or
persons nearby. Use suitable personal protective equipment such as dust mask, etc. to prevent
this risk.
POISONOUS DUSTS!
Sanding paints containing lead, some types of
wood and metal for example may give rise to
hazardous or poisonous dusts and represents a
risk to the health of the person operating the
device and to anyone near the work area.
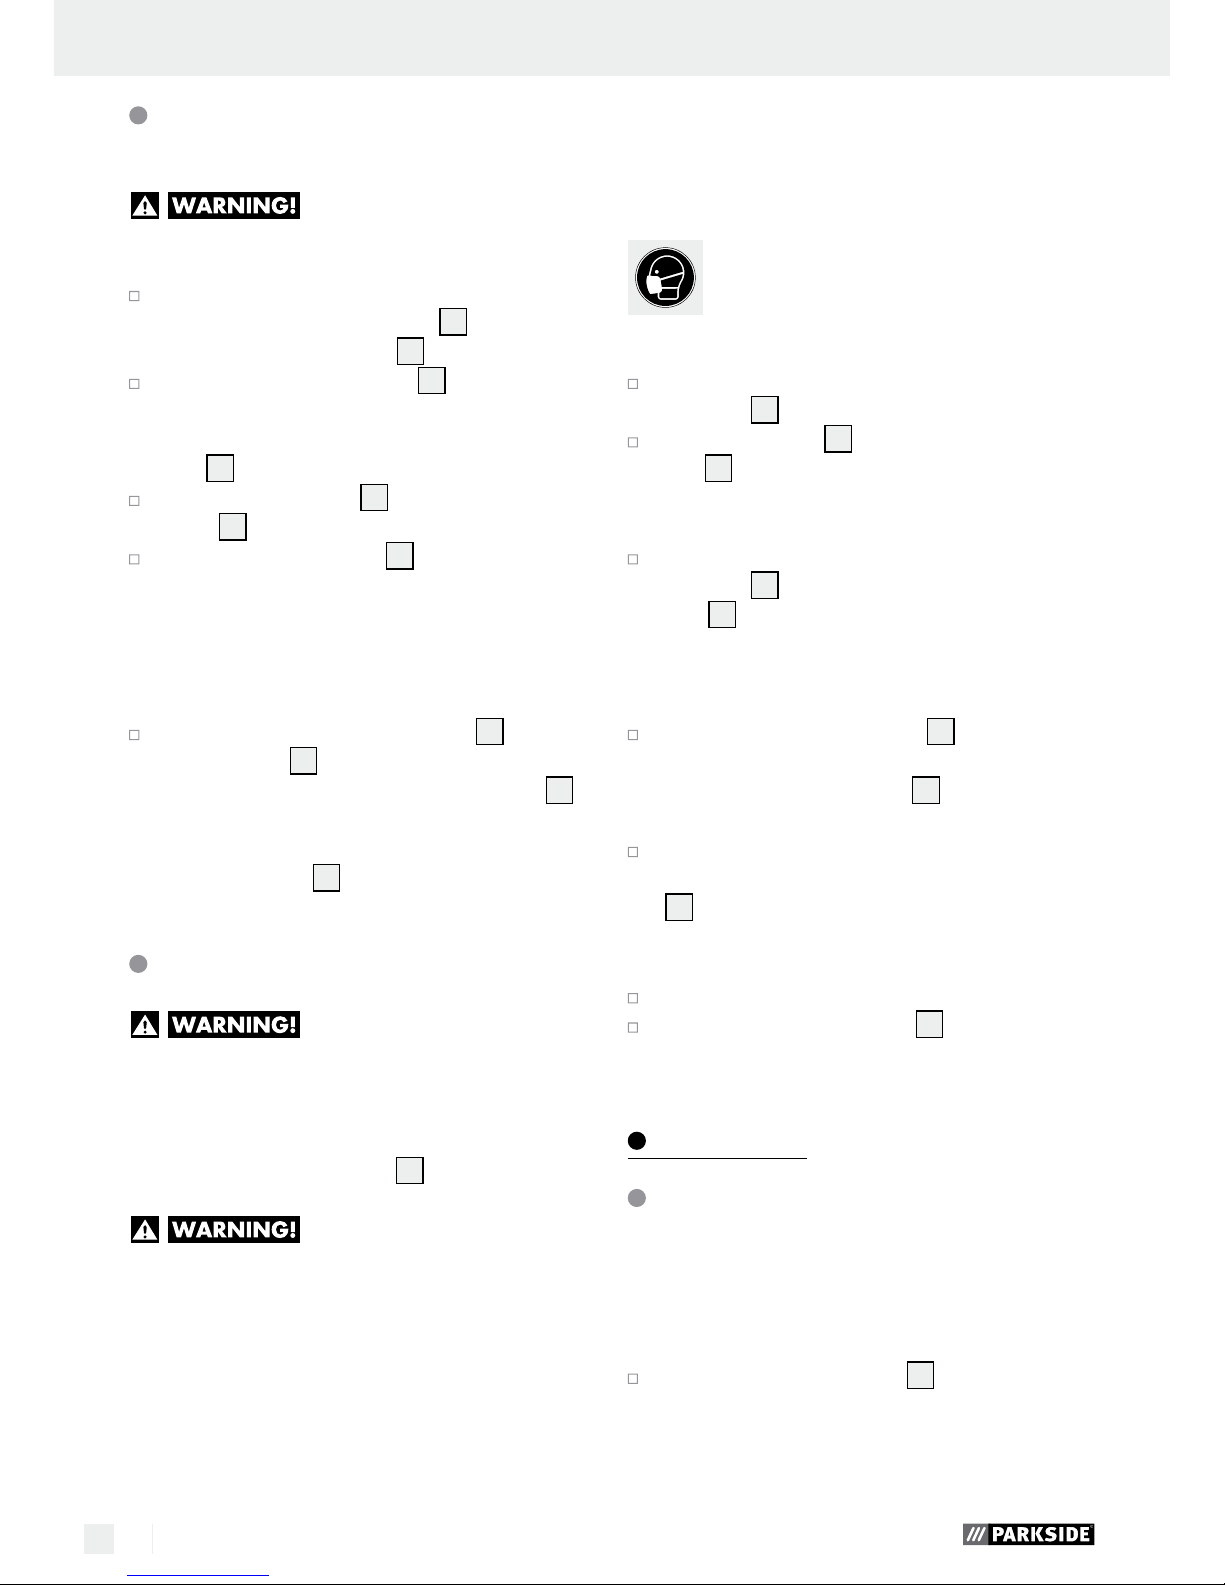
Wear safety glasses and a dust protection mask!
Securely support the workpiece. Use clamps or
a vice to grip the workpiece firmly. This is much
safer than holding it with your hand.
Never support yourself by placing your hands
near or in front of the device or the workpiece
surface. A slip can result in injury.
If a dangerous situation arises, pull the mains
plug immediately out of the mains socket.
Always work with the mains lead leading
away from the rear of the device.
Avoid contact with the moving sanding belt.
Do not work on moistened materials or damp
surfaces.
Always switch on the device before placing it
against the workpiece. After sanding, lift the device from the workpiece before switching it off.
When working always hold the device securely
with both hands. Always keep proper footing
and balance.
Switch the device off and allow it to come to
a complete standstill before you put it down.
When taking a break from your work, before
carrying out any tasks on the device itself (e.g.
changing the sanding belt) and when you are
not using the device, always pull the mains plug
out of the mains socket.
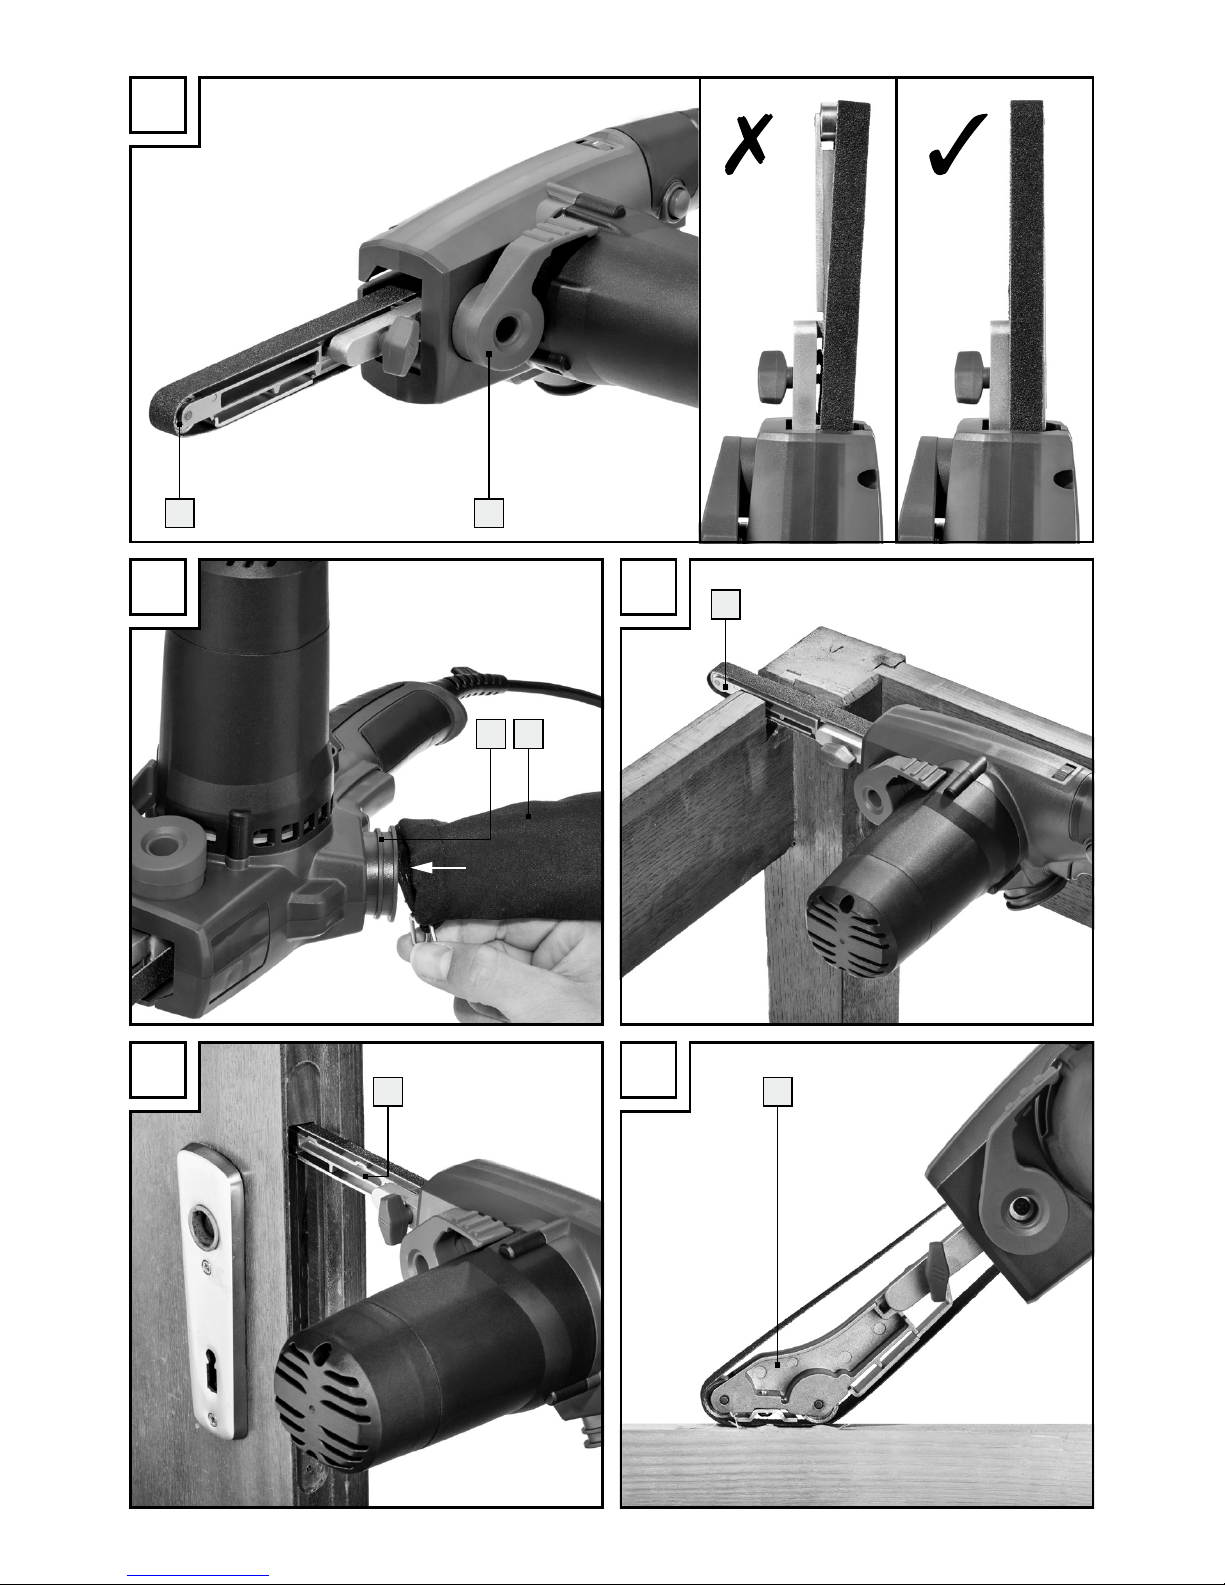
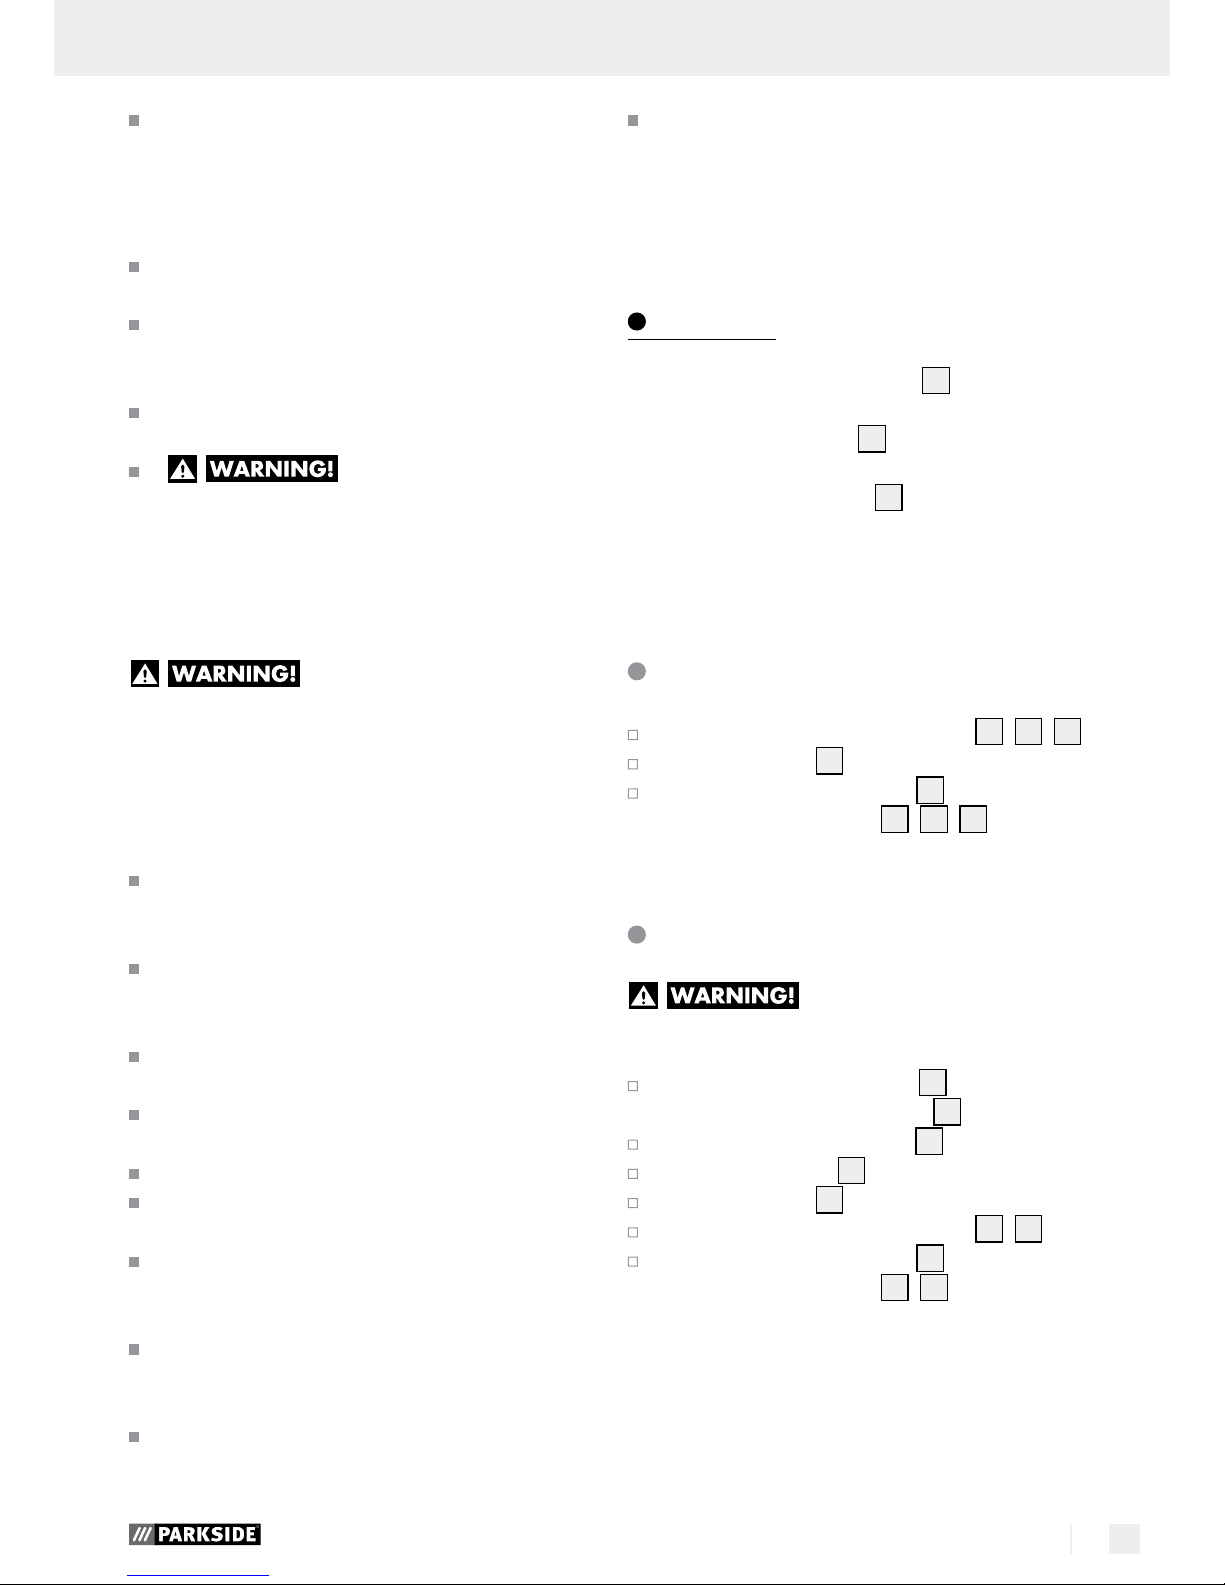
Start-up
Note: the small grinding frame 12 is designed for
fine jobs, cutting and carving (see Fig. E).
The large grinding frame
8
is suitable for general
applications, slotting and making joints (see Fig. F).
The angled grinding frame
13
is suitable for grooving and sanding the middle of the work piece and
confined areas. Also use it to smooth bent areas
(see Fig. G).
Installing the grinding frame
Attach the desired grinding frame 8, 12, 13.
Insert the spring 14 into the mounting hole.
Tighten the adjusting screw 7 on the device
until the grinding frame
8, 12, 13
is in line
with the tool (see Fig. A).
Changing the grinding frame
RISK OF INJURY! Always un-
plug from the mains before working on the band file.
Unscrew the adjusting screw 7 from the device.
Be sure not to lose the spring
14
.
Remove the grinding frame 8.
Remove the spring 14.
Insert the spring 14 into the mounting hole.
Attach the desired grinding frame 12, 13.
Tighten the adjusting screw 7 on the device
until the grinding frame
12, 13
is in line with
the tool (see Fig. A).
Page 10
10 GB
Start-up / Operation
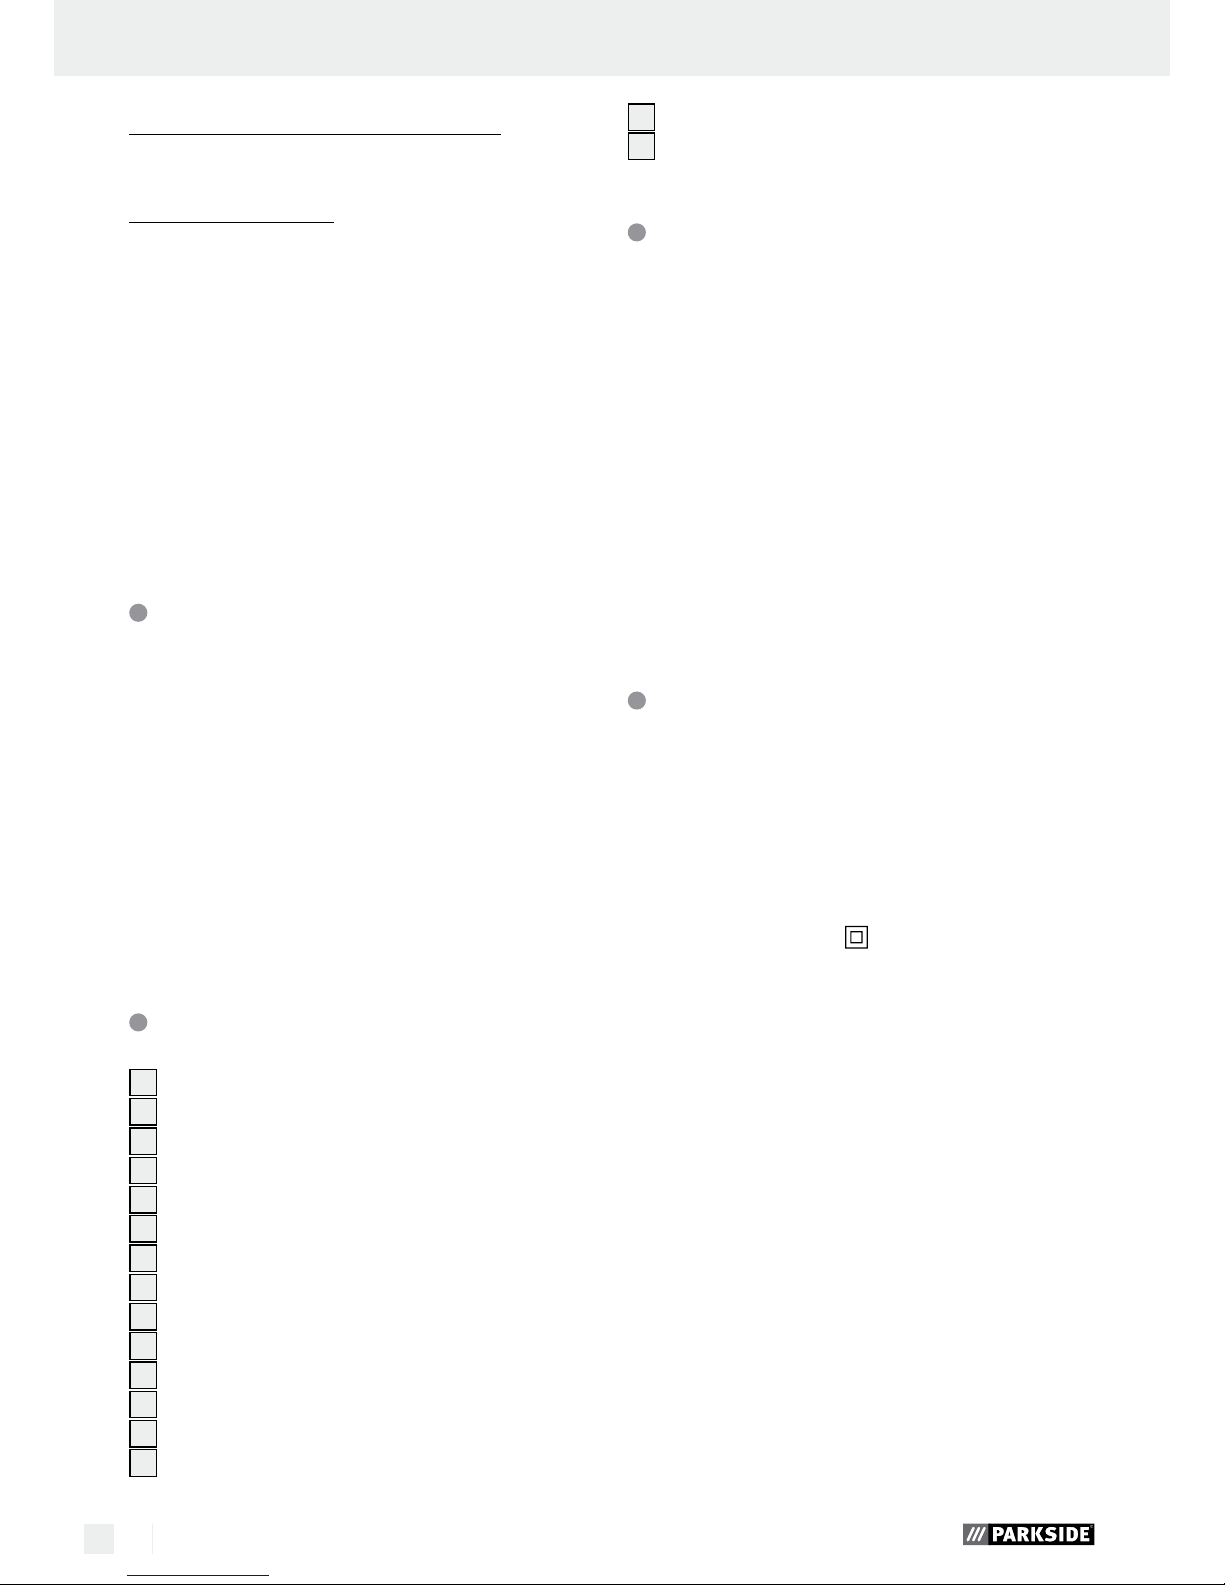
Clamping / changing
the abrasive belt
RISK OF INJURY! Always un-
plug from the mains before working on the band file.
Loosen the clamping device for the abrasive belt
by moving the clamping lever
9
forward (see
Fig. B). The abrasive belt
11
can be removed.
Slide the new abrasive belt 11 through the slot
in the housing of the tool. Important: The direction of the arrow on the inside of the abrasive
belt
11
and the housing of the tool must match.
Slip the abrasive belt 11 over the rear and front
roller
15
.
Push the clamping lever 9 back into the start-
ing position.
Manually adjusting the abrasive belt:
If the path of the belt does not straighten after
switching on, it may need to be adjusted manually.
To do so, turn the adjusting screw 7 until the
abrasive belt
11
is centred.
IMPORTANT: Be sure the abrasive belt
11
does not grind into the housing. Regularly
check the path of the belt and adjust with the
adjusting screw
7
if necessary (see Fig. C).
Dust extraction
EXPLOSION HAZARD!
A special dust extractor must be used for explosive
dust / air mixtures.
FIRE HAZARD DUE TO SPARKING! Do not
use dust extraction (dust bag
5
or vacuum) when
grinding metal.
FIRE HAZARD! Fire hazard
when using electric devices with dust bag or connected to a vacuum via dust extraction! Unfavourable
conditions, e.g. sparking - when grinding metal or
metal pieces in wood - wood dust inside the dust
bag (or inside the dust bag of the vacuum) can
spontaneously ignite. This can particularly occur if
the wood dust comes is mixed with paint particles
or other chemicals and the ground product is hot
after long work periods. Therefore be sure to avoid
the ground materials and the device from overheating and always empty the dust bag resp. the dust
bag of the vacuum before taking breaks.
Wear a dust
mask!
Dust extraction by dust bag (see Fig. D):
Compress the handles of the wire ring on the
dust bag
5
to make it larger.
Slip the dust bag 5 onto the adapter connec-
tion
16
.
Uninstalling / removing the dust bag:
Compress the handles of the wire ring on the
dust bag
5
to make it larger. Remove the dust
bag
5
from the device.
Adapter for external extraction
Connecting:
Place the extraction adapter 10 onto the file so
the teeth fit into the designated notches. Now
turn the extraction adapter
10
clockwise to
tighten.
Slide the hose of a reliable dust extractor (e.g.
workshop vacuum) onto the extraction adapter
10
.
Removal:
Pull the hose out of the dust extraction unit.
Turn the extraction adapter 10 counter-clock-
wise and remove from the file.
Operation
Switching on and off
When operating the device you can select between
intermittent or continuous operation:
Switching on temporary operation:
Push the ON / OFF switch 4.
Page 11

11 GB
Operation / Maintenance and cleaning / Service centre / Warranty
Switching off temporary operation:
Release the ON / OFF switch 4.
Engaging continuous operation:
Press and hold the ON / OFF switch 4 and
press the locking button
2
.
Disabling continuous operation:
Press the ON / OFF switch 4 and release.
Selecting the speed and
abrasive belt
You can select the speed using the speed control 1.
The optimal belt speed depends on the material you
will be working on. Always determine the respective
best speed yourself on a test piece.
Tips and tricks
Never use the same abrasive belt for wood
and metal.
Worn or torn abrasive belts can damage the
work piece. Therefore, regularly replace the
abrasive belts.
Only hang the abrasive belts to store, as folds
etc. render them useless.
Maintenance and Cleaning
RISK OF INJURY! Always un-
plug from the mains before working on the band file.
The band file is maintenance-free.
Clean the device immediately after finishing
your work.
Use a dry cloth to clean the device. Never use
petrol, solvent or cleaners which attack plastic.
Emptying / cleaning the dust bag:
Compress the handles of the wire ring on the
dust bag
5
to make it larger. Remove the dust
bag
5
from the device.
Tap the dust bag 5 to completely empty it,
then reattach it to the adapter connection
16
.
Always keep the vents clear.
Remove dust clinging to the device with a brush.
Q
Service centre
Have your device
repaired only by qualified specialist
personnel using original manufacturer
parts only. This will ensure that your device
remains safe to use.
If the power cable of this
tool is damaged, it must be replaced by the
manufacturer or its customer service, or a similarly qualified person, to prevent hazards.
Note: Spare parts not listed (e.g. carbon brushes,
switches) can be ordered through our call centre.
Q
Warranty
The warranty for this appliance is for 3
years from the date of purchase. The appliance has been manufactured with care
and meticulously examined before delivery. Please retain your receipt as proof
of purchase. In the event of a warranty
claim, please make contact by telephone
with our Service Department. Only in this
way can a post-free despatch for your
goods be assured.
The warranty covers only claims for material and
maufacturing defects, but not for transport damage,
for wearing parts or for damage to fragile components, e.g. buttons or batteries. This product is for private use only and is not intended for commercial use.
The warranty is void in the case of abusive and improper handling, use of force and internal tampering
not carried out by our authorized service branch. Your
statutory rights are not restricted in any way by this
warranty.
The warranty period will not be extended by repairs
made unter warranty. This applies also to replaced
and repaired parts. Any damage and defects extant
Page 12

12 GB
… / Disposal / Translation of the original declaration of conformity / Manufacturer
on purchase must be reported immediately after
unpacking the appliance, at the latest, two days after
the purchase date. Repairs made after the expiration
of the warranty period are subject to payment.
GB
Service Great Britain
Tel.: 0871 5000 720
(0.10 GBP/Min.)
e-mail: kompernass@lidl.co.uk
IAN 115720
Q
Disposal
The packaging is wholly composed of
environmentally-friendly materials that can
be disposed of at a local recycling centre.
Do not dispose of electrical power
tools with the household rubbish!
In accordance with European Directive 2012 / 19 / EU
(covering waste electrical and electronic equipment)
and its transposition into national legislation, worn
out electrical power tools must be collected sepa
rately
and taken for environmentally compatible recycling.
Contact your local refuse disposal authority for
more details of how to dispose of your worn out
electrical devices.
Translation of the original
declaration of conformity /
Manufacturer
We, KOMPERNASS HANDELS GMBH, the person
responsible for documents: Mr Semi Uguzlu, BURGSTRASSE 21, 44867 BOCHUM, GERMANY, hereby
declare that this product complies with the following
standards, normative documents and EU directives:
Machinery Directive
(2006 / 42 / EC)
EU Low Voltage Directive
(2006 / 95 / EC)
Electromagnetic Compatibility
(2004 / 108 / EC)
RoHS Directive (2011 / 65 / EU)
Applicable harmonized standards
EN 60745-1:2009/A11:2010
EN 60745-2-4:2009/A11:2011
EN 62233:2008
EN 55014-1:2006/A2:2011
EN 55014-2:1997/A2:2008
EN 61000-3-2:2014
EN 61000-3-3:2013
Type / Description of product:
File belt sander PBF 400 A1
Date of manufacture (DOM): 07–2015
Serial number: IAN 115720
Bochum, 31.07.2015
Semi Uguzlu
- Quality Manager -
We reserve the right to make technical modifications
in the course of further development.
Page 13

13 BG
Съдържание
Увод
Употреба по предназначение............................................................................................... Stranica 14
Оборудване ............................................................................................................................. Stranica 14
Обем на доставката ............................................................................................................... Stranica 14
Технически данни ................................................................................................................... Stranica 14
Общи инструкции за безопасност при работа
с електроуреди
1. Работно място-безопасност .............................................................................................. Stranica 15
2. Електрическа безопасност ................................................................................................ Stranica 15
3. Безопасност на хората ...................................................................................................... Stranica 16
4. Употреба и обслужване на електроуреда .................................................................... Stranica 16
5. Сервиз .................................................................................................................................. Stranica 17
Указания за безопасност при работа с лентови пили ...................................................... Stranica 17
Пускане в действие
Монтиране на рамката за шлифоване ............................................................................... Stranica 18
Смяна на рамката за шлифоване ........................................................................................ Stranica 18
Затягане / смяна на шлифовъчната лента ........................................................................... Stranica 18
Прахоулавяне.......................................................................................................................... Stranica 19
Обслужване
Включване и изключване ...................................................................................................... Stranica 19
Избиране на обороти и шлифовъчна лента ...................................................................... Stranica 20
Съвети ....................................................................................................................................... Stranica 20
Поддръжка и почистване .................................................................................... Stranica 20
Сервиз ...................................................................................................................................... Stranica 20
Гаранция .............................................................................................................................. Stranica 20
Изхвърляне на уреда ............................................................................................... Stranica 21
Превод на оригиналната ЕО Декларация за
съответствие / Производител .............................................................................. Stranica 22
Page 14

14 BG
Лентова пила PBF 400 A1
Увод
Поздравяваме Ви за покупката на Вашия нов
уред. Вие избрахте висококачествен продукт.
Ръководството за експлоатация е част от този
продукт. То съдържа важни указания за безопасност, употреба и изхвърляне. Преди употребата
на продукта се запознайте с всички инструкции
за обслужване и безопасност. Използвайте продукта
само съгласно описанието и за посочените
области на употреба. Когато предавате продукта
на трети лица, предавайте заедно с него и всички
документи.
Употреба по предназначение
Лентовата пила е предназначена за изпиляване
най-вече в трудно достъпни места, за работа по
дърво, пластмаса, метал и шпакловъчна маса,
както и боядисани повърхности. Моля, обърнете
внимание, че при обработка на различни видове материали трябва да поставяте съответни
шлифовъчни ленти с различна едрина на абразивните зърна и да настройвате оборотите също
съобразно материала. Уредът не е предназначен
за професионални цели. Всяко друго приложени
е
или промяна на уреда се считат за нецелесъобразни и крият значителни опасности от злополуки. Производителят не носи отговорност за ще
ти,
възникнали поради нецелесъобразна употреба.
Оборудване
1
Регулатор на оборотите
2
Фиксиращ бутон
3
Ръкохватка
4
Превключвател ВКЛ. / ИЗКЛ.
5
Колектор за прах
6
Странична ръкохватка
7
Монтажен и регулиращ винт
8
Рамка за шлифоване, голяма
9
Затегателен лост
10
Адаптер за прахоулавяне
11
Шлифовъчна лента
12
Рамка за шлифоване, малка
13
Рамка за шлифоване, под ъгъл
14
Пружина
15
Предна ролка
16
Връзка за адаптер
Обем на доставката
1 лентова пила PBF 400 A1
5 шлифовъчни ленти за метал, дърво, 8 x 455 mm
(2 x 60 едрина на зърното, 2 x 80 едрина на
зърното, 1 x 120 едрина на зърното)
5 ш
лифовъчни ленти за метал, дърво 13 x 455 mm
(2 x 60 едрина на зърното, 2 x 80 едрина на
зърното, 1 x 120 едрина на зърното)
1 колектор за прах
1 адаптер за прахоулавяне (за външно прахоу-
лавяне)
1 права рамка, 8 mm
1 права рамка, 13 mm
1 рамка под ъгъл, 13 mm
1 куфарче за носене
1 ръководство за експлоатация
Технически данни
Лентова пила PBF 400 A1
Номинално напрежение: 230 V∼ 50 Hz
Номинална консумирна
мощност: 400 W
Обороти на празен ход: n
0
2350–3600 min
-1
Скорост на лентата на
празен ход: 1070–1650 m / min
Шлифовъчна лента: 8 x 455 mm и
13 x 455 mm
Клас на защита: II /
Информация за нивото на шума и
вибрациите:
Стойността на нивото на шума е определена в
съответствие с EN ISO 4871. Стойността на изчисленото А-ниво на електроуреда обикновено е:
Увод
Page 15

15 BG
Ниво на силата на звука LpA: 82 dB(A)
Логаритмична величина
на мощността на звука L
WA
: 93 dB(A)
Неопределеност К: 3 dB
Носете антифони!
Общата стойност на вибрациите (векторна сума
в тр
ите посоки) е определена съгласно EN 60745:
Стойност на вибрационните емисии: ah 4,0 m / s
2
Неопределеност K = 1,5 m / s
2
Указание: Стойността на вибрационните емисии, посочена в настоящите указания, е измерена в съответствие с метод, стандартизиран в
EN 60745 и може да се използва за сравняване
на уреди. Посочената стойност на вибрационни
емисии може да се използва като предварителн
а
оценка на експозицията.
Стойността на вибрационните емисии се променя според употребата на електроуреда и в някои случаи може да
бъде по-високо от посочената в тази инструкция
стойност. Вибрационното натоварване може да
бъде подценено, ако уредът се използва редовно
по такъв начин.
Старайте са да намалите максимално натоварването вследствие вибрации. Примерни мерки
за намаляване на вибрационното натоварване
са носенето на ръкавици при използване на инструмента и ограничаването на работното врем
е.
При това следва да се вземат предвид всички
етапи на работния цикъл (например, времето,
в което електрическият инструмент е изключен
и времето, в което е включен, но работи без натоварване).
Общи инструкции за
безопасност при работа
с електроуреди
Прочетете всички инструкции за безопасност и указанията. Пропуските
при спазване на инструкциите за безопасност и
указанията може да причинят токов удар, пожар
и / или тежки наранявания.
За в бъдеще спазвайте всички указания
и инструкции за безопасност!
Използването на понятието „електроуред” в инструкциите за безопасност се отнася за електрически инструменти, включвани в електрическата
мрежа (посредством мрежов кабел), както и за
захранвани от акумулатор електрически инструменти (без мрежов кабел).
1. Работно място-безопасност
a) Поддържайте работното място чисто
и добре осветено. Безпорядъкът и лошото
осветление на зоната, в която се работи, могат да доведат до злополуки.
б) Не работете с електроуреди във
взривоопасни зони, в които се намират запалими течности, газове или
прахообразни вещества. Електроуре-
дите могат да възпроизведат искра, която да
възпламени праха или изпаренията.
в) По време на работа с електроуреда
дръжте децата и странични лица
настрани. Ако отклоните вниманието си
може да загубите контрола върху уреда.
2. Електрическа безопасност
a) Щепселът за включване на електро-
уреда трябва да е съвместим с контакта. По щепсела в никакъв случай
не бива да се предприемат промени.
Не използвайте адаптиращи щепсели
при заземени електроуреди. Щепсе-
лите, по които няма направени промени и
подходящите контакти намаляват риска от
електрически удар.
б) Избягвайте допир на тялото до зазе-
мени повърхности, като тръби, радиатори, кухненски печки и хладилниц
и.
Съществува голям риск от токов удар, ако
Вашето тяло е заземено.
Увод / Общи инструкции за безопасност при работа с електроуреди
Page 16

16 BG
в) Предпазвайте вашите електроуреди
от дъжд и влага. Проникването на влага
в електроуреда повишава опасността от токов удар.
г) Не използвайте кабела извън негово-
то предназначение, за да носите, да
окачвате уреда или да издърпвате с
него щепсела от контакта. Дръжте
кабела надалеч от горещи предмети,
масло, остри ръбове или подвижните
части на уреда. Повредените или оплете-
ни кабели повишават риска от токов удар
.
д) Ако работите с електроуред на от-
крито, използвайте само удължаващи
кабели, разрешени за условия на открито. Използването на подходящ удължава
щ
кабел за употреба на открито намалява риска
от токов удар.
е) Ако работата с електроуреда във
влажна среда е неизбежна, използвайте автоматичен защитен изключв
ател. Употребата на автоматичен защите
н
изключвател намалява риска от електрически удар.
3. Безопасност на хората
a) Бъдете винаги внимателни, обръщай-
те внимание на това, което правите
и извършвайте разумно работата си
с електроуреда. Не използвайте
електроуреди, когато сте уморени
или сте под въздействието на дрога,
алкохол или лекарства. Един момент
невнимание при употребата на електроуреда може да доведе до сериозни наранявания.
б)
Носете предпазна екипировка и вина-
ги защитни очила. Носенето на лична
предпазна екипировка като предпазна маска
против прах, предпазни обувки, които не се
хлъзгат, защитна каска или шумозаглушители,
според вида и употребата на електроуреда,
намалява риска от наранявания.
в)
Избягвайте неволно включване. Избя
г-
в
айте неволно включване. Уверете с
е,
че електроуредът е изключен, преди
за го свържeте към захранването и /
или батерията, да го вземете или
носите. Ако по времето, когато носите уре-
да, пръстът ви е на бутона, или ако уредът е
бил включен в електрическата мрежа, може
да стане злополука.
г) Оставете настрана всички инструмен-
ти за настройване и гаечни ключове
преди да включите електроуреда.
Инструмент или ключ, който се намира на
въртяща се част от уреда може да причини
наранявания.
д)
Избягвайте необичайното положение
на тялото. Погрижете се за стабилна
стойка и по всяко време пазете равновесие. Така ще можете да контролирате
електроуреда в неочаквани ситуации.
е) Носете подходящо облекло. Не но-
сете широки дрехи или украшения.
Пазете косите, облеклото и ръкавиците от въртящите се части. Свободното
облекло, украшенията или дългите коси
може
да бъдат захванати от въртящите се части.
ж) Ако трябва да бъдат монтирани пра-
хоизсмукващи и прахоулавящи
приспособления се уверете, че те са
закрепени и се използват правилно.
Употребата на прахоизсмукващи приспособления може да ограничи вредите от прах.
4. Употреба и обслужване
на електроуреда
a) Не преотстъпвайте уреда. За Вашата
работа използвайте правилния уред.
С подходящия уред ще работите по-добре и
по-безопасно в определената област.
б) Не използвайте електроуред с повре-
ден изключвател. Електроуред, който не
може да се включи и изключи е опасен и
трябва да се ремонтира.
в) Изключете щекера от контакта и /
или отстранете батерията, преди да
предприемете настройки по уреда,
да сменяте части или да приберете
уреда. Тази мярка за безопасност предо-
твратява неумишлен старт на електроуреда.
Общи инструкции за безопасност при работа с електроуреди
Page 17

17 BG
г) Съхранявайте неупотребявани елек-
троуреди на места недостъпни за
деца. Не оставяйте лица, които не
са запознати или не са прочели тази
инструкция, да работят с уреда.
Елек-
троуредите са опасни, когато се използват
от
неопитни лица.
д) Поддържайте грижливо електро-
уредите. Проверявайте дали подвиж
ните части функционират безу-
пречн
о и не са затегнати, дали има
счупени части или части, които са
повредени по начин, който пречи
на правилното функциониране на
уреда. Преди употреба дайте повредените части на ремонт. Много от
злополуките се случват поради лошо поддържани електроуреди.
е) Режещите инструменти следва да се
поддържат остри и чисти. Внимателно
поддържани режещи инструменти с остри
режещи елементи по-рядко се заклинват и
се
управляват по-лесно.
ж) Използвайте електроуреди, принад-
лежности към тях, инструменти и.т.н.
в съответствие с тези указания. При
това се съобразявайте с условията за работа и извършваните действия. Употребата на
електроуреди за цели, различни от тези, за
които те са предвидени, може да доведе до
опасни ситуации.
5. Сервиз
a) Предавайте уреда за ремонт на ква-
лифициран персонал и използвайте
само оригинални резервни части. С
това се гарантира запазването на сигурността на уреда.
Указания за безопасност при
работа с лентови пили
Хващайте уреда за изолираните ръ-
кохватки, защото шлайфащата лента
може да закачи мрежовия си кабел.
Повреда на захранващия кабел, може да
доведе до поставяне под напрежение на
металните части на уреда и да предизвика
токов удар.
ОПАСНОСТ ОТ ЗАПАЛВАНЕ ПОРАДИ
ХВЪРЧАЩИ ИСКРИ! Когато шлифовате
метал възникват искри. Затова внимавайте,
никой да не бъде изложен на опасност и в
близост до работното място да няма леснозапалими материали.
При обработката на дърво и особено на
материали, при които възниква увреждащо
здравето запрашаване, включвайте уреда
към подходяща външна засмукваща уредба.
При обработка на пластмаси, бои, лакове
и др. се погрижете да има достатъчно проветряване.
Лентовата пила е предназначена за сухо
повърхностно шлифоване на дърво, пластмаса, метал и шпакловъчна маса, както и
на боядисани повърхности. Уредът може да
се използва само за сухо шлифоване.
Материали, съдържащи азбест, не бива да
се обработват. Азбестът се счита за канцерогенен.
При шлайфане
напр. на бои, съдържащи олово, на някои
видове дървесина и метал може да се образува вреден / отровен прах. Контактът или
вдишването на този прах може да представлява опасност за оператора или намиращи
се в близост лица. Използвайте подходящи
лични предпазни средства, като противопрахова маска и др., за да избегнете риска.
ОТРОВЕН
ПРАХ! При шлифоването на например
съдържащи олово мазилки, някои видове
дървесина, и метали възниква вреден / отровен прах, който представлява заплаха за
оператора на машината или за намиращи
се в близост лица.
Носете защитни очила и маска за прах!
Обезопасете инструмента. Използвайте за-
тягащи съоръжения / менгеме, за да закрепите
изделието. Така то се крепи по-стабилно,
отколкото в ръката ви.
В никакъв случай не подпирайте ръцете си
в близост до или пред уреда или обработ-
Общи инструкции за безопасност при работа с електроуреди
Page 18

18 BG
ваната повърхност, тъй като има опасност
от нараняване в случай на подхлъзване.
При опасност веднага извадете щепсела от
контакта.
Кабелът за захранването да се извежда
винаги зад уреда.
Избягвайте контакт с движещата се шлифо-
въчна лента.
Не обработвайте навлажнени или мокри
повърхности.
Инструментът се води по изделието само
при включен уред. След обработката на изделието първо отстранете уреда от него и
едва след това го изключете.
Дръжте уреда по време на работа винаги
здраво с две ръце. Съблюдавайте безопасното му разположение.
Изчакайте уреда да спре напълно и го из-
ключете преди да го оставите.
Винаги изваждайте щепсела от контакта при
работните паузи, особено при работи по
самия уред (например смяна на шлифовъчната хартия), както и когато не го ползвате.
Пускане в действие
Указание: Малката рамка за шлифоване 12
е разработена за фина работа, за рязане и резбоване (виж фиг. E).
Голямата рамка за шлифоване
8
е подходяща
за общо приложение, за назъбване и изработване на съединения (виж фиг. F).
Рамката за шлифоване под ъгъл
13
е подходяща
за изработване на канали и шлифоване в среда
та
на детайлите и в ограничени участъци. Използвайте я също и заглаждане на извити повърхности (виж фиг. G).
Монтиране на рамката
за шлифоване
Поставете необходимата рамка за шлифо-
ване
8, 12, 13
.
Поставете пружината 14 в монтажния отвор.
Затегнете регулиращия винт 7 в уреда, до-
като рамката за шлифоване
8, 12, 13
заста-
не в една линия с инструмента (виж фиг. A).
Смяна на рамката за
шлифоване
ОПАСНОСТ ОТ
НАРАНЯВАНЕ! Винаги изключвайте щепсела
от контакта преди извършване на дейности по
лентовата пила.
Развийте регулиращия винт 7 от уреда.
При това внимавайте да не изгубите пружината
14
.
Отстранете рамката за шлифоване 8.
Отстранете пружината 14.
Поставете пружината 14 отново в монтаж-
ния отвор.
Поставете необходимата рамка за шлифо-
ване
12, 13
.
Затегнете отново регулиращия винт 7 в
уреда, докато рамката за шлифоване
12, 13
застане в една линия с инструмента (виж
фиг. A).
Затягане / смяна на
шлифовъчната лента
ОПАСНОСТ ОТ
НАРАНЯВАНЕ! Винаги изключвайте щепсела
от контакта преди извършване на дейности по
лентовата пила.
Освободете затегателния механизъм на
шлифовъчната лента, като изместите затегателния лост
9
напред (виж фиг. B). Шлифо-
въчната лента
11
може да се извади.
Вкарайте новата шлифовъчна лента 11
през отвора в корпуса на уреда. Важно:
Посоката на стрелките от вътрешната страна на шлифовъчната лента
11
и върху кор-
пуса на уреда трябва да съвпадат.
Прокарайте шлифовъчната лента 11 над
задната и предната ролка
15
.
Общи инструкции за безопасност при работа … / Пускане в експлоатация
Page 19

19 BG
Натиснете затегателния лост 9 отново в
изходно положение.
Ръчно регулиране на шлифовъчната
лента:
Ако след включване лентата не е центрирана,
следва да регулирате хода й ръчно, ако е необходимо.
За целта завийте регулиращия винт 7,
докато шлифовъчната лента
11
се движи
центрирано.
ВАЖНО: Задължително съблюдавайте
шлифовъчната лента
11
да не се трие в корпуса. Проверявайте редовно хода на лентата и при нужда извършвайте допълнително
настройване чрез регулиращия винт
7
(виж
фиг. C).
Прахоулавяне
ОПАСНОСТ ОТ
ЕКСПЛОЗИЯ! При взривоопасен прах / въз-
душна смес трябва да използвате подходящ за
целта аспиратор.
ОПАСНОСТ ОТ ПОЖАР ПОРАДИ ПРЕХВЪРЧАЩИ ИСКРИ! При шлайфане на метали
не използвайте аспиратори (колектор за прах
5
или прахосмукачка).
ОПАСНОСТ ОТ
ПОЖАР! При работа с електрически уреди,
които са оборудвани с колектор за прах или
могат да бъдат свързани чрез аспиратор с прахосмукачка, съществува опасност от пожар!
При неблагоприятни условия, като напр. прехвърчащи искри - при шлайфане на метал или
метални остатъци в дървесина - дървесният прах
в колектора (или в торбата на прахосмукачката)
може да се възпламени от само себе си. Това
може да се случи най-вече тогава, когато дървесният прах е смесен с остатъци от боя или
други химични вещества и шлифованият детайл
се загрее след продължителна работа. Затова
задължително избягвайте прегряване на шлифования детайл и на уреда и преди почивка винаги изпразвайте колектора за прах или торбата
на прахосмукачката.
Носете противопрахова маска!
Прахоулавяне с колектор за прах (виж
фиг. D):
Притиснете дръжките на теления пръстен на
колектора за прах
5
, така че обиколката
му да се увеличи.
Сега поставете колектора за прах 5 във
връзката за адаптер
16
.
Демонтиране / сваляне на колектора
за прах:
Притиснете дръжките на теления пръстен
на колектора за прах
5
, така че обиколката му да се увеличи. Издърпайте колектора
за прах
5
от уреда.
Адаптер за външно прахоуловително
устройство
Свързване:
Поставете адаптера за прахоулавяне 10 вър-
ху пилата, така че зъбите му да паснат в
предвидените прорези. Завийте адаптера
за прахоулавяне
10
по посока на часовни-
ковата стрелка.
Поставете маркуча на разрешено за упо-
треба прахоуловително устройство (напр.
на индустриална прахосмукачка) върху
адаптера
10
.
Отстраняване:
Издърпайте маркуча на прахоуловителното
устройство.
Развийте адаптера за прахоулавяне 10 об-
ратно на часовниковата стрелка и го издърпайте от пилата.
Обслужване
Включване и изключване
Можете да избирате между моментен и непрекъснат работен режим на лентовата пила.
Пускане в експлоатация / Обслужване
Page 20

20 BG
Включване на моментен работен режим:
Натиснете превключвателя ВКЛ. / ИЗКЛ. 4.
Изключване на моментен работен режим:
О
свободете превключвателя ВКЛ. / ИЗКЛ. 4.
Включване на непрекъснат работен
режим:
Натиснете превключвателя ВКЛ. / ИЗКЛ. 4,
задръжте го и натиснете фиксиращия бутон 2.
Изключване на непрекъснат работен
режим:
Натиснете превключвателя ВКЛ. / ИЗКЛ 4
и го отпуснете.
Избиране на обороти
и шлифовъчна лента
Посредством регулатора 1 можете да избирате оборотите. Оптималната скорост на лентата
зависи от обработвания материал. Винаги определяйте най-подходящите обороти чрез практически опит.
Съвети
Никога не обработвайте дърво и метал с
една и съща шлифовъчна лента.
Износените или частично разкъсани шли-
фовъчни ленти могат да повредят детайла.
Затова редовно подменяйте шлифовъчните
ленти.
Съхранявайте шлифовъчните ленти само във
висящо положение, тъй като от прегъването
те стават негодни за употреба.
Поддръжка и почистване
ОПАСНОСТ ОТ
НАРАНЯВАНЕ! Винаги изключвайте щепсела
от контакта преди извършване на дейности по
лентовата пила.
Лентовата пила не изисква поддръжка.
Почиствайте уреда веднага след приключ-
ване на работа.
За почистване на уреда използвайте суха
кърпа и в никакъв случай бензин, разтворители или почистващи препарати, които разяждат пластмаса.
Изпразване / почистване на колектора
за прах:
Притиснете дръжките на теления пръстен на
колектора за прах
5
, така че обиколката
му да се увеличи. Издърпайте колектора за
прах
5
от уреда.
Изпразнете напълно колектора за прах 5
чрез почукване и след това го поставете отново във връзката за адаптер
16
.
Дръжте вентилационните отвори винаги
свободни.
Отстранявайте полепналия прах с четка.
Q
Сервиз
Ремонтирай-
те вашите уреди в сервиз или от квалифициран електротехник само с
оригинални резервни части. Така се
гарантира, че ще се запази безопасността
на уреда.
Ако захранва-
щият кабел на уреда е повреден, той трябва
да се подмени от производителя, сервиза или
лице със сходна квалификация, за да се избегнат опасности.
Указание: Резервни части, които не са изброе
ни
(като напр. графитни четки, превключватели),
можете да поръчвате в нашите кол центрове.
Гаранция
За този уред получавате 3 години гаранция, считано от датата на покупката.
Уредът е произведен с необходимото
внимание и тестван добросъвестно. Мо
ля,
Обслужване / Поддръжка и почистване / Сервиз / Гаранция
Page 21

21 BG
пазете касовата бележка като доказателство за покупката. В случай на гаранционно събитие се свържете по телефона
с вашия сервиз. Само така може да се
гарантира безплатно изпращане на вашия уред.
Гаранцията се отнася само за дефекти на материалите и фабрични дефекти, но не и за повреди,
възникнали по време на транспорта, за износващи се части или повреди по чупливите части,
например изключвател или акумулаторни батерии. Продуктът е предназначен за ваша лична
употреба, но не и за употреба за стопански цели.
П
ри зловредно и неправомерно отношение, употр
еба на сила и посегателство, които не са извършени
от нашите сервизи, гаранцията отпада. Ва
шите за-
конни права не се ограничават от тази гаранция.
Гаранционният период не се удължава след извършени гаранционни услуги. Това се отнася и з
а
подменени и ремонтирани части. За евентуални
налични повреди в момента на покупката трябва
да бъде съобщено веднага след разопаковането,
но най-късно до два дни след датата на закупуване. След изтичане на гаранцията ремонтите
се заплащат.
BG
Сервизно обслужване България
Тел.: 00800 1114920
e-мейл: kompernass@lidl.bg
IAN 115720
Q
Изхвърляне на уреда
Опаковката е изработена от екологични материали, които може да предадете за рециклиране по местоживеене.
Не изхвърляйте електроуреди
заедно с битовите отпадъци!
Според Европейската директива 2012 / 19 / EU
за стари електрически и електронни уреди и
прилагане на националното законодателство,
излезлите от употреба електроуреди се събират
разделно и се предават за екологично рециклиране.
За възможностите за предаване на излезлия от
употреба уред може да се информирате от общинската или градска управа.
Гаранция / Изхвърляне на уреда
Page 22

22 BG
Превод на оригиналната ЕО Декларация за съответствие / Производител
Превод на оригиналната ЕО
Декларация за съответствие /
Производител
Ние, KOMPERNASS HANDELS GMBH, отговорно
лице за документацията: г-н Semi Uguzlu, BURGSTRASSE 21, 44867 BOCHUM, GERMANY, Германия, декларираме, че този продукт съответства
на следните норми, нормативни документи и
ЕО-директиви:
Директива за машините
(2006 / 42 / EC)
Οδηγία περί χαηλή τάση ΕΚ
(2006 / 95 / ΕC)
Електромагнитна съвместимост
(2004 / 108 / EC)
RoHS Директива
(2011 / 65 / EU)
Приложени хармонизирани норми
EN 60745-1:2009/A11:2010
EN 60745-2-4:2009/A11:2011
EN 62233:2008
EN 55014-1:2006/A2:2011
EN 55014-2:1997/A2:2008
EN 61000-3-2:2014
EN 61000-3-3:2013
Тип / Обозначение на продукта:
Лентова пила PBF 400 A1
Date of manufacture (DOM): 07–2015
Сериен номер: IAN 115720
Bochum, 31.07.2015
Semi Uguzlu
- Мениджър по качеството -
Запазваме си правото на технически промени
с цел усъвършенстване на уреда.
Page 23

23 DE/AT/CH
Einleitung
Bestimmungsgemäßer Gebrauch .......................................................................................................Seite 24
Ausstattung ..........................................................................................................................................Seite 24
Lieferumfang ........................................................................................................................................ Seite 24
Technische Daten ................................................................................................................................ Seite 24
Allgemeine Sicherheitshinweise für Elektrowerkzeuge
1. Arbeitsplatz-Sicherheit .................................................................................................................... Seite 25
2. Elektrische Sicherheit ...................................................................................................................... Seite 25
3. Sicherheit von Personen .................................................................................................................Seite 26
4. Verwendung und Behandlung des Elektrowerkzeugs .................................................................. Seite 26
5. Service ............................................................................................................................................. Seite 27
Sicherheitshinweise für Bandfeilen ..................................................................................................... Seite 27
Inbetriebnahme
Schleifrahmen montieren ....................................................................................................................Seite 28
Schleifrahmen wechseln .....................................................................................................................Seite 28
Schleifband einspannen / wechseln ...................................................................................................Seite 28
Staubabsaugung ................................................................................................................................. Seite 29
Bedienung
Ein- und ausschalten ............................................................................................................................ Seite 29
Drehzahl und Schleifband wählen.....................................................................................................Seite 30
Tipps und Tricks ................................................................................................................................... Seite 30
Wartung und Reinigung .....................................................................................................Seite 30
Service ...............................................................................................................................................Seite 30
Garantie ........................................................................................................................................... Seite 30
Entsorgung ..................................................................................................................................... Seite 31
Original-EG-Konformitätserklärung / Hersteller ............................................ Seite 31
Inhaltsverzeichnis
Page 24

24 DE/AT/CH
Einleitung
Bandfeile PBF 400 A1
Einleitung
Wir beglückwünschen Sie zum Kauf Ihres neuen
Gerätes. Sie haben sich damit für ein hochwertiges
Produkt entschieden. Die Bedienungsanleitung ist
Teil dieses Produkts. Sie enthält wichtige Hinweise
für Sicherheit, Gebrauch und Entsorgung. Machen
Sie sich vor der Benutzung des Produkts mit allen
Bedien- und Sicherheitshinweisen vertraut. Benutzen Sie das Produkt nur wie beschrieben und für
die angegebenen Einsatzbereiche. Händigen Sie
alle Unterlagen bei Weitergabe des Produkts an
Dritte mit aus.
Bestimmungsgemäßer
Gebrauch
Die Bandfeile ist für Feilarbeiten, besonders an
schwer
zugänglichen Stellen, an Holz, Kunststoff, Metall und
Spachtelmasse sowie lackierten Oberflächen ausgelegt. Beachten Sie bitte, dass Sie zur Bearbeitung
der verschiedenen Materialien entsprechende Schleifbänder mit unterschiedlicher Körnung einsetzen und
die Drehzahl ebenfalls dem Material anpassen. Das
Gerät ist nicht für den gewerblichen Einsatz bestimmt.
Jede andere Verwendung oder Veränderung der
Maschine gilt als nicht bestimmungsgemäß und birgt
erhebliche Unfallgefahren. Für aus bestimmungswidriger Verwendung entstandene Schäden übernimmt
der Hersteller keine Haftung.
Ausstattung
1
Drehzahlregler
2
Feststelltaste
3
Handgriff
4
EIN- / AUS-Schalter
5
Staubbeutel
6
seitlicher Handgriff
7
Montage- und Justierschraube
8
Schleifrahmen, groß
9
Spannhebel
10
Absaugadapter
11
Schleifband
12
Schleifrahmen, klein
13
Schleifrahmen, gewinkelt
14
Feder
15
vordere Rolle
16
Adapteranschluss
Lieferumfang
1 Bandfeile PBF 400 A1
5 Schleifbänder für Metall, Holz, 8 x 455 mm
(2 x 60er Körnung, 2 x 80er Körnung,
1 x 120er Körnung)
5 Schleifbänder für Metall, Holz 13 x 455 mm
(2 x 60er Körnung, 2 x 80er Körnung,
1 x 120er Körnung)
1 Staubbeutel
1 Absaugadapter (zur externen Staubabsaugung)
1 gerader Rahmen, 8 mm
1 gerader Rahmen, 13 mm
1 angewinkelter Rahmen, 13 mm
1 Tragekoffer
1 Bedienungsanleitung
Technische Daten
Bandfeile PBF 400 A1
Nennspannung: 230 V∼ 50 Hz
Nennaufnahme: 400 W
Leerlaufdrehzahl: n
0
2350–3600 min
-1
Leerlauf-Bandge schwindigkeit: 1070–1650 m / min
Schleifband: 8 x 455 mm und 13 x 455 mm
Schutzklasse: II /
Geräusch- und Vibrationsinformationen:
Messwert für Geräusch ermittelt entsprechend
EN ISO 4871. Der A-bewertete Geräuschpegel
des Elektrowerkzeugs beträgt typischerweise:
Schalldruckpegel L
pA
: 82 dB(A)
Schallleistungspegel L
WA
: 93 dB(A)
Unsicherheit K: 3 dB
Gehörschutz tragen!
Page 25

25 DE/AT/CH
Einleitung / Allgemeine Sicherheitshinweise für Elektrowerkzeuge
Schwingungsgesamtwerte (Vektorsumme dreier
Richtungen) ermittelt entsprechend EN 60745:
Schwingungsemissionswert: a
h
4,0 m / s
2
Unsicherheit K = 1,5 m / s
2
Hinweis: Der in diesen Anweisungen angegebene
Schwingungsemissionswert ist entsprechend einem
in EN 60745 genormten Messverfahren gemessen
worden und kann für den Gerätevergleich verwendet
werden. Der angegebene Schwingungsemissionswert kann auch zu einer einleitenden Einschätzung
der Aussetzung verwendet werden.
Der Schwingungsemissionswert
wird sich entsprechend dem Einsatz des Elektrowerkzeugs verändern und kann in manchen Fällen über
dem in diesen Anweisungen angegebenen Wert
liegen. Die Schwingungsbelastung könnte untersch
ätzt
werden, wenn das Elektrowerkzeug regelmäßig in
solcher Weise verwendet wird.
Versuchen Sie, die Belastung durch Vibrationen so
gering wie möglich zu halten. Beispielhafte Maßnahmen zur Verringerung der Vibrationsbelastung
sind das Tragen von Handschuhen beim Gebrauch
des Werkzeuges und die Begrenzung der Arbeitszeit. Dabei sind alle Anteile des Betriebszyklus zu
berücksichtigen (beispielsweise Zeiten, in denen
das Elektrowerkzeug abgeschaltet ist, und solche,
in denen es zwar eingeschaltet ist, aber ohne Belastung läuft).
Allgemeine Sicherheitshinweise
für Elektrowerkzeuge
Lesen Sie alle
Sicherheitshinweise und Anweisungen. Versäumnisse bei der Einhaltung
der Sicherheitshinweise und Anweisungen können
elektrischen Schlag, Brand und / oder schwere Verletzungen verursachen.
Bewahren Sie alle Sicherheitshinweise
und Anweisungen für die Zukunft auf!
Der in den Sicherheitshinweisen verwendete Begriff
„Elektrowerkzeug“ bezieht sich auf netzbetriebene
Elektrowerk
zeuge (mit Netzkabel) und auf akkube-
triebene Elektrowerkzeuge (ohne Netzkabel).
1. Arbeitsplatz-Sicherheit
a) Halten Sie Ihren Arbeitsbereich sauber
und gut beleuchtet. Unordnung und unbeleuch-
tete Arbeitsbereiche können zu Unfällen führen.
b) Arbeiten Sie mit dem Elektrowerk-
zeug nicht in explosionsgefährdeter
Umgebung, in der sich brennbare Flüssigkeiten, Gase oder Stäube befinden.
Elektrowerkzeuge erzeugen Funken, die den
Staub oder die Dämpfe entzünden können.
c) Halten Sie Kinder und andere Personen
während der Benutzung des Elektrowerkzeugs fern. Bei Ablenkung können
Sie die Kontrolle über das Gerät verlieren.
2. Elektrische Sicherheit
a) Der Anschlussstecker des Elektrowerk-
zeuges muss in die Steckdose passen.
Der Stecker darf in keiner Weise verändert werden. Verwenden Sie keine
Adapterstecker gemeinsam mit
schutzgeerdeten Elektrowerkzeugen.
Unveränderte Stecker und passende Steckdosen
verringern das Risiko eines elektrischen Schlages.
b) Vermeiden Sie Körperkontakt mit ge-
erdeten Oberflächen, wie von Rohren,
Heizungen, Herden und Kühlschränken.
Es besteht ein erhöhtes Risiko durch elektrischen
Schlag, wenn Ihr Körper geerdet ist.
c) Halten Sie Elektrowerkzeuge von Re-
gen oder Nässe fern. Das Eindringen von
Wasser in ein Elektrogerät erhöht das Risiko
eines elektrischen Schlages.
d) Zweckentfremden Sie das Kabel nicht,
um das Elektrowerkzeug zu tragen,
aufzuhängen oder um den Stecker aus
der Steckdose zu ziehen. Halten Sie
das Kabel fern von Hitze, Öl, scharfen
Kanten oder sich bewegenden Geräteteilen. Beschädigte oder verwickelte Kabel
erhöhen das Risiko eines elektrischen Schlages.
Page 26

26 DE/AT/CH
Allgemeine Sicherheitshinweise für Elektrowerkzeuge
e) Wenn Sie mit einem Elektrowerkzeug
im Freien arbeiten, verwenden Sie nur
Verlängerungskabel, die auch für den
Außenbereich zugelassen sind. Die
Anwendung eines für den Außenbereich
geeigneten Verlängerungskabels verringert
das Risiko eines elektrischen Schlages.
f) Wenn der Betrieb des Elektrowerk-
zeuges in feuchter Umgebung nicht
vermeidbar ist, verwenden Sie einen
Fehlerstromschutzschalter. Der Einsatz
eines Fehlerstromschutzschalters vermindert
das Risiko eines elektrischen Schlages.
3. Sicherheit von Personen
a)
Seien Sie stets aufmerksam, achten Sie
darauf, was Sie tun und gehen Sie mit
Vernunft an die Arbeit mit einem Elek
trowerkzeug. Benutzen Sie kein Elektrowerkzeug, wenn Sie müde sind oder
unter dem Einfluss von Drogen, Alkohol oder Medikamenten stehen. Ein
Moment der Unachtsamkeit beim Gebrauch
des Elektrowerkzeuges kann zu ernsthaften
Verletzungen führen.
b)
Tragen Sie persönliche Schutzausrüstung
und immer eine Schutzbrille. Das Tragen
persönlicher Schutzausrüstung wie Staubmask
e,
rutschfeste Sicherheitsschuhe, Schutzhelm oder
Gehörschutz, je nach Art und Einsatz des
Elektrowerkzeuges, verringert das Risiko von
Verletzungen.
c) Vermeiden Sie eine unbeabsichtigte
Inbetriebnahme. Vergewissern Sie sich,
dass das Elektrowerkzeug ausgeschaltet ist, bevor Sie es an die Stromversorgung und / oder den Akku anschließen,
es aufnehmen oder tragen. Wenn Sie
beim
Tragen des Elektrowerkzeuges den Finger am
Schalter haben oder das Gerät bereits eingeschaltet an die Stromversorgung anschließen,
kann dies zu Unfällen führen.
d) Entfernen Sie Einstellwerkzeuge oder
Schraubenschlüssel, bevor Sie das
Elektrowerkzeug einschalten. Ein Werk-
zeug oder Schlüssel, der sich in einem drehenden
Geräteteil befindet, kann zu Verletzungen führen.
e) Vermeiden Sie eine abnormale Körper-
haltung. Sorgen Sie für einen sicheren
Stand und halten Sie jederzeit das
Gleichgewicht. Dadurch können Sie das
Elektrowerkzeug in unerwarteten Situationen
besser kontrollieren.
f) Tragen Sie geeignete Kleidung. Tragen
Sie keine weite Kleidung oder Schmuck.
Halten Sie Haare, Kleidung und Handschuhe fern von sich bewegenden
Teilen. Lockere Kleidung, Schmuck oder lange
Haare können von sich bewegenden Teilen
erfasst werden.
g) Wenn Staubabsaug- und -auffangein-
richtungen montiert werden können,
vergewissern Sie sich, dass diese
angeschlossen sind und richtig verwendet werden. Die Verwendung einer
Staubabsaugung kann Gefährdungen durch
Staub verringern.
4. Verwendung und Behandlung
des Elektrowerkzeugs
a) Überlasten Sie das Gerät nicht. Ver-
wenden Sie für Ihre Arbeit das dafür
bestimmte Elektrowerkzeug. Mit dem
passenden Elektrowerkzeug arbeiten Sie besser
und sicherer im angegebenen Leistungsbereich.
b) Benutzen Sie kein Elektrowerkzeug,
dessen Schalter defekt ist. Ein Elektrowerk-
zeug, das sich nicht mehr ein- oder ausschalten
lässt, ist gefährlich und muss repariert werden.
c) Ziehen Sie den Stecker aus der Steck-
dose und / oder entfernen Sie den Akku,
bevor Sie Geräteeinstellungen vornehmen, Zubehörteile wechseln oder
das Gerät weglegen. Diese Vorsichtsmaß-
nahme verhindert den unbeabsichtigten Start
des Elektrowerkzeuges.
d) Bewahren Sie unbenutzte Elektrowerk-
zeuge außerhalb der Reichweite von
Kindern auf. Lassen Sie Personen das
Gerät nicht benutzen, die mit diesem
Page 27

27 DE/AT/CH
Allgemeine Sicherheitshinweise für Elektrowerkzeuge
nicht vertraut sind oder diese Anweisungen nicht gelesen haben. Elektrowerk-
zeuge sind gefährlich, wenn sie von unerfahrenen
Personen benutzt werden.
e) Pflegen Sie Elektrowerkzeuge mit
Sorgfalt. Kontrollieren Sie, ob bewegliche Teile einwandfrei funktionieren
und nicht klemmen, ob Teile gebrochen
oder so beschädigt sind, dass die Funktion des Elektrowerkzeuges beeinträchtigt ist. Lassen Sie beschädigte Teile vor
dem Einsatz des Gerätes reparieren.
Viele Unfälle haben ihre Ursache in schlecht
gewarteten Elektrowerkzeugen.
f) Halten Sie Schneidwerkzeuge scharf
und sauber. Sorgfältig gepflegte Schneid-
werkzeuge mit scharfen Schneidkanten verklemmen sich weniger und sind leichter zu führen.
g) Verwenden Sie Elektrowerkzeug,
Zubehör, Einsatzwerkzeuge usw.
entsprechend diesen Anweisungen.
Berücksichtigen Sie dabei die Arbeitsbedingungen und die auszuführende
Tätigkeit. Der Gebrauch von Elektrowerkzeu-
gen für andere als die vorgesehenen Anwendungen kann zu gefährlichen Situationen führen.
5. Service
a) Lassen Sie Ihr Elektrowerkzeug nur von
qualifiziertem Fachpersonal und nur
mit Original-Ersatzteilen reparieren.
Damit wird sichergestellt, dass die Sicherheit
des Elektrowerkzeugs erhalten bleibt.
Sicherheitshinweise
für Bandfeilen
Halten Sie das Gerät an den isolierten
Griffflächen, da das Schleifband das
eigene Netzkabel treffen kann. Das Be-
schädigen einer spannungsführenden Leitung
kann metallene Geräteteile unter Spannung
setzen und zu einem elektrischen Schlag führen.
BRANDGEFAHR DURCH FUNKENFLUG!
Wenn Sie Metalle schleifen entsteht Funkenflug.
Achten Sie deshalb unbedingt darauf, dass
keine Personen gefährdet werden und sich keine
brennbaren Materialien in der Nähe des Arbeitsbereiches befinden.
Schließen Sie beim Bearbeiten von Holz und
insbesondere wenn Materialien bearbeitet
werden, bei denen gesundheitsgefährdende
Stäube entstehen, das Gerät an eine geeignete
externe Absaugvorrichtung an.
Sorgen Sie bei der Bearbeitung von Kunststoffen,
Farben, Lacken etc. für ausreichende Belüftung.
Die Bandfeile ist für trockenes Flächenschleifen
von Holz, Kunststoff, Metall und Spachtelmasse
sowie lackierten Oberflächen ausgelegt. Das
Gerät darf nur für Trockenschliff verwendet
werden.
Asbesthaltiges Material darf nicht bearbeitet
werden. Asbest gilt als krebserregend.
Beim Schleifen von z.B.
bleihaltigen Anstrichen, einigen Holzarten und
Metall können schädliche / giftige Stäube entstehen. Die Berühung oder das Einatmen dieser
Stäube kann eine Gefährdung für die Bedienperson oder in der Nähe befindliche Personen
darstellen. Verwenden Sie geeignete persönliche
Schutzausrüstungen, wie Staubschutzmaske, usw.,
um die Gefährdung zu vermeiden.
GIFTIGE STÄUBE! Die beim
Schleifen von z. B. bleihaltigen Anstrichen,
einigen Holzarten und Metallen entstehenden
schädlichen / giftigen Stäube stellen eine
Gesundheitsgefährdung für die Bedienperson
oder in der Nähe befindliche Personen dar.
Tragen Sie Schutzbrille und Staubschutzmaske!
Sichern Sie das Werkstück. Benutzen Sie
Spannvorrichtungen / Schraubstock, um das
Werkstück festzuhalten. Es ist damit sicherer
gehalten, als mit Ihrer Hand.
Stützen Sie auf keinen Fall die Hände neben
oder vor dem Gerät und der zu bearbeitenden
Fläche ab, da bei einem Abrutschen Verletzungsgefahr besteht.
Ziehen Sie bei Gefahr sofort den Netzstecker
aus der Steckdose.
Führen Sie das Netzkabel immer nach hinten
vom Gerät weg.
Vermeiden Sie den Kontakt mit dem laufenden
Schleifband.
Page 28

28 DE/AT/CH
Allgemeine Sicherheitshinweise für Elektrowerkzeuge / Inbetriebnahme
Bearbeiten Sie keine angefeuchteten Materialien
oder feuchte Flächen.
Führen Sie das Gerät immer eingeschaltet gegen
das Werkstück. Heben Sie das Gerät nach der
Bearbeitung vom Werkstück ab und schalten
Sie es erst dann aus.
Halten Sie das Gerät während der Arbeit immer
fest mit beiden Händen. Sorgen Sie für einen
sicheren Stand.
Lassen Sie das Gerät vollständig zum Stillstand
kommen und schalten Sie es aus, bevor Sie
es ablegen.
Ziehen Sie bei Arbeitspausen, vor allen Arbeiten
am Gerät (z. B. Wechsel des Schleifpapiers)
und bei Nichtgebrauch immer den Netzstecker
aus der Steckdose.
Inbetriebnahme
Hinweis: Der kleine Schleifrahmen 12 ist für
feinere
Arbeiten, zum Schneiden und zum Schnitzen konzipiert (s. Abb. E).
Der große Schleifrahmen
8
ist für allgemeine
Anwendungen geeignet, zum Auskerben und zur
Herstellung von Verbindungen (s. Abb. F).
Der gewinkelte Schleifrahmen
13
ist zum Furchen
und Schleifen in der Mitte der Werkstücke und in
begrenzten Bereichen geeignet. Benutzen Sie ihn
auch, um gekrümmte Flächen zu glätten (s. Abb. G).
Schleifrahmen montieren
Setzen Sie den gewünschten Schleifrahmen 8,
12, 13
ein.
S
etzen Sie die Feder 14 in das Montageloch ei
n.
Schrauben Sie die Justierschraube 7 am Gerät
fest, bis sich der Schleifrahmen
8, 12, 13
in
einer Linie mit dem Werkzeug befindet (siehe
Abb. A).
Schleifrahmen wechseln
VERLETZUNGSGEFAHR!
Ziehen Sie den Netzstecker immer aus der Steckdose, bevor Sie Arbeiten an der Bandfeile
durchführen.
Schrauben Sie die Justierschraube 7 vom Ge-
rät ab. Achten Sie dabei darauf, dass Sie nicht
die Feder
14
verlieren.
Entfernen Sie den Schleifrahmen 8.
Entfernen Sie die Feder 14.
Setzen Sie die Feder 14 wieder in das Monta-
geloch ein.
Setzen Sie den gewünschten Schleifrahmen 12,
13
ein.
Schrauben Sie die Justierschraube 7 wieder am
Gerät fest, bis sich der Schleifrahmen
12, 13
in
einer Linie mit dem Werkzeug befindet (s. Abb. A).
Schleifband einspannen /
wechseln
VERLETZUNGSGEFAHR!
Ziehen Sie den Netzstecker immer aus der Steckdo
se,
bevor Sie Arbeiten an der Bandfeile durchführen.
Lösen Sie die Spannvorrichtung für das Schleif-
band, indem Sie den Spannhebel
9
nach
vorne schieben (siehe Abb. B). Das Schleifband
11
lässt sich entnehmen.
Schieben Sie das neue Schleifband 11 durch
den Schlitz im Gerätegehäuse. Wichtig: Die
Pfeilrichtungen auf der Innenseite des Schleifbandes
11
und am Gerätegehäuse müssen
übereinstimmen.
Führen Sie das Schleifband 11 über die hintere
und vordere Rolle
15
.
Drücken Sie den Spannhebel 9 wieder in die
Ausgangsposition.
Schleifband manuell justieren:
Wird der Bandlauf nach dem Einschalten nicht zentriert,
müssen Sie den Bandlauf ggf. manuell nachstellen.
Drehen Sie dazu die Justierschraube 7, bis
das Schleifband
11
zentriert läuft.
Page 29

29 DE/AT/CH
Inbetriebnahme / Bedienung
WICHTIG: Achten Sie unbedingt darauf, dass
sich das Schleifband
11
nicht am Gehäuse einschleift. Prüfen Sie regelmäßig den Bandlauf
und regeln Sie ihn, wenn nötig, mit der Justierschraube
7
nach (siehe Abb. C).
Staubabsaugung
EXPLOSIONSGEFAHR! Bei
explosivem Staub / Luftgemisch müssen Sie einen
dazu speziell geeigneten Absauger verwenden.
BRANDGEFAHR DURCH FUNKENFLUG!
Verwenden Sie beim Schleifen von Metallen keine
Staubabsaugung (Staubbeutel 5 oder Staubsauger).
BRANDGEFAHR! Beim Arbei-
ten mit Elektrogeräten, die über einen Staubbeutel
verfügen oder durch eine Staubabsaugvorrichtung
mit dem Staubsauger verbunden werden können,
besteht Brandgefahr! Unter ungünstigen Bedingu
ngen,
wie z. B. bei Funkenflug - beim Schleifen von Metall
oder Metallresten in Holz - kann sich Holzstaub im
Staubbeutel (oder im Staubbeutel des Staubsauger
s)
selbst entzünden. Dies kann insbesondere dann geschehen, wenn der Holzstaub mit Lackresten oder
anderen chemischen Stoffen vermischt ist und das
Schleifgut nach langem Arbeiten heiß ist. Vermeiden
Sie deshalb unbedingt eine Überhitzung des Schleifguts und des Gerätes und entleeren Sie vor Arbeitspausen stets den Staubbeutel bzw. den Staubbeutel
des Staubsaugers.
Tragen Sie eine
Staubschutzmaske!
Staubabsaugung mit Staubbeutel
(siehe Abb. D):
Drücken Sie die Griffe des Drahtrings am Staub-
beutel
5
zusammen, sodass sich sein Umfang
vergrößert.
Stecken Sie den Staubbeutel 5 nun auf den
Adapteranschluss
16
.
Staubbeutel demontieren / abnehmen:
Drücken Sie die Griffe des Drahtrings am Staub-
beutel
5
zusammen, sodass sich sein Umfang
vergrößert. Ziehen Sie den Staubbeutel
5
vom
Gerät ab.
Adapter zur Fremdabsaugung
Anschließen:
Stecken Sie den Absaugadpter 10 auf die Feile,
sodass seine Zähne in die vorgesehenen Kerben
passen. Drehen Sie nun den Absaugadapter
10
im Uhrzeigersinn fest.
Schieben Sie den Schlauch einer zulässigen
Staubsaugvorrichtung (z. B. eines Werkstattstaubsaugers) auf den Absaugadapter
10
.
Entnehmen:
Ziehen Sie den Schlauch der Staubsaugvor-
richtung ab.
Drehen Sie den Absaugadapter 10 gegen den
Uhrzeigersinn und ziehen Sie ihn von der Feile ab
.
Bedienung
Ein- und ausschalten
Sie können beim Betrieb der Bandfeile zwischen
Moment- und Dauerbetrieb auswählen.
Momentbetrieb einschalten:
Drücken Sie den EIN- / AUS-Schalter 4.
Momentbetrieb ausschalten:
Lassen Sie den EIN- / AUS-Schalter 4 los.
Dauerbetrieb einschalten:
Drücken Sie den EIN- / AUS-Schalter 4, halten
Sie ihn gedrückt und drücken Sie die Feststelltaste
2
.
Dauerbetrieb ausschalten:
Drücken Sie den EIN- / AUS-Schalter 4 und
lassen Sie ihn los.
Page 30

30 DE/AT/CH
Drehzahl und
Schleifband wählen
Mit dem Drehzahlregler 1 können Sie die Drehzahl
wählen. Die optimale Bandgeschwindigkeit ist ab
hängig von dem zu bearbeitenden Material. Ermitteln
Sie die jeweils beste Drehzahl immer selbst in einem
praktischen Versuch.
Tipps und Tricks
Niemals mit demselben Schleifband Holz und
Metall bearbeiten.
Verschlissene oder eingerissene Schleifbänder
können das Werkstück beschädigen. Wechseln
Sie die Schleifbänder deshalb rechtzeitig aus.
Bewahren Sie Schleifbänder nur hängend auf,
da sie durch Knicke etc. unbrauchbar werden.
Wartung und Reinigung
VERLETZUNGSGEFAHR!
Ziehen Sie den Netzstecker immer aus der Steckdose,
bevor Sie Arbeiten an der Bandfeile durchführen.
Die Bandfeile ist wartungsfrei.
Reinigen Sie das Gerät direkt nach Abschluss
der Arbeit.
Verwenden Sie zur Reinigung des Gerätes ein
trockenes Tuch und keinesfalls Benzin, Lösungsmittel oder Reiniger, die Kunststoff angreifen.
Staubbeutel entleeren / reinigen:
Drücken Sie die Griffe des Drahtrings am Staub-
beutel
5
zusammen, sodass sich sein Umfang
vergrößert. Ziehen Sie den Staubbeutel
5
vom
Gerät ab.
Leeren Sie den Staubbeutel 5 vollständig durch
Ausklopfen und stecken Sie ihn anschließend
wieder auf den Adapteranschluss
16
.
Halten Sie Lüftungsöffnungen immer frei.
Entfernen Sie anhaftenden Schleifstaub mit
einem Pinsel.
Service
Lassen Sie Ihre Geräte
von der Servicestelle oder einer El
ektrofachkraft und nur mit Original-Ersatzteilen reparieren. Damit wird sichergestellt,
dass die Sicherheit des Gerätes erhalten bleibt.
Wenn die Netzanschluss-
leitung dieses Gerätes beschädigt wird, muss sie
durch den Hersteller oder seinen Kundendienst
oder eine ähnlich qualifizierte Person ersetzt
werden, um Gefährdungen zu vermeiden.
Hinweis: Nicht aufgeführte Ersatzteile (wie z.B.
Kohlebürsten, Schalter) können Sie über unsere
Callcenter bestellen.
Garantie
Sie erhalten auf dieses Gerät 3 Jahre Garantie ab Kaufdatum. Das Gerät wurde
sorgfältig produziert und vor Anlieferung
gewissenhaft geprüft. Bitte bewahren Sie
den Kassenbon als Nachweis für den Kauf
auf. Bitte setzen Sie sich im Garantiefall mit
Ihrer Servicestelle telefonisch in Verbin
dung.
Nur so kann eine kostenlose Einsendung
Ihrer Ware gewährleistet werden.
Die Garantieleistung gilt nur für Material- oder Fabrikationsfehler, nicht aber für Transportschäden,
Verschleißteile oder für Beschädigungen an zerbrechlichen Teilen, z. B. Schalter oder Akkus.
Das Produkt ist lediglich für den privaten und nicht
für den gewerblichen Gebrauch bestimmt.
Bei missbräuchlicher und unsachgemäßer Behandlung, Gewaltanwendung und bei Eingriffen, die nicht
von unserer autorisierten Service-Niederlassung
vorgenommen wurden, erlischt die Garantie. Ihre
gesetzlichen Rechte werden durch diese Garantie
nicht eingeschränkt.
Die Garantiezeit wird durch die Gewährleistung nicht
verlängert. Dies gilt auch für ersetzte und reparierte
Teile. Eventuell schon beim Kauf vorhandene Schäden
Bedienung / Wartung und Reinigung / Service / Garantie
Page 31

31 DE/AT/CH
und Mängel müssen sofort nach dem Auspacken
gemeldet werden, spätestens aber zwei Tage nach
Kaufdatum. Nach Ablauf der Garantiezeit anfallende
Reparaturen sind kostenpflichtig.
DE
Service Deutschland
Tel.: 0800 5435 111
E-Mail: kompernass@lidl.de
IAN 115720
AT
Service Österreich
Tel.: 0820 201 222
(0,15 EUR/Min.)
E-Mail: kompernass@lidl.at
IAN 115720
CH
Service Schweiz
Tel.: 0842 665566
(0,08 CHF/Min., Mobilfunk
max. 0,40 CHF/Min.)
E-Mail: kompernass@lidl.ch
IAN 115720
Entsorgung
Die Verpackung besteht aus umweltfreundlichen Materialien, die Sie über die örtlichen
Recyclingstellen entsorgen können.
Werfen Sie Elektrowerkzeuge
nicht in den Hausmüll!
Gemäß Europäischer Richtlinie 2012 / 19 / EU über
Elektro- und Elektronik-Altgeräte und Umsetzung in
nationales Recht müssen verbrauchte Elektrowerkzeuge getrennt gesammelt und einer umweltgerechten
Wiederverwertung zugeführt werden.
Möglichkeiten zur Entsorgung des ausgedienten
Gerätes erfahren Sie bei Ihrer Gemeinde- oder
Stadtverwaltung.
Original-EG-Konformitätserklä-
rung / Hersteller
Wir, KOMPERNASS HANDELS GMBH, Dokumente
n-
verantwortlicher: Herr Semi Uguzlu, BURGSTRASSE 21
,
44867 BOCHUM, DEUTSCHLAND, erklären hiermit, dass dieses Produkt mit den folgenden Normen,
normativen Dokumenten und EG-Richtlinien übereinstimmt:
Maschinenrichtlinie
(2006 / 42 / EC)
EG-Niederspannungsrichtlinie
(2006 / 95 / EC)
Elektromagnetische Verträglichkeit
(2004 / 108 / EC)
RoHS Richtlinie (2011 / 65 / EU)
angewandte harmonisierte Normen
EN 60745-1:2009/A11:2010
EN 60745-2-4:2009/A11:2011
EN 62233:2008
EN 55014-1:2006/A2:2011
EN 55014-2:1997/A2:2008
EN 61000-3-2:2014
EN 61000-3-3:2013
Typ / Gerätebezeichnung:
Bandfeile PBF 400 A1
Herstellungsjahr: 07–2015
Seriennummer: IAN 115720
Bochum, 31.07.2015
Semi Uguzlu
- Qualitätsmanager -
Technische Änderungen im Sinne der Weiterentwicklung sind vorbehalten.
Garantie / Entsorgung / Original-EG-Konformitätserklärung / Hersteller
Page 32

IAN 115720
KOMPERNASS HANDELS GMBH
BURGSTRASSE 21
44867 BOCHUM
GERMANY
Last Information Update · Актуалност на
информацията · Stand der Informationen:
07 / 2015 · Ident.-No.: PBF400A1072015-BG
 Loading...