

Page 1

Contact Information
At Parks Medical Electronics, we value your input to make the manual as
usable as possible. Any comments or suggestions would be much
appreciated.
Please send any comments or suggestions to:
1-800-547-6427 option 3
1-888-356-9522
Or
mfoley@parksmed.com
Page 2

Parks Medical Electronics, Inc. HIPPA Compliance Policy Statement:
1. For standard support where Parks Medical Electronics, Inc. (PME) does not anticipate
disclosing or receiving any individually identifiable information, Parks Medical
Electronics, Inc.’s HIPAA response is:
PME does not anticipate disclosing or receiving any confidential
information, in the normal course of providing services under these
agreements. In the event that confidential information will be disclosed,
PME requires utilizing a Business Associate Addendum (BAA). This
addendum may be provided by PME upon request.
2. In rare cases where PME receives individually identifiable information and a BAA is not
sufficient, PME’s HIPAA assurance clause is:
If as a BUSINESS ASSOCIATE, PME has access to Protected Health
Information (PHI) in fulfilling its responsibilities under contract, PME is prepared
to comply with the Health Insurance Portability and Accountability Act of 1996.
As such, PME will not use or disclose any PHI except in the course of meeting its
contractual obligations or as required by law and will take reasonable steps to
insure that agents or subcontractors working on its behalf agree to the same
restrictions. PME will protect against any non-permitted use or disclosure of PHI
using no less than a reasonable amount of care and report any non-compliance of
which it becomes aware.
If PME has sole possession of PHI, then at the request and direction of the
COVERED ENTITY and if feasible, PME will make available PHI in accordance
with the requirements of 45 CFR Sections 164.524, 164.526, and 164.528. Upon
reasonable notice and during normal business hours, the Secretary of the United
States Department of Health and Human Services shall have the right to audit
PME’s records and practices related to the use and disclosure of PHI to ensure
compliance. Costs for all such requests will be the responsibility of the
COVERED ENTITY.
At termination of contract or upon request, PME will, if feasible, return or destroy
all PHI received or created as result of this contract and retain no copies. If return
or destruction is not feasible, protections against use or disclosure shall survive
this agreement.
NOTE: The first time you enter Sonova, you will automatically be
sent to the HIPAA configuration screen to set up your Administrator
password. For details on setting up HIPAA, please see the HIPAA
portion of this manual starting on page 27.
Page 3

SONOVA SOFTWARE
TABLE OF CONTENTS
Turning on your Flo-Lab and entering the Sonova software………………………Page 1
Starting a NEW PATIENT study…………………………………………………………………………………………………Page 2
View your patient database in STUDY ARCHIVES……………………………………………………Page 10
Utilities
Custom Sequence…………………………………………………………………………………………………………………Page 11
Export Patient Data………………………………………………………………………………………………………Page 13
Backup Patient Data………………………………………………………………………………………………………Page 14
Restore Patient Data……………………………………………………………………………………………………Page 15
Burning Backups to your CD Drive……………………………………………………………………Page 16
Restoring Backups from your CD drive…………………………………………………………Page 17
System Setup…………………………………………………………………………………………………………………………Page 18
Options
DICOM® Configuration……………………………………………………………………………………………………Page 21
Connecting your network cable……………………………………………………………………………Page 23
Temperature Sensor (for Raynauds)…………………………………………………………………Page 24
Dongle. About and Driver information…………………………………………………………Page 26
HIPAA Configuration………………………………………………………………………………………………………………………Page 28
Function keys used throughout Sonova…………………………………………………………………………Page 32
DICOM® is the registered trademark of the National Electrical Manufacturers Association for its standards publications
relating to digital communications of medical information
Page 4

SONOVA SOFTWARE
Sonova breaks testing into four separate study types or groups:
Lower Arterial
Venous
Upper Arterial
Carotid
Though each of these sections contains testing protocols that may be unique to that test type,
they also each contain patient data input sections that are virtually identical to one another. Entry
of Patient information and completion of the History sections, for example, follow identical steps
regardless of the type of study selected. This chapter deals with using those patient testing
features and sections which are common to all study types.
A. TURNING ON THE FLO-LAB
If not already in operation, turn on the main power switch on the right hand side of the
Flo-Lab cart. In most cases, this will “power up” all components/peripherals on the Flo-Lab.
NOTE: Because computer manufacturers are making changes rapidly and many are
moving toward the use of an electronic “ON/OFF” button, on some systems it may be
necessary to press the power button in the computer separately, after the main
system power has been activated.
B. ENTERING THE SONOVA PROGRAM
When the Flo-Lab / Computer is turned on, the user will see a typical computer bootup on the
screen, as the computer completes its self-checks. After several seconds, the computer will load.
Microsoft Windows (Win 95, 98, 2000, ME, XP and NT will all run the Sonova Software).
The system should now enter the Parks Sonova program automatically, flashing the Sonova
splash screen, and then presenting the user with the main menu.
From The Main Menu you can start a NEW STUDY. Pull up patients from STUDY ARCHIVES.
Configure Sonova, Backup and Restore patient data, set Custom Sequences in UTLITIES.
Sonova users manual page 1
Page 5
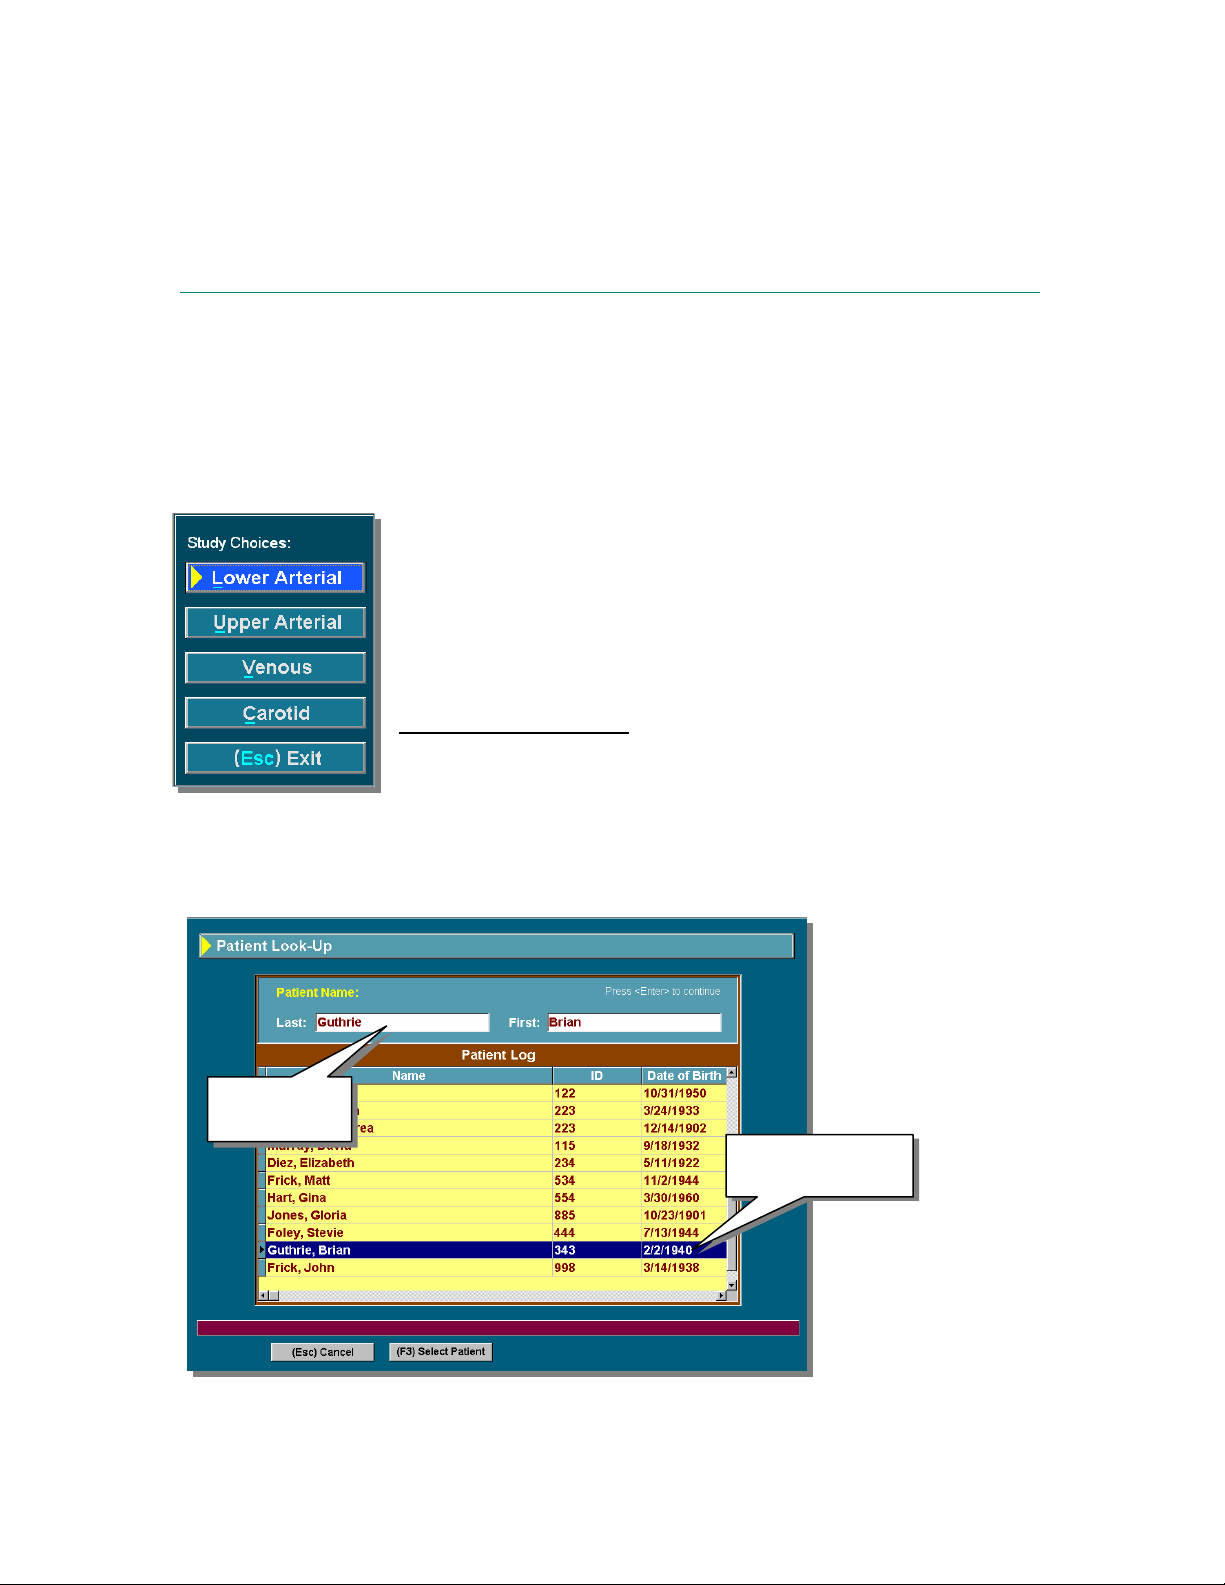
NEW STUDY
STARTING A NEW STUDY
Entering NEW STUDY will give you the choice of study types: History
questions, Patient information, Impressions and Output are all common
within each test
Once you enter one of the choices, you will enter the Patient lookup screen
Patient Look-up Screen:
Enter the patient’s name or select the patient from the list by scrolling
and double clicking on the patient’s name, or highlight patient’s name
and press F3 to select.
Input a new
patient name.
Or, Select from the
patient archive list
Sonova users manual page 2
Page 6
NEW STUDY
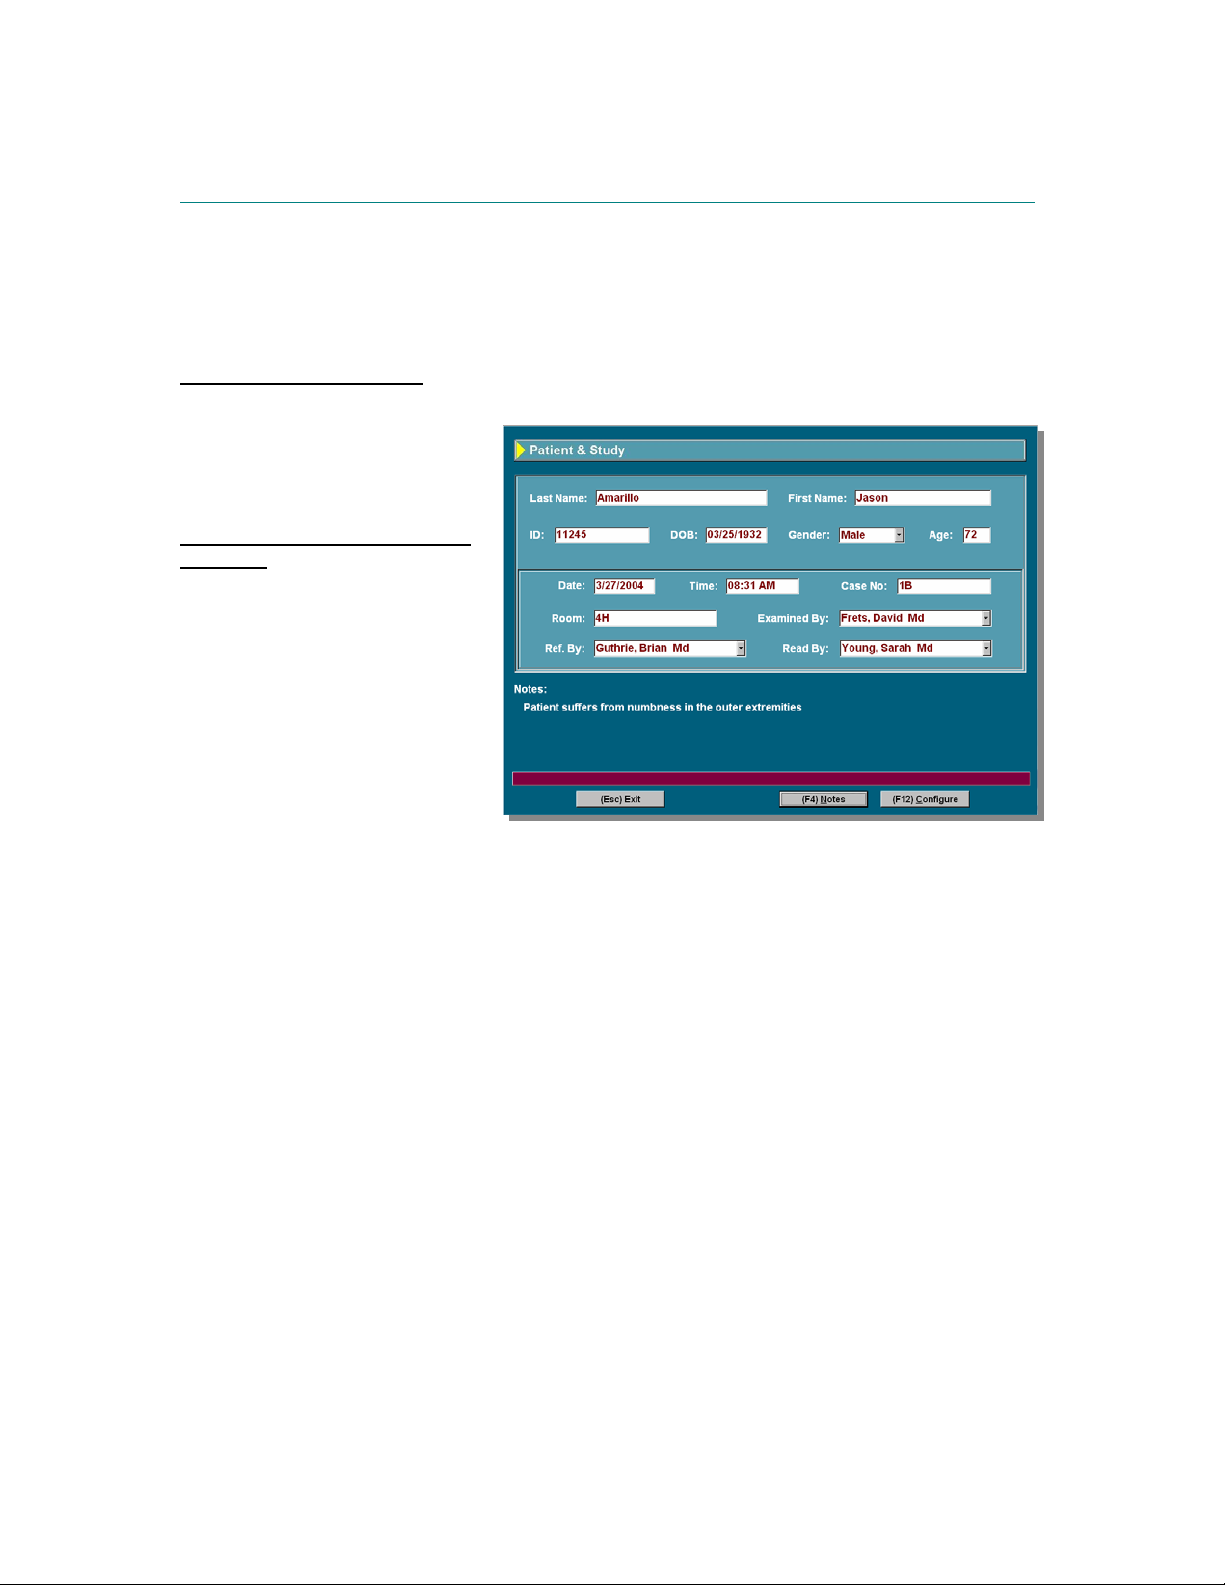
Once your patient is entered, you will move to the Patient and Study screen.
Patient and study screen:
Enter your patient’s information.
Once D.O.B. is entered, the age
will automatically appear. Current
Date and Time will be
automatically inputed.
Examined By, Referred By and
Read By:
To ADD a name in these fields:
Start typing the name. If the name
does not currently exist, NAME
AND CONTACT screen will
appear. Fill in all appropriate
information. Check one or all of
the three boxes at the bottom
(Exam By, Referred By or Read
By). The name will appear in the
drop down window on the
PATIENT AND STUDY screen.
To DELETE a name out of one or all of these fields: Choose the name you want to delete from
the drop down window (Exam By, Referred By or Read By). Press ALT+ENTER to bring up the
NAME AND INFORMATION screen. Uncheck any or all of the check boxes (Exam By, Referred
By or Read By) that you would like to delete the name from. Then exit.
F12 Configure – Allows user defined labels for the CASE NUMBER and the ROOM NUMBER. If
either of the current values is blank, that field will be removed from the PATIENT AND STUDY
screen.
F4 Notes – Brings up PATIENT AND STUDY NOTES screen. Type your patient’s notes.
F5 Save File – If you have frequently used notes, they may be saved as a file. After you type the
note, press F5. You will be prompted to enter a name for the file.
F4 Insert File – Choose the note file from the list; it will be placed where your cursor is located on
the PATIENT AND STUDY NOTES screen. To delete a notes file, single left click on the file to
highlight, then press delete.
F3 Spell Check – Press F3 to spell check your notes.
Sonova users manual page 3
Page 7

NEW STUDY
Once you have entered all pertinent patient information, press the escape key to enter the
MAIN MENU for your study type. From here you can enter your HISTORY, TEST SELECT,
IMPRESSIONS and REPORTER.
Returns to the PATIENT AND STUDY SCREEN.
Use TAB to highlight input window, highlight the appropriate
answer to the question by using arrow key and press ENTER.
You will automatically move to next question. If using the mouse,
point mouse and click on input window. The available answers
will drop down. Choose the correct answer by single left clicking on mouse. You will
automatically go to next question.
F3 Next Page –
F4 Notes - HISTORY NOTES screen. Type your patient’s notes.
F5 Save File – If you have frequently used notes, they may be saved as a file. After you type the
note, Press F5. You will be prompted to enter a name for the file.
F4 Insert File – Choose the note file from the list; it will be placed where your cursor is located on
the PATIENT AND STUDY NOTES screen. To delete a notes file, single left click on the file to
highlight, then press delete.
F3 Spell Check – Press F3 to spell check your notes.
F12 Configure – Configure history questions and answers
When you add categories,
they show up as tabs here
Select an answer
from the drop
down window
Sonova users manual page 4
Page 8

NEW STUDY
To add questions to categories,
choose the appropriate category from
the drop down box. Highlight and
Move the questions from the
“Questions” window to the “Selected
Questions” window by clicking on the
> button (>> will move all questions
From “Questions”
to the “Selected Questions” window.
To remove questions from the
category, highlight the Question in the
“Selected Questions” window and
click on the < button. (<< will move all
questions From “Selected Questions”
to the “Questions” window).
F2 CATEGORIES:
To add a category, click on the “Category” input
box and enter the title of the new category;
Press ENTER. The new category will appear in
the list.
To delete a category, single left click on the
category to be deleted then press F5 to delete.
With a category
highlighted, Press F5
to delete.
Sonova users manual page 5
Page 9
NEW STUDY
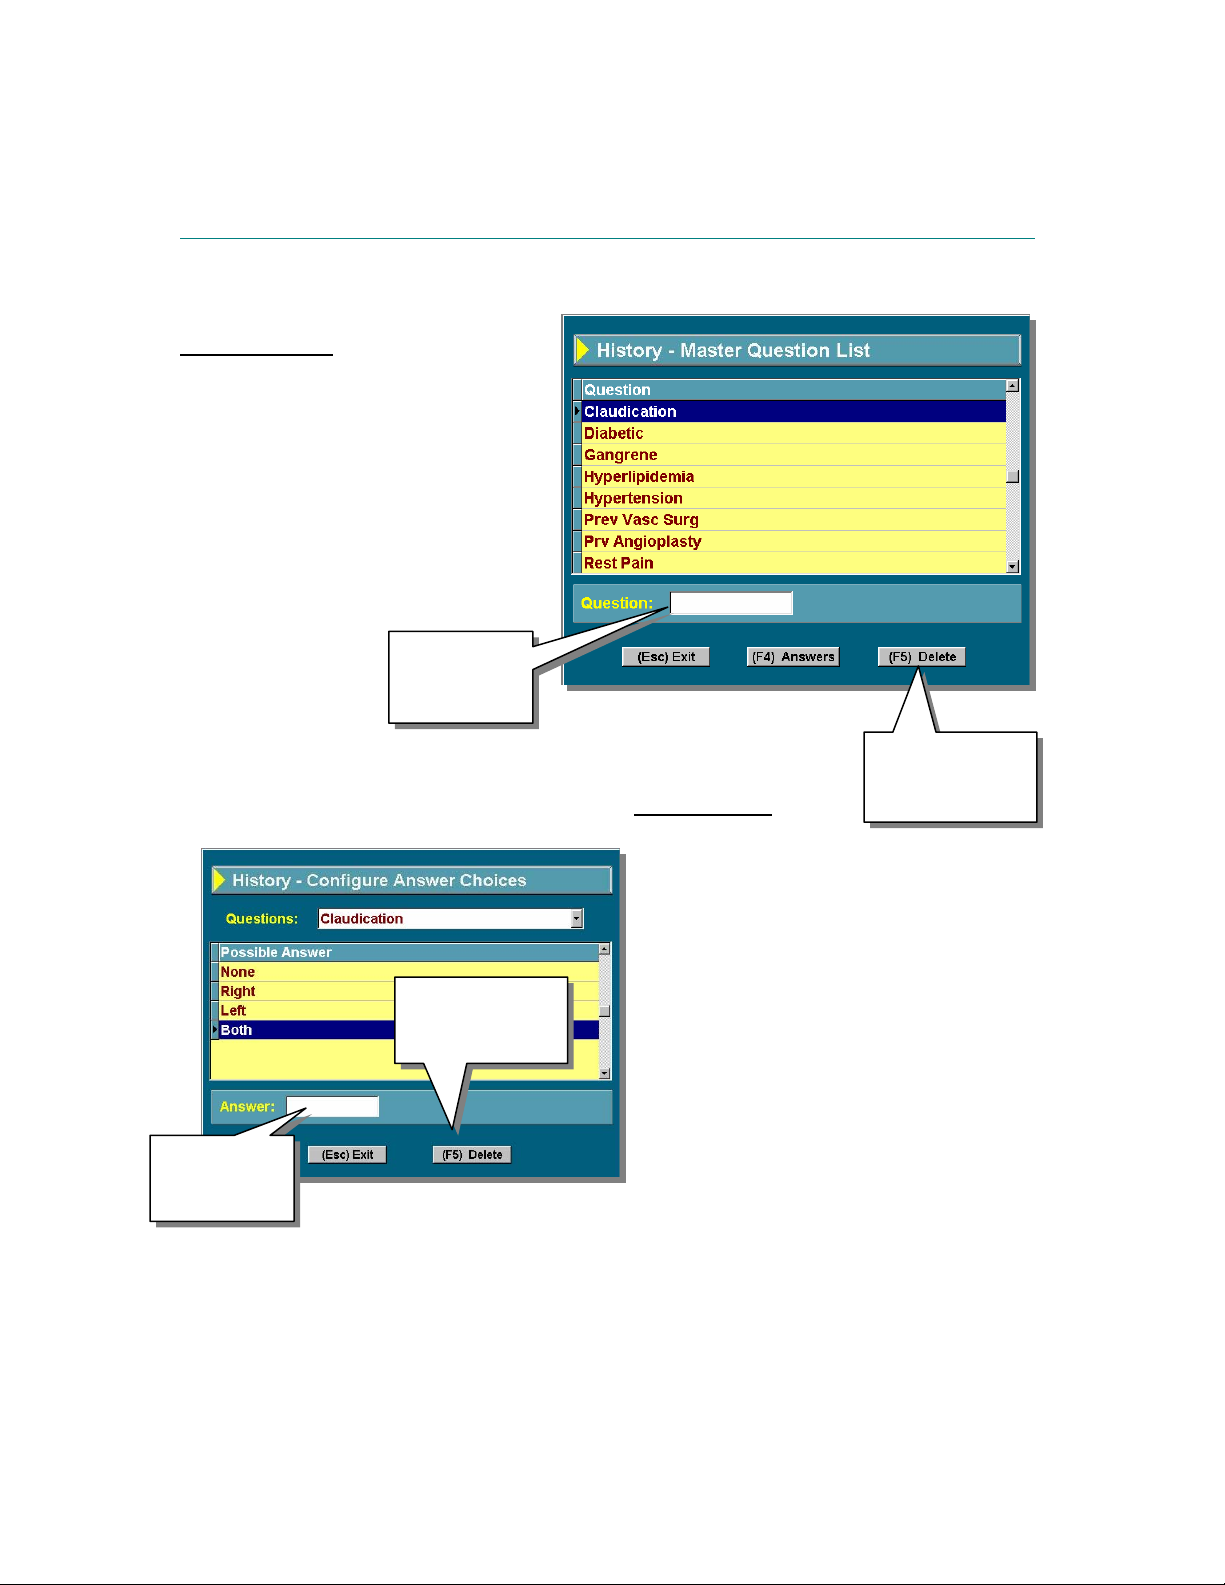
F3 QUESTIONS:
To add a question, click your mouse on
the “questions” input box, type the
question and press ENTER. The
question will show up in the question list.
To delete a question, Use Mouse or
arrow keys to scroll up and down in the
question list. Single left click on the
question to be deleted to highlight then
press F5 to delete.
To add or modify or delete answers, choose
Enter answers
in the input
box.
To Delete answers, Click on desired answer in the “Possible Answer” list to highlight,
then F5 to delete.
Enter new
questions in
the input box.
F5 will delete the
highlighted
question.
Sonova users manual page 6
F5 will delete the
highlighted
answer.
F4 ANSWERS:
the question in the “Question” drop down box
by single left clicking on the input box and
scrolling up or down until you find the desired
question. Click on it to highlight.
To Add answers, type each answer in the
“Answer” input box then press ENTER.
Repeat until all answers for that question are
located in the “Possible Answer” list.
To modify current answers, click on the
answer in the “Possible Answer” list and
make your change in the “Answer” window.
Press ENTER and the change will appear
in the list.
Page 10
NEW STUDY
Takes you into the tests for the study type that you chose.
(IE: LOWER ARTERIAL – Pulses, Doppler, VPR…etc.)
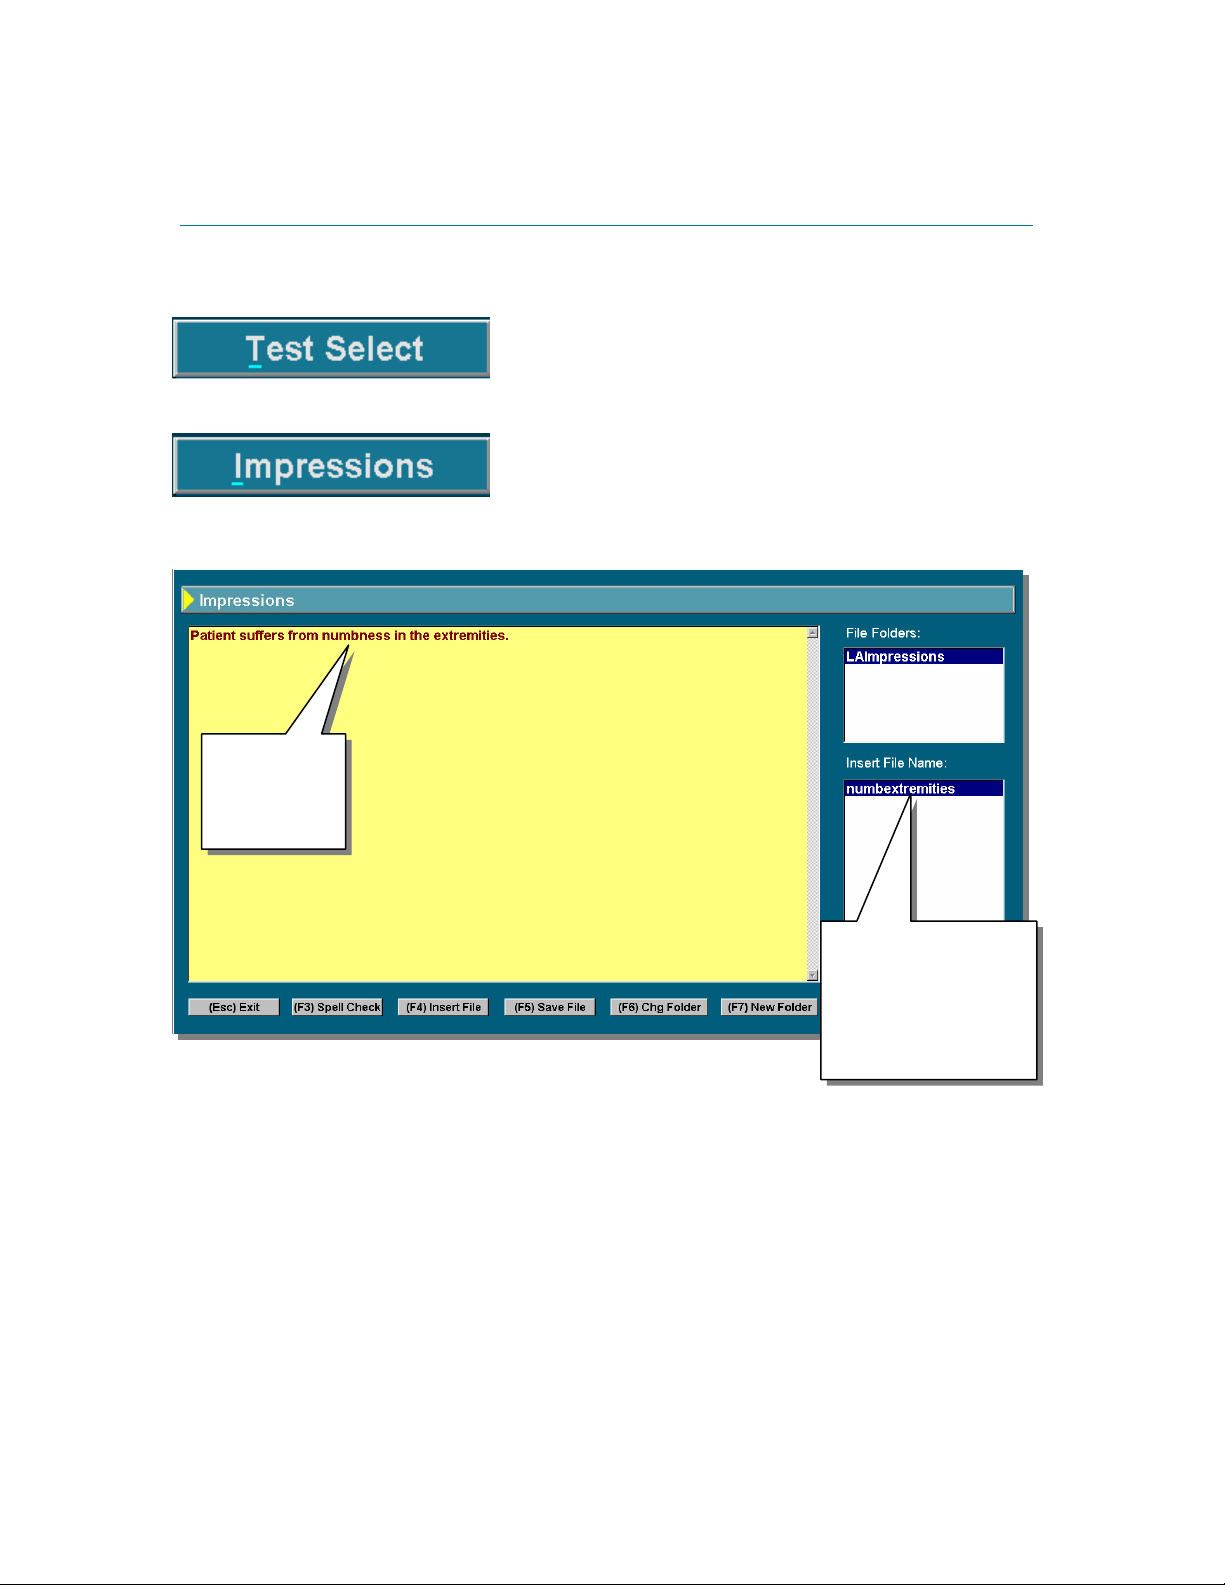
Enter impressions for patient. On exit, the impressions will
be located in the patient information screen.
Enter your
impressions
here on the
input screen.
Use your mouse to
click on the saved
note. The note will
appear where your
cursor is located on the
F3 Spell Check - Spell check after you have typed your notes.
F4 Insert File - Double click the saved note from the “Insert File Name” window. The note will be
placed on the Impressions screen wherever the blinking cursor is located.
F5 Save File - You will be prompted to enter a file name. This will save anything typed in the
Impressions window to that file name. It will be stored in the “Insert File Names” window.
F6 Change Folder - Highlights the “File Folder” window. Double click on the folder you want to
activate.
F7 New Folder - Prompts you to type a new folder name. The folder name will appear in the
“File Folders” window. Each file in this window will have different “File names” stored within them.
input screen
Sonova users manual page 7
Page 11
NEW STUDY
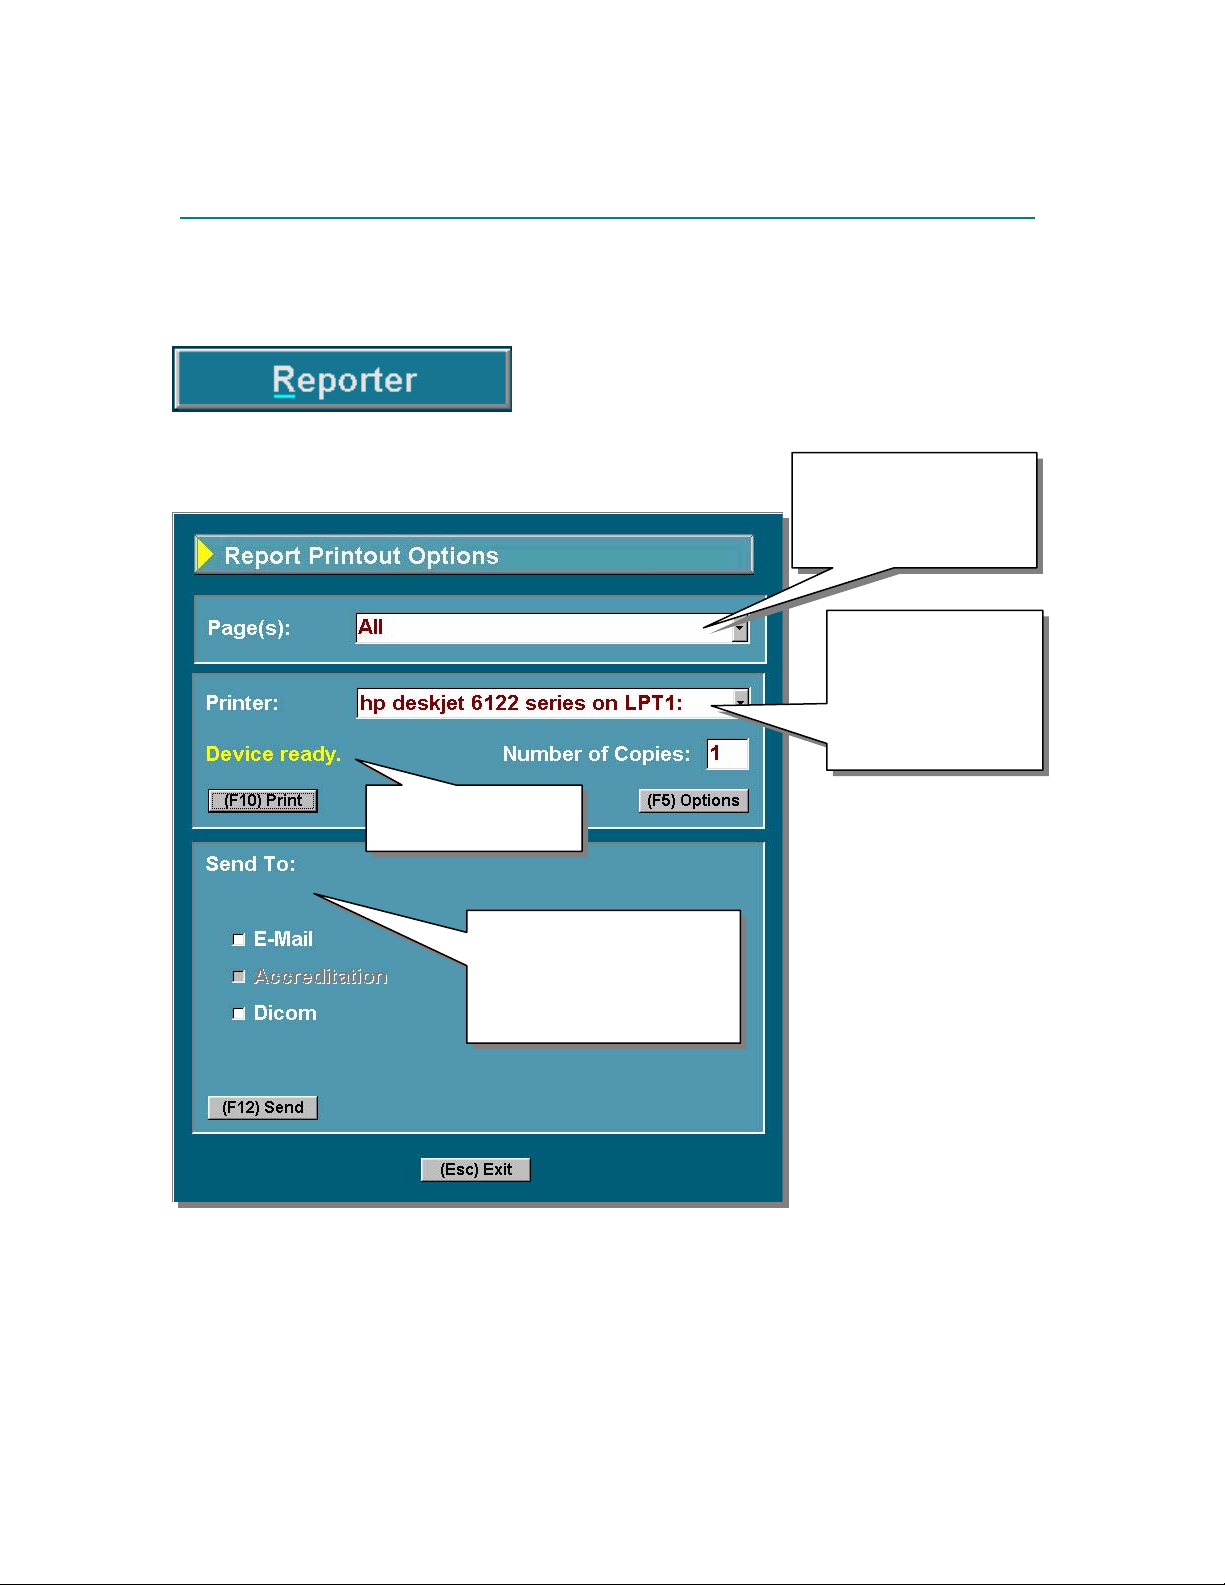
Reporter allows you to output your patient studies to your
printer, e-mail, accreditation software or DICOM®
(Optional)
Let’s you know your
printer is ready to print
These “Send to” options
allow you to send your
reports to e-mail,
accreditation software or to
DICOM
windows default printer. To print your report as a PDF file, choose SINGLE PDF from the drop
down menu. Your full report will be stored on the systems on-board computer whereever you
have designated.
Number of Copies: Select the number of copies of the report you want printed.
Send to: Send the report to e-mail (see below), accreditation software or to your DICOM
(Optional).
® (Optional).
Print ALL pages of the
report. Click on the
dropdown arrow to select
individual test to print.
This is the printer you
will print to. Click the
dropdown arrow to
select other printers
connected to your
system.
Once you enter the
“Report Printout Options”
screen, Press F10 to start
printing.
Page(s): To print only
specific pages of the test,
click on the drop down
arrow and select the test
you want to print. All is
the default and will print
the entire test.
Printer: Allows you to
select the printer that you
want to print to; this
includes network printers.
The default is the printer
you have selected as your
® server
Sonova users manual page 8
Page 12
NEW STUDY
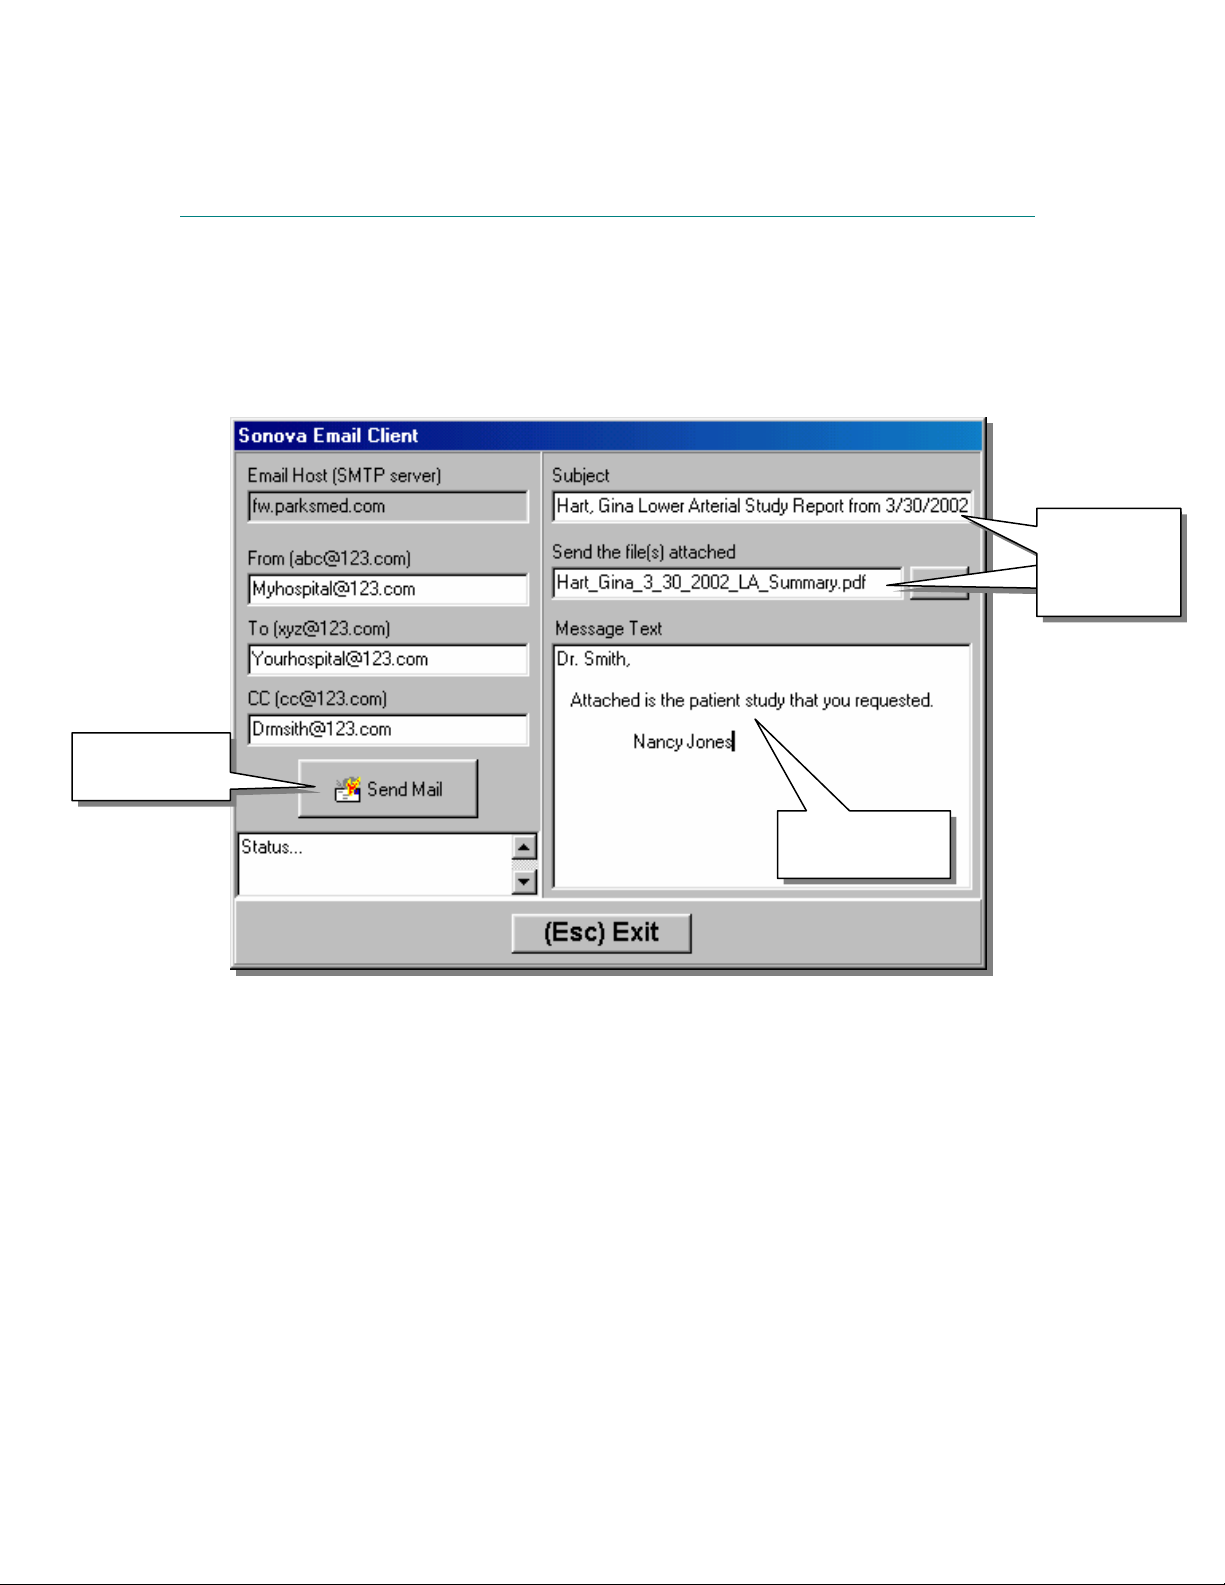
You may e-mail your patient’s test simply by typing the e-mail address of the person you want to
send it to in the “To” input window, then type your message and click the send button. The test
will be e-mailed to the recipient in Adobe Acrobat PDF format.
Subject and
Send are
automatically
filled in
Click here to
send the e-mail
E-mail Host: Enter the your e-mail host (SMTP Server name) here.
From: Enter the e-mail address you are sending the data from. Defaults to the last address
entered.
To: Enter the e-mail address of the person you are sending the data to. Defaults to the last
address entered.
CC: (stands for Carbon Copy) This sends a copy of the data to another address that you also
want to see the data.
Subject: Displays the patient’s name, test and date on the subject line of the recipient. This is
done automatically. To change the subject, click on input box with mouse and enter a new
message.
Send the file(s) attached: Shows you what files are going to be sent.
Message text: Type in a message for the recipient.
Send mail (Button): Sends your e-mail to the recipient.
Type your e-mail
message here.
Sonova users manual page 9
Page 13
STUDY ARCHIVES
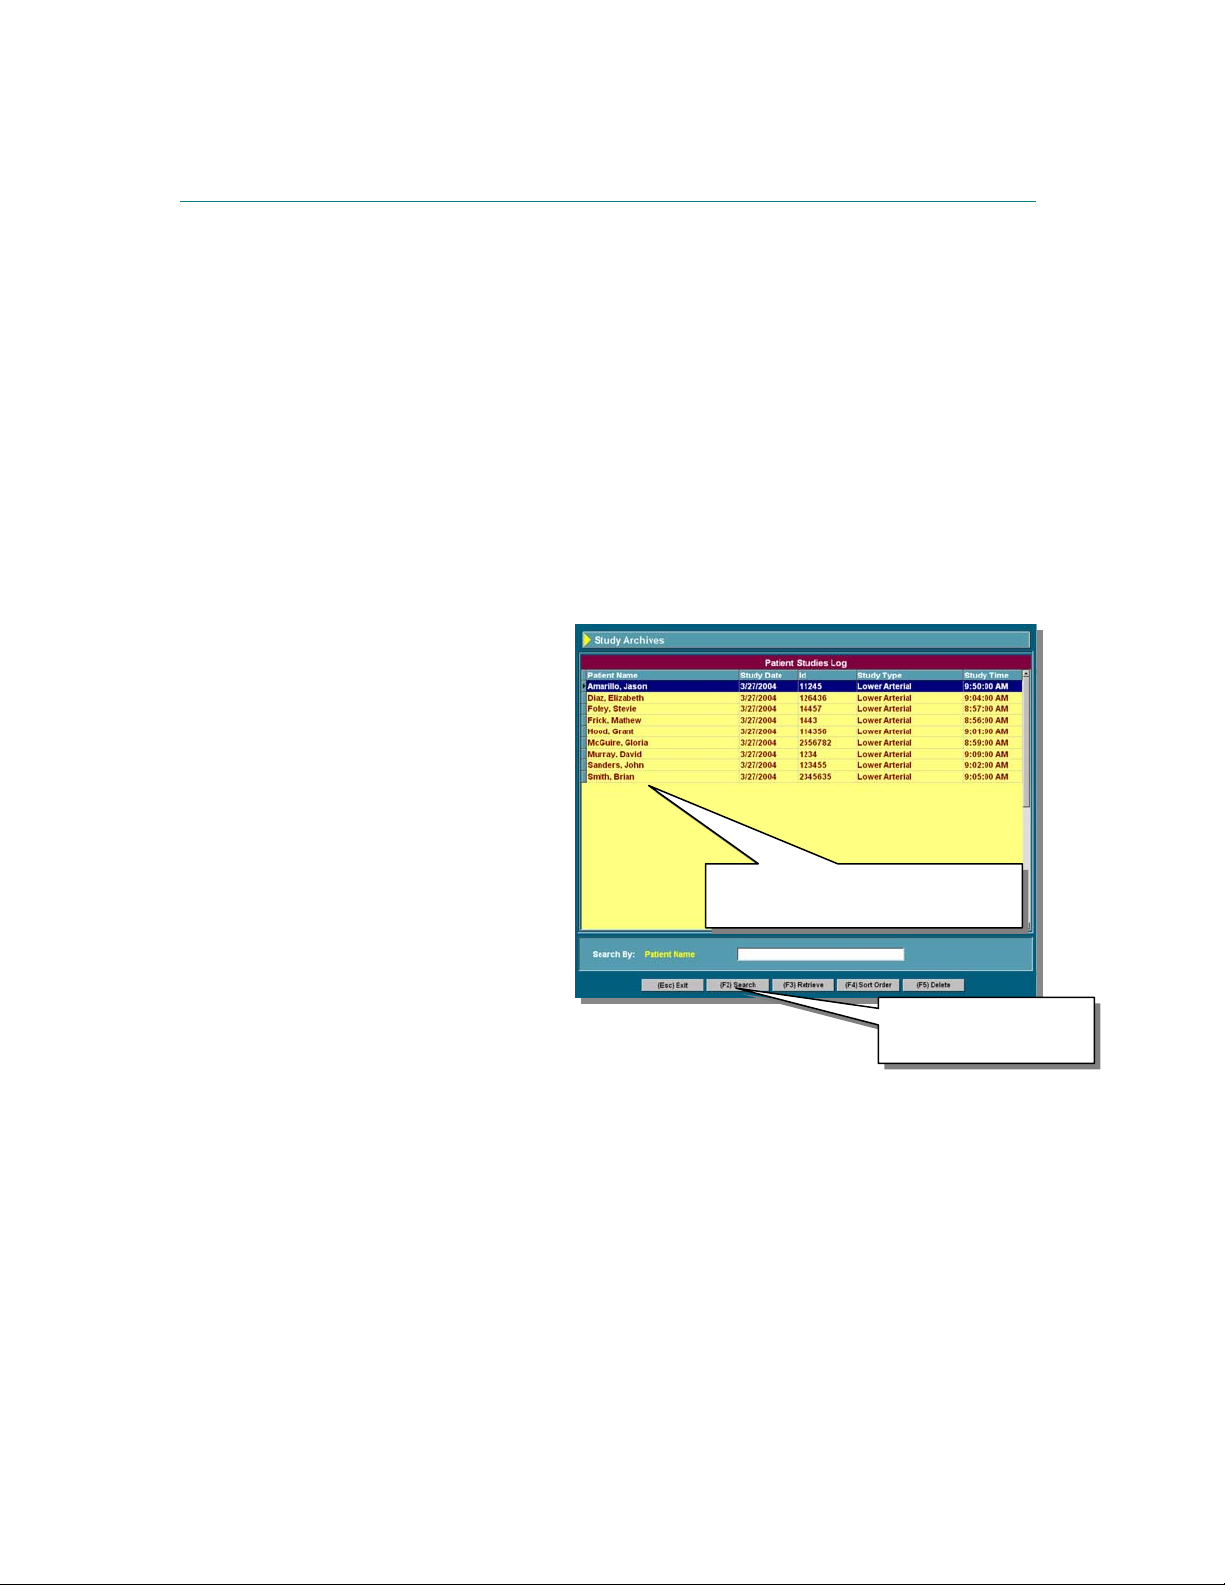
Enter Study Archives to retrieve a previously stored patient.
Scroll up or down by using the mouse or the keyboard. Double-click on desired patient, or
highlight the patient and press F3 to retrieve. You will be prompted “You are about to retrieve an
archived patient… continue?” “No” will cause the question box to disappear, “Yes” will pull up this
patient’s tests and bring you to the report screen.
F2 Search
Activates the “Search By” window.
The type of search is dictated by your sort
order (see F4 Sort Order below). You will
always be searching the first column of
data under your “Patient Study Log”. As
you type in the “Search By” input box, the
program will locate everything equal in the
patient list.
F3 Retrieve
Pulls up the highlighted patient’s study
from the archives and takes you to the
report screen.
F4 Sort Order
Every time you press F4, the Patient
Study Log order is sorted by Patient
Name, Study Date or ID.
F5 Delete
Find the patient by either scrolling through the patient names or by pressing F2 Search. With
desired patient highlighted, press F5 Delete to remove the patient from the archives.
Select your patient from the list.
Click on or press F3 to retrieve.
Or, enter patient name
to search
Sonova users manual page 10
Page 14

UTILITIES
UTILITIES allows you to maintain the Sonova software and patient data. Within UTILITIES, you can SET
CUSTOM SEQUENCING, BACKUP PATIENT DATA, RESTORE PATIENT DATA and set up the Sonova
software in SYSTEM SETUP.
CUSTOM SEQUENCE
To Set up a custom sequence:
1. Choose your study type (lower Arterial or Upper Arterial). Press ENTER.
2. Give your Sequence a name. This can be any name you want (IE: Persons
name, Protocol…etc). Press ENTER.
3. With the “Available Sites” window active, scroll through the list of tests and
single click on the test you want. This will highlight it. Click on the > button to
move it over to the “Acquisition Sequence” Window. Continue until all tests you
want are in the “Acquisition Sequence” window.
Sonova users manual page 11
Page 15

UTILITIES
4. The list in the “Acquisition Sequence” window is the sequence the tests will be done. To move
one of the tests higher or lower in the list, click on the test to highlight it, then use the “red” arrow
keys to move it up or down until it is where
you want it.
5. Once the sequence is in the order that you want in the “Acquisition Sequence” window, Press
F2 to save. ESC to exit.
Description of arrow buttons within Custom Sequence
Moves the highlighted acquisition site from the “Available sites” window to the “Acquisition
Sequence” window.
Moves all of the acquisition sites from the “Available sites” window to the “Acquisition Sequence”
window.
Moves the highlighted acquisition site from the “Acquisition Sequence” window to the “Available
sites” window.
Moves all of the acquisition sites from the “Acquisition Sequence”” window to the “Available sites”
window.
Moves the highlighted acquisition site up in the list. This allows you to customize the list in any
order you want.
Moves the highlighted acquisition site down in the list. This allows you to customize the list in any
order you want
TO ACTIVATE CUSTOM SEQUENCING: Enter patient information as normal. From the “TEST
CHOICES” screen, click on the “CUSTOM SEQUENCE” button or press “C” (hot key). Choose
the sequence name you want to activate by using the arrow pad and ENTER (either on keyboard
or 18-B remote) or by double clicking. Your sequence will begin. Once your sequence is
finished, you will automatically be put into the report screen. Note: The “Custom Sequence”
button will not be visible unless you have at least one Custom Sequence entered.
Sonova users manual page 12
Page 16

UTILITIES
EXPORT DATA
1. Choose the drive you want to export to
This is the drive
the data will be
exported to.
Type a date range to export.
Once the export is complete, the files will be located on the drive that you specified in a folder
called SONOVA_EXPORT.
by clicking the drop down arrow. You
will see a list of available drives
including network drives (if connected
to a network). Click on desired drive
and it will appear in the “AVAILABLE
DRIVES” window.
2. Choose an export type by clicking on the
down arrow and clicking on the export type
with your mouse.
3. Choose what you want to export. “Date
Range” will allow you to type a specific date
range to export. “All” will export all patient
data.
4. Press (F2) on keyboard or click the
“EXPORT” button with mouse.
Sonova users manual page 13
Page 17

UTILITIES
BACKUP PATIENT DATA
1. Choose the drive you want to
backup to by clicking the drop
down arrow located under
“Available Drives”. You will see a
list of available drives including
network drives (if connected to a
network). Click on the desired
drive and it will appear in the
“AVAILABLE DRIVES”
window.
2. Select what you want to backup -
PATIENT DATA will back up the
patient studies; SYSTEM
SETTINGS will back up
your history questions,
saved notes, custom
sequencing and labels.
3. Choose a date range. Click
the “YEAR” drop down box
and select the available year.
Click the “MONTH” dropdown
box and select the available
months.
4. If you want to backup all patient
data, click on “ALL”.
5. Press (F2) on keyboard or click the “BACKUP” button with
mouse. The Back up progress will be displayed, then disappear when finished.
This is the drive your
data will backup to.
“All” will backup all
patient data.
Sonova users manual page 14
Page 18

UTILITIES
RESTORE PATIENT DATA
1. Choose the drive
you want to
restore from by
clicking the drop
down arrow. You
This is the drive your
data will restore from.
“All” will restore all
patient data.
3. Choose a date range. Click the “YEAR” drop down box and select the available year. Click
the “MONTH” dropdown box and select the available months.
4. If you want to restore all patient data, click on “ALL”.
5. Press (F2) on keyboard or click the “RESTORE” button with mouse.
will see a list of
available drives
including network
drives (if
connected to a
network). Click on
desired drive and
it will appear in the
“AVAILABLE
DRIVES” window.
2. Select what you
want to restore.
PATIENT DATA:
will restore the
patient studies.
SYSTEM SETTINGS:
Will restore your
history questions,
Saved notes, Custom
Sequencing and
Labels.
Sonova users manual page 15
Page 19

Page 20

___________________________________________________________UTILITIES
BURNING BACKUPS TO CD
NOTE: This utility was released 09/18/06. If your Flo Lab was manufactured previous to this date, please
call the factory and we will direct you in getting you the software.
1. Perform a regular patient and/or system backup to your C: drive. Please follow instructions as
explained on page 14. Once finished, Exit the Sonova program
2. Go to the START button (located on your task bar in the lower left portion of your screen) Then go to
PROGRAMS, SONOVA FOR WINDOWS and SONOVABURN. The following window will appear.
Will only burn
patient and system
settings that have
been backed up to
the C: drive.
3. Select a drive to back up to from the drop down list. Your burnable CD drive should usually be the
default.
4. Select the type of backup you want to burn onto the CD. “Burn only backup files” will burn your latest
backup to the CD. “Backup all of Sonova files”. This will backup your entire Sonova folder. These are
all the files it takes to run Sonova including your patient data and system settings.
5. Make sure you have a blank CD in the CD drive and Click the BACKUP button. Once the Files are
burned onto the CD, the CD tray should open. You now have all of your backups on CD.
If you explore the CD, you will find one folder for patient backups and one for complete Sonova backups.
Within each of those folders, is a folder for each time that you have made a backup. These are labeled by
date and time. You can put several of each type of backup onto one CD. The next section will explain how
to restore this data.
Will burn the
entire vipwin1
folder to CD
Sonova users manual page 16
Page 21

__________________________________________________________UTILITIES
RESTORING BACKUPS FROM CD
1. Make sure that the Sonova program is not currently running.
2. Insert the CD that contains the backup(s) that you want to restore.
3. Go to the START button (located on your task bar in the lower left portion of your screen) Then go to
PROGRAMS, SONOVA FOR WINDOWS and SONOVABURN. The “So nova CD Backup” screen
will be displayed.
4. Select a drive letter to restore from by clicking the drop down arrow - Your CD drive should usually be
the default.
5. Select a temporary drive letter – This is a temporary drive that does not exist on your system. It will
temporarily be created for the restore. In most cases, the current drive displayed will work.
6. Click on the “Restore to Drive” button. The following window will appear.
Click the drop down button to
view, then select the date of
the backup that you want to
restore. Then click OK.
7. Choose the date of the backup that you want to restore, Then click OK – The backup will get moved to
the Temporary directory that you chose. When complete, The following message will appear.
This window confirms that the restore you
have chosen has successfully been copied to
the temporary drive. In this case, the drive is
F: You will need to remember this drive
letter for step 11.
8. Click the OK button on the “Copy Complete” window.
9. Double click on the Sonova icon on your desktop to enter the Sonova software.
10. Click on UTILITIES then RESTORE
11. Select the temporary drive letter from the drop down window.
12. Choose to either restore patient data or system settings.
13. Choose to restore ALL patient data or select a date range to restore.
14. Press F2 or click the Restore button – The data will be restored into Sonova. You will see a %
progression as it restores.
15. When the restore is complete, Exit or minimize the Sonova software.
16. The Sonova CD Backup window should still be present. Click the Finish Restore button.
Your restore is now complete.
Sonova users manual page 17
Page 22

UTILITIES
CLIENT INFORMATION TAB
Input your facility
information (Name and
address). This information
will be visible as the
Type your hospital info here. It
will appear on the splash screen
as Sonova is loading.
Clicking here allows you to
select a report header.
Address
displayed
on splash
screen.
1. Click on the “REPORT HEADER BITMAP” button.
2. A window will appear that is pointing to the VIPWIN1
folder on your system. Double click on the .bmp file in
the window. (The name of the file is usually “your
hospital name” .bmp). Once you exit, you will be able
to see the header on the report screen and it will print
at the top of your reports.
HEADERS: Headers can be created by you. With a little work in the Windows PAINT utility, you
can develop a custom header. The only requirement is that the area for the header must be no
bigger than 760X72. You can import your hospital logo and add text to it. Once you have saved
it, place the file in the C:\PROGRAM FILES\VIPWIN1 folder, then follow the instructions for
loading your header bitmap.
SONOVA software is
loading.
REPORT HEADER
BITMAP.
To install a header that will
appear on the top of the
first page on your printed
reports (also on the report
screen).
Sonova users manual page 18
Page 23

UTILITIES
COMMUNICATION TAB
FloLab Serial Port: Allows
you to select the serial port
that opens communication
between the FloLab and
the on board computer.
Default is COM1.
Thermometer Serial Port:
Allows you to select the
serial port that opens
communications between
the Temperature Wand
(OPTIONAL) and the onboard computer. Default is
COM2.
MPI Card Type: Allows you
to select the type of
interface card that is
located inside the onboard computer, this runs the (OPTIONAL) Multi Port Inflation system (MPI).
Default is PCI.
MPI Auto Step Delay: Allows you to select the delay time of the MPI (OPTION) auto step feature
(see AUTO STEP in Sonova Functions section). Default is 1500.
Sonova users manual page 19
Page 24

UTILITIES
POST EXERCISE TAB
Option A lets you
Option A lets you
use both hose sets to
use both hose sets to
perform the exercise
perform the exercise
test
test
MPI option B
lets you
perform the
exercise test
using only
one hose set.
Sonova users manual page 20
Page 25

______________________________________________________________OPTIONS
DICOM CONFIGURATION
Note: This instruction is only valid if you are running the Sonova Startup Utility Version 5.0 or above.
To load version 5.0 of the Sonova Startup, insert the Sonova install disk Rev F into your computer’s CD
drive. Click on INSTALL SONOVA UTILITIES then click on INSTALL SONOVA STARTUP v5.
Follow the onscreen prompts to complete the installation.
1. Enter the Sonova program and go into UTILITIES, SYSTEM SETUP and then click on the DICOM
tab. The following screen will appear.
2. Select localNetwork Drive, then click on the CHANGE PATH Button. In the Select Directory input
box type C:\SonovaDicom\ . Click OK then Exit the System settings screen and exit the Sonova
program.
3. Click the Start button located in the lower left portion of your screen. Then click on PROGRAMS,
SONOVA FOR WINDOWS and DICOM SERVER SETUP. The following window will appear.
Change Path to: C\SonovaDicom\
Choose Local/Network Drive
Sonova users manual page 21
DICOM Tab.
Page 26

______________________________________________________________OPTIONS
DICOM CONFIGURATION
4. Click on Add new Server. An input box will appear. Enter a server name and click OK. Note: This is
a descriptive name of the server you are sending to. It is not any part of the configuration used in
transferring the file.
5. Choose either DNS Name or IP Address under SCP Configuration. Then add the correct name or
address in the input box.
6. Enter the port
7. Enter the SCP AE Title.
8. Enter the Sonova AE Title. The default is SONOVA However it can be changed to meet your facility’s
needs.
9. Use this server – If this is checked, this patient study will send to this server every time you send to
DICOM. You can send to one or all of the servers that you have entered.
10. Click the Test Configuration button. This will ping the server you have set up and let you know if it
successfully communicates.
Note: The information entered into steps 5 through 9 should be provided by your PACS
administrator or IT department.
Sonova users manual page 22
Page 27

______________________________________________________________OPTIONS
CONNECTING THE NETWORK CABLE
Connecting the 14’ network cable to the back of the Flo Labs on board computer allows you to transmit
patient data to your DICOM system. It can be done in four easy steps and requires only a phillips head
screwdriver.
STEP ONE – Using the screwdriver, remove the three screws that hold the back door closed. Once the door
is open you will have access to the computer. Also open the access door that will reveal the back of the
computer. This is located on the left side of the Flo Lab and can be opened by unscrewing the two
thumbscrews.
This illustration shows the back of
the computer. Not all will look
exactly the same but will be similar.
Here you can see the different
components plugged in.
(IE: Printer, Monitor, etc.)
STEP TWO – Connect the 14’
cable to the Ethernet adapter
(network plug).
STEP THREE – Route the
cable behind the computer
strap , then through the
hole on the lower end of
the back door where the
power cord is routed.
STEP FOUR – Close the back door of
the Flo Lab and replace the three phillips
head screws. Then close the access door
and hand tighten the two thumbscrews.
Once you plug the Ethernet cable into
your facilities network port, you will be
ready to set up Sonova to send to your
DICOM (PACS) system.
NOTE: To complete the setup for your DICOM option, refer to the DICOM
and DONGLE set up in the OPTIONS portion of your Sonova manual.
Sonova users manual page 23
Page 28

OPTIONS
TEMPERATURE SENSOR OPTION (For Thermal Raynauds)
Before your temperature sensor can be used, you must insert the USB dongle that came with the
sensor into one of the USB slots on the back of your on-board computer. If this is not in place, the
thermal test for Raynauds will not exist within Sonova.
To install your temperature sensor, open the access door on the left side of your Flo Lab. This will
reveal the back of your on-board computer. Insert the serial cable end of the sensor into the B
serial port on the back of the 2100’s computer.
The first time you enter the Raynauds test, it will be set for Raynauds pressures. To enter the
Thermal screen, Press F6 Sonova will remember what test you were in
last (Thermal, Pressures or Waveforms) and will always enter into that
test.
To configure time labels,
Press Alt+F11.
F2 - Jumps you to the left side if you are on the right side and to the right side if you are on the
left side.
F3 - Opens up your acquisition boxes for manual entry.
F5 - Jumps you to Raynauds Waveform test
F7 - Resets your timer.
F11 - Jumps you to the Raynauds Pressures test.
Alt+F11 – Allows you to change the time labels to fit the protocol of your vascular lab.
With the sensor on a digit, press and hold the
sensor button until the temperature displays
here. Also, the “Temperature Gun Status” light
will turn red indicating that the temperature has
been acquired.
Once you release the
button, the reading
will display in the
appropriate box.
Sonova users manual page 24
Page 29

OPTIONS
TEMPERATURE SENSOR OPTION (For Thermal Raynauds)
As you can see from the example to
the right, The printed report generated
is in the same format as the test
screen.
Your Temperature sensor can display the temperature as Fahrenheit or Celsius. To change the
setting, enter UTILITIES from Sonova’s opening menu. Next enter SYSTEM SETUP. Once in
system setup, you will see folder tabs along the top of the window. Click on the
COMMUNICATIONS tab and you will see the following:
Patient’s
Identification
number.
Configuration Tab
Check this box to have
your temperature display
in Celsius
Use your mouse to put a check in the box to make your temperature display in Celsius. If the box
is unchecked, your temperature will display in Fahrenheit.
Sonova users manual page 25
Page 30

OPTIONS
USB DONGLE
What is a USB Dongle? The dongle is a device that when inserted into your Flo Lab’s on-board
computer, enables the use of such options as DICOM and the Temperature thermometer for
Raynauds testing. These dongles are programmed here at the factory for your facility and the
options that you have purchased. Currently, all new Flo Labs ship with a dongle already inserted
into your on-board computer. If you decide that you want to purchase one or more of the Sonova
options, we will send you a file that will update your dongle for that option(s). NOTE: If your
dongle is not inserted into the on-board computer, your options will not
USB Option
enabling Dongle.
This illustration shows the USB Dongle
inserted into one of the USB ports on the
Flo Lab’s on-board computer.
Loading Windows
All Flo Labs are now being shipped with all drivers loaded. If you have purchased
one or more of the Sonova options separate from your Flo Lab, you may need to load the driver
for the dongle.
® drivers for your Dongle.
Windows® XP
While in Windows and Sonova not running. Plug the USB dongle into one of the on-board
computer USB slots. If the driver is not loaded, A “Found new hardware wizard” window will
appear (if driver is loaded, you will not get this message).
Check the “not at this time” box then click on NEXT.
At the next screen check “Install from a list or specific location (advanced)” box, then click NEXT
At the next screen check “Include this location in the search” Then click the BROWSE button.
Browse to: Local disk C:, program files, vipwin1. Then click on the OK button.
This will bring you back to where you browsed from. Click NEXT
The Drivers will now load. Once complete you can click on the FINNISH button and you may now
start using the Sonova options that you have purchased.
exist in Sonova.
Sonova users manual page 26
Page 31

OPTIONS
USB DONGLE
Windows® 98
To load the drivers into Windows 98 is a two step process.
STEP ONE:
While in Windows and Sonova not
computer USB slots.
Double click on the MY COMPUTER icon found in the upper left hand portion of your screen.
Double click on the CONTROL PANEL icon.
Click on the DEVICE MANAGER tab.
Double click on “USB Dongle software protection device”. There should be a yellow “!” to the left
of it.
Click on UPDATE DRIVER button.
In the “update device driver wizard” window click NEXT.
At the next screen, check “search for a better driver than the one you are using now” and click
NEXT.
At the next screen choose “specify a location” then click the BROWSE button.
Browse to C:, program files, vipwin1. Then click OK.
You should be at the screen that you browsed from. Click on Next.
At the next screen click on FINNISH.
STEP TWO:
Insert the Sonova 3.51 full build into your CD drive in your on-board computer. When the installer
starts to auto load, Press CANCEL.
Double click on the MY COMPUTER icon in the upper left hand portion of your computer screen.
Right click on the CD ROM icon and choose EXPLORE from the list.
Double click on PROGRAM FILES folder, then the VIPWIN1 folder, then the DONGLE DRIVERS
folder.
Right Click on the USBINSTALL file and choose COPY.
Click the BACK button until you can see all the drives on your computer (EG: C:, CD Drive, Zip
Drive..etc). Right click on your C: drive and choose PASTE from the list (This will paste the
usbinstall file to your C: drive).
Click on your Start button located in the lower left hand corner of your computer screen and
choose RUN.
At the input box, type “C:\usbinstall /b” and click OK.
At the “Work station Dongle installation” window, Click OK
You must now reboot your computer for this to take effect. Once your computer is back up, you
may now begin to use the Sonova option(s) that you purchased.
running. Plug the USB dongle into one of the on-board
Sonova users manual page 27
Page 32

HIPAA CONFIGURATION
The very first time that Sonova is entered. You will
automatically be sent to the Administration screen and
forced to enter your administrator password. You will
be prompted for this password every time you enter
the administration section to make changes or add
new users. The password you enter must be at least 6
characters in length.
The first time you enter
Sonova, you will get
this message…
…And forced
to enter an
Administrator
password.
You may now enter users and their passwords.
Assigning users and passwords:
Enter the names for Flo Lab users
in the “User Name” field. You
must then tab or mouse click to
“New Password” and enter a
password. Passwords must be at
least 6 characters in length. To
confirm the password, tab or
mouse click to “Confirm
Password”. Tab or mouse click
on the “ASSIGN” button. You
may add as many users as you would like. These user names and passwords will be used when entering the
program or terminating a lock out screen.
Change Administration Password:
current password. In the “New Password” box, enter the new password. The password must be at least 6
characters in length. Then confirm the password in the “Confirm Password” field.
To change the administration password you must first supply the
Sonova users manual page 28
Page 33

HIPAA CONFIGURATION
OPTIONS: There are four different options that you may password protect. Backups, exports, e-mails and
general.
General:
Screen Saver Timer: If there is no activity
with the Sonova program. A screen saver will
appear after the amount of time selected for
this field. When the screen saver is displayed,
Any key stroke or mouse movement will bring
you back to where you were in the Sonova
program.
Lockout timer: This sets the amount of time
it will take for you to be locked out of Sonova
and need a password to enter back in.
Example: Your screen saver timer is set for 10
minutes and your lockout timer is set for 15
minutes. After 10 minutes of inactivity with
Sonova. The screen saver screen will appear.
If there is an additional 15 minutes of
inactivity, the lockout screen will activate and
you will now be prompted for a password to
enter back into the Sonova Software.
Disable Administration: Checking this box will disable all HIPAA functions with Sonova. There will be
no passwords or screen savers that will appear. YOUR FLO LAB WILL NOT BE HIPAA COMPLIANT
AT THIS TIME.
Audit Log Location:
a user is prompted for an action (IE: “it has been 5 days since your last backup, Would you like to perform
a backup”. Yes or No, Your action will be logged.). This gives the administrator the ability to view who has
done what within Sonova. The Audit log Location allows the administrator to choose where they want this
log on the system. The default it C:\Program Files\VipWin1\Logs.
This option allows you to set your screen saver, lockout times and your audit log location.
Current audit
log location.
With this checked, you
will no longer be HIPAA
compliant.
The Sonova software allows the administrator to view a log of user actions. Any time
Sonova users manual page 29
Page 34

HIPAA CONFIGURATION
specify in this field). A YES answer will take you to the backup screen so that you can perform
the backup. A no Answer will exit you out of Sonova. NOTE: Either way you reply, it will be
logged in the audit log (see Audit Log Location above)
Disable Backup Prompt:
Sonova program.
Backups:
Enable The Backup Password protection:
Checking this box will enable the need for
passwords when backing up and restoring
patient data. If the box is unchecked, You will
NOT be prompted for a password when
backing up or restoring.
Password: Enter a password into the input box.
(in this example the password is BACKUP)
The user will be prompted for this password
when backing up or restoring patient data. T he
password must be at least 6 characters in length.
Backup Prompted Days: The Sonova program
takes note of when you do backups. As you exit
Sonova. It will prompt “It has been XX days
since your last backup. Would you like to
backup now Y/N”. (XX=the value that you
If this box is checked, You will not be prompted for a backup when exiting the
Sonova users manual page 30
Page 35

HIPAA CONFIGURATION
Exports:
Enabled Export Password Protection:
box activates password protection when using the
EXPORT function in Sonova. If the box is unchecked,
it disables the need for a password when exporting.
To enter a password for the export feature: Check
the “Enable Export Password Protection” box and enter
your password. The password must be at least 6
characters in length.
E-mails:
Enabled Attachment Password Protection:
Checking this box activates password
protection when e-mailing patient studies from
Sonova. If the box is unchecked, it disables
the need for a password when emailing patient
studies. to enter a password for the e-mail
feature: Check the “Enable Attachment
Password Protection” box and enter your
password. The password must be at least 6
characters in length.
Checking this
Sonova users manual page 31
Page 36

SONOVA FUNCTION KEYS
The function keys below work within most but not all tests.
Displays a help screen for your current location in Sonova.
Press F3 to display grading window. Select the appropriate grade using
arrow keys then press enter (or by clicking using the mouse). Press F3
to enter a custom grade.
NOTE: Grading option will not be visible until you are at a saved
wave site.
Type your patient’s notes for your current location.
F3 Spell Check – Press F3 to
spell check your notes.
F4 Insert File – Choose the
note file from the list, it will be
placed where your cursor is
located on the PATIENT AND
STUDY NOTES screen.
To delete a notes file, single
left click on the file to highlight,
then press delete.
F5 Save File –
If you have frequently used
notes, they may be saved as a
file. After you type the note,
Press F5. You will be
prompted to enter a name for the file.
To Insert a saved
note, press F4
from the Test
Notes screen.
Use arrow keys
to highlight
desired note then
press enter.
F5 will prompt you to
enter a file name for
your note.
Sonova users manual page 32
Page 37

SONOVA FUNCTION KEYS
Activates a dual wave screen. Pressing F5 again will activate a singe wave
screen.
Resets the timer located in the lower left portion of your screen.
Using the arrow keys (remote or keyboard), move to the saved wave that
you want to delete. Press F8. You will be prompted “Wave and grade will
be deleted, Yes or No”. Click on the “Yes” button and the wave will be
deleted. Click on “No” and there will be no change.
F9 on the keyboard or Freeze on the remote will freeze the current waveform
or pressure.
F10 on the keyboard or Save on the remote will save the frozen waveform
(see F9 Freeze) to the on board computer. The stored wave or pressure will
be printed on the report.
Depending on the test you are in, F11 and F12 may jump you to
different tests.
Will jump you to the Segmental BP section of Sonova.
Will jump you to the VPR section of Sonova.
Sonova users manual page 33
Page 38

SONOVA FUNCTION KEYS
The following can only be accessed by first holding the ALT key on the keyboard.
ALT F1 SIZE – Changes the size of the wave - X2. (100 to 50 to 25, etc.)
ALT F3 MOVE WAVE – Moves a saved wave to an unsaved site.
1. Before pressing ALT+F3, make sure
that the wave you want to move is
selected. (This is indicated by “> <” on
Wave will be
moved from
this site.
To one of
these empty
sites.
ALT F4 SWEEP SPEED – Every time you press ALT+ F4 your wave
speed will change. The rate of speed is by MM per second and the range
is 1, 5, 10, 25 and 50. The default is 25.
either side of the saved wave).
2. Press ALT+F3 and a “MOVE WAVE
FROM SITE” screen will activate.
3. The active site name should appear
in the upper portion of the screen.
Using the keyboard or remote arrows,
highlight the available site on the lower
portion of the window and press F2 to
move.
4. You will be prompted “You are about
to move a wave, Continue?” Answering
“YES” will move the wave to your
selected site. Answering “NO” will
cancel your move.
Sonova users manual page 34
Page 39

SONOVA FUNCTION KEYS
ALT F5 GRADE AS GO – If GRADE AS GO is “on”, a grading screen will appear as soon as the
SAVE button (or F9 on keyboard) is pressed. Select desired grade using the arrow keys (remote
or keyboard) then press ENTER (remote or keyboard). Press F3 to enter a custom grade. To
turn off GRADE AS GO, press ALT+F5 again.
Use arrow keys or
mouse to select proper
grade for wave.
Current site
that you are
grading.
Sonova users manual page 35
Wave to be
graded.
Page 40

SONOVA FUNCTION KEYS
ALT+F12 CONFIGURE – Allows you to fully configure the current test.
CONFIGURE SITE LABEL AND
SETTINGS screen to change a
label: Highlight the site name that
you wish to change by clicking on
it. The name will appear in the
LABEL input box. Type the new
label and press enter.
To Delete a label: Highlight the
site name that you wish to delete
by clicking on it. The name will
appear in the LABEL input box.
Remove the label and press enter.
To Change Modality: Highlight
the site name that you want to
change. Click on the MODALITY
drop down arrow and click on the
modality that you want for that
label (Doppler, VPR or PPG).
This modality will activate as you
perform your doppler test.
F2 OPTIONS – SITE
SETTINGS screen:
Choose a site to configure from
the SITE drop down box.
Highlight what you want to
change from the OPTIONS
panel. Click on the setting you
want from the list in the
SETTINGS panel.
Sonova users manual page 36
Page 41

SONOVA FUNCTION KEYS
F3 SEQUENCE:
CONFIGURE ACQUISITION
SEQUENCE screen.
The list is the order in which
the test will be performed.
To change the order, click
on one of the sites in the list
to highlight it. Use the red
up and down arrows to
move it wherever you want it
in the list. Continue until the
list is in the order you want.
Clicking on the up red
arrow will move the
highlighted site up in
the list. The red down
arrow will move it
down in the list.
F4 DEFAULTS – Resets all labels and settings to the factory defaults for your current
location.
Sonova users manual page 37
Page 42

Notes
Page 43

Notes
 Loading...