

Parks 915-BL Service Manual
PARKS
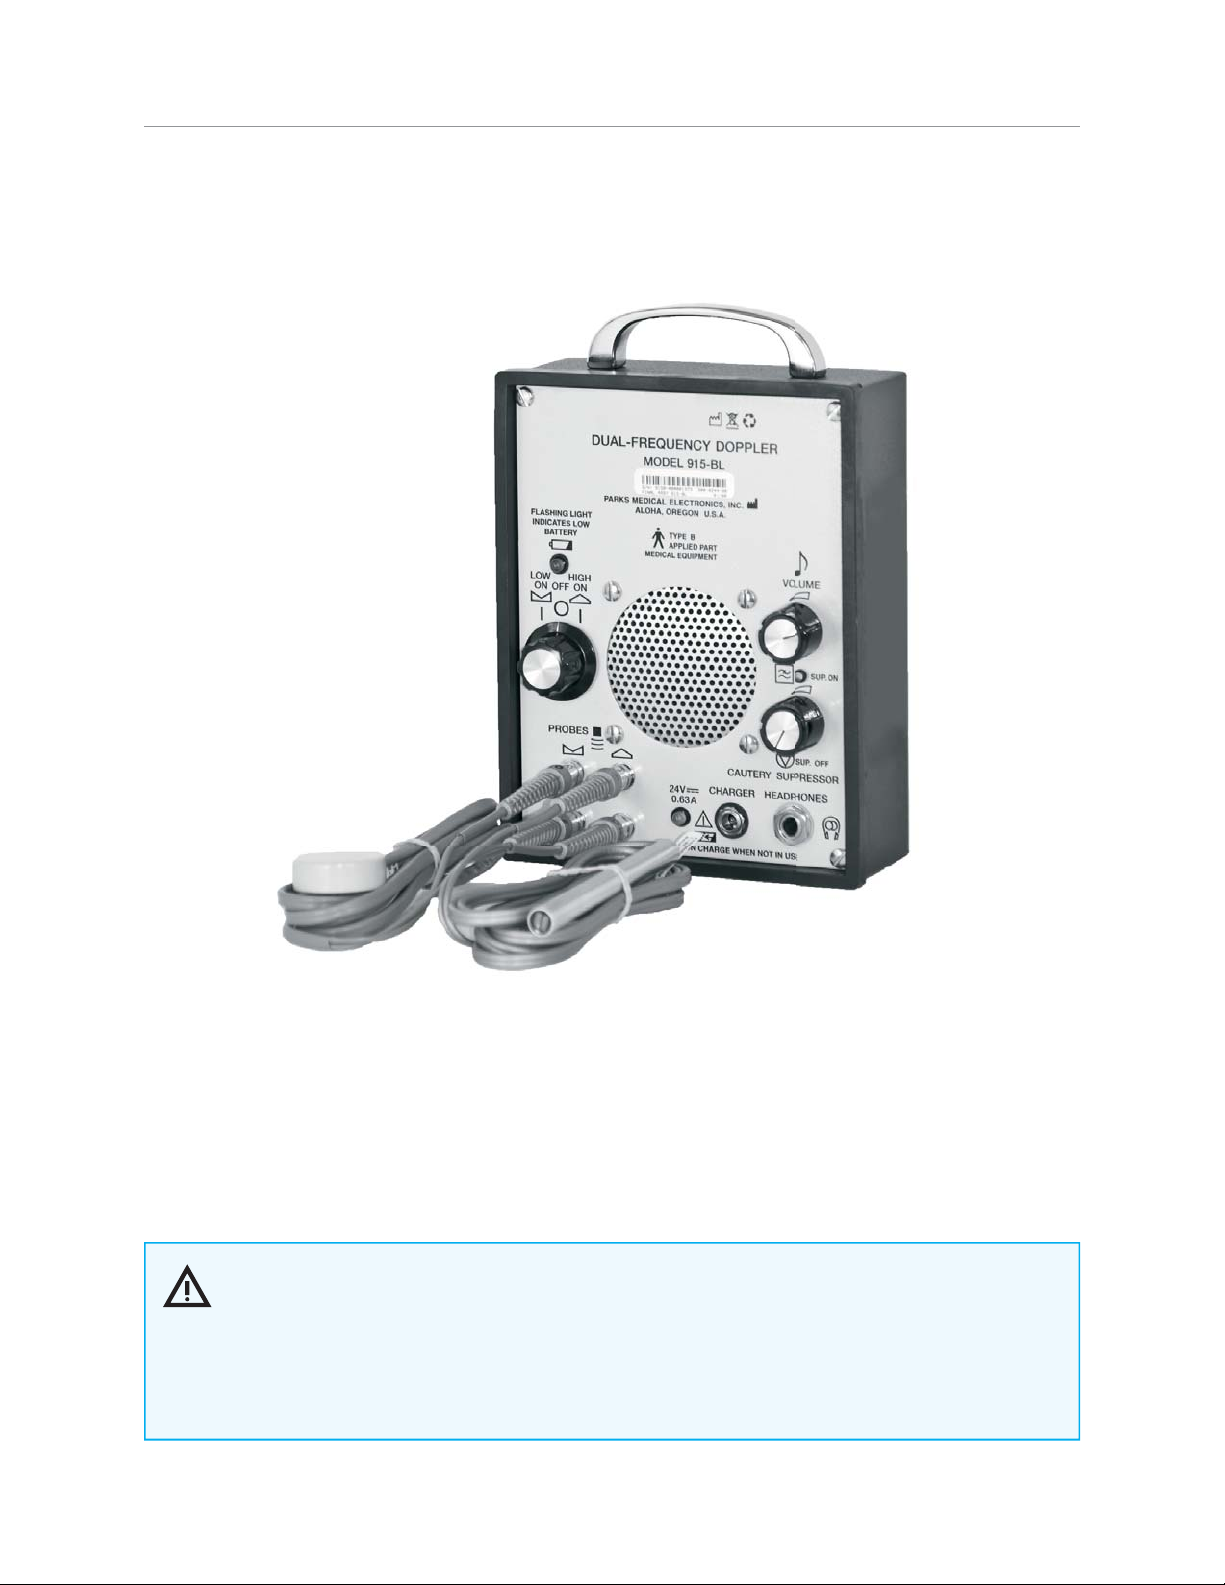
915-BL Dual-Frequency Doppler
Operating/Service Manual
The 915-BL Dual-Frequency Doppler is two Dopplers in one case. The low-frequency nominal 2 MHz
precordial probe may be used to detect the passage of air emboli in the heart. The high-frequency nominal
8-9 MHz pencil probe is used for systolic pressures at sites where a stethoscope is not used, as well as
to detect blood pressures that are too low for a stethoscope to auscultate. This probe can also be used to
listen for blood fl ow and pulses distal to arterial repair.
A built-in cautery suppressor with a controllable threshold shuts off the sound when the interference gets
too high.
Read this manual prior to use.
Follow manufacturer’s guidelines for safety and maintenance of equipment.
This instrument was manufactured to comply with all relevant national or international regulations and
left the factory in safe condition. In order to keep this instrument in a perfect and safe condition, it is up
to the user to observe all instructions and warnings included in this manual.
915-BL, UNM 5.5 6/2012
915-BL Dual Frequency Doppler
1

2
Parks Medical Electronics, Inc.
Aloha, Oregon U.S.A.

Table Of Contents
Introduction
Installation and Setup ............................................ 4
Safety .................................................................... 4
Instrument Identifi cation Information ..................... 4
Equipment Description
Probes .................................................................. 6
Battery Charger ..................................................... 7
Cautery Suppressor .............................................. 7
Optional Headphones............................................ 7
Operating Instructions
Setting Up the Instrument...................................... 8
Using the Coupling Gel ......................................... 8
Using the Probe..................................................... 8
Using the Cautery Suppressor .............................. 9
Shutting Down the Instrument ............................... 9
Charging the Battery ............................................. 9
Diagnostic Procedures
Performing Diagnostic Procedures...................... 10
Detecting the Passage of Air Emboli in the Heart ..... 10
Positioning the Precordial Probe ......................... 10
Taking Blood Pressure (BP) Measurements ....... 10
Measuring Systolic Pressure ................................11
Lower Extremity Arterial Evaluation......................11
Preoperative and Postoperative Blood Pressure
(BP) Measurements ............................................ 13
Upper Extremity Arterial Evaluation..................... 13
Venous Evaluation............................................... 13
References .......................................................... 14
Maintenance and Service
Cleaning the Instrument ...................................... 15
Cleaning the Probes ............................................ 15
Tuning ................................................................. 15
Routine Maintenance .......................................... 15
Replacing the Battery .......................................... 16
Replacing the Fuse ............................................. 16
Technical Support and Service ............................ 16
Troubleshooting Guide ........................................ 17
Technical Information and Notes
Specifi cations .................................................... 20
Warranty .............................................................. 21
Physiological Effects of Ultrasound ..................... 21
Environmental Hazards ....................................... 21
Electrical Safety................................................... 22
Ordering Information and Replacement Parts ..... 23
Contact Information ............................................. 23
Appendix
Acoustic Output Power ....................................... 25
Practical Offi ce Technics for
Physiologic Vascular Testing ............................... 32
915-BL Dual Frequency Doppler
3
Introduction
Installation and Setup
Unpack the instrument and accessory equipment from the packing box.
The 915-BL kit includes:
915-BL Dual-Frequency Doppler
2.1-2.25 MHz (Specifi ed) Precordial Probe
8.0-9.9 MHz (Specifi ed) Pencil Probe or Adult Flat Probe
24VDC
Ultrasound Transmission Gel, 0.25 L
Operating/Service Manual
Place this instrument on a clean, nonconductive, level surface.
The instrument should not be placed near devices which may cause radio interference or grounding.
The Doppler unit is shipped fully charged and ready to use.
Read the Operating Manual prior to using instrument.
0.63 A Battery Charger
Safety
This instrument is intended for use by health care professionals only.
The following symbols are used throughout this manual:
CAUTION: Indicates a potentially hazardous situation that, if not avoided, could result in personal
injury or damage to the instrument.
DANGEROUS VOLTAGE: Indicates a potential electrical hazard that, if not avoided, could result in
personal injury or damage to the instrument.
TYPE B APPLIED PART
MEDICAL EQUIPMENT
Type B Applied Part: complies with degree of protection against electric shock required by IEC 60601-1.
Class IIa Equipment:
This noninvasive ultrasound Doppler meets the safety requirements specifi ed for a Class IIa active
medical device.
Acoustic Output Power is within limits set by the FDA and the European Union.
This device is intended for vascular studies. It is not intended for obstetrical use.
Parks Medical Electronics, Inc. manufactures a complete line of obstetrical Dopplers.
Instrument Identification Information
Write the information from your instrument bar code label here or on the parts page for reference when
reordering parts or requesting technical support:
Serial N umber
Model Date of Manufacture
Date instrument purchased Customer Number
4
Parks Medical Electronics, Inc.
Part Number
Aloha, Oregon U.S.A.
Equipment Description
.
P
.
FLAS
G
HT
INDI
CATE
S LO
W
ON OFF ON
C
HEADPHONES
VOLUME
KEEP ON CHARGE WHEN NOT IN USE
APPLIED PART
M
EQUI
ON
CAU
SSO
R
SUP.
OF
F
LOW HIGH
A
DUAL-FREQUENCY DOPPLER
DUAL-FREQUENCY DOPPLER
DUAL-FREQUENCY DOPPLER
1
FLASHING LIGHT
HING LI
INDICATES LOW
BATTERY
2
LOW HIGH
W H
ON OFF ON
MODEL 915-BL
MODEL 915-BL
MODEL 915-BL
ARKS MEDICAL ELECTRONICS, INC
PARKS MEDICAL ELECTRONICS, INC.
ALOHA, OREGON U.S.A.
ALOHA, OREGON U.S.A
0197
TYPE B
APPLIED PART
MEDICAL EQUIPMENT
EDICAL
PMENT
VOLUME
11
3
PROBES
PROBES
4
2.1 MHZ
5
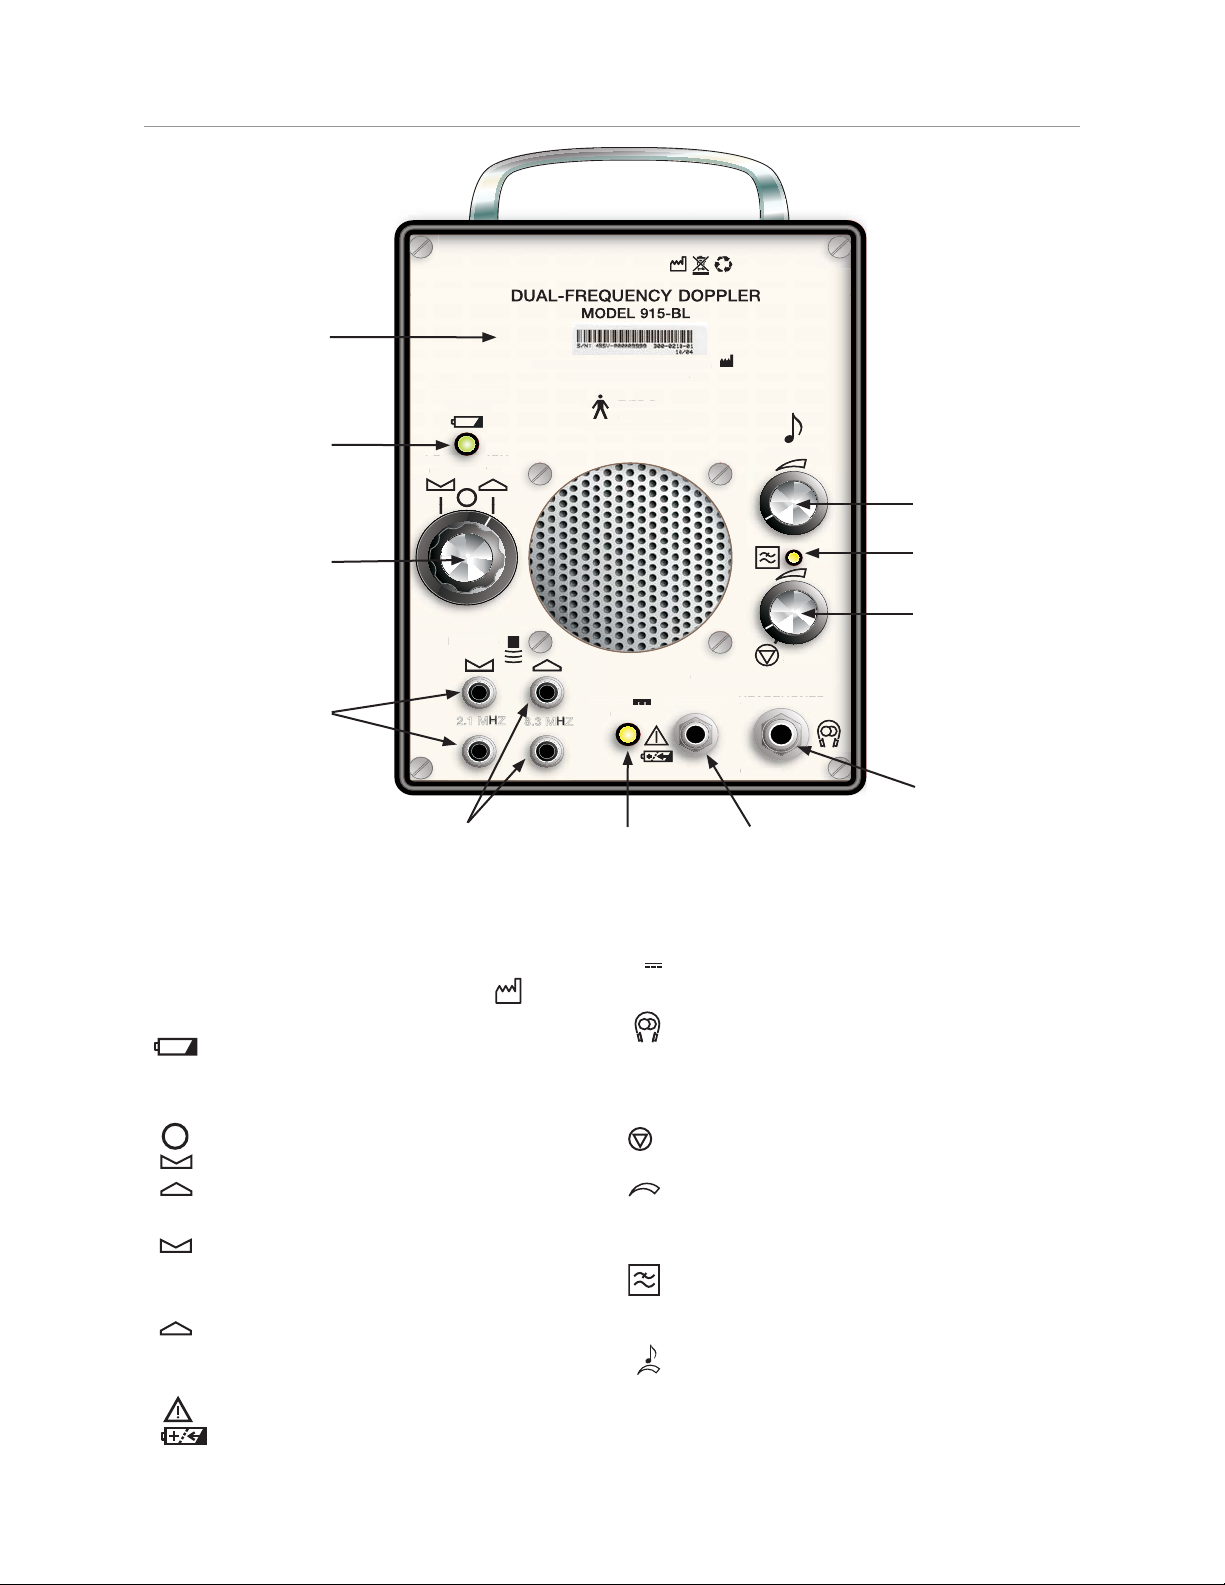
1. Manufacturer’s Label
Lists serial number (SN), part number,
model, and date of manufacture.
Battery 2. Indicator Lamp
This lamp lights when the unit is turned on.
Blinking lamp warns battery needs charging.
3. Power Control Knob
The center position turns instrument off.
Turn switch to the left for 2 MHz probes.
Turn switch to the right for 8 MHz probes.
4. 2.1-2.25 MHz (Specifi ed) Probe Jacks
The low-frequency precordial probe
plugs into these jacks.
5. 8.0-9.9 (Specifi ed) MHz Probe Jacks
The high-frequency pencil probes and fl at
probes plug into these jacks.
6. Battery Charger Indicator Lamp
This lamp lights when the unit is charging.
24 V
0.63 A
8.3 MHZ
.63
KEEP ON CHARGE WHEN NOT IN USE
6
Front Panel
24 V
0.63 A
8. Headphone Jack
9. Cautery Suppressor Control Knob
10. Cautery Suppressor Indicator Lamp
11. Volume Control Knob
SUP. ON
10
9
CAUTERY SUPPRESSOR
TERY SUPPRE
HARGER
CHARGER HEADPHONES
SUP. OFF
8
7
Battery Charger Jack7.
The battery charger plugs into this jack.
Optional headphones plug into this jack.
This knob controls the amount of cautery
noise that is cut out.
The full counterclockwise position turns the
cautery suppressor off (SUP OFF).
Turning the knob clockwise cuts out more
noise.
This indicator lamp is lit only when the
cautery suppressor is on (SUP ON).
This knob controls the Doppler sound level.
Turning the knob clockwise increases the
volume.
915-BL Dual Frequency Doppler
5
Equipment Description
Probes
Each probe consists of two crystals; one transmits ultrasound waves and one receives the refl ected
waves. The initial energy beam is as wide as the crystal. The probe’s two connectors can be plugged into
either of the two jacks on the Doppler that match the probe frequency. The Doppler is tuned to the probe
frequency. The frequency is identifi ed on the panel next to the jacks and on the label attached to each
probe cable.
Damage to either crystal will impair or prevent probe function. The material covering the crystals can be
damaged by abrasion, soaking in alcohol or cleansers, and excessive heat.
The 915-BL comes with a 2.1-2.25 MHz (frequency specifi ed) precordial probe and either a 8.0-9.9
MHz (frequency specifi ed) standard pencil probe or fl at probe. The precordial probe is used to detect air
emboli in the heart. The pencil probe is used to detect blood fl ow and monitor systolic blood pressure in
the legs. The fl at probe is designed to be taped on the wrist for repeated blood pressure measurements.
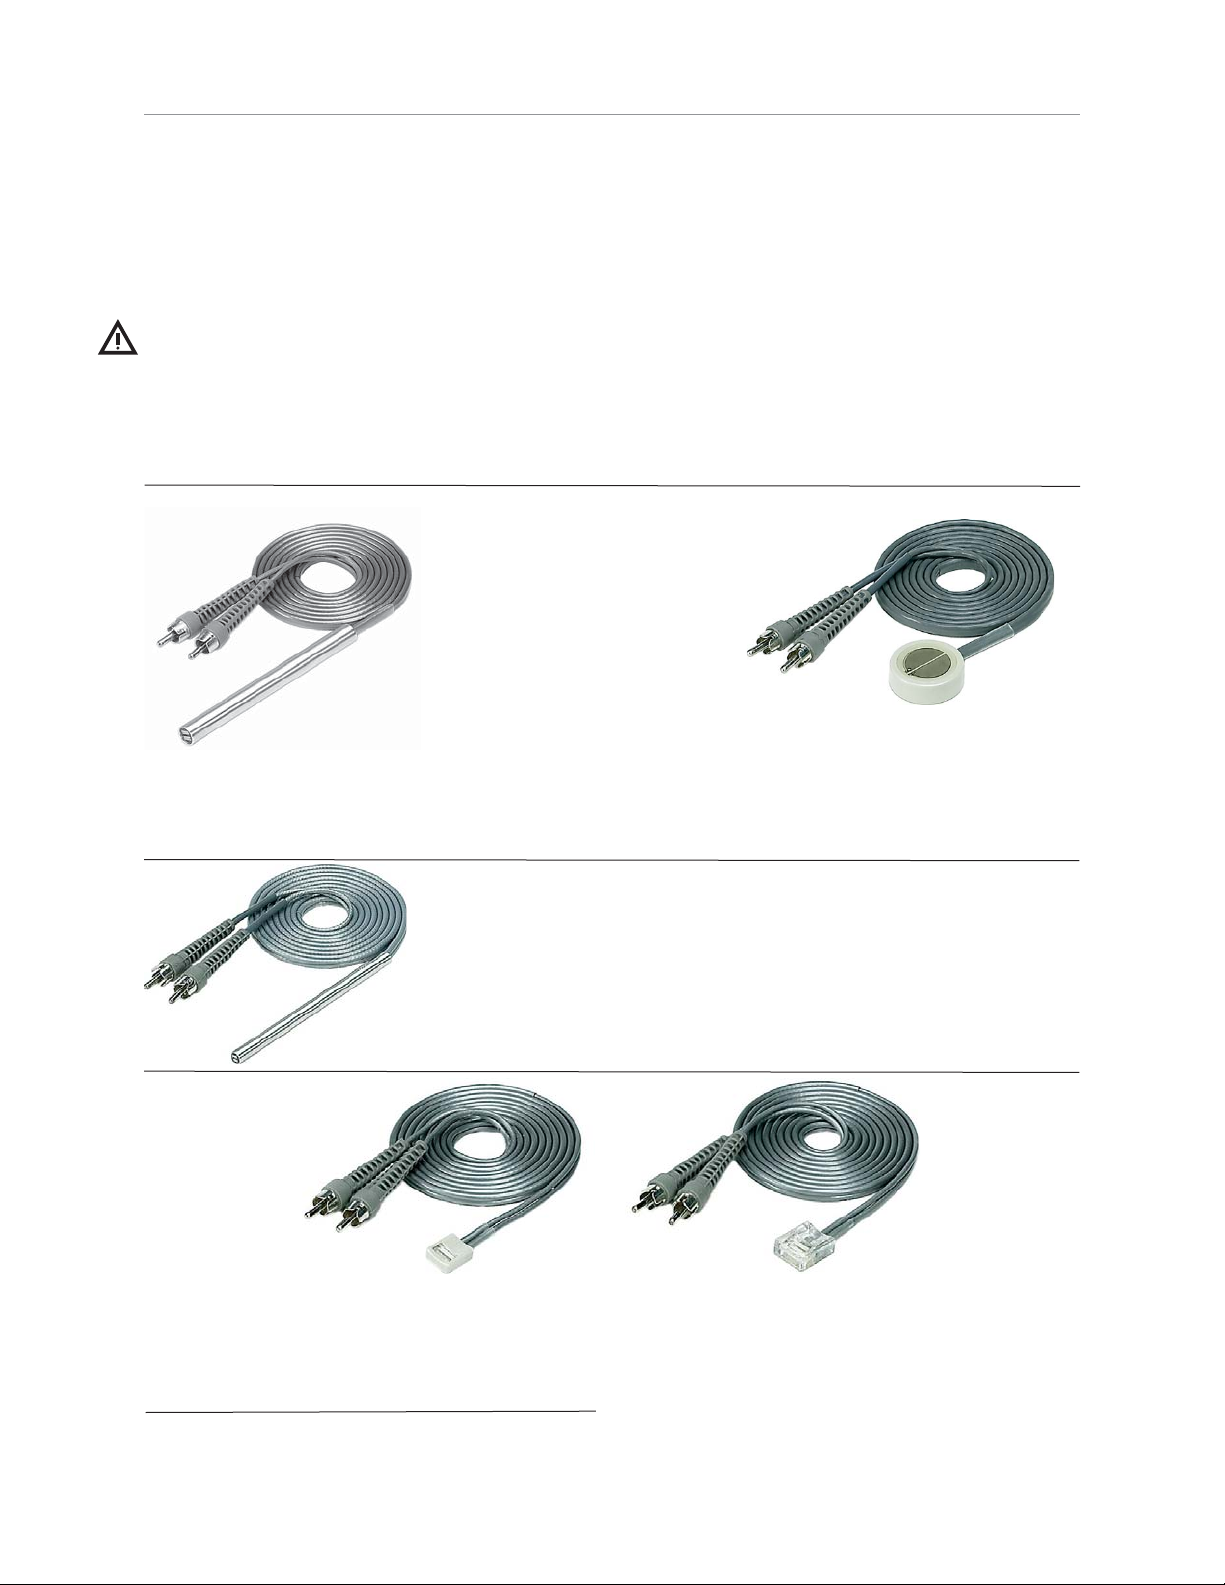
Probes with double-shielded
cables can be ordered for use
in locations with high levels of
electrical interference.
Standard Pencil Probe
(an option with kit)
Frequency: high: 8.0-9.9 MHz (Specifi ed)
Diameter: high: 3/8 in
Cable length*: 5 ft standard
Standard diagnostic probe.
Skinny Pencil Probe
(optional at additional cost)
Frequency: 8.0-9.9 MHz (Specifi ed)
Diameter: 1/4 in
Cable length*: 5 ft standard
The smaller probe crystal concentrates power to produce a beam with higher
intensity than the standard probe, providing better resolution for small vessels.
Infant
Flat Probes
(an option with kit)
Precordial Probe
(included with kit)
Frequency: 2.1-2.25 MHz (Specifi ed)
Diameter: 3/4 in
Cable length*: 5 ft standard
May be used for detecting air emboli in
the heart.
Adult
(Double Shielded)
Frequency: 8.0-9.9 MHz (Specifi ed)
Size: Adult 5/8 in X 3/4 in; Infant 1/2 in X 5/8 in
Cable length*: 5 ft standard
Crystals are set into the plastic so that the ultrasound beam goes into the vessel at about 15 degrees
from perpendicular. Flat probes are easily taped into place for taking repeated measurements.
*7 and 10 ft cable lengths are available by special order. Doppler must be tuned to probes with longer cables.
6
Parks Medical Electronics, Inc.
Aloha, Oregon U.S.A.

Equipment Description
Battery Charger
The Doppler comes with a 24VDC 0.63 A battery charger; the charger plugs into the front of the
Doppler and must be connected to an AC power supply (appropriate wall plug adapter must be used for
outlets other than 120 V). The Doppler battery cannot be overcharged. The Doppler cannot be operated
while it is connected to the battery charger.
Battery Life
Battery life between charges for a new battery will be more than 16 hours on a full charge. The battery
life will decrease as the battery ages or if it is not kept fully charged.
With normal service and care, a battery can be expected to last two to three years. Leaving the battery
discharged for days will shorten the life of the battery.
Cautery Suppressor
Under normal operating conditions, the cautery suppressor is off.
Use of the Doppler in the presence of a cautery can cause interference. A cautery generates sound over
a wide band of frequencies that cannot be fi ltered by the Doppler. The frequencies close to the probe
frequency will be picked up by the probe wires and transmitted to the Doppler speaker. Experimenting
with placement of the probe cable and the Doppler can minimize cautery interference, but not eliminate
it. The cautery suppressor is designed to shut off sound to the Doppler speaker or headphones when the
volume of the cautery interference exceeds that of the blood fl ow or air emboli detected by the probe.
The control knob for the cautery suppressor is on the front panel of the Doppler. The cautery suppressor
is off when the cautery suppressor control knob is turned all the way counterclockwise. Turning the knob
clockwise increases the level of suppression.
Headphones
The speaker is disconnected when the optional low impedance stereo headphones are plugged in. You will
always hear more through the headphones, especially when checking weak fl ow or veins.
915-BL Dual Frequency Doppler
7
Operating Instructions
Setting Up the Instrument
Place the instrument near the patient to be tested.1.
▪ The instrument should not be placed near devices which may cause radio interference.
The instrument should not come into contact with metal surfaces or other electronic devices. ▪
Plug the desired probe into the correct MHz jacks; the probe cable connectors can plug into either 2.
jack of the same frequency. The probe frequency is identifi ed on the panel and on the probe label.
Remove the 3. red protective cover from the probe tip prior to use.
Using the Coupling Gel
The probes require a conductive medium to maintain an interface between the skin and the probe for
signal transmission. Use only a coupling gel made for ultrasonic applications.
Using the Probe
Parks’ pencil probes are positioned differently than other Doppler probes because they are designed to
detect blood fl ow in vessels that are too deep to feel. The main energy of the beam is only as wide as the
crystals in the probe, so you must always search the area of the vessel and tilt the probe to obtain best
Doppler sounds. Parks recommends that you practice searching for arteries at the ankle
1. Inspect the probe for cleanliness and damage prior to each use (See Electrical Safety).
Invert the 2. gel squeeze bottle and shake it downward to get the gel near the bottle opening.
Squeeze about ¼ inch of gel onto the tip of the probe or skin surface, making sure there are no 3. air
bubbles.
Turn the volume control all the way down (counterclockwise).4.
Turn the instrument on, setting the control knob to the frequency of the probe.5.
For normal operation, turn the cautery suppressor off.6.
7. Gradually turn up the volume (clockwise).
A rumbling sound can be caused by the vibration of the gel from operator movement.
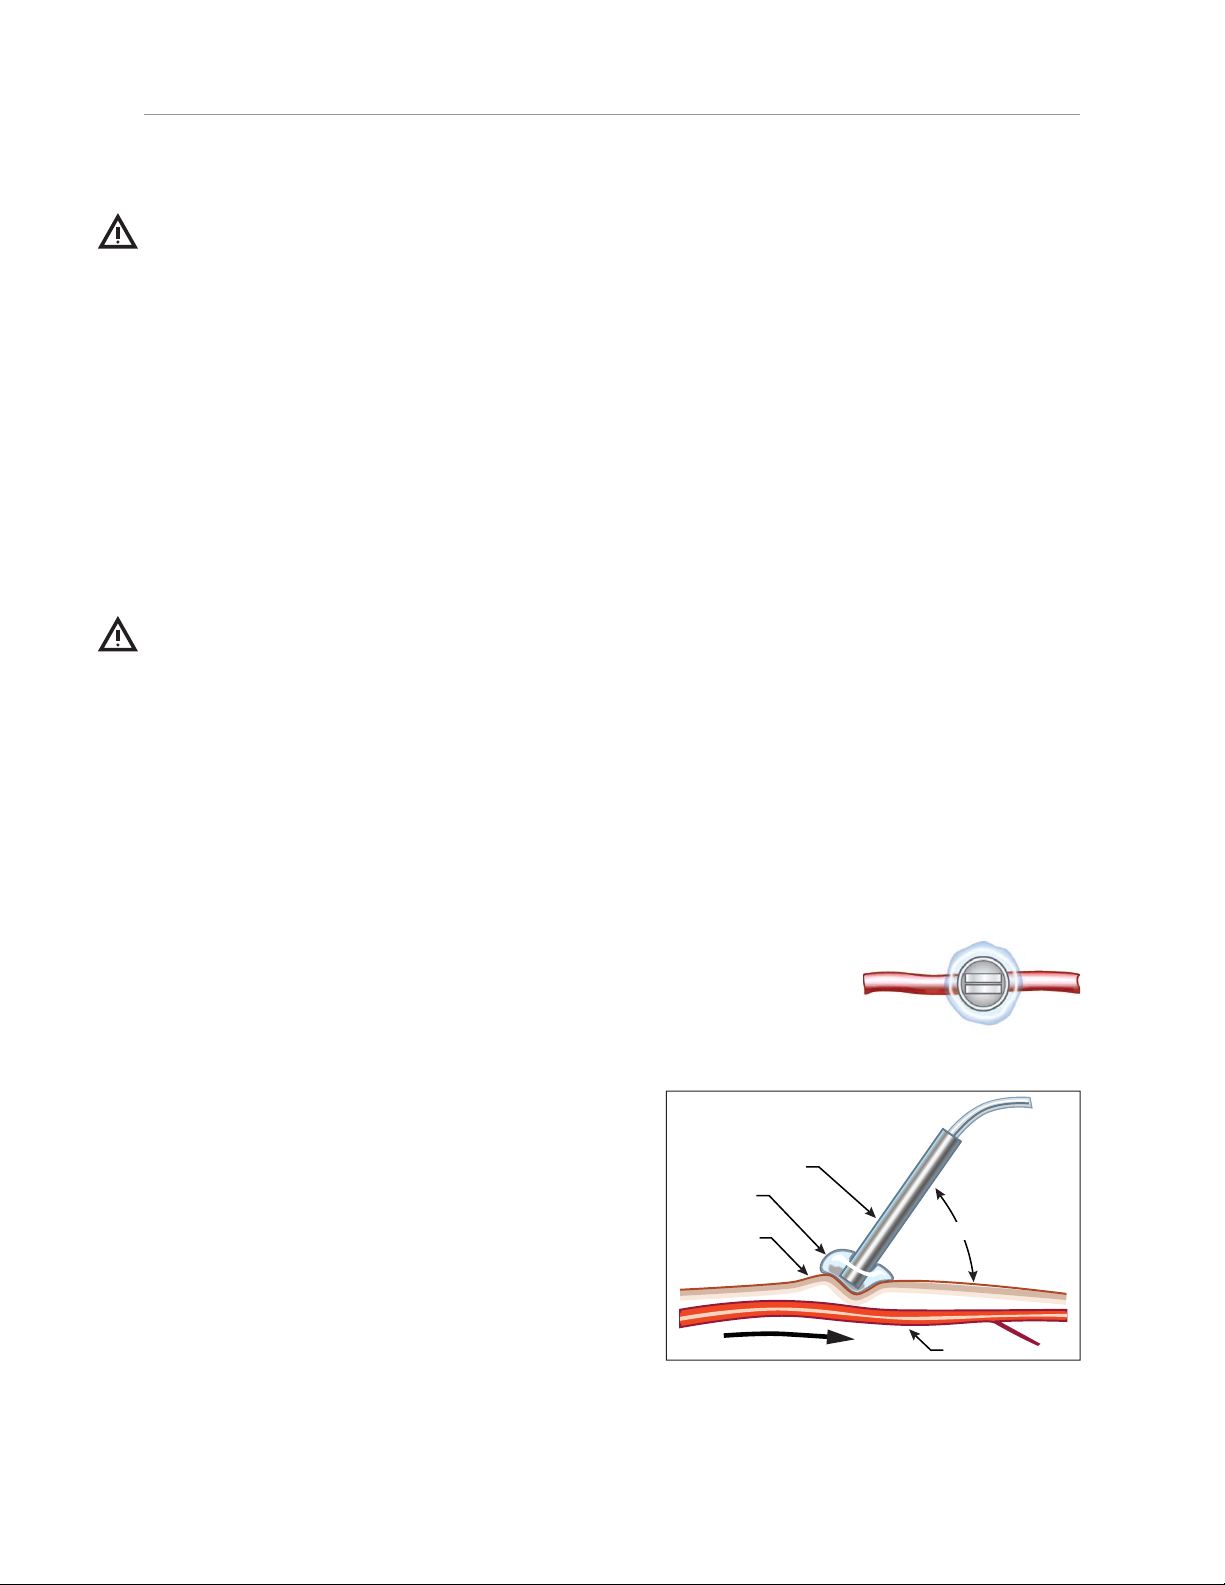
Positioning the Pencil Probe*
Place the pencil probe over the approximate position of the target vessel.1.
Align the probe’s crystals parallel to the vessel for best artery-vein ▪
separation.
Tilt the back of the pencil probe to an angle about 15 degrees from 2.
perpendicular, making certain there is gel in the pathway between the
probe and the skin.
Move the probe and the skin to try to fi nd the center 3.
of the vessel.
Search for the most “pulsating” sound by adjusting ▪
the angle and direction of the probe on the skin.
The Doppler sound for an artery is a hissing noise ▪
at systole.
Background sounds are more or less continuous. ▪
If you do not hear any sounds, move probe to a ▪
different location.
Note that too much pressure on the skin can ▪
occlude a vein, less likely an artery.
*See Diagnostic Procedures section for placement of precordial probe and fl at probe.
8
Parks Medical Electronics, Inc.
Skin Line
Flow Direction Blood Vessel
Probe
Gel
Probe crystals
Blood vessel gel
Listen for best signal
Aloha, Oregon U.S.A.

Operating Instructions
Turn the volume up to near maximum to search for deep arteries, small or obstructed arteries, and 4.
veins.
The ▪ Doppler sounds associated with low-velocity blood fl ow have a very low pitch.
The higher volume setting will also increase the transient background noise. ▪
Avoid unnecessary movement of the probe on the skin to minimize transient background noise. 5.
Using the Cautery Suppressor
To Minimize Cautery Interference:
1. Keep probe wires as far away from the cautery wires as possible.
2. Make sure that the patient is well grounded with the cautery machine’s grounding plate.
3. Do not hang the Doppler by its handle on an IV pole; hang it with nonconductive material.
Setting the Cautery Suppressor Level
Position the probe to obtain the best fl ow sound from the patient. 1.
After the patient is anesthetized and before the cautery is used, gradually turn up the cautery 2.
suppressor level until the patient’s blood fl ow sounds start cutting out on peak sounds.
Turn the control down (counterclockwise) until the sounds are again normal.3.
If the patient’s fl ow varies, you may need to make this adjustment again.4.
Shutting Down the Instrument
Turn the instrument off.1.
Wipe the gel off of the probe with a soft tissue.2.
Disconnect the probe from the Doppler only if necessary for cleaning; probe jacks wear out with ▪
repeated connecting/disconnecting of the probes.
Connect the instrument to the 3. battery charger.
Charging the Battery
The 915-BL comes with a 24VDC 0.63 A battery charger. The instrument should be connected to the
battery charger after the last usage of each day.
Plug the connector of the battery charger into the battery charger jack on the front of the instrument.1.
Plug the charger into an AC outlet (use appropriate plug adapter for outlets other than 120 V). 2.
The charger indicator lamp will light up to show that the Doppler battery is being charged.
The 915-BL has two battery-charging safety features:
The Doppler cannot be operated while the battery is being charged. The battery is disconnected 1.
from the unit while it is being charged; only the charging circuit is active.
The battery cannot be overcharged.2.
A blinking battery indicator lamp warns that the battery needs to be charged. The unit will continue to
operate for a few hours if necessary after the light begins to fl ash, but should be recharged as soon as
possible. Allow 12 hours to completely recharge the battery. Letting the battery completely discharge
shortens the life of the battery.
Charging Doppler in the Optional Carrying Case
If your Doppler came in a carrying case, Parks recommends that you keep the unit on charge with the
carrying case lid off. The carrying case has slip hinges that allow for easy removal of the lid.
If you do not remove the lid during charging, be sure the charger cord is in the small rubber grommeted
half-moon cutout before closing the lid of the carrying case. This will prevent damage to the charger cord
which might lead to electrical shock.
915-BL Dual Frequency Doppler
9

Diagnostic Procedures
Performing Diagnostic Procedures
Follow the attending physician’s and the institution’s protocols for diagnostic procedures.
This section of the manual is provided only as a guide, not to determine how a diagnosis is made.
The low-frequency precordial probe may be used to detect the passage of air emboli in the heart. The
high-frequency pencil probe is used for systolic pressures at sites where a stethoscope is not used, as
well as to detect blood pressures that are too low for a stethoscope to auscultate. This probe can also
be used to listen for blood fl ow and pulses distal to arterial repair. A built-in cautery suppressor with a
controllable threshold shuts off the sound when the interference gets too high.
Detecting the Passage of Air Emboli in the Heart
The cautery suppressor setting must be sensitive enough to detect air bubbles. It is recommended that
placement and settings be tested with an air bubble.
Positioning the Precordial Probe
The active side of the probe is the side that clearly shows the gray disc with
the stripe across the center. This side goes against the chest. You must
use ultrasonic gel over the crystal part of the probe in contact with the skin.
Placement of the probe is critical in order to provide a pathway for the beam
to be transmitted and then detected after it is refl ected. Ultrasound does
not pass through bone, so the probe must be centered between the ribs.
Recommended placement is in the 4th-5th intercostal space or over the tricuspid valve.
Placement in the right intercostal space between the fourth and fi fth ribs:
Place the patient in a supine position.1.
Place the probe so that the central division of the crystals is centered in the intercostal space, 2.
parallel to the ribs. Centering the fi rst few inches of the probe cable in the intercostal space and
taping it in place improves alignment.
Verify probe placement by listening for venous fl ow or passage of air embolus.3.
Affi x the probe in place with an adhesive or elastic bandage.4.
Have the patient sit up.5.
Retest the probe to verify probe placement.6.
If satisfactory placement cannot be obtained using the intercostal space, place the probe over the
tricuspid valve.
Placement over the tricuspid valve:
Follow steps as above, listening for the best swishing blood fl ow and valve leafl et movement over the
tricuspid valve to optimize placement. Do not turn the cautery suppressor control up so high that it
blocks bubble noise.
Watch for gel loss during an operation, since loss of the interface between the skin and the probe will
impair ultrasonic transmission.
Taking Blood Pressure (BP) Measurements
A Doppler can be used to make accurate systolic pressure measurements, with greater sensitivity than a
stethoscope. A stethoscope is only used to take arm blood pressure, but a Doppler can be used for both
upper and lower extremity blood pressures. The Doppler allows for the detection of low blood pressure in legs,
fi ngers, and in animal legs and tails. Measurements as low as 10 mm Hg have been documented. Diastolic
pressure can only be estimated, not accurately measured, by Doppler use. To estimate diastolic pressure,
insert the fl at probe under the lower edge of the BP cuff and listen for either the loss of sound as diastolic
pressure passes or the return of the dicrotic notch, which is the beginning of the cardiac cycle.
10
Parks Medical Electronics, Inc.
Aloha, Oregon U.S.A.
Diagnostic Procedures
Measuring Systolic Pressure
Because the sound quality is not as critical, it is possible to align the pencil probe’s crystals perpendicular
to the vessels to take blood pressures. Follow the operating instructions for positioning the pencil probe
to optimize Doppler sounds.
Accurate systolic measurements require a BP cuff width suitable to the limb
being tested. The cuff is infl ated 20-30 mm Hg above estimated systolic
pressure and then released, just as with BP measurements using a stethoscope. The systolic pressure is the sphygmomanometer reading when the
Doppler detects the fi rst fl ow sound as the cuff is defl ated.
Patients with calcifi ed vessels resulting from diabetic or renal disease processes can have falsely
elevated blood pressures.
Probe crystals
Blood vessel gel
Lower Extremity Arterial Evaluation
Peripheral arterial Doppler studies can give an indication of the severity and location of arterial disease and
monitor its course. Generalized Doppler studies may not differentiate between a stenosis and an occlusion.
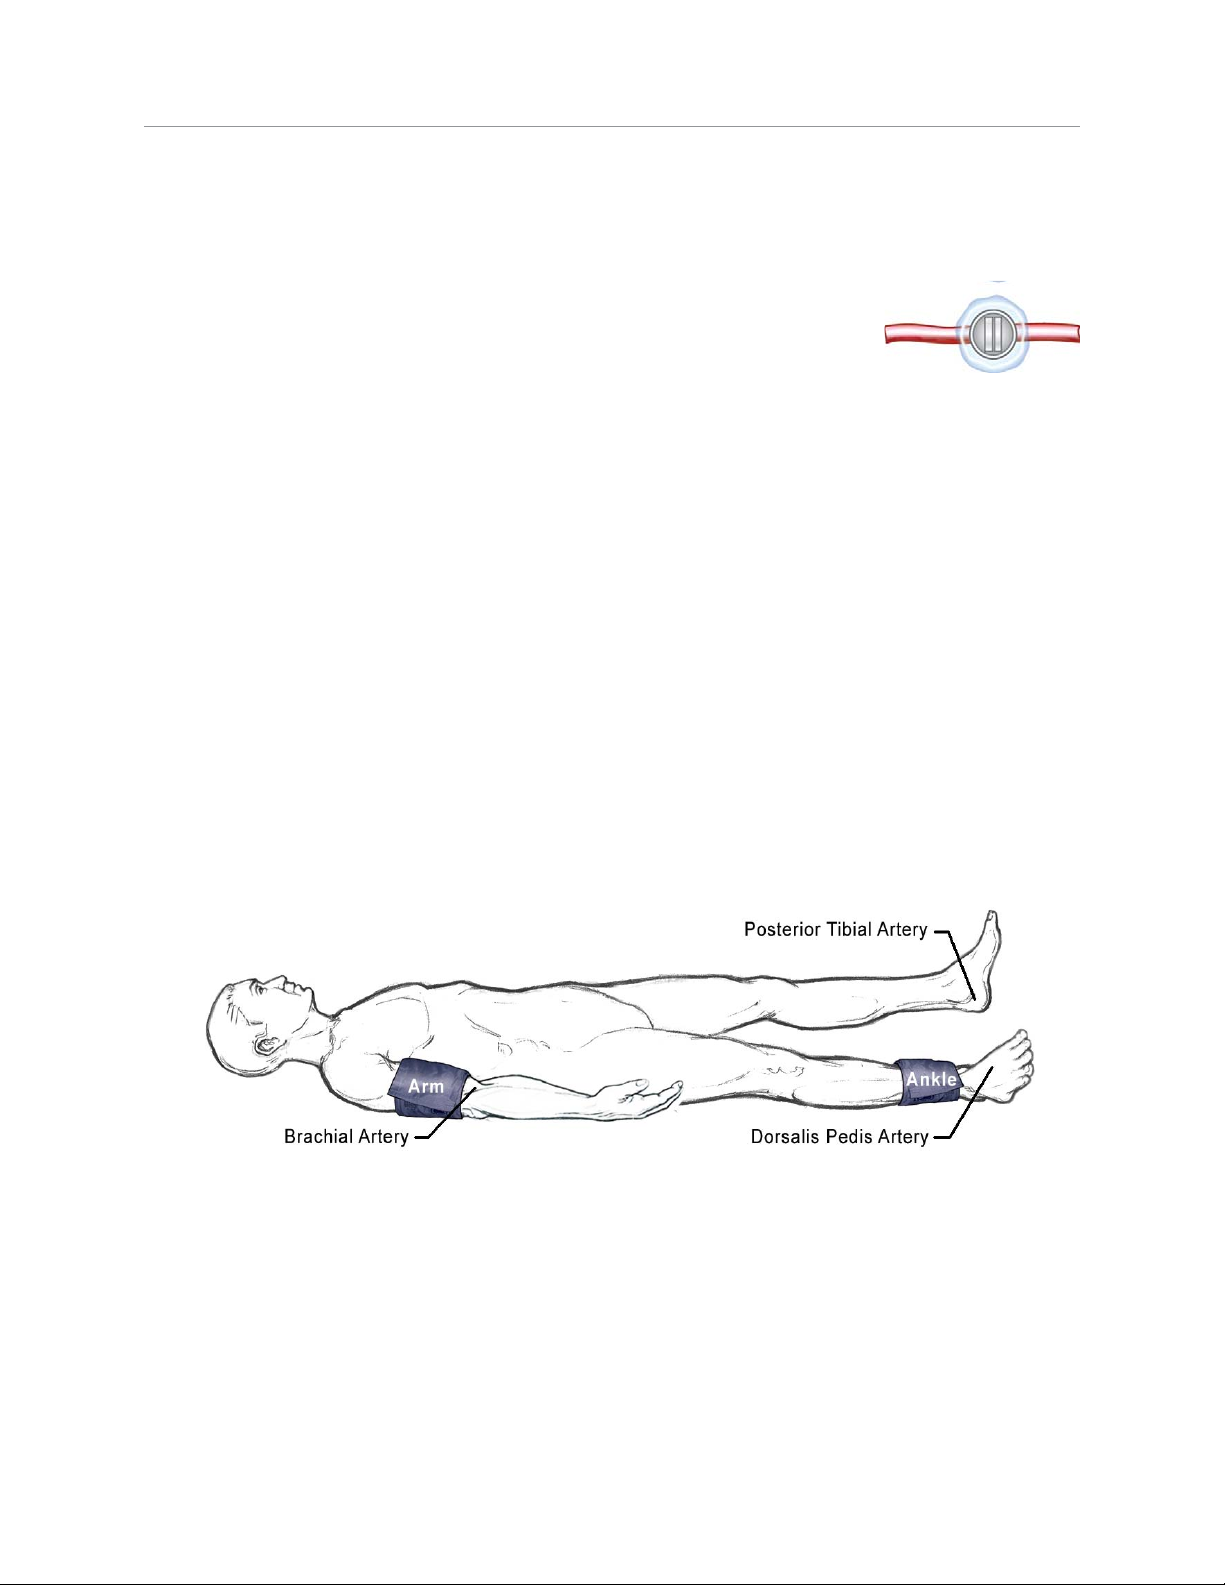
Ankle/Brachial Index (ABI)
When a full lower extremity study is not needed, bilateral brachial and ankle blood pressures (BP) can
be taken. The values are used to calculate the ankle/brachial index (ABI), also known as the ankle/ arm
pressure index (API). The interpretation of the indices varies, but the normal ratio is ≈ 1.
To Obtain Ankle/Brachial Indices:
Obtain bilateral arm blood pressures of brachial or radial artery with the Doppler, using the standard 1.
pencil probe.
Place a BP cuff on the right ankle; using a Doppler, listen for a signal on the 2. posterior tibial and
dorsalis pedis arteries (see drawing).
Infl ate the BP cuff 20-30 mm Hg beyond the last detectable Doppler signal (target 20-30 mm Hg 3.
above higher brachial pressure), and then gradually decrease the pressure in the cuff until you hear
a Doppler signal. This is the ankle pressure. Use result from artery which gives the higher reading.
Repeat this procedure for the left ankle.4.
If pressure measurements must be repeated, allow a rest time of about a minute between infl ations 5.
of the BP cuff.
Divide the ankle pressures by the highest brachial pressure; this is the ankle/brachial index.6.
Example: R L7.
Brachial systolic pressure 125 140 Higher brachial pressure
Ankle systolic pressure 90 85 is used for calculations.
Ankle/brachial indices (ABI) 0.64 0.61
If the ABI is unquestionably normal bilaterally, there is no need to perform segmental studies.
915-BL Dual Frequency Doppler
11
 Loading...