

Parkray DERWENT, CONSORT 4, CONSORT 5, CONSORT 5 COMPACT, CONSORT 5 SLIMLINE Maintenance Manual
...
1
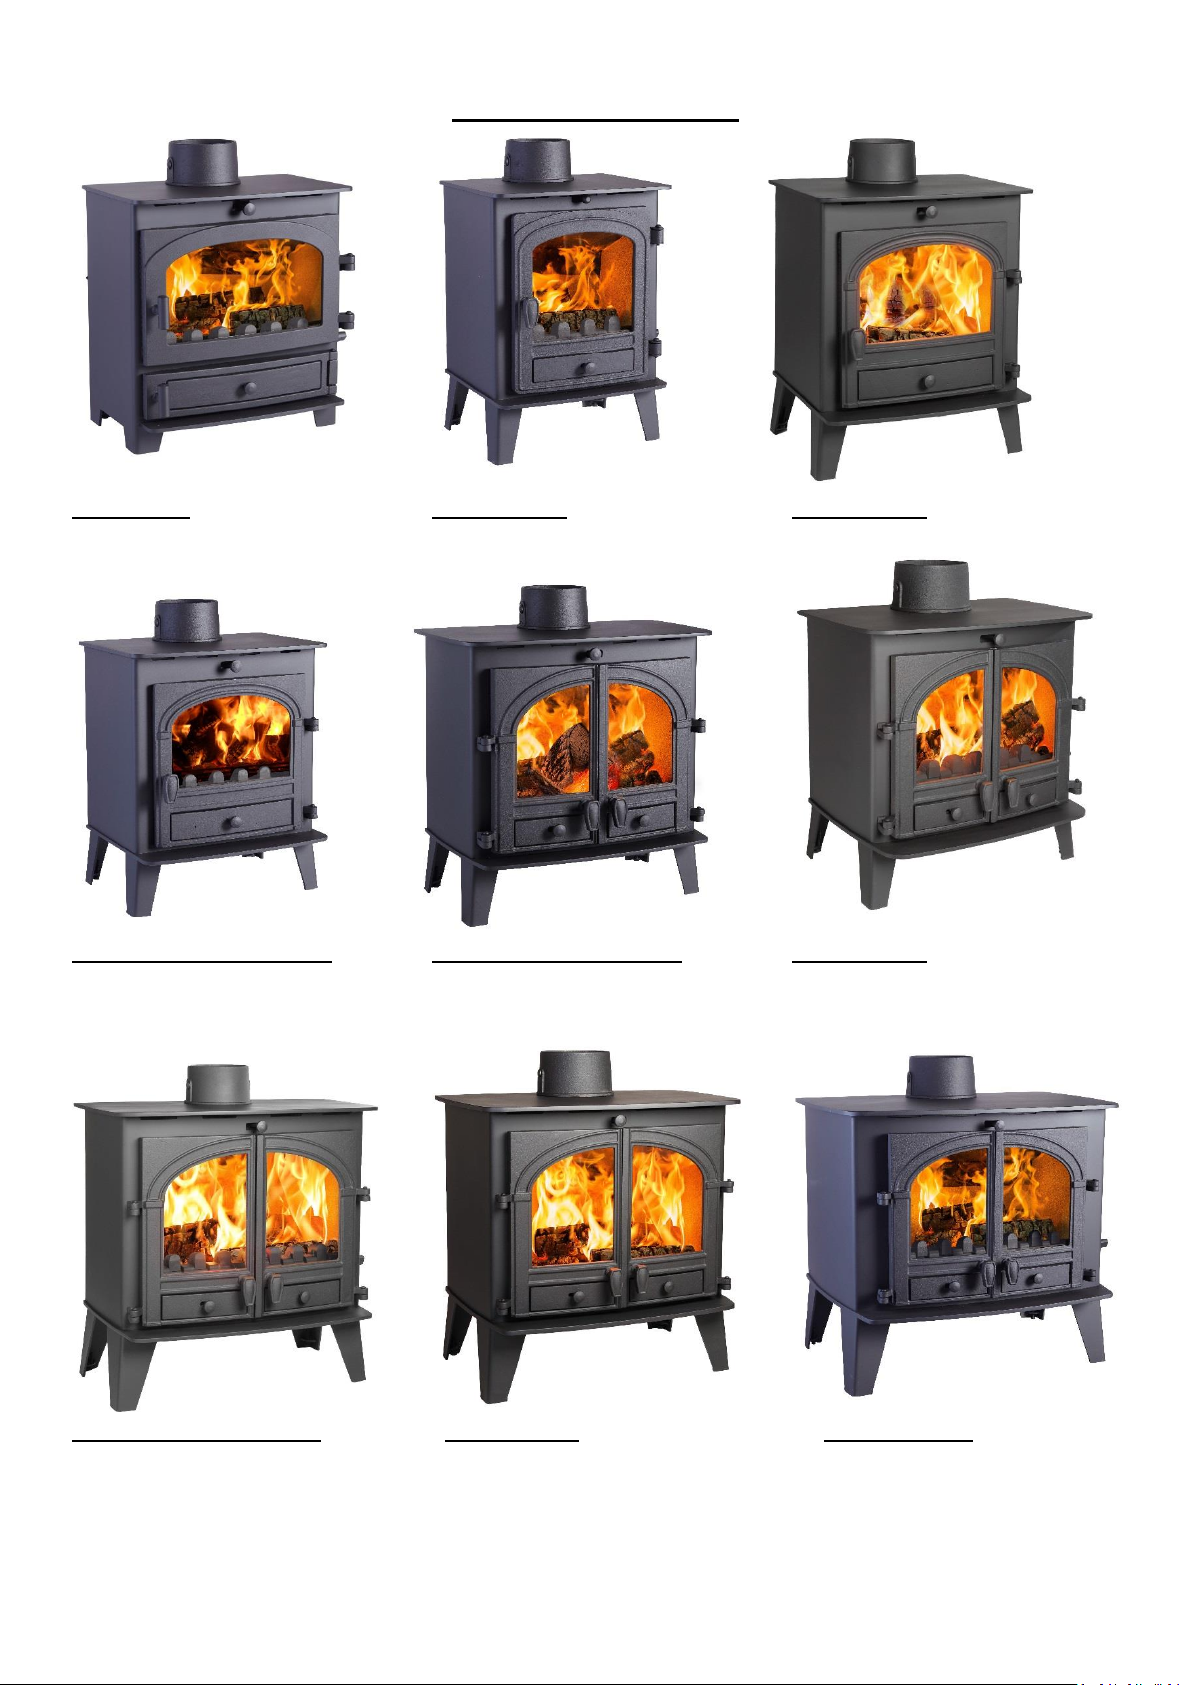
DERWENT
CONSORT 4
CONSORT 5
COMPACT 5
5 SLIMLINE
CONSORT 7
9 SLIMLINE
CONSORT 9
CONSORT 15
MULTIFUEL AND WOOD CE VII MODELS
Instructions for:
Installation/Operating/Maintenance/Servicing
JINCNSDA REV B 06/06/2019
2
STOVE MODELS
DERWENT CONSORT 4 CONSORT 5
CVSDR05FM CVCN04FM/CVCN04FW CVSCS05FM/CVSCS05FW
CONSORT 5 COMPACT CONSORT 5 SLIMLINE CONSORT 7
CVSCNC05FM/CVSCNC05FW CVCNS05FM/CVSCNS05FM CVCN07FM/CVSCN07FM
CVCNS05FW/CVSCNS05FW CVCN07FW/CVSCN07FW
CONSORT 9 SLIMLINE CONSORT 9 CONSORT 15
CVCNS09FM/CVSCNS09FM CVCN09FM/CVSCN09FM CVCN15FM/CVSCN15FM
CVCNS09FW/CVSCNS09FW CVCN09FW/CVSCN09FW CVCN15FW/CVSCN15FW

3
CONTENTS INDEX:
STOVE MODELS…………………………………………………………………………………………………. 2
TECHNICAL SPECIFICATION………………………………………………………………………………. 4/5
IMPORTANT INFORMATION…………………………………………………………………………….. 6/7
SAFETY…………………………………………………………………………………………………………….. 7
REMOVE INTERNAL COMPONENTS………………………………………………………………….. 8/9
APPLIANCE DIMENSIONS…………………………………………………………………………………. 10-12
PRE INSTALLATION REQUIRMENTS………………………………………………………………….. 13
LEGAL REQUIREMENTS……………………………………………………………………………………. 14
CLEARANCES……………………………………………………………………………………………………. 15/16
COMMISSIONING AND HANDOVER…………………………………………………………………. 16/17
OPERATING INSTRUCTIONS…………………………………………………………………………….. 17-21
MAINTENANCE & SERVICING………………………………………………………………………….. 21/22
TROUBLESHOOTING……………………………………………………………………………………….. 23/24
SPARES………………………………………………………………………………………………… …………. 25-36
INSTALLATION & COMMISSIONING CHECK LIST………………………………………………. 37
SERVICE RECORDS…………………………………………………………………………………………… 38
FULL WARRANTY INFORMATION…………………………………………………………………….. 39/40
Welcome to the Hunter Stoves family and thank you for purchasing a Parkray
Consort stove. This stove was designed and built to be a high-performance
heating appliance, and we hope it will bring you great enjoyment. The
natural environment is important to us, so our stoves are manufactured to
provide you with a clean and efficient burn that will keep you warm through
cold winter nights.
4
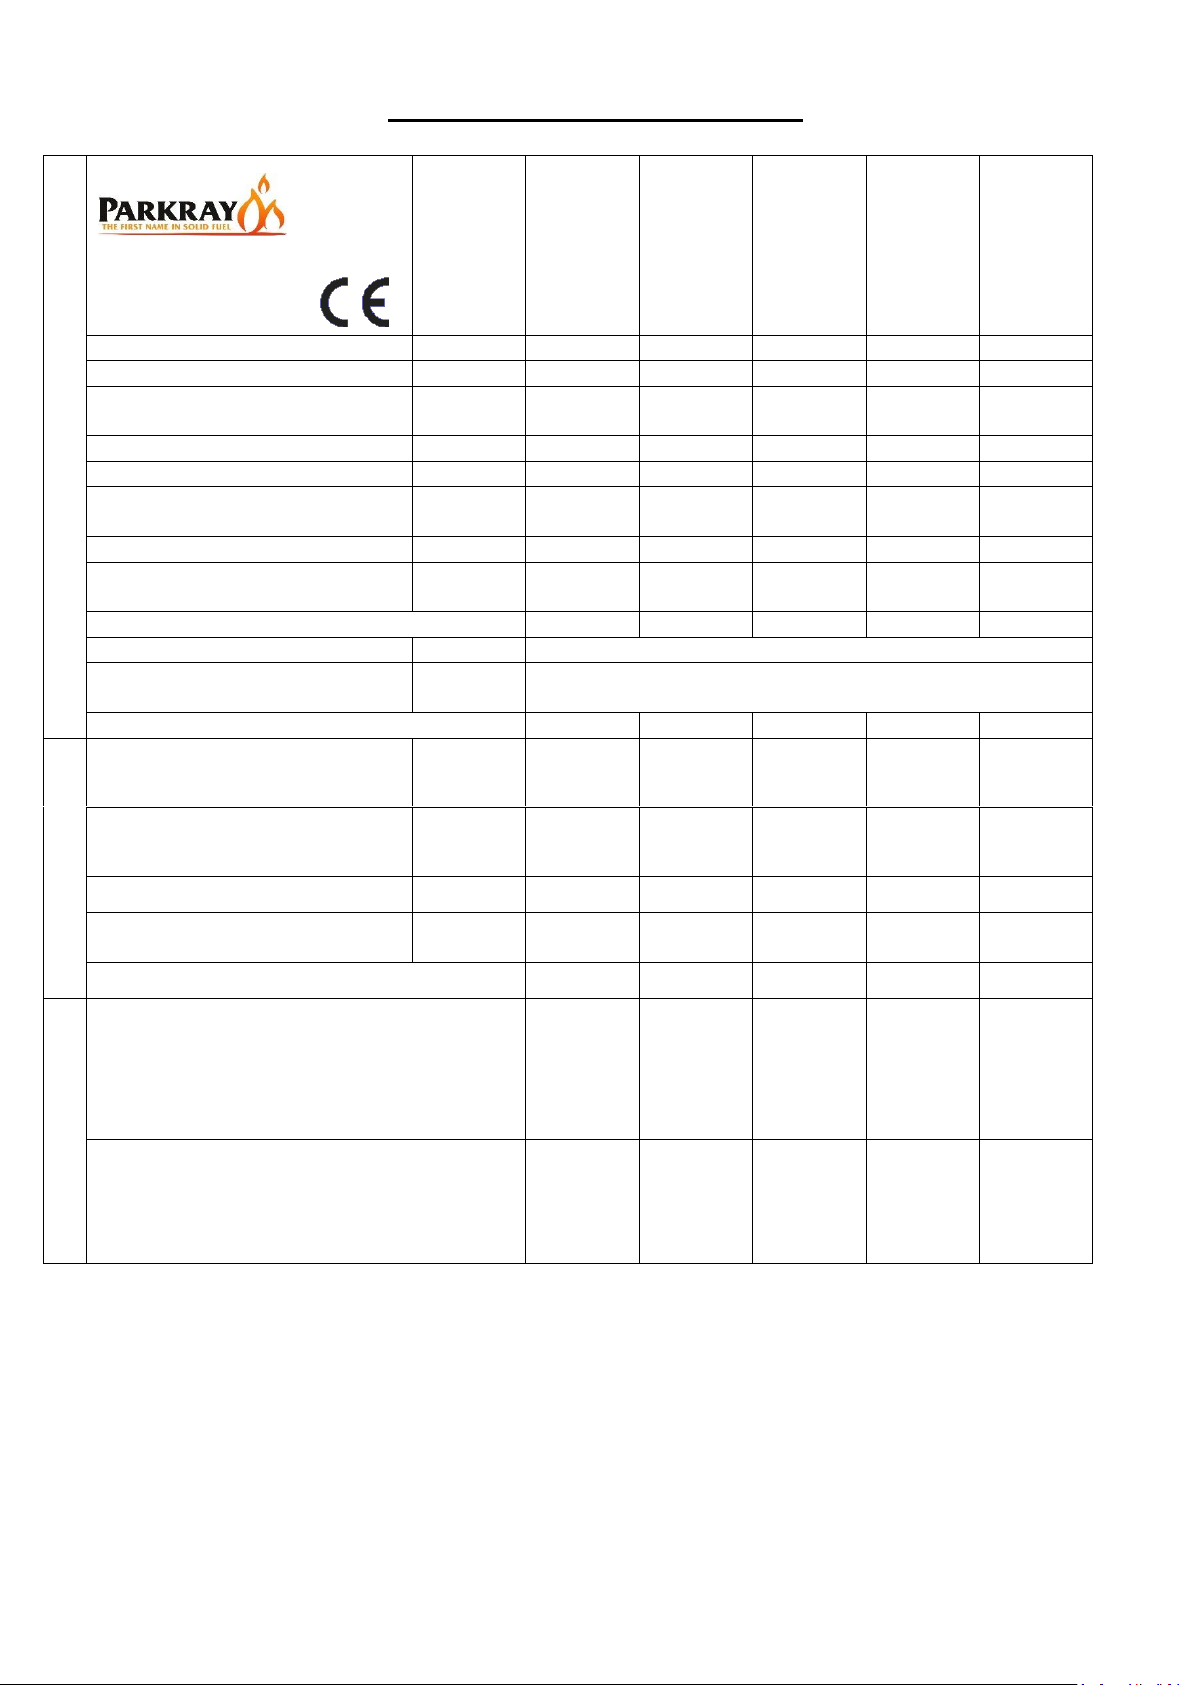
Technical Specification
GENERAL
DERWENT
CONSORT 4
CONSORT 5
COPMACT
CONSORT 5
CONSORT 5
SLIMLINE
Energy Efficiency Class
A A A A A Nominal Heat Output
Wood
4.8kW
4.7kW
4.7kW
4.0kW
4.4kw
Smokeless
Fuel
NA
3.0kW
NA
NA
NA
Energy Efficiency
102
97
101
104
98
Efficiency
Wood
76.8%
72.8%
76.0%
78.0%
74.1%
Efficiency
Smokeless
Fuel
NA
66.7%
NA
NA
NA
Mean CO (@13% O₂)
Wood
0.43%
0.27%
0.30%
0.44%
0.32%
Mean CO (@13% O₂)
Smokeless
Fuel
NA
0.54%
NA
NA
NA
Appliance Mass
62kg
64kg
95kg
88kg
88kg
Recommended Fuels
Wood
Seasoned Wood (less than 20% moisture content)
Smokeless
Fuel
Anthracite or a manufactured briquette smokeless fuel which is
suitable for closed door appliances.
Log Length
258mm
280mm
330mm
280mm
400mm
FLUES
Mean Flue Gas Temperature
Wood
271°C
270°C
269˚C
246˚C
268˚C
Mean Flue Gas Temperature
Smokeless
Fuel
NA
332˚C
NA
NA
NA
Flue Gas Mass Flow
Wood
4.3 g/s
5.7 g/s
4.7 g/s
3.8 g/s
5.0 g/s
Flue Gas Mass Flow
Smokeless
Fuel
NA
7.9 g/s
NA
NA
NA
Flue Outlet Size (Top or Rear Option)
125mm
125mm
125mm
125mm
125mm
VENTILATION
- Where leakage is greater than
5m³/hour/m²
- Ventilation normally required =
550mm² per kW output over 5kW
NONE
NONE
NONE
NONE
NONE
- Where leakage is less than or equal to
5m³/hour/m²
- Ventilation normally required =
550mm² per kW output
2640mm²
2255mm²
2585mm²
2200mm²
2420mm²
For further information on ventilation please refer to Building Regulations Document J or your installer.
This stove has been designed and assembled so that it may be used to burn wood logs in a Smoke Control Area.
Find out if you are in a Smoke Control Area by contacting your Local Authority.
The Derwent, Consort 4, Consort 5 and Compact 5 and Consort 5 Slimline have been fitted with a permanent stop
that prevents closure of the secondary air slider. Removal of this will lead to the appliance potentially causing smoke
emissions. Without the permanent stop in place the appliance is not an exempt appliance and so may leave the
householder liable for a fine up to £1000.
5
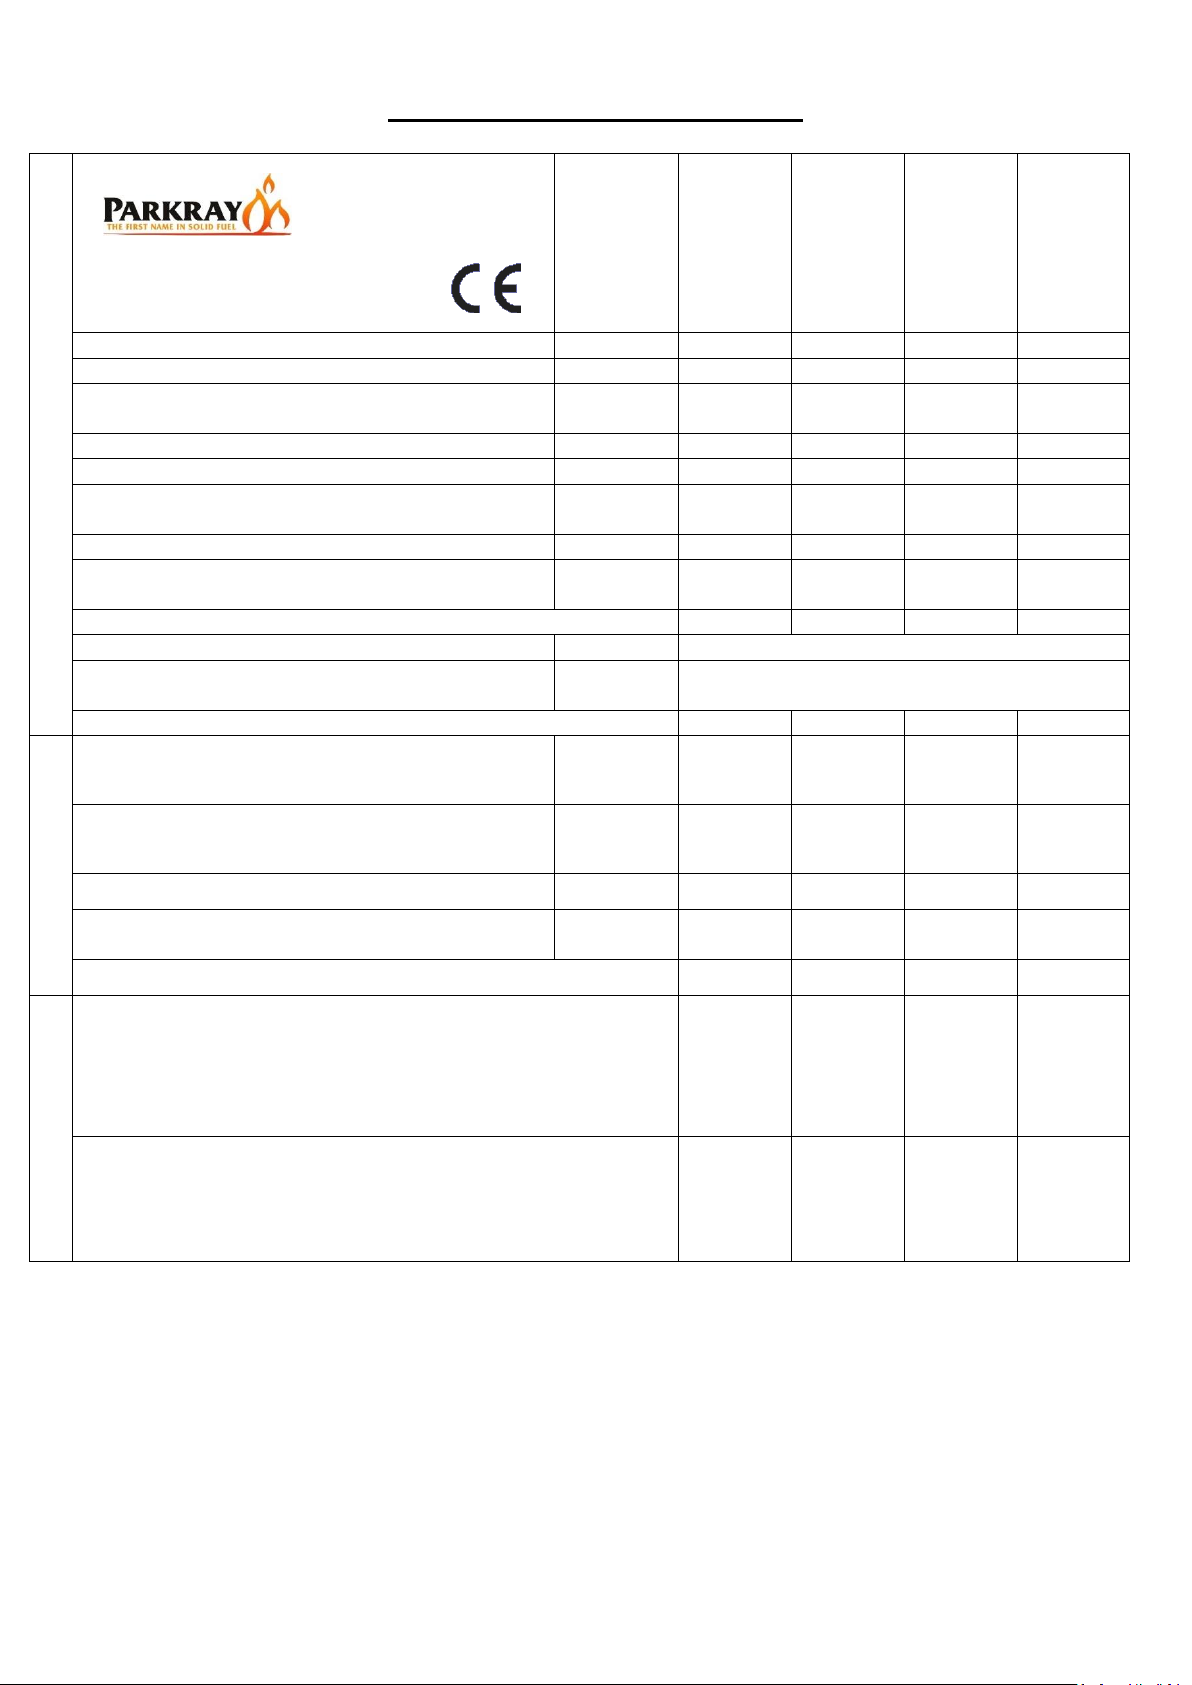
Technical Specification
GENERAL
CONSORT 7
CONSORT 9
SLIMLINE
CONSORT 9
CONSORT 15
Energy Efficiency Class
A A A A
Nominal Heat Output
Wood
5.4kW
4.9kW
9.1kW
11.9kW
Smokeless
Fuel
6.5kW
NA
7.8kW
9.0kW
Energy Efficiency
101
96
105
105
Efficiency
Wood
75.9%
72.4%
78.9%
78.6%
Efficiency
Smokeless
Fuel
67.3%
NA
68.5%
79.4%
Mean CO (@13% O₂)
Wood
0.27%
0.25%
0.38%
0.57%
Mean CO (@13% O₂)
Smokeless
Fuel
0.22%
NA
0.35%
0.18%
Appliance Mass
111kg
108kg
120kg
163kg
Recommended Fuels
Wood
Seasoned Wood (less than 20% moisture content)
Smokeless
Fuel
Anthracite or a manufactured briquette smokeless
fuel which is suitable for closed door appliances.
Log Length
380mm
400mm
500mm
500mm
FLUES
Mean Flue Gas Temperature
Wood
265°C
271°C
293˚C
339˚C
Mean Flue Gas Temperature
Smokeless
Fuel
332
NA
304˚C
275˚C
Flue Gas Mass Flow
Wood
5.7 g/s
6.2 g/s
6.4 g/s
6.4 g/s
Flue Gas Mass Flow
Smokeless
Fuel
NA
NA
8.5 g/s
7.2 g/s
Flue Outlet Size (Top or Rear Option)
150mm
125mm
150mm
150mm
VENTILATION
- Where leakage is greater than 5m³/hour/m²
- Ventilation normally required = 550mm² per kW output
over 5kW
825mm²
NONE
2255mm²
3795mm²
- Where leakage is less than or equal to 5m³/hour/m²
- Ventilation normally required = 550mm² per kW output
2970mm²
2750mm²
5005mm²
6545mm²
For further information on ventilation please refer to Building Regulations Document J or your installer.
This stove has been designed and assembled so that it may be used to burn wood logs in a Smoke Control Area.
Find out if you are in a Smoke Control Area by contacting your Local Authority.
The Consort 7 and Consort 9 Slimline have been fitted with a permanent stop that prevents closure of the secondary
air slider. Removal of this will lead to the appliance potentially causing smoke emissions. Without the permanent
stop in place the appliance is not an exempt appliance and so may leave the householder liable for a fine up to
£1000.

6
General Guidance
It is important that your stove is correctly installed and operated as Hunter Stoves Group cannot accept
responsibility for any fault arising through incorrect installation, use, maintenance or servicing.
These instructions cover the basic principles to ensure satisfactory installation of the stove, although detail may
need slight modification to suit particular local site conditions.
The installation must comply with current Building Regulations, National and European Standards, Local Authority
Byelaws and other specifications or regulations as they affect the installation of the appliance.
The Building Regulations requirements may also be met by adopting the relevant recommendations in the current
issues of British Standards BS 8303 and BS EN 15287-1.
Only use approved fuels on this appliance. Information about this can be found on Page 20.
This is a Domestic Appliance and must only be used in accordance with these instructions. Do not place articles that
are affected by high temperatures on, or near, this appliance. Do not place furniture or other items within 1 metre
of the front of this appliance. See the note on material clearances on pages 15/16.
Fitting a stove in a room which also contains an extractor fan and/or cooker hood should be avoided where
possible. If this is unavoidable, the suitability of the space for fitting this appliance must be decided at the discretion
of a qualified installer, and a flue draught interference test must be performed.
Do not obstruct the ventilation required for the safe use of this appliance.
Competent Persons Scheme
Hunter Stoves Group recommend that this stove is installed by a member of an accredited competent persons
scheme e.g. HETAS.
If the installer is not a member of a competent person’s scheme, it is a legal requirement, in the UK, to notify your
Local Building Control Officer in advance of any installation work starting.
Health and Safety Precautions
Special care must be taken when installing the stove such that the requirements of the Health and Safety at Work
Act are met.
Handling
This appliance is very heavy. Adequate facilities must be available for loading, unloading and site handling.
Fire Cement
Some types of fire cement are caustic and should not be allowed to come into contact with the skin. In case of
contact, wash immediately with plenty of water.
Asbestos
This stove contains no asbestos. If there is a possibility of disturbing any asbestos in the course of installation, then
please seek specialist guidance and use appropriate protective equipment.
PLEASE READ THESE INSTRUCTIONS PRIOR TO INSTALLATION AND OPERATION. KEEP THESE
INSTRUCTIONS IN A SAFE PLACE FOR FUTURE REFERENCE AND SERVICING.
THIS APPLIANCE WILL BECOME VERY HOT WHEN USED IN ACCORDANCE WITH THESE INSTRUCTIONS,
HUNTER STOVES RECOMMEND THAT AN APPROVED GUARD IS USED TO PROTECT THE YOUNG, ELDERLY
OR INFIRM FROM HARM.
THE INSTALLER COMMISSIONING SHEET CAN BE FOUND ON THE BACK COVER. PLEASE ENSURE THAT IT IS
COMPLETED PRIOR TO USE.

7
Metal Parts
When installing or servicing this stove, care should be taken to avoid the possibility of personal injury.
Modification
No unauthorised modification of this appliance should be carried out.
Safety
WARNING – This appliance will be hot when in operation and due care should be taken. The supplied operating tool
or glove may be used to open the door and operate the air controls.
Aerosols
Do not use an aerosol spray on or near the stove when it is alight.
Fireguards
Always use a fireguard in the presence of children, the elderly or the infirm. The fireguard should be manufactured in
accordance with BS8423 – Fireguards for use with solid fuel appliances.
Do not Over-Fire
It is possible to fire the stove beyond its design capacity. This could damage the stove so watch for signs of overfiring. If any part of the stove starts to glow red, the stove is in an over-fire situation and the controls should be
adjusted accordingly. Never leave the stove unattended for long periods without first adjusting the controls to a
safe setting. Careful air supply control should be exercised at all times.
Fume Emission
Properly installed, operated, this appliance will not emit fumes. Occasional fumes from de-ashing and refuelling may
occur. Persistent fume emission must not be tolerated.
This appliance should not be operated with the door open.
If fume emission persists, then the following immediate action should be taken: -
➢ Open doors and windows to ventilate the room.
➢ Let the fire go out or eject and safely dispose of fuel from the appliance.
➢ Check for flue/chimney blockage and clean if required.
➢ Do not attempt to re-light the fire until the cause of the fume emission has been identified and corrected.
If necessary, seek expert advice.
Adverse Weather
In a small number of installations, occasional local weather conditions (e.g. wind from a particular direction) may
cause downdraught in the flue and cause the stove to emit fumes. In these circumstances, the stove should not be
used. A professional flue installer will be able to advice on solutions to this problem (e.g. anti-downdraught cowl).
Carbon Monoxide Detector
Hunter Stoves recommend a Carbon Monoxide Detector that conforms to the latest issue of BS EN 50292 is placed
in the same room as the appliance. The installation of such an alarm is not considered as a substitute for regular
maintenance or servicing or the appliance and Flue system.
IN THE EVENT OF A CHIMNEY FIRE:
➢ Raise the alarm
➢ Call the Fire Brigade
➢ Close appliance air controls
➢ Move furniture, ornaments etc. away
➢ Place a fireguard in front of stove
➢ Check the chimney breast for signs of excessive heat.
If the wall is becoming excessively hot, move furniture away.
Ensure the Fire Brigade can gain access to your roof space in order to check for fire spread.
8
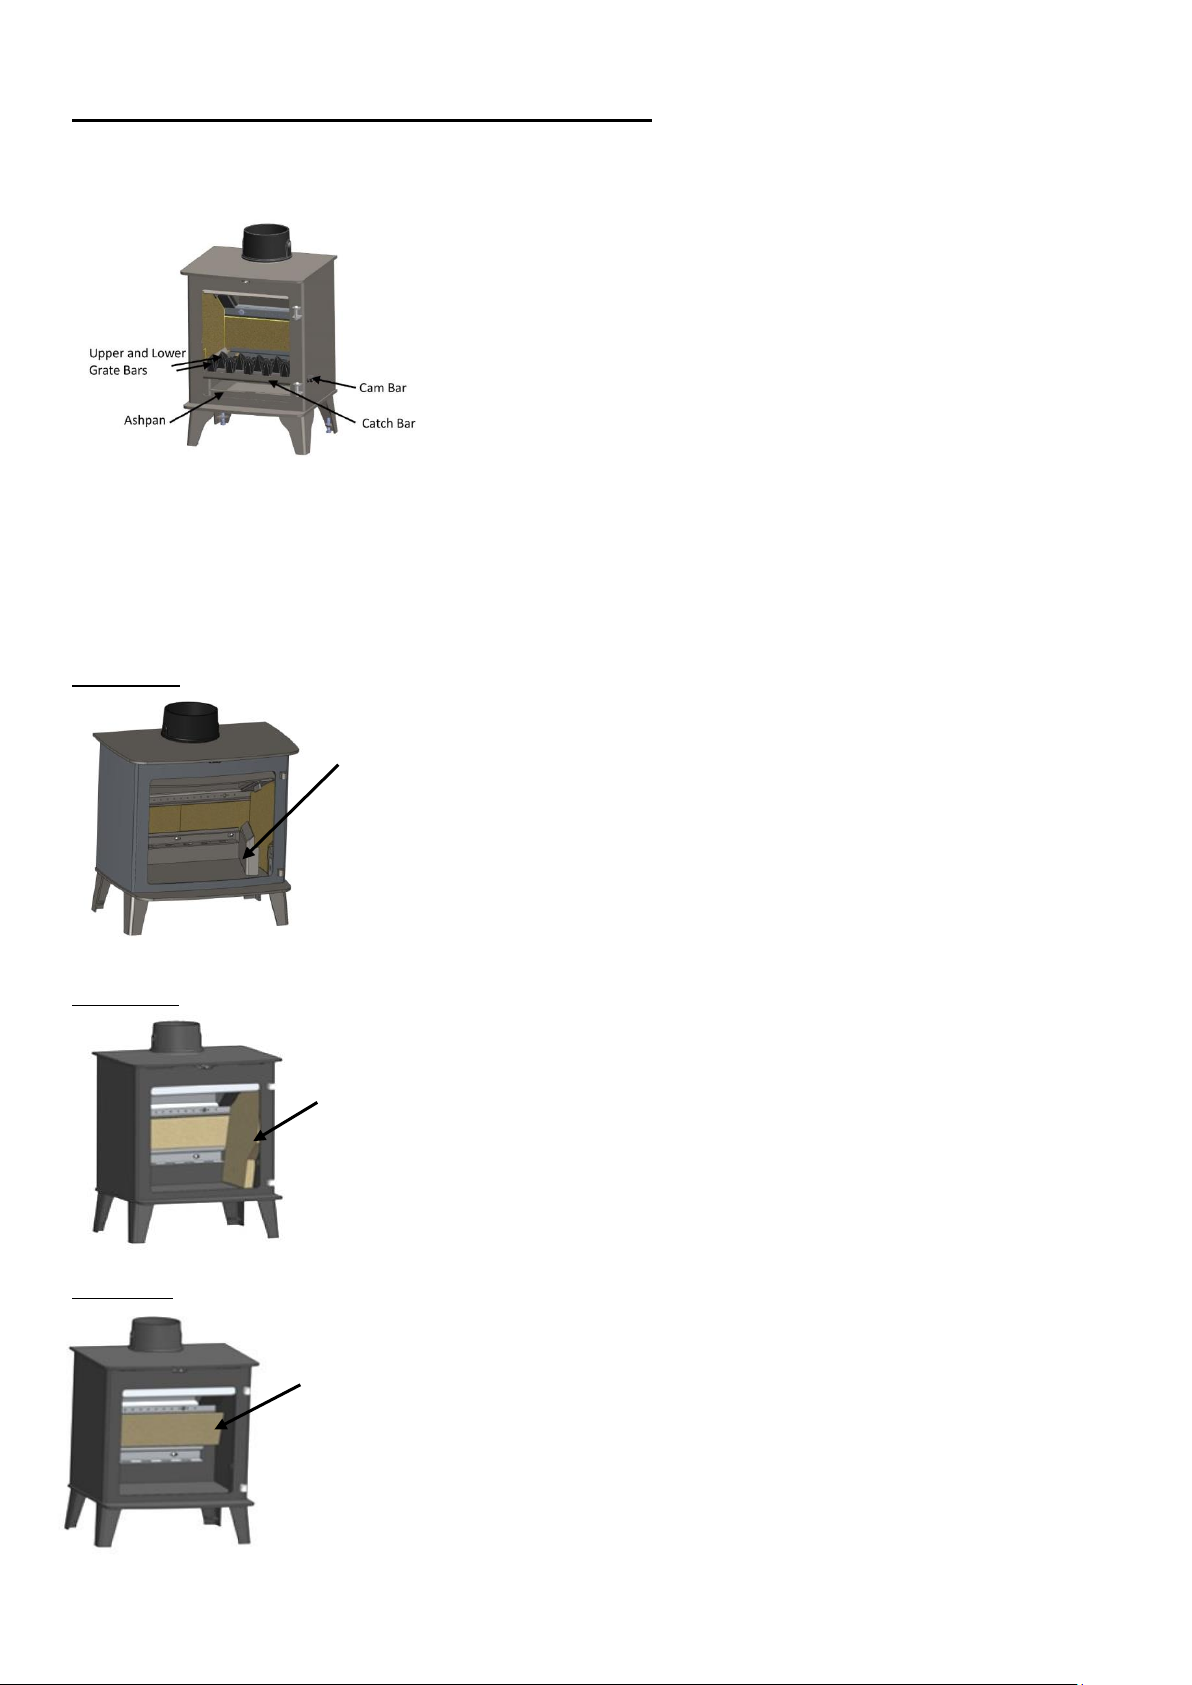
Removing Internal Components
All internal components must be removed prior to fitting the stove. This will make handling the stove easier; allow
access to fixings and the flue outlet; as well as protect the internal components from damage during the installation
process.
1. Open the door and remove the ashpan.
2. Remove the grate bars by lifting the front up off the cam bar and sliding forward off the rear grate support and lift
out of the firebox.
3. Remove the cam bar by lifting the left-hand end of it upwards until it clears the side casting. Pull the left-hand end
towards the front of the stove and then slide all the way out. Take care not to lose the cam hole plate.
4. Remove the catch bar by lifting upwards and pulling forwards out of the stove body.
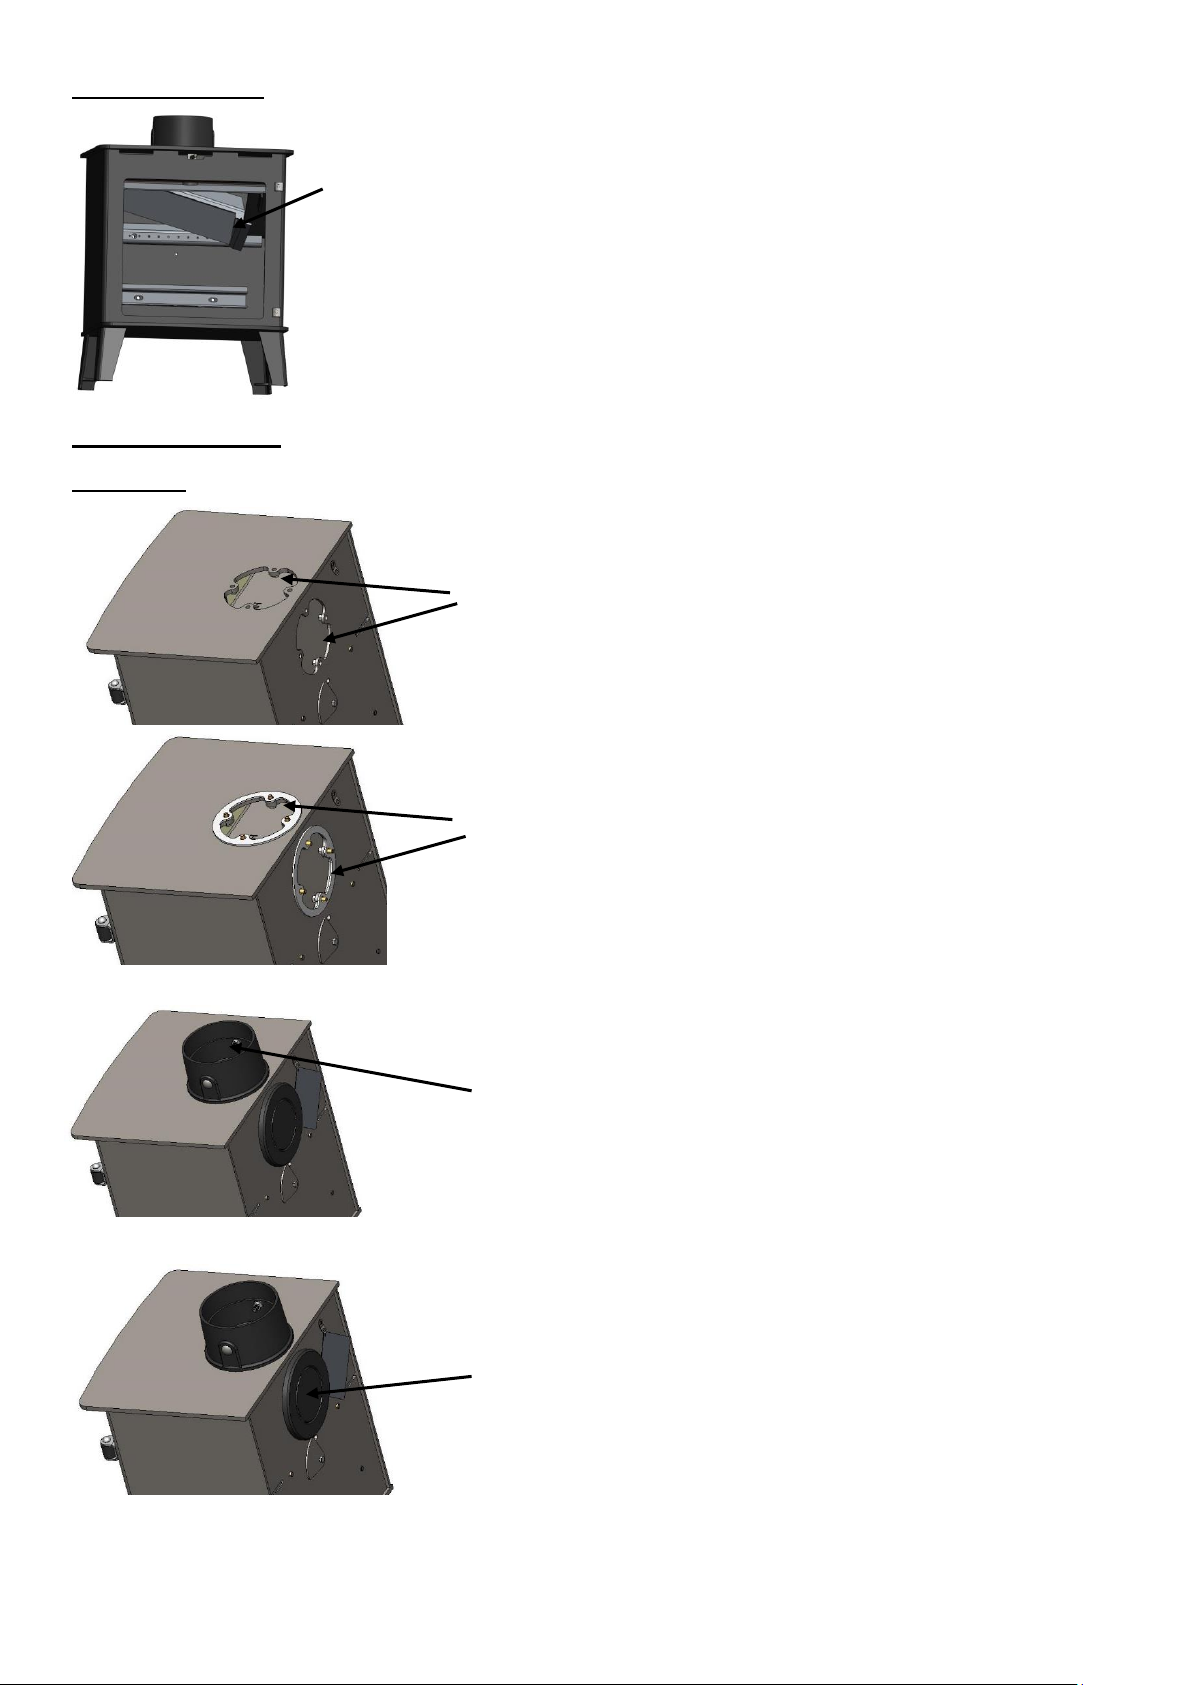
Side Plates
Side Bricks
Rear Brick
Pull the top edge of the Rear
Brick forward and lift the
brick out of the Stove.
Slide the base of the
Side Brick towards the
centre of the stove and
remove.
Slide out both
Side Plates
9
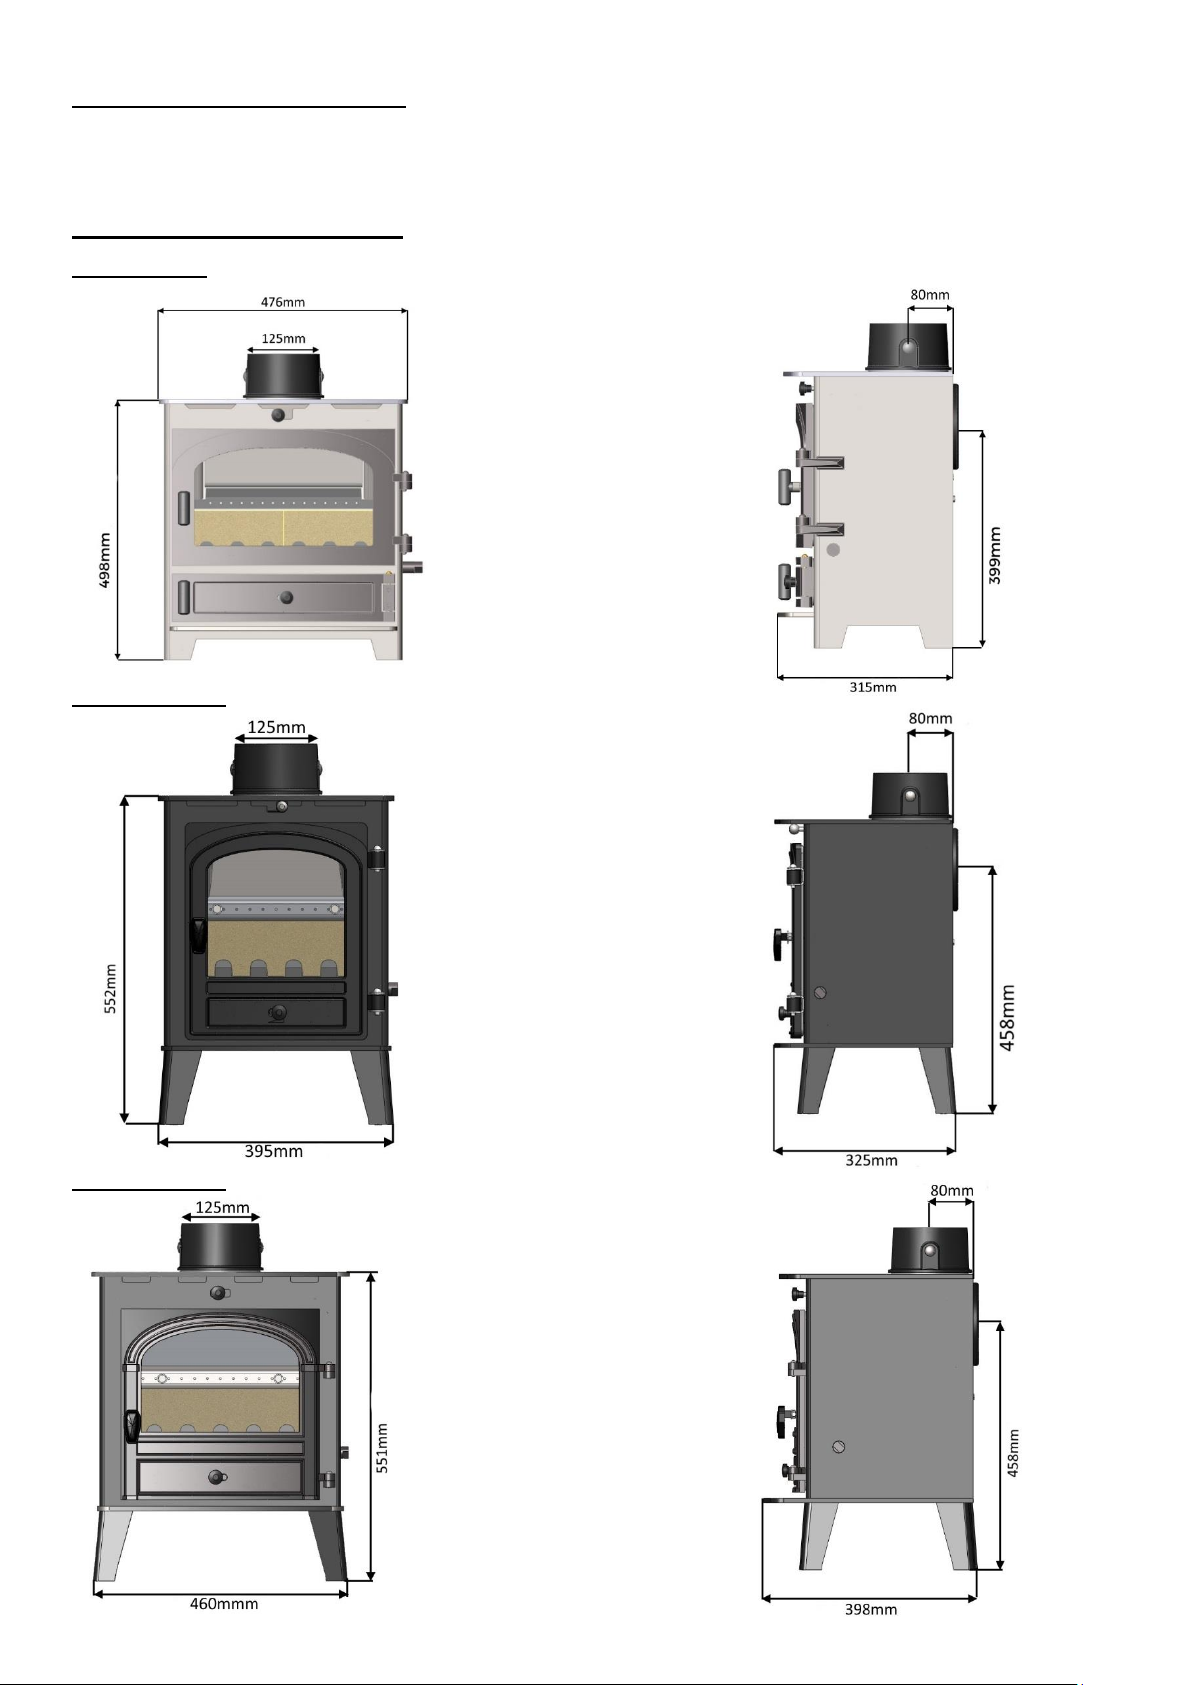
Baffle/Throat Plate
Stove Assembly
Flue Collar
Blanking Plate
Lift the Baffle and slide to
the left. When the right
side of the Baffle clears the
Baffle Support, lower the
Baffle into the Fire Box and
remove.
Place the bolts downwards through the fixing holes (head side
upwards). Then tighten by using supplied nuts from inside stove.
Place the gasket on the outlet and put blanking plate on top of this.
Screw the bolts from the inside of the stove into the blanking plate.
Place the flue collar gasket on the outlet to be used.
Top or rear outlet
10
Re-Assembling The Stove
Refit all the internal parts by following the ‘removing internal component’ instructions in
reverse order.
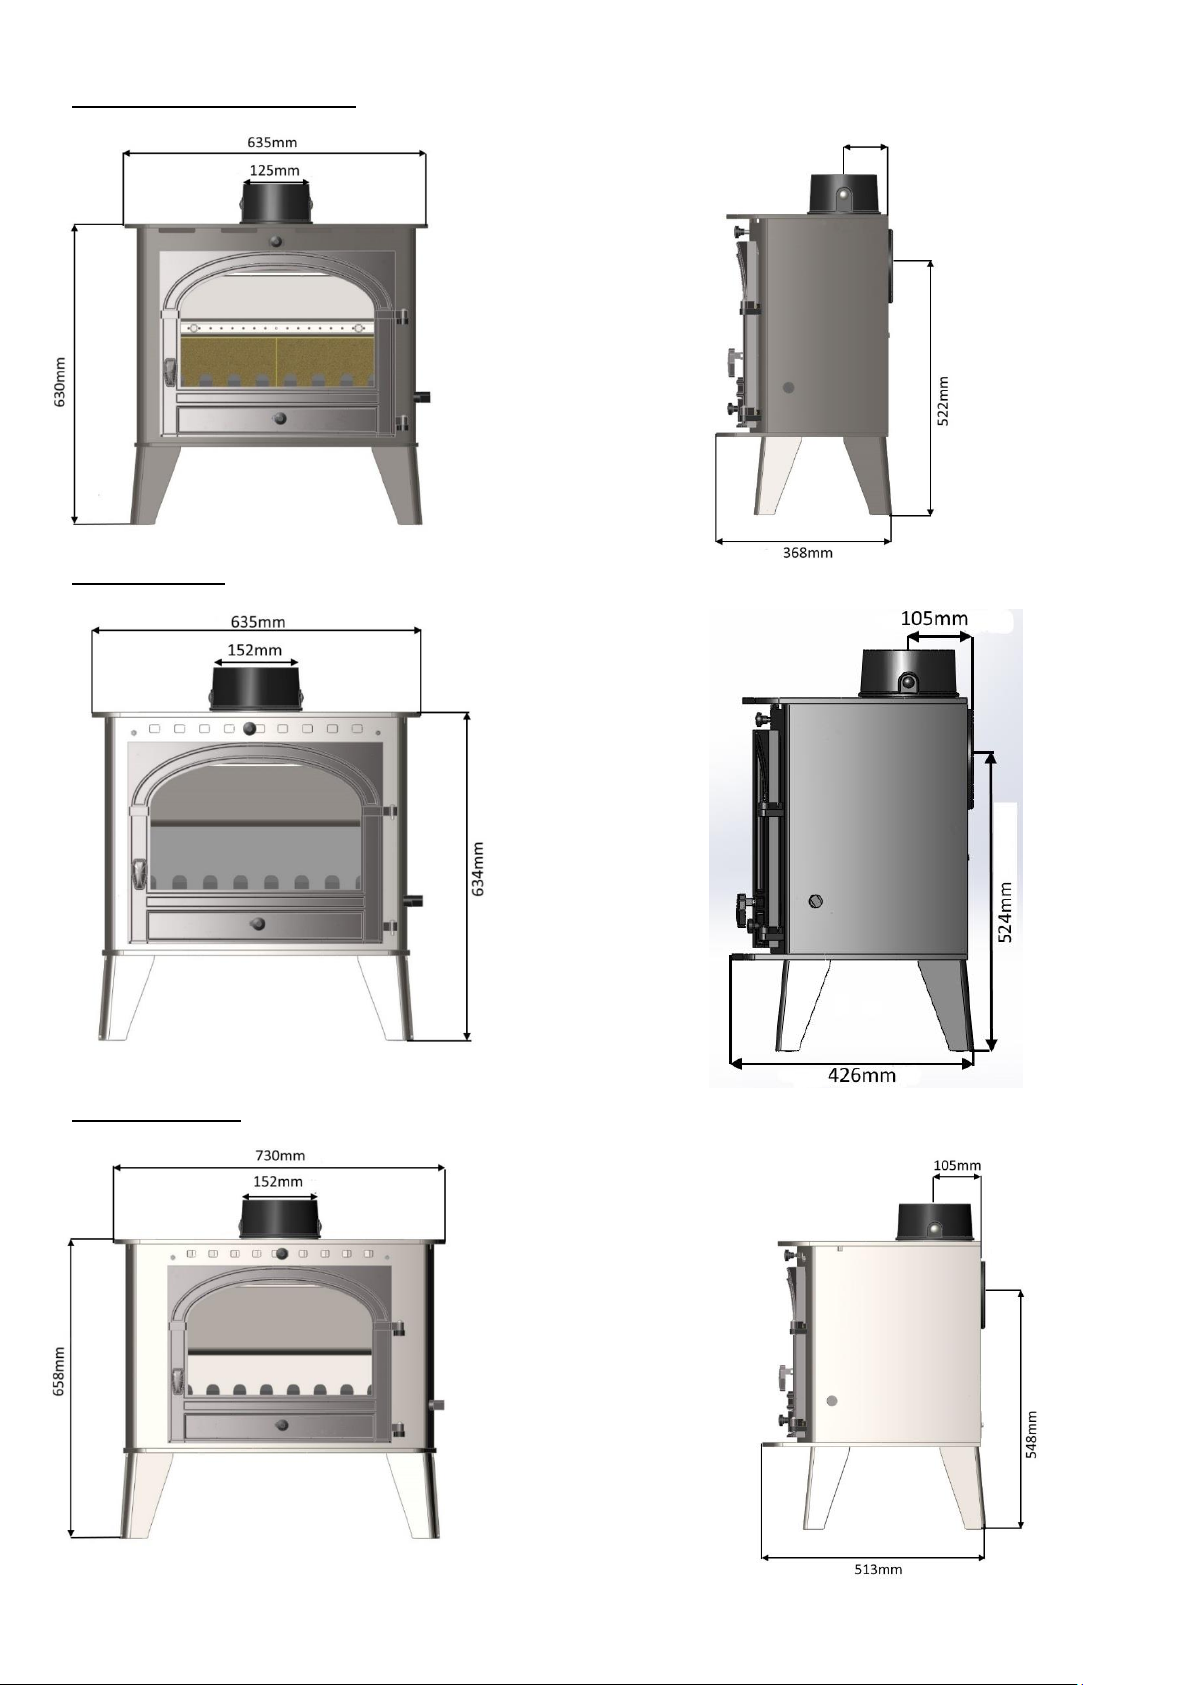
APPLIANCE DIMENSIONS
DERWENT
CONSORT 4
CONSORT 5
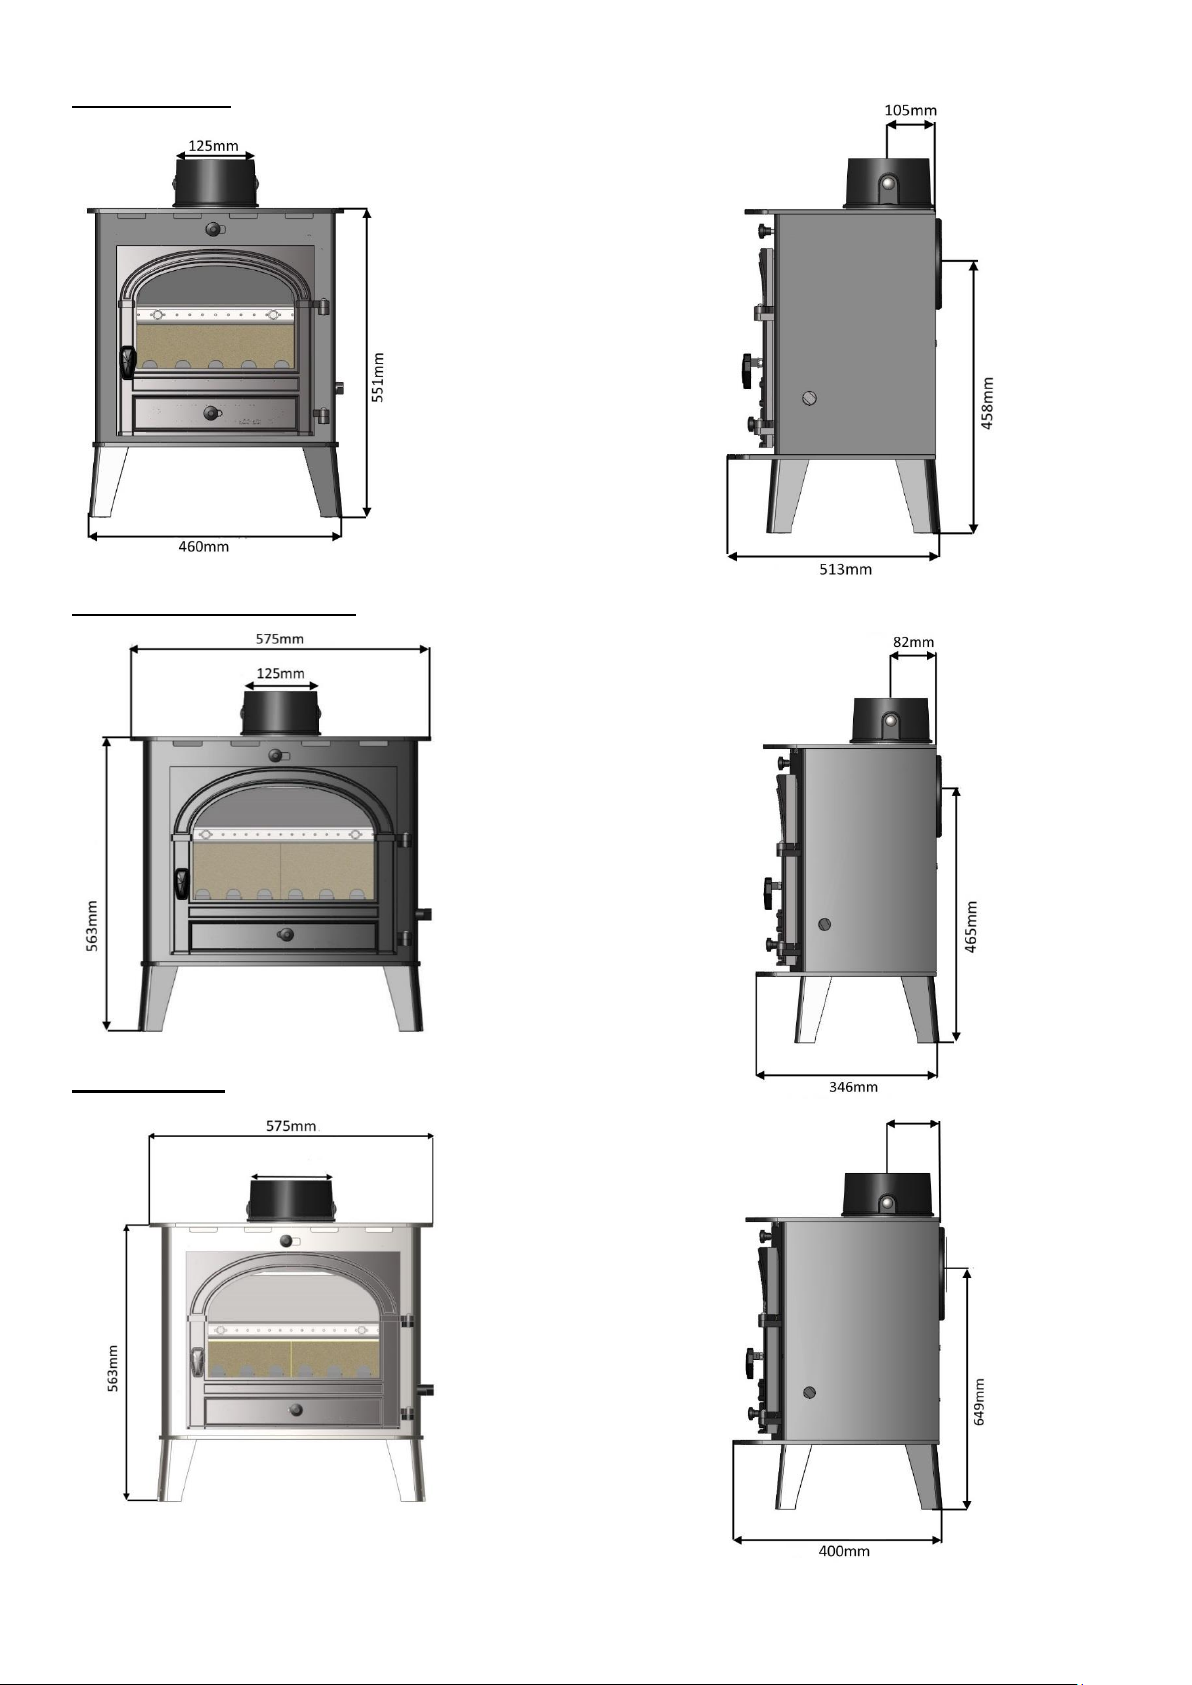
11
COMPACT 5
CONSORT 5 SLIMLINE
CONSORT 7
12
CONSORT 9 SLIMLINE
CONSORT 9
CONSORT 15
 Loading...