

Page 1
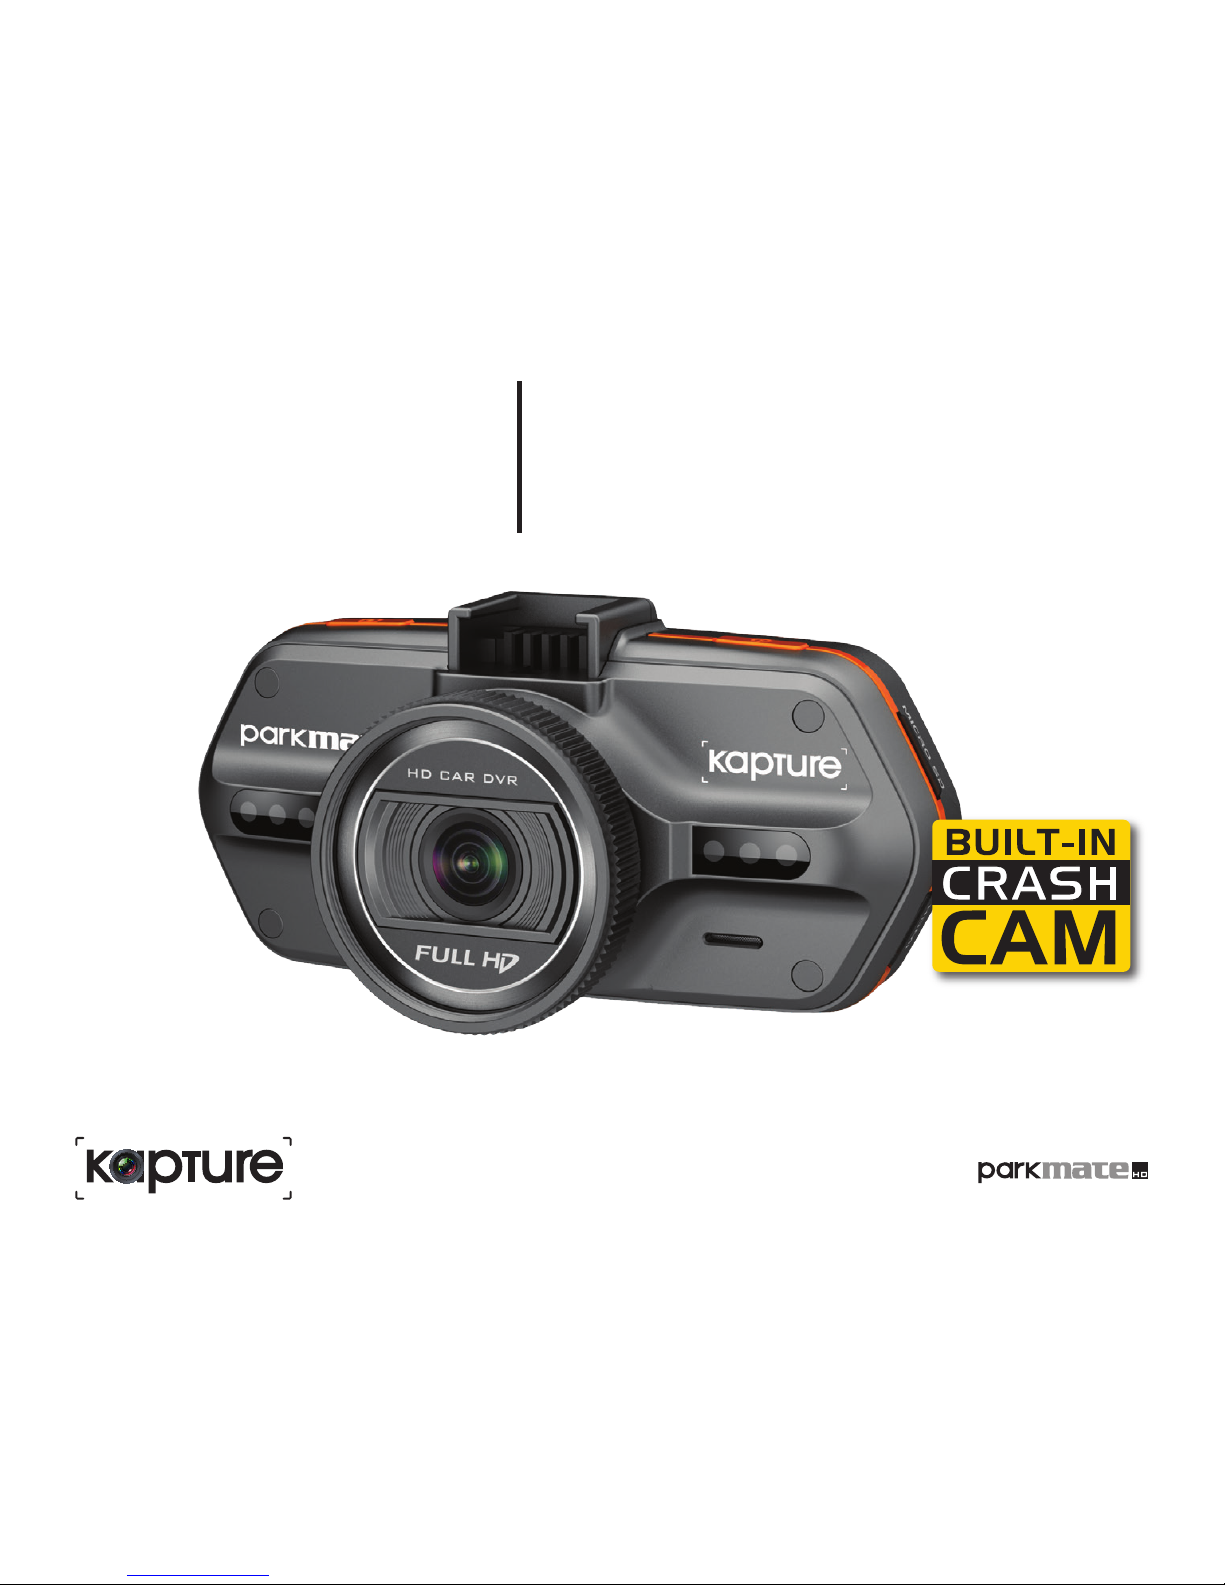
Full HD
KPT-700 User Manual
In-Car DVR
Page 2

2
Product Picture & Function 2
a) Device Introduction ................................................................................................................................. 2
b) Button Function ...................................................................................................................................... 3
c) LED Light Status List ............................................................................................................................. 5
d) Product Accessories ............................................................................................................................... 5
Basic Operation 5
a) Micro SD Card Installation ....................................................................................................................... 5
b) Camera Holder Installation ...................................................................................................................... 6
c) Power Supply ......................................................................................................................................... 6
d) G-sensor Function .................................................................................................................................. 8
e) Video Mode ............................................................................................................................................ 9
f) Image Capture ....................................................................................................................................... 10
g) Playback Mode ..................................................................................................................................... 10
Menu Setting 12
a) Video Mode .......................................................................................................................................... 12
b) Playback Mode ..................................................................................................................................... 16
Connection 17
a) Connect to TV ...................................................................................................................................... 17
b) Connect to Computer ........................................................................................................................... 17
Product Specification 18-19
Page 3
3
Product Picture & Function
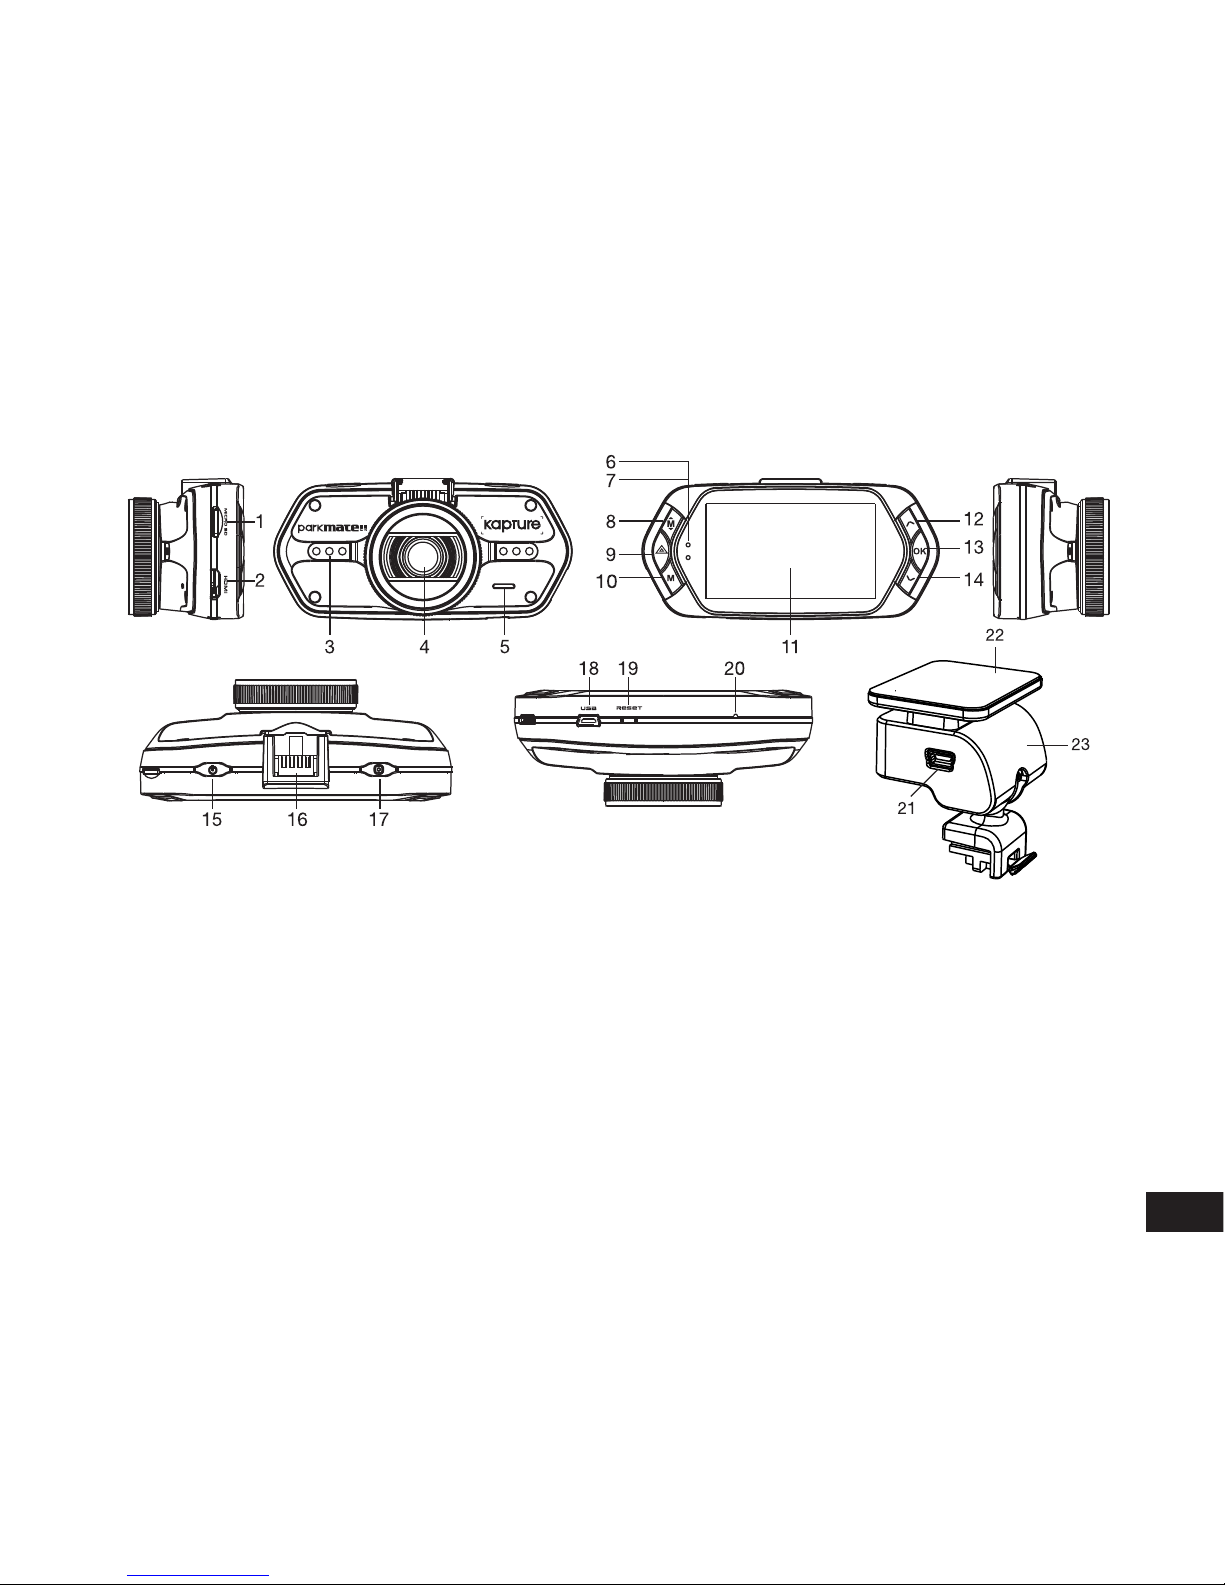
a) Device Introduction
1. Micro SD Card Slot 9. File Protection Button 17. Photo Button
2. HDMI Port 10. Mode Button 18. USB Port
3. LED Light 11. LCD Display 19. Reset Button
4. Lens 12. Up Button 20. Microphone
5. Speaker 13. OK Button 21. Power Input
6. Status Light (Blue) 14. Down Button 22. Interchangeable Mount
7. Charging Light (Red) 15. Power Button 23. Camera Holder
8. Menu Button 16. Holder Connector
Page 4
4
b) Button Function
Power Button Press this button for 2~3 sec. to turn on/off the device.
Photo Button In video mode, at any time, press this button to take picture.
In playback mode, when replaying video, press this button to take picture of current video.
Menu Button Press this button during standby status or playback mode, menu list of current mode will
appear.
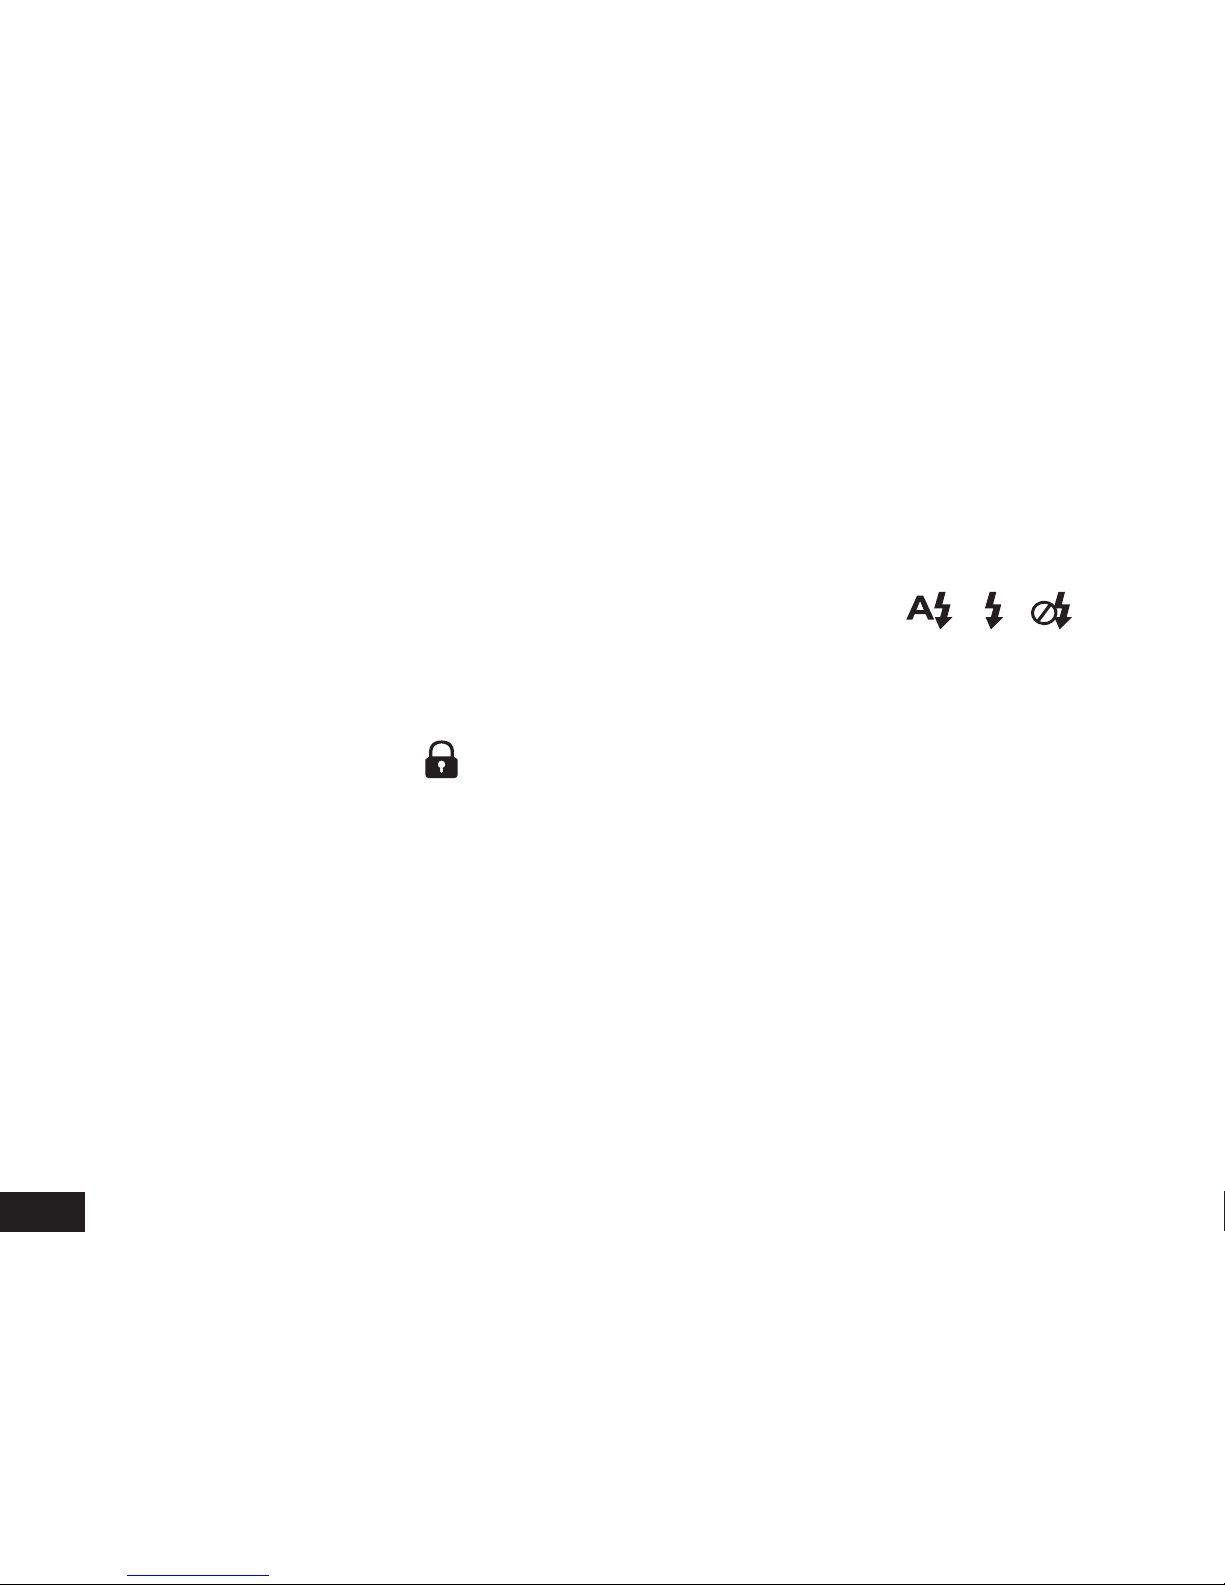
During recoding, press this button to change the flash light status “ “, “ “, “ “
File Protection Button
In video mode, during recording, press this button to set the recording video to be
protected manually, so as to prevent it from being overwritten by loop recording.
In playback mode, press this button to lock or unlock the video file. When file protection is
active, the icon “ ” will appear on LCD display.
Mode Button The DVR has two modes, video mode and playback mode.
Pressing this button during standby status switches the camera between video mode and
playback mode.
When the DVR is recording, the Menu Button function is disabled.
Up Button In video mode, press this button to turn on/off LCD display. In menu setting, press this
button to up item.
In playback mode, press this button to choose previous file.
In playback mode, when playing video file, press this button to reverse playback.
OK Button In video mode, press this button to start/stop recording.
In playback mode, press this button to play/pause video file.
In menu setting, press this button to confirm the menu setting.
Down Button In video mode, press this button to start/stop sound recording.
In menu setting, press this button to next item.
In playback mode, press this button to choose next file.
In playback mode, when playing video file, press this button to advance playback.
Page 5
5
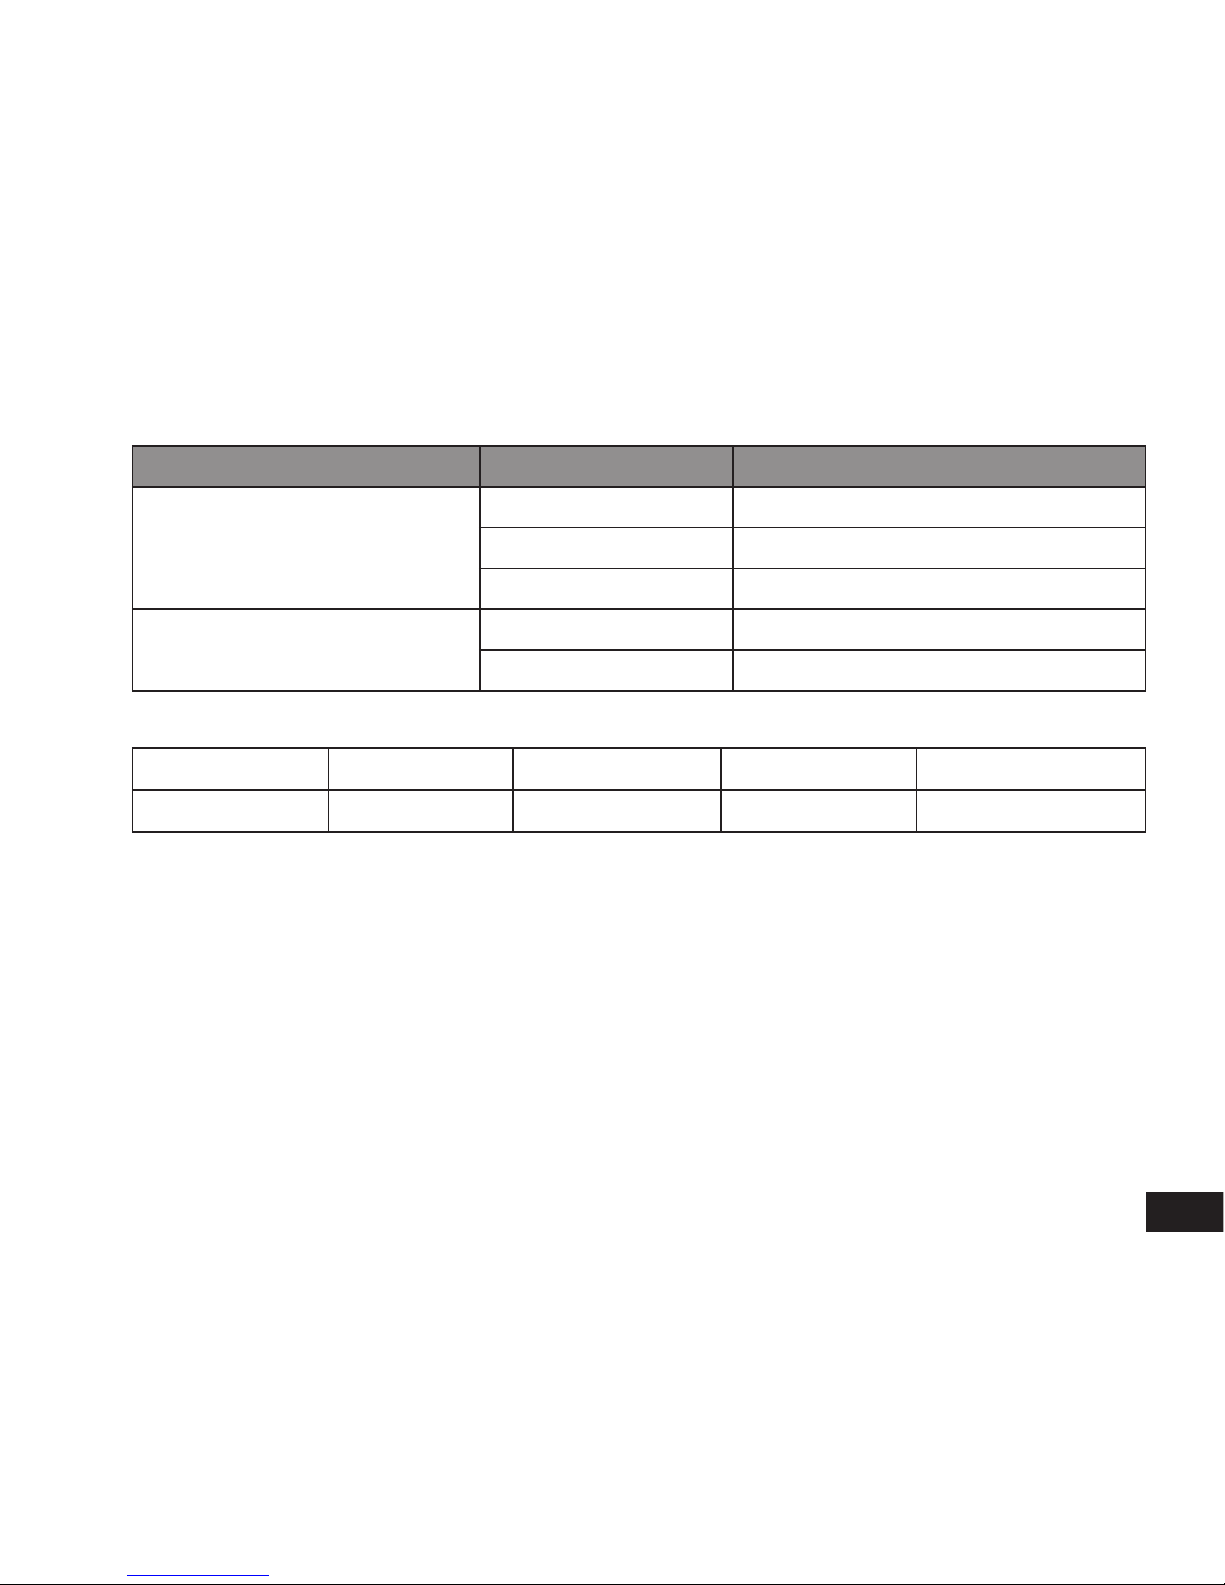
c) LED Light Status List
LED Light Status Meaning
Status Light (Blue)
Flash DVR is Recording
On DVR is in standby or Playback Mode
Off DVR is off
Charging Light (Red)
On Charging Battery
Off Charging finish
d) Product Accessories
1. Car DVR x1 2. Car Charger x1 3. Camera Holder x1 4. Suction Cup x1 5. Flat Mount x1
6. HDMI Cable x1 7. USB Cable x1 8. User’s Manual x1
Page 6
6
Basic Operation
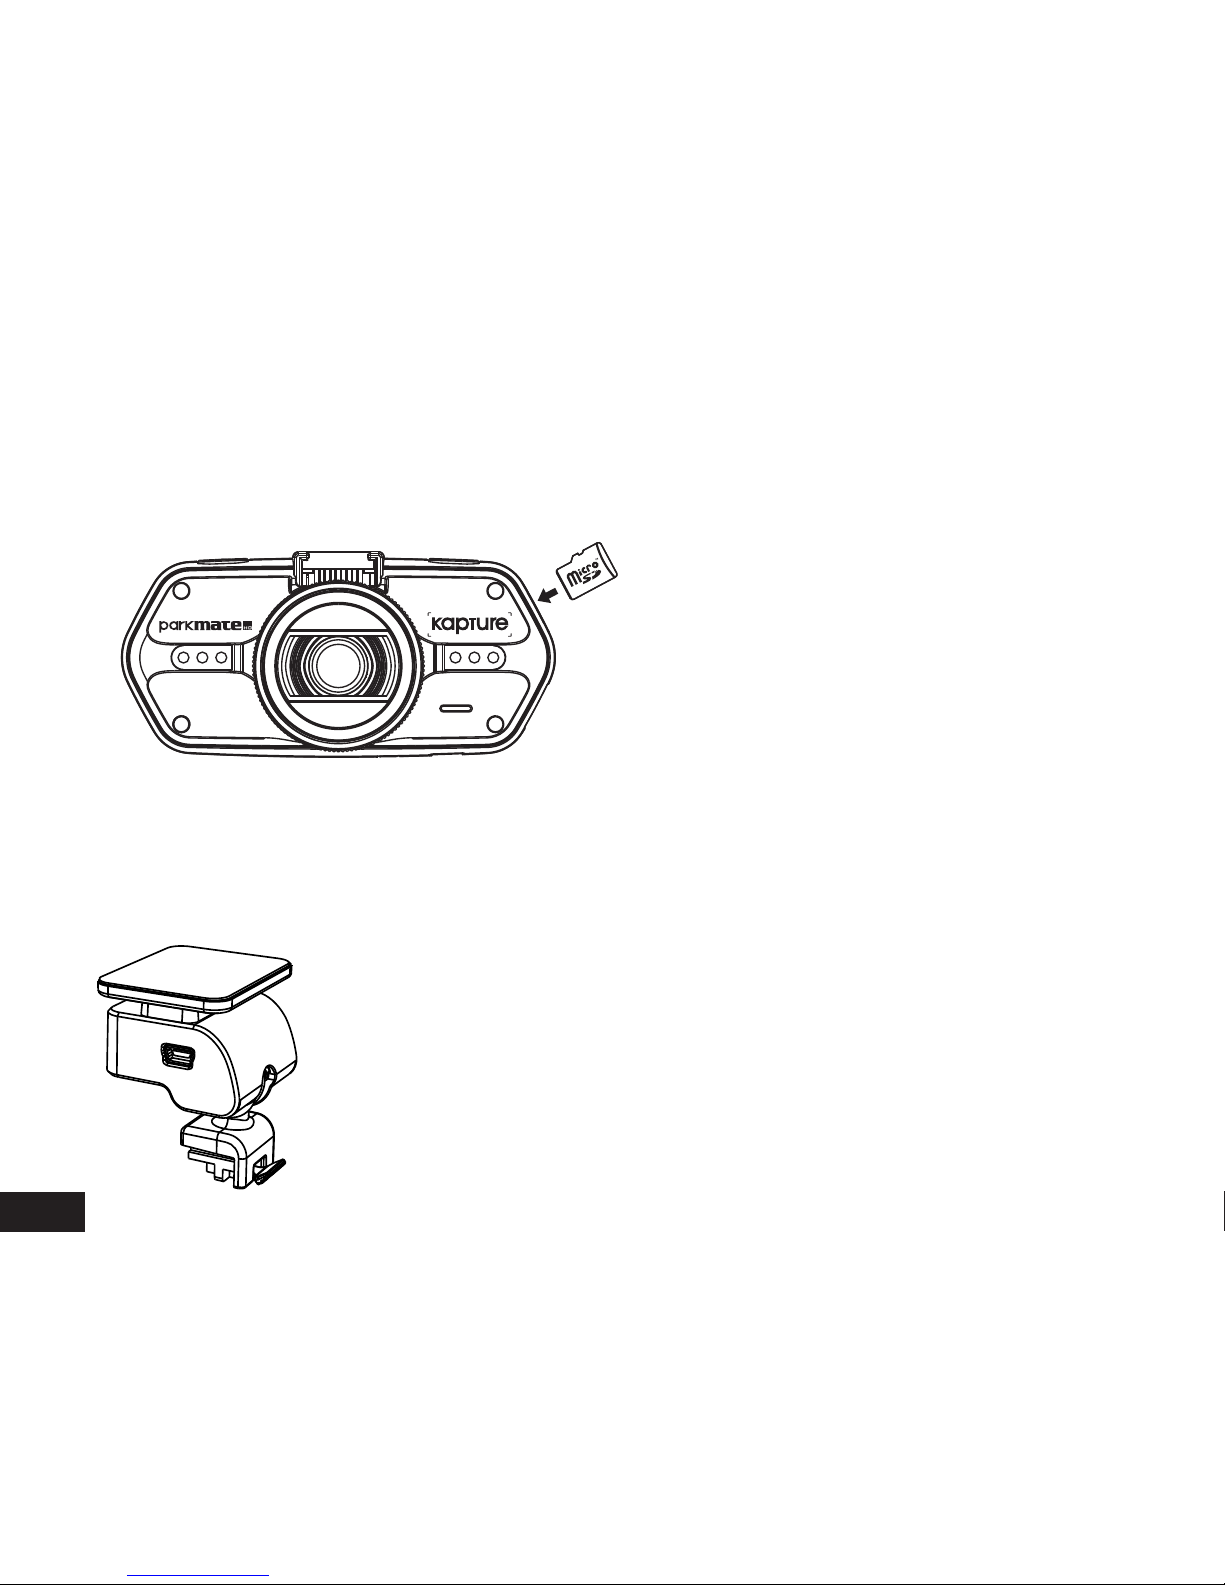
a) Micro SD Card Installation
Install the Micro SD Card into Micro SD Card Slot as picture shown.
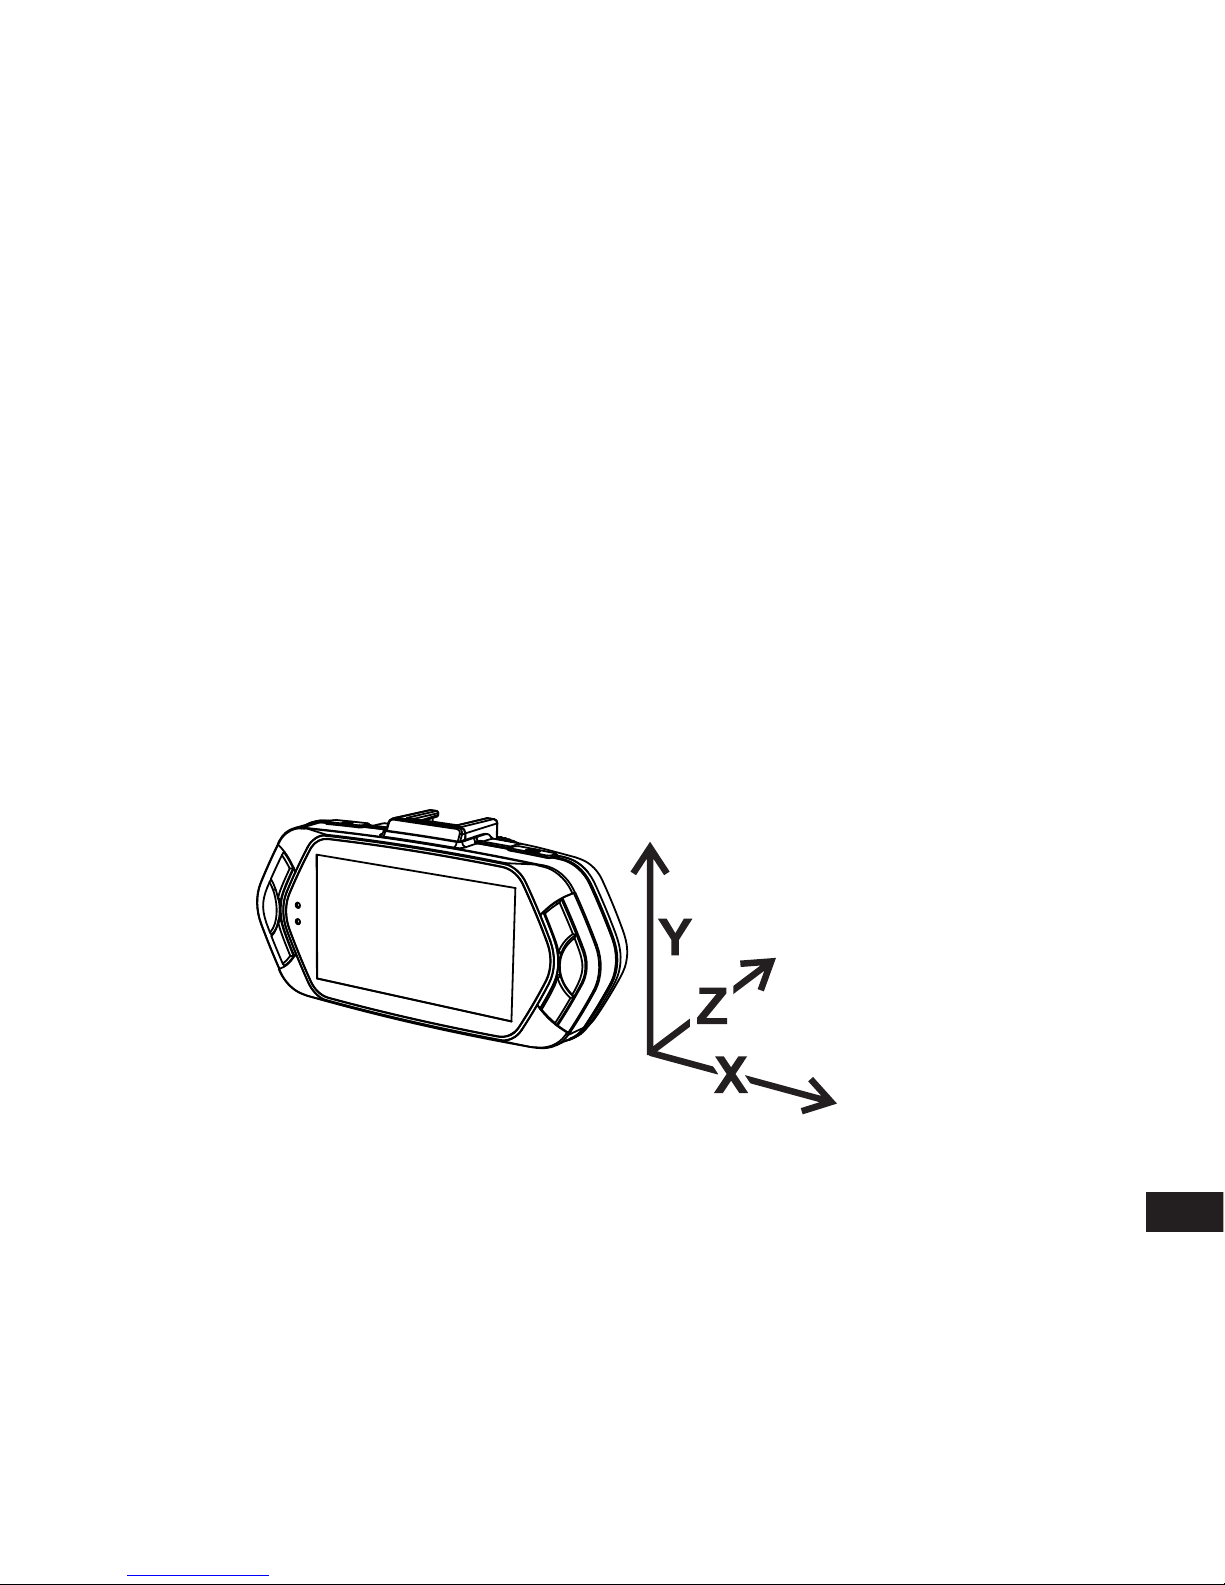
b) Camera Holder Installation
Install the camera holder onto the DVR by sliding the camera holder (pictured) onto the main body of the
camera, ensuring that it clicks in place. Although the picture shows the flat mount, there is also the option to
remove the flat mount and replace with the supplied suction cup.
Page 7
7
c) Power Supply
Connect car charger to DVR USB port and insert the charger in your car cigarette lighter charging port,
start your engine, the DVR will automatically power on and start recording.
Note: There are two Mini USB ports, one is on the DVR, another is on the Camera Holder.
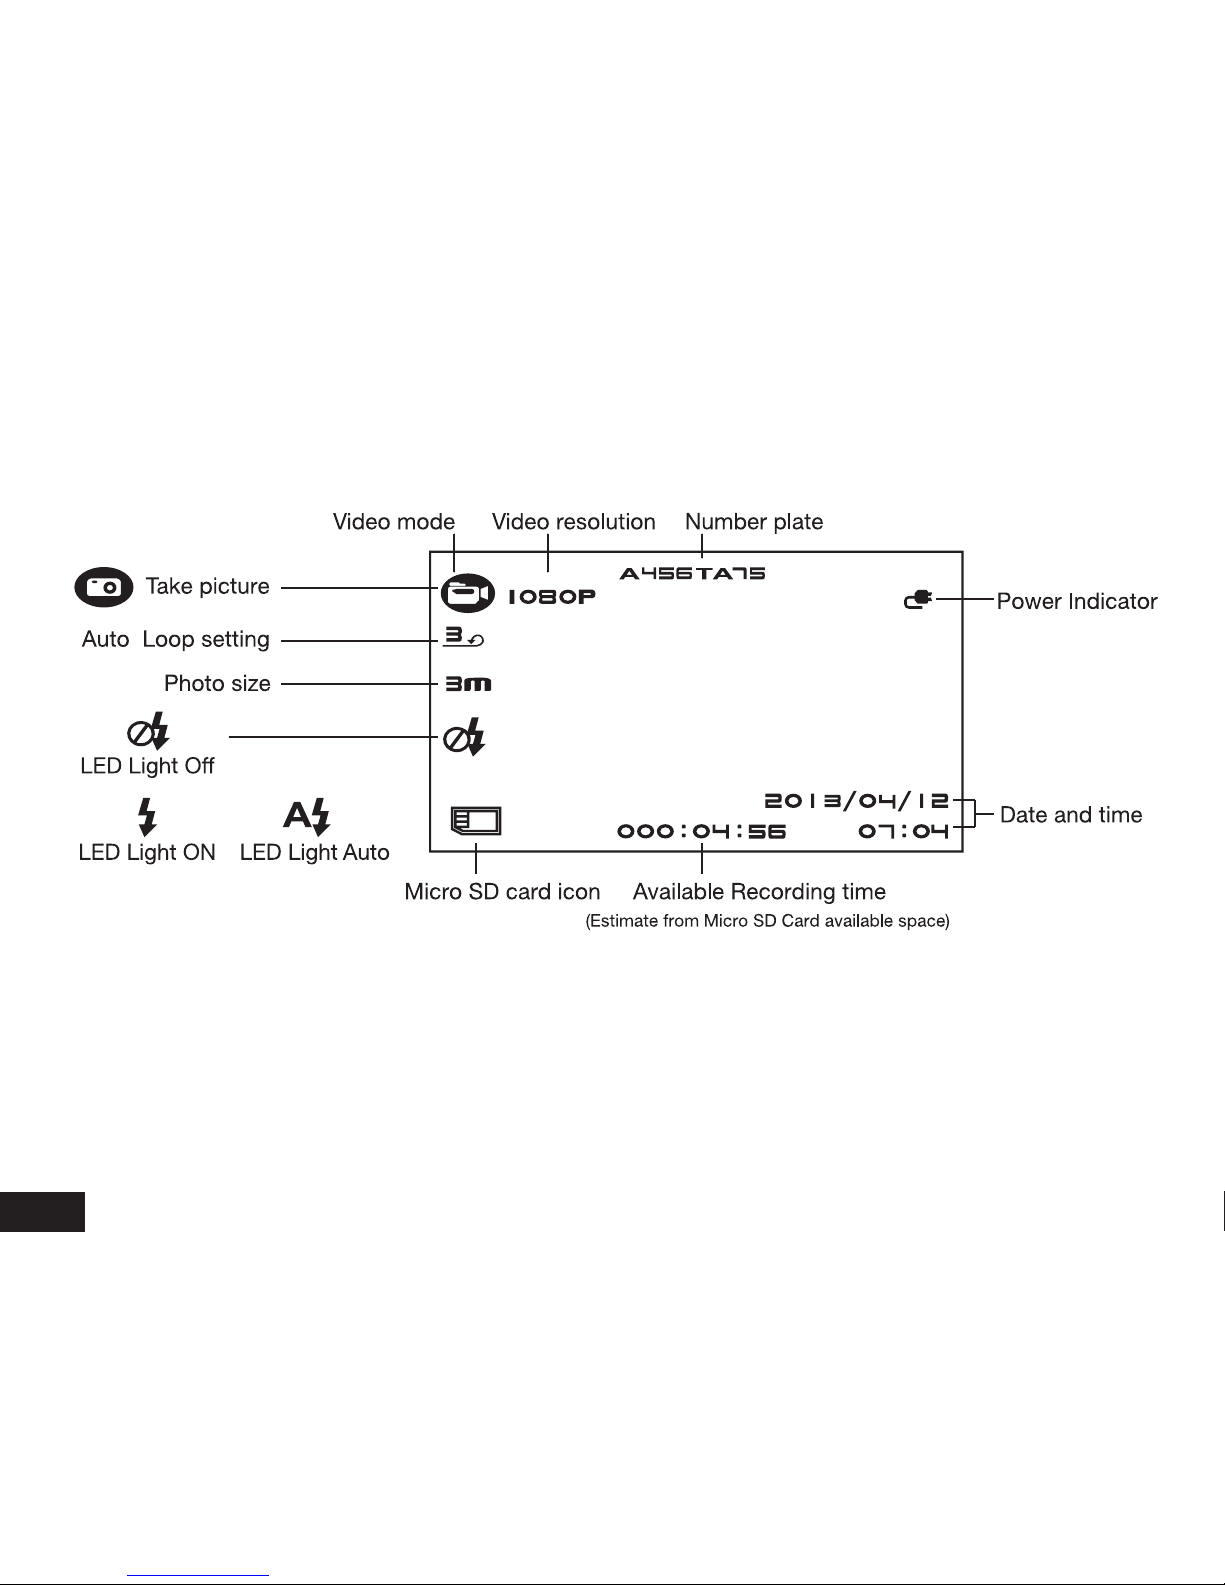
d) G-sensor Function
When a collision occurs, the Gravity Sensor (G Sensor) records the direction and exact data of the collision.
According to the G sensor sensitivity setting, the DVR will determine whether to set the currently recording
video to protection mode or not, which will ensure the current video is protected from being overwritten by
loop recording.
G-Sensor direction is as per the following image.
Page 8
8
e) Video Mode
In video mode, in standby status, LCD display will be shown as below:
Page 9
9
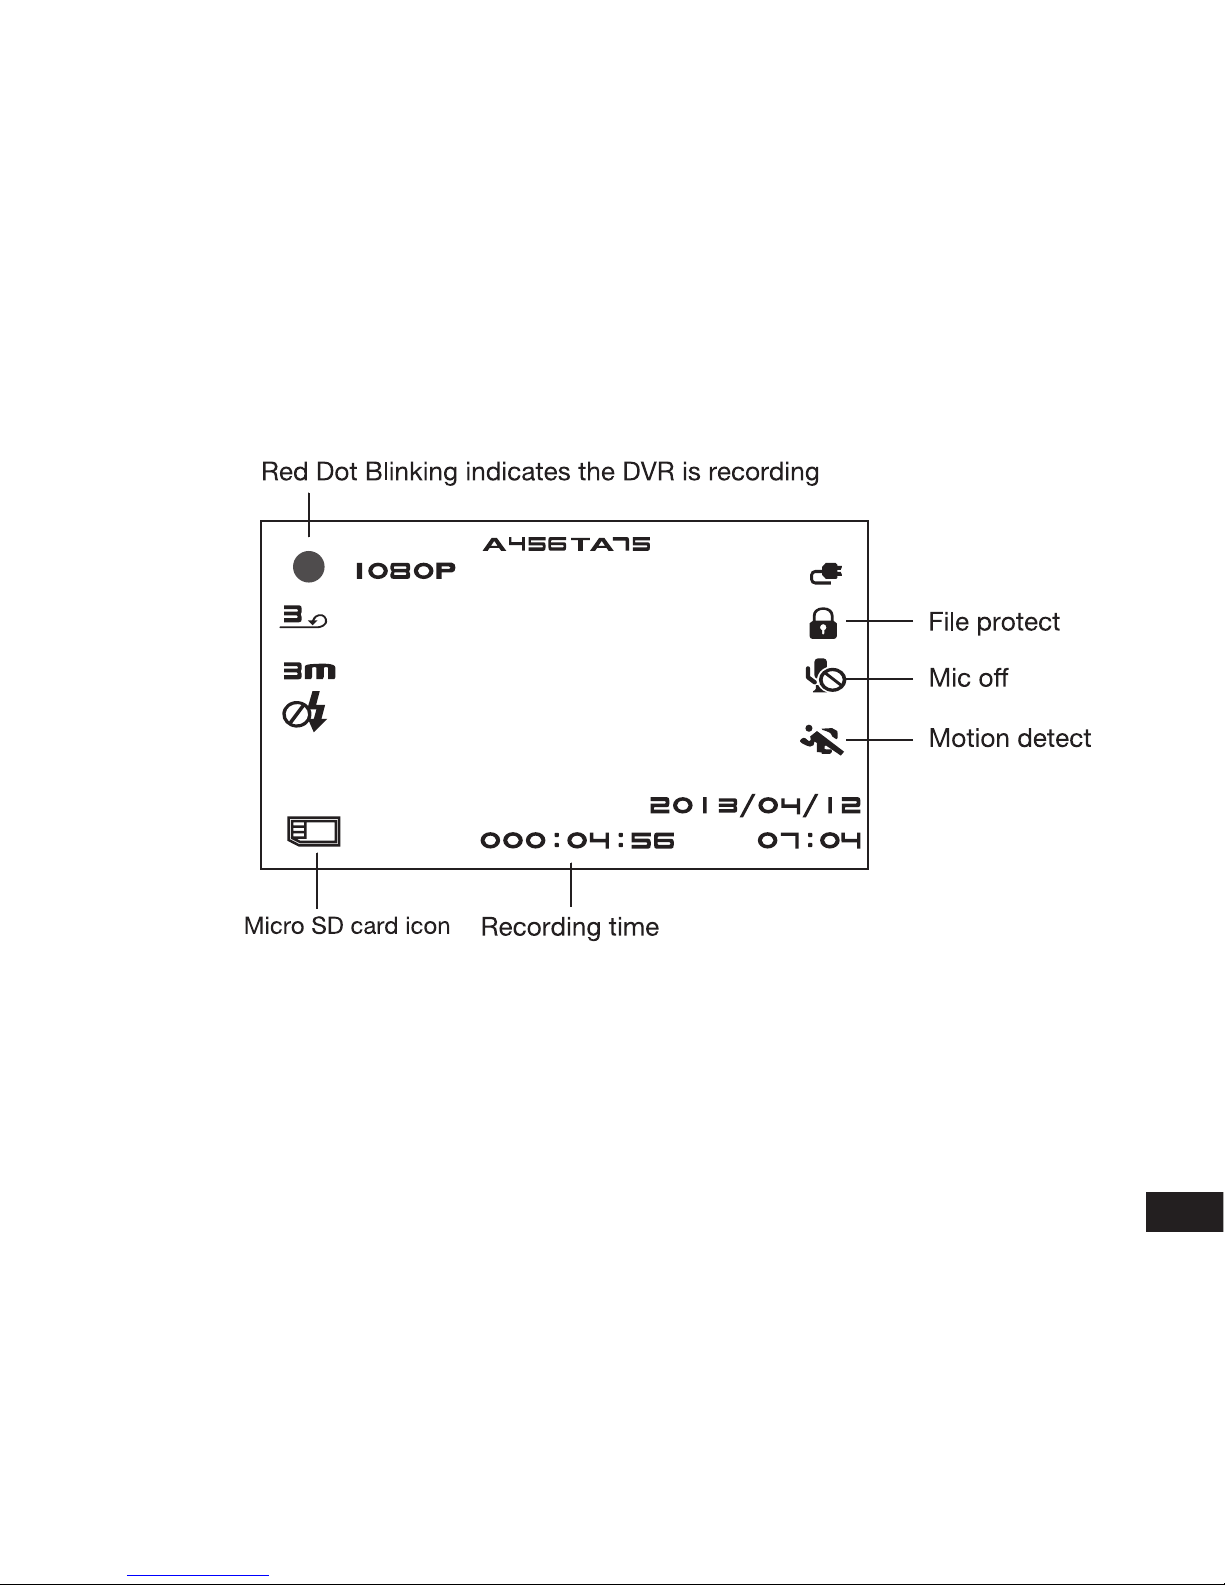
In video mode, in recording status, LCD display will be shown as below:
f) Image Capture
In video mode, at any time, press photo button to capture an image.
In playback mode, when video is playing, press photo button to take snapshot of current video.
g) Playback Mode
Press Mode Button to enter playback mode, then press Menu Button to choose preview video/picture file in
outer card or inner card. Use the direction button to control playback operation.
Page 10
10
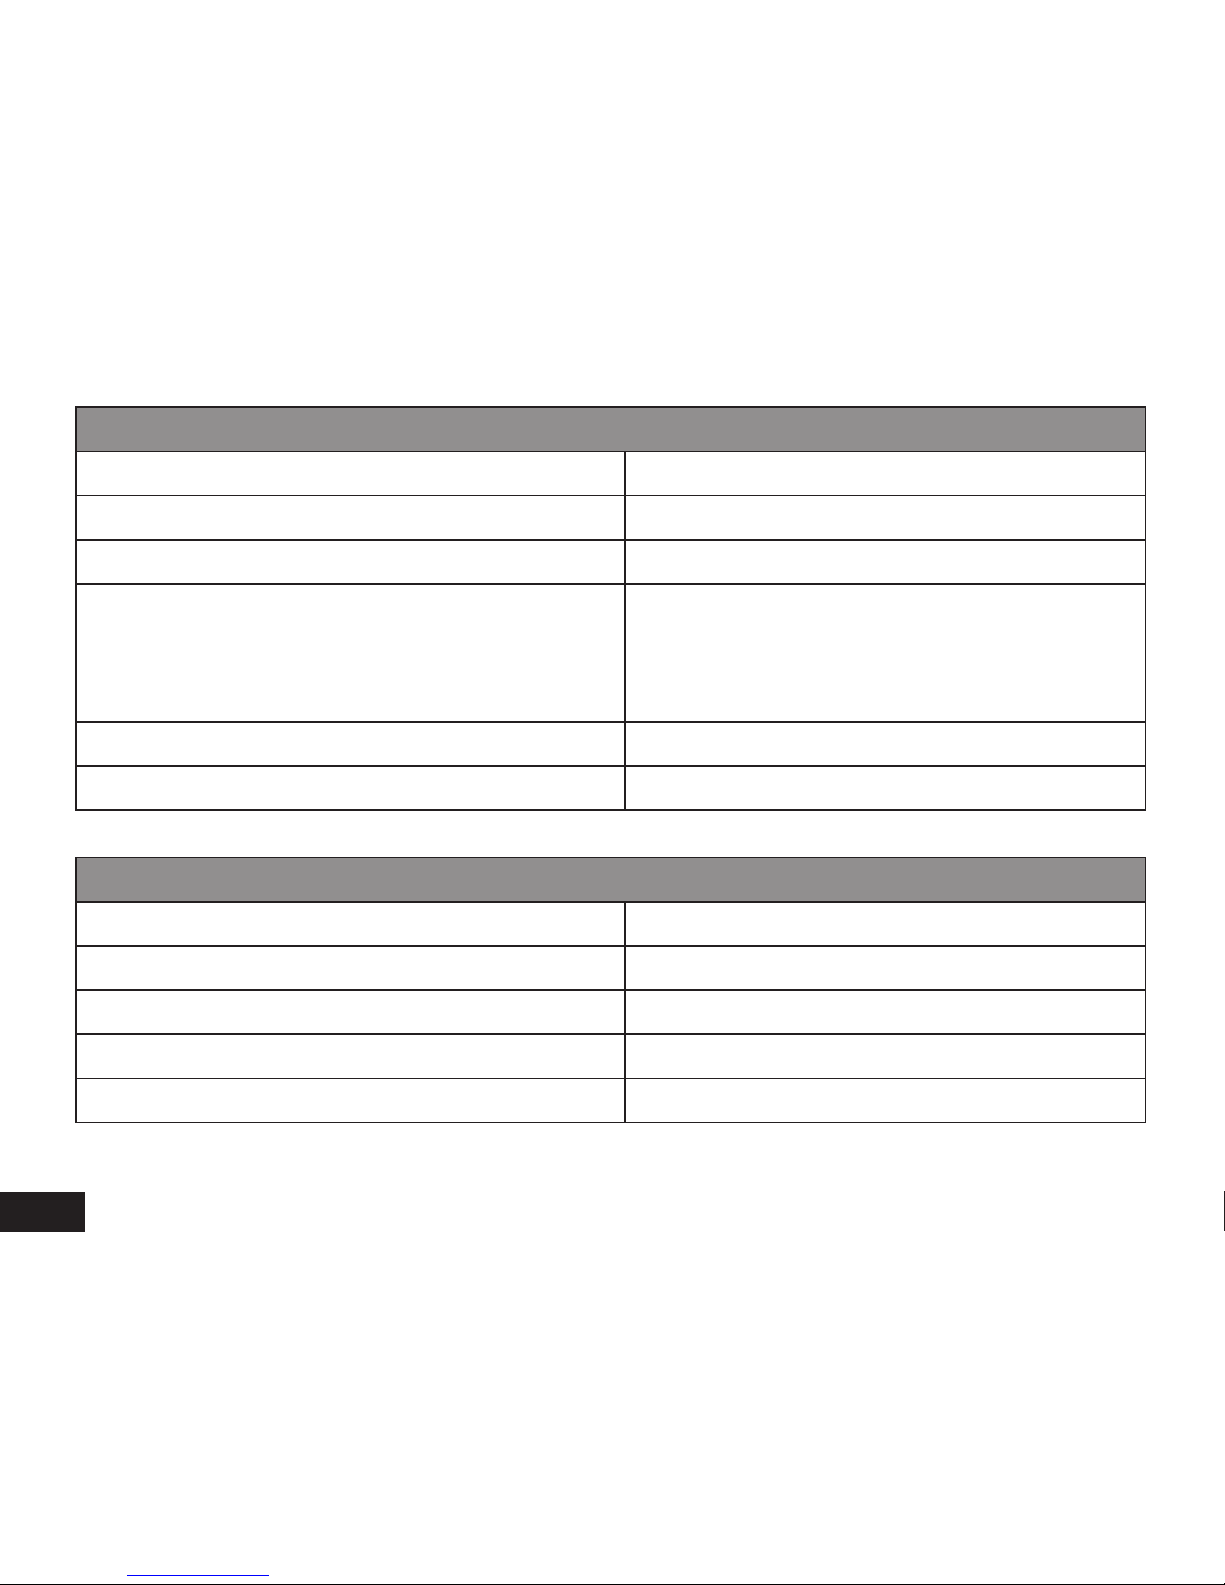
Preview in six grids
Up Button
Previous file
Down Button
Next file
OK Button
Confirm
Menu Button
Enter menu list (in this menu setting, “copy to another
card” means you can copy files from the “Outer Card”
(Micro SD) to “Inner Card” (Internal Memory) or copy
files from “Inner Card” (Internal Memory) to “Outer Card”
Micro SD.
File Protection Button
Lock / Unlock Video / Picture file
Mode Button
Change mode
Play
OK Button
Play / Pause
Menu Button
Delete menu
File Protection Button
Lock / Unlock video file
Mode Button
Back to six grids preview
Photo Button
Take snapshot of current video
Page 11
11
Menu Setting
The DVR has two modes, Video Mode and Playback Mode.
a) In Video Mode (Please refer to pages 4 & 5 for button functions)
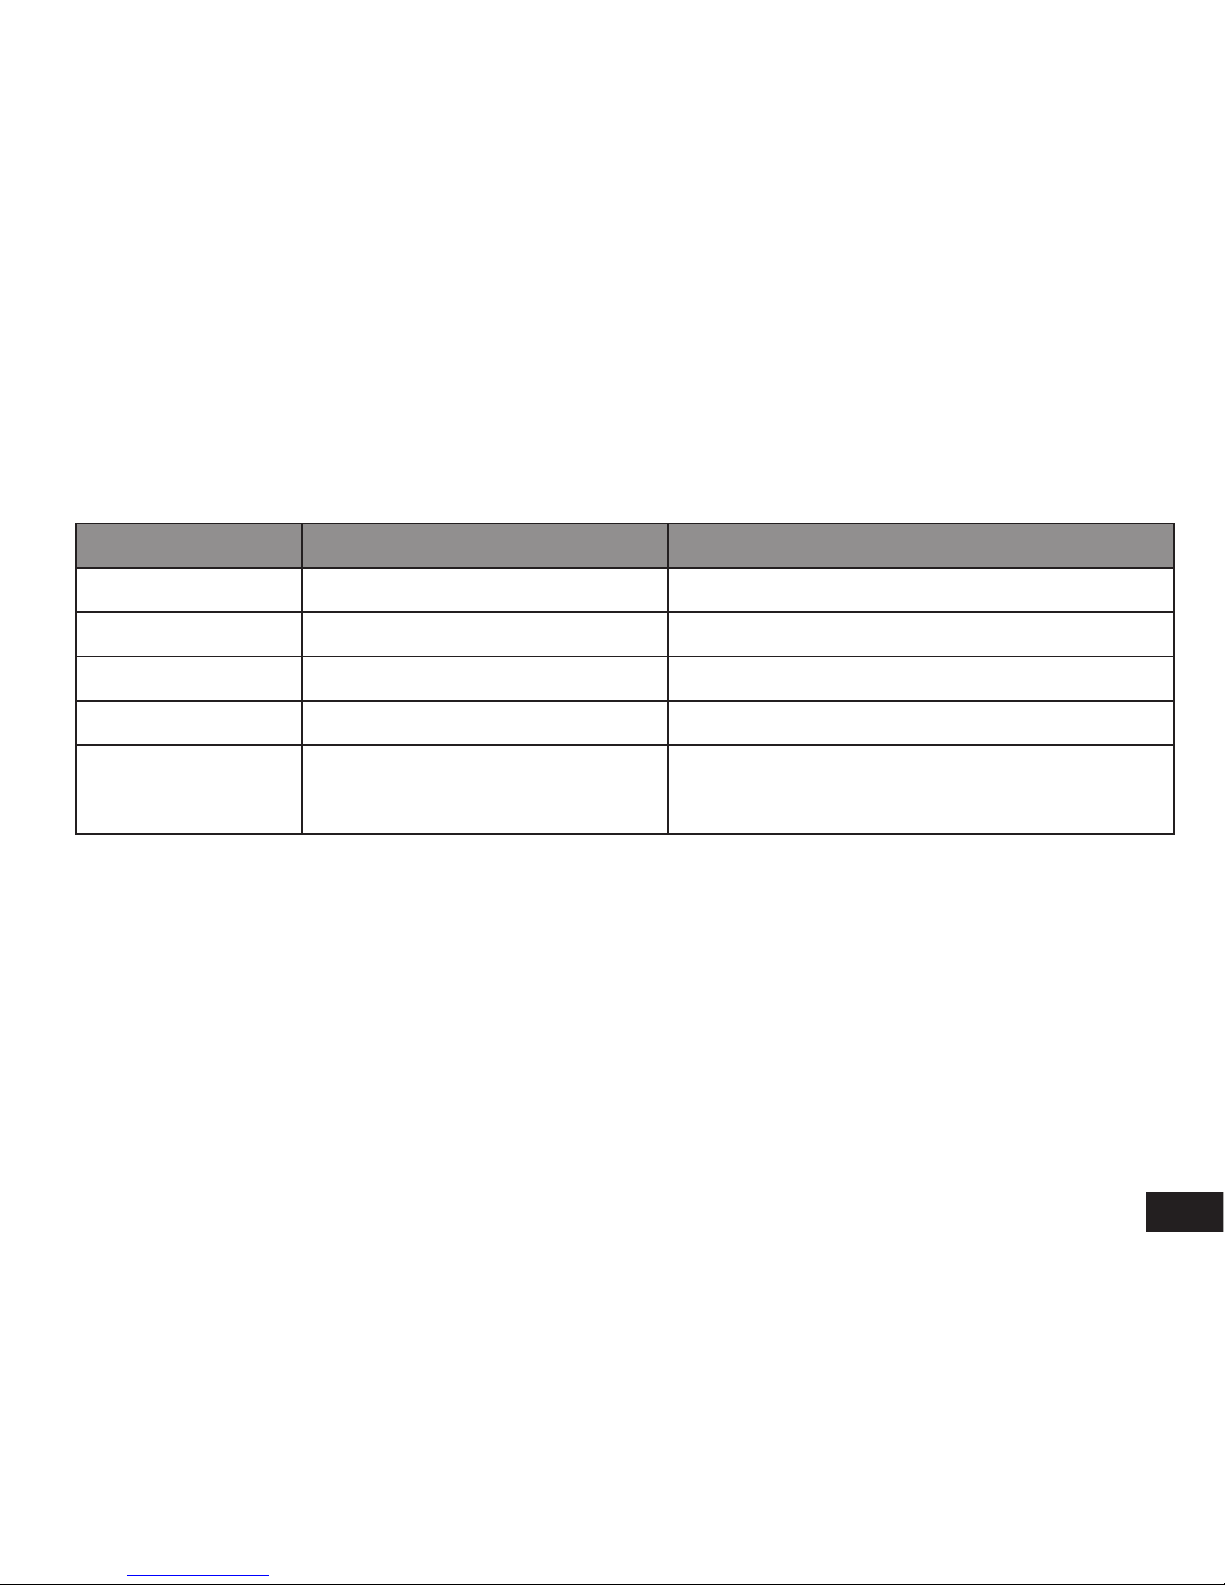
Video Menu Item Remark
Video Resolution
1080P / 720P
Set Video Resolution
Photo Size
0.9M / 2M / 3M / 3.7M
Set Picture Resolution
Loop Setting
Off / 1min / 3 min / 5 min
Set Loop Recording Time
Motion Detect
Off / On
Set Motion Detection or not
Sensor Flip
Off / On
If setting is on, the menu and image is flipped vertically
180° degrees. This feature also allows you to install the
DVR upside down to suit your requirements.
Page 12
12
Effect Menu Item Remark
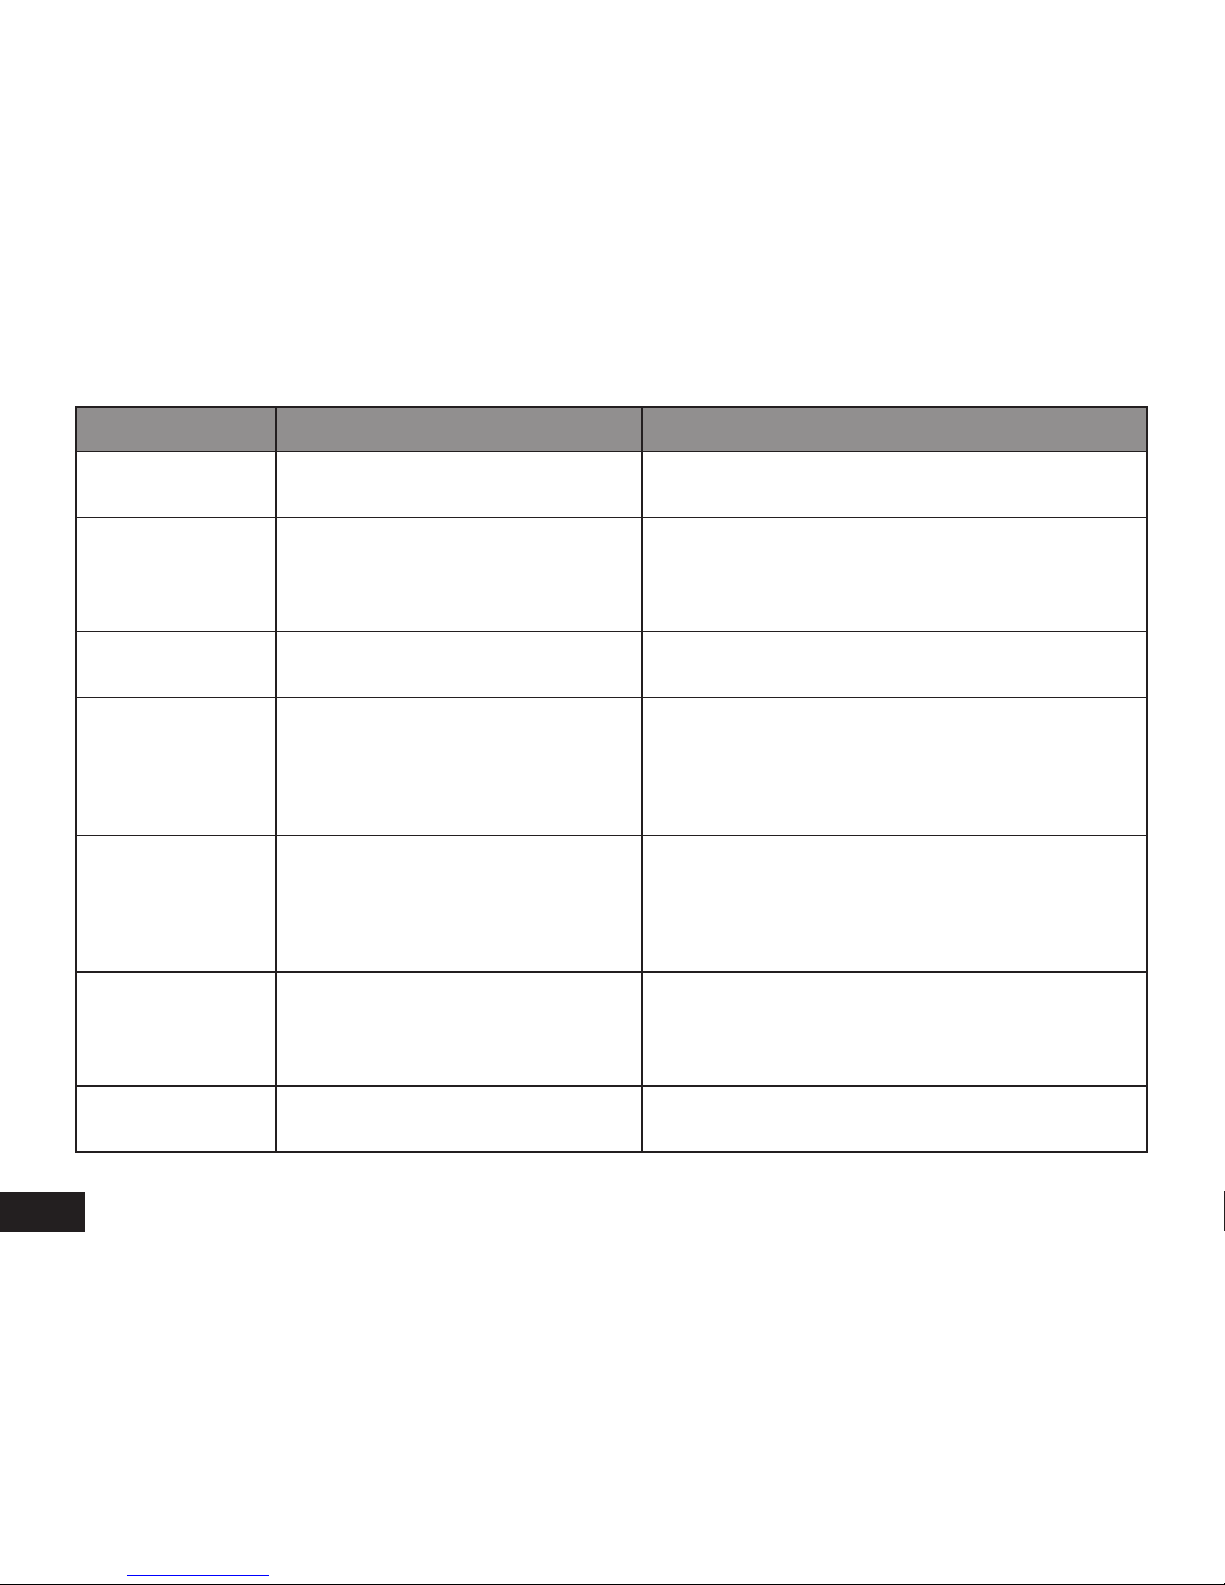
Flicker
50HZ / 60HZ
If your local AC power frequency is 50Hz, please select
60Hz.
Auto Exposure
Auto / Landscape / Portrait /
Sports / Night Scene
This setting can be selected to allow shooting to be
more conformed to the surroundings and achieve
optimum shooting effect. Select [AUTO] to allow the
DVR to choose the setting automatically.
AE ISO
Auto / 100 / 200 / 400
According to the brightness during shooting, selecting
[AUTO] can set optimum ISO sensitivity.
White Balance
Auto / Sunny / Cloudy /
Fluorescent / Incandescent
Selecting [AUTO] under normal circumstances will set
the white balance. If [AUTO] mode does not produce
natural colours, please manually change the White
Balance setting according to the appropriate light
conditions.
Sharpness
Standard / Hard / Soft
Sharpness means the significant degree of contour
image during shooting. The higher the sharpness, the
more obvious the contour image of characters and
scene, it is very useful for face recognition during driving
recording.
AE Bias
- 2 / -1.7/ -1. 3 / -1/ - 0 .7/
- 0.3/0/0.3/0.7/1/1.3/1.7/2
This value set to “+” side, the device would brighten
video to avoid under-exposure. If this value set to “–”
side, the device would darken video to avoid over
exposure.
Quality
Super Fine / Fine / Normal
Higher Quality, more detail in the video recording, video
file size will be bigger.
Page 13
13
Setup Menu Item Remark
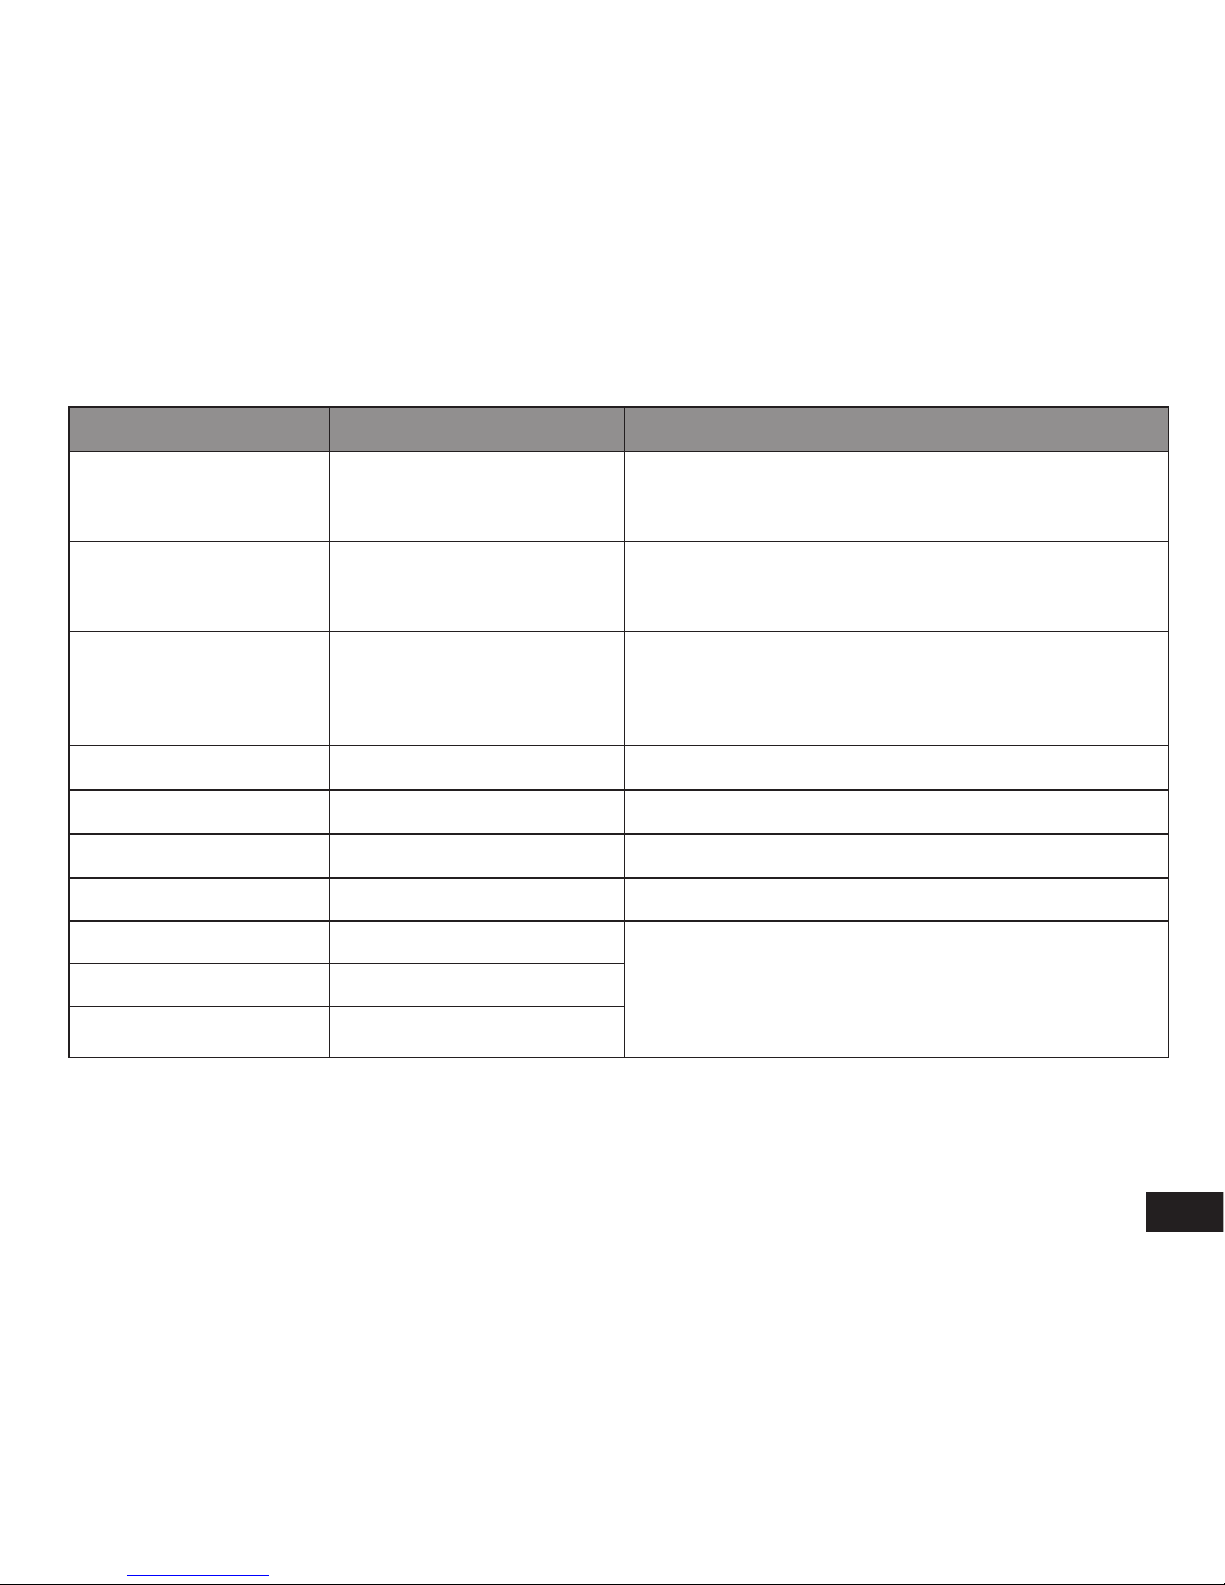
Auto Power O
Off / 1min / 3min / 5min
When this item is set and the device is in standby mode,
if no operation to device, after setting time, device will
automatically shut off.
Power O Screen
Off / 30s / 1min / 3min
When this item is set, if no operation to device, the screen
will shut off after setting time and enter sleep mode;
pressing any button will wake up the screen.
Time Setup
Time Setup
Setting time and time zone.
Note: Please set your area time zone according to
Greenwich Mean Time. Eg Melbourne, Australia is GMT
+10, so set value to +10 if you live in Melbourne.
Time Setup
On / Off
To set the time stamp on Video.
Velocity Stamp
On / Off
To set the speed stamp on Video.
Driver Num Stamp
On / Off
To record and display your car’s number plate on the Video.
Driver Number
To set your car’s number plate.
G-sensor X Sensitivity Close / Low / Middle / High
To set the X Y Z Axis G-sensor sensitivity. The Higher the
value, the more sensitive the G-sensor in the DVR, and
the more likely the video file will be protected in case of an
incident. For Details, please refer to G-sensor Function on
page 7.
G-sensor Y Sensitivity Close / Low / Middle / High
G-sensor Z Sensitivity Close / Low / Middle / High
Page 14
14
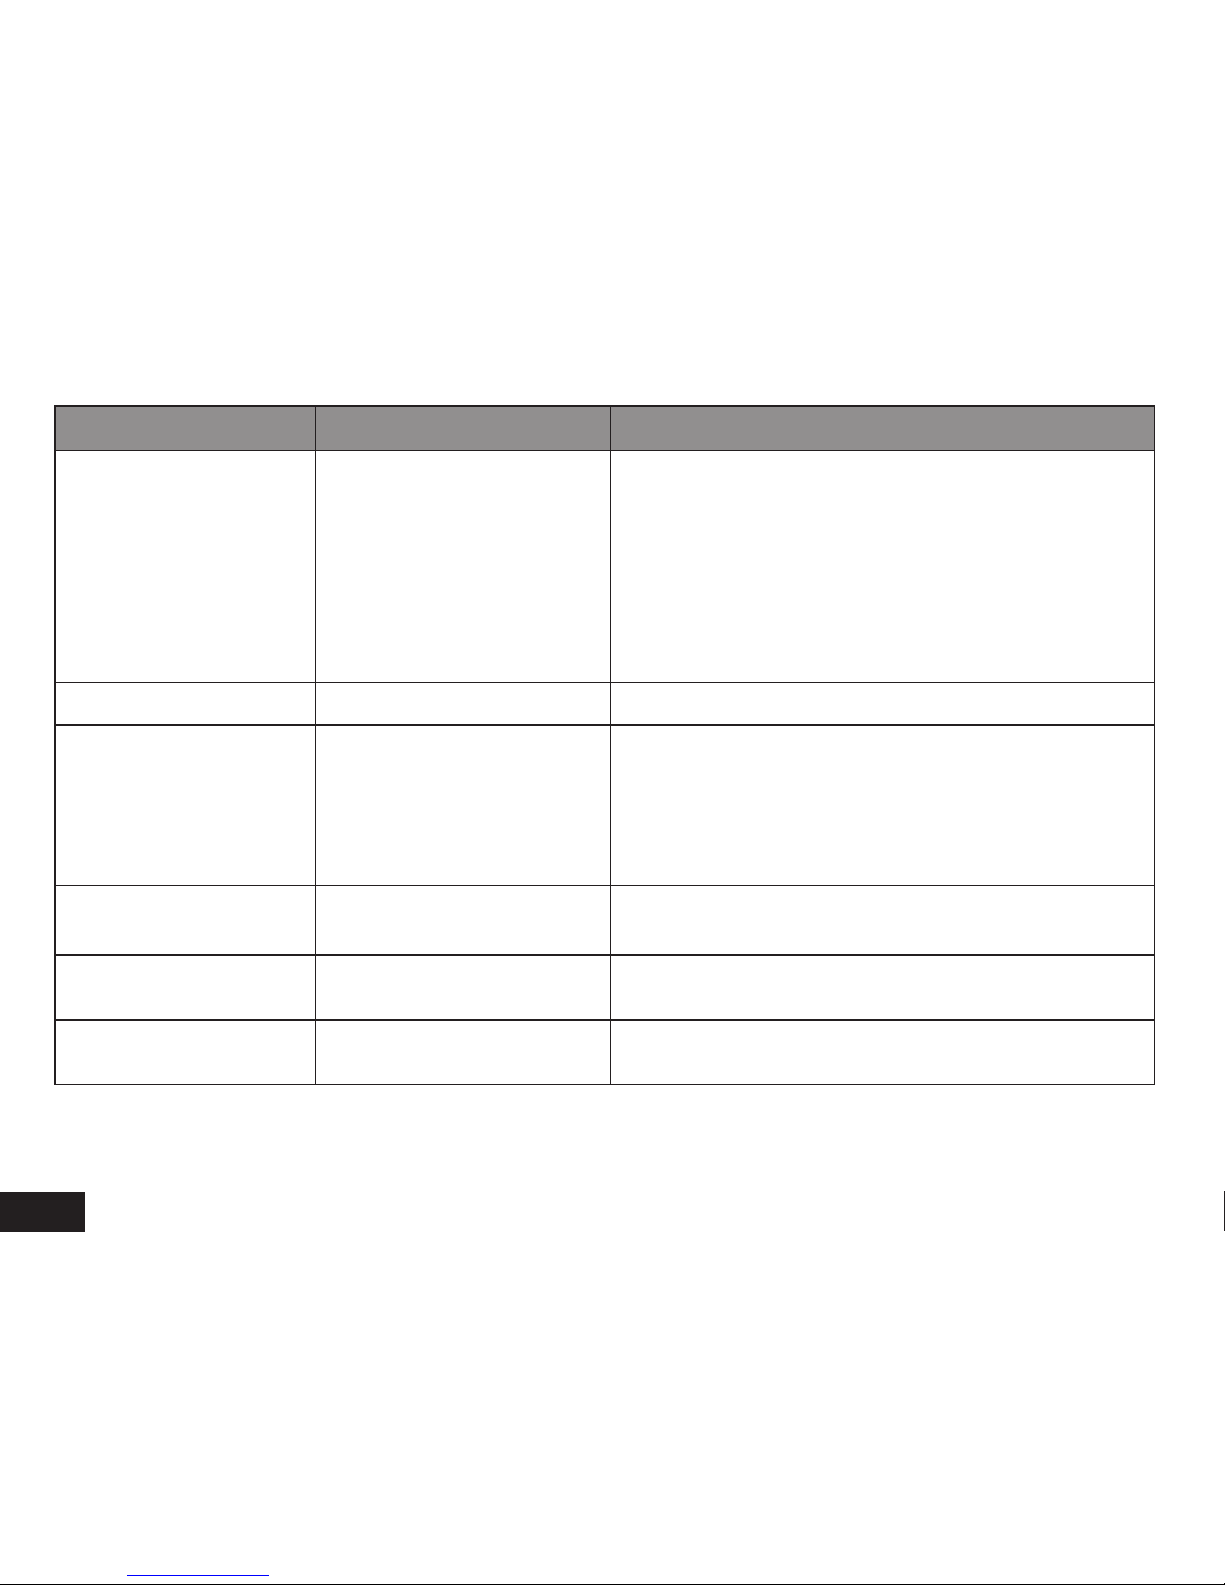
Setup Menu Item Remark
Key Light Auto / Open / Close
To set the key light (button back-light) function.
When set to “Auto” and the LCD screen is on, key light will
be on. When the LCD screen is off, key light will be off. The
LCD screen can be turned off by manually selecting the
“Up” button or via the menu setting “Power Off Screen”. The
LCD screen can be activated by pressing any button. When
the key light is set to “Open”, the key light will be on all the
time after the DVR is powered on. When the key light is set
to “Close”, the key light will be off all the time.
Beep Sound High / Low / Off
To set the button sound.
Choose Card Outer Card / Inner Card
Choose “Outer card” for the video/picture file to be stored
on the outer card (Micro SD). In playback mode, the LCD
display will show outer card video/picture. Choose “Inner
card” for the video/picture file to be stored in inner card
(internal memory). In playback mode, the LCD display will
show inner card video/picture.
Language
English / Russia / Czech /
Polish / Chinese
To set Language.
Default Setting No / Yes
This function will reset all settings on the device to default
factory settings.
Format No / Yes
Select “Inner card” (Internal Memory) or “Outer card” (Micro
SD), “Format” and “yes” to format your storage.
Page 15
15
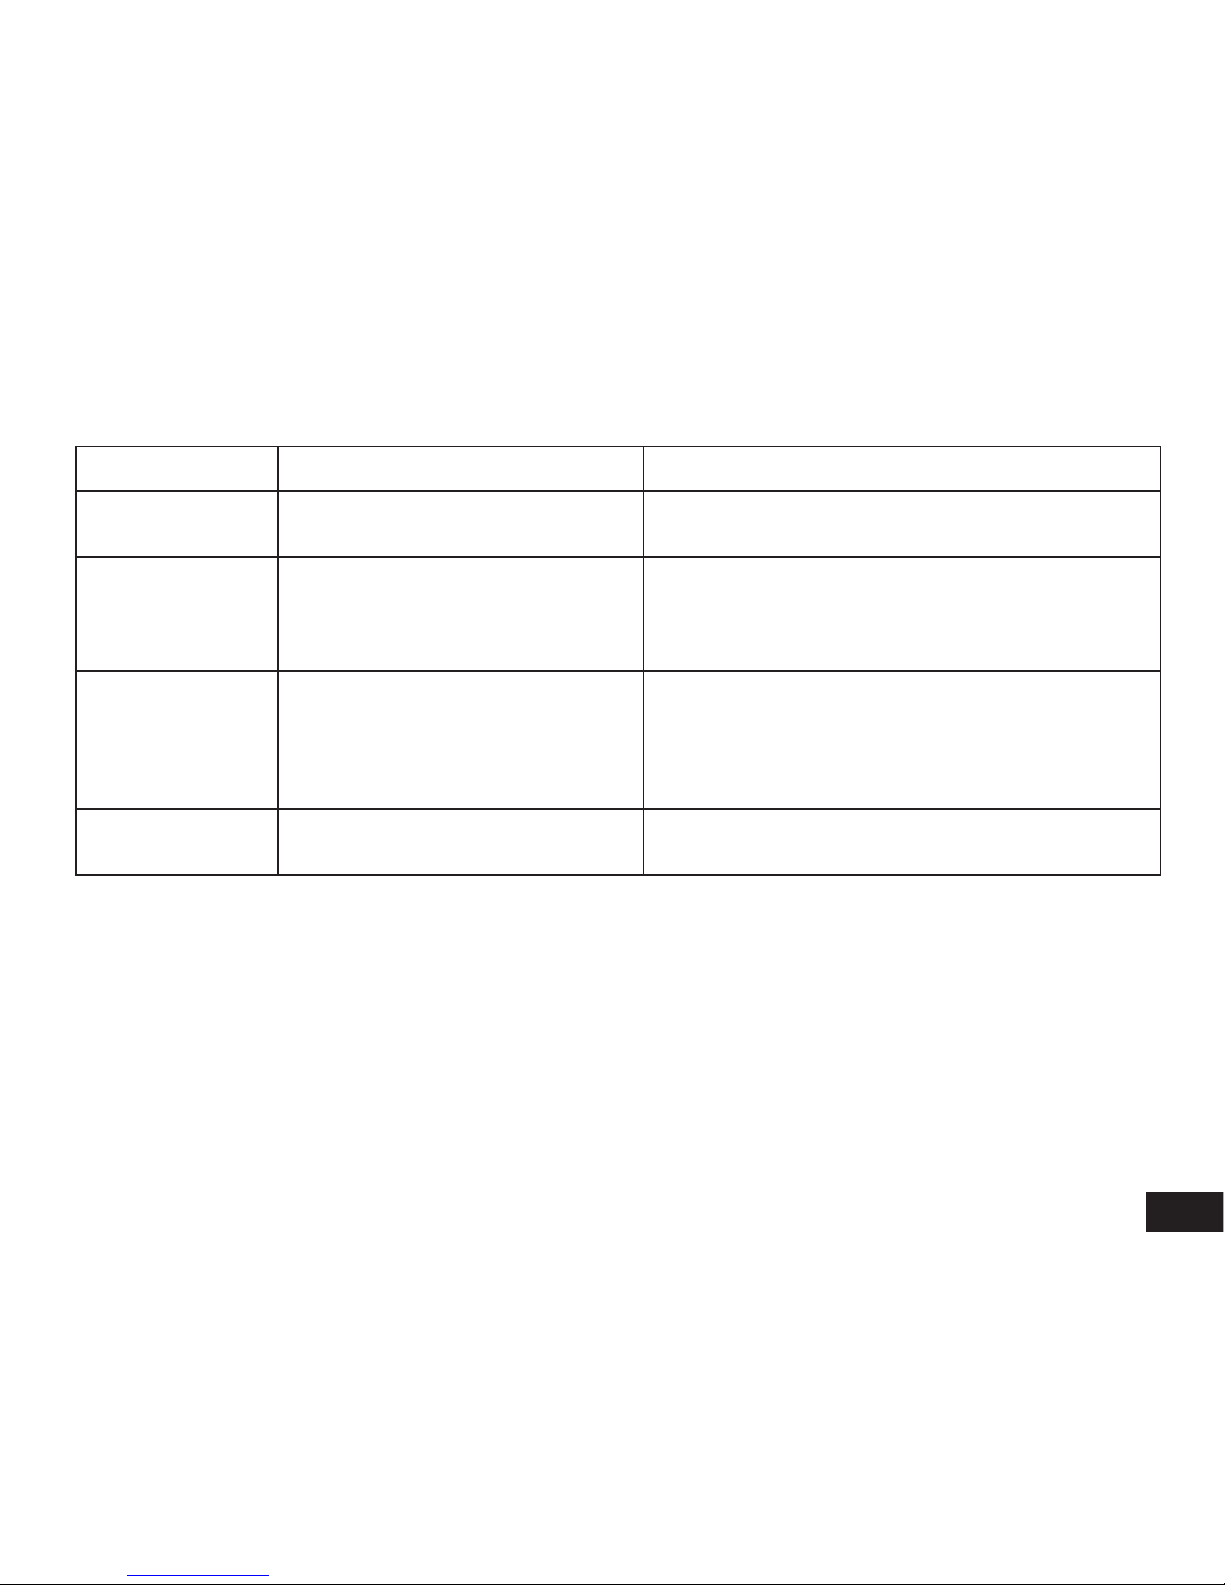
b) In Playback Mode
Delete File
No / Only This / All Select to delete files.
Format
No / Yes
Select “Inner card” (internal memory) or “Outer card”
(Micro SD), “Format” and “yes” to format your storage.
Auto Play
Off/ On
If selected, in video playback mode, the video will
automatically play one after another. In picture playback
mode, the picture will automatically play one after
another.
Copy to Another
Card
No / Yes
Permits copying of the current video to another storage
location. For example, if the current card selected is
“Outer card” (Micro SD), once this option is selected the
current video will be copied to the “Inner card” (Internal
memory).
Choose Card
Inner Card / Outer Card
Choose playback from “Inner card” (Internal memory) or
“Outer card” (Micro SD).
Page 16

16
Connection
a) Connecting to a TV
The DVR can output the video to Video equipment (TV or Monitor) for playback or to adjust settings.
1. Insert Micro SD card to DVR.
2. Connect HDMI cable to the video equipment (TV or Monitor) and the DVR.
3. Ensure DVR is powered on and in Standby mode.
4. Adjust the input of the video equipment to HDMI.
5. Installation completed.
Note: When connecting with a TV, the DVR LCD screen will automatically shut off.
b) Connect to Computer
1. Insert Micro SD card to DVR.
2. Ensure DVR is powered on and in Standby mode.
3. Connect USB cable to DVR and computer, “USB connection” will be shown on screen, and
“removable disk” will be shown on computer.
4. Open the device “removable disk” on your computer to view files.
5. Select files to replay picture file or video file.
6. Protected files or files copied from another card will be stored in a specific folder named
”999PROTE”.
Page 17
17
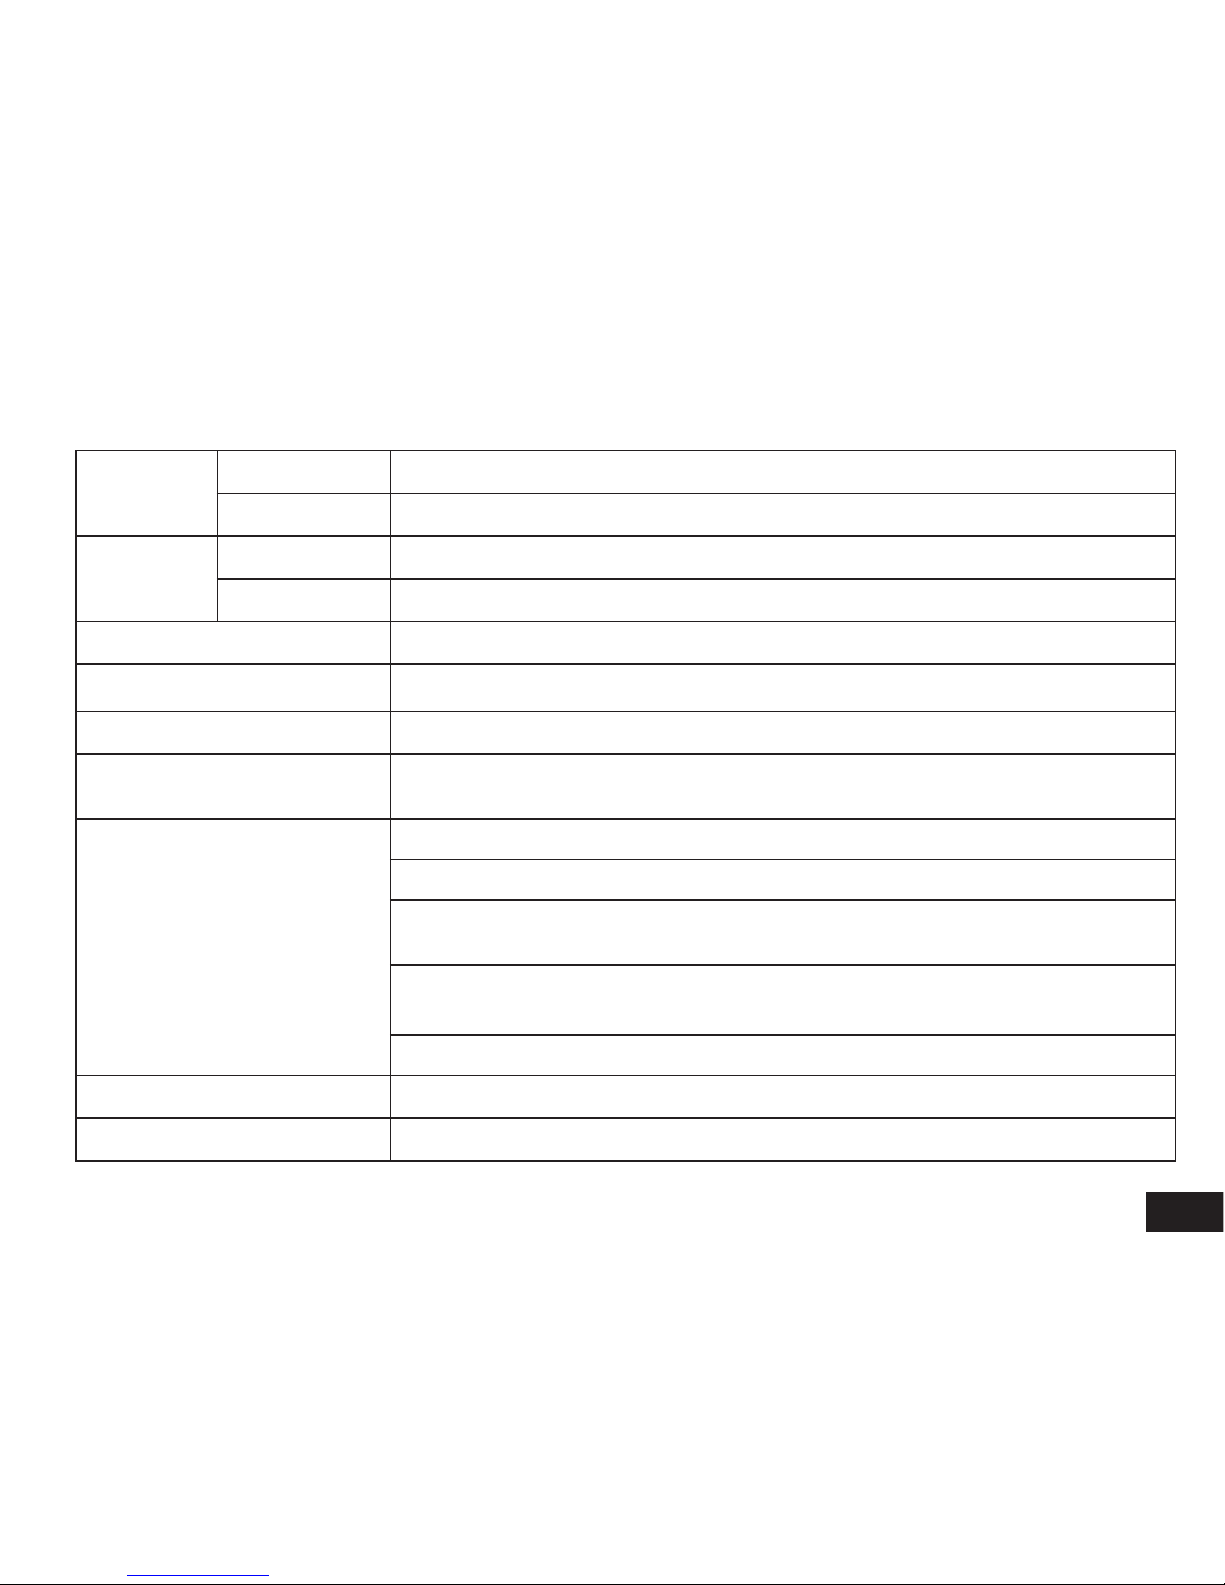
Product Specification
Camera
Resolution
2MB
View Angle
110° in 1080P
Video
Standard
Mov file, H.264 Compression
Resolution
1920 x 1080 @ 30fps | 1280 x 720 @ 30fps
Audio
Built-in Microphone, can be turned off by menu or button
Still Image
2560 x 1440 | 2304 x 1296 | 1920 x 1080 | 1280 x 720
LCD
2.7” LCD Display
G-Sensor
When a heavy hit is encountered the device will automatically protect the latest files for
future reference so they can’t be deleted.
Other Function
External Card Slot
Lighting Keyboard for Night Operation
Uninterrupted Cycle Recording: Over-write first file if memory is full, no interruption
between Video File
File Protection Function: Once File is protected, it cannot be deleted during further cycle
recording
Automatically records after Car is powered on
SD card Slot
Supports up to 32GB Micro SD card
OSD Language
English / Russian / Czech / Polish / Chinese
Page 18
18
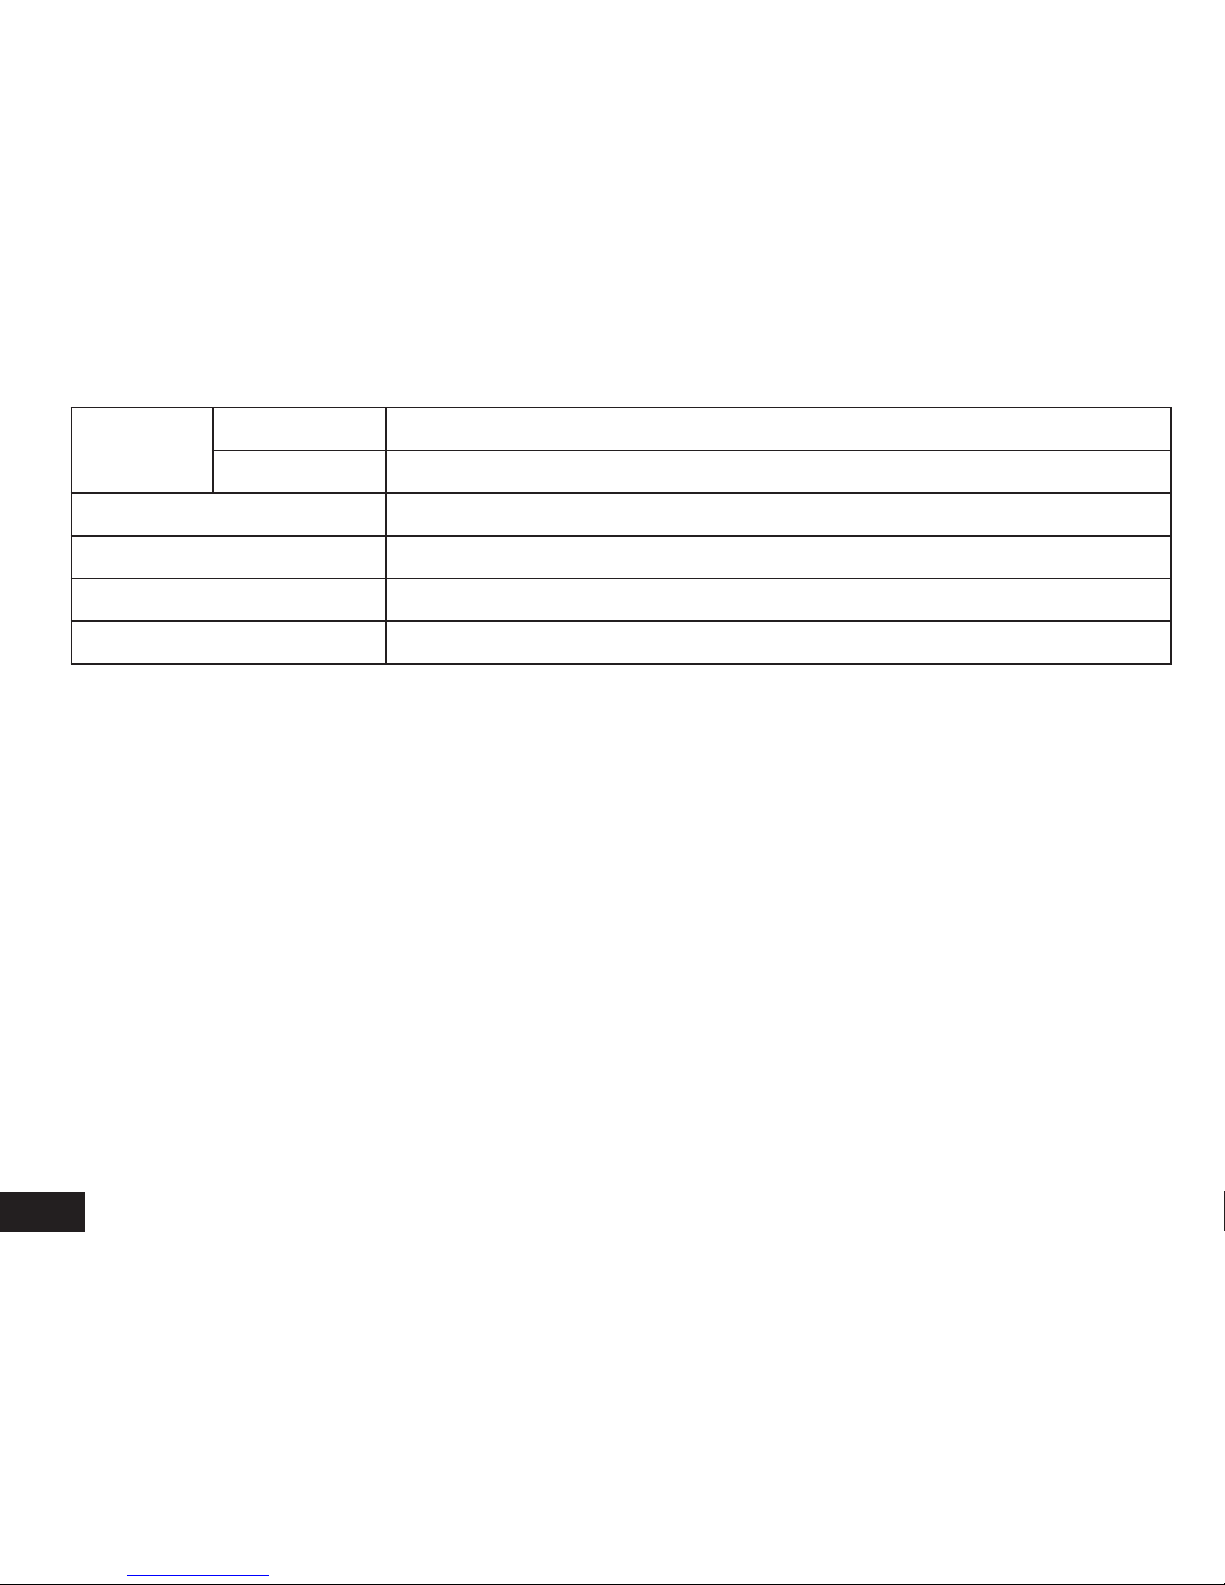
Interface
USB
USB 2.0
AV Terminal
HDMI
Battery
Built-in 400 mAh Battery
Power
12-24V Car Charger
Colour
Black
Size
103 x 51 x 40 mm
Page 19

Page 20
www.directed.com.au
www.parkmate.com.au
© Parkmate 2014
 Loading...