

Parklander PZT-52C Owner's Manual

Parklander Zero Turn
Operator’s Manual
Power Products
Phone: +61 (2) 9584 7700
Free fax: 1800 802 789
Fax: +61 (2) 9153 9122
www.parklands.net
PZT-52C
106 Belmore road north Riverwood
2210 Sydney NSW Australia

General
General
General
General Information
Information
Information
Information
Thank you for choosing Parklander as your preferred lawn mowing machine.
This owner’s manual contains information on safety instructions, assembly requirements,operation
instructions and maintenance requirements to assist you in the correct use of the machine.
The manual also contains information on adjustment settings and troubleshooting procedures which you may
require then.
We
advise that you read this manual in its entirety before operating the units performance features, assembly
and maintenance requirements,to ensure that you prolong the life of your machine and promote quality and
maximum efficiency.
As with all mechanical equipment ,your machine will require cleaning and upkeep,remembering that it’s
important to regularly lubricate the machine as specified in the manual.
If the owners manual becomes lost or damaged in any way,please ensure that you seek a replacement copy
immediately by contacting our sales department.(phone number)
If additional information is required please contact our sales department.[or your preferred dealer]
The illustrations and data used in this manual were current at the time of printing .
However due to possible in-line production changes,your machine may vary slightly in detail.
The manufacturer reserves the right to make changes or add improvements to its products at any time
without incurring any obligation to make such changes to previously manufactured products.
IMPORTTANT
IMPORTTANT
IMPORTTANT
IMPORTTANT
This
This
This
This machine
machine
machine
machine is
is
is
is not
not
not
not a
a
a
a toy
toy
toy
toy it
it
it
it is
is
is
is a
a
a
a power
power
power
power equipment
equipment
equipment
equipment designed
designed
designed
designed for
for
for
for lawn
lawn
lawn
lawn and
and
and
and garden
garden
garden
garden maintenance,
maintenance,
maintenance,
maintenance,
therefore
therefore
therefore
therefore should
should
should
should be
be
be
be treated
treated
treated
treated as
as
as
as such,any
such,any
such,any
such,any misuse
misuse
misuse
misuse or
or
or
or mistreatment
mistreatment
mistreatment
mistreatment of
of
of
of the
the
the
the machine
machine
machine
machine may
may
may
may result
result
result
result in
in
in
in death
death
death
death or
or
or
or
serious
serious
serious
serious injure
injure
injure
injure to
to
to
to the
the
the
the operator.Any
operator.Any
operator.Any
operator.Any mishandling
mishandling
mishandling
mishandling or
or
or
or misuse
misuse
misuse
misuse of
of
of
of the
the
the
the machine
machine
machine
machine may
may
may
may result
result
result
result in
in
in
in direct
direct
direct
direct damage
damage
damage
damage
to
to
to
to the
the
the
the machine.It
machine.It
machine.It
machine.It is
is
is
is the
the
the
the responsibility
responsibility
responsibility
responsibility of
of
of
of the
the
the
the operator
operator
operator
operator to
to
to
to practice
practice
practice
practice safe
safe
safe
safe handing
handing
handing
handing of
of
of
of the
the
the
the machine
machine
machine
machine at
at
at
at all
all
all
all
times
times
times
times and
and
and
and adhere
adhere
adhere
adhere to
to
to
to the
the
the
the safety
safety
safety
safety instructions
instructions
instructions
instructions outlined
outlined
outlined
outlined in
in
in
in the
the
the
the manual
manual
manual
manual to
to
to
to avoid
avoid
avoid
avoid death
death
death
death or
or
or
or serious
serious
serious
serious injure
injure
injure
injure or
or
or
or
damage
damage
damage
damage to
to
to
to the
the
the
the machine.
machine.
machine.
machine.

- 1 -
CONTENTS
CONTENTS
CONTENTS
CONTENTS
SPECIFICATIONS ......................................................................................................................................... - 3 -
1. SAFETY SYMBOLS ............................................................................................................................... - 2 -
2. SAFETY DECALS ................................................................................................................................... - 2 -
3. SAFETY INFORMATION ....................................................................................................................... - 4 -
3.1. Trainings .......................................................................................................................................... - 4 -
3.2. Preparation ....................................................................................................................................... - 5 -
3.3. Fuel Handling Safety ....................................................................................................................... - 5 -
3.4. Operational Safety ........................................................................................................................... - 6 -
3.5. Maintenance Safety ......................................................................................................................... - 6 -
3.6. Storing Safely .................................................................................................................................. - 7 -
4. ASSEMBLY INSTRUCTIONS ................................................................................................................ - 8 -
4.1. Uncrate Mower ................................................................................................................................ - 8 -
4.2. Install Roller Protection System ...................................................................................................... - 8 -
4.3. Install Steering Lever ....................................................................................................................... - 8 -
4.4. Install Discharge Chute ................................................................................................................... - 8 -
4.5. Service Battery ................................................................................................................................ - 8 -
4.6. Service Engine ................................................................................................................................. - 9 -
4.7. Service Hydraulic Oil ...................................................................................................................... - 9 -
5. OPERATION ............................................................................................................................................ - 9 -
5.1. Controls And Switches .................................................................................................................. - 10 -
5.2. Pre-Start Check List ....................................................................................................................... - 11 -
5.3. Mounting And Dismounting The Mower ...................................................................................... - 12 -
5.4. Starting The Engine ....................................................................................................................... - 12 -
5.5. Cold Weather Starting Tips ............................................................................................................ - 13 -
5.6. Steering Lever Operation ............................................................................................................... - 13 -
5.7. Mowing ......................................................................................................................................... - 15 -
5.8. Uneven Terrain .............................................................................................................................. - 16 -
5.9. Stopping The Engine ..................................................................................................................... - 16 -
5.10. Transporting Machine .................................................................................................................. - 17 -
5.11. Loading Machine ......................................................................................................................... - 17 -
5.12. Storing Safely .............................................................................................................................. - 17 -
6. MAINTENANCE ................................................................................................................................... - 18 -
6.1. Check Engine Oil Level ................................................................................................................ - 18 -
6.2. Checking Drive System Fluid Level .............................................................................................. - 18 -
6.3. Lubrication .................................................................................................................................... - 18 -
6.4. Capacities ...................................................................................................................................... - 19 -
6.5. Tire Air Pressure ............................................................................................................................ - 19 -
6.6. Drive System ................................................................................................................................. - 19 -
6.7. Crankcase Oil And Air Filter ......................................................................................................... - 19 -
6.8. Battery Maintenance ...................................................................................................................... - 19 -
6.9. Deck Cleaning ............................................................................................................................... - 19 -
6.10. Blade Inspection .......................................................................................................................... - 20 -

- 2 -
6.11. Blade Removal ............................................................................................................................ - 20 -
6.12. Blade Sharpening ......................................................................................................................... - 20 -
6.13. Balancing the Mower Blades ....................................................................................................... - 20 -
6.14. Blade Installation ......................................................................................................................... - 21 -
7. ADJUST MENTS .................................................................................................................................... - 21 -
7.1. Cutting Height Adjustment ......................................................................................................... - 21 -
7.2. Deck Leveling Adjustment . ........................................................................................................... - 22 -
7.3. Deck Belt Adjustment .................................................................................................................... - 22 -
7.4. D ump Drive Belt Adjustment . ....................................................................................................... - 23 -
7.5. Neutral A djustment. ....................................................................................................................... - 23 -
7.6. Seat Adjustment. ............................................................................................................................ - 24 -
7.7. Parking Brake Adjustment ............................................................................................................. - 24 -
8. TROUBLESHOOTING ......................................................................................................................... - 24 -
9. ELECTRICAL DIAGRAM .................................................................................................................... - 28 -
Warranty Terms & Conditions ...................................................................................................................... - 30 -

- 3 -
SPECIFICATIONS
SPECIFICATIONS
SPECIFICATIONS
SPECIFICATIONS
Engine
Engine
Engine
Engine B&S t wo cylinder, 4 cycle
Model No.
Professional
Professional
Professional
Professional Series
Series
Series
Series M44P7
M44P7
M44P7
M44P7
Horsepower
(G.I.H.P.) 26 HP ( 19.39 kw)
Displacement 724 cc.
No-load r.p.m. 3600 r/min
Charging System 12VDC 12.5 amp. negative ground
Starter Electric
Electrical System Safety interlocked
Deck
Deck
Deck
Deck Drive
Drive
Drive
Drive Electric clutch
Drive
Drive
Drive
Drive System
System
System
System D ual Hydro-Gear Commercial ZT-5400
Steering
Steering
Steering
Steering
Dual levers independently control speed and direction of travel
Zero turning radius
Speed
Speed
Speed
Speed
Forward (variable) 0 to 9 .4 m.p.h. ( 15.8 km/h)
backward
(variable) 0 to 5.6 m.p.h. (9 km/h)
Fuel
Fuel
Fuel
Fuel Tank
Tank
Tank
Tank
Capacity
Capacity
Capacity
Capacity 10 U.S. gal. ( 38 L .)
Tire
Tire
Tire
Tire Sizes
Sizes
Sizes
Sizes
Drive Wheels 23
×
10.5
-
12 4 ply rated
Front Wheels 13
×
6.50
-
6 4 ply rated
Dimensions
Dimensions
Dimensions
Dimensions of
of
of
of Tractor
Tractor
Tractor
Tractor
Seat Back Height 47.2 "
(
1 .2 m
)
Seat Cushion
Height 30.3 "
(
0.77 m
)
Tractor Width 5 3.1 " ( 1 .35 m )
Tractor Length 82.7 "
(
2 .1 m
)
Wheel Base 39.8 "
(
1 .01 m
)
Weight - Uncrated 1037 lbs. ( 470 kg.)
Weight - Crated 1213 lbs. ( 550 kg.)
6$)(7<
6$)(7<
6$)(7<
6$)(7< 6<0%2/6
6<0%2/6
6<0%2/6
6<0%2/6
7KLV
7KLV
7KLV
7KLV 6$)(7<
6$)(7<
6$)(7<
6$)(7< $/(57
$/(57
$/(57
$/(57 6<0%2/
6<0%2/
6<0%2/
6<0%2/ LV XVHG
ERWK LQ WKLV PDQXDO DQG RQ WKH PDFKLQH WR
DOHUW \RX WR LGHQWLI\ LPSRUWDQW VDIHW\
PHVVDJHV ZKLFK PXVW EH IROORZHG WR DYRLG
DFFLGHQWV7KLV V\PERO PHDQV $77(17,21
$77(17,21
$77(17,21
$77(17,21
%(&20(
%(&20(
%(&20(
%(&20( $/(57
$/(57
$/(57
$/(57
7KH VDIHW\ DOHUW V\PERO LV WR DOHUW \RX WR WKH
XQVDIH DFWLRQ RU VLWXDWLRQ DQG LV DFFRPSDQLHG
E\ WKH ZRUG
'$1*(5
'$1*(5
'$1*(5
'$1*(5 :$51,1*
:$51,1*
:$51,1*
:$51,1*RU&$87,21
&$87,21
&$87,21
&$87,21
)DLOXUH WR REVHUYH WKH
VDIHW\ LQVWUXFWLRQV :,//
:,//
:,//
:,// UHVXOW LQ GHDWK RU
VHULRXV LQMXUH
)DLOXUH WR REVHUYH WKH
VDIHW\ LQVWUXFWLRQV &28/'
&28/'
&28/'
&28/' UHVXOW LQ GHDWK RU
VHULRXV LQMXU\
)DLOXUH WR REVHUYH WKH
VDIHW\ LQVWUXFWLRQV &28/'
&28/'
&28/'
&28/' UHVXOW LQ
PLQRU RU PRGHUDWH LQMXU\
6$)(7<
6$)(7<
6$)(7<
6$)(7< '(&$/6
'(&$/6
'(&$/6
'(&$/6
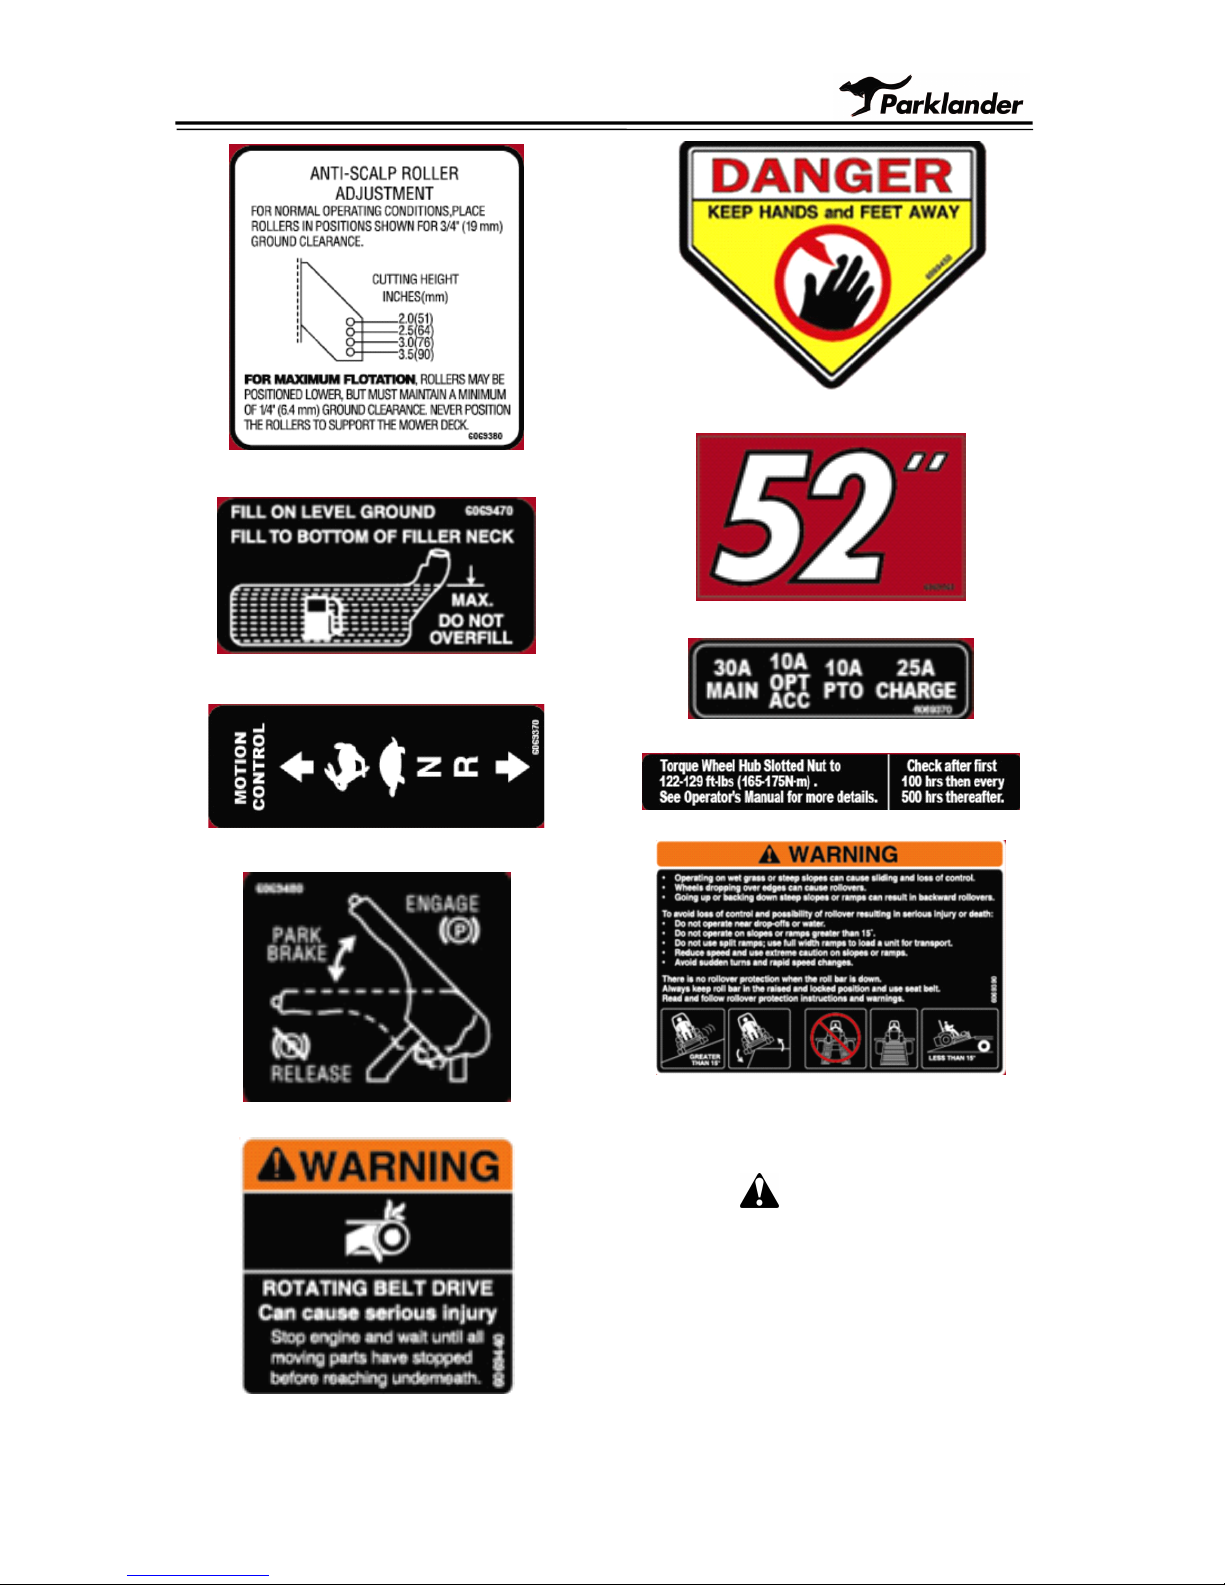
z
$OO '$1*(5 :$51,1* &$87,21
DQG LQVWUXFWLRQDO PHVVDJHV RQ \RXU
PDFKLQH VKRXOG EH FDUHIXOO\ UHDG DQG
REH\HG 3HUVRQDO LQMXU\ FDQ UHVXOW ZKHQ
WKHVH LQVWUXFWLRQV DUH QRW IROORZHG 7KH
LQIRUPDWLRQ LV IRU \RXU VDIHW\ DQG LW LV
LPSRUWDQW 7KH VDIHW\ GHFDOV EHORZ DUH RQ
\RXU PDFKLQH7KH SRVLWLRQ RI GHFDOV UHIHU
WR )LJXUH DQG )LJXUH
z
.HHS DOO VDIHW\ GHFDOV OHJLEOH 5HPRYH DOO
JUHDVH GLUW DQG GHEULV IURP VDIHW\ GHFDOV
DQG LQVWUXFWLRQDO ODEHOV
)LJXUH
)LJXUH
z
6DIHW\ GHFDOV PXVW EH UHSODFHG LI WKH\ DUH
PLVVLQJ RU LOOHJLEOH
z
:KHQ QHZ FRPSRQHQWV DUH LQVWDOOHG EH
VXUH WKDW FXUUHQW VDIHW\ GHFDOV DUH DIIL[HG
WR WKH UHSODFHG FRPSRQHQWV
z
1HZ VDIHW\ GHFDOV PD\ EH REWDLQHG IURP
\RXU DXWKRUL]HG HTXLSPHQW GHDOHU RU
GLVWULEXWRU
'$1*(5
'$1*(5
'$1*(5
'$1*(5
&$87,21
&$87,21
&$87,21
&$87,21
:$51,1*
:$51,1*
:$51,1*
:$51,1*
serious
injury or death.
serious
injury or death.

- 3 -
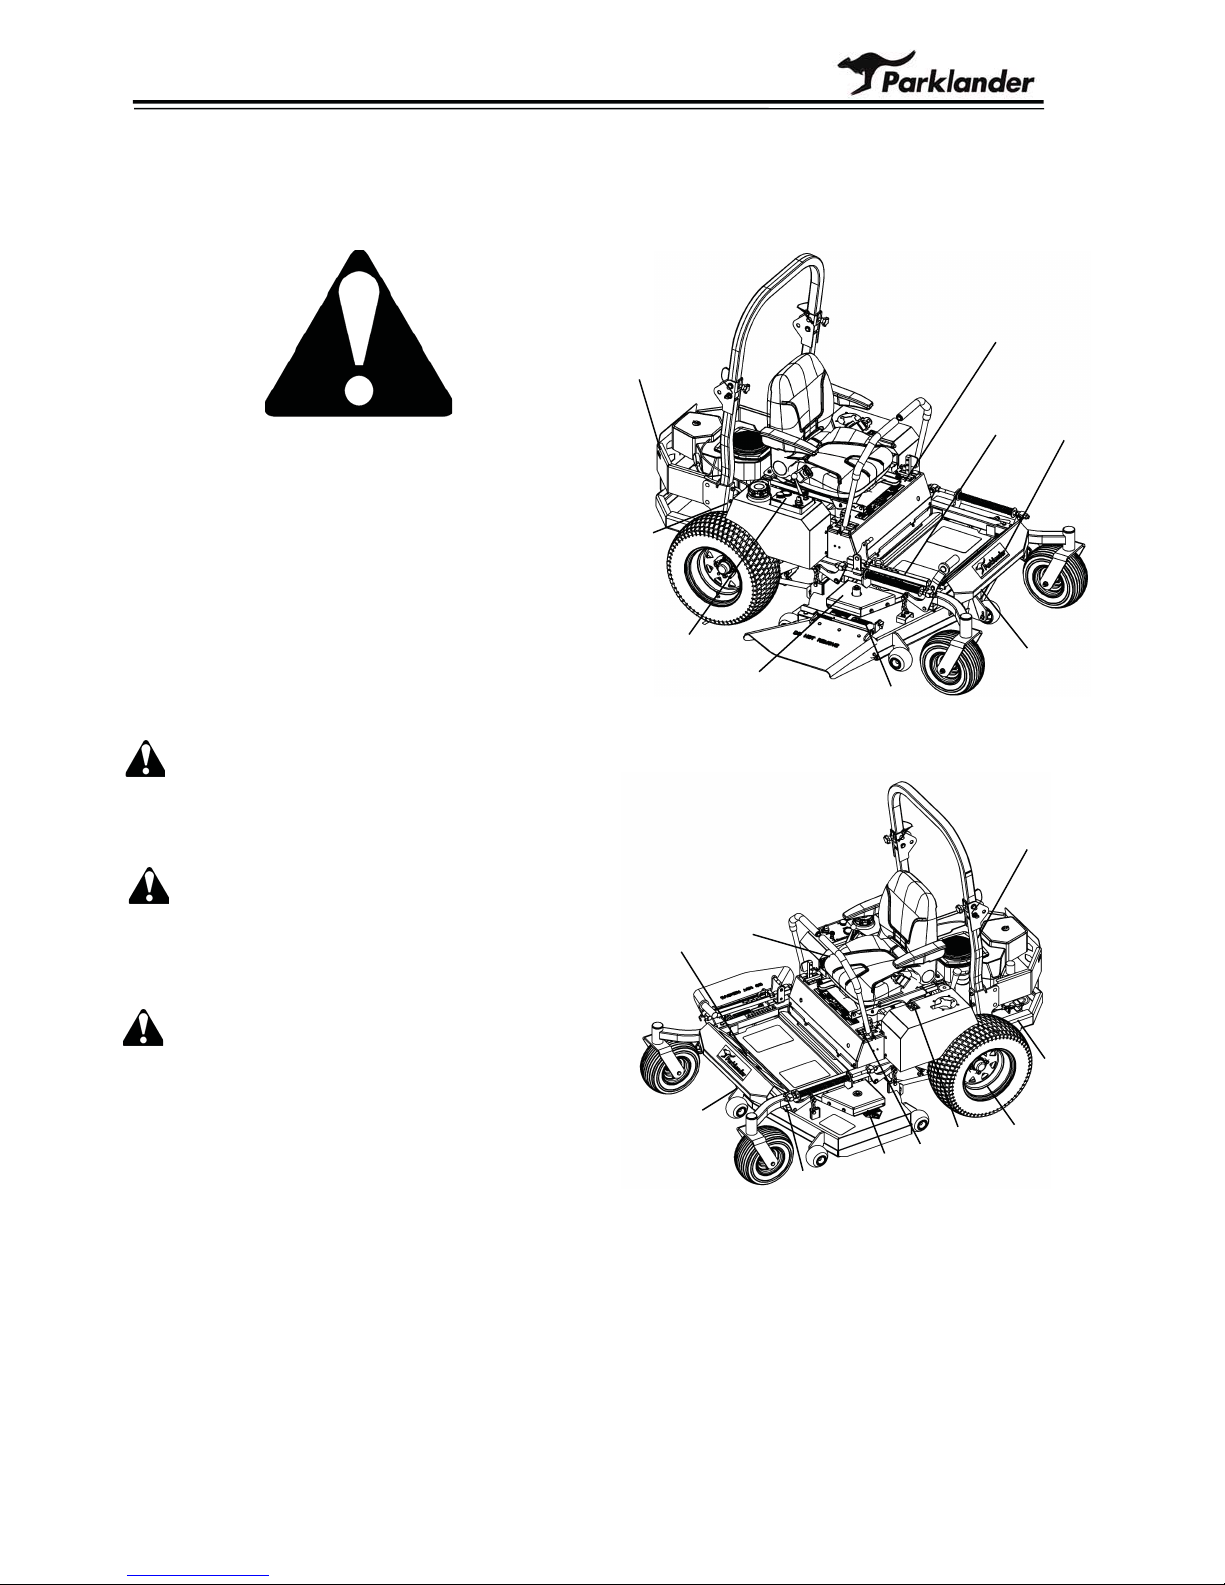
�
Familiarize yourself with the following
safety decals and instruction labels. They
are critical for the safe operation of your
machine.
1. On The Front Frame
2. On The Right Frame
3. Under The Belt Shields,LH & RH
4. On The Mower Deck,RH
5. On The Console
6. Rear Of The Shield Of Engine,LH & RH
7.On The Mower Deck
8.On The Front Frame 9.On The Lower Roll Bar
- 4 -
10.On The Front Mower Deck
11.On The Rear Of Right Wheel Shield
12.On The Head Shield ,LH & RH
13.On The Left Wheel Shield
14.On The Rear Frame,LH & RH
15.On The Mower Deck,LH & RH
16.Front Of Mower Deck
17.Besides Mounting Plate Of Fuse
18.On the out of wheel hub
19.On The Front Frame
3.
SAFETY
SAFETY
SAFETY
SAFETY INFORMATION
INFORMATION
INFORMATION
INFORMATION
CAUTION
CAUTION
CAUTION
CAUTION
The
The
The
The safety
safety
safety
safety of
of
of
of this
this
this
this machine
machine
machine
machine relies
relies
relies
relies on
on
on
on it
it
it
it
being
being
being
being operated
operated
operated
operated within
within
within
within the
the
the
the conditions
conditions
conditions
conditions
that
that
that
that explained
explained
explained
explained in
in
in
in this
this
this
this manual.
manual.
manual.
manual. Please
Please
Please
Please
r
r
r
r ead
ead
ead
ead the
the
the
the manual
manual
manual
manual carefully
carefully
carefully
carefully before
before
before
before
operating.
operating.
operating.
operating. Make
Make
Make
Make sure
sure
sure
sure the
the
the
the operator
operator
operator
operator is
is
is
is
thoroughly
thoroughly
thoroughly
thoroughly familiar
familiar
familiar
familiar with
with
with
with the
the
the
the safety
safety
safety
safety rules.
rules.
rules.
rules.
3.1.
3.1.
3.1.
3.1. Trainings
Trainings
Trainings
Trainings

z
5HJDUG WKH PDFKLQH DV D SLHFH RI SRZHU
HTXLSPHQW VR DQ\ SHUVRQ ZKR RSHUDWHV
WKH PDFKLQH 0867 EH WUDLQHG DQG FDSDEOH
RI WKH VDIH RSHUDWLRQ RI WKH HTXLSPHQW DQG
FRQWUROV
z
.QRZ \RXU FRQWUROV DQG KRZ WR VWRS WKH
PDFKLQH HQJLQH DQG PRZHU GHFN LQ DQ
HPHUJHQF\
z
7R
DYRLG DFFLGHQW RU LQMXU\ '2 127
DOORZ DQ\RQH WR RSHUDWH WKLV PDFKLQH
ZLWKRXW UHDGLQJ WKH LQVWUXFWLRQ
z
1HYHU DOORZ \RXQJ FKLOGUHQRU
XQTXDOLILHG LQGLYLGXDOV WR RSHUDWH WKH
HTXLSPHQW
z
.HHS \RXQJ FKLOGUHQ DQG SHWVDZD\ IURP
WKH ]RQH RI RSHUDWLRQ WR DYRLG DFFLGHQWV
RU KD]DUGV WR RWKHU SHRSOH RU WKHLU
SURSHUW\
3UHSDUDWLRQ
3UHSDUDWLRQ
3UHSDUDWLRQ
3UHSDUDWLRQ
z
:KLOH PRZLQJDOZD\V ZHDU WLJKW DQG
EHOWHG FORWKLQJ :HDU SURWHFWHG IRRWZHDU
1HYHU RSHUDWH WKH PDFKLQH LQ EDUH IHHW
RSHQ WRHG IRRWZHDU
z
:DON DURXQG PDFKLQH DQG YLVXDOO\
LQVSHFW IRU GDPDJHG ORRVH RU PLVVLQJ
FRPSRQHQWV '2
'2
'2
'2 127
127
127
127 RSHUDWH XQOHVV DOO
FRPSRQHQWV DUH SURSHUO\ LQVWDOOHG
DGMXVWHG DQG LQ JRRG ZRUNLQJ FRQGLWLRQ
z
0DNH VXUH DOO VDIHW\ VZLWFKHV IXQFWLRQ
SURSHUO\ 6HH 2SHUDWLRQ VHFWLRQ IRU GHWDLOV
z
0DNH VXUH DOO VDIHW\ VKLHOGLQJ LV LQ JRRG
FRQGLWLRQ DQG SURSHUO\ LQVWDOOHG
z
&KHFN EUDNH DFWLRQ EHIRUH \RX RSHUDWH
$GMXVW RU FKHFN EUDNHV DV UHTXLUHG
z
0DNH VXUH DOO VDIHW\ GHFDOV DUH LQVWDOOHG
DQG LQ JRRG FRQGLWLRQ
z
5HPRYH DFFXPXODWHG GHEULV IURP
PDFKLQH WR DYRLG ILUH KD]DUG
z
7KRURXJKO\ LQVSHFW DUHD WR EH FXW DQG
UHPRYH VWRQHV EUDQFKHV ZLUHV DQG
DFFXPXODWHG GHEULV WKDW PLJKW EH WKURZQ
FDXVLQJ SHUVRQDO LQMXU\ RU GDPDJH
z
(YDOXDWH WKH WHUUDLQ WR GHWHUPLQH ZKDW
DFFHVVRULHV DQG DWWDFKPHQWV DUH QHHGHG WR
SURSHUO\ DQG VDIHO\ SHUIRUP WKH MRE
z
1HYHU SHUPLW DQ\ SHUVRQ EHVLGHV WKH
RSHUDWRU WR ULGH RU RSHUDWH WKH PRZHU DW
DQ\ WLPH
z
2SHUDWH RQO\ LQ GD\OLJKW RU JRRG DUWLILFLDO
OLJKW
)XHO
)XHO
)XHO
)XHO +DQGOLQJ
+DQGOLQJ
+DQGOLQJ
+DQGOLQJ 6DIHW\
6DIHW\
6DIHW\
6DIHW\
z
,Q FHUWDLQ FRQGLWLRQV JDVROLQH LV
H[WUHPHO\ IODPPDEOH DQG KLJKO\
H[SORVLYH
$
ILUH RU H[SORVLRQ IURP
JDVROLQH FDQ EXUQ \RX DQG RWKHUV DQG FDQ
GDPDJH SURSHUW\
z
)LOO WKH IXHO WDQN RXWGRRUV LQ DQ RSHQ
DUHD ZKHQ WKH HQJLQH LV FROG :LSH XS DQ\
VSLOO JDVROLQH
z
'2
'2
'2
'2 127
127
127
127 ILOO WKH IXHO WDQN FRPSOHWHO\
IXOO $GG JDVROLQH WR WKH IXHO WDQN XQWLO WKH
OHYHO RI WKH ILOOHU QHFN 7KLV HPSW\ VSDFH
LQ WKH WDQN DOORZV JDVROLQH WR H[SDQG
z
1HYHU VPRNH ZKHQ KDQGOLQJ JDVROLQH
DQG NHHS DZD\ IURP RSHQ IODPHV RU ZKHUH
JDVROLQH IXPHV PD\ EH LJQLWHG E\ D VSDUN
z
6WRUH JDVROLQH LQ DQ DSSURYHG FRQWDLQHU
DQG NHHS LW RXW RI WKH UHDFK RI FKLOGUHQ
1HYHU EX\ PRUH WKDQ D GD\ VXSSO\ RI
JDVROLQH
z
$OZD\V SODFH JDVROLQH FRQWDLQHUV RQ WKH
JURXQG DZD\ IURP \RXU YHKLFOH EHIRUH
ILOOLQJ
z
'2
'2
'2
'2 127
127
127
127 ILOO JDVROLQH FRQWDLQHUV LQVLGH D
YHKLFOH RU RQ D WUXFN RU WUDLOHU EHG
EHFDXVH LQWHULRU FDUSHWV RU SODVWLF WUXFN
EHG OLQHUV PD\ LQVXODWH WKH FRQWDLQHU DQG
VORZ WKH ORVV RI DQ\ VWDWLF FKDUJH
z
:KHQ SUDFWLFDO UHPRYH JDVSRZHUHG
HTXLSPHQW IURP WKH WUXFN RU WUDLOHU DQG
UHIXHO WKH HTXLSPHQW ZKHQ LWV ZKHHOV DUH RQ
WKH JURXQG
z
,I WKLV LV QRW SRVVLEOH WKHQ UHIXHO VXFK
HTXLSPHQW RQ D WUXFN RU WUDLOHU IURP D
SRUWDEOH FRQWDLQHU UDWKHU WKDQ IURP D
JDVROLQH GLVSHQVHU QR]]OH
z
,I D JDVROLQH GLVSHQVHU QR]]OH PXVW EH XVHG
NHHS WKH QR]]OH LQ FRQWDFW ZLWK WKH ULP RI
spilt
Can cause re.

- 6 -
the fuel tank or container opening at all
times until fueling is complete.
�
Never use cellular phones or other portable
electronic devices when handling fuel.
3.4.
3.4.
3.4.
3.4. Operational
Operational
Operational
Operational Safety
Safety
Safety
Safety
�
Read “ Operation ” section of this manual
before attempting to operate this machine.
�
DO NOT operate without ROPS (Roll
Over Protection System) deployed.
�
Fenders serve as shields. DO NOT
operate without them.
�
DO NOT drive machine without mower
deck installed. The proper stability of the
machine depends on the weight of the
mower deck.
�
Keep bystanders away from equipment
whi st it is in operation.
�
Keep children and pets a safe distance.
Never direct ly discharge toward s a person .
�
Start engine from operator
’
s seat after
disengaging PTO and placing steering
levers into the swing-out (neutral lock)
position.
�
Keep hands and feet away from
underneath mower deck while engine is
running. Keep clear of all moving parts on
machine.
�
Wear suitable hearing protection devices
to protect engine noise.
�
DO
DO
DO
DO NOT
NOT
NOT
NOT operate in backward unless
absolutely necessary and ensure the area
behind you is clear and safe .
�
The machine is equipped with a foldable
ROPS, always wear seatbelt when ROPS
is deployed.
�
When foldable ROPS must be down (i.e.
loading or unloading on an enclosed
trailer), DO NOT use seatbelt and drive
car efully.
�
DO NOT move steering levers from
forward to backward or backward to
forward position rapidly. The sudden
direction change may cause loss of
control.
�
DO NOT operate on steep slopes.
�
DO NOT stop, start or change directions
suddenly on slopes.
�
Use extr a care and maintain minimum
ground speed when traveling or operating
on a slope, over rough ground, or when
operating close to ditches and fences.
�
Keep alert for holes, rocks, roots and
other hidden hazards in the terrain. Keep
away from drop-offs and soft
embankments.
�
Stop machine and mower deck
immediately while striking an obstruction
or hard object . Turn engine off, inspect
machine and mower deck. Repair any
damage before resuming operation.
�
Disengage PTO, stop engine, select park
brake, remove key and wait for all
movement to stop before dismounting,
making adjustments, cleaning, or
unclogging the machine.
�
Never transport mower with blades
running. Disengage PTO before crossing
streets, sidewalks, driveways, etc.
�
Watch for traffic when operating near or
crossing roadways.
�
This machine is not equipped for
highway use, especially when safety
lighting and marking is required. It is
NOT a recreational vehicle.
�
This unit is not equipped with a drawbar.
DO NOT pull loads.
�
Take all possible precautions when the
machine is unattended: disengage PTO,
lower mower deck, place steering levers in
neutral, set parking brake, stop engine and
remove key from ignition.
�
Never carry passengers.
�
DO NOT run engine in an enclosed area
without adequate ventilation. Exhaust
gases contain carbon monoxide, which is
an odorless and deadly poison.
3.5.
3.5.
3.5.
3.5. Maintenance
Maintenance
Maintenance
Maintenance Safety
Safety
Safety
Safety
�
Always undertake maintenance with the

- 7 -
machine parked on a hard level surface;
with the engine stopped and the PTO
disengaged; with the park brake set; and
with the key removed from the ignition.
�
Always remove the grounded (-) clamp
from the battery when performing
maintenance on the engine, clutch, or any
other electrical system.
�
Always wear tight fitting clothing and
safety equipment when preforming
maintenance . Keep work area clean and
dry.
�
Never work under the machine without
jack stands or other equivalent safety
blocks. DO NOT depends solely on
mechanical or hydraulic jacks or lifts for
support. Always use adequate wheel
chocks on tires remaining on the ground.
�
Hydraulic hoses can fail due to physical
damage, kinks, age, and exposure. Check
hoses regularly. Replace damaged hoses.
�
Escaping fluid under pressure can
penetrate the skin causing serious injury.
Avoid risks by relieving pressure before
disconnecting hydraulic or other lines.
Tighten all connections before applying
pressure. If an accident occurs, see a
doctor immediately.
�
Search for leaks with a piece of cardboard
by placing it under suspected leaks .
Protect hands and body from high pressure
fluids.
�
If it is necessary to run an engine in an
enclosed area, remove the exhaust gases
from the area with an exhaust pipe
extension. If an exhaust pipe extension is
not available, work near the open doors
and windows .
�
Waste products such as used oil, fuel,
and batteries can harm the environment
and people. Dispose of waste products
properly.
�
Never attempt to disconnect or alter any
part of the safety interlock systems.
�
DO NOT change engine governor
settings.
�
Keep engine free of grass, leaves, or
excess grease to reduce fire hazard and
minimize engine overheating.
�
Keep machine and mower deck in good
operating condition and all safety devices
in proper place.
�
Periodically tighten all bolts, nuts and
screws. Check that all locking pins are
properly installed and in good condition.
�
Check brake operation frequently. Adjust
and service as required.
3.6.
3.6.
3.6.
3.6. Storing
Storing
Storing
Storing Safely
Safely
Safely
Safely
�
Never store the machine with gasoline in
the tank inside a building where fumes
may reach an open flame, spark or pilot
light as on a furnace, water heater, clothes
dryer, or other gas appliance. Allow
engine to cool before storing .
�
If engine is to be unused for 30 days or
more, add a fuel stabilizer to the fuel
system.
A
fuel stabilizer is an acceptable
additive in minimizing the formation of
fuel gum deposits during storage. Add
stabilizer to gasoline in fuel tank or
storage container. Always follow mix ratio
found on stabilizer container. Run engine
at least 10 minutes after adding stabilizer
to allow it to reach the carburetor.
�
If draining fuel tank, drain fuel into an
approved container outdoors and away
from open flame.
�
Always provide adequate ventilation
when running engine indoors. Exhaust
gases contain carbon monoxide, which is
an odorless and deadly poison.
�
Remove all accumulated debris from
mower deck and tractor.
�
Sand areas where paint is chipped and
rep air to prevent rust. Lubricate all
locations to prevent moisture damage
during storage.
- 8 -
4.
ASSEMBLY
ASSEMBLY
ASSEMBLY
ASSEMBLY INSTRUCTIONS
INSTRUCTIONS
INSTRUCTIONS
INSTRUCTIONS
4.1.
4.1.
4.1.
4.1. Uncrate
Uncrate
Uncrate
Uncrate Mower
Mower
Mower
Mower
4.2.
4.2.
4.2.
4.2. Install
Install
Install
Install Roller
Roller
Roller
Roller Protection
Protection
Protection
Protection System
System
System
System
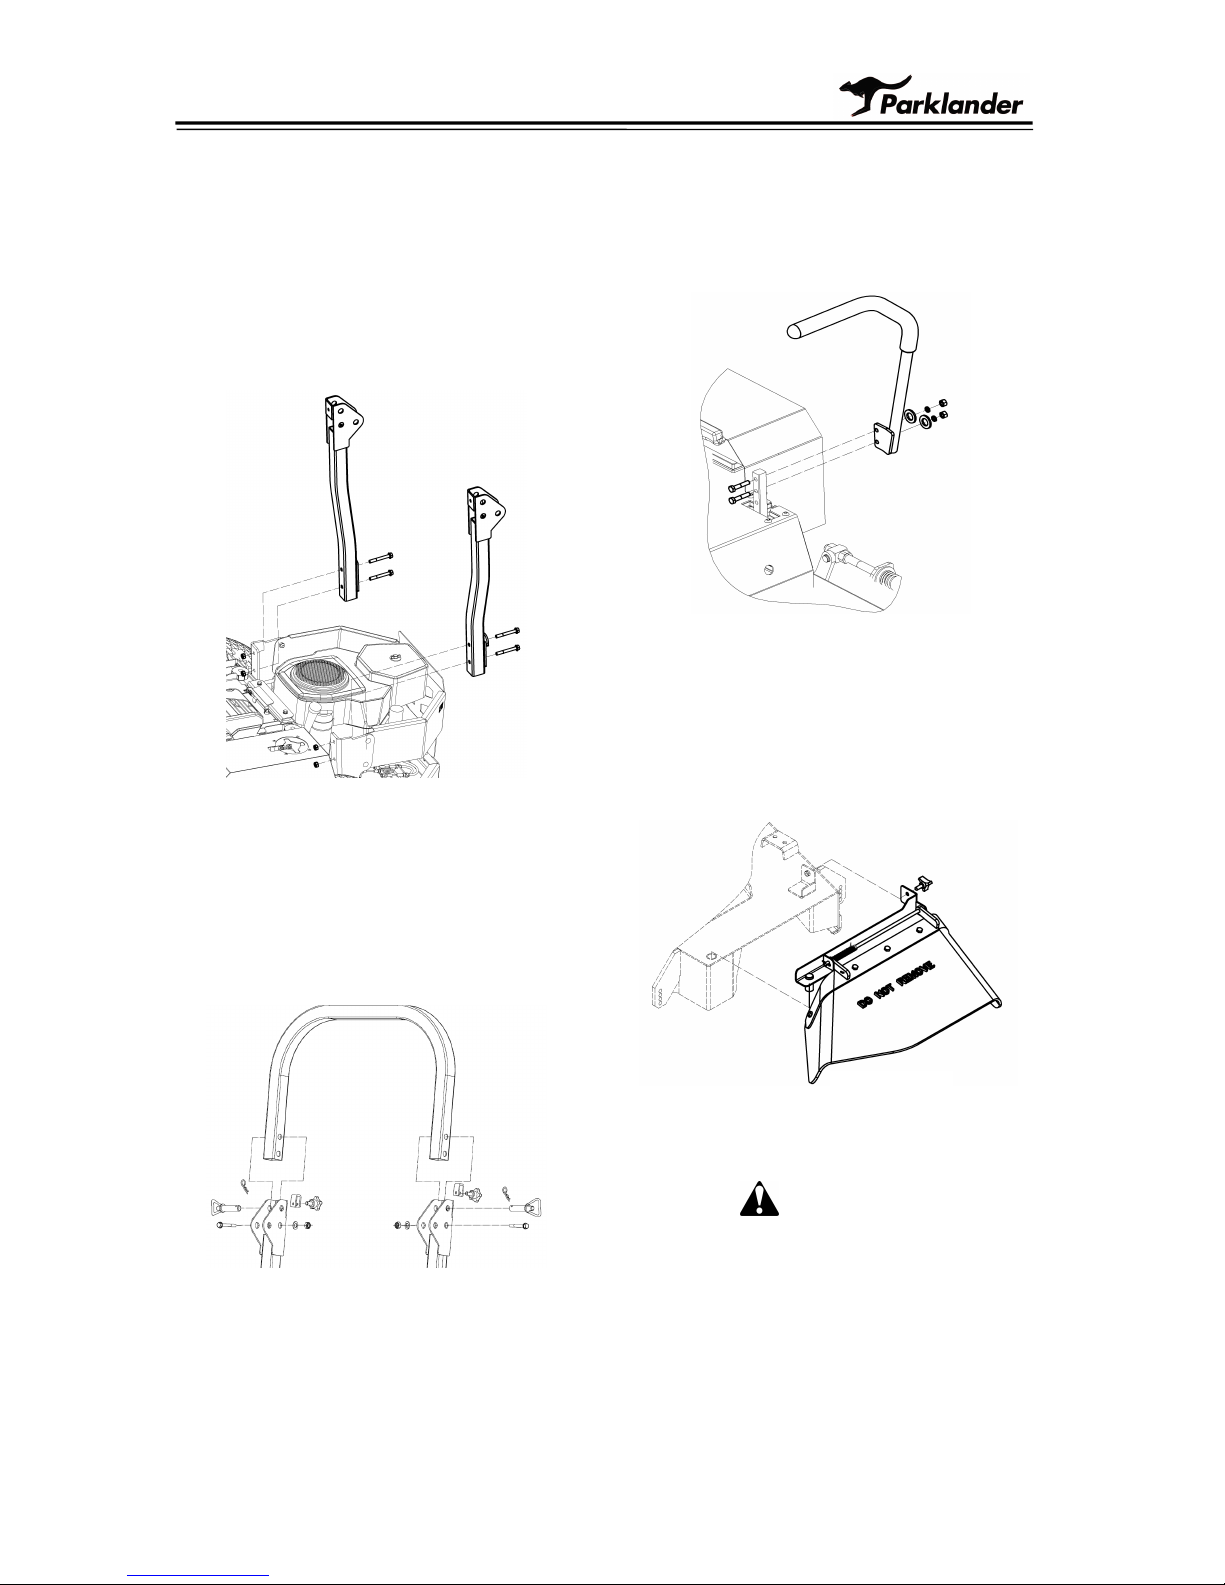
4..2.1
4..2.1
4..2.1
4..2.1 Locate and align the left and
right lower roll bar tubes with the
machine frame(Refer to Figure 3),
torque all the nuts to 41-47N.m
Figure 3
4.2.2
4.2.2
4.2.2
4.2.2 Locate the upper u-shaped section
of the roll bar. Install the upper roller
section using the latch pin
assemblies .Refer to Figure 4.
Figure 4
4.3.
4.3.
4.3.
4.3. Install
Install
Install
Install Steering
Steering
Steering
Steering Lever
Lever
Lever
Lever
4.3.1
4.3.1
4.3.1
4.3.1 Loosen and remove the two bolts
and spring s which attach to the control
arm shaft .
4.3.2
4.3.2
4.3.2
4.3.2 Place the lever on the outside of
the control arm shaft and secure with
bolts and washers (Refer to Figure
5),t ighten until snug . Repeat on
opposite side of unit.
Figure 5
4.4.
4.4.
4.4.
4.4. Install
Install
Install
Install Discharge
Discharge
Discharge
Discharge Chute
Chute
Chute
Chute
Locate the discharge to the mower
deck(Refer to Figure 6) and tighten knob
until chute is snug .
Figure 6
4.5.
4.5.
4.5.
4.5. Service
Service
Service
Service Battery
Battery
Battery
Battery
DANGER
DANGER
DANGER
DANGER
Charging the battery may produce explosive
gasses that can explode causing serious
injury.Keep sparks, flames, or cigarettes
away from battery
4.5.1
4.5.1
4.5.1
4.5.1 Remove left shield components to gain
access to the battery .
4.5.2
4.5.2
4.5.2
4.5.2 Check the voltage of the battery with a

- 9 -
digital voltmeter, Locate the voltage of the
battery in the table below and charge the
battery for the recommended time (Refer to
Table 1) interval to bring the charge up to a
full charge of 12.6V olts or greater.
IMPORTANT:
IMPORTANT:
IMPORTANT:
IMPORTANT: Make
Make
Make
Make sure
sure
sure
sure the
the
the
the negative
negative
negative
negative &
&
&
&
positive
positive
positive
positive battery
battery
battery
battery cables
cables
cables
cables are
are
are
are correctly
correctly
correctly
correctly
connected
connected
connected
connected ,
,
,
, and
and
and
and the
the
the
the battery
battery
battery
battery charger
charger
charger
charger used
used
used
used
for
for
for
for charging
charging
charging
charging the
the
the
the battery
battery
battery
battery has
has
has
has an
an
an
an output
output
output
output of
of
of
of
16
16
16
16 volts
volts
volts
volts and
and
and
and 7
7
7
7 amps
amps
amps
amps or
or
or
or less
less
less
less to
to
to
to avoid
avoid
avoid
avoid
damaging
damaging
damaging
damaging the
the
the
the battery.
battery.
battery.
battery.
Table 1
V oltage Reading Percent Charge Maximum Charger settings Charging Interval
12.6 or greater 100% 16V olts/7 amps No charging Required
12.4-12.6 75%-100% 16Volts/7 amps 30 Minutes
12.2-12.4 50%-75% 16Volts/7 amps 1 Hour
12.0-12.2 25%-50% 14.4Volts/4 amps 2 Hours
11.7-12.0 0-25% 14.4V olts/4 amps 3 Hours
11.7 or less 0% 14.4V olts/4 amps 6 Hours or more
4.5.3
4.5.3
4.5.3
4.5.3 Connecting the negative battery cables:
Note:
Note:
Note:
Note: If the positive cable is also
disconnected, connect the positive (red) cable
to the positive battery terminal first, then the
negative (black) cable to the negative battery
terminal. Slip insulator boot over the positive
terminal.
Note:
Note:
Note:
Note: If time does not permit charging the
battery, or if charging equipment is not
available, connect the negative battery cables
and run the vehicle continuously for 20 to 30
minutes to sufficiently charge the battery.
CAUTION
CAUTION
CAUTION
CAUTION
�
Battery contains sulfuric acid, avoid
contact and always shield eyes, face, skin
and clothing from battery ,cigarettes .
Flames or sparks could cause battery to
explode
�
DO NOT charge or use booster cables or
adjust post connection without proper
training;
�
If battery acid comes in contact with skin
or eyes then flush with water and call a
physician immediately.
� Keep out of reach of children.
4.6.
4.6.
4.6.
4.6. Service
Service
Service
Service Engine
Engine
Engine
Engine
Engine is shipped with oil, check oil lever
and if necessary fill to the appropriate lever .
4.7.
4.7.
4.7.
4.7. Service
Service
Service
Service Hydraulic
Hydraulic
Hydraulic
Hydraulic Oil
Oil
Oil
Oil
The machine is shipped with hydraulic oil in
the reservoir. Run the machine for
approximately 15 minutes to allow any extra
air to purge out of the hydraulic system.
Check hydraulic reservoir and if necessary
fill the reservoir to the appropriate level with
Mobil 1 SAE 20 W-50 synthetic motor oil.
Replace hydraulic reservoir cap and tighten
until snug. DO NOT over tighten.
5.
OPERATION
OPERATION
OPERATION
OPERATION
The safe operation of this machine is the
responsibility of the operator. Any person
who operates the machine MUST be
instructed in and capable of the safe
operation of the machine and all controls.
Read all safety information on pages 4
through 6 .
5.1.
5.1.
5.1.
5.1. Controls
Controls
Controls
Controls And
And
And
And Switches
Switches
Switches
Switches
Know your controls and how to stop the
machine, engine, and mower deck quickly in
an emergency. DO NOT operate this machine
until you are completely familiar with the
controls and comfortable with your ability.
 Loading...