

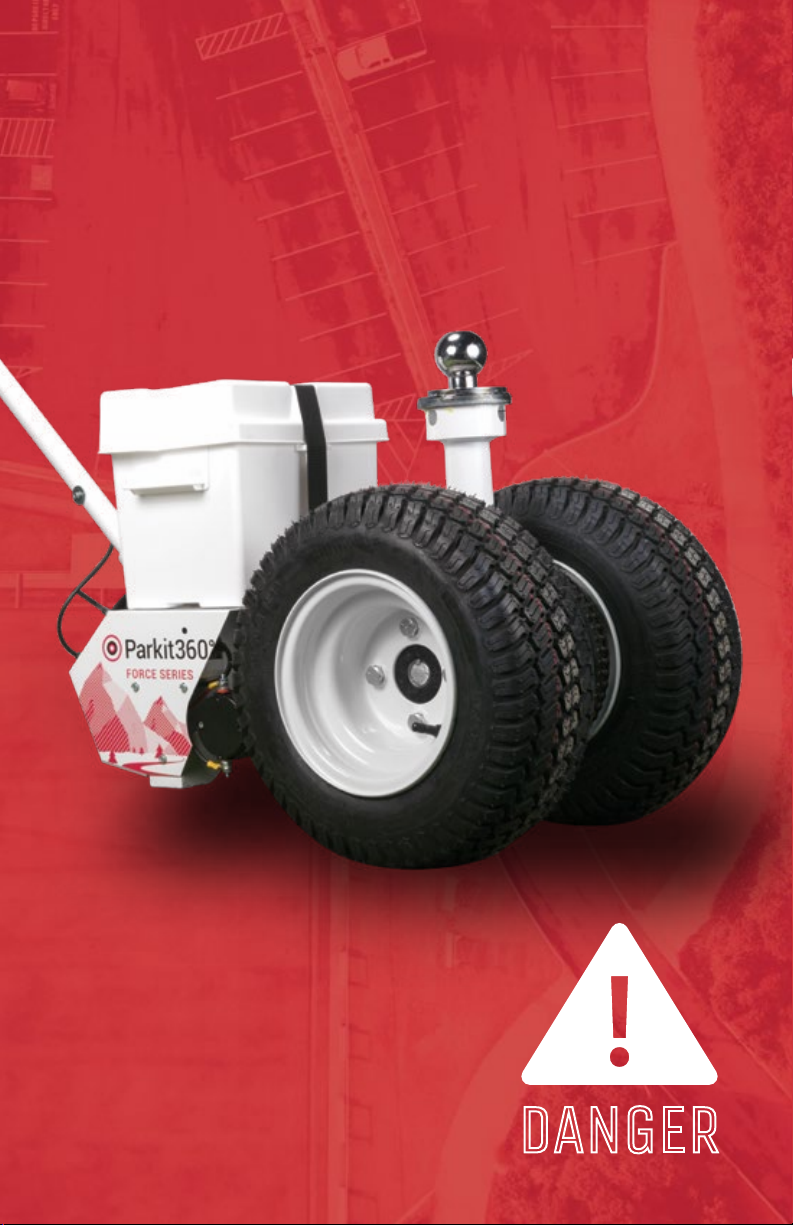
FORCE 5K & 10K
INSTRUCTION MANUAL
VERSION 3.8
READ CAREFULLY
BEFORE OPERATION
IMPROPER USE OF THIS DOLLY CAN
CAUSE DAMAGE TO YOUR TRAILER,
PERSONAL INJURY OR EVEN DEATH.
DANGER
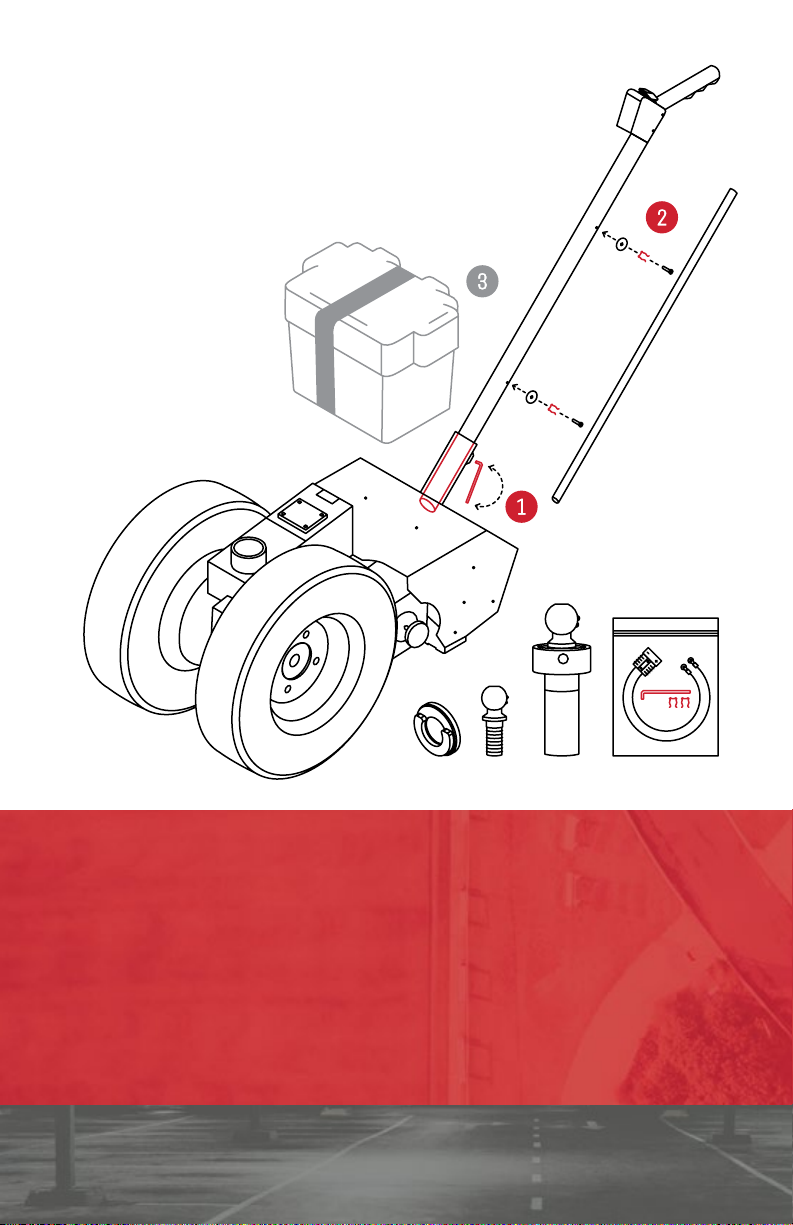
IN THE BOX
ALL PACKAGES INCLUDE:
Force Dolly
Handle & Tightening Bar
Ball Mount: 18”, 20” or 24”
2” & 2 5/16” Hitch Ball
Thrust Washer
Hardware Kit:
• 2 Handle Spring Clips
• Allen Key
• 20” Battery Cable
ASSEMBLY
Insert the Handle into the Dolly and tighten both Allen Screws to secure it.
Connect the two Handle Control Cables. Make sure the Arrows on the
Cable Heads are aligned. Twist the plastic nut over the connection.
Install the Spring Clips onto the Handle to store the Tightening Bar.
OPTIONAL: MOUNT BATTERY BOX WITH PROVIDED STRAP.
FEATURES
VOLT METER
Digital Meter that measures and
displays Power Level of Battery.
FREEWHEEL KNOB
Engages or Disengages Motor to
move the Dolly With or Without Power.
BATTERY CHARGER (B2+B3)
Activates when the Dolly is plugged
into a Wall Socket. Stops charging
automatically when charger is full.
SMART BRAKE (B2+B3)
7-Way Power Plug that Controls
the Trailer’s Electric or Surge Brakes.
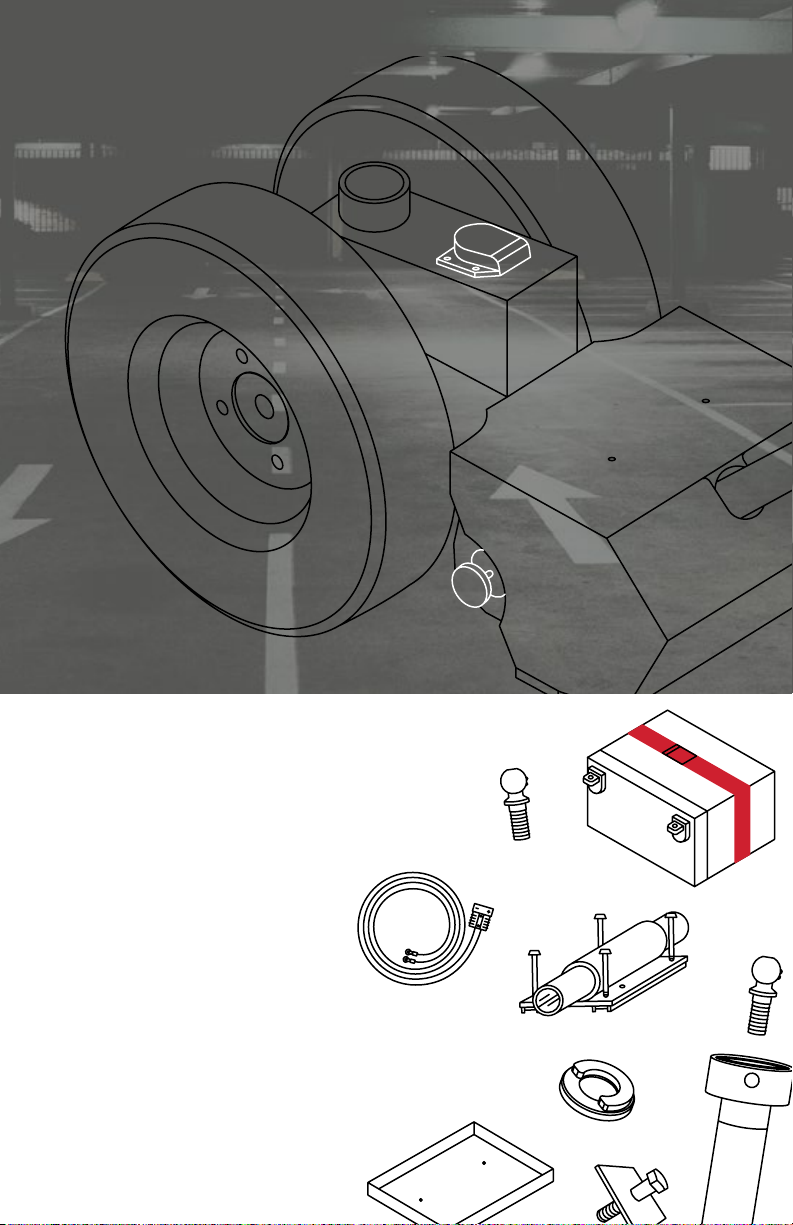
OPTIONAL PARTS
Telescopic Frame Adapter
1 7/8” or 50mm Hitch Ball
Pintle Hitch Adapter
80” Battery Cable
Smart Brake
U1 Battery Kit*
ORDER ONLINE OR CALL TOLL-FREE:
1-888-926-5517 ext. 1 or 4
PARKIT360.COM
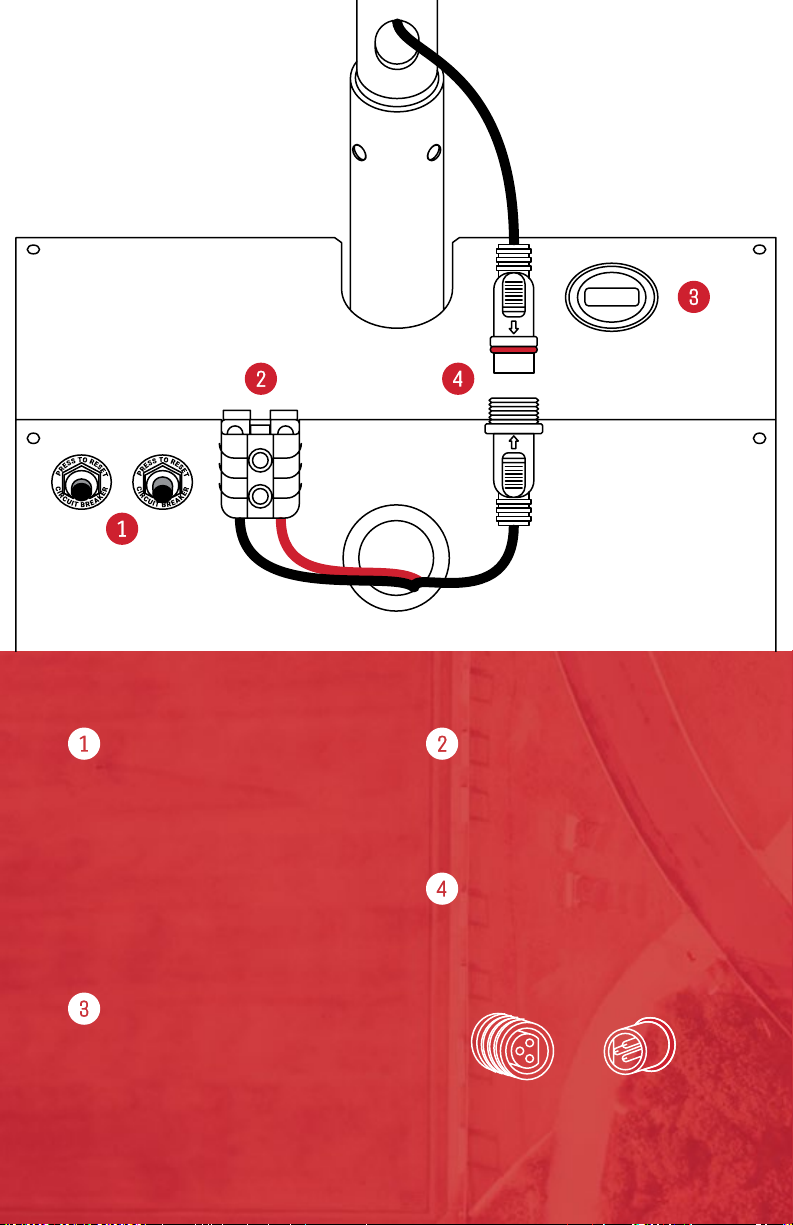
MODULE
QUESTIONS?
CALL TOLL-FREE:
FEATURES
1-888-926-5517
ext. 4 or 1
CIRCUIT BREAKERS
Prevents Motors and Smart Brake
from overheating. If a breaker trips,
the Reset Button will extend up to
1/2” from the panel.
Allow 30 seconds for the system
to cool down, then press Reset.
VOLT METER
Digital Meter that measures and
displays Power Level of Battery.
Fully Charged Batteries Rest
between 12.6 to 13V.
BATTERY CABLE PLUG
Plug the 20” or 80” Battery Cable into
this port to turn on the Dolly.
HANDLE POWER CABLES
Make sure the pins and at faces
are properly aligned. Do NOT force
them together.
Twist the locking cap over the
connection to secure it.
DRIVE MODES:
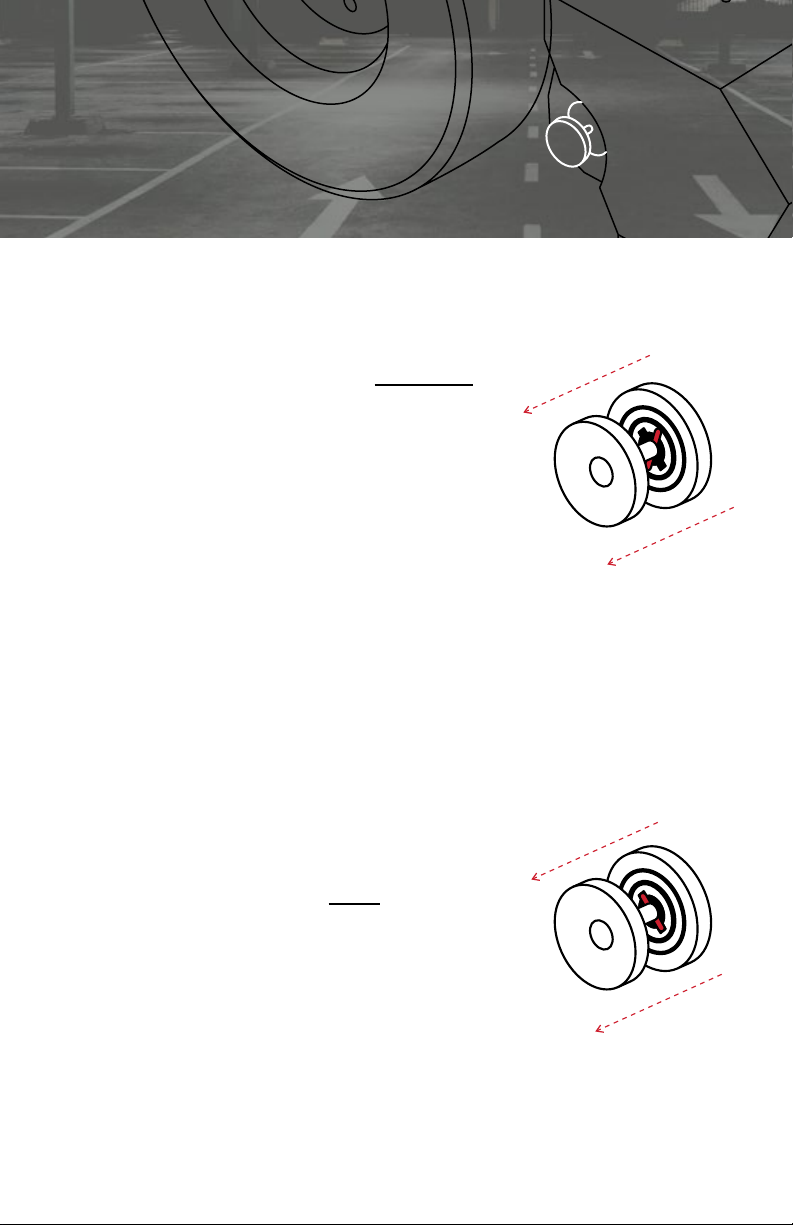
FREEWHEEL KNOB
FREEWHEEL
NEUTRAL. MOVE THE DOLLY WITHOUT
POWER WHILE IT IS NOT UNDER LOAD.
If you are in Engaged Mode, the wheels will be
locked in the drive position.
Without power, the Dolly will only move an inch
forwards or backwards before stopping.
Rock the Dolly so the wheels rest in between
these two stop points.
Pull on the Knob and turn it clockwise. Rest the
small pin on the outer edge, not in the pin hole.
ENGAGED
DRIVE. FOR CONNECTING TO THE
TRAILER AND PARKING WITH POWER.
Ensure the Dolly is in parking position and ready
to connect to the trailer hitch.
Pull on the Knob and turn it clockwise. Align the
small pin with the corresponding slot.
Rock the Dolly back and forth. The knob will pop
in with a “click”, engaging the Dolly into Drive.
REST PIN OUTSIDE
PLACE PIN INSIDE

POWER OPTIONS
DOLLY-MOUNTED BATTERY
SINGLE 12V BATTERY
Connect the 20” Cable
to one of the following
battery types:
• Group 24 Deep Cycle
• Marine
• U1 Sealed
Batteries can be purchased
at a local Hardware Store.
GROUP 24
or MARINE
U1 SEALED
TRAILER BATTERY
TWO 12V BATTERIES
Connect the 80” Cable
to either Trailer Battery:
PLUG CABLE INTO DOLLY TO
turn ON or OFF
TWO 6V BATTERIES
Connect the 80” Cable across
Both Batteries:

DANGER
DO NOT EXCEED DOLLY’S
MAX. WEIGHT CAPACITY
CAN CAUSE DAMAGE TO YOUR TRAILER,
SERIOUS INJURY, OR EVEN DEATH.
FORCE 5K
UP TO 5,000 LBS
FORCE 10K
UP TO 10,000 LBS
RE-TIGHTEN BALL MOUNT
BEFORE OPERATION
USE JACK POST CONNECTION OR TELESCOPIC
FRAME ADAPTER FOR TRAILERS:
- BETWEEN 8,000-10,000 LBS GROSS WEIGHT
- WITH MORE THAN 800 LBS TONGUE WEIGHT
- WITH ARTICULATED HITCHES
DO NOT OPERATE ON
MORE THAN 6% GRADE
RISK OF RUNAWAY TRAILER.
DO NOT OPERATE ON STEEP INCLINES.

CONNECTING TO YOUR TRAILER:
BALL MOUNT ADAPTER
While in Freewheel Mode, move the Dolly and Accessories to the Trailer.
Choose your preferred Hitch Ball Size, and assemble the Ball Mount.
BALL MOUNT ASSEMBLY
HITCH BALL
Thread desired Hitch Ball into the
Ball Mount. Apply a generous portion
of All-Purpose Grease along the top
surface of the Ball Mount Collar.
The shoulder of the Hitch Ball should
rest slightly below the top of the collar.

HITCH BALL
PLACEMENT
WELD SPOTS
Insert the assembled Ball Mount
into the Hitch and lock as normal.
Make sure the Weld Spots on
the Hitch Ball are pointed towards
the rear left side of your trailer
at about 10 o’clock.
The hitch may not lock if they are
not positioned properly!
HITCH CONNECTION
Turn the Ball Mount Counter Clockwise until the gap between
the Ball Mount Collar and Trailer Tongue closes tightly, with no gap.
FLUSH,
FLAT,
TIGHT,
NO GAP
Have a Step Down Hitch or another
obstruction preventing a at connection?
SEE THRUST WASHER INSTALLATION.

CONNECTION GAP?
THRUST WASHER
Remove the Hitch Ball and place the
Thrust Washer on top of the Ball Mount
with the open section facing the trailer.
Reinstall the Hitch Ball and continue
Hitch Connection as normal.
While tightening, hold the Thrust Washer
in place to prevent it from spinning.
STILL HAVING TROUBLE? SEE ALTERNATE CONNECTIONS.
TIGHTEN THE
BALL MOUNT
TIGHTENING BAR
Once the Ball Mount is secure,
use the Tightening Bar to ensure
the connection is as tight as possible!
This will take a few rotations.
DANGER
OPERATING WITH A LOOSE CONNECTION
CAN CAUSE DAMAGE TO YOUR TRAILER,
PERSONAL INJURY, OR EVEN DEATH.

ENGAGE MOTOR
INTO DRIVE
CONNECT BATTERY
Plug the Battery Cable into
the Dolly to turn it ON.
FREEWHEEL KNOB
Ensure the Dolly is in
parking position and
ready to connect to the
Hitch. Engage the Motor.
ALIGN THE DOLLY
Using the Handle Toggle Switch, Drive the Dolly
underneath the hitch. Align the Ball Mount with
the top of the Dolly’s Receiver Tube.

INSERT BALL MOUNT
Reverse the Dolly to Level, then lower Ball Mount
fully into the Receiver Tube.
Ensure that the Jack Post is off of the ground.
REVERSE
RE-TIGHTEN BALL MOUNT
Using the Toggle Switch, move the Dolly back & forth
slightly. Re-tighten Ball Mount. Repeat 2-3 times
or until you can’t tighten anymore.
READY!
ENSURE CONNECTION IS
AS TIGHT AS POSSIBLE
BEFORE OPERATING!

PARKING YOUR TRAILER
Use the Forward and Reverse Toggle Switch to steer
into tight spaces that are nearly impossible for vehicles.
DISCONNECTING THE HITCH
Chock Trailer Wheels to prevent a runaway trailer.
Unplug the Battery Cable from the Dolly.
Raise the Trailer to withdraw the Ball Mount.
The Ball Mount can be removed or left on the hitch for later use.
STORAGE
Freewheel the Dolly to desired storage area, preferably under cover.
Plug the Dolly into a Wall Outlet to Charge the Battery.
MAINTENANCE
Grease the Receiver Tube and Lubricate the Chain with Chain Lube
Can be done Annually, or more often if used more frequently.
CALL TOLL-FREE:
QUESTIONS?
1-888-926-5517 ext. 4 or 1

ALTERNATE
CONNECTIONS
TRAILER JACK POST
Remove the Ball Mount Adapter.
Lower the Trailer Jack into the
Dolly’s Receiver Tube, following
the standard connection process.
The trailer should rest as close
to the Dolly’s Tires as possible to
reduce strain on the Jack Shaft.
TELESCOPIC
FRAME ADAPTER
Remove the Ball Mount Adapter.
Attach the Telescopic Adapter to
the Y section of the trailer frame.
Lower the Telescoping Pipe into
the Dolly, following the standard
connection process. Slide the
Adapter’s locking pin into place.
CALL TOLL-FREE:
1-888-926-5517
Ext. 1 - Sales
Ext. 2 - Administration
Ext. 4 - Technical Support
OFFICE HOURS (WEEKDAYS)
8AM-6PM EST
sales@parkit360.com
admin@parkit360.com
support@parkit360.com

2 YEAR PARTS & REPAIR WARRANTY
Your Parkit360 Dolly is covered for 2 years from the initial date of purchase.
If a defect is found during this time, contact us with the original sales receipt
number and details of the fault encountered.
Our Technical Support will attempt to solve the issue remotely. If the issue
appears to be caused by defective parts, we will provide free replacement parts,
excluding shipping costs.
If the 2 Year Warranty has expired or if you are not the original owner, you
will have to pay the cost of parts and shipping. This repair will be covered for
3 months, starting 7 days from the date of shipment.
The Repair Warranty will expire either at the end of the 3 month period, or at
the expiration of the original 2 -Year Warranty, whichever is later.
30 DAY RETURN POLICY
If a material defect is found or if the Parkit360 has failed to perform to your
expectations, return it within 30 days of the date of sale for a refund, less the
at shipping cost of $250 and 20% restocking fee.
1. Call us at 1-888-926-5517 EXT.1 to let us know about your return.
Please provide us with your Sales Receipt or Online Order number.
2. Our staff will provide you with an RMA# that must be written on the box
prior to sending. If your Unit came with a Battery Box, please keep it. This
accessory does not need to be returned.
3. Tell us when the package is ready. Our staff will provide you with a Shipping
Label that must be axed to the box prior to drop off at your nearest FedEx
Depot. If you are unable to drop off the Unit, Pick-Up can be arranged.
4. Receive your refund minus the shipping and restocking fee once the Dolly
arrives at our warehouse.
EXCLUSIONS AND LIMITATIONS
The 2 Year Warranty and 30 Day Return Policy do not cover:
• Normal wear and tear of the Parkit360 from use
• Shipping Costs for Returns / Repairs
• Customer Neglect and Improper Use or Storage of the Parkit360
• Modied Dollies, or if the Serial Number has been altered or removed

DANGER
DO NOT EXCEED DOLLY’S
MAX. WEIGHT CAPACITY
RE-TIGHTEN BALL MOUNT
BEFORE OPERATION
DO NOT OPERATE ON MORE
THAN A 6% GRADE
PARKIT360 INC.
130 Industrial Ave, Unit 600
Carleton Place, ON K7C 3T2 Canada
1-888-926-5517 or PARKIT360.com
 Loading...