

Page 1

Adsorption dryer
K-MT 1-4/D3
( Generation - 3)
Operating manual
Revisione 0 —2018 /EN
Cod: 398H272183
Page 2

Page 3

EN | User Manual
Index
Machine passport 3
General information 4
Manufacturer’s details .............................................................................................................. 4
Details on the dryer ................................................................................................................... 4
About these operating instructions ........................................................................................... 5
For your own safety 6
General safety notes ................................................................................................................. 6
Intended use of the dryer .......................................................................................................... 7
Signs and hazard areas on the dryer ....................................................................................... 8
Transportation, installation and storage 10
Information on transportation packaging ................................................................................ 10
What to do in the case of transport damage occurring? ........................................................ 10
Transporting and installing the dryer ....................................................................................... 11
Storing the dryer ..................................................................................................................... 13
Technical product description 14
Summary drawing ................................................................................................................... 14
Function description ............................................................................................................... 14
Available options ..................................................................................................................... 17
Installation 19
Preconditions for installation .................................................................................................. 19
Connect piping ....................................................................................................................... 20
Installing the electrical connection .......................................................................................... 21
Start-up 23
Requirements for initial start-up ............................................................................................. 23
Setting times of the operating phases .................................................................................... 23
Overview of operating and control elements .......................................................................... 24
Start up dryer .......................................................................................................................... 27
Changing cycle mode (optional) ............................................................................................. 29
Monitoring dryer operation 30
With dewpoint-sensing control (optional) ............................................................................... 30
Shutdown and restart dryer 31
Emergency shutdown ............................................................................................................31
Depressurising and shutting down the dryer .......................................................................... 31
If work is to be carried out on the electrical system ............................................................... 32
Restart .................................................................................................................................... 32
Maintenance and repair of the dryer 33
Notes on maintenance ............................................................................................................ 33
Regular maintenance intervals ................................................................................................ 34
Instructions for use of the dongle ........................................................................................... 35
Daily maintenance tasks ......................................................................................................... 35
Maintenance work to be completed every 12 months ............................................................ 36
Maintenance work to be completed every 24 months ............................................................ 38
Maintenance work to be completed every 48 months ............................................................ 38
Identify and eliminate faults 43
Summary of faults ................................................................................................................... 43
K-MT 1-4/D3 1
Page 4

EN | User Manual
Annex with technical documentation 46
Technical data ......................................................................................................................... 47
Replacement and wear part list .............................................................................................. 48
Logic control diagram ............................................................................................................. 49
Flow diagram .......................................................................................................................... 51
Dimensional drawing .............................................................................................................. 52
2 K-MT 1-4/D3
Page 5

EN | User Manual Machine passport
Machine passport
It is the responsibility of the owner,
◊ to enter for the rst time any appliance data not stated above,
◊ to keep these appliance data up to date.
The above-stated appliance data provide for a clear identi cation of the dryer and its components, and signi cantly facilitate any service measures.
Further important data on the dryer such as the details on the permissible operating pressure
and the electrical connection are found on the type plate (for position of the type plate see
page 8 )
K-MT 1-4/D3 3
Page 6

EN | User Manual General information
General information
Manufacturer’s details
Name and address
Parker Hannifi n Manufacturing S.r.l.
Sede Legale: Via Privata Archimede, 1- 2009 Corsico (MI) Italy
Sede Operativa: Gas Separation and Filtration Division EMEA - Strada Zona Industriale, 4
35020 S.Angelo di Piove (PD) Italy
tel +39 049 971 2111- fax +39 049 9701911
Web-site: www. parker.com/hzd
e-mail: technical.support.hiross@parker.com
Details on the dryer
Standard equipment
Standard dryer*, consisting of:
◊ 2 vessels, lled with desiccant
◊ 1 upstream lter
◊ 1 downstream lter
◊ Piping and muf er
◊ Control system
Associated documents
◊ Operating instructions (present)
◊ Technical documentation (see annex)
◊ Circuit diagrams (see separate document)
◊ Operating manual for installed lters (separate document)
Notes on supplementary documents
Supplementary documents such as operating manuals for options or pertaining components
must always be heeded. They contain additional information, e.g. regarding maintenance,
and are therefore necessary for safe operation of the plant.
* Planned dryers may be equipped with special components.
4 K-MT 1-4/D3
Page 7

EN | User Manual General information
About these operating instructions
These operating instructions contain basic information on the safe use of the dryer.
Characters and symbols used
Work steps that you have to carry out in the sequence stated are marked by black tri-
angles.
◊ Lists are marked by a small box
Note:
These notes provide you with hints and information on the safe and effi cient
handling of machines and devices.
Warning!
These safety notes warn against damage to property and help you to avoid
such damage.
Danger!
These danger notes with a grey background warn against personal injury and/
or danger to life and limb; danger notes help you to avoid serious or life-threatening situations for yourself and/or third parties.
Target group of these operating instructions
These operating instructions are intended for all persons working on and using the dryer. We
assume that all such persons are specialist personnel, e.g. tters or electricians.
Operating instructions: handling
These operating instructions must be continuously available at the site where the dryer is
used. We recommend to prepare a copy and to keep the same in a safe and freely accessible
place next to the dryer. Keep the original document in a safe place.
K-MT 1-4/D3 5
Page 8

EN | User Manual For your own safety
For your own safety
The dryer has been built in accordance with the state of the art and the recognized technical
safety regulations. Nevertheless, there is a risk of personal injury and damage to property
when the dryer is used, if
◊ it is operated by non-quali ed personnel,
◊ not used within its intended design speci cations,
◊ is repaired or maintained incorrectly.
Note:
For your own safety and to prevent machine damage, please note the information and safety notes in these operating instructions when working with the
dryer.
General safety notes
Warning against sudden air ejection
When the hollow section vessels are depressurised, air fl ows suddenly out of
the sound absorber.
◊ This causes a sudden loud cracking noise.
◊ Due to particles carried in the air fl ow, there is a very considerable risk of
eye injury.
When working on the dryer, always wear eye and ear protection equipment.
Hazard due to a sudden release of pressure!
Never remove any parts of the dryer, or manipulate the same in any way, for
as long as the plant is still pressurised! A sudden escape of pressure may
cause serious injuries.
Before carrying out any work on the dryer, fi rst depressurise the plant.
Risk of injury due to voltage-carrying parts!
The electrical supply cable and external power lines are live even after the
dryer is switched off and, in the event of body contact, may cause serious
injury! Before carrying out any work on the electrical system, the electrical
supply cable and all external power lines must be made voltage-free!
Personnel qualifi cation
Only authorized and quali ed specialist personnel may be tasked with the work on the dryer
described in these operating instructions.
Conversions and modifi cations
Without prior approval by the manufacturer, no conversions and modi cations must be made
to the dryer! Any non-approved modi cations may restrict the operational safety of the dryer
and cause damage to property or personal injury.
Handling drying agents
The drying agents used do not pose any risk to health. However, when lling and emptying
the hollow section vessels with drying agents, increased dust generation may occur. Please
comply with the following instructions:
◊ When lling drying agents, wear a dust mask and eye protection!
◊ If a spillage occurs, any spilt drying agent must be taken up immediately. There is a risk of
skidding!
6 K-MT 1-4/D3
Page 9

EN | User Manual For your own safety
Disassembly and disposal
◊ Dispose all parts of the dryer, the drying agent, and all other operating materials in an envi-
ronmentally safe way and in accordance with all current statutory regulations.
Intended use of the dryer
The dryer is exclusively intended for drying compressed air. Depending on de ned input
conditions, it dries compressed air for industrial use.
The dryer is designed for compressed air, which is free from aggressive water, oil, and solid
matter constituents.
As standard, the dryer is intended to be sited within a building and protected against the
weather.
The dryer may be operated only in accordance with the data on the type plate and in accordance with the contractual conditions.
Suspected misuse
The dryer must not be misused as a climbing aid! Pipes, valves, and similar ttings have not
been designed for such loads. They could fracture, tear off, or become damaged in another
way.
K-MT 1-4/D3 7
Page 10

EN | User Manual For your own safety
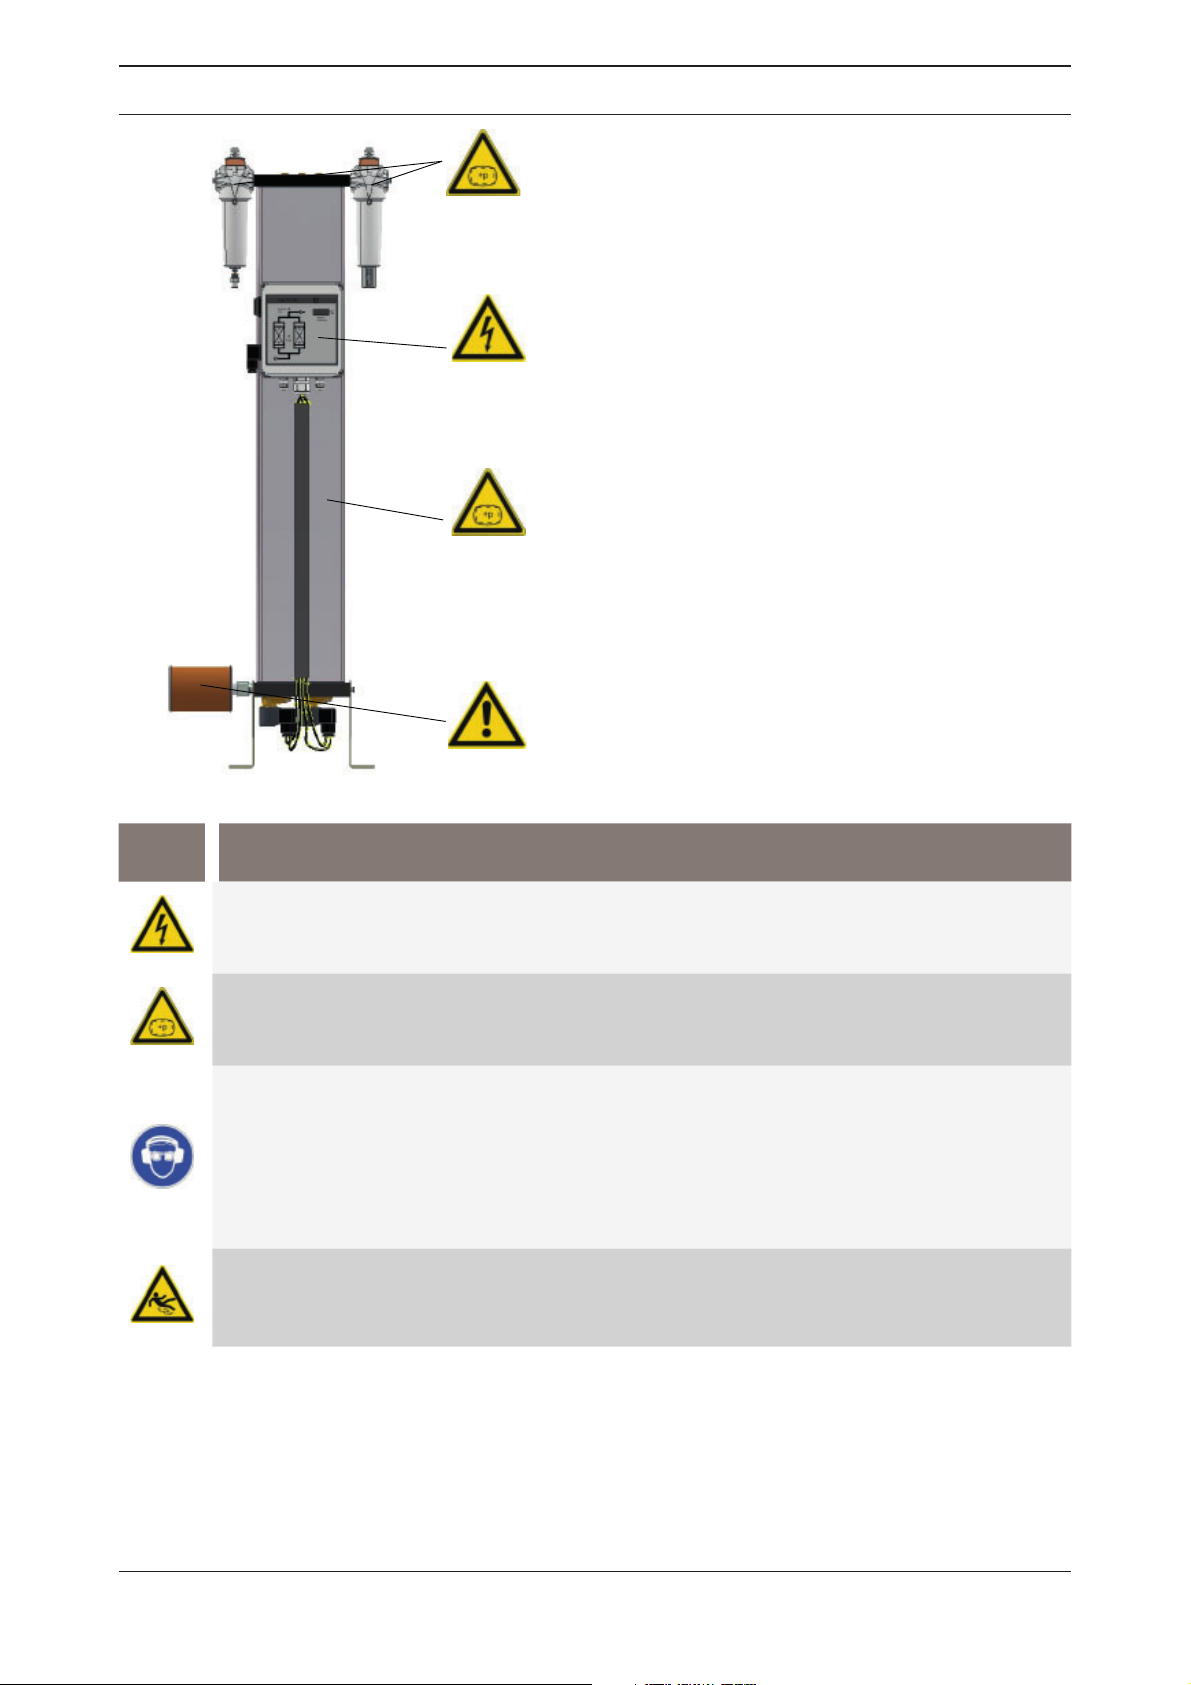
Signs and hazard areas on the dryer
Signs and labels
Operating data plate
Type plate of dryer
Type plate of downstream
Type plate of upstream lter
lter
Front view
Please note the above plates and instructions attached to the dryer. Ensure that they are not
removed and are always readable.
8 K-MT 1-4/D3
Page 11
EN | User Manual For your own safety
Hazard caused by overpressure
Hazard caused by electrical voltage
Hazard caused by sudden air ejection during
expansion
Risk of damage to eyes
Symbol Hazard area
Warning against hazardous electrical voltage
Different parts of the dryer carry electrical current. These parts may be connected,
opened, and maintained by authorized specialist personnel only.
Warning against overpressure
The entire dryer is under pressure. Before commencing any work, the plant must
be depressurised.
Warning against sudden air ejection
When the vessels are depressurised, air ows suddenly out of the sound absorber:
◊ This causes a sudden loud cracking noise.
◊ Due to particles carried in the air ow, there is a very considerable risk of eye
injury.
When working on the dryer, always wear eye and ear protection equipment.
Skid risk
When emptying and lling the vessels with drying agent, there is a risk of skidding
caused by spilt drying agent.
K-MT 1-4/D3 9
Page 12
EN | User Manual Transportation, installation and storage
Transportation, installation and storage
Danger due to incorrect transportation!
The dryer must be transported by authorized and qualifi ed specialist personnel
only. During transportation all applicable national regulations for accident prevention must be complied with. Otherwise there is a risk of personal injury.
Always adhere to the stickers and notes on the packaging of the dryer!
◊ Only use suitable and technically perfect lifting gear with a suf cient carrying capacity.
During transportation the dryer must be carefully secured against falling over.
The manufacturer will not be liable for any damage caused by incorrect storage or incorrect
transportation. Please note therefore the following instructions as well as the storage instructions on page 13.
Information on transportation packaging
Depending on the type of transportation, the dryer is delivered in different types of packaging:
◊ All transportation types: the apertures of the dryer are closed off by means of plugs.
◊ In addition, when transportation is effected by air: the dryer is packaged in a wooden box.
◊ In addition, when transportation is effected by ship: the dryer is packaged in a lm material
and in a wooden box.
If the packaging is undamaged
The undamaged packaging should be removed only at the nal installation site, as it
offers protection against any weather in uences.
What to do in the case of transport damage occurring?
Check whether only the packaging or the dryer itself were damaged.
Inform the haulier immediately in writing of any damages.
Contact the manufacturer urgently in order to report the damage.
Warning!
A damaged dryer must not be taken into operation! Damaged components may
lead to functional faults and possibly cause further damage.
10 K-MT 1-4/D3
Page 13
EN | User Manual Transportation, installation and storage
Transporting and installing the dryer
Requirements for the installation site
The conditions at the installation site have a large in uence on the functional capability of the
dryer and the service life of the drying agent. In order to ensure a mode of operation, which is
as continuous as possible, and low maintenance, the installation site must meet the following
requirements:
◊ The installation site must be located within a building. Protect the dryer against moisture.
◊ The ambient temperature must not drop below +1,5 °C (34,7 °F).
◊ Heed the dryer’s noise emission when selecting the installation location.
◊ The installation area must be level, rm and vibration-proof. It must have the necessary car-
rying capacity for the weight of the dryer. The weight of the dryer is speci ed in the technical
data section of the annex.
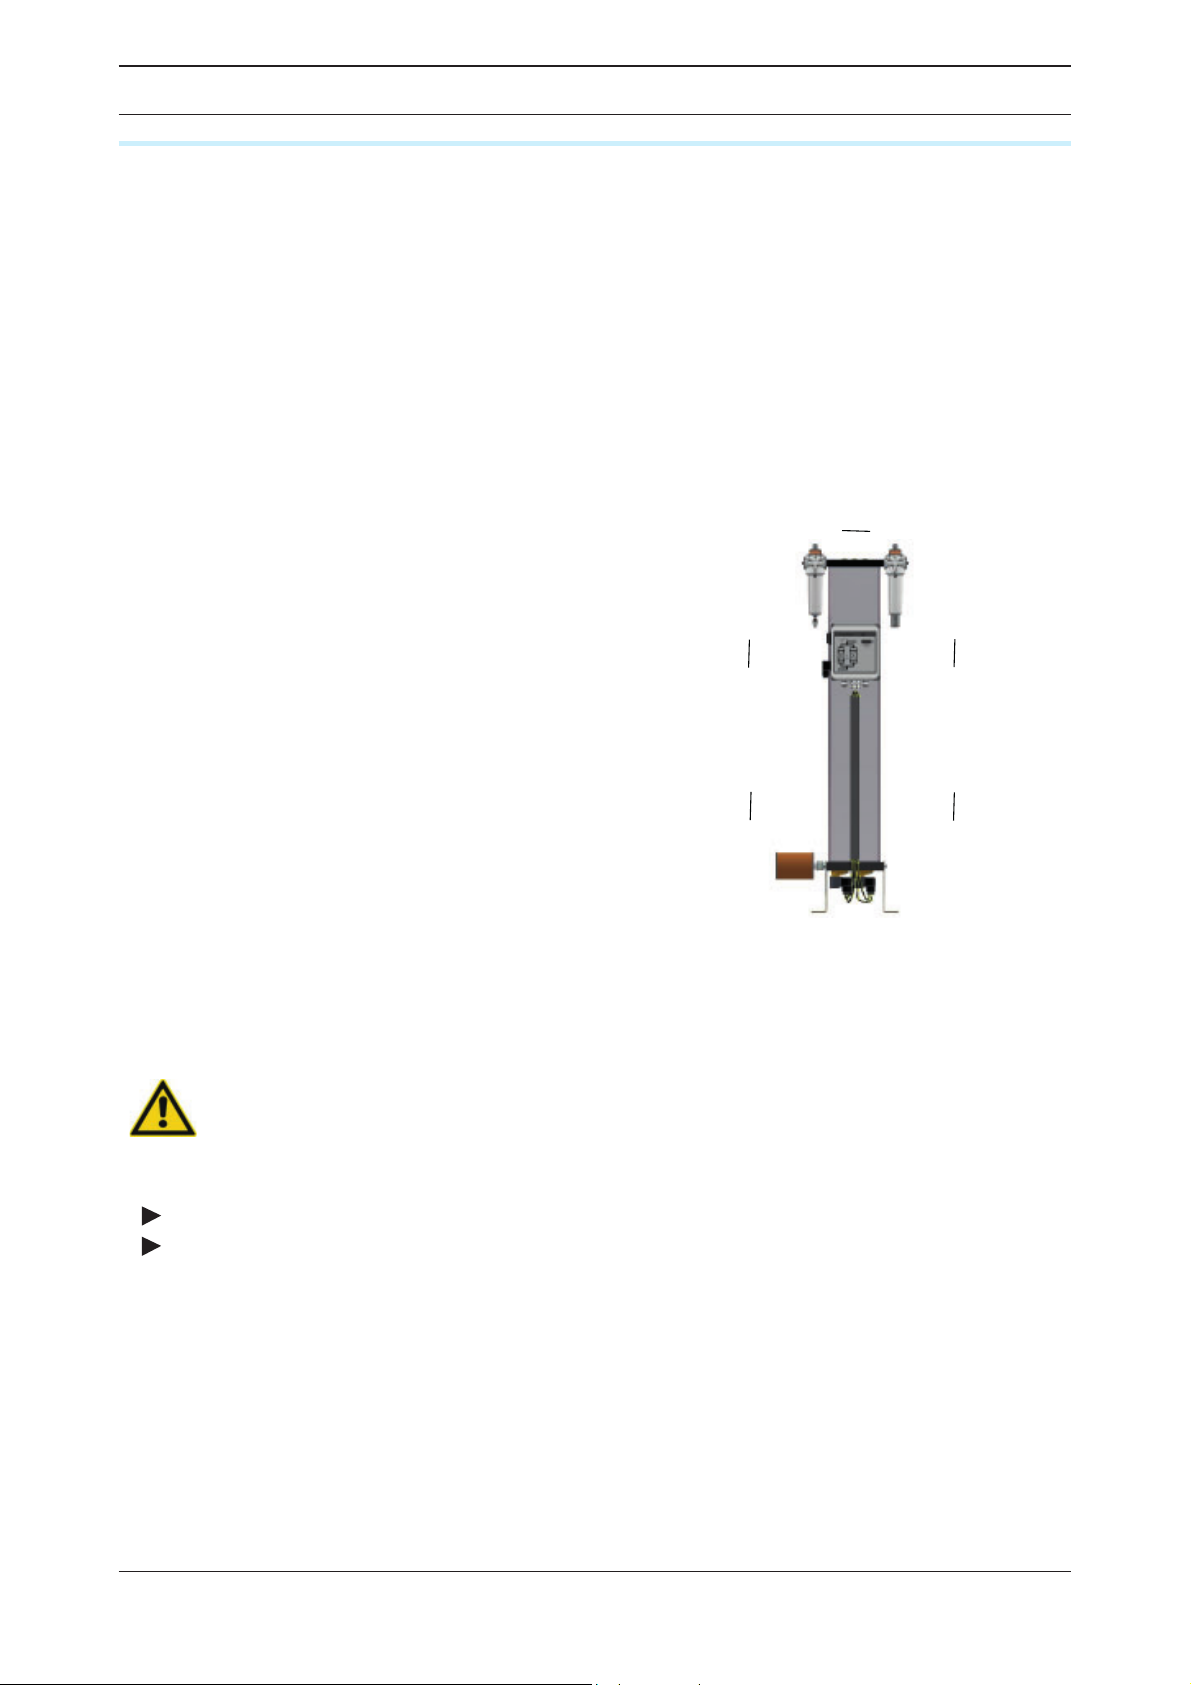
◊ The dryer should be installed with suf cient
spacing at the top, sides, and rear, in order to
be able to carry out maintenance work and
change the drying agent without any hindrances (see gure).
If in doubt, the installation site must be inspected by specialists. If you have any queries in this
regard, please contact the manufacturer (see
pag. 4
Transporting and installing the dryer
Warning against damage to property!
The dryer is delivered standing on its side on a transportation pallet. Top and
sides have not been designed for mechanical loads. Therefore do not place any
load onto the top face. Do not stack.
Therefore, always transport the dryer on a lifting or forklift truck.
The dryer should only be transported in an upright position.
Secure the dryer on the lifting or forklift truck against sliding movements.
Transport the dryer to its installation site.
1 m
D
D
1 m
Necessary spacing at the top and sides
1 m
D
= min. 1 m
D
D
1 m
1 m
K-MT 1-4/D3 11
Page 14

EN | User Manual Transportation, installation and storage
Secure the cardboard box or pallet on the lifting or forklift truck against sliding move-
ments.
Transport the dryer to its installation site.
Remove the packaging of the dryer
Carefully place the dryer in an upright position.
Place the dryer at its installation site.
Dryer in the box
Anchor dryer to the fl oor
The upright stand pro les of the dryer are
provided with pre-drilled anchorage bores
(see gure).
Use suitable attachment material to
anchor the dryer to the oor.
In the case of vibrating oors: place the
dryer on suitable vibration dampers.
Mount dryer on the wall
The stand pro les can be rotated by 90° towards the rear side of the dryer and secured in
this position (see arrow in above gure).
Remove the screws at the muf er and the stand pro les. Rotate the stand pro les by 90°
until the auxiliary holes for the securing screws and the muf er are aligned with each other.
Retighten the screws securing the stand pro le and the muf er.
Use suitable attachment material of suf cient carrying force to anchor the dryer to the
wall.
Dryer on pallet
Bores on the stand pro les
12 K-MT 1-4/D3
Page 15

EN | User Manual Transportation, installation and storage
Storing the dryer
If the dryer is to be stored for an extended period of time, the storage location must meet the
following conditions:
◊ The dryer must not be stored in the open air.
◊ The storage room must be dry.
◊ The storage room must be free from dust or the dryer must be covered by a protective
sheet.
◊ The storage room must have an ambient temperature of at least +1 °C (33,8 °F).
In order to store the dryer proceed as follows:
Take dryer out of operation as described on page 31.
Ensure that the compressed air inlet valve installed by the owner, and the installed
compressed air outlet valve installed by the owner, are both closed, and that the dryer is
depressurised.
Disconnect dryer from the compressed air system.
Disconnect the dryer from the electrical power supply and all external lines.
Use lm material or similar to close the compressed air inlet apertures and compressed
air outlet apertures on the dryer in order to protect them against contamination.
If possible cover dryer with a protective sheet.
The dryer can now be stored for long periods.
Note:
If you wish to take the dryer back into service after an extended period of storage, please proceed as described for its fi rst commissioning and start-up (see
page 27).
Store drying agents
Do not store drying agents in the open air.
Protect drying agents against humidity.
K-MT 1-4/D3 13
Page 16
EN | User Manual Technical product description
Technical product description
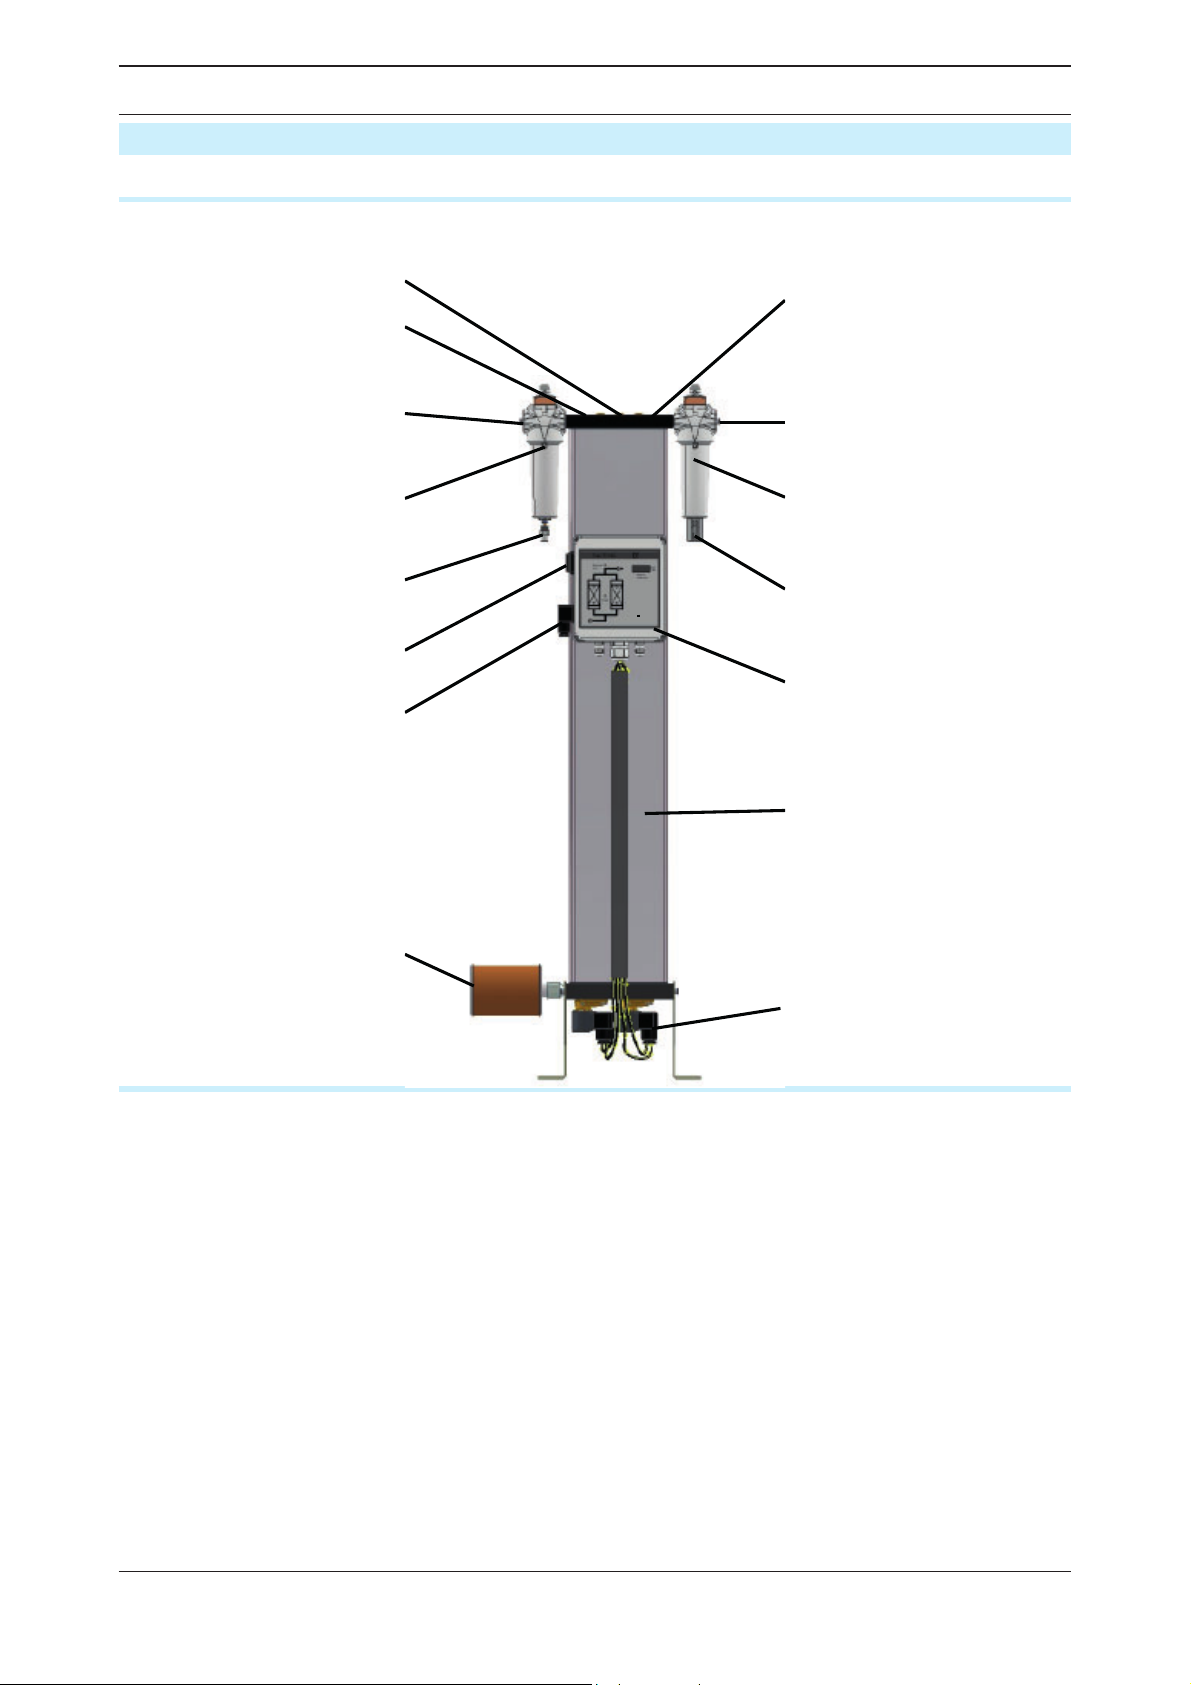
Summary drawing
Front view
Regeneration gas return
RV3–RV4 (Option)
Check valve plate (RV1–RV2)
Dewpoint sensor (optional)
Compressed air inlet
Upstream lter
Condensate trap
ON/OFF switch
Power connection
Muf er
Compressed air outlet
Downstream lter
Manual drain valve
Control box with Multitronic
control
Double-chamber vessel
Solenoid valves (Y1-Y4)
Function description
The dryer dries the compressed air supplied by the compressor and makes it available for
industrial use.
Upstream lters clean the compressed air and remove dust, dirt, oil, and water droplets, before the compressed air reaches the dryer. Thus, an upstream lter is also used for extending
the service life of the drying agent.
Downstream lters clean the compressed air from drying agent abrasions, before it is fed into
the compressed air system.
The two chambers of the hollow section vessel contain an extremely porous drying agent by
means of which humidity is removed from the compressed air and stored just as in a sponge.
The stored humidity is then removed again from the drying agent and re-introduced into the
ambient environment.
To this end, the two chambers alternate between different operating modes. Whilst in one
vessel, compressed air is de-humidi ed (adsorption), in the other vessel the humid drying
agent is prepared for another charge (regeneration). These two states, which run in parallel
during compressed air preparation, are described below.
14 K-MT 1-4/D3
Page 17
EN | User Manual Technical product description
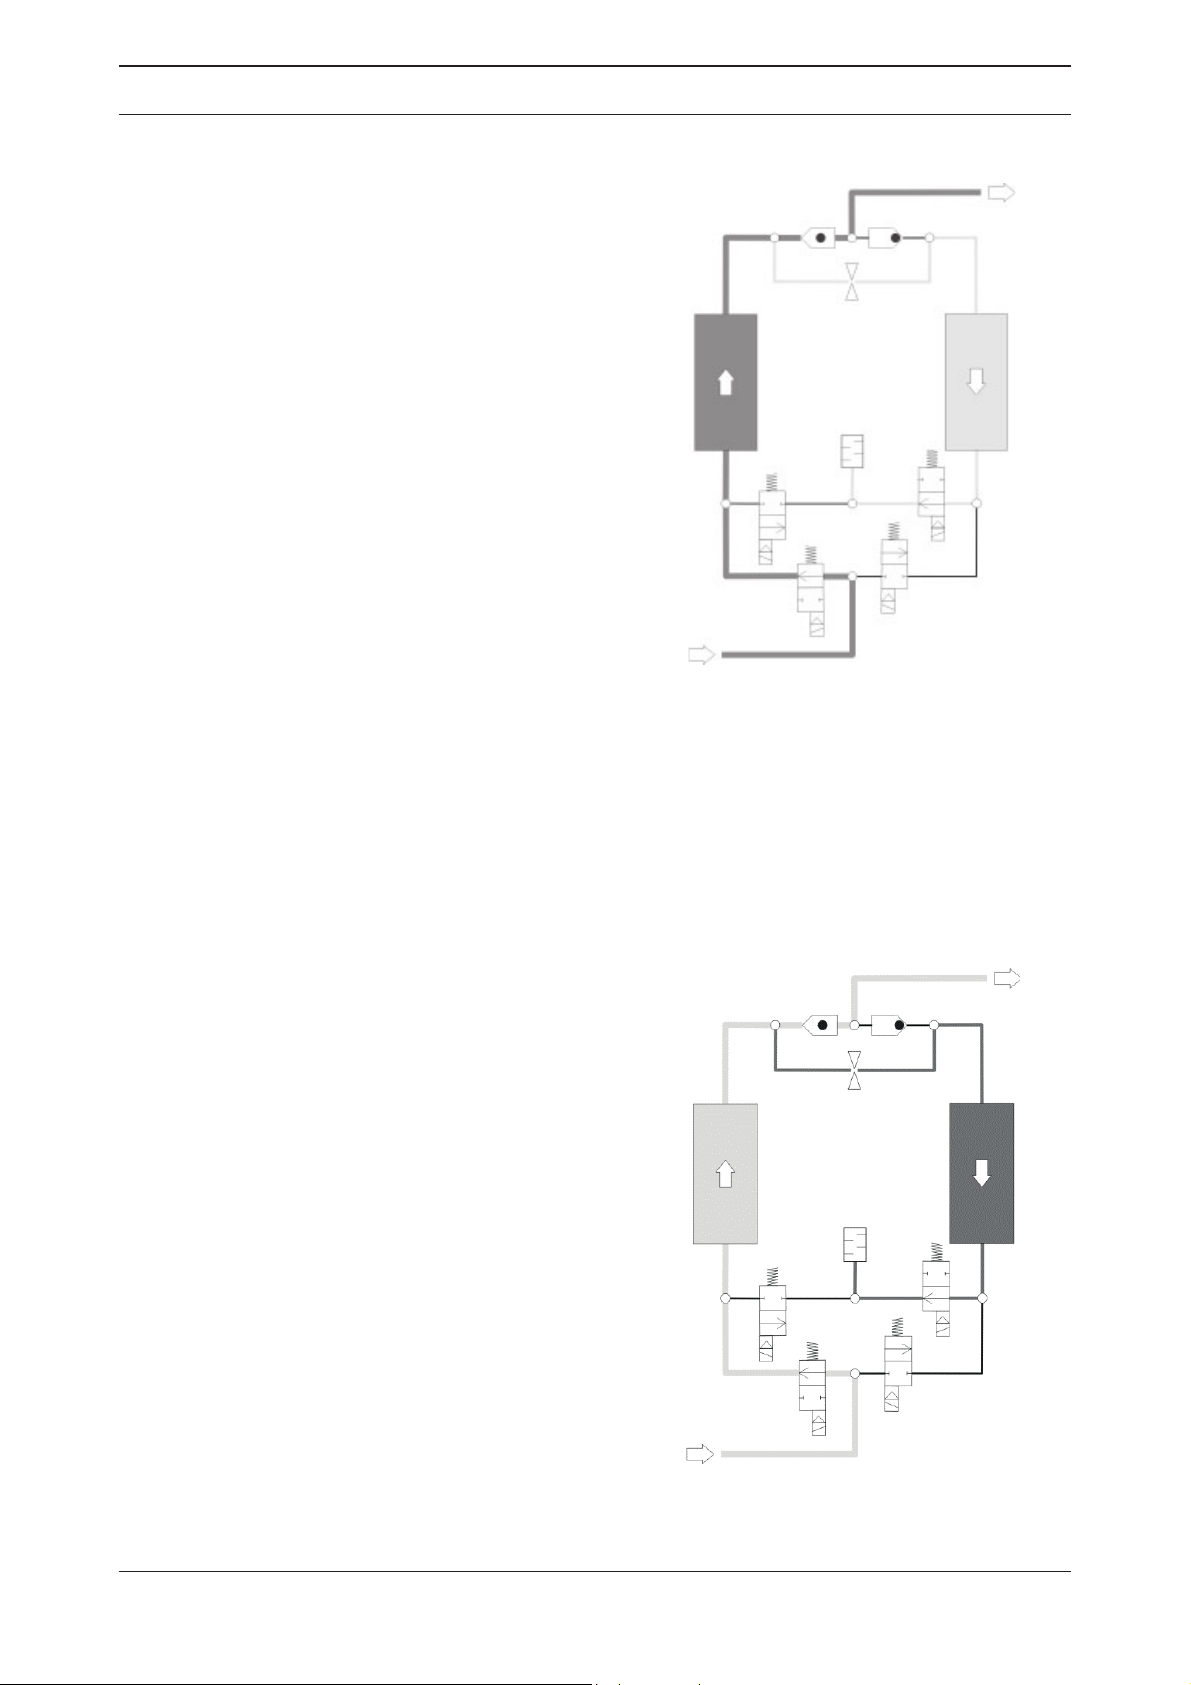
Adsorption
Via a compressor, humid compressed air is
supplied to the upstream lter. From here, the
compressed air ows upwards through the
absorption chamber, which is pressurised. In
so doing, the drying agent dehumidi es the air.
The dry compressed air is supplied to the pipe
network via the downstream lter.
Here, adsorption is shown in the left
vessel.
Regeneration (running in parallel to the adsorption)
At the same time the other chamber is prepared for a renewed take-up of humidity. This
process is called regeneration.
The regeneration is subdivided into three phases: expansion, dehumidi cation, and
pressure build-up. With the dewpoint-sensing control option, the regeneration phase is
followed by a standby phase.
Expansion phase
During the expansion phase the pressure in the
right chamber is released via the muf er down
to ambient pressure within just a few seconds.
The out ow of the compressed air becomes
noticeable due to a sudden powerful ow noise
at the muf er.
Dehumidifi cation phase
Prior to being released into the pipe network,
dried compressed air is bled by means of an
ori ce plate. This separate regeneration air ow
is fed through the depressurised chamber. The
humidity stored in the drying agent is taken up
by the air ow and expelled into atmosphere via
the muf er.
Here, regeneration is shown in the right
vessel.
K-MT 1-4/D3 15
Page 18

EN | User Manual Technical product description
Pressure build-up phase
After dehumidi cation the pressure in the
regenerated hollow section vessel is built up to
operating pressure, so that the switchover from
regeneration to adsorption can take place at
operating pressure level.
Pressure build-up
Standby phase (only with the dewpoint-sensing control option)
When in standby phase, the fully regenerated vessel is ready for absorption operation. The
system is switched to this vessel, as soon as the measured dewpoint at the compressed air
outlet has reached the set dewpoint value for switchover.
Switchover
When the drying agent in the adsorbing chamber has taken up a suf cient level of humidity,
then the switchover between the vessels will be effected between the vessels. Following
switchover, the above-described process is repeated, with the adsorption and regeneration
now taking place in the respective different vessel.
16 K-MT 1-4/D3
Page 19

EN | User Manual Technical product description
Available options
The following options are available for the dryer:
◊ Start-up device
◊ Signalling contacts of the control system & compressor synchronisation
◊ Regeneration gas return
◊ Dewpoint-sensing control
◊ Fine lter muf er
◊ Nozzle kit
Start-up device
A start-up device basically consists of a pressure holding device, which is located at the rear
of the dryer. The pressure holding device ensures that pressure can build up in the dryer and
adsorption take place.
It is always required when an empty compressed air reservoir or an empty compressed air
system must be lled downstream of the dryer (e.g. following weekend shutdowns and when
the pressure in the compressed air system can frequently drop below the stated operating
pressure).
Signalling contacts of the control system & compressor synchronisation
The control system is equipped with a digital input for the synchronised operation with a
compressor. This feature allows for synchronised and thus ef cient dryer operation with
discontinuous compressor operation.
Compressor synchronisation helps reduce energy costs, as the dryer can be operated independently of the compressor.
The compressor synchronisation controller is a higher-level controller than the pressure dew
point controller (see below). When both options are in place, the compressor synchronisation
controller is treated as the prime controller.
The control system can also be equipped with an optional operation signalling contact with
which the dryer operation can be monitored from an external device. Dryers with the optional
dewpoint-sensing control are equipped with such a contact as standard. It is used for the
transmission of operating signals and for the output of dewpoint alarms.
Regeneration gas return
When the compressor is switched off, the regeneration gas return ensures that regeneration is continued, as soon as a certain compressed air volume is reached behind the dryer.
The regeneration process must be continued and ended so that the drying agent does not
become unusable prematurely.
Dewpoint-sensing control
With a dewpoint-sensing control system, you can operate the dryer in xed or variable
cycles. In the xed cycle, switchover is effected after a xed time period (usually after 5
minutes). In the variable cycle, the switchover is effected in relation to the dew point reached
and the charging of the drying agent . The adsorption time in the variable cycle amounts to
60 minutes maximum.
Fine fi lter muffl er
A ne lter muf er is used to reduce the noise emission of the dryer to lower levels than the
standard muf er can provide. If installed, the ne lter muf er replaces the original installed
muf er.
K-MT 1-4/D3 17
Page 20

EN | User Manual Technical product description
Nozzle kit
In the case that the operating pressure deviates from the standard design pressure (7bare)
it is possible that the amount of necessary regeneration air changes. This effect may have
a negative impact on the cost-effectiveness of the dryer. To prevent this, it is possible to
replace the built in regeneration air nozzle by a nozzle with a modi ed bore. This replacement
optimizes the regeneration air consumption and therefore restores the energy ef ciency of
the dryer. To receive more information on this conversion, please contact the manufacturer.
18 K-MT 1-4/D3
Page 21

EN | User Manual Installation
Installation
Warning against hazardous electrical voltage
Different parts of the dryer carry electrical current. These parts may be connected,
opened, and maintained by authorized specialist personnel only.
As soon as the dryer has been set up at its installation location, you can install the compressed air infeed and outlet lines make the electrical connections.
Preconditions for installation
For a correct installation the following preconditions must be met on the part of the owner.
◊ Connections and lines for the infeed and outfeed of compressed air must be provided.
◊ A compressed air inlet valve as well as a compressed air outlet valve must be installed by
the owner, so that the dryer can be installed and maintained in a depressurised condition
(see also the installation example on page 20).
◊ All pipes, couplings, and connections must have the correct diameter and match the oper-
ating pressure.
Hazard caused by exceeding the limit values!
A safety device must be provided in order to protect against the maximum
permissible operating pressure from being exceeded.
The safety device must be installed so that the dryer is reliably protected from
exceeding the maximum permitted operating pressure even when the temperature of the compressed gas increases.
The data required to meet these preconditions are contained in the technical documentation
attached in the annex.
Warning!
If the above preconditions are not complied with, a safe operation of the dryer
cannot be assured. Also, the functionality of the dryer may be detrimentally
affected.
K-MT 1-4/D3 19
Page 22

EN | User Manual Installation
Connect piping
In order to ensure that the dryer operates optimally, the dryer must be assembled into the
compressed air system free of all stresses.
Ensure before connection that all infeed and outfeed compressed air lines and valves are
clean and undamaged.
Check the bolt connections and retighten if necessary, as they could have worked loose
during transportation.
Remove plugs on the pressure inlet and outlet.
All piping must be free from any stress and tension whatever!
Pipes subject to stress may burst due to the load placed on them during operation. This may cause damage to property and personal injury.
Use steel pipes to connect the dryer to the compressed air system.
The following gure shows an installation example.
Compressed air system Item. Component
1
23
5
67
4
10
8
Example of an installation with bypass line
The connection lines for the upstream lter (3) are to be installed at a slight incline in the
direction of the upstream lter.
One shutdown valve each (2, 6) is to be installed at the compressed air inlet and outlet
ends of the dryer.
If you t a bypass line (8) with additional shutdown valve:
Fit the line such that, when carrying out maintenance work on the dryer, the line system can
continue to be supplied with compressed air.
9
11
1 Entry, humid air
Compressed air inlet
2
valve, owner end
3 Upstream lter
4 Dryer
5 Downstream lter
Compressed air outlet
6
valve, owner end
7 Outlet, dry air
8 Bypass line (option)
Valve in bypass line
9
(option)
10 Bypass lter (option)
Valve, outlet bypass lter
11
(option)
20 K-MT 1-4/D3
Page 23

EN | User Manual Installation
Installing the electrical connection
Warning against electrical voltage
Only qualifi ed specialist personnel may carry out work on the electrical system!
Installing the supply cable
The components of the dryer have been connected to the control cabinet at the factory. You
only need to connect the control cabinet to the electrical supply cable.
The switchbox is provided with a connector where electrical power must be connected.
Ensure that the cross-section of the electrical supply cable corresponds to the power
rating of the dryer and the electrical voltage provided by the customer.
Make the electrical supply cable to the dryer voltage-free.
Secure the electrical supply cable to the dryer against switch-on.
Undo bolt (1) on the connector and withdraw
connector with seal from the switchbox.
Use a suitable tool to remove the terminal
block from the connection box.
Undo the PG union and pull the cable through the aperture (3). The exposed phase ends
should not be longer than 35 mm max.
Now make the cable connection as follows:
— .. Earth to terminal PE
— .. L1 to terminal 1
— .. N to terminal 2
Terminal 3 is not used.
Connect electrical cable to device
adapter
Fit terminal block into the connector and use bolt to remount the connector with seal on
the switchbox.
In all phases the dryer must be protected against short circuits by means of fuses.
In order to relief cable strain, re-tighten the PG union.
K-MT 1-4/D3 21
Page 24

EN | User Manual Installation
Connecting the external signalling lines
For compressor synchronisation
The controller is tted as standard with a digital input which makes the dryer regeneration
dependent on operation of the compressor (switch S1 on the controller’s circuit board, see
also gure below).
If switch S1 is in the ON position, operation of the compressor and dryer regeneration run
synchronously: When the compressor is stopped, the dryer regeneration also stops. When
the compressor is restarted, regeneration also restarts.
If switch S1 is in the OFF position, any regeneration process which has been started, is
always continued until completed.
To install the external line, proceed as follows:
Connect the signalling line to the potential-free busbar connection of the compressor to
terminals 1 and 2 on the control board (see circuit diagram).
Hinweis:
The compressor synchronisation controller is a higher-level controller than the
pressure dew point controller. When both options are in place, the compressor
synchronisation controller is treated as the prime controller.
For operation monitoring system (optional)
Operators have the option to connect the dryer to a fault signalling system, connecting the
respective line to a potential-free operation signalling contact. With this option, the following
statuses and events can for example be transmitted to a remote control room:
◊ Dryer on (contact made)
◊ Power supply disconnected (no contact)
◊ Dewpoint alarm (only with dewpoint-sensing control option, no contact)
To install the external lines, proceed as follows:
Connect the lines of the fault signalling system to relay K5 (see circuit diagram).
Check bolt connections
Before the initial start-up:
Check all unions and bolt connections as well as the terminals in the control cabinet for
secure seating; re-tighten if necessary.
22 K-MT 1-4/D3
Page 25

EN | User Manual Start-up
Start-up
◊ Carry out all prescribed tests and checks.
◊ Before start-up, ensure that no tools or other foreign parts have been left lying in a part of
the dryer where they might pose a hazard to the dryer being started up.
Requirements for initial start-up
For the rst start-up the following preconditions must have been met:
◊ The pipe system is free from contaminations.
◊ All shutdown valves are closed.
◊ The dryer is correctly sited and installed.
Checks before start-up
Ensure that
◊ all pipe, cable and bolt connections on the dryer have been retightened,
◊ no pipes chafe against body edges,
◊ all mountings are perfectly secure,
◊ the needle valve of the oil indicator is closed,
◊ the electrical connections are in safe contact and in good condition,
◊ owner-end and pressurised parts such as safety valves or other devices are not blocked up
by dirt or paint,
◊ all compressed air system parts which are pressurised (valves, hoses etc.) are free from
wear symptoms and defects.
Setting times of the operating phases
In its standard version the dryer is delivered with a time-dependent control system. The
phase sequence occurs in a xed cycle.
With the optional dewpoint-sensing control, the dryer can also be operated at variable cycles
(depending on the dewpoint).
The following table provides information on the duration of the individual phases
Phase duration Fixed cycle Variable cycle
Adsorption 5 min 60 min, max
Regeneration, total 5 min 5 min
- of which: expansion time ~ 0,2 min ~ 0,2 min
- of which: dehumidi cation time ~ 4 min ~ 4 min
- of which: pressure build-up ~ 1 min ~ 1 min
Standby -- ~ 55 min, max.
K-MT 1-4/D3 23
Page 26

EN | User Manual Start-up
Overview of operating and control elements
ON/OFF switch
The ON/OFF switch (2) is located to the side of the switchbox and above the mains plug (1,
see gure):
◊ If it is set to 0, the power supply is disconnected and the dryer is switched off. The main
valves are (V1, V2) are open, while the expansion valves (V3, V4) are closed. This means that
the air can circulate in the main processing direction, even if the dryer is switched off.
◊ If the switch is set to I, the dryer is switched
on and begins to operate in xed cycle mode
(i.e. time-controlled).
◊ If the switch is set to position II, the dryer is
switched on and begins to operate
— with compressor synchronisation
— in variable cycle mode (i.e. dew-point-controlled).
Position II is only relevant for operation with
the optional compressor synchronisation and/
or dewpoint-sensing control
Display panel
The display panel at the switchbox is equipped
with LEDs (light emitting diodes) and a digital
display, indicating the operating status of the
dryer:
Switchbox with ON/OFF switch
Display panel at the switchbox
24 K-MT 1-4/D3
Page 27

EN | User Manual Start-up
LED Power (1)
LED is on when dryer is switched on.
Flow diagram (2)
The current operating phases of the dryer are indicated by means of 4 LEDs:
Vessel B1
Regeneration 1
Adsorption 1
Depending on the operating phase, the following LEDs might be on simultaneously:
Adsorption B1 and regeneration B2 or regeneration B1 and adsorption B2.
Digital display (3)
The digital display shows the individual programme steps and the respective remaining time.
For details regarding the sequence of the individual processing steps and their duration,
please refer to the logic control diagram, page 49.
Display Explanation
2 215 Default display: The gure to the left indicates the current processing step; the
gure to the right shows the remaining time in seconds.
In this example, step 2 is being completed, whereby there are 215 seconds
remaining.
Vessel B2
Regeneration 2
Adsorption 2
SEr After 8000 operating hours, “SEr.” (service) is displayed for periods of 1 minute,
alternating with the default display.
Notify the service personnel of the manufacturer, as a routine service is now
due.
-25 With the dewpoint-sensing control option, the display shows the currently
measured dewpoint instead of the default data. The range of display is 100 °C
(-148 °F) to +20 °C (68 °F).
If the measured dewpoint exceeds the preset alarm limit (5 °C (41 °F) above the
switchover value), the displayed dewpoint value is ashing.
With the optional dewpoint-sensing control, the following error messages might be displayed:
Display Cause
+20 ◊ Upper measuring range limit exceeded
999 ◊ Dewpoint sensor defective.
sens
o
-999
LED Economy cycle (4)
◊ Dewpoint sensor not powered
◊ Cable defective or disconnected
◊ Sensor defective
K-MT 1-4/D3 25
Page 28

EN | User Manual Start-up
This LED is only relevant in units that are equipped with the optional dewpoint-sensing
control. The diode lights up when the dryer is switched on and in the standby phase and no
regeneration air is required.
26 K-MT 1-4/D3
Page 29

EN | User Manual Start-up
Start up dryer
Warning against sudden air ejection!
During expansion the pressure is released suddenly through the muffl er:
◊ A loud cracking noise occurs which can injure your hearing.
◊ Particles carried in the air fl ow act like bullets and can injure your eyes or
skin.
Always wear eye and ear protection, therefore, when you are in the vicinity of
the dryer!
Hazard due to a sudden release of pressure!
Never remove any parts of the dryer, or manipulate the same in any way, for as
long as the plant is still pressurised! A sudden escape of pressure may cause
serious injuries.
Before carrying out any work on the dryer, fi rst depressurise the plant.
◊ Carry out all prescribed tests and checks.
◊ The factory settings on the control board in the switchbox must not be changed on any
account without prior approval by the manufacturer.
◊ Before start-up, ensure that no tools or other foreign parts have been left lying in a part of
the dryer where they might pose a hazard to the dryer being started up.
Open compressed air supply and switch on dryer
For start-up, please proceed in the sequence shown here.
Ensure that the compressed air inlet and outlet valves installed by the owner are closed
(see installation example on page
Ensure that the compressed air system upstream of the dryer is pressurised. If necessary,
pressurise (switch on compressor).
20).
Slowly open compressed air inlet valve!
Avoid sudden pressure build-up in any circumstance! If pressure builds up too
fast, this may cause damage to the dryer. Therefore, the compressed air inlet
valve must always be opened quite slowly!
Slowly open the compressed air inlet valve, installed by the owner, upstream of the dryer.
Switch on dryer: to this end, set the ON/OFF switch to I
If the dryer is taken into operation for the rst time, or after a change of drying agent, the
following intermediate step is meaningful. In the case of a restart situation, the following
intermediate step can be skipped.
Operating the dryer for the fi rst time (or after a change of drying agent) separately
Depending on the transportation and storage conditions, the drying agent in the chambers
can already be loaded with humidity from the environment. At each rst start-up it makes
sense therefore to operate the dryer from some time separately from the compressed air
system. This causes the drying agent in each chamber to be regenerated repeatedly and thus
to be prepared optimally for the take-up of humidity.
Note:
Depending on the pressure dew point to be achieved, we recommend to operate the dryer at fi rst start-up with compressed air consumption:
◊ for at least 4 hours at a pressure dew point of –25 to –40 °C or
◊ for approx. 5 to 7 days at a pressure dew point of –70 °C.
If you wish to take the dryer into operation in accordance with our recommendation, proceed
as follows:
K-MT 1-4/D3 27
Page 30

EN | User Manual Start-up
Ensure that the compressed air outlet valve installed by the owner is closed.
Keep the compressed air outlet valve closed for the time period recommended above.
Then the dryer can be taken into service in the compressed air system as described in the
following section:
Operate dryer immediately in the compressed air system
Ensure that the compressed air system downstream of the dryer is pressurised or that a
start-up device (option, see page
downstream of the dryer.
The importance of this increases with the size of the compressed air system downstream of
the dryer. Smaller compressed air systems can be pressurised also by means of compressed
air fed through the dryer.
Slowly open compressed air outlet valve!
Avoid a sudden drop in pressure in any circumstance! If pressure drops too
fast, this may cause damage to the dryer. Therefore, the compressed air outlet
valve must always be opened quite slowly!
Slowly open the compressed air outlet valve installed by the owner. The pressure should
not drop below the operating pressure (if poss.). If necessary, keep the compressed air outlet
valve in a slightly open position until the compressed air system downstream of the dryer has
lled up completely; only then should the valve be opened fully.
The dryer has then be taken into operation within the compressed air system.
In the event of a fault
In the event of an emergency or if a safety-relevant disruption occurs (e.g. escaping compressed air, defective component), immediately close the compressed air supply line and set
the ON/OFF switch of the dryer to 0 in order to disconnect it from the power supply. Afterwards depressurise the dryer (see also chapter , page
Then proceed as follows:
Remedy fault:
Look up possible cause of the fault, and how to remedy the same, in the table on page
43.
Remedy fault.
Repeat the start-up procedure.
17) was installed into the compressed air system directly
31).
28 K-MT 1-4/D3
Page 31

EN | User Manual Start-up
Changing cycle mode (optional)
When can I change cycle mode?
If the dryer has been successfully commissioned and is equipped with one of the following
options:
◊ compressor synchronisation or
◊ dewpoint-sensing control
it can be set to economy cycle mode.
When should I change cycle mode?
Cycle changes should be made during the pressure build-up phase and prior to switchover;
during this phase, the pressure in both vessels is just below operating pressure so that a fast
pressure build-up is prevented when the vessels are switched.
During this period, only the adsorption LED is on in the diagram, and the digital display
shows step 4 or step 9 for the duration of 1 minute (see logic control diagram; not displayed
with dewpoint sensing).
Which cycle modes can I choose?
If the dryer is connected to a compressor synchronisation system and is equipped with the
dewpoint-sensing control option, these two optional devices can only started together. The
compressor synchronisation has thereby precedence over the dewpoint-sensing control.
With compressor synchronisation
If compressor synchronisation is enabled, the dryer can only be operated in conjunction with
the compressor. As soon as the compressor is switched off, the dryer is automatically set to
standby mode.
In standby mode, the control system remains on, and the dryer is ready for the next switchover, which is made as soon as the compressor is switched on.
Note:
The compressor synchronisation controller is a higher-level controller than the
pressure dew point controller. When both options are in place, the compressor
synchronisation controller is treated as the prime controller.
With dewpoint-sensing control
Dryers equipped with dewpoint-sensing control operated in variable cycle mode, based on
the measured dewpoint of the dried air at the compressed air outlet. As soon as a certain
dewpoint is reached, as the drying agent in the absorbing chamber is saturated, the chambers are switched.
The dewpoint at which a switchover is made is preset at the factory.
How do I change cycle mode?
Wait until the dryer has reached the pressure build-up phase (phase prior to switchover).
One LED for Adsorption B1/B2 is on in the ow diagram.
Set the ON/OFF switch to position II.
The programme continues the cycle.
K-MT 1-4/D3 29
Page 32

EN | User Manual Monitoring dryer operation
Monitoring dryer operation
The dryer operates fully automatically. However, you should carry out the regular checks
described in the Chapter Maintenance and repair of the dryer.
Warning against sudden air ejection!
During expansion the pressure is released suddenly through the muffl er:
◊ A loud cracking noise occurs which can injure your hearing.
◊ Particles carried in the air fl ow act like bullets and can injure your eyes or
skin.
Always wear eye and ear protection, therefore, when you are in the vicinity of
the dryer!
◊ The more powerful the dryer is, the more noise may be generated during operation. There-
fore, the operator must provide suitable protective equipment (e. g. ear protection).
◊ Only operate the dryer within the permissible limits (see type plate). By operating the dryer
in conditions that go beyond the de ned values, the dryer is subjected to loads for which it
has not been designed. This may cause functional defects.
◊ Check the dryer regularly for externally visible damage and defects. Any changes, even in
its operating behaviour, must be reported immediately to the competent of ce or person.
◊ In the event of an emergency or if a safety-relevant disruption occurs (e.g. escaping com-
pressed air, defective component), immediately close the compressed air supply line and set
the ON/OFF switch of the dryer to 0 in order to disconnect it from the power supply. Afterwards depressurise the dryer (see also chapter , page
after all defects have been eliminated.
31). The unit may only be restarted
With dewpoint-sensing control (optional)
Display of dewpoint
If the dryer is equipped with a dewpoint-sensing control system, the digital display at the
front of the switchbox shows the currently measured dewpoint. The range of display is –100
°C (-148 °F) to +20 °C (68 °F).
If the set dewpoint is exceeded, the system automatically completes a switchover between
the chambers. The dewpoint at which a switchover is made is preset at the factory.
After commissioning or extensive maintenance work, check the dewpoint display at the
dryer.
Under certain circumstances, the desired dewpoint is only reached after prolonged operation.
Error messages
If the measured dewpoint exceeds the preset alarm limit (5 °C (41 °F) above the switchover
value), the displayed dewpoint value is ashing. In addition, an error message can be issued
through the potential-free busbar.
Error codes and their causes:
Display Cause
+20 ◊ Upper measuring range limit exceeded
999 ◊ Dewpoint sensor defective
sens
o
-999
For instructions on how to eliminate faults, see chapter Identify and eliminate faults
◊ Dewpoint sensor not powered
◊ Cable defective
◊ Sensor defective
30 K-MT 1-4/D3
Page 33

EN | User Manual Shutdown and restart dryer
Shutdown and restart dryer
In the following cases, the dryer must be fully shut down and depressurised:
◊ In the event of an emergency or malfunction
◊ For maintenance work
◊ For dismantling
Caution!
Risk of damage to the dryer, if it is switched off during the expansion or drying
phase.
During these phases, the pressure in the regenerating chamber is released
to ambient pressure: If the main valve is opened, as the dryer is switched off,
there is a sudden pressure build-up in the chamber. This might result in
◊ damage to the drying agent, and
◊ excessive abrasion, with negative impact on the regeneration capacity.
Before switching off the dryer, wait until it has reached the pressure build-up
phase or is in standby mode (before switchover).
Note:
If the unit is equipped with a compressor synchronisation system, fi rst switch
off the compressor and then wait until the dryer has reached the standby phase
before switching it off with the ON/OFF switch.
This ensures that the regeneration cycle is completed, and that the pressure in
both chambers is at the same level.
As soon as the dryer is switched on again, the programme continues the cycle
from the point at which it has been stopped.
Emergency shutdown
To emergency shut-down the dryer heed to the following instructions:
Close shut off valves upstream and downstream of the dryer (if applicable)
Disconnect the electrical power supply (i.e. by switching the On/Off switch to 0).
◊ The dryer is now off-line.
If applicable, depressurise the dryer now.
Before re-commissioning of the dryer ensure that the emergency situation has been solved
and that the dryer is not damaged.
Never commission a damaged dryer!
Depressurising and shutting down the dryer
Close compressed air feed line
Close the compressed air inlet valve (provided by the operator).
Disconnect voltage supply
Switch off the dryer by setting the ON/OFF switch to position 0.
Disconnect dryer from compressed air system
Close the compressed air outlet valve installed by the owner.
If available, open bypass line.
Depressurise dryer
Depressurise dryer, e.g. by opening the manual drain at the downstream lter.
K-MT 1-4/D3 31
Page 34

EN | User Manual Shutdown and restart dryer
If work is to be carried out on the electrical system
Depressurise and shut down the dryer, following the instructions in the above chapter.
Risk of injury due to voltage-carrying parts!
The electrical supply cable and external power lines are live even after the
dryer is switched off and, in the event of body contact, may cause serious
injury! Before carrying out any work on the electrical system, the electrical
supply cable and all external power lines must be made voltage-free!
Make the electrical supply cable to the dryer voltage-free.
Secure the electrical supply cable to the dryer against switch-on.
Restart
Depending on the ttings installed by the operator and the actual pressure conditions, the
unit might have to be restarted at operating pressure. The following general rules apply:
◊ When switched off, the dryer is open in main ow direction. With the optional start-up de-
vice , the set minimum pressure must however be reached prior to restart.
◊ A return ow is only possible in connection with the optional regeneration gas return (and
provided that the pressure outlet valve is open).
◊ If the dryer is equipped with a dewpoint-sensing control system, it is depressurised gradu-
ally, according to the read measuring current.
If compressed air system and dryer have remained at operating pressure
Ensure that the compressed air inlet valve (provided by the operator) is open.
Set ON/OFF switch to I. The programme continues the cycle from the point at which it
was interrupted.
Slowly open compressed air outlet valve!
Avoid a sudden drop in pressure in any circumstance! If pressure drops too
fast, this may cause damage to the dryer. Therefore, the compressed air outlet
valve must always be opened quite slowly!
Slowly open the compressed air outlet valve installed by the owner. The pressure should
not drop below the operating pressure (if poss.). If necessary, keep the compressed air outlet
valve in a slightly open position until the compressed air system downstream of the dryer has
lled up completely; only then should the valve be opened fully.
If available, block off bypass line.
The dryer is now in operation again and operates fully automatically.
If compressed air system and dryer have not remained at operating pressure
If disconnected, reconnect the voltage supply of the dryer.
Ensure that the manual drain on the downstream lter is closed.
Pressurise and switch on the dryer as described in the section Open compressed air
supply and switch on dryer on page 27.
The dryer is now in operation again and operates fully automatically.
32 K-MT 1-4/D3
Page 35

EN | User Manual Maintenance and repair of the dryer
Maintenance and repair of the dryer
In order to allow maintenance work on the dryer to be carried out ef ciently and without danger for maintenance personnel, you should comply with the following instructions.
Notes on maintenance
Danger!
There is a very considerable risk of personal injury, when carrying out work on
the activated and pressurised dryer.
Danger!
Before commencing any maintenance tasks always shut down the dryer as
described on page
Warning!
Maintenance tasks may be carried out only by authorized and qualifi ed specialist personnel, and only with the plant in a switched off and depressurised
condition.
Note:
In order to ensure perfect maintenance and reliable operation we recommend
that you conclude a maintenance contract.
When exchange or replacement parts are ordered, always state the dryer type
and the build no. of the dryer. These data are found on the type plate.
◊ Carry out all maintenance work only when the plant has been shut down and depressur-
ised!
◊ Bolt connections must be undone with care! Note ram pressure values! Otherwise emerging
media may cause personal injury.
◊ Do not modify the factory settings of the control system in any way without prior consulta-
tion with the manufacturer.
◊ Never carry out any manipulations on a hollow pro le vessel or modify the same in any
way!
◊ Following maintenance work, always check all ange and bolt connections for leakage and
secure seating.
◊ Never use pipes and ttings as steps or holding points! The components might fracture, or
the distortions which occur may cause internal damage on the dryer. There is a risk of injury
by slipping off the components, components breaking off, and expanding compressed air!
◊ Never leave tools, loose parts or cloths at or on the dryer.
◊ Only use replacement parts that are suitable for the relevant function and meet the techni-
cal requirements stipulated by the manufacturer. This is always the case, if you use original
replacement parts only.
31 !
K-MT 1-4/D3 33
Page 36

EN | User Manual Maintenance and repair of the dryer
Regular maintenance intervals
Note:
If a chamber has been depressurised, e.g. after completion of the ex-pansion
phase, and the pressure remains above 0 bar, the chamber is pressurised by
what is known as ram pressure. This might be due to
◊ blockage at the muffl er(s)
◊ contamination of the perforated plates
◊ spent drying agent
To prevent such malfunctions, regularly service the dryer as described below.
The table provides an overview of the maintenance work to be carried out. The individual
tasks are described in the following pages.
Component Maintenance task to be carried out Maintenance
interval
Complete dryer Carry out visual checks and function checks.
Muf er K-MT 1-2 :
Clean muf er, replace if necessary.
K-MT 3-4 :
Muf ers must be replaced annually and after
each desiccant change.
Fine lter muf er
(option)
Sensor of optional
dewpoint-sensing
control system
Solenoid valves Replace membrane.
Solenoid and check
valves
Demisters, perforated
plates, drying agent
Replace silencer element annually and after
each desiccant change.
Replace.
Solenoid valves: Replace membranes and coils.
Check valves: Replace balls and springs.
Replace
daily
12 months
24 months
•
••
••
•
•
•
48 months
See page
35
36
36
37
37
38
38
•
39
•
Upstream and downstream lter
Please see the enclosed operating instructions for the attached lters.
Maintenance work has to be carried out as speci ed in this document.
34 K-MT 1-4/D3
Page 37

EN | User Manual Maintenance and repair of the dryer
Instructions for use of the dongle
If the message SEr, is displayed on the display of the Multitronic controller, the dryer is due
for servicing. The message appears, ashing every 60 seconds, once the preset number of
operating hours (e. g. 8000 oh) has been reached. After maintenance has been carried out,
you can use the dongle to reset the counter to 0 and delete the message from the display. A
dongle is enclosed with every service kit. Each dongle can only be used once.
Switch off the controller. Caution! The electric line is still live. Do not touch live parts!
Open the lid to the Multitronic controller. The circuit board in housed underneath it.
Slot the dongle into the dongle interface X9 PC.
Press and hold the reset key S3.
Switch on the controller. The following appears in the display:
for a short time 0.SET
then ashing
The service counter is then reset to 0.
If the following appears in the display
for a short time FAIL
then ashing
OFF
OFF
this means that the dongle has already been used once and cannot be used again.
Switch off the controller again and remove the dongle.
Dispose of the unusable dongle and use a new one.
Daily maintenance tasks
Carry out visual and function check on the complete dryer
Check dryer for external damage or unusual noise generation.
Duly eliminate any defects found.
If message SEr. is displayed, a routine service must be completed:
Contact the service department of the manufacturer.
Clean dryer
Remove any loose dust by means of a dry cloth, and, if required, also by means of a
moist and well wrung cloth.
Clean the surfaces with a moist well wrung cloth.
K-MT 1-4/D3 35
Page 38

EN | User Manual Maintenance and repair of the dryer
Maintenance work to be completed every 12 months
Check muffl ers
The dryer is either equipped with a standard muf er or a ne lter muf er. If the respective
muf er becomes blocked, a dam pressure is generated which in extreme cases may cause
the muf er to burst.
Hazard caused by blocked muffl er!
Blocked muffl ers can cause a dangerous overpressure to build up which may
cause the muffl ers to burst. Flying fragments may cause personal injury and
damage to property.
Therefore, muffl ers must be checked at least once a year and cleaned
(K-MT 1-2 ) .
Warning against sudden air ejection!
During expansion the pressure is released suddenly through the muffl er:
◊ A loud cracking noise occurs which can injure your hearing.
◊ Particles carried in the air fl ow act like bullets and can injure your eyes or
skin.
Always wear eye and ear protection, therefore, when you are in the vicinity of
the dryer!
The correct procedures for all muf er versions are described below.
Clean or renew standard muffl ers
Depressurise the dryer and shut it down
(see page 31 ).
Unscrew muf er as shown in the opposite
gures:
— ..K-MT 1-2 = Pos. A,
— ..K-MT 3-4 = Pos. B
K-MT 1-2
— ..Blow out with compressed air for cleaning
— ..or renew muf er, if necessary.
K-MT 3-4
Muf ers must be replaced annually and after each desiccant change.
Screw sound absorber tight again.
Restart dryer (see page 32 ).
Undo muf er
36 K-MT 1-4/D3
Page 39

EN | User Manual Maintenance and repair of the dryer
Replace the element in the fi ne fi lter muffl er
Depressurise the dryer and shut it down
(see page 31 ).
Undo knurled screw on the lid cap and
remove cap.
Unscrew old lter element. Arrows on the
element bottom mark the direction of rotation.
Insert new lter element and screw on
tightly.
Re-engage lid cap at the top section of the housing and x in position by means of the
knurled screw.
Restart dryer (see page 32 ).
Renew dewpoint sensor
To ensure precision dew point measurement,
it is recommended to replace the dew point
sensor every year. This period depends however on the actual application and might thus be
extended accordingly.
Renew muf er element
Dewpoint sensor (1)
Warning!
The dew point sensor is a sensitive measuring device. It can be damaged if
subjected to forceful vibrations or shocks. Therefore, please handle the dew
point sensor with great care at all times.
In order to limit the impact on the dryer operation to a minimum, we recommend that you
contact the manufacturer well in advance and order a new dewpoint sensor. After receipt of
the new pressure dewpoint sensor, replace the sensor as follows:
Hold the box of the dewpoint sensor ready.
Release pressure from dryer and shut down the unit (see page 31 )
Loosen the screw at the adapter (1) and disconnect signal cable with the adapter and
K-MT 1-4/D3 37
Page 40

EN | User Manual Maintenance and repair of the dryer
seal.
Remove dewpoint sensor from the sensor cell (3) by turning the nut (2).
Take the new dewpoint sensor (2) from the box, remove the protective caps (4, 5) and
screw it into the sensor chamber (3).
Place seal onto sealing face; connect adapter (1) and secure it by tightening the screw.
If no other maintenance work is to be carried out: Restart the dryer (see page 32 ).
Place the protective caps (4, 5) onto the old dew point sensor and dispose of it in accor-
dance with the applicable regulations.
Maintenance work to be completed every 24 months
Replace the membranes of solenoid valves
You should replace the membranes of solenoid valves every two years. Proceed as described
in section Replace solenoid valves . You must, however, replace the membranes only (contained in the Service Kit for 24 months).
Maintenance work to be completed every 48 months
Replace check valves
Check valves are wear parts and must thus be replaced every 48 months, even if no damage
is visible.
Release pressure from dryer and shut down the unit (see page 31 ).
Remove the securing screws at the rear of the check valve plate.
Insert new balls and new springs and ensure that they are not jammed.
Replace the seals at the securing screws and tighten the screws.
With regeneration gas return (optional):
Also replace the two additional check valves, following the above instructions.
If no other maintenance work is to be carried out: Restart the dryer (see page 32 ).
38 K-MT 1-4/D3
Page 41

EN | User Manual Maintenance and repair of the dryer
Replace solenoid valves
Solenoid valves are wear parts and must thus be replaced every 48 months, even if no damage is visible.
Release pressure from dryer and shut down
the unit (see page 31 ).
Preparation for the replacement of all four
solenoid valves:
Check the speci cations of the valves:
— The rated voltage of the solenoids (1) must
correspond to that indicated on the type plate
of the dryer.
— Solenoid valves Y1/Y2 at the dryer rear
must be open when not energised (valve piston
without notch, 2).
— Solenoid valves Y3/Y4 at the dryer front
must be closed when not energised (valve
piston with notch, 2).
Position the new solenoid valves at the
points at which they are to be mounted in order
to prevent any confusion at a later stage.
For each solenoid valve, proceed as follows:
Remove solenoid valve from the holder (3).
Remove the valve together with the solenoid
and the diaphragm (4).
Insert new diaphragm with guide (4) and
secure it to the holder (3).
Position new solenoid (1) onto the armature
and secure it to the spring bracket (5).
If no other maintenance work is to be carried out: Restart the dryer (see page 32 ).
Replace perforated plates, demisters and drying agent
To complete the following maintenance tasks, you must dismantle the plates and the vessels.
We therefore recommend that you carry out these tasks together.
Replace upper perforated plates
Perforated plates are tted under the check valve plate and over the solenoid valve plate;
these retain the drying agent. If these perforated plates become blocked, a dam pressure
is generated which can cause compressed air uctuations in the compressed air system. In
order to remove the upper perforated plates, the check valve plate must be removed.
Risk of falls!
The dryer must not be misused as a climbing aid! The components have not
been designed for such loads and could fracture.
Only use approved climbing aids when disassembling the check valve plate.
Solenoid valve
K-MT 1-4/D3 39
Page 42

EN | User Manual Maintenance and repair of the dryer
Depressurise the dryer and shut it down
(see page 31 ).
Loosen the screws at the check valve plate
and lift off the plate.
Removing and replacing, perforated plate
and pressure springs.
Before reassembling the check valve plate, you
should replace the drying agent.
Removing the check valve plate
Replace drying agent
The service life of the drying agent is usually approx. 3 to 5 years. However, in favourable
installation conditions, the change of drying agent may be carried out at a substantially later
date (for notes on the installation site, see also page 10 ). The change interval is determined by the degree of contamination of the compressed air (which can be minimised by
regularly replacing upstream lter elements). Oil, dust, and dirt particles cover the drying
agent surface and reduce its effective surface, in part quite irreversibly. If in doubt, have a
sample of your drying agent assessed by specialists.
Comply with the following safety notes when changing the drying agent:
Wear eye protection and dust mask due to increased dust generation!
When emptying the drying agent, increased dust generation may occur.
In order to avoid any eye irritations, wear protective goggles!
In order to avoid any dust inhalation, wear dust mask!
Risk of skidding!
If drying agent has been spilt on the fl oor, there is a risk of skidding caused by
the drying agent beads. Therefore, spilt drying agent must always be taken up
immediately.
Remove used drying agent
Use an industrial vacuum cleaner to hoover up carefully the drying agent out of the cham-
bers.
Warning!
If the dryer is not used within specifi cations, the drying agent can be contaminated with pollutants. Always take this into account for the environmentally
safe disposal of the drying agent. The waste code numbers of the drying agent
can be obtained from the manufacturer.
Dispose of the used drying agent in accordance with all applicable regulations.
40 K-MT 1-4/D3
Page 43

EN | User Manual Maintenance and repair of the dryer
Replacing the lower perforated plate
Loosen the screws on the solenoid valve
plate.
Remove and replace perforated plate and
demisters.
Loosen the solenoid valve plate
Reaf x the solenoid valve plate:
Use a dyamometric key to tighten the
screws, and take care to observe the following
torques:
— 25 Nm in the case of K-MT 1-4
Tighten the screws crosswise in accordance
with the sequence shown on the right.
Repeat the process once.
Next the new drying agent should ll up.
Correctly af xing the solenoid valve plate
Fill with new drying agent and remount check valve plate
Risk of falls!
The dryer must not be misused as a climbing aid. The components have not
been designed for such loads and could fracture.
Only use approved climbing aids when fi lling the chambers.
Slowly ll up with new drying agent in the chamber. If necessary, use a funnel. Take spe-
cial note of the next step.
Ensure that the drying agent is lled into the chambers with a high bulk density.
Note:
To achieve an optimum bulk density, we recommend using a „snowstorm“
fi lling pipe available from the manufacturer.
K-MT 1-4/D3 41
Page 44

EN | User Manual Maintenance and repair of the dryer
Subsequently, position the perforated plate onto the check valve plate, align them proper-
ly and secure them.
Reaf x the check valve plate:
Use a dyamometric key to tighten the
screws, and take care to observe the following
torques:
— 25 Nm in the case of K-MT 1-4
Tighten the screws crosswise in accordance
with the sequence shown on the right.
Repeat the process once.
Restart the dryer (see page 32 ). Check
that the connection is leak tight.
Operate the dryer for two cycles, then shut
it down again.
Replace sound absorber as described on page 36
Correctly af xing the check valve plate
42 K-MT 1-4/D3
Page 45

EN | User Manual Identify and eliminate faults
Identify and eliminate faults
The following table provides information on what designatory abbreviations are to be used for
the various components. These designations are also found in the technical documentation.
Used abbreviation Component
PDI Differential pressure gauge
V1–V2 (Y2–Y1) Main valves (solenoid valves)
V3–V4 (Y3–Y4) Expansion valves (solenoid valves)
RV1–RV2 Check valves
RV3–RV4 Check valves of regeneration gas return line (optional)
Summary of faults
There are different fault types. In the case of most electrically caused faults (e.g. short circuit,
defective fuse, etc.) the expansion valve closes and the regeneration is interrupted. In the
case of some process faults, the dryer will continue to operate for some time. Other faults on
the dryer become noticeable e.g. due to unusual noises and ran pressures.
The following table shows who is allowed to remedy a fault: the owner’s specialist personnel
or the manufacturer’s service engineer.
Table of possible faults
Fault Possible cause Remedy
No pressure build-up The compressed pressure
system upstream from the
dryer is not pressurised.
Excessive compressed
air consumption
Leakage Check condensate trap at
Check whether the compressed pressure system
upstream from the dryer is
pressurised. Eliminate any
faults in the compressed air
system.
the upstream lter; clean, if
necessary.
Specialised
personnel
Service
technician
•
••
K-MT 1-4/D3 43
Page 46

EN | User Manual Identify and eliminate faults
Fault Possible cause Remedy
Specialised
personnel
Dryer cannot be
switched over
Solenoid valve Y1/Y2 cannot be opened.
Check supply voltage, cable, contacts and solenoid;
replace, if necessary.
••
Service
technician
Solenoid valve Y1/Y2 cannot be opened properly
(audible humming sound or
valve apping).
Control board defective. Check fuse in supply line
Power supply interrupted,
cable broken.
Compressor might be off. Check compressor synchro-
Error in control programme. Restart programme.
No expansion Solenoid valve Y3/Y4 can-
not be opened.
Solenoid valve Y3/Y4 cannot be opened properly
(audible humming sound or
valve apping).
Check supply voltage.
Check spring and solenoid;
replace, if necessary.
and in the switchbox; replace, if necessary.
Reconnect the unit to the
power supply.
nisation circuit.
Check supply voltage, cable, contacts and solenoid;
replace, if necessary.
Check supply voltage.
Check spring and solenoid;
replace, if necessary. Check
solenoid valve for contamination; clean or replace, if
necessary.
••
••
••
•
•
••
••
Dryer is continuously
bled
Dryer is excessively
bled
Solenoid valve Y3/Y4
cannot be closed properly
(audible humming sound or
valve apping).
Solenoid valve Y1/Y2 cannot be closed
Check supply voltage.
Check spring and solenoid;
replace, if necessary. Check
diaphragm; replace, if
necessary.
Check solenoid and
diaphragm; replace, if
necessary.
••
••
44 K-MT 1-4/D3
Page 47

EN | User Manual Identify and eliminate faults
With dewpoint-sensing control (optional)
Fault code Description of
fault
+20 Upper measuring
range limit exceeded
999 Dewpoint sensor
defective
sens
o
–999
SEr Display for service
Sensor not powered,
or cable or sensor
defective
interval. Regular
maintenance tasks
must be carried out.
Possible cause Remedy
Drying capacity
exceeded.
Error in programme. Restart programme.
Sensor defective or
irreversibly contaminated.
Sensor, sensor cable
or sensor adapter
defective.
The display appears
after every 8000
operating hours.
See instructions for
commissioning. If the
drying agent is wet,
replace it.
Replace sensor.
Visual inspection; check
power supply (24 V
to terminals 4 and 6).
Replace defective component(s).
Inform the manufacturer’s service staff and
order the appropriate
service kit. The package
includes a dongle with
which you can reset the
operating hours counter
after maintenance has
been carried out. For
instructions on how to
use the dongle see the
enclosed information
sheet (in the service kit).
Specialised
personnel
Service
technician
•
••
••
••
K-MT 1-4/D3 45
Page 48

EN | User Manual Annex with technical documentation
Annex with technical documentation
This annex comprises the following information and technical documentation:
◊ Technical data
◊ Replacement and wear parts list
◊ Logic control diagram
◊ Flow diagram
◊ Dimensional drawing
46 K-MT 1-4/D3
Page 49

EN | User Manual Annex with technical documentation
Technical data
Operating Range
Site Selection frost-free indoor installation in a
non-hazardous environment
Ambient temperature 1,5 to 50 °C (24,7 to 122 °F)
Compressed air inlet temperature 25 to 50 °C (68 to 122 °F)
Max. operating overpressure 16 bar
e
Min. operating pressure 5 bare
Medium Compressed air and gaseous nitrogen
Fluid group 2
Electrical connection
Mains voltage, standard 230 V, 50-60 Hz
Alternative voltage 115 V, 50-60 Hz and 24 V DC
Protection class IP65
Please note type plate and attached electrical circuit diagram!
Performance details
Type Volumetric
fl ow¹ in
m3/h
Nominal2
pipe size
Upstream fi lter Downstream
fi lter
Nominal
Pressure
in bar
e
Nominal
temperature
K-MT 1 8 1/4 AAP010AGFI AOP010AGMI 16 50
K-MT 2 15 1/4 AAP010AGFI AOP010AGMI 16 50
K-MT 3 25 1/4 AAP010AGFI AOP010AGMI 16 50
°C
K-MT 4 35 1/4 AAP010AGFI AOP010AGMI 16 50
1
. m/h, relating to 1 bara and 20°C at the compressor suction capacity. Subsequently com-
pressed to 7 bare and 35°C inlet ..temperature to the dryer at 100% relative humidity – for
pressure dewpoints of -25°C and -40°C.
2
In accordance with DIN ISO 228 (BSP-P); alternatively ANSI B 1.20.1 (NPT-F).
Noise emission
Noise level : +3 dB (A)1 65 – 86 dB(A)
1
.. relative to free eld measurement, 1 m surr. eld
Dimensions
Please heed to the dimensional drawings and the according table containing dimensions
and weight on page 52.
Drying agent
Chamber 1 100 % molecular sieve
Chamber 2 100 % molecular sieve
K-MT 1-4/D3 47
Page 50

EN | User Manual Annex with technical documentation
Replacement and wear part list
Note:
When exchange or replacement parts are ordered, always state the dryer type
and the build no. of the dryer. These data are found on the type plate.
Service-kits
For model Maintenance-
interval
K-MT 1 to
K-MT 4
K-MT 1 to
K-MT 4
K-MT 1 to
K-MT 4
Desiccant packs (complete dryer)
Order-ID. K-MT 1 K-MT 2 K-MT 3 K-MT 4
DESPAC1MS 1X 1X
DESPAC4MS 1X 1X 2X
DESPAC15MS
12 and 36
months
24 months
48 months
Mains-
voltage
115V,
230V
115V,
230V
230V SKK1-K4/D3/48 Reset- module, valve
115V SKK1-K4/D3/48/115
Order-ID. Scope of delivery
SKK1-K4/D3/12
SKK1-K4/D3/24
Reset-module, muf er
and lter elements
Reset- module, valve
membranes, muf er and
lter elements
membranes, solenoid
coils, check valves,
demisters, perforated
plates, muf er and lter
elements
48 K-MT 1-4/D3
Page 51

EN | User Manual Annex with technical documentation
Logic control diagram
Adsorption in B1 and regeneration in B2
K-MT 1-4/D3 49
Page 52
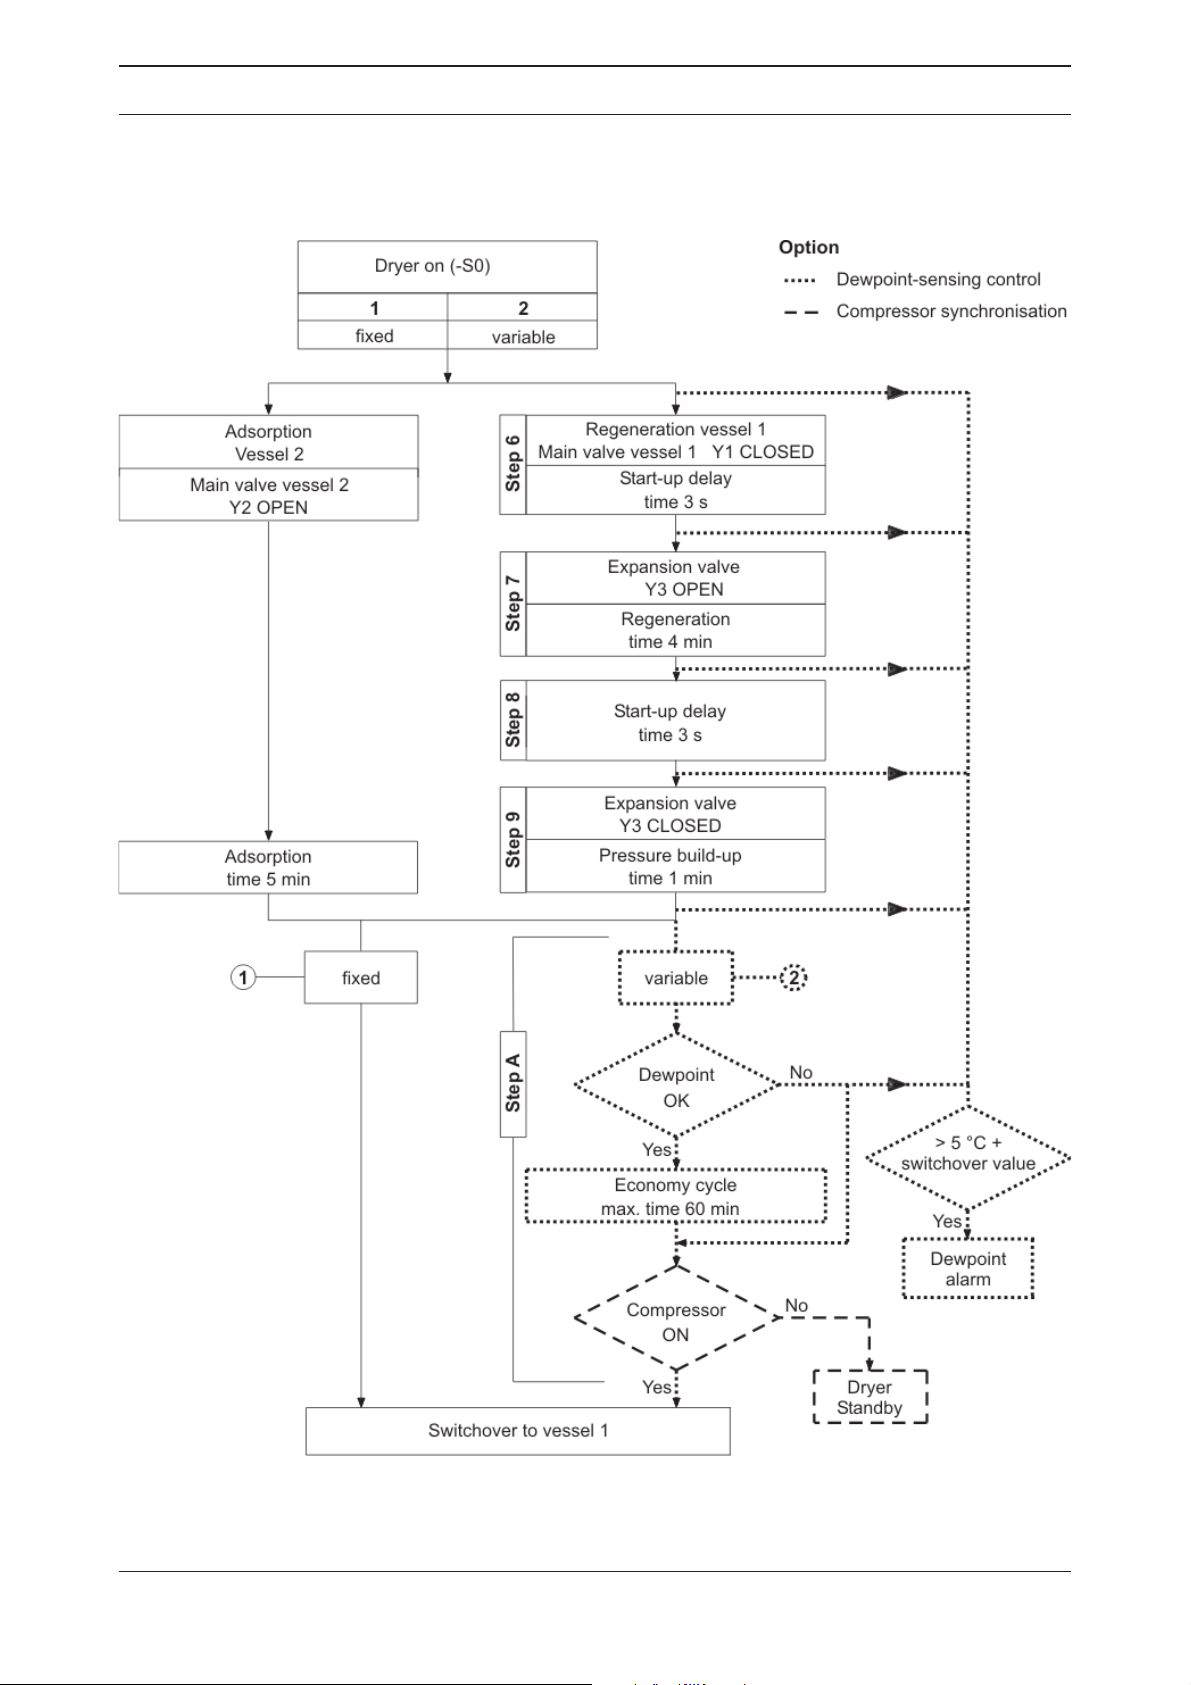
EN | User Manual Annex with technical documentation
Regeneration in B1 and adsorption in B2
50 K-MT 1-4/D3
Page 53

EN | User Manual Annex with technical documentation
Flow diagram
Item Designation Item Designation
10 Check valve plate 60 Control unit
10.101 Seal 70 Control system
10.102 Perforated plate 80 Upstream lter
10.107 Demister, left 90 Downstream lter
10.108 Demister, right 100 Muf er
10.109 Left perforated plate * Optional devices:
10.110 Conical pressure spring 110 Start-up device
10.111 Right perforated plate 120 Regeneration gas return line
50 Regeneration gas ori ce plate 701 Dewpoint-sensing unit
K-MT 1-4/D3 51
Page 54

EN | User Manual Annex with technical documentation
Dimensional drawing
Installation on fl oor
A
B
D
Type
BSP-P/
NPT
E
Dimensions [mm]
ABCDEF
F
C
Weight
[kg]
K-MT 1 1/4" 326 400 216 376 101 90 11,5
K-MT 2 1/4" 326 575 216 551 101 90 15,5
K-MT 3 1/4" 326 825 216 801 101 90 20,0
K-MT 4 1/4" 326 1075 216 1051 101 90 25,0
52 K-MT 1-4/D3
Page 55

Page 56

A division of Parker Hannifin Corporation
Parker Hannifin Manufacturing S.r.l.
Sede Legale: Via Privata Archimede, 1- 2009 Corsico (MI) Italy
Sede Operativa: Gas Separation and Filtration Division EMEA - Strada Zona
Industriale, 4
35020 S.Angelo di Piove (PD) Italy
tel +39 049 971 2111- fax +39 049 9701911
Web-site: www. parker.com/hzd
e-mail: technical.support.hiross@parker.com
 Loading...