

300 Executive Drive, Edgewood, NY 11717
1-800-243-7446 • Fax: 631-249-1242 • www.parkell.com • Email: info@parkell.com
European Authorized Representative: (Not a dealer/distributor)
EMERGO EUROPE, Molenstraat 15, 2513 BH, The Hague, The Netherlands
Tel: +31 (0)70 345 8570 Fax: +31 (0)70 346 7299
Troubleshooting the Digitest Pulp Vitality Tester
1) Display does not li ght when but ton is depres sed.
a) Battery wea k or dead – Need s replacem ent.
b) Unit damaged – Needs serv ice.
2) Tooth Probe loose or rot ating in Power U nit.
a) Tooth Probe base too loos e—A djust base wit h screwdri ver.
3) Vitality te st showing no r esponse at “ 64” readi ng, while co ntrol tooth is normal.
a) Tooth is actually non-vital.
b) Tooth Probe not adequatel y contact ing tooth – Ap ply toothpa ste to probe and reapply to too th.
c) Lip Clip Wire A ssembly no t connected to Power Unit wh ile wearing g loves – Conne ct Lip Clip
and Wire Ass embly as detailed above.
4) Vitality te st showing imm ediate resp onse at very low reading.
a) Tooth is hyperemic – recommend endodontic treatment.
b) If problem per sists with all teeth tested, u nit needs ser vice.
Warranty
Parkell will repair or repl ace, at its opt ion, a defect ive unit. This w arranty d oes not cover r epairs whe re
the only fault found is a weak or d ead batter y. Always repla ce the batt ery with a f resh one bef ore
returning t he unit for war ranty ser vice, to rule this out as th e cause of the p roblem. This warra nty is
in lieu of all wa rranties of merc hantab ility, tn ess for pur pose or ot her warr antie s, express or
implied. Parkell does not a ccept liab ility for a ny loss or damag e, direct, c onsequential or other wise,
arising out of the use of or th e inabilit y to use the pro duct herein d escribed. Before usi ng, the user
shall determine the suitability of the product for its intended use and the user assumes all risk and
liability whatsoever in connection herewith.
Device Description
The Digitest II™ Pulp Vitality Tester is a hand- held,
battery-powered dental diagnostic device that
identie s a living tooth ner ve by stimulati ng it with a
weak electric current. When the operator depresses
the button , the strengt h of the elec trical st imulus
automatic ally increases at a rate pre set by the
operator. The uni que waveform is d esigned to tr igger
a patient resp onse in a vital nerve wi th a minimal
amount of disc omfor t.
Intended use/indications
The Digitest II Pulp Vita lity Tester is intend ed to
be used as a diagnostic inst rument to ass ist in the
determinat ion of the vit ality of th e dental pulp.
Contraindications
This device i s contraindicated fo r use on a patient
or by an operato r wearing a cardiac pace maker
or any other intr a-co rporeal e lectron ic device
(internal de brillato r, insulin pump, etc.), or any
personal electronic monitoring device.
Warning
• Do not modif y this device. M odicat ion may
violate safety codes, endanger the patient
and the oper ator, and void the war ranty.
• This devic e should on ly be used by lic ensed
dental profe ssionals qu alied in the us e of
the unit.
• Read and understand all instruction manuals
before using t he device.
Specications
• Protect ion Against El ectric S hock - Class 1,
Type B applied par t
• Equipment n ot suitable f or use in the pr esence
of ammable or exp losive gases . Use of dental
nitrous oxide/oxygen analg esia is acce ptable.
• Protect ion Against I ngress of Liq uids -
Pulp Tester - IPX0 (Ordinar y)
• Mode of Operati on of Equipment - C ontinuous .
• Operat ing condit ions: 15- 40°C, 10-80% RH
(non-condensing)
• Transport and Storage conditions: 10-40°C,
10-80% RH (non-condensing)
Conformance to Standards
Parkell’s qualit y system is cer tied to
ISO90 01/ISO13485, and thi s device conf orms
with IEC 60 601-1, UL 60601-1:2003,
IEC 60601-1-2, CAN /CSA- C22.2 N o. 60601-1-0 8
& Medical Dev ice Direc tive 93/42/EEC.
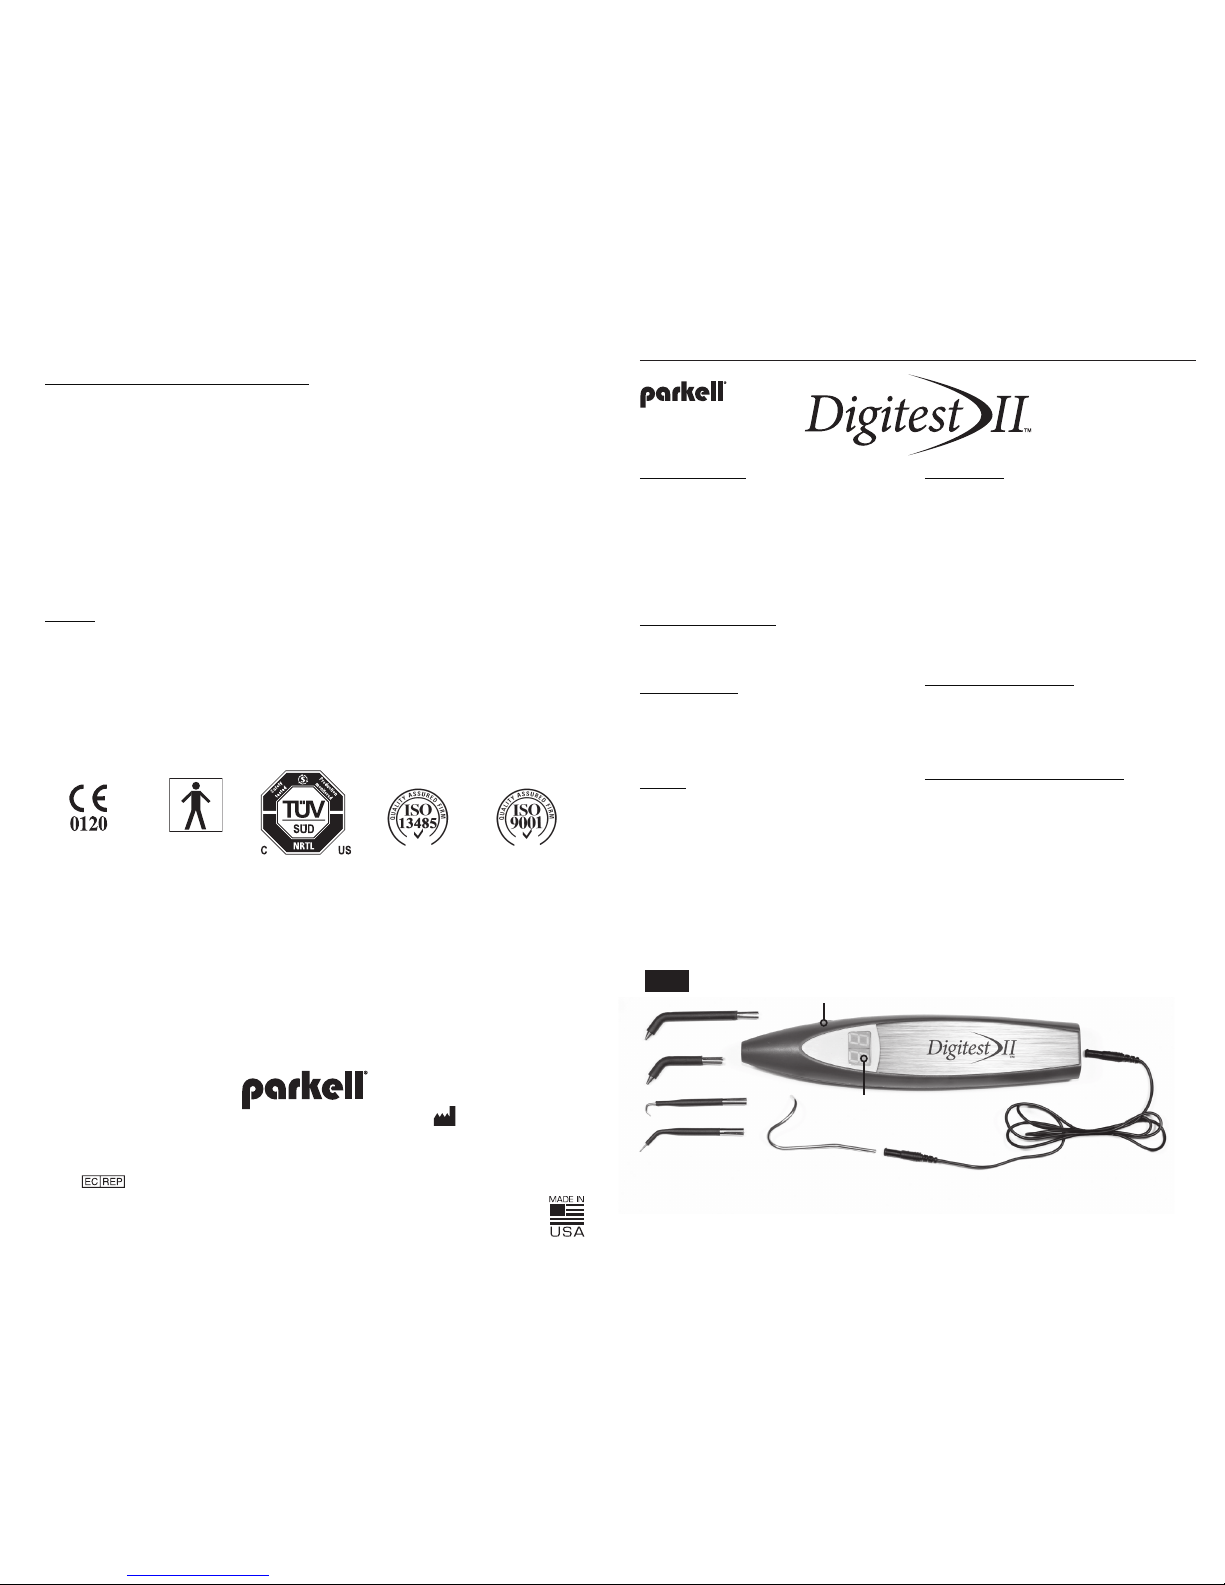
The Digitest II kit includes (Figure 1)
(1) Digitest II Pulp Vital ity Tester
(1) High- output alkaline battery (9-Volt)
(already installed in the tester)
(2) Autoclavable stainless steel standard size
tooth probes (anterior and posterior)
(2) Autoclavable stainless steel precision
size tooth pro bes, for test ing small or
difc ult-to- acces s labial or lingua l surfac es
or accessible crown margins.
(1) Autoclavable Lip Clip with Wire As sembly
(1) Instructions for Us e / Warranty Regi stration Card
(1) Durable Plastic Storage Case
CAUTION: R X ONLY
INSTRUCTIONS FOR USE: Pulp Vitality Tester
(Stock No. D640)
A00 653revD10 15
Lip Clip
Digital Display
Stimulus Adjustment
Control Button
A
C
B
D
Autoclavable Probes
A. Posterior
B. Anterior
C. Precision Lingual
D. Precisi on Labi al
Wire Assembly
Fig. 1
Type “BF”
Applied Part
Certified to MDD
93/42/EEC
Cleaning and Infection Control of the Digitest II
• DO NOT AUTOCLAVE THE DIGITEST II POW ER
UNIT, AS THIS WILL CAU SE DAMAGE TO IT.
• Ideally, the Powe r Unit shoul d be protecte d using
appropriately-sized disposable plastic barrier
sleeves. Since the Digitest II incorporates sophisticated el ectroni c circuitr y, it should not be directly
sprayed with o r soaked in disin fectant. T he device
may be disinfec ted by wiping it w ith a damp cl oth or
paper towel sp rayed with an EPA- approved hig hlevel surface disinfectant, and dried with a paper
towel. Follow th e surfac e disinfecting protoc ol
specie d by the disinfect ant manufac turer.
• Autoc laving does n ot remove accumulated
debris. Before autocl aving, scru b the autocl avable
compone nts with a brush, or clean i n an ultrasonic
cleaner, using warm, soapy water.
• The Tooth Probe s, Lip Clip and W ire Assemb ly may
be sterilize d in any conventi onal steam auto clave
(132-135C for 15 min for gravity dis placemen t or
4 minutes for pr evacuum cycle, o r using the ma nufacturer’s recommended procedure, if different).
Minimum co ol down inter val is 15 min.
Service and Maintenance
• Do not open th e Power Unit, except to ch ange the
battery. There are no user-serviceable parts inside.
Internal re pairs are to be m ade only by authorized
Parkell personnel, by retur ning the uni t to the
service address at the end of these instructions.
• Avoid dropp ing the Power Un it or subjec ting it to
physical shock.
• Batter y should be removed if unit is to b e stored
unused for mo re than 30 days.
• To prolong batt ery life, t he device auto maticall y
turns off after 14 seco nds of inacti vity.
• When the b attery capacit y is low, the Left a nd
Right digit al display digit s will ash alter natively
while the uni t is activated. Replace the b attery as
explained in the section “Ch anging the Bat tery ”.
• If a Tooth Probe bec omes loo se in the mount of
the Power Unit , it may be tighten ed by careful ly
insert ing a at screwdr iver blade into the sp lit
metal base of the pr obe and gently exp anding
the sides apa rt with a t wist of the t ool.
• Disca rd and replac e any Tooth Probe if the
metal or the insulation becomes damaged
during use.
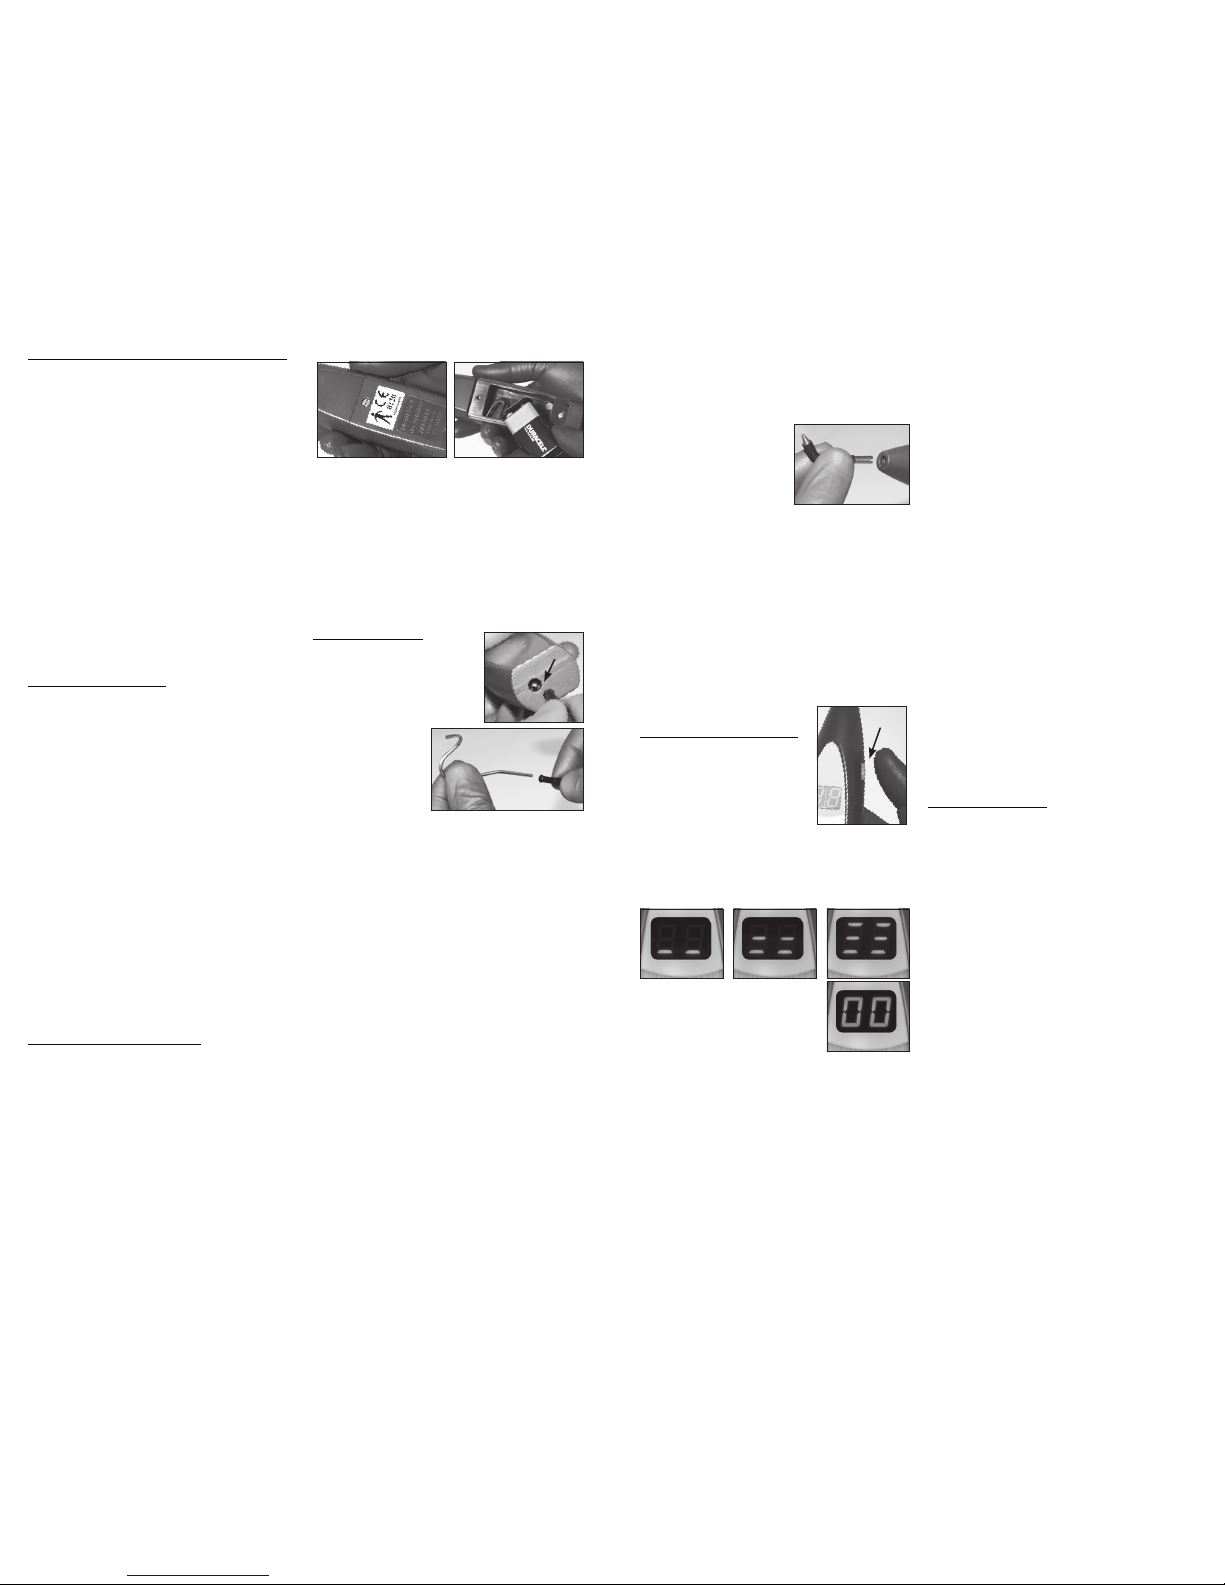
Changing the Battery (Figure 2)
• The Digi test II Pulp Vitality Tester comes with a
high- output, 9 Volt alkaline batte ry facto ry insta lled.
• The replacement bat tery may be a R adio Shack
23-5 53, Duracell MN1604, Panasonic 6A M6
or equivalent . Although recharg eable 9 Volt
batteries may be utilize d, they will req uire more
frequent changing and charging because of the
consider able volta ge required to perfor m the pulp
testing procedure.
• To replace a weak bat tery, remove sc rew (A) and
carefully lift of f the plastic b atter y door (B) by gently
pulling it away fr om the Power Uni t. Withdr aw the
weak batter y from th e batter y enclosur e, and
unsnap the wi re batter y connec tor. Discard
battery in accordance with all applicable
environmental laws.
• The fres h batter y should be sn apped onto th e
connector and place d in the Power Unit so the
top end attac hed to the conn ector is plac ed rst
into the openi ng. Slight pr essure on th e bottom of
the batter y will help it to slide home. Rep lace the
plastic bat tery door (B) by engaging th e tabs on the
bottom rs t, and tighten th e screw (A) gently.
Digitest II Setup, Prior to Performing
Pulp Vitality Testing
• Standard infection control
protocol should be followed
during pulp te sting, by wear ing
disposable rubber, vinyl or
nitrile gl oves. When wear ing
gloves, the ci rcuit
is completed by
using the autoclavable Lip Clip and
Wire Assembly.
Plug one end of the
wire assemb ly onto
the socket on the
bottom of th e Power Unit (C), and inser t the Lip Clip
(D) into the other so cket. Place a sm all amount of
toothpaste o n the lip to enhan ce elect rical conductivity, and the n place the Li p Clip over the pat ient’s
toothpaste -coa ted lip, making g ood contact with
the mucosa.
• Although it is stron gly recom mended that g loves be
worn when performing vitality testing to maintain
accepted st andards of infection c ontrol, if g loves
are not being wo rn, the gro und wire need n ot be
used. The ope rator may com plete the cir cuit by
making contact with t he metal plate o f the unit
and touchin g the patient ’s cheek or chin with the
free hand.
• Remembe r that to accur ately diagnose the con dition of the tooth, pulp testi ng must be per formed
on a patient wh o has not been an esthetized o r
received ga s analgesi a. Make sure to use t he
Digitest II te ster BEFORE yo u administer l ocal
anaesthesia or gas analgesia.
• The to oth to be tested and the adjacent teeth must
be clean and dr y. Interproxima l embrasures sh ould
be made free of a ny impacted fo od debris, saliva,
water or plaque by os sing or scali ng with an
instrument and air-drying before testing.
• It is ofte n useful to ele ctric ally isolate t he tooth
being tested f rom neighb oring teet h or metalli c
restorati ons by wrappin g it with a cle ar mylar
strip, such as t hose used in f abricat ing Class II I
composite restorations.
• A dry c otton roll s hould be plac ed in the
buccal ves tibule to iso late the tooth f rom the lip
and cheek.
• A plastic m irror sho uld be used to keep t he tongue
off of the to oth during te sting.
• Inser t Tooth Probe (E) into
the open end of the Power
Unit. To enhance electrical
conductivity and contact
between to oth and prob e,
apply a small amount of
toothpaste to t he metal tip.
• Meta l or cerami c surfac es cannot b e used as
touch point s for the Tooth Probe s. Teeth selected
for pulp testin g must possess enough expose d
enamel or dentin to allow the probe to make
contact w ithout touc hing the gin giva or a metal
restorati on. In cer tain case s, this may require the
use of a Precis ion Probe (in cluded).
• Fully inst ruct the patient as to what you will be
doing, so they a re not surpr ised durin g the test.
• Tell the patie nt that when th e vitalit y test is
underway, they should carefully raise their hand
at the rst sign of se nsing the stimu lus. This
should avoid any p atient disc omfort .
Pulp Vitality Testing with the
Digitest II Pulp Vitality Tester
1) To activate the unit, pre ss
and hold the st art but ton (F) for
a half second, and then release
the button . When the but ton is
depresse d, the display will show
one row of hor izontal bar s if the
device is set fo r “SLOW”, two
rows for “M EDIUM ”, or three rows for “ FAST”. When
the button i s released, t he display will read “0 0”,
indicating that it is read y to begin the v itality te st.
The display wi ll shut off i f the unit is not us ed within
14 seconds.
2) If the desir ed stimulus r ate
mode was displayed, the vita lity
test may proc eed, as detail ed in
Step 4.
3) If you wish to ch ange the
stimulus rate m ode, repeatedly press an d release
the button t wice in q uick succ ession. Th e display
will cycle between the t hree stimulus rate modes.
When the des ired sett ing is displayed, press the
button one m ore time to let t he display retu rn to
“00”, so the te st may begin.
NOTE: The uni t will rem ember t he last
stimulu s rate mo de sett ing, even if t he devic e
is powere d down.
4) Place the too thpaste- covered tip of the Tooth
Probe on the middle of the la bial or lingu al surfac e
of the tooth. Avoi d soft tis sue and restorations suc h
as crowns, am algams or c omposites .
5) Depres s and hold the b utton, and t he display
number will r ise, indic ating that a ge ntle- pulse
stimulus is be ing automatically app lied to the too th.
When the patient indica tes that they feel the stimu lus, release the button. The stimulus w ill stop im-
mediately. The display will freeze and ho ld the nal
reading for app roximately 14 seco nds, so it may be
noted. The unit w ill then auto maticall y turn itse lf off.
6) The maximum st imulus readin g is 64. Even if
there is no re sponse at thi s level, there is s till the
possibili ty that the t ooth is vita l. No sensati on at
this number s imply sugge sts that the to oth is nonresponsive a t the time of th e test. However, since
teeth have been k nown to recove r from traum atic
injury many days after presenting with a “non-vital”
reading, fol low up testing i s almost alway s indicated
after any init ial reading s. If this reading persis ts over
several visit s, it is reasonable to assum e that the
tooth is non -vital. Ho wever, this conclu sion shoul d
always be conrmed by another ac cepted end odontic testing method.
7) To verify the r eading, a corresponding control
tooth in the sa me arch shou ld be tested. M olars
should be matc hed to molar s, premolars to premo lars, cuspids to cuspids, and incisors to incisors.
If this is not po ssible because teeth a re absent,
endodonti cally tre ated, or have full c overage restorations, a si milar tooth in the opposi te arch shoul d
be used.
Clinical Observations
• It is not p ossible to p repare a “ table of nor mal
values” for pul p tester readi ngs, becau se THERE
IS NO “NO RMAL” IN PULP TESTING. Rather, the
clinician should perform sequential comparisons
between th e subject to oth and the control toot h
at consecutive ofc e visits, observing ho w the
readings are changing as time progresses. By
utilizing el ectric p ulp testing, a long with al l available diagno stic infor mation, it is of ten possible to
predict wh ere the tooth’s vitality is he ading. This
allows the c linician to m ake informed d ecision s as
to whether endodontic therapy is appropriate, and
whether it is p rudent to sim ply watch and wa it.
• There are g eneral anat omic trend s in pulp vital ity
readings. Posterior teeth generally require greater
stimulus than anteriors, probably because of the
greater thic kness of en amel and dent in in posterior
teeth. Enamel requires a greater stimulus than
dentin or cementum, because of the higher percentage of non-conductive mineral, and the lower
percenta ge of water. Cross- arch teet h, or opposing teeth will have similar thresholds to stimulus.
• The stimu lus thresho ld may also be af fected by
such factors as the age, ge nder and previous pain
history of the patient , pulp chambe r size, trauma,
pathology and use of pres criptio n and non- prescription medicat ions, or illi cit drug us e.
A
D
E
SLOW MEDIUM FAST
REA DY
B
Fig. 2
F
C
Continued
 Loading...