

Page 1
DEVICE DESCRIPTION
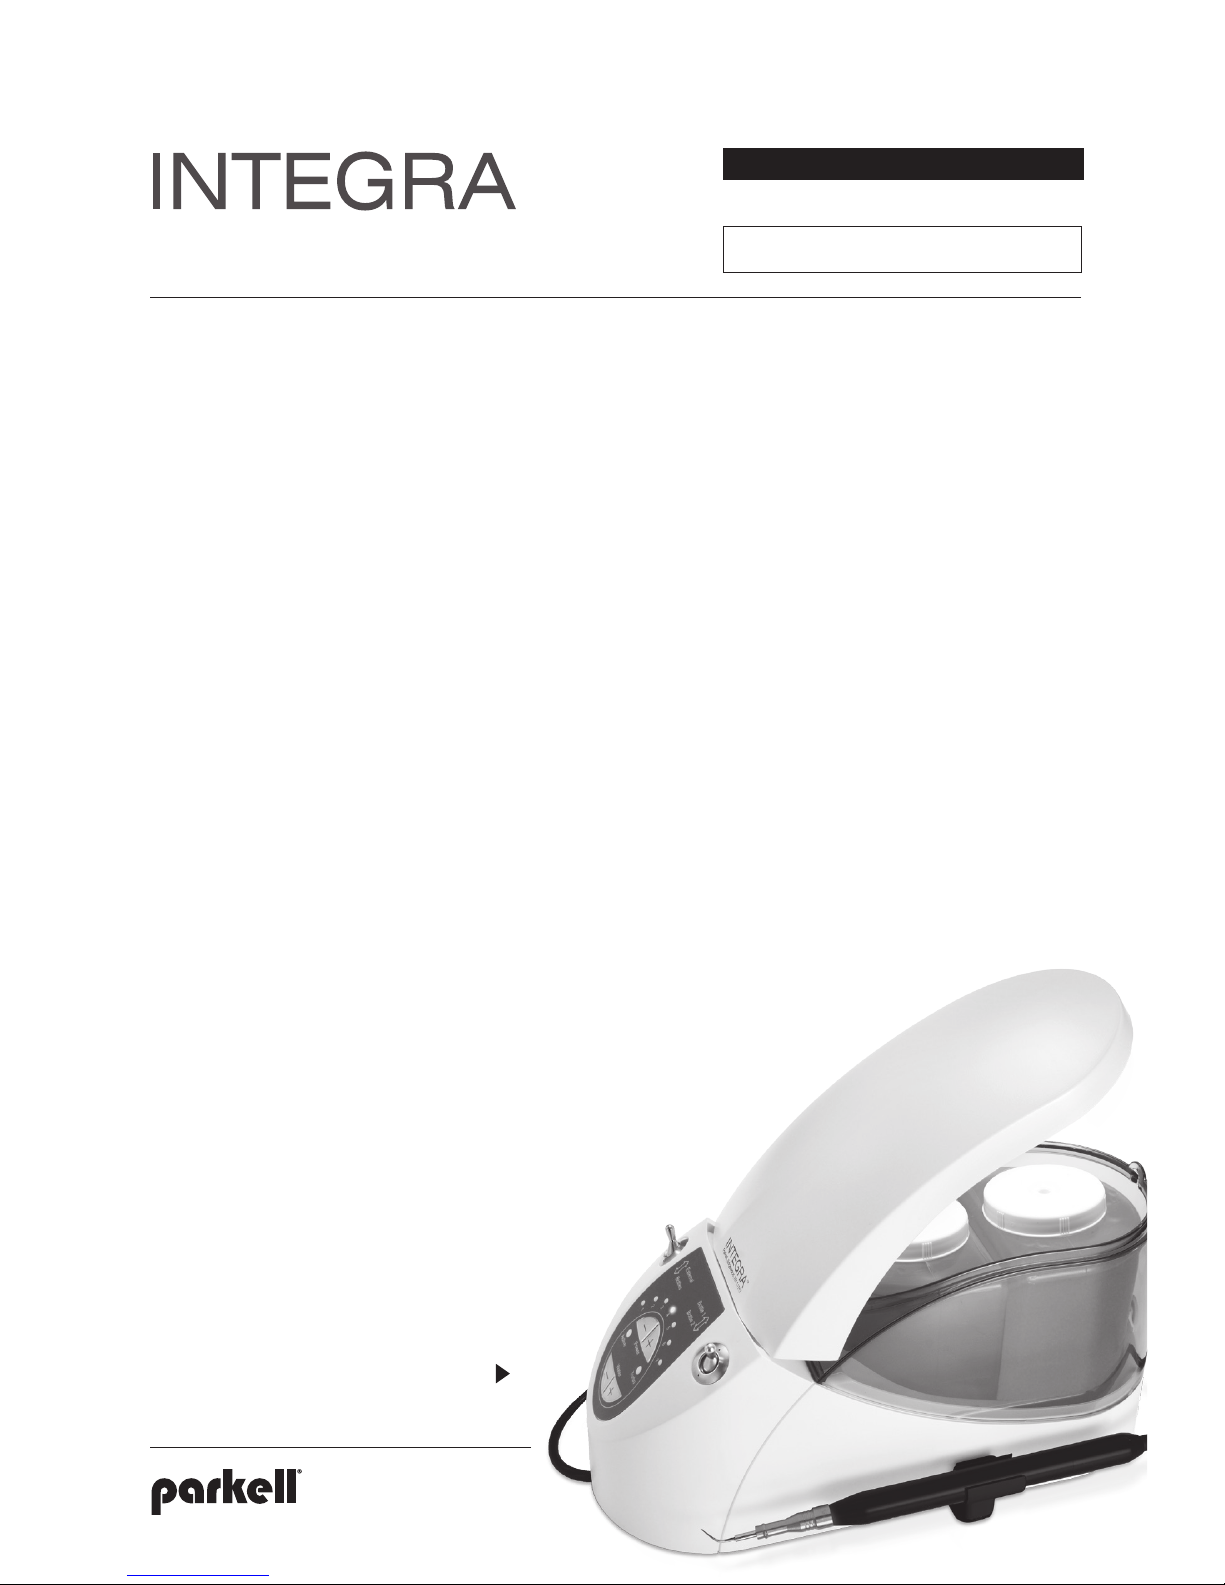
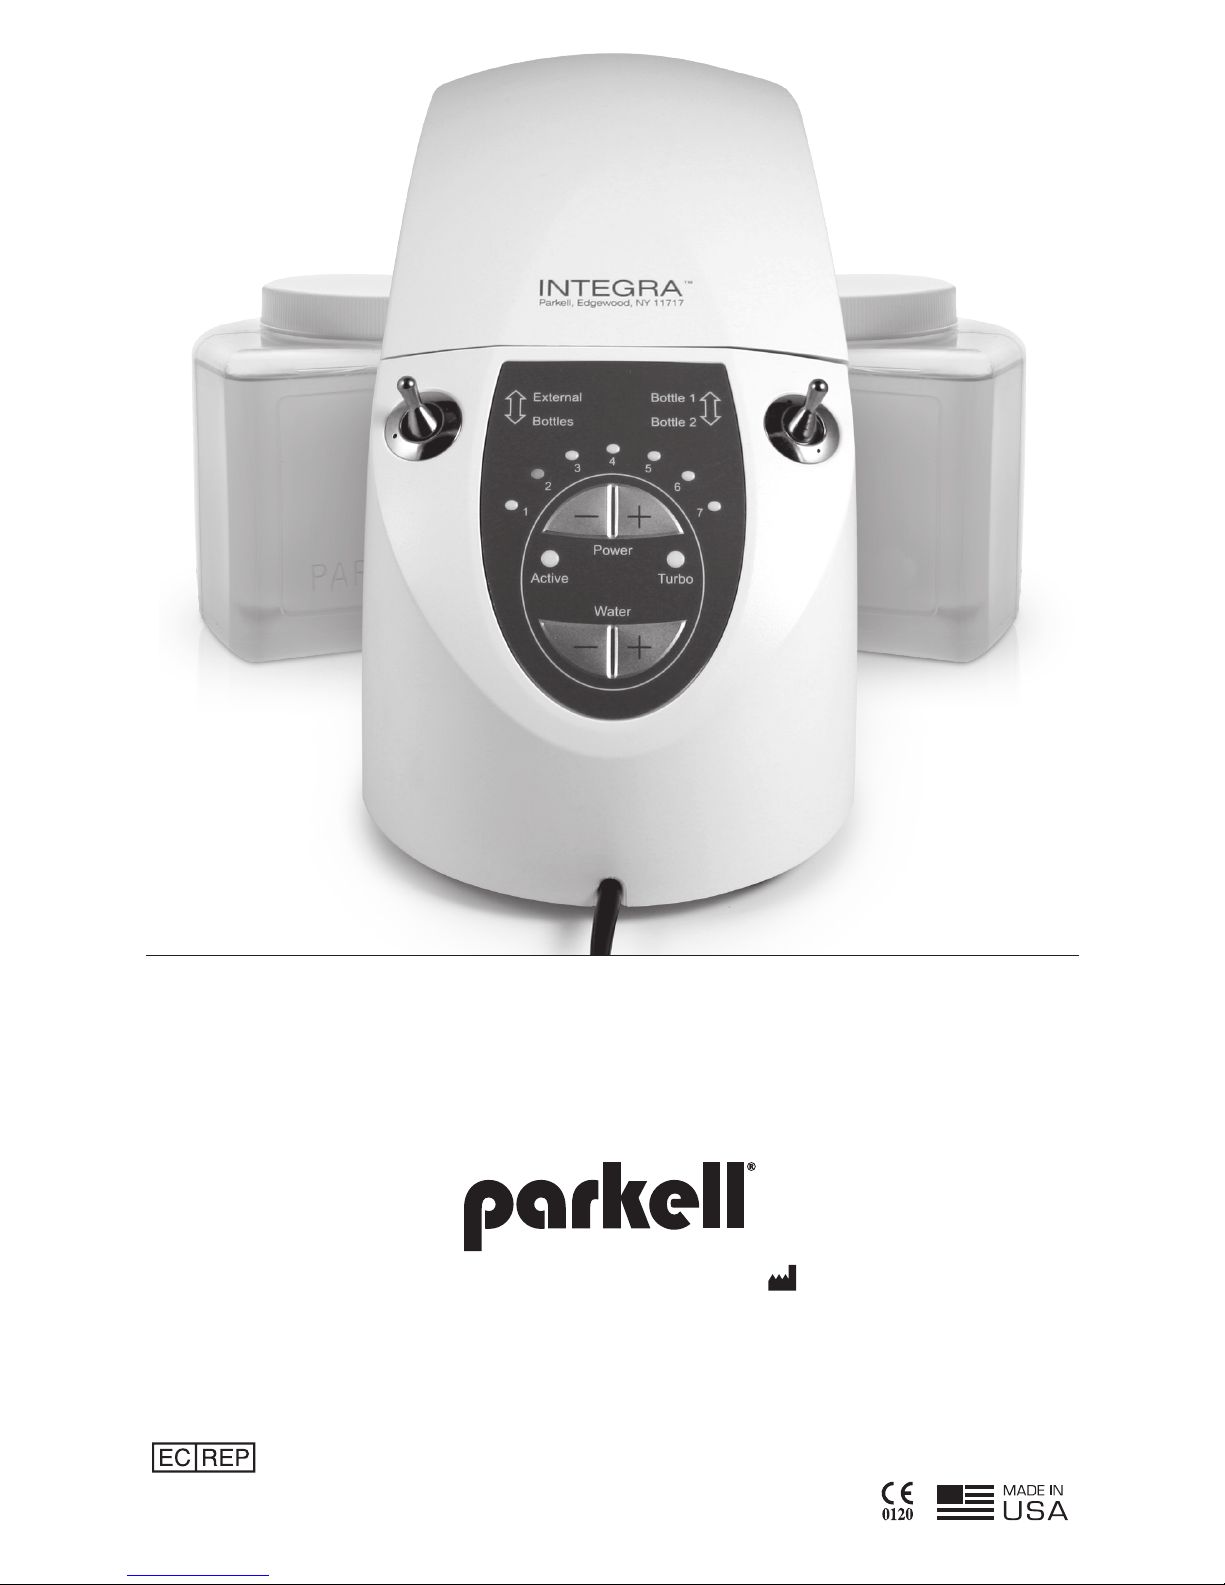
The Parkell Integra™ is a magnetostrictive, autotuning, ultrasonic tooth scaler that operates at either
25 KHz or 30 KHz. It has an integrated, two-bottle,
pump-driven fluid supply, and is also capable of
obtaining fluid from an external water supply.
The Integra automatically detects whether the
handpiece contains a 25 KHz or 30 KHz insert, and
switches to the correct operating frequency. The
Integra has an expanded low-power range to improve
patient comfort, and a power-boosting, user-controlled
TURBO feature to increase scaling power when needed
for heavy deposits.
INTENDED USE/INDICATIONS
For removal of calculus, plaque and oral debris from
teeth during dental prophylaxis/scaling.
CONTRAINDICATIONS TO USE
Because of the potential for electromagnetic
interference, this device should not be used on
patients or by clinicians with cardiac pacemakers,
internal defibrillators, intracorporeal fluid pumps or
any other implantable electronic devices, or in close
proximity to sensitive patient monitoring devices such
as pulse oximeters.
IMPORTANT INFORMATION REGARDING USE OF NON-PARKELL INSERTS:
Parkell ultrasonic scalers are compatible with most
major brands of ultrasonic inserts. For optimal
performance of your scaler and insert, we recommend
using Parkell ultrasonic inserts. Parkell cannot
guarantee that all non-Parkell inserts available on the
market today or in the future will work properly with
our scalers. For more information, contact Parkell.
WARNINGS
• The water supply to the scaler should always be
turned off whenever the device is being connected,
disconnected, or when not in use.
• Do not run this device dry. Water must always flow
through tip during use to cool handpiece and insert.
• The power supply line cord functions as the AC
power disconnect device for the scaler.
• The transformer should be located above and away
from any sources of water. As with all electrical
devices, the unit should not be immersed in water
or other liquids. Do not reach for the device if it has
fallen into liquid until power is disconnected, and
do not use the device after it has fallen into liquid.
Return the device to Parkell for servicing.
• Modification of this device will void the warranty, and
may violate safety codes, endangering the patient
and/or the clinician.
• This equipment is not suitable for use in the
presence of a flammable anesthetic gas mixture
(when used along with air or oxygen).
• This equipment produces electromagnetic energy
and may cause interference with other nearby
electronic devices. Should this occur, changing the
position or location of the device
may be necessary.
™
INSTRUCTIONS FOR USE
STOCK NO. D680
24-HOUR SAFETY HOTLINE
1-800-535-5053
CAUTION: RX ONLY
This manual, in whole or in part, should not be considered a substitute for formal training in Ultrasonic Scaling.
Appropriate professional education is STRONGLY RECOMMENDED prior to using this device clinically.
ULTRASONIC SCALER
Shown with Parkell’s Burnett
Power-Tip Insert (not included)
A00545revC0317
Page 2

Easy-to-clean touch panel resists all
standard disinfectants
Digital fluid and power
controls mean fast,
precise settings (Use
the Smart Foot Pedal
for hands-free power
adjustment.)
Automatically adjusts operating
frequency to match either 25KHz
or 30KHz inserts
Autoclavable
handpiece
sheaths
Handpiece-holder
mounts on left or right
CLINICAL PRECAUTIONS
• Protect patient’s eyes, lips, cheeks, tongue or other
vulnerable tissues from contact with the vibrating
scaler tip.
• Protect the patient’s clothing from water damage
when using this device.
• Clinicians should wear eye protection and facemask
when using this device.
• Keep the long axis of the insert tip parallel to the long
axis of the tooth while maintaining gentle contact with
the root to “wipe” deposits from the tooth. Prolonged
perpendicular contact between the insert tip and the
tooth will damage the tooth by gouging it.
INDIVIDUALIZATION OF TREATMENT
If patient or operator is pregnant, or has any medical
condition which might be affected by this device during
treatment, consult a physician prior to use.
THE INTEGRA IS SUPPLIED WITH:
(1) Magnetostrictive Scaler Control Unit with
integrated, pump-driven, two-bottle water supply,
attached handpiece, foot controller and water line
(with male quick-connect coupler).
(1) Detachable Foot Controller.
(2) Autoclavable handpiece sheaths (one attached)
(Stock No. D576).
(2) Fluid Bottles with screw-on caps.
(1) Bottle Lock.
(2) Inline water filters (one attached to water line)
(Stock No. D419).
(1) Transformer with cable (Stock No. D408/GS257-
120V, D403/GS438-230V).
(1) Instructions for Use
INSERTS
Magnetostrictive inserts for the Integra scaler are
available separately, and are not included with the basic
scaler unit. However, they may be included in a scaler
package that you have chosen to purchase. Parkell
scalers are compatible with most major brands of 25
KHz or 30 KHz magnetostrictive ultrasonic inserts.
For optimal performance of your scaler and insert, we
recommend using Parkell ultrasonic inserts. Parkell
cannot guarantee that all non-Parkell inserts available
on the market today or in the future will work properly
with our scalers. For more information, contact Parkell.
The scaler automatically adjusts the operating
frequency to match that of the insert in the handpiece
without operator intervention. Brand new inserts may
initially fit tightly in the handpiece, and may be inserted
and removed more easily by using a slight twisting
motion, or by lubricating the insert “O” ring with water.
Old, worn or blunt inserts will scale poorly and generate
excess heat, and should be replaced when necessary.
SPECIFICATIONS
• Operating frequencies – 25KHz and 30KHz.
•
Operating temperature – between 50°F (10°C) and 95°F (35°C).
•
Operates at relative humidity of 10-80%
(non-condensing).
• Weight: 35 oz. / Dimensions: 5” W x 6” H x 11.5” D.
•
Power: 120VAC model - 60 Hz, 120VA / 230VAC model 50 Hz, 120VA / 100 VAC model – 50/60 Hz, 120VA.
• Transport and storage conditions: 10-40°C, 10-80%
RH (non-condensing).
ADDITIONAL SPECIFICATIONS
• Protection against electric shock: Class 1, Type B
applied part.
• Protection Against Ingress of Liquids
1. Foot Switch & Scaler - IPX1 (drip-proof).
2. Power Supply - IPX0 (ordinary).
• Mode of operation of equipment: Intermittent – 66%
duty cycle, 10 minutes on, 5 minutes off.
2
Page 3
I
INSTALLING THE SCALER
Locate the device where the control panel will be easy
to reach during scaling procedures, and where the
water filter at the rear of the unit may be periodically
changed without difficulty. The scaler requires
access to a grounded electrical outlet and an optional
connection to a source of drinking-quality water from
the building water supply. Alternatively, the unit may
receive fluid exclusively from the internal bottle supply
WATER CONNECTION
If the clinician chooses to operate the Integra on city
water, before plugging in the device, they should
connect the scaler’s water line through the included
filter disk to a drinking-quality water supply (15-35 psi
optimal), free of sediment, at room temperature. An
external, office-wide water filter is recommended to
minimize frequent changes of the device’s in-line water
filter. The male quick-connect that comes on the end
of the water hose is the standard fitting presently used
in the dental industry. If you are replacing a scaler that
uses an Adec-type or other type of connection, remove
the old fitting from the unit hose and attach it to the
new water line. Check for leaks at all hose and filter
connections before use, and tighten if necessary.
USING THE INTERNAL FLUID
SUPPLY BOTTLES
The Parkell Integra is equipped with two internal
bottles which can supply the fluid that flows through
the handpiece for cooling and lavage during use. The
bottles may be filled with drinking-quality water, or
diluted with anti-microbials at a ratio of 4 parts water
to 1 part chlorhexidine or mouthwash. If fluids other
than water are used in the bottles, the system should
be flushed with plain water after each use.
To fill the bottles:
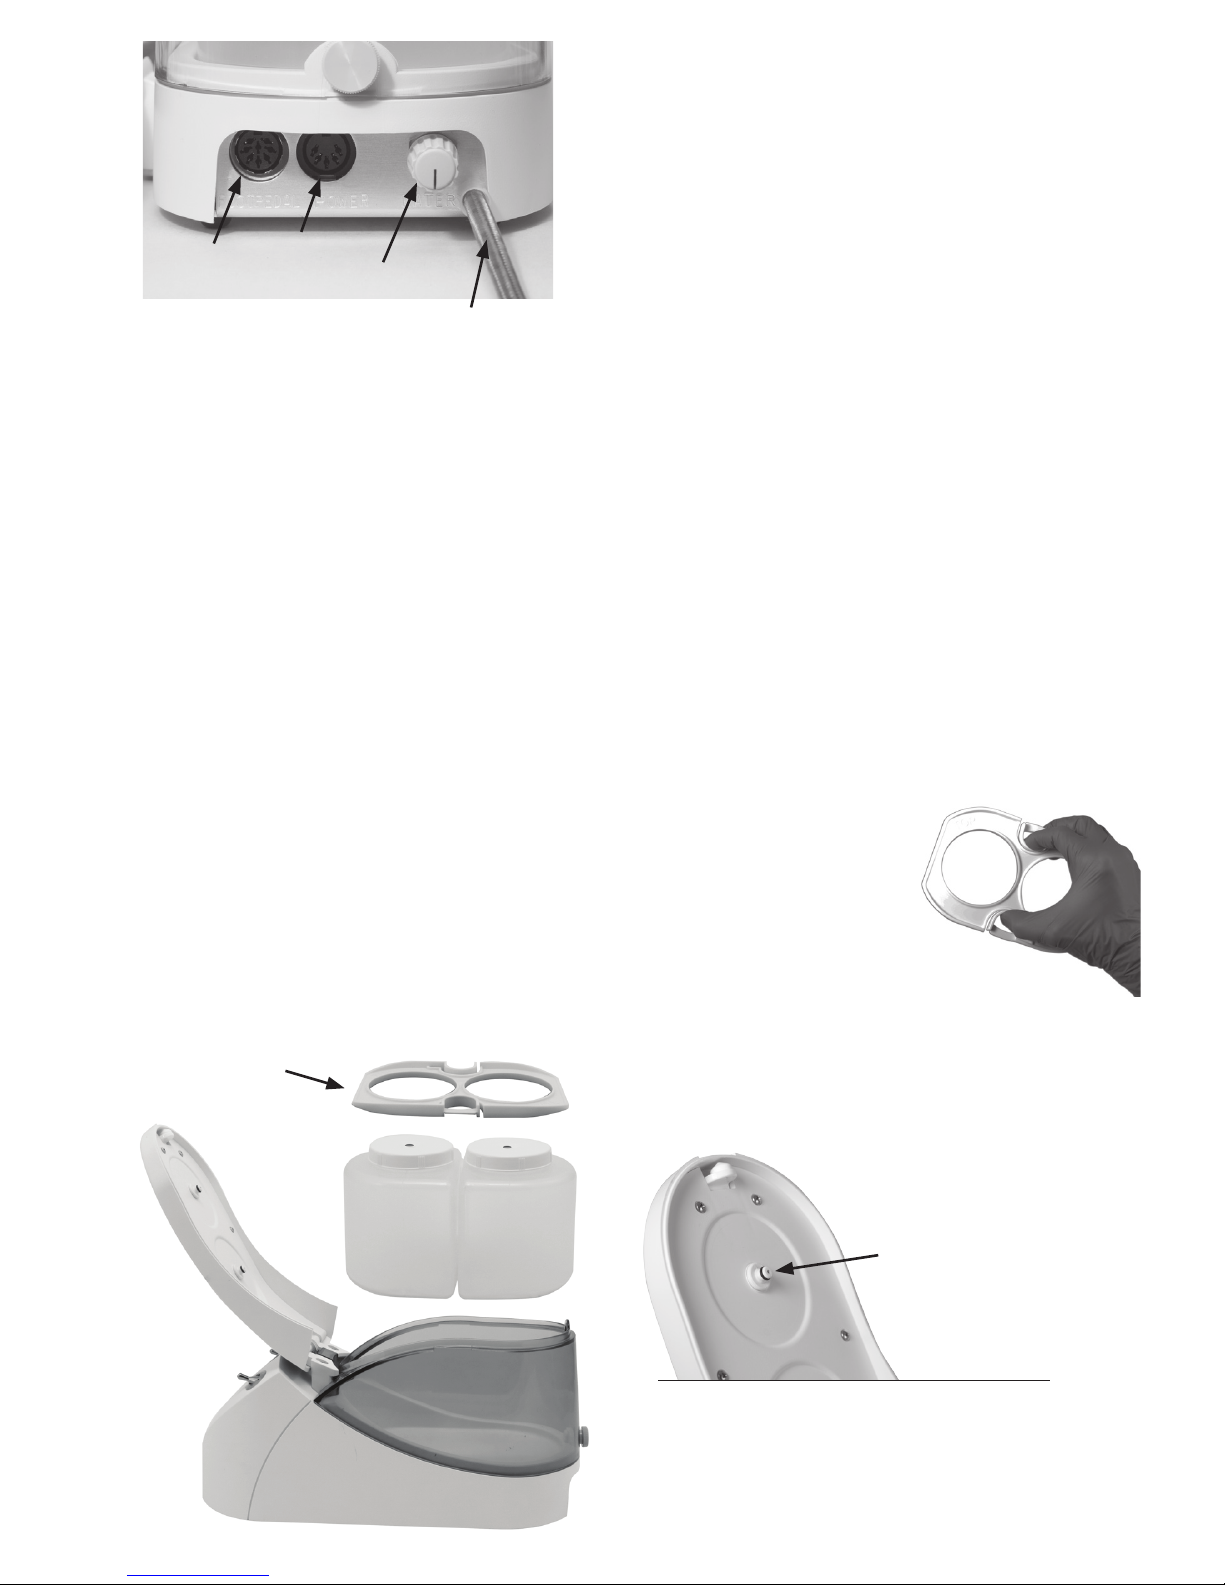
1. Open the Integra cover. You will see two bottles, with
the bottle-lock holding them in place.
2. Using finger and thumb, gently squeeze the two
retaining lugs of the bottle-lock and remove it
from the unit.
3. Remove the bottles from the unit. Unscrew and
remove the caps from them.
4. Fill the bottles up to the fill line marked on the side.
5. Replace the caps on the bottles, making sure they
are screwed on all the way.
6. Replace the bottles in the rear of the Integra, making
sure they are standing upright in the base of the unit.
7. Replace the bottle-lock over the bottles. Look for
the word “Top” on the bottle-lock to make sure it
is in correctly. As before, using finger and thumb,
squeeze the two retaining lugs and
gently press the bottle-lock down.
Release the lugs. They should
locate into the side of the clear
cover and hold the bottles firmly
in place.
8. Completely close the Integra lid. If not
fully closed, the unit will not be able to draw fluid
from the bottles.
9. Monitor the fluid level in the bottles regularly during
use and refill as required. A constant fluid flow is
necessary for correct operation of the Integra
during scaling.
Foot Pedal
Power
External water
flow regulator
External water
connection
3
Bottle-Lock
(DO NOT DISCARD)
Apply lubricant
to both ‘O’ rings.
The lid must be closed completely for the unit to function
correctly with the internal fluid system. If the lid does not
close completely or it sticks, then the t wo black ‘O’ rings
on the underside of the cover may be dry and require a little
lubrication. Apply a very thin layer of Vaseline to each ‘O’
ring with a Q-Tip. Just a thin layer is all that is necessary.
IMPORTANT:
Page 4

CONTROLLING THE FLUID FLOW
The water source is selected using the two toggle
switches on the front of the unit.
• The left switch selects the fluid source between
“External”, from the rear connector to the city water,
or “Internal”, from the bottles inside the Integra.
• The right switch selects the fluid source between the
“Front” or the “Rear” bottle.
When using the internal bottle water source, room
temperature, sterile, deionized or distilled water is
preferred. 4 par ts water may be mixed with 1 part
FDA-approved mouthwash for a pleasant-tasting
irrigation fluid.
The fluid-control buttons on the touch panel control the
output of the pump from the internal bottles only. If you
are using an external water source, water flow
is adjusted using the water control knob on the back
of the unit.
If you are using the internal bottles as a fluid source,
the flow is controlled by using the WATER (+) and
(–) buttons on the touch panel at the front of the unit.
When you press either button the display will start to
flash to indicate that it is now showing the water flow
rate (1 is the lowest; 7 is the highest). As you hold the
button the flow will change as shown by the display.
When you release the button the display will return to
showing the power level after a few seconds. When
in operation, the sound of the pump will speed up or
slow down depending on the fluid flow setting. If fluid
does not flow through the insert when the foot pedal is
depressed, consult the Troubleshooting section later in
these instructions.
HOW TO REPLACE THE FILTER DISK
If an external water source is used, the water filter disk
on the rear hose of the unit should be replaced every
3-4 months, or when it becomes dark or clogged with
debris, or when water flow is impeded. Replacement
filters are available from Parkell (Stock No. D419 – ten
per package). To change the filter:
1. Make sure all water valves from the water supply to
the Integra are shut off before changing the filter.
2. Disconnect the scaler water supply hose from the
water supply at the quick-connect.
3. Remove the old filter disk by holding it in one hand
and twisting off the hose connectors on either side.
They rotate in opposite directions.
4. Install the new filter disk in the same position as
the old one, and tighten the connectors by hand in
reverse. Do not use a tool.
5. Reconnect the scaler water supply hose to the water
supply via the quick-connect, open the control valve
and check for leaks.
6. Note: If the filter becomes clogged and you do not
have a replacement disk, the hose connectors may be
locked together TEMPORARILY without the filter disk
to allow emergency operation only.
ELECTRICAL CONNECTION
The scaler must only be powered via the Transformer
Assembly that is supplied with the device by Parkell. The
scaler and its separate transformer generate a minimal
amount of heat. Avoid covering them, to allow normal
cooling.
1. Plug the transformer power cord connector into the
“PWR” receptacle on the back of the scaler, with the
arrow on the plug on top.
2. Plug the foot pedal into the “FTPEDAL” receptacle
on the back of the scaler, with the arrow on the plug
on top.
3. Plug the transformer power cord into a grounded
electrical outlet.
USE OF AUTOCLAVABLE SHEATHS AND
ULTRASONIC INSERTS
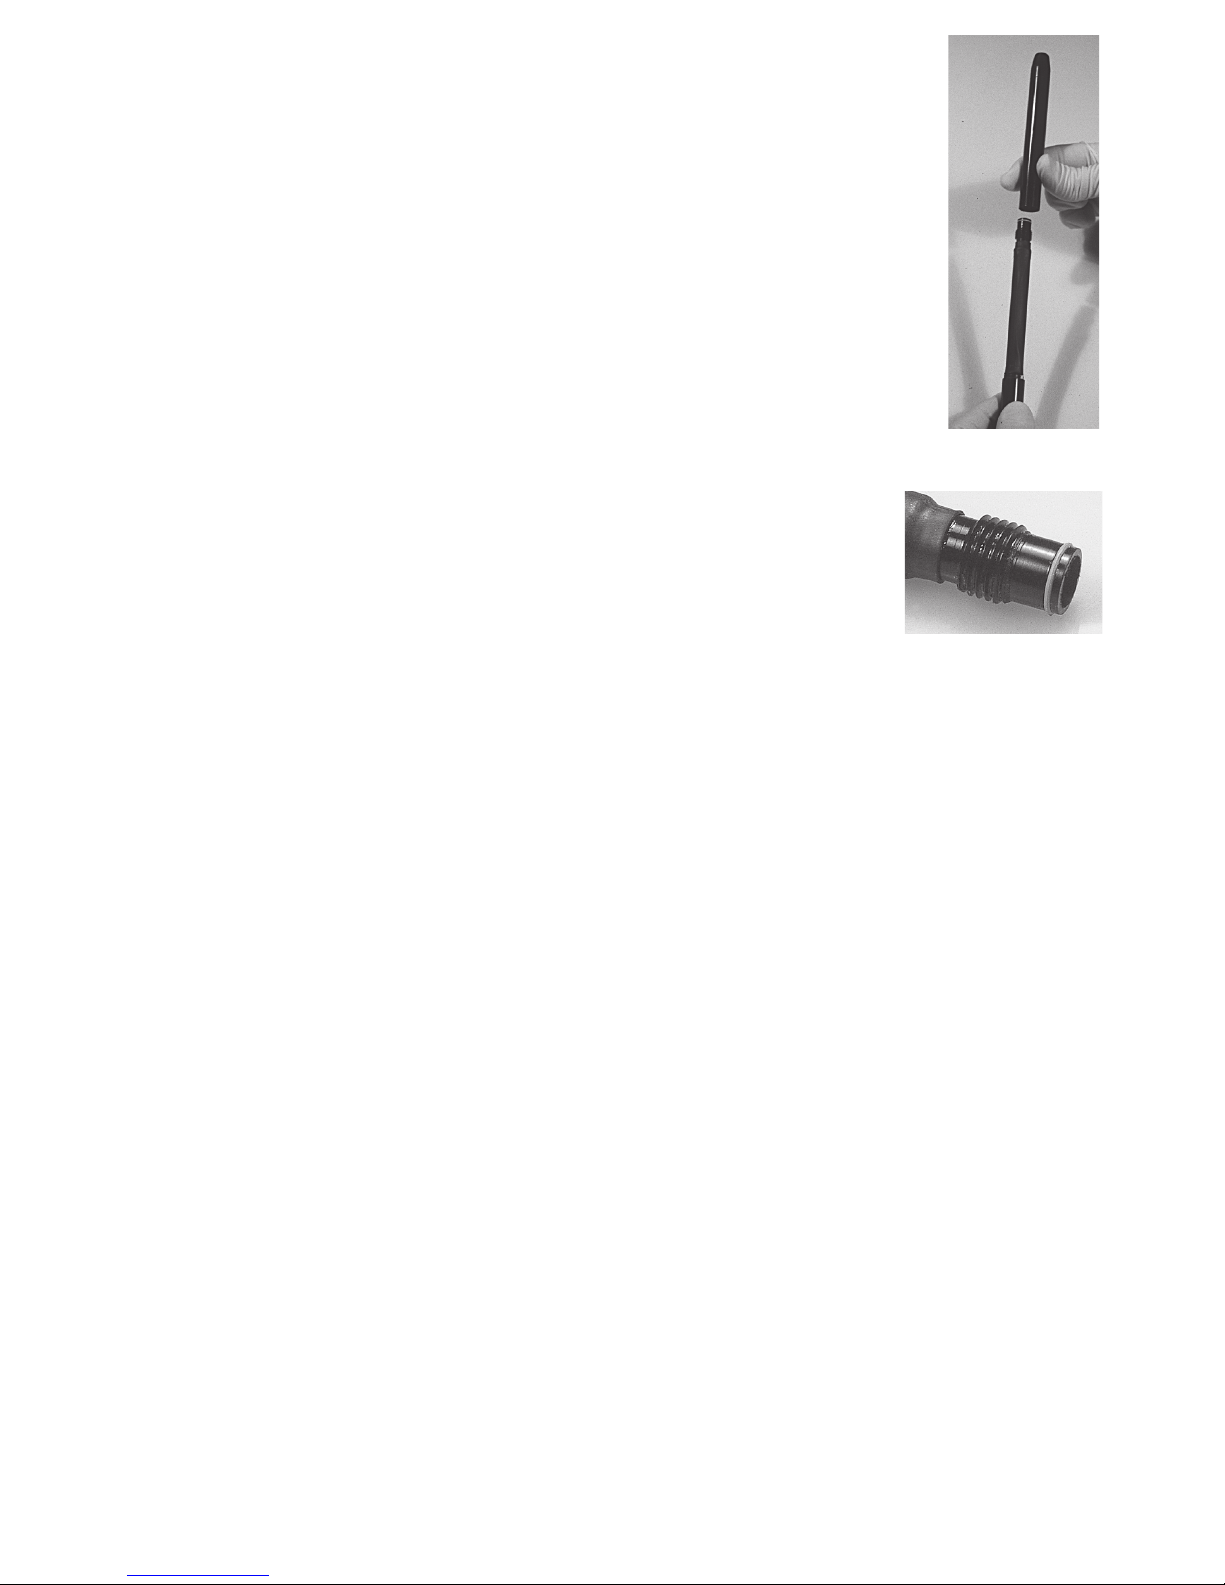
1. The Integra handpiece is provided with the
autoclavable handpiece sheath attached. Prior to
use, the sheath should be removed and sterilized in a
steam autoclave. To remove it, hold the handpiece at
the base with one hand and turn the sheath counterclockwise with the other, taking care not to twist or
damage the hose. The sheath will unscrew and slip
off. Confirm that the orange O-ring is still present on
the end of the handpiece.
2. To replace the sheath, lubricate the O-ring on the
handpiece with water to assure a good seal. Slide
the sheath over the handpiece carefully to avoid
damaging or dislodging the O-ring and gently thread
the sheath onto the handpiece clockwise, until there is
no gap between the two. Do not overtighten.
TURNING THE SCALER ON AND OFF
To turn the scaler on, press any button on the touch
panel. The display will illuminate to indicate that the
scaler is on.
To turn the scaler off, press the WATER minus (–) button
and the POWER minus (–) buttons at the same time. The
display will go out, indicating that the unit is off. The unit
will remember any settings you made when it is turned
on again.
4
External
water
source
Internal
bottle
Rear
bottle
Front
bottle
Page 5
Press the foot-pedal to activate the scaling function.
Release the foot-pedal to deactivate. Whenever you
release the pedal, the ACTIVE light on the front panel
will instantly turn off. If you were scaling in the TURBO
mode, the TURBO light will also turn off.
To conserve power, the Integra will go to “sleep” if it is
not used for about 30 minutes. The display will go out
and the unit will not respond to the foot pedal. To “wake
up” the Integra, simply press any of the buttons on the
touch panel.
SAFETY NOTES: Turning off the POWER does not shut
off the external water connection. Make sure to turn off
any external water sources to the Integra every time you
are not using the unit. The pedal should be placed where
it will not accidentally be pressed when the device is
not in use.
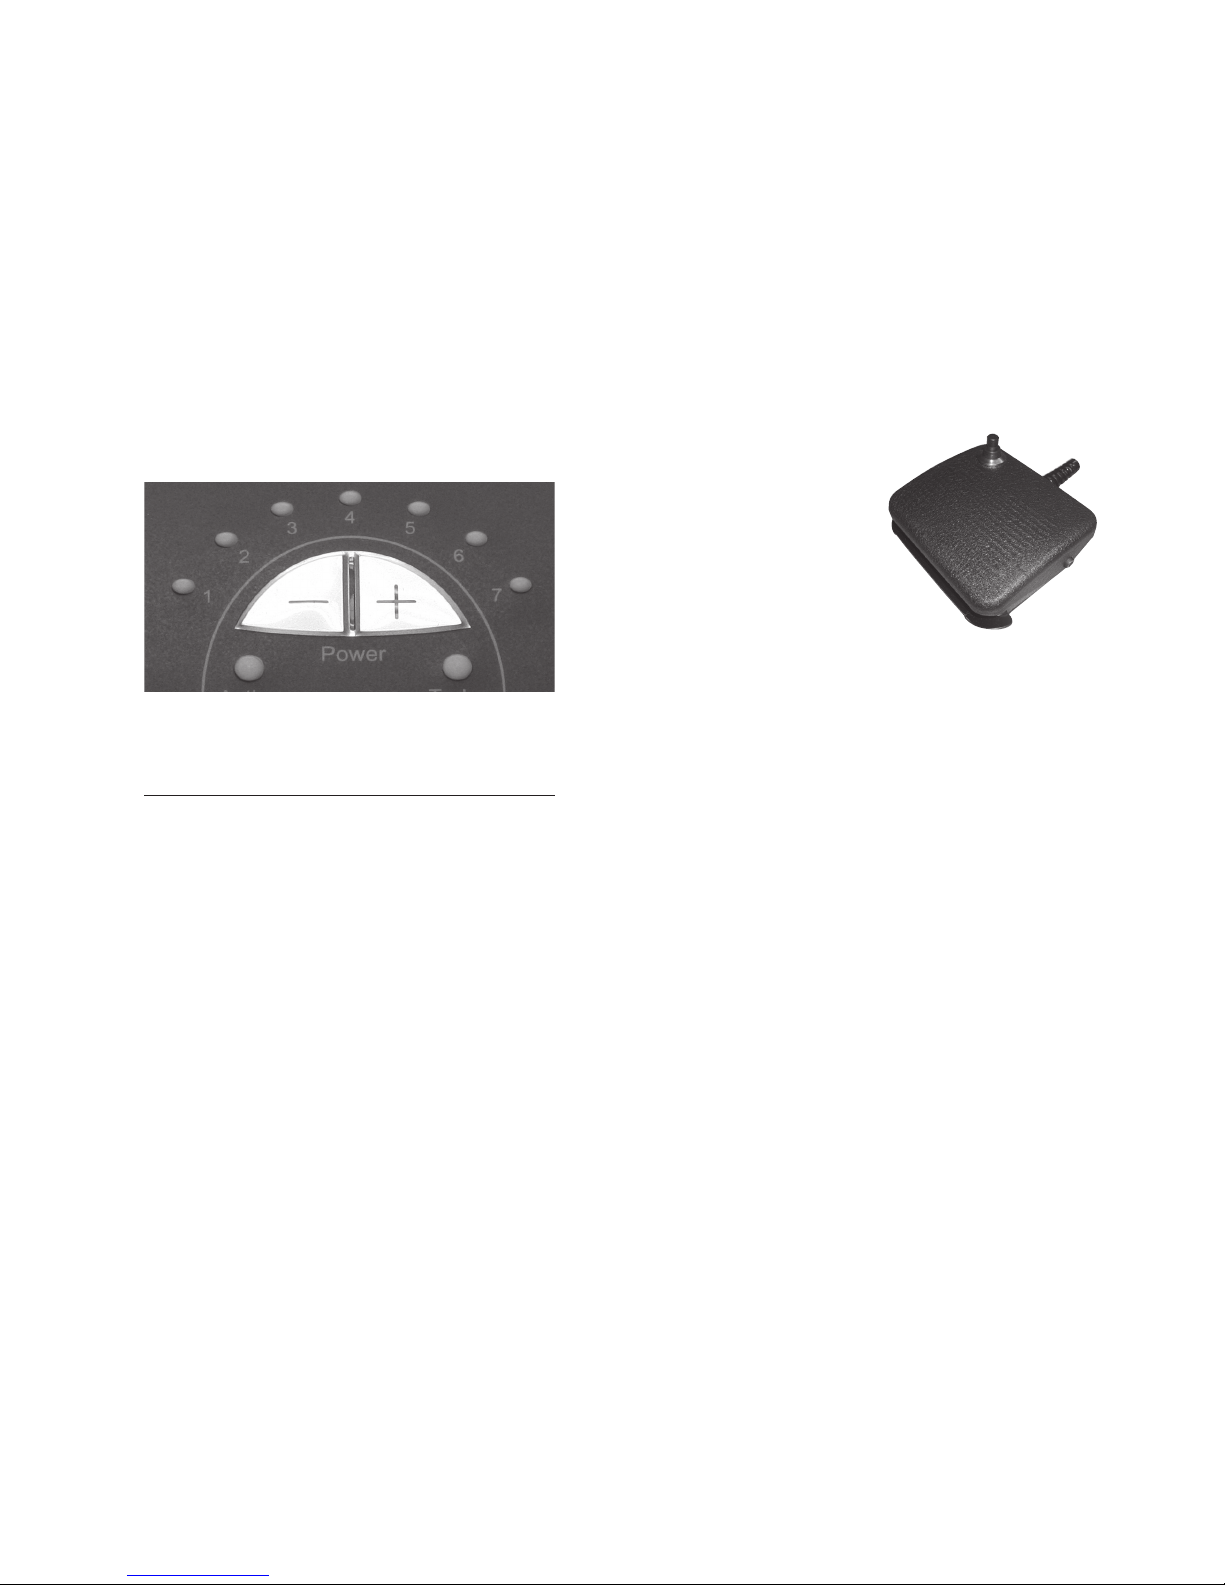
CONTROLLING THE POWER OUTPUT
The Integra gives you three ways to adjust the scaling
power: The POWER (+) and (–) buttons on the touch
panel at the front of the unit, the silver-colored POWER
button on the foot pedal, and the TURBO mode. When
you adjust the power using any of these methods, colorcoded lights on the touch panel indicate the operating
power setting and mode.
Use the POWER (+) and (–) buttons on the touch panel
to set the initial power for the scaling procedure at hand.
Power is usually set at 3 – 4 to start. The color-coded
LEDs will show the current power setting. When the foot
pedal is partially depressed (to the first position), the
insert will begin vibrating and water will flow.
If the Power is set for the 1 – 2, the blue “Perio” lights
will illuminate, and the tip will vibrate at a much lower
power than a traditional scaler when the foot pedal is
depressed. This allows more comfortable debridement
for sensitive patients.
You can also adjust the power by depressing the
POWER button on the top of the foot pedal with your
foot. If you press and release (tap) the button, the power
will increase by one step (i.e. from 4 to 5 as shown by
the display). If you press the button and hold it down,
the power will decrease in steps. In either case, the
color-coded LEDs will show any change in the current
power setting.
Note: There is a small switch on the rear of the foot
pedal to allow you to enable or disable the POWER
button. If the switch is in the UP position, the POWER
button is enabled. If the switch is in the DOWN position,
it is disabled.
THE TURBO MODE
For short-term increases in power during scaling,
simply increase foot-pressure on the pedal. The TURBO
light will illuminate. This will instantly boost scaling
power to a point midway between the current setting
and the scaler’s maximum power. Engaging the TURBO
mode at a low power setting causes a significant boost
in power. Engaging the TURBO mode at high power
causes very little change in power.
To return to normal scaling
power, lighten foot pressure.
The TURBO light will go out.
The TURBO mode allows you
to scale at lower power than
usual, because you do not
have to allow for occasional
pieces of tenacious calculus.
If you encounter hard-toremove accretions during debridement, simply use the
TURBO mode to eliminate them. The TURBO mode does
not change water flow, so extended use of the feature
may require a water adjustment.
CLINICAL SUGGESTIONS ON
TOOTH SCALING
• Ultrasonic scalers should be used by trained, licensed
professionals only.
• If patient is new to ultrasonic scaling, explain to
them what to expect. Usually, the patient should not
experience discomfort, but if this occurs, adjust
power and water controls, and lighten up on your
handpiece pressure.
• Inser ts and handpiece sheaths must be sterilized
before each use.
•
DO NOT OPERATE UNIT WITHOUT WATER FLOWING.
• Do not test a scaler tip with your fingers while the unit
is operating. The tip will feel hot, and the test will not
be valid as to how the patient will feel.
• Use of face mask by the clinician and high-volume
intraoral suction is strongly recommended when
operating this device, to avoid inhalation of
microbially-contaminated aerosols.
• If you are using the internal water bottles to supply
fluid to the unit, you may fill them with FDA-approved
mouthwashes in a ratio of 4 parts water to 1 part
mouthwash. Fill the bottles outside of the scaler,
replace the lids and then carefully place the bottles
into the plastic housing. Do not overfill the bottles.
When you adjust the power using either the
touch panel or the foot pedal, color-coded
lights indicate the operating power.
5
Page 6
• Use the lowest effective scaling power for the
case at hand. This keeps heat generation to a
minimum. Red-zone power is best reserved for
patients anesthesia.
• Before using the insert in the oral cavity, adjust
the water spray over a sink or cuspidor until desired
mist is obtained. For maximum patient comfort, use
a good flow of water as a coolant, lubricant and to
flush out debris.
• Hold the handpiece in a comfortable pen-grasp.
To remove deposits from teeth, always use a light
brushing stroke with the side of the insert tip, in
contact with and parallel to the root surface. Excess
pressure will not improve scaling action, but may
cause heating and pain to the patient. Keep the scaler
inser t in motion at all times, using repeated gentle
strokes to remove all tenacious deposits.
• Do not use the point of the insert on the tooth surface.
You may gouge the tooth.
• Pause occasionally during scaling by removing foot
from pedal to evaluate deposit removal.
• Exercise caution near ceramic or resin restorations,
as they can discolor or fracture if stressed.
COMMON OPER ATOR ERRORS THAT MAY
RESULT IN POOR CLINICAL PERFORMANCE
• Failure to keep insert tip parallel to the long axis of
the tooth.
• Excessive use of hand pressure.
• Failure to use the lowest effective power setting for the
case at hand.
• Insufficient water flow.
• Use of a heated water supply causing excessive water
temperature at the insert tip.
• Scaling with the point of the insert instead of the side.
• Using inserts that are damaged, bent or worn out.
CLEANING AND INFECTION CONTROL
Consult www.CDC.gov for the most current guidelines
for infection control in dental health-care settings.
DO NOT AUTOCLAVE the Integra control unit, as
autoclave heat will destroy it. The control unit should
be cleaned of debris with a water-damp paper towel,
disinfected by wiping with a paper towel that has been
saturated with an EPA-registered low-level (HIV/HBV
claim) to intermediate-level (tuberculocidal claim)
hospital disinfectant, wiped of chemical residue with a
water-damp paper towel, and dried. Utilize the surface
disinfecting protocol of the disinfectant manufacturer.
1) Autoclaving does not remove debris that has
accumulated on the sheath or the insert. Failure to
adequately remove debris will result in inadequate
sterilization. The sheath and insert must be washed in
soap and water either manually
or in an ultrasonic cleaner, rinsed
in running water and dried prior
to bagging them for processing
in a steam autoclave.
2) Sheaths and inserts may be
sterilized in any conventional
steam autoclave following
manufacturer’s instructions.
A typical steam cycle is
250°F-268°F / 121°C-131°C for
30 minutes at a minimum of 15
psi, followed by a 15-minute
minimum cool-down period.
After sterilization, inspect the
device in the autoclave bag for
integrity.
If suspicion about the item
exists, discard it and order a
replacement from Parkell or
your dealer.
3) DO NOT USE DRY HEAT OR
CHEMCLAVE on the sheath
or the insert.
TROUBLESHOOTING THE INTEGRA
(when in doubt, contact Parkell for advice)
Unit does not operate (LED’s do not light):
• Transformer cable disconnected from wall outlet or
scaler. Reconnect properly.
• Wall outlet not live. Reconnect properly.
• Unit is in “sleep” mode. Press any button on the panel
to wake it up.
• Foot pedal or cable is damaged. Contact Parkell.
• Unit fuse has failed. Contact Parkell.
Insert does not vibrate properly:
• Faulty, damaged or worn insert. Replace.
• Inser t not correctly seated in handpiece.
Reinsert properly.
• Power control not correctly adjusted. Readjust.
• Use of non-compatible, non-Parkell insert.
Excess heat at handle or tip of insert:
• Faulty, damaged or worn insert. Replace.
• Too little water flow. Insert or filter may be blocked.
Inspect and clear blockage, or replace insert or filter.
• Power too high for the amount of water. Increase
water flow.
• Excessive hand pressure applied. Correct technique.
• Heated water being used. Use room temperature
water only.
6
Page 7

No water spray when foot pedal is
depressed:
• Water line blocked or kinked. Correct.
• Water passage in the scaling insert clogged. Inspect
and clear blockage, or replace insert.
• Water filter clogged. Replace.
• No water supply connected. Correct.
• Water bottles empty.
• Water switch set to “External” without connection to
city water.
• Lid not fully closed.
go into handpiece correctly:
• Inser t stack is bent. Straighten plates carefully by
hand and reinsert.
• O-ring is too tight. Lubricate O-ring with water and
use twisting motion to seat insert.
• Autoclavable handpiece sheath is not attached
to handpiece.
Insert falls out of handpiece or water leaks
from front of handpiece:
• O-ring damaged or worn. Replace O-ring on insert
and/or handpiece.
Insert comes out of handpiece when pedal
is depressed:
• Water pressure is too high. Adjust water pressure to
15-35 psi at dental unit connection or in floor junction
box, adjust water flow rate or replace insert O-ring.
Water leaks at base of handpiece:
• Orange O-ring at end of handpiece is missing
or damaged.
USER MAINTENANCE AND
AUTHORIZED SERVICE
The Parkell Integra requires very little maintenance
for years of trouble-free operation. There are no
user-serviceable parts inside the control unit or the
foot pedal. Opening the cases will void all warranties.
Authorized Parkell personnel must make all
internal repairs.
Parkell urges all scaler users to monitor the condition
of the water filter periodically and change the filter
whenever noticeable darkening of the disk occurs,
or when water flow decreases. Failure by the user
to periodically change the water filter will result in
contamination and clogging of the internal water
components, as well as costly and unnecessary
service calls.
The ultrasonic inserts, handpiece sheaths, power
supply, water filter, water hose, bottle-lock and irrigant
bottles are all detachable and may be replaced by the
user. Contact Parkell for a list of authorized inserts and
available replacement parts.
Within the US, all repairs must be made by Parkell. We
maintain a complete service and parts facility in our
factory at 300 Executive Drive, Edgewood, NY 11717.
After calling our factory for advice, equipment needing
service in the US should be returned, freight pre-paid,
via approved common carrier (e.g. USPS, UPS, FedEx),
and adequately insured. Return all accessories with the
unit, and include a written explanation of the problem.
Pack in the original box, add plenty of cushioning
material, and overbox the unit during shipping. Transit
should maintain a dry temperature of 50°F-110°F.
You will be contacted for approval of the repair, along
with any associated costs, before any work requiring
payment. The unit will be repaired and returned to you.
Outside the US, repairs must be made by a
Parkell-authorized facility.
If you have any questions or problems with the
installation or use of your Integra, call Technical
Support Service at 1-800-243-7446, M-F from 8:30 AM
to 5:30 PM EST. Outside of the USA or Canada,
call +1 631-249-1134.
CONFORMANCE TO STANDARDS
Parkell’s Integra is TUV listed and conforms to IEC
60601-1, 60601-1-2 and CAN/CSA C22.2 No. 601.1.
Parkell’s quality system is certified to ISO13485.
The device is CE marked and is certified to European
Medical Device Directive (93/42/EEC).
The symbol
on the scaler indicates the
Protective Earth connection.
The symbol
or is intended to alert the
user to the presence of important operating and
maintenance (servicing) instructions in the literature
accompanying the scaler.
WARRANTY
Parkell will repair or replace, at its option, a defective
unit. This warranty is in lieu of all warranties of
merchantability, fitness for purpose or other warranties,
express or implied. Please note that any unauthorized
alteration, misuse, abuse, or failure to follow operating
instructions supplied with this unit will automatically
void all warranties associated with the unit.
Parkell does not accept liability for any loss or damage,
direct, consequential or otherwise, arising out of
the use of or the inability to use the product herein
described. Before using, the user shall determine
the suitability of the product for its intended use and
the user assumes all risk and liability whatsoever in
connection herewith.
If you purchased this product directly from Parkell, your
unit is automatically registered. Your invoice is your
“Warranty Registration” receipt. If you purchased this
product from a domestic or overseas dealer, please
register your product via the Internet at www.parkell.
com. Locate and complete the online form, print a
copy for your records, and click the “Submit” button.
Store the printout in a safe place.
For full Warranty and Terms of Use information,
please see www.parkell.com.
Parkell’s Quality System is cer tified to ISO 13485.
7
Page 8
300 Executive Drive, Edgewood, NY 11717
Toll-Free: 1-800-243-7446 • Phone: 631-249-1134
Fax: 631-249-1242 • E-mail: [email protected]
www.parkell.com
THIS PRECISION DENTAL DEVICE WAS DESIGNED, MANUFACTURED AND
IS SERVICED IN THE UNITED STATES OF AMERICA BY:
European Authorized Representative (Not a dealer/distributor):
Directa AB - P.O. Box 723, Finvids väg 8 SE-194 27 Upplands Väsby - Sweden
 Loading...