

Page 1
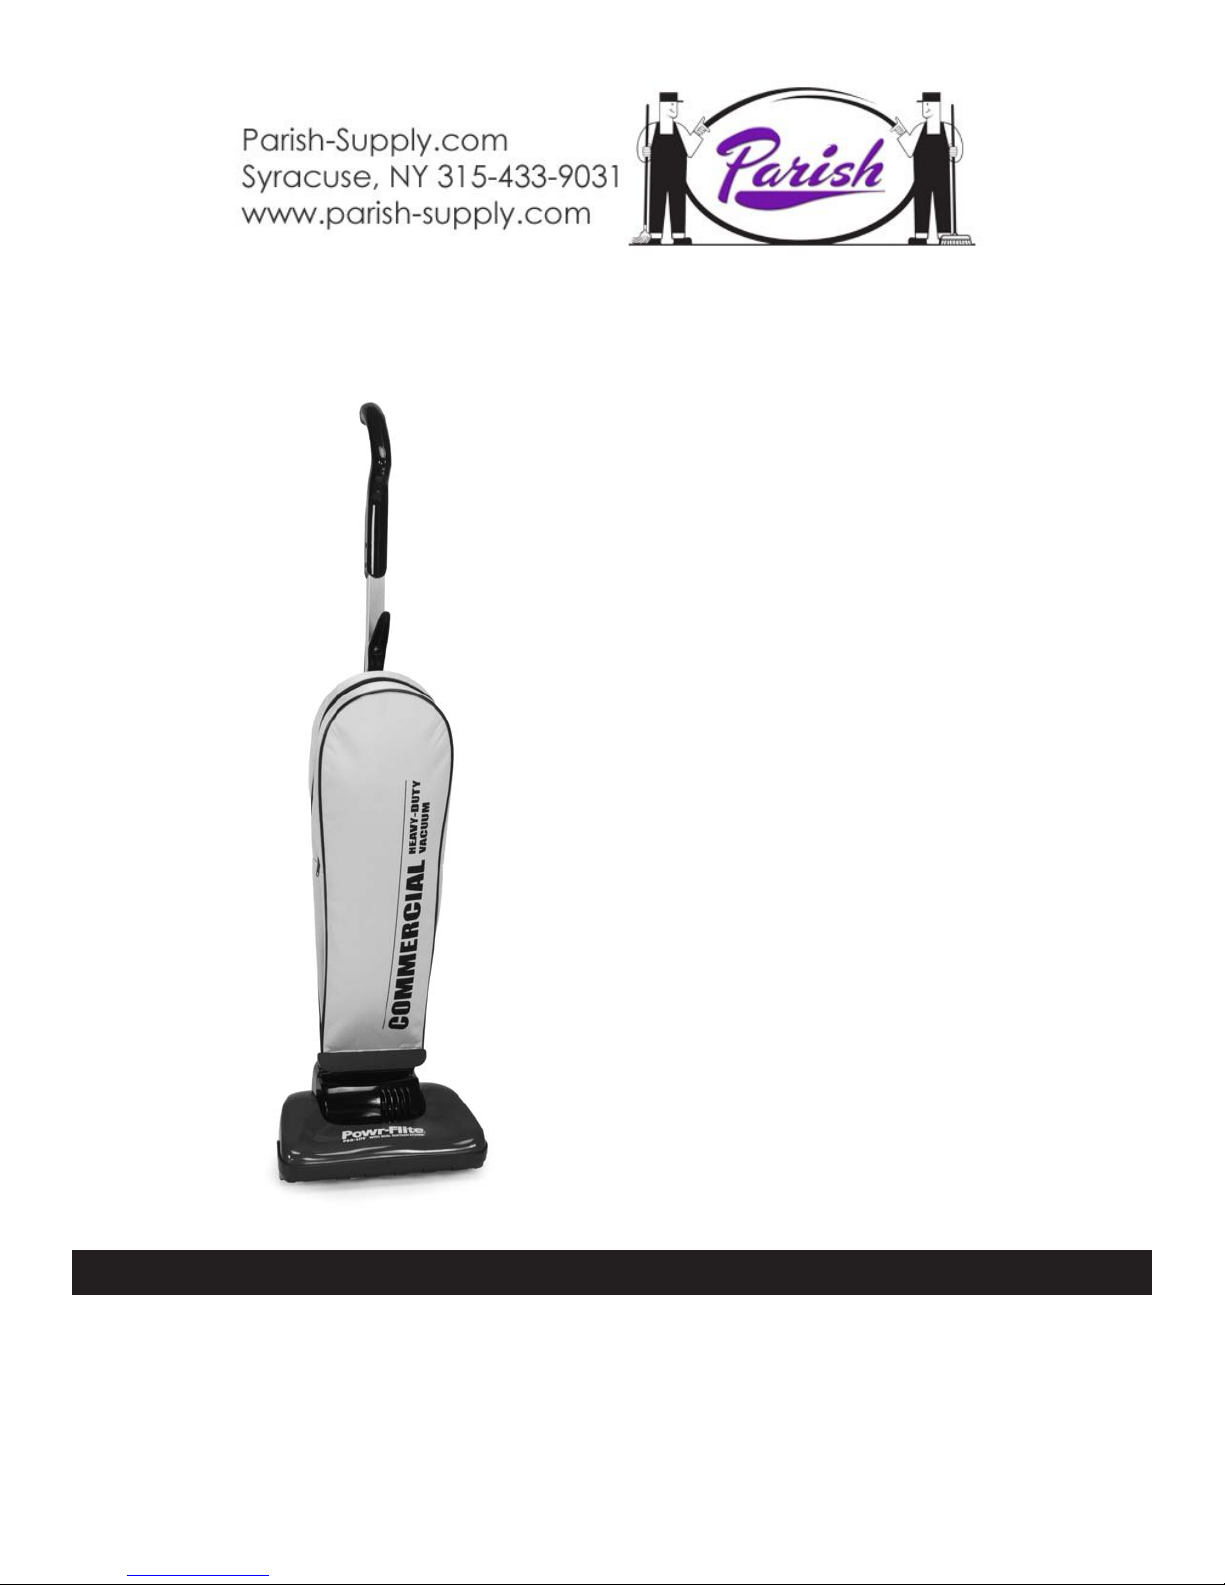
Dual Suction System
Pro-Lite
Model PF62EC
POWR-FLITE LIMITED WARRANTY
Powr-Flite will repair or exchange parts for your vacuum in the event of a manufacturing defect as follows:
PARTS: New or comparable rebuilt parts, for one year after original purchase.
LABOR: Carry-in service can be obtained during the warranty period by taking
your vacuum to an Authorized Powr-Flite W
IMPORTANT WARRANTY CONDITIONS: A purchase receipt or other proof of
date of original consumer purchase also will be required before warranty service
is rendered.
arranty Service Center.
This warranty covers normal use and does not cover damage which occurs in
shipment or failure resulting from alteration, accident, misuse, abuse, neglect, or
improper maintenance.
ATEMENT: This warranty is not transferable and extends only to the original
ST
purchaser when a new Powr-Flite vacuum is purchased from an Authorized
Powr-Fite Dealer. This warranty gives you specific legal rights, and you may
have other rights that vary from state to state.
A Tacony Company, Fort Worth, Texas 76140-1710, Call Toll-Free (800) 880-2913
©Powr-Flite, All Rights ReservedPFSM-PF62EC 09.06
Page 2
IMPORTANT SAFETY INSTRUCTIONS
GROUNDING INSTRUCTIONS
When using an electrical appliance, basic precautions should be
bserved, including the following: Read all instructions before
o
using your lightweight upright vacuum cleaner.
WARNING: To reduce the risk of fire, injury or electric shock:
Never leave cleaner unattended when it is plugged in.
•
• Unplug from outlet when not in use and before servicing.
• Never use with damaged cord or plug.
• Never unplug by pulling on cord.
• Never pull or carry by cord, use cord as a handle, close door
n cord, pull cord around sharp corners, run cleaner over
o
cord, or expose cord to heated surfaces.
• Never use cleaner if it has been dropped, damaged, left
outdoors or dropped into water. Return it to place of purchase.
• Never allow children to use as a toy.
• Never use outdoors or on wet surfaces.
• Never handle cleaner or plug with wet hands.
• Never put any object into openings, use with blocked opening,
or restrict air flow.
• Never use without dust bag and/or filters in place.
• Never allow hair, loose clothing, fingers or body parts to get
near openings or floor brush in the appliance.
• Never pick up hot coals, cigarette butts, matches or any hot,
smoking, or burning objects.
• Never pick up hard or sharp objects such as glass, nails,
screws, coins, etc.
• Never pick up flammable or combustible materials (lighter
fluid, gasoline, kerosene, etc.) or use in the presence of
explosive liquids or vapor.
• Connect to a properly grounded outlet only.
See grounding instructions.
• Never pick up toxic material (chlorine bleach, ammonia,
drain cleaner
Never use in an enclosed space filled with vapors given of
•
by oil base paint, paint thinner, some moth proofing
substances, flammable dust, or other explosive or toxic vapors.
• Never use for any purpose other than described in this
User’s Guide.
• Use only on dry, indoor surfaces.
• Keep openings free of dust, lint, hair, etc.
•
Keep appliance on a level surface.
• Turn off all controls before plugging in or unplugging cleaner.
Be extra careful when cleaning stairs.
•
• Pay close attention when working around children.
, etc.).
f
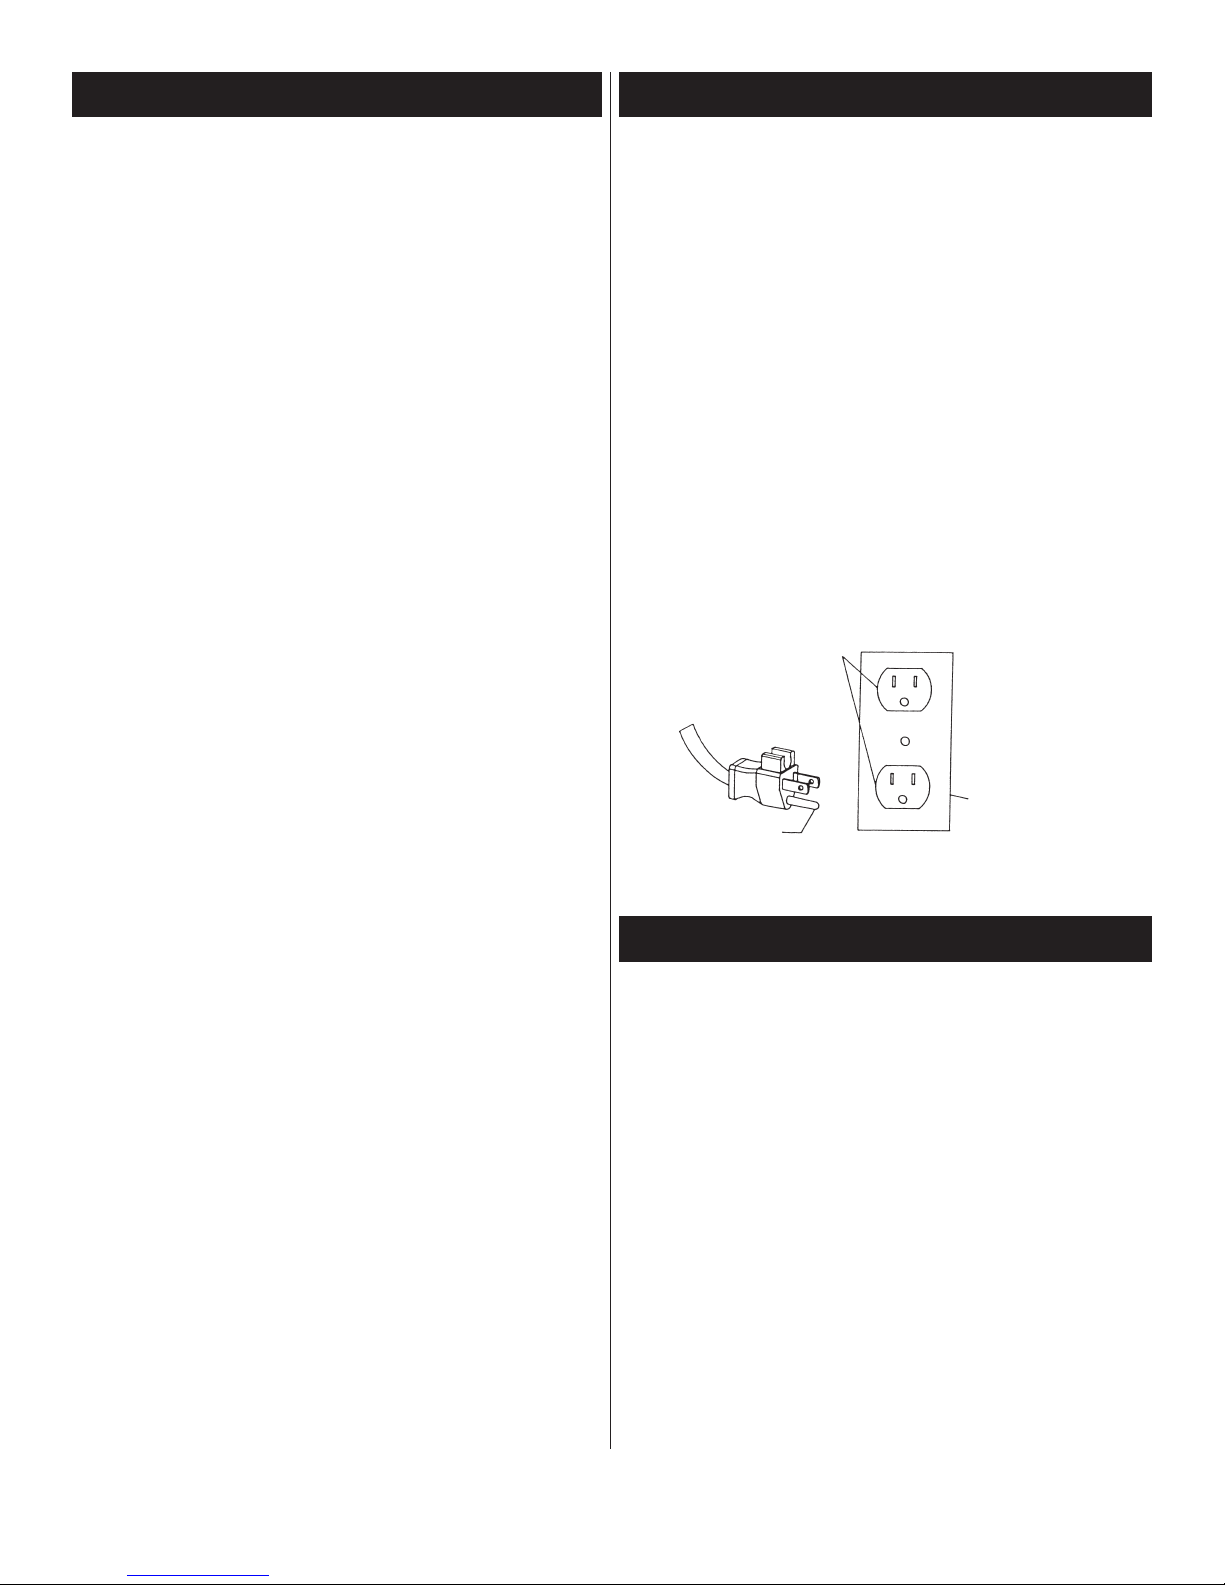
This appliance must be connected to a grounded wiring system.
If it should malfunction or break down, grounding provides a safe
path of least resistance for electrical current, reducing the risk of
lectrical shock. The cord for this appliance has an equipment-
e
grounding conductor and a grounding plug. It must only be
lugged into an outlet that is properly installed and grounded in
p
accordance with all local codes and ordinances.
WARNING: Improper connection of the equipment-grounding
conductor can result in a risk of electrical shock. Check with a
ualified electrician or service person if you aren’t sure if the out-
q
let is properly grounded. NEVER MODIFY THE PLUG. If it will
not fit the outlet, have a proper outlet installed by a qualified electrician. This appliance is designed for use on a nominal 120-volt
circuit, and has a grounding attachment plug that looks like the
plug in the drawing above. Make certain that the appliance is
connected to an outlet having the same configuration as the plug.
No plug adapter should be used with this appliance.
Grounded
Outlet
Prong or
Grounding pin
Grounded
Outlet Box
PRODUCT FEATURES AND BENEFITS
The Dual Suction System is a lightweight, yet powerful, cleaning
system ideal for commercial use on all types of carpets and
floors.
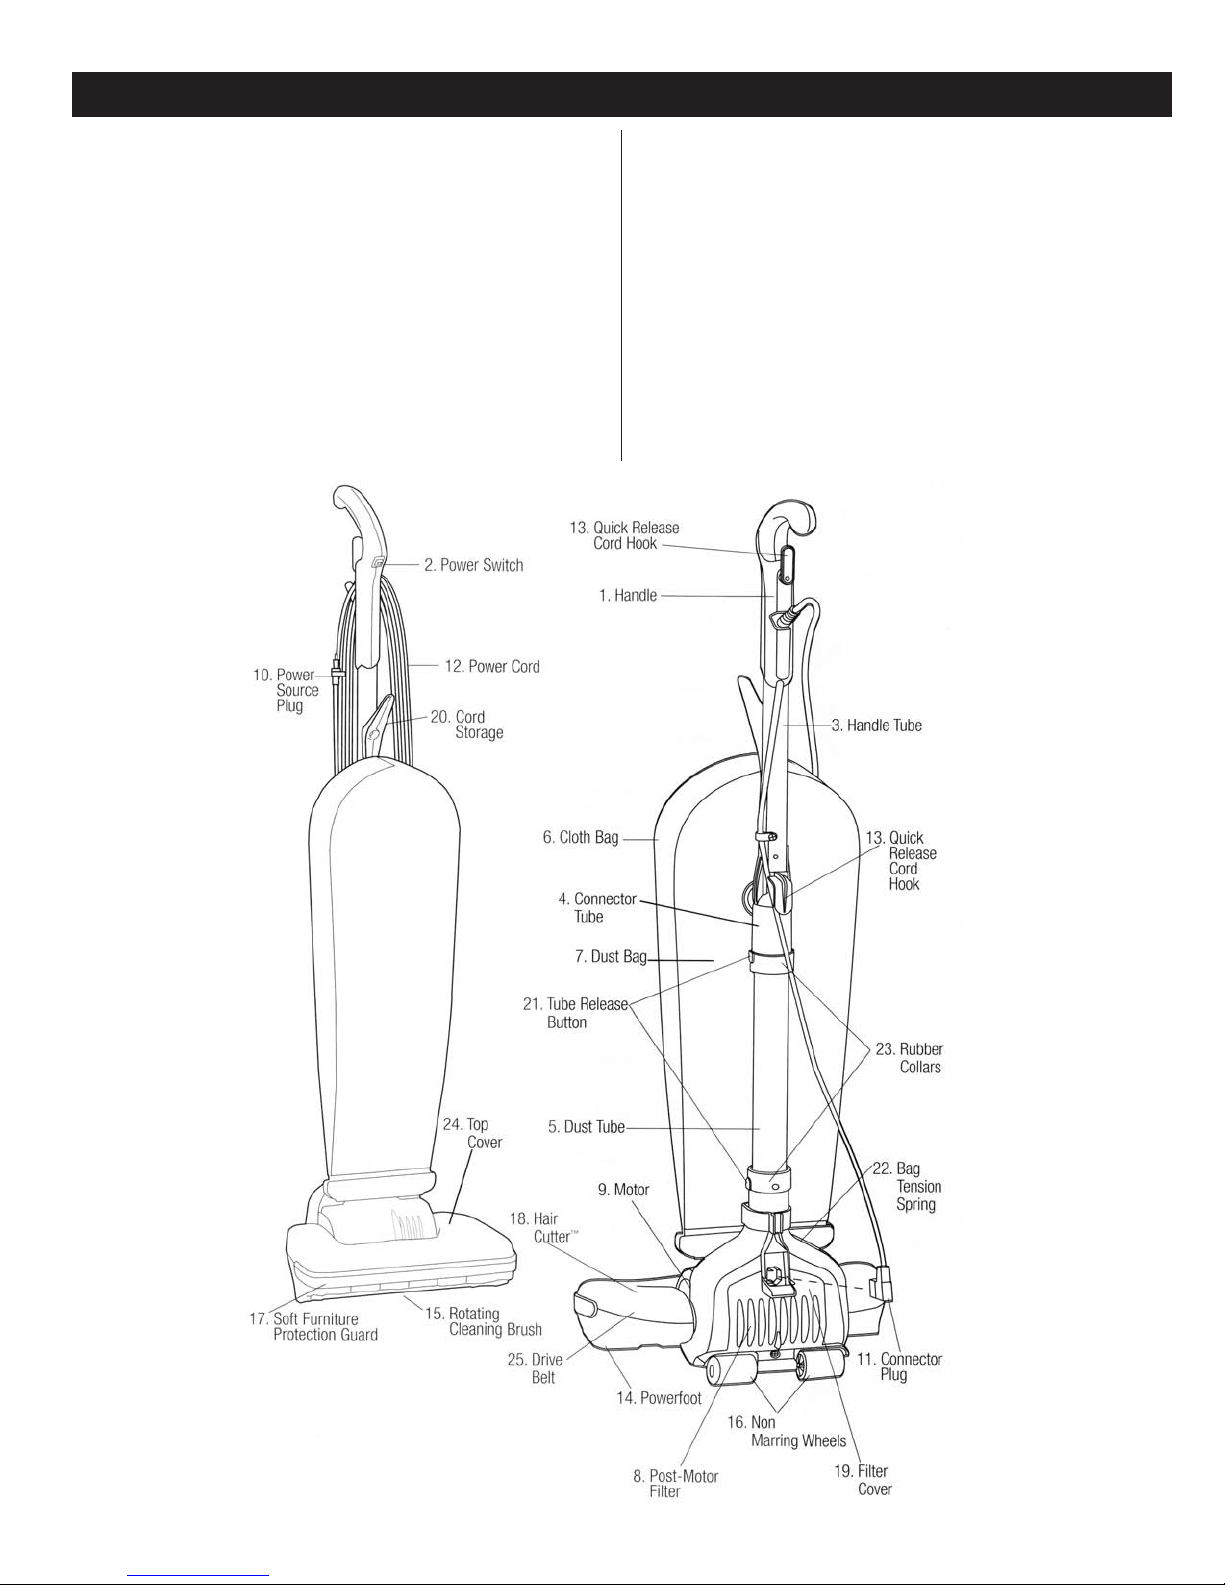
1. Handle – designed for comfort and easy maneuvering.
2. Power Switch – conveniently located in handle.
3. Handle Tube – lightweight, for easy movement and use.
4. Connector Tube – strong lightweight aluminum tube is
designed for optimal airflow
Dust Tube – large diameter dust tube designed to
5.
minimize clogging.
6. Cloth Bag – durable, reinforced material for years of service.
7. Dust Bag – top loading bag for clean and easy bag change.
8. The Post-Motor Filter – helps to reduce motor emissions.
9. Motor – 6 amps of full cleaning power, saves energy
10. Power Source Plug – grounded for safe, reliable operation.
11. Connector Plug – for enhanced safety.
12. Power Cord – 50 foot heavy-duty, commercial quality for
extended reach.
.
.
SAVE THESE INSTRUCTIONS
Page 3
PRODUCT FEATURES AND BENEFITS
13. Quick Release Cord Hooks – for quick, easy removal of
ower cord.
p
14. Powerfoot – twin fan/dual suction design for deeply embedded
dirt and superior edge cleaning.
15. Rotating Cleaning Brush – continuous, rotating dual action for
thorough cleaning; white, non-marring bristles.
6. Non-Marring Wheels – safe for use on bare floors.
1
17. Soft Furniture Protection Guard – helps protect furniture
hile vacuuming.
w
18. Hair Cutter – ensures that any long hair or other fibers are cut
and broken down into lengths that are manageable for the
vacuum. This helps to prevent clogs.
19. Filter Cover – easily removes with one screw for easy
ccess to filter.
a
20. Dual Cord Storage – wrap cord around the back of the unit, or
simply hang cord on the front Cord Storage Hook.
21. Tube Release Buttons – allows for easy access in the unlikely
event of the tube clogging.
2. Bag Tension Spring – keeps the bag secure at the base of
2
the bag.
3. Rubber Collars – designed to seal air path at critical
2
connections, preventing loss of airflow.
24. Top Cover – simply removes with 3 screws allowing for easy
belt change.
25. Drive Belt – designed for optimal life and performance.
Page 4
HOW TO ASSEMBLE
WARNING: Plastic bags or film can be dangerous. To avoid danger of suffocation,
eep away from babies and children.
k
he dual Suction System is packaged for convenience and requires minimal assembly.
T
The only tool you will need is a Phillips head screwdriver.
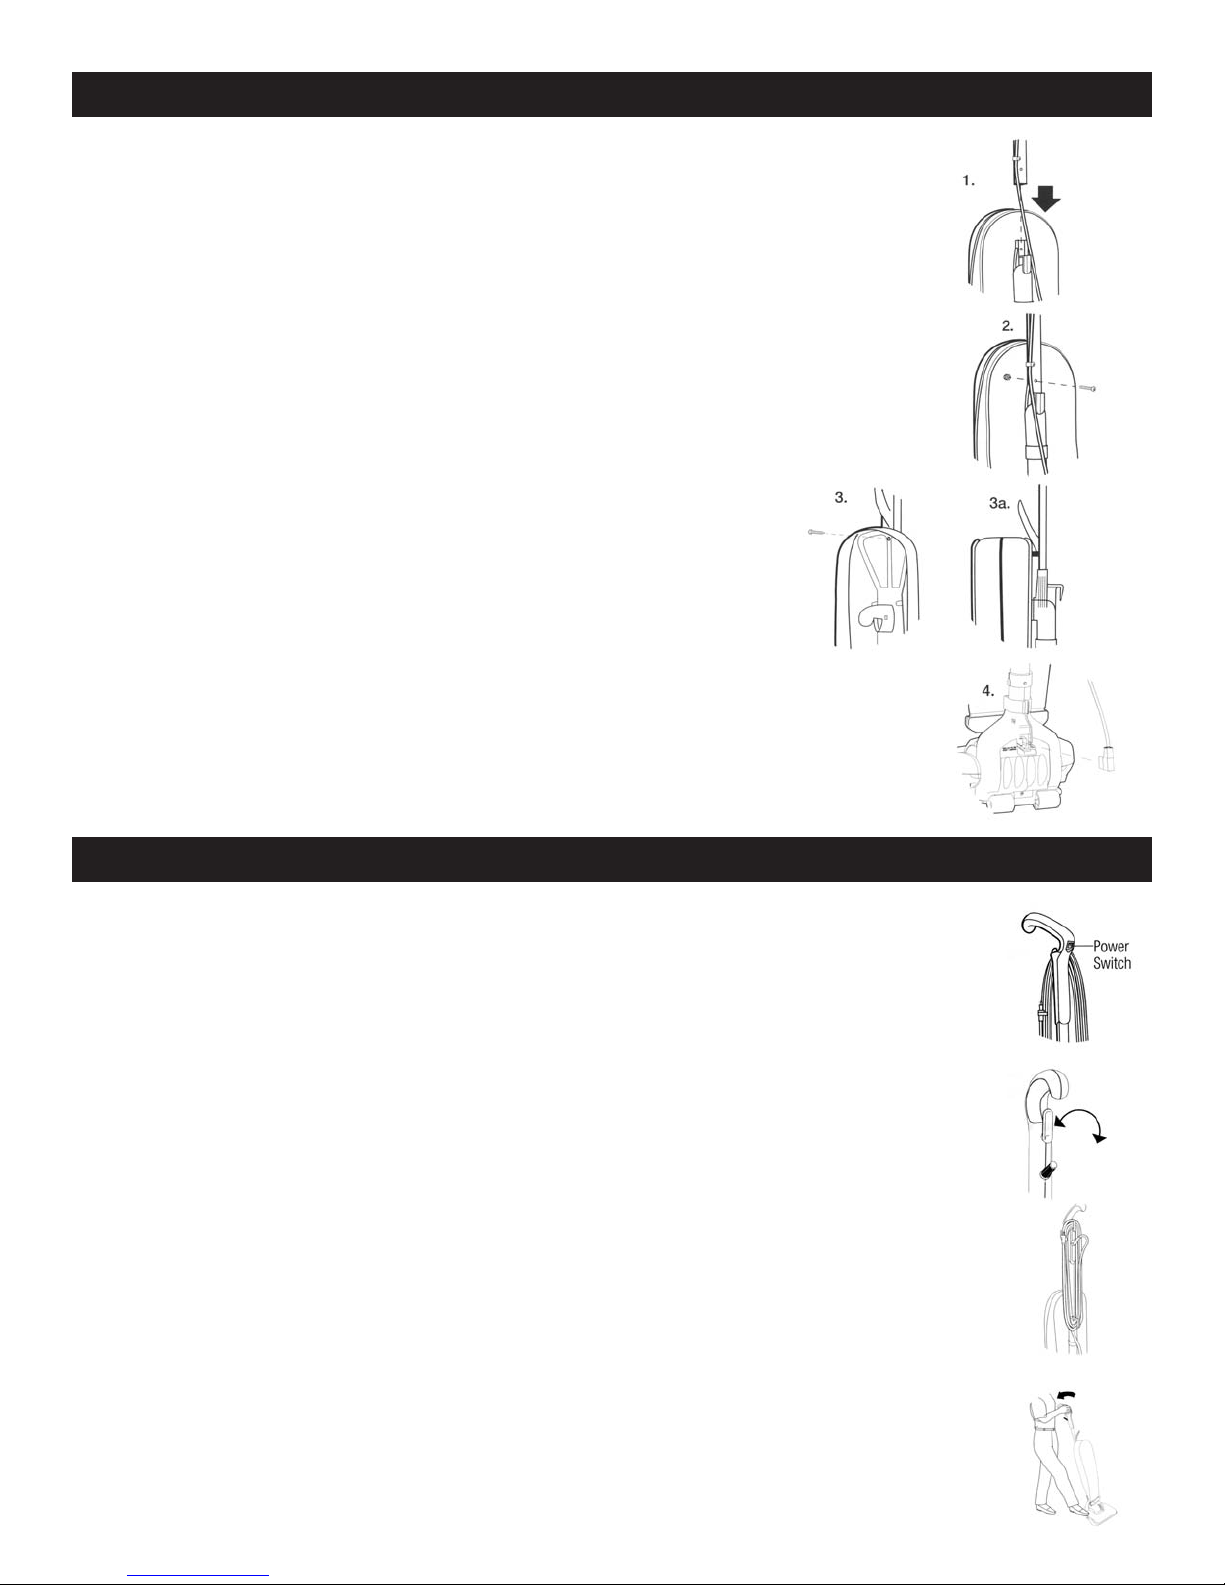
1. Slide the handle Tube into the Connector, aligning the hole in the Handle Tube with
the molded hole at the top of the Connector.
2. Hold the hex nut in front of the Connector in the hex shaped cavity while inserting the
screw with your finger from the back. Tighten the screw while placing your finger over
the hex cavity to hold the hex nut in place. After a few turns, tighten further with a
Phillips head screwdriver. Do not overtighten.
3. Slide screw through plastic Cord Hook from the inside of Cloth Bag. Align screw with
hole in Handle Tube. Tighten screw.
4. Remove screw from Filter Cover. Remove Filter Cover. Insert the Connector Plug
into the back of the unit at the rear of the Powerfoot – Make sure the Connector Plug
is fully inserted. Replace Filter Cover. Replace Filter Cover Screw.
Your Vacuum cleaner is now ready to use.
HOW TO USE YOUR DUAL SUCTION SYSTEM VACUUM
Tip. Before cleaning under low furniture, always check area first for objects that might harm the Rotating
Cleaning Brush or get caught in the Dust Tube.
Power Supply
The Power Cord is stored at the back of the vacuum cleaner, and is looped around the Quick Release Cord
Hooks. The polarized Power Source Plug is designed to attach to the Power Cord during storage. Before
using, make sure the Connector Plug is securely attached to the Powerfoot and that the Power Source Plug is
plugged into a polarized outlet.
Power Switch
The Power Switch is located in the Handle of the cleaner. Push down (I) to turn ON. Push up (O ) to turn
OFF.
Power Cord Storage
When you are finished using your vacuum, return it to the upright position. Make sure the vacuum is turned
OFF. Always unplug the vacuum by grasping the Power Source Plug (NOT the Power Cord) and disconnecting from the outlet. Properly store the Power Cord by winding the cord around the Quick Release Cord Hooks
on the back of the vacuum in a continuous loop, or by hanging the cord on the Cord Storage Hook located on
the front of the vacuum. Attach the Power Source Plug to the Power Cord.
Operation
This vacuum, with Dual Suction System is designed to effectively and safely clean all types of carpeting, wood,
linoleum, and vinyl floors. Its wide 14-inch Powerfoot makes cleaning quick and easy.
To place the vacuum in position for use, lightly press your foot on the Powerfoot and tip the Handle backwards.
Page 5
HOW TO USE YOUR DUAL SUCTION SYSTEM VACUUM
Routine Maintenance
For maximum performance from your vacuum, check and maintain vacuum
parts regularly.
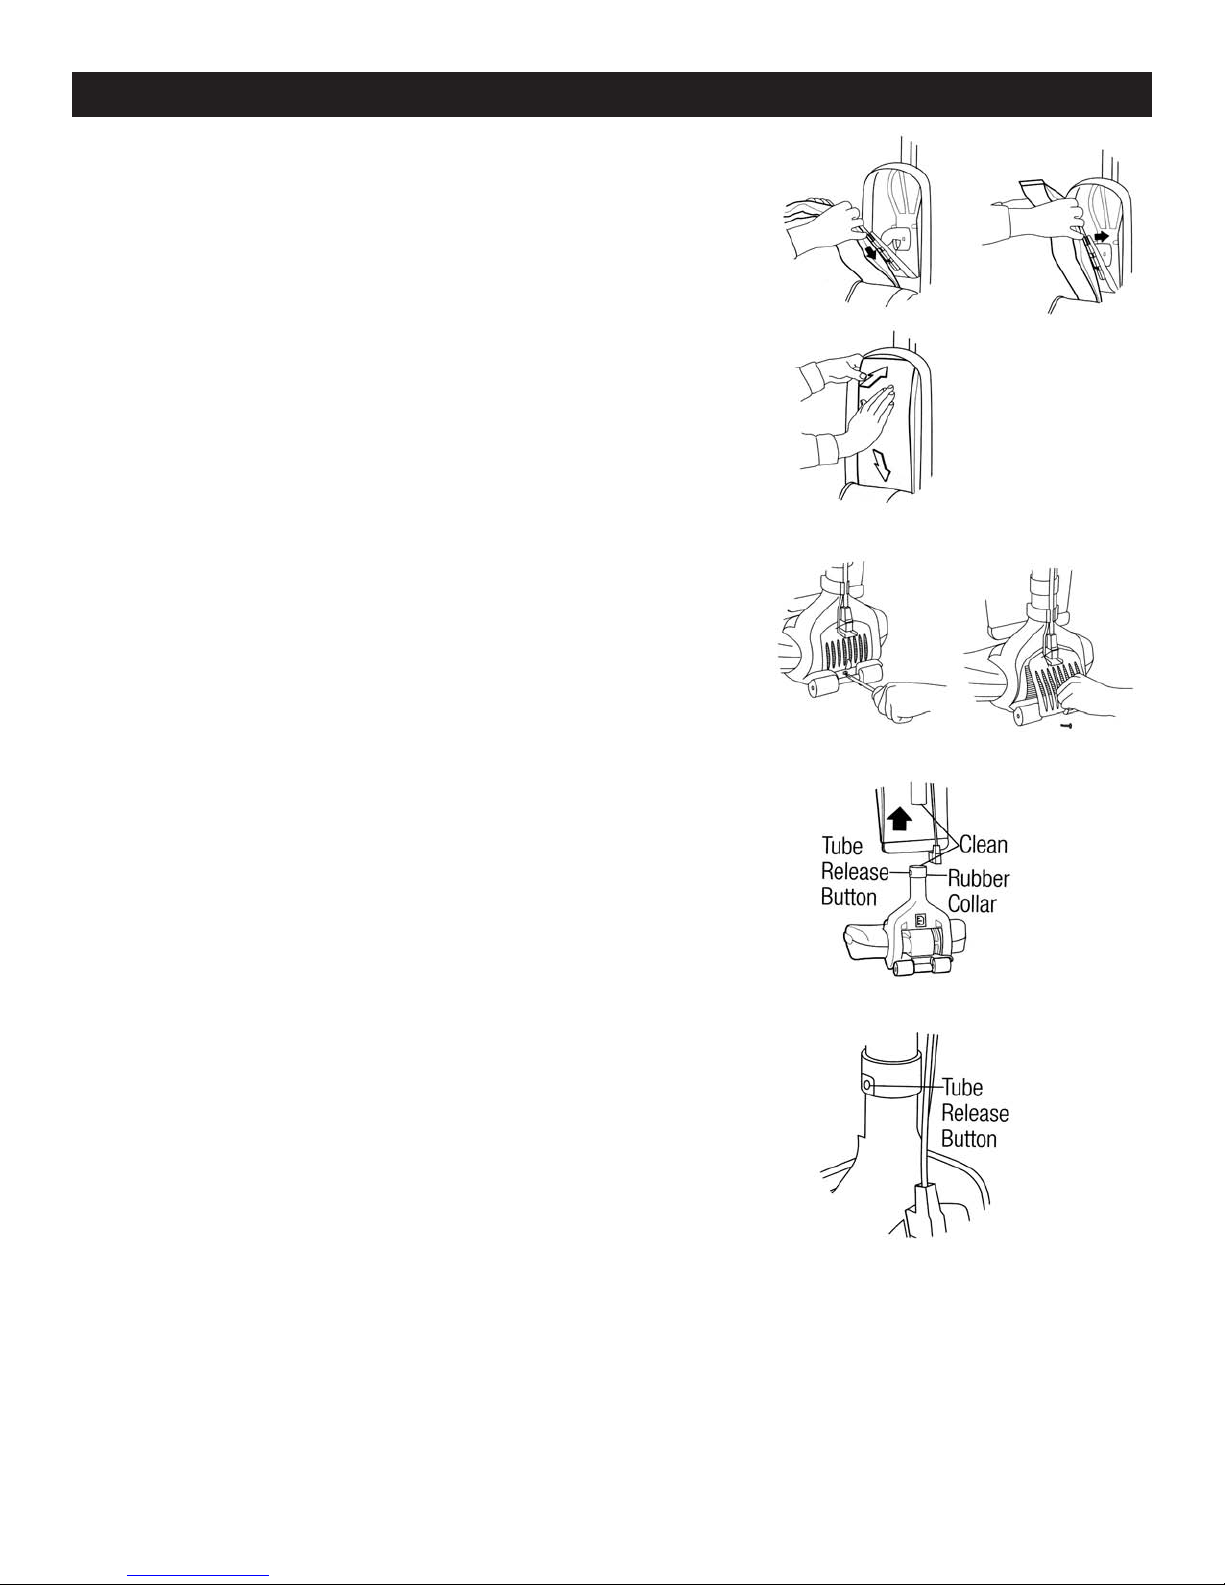
Replacing the Dust Bag
Check the Dust Bag weekly. Replace the Dust Bag when it is near full or when
leaning suction diminishes. Never reuse a Dust Bag.
c
WARNING: To avoid electrical shock or injury from moving parts, always turn OFF
the Power Switch and unplug the Power Source Plug before performing maintenance
r trouble shooting. Always unplug by grasping the Power Source Plug; NEVER
o
pulling on the Power Cord to unplug.
Tip: Vacuuming new carpet or vacuuming fine powders may clog the Dust Bag.
Check Dust bag often.
Unplug vacuum by grasping and pulling on the Power Source Plug.
Unzip Cloth Bag. Remove collar retainer by pressing on the two tabs and pulling the
top towards you. Dispose of Dust Bag.
Slide collar of new Dust Bag completely into collar retainer.
Push collar retainer back into position and secure in place.
Tuck the remainder of the Dust Bag completely inside the Cloth Bag. Make sure it
lays flat, top to bottom, without bunching. Zip Cloth Bag.
Cleaning the Dust Tube
The vacuum features Dust Tube designed to optimize cleaning power. For best performance, routinely check and clear excess dust and other debris.
Note: Cover floor with newspaper to catch any loose material or dust removed during cleaning.
Release Bag Tension Spring.
Remove Filter Cover screw and then remove Filter Cover.
Unplug Connector Plug.
Locate the Tube Release Button at the top of the Powerfoot. The Tube Release
Button is hidden under a Rubber Collar on the side of the Dust Tube and can be
pressed through the Rubber Collar. Lift off the Dust Tube while pressing on the Tube
Release Button.
ube and the top section of the
Use a wire brush to clean out the inside of the Dust
Powerfoot where they connect.
Reconnect the tube with the Powerfoot. It should snap into place. Make sure that
the tube release button on the T
Rubber Collar
.
ube lines up with the T
T
ube Release Button on the
Plug the Connector Plug back into base of vacuum.
ARNING: To avoid electrical shock or injury from moving parts, always turn OFF
W
the Power Switch and unplug the Power Source Plug before performing maintenance
or trouble shooting. Always unplug by grasping the Power Source Plug; NEVER
pulling on the Power Cord to unplug.
Page 6
HOW TO USE YOUR DUAL SUCTION SYSTEM VACUUM
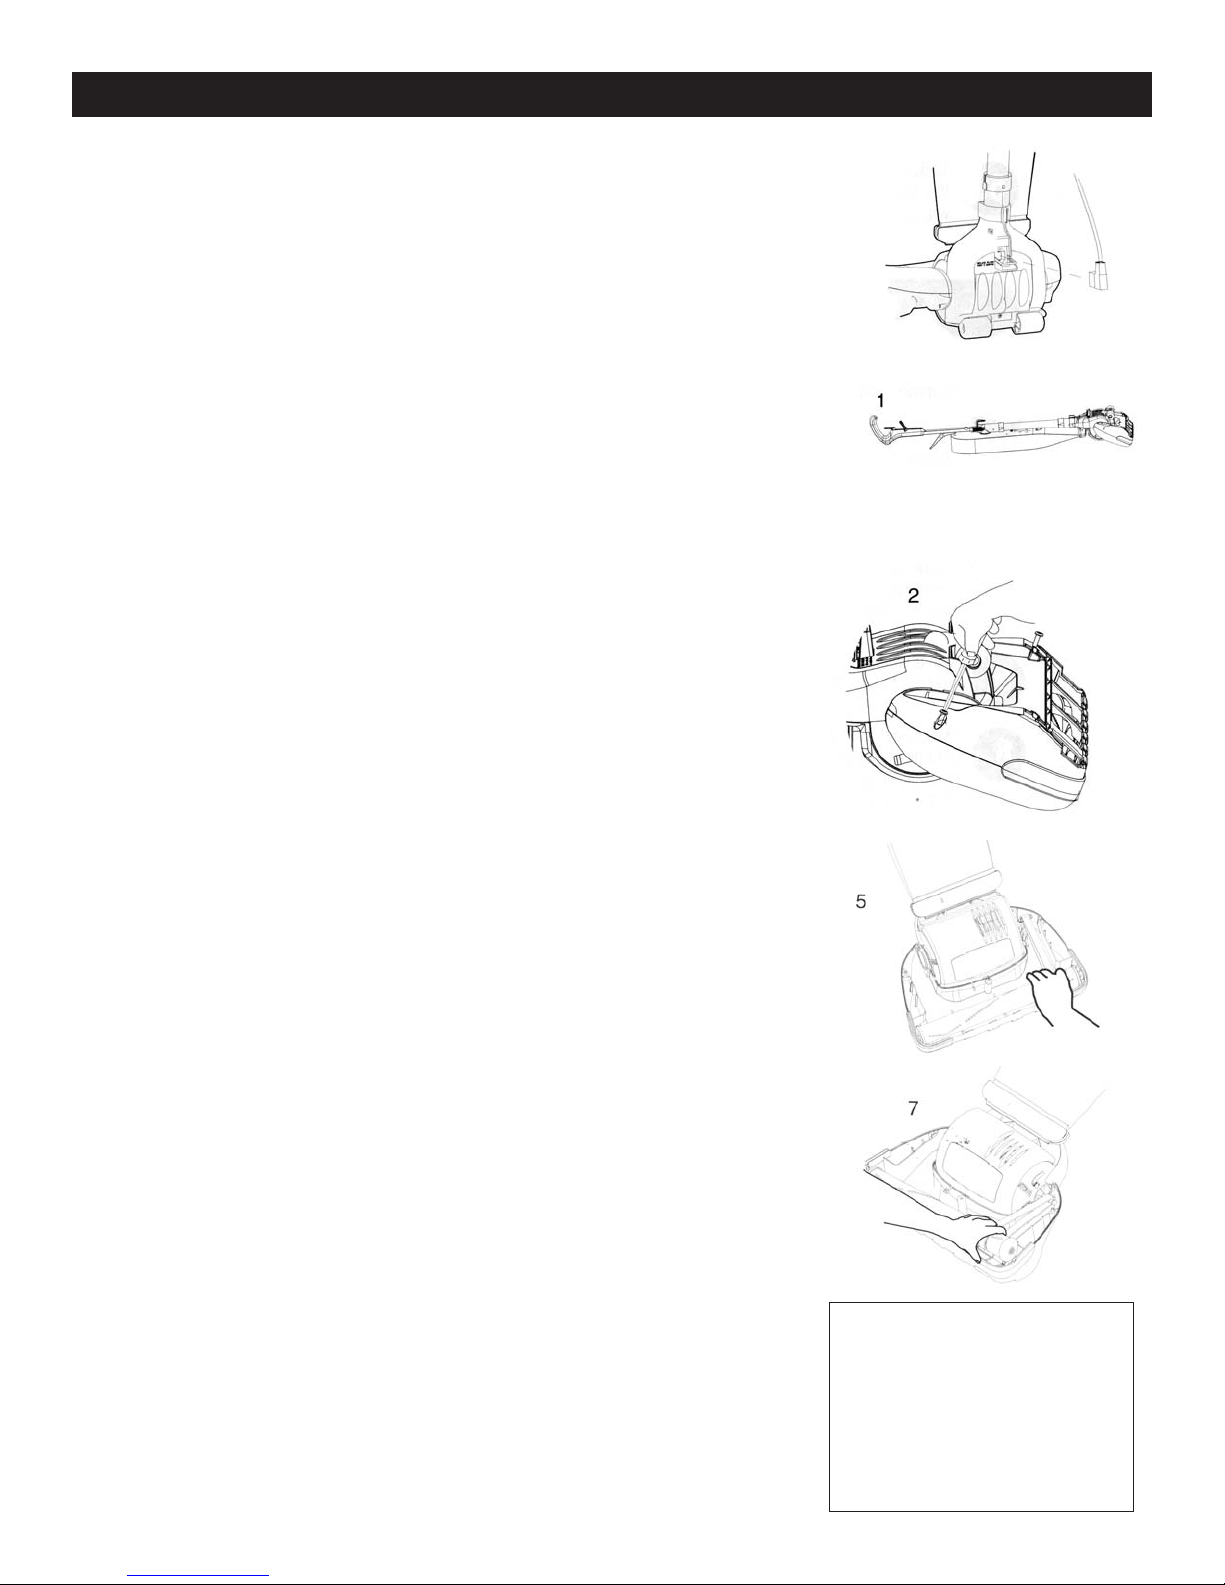
Cleaning the Filter
The Post-Motor Filter is located in the Powerfoot of your vacuum cleaner. It should be
checked often, and cleaned when the Post-Motor Filter becomes dirty.
1.To Clean Post-Motor Filter, remove the screw with a Phillips head screwdriver.
.Lift out Filter Cover.
2
.Remove Post-Motor-Filter and wash with mild soap and water. Dry thoroughly.
3
.Reinstall clean and dried Post-Motor filter.
4
5.Replace Filter Cover by sliding in the two tabs at the top of the Filter Cover and
centering over the screw hole.
6. Replace screw.
Cleaning the Rotating Cleaning
Brush/Replacing the Drive Belt
Check the Rotating Cleaning Brush and Drive Belt regularly for wear or damage. Keep the
Rotating Cleaning Brush ends free of string, hair, and carpet fibers. These can become
entangled and reduce the vacuum’s cleaning effectiveness.
NOTE: The Rotating Cleaning Brush can most often be cleaned without removal from the
vacuum. If there is an excessive amount of hair and debris, remove the Rotating Cleaning
Brush for proper cleaning.
1.Unplug the vacuum and turn face down on a flat surface.
2.Remove all 3 screws from the bottom of the Powerfoot.
3.Grip both the Top Cover and base while turning unit back over. Lift off Top Cover.
4.Check Drive Belt. If it is broken or damaged, remove Rotating Cleaning Brush and
replace Drive Belt.
WARNING: To avoid electrical shock or injury from moving parts, always turn OFF the
Power Switch and unplug the Power Source Plug before performing maintenance or trouble
shooting. Always unplug by grasping the Power Source Plug; NEVER pulling on the Power
Cord to unplug.
5.
T
o remove the Rotating Cleaning Brush, pull the right side of the Rotating Cleaning
Brush toward the front of the Powerfoot as you lift slowly
Clean off Rotating Cleaning Brush as necessary.
6.
Place existing or new Drive Belt over Rotating Cleaning Brush and the motor shaft. Insert
7.
the end cap pin on the left of the Rotating Cleaning Brush into the slot on the Powerfoot
and slide the end cap pin on the right end of the Rotating Cleaning Brush in to the slot in
the Powerfoot and lower until it clicks into place.
.
8.Make sure the Furniture Protection Guard is still intact.
9.Align the 3 tabs on the Top Cover with the 3 slots in the Powerfoot. Press into place,
making sure the Furniture Protection Guard is on the outside.
Turn vacuum cleaner face down.
10.
11. Reinstall the 3 screws beginning with the center screw.
WARNING: To avoid electrical
shock or injury from moving parts,
always turn OFF the Power Switch
and unplug the Power Source Plug
before performing maintenance or
trouble shooting. Always unplug by
grasping the Power Source Plug;
NEVER pulling on the Power Cord
to unplug.
Page 7

TROUBLESHOOTING
Vacuum cleaner won’t run.
ossible Causes Remedies
P
Vacuum Cleaner is not plugged in Check power Source Plug and Connector Plug
Household fuse/circuit breaker tripped Check/replace fuse – Reset breaker
Vacuum cleaner won’t pick up dirt.
Possible Causes Remedies
Dust Bag is full Replace with new Dust Bag
Drive Belt not functioning Realign Drive Belt or replace if damaged
Rotating Cleaning Brush bristles worn Replace Rotating Cleaning Brush
Rotating Cleaning Brush jammed Remove Rotating Cleaning Brush and clean debris from
brush ends; Reinstall Drive Belt
Dust Tube is clogged Clean Dust Tube
Accumulation of dust inside Cloth Bag
Possible Cause Remedies
Dust Bag is clogged or dirty Replace with new Dust Bag
Dust Bag collar retainer not secure Secure Dust Bag collar retainer
Inlet clogged Shake dust down to bottom of Dust Bag.
Page 8
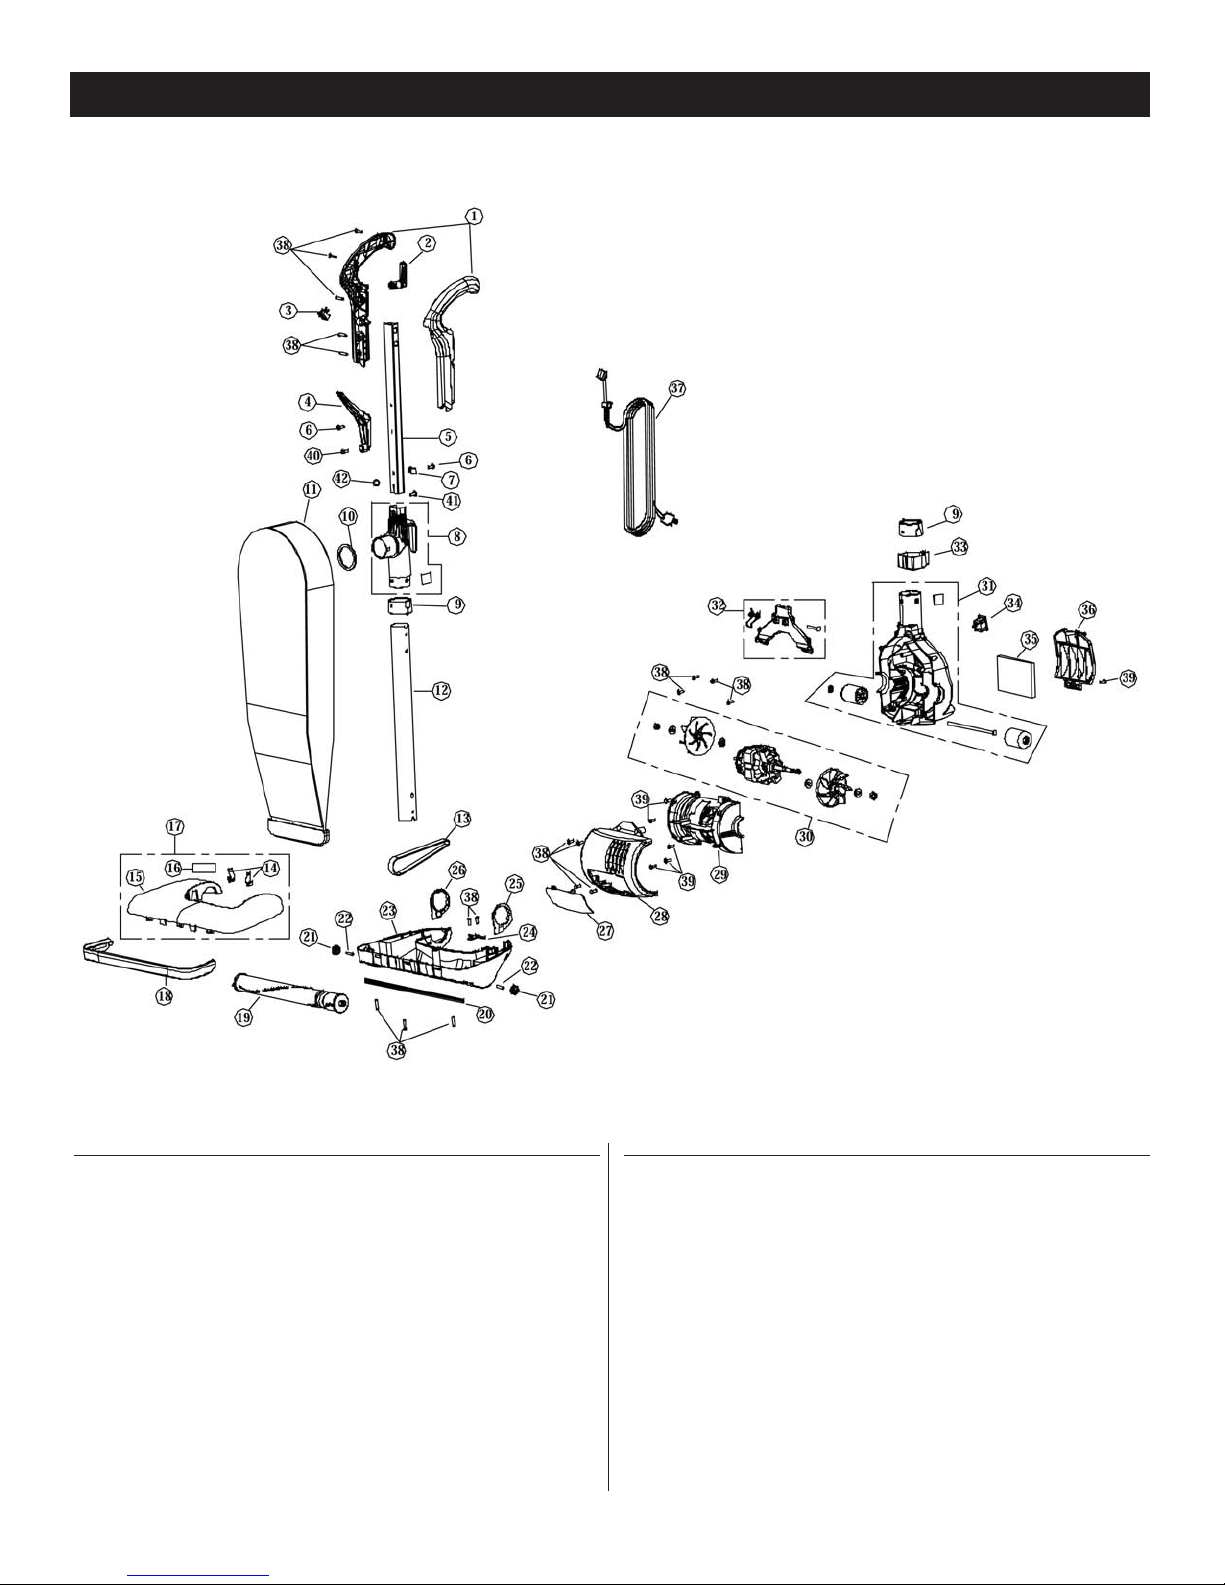
PARTS
ref# part # description
1
2 B431-4814 Upper Cord Hook
3 A428-2014 Main Switch Handle
4
5 B431-4700 Handle Tube Rectangular
6 A090-0200 Screw
7 A090-0100 Cable Clamp
8 D431-4300 Upper Duct Diverter & Bag Mount Assembly
9
10
11 D431-0600 Zippered Cloth Bag Assembly
12 B431-4000 Duct Tube
13
14 B016-1400 Upright Stop w/Spring Clips
15 B017-3639 Nozzle Cover
16 B206-7900 Nozzle Label
17
18
19
20 B015-2414 Squeege
21 B010-1414 Small Wheel
C431-4400
B431-4914
B431-4214
1-4414
B21
B014-0814 Belt
D017-3600 Nozzle Cover Assembly
B029-0414
B012-3000
Assembly
Handle
Cord Hook Commercial
Rubber Collar
Bag Mount Foam Gasket
Furniture Guard
Assembly
Agitator
ref# part # description
22
23 B016-1314 Basetray
24 B014-0000 Belt Guard Hair Cutter
25
26 B016-0400 Right Pivot
27 B018-0239 Lens
28 B051-0639 Lense Holder Cover
29 B051-0514 Motor Cover
30
31
32 D051-0400 Duct Cover Assembly
33 B431-4114 Lower Cord Clip/Yoke Support
34
35 B051-0239 Post Filter
36 B051-0114 Post Filter Cover
37 A434-0831 Cord Set
38
39
40
41 A090-0400 Screw
42 A090-0500 Nylon Insert
B010-0900
B016-0600
13-3200
D1
D051-0000
A028-0214 Male Plug
A732-8314 Screw
A732-8414
A090-0300
Axle
Small
Left Pivot
Motor Assembly
Motor Housing
Screw
Screw
Assembly
©Powr-Flite, All Rights ReservedPFSM-PF62EC 09.06
 Loading...