

Page 1

VELOX
®
VELOX® Junior
©2016 PARI GmbH Spezialisten für effektive Inhalation, 055D1001-B 01/16
Page 2

de
Gebrauchsanweisung .................................
3
en Instructions for use .....................................
Electromagnetic compatibility....................
31
59
Page 3

– 3 –
Gebrauchsanweisung
de
Stand der Information: 2015-09. Alle Rechte vorbehalten. Technische und optische
Änderungen sowie Druckfehler vorbehalten. Abbildungen ähnlich.
WICHTIGE HINWEISE................................................................. 5
Allgemein......................................................................................
Informationen zur Gebrauchsanweisung......................................
Gestaltung von Sicherheitshinweisen ..........................................
Umgang mit dem Gerät ................................................................
Therapie von Babys, Kindern und hilfsbedürftigen Personen ......
Hygiene ........................................................................................
PRODUKTBESCHREIBUNG....................................................... 7
Lieferumfang ................................................................................
Zweckbestimmung .......................................................................
Bestimmungsgemäßer Gebrauch ................................................
Gegenanzeigen ............................................................................
Produktvarianten ..........................................................................
Materialinformation.......................................................................
Wartung........................................................................................
Lebensdauer ................................................................................
de
5
5
5
5
6
6
7
8
8
8
8
8
8
9
INHALATION ............................................................................... 10
Inhalation vorbereiten...................................................................
Inhalation durchführen..................................................................
Gerätesignale ...............................................................................
REINIGUNG UND DESINFEKTION............................................. 18
Vorbereitung.................................................................................
Steuerungseinheit ........................................................................
Vernebler......................................................................................
Trocknung und Aufbewahrung .....................................................
FEHLERSUCHE........................................................................... 25
TECHNISCHE DATEN................................................................. 26
Elektrischer Anschluss .................................................................
Abmessungen / Gewicht ..............................................................
Aerosoldaten ................................................................................
10
13
17
18
19
19
24
26
26
26
Page 4

– 4 –
Klassifikation nach DIN EN 60601-1 ............................................
Angaben zur elektromagnetischen Verträglichkeit .......................
Empfohlene Schutzabstände .......................................................
Umgebungsbedingungen für den Betrieb.....................................
26
27
27
27
SONSTIGES................................................................................. 28
Transport und Lagerung...............................................................
Entsorgung ...................................................................................
Garantiebedingungen...................................................................
Kontakt .........................................................................................
Zeichenerklärung..........................................................................
28
28
28
29
30
Page 5

– 5 –
1 WICHTIGE HINWEISE
1.1 Allgemein
Lesen Sie diese Gebrauchsanweisung vollständig durch. Bewahren Sie sie zum späteren Nachschlagen auf. Bei Nichtbeachtung der Gebrauchsanweisung können Verletzungen oder Schäden am Produkt nicht ausgeschlossen werden.
1.2 Informationen zur Gebrauchsanweisung
Diese Gebrauchsanweisung ist für den Anwender zu Hause bestimmt.
Gebrauchsanweisungen können Sie bei Verlust bei der PARIGmbH bestellen [siehe:
Kontakt, Seite29]. Für einzelne Produkte sind die Gebrauchsanweisungen sowohl in
deutscher als auch in englischer Sprache im Internet abrufbar: www.pari.com (auf der
jeweiligen Produktseite).
1.3 Gestaltung von Sicherheitshinweisen
Sicherheitsrelevante Warnungen sind in dieser Gebrauchsanweisung in Gefahrenstufen eingeteilt:
– Mit dem Signalwort VORSICHT sind Gefahren gekennzeichnet, die ohne Vor-
sichtsmaßnahmen zu leichten bis mittelschweren Verletzungen oder zu Beeinträchtigungen der Therapie führen können.
– Mit dem Signalwort HINWEIS sind allgemeine Vorsichtsmaßnahmen gekennzeich-
net, die im Umgang mit dem Produkt beachtet werden sollten, um Schäden am
Produkt zu vermeiden.
1.4 Umgang mit dem Gerät
Der VELOX ist ein elektrisches Gerät, das mit Kleinspannung betrieben wird. Er ist so
konzipiert, dass keine stromführenden Teile zugänglich sind. Bei nicht geeigneten
Umgebungsbedingungen bzw. einer Beschädigung der Steuerungseinheit oder des
Netzteils kann dieser Schutz jedoch nicht mehr vorhanden sein. Beachten Sie daher
die folgenden Hinweise, um einen Gerätedefekt und die damit verbundene Gefahr
durch Kontakt mit stromführenden Teilen (z.B. elektrischer Schlag) zu vermeiden:
– Verwenden Sie zum Betrieb des VELOX nur das von PARI mitgelieferte Netzteil
(Fuhua UE05WV oder Friwo FW7575M, Ausgangskleinspannung 5VDC).
– Lassen Sie den VELOX während des Betriebes niemals unbeaufsichtigt.
– Ziehen Sie aus Sicherheitsgründen unter folgenden Umständen stets das Netzteil
aus der Steckdose:
– bei Störungen während des Betriebes
– vor jeder Reinigung und Pflege
– unmittelbar nach dem Gebrauch
– Ziehen Sie das Netzteil nicht am Kabel aus der Steckdose.
– Achten Sie darauf, dass das Kabel niemals geknickt, gequetscht oder eingeklemmt
wird. Ziehen Sie das Kabel nicht über scharfe Kanten.
– Halten Sie den VELOX und das Kabel von heißen Flächen (z.B. Herdplatte, Heiz-
strahler, offenes Feuer) fern. Das Gehäuse des VELOX oder die Isolierung des Ka-
bels könnten beschädigt werden.
Page 6

– 6 –
– Halten Sie das Netzteil von Haustieren (z.B. Nagetieren) fern. Diese könnten die
Isolierung des Kabels beschädigen.
– Der VELOX darf nicht in Betrieb genommen bzw. es muss sofort das Netzteil aus
der Steckdose gezogen werden, wenn die Steuerungseinheit oder das Netzteil beschädigt ist oder der Verdacht auf einen Defekt besteht.
1.5 Therapie von Babys, Kindern und hilfsbedürftigen Personen
Babys, Kinder und hilfsbedürftige Personen dürfen nur unter ständiger Aufsicht eines
Erwachsenen inhalieren. Nur so ist eine sichere und wirksame Therapie gewährleistet. Diese Personengruppe schätzt oftmals Gefährdungen falsch ein, wodurch eine
Verletzungsgefahr bestehen kann.
Achten Sie darauf, dass Sie alle Produktbestandteile stets außer Reichweite von Babys und Kleinkindern aufbewahren.
Für die Behandlung von Babys und Kleinkindern, die noch nicht mit dem Mundstück
inhalieren können, gibt es spezielle Masken.
1.6 Hygiene
Beachten Sie folgende Hygienehinweise:
– Waschen Sie sich vor jeder Benutzung und Reinigung gründlich die Hände.
– Verwenden Sie zur Inhalationstherapie nur gereinigte Produktbestandteile.
– Bewahren Sie das Produkt und das Zubehör nicht in feuchter Umgebung oder zu-
sammen mit feuchten Gegenständen auf. Verunreinigungen und Restfeuchte führen zu Keimwachstum, wodurch eine erhöhte Infektionsgefahr besteht.
– Führen Sie die Reinigung unbedingt auch vor der ersten Anwendung durch.
Page 7
– 7 –
2 PRODUKTBESCHREIBUNG
2.1 Lieferumfang
Prüfen Sie, ob alle Teile Ihres PARI Produkts im Lieferumfang enthalten sind. Sollte
etwas fehlen, verständigen Sie umgehend den Händler, von dem Sie das PARI Produkt erhalten haben.
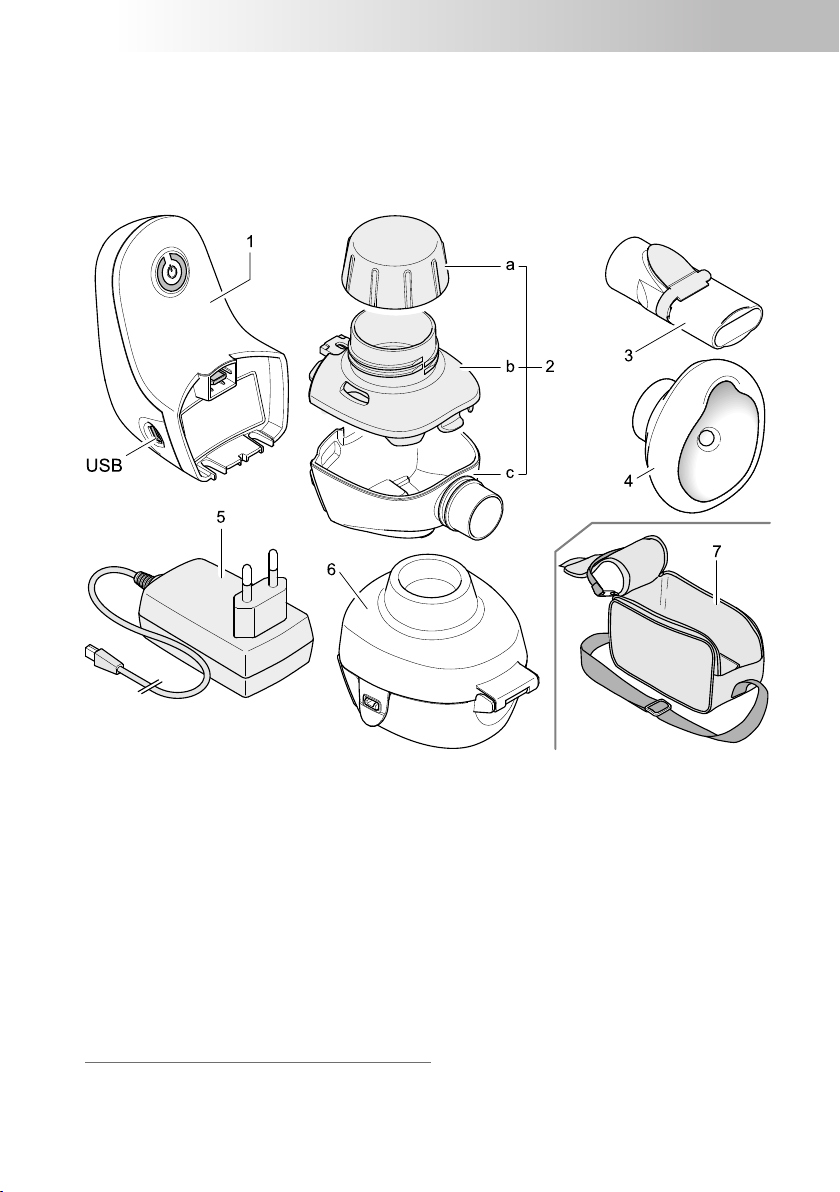
(1) Steuerungseinheit
(2) Vernebler1, bestehend aus
(2a) Medikamentendeckel (farbig)
(2b) Medikamentenbehälter mit Aerosolerzeuger2 (farbig)
(2c) Verneblerkammer
(3) Mundstück
(4) SMARTMASK Baby
1
1, 3
(5) Netzteil
(6) VELOXcare
(7) Tasche
1) Nicht für einen Patientenwechsel vorgesehen, d.h. nur von ein und derselben Person zu verwenden.
2) TouchSpray® Technology made under license from the Technology Partnership PLC.
3) Nur enthalten in der Produktvariante „VELOX Junior“.
Page 8
– 8 –
2.2 Zweckbestimmung
Der VELOX ist ein Inhalationsgerät zur Therapie der Atemwege.
2.3 Bestimmungsgemäßer Gebrauch
Der Vernebler, das Mundstück und die SMARTMASKBaby dürfen aus hygienischen
Gründen nur von einem einzigen Patienten verwendet werden.
Das Produkt ist nur für Patienten geeignet, die selbständig atmen und bei Bewusstsein sind.
Nur für die Inhalationstherapie zugelassene Medikamente dürfen verwendet werden.
Beachten Sie eventuelle Einschränkungen in der Gebrauchsinformation des jeweiligen Medikaments.
Der VELOX ist nicht für eine Anwendung mit Antibiotika zur Therapie von bakteriellen Infektionen der Atemwege (z.B. bei Pseudomonas aeruginosa) vorgesehen.
2.4 Gegenanzeigen
Keine.
2.5 Produktvarianten
DenVELOX gibt es in zwei verschiedenen Versionen:
– VELOX
Zur Behandlung der Atemwege von Erwachsenen und Kindern ab ca. 3Jahren.
– VELOX Junior
Zur Behandlung von Babys ab einem Körpergewicht von ca. 2,5kg, Kleinkindern
und Kindern.
Sollten diese noch nicht mit dem Mundstück inhalieren können, muss zur Behandlung die im Lieferumfang enthaltene SMARTMASK Baby verwendet werden.
2.6 Materialinformation
Polypropylen Vernebler, Mundstück, VELOXcare
Thermoplastisches Elastomer Vernebler, Mundstück, Steuerungseinheit (Gehäuse),
Acrylnitril-Butadien-Styrol Steuerungseinheit (Gehäuse)
Silikon SMARTMASK Baby
VELOXcare
2.7 Wartung
Das Gerät ist wartungsfrei.
Page 9

– 9 –
2.8 Lebensdauer
Komponente Erwartete Lebensdauer
Steuerungseinheit 3 Jahre
Vernebler 1 Jahr
Maske 2 Jahre
VELOXcare 3 Jahre
Der Vernebler ist für 365Anwendungen und 52Desinfektionen ausgelegt.
Wenn die Behandlung einer Krankheit eine intensivere Nutzung und/oder häufigere
Desinfektionen erforderlich macht, verkürzt sich die Lebensdauer.
Die einzelnen Komponenten sind spätestens bei Erreichen der oben angegebenen,
erwarteten Lebensdauer auszutauschen.
Page 10
– 10 –
3 INHALATION
3.1 Inhalation vorbereiten
Die Steuerungseinheit kann mit dem mitgelieferten Netzteil oder mit Batterien (bzw.
Akkus) betrieben werden. Es wird empfohlen, Batterien vor der Montage des Verneblers einzusetzen. Das Netzteil hingegen sollte erst unmittelbar vor der Inhalation angeschlossen werden.
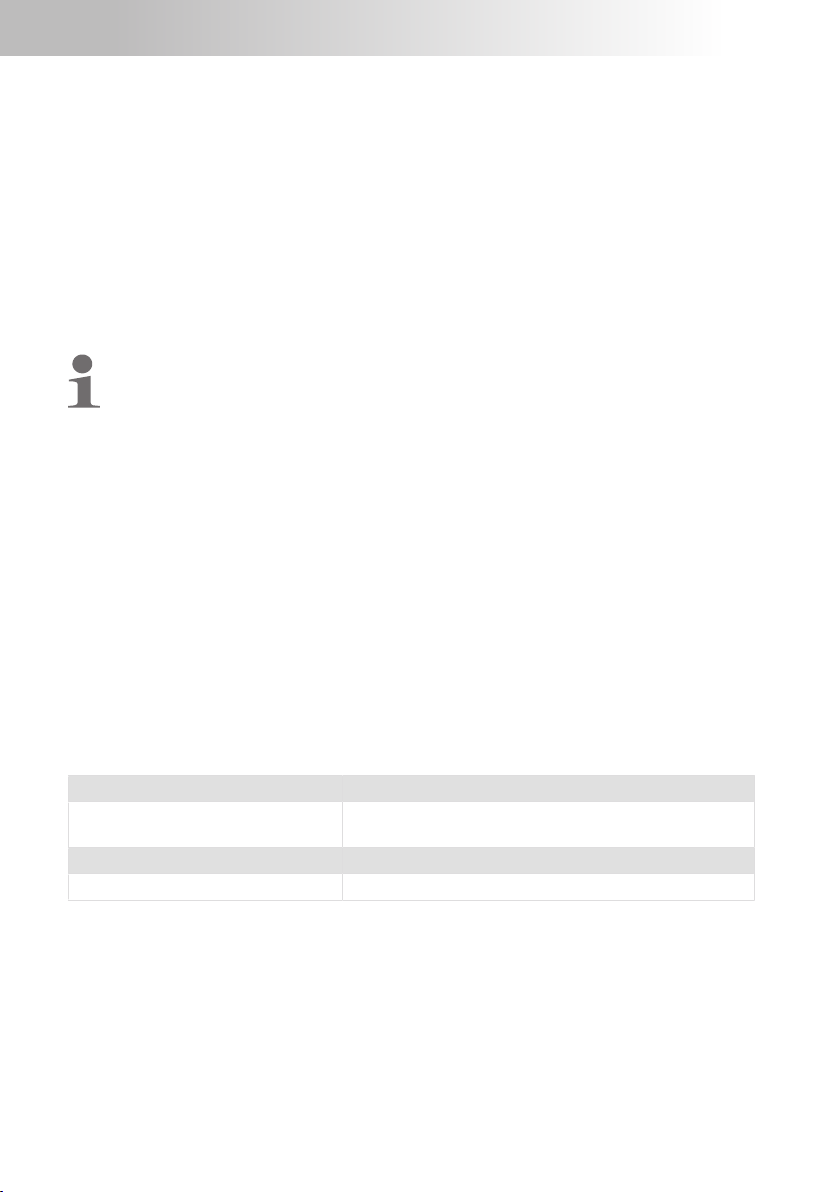
Batterien einsetzen bzw. wechseln
• Öffnen Sie den Batteriefachdeckel der
Steuerungseinheit.
• Nehmen Sie ggf. verbrauchte Batterien heraus.
Ziehen Sie dazu an den beiden Laschen.
• Setzen Sie neue Batterien ein.
Beachten Sie dabei die Polungssymbole im
Batteriefach der Steuerungseinheit.
Page 11
– 11 –
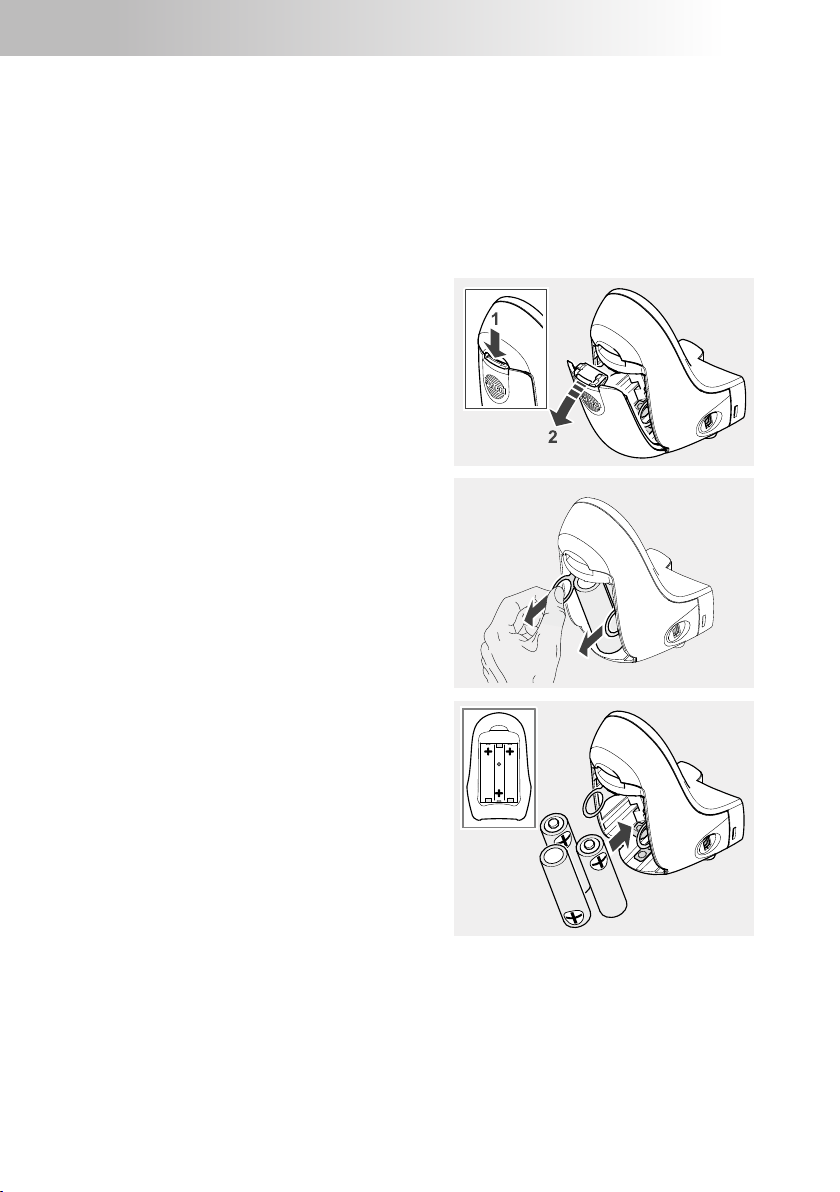
• Schließen Sie den Batteriefachdeckel.
Der Deckel ist sicher verschlossen, wenn er
eingerastet ist.
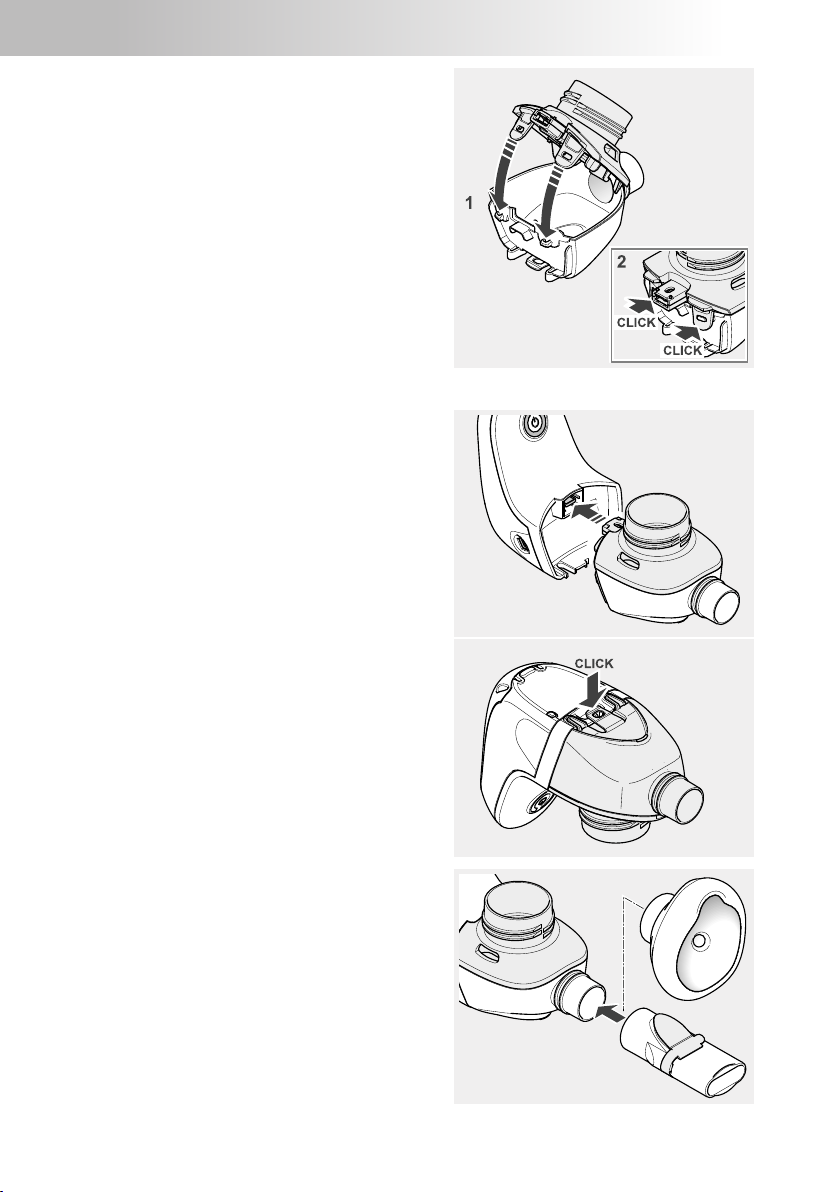
Montage
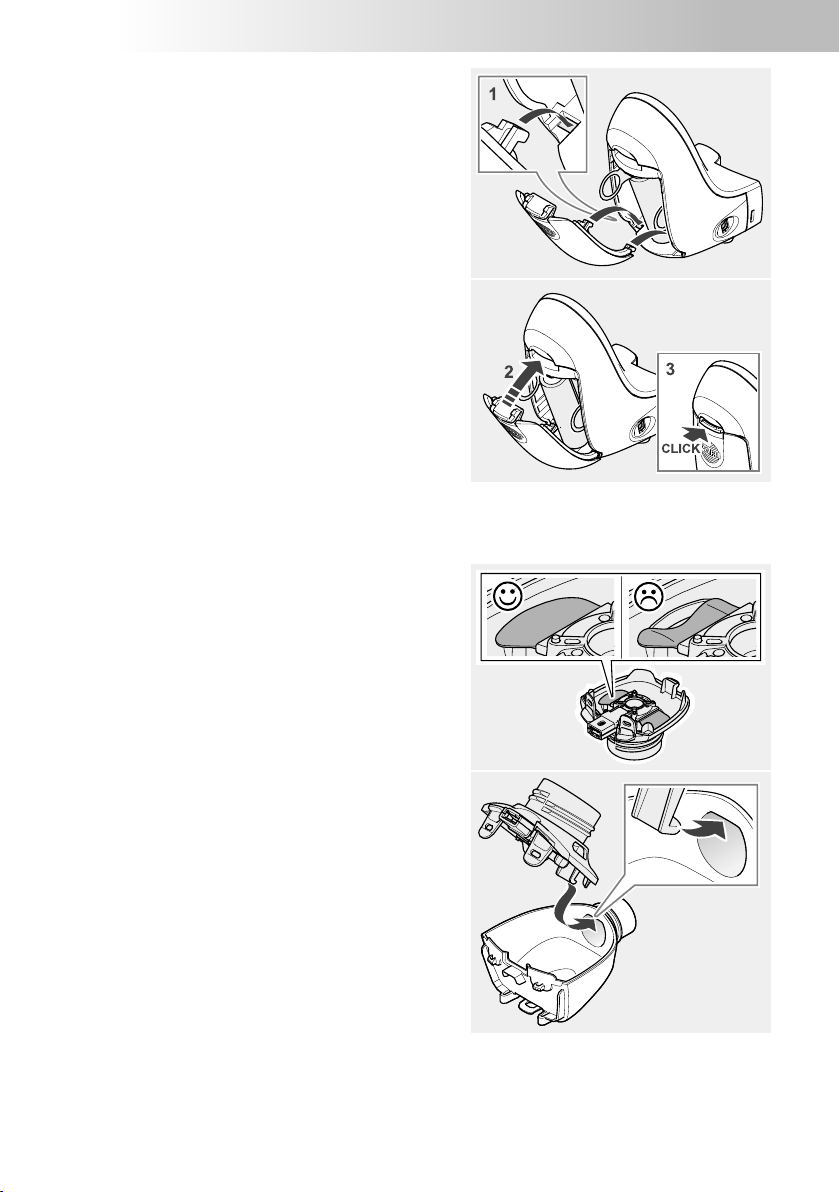
Verbinden Sie den Medikamentenbehälter mit der Verneblerkammer:
• Prüfen Sie die korrekte Position der beiden
Ventilflügel an der Unterseite des Medikamentenbehälters und korrigieren Sie diese
ggf. vorsichtig.
• Positionieren Sie den Haken des Medikamentenbehälters wie in der Abbildung dargestellt.
Page 12
– 12 –
• Setzen Sie den Medikamentenbehälter
bündig auf die Verneblerkammer und
schließen Sie die Laschen.
Verbinden Sie den Vernebler mit der Steuerungseinheit:
• Stecken Sie den Vernebler in die Steuerungseinheit.
• Schließen Sie die Lasche an der Unterseite
des Geräts.
• Stecken Sie das Mundstück bzw. die Maske auf den Vernebler.
Page 13
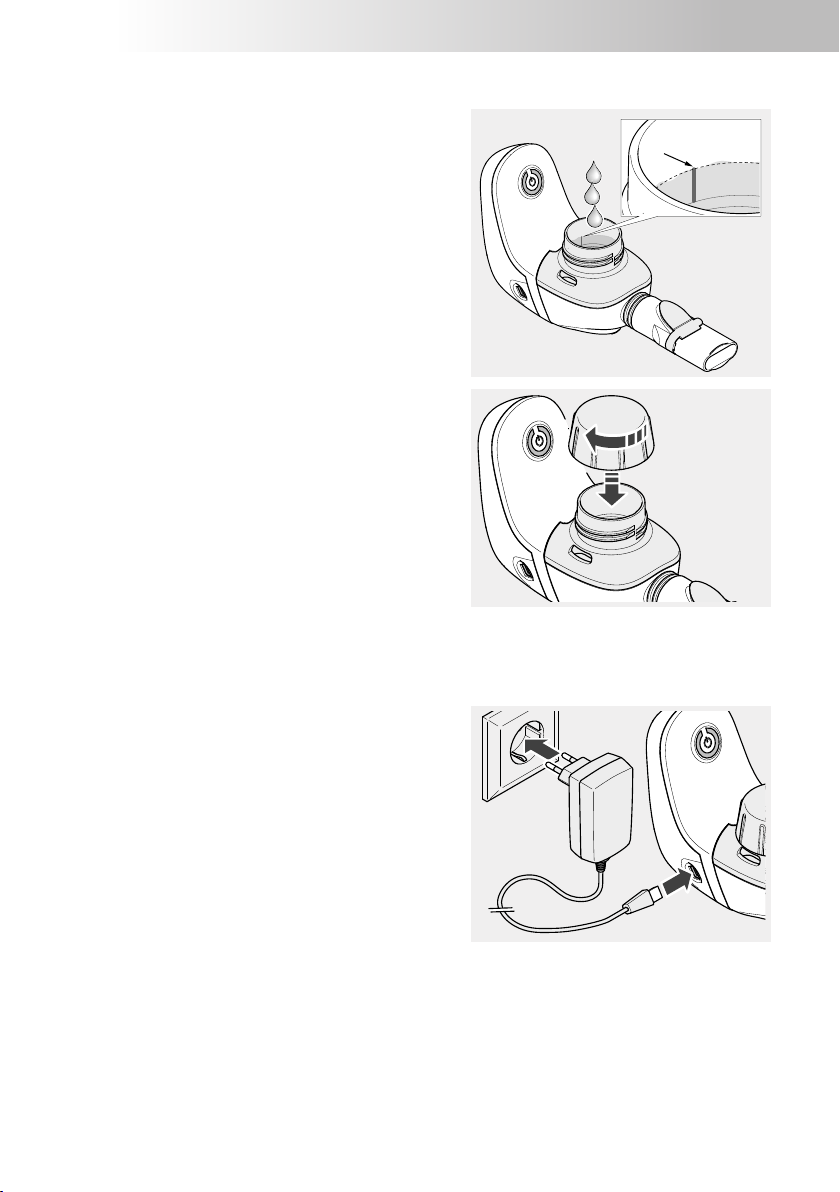
max. 6ml
– 13 –
Medikament einfüllen
• Schrauben Sie ggf. den Medikamentendeckel vom Vernebler.
• Füllen Sie die vom Arzt angewiesene Menge Medikament in den Medikamentenbehälter (mindestens 2ml, maximal 6ml).
• Schrauben Sie den Medikamentendeckel
auf den Vernebler.
3.2 Inhalation durchführen
VELOX einschalten
Bei Betrieb mit dem Netzteil:
• Stecken Sie den USB-Stecker des Netzteils
in den USB-Anschluss an der Steuerungseinheit.
• Verbinden Sie das Netzteil mit einer geeigneten Steckdose.
► Der VELOX ist betriebsbereit.
• Setzen Sie sich entspannt und aufrecht hin.
Page 14
– 14 –
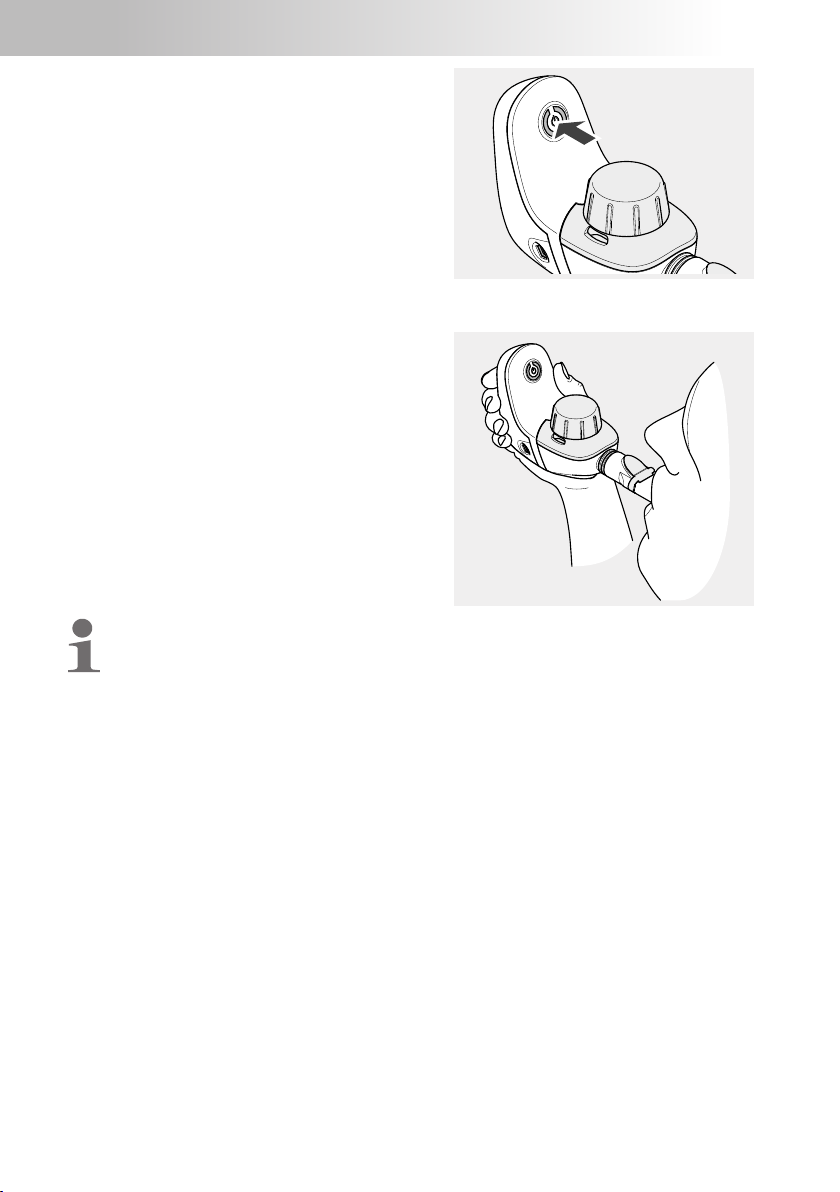
• Drücken Sie die Ein/Aus-Taste an der
Steuerungseinheit, um die Vernebelung zu
starten.
► Es ertönt ein kurzer Signalton.
► Die LED der Taste leuchtet grün.
Mit dem Mundstück inhalieren
• Halten Sie den VELOX waagerecht.
• Nehmen Sie das Mundstück zwischen die
Zähne und umschließen Sie es mit den Lippen.
• Atmen Sie möglichst langsam und tief
durch das Mundstück ein und entspannt
wieder aus.
Achten Sie während der Inhalation darauf, den VELOX nicht zu stark zu kippen,
damit keine Flüssigkeit über das Mundstück in den Mund gelangt.
Page 15
– 15 –
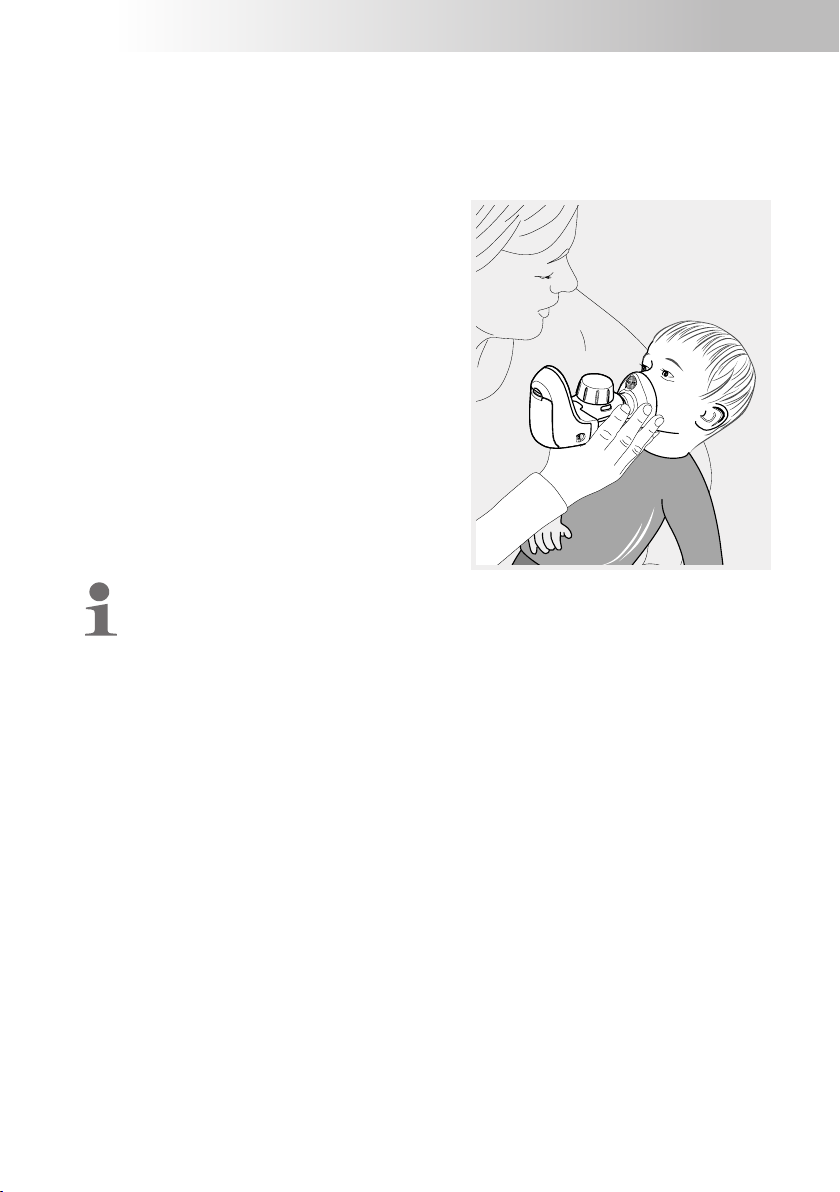
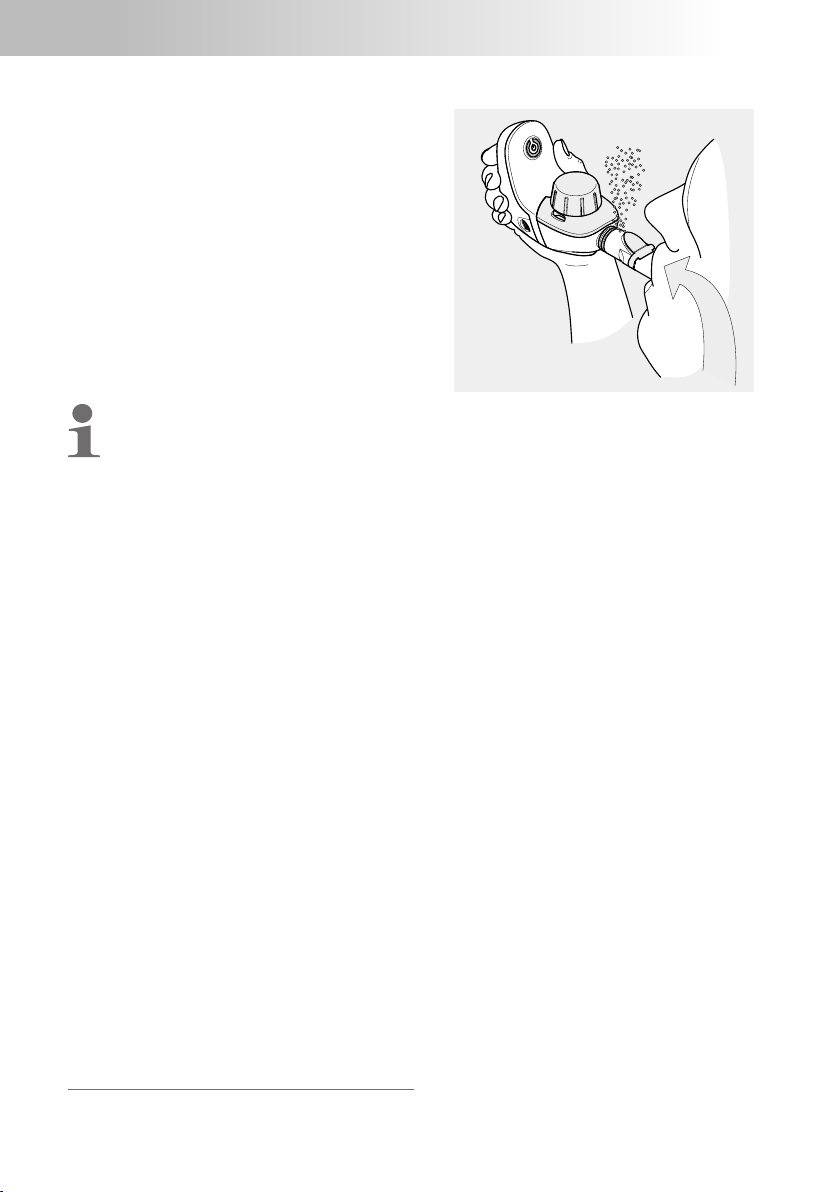
Mit der SMARTMASK Baby inhalieren
Für eine wirksame Therapie mit der SMARTMASK Baby muss die Maske beide
Mundwinkel und die Nase vollständig umschließen. Ist die Maske zu klein, können Sie
das Mundstück verwenden oder im Fachhandel eine geeignete PARIKindermaske erhalten.
• Halten Sie den VELOX waagerecht.
• Setzen Sie die Maske mit leichtem Druck
dicht über Mund und Nase auf.
Um Aerosolverluste zu reduzieren, achten
Sie darauf, dass die Maske dicht sitzt.
Kranke Säuglinge wehren sich häufig gegen das Andrücken der Gesichtsmaske
und drehen den Kopf hin und her. Für eine effektive Inhalation greifen Sie den
Vernebler von hinten so, dass Ihre Finger die Maske halten und sich der kleine
Finger an der Wange des Kindes abstützt. So können Sie den Bewegungen des
Kopfes leichter mit der Maske folgen. Achten Sie dabei darauf, dass die bei-
den seitlichen Öffnungen in der Maske frei bleiben, damit das Kind ungehindert ausatmen kann.
Page 16
– 16 –
Wie lange muss inhaliert werden?
Der VELOX erzeugt für die Inhalationstherapie
aus dem eingefüllten Medikament Aerosol4.
Während der Inhalation tritt das Aerosol beim
Ausatmen durch das Mundstück als Nebel am
Ventil aus, bis kein Medikament mehr vernebelt werden kann. Die Inhalation kann beendet
werden, sobald kein Nebel mehr austritt.
In der Verneblerkammer sammelt sich aus technischen Gründen ein geringer
Teil des Medikaments, der nicht vernebelt werden kann. Die Menge dieses
Medikamentenrests variiert in Abhängigkeit zur eingefüllten Medikamentenmenge. Die einzufüllende Medikamentenmenge ist darauf abgestimmt, so dass trotzdem ausreichend Medikament vernebelt wird.
Der Medikamentenrest sollte direkt nach Beendigung der Inhalation entsorgt
werden, damit er nicht verschüttet wird.
Inhalation unterbrechen
Schalten Sie den VELOX grundsätzlich aus, wenn Sie die Inhalation kurz unterbrechen wollen.
Vernebelt das Gerät, ohne dass inhaliert wird, geht Medikament an die Umgebungsluft verloren und es sammelt sich vermehrt Medikament in der Verneblerkammer. Dadurch besteht die Gefahr, dass zu wenig Medikament inhaliert wird.
VELOX ausschalten
• Sobald Sie mit der Inhalation fertig sind, schalten Sie das Gerät aus, indem Sie erneut die Ein/Aus-Taste drücken.
► Es ertönt ein kurzer Signalton.
► Die LED der Taste erlischt.
• Ziehen Sie ggf. das Netzteil aus der Steckdose und trennen Sie das Kabel von der
Steuerungseinheit.
4) Aerosol: In Gasen oder Luft schwebende kleine Partikel aus fester, flüssiger oder gemischter
Zusammensetzung.
Page 17

– 17 –
3.3 Gerätesignale
Der VELOX gibt mithilfe einer LED in der Ein/Aus-Taste sowie über ein akustisches
Signal Auskunft über verschiedene Betriebszustände:
Einschalten des Geräts: LED leuchtet grün auf. 1 Piepton.
Während des Betriebs: LED leuchtet grün.
Niedriger Batteriestand: LED blinkt grün.
Batterie leer / zu niedrige
Spannung:
Der Vernebler ist nicht mit
der Steuerungseinheit
verbunden:
Die max. Betriebsdauer von
15 Min. ist überschritten:
Ausschalten des Geräts: LED erlischt. 1 Piepton.
LED blinkt dreimal orange. 1 Piepton.
Das Gerät wird automatisch
abgeschaltet.
LED blinkt dreimal orange. Das Gerät wird automatisch
abgeschaltet.
LED blinkt dreimal grün. 1 Piepton.
Das Gerät wird automatisch
abgeschaltet.
Page 18
– 18 –
4 REINIGUNG UND DESINFEKTION
4.1 Vorbereitung
Zerlegen Sie das Inhalationsgerät in seine Einzelteile:
• Ziehen Sie das Mundstück bzw. die Maske
vom Vernebler ab.
• Ziehen Sie das blaue Ausatemventil am
Mundstück vorsichtig aus dem Schlitz heraus. Das Ventil muss danach immer noch
am Mundstück hängen.
• Öffnen Sie die Lasche an der Unterseite
des Geräts.
• Ziehen Sie den Vernebler von der Steuerungseinheit ab.
• Öffnen Sie die Laschen an der Verneblerkammer und nehmen Sie den Medikamentenbehälter von der Verneblerkammer ab.
Page 19
– 19 –
• Schrauben Sie den Deckel vom Medikamentenbehälter.
4.2 Steuerungseinheit
• Wischen Sie die Außenflächen der Steuerungseinheit bei Bedarf mit einem sauberen, feuchten Tuch ab.
HINWEIS
Eingedrungene Flüssigkeiten können einen Gerätedefekt verursachen. Sprühen
Sie deshalb keine Flüssigkeit auf die Steuerungseinheit oder auf das Netzteil.
4.3 Vernebler
HINWEIS
Um eine Beschädigung des Aerosolerzeugers zu vermeiden, legen Sie den
Medikamentenbehälter weder in die Mikrowelle noch in die Geschirrspülmaschine.
Auch eine mechanische Reinigung durch Bürsten oder Kratzen kann die Funktion
des Gerätes beeinträchtigen.
Reinigung
Der Vernebler, das Mundstück und die Maske müssen nach jeder Anwendung
gründlich gereinigt werden.
• Legen Sie alle Teile ca. 5Minuten lang in
warmes Leitungswasser mit etwas Spülmittel.
• Spülen Sie alle Teile gründlich unter fließendem Wasser ab.
• Beschleunigen Sie das Abtropfen des Wassers durch Ausschütteln aller Teile.
Spülen des Aerosolerzeugers
Der Aersolerzeuger befindet sich im Medikamentenbehälter. Für eine einwandfreie
Funktion sollte dieser einmal wöchentlich mithilfe des VELOXcare gespült werden.
Die Spülung des Medikamentenbehälters mit dem VELOXcare dient der mechanischen Freispülung der Membran des Aerosolerzeugers. Diese Spülung ersetzt nicht das Reinigen und Desinfizieren des Medikamentenbehälters!
Page 20
– 20 –
• Öffnen Sie die seitlichen Laschen am
VELOXcare.
• Klappen Sie das VELOXcare auf.
• Setzen Sie den Medikamentenbehälter mit
seiner Öffnung nach unten in das Unterteil
des VELOXcare.
Info: Die blauen Ventilflügel müssen sich
oben befinden.
• Klappen Sie das VELOXcare zu und schließen Sie die Laschen.
Page 21

max. 2,5 ml
– 21 –
• Stecken Sie das VELOXcare an die Steuerungseinheit.
• Schließen Sie die Lasche an der Unterseite
des Geräts.
• Füllen Sie 2,5ml isotone Salzlösung oder
destilliertes Wasser in das VELOXcare.
Bei Betrieb mit dem Netzteil:
• Stecken Sie den USB-Stecker des Netzteils
in den USB-Anschluss an der Steuerungseinheit.
• Verbinden Sie das Netzteil mit einer geeigneten Steckdose.
► Das VELOXcare ist betriebsbereit.
Page 22

– 22 –
• Drücken Sie die Ein/Aus-Taste an der
Steuerungseinheit, um die Spülung zu starten.
► Es ertönt ein kurzer Signalton.
► Die LED der Taste leuchtet grün.
► Die Spülung wird durchgeführt.
• Sobald die gesamte Spülflüssigkeit durchgelaufen ist, schalten Sie das Gerät aus, indem Sie erneut die Ein/Aus-Taste drücken.
► Es ertönt ein kurzer Signalton.
► Die LED der Taste erlischt.
• Öffnen Sie die Lasche an der Unterseite
des Geräts.
• Ziehen Sie das VELOXcare von der Steuerungseinheit ab.
• Öffnen Sie die Laschen am VELOXcare und klappen Sie es auf.
• Entnehmen Sie den Medikamentenbehälter.
• Spülen Sie das VELOXcare und den Medikamentenbehälter gründlich mit Leitungswasser aus.
Der Medikamentenbehälter muss im Anschluss an eine Spülung im VELOXcare
desinfiziert werden.
Das VELOXcare kann bei Bedarf zusammen mit den Verneblerteilen gereinigt
und desinfiziert werden.
Desinfektion
Der Vernebler, das Mundstück und die Maske müssen einmal wöchentlich im Anschluss an die Reinigung desinfiziert werden. Nur gereinigte Teile können wirksam
desinfiziert werden.
VORSICHT
Eine feuchte Umgebung begünstigt Keimwachstum. Entnehmen Sie daher alle Teile unmittelbar nach Beendigung der Desinfektion aus dem Kochtopf bzw. aus dem
Desinfektionsgerät. Trocknen Sie die Teile. Eine vollständige Trocknung reduziert
die Infektionsgefahr.
Page 23

– 23 –
In kochendem Wasser
• Legen Sie alle Einzelteile mind. 5 Minuten in kochendes Wasser.
Verwenden Sie einen sauberen Kochtopf und destilliertes Wasser.
Kunststoff schmilzt bei Berührung mit dem heißen Topfboden. Achten Sie deshalb auf ausreichenden Wasserstand im Topf. Damit vermeiden Sie eine Beschädigung der Einzelteile.
• Beschleunigen Sie das Abtropfen des Wassers durch Ausschütteln aller Teile.
Mit einem handelsüblichen, thermischen Desinfektionsgerät für Babyflaschen (keine Mikrowelle)
Verwenden Sie für eine wirksame Desinfektion ein thermisches Desinfektionsgerät
mit einer Laufzeit von mindestens 6 Minuten. Für die Durchführung der Desinfektion,
die Dauer des Desinfektionsvorgangs sowie die erforderliche Wassermenge beachten
Sie die Gebrauchsanweisung des verwendeten Desinfektionsgerätes.
VORSICHT
Eine unzureichende Desinfektion begünstigt Keimwachstum und erhöht damit die
Infektionsgefahr. Die Desinfektion ist erst wirksam durchgeführt, wenn sich das
Desinfektionsgerät automatisch abgeschaltet hat bzw. die in der Gebrauchsanweisung des Desinfektionsgeräts angegebene Mindest-Desinfektionszeit erreicht
ist. Schalten Sie das Gerät daher nicht vorzeitig ab. Achten Sie außerdem auf dessen Sauberkeit und überprüfen Sie regelmäßig die Funktionsfähigkeit.
Chemische Reinigung mit Desinfektion
Mithilfe einer chemischen Aufbereitung kann die Reinigung und Desinfektion in einem
Arbeitsgang durchgeführt werden. Verwenden Sie dafür das reinigende Desinfektionsmittel Bomix®plus.
Für den sicheren Umgang mit der Chemikalie beachten Sie die Gebrauchsinformation
des Desinfektionsmittels, insbesondere die darin enthaltenen Sicherheitshinweise.
VORSICHT
Eine unzureichende Desinfektion begünstigt Keimwachstum und erhöht damit die
Infektionsgefahr. Eine ausreichende Reinigung mit Desinfektion kann nur erreicht
werden, wenn das angegebene Mischungsverhältnis sowie die angegebene Einwirkzeit eingehalten wurde und wenn alle Einzelteile während der gesamten Einwirkzeit vollständig von der Lösung bedeckt sind. Es dürfen keine Hohlräume oder
Luftblasen vorhanden sein.
• Bereiten Sie eine 2%-Bomix®-plus-Lösung
vor, indem Sie 10ml des Konzentrats mit
500ml Leitungswasser mischen.
• Legen Sie alle Einzelteile in die vorbereitete Lösung und lassen Sie sie 5Minuten
einwirken.
Wird die Einwirkdauer deutlich überschritten, können die Kunststoffteile den
Geruch des Desinfektionsmittels annehmen.
Page 24

– 24 –
• Spülen Sie alle Teile gründlich unter fließendem Wasser ab (Rückstände des Desinfektionsmittels können allergische Reaktionen oder Schleimhautirritationen verursachen).
• Beschleunigen Sie das Abtropfen des Wassers durch Ausschütteln aller Teile.
• Entsorgen Sie die verwendete Lösung (die verdünnte Lösung kann über den Ausguss entsorgt werden).
Visuelle Kontrolle
Überprüfen Sie alle Produktbestandteile nach jeder Reinigung und Desinfektion. Ersetzen Sie gebrochene, verformte oder stark verfärbte Teile.
4.4 Trocknung und Aufbewahrung
• Legen Sie alle Teile auf eine trockene, saubere und saugfähige Unterlage und lassen Sie sie vollständig trocknen.
• Schlagen Sie alle Einzelteile in ein sauberes, fusselfreies Tuch ein (z.B. Geschirrtuch) und bewahren Sie sie an einem trockenen, staubfreien Ort auf.
HINWEIS
Ausgelaufene Batterien können eine Beschädigung des Geräts verursachen.
Entfernen Sie deshalb die Batterien bzw. Akkus, wenn das Gerät voraussichtlich
längere Zeit nicht benutzt wird [siehe: Batterien einsetzen bzw. wechseln, Seite10].
Page 25

– 25 –
5 FEHLERSUCHE
Fehler Mögliche Ursache Vorgehen
Der VELOX lässt sich
nicht einschalten.
Der VELOX vernebelt
nicht oder hat unerwartet
aufgehört zu vernebeln.
Die Vernebelung dauert
länger als gewöhnlich.
Bei der Reinigung mit
dem VELOXcare ist die
Reinigungsflüssigkeit
nicht komplett
durchgelaufen.
Bei Fehlern, die in diesem Kapitel nicht aufgeführt sind, oder wenn das vorgeschlagene Vorgehen den Fehler nicht behebt, wenden Sie sich an das Service Center der
PARIGmbH.
Die Batterien sind leer. Setzen Sie neue Batterien ein
Das Netzteil ist nicht richtig in
eine Steckdose eingesteckt
oder der USB-Stecker sitzt
nicht richtig im USB-Anschluss
der Steuerungseinheit.
Es wurde kein Medikament
eingefüllt.
Die Inhalation wurde
unterbrochen.
Die maximale Betriebszeit pro
Anwendung von 15Minuten ist
erreicht.
Es ist Salzlösung oder
Medikament in den
Steckerbereich gelangt.
Der Aerosolerzeuger ist
verstopft.
Das Gerät hat automatisch
nach 15Min. ausgeschaltet,
obwohl die Flüssigkeit noch
nicht vollständig durchgelaufen
ist.
oder schließen Sie das
Netzteil an.
Überprüfen Sie den korrekten
Sitz des Netzteils in der
Steckdose und des USBSteckers in der
Steuerungseinheit.
Füllen Sie ein geeignetes
Medikament ein.
Drücken Sie die Ein/AusTaste, um die Inhalation
fortzuführen.
Spülen Sie den Stecker des
Verneblers mit Leitungswasser
aus und schütteln ihn gut ab.
Wischen Sie mit einem
trockenen Tuch über den
Stecker zum Vernebler an der
Steuerungseinheit.
Spülen Sie den
Aerosolerzeuger mit dem
VELOXcare.
Schalten Sie die
Steuerungseinheit über die
Ein/Aus-Taste wieder ein.
Dann wird auch die restliche
Flüssigkeit durchgespült.
Page 26

– 26 –
6 TECHNISCHE DATEN
6.1 Elektrischer Anschluss
Leistungsaufnahme < 2,0 W
Betrieb mit Netzteil: Fuhua (UE05WV) bzw. Friwo (FW7575M)
Netzspannung 100 – 240 V
Netzfrequenz 50/60 Hz
Ausgangskleinspannung 5 VDC
Betrieb mit Batterien/Akkus
Batterien 3 × 1,5 V (Mignon AA LR6/Alkaline)
Akkus 3 × 1,2 V (NiMH)
6.2 Abmessungen / Gewicht
Gewicht Gesamtgerät inkl. Mundstück (ohne
Batterien)
110 g
Steuerungseinheit
Abmessungen [B × H × T] 72 mm × 91 mm × 60 mm
Gewicht (ohne Batterien) 70 g
Vernebler (inkl. Mundstück)
Abmessungen [B × H × T] 139 mm × 66 mm × 61 mm
Gewicht (inkl. Mundstück) 40 g
6.3 Aerosoldaten
Aerosoldaten gemäß DIN EN 13544-1 sind auf Anfrage bei der PARIGmbH erhältlich.
6.4 Klassifikation nach DIN EN 60601-1
Art des Schutzes gegen elektrischen Schlag (Netzteil) Schutzklasse II
Grad des Schutzes gegen elektrischen Schlag des
Anwendungsteils (Vernebler)
Grad des Schutzes gegen Eindringen von Wasser nach
EN60529 (IP-Schutzgrad)
Grad des Schutzes bei Anwendung in Gegenwart von
brennbaren Gemischen von Anästhesiemitteln mit Luft, mit
Sauerstoff oder mit Lachgas
Betriebsart Dauerbetrieb
Tp BF
IP 22
Kein Schutz
Page 27

– 27 –
6.5 Angaben zur elektromagnetischen Verträglichkeit
Medizinische elektrische Geräte unterliegen hinsichtlich der elektromagnetischen Verträglichkeit (EMV) besonderen Vorsichtsmaßnahmen. Sie dürfen nur gemäß den
EMV-Hinweisen installiert und in Betrieb genommen werden.
Tragbare und mobile Hochfrequenz-Kommunikationseinrichtungen können medizinische elektrische Geräte beeinflussen. Die Verwendung von anderem Zubehör, anderen Wandlern und Leitungen als den angegebenen, mit Ausnahme der Wandler und
Leitungen, die der Hersteller des medizinischen elektrischen Gerätes als Ersatzteile
für interne Komponenten verkauft, kann zu einer erhöhten Aussendung oder einer reduzierten Störfestigkeit des Gerätes führen.
Das Gerät darf nicht unmittelbar neben oder mit anderen Geräten gestapelt angeordnet werden. Wenn der Betrieb nahe oder mit anderen Geräten gestapelt erforderlich
ist, sollte das medizinische elektrische Gerät beobachtet werden, um seinen ordnungsgemäßen Betrieb in der benutzten Anordnung sicherzustellen.
Technische Daten zur elektromagnetischen Verträglichkeit (EMV-Hinweise) in tabellarischer Form liegen dem Gerät bei. Sie sind außerdem auf Anfrage bei der
PARIGmbH oder im Internet unter www.pari.com auf der jeweiligen Produktseite
unter „Technische Daten“ zu erhalten.
6.6 Empfohlene Schutzabstände
Empfohlene Schutzabstände zwischen tragbaren und mobilen Hochfrequenz(HF)Telekommunikationsgeräten und dem Produkt:
Das Produkt ist für den Betrieb in einer elektromagnetischen Umgebung bestimmt, in
der gestrahlte HF-Störgrößen kontrolliert werden. Der Anwender kann helfen, elektromagnetische Störungen dadurch zu verhindern, dass er Mindestabstände zwischen
tragbaren und mobilen HF-Kommunikationseinrichtungen (Sendern) und dem Produkt, wie unten entsprechend der maximalen Ausgangsleistung der Kommunikationseinrichtung empfohlen, einhält.
Schutzabstand gemäß Sendefrequenz:
Nennleistung des
Senders
0,01 W 0,12 m 0,12 m 0,23 m
0,1 W 0,38 m 0,38 m 0,73 m
1 W 1,2 m 1,2 m 2,3 m
10 W 3,8 m 3,8 m 7,3 m
100 W 12 m 12 m 23 m
Für Sender, deren Nennleistung in obiger Tabelle nicht angegeben ist, kann der Abstand unter Verwendung der Gleichung bestimmt werden, die zur jeweiligen Spalte
gehört, wobei „P“ die Nennleistung des Senders in Watt (W) gemäß der Angabe des
Senderherstellers ist.
150kHz bis 80MHz
d = 1,2 × SQRT(P)
80MHz bis 800MHz
d = 1,2 × SQRT(P)
800MHz bis 2,5GHz
d = 2,3 × SQRT(P)
6.7 Umgebungsbedingungen für den Betrieb
Umgebungstemperatur 5°C bis +40°C
Relative Luftfeuchtigkeit 15% bis 93% (nicht kondensierend)
Luftdruck 700 hPa bis 1.060 hPa
Page 28

7 SONSTIGES
7.1 Transport und Lagerung
– 28 –
Minimale Umgebungstemperatur (ohne Kontrolle der
relativen Luftfeuchtigkeit)
Maximale Umgebungstemperatur (bei einer relativen
Luftfeuchtigkeit von bis zu 93%)
Luftfeuchtigkeit max. 93%
Luftdruck 500 hPa – 1.060 hPa
-25°C
+70°C
7.2 Entsorgung
Dieses Produkt fällt in den Geltungsbereich der WEEE5. Demnach darf dieses Produkt nicht über den Hausmüll entsorgt werden. Es sind die jeweiligen landesspezifischen Entsorgungsregeln zu beachten (z.B. Entsorgung über die Kommunen oder
Händler). Materialrecycling hilft, den Verbrauch von Rohstoffen zu verringern und die
Umwelt zu schützen.
7.3 Garantiebedingungen
PARI garantiert Ihnen ab Erstkaufdatum während der im Garantieschein angegebenen Garantiezeit, dass Ihr Gerät bei bestimmungsgemäßem Gebrauch keine herstellungsbedingten Material- oder Verarbeitungsmängel aufweist. Der Garantieanspruch
unterliegt einer Verjährung von 12Monaten. Die von PARI gegebene Garantie gilt zusätzlich zur Gewährleistungsverpflichtung Ihres Verkäufers. Ihre gesetzlichen Rechte
bei Mängeln gegenüber Ihrem Verkäufer werden durch die Garantie oder den Eintritt
des Garantiefalls nicht eingeschränkt. Als Garantie- sowie Eigentumsnachweis gilt der
vom Fachhändler abgestempelte Garantieschein.
Was wird von der Garantie erfasst?
Sollte ausnahmsweise ein Mangel auftreten, wird PARI nach seiner Wahl das Gerät
reparieren, austauschen oder den Einkaufspreis des Produkts zurückerstatten. Der
Austausch des Geräts kann sowohl in das gleiche als auch ein mindestens
vergleichbar ausgestattetes Modell erfolgen. Der Austausch oder die Reparatur des
Geräts begründet keine neue Garantie. Alle ausgetauschten Altgeräte oder Teile
werden Eigentum von PARI. Weitere Ansprüche sind ausgeschlossen. Dies gilt
insbesondere für jegliche Schadensersatzansprüche. Dieser Haftungsausschluss
findet keine Anwendung im Fall der Verletzung des Lebens, des Körpers und der
Gesundheit, bei Vorsatz und grober Fahrlässigkeit, der Produkthaftung und bei
Verletzung wesentlicher Pflichten aus dem Garantievertrag.
Die Garantie wird nicht gewährt, wenn
– das Gerät nicht ordnungsgemäß nach den Vorgaben der Gebrauchsanweisung in
Betrieb genommen oder verwendet wurde
– Schäden vorhanden sind, die auf äußere Einflüsse wie Wasser, Feuer, Blitzschlag
u.ä. zurückzuführen sind
5) Richtlinie 2002/96/EG DES EUROPÄISCHEN PARLAMENTS UND DES RATES vom 27. Januar 2003 über
Elektro- und Elektronik-Altgeräte.
Page 29

– 29 –
– der Schaden durch einen unsachgemäßen Transport entstanden ist oder ein Sturz-
schaden vorliegt
– das Gerät unsachgemäß behandelt oder gepflegt wurde
– die Seriennummer am Gerät geändert, entfernt oder sonst unleserlich gemacht
wurde
– von durch PARI nicht autorisierten Personen Reparaturen, Anpassungen oder Ver-
änderungen am Gerät vorgenommen wurden
Im Übrigen erstreckt sich die Garantie nicht auf Verschleißteile, also Geräteteile, die
normaler Abnutzung ausgesetzt sind.
Im Falle einer Reklamation, bringen Sie bitte das vollständige Gerät zu Ihrem Fach-
händler oder schicken Sie es uns im Originalkarton verpackt und frankiert mit dem
vom Fachhändler abgestempelten Garantieschein ein.
Die "Garantiezeit" läuft ab Kaufdatum.
7.4 Kontakt
Für Produktinformationen jeder Art, im Fehlerfall oder bei Fragen zur Handhabung
wenden Sie sich bitte an unser Service Center:
Tel.: +49 (0)8151-279 279 (deutschsprachig)
+49 (0)8151-279 220 (international)
Für Reparaturen und Garantiefälle senden Sie bitte das Gerät an folgende Adresse:
PARI GmbH – Technischer Service
Holzhofstr. 10b, 82362 Weilheim, Germany
Page 30

– 30 –
7.5 Zeichenerklärung
Auf dem Gerät bzw. auf der Verpackung befinden sich folgende Zeichen:
Gebrauchsanweisung beachten.
Bestellnummer
Seriennummer des Geräts
Gleichstrom
Wechselstrom
Schutzgrad des Anwendungsteils: Typ BF
Das Gerät ist geschützt gegen ein Eindringen von Fremdkörpern oder Wasser.
Minimale und maximale Umgebungstemperatur
Minimale und maximale Luftfeuchtigkeit
Minimaler und maximaler Luftdruck
Das Medizinprodukt wurde nach dem 13. August 2005 in Verkehr gebracht.
Das Produkt darf nicht über den normalen Hausmüll entsorgt werden.
Das Symbol der durchgestrichenen Mülltonne weist auf die Notwendigkeit der
getrennten Sammlung hin.
Hersteller
Das Produkt erfüllt die Anforderungen gemäß 93/42/EWG (Medizinprodukte)
und 2011/65/EU (RoHS).
Page 31

– 31 –
Instructions for use
en
Information as of: 2015-09. All rights reserved. Technical and design changes and
printing errors reserved. Principle shown in illustrations.
IMPORTANT INFORMATION...................................................... 33
General.........................................................................................
Information about the instructions for use ....................................
Structure of safety instructions .....................................................
Using the device...........................................................................
Treatment of babies, children and anyone who requires
assistance .................................................................................... 34
Hygiene ........................................................................................
PRODUCT DESCRIPTION .......................................................... 35
Components .................................................................................
Intended purpose .........................................................................
Intended use.................................................................................
Contraindications..........................................................................
Product variants ...........................................................................
Material information......................................................................
Maintenance.................................................................................
Operating life ................................................................................
33
33
33
33
34
35
36
36
36
36
36
36
37
en
INHALATION ............................................................................... 38
Preparing for inhalation ................................................................
Performing the inhalation .............................................................
Device signals ..............................................................................
CLEANING AND DISINFECTION................................................ 46
Preparation...................................................................................
Controller......................................................................................
Nebuliser ......................................................................................
Drying and storage .......................................................................
TROUBLESHOOTING................................................................. 53
TECHNICAL DATA...................................................................... 54
Electrical connection ....................................................................
Dimensions / Weight ....................................................................
38
41
45
46
47
47
52
54
54
Page 32

– 32 –
Aerosol data .................................................................................
Classification according to DINEN60601-1 ................................
Information about electromagnetic compatibility ..........................
Recommended safety distances ..................................................
Ambient conditions for operation..................................................
54
54
55
55
55
MISCELLANEOUS ...................................................................... 56
Transportation and storage ..........................................................
Disposal........................................................................................
Terms and conditions of warranty ................................................
Contact .........................................................................................
Explanation of symbols ................................................................
56
56
56
57
57
Page 33

– 33 –
1 IMPORTANT INFORMATION
1.1 General
Please read these instructions for use carefully and completely. Do not discard, so
you can consult them at a later date. If you fail to comply with the instructions for use,
injury or damage to the device cannot be ruled out.
1.2 Information about the instructions for use
These instructions for use are intended for the user at home.
If these instructions for use are lost, you can request another copy from PARIGmbH
[see:Contact, page57]. The instructions for use for some products can be retrieved
on the internet in both German and English. Simply visit: www.pari.com (on the
respective product page).
1.3 Structure of safety instructions
Safety-critical warnings are categorised according to hazard levels in these instructions for use:
– The signal word CAUTION is used to indicate hazards which, without pre-
cautionary measures, can result in minor to moderate injury or impair treatment.
– The signal word NOTICE is used to indicate general precautionary measures
which are to be observed to avoid damaging the product during use.
1.4 Using the device
The VELOX is an electrical device that is operated at extra-low voltage. It has been
designed so that no live parts are accessible. However, if ambient conditions are unfavourable or if the controller or power adapter is damaged, this protection may no
longer be assured. Therefore, please follow the instructions below to avoid damage to
the device and the associated danger of contact with live parts (e.g., electric shock):
– Only use the power adapter supplied by PARI to operate the VELOX (Fuhua
UE05WV or Friwo FW7575M, output extra-low voltage 5VDC).
– Never leave the VELOX unattended while it is in use.
– For safety reasons, always disconnect the power adapter from the socket under
the following circumstances:
– if a malfunction occurs during operation
– before cleaning and maintaining the device
– immediately after use
– Never pull the power adapter out of the socket by the cable.
– Make sure that the cable is never kinked, pinched or jammed. Do not pull the cable
over sharp edges.
– Keep the VELOX and the cable away from hot surfaces (e.g., stove top, electric
fire, open fire). Direct heat may damage the VELOX housing or the cable insula-
tion.
– Keep the power adapter away from domestic animals (e.g., rodents). They may
damage the cable insulation.
– The VELOX must not be operated and/or the power adapter must be unplugged
from the socket immediately if the controller or the power adapter is damaged, or if
a fault is suspected.
Page 34

– 34 –
1.5 Treatment of babies, children and anyone who requires assistance
Babies, children and anyone who requires assistance must be supervised constantly
by an adult during inhalation therapy. This is the only way to ensure safe and effective
treatment. Individuals in this group often underestimate the hazards involved, thus
resulting in a risk of injury.
Make sure that you always keep all components of the product out of the reach of babies and infants.
Special masks may be obtained for treating babies and infants who are not yet able to
inhale using the mouthpiece.
1.6 Hygiene
Observe the following hygiene instructions:
– Before every use and cleaning, wash your hands thoroughly.
– Do not use product components for inhalation therapy unless they have been
cleaned.
– Do not keep the product and accessories in a damp environment or together with
damp objects. Contamination and residual moisture encourage the growth of bacteria, so increasing the risk of infection.
– Make absolutely sure you also carry out cleaning before using the device for the
first time.
Page 35

– 35 –
2 PRODUCT DESCRIPTION
2.1 Components
Check that all components of your PARI product are contained in your package. If
anything is missing, please notify the dealer from whom you purchased the PARI
product immediately.
(1) Controller
(2) Nebuliser1, consisting of
(2a) Medication cap (colour-coded)
(2b) Medication reservoir with 2 aerosol head (colour-coded)
(2c) Aerosol chamber
(3) Mouthpiece
(4) SMARTMASK Baby
1
1, 3
(5) Power adapter
(6) VELOXcare
(7) Case
1) Not intended for change of patients, i.e., for use by one person only.
2) TouchSpray® Technology made under license from the Technology Partnership PLC.
3) Only included with product variant "VELOXJunior".
Page 36

– 36 –
2.2 Intended purpose
The VELOX is an inhalation device for treatment of the airways.
2.3 Intended use
For reasons of hygiene, the nebuliser, the mouthpiece and the SMARTMASK Baby
must only be used by a single patient.
This product is only designed for patients who are able to breathe by themselves and
are conscious.
Only medication that has been approved for inhalation treatment must be used. Take
note of any restrictions in the instructions for use of the medication in question.
The VELOX is not designed for use with antibiotics that are intended to treat
bacterial infections of the respiratory tract (e.g., Pseudomonas aeruginosa).
2.4 Contraindications
None.
2.5 Product variants
The VELOX is available in two different versions:
– VELOX
For treatment of the respiratory tract in adults and children aged approx. 3years
and older.
– VELOX Junior
For treating babies with a body weight of approx. 2.5kg and more, infants and children.
If these younger patients are not yet able to inhale using the mouthpiece, treatment
must be carried out using the SMARTMASKBaby included with the product.
2.6 Material information
Polypropylene Nebuliser, mouthpiece, VELOXcare
Thermoplastic elastomer Nebuliser, mouthpiece, controller (housing),
Acrylonitrile butadiene styrene Controller (housing)
Silicone SMARTMASK Baby
VELOXcare
2.7 Maintenance
The device does not require any maintenance.
Page 37

– 37 –
2.8 Operating life
Component Expected life cycle
Controller 3 years
Nebuliser 1 year
Mask 2years
VELOXcare 3 years
The nebuliser is designed for 365 applications and 52disinfections.
If the treatment of a disease necessitates more intensive use and/or more frequent
disinfections, the life cycle of the device is shortened.
The individual components must be replaced as soon as the expected life cycles indicated above have elapsed, if not sooner.
Page 38

– 38 –
3 INHALATION
3.1 Preparing for inhalation
The controller can be operated with the accompanying power adapter or with batteries
(or rechargeable batteries). It is recommended to insert the batteries before assembling the nebuliser. On the other hand, the power adapter should not be connected
until just before starting the inhalation session.
Inserting and replacing batteries
• Open the battery compartment cover on the
controller.
• If necessary, remove used batteries.
To do this, pull the two release strips.
• Insert new batteries.
Make sure that the batteries are aligned to
match the polarity symbols on the controller
battery compartment.
Page 39

– 39 –
• Close the battery compartment cover.
The cover is closed correctly when it clicks
into place.
Assembly
Attach the medication reservoir to the aerosol chamber:
• Check that the two valve vanes on the underside of the medication reservoir are in
the correct position. Adjust them carefully if
necessary.
• Position the hook on the medication reservoir as shown in the figure.
Page 40

– 40 –
• Place the medication reservoir flush with
the aerosol chamber and close the locking
tabs.
Connect the nebuliser to the controller:
• Insert the nebuliser in the controller.
• Close the tab on the underside of the
device.
• Attach the mouthpiece or mask to the
nebuliser.
Page 41

max. 6ml
– 41 –
Adding medication
• If necessary, unscrew the medication cap
from the nebuliser.
• Add the quantity of medication prescribed
by your doctor to the medication reservoir
(at least 2ml, not more than 6ml).
• Screw the medication cover onto the
nebuliser.
3.2 Performing the inhalation
Switching the VELOX on
Operation with the power adapter:
• Insert the USB connector of the power adapter in the USB port on the controller.
• Connect the power adapter to a suitable
power socket.
► The VELOX is ready to use.
• Sit in an upright position and relax.
Page 42

– 42 –
• To start nebulisation, press the On/Offbutton on the controller.
► The device emits a short acoustic signal.
► The LED on the button lights up green.
Inhaling with the mouthpiece
• Hold the VELOX horizontally.
• Hold the mouthpiece between your teeth
and enclose it with your lips.
• Breathe in as slowly and deeply as possible
through the mouthpiece, and out again
calmly.
Make sure that the VELOX is not tilted too far while inhaling, otherwise the fluid
will run through the mouthpiece and get into your mouth.
Page 43

– 43 –
Inhaling with the SMARTMASK Baby
To ensure effective treatment with the SMARTMASKBaby, the mask must completely
cover both corners of the mouth and the nose. If the mask is too small, you can use
the mouthpiece or buy a suitable PARI child mask from your specialist dealer.
• Hold the VELOX horizontally.
• Gently press the mask against the face so
that it fits snugly over the mouth and nose.
To minimise aerosol losses, make sure that
the mask is firmly in place.
Sick infants often struggle when the mask is pressed against their face, and twist
their head back and forth. For effective inhalation, hold the nebuliser from behind
so that your fingers support the mask and your little finger rests on your child's
cheek. This will enable you to follow the movements of the child's head with the
mask more easily. Make sure that both side openings in the mask are unob-
structed, so that the child can breathe out freely.
Page 44

– 44 –
How long should an inhalation session last?
The VELOX generates an aerosol4 for inhalation treatment from the medication that is added to the reservoir. During an inhalation session, the aerosol escapes from the valve as a
mist when it is exhaled through the mouthpiece. This continues until no more medication
can be nebulised. Inhalation can be stopped
as soon as no more mist comes out.
For technical reasons, a small portion of the medication cannot be nebulised and
collects in the aerosol chamber. The amount of residual medication varies according to the quantity of medication poured into the reservoir. The quantity of
medication that must be added to the reservoir is adjusted so that sufficient medication can be nebulised even after taking the residue into account.
The residue should be disposed of as soon as the inhalation session is finished,
to prevent it from being spilled.
Interrupting the inhalation session
Always switch the VELOX off whenever you want to interrupt the inhalation session
briefly.
If the device continues to nebulise medication that is not being inhaled, unused medication escapes into the atmosphere and the quantity left in the aerosol chamber increases. This creates the risk that too little medication will be inhaled.
Switching the VELOX off
• As soon as the inhalation session is finished, switch the device off by pressing the
On/Off button.
► The device emits a short acoustic signal.
► The LED in the button goes out.
• If necessary, disconnect the power adapter from the power socket and disconnect
the cable from the controller.
4) Aerosol: Small particles of solid, liquid or mixed composition suspended in gases or air.
Page 45

– 45 –
3.3 Device signals
The VELOX communicates information about its various operating states via an LED
in the On/Off button and an acoustic signal:
Switching on the device: LED lights up green. 1 beep.
During operation: LED is lit green and steady.
Low battery: LED flashes green.
Battery flat / voltage too low: LED flashes orange three
The nebuliser is not
connected to the controller:
The max. operating time of
15 min. has been exceeded:
Switching the device off LED goes out. 1 beep.
times.
LED flashes orange three
times.
LED flashes green three
times.
1 beep.
The device switches itself off
automatically.
The device switches itself off
automatically.
1 beep.
The device switches itself off
automatically.
Page 46

– 46 –
4 CLEANING AND DISINFECTION
4.1 Preparation
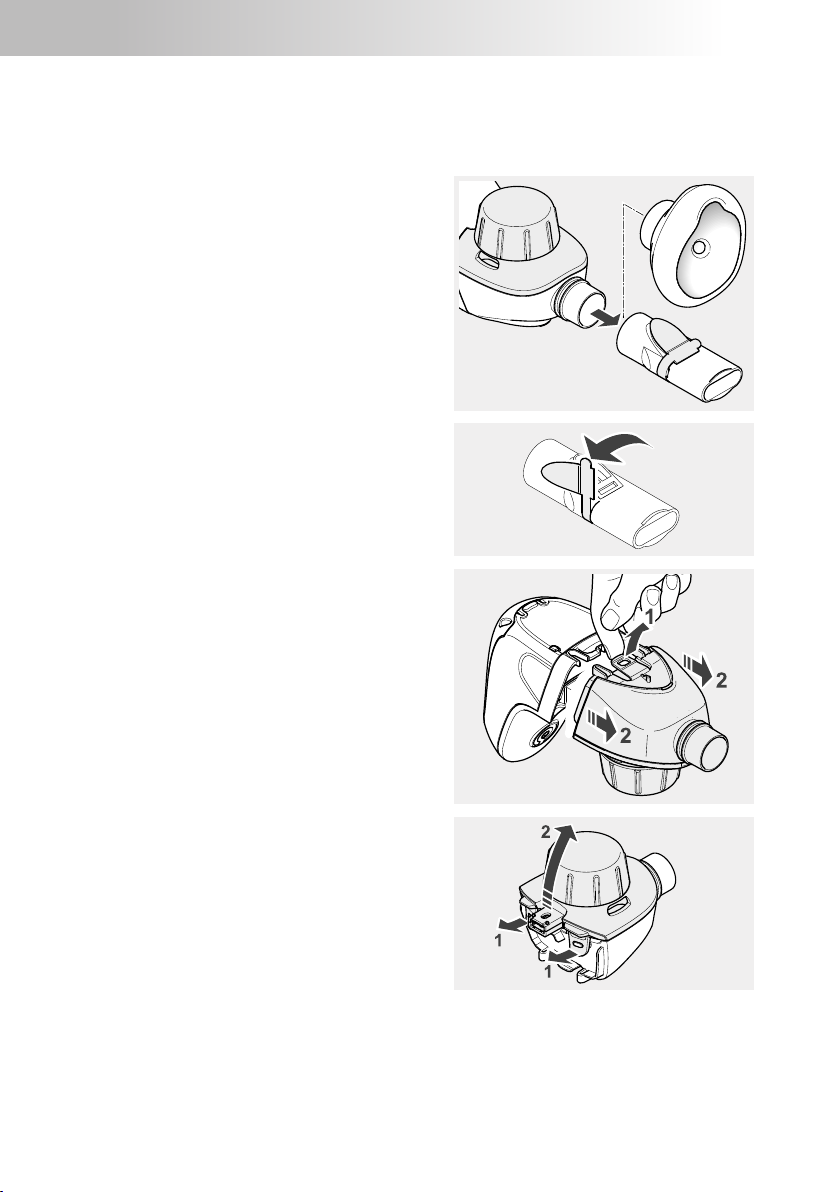
Dismantle the inhalation device into its individual parts:
• Pull the mouthpiece or mask off the
nebuliser.
• Carefully pull the blue expiratory valve out
of the slot in the mouthpiece. The valve
must still be attached to the mouthpiece.
• Release the tab on the underside of the
device.
• Pull the nebuliser away from the control
unit.
• Release the tabs on the aerosol chamber
and detach the medication reservoir from
the aerosol chamber.
Page 47

– 47 –
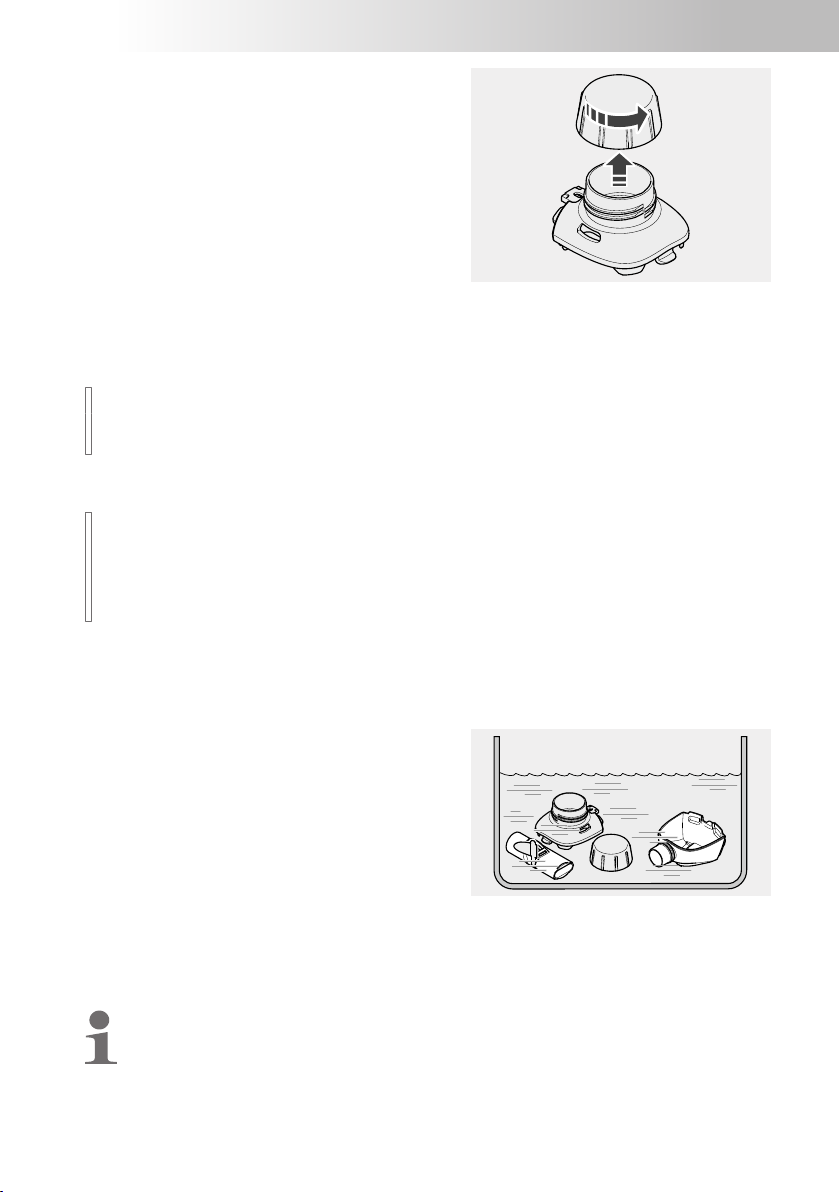
• Unscrew the cap on the medication reservoir.
4.2 Controller
• Wipe the outer surfaces of the controller with a clean, damp cloth as necessary.
NOTICE
Liquids that get into the device can cause a fault in the device. Therefore, never
spray any liquids onto the controller or the power adapter.
4.3 Nebuliser
NOTICE
In order to avoid damaging the aerosol head, never attempt to process the medication reservoir in a microwave oven or a dishwasher. Mechanical cleaning by
brushing or scouring can also impair the function of the device.
Cleaning
The nebuliser, the mouthpiece and the mask must be cleaned thoroughly after every
application.
• Place all parts in warm tap water with a little
dishwashing liquid for at least 5min.
• Rinse all parts thoroughly in running water.
• You can remove excess water more quickly
by shaking all parts.
Rinsing the aerosol head
The aerosol head is located in the medication reservoir. To ensure perfect functioning,
it should be rinsed once a week using the VELOXcare.
Rinsing the medication reservoir with the VELOXcare serves to mechanically
flush the membrane in the aerosol head. This rinsing does not replace the need
to clean and disinfect the medication reservoir!
Page 48

– 48 –
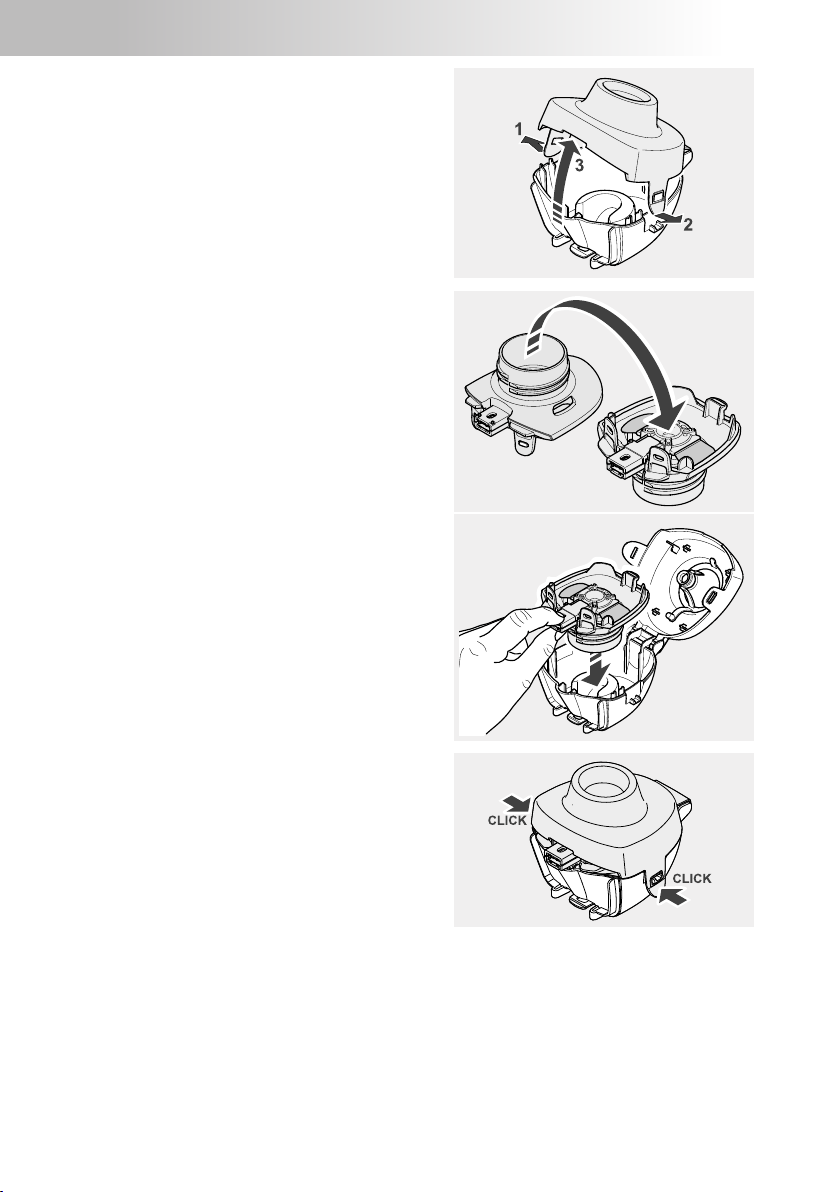
• Release the tabs on the side of the
VELOXcare.
• Open the VELOXcare.
• Place the medication reservoir in the bottom part of the VELOXcare with the reservoir opening facing downwards.
Info: The blue valve vanes must be uppermost.
• Close the VELOXcare and engage the
tabs.
Page 49

max. 2.5 ml
– 49 –
• Connect the VELOXcare to the controller.
• Close the tab on the underside of the
device.
• Fill the VELOXcare with 2.5ml isotonic saline solution or distilled water.
Operation with the power adapter:
• Insert the USB plug of the power adapter in
the USB port on the controller.
• Connect the power adapter to a suitable
power socket.
► The VELOXcare is ready to operate.
Page 50

– 50 –
• Press the On/Off button on the controller to
begin rinsing.
► The device emits a short acoustic signal.
► The LED on the button lights up green.
► The rinsing function is executed.
• As soon as all of the rinsing fluid has run
through, switch the device off by pressing
the On/Off button again.
► The device emits a short acoustic signal.
► The LED in the button goes out.
• Release the tab on the underside of the
device.
• Disconnect the VELOXcare from the controller.
• Release the tabs on the VELOXcare and open it.
• Take the medication reservoir out.
• Rinse the VELOXcare and the medication reservoir thoroughly with tap water.
The medication reservoir must always be disinfected immediately after rinsing in
the VELOXcare.
If necessary, the VELOXcare can be cleaned and disinfected together with the
nebuliser parts.
Disinfection
The nebuliser, the mouthpiece and the mask must be disinfected once a week immediately after cleaning. Only parts that have been cleaned can be disinfected effectively.
CAUTION
A damp environment may encourage the growth of bacteria. Therefore, remove all
parts from the pot or disinfector as soon as disinfection has finished. Dry the parts.
The risk of infection is reduced when the parts are dried completely.
Page 51

– 51 –
In boiling water
• Place all the individual parts in boiling water for at least 5minutes.
Use a clean pot and distilled water.
Plastic will melt if it comes into contact with the hot base of the pot. Therefore,
make sure there is plenty of water in the pot. This way you will avoid damaging
the components.
• You can remove excess water more quickly by shaking all parts.
Using a standard thermal disinfector for baby bottles (not a microwave oven)
For effective disinfection, use a disinfector with a runtime of at least 6minutes. Regarding disinfection, the duration of the disinfection procedure and the quantity of water required for this, follow the instructions for use of the disinfector you are using.
CAUTION
Inadequate disinfection encourages the growth of bacteria and thus increases the
risk of infection. Thorough disinfection has not been completed until the disinfector automatically switches itself off, or the minimum disinfection time specified in
the instructions for use of the disinfector has elapsed. Therefore, do not switch the
device off prematurely. Also make sure that the disinfector is kept clean and regularly check that it is in good working order.
Chemical cleaning with disinfection
Cleaning and disinfection can be carried out in a single cycle using a chemical
preparation process. For this, use the cleaning disinfecting agent Bomix®plus.
To ensure safety when handling chemicals, follow the instructions for use of the disinfecting agent, particularly the accompanying safety instructions.
CAUTION
Inadequate disinfection encourages the growth of bacteria and thus increases the
risk of infection. Adequate cleaning with disinfection can only be assured if the
specified mixing ratio and application time are adhered to, and if all individual parts
are completely immersed in the solution for the entire application time. There must
not be any air pockets or bubbles.
• Prepare a 2% solution of Bomix®plus by
mixing 10ml of the concentrate with 500ml
tap water.
• Place all the individual parts in the prepared solution and leave them to soak for
5min.
If the application period is exceeded significantly, the plastic parts may take on
the smell of the disinfectant.
Page 52

– 52 –
• Rinse off all parts thoroughly in running water (residues of the disinfectant can
cause allergic reactions or irritations of the mucous membrane).
• You can remove excess water more quickly by shaking all parts.
• Dispose of the used solution (the diluted solution can be got rid of down the drain).
Visual inspection
Inspect all product components after each cleaning and disinfection. Replace any
broken, misshapen or seriously discoloured parts.
4.4 Drying and storage
• Place all parts on a dry, clean and absorbent surface and let them dry completely.
• Wrap all the individual parts in a clean, lint-free cloth (e.g., a tea-towel) and keep in
a dry, dust-free environment.
NOTICE
Leaking batteries can cause damage to the device. Therefore, always remove
batteries or rechargeable batteries if you do not expect to use the device for a prolonged period [see:Inserting and replacing batteries, page38].
Page 53

– 53 –
5 TROUBLESHOOTING
Fault Possible cause Procedure
The VELOX cannot be
switched on.
The VELOX is not
nebulising or has
unexpectedly stopped
nebulising.
Nebulising takes longer
than usual.
When cleaning with the
VELOXcare, not all of the
cleaning fluid was
circulated.
In the event of faults that are not listed in this chapter, or if the suggested procedure
does not correct the fault, contact the PARIGmbH ServiceCenter.
The batteries are flat. Insert new batteries or connect
The power adapter is not
plugged into a socket
correctly, or the USB
connector is not properly
seated in the USB port on the
controller.
No medication has been
added.
The inhalation session has
been interrupted.
The maximum operating time
of 15minutes per application
has elapsed.
Saline solution or medication
has got into the plug area.
The aerosol head is blocked. Rinse the aerosol head and
The device switched off
automatically after 15 min.,
even though not all of the
liquid had passed through.
the power adapter.
Ensure that the power adapter
is plugged into the power
socket and the USB connector
is seated correctly in the
controller.
Add a suitable medication.
Press the On/Off button to
resume the inhalation session.
Rinse the nebuliser connector
with tap water and shake it
thoroughly to remove excess
water. Wipe a dry cloth over
the nebuliser connector on the
controller.
the VELOXcare.
Switch the controller on again
with the On/Off button. The
remaining fluid will then be
flushed through.
Page 54

– 54 –
6 TECHNICAL DATA
6.1 Electrical connection
Power consumption < 2.0 W
Operation with power adapter: Fuhua (UE05WV) or Friwo (FW7575M)
Supply voltage 100 – 240 V
Mains frequency 50/60Hz
Output extra-low voltage 5 VDC
Operation with batteries/rechargeable batteries
Batteries 3 × 1.5 V (Mignon AA LR6/alkaline)
Rechargeable batteries 3 × 1.2 V (NiMH)
6.2 Dimensions / Weight
Weight of complete device incl. mouthpiece
(without batteries)
110g
Controller
Dimensions [W×H×D] 72 mm × 91 mm × 60 mm
Weight (without batteries) 70 g
Nebuliser (incl. mouthpiece)
Dimensions [W×H×D] 139 mm × 66 mm × 61 mm
Weight (incl. mouthpiece) 40 g
6.3 Aerosol data
Aerosol data according to DINEN13544-1 is available on request from PARIGmbH.
6.4 Classification according to DINEN60601-1
Type of electric shock protection (power adapter) Protection classII
Degree of protection from electric shock of the part used
(nebuliser)
Degree of protection against water ingress in accordance with
EN60529 (IPrating)
Degree of protection when used in the presence of flammable
mixtures of anaesthetics with air, with oxygen, or with nitrous
oxide
Operating mode Continuous operation
Tp BF
IP 22
No protection
Page 55

– 55 –
6.5 Information about electromagnetic compatibility
Electrical medical equipment is subject to special precautionary measures with regard
to electromagnetic compatibility (EMC). Such equipment must only be installed and
operated in accordance with EMCinstructions.
Portable and mobile high-frequency communication devices can disrupt electrical
medical equipment. Using accessories, converters and power cords other than those
specified (with the exception of converters and power cords that the manufacturer of
the medical electrical device sells as spare parts for internal components) can result
in higher emission levels or lower the resistance to interference of the device.
The device must not be placed directly beside or on top of other devices for operation.
If the medical electrical device must be placed beside or on top of other devices to operate it, it should be monitored constantly to ensure that it is operating properly in the
arrangement used.
Technical data on electromagnetic compatibility (EMCinstructions) in table format are
included with the device. These can also be ordered from PARIGmbH or downloaded
from the internet at www.pari.com under "Technical Data" on the respective product
page.
6.6 Recommended safety distances
Recommended safety distances between portable and mobile high-frequency (HF)
telecommunication devices and the device:
The product is intended for operation in an electromagnetic environment in which radiated HF transients are monitored. The user can help to prevent electromagnetic interference by observing the minimum safety distances between portable and mobile HF
communication equipment (transmitters) and the product, as recommended below in
accordance with the maximum output power of the communication device.
Safety distance depending on transmitting frequency:
Rated power of the
transmitter
0.01 W 0.12 m 0.12 m 0.23 m
0.1 W 0.38 m 0.38 m 0.73 m
1 W 1.2 m 1.2 m 2.3 m
10 W 3.8 m 3.8 m 7.3 m
100 W 12 m 12 m 23 m
150kHz to 80MHz
d = 1.2 × SQRT(P)
80MHz to 800MHz
d = 1.2 × SQRT(P)
800MHz to 2.5GHz
d = 2.3 × SQRT(P)
For transmitters whose rated power does not appear in the table above, the safety
distance can be calculated using the equation associated with the respective column,
where "P" is the rated power of the transmitter in Watt (W) according to the information supplied by the device manufacturer.
6.7 Ambient conditions for operation
Ambient temperature 5 °C to +40 °C
Relative humidity 15% to 93% (non-condensing)
Atmospheric pressure 700hPa to 1,060hPa
Page 56

7 MISCELLANEOUS
7.1 Transportation and storage
– 56 –
Minimum ambient temperature (without monitoring of
relative humidity)
Maximum ambient temperature (with relative humidity of
up to 93%)
Humidity max. 93%
Atmospheric pressure 500hPa – 1,060hPa
-25 °C
+70 °C
7.2 Disposal
This product falls within the scope of the European Council Directive on Waste Electrical and Electronic Equipment (WEEE)5. Accordingly, this product must not be disposed of with domestic waste. The disposal regulations prevailing in the respective
member countries must be observed (e.g., disposal by local authorities or dealers).
Materials recycling helps to reduce the consumption of raw materials and protect the
environment.
7.3 Terms and conditions of warranty
PARI guarantees that your device, if used according to the instructions, will be free
from defects in material and workmanship caused by the manufacturing process for
the warranty period indicated on the warranty certificate, beginning on the date of initial purchase. Claims under the warranty shall be subject to a limitation period of
12months. The warranty provided by PARI applies in addition to the warranty obligation of your dealer. Your statutory rights with respect to your dealer in the event of defects are not limited by the warranty or any claim under the warranty. The warranty
certificate stamped by the dealer serves as your proof of warranty and ownership.
What does the warranty cover?
If, exceptionally, a defect is discovered, PARI will at its discretion repair or replace the
device, or refund the purchase price of the product. If it is replaced, the replacement
device may either be the same model or a model that is at least comparably
equipped. Replacement or repair of the device shall not serve as the basis for a new
warranty. All replaced old devices or parts shall become the property of PARI. Further
claims are excluded. This applies particularly for any claims for compensatory damages. This disclaimer of warranty shall be ineffective in the event of injury to life, limb
or health, in cases of wilful wrongdoing and gross negligence, product liability and if
substantive obligations under the warranty agreement are violated.
The warranty shall be cancelled if
– the device has been operated or used improperly with respect to the descriptions in
the instructions for use
– damage is present that is attributable to the effects of water, fire, lightning, etc.
– the damage was caused by transporting the device incorrectly or a falling impact
– the device has been misused or not cared for correctly
5) Directive 2002/96/EC of the EUROPEAN PARLIAMENT AND THE EUROPEAN COUNCIL of January 27,
2003 on waste electrical and electronic equipment.
Page 57

– 57 –
– the serial number on the device has been changed, removed, or otherwise
rendered illegible
– repairs, adaptations or modifications have been made to the device by persons not
authorised by PARI
Moreover, the warranty does not cover wearing parts, that is to say device parts that
are exposed to normal wear.
In the event of a complaint, please bring the entire device to your specialist dealer or
send it to us packed in the original box, postage paid, together with the warranty certificate stamped by the dealer.
The "warranty period" begins on the date of purchase.
7.4 Contact
For all product information and in the event of defects or questions about usage,
please contact our ServiceCenter:
Tel.: +49 (0)8151-279 279 (German-speaking)
+49(0)8151-279220 (international)
7.5 Explanation of symbols
The following symbols can be found on the device and/or the packaging:
Please follow the instructions for use.
Order no.
Serial number of the device
Direct current
Alternating current
Protection class of the part used: Type BF
The device is protected against infiltration by foreign bodies or water.
Minimum and maximum ambient temperature
Minimum and maximum humidity
Page 58

– 58 –
Minimum and maximum air pressure
The medical device was distributed commercially after 13August2005. This
product must not be disposed of with normal domestic waste. The symbol
of the refuse bin with a cross through it indicates that it must be disposed of
separately.
Manufacturer
This product satisfies the requirements of 93/42/EEC (Medical devices) and
2011/65/EU (RoHS).
Page 59

– 59 –
ELECTROMAGNETIC COMPATIBILITY – Guidance and
manufacturer's declaration DINEN60601-1-2:2007
(IEC60601-1-2:2007)
Electromagnetic compatibility
Medical electrical devices are subject to special precautionary measures in particular
regarding EMC with the installation and operation.
Portable and mobile HF-communication devices e.g. mobile phone can affect medical
electrical devices.
Use of accessories and lines other than those indicated can lead to increased
transmission or reduced noise immunity of the equipment. The equipment has to be
operated exclusively with original accessories.
The device should not be used beside or on top of other equipment. If such use is
unavoidable, the device should be observed to verify normal operation in the
configuration in which it will be used.
The EUT is intended for use in the electromagnetic environment specified below. The
customer or the user of the EUT must ensure that it is used in such environment.
There is no essential performance.
Electromagnetic emissions
Emission test Compliance
RF emissions CISPR 11 Group 1 EUT uses RF energy only for its internal
Class B The EUT is suitable for use in all
Harmonic emissions
IEC61000-3-2
Voltage fluctuations /
flicker emissions
IEC61000-3-3
Table 1 of DIN EN 60601-1-2:2007 (IEC 60601-1-2:2007)
Not applicable
Passed
Electromagnetic environment –
Guidance
function.
Therefore, RF-emission is very low and not
likely to cause any interference with nearby
electronic equipment.
establishments, including domestic
establishments and those directly
connected to the public low-voltage power
supply network that supplies buildings used
for domestic purposes.
Page 60

Electromagnetic immunity
– 60 –
Immunity test
Electrostatic
discharge (ESD)
IEC 61000-4-2
Electrical fast
transient /burst
IEC 61000-4-4
Surge
IEC 61000-4-5
Voltage dips, short
interruptions and
voltage variations
on power supply
input lines
IEC 61000-4-11
IEC60601 test
level
±6kV contact
±8kV air
±2kV for power
supply lines
±1kV for input /
output lines
±1kV common
mode
±2kV differential
mode
1)
<5% U
T
(>95% dip of UT)
for 1/2 cycle
40% U
T
(60% dip of UT)
for 5 cycles
70% U
T
(30% dip of UT)
for 25 cycles
Compliance
level
±6kV contact
±8kV air
±2kV for power
supply lines
±1kV for input /
output lines
±1kV common
mode
±2kV differential
mode
1)
<5% U
T
(>95% dip of UT)
for 1/2 cycle
40% U
T
(60% dip of UT)
for 5 cycles
70% U
T
(30% dip of UT)
for 25 cycles
Electromagnetic environment –
Guidance
Floors should be wood, concrete
or ceramic tile. If floors are
covered with synthetic material,
the relative humidity should be at
least 30%.
Mains power quality should be
similar to that of a typical
commercial or hospital
environment.
Mains power quality should be
similar to that of a typical
commercial or hospital
environment.
Mains power quality should be
similar to that of a typical
commercial or hospital
environment. When the user of
the Medical Electrical Equipment
continued function also calls in
the event of disruption of supply,
it is recommended the EUT from
an uninterruptible power supply
or a battery.
Power frequency
(50Hz/60Hz)
magnetic field
IEC 61000-4-8
Conducted RF
IEC 61000-4-6
<5% U
T
(>95% dip of UT)
for 5s
<5% U
T
(>95% dip of UT)
for 5s
3A/m 3A/m Power frequency magnetic fields
should be at levels characteristic
of a typical location in a typical
commercial or hospital
environment.
3V
eff
150kHz to
80MHz
3V
eff
150kHz to
80MHz
Portable and mobile RF
communication equipment should
be used no closer to any part of
the EUT, including cables, than
the recommended separation
distance calculated from the
equation applicable to the
frequency of the transmitter.
Page 61

– 61 –
Immunity test
Radiated RF
IEC 61000-4-3
IEC60601 test
level
3V/m
80MHz to
2,5GHz
Compliance
level
Electromagnetic environment –
Guidance
3V/m Recommended separation
distance:
d = 3,5/3 * SQRT (P)
d = 3,5/3 * SQRT (P)
80MHz to 800MHz
d = 7/3 * SQRT (P)
800MHz to 2,5GHz
where "P" is the maximum output
power rating of the transmitter in
watts (W) according to the
transmitter manufacturer and d is
the recommended separation
distance in metres (m).
Field strengths from fixed RF
transmitters, as determined by an
electromagnetic site survey2),
should be less than the
compliance level in each
frequency range3). Interference
may occur in the vicinity of
equipment marked with the
following symbol:
Tables 2 and 4 of DIN EN 60601-1-2:2007 (IEC 60601-1-2:2007)
1) UT is the AC mains voltage prior to application of the test level.
2) Field strengths from fixed transmitters, such as base stations for radio (cellular/cordless) telephones and
land mobile radios, amateur radio, AM and FM radio broadcast and TV broadcast cannot be predicted
theoretically with accuracy.
To assess the electromagnetic environment due to fixed RF transmitters, an electromagnetic site survey
should be considered. If the measured field strength in the location in which the EUT is used exceeds the
applicable RF compliance level above, the EUT should be observed to verify normal operation.
If abnormal performance is observed, additional measures may be necessary, such as reorienting or
relocating the EUT.
3) Over the frequency range 150kHz to 80MHz, field strengths should be less than 3V/m.
Note 1:
At 80Hz and 800MHz, the higher frequency range applies.
Note 2:
These guidances may not apply in all situations. Electromagnetic propagation is
affected by absorption and reflection from structures, objects and people.
Page 62

– 62 –
Recommended separation distances
For portable and mobile RF communication equipment and the EUT.
The EUT is intended for use in the electromagnetic environment in which radiated RF
disturbances are controlled. The customer or user of the EUT can help prevent
electromagnetic interference by maintaining a minimum distance between portable
and mobile RF communication equipment (transmitters) and the EUT as
recommended below, according to the maximum output power of the communications
equipment.
Rated maximum
output power of
transmitter [W]
0.01 0,12 m 0,12 m 0,23 m
0.1 0,38 m 0,38 m 0,73 m
1 1,2 m 1,2 m 2,3 m
10 3,8 m 3,8 m 7,3 m
100 12 m 12 m 23 m
Table 6 of DIN EN 60601-1-2:2007 (IEC 60601-1-2:2007)
Separation distance according to frequency of transmitter in [m]
150kHz to 80MHz
d = 1,2 × SQRT(P)
80MHz to 800MHz
d = 1,2 × SQRT(P)
800MHz to 2.5GHz
d = 2,3 × SQRT(P)
For transmitters rated at a maximum output power not listed above, the recommended
separation distance d in metres [m] can be determined using the equation applicable
to the frequency of the transmitter, where P is the maximum output power rating of the
transmitter in watts [W] according to the transmitter manufacturer.
Note 1:
At 80 MHz and 800 MHz, the higher frequency range applies.
Note 2:
These guidances may not apply in all situations. Electromagnetic propagation is
affected by absorption and reflection from structures, objects and people.
Page 63

PARI VELOX / VELOXcare
CERTIFICATE OF GUARANTEE
We grant a 2year guarantee on the control unit of the
VELOX and a 6month guarantee on the VELOXcare,
commencing on the date of purchase.
PARI GmbH
Technical Service Dept.
Holzhofstr. 10b
82362 Weilheim, Germany
Page 64

Bar code label
Application no:
Confirmation of purchase:
The appliance with the above appliance number was sold in
its original packaging.
Purchase date Stamp and signature of the dealer
©2016 PARI GmbH Spezialisten für effektive Inhalation, 055D1001-B 01/16
PARI GmbH
Moosstrasse 3 • 82319 Starnberg • Germany
Tel.: +49 (0) 81 51-2 79 0 • Fax: +49 (0) 81 51-2 79 101
E-Mail: info@pari.de • www.pari.com
 Loading...