

Page 1
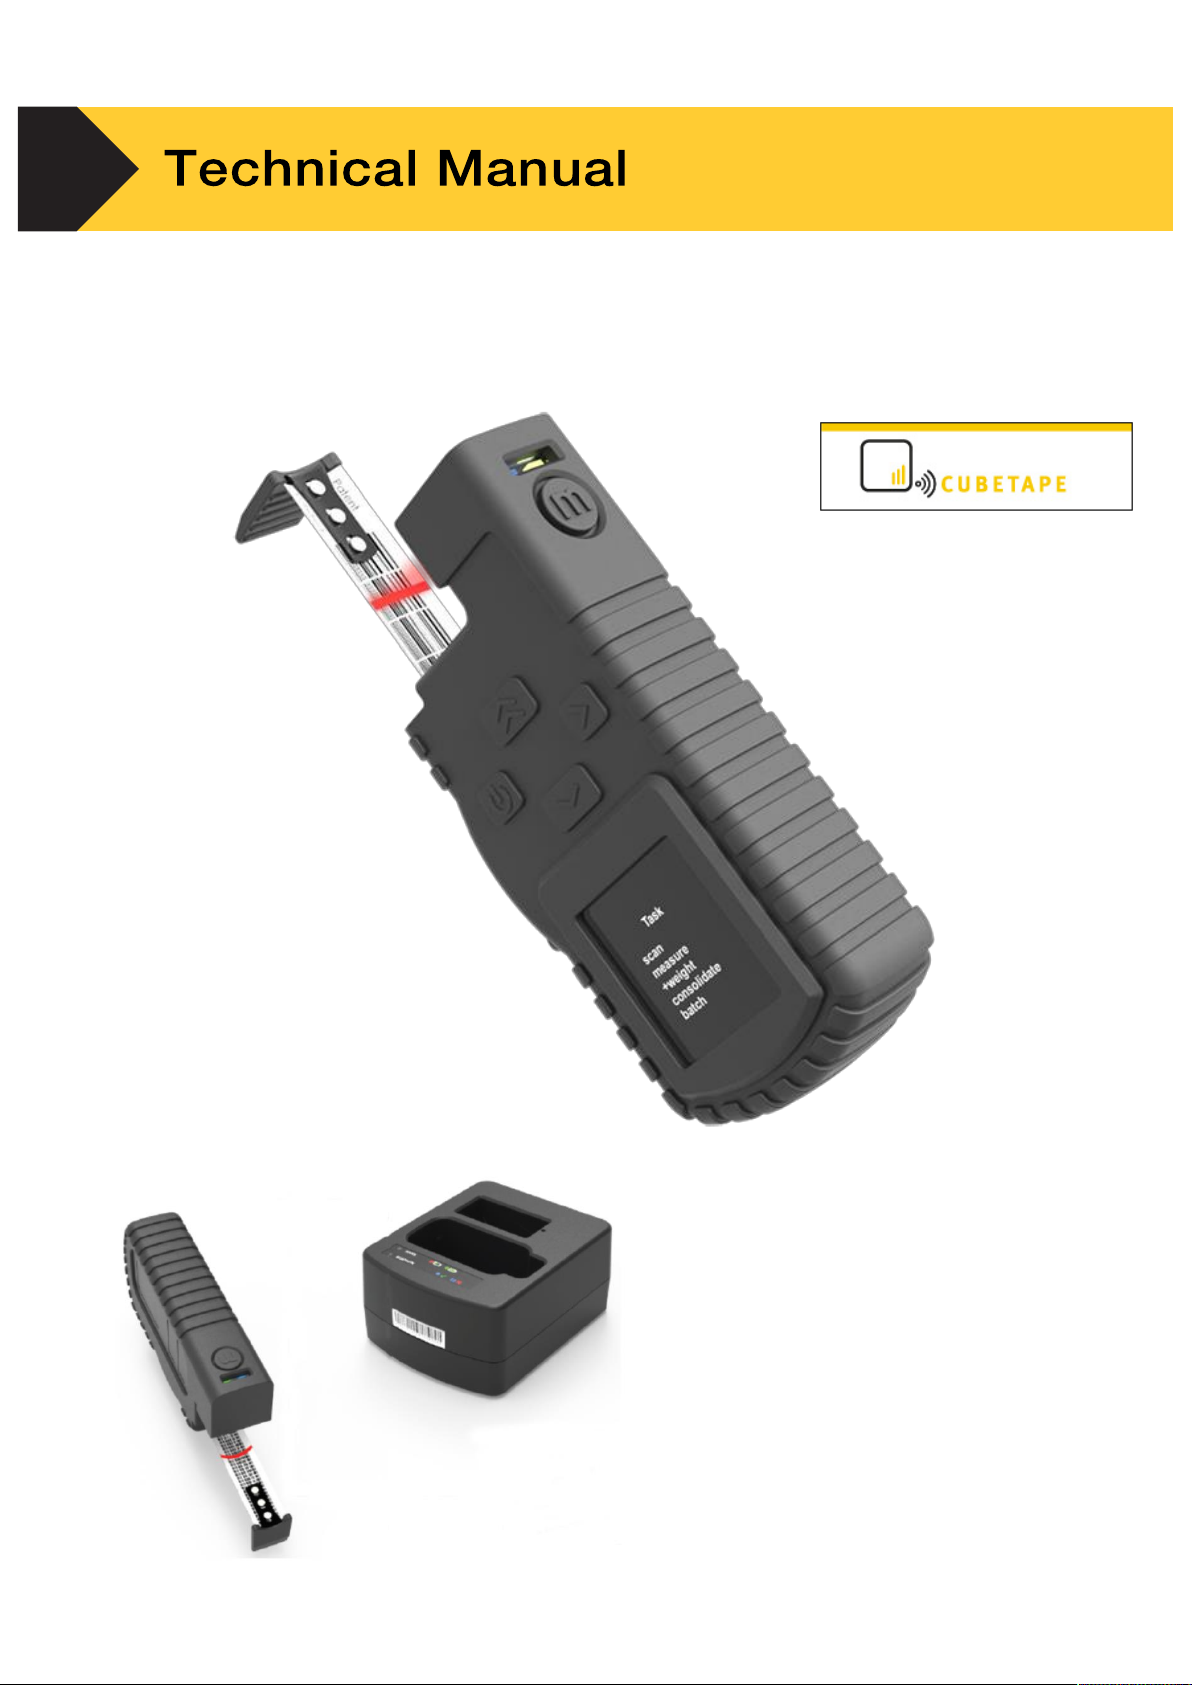
C190 CubetapePRO + Cradle
CubetapePRO -- provides exact
volumetric weight measurement by
measuring L x W x H of an object.
An optional cradle can be used for
charging the unit and also for HID
connectivity to a host application.
For example WMS packages and
shipping software.
Page 2

Technical manual-C190CubetapePRO
1
1
Introduction ................................................................................
3
1.1
1.2
1.3
1.4
1.5
1.6
1.7
1.7.1
1.7.2
2
2.1
2.2
2.3
2.3.1
2.3.2
2.3.3
2.3.4
2.3.5
2.3.6
2.4
2.4.1
2.4.2
2.4.3
2.4.4
2.4.5
3
3.1
3.2
3.2.1
3.2.2
3.3
3.3.1
3.3.2
3.3.3
3.3.4
3.3.5.
3.3.6
3.3.7
3.3.8
C190CubetapePRO Overview.....................................................
3
Main Features ..............................................................................
4
Specification.................................................................................
4
Model Identification ......................................................................
4
Inspection and Contents Checklist ..............................................
5
Physical Dimensions ....................................................................
5
Display and Buttons .....................................................................
6
Display Elements ..........................................................................
6
Button + Brake Operation ...........................................................
6
Operation ....................................................................................
8
Overview .....................................................................................
8
Power On/Off ...............................................................................
8
Basic Functionality .......................................................................
8
Scan .............................................................................................
9
Measure ......................................................................................
9
Transmit Data ..............................................................................
10
Insert Pallet ..................................................................................
10
Append.........................................................................................
11
Return to Last Recorded Data .....................................................
11
Tasks ...............................................................................................
11
Measure .......................................................................................
12
Weigh ...........................................................................................
13
Consolidate ..................................................................................
14
Ship ..............................................................................................
15
Batch Upload ...............................................................................
16
Configuration ............................................................................
17
Overview ......................................................................................
17
Settings in C190 Cubetape
PRO ..................................................
18
Settings Menu ..............................................................................
18
Scan Engine Configuration ..........................................................
19
Settings via PC ............................................................................
19
Cubetape Manager Software Download .....................................
20
Cubetape Manager Software Installation ....................................
20
Connect the device to Cubetape Manager Software ..................
20
Configure C190CubetapePRO via Cubetape Manager Software .........
20
Global Settings .............................................................................
21
Workflows .....................................................................................
22
Device Information ........................................................................
25
Bluetooth Pair C190Cubetape
.....................................................
25
Page 3

Technical manual-C190CubetapePRO
2
3.3.9 Advanced Menu Item ............................................................. 26
3.3.10 Disconnect .............................................................................. 26
4 Communication and Development ..................................... 27
4.1 Overview ................................................................................. 27
4.2 Connection via Bluetooth .......................................................... 27
4.2.1 PC Requirements ................................................................... 27
4.2.2 Connection Procedure ........................................................... 27
4.2.3 Connection Feedback ............................................................ 33
4.3 Connection via USB ............................................................... 33
4.3.1 PC Requirements ................................................................... 33
4.3.2 Connection Procedure ........................................................... 33
4.4 Data Format ............................................................................ 34
4.5 Pair Supported Weighing Indicator ......................................... 35
4.5.1 Connection Method ................................................................ 35
4.5.2 Connection Procedure ........................................................... 35
4.6
SDK ........................................................................................
36
4.6.1
SDK Overview ............................................................................ 36
4.6.2 SDK Contents ......................................................................... 36
4.6.3 PC Requirements ................................................................... 37
4.6.4 Samples.................................................................................. 37
4.6.5 Device Keyboard Wedge ....................................................... 38
4.6.6 Operating Notes ..................................................................... 39
5 Service and M
aintenance
...................................................... 4.
1
5.1 Overview ................................................................................. 41
5.2 Service Alert System .............................................................. 41
5.3 Cleaning and Maintenance Process ....................................... 41
5.4 Service .................................................................................... 42
5.5 Battery Charging and Feedback ............................................ 42
5.6 Tape Cassette and Battery Replacement .............................. 43
5.6.1 Tape Cassette Replacement .................................................. 43
5.6.2 Battery Replacement .............................................................. 43
5.7 Troubleshooting ...................................................................... 44
6
Spare Parts and Accessories ..............................................
45
Page 4

Technical manual-C190CubetapePRO
3
1.
1.1
CubetapePRO Overview
The CubetapePRO is a portable data-capture device for use in transport,
shipping and warehousing applications. It is designed to collect, record and
transfer data records made up of a series of items, including barcodes,
piece counts, weights, dimensions, and other information, such as device
serial number and units.
Cubetape captures dimensions using an integrated digital tape, and (if configured)
item information using a barcode scanner. On-board display and function keys
allow other data to be collected using a series of configurable tasks.
Data is collected and stored on Cubetape. The recorded data can be transferred
to a host application running on a PC, PDA, smart indicator, tablet or phone.
Communication options include Bluetooth (HID and SPP profiles) and physical
USB cable. When connection is established, data transmission can be
performed in either online or batch modes.
Cubetape supports multiple data-capture tasks, which can be selected and
loaded by an operator from the application menu. Standard applications are
Measure, Weigh, Consolidate, Batch Upload and Ship.
1.2
Main Features
•
Easy-to-handle robust enclosure with protective silicone sleeve
•
Standard 3 meter tape for dimensional measurement – BoT (Barcode on Tape)
•
OLED 24-bit full-color display with 128 × 128 resolution
•
Li-ion 970mAh battery with 2-hour recharge cycle
•
Motorola scan engine for tape + barcode reading and decryption
•
Class 2 SPP and HID profile Bluetooth connectivity for data transmission
•
USB serial port for PC connection and battery charging
•
Front button access to basic functions, such as scan and measure
•
Supplementary Cubetape Manager software for configuration and management
•
Supplementary CheckMate for Windows software for data handling and processing
•
Supplementary CheckMate for Android App for data capture including server software
•
Automatic shutdown features for energy conservation
Page 5
Technical manual-C190CubetapePRO
4
1.
1.3
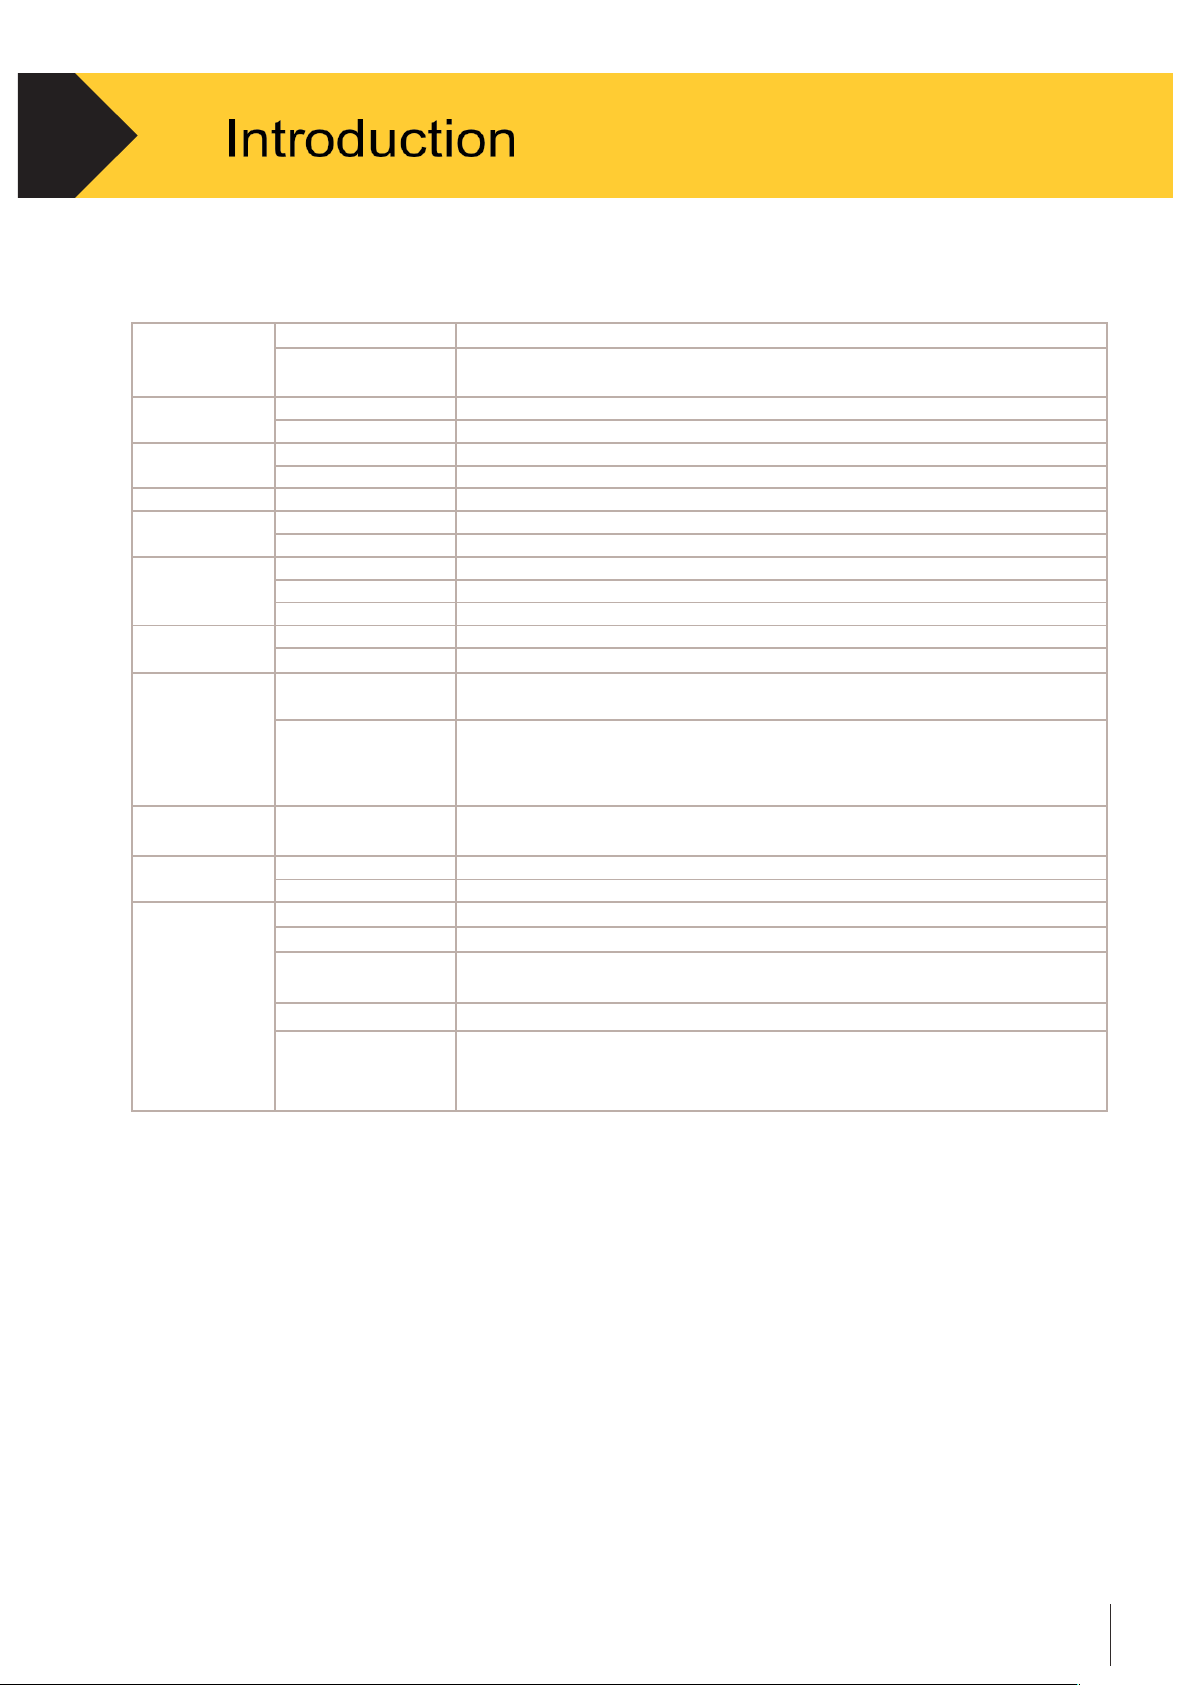
Specification
Measurement
Tape
19mm × 3m (9ft)
Units
US – inches (rounded to whole, half or tenth)
Metric – cm (rounded to whole or half), mm
Communications
Bluetooth®
Class 2 SPP and HID profiles
USB
Types AB for data transfer and recharge
Power
Li-ion
970mAh with 2-hour recharge cycle
Duty Cycle
Minimum 2 days on heavy duty cycle
Display
OLED
128 × 128 @ 24 bit full color
Scanner
1D
Optical 650nm visible laser diode
Program
Common symbology’s and features
Functions
Five Buttons
Measure, Scan/Record, Send/Next, Save/Append, Back/Power
Shortcuts
Insert Pallet, Same as Last, Append
Ergonomics
Tactile, 3 × LEDs, buzzer
Physical
Dimensions
123mm × 72mm × 31mm
Weight
Approximately 230g
Software
SDK
.NET and .NET Compact Framework, Desktop, PDA and PDA wedge
sample applications
Software
Cubetape Manger configuration and management utility
CheckMate for Windows
CheckMate App for Android
CheckMate for server
PDA Pairing Utility
Windows Mobile and WinCE utility to simplify and streamline
connection and data transfer to qualified Motorola PDAs
Regulatory
Environment
C-Tick, CE and FCC Certifications
Metrology
NMI 13-1-23, MID 008, NTEP
Other
Application
Programmable/Configurable
Temperature
-20°C to 50°C, 14°F to 120°F
Humidity
Operating: non-condensed 10% to 80%
Storage: 5% to 80%
Accessories
Tape cassette, Silicone Sleeve, Battery
Warranty
12 months on Cubetape device
3 months on accessories
Tape Cassette is a consumable item and provided without warranty
Table 1
1.4
Model Identification
The CubetapePRO model number, serial number, firmware version, counter
and MAC address can be found either in the About tab in the Settings menu,
or under the “Device Info” tab in Cubetape Manager software when the
device is connected with a PC host. See Chapter 3 Section 3.7.1 for more
detailed information.
Page 6
Technical manual-C190CubetapePRO
5
1.
1.5
Inspection and Contents Checklist
Verify the contents and inspect the package immediately upon delivery. If the
shipping container is damaged, check for internal damage and file a freight
claim with the carrier, if necessary. If the container is not damaged, remove
the device from its protective package, noting how it was packed, and
inspect each component for damage.
If shipping the device is required, it is best to use the original shipping
container. The device must be packed correctly to ensure its safe
transportation.
The package should include:
•
C190CubetapePRO Device
•
Quick User Guide
•
Battery Pack (assembled inside)
•
Tape Cassette (assembled inside)
•
USB Cable
1.6
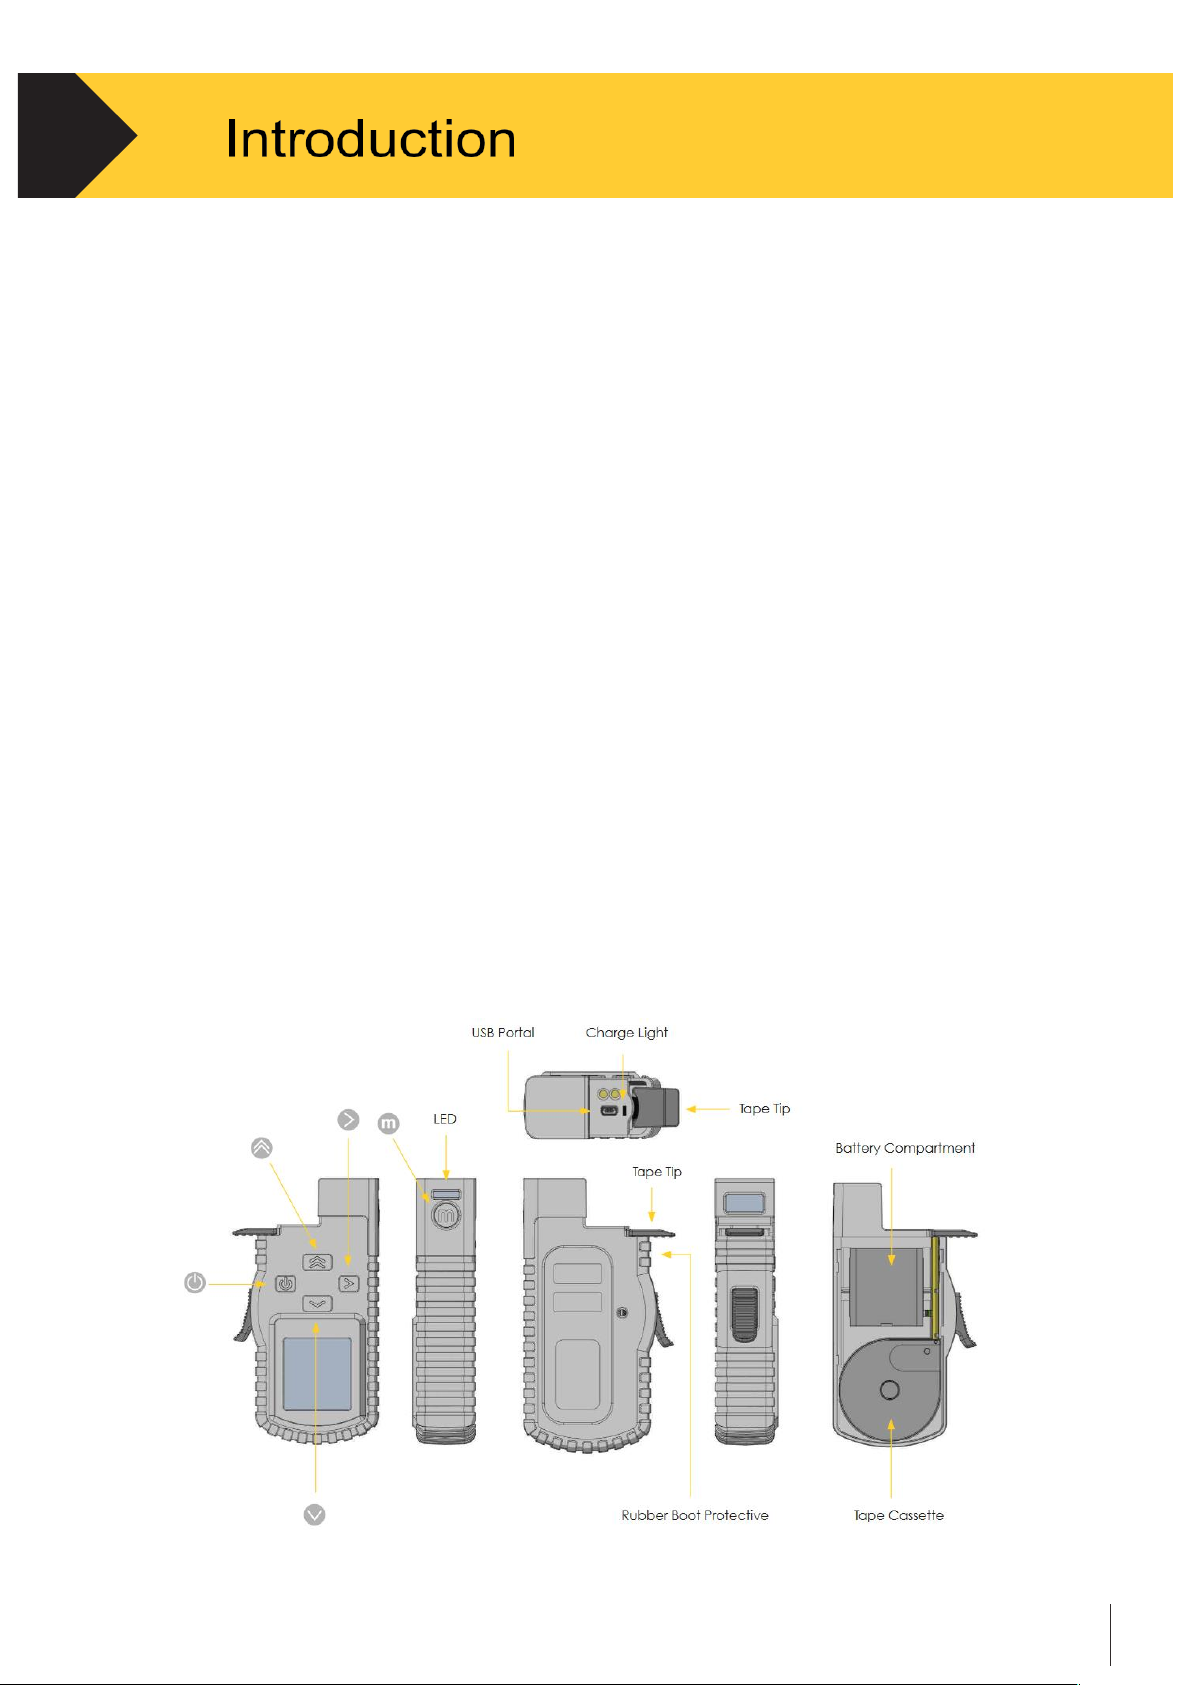
Physical Dimensions
The physical layout of CubetapePRO is shown in Figure 1-1
Figure 1-1
Page 7
Technical manual-C190CubetapePRO
6
1.
1.7
Display and Buttons
C190CubetapePRO uses an OLED 24 bit full color display with a resolution of 128 × 128.
1.7.1
Display Elements
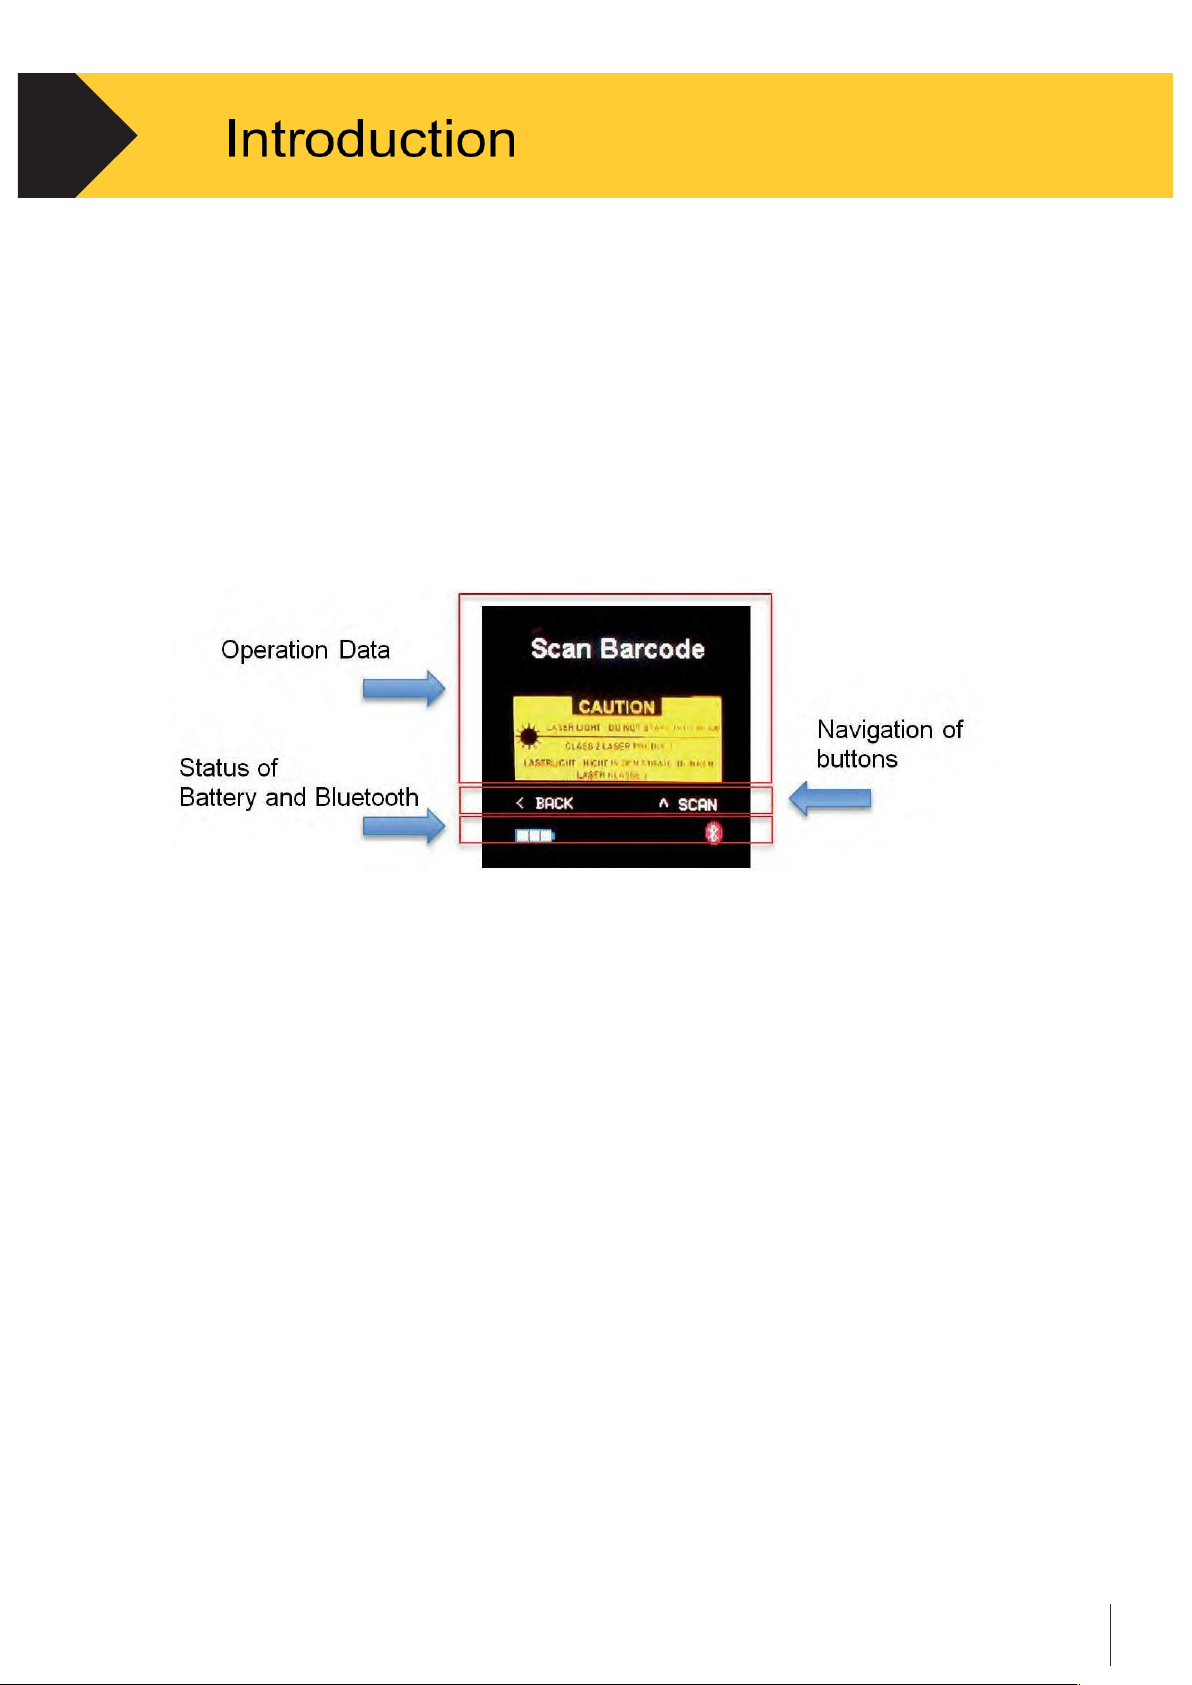
The screen display has three major components: Operation Data, Navigation and Status.
Figure 1-2
•
Data is displayed as it is collected.
•
Navigation information assists the operator complete tasks.
•
Status area provides information on the battery and Bluetooth®.
Battery information is displayed at the bottom left corner of the screen
while Bluetooth connectivity is displayed at the bottom right corner. When
the Bluetooth icon is red, there is no active Bluetooth connection, and when
the icon is blue the connection is active.
Also on the side above the M button you can find a blue LED – flashing
means > no Bluetooth connection, and continuous blue means Bluetooth
pairing successful > unit is connected with a host device.
The green LED indicates the ON / OFF status.
Page 8
Technical manual-C190CubetapePRO
7
1.
1.7.2
Button + Brake Operation
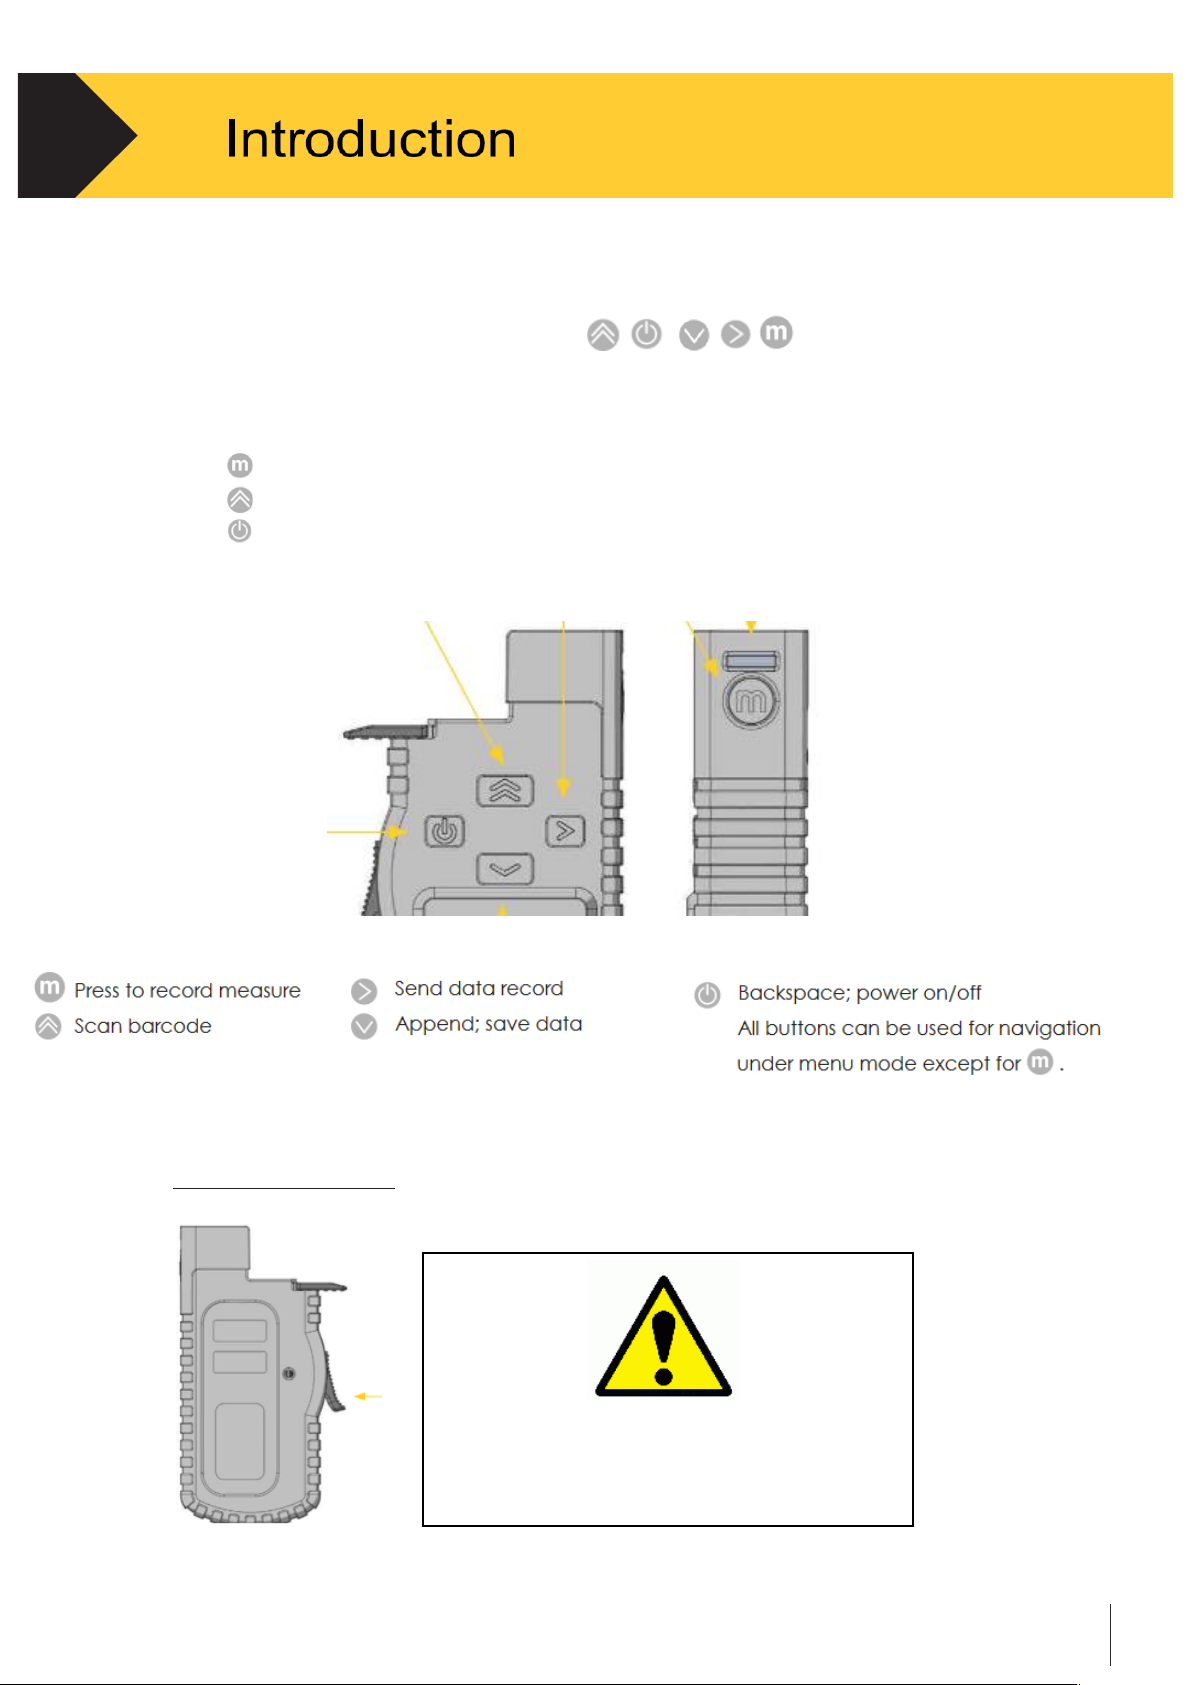
The CubetapePRO has five main buttons.
The four buttons on the front are used for navigation or data collection purposes.
The
button – press to record measurement
The
button – press to scan a barcode label
The
button for power on/off. Buttons are context sensitive.
Figure 1-3
Tape retraction brake
The manual retraction brake on the side of the
Cubetape must be used at all time when the
tape is retracted and develops high speeds
which could damage the tape tip
Page 9
Technical manual-C190CubetapePRO
8
2.
2.1
Overview
This chapter provides information about the main functions of C190CubetapePRO,
including button usage, display options, basic field operations and workflows.
Operation of the device depends on which functions are enabled. The functionality
discussed in this chapter is based on the device only, without any communication
or configuration from the Cubetape Manager software. For detailed information
about configurations via PC software, see Chapter 3.
2.2
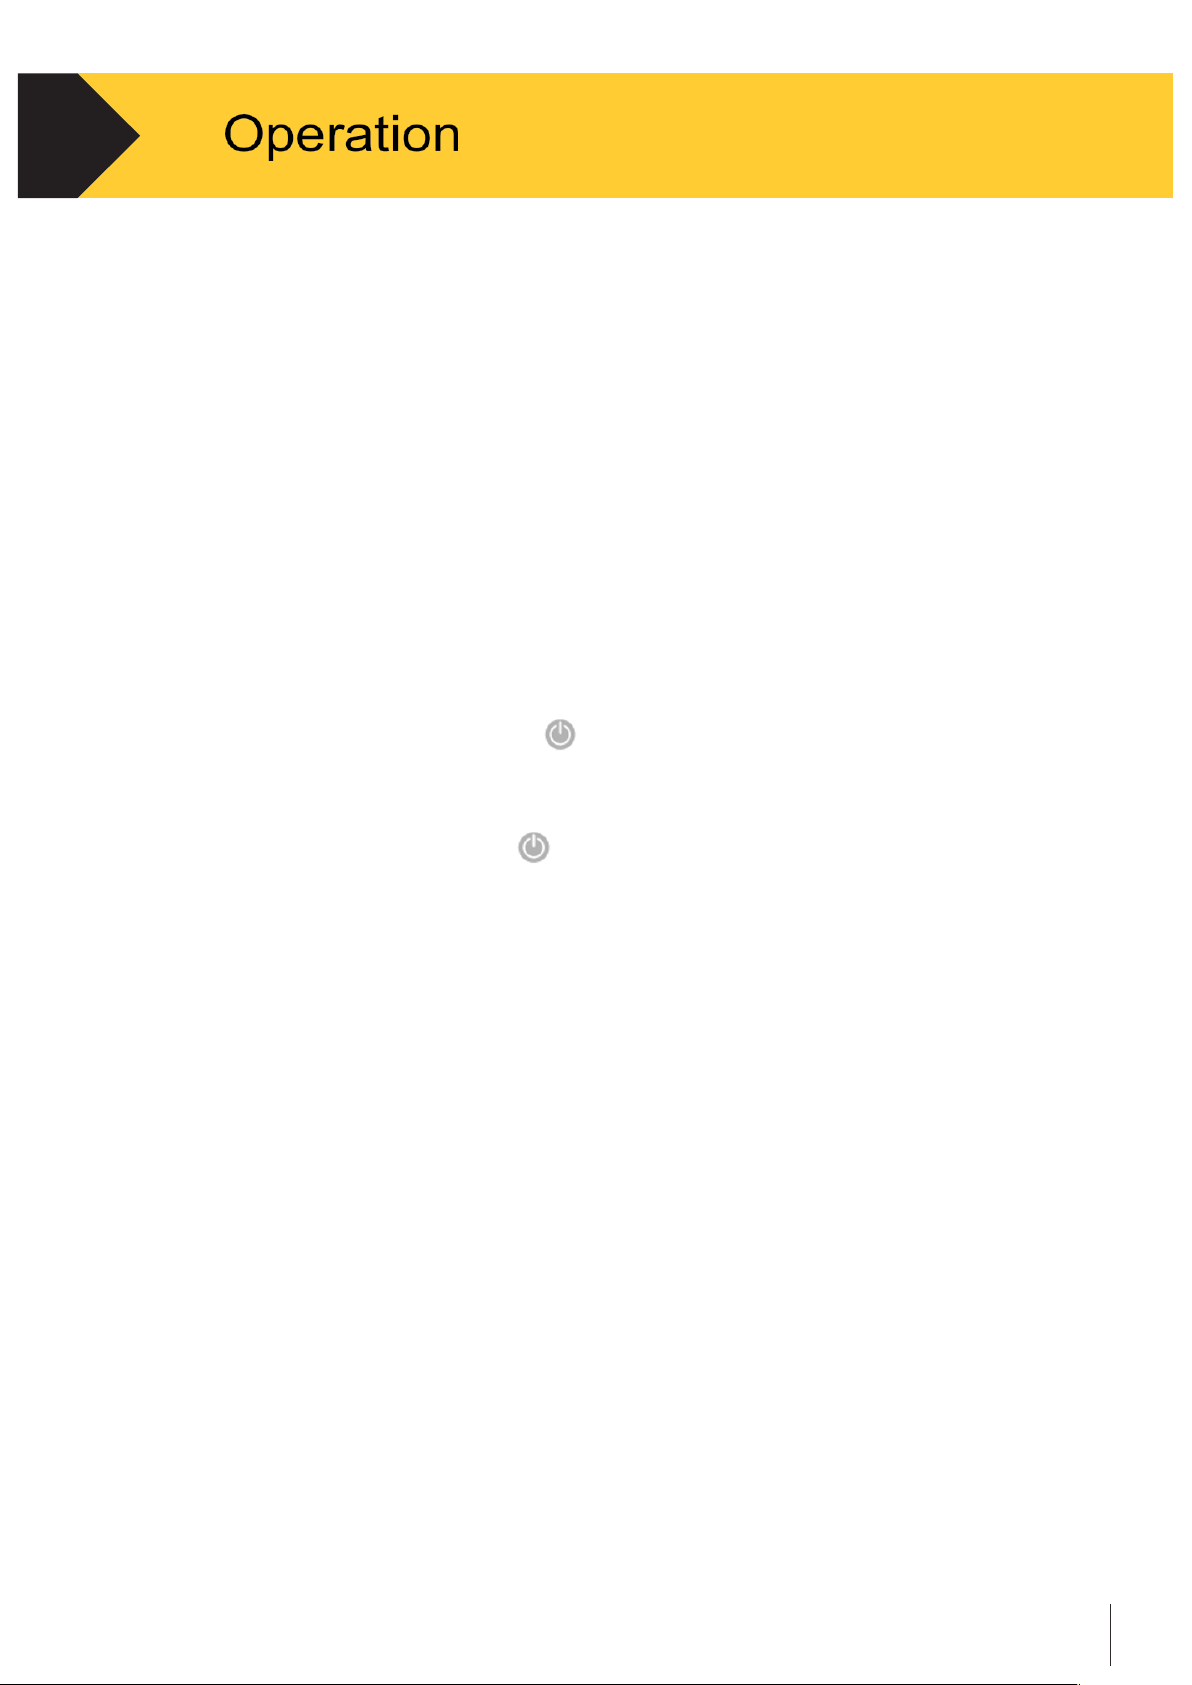
Power On/Off
•
To turn on the device, short press .
•
* Legal for trade versions will present an info screen- press any key to proceed
•
To shut down the device, press
for approximately 3 seconds, then release when
“Power Off” is indicated on screen or five beeps are heard.
•
Cubetape will auto shut down after 10 minutes of no key press
NB -- Please charge your Cubetape regularly to avoid ‘low bat’ situations
Parceltools provide a convenient charger / cradle unit for this purpose.
2.3
Basic Functionality
This section provides information of some fundamental functions of C190CubetapePRO
The following functions are addressed in this section:
•
Scan • Measure
•
Transmit Data
• Insert Pallet
•
Append
•
Return to Last Recorded Data
Page 10
Technical manual-C190CubetapePRO
9
2.
2.3.1
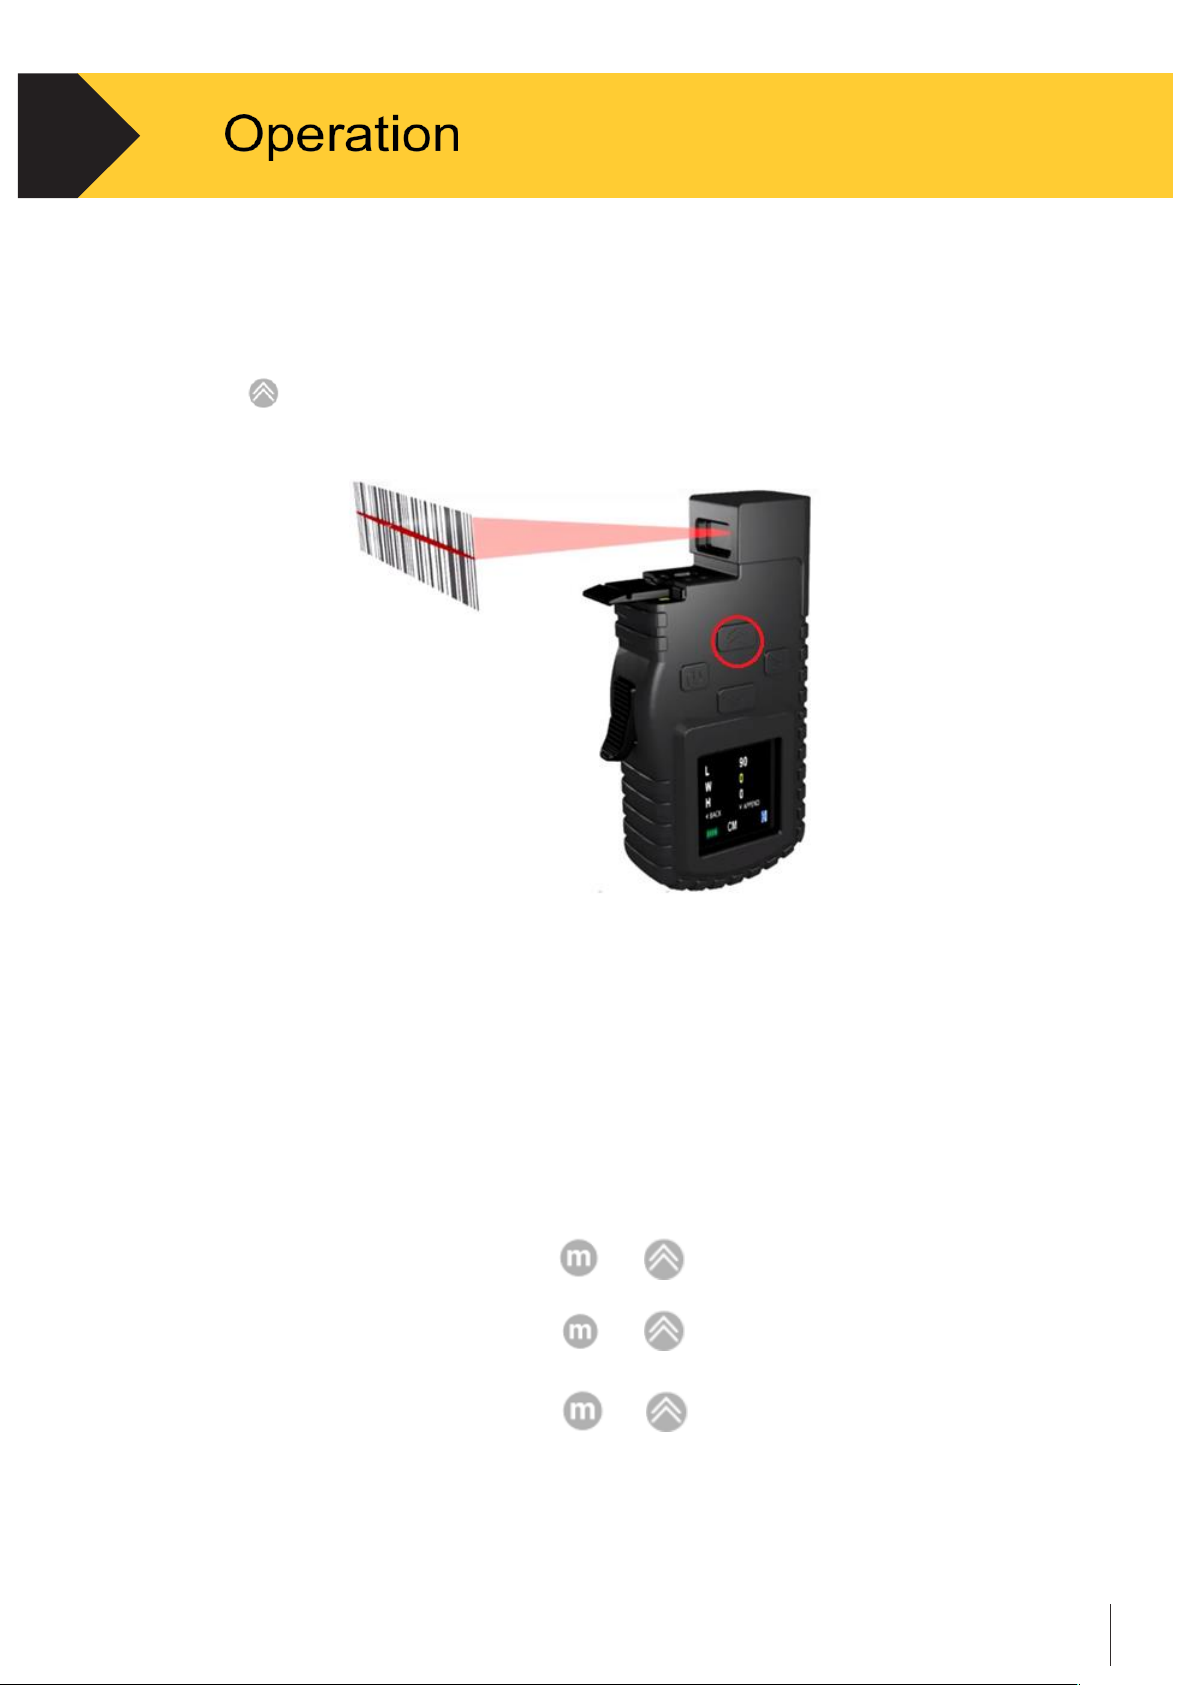
Scan
•
Turn on the device and “Scan Barcode” is indicated on screen.
•
Aim the scanner at a proper tilting angle (ideally perpendicular to the scanning surface).
•
Press
to scan.
Figure 2-1 Scan Operation
2.3.2
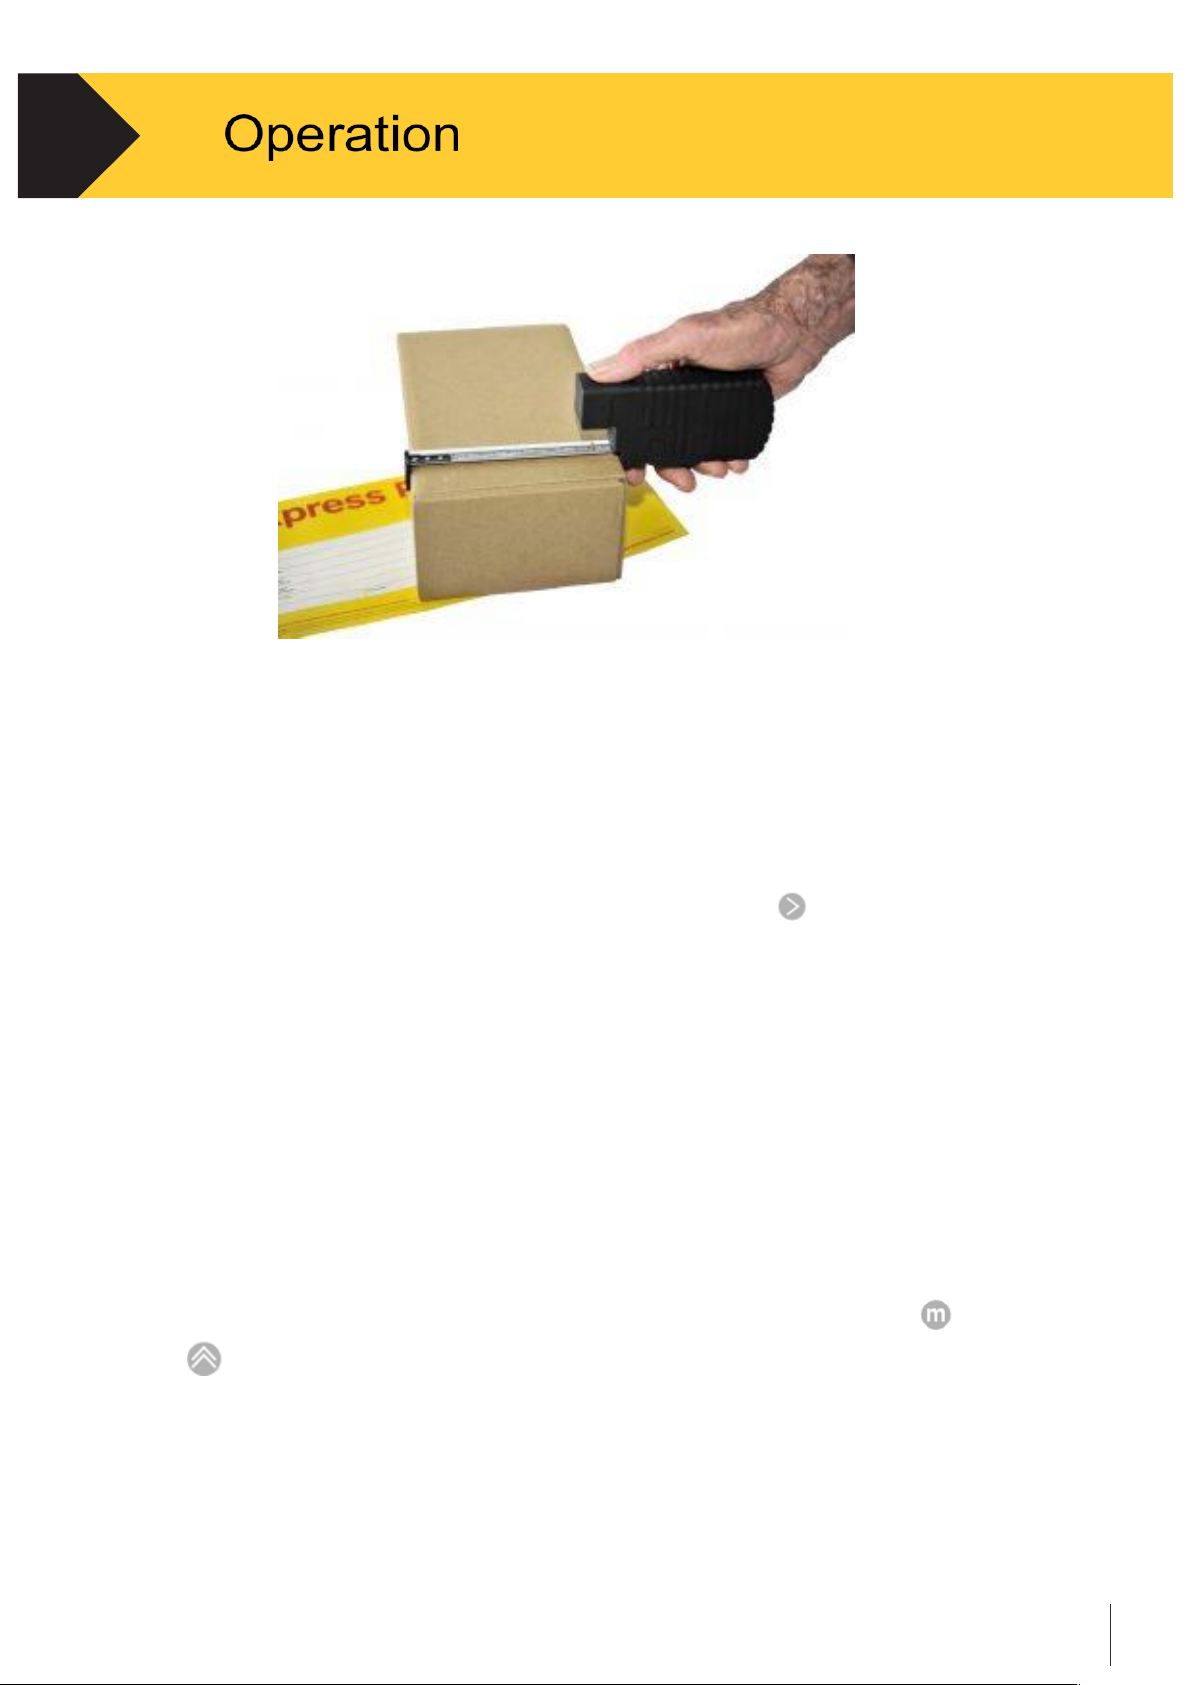
Measure
•
Stretch the tape tip to one end of the object, then align the Tape Stop with
other end of the object.
•
Make sure the tape is parallel with the edge of the object during measurement
•
Measure item length.
•
Record measured length by pressing
or
•
Measure item width.
•
Record measured width by pressing
or
•
Measure item height.
•
Record measured height by pressing or
Page 11
Technical manual-C190CubetapePRO
10
2.
Figure 2-2 - Measure Operation
2.3.3
Transmit Data
•
In the
Measure
task, when connected online to a host system via Bluetooth
recorded data can be sent to the host system by pressing .
•
In batch mode, recorded data can be sent to a host system using the
Batch Upload
method in the application menu via USB connection. See Section 2.4.5 in this chapter
for detailed instruction
•
In the
Ship or Scan
task, transmit is automatic and is part of scanning or
measuring process.
2.3.4
Insert Pallet dimensions ( if activated in settings )
•
With the tape in the Home position and cursor in the Length field, press
or
to insert the default pallet length and width.
Page 12
Technical manual-C190CubetapePRO
11
2.
2.3.5
Append ( if activated in Settings )
The Append function enables the operator to add up to three length
measurements together, useful when the item length is longer than the
3 meter tape.
•
The append function enables the operator to sum three measurements of length
together, especially when the item length is longer than the 3 meter tape.
•
When in Length measurement position - Press to Append measurement 1;
•
Measure length 2 and if needed length 3;
•
Record appended measurement by pressing whiles take your last measurement ;
•
The length recorded will be the sum of length 1, 2 and length 3.
2.3.6 Return to Last Recorded Data
•
Press several times until the cursor is in the length field;
•
Press will display the last recorded measurement on screen.
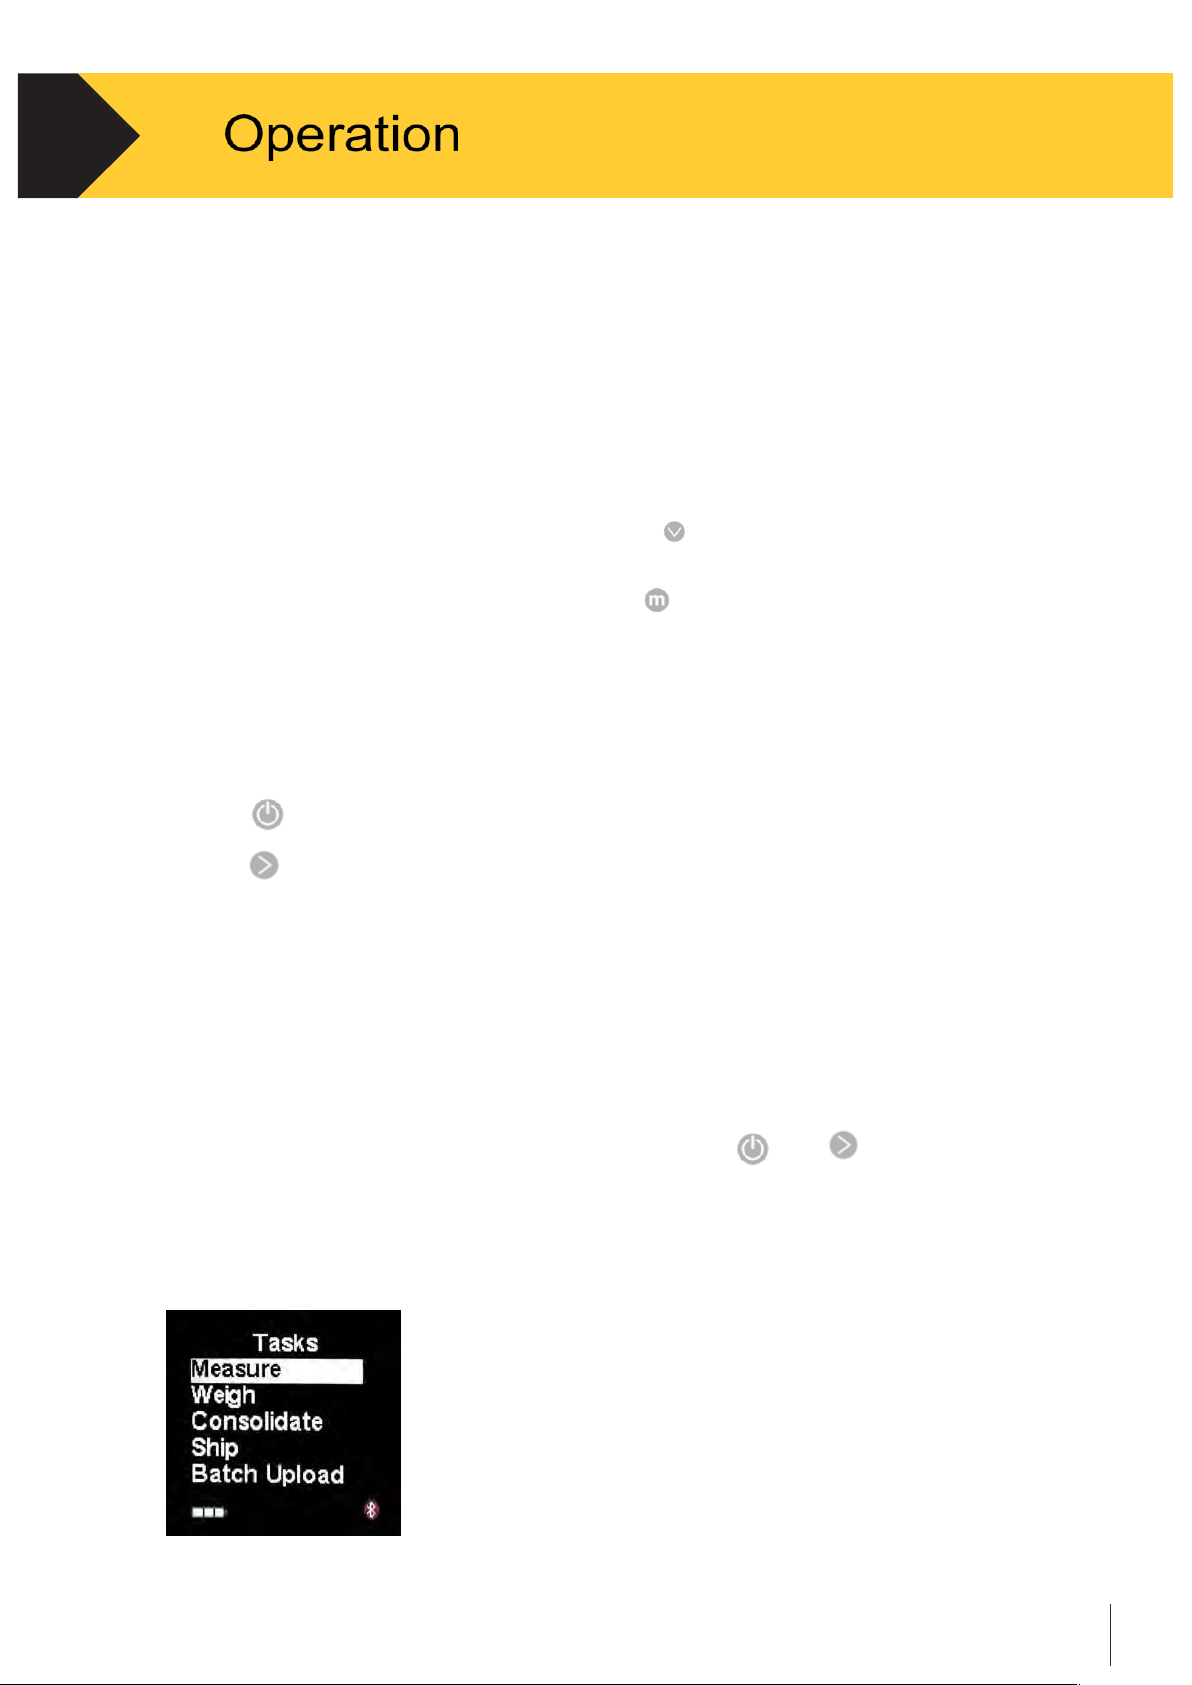
2.4
Tasks
The CubetapePRO provides five different tasks, which can be directly accessed on
the device. When the device is turned on, it will be set up for the Task last used.
If a different task is needed, the operator has to access the menu to load a different task.
Enter the Tasks menu from current operation by pressing
and
together.
The four buttons on the front panel can be used for navigation and selection.
See Section 1.7.2 for more details.
Figure 2-3
Page 13
Technical manual-C190CubetapePRO
12
2.
2.4.1
Measure
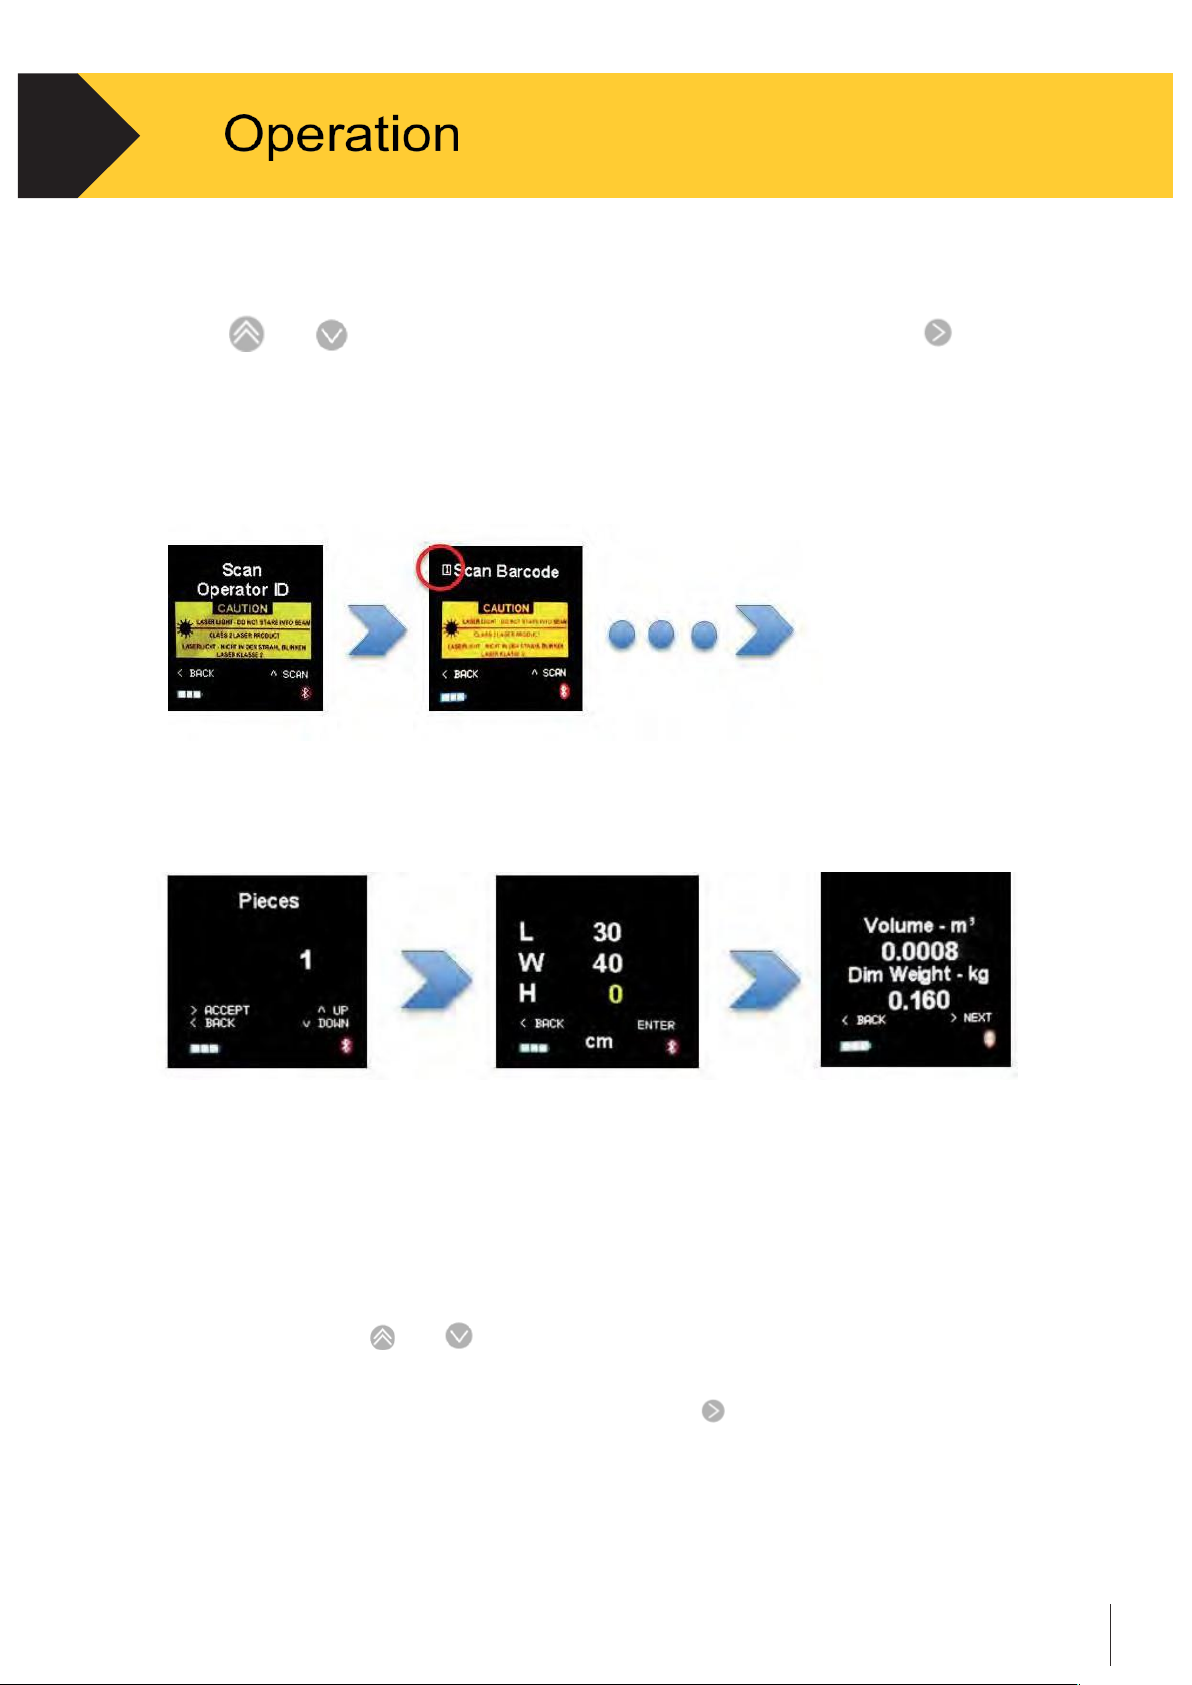
•
Use
and
to scroll, when the cursor is on the Measure tab, press
to select.
•
The display will be redirected to the first step in the Measure workflow.
All the operation steps can be configured via Cubetape Manager software.
See chapter 3 for more details. If the operation is disabled, the operation will skip to
the next step directly.
Figure 2-3
Figure 2-5
Figure 2-4
Figure 2-6 Figure 2-7
-
Scan the operator ID: This operation needs to be performed when the device is
powered on only. To change the Operator ID, restart the device See Figure 2-3.
-
Scan barcode: Up to 3 barcodes can be scanned, depending on the configuration.
The sequence number shows on the left top on the screen See Figure 2-4.
-
Input pieces: Use and to scroll the value See Figure 2-5.
-
Measure the length, width and height See Figure 2-6.
-
Show the volume and dimensional weight. Press to send/save the record.
Page 14
Technical manual-C190CubetapePRO
13
2.
2.4.2
Weigh
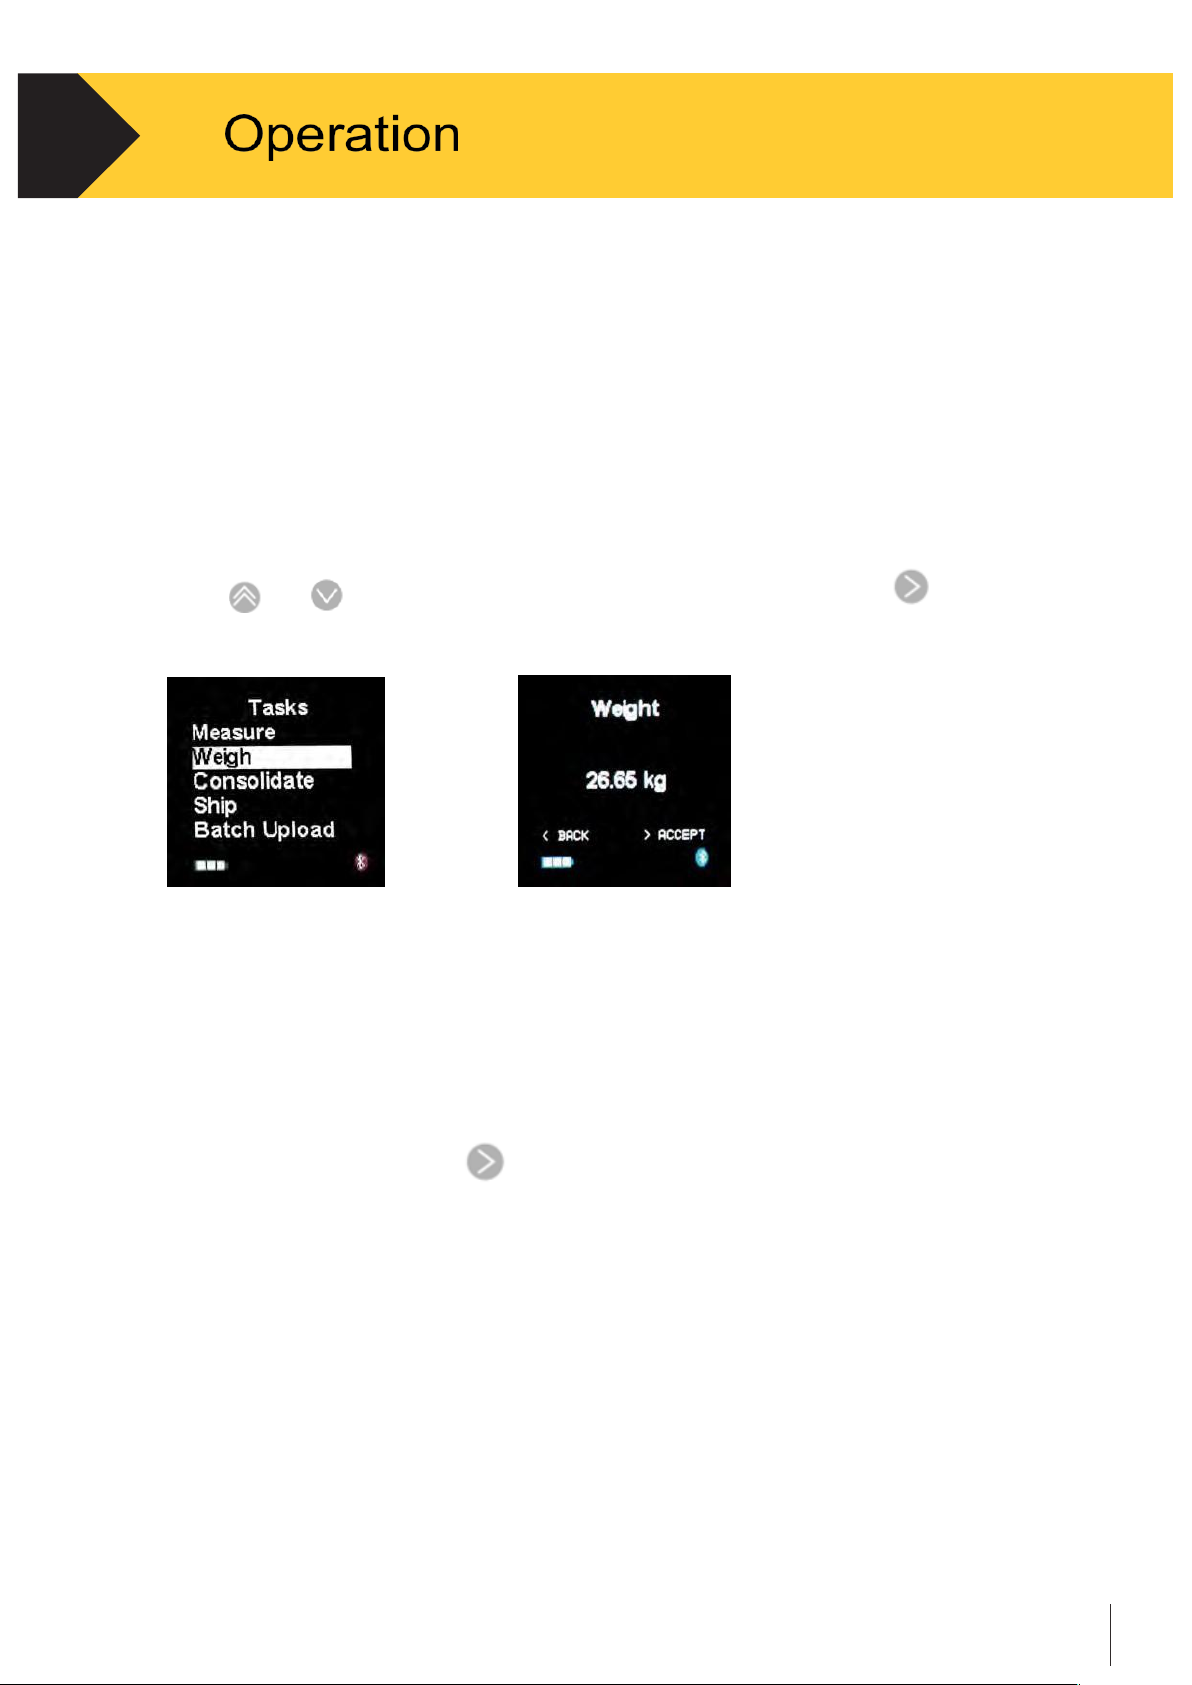
The CubetapePRO can record the weight from supported scales via Bluetooth.
This application only works in “batch” mode. The weight data is stored in a record
along with barcode, dimensions and other information. The records needs by
uploaded by the “Batch Upload” operation to a PC with CargoDesk software.
Pair with a weighing scale first. Chapter 4 Section 4.5 for instructions and
information.
•
Use and
to scroll, when the cursor is on the Weigh tab, press
to select.
Figure 2-8
•
The display will be redirected to the first step in the Weigh workflow.
The Weigh workflow is similar to the Measure application.
See Section 2.4.1 for more details.
•
Keep the goods on the scale before scanning the barcode label on the goods.
After scanning the barcode the weight is automatically received as shown
on Figure 2-8. Press
to accept / continue.
•
After the dimensioning process, the record will be saved automatically.
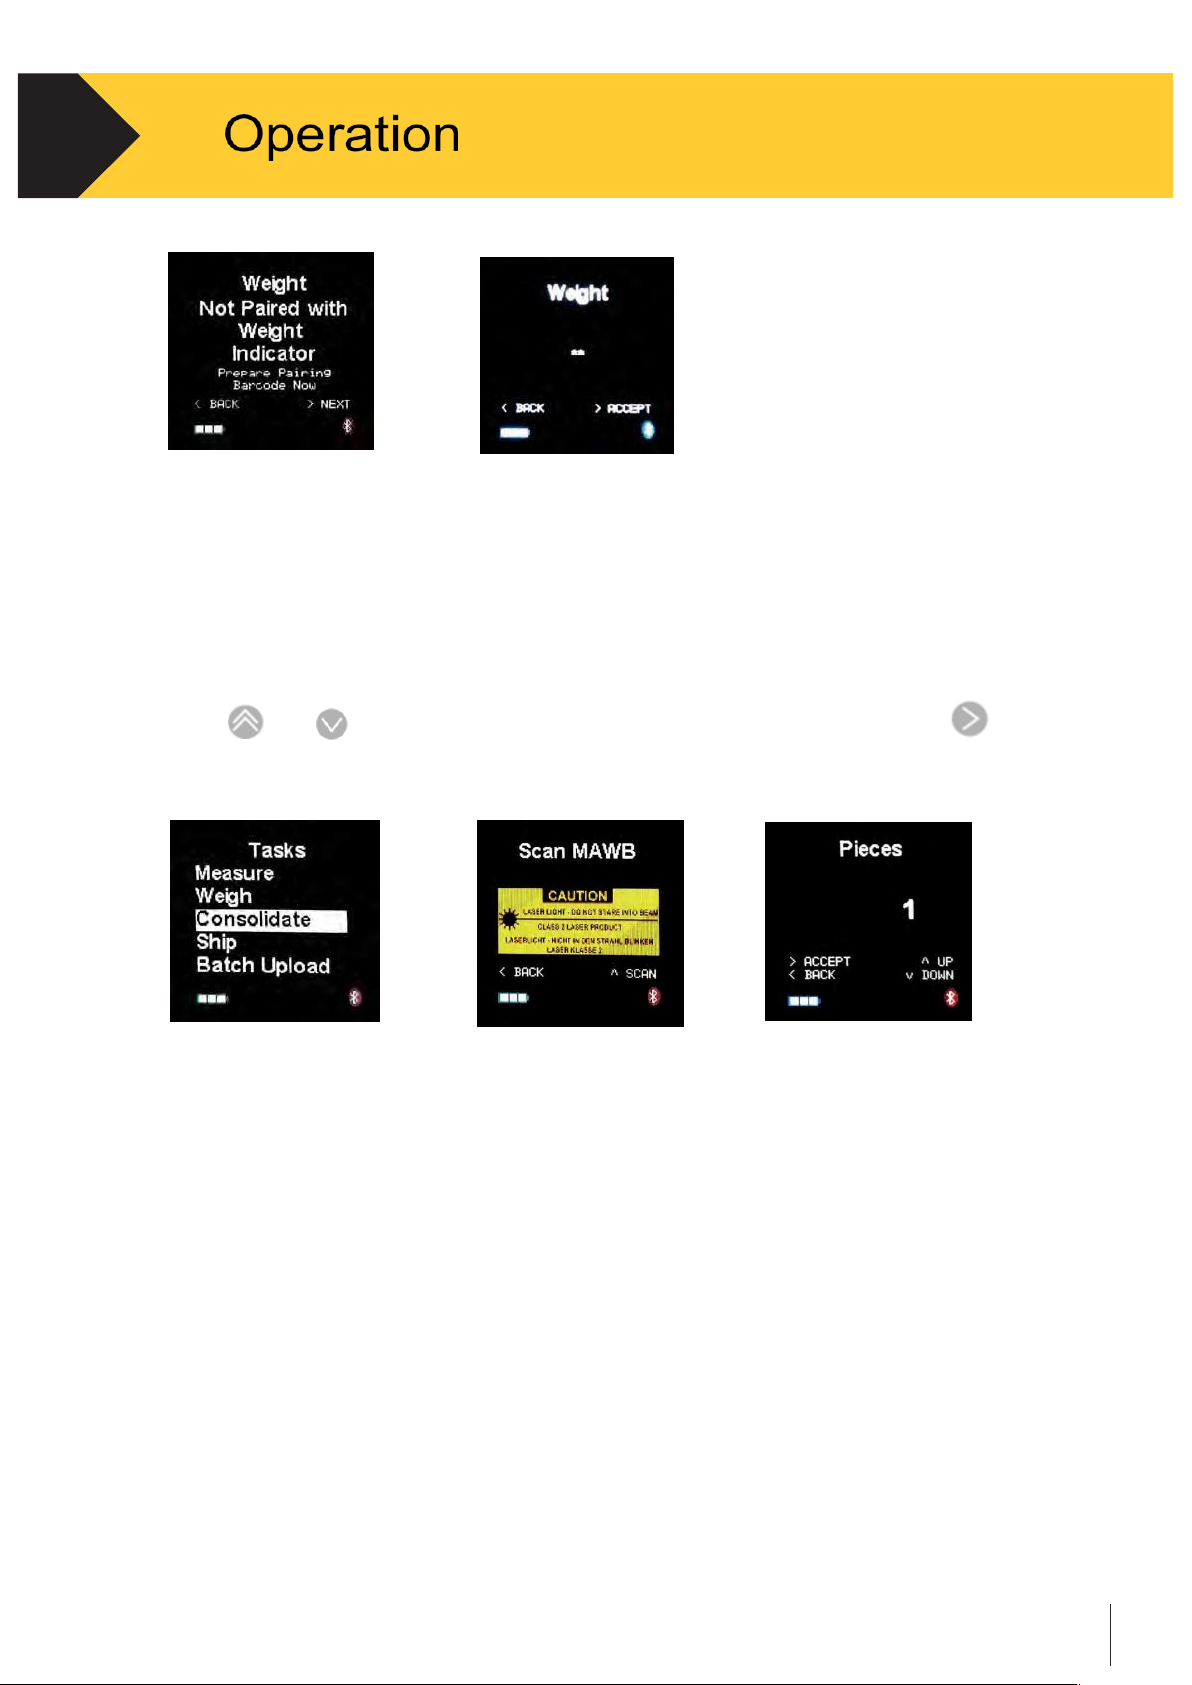
Note: In order to receive weight from the scale, Cubetape must be connected.
If the scale is not connected, the warning shown in Figure 2-9 will be displayed.
Please check the connection and pair again if required.
If the scale cannot respond to the Cubetape, the display would stay on the
capturing screen, see the Figure 2-10. Please check the configuration on the
scale.
Page 15
Technical manual-C190CubetapePRO
14
2.
Figure 2-9 Figure 2-10
2.4.3
Consolidate
C190Cubetape can consolidate multiple items under one barcode. This application also works
in “batch” mode. The records needs be uploaded by the Batch Upload operation to a host.
•
Use
and
to scroll, when the cursor is on the Consolidate tab, press
to
select. See Figure 2-11.
Figure 2-11 Figure 2-12 Figure 2-13
•
The display will be redirected to the first step in the Consolidate workflow. The
process is similar to the “Measure” Task. See Section 2.4.1 for more details.
•
After the dimensioning measurements, the workflow loops back to collect data for
the next item (see Figure 2-13).
•
After the dimensioning measurements, the record is saved automatically.
Page 16
Technical manual-C190CubetapePRO
15
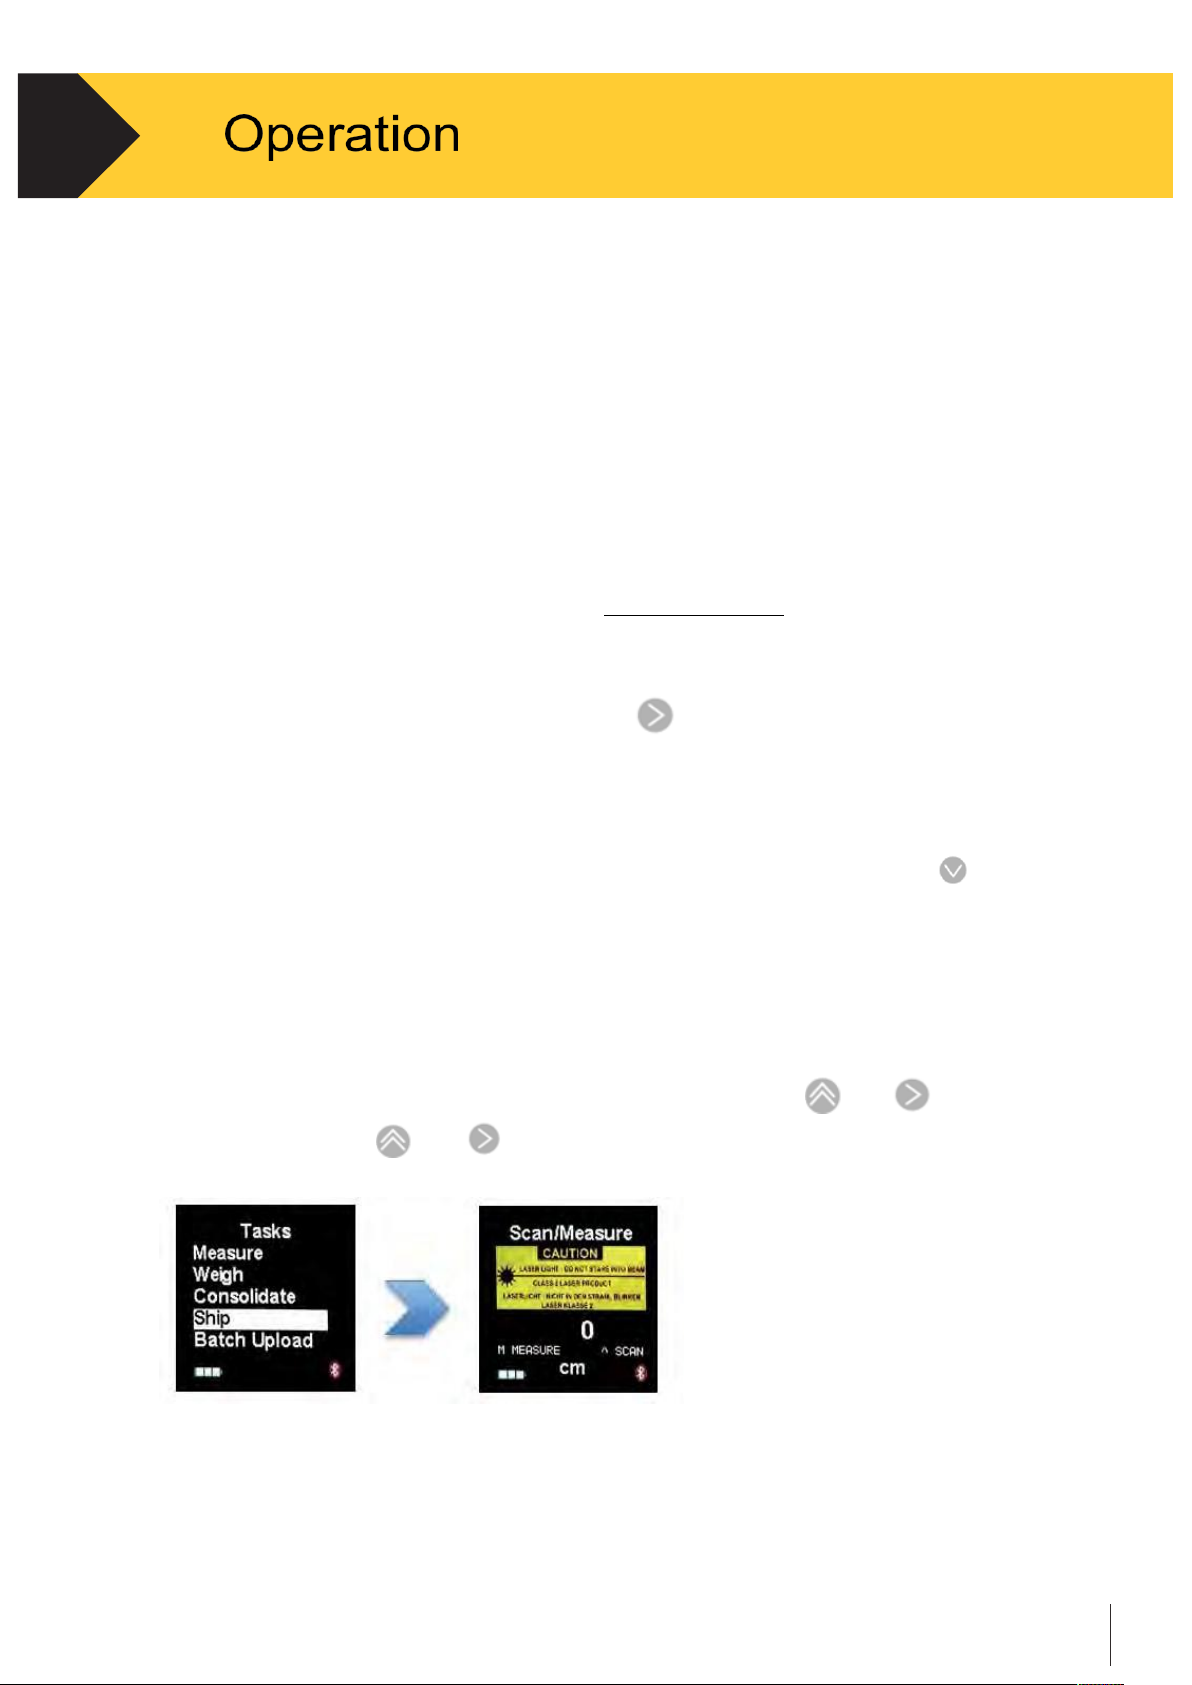
2.
2.4.4
Cubetape Shipper (Ship) Instructions
Introduction
The workflow or task SHIP provides an on-line connection with a host, sending data in
real time using a Bluetooth connection.
The Measure button, (on the side) will record the length from the tape and send it
(followed by a tab) via Bluetooth to a connected host The Bluetooth on this device is
setup to use the HID profile, meaning the data is sent to the foreground application
running on a host (typically a PC, PDA, iPad, Phone etc.) The device will need to be
paired to a host system before use. Also the Parceltools Cradle can be used for this
functionality.
If using an iPad as a demo host, the right arrow
acts as a keyboard escape key -
pressing it when connected will display or hide the iPad on screen keyboard. This is
useful if you need to enter alpha text as well as transfer barcode and dimensional
information.
The Cubetape has an inbuilt Dim Weight calculator. Pressing the down arrow
once, will display the Dim Weight for a domestic shipment (using factor 166) for the last
3 measurements, and pressing down arrow again, will display Dim Weight for an export
shipment (using factor 139).
Some customers have discounted conversion factors and the value of the conversion
factor[s] can be adjusted from the settings menu. To do this hold
and
select
settings and use the
and
to increment and decrement the values
Figure 2-14 Figure 2-15
Page 17
Technical manual-C190CubetapePRO
16
2.
Integration
Bluetooth HID mode is ideal for demonstration as there is no need for any software on
the host. Data will appear in the active application wherever the cursor is located, and
format characters (tab, cr, lf for example) can be used to position the data in t he right
location. However if cursor independence is an issue, Cubetape can instead be
connected to the host using Bluetooth serial port profile (SPP). The data sent from
Cubetape can be accessed at the relevant COM port on the host and can be made
available programmatically. To simplify this process for the host application, Parceltools
has published an SDK comprising a dll and a sample desktop application. The dll
manages the low level Cubetape interface (BT and COM port connection) and makes
the data available via a higher level set of methods and properties. We envisage the
major shipping applications would require cursor independence, and if so the SDK may
be a useful tool. There are a number of implementations in Australia and Asia where
this approach has been us used
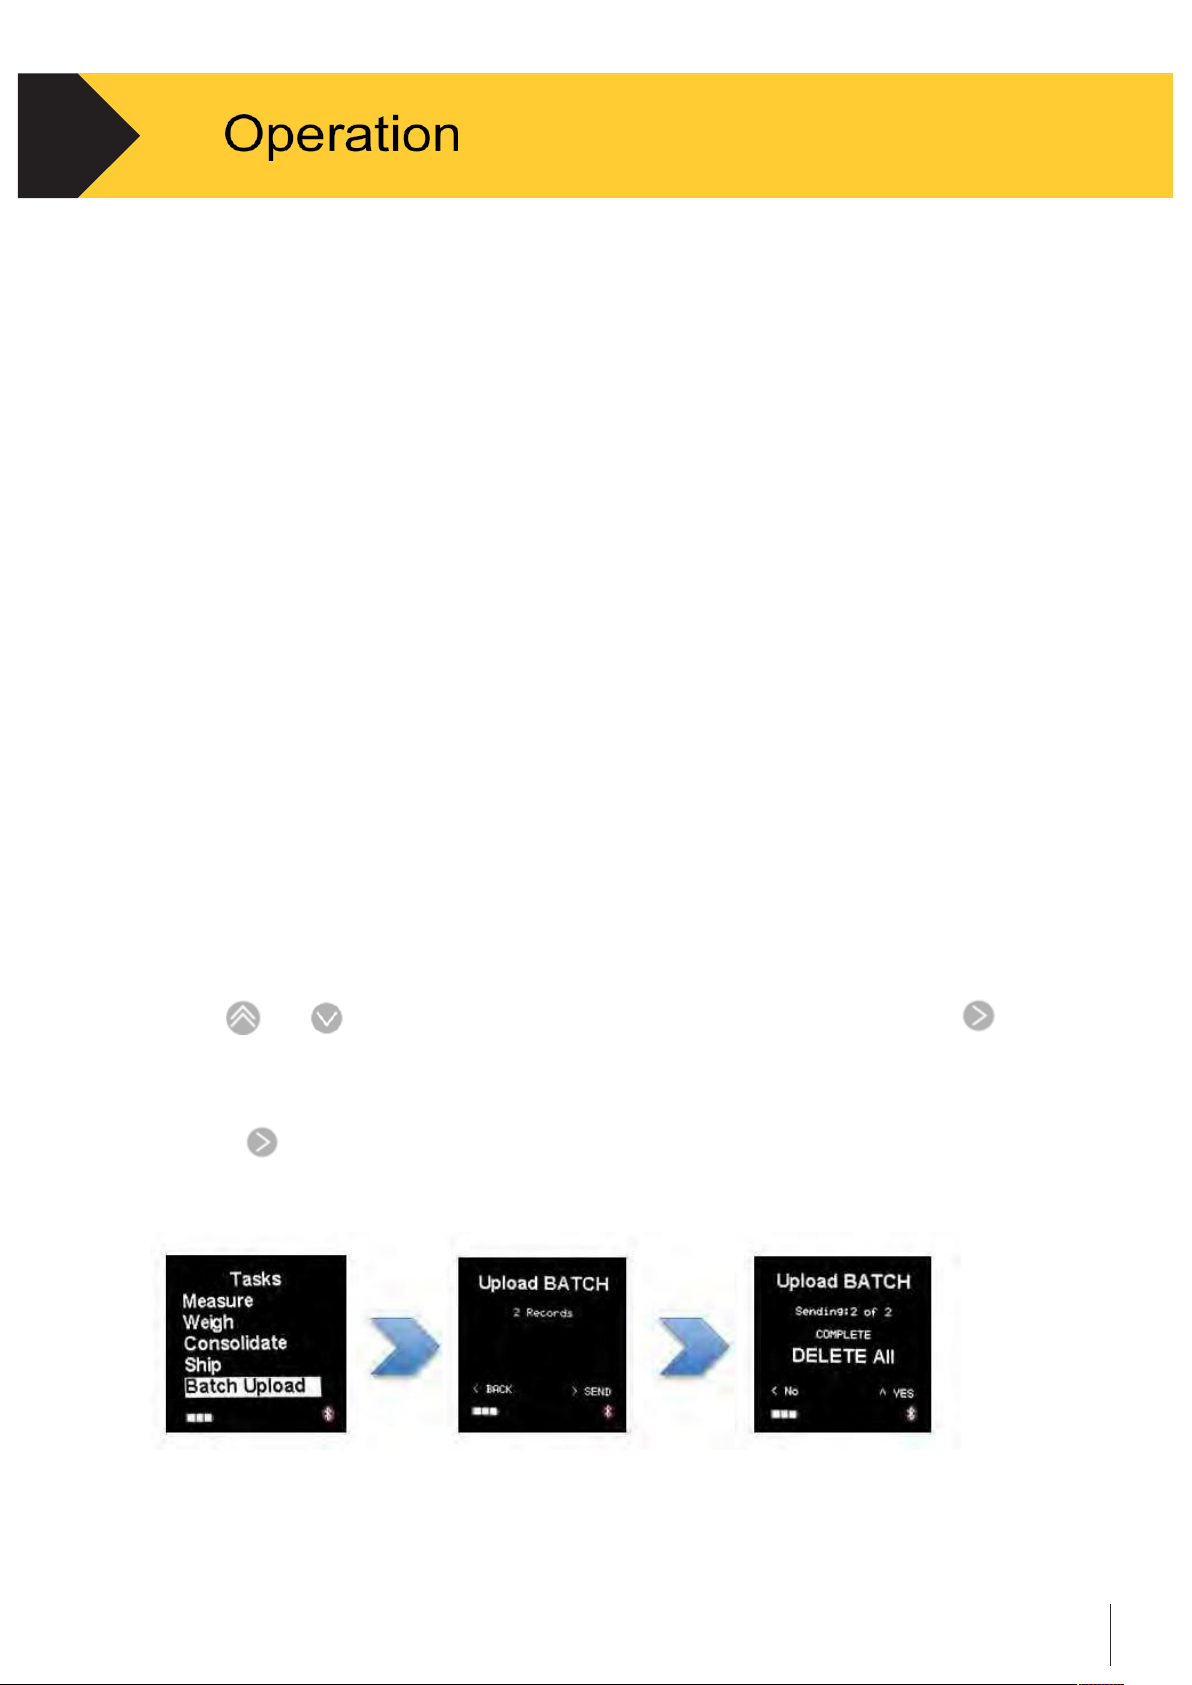
2.4.5
Batch Upload
Batch Upload functions when there is locally saved data records in the device.
Note:
Please note the configuration for the communication. Usually, this function works
under the
USB connection
option. See Section 3.3.5 and Section 4.3 for detailed information.
•
Use
and
to scroll, when the cursor is on the Batch Upload tab, press
to
select. See Figure 2-16.
•
The display will show the number of records saved in the device. See Figure 2-16.
Press
to send the data.
•
Completing the data transmission, select to keep or delete the current records.
Figure 2-16
Page 18
Technical manual-C190CubetapePRO
17
3.
3.1
Overview
This chapter provides information about how to configure the C190CubetapePRO device. It
describes access to the Settings menu where the device can be managed. It also provides
detailed information on configuring Cubetape via the PC based Cubetape Manager software.
3.2
Settings in C190Cubetape
The CubetapePRO has six basic settings, which can be directly accessed on the device.
Upon turning on the device, it automatically functions under default or previously
configured settings.
If a different settings configuration is needed, the operator has to enter the
Settings menu to adjust.
•
To enter the Settings menu, power the device on.
•
When the display is showing the Laser warning screen, press
and
simultaneously
to enter the Settings menu.
3.2.1
Settings Menu
The five buttons on the front and side of the device are used for navigation and selection
purposes under the Settings menu. See Section 1.7.2 for more details.
3.2.1.1
Cubetape Manager software
Plug the USB cable into the host computer (Windows), which has installed the Cubetape Manager
software.
•
Press and simultaneously to enter the Settings menu. - the cursor is on
the CubeTapeMgr tab, press to select.
Page 19
Technical manual-C190CubetapePRO
18
3.
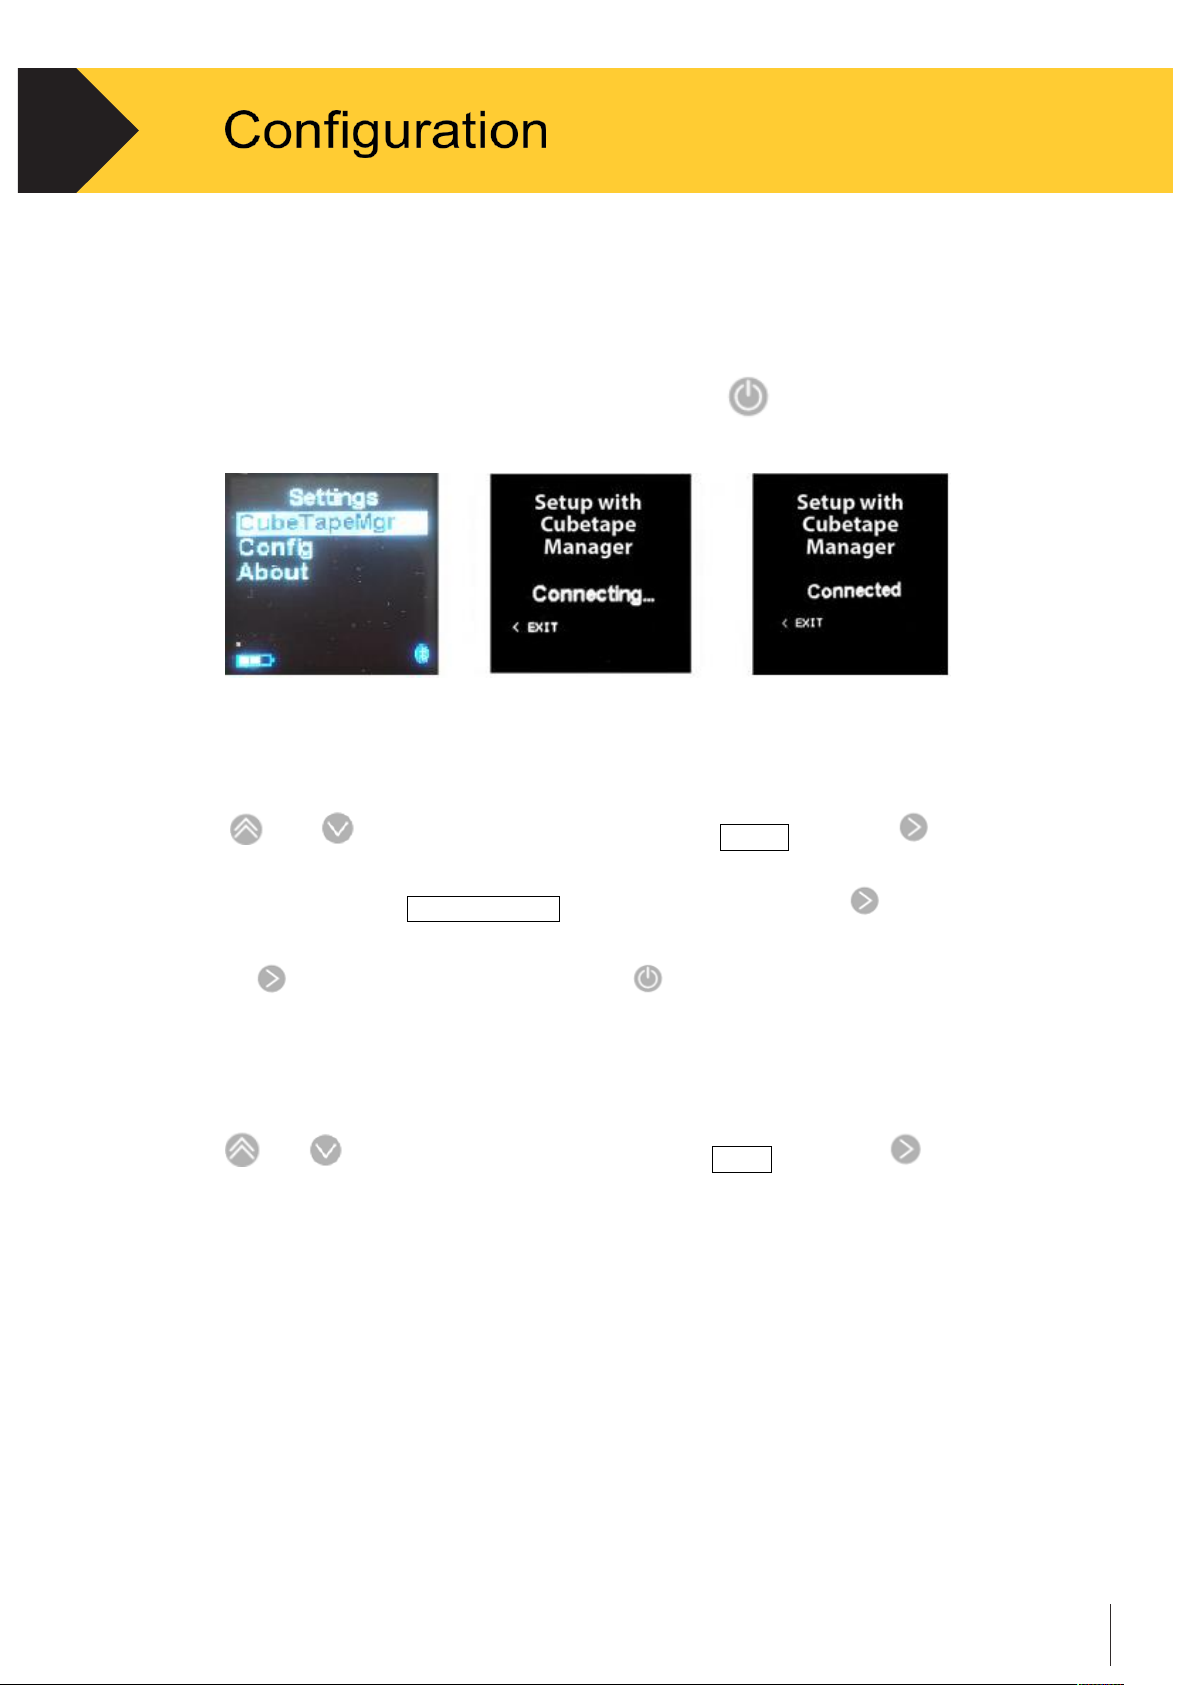
•
The display shows “Setup with CubetapePRO Manager.” See Figure 3-1.
•
Press the “Detect” button on the Cubetape Manager software to connect to the device.
When the device is detected by the software, the display shows “Connected”. See Figure 3-1.
•
See Section 3-3.in this chapter for more information on software configuration.
•
After “Write” the configuration to the device, press to reboot the Cubetape
This enables new configurations using a PC.
Figure 3 – 1
3.2.1.2 Bluetooth Settings
•
Use
and
to scroll, when the cursor is on the Config tab, press to select
and enter Bluetooth settings.
•
The display will show Comm Method tab in Config screen press to select.
•
Select desired Bluetooth connection profile according using Up and Down keys.
Press to accept a (new) setting. Press to go back.
3.2.1.2
About
•
Use
and
to scroll. When the cursor is on the About tab, press to select.
The About setting displays the identification information of the device, including serial
number, firmware version, model ID, etc.
3.2.2 Scan Engine Configuration
The scan engine used by Cubetape is the Motorola SE965. The SE965 is very widely used in
both Motorola and third-party equipment, which is fully programmable, supports all of
the standard barcode symbology’s and has many other features and options.
Cubetape ships with factory defaults set for the SE965, but these can be changed to suit
local conditions. Ask your dealer for instructions.
Page 20
Technical manual-C190CubetapePRO
19
3.
3.3
Settings via PC
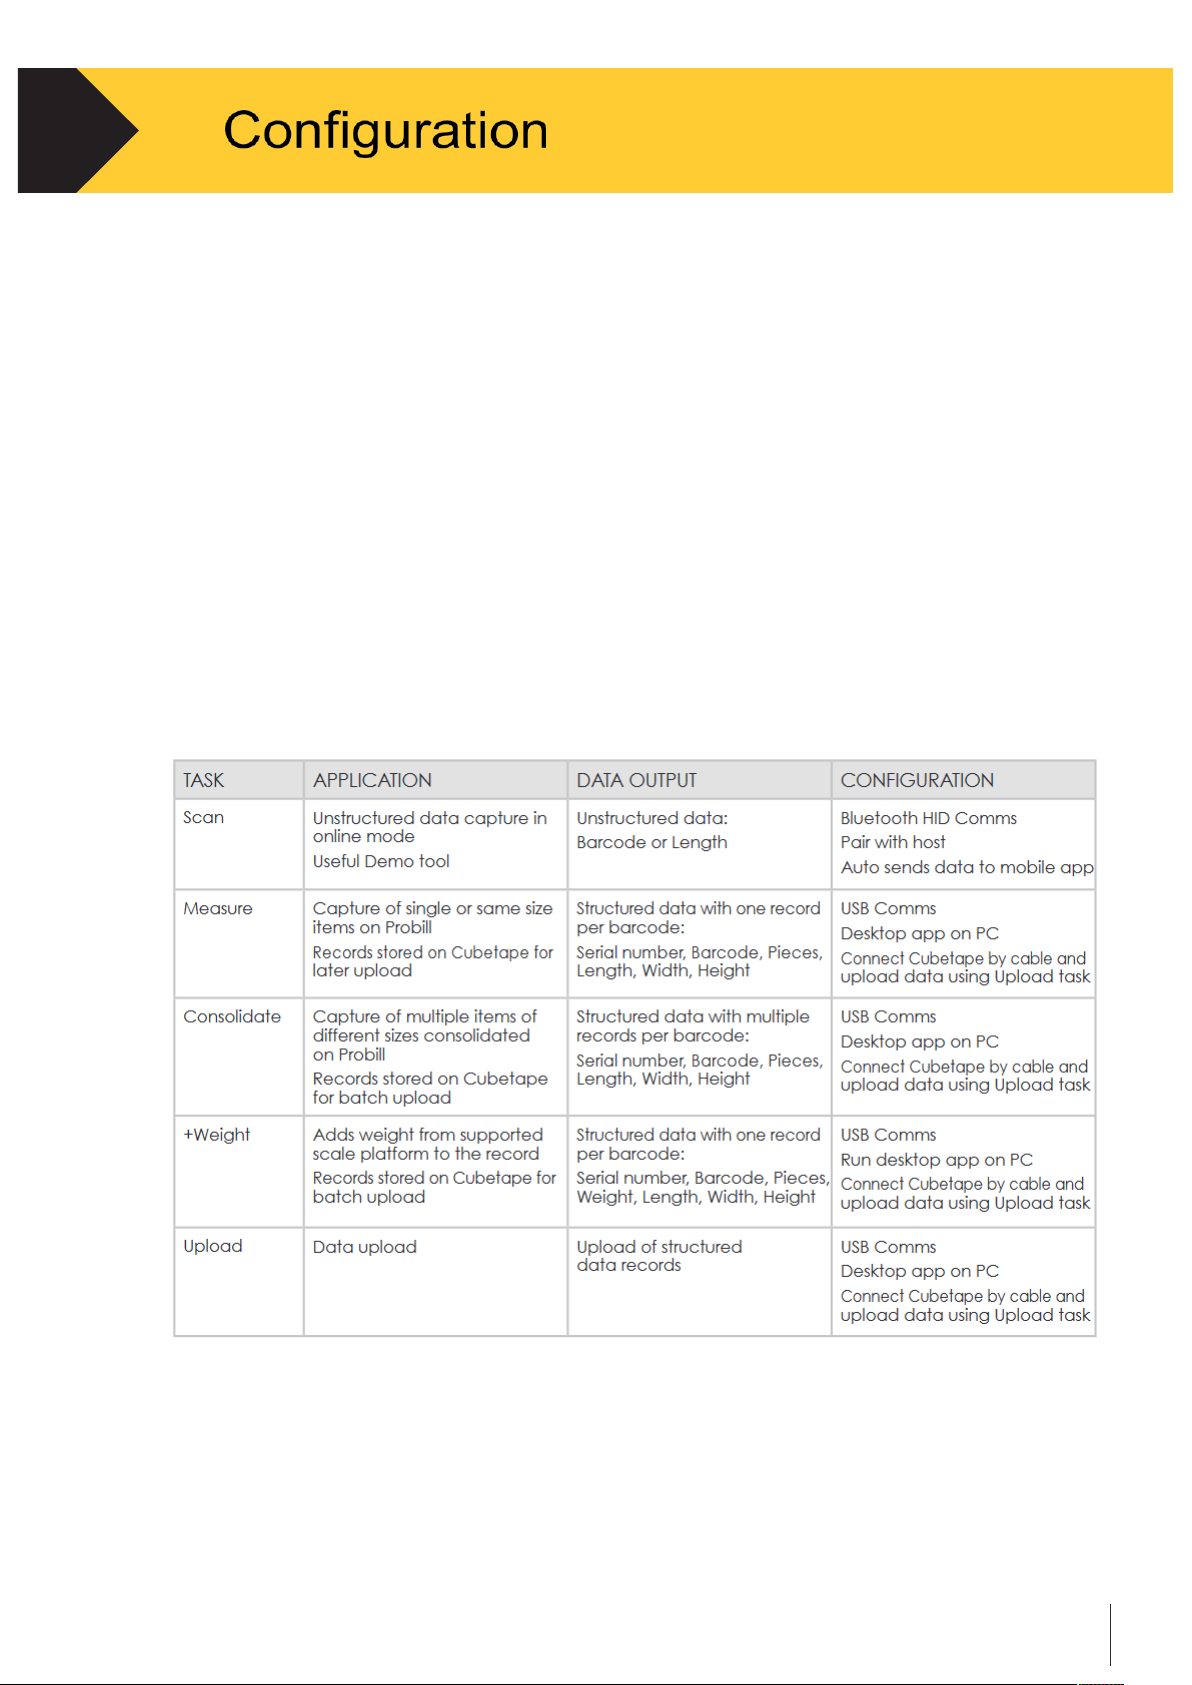
The CubetapePRO is a powerful device with many possible configurations.
This section introduces the functions configurable through Cubetape Manager
software.
Cubetape Manager enables administrators to configure units, dimension-weight
factor, pallet size, workflow sequence, data format and a variety of other settings.
The taskbar on Cubetape Pro provides ready access to different data capture
tasks. The default taskbar contains 5 tasks for use in presenting the main features
of the device with minimal setup and configuration. In production, end users
typically have one or more tasks setup for their operational requirement using the
Manager desktop application. Custom configurations can be saved in an xml
format to simplify provisioning and customer support
Current version of the Cubetape Manager software supports Windows
operating systems only. System requirement:
•
Windows XP SP2 or later
•
A minimum of 64MB RAM
•
At least 10MB of hard drive space
Page 21
Technical manual-C190CubetapePRO
20
3.
3.3.1
Cubetape Manager Software Download
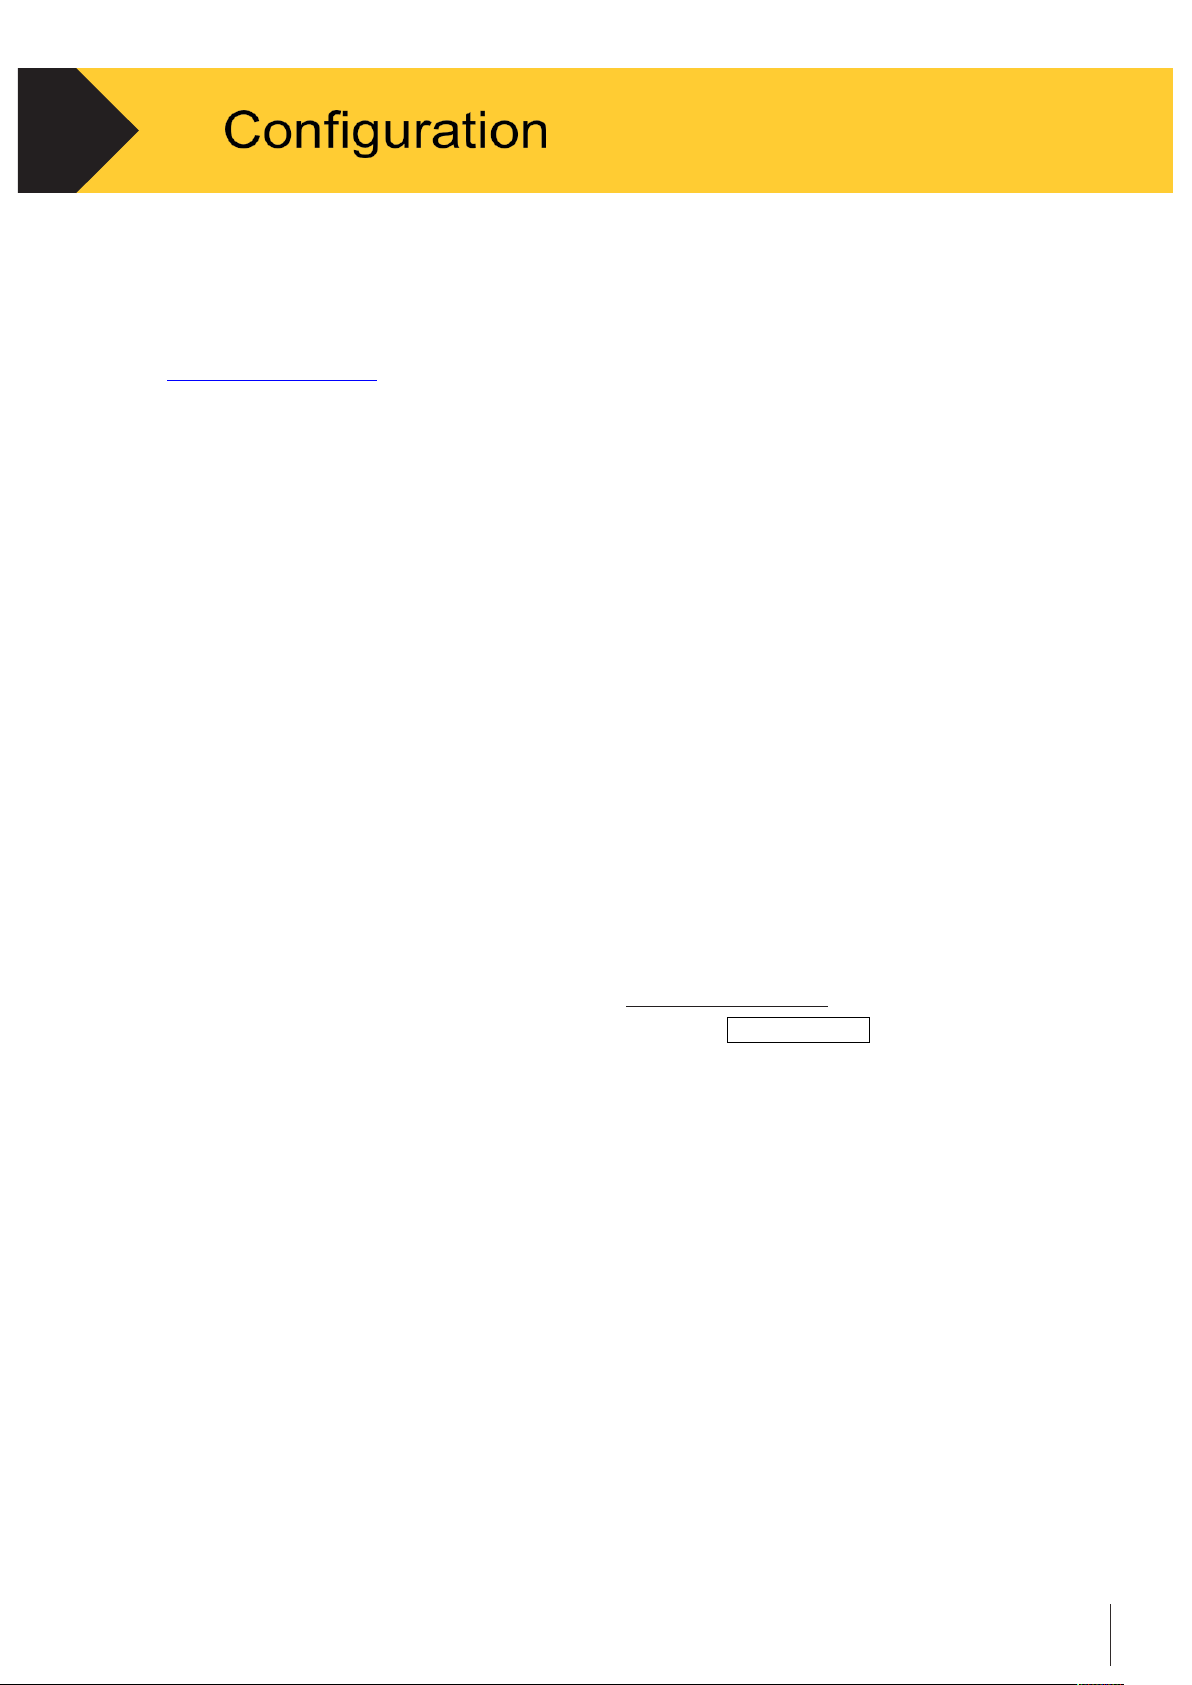
The software can be accessed and downloaded from the link below:
www.cubetape.com
3.3.2
Cubetape Manager Software Installation
•
Extract the ZIP file into a new folder after downloading
•
Click on CubetapeManager.exe to install the application
3.3.3
Connect the device to Cubetape Manager software
USB connection is the supported method for connection.
•
Turn on the CubetapePRO device.
•
Connect the CubetapePRO with PC by plugging in the USB ports with the USB
cable at both ends. Typically, a new serial port will be automatically installed. If
the driver fails running automatically, please download the driver from the
flowing link and install the driver manually: www.cubetape.com
•
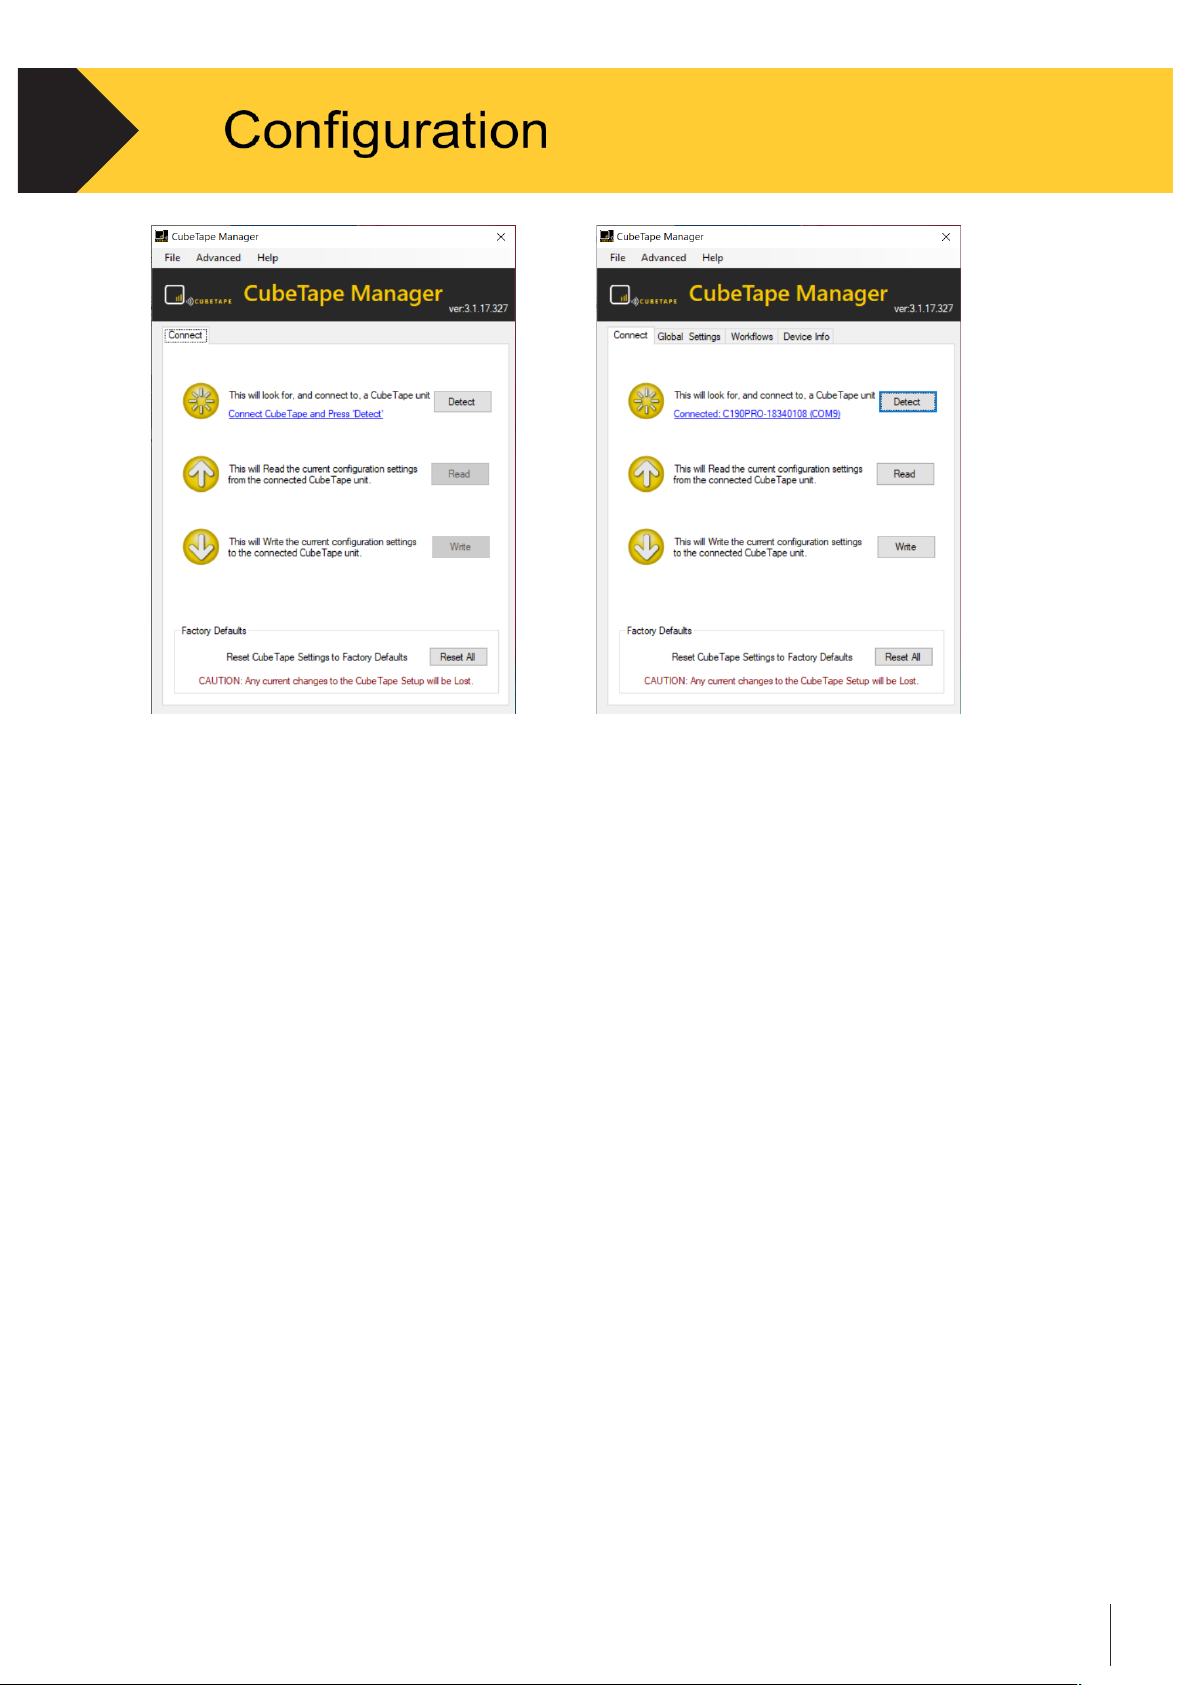
Enter the Settings menu on C190CubetapePRO, select CubeTapeMgr
•
The Cubetape Manager interface displays connection status as “Connecting.”
•
See Figure 3-2.
Page 22
Technical manual-C190CubetapePRO
21
3.
.
Figure 3-2 Figure 3-3
•
Click on “Detect” and Cubetape Manager will find the connected Cubetape and both
Cubetape and Cubetape Manager will display “Connected.” See Figure 3-3.
3.3.4
Configure the CubetapePRO via Cubetape Manager Software
This subsection discusses the various settings managed through Cubetape Manager.
•
The “Read” button is used for reading the existing configuration in Cubetape. It
should be used to load an existing configuration from the connected Cubetape into
Cubetape Manager.
•
To load the existing configuration to the Cubetape Manager, click the File on
menu and then click Load Configuration. See Figure 3-4.
•
After the configuration, the current setting can be saved as one “.xml” file which
can be load to another Cubetape. Click Save Configuration.
•
The “Write” button is used to write a new configuration to Cubetape, it should
be selected after configuration by PC and before disconnecting the USB cable.
Note that the new configuration is only available on the CubetapePRO after writing.
•
After clicking on the “Write” button, the writing process starts and ends
with a confirmation window
Page 23
Technical manual-C190CubetapePRO
22
3.
figure 3–4
3.3.5
Global Settings
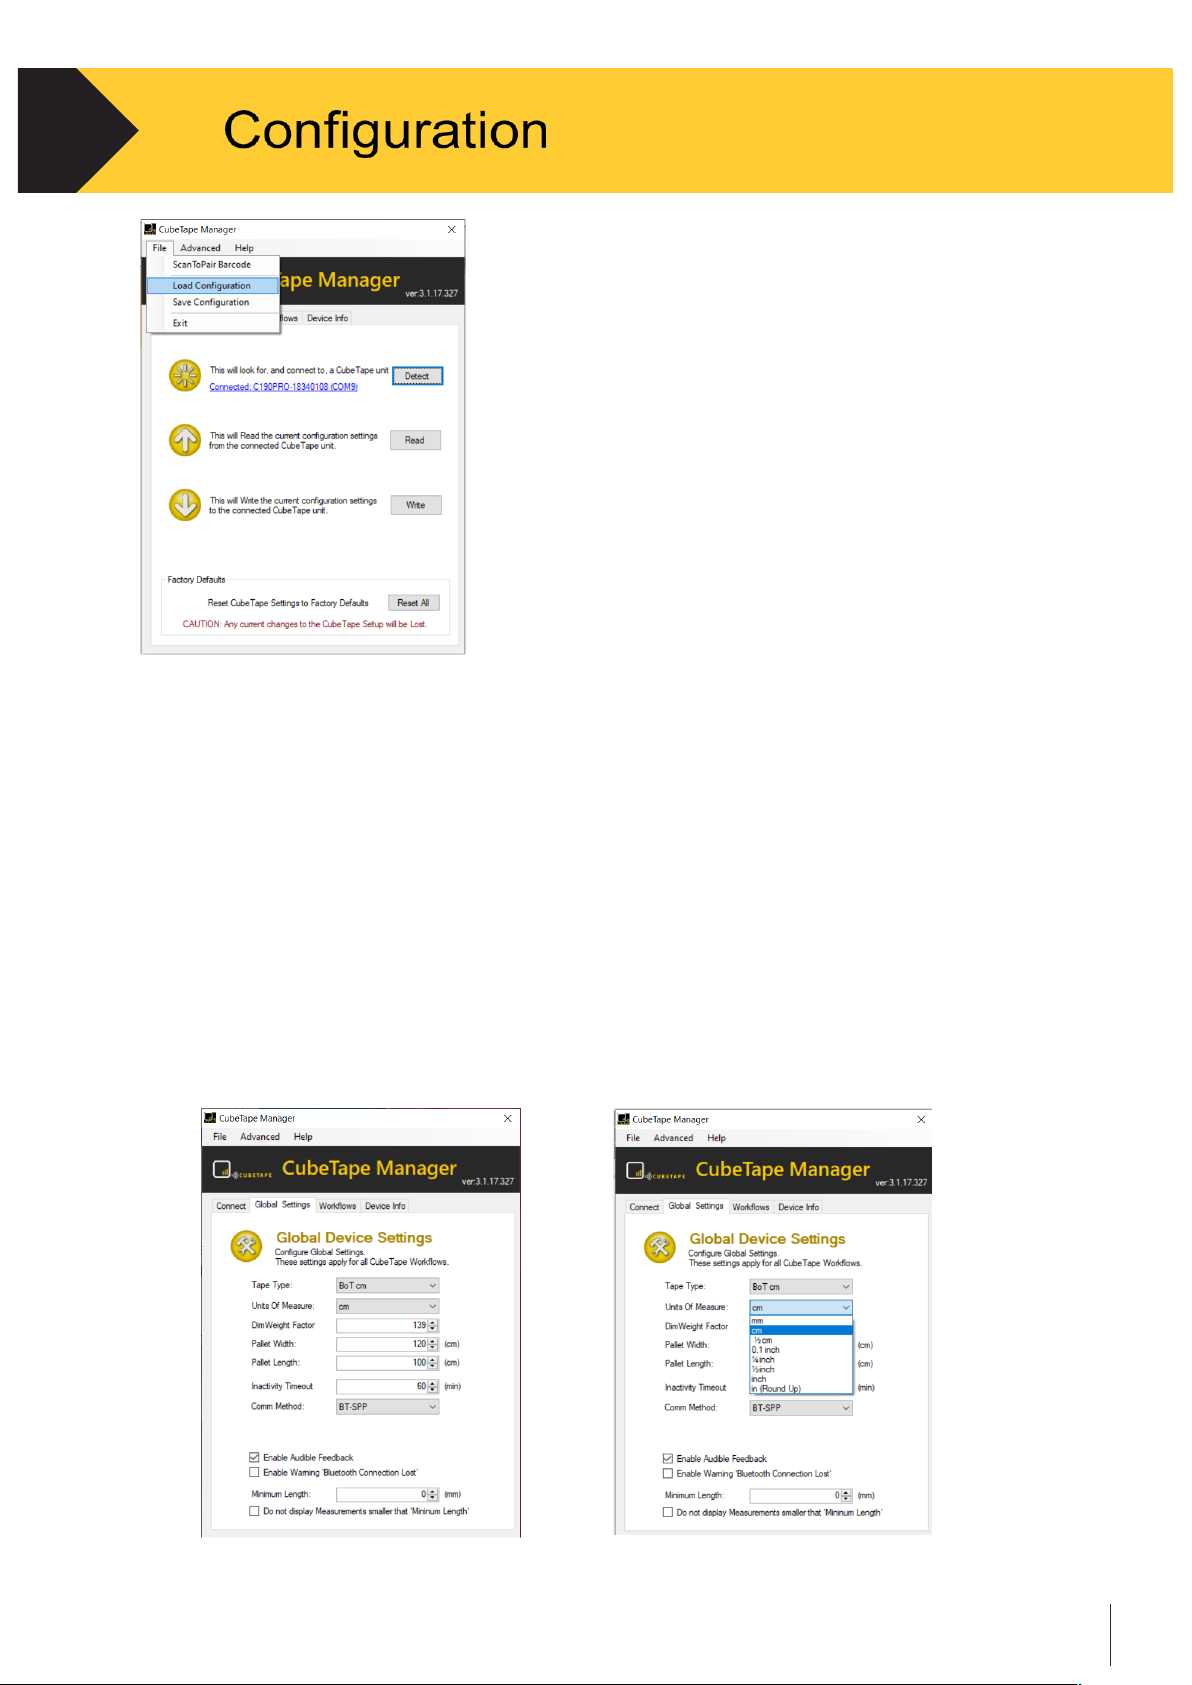
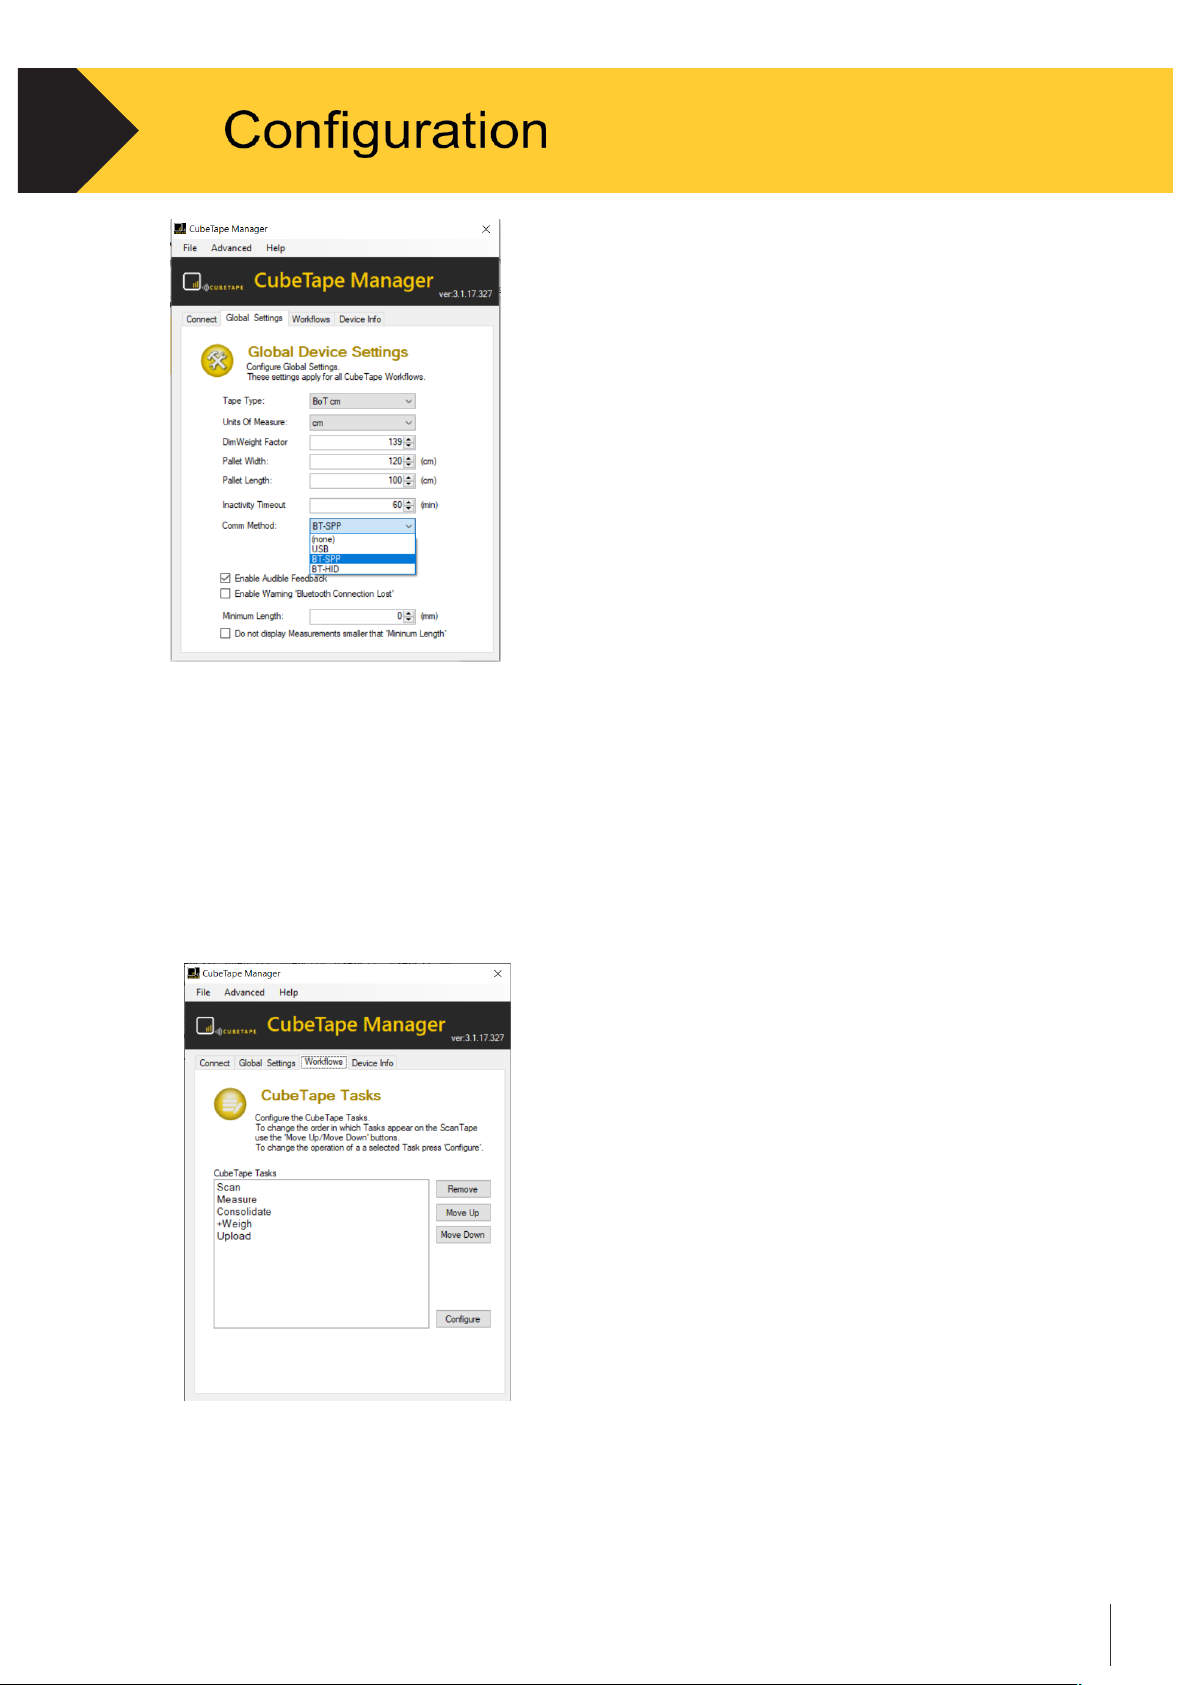
The Global setting tab is used to set the device parameter including Units, Dimensional -Weight
Factor, Pallet Size, Communication Method, Audio Feed back etc… for Cubetap ePRO.
•
Use the navigation arrows on the menu bar and click on “Global Settings” tab. See Figure 3-5.
•
To change the unit for measurement, adjust in “Units of Measure” bar. See Figure 3-6.
•
To change values of dimension-weight factor, default pallet size, adjust in corresponding
bars under “Global Settings” tab. Note that pallet width and length are always expressed
in centimeters.
•
To change the communication method, adjust in “Comm Method” bar. For the on live
application, the communication should be set as Bluetooth (BT-SPP or BT-HID).
USB port is usually used for Batch Mode See Figure 3-7.
Figure 3-5
Figure 3-6
Page 24
Technical manual-C190CubetapePRO
23
3.
Figure 3-7
3.3.6
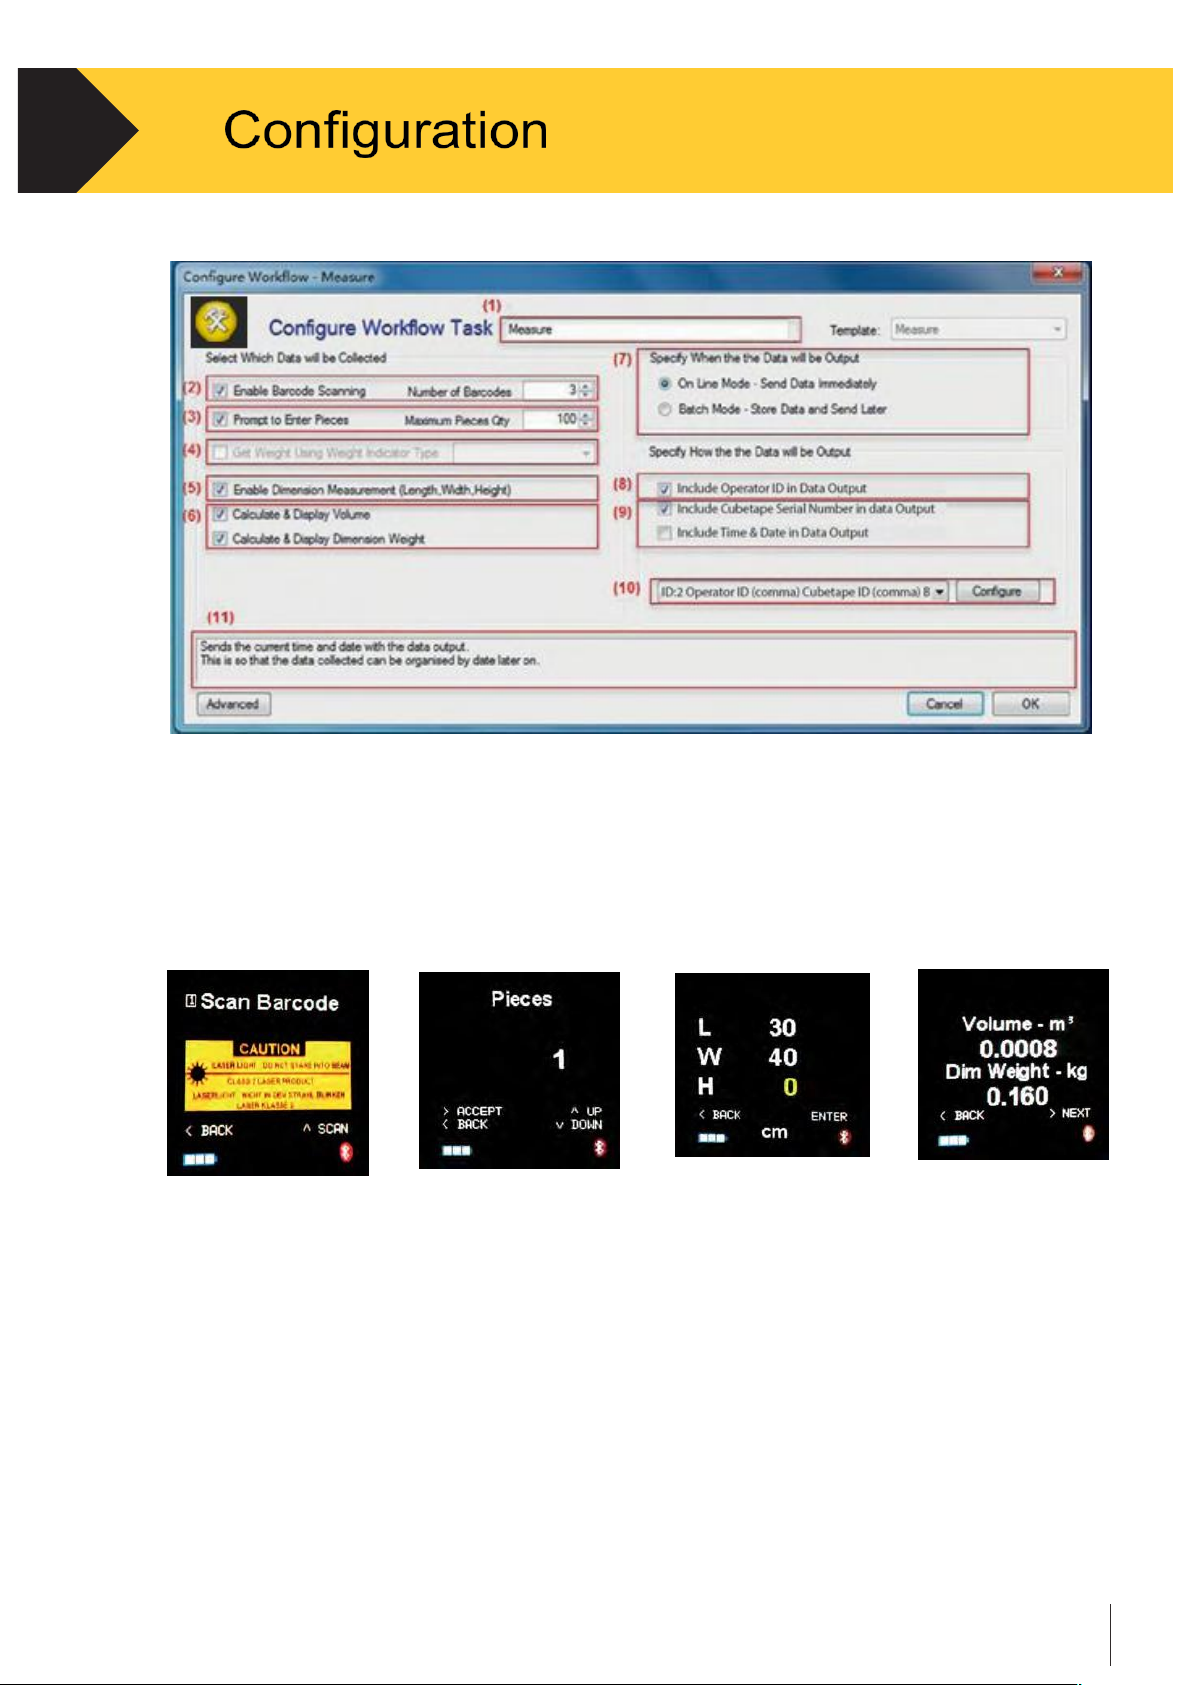
Workflows ( or Tasks )
•
Use the navigation arrows on the menu bar and click on “Workflows” tab.
This screen controls the content of the task menu on Cubetape. The order of the
applications can be changed, or they can be removed altogether. See Figure 3 -8.
Note that needs be careful to remove the Task from the list. To find back the Task that
is removed, the only way is turning to the Connect tab and clicking the Res et All to load
all the default settings.
Figure 3-8
•
Also the five applications in Cubetape can be configured independently.
•
For instance, to modify the
Measure
Application, highlight “
Measure
” then click on “Configure.”
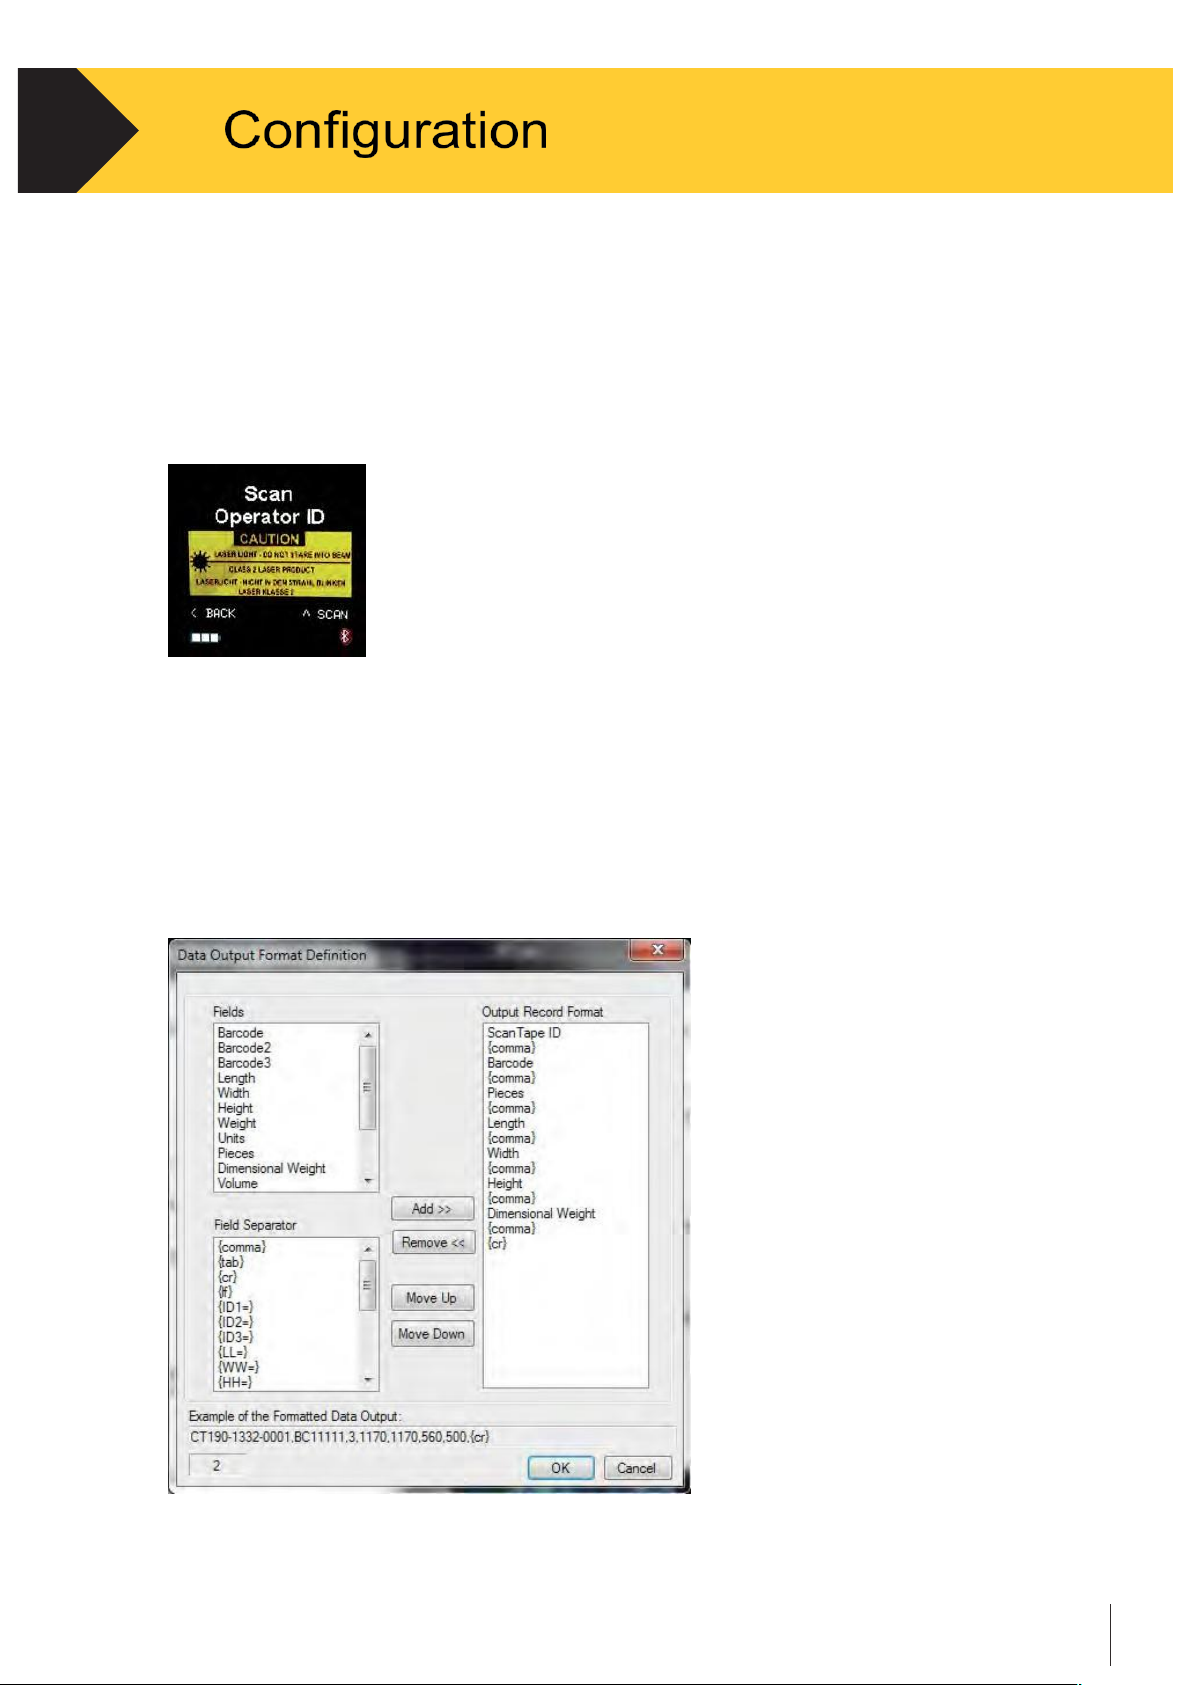
A configuration window will be displayed. See Figure 3-9.
Page 25
Technical manual-C190CubetapePRO
24
3.
Figure 3-9
(1)
The name of Task can be edited.
(2)
Enable Barcode Scanning should show a scanning window during application.
See Figure 3-10. The maximum number of barcodes is 3. The barcodes number will be on
the top left corner of display. Move out the tick to disable this operation in application.
Figure 3-10 Figure 3-11
Figure 3-12 Figure 3-13
(3)
Enable to Enter should show Piece window during application. See Figure 3-11. Set the
maxim piece number, which can be entered via application. Move out the tick to
disable this operation in application.
(4)
This configuration is only available in Weigh Task. Choose the needed
scale from the pull down list.
(5)
Dimensioning Measurement should be always enabled for most applications except Ship.
The operation windows shows on Figure 3-12.
Page 26
Technical manual-C190CubetapePRO
25
3.
(6) Enable the Calculation of Volume or Dimensional Weight will show the result window
(See Figure 3-13) before the data transmission/save.
(7)
Select the correct working mode for different applications. For certain tasks, the working
mode is fixed as Live or Batch. Typically, On Live mode should be available for
Bluetooth communication.
(8)
Enable Operator ID will show an Input ID window once. See Figure 3-14. When operator ID
is scanned successfully one time, the ID will store in the device.
Figure 3-14
Note that the Cubetape needs to restart to reenter the operator ID.
(9)
The serial number of the Cubetape and real-time data can be included into the data
output. It can be configured in Data Format too.
(10)
Click the Configure button to go into the Output Data Format window. See Figure 3-15.
For Weighing, Consolidate Tasks that choose Batch communication. The Data Output
Format should be configured under Batch Upload Task. See more details on section 3-15.
(11)
Help window.
Figure 3-15
Page 27
Technical manual-C190CubetapePRO
26
3.
.
3.3.7
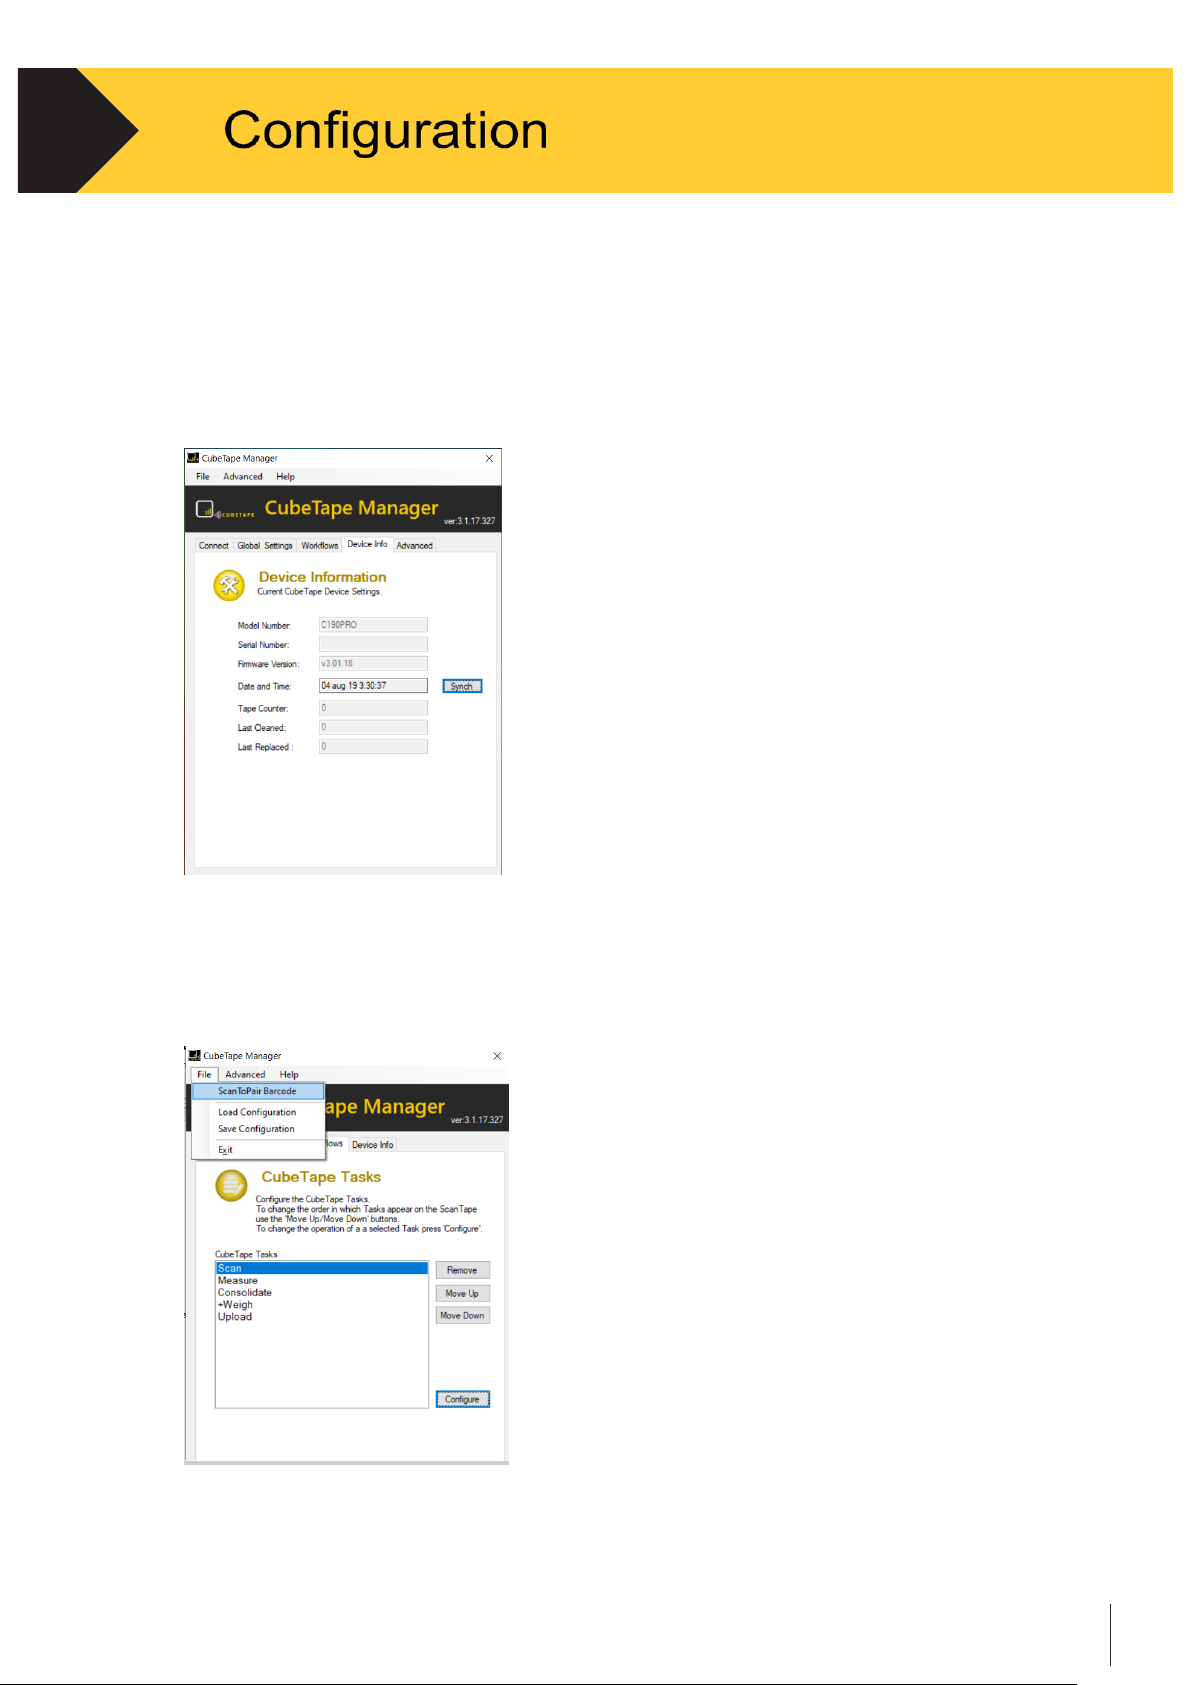
Device Information
•
Use the navigation arrows on the menu bar and click on “Device Information” tab.
•
Device information, such as model ID, serial number, firmware version, time and date
and tape counter can be reviewed under the tab. See Chapter 1 Section 1.5 also.
Figure 3-16
•
Bluetooth Pair with the Cubetape
The File menu item provides access to the
ScanToPair Barcode
utility.
Access to create barcode. See Figure 3-17.
Figure 3-17
Page 28
Technical manual-C190CubetapePRO
27
3.
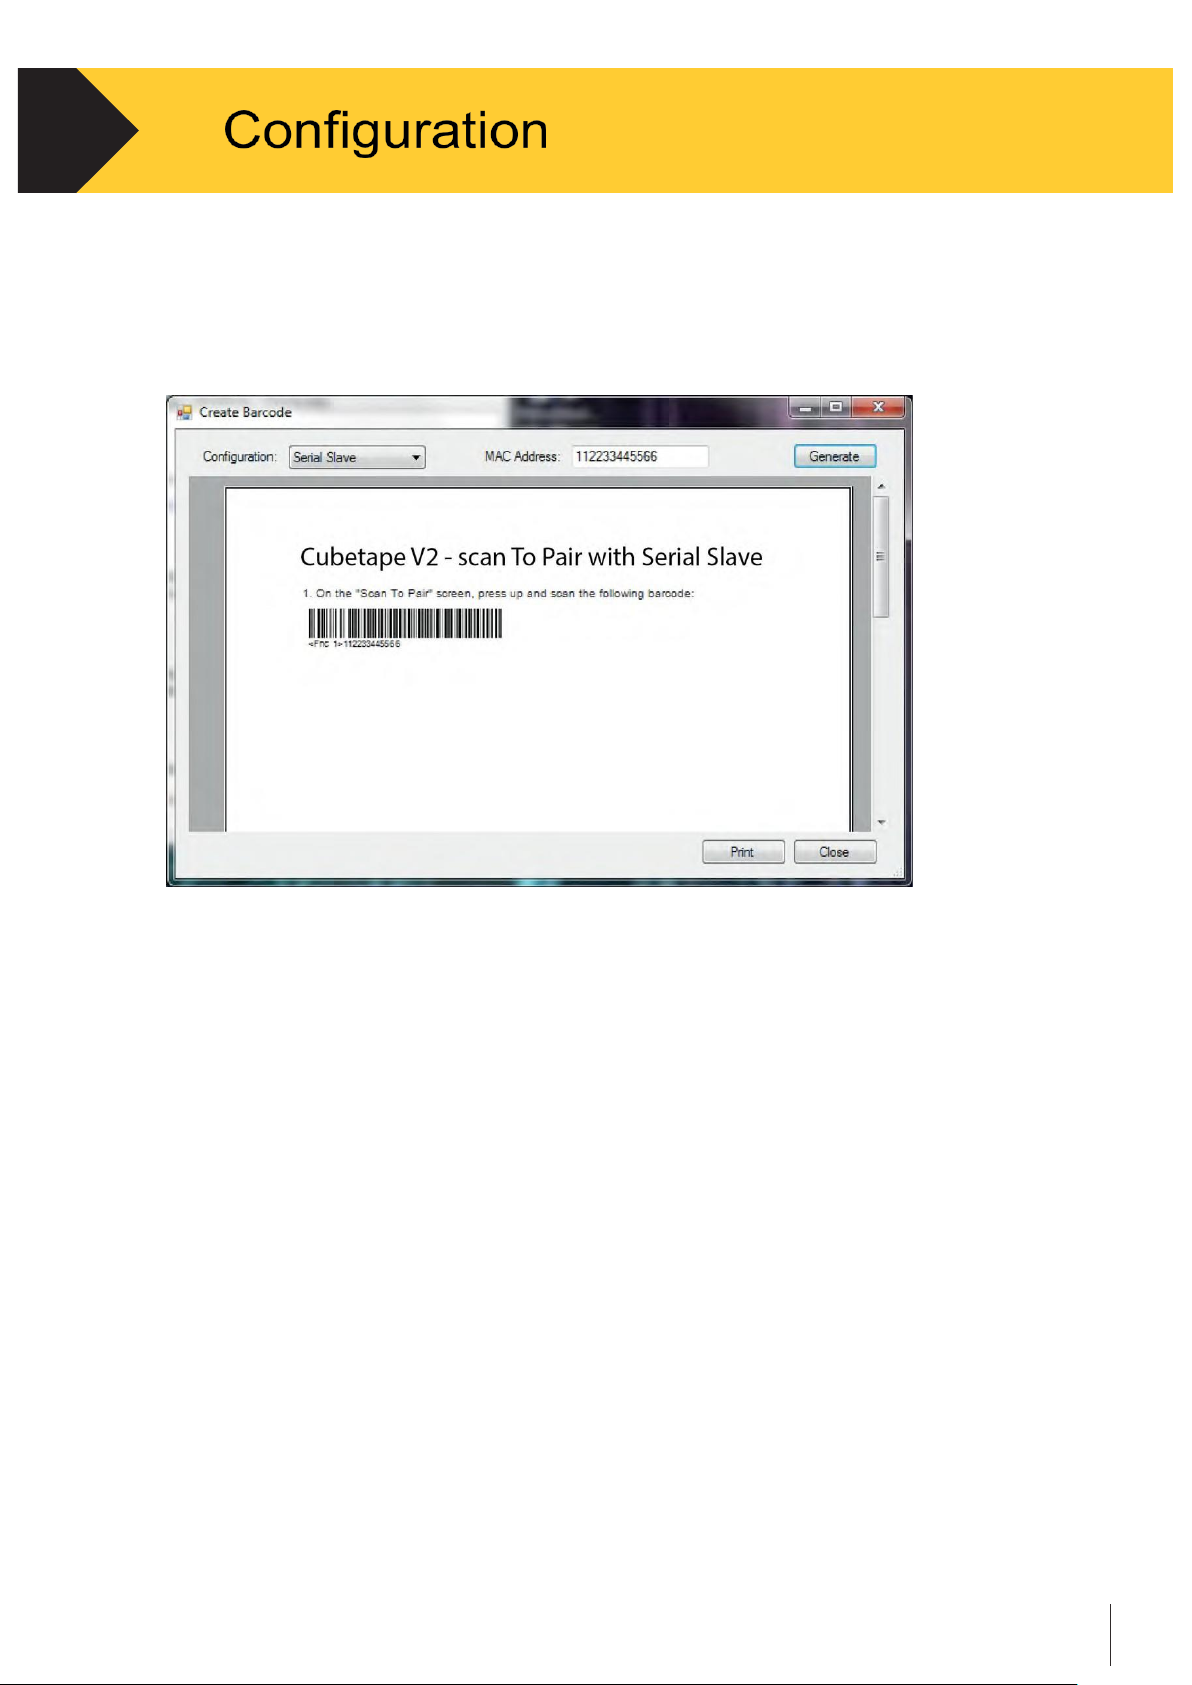
Select from a list of available Bluetooth configuration options (serial slave, PDA SPP, PDA HID,
PC SPP, and PC HID), enter the 12 digit Bluetooth MAC address of the device to be paired with,
and click Generate to produce a pairing barcode.
Figure 3-18
Print out the barcode. And scan the barcode under the scan window of Cubetape. See Figure 3-18.
The Cubetape will pair Bluetooth automatically. See Figure 3-19. After the paring successfully (wait
for 5 seconds), the Bluetooth icon on the bottom right corner would turn to blue.
3.3.8
Advanced Menu Item
•
Advanced menu option allows password access to factory settings only.
3.3.9
Disconnect
Press Exit on Cubetape for exit and restart after the configuration has been written into Cubetape.
•
Close the Cubetape Manager application and disconnect the USB cable.
•
Cubetape will restart with the new configuration.
Note: Please remember to write configured settings onto the device before closing the
application or disconnecting, otherwise all configured data will be lost.
Page 29

Technical manual-C190CubetapePRO
28
4.
and
4.1
Overview
This chapter provides information on the communication options for the CubetapePRO. The
setup process for each communication method is described in depth in this chapter.
4.2
Connection via Bluetooth
The CubetapePRO includes an embedded Bluetooth unit with SPP and HID profiles available.
Cubetape can be connected to any device supporting SPP or HID profiles.
Cubetape needs to be paired and connected with a host before data can be
transferred. Pairing can be performed with no physical connection between the device
and the host. The process should be straight forward, but issues can arise across
different Bluetooth radio hardware, operating systems and Bluetooth stacks.
4.2.1
PC Requirements
•
For Windows users: Windows XP SP2 or later with either embedded or separate
Bluetooth module.
•
For Macintosh users: Mac OS X 10.2 or later.
4.2.2
Connection Procedure
The connection procedure can vary across PC or Mac platforms and under different versions of
operating systems. The instruction below provides a standard procedure on Windows 7 and
Mac OS X 10.9.
Page 30
Technical manual-C190CubetapePRO
29
4.
and
4.2.2.1
PC Connection
•
Make sure Bluetooth is enabled on your PC.
•
Turn on the CubetapePRO.
•
Enter Settings on Cubetape, inside the Bluetooth option, select “BT SPP” by pressing .
See Chapter 3 Section 3.2.1.1 for more details, or configure using Cubetape Manager.
•
Click on the “Bluetooth Device” icon at the bottom right corner of your PC screen,
then select “Add a Device.”
•
Cubetape should be displayed in the “Add a Device” dialogue box. This may take a
short while and may need to be repeated if the device is not found. See Figure 4-1.
Figure 4-1
•
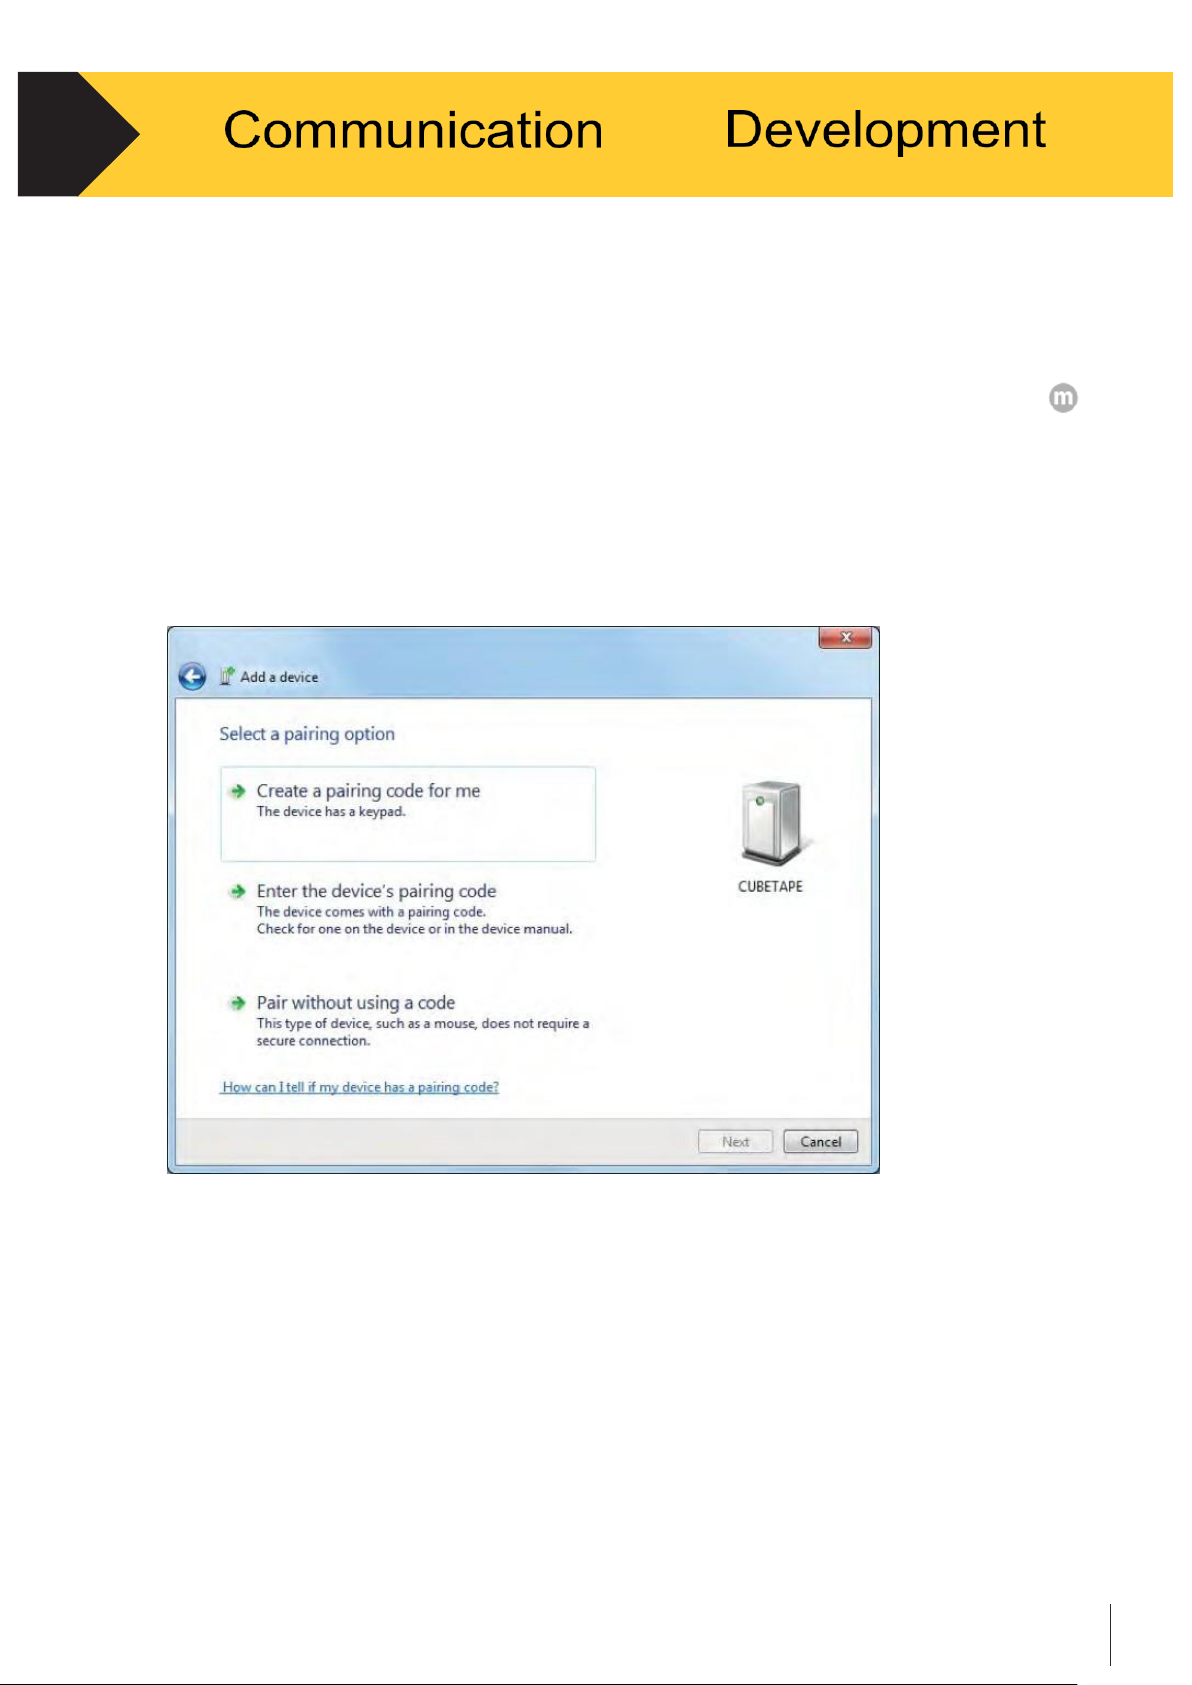
Highlight Cubetape, select “Next,” and you may see the “Select a pairing option”
dialogue box. (This step can be omitted if the host is using SSP Bluetooth pairing).
See Figure 4-2.
Page 31
Technical manual-C190CubetapePRO
30
4.
and
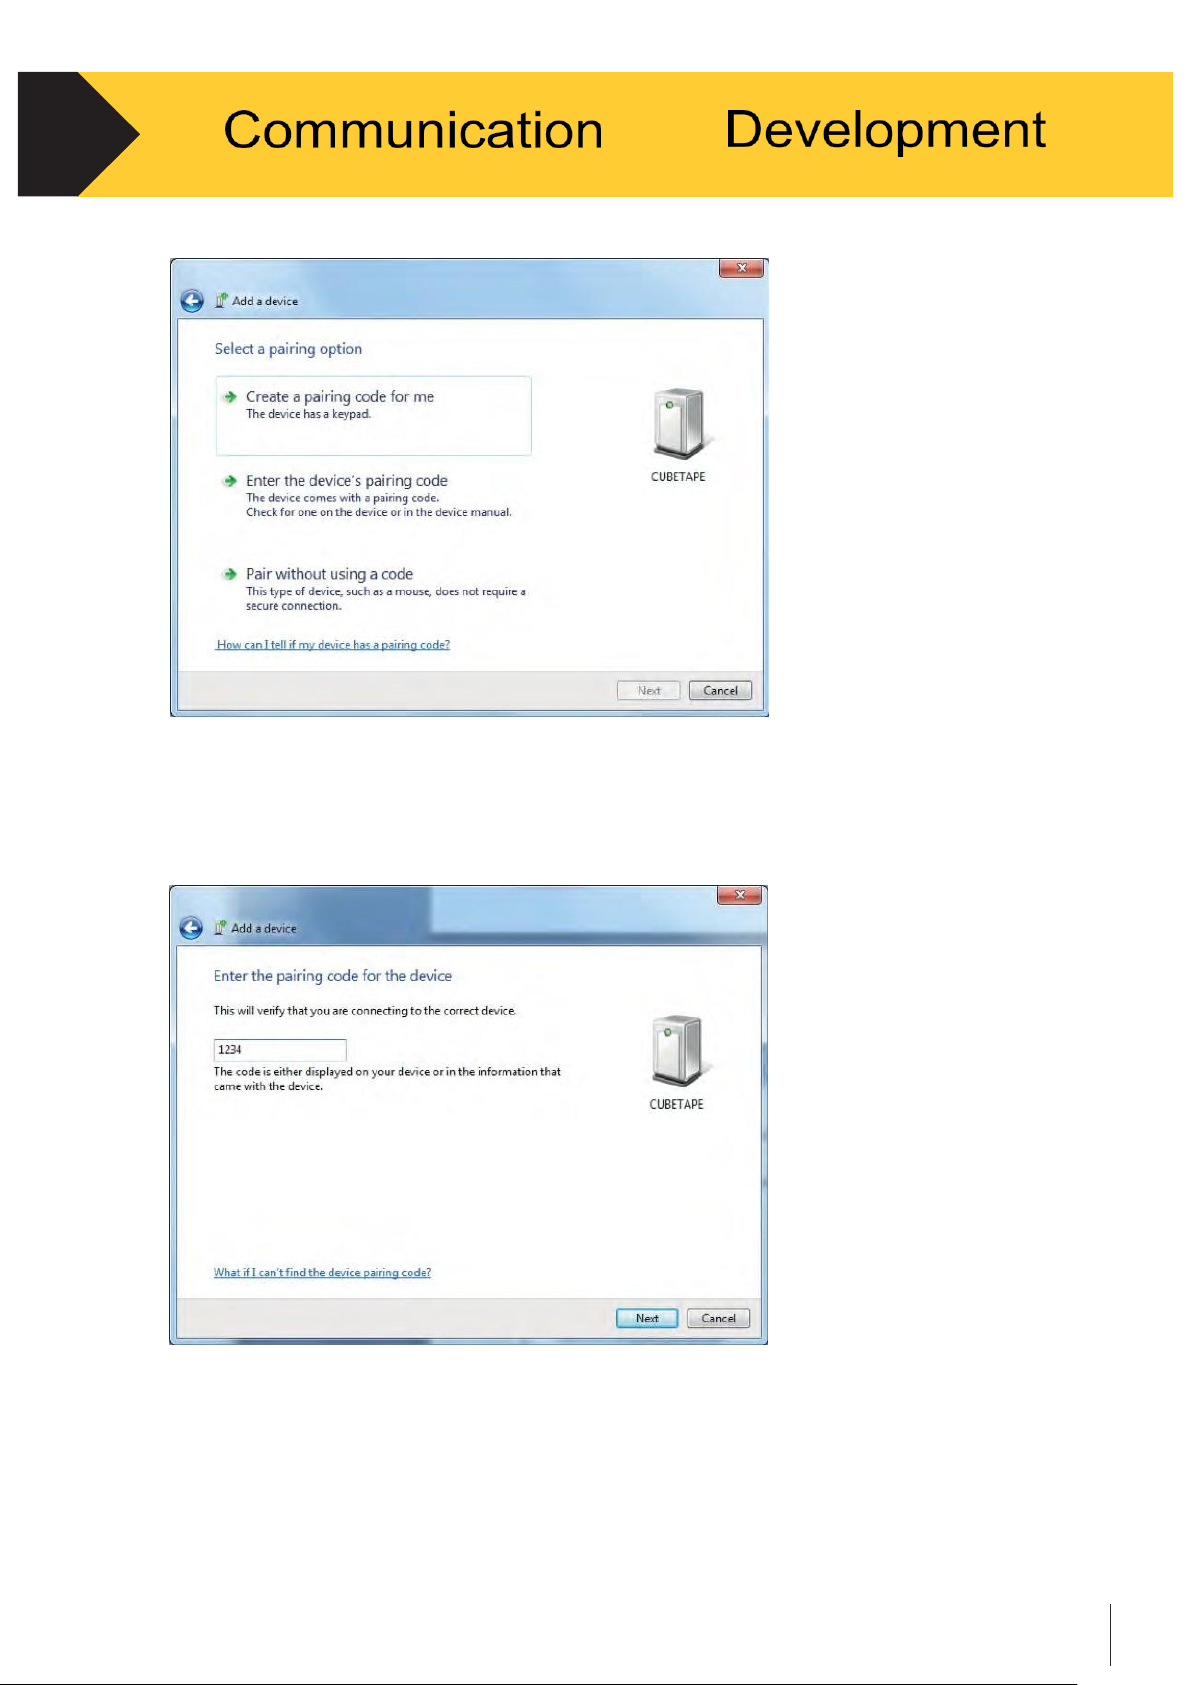
Figure 4-2
•
Select “Enter the device’s pairing code” and key the default PIN code: 1234.
See Figure 4-3.
Figure 4-3
•
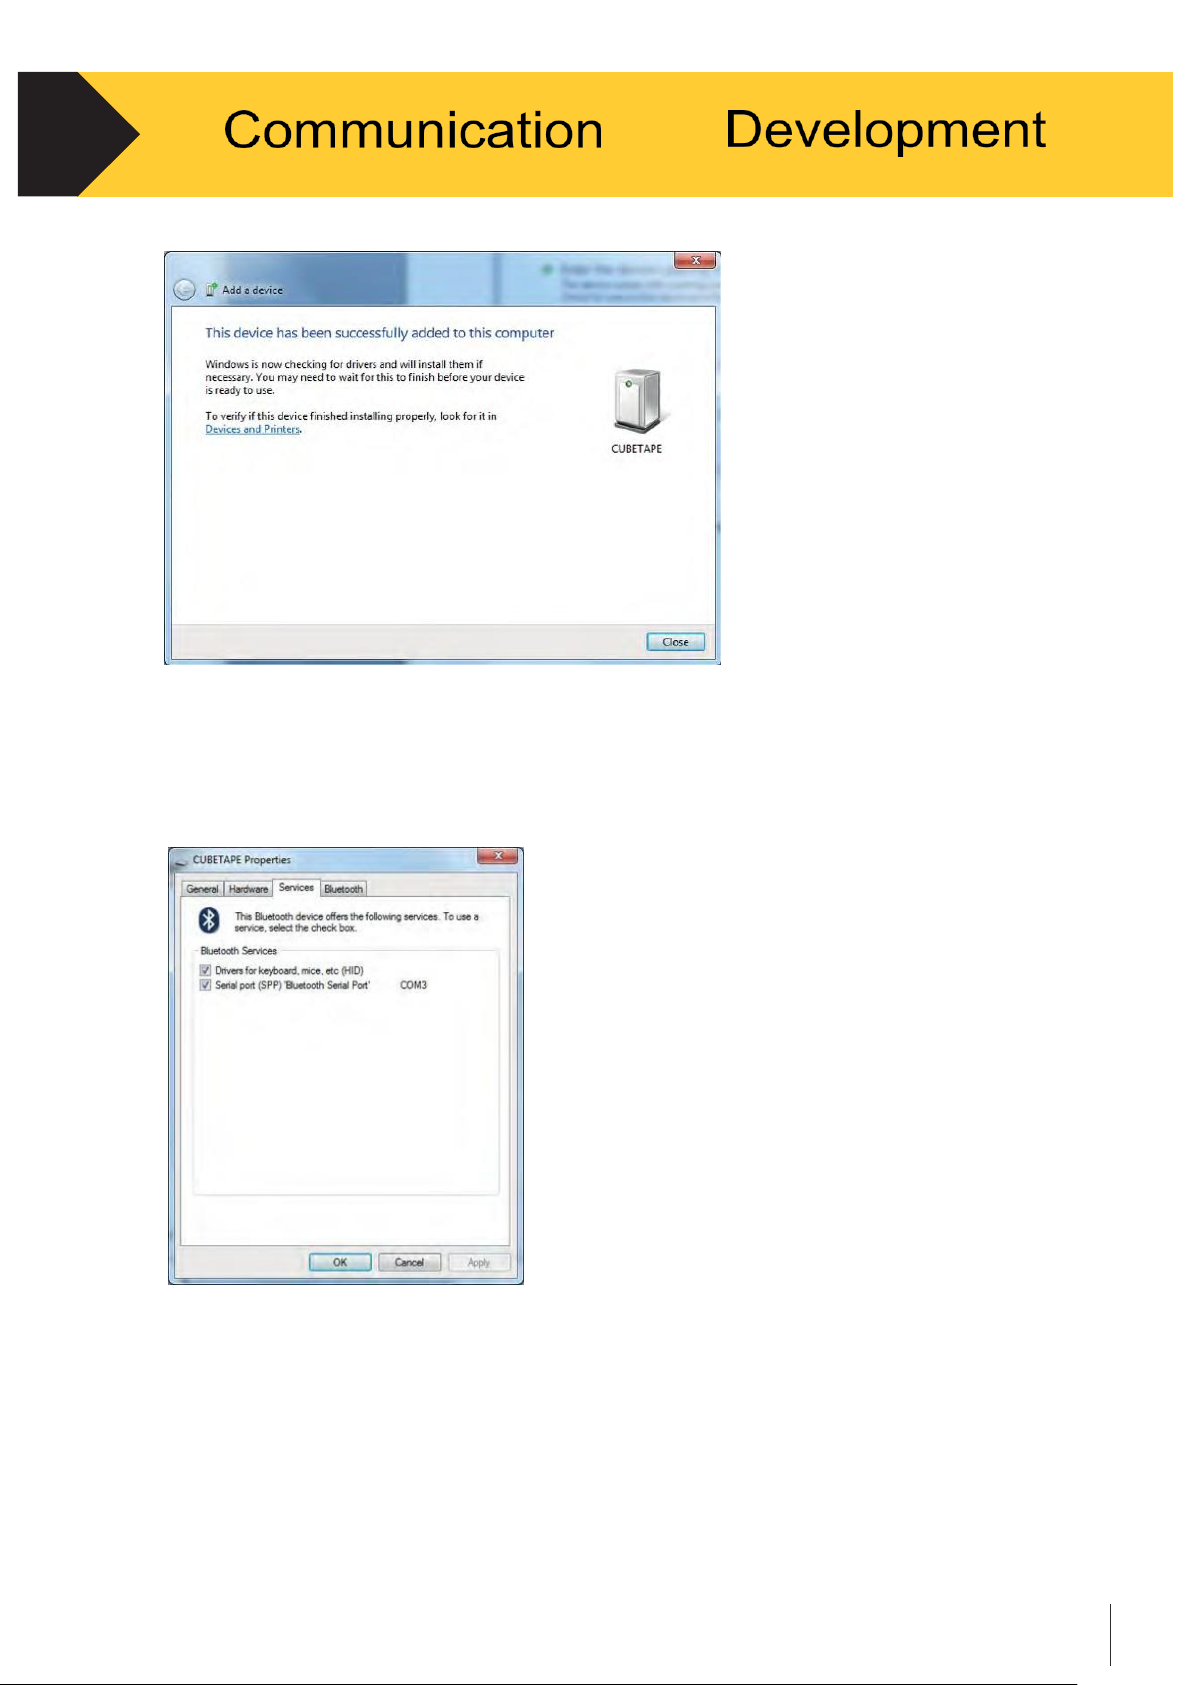
Typically, there will be some driver installation, then a success message will
be displayed. See Figure 4-4
Page 32
Technical manual-C190CubetapePRO
31
4.
and
Figure 4-4
•
To confirm which services and ports are in use right click on Cubetape in
“Bluetooth Devices” and select “Properties.” The “Services” tab displays the
services and the COM port in use. See Figure 4-5.
Figure 4-5
•
Cubetape is now connected and data can be transferred under the
Serial Port Profile (SPP).
* Please note that the above instructions must be followed in sequence
strictly, otherwise the application might not respond or breakdown.
Page 33
Technical manual-C190CubetapePRO
32
4.
and
4.2.2.2
iOS Connection
•
Turn on C190CubetapePRO.
•
Enter Settings on Cubetape, inside the Bluetooth option, select “BT HID” by pressing
.
See Chapter 3 Section 3.2.1.1 for more detail, or configure from Cubetape Manager.
•
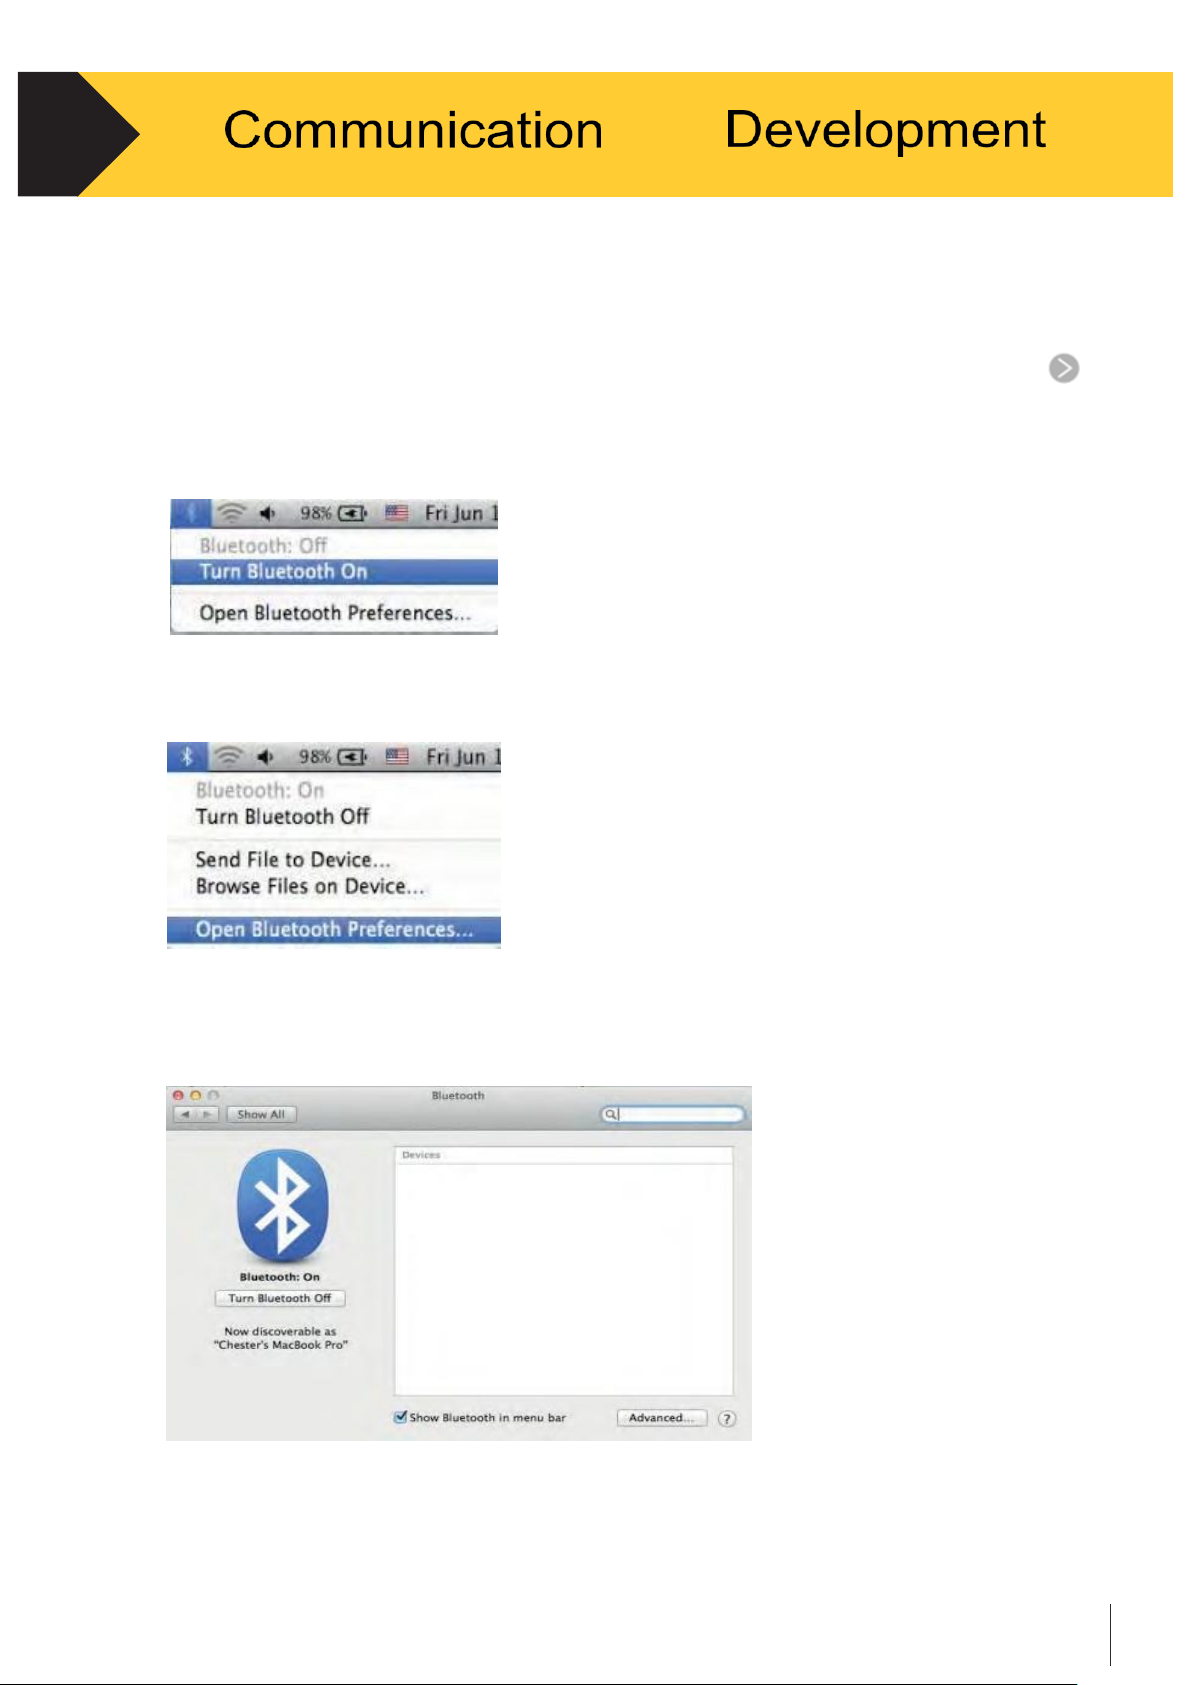
Turn on the Bluetooth switch on the upper right corner of the task bar. See Figure 4-6.
Figure 4-6
•
Select “Open Bluetooth Preferences.” See Figure 4-7.
Figure 4-7
•
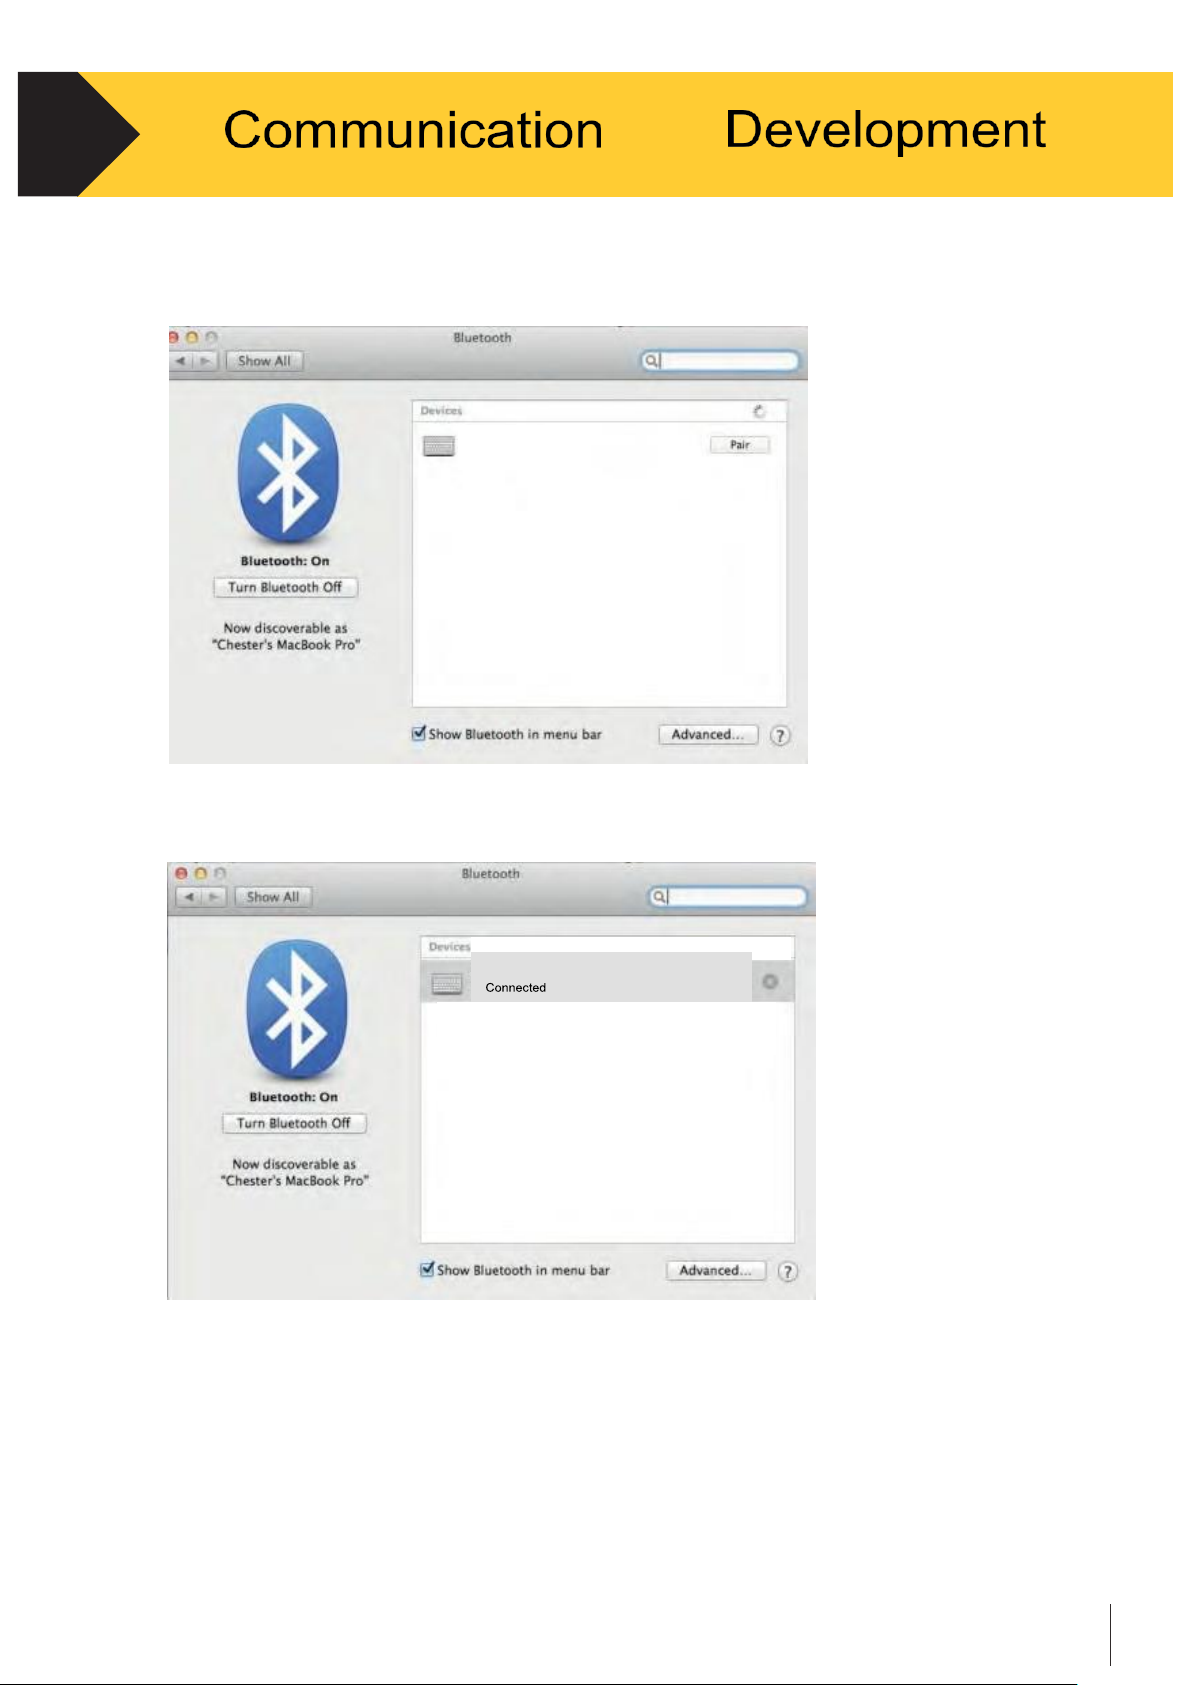
Find Cubetape in the searching window, this may take a while or be repeated if
not successful at first. See Figure 4-8.
Figure 4-8
Page 34
Technical manual-C190CubetapePRO
33
4.
and
•
When Cubetape is discovered by the system, select “Pair” to connect with Cubetape.
See Figure 4-9.
Figure 4-9
•
When pairing is successful, a small subtext indicating “connected” will be displayed
underneath the Cubetape icon. See Figure 4-10.
Figure 4-10
•
Cubetape is now connected and data can be transferred under the Human Interface
Device Profile (HID).
* Please note that the above instructions must be followed in sequence otherwise the
application might not respond or breakdown.
Cubetape
Cubetape –
Page 35

Technical manual-C190CubetapePRO
34
4.
and
4.2.3
Connection Feedback
•
A Bluetooth indicator symbol appears at the right bottom of the screen.
•
When Bluetooth connection is established, the symbol displays as bright blue.
•
If Bluetooth is not activated or the connection is lost, the symbol displays as red.
4.3
Connection via USB
C190MFT Cubetape™ comes standard with a USB cable for data transmission,
software connection and battery charging.
4.3.1
PC Requirements
The USB port is solely provided for data connection to Windows PCs.
Connection with host systems other than Windows PCs via USB functions
as charging the device only.
The Windows system requirements are:
•
Windows XP SP2 or later.
•
USB 2.0 port or later.
4.3.2
Connection Procedure
•
Turn on C190MFT Cubetape™ first to connect.
•
The system may take a while to install drivers for the USB program upon
first-time connection.
•
Once the connection is established, the device will be charged automatically.
•
See Chapter 3 Section 3.3.3 for advanced USB connection methods.
Page 36
Technical manual-C190CubetapePRO
35
4.
and
4.4
Data Format
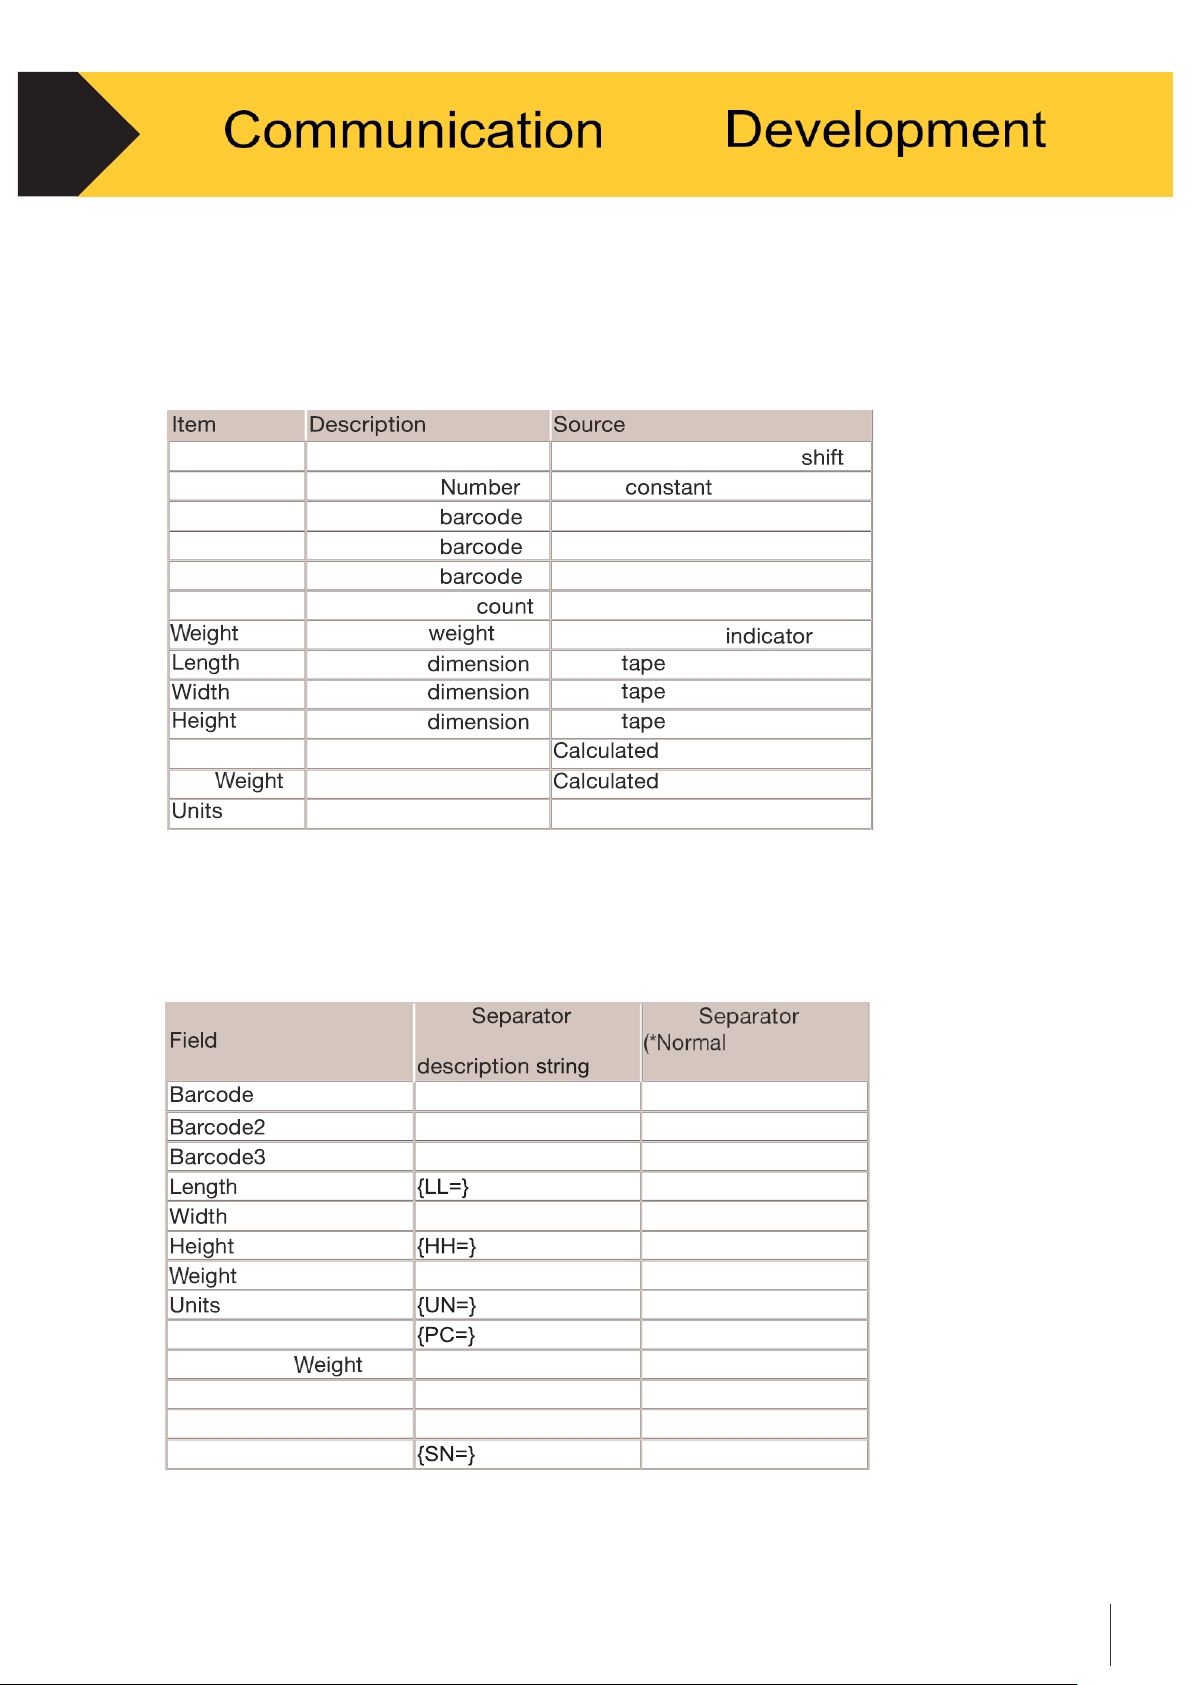
Data format of C190MFT Cubetape™ is in the form of standard text mapped by ASCII
codes. Table 4 provides a general view of the format for data item records.
Table 4
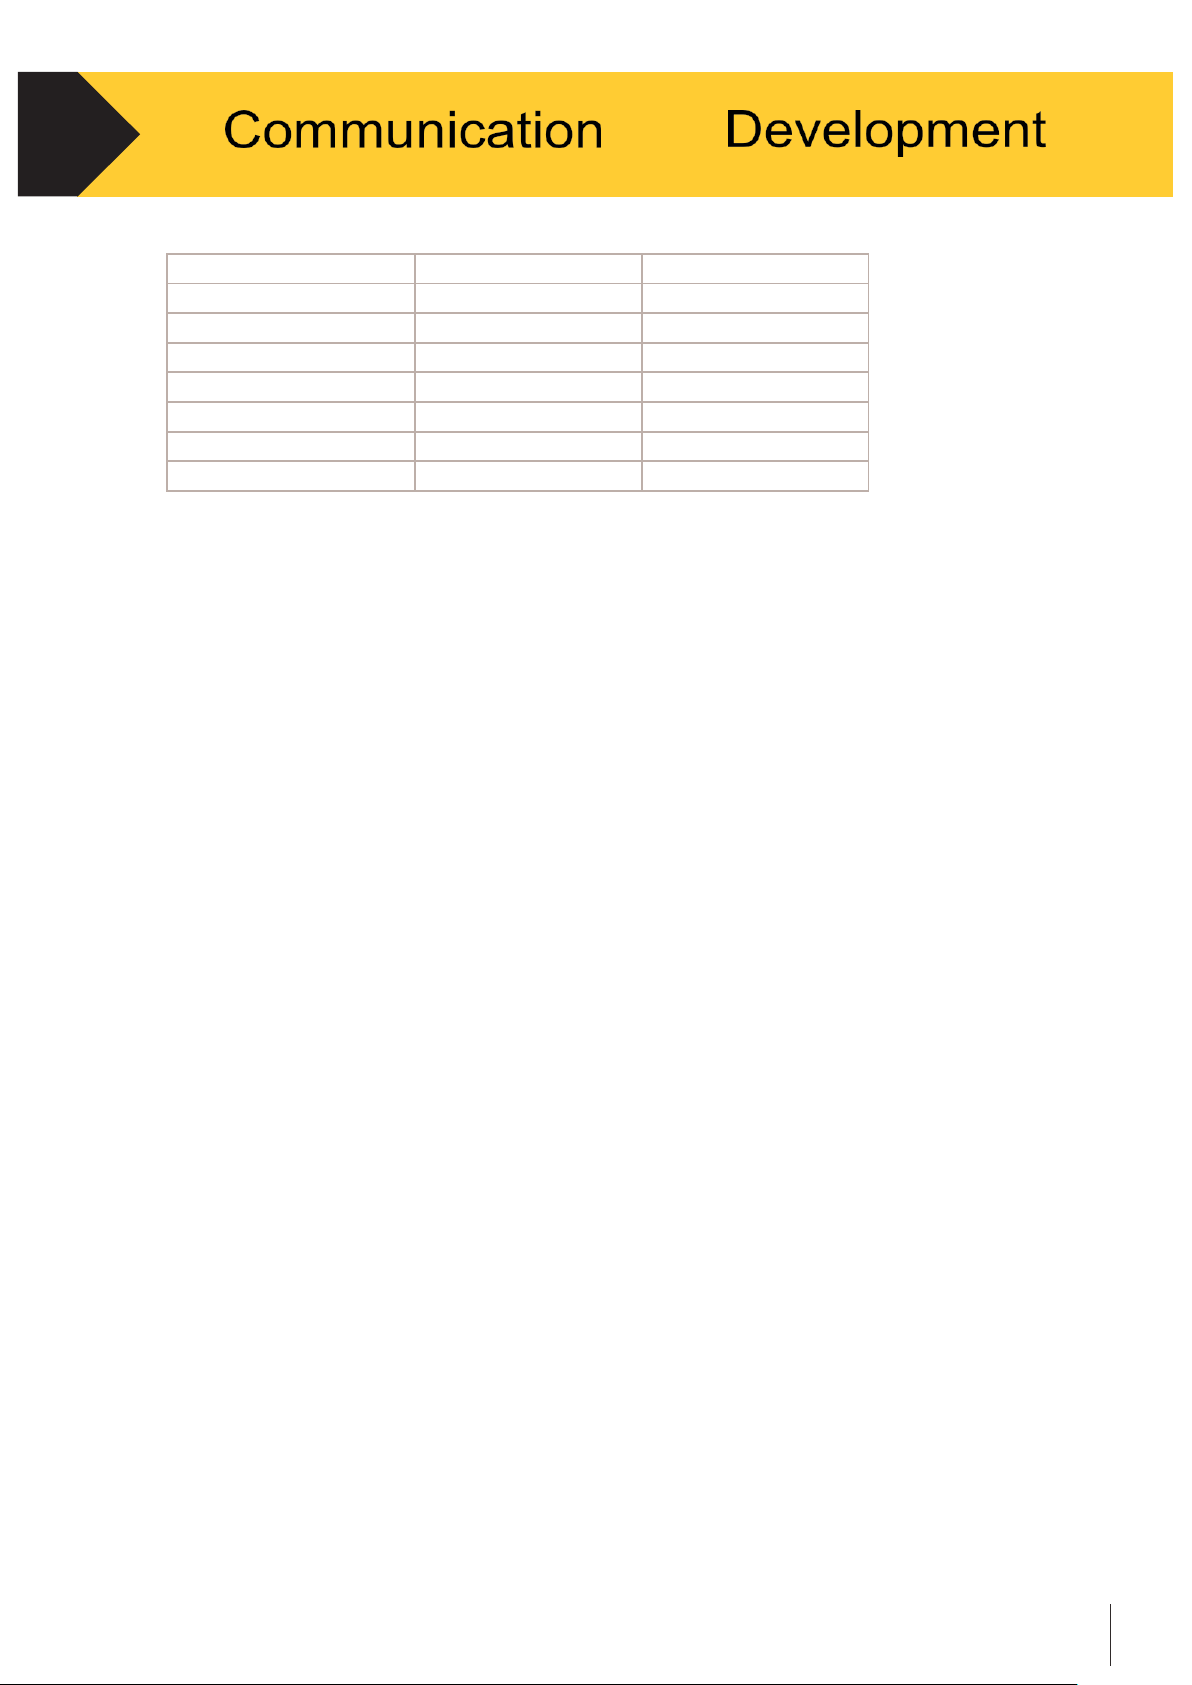
Table 5 provides the data format in output. The data output format can be customized under
the “Workflows” tab in Cubetape Manager.
Table 5
Field
(*Typical
Field
symbol)
Pieces
Dimensional
Volume
Operator ID
Cubetape ID
{ID1=}
{ID2=}
{ID3=}
{WW=}
{WW=}
{PW=}
{VV=}
{OP=}
OpID
Operator ID
Scanned at beginning of
SN
Device Serial
Device
ID1
32 character
Scanner
ID2
32 character
Scanner
ID3
32 character
Scanner
Pieces
4 character item
Direct entry
4 character
Connected scale
4 character
Digital
4 character
Digital
4 character
Digital
Volume
L × W × H
Dim
Derived from Volume
Metric or US
Configuration Setting
Page 37
Technical manual-C190CubetapePRO
36
4.
and
{comma}
{tab}
{cr}
{If}
*{star}
/{slash}
{custom-start}
{custom-end}
Example of the Formatted Data Output:
ID1=BC23015234, PC=3, LL=1170, WW=1170, HH=560, VV=73.45, DW=500, UN=mm
4.5
Pair with Supported Weighing Scale
The CubetapePRO is specially optimized for tasks in combination with supported weighing
scales.
4.5.1
Connection Method
The CubetapePRO is connected with the weighing scale via Bluetooth
communications. The weighing scale should have a Bluetooth interface available.
Make sure to select the “Weigh” application in the Cubetape Application menu, as
discussed in Chapter 2 Section 2.4.1.2, for connection preparation.
4.5.2
Connection Procedure
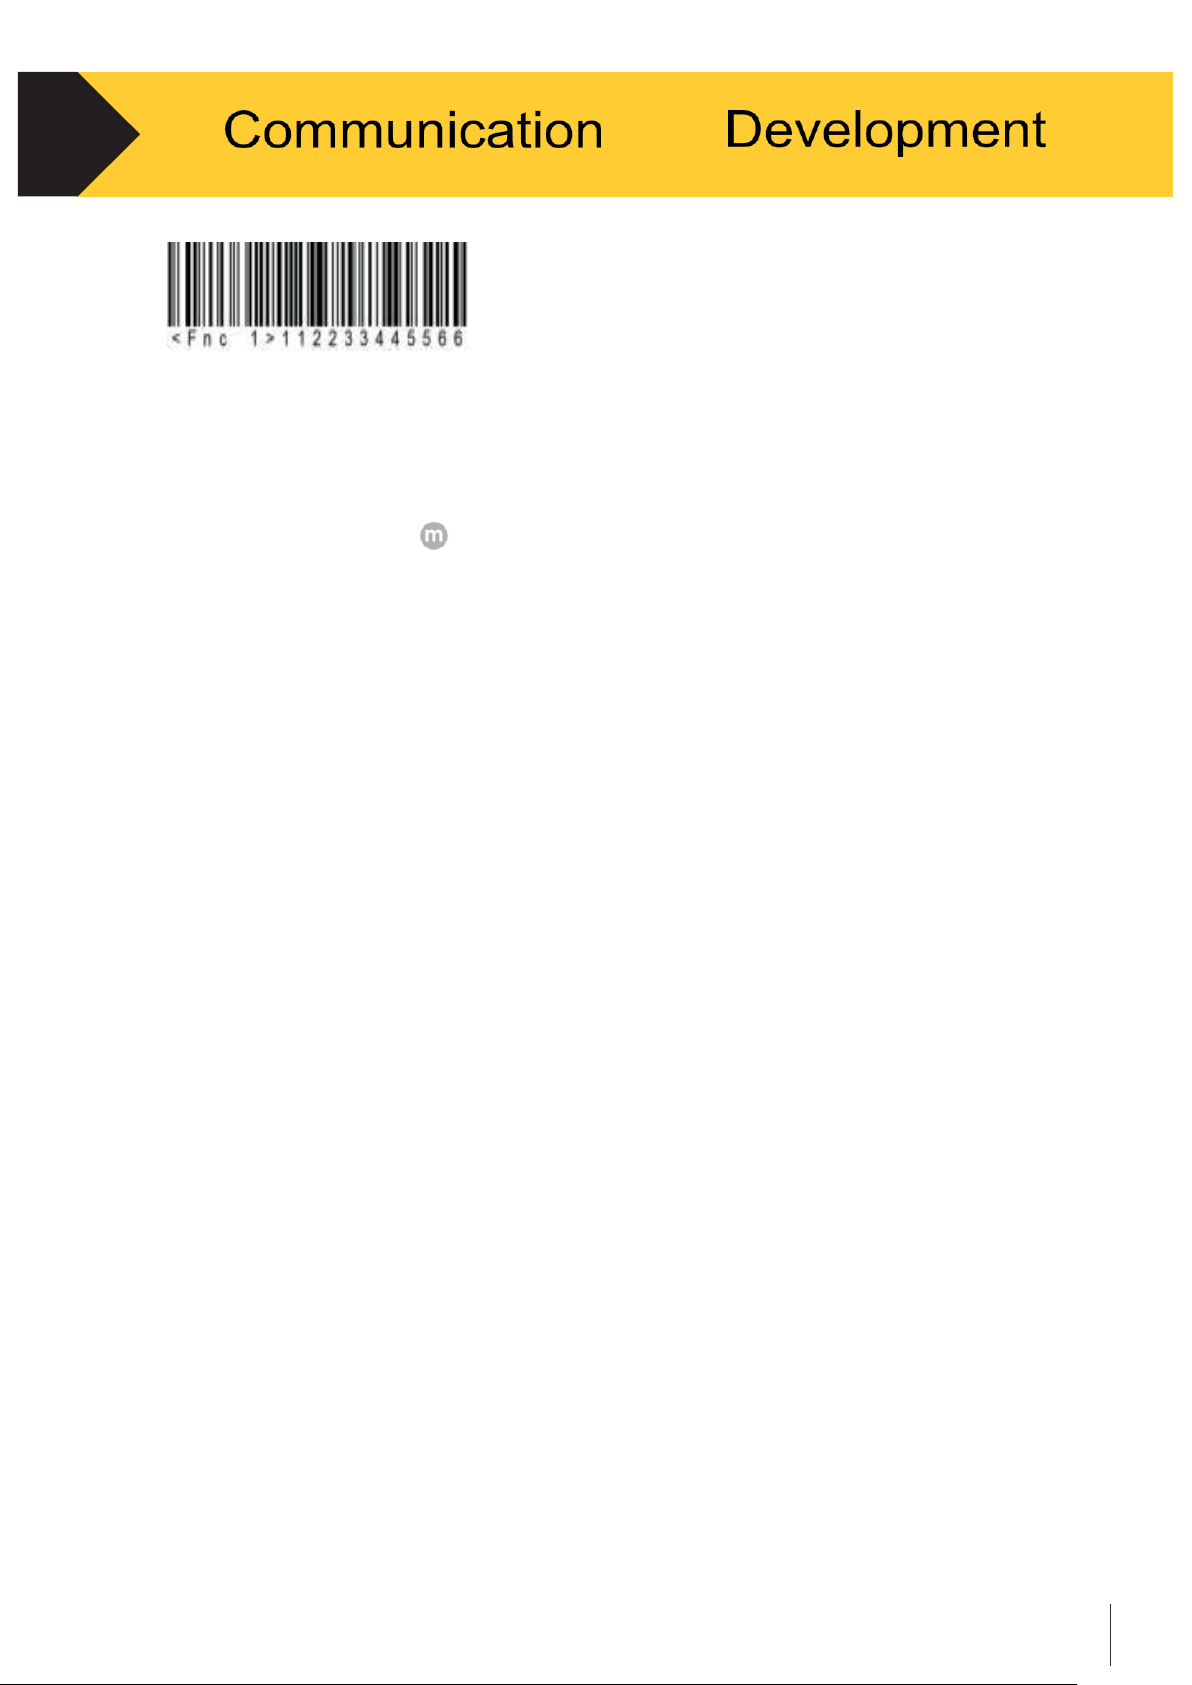
Find the 12-digit Bluetooth MAC address of the weighing scale. Create the barcode as the
following format: <Fnc 1>112233445566, where “112233445566” is the MAC address of the indicator.
This barcode also can be created using the Scan to Pair utility by the Cubetape Manager
software detailed in Section 3.3.8. Sample barcode as follows:
Page 38
Technical manual-C190CubetapePRO
37
4.
and
The CubetapePRO needs to use Bluetooth SPP (Serial Port Profile) to pair and
communicate with the indicator. The complete process is as follows:
•
Ensure that the CubetapePRO is in SPP mode by going to Settings/Bluetooth and
selecting SPP with the button, or by configuring BT SPP in Cubetape Manager.
•
Ensure the weighing scale is turned on.
•
Scan the pairing barcode with Cubetape.
•
The CubetapePRO will display: “Pair Sent 112233445566 SPP”
•
Devices will pair in a couple of seconds when the Bluetooth icon on Cubetape turns
bright blue.
•
Enter the Application menu on the Cubetape and select “Weigh” to start tasks.
•
Sample tasks can be found in Chapter 2 Section 2.4.2.3.
4.6
SDK
4.6.1
SDK Overview
The SDK is provided to simplify the integration of Cubetape with Windows desktop
and mobile environments, remove hardware and connectivity dependencies from the
application developer and expose a standard set of methods and properties for ISVs.
4.6.2
SDK Contents
The SDK contains the following items:
•
Cubetape dll (.NET Compact Framework - Windows CE 5.00 or Windows Mobile 5.0 and later)
•
Cubetape dll (.NET Framework - Windows XP SP2 and later)
•
Desktop Client
•
Device Sample (.cab file)
•
Device Keyboard Wedge (.cab file)
•
Samples (Desktop and Device sample application code)
•
Compiled Object-Model Help documentation (Integrates with Visual Studio on installation)
Page 39

Technical manual-C190CubetapePRO
38
4.
and
4.6.3
PC Requirements
Desktop PC
•
Windows XP SP2 or later
•
.NET Framework 2.0 or later
•
Microsoft or Broadcom Bluetooth stack software
•
Visual Studio 2008 (Using either C# or Visual Basic)
Mobile Device
•
Windows CE 5.0 or later
•
Windows Mobile 5.0 or later
•
Microsoft, Broadcom or Stone Street One stack software
•
.NET Compact Framework 2.0 or later
4.6.4
Samples
The Samples folder contains two sample applications, one for Desktop Windows and the
other for mobile devices. They both perform the same functions but are optimized for the
screen and input options available, respectively. The code is written in C# and illustrates how
to use the Cubetape Manager class in the SDK to connect to the device and receive data.
A pre-compiled version of the Desktop Sample is installed, which you can access from the
“Desktop Sample” start menu shortcut. A compiled version of the device sample is
provided in .cab format for installation onto a compatible device.
The “Device Sample” start menu shortcut will open the folder containing this
.cab file enabling you to copy it to an attached device.
The samples are created with Visual Studio 2008 as C# projects. The code is simple to follow
and can be easily duplicated in Visual Basic with very few changes. It is possible to open the
desktop sample in Visual Studio 2010, which will perform a one-off upgrade. The device
sample must be opened in Visual Studio 2008 as Visual Studio 2010 does not support
.NET Compact Framework projects.
Page 40

Technical manual-C190CubetapePRO
39
4.
and
4.6.5
Device Keyboard Wedge
The Device Keyboard Wedge provides a method to use the Cubetape device with existing
software by passing through received data as Keyboard input. This allows you to use the
Cubetape device even if you can’t modify an existing application to use the Cubetape
SDK. The CubetapeWedge.cab file installs the wedge to the device and it will load
whenever the device is soft-reset.
The keyboard output is defined by the contents of a registry key, which contains a
mask for the generated keystrokes.
The default behavior is:
“ID = {id}, PC = {pc}, LL = {ll}, WW = {ww}, HH = {hh}, UN = {un}, {ENTER}”
•
The two letter codes in curly braces are replaced with the values of those specific fields.
•
{ENTER} is a constant which defines the keyboard Return/Enter key.
•
The string interprets special constants like the System.Windows.Forms.SendKeys.
Send.NET method.
Therefore the following special keys are supported:
•
{TAB} = Tab
•
{PGUP}, {PGDN} = Page Up / Page Down
•
{LEFT}, {RIGHT}, {UP}, {DOWN} = keyboard arrow keys
These special characters must be escaped in curly brackets: + ^ % { } [ ] ~
•
For example: “{ [ }”
So to send the record contents with no headers and a tab control between each field
the mask should be set to:
“{id} {TAB} {pc } {TAB} {ll} {TAB} {ww} {TAB} {hh} {TAB} {un} {ENTER}”
The value is stored in the Registry at: HKEY_LOCAL_MACHINE \SOFTWARE\Cubetape
Page 41

Technical manual-C190CubetapePRO
40
4.
and
In a string value called “WedgeMask,” you can provision this value either:
•
Within a .cab Setup project specifying this registry key
•
Using a Registry Editor application on the device or remotely from a desktop PC
•
From your own application code using the Registry API or .NETCF RegistryKey class
4.6.6
Operating Notes
Quickstart instructions to pair with a PDA and transfer data records from Cubetape:
•
Power up the PDA
•
Ensure that Bluetooth is turned on
•
Power up the Cubetape
•
Select Cubetape sample from the PDA start menu or menu bar
•
To pair the devices scan the barcode on Cubetape, or select Search and select the
Cubetape mac address
•
Data collection screen will load in a few seconds while devices are now paired
•
Item and dimensional data can be collected on Cubetape and transferred to the PDA
•
Current item data will be displayed on the current item tab and all data for this
session will be displayed on All Data tab.
Page 42
Technical manual-C190CubetapePRO
41
5.1
Overview
This chapter provides information of professional services, device maintenance, common
problem diagnostics and other miscellaneous items.
C190MFTCubetape™ is designed to provide years of dependable operation. However,
Parceltools recommends that as with any industrial measurement equipment - the device
is serviced periodically. Timely, factory - specified maintenance and calibration by
a Parceltools - authorized service technician would ensure and document accurate and
dependable performance to specifications.
5.2
Service Alert System
Cubetape firmware includes an alert system to support the process of cleaning
and replacement of tapes.
Cubetape tracks tape usage and will issue two types of service alerts, “clean tape” and
“replace tape cassette” alert.
When the tape is due for cleaning or replacement, Cubetape will issue a service alert at
power on. The operator can proceed to normal data capture by selecting “next,” but will
be reminded to clean the tape or change the tape cassette until the alert is dismissed
from Settings/Maintenance.
5.3
Cleaning and Maintenance Process
When the “clean tape” alert has been issued it is recommended to follow the following process:
•
Inspect the tape markings.
•
If the regular black marks are dirty or obscured, clean gently with a soft cloth and a
mild alcohol-based solvent.
Page 43
Technical manual-C190CubetapePRO
42
When the “replace tape” alert has been issued it is recommended to follow the
following process:
•
Remove the tape cassette
•
Blow out the tape sensor area and cassette recess with an air duster
•
Replace the tape cassette with a new unit
Clean the device’s keypad and rubber cover with a clean, soft cloth that has been dampened
with mild glass cleaner. Do not use any type of industrial solvent, such as toluene or isopropanol
(IPA) that could damage the device’s finish. Do not spray cleaner directly on the device.
Regular maintenance inspections and calibration by a qualified service technician are
recommended. Care should be taken to avoid any punctures to this surface or any
vibrations or shocks to the instrument. If the front display is punctured, ensure that steps
are taken to prevent dust and moisture from entering the unit until the device can
be repaired.
5.4
Service
Only qualified personnel should perform installation, programming and service. Please
contact a local authorized Parceltools representative for assistance.
Parceltools recommends periodic preventative maintenance for the device to ensure reliability
and to maximize service life. All measurement systems should be periodically calibrated and
certified as required to meet production, industry and regulatory requirements. We can help
you maintain uptime, compliance and quality system documentation with periodic
maintenance and calibration services. Contact your local Parceltools authorized service
organization to discuss your requirements.
5.5
Battery Charging and Feedback
•
The battery indicator symbol appears at the left bottom of the screen.
•
The symbol displays battery in the form of percentage.
•
To charge the battery, connect C190CubetapePRO to a PC or power adaptor
via the USB cable. OR place the device in the Parceltools charging cradle
•
The charge light is on during the charging process.
•
When charging is finished, the charge light will go off.
•
If the battery remaining drops below 33 percent, the symbol turns red and alerts
the operator.
Page 44
Technical manual-C190CubetapePRO
43
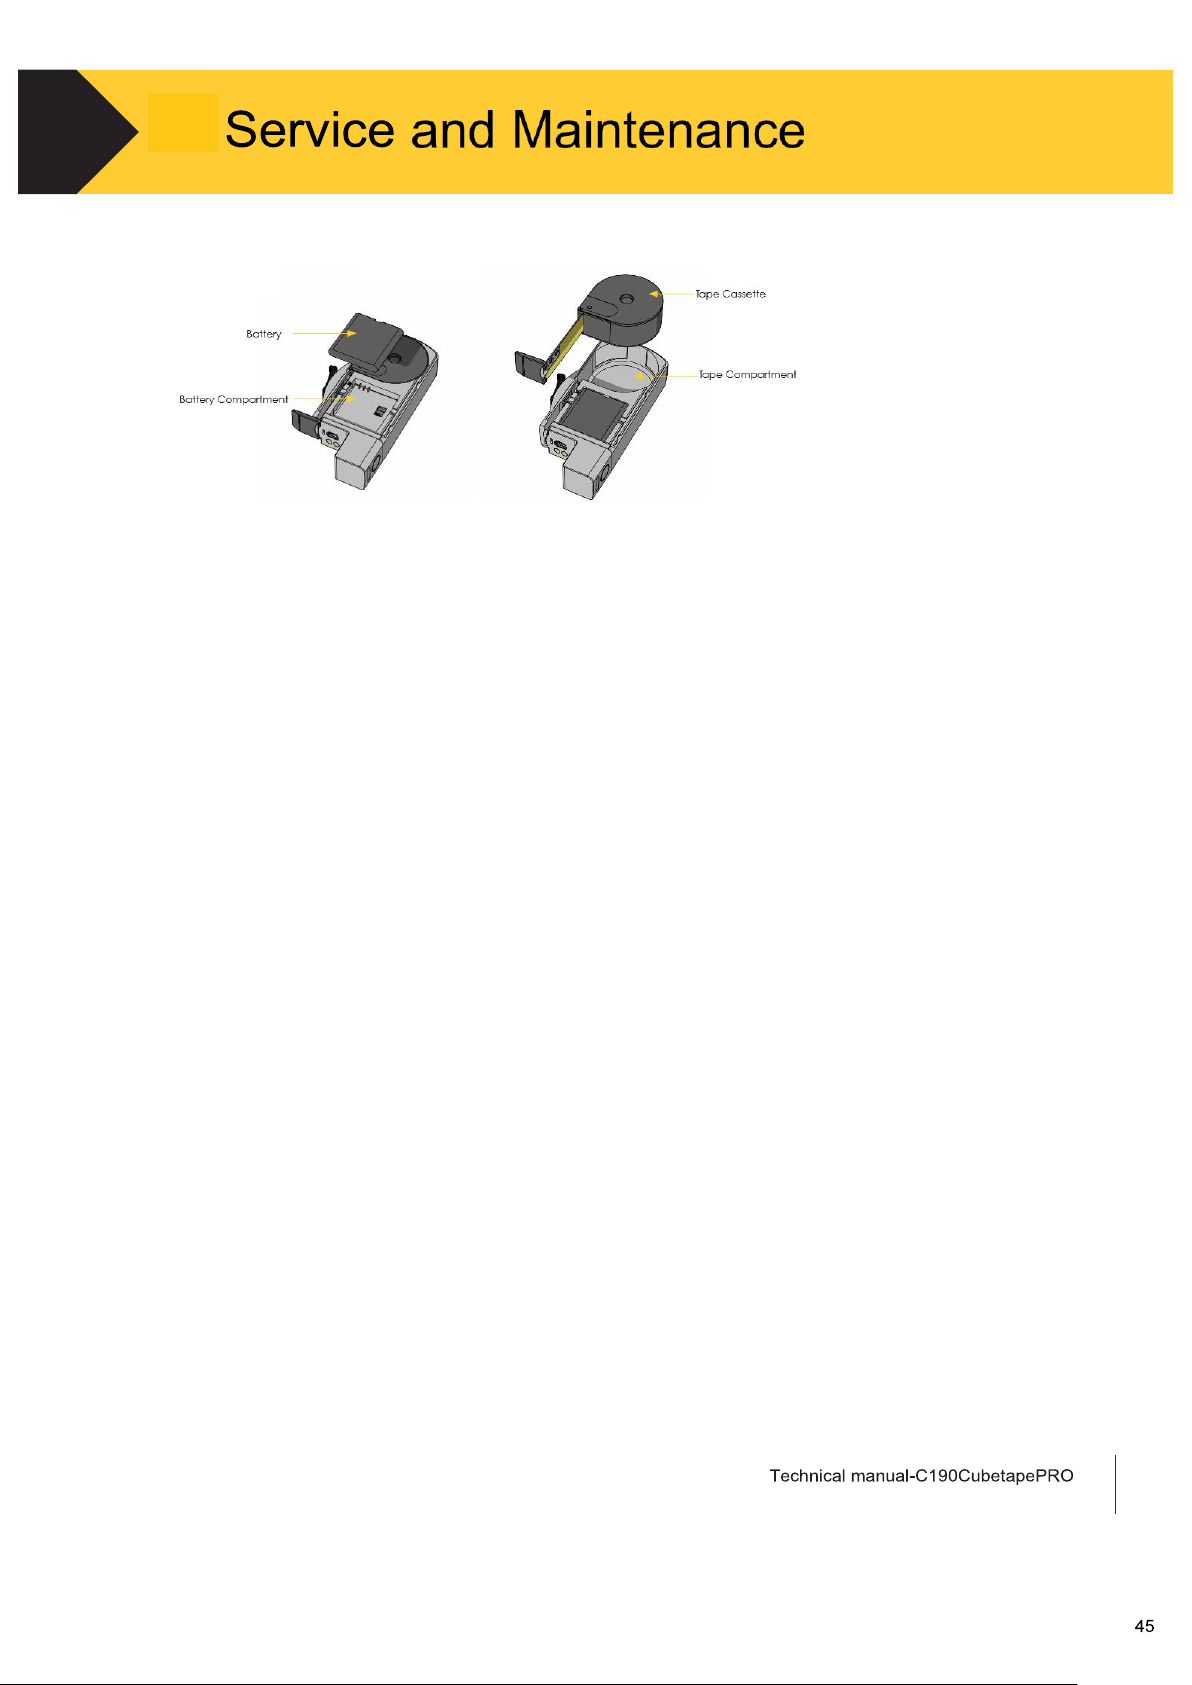
5.6
Tape Cassette and Battery Replacement
•
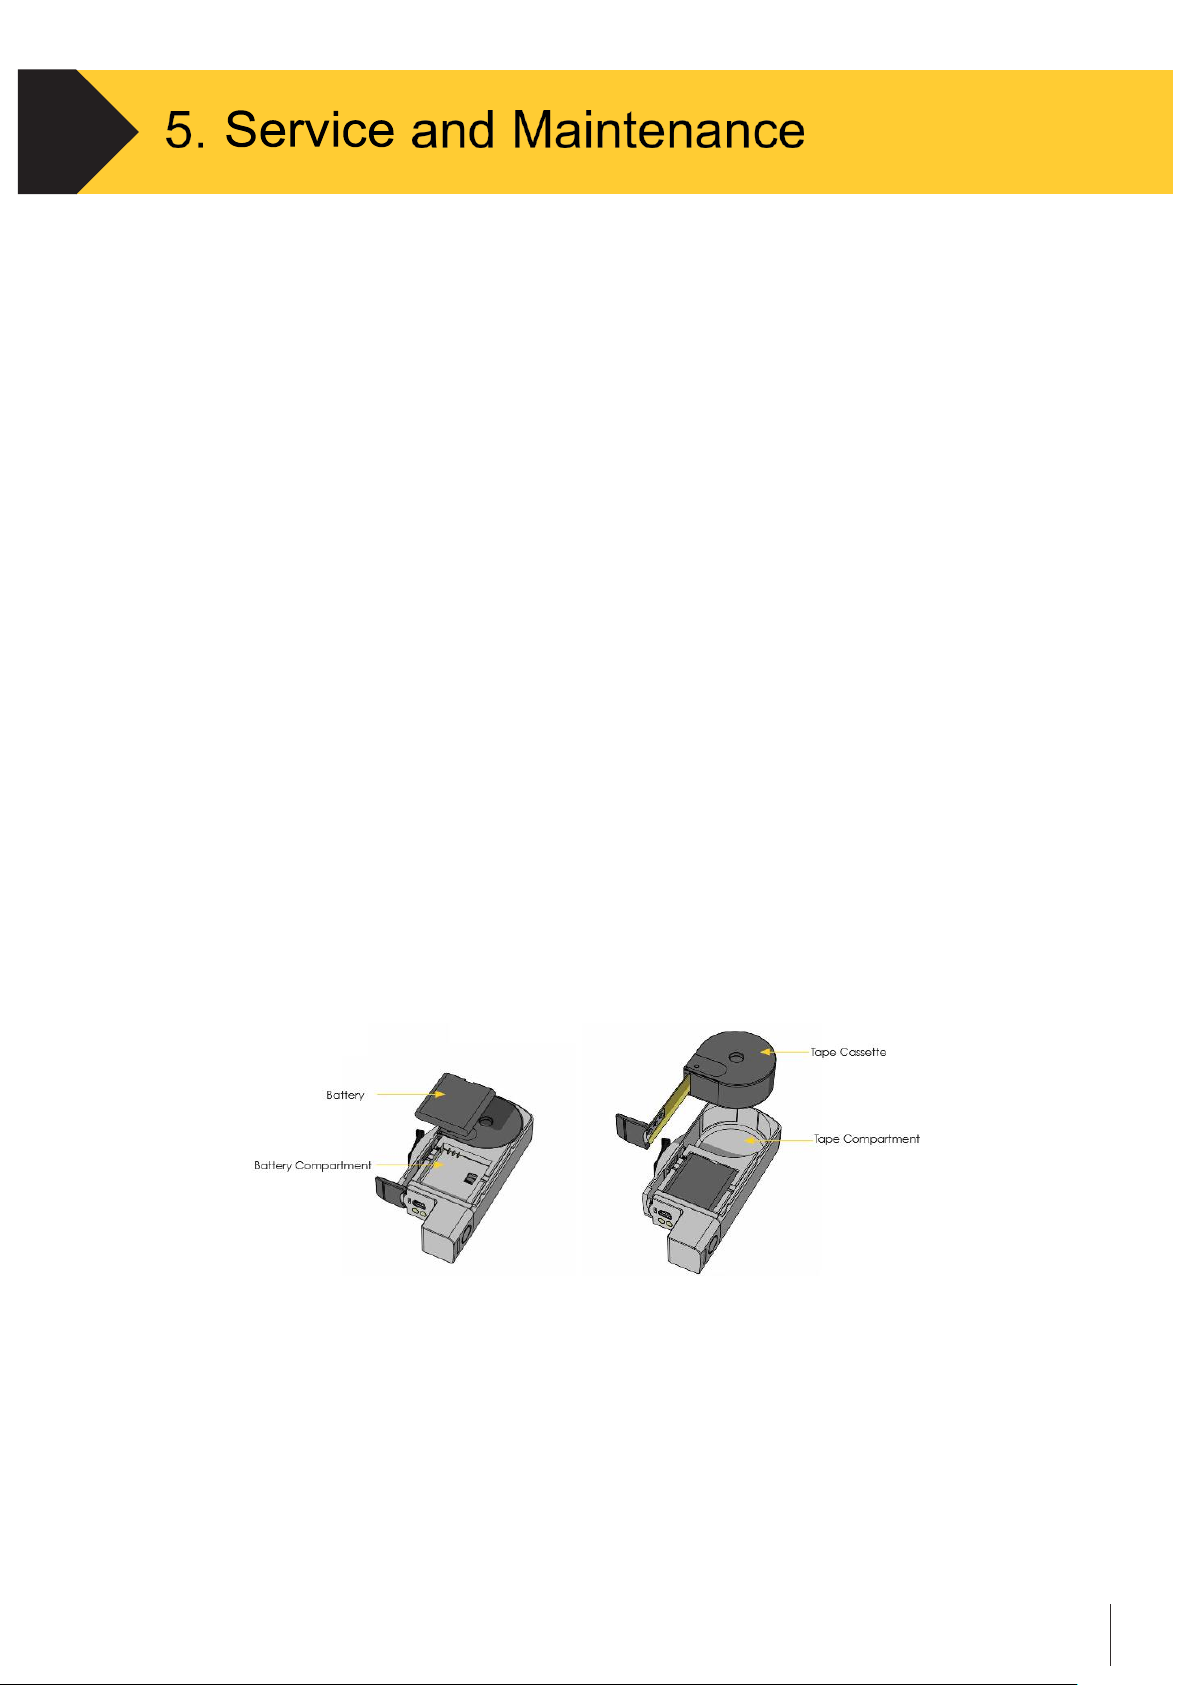
To replace the tape cassette and battery, remove the silicone sleeve first.
•
To slide the rear cover of the device down, push the index finger at the upper right
corner of the rear cover as indicated.
5.6.1
Tape Cassette Replacement
•
Remove and replace the tape cassette by turning over the C190Cubetape PRO, extracting
the tape a few centimeters and then lifting the tape away from the device slowly.
5.6.2
Battery Replacement
•
To replace the tape cassette and battery, remove the rubber sleeve first.
•
Then slide the rear cover of the device down by pushing the index triangle at the upper
right corner of the rear cover as indicated below.
•
Remove and replace the battery by slightly press the trough at the middle edge of the
battery upward as indicated below
•
Remove and replace the tape cassette by turning Cubetape PRO over, extracting the tape
a few centimeters and then lifting the tape away from the device slowly
Figure 5-1
Tape Cassette and Battery Replacement
Page 45
Technical manual-C190CubetapePRO
44
5.7 Troubleshooting
The following chart lists a few potential symptoms and some suggestions for resolving the
issue. If a problem that is not listed in Table 5 occurs, or if the suggested fix does not
resolve the problem, contact an authorized Parceltools service representative for assistance.
Symptom Suggestion
Device breakdown or
not responding
Replace the battery then reassemble.
Unable to connect to
STManager via USB
Disconnect all components, then follow the
instructions in chapter 4 Section 4.3 to reconnect.
Bluetooth connection
problems Bluetooth
Check the Bluetooth profile and other procedures
as described in chapter 3 Section 3.3.8 and
chapter 4 Section 4.2 to reconnect.
Hardware problems
Please contact an authorized Parceltools
representative for hardware maintenance services.
Table 5
Page 46
6
Battery Charging and Feedback
A battery indicator symbol appears at the left bottom of the screen.
The symbol displays battery in the form of percentage.
To charge the battery, connect Cubetape PRO to a PC or power adaptor via the USB cable.
The charge light is on during the charging process.
When charging is finished, the charge light will go off.
If the battery remaining drops below 10%, the symbol turns red and alerts the operator.
Cleaning and Maintenance Process
For sensor versions daily clean the system using the air duster and maintenance port as shown.
(Note the maintenance port is concealed beneath the rugged cover.)
Regularly wipe the tape blade with a non-solvent cleaner.
Replace the tape when tape is worn and yellow particles appear.
Parceltools Pty Ltd
Parceltools USA LLC
Parceltools Europe BV
Page 47

Cubetape and ScanTape Firmware Upgrade process
To upgrade Cubetape or ScanTape firmware:
Put ScanTape/Cubetape into firmware upgrade mode by holding the down arrow and
powering on, or selecting Firmware upgrade from the Settings menu. Device will make 3
long beeps, but screen will be off
Connect to PC by USB cable
Run CubeTapeLoader.exe or ScanTapeLoader.exe and follow the prompts.
Cubetape or ScanTape firmware will be updated.
Process requires Cubetape firmware V1.12C and above.
Prior to firmware version V2.02.14, Bluetooth serial connections on the host PC could interfere with
the automated device detection process used in the firmware upgrade. If the Loader program is not
able to connect to the Cubetape/ScanTape device, remove any Bluetooth serial connections using
Device Manager. This will allow the upgrade process to complete. The issue is resolved with
V2.02.14 and above.
Page 48
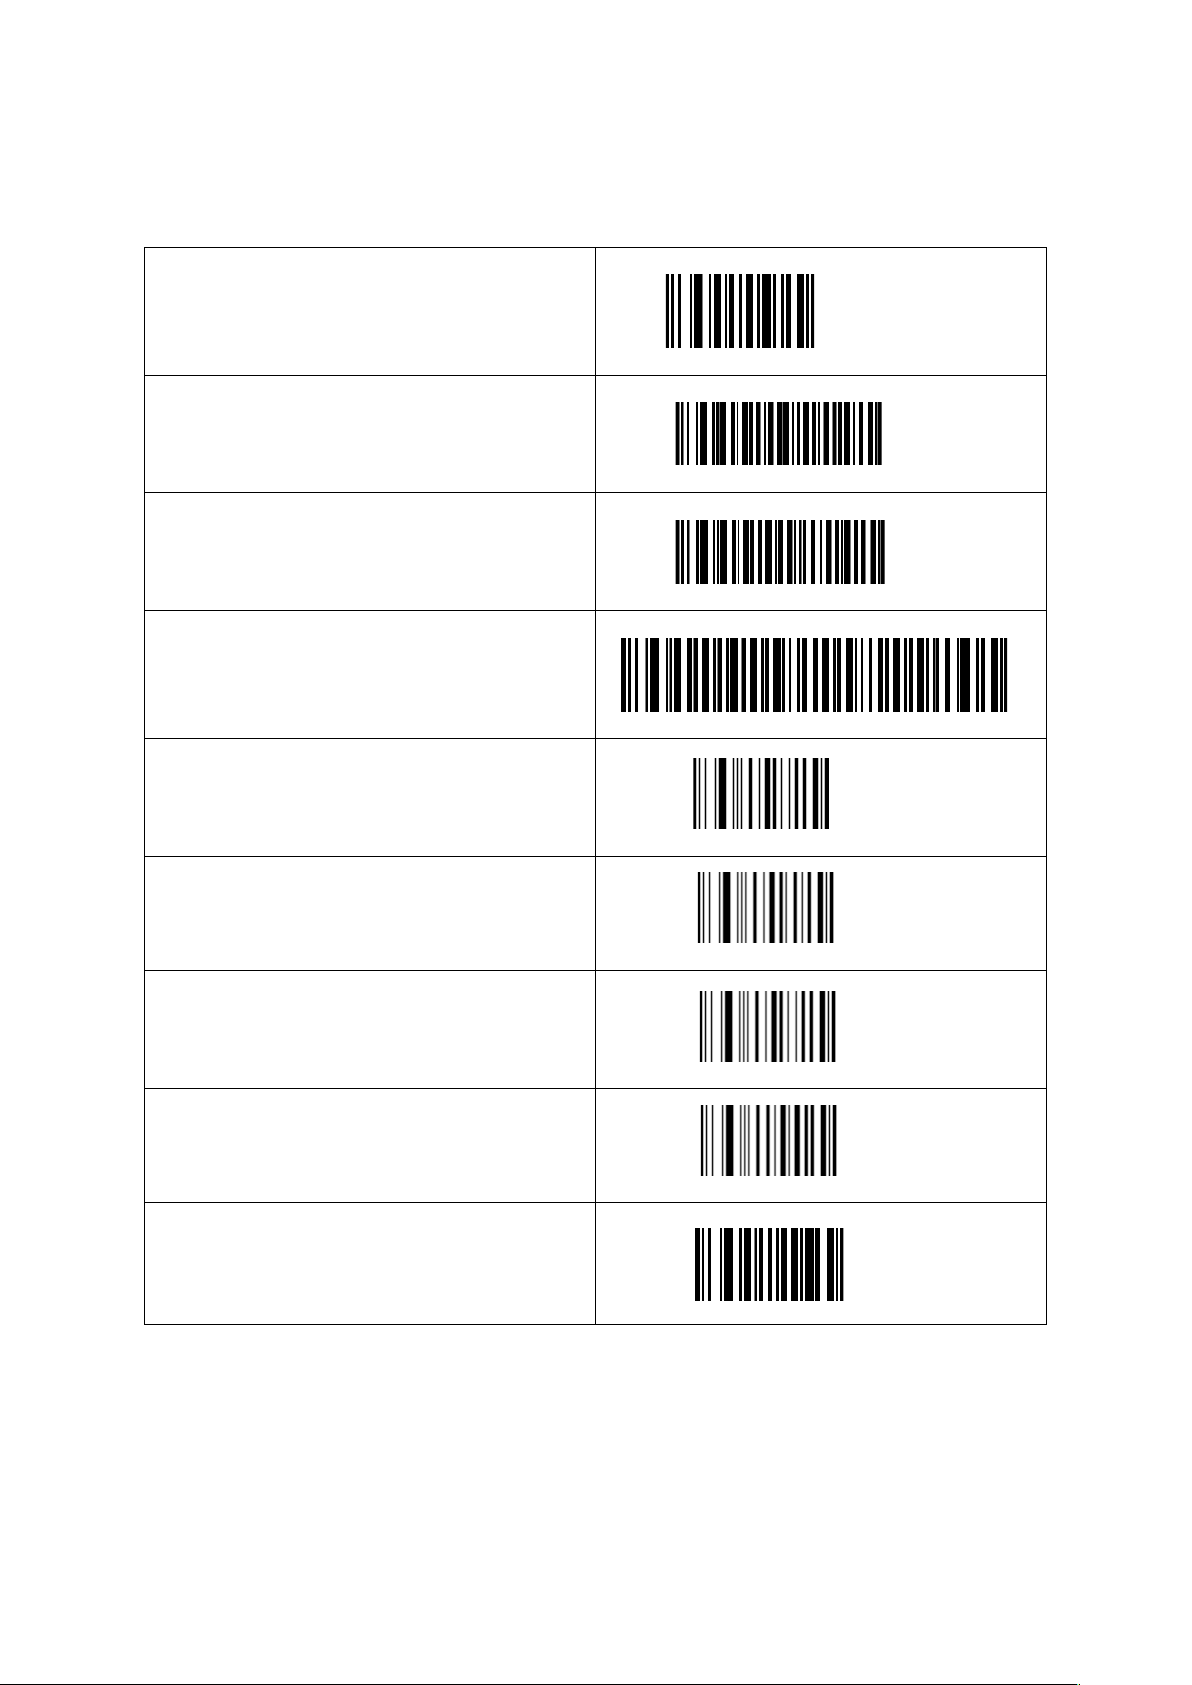
SE965 Setup Barcodes for C190PRO – May 2019
Set Factory Defaults
Disable adaptive Scanning
Enable M2of5
M2of5 length within range 01 and 04
0
1
0
4
Write to PT Defaults
 Loading...