

Page 1
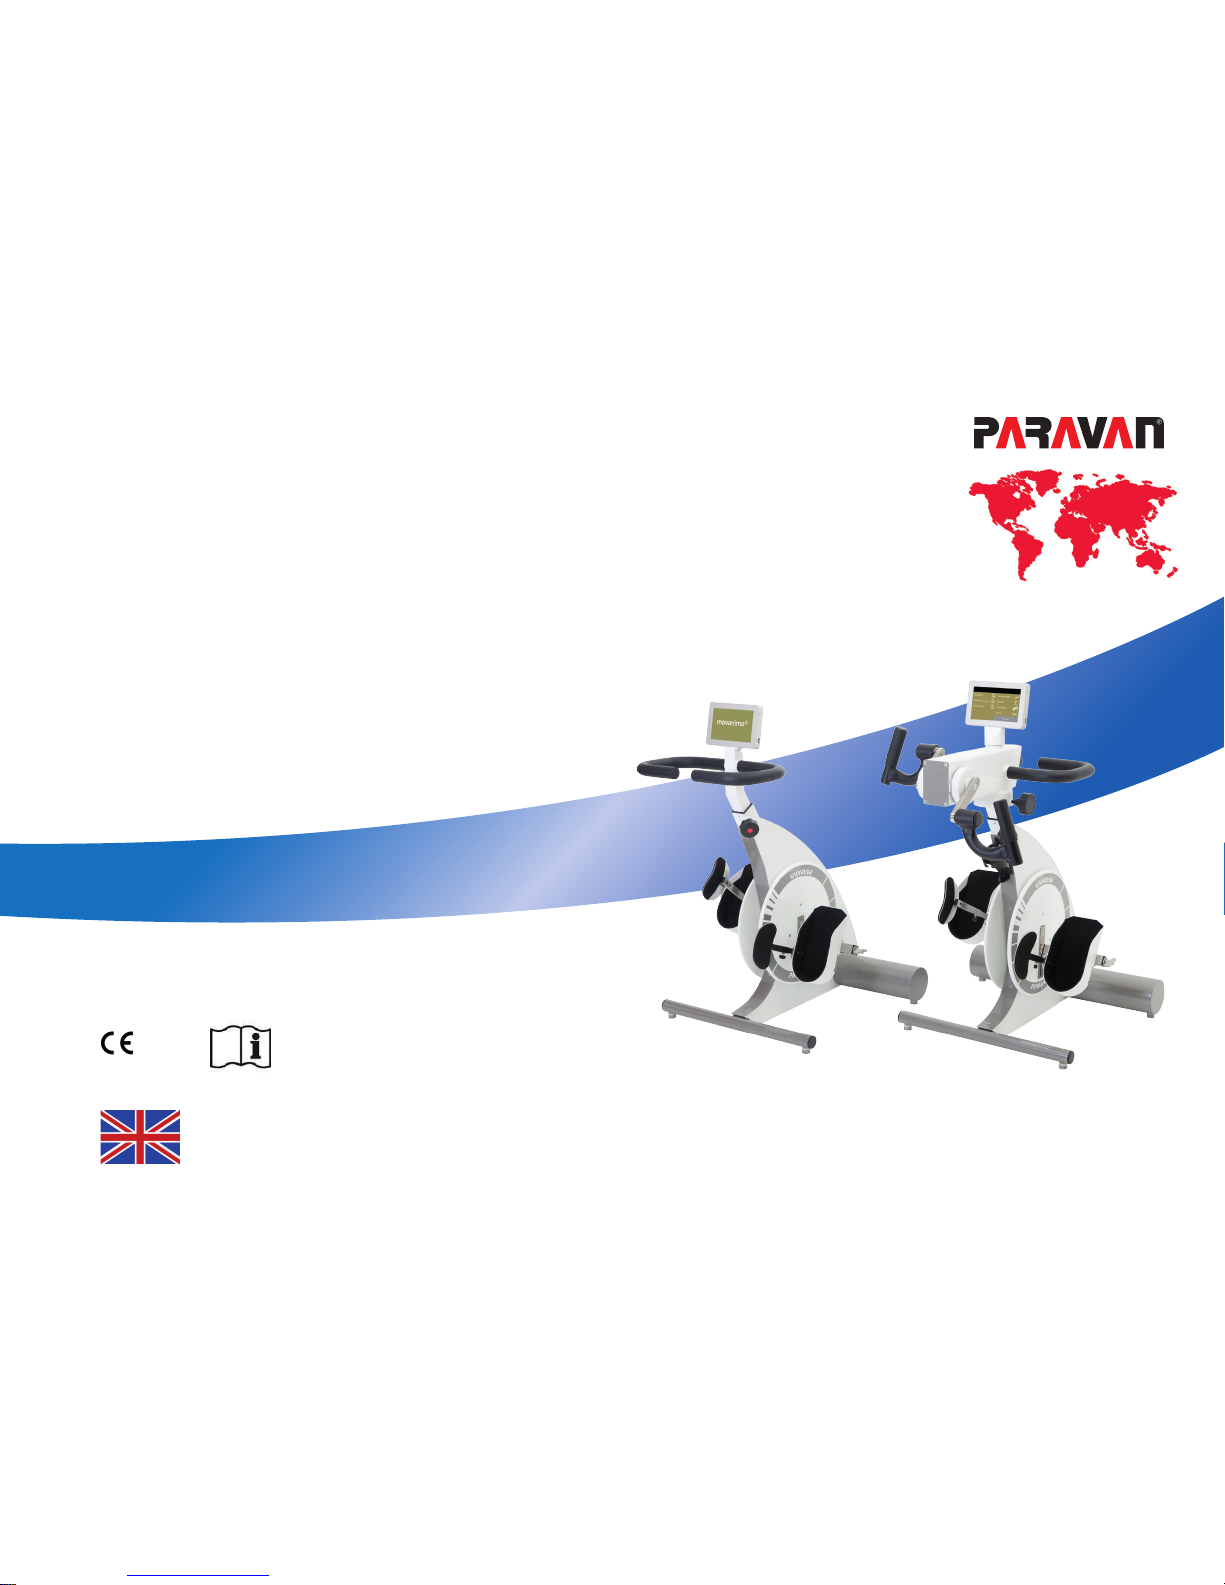
movanimo touch
movanimo touch plus
Operating manual
(Englisch translation of the original user maual)
0633
Page 2

Valid for the following models movanimo touch (leg trainer), Art.-Nr. 8000
from 03/2014 movanimo touch plus (arm trainer), Art.-Nr. 8200
Publisher and Copyright Holder: PARAVAN medical GmbH, 72539 Pfronstetten-Aichelau
Date of Publication: 19.05.2014
Documentnumber: movanimo_EN_Rev2.1
Revision number: 2.1
Page 3

1 von 147
mov01_EN_Rev.2.1
Dear customer,
Thank you very much for having chosen our movanimo. Wou will nd all the important information
and tips you need on your new movanimo in this User‘s Manual. Please carefully read the information
on the page to follow in order to make sure your movanimo will give you many years of problem-free
service. Keep this User‘s Manual in a handy place fpr later reference. Our user manual contains answers
to questions relating to the operation and care of the movanimo and its ttings. If you should have any
questions or suggestions on the movanimo, please do not hesitate to get in contact with us.
Your PARAVAN medical team
Page 4

2 von 147 - Table of contents - mov01_EN_Rev.2.1
Table of contents
General
1. Details on publisher ...................................................................................10
1.1 Your manufacturer ....................................................................................................10
1.1.1 Copyright .................................................................................................................11
2. General Information ..................................................................................12
2.1 Informationen zur Gebrauchsanweisung .....................................................................12
2.2 Information about the operating manual ..................................................................... 12
2.3 Illustrations in the operating manual ..........................................................................14
2.4 Illustrations in User manual .......................................................................................15
2.5 Technical changes ..................................................................................................... 15
3. Proper usage ..............................................................................................16
3.1 Fields of use ............................................................................................................. 17
3.2 Side effects and contraindications ..............................................................................18
3.2.1 Side effects ..............................................................................................................18
3.2.2 Contraindications ......................................................................................................18
3.3 Important instructions for the training ........................................................................19
3.4 Minimum requirements for training ............................................................................. 20
4. Disclaimer of liability ................................................................................22
5. Therapy with movanimo ............................................................................24
5.1 Therapy forms ..........................................................................................................24
5.2 Anti-spastic control and –relaxation ............................................................................ 25
6. Safety instructions .....................................................................................26
Information
7. Device overview ........................................................................................34
7.1 Device overview leg trainer (movanimo touch) ............................................................ 34
7.2 Device overview arm trainer (movanimo touch plus) .................................................... 35
Page 5

3 von 147
- Table of contents -mov01_EN_Rev.2.1
7.3 Detailed view touch panel .......................................................................................... 36
7.4 Accessories ...............................................................................................................37
7.4.1 Lower leg restraint (article no. 7450) .......................................................................... 37
7.4.2 RTR tilt protection (article no. 7700) ........................................................................... 37
7.4.3 Tilt protection protect (article no. 7500)...................................................................... 38
7.4.4 movanimo cardio set (article no. 8500) ....................................................................... 38
7.5 Artikelnummer und Bezeichnungen ............................................................................40
7.6 Kennzeichnung .........................................................................................................41
Prepare
8. Activation, operation and transport .........................................................42
8.1 Inspection before activation ....................................................................................... 42
8.2 Activation of leg trainer .............................................................................................43
8.3 Standby mode ..........................................................................................................44
8.4 Adjusting the pedal width .......................................................................................... 45
8.5 Adjusting the pedal radius .........................................................................................47
8.6 Adjusting the handhold height ...................................................................................49
8.7 Lower leg restraint (accessory, article number 7450) ................................................... 51
8.8 Adjusting the pedestal foot ........................................................................................ 53
8.9 Activation of the arm trainer movanimo touch plus ...................................................... 54
8.10 Adjusting the movanimo cardio set (article no. 8500)...................................................57
8.11 Transport .................................................................................................................. 59
Operate
9. Proper usage of the movanimo .................................................................62
9.1 Secure sitting- and body position ...............................................................................62
9.2 General training recommendations .............................................................................66
Page 6

4 von 147 - Table of contents - mov01_EN_Rev.2.1
10. Operating the touch panel .........................................................................70
10.1 Operating the touch panel .........................................................................................70
10.2 Hauptmenü ..............................................................................................................70
10.3 Most important button functions ................................................................................72
10.3.1 Plus- /Minus buttons ................................................................................................. 72
10.3.2 Horizontal Arrow button............................................................................................. 72
10.3.3 Home button ............................................................................................................ 72
10.3.4 Back button .............................................................................................................. 73
10.3.5 Conrm and Decline buttons ...................................................................................... 73
10.3.6 Start and Stop buttons .............................................................................................. 73
10.4 Training menu ........................................................................................................... 75
10.4.1 Displays and control buttons in the top control eld ..................................................... 75
10.4.2 Displays and control buttons in the lower control eld .................................................. 76
10.4.3 Display values in the training control eld ...................................................................77
10.5 Access-/ Exit aid .......................................................................................................80
10.5.1 Access ...................................................................................................................... 80
10.5.2 Exit 80
10.6 ASC – Anti-spastic control .......................................................................................... 81
10.7 Further settings during training .................................................................................. 83
10.7.1 Timer ....................................................................................................................... 83
10.7.2 RPM – Revolutions per minute ...................................................................................84
10.7.3 Resistance ................................................................................................................ 86
11. Training programs .....................................................................................88
11.1 Therapy programs – Indication-guided training ........................................................... 88
11.2 Training phases ......................................................................................................... 92
11.3 Training levels ........................................................................................................... 93
11.4 Free training ............................................................................................................. 95
11.4.1 Passive training ......................................................................................................... 95
11.4.2 Active training ...........................................................................................................95
Page 7

5 von 147
- Table of contents -mov01_EN_Rev.2.1
11.4.3 Soft training ............................................................................................................. 95
11.4.4 Symmetry training .....................................................................................................96
12. Training evaluation ....................................................................................98
12.1 Training analysis ....................................................................................................... 98
12.2 Training statistics (menu Statistics) ............................................................................. 100
13. Settings ......................................................................................................102
13.1 Training times ........................................................................................................... 102
13.2 Traininsparameter ..................................................................................................... 103
13.3 Time and date ..........................................................................................................104
13.4 User data .................................................................................................................104
13.5 Technological parameters .......................................................................................... 105
13.5.1 Rotational speed limit ................................................................................................ 105
13.5.2 Block changes ........................................................................................................... 105
13.5.3 Reset factory settings ................................................................................................ 105
13.6 Conguration of the anti-spastic control (ASC) ............................................................107
13.6.1 ASC level .................................................................................................................. 107
13.6.2 ASC on/off ................................................................................................................ 107
13.6.3 Change of direction ................................................................................................... 109
13.7 Rotational direction automatic ................................................................................... 110
13.8 Automatic rotational speed adjustment ....................................................................... 110
13.9 Language ................................................................................................................. 111
Help
14. Problems and corrections ..........................................................................112
15. Safety-related controls and maintenance .................................................114
16. Cleaning and care ......................................................................................116
Technology
Page 8

6 von 147 - Table of contents - mov01_EN_Rev.2.1
17. Service life and disposal ...........................................................................120
17.1 1 Duration of servicibility ...........................................................................................120
17.2 Disposal ...................................................................................................................120
18. Technical data ............................................................................................122
18.1 Description of the system ..........................................................................................122
18.2 Dimensions and weight .............................................................................................122
18.3 Technische Werte ...................................................................................................... 123
18.4 Operating- and transport conditions ...........................................................................125
18.5 Used materials .......................................................................................................... 125
19. Electriomagnetic compatibility (EMC) .......................................................126
19.1 Information regarding Electromagnetic compatibilty ....................................................126
19.2 Compliance level ....................................................................................................... 127
20. Warranty ....................................................................................................134
21. EC-Declaration of conformity ....................................................................138
Space for your Notes .................................................................................141
Page 9

7 von 147
- Table of contents -mov01_EN_Rev.2.1
Page 10

8 von 147 - Table of illustrations - mov01_EN_Rev.2.1
Table of illustrations
Fig. 1: QR-Code............................................................................................................... 10
Fig. 2: Symbol for hazard alert.......................................................................................... 14
Fig. 3: Symbol for prohibition............................................................................................ 14
Fig. 4: movanimo touch.................................................................................................... 34
Fig. 5: movanimo touch plus............................................................................................. 35
Fig. 6: Touch panel .......................................................................................................... 36
Fig. 7: Lower leg restraints................................................................................................ 37
Fig. 8: RTR tilt protection.................................................................................................. 37
Fig. 9: External power supply and socket ........................................................................... 43
Fig. 10: Power switch......................................................................................................... 43
Fig. 11: Foot cuffs with quick- adjust setting (white stop bolt lock)......................................... 45
Fig. 12: Adjusting the pedal radius (wing screw)................................................................... 47
Fig. 13: Quick release lever for height adjustment (stop bolt lock with red safety pin)............. 49
Fig. 14: Adjusting the lower leg restraint.............................................................................. 51
Fig. 15: Fixed lower leg restraint..........................................................................................51
Fig. 16: Locking screw adjustable arm................................................................................. 56
Fig. 17: Using movanimo touch as legtrainer........................................................................ 56
Fig. 18: Using movanimo touch plus as upper body trainer.................................................... 56
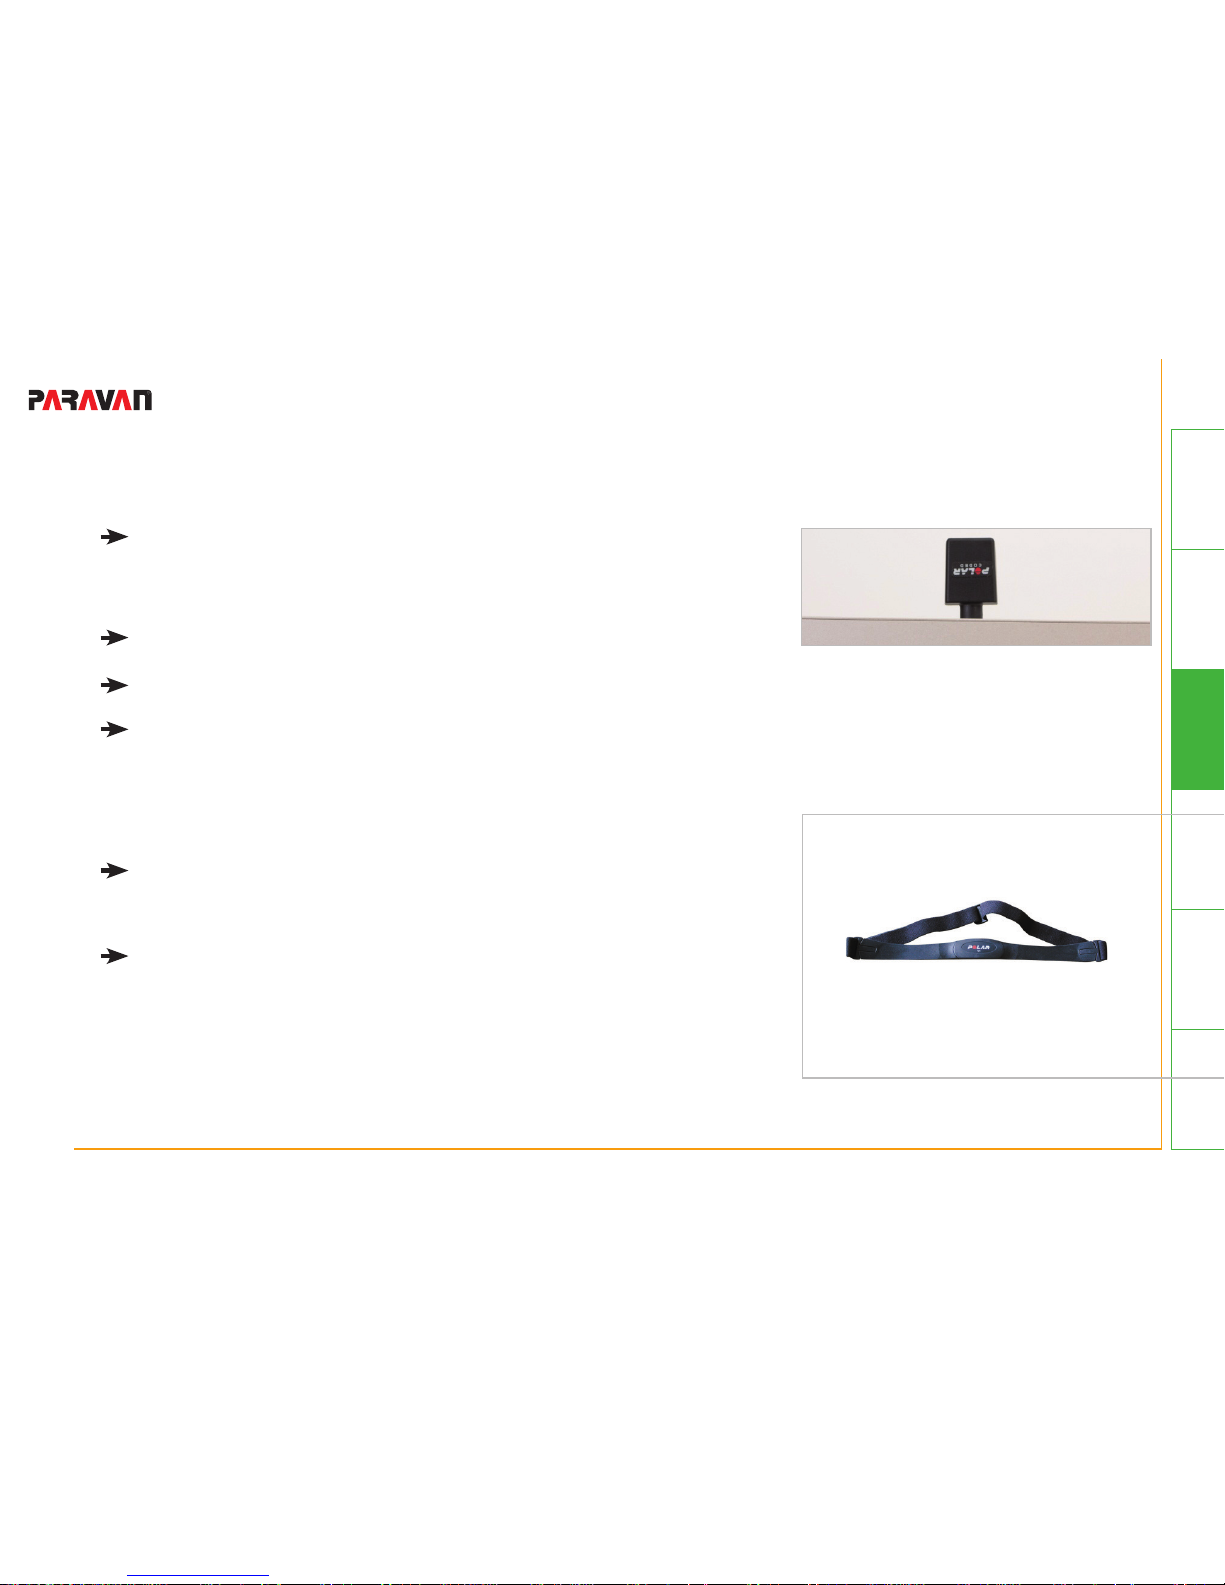
Fig. 19: Heart rate receiver................................................................................................. 57
Fig. 20: Chest strap heart rate............................................................................................ 57
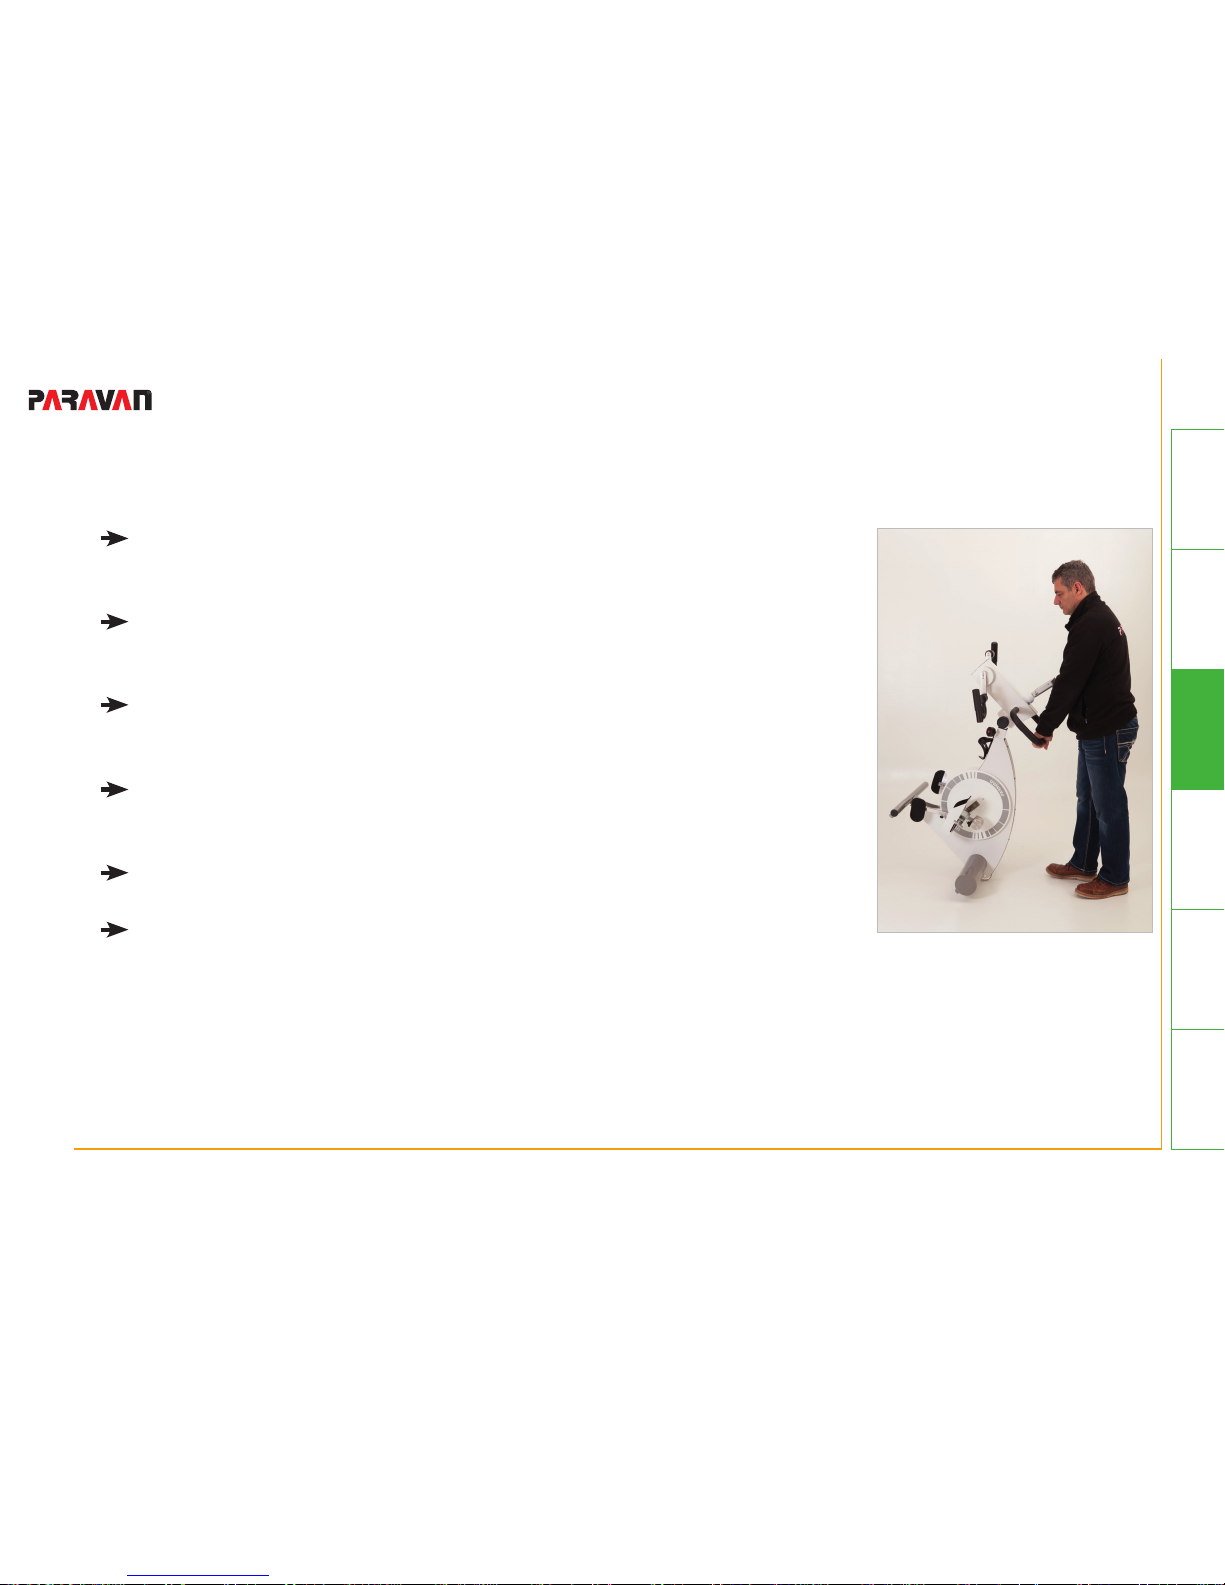
Fig. 21: Transport des movanimo........................................................................................ 59
Fig. 22: Hauptmenü........................................................................................................... 70
Fig. 23: Plus- /Minus-buttons.............................................................................................. 72
Fig. 24: Horizontale Arrow button....................................................................................... 72
Fig. 25: Home button......................................................................................................... 72
Fig. 26: Back button........................................................................................................... 73
Page 11

9 von 147
- Table of illustrations -mov01_EN_Rev.2.1
Fig. 27: Conrm buttons...................................................................................................... 73
Fig. 28: Decline buttons....................................................................................................... 73
Fig. 29: Start button............................................................................................................ 73
Fig. 30: Stop button............................................................................................................ 74
Fig. 31: Training menu........................................................................................................ 75
Fig. 32: Top and lower control eld...................................................................................... 75
Fig. 33: training control eld................................................................................................ 77
Fig. 34: Customizable elds ................................................................................................. 79
Fig. 35: Adjusting the anti- spastic control............................................................................ 81
Fig. 36: ASC aktiviert.......................................................................................................... 81
Fig. 37: Menu Indication Guided Training.............................................................................. 88
Fig. 38: Button heart rate.................................................................................................... 89
Fig. 39: Display training program and phase......................................................................... 93
Fig. 40: Display training level............................................................................................... 93
Fig. 41: Anzeige Symetrietraining......................................................................................... 96
Fig. 42: Training analysis..................................................................................................... 98
Fig. 43: Training statistics.................................................................................................... 100
Fig. 44: Menü Einstellungen.................................................................................................102
Fig. 45: Display training settings blocked.............................................................................. 105
Page 12
10 von 147
General
Information Prepare Operate Help Technology
- Details on publisher - mov02_EN_Rev.2.1
1. Details on publisher
1.1 Your manufacturer
Fig. 1: QR-Code
PARAVAN medical GmbH
Main ofce / HQ / Production Plant
PARAVAN Str. 5-10, D-72539 Pfronstetten-Aichelau
• Phone: +49 (0)7388/9995-91
• Fax: +49 (0) 7388/9995-999
• e-Mail: [email protected]
• Internet: www.PARAVAN.de
Many mobile phones and PDAs contain an integrated camera
an software that allowsyou to interpret QR codes so that you
can read ourcontact information directly into the address book
of your mobile phone or PDA
Page 13
11 von 147
General
InformationPrepareOperateHelpTechnology
- Details on publisher -mov02_EN_Rev.2.1
1.1.1 Copyright
© 2014 PARAVAN medical GmbH, Germany
Any usage of this publication, whether in its entirety or in excerpts, as well as the reproduction of illustrations and images is prohibited without the written consent of PARAVAN medical GmbH.
Page 14
12 von 147
General
Information Prepare Operate Help Technology
- General Information - mov02_EN_Rev.2.1
2. General Information
2.1 Information about the operating manual
Thank you for choosing movanimo. Please read the operating manual carefully before you begin using this
device.
The employees at our house hope that you enjoy training on your new therapy device, and we wish you
good health.
2.2 ISymbols used in the operating manual
This user manual includes safety information which
help the user to identify potential hazards and to avoid them.
In the user manual potential hazards are highlighted by using
three signal words:
• Danger
• Warning
• Caution
In addition, the signal word Note has been introduced for helpful information.
Page 15
13 von 147
General
InformationPrepareOperateHelpTechnology
- General Information -mov02_EN_Rev.2.1
DANGER
Indicates an imminently hazardous situation which, if not avoided, may result in death or serious injury.
WARNING
Indicates a potentially hazardous situation which, if not avoided, could result in injury.
CAUTION
Indicates a potentially hazardous situation which, if not avoided, may result in minor or moderate injury.
This signal word may also be used to highlight unsafe practices or potential damage of the device or equipment.
NOTE
Indicates additional helpful information.
Page 16

14 von 147
General
Information Prepare Operate Help Technology
- General Information - mov02_EN_Rev.2.1
2.3 Illustrations in the operating manual
Potential hazards, mandatory actions, prohibitions, and user actions are illustrated using the same symbol
shapes throughout all instructions for use.
Fig. 2: Symbol for hazard alert
Hazard alert
An equilateral triangle is used to convey hazard alert messages, regardless of their hazard level. Hazard level is conveyed by use of the appropriate signal word as described in
chapter 2.2.
Fig. 3: Symbol for prohibition
Prohibition
A circular band with a 45° diagonal slash from upper left to
lower right is used to indicate prohibition.
User actions
A bullet at the beginning of a sentence indicates a
required user action.
Page 17

15 von 147
General
InformationPrepareOperateHelpTechnology
- General Information -mov02_EN_Rev.2.1
2.4 Illustrations in User manual
Please be aware that the appearance of the product and display screen may differ slightly from the illustrations used here.
The manufacturer reserves the right to make changes to the product, the technical data, the software or
the assembly- and operating manual without prior notice.
NOTE
The operating manual must remain accessible to the user at all times and stored for usage at a later point
in time.
2.5 Technical changes
Page 18

16 von 147
General
Information Prepare Operate Help Technology
- Proper usage - mov02_EN_Rev.2.1
3. Proper usage
The motorized therapy device movanimo is used to therapeutically exercise arms and legs. It has been
designed for patients with limited movement due to a neurological or neuromuscular disease.
movanimo can be used for the following forms of exercise therapy:
• Passive movement therapy: The motor moves arms or legs.
• Active movement therapy: The patient moves arms or legs with own muscle strength.
• Active movement therapy with motor support (softtraining): The patient actively moves
arms or legs with own muscle strength while the motor provides targeted support.
movanimo can be used as an arm- or leg trainer. It is not possible to use the arm- and leg trainer at the
same time.
Page 19

17 von 147
General
InformationPrepareOperateHelpTechnology
- Proper usage -mov02_EN_Rev.2.1
3.1 Fields of use
Use movanimo touch as:
• leg exerciser (movanimo touch)
• upper body exerciser (movanimo touch plus)
The use of the exerciser is especially recommended for:
The use of „movanimo touch“ is suitable for the following elds of use
• paralysis or neuromuscular diseases with reduced arm and leg mobility, e.g. after paraplegia, multi-
ple sclerosis, muscular dystrophy, parkinson´s disease, brains damages or neuromuscular diseases
with comparable damage pictures,
• cardiovascular diseases
• metabolic diseases
• rheumatic diseases
• vascular disorders
• physical inactivity
Page 20

18 von 147
General
Information Prepare Operate Help Technology
- Proper usage - mov02_EN_Rev.2.1
3.2 Side effects and contraindications
• The extent and duration of the therapy should be coordinated with your physician, therapist or phy-
sical therapist in order to avoid overextension or adverse side effects.
• Risks occur when the patient is strained beyond his or her personal limits and capacity.
• Undesired side effects, such as muscle-/joint pain, too severe muscle tone reduction and skin injuries
may occur in rare cases.
The motor-supported movement therapy is essentially a gentle therapy form. There are, however, conditions under which this therapy form should not be practiced. These contraindications include:
• Severe pain when performing movements
• Diseases or injuries that require immobilization, as e.g. a recent bone fracture
• Acute compression (pressure damage) of a nerve
• Infections with fever
• Brittel bones
• Unstable circulation
• In cases of cardiac insufciency or poor circulation, you should consult a doctor before training. In
this case you should only train with the exerciser under adult supervision.
3.2.1 Side effects
3.2.2 Contraindications
Page 21

19 von 147
General
InformationPrepareOperateHelpTechnology
- Proper usage -mov02_EN_Rev.2.1
3.3 Important instructions for the training
• Please discuss the applicability of the movanimo movement therapy as well as a suitable therapy
form, duration and all appropriate device settings with your specialist physician or physical therapist.
• The therapy device is designed for people with a body weight of up to 130 kg. When properly used,
the arm trainer is not burdened by more than 15 kg on each side and the leg trainer by not more
than 25 kg on each side.
• The device can only be properly used with approved PARAVAN medical GmbH accessories.
NOTE
The movanimo movement trainer is exclusively suited for therapeutic purposes and the intended
use includes the treatment as a medical device.
The device is not suitable for the following medical purposes: diagnostics, monitoring and measure ment.
Page 22

20 von 147
General
Information Prepare Operate Help Technology
- Proper usage - mov02_EN_Rev.2.1
3.4 Minimum requirements for training
• The user must have been given instruction by authorized and skilled personnel for safe handling of
the device
• User can sit upright
• User is only allowed to train without supervision, if he is able to operate the device independently.
Page 23

21 von 147
General
InformationPrepareOperateHelpTechnology
- Proper usage -mov02_EN_Rev.2.1
Page 24

22 von 147
General
Information Prepare Operate Help Technology
- Disclaimer of liability - mov02_EN_Rev.2.1
4. Disclaimer of liability
PARAVAN medical GmbH is not responsible or liable in any way for losses, damages or costs resulting from
or associated with
• Faulty installation, repair or maintenance by persons who are not authorized by PARAVAN medical
GmbH
• Usage of accessories that have not been cleared by PARAVAN medical GmbH
• Improper or wrong usage
• Usage without consulting a specialist physician or therapist
• Non-compliance with the operating manual
• Gross negligence
Page 25

23 von 147
General
InformationPrepareOperateHelpTechnology
- Disclaimer of liability -mov02_EN_Rev.2.1
Page 26

24 von 147
General
Information Prepare Operate Help Technology
- Therapy with movanimo - mov02_EN_Rev.2.1
5. Therapy with movanimo
5.1 Therapy forms
The following therapy forms are possible with movanimo:
Passive movement with motor power
The limbs are moved by motor power only. The acceleration and stopping of the pedals is gentle and consistent. The full rotational speed is reached after a minimum of 10 seconds. The maximum rotational speed
in passive training is 60 rpm.
Active movement with own muscle strength
This movement type is performed with more or less active muscle movement. Two forms are available.
Soft training: Active movement with passive motor support
Your active movements are supported by passive motor power.
Active movement against motor resistance
Your muscles must work against resistance, and this promotes muscle growth. The resistance can
be adjusted to 20 settings, basically comparable to a gear shift on a bicycle. The higher the gear,
the harder the pedaling is. This function specically trains your muscles.
The device can be operated forwards or backwards. An automatic rotational change can also be congured
with the rotational direction automatic.
Page 27

25 von 147
General
InformationPrepareOperateHelpTechnology
- Therapy with movanimo -mov02_EN_Rev.2.1
5.2 Anti-spastic control and –relaxation
movanimo is equipped with anti-spastic control, which, in case of an identied spasm, stops the training
and restarts it after a short pause. It can be congured whether the pedals should continue to turn for-
wards or backwards or in the opposite direction when a spasm is recognized. By default movanimo runs in
the opposite direction when it identies a spasm. The spasm-relaxation program relaxes cramps and loosens the muscles. The sensitivity for the spastic control can be adjusted to six settings according to your
individual needs.
Page 28

26 von 147
General
Information Prepare Operate Help Technology
- Safety instructions - mov02_EN_Rev.2.1
6. Safety instructions
Please read the following safety instructions carefully. Inaccurate compliance or non-compliance with these
instructions may endanger the patient, the operator or auxiliary personnel.
Please read user manual carefully.
Always ensure that no children or animals are in the vicinity of the moving pedals (pinch point
hazard).
It is not allowed to use accessories that are approved by PARAVAN medical GmbH. You may only
use accessories and connect devices to the USB interface and jack outlet that have been approved
by PARAVAN medical GmbH
The device is equipped with an external power supply (AHM 150 PS24C2). The device may only be
put into operation with the supplied power supply and plug connection. Please ensure that power
supply and electrical cables are in proper condition.
Only the manufacturer or authorized personnel may open the device.
The power plug must be disconnected before opening the casing.
Additions, new installations, changes or repairs may only be performed by authorized personnel.
Page 29

27 von 147
General
InformationPrepareOperateHelpTechnology
- Safety instructions -mov02_EN_Rev.2.1
In case of damages, unusual sounds or burnt smells, immediately pull the power plug on the device
and contact an authorized service technician.
The device must be used according to the instruction manual. Especially the permissible operating
conditions must be observed (see Chapter 18.4).
Do not place any liquids on or in the vicinity of the device.
Children may only train on the movanimo device under constant supervision.
Always wear appropriate shoes without shoelaces when using the leg trainer. Danger of injuries by
pinched shoelaces
The device may only be operated when both foot cuffs are attached.
Do not leave the device in direct sunlight, in front of radiators or other heat sources as this will heat
up the surface of the casing, which can be dangerous.
Page 30

28 von 147
General
Information Prepare Operate Help Technology
- Safety instructions - mov02_EN_Rev.2.1
Place the device on a at surface, ensuring that all ve pedestal feet are securely positioned
on the ground. If the device is set up on a carpet, make sure the carpet does not slip.
Ensure that the ventilation outlet of the lower pipe remains open.
It is possible that maintenance products for carpets, hardwood ooring or tiles contain substances
that may attack and soften the plastic caps of the therapy device’s pedestal feet. This can lead to
residue on the oor. The manufacturer PARAVAN medical GmbH is not liable for such damages.
Do not use solvent-containing, caustic or harsh cleaners.
Prevent uid entry into the device or touch panel.
Ensure that user can not reach into moving parts, such as foot shells, arm cranks or protection disc.
Ensure that footshells and arm cranks can rotate freely.
Ensure that locking bolt for height adjustment is securely engaged and tightened.
Ensure that wing bolt for adjusting the pedal radius is tightened securely.
Ensure that white locking bolt for adjusting pedal width is securely engaged and tightened.
Page 31
29 von 147
General
InformationPrepareOperateHelpTechnology
- Safety instructions -mov02_EN_Rev.2.1
Your seat, just as for a wheel chair, chair or the like, must be positioned so it does not tilt or slip on
the oor. A tilt protection for wheelchairs can be ordered as an accessory.
The therapy device is designed to be used while sitting; do not step into the foot cuffs with your
entire bodyweight, and do not hang from the arm trainer
Before you begin your therapy with the leg trainer, make sure your legs and arms are fastened se curely.
When using the arm trainer, your feet may not be fastened to the foot cuffs.
Make sure your seat is positioned properly in relation to the device. Avoid overstretching your joints
(see chapter 9.1).
Please do not smoke during the training
Page 32
30 von 147
General
Information Prepare Operate Help Technology
- Safety instructions - mov02_EN_Rev.2.1
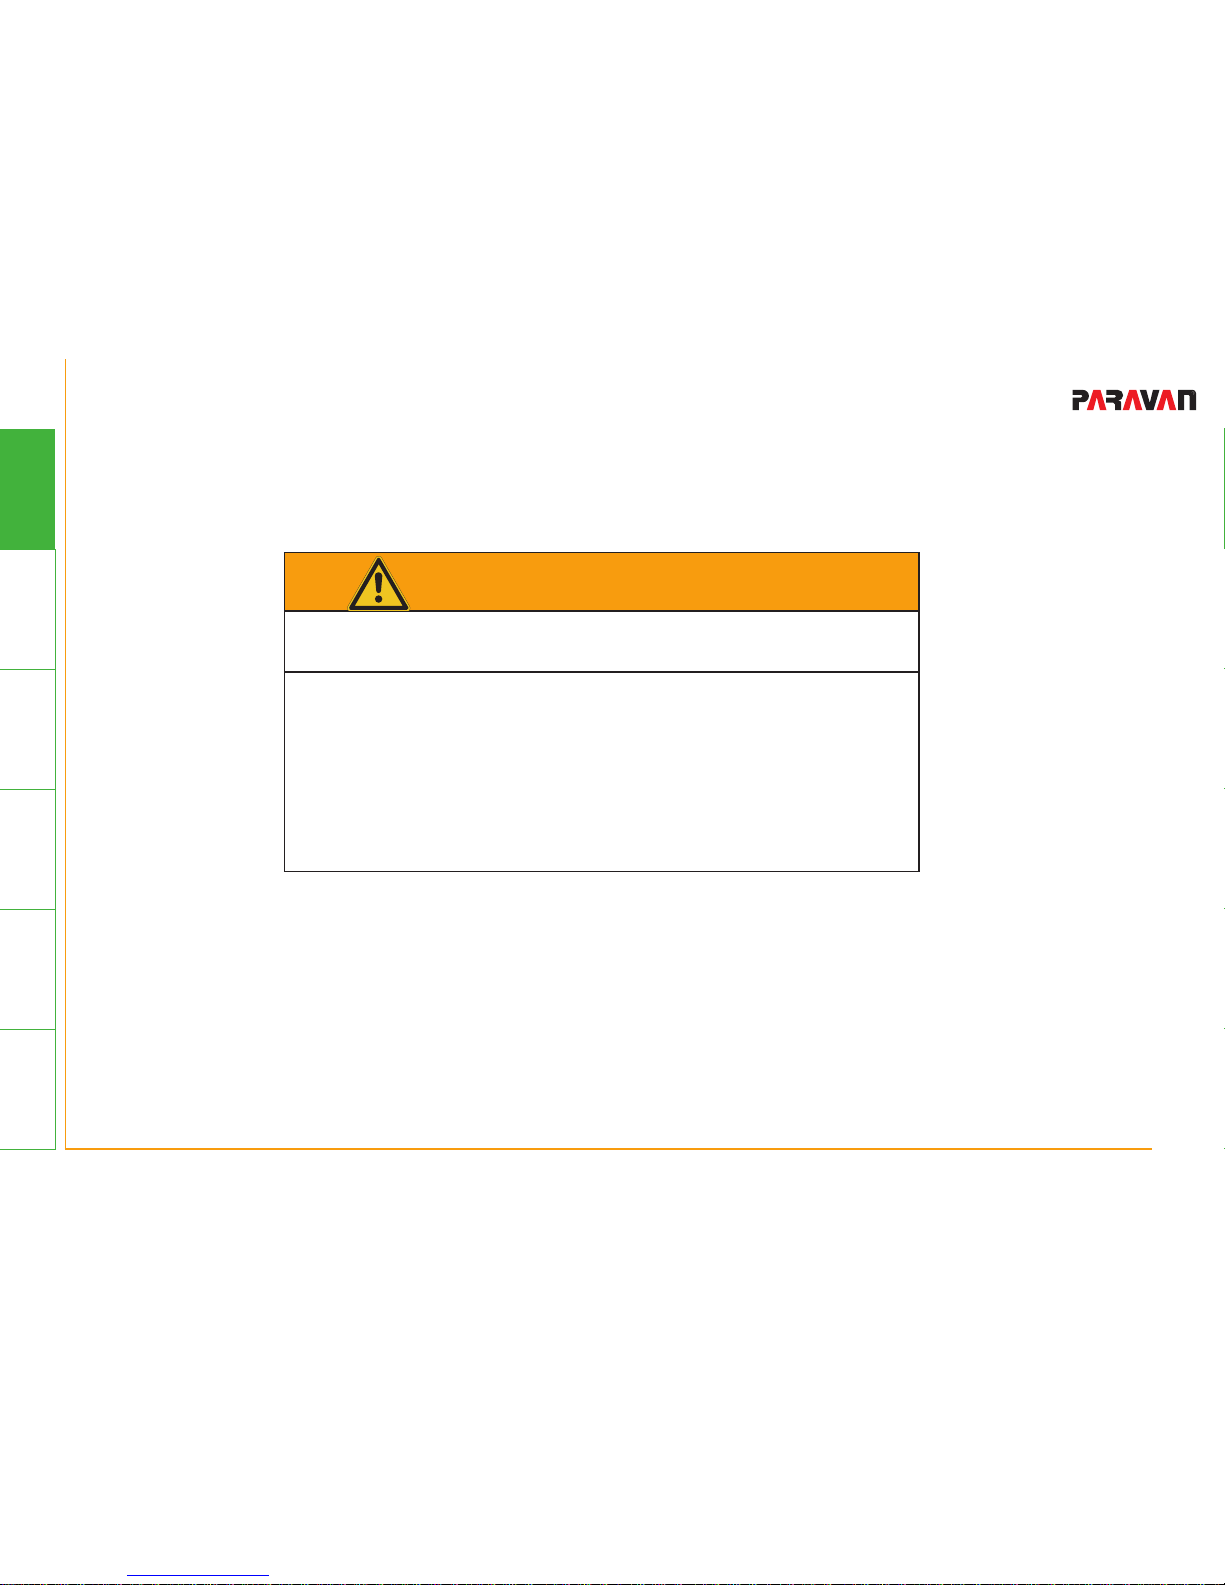
WARNING
Danger of injuries due to lack of independance
• Please verify with your dealer or physician if the pre-
sence of an attendant is required for a safe training.
• If the user cannot operate the device safely without
assistance make sure that the user exercises with a
trained attendant who is able to stop the device at any
time.
Page 33
31 von 147
General
InformationPrepareOperateHelpTechnology
- Safety instructions -mov02_EN_Rev.2.1
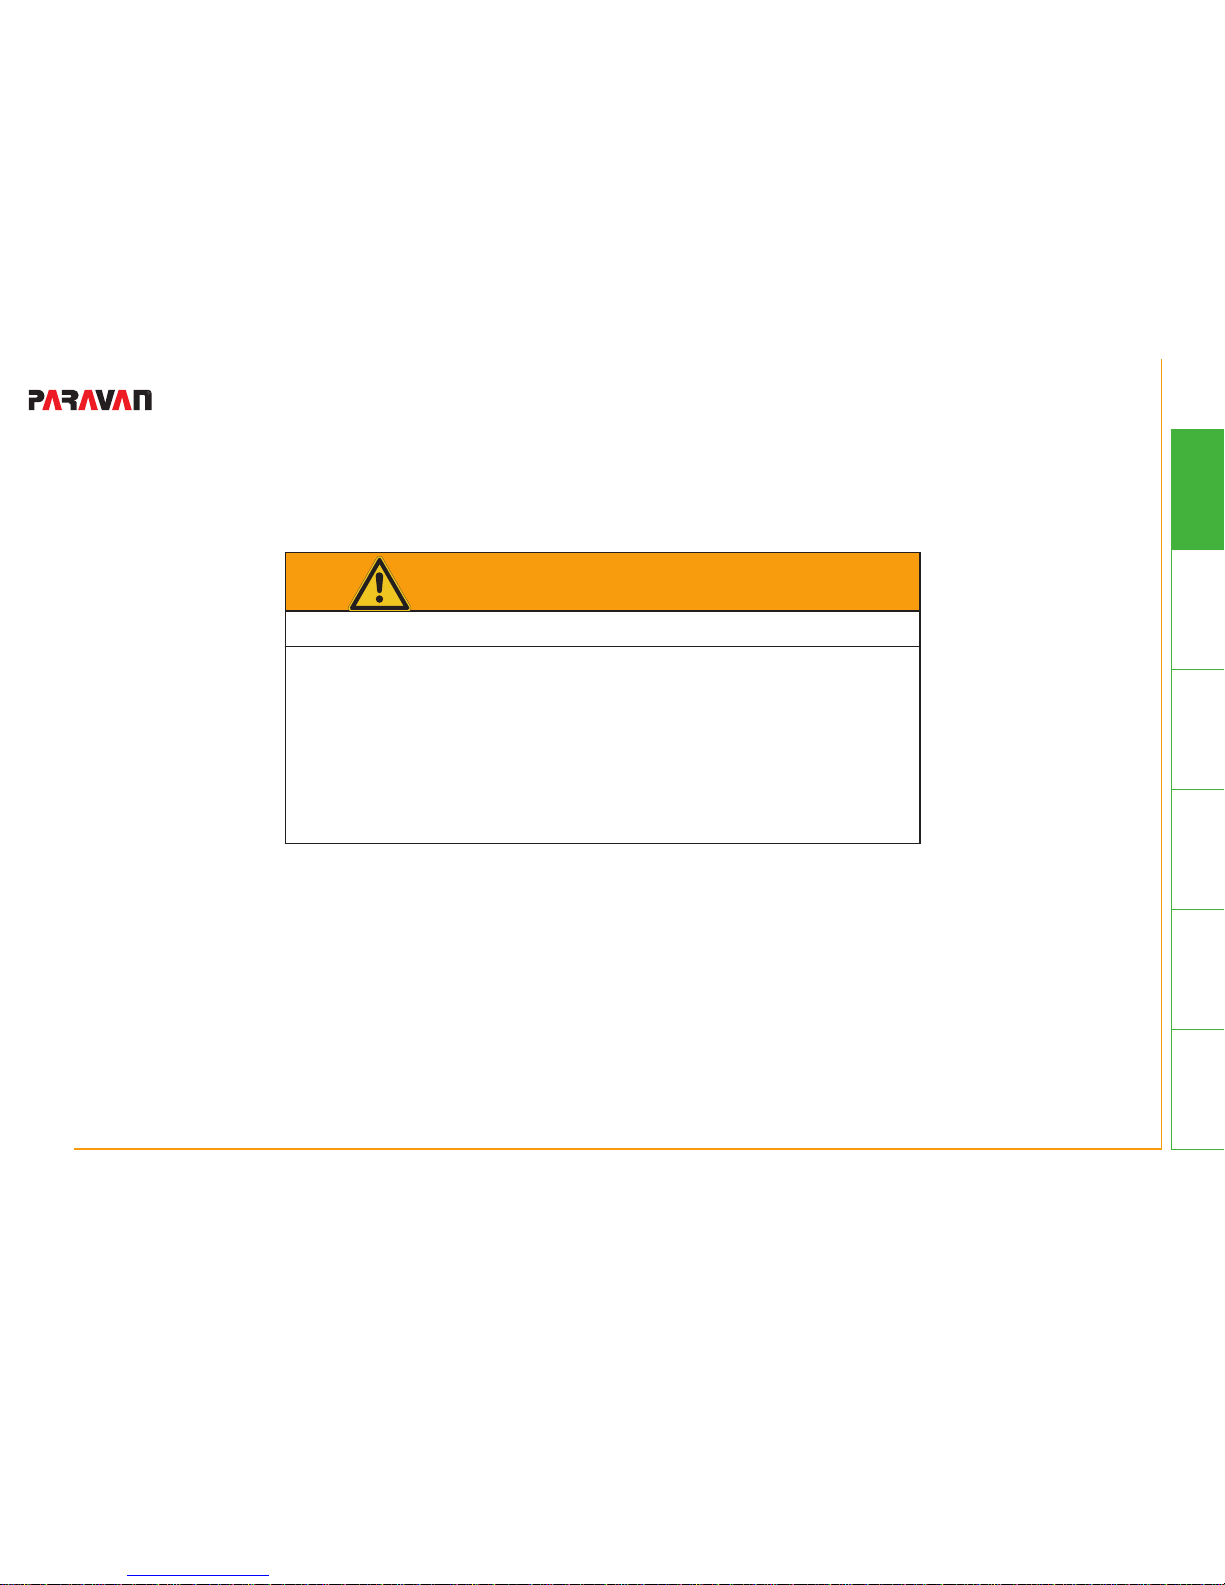
WARNING
Danger of injuries due to physical impairment
• Please immediately contact a physician if you are
experiencing pain or discomfort as a result of training
with movanimo.
Page 34
32 von 147
General
Information Prepare Operate Help Technology
- Safety instructions - mov02_EN_Rev.2.1
DANGER
Danger to life due to cardiac pacemaker
• If using a cardiadic pacemaker consult a doctor before
the rst training session and discuss the potential
complications.
• Be aware of potential electromagnetical emissions and
contact a trained dealer.
Page 35
33 von 147
General
InformationPrepareOperateHelpTechnology
- Safety instructions -mov02_EN_Rev.2.1
WARNING
Danger of injuries due to inappropriate preparation
• Always inspect the device before use to ensure that the
equipment, especially the plug, the power supply and
the cable, are not damaged.
• Disinfect movanimo before every training.
• Make sure that cranks can move freely.
Page 36
34 von 147
General
Information
Prepare Operate Help Technology
- Device overview - mov03_EN_Rev.2.1
7. Device overview
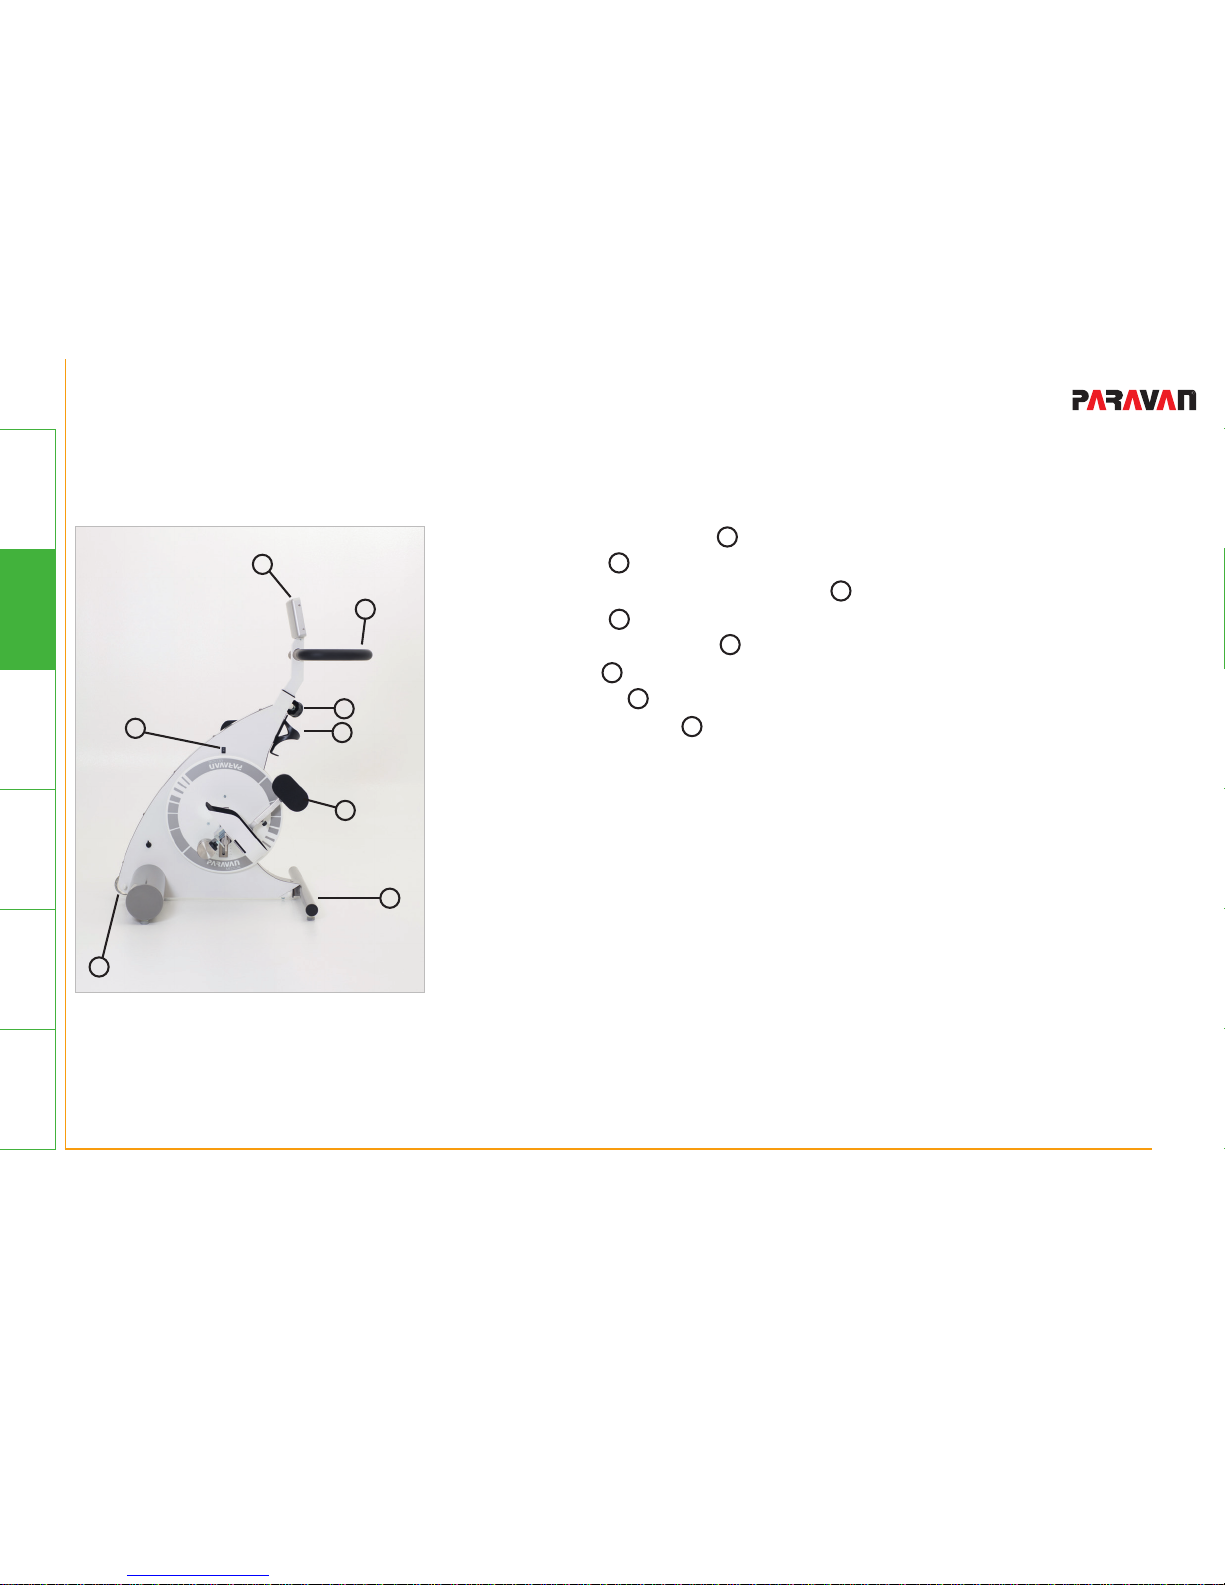
7.1 Device overview leg trainer (movanimo touch)
Fig. 4: movanimo touch
• Touchpanel (controls)
• Handle bar
• Locking screw height adjustment
• Cup holder
• Power switch (on/off)
• Footshells
• Pedestal foot
• Transportation roll
5
8
7
6
4
3
2
1
8
7
6
5
4
2
3
1
Page 37
35 von 147
General
Information
PrepareOperateHelpTechnology
- Device overview -mov03_EN_Rev.2.1
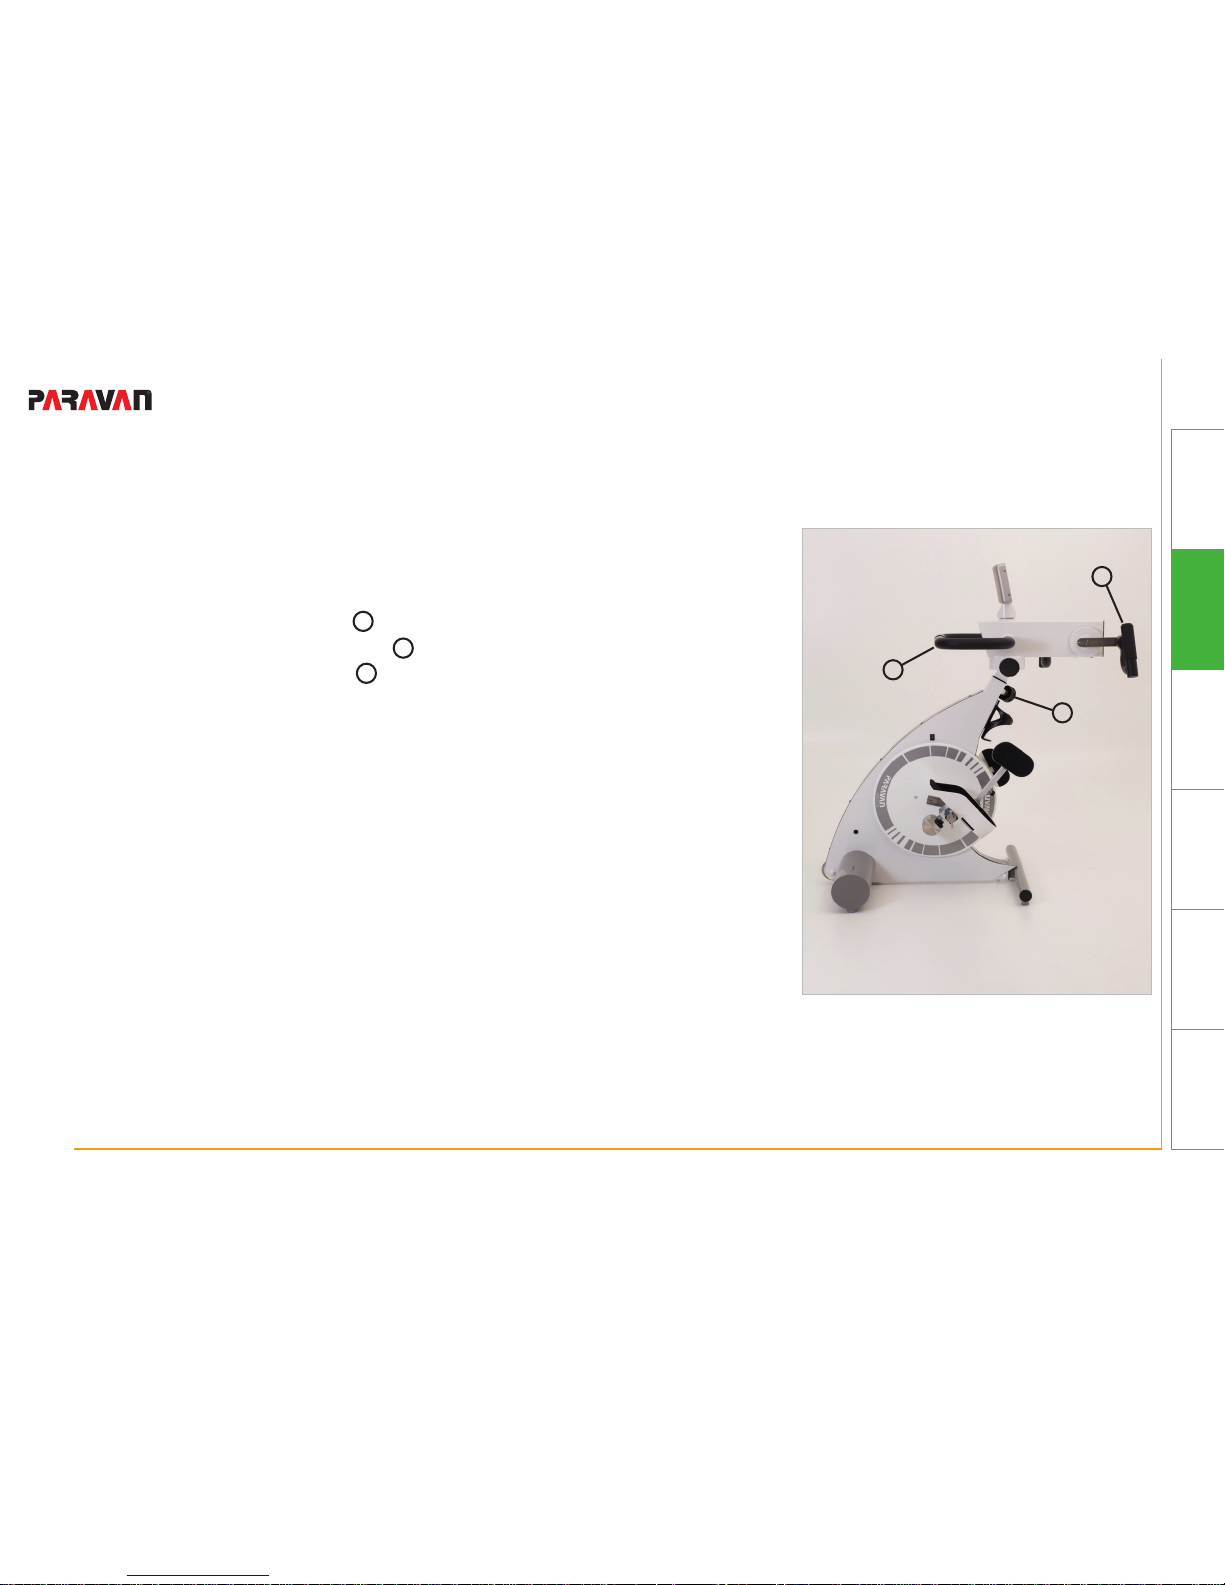
• Handle bar legtrainer
• Locking screw Swivel arm
• Handholds armtrainer
Fig. 5: movanimo touch plus
7.2 Device overview arm trainer (movanimo touch plus)
11
10
9
11
10
9
Page 38
36 von 147
General
Information
Prepare Operate Help Technology
- Device overview - mov03_EN_Rev.2.1
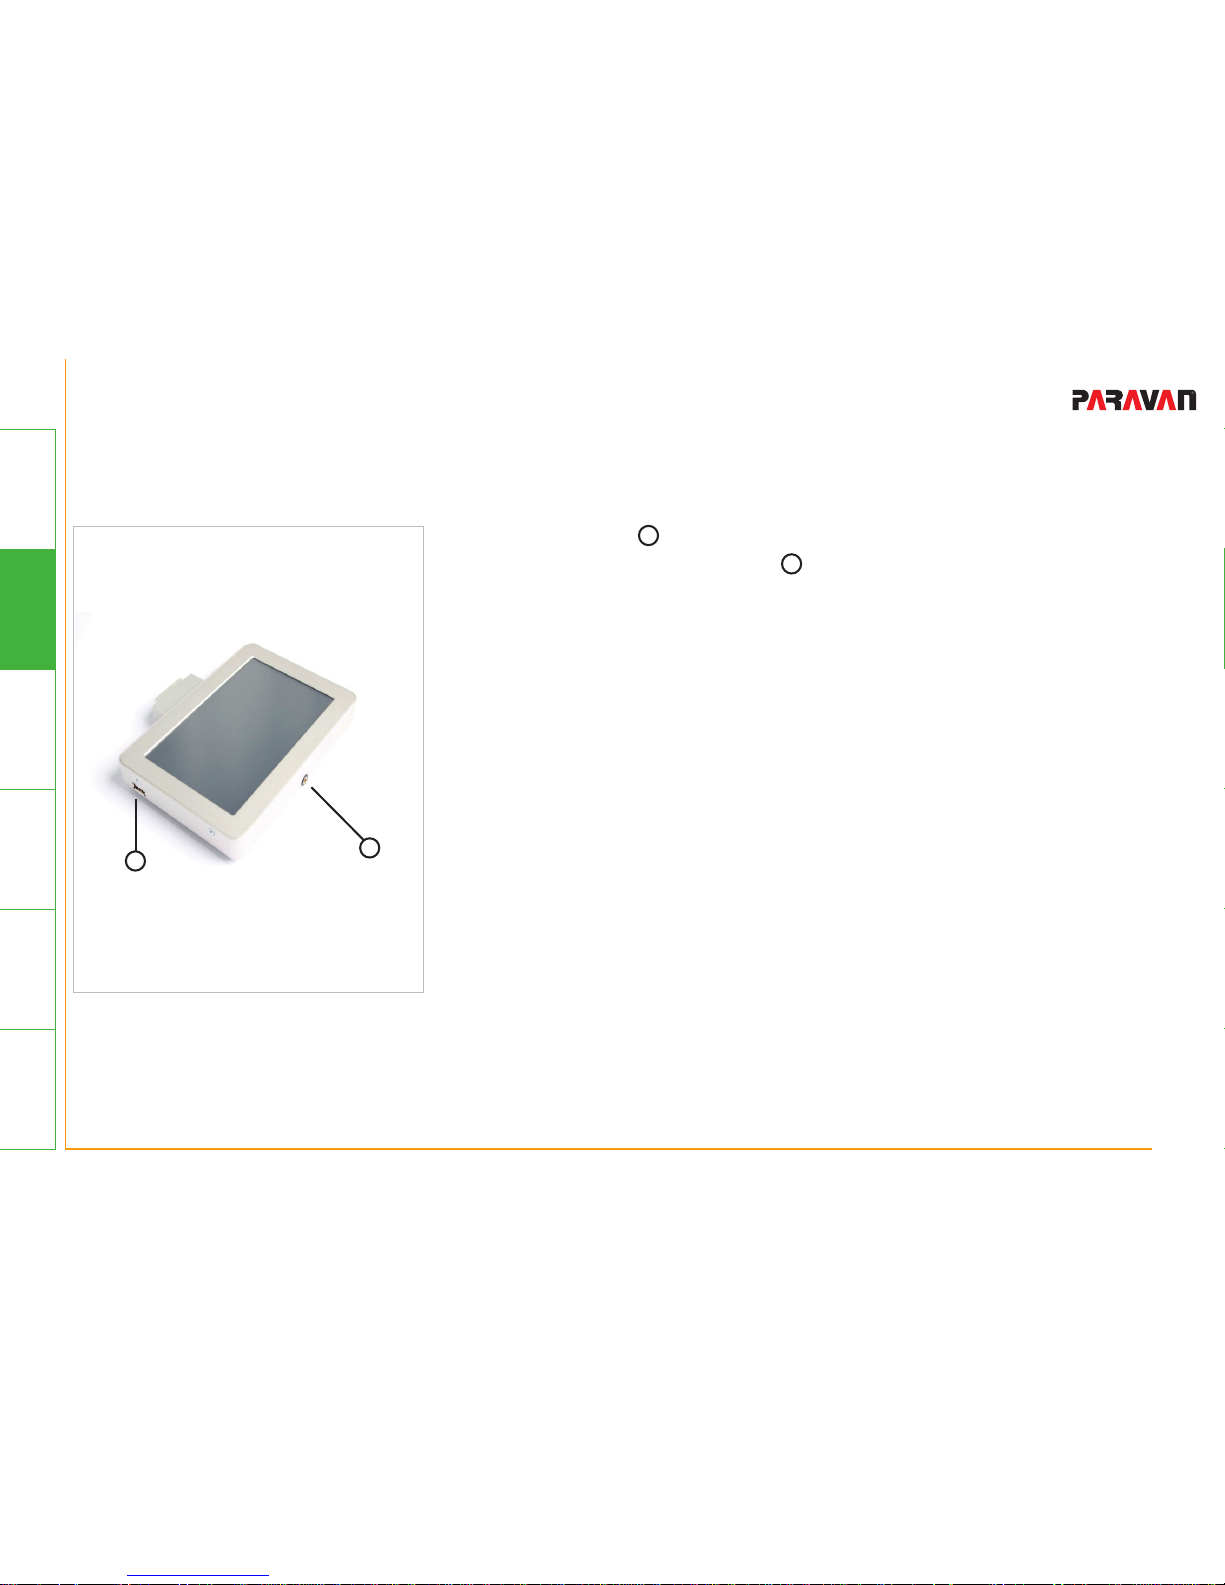
7.3 Detailed view touch panel
Fig. 6: Touch panel
• USB interface
• Jack outlet (POLAR receiver)
13
12
13
12
Page 39
37 von 147
General
Information
PrepareOperateHelpTechnology
- Device overview -mov03_EN_Rev.2.1
7.4 Accessories
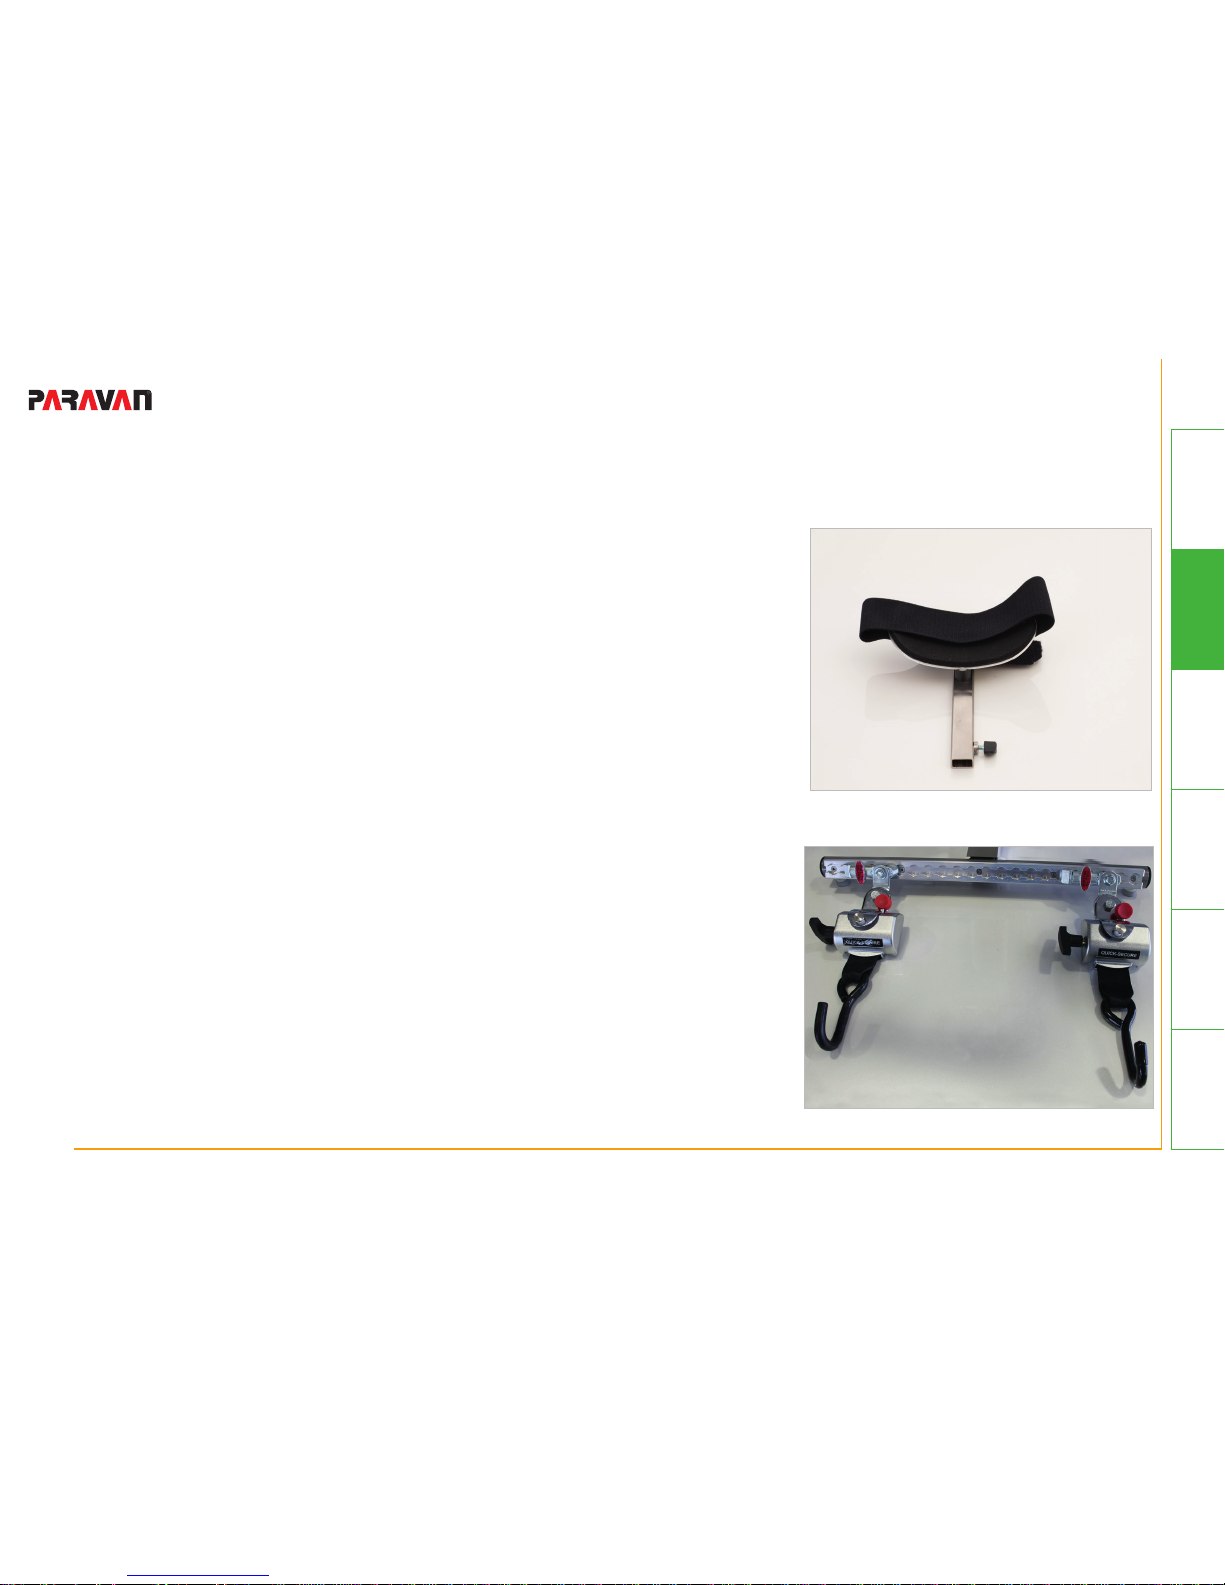
7.4.1 Lower leg restraint (article no. 7450)
The height-adjustable lower leg restraints ensure additional stabilization and guidance of the lower leg during training and prevent the
legs from bending sideways.
7.4.2 RTR tilt protection (article no. 7700)
The RTR tilt protection consists of two rubber wheels that latch on
to the pedestal foot of the movement trainer and hook onto the
wheelchair from where it can be controlled.
Fig. 7: Lower leg restraints
Fig. 8: RTR tilt protection
Page 40
38 von 147
General
Information
Prepare Operate Help Technology
- Device overview - mov03_EN_Rev.2.1
7.4.3 movanimo cardio set (article no. 8500)
The movanimo cardio set allows you to monitor and display your heart rate during training. The set consists of a training belt (sender) and a receiver, which is inserted into the jack outlet on the top side of the
touch panel. We use Polar technology for this accessory. The activation is described in Chapter 8.10.
Page 41
39 von 147
General
Information
PrepareOperateHelpTechnology
- Device overview -mov03_EN_Rev.2.1
7.5 Article number and -designation
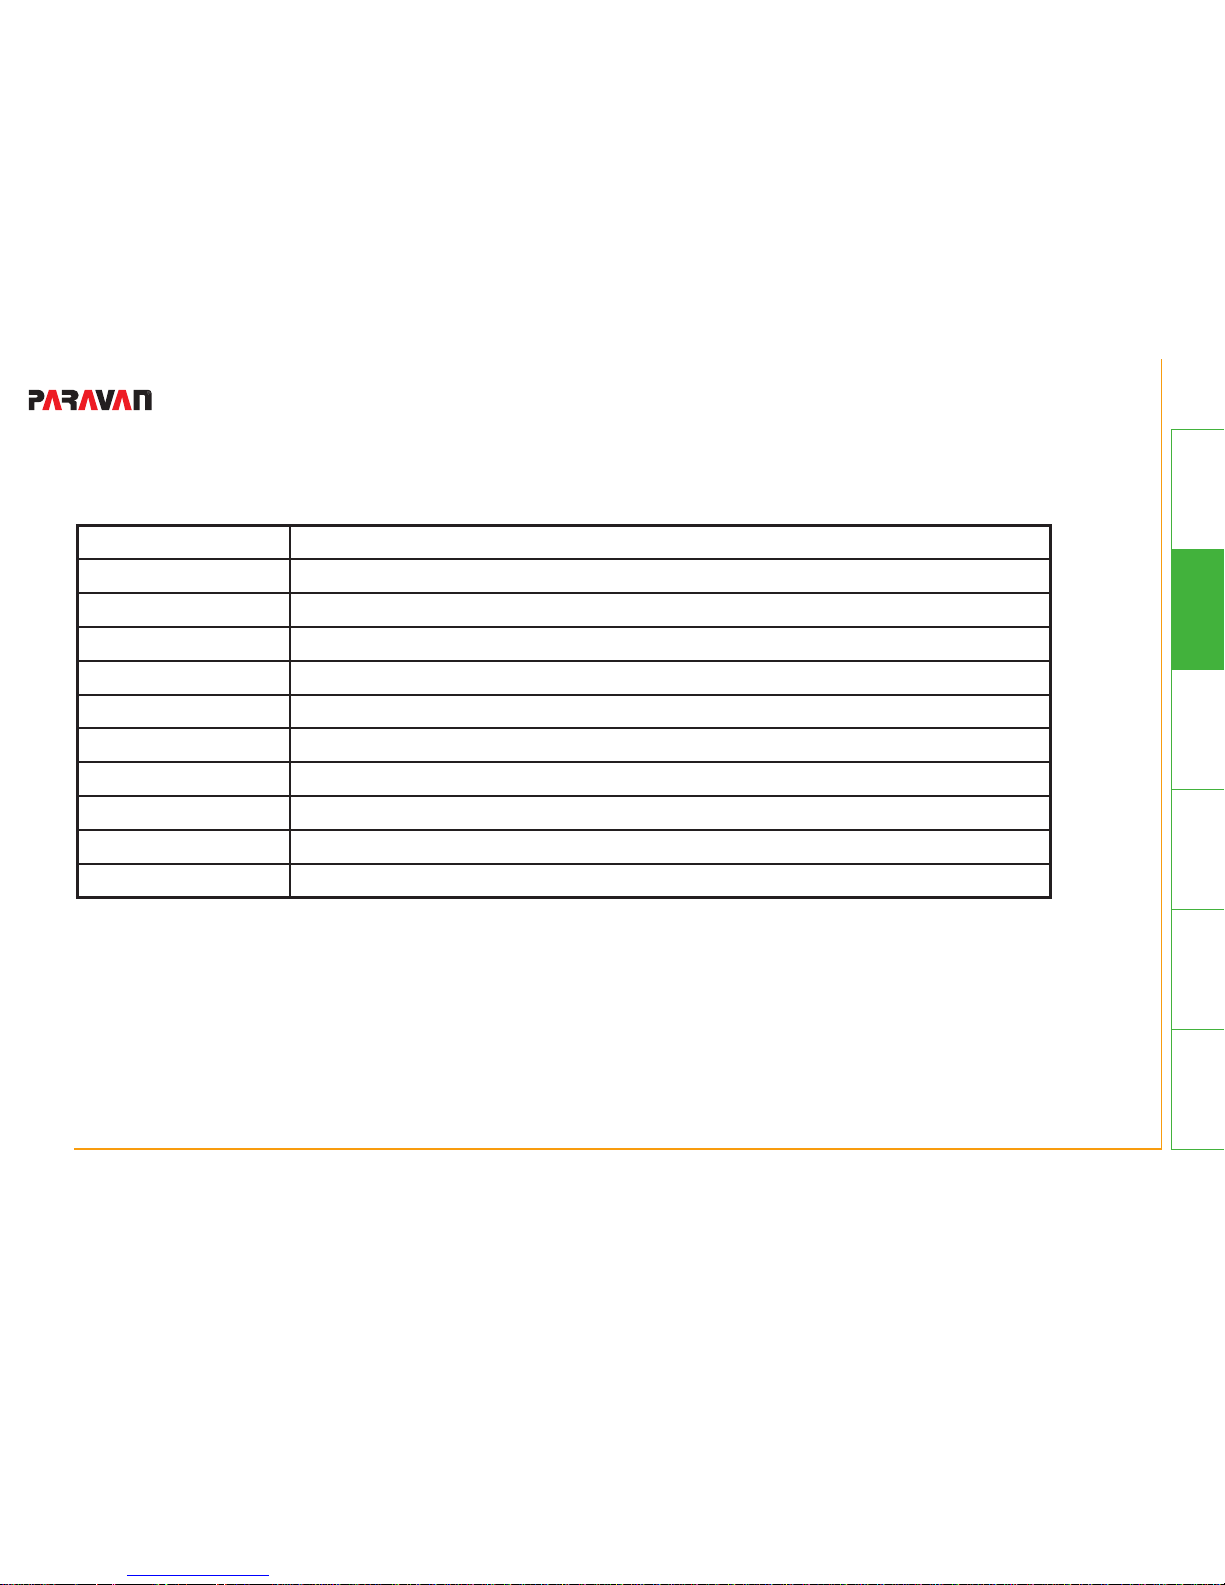
Article no. Designation
8000 movanimo touch
8200 movanimo touch plus
8450 Armtrainer upgrade kit
8500 movanimo cardio set for heart rate monitoring
8601 Handx Size 2 (men)
8602 Handx Size 1 (ladies)
8603 Handx Size 0 (children)
7450 Lower leg restraint
7700 Tilt protection “RTR”
7300 Functional electric stimulation (manufacturer BerkelBike)
Please only use accessory parts that have been approved by PARAVAN medical GmbH, otherwise PARAVAN
medical GmbH cannot unconditionally guarantee the application safety of the device. Warranty- and liability
claims also become invalid if unapproved parts are used.
Page 42
40 von 147
General
Information
Prepare Operate Help Technology
- Device overview - mov03_EN_Rev.2.1
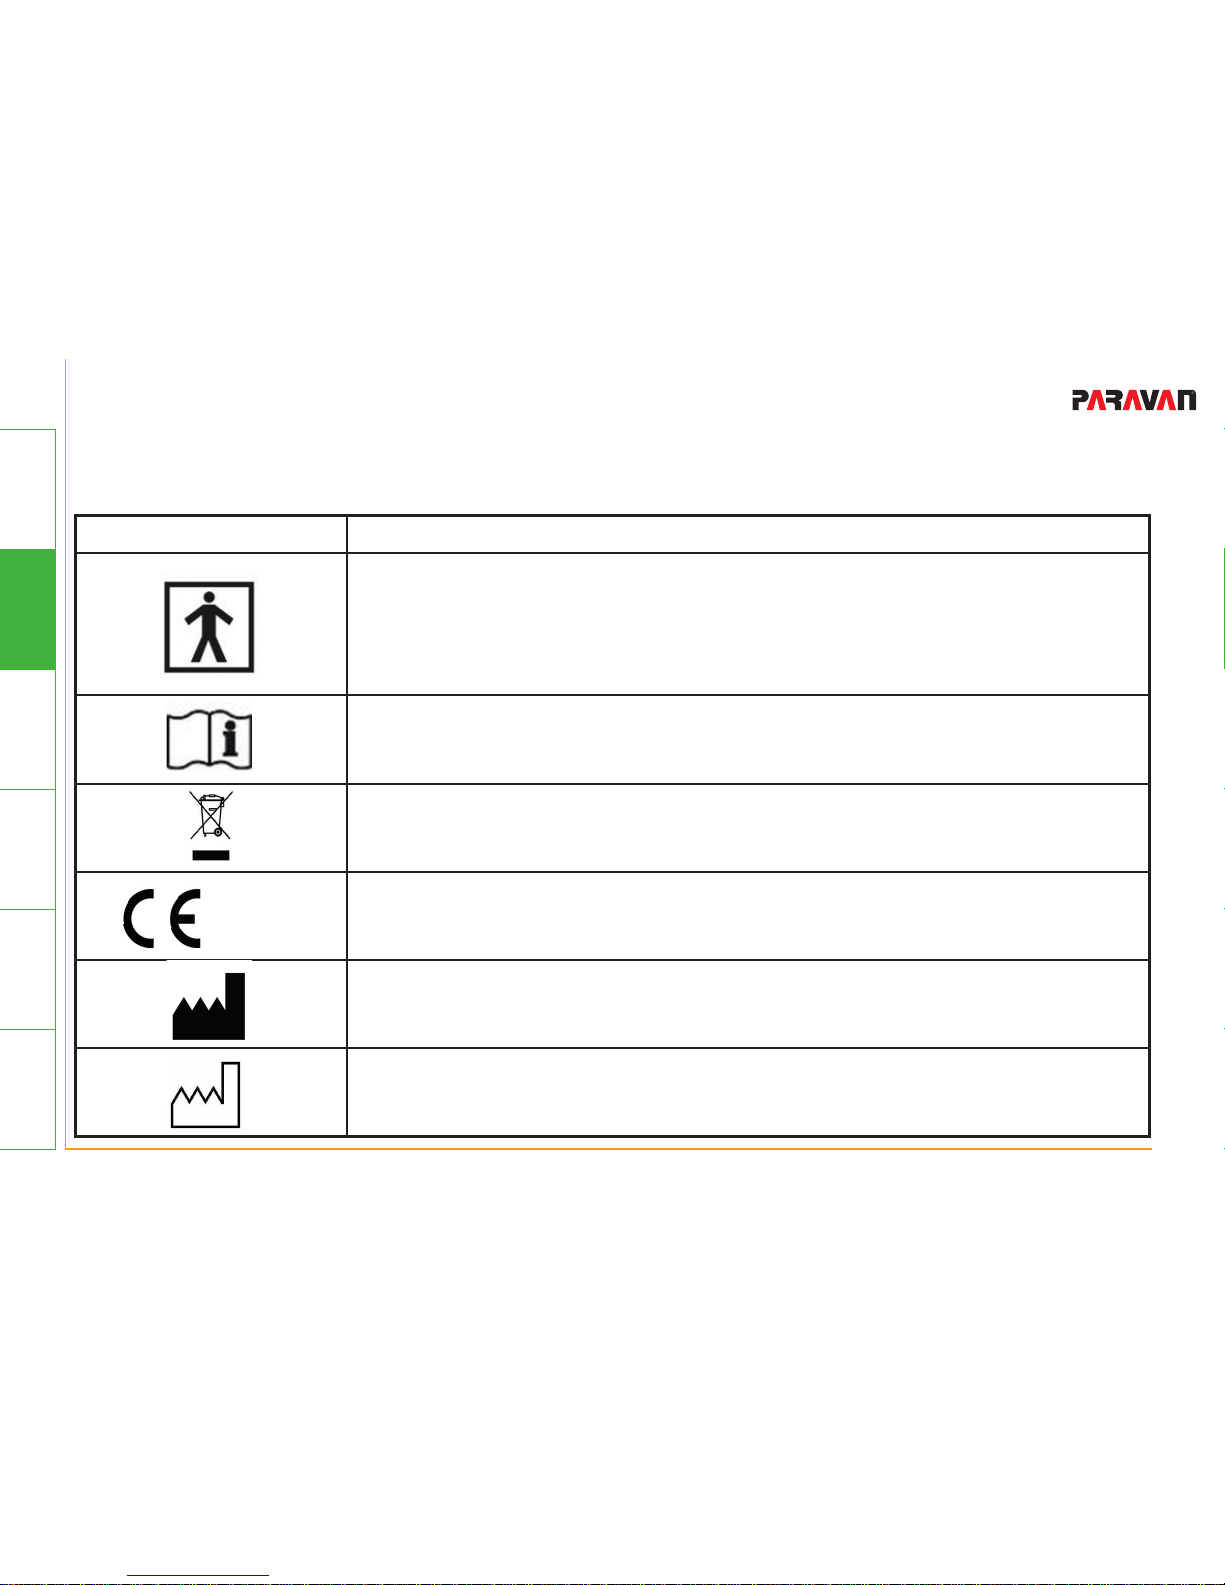
The following signs are applied to the device:
7.6 Symbols on the product
Symbol Meaning
Application part Type BF
All parts that come into contact with the patient during proper usage are considered to be application parts (e.g. footshells, handlebar, leg guidance, touch
panel).
Please follow the operating manual.
Ecologically responsible disposal as described in Chapter 17.2
0633
The device conforms to the guideline for medical products 93/42 EEC (notied
body: Berlin Cert GmbH).
Manufacturer
Manufacturer date (year in four digits)
Page 43
41 von 147
General
Information
PrepareOperateHelpTechnology
- Device overview -mov03_EN_Rev.2.1
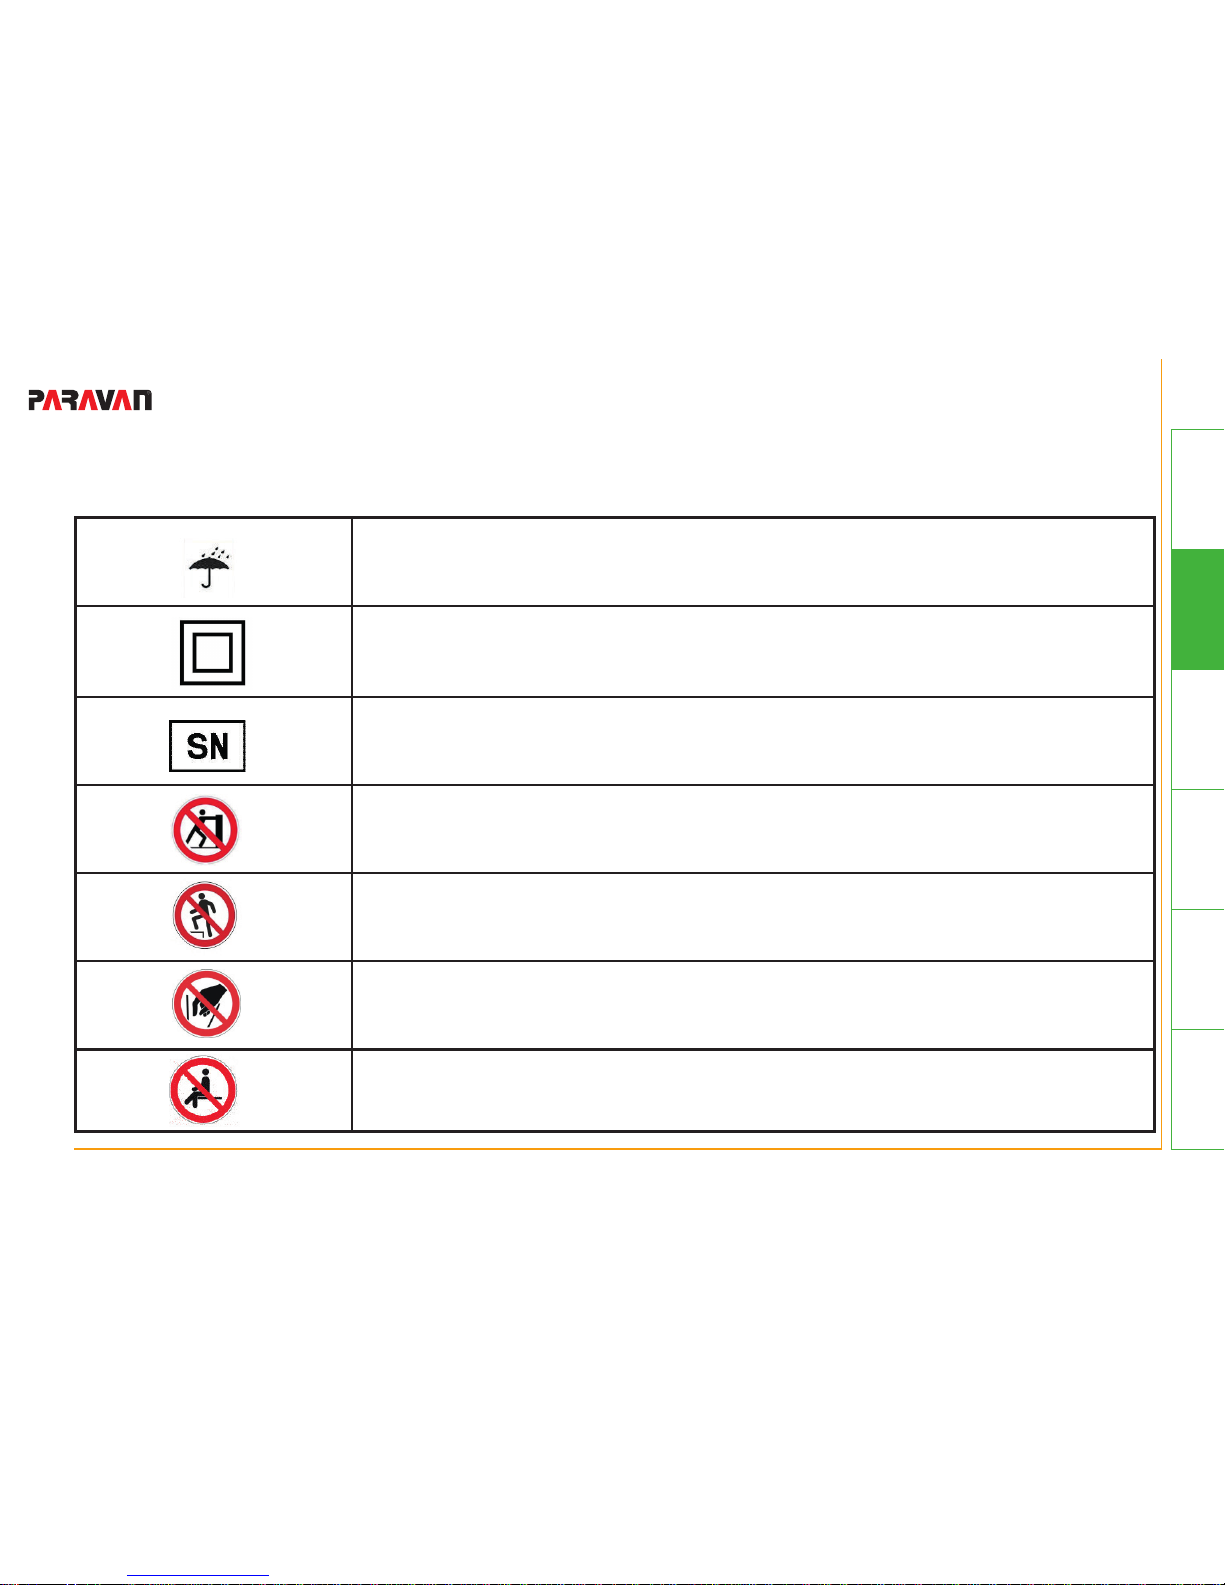
Protect device against wetness and rain
device of protection class II
Serial number of device
Do not lean against device „movanimo touch“. Do not lean against upper tor-
so exerciser. Do not lean against handle bars. Danger through slipping away
of device.
Do not stand on device, e.g. footshells, oor stand, cover or tubes.
Risk through moving parts. Don´t touch protection disc during running operation. Don´t reach into arm cranks during running operation. Don´t reach into
footshells during running operation.
Don´t sit on handlebar or exerciser. Don´t lean at exerciser.
Page 44
42 von 147
General
Information
Prepare
Operate Help Technology
- Activation, operation and transport - mov04_EN_Rev.2.1
8. Activation, operation and transport
8.1 Inspection before activation
Please remove the packaging material and transport safety devices before activation.
Check the contents for completeness and damages that may have occurred during transport.
Please notify your delivery service immediately in case of incomplete contents or existing damages.
Page 45

43 von 147
General
Information
Prepare
OperateHelpTechnology
- Activation, operation and transport -mov04_EN_Rev.2.1
8.2 Activation of leg trainer
Your device is equipped with an external power supply (AHM 150
PS24C2).
Please insert the plug of the power supply cable in the corres ponding socket on the back of the device.
Use the power cord to connect the power supply connection
to the power supply socket.
Controlthecablesforasecuret.
Turn the device on with the power switch.
The screen will turn on automatically and display the main
menu (see Chapter 10).
Fig. 9: External power supply
and socket
Fig. 10: Power switch
Page 46
44 von 147
General
Information
Prepare
Operate Help Technology
- Activation, operation and transport - mov04_EN_Rev.2.1
8.3 Standby mode
The display has a standby mode. In standby mode the screen is dark.
Standby mode is activated by pressing down on the display at any place for ca. 5 seconds.
To switch from standby mode to operational readiness, press the display again at any location for
ca. 5 seconds until the main menu appears.
Page 47
45 von 147
General
Information
Prepare
OperateHelpTechnology
- Activation, operation and transport -mov04_EN_Rev.2.1
8.4 Adjusting the pedal width
Before modifying the pedal width please switch off the device.
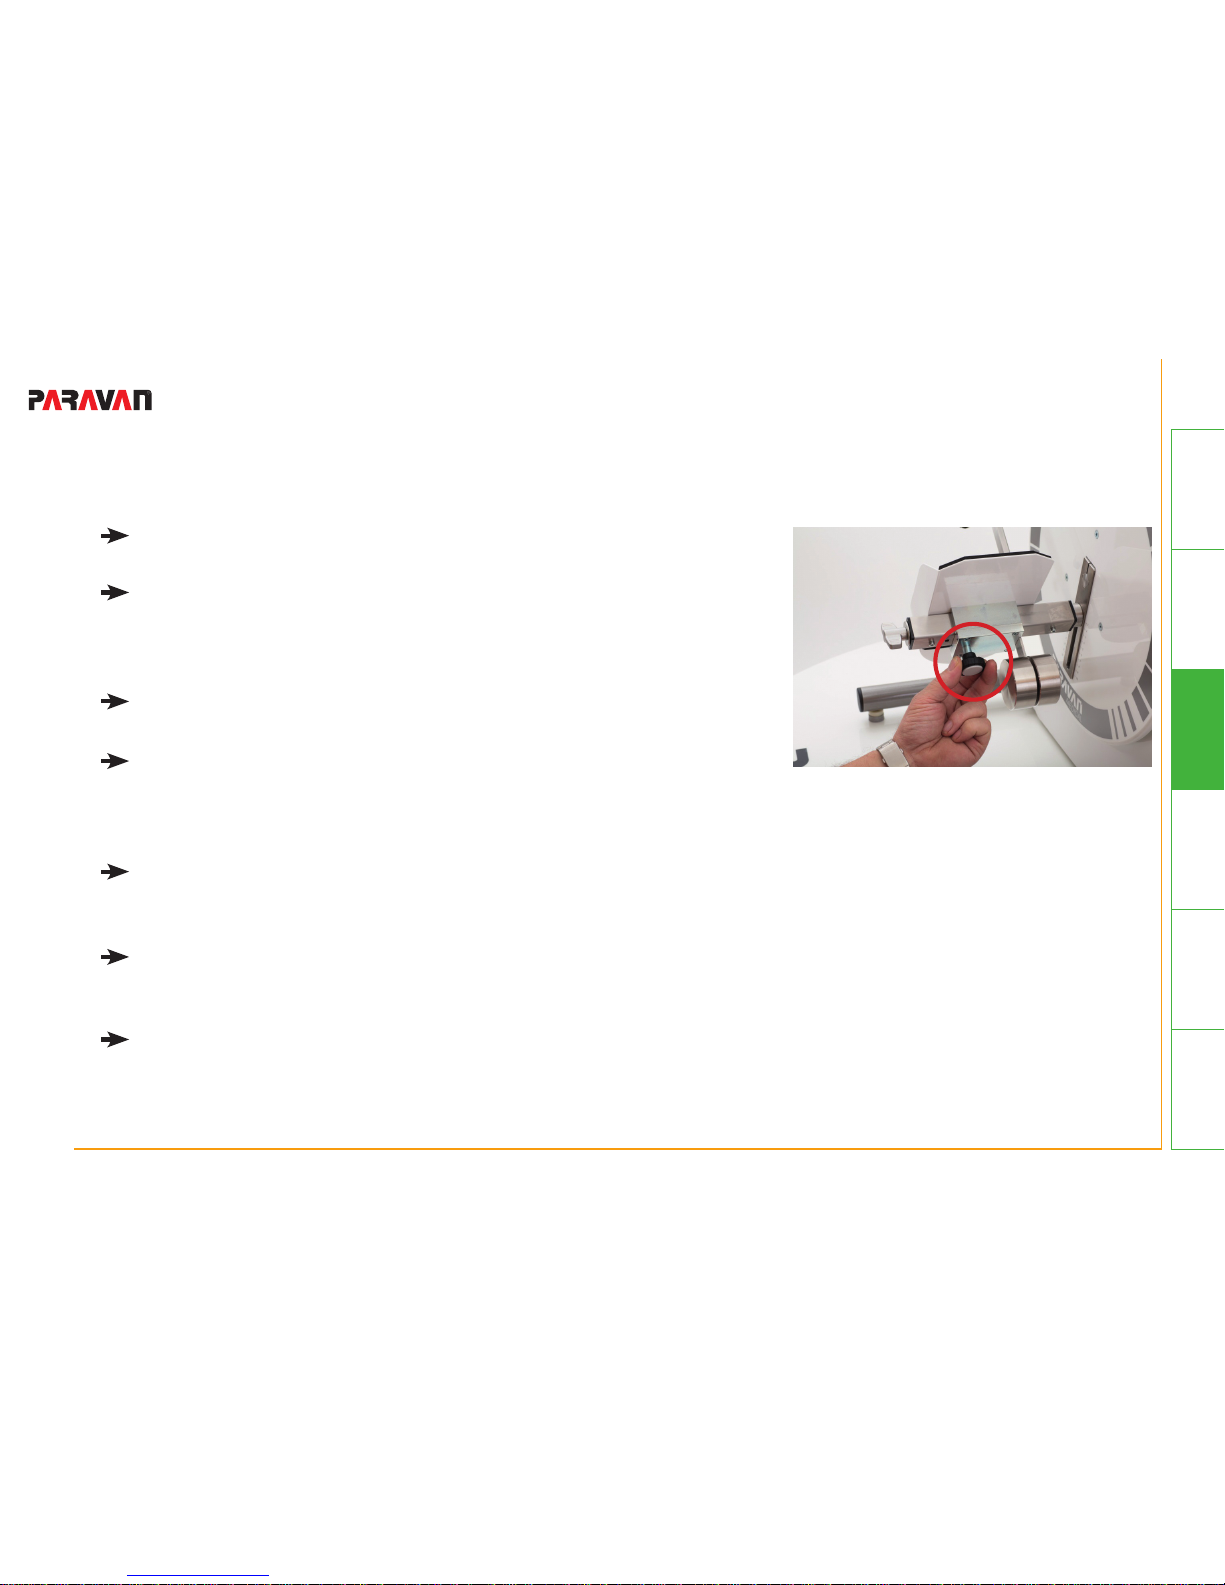
The device has two foot cuffs, which can be adjusted in the
horizontal width by opening the white locking bolt (quick-
adjust setting).
You can select 4 positions on each side of the pedal.
In ordert o adjust the pedal width unsrew the white stop bolt
lock under the foot cuff and pull out locking pin till you can
move the foot cuff.
Move foot cuff tot he desired position till locking pin snaps in
on pedal arm.
Make sure that the same pedal width is set on both sides;
otherwise the device may run unevenly
Please be sure to tighten the white locking bolt securely again
when the foot cuff is in the desired position.
Fig. 11: Foot cuffs with quickadjust setting (white stop bolt lock)
Page 48
46 von 147
General
Information
Prepare
Operate Help Technology
- Activation, operation and transport - mov04_EN_Rev.2.1
WARNING
Danger of injuries due to loose foot cuffs
• Ensure that white stop bolt lock is always tightened
securely.
Page 49
47 von 147
General
Information
Prepare
OperateHelpTechnology
- Activation, operation and transport -mov04_EN_Rev.2.1
8.5 Adjusting the pedal radius
Before modifying the pedal width please switch off the device.
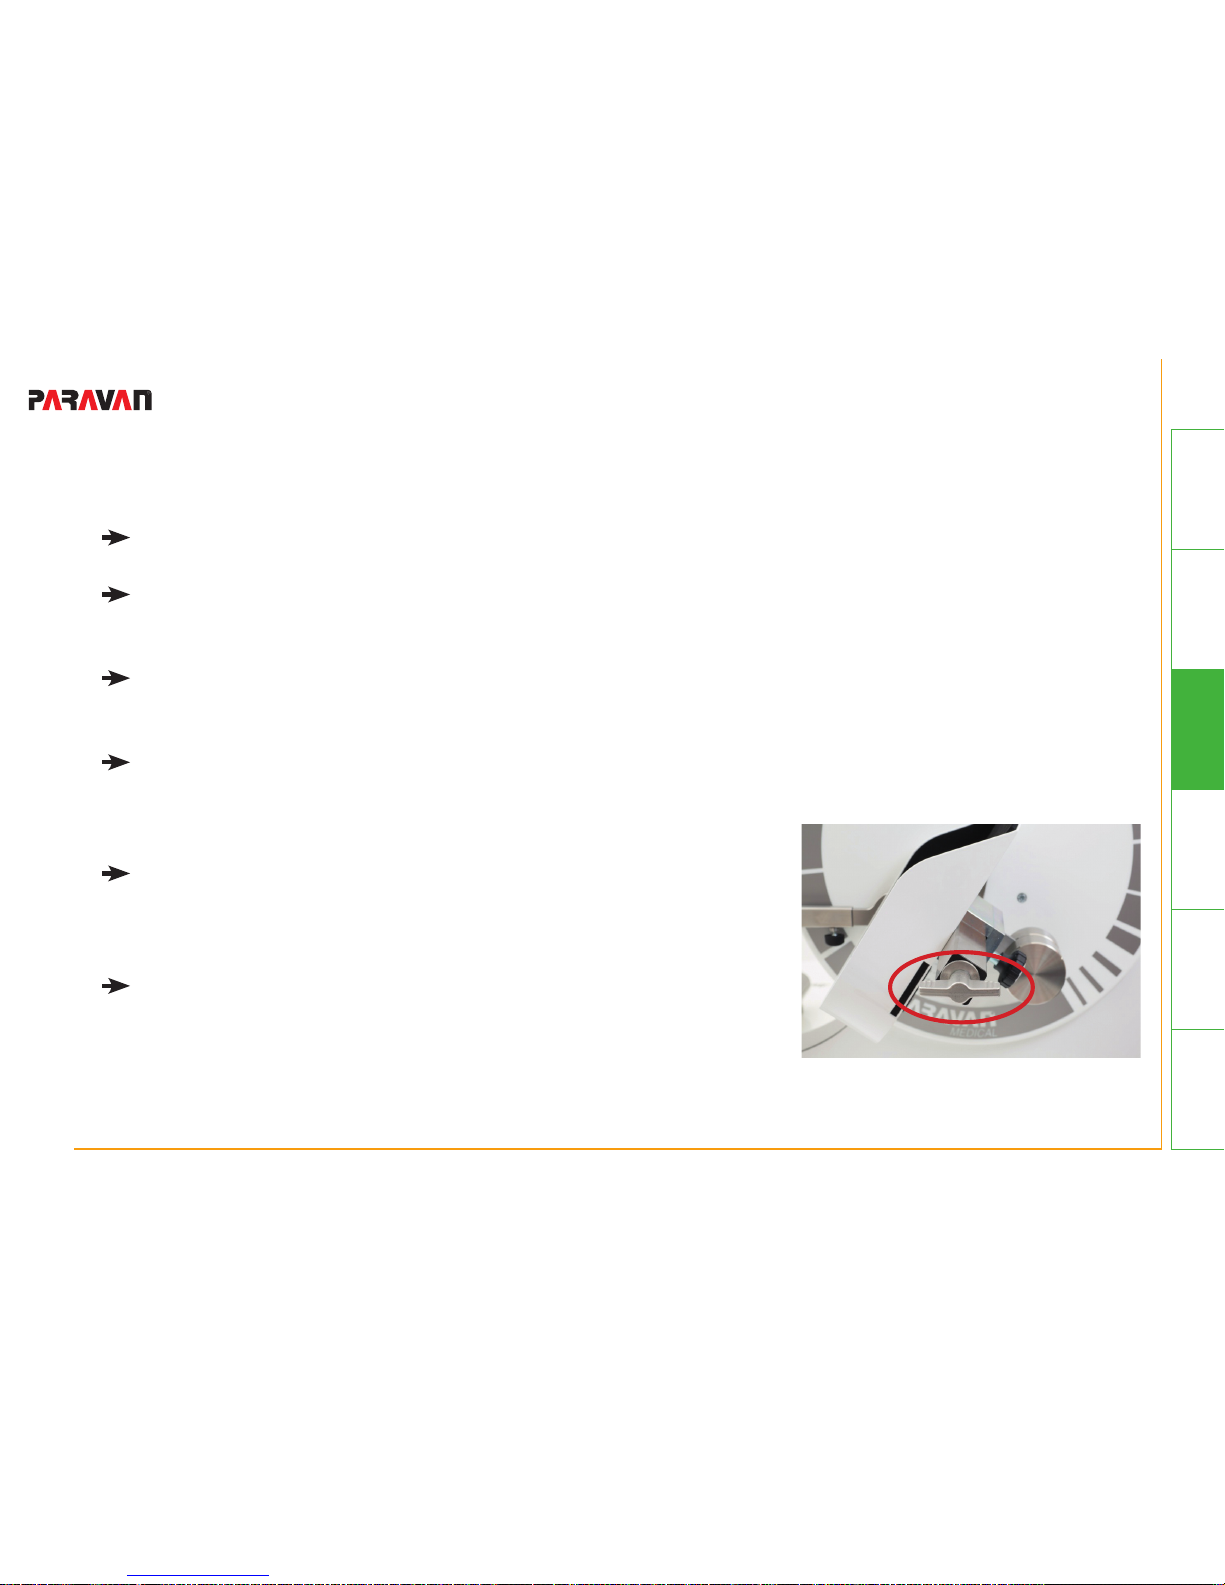
The pedal radius is adjusted by opening the quick-adjust lock
(wing screw) at the front of the pedal axis.
Unscrew wing screw and move foot shell with both hands to
the desired position. Then re-tighten wing screw securely.
The radius can be adjusted smoothly on a scale of 1 to 10 cm.
The larger the pedal radius, the more energy must be exerted
to complete a pedal rotation.
Your knee joints should always be slightly bent to avoid strai ning your joints. If necessary, correct the distance to the device
or the pedal radius.
When starting to train use a smaller pedal radius.
Fig. 12: Adjusting the pedal
radius (wing screw)
Page 50
48 von 147
General
Information
Prepare
Operate Help Technology
- Activation, operation and transport - mov04_EN_Rev.2.1
HINWEIS
Make sure that the pedal radius is the same on both sides, otherwise the pedals may rotate
unevenly.
WARNING
Danger of injuries due to loose pedal arm
• Ensure the pedal arm is fastened securely again after
the adjustment.
• Ensure that wing screw is tightened securely every time
before training.
Page 51
49 von 147
General
Information
Prepare
OperateHelpTechnology
- Activation, operation and transport -mov04_EN_Rev.2.1
8.6 Adjusting the handhold height
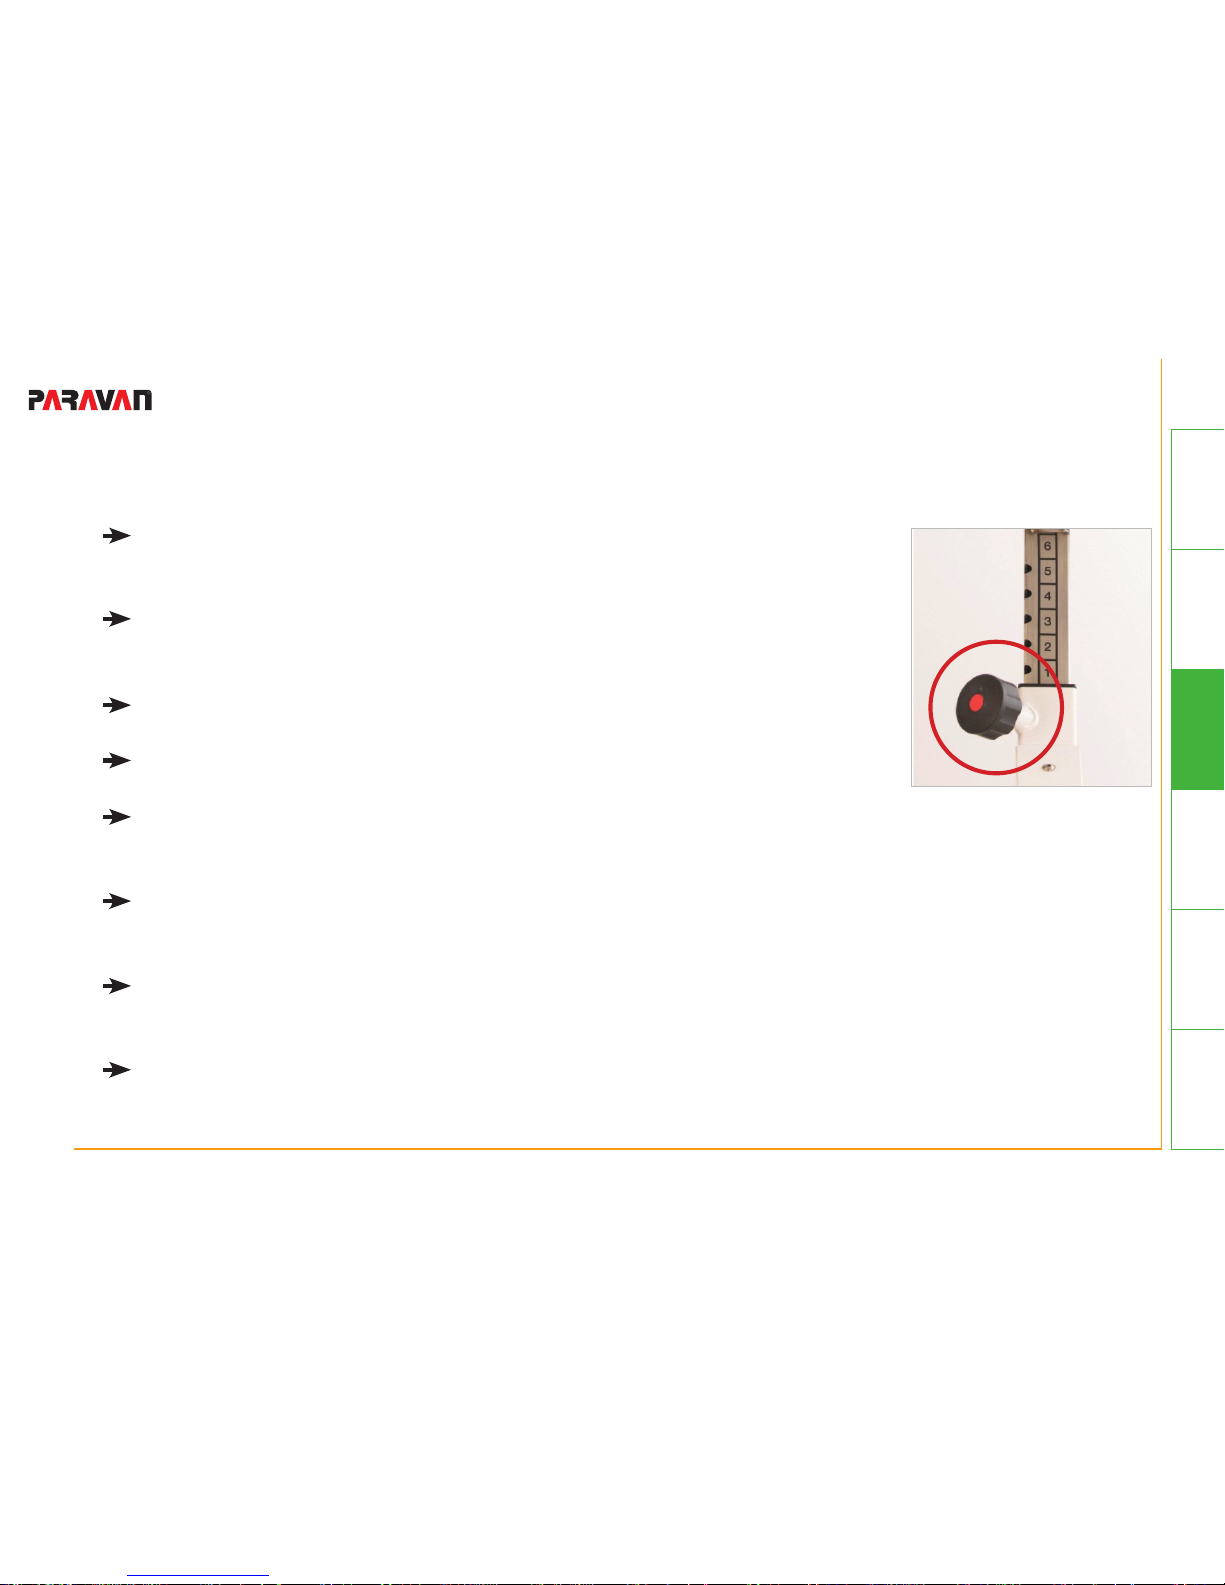
Disengage the quick-release lever to adjust the handhold or armtrai ner height. Unscrew lever till you can remove stop bolt lock.
Now you can lower or raise the handlebar or armtrainer. You can
adjust 6 height positions.
Please make sure that stop bolt lock snaps in securely.
The red safety pin indicates if locking bolt is snapped in.
Red safety pin must not protrude out of its guide if locking bolt is
snapped in.
When you are done, fasten the height adjustment again with the
lever securely.
Please always check the tightness of the lever before you start to
train.
When setting the handhold height, ensure that the handholds do not
collide with your legs during movement.
Fig. 13: Quick release
lever for height adjustment (stop bolt lock
with red safety pin)
Page 52
50 von 147
General
Information
Prepare
Operate Help Technology
- Activation, operation and transport - mov04_EN_Rev.2.1
WARNING
Risk of injuries due to height adjustment
• Please make sure that locking bolt always snapped in
entirely.
• The red safety pin indicates if locking bolt is snapped
in.
• Red safety pin must not protrude out of its guide if
locking bolt is snapped in.
• Before training always make sure that locking bolt is
fastened securely and the lever is securely screwed.
Page 53
51 von 147
General
Information
Prepare
OperateHelpTechnology
- Activation, operation and transport -mov04_EN_Rev.2.1
8.7 Lower leg restraint (accessory, article number 7450)
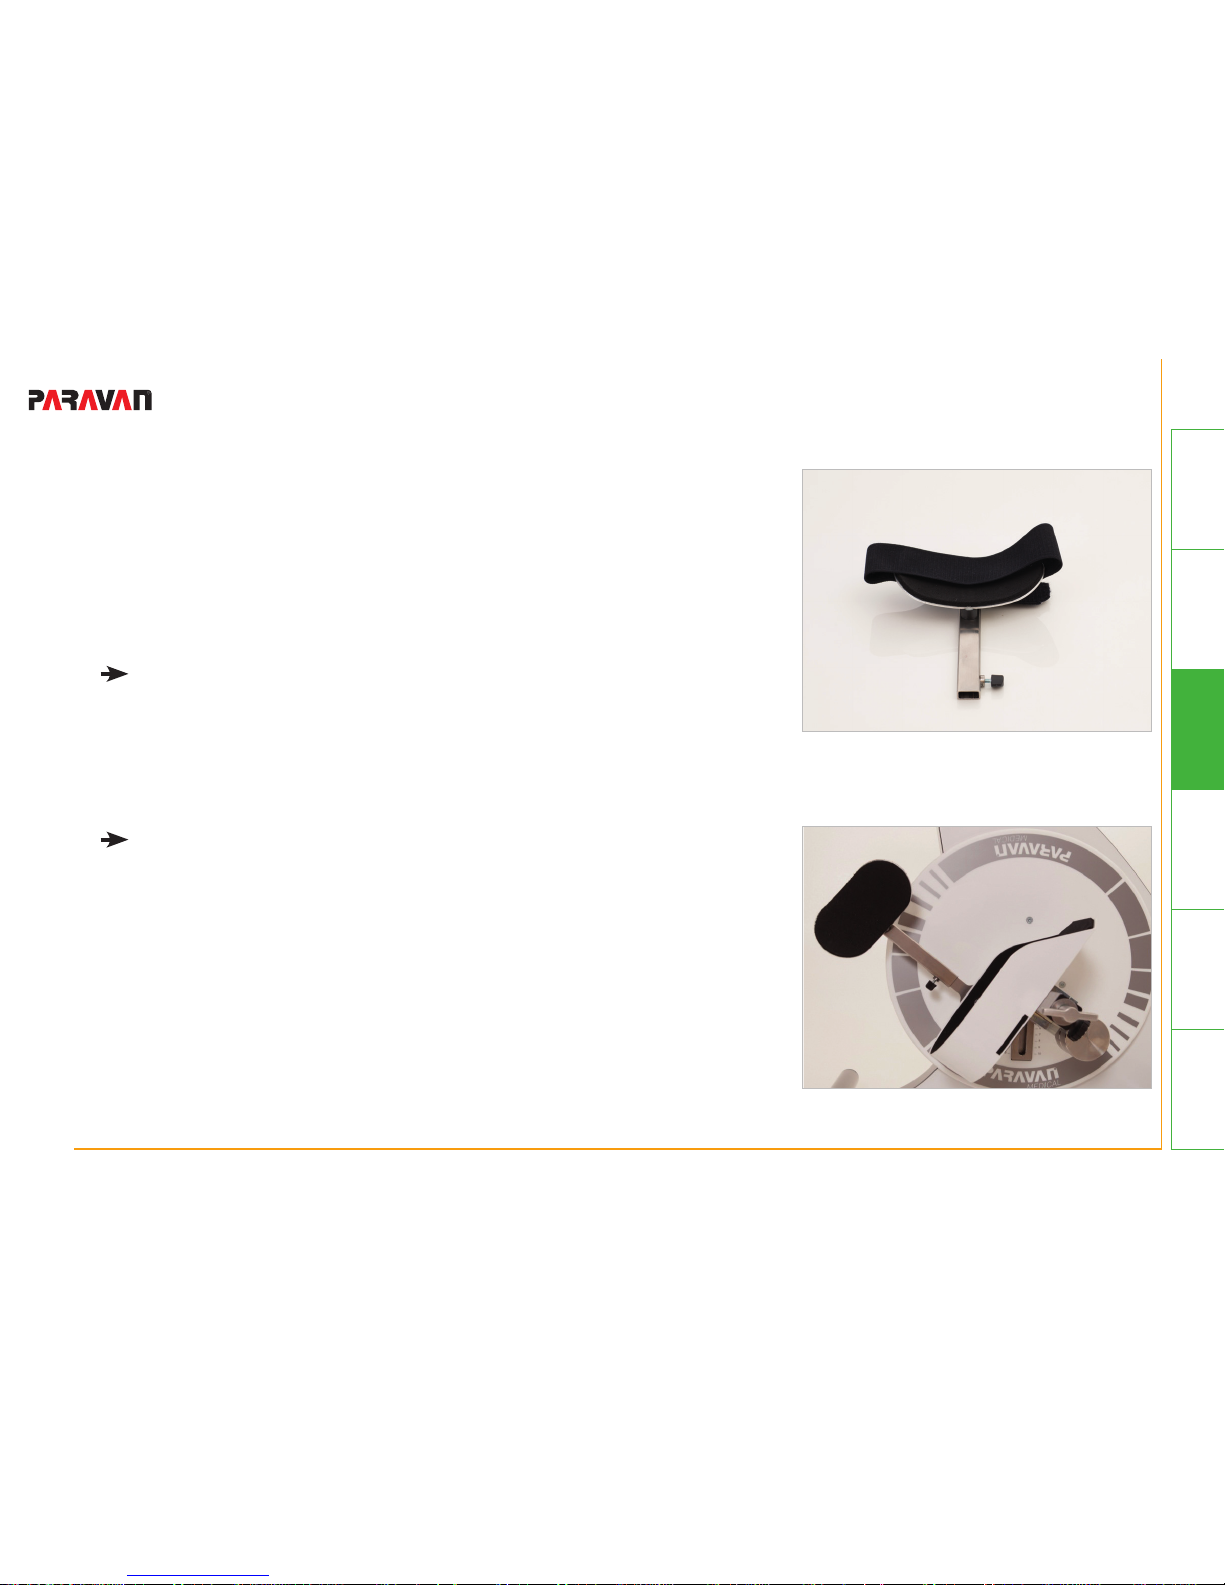
You can support your legs with the lower leg restraint (calf cuffs) in
order to securely guide your legs during movement. We recommend
inserting a lower leg restraint if your legs tend to press together or tilt
to the inside or outside.
After your feet have been placed in the pedals, insert the
metal fastening rod into the cradle. Ensure that it is attached
as high as possible, i.e. not more than a hand width below
your knee joint. For this purpose loosen the set screw and
adjust the calf cuff to the desired height.
Now place the Velcro tape around your leg and fasten it to
the calf cuff. Ensure that the Velcro tape is not too tight so as
not to impede blood circulation.
Fig. 14: Adjusting the lower leg
restraint
Fig. 15: Fixed lower leg restraint
Page 54
52 von 147
General
Information
Prepare
Operate Help Technology
- Activation, operation and transport - mov04_EN_Rev.2.1
WARNUNG
Risk of injuries due to lack of independance of user
• Patients who are incapable of removing the lower leg
restraint themselves are not permitted to train without
supervision.
Page 55
53 von 147
General
Information
Prepare
OperateHelpTechnology
- Activation, operation and transport -mov04_EN_Rev.2.1
8.8 Adjusting the pedestal foot
Movanimo is equipped with an extendible pedestal foot. When movanimo is used as an arm trainer (device
version movanimo touch plus), the center of gravity is higher than when it is used as a leg trainer. Therefore, the pedestal foot is extended from the device body to its maximum length to provide additional stability
when the arm trainer is used. Open both cylinder head screws at the pedestal foot with the supplied Allen
key and pull out the pedestal foot to its maximum length until you can again insert the screws in the designated screw holes.
Page 56
54 von 147
General
Information
Prepare
Operate Help Technology
- Activation, operation and transport - mov04_EN_Rev.2.1
8.9 Activation of the arm trainer movanimo touch plus
Before using the armtrainer please pull out the pedestal foot, as described in Chapter 8.8, to the maximum length in order to ensure the stability of the device.
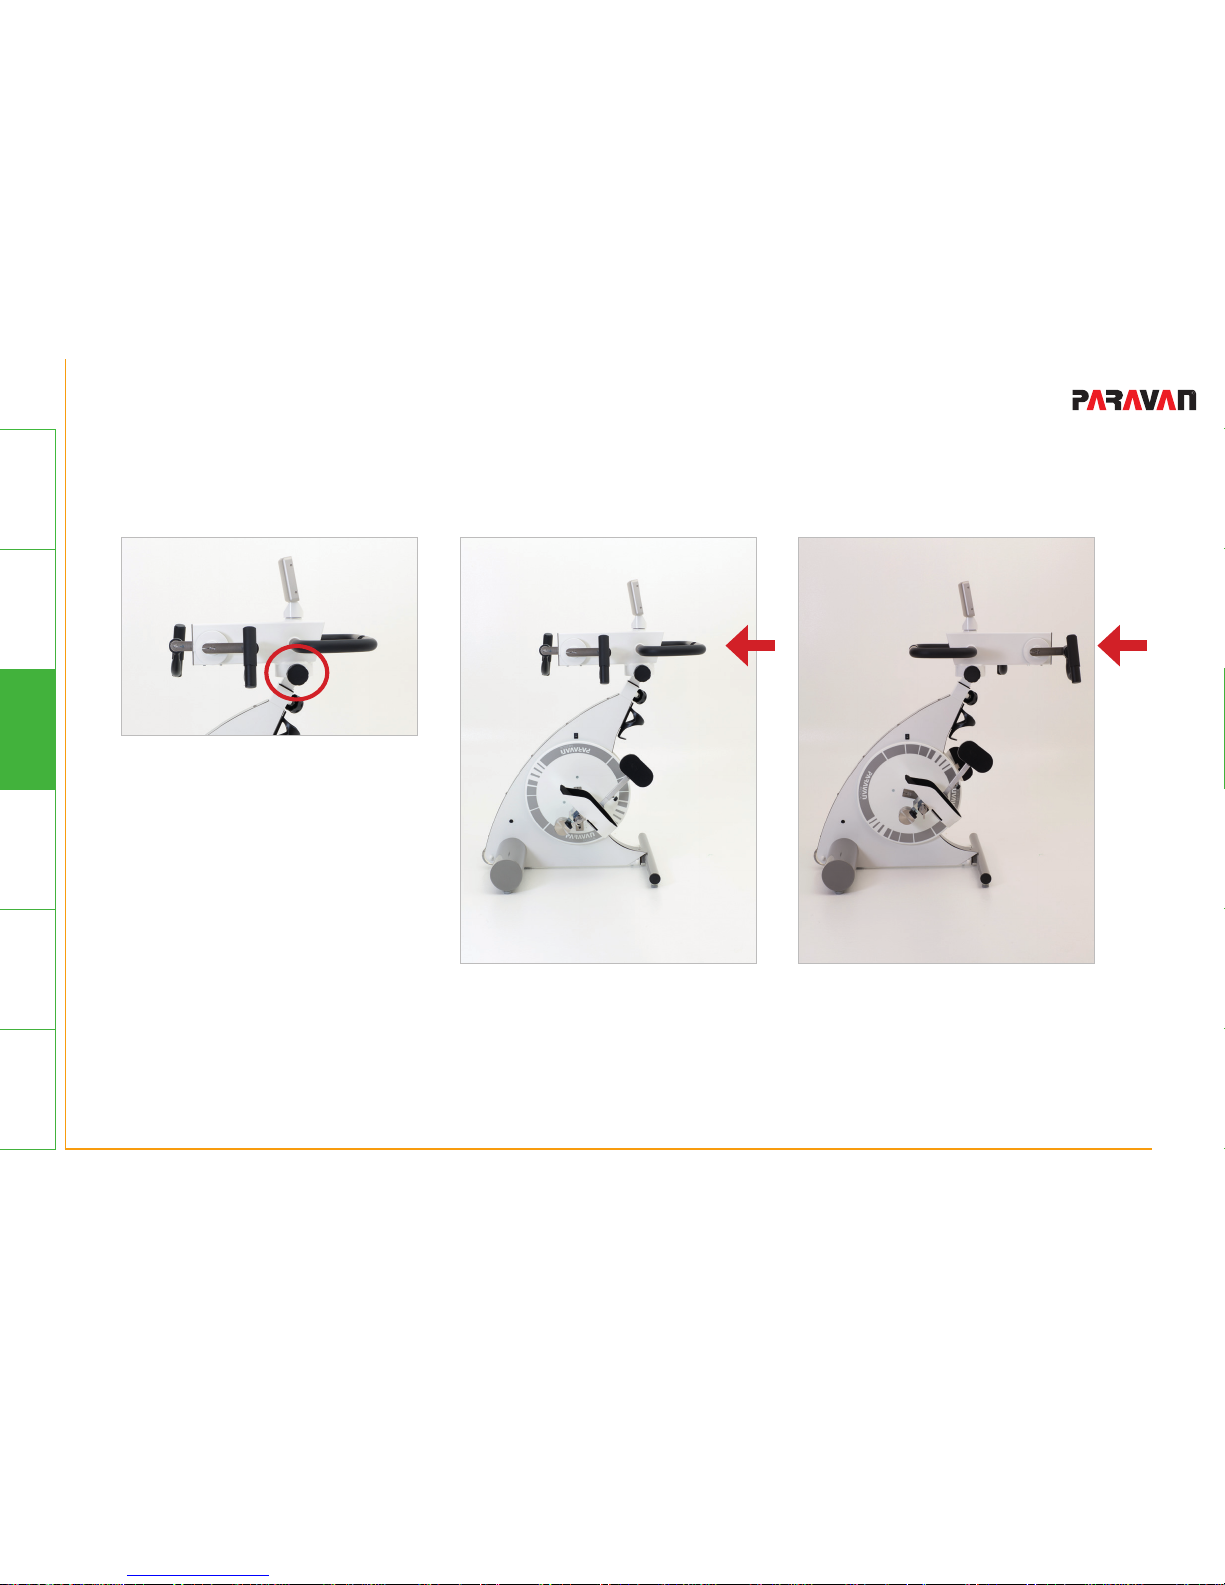
You can either use movanimo touch plus as legtrainer or as upper body trainer.
If you use movanimo as armtrainer, please open the two locking screws and swivel the device by
180 degrees.
After rotating the upper device please tighten the two locking screws securely.
You can now activate the arm trainer with the touch panel (see Chapter 9.4.2).
Page 57
55 von 147
General
Information
Prepare
OperateHelpTechnology
- Activation, operation and transport -mov04_EN_Rev.2.1
NOTE
It is not possible to operate the arm- and leg trainer at the same time. When using the arm trai-
ner,thefeetmustnotbexatedinthefootcuffs.
DANGER!
Danger of injuries
• Do not put feet into foot rests during upper body
training.
Page 58
56 von 147
General
Information
Prepare
Operate Help Technology
- Activation, operation and transport - mov04_EN_Rev.2.1
Fig. 16: Locking screw
adjustable arm
Fig. 17: Using movanimo
touch as legtrainer
Fig. 18: Using movanimo
touch plus as upper body
trainer
Page 59
57 von 147
General
Information
Prepare
OperateHelpTechnology
- Activation, operation and transport -mov04_EN_Rev.2.1
8.10 Adjusting the movanimo cardio set (article no. 8500)
Insert the heart rate receiver into the jack on the top of the
touch panel in order to use the movanimo cardio set.
The logo, which is attached to the receiver, must point in your
direction.
Place the chest strap around your chest. The strap can be
easily put on or taken off and fastened with a hook.
The length of the belt is adjustable from size M-XXL. The ma ximum circumference is ca. 90 cm.
During training, the sender, which is attached to the belt,
must point in the direction of the heart rate monitor.
When the chest strap has been put on correctly and the recei ver is plugged in, movanimo touch will display your heart rate
during training (see Chapter 10.4.3)
Fig. 19: Heart rate receiver
Fig. 20: Chest strap heart rate
Page 60
58 von 147
General
Information
Prepare
Operate Help Technology
- Activation, operation and transport - mov04_EN_Rev.2.1
CAUTION
Danger of material damage due to inappropriate
handling
• Do not fold cardio-pulse-set.
• Do not leave cardio-pulse-set in direct sunlight for
longer periods of time
Page 61
59 von 147
General
Information
Prepare
OperateHelpTechnology
- Activation, operation and transport -mov04_EN_Rev.2.1
8.11 Transport
Before moving the device, ensure that it is turned off and that the
power plug has been disconnected.
Please remove the external power supply from the device before mo ving the device.
Tilt the device carefully towards you until you are able to move the
device over the rolls.
Always hold the device securely with both hands on the handlebar
during transportation.
You can move the leg trainer on its wheels to the desired location.
If it is not possible to move the leg trainer in this fashion, you can
carry it with at least two people by lifting from the underside of the
frame.
Fig. 21: Transportation of
movanimo
Page 62
60 von 147
General
Information
Prepare
Operate Help Technology
- Activation, operation and transport - mov04_EN_Rev.2.1
The wheels are not suitable for transporting the device over long distances or uneven ground.
Please carry the device with two people if it is to be transported over stairs.
Page 63
61 von 147
General
Information
Prepare
OperateHelpTechnology
- Activation, operation and transport -mov04_EN_Rev.2.1
WARNING
Risk of injury due to incorrect transport
• Please carry the device with two people if it is to be
transported over stairs.
• Transportdeviceexclusivelyonevenandstableoors
• Before moving the device, ensure that it is turned off
and that the external power supply has been removed
entirely.
Page 64
62 von 147
General
Information Prepare Operate Help Technology
- Proper usage of the movanimo - mov05_EN_Rev.2.1
9. Proper usage of the movanimo
9.1 Secure sitting- and body position
The right sitting position is especially important for therapy success. Please observe the following recommendations:
If you are operating the device from a wheelchair, ensure that the wheelchair is fastened securely
and that you are using a suitable wheelchair. The wheelchair should not tilt backwards. We recom mend using the tilt protection RTR Protect (article no. 7700) or the tilt protection protect
(article no. 7500), especially if spasms occur during training.
If you are operating the device from a chair, make sure that the chair is stable, has a straight and
highbackrestandcannottiltbackwards.Donotuseachairwithwheels(e.g.ofcechair).
Sit straight and in a central position. The wheelchair or chair must be placed centrally to the device.
Page 65
63 von 147
General
InformationPrepareOperateHelpTechnology
- Proper usage of the movanimo -mov05_EN_Rev.2.1
Please further observe the following indications when using the leg trainer.
Ensure a proper distance from your wheelchair or chair to the device. Your legs should be slightly a
ngled and not stretched in order to prevent injuries to joints, muscles and tendons. If you are just
starting out, choose a somewhat shorter distance to the machine.
Set the right handhold height according to your body size. The arms must not be stretched, and the
knees should not collide with the handholds during movement.
Make sure that your feet are securely fastened in the foot cuffs with the Velcro straps.
If you suffer from signs of paralysis, we recommend using the lower leg restraint (see Chapter 8.9).
Page 66
64 von 147
General
Information Prepare Operate Help Technology
- Proper usage of the movanimo - mov05_EN_Rev.2.1
Please observe the following indications when using the arm trainer:
The legs must not be fastened to the foot cuffs.
Set the correct height and width and ensure that your elbow joints are not extended too far
(see Chapter 8.9).
Set the correct width for the pedestal foot.
If your arm muscles are weak or partially paralyzed, we recommend using arm cuffs with
restraints (article no. 7110).
Page 67
65 von 147
General
InformationPrepareOperateHelpTechnology
- Proper usage of the movanimo -mov05_EN_Rev.2.1
WARNING
Danger of injuries due to wrong sitting position
• Let your physician or therapist show you the correct
sittingpositionbeforetrainingforthersttime.
Page 68
66 von 147
General
Information Prepare Operate Help Technology
- Proper usage of the movanimo - mov05_EN_Rev.2.1
9.2 General training recommendations
Training with the movanimo movement trainer has a positive effect on both body and mind. Regular training can contribute to muscle build-up, loosening of joints, circulation improvement and digestive stimulation. movanimo can be used to prevent lack of movement as well as for therapeutic purposes. A suitable
training plan that has been customized to your individual requirements is important for the success of your
training.
WARNING
Danger of injuries due to excessive training
• Coordinate your individual training plan with your
physician or therapist in order to attain the desired
training results.
Page 69
67 von 147
General
InformationPrepareOperateHelpTechnology
- Proper usage of the movanimo -mov05_EN_Rev.2.1
The following recommendations are valid for proper training:
Adjust the training sessions to your physical abilities and health conditions.
It is better to perform more and shorter training sessions than long training sessions in which you
physically exert yourself too much.
Ifpossible,planyourtrainingsessionsatxedtimesinyourdailyschedule.Regulartrainingwill
more likely lead to the desired training results than sporadic training.
Start your training sessions in passive training to loosen the joints and relax spasms.
At training begin, select a lower speed of rotation and pedaling resistance. When in doubt, set a
somewhat shorter pedal radius.
If you are unsure, select the training step „Easy” from the training programs under the menu
Indication-guided training.
Page 70
68 von 147
General
Information Prepare Operate Help Technology
- Proper usage of the movanimo - mov05_EN_Rev.2.1
Thetrainingshouldbefunandkeepyoumotivatedforthelongterm.Therstpositiveeffectsareusually
noticeable after 4 to 6 weeks of daily training.
A training is successful when your muscles become more relaxed and the motor exerts less power than
previously to rotate the pedals without stopping. You can slowly adapt your training, depending on your
physical condition and progress.
Page 71
69 von 147
General
InformationPrepareOperateHelpTechnology
- Proper usage of the movanimo -mov05_EN_Rev.2.1
Page 72
70 von 147
General
Information Prepare Operate Help Technology
- Operating the touch panel - mov05_EN_Rev.2.1
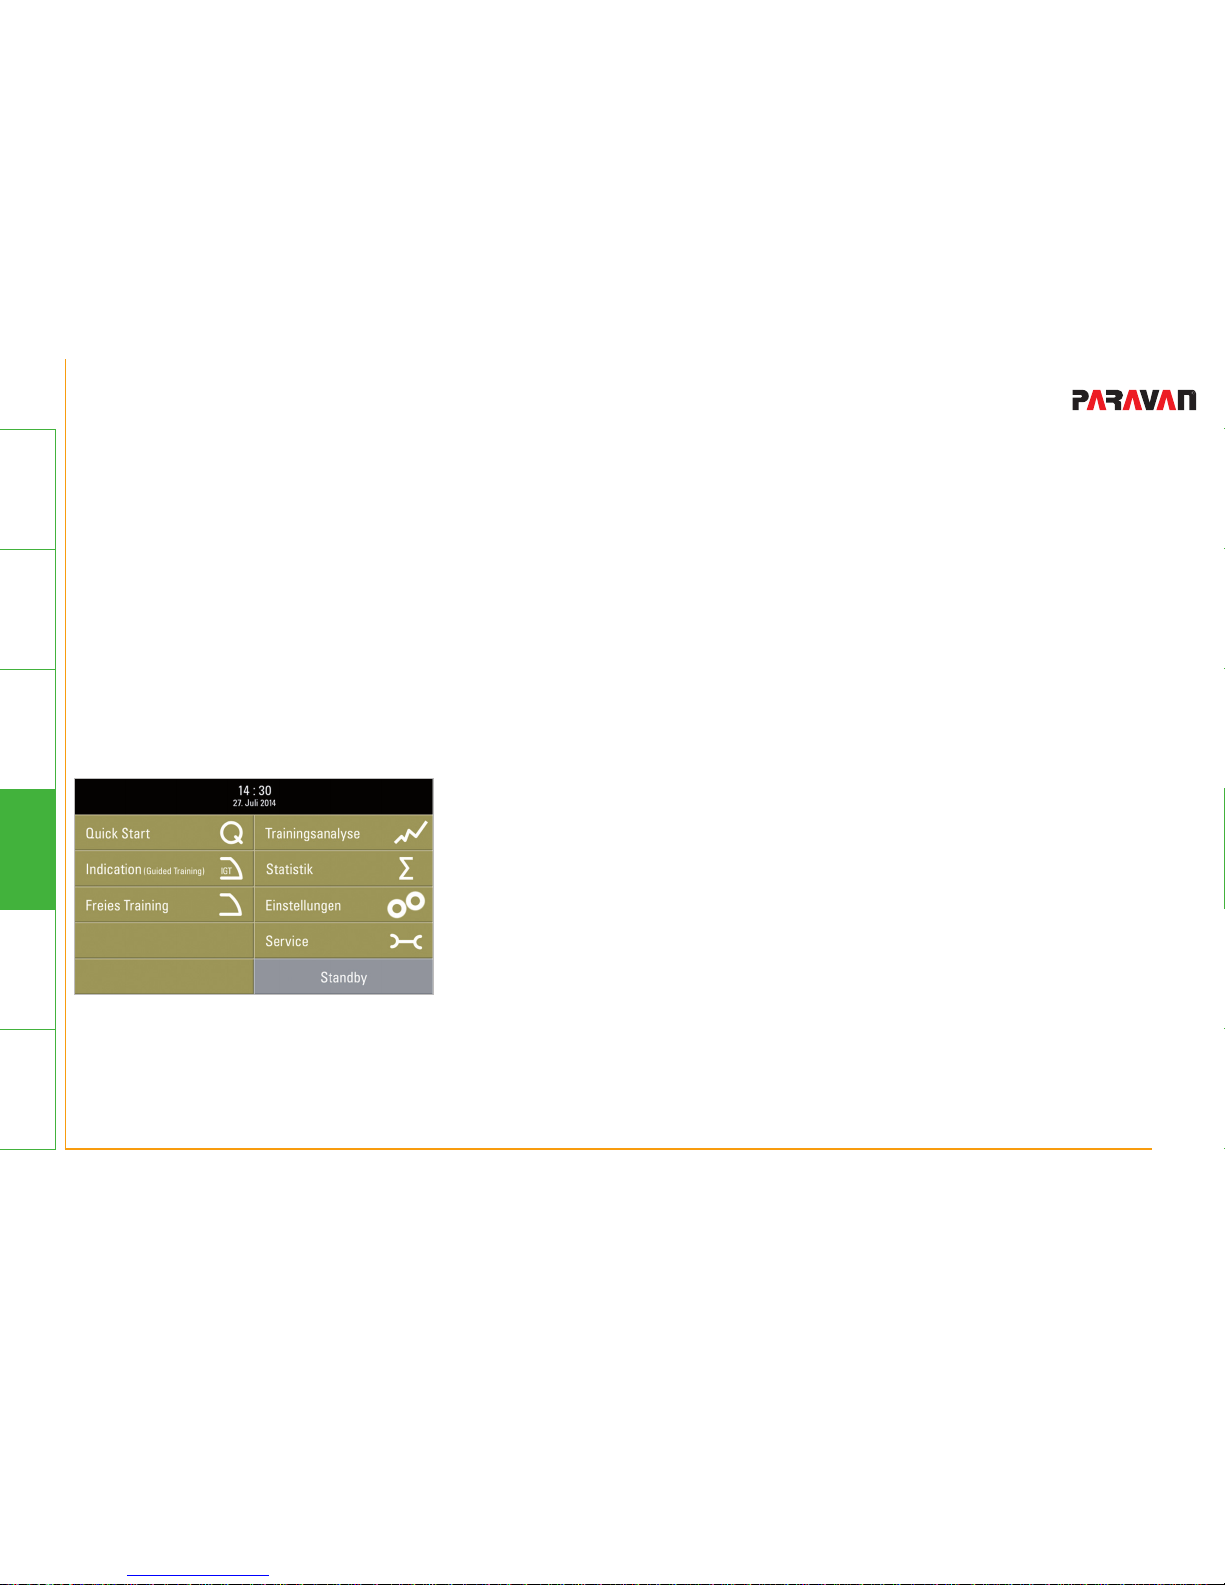
The touch panel has a high-quality 7.5-inch display. All functions are
triggered by touching the appropriate numerical buttons with your
ngertips.Thedisplayisconguredsothatitonlyreactstoslight
pressure in order to avoid accidental operation. Use e.g. your index
nger,middlenderorthumbtooperatethedisplay.
10. Operating the touch panel
Fig. 22: Main menu
10.1 Operating the touch panel
You can choose from the following program items:
• Quick start: This button will immediately begin your training
with an already preset standard training.
• Indication-guided training: With this button you can access
a selection of preset trainings for various symptoms.
• Free training: With this button you can access a selection of
further trainings without presets.
10.2 Main menu
Page 73
71 von 147
General
InformationPrepareOperateHelpTechnology
- Operating the touch panel -mov05_EN_Rev.2.1
• Training analysis: Use this button to display your current training evaluation after completing a
training. Press the Arrow buttons to display the last 10 completed trainings.
• Statistics: Statistics will show you an evaluation of all completed trainings in the long-term display
(added and average values).
• Settings: With this button you can access the settings menu in which you can change the default
training parameters.
• Service: The service functions are secured by a 4-digit code and only accessible to a service
technician. E.g. software updates are entered in the service menu.
• Standby: This button puts the machine in standby mode. It must be pressed for 5 seconds in order
to avoid accidental operation. The screen will dim as soon as the device enters standby mode. Press
the touch panel at any location for ca. 5 seconds to awaken the device again.
Page 74
72 von 147
General
Information Prepare Operate Help Technology
- Operating the touch panel - mov05_EN_Rev.2.1
10.3 Most important button functions
10.3.1 Plus- /Minus buttons
With these buttons you can gradually increase or decrease values, such as e.g.
resistance, RPM, date etc.
10.3.2 Horizontal Arrow button
UsethesebuttonstoswitchbetweenseveralsettingeldsinthemenuSettings.
10.3.3 Home button
With this button you can access the main menu. It is deactivated for the currently active training.
Fig. 23: Plus- /Minusbuttons
Fig. 24: Horizontal
Arrow button
Fig. 25: Home button
Page 75
73 von 147
General
InformationPrepareOperateHelpTechnology
- Operating the touch panel -mov05_EN_Rev.2.1
10.3.4 Back button
With this button you can navigate back to your previous setting.
10.3.5 ConrmandDeclinebuttons
Youconrmamenuselectionbypressingthisbutton.
You decline a menu selection by pressing this button.
10.3.6 Start and Stop buttons
Your training starts when you press this button.
Fig. 26: Back button
Fig. 27: Decline buttons
Fig. 28: Conrmbuttons
Fig. 29: Start button
Page 76
74 von 147
General
Information Prepare Operate Help Technology
- Operating the touch panel - mov05_EN_Rev.2.1
The Start button will begin your training. The machine starts out gently and
slowly increases its rotational speed until it reaches the preset value. The full
rotational speed is reached after a minimum of 10 seconds. The maximum
rotational speed in passive training is 60 RPM.
You stop your training program by pressing this button.
This gently reduces the rotational speed until it stops. Press the Start button
again if you wish to continue your training. Press the Home button if you wish
to exit the training program entirely. You will be automatically get tot he training analysis.
Fig. 30: Stop button
Page 77
75 von 147
General
InformationPrepareOperateHelpTechnology
- Operating the touch panel -mov05_EN_Rev.2.1
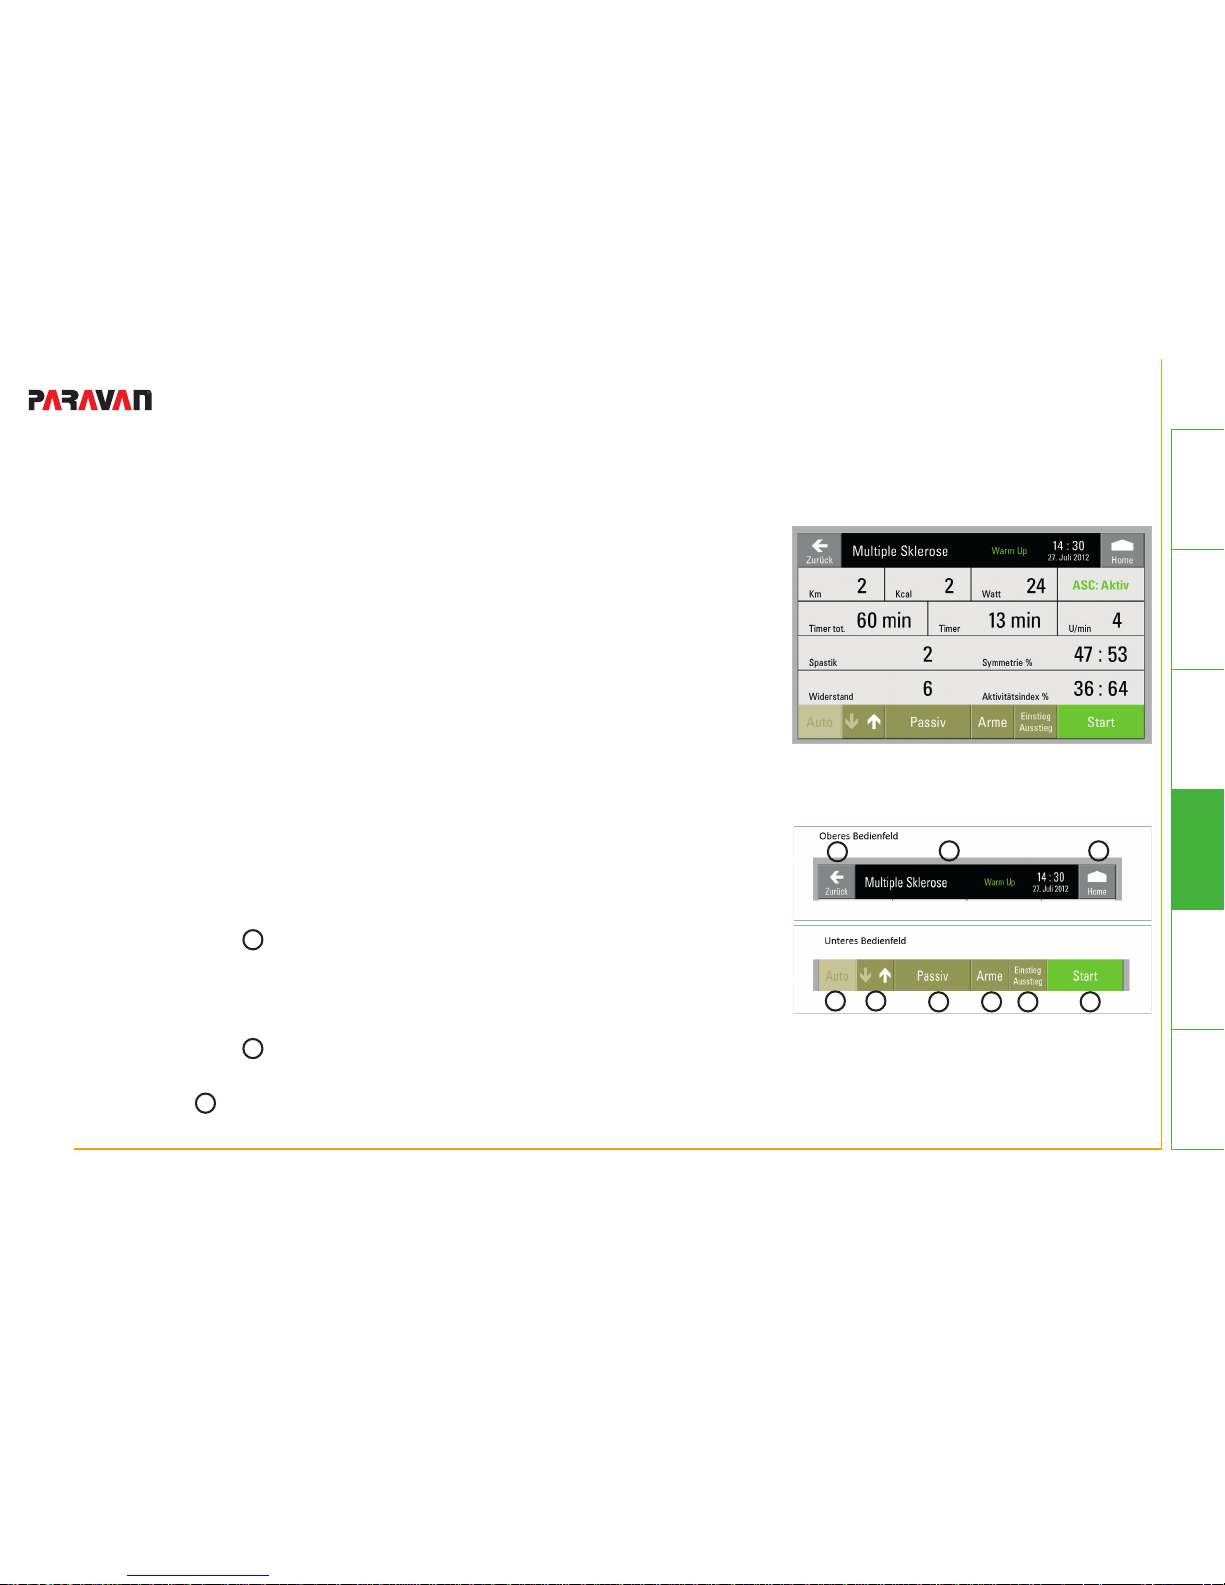
10.4 Training menu
The training screen is displayed when a training program is
prompted:
The training screen is divided as follows:
• Topcontroleld(1-3)
• Lowercontroleld(Buttons4–9)
• Trainingcontroleld(Buttons10–20)
10.4.1 Displays and control buttons in the top
controleld
• Back button: Use this button to navigate back to your previ-
ous setting
• Display eld: Thiseldshowsyouthecurrenttraining
program and training phase as well as the time and date. The
following training phases are displayed: Warm-up, training,
cool-down.
• Home button: Use this button to navigate back to the main
menu.
Fig. 31: Training menu
3
9
8
5
6
4
7
1
2
2
3
1
Fig. 32: Top and lower control
eld
Page 78
76 von 147
General
Information Prepare Operate Help Technology
- Operating the touch panel - mov05_EN_Rev.2.1
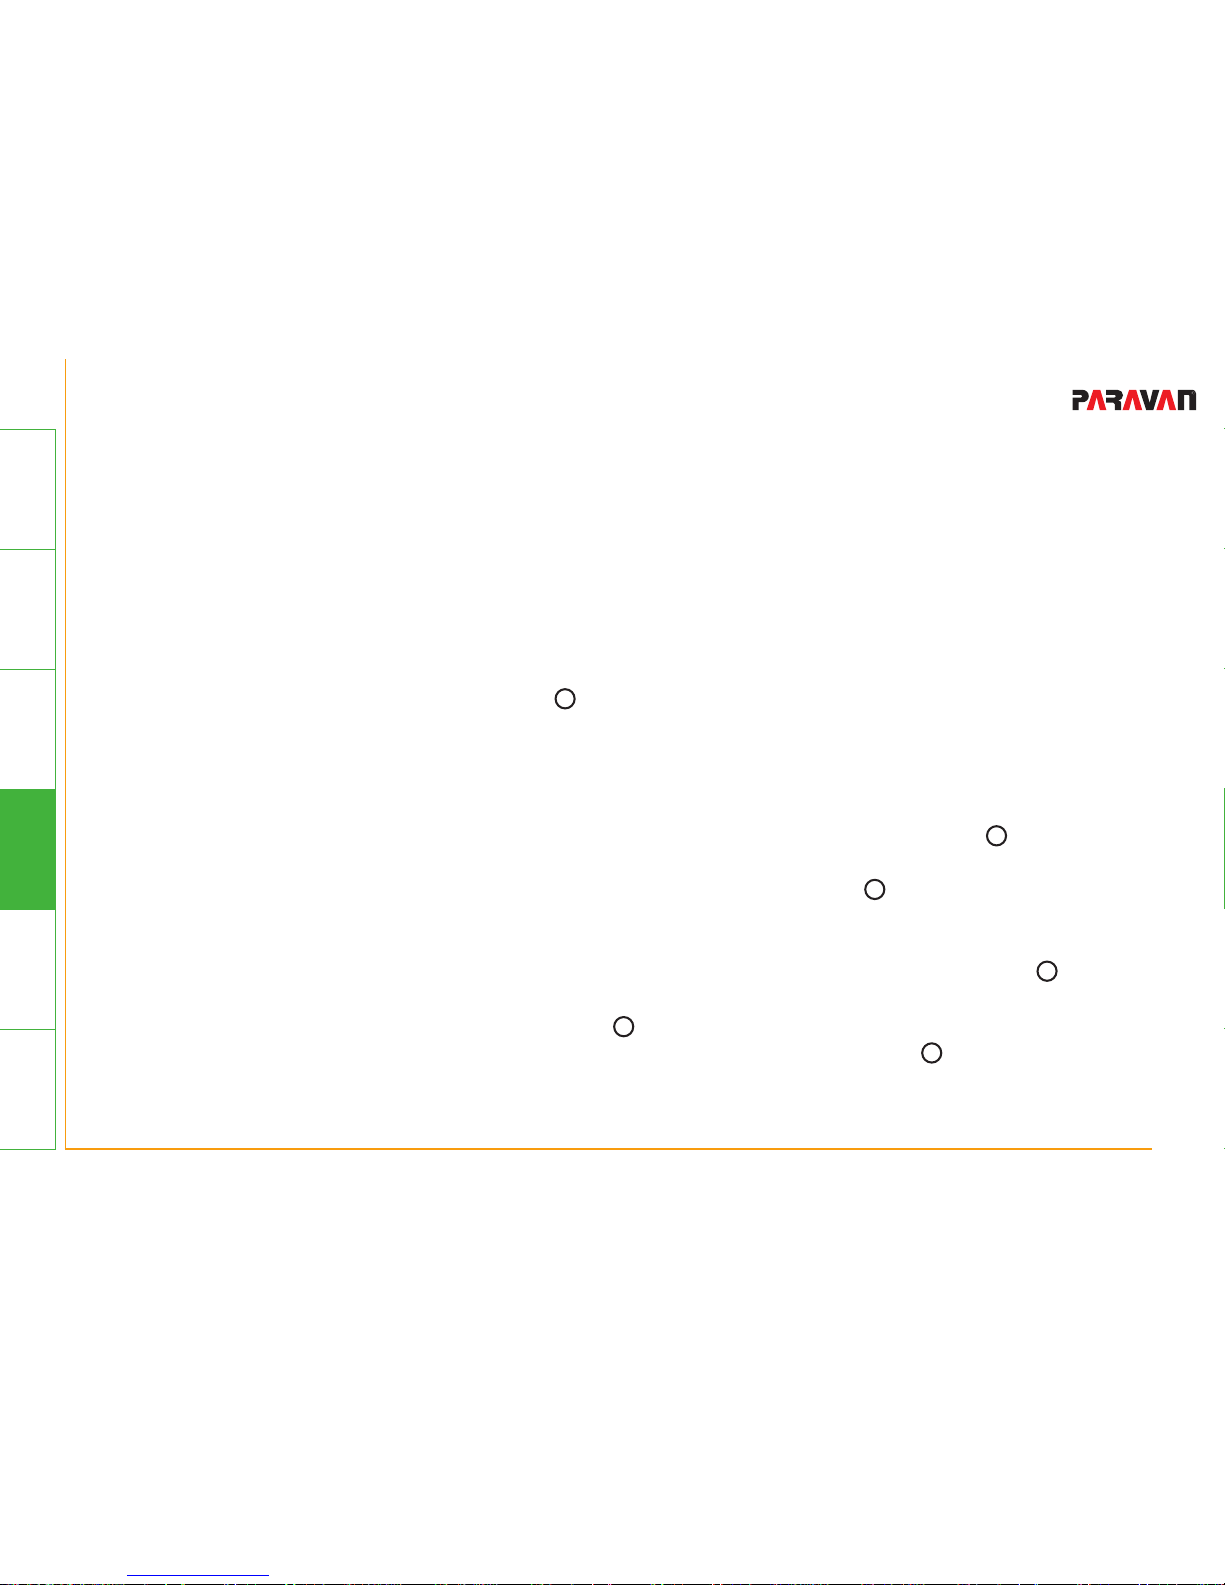
10.4.2 Displaysandcontrolbuttonsinthelowercontroleld
• Automatic directional change (rotational direction automatic): With this button you can
activate or deactivate the automatic change in the pedaling direction. The button is green when the
rotational direction automatic is activated. When it is deactivated, the button is highlighted in light
green. You can adjust the time duration for the automatic directional change in the menu Settings.
The default setting is 3 minutes. The rotational speed is gently reduced to a standstill before the rota tional direction is changed. movanimo only changes the direction once the movement has stopped
completely; it then starts out gently again.
• Switch button Forward-/Backward rotation (rotational direction): With this button you can
switch the pedaling direction from forward to backward (and vice versa). In forward the white arrow
points upward. In backward the white arrow points downward. When changing the rotational direc tion, the rotational speed of the pedals is gently reduced to a standstill. movanimo only changes the
direction once the movement has stopped completely; it then starts out gently again.
• Switch button Active/Passive: Use this button to switch between the active drive, which requires
the use of muscle power, and the passive drive, which uses motor power.
• Switch button Arm-/Leg trainer: Use this button to switch between the arm- and leg trainer
(accessory). The button is only active when the arm trainer has been installed correctly and the leg
training has ended. It is not possible to operate the arm- and leg trainer at the same time.
• Access/Exit: By pressing these buttons the pedals are moved to a favorable position for accessing
or exiting the foot cuffs (also see Chapter 10.5).
• Start/Stop: These button start or stop the training (see also Chapter 10.3.6).
9
8
7
6
5
4
Page 79
77 von 147
General
InformationPrepareOperateHelpTechnology
- Operating the touch panel -mov05_EN_Rev.2.1
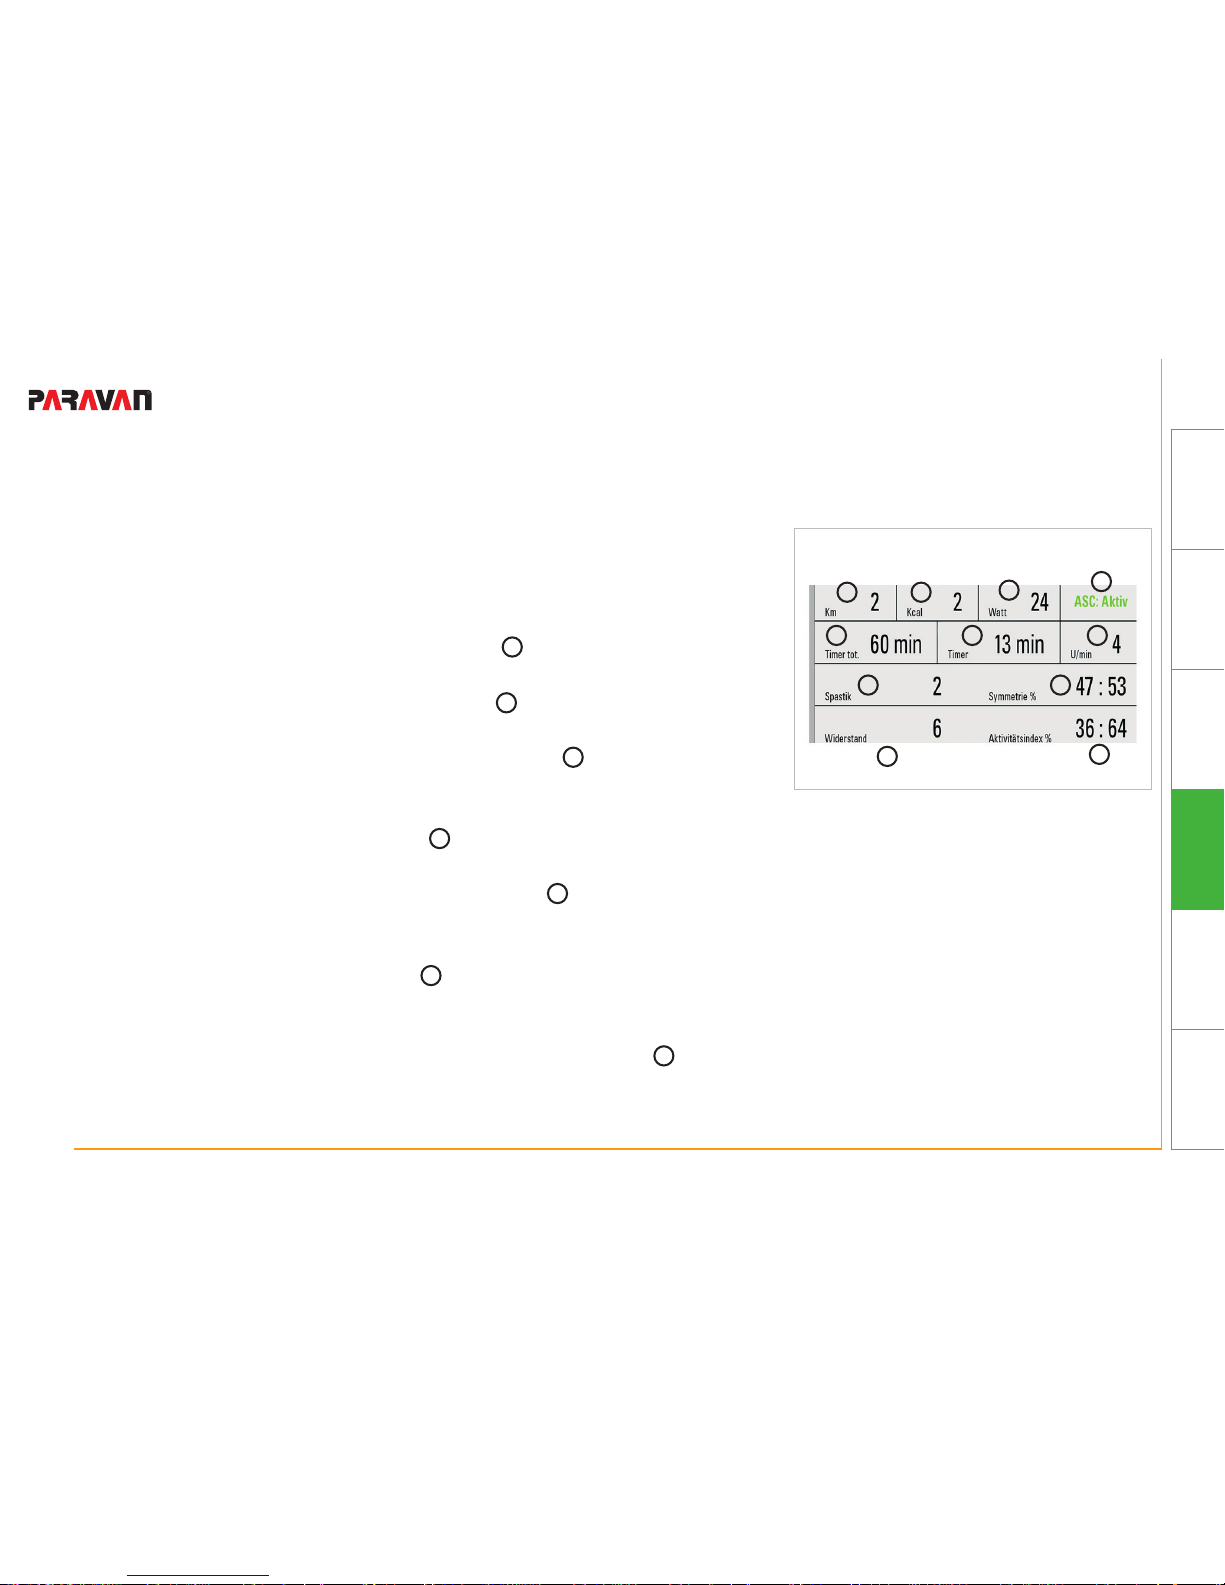
10.4.3 Displayvaluesinthetrainingcontroleld
Thefollowingvaluesaredisplayedinthemiddledisplayeldofthe
training menu:
• Distance covered: Thiseldshowsthedistancethatwas
covered through active muscle work.
• Calorie display: Thiseldshowstheenergyinkcalthatwas
exerted through active muscle work.
• Watts display (generated output): Thiseldshowsthe
activepedalingoutput–measuredinwatt.
• Heart rate: Thiseldindicatesyourcurrentheartrate,
provided the accessory for the movanimo cardio set
(article no. 8500) is attached.
• Duration: Thiseldshowsthetotalremainingtrainingtime,
including warm-up and cool-down phase.
• Timer DiThiseldshowsthedurationforthecurrenttrai-
ning phase (warm-up, training, cool-down). Press this button
to change the time duration.
• RPM – Revolutions per minute: Thiseldshowsthe
pedal revolutions per minute. Press this button in passive
training to change the pedal revolutions per minute.
Fig. 33: trainingcontroleld
20
19
15
18
14
12
17
10 11
14
16
13
12
11
16
13
15
10
Page 80
78 von 147
General
Information Prepare Operate Help Technology
- Operating the touch panel - mov05_EN_Rev.2.1
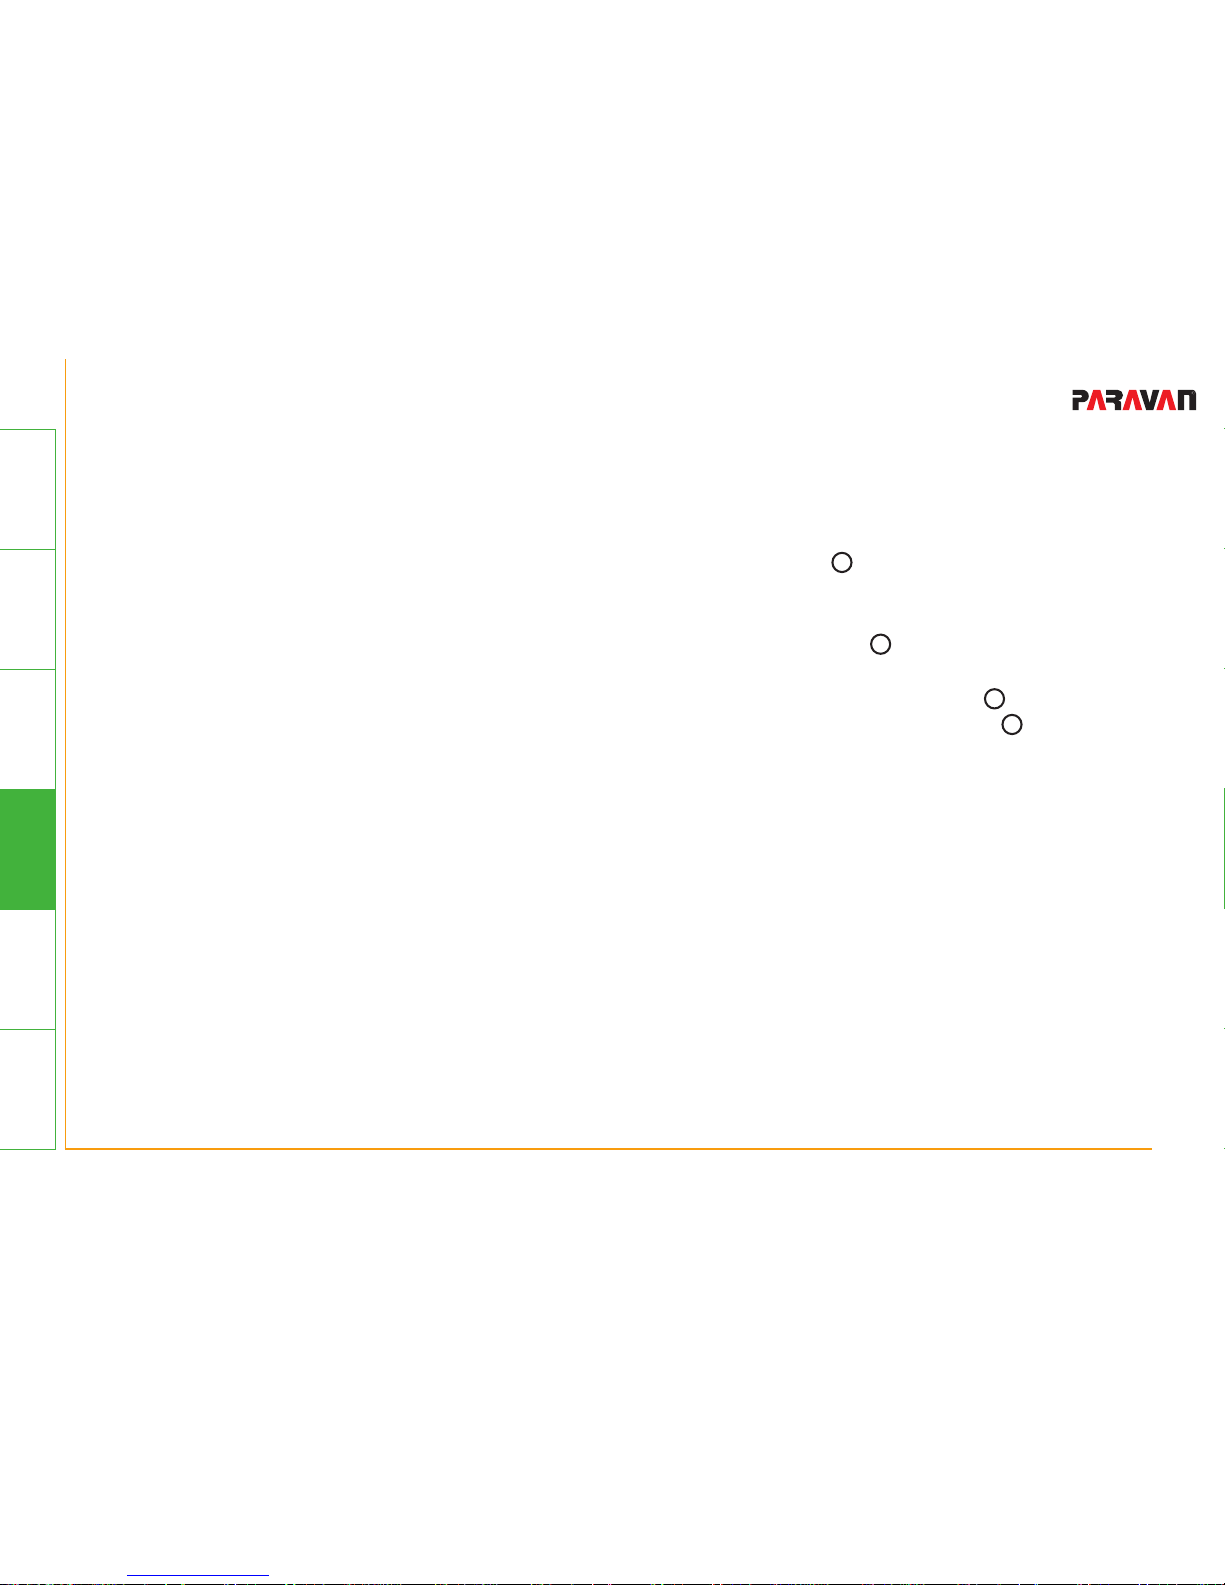
• ASC level – Anti-spastic control: Thiselddisplaysthesensitivitysettingfortheanti-spasticcon-
trol in passive training. Press this button to adjust the sensitivity level.
• Symmetry: Thiseldindicatesthestrainlevelfortherightandlefthalfofyourbodyduringactive
training. It displays percentage values for the left and right side. The sum always adds up to 100 %.
Press this button to access the graphical bar chart view for the symmetry.
• Resistance: Thiseldshowsyouthebreakresistanceofthemotor.Pressthisbuttontochangethe
resistance during active training. In passive training this button is highlighted in grey.
• Activity index: Thiseldindicatesthepercentageofyouractivemuscleparticipation.
20
19
18
17
Page 81
79 von 147
General
InformationPrepareOperateHelpTechnology
- Operating the touch panel -mov05_EN_Rev.2.1
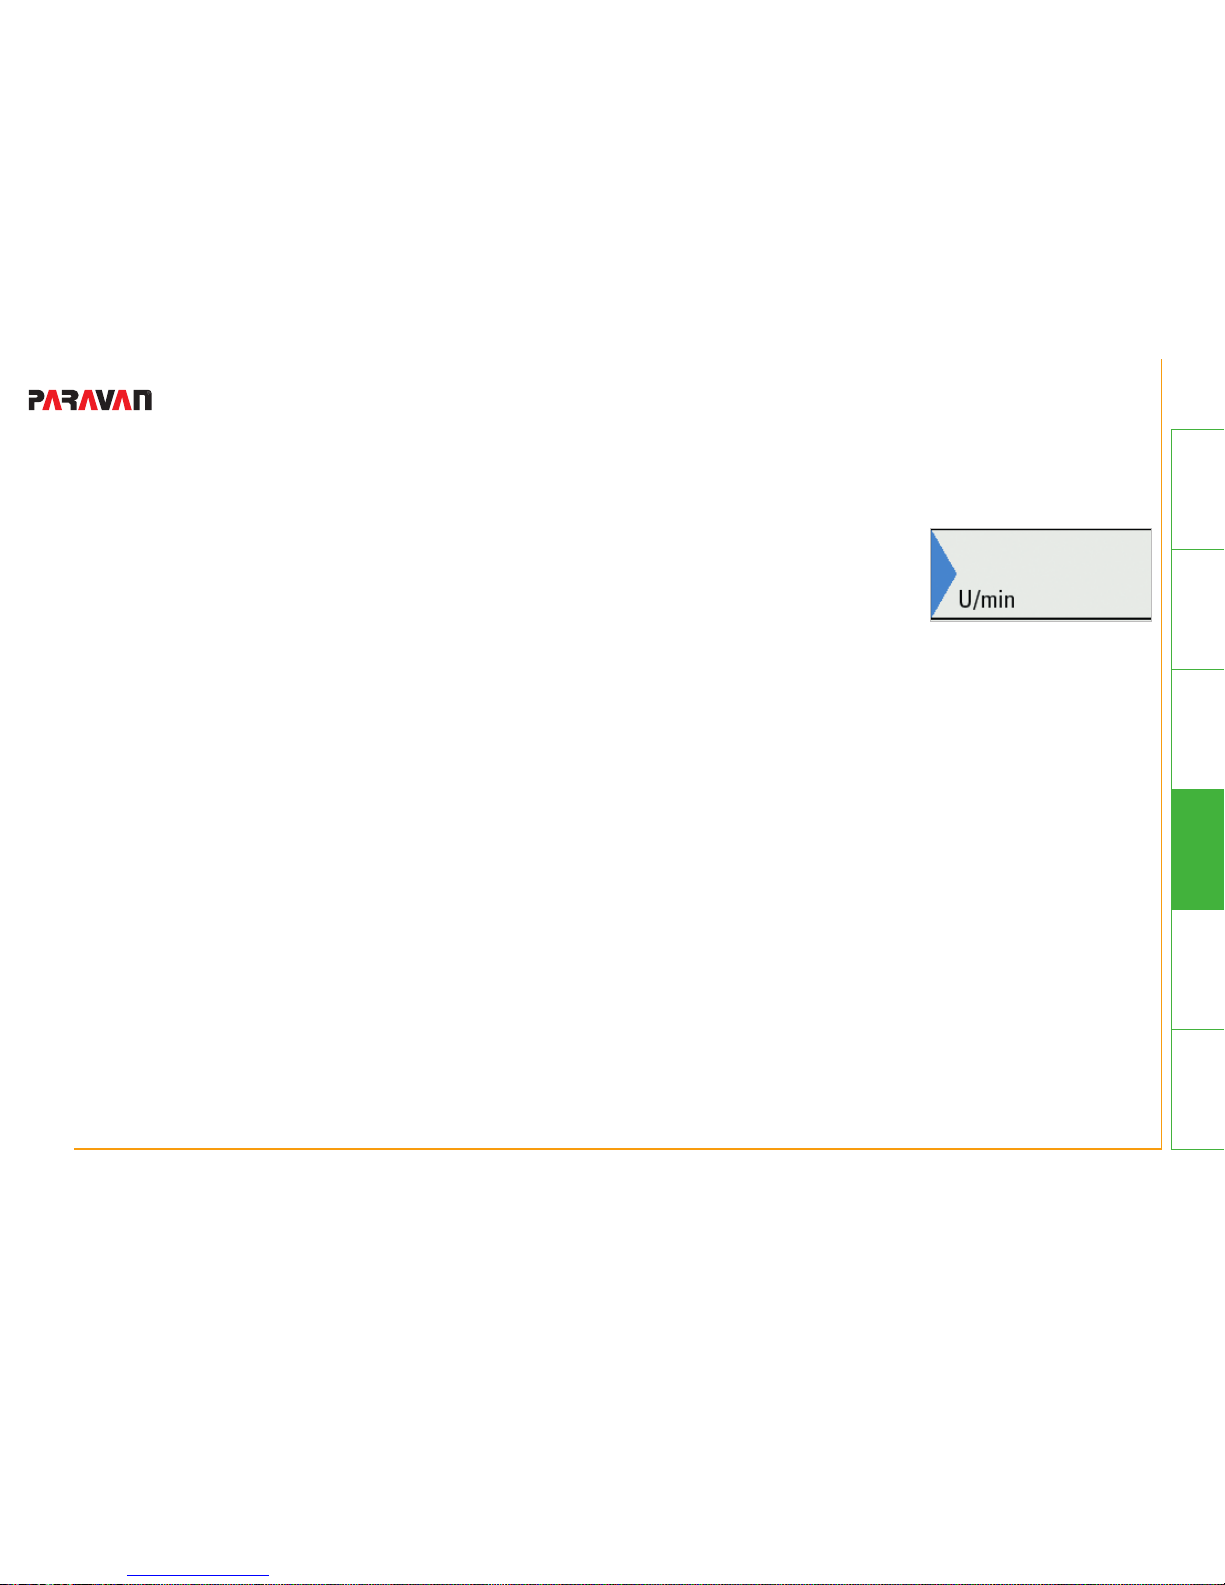
Alleldsinthetrainingmenuethatcanbemodiedduringthetrainingare
marked with a blue triangle.
Thesearethefollowingelds:
• RPM
• Resistance
• ASC-level
• Symmetry display (during active mode)
• Bpm (during cardio training)
Fig. 34: Customiz-
ableelds
Page 82
80 von 147
General
Information Prepare Operate Help Technology
- Operating the touch panel - mov05_EN_Rev.2.1
10.5 Access-/ Exit aid
Before beginning your training, use the access-/exit aid to bring the foot cuffs into a comfortable position.
First, press the button Access-/Exit aid. This moves the right foot cuff down. Now place your right foot into
thefootcuffandxatethefootwiththeVelcrotape.ThenpressthebuttonAccess-/Exitaidagain.Now
theleftfootcuffwillmovedown.PlaceyourleftfootintothefootcuffandxateitwiththeVelcrotape.
10.5.1 Access
10.5.2 Exit
Afteryouhavenishedyourtraining,pressthebuttonAccess-/Exitaid.Thiswillmovetherightfootcuff
down. You can now remove the right foot from the foot cuff. Then press the button Access-/Exit aid again
to move the left foot cuff down so you can take your left foot out.
Page 83
81 von 147
General
InformationPrepareOperateHelpTechnology
- Operating the touch panel -mov05_EN_Rev.2.1
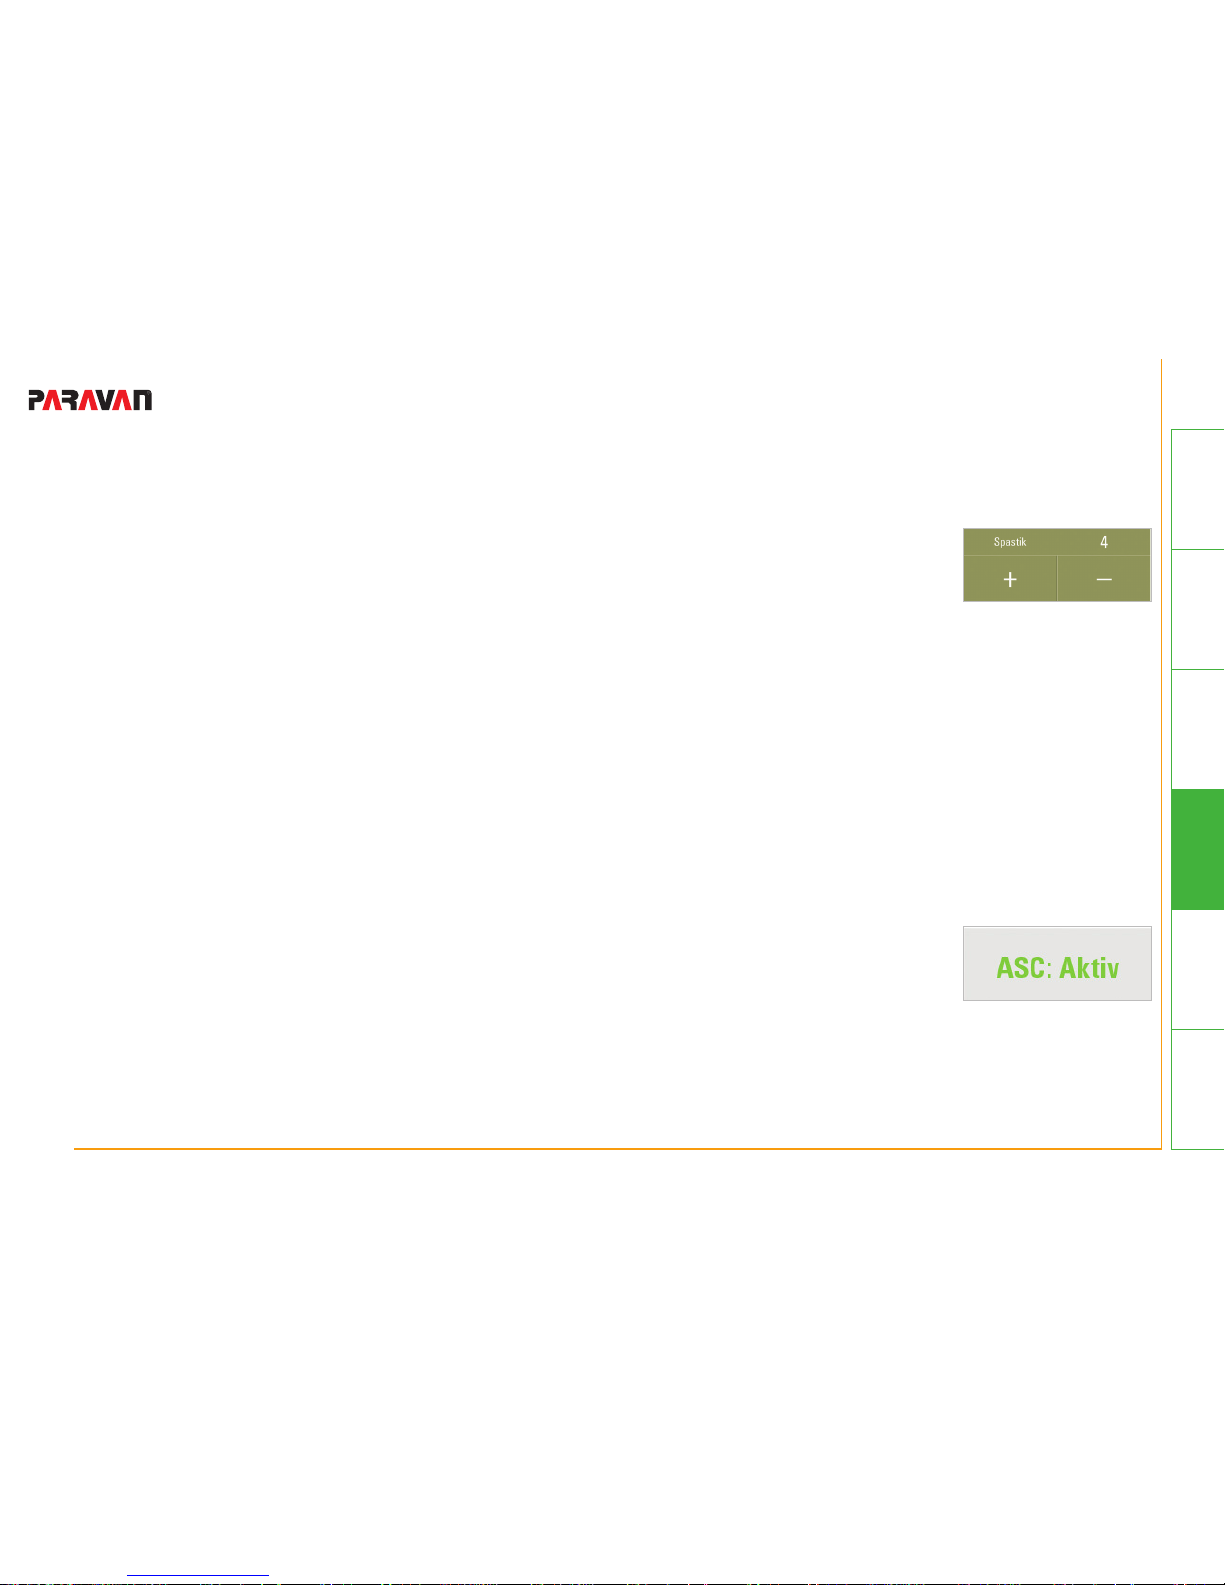
10.6 ASC – Anti-spastic control
The anti-spastic control (ASC) protects you during passive training from over-exertion
or inappropriate straining in the case of spasms. The pedals stop as soon as movanimo recognizes a spasm. Additionally a red bar appears on the touch screen. The pedals
remain motionless for ca. 4 seconds, and then the movement starts anew. By default
the machine will start out in the opposite direction. You can change the restart direction
(forward, backward, opposite direction) in the menu Settings (see Chapter 13.6).
The severity of spasms differs from patient to patient; therefore the sensitivity of the
movanimo spastic control is customizable. By pressing the button ASC level during the
current training, you can access the settings menu for the anti-spastic control.
Under this setting you can adjust the sensitivity for the spastic control with the Plus-/
Minus buttons. You can select a level for ASC from 1 = very sensitive to 6 = less sensitive. If you set the anti-spastic control to a very low level, it will be triggered very quickly
and stop the machine during training. If set to higher values, the ASC will only recognize
more severe spasms.
If required, the anti-spastic control can also be deactivated under the menu Settings
(see Chapter 13.6).
Fig. 35: Adjusting the antispastic control
Fig. 36: ASC
aktiviert
Page 84
82 von 147
General
Information Prepare Operate Help Technology
- Operating the touch panel - mov05_EN_Rev.2.1
WARNING
Risk of injury due todamaged or inappropriate
adjusted safety equipment
• Before every training, make sure that anti spastic
control is working correctly.
• We recommend always leaving the anti-spastic control
on.
• Adjust the anti spastic control to the health and
physical conditions of the user.
• The ASC should only be turned off when this has been
cleared with your physician or therapist.
Page 85
83 von 147
General
InformationPrepareOperateHelpTechnology
- Operating the touch panel -mov05_EN_Rev.2.1
10.7 Further settings during training
10.7.1 Timer
You can access the settings menu for the timer by pressing the button Timer. This setting lets you change
the time duration for the current training phase (warm-up, training, cool-down). You can set the training
duration to a maximum of 120 minutes.
The training duration can be increased with the Plus button and decreased with the Minus button for the
current training phase.
WARNING
Danger of injuries due to excessuve training duration
• Adjust the training duration to your individual well-
being. It is better to train regularly but with shorter
training durations.
Page 86
84 von 147
General
Information Prepare Operate Help Technology
- Operating the touch panel - mov05_EN_Rev.2.1
10.7.2 RPM–Revolutionsperminute
Press the button RPM during passive training to access the settings menu for the rotational speed (measured in pedal revolutions per minute).
Please take Warning:
• Pedals are accelerated and stopped in a gentle and consistent manner.
• The full rotational speed is reached after a minimum of 10 seconds.
• The maximum rotational speed in passive training is 60 RPM.
Use the Plus button to increase the revolutions per minute. You can increase the value to a maximum of 60
RPM. Use the Minus button to decrease the revolutions per minute.
The button RPM is only activated in passive training.
Page 87
85 von 147
General
InformationPrepareOperateHelpTechnology
- Operating the touch panel -mov05_EN_Rev.2.1
WARNING
Danger of injuries due to overexertion
• It is best to start with a low rotational speed and incre-
aseitgradually–dependingonyourpersonalwell-
being and capacity.
Page 88
86 von 147
General
Information Prepare Operate Help Technology
- Operating the touch panel - mov05_EN_Rev.2.1
10.7.3 Resistance
Press the button Resistance during active training to access the settings menu for motor resistance.
With the Plus button you can increase the motor resistance during active training. You will now have to
exert more power to rotate the pedals. With the Minus button you can decrease the motor resistance in
active training. You will now need to exert less power to rotate the pedals. In passive training this button is
highlighted in grey.
You can set the resistance from Level 1 = very low motor resistance to Level 20 = very high resistance.
WARNUNG
Danger of injuries due to inappropriate setting of training resistance
• It is best to start with a low resistance and increase it
gradually - depending on your personal well-being and
capacity.
Page 89
87 von 147
General
InformationPrepareOperateHelpTechnology
- Operating the touch panel -mov05_EN_Rev.2.1
Page 90
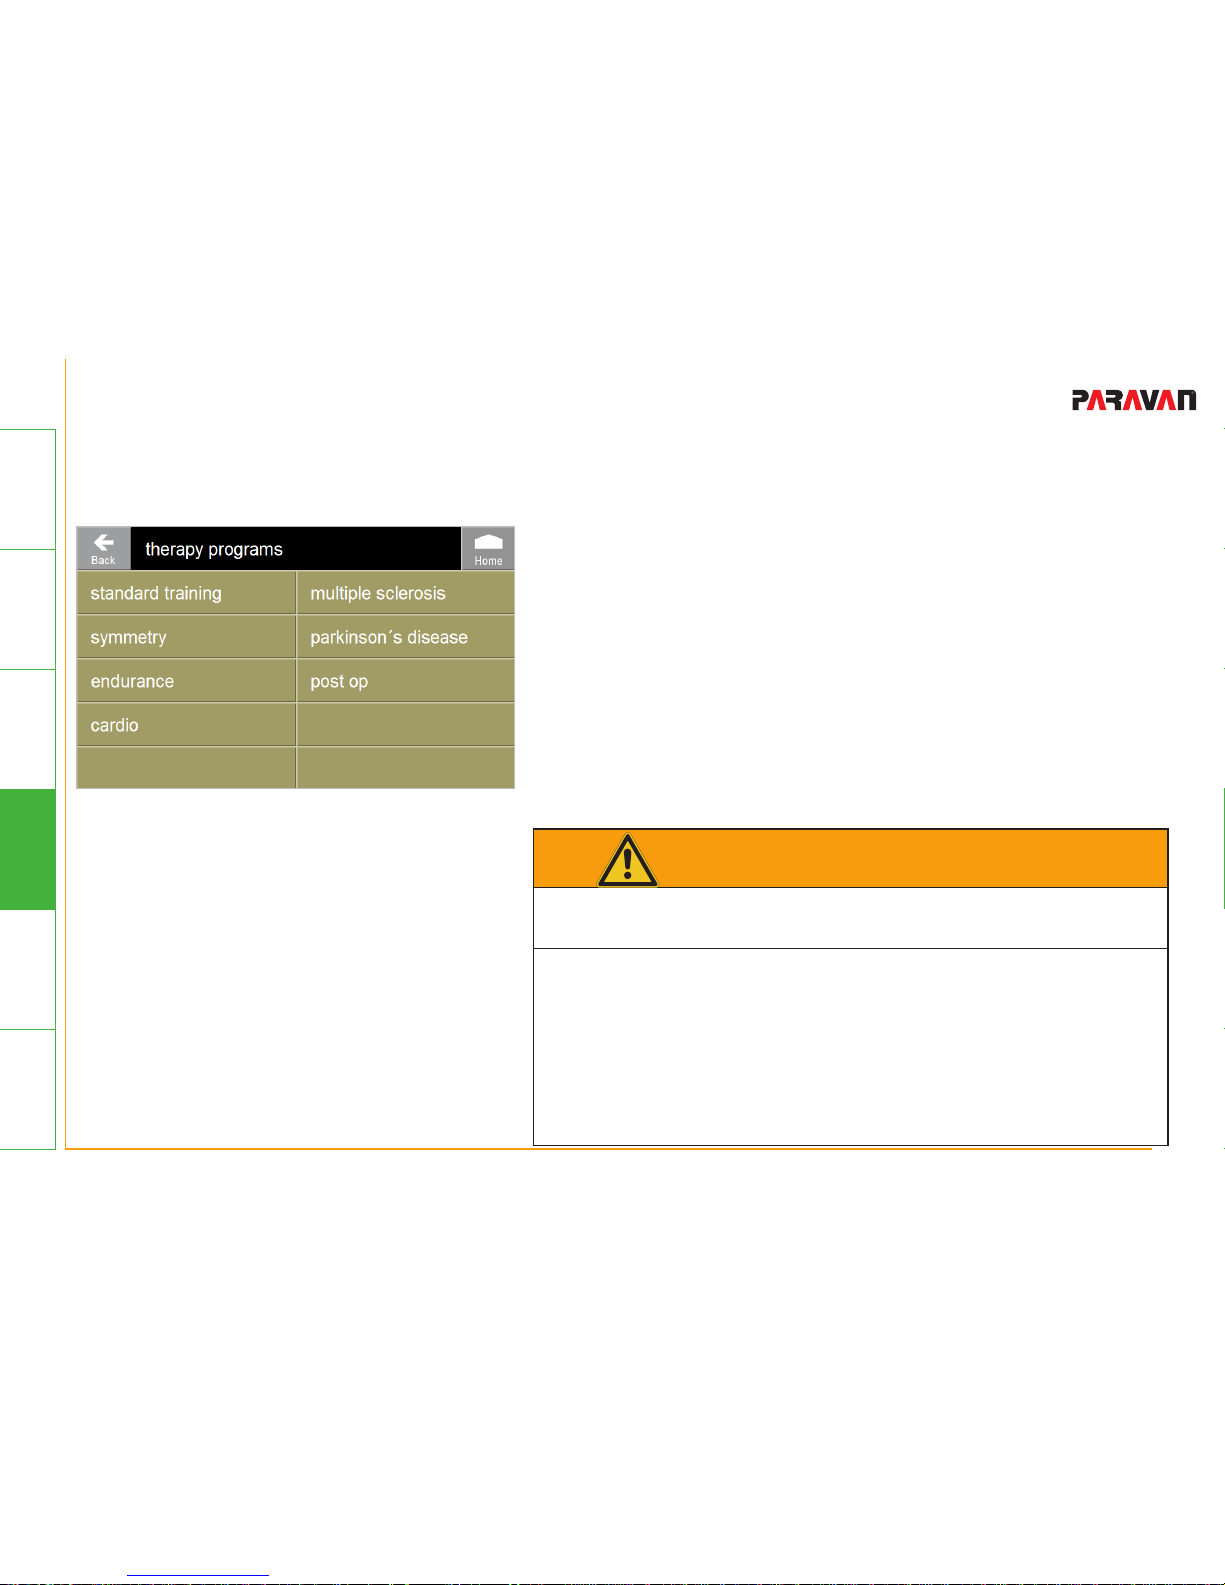
88 von 147
General
Information Prepare Operate Help Technology
- Training programs - mov05_EN_Rev.2.1
11. Training programs
11.1 Therapy programs – Indication-guided training
Fig. 37: Menu Indication Guided Training
Various training programs are deposited under this menu,
depending on indication and therapy goal; these programs
have been developed together with therapists. The training
programsmakethecongurationoftrainingparameters
easier by suggesting training settings for the warm-up-,
training- and cool-down phase. The preset values can be adjusted during the current training as well as under the menu
Training settings.
WARNING
Danger of injuries due to inappropriate adnustment of
training parameters
• The preset values in the indication-guided training are
general training suggestions.
• It is imperative that you coordinate and customize your
training settings beforehand with your physician or
therapists.
Page 91
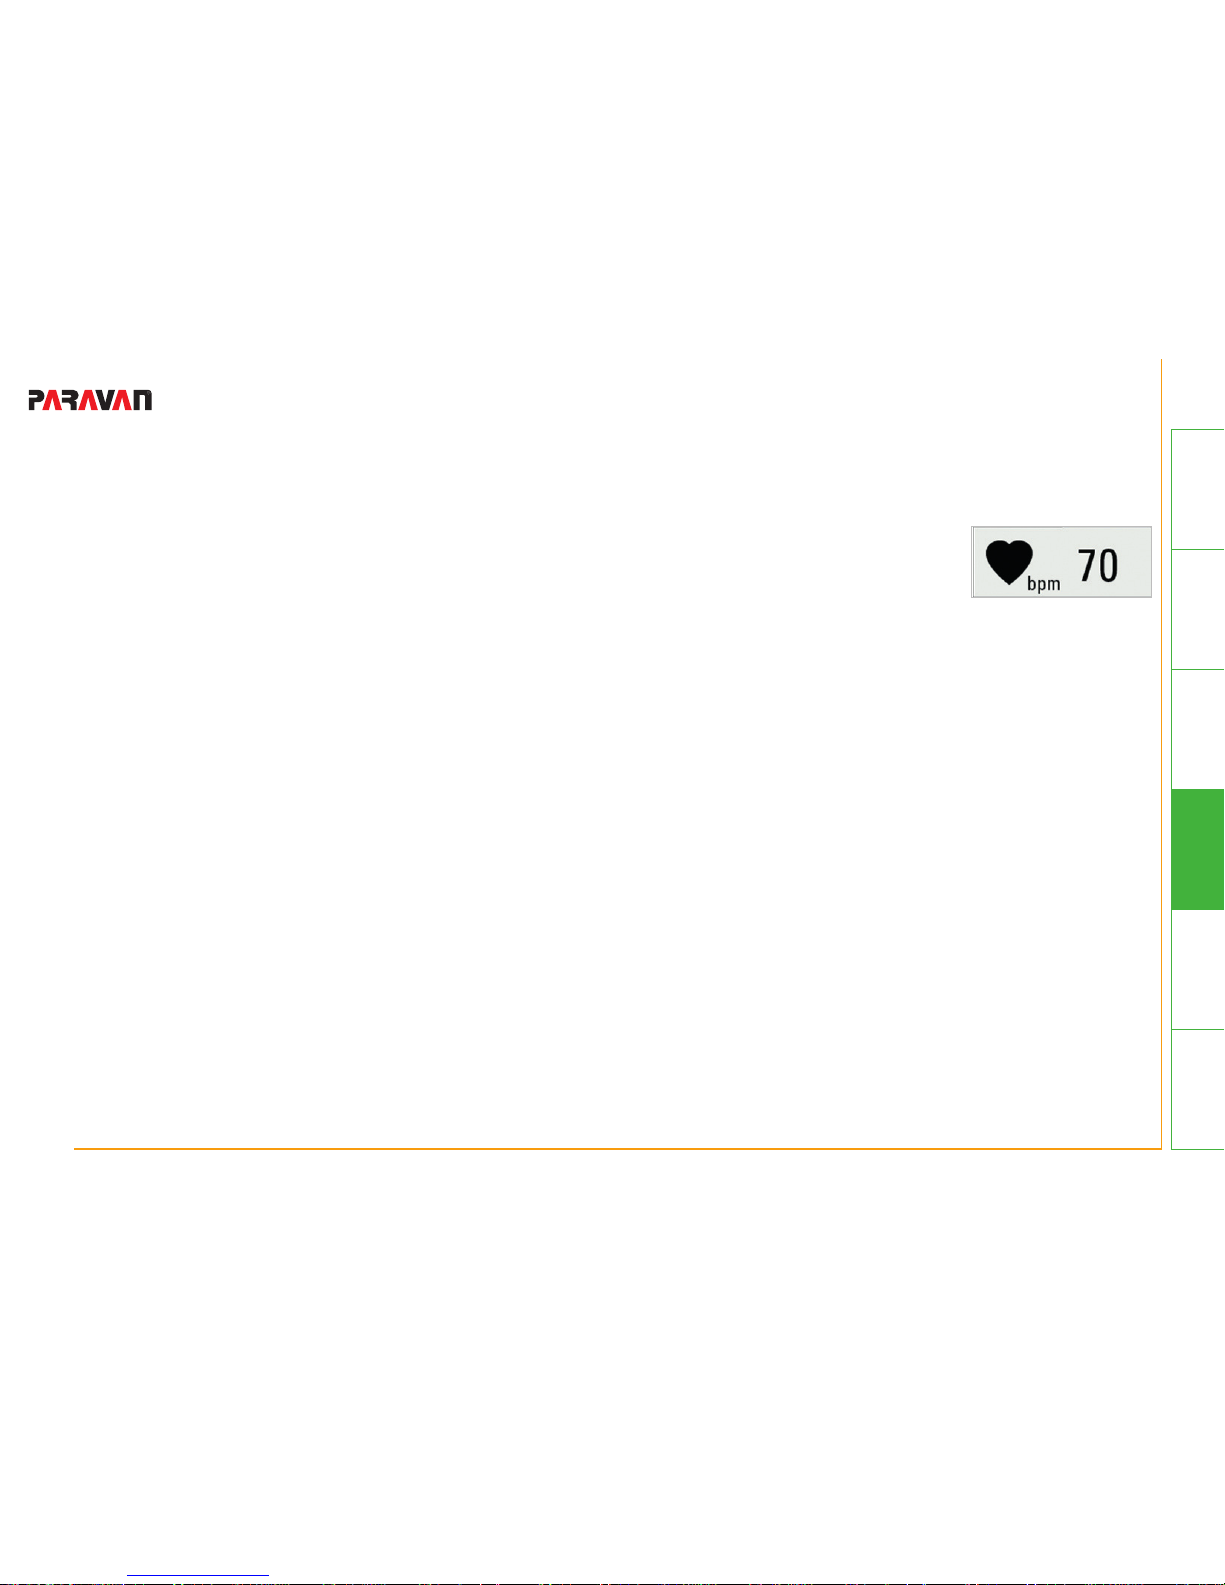
89 von 147
General
InformationPrepareOperateHelpTechnology
- Training programs -mov05_EN_Rev.2.1
The following training programs have been preset for the indication-guided training:
• Standard Training
• Symmetry
• Endurance: Depending on the training level, a different default watt setting is
set as the target value for the active training with this program. The motor re sistance automatically adjusts to the rotational speed so that the generated out-
put (measured in watt) always remains the same.
• Cardio: (only for accessory movanimo cardio set, article no. 8500) A certain
heart rate is preset as the target heart rate for this program. The resistance of
themotorisautomaticallyreducedassoonastheconguredheartrateis
reached.
Fig. 38: Button
heart rate
Page 92
90 von 147
General
Information Prepare Operate Help Technology
- Training programs - mov05_EN_Rev.2.1
• Multiple sclerosis:Afterthepassivewarm-uptrainingphase,aspecicresistanceispresetforthis
program, depending on the selected training level in the active training.
• Parkinson’s disease: Afterthepassivewarm-uptrainingphase,aspecicresistanceispresetfor
this program, depending on the selected training level in the active training. Rotational speed and
motor power are set a little higher than for the program Multiple sclerosis since, based on experience,
a somewhat larger pedal radius is required for training with this indication.
• Post-operative: Soft training is activated in active training for this program in order to gently sup-
port you in your movement.
NOTE
In the menu Settings (see Chapter 13.2) you can change the values for the indication-relevant
trainings at any time according to your requirements.
Page 93
91 von 147
General
InformationPrepareOperateHelpTechnology
- Training programs -mov05_EN_Rev.2.1
DANGER!
Danger to life due to inappropriate setting of heart
rate
• The preset heart rate should be adjusted in accordance
with the maximum heart rate of the respective patient.
Page 94
92 von 147
General
Information Prepare Operate Help Technology
- Training programs - mov05_EN_Rev.2.1
11.2 Training phases
Each training is divided into three phases:
• Warm-up phase
This phase warms up your muscles, loosens your joints and relaxes cramps and spasms. A passive
trainingwithlowrotationalspeedisnormallyconguredforthewarm-upphase.
• Training phase
In the actual training phase you start your individual training program, depending on the selected
training program and your physical condition. Several forms of motor support are possible, depending
on the training program and desired level of active muscle participation:
o Active training – without motor support: Solely own muscle activity. The pedal resis-
tance can be adjusted at any time. It is recommended to begin with a lower pedal resis tance.
o Active Training – with motor assistance (Softtraining): Soft support by motor
o Passive training: You are passively moved by the motor. The rotational speed can be
adjusted at any time.
• Cool-down phase
When the training phase ends, a short cool-down phase begins in passive training at a low rotational
speed, which gently fades out the training.
Page 95
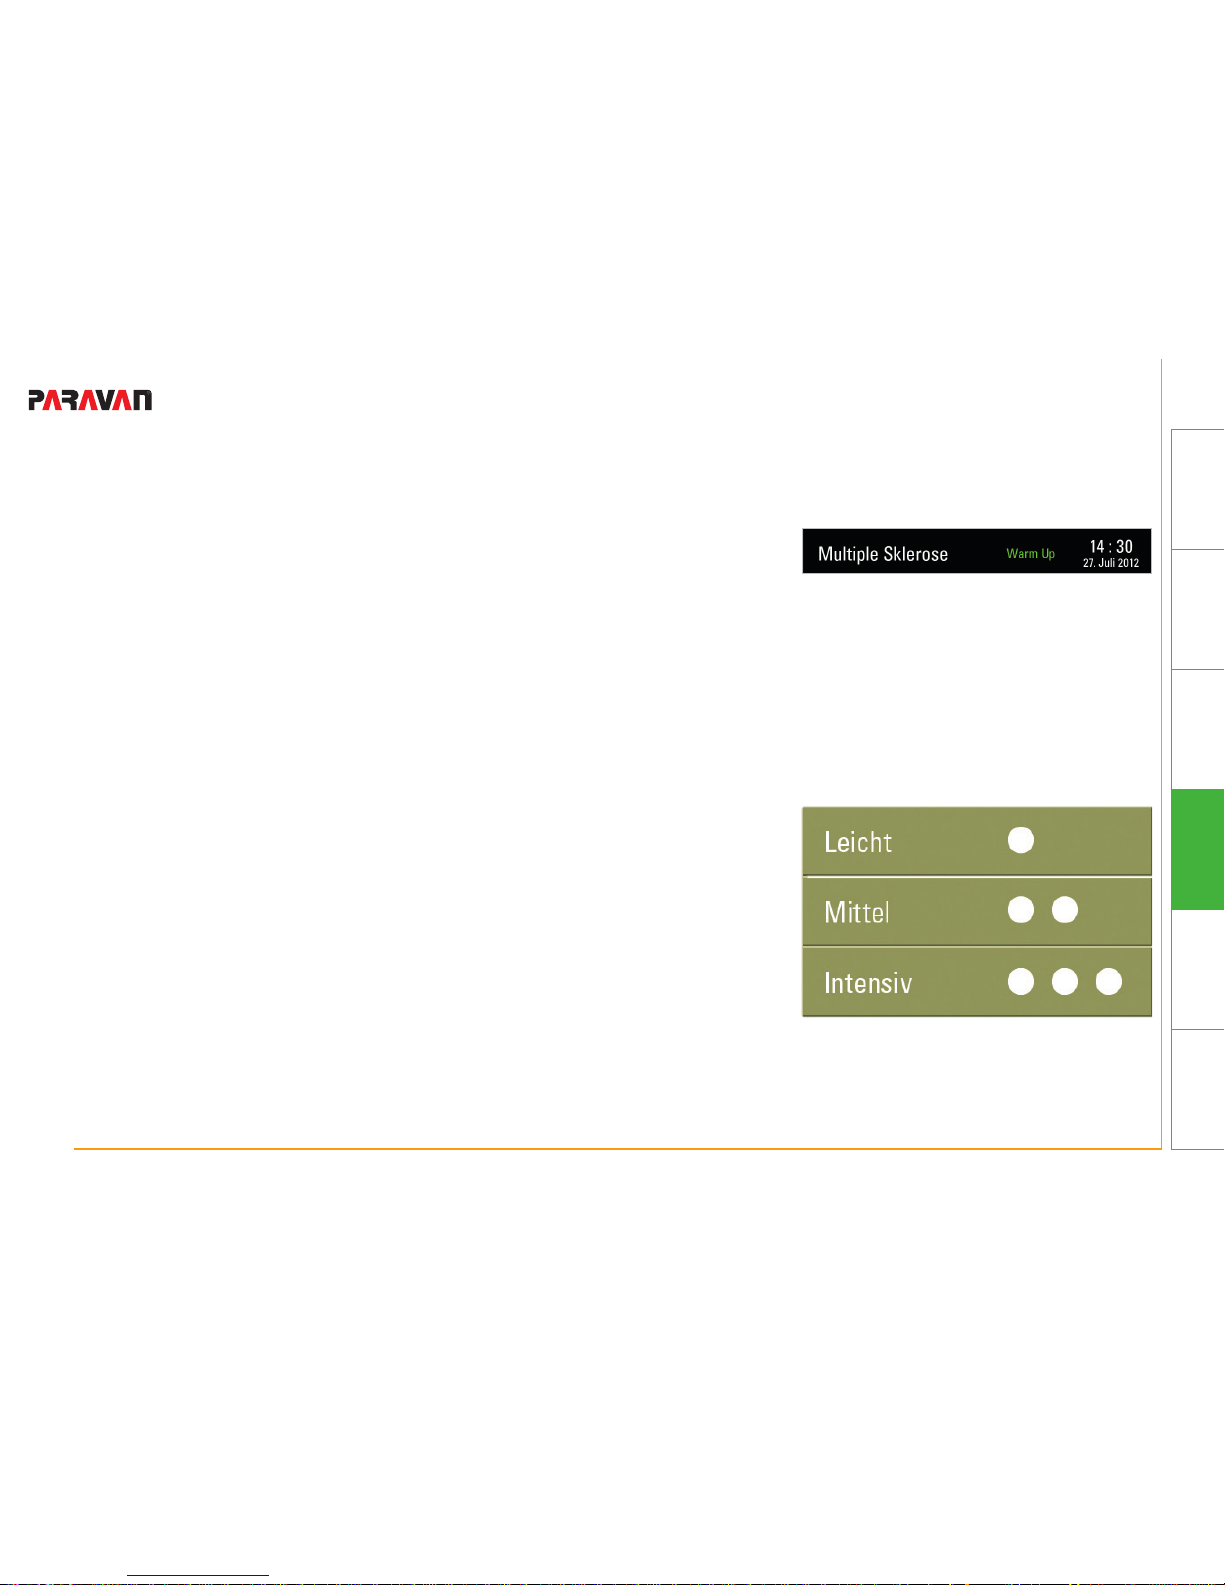
93 von 147
General
InformationPrepareOperateHelpTechnology
- Training programs -mov05_EN_Rev.2.1
Thestatuseldatthetopofthescreenmarginwilldisplaytheactive
training phase and its remaining duration. You can adjust the duration of the respective training phase in the current training at any time
by pressing the button Timer and adjusting the values to your requirements.
11.3 Training levels
The preset trainings in the indication-guided training let you choose
from three training levels so that you can easily adapt your training
according to your training progress and personal well-being:
• Easy:
Short training times and low rotational speeds
• Medium:
Medium training times and medium rotational speeds
• Intensive:
Long training times and high rotational speeds
Fig. 39: Display training program
and phase
Fig. 40: Display training level
Page 96
94 von 147
General
Information Prepare Operate Help Technology
- Training programs - mov05_EN_Rev.2.1
WARNING
Danger of injuries due to inappropriate or excessive
training
• It is imperative that you coordinate your training times
with your therapist and adjust the values if necessary.
• Choose an easy training level when starting out or if
you are beginning your training again after a longer
break.
Page 97
95 von 147
General
InformationPrepareOperateHelpTechnology
- Training programs -mov05_EN_Rev.2.1
11.4 Free training
This training menu lets you customize the training program yourself. Four training settings are possible.
11.4.1 Passive training
During passive training you are moved by the motor. You can adjust the rotational speed at any time up to
a maximum speed of 60 RPM.
11.4.2 Active training
Duringactivetrainingyoupedalagainstanindividuallyconguredbrakeresistanceofthemotor.Youcan
adjust the resistance to 20 levels, depending on your individual requirements, from 1 = very low resistance
to 20 = very high resistance. We recommend beginning with a low resistance at the beginning of your
training.
11.4.3 Soft training
During soft training your active muscle participation is gently supported by the motor. This is especially hel-
pfulwhenyourmusclestrengthhasdecreasedsignicantly.Themotorstartsataslowspeedtosupport
you.
Page 98
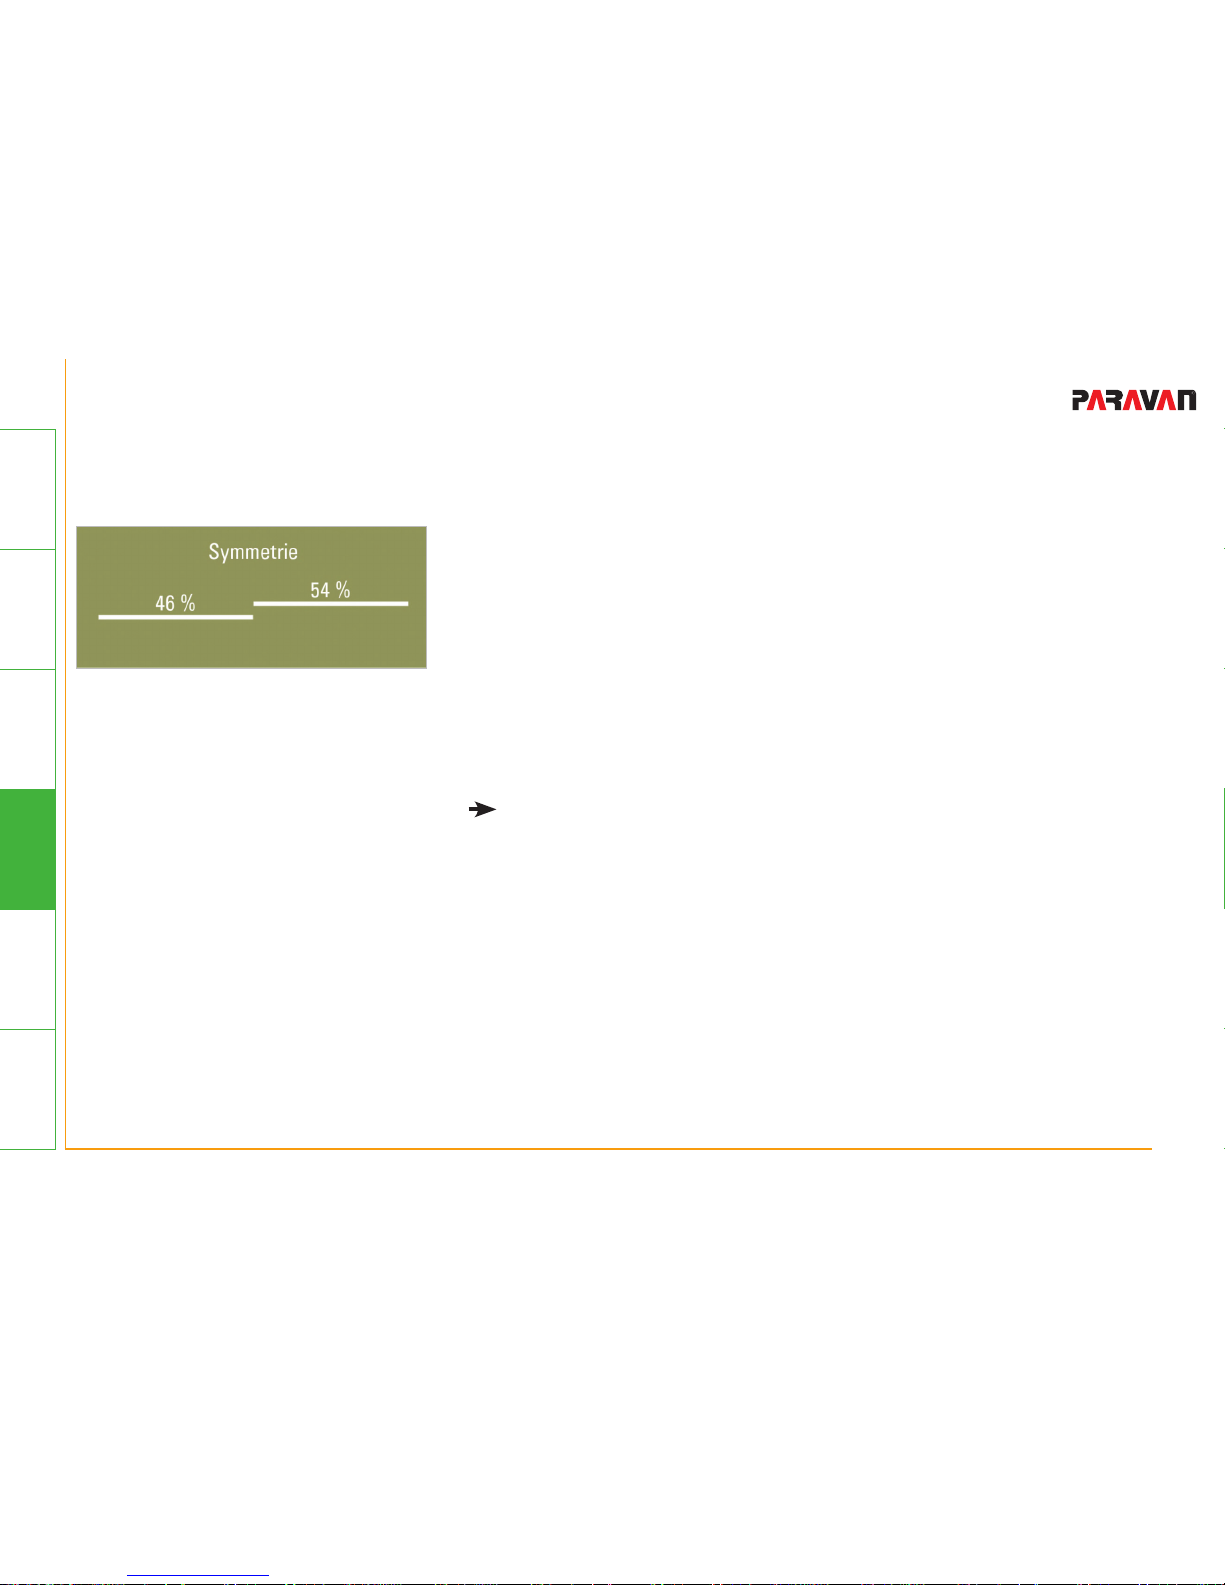
96 von 147
General
Information Prepare Operate Help Technology
- Training programs - mov05_EN_Rev.2.1
11.4.4 Symmetry training
Fig. 41: Display Symetry
Symmetry training is a variant of active training, which uses the
patient’s muscle strength. The objective is to equally, i.e. symmetrically, strain the right and left half of the body. The horizontal lines and
values indicate how intensely you are using your left or right leg. The
values always add up to 100 %. The goal is to keep both horizontal
lines at the same level; if possible, they should form a straight line.
Ideally, the displayed value should be 50 % on both sides.
NOTE
Please be aware that incorrect values may result when a
different pedal radius has been set for each side or when you
are not sitting in a central position in the chair or wheelchair.
Page 99
97 von 147
General
InformationPrepareOperateHelpTechnology
- Training programs -mov05_EN_Rev.2.1
Page 100
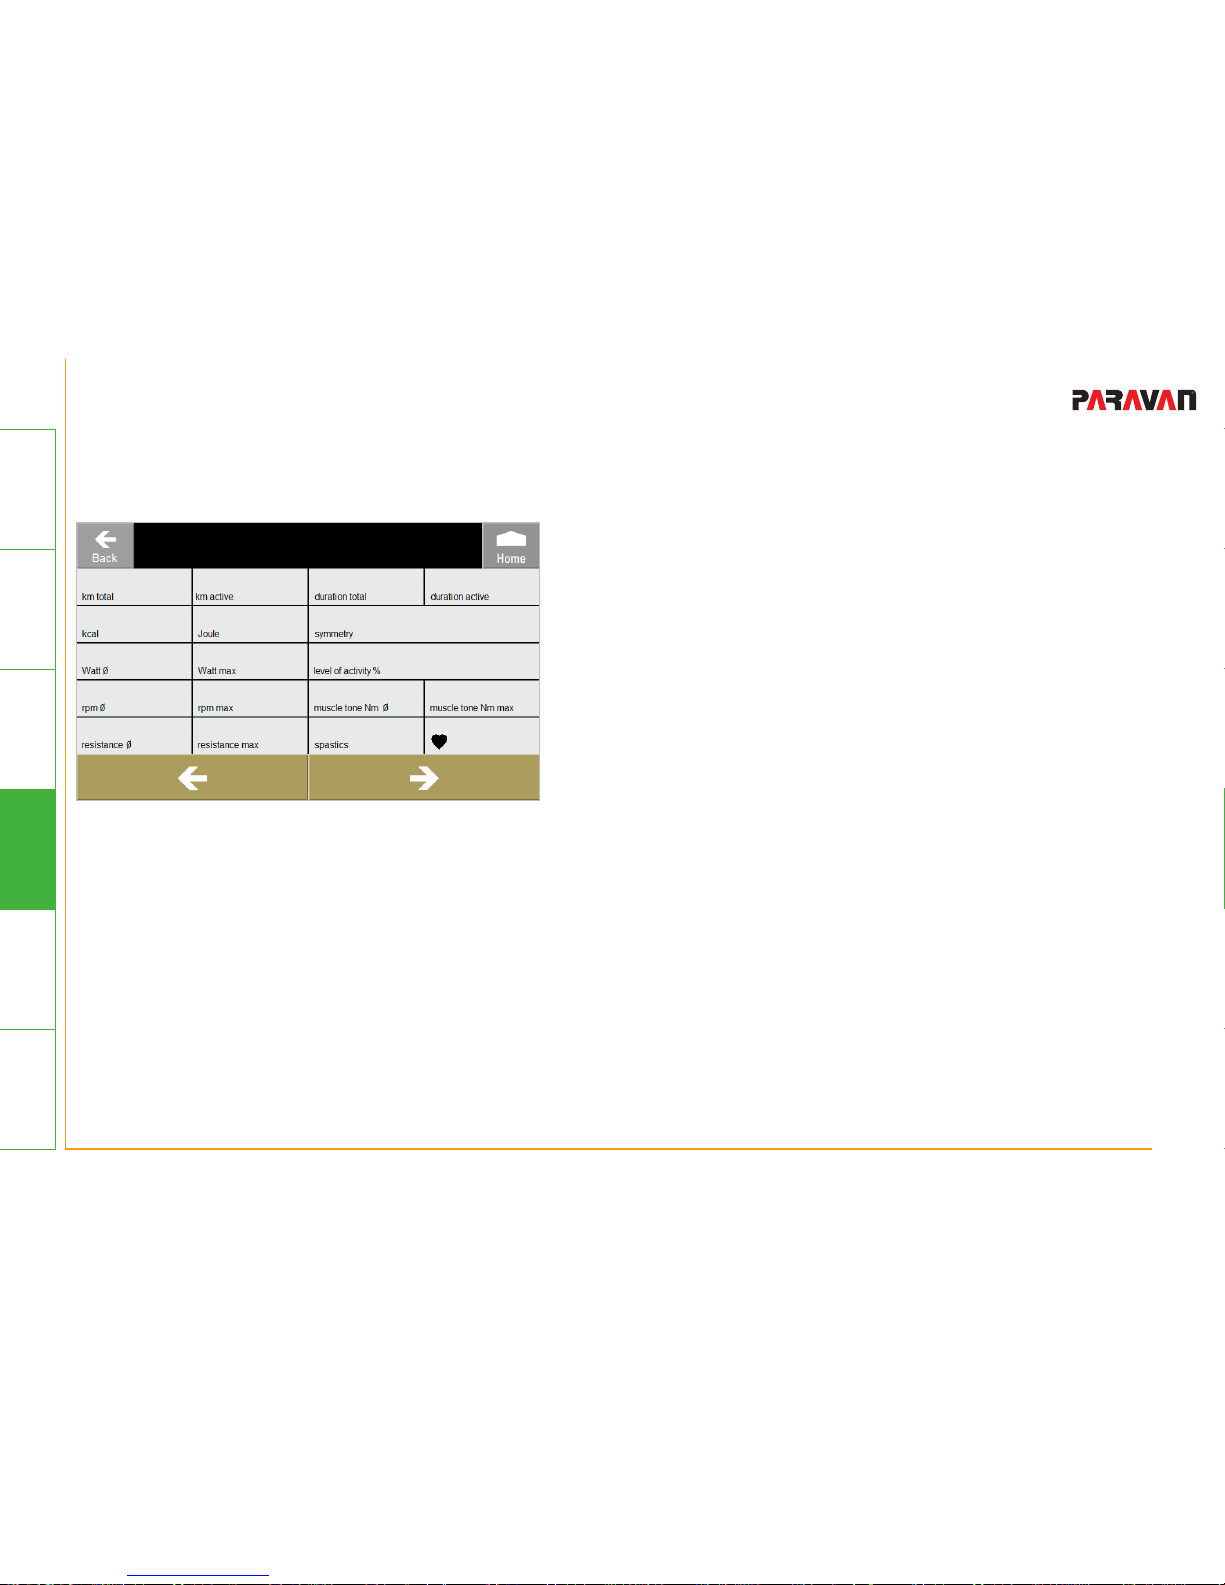
98 von 147
General
Information Prepare Operate Help Technology
- Training evaluation - mov05_EN_Rev.2.1
12. Training evaluation
12.1 Training analysis
Fig. 42: Training analysis
After ending your training, you can evaluate your results
under the menu Training analysis.
The following values will be displayed:
• Training distance (km total): Total covered dis-
tance (active training and passive training)
• Training distance active (km active): Distance
covered with own muscle strength (active training)
• Training duration (total duration): Total training
duration
• Training duration active (active duration): Per
centage of training duration in active training
• Energy (kcal): Expended energy in kcal
• Energy (joule): Expended energy in joule
• Symmetry: Average strain distribution of left and
right side
• Output (watt average): Average of generated
output in watt
• Output (watt max): Maximum of generated output
in watt during training
• Activity index (in %): Percentage of generated
distance with own muscle strength
 Loading...