

Parata Systems AccuCount II User Manual

AccuCount II User Guide
120-0313 Rev 04
The information in this document is proprietary
and confidential to Parata Systems, LLC. Content
may be changed at any time and without notice.
Parata Systems, LLC 2600 Meridian Parkway Durham, NC 27713 www.parata.com

AccuCount II User Guide
Publication Information
Copyright
©2014–2015 Parata Systems, LLC. All rights reserved.
No part of this documentation or the associated product may be reproduced, processed,
duplicated or published in any form by photocopying, microfilming, reprinting or other
process, in particular electronic means, without the written agreement of Parata Systems, LLC.
Trademarks
AccuCount, AccuMed, APM, Automated Will Call, AutoScript III, Baker Cassette, Baker Cell,
Baker Universal, Baker Universal 2010, onePac, Parata, Parata and design, Parata Consulting,
Parata Front Runners Club, Parata Express, Parata PASS 500, Parata PASS 208, Parata PASS
Pack, Parata Check PASS, Parata First PASS, Parata PASS Ware, Max, Mini, Circle of
Pharmacy Care, Circle of Pharmacy Care Fill Serve Adhere and design, Next-Generation
Pharmacist, Next Generation Pharmacist logo, and Parata Puts You Out In Front are
trademarks or registered trademarks of Parata Systems LLC.
AccuSign, AccuScript, AutoLink, Drug Image Library, Drug Image Library and design, and
Pharmacy 2000 are trademarks or registered trademarks of McKesson Automation Systems
Inc. PACMED and PACVISION are trademarks of McKesson Automation Inc. in the US.
PACMED and PACVISION are trademarks or registered trademarks of McKesson
Automation Canada Corporation in Canada.
Third-Party Acknowledgements
Microsoft and Windows are registered trademarks or trademarks of Microsoft Corporation in
the United States and/or other countries. Other brands and their products are trademarks or
registered trademarks of their respective holders and should be noted as such.
United States Government Rights
Use, duplication or disclosure by the U.S. government is subject to the restrictions set forth in
the Parata Systems, LLC Agreement and as provided in DFARS 227.7202-1(a), 227.7202-3(a)
and 227.7202-4 (1998 ed., revised June 21, 2005), DFARS 252.227-7013(b)(3) and (c) (NOV
1995, revised January 23, 2006), FAR 12.212(a) (1995), FAR 52.227-19, or FAR 52.227-14
(ALT III), as applicable. Unpublished rights are reserved under the copyright laws of the
United States.
Disclaimer
The information contained herein is considered accurate at the time of publication. Parata
Systems, LLC reserves the right to make changes to the documentation or associated product
at anytime without notice.
Customer Care
1-888-PARATA-1
ii 120-0313 Rev 04

Usage Disclaimer
The AccuCount II scale is a tool, but not a replacement of the Pharmacist, who remains the
final responsible party with respect to the handling, storing, dispensing, packaging and
administering of medications and supplies to patients or other third parties through or related
to the use of the AccuCount II scale.
Safety Representations and Symbols
Important instructions, which involve safety, are annotated with the appropriate information:
NOTE Notes provide tips and important rules on the correct operation of the AccuCount II.
WARNING! The exclamation point within an equilateral triangle on Warnings alerts you to the presence
of important operating and maintenance (servicing) instructions in the literature that
accompanies the appliance.
Double Insulation
Unit is double insulated.
UL Compliance
Complies with UL 61010-1, Second Ed. and CSA C22.2 No. 61010-1, Second Ed.
Damage to the scale or personal injury may occur if used in a manner not specified by the
manufacturer.
FCC/ICES-003 Compliance
This Class A digital apparatus complies with Canadian ICES-003. CET Appareil numérique de
la classe A est conforme á la norme NMB-003 du Canada.
This device complies with part 15 of the FCC Rules. Operation is subject to the following two
conditions: (1) This device may not cause harmful interference, and (2) this device must accept
any interference received, including interference that may cause undesired operation.
120-0313 Rev 04 iii

AccuCount II User Guide
Safety Recommendations
WARNING! The Bar Code Laser Scanner uses a low-power, visible laser diode. As with any bright light
source, such as the sun, you should avoid staring directly into the light beam. Momentary
exposure to a CDRH Class II laser is not known to be harmful. The Scanner is certified to
be a Class II Laser Product with the United States Department of Health and Human
Services Center for Devices and Radiological Health. Do not look directly into the laser
beam.
WARNING! The AccuCount II operates on 110VAC electrical voltage. The AccuCount II must only be
used with the power adapter supplied exclusively for use with the AccuCount II. Be sure to
hold the plug, not the cable, when disconnecting the device from an electrical outlet.
WARNING! Before inserting the power adapter, make sure that the operating voltage stated on the
power adapter agrees with the main voltage. If not, contact Parata Systems Customer
Care.
WARNING! If the power adapter or its cables is damaged, the AccuCount II must immediately be
disconnected from the electricity supply. The AccuCount II must only be operated with a
power adapter in perfect working condition.
WARNING! Take care when weighing liquids in containers so that no liquid spills into the AccuCount II
or into connections on the rear of the equipment or into the power adapter.
If a spill occurs, immediately unplug the AccuCount II from the main electricity supply and
contact Parata Systems Customer Care.
WARNING! There are no user-serviceable parts located within the AccuCount II.
Contact Parata Systems Customer Care for repair or replacement.
WARNING! Only UL-listed devices (or equivalent) may be used with the AccuCount II.
iv 120-0313 Rev 04

Contents
Chapter 1 – Installation
1.1 Parts included . . . . . . . . . . . . . . . . . . . . . . . . . . . . . . . . . . . . . . . . . . . . . . . . . . . . . . . . . . . 1-1
1.2 Inspection and assembly . . . . . . . . . . . . . . . . . . . . . . . . . . . . . . . . . . . . . . . . . . . . . . . . . . 1-2
1.2.1 Unpacking the scale . . . . . . . . . . . . . . . . . . . . . . . . . . . . . . . . . . . . . . . . . . . . . . . . 1-2
1.2.2 Transport, shipping, and storage. . . . . . . . . . . . . . . . . . . . . . . . . . . . . . . . . . . . . . 1-3
1.2.3 Choosing a suitable location . . . . . . . . . . . . . . . . . . . . . . . . . . . . . . . . . . . . . . . . . 1-3
1.2.4 Installing the scale . . . . . . . . . . . . . . . . . . . . . . . . . . . . . . . . . . . . . . . . . . . . . . . . . 1-3
1.3 Leveling and calibration . . . . . . . . . . . . . . . . . . . . . . . . . . . . . . . . . . . . . . . . . . . . . . . . . . . 1-8
1.3.1 Leveling . . . . . . . . . . . . . . . . . . . . . . . . . . . . . . . . . . . . . . . . . . . . . . . . . . . . . . . . . . 1-8
1.3.2 Calibration . . . . . . . . . . . . . . . . . . . . . . . . . . . . . . . . . . . . . . . . . . . . . . . . . . . . . . . . 1-8
Chapter2–Overview
2.1 About the AccuCount II . . . . . . . . . . . . . . . . . . . . . . . . . . . . . . . . . . . . . . . . . . . . . . . . . . . . 2-1
2.2 About the AccuCount II drug library . . . . . . . . . . . . . . . . . . . . . . . . . . . . . . . . . . . . . . . . . . 2-2
2.3 Functions . . . . . . . . . . . . . . . . . . . . . . . . . . . . . . . . . . . . . . . . . . . . . . . . . . . . . . . . . . . . . . . 2-3
2.4 Display . . . . . . . . . . . . . . . . . . . . . . . . . . . . . . . . . . . . . . . . . . . . . . . . . . . . . . . . . . . . . . . . . 2-5
2.4.1 Application screens . . . . . . . . . . . . . . . . . . . . . . . . . . . . . . . . . . . . . . . . . . . . . . . . 2-6
2.4.2 Info screens. . . . . . . . . . . . . . . . . . . . . . . . . . . . . . . . . . . . . . . . . . . . . . . . . . . . . . . 2-9
2.5 Navigating screens and menus . . . . . . . . . . . . . . . . . . . . . . . . . . . . . . . . . . . . . . . . . . . . . 2-9
2.6 Alphanumeric input . . . . . . . . . . . . . . . . . . . . . . . . . . . . . . . . . . . . . . . . . . . . . . . . . . . . . . 2-10
2.6.1 Finding additional characters . . . . . . . . . . . . . . . . . . . . . . . . . . . . . . . . . . . . . . . 2-10
2.6.2 Number and character entry . . . . . . . . . . . . . . . . . . . . . . . . . . . . . . . . . . . . . . . . 2-11
2.6.3 Examples. . . . . . . . . . . . . . . . . . . . . . . . . . . . . . . . . . . . . . . . . . . . . . . . . . . . . . . . 2-11
2.7 Product specifications. . . . . . . . . . . . . . . . . . . . . . . . . . . . . . . . . . . . . . . . . . . . . . . . . . . . 2-12
120-0313 Rev 04 v

AccuCount II User Guide
Chapter 3 – Operations
3.1 Powering on the scale . . . . . . . . . . . . . . . . . . . . . . . . . . . . . . . . . . . . . . . . . . . . . . . . . . . . . 3-1
3.2 Home screen . . . . . . . . . . . . . . . . . . . . . . . . . . . . . . . . . . . . . . . . . . . . . . . . . . . . . . . . . . . . 3-2
3.3 Applications menu . . . . . . . . . . . . . . . . . . . . . . . . . . . . . . . . . . . . . . . . . . . . . . . . . . . . . . . . 3-3
3.3.1 Weighing application . . . . . . . . . . . . . . . . . . . . . . . . . . . . . . . . . . . . . . . . . . . . . . . 3-3
3.3.2 Piece Counting application . . . . . . . . . . . . . . . . . . . . . . . . . . . . . . . . . . . . . . . . . . 3-5
3.3.3 Rx-Check application . . . . . . . . . . . . . . . . . . . . . . . . . . . . . . . . . . . . . . . . . . . . . . . 3-7
3.3.4 Non-Rx-Check Application . . . . . . . . . . . . . . . . . . . . . . . . . . . . . . . . . . . . . . . . . . 3-11
3.4 User menu . . . . . . . . . . . . . . . . . . . . . . . . . . . . . . . . . . . . . . . . . . . . . . . . . . . . . . . . . . . . . 3-16
3.5 Settings menu . . . . . . . . . . . . . . . . . . . . . . . . . . . . . . . . . . . . . . . . . . . . . . . . . . . . . . . . . . 3-17
Chapter 4 – Customization
4.1 Administrator submenu. . . . . . . . . . . . . . . . . . . . . . . . . . . . . . . . . . . . . . . . . . . . . . . . . . . . 4-2
4.1.1 Define user submenu. . . . . . . . . . . . . . . . . . . . . . . . . . . . . . . . . . . . . . . . . . . . . . . 4-4
4.1.2 User 1|2|3|4|5|6|7 . . . . . . . . . . . . . . . . . . . . . . . . . . . . . . . . . . . . . . . . . . . . . . 4-6
4.1.3 Define administrator. . . . . . . . . . . . . . . . . . . . . . . . . . . . . . . . . . . . . . . . . . . . . . . . 4-8
4.1.4 Theft protection. . . . . . . . . . . . . . . . . . . . . . . . . . . . . . . . . . . . . . . . . . . . . . . . . . . . 4-9
4.2 Configuration submenu. . . . . . . . . . . . . . . . . . . . . . . . . . . . . . . . . . . . . . . . . . . . . . . . . . . 4-11
4.2.1 Weighing parameters . . . . . . . . . . . . . . . . . . . . . . . . . . . . . . . . . . . . . . . . . . . . . . 4-12
4.2.2 Calibration . . . . . . . . . . . . . . . . . . . . . . . . . . . . . . . . . . . . . . . . . . . . . . . . . . . . . . . 4-13
4.2.3 Protocol . . . . . . . . . . . . . . . . . . . . . . . . . . . . . . . . . . . . . . . . . . . . . . . . . . . . . . . . . 4-16
4.2.4 Interface RJ45. . . . . . . . . . . . . . . . . . . . . . . . . . . . . . . . . . . . . . . . . . . . . . . . . . . . 4-24
4.2.5 Device settings . . . . . . . . . . . . . . . . . . . . . . . . . . . . . . . . . . . . . . . . . . . . . . . . . . . 4-25
4.2.6 Date/Time . . . . . . . . . . . . . . . . . . . . . . . . . . . . . . . . . . . . . . . . . . . . . . . . . . . . . . . 4-27
4.2.7 Min. sample weight. . . . . . . . . . . . . . . . . . . . . . . . . . . . . . . . . . . . . . . . . . . . . . . . 4-28
4.2.8 Properties . . . . . . . . . . . . . . . . . . . . . . . . . . . . . . . . . . . . . . . . . . . . . . . . . . . . . . . 4-29
4.2.9 Balance information . . . . . . . . . . . . . . . . . . . . . . . . . . . . . . . . . . . . . . . . . . . . . . . 4-30
4.2.10 Firmware history . . . . . . . . . . . . . . . . . . . . . . . . . . . . . . . . . . . . . . . . . . . . . . . . . . 4-30
4.3 Application options . . . . . . . . . . . . . . . . . . . . . . . . . . . . . . . . . . . . . . . . . . . . . . . . . . . . . . 4-31
4.3.1 Weighing menu . . . . . . . . . . . . . . . . . . . . . . . . . . . . . . . . . . . . . . . . . . . . . . . . . . . 4-31
4.3.2 Piece Counting menu . . . . . . . . . . . . . . . . . . . . . . . . . . . . . . . . . . . . . . . . . . . . . . 4-36
4.3.3 Submenus common to Weighing and Piece Counting . . . . . . . . . . . . . . . . . . . . 4-40
4.3.4 Rx-Check and Non-Rx-Check settings . . . . . . . . . . . . . . . . . . . . . . . . . . . . . . . . . 4-62
vi 120-0313 Rev 04

Chapter 5 – Maintenance
5.1 Cleaning . . . . . . . . . . . . . . . . . . . . . . . . . . . . . . . . . . . . . . . . . . . . . . . . . . . . . . . . . . . . . . . . 5-1
5.2 Updating the drug database . . . . . . . . . . . . . . . . . . . . . . . . . . . . . . . . . . . . . . . . . . . . . . . . 5-2
5.2.1 Installing the Drug Info Download tool . . . . . . . . . . . . . . . . . . . . . . . . . . . . . . . . . 5-2
5.2.2 Preparing the scale for the drug database update . . . . . . . . . . . . . . . . . . . . . . . 5-5
5.2.3 Transferring a new database to the scale . . . . . . . . . . . . . . . . . . . . . . . . . . . . . . 5-5
5.3 Backing up the drug database to a PC. . . . . . . . . . . . . . . . . . . . . . . . . . . . . . . . . . . . . . . . 5-8
5.4 Restoring a drug database from a PC . . . . . . . . . . . . . . . . . . . . . . . . . . . . . . . . . . . . . . . 5-10
5.5 Updating the firmware. . . . . . . . . . . . . . . . . . . . . . . . . . . . . . . . . . . . . . . . . . . . . . . . . . . . 5-11
5.5.1 Installing the Universal Download tool . . . . . . . . . . . . . . . . . . . . . . . . . . . . . . . . 5-11
5.5.2 Preparing the scale for the firmware update . . . . . . . . . . . . . . . . . . . . . . . . . . . 5-14
5.5.3 Installing the new firmware on the scale . . . . . . . . . . . . . . . . . . . . . . . . . . . . . . 5-15
5.6 Programming the handheld bar code scanner . . . . . . . . . . . . . . . . . . . . . . . . . . . . . . . . 5-21
Contents
Chapter 6 – Troubleshooting
120-0313 Rev 04 vii

AccuCount II User Guide
viii 120-0313 Rev 04

Installation
This chapter provides information about unpacking, installing, leveling, and
calibrating an AccuCount II scale.
1.1 Parts included
Table 1-1 shows the items that should be included with your AccuCount II scale.
No tools are required for assembly.
Table 1-1: Parts included with your AccuCount II scale kit
Subassembly Part Part number
Scale Box AccuCount II Scale 360-9370-001
Power Adapter 601502.00
6 ft. USB Type-A to USB Type-B Cable 004-402
Weighing Pan 601504.00
Pan Support 601505.00
Draft shield 601496.00
Accessories Box Scanner w/USB Cable 650-0252
Gooseneck Stand with Mount 306-0450
Two (2) Weighing Scoops 601489.00
Additional Items AccuCount II User Guide (this book) 120-0313
Compounding Plate 601556.00
AccuCount II Upload/Download Utilities CD 411-0113
Library Version Information Sheet 120-0288
Chapter 1
If you find that something is missing from your AccuCount II shipment please call
1-888-PARATA-1.
120-0313 Rev 04 1–1

AccuCount II User Guide
1.2 Inspection and assembly
When you receive your AccuCount II, be sure to confirm that all parts and accessories
are supplied, per Table 1-1. This section details how to unpack and assemble the scale.
1.2.1 Unpacking the scale
The scale is delivered in an environmentally-friendly package, specifically developed
for protection during transportation.
NOTE Retain the original packaging in order to avoid transportation damages when shipping or
transporting the scale, or to allow the scale to be stored in the best conditions if it is out of
operation for an extended period.
In order to avoid damage, attention must be given to the following points when
unpacking the AccuCount II:
• Unpack the scale carefully. It is a precision instrument.
• When outside temperatures are very low, the scale should first be stored for a few
hours in the unopened transport package in a dry room at normal temperature, so
that no condensation settles on the scale when unpacking.
• Check the scale immediately after unpacking for externally visible damage. If you
find transport damage, please inform your Parata Systems Customer Care
representative immediately.
• If the scale is not to be used immediately after purchase but only at a later time, it
should be stored in a dry place where fluctuations in temperature are as low as
possible.
• Read through these operating instructions, even if you already have experience with
scales. Pay particular attention to the “Safety Recommendations” on page iv.
1–2 120-0313 Rev 04

1.2.2 Transport, shipping, and storage
Your scale is a precision instrument. Treat it with care. If you would like to transport,
ship, or store the scale for an extended period, disconnect it from the electricity supply,
clean it thoroughly (see “Cleaning” on page 5-1) and ensure the following:
• Remove the weighing pan and weighing pan support from the scale!
• No violent shaking, vibrations, or severe impacts
• No significant temperature fluctuations (to avoid condensation)
• No direct solar radiation
• No moisture
CAUTION The scale should preferably be transported, shipped, or stored in the original packaging,
as this provides optimum protection for the scale.
Chapter 1 – Installation
1.2.3 Choosing a suitable location
The scale’s location must be chosen to optimize operation of your scale, so that the
allowable ambient conditions and prerequisites are met and maintained:
• Place the scale on a solid, firm, level, and preferably vibration-proof base.
• Ensure that the scale cannot be shaken or knocked over.
• Protect the scale from direct solar radiation.
• Avoid drafts and excessive temperature fluctuations around the scale.
• Avoid magnets and magnetic fields, including those generated by radios, portable
phones, speakers, power adapters, and power strips.
1.2.4 Installing the scale
The AccuCount II scale is designed to work standalone, or you can use it in
conjunction with the included Datalogic Gryphon USB bar code scanner, an optional
USB keyboard (not included), or an optional Dymo SE450 USB Label Writer printer
(not included).
To install the scale, the scanner, and a USB keyboard
1 Unpack all components and remove them from their bags and bubble wrap.
NOTE Save the original packaging, for possible future transport, shipping, or storage.
2 Optional: Install the gooseneck stand and cradle for the handheld bar code scanner onto the
scale.
120-0313 Rev 04 1–3
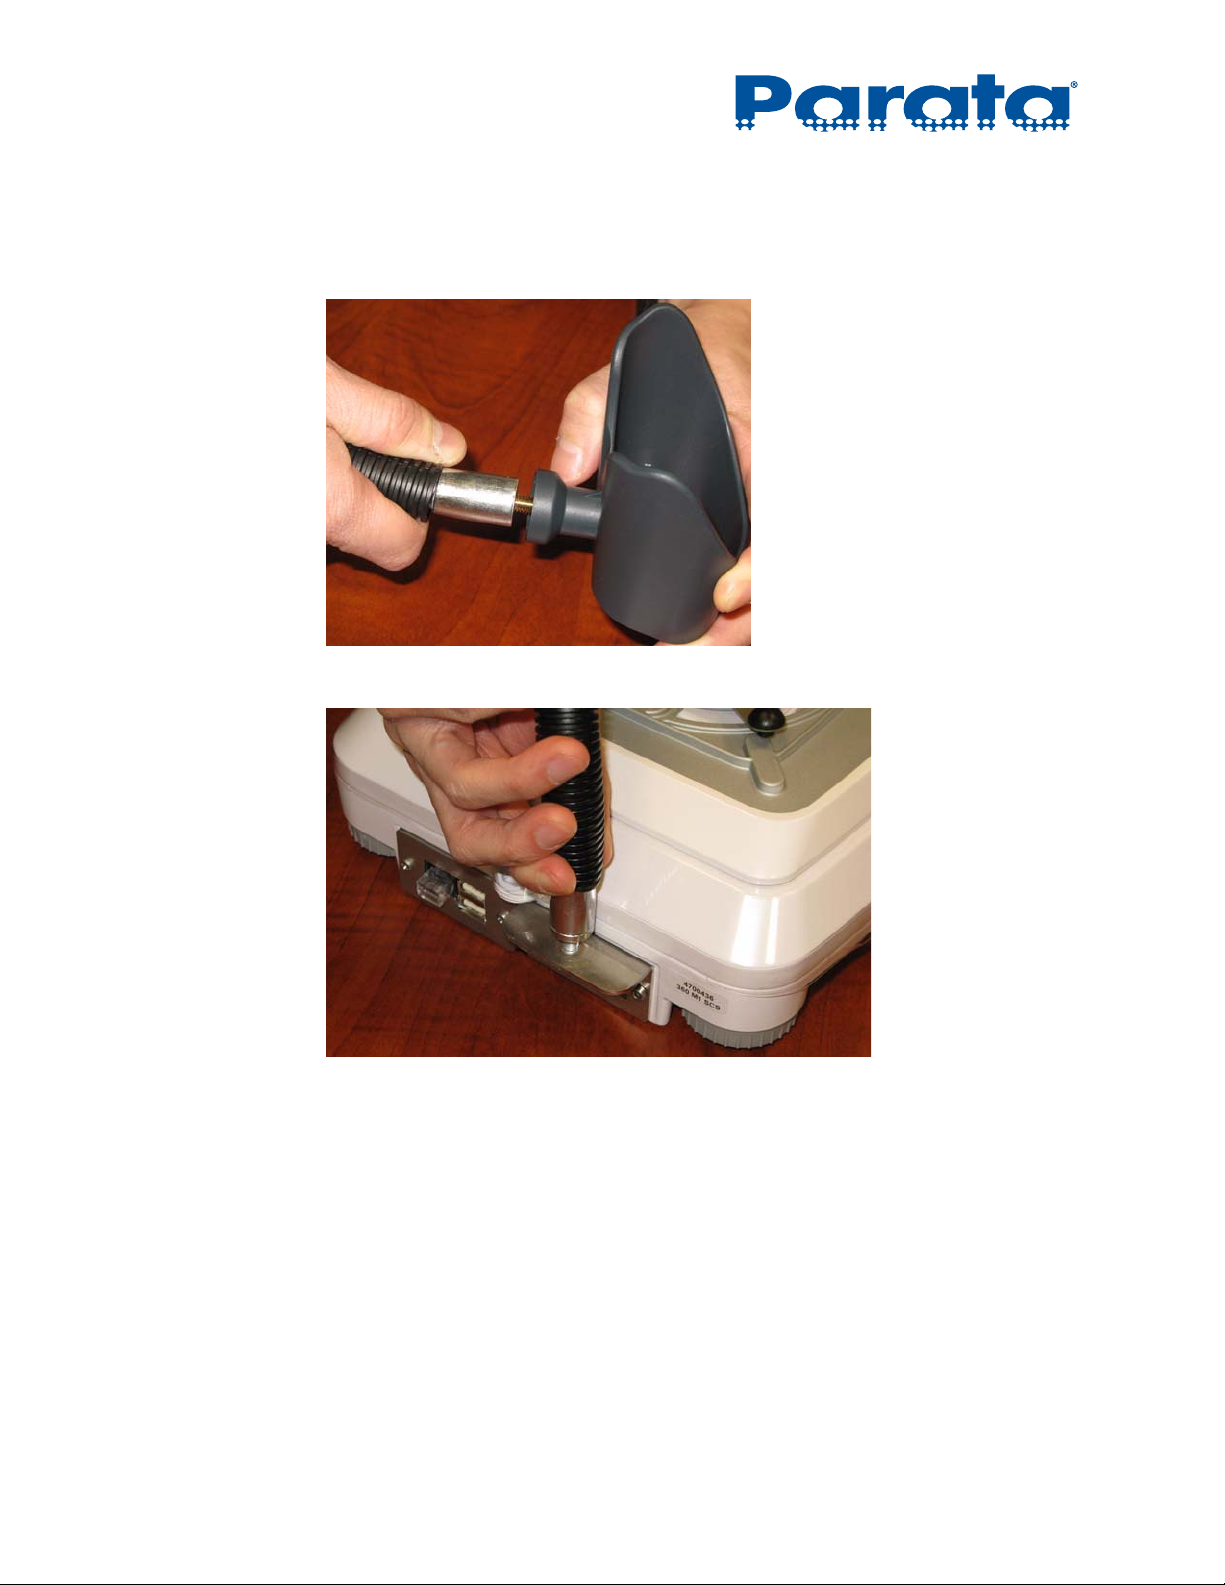
AccuCount II User Guide
a. Screw the bar code scanner cradle into the gooseneck.
Hold the metal core of the gooseneck as you screw on the cradle, to prevent it from
spinning within the black flexible tubing.
b. Screw the gooseneck onto the threaded post at the back of the scale.
3 Position the scale on a firm, level, vibration-proof surface.
Ideally, place the scale in its permanent location: moving the scale requires re-leveling and
re-calibration. Avoid placing the scale beneath an air conditioning or heating vent, as the
forced air can affect the scale’s accuracy.
1–4 120-0313 Rev 04
Chapter 1 – Installation
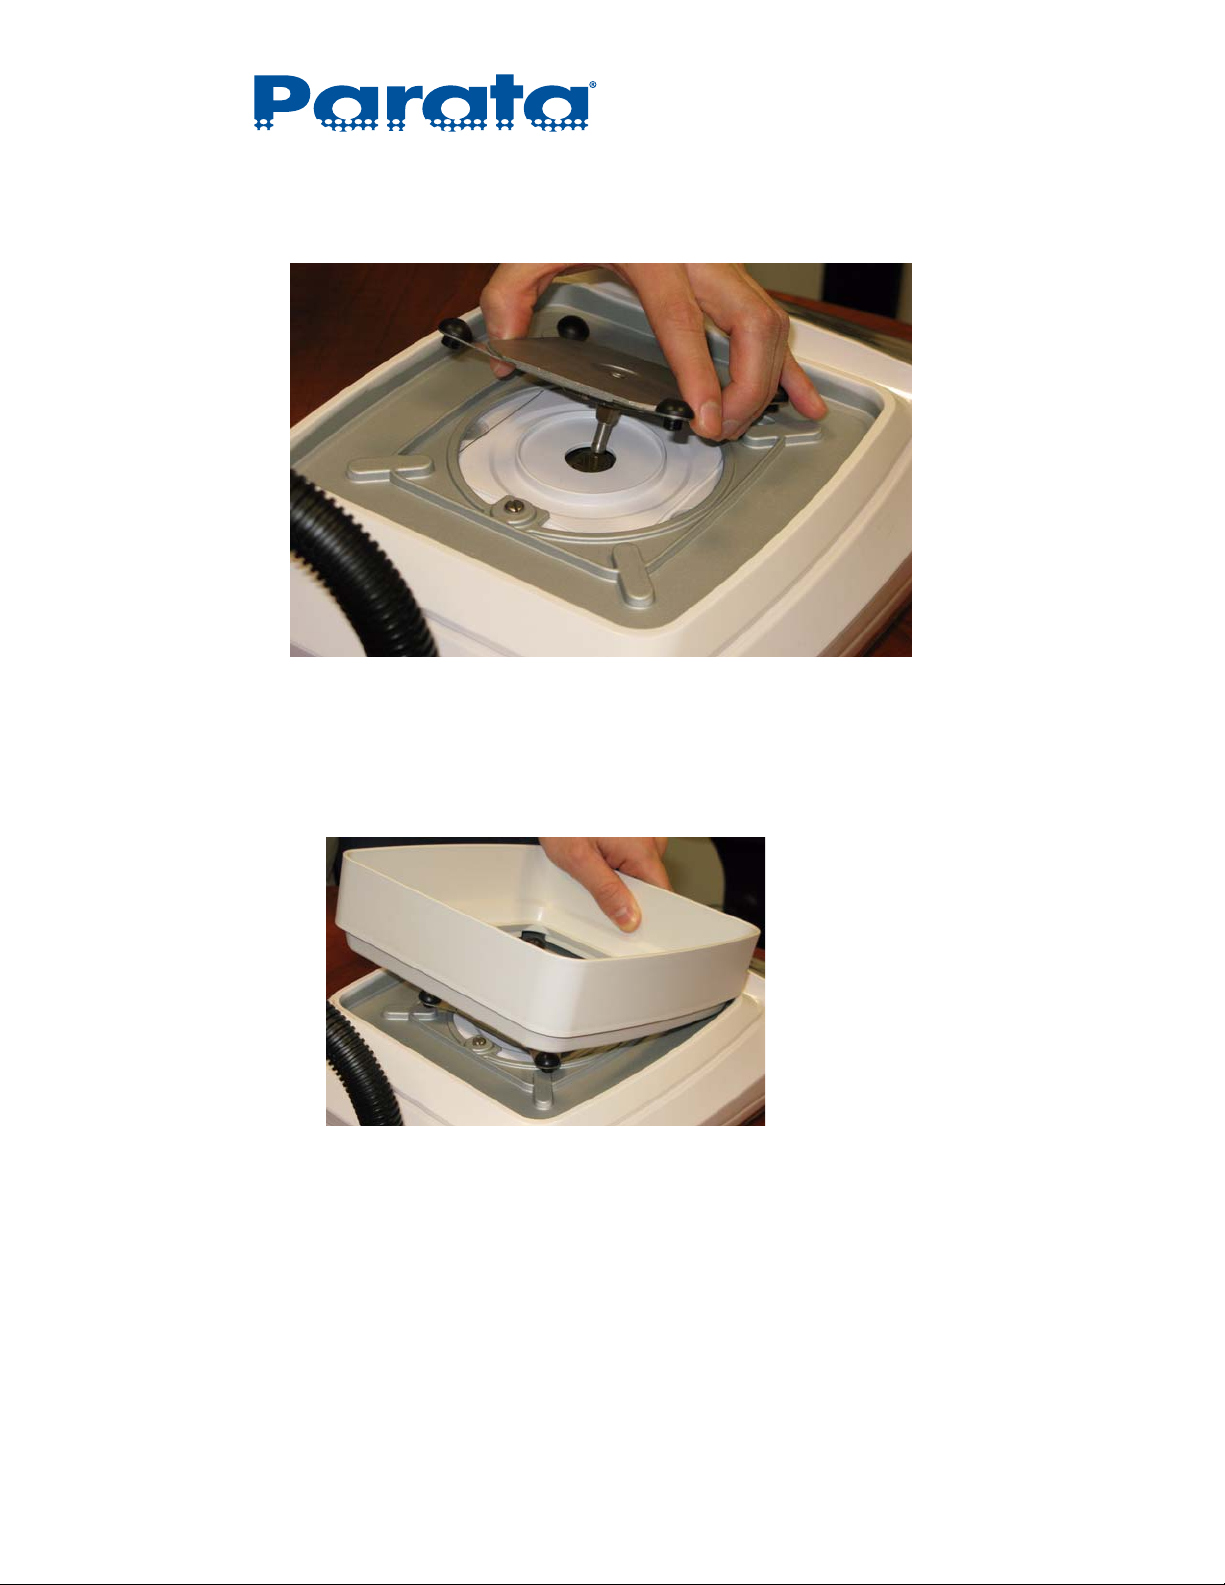
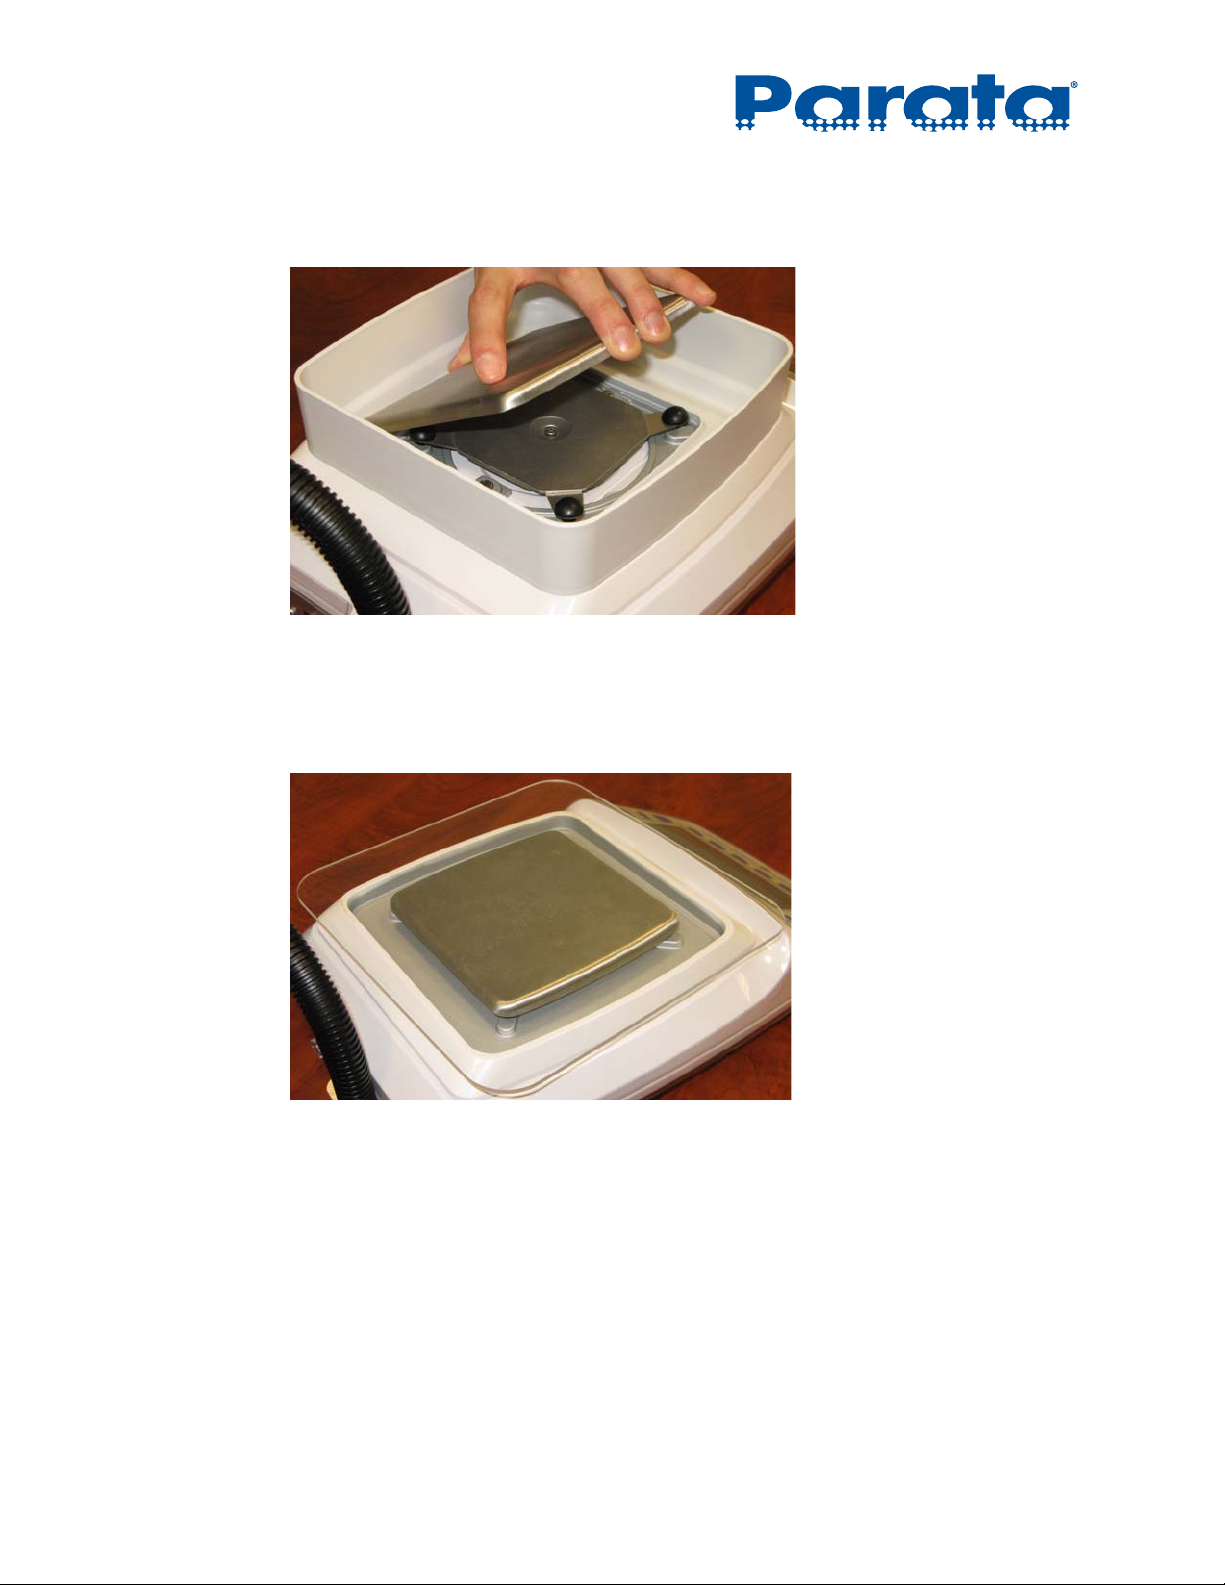
4 Place the weighing pan support onto the scale so that its centering bolt goes into the center,
square hole over the scale mechanism.
5 Do one of the following:
If you are going to use the compounding plate, set the draft shield aside or store it.
If you are not going to use the compounding plate, place the draft shield on the scale so
that it drops into the rectangular recess at the top of the scale (the long dimension is
oriented front-to-back).
6 Remove the protective paper from the top of the weighing pan, and then place the weighing
pan onto the weighing pan support.
120-0313 Rev 04 1–5
AccuCount II User Guide
NOTE Ensure that the two black rings on the bottom of the weighing pan center over their
respective black bumpers on the weighing pan support.
7 If you are going to use the compounding plate, center it on top of the weighing pan.
NOTE The draft shield can not be installed while you are using the compounding plate
(unless you are using the compounding plate on top of the draft shield during
calibration, to minimize the impact of drafts).
1–6 120-0313 Rev 04
Chapter 1 – Installation
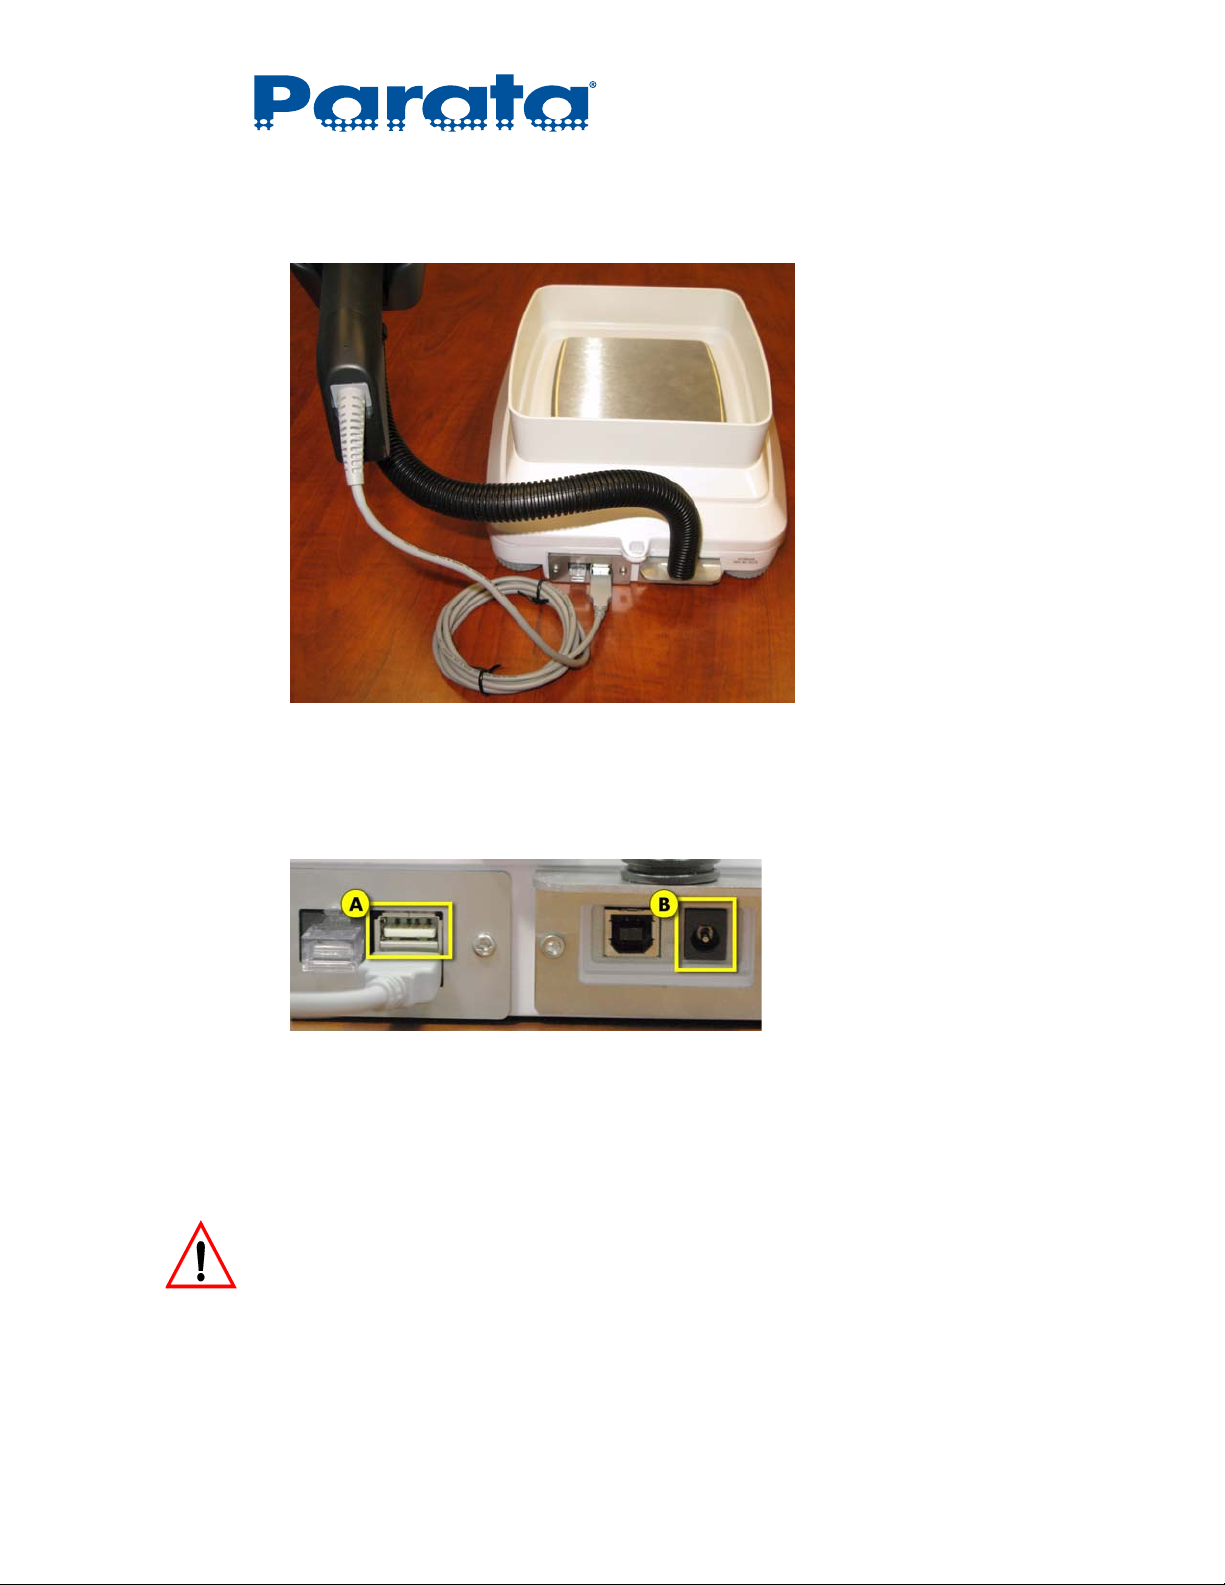
8 Connect the included handheld bar code scanner to one of the Type A (wide) USB ports on the
rear of the scale, and then place the scanner into the cradle.
9 Optional: Attach one of the following devices to the other Type A (wide) USB port on the rear of
the scale (A):
Standard USB keyboard
Dymo SE450 USB Label Writer printer
NOTE You can swap out keyboard, scanner, and printer as needed.
Each time that you change USB devices, disconnect and reconnect the power supply
to ensure that the newly connected devices are recognized.
10 Connect the power adapter to the power port on scale (B) and then plug the power adapter into
a 110VAC wall socket.
WARNING! The scale must be operated with the supplied power adapter only. Before you connect the
power adapter to the outlet, check that the operating voltage on the power adapter matches
the local outlet voltage. If it does not, contact Parata Systems Customer Care.
120-0313 Rev 04 1–7

AccuCount II User Guide
1.3 Leveling and calibration
The AccuCount II has a high-precision balance which must be leveled and calibrated
for the scale to function properly. When you first install the scale and any time that the
scale is physically moved, perform the leveling and calibration functions in this
section.
NOTE It is the owner's responsibility to calibrate the AccuCount II.
1.3.1 Leveling
To function properly, the scale must be precisely horizontal. The scale is fitted with
one spirit level and two adjustable feet for level-control. The feet can be used to
compensate for small height differences and/or unevenness in the surface where the
scale is placed. The two feet must be adjusted as follows:
• both of the feet are in contact with the surface
• the air bubble is precisely in the center of the bubble level, as shown below:
Incorrect Correct
NOTE In order to get exact measurements, the scale must be carefully leveled during initial
installation and after each time that it is moved or relocated.
Do not slide or move the scale when it is not in use, as it must be leveled before being
used again.
1.3.2 Calibration
Calibration of the scale must be carried out on initial installation and after each
subsequent relocation. To ensure exact measurements, calibration of the scale every
30 to 60 days is recommended.
Do not move or slide the scale when it is not in use, as it must be recalibrated before
being used again.
1–8 120-0313 Rev 04
There are five calibration settings:
• Off – no calibration available
• Internal calibration – (default, recommended) using the scale’s internal weights
• External – using the Parata-supplied 200-gram weight (part number 601495.00)
• External user defined – using a user-supplied, specified weight
• Automatic calibration – at a specified time and/or after a specified temperature change
NOTE If a scale has been sealed to conform to local regulations, then only Internal and
Automatic calibration are available.
1.3.2.a Internal calibration
The recommended calibration mode is Internal calibration. This is also the calibration
mode for which the scale is configured when it is shipped.
Chapter 1 – Installation
Internal calibration can be performed as needed, and it should be performed when the
scale is moved and every 30 to 60 to ensure accurate readings.
To perform an Internal calibration
1 Select the Weighing application from the Home screen using the soft keys (see “Applications
menu” on page 3-3).
2 Press-and-hold the Tare key until the Calibration menu appears.
NOTE For internal calibration, Parata recommends placing the compounding plate on top of
the draft shield for maximum isolation from air current and, thus, maximum accuracy.
3Use the and soft keys to select Calibration.
4 Press the Enter soft key.
The calibration starts.
NOTE You can interrupt the calibration at any time by pressing the On/Off key.
5 The weighing or counting application resumes when the Internal calibration is complete.
120-0313 Rev 04 1–9
AccuCount II User Guide
1.3.2.b Automatic calibration
You can set the AccuCount II to calibrate automatically at a particular time of day, when
the ambient temperature changes by a set amount, or both.
Automatic calibration performs an internal calibration based on those settings
(see “Calibration” on page 4-13 for more information).
NOTE Parata recommends that you set the automatic calibration time to a time outside of
operating hours.
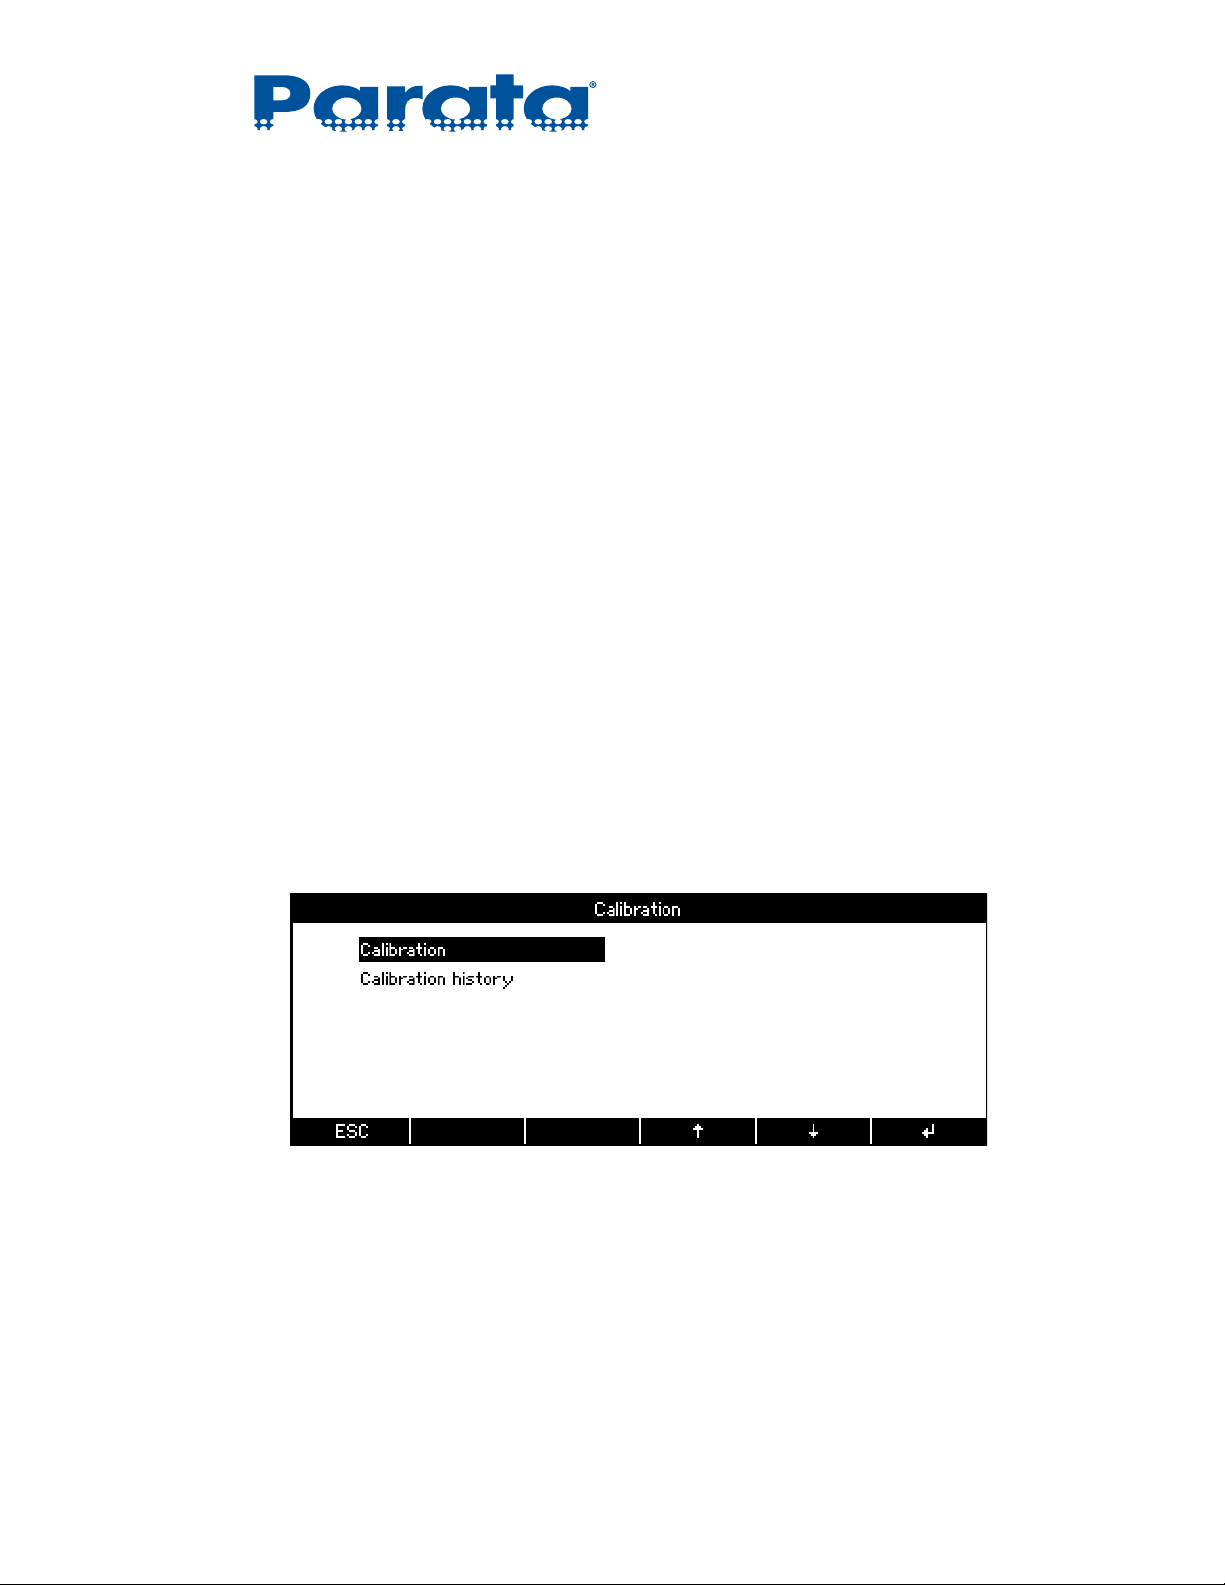
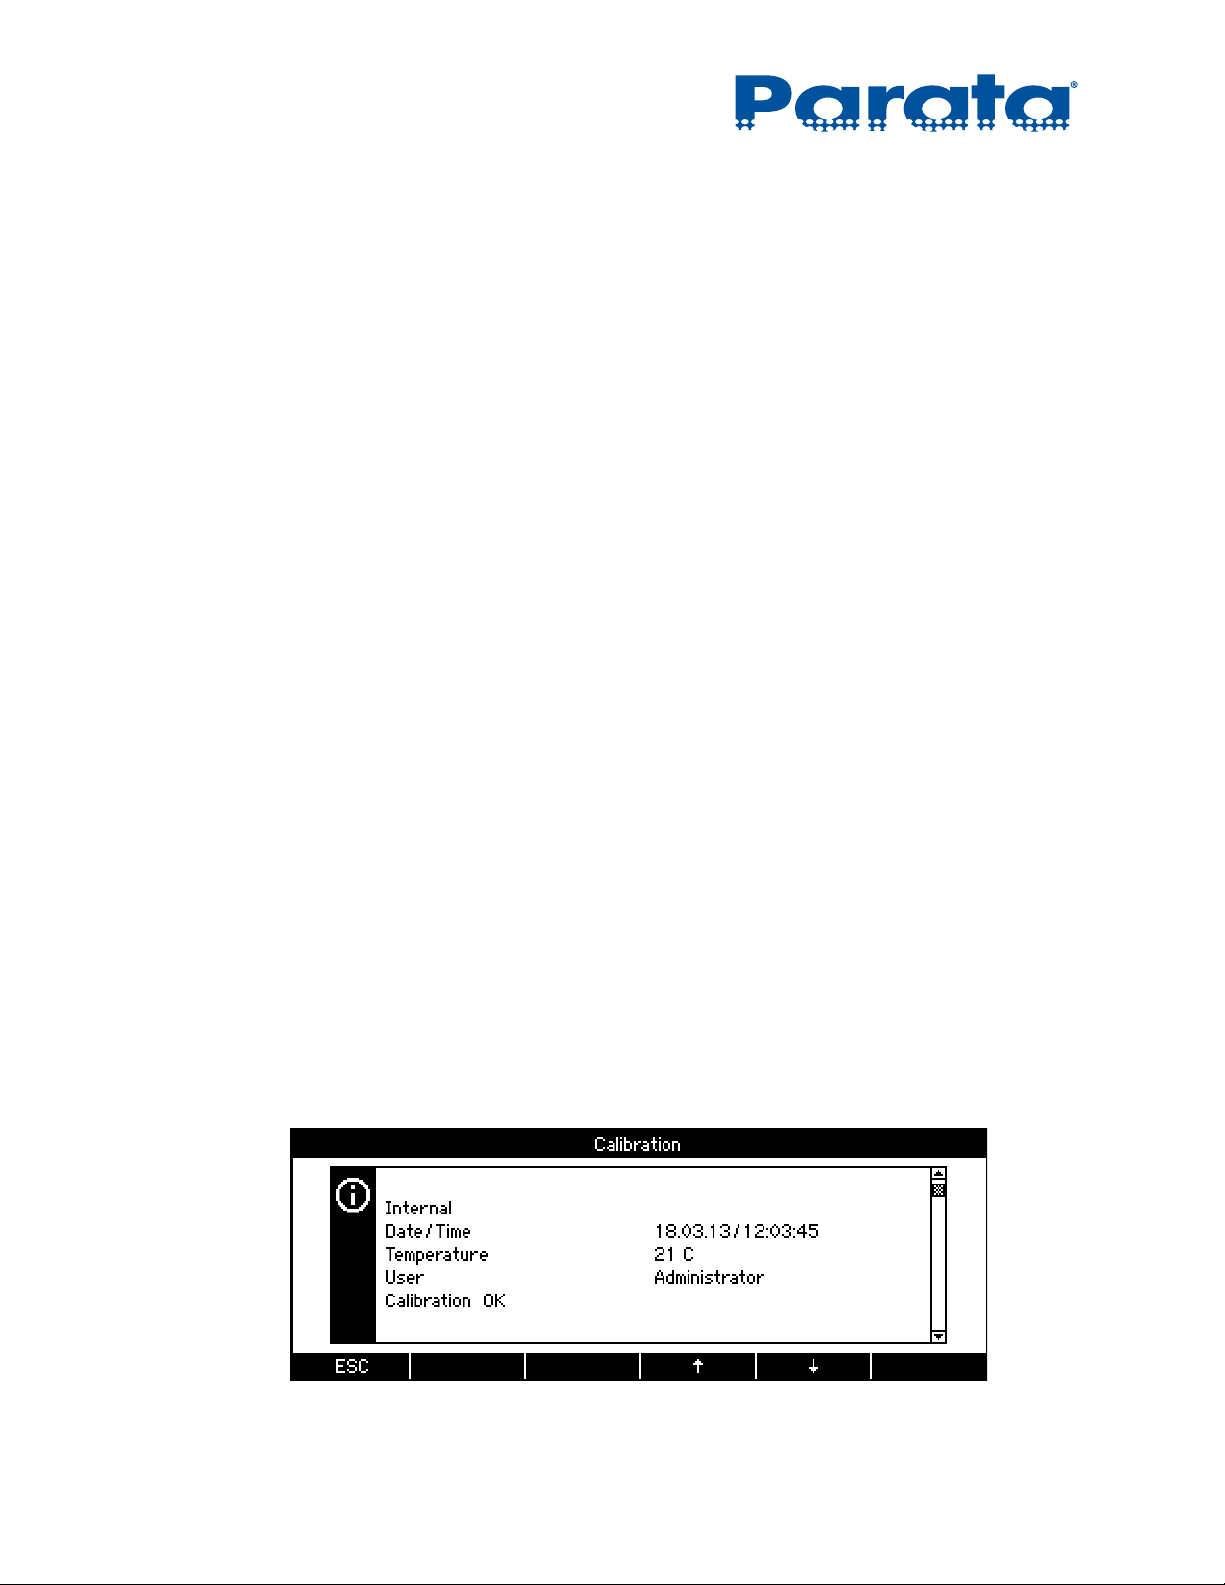
1.3.2.c Calibration history
The AccuCount II maintains a record of every calibration that it conducts, be the
calibration automatic or requested by a user. Each record includes the following
details:
• Calibration type (see “Calibration” on page 4-13)
• Date and time
• Ambient temperature
• User logged into the scale at the time of calibration
• Calibration results (e.g., Calibration OK)
To check the calibration history
1 Select the Weighing application from the Home screen using the soft keys (see “Applications
menu” on page 3-3).
2 Press-and-hold the Tare key until the Calibration menu appears.
3Use the and soft keys to select Calibration history.
4 Press the Enter soft key.
The calibration history info screen appears (scrolled down to show a record, below).
See “Info screens” on page 2-9 for more information about using this screen.
1–10 120-0313 Rev 04
1.3.2.d Calibration compliance
The AccuCount II is designed to comply with the most stringent requirements of
Weights and Measures. It is designed to be accessible for calibration, and it can be
officially sealed.
If your locality requires a NIST/NTEP official to calibrate your AccuCount II, point
out your new scale when the officer visits.
1.3.2.e Sealing the scale
The AccuCount II scale can be sealed with security seals for your locality, to conform
to National Institute of Standards and Technology (NIST) Handbook 44 requirements.
NOTE It will not be possible to perform external calibrations once the scale is sealed
(see “Calibration” on page 4-13 for information about the external calibration modes).
Chapter 1 – Installation
To seal the scale
1 Disconnect the power adapter from the outlet and from the rear of the scale.
2 Remove the weighing pan, weighing pan support, and draft shield (if installed) from the scale.
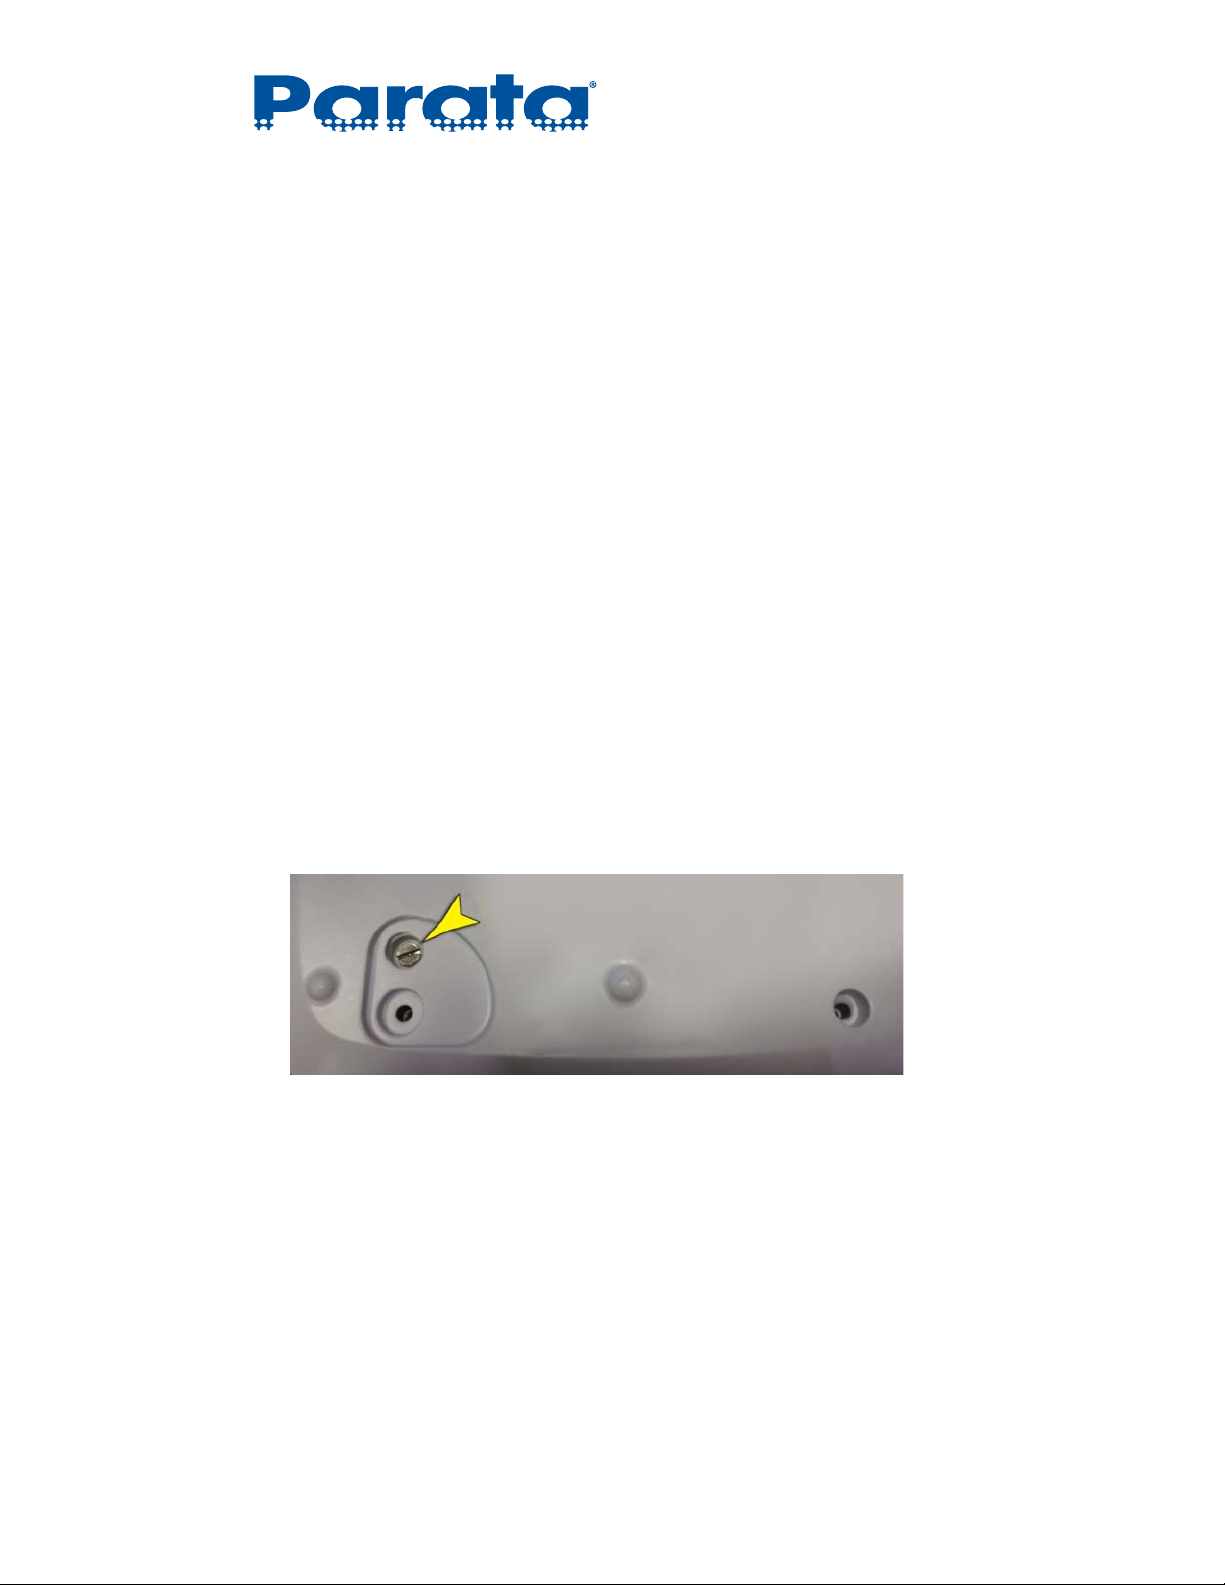
3 Turn the scale upside down and remove the screw that covers the service switch.
NOTE Retain the screw for later reassembly.
4 Turn the scale upright; and then install the draft shield (required), the weighing pan support,
and the weighing pan (see steps 4 through 6 in “Installing the scale” on page 1-3).
5 Connect the power adapter to the rear of the scale and to the outlet (see step 10 in “Installing
the scale”).
6 After the scale has powered on, slide the front edge of the scale off the surface just enough to
expose the service switch screw hole.
7 Use a paper clip to reach up into the screw hole and press the service switch.
120-0313 Rev 04 1–11
AccuCount II User Guide
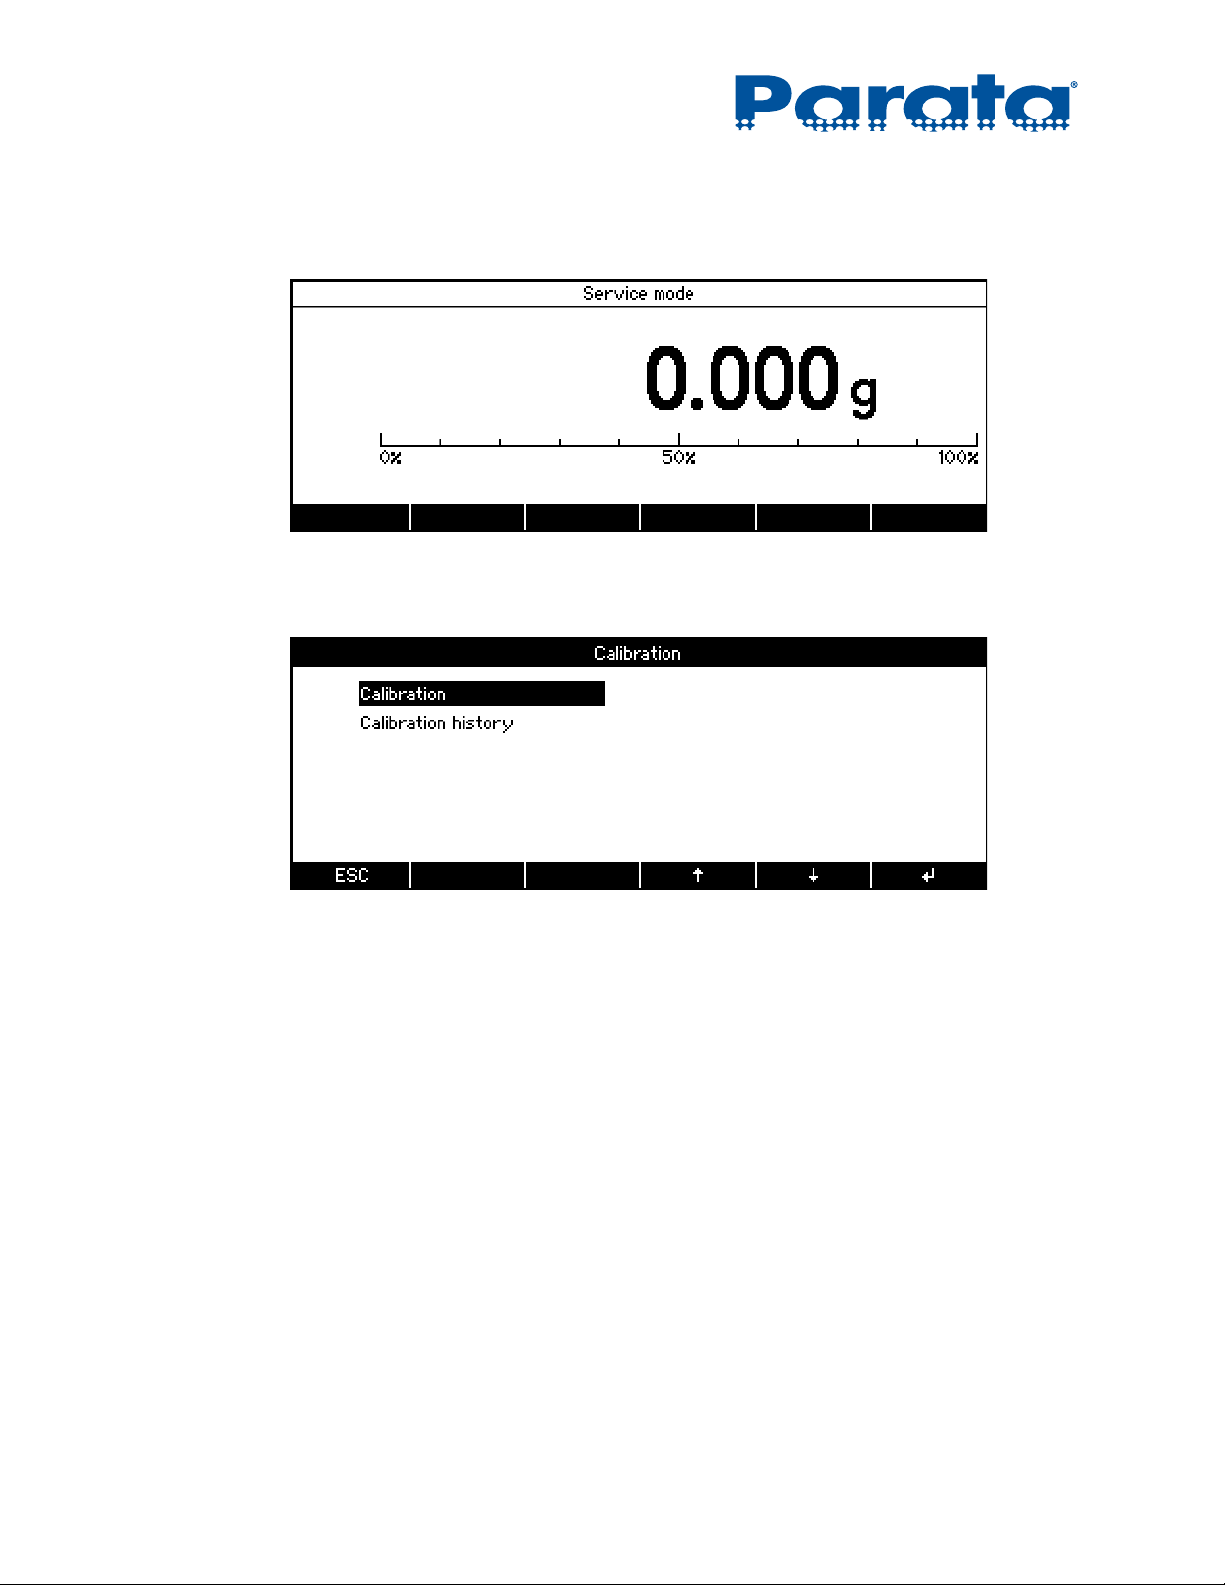
NOTE The screw hole is on the bottom-right near the front, when the scale is upright.
The scale switches into Service mode, whose display is similar to the Weighing application.
8 Slide the scale back onto the surface and level it (see “Leveling” on page 1-8).
9 Press and hold the Tare key until the Calibration menu appears.
10 Use the and soft keys to select Calibration.
11 Press the Enter soft key.
The scale begins a special calibration process that is only available in Service mode, during
which it performs three calibrations:
Internal
External
Internal
1–12 120-0313 Rev 04
Chapter 1 – Installation
12 Wait for the first internal calibration to complete.
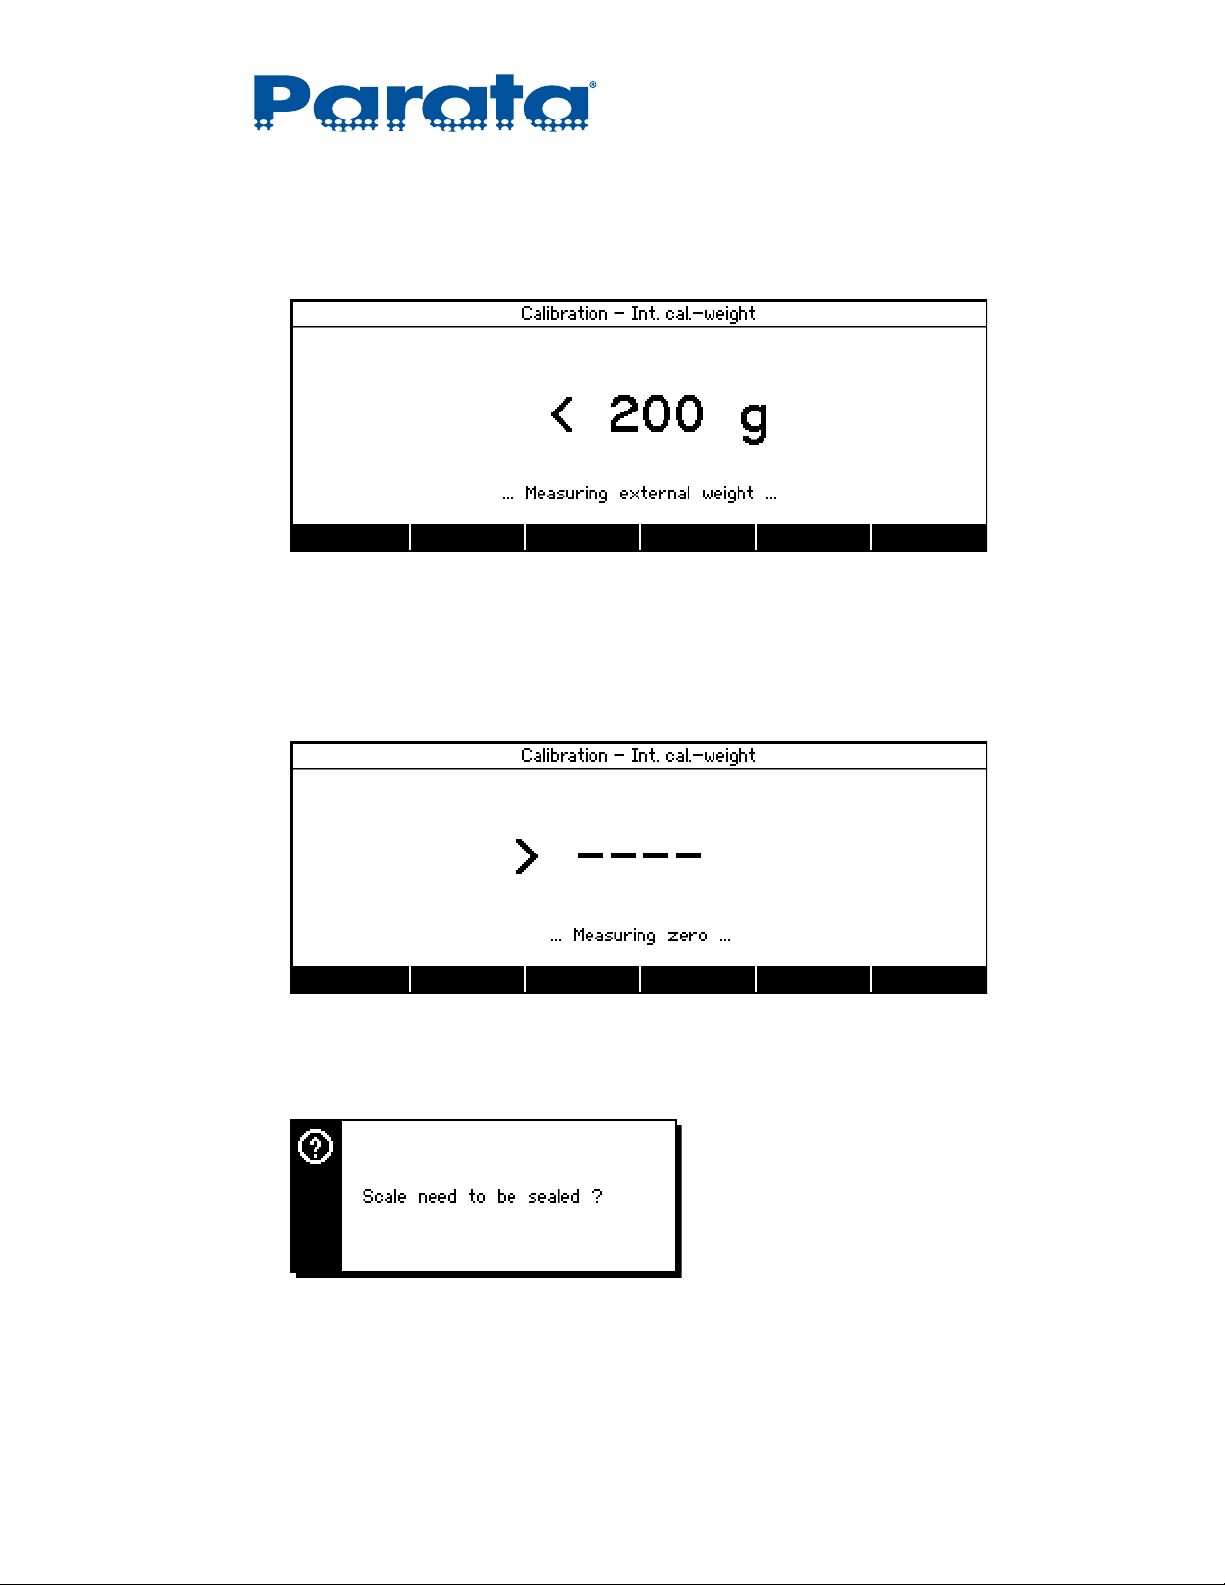
The display indicates that the weight on the pan is less than the expected weight of at least
200 grams.
13 Place a weight between 200 and 600 grams on the center of the weighing pan.
The scale continues with external calibration.
14 Wait for the external calibration to complete, after which the scale flashes > ---- and displays
...Measuring zero... because the weight on the pan is now greater than the expected weight of
0grams.
15 Remove the weight from the weighing pan and wait for the scale to perform one more internal
calibration.
The scale displays the Scale needs to be sealed? prompt.
120-0313 Rev 04 1–13
AccuCount II User Guide
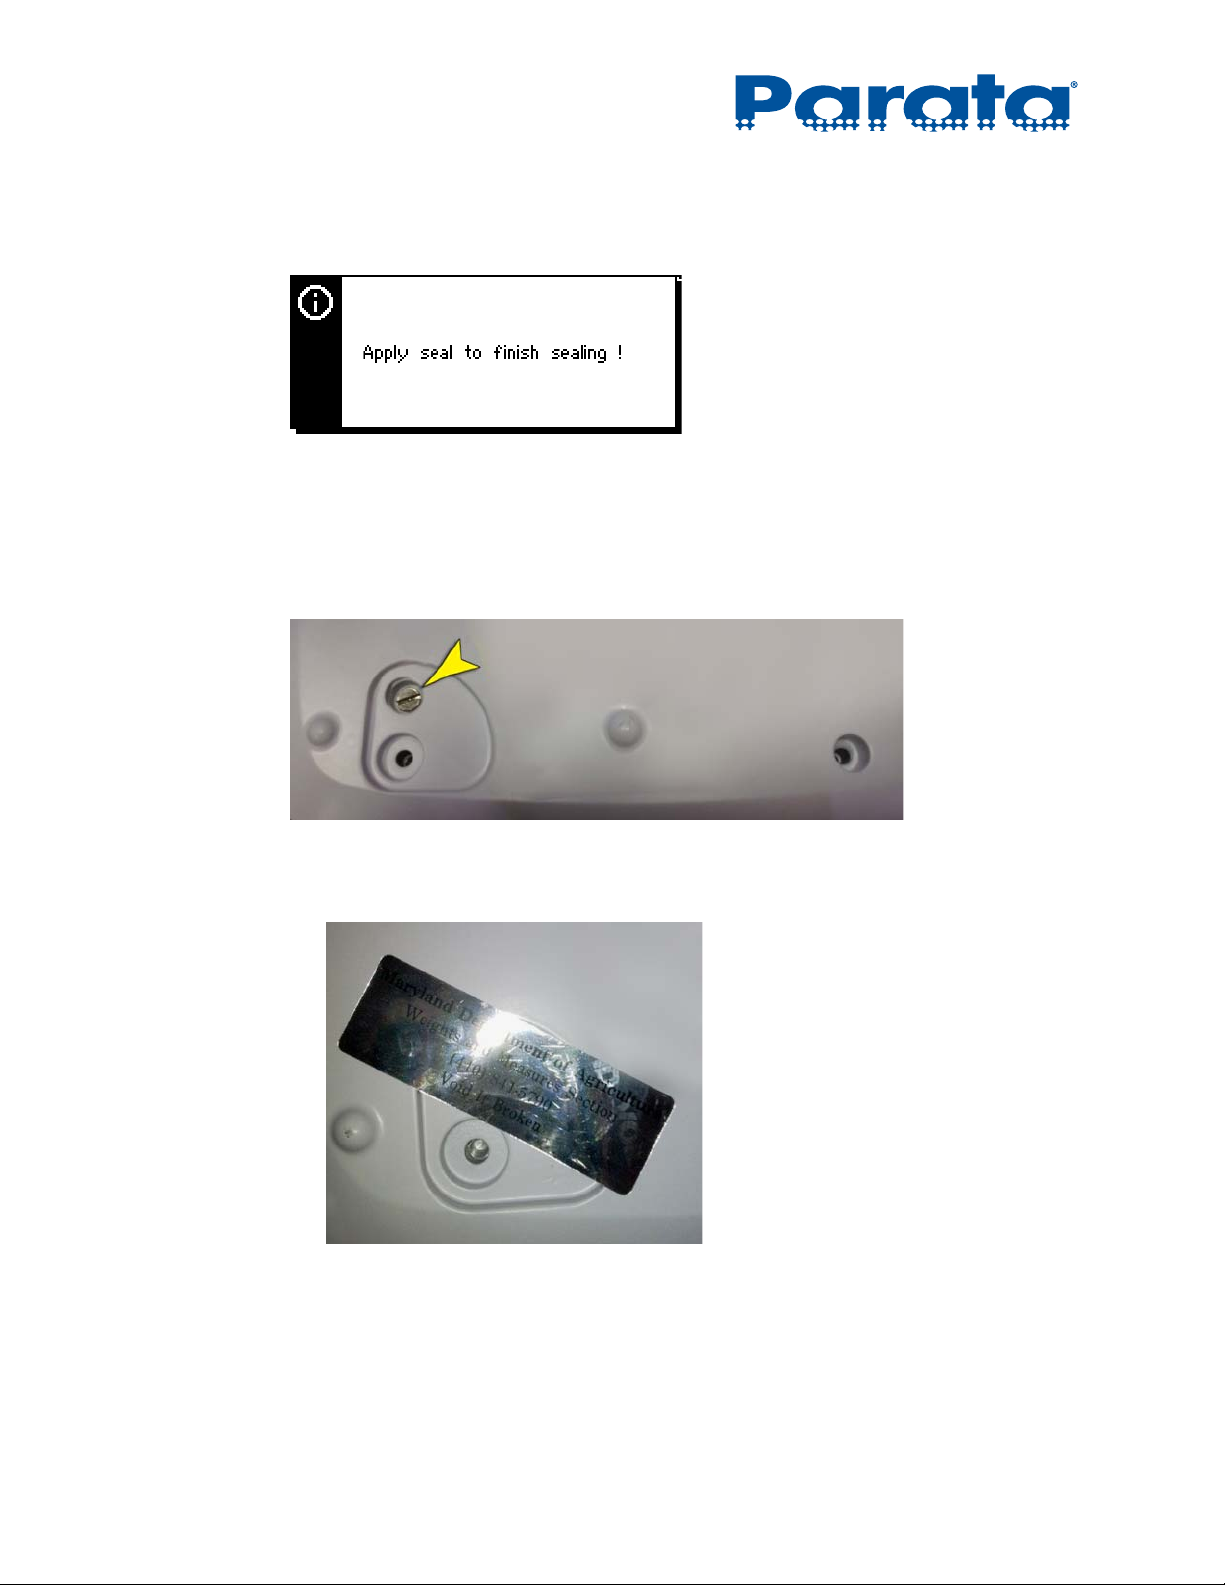
16 Press the Yes soft key to confirm that you want to seal the scale.
The scale displays the Apply seal to finish sealing ! prompt.
17 Press the OK soft key.
18 Disconnect the power adapter from the outlet and from the rear of the scale.
19 Remove the weighing pan, weighing pan support, and draft shield from the scale.
20 Turn the scale upside down and reinstall the screw that covers the service switch.
21 Seal the scale in three locations:
a. Place a self-destructive seal over the service switch screw.
1–14 120-0313 Rev 04
Chapter 1 – Installation
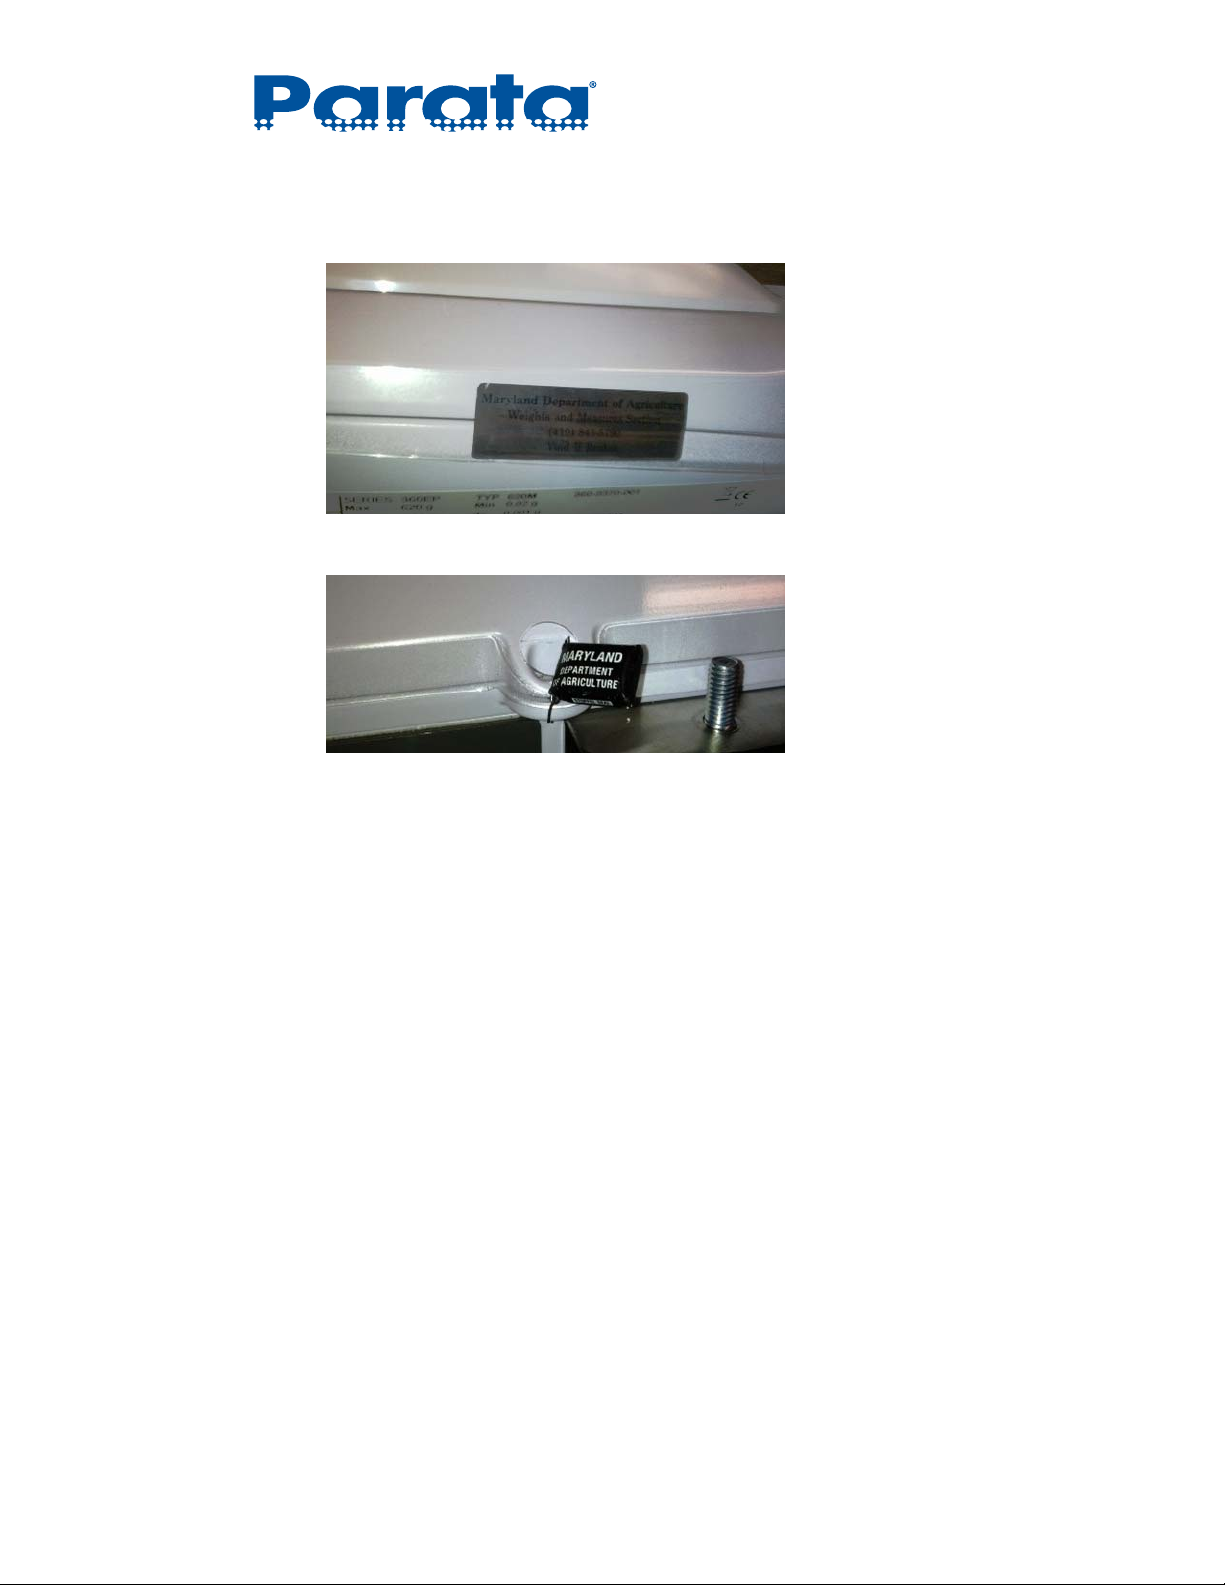
b. Turn the scale upright; and then place a self-destructive seal over the seam of the body of
the scale, under the dust shield.
c. Affix a wire seal to the white tab on the back of the scale to prevent access to its interior.
22 Install the draft shield (if it was in use before step 1), the weighing pan support, and the
weighing pan (see steps 4 through 6 in “Installing the scale” on page 1-3).
23 Connect the power adapter to the rear of the scale and to the outlet (see step 10 in “Installing
the scale”).
120-0313 Rev 04 1–15

AccuCount II User Guide
Installation notes
1–16 120-0313 Rev 04

Overview
This chapter provides an overview of the functionality, display, and keypad on an
AccuCount II scale.
2.1 About the AccuCount II
The AccuCount II scale is a Class II, NTEP-approved device with a 620-gram capacity
and one-milligram readability. It features an internal self-calibration system, an
internal drug library with up to 500,000 drugs, and support for USB connection to a
PC for software and drug database updates.
The AccuCount II scale supports up to two of the following peripherals at a time:
Chapter 2
• Standard USB keyboard
• Datalogic Gryphon USB bar code scanner
• Dymo SE450 USB Label Writer printer
The built-in applications support weighing, piece counting, and stock bottle UPC bar
code verification with or without prescription NDC bar code comparison.
NOTE The AccuCount II is designed for Stand-Alone Operation only.
It does not interface with host systems.
Finally, the AccuCount II is packaged with a draft shield, a weighing pan, two
weighing scoops, a compounding plate, and a USB bar code scanner. It provides a
ready-to-run prescription filling and compounding tool.
120-0313 Rev 04 2–1

AccuCount II User Guide
2.2 About the AccuCount II drug library
The AccuCount II scale’s internal drug library can hold up to 500,000 drugs. This
library allows users to quickly compare the weight of known pills, to provide a quantity
when using the Rx-Check or Non-Rx-Check applications.
The drug library is comprised of two components:
• Standard database, which is a library of drugs compiled and distributed by Parata.
• User database, which contains any drugs added by the user that are not in the
standard database. The maximum number of drugs in the user database is 10,000.
Chapter 3, “Operations” provides details about how to work with drug library data
while using AccuCount II applications.
Chapter 5, “Maintenance” provides details about upgrading, backing up, and restoring
the drug library in the scale.
2–2 120-0313 Rev 04
2.3 Functions
In order to complete any of the functions with the AccuCount II, you must first
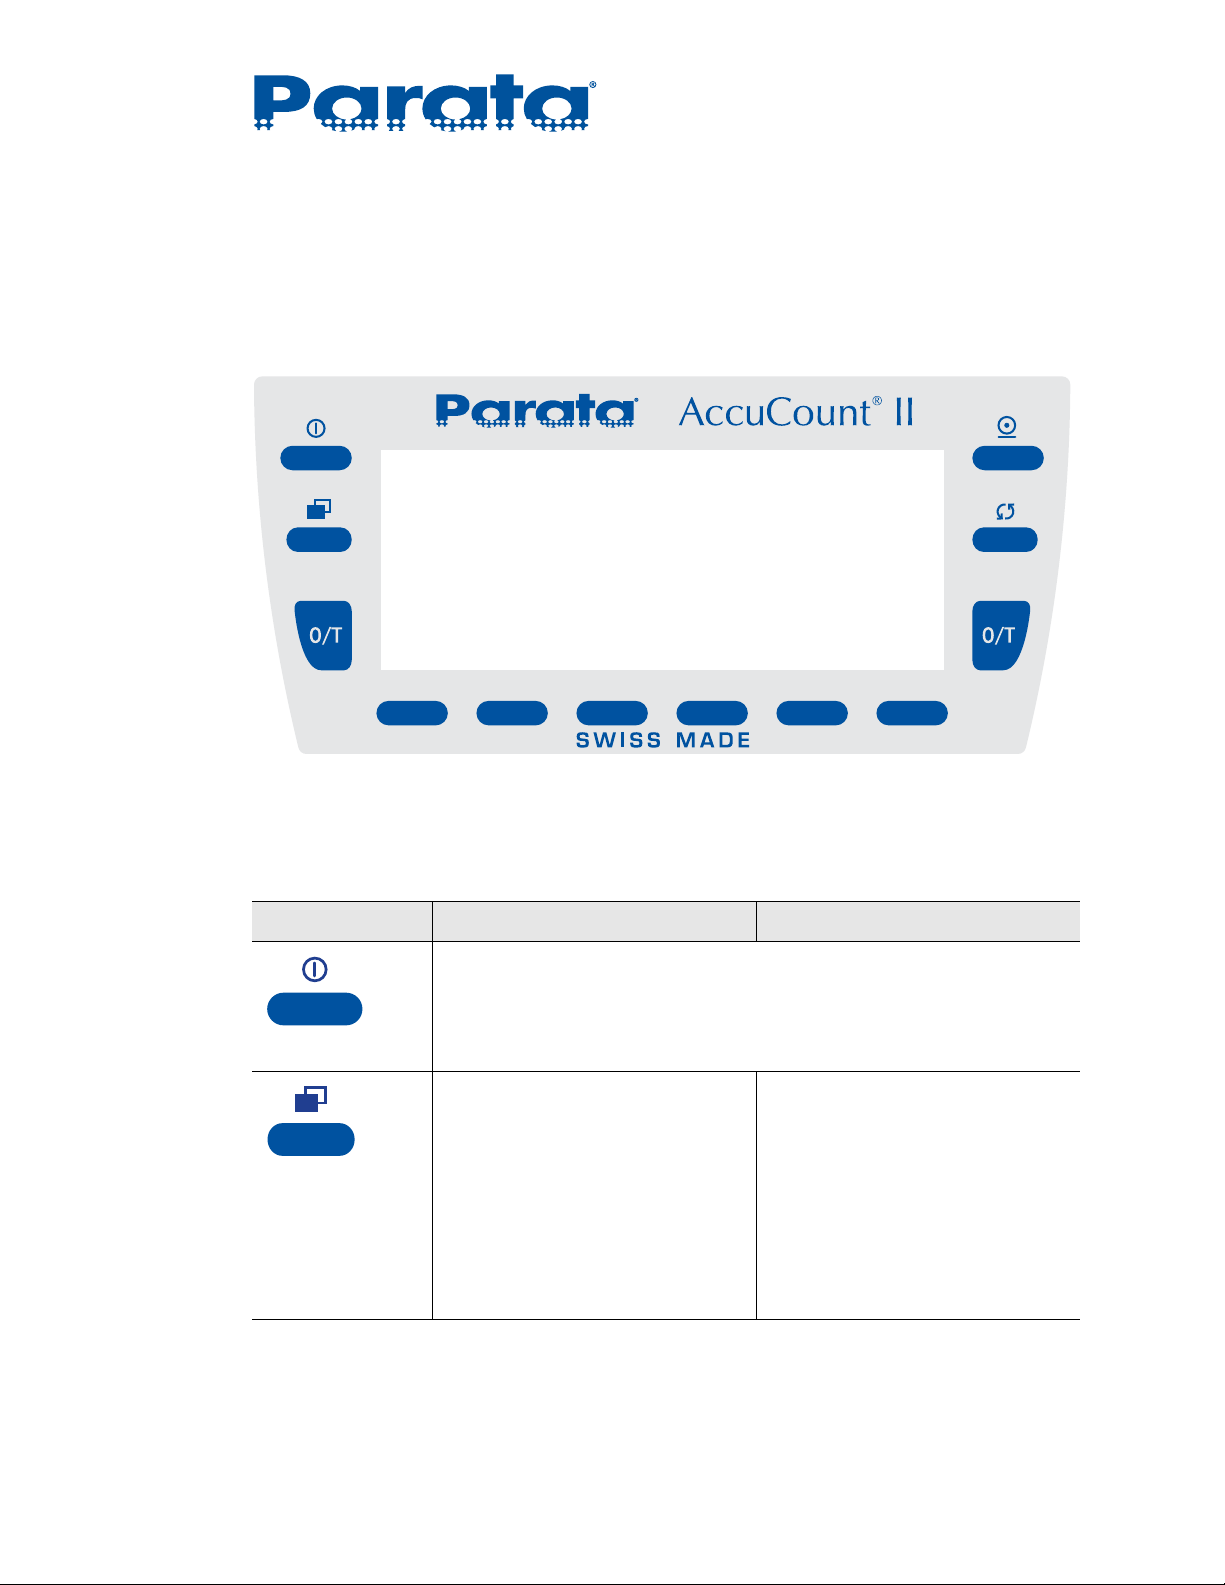
understand the Twelve-Key Control Panel (Figure 2-1) and the key functions
(Table 2-1). Each button is referred to throughout the manual.
Chapter 2 – Overview
Figure 2-1: Twelve-Key Control Panel
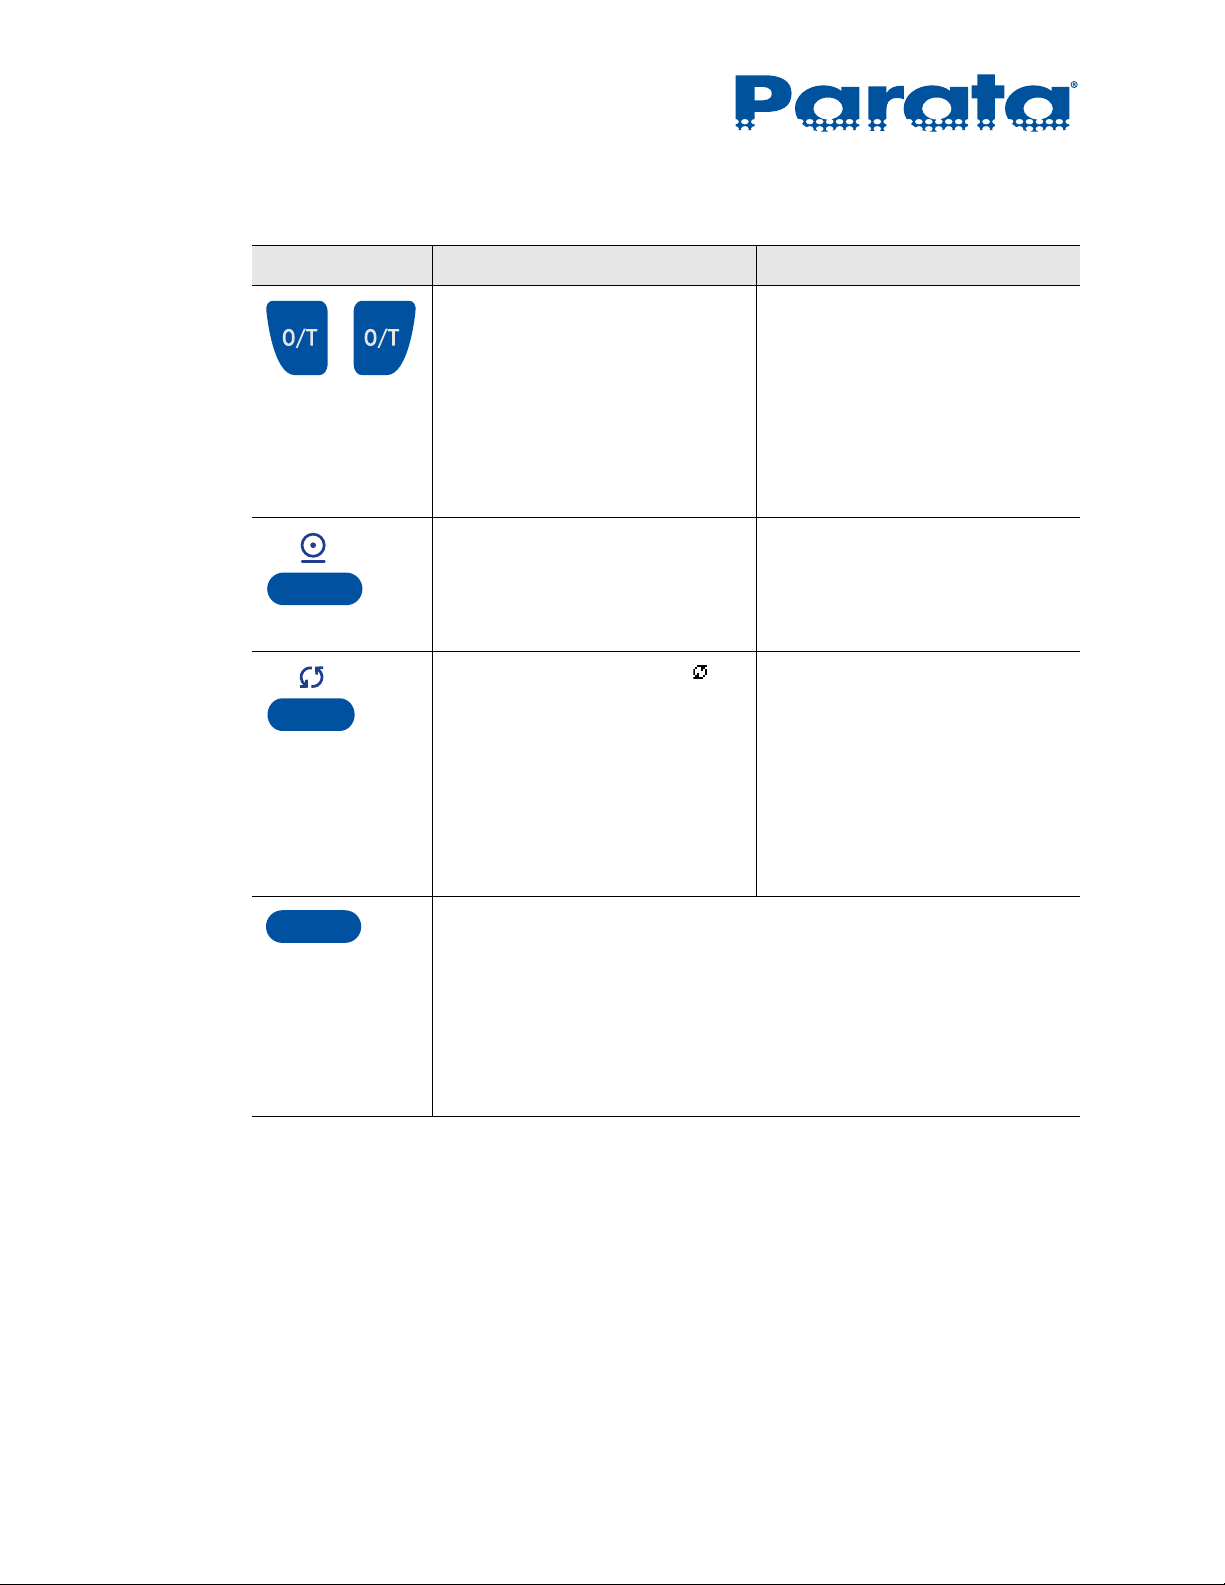
Table 2-1: Key functions
Key(s) Function(s) in an application Function(s) in a menu
1 Press to put the scale into Standby mode.
NOTE: The scale continues to draw power to keep the balance zeroed.
You must unplug the scale to completely power it down.
On/Off key
1 Press to exit the menu.
2 Press and hold to return to the
Home screen from any point.
Menu key
1 Press to enter the context
menu for the Weighing and
Piece Counting applications.
The context menu can be used
to set what items appear in the
display and what functions are
assigned to each soft key.
2 Press and hold to return to the
Home screen from any point.
120-0313 Rev 04 2–3
AccuCount II User Guide
Table 2-1: Key functions (cont’d)
Key(s) Function(s) in an application Function(s) in a menu
Tare keys
Print key
Rotate key
1 Press to re-zero the scale.
2 Press to tare the scale.
3 Press and hold to bring up the
calibration menu. This menu
uses the calibration method
chosen through the
Configuration menu (see
“Calibration” on page 4-13).
1 Press to transmit the current
measuring result or the
contents of an info screen to
an attached Dymo printer.
1 When the rotate symbol ( )
appears in the activity area,
press to exchange the results
from the primary and
secondary display.
2 Press and hold to call up the
next information page.
Continue to hold to cycle
through all the pages.
1Not functional.
1Not functional.
1 When the rotate symbol
appears in the activity area,
press to rotate through soft key
options (see “Alphanumeric
input” on page 2-10).
Soft keys (6)
1 Press to select the option displayed on the LCD above the soft key.
The actual function of each key is context-sensitive and changes
depending on the application and any customization that you do.
If you have more than six functions assigned to soft keys for an
application, and soft keys appear, to switch between soft key
assignments.
When a standard USB keyboard is attached to the scale,
F1 through F6 on the keyboard correspond to soft keys 1 through 6.
2–4 120-0313 Rev 04
2.4 Display
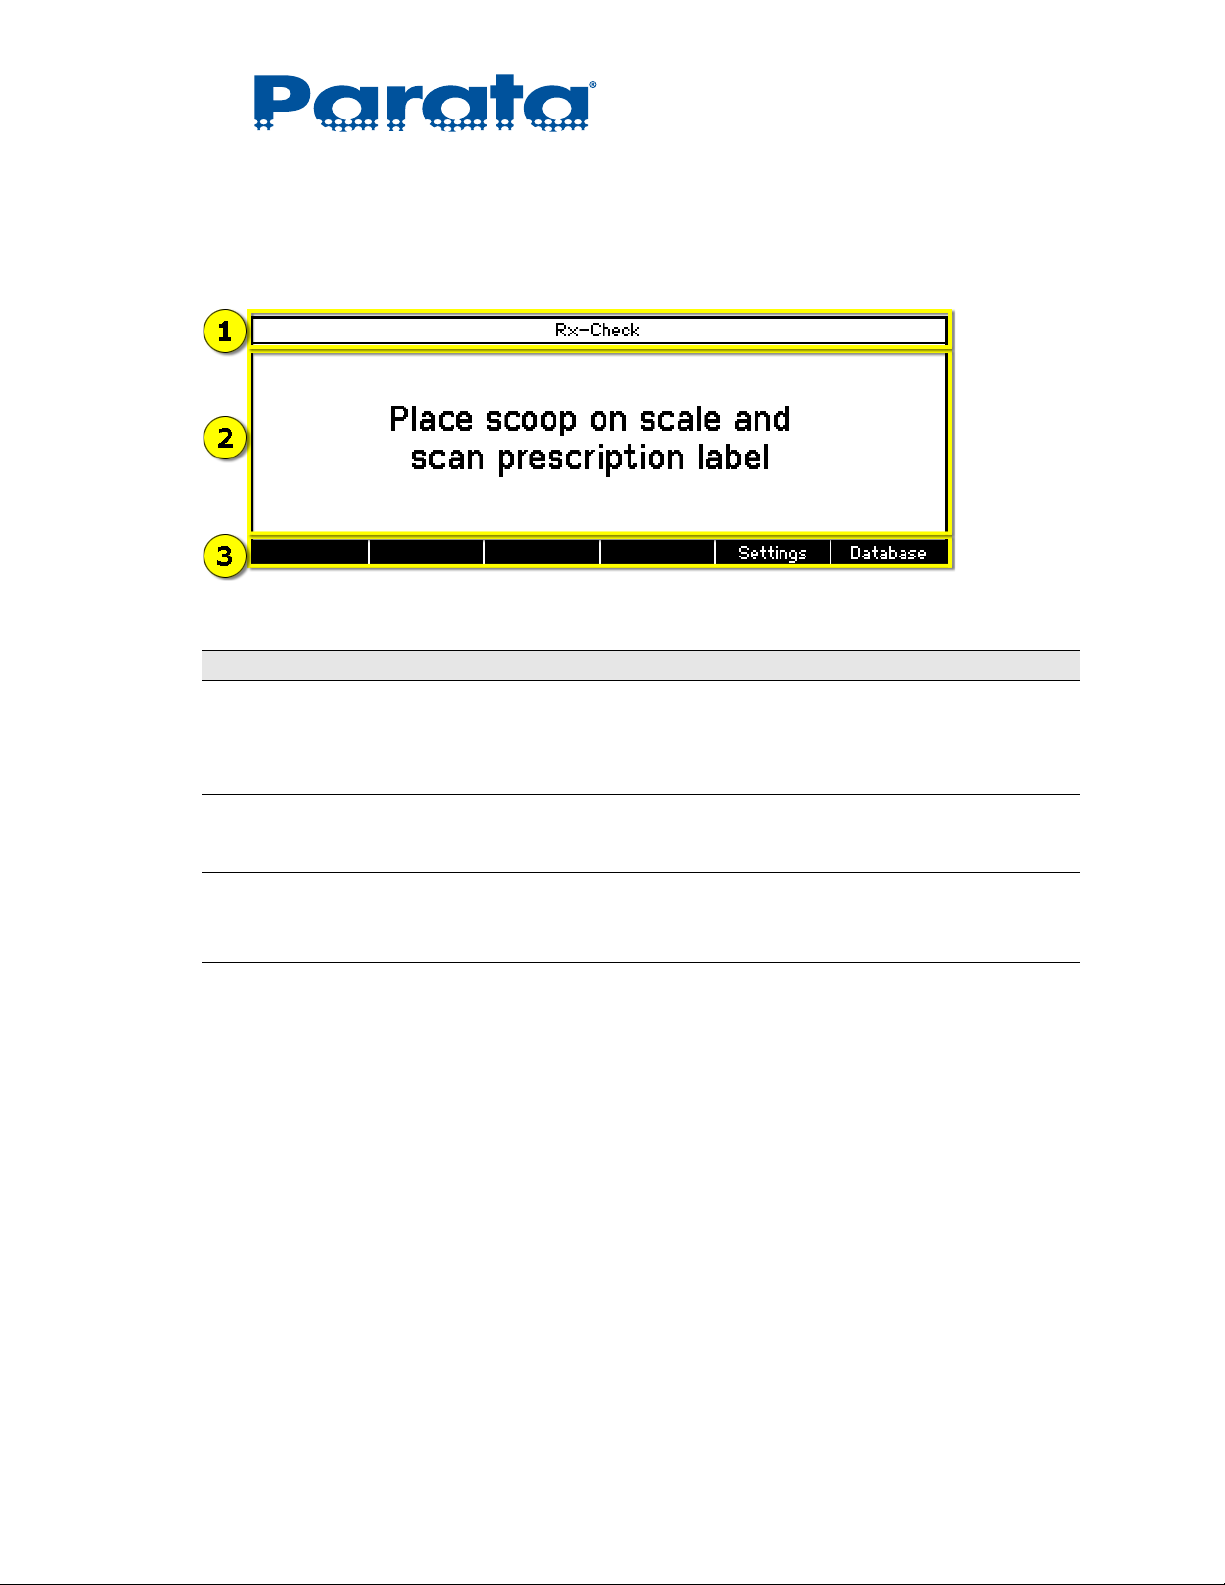
The AccuCount II display is divided into sections, as shown in Figure 2-2:
Figure 2-2: AccuCount II display sections
Chapter 2 – Overview
Section Name Description
Headline Displays the running application.
Displays the capacity indicator when weighing in the Rx-Check and
Non-Rx-Check applications.
Information Area Display a variety of weighing and/or drug information details, depending
Function Bar Displays the function of each soft key in the current context.
upon the application (see “Application screens” on page 2-6 for details).
The available functions can be customized in some applications.
120-0313 Rev 04 2–5
AccuCount II User Guide
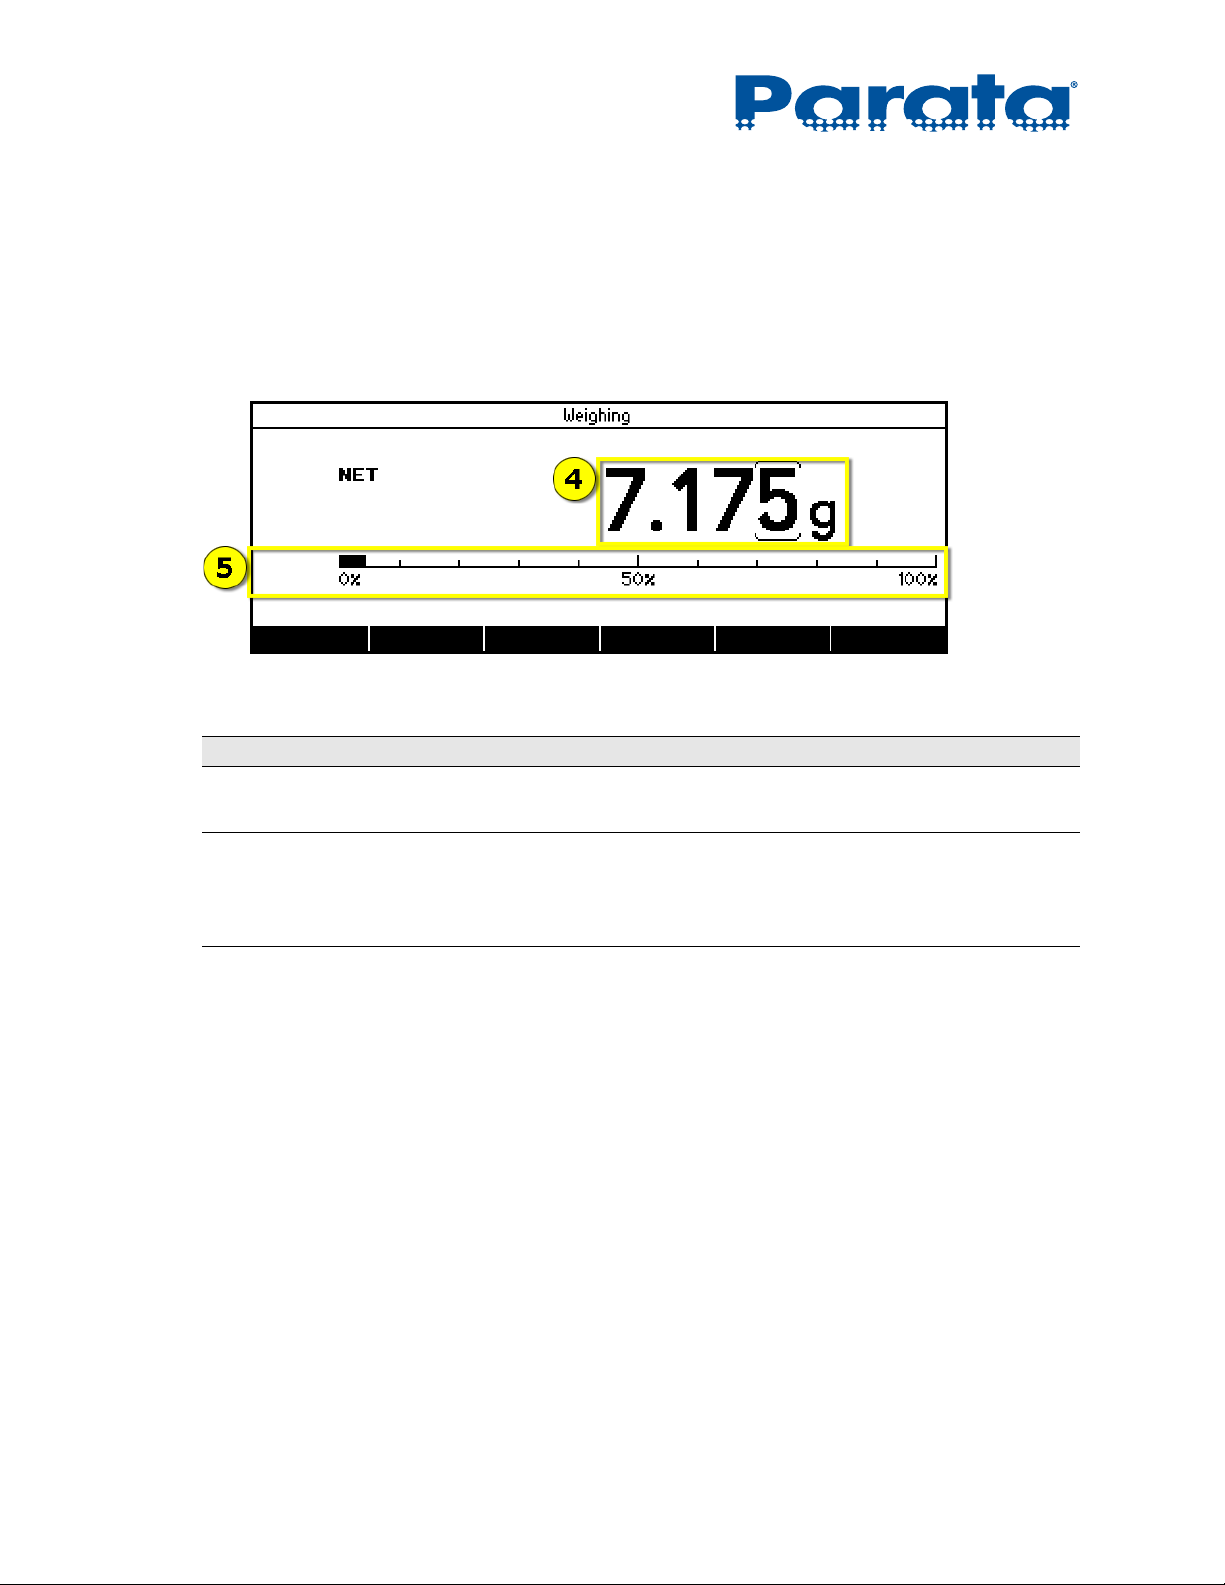
2.4.1 Application screens
Once you are weighing items in an application, the main display area shows more
information, as shown in sections 2.4.1.a through 2.4.1.c below.
2.4.1.a Weighing application details
Figure 2-3: Details displayed while weighing in the Weighing application
Area Name Description
Weight The exact weight that the scale is currently reading.
Capacity indicator Shows the percentage of the scale’s capacity that is used by the pills that
you are currently weighing.
Each vertical line on the scale represents 10% of the scale’s capacity.
2–6 120-0313 Rev 04
 Loading...