

Parasound HALO P 7 Owner's Manual

IMPORTANT SAFETY INSTRUCTIONS
The lightning fl ash with the arrowhead symbol within an equilateral triangle is intended to alert the user
to the presence of “dangerous voltage” inside the product that may constitute a risk of electric shock.
The exclamation point within an equilateral triangle is intended to alert the user to the presence
of important operating and maintenance instructions in the literature accompanying the product.
TO REDUCE THE RISK OF ELECTRIC SHOCK, DO NOT REMOVE COVER. NO USER-SERVICEABLE
PARTS INSIDE. REFER SERVICING TO QUALIFIED SERVICE PERSONNEL
— Read all the safety and operating instructions before operating this product.
— Retain safety and operating instructions for future reference.
3.
— Adhere to all warnings on the product and in the operating instructions.
— Follow all operating and use instructions.
Cleaning
— Unplug this product from the wall outlet before cleaning. Use a damp cloth for cleaning.
Attachments
— Do not use attachments that are not recommended by the product manufacturer;
they may be hazardous.
Water and Moisture
— Do not use this product near water.
Accessories
— Do not place this product on an unstable cart or stand. The product may fall, causing
Ventilation
— Slots and openings in the cabinet are provided for ventilation to ensure reliable operation of
the product and to protect it from overheating. These openings must not be blocked or covered. This product
— Operate this product only from the type of power source indicated on the label.
to replace your obsolete outlet. Do not defeat the safety purpose of the grounding plug.
— Power supply cords should be routed so that they are not likely to be
walked on or pinched by items placed upon or against them.
— Unplug the unit from the wall outlet for added protection during a lightning storm
and when it is left unattended and unused for long periods of time. This will prevent damage to the
— Do not overload wall outlets or extension cords. This can result in a fire or electric shock.
— Never push objects of any kind into this product through any openings;
they may touch dangerous voltage points or short out parts that could result in fire or electric shock.
Servicing
— Do not attempt to repair or service this product yourself. Opening or removing covers may
— Unplug this product from the wall outlet and refer servicing to qualified
a)
If the power-supply cord or plug is damaged.
If liquid has been spilled into the product.
c)
If the product has been exposed to rain or water.
d)
e)
If the product has
f)
If the product exhibits a distinct change in performance.
— When replacement parts are required, be sure the service technician has used
Safety Check
— Upon completion of any service or repairs to this product, ask the service technician
to perform safety checks to determine that the product is in proper operating condition.
Wall or Ceiling Mounting
— Mount the product to a wall or ceiling only as recommended.
— The product should be situated away from heat sources such as radiators, heat registers,

Your new Parasound
®
Halo P 7 preamplifi er is the pinnacle of analog audio technology and value
We are proud to offer you this exceptionally versatile audio component, knowing that it will
We appreciate you taking the time to read these instructions and thank you for selecting
Also note your Parasound Dealer’s name and telephone number. Your purchase receipt/bill
There is no Parasound warranty for this unit if it was not purchased from an Authorized
very carefully, as you will need to depend entirely upon your dealer, and NOT upon Parasound.
at
or you can call
between 8:30 am and 4 pm Pacific time.
A missing or altered serial number could indicate that this unit was re-sold by an unauthorized
INTRODUCTION
OWNERSHIP REFERENCE INFORMATION
/
/
3

4
Audio Input Connections
Audio Output Connections
20
23
25
26
TABLE OF CONTENTS

UNPACKING YOUR P 7 AND PLACEMENT GUIDLINES
Carefully remove your P 7 from its shipping carton and locate all the enclosed accessories:
Remote control and two AAA batteries
AC power cord
Stereo 3.5mm cable for front panel MP3 input
Four trigger wires, two with 2.5 mm sub-mini plugs, two with a 2.5mm and a 3.5mm mini plug
While you are unpacking your P 7, inspect it thoroughly for possible shipping damage and tell your
taped seams on the bottom fl aps. This would be a good time to make a copy of your sales receipt
to store with the P 7’s original packing.
The P 7 will be easier to use and will last longer if you follow these simple guidelines:
Place the P 7 on a shelf that will adequately support its weight.
Unless you’ll control the P 7 through a remote infrared sensor/repeater system, put it on a shelf
where you can aim the remote control handset directly at the P 7. (If you use a remote repeater
To reduce the chances of your P 7 overheating please follow these guidelines:
Install your P 7 away from heat sources such as heating ducts, radiators, or heat-producing
Always position the P 7 horizontally.
We do not recommend placing the P7 directly on top of a power amplifi er because this could
Do not install the P 7 in an unventilated equipment cabinet or compartment. Pockets of stagnant
With its four feet removed, the P 7’s front panel height occupies two rack spaces: 3.5” or
and the other components mounted in the rack.
Tighten each bolt just enough to keep the unit secure in the rack to avoid deforming the
5
6
Always disconnect the AC cords to your P 7 and power amplifi er(s) before making or
changing any input, output or trigger wire connections.
Inserting or removing an input or
them to pull loose. The P 7 has many different types of audio and control connections and some
AUDIO INPUT CONNECTIONS
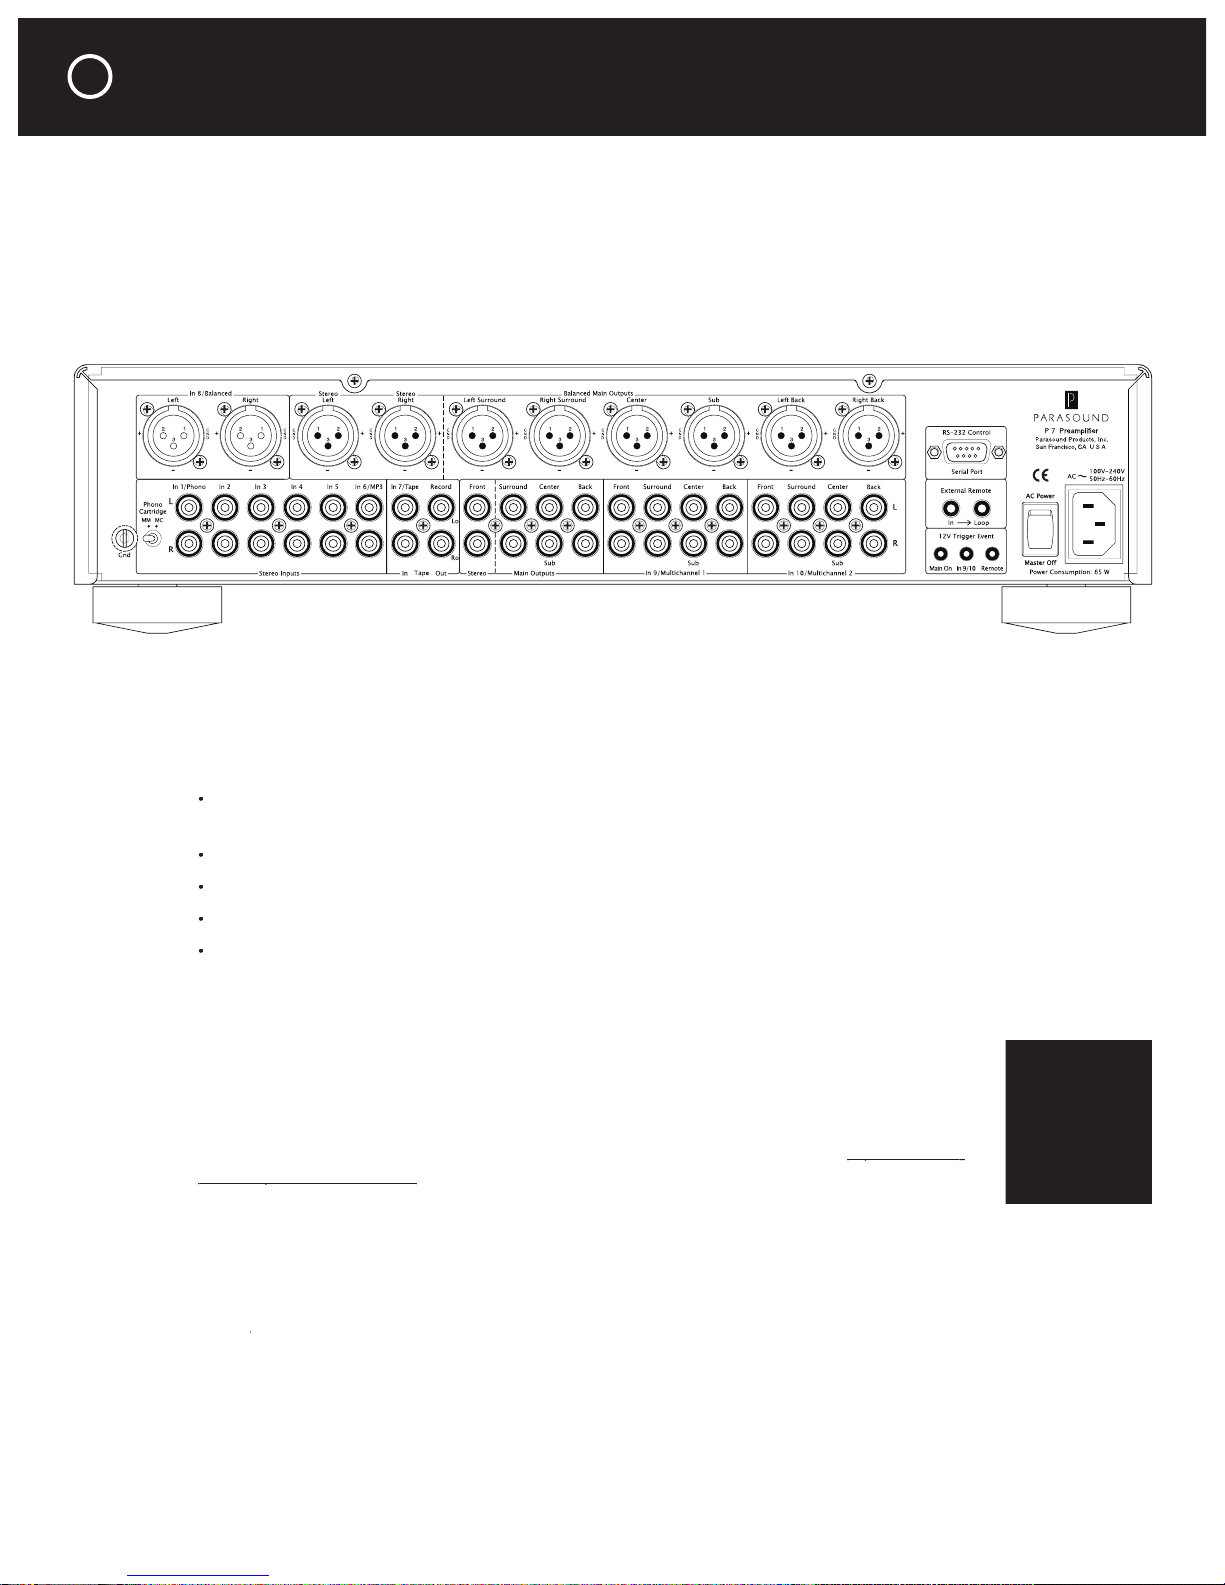
The P 7 is equipped with a total of 10 audio inputs:
1 phono input for connecting a turntable with either a moving magnet or moving coil cartridge
6 pairs of unbalanced line level RCA type input jacks (In 2 ~ In 7/Tape)
1 pair of balanced XLR inputs (In 8/Balanced)
2 multi-channel inputs for surround sound movies and music (In 9/Multi 1 and In 10/Multi 2)
A front panel 3.5mm input jack for connecting a portable device such as an MP3 player is
The P 7 is equipped with a high quality phono preamplifi er. If you wish to connect a
turntable, set the Input 1 Phono Cartridge switch to MM (moving magnet) or
through the hole and twist the knurled cap clockwise to tighten it against the bare wire.
If the volume is far too low or far too high when you listen to your LPs, you have selected
the incorrect setting for your type of phono cartridge.
CONNECTING YOUR P 7

CONNECTING YOUR P 7: AUDIO INPUT CONNECTIONS
all have the same input sensitivity, input
typical analog line level source such as a
for connecting an audio recorder.
The rear panel In 6/MP3 jacks and the front panel MP3 input jack are both for Input 6 so
you should not connect a source to the rear panel In 6/MP3 jacks if you plan to use the front
and the front panel MP3 jack you would hear both sources playing at the same time.
fl oor contributes to a more defi ned and spacious soundstage. For
Asked Questions section of this manual.
These sources include many
Inputs 9 and 10 can also be used for additional stereo sources by using just their Front
the included cable with the 3.5mm stereo plugs between the MP3 player’s headphone jack
and the P 7’s MP3 input jack. For the best sound with an iPod
®
set the iPod’s volume to
around 75% of its maximum. If you plan to use the front panel MP3 input jack you
to the rear panel Input 6 jacks since they share the same circuitry.
If your portable MP3 player does not sound as loud as your other sources you can
this manual for more information about changing the Input Offset.
7

8
AUDIO OUTPUT CONNECTIONS
There are 2 sets of Main Output jacks, one set with RCA connectors and one set with balanced
XLR connectors. There is also a fi xed level record output for connecting an audio recorder. Read
through this section to determine which connections should be used in your setup.
The Main Output jacks connect to the inputs on your power amplifi er(s).
The P 7 is equipped with both balanced and unbalanced output jacks.
The balanced and unbalanced output jacks are active simultaneously.
your subwoofer. The frequency characteristics of the subwoofer output is determined by choices
you make in the P 7’s setup menu. For more information about the subwoofer output setup see
a 7.1 system, you will also connect the Main Output Back L & R jacks.
The P 7’s center, surround and back channel outputs reproduce signals only from sources
that are connected to the center, surround and back channel input jacks of the multichannel inputs
The P 7 has built-in analog bass management for audio systems which include a subwoofer. The
When inputs 1 through 8 are selected, the P 7 creates a subwoofer channel output by mixing the
the subwoofer crossover frequency in the P 7 Setup menu. If you have small front left and right
and speaker size/crossover settings should be selected in the source component’s setup menu.
CONNECTING YOUR P 7: AUDIO OUTPUT CONNECTIONS

CONNECTING YOUR P 7: AUDIO OUTPUT CONNECTIONS
The frequency response of the Left, Right & Sub output jacks is not affected by the P 7.
A subwoofer channel is not created by the P 7.
The subwoofer channel level can be adjusted from the P 7’s remote control or at the front panel.
the front panel, press the Select button twice then rotate the Volume/Select knob. There are two
and another setting for the multichannel inputs (Inputs 9 and 10). This is useful because you may
The Record Out jacks connect to the record Input jacks on your audio recorder. The Record Out
jacks provide fi xed level signals that are unaffected by the P 7’s volume control, balance control,
tone controls or mute. The Record Out jacks of the P 7 are always “live” and there is no simulta-
With stereo sources the Record Out jacks carry the L and R signals. For 5.1 or 7.1 channel
9
 Loading...