


IMPORTANT SAFETY INSTRUCTIONS
The lightning flash with the arrowhead symbol within an equilateral triangle is intended to alert the user
to the presence of “dangerous voltage” inside the product that may constitute a risk of electric shock.
The exclamation point within an equilateral triangle is intended to alert the user to the presence
of important operating and maintenance instructions in the literature accompanying the product.
TO REDUCE THE RISK OF ELECTRIC SHOCK, DO NOT REMOVE COVER. NO USER-SERVICEABLE
PARTS INSIDE. REFER SERVICING TO QUALIFIED SERVICE PERSONNEL
1. Read Instructions — Read all the safety and operating instructions before operating this product.
2. Retain Instructions — Retain safety and operating instructions for future reference.
3. Heed Warnings — Adhere to all warnings on the product and in the operating instructions.
4. Follow Instructions — Follow all operating and use instructions.
5. Cleaning — Unplug this product from the wall outlet before cleaning. Use a damp cloth for cleaning.
Clean the outside of the product only.
6. Attachments — Do not use attachments that are not recommended by the product manufacturer;
they may be hazardous.
7. Water and Moisture — Do not use this product near water.
8. Accessories — Do not place this product on an unstable cart or stand. The product may fall, causing
bodily injury and damage to the product. A product and cart combination should be moved with care.
Quick stops, excessive force, and uneven surfaces may cause the product and cart to overturn.
9. Ventilation — Slots and openings in the cabinet are provided for ventilation to ensure reliable operation of
the product and to protect it from overheating. These openings must not be blocked or covered. This product
should not be placed in a built-in installation such as a bookcase or rack unless proper ventilation is provided.
10. Power Sources — Operate this product only from the type of power source indicated on the label.
If you are not sure of the type of power supply to your home, consult your dealer or local power
company. This product is equipped with a three-prong grounding plug. This plug will only fit into a
grounding power outlet. If you are unable to insert the plug into the outlet, contact your electrician
to replace your obsolete outlet. Do not defeat the safety purpose of the grounding plug.
11. Power Cord Protection — Power supply cords should be routed so that they are not likely to be
walked on or pinched by items placed upon or against them.
12. Lightning — Unplug the unit from the wall outlet for added protection during a lightning storm
and when it is left unattended and unused for long periods of time. This will prevent damage to the
product due to lightning and power line surges.
13. Overloading — Do not overload wall outlets or extension cords. This can result in a fire or electric shock.
14. Inserting Objects into Unit — Never push objects of any kind into this product through any openings;
they may touch dangerous voltage points or short out parts that could result in fire or electric shock.
15. Servicing — Do not attempt to repair or service this product yourself. Opening or removing covers may
expose you to dangerous voltage and other hazards. Refer all servicing to qualified service personnel.
16. Damage Requiring Service — Unplug this product from the wall outlet and refer servicing to qualified
service personnel under the following conditions: a) If the power-supply cord or plug is damaged.
b) If liquid has been spilled into the product. c) If the product has been exposed to rain or water. d)
If the product does not operate normally by following the operating instructions. e) If the product has
been dropped or damaged in any way. f) If the product exhibits a distinct change in performance.
17. Replacement Parts — When replacement parts are required, be sure the service technician has used
replacement parts specified by the manufacturer. Unauthorized substitutions may result in fire, electric
shock, and other hazards.
18. Safety Check — Upon completion of any service or repairs to this product, ask the service technician
to perform safety checks to determine that the product is in proper operating condition.
19. Wall or Ceiling Mounting — Mount the product to a wall or ceiling only as recommended.
20. Heat — The product should be situated away from heat sources such as radiators, heat registers,
stoves, and other products (including amplifiers) that produce heat.
www.parasound.com

INTRODUCTION
OWNERSHIP REFERENCE INFORMATION
Parasound D 3 Disc Player Serial #:
Parasound Dealer:
/ /
Dealer Phone Number:
Date of Purchase:
( ) -
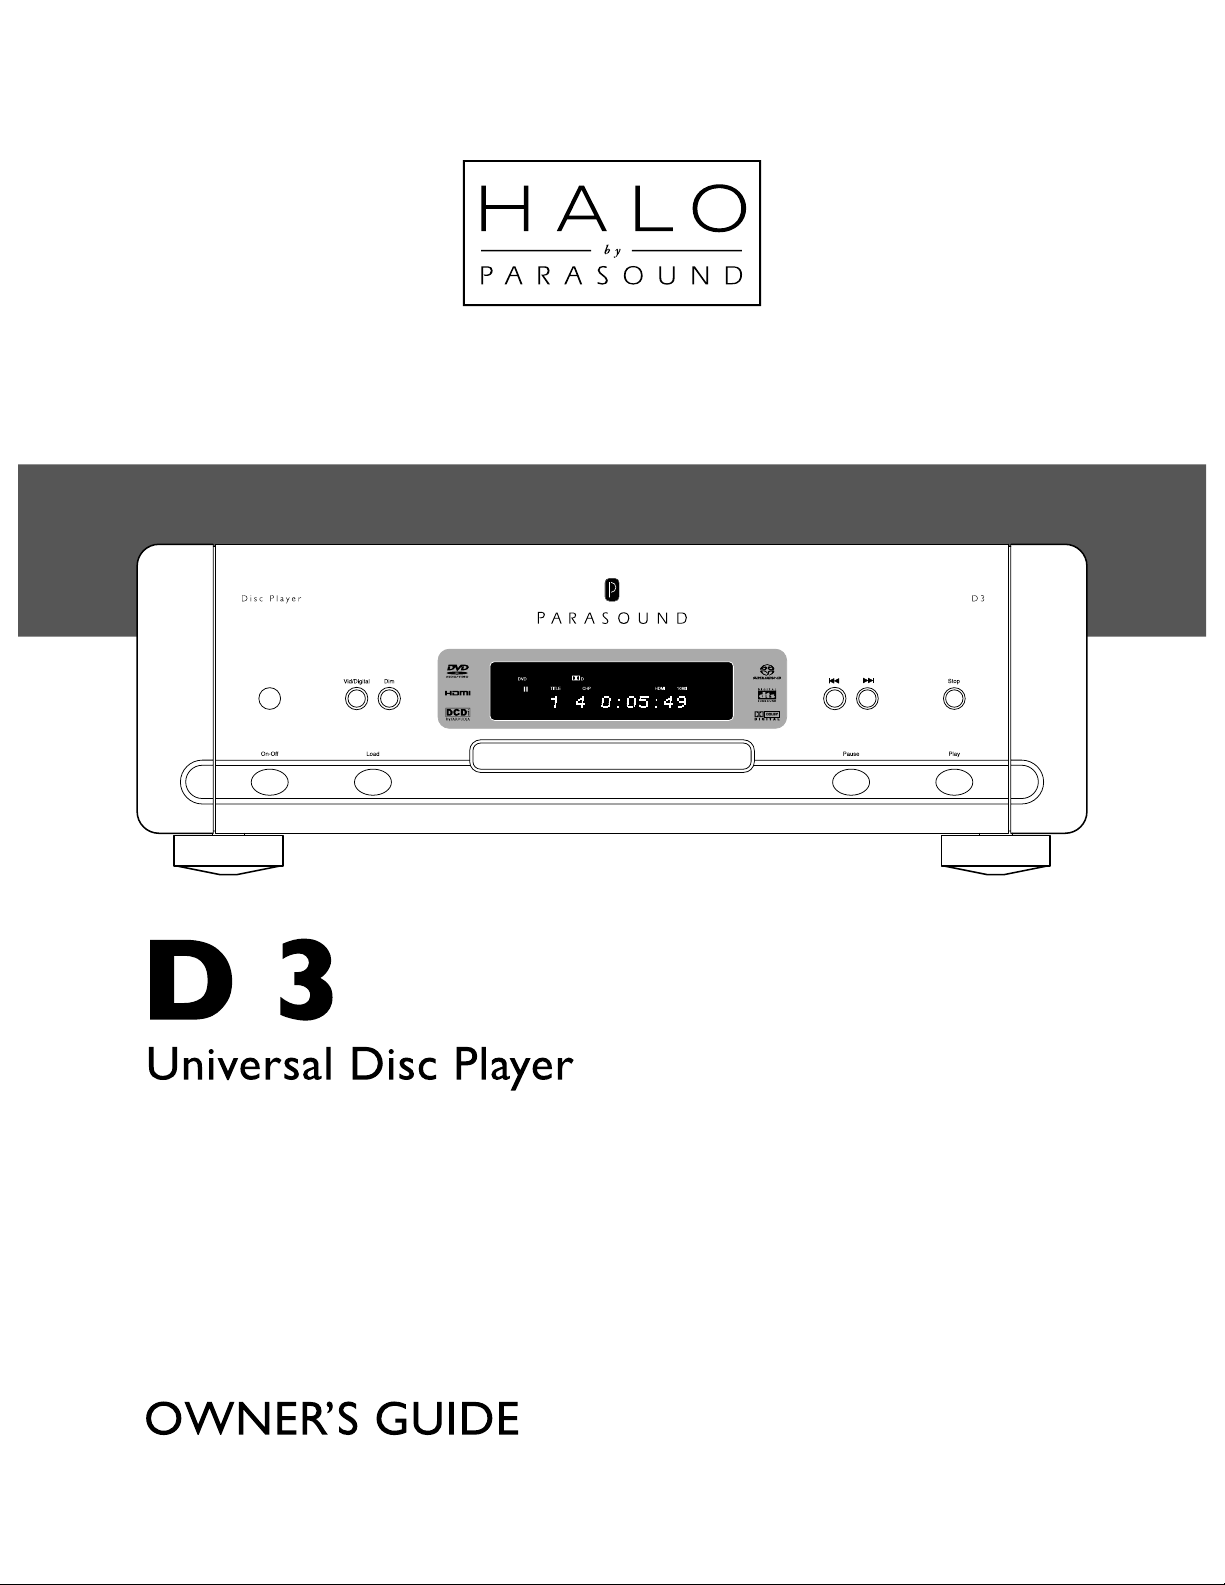
Thank You for Choosing Parasound
Your Parasound® D 3 is an advanced disc player with extraordinary performance capabilities.
We designed the D 3 to be very easy to set up and to operate. This manual is divided into two
sections. The first section describes connections and menu setup selections that will enable
you to play movies and CDs right away, even if you’ve had little or no previous experience with
audio-video components. The second section explains the advanced features that you may prefer
to use later or even ignore altogether.
We appreciate you taking the time to read these instructions and thank you for selecting
Parasound. For updates and corrections to this manual, we invite you to check our web site,
www.parasound.com
Enjoy.
The Parasound Staff
Keeping Records for Future Reference
Record the serial number located on the back panel of your D 3 in the space below. Also note
your Parasound Dealer’s name and telephone number. We recommend that you make a copy
of your original purchase receipt/bill of sale and store the original and the copy in a safe place.
Your purchase receipt/bill of sale is required to determine if your D 3 is eligible for Parasound
warranty service. We recommend you keep a copy with your original packaging.
3
You Should Know
There is no Parasound warranty for this unit if it was not purchased from an Authorized
Parasound Dealer. Investigate warranty coverage statements made by an unauthorized dealer
very carefully, as you will need to depend entirely upon your dealer, and NOT upon Parasound.
Unauthorized dealers lack the capability to make repairs or arrange for repairs of Parasound
equipment. Authorized Parasound Dealers are listed at www.parasound.com or you can call us
at 415-397-7100 between 8:30 am and 4:30 pm Pacific time to verify the status of a dealer.
A missing or altered serial number could indicate that this unit was sold by an unauthorized
dealer or is stolen merchandise. If this unit is missing its serial number, you should return it to
your dealer immediately for a full refund.

4
TABLE OF CONTENTS
Important Safety Instructions . . . . . . . . . . . . . . . . . . . . . . . . . . . . . . . . . . . . . . . . 2
Introduction . . . . . . . . . . . . . . . . . . . . . . . . . . . . . . . . . . . . . . . . . . . . . . . . . . . 3
Unpacking and Placement Guidelines . . . . . . . . . . . . . . . . . . . . . . . . . . . . . . . . . . 6
Rack Mounting . . . . . . . . . . . . . . . . . . . . . . . . . . . . . . . . . . . . . . . . . . . . . . . . . 6
Getting Started . . . . . . . . . . . . . . . . . . . . . . . . . . . . . . . . . . . . . . . . . . . . . . . . . 7
Connecting Your D 3 . . . . . . . . . . . . . . . . . . . . . . . . . . . . . . . . . . . . . . . . . . . . . . 8
Video Connections . . . . . . . . . . . . . . . . . . . . . . . . . . . . . . . . . . . . . . . . . . . . . . . 9
Audio Connections . . . . . . . . . . . . . . . . . . . . . . . . . . . . . . . . . . . . . . . . . . . . . . 11
AC Voltage Switch . . . . . . . . . . . . . . . . . . . . . . . . . . . . . . . . . . . . . . . . . . . . . . 12
IR Remote Repeater Input . . . . . . . . . . . . . . . . . . . . . . . . . . . . . . . . . . . . . . . . . 12
RS-232 Serial Port . . . . . . . . . . . . . . . . . . . . . . . . . . . . . . . . . . . . . . . . . . . . . . 12
Video and Audio connections for a Remote Zone . . . . . . . . . . . . . . . . . . . . . . . . . . 12
Power Up Your D 3 . . . . . . . . . . . . . . . . . . . . . . . . . . . . . . . . . . . . . . . . . . . . . . 13
Navigating The Setup Menus . . . . . . . . . . . . . . . . . . . . . . . . . . . . . . . . . . . . . . . . . . 15
Video Setup . . . . . . . . . . . . . . . . . . . . . . . . . . . . . . . . . . . . . . . . . . . . . . . . . . . . 17
HDMI Output . . . . . . . . . . . . . . . . . . . . . . . . . . . . . . . . . . . . . . . . . . . . . . . . . 17
HDMI Format . . . . . . . . . . . . . . . . . . . . . . . . . . . . . . . . . . . . . . . . . . . . . . . . . 17
Video Output . . . . . . . . . . . . . . . . . . . . . . . . . . . . . . . . . . . . . . . . . . . . . . . . . 17
Scan Type . . . . . . . . . . . . . . . . . . . . . . . . . . . . . . . . . . . . . . . . . . . . . . . . . . . 17
TV Display . . . . . . . . . . . . . . . . . . . . . . . . . . . . . . . . . . . . . . . . . . . . . . . . . . 18
TV System . . . . . . . . . . . . . . . . . . . . . . . . . . . . . . . . . . . . . . . . . . . . . . . . . . 18
Black Level . . . . . . . . . . . . . . . . . . . . . . . . . . . . . . . . . . . . . . . . . . . . . . . . . . 18
Audio Setup . . . . . . . . . . . . . . . . . . . . . . . . . . . . . . . . . . . . . . . . . . . . . . . . . . . . 19
Speaker Size . . . . . . . . . . . . . . . . . . . . . . . . . . . . . . . . . . . . . . . . . . . . . . . . . 19
Subwoofer . . . . . . . . . . . . . . . . . . . . . . . . . . . . . . . . . . . . . . . . . . . . . . . . . . 19
Front L & R . . . . . . . . . . . . . . . . . . . . . . . . . . . . . . . . . . . . . . . . . . . . . . . . . . 19
Center Speaker . . . . . . . . . . . . . . . . . . . . . . . . . . . . . . . . . . . . . . . . . . . . . . . 20
Surround L & R . . . . . . . . . . . . . . . . . . . . . . . . . . . . . . . . . . . . . . . . . . . . . . . 20
Crossover . . . . . . . . . . . . . . . . . . . . . . . . . . . . . . . . . . . . . . . . . . . . . . . . . . . 20
Distance Setup . . . . . . . . . . . . . . . . . . . . . . . . . . . . . . . . . . . . . . . . . . . . . . . 20
Level Setup . . . . . . . . . . . . . . . . . . . . . . . . . . . . . . . . . . . . . . . . . . . . . . . . . . 21
Test Tone . . . . . . . . . . . . . . . . . . . . . . . . . . . . . . . . . . . . . . . . . . . . . . . . . . . 21

TABLE OF CONTENTS
Audio Output . . . . . . . . . . . . . . . . . . . . . . . . . . . . . . . . . . . . . . . . . . . . . . . . . . . 22
Audio Out . . . . . . . . . . . . . . . . . . . . . . . . . . . . . . . . . . . . . . . . . . . . . . . . . . . 22
Late Night . . . . . . . . . . . . . . . . . . . . . . . . . . . . . . . . . . . . . . . . . . . . . . . . . . . 22
DVD Audio Area . . . . . . . . . . . . . . . . . . . . . . . . . . . . . . . . . . . . . . . . . . . . . . . 22
SACD Area . . . . . . . . . . . . . . . . . . . . . . . . . . . . . . . . . . . . . . . . . . . . . . . . . . 22
Language Setup . . . . . . . . . . . . . . . . . . . . . . . . . . . . . . . . . . . . . . . . . . . . . . . . . . 23
Other Setup . . . . . . . . . . . . . . . . . . . . . . . . . . . . . . . . . . . . . . . . . . . . . . . . . . . . 24
Angle Mark . . . . . . . . . . . . . . . . . . . . . . . . . . . . . . . . . . . . . . . . . . . . . . . . . 24
Screen Saver . . . . . . . . . . . . . . . . . . . . . . . . . . . . . . . . . . . . . . . . . . . . . . . . 24
Parental . . . . . . . . . . . . . . . . . . . . . . . . . . . . . . . . . . . . . . . . . . . . . . . . . . . 24
Password . . . . . . . . . . . . . . . . . . . . . . . . . . . . . . . . . . . . . . . . . . . . . . . . . . 24
Momentary OSD . . . . . . . . . . . . . . . . . . . . . . . . . . . . . . . . . . . . . . . . . . . . . 24
Background . . . . . . . . . . . . . . . . . . . . . . . . . . . . . . . . . . . . . . . . . . . . . . . . . 24
Restore Defualt . . . . . . . . . . . . . . . . . . . . . . . . . . . . . . . . . . . . . . . . . . . . . . 24
Advanced Video . . . . . . . . . . . . . . . . . . . . . . . . . . . . . . . . . . . . . . . . . . . . . . . . . 25
5
Custom Video Setup . . . . . . . . . . . . . . . . . . . . . . . . . . . . . . . . . . . . . . . . . . . 25
Preset Select . . . . . . . . . . . . . . . . . . . . . . . . . . . . . . . . . . . . . . . . . . . . . . . . 26
Remote Control Functions . . . . . . . . . . . . . . . . . . . . . . . . . . . . . . . . . . . . . . . . . 27
Typical Problems and Remedies . . . . . . . . . . . . . . . . . . . . . . . . . . . . . . . . . . . . . 29
If You Require Assistance . . . . . . . . . . . . . . . . . . . . . . . . . . . . . . . . . . . . . . . . . 31
Repairs: Return Authorization and Shipping . . . . . . . . . . . . . . . . . . . . . . . . . . . . . 31
Warranty Repair . . . . . . . . . . . . . . . . . . . . . . . . . . . . . . . . . . . . . . . . . . . . . . . 31
Language Code Chart . . . . . . . . . . . . . . . . . . . . . . . . . . . . . . . . . . . . . . . . . . . . 32
Specifications . . . . . . . . . . . . . . . . . . . . . . . . . . . . . . . . . . . . . . . . . . . . . . . . . 33
Connection and Setup Notes . . . . . . . . . . . . . . . . . . . . . . . . . . . . . . . . . . . . . . . 34
6
UNPACKING YOUR D 3 AND PLACEMENT GUIDELINES
Unpacking Your D 3
Carefully unpack your D 3 from its shipping carton and locate all the enclosed accessories:
•
Remote control, two AAA batteries
•
AC power cord
•
Combination cord for two channel audio and composite video
While you are unpacking your D 3, inspect it thoroughly for possible shipping damage and tell
your Parasound dealer right away if you find any. If possible, save and store both the inner and
outer cartons and–most especially–the foam packing inserts, so you can use them to protect
the D 3 if you have to move it or ship it. You can flatten the cartons to save room in storage by
cutting the taped seams on the bottom flaps.
Placement Guidelines
The D 3 will be easy to use and will last longer if you follow these simple guidelines:
•
Place the D 3 on a shelf that will adequately support its weight.
•
Unless you’ll control the D 3 through a remote infrared sensor/repeater system, pick a shelf
where you can aim the remote control handset directly at the D 3. (If you do use remote repeater
sensors, be sure the remote’s signals can’t reach both the IR repeater’s sensor and the unit’s
front-panel sensors at the same time.)
If you’re installing the D 3 yourself, use cables that are long enough to leave at least two feet
of slack; that will enable you to pull the D 3 out of the cabinet to check or change connections
without inadvertently disconnecting cables. If you’re putting the D 3 in a cabinet, make sure
there’s grab space on each side; with a space that’s at least 22 inches wide, you’ll be able to turn
it around for access to its rear panel connections.
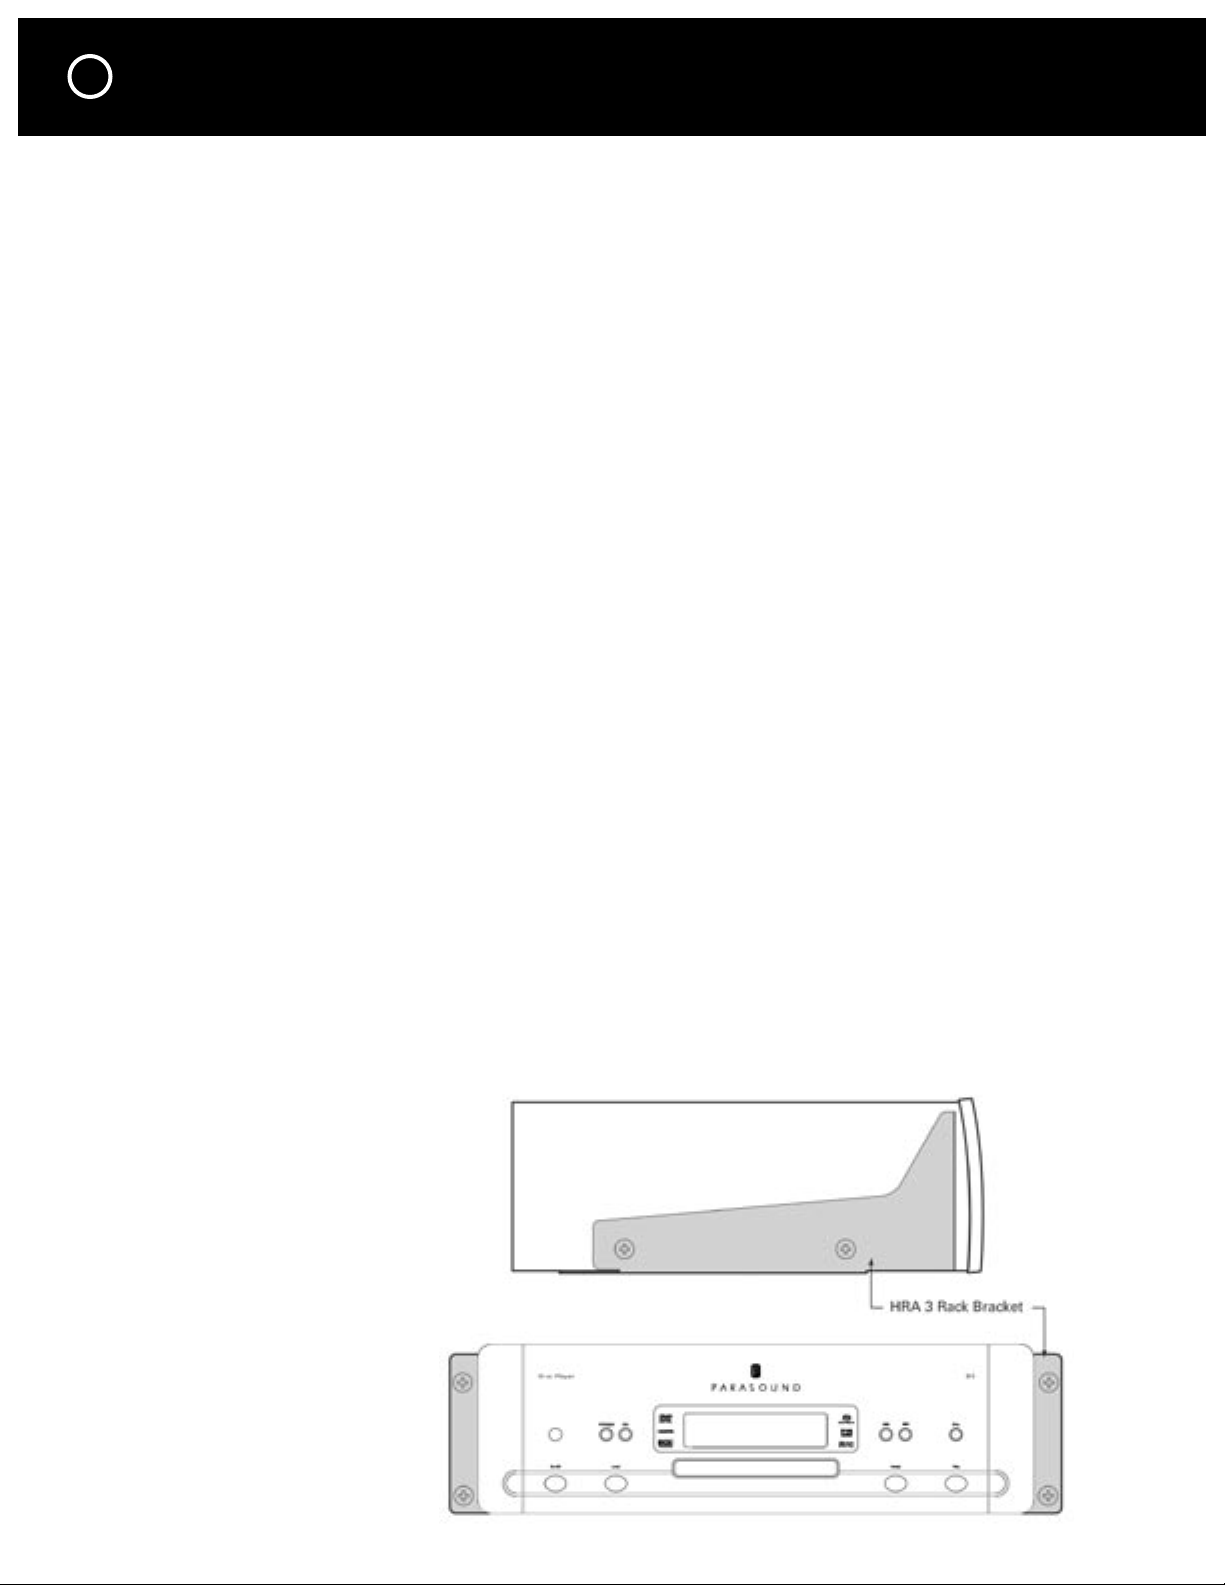
Rack Mounting Your Parasound D 3
With its four feet removed, the D 3’s front panel height occupies three rack spaces (51⁄4” or 133
mm—a single standard rack space occupies 13⁄4” vertical space.) For mounting in a standard 19”
equipment rack, you must use the Parasound HRA 3 rack mount kit (purchased separately). The
HRA 3 includes four bolts and eight plastic washers with raised “shoulders.”
Slide one washer onto each mounting bolt with its raised shoulder pointing toward the panel hole.
Carefully insert the bolt through the hole and slide the other washer on the bolt with its raised
shoulder facing the rear side of the panel. The washers will sandwich the D 3 panel and the four
mounting bolts to prevent metal-to-metal contact between the Model D 3 chassis, the equipment
rack, and the other components mounted in the rack.
Note: Tighten each bolt just
enough to keep the unit secure
in the rack to avoid deforming
the shoulder washers.
GETTING STARTED
To get the most out of your Halo D 3, you’ll need to know how to connect it to your other
components, how to set it up for your listening space and how to operate it. This manual is
organized in this order:
7
Connecting Your D 3: pages 8 – 12
This will show you how to make the video and audio connections that go between your Halo D 3
and your 5.1 channel or 7.1 channel surround controller (or AV receiver) and your TV. Which connections you make will depend on the capabilities of the other equipment in your audio system.
Setting Up Your D 3: pages 15 – 26
This section will show you how to make the selections in your D 3’s Setup Menu to match your
D 3 to your TV and your loudspeakers. You will also learn how to set up each channel to play at
the correct volume level and so that the sound from each channel reaches your seating position
at the correct time. You do not need to make all of these adjustments right away, so feel free to
enjoy your movies now and come back to this section at a later time.
Remote Control Functions: pages 27 – 28
Here you will learn about some of the more advanced buttons on your remote control.
Frequently Asked Questions: pages 29 – 30
There may be answers here if you can’t get something to work correctly. If you are still having
problems, please contact your dealer or call the Parasound Tech Department for technical support.
The telephone number and hours are shown on page 31.
8
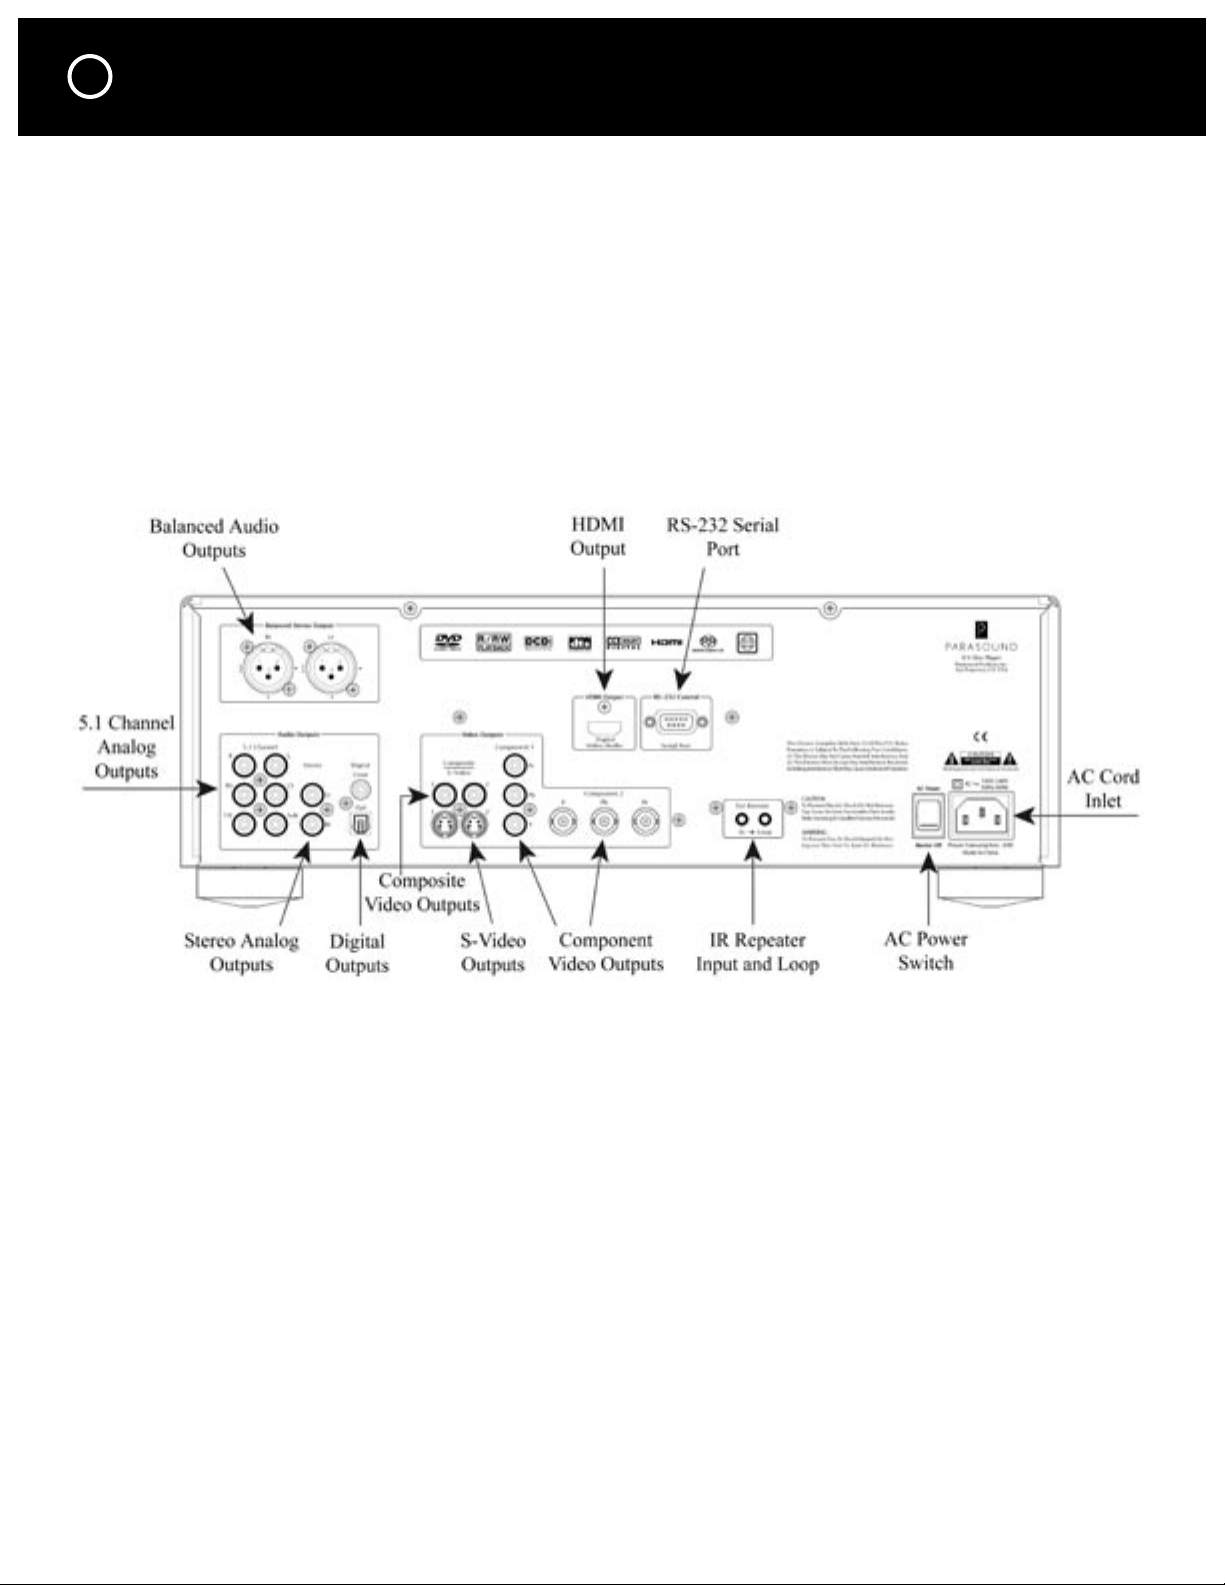
CONNECTING YOUR D 3
Making Connections
The connector jacks on various components often have different names, so read the operating
instructions of each component to make sure you are identifying the correct jacks by the names
we use on the D 3 and in this manual.
Jacks on the units and the plugs on your video and audio cables are usually color coded to
simplify hookup. Be sure to connect the same color plugs to their corresponding jacks.
Don’t attach the D 3’s AC cord yet. You will do this after all the other connections are made.
CONNECTING YOUR D 3 continued
VIDEO CONNECTIONS
You should make the video connection between the D 3 and your TV first. It will be either direct
or via the video inputs on your surround controller (or AV receiver). A video connection is required
to view the D 3’s setup menu on your TV. This section will help you make the video connection.
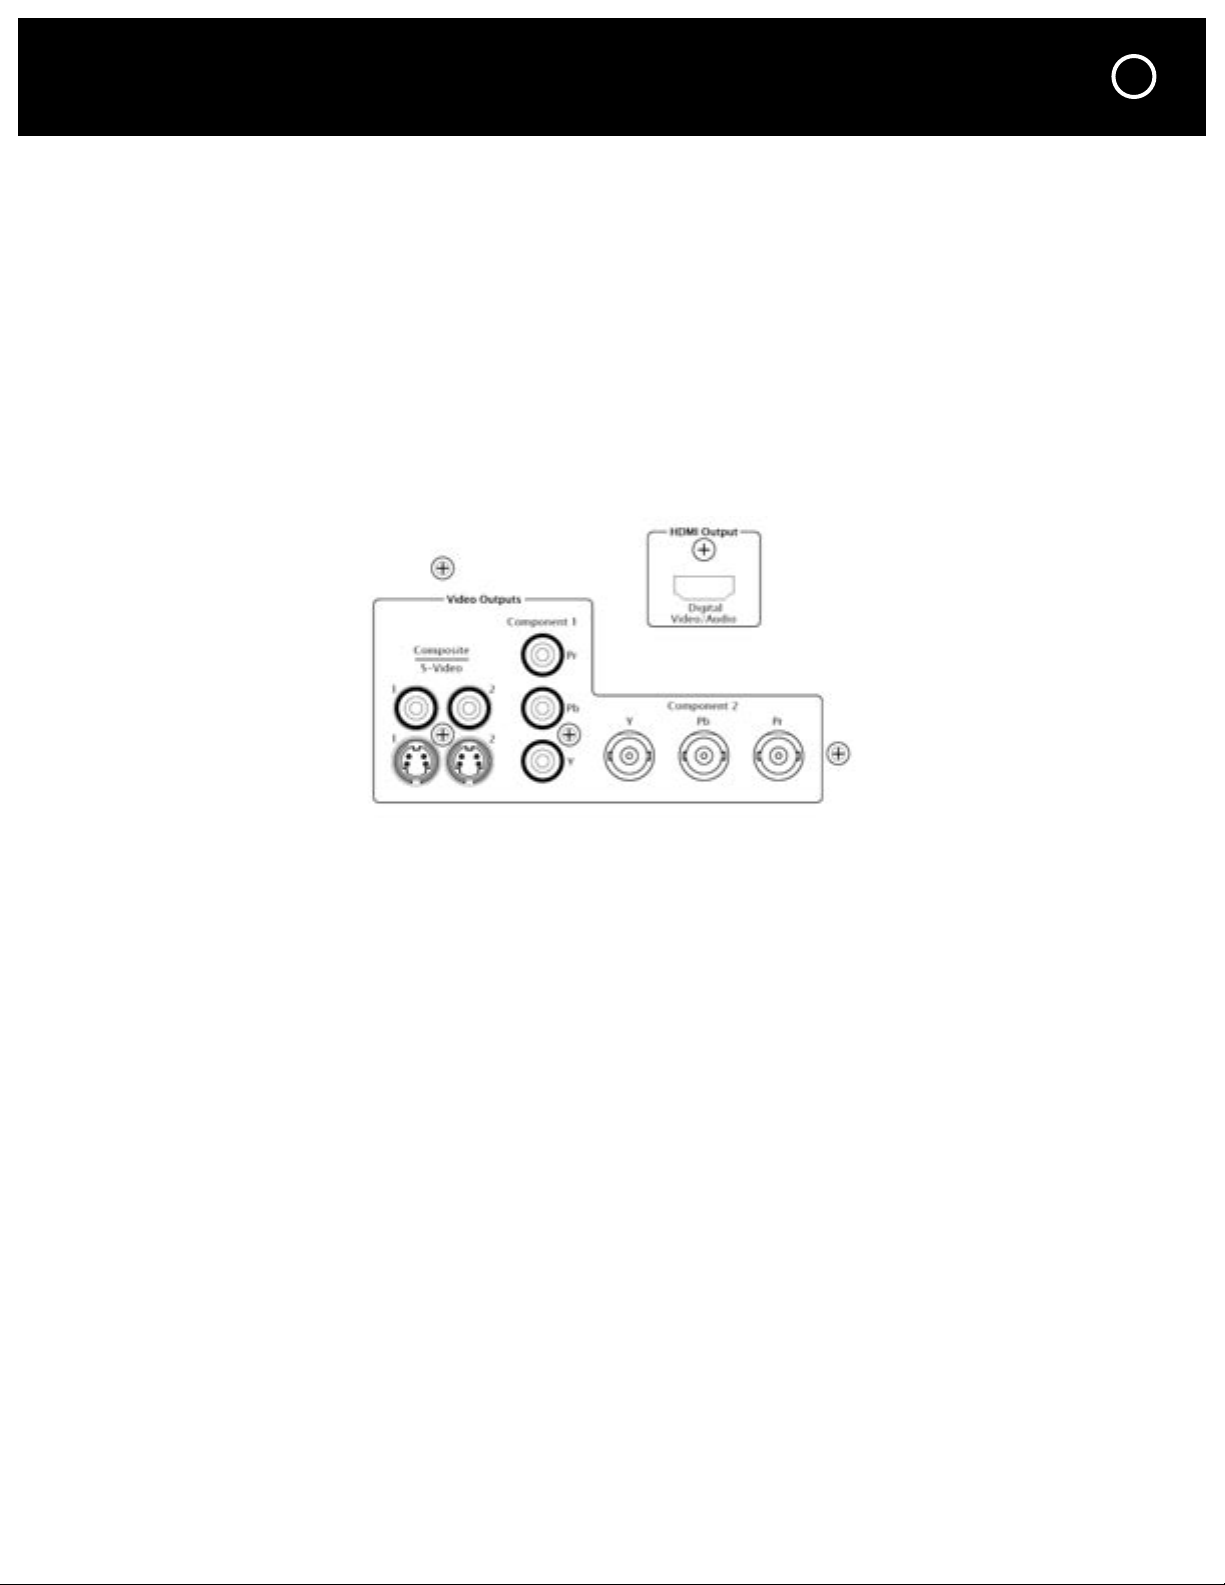
The D 3 includes four different types of video outputs. All of the video outputs can be active
at the same time allowing you to use a combination of connections for a second TV or second
Zone. You will connect only one of the D 3 video outputs for your primary viewing area, or “main
zone.” Choose the best quality video output for which your TV has a matching input.
- HDMI provides the best picture quality. Only High Definition digital TVs include an HDMI input.
- Component video is the next best and consists of three separate cables.
- S-video is next, but it’s a big step down in picture quality from component video.
- Composite video is the lowest quality but is the most common type of connection.
9
HDMI Video Connections
Connect the HDMI Output connector of the D 3 to the HDMI INPUT connector on your TV using a
high quality HDMI-certified cable. If your TV does not have an HDMI or DVI connector you should
skip to “Component Video connections” on the next page.
HDMI connections are for the transmission of uncompressed wide bandwidth digital video and
stereo or multi-channel digital audio signals. HDMI data transmission is usually superior because
it avoids degradation from video digital-to-analog and analog-to-digital conversion, so what you
see and hear is a perfect reproduction of the disc being played.
“HDMI” will flash on the D 3’s front panel when an HDMI cable is not connected between the
D 3 and a TV or if your TV is turned off. If you are not using the HDMI output you can turn it off
in the Video setup menu and it will stop flashing.
Note: If you have more than one HDMI source component (such as a cable or satellite receiver,
or a game console) you may need to use an external HDMI switcher.
We strongly recommend the HDMI-certified Parasound Zhd five input switcher. You can find
details on the Zhd at www.parasound.com.
D 3 HDMI Output to a TV’s DVI Input
If your TV is equipped with a DVI input connector instead of an HDMI input connector you might
be able to use it with a commercially available HDMI-to-DVI adapter. Please make sure your TV’s
DVI Input supports HDCP (High-bandwidth Digital Content Protection), otherwise it will not be
compatible with the D 3. If you plan to route the DVI signal through your surround controller’s or
AV receiver’s DVI input, it must also support HDCP.
Note: Many earlier model TVs with DVI inputs are not HDCP-compliant (digital copyright protection)
and will not operate with the D 3 HDMI output. Your TV’s owner’s manual or your TV dealer can
tell you if the TV is HDCP-compliant.
10
CONNECTING YOUR D 3 continued
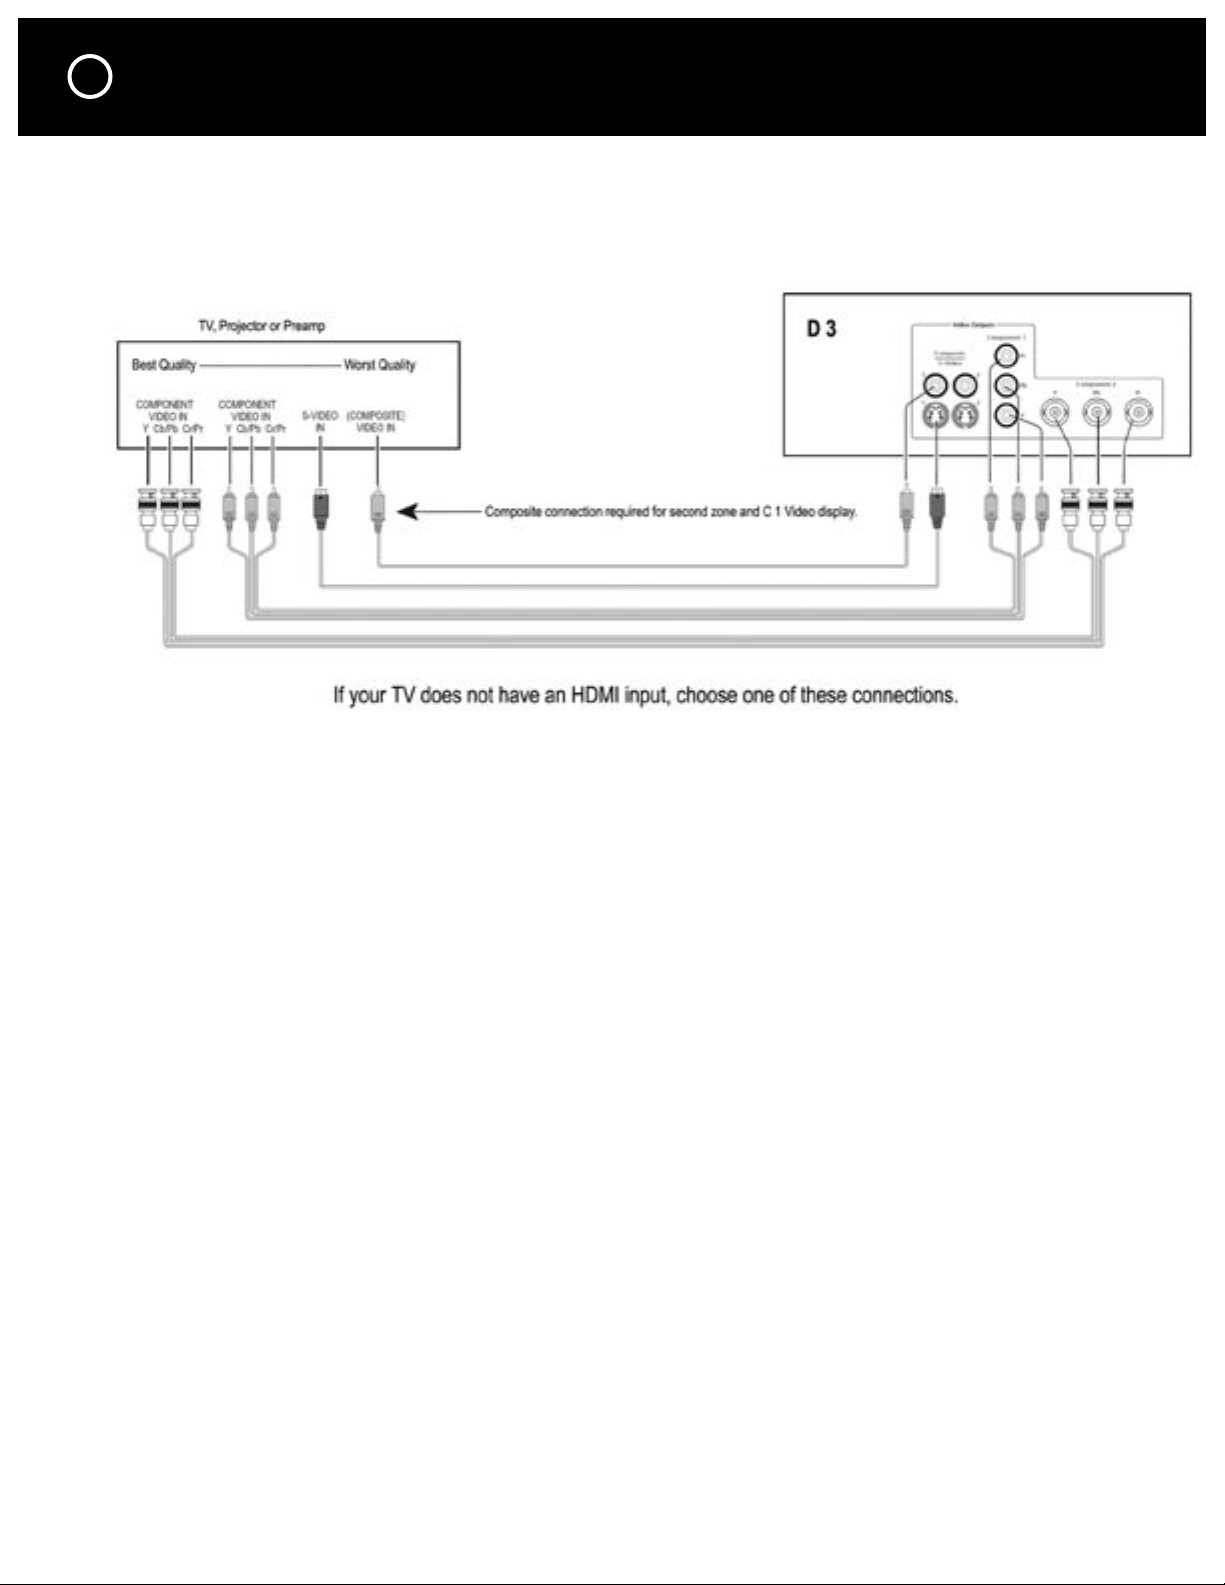
No HDMI or DVI input on your TV?
If your TV does not have an HDMI input you will have to use one of the analog video
connections. These connections are Component, S-Video and Composite. Choose the
highest quality connection that your TV has.
Component Video Connections
If your TV doesn’t have an input for HDMI or DVI
This is a three-cable connection that must use cables that are made for video. The three Component
Video jacks are identified with red, green, and blue colors. The component video cable’s plugs are
usually color-coded to help you connect the same color jacks on the D 3 and your TV.
Connect either set of the Component Video Out 1 or 2 jacks on your D 3 to the three
corresponding Component Video Input jacks on your TV or your surround controller/receiver.
The Component Video Out 1 jacks are standard RCA type and the Component Video Out 2
jacks are higher quality, more robust, BNC jacks.
S-Video Connections
If your TV doesn’t have an input for HDMI, DVI or Component Video
Connect either the S-Video 1 or 2 Out jack on your D 3 to the S-VIDEO input jack of your
surround controller/receiver or TV. The S-Video 1 and 2 Out jacks carry the same video signal,
enabling connection of two TVs.
Note: Connect the S-Video jacks only if you do not use either the Component Video or
Composite Video connections.
Composite Video Connections
If your TV doesn’t have an input for HDMI, DVI, Component Video or S-Video
Connect either the Composite Video 1 or 2 Out jack on your D 3 to the Composite VIDEO
(or sometimes called simply VIDEO) input jack of your surround sound controller/receiver or TV. The
Composite Video 1 and 2 Out jacks carry the same video signal, enabling connection of two TVs.
Note: Connect the Composite Video jacks only if you do not use either the Component Video
or S-Video connections. An exception is if you are using the remote, Zone B, feature on a
Parasound C 1, C 2 or Model 7100 7.1 Channel Surround Controller.
Note: All of the analog video connections are active simultaneously.
CONNECTING YOUR D 3 continued
AUDIO CONNECTIONS
TO YOUR SURROUND CONTROLLER OR RECEIVER
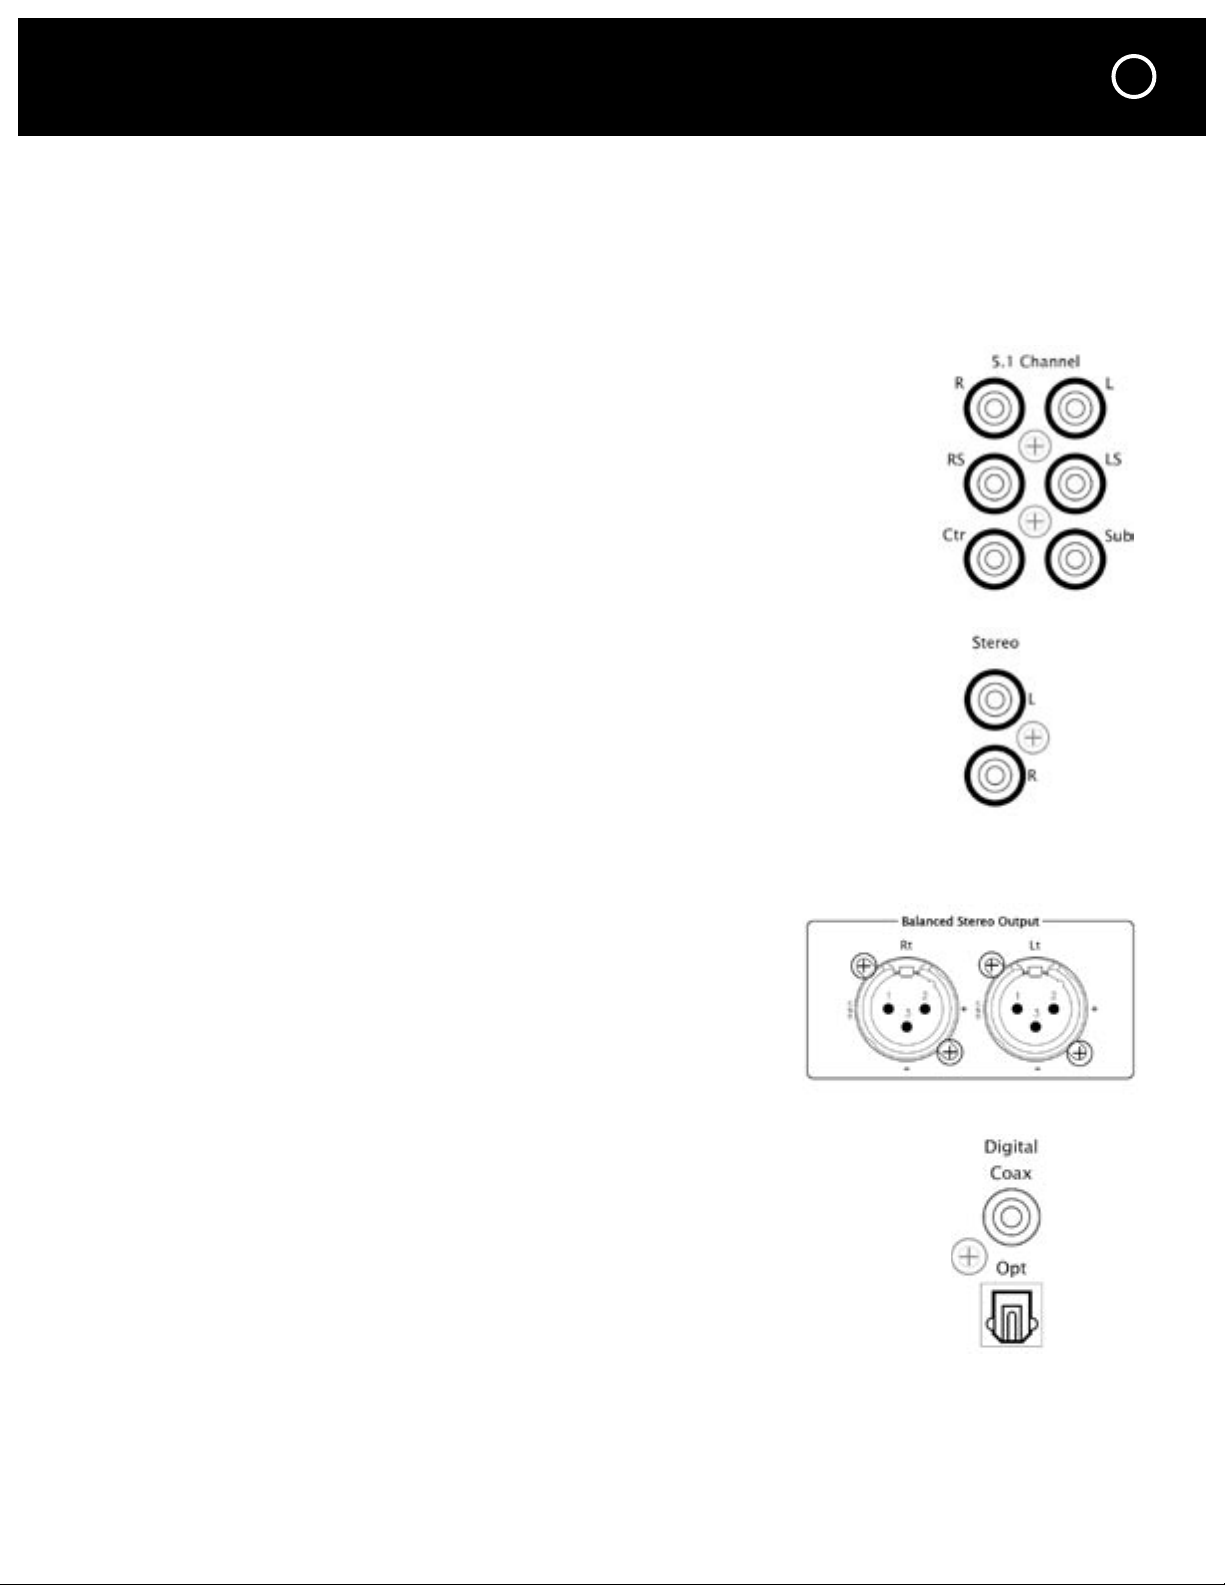
There are four types of audio output connections, unbalanced analog, balanced analog,
digital and HDMI. The proper connection will depend on your audio system’s capabilities.
Analog Audio Outputs
5.1 Channel Analog Audio Outputs
Connect these jacks to the corresponding channel input jacks of your
surround controller or AV receiver. These connections are required to
reproduce high resolution multi-channel DVD-A (DVD Audio) and SACD
recordings because full resolution is not available via the HDMI or Digital
Coaxial or Optical outputs. If you do not plan on listening to DVD-A or SACD
discs you do not need to use these jacks.
Note: The D 3 supports HDMI 1.1 which does not
include playback of SACD audio over HDMI.
Unbalanced Stereo Outputs
These jacks can connect to a second stereo preamp or receiver or to the remote
Zone audio input jacks on a Parasound 7.1 Channel Surround Controller. They
carry the same signals as the 5.1 Analog Audio Output L and R jacks.
Note: You will not hear any dialog from the stereo outputs when playing a DVD
recorded with surround sound, unless you selected NONE for the center speaker
in the Audio setup menu. For information on the Audio setup menu see page 19.
11
Balanced Stereo Outputs
Recording and broadcast studios use balanced connections almost exclusively because of their
inherent ability to reject noise and hum, even with long cable runs.
The balanced XLR jacks on the D 3 are wired according to the
AES standard: pin 1 shield, pin 2 + (positive), pin 3 – (negative
or “return”). Should you need to connect the D 3’s XLR jacks
to the unbalanced RCA jacks on another component, you can
make an adapter cable by wiring an unbalanced cable’s shield
to pin 1 on an XLR connector, wiring the unbalanced cable’s
center conductor to pin 2, and leaving pin 3 unconnected.
Digital Outputs
Connect either the Digital Coaxial jack or the Optical connector (Toslink) to one
of the Coaxial or Optical inputs on your surround controller or receiver. This is your
primary audio connection for use with DVD movies and CDs. When using the
Coaxial output, make sure to use a digital cable that is made for this purpose; a
standard audio cable will not pass digital signals correctly. Toslink cables are fragile;
be very careful not to bend the fiber optic cable sharply.
Note: The D 3 Coaxial or Optical digital outputs do not carry DVD Audio and SACD
digital audio signals. To play multi-channel DVD Audios and SACDs, you should also
connect the 5.1 Ch Audio Output jacks.

12
CONNECTING YOUR D 3 continued
HDMI Audio Connection
A small number of surround controllers and receivers can decode the
audio in the HDMI signal and therefore no other audio connection is
necessary for your main zone. If your surround controller or receiver
does not have an HDMI input or does not decode HDMI audio you
will need to use the Digital Coaxial or Optical connections and the
5.1 channel analog audio inputs.
Note: Some TVs with HDMI inputs do not accept HDMI audio signals. For these TV sets you’ll need
to make separate audio connections from the D 3’s Digital or Analog Audio Output jacks. If you’re
using a TV’s DVI input you will need to make an analog audio connection because DVI cables do not
carry audio signals. High-Resolution SACD audio is not available through the HDMI connection.
AC Connection and Rear Panel Power Switch
The D 3 operates on 100 - 240 volts, so no AC voltage selector switch is
necessary. Plug its AC power cord into an AC outlet that is always live (not
switched). The D 3 will not operate properly if it’s plugged into an AC outlet
that might be switched off. When the rear panel AC Power switch is switched
on you can turn the D 3 on and off with its front panel On-Off button or
remote control On and Off buttons. The only time you will be likely to turn
off the AC Power switch is when you will be away for an extended time.
IR Remote Repeater Input
The IR input jack is a 1/8” (3.5mm) mini jack that connects to an
IR (infrared) repeater system. An IR repeater system includes an IR
receiver that relays or “repeats” the IR commands from your remote
control handset to extend its range. This enables you to control your
D 3 from another room, or when it is located behind closed cabinet doors.
The Loop Out jack will relay the same IR information present at the
input jack making it easy to connect a second IR-controlled component.
Note: Position the IR repeater receiver so that the IR beam from your remote control handset cannot
also reach the D 3, otherwise, the D 3 may not respond correctly to the remote’s commands. When
positioning the IR repeater’s receiver remember that infrared can be reflected like visible light.
RS-232 Serial Port
This 9-pin female DB9 connector is a full-duplex serial port. This permits
the D 3 to communicate in two directions with software-based home
automation and control systems such as Crestron, AMX, Control4, and
Elan. The RS-232 write (command) and read (display feedback) codes
may be found at: www.parasound.com.
When the D 3 is connected to such a controller, it can be controlled and its status monitored
from keypads and hand-held remotes or touch-screen panels throughout your house. The
capabilities of such connections, and the programming and interfacing needed will depend on
the automation system you select; consult your Parasound dealer or custom installer for more
information regarding interfacing an external control system to your D 3.
Video & Audio Connections for a Remote Zone
Parasound surround controllers and many AV receivers include input jacks so you can watch
your movies in another room (usually called the remote zone, or Zone B).
- Connect one of the D 3’s Composite Video Out jacks to the Zone Video Input jack on
your surround controller.
- Connect the D 3’s audio Stereo jacks to the Zone audio input jacks on your surround controller.
These are independent from the video and audio connections you used for your home theater.

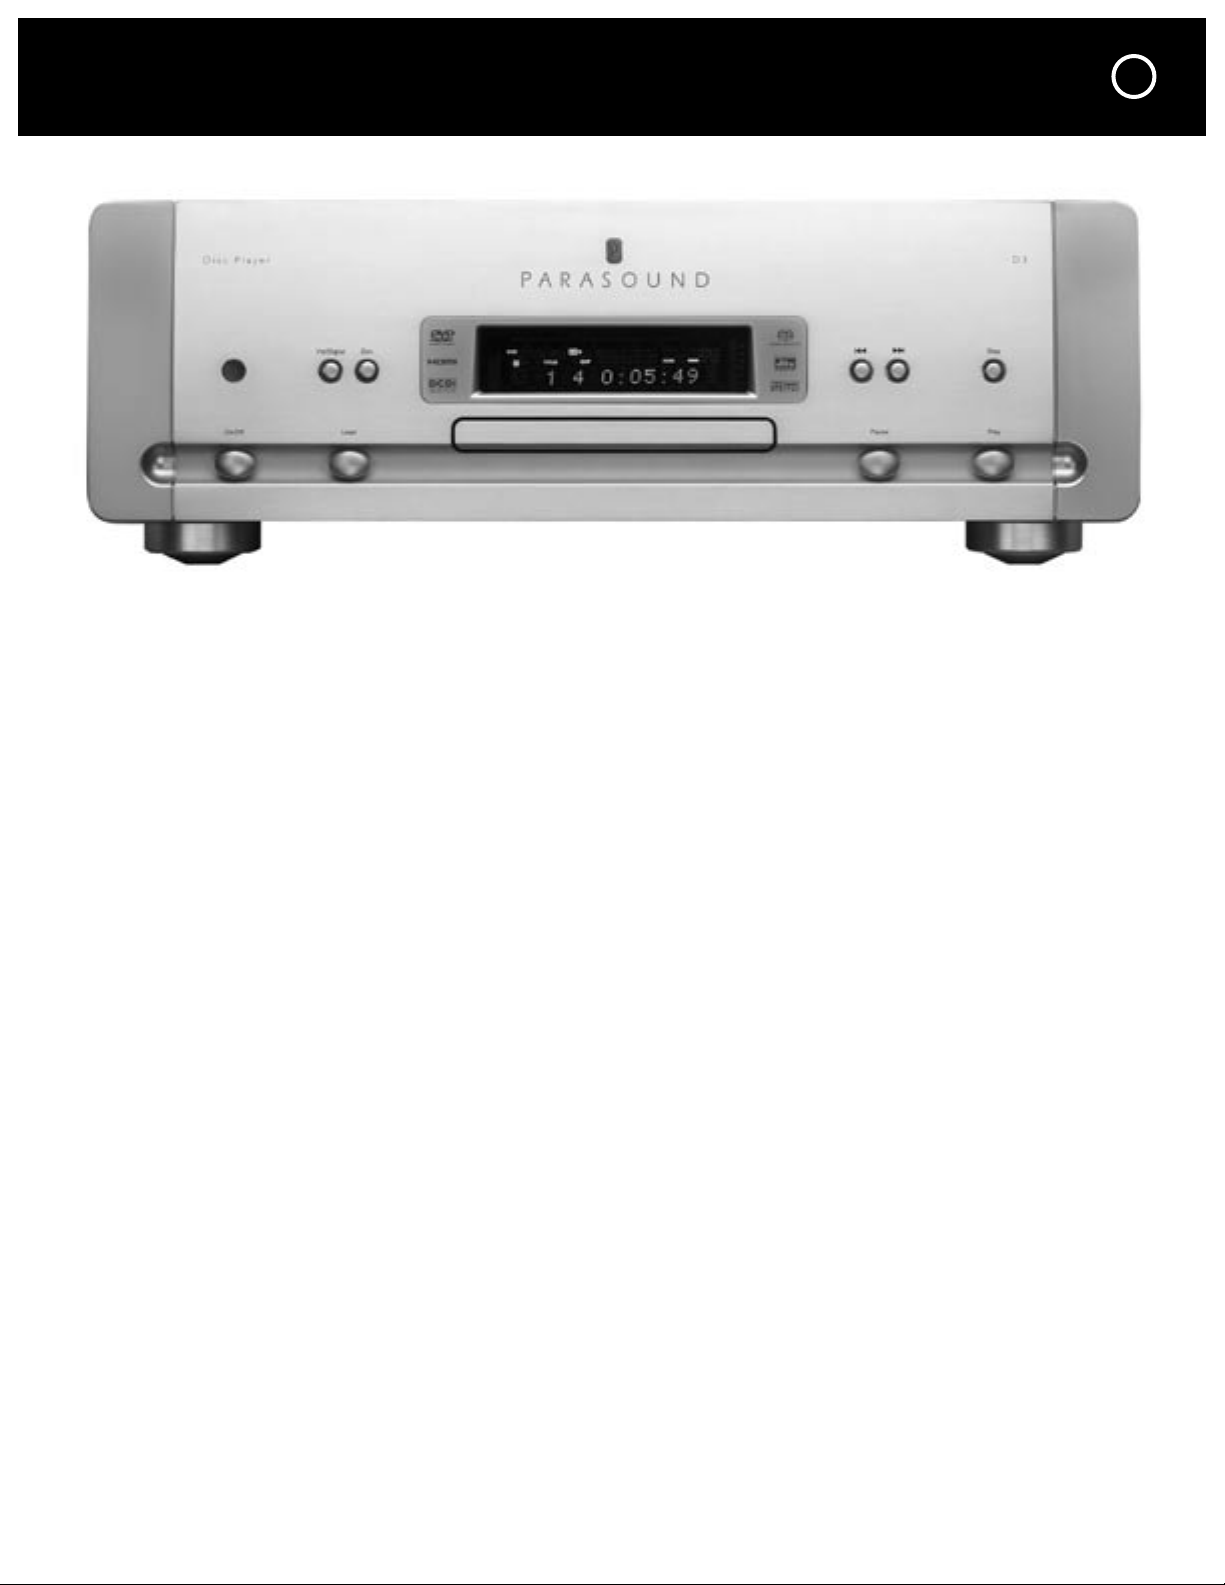
POWER UP YOUR D 3
After your D 3 is connected to the rest of your home theater system you are ready for its
shake-down cruise. Select the TV’s Input for its Input jacks which you connected to the
D 3’s Video Out jacks.
- Press the D 3’s rear panel Master AC Power switch to its On position. You should now
notice a very faint blue glow behind its On-Off button and a red glow behind its P logo badge.
- Press the On-Off button on the front panel to turn the D 3 on: the P logo will glow brighter,
blue will glow around all the buttons, and the front-panel display will light up.
- You can now press the LOAD button and insert a DVD into the exposed loading tray.
A few seconds after you press the PLAY button you should see and hear the opening
screens of the movie.
- Once you are confident that the D 3 is properly connected to the rest of your system you
may want to adjust some of the settings in the setup menu. The next section of this manual
is dedicated to the setup menu.
Note: If you don’t see/hear anything now, please recheck your connections and make sure your
TV is on. Check that the TV and surround controller (or AV receiver) selected inputs are the same
as the input jacks which are connected to the D 3.
13

14
SETUP MENU TABLE OF CONTENTS
Navigating The Setup Menus . . . . . . . . . . . . . . . . . . . . . . . . . . . . . . . . . . . . . . . . . . 15
Video Setup . . . . . . . . . . . . . . . . . . . . . . . . . . . . . . . . . . . . . . . . . . . . . . . . . . . . 17
HDMI Output . . . . . . . . . . . . . . . . . . . . . . . . . . . . . . . . . . . . . . . . . . . . . . . . . 17
HDMI Format . . . . . . . . . . . . . . . . . . . . . . . . . . . . . . . . . . . . . . . . . . . . . . . . . 17
Video Output . . . . . . . . . . . . . . . . . . . . . . . . . . . . . . . . . . . . . . . . . . . . . . . . . 17
Scan Type . . . . . . . . . . . . . . . . . . . . . . . . . . . . . . . . . . . . . . . . . . . . . . . . . . . 18
TV Display . . . . . . . . . . . . . . . . . . . . . . . . . . . . . . . . . . . . . . . . . . . . . . . . . . 18
TV System . . . . . . . . . . . . . . . . . . . . . . . . . . . . . . . . . . . . . . . . . . . . . . . . . . 18
Black Level . . . . . . . . . . . . . . . . . . . . . . . . . . . . . . . . . . . . . . . . . . . . . . . . . . 18
Audio Setup . . . . . . . . . . . . . . . . . . . . . . . . . . . . . . . . . . . . . . . . . . . . . . . . . . . . 19
Speaker Size . . . . . . . . . . . . . . . . . . . . . . . . . . . . . . . . . . . . . . . . . . . . . . . . . 19
Subwoofer . . . . . . . . . . . . . . . . . . . . . . . . . . . . . . . . . . . . . . . . . . . . . . . . . . 19
Front L & R . . . . . . . . . . . . . . . . . . . . . . . . . . . . . . . . . . . . . . . . . . . . . . . . . . 19
Center Speaker . . . . . . . . . . . . . . . . . . . . . . . . . . . . . . . . . . . . . . . . . . . . . . . 20
Surround L & R . . . . . . . . . . . . . . . . . . . . . . . . . . . . . . . . . . . . . . . . . . . . . . . 20
Crossover . . . . . . . . . . . . . . . . . . . . . . . . . . . . . . . . . . . . . . . . . . . . . . . . . . . 20
Distance Setup . . . . . . . . . . . . . . . . . . . . . . . . . . . . . . . . . . . . . . . . . . . . . . . 20
Level Setup . . . . . . . . . . . . . . . . . . . . . . . . . . . . . . . . . . . . . . . . . . . . . . . . . . 21
Test Tone . . . . . . . . . . . . . . . . . . . . . . . . . . . . . . . . . . . . . . . . . . . . . . . . . . . 21
Audio Output . . . . . . . . . . . . . . . . . . . . . . . . . . . . . . . . . . . . . . . . . . . . . . . . . . . 22
Audio Out . . . . . . . . . . . . . . . . . . . . . . . . . . . . . . . . . . . . . . . . . . . . . . . . . . . 22
Late Night . . . . . . . . . . . . . . . . . . . . . . . . . . . . . . . . . . . . . . . . . . . . . . . . . . . 22
DVD Audio Area . . . . . . . . . . . . . . . . . . . . . . . . . . . . . . . . . . . . . . . . . . . . . . . 22
SACD Area . . . . . . . . . . . . . . . . . . . . . . . . . . . . . . . . . . . . . . . . . . . . . . . . . . 22
Language Setup . . . . . . . . . . . . . . . . . . . . . . . . . . . . . . . . . . . . . . . . . . . . . . . . . . 23
Other Setup . . . . . . . . . . . . . . . . . . . . . . . . . . . . . . . . . . . . . . . . . . . . . . . . . . . . 24
Angle Mark . . . . . . . . . . . . . . . . . . . . . . . . . . . . . . . . . . . . . . . . . . . . . . . . . 24
Screen Saver . . . . . . . . . . . . . . . . . . . . . . . . . . . . . . . . . . . . . . . . . . . . . . . . 24
Parental . . . . . . . . . . . . . . . . . . . . . . . . . . . . . . . . . . . . . . . . . . . . . . . . . . . 24
Password . . . . . . . . . . . . . . . . . . . . . . . . . . . . . . . . . . . . . . . . . . . . . . . . . . 24
Momentary OSD . . . . . . . . . . . . . . . . . . . . . . . . . . . . . . . . . . . . . . . . . . . . . 24
Background . . . . . . . . . . . . . . . . . . . . . . . . . . . . . . . . . . . . . . . . . . . . . . . . . 24
Restore Defualt . . . . . . . . . . . . . . . . . . . . . . . . . . . . . . . . . . . . . . . . . . . . . . 24
Advanced Video . . . . . . . . . . . . . . . . . . . . . . . . . . . . . . . . . . . . . . . . . . . . . . . . . 25
Custom Video Setup . . . . . . . . . . . . . . . . . . . . . . . . . . . . . . . . . . . . . . . . . . . 25
Preset Select . . . . . . . . . . . . . . . . . . . . . . . . . . . . . . . . . . . . . . . . . . . . . . . . 26

SETTING UP YOUR D 3
Navigating the Setup Menu with the Remote Handset
You’ll need to make some selections so that the D 3 performs correctly in your home theater
system. These Menu settings are selected by using the D 3’s remote control handset. If you
have not already done so, open the battery compartment cover and install the batteries, making
sure their directions match the markings on the remote.
Notes:
- You don’t need to make all of these selections right away.
- Your D 3 must be connected to a TV to use the setup menu because its front panel does not
display the setup menu. Don’t forget to select the proper input on your TV.
- If you think your D 3 is set up for the wrong video type (NTSC or PAL) or if there is no output
from the HDMI jack please see the FAQ section of this manual.
- If your D 3 is connected to your TV only by an HDMI cable and you cannot see the setup menu,
you may need to temporarily connect a composite video cable in order to view the setup menu.
Then you can turn on your D 3’s HDMI output.
Start with your D 3 power turned on and at full stop (press the STOP button twice).
Press the SETUP button on your remote handset.
15
The main menu will appear.
This is the onscreen display (OSD)
Setup Menu Structure
The MAIN MENU setup screen shows the titles of the five setup categories.
- VIDEO SETUP
- AUDIO SETUP
- LANGUAGE SETUP
- OTHER SETUP
- ADVANCED VIDEO
Each of these titles branches out into its own page,
where you will make your actual selections or adjustments. For example, when you select VIDEO SETUP
you will see the VIDEO SETUP page.

16
SETTING UP YOUR D 3 continued
Once you see the setup menu on your TV screen you can make
selections or adjustments with the D 3 remote handset’s
cursor buttons and central ENTER button. You only need to move
your thumb a short distance to press any of these five buttons and
you’ll soon know which button you’re pressing without having to look
at the remote. The setup process will go much faster when you are
focused on the Setup menu on your TV, without having to look at
which remote button you’re pressing.
Actual adjustments or selections on each menu page are made with
the , , and cursor buttons. Press the and cursor buttons
to select the item in the left column which you wish to adjust. When you select a menu item
it will be highlighted. Then press the cursor button to highlight the right column. Use the
and buttons to highlight your selection or adjustment in the right column and then press
the ENTER button to select it. Press the cursor button to return to the left column.
After you have made all the selections for that menu
page, press the button until EXIT is highlighted.
When you press the ENTER button to select EXIT,
the next higher level menu page will reappear.
Saving Your Setup Selections
Your settings are automatically saved when
you press the SETUP button on the remote or
by pressing the ENTER button when EXIT is
highlighted on the MAIN MENU.
, , ,

SETTING UP YOUR D 3 continued
VIDEO SETUP MENU
This is the first menu page you should set up; it’s used to adapt the D 3 to the type of TV you
are using. The D 3 comes from the factory with the HDMI output turned on and a screen shape
of 16:9 which is suitable for widescreen TVs.
HDMI OUTPUT
If your TV is equipped with an HDMI input you will want to
set the D 3’s HDMI output to ON. When the D 3’s HDMI
output is turned on, “HDMI” will illuminate continuously on
the front panel display. If the HDMI output is turned on and
the D 3 is not connected to a TV with an HDMI input, or if the
HDMI TV is not turned on, then “HDMI” will flash on and off.
Note: Progressive scan (SCAN TYPE) is not available through
the component video outputs when HDMI is set to ON.
HDMI FORMAT
This changes the HDMI colors in case you are using a
DVI-equipped TV instead of a TV with an HDMI input.
The three settings are YCbCr, RGB NORMAL and
RGB ENHANCED.
- Select YCbCr if your TV has an HDMI input.
- Select RGB NORMAL if you are using a TV with a
DVI input (with a DVI-to-HDMI adapter). RGB NORMAL
outputs the video signals from the HDMI OUTPUT connector with a digital RGB video level (data range)
of 16 (black) to 235 (white).
- Select RGB ENHANCED if the black levels do not look
correct when using a DVI connection. RGB ENHANCED outputs the video signals with a digital
RGB video level (data range) of 0 (black) to 246 (white). These settings are determined by your
particular TV; for details, refer to the operating instructions of your TV.
17
VIDEO OUTPUT
This selects the resolution of the video signals output
from the HDMI jack. VIDEO OUTPUT should be set to
match your TV’s native resolution. The native resolution
of most HDMI-equipped TVs is either 720p or 1080i.
Refer to the operating instructions of your TV for details
on its native resolution. We invite you to experiment
with these settings to see which looks best.
Note: If you don’t see any picture after selecting a
resolution, it may mean that you selected a resolution
that is incompatible with your TV. The AUTO setting will
allow your D 3 and TV to “talk” to each other and set the
appropriate resolution automatically.

18
SETTING UP YOUR D 3 continued
SCAN TYPE
This determines if the component video output is
interlaced (480i) or progressive scan (480p). Refer to
your TV’s operating and connection instructions to find
out if it is compatible with a progressive scan signal.
Note: If the HDMI OUTPUT is turned on the component
video output will be forced to the interlaced setting and
cannot be changed to progressive scan.
TV DISPLAY
This should be set to match your TV’s aspect ratio
(screen shape). If your TV has a 4:3 aspect ratio select
either 4:3 LETTERBOX or 4:3 PAN-SCAN. If your TV is a
“widescreen” TV, select 16:9 WIDE.
- PAN-SCAN is useful for viewing a 16:9 or widescreen
DVD on a 4:3 TV. PAN-SCAN automatically trims off
the far left and right of the image so that the remaining
picture completely fills your 4:3 TV screen.
- 4:3 LETTERBOX preserves the full 16:9 or widescreen
picture width, but it leaves black bars at the top and
bottom of the screen.
TV SYSTEM
This determines if your D 3 will output an NTSC or a
PAL signal. Set the TV SYSTEM according to your
geographic location or refer to your TVs owner’s
manual for the proper setting.
- NTSC is the television broadcast system used in
North America and some Asian countries.
- PAL is most commonly used in Europe.
Note: Many newer TVs adjust for NTSC or PAL formats
automatically. If you think your D 3 is set to the wrong
setting because you cannot see any picture, see the
FAQ section on page 29.
BLACK LEVEL
This allows you to select the intensity of the black
output by the D 3. Please note that not all TVs are
capable of displaying the darker black levels.

SETTING UP YOUR D 3 continued
AUDIO SETUP MENU
You can skip this Audio Setup (pages 19-21) if you are only using Digital Coax or Optical
audio outputs because these settings only affect the analog outputs.
This section will help you set up the audio portion of the D 3. SPEAKER SIZE, DISTANCE SETUP
and LEVEL SETUP only affect the Analog Audio 5.1 Channel Outputs. The setup for the Digital
Coaxial and Optical outputs is made in the menu of your surround controller or AV receiver. Refer
to the owner’s manual of your surround sound processor or AV receiver for setting up your system
speakers when using the digital outputs of the D 3.
SPEAKER SIZE
This is the first step in the Audio Setup of your D 3;
it’s used to adapt the D 3 to the number, locations, and
types of speakers in your system. The D 3 comes from
the factory with all speakers set to SMALL because this
applies to the majority of home theater systems.
The SMALL setting is for speakers with limited bass
capacity (bass drivers smaller than 6”);
To reduce distortion and increase power handling for
“small” speakers the D 3 filters out the bass signals
and redirects them to the subwoofer channel. This bass
diversion takes place at the frequency setting in the
SIZE SETUP menu.
The LARGE setting is for larger speakers which can
handle low bass without distortion and often when a
subwoofer is not used in the system. There is no bass
filtering. If you’re not sure if you should classify your
speakers as “Small” or “Large,” watch a few movies
scenes at SMALL and again at LARGE to determine
which sounds better.
19
SUBWOOFER
Select YES if your system includes a subwoofer.
Select NO if you’re not using a subwoofer.
FRONT L&R
These are the left and right front speakers and may be
set to LARGE or SMALL.

20
SETTING UP YOUR D 3 continued
CENTER SPEAKER
This may be set to LARGE, SMALL or NONE. Set to
LARGE or SMALL, according to the guidelines in the
previous paragraphs. Set to NONE if your home theater
has no center channel speaker. The D 3 will blend the
center channel signals into your front left and right front
speakers. This creates a “Phantom” center channel
sound image because the center channel sound will
appear to come from the middle space between your
left and right front speakers, even without an actual
center channel speaker.
SURROUND L&R
These are the speakers that are placed at the sides
of your room. This may be set to LARGE, SMALL or
NONE. Set to LARGE or SMALL, according to the
guidelines above. If you select NONE the surround
channel signals are blended into the front channels.
CROSSOVER
This sets the subwoofer bass filter’s cutoff frequency
from 70 Hz to120 Hz, in 10 Hz increments and from
120 Hz to 160 Hz, in 20 Hz increments. The optimum
setting will depend on your speakers, your sub, and
your room’s acoustics. The best starting point is 80 Hz.
Don’t use both the crossover filter in your sub and the
Crossover filter in the D 3, or some bass frequencies
you want may not be heard at all. If your subwoofer
doesn’t have a bypass switch for its crossover filter,
adjust it to its highest frequency setting to minimize
redundant filtering. If your sub has a fixed filter and no
bypass, set the D 3 Sub filter to 160 Hz.
DISTANCE SETUP
Use the DISTANCE SETUP menu to calibrate the arrival
time for the sound from each speaker. Convincing
surround sound depends on the sound reaching your
ears from each speaker at the same time as the recording
engineer intended. For example, if your front speakers
are three feet further from you than your surrounds are,
the sound from the front speakers will reach you about
3 milliseconds (0.003 sec.) later than the surrounds and
you might hear, say, an echo before the shot itself. To
compensate for your speaker placement, your D 3 can
delay the sound from the surround speakers by three
milliseconds, restoring the correct timing. You can set
delays by measuring the distance from each speaker
to your head when you’re seated in your favorite
viewing/listening position and entering it in the
DISTANCE SETUP.
Use a measuring tape and note the distance from your primary listening position to each speaker.
The D 3 will translate each foot (.34 meters) of distance for a given channel into 1ms (millisecond)
of delay. For each speaker, the distance can be set in 1-foot increments from 5 to 30 feet (or 1.5 to
9 meters, if you set the UNITS for METERS).
Note: You cannot set distance for any speakers set to NONE or NO in the SPEAKER SIZE setup page.

SETTING UP YOUR D 3 continued
LEVEL SETUP
Use the LEVEL SETUP menu to calibrate the volume
level for each speaker. Convincing surround sound
depends on the sound reaching your ears from each
speaker at the same volume level as the recording
engineer intended. Because home theater systems and
home theater environments vary, the simplest way to
do that is to send a standard test signal to each speaker,
one at a time, and measure each one’s sound level at
the primary listening position. You can then adjust
each channel’s level so that all the sound levels are
calibrated to be equal.
Note: These adjustments do not effect the coaxial
and optical digital outputs. Only the analog audio
outputs are effected.
TEST TONE
Press this button to start the test noise which will
cycle from speaker to speaker every few seconds. The
current speaker reproducing the test tone is identified
at the bottom left corner of the setup screen. As the
test tone cycles through each speaker you can adjust
each speaker setting so that all speakers will play at
the same level.
Note: You cannot set the level for any speakers set to
NONE or NO in the SPEAKER SIZE setup page.
You can match speaker levels to each other with
reasonable accuracy just by listening to the D 3’s
test tone. However, you might wish to purchase an inexpensive SPL (sound-pressure-level)
meter to make more accurate measurements. Radio Shack makes two popular and
inexpensive SPL meters.
To use the SPL meter for level calibration will require both hands. Hold the SPL meter in one
hand with its microphone end upright, near where your head would be when you sit in your
primary viewing/listening seat. Hold the D 3’s remote handset in your other hand; you’ll be able
to make level calibration adjustments using just your thumb to press its cursor buttons.
21

22
SETTING UP YOUR D 3 continued
AUDIO OUTPUT
In this section you will be able to set up some of your D 3’s more advanced audio features.
AUDIO OUT
This sets both the HDMI audio output and the analog
audio output together. It does not affect the coaxial and
optical digital outputs.
- HDMI AUTO, the D 3 HDMI jack automatically outputs
only the number of HDMI audio channels your HDMI TV
or surround controller/receiver can decode.
- MULTI CH allows surround sound audio signals to pass
through the HDMI and Analog 5.1 Channel output jacks.
- STEREO restricts both HDMI and analog audio outputs
to two channel stereo, disabling surround sound.
Note: The AUDIO OUT setting does not affect the digital coaxial and optical outputs. The format
of the digital signal at the coaxial and optical output jacks is determined solely by the DVD being
played and the settings in the DVD disc setup menu.
LATE NIGHT
This is a dynamic range limiter which you can set to restrict
the very loud portions of Dolby Digital soundtracks. This
operates by making low volume sounds a bit easier to hear
while also reducing the volume level of the louder sounds.
Selecting LATE NIGHT enables you to hear all of the dialog
without awakening your family (or neighbors) when the sound
effects get loud. LATE NIGHT can be set from 0 to 8, the
higher numbers represent greater limit of dynamic range.
Note: This feature only works with DVD movies recorded in Dolby Digital and it only affects the
5.1 analog and stereo outputs. Your surround receiver or AV receiver will have its own late night
adjustment for digital audio signals coming from the D 3’s Digital Coaxial or Optical output jacks.
DVD AUDIO AREA
Some DVD Audio discs consist of separate DVD-Video and
DVD-Audio content (areas) on a single disc. You can select
the desired area to be played by selecting the DVD AUDIO
or DVD VIDEO AREA. Please note that if the disc does not
contain separate Video and Audio sections, the available section
will be played regardless of the DVD AUDIO AREA setting.
SACD AREA
Some SACDs consist of two channel and multi-channel
audio areas on a single disc. In addition, “hybrid SACDs”
consist of both high-resolution SACD material and
standard CD-resolution material on a single disc. You
can select the desired area to be played by selecting
the MULTICHANNEL, 2CHANNEL or CD AREA. You can
also select the desired SACD disc area by pressing the
SACD button on the remote handset.
Note: An SACD cannot play if you selected an SACD area
which it does not contain. If the disc won’t play, the D 3
front panel will show NO MULTI CH. In this case you must
select the appropriate SACD AREA in the setup menu or
by pressing the SACD button on the remote handset.

SETTING UP YOUR D 3 continued
LANGUAGE SETUP
Your D 3 is set at the factory to play movies in English.
If you prefer your DVD movies to default to a language
other than English this section will help you make
those settings.
Note: If a DVD was not recorded with your
selected language a default language will be used.
AUDIO will set the default
audio track language for your DVD movies.
SUBTITLE will set the default
subtitle language for your DVD movies.
DISC MENUS will set the default
DVD movie menu language.
Setting up Other languages not listed
If the language you desire is not listed you can select the OTHER menu option and enter the
4-digit language code. Please refer to the “DVD Language Code List” on page 32 to find the
code for your preferred language. Enter the 4-digit code by using the numeric buttons on the
remote handset, then press the ENTER button. When the code is input correctly the main
Language Setup page will be displayed. If you input an invalid code, INVALID LANGUAGE CODE
is displayed. In this case check your language code and re-enter it.
23

24
SETTING UP YOUR D 3 continued
OTHER SETUP
The OTHER SETUP page contains a number of setup
options to help you get the most from your D 3. These
settings are not required for basic operation, and you
may prefer to make these settings later, or not at all.
ANGLE MARKER
Some DVDs contain scenes which have been shot simultaneously from multiple camera angles. The ANGLE
MARKER setting determines if the angle symbol “ ”
is displayed when an alternate viewing angle is available.
The same scene can be viewed from each of these
different angles in DVDs that include these special
features. The recorded angles differ depending on the disc used. During playback of the scene
which was recorded from multiple camera angles, press the ANGLE button on the remote handset
if you see the angle symbol “ ” on your TV. You will never see this symbol if the ANGLE
MARKER option is set to NO.
SCREEN SAVER
Some TVs may have an image “burned” into its screen if a static picture is displayed continuously for a long time in the stop or pause mode. To prevent this, set the SCREEN SAVER to ON.
With the screen saver on, the D 3 will automatically activate the screen saver function if a static
picture is displayed for over 5 minutes. Please note that “burn in” is most common on CRT and
Plasma TVs and therefore the screen saver should always be turned on with these TV types.
PARENTAL
This feature is used to restrict playback of DVD movies that contain scenes with language or
violence that are inappropriate for young people. Set the PARENTAL level to the rating you wish
to allow others to view on your D 3. Discs with ratings that exceed the PARENTAL setting will
not be playable.
PASSWORD
This allows the default password to be changed to something you can more easily remember.
The D 3 comes from the factory with the password set to “3308.” If you forget your password
enter the code 3308, then change the password to a new one. Make a note of the new
password in a secure location.
MOMENTARY OSD
This determines if the OSD (On Screen Display) appears on your TV screen when changing
DVD chapters, pausing, etc. Turn the MOMENTARY OSD to OFF if you do not want your D 3 to
display any status information on your TV.
BACKGROUND
This allows you to select the background color on your TV screen when playing CDs and when the
D 3 is stopped. The options are BLUE, BLACK and LOGO. LOGO is the Parasound logo screen.
RESTORE DEFAULT?
If you select this, it will cancel all of your menu settings and return your D 3 to the original factory
default settings. You will lose all the settings you have made.

SETTING UP YOUR D 3 — ADVANCED continued
ADVANCED VIDEO
This section of the setup menu allows you to fine-tune
the colors and picture characteristics of your D 3 to compensate for the characteristics of your
particular TV, as well as the brightness and color of your room. There are two sub-menus on
the ADVANCED VIDEO setup page, CUSTOM VIDEO SETUP and PRESET SELECT. We do not
recommend experimenting with these advanced video adjustments unless you are unsatisfied
with the picture quality.
Note: The easiest way to make these adjustments is to first start a movie playing. Now press
the STOP button only once and then the SETUP button. Make your video adjustments, exit
the SETUP MENU and then press the PLAY button. The movie will resume from the same
location making it easy to see how the picture has changed.
CUSTOM VIDEO SETUP
On this menu page you will be able to make adjustments
to many different picture parameters. After you have
completed making these adjustments, go to the PRESET
SELECT setup page and select the USER preset. If you
don’t do this your custom video setup adjustments will
not take effect.
25
BRIGHTNESS
This sets the brightness of the image
within the range of -6 to 6.
CONTRAST
This adjusts the difference between light and dark of
the image within the range of -6 to +6. Dark colors will
become darker and light colors will become lighter.
HUE
This adjusts the balance between green and red within
the range of Green 6 to Red 6. The easiest way to adjust HUE is to adjust it for the most natural skin tones.
SHARPNESS M (middle)
This adjusts the sharpness of the image in the middle
band of video frequencies, within the range of -6 to +6.
Its effects are very subtle and might not be visible with many DVDs.
SHARPNESS H (high)
This adjusts the sharpness of the image in the high band of video frequencies within the
range of -6 to +6. Its effects are very subtle and might not be visible with many DVDs.
CCS
This stands for Cross Color Suppression and allows you to remove the cross color artifacts
in the video signal due to poor Y/C separation present in some DVD video recordings.
CHROMA LEVEL
This allows the adjustment of the overall color intensity. This is also known as color saturation.
CHROMA LEVEL can be set from -6 to +6.
26
SETTING UP YOUR D 3 — ADVANCED continued
CHROMA DELAY
This adjusts the delay between the video brightness signal and the video color signal
information of an image. If the luminence (Y) connecting cable is significantly longer than the
chroma (C) cable the luma information will arrive later than the chroma information, causing
poor picture quality. CHROMA DELAY can be adjusted from -2 to +2.
ENHANCE V (vertical)
The vertical enhancer will enhance the vertical transitions in the luma, sharpening the vertical
detail to produce a more lifelike picture. This can be adjusted in a range of 0 to 11. Its effects are
very subtle and might not be visible with many DVDs.
ENHANCE H (horizontal)
The horizontal enhancer will enhance the horizontal luma, and horizontal chroma, sharpening the
horizontal details. This can be adjusted in a range of 0 to 11. Its effects are very subtle and might
not be visible with many DVDs.
DIGITAL NR (Noise Reduction)
This feature can help remove noise from the picture, resulting in a cleaner image without
“snow.” The settings are OFF, AUTO, LOW, MID and HIGH. We encourage you to experiment
with the settings. In many cases the image quality will be clear enough without Digital NR.
DEFAULT?
This will reset all of the settings under the CUSTOM VIDEO SETUP to the factory defaults.
Note: Don’t forget to select the USER option on the PRESET SELECT setup page or your custom
video adjustments will not take effect.
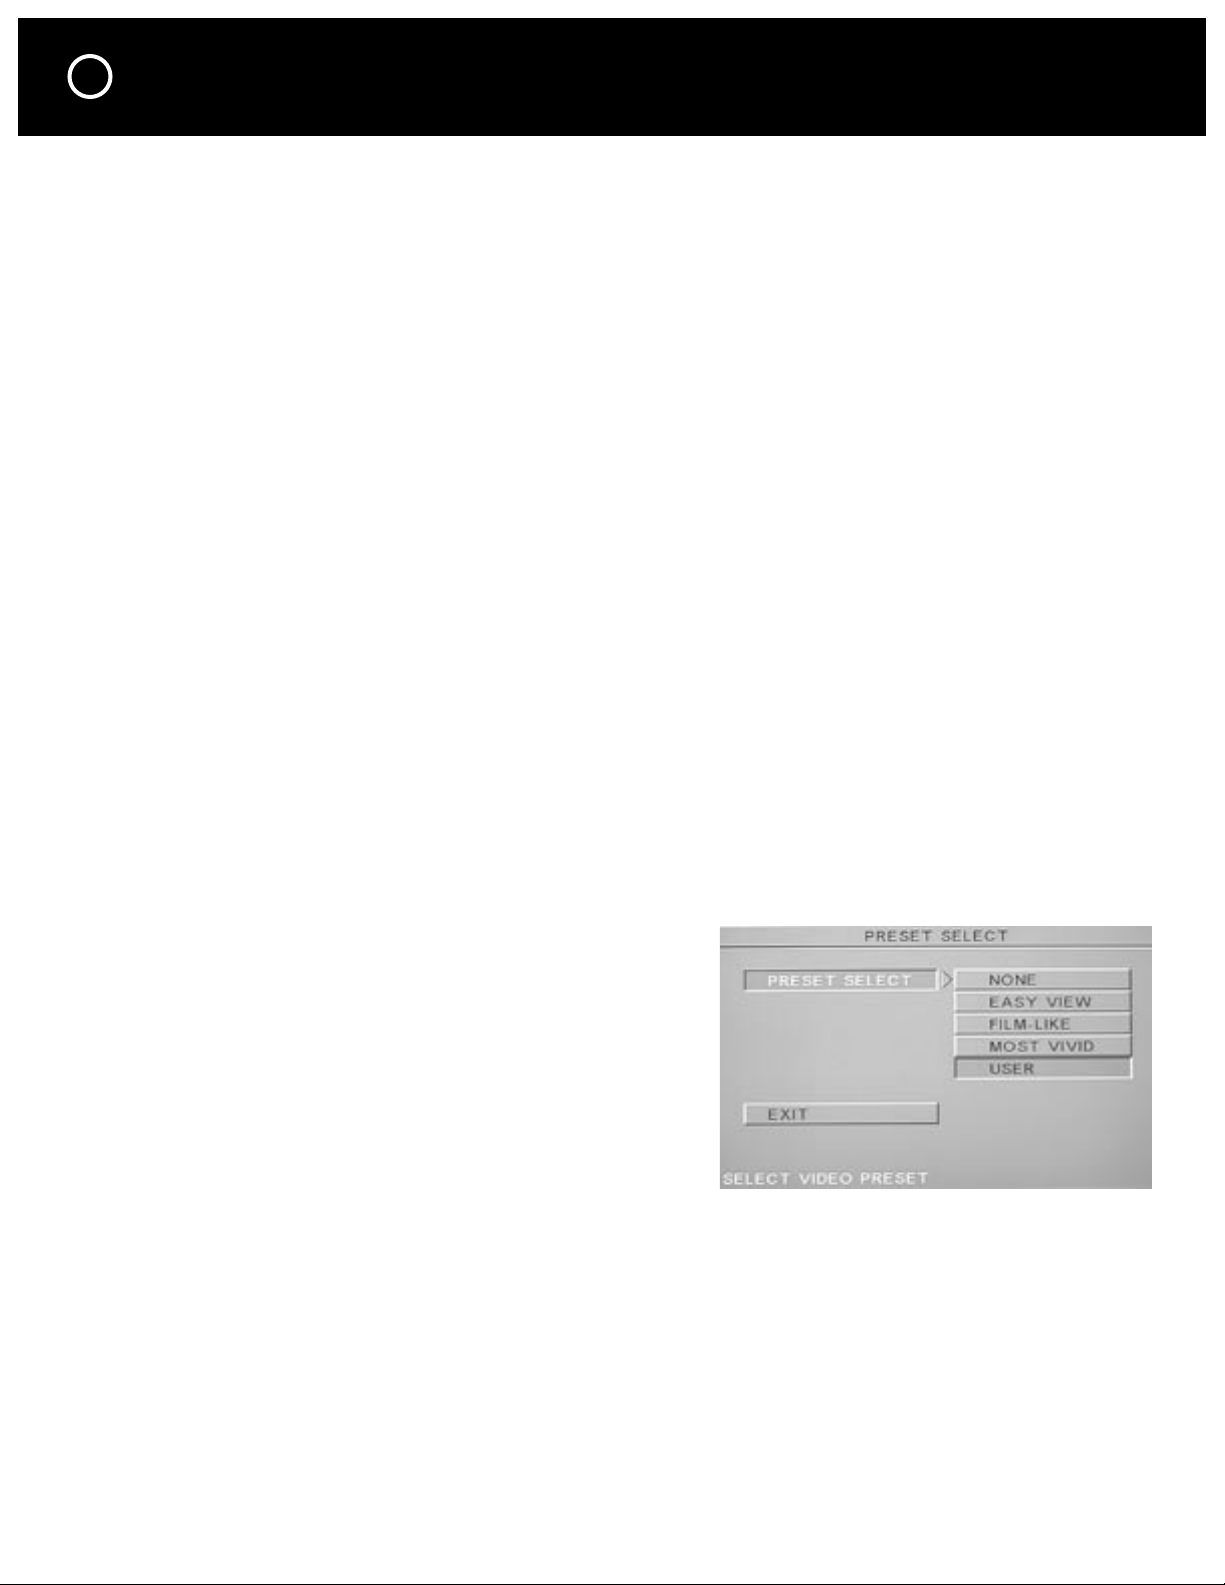
PRESET SELECT
On this setup page you can select 5 different video
“presets.” Each preset will have a slightly different
effect on your image. Based on your TV and your
personal preference you may wish to experiment
with these different settings.
NONE
This maintains the factory default settings. This is
equivalent to setting all of the adjustments on the
CUSTOM VIDEO SETUP page to 0.
EASY VIEW
This makes the picture bright, but slightly more diffused, with softer edges.
FILM-LIKE
This gives a movie film character to the picture.
MOST VIVID
This makes shapes and colors stand out boldly with the most contrast; it is especially enjoyable
for sporting events.
USER
This will activate the settings made on the CUSTOM VIDEO SETUP page.

REMOTE CONTROL FUNCTIONS
This section will help familiarize you with some of the more advanced features on your D 3’s
remote control handset. All of the following features are operated by the remote handset.
DIMMER (DIM)
Pressing this button changes the brightness of the front panel display.
DISPLAY
Pressing this button changes what disc information is displayed on your TV.
SEARCH
Pressing this button allows you to quickly jump to a specific chapter or time
on a disc. Press the SEARCH button once and then enter the desired chapter
number. Press the SEARCH button twice and then enter the desired time.
MARKER
Pressing this button allows you to mark a desired scene/frame and then
quickly jump back to it at any time. To mark a location on a disc, press the
MARKER button then press the up or down cursor buttons to select a
marker number, then press the ENTER button. That location has now been
stored. To recall a “marked” location on a disc, press the MARKER button
then the right cursor button, then press up or down to select the marker
number you wish to recall, then press the ENTER button. The movie will
now jump to the scene you previously marked. It is possible to store
up to 14 markers.
27
REPEAT
Pressing this button allows you to play a current title, group, chapter,
folder (MP3 or JPG) track or file (MP3 or JPG) repeatedly. Each press of
the REPEAT button engages a different repeat mode.
- DVD repeat modes are: CHAPTER REPEAT, TITLE REPEAT and REPEAT OFF.
- CD and SACD repeat modes are:
TRACK REPEAT, ENTIRE DISC REPEAT and REPEAT OFF.
- DATA file (MP3, WMA and JPG) repeat modes are:
ONE FILE REPEAT, FOLDER REPEAT, NORMAL DISC PLAYBACK,
DISC REPEAT, NORMAL SINGLE FILE PLAYBACK and
NORMAL FOLDER PLAYBACK.
REPEAT A/B
This button allows a specific section of a disc to be continuously repeated.
During playback, at the beginning of the part you want to repeat, press the
REPEAT A/B button. Then press the REPEAT A/B button at the end of the
section you want to repeat. To return to normal playback, press the REPEAT
A/B button repeatedly until A TO B CANCELLED is displayed.
PROGRAM
Pressing this button enables up to 25 audio tracks to be programmed in any desired order. Press
the PROGRAM button then the track numbers in the order you wish to play them. When you
have entered the last track number press the ENTER button. To cancel the program mode press
the STOP button then the PROGRAM button.
RANDOM
Press this button to enable the D 3 to play tracks of audio discs in a random order.

28
REMOTE CONTROL FUNCTIONS continued
AUDIO
Press this button to cycle through the available audio tracks of a DVD movie. These audio tracks
might include different languages and different surround sound formats.
SUBTITLE
Press this button to cycle through the available subtitles of a DVD movie.
ZOOM
Press this button to zoom in to enlarge the picture of a DVD movie. When zoomed in you can
use the right, left, up, down buttons to see different parts of the image.
ANGLE
Press this button to display alternate viewing angles of a movie scene on DVDs which contain
scenes that have been shot simultaneously from multiple camera angles. For the few DVDs
that include these special features the same scene can be viewed from each of these different
angles. During playback of the scene recorded with multiple camera angles, press the ANGLE
button on the remote handset if you see the angle symbol “ ” on your TV. You will never see
this symbol if the ANGLE MARKER option in the D 3 Setup menu is set to NO or if the DVD you
are playing does not include this option. DVDs with the viewing angle feature are uncommon.
SACD
Press this button to select the different areas or “layers” of an SACD disc. Some SACDs consist
of two channel and multi-channel audio on the same disc. Hybrid SACD discs also include a CD
layer so it can be played on any CD player. The different SACD layers can only be selected when
an SACD disc is in the tray and the D 3 is stopped. Pressing the SACD button will override the
setting for SACD AREA in the AUDIO SETUP menu.
VID/DIGITAL OFF
Turning off all the video and digital audio related circuits helps to eliminate audible interference when
playing audio-only discs. Pressing the VID/DIGITAL OFF button once will turn off the D 3’s video
circuits. PURE DIGITAL will be displayed on the front panel. Pressing the VID/DIGITAL OFF button a
second time will turn off both the Video and Digital audio circuits. PURE ANALOG will be displayed
on the front panel. Pressing this button a third time turns on the video and digital audio circuit.
MENU
Press this button to view the main menu of a DVD disc. Press this button at any time a
DVD is playing to see the DVD’s main menu.
TOP MENU
This button is for use only with special DVDs that contain more than one title (movie)
on a single disc. These DVDs are uncommon.
SETUP
Press this button to view the D 3’s on-screen SETUP MENU. The player must be at a full stop
(press stop twice) to enter the SETUP MENU or some of the settings will be grayed-out and can
not be changed.
RETURN
This feature is helpful when navigating the D 3’s SETUP MENU. Pressing the RETURN button
will take you back one level in the setup menu.
PAGE & TITLE/GROUP
Press these buttons to navigate special DVDs that have multiple titles and pages on a single disc.
These DVDs are uncommon.

FREQUENTLY ASKED QUESTIONS
Why does the image look stretched or squished?
The setting for TV DISPLAY might not be set correctly in the VIDEO SETUP menu.
Set TV DISPLAY in the VIDEO SETUP menu for the correct shape of your TV’s screen.
See page 18 for information on setting TV DISPLAY.
Why can’t I turn on Progressive Scan?
Progressive scan is not possible while the HDMI output is turned on.
Turn the HDMI output off In the VIDEO SETUP menu and then turn progressive scan on.
I am using the D 3 with an HDMI-to-DVI adapter and the image is scrambled or is not visible at all.
Many earlier model TVs with DVI inputs will not operate with the D 3’s HDMI output because
they are not HDCP-compliant (digital copyright protection). Review your TV’s owner’s manual or
contact your dealer if you are not sure if your TV is HDCP-compliant.
I cannot hear the dialog in movies while using the stereo analog audio outputs.
How do I get the dialog through the Left and Right output jacks?
In order to get the dialog through the stereo outputs you must select NONE
for the center speaker in the SPEAKER SIZE setup menu.
29
SACD discs will not play and the TV shows “NO MULTI CH”.
This will occur when you are trying to play a stereo SACD and the D 3 is setup for Multi-channel
SACD playback. In this case you must select 2CHANNEL for the SACD area in the setup menu or
by pressing the SACD button on the remote handset.
I cannot see any picture on the TV and the front panel of the D 3 shows
“PURE DIGITAL” or “PURE ANALOG”.
The video circuits of the D 3 have been turned off. Press the front panel or remote control button
labeled Vid/Digital until PURE ANALOG and PURE DIGITAL are no longer displayed. The video
circuits are now turned on.
Colors are not correct or skin tones do not look realistic.
Reset the PRESET SELECT under the CUSTOM VIDEO SETUP to NONE. If colors still do not
look correct you should check the color adjustments of your TV. For more information see your
TV’s instructions.
I think the D 3 is set for PAL and I need NTSC because the picture is scrambled or distorted.
How do I change this to NTSC without being able to see the setup menu?
- If there is a disc in the D 3, remove it.
- Press the OFF button to turn the D 3 OFF.
- Press the ON button to turn the D 3 on again.
- Press these remote control buttons:
SETUP – ENTER – – – – – – ENTER.
The D 3 will now be set for NTSC operation.
Note: The “ ” symbol refers to the right cursor button, not the PLAY button.

30
FREQUENTLY ASKED QUESTIONS continued
There is no picture using the HDMI output.
How do I turn it on without being able to see the setup menu?
- If there is a disc in the D 3, remove it.
- Turn the D 3 Off and then back On
- On the remote control press:
SETUP – ENTER – –
The HDMI output should now be turned on and HDMI should be displayed on the D 3’s front panel.
Note: The “ ” symbol refers to the right cursor button, not the PLAY button.
Why is “HDMI” flashing on the front panel?
HDMI flashes when an HDMI cable is not connected between the D 3 and an HDMI TV. If you
are not using the HDMI output turn HDMI off in the VIDEO SETUP menu and it will stop flashing.
How long can the HDMI cable be from the D 3 to my TV?
The maximum HDMI cable distance will vary significantly between cable brands. Not all brands
are HDMI-certified and some may use inferior materials, making long runs impossible. When
an HDMI cable run is too long you may see pixels dropping out (snow over the picture) or the
picture may be completely blank. We have tested the D 3 with cable runs of over 50 feet (16.5
Meters) with some cable brands. If you need to go a longer distance we strongly recommend
the HDMI-certified Parasound Zhd five input switcher. You can find details on the Zhd at www.
parasound.com.
– ENTER.
What is HDCP?
HDCP (High-bandwidth Digital Content Protection) is a technology used with DVI and HDMI to
prevent unauthorized duplication of digital video and audio content. HDCP compliance is required
on all HDMI equipment and is an option with DVI equipment. Your TV must have HDCP or you
will not be able to use the D 3’s HDMI output.

ARE YOU HAVING DIFFICULTY?
Call your Parasound dealer first. If your dealer can’t help you with your problem we
encourage you to call Parasound’s Technical Service Department, toll-free at 1-866-770-8324,
Monday - Friday, 8am - 4pm Pacific time. We can suggest other diagnostic tests you can easily
perform. If we determine that your Model D 3 should be returned to Parasound or an Authorized
Parasound Warranty Center for inspection and possible servicing, we will provide the location
of a warranty center near you or shipping instructions and a Return Authorization number for its
return to Parasound.
Before You Return Any Unit to Parasound for Service
Before you send your unit to Parasound, you will need to obtain a specific Return Authorization
(RA) number and shipping instructions for the D 3 and all of its accessories from Parasound’s
Technical Department. The RA number must be clearly marked on the outer carton. Use the
original factory packing materials and arrange adequate insurance to cover its value. You must
include a copy of your purchase receipt, since this document establishes the validity of this unit’s
warranty. Warranty repairs are only performed by Parasound or Parasound Authorized warranty
centers when your purchase receipt is from a Parasound Authorized Dealer or Parasound Authorized Reseller.
Units Will Be Refused by Parasound Under the Following Conditions
1. Unit was sent without the Parasound-assigned RA number marked on the carton.
2. Unit was sent in an unsuitable shipping carton, likely to have been damaged in transit.
3. Unit has inadequate packing, unit likely to have been damaged in transit.
4. Unit was shipped collect for shipping charges. We do not accept collect shipments.
5. Unit was shipped via the US Postal Service.
6. Unit was sent to an address other than the address instructed by our Technical Department.
Note: The shipping address is not the same as Parasound’s office address.
31
Warranty Repair
Read your accompanying Parasound Limited Warranty carefully to understand the applicable rights
and limitations. This section provides instructions for obtaining repairs, both for units covered
under the Parasound Limited Warranty and for units or situations which are outside the Warranty.
Note: The D 3 warranty period is shorter than the Parasound Limited Warranty for other models.
Unit is not eligible for repair under the terms of the Parasound warranty if:
1. Unit was not purchased from a Parasound Authorized Dealer or Parasound Authorized Reseller.
2. You are not the original owner. The warranty is not transferable.
3. Unit’s serial number was removed, modified, or defaced.
4. Unit shows evidence of abuse and/or misuse.
5. Unit was modified in any way.
6. A prior repair was attempted by an unauthorized repair station.
Licensing Patent Acknowledgements
Manufactured under license from Dolby Laboratories. ”Dolby,“ ”Pro Logic“, and the double-D
symbol are trademarks of Dolby Laboratories. Manufactured under license from Digital Theater
Systems, Inc. US Pat. No. 5,451,942, 5,956,674, 5,974,380, 5,978,762 and other worldwide patents issued and pending. ”DTS,“ ”DTS-ES Extended Surround,“ and ”Neo:6“ are trademarks of
Digital Theater Systems, Inc. Copyright 1996, 2000, Theater Systems, Inc. All Rights Reserved.
The HDMI logo and High-Definition Multimedia Interface are trademarks of HDMI Licensing LLC.
Some technology used in this disc player is protected under U.S. patent numbers 4,631,603;
4,577,216; 4,819,098; 4,907,093; 5,315,448; 6,516,132.

32
LANGUAGE CODE CHART

D 3 SPECIFICATIONS
Audio Specifications
Frequency Response
Sampling Frequency 192 kHz, DVD-A 4 Hz - 88 kHz
Sampling Frequency 96 kHz, DVD 4 Hz - 44 kHz
Sampling Frequency 48 kHz, DVD 4 Hz - 22 kHz
Sampling Frequency 44.1 kHz, CD 4 Hz - 20 kHz
SACD 2 Hz - 100 kHz
Dynamic Range
DVD (48 kHz, 24 bit) 104 dB
SACD 108 dB
Audio CD 100 dB
Distortion and S/N
Signal-to-Noise Ratio, IHF “A” weighted 100 dB
Total harmonic distortion, 1 kHz 0.003 %
Wow and flutter < 0.002 %
33
Output Levels
Analog output level, 10 kΩ 2.0 V
Coaxial, 75 Ω 0.5 Vp-p
Optical, 660 nm -21dBm – -15dBm
Audio Digital-to-Analog Converters 192 kHz / 24-Bit
Video Specifications
General Video
Video Compression MPEG 2
Video Signal Format NTSC / PAL
HDMI Spec 1.1 with HDCP
General Information
Dimensions
Output Levels, 75 Ω
Composite 1.0 Vp-p
S-Video: Y/C 1.0 / 0.286 Vp-p
Component: Y / Pb / Pr 1.0 / 0.7 / 0.7 Vp-p
Video Digital-to-Analog Converters
216 MHz / 12-Bit
Power Requirements
Net Weight
Front Panel Width: 17 1⁄4” (437 mm)
Front Panel Height: 5 1⁄4” (133 mm)
Height with feet: 5 7⁄8” (150 mm)
Depth: 15” (381 mm)
100 V to 240 V AC, 50/60 Hz, 30 watts
15 lb. (6.8 kg)
Shipping Weight
23 lb. (10.4 kg)
Note: Features and specifications subject to change without notice.

34
CONNECTION AND SETUP NOTES
Notes:

CONNECTION AND SETUP NOTES
Notes:
35

 Loading...