

Page 1

O W N E R ' S M A N U A L
CSE 6.1 Center Surround Expander
www.parasound.com
Page 2

Table of Contents
Front, Rear Panel and Remote Control Drawings ............................................... 4
Introduction .......................................................................................................... 6
Unpacking ............................................................................................................6
Installation and Rack Mounting ............................................................................ 6
About Rear Center Surround Channel Technology ..............................................7
Making Connections to Your CSE 6.1................................................................... 9
Setting up Your CSE 6.1 Center Surround Expander ......................................... 1 0
Operating Your CSE 6.1 ..................................................................................... 12
Maintaining Your Parasound CSE 6.1................................................................. 13
CSE 6.1 Specifications....................................................................................... 14
CSE 6.1 Center Surround Expander Features
Works with any 5.1 Surround Processor or Receiver
6.1 Information Present Indicator
Fully Remote Controllable
Dual Center Surround Outputs
Rear Subwoofer Output Jack
Adjustable Rear Subwoofer Low-Pass Filter
Calibration Circuitry For Setting Center Surround Level
LS, RS Unity Gain Setting Makes Level Setting Easy
Special Output Jacks for Overhead Ambient Effects
External Infrared Remote Control Input
Gold Plated RCA Jacks
External 12 V Power Supply
Unique Circle Surround® Matrix Processing
2
Page 3

Important Safety Instructions
Save these instructions for future use
This triangle alerts you to the dangerous voltages inside that may be a shock hazard.
This triangle alerts you to important operating and maintenance instructions in this manual.
ü Always use with the correct line voltage. Refer to the manufacturer’s operating instructions for power
requirements. Be advised that different operating voltages may require the use of a dif ferent line cord and/
or attachment plug.
ü Do not install the unit in an unventilated rack, or directly above heat producing equipment such as power
amplifiers. Observe the maximum ambient operating temperature listed in the product specification.
ü Slots and opening on the case are provided for ventilation; to ensure reliable operation and prev ent it from
overheating, these openings must not be blocked or covered. Never push objects of any kind through the
ventilation slots. Never spill a liquid of any kind on the unit.
ü Never attach audio power amplifier outputs directly to any of the unit’s connectors.
ü To prevent shock or fire hazard, do not expose the unit to rain or moisture, or operate it where it will be
exposed to water.
ü Do not attempt to operate the unit if it has been dropped, damaged, exposed to liquids, or if it exhibits a
distinct change in performance indicating the need for service.
ü This unit should only be opened by qualified service personnel. Removing covers will expose you to
hazardous voltages.
ü Adhere to all warnings on the unit and in the operating instructions.
ü Take precautions not to defeat the grounding or polarization of the units power cord.
ü Do not overload wall outlet, extension cords or inte gral conv enience receptacles, as this can result in a risk
of fire or electrical shock.
ü Route power supply cords so that they are not likely to be walked on or pinched by items placed on or
against them, paying particular attention to cords at plugs, convenience receptacles, and the point at which
they exit from the unit.
ü The unit should be cleaned only as recommended.
Communications Notice
This equipment generates and uses radio frequency energy and if not installed and used properly, tha t is, in
strict accordance with the manufacturer’s instructions, may cause interference to radio and television reception.
It has been type tested and found to comply with the limits for a Class B computing device in accordance with
the specifications in Subpart J of Part 15 of FCC Rules, which are designated to provide reasonable protection
against such interference in a residential installation. Howev er , there is no guarantee that interference will not
occur in a particular installation. It this equipment does cause interference to radio or television reception,
which can be determined by turning the equipment OFF and ON, the user is encouraged to try to correct the
interference by one or more of the following measures:
ü Reorient the television receiving antenna
ü Relocate the AVC-2500 away from the television
ü Plug the AVC-2500 into a different A C outlet so that the A VC-2500 and tele vision are on different br anch
circuits.
If necessary, the user should consult the dealer or an experienced radio/television technician for additional
suggestions. The user may find the following booklet prepared by the Federal Communications Commission
helpful: “How to identify and Resolve Radio/TV Interference Problems.” This booklet is available from the
U.S. Government printing office, Washington, DC 20402, Stock No.004-000-00345-4.
Le présent appareil numénque n’ émet pan de bruits radioélectriques dépassant len limites applicables aux
appareils numériques de la class B prescrites dans le Réglement sur le brouillage radloélectrique édicté par le
ministère des Communications du Canada.
3
Page 4
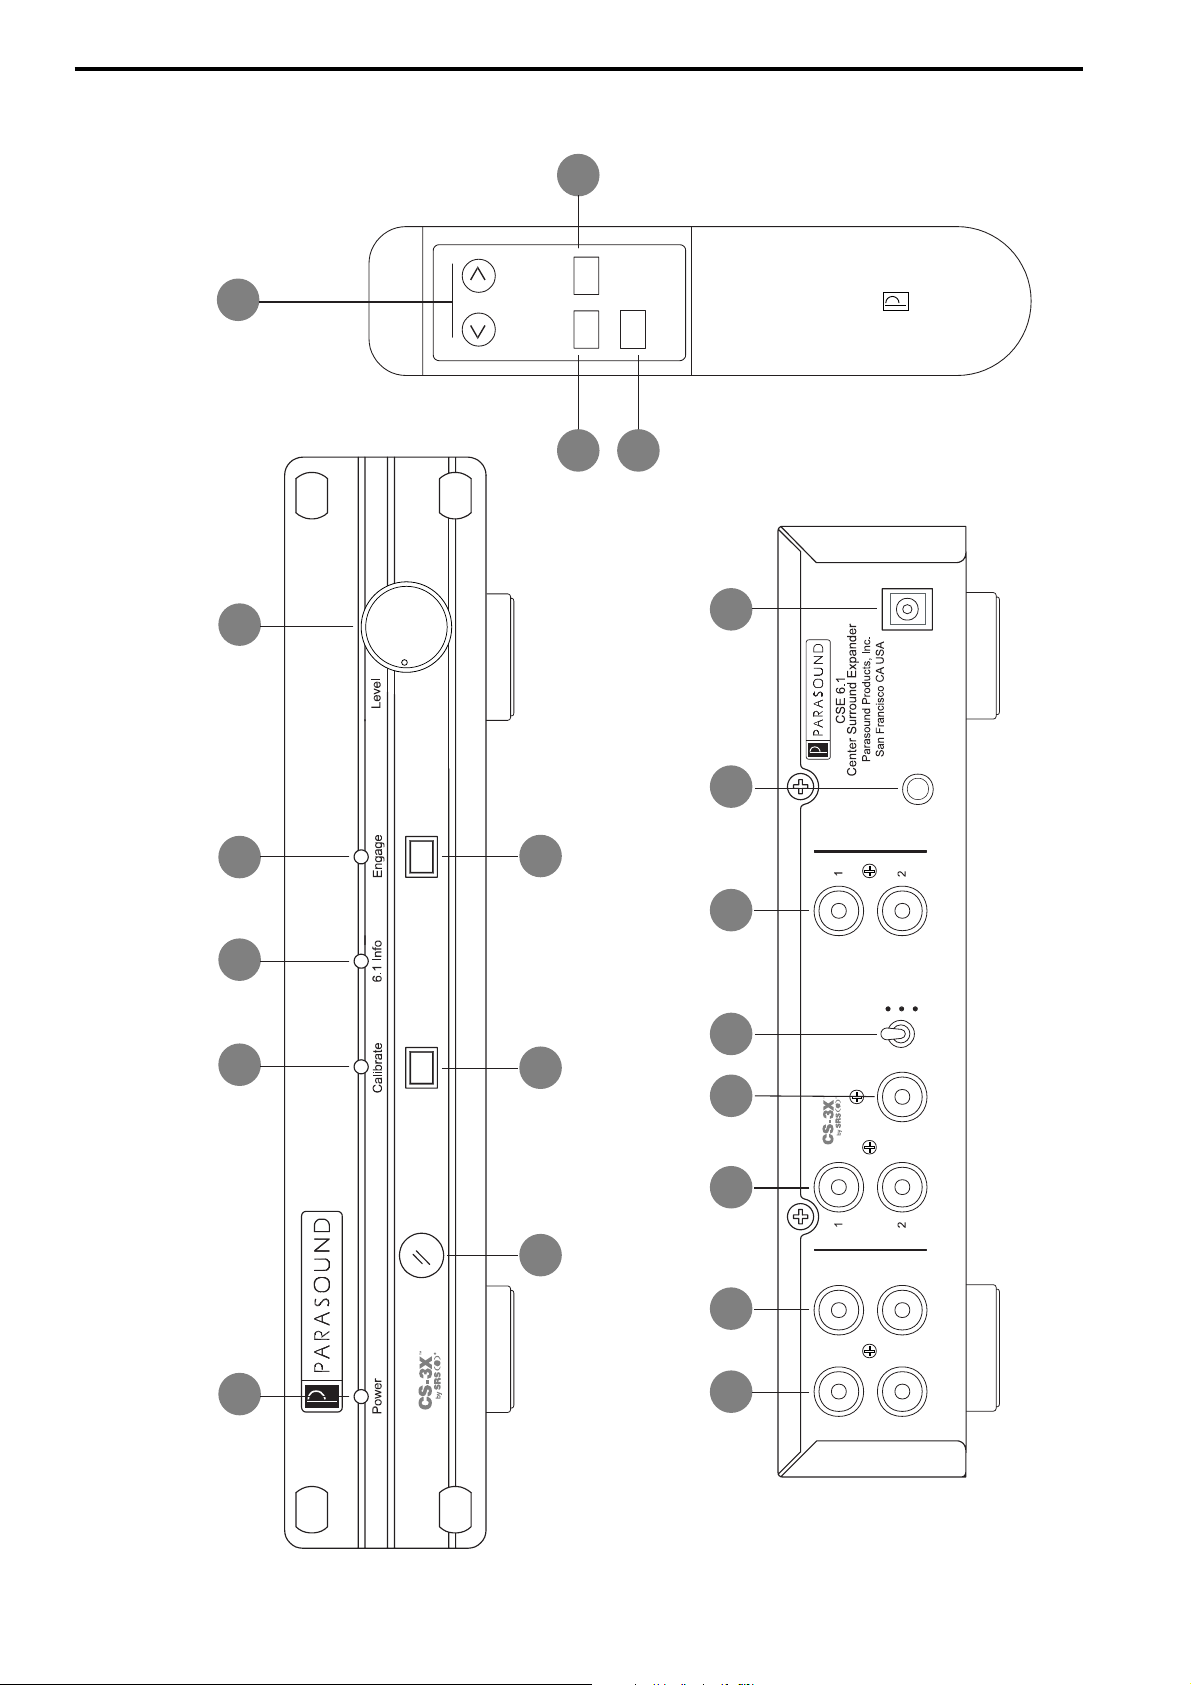
5
Level
Center Surround
Engage
Bypass
Calibrate
CSE 6.1
Center Surround Expander
9 8
5
7
171413
AC 12V/500mA
External Supply
External
Remote Input
Out
Special
80 Hz
Full Range
120 Hz
Rear Sub
21 3 4
7 8
is a trademark of SRS Labs, Inc.
Designed in the USA by Smart Devices
CSE 6.1 Center Surround Expander
Crossover
Out
Rear Sub
Out
6
Out
LS
10 11 12 15 16
RS
In
Surround Channels Center Surround
4
Page 5

15. Special Output Jacks
Connect the Special Out jacks to an
additional two-channel amplifier and a
pair of speakers to use the Special Out
circuit.
16. External Remote Control Input
The External Remote Input allows for
remote control operation via a wired
infrared (IR) repeater system or system
controller.
11. Left, Right Surround Output Jacks
Connect the Left Surround and Right
Surround Out jacks of the CSE 6.1 to the
LS and RS power amplifier input jacks
that were previously connected to the LS
and RS output jacks of your 5.1 channel
surround controller.
12. Center Surr ound Output Jacks
Connect the Center Surround Out jack(s)
to the additional power amplifier
channel(s) that will drive your new rear
17. External 12 V Power Supply Jack
This connector is for the 120 V - 15 V A C
external power adapter that is supplied
with the CSE 6.1.
center surround speaker(s).
13. Rear Subwoof er Output Jac k
The Rear Sub Out jack connects to a
powered subwoofer for the rear section
of your home theater.
14. Subw oofer Cr ossover Switc h
This Rear Sub Crossover switch lets you
select the frequency range of the Rear
Sub Out low pass circuit.
Parasound CSE 6.1 Controls, Connectors, and Indicators
7. Calibrate Button
When the Calibrate button on the front
panel or remote control is pressed, the
internal noise generator is activated.
8. Engage Button
When you press the Engage button on the
front panel or remote control, the CSE 6.1
processes center surround channel and
rear sub information. Press the Engage
button again to bypass the CSE 6.1.
1. Power LED
The Power LED illuminates when the AC
power adapter is plugged into the rear
panel of the CSE 6.1 and power is applied
at the AC outlet.
2. Calibrate Button and Indicator
The Calibrate LED illuminates to indicate
that the CSE 6.1 is in the calibration mode.
3. 6.1 Inf o Indicator
Left and Right Surround Input Jacks
9. Bypass Button
The remote control has a separate Bypass
button so you’ll know that the CSE 6.1 is
in the bypass mode without having to
view its front panel indicator.
10.
Use standard RCA interconnect cables to
connect the line level Left Surround (LS)
and Right Surround (RS) output jacks on
your surround 5.1 channel controller or
The 6.1 Info LED illuminates whenever
the CSE 6.1 recognizes potential rear
center surround channel information
present in the left and right surround
channels.
4. Engage Indicator
The Engage LED illuminates to indicate
that the CSE 6.1 circuits are activated.
5. Center Surround Level Contr ol
The Center Surround Level control on the
receiver to the Left and Right Surround
Channel In jacks on the CSE 6.1.
front panel and remote control adjusts the
CS channel independently of the LS and
RS or Rear Sub channel outputs.
6. Infrared Receiver
Infrared signals from the remote control
are received through the IR recei ving eye.
5
Page 6

Introduction
Congratulations on the purchase of this precision audio component and thank you for your
selection of Parasound. The P arasound CSE 6.1 was designed to augment 5.1 channel surround
controllers or receivers to create “6.1” effects and filtering for a rear channel subwoofer.
The CSE 6.1 is unique in its design and operation, so please be sure to thoroughly review
this manual before you begin installation.
The CSE 6.1 requires one or two additional power amplifier channels to drive on or two
Rear Center Surround speakers.
Speakers for your Rear Center Surround Channel
You may use one or two rear center surround speakers. If your room isn’t very wide, a
single speaker will create more convincing rear surround effects than two speakers. You
should select a speaker whose sonic characteristics are as close as possible to your left and
right surround speakers.
Unpacking
Carefully unpack your CSE 6.1, the enclosed remote control handset and A C po wer adapter .
Be sure to inspect the unit for any possible shipping damage. If you notice any , contact your
Parasound Dealer immediately . Sa v e the carton and all of the packing materials in case you
ever need to ship the CSE 6.1 for repair.
Installation and Rack Mounting
Locate your CSE 6.1 on a sturdy surface and out of direct sunlight that may interfere with its
remote control sensor. Place your CSE 6.1 a way equipment such as computers or tuners that
could cause interference.
Its panel dimensions are one rack space high (1 3/4” or 44 mm) by one-half rack width
(9 1/2" or 242 mm). It will fit into a standard 19" wide equipment rack when mounted sideby-side with other Parasound half-width components. Optional parts are available from
Parasound to rack mount the CSE 6.1 by itself or alongside another Parasound half width
unit.
Before you proceed, locate the serial number on the rear panel and record it here for future
reference:
Serial #____________________ Date of Purchase___________________
Parasound Dealer ____________________ Phone Number____________________
6
Page 7

About Rear Center Surround Channel Technology
The current standard for digital home theaters is based on 5.1 encoding and decoding. “5.1”
means that there are six channels that are recorded and reproduced discretely , or independent
from one another. “5” refers to the fiv e channels whose speakers reproduce a wide frequency
range: left front, center front, right front, left surround, and right surround, while “.1” refers
to a sixth bass-only channel for the subwoofer.
Dolby® Laboratories recently developed a process for recording engineers to mix an
additional wide-range channel that is used to reproduce rear center surround (CS) effects.
This has come to be known as “6.1” or “Surround-EX.” Dolby Surround EX™ and DTSES® Matrix are techniques used to encode a rear center surround channel into the LS and
RS channels of a 5.1 digital recording. THX Surround EX™ is Lucasfilm’ s name for licensing
Dolby Surround EX when it is used in consumer products.
Dolby Surround EX specifications include two rear surround speakers to improve sound
distribution across the back of movie theaters (or a very wide home theater room). Some
companies call their systems “7.1” when there are two rear surround speakers, but their
source is still a single rear center surround channel. Dolby Surround EX encoding and THX
Surround EX decoding are both based on Dolby Pro Logic technology that was developed
in the 1980s.
T o create a rear center surround channel, Parasound has chosen a ne wer and more sophisticated
matrix decoding technology called Circle Surround®. Compared to Dolby Surround EX,
Circle Surround provides superior reproduction of center surround effects with “6.1”-encoded
movies as well as deriving more effective rear center surround effects from normal 5.1encoded sources.
The Parasound CSE 6.1 reproduces its rear center surround channel from any sound track or
music encoded for Surround EX or DTS-ES Matrix. It offers two identical center surround
outputs, so you may use one or two CS channel amplifier channels and speakers to suit your
home theater’ s size and room acoustics.
The CSE 6.1 has a unique “6.1 Info” indication LED. This LED illuminates when the CSE
6.1 recognizes potential rear center surround channel information present in the left and
right surround channels. Because the CSE 6.1 doesn’t require a 6.1-encoded digital bitstream
to derive a rear center surround channel, it can enhance surround effects in man y digital 5.1
channel sources and even many tw o channel digital or analog sources recorded in Pro Logic
or simply rich with ambient spatial information.
The CSE 6.1 also includes a rear subwoofer output with its own switchable lo w-pass crossover .
Over the top? We don’t think so. When sound comes from behind you, it simply can’t
“connect” it to the low frequency sound emanating from a subwoofer that is located in front
of you. A special effects explosion or airplane fly-over coming from behind you sounds
much more convincing when its bass frequencies come from the same plane as the rear
speakers. A rear sub preserv es the timbre and coherence of front-to-rear panned effects.
7
Page 8

AC 12V/500mA
External Supply
Level
CSE 6.1
CONNECTION GUIDE
To Center Channel Amplifier
To Subwoofer Amplifier
To Left and Right Channel Amplifier
Designed in the USA by Smart Devices
is a trademark of SRS Labs, Inc.
80 Hz
Full Range
120 Hz
External
Remote Input
Out
Special
Rear Sub
Crossover
Out
Rear Sub
80 Hz
Crossover
60 Hz 120 Hz
Bypass
Crossover
40 Hz 150 Hz Min Max
Frequency
Input
Surround Speaker
Optional Second Center
To First Center
Surround Speaker
Center
L
LS
Existing 5.1 Surround
Processor Line Outputs
Surround Out Main Out
8
R
RS
Subwoofer
Main
Output
LS
RS
Out
Out
In
Surround Channels Center Surround
LS RS CS 1 CS 2
To Right
Surround Speaker
To Left
Left and Right Surround Amplifier Center Surround Amplifier Powered Rear Subwoofer
Surround Speaker
Page 9

Making Connections to Your CSE 6.1
Refer to the Drawing on Page 8
Before making any connections, turn off the power to your surround controller and power
amplifier. Make certain that all your connections are secure and that there is no tension on
the cables which could cause them to pull loose.
CSE 6.1 Left and Right Surround Input Jacks
Use standard RCA interconnect cables with RCA plugs to connect the line level Left Surround
(LS) and Right Surround (RS) output jacks on your 5.1 surround controller or receiver to the
Left and Right Surround Channel In jacks on your CSE 6.1.
Your power amplifier’ s LS and RS channel inputs are now temporarily disconnected.
CSE 6.1 Left Surround, Right Surround Output Jacks
Connect the Left Surround (LS) and Right Surround (RS) Out jacks on the CSE 6.1 to the
LS and RS power amplifier channel input jacks that were previously connected to the LS
and RS output jacks on your 5.1 channel surround controller.
CSE 6.1 Center Surround Output Jacks
Connect the Center Surround Out jack(s) on the CSE 6.1 to the additional power amplifier
channel(s) that will drive your new rear center surround speaker(s). The Center Surround
Out jacks are connected in parallel and both carry the same signal. The second Center Surround
Out jack simply provides a con venient way to add an additional rear center channel surround
speaker.
CSE 6.1 Special Output Jacks
Dolby Surround EX was originally intended to include a channel for center ceiling mounted
speakers in movie theaters, but it was dropped from their specification after movie theater
owners objected to the added expense. That does not preclude you from trying this.
The CSE 6.1 Special Output circuit provides a channel that is different than the CS channel.
This “Special” channel creates very realistic ambient effects with one or two additional
speakers in mid-room ceiling locations. Connect either or both of the Special Out jacks to an
additional amplifier and one or two speakers to take advantage of the Special Out circuit.
The best results may be obtained using a relatively modest speaker located directly above
your mid-room sitting position. This speaker can have attenuated high frequency response
relative to your other speakers, since it’s much closer to your ears than the other speakers
are. Needless to say , we urge extreme caution in attaching a speaker to the ceiling so there is
no risk it could fall on you. We cannot endorse attaching a speaker overhead unless a licensed
contractor performs this job.
9
Page 10

CSE 6.1 Rear Subwoofer Output Jack
The CSE 6.1. Rear Sub Out jack enables you to use a separate subwoofer in the rear of your
home theater. You will discover that rear surround effects are much more realistic when low
bass frequencies are reinforced with a rear sub. The new rear Sub should be located as close
as possible to your new CS channel speaker(s).
CSE 6.1 Rear Subwoofer Crossover Switch
This Rear Sub Crossover switch lets you select the frequency range of the Rear Sub Out
circuit. Setting this switch to 80 Hz or 120 Hz uses the low pass filter of the CSE 6.1.
Setting the switch to Full Range bypasses the low pass filter of the CSE 6.1 and uses the
crossover built into your powered subwoofer. The Rear Sub low pass filter does not affect
the frequency response of the Center Surround or Special outputs.
CSE 6.1 External Remote Control Input
The External Remote Input allows for remote control operation via a wired infrared (IR)
repeater system or system controller . The input jack accepts a standard 1/8" (3.5 mm) twoconductor (mono) mini plug whose tip is positive and sleeve is negative. Your Authorized
Parasound Dealer or Custom Installer can recommend a compatible infrared repeater system
for the CSE 6.1.
CSE 6.1 External 12 V Power Supply Jack
This connector is for the 120 V - 15 V AC external power adapter that is supplied with the
CSE 6.1 sold in countries where 120 V A C line v oltage is standard. Once you ha ve made all
of your input and output connections, connect this external supply to the 15 V connector on
the rear panel of the CSE 6.1.
Setting up Your CSE 6.1 Center Surround Expander
Refer to the Drawing on Page 4
The CSE 6.1 does not filter the bass output to the LS, RS, or CS channels. Since your CS
channel speaker(s) are unlikely to be larger or smaller than your LS and RS channel speakers, you do not have to change the bass management settings of your 5.1 surround controller
or receiver. If you find you must use the “small” setting for your LS and RS speakers to
avoid distortion, you ma y need to advance the lev el of your rear sub to compensate for this
bass filtering.
Calibrating Your Home Theater System after Installing the CSE 6.1
The CSE 6.1 was designed to make 6.1 calibration easy , and without any need to recalibrate
your existing 5.1 system. The calibration procedure is intuitive and non-technical. If you are
adding the CSE 6.1 to a 5.1 system that is already calibrated, you don’t need to repeat its
calibration after the CSE 6.1 is connected. The LS and RS outputs from the CSE 6.1 will
retain their same levels as before as long as you don’t change the input le vel controls on an y
of your power amplifier channels. If you switch your from host processor LS and RS speaker
output from “small” to “large” you should probably recalibrate your 5.1 system before
calibrating the CSE 6.1.
10
Page 11

Important Note: In order for the CSE 6.1 to have appropriate information to properly decode
the rear center surround channel, the left and right surround channels must be set within 3
dB of each other when adjusted on your host 5.1 processor is calibrated. Be sure to check the
surround levels are matched closely enough before installing the CSE 6.1.
When No Calibration Is Required
When the CSE 6.1 is designed so that when the CS level control is in its middle “12 o’clock”
position, the Rear Center Surround Out sound pressure level should be nearly the same as
your left and right surround speakers and no calibration should be necessary. Thus, if your
CS speaker(s) and amplifier channels are identical to your LS and RS speakers and amplifier
channels, the levels will be similar.
Of course, you can increase or decrease the rear center surround level with respect to the left
and right surround speakers to account for the relative speaker sensiti vity and amplifier gain
differences, or to suit your tastes.
Calibrating Your New CS Channel by Ear
If you use different amplifiers and/or speakers f or the center surround channel, you can use
the built-in test tone generator to insure that the center surround speaker lev el is the same as
the left and right surround speakers. You can also use the calibration circuit to confirm that
the middle CS level knob position is the proper setting for your home theater.
Calibration Procedures
1. Turn on your home theater system.
2. Take a seat in your customary listening/vie wing location.
3. Set the CS level to minimum by pressing the < Level button on your CSE 6.1 remote
control for 3-4 seconds.
4. Press the Engage button on the CSE 6.1 remote control.
3. Press the Calibrate button on the CSE 6.1 remote control.
4. The LS, CS and RS speakers (only) will reproduce the pink noise test tone at the same
time. The rest of the speakers will be silent.
5. From your listening position, slowly adjust the CS lev el with the < Le vel button on your
CSE 6.1 remote control until the “hole” in the middle of the rear soundstage is filled, but
the CS speaker is not louder than the LS and RS speakers.
6. After calibration, press the Calibrate button again to turn the test tone off.
7. Note the level on the front panel so you can reset the CSE 6.1 to the calibrated level
should you want to experiment with the rear center surround channel level.
You can also perform these functions with the front panel controls, but you’ll need to return
to your listening/viewing location to assess each adjustment. The front panel Engage b utton
reverts to Bypass when it is pressed a second time, whereas the remote control has a se parate
Bypass button so you’ll know that the CSE 6.1 is in the bypass mode without ha ving to view
its front panel indicator.
11
Page 12

Calibrating the Rear Sub Level
1. Turn on your home theater system.
2. Set the crossover frequency for the rear subwoofer according to the size of your CS
channel speaker(s).
3. Press Engage and Calibrate button on the remote control to feed the pink noise test tone
to the LS, CS, RS speakers again.
4. Adjust the level of the rear sub so it “fills in” the lower frequencies, but does not draw
attention to itself. You will probably find some experimentation necessary to find the
best crossover frequency.
Operating Your CSE 6.1
Refer to the Drawing on Page 4
Center Surround Level Control
The CS Level control adjusts only the CS channel, but not the LS and RS or Rear Sub
channel outputs. If you want to change the rear surround channel lev els, we recommend that
you make adjust your LS and RS channels simultaneously. If you trim the LS or RS levels
separately, you will undo the CS level calibration. Since the CS level and rear subwoofer
shouldn’t require resetting after initial calibration, however, please feel free to e xperiment.
Note: Since the CS Level knob is attached to a motor and gear, it is normal to feel some
resistance when you turn it manually.
Power Indicator
The CSE 6.1 is always on and draws negligible power. Its green Power LED illuminates
when the AC power adapter is connected and is plugged into a live AC outlet.
Calibrate Button and Indicator
When the Calibrate button on the front panel or remote control is pressed, the internal test
tone noise generator is activated. The red Calibrate LED also illuminates to indicate that the
CSE 6.1 calibration is on.
6.1 Info Indicator
The green 6.1 Info LED illuminates whenever the CSE 6.1 recognizes potential rear center
surround channel information available in the left and right surround channels. If you see it
flashing frequently , pressing the Engage button will yield 6.1 effects. If y ou don’t see the 6.1
Info LED flashing, it means there is not sufficiently productive 6.1 information present in
the 5.1 source. If you press the Engage button anyway, you may actually degrade the
spaciousness of the sound field.
Engage Button and Indicator
12
When you press the Engage button, the CSE 6.1 extracts and removes rear center channel
information from the LS and RS channels. It sends it to the rear center surround channel
amplifier and speaker(s) and to the Rear Sub output. The LS and RS signals are r eturned to
their respective amplifier channels and speak ers without any rear center surround information.
The green Engage LED illuminates when the CSE 6.1 circuits are activated.
Page 13

T o disengage, or bypass, the CSE 6.1 circuits, simply press the Engage button a second time
and its LED will no longer light. When the CSE 6.1 is disengaged, the LS and RS signals
bypass the CSE 6.1 circuits and connect directly to the left and right surround amplifier
channels for pure 5.1 reproduction. The CSE 6.1 remote control has a separate Bypass button
so you’ll know that the CSE 6.1 is disengaged without ha ving to view its front panel indicator.
Maintaining Your Parasound CSE 6.1
Your Parasound processor requires no periodic maintenance and has no user serviceable
parts inside. The exterior can easily be cleaned with a soft cloth moistened only with a fe w
drops of water or glass cleaner.
In Case of Tr ouble
If you suspect a problem with your CSE 6.1, first turn off your po wer amplifier and check all
your connections. Another component or even a defecti ve hookup cable may cause the trouble.
In rack mounted systems, ground loops and hum will often develop via ground loops caused
by redundant grounding of the metal rack rails of the equipment rack. This problem is usually
solved with nylon insulating shoulder washers (refer to the Rack Mounting section in this
owner’s manual).
If All Else Fails
Call your Parasound dealer or Parasound Technical Service Department. We can usually
suggest other diagnostic tests you can easily perform. If we determine that your CSE 6.1
should be returned to Parasound or an Authorized Parasound Warranty Center for inspection
and possible servicing, call Parasound for the location of a warranty center near you or
shipping instructions for return to Parasound.
Returning your CSE 6.1 to Parasound for Service
If we determine that you should send your CSE 6.1 to Parasound, you will need to obtain a
Return Authorization (RA) number. The RA number must be clearly marked on the outer
carton only. Ship the unit with adequate insurance and a copy of your purchase receipt
inside to validate your warranty. You must provide an original purchase receipt from an
Authorized Parasound Dealer for warranty repair . Units purchased from unauthorized dealers
are not eligible for warranty repair. Units that arri ve without an RA number , without a suitable
shipping carton or with evidence of improper internal packing materials may be refused. We
do not accept collect shipments. After repair under warranty , the unit will be returned to you
via prepaid UPS within the Continental United States.
In the case of a non-warranty repair, contact us and we will advise you of the r epair charges
before you ship the unit to us. The same packing and Return Authorization number
requirements apply .
13
Page 14

Frequency Response
10 Hz to 150 kHz LS, RS
10 Hz to 150 kHz CS
10 Hz to 120 Hz, Subwoofer
Harmonic Distortion
< 0.05 % 1 kHz
IM Distortion
< 0.06%
Input Impedance
47 kΩ
Output Impedance
600 Ω
CSE 6.1 Specifications
Signal/Noise Ratio
> 70 dB
Dynamic Range
> 85 dB
Crosstalk
> 50 dB
Dimensions
9 1/2" wide x 1 3/4" high x 7" deep, 2 1/4" high with feet
Weight
3 1/2 lb
Power Supply
110 V - 120 V 60 Hz AC Input
15 Vac - 400 mA Output
14
Circle Surround is a registered trademark of SRS Laboratories, Inc.
Dolby and Dolby Pro Logic are registered trademarks of Dolby Laboratories. Dolby Digital–Surround EX is
a trademark of Dolby Laboratories.
THX is a registered trademark of Lucasfilm, Ltd. THX Surround EX is a trademark of Lucasfilm, Ltd.
DTS-ES and DTS-ES Matrix are trademarks of DTS Technologies.
Features and specifications subject to change without notice
Page 15

Parasound Products, Inc. 950 Battery Street, San Francisco, CA 94111
415-397-7100 / FAX 415-397-0144 www.parasound.com
© 2000 Parasound Products, Inc. Rev 2.0
15
 Loading...