

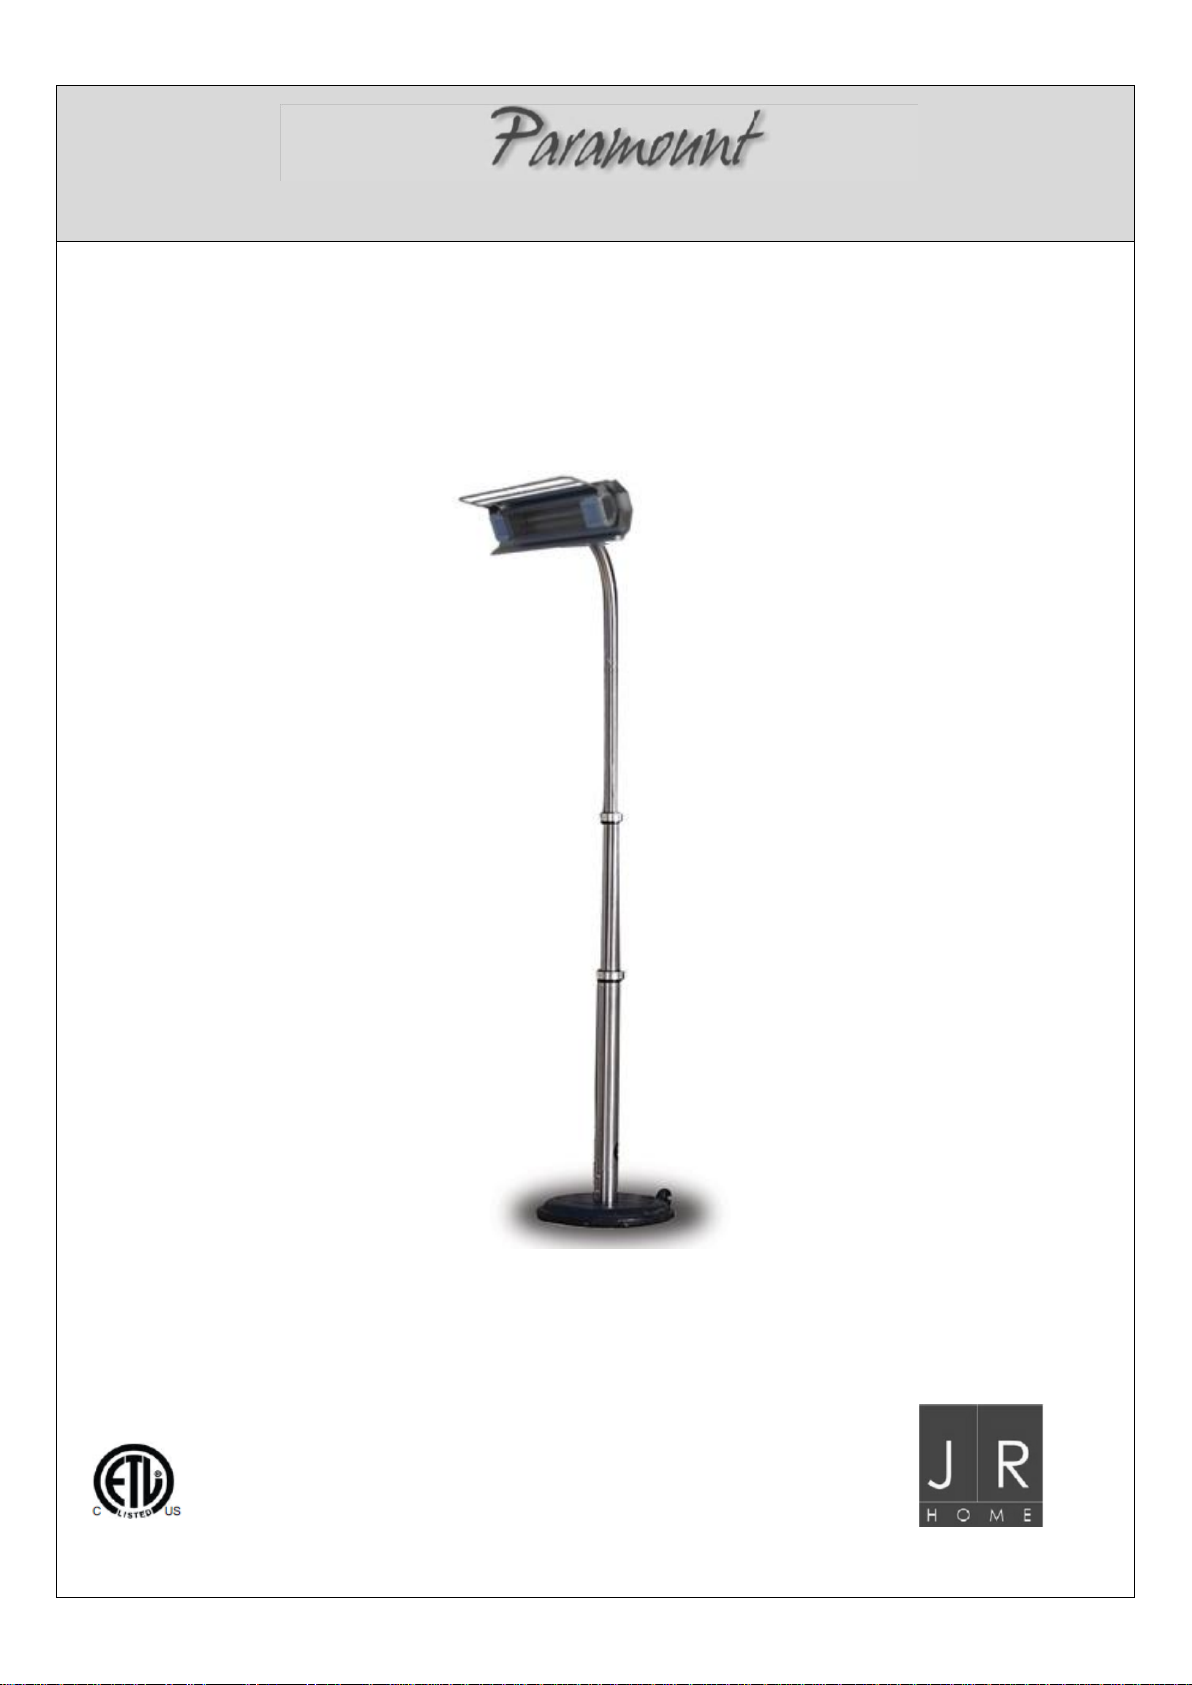
Pole Mounted Infrared Electric Patio Heater
Model # MS-1500WOIRPH
ETL # LIP-15-TGG-SP, LIP-15-TGG-SP-SB-SP-BK
INSTRUCTION MANUAL
IMPORTANT
Please read this manual carefully for guidance on the safe assembly and use of this product.
Save these instructions for future reference.
1
Safety Guidelines
Failure to follow warnings and operational instructions contained in this manual can result in severe
property damage and / or personal injury.
DANGER
Indicates a potentially hazardous situation
which, if not avoided, WILL result in serious
injury or death.
WARNING
Indicates a potentially hazardous situation
which, if not avoided, COULD result in
serious injury or death.
CAUTION
Indicates a potentially hazardous situation
which, if not avoided, MAY cause moderate
injury or damage to the equipment.
NOTICE:
Indicates important information that if not followed, may
cause damage to the equipment.
DANGER
Risk of Fire. There is always a risk of fire when working with a heater. Keep heater away a minimum
of 25 feet (7.6M) from flammable liquids and material.
Risk of Fire. Do not use the unit until it has been mounted to the ground. If the unit falls on the ground
it may start a fire. Ensure that the heater is stable and mounted in place on a level surface. Follow
these instructions and keep at least 3 feet (0.9M) clear from any objects.
Hot or Burn Hazard. This unit may be extremely hot while in use. Careful when handling especially
around the head of the unit.
Electrical Hazard. Disconnect from electrical outlet before working on the unit to avoid chance of
electrical shock.
Electrical Shock. Do not use the heater near water. Do not use if raining or snowing. Do not use if
cord has been damaged.
CAUTION.
Improper treatment of the heater can damage it and also shorten its life span.
To prevent electrical shock, ensure the electrical plug is properly inserted into the electrical outlet.
Unit is hot when operating. Keep it at least 3 feet (0.9M) away from everything. Do not place any
objects such as furniture, papers, clothing or curtains closer than 3 feet (0.9M) to the front and sides
of the heater.
Do not place near clothing for drying.
2
NOTICE
Thank you for purchasing the J. R. Homes, Pole Mounted Infrared Electric Patio Heater.
Please read these instructions carefully. They have been written to help you make the most of your Pole Mounted
Infrared Electric Patio Heater.
FEATURES
Environmentally friendly: Silent, clean, and odourless infrared heating with no harmful emissions or toxic
residuals.
Safe: No flame, no gas, no UV rays and ETL approved.
Efficient: About one tenth the energy cost of LPG heaters. No LPG cylinders to change.
Convenient: Operates on standard household electric power. For outdoor use only.
No wasted heating of the air. Maximum heat within seconds as radiant heat is not affected by the wind.
Replacement heater tubes are easy to install.
Adjustable height stainless steel pole and body and aluminum heater housing.
SPECIFICATION
Heater type: Electric infrared quartz lamp.
Electrical supply: 120Volts, 60Hz
Power rating: 1500Watts
Current rating: 13 Amps
Heater lamp life expectancy: 5000 operating hours.
Assembled dimensions: 93” extended height, 18” diameter base, 22” wide heater housing.
Assembled weight: 53 lbs.
Safety: Built-in Auto Shut-Off when tilted.
DANGER
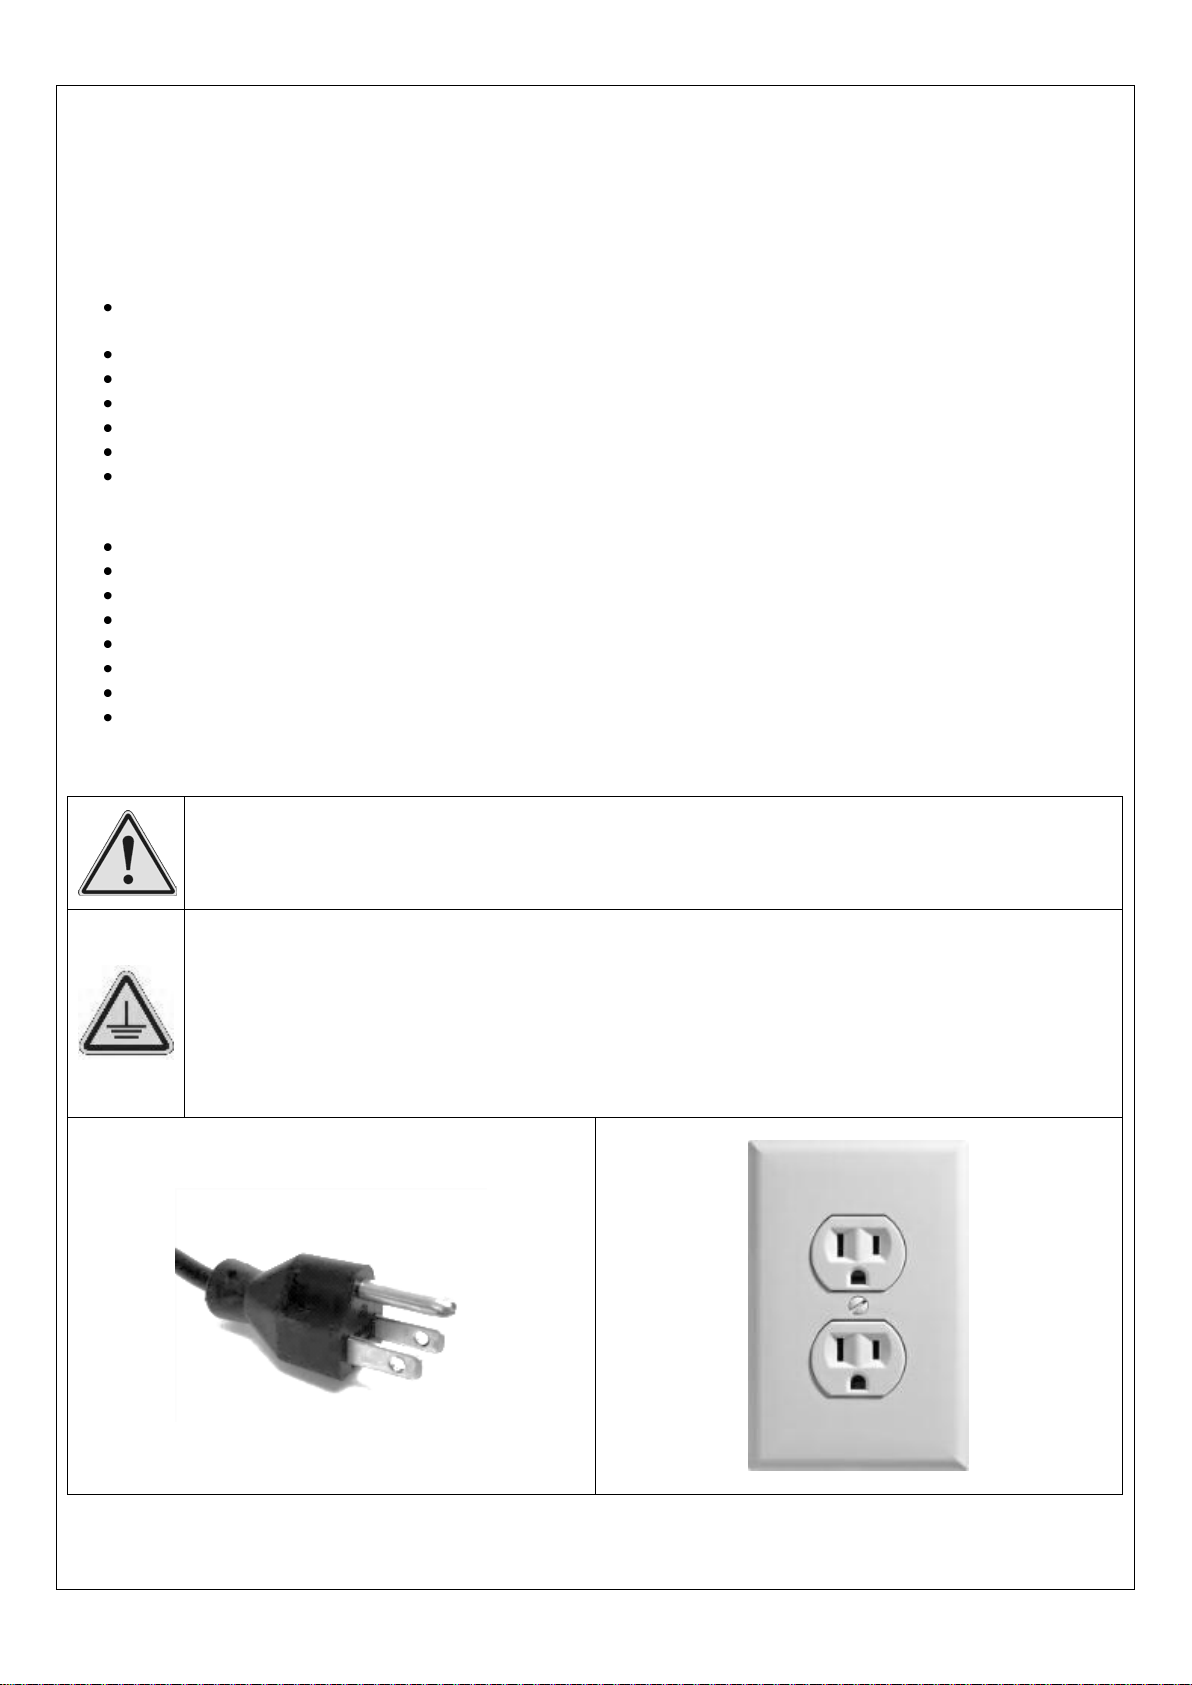
Grounding (Earthing)
This product must be connected to a three wire grounded power supply. The product comes fitted with
an appropriate power plug as shown below. The plug must be connected to a power outlet with the
same configuration that has been installed and electrically grounded in accordance local codes and
ordinances as shown below. Do not use a power adaptor with this product. Check with a licensed
electrician if the grounding instructions are not understood completely or if the power outlet does not
match the plug.
3

IMPORTANT OPERATING INSTRUCTIONS
1. Read all the instructions before using this heater.
2. The head of this heater will get very hot during use. To avoid burning, do not let bare skin touch the hot
surfaces. If provided, use handles when moving this heater. Keep flammable materials such as furniture,
pillows, bedding, papers, cloths and curtains at least 3 feet (0.9M) from the heater.
3. DO NOT LEAVE the heater unattended. Extreme caution is necessary when any heater is used by, or near,
children or disabled persons and whenever the heater is left unattended.
4. Always unplug the heater when not in use and cover to protect from rain or snow. Remove any cover before
use.
5. Do not operate the heater with a damaged power cord or power plug or if the heater becomes wet,
malfunctions or has been dropped or damaged in any manner. Return the heater to an authorized service
facility for repairs.
6. Operate 3 feet (0.9M) from people or objects. FOR OUTDOOR USE ONLY.
7. Never operate the heater near water or where it can be knocked over. In the event the heater does fall into
water, immediately turn off the power to the power socket then remove the power plug from the power socket.
Do not place your hand in the water until you are sure the power has been disconnected.
8. This product is fitted with a power-off tilt switch. Power to the heater tube will be shut-off should the unit
accidentally fall over or be tilted more than 15 degrees. To reset, unplug from the power socket, reposition the
unit on a flat level surface and plug in again.
9. This product is fitted with a non-self-resetting thermal fuse to provide protection in the event of overheating.
Repair must only be made by a qualified service agent.
10. Do not run the power cord under carpeting. Do not cover the power cord with throw rugs, runners, or similar
coverings. Arrange power cord away from traffic area and where it will not be tripped over.
11. Connect to properly grounded (earthed) power outlets.
12. Do not use near flammable materials. Do not use the heater in areas where gasoline, paint or flammable
liquids are used or stored.
13. Use the heater only as described in this manual. Any other use is not recommended by the manufacturer as it
may cause fire, electrical shock or injury to persons.
14. Avoid the use of an extension power cord because the extension power cord may overheat and cause a risk of
fire. However, if you have to use an extension power cord, use either a 12 or 14 gauge wire, which is rated at
not less than 1900 Watts. The recommended maximum length for a 14 gauge power cord is 50 feet (15.2M),
but if it needs to be longer use a 12 gauge power cord which is suitable for a maximum length of 100 feet
(30.4M).
15. Only one heater is recommended per household. Special household wiring may be necessary if more than
one heater is needed.
16. SAVE THESE INSTRUCTIONS for future reference.
4

COMPONENTS
Please open the packing carefully and confirm you have all the following components. Should any components be
missing or damaged, please report promptly to your supplier.
1. Heater head assembly.
2. Safety bar
3. Top bracket
4. Curved top tube
5. Upper straight tube
6. Adjustable tubes
7. Lower straight tube
8. Base bracket
9. Base assembly
10. 2 x small screws with
washers
11. 19 x large screws
12. 1 x M12 nut with flat washer
& spring washer.
5

IDENTIFY THE LOCATION OF COMPONENTS ON THE FINISHED ASSEMBLY
ASSEMBLY TOOLS
The following hand tools, not supplied, are required for assembly.
A large cross head screwdriver.
A medium cross head screwdriver
An M12 wrench or adjustable wrench.
ASSEMBLY PROCEDURE
Check inside the box to ensure all parts are included before starting assembly. Prior to assembly, please read these
instructions carefully. Carry out assembly on a soft surface to avoid scratching the surface.
Step 1: Prepare the heater head assembly, item 1, to fit the safety bar, item 2.
6
Remove these
Remove these

Step 2: Align the safety bar, item 2, to the heater head assembly, item 1. Insert and tighten the screws.
Step 3: Note the orientation of the top bracket, item 3, to the curved top tube, item 4. Insert and tighten four large
screws, items 11.
Step 4: Thread the power cord through the top bracket, item 3 and curved top tube, item 4.
Step 5: Note the orientation of the tilt switch to the top bracket and align the two parts. Insert and tighten two small
screws with washers, items 10.
7
Replace these
Replace these
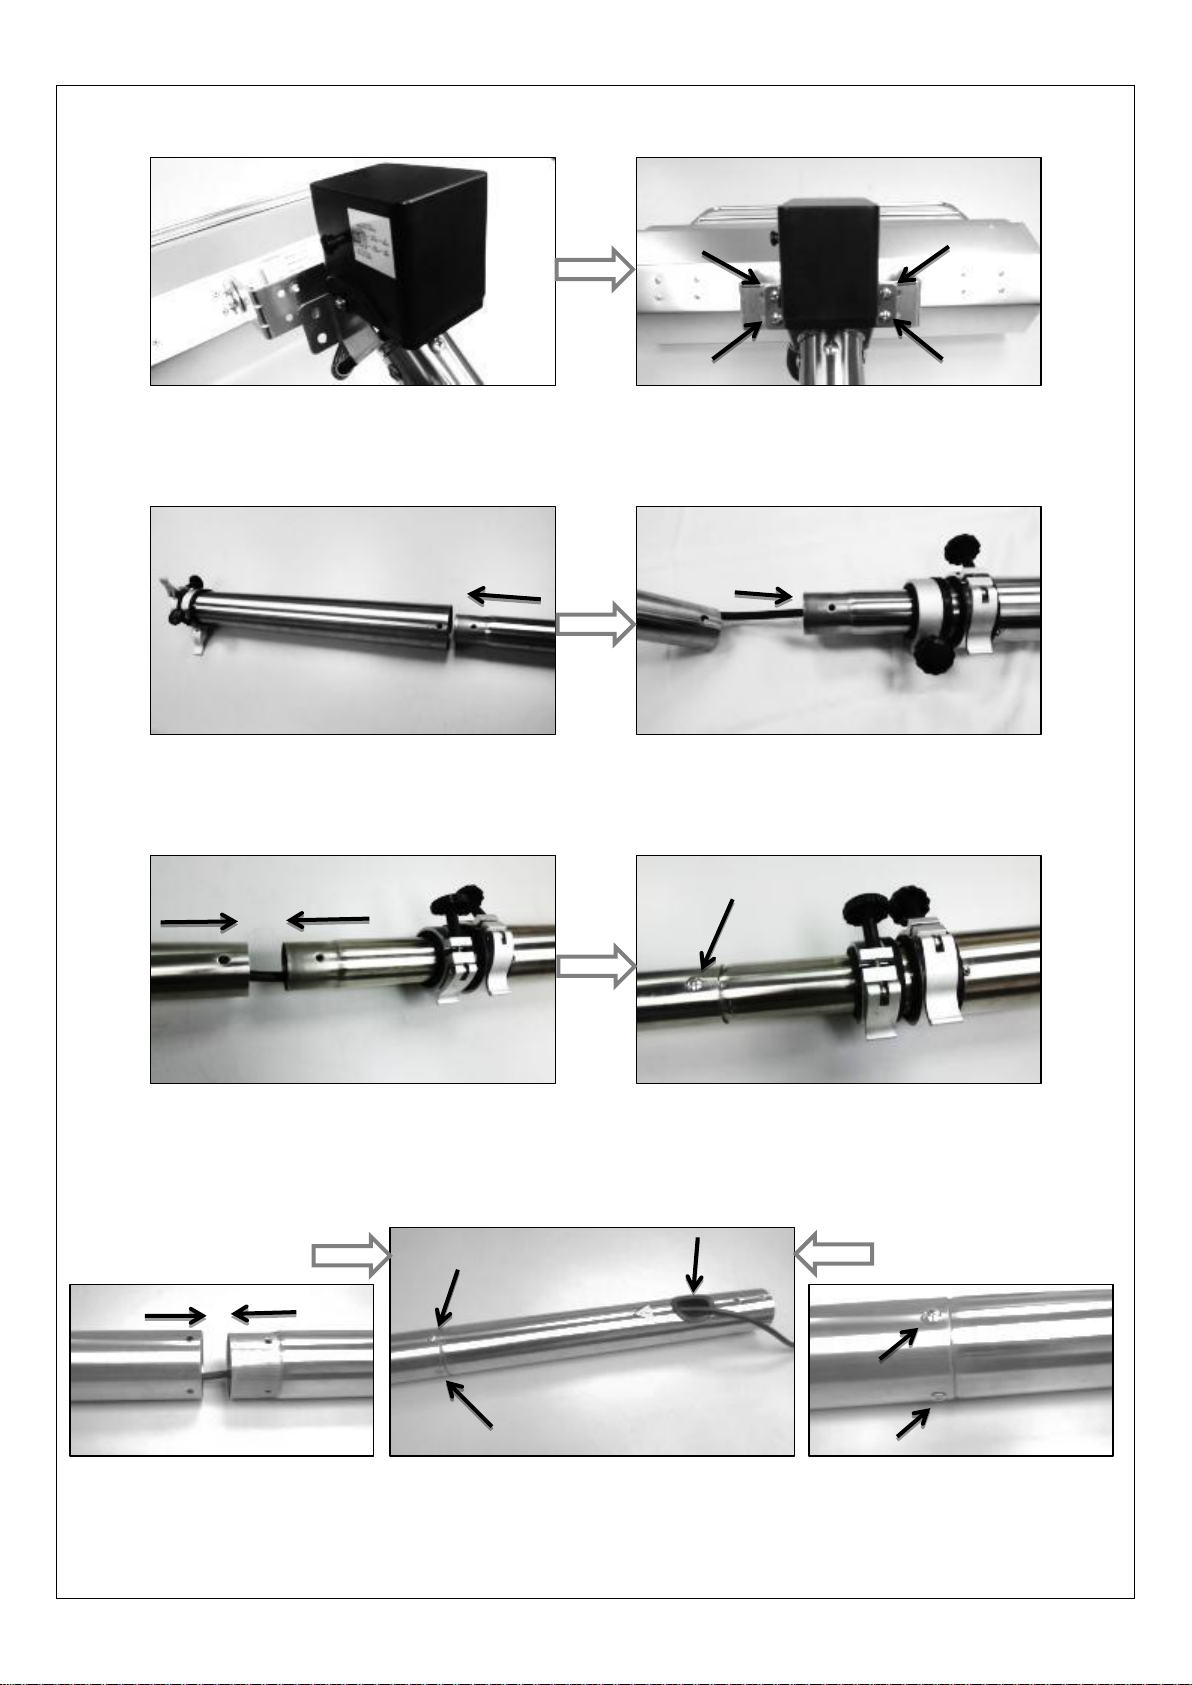
Step 6: Note the orientation of the top bracket to the heater head. Insert and tighten four large screws, items 11.
Step 7: Release the adjustable tubes clamps and slide the upper straight tube, item 5 through the adjustable tubes,
item 6, narrow end first. Thread the power cord through the tubes.
Step 8: Align the small end of the upper straight tube, item 5 with the screw hole in the curved top tube, item 4. Insert
and tighten a large screw, item 11.
Step 9: Thread the power cord through the lower straight tube, item 7, passing it out through the hole in the side of the
tube. Align the small end of the lower straight tube, item 7 with the screw holes in the adjustable tubes, item 6. Insert
and tighten four large screws, items 11.
8

Step 10: Insert the base bracket threaded bolt, item 8 into the base assembly, item 9. Invert the base assembly and fit
the large flat washer, the spring washer and the M12 nut, items 12 onto the bolt, in that sequence and tighten the nut.
Step 11: Place the base assembly item 9 on the floor and align the lower straight tube, item 7 with the screw holes in
the base bracket, item 8. Insert and tighten eight large screws, items 11.
Step 12: Recheck the tightness of all screws and the M12 base bracket mounting nut, then position the complete
heater assembly on a flat surface in the preferred location. Whilst the base is heavy enough to support the heater
assembly, for extra safety against being knocked over, bolt the base to the floor through the two holes in the base.
These fixing bolts are not supplied, but select bolts of adequate length and type to suit the floor surface material.
Step 13: Select the required heater head angle limits screw position. Tighten the screw.
Narrow angle Wide angle
9

Step 14: With the heater in the required operating location check that the heater head assembly is level. This is
necessary to avoid uneven heating of the infrared lamp, which will shorten its life span. If not level, release the screws
holding the top bracket to the heater head assembly and to the upper curved tube, adjust the heater head assembly to
a level position, then re-tighten the screws.
Head not level. Relax these 8 screws to set head level. Head correctly leveled.
Step 15: Adjust the height of the pole by releasing the clamp at the top end of each adjustable tube and release the
clamping bolts until the tubes slide freely. Adjust the pole to the required height then tighten the clamping bolts and
close the clamps to firmly secure the adjustable tubes.
Step 16: Assembly is now complete and you are ready to power the heater for the first time. First set the tilt-switch to
ON by pulling the setting button out as shown on the below label on the tilt-switch housing.
Step 17: Check that your household power matches the voltage and power rating shown on the rating label on the
heater head assembly and that the outlet socket is grounded and matches the power plug on the power cord of the
heater. You can now plug the heater power plug into the power outlet socket then switch on the power to the power
outlet socket. The heater should start immediately.
10
Clamp closed
Clamp open
Clamping bolt
Clamping bolt

TROUBLESHOOTING
In the unlikely event that the heater fails to operate, check the following:-
Problem
Probable Cause
Solution
Heating tube
will not light
No power.
Check the power plug connection with the power outlet.
Tilt switch knob set to “OFF”.
Set tilt switch knob to “ON”
Non-self-resetting thermal fuse blown.
Refer to service agent for repair.
Heating tube is damaged.
Replace with new heating tube.
Tilt-switch activated.
Keep body vertical.
Tilt-switch is damaged.
Replace new tilt-switch.
Loose power connection.
Check and tighten power connections.
Heating
element glows
unevenly from
end to end
Heater head is not level.
Adjust the position of the heater or the head to achieve
level mounting.
HEATER TUBE REPLACEMENT
1. Remove power cord from power socket to ensure heater has no power connection.
2. Use screw driver to take off Heater head assembly side covers (See diagram 1 below)
3. Remove side covers and grille protector. (See diagram 2 below)
4. Remove tube from both terminals on each side. (See diagram 3 below)
5. Insert new tube into clipper and plug in both terminals. Make sure there are no metal parts around or touching
the heating tube.
6. Refit the grille and both side covers.
7. Replace power cord plug into the power socket and turn power on to check the new replaced heating tube.
8. Store in a safe place where the unit won’t get damaged or broken.
9. Dispose of the defective heater tube properly.
11

IMPORTANT
For questions, concerns or problems with our product please
email our customer service department:
customercare@jrhome.com or call 1-800-561-5550.
DATED PROOF OF PURCHASE REQUIRED FOR WARRANTY SERVICE.
WARRANTY
This product is inspected, tested and carefully packaged to minimize the chance of damage during
shipment. If a part (excluding light bulbs and fuses) within one year from the date of purchase proves to
be defective in material of fabrication under normal use, the part will be repaired or replaced. The
Company’s obligation under the warranty is to replace or repair defective parts at our discretion. Any
expenses or damage resulting from the installation, removal or transportation of the product will be the
responsibility of the owner and are not covered by this warranty. The owner assumes all other risks
arising from the use or misuse of the product. The warranty will be void if the product damage or failure is
deemed by the Company to be caused by accident, alteration, misuse, abuse, incorrect installation or
removal, or connected to an incorrect power source by the owner. The Company neither assumes, nor
authorizes any person or entity to assume for it any obligation or liability associated with its products.
Light bulbs and fuses are not covered under this warranty. If you have any questions regarding the
warranty or service, please call our toll free number: 1-800-561-5550.
Customer Service
JR Home Products
Unit 1 – 5628 Riverbend Drive, Burnaby BC, V3N OC1
Toll Free: 1-800-561-5550
E-mail: customercare@jrhome.com
You MUST register your product to receive warranty service.
Registration can be completed online at www.jrhome.com or by mailing this form.
Warranty Registration Form / Formulaire d’enregistrement de la garantie
Name / Nom: ____________________________________
Street / Adress: __________________________________
City / Ville: ______________________________________
Province / Province: _______________________________
Postal Code / Code Postal: _________________________
Daytime Phone / No téléphone jour: __________________
Evening Phone / No téléphone soir: __________________
E-Mail Address / Courriel: __________________________
Product / Produit:_________________________________
Place of Purchase / Lieu de l’achat: __________________
Date of Purchase / Date de l’achat: __________________
Model # / No de modèle: ___________________________
Serial # / Numéro de série: _________________________
You MUST register your product to receive warranty
service.
For warranty service contact J&R Home Products at
the address, phone numbers listed below within 30
days of purchase. Be sure to have your sales receipt
and original date of purchase. All warranty service will
be coordinated by J&R Home Products service center.
Vous DEVEZ en enregistrer votre produit pour vous
prevaloir de la garantie.
Afin de faire valoir de la garantie, communiquex avec
J&R Home Products à la adresse et aux numérous
indiqués ci-dessous dans les 30 jours suivant la date
d‘achat. Ayes en main votre reçuet la date d'achat.
Toutes les demandes liées aux guaranties seront
traitées par le centre de service de J&R Home
Products.
Please mail to / Veuillez poster le tout à: Parts & Service Department,
J&R Home Products Ltd., Unit 1 – 5628 Riverbend Drive, Burnaby BC, V3N OC1.
12

Radiateur de terrasse électrique à rayonnement
infrarouge sur pied
N° de modèle MS-1500WOIRPH
MODE D’EMPLOI
NOTE IMPORTANTE
Prière de lire attentivement le présent mode d’emploi afin de savoir comment monter et utiliser cet appareil.
Conserver ce mode d’emploi à titre de référence.
1
N° ETL LIP-15-TGG-SP, LIP-15-TGG-SP-SB-SP-BK

Consignes de sécurité
Le fait de ne pas tenir compte des mises en garde et des directives de fonctionnement contenues dans le
présent mode d’emploi pourrait provoquer des dommages matériels graves ou des préjudices corporels.
DANGER
Signifie que la situation pose un risque et
que si le risque n’est pas évité, de graves
blessures ou la mort en RÉSULTERONT.
AVERTISSEMENT
Signifie que la situation pose un risque et
que si le risque n’est pas évité, de graves
blessures ou la mort POURRAIENT EN
RÉSULTER.
MISE EN GARDE
Signifie que la situation pose un risque et
que si le risque n’est pas évité, des
blessures de gravité moyenne ou des
dommages à l’équipement PEUVENT en
résulter.
AVIS
Signifie qu’il s’agit de consignes importantes à suivre
afin d’éviter d’endommager l’appareil.
DANGER
Risque d’incendie. L’exécution de travaux sur un radiateur pose toujours un risque d’incendie. Garder
l’appareil à une distance de 7,6 m (25 pi) de liquides et de matériaux inflammables.
Risque d’incendie. Ne pas utiliser l’appareil avant qu’il soit fixé au sol. La chute de cet appareil peut
provoquer un incendie. Il faut s’assurer que le radiateur est stable et qu’il est installé sur une surface
plane. Suivre les consignes et garder l’appareil à au moins 0,9 m (3 pi) de tout objet.
Risque électrique. Débrancher l’appareil de la prise de courant avant de procéder à des travaux afin
d’éviter le risque d’électrocution.
Risque de décharge électrique. Ne pas utiliser à proximité de l’eau. Ne pas utiliser s’il pleut ou s’il
neige. Ne pas utiliser si le cordon est endommagé.
MISE EN GARDE
La durée de vie utile de l’appareil pourrait être réduite si celui-ci est employé incorrectement.
Afin d’éviter le risque de décharge électrique, vérifier si la fiche est bien insérée dans la prise de
courant.
L’appareil devient chaud lorsqu’il fonctionne. Garder tout objet à au moins 0,9 m (3 pi) de l’appareil.
Il faut éviter de disposer des articles comme des meubles, du papier, des vêtements ou des rideaux
à moins de 0,9 m (3 pi) de la partie avant et des côtés de l’appareil.
Ne pas suspendre des vêtements à proximité de l’appareil pour les faire sécher.
2

AVIS
Nous vous remercions d’avoir fait l’acquisition du radiateur de terrasse électrique à rayonnement infrarouge sur pied de
J. R. Homes.
Veuillez lire attentivement les instructions. Elles ont été rédigées dans le but de vous aider à utiliser votre radiateur de
terrasse électrique à rayonnement infrarouge sur pied à son plein potentiel.
CARACTÉRISTIQUES
Écologique : appareil de chauffage infrarouge silencieux, propre et sans odeur qui ne produit aucun rejet
dangereux ni résidu toxique.
Sécuritaire : aucune flamme, aucun gaz, aucun rayonnement UV. Homologation ETL.
Efficace : l’appareil utilise environ un dixième de l’énergie des radiateurs fonctionnant au gaz de pétrole
liquéfiés (GPL). Aucune bouteille de GPL à remplacer.
Pratique : fonctionne au moyen d’un branchement à une prise de courant ordinaire. S’utilise exclusivement à
l’extérieur.
Pratiquement aucune attente avant que l’air se réchauffe. Chaleur maximale en quelques secondes, car le
chauffage rayonnant n’est pas affecté par le vent.
Remplacement simple de l’élément chauffant.
Mât d’acier inoxydable réglable et tête du radiateur en aluminium.
DONNÉES TECHNIQUES
Type de radiateur : lampe infrarouge à quartz fonctionnant à l’électricité
Alimentation électrique : 120 V, 60 Hz
Puissance nominale : 1 500 W
Courant nominal : 13 A
Durée de vie utile de la lampe chauffante : 5 000 heures de fonctionnement
Dimensions de l’appareil monté : hauteur maximale de 236 cm (93 po), diamètre de la base de 46 cm (18 po),
largeur de la tête du radiateur de 56 cm (22 po)
Poids de l’appareil monté : 24 kg (53 lb)
Sécurité : dispositif de fermeture automatique en cas d’inclinaison
DANGER
Mise à la terre
L’appareil doit être branché à une source d’alimentation trifilaire mise à la terre. Le radiateur est doté
d’une fiche adéquate comme le montre l’image ci-dessous. S’assurer que l’appareil est branché à une
prise dont la configuration correspond à celle de la fiche et dont l’installation et la mise à la terre sont
conformes aux codes et aux règlements en vigueur. Il ne faut pas utiliser un adaptateur. Faire appel à
un maître électricien si les directives de mise à la terre ne sont pas claires ou si la prise murale ne peut
pas recevoir la fiche.
3

DIRECTIVES DE FONCTIONNEMENT IMPORTANTES
1. Lisez en entier les consignes avant d’utiliser l’appareil.
2. La partie chauffante de cet appareil (la tête) peut devenir très chaude lorsqu’elle fonctionne. Afin de prévenir
les brûlures accidentelles, évitez le contact entre la peau de nue et les surfaces chaudes de l’appareil. Pour
déplacer l’appareil, utilisez les poignées, le cas échéant. Assurez-vous que les matières combustibles, comme
les meubles, les oreillers, la literie, le papier, les vêtements et les rideaux, se trouvent à au moins 0,9 m (3 pi)
de l’appareil.
3. NE LAISSEZ JAMAIS l’appareil sans surveillance. Il est nécessaire d’observer une grande prudence lorsque
des enfants ou des personnes handicapées utilisent l’appareil ou se trouvent à proximité de celui-ci ou quand
l’appareil fonctionne sans surveillance immédiate.
4. Débranchez toujours un appareil qui ne sert pas et recouvrez-le afin de le protéger de la pluie ou de la neige.
Retirez tout élément de protection avant de vous servir de l’appareil.
5. Ne faites pas fonctionner un appareil défectueux, qui est tombé ou qui a été endommagé d’une quelconque
façon, ou dont le cordon ou la fiche sont endommagés. Retournez l’appareil à un point de service autorisé afin
qu’il soit réparé.
6. Tenez les gens et les objets à au moins 0,9 m (3 pi) de l’appareil. S’UTILISE EXCLUSIVEMENT À
L’EXTÉRIEUR.
7. Ne faites jamais fonctionner l’appareil à proximité de l’eau ou à un endroit où il risque d’être renversé. Si
l’appareil tombe à l’eau, coupez immédiatement l’alimentation électrique à la prise de courant et débranchez
ensuite la fiche de la prise. Ne plongez pas la main dans l’eau avant d’avoir la certitude que l’alimentation est
coupée.
8. L’appareil est doté d’un interrupteur d’inclinaison qui coupe automatiquement le courant. L’alimentation de
l’élément chauffant sera coupée immédiatement si l’appareil tombe ou si l’inclinaison de l’appareil est de plus
de 15 degrés. Pour remettre l’appareil en marche, débranchez la fiche, remettez l’appareil sur une surface
plane et rebranchez-le.
9. L’appareil est muni d’un fusible thermique sans réenclenchement qui assure une protection en cas de
surchauffe. Seul un technicien autorisé peut en effectuer la réparation.
10. Évitez de faire passer le cordon sous de la moquette. Ne recouvrez pas le cordon d’alimentation d’une
carpette, d’un tapis ou d’un article similaire. Évitez de laisser le cordon d’alimentation dans un endroit passant
où il pourrait faire trébucher quelqu'un.
11. Ne branchez l’appareil qu’à une prise mise à la terre correctement.
12. N’utilisez pas à proximité de matériaux inflammables, ni dans des lieux où de l’essence, de la peinture ou des
liquides inflammables sont utilisés ou rangés.
13. Ne vous servez pas de l’appareil pour un autre usage que celui décrit dans le présent mode d’emploi. Un
usage non recommandé par le fabricant pose un risque d’incendie, de décharge électrique ou de blessures.
14. Évitez d’utiliser une rallonge : elle pourrait surchauffer et provoquer un incendie. Cependant, s’il s’avère
nécessaire d’en utiliser une, il doit s’agir d’une rallonge d’une grosseur minimale de 12 ou de 14 et d’un calibre
minimal de 1 900 W. La longueur recommandée d’une rallonge d’une grosseur de 14 est de 0 à 15,2 m (0 à
50 pi), mais si une rallonge plus longue est requise, utilisez un fil d’une grosseur de 12, mais dont la longueur
est inférieure à 30,4 m (100 pi).
15. On recommande un seul appareil par résidence. Un câblage particulier pourrait être nécessaire si plus d’un
appareil est employé.
16. CONSERVEZ CES DIRECTIVES à titre de référence.
4

PIÈCES
Veuillez ouvrir l’emballage avec soin et vérifiez si toutes les pièces énumérées sont incluses. Si des pièces manquent
ou sont défectueuses, veuillez en aviser immédiatement le fournisseur.
1. Tête du radiateur
2. Barre protectrice
3. Bride de fixation supérieure
4. Tube courbé supérieur
5. Tube droit supérieur
6. Tubes réglables
7. Tube droit inférieur
8. Bride de fixation de la base
9. Base
10. 2 petites vis avec rondelles
11. 19 grandes vis
12. 1 écrou M12 avec rondelle
plate et rondelle élastique
5

REPÉRAGE DE L’EMPLACEMENT DES PIÈCES SUR L’APPAREIL MONTÉ
OUTILS DE MONTAGE
Les outils à main suivants, non compris, sont nécessaires pour réaliser le montage.
Un tournevis cruciforme de grande taille
Un tournevis cruciforme de taille moyenne
Une clé M12 ou une clé à molette
DIRECTIVES DE MONTAGE
Avant de commencer le montage du produit, vérifiez si la boîte contient toutes les pièces nécessaires. Lisez
attentivement les directives avant de commencer. Réalisez le montage sur une surface lisse afin d’éviter d’érafler les
surfaces.
Étape 1 : Préparez la tête de l’ensemble radiateur, pièce n° 1, afin d’y fixer la barre protectrice, pièce n° 2.
6
Retirez les deux vis
Retirez les deux vis

Étape 2 : Ajustez correctement la barre protectrice, pièce n° 2, par rapport à la tête du radiateur, pièce 1. Vissez les
vis.
Étape 3 : Ajustez correctement la bride de fixation supérieure, pièce n° 3, par rapport au tube courbé supérieur, pièce
n° 4. Vissez quatre grandes vis, pièce n° 11.
Étape 4 : Faites passer le cordon d’alimentation à l’intérieur de la bride de fixation supérieure, pièce n° 3, ainsi que
dans le tube courbé supérieur, pièce n° 4.
Étape 5 : Disposez correctement l’interrupteur d’inclinaison par rapport à la bride de fixation supérieure et alignez les
deux pièces. Vissez deux petites vis et les rondelles, pièce n° 10.
7
Revissez les vis
Revissez les vis

Étape 6 : Ajustez correctement la bride de fixation supérieure par rapport à la tête du radiateur. Vissez quatre grandes
vis, pièce n° 11.
Étape 7 : Relâchez les clamps de fixation des tubes réglables et faites glisser le tube droit supérieur, pièce n° 5, à
l’intérieur des tubes réglables, pièce n° 6, en commençant par l’extrémité étroite. Faites glisser le cordon d’alimentation
à l’intérieur des tubes.
Étape 8 : Placez l’extrémité plus étroite du tube droit supérieur, pièce n° 5, vis-à-vis du trou de vis du tube courbé
supérieur, pièce n° 4. Vissez une grande vis, pièce n° 11.
Étape 9 : Faites glisser le cordon d’alimentation à l’intérieur du tube droit inférieur, pièce n° 7, en l’insérant dans le trou
pratiqué sur le côté du tube. Placez l’extrémité étroite du tube droit inférieur, pièce n° 7, vis-à-vis des trous de vis des
tubes réglables, pièce n° 6. Vissez quatre grandes vis, pièce n° 11.
8

Étape 10 : Insérez le boulon fileté de la bride de fixation de la base, pièce n° 8, dans la base, pièce n° 9. Retournez la
base à plat sur le sol. Enfilez la rondelle, la rondelle élastique et l’écrou M12 sur le boulon, dans cet ordre, et serrez
l’écrou.
Étape 11 : Déposez la base sur le sol, pièce n° 9, et placez le tube droit inférieur, pièce 7 vis-à-vis les trous de vis de la
bride de fixation de la base, pièce n° 8. Vissez huit grandes vis, pièce n° 11.
Étape 12 : Vérifiez si les vis sont bien serrées ainsi que l’écrou M12 de la bride de fixation de la base. Installez ensuite
le radiateur monté à l’endroit désiré. Quoique la base soit suffisamment lourde pour supporter le radiateur monté,
vissez la base au sol en utilisant les deux trous pratiqués dans la base afin d’assurer une protection accrue en évitant
les chutes. Les boulons de fixation ne sont pas compris. Choisissez des boulons de la longueur adéquate et qui sont
adaptés au matériau du sol.
Étape 13 : Positionnez la tête du radiateur à l’angle adéquat à l’aide des vis. Vissez les vis.
Angle fermé Grand angle
9

Étape 14 : Une fois le radiateur installé à l’endroit voulu, vérifiez si la tête du radiateur est horizontale. On évite ainsi un
chauffage inégal de la lampe infrarouge qui réduirait sa durée de vie. Si la tête n’est pas droite, dévissez les vis fixant
la bride de fixation supérieure à la tête et au tube courbé supérieur. Réglez la position de la tête jusqu’à ce qu’elle soit
à l’horizontale, puis revissez les vis.
La tête n’est pas à l’horizontale. Dévissez les 8 vis afin de pouvoir ajuster la tête. Tête à l’horizontale.
Étape 15 : Réglez la hauteur du mât en relâchant le clamp dans la partie supérieure de chaque tube réglable et en
desserrant les molettes jusqu’à ce que les tubes glissent librement. Réglez le mât à la hauteur voulue, puis resserrez
les molettes et refermez le mécanisme des clamps afin de serrer fermement les tubes réglables.
Étape 16 : Le montage est désormais terminé et vous êtes prêt à alimenter l’appareil en électricité pour la première
fois. Réglez d’abord l’interrupteur d’inclinaison à la position de marche (ON) en tirant sur le bouton de réglage, comme
le montre l’illustration de l’étiquette du boîtier de l’interrupteur d’inclinaison qui est reproduite ci-dessous.
Étape 17 : Vérifiez si le courant de votre résidence correspond à la tension nominale et à la puissance nominale
figurant sur l’étiquette signalétique apposée sur la tête du radiateur. Vérifiez si la prise de courant est mise à la terre et
est adaptée aux exigences du cordon d’alimentation de l’appareil. Vous pouvez alors brancher la fiche de l’appareil
dans la prise de courant avant de rétablir l’alimentation de celle-ci. Le radiateur devrait se mettre en marche
immédiatement.
10
Clamp de fixation fermé
Clamp de fixation ouvert
Molette du clamp de
fixation clamp
Molette du clamp
de fixation

DÉPANNAGE
S’il advenait que le radiateur ne fonctionne pas, vérifiez ce qui suit :
Problème
Cause possible
Solution
Élément
chauffant ne
produisant
aucun
éclairage
Aucune alimentation électrique
Vérifiez si la fiche est branchée dans la prise de courant
Le bouton de l’interrupteur
d’inclinaison est réglé à la position
d’arrêt (OFF)
Réglez l’interrupteur d’interrupteur d’inclinaison à la
position de marche (ON)
Le fusible thermique sans
réenclenchement est grillé
Consultez un représentant du service à la clientèle pour
obtenir une réparation
Élément chauffant endommagé
Remplacez par un nouvel élément chauffant
L’interrupteur d’inclinaison est activé
Gardez le corps de l’appareil à la verticale
L’interrupteur d’inclinaison est
défectueux
Remplacez l’interrupteur d’inclinaison par un neuf
Le branchement d’alimentation est
lâche
Vérifiez et resserrez les branchements
L’élément
chauffant luit
inégalement
d’une extrémité
à l’autre
Le corps du radiateur est incliné
Réglez la position du radiateur ou la tête du radiateur de
sorte que le tout soit bien droit
REMPLACEMENT DE L’ÉLÉMENT CHAUFFANT
1. Débranchez le cordon d’alimentation de la prise pour éviter que l’appareil soit alimenté en électricité.
2. Utilisez un tournevis afin de retirer les plaques latérales de la tête du radiateur (voir la figure 1).
3. Retirez les plaques latérales et la grille de protection (voir la figure 2).
4. Dégagez l’élément chauffant des deux bornes à chaque extrémité (voir la figure 3).
5. Insérez le nouvel élément chauffant en le glissant dans la pince. Veillez à ce qu’aucune pièce de métal ne se
trouve à proximité de l’élément chauffant ou en contact avec celui-ci.
6. Remettez en place la grille et les plaques latérales.
7. Rebranchez le cordon d’alimentation à la prise et mettez en marche l’appareil pour vérifier si le nouvel élément
chauffant fonctionne correctement.
8. Rangez l’appareil à l’abri afin d’éviter qu’il soit endommagé ou brisé.
9. Jetez l’élément chauffant défectueux de la manière qui convient.
Side Cover = Plaque latérale; Grill = Grille; Panel = Plaque; Clipper = Pince; Terminal = Borne; Tube = Élément chauffant
11

NOTE IMPORTANTE
Si vous avez des questions au sujet de nos produits ou éprouvez des difficultés, faites parvenir un courriel à
notre service à la clientèle :
customercare@jrhome.com ou composez le 1 800 561-5550.
UNE PREUVE D’ACHAT DATÉE EST REQUISE POUR FAIRE VALOIR LA GARANTIE.
GARANTIE
Cet appareil a été inspecté, testé et emballé avec soin afin d'éviter tout risque de détérioration durant
l'expédition. Si vous constatez que, dans des conditions normales d'utilisation, l'une des pièces présente
un défaut de matériau ou de fabrication (à l'exception des ampoules et des fusibles) dans un délai d’un
an suivant la date d'achat, la pièce défectueuse sera réparée ou remplacée, à notre gré. En vertu de la
présente garantie, l’unique responsabilité de l'entreprise consiste à remplacer ou à réparer la pièce
défectueuse. Tous les frais ou dommages découlant de l'installation, du retrait ou du transport de
l'appareil relèvent de la responsabilité du propriétaire et ne sont nullement couverts par la présente
garantie. Le propriétaire assumera tous les autres risques découlant de l'utilisation ou du mauvais usage
du produit. La garantie sera nulle si l'entreprise juge que la défectuosité ou la défaillance du produit
découle d'un accident, d'une altération, d'un mauvais usage, d'une utilisation abusive, d'une installation
ou d'un retrait effectués inadéquatement ou d'un branchement à une source d'alimentation inadéquate de
la part du propriétaire. L'entreprise n'assumera aucune autre obligation ni responsabilité relativement à ce
produit et n'autorise personne ni aucune entité à assumer d'autres obligations et responsabilités. Les
ampoules et les fusibles ne sont pas couverts par la garantie. Si vous avez des questions au sujet de la
garantie ou du service, composez notre numéro sans frais : 1 800 561-5550.
Service à la clientèle
JR Home Products
Unit 1 – 5628 Riverbend Drive, Burnaby (BC) V3N OC1
Sans frais : 1 800 561-5550
Courriel : customercare@jrhome.com
Vous DEVEZ enregistrer le produit afin de faire valoir la garantie.
L’enregistrement peut être effectué en ligne dans le site www.jrhome.com ou en postant ce formulaire.
Warranty Registration Form/Formulaire d’enregistrement de la garantie
Name/Nom : ___________________________________
Street/Adresse : __________________________________
City/Ville : ______________________________________
Province/Province : _______________________________
Postal Code/Code postal : _________________________
Daytime Phone/No téléphone jour : __________________
Evening Phone/No téléphone soir : __________________
E-Mail Address/Courriel : __________________________
Product/Produit : _________________________________
Place of Purchase/Lieu de l’achat : __________________
Date of Purchase/Date de l’achat : __________________
Model #/No de modèle : ___________________________
Serial #/Numéro de série : _________________________
You MUST register your product to receive warranty
service.
For warranty service contact J&R Home Products at
the address, phone numbers listed below within 30
days of purchase. Be sure to have your sales receipt
and original date of purchase. All warranty service will
be coordinated by J&R Home Products service center.
Vous DEVEZ enregistrer votre produit afin de vous
prévaloir de la garantie.
Afin de faire valoir la garantie, communiquez avec J&R
Home Products à l’adresse et au numéro indiqués cidessous dans les 30 jours suivant la date d‘achat.
Ayez en main votre reçu et la date d'achat. Toutes les
demandes liées à la garantie seront traitées par le
centre de service à la clientèle de J&R Home
Products.
Please mail to/Veuillez poster le tout à l’adresse : Parts & Service Department,
J&R Home Products Ltd., Unit 1 – 5628 Riverbend Drive, Burnaby (BC) V3N OC1.
12
 Loading...