


ELECTRIC FIREPL ACE INSERT
Model #: DBL05-A3
OWNER'S
MANUAL
W
A
1
YEAR
limited
R
R
Y
T
N
A
&
IMPORTANT SAFETY
INSTRUCTIONS
FOR CUSTOMER SERVICE INQUIRIES, PLEASE CALL 1-800-561-5550.
* Save this manual for future reference.
Warning: Do not move insert while operating.
R
C
US
2
Read these instructions completely before
beginning installation. Failure to follow them
could cause a heater malfunction resulting in
serious injury and/or property damage.
WARNING: All electric heaters have
!
hot and arcing or sparking parts inside.
Do not use it in areas where gasoline,
paint or flammable liquids are present.
!
WARNING: This electric fireplace is
tested and listed for use only with the
optional accessories listed in these
instructions. Use of optional
accessories not specifically tested for
this electric fireplace could void the
heater warranty and/or result in a
safety hazard.
This electric fireplace meets the
construction and safety standards of H.U.D.
for application in manufactured homes when
installed according to these instructions.

TABLE OF CONTENTS
3
Important Safety Instructions.....................................................
Listing Approvals .....................................................................
Product Dimension Specifications .............................................
Locating Fireplace ..................................................................
Unpacking and Testing Fireplace ..............................................
Installation ............................................................................
Finishing Checklist ..................................................................
Operating Instructions ............................................................
Maintenance
.........................................................................
4
6
7
8
9
10
12
13
15
Troubleshooting......................................................................18
Warranty.................................................................................19
4
IMPORTANT SAFETY INSTRUCTIONS
1/
Prior to plugging your heater into an electrical outlet,
verify that the circuit breakers for the outlet are on.
The heater may emit a slight, harmless odor when first
2/
used. This odor is normal and it is caused by the initial
heating of internal heater elements and will not occur
again.
If your heater does not emit heat, consult the operation
3/
section of this manual for further information.
Use with a CSA or UL certified surge protector.
4/
CAUTION
RISK OF ELECTRIC SHOCK
DO NOT OPEN
NO USER-SERVICEABLE PARTS INSIDE
HIGH TEMPERATURE
SA1965 SA1965
KEEP ELECTRICAL CORDS
KEEP DRAPERY AND OTHER FURNISHINGS AT
LEAST 3 FEET (0.9m) FROM THE FRONT AND
SIDES OF THE HEATER.
!
CAUTION: High temperature, risk of fire,
keep electrical cords, drapery,
furnishings, and other combustibles at
least 3 feet (0.9m) from the front of the
heater and away from the side and rear.
!
WARNING: Servicing should be done only
while the heater is disconnected from the
power supply circuit.

IMPORTANT SAFETY INSTRUCTIONS
IMPORTANT INSTRUCTIONS
When using electric appliances, basic precautions should
always be followed to reduce the risk of fire, electric shock,
and injury to persons, including the following:
1/
Read all instructions before using this heater.
2/
This heater is hot when in use. To avoid burns, do not let bare
skin touch hot surfaces. If provided, use handles when moving
this heater. Keep combustible materials, such as furniture,
pillows, bedding, papers, clothes, and curtains at least 3 feet
(0.9 meters) from the front of the heater and keep them away
from the sides and rear.
3/
Extreme caution is necessary when any heater is used by or
near children or invalids and whenever the heater is left
operating and unattended.
5
4/
Always unplug heater when not in use.
5/
Do not operate any heater with a damaged cord or plug or after
the heater malfunctions, has been dropped or damaged in any
manner. Return heater to authorized service facility for
examination, electrical or mechanical adjustment, or repair.
Do not use outdoors.
6/
7/
This heater is not intended for use in bathrooms, laundry areas
and similar indoor locations. Never locate heater where it may
fall into a bathtub or other water container.
8/
Do not run cord under carpeting. Do not cover cord with throw
rugs, runners, or the like. Arrange cord away from traffic area
and where it will not be tipped over.
To disconnect heater, turn controls to off, then remove plug from
9/
outlet.
10/
Connect to properly grounded outlets only.
11/
Do not insert or allow foreign objects to enter any ventilation or
exhaust opening as this may cause an electric shock or fire, or
damage the heater
.
6
IMPORTANT SAFETY INSTRUCTIONS
12/
To prevent a possible fire, do not block air intakes or exhaust in
any manner. Do not use on soft surfaces, like a bed, where
openings may become blocked.
13/
A heater has hot and arcing or sparking parts inside. Do not use
it in areas where gasoline, paint, or flammable liquids are used
or stored.
14/
Use this heater only as described in this manual.Any other use
not recommended by the manufacturer may cause fire, electric
shock, or injury to persons.
15/
Avoid the use of an extension cord because the extension cord
may overheat and cause a risk of fire. However, if you have to
use an extension cord, the cord shall be No.14AWG minimum
size and rated not less than 1875 watts.
16/
SAVE THESE INSTRUCTIONS
LISTING APPROVALS
This heater has been tested in accordance with the CSA Standards for
fixed and location-dedicated electric room heaters in the United States
and Canada. If you need assistance during installation, please contact
your local dealer.
Model Number:
Description: 27" Fireplace Insert
Voltage: 120VAC
Watts:
Amps:
Width:
Height:
Depth:
Net Weight:
Gross Weight:
DBL05-A3
MAX 1500W
15Amp Grounded Circuit
27.17" (690 mm)
28.74" (730mm)
11.02" (280mm)
66lbs (30kgs)
70.4lbs (32kgs)
Note: This heater
must be
electrically wired
and grounded in
accordance with
local codes or, in
the absence of
local codes, with
National Electric
Code ANSI/NFPA
70-latest edition
or the Canadian
Electric Code,
CSA C22.1 as
appropriate.
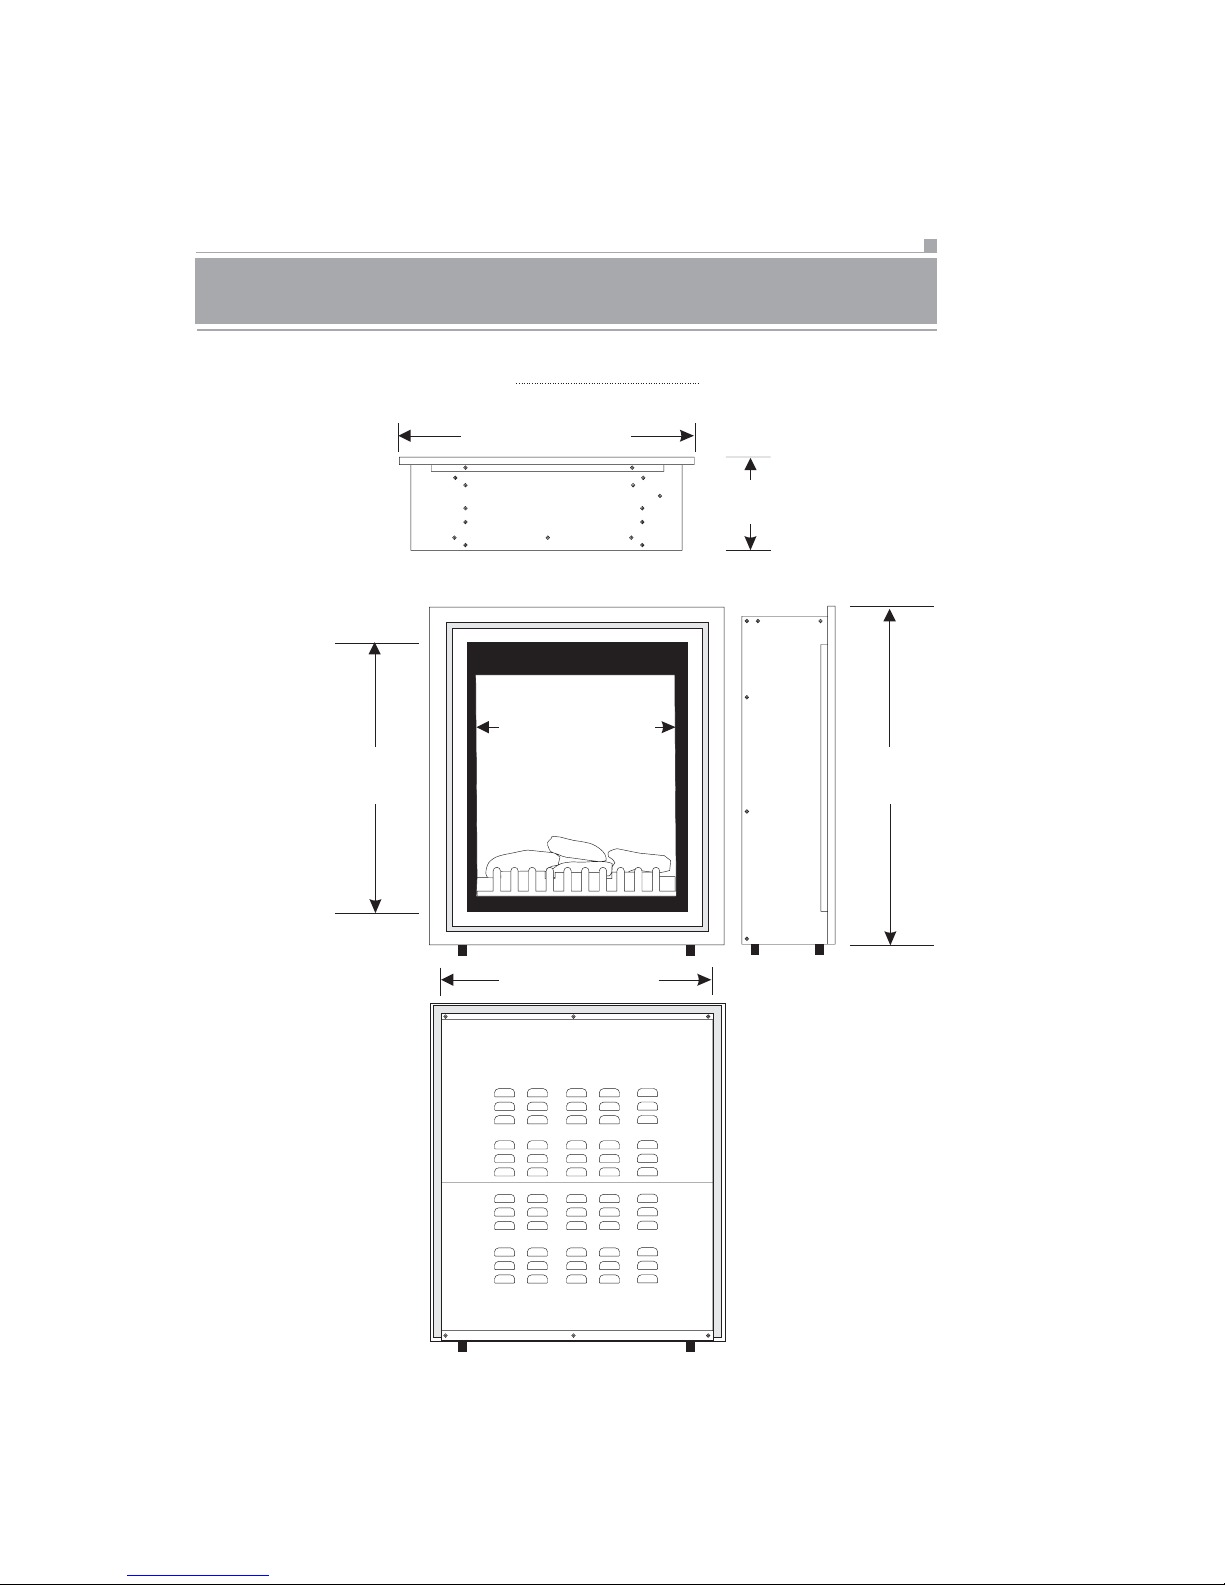
PRODUCT DIMENSION SPECIFICATIONS
Figure 1
Fireplace Dimensions
7
Front
View
(648mm)
Front
Back
25.5"
27.17" (690mm)
Top View
20.8" (528mm)
23.5" (597mm)
11.02"
(280mm)
28.74"
(730mm)
Back
View
8
LOCATING FIREPLACE
!
WARNING: Due to high temperatures, this electric fireplace
should be located out of traffic. Keep combustible materials
such as furniture, pillows, bedding, papers, clothes and
curtains at least 3 feet (0.9m) from the front of the heater.
!
!
WARNING: Never locate this electric fireplace where it
may fall into a bathtub or other water container.
NOTICE: Minimum clearance of 1" on all sides
must be maintained at all times. Illustrations
throughout these instructions reflect typical
installations and are for design purposes only.
Actual installations may vary slightly due to
individual preferences.
WARNING:To
preventcontactwith
sagging or loose
insulation, the electric
fireplace must not be
installed against vapor
barrier or exposed
insulation. Localized
overheating could occur
and a fire could result.
!
CAUTION: Wear
gloves and safety
glasses for protection
during installation and
maintenance.
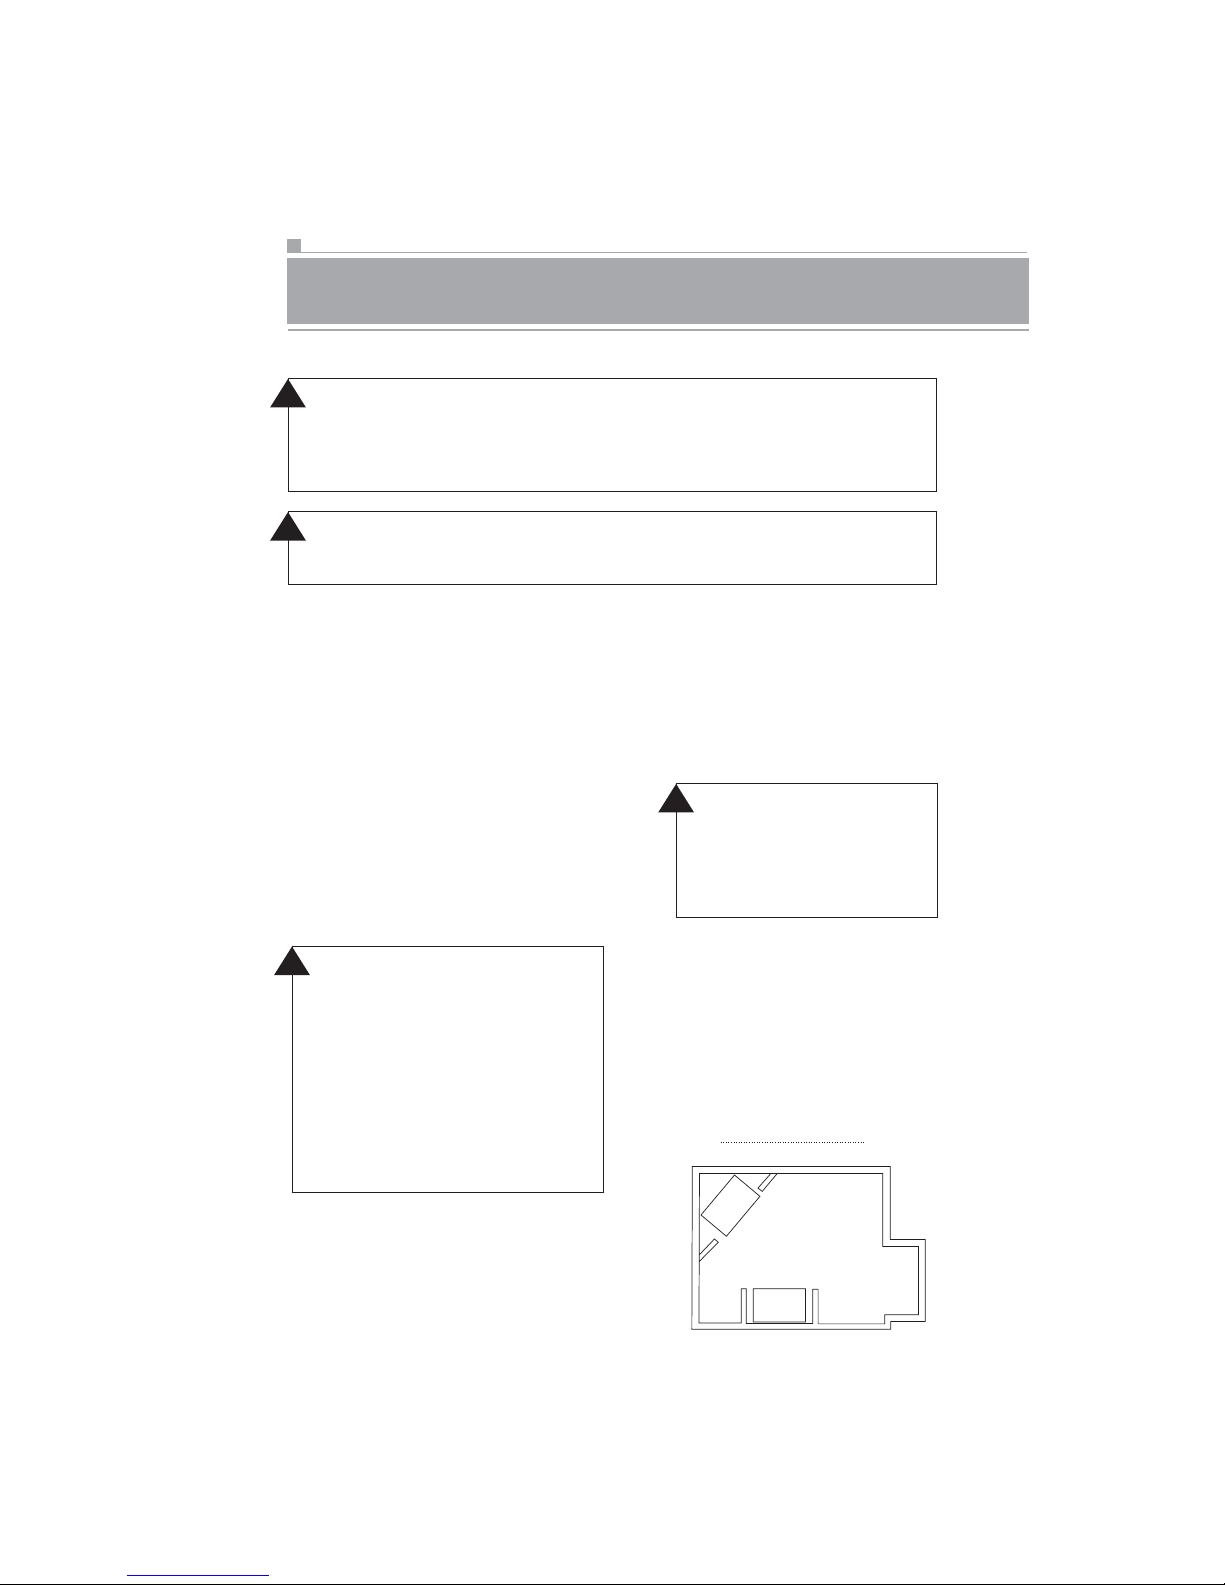
Figure 2 illustrates a variety
of ways the fireplace may be
located in a room. The heater
may be installed directly on
the floor (uncarpeted), or
raised on a hearth.
Figure 2
Heater Locations

UNPACKING AND TESTING FIREPLACE
Carefully remove the unit from the box. Prior to installing the unit, test to
make sure the unit operates properly. To do this, plug the unit's power
supply cord into a conveniently located 120-Volt grounded outlet.
!
CAUTION: Theunit'spowersupplycordmustbe
connected to a properly grounded and protected 120volt
outlet. Always use ground fault protection where required
by the electrical code.
!
WARNING: Donotoperatetheunitif
it is damaged or has malfunctioned.
9
10
INSTALLATION
!
WARNING: RISK OF FIRE! The power cord must not be
pinched against a sharp edge. Secure cord to avoid tripping or
snagging to reduce the risk of fire, electric shock or personal
injury. Do not run cord under carpeting. Do not cover cord with
throw rugs, runners or the like. Arrange cord away from traffic
areas and where it will not be tripped over.
!
WARNING: RISK OF FIRE! To prevent a possible fire, do not
blockairintakeorexhaustinanymanner. Donotuseonsoft
surfaces where openings may become blocked.
!
WARNING: RISK OF FIRE! Do not blow or place insulation
against the fireplace.
!
WARNING: This electric fireplace is tested and listed for use
only with the approved optional accessories. Use of optional
accessories not specifically tested for this electric fireplace
couldvoidthewarrantyand/orresultinasafetyhazard.
!
WARNING: If the infor-
mationinthese
instructions is not
followedexactly,afire
or explosion may result
causing property
damage, personal injury
or death.
Donotstoreoruse
gasoline or other
flammable vapors in the
vicinity of this or any
other heater.
BEFORE
INSTALLATION
Select a suitable location
that is not susceptible to
moisture and is away from
drapes, furniture and high
traffic areas. Note: Follow
all national and local
electrical codes. This
fireplace can be installed
into either an existing
fireplace opening or as new
construction / renovation.
NOTICE: Never pick unit up
by louvers. Louvers will
bend.

INSTALLATION
Existing Fireplace Installation
Thoroughly clean out the existing fireplace and hearth area.
Plan the power supply. If an existing grounded outlet is near the
fireplace, the power cord can run behind the fireplace. If the cord is
not long enough to reach the outlet, a grounded extension cord
minimum AWG No. 14 and rated to a minimum of 1875 watts may be
used. If you plan to cut or drill a hole in the existing fireplace for wiring,
it is best to hire a professional to do this step in order to prevent
personal injury. To reduce the risk of fire, do not run the power cord
under rugs, carpets, etc. Arrange the power supply cord away from
high traffic areas where it may pose a tripping hazard.
New Construction or Renovation
11
1/
Select a location that is not prone to moisture and
is located at least 0.9 m or 3 feet away from
combustible materials such as curtains or drapes,
furniture, bedding, paper, etc.
2/
Place the unit in selected location to see how it will
look in the future.
Mark the desired location on the floor and store
3/
unit in a safe, dry and dust free location.
4/
Frame in an opening leaving at least 1/4" (6 mm)
around the edge of the unit. Any new wiring must
be done in compliance with local and national
codes and other applicable regulations in order to
reduce the risk of fire, electric shock or other
injuries. Therefore, it is strongly recommended
that you hire a professional to complete any such
work.

12
INSTALLATION
Installing the Fireplace Insert
Once the site has been prepared, the fireplace insert can be installed.
1/
Make sure the main power switch is in the "OFF" position.
2/
Plug the fireplace into a 15-amp/120 volt, grounded outlet. Use a CSA
3/
or UL approved surge protector.
Push fireplace insert so that the trim is against the finished mantel or
4/
wall surface.
!
WARNING: Grills on this
electric fireplace cannot, in
anyway,becoveredasit
may create a fire hazard.
> Power supply service must be completed prior to finishing to avoid
reconstruction.
> Grills and air openings cannot be covered in any circumstances.
FINISHING CHECKLIST
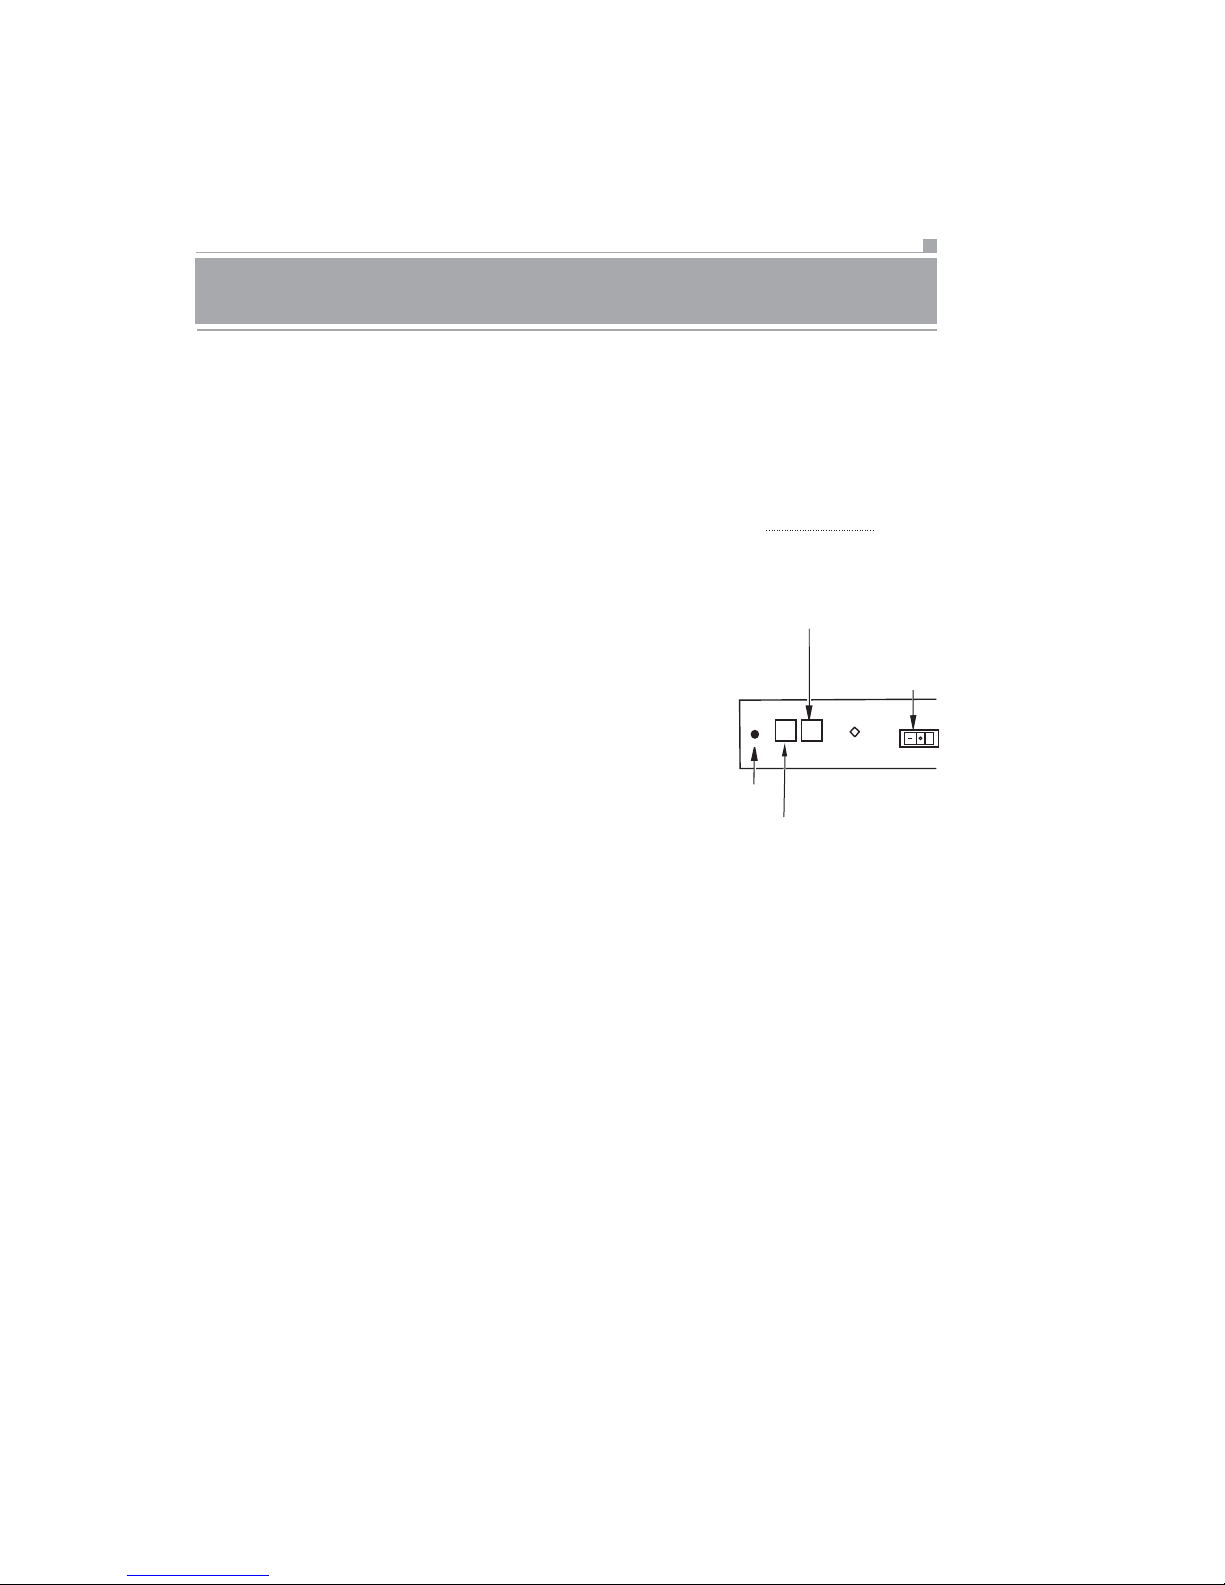
OPERATING INSTRUCTIONS
The controls (see Figure 3) are located on the bottom right corner of the
unit.
Plug in your electric fireplace.
1/
2/
Main ON/OFF Power Switch and LED:
This switch is located on the right side
of the control panel.
When the unit is first turned on, the
default settings are as follows:
- Ember bed: LOW
- Flame: HIGH
- Heater: OFF
3/
Temperature Control Button and LED:
The HEATER LED is located to the right
of the FLAME Button. Push the TEMP
button to cycle through different heater
settings. Press and release
the TEMP button to cycle through LO,
MED,HIandOFF.EachtimetheTEMP
button is pushed, the HEATER LED will
change to its corresponding color:
Green for LO, Orange for MED, Red for
HI, and blank for OFF. When the heater
is turned on, heat will emit through
the vents located in the middle of the
top louver panel (see Figure 1, page 7).
The heater has a built-in thermostat so
it will shut off automatically once the
pre-set temperature is reached. It will
also turn on automatically if the room
temperature drops below the pre-set
temperature. Note: When the heater is
turned on for the first time, it may
release a slight, harmless odour. This
odour is a normal occurrence caused
by the initial heating of the internal
heating elements and should not occur
again.
Remote Control
Receiver
Figure 3
Controls For
Electric Fireplace
Flame Control
Button
FLAME
TEMP
Temperature
Control Button
Heater
Power Button
13
ON/OFF
4/
Flame Control Button: This button is located to the
right of the TEMP Button (see Figure 3). After power is
turned on, push the FLAME control button to adjust
the flame and ember bed brightness. Press and
release the Flame Control Button to cycle through LO,
MED,HI and OFF.
MAINTENANCE
15
!
WARNING: Always disconnect the power and allow the
electric fireplace to cool before performing any cleaning,
maintenance or relocation of this electric fireplace. Turn
controls to OFF and remove plug from outlet or turn off the
house circuit breaker to electric fireplace receptacle.
Turn off electric fireplace or the house circuit breaker to the
fireplace before performing any cleaning and/or maintenance.
Allow electric fireplace to cool completely.
Most halogen light bulbs are rated to last approximately 1800 hours.
Like all light bulbs, halogen bulbs require periodic replacement. When
the bulbs in your unit have burned out you will notice one or more of
following:
Preparation for Maintenance
Common Observed Problems:
There is no flame
Flame is dim or dark in certain areas
Flame is not moving or glowing
Your fireplace unit must be opened in order to replace the light
bulbs. To reduce the number of times you need to open the unit,
replace all bulbs at the same time if they are close to the end of their
rated life.
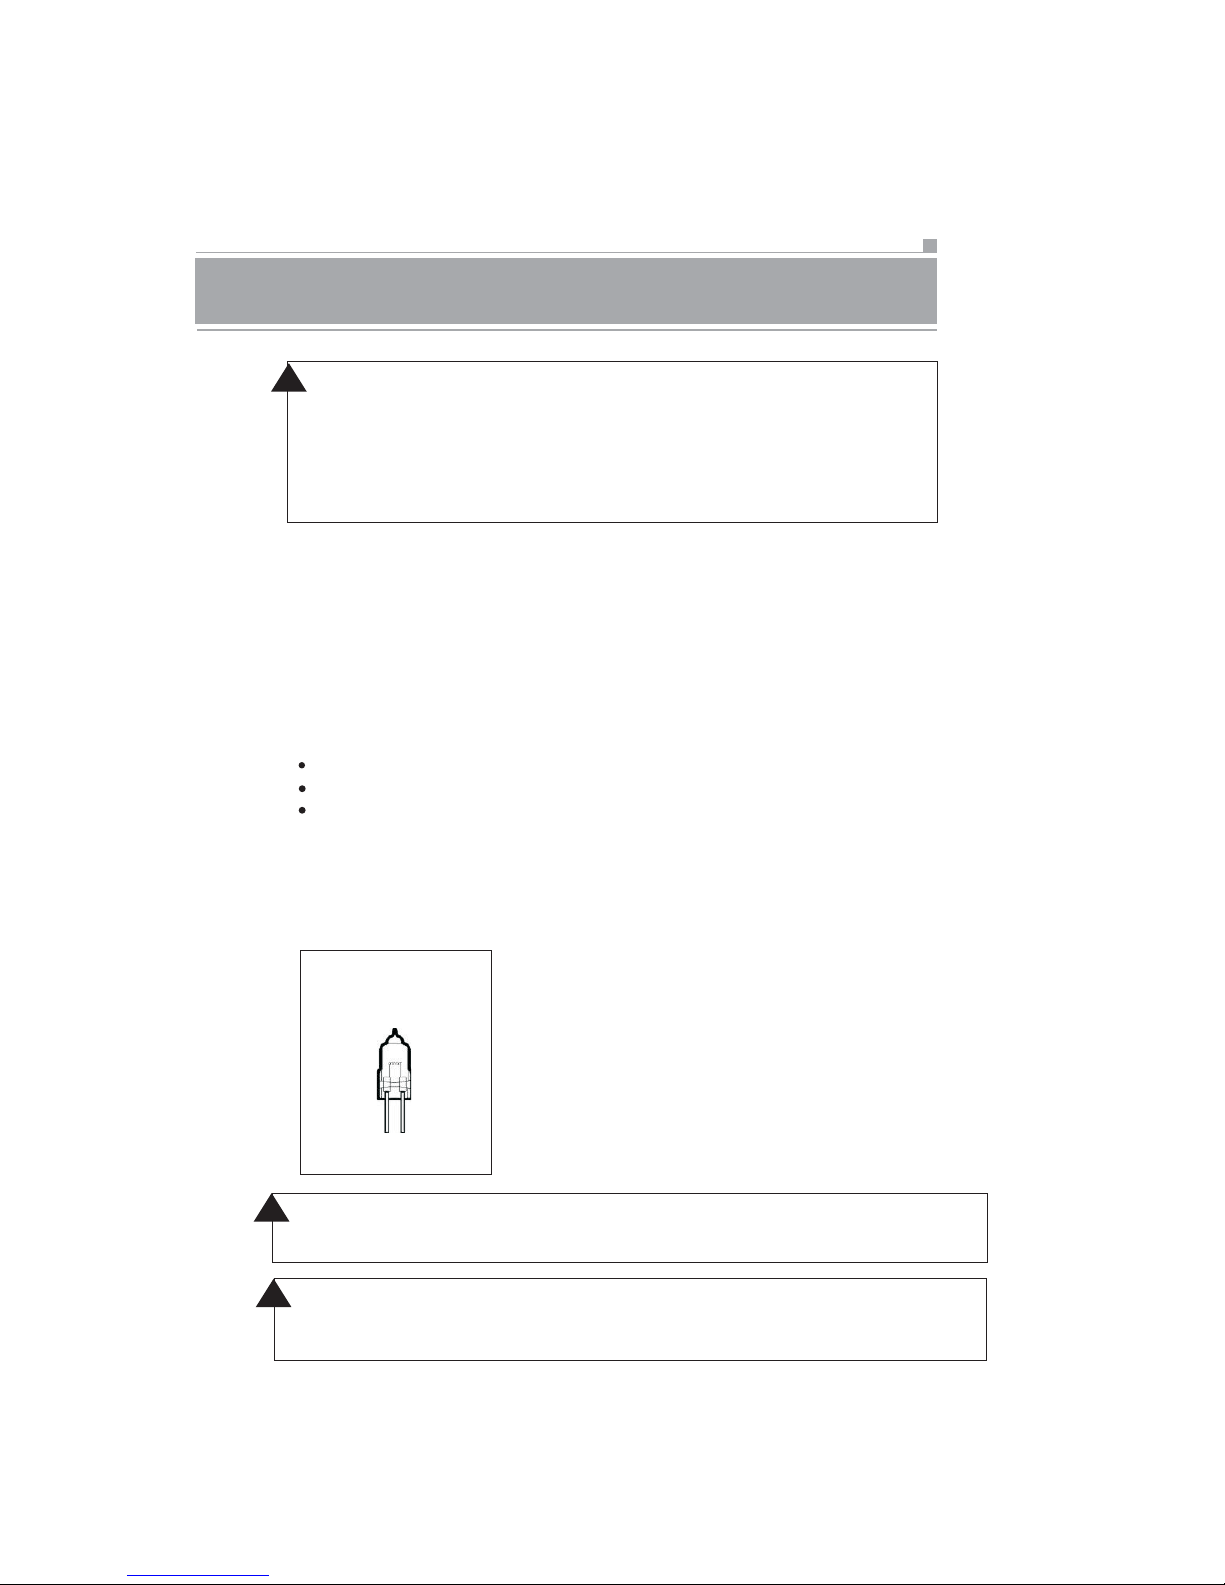
Bulb Type:
GX 6.35 120v, 35W
Maximum
There are a total of 6 halogen light bulbs
(type GX6.35 rated 120volts, 35watts) in
your unit:
6 pcs included
!
!
WARNING: Do not install replacement bulbs that exceed
WARNING: Thehalogenlightbulbsinyourunitcanbecome
extremely hot. Allow at least 10 minutes between turning off the
heater and removing the light bulbs to avoid accidental burns.
2 bulbs
* provide illumination for the
ember bed
2 bulbs
* provide illumination for
flame generation
* for replacement
2 extra bulbs
specified maximum watts.

14
OPERATING INSTRUCTIONS
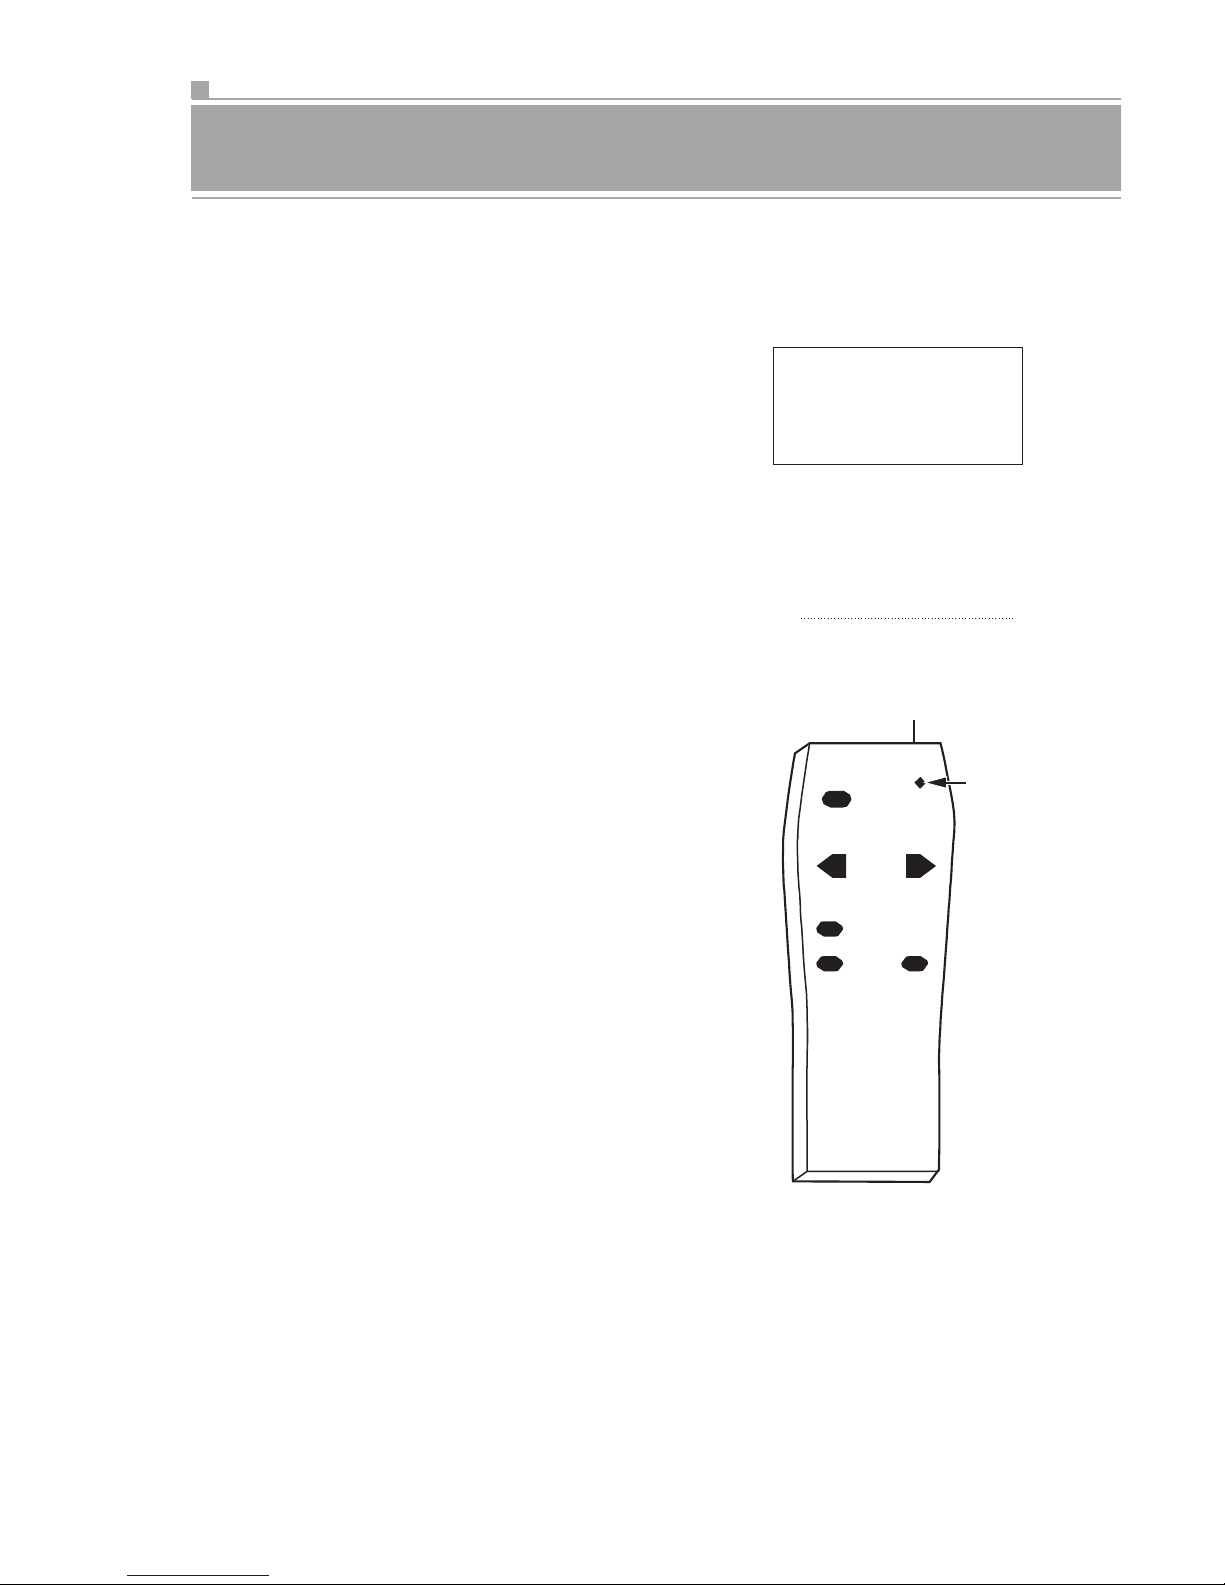
OPERATING BY REMOTE CONTROL
1/
Plug in your electric fireplace.
Push the ON/OFF Power Button to turn
2/
the unit on.
When operating the remote control, it
3/
must be pointed at the sensor on the
bottom PANEL.
The ON/OFF button at the top left of the
4/
remote is the main ON/OFF power button.
Pressing this button activates the power
to the unit.
Note: Make sure your
batteries are fully
charged and installed
correctly in your remote
control.
Figure 4
Remote Control For
Electric Fireplace
To adjust the ember bed lighting and
5/
flame brightness, press the "-" or "+"
EMBER buttons. There are seven levels
of brightness.
The HEATER button activates the heater,
The heater is pre-set to the following
temperatures: HI will shut off when room
reaches approximately 86 F (30 C).
MED will shut off when room reaches
approximately 75 F (24 C). LO will shut
off when room reaches approximately
64 F (18 C).
To adjust the height of the flame, press "-
6/
" or "+" FLAME buttons. There are seven
levels of flame effect.
To turn off the fireplace, press the
7/
ON/OFF button once. When you restart
the fireplace with the remote control, all
of the features you had set will remain in
effect. NOTICE: This remote control must
remain within 8 meters or 26 feet of the
fireplace to be effective.
ON/OFF
-
HEATER
-
Infrared Ray Exit
+
EMBER
FLAME
+
Indicator
Light

16
MAINTENANCE
Flame Generation Bulb Replacement
1/
2.1/
2.2/
Remove the screw as shown in Figure 6
that is used to secure the flame
generation cylinder drum.
Squeeze half of drum cylinder until its top
2.3/
edge clears the top drum track. Remove
the bottom edge of the cylinder drum
from the bottom drum track. This will give
you access to the light bulbs. Note: Do
not exert excessive pressures on the
drum cylinder as this may cause damage.
3/
4/
Two Sc re ws
On The Side
Flame Generation
Cylinder Drum
Figure 7
Flame Generation
Cylinder Drum
Figure 5
Back Plate
3Screws
On The Back
Figure 6
Flame Drum Cylinder
Screw
Flame Drum Cylinder
Mantel
Two Sc re ws
On The Side
5/
6/
7/
Drum Bulb Replacement
Figure 8
Bulbs with
Spring Clips
Flame Drum
Cylinder (Half)

MAINTENANCE
17
Ember Bed Bulb Replacement
1/
2/
3/
4/
5/
6/
7/
Two Sc re ws
On The Side
Figure 9
Back Plate
3Screws
On The Back
Figure 10
Ember bed bulb
Replacement
Figure 11
Ember bed bulb
Replacement
Mantel
Two Sc re ws
On The Side
BACK GLASS
1/
The glass is cleaned in the factory during assembly. During shipment,
installation, handling, etc. the glass surface may collect dust particles.
These can be removed by buffing lightly with a clean dry cloth.
2/
To remove fingerprints or other marks, the glass can be cleaned with a
damp cloth using a good quality household glass cleaner. The glass
should be completely dried with a lint free cloth or paper towel.
3/
In the event of glass breakage, vacuum all remaining glass pieces with
a shop vac. DO NOT VACUUM WHILE PIECESARE HOT. Replace
glass only with replacement part specifically for this heater. Never
substitute material. Only fully tempered safety glass may be used on
this heater.

18
TROUBLESHOOTING
!
WARNING: Turn off the fireplace completely and let cool
before servicing. Only a qualified service person should
service and repair this electric fireplace.
OBSERVED PROBLEM
Dimornoflame
Ember is not glowing
or dimming
Flame is not moving
Flame sputters
No warm air is coming
out of the heater
Remote control does not
work
POSSIBLE CAUSE
1. Bulb(s) are burnt out
2. Wiring is loose
1. Bulb(s) are burnt out
1. Loose wiring
2. Flame motor defective
1. Flame motor is
defective
1. Room temperature is
higher than the heater
setting (if it is set to LO)
1. Low batteries
REMEDY
1. Inspect bulbs and
replace if necessary
2. Inspect wiring for
loose connections and
repair or replace if
necessary
1. Inspect bulbs and
replace if necessary
1. Inspect wiring for
loose connections
2. Call a qualified
service technician to
replace flame motor
1. Call a qualified
service technician to
replace flame motor
1. Set heater to MED
or HI (Please refer
to pages 13 and 14)
1. Replace AA batteries
in remote control
Fireplace will not come
on when switch is flipped
to ON
Fireplace turns off and will
not turn on
1. Fireplace is not
plugged in to an electrical
outlet
2. Fireplace fuse has
blown
1. Fireplace has
overheated and safety
device has cause thermal
switch to disconnect or
home circuit breaker has
opened
1. Check plug
2. Replace fireplace
fuse with F3.15A fuse
1. Turn off the fireplace
completely then contact
the qualified service
person to service and
repair this fireplace

WARRANTY
This insert is inspected, tested and carefully packaged to
minimize the chance of damage during shipment. If a part
(excluding light bulbs and fuses*) within one year from the
date of purchase proves to be defective in material or
fabrication under normal use, the part will be repaired or
replaced. The Company's obligation under the warranty is
to replace or repair defective parts at our discretion. Any
expenses or damage resulting from the installation,
removal or transportation of the product will the
responsibility of the owner and are not covered by this
warranty. The owner assumes all other risks arising out
from the use or misuse of the product. The warranty will be
void if the product damage or failure is deemed by the
Company to be caused by accident, alteration, misuse,
abuse, incorrect installation or removal, or connection to
an incorrect power source by the owner. The Company
neither assumes, nor authorizes any person or entity to
assume for it any obligation or liability associated with its
products.
19
* Light bulbs and fuses are not covered under
this warranty
If you have any
questions regarding
the warranty or service,
please email:
parts@jrhome.com

IMPORTANT
Only return this product to the
store if it was purchased within
90 days. If you have problems
after 90 days of purchase,
please email our customer
service department for any
questions or concerns:
parts@jrhome.com
or please call 1-800-561-5550.
DATED PROOF OF PURCHASE
REQUIRED FOR WARRANTY
SERVICE.
Approved for use in
Canada and the United States

FO YER É LEC TRIQ UE À E NC ASTRER
No modèle: DBL05-A3
MA N U E L
DE L 'U T IL IS AT E U R
E T C O NS IG NE S D E
S É C U R IT É I MP O R TA N T E S
R
C
US
1
AY E R
Y
W
T
A
N
R
R
A
eli im t d
* Conserv er ce manuel pour consul tation ultérieure.
Mise en garde : Ne jamais déplacer le foyer encastrable pen dant qu'il fonctionn e.
P O U R C O MM U NIQ UE R A VE C L E S E R V IC E À L A C L IE N T È L E ,
C O M P OS E R L E , 1 -8 00- 5 61 -5 55 0.

Avant d'utiliser cet appareil, prière de lire
attentivement les directives en entier. Le défaut de
se conformer aux directives pourrait entraîner une
défaillance de l'appareil de chauffage, ce qui
pourrait résulter en des blessures graves ou en
des dommages matériels.
MISE EN GARDE : Tous les appareils de
chauffage électrique sont dotés de
pièces qui produisent de la chaleur ou
des étincelles. Ne jamais utiliser en
présence d'essence, de peinture ou de
liquides inflammables.
MISE EN GARDE : Le foyer électrique
est testé et homologué pour n'être
utilisé qu'avec les accessoires
optionnels mentionnés dans les
présentes directives. Utiliser des
accessoires optionnels qui n'ont pas
été testés précisément pour ce foyer
électrique annule la garantie couvrant
le foyer électrique et pose un risque
d'accident.
À condition que le foyer électrique soit
installé conformément aux présentes
directives, il respecte les normes de
construction et de sécurité préconisées par
le Department of Housing and Urban
Development en ce qui a trait à une
installation dans des maisons
préfabriquées.
2
!
!

Consignes de sécurité importantes............................................
Homologations .......................................................................
Spécifications et dimensions de l'appareil .................................
Choix de l'emplacement du foyer .............................................
Déballage et essai de l'appareil ................................................
Installation ............................................................................
Liste de vérification finale........................................................
Instructions de fonctionnement...............................................
Entretien................................................................................
Dépannage...........................................................................18
Garantie................................................................................19
3
TABLE DES MATIÈRES
4
6
7
8
9
10
12
13
15
Directives de montage du manteau de bois.........................................21

4
CONSIGNES DE SÉCURITÉ IMPORTANTES
Avant de brancher l'appareil à une prise de courant, vérifier
si le disjoncteur du circuit de la prise est armé.
Il se peut que l'appareil de chauffage dégage une faible
odeur, non dangereuse, lors de la première utilisation. Cette
odeur est normale: elle provient des éléments chauffants
internes qui sont chauffés pour la première fois. Par la suite,
l'appareil ne dégagera plus d'odeur.
Si l'appareil ne produit pas de chaleur, consulter la section
consacrée au fonctionnement dans le manuel pour obtenir
plus de détails.
Utiliser un limiteur de surtension homologué CSA ou UL.
GARDER LES RIDEAUX ET LES AUTRES
MEUBLES À AU MOINS DE 0,9 M (3 PI) DU
DEVANT ET DES CÔTÉS DE L'APPAREIL.
MISE EN GARDE : Ne pas procéder à
l'entretien de l'appareil qu'après l'avoir
débranché de son circuit d'alimentation
1/
2/
3/
!
SA1965
SA1965
ATTENTION
RISQUE DE CHOC ÉLECTRIQUE
NE PAS OUVRIR
AUCUNE PIÈCE INTERNE NE NÉCESSITE DE L'ENTRETIEN
TEMPÉRATURE ÉLEVÉE
CONSERVER LE CORDON ÉLECTRIQUE
4/
ATTENTION: Température élevée! Risque
d'incendie! Garder les cordons
électriques, les draperies, les meubles et
les autres matières combustibles à au
moins 0,9 m (3 pi) du devant de l'appareil
de chauffage et loin de ses côtés et de sa
!

5
CONSIGNES DE SÉCURITÉ IMPORTANTES
L’utilisation d'un appareil électrique nécessite des précautions
élémentaires à observer en tout temps afin de réduire les risques
d’incendie, de choc électrique et de blessures, notamment les précautions
qui suivent:
Lire les consignes en entier avant d'utiliser l'appareil de chauffage.
L'appareil de chauffage peut devenir chaud quand il fonctionne. Afin de
prévenir les brûlures accidentelles, éviter le contact entre la peau de nue
et les surfaces de l'appareil. Si l'appareil est doté de poignées, prière de
les utiliser pour le déplacer. S'assurer que les matières combustibles,
comme les meubles, les oreillers, la literie, le papier, les vêtements et
les rideaux, se trouvent à au moins 0,9 m (3 pi) du devant de l'appareil et
loin de ses côtés et de sa partie arrière.
Une extrême prudence est requise lorsqu'un appareil de chauffage est
utilisé par des enfants ou à proximité de ceux-ci ainsi que chaque fois
que l'appareil de chauffage fonctionne sans surveillance.
Toujours débrancher un appareil de chauffage qui ne sert pas.
Ne pas faire fonctionner un appareil de chauffage défectueux, qui est
tombé ou qui a été endommagé d'une quelconque façon, ou dont le
cordon ou la fiche sont endommagés. Retourner l'appareil de chauffage
à un point de service autorisé afin qu'il soit vérifié, que des réglages
électrique ou mécanique y soient apportés ou qu'il soit réparé.
Ne pas utiliser à l'extérieur.
Cet appareil de chauffage n'est pas conçu pour être utilisé dans une
salle de bain, une salle de lessive ou dans tout autre endroit semblable à
l'intérieur d'une résidence. Ne jamais installer l'appareil dans un endroit
où il pourrait tomber dans une baignoire ou dans de l'eau.
Éviter de faire passer le cordon électrique sous de la moquette. Ne pas
recouvrir le cordon électrique d'une carpette, d'un tapis ou d'un article
similaire. Éviter de laisser le cordon électrique dans un endroit passant
où il pourrait faire trébucher quelqu'un.
Pour débrancher l'appareil de chauffage, tourner le dispositif de
commande à la position OFF, puis débrancher la fiche de la prise.
Brancher l'appareil à une prise mise à la terre seulement.
Ne pas insérer ni laisser s'infiltrer des corps étrangers dans les
ouvertures de ventilation et d'évacuation d'air au risque de recevoir un
choc électrique, de causer un incendie ou d'endommager l'appareil.
CONSIGNES IMPORTANTES
1/
2/
3/
4/
5/
6/
7/
8/
9/
10/
11/

6
12/
13/
14/
15/
HOMOLOGATIONS
L'appareil de chauffage a été testé conformément aux normes de la CSA
en matière de radiateurs électriques fixes ou destinés au chauffage d'une
pièce aux Etats-Unis et au Canada. Si vous avez besoin d'aide pendant
l'installation, prière de communiquer avec le marchand de votre région.
Nota : Le câblage
électrique et la
mise à la terre de
cet appareil de
chauffage doivent
être conformes
aux codes en
vigueur dans la
région ou, en
l'absence de tels
codes, à la version
la plus récente de
la norme
ANSI/NFPA 70 du
Code national de
l'électricité ou à la
norme CSA C22.1
du Code canadien
de l'électricité,
selon le cas.
CONSIGNES DE SÉCURITÉ IMPORTANTES
Description: Foyer encastrable de 686 mm (27 po)
Tension: 120 V CA
Puissance: 1 500 W MAX
Intensité: 15 A circuit avec mise à la terre
Largeur: 690 mm (27,17 po)
Hauteur: 730 mm (28,74 po)
Profondeur: 280 mm (11,02 po)
Poids net: 30 kg (66 lb)
Poids brut: 32 kg (70,4 lb)
Num ér o de mod èle: DBL 05 -A3
Pour éviter les risques d'incendie, ne pas obstruer les prises d'air ni
les sorties de ventilation d'une quelconque façon. Ne pas installer
sur une surface molle, comme un lit, afin d'éviter de bloquer ces
ouvertures.
Un appareil de chauffage est doté de pièces internes qui produisent
de la chaleur ou des étincelles. Ne jamais utiliser dans un endroit où
de l'essence, de la peinture ou des liquides inflammables sont
utilisés ou entreposés.
Ne pas utiliser l'appareil de chauffage pour un autre emploi que celui
décrit dans le présent manuel. Un usage non recommandé par le
fabricant pose un risque d'incendie, de choc électrique ou de
blessures.
Éviter d'utiliser une rallonge électrique: elle pourrait surchauffer et
causer un incendie. Cependant, s'il s'avère nécessaire d'en utiliser
une, il doit s'agir d'une rallonge d'une grosseur minimale de 14 AWG
et d'un calibre minimal de 1875 W.
CONSERVER CES CONSIGNES!

7
SPÉCIFICATIONS ET DIMENSIONS DE L'APPAREIL
Figure 1
Dimensions du foyer
27,17" (690mm)
11,02"
(280mm)
25,5"
(648mm)
20,8" (528mm)
28,74"
(730mm)
23,5" (597mm)
Vue en plan
Arrière
Avant
Vue
de face
Vue
arrière
Vue
de côté
L’aspirateur de L’appareil de Chauffage:
NE COUVREZ PAS

MISE EN GARDE: Compte tenu que le foyer électrique peut
atteindre une température élevée, il ne doit pas être installé
dans un endroit passant. S'assurer que les matières
combustibles, comme les meubles, les oreillers, la literie, le
papier, les vêtements et les rideaux, se trouvent à au moins
0,9 m (3 pi) du devant de l'appareil.
MISE EN GARDE: Ne jamais installer l'appareil dans un
endroit où il pourrait tomber dans une baignoire ou dans de
l'eau.
AVIS : Il faut s'assurer de préserver un dégagement minimal de
2,54 cm ou 1 po tout autour de l'appareil, et ce, en permanence.
Les illustrations montrées dans ces directives indiquent des
installations type et ne servent que pour les besoins de
l'aménagement. L'installation réelle peut légèrement varier en
raison de préférences personnelles.
ATTENTION: Le port
de gants et de lunettes
de sécurité est
nécessaire afin de se
protéger pendant
l'installation et
l'entretien.
La Figure 2 montre diverses
manières d'installer le foyer
électrique dans une pièce.
L'appareil peut reposer
directement sur le sol (sans
tapis) ou dans un âtre.
Figure 2
Lieux d'installation de l'appareil
8
CHOIX DE L'EMPLACEMENT DU FOYER
!
!
!
!
MISE EN GARDE: Afin
d'éviter tout contact
avec de l'isolant affaissé
ou à nu, le foyer
électrique ne doit pas
installé contre un pare-
vapeur ou de l'isolant
apparent. Une
surchauffe localisée
peut survenir et
provoquer un incendie.

9
Déballer l'appareil en procédant avec soin. Avant d'installer
l'appareil, s'assurer qu'il fonctionne correctement en
branchant le cordon d'alimentation dans une prise de
courant de 120 V avec mise à la terre située à proximité.
DÉBALLAGE ET ESSAI DE L'APPAREIL
Directives de mise à la terre
Ce poêle est conçu pour être utilisé avec une prise de
courant de 120 volts. Le cordon d'alimentation est muni
d'une fiche, voir la Figure 1-A ci-dessous. Un adaptateur est
compris, voir la Figure 1-C. Ce dernier sert au branchement
de fiches à trois lames (avec mise à la terre) dans une prise
à deux fentes. La patte de mise à la terre verte en saillie de
l'adaptateur doit être connectée à une mise à la terre
permanente, comme une boîte de prise de courant avec
mise à la terre appropriée. Ne pas utiliser l'adaptateur si une
prise à la terre à trois fentes est disponible.
Figure 1
(A)
(B)
(C)
Méthodes de mise à la terre
VIS DE MÉTAL
PLAQUE D'UNE PRISE À LA TERRE
PRISE DE TERRE
ADAPTATEUR
MISE À LA TERRE
INTERDIT AU CANADA
Pour débrancher l'appareil, tourner les commandes à la
position d'arrêt (OFF), puis débrancher la fiche de la
prise.

10
MISE EN GARDE: RISQUE D'INCENDIE! Afin de d'éviter les
risques d'incendie, ne pas obstruer les prises d'air ou les
bouches de sortie d'air. Ne pas installer sur une surface molle
qui risquerait de bloquer les ouvertures.
MISE EN GARDE : RISQUE D'INCENDIE! Ne pas projeter ni
installer de l'isolant directement sur le foyer électrique.
MISE EN GARDE : Le foyer électrique est testé et homologué
pour n'être utilisé qu'avec les accessoires optionnels
mentionnés dans les présentes directives. Utiliser des
accessoires optionnels qui n'ont pas été testés précisément
pour ce foyer électrique annule la garantie couvrant le foyer
électrique et pose un risque d'accident.
INSTALLATION
MISE EN GARDE: RISQUE D'INCENDIE! Le cordon
d'alimentation ne doit pas être coincé contre une arête vive.
Afin d'éviter le risque d'incendie, de choc électrique ou de
blessure, fixer le cordon en place afin d'éviter qu'il ne fasse
trébucher une personne. Éviter de faire passer le cordon
sous de la moquette. Ne pas recouvrir le cordon électrique
d'une carpette, d'un tapis ou d'un article similaire. Éviter de
laisser le cordon électrique dans un endroit passant où il
pourrait faire trébucher quelqu'un.
MISE EN GARDE : Le fait de
ne pas observer
rigoureusement les
présentes directives pose un
risque d'incendie ou
d'explosion ce qui pourrait
entraîner des dommages
matériels, des blessures ou
même la mort. Ne pas
entreposer ou utiliser de
l'essence ou d'autres
produits dégageant des
vapeurs inflammables à
proximité de cet appareil ou
de tout autre appareil de
chauffage.
AVANT L'INSTALLATION
Choisissez un emplacement
convenable qui n'est pas sujet à
l'humidité ni passant et qui est
éloigné de toute matière
combustible, comme des
rideaux, des draperies, des
meubles, de la literie, du papier
ou autres. Nota: observez tous
les codes d'électricité
nationaux ou régionaux en
vigueur. Le foyer peut être
installé dans l'ouverture d'un
foyer existant ou dans un
endroit nouvellement construit
ou rénové.
AVIS: Ne jamais soulever l'appareil
en tirant sur les registres afin
d'éviter leur fléchissement.
!
!
!
!
!

11
No uve lle con str uction ou rénova tio n
INSTALLATION
Installation dans un foyer existant
Nettoyer soigneusement le foyer existant et l'âtre.
Planifier l'étape de l'alimentation électrique. Si une prise avec mise à
la terre est située à proximité, le cordon électrique peut passer à
l'arrière du foyer. Si le cordon n'est pas assez long pour atteindre la
prise, une rallonge électrique avec mise à la terre, AWG no 14 et d'une
puissance nominale minimale de 1 875 watts peut être employée. S'il
est prévu de pratiquer une ouverture ou de percer un trou dans le
foyer existant pour laisser passer un fil, il est fortement recommandé
de faire appel à un professionnel pour exécuter cette tâche afin
d'éviter tout risque de blessure. Pour éviter les risques d'incendie, ne
pas faire passer le cordon d'alimentation sous du tapis, une moquette,
etc. Éviter de laisser le cordon électrique dans un endroit passant où il
pourrait faire trébucher quelqu'un.
Choisir un emplacement qui n'est pas sujet à
l'humidité et qui est situé à au moins 0,9 m (3
pieds) de toute matière combustible, comme des
rideaux, des draperies, des meubles, de la literie,
du papier ou autres.
Installer l'appareil à l'endroit choisi pour vérifier
quel effet il a dans la pièce.
Marquer l'endroit choisi sur le plancher et
entreposer l'appareil dans un emplacement sûr,
sec et exempt de poussière.
Tracer le cadre de l'ouverture en laissant au moins
un espace de 6 mm (1/4 pouce) tout autour de
l'appareil. Tout nouveau câblage électrique devra
être réalisé conformément aux codes en vigueur
dans la région et le pays ainsi qu'à tout autre
règlement en vigueur afin d'éviter les risques
d'incendie, de choc électrique ou de blessures. Il
est fortement recommandé de faire appel à un
professionnel pour exécuter ce genre de travaux.
1/
2/
3/
4/

12
INSTALLATION
L’ ins tallatio n du foy er e ncastrab le
Une fois l'emplacement prêt, le foyer encastrable peut être installé.
S'assurer que l'interrupteur principal est à la position OFF (éteint).
Brancher le foyer électrique à une prise de 15 A et de 120 volts avec
mise à la terre. Utiliser un limiteur de surtension homologué CSA ou
UL.
Pousser le foyer encastrable de sorte que la garniture s'appuie sur le
manteau monté ou sur le mur.
1/
2/
3/
4/
MISE EN GARDE: Les
aspirateurs de l’appareil du
chauffage de ce foyer électrique
ne doivent jamais être
couverts, en aucun cas, afin
d'éviter tout risque d'incendie.
!
> Pour éviter de devoir reconstruire, le câblage d'alimentation électrique
doit être réalisé avant de procéder aux travaux de finition.
> Les registres et les ouvertures d'aération ne doivent jamais être
couverts.
LISTE DE VÉRIFICATION FINALE

13
Les commandes (voir la Figure 3) sont situées dans le coin inférieur
droit de l'appareil.
Branchez votre foyer électrique.
Interrupteur principal d'alimentation ON/OFF (marche/arrêt) et
voyant DEL: Cet interrupteur est situé du côté droit du panneau de
commande. Le symbole « | » indique la position de marche, tandis
que le symbole « O » indique la position d'arrêt.
Au moment de la mise en marche initiale de l'appareil, les réglages
par défaut sont les suivants:
- Lit de braises: LOW (bas)
- Flammes: HIGH (élevé)
- Appareil de chauffage: OFF (arrêt)
Bouton de réglage de la température et voyant DEL: Le VOYANT
DE L'APPAREIL DE CHAUFFAGE est situé à droite du bouton de
commande des FLAMMES. Appuyer sur le bouton TEMP
(température) pour passer d'un réglage de la température à l'autre.
Presser puis relâcher le bouton TEMP pour passer d'un réglage à
l'autre, soit LO (bas), MED (moyen), HI (élevé) et OFF (arrêt).
Chaque fois que le bouton TEMP est pressé, la couleur du voyant
DEL change en fonction de la plage: vert pour LO (bas), orange pour
MED (moyen), rouge pour HI (élevé) et rien pour OFF (arrêt). Quand
la fonction de chauffage est activée, la chaleur s'échappe des fentes
situées au milieu du registre du haut (voir la Figure 1 de la page 7).
L'appareil de chauffage est doté d'un thermostat intégré. Il cesse
donc de fonctionner dès que la température de consigne est atteinte.
De plus, il se remet en marche dès que la température ambiante
tombe sous le degré de consigne. Nota: Il se peut que l'appareil de
chauffage dégage une faible odeur, non dangereuse, lors de la
première utilisation. Cette odeur est normale: elle provient des
éléments chauffants internes qui sont chauffés pour la première fois.
Par la suite, l'appareil n'émettra plus d'odeur.
1/
2/
3/
4/
Bouton de commande des
flammes: Ce bouton est situé à
droite du bouton TEMP
(température) (voir la Figure 3).
Une fois l'appareil sous tension,
appuyer sur le bouton de
commande des FLAMMES pour
régler l'intensité des flammes et
du lit de braises. Presser puis
relâcher le bouton de commande
des flammes à plusieurs reprises
pour passer d'un degré à l'autre:
LO, MED, HI et OFF (bas, moyen,
élevé et arrêt).
INSTRUCTIONS DE FONCTIONNEMENT
Figure 3
Commandes du
foyer électrique
Interrupteur
d'alimentation
Heate r
Bouton de réglage
de la température
Bouton de commande
des flammes
Capteur de la
commande à distance
TEM P
FL AME
14
Figure 4
Commande à
distance du foyer
électrique
Brancher le foyer électrique.
S'assurer que le bouton principal ON/OFF de
l'appareil du chauffage est à la position de « ON
» ! Autrement, la commande à distance du foyer
électrique ne fonctionner pas.
Au moment d'utiliser la commande à distance,
pointez-la en direction du face de l’appareil du
chauffage.
Le bouton ON/OFF (marche/arrêt) situé dans le
coin supérieur gauche de la commande est le
bouton principal d'alimentation. En appuyant
sur ce bouton, on met en marche l'appareil.
Afin de régler l'intensité de la luminosité du lit de
braises et des flammes, appuyez sur les
boutons (-) et (+) de la fonction EMBER (lit de
braises). Il y a sept niveaux de luminosité.
Pour régler la luminosité des flammes, appuyez
sur les boutons (-) et (+) de commande des
flammes (FLAME). Il y a sept niveaux de
luminosité des flammes.
Pour éteindre le foyer, appuyez une fois sur le
bouton d'alimentation (ON/OFF). Quand vous
remettez en marche le foyer à l'aide de la
commande à distance, tous les réglages
effectués précédemment demeureront les
mêmes. NOTA: pour que cette commande à
distance fonctionne, elle doit être utilisée à
Le bouton de la fonction de chauffage(HEATER)
active la fonction de chauffage. Appuyez sur le
bouton HEATER à plusieurs reprises pour
choisir les quatres selections des températures
(LO, MED, HI et OFF). Le LED de HEATER
devient vert pour LO (bas), orange pour MED
(moyen), et rouge pour HI (élevé), et blanc pour
OFF ( arrête). L'appreil arrête de chauffeur
quand la température ambiante atteint la
température désirée, et l'appreil commence de
chauuffeur automatiquement quand la
temperature tombe en dessous la température
préétabli.
Nota : S'assurer que les
piles sont correctement
chargées et insérées
dans la commande à
distance.
FO NCTIONN EM ENT À PART IR DE LA COMMAND E À D ISTA NCE
1/
2/
3/
4/
5/
6/
Sort ie du ray on infraro uge
Voyan t
indi cat eur
ON/O FF
+
-
EMBE R
HEATER
FLAM E
-
+
7/
INSTRUCTIONS DE FONCTIONNEMENT
8/

15
ENTRETIEN
Les manifestations les plus couramment observées:
On ne voit aucune flamme;
Les flammes sont faibles ou sombres à certains endroits;
Les flammes ne bougent ni ne s'illuminent.
MISE EN GARDE: Ne pas installer des ampoules de rechange
dont la puissance excède la puissance maximale prescrite.
!
Préparation à l'entretien
MISE EN GARDE: Toujours débrancher l'appareil et le
laisser refroidir avant de procéder à son nettoyage, à son
entretien ou de le déplacer. Tourner le dispositif de
commande à la position OFF puis retirer la fiche de la prise
de courant ou mettre hors circuit le disjoncteur connecté à
Mettre hors circuit le disjoncteur connecté à la prise alimentant
l'appareil avant de procéder au nettoyage ou à l'entretien de
l'appareil.
Laisser l'appareil refroidir complètement.
!
La plupart des ampoules à halogène ont une durée de service d'environ
1 800 heures. Comme toutes les ampoules, il est nécessaire de
remplacer périodiquement les ampoules à halogène. Quand les
ampoules de l'appareil sont grillées, on remarquera une ou plusieurs
des manifestations suivantes :
On doit ouvrir l'appareil afin de remplacer les ampoules. Afin d'avoir à
ouvrir moins souvent l'appareil, remplacer toutes les ampoules en
même temps si leur durée de service s'achève.
Au total, votre appareil contient six
ampoules à halogène de type GX6.35,
d'une puissance nominale de 120 V et
de 35 W.
• 2 ampoules illuminent le lit de braises
• 2 ampoules illuminent l'ensemble de
simulation des flammes
• 2 ampoules supplémentaires servent
d'ampoules de rechange
Type d'ampoules :
GX 6.35, 120 V,
35 W Max.
MISE EN GARDE: Les ampoules à halogène de l'appareil
peuvent devenir extrêmement chaudes. Pour éviter les
brûlures cutanées, attendre au moins 10 minutes après avoir
mis l'appareil hors tension pour procéder au remplacement
des ampoules.
!
6 pièces
comprises

16
ENTRETIEN
Retirer les 7 vis situées dans la moitié
inférieure du foyer encastrable, comme
le montre la Figure 5. Retirer le panneau
arrière.
Repérer le tambour rotatif de simulation
de flammes. Le tambour est constitué de
deux moitiés amovibles. Il y a deux(2)
pièces de tôle noire mate perforées. Ces
deux pièces peuvent être retirées de
l'appareil (voir la Figure 6).
Retirer les vis servant à maintenir en
place le tambour rotatif de simulation de
flammes, comme le montre la Figure 6.
Presser la moitié du tambour rotatif
jusqu'à ce que ses extrémités se
dégagent des sillons supérieurs.
Retirer la moitié inférieure du tambour
des sillons inférieurs. (Figure 7) L'accès
aux ampoules est dégagé. Notation : Ne
pressez pas trop fortement le tambour
rotatif afin d'éviter de l'endommager.
Retirer la pince à ressort. Tenir la
douille en tirant sur l'ampoule grillée
(Figure 8).
Tenir la douille en insérant la nouvelle
ampoule (La puissance de l'ampoule Ne
Devez PAS dépasser la puissance
prescrite). Remettre en place la pince à
ressort.
Répéter les étapes 3 et 4 pour la
deuxième ampoule.
Insérer la moitié inférieure du tambour
rotatif dans les sillons inférieurs.
Presser doucement le tambour rotatif
jusqu'à ce que ses extrémités
supérieures s'insèrent à l'intérieur des
sillons supérieurs. Revisser les vis
enlevées à l'étape 2.
Fixer le panneau arrière de l'appareil au
châssis en revissant les 7 vis qui
avaient été enlevées à l'étape 1 (Figure
). 5
Re mpl acement d es a mpoules d e simul ati on des fla mme s
1/
2.1/
2.2/
2.3/
3/
4/
Figure 7
Tambour rotatif d e
simulation d e flammes
Tamb our r otatif
Figure 5
Panneau arrière
5/
Deux vi s
sur le cô té
Deux vi s
sur le cô té
Figure 8
Remplacement de
l'ampoule du t ambour
Tamb our r otatif
(moi tié )
Ampo ule s avec
pinc es à re sso rt
6/
Figure 6
Tambour rotatif d e
simulation d e flammes
Tamb our r otatif
Vis
7/
manteau de la ch eminée
Trois v is
à l'arr ière
Presser
VUE ARRIÈRE

17
ENTRETIEN
Re mpl acement a mpo ules du lit de b rai ses
Retirer les 7 vis situées dans la moitié
inférieure de l'arrière de l'appareil
encastrable, comme le montre la Figure
9. Retirer le panneau arrière.
(Figure 9)
Repérer les ampoules du lit de braises
qui sont situées sous le tambour rotatif
de simulation des flammes (Figure 10).
Tenir la douille en tirant sur l'ampoule
grillée (Figure 11).
Tenir la douille en insérant la nouvelle
ampoule (la puissance de l'ampoule NE
DOIT PAS dépasser la puissance
prescrite).
Répéter les étapes 3 et 4 pour la
deuxième ampoule.
Remettre en place le panneau arrière en
le fixant à l'appareil à l'aide des 7 vis
enlevées à l'étape 1 (Figure 9).
Figure 10
Remplacement ampoules
du lit de braises
4/
1/
2/
3/
5/
6/
Figure 11
Remplacement ampoules
du lit de braises
Figure 9
Panneau arrière
Trois v is
à l'arr ière
Deux vi s
sur le cô té
Deux vi s
sur le cô té
manteau de la ch eminée
PANN EAU DE VE RRE A RRI ÈRE
Le panneau de verre est nettoyé en usine
pendant son assemblage. Il est possible
que de la poussière se dépose sur la
surface pendant l'expédition,
l'installation, la manutention ou autre. Il
est possible de retirer la poussière en
frottant doucement la surface à l'aide d'un
chiffon propre et sec.
Pour éliminer les marques de doigt ou
autres, nettoyer la surface à l'aide d'un
chiffon humide imbibé d'un nettoyant pour
verre ménager de bonne qualité.
Assécher complètement la surface à
l'aide d'un chiffon sec et non pelucheux
ou d'un essuie-tout.
Advenant que le verre se brise, aspirer
toutes les morceaux de verre à l'aide d'un
aspirateur d'atelier. ATTENDRE QUE LES
MORCEAUX REFROIDISSENT AVANT
D'UTILISER L'ASPIRATEUR. Pour
remplacer un panneau de verre brisé,
n'utiliser que du verre conçu pour cet
appareil de chauffage. Ne jamais utiliser
des pièces non recommandées. Seul du
verre trempé de sécurité peut être installé
sur cet appareil de chauffage.
1/
2/
3/
ampoules
VUE ARRIÈRE

MISE EN GARDE: Éteindre complètement le foyer électrique
et le laisser refroidir avant de procéder à son entretien. Seul
un technicien qualifié peut procéder à l'entretien et à la
réparation du foyer électrique.
!
18
DÉPANNAGE
La co mm and e à
di sta nc e n e f onc ti onn e
pa s
1. Les piles sont faibles.
1. Remplacer les piles AA
de la commande à
distance.
CAUSE POSSIBLE
PROBLÈME CONSTATÉ
SOLUTION
Lumière faible ou
absence de flamme
1. l'ampoule est grillée
1. Vérifier l'ampoule dans la
tambour rotatif de
simulation de flammes et
remplacer au besoin
Le lit de braises ne
s'illumine pas ou
l'éclairage en est faible
1. l'ampoule est grillée
1. Vérifier l'ampoule du lit
de braises et remplacer au
besion
L'appareil ne produit
aucun courant d'air
chaud
Le foyer électrique
s'éteint et ne se remet
pas en marche.
1.le foyer n'est pas
branché à une prise de
courant.
2.Le foyer a surchauffé et
le dispositif de sécurité a
fait en sorte de
déconnecter le
thermorupteur ou
d'actionner le disjoncteur.
1.Vérifier la fiche.
2.Débrancher le foyer,
laisser le refroidir pour 10
minutes, et le brancher
après
Le fo ye r n e s e met p as
en ma rc he lo rsque
l' int er rup te ur es t l a
po sit io n O N.
1.Le foyer a surchauffé et
le dispositif de sécurité a
fait en sorte de
déconnecter le
thermorupteur ou
d'actionner le disjoncteur.
2. Le fuisible du foyer
a sauté.
1.Débrancher le foyer,
laisser le refroidir pour 10
minutes, et le brancher
après.
2.Rajuster le disjoncteur de
la maison.
1. Le degré de la
température ambiante
est plus élevé que celui
de la température de
consigne (si le niveau est
LO ou bas).
1. Régler le niveau à
MED (moyen) ou HI
(élevé).

Ce foyer électrique encastrable a été inspecté, testé et emballé
avec soin afin d'éviter tout risque de détérioration durant
l'expédition. Si vous constatez que, dans des conditions
normales d'utilisation, l'une des pièces présente un défaut de
matériau ou de fabrication, à l'exception des ampoules*, dans un
délai de un an suivant la date d'achat, la pièce défectueuse sera
réparée ou remplacée. En vertu de la présente garantie, la
responsabilité de l'entreprise consiste à remplacer ou à réparer
la pièce défectueuse. Tous les frais ou dommages découlant de
l'installation, du retrait ou du transport de l'appareil relèvent de
la responsabilité du propriétaire et ne sont nullement couverts
par la présente garantie. Le propriétaire assumera tous les
autres risques découlant de l'utilisation ou du mauvais usage du
produit. La garantie sera nulle si l'entreprise juge que la
défectuosité ou la défaillance du produit découle d'un accident,
d'une altération, d'un mauvais usage, d'une utilisation abusive,
d'une installation ou d'un retrait effectués inadéquatement, d'un
branchement à une source d'alimentation inadéquate de la part
du propriétaire. L'entreprise n'assumera aucune autre obligation
ni responsabilité par rapport à ce produit et n'autorise personne
ni aucune entité à assumer d'autres obligations et
responsabilités.
* Les ampoules et les fusibles ne sont pas couverts
par la présente garantie.
Si vous avez des
questions au sujet de la
garantie ou du service,
envoyez un courriel à
l'adresse suivante :
parts@jrhome.com
GARANTIE
19

IMPORTANT
Ne retourner ce produit au magasin
que si l'achat remonte à moins de 90
jours. Si vous éprouvez des difficultés
90 jours après l'achat, ou si vous avez
des questions ou des préoccupations,
prière de faire parvenir un courriel à
notre Service à la clientèle à l'adresse
suivante: parts@jrhome.com ou
1-800-561-5550.
UNE PREUVE D'ACHAT
DATÉE EST REQUISE POUR
SE PRÉVALOIR DE LA
GARANTIE.
téléphoner
Utilisation approuvée au
Canada et aux États-Unis

DIRECTIVES DE MONTAGE DU MANTEAU DE BOIS
B
C
A
D
DIRECTIVES DE MONTAGE DU MANTEAU DE BOIS
Le manteau de bois comprend
Quincaillerie comprise
1
3
5
2
4
6
Panneau central
Panneau avant gauche
Panneau avant droit
Panneau latéral gauche
Panneau latéral droit
Partie supérieure du manteau
30 vis dont 28 sont utilisent et 2 servent de rechange (servent à
assembler le manteau de la cheminée, comme le montre A)
2 supports de métal en forme de L (comme le montre B), et 4
rondelles de métal (servent à fixer le manteau de la cheminée au
mur, comme le montre C).
•
•
A
B
C
2 vis (servent à fixer le manteau de la cheminée au mur, comme
le montre D).
•
D
R
C
US
* Conserver ce manuel pour consultation ultérieure.
Mise en garde : Ne jamais déplacer le foyer encastrable
pendant qu'il fonctionne.
Le foyer encastrable
Torino doit être utilisé
IMPORTANT: Les vis fournies a vec les supports ne servent qu'à fixer les
supports de métal en forme de L au manteau. Pour fixer le manteau au mur,
veuillez choisir les vis ou les dispositifs de fixation qui co nviennent.
21

Directives de montage
22

Vue avant du manteau
Vue avant du manteau et
du foyer encastrable
Mur
Sol
Support de métal en forme de L et rondelle
Fixer l'appareil au mur
r
Foye
c
en ast
ble
ra
La prise de cou rant
MISE EN GARDE:
Pour plus de sécurité, utiliser les supports en forme
de L et les rondelles pour fixer le manteau au mur.
MISE EN GARDE:
Laisser un dérangement minimal de 2,54 cm (1 po) entre le mur et le
manteau afin que le cordon électrique puisse bouger librement.
23

Important
Ne retourner ce produit au magasin que si
l'achat remonte à moins de 90 jours. Si vous
éprouvez des difficultés 90 jours après
l'achat, ou si vous avez des questions ou des
préoccupations, prière de faire parvenir un
courriel à notre Service à la clientèle à
l'adresse suivante: parts@jrhome.com ou
1-800-561-5550.
UNE PREUVE D'ACHAT
DATÉE EST REQUISE POUR
SE PRÉVALOIR DE LA
GARANTIE.
téléphoner
 Loading...