

Page 1
Copyright(C)2001-2012, PAPAGO Inc., All right reserved.
User Guide
使用手冊
Page 2
繁體中文 1
1. 產品介紹
1.1 包裝內容
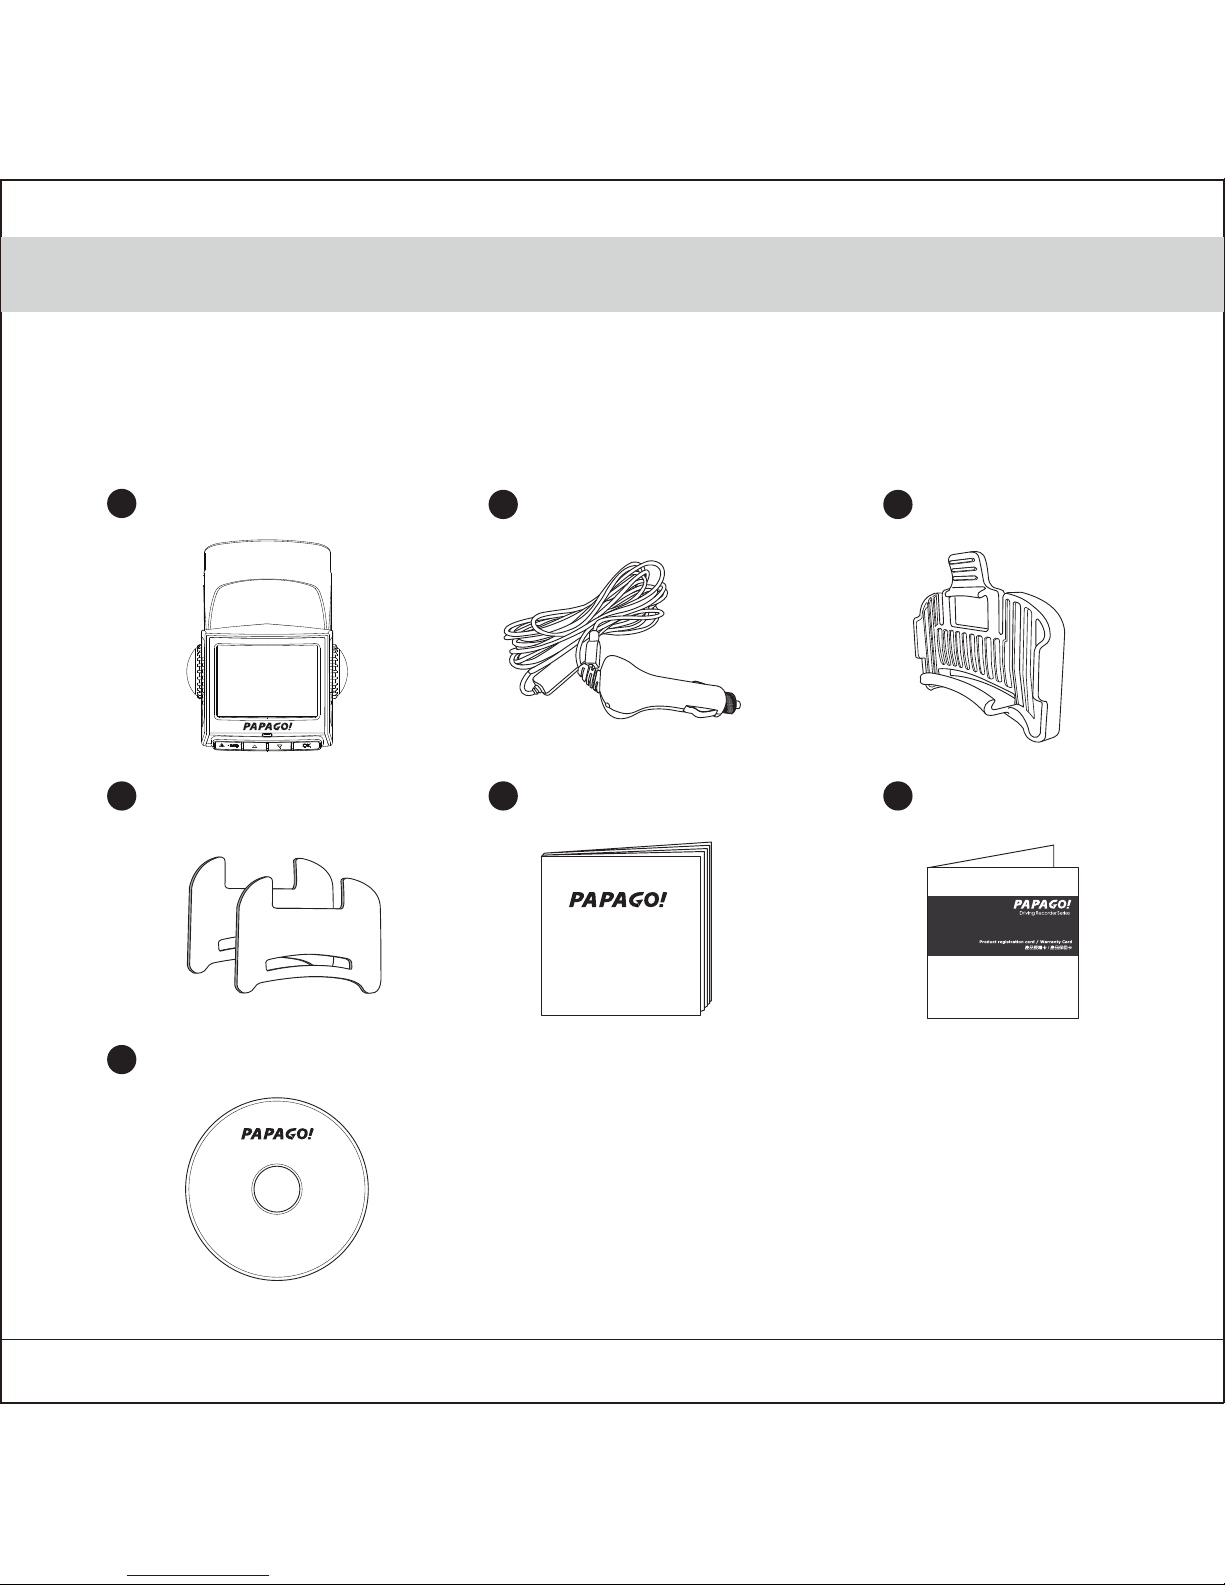
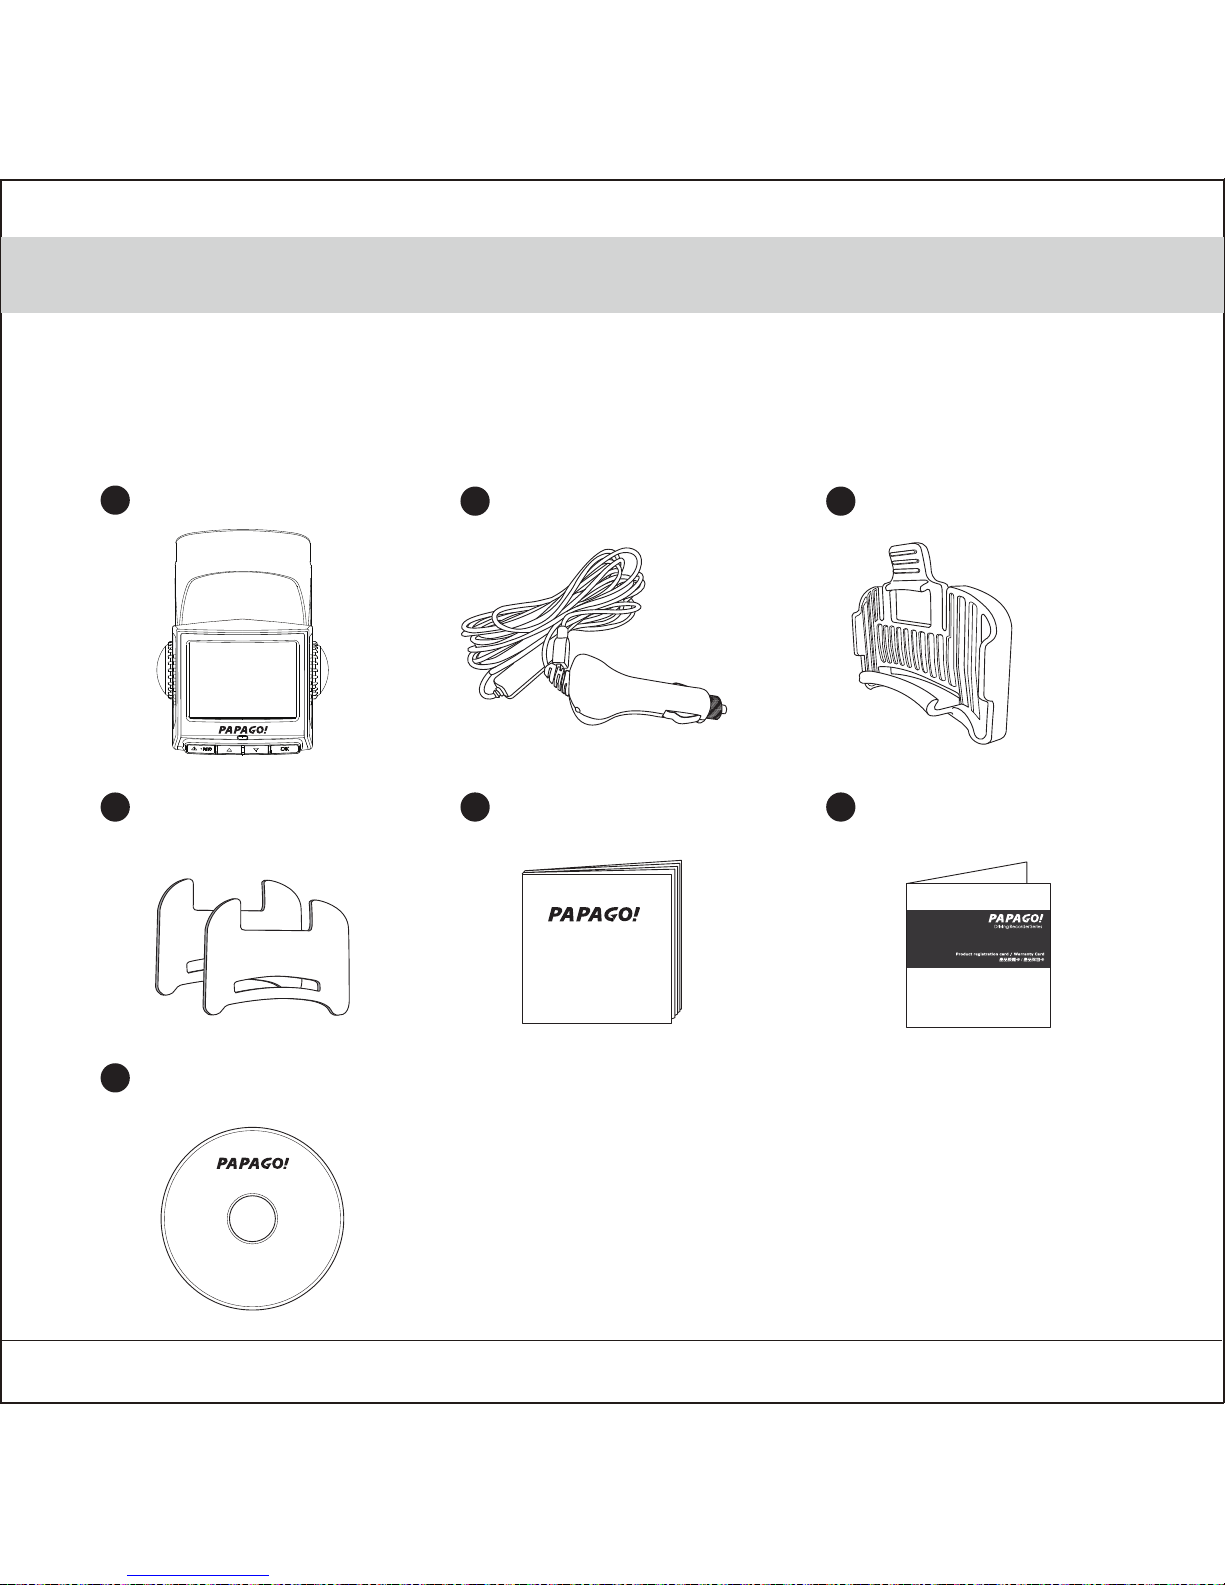
包裝內應有下列所有配件,若有任何配件損壞或遺漏,請立即向您購買經銷商反映。
行車記錄器
2
3
4
5
6
7
車用變壓器 快拆背夾
背膠兩片 使用手冊 保固卡
安裝光碟
Install
User Guide
1
Page 3
繁體中文 2
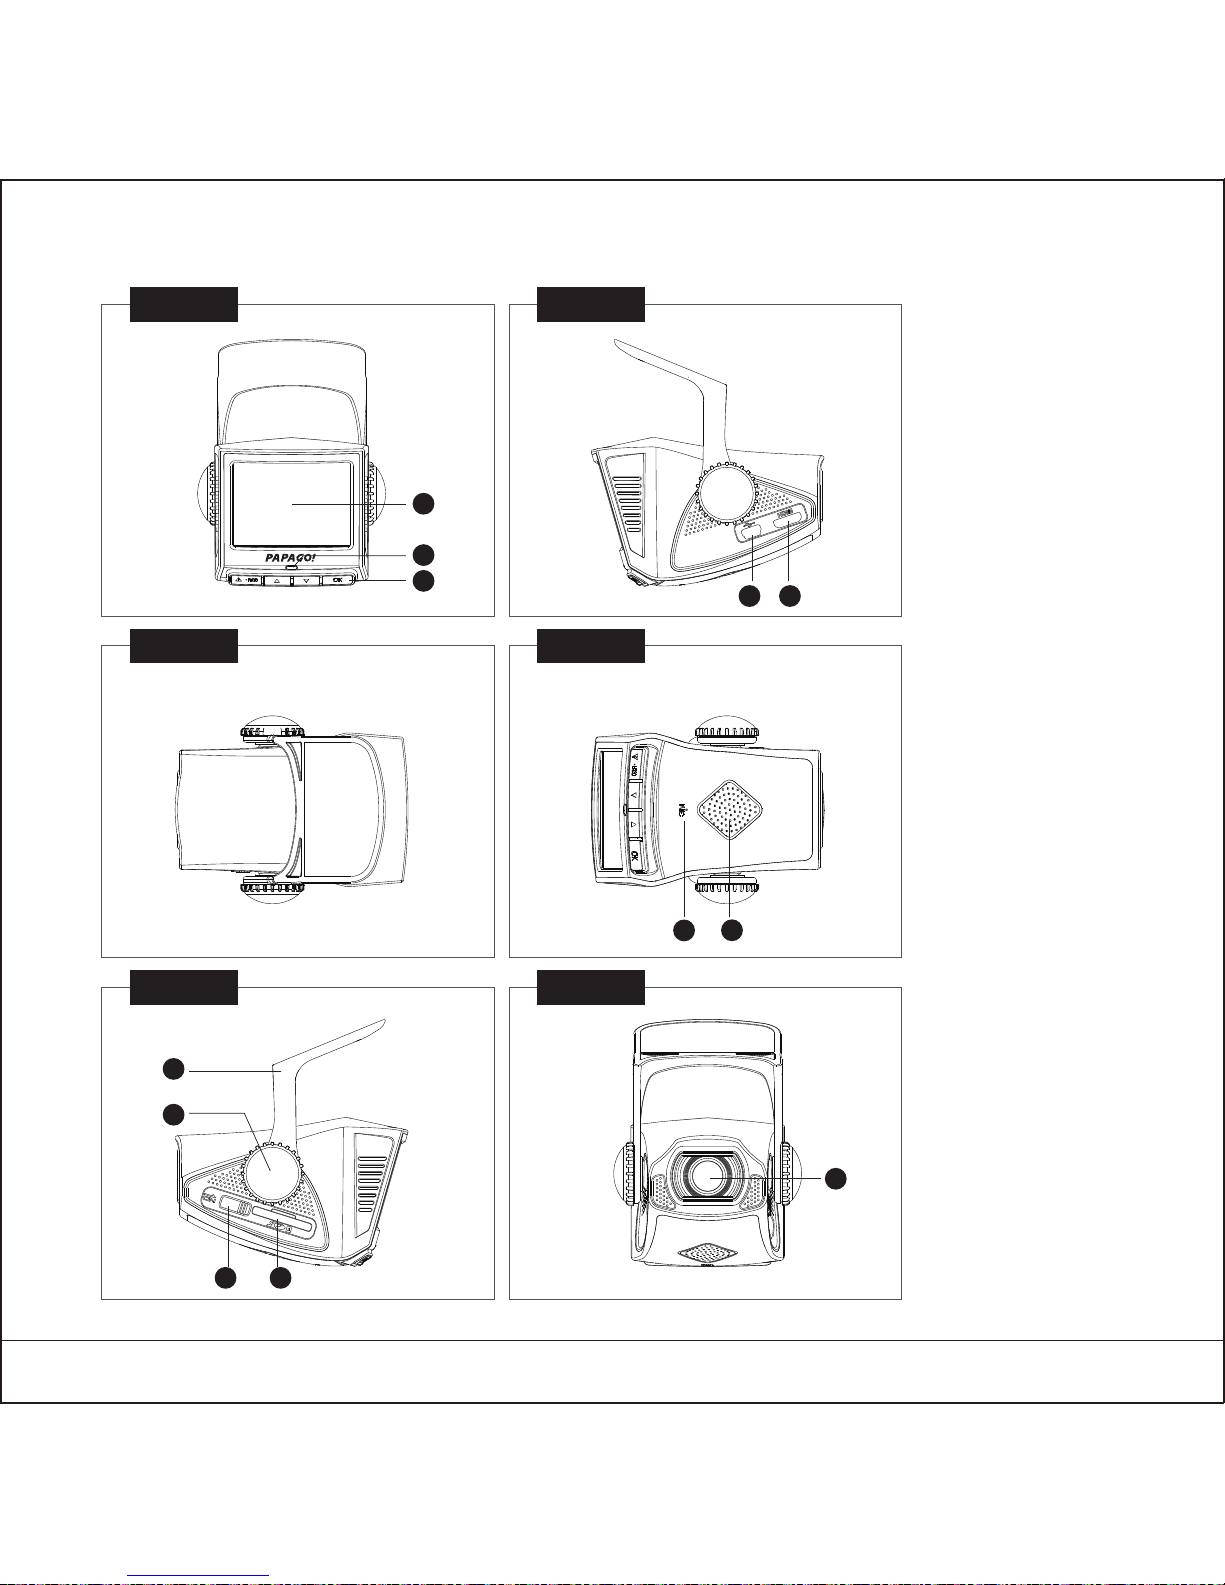
1.2 主機介面
3
6
2
5
8
9
12
4
7
1
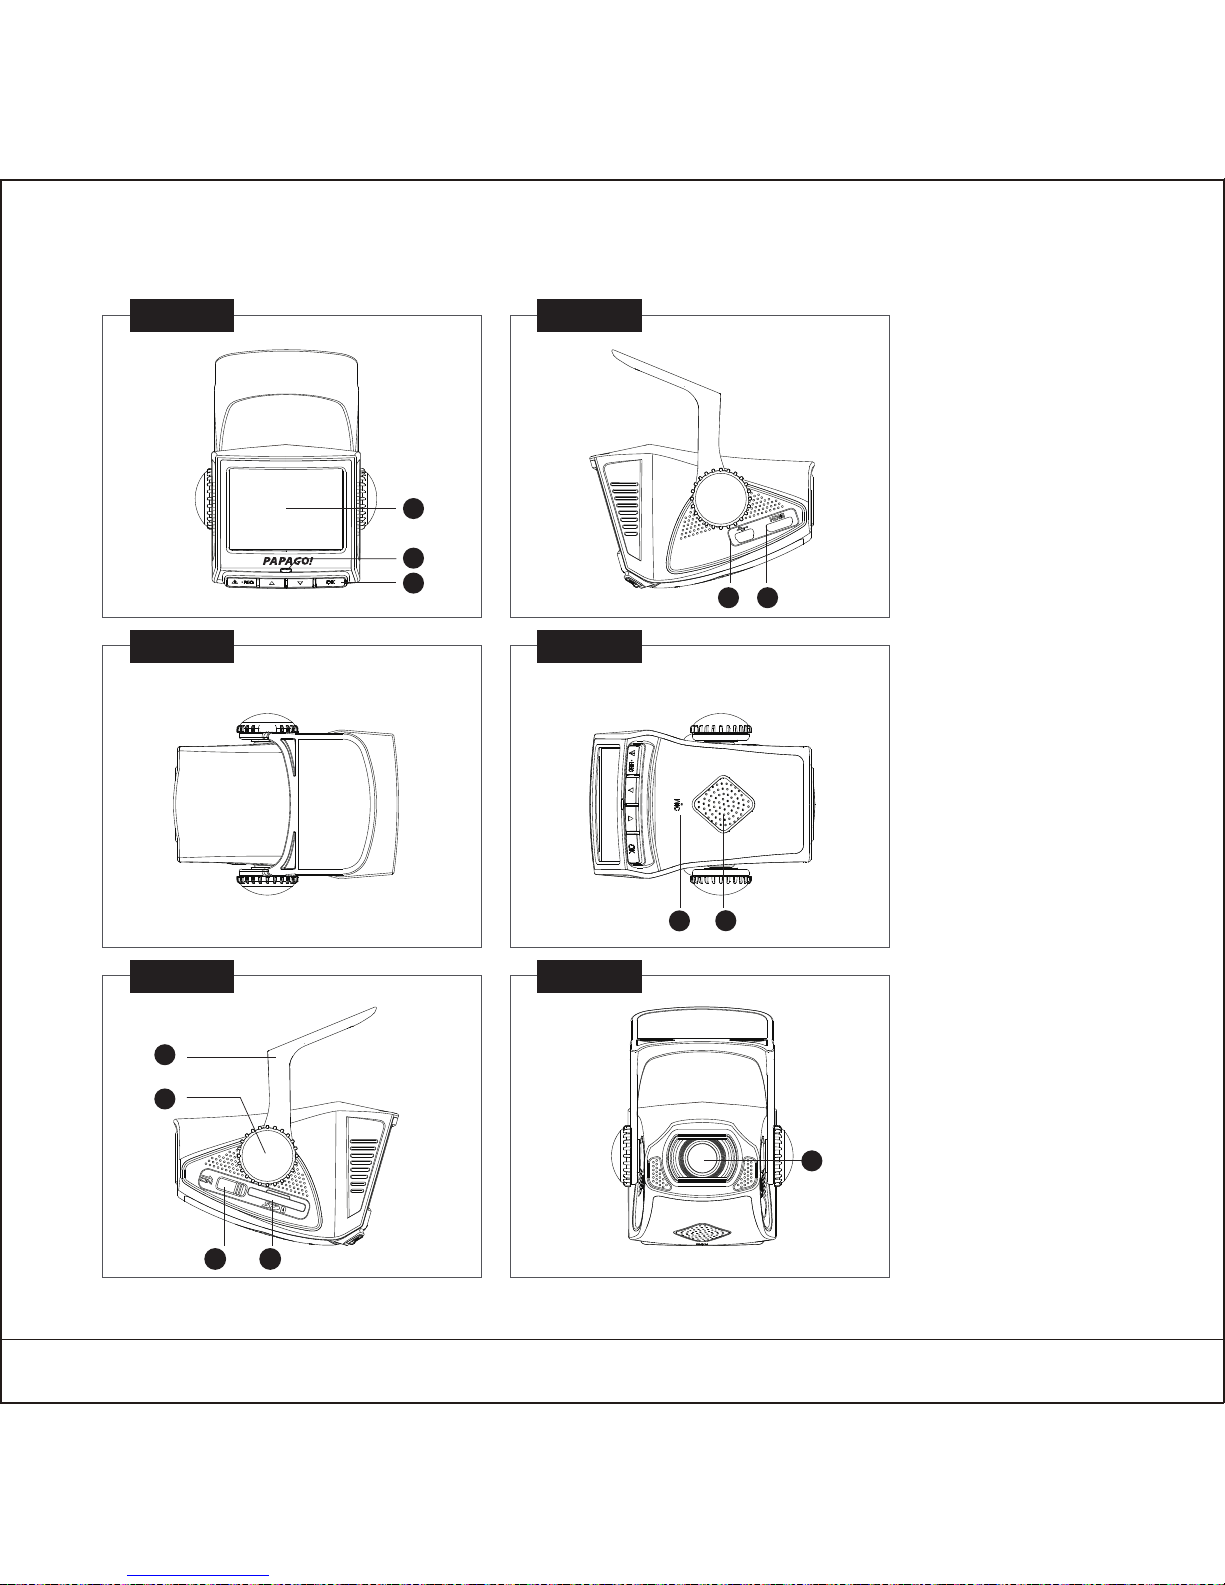
1. 2.4吋螢幕
2. LED指示燈
3. 功能按鈕
4. Mini USB孔
5. HDMI輸出介面
6. 錄音麥克風
7. 喇叭
8. 車架
9. 車架鎖定旋鈕
10. 電源開關
11. SD卡插槽
12. 鏡頭
前視圖 右視圖
頂視圖 底視圖
左視圖 後視圖
10
11
Page 4
切勿把機器安裝在安全氣囊彈蓋上或安全氣囊的工作範圍內。
本公司對因車輛碰撞或汽車安全氣囊的問題而導致的傷害或死亡不承擔任何責任。
安全氣囊警告
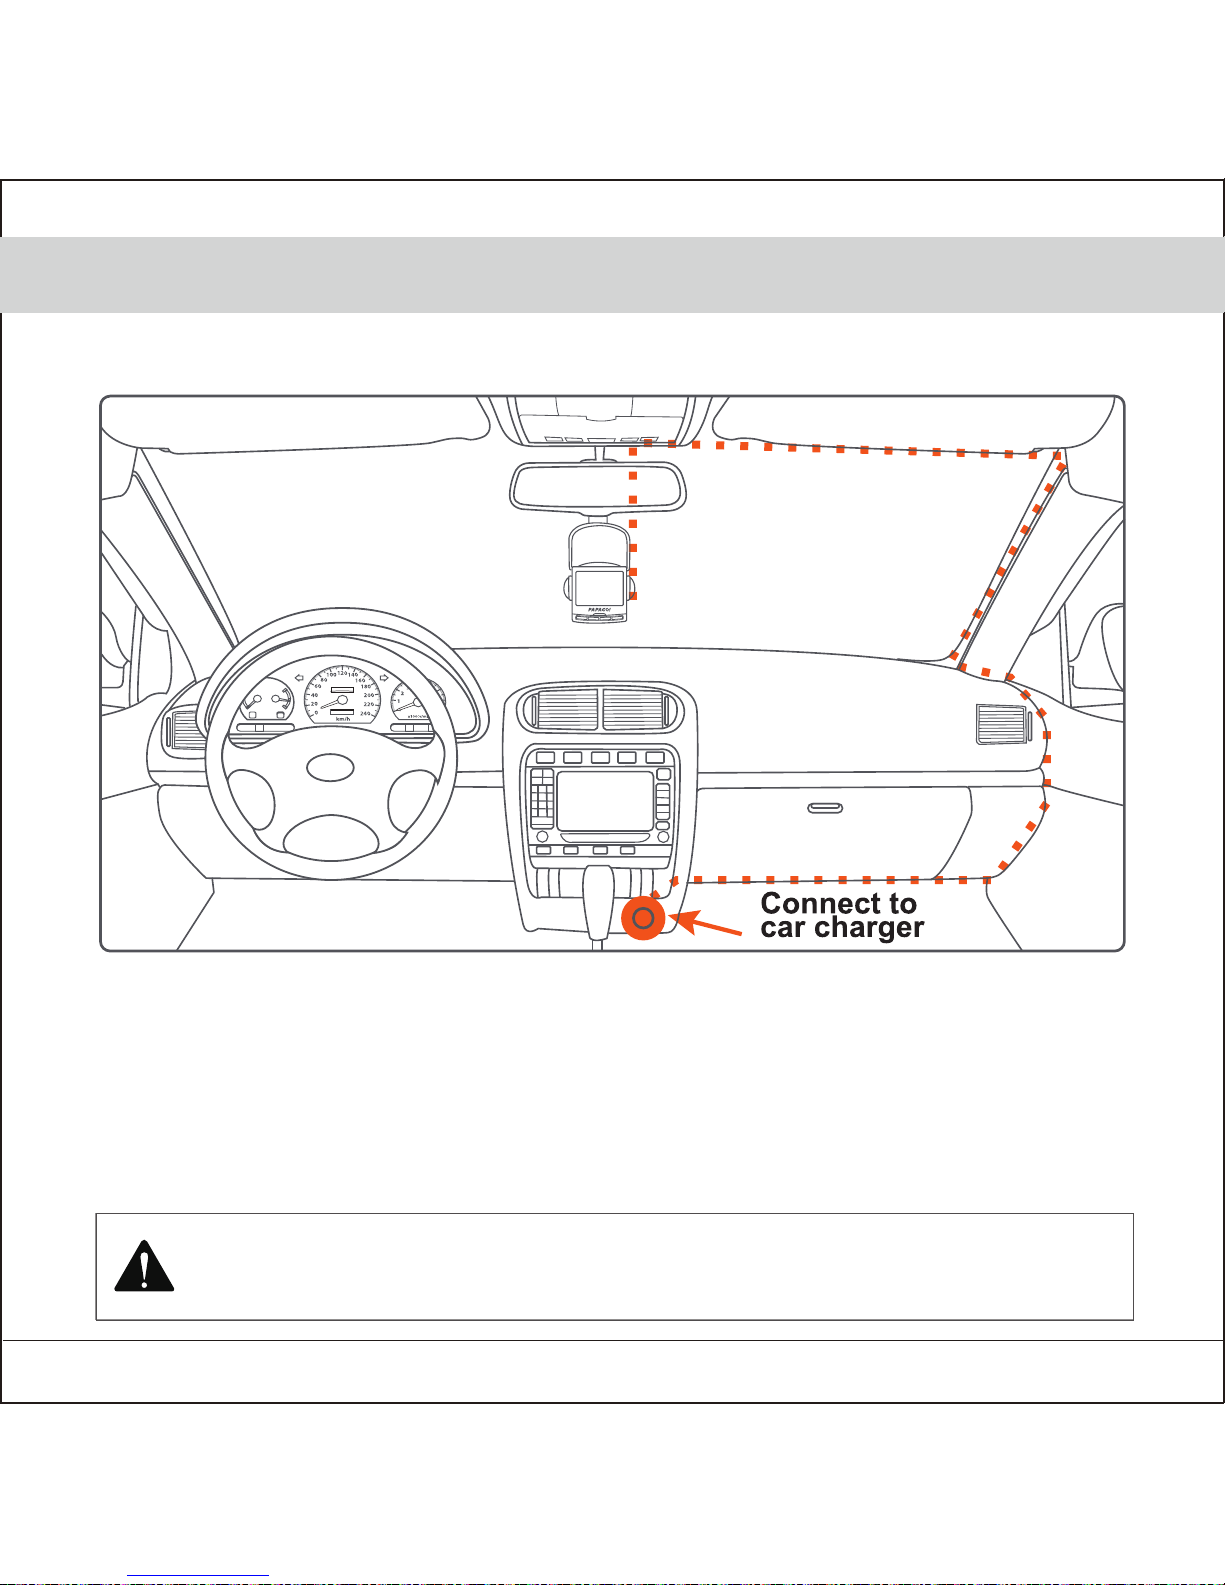
2.1 安裝位置
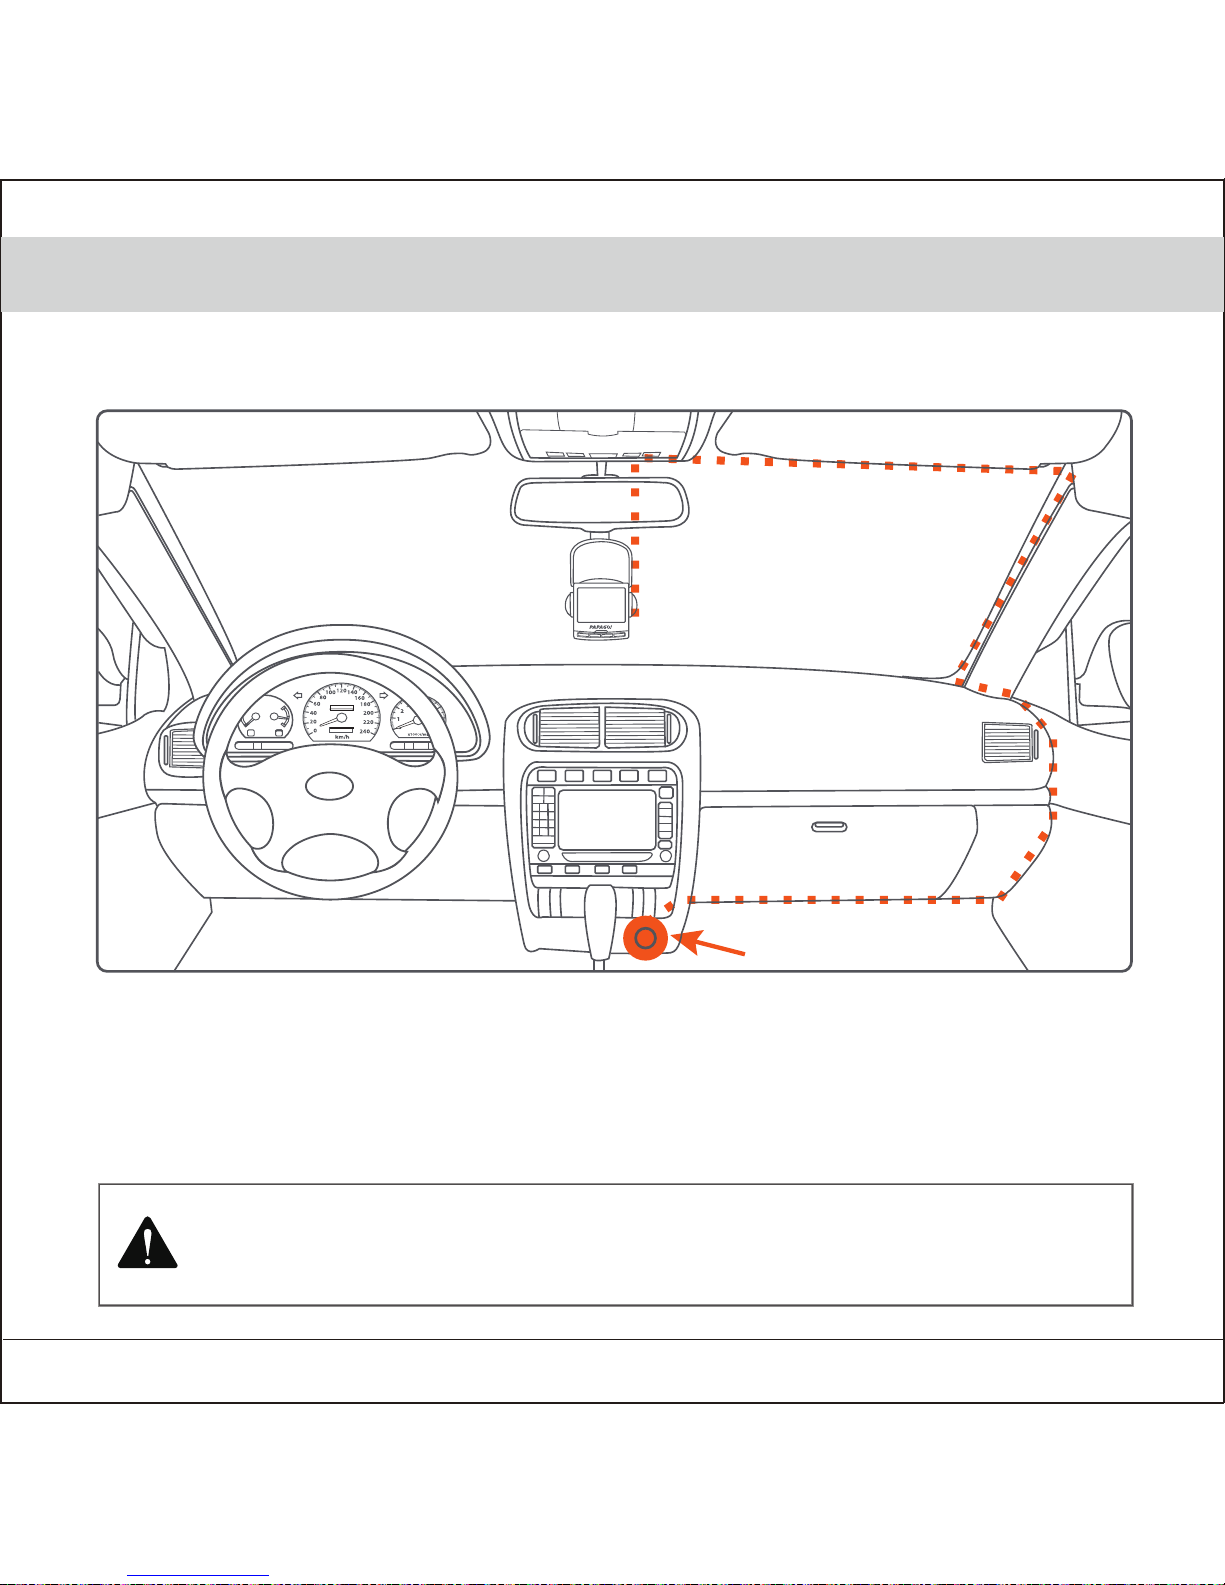
1. 盡可能安裝在靠近車內後視 鏡附近,影像視野較佳處,不遮蔽觀看螢幕的位置。
2. 鏡頭拍攝位置處於雨刷清潔範圍內,確保雨天可清晰拍攝。
3. 不安裝在汽車安全氣囊活動範圍之內。
4. 不安裝在汽車隔熱紙上,以免損毀汽車隔熱紙。
5. 安裝位置不受汽車隔熱紙影響或任何具干擾性之電子產品周圍。
繁體中文 3
2. 安裝與拆卸
連結車充
最佳安裝位置
Page 5
繁體中文 4
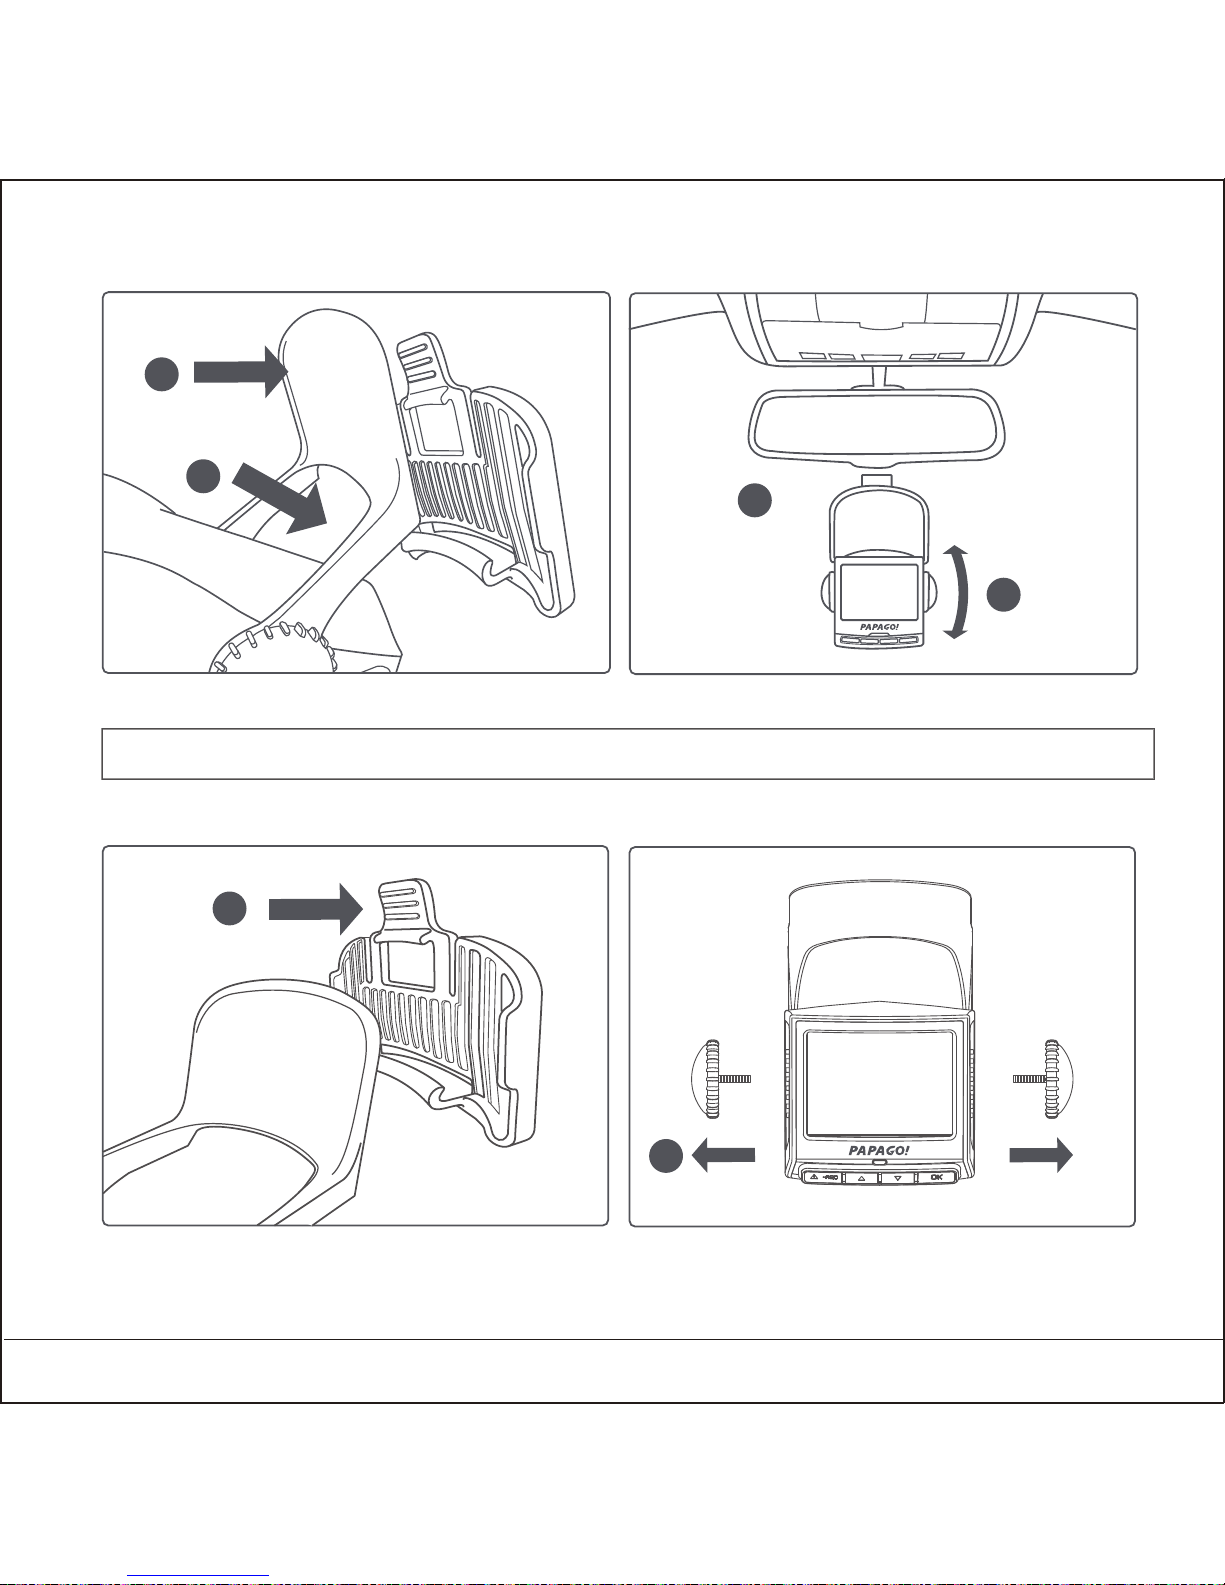
2.2 安裝方式
2.3 主機拆卸
1. 放至快拆背夾。 2. 向內按壓。
1. 向後按壓將機器(含車架)從快拆背夾上取下。
2. 或旋開車內固定旋鈕取下機器主體。
2
1
3
4
3. 黏貼置至適當位置。 4. 調整角度。
2
1
註 : 黏貼24小時內不得移動。
Page 6
繁體中文 5
3. 開始使用
3.1 開機
1. 車用變壓器插入汽車點煙器插頭。
2. 車用變壓器USB接頭插入主機USB孔。
3. SD卡插入SD插槽後,將電源開關右切至ON。
3.4 自動開關機
1. 將電源開關切至ON。
2. 車輛熄火主機將自動關機。
3. 車輛再次發動,主機將會自動開機並開始循環錄影。
3.3 關機
1. 將電源開關切至OFF。
2. 待電源完全關閉後再拔取SD卡,以避免檔案損毀。
3.2 首次開機
設定語系、日期和時間。
註 : 車輛熄火後點煙器仍持續供電者,不支援此功能。
Page 7
繁體中文 6
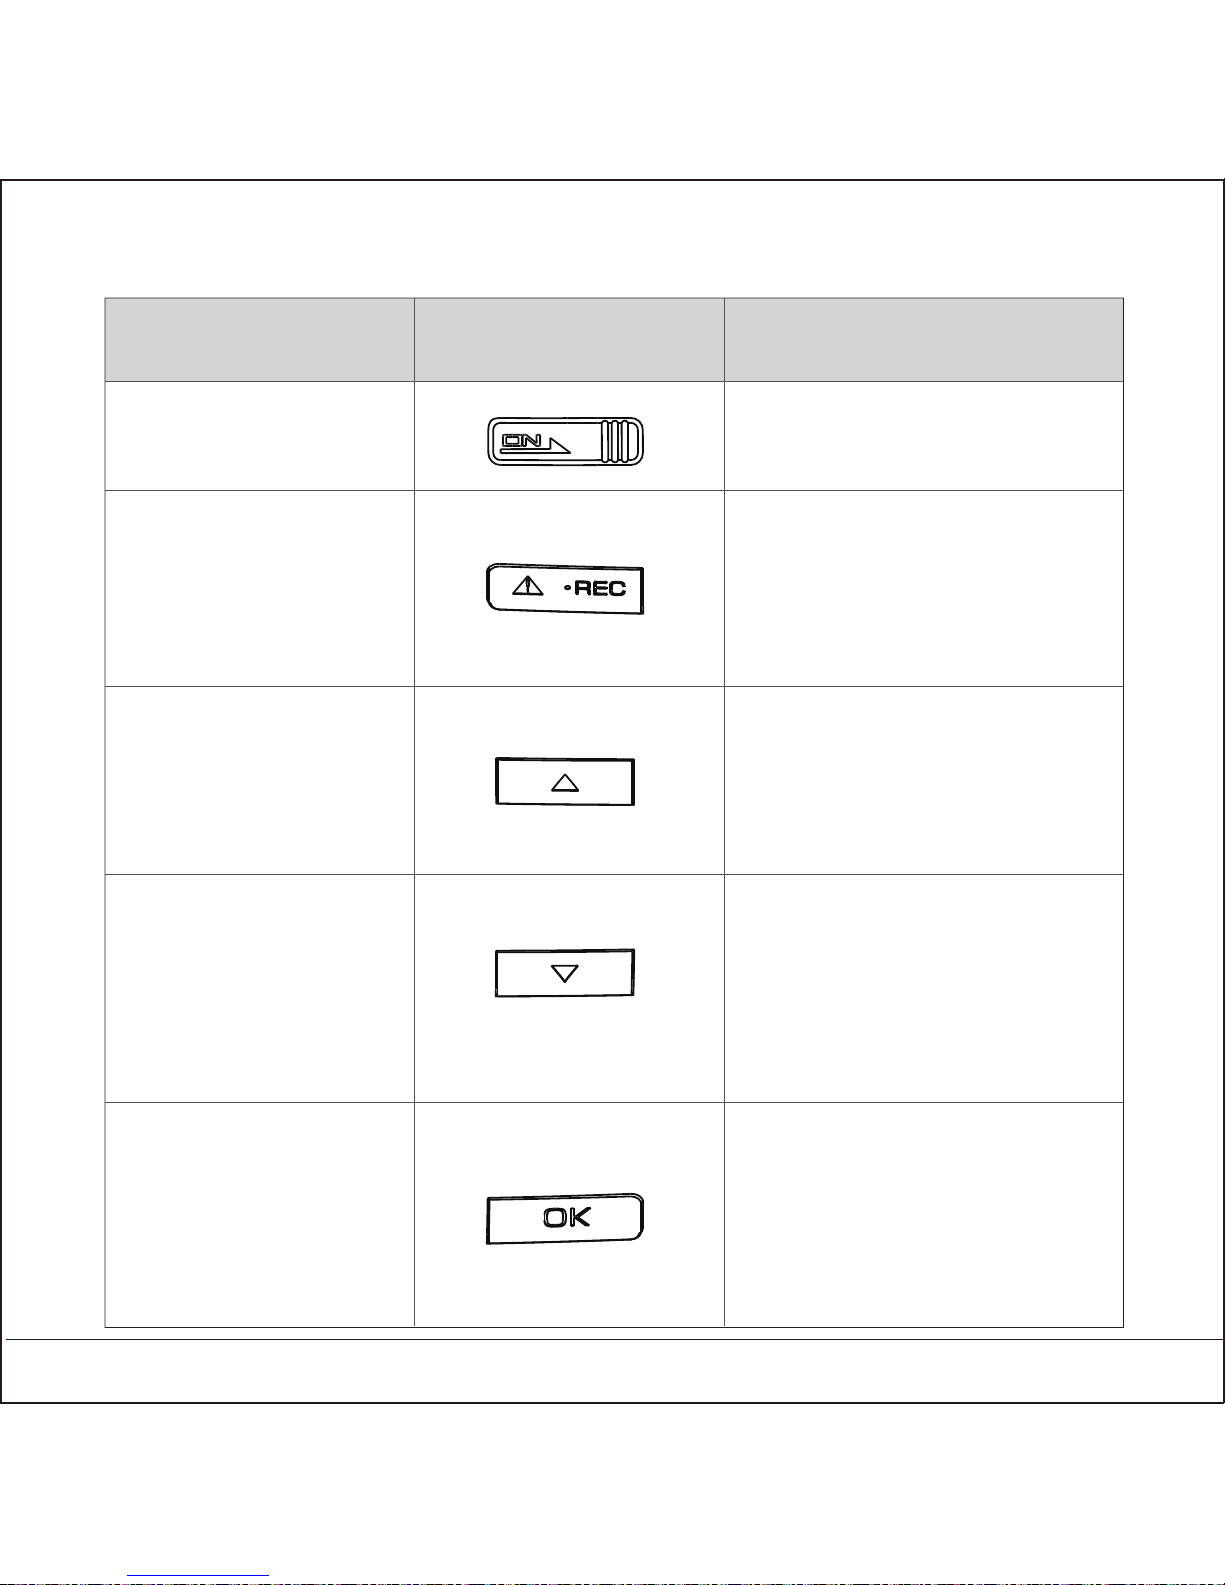
3.5 按鈕功能說明
錄影/時間
-影像保留
錄影/時間
-進播放選單
電源開關 電源開啟/關閉
影像保留
向上/播放
向下/設定
模式切換/關螢幕
說 明 按 鈕 功 能
播放/設定
-返回
播放/設定
-向上
錄影/時間
-進設定選單
-長按為拍照功能
錄影/時間
-模式切換
-長按為開關錄音
播放/設定
-確認
播放/設定
-向下
Page 8
繁體中文 7
3.6 LED指示燈
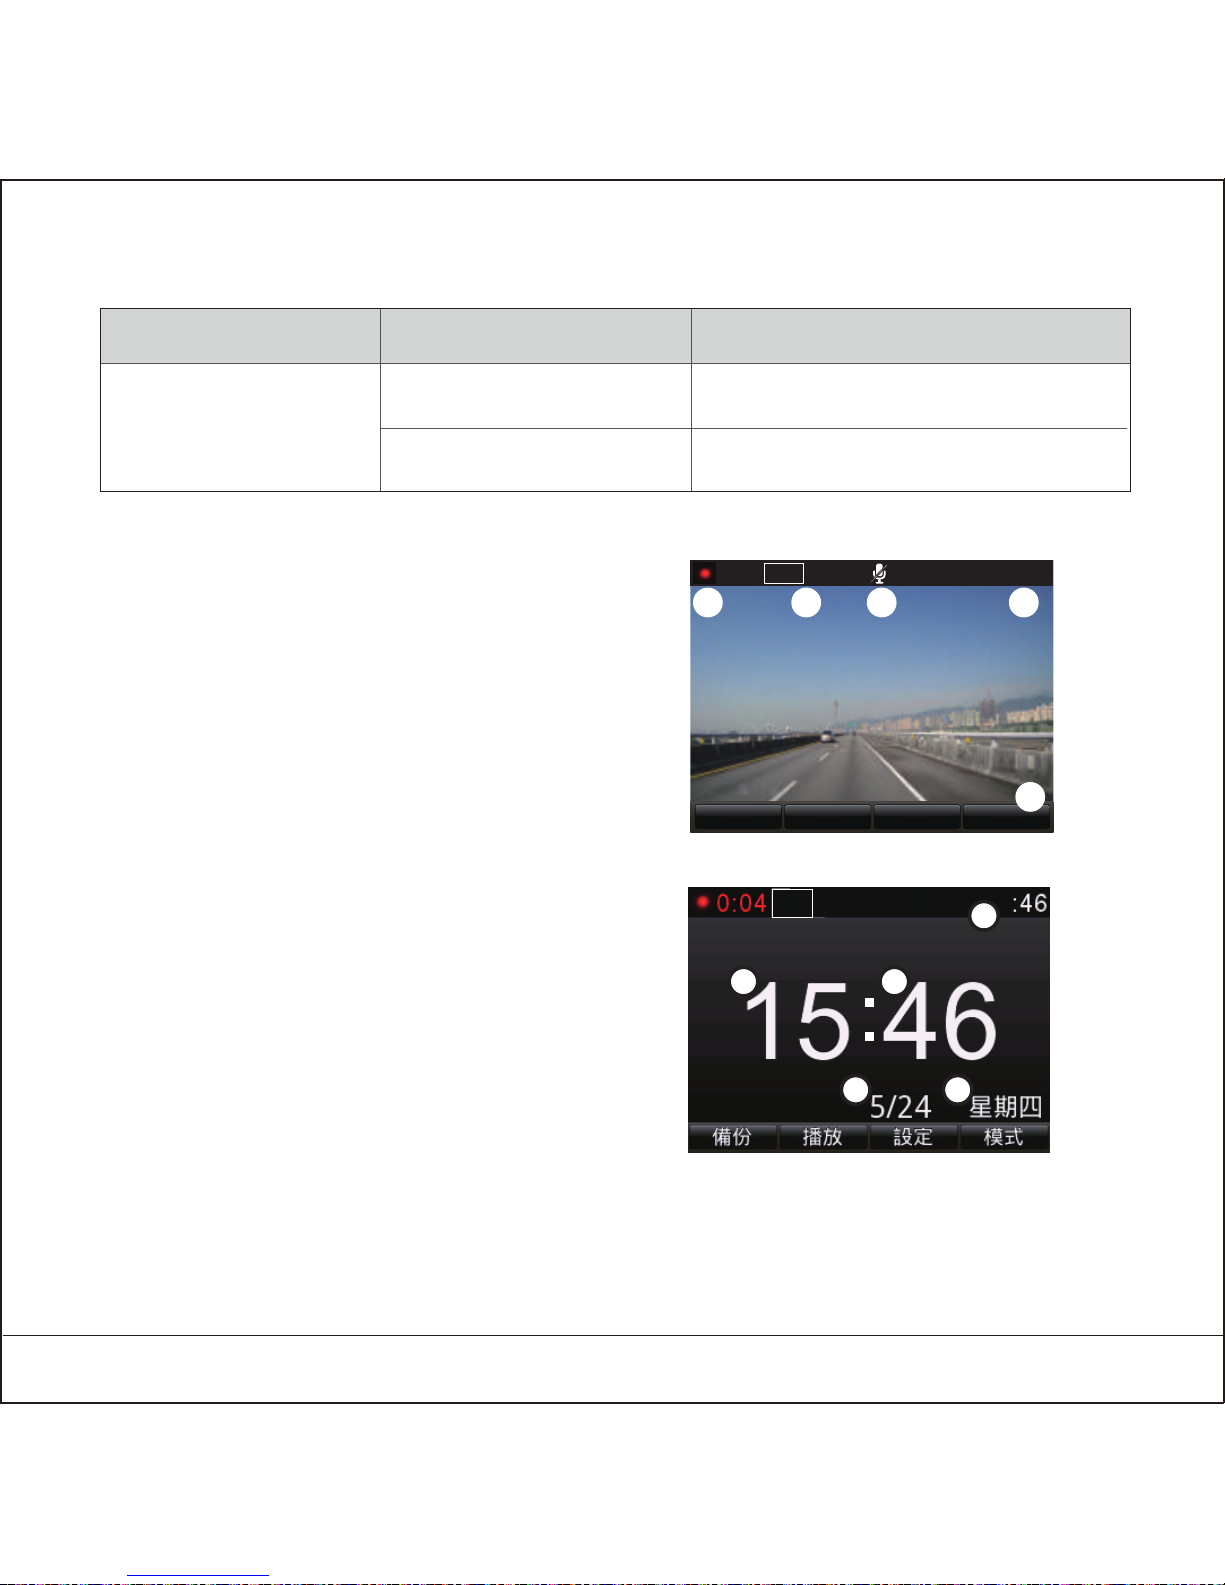
3.7 錄影畫面
1. 影片時間
2. 影片保留空間
3. 錄音關
4. 目前時間
5. 功能列
錄影
綠色
紅色
未錄影
錄影中
指 示 燈 顏 色 定 義
模式設定播放備份
0:15 11:484/5
2
3
4
5
1
3.8 時間模式
1. 秒
2. 時
3. 分
4. 日期
5. 星期
2
3
4/5
1
4 5
Page 9

繁體中文 8
3.9 五組影像保留空間
1. 手動保留
於錄影時按下影像備份按鈕,可將目前影像保留,避免被覆寫。
2. 碰撞自動保留
發生碰撞事故,啟動自動保留機制,避免事故影像於循環錄影中被覆寫。
4. 拍攝/播放影像
4.1 循環錄影
1. 將SD插入主機,並將電源開關切至ON位置,即開始循環錄影。
2. 循環影像預設每段影片長度為5分鐘,並於SD卡空間不足時覆蓋舊檔。
4.2 錄音開關
1. 於錄影模式下,長按模式按鈕待畫面右上方顯示關錄音符號顯示即關閉錄音功能。
2. 反之,再長壓至關錄音符號消失,即開啟錄音功能。
4.4 影像與相片播放/刪除
1. 於錄影狀態按播放鍵進入播放選單。
2. 選取播放來源(循環錄影或緊急錄影)
3. 選擇影像進行播放/刪除。
4. 選擇相片瀏覽撥放相片。
5. 檔案排序 : 選檔案排序方式。
4.3 關閉螢幕
於錄影模式下,按模式切換按鈕,可切換至關閉螢幕模式。
Page 10
繁體中文 9
5.1 加速度感應器
1. 加速度感應器狀態 : 顯示目前三軸感應值並可手動校正。
2. 碰撞靈敏度設定 : 可選擇關閉、低、中和高敏感度。
1. 設定日期與時間 : 進入設定時間頁面,手動設定日期和時間。
2. 使用24小時格式 : 開啟或關閉24小時顯示格式。
3. 日期格式 : 三種日期顯示方式。
5.3 日期與時間
1. 影像解析度 : 可選擇下表支援之影像格式進行錄影。
2. 數位寬動態 : 開啟或關閉。
5.2 影像格式
1080p 30fps Full HD畫質 1920x1080 每秒30張影格
720p 60fps
720p 30fps
HD畫質 1280x720 每秒60張影格
HD畫質 1280x720 每秒30張影格
5. 系統設定(TBD)
5.4 音效
1. 音量調整 : 調整系統音量大小。
2. 影音設定 : 選擇錄影或錄影加錄音音效。
3. 按鍵音 : 開啟或關閉。
Page 11
繁體中文 10
6. 安裝 GoLife
6.1 系統需求
5.5 顯示
1. 螢幕亮度 : 調整螢幕亮度。
2. 螢幕逾時 : 設定螢幕永遠開啟或1、3、5分鐘後自動關閉。
3. 影片顯示資訊 : 開啟或關閉在影片上內置時間資訊。
4. LED 指示燈 : 開啟或關閉LED 指示燈。
5.6 語言
支援多國語系。
5.7 系統
1. 恢復原廠設定 : 將所有設定回復至原廠預設狀態。
2. 格式化記憶卡 : 將格式化記憶卡。
3. 系統資訊 : 顯示目前系統版本資訊。
4. 記憶卡資訊 : 顯示記憶卡相關資訊。
作業系統
CPU
記憶體
瀏覽器
介面
Pentium 4 2.4GHz以上
512MB以上
SD卡讀卡機
IE8
Windows 7 / Vista / XP operating system
Page 12
繁體中文 11
6.2 軟體安裝
將包裝內的CD光碟插入電腦,按照光碟指引安裝完成GoLife撥放軟體,安裝完成
後即可由桌面捷徑開啟GoLife。
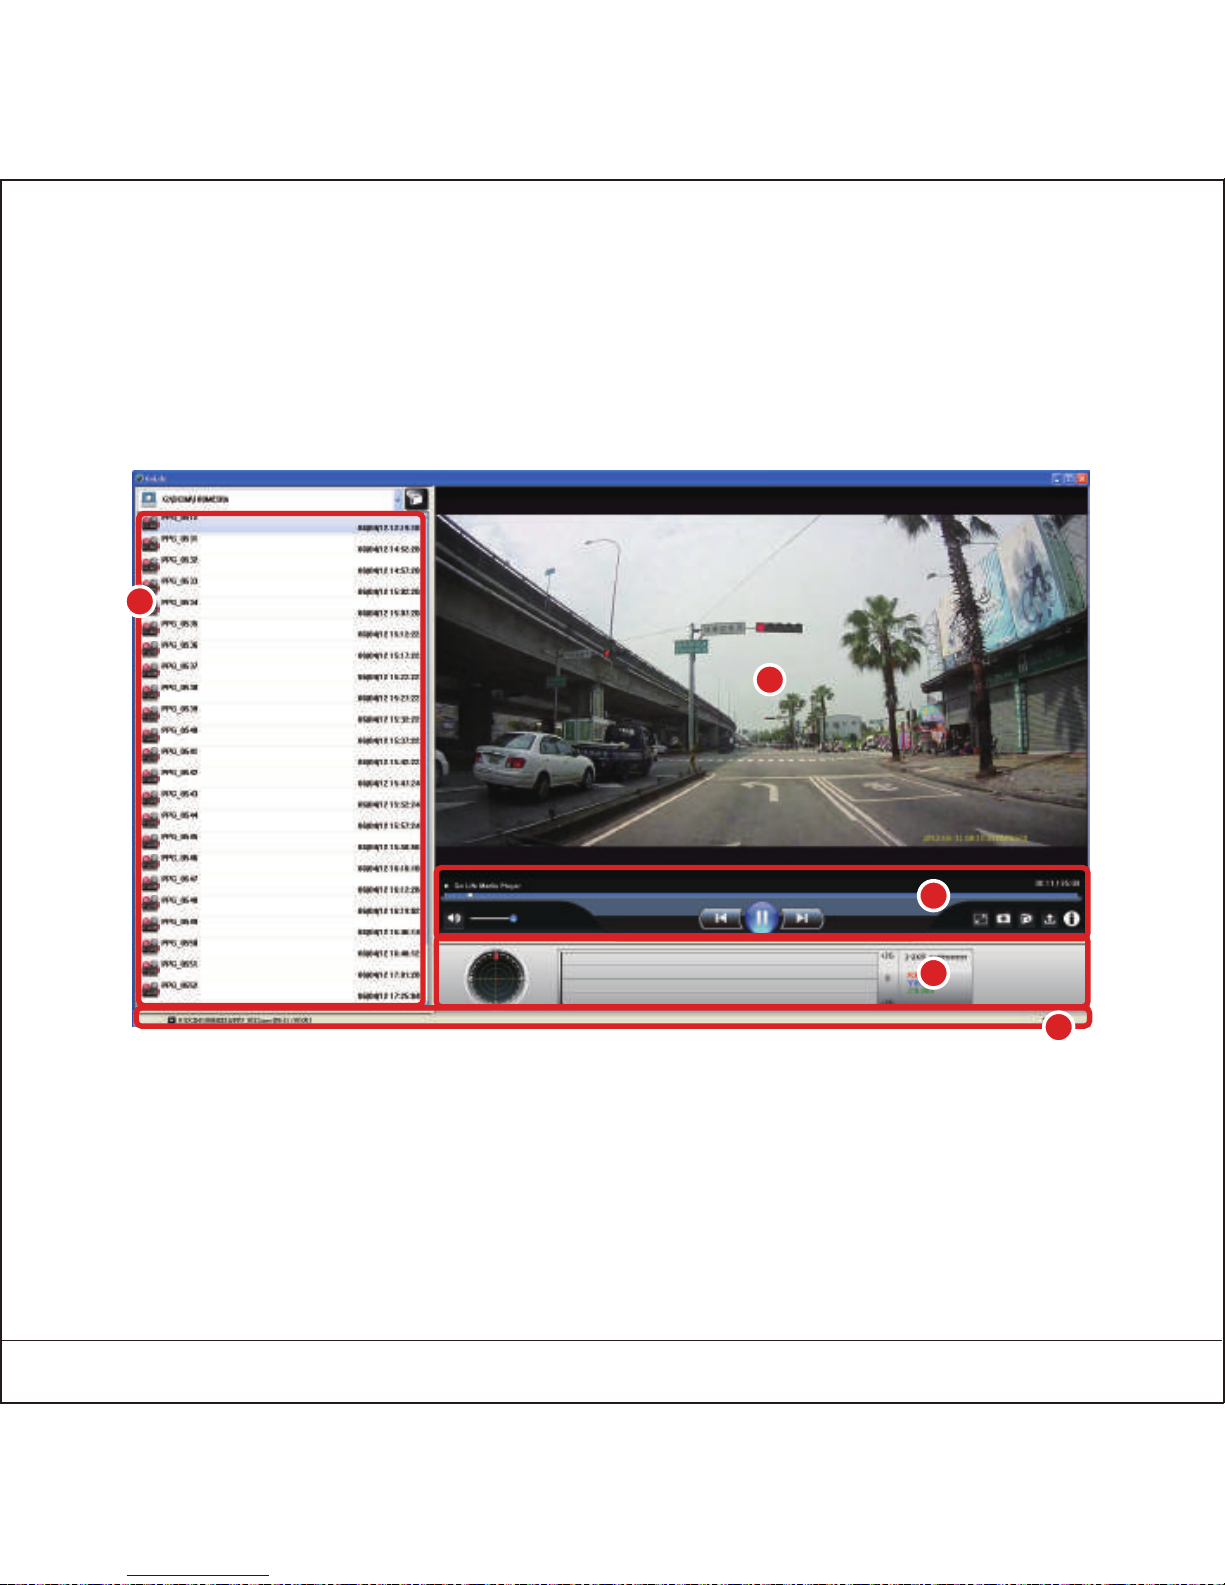
6.3 播放介面
1. 資料夾內影片列表。
2. 影片播放。
3. 功能列表
4. G-Sensor/G-Sensor三軸顯示。
5. 檔案路徑與名稱/播放時間。
2
3
4
5
1
Page 13
繁體中文 12
7. 注意事項
7.1 使用相關
1. 當車輛熄火後點煙器仍供電的使用者,在離開車子時務必將點煙器插頭拔起,
以避免耗光電瓶內電力或造成其餘意外狀況發生。
2. 在車輛熄火、電源開關關閉或任何引發電源被切斷狀況發生時,仍有內建備用
電源可將錄影檔案寫入。
3. 在關機過程中勿立即將SD卡取出,避免檔案造成損毀。
7.2 SD卡相關
1. 請使用Class6、容量8GB以上之SD卡。
2. 使用前務必將SD卡進行格式化。
3. SD卡容量和可錄製時間對應如下。(僅供參考)
SD卡容量
8GB
16GB
32GB
120min
240min
480min
240min
480min
960min
720p 30fps
1080p 30fps / 720p 60fps
Page 14
繁體中文 13
8. 參考資料
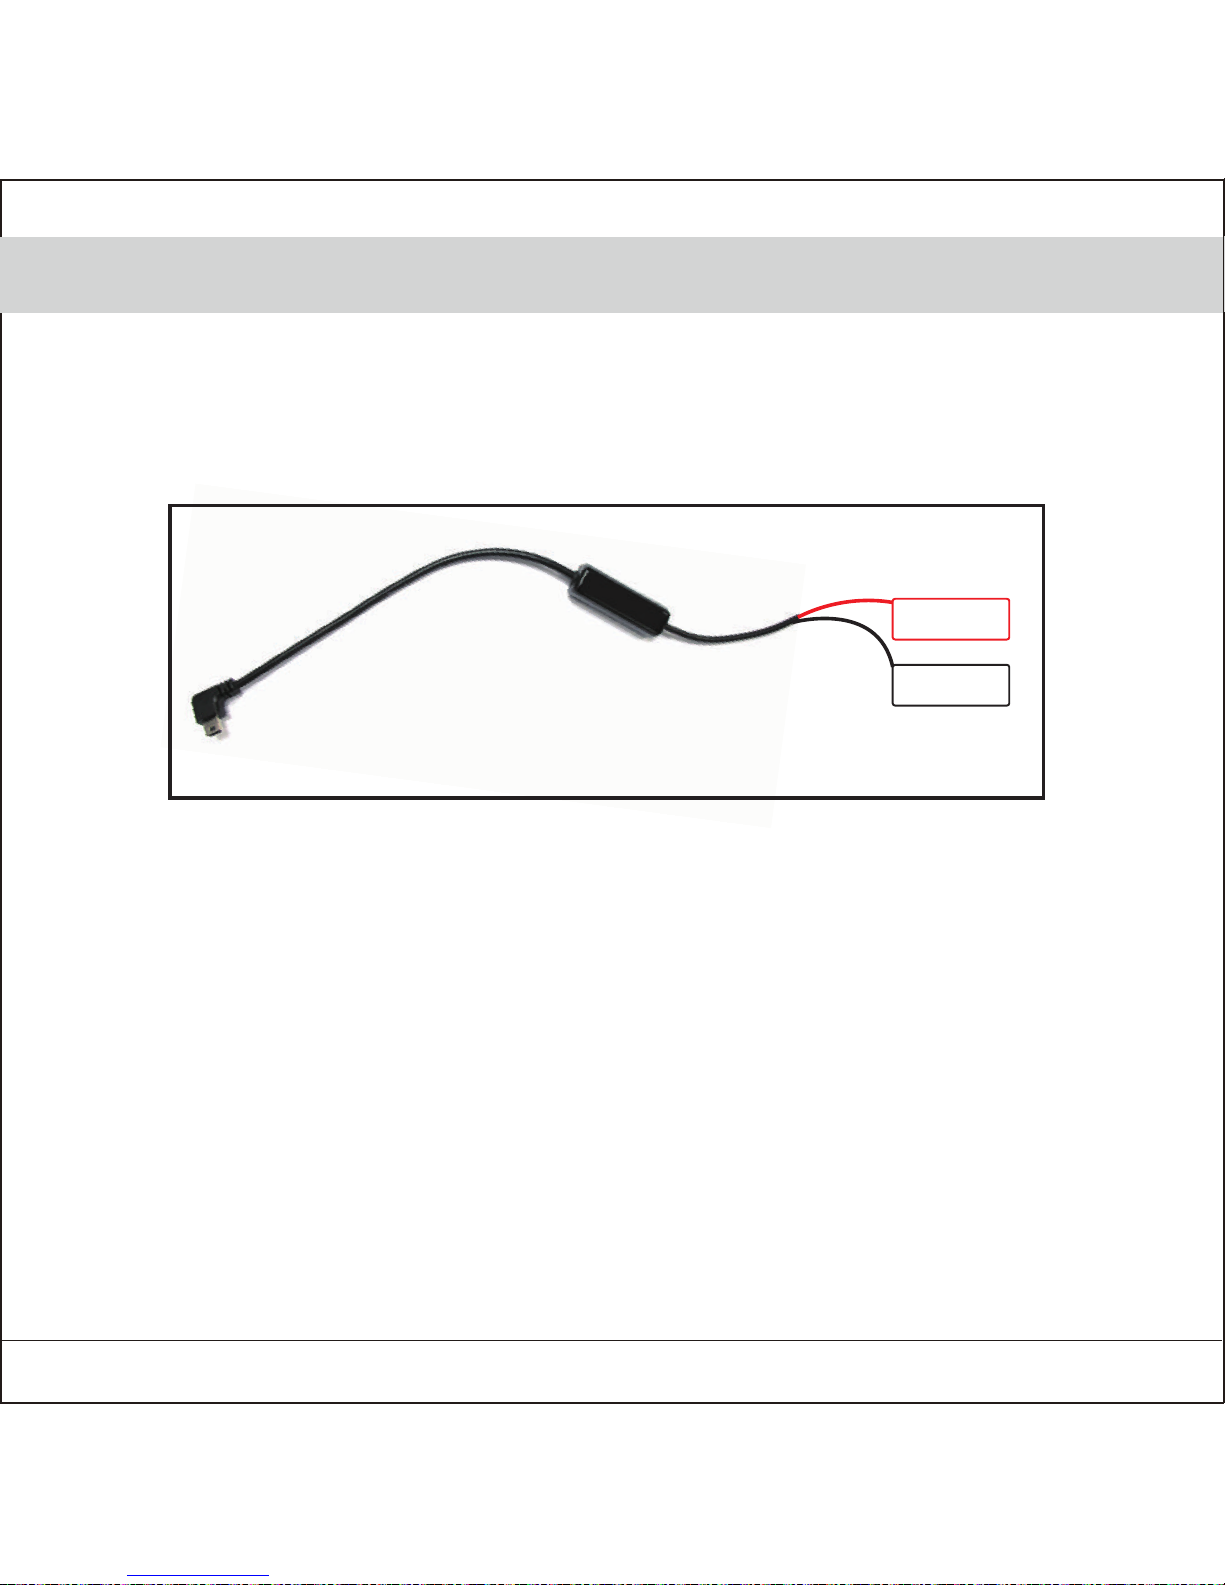
車內變壓器直接連接車上電源方式(此安裝方式不在產品保固範圍內)
1. 將車用變壓器從變壓器前段剪斷,務必保留變壓器。
2. 電線內含紅色線端接至車身ACC.電源,黑色端接至車身負極,如下圖。
放變壓器線材連接圖
變壓器
紅
ACC.電源
車身負極
黑
Page 15
English 1
1. Production Introduction
1.1 Package Content
Device
2
3
4
5
6
7
Car Charger
Package should include below items
Removable Buckle
Sticker x 2 pcs Quick Start Guide Warranty Card
CD (PC Software)
1
Install
User Guide
Page 16
English 2
1.2 Device Interface
3
6
2
5
8
9
10
11
12
4
7
1
1. 2.4”Screen
2. LED Light
3. Buttons
4. Mini USB
5. HDMI
6. Microphone
7. Speaker
8. Bracket
9. Knob x 2 pcs
10. Power Switch
11. SD Card Slot
12. Lens
Front View Right View
Top View Bottom View
Left View Rear View
Page 17
English 3
2. Install/Uninstall
2.1 Install Location
1. Put the device around the area of front rear view mirror, to have better view.
2. Make sure the lens is within windshield wiper area, to have the clear video quality in
the raining day.
3. Don’t install the device within the area of air safety bag.
4. Don’t install on the tented windshield film, to prevent any damage of the film.
5. Don’t install on the area that will affect by the tinted window film or any interference
electronic products.
Do not put the device within the area of air safety bag. Our company is not responsible for
any damage or injure caused by air safety bag.
Air Safty Bag Warning
Best mounting
location
Page 18
English 4
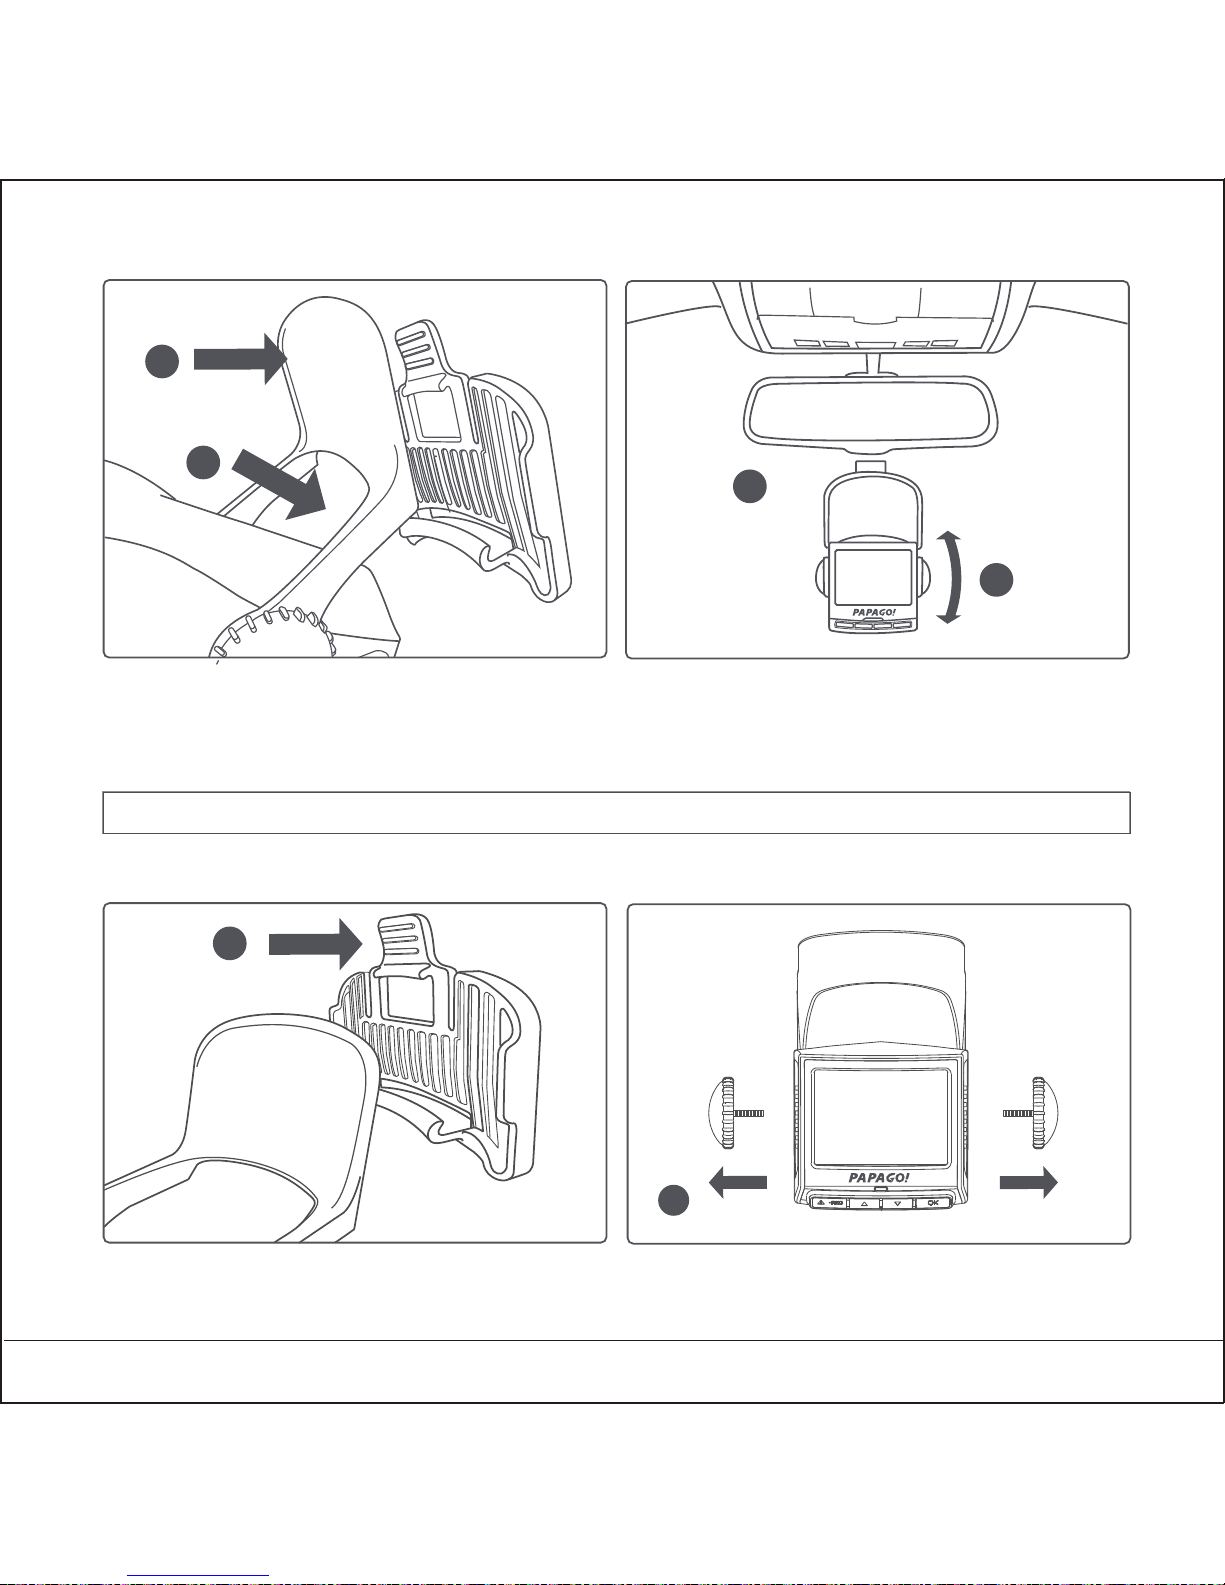
2.2 Install
2.3 Uninstall
1. Put the device on top of the removable buckle.
2. Push to lock.
3. Stick the removable buckle on proper area.
4. Adjust the angle.
1. Push the button to release the device from removable buckle.
2. Or take off the device by release the knobs.
2
1
3
4
2
P.S. Do not move the position of the buckle within 24 hours.
1
Page 19
English 5
3. Start to Use
3.1 Power On
1. Insert the car charger into the car lighter.
2. Insert the USB cable into the USB port.
3. Insert the SD card into the SD card slot, and switch for Power ON.
3.4 Auto Power ON/OFF
1. Switch to Power ON.
2. Auto Power OFF after car power off.
3. After start up the car again, the device will auto Power ON again and start
cycle recording.
3.3 Power Off
1. Switch to Power OFF.
2. Take off the SD card after completely power off.
3.2 First Start On
Setting the language,date and time.
P.S. If the car power off but the car lighter still working, then will not
support for this feature.
Page 20
English 6
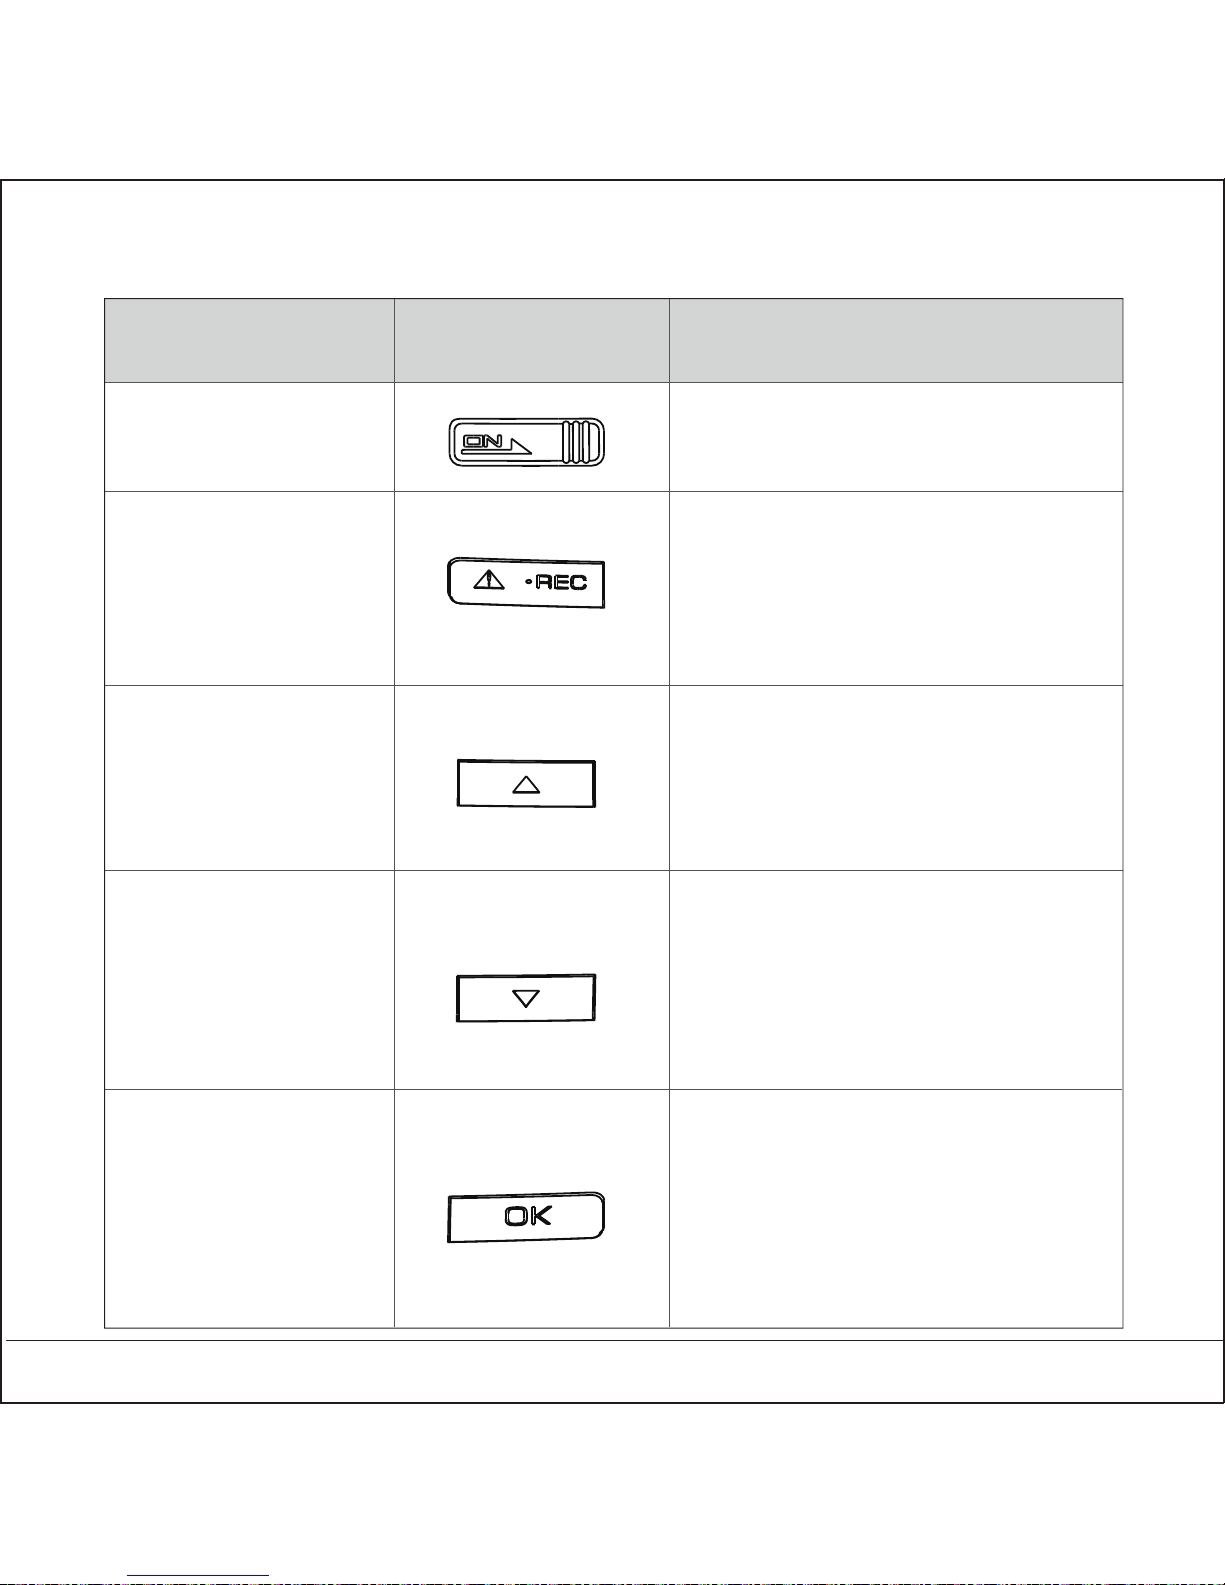
3.5 Features of Each Button
Introduction Button Feature
Video Saving
Up/Play
Down/Setting
Mode switch/
screen off
On/Off Power ON/OFF
Recording/Time Mode
-Video saving
Play/Setting
-Back to recording
Recording/Time Mode
- Enter play list
Play/Setting
-Up
Recording/Time Mode
- Enter setting list
- Long press for taking picture
Play/Setting
-Down
Recording/Time Mode
-Enter map mode
- Long press for turn on/off
voice recording
Play/Setting
-Confirm
Page 21
English 7
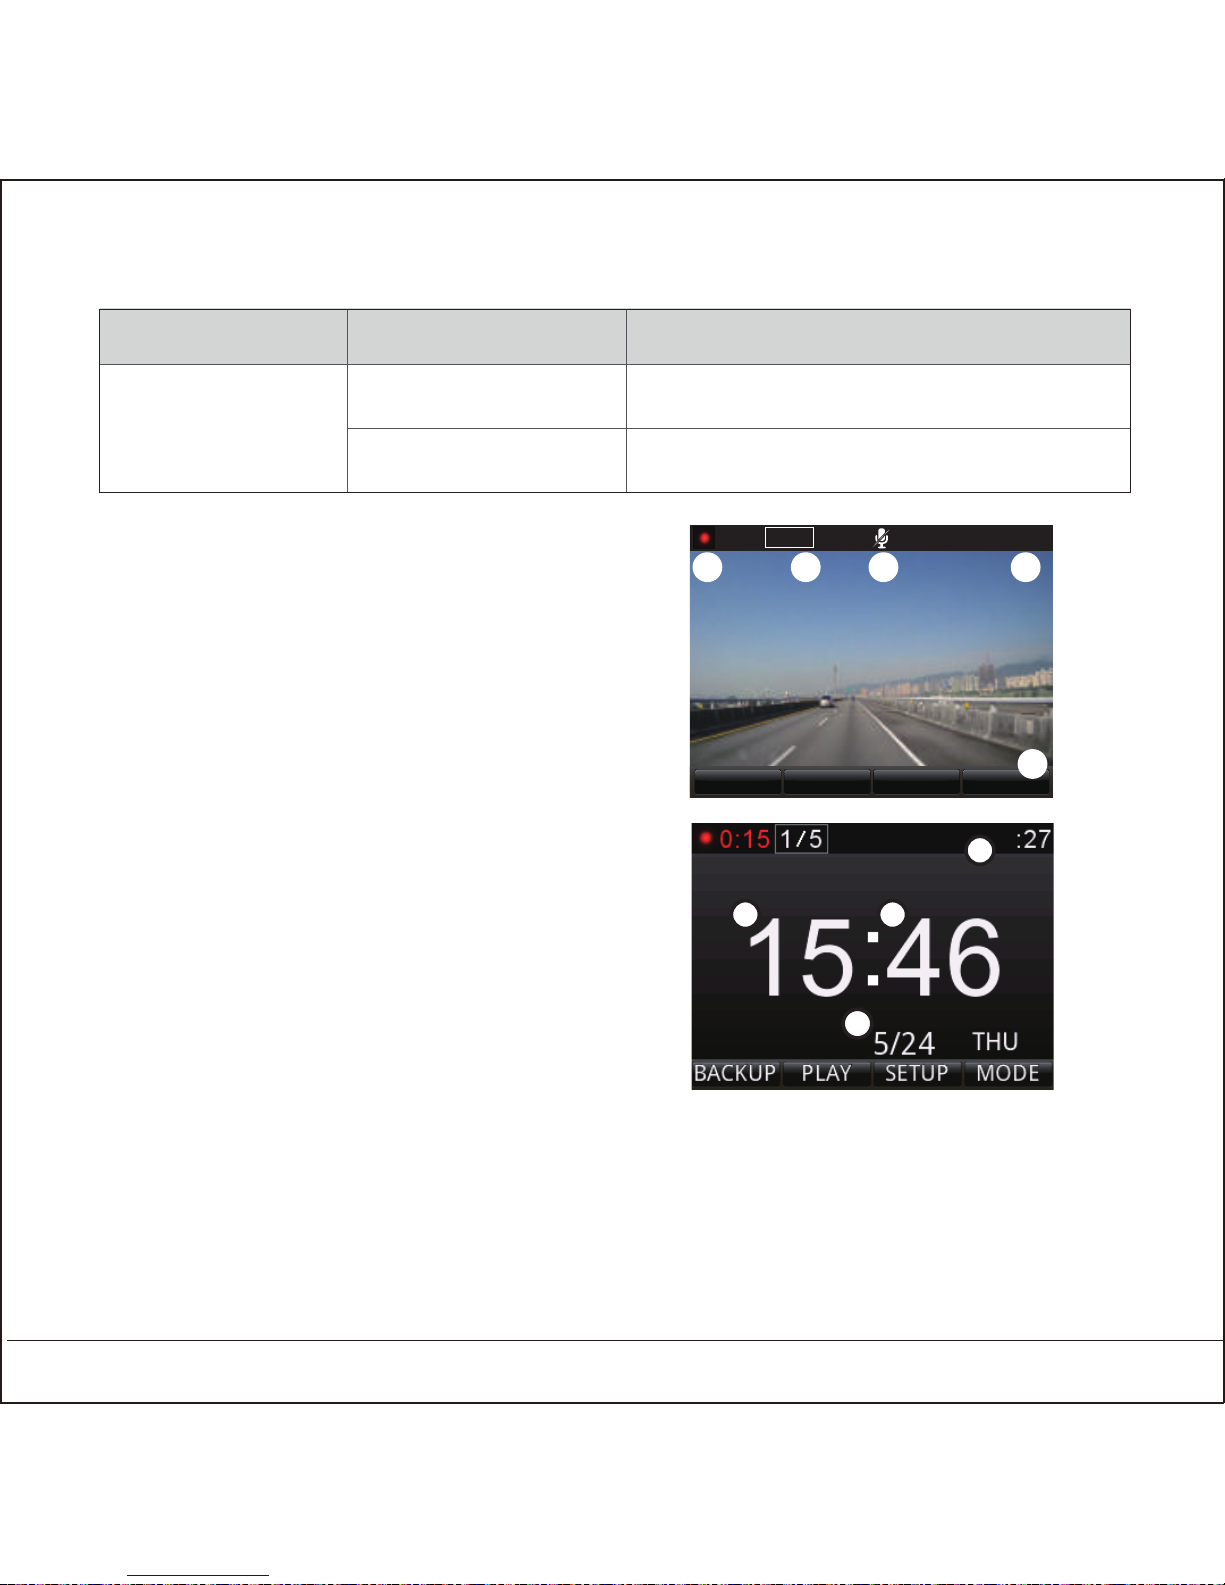
3.7 Video screen
1. video time
2. video reserved space
3. voice record off
4. current time
5. feature list
Recording
ModeSettingPlayBackup
0:15 11:48
2
3
4
5
1
3.9 5 Sets Video Reserved Space
1. Manual Save : Push the video copy button during recording for save the
current video to prevent for auto rewritten.
2. Bump Auto save : When any bump happened, will activate auto save
system, to prevent accident video to be over rewritten.
3.6 LED Light
Not recording
Recording
LED Color Definition
Green
Red
4/5
1. Second
2. Hour
3. Minute
4. Date
3.8 Time Mode
2
3
1
4
Page 22

English 8
4. Record/Play
4.1 Cycle Recording
1. Insert SD card, power switch ON to start record.
2. Each recording file is default 5 minutes, and will overwritten while out of
SD card memory.
2. On the other hand, push longer again for “setting” button, until the
upper right side disappear the microphone off icon to on the voice recording
feature again.
4.2 Voice Recording
1. Under recording mode, push longer for “Mode” button, until the upper
right side shows microphone off icon to off the voice recording feature.
4.3 Screen off
Push longer with mode button during video recording to off the screen.
4.4 Video Play/Delete
1. Under recording mode, push play button to enter play menu.
2. Select play source file(Normal or Emergency)
3. Select video to play/delete.
4. Select Photo to play/delete.
5. Select file Sort.
Page 23
5.1 G-sensor Status
1. G-sensor Status: Show current data and could adjust manually.
2. Collide Record : To select off/low/middle/high sensitivity.
1. Set date and time :
Enter setting menu, manually setting date and time.
2. 24-hour format :
On/off 24 hours format.
3. Date format
5.3 Date and Time
5.4 Sound
1. Volume Control : Adjust system volume.
2. Record Setting : Video only or Video and Audio.
3. Key Tone : On/Off button sound
English 9
5. System Setting(TBD)
1. Video Resolution : To select resolution and format for video quality.
2. Digital-WDR : On/Off digital WDR.
1080p 30fps Full HD quality 30 frames/ per second
720p 60fps
720p 30fps
HD quality 60 frames/ per second
HD quality 30 frames/ per second
5.2 Video Format
Page 24
English 10
6. GoLife Installation
5.5 Display
1. Brightness : Adjust screen brightness.
2. Screen Timeout : To set screen always on or auto off after 1, 3, 5 minutes.
3. Time Stamp : On/off video with speed/time info.
4. LED Indicator : On/off LED light.
5.6 Language
Support multi-languages
6.1 System inquiry
5.7 System
1. Factory Reset : To have all settings reset to default status.
2. Format SD Card
3. System Info : Showing current system version and map version in the SD card.
4. SD Card Info
O/S
CPU
Memory
Interface
Browser
Pentium 4 2.4GHz above
512MB above
SD card reader
IE8
Windows 7 / Vista / XP operating system
Page 25
English 11
6.2 Software package
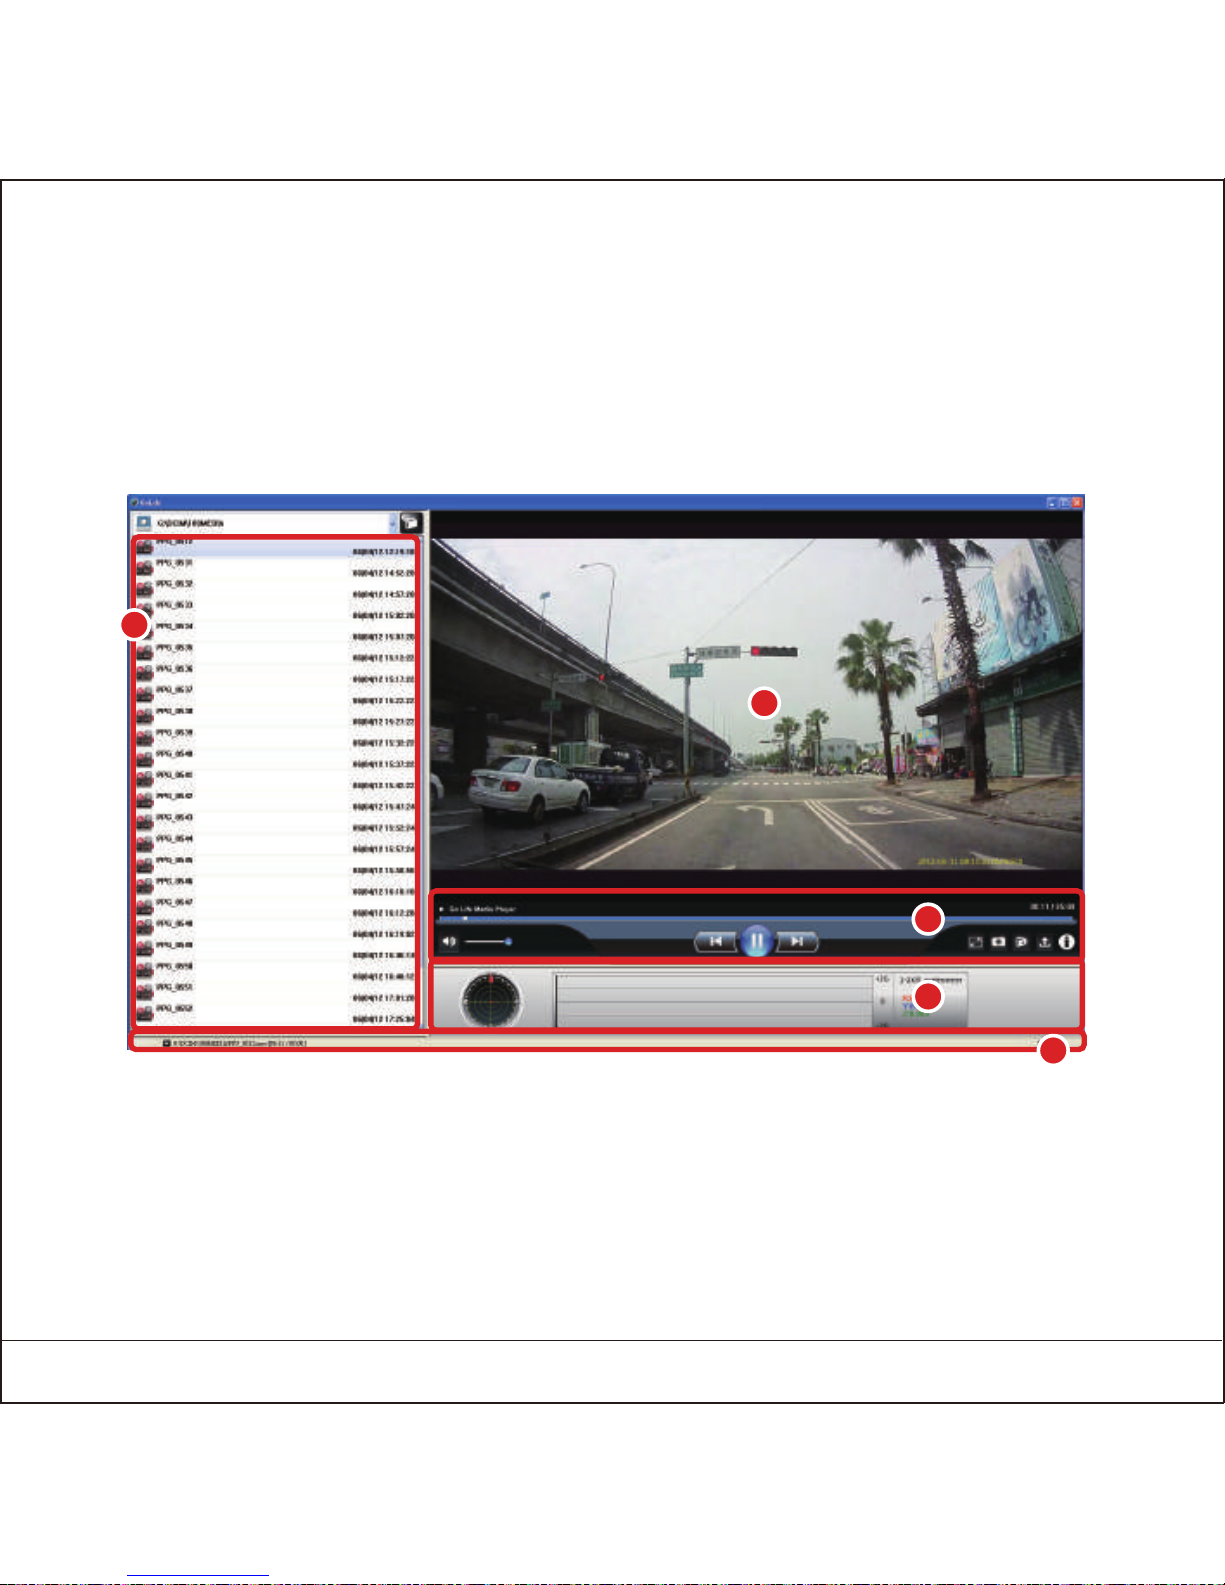
6.3 Player interface
Please insert the CD disc to your computer, and follow the instruction to
install GoLife for software player. After installation, you may enter GoLife
from your desk top directly.
1. Video file list
2. Video playing
3. Feature list
4. G-sensor/G-sensor value display
5. File name & path/display time
2
3
4
5
1
Page 26
English 12
7. Caution
7.1 Usage Related
1. If car lighter still on after car power off, make sure to pull off the car charger,
in case to run out all the battery or cause any accident.
2. There will be backup battery to record the files after car power off, device
power off or any emergency power off.
3. Do not take off SD card immediately during the device power off, to prevent
file damage.
7.2 SD Card Related
1. Please use at least Class 6, 8GB SD card
2. Before use, please formatting the SD card
3. SD card memory & recording time for reference
(Exclude map data in the SD card)
SD card Memory
8GB
16GB
32GB
120min
240min
480min
240min
480min
960min
720p 30fps
1080p 30fps / 720p 60fps
Page 27
English 13
8. Reference Info
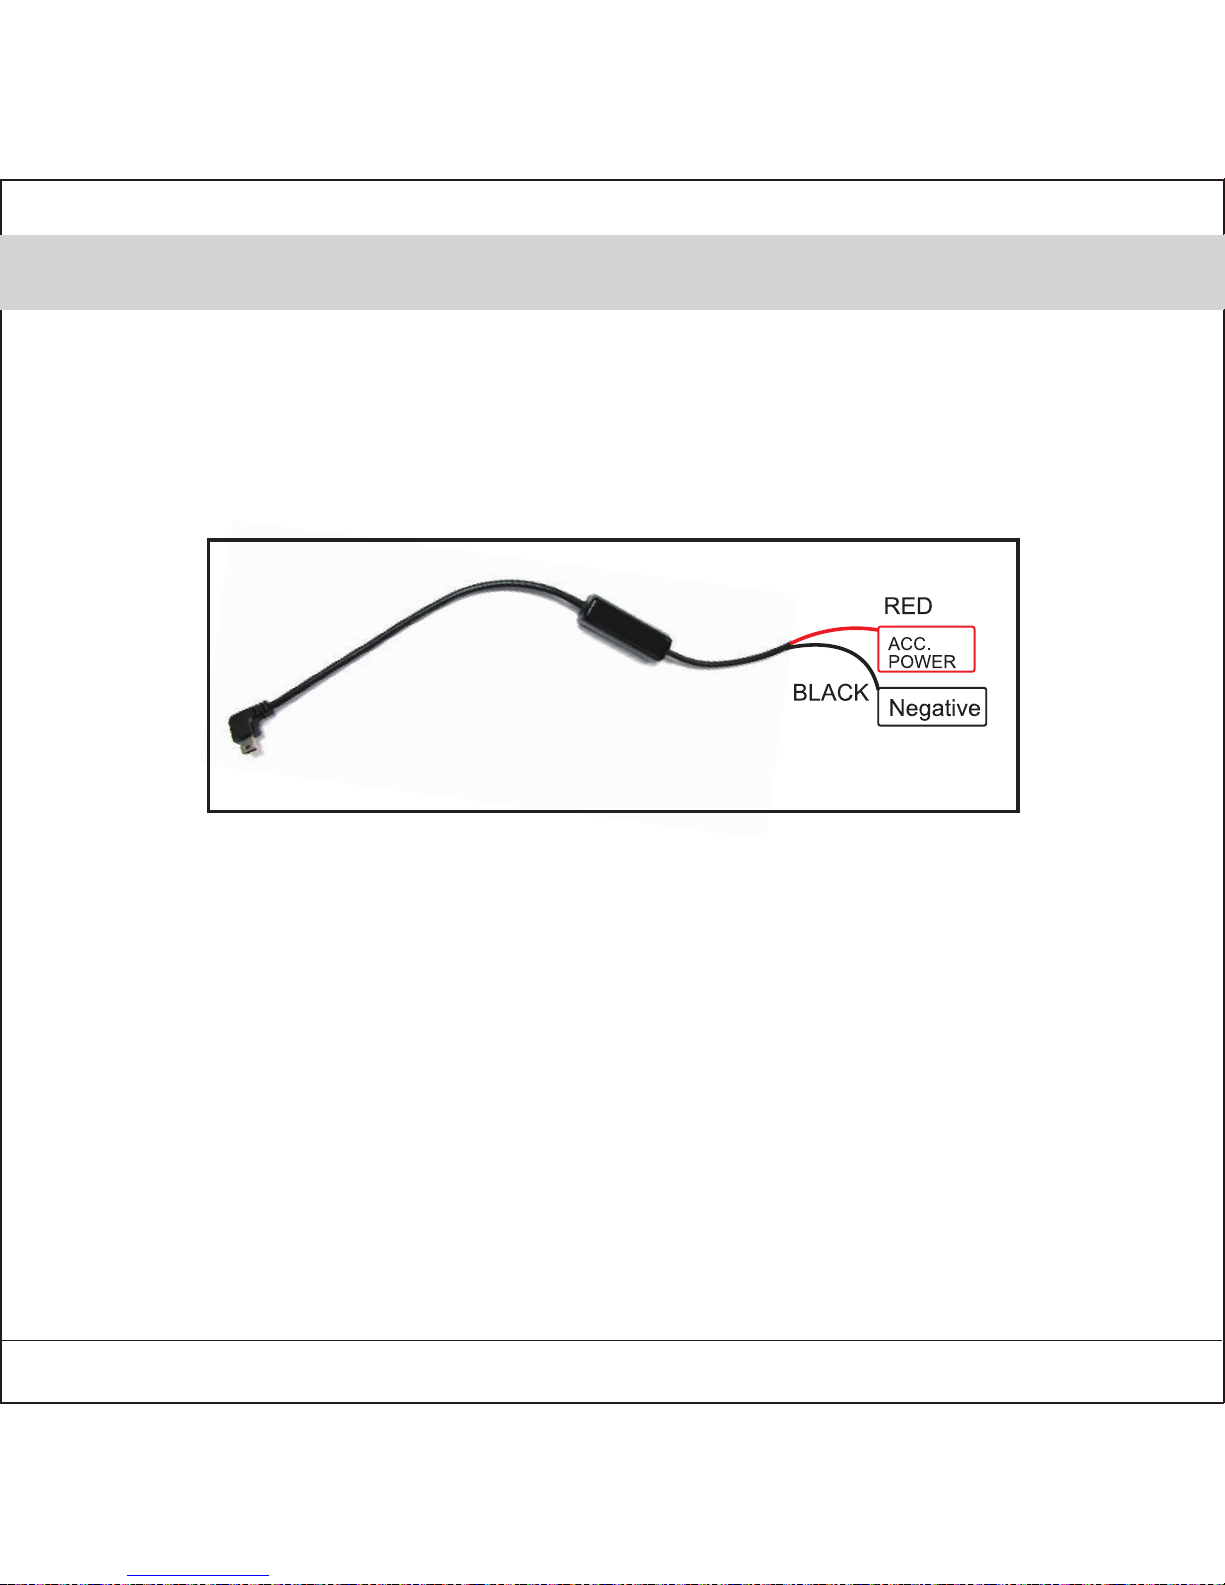
To use car charger connect directly to car power source.
(this installation method is not covered in the warranty.)
1. To cut car charger cable at the front side, make sure to keep the regulator.
2. To connect red cable to ACC. power, and black cable to negative.
Regulator
 Loading...