

Paradyne 6351, Hotwire ReachDSL 6351 Installation Instructions Manual

Hotwire® 6351 ReachDSL™ Router
Installation Instructions
Document Number 6351-A2-GN10-20
February 2004
Contents
Software and Firmware License Agreement ................................................. 1
Product Documentation Online ..................................................................... 3
Hotwire 6351 ReachDSL Router Overview .................................................. 3
Getting Started .............................................................................................. 6
Installing the Hotwire 6351 ReachDSL Router ............................................. 7
Power-On ...................................................................................................... 12
Troubleshooting ............................................................................................ 13
Configuration Setup ...................................................................................... 14
Graphical User Interface ............................................................................... 15
Cables and Connectors ................................................................................ 17
Optional Wall Placement ............................................................................... 20
ReachDSL Router Technical Specifications ................................................. 22
Important Safety Instructions ........................................................................ 23
Government Requirements ........................................................................... 24
Warranty, Sales, Service, and Training Information ...................................... 28
Software and Firmware License Agreement
ONCE YOU HAVE READ THIS LICENSE AGREEMENT AND AGREE TO ITS
TERMS, YOU MAY USE THE SOFTWARE AND/OR FIRMWARE INCORPORATED
INTO THE PARADYNE PRODUCT. BY USING THE PARADYNE PRODUCT YOU
SHOW YOUR ACCEPTANCE OF THE TERMS OF THIS LICENSE AGREEMENT.
IN THE EVENT THAT YOU DO NOT AGREE WITH ANY OF THE TERMS OF THIS
LICENSE AGREEMENT, PROMPTLY RETURN THE UNUSED PRODUCT IN ITS
ORIGINAL PACKAGING AND YOUR SALES RECEIPT OR INVOICE TO THE
LOCATION WHERE YOU OBTAINED THE PARADYNE PRODUCT OR THE
LOCATION FROM WHICH IT WAS SHIPPED TO YOU, AS APPLICABLE, AND YOU
WILL RECEIVE A REFUND OR CREDIT FOR THE PARADYNE PRODUCT
PURCHASED BY YOU.
1

The terms and conditions of this License Agreement (the “Agreement”) will apply to the
software and/or firmware (individually or collectively the “Software”) incorporated into
the Paradyne product (the “Product”) purchased by you and any derivatives obtained
from the Software, including any copy of either. If you have executed a separate written
agreement covering the Software supplied to you under this purchase, such separate
written agreement shall govern.
Paradyne Corporation (“Paradyne”) grants to you, and you (“Licensee”) agree to accept
a personal, non-transferable, non-exclusive, right (without the right to sublicense) to use
the Software, solely as it is intended and solely as incorporated in the Product
purchased from Paradyne or its authorized distributor or reseller under the following
terms and conditions:
1. Ownership: The Software is the sole property of Paradyne and/or its licensors. The
Licensee acquires no title, right or interest in the Software other than the license
granted under this Agreement.
2. Licensee shall not use the Software in any country other than the country in which
the Product was rightfully purchased except upon prior written notice to Paradyne
and an agreement in writing to additional terms.
3. The Licensee shall not reverse engineer, decompile or disassemble the Software in
whole or in part.
4. The Licensee shall not copy the Software except for a single archival copy.
5. Except for the Product warranty contained in the manual, the Software is provided
“AS IS” and in its present state and condition and Paradyne makes no other
warranty whatsoever with respect to the Product purchased by you. THIS
AGREEMENT EXPRESSLY EXCLUDES ALL OTHER WARRANTIES, WHETHER
EXPRESS OR IMPLIED, OR ORAL OR WRITTEN, INCLUDING WITHOUT
LIMITATION:
a. Any warranty that the Software is error-free, will operate uninterrupted in your
operating environment, or is compatible with any equipment or software
configurations; and
b. ANY AND ALL IMPLIED WARRANTIES, INCLUDING WITHOUT LIMITATION
IMPLIED WARRANTIES OF MERCHANTABILITY, FITNESS FOR A
PARTICULAR PURPOSE AND NON-INFRINGEMENT.
Some states or other jurisdictions do not allow the exclusion of implied warranties
on limitations on how long an implied warranty lasts, so the above limitations may
not apply to you. This warranty gives you specific legal rights, and you may also
have other rights which vary from one state or jurisdiction to another.
6. IN NO EVENT WILL PARADYNE BE LIABLE TO LICENSEE FOR ANY
CONSEQUENTIAL, INCIDENTAL, PUNITIVE OR SPECIAL DAMAGES,
INCLUDING ANY LOST PROFITS OR LOST SAVINGS, LOSS OF BUSINESS
INFORMATION OR BUSINESS INTERRUPTION OR OTHER PECUNIARY LOSS
ARISING OUT OF THE USE OR INABILITY TO USE THE SOFTWARE,
WHETHER BASED ON CONTRACT, TORT, WARRANTY OR OTHER LEGAL OR
EQUITABLE GROUNDS, EVEN IF PARADYNE HAS BEEN ADVISED OF THE
POSSIBILITY OF SUCH DAMAGES, OR FOR ANY CLAIM BY ANY THIRD
PARTY.
2

7. The rights granted under this Agreement may not be assigned, sublicensed or
otherwise transferred by the Licensee to any third party without the prior written
consent of Paradyne.
8. This Agreement and the license granted under this Agreement shall be terminated
in the event of breach by the Licensee of any provisions of this Agreement.
9. Upon such termination, the Licensee shall refrain from any further use of the
Software and destroy the original and all copies of the Software in the possession of
Licensee together with all documentation and related materials.
10. This Agreement shall be governed by the laws of the State of Florida, without
regard to its provisions concerning conflicts of laws.
Product Documentation Online
Complete documentation for this product is available at www.paradyne.com.
Select Library → Technical Manuals → Hotwire DSL Systems.
For more information about Hotwire DSL Routers, refer to the following document:
6371-A2-GB20 Hotwire DSL Routers User’s Guide
To install a phone filter, refer to the appropriate document:
6035-A2-GN11 Hotwire 6035 Universal Phone Filter Installation Instructions
6040-A2-GN11 Hotwire 6040 Universal Wall Jack Phone Filter Installation
Instructions
To order a paper copy of a Paradyne document, or to speak with a sales representative,
please call 1-727-530-2000.
Hotwire 6351 ReachDSL Router Overview
The Hotwire® 6351 ReachDSL™ Router is a component in the Hotwire ReachDSL
System that interoperates with Hotwire 8312 and 8314 ReachDSL cards in the Digital
Subscriber Line Access Multiplexer (DSLAM) system.
The ReachDSL Router operates as an IP router, connecting a DSL link to an Ethernet
network to provide high-speed Internet or corporate LAN access over traditional
twisted-pair copper telephone wiring. ReachDSL technology operates over existing
copper wire with existing telephone jacks to provide adaptive rates, and to dynamically
adapt and allocate bandwidth to optimize applications.
Hotwire ReachDSL System
Copper pairs run from the central office (CO) to the customer premises (CP) to create
the local loop. The local loop terminates on the customer premises at the demarcation
point.
3
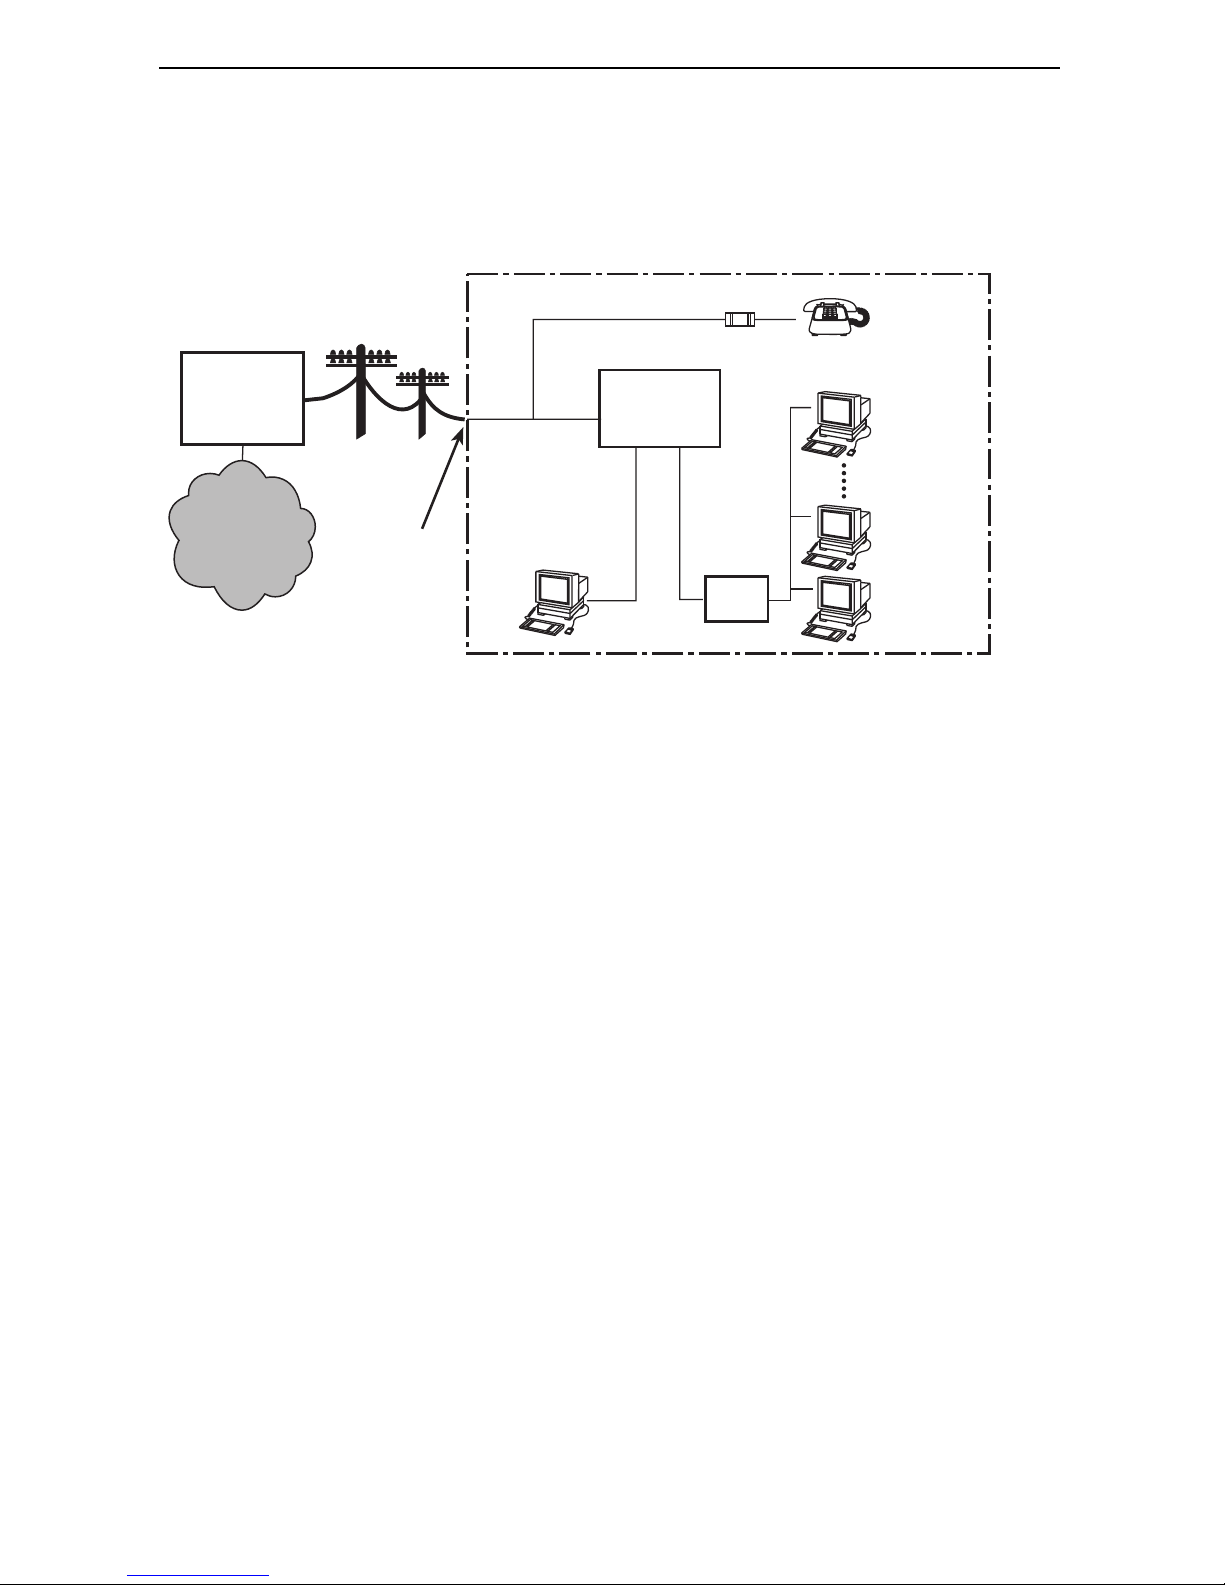
The ReachDSL Router does not require a POTS splitter at the demarcation point to
support line sharing by data and voice services. Standard phone wiring is used for
connection to the router.
Customer Premises (CP)
Filter
Central
Office
(CO)
ReachDSL
Router
DSL/POTS
Local Loop
End-user
Systems
Network
Service
Provider
(NSP)
Demarcation
Point
Ethernet
Crossover
Cable
or
Ethernet
Cable
Hub
DSL – Digital Subscriber Lines
01-16938-01
POTS – Plain Old Telephone Service
NOTE:
In this document:
— A telephone is used to represent any equipment that plugs into a phone jack
and uses the POTS line, such as a phone, modem, or fax machine.
— End-user system is used to represent any host with an Ethernet connection
and ReachDSL-based service.
— RJ11 wall jack is used to represent either an RJ11 or RJ14 wall jack. The RJ14
wall jack is used for a phone with two lines.
— Service provider is used to represent any Internet Service Provider (ISP) or
remote Local Area Network (LAN) provider.
4
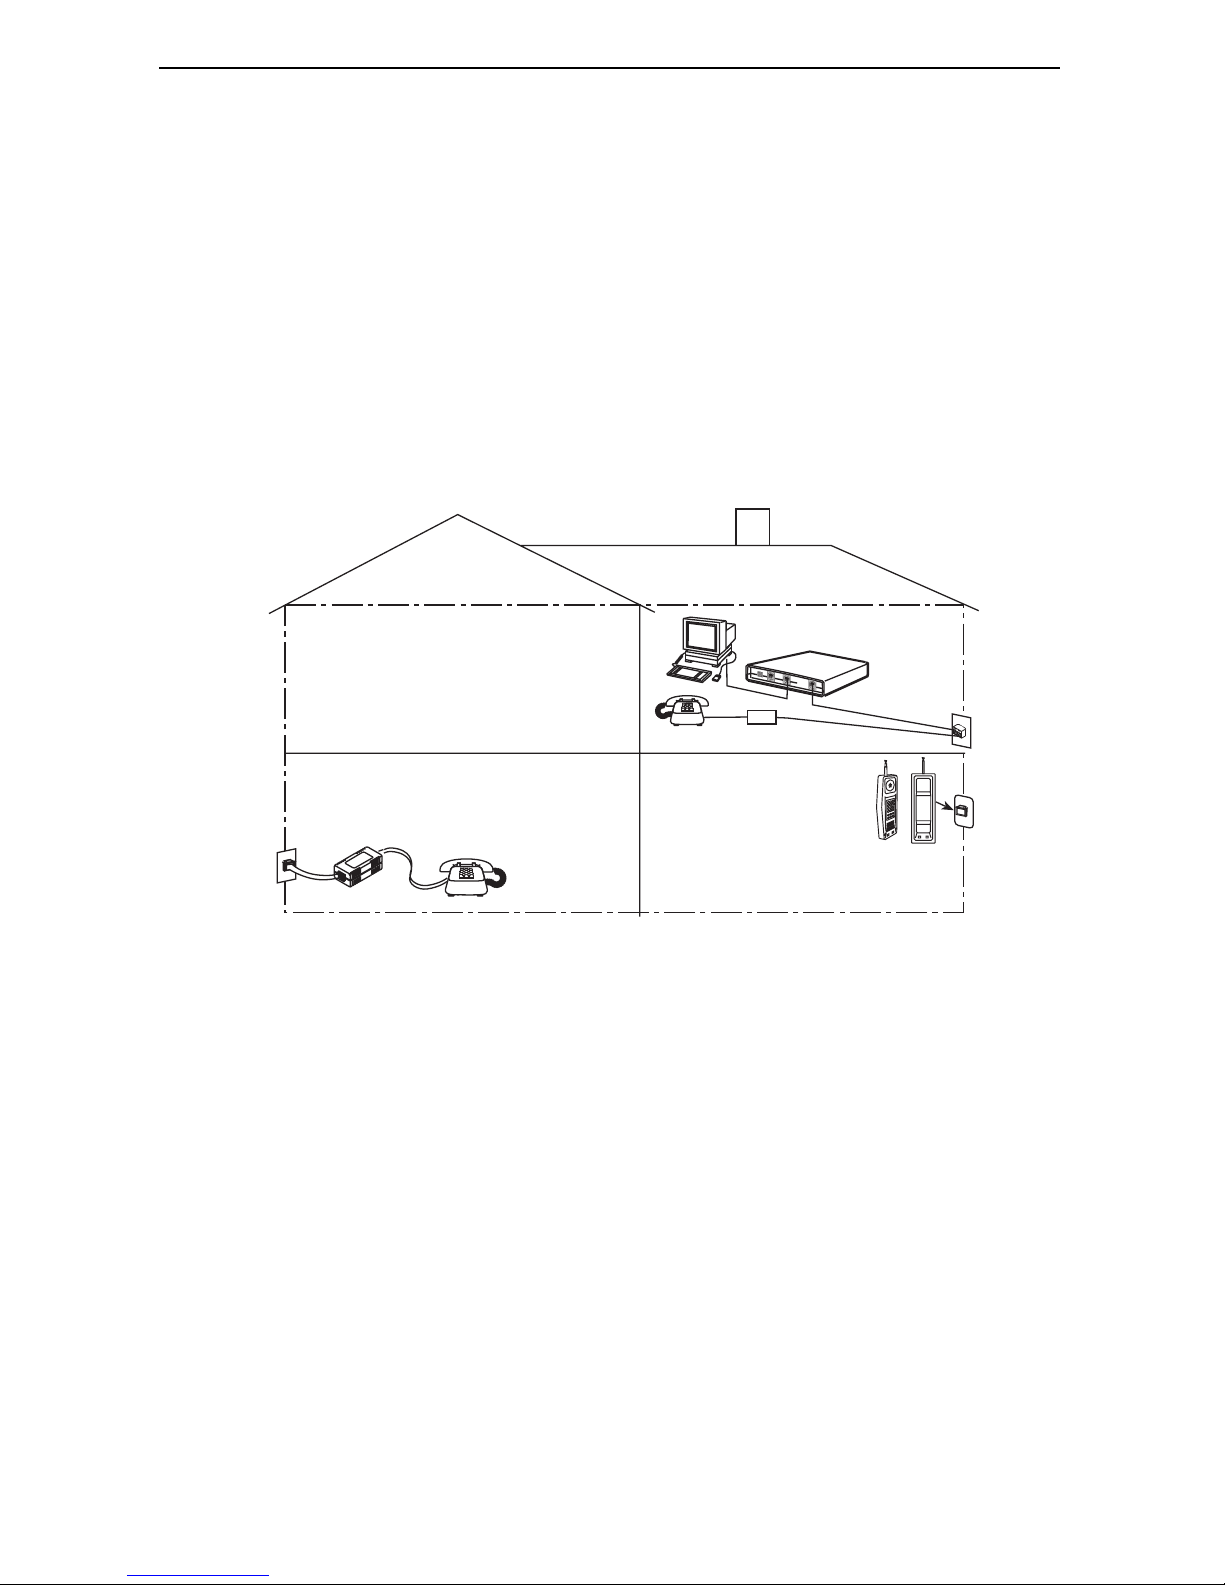
Phone Filters
For optimum performance, if the wiring for the router is also used for voice (POTS), a
phone filter should be installed on each voice line with a phone, modem, fax machine, or
other telecommunications device attached. One Hotwire phone filter can be used with
multiple telecommunications devices (for example, a phone and a fax machine can be
supported using a single filter), provided a multiple line adapter is used.
There are two Hotwire phone filters that can be used with the ReachDSL Router:
Hotwire 6035 Universal Phone Filter is designed for use with a tabletop phone.
Hotwire 6040 Universal Wall Jack Phone Filter is designed for use with a
wall phone.
Customer
Premises (CP)
DSL
P
O
W
E
R
C
O
N
S
O
L
E
E
T
H
E
R
N
E
T
D
S
Phone Filter
L
Router
RJ11
Wall
Jack
RJ11
Wall Jack
6035
Phone Filter
6040
Wall Jack
Phone
Filter
01-17038
5

Getting Started
Before beginning your router’s installation, make sure that you have all the equipment
that you will need.
Package Checklist
In addition to these instructions, verify that your package contains the following:
❑ Hotwire 6351 ReachDSL Router
❑ DSL interface cable with RJ11 modular plugs
❑ Power cord with power transformer
Wiring and Connectors You Will Need
The following wiring and standard connectors are used with this product:
❑ Standard RJ11 (or RJ14) wall jack for the DSL cable.
❑ Multiple line adapter if a telephone and router are connected in the same location.
❑ Standard Ethernet 8-pin, non-keyed modular plug for a PC or workstation with an
Ethernet straight-through or crossover cable.
— Refer to procedures in Installing the Hotwire 6351 ReachDSL Router on
page 7 to install cables.
— Refer to Cables and Connectors on page 17 for standard pin numbers.
Optional Cable and Adapters
The Hotwire 6351 ReachDSL Router is typically configured remotely by the service
provider. The following optional cable and adapters are only used when configuring the
router locally:
❑ Console cable: Straight-through cable with 8-pin non-keyed modular plugs
(Part No. 035-0276-1431)
❑ Console adapter:
— 8-pin modular-to-DB9 adapter plug (Part No. 002-0093-0031), or
— A configurable DB9-to-RJ45 adapter, wired as shown in 8-Pin Modular to DB9
Adapter Plug on page 18.
6

Installing the Hotwire 6351 ReachDSL Router
Place the ReachDSL router on a flat surface, with clearance for the rear connectors. For
router cable pin assignments, refer to Cables and Connectors on page 17.
Connecting the DSL Line in a Home Environment (Phone and Router in
the Same Location)
Use the supplied RJ11 6-pin cable for the DSL connection. You will also need a multiple
line adapter and a phone filter (see Phone Filters on page 5).
Procedure
1. Insert a multiple line adapter into the wall jack.
2. Insert one end of the cable into the DSL jack on the router.
3. Insert the other end of the cable into one of the jacks (Line 1 or Line 2) on the
multiple line adapter.
4. Insert the line cord from the LINE jack on the filter into the empty jack on the
multiple line adapter.
5. Insert the phone line cord from the phone into the PHONE jack on the filter.
6351 ReachDSL Router
POW
ER
CONSOLE
ETHERNET
DSL
Multiple
Line
Adapter
LINE
PHO
N
E
Filter
01-17017
7
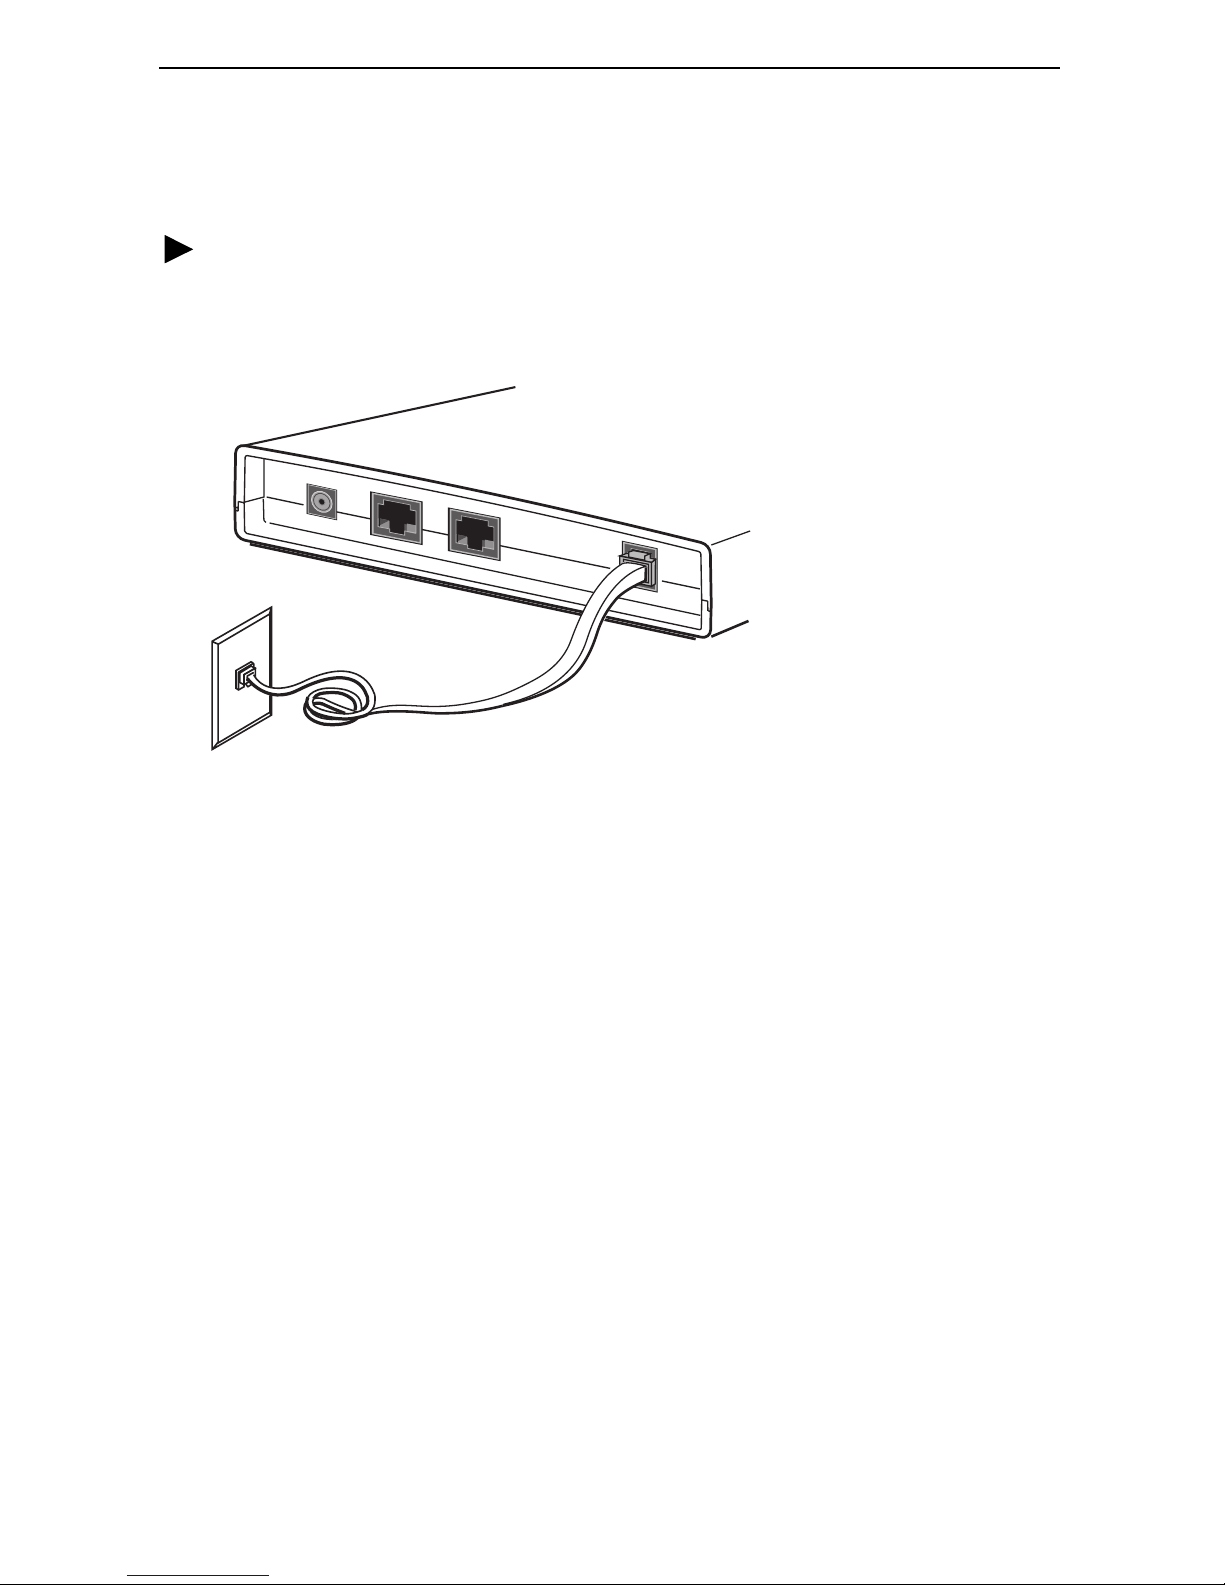
Connecting the DSL Line in All Other Environments
Use the supplied RJ11 6-pin cable for the DSL connection.
Procedure
1. Insert one end of the cable into the DSL jack on the router.
2. Insert the other end of the cable into the wall jack.
6351 ReachDSL Router
POW
ER
CONSOLE
ETHERNET
Wall
Jack
DSL
01-16927
8
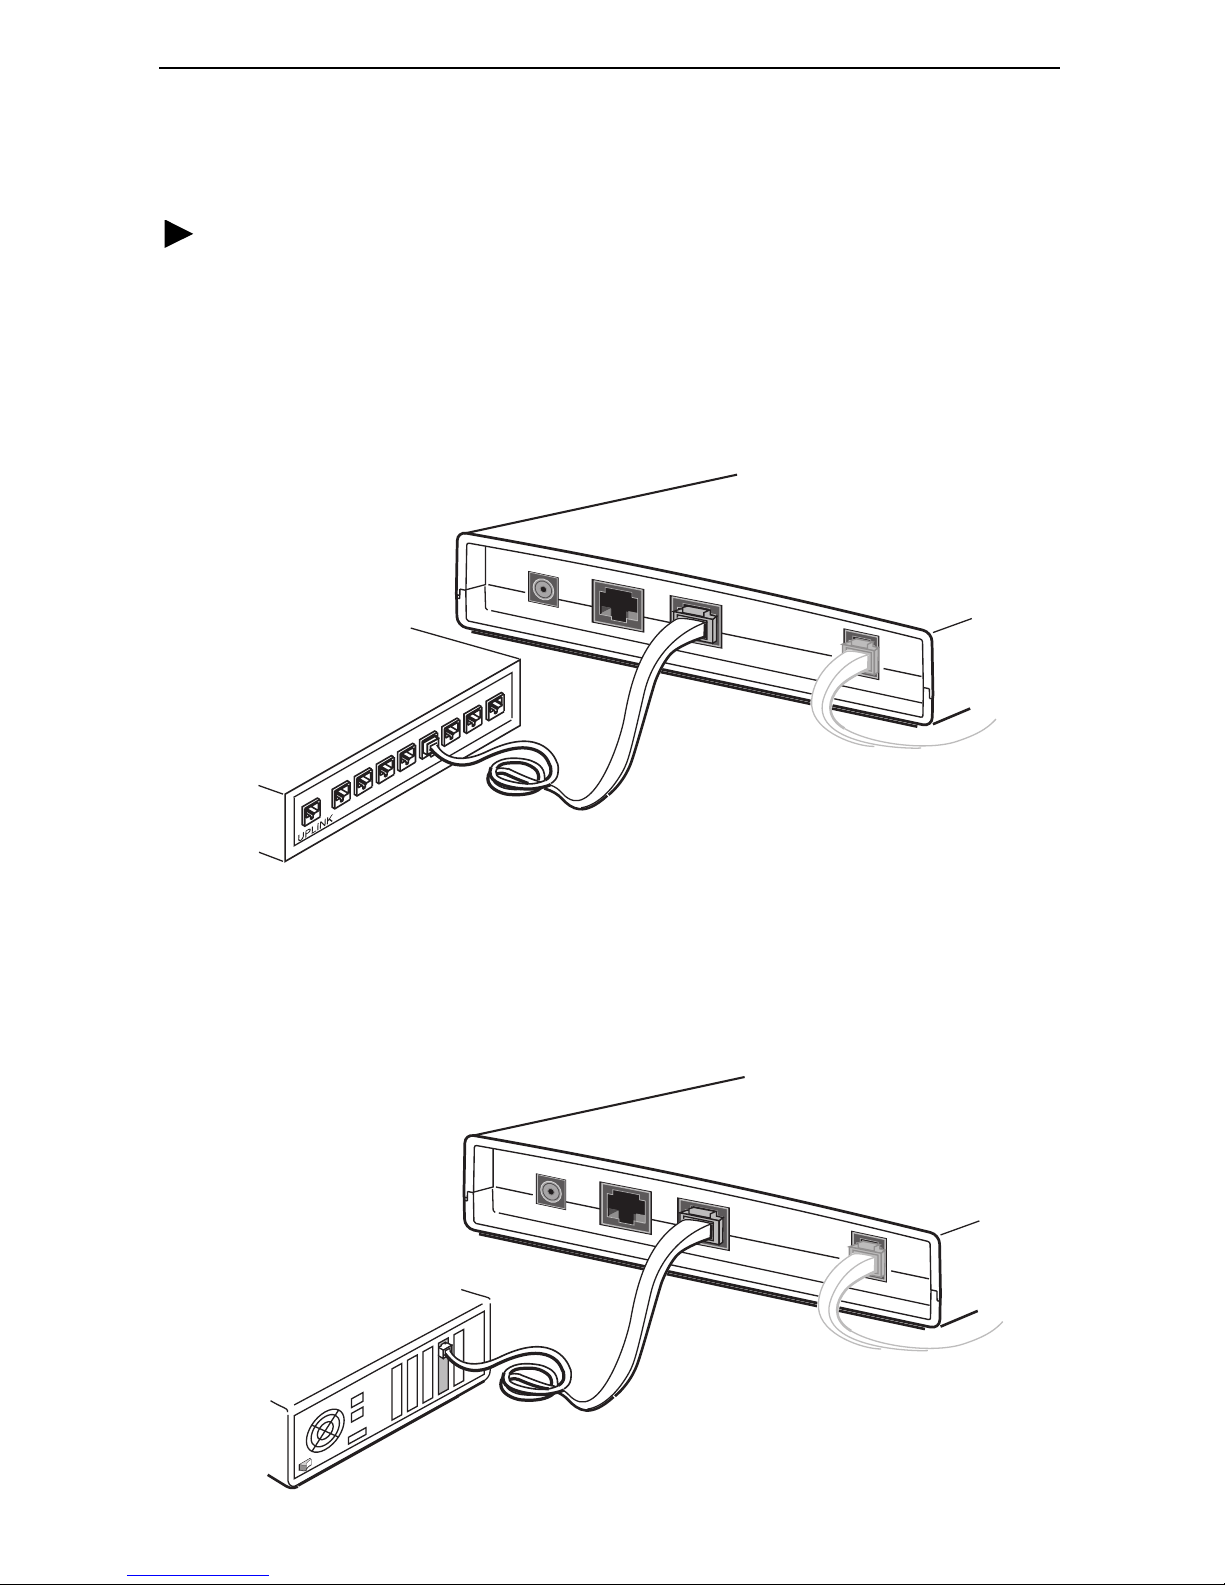
Connecting the Ethernet Cable
Use an 8-pin Ethernet straight-through or crossover cable for the Ethernet connection.
Procedure
To connect an Ethernet Hub using a straight-through cable:
— Insert one end of the straight-through cable into the ETHERNET jack on the
router and connect the other end to an Ethernet hub. Do not connect it to the
hub’s optional Uplink connection; the Uplink connection requires an Ethernet
crossover cable. To support multiple end-user systems, refer to Increasing the
Number of End-User Systems on page 14.
6351 ReachDSL Router
Ethernet
Line
Ethernet
Hub
6
7
8
POWER
1
2
3
4
5
Ethernet
CONSOLE
ETHERNET
DSL
01-16928-01
Straight-through
Cable
To connect a PC using a crossover cable:
— Insert one end of the crossover cable into the ETHERNET jack on the router
and connect the other end of the cable to a PC with an Ethernet Network
Interface Card (NIC) installed.
6351 ReachDSL Router
Ethernet
Line
PC with Ethernet
Network Interface
Card (NIC)
POWER
CONSOLE
Ethernet
Crossover
Cable
ETHERNET
DSL
01-16929-01
9
 Loading...