

Paradyne 6212, 1813, 1823, 1862, 6212-A1 User Manual

Command Line Interface
for 1813 and 1823 VoIP Gateways,
1862 SIP IAD, and 6212-A1 Router
User’s Guide
Document Number 1800-A2-GB20-00
June 2005

Command Line Interface User’s Guide
Copyright 2005 Paradyne Corporation.
All rights reserved.
Printed in U.S.A.
Notice
This publication is protected by federal copyright law. No part of this publication may be copied or distributed,
transmitted, transcribed, stored in a retrieval system, or translated into any human or computer language in any form
or by any means, electronic, mechanical, magnetic, manual or otherwise, or disclosed to third parties without the
express written permission of Paradyne Corporation, 8545 126th Ave. N., Largo, FL 33773.
Paradyne Corporation makes no representation or warranties with respect to the contents hereof and specifically
disclaims any implied warranties of merchantability or fitness for a particular purpose. Further, Paradyne Corporation
reserves the right to revise this publication and to make changes from time to time in the contents hereof without
obligation of Paradyne Corporation to notify any person of such revision or changes.
Changes and enhancements to the product and to the information herein will be documented and issued as a new
release to this manual.
Warranty, Sales, Service, and Training Information
Contact your local sales representative, service representative, or distributor directly for any help needed. For
additional information concerning warranty, sales, service, repair, installation, documentation, training, distributor
locations, or Paradyne worldwide office locations, use one of the following methods:
Internet: Visit the Paradyne World Wide Web site at www.paradyne.com. (Be sure to register your warranty at
www.paradyne.com/warranty.)
Telephone: Call our automated system to receive current information by fax or to speak with a company
representative.
Within the U.S.A., call 1-800-870-2221
Outside the U.S.A., call 1-727-530-2340
Document Feedback
We welcome your comments and suggestions about this document. Please mail them to Technical Publications,
Paradyne Corporation, 8545 126th Ave. N., Largo, FL 33773, or send e-mail to userdoc@paradyne.com. Include
the number and title of this document in your correspondence. Please include your name and phone number if you
are willing to provide additional clarification.
Trademarks
Acculink, ADSL/R, Bitstorm, Comsphere, DSL the Easy Way, ETC, Etherloop, FrameSaver, GranDSLAM,
GrandVIEW, Hotwire, the Hotwire logo, Jetstream, MVL, NextEDGE, Net to Net Technologies, OpenLane, Paradyne,
the Paradyne logo, Paradyne Credit Corp., the Paradyne Credit Corp. logo, Performance Wizard, ReachDSL,
StormPort, TruePut are registered trademarks of Paradyne Corporation. Connect to Success, Hotwire Connected,
iMarc, JetFusion, JetVision, MicroBurst, PacketSurfer, Quick Channel, Reverse Gateway, Spectrum Manager, and
StormTracker are trademarks of Paradyne Corporation. All other products and services mentioned herein are the
trademarks, service marks, registered trademarks, or registered service marks of their respective owners.
2 1800-A2-GB20-00

Command Line Interface User’s Guide
Preface
This instruction guide introduces the command line interface (CLI) for the Telnet management
of the 1813 and 1823 VoIP Gateways, the 1862 SIP IAD, and 6212 Router. If your device has a
console port, you can also access the CLI from a VT100 terminal or equivalent (such as a PC
running Hyperterminal or Telix).
This manual is written for a range of ADSL products. Some specific commands may not be
available for all devices. For example, wireless functions will only be available for products with
wireless functionality.
See the user’s guide for your device for information about web-based management.
1800-A2-GB20-00 3

Command Line Interface User’s Guide
Table of Contents
CHAPTER 1 TELNET ACCESS ......................................................................................... 10
1.1 SETTING A COMMON IP ADDRESS.................................................................................. 10
1.2 LOGIN ............................................................................................................................ 12
CHAPTER 2 GENERAL OPERATION.............................................................................. 13
2.1 CLI REFERENCE............................................................................................................. 13
2.2 G
2.2.1 ls............................................................................................................................ 14
2.2.2 help........................................................................................................................ 14
2.2.3 accountstats........................................................................................................... 15
2.2.4 exit......................................................................................................................... 15
2.2.5 version................................................................................................................... 15
2.2.6 date........................................................................................................................ 16
2.2.7 erase...................................................................................................................... 16
2.2.8 save ....................................................................................................................... 16
2.2.9 reboot.................................................................................................................... 16
2.2.10 ping .......................................................................................................................16
2.2.11 time........................................................................................................................ 17
2.3
2.3.1 logSeverity............................................................................................................. 18
2.3.2 log .........................................................................................................................18
2.3.3 logFtpServer ......................................................................................................... 19
2.3.4 loginfo................................................................................................................... 19
2.4 U
2.5 E
2.5.1 Primary IP address............................................................................................... 24
2.5.2 Alias IP Address.................................................................................................... 25
2.6 R
2.6.1 add......................................................................................................................... 25
2.6.2 delete..................................................................................................................... 26
2.6.3 list.......................................................................................................................... 26
2.6.4 rarpd .....................................................................................................................27
2.7
2.8
ENERIC ........................................................................................................................ 14
LOGGER.......................................................................................................................... 18
SER ACCOUNT ............................................................................................................. 20
THERNET IP ADDRESS ................................................................................................. 23
ARPD ........................................................................................................................... 25
TIMEOUT ........................................................................................................................ 27
BAUDRATE ..................................................................................................................... 27
CHAPTER 3 QUICK CONFIGURATION.........................................................................29
3.1 RFC
1483 BRIDGED....................................................................................................... 29
3.1.1 PART 1 Create a PVC........................................................................................... 29
3.1.2 PART 2 Set the PVC to RFC 1483 Bridged..........................................................29
3.1.3 PART 3 Delete the PVC for RFC1483 Bridged....................................................30
3.2 RFC
1483 ROUTED........................................................................................................30
3.2.1 PART 1 Create a new VC...................................................................................... 30
3.2.2 PART 2 Set the PVC to RFC 1483 Routed............................................................ 31
4 1800-A2-GB20-00

Command Line Interface User’s Guide
3.2.3 PART 3 Set up an IP address for the WAN interface............................................ 31
3.2.4 PART 4 Delete the PVC to RFC 1483 Routed...................................................... 31
3.3 IP
OA.............................................................................................................................. 32
3.3.1 PART 1 create a new PVC.................................................................................... 32
3.3.2 PART 2 Set the PVC to IPoA ................................................................................ 32
3.3.3 PART 3 Delete the PVC for IPoA......................................................................... 33
3.4 PPP
OE........................................................................................................................... 33
3.4.1 PART 1 Create a new VC...................................................................................... 33
3.4.2 PART 2 Set the PVC to PPPoE............................................................................. 33
3.4.3 PART 3 Delete the PVC for PPPoE...................................................................... 34
3.5 PPP
OA........................................................................................................................... 35
3.5.1 PART 1 Create a new VC...................................................................................... 35
3.5.2 PART 2 Set the PVC to PPPoA............................................................................. 35
3.5.3 PART 3 Delete the PVC for PPPoA...................................................................... 36
3.6 MER.............................................................................................................................. 36
3.6.1 PART 1 Create a new VC...................................................................................... 36
3.6.2 PART 2 Set the PVC to MER ................................................................................ 36
3.6.3 PART 3 Set up an IP address for the WAN interface............................................ 37
3.6.4 PART 4 Delete the PVC for MER......................................................................... 37
CHAPTER 4 COMMAND LINE INTERFACE SIP.......................................................... 38
4.1 SIP
HOST (USER AGENT)............................................................................................. 38
4.1.1 Configuration........................................................................................................ 38
4.1.2 Displaying............................................................................................................. 38
4.2 SIP
PROXY/REGISTRAR SERVER....................................................................................39
4.2.1 Configuration........................................................................................................ 39
4.2.2 Displaying............................................................................................................. 39
4.3 SIP
DOMAIN .................................................................................................................. 39
4.3.1 Configuration........................................................................................................ 39
4.3.2 Displaying............................................................................................................. 40
4.4 C
ODECS SUPPORTED ...................................................................................................... 40
4.4.1 Configuration........................................................................................................ 40
4.4.2 Displaying............................................................................................................. 41
4.5 P
HONE ........................................................................................................................... 41
4.5.1 Configuration........................................................................................................ 41
4.5.2 Displaying............................................................................................................. 42
4.5.3 Configuration........................................................................................................ 42
4.5.4 Displaying............................................................................................................. 43
4.5.5 Deleting................................................................................................................. 43
4.6 C
ALL FORWARD............................................................................................................. 43
4.6.1 Configuration........................................................................................................ 43
4.6.2 Displaying............................................................................................................. 44
4.7 A
UTHENTICATION.......................................................................................................... 44
4.7.1 Configuration........................................................................................................ 44
4.7.2 Displaying............................................................................................................. 45
4.8 R
4.9 I
EGISTRATION............................................................................................................... 45
NTER-DIGIT TIMEOUT ...................................................................................................46
1800-A2-GB20-00 5

Command Line Interface User’s Guide
4.10 MAX RINGS.................................................................................................................... 46
4.11 D
4.12 V
IAL PLAN..................................................................................................................... 47
OICE CONFIGURATION................................................................................................. 47
4.12.1 Voice Options........................................................................................................ 47
4.12.2 Jitter Buffer Configuration ................................................................................... 48
4.12.3 Country ................................................................................................................. 48
4.13 P
HONE OPERATIONS ...................................................................................................... 48
4.13.1 Normal Call Hold .................................................................................................48
4.13.2 Consultation Call Hold......................................................................................... 49
4.13.3 Call Resume.......................................................................................................... 49
4.13.4 Call Switch............................................................................................................ 49
4.13.5 Call Waiting.......................................................................................................... 49
CHAPTER 5 ADVANCED CONFIGURATION................................................................ 50
5.1 S
5.2 E
TATIC ROUTE...............................................................................................................50
THERNET...................................................................................................................... 51
5.2.1 MAC Address........................................................................................................ 51
5.2.2 rmon...................................................................................................................... 52
5.2.3 pread..................................................................................................................... 52
5.2.4 pwrite .................................................................................................................... 52
5.2.5 elink....................................................................................................................... 53
5.2.6 Ethernet up/down..................................................................................................54
5.3 B
RIDGE .......................................................................................................................... 54
5.3.1 arpproxy................................................................................................................ 54
5.3.2 pvc......................................................................................................................... 55
5.3.3 group..................................................................................................................... 55
5.3.4 group3................................................................................................................... 56
5.3.5 cachetimer............................................................................................................. 57
5.3.6 setmultiport........................................................................................................... 57
5.3.7 list.......................................................................................................................... 58
5.3.8 stats....................................................................................................................... 58
5.3.9 bridge.................................................................................................................... 58
5.3.10 vstats ..................................................................................................................... 58
5.3.11 vlantable................................................................................................................ 59
5.3.12 vlanmode............................................................................................................... 59
5.3.13 fdbmode................................................................................................................. 60
5.3.14 igmpsnooping........................................................................................................ 60
5.3.15 stp.......................................................................................................................... 60
5.3.16 filter....................................................................................................................... 62
5.3.17 filterlist.................................................................................................................. 63
5.3.18 filterflush............................................................................................................... 63
5.3.19 l2_list..................................................................................................................... 63
5.3.20 l2_fil...................................................................................................................... 63
5.4 SNMP............................................................................................................................ 65
5.4.1 list.......................................................................................................................... 66
5.4.2 sysconf................................................................................................................... 66
5.4.3 shutdown............................................................................................................... 67
6 1800-A2-GB20-00

Command Line Interface User’s Guide
5.4.4 start....................................................................................................................... 67
5.4.5 comconf................................................................................................................. 67
5.4.6 delcomm................................................................................................................ 67
5.4.7 trapconf................................................................................................................. 68
5.4.8 trap........................................................................................................................ 68
5.4.9 agconfig................................................................................................................. 69
5.5 F
IREWALL...................................................................................................................... 69
5.5.1 policy..................................................................................................................... 69
5.5.2 policy delete.......................................................................................................... 70
5.5.3 policy modify......................................................................................................... 70
5.5.4 policy enable......................................................................................................... 71
5.5.5 policy disable........................................................................................................ 71
5.5.6 policy list............................................................................................................... 71
5.5.7 nat ......................................................................................................................... 71
5.5.8 publicip .................................................................................................................72
5.5.9 links....................................................................................................................... 72
5.5.10 nataction ...............................................................................................................73
5.5.11 spoof...................................................................................................................... 73
5.5.12 setwt ...................................................................................................................... 74
5.5.13 listwt...................................................................................................................... 74
5.5.14..................................................................................................................................... 74
5.5.15 Attach....................................................................................................................75
5.5.16 listwfq.................................................................................................................... 76
5.5.17 remove................................................................................................................... 76
5.5.18 qstat....................................................................................................................... 77
5.5.19 createtc.................................................................................................................. 77
5.5.20 deletetc.................................................................................................................. 77
5.5.21 listtc....................................................................................................................... 78
5.5.22 tcstat...................................................................................................................... 78
5.5.23 firewall.................................................................................................................. 78
5.5.24 attack..................................................................................................................... 78
5.6 NAPT............................................................................................................................ 79
5.6.1 natif....................................................................................................................... 80
5.6.2 links....................................................................................................................... 80
5.6.3 nat ......................................................................................................................... 80
5.6.4 addressmap........................................................................................................... 82
5.6.5 portmap................................................................................................................. 83
5.6.6 delrdaddr............................................................................................................... 84
5.6.7 maplist................................................................................................................... 85
5.6.8 addpublic............................................................................................................... 85
5.6.9 delpublic................................................................................................................ 86
5.6.10 listpubaddrs........................................................................................................... 86
5.7 HTTP
5.8 DHCP
PROXY.................................................................................................................86
SERVER............................................................................................................... 87
5.8.1 start....................................................................................................................... 87
5.8.2 stop........................................................................................................................ 88
1800-A2-GB20-00 7

Command Line Interface User’s Guide
5.8.3 subnet.................................................................................................................... 88
5.8.4 host........................................................................................................................ 89
5.8.5 lease ...................................................................................................................... 90
5.9 DHCP
RELAY................................................................................................................. 90
5.10 ADSL............................................................................................................................ 91
5.10.1 setmode ................................................................................................................. 91
5.10.2 readcmv................................................................................................................. 91
5.10.3 writecmv................................................................................................................ 92
5.10.4 mon........................................................................................................................ 92
5.10.5 addusercmv........................................................................................................... 92
5.10.6 delusercmv ............................................................................................................ 93
5.10.7 listusercmv ............................................................................................................ 93
5.10.8 eread .....................................................................................................................93
5.10.9 ewrite..................................................................................................................... 93
5.10.10 mwrite ............................................................................................................... 94
5.10.11 mread ................................................................................................................ 94
5.10.12 adslup................................................................................................................ 94
5.10.13 adsldown........................................................................................................... 94
5.10.14 tone.................................................................................................................... 95
5.10.15 bitalloc .............................................................................................................. 95
5.10.16 adslstat.............................................................................................................. 95
5.11 ADSL2+
CLI................................................................................................................. 96
5.11.1 Configuration........................................................................................................ 96
5.11.2 Displaying............................................................................................................. 97
5.12 DNS............................................................................................................................... 98
5.12.1 list.......................................................................................................................... 98
5.12.2 set.......................................................................................................................... 98
5.12.3 dnsr .......................................................................................................................99
5.13 IGMP
5.14 R
PROXY............................................................................................................... 100
IP...............................................................................................................................101
5.14.1 rip........................................................................................................................ 101
5.14.2 ver .......................................................................................................................101
5.14.3 list........................................................................................................................ 101
5.15 SNDCP........................................................................................................................ 102
5.15.1 pppoe................................................................................................................... 102
5.15.2 pppoedefault........................................................................................................ 104
5.15.3 pppoestart ........................................................................................................... 105
5.15.4 pppoestop............................................................................................................105
5.15.5 pppoelist.............................................................................................................. 105
5.15.6 pppoedel.............................................................................................................. 105
5.15.7 pppoa................................................................................................................... 105
5.15.8 pppoastart........................................................................................................... 107
5.15.9 pppoastop............................................................................................................ 107
5.15.10 pppoalist.......................................................................................................... 107
5.15.11 pppoadel.......................................................................................................... 107
5.15.12 pppoadefault ................................................................................................... 108
8 1800-A2-GB20-00

Command Line Interface User’s Guide
5.15.13 list.................................................................................................................... 108
5.15.14 ipoa .................................................................................................................108
5.15.15 routedbridge.................................................................................................... 110
5.15.16 1483mer .......................................................................................................... 110
5.15.17 mer .................................................................................................................. 111
5.15.18 relay ................................................................................................................ 111
5.15.19 liststat.............................................................................................................. 112
5.15.20 ppptrace .......................................................................................................... 112
5.16
ATM ............................................................................................................................. 112
5.16.1 showatmconn....................................................................................................... 113
5.16.2 vcadd................................................................................................................... 113
5.16.3 vpadd................................................................................................................... 114
5.16.4 deletevc ............................................................................................................... 115
5.16.5 atmstats............................................................................................................... 115
5.16.6 f5lb ...................................................................................................................... 115
5.17
5.18 ACL
REMOTE WEB/TELNET/FTP/SNMP .................................................................................. 116
(ACCESS CONTROL LIST) .................................................................................... 116
5.18.1 addacl.................................................................................................................. 116
5.18.2 deleteacl.............................................................................................................. 118
5.18.3 listacls................................................................................................................. 119
CHAPTER 6 PERFORMANCE MONITORING ............................................................120
6.1 B
6.2 S
ITMAP........................................................................................................................120
TATISTIC .................................................................................................................... 121
CHAPTER 7 TFTP UPLOAD & DOWNLOAD............................................................... 122
7.1 U
7.2 A
7.3 U
7.4 U
7.5 D
PLOADING THE SOFTWARE FILE ................................................................................. 123
UTO UPGRADE........................................................................................................... 124
PLOADING THE CONFIGURATION FILE ........................................................................ 124
PGRADING THE SOFTWARE ........................................................................................ 126
OWNLOADING THE CONFIGURATIONS........................................................................ 127
CHAPTER 8 WIRELESS LAN.......................................................................................... 128
8.1 W
8.2 W
8.3 C
IRELESS LAN CONFIGURATION................................................................................ 128
IRELESS ASSOCIATION.............................................................................................. 132
OMMAND LINE INTERFACE ........................................................................................ 132
8.3.1 disassoc............................................................................................................... 132
8.3.2 association .......................................................................................................... 132
8.3.3 remaintime .......................................................................................................... 132
8.3.4 listdevices............................................................................................................ 133
8.3.5 Example............................................................................................................... 133
8.4 W
IRELESS LAN BATCH CONFIGURATION.................................................................... 134
1800-A2-GB20-00 9

Command Line Interface User’s Guide
Chapter 1 Telnet Access
The Command Line Interface (CLI) can be used to configure your endpoint device. Telnet is
used to access the CLI.
To Telnet to the device, you can either set your PC’s IP address to the same domain as the
endpoint, or set the endpoint’s IP address to the same domain as your PC. The default IP address
of the endpoint is 192.168.1.1.
The timeout period of the Telnet session is three minutes. If no command is entered for three
minutes, the Telnet session is terminated.
1.1 Setting a Common IP Address
To log on to the device using Telnet, your PC and the endpoint should both be on the same
network segment. You can either modify the IP address of your PC to the same domain of the
endpoint, or modify the IP address of the endpoint to the same domain as your PC.
You can modify the IP address of the endpoint by completing the following steps:
STEP 1: Enter a management tool (http or cli) for your endpoint
STEP 2: Change the IP address to the same domain as your workstation.
STEP 3: Save the settings to the flash and reboot the endpoint.
10 1800-A2-GB20-00
Command Line Interface User’s Guide
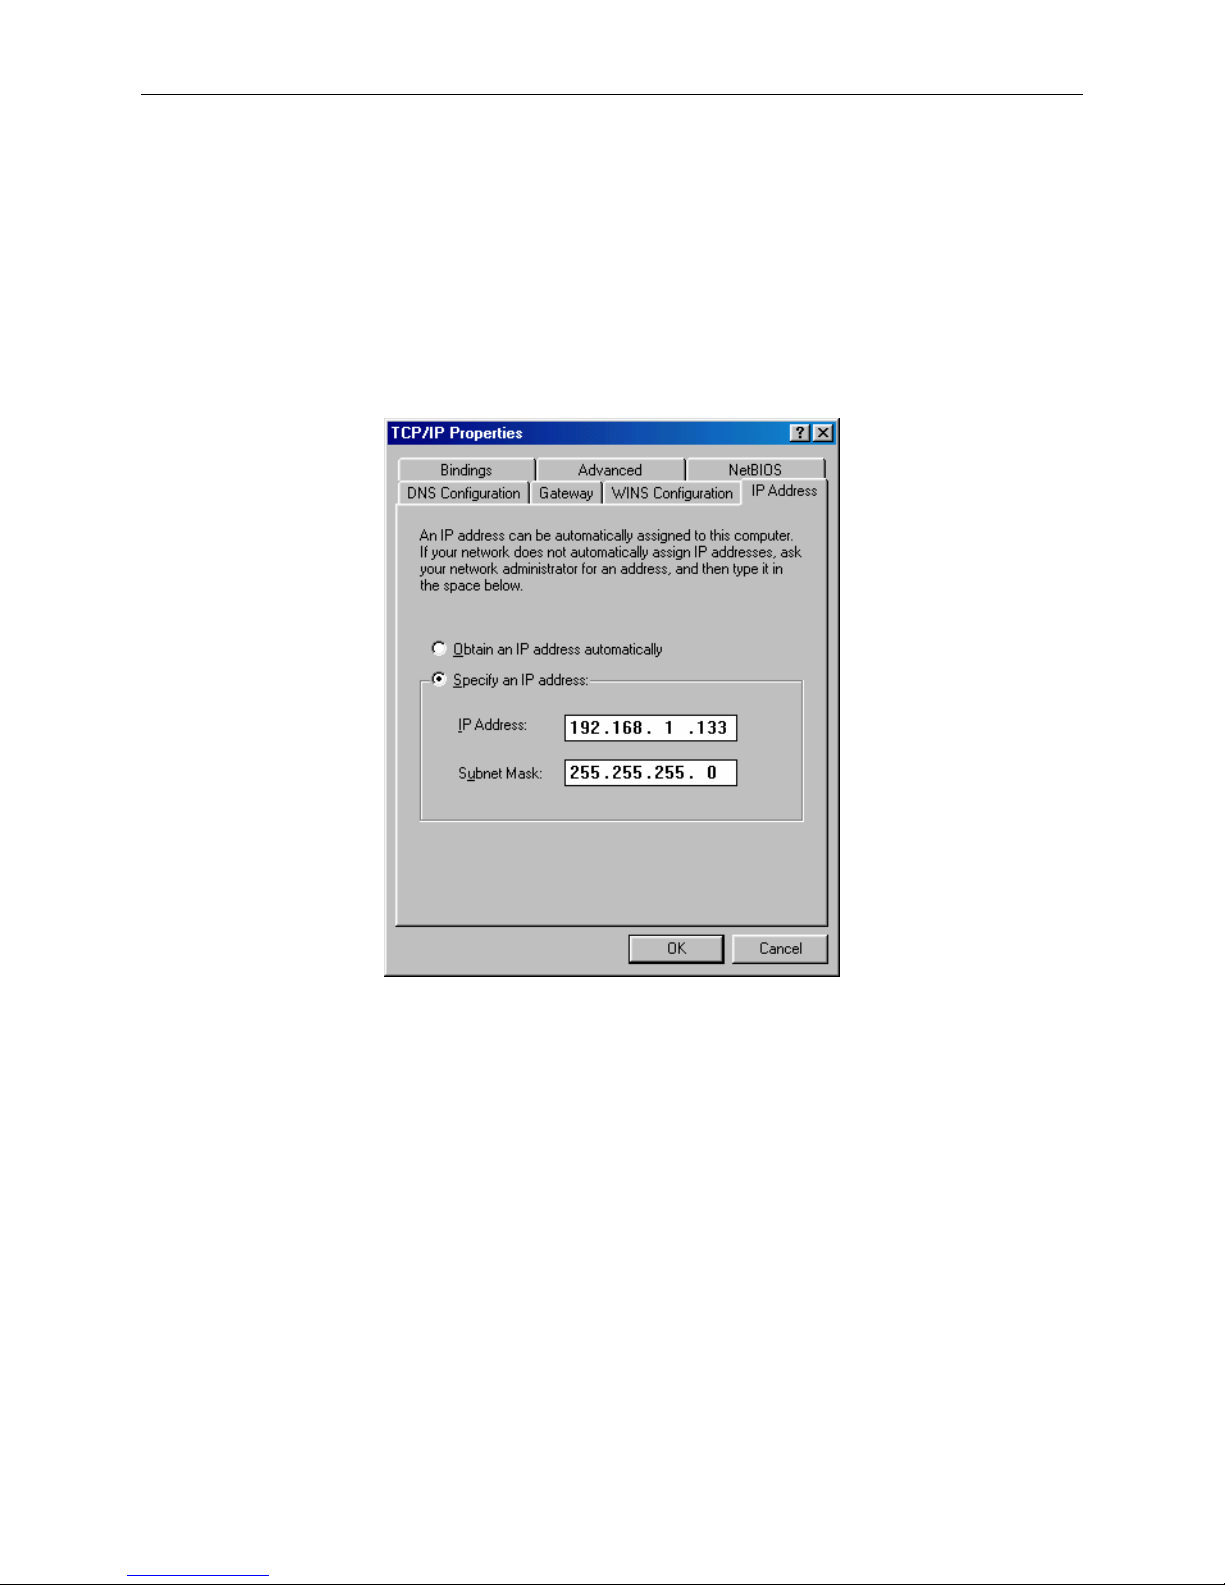
You can modify the IP address of your PC by from its TCP/IP definition. Follow the steps
below:
STEP 1: Enter the TCP/IP screen. (Under Windows XP, for example, click on Control Panel
from the Windows Start menu. Double-click on Network Connections.Right-click on
Local Area Connection and select Properties. Then select Internet Protocol and select
Properties.)
STEP 2: Change the IP address to the same domain as your endpoint (which has a default
address of 192.168.1.1 and a default subnet mask of 255.255.255.0). For example:
STEP 2: Click on OK to submit the settings.
1800-A2-GB20-00 11

Command Line Interface User’s Guide
1.2 Login
To access Telnet to manage your endpoint, complete the following steps: The default IP address
is 192.168.1.1. Use the default IP address to log on to the endpoint if it was not changed.
STEP 1
STEP 2
STEP 3
STEP 4
STEP 5
Make sure that the endpoint and your PC are on the same network
segment.
Connect your endpoint to a PC via the LAN
Click RUN from Windows Start menu and type:
telnet x.x.x.x
(where x.x.x.x represents the IP address of the endpoint).
You will be prompted to enter a User Name and Password. Enter
root
for the User Name and
1234
for the Password.
The first prompt of the CLI interface appears. The prompt shows the
user name (ex. 1234) used to log to the endpoint.
login: root
Password:
[1234@ home]$
Note: If you fail to access the endpoint, make sure both your PC and th e endpoint are in the sam e IP
domain. If you do not know the e ndpoi nt’s IP ad dress, pr ess the re cessed b utton o n the rear
panel to restore the default L AN IP a ddress (192.168 .1.1).
12 1800-A2-GB20-00

Command Line Interface User’s Guide
Chapter 2 General Operation
2.1 CLI Reference
All the system commands for various modules are organized in different directories. All these
directories are put under the directory called home. However, they can be listed using the ls
command. All the administration commands are put in home/auth. The current working
directory’s name is included in the command prompt (for example, [1234@bridge]$).
Each prompt consists of two parts: user name and directory. The two parts are divided by the
character @. For example, in the prompt 1234@bridge the first part (1234) is the user logged to
the endpoint. The second part (bridge) shows the current working directory.
The commands in the CLI are case sensitive.
1800-A2-GB20-00 13

Command Line Interface User’s Guide
2.2 Generic
The CLI provides generic commands for navigating between directories, listing the commands in
a directory, and providing help. All the generic commands can be executed from any directory.
2.2.1 ls
ls
When you enter a directory, you can use the ls command to display the available commands. It
lists all the commands registered in the current working directory.
EXAMPLE
[1234 @ ethernet]$ ls
A <CMD> setemac
A <CMD> rmon
A <CMD> pread
A <CMD> pwrite
A <CMD> elink
A <CMD> up
A <CMD> down
A <CMD> stat
[1234 @ ethernet]$
2.2.2 help
The help command is useful when you are not sure of the functions and usages of a command. It
displays help and usage text for the specified command. If nothing is specified, it displays help
text for all general commands.
The following line is an example usage of the help command you type at the home prompt.
[1234 @ home]$ help –o <command>
EXAMPLE
14 1800-A2-GB20-00

Command Line Interface User’s Guide
The following screen is an example of displaying the usage for the rip command.
[1234 @ home]$ help -o rip
DESCRIPTION
Contains RIP related commands
USAGE
rip
If nothing is specified, it displays information about all general commands.
2.2.3 accountstats
accountstats modulename
This command displays accounting details of the specified module.
2.2.4 exit
exit
If the user is working in the home directory, the session is closed. Otherwise exit changes the
working directory to its immediate parent directory.
2.2.5 version
version
This command displays the endpoint software version.
EXAMPLE
[1234 @ home]$ version
WLAN Gateway SoftwareV1.6.9
1800-A2-GB20-00 15

Command Line Interface User’s Guide
2.2.6 date
date
This command displays the endpoint date and time.
EXAMPLE
[1234 @ home]$ date
DATE (MM:DD:YYYY) 1:10:2002 TIME (H:M:S) 4:56:59
2.2.7 erase
erase
This command erases all the configurations in the system. That means the factory default settings
are retrieved.
2.2.8 save
save
This command saves the current configurations into flash memory. The current configurations
will be available after the system is booted or reset.
2.2.9 reboot
reboot
This command restarts the endpoint. You must reconnect to the endpoint after you run this
command. The endpoint will be rebooted with the saved configurations on the flash. If you
reboot the endpoint without saving the changes, those parameters will be lost.
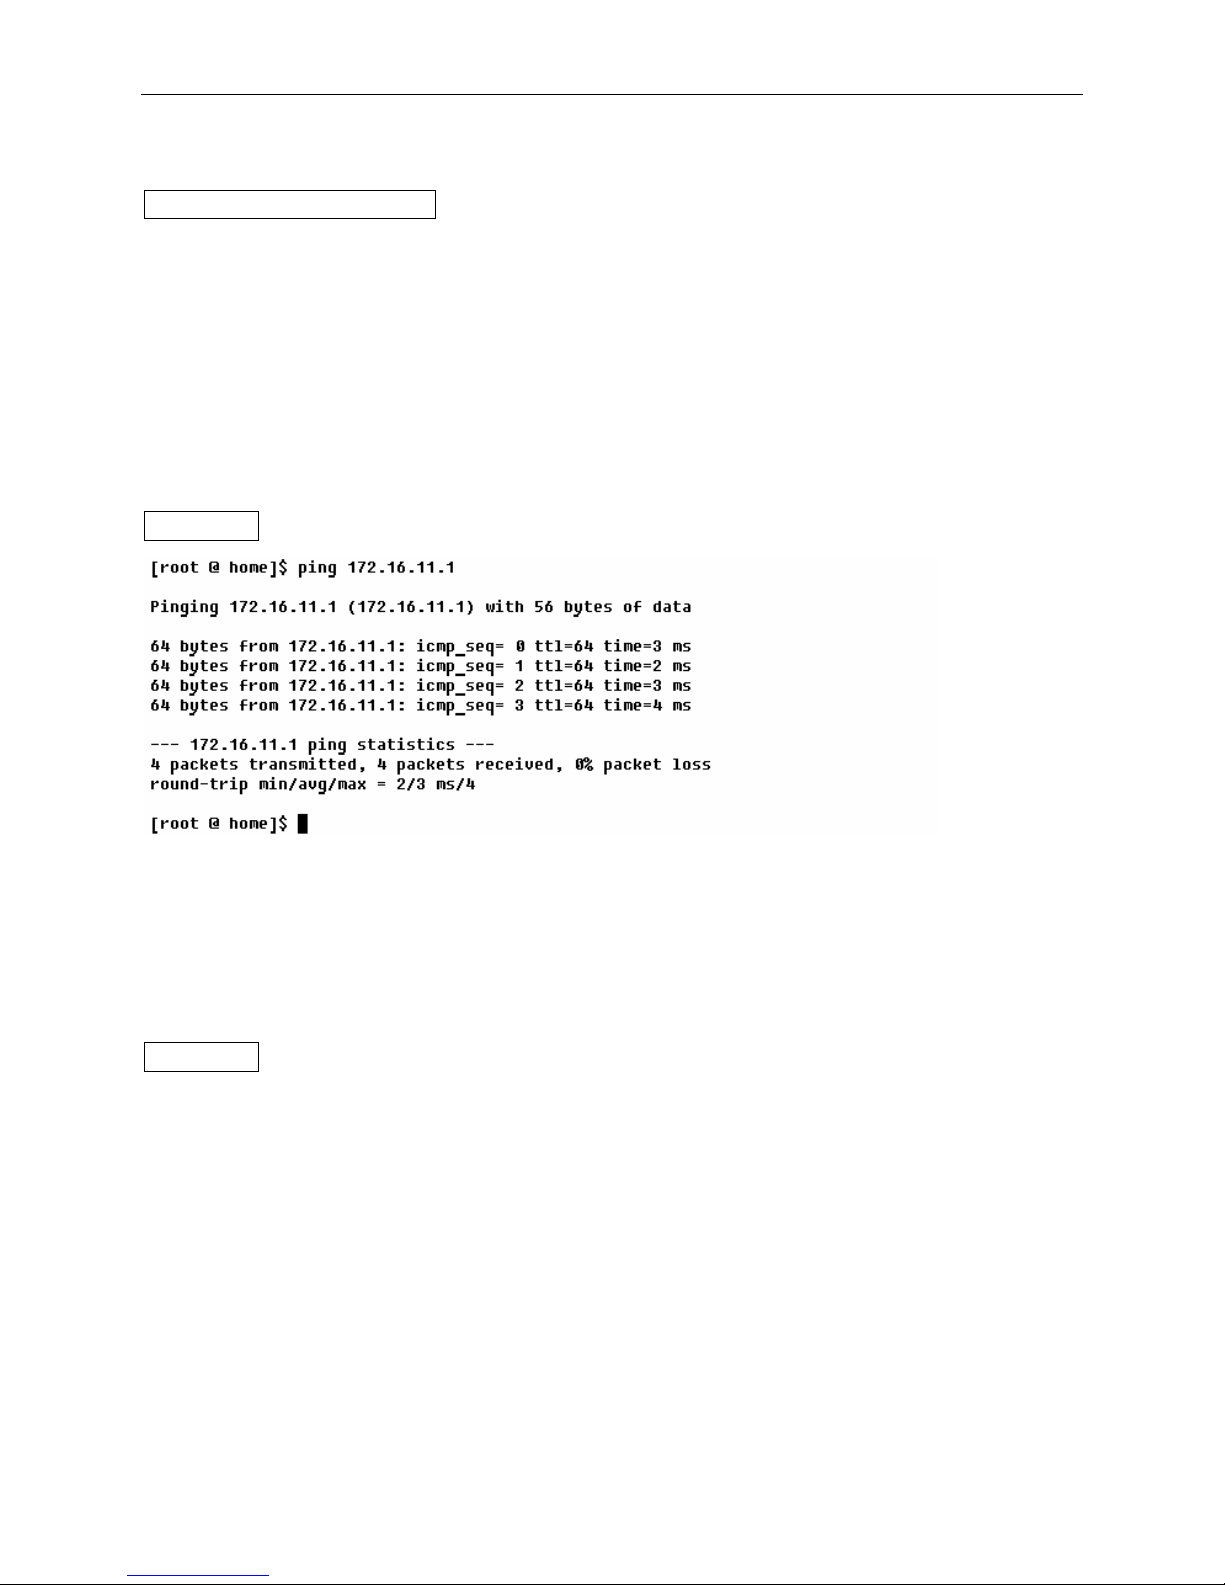
2.2.10 ping
ping address [ -o [ -s size ] ]
The utility ping utilizes the ICMP protocol's ECHO_REQUEST datagram to elicit an ICMP
ECHO_RESPONSE from the specified host or network gateway. If the host responds, ping will
print the response. By default, the ping command will send four ping requests to the host. This
diagnostic function can verify if the remote host is reachable for Telnet or FTP purposes.
If data size is not specified in the command, it will try 64 bytes for four times.
16 1800-A2-GB20-00
Command Line Interface User’s Guide
COMMAND DESCRIPTION
address
destination IP address you wish to ping in the form x.x.x.x, where each x is a decimal number 0
to 255.
size
Data size to ping the host. The accepted size is 56 bytes to 1492 bytes.
EXAMPLE
2.2.11 time
time
The time command reveals the elapsed time of how long the endpoint is powered on.
EXAMPLE
[1234 @ home]$ time
System Elapse Time : 23:21:46:
[1234 @ home]$
1800-A2-GB20-00 17

Command Line Interface User’s Guide
2.3 logger
logseverity
log
logftpserver
loginfo
logadd
2.3.1 logSeverity
logseverity -o error/info on/off
This command is used to set the trace for the log severity level.
COMMAND DESCRIPTION
error/info
This option specifies the severity level.
on/off
This option specifies weather the trace is set or not.
EXAMPLE
logseverity -o error on
This command will set the trace for the log level “error”.
logSeverity -o [error/info] [on/off ]
This command is used to set the specified log level as ON or OFF. By default, error and info log
level messages are off. There is no on/off option for exception log level messages. The exception
log messages are always displayed (on).
2.3.2 log
log -o [ [all] / [<modulename>] [<loglevel>]]
This command is used to display the logged messages. The logged messages will be displayed
based on the specified module name or the log level or both the module and log levels.
COMMAND DESCRIPTION
<loglevel>
18 1800-A2-GB20-00

Command Line Interface User’s Guide
Loglevel can be given as exception, error or info.
<module name>
Module name can be all, ip, tcp, udp, sockets, rawip, icmp, arp, igmp, app, cdcli, if, telnet, dns,
snmp, http, ping, ftp, ftpd, tftp, bootp, dhcpc, dhcps, qosbw, ipsec, ike, nat, firewall, diffserv,
logger, queuing, ipoa, pppoa, ethoa, httpproxy, ftpproxy.
EXAMPLE
log –o all
This command will displays all the logged messages.
log –o firewall
This command will display messages logged from the firewall module.
log –o error
This command will display messages logged based on the log level “error”.
log –o firewall error
This command will display the messages logged based on the log level “error” from the firewall
module.
2.3.3 logFtpServer
logFtpServer [server_address] [username] [password]
This command is used to configure the ftp server address, user login and password to store the
logger messages.
EXAMPLE
logftpserver 192.168.1.100 snaidu 12345
This command will configure the ftp server address as 192.168.1.100, username as snaidu and
password as 12345. While uploading the logged messages it opens a connection to the ftp server
on 192.168.1.100 and login as “snaidu”. Then it will store the log messages in the file named
“fwlogfile”.
2.3.4 loginfo
loginfo
1800-A2-GB20-00 19

Command Line Interface User’s Guide
This command displays the configured logger information. This will contain the trace
information, ftpserver, and login information.
EXAMPLE
[1234 @ logger]$ loginfo
Error Trace : OFF
Info Trace : OFF
Server Address : 192.168.26.10
User Name : firewall
Password : firewall
2.4 User Account
A default user account is provided to configure, maintain, and operate the endpoint in HTTP
(web), CLI, and FTP modes. The default user name is 1234, and the default password 1234. To
add, modify, delete, or list the user name and password, enter the auth directory.
[1234 @ home]$ auth
At the auth directory, you can use the ‘ls’ command to display the available commands:
[1234 @ home]$ auth
[1234 @ auth]$ ls
A <CMD> adduser
A <CMD> deluser
A <CMD> changepasswd
A <CMD> modifyuser
A <CMD> listusers
A <CMD> resetuser
[1234 @ auth]$
There are three management modes and two access privileges. The three modes are cli, http, and
ftp. The cli and http modes provide full parameters to configure, maintain, operate, and monitor
the endpoint. The ftp mode only allows software upgrade, configuration upgrade, and
configuration backup.
20 1800-A2-GB20-00

Command Line Interface User’s Guide
The two access privileges are admin and ordin. The admin privilege provides full right including
read and write accesses. The ordin privilege only allows reading and monitoring the parameters
via http or cli. An ftp user must have an admin privilege.
adduser
adduser username -o -services [services] -permissions [permissions]
services : [cli/ftp/http]
permissions : [admin/ordin]
Adds a new user to the system. This command asks to set password for the user. Only
administrators can use this command.
EXAMPLE
[1234 @ auth]$ adduser mrpizza -o -services cli -permissions ordin
Enter password:
Confirm password:
User Name Succesfully Added.
[1234 @ auth]$
deluser
Deluser <username>
Enter this command followed by the name of the user to be deleted. Only administrators can use
this command.
EXAMPLE
[1234 @ auth]$ deluser mrpizza
Successfully Deleted
[1234 @ auth]$
modifyuser
modifyuser <username> -o
-addservices <cli | ftp | http>
-delservices <cli | ftp | http>
-permissions <admin | ordin>
The modifyuser command modifies the properties of a user’s account.
1800-A2-GB20-00 21

Command Line Interface User’s Guide
COMMAND DESCRIPTION
<username>
The name of the user whose services or permissions are to be modified.
EXAMPLE
-addservices <cli | ftp | http>
Adds cli, ftp, or http services to the user.
-delservices <cli | ftp | http>
Removes cli, ftp, or http services from the user.
modifyuser xyz –o -addservices ftp -permissions ordin
Allows user “xyz” ordinary permissions to access the system via ftp. In addition, gives the user
“xyz” ordinary permissions. In other words user “xyz” is not an administrator.
modifyuser abc -o -delservices http
Prohibits user “abc” from accessing the system via http.
modifyuser xyz -o -addservices ftp delservices http -permissions ordin
Allows user “xyz” to access the system via ftp and prohibits that user from accessing the system
via http. In addition, gives the user “xyz” ordinary permissions. In other words user “xyz” is not
an administrator.
changepasswd
changepasswd <username>
Changes password of the existing user. This is an administrators command; ordinary users can
not use this. This command prompts for entering the old password before setting up the new
password.
EXAMPLE
[1234 @ auth]$ changepasswd
changepasswd username
[1234 @ auth]$ changepasswd pppoe
Enter old password:
Enter New password:
Confirm New password:
Password changed
[1234 @ auth]$
The command changes the password for user “pppoe.”
22 1800-A2-GB20-00

Command Line Interface User’s Guide
listusers
listusers
The listusers command lists all registered users to use cli/http/ftp.
EXAMPLE
[1234 @ auth]$ listusers
1 1234 cli http ftp ADMIN
2 pppoe http ADMIN
3 maylyne ORDIN
4 may ORDIN
5 pizza cli ftp ADMIN
[1234 @ auth]$
resetuser
The resetuser command resets the user password. This is an administrators command; ordinary
users can not use this. This command won’t prompt for inputting the old password while
command “changepasswd” will.
EXAMPLE
[1234 @ auth]$ resetuser pppoe
Enter New password:
Confirm New password:
Password changed
[1234 @ auth]$
Resets the password for user “pppoe.”
2.5 Ethernet IP Address
There are two configurable Ethernet interfaces, identified with eth0 and eth1 in CLI. Each
Ethernet interface provides two default IP addresses.
z Interface eth0- 192.168.1.1 (primary) and 192.168.1.2 (alias)
z Interface eth1- 192.168.2.1 (primary) and 192.168.2.2 (alias)
1800-A2-GB20-00 23

Command Line Interface User’s Guide
To set up an IP address and subnet mask for the Ethernet interface, use the following command
after the prompt of [1234 @ home]$.
ifconfig -o <interface-name> inet <address> [parameters]
ifconfig -o -a displays the information of the interfaces
ifconfig -o -l
parameters- mtu <n 72-1500>, broadcast <address>, netmask <mask>, up, down
COMMAND DESCRIPTION
<interface name>
The LAN interface to be configured. Type eth0 for Interface Ethernet 1, and type eth0 for
Interface Ethernet 2.
<address>
The IP address or subnet mask to be assigned to the interface. Dot-notation is used to enter the IP
address (for example 192.168.2.1).
netmask <mask>
The netmask is used to extract the network portion of the IP address. It also specifies how much
of the IP address is to be reserved for subdividing the network into sub networks, which are
taken from the host field of the address. Netmask is added with the interface IP address to get a
network ID that is used in routing to indicate that this network is reachable through these
interfaces. The mask can be specified as a single hexadecimal number with a leading 0x for
example 0xffffff00, or with a dot-notation Internet address 255.255.255.0
alias <address>
To add the alias IP address
-alias <address>
To delete the alias IP address
2.5.1 Primary IP address
To assign an IP address of 172.0.0.1 with a 24-bit subnet mask to the eth1 interface, use this
command:
ifconfig eth1 172.0.0.1 netmask 255.255.255.0
After typing the command, the home prompt displays. Save the changes by typing save. The
following message displays and shows that the changes are successful.
Configuration saved successfully
24 1800-A2-GB20-00

Command Line Interface User’s Guide
2.5.2 Alias IP Address
To set up the alias IP address, use this command:
[1234 @ home]$ ifconfig –o <interface name> inet <address> alias netmask <address>
EXAMPLE
[1234 @ home]$ ifconfig -o eth0 inet 172.1.1.1 alias netmask 255.255.255.0
The above example assigns an alias IP address of 172.1.1.1 with a 24-bit subnet mask to the eth0
interface.
[1234 @ home]$ ifconfig -o <interface name> inet <address> -alias netmask <address>
To delete the alias IP address, use this command:
2.6 Rarpd
add
list
rarpd
delete
The rarpd commands are put in the rarpd directory, used to get the IP address of diskless system.
2.6.1 add
add <0xH/Waddress > <IPAddress >
Used to add Hardware address and IP address into the DataBase.
COMMAND DESCRIPTION
<0xH/Waddress >
Hardware address in hexadecimal format.
<IPAddress >
IP address in dot notation.
1800-A2-GB20-00 25

Command Line Interface User’s Guide
EXAMPLE
add 0x112233445566 192.168.3.4
Adds the H/W address and IP Address mapping in the database.
2.6.2 delete
delete <0xH/Waddress >
Deletes an entry in the existing RARP DataBase.
<0xH/Waddress >
Hardware address in hexadecimal format.
EXAMPLE
delete 0x112233445566
Deletes mapping of H/W address 11:22:33:44:55:66 to IP Address, from the database.
2.6.3 list
list
Lists the RARP DataBase entries.
EXAMPLE
[1234 @ rarpd]$ list
H/W ADDR IP ADDRESS
11:22:33:44:55:66 192.168.3.4
26 1800-A2-GB20-00

Command Line Interface User’s Guide
2.6.4 rarpd
rarpd <-a | interface>
The rarpd command starts the RARPD on the specified interface or all the interfaces.
EXAMPLE
rarpd eth0
This command starts the RARPD on eth0 interface.
rarpd eth0
If RARPD is already running the above command, it displays: “Rarpd is already running on the
interface”
rarpd -a
This command starts the RARPD on all the interfaces.
2.7 timeout
timeout -t(telnet) n(seconds)
The timeout command sets up the timeout period for the telnet session
COMMAND DESCRIPTION
<seconds>
the timeout period in seconds, which can be up to 300 seconds.
EXAMPLE
timeout -t 300
The command configures the timeout period to 300 seconds.
2.8 baudrate
baudrate <value>
1800-A2-GB20-00 27

Command Line Interface User’s Guide
COMMAND DESCRIPTION
<value>
The baud rate of the console session. 0 represents 9600 bps; 1 represents 38400 bps; 2 represents
57600 bps. 3 represents 115200 bps.
EXAMPLE
baudrate 3
The baudrate command configures the baud rate to 115200 bps.
28 1800-A2-GB20-00
Command Line Interface User’s Guide
Chapter 3 Quick Configuration
This chapter describes how to configure the endpoint for the first time using the CLI. The
endpoint can work after these settings are complete.
3.1 RFC 1483 Bridged
To enable the bridging function of the endpoint, enter the sndcp directory from the prompt of
[1234 @ sndcp]$. In the sndcp directory, type bridge to enter the bridge directory.
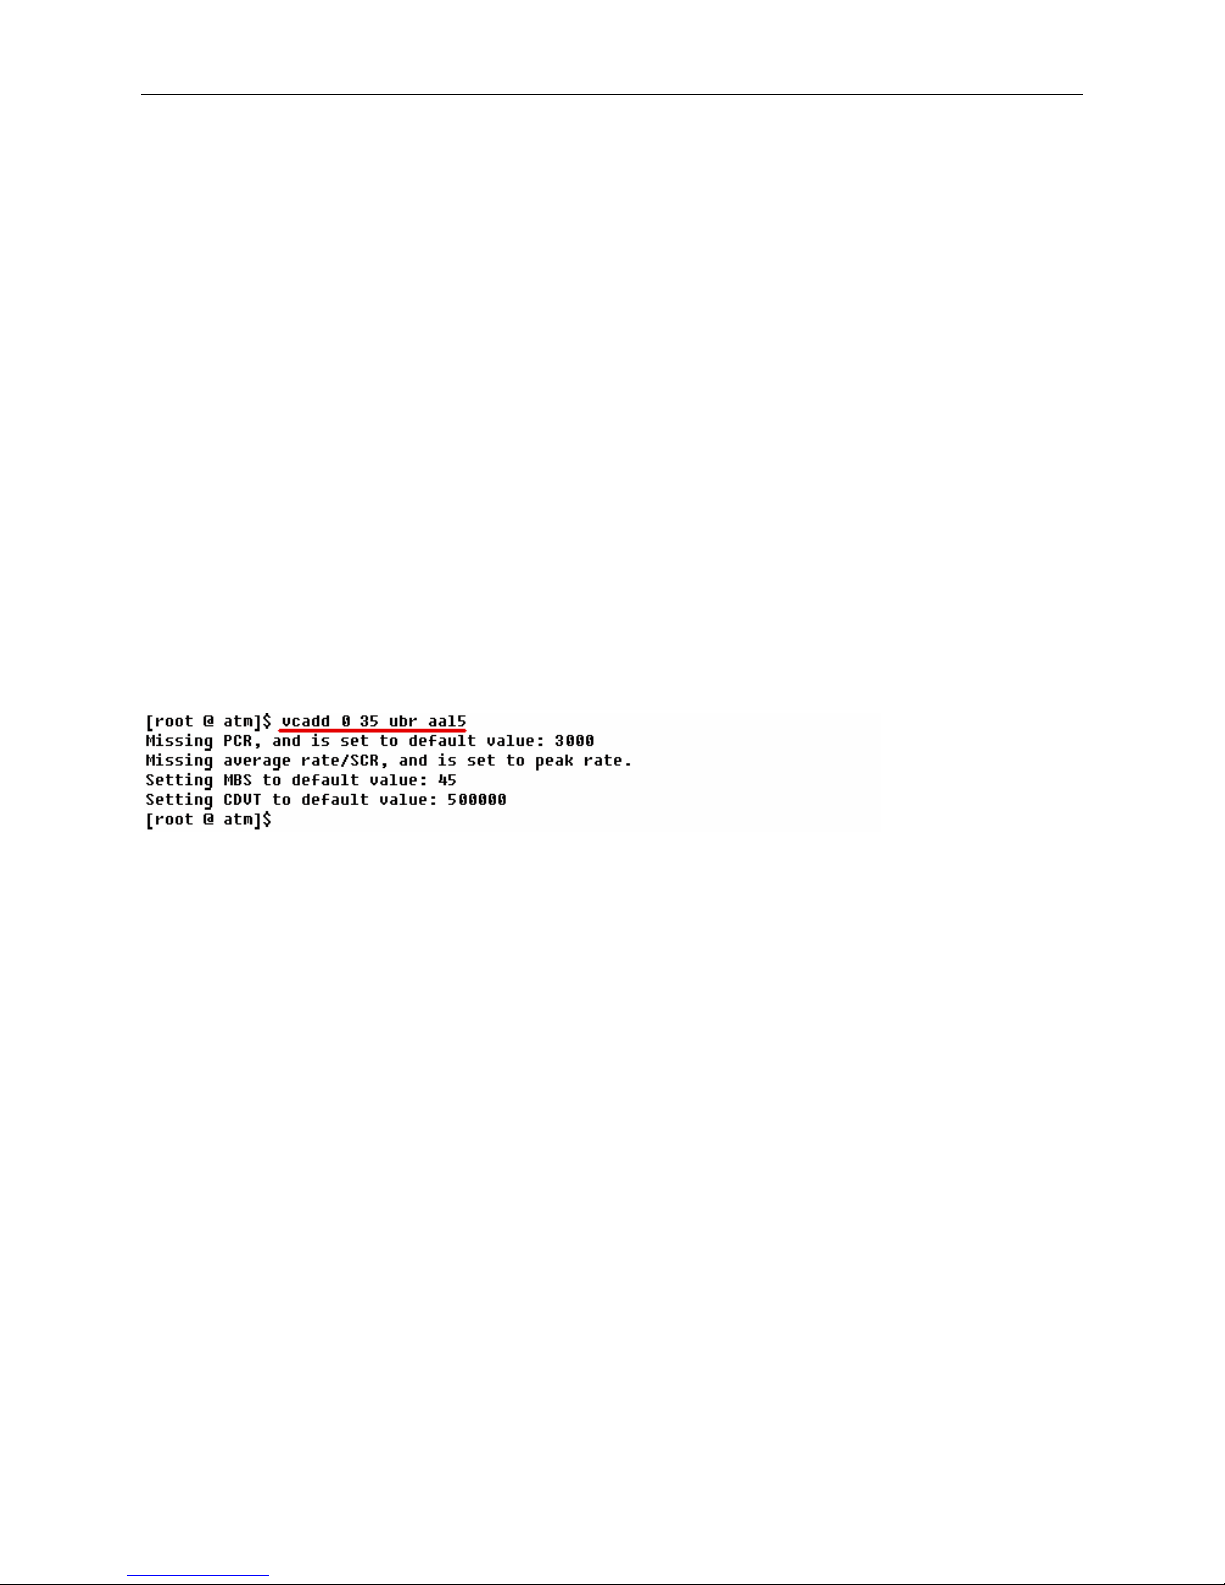
3.1.1 PART 1 Create a PVC
1. Type atm at the home prompt to enter the atm directory.
2. Type vcadd 0 35 ubr aal5
3. At the atm prompt, type home or exit to return to the home prompt.
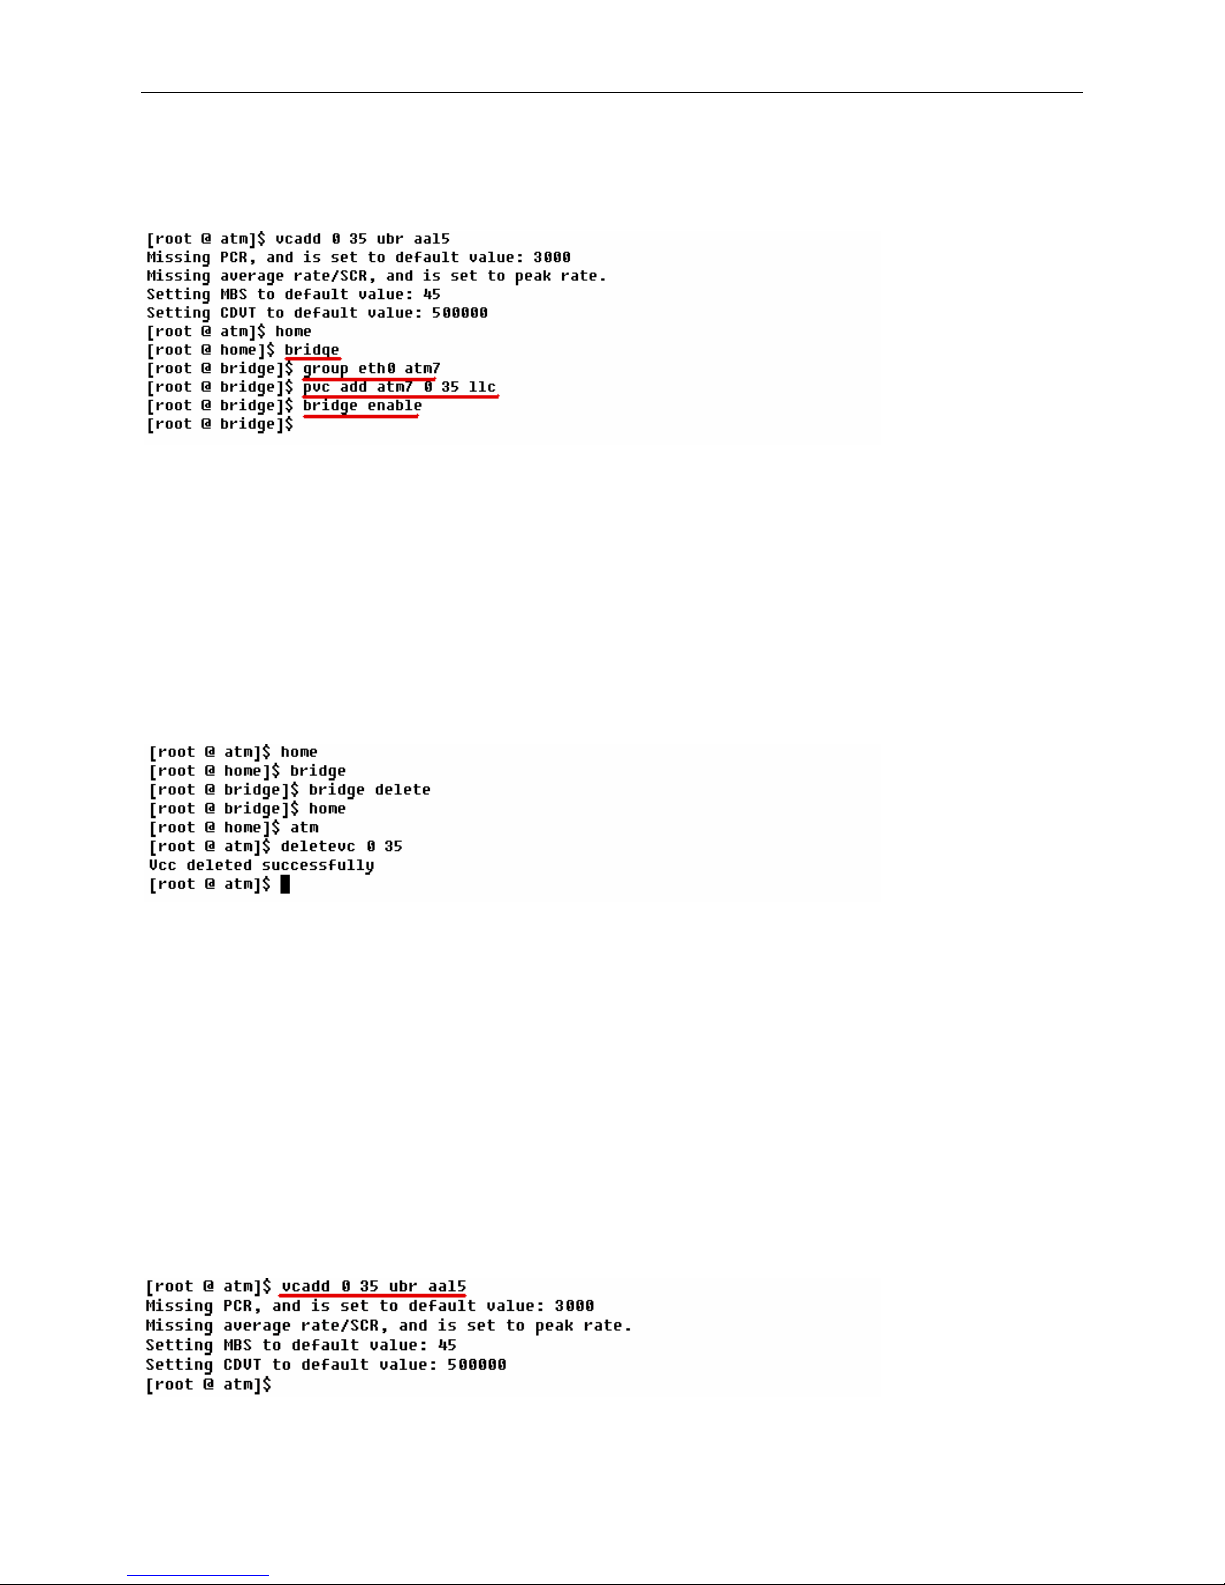
3.1.2 PART 2 Set the PVC to RFC 1483 Bridged
1. If there is no other RFC 1483 PVC set up, you must join the Ethernet interface to an ATM
interface (atm0 to atm7). Therefore, traffic can be transferred between the two interfaces. To
do this, type bridge to enter the bridge prompt. By factory default, interfaces Ethernet, atm7,
and wlan0 are joined to the bridge.
2. Type group eth0 atm7. In this case, atm7 is used. You can choose any other atm interface
you wish.
3. If the setup is successful, the bridge prompt pops up. If a PVC was set up other than the new
one, the message pops up: Group Exist or Interface Busy
You must delete the old PVC or PVCs to add the new group.
4. Under the bridge prompt, type pvc add atm7 0 35 llc. In this case, atm7 is used. You must
choose the atm interface that is joined to the bridge.
1800-A2-GB20-00 29
Command Line Interface User’s Guide
5. Type bridge enable.
6. If the bridge prompt pops up, a PVC 0/35 is successfully enabled for the RFC 1483 Bridged
mode.
3.1.3 PART 3 Delete the PVC for RFC1483 Bridged
To delete the PVC set up for the RFC 1483 Bridged, you must delete the service first under the
bridge prompt. Secondly, delete the VC under the atm prompt. The following screen is an
example.
3.2 RFC 1483 Routed
There are two major parts to set up a RFC 1483 Bridged PVC. The first part is to add a PVC
under the atm directory. The second part is to assign the new PVC to the RFC1483 Bridged
mode under the bridge directory. The following is an example of adding an RFC1483 Bridged
PVC at 0/35.
3.2.1 PART 1 Create a new VC
1. Type atm to enter the home prompt.
2. Type vcadd 0 35 ubr aal5
30 1800-A2-GB20-00
 Loading...