

Page 1

You have accessed an older version of a
Paradyne product document.
Paradyne is no longer a subsidiary of
AT&T. Any reference to AT&T Paradyne is
amended to read Paradyne Corporation.
Page 2

COMSPHERE
3000 Series Carrier
Installation Manual
Document No. 3000-A2-GA31-80
Printed on recycled paper
P
ara
December 1994
dyn
e
Page 3

COMSPHERE 3000 Series Carrier
COMSPHERE
3000 Series Carrier
Installation Manual
3000-A2-GA31-80
9th Edition (December 1994)
Changes and enhancements to the product and to the information herein will be documented and issued as a new release.
A customer opinion card is provided at the front of this publication and your comments are appreciated. If the form has
been removed, address comments to AT&T Paradyne Corporation, Technical Publications, 8545 126th Ave. N., P.O. Box
2826, Largo, Florida, 34649-2826. AT&T Paradyne may use or distribute any of the information supplied, as appropriate,
without incurring any obligation whatsoever.
ACCULINK is a registered trademark of AT&T.
ACCUNET is a registered trademark of AT&T.
ANALYSIS is a trademark of AT&T.
AT is a trademark of Hayes Microcomputer Products, Inc.
COMSPHERE is a registered trademark of AT&T.
DATAPHONE is a registered trademark of AT&T.
Dataroute is a registered trademark of Bell Canada.
MCI is a registered trademark of MCI Communications, Inc.
Microsoft is a registered trademark of Microsoft Corporation.
US SPRINT is a registered trademark of US SPRINT Communications Company.
Windows is a trademark of Microsoft Corporation.
COPYRIGHT E 1994 AT&T Paradyne Corporation. All rights reserved.
This publication is protected by federal copyright law. No part of this publication may be copied or distributed, transmitted, transcribed, stored in a retrieval system,
or translated into any human or computer language in any form or by any means, electronic, mechanical, magnetic, manual or otherwise, or disclosed to third parties
without the express written permission of A T&T Paradyne Corporation, 8545 126th A venue North, P.O. Box 2826, Largo, Florida 34649-2826.
AT&T Paradyne Corporation makes no representation or warranties with respect to the contents hereof and specifically disclaims any implied warranties of
merchantability or fitness for a particular purpose. Further, AT&T Paradyne Corporation reserves the right to revise this publication and to make changes from
time to time in the contents hereof without obligation of AT&T Paradyne Corporation to notify any person of such revision or changes.
A December 1994 3000-A2-GA31-80
Page 4

Important Safety Instructions
1. Read and follow all warning notices and instructions marked on the product or
included in the manual.
2. This product is intended to be used with a three-wire grounding type plug - a plug
which has a grounding pin. This is a safety feature. Equipment grounding is vital to
ensure safe operation. Do not defeat the purpose of the grounding type plug by
modifying the plug or using an adaptor.
Prior to installation, use an outlet tester or a voltmeter to check the ac receptacle for
the presence of earth ground. If the receptacle is not properly grounded, the
installation must not continue until a qualified electrician has corrected the problem.
If a three-wire grounding type power source is not available, consult a qualified
electrician to determine another method of grounding the equipment.
The dc configuration of this product is to be grounded by connecting an external wire
between the building ground and the equipment ground screw on the rear of the
power supply assembly. Consult a qualified electrician to ensure that the ground
connections are connected.
Safety Instructions
3. Slots and openings in the cabinet are provided for ventilation. To ensure reliable
operation of the product and to protect it from overheating, these slots and openings
must not be blocked or covered.
4. Do not allow anything to rest on the power cord and do not locate the product where
persons will walk on the power cord.
5. Do not attempt to service this product yourself, as opening or removing covers may
expose you to dangerous high voltage points or other risks. Refer all servicing to
qualified service personnel.
6. General purpose cables are provided with this product. Special cables, which may be
required by the regulatory inspection authority for the installation site, are the
responsibility of the customer.
7. When installed in the final configuration, the product must comply with the applicable
Safety Standards and regulatory requirements of the country in which it is installed. If
necessary, consult with the appropriate regulatory agencies and inspection
authorities to ensure compliance.
8. A rare phenomenon can create a voltage potential between the earth grounds of two
or more buildings. If products installed in separate buildings are interconnected, the
voltage potential may cause a hazardous condition. Consult a qualified electrical
consultant to determine whether or not this phenomenon exists and, if necessary,
implement corrective action prior to interconnecting the products.
In addition, if the equipment is to be used with telecommunications circuits, take the
following precautions:
– Never install telephone wiring during a lightning storm.
– Never install telephone jacks in wet locations unless the jack is specifically designed
for wet locations.
– Never touch uninsulated telephone wires or terminals unless the telephone line has
been disconnected at the network interface.
– Use caution when installing or modifying telephone lines.
– Avoid using a telephone (other than a cordless type) during an electrical storm.
There may be a remote risk of electric shock from lightning.
– Do not use the telephone to report a gas leak in the vicinity of the leak.
B3000-A2-GA31-80 December 1994
Page 5

COMSPHERE 3000 Series Carrier
Notices
" " " " "
" !
" "" !
C December 1994 3000-A2-GA31-80
Page 6

Table of Contents
Preface
Objectives and Reader Assumptions vii. . . . . . . . . . . . . . . . . . . . . . . . . . .
Abstract vii. . . . . . . . . . . . . . . . . . . . . . . . . . . . . . . . . . . . . . . . . . . . . . . . .
Related Documents vii. . . . . . . . . . . . . . . . . . . . . . . . . . . . . . . . . . . . . . . .
1. Introduction
Overview 1-1. . . . . . . . . . . . . . . . . . . . . . . . . . . . . . . . . . . . . . . . . . . . . . . .
Features 1-1. . . . . . . . . . . . . . . . . . . . . . . . . . . . . . . . . . . . . . . . . . . . . . . . .
Technical Specifications 1-3. . . . . . . . . . . . . . . . . . . . . . . . . . . . . . . . . . . .
Equipment Warranty and Support 1-8. . . . . . . . . . . . . . . . . . . . . . . . . . . . .
2. Installation Planning
Overview 2-1. . . . . . . . . . . . . . . . . . . . . . . . . . . . . . . . . . . . . . . . . . . . . . . .
Customer Responsibilities 2-2. . . . . . . . . . . . . . . . . . . . . . . . . . . . . . . . . . .
Installation Considerations 2-2. . . . . . . . . . . . . . . . . . . . . . . . . . . . . . . . . . .
3. Installation
Overview 3-2. . . . . . . . . . . . . . . . . . . . . . . . . . . . . . . . . . . . . . . . . . . . . . . .
Cabinet Unpacking and Setup 3-4. . . . . . . . . . . . . . . . . . . . . . . . . . . . . . . .
Carrier Installation 3-5. . . . . . . . . . . . . . . . . . . . . . . . . . . . . . . . . . . . . . . . .
Power Transformer Unit Installation 3-10. . . . . . . . . . . . . . . . . . . . . . . . . . .
Fan Module Installation 3-15. . . . . . . . . . . . . . . . . . . . . . . . . . . . . . . . . . . . .
Shared Diagnostic Control Panel (SDCP) Installation 3-17. . . . . . . . . . . . .
Speaker Panel Installation 3-19. . . . . . . . . . . . . . . . . . . . . . . . . . . . . . . . . . .
Shared Diagnostic Unit (SDU) Installation 3-22. . . . . . . . . . . . . . . . . . . . . .
Auxiliary Backplane Installation 3-32. . . . . . . . . . . . . . . . . . . . . . . . . . . . . .
Network Interface Installation 3-37. . . . . . . . . . . . . . . . . . . . . . . . . . . . . . . .
Circuit Card Installation 3-47. . . . . . . . . . . . . . . . . . . . . . . . . . . . . . . . . . . . .
i3000-A2-GA31-80 December 1994
Page 7

COMSPHERE 3000 Series Carrier
Appendices
Glossary
Index
A. COMSPHERE Interface Connections A-1. . . . . . . . . . . . . . . . . . . . . .
B. Models 3151/3161 Interface Connections B-1. . . . . . . . . . . . . . . . . . .
C. Equipment List C-1. . . . . . . . . . . . . . . . . . . . . . . . . . . . . . . . . . . . . . . .
ii December 1994 3000-A2-GA31-80
Page 8

Table of Contents
List of Figures
Figure Page
1-1 COMSPHERE 3000 Series Carrier 1-2. . . . . . . . . . . . . . . . . . . . . . . . . . . . . . . . . . . . . .
3-1 COMSPHERE 3000 Series Carrier Assembly 3-2. . . . . . . . . . . . . . . . . . . . . . . . . . . . .
3-2 COMSPHERE 3000 Series Carrier Mounting Brackets 3-6. . . . . . . . . . . . . . . . . . . . . .
3-3 Installation of First Carrier into Cabinet with Threaded Screw Holes 3-7. . . . . . . . . . .
3-4 Installation of First Carrier into Cabinet with No Threaded Screw Holes 3-8. . . . . . . .
3-5 72-Inch Cabinet Fully Configured with Six COMSPHERE 3000 Series Carriers 3-9. .
3-6 Power Transformer Unit Installation 3-10. . . . . . . . . . . . . . . . . . . . . . . . . . . . . . . . . . . . .
3-7 COMSPHERE 3000 Series Carrier (Rear) 3-11. . . . . . . . . . . . . . . . . . . . . . . . . . . . . . . .
3-8 Alarm Output or Ground Strap T erminal Installation 3-13. . . . . . . . . . . . . . . . . . . . . . . .
3-9 Alarm Output Contacts 3-14. . . . . . . . . . . . . . . . . . . . . . . . . . . . . . . . . . . . . . . . . . . . . . .
3-10 Fan Module Installation 3-16. . . . . . . . . . . . . . . . . . . . . . . . . . . . . . . . . . . . . . . . . . . . . . .
3-11 Shared Diagnostic Control Panel 3-17. . . . . . . . . . . . . . . . . . . . . . . . . . . . . . . . . . . . . . . .
3-12 Shared Diagnostic Control Panel (SDCP) Installation 3-18. . . . . . . . . . . . . . . . . . . . . . .
3-13 Models 3811/3911 Speaker Panel Installation Directly to Cabinet Rails 3-20. . . . . . . . .
3-14 SDU Faceplate 3-22. . . . . . . . . . . . . . . . . . . . . . . . . . . . . . . . . . . . . . . . . . . . . . . . . . . . . .
3-15 Shared Diagnostic Unit Circuit Card, Rear View 3-23. . . . . . . . . . . . . . . . . . . . . . . . . . .
3-16 Circuit Pack Lock 3-26. . . . . . . . . . . . . . . . . . . . . . . . . . . . . . . . . . . . . . . . . . . . . . . . . . .
3-17 NMS to a COMSPHERE 3000 Series Carrier Connection 3-28. . . . . . . . . . . . . . . . . . . .
3-18 Daisy Chaining of Devices into a COMSPHERE 3000 Series Carrier 3-29. . . . . . . . . . .
3-19 Daisy Chaining of Devices from a COMSPHERE 3000 Series Carrier 3-30. . . . . . . . . .
3-20 NMS and Shared Diagnostic Control Panel Interface Connections 3-31. . . . . . . . . . . . .
3-21 Auxiliary Backplane Being Installed over Slots 9–16 of the
COMSPHERE 3000 Series Carrier 3-32. . . . . . . . . . . . . . . . . . . . . . . . . . . . . . . . . . . .
3-22 COMSPHERE 3000 Series Carrier with Two Auxiliary Backplanes 3-33. . . . . . . . . . . .
3-23 T1 Network Cable Retainer 3-34. . . . . . . . . . . . . . . . . . . . . . . . . . . . . . . . . . . . . . . . . . . .
3-24 Auxiliary Backplane 3-35. . . . . . . . . . . . . . . . . . . . . . . . . . . . . . . . . . . . . . . . . . . . . . . . .
3-25 COM Port Adapter 3-36. . . . . . . . . . . . . . . . . . . . . . . . . . . . . . . . . . . . . . . . . . . . . . . . . . .
3-26 PC Attached to Auxiliary Backplane Using COM Port Adapter and Cable 3-36. . . . . . .
3-27 Network Interface Cable Installation 3-37. . . . . . . . . . . . . . . . . . . . . . . . . . . . . . . . . . . . .
3-28 Dial/Lease Modem Interconnection Schemes 3-39. . . . . . . . . . . . . . . . . . . . . . . . . . . . . .
3-29 DSU, DBM, or DSU with V.32 or 2-Wire Switched 56 DBM
Interconnection Schemes 3-40. . . . . . . . . . . . . . . . . . . . . . . . . . . . . . . . . . . . . . . . . . . .
3-30 DSU with 4-Wire Switched 56 DBM Interconnection Schemes 3-41. . . . . . . . . . . . . . . .
3-31 Network Interface Module 3-44. . . . . . . . . . . . . . . . . . . . . . . . . . . . . . . . . . . . . . . . . . . . .
3-32 Dial Network Interface Module Installation 3-45. . . . . . . . . . . . . . . . . . . . . . . . . . . . . . .
3-33 Network Interface for Models 3151 and 3161 Using an Auxiliary Backplane 3-46. . . . .
3-34 Modular DSU or Dial/Lease Modem, and Rear Connector Plate 3-47. . . . . . . . . . . . . . .
3-35 Modular DSU-TDM or DSU-MCMP and Connector Module 3-48. . . . . . . . . . . . . . . . .
3-36 Model 3151 and 3161 Circuit Cards 3-49. . . . . . . . . . . . . . . . . . . . . . . . . . . . . . . . . . . . .
iii3000-A2-GA31-80 December 1994
Page 9

COMSPHERE 3000 Series Carrier
Figure Page
3-37 Circuit Card Installation 3-51. . . . . . . . . . . . . . . . . . . . . . . . . . . . . . . . . . . . . . . . . . . . . . .
3-38 Cabling and Ferrite Chokes 3-52. . . . . . . . . . . . . . . . . . . . . . . . . . . . . . . . . . . . . . . . . . . .
A-1 50-Pin Cable Connector A-1. . . . . . . . . . . . . . . . . . . . . . . . . . . . . . . . . . . . . . . . . . . . . . .
A-2 50-Pin to Modular Plug Digital/Lease Conversion Cable A-4. . . . . . . . . . . . . . . . . . . .
A-3 Connectors on the COMSPHERE 3000 Series Carrier Backplane A-9. . . . . . . . . . . . . .
B-1 Auxiliary Backplane Connectors B-2. . . . . . . . . . . . . . . . . . . . . . . . . . . . . . . . . . . . . . . .
B-2 T1 Line Interface Multiplug Adapter with RJ48C Connector
B-3 T1 Network Interface Multiport Adapter with 50-pin RJ48H to
B-4 DTE (DSX-1) Cable B-7. . . . . . . . . . . . . . . . . . . . . . . . . . . . . . . . . . . . . . . . . . . . . . . . .
B-5 COM Port-to-PC Cable (Feature Number 3100-F1-550) B-8. . . . . . . . . . . . . . . . . . . . .
B-6 COM Port-to-PC Adapter (Feature Number 3100-F1-920) B-9. . . . . . . . . . . . . . . . . . .
B-7 COM Port Adapter B-9. . . . . . . . . . . . . . . . . . . . . . . . . . . . . . . . . . . . . . . . . . . . . . . . . . .
B-8 COM Port-to-Terminal/Printer Cable (Feature Number 3100-F1-540) B-10. . . . . . . . . .
B-9 EIA-530A to RS449 Adapter Cable (Feature Number 3100-F1-580) B-13. . . . . . . . . . . .
B-10 EIA-530A to V.35 Adapter Cable (Feature Number 3100-F1-570) B-15. . . . . . . . . . . . .
B-11 External Clock Connector B-16. . . . . . . . . . . . . . . . . . . . . . . . . . . . . . . . . . . . . . . . . . . . .
B-12 Diagnostic Channel Extension Cable Connectors B-17. . . . . . . . . . . . . . . . . . . . . . . . . . .
B-13 Diagnostic Channel Extension Cable (Feature Number 3100-F1-910) B-17. . . . . . . . . . .
(Feature Number 3100-F1-930) B-4. . . . . . . . . . . . . . . . . . . . . . . . . . . . . . . . . . . . . . .
8-pin RJ48C Connectors (Feature Number 3100-F1-930) B-5. . . . . . . . . . . . . . . . . .
iv December 1994 3000-A2-GA31-80
Page 10

Table of Contents
List of Tables
Table Page
1-1 Technical Specifications for the COMSPHERE 3000 Series Carrier 1-3. . . . . . . . . . . .
3-1 Fan Module Cooling Requirements 3-15. . . . . . . . . . . . . . . . . . . . . . . . . . . . . . . . . . . . . .
3-2 Shared Diagnostic Control Panel Status Indicators 3-17. . . . . . . . . . . . . . . . . . . . . . . . . .
3-3 Shared Diagnostic Unit Status Indicators 3-23. . . . . . . . . . . . . . . . . . . . . . . . . . . . . . . . .
3-4 Carrier Address DIP Switches 3-24. . . . . . . . . . . . . . . . . . . . . . . . . . . . . . . . . . . . . . . . . .
3-5 Carrier Address Assignment 3-25. . . . . . . . . . . . . . . . . . . . . . . . . . . . . . . . . . . . . . . . . . .
3-6 Protocol DIP Switches 3-25. . . . . . . . . . . . . . . . . . . . . . . . . . . . . . . . . . . . . . . . . . . . . . . .
A-1 Digital or Analog Leased-Line Network Interface A-2. . . . . . . . . . . . . . . . . . . . . . . . . .
A-2 RJ21X (Permissive) Dial and 2-Wire Switched 56 Network Interface Module A-2. . . .
A-3 RJ27X (Programmable) Dial Network Interface Module A-3. . . . . . . . . . . . . . . . . . . . .
A-4 SJA57 4-Wire Switched 56 Network Interface Module A-3. . . . . . . . . . . . . . . . . . . . . .
A-5 SDU – NMS Interface A-4. . . . . . . . . . . . . . . . . . . . . . . . . . . . . . . . . . . . . . . . . . . . . . . .
A-6 SDU – Shared Diagnostic Control Panel Interface A-4. . . . . . . . . . . . . . . . . . . . . . . . . .
A-7 Pinout for 3600-F2-503 (Digital and JM8 Leased) Network Interface Cables A-5. . . . .
A-8 Pinout for 3600-F2-504 (Dial Programmable – RJ45S) Network Interface Cable A-6. .
A-9 Pinout for 3600-F1-505 (Dial Permissive – RJ11C) Network Interface Cable A-7. . . . .
A-10 Pinout for 3000-F1-009 (50-Pin to Eight 6-Pin Modular) Network
Interface Cable A-8. . . . . . . . . . . . . . . . . . . . . . . . . . . . . . . . . . . . . . . . . . . . . . . . . . . .
A-11 Connectors on the COMSPHERE 3000 Series Carrier’ s Backplane A-9. . . . . . . . . . . . .
A-12 D-Lead Control Interface A-10. . . . . . . . . . . . . . . . . . . . . . . . . . . . . . . . . . . . . . . . . . . . . .
B-1 Auxiliary Backplane Connectors B-3. . . . . . . . . . . . . . . . . . . . . . . . . . . . . . . . . . . . . . . .
B-2 T1 Network Interface Connector (RJ48H) B-6. . . . . . . . . . . . . . . . . . . . . . . . . . . . . . . .
B-3 DTE (DSX-1) Interface Connector (J3) B-7. . . . . . . . . . . . . . . . . . . . . . . . . . . . . . . . . . .
B-4 COM Port Adapter Connector (J6) B-10. . . . . . . . . . . . . . . . . . . . . . . . . . . . . . . . . . . . . .
B-5 EIA-530A Port Interface Connector B-11. . . . . . . . . . . . . . . . . . . . . . . . . . . . . . . . . . . . .
B-6 RS449 Port Interface Connector B-12. . . . . . . . . . . . . . . . . . . . . . . . . . . . . . . . . . . . . . . .
B-7 V.35 Port Interface Connectors B-14. . . . . . . . . . . . . . . . . . . . . . . . . . . . . . . . . . . . . . . . .
B-8 External Clock Connector B-16. . . . . . . . . . . . . . . . . . . . . . . . . . . . . . . . . . . . . . . . . . . . .
v3000-A2-GA31-80 December 1994
Page 11

COMSPHERE 3000 Series Carrier
This page intentionally left blank.
vi December 1994 3000-A2-GA31-80
Page 12

Preface
Objectives and Reader
Assumptions
This manual contains installation information for the
COMSPHEREr 3000 Series Carrier and is designed to be
used with Data Service Units (Models 3511, 3551, 3611,
and 3616), dial/lease modems (Models 3811 and 3911),
T1 CSUs (Model 3151), and T1 DSU/CSUs
(Model 3161).
The appropriate supplements are referred to for
specific unit installation and operation information. It is
assumed that you are familiar with the functional
operation of data equipment, digital network services,
Data Service Units (DSUs), and dial/lease modems.
Abstract
Chapter 1 provides descriptive information about the
COMSPHERE 3000 Series Carrier, the T1 CSUs, T1
DSU/CSUs, DSUs and dial/lease modems supported,
optional equipment, and technical specifications.
Chapter 2 lists the customer’s responsibilities and
provides guidelines for installing the carrier and its related
components.
Related Documents
3000-A2-GB41 COMSPHERE –48 Vdc Central
Office Power Unit Installation
Guide
3100-A2-GK40 ACCULINK 3151 CSU and
3161 DSU/CSU General
Information Guide
3150-A2-GB21 ACCULINK 315x Channel
Service Unit Operator’s Guide
3151-A2-GL11 ACCULINK 3151 Channel
Service Unit Reference Card
3160-A2-GB21 ACCULINK 316x Data Service
Unit/Channel Service Unit
Operator’s Guide
3161-A2-GL11 ACCULINK 3161 DSU/CSU
Reference Card
3510-A2-GN32 3500 Series Data Service Units,
Models 3510 and 3511, User’s
Guide
3550-A2-GB20 COMSPHERE 3550 Series Data
Service Units, Models 3550 and
3551, User’s Guide
Chapter 3 provides descriptive information and
installation procedures for mounting the carrier in a
cabinet, and installing the power supply, the optional fan
module, the optional Shared Diagnostic Control Panel
(SDCP), the optional speaker panel (for Models 3811 and
3911 dial/lease modems only), the network interface
modules, Shared Diagnostic Unit (SDU), and the DSU or
dial/lease modem.
The Glossary provides definitions for acronyms and
product-specific terms used in this manual.
3610-A2-GB41 COMSPHERE 3600 Series Data
Service Units, Models 3610 and
361 1, Time Division Multiplexer,
Multichannel Multipoint, and
Digital Bridge Options,
Applications Guide
3610-A2-GB46 COMSPHERE 3600 Series Data
Service Units, Models 3610 and
3611, Dial Backup Module and
SNA Diagnostic Interface
Options, User’s Guide
vii3000-A2-GA31-80 December 1994
Page 13

COMSPHERE 3000 Series Carrier
3610-A2-GB48 COMSPHERE 3600 Series Data
Service Units, Models 3610 and
361 1, Time Division Multiplexer,
Multichannel Multipoint, and
Digital Bridge Options, User’s
Guide Supplement
3610-A2-GN32 COMSPHERE 3600 Series Data
Service Units, Models 3610 and
3611, Dial Backup Module and
SNA Diagnostic Interface
Options, Applications Guide
3610-A2-GB91 COMSPHERE 3600 Series Data
Service Units, Models 3610 and
361 1, Operator’s Guide
3615-A2-GB20 COMSPHERE DualFlow Data
Service Units, Models 3615 and
3616, User’s Guide
3810-A2-GB91 COMSPHERE 3800 Series
Modems, Models 3810, 381 1,
and 3820, User’s Guide
3910-A2-GN32 COMSPHERE 3900 Series
Modems, Models 3910 and
3911, Point-to-Point/Multipoint,
Installation and Operation
Manual
Ordering Information
To order AT&T Paradyne documentation, please call
1-800-545-2354, extension 2222.
viii December 1994 3000-A2-GA31-80
Page 14

Introduction
Overview 1-1. . . . . . . . . . . . . . . . . . . . . . . . . . . . . . . . . . . . . . . . . . . . . . . . . . . . . . . . . . . . . . . . . . . . . . . . . .
Features 1-1. . . . . . . . . . . . . . . . . . . . . . . . . . . . . . . . . . . . . . . . . . . . . . . . . . . . . . . . . . . . . . . . . . . . . . . . . . .
Technical Specifications 1-3. . . . . . . . . . . . . . . . . . . . . . . . . . . . . . . . . . . . . . . . . . . . . . . . . . . . . . . . . . . . . .
Equipment Warranty and Support 1-8. . . . . . . . . . . . . . . . . . . . . . . . . . . . . . . . . . . . . . . . . . . . . . . . . . . . . .
Equipment Service 1-8. . . . . . . . . . . . . . . . . . . . . . . . . . . . . . . . . . . . . . . . . . . . . . . . . . . . . . . . . . . . . . .
Out of Warranty 1-9. . . . . . . . . . . . . . . . . . . . . . . . . . . . . . . . . . . . . . . . . . . . . . . . . . . . . . . . . . . . . . .
Enhanced Support Services 1-9. . . . . . . . . . . . . . . . . . . . . . . . . . . . . . . . . . . . . . . . . . . . . . . . . . . . . . . . .
1
Overview
AT&T Paradyne offers the COMSPHERE
3000 Series Carrier, Figure 1-1, assembly to support
high-density mounting of the following AT&T Paradyne
products in a central-site environment:
• Model 3151 Channel Service Units (T1 CSUs)
• Model 3161 Data Service Units/Channel Service
Units (T1 DSU/CSUs)
• Models 3511, 3551, 3611, and 3616 Data Service
Units (DSUs)
• Models 3811 and 3911 dial/lease modems
r
Features
The carrier provides a convenient assembly in which
you can install a combination of up to 16 T1 CSUs, T1
DSU/CSUs, DSUs, and/or dial/lease modems in a
space-efficient package for crowded computer/
communications room environments.
In addition to the 16 devices, a single carrier operates
with a power transformer unit, an optional fan module, an
optional Shared Diagnostic Control Panel (SDCP), and an
optional speaker panel (for use with Models 3811 and
3911 dial/lease modems only).
The number of devices that can be installed in a carrier
is reduced by one for each Time Division Multiplexer
(TDM) or Multichannel Multipoint (MCMP) circuit card
that is installed. A TDM or MCMP card (functioning as a
multiplexer or digital bridge) is physically attached to a
Model 3611 DSU and occupies a separate slot in the
carrier. For digital bridge applications, each DBM-V,
DBM-S, or DBM-D occupies a separate slot, as well.
The ac power distribution systems for the carrier
consist of a power transformer unit that contains two
transformers, each serving eight slots in the carrier. The
backplane distributes low-voltage ac power from the
transformers to each slot, and an individual power supply
on each DSU or dial/lease modem produces the regulated
dc voltage.
A carrier designed to operate from a –48 Vdc power
unit is also available. This unit, called the Central Office
(CO) Power Unit, consists of a single dc power module
with a fan and operates in Basic mode (the mode of
operation in which the single power module supplies
power to the entire carrier). An optional second power
module is available for the CO Power Unit. With the
optional second power module, the CO Power Unit can be
configured to operate in either the Redundant mode (the
mode of operation in which both power modules serve all
the slots in the carrier and if one power module fails, the
remaining power module assumes the entire load) or the
Independent mode (the mode of operation in which each
power module serves only eight consecutive slots –
Slots 1 through 8 or Slots 9 through 16 in the carrier). The
Shared Diagnostic Unit (SDU), which is contained in
Slot 0, is powered by both power modules. For more
information, see the COMSPHERE –48 Vdc Central
Office Power Unit Installation Guide.
1-13000-A2-GA31-80 December 1994
Page 15
COMSPHERE 3000 Series Carrier
Figure 1-1. COMSPHERE 3000 Series Carrier
An optional fan module for the ac carriers is available
to provide forced air cooling to dissipate heat generated
within the carrier. It is recommended that fully configured
carriers and cabinets be installed with fan modules to
extend the life of the equipment. Guidelines for fan
module provisions are listed in T able 3-1 of the Fan
Module Installation section in Chapter 3.
An SDCP is required for initial installation and for
testing of 3600 Series DSUs, 3151 T1 CSUs, and 3161 T1
DSU/CSUs and their options. Models 3811 and 3911
dial/lease modems can be installed using the SDCP or AT
commands from the attached DTE. The SDCP, in
conjunction with the SDU, allows up to eight
COMSPHERE 3000 Series Carriers to be managed from
one control panel. Models 3551, 3611, and 3616 DSUs
and Models 3811 and 3911 dial/lease modems are
managed by either the COMSPHERE 6700 or 6800 Series
Network Management System (NMS).
Within the carrier, the first slot (Slot 0) is reserved for
the SDU. The SDU provides the required interface that
daisy chains carriers together for NMS and/or SDCP
control. In a cabinet configuration, connectivity between
the DSUs in the individual carriers allows control of
compatible units in the cabinet through a single NMS
interface, a single SDCP, or both.
On the rear of the carrier is a pair of 50-pin connectors
(P21 and P22) that provide the following network
interfaces:
• Digital line interface for DSUs.
• Analog leased-line interface for dial/lease modems.
1-2 December 1994 3000-A2-GA31-80
Page 16
Introduction
Network Interface Modules (NIMs) can be installed at
the rear of the carrier (when not occupied by an Auxiliary
Backplane) to provide the PSTN (dial) or switched
56 kbps digital service interface for both DSUs and
dial/lease modems. There are nine different NIMs. For a
list of the feature/part numbers of these NIMs, see
Appendix B of this manual.
Alternatively, you can install up to two Auxiliary
Backplanes at the rear of the carrier to allow Model 3151
T1 CSUs and Model 3161 T1 DSU/CSUs to provide an
interface between a T1 digital network and Customer
Premise Equipment (CPE).
A modular DSU or dial/lease modem is a circuit card
that contains “gold finger” contacts on the rear edge of the
card and is supplied with a rear connector plate. A rear
connector plate has two DTE connectors, a 25-pin
EIA-232 connector and a 25-pin CCITT V.35 connector.
It allows removal of a modular circuit card without
disconnecting the DTE cables at the rear of the carrier.
Also, there are connector modules which have six ports
and are supplied with the modular DSU-TDM or
Table 1-1
Technical Specifications for the COMSPHERE 3000 Series Carrier
DSU-MCMP circuit cards. These connector plates and
modules function as interfaces between the modular
circuit cards and the DTEs.
This manual describes the procedure for installing a
COMSPHERE 3000 Series Carrier into a COMSPHERE
72-inch cabinet. A COMSPHERE 72-inch cabinet with
available equipment-mounting dimensions of 63 inches
high by 19 inches wide has the capacity to hold up to six
carriers, allowing for a high-density installation
combination of up to 96 DSUs and/or dial/lease modems.
COMSPHERE 3000 Series Carriers can also be mounted
in other types of EIA standard 19- or 23-inch wide
cabinets. (The heights of the other types of cabinets may
vary.)
Technical Specifications
Table 1-1 lists the Technical specifications for the
COMSPHERE 3000 Series Carrier.
(1 of 6)
Technical Specifications
ENVIRONMENT
Operating Temperature
Relative Humidity
Storage Temperature
Shock and Vibration
POWER REQUIREMENTS
Carrier with ac power supply
(maximum capacity)
100 Vac (approved for use with
Models 3811 and 3911)
115 Vac (approved for use with
Models 3151, 3161, 3511, 3551, 3611,
3616, 3811, and 3911)
230 Vac (approved for use with
Models 3811 and 3911)
Fan Module
100 Vac
115 Vac
230 Vac
Shared Diagnostic Control Panel (SDCP)
100 Vac
115 Vac
230 Vac
Criteria
32_F (0_C) to 122_F (50_C)
5% to 95% (noncondensing)
–4_F (–20_C) to 158_F (70_C)
Withstands normal shipping and handling
85āĊ100 Vac, 47-63 Hz (3.0 amp, 175 watts at 100 Vac)
90āĊ132 Vac, 60 Hz ±3 (3.0 amp, 216 watts at 115 Vac)
220ā—240 Vac nominal, 47 to 63 Hz (1.5 amp, 175 watts
at 230 Vac)
Supplied by carrier, 45 watts at 100 Vac
Supplied by carrier, 45 watts at 115 V ac
Supplied by carrier, 57 watts at 230 Vac
Supplied by carrier, 1 watt at 100 Vac
Supplied by carrier, 1 watt at 115 Vac
Supplied by carrier, 1 watt at 230 Vac
1-33000-A2-GA31-80 December 1994
Page 17

COMSPHERE 3000 Series Carrier
Technical Specifications for the COMSPHERE 3000 Series Carrier
Technical Specifications Criteria
POWER REQUIREMENTS (Cont’d)
Shared Diagnostic Unit (SDU)
Model 3151
Model 3161
Model 3511
Models 3551 and 3611
DBM-V, DBM-S, or DBM-D
Models 3551, 3611, and 3616 with DBM
Model 3611 with TDM
Model 3611 with DBM and TDM
Model 3611 with MCMP
Model 3611 with DBM and MCMP
Table 1-1
(2 of 6)
24 Vac (CT), 60 Hz ±3 (0.01 amp, 1.5 watts at 115 Vac)
24 Vac (CT), 60 Hz ±3 (3.7 watts at 115 Vac)
24 Vac (CT), 60 Hz ±3 (9.3 watts at 115 Vac)
24 Vac (CT), 60 Hz ±3 (0.07 amp, 6 watts at 115 Vac)
24 Vac (CT), 60 Hz ±3 (0.03 amp, 4.5 watts at 115 Vac)
24 Vac (CT), 60 Hz ±3 (0.05 amp, 8.0 watts at 115 Vac)
24 Vac (CT), 60 Hz ±3 (0.05 amp, 8.0 watts at 115 Vac)
24 Vac (CT), 60 Hz ±3 (0.07 amp, 8.6 watts at 115 Vac)
24 Vac (CT), 60 Hz ±3 (0.09 amp, 12.15 watts at 115 Vac)
24 Vac (CT), 60 Hz ±3 (0.08 amp, 9.1 watts at 115 Vac)
24 Vac (CT), 60 Hz ±3 (0.10 amp, 12.65 watts at 115 Vac)
Model 3811 modem
Model 3911 modem
Carrier with sixteen 3551, 3611, and 3616
DSUs with DBMs plus SDU and fan module
Carrier with sixteen 3151 CSUs plus SDU,
SDCP, and fan module
Carrier with sixteen 3161 DSU/CSUs plus
SDU, SDCP, and fan module
FAN MODULE POWER DISSIPA TION
100 Vac
115 Vac
230 Vac
24 Vac (CT), 47—63 Hz (0.05 amp, 3.4 watts at 100 Vac)
24 Vac (CT), 60 Hz ±3 (0.04 amp, 3.4 watts at 115 Vac)
24 Vac (CT), 47—63 Hz (0.02 amp, 3.4 watts at 230 Vac)
24 Vac (CT), 47—63 Hz (0.07 amp, 4.0 watts at 100 Vac)
24 Vac (CT), 60 Hz ±3 (0.06 amp, 4.0 watts at 115 Vac)
24 Vac (CT), 47—63 Hz (0.03 amp, 4.0 watts at 230 Vac)
90—132 Vac, 60 Hz ±3 (1.65 amp, 165 watts at 115 Vac)
90—132 Vac, 60 Hz ±3 (1.25 amp, 111 watts at 115 Vac)
90—132 Vac, 60 Hz ±3 (2.4 amp, 215 watts at 115 Vac)
154 Btu/hr
154 Btu/hr
195 Btu/hr
1-4 December 1994 3000-A2-GA31-80
Page 18

Technical Specifications for the COMSPHERE 3000 Series Carrier
Technical Specifications Criteria
HEAT DISSIPATION (MAX.)
Shared Diagnostic Unit (SDU)
Model 3151 T1 CSU
Model 3161 T1 DSU/CSU
Model 3511 DSU
Models 3551 and 3611 DSUs
DBM-V, DBM-S, or DBM-D
Models 3551, 3611, and 3616 with DBM
Model 3611 with TDM
Model 3611 with MCMP
Model 3811 modem
Model 3911 modem
PHYSICAL DIMENSIONS
Carrier
Height
Width
Depth
Power Transformer Unit
Height
Width
Depth
Fan Module
Height
Width
Depth
Shared Diagnostic Control Panel (SDCP) or
Speaker Panel
Height
Width (length)
Depth
Shared Diagnostic Unit (SDU)
Height
Width
Depth
Models 3511, 3551, 3611, 3616, 3811, and
3911
Height
Width (thickness)
Depth
Introduction
Table 1-1
(3 of 6)
5.2 Btu/hr
12.6 Btu/hr (3.7 watts)
31.7 Btu/hr (99.3 watts)
20.5 Btu/hr
22.2 Btu/hr
29.0 Btu/hr
29.0 Btu/hr
33.4 Btu/hr
33.4 Btu/hr
11.7 Btu/hr
13.7 Btu/hr
10.5 inches (26.7 cm)
19.0 inches (48.3 cm)
14.0 inches (35.6 cm)
2.5 inches (6.4 cm)
16.9 inches (42.9 cm)
6.5 inches (16.5 cm)
1.8 inches (4.4 cm)
19.0 inches (48.3 cm)
5.0 inches (12.7 cm)
2.6 inches (6.5 cm)
19.0 inches (48.3 cm)
0.8 inches (1.1 cm)
7.1 inches (18.1 cm)
1.0 inches (2.5 cm)
12.9 inches (32.8 cm)
7.1 inches (18.1 cm)
1.0 inches (2.5 cm)
13.4 inches (34.0 cm)
1-53000-A2-GA31-80 December 1994
Page 19

COMSPHERE 3000 Series Carrier
Technical Specifications for the COMSPHERE 3000 Series Carrier
Technical Specifications Criteria
PHYSICAL DIMENSIONS (Cont’d)
Model 3611 with TDM or MCMP
Height
Width (widest-point faceplates)
Depth
Models 3151 and 3161
Height
Width
Depth
Rear Connector Plate (2-port)
Height
Width
Depth (25-pin V.35 Interface)
Connector Module (6-port)
Height
Width
Depth
Auxiliary Backplane
Height
Width
Depth
Table 1-1
(4 of 6)
7.1 inches (18.1 cm)
2.0 inches (5.0 cm)
13.4 inches (34.0 cm)
7.1 inches (18.0 cm)
1.0 inches (2.5 cm)
14.2 inches (36.1 cm)
5.2 inches (13.2 cm)
0.9 inches (2.3 cm)
1.0 inches (2.5 cm)
6.9 inches (17.5 cm)
1.8 inches (4.6 cm)
3.3 inches (8.4 cm)
9.0 inches (22.9 cm)
8.0 inches (20.3 cm)
1.3 inches (3.3 cm)
WEIGHT
Carrier (empty)
Power Transformer Unit
100 Vac
115 Vac
230 Vac
Fan Module
100 Vac
115 Vac
230 Vac
Shared Diagnostic Control Panel (SDCP)
Rear Connector Plate (2-port)
25-pin EIA-232/25-pin V.35
Connector Module (6-port)
Speaker Panel
Shared Diagnostic Unit (SDU)
Network Interface Module (NIM)
Model 3151
Model 3161
Auxiliary Backplane
17.0 pounds (7.7 kg)
14.6 pounds (6.6 kg)
19.0 pounds (8.6 kg)
14.1 pounds (6.4 kg)
6.7 pounds (3.0 kg)
8.0 pounds (3.6 kg)
7.5 pounds (3.4 kg)
1.6 pounds (0.7 kg)
0.1 pounds (0.06 kg)
1.0 pound (0.5 kg)
1.3 pounds (0.6 kg)
1.0 pounds (0.5 kg)
0.2 pounds (0.1 kg)
1.3 pounds (0.6 kg)
1.8 pounds (0.82 kg)
2.4 pounds (1.1 kg)
1-6 December 1994 3000-A2-GA31-80
Page 20

Table 1-1
(5 of 6)
Technical Specifications for the COMSPHERE 3000 Series Carrier
Technical Specifications Criteria
Introduction
NETWORK INTERFACE
Digital/Lease Network Interface
Network Interface Module:
Dial
4-wire Switched 56 (U.S. only)
2-wire Switched 56
Model 3151 and 3161 Physical Interface
USA
Canada
DTE INTERFACE
Model 3151
Physical Interface
Framing Format
Coding Format
DTE Line Equalization
Full Compliance with AT&T Technical Reference
62310–1987, ‘‘Digital Data System Channel Interface
Specification,” November 1987; and Bell Canada ‘‘Digital
Circuit Terminating Equipment (DCTE) Specifications,”
July 1989, Issue 1
(2) 50-pin connector
Digital: USOC RJ48T
Lease: 50-pin to 8-pin cable; JM8
(1 or 2) 50-pin connector
Permissive: USOC RJ21X
Programmable: USOC RJ27X
(1 or 2) 50-pin connector; USOC SJA57
(1 or 2) 50-pin connector
(1 or 2) 50-pin connector; RJ48H (T1)
CA81A (T1 with adapter cable)
DB15S
D4, ESF
AMI, B8ZS
5 selectable ranges from 0 to 655 feet (0 to 196.5 meters)
Send AIS
Model 3161 (DSX-1)
Physical Interface
Framing Format
Coding Format
DTE Line Equalization
Send AIS
MODEL 3161 PORT INTERFACE
Standards
Rates
Selectable
DB15S
D4, ESF
AMI, B8ZS
5 selectable ranges from 0 to 655 feet (0 to 196.5 meters)
Selectable
EIA 530A, V.35, RS-449, V.11
Nx64 – 64-1.536 Mb
Nx56 – 56-1.344 Mb
1-73000-A2-GA31-80 December 1994
Page 21

COMSPHERE 3000 Series Carrier
Table 1-1
(6 of 6)
Technical Specifications for the COMSPHERE 3000 Series Carrier
Technical Specifications Criteria
MODEL 3161 CLOCKING SOURCES T1 network interface, DSX-1 T1 interface, Port 1, internal
clock, external clock
APPROVALS
Underwriters Laboratories, Inc. (UL)
Recognized Component
UL Standard for Safety, UL 1950
Canadian Standards Association
Certified Component
CSA Standard C22.2 No. 950-M89
Equipment Warranty
and Support
AT&T Paradyne’s Customer Assistance Center is
available 24 hours a day to help you place an installation
request, report a hardware or software problem, or place a
trouble report. The center provides technical support and
remotely diagnoses equipment problems Monday through
Friday, between the hours of 8 a.m. and 8 p.m. EST,
excluding holidays. You can also call the center if you
participate in the on-site support program (refer to the
Enhanced Support Services section) or if you would like
to request support on a time and materials basis.
Call the following toll-free number to reach the
Customer Assistance Center:
1-800-237-0016
NOTE
Equipment Service
To obtain service under your warranty, call the
Customer Assistance Center at the number listed above.
Please have the following information available before
you call:
Company Name and Address
Contact Name and T elephone Number
Shipping Address, if different from the company
address
Billing Address, if different than the shipping
address
Model Number and Serial Number of the unit
A brief description of the problem
The Customer Assistance Center will verify that the
equipment is in need of repair. You are provided a Return
Materials Authorization (RMA) number to help expedite
the repair request. Once you receive an RMA number,
pack the unit securely and ship the package insured and
postage prepaid to:
Effective January 1, 1995, the
Customer Assistance Center is
available to provide technical
support 24 hours a day,
365 days a year.
1-8 December 1994 3000-A2-GA31-80
AT&T Paradyne Corporation
Customer Support
Attn: Repair Center
8550 Ulmerton Road, Building B
Largo, Florida 34641
Make sure the RMA number is in a visible location on
the outside of the package.
Page 22

Introduction
Out of Warranty
If your equipment is out of warranty and you do not
have a maintenance support agreement, factory repair
support is available.
To send equipment to AT&T Paradyne’s Repair Center,
call the following toll-free number Monday through
Friday, between the hours of 8 a.m. and 5 p.m. EST,
excluding holidays:
1-800-772-7691
Please have your purchase order number and the
information listed in the Equipment Service section ready
when you call for your RMA number. Package and ship
the equipment to the Repair Center as described, making
sure the RMA number is clearly visible on the outside of
the package.
Enhanced Support Services
In addition to the customer support described, AT&T
Paradyne offers a wide variety of enhanced customer
support programs that are designed to meet our customers
needs. Our high quality support programs range from
equipment installation to premium on-site support, as well
as network management.
For more information about our enhanced support
services, contact your AT&T Paradyne representative, or
call the following toll-free number, 8 a.m. to 5 p.m. EST,
excluding holidays:
1-800-482-3333
1-93000-A2-GA31-80 December 1994
Page 23

COMSPHERE 3000 Series Carrier
This page intentionally left blank.
1-10 December 1994 3000-A2-GA31-80
Page 24

Installation Planning
Overview 2-1. . . . . . . . . . . . . . . . . . . . . . . . . . . . . . . . . . . . . . . . . . . . . . . . . . . . . . . . . . . . . . . . . . . . . .
Customer Responsibilities. 2-2. . . . . . . . . . . . . . . . . . . . . . . . . . . . . . . . . . . . . . . . . . . . . . . . . . . . . . . . .
Installation Considerations 2-2. . . . . . . . . . . . . . . . . . . . . . . . . . . . . . . . . . . . . . . . . . . . . . . . . . . . . . . . .
2
Overview
Before installing your COMSPHERE 3000 Series
Carrier into a COMSPHERE cabinet (or equivalent),
verify that you have everything you need to complete the
installation, and that you have ordered the appropriate
components.
The following steps are required for planning the
installation of the carrier:
• Preparing the site.
• Determining the necessary components for your
carrier.
• Securing ac power with proper grounding for your
new equipment.
The following steps are required for the installation of
the carrier and related components:
• Setting up the carrier cabinet.
• Installing the carrier(s) and removing the cover
plate.
• Installing the Shared Diagnostic Control Panel
ribbon cable if a Shared Diagnostic Control Panel
(SDCP) is to be installed.
• Installing the power transformer unit.
• Installing the fan module, if applicable.
• Mounting the SDCP, if applicable, or replacing the
cover plate.
• Mounting the speaker panel for Models 3811 and
3911 dial/lease modems, if applicable, between
multiple carriers.
• Inter-connecting the Shared Diagnostic Unit (SDU)
between carriers, if applicable.
• Connecting the SDU to an NMS, if applicable,
between multiple carriers.
• Connecting the network cables.
• Installing a frame ground/signal ground strap.
• Connecting the carrier to an alarm output, if
required.
• Supplying ac power to the carrier.
• Installing the rear connector plates and/or connector
modules for modular devices, if applicable.
• Installing the Network Interface Modules (NIMs).
• Installing the 3151/3161 Auxiliary Backplanes, if
needed.
• Installing the devices and/or filler panels. (Filler
panels are required for unfilled slots in the carrier.)
2-13000-A2-GA31-80 December 1994
Page 25

COMSPHERE 3000 Series Carrier
Customer Responsibilities
Preparing the installation site, including securing ac
power with proper grounding, and verifying that you have
the appropriate components for your site requirements are
your responsibility. You can call your AT&T Paradyne
representative, however, if you need assistance or have
any questions.
When you order your COMSPHERE 3000 Series
Carrier, certain components are supplied with your carrier;
other components must be ordered separately.
Supplied with the carrier:
• 3000 Series Carrier assembly
• Fuses
• Cable ties
• Signal ground/frame ground strap
You are responsible for ordering/supplying the
following equipment:
• COMSPHERE 72-inch cabinet, or other non-A T&T
Paradyne EIA standard 19- or 23-inch wide cabinet.
• Shared Diagnostic Unit (SDU), if needed.
• 3151/3161 Auxiliary Backplanes, if needed.
• T1 CSUs, T1 DSU/CSUs, DSUs, DBM-Vs,
DBM-Ss, DBM-Ds, and/or dial/lease modems, and
options needed (DBMs, TDMs, MCMPs).
• Filler panels for empty slots.
• Applicable manuals
An equipment list is included at the end of this manual
to assist you in ordering any additional components you
may require.
Installation Considerations
Your installation site should be well-ventilated, clean,
and free of environmental extremes. There should be 2 to
3 feet of clearance at the front and rear of the cabinet in
which the carrier is to be installed to allow access for
installation of the power transformer unit, (optional) fan
module, and (optional) SDCP, as well as the network
interface connectors, rear connector plates, and DTE
cables.
• Power transformer unit.
• Fan module(s), if needed.
• SDCP .
• Speaker panel (for use with the Models 3811 and
3911 modems), if needed.
• One digital or leased network interface cable for
each of the eight DSUs or modems.
• TDM (and MCMP) and/or digital bridge interface
cables, if needed.
• One or two Network Interface Modules (NIMs), if
needed.
• One or two dial network interface cables, if needed.
• Connecting cables and cords. (For a complete list of
the available cables and cords, see Appendix B of
this manual.)
• Rear connector plates for optional pre-mounting.
(Modular devices are packaged with rear connector
plates, but you can also order rear connector plates
separately.)
HANDLING PRECAUTIONS
FOR
ST ATIC SENSITIVE DEVICES
AT&T Paradyne products are
designed to protect sensitive
components from damage due to
electrostatic discharge (ESD)
during normal operation. When
performing installation
procedures, however, take
proper static control precautions
to prevent damage to
equipment. If you are not sure of
the proper static control
precautions, contact the nearest
A T&T Paradyne Customer
Support office.
2-2 December 1994 3000-A2-GA31-80
Page 26

Installation Planning
One COMSPHERE 72-inch cabinet can accommodate
up to six COMSPHERE 3000 Series Carriers. A cabinet
does not need to be fully populated with carriers, however.
There are several general rules to follow during
installation of the carrier.
1. If installing multiple carriers, install the lower one
first, and if installing a full cabinet of carriers,
install the carriers from the bottom of the cabinet
and work up. This provides the following:
a. Proper alignment for subsequent carriers.
b. Easier carrier installation since they can be
placed in the mounting and lowered onto the
mounting screws.
c. Easier connection of the DTE interface.
d. Proper cabinet balance. Bottom-up installation
keeps the cabinet from becoming top heavy.
2. You must mount carriers when they are empty.
If a carrier is installed in an EIA standard 23-inch
(wide) cabinet, however, the mounting brackets on the
carrier must be reversed before the carrier is mounted.
Carriers can be installed in either EIA standard 19- or
23-inch (wide) cabinets.
Models 3551, 3611, and 3616 DSUs and Models 3811
and 3911 dial/ lease modems within the COMSPHERE
3000 Series Carrier(s) can be managed from an SDCP, a
Network Management System (NMS), or both.
Remember that the Models 3551, 3611, and 3616 DSUs
and Models 3811 and 3911 dial/lease modems are
managed by the 6700 or 6800 Series NMS. A
COMSPHERE 3000 Series Carrier cannot be connected to
both a 6700 Series NMS and a 6800 Series NMS at the
same time.
The location of the SDCP within the cabinet should be
determined ahead of time. It should be installed at a
convenient level, usually at eye-level. In a fully
configured cabinet, this would be the fourth or fifth carrier
from the bottom. Note that the Model 3511 DSUs are not
capable of being managed by an SDCP.
The alarm output connection is closed, activating the
customer-supplied alarm, when any DSU or Model 381 1
or 3911 dial/lease modem in the carrier has an alarm
condition that lights the red Alrm LED of the DSU or
modem. For information on how to connect the alarm
output, see the Alarm Output Connection section in
Chapter 3.
Up to eight carriers can be controlled by an SDCP, but
there must be a Shared Diagnostic Unit (SDU) installed in
each carrier. (Slot 0 in each carrier is reserved for the
SDU.) The SDU provides the interface that connects the
SDCP to other carriers. Cabling is required that daisy
chains these interfaces together.
If the units in the carriers are to be managed from an
NMS, an SDU is required in all carriers. Up to eight
carriers can be daisy chained together.
Cooling requirements should be given consideration.
Depending upon the number of units in the carrier and
how they are equipped, a fan module may be
recommended. Table 3-1 in Chapter 3 will help you
determine whether or not you need additional cooling for
your carrier.
Two 50-pin connectors (P21 and P22) at the rear of the
carrier, each serving eight slots, provide the digital
interface for DSUs and the analog leased-line interface for
dial/lease modems. DSUs and dial/lease modems can be
placed in the same carrier, but they should be grouped
together, (e.g., eight DSUs with a digital interface and
eight dial/lease modems with an analog leased-line
interface).
2-33000-A2-GA31-80 December 1994
Page 27

COMSPHERE 3000 Series Carrier
If modular devices are installed in the same carrier as
non-modular devices, the modular devices must be
installed to the left of all other devices, as viewed from
the front of the carrier.
If your carriers are equipped with DSUs with DBMs,
dial/lease modems, or modems having dial backup
capability, the half of the carrier containing those devices
must have a Network Interface Module (NIM) installed to
provide a dial network or switched 56 kbps digital service
interface. Since one module serves eight slots, it is best to
group units with dial capability.
NIMs can be installed at the rear of the carrier. There is
a total of nine different NIMs available.
The carrier’s backplane contains connectors which
automatically engage mating connectors on DSUs (and
TDM or MCMP circuit cards, if installed) or dial/lease
modems when they are installed. T o prevent accidental
contact with these connectors, use filler panels for unfilled
slots. Verify that you have ordered a sufficient quantity.
To use 3151 CSUs or 3161 DSU/CSUs in the carrier,
you must remove any rear connector plates or modules
and add the 3151/3161 Auxiliary Backplane. Using a
single Auxiliary Backplane, you can install any
combination of up to eight 3151 CSUs and 3161
DSU/CSUs on one side of the 3000 Series Carrier, and up
to eight 3600, 3800, and 3900 Series devices on the other
side of the carrier. Alternatively, using two Auxiliary
Backplanes, you can install up to sixteen 3151 CSUs or
3161 DSU/CSUs in a single 3000 Series Carrier.
For each non-modular TDM or MCMP circuit card
installed in the carrier, determine whether the circuit card
is to be used as a Time Division Multiplexer (TDM) or as
a digital bridge. A TDM interface cable is supplied with
each non-modular TDM or MCMP circuit card. However,
a digital bridge interface cable must be ordered separately.
For modular TDM or MCMP circuit cards, use
standard cables for Ports 1 through 6. However, a 6-port
V.35 interconnect cable is required for the 26-pin
high-density D-type connector on the connector module.
This cable must be ordered separately.
It is recommended that you do not perform any
procedure that removes power to the carrier (for example,
replacing the power transformer unit or disconnecting
power to the power transformer to install an SDCP in a
fully configured carrier) during peak operating hours since
disconnecting power disables all units in the carrier.
2-4 December 1994 3000-A2-GA31-80
Page 28

Installation
Overview 3-2. . . . . . . . . . . . . . . . . . . . . . . . . . . . . . . . . . . . . . . . . . . . . . . . . . . . . . . . . . . . . . . . . . . . . . . . .
Cabinet Unpacking and Setup 3-4. . . . . . . . . . . . . . . . . . . . . . . . . . . . . . . . . . . . . . . . . . . . . . . . . . . . . . . . . .
Presetup Inspection 3-4. . . . . . . . . . . . . . . . . . . . . . . . . . . . . . . . . . . . . . . . . . . . . . . . . . . . . . . . . . . . . . .
Unpacking the Cabinet 3-4. . . . . . . . . . . . . . . . . . . . . . . . . . . . . . . . . . . . . . . . . . . . . . . . . . . . . . . . . . . .
Cabinet Setup 3-5. . . . . . . . . . . . . . . . . . . . . . . . . . . . . . . . . . . . . . . . . . . . . . . . . . . . . . . . . . . . . . . . . . .
Leveling the Cabinet 3-5. . . . . . . . . . . . . . . . . . . . . . . . . . . . . . . . . . . . . . . . . . . . . . . . . . . . . . . . . . .
Reversing the Cabinet Doors 3-5. . . . . . . . . . . . . . . . . . . . . . . . . . . . . . . . . . . . . . . . . . . . . . . . . . . . .
Carrier Installation 3-5. . . . . . . . . . . . . . . . . . . . . . . . . . . . . . . . . . . . . . . . . . . . . . . . . . . . . . . . . . . . . . . . . .
Preinspection Installation 3-5. . . . . . . . . . . . . . . . . . . . . . . . . . . . . . . . . . . . . . . . . . . . . . . . . . . . . . . . . .
Installation 3-6. . . . . . . . . . . . . . . . . . . . . . . . . . . . . . . . . . . . . . . . . . . . . . . . . . . . . . . . . . . . . . . . . . . . . .
Power Transformer Unit Installation 3-10. . . . . . . . . . . . . . . . . . . . . . . . . . . . . . . . . . . . . . . . . . . . . . . . . . . .
Preinstallation Inspection 3-10. . . . . . . . . . . . . . . . . . . . . . . . . . . . . . . . . . . . . . . . . . . . . . . . . . . . . . . . . .
Installation 3-10. . . . . . . . . . . . . . . . . . . . . . . . . . . . . . . . . . . . . . . . . . . . . . . . . . . . . . . . . . . . . . . . . . . . .
SDCP Ribbon Cable Installation 3-10. . . . . . . . . . . . . . . . . . . . . . . . . . . . . . . . . . . . . . . . . . . . . . . . . .
Power Transformer Unit Installation 3-11. . . . . . . . . . . . . . . . . . . . . . . . . . . . . . . . . . . . . . . . . . . . . . .
SGRD/FGRD Connection 3-12. . . . . . . . . . . . . . . . . . . . . . . . . . . . . . . . . . . . . . . . . . . . . . . . . . . . . . .
Alarm Output Connection 3-13. . . . . . . . . . . . . . . . . . . . . . . . . . . . . . . . . . . . . . . . . . . . . . . . . . . . . . .
Fan Module Installation 3-15. . . . . . . . . . . . . . . . . . . . . . . . . . . . . . . . . . . . . . . . . . . . . . . . . . . . . . . . . . . . . .
Preinstallation Inspection 3-15. . . . . . . . . . . . . . . . . . . . . . . . . . . . . . . . . . . . . . . . . . . . . . . . . . . . . . . . . .
Installation 3-15. . . . . . . . . . . . . . . . . . . . . . . . . . . . . . . . . . . . . . . . . . . . . . . . . . . . . . . . . . . . . . . . . . . . . .
Shared Diagnostic Control Panel (SDCP) Installation 3-17. . . . . . . . . . . . . . . . . . . . . . . . . . . . . . . . . . . . . . .
Preinstallation Inspection 3-18. . . . . . . . . . . . . . . . . . . . . . . . . . . . . . . . . . . . . . . . . . . . . . . . . . . . . . . . . .
Installation 3-18. . . . . . . . . . . . . . . . . . . . . . . . . . . . . . . . . . . . . . . . . . . . . . . . . . . . . . . . . . . . . . . . . . . . . .
Speaker Panel Installation 3-19. . . . . . . . . . . . . . . . . . . . . . . . . . . . . . . . . . . . . . . . . . . . . . . . . . . . . . . . . . . .
Preinstallation Inspection 3-19. . . . . . . . . . . . . . . . . . . . . . . . . . . . . . . . . . . . . . . . . . . . . . . . . . . . . . . . . .
Installation 3-19. . . . . . . . . . . . . . . . . . . . . . . . . . . . . . . . . . . . . . . . . . . . . . . . . . . . . . . . . . . . . . . . . . . . .
Shared Diagnostic Unit (SDU) Installation 3-22. . . . . . . . . . . . . . . . . . . . . . . . . . . . . . . . . . . . . . . . . . . . . . .
Preinstallation Inspection 3-22. . . . . . . . . . . . . . . . . . . . . . . . . . . . . . . . . . . . . . . . . . . . . . . . . . . . . . . . . .
Installation 3-24. . . . . . . . . . . . . . . . . . . . . . . . . . . . . . . . . . . . . . . . . . . . . . . . . . . . . . . . . . . . . . . . . . . . . .
NMS Connection 3-27. . . . . . . . . . . . . . . . . . . . . . . . . . . . . . . . . . . . . . . . . . . . . . . . . . . . . . . . . . . . . . . . .
Auxiliary Backplane Installation 3-32. . . . . . . . . . . . . . . . . . . . . . . . . . . . . . . . . . . . . . . . . . . . . . . . . . . . . . .
COM Port Connection – External PC 3-36. . . . . . . . . . . . . . . . . . . . . . . . . . . . . . . . . . . . . . . . . . . . . . . . .
Network Interface Installation 3-37. . . . . . . . . . . . . . . . . . . . . . . . . . . . . . . . . . . . . . . . . . . . . . . . . . . . . . . . .
Digital or Analog Leased-Line Network Interfaces 3-42. . . . . . . . . . . . . . . . . . . . . . . . . . . . . . . . . . . . . .
Dial Network Interface 3-42. . . . . . . . . . . . . . . . . . . . . . . . . . . . . . . . . . . . . . . . . . . . . . . . . . . . . . . . . . . .
2-Wire Switched 56 kbps Network Interface 3-43. . . . . . . . . . . . . . . . . . . . . . . . . . . . . . . . . . . . . . . . . . .
4-Wire Switched 56 kbps Network Interface 3-43. . . . . . . . . . . . . . . . . . . . . . . . . . . . . . . . . . . . . . . . . . .
NIM Installation 3-44. . . . . . . . . . . . . . . . . . . . . . . . . . . . . . . . . . . . . . . . . . . . . . . . . . . . . . . . . . . . . . . . .
COMSPHERE 3811 Control Interface 3-45. . . . . . . . . . . . . . . . . . . . . . . . . . . . . . . . . . . . . . . . . . . . . . . .
Models 3151 and 3161 Network Interface 3-45. . . . . . . . . . . . . . . . . . . . . . . . . . . . . . . . . . . . . . . . . . . . .
Circuit Card Installation 3-47. . . . . . . . . . . . . . . . . . . . . . . . . . . . . . . . . . . . . . . . . . . . . . . . . . . . . . . . . . . . . .
Preinstallation Inspection 3-50. . . . . . . . . . . . . . . . . . . . . . . . . . . . . . . . . . . . . . . . . . . . . . . . . . . . . . . . . .
Modular Circuit Card Installation 3-50. . . . . . . . . . . . . . . . . . . . . . . . . . . . . . . . . . . . . . . . . . . . . . . . . . . .
Non-Modular Circuit Card Installation 3-52. . . . . . . . . . . . . . . . . . . . . . . . . . . . . . . . . . . . . . . . . . . . . . .
Models 3151 and 3161 Circuit Card 3-54. . . . . . . . . . . . . . . . . . . . . . . . . . . . . . . . . . . . . . . . . . . . . . . . . .
Filler Panels 3-54. . . . . . . . . . . . . . . . . . . . . . . . . . . . . . . . . . . . . . . . . . . . . . . . . . . . . . . . . . . . . . . . . . . .
3
3-13000-A2-GA31-80 December 1994
Page 29
COMSPHERE 3000 Series Carrier
Overview
A COMSPHERE 72-inch cabinet is available for
mounting the COMSPHERE 3000 Series Carriers. Up to
six carriers can be mounted into a single cabinet. The
COMSPHERE 3000 Series Carriers can also be mounted
into other commercial EIA standard 19-inch and 23-inch
cabinets.
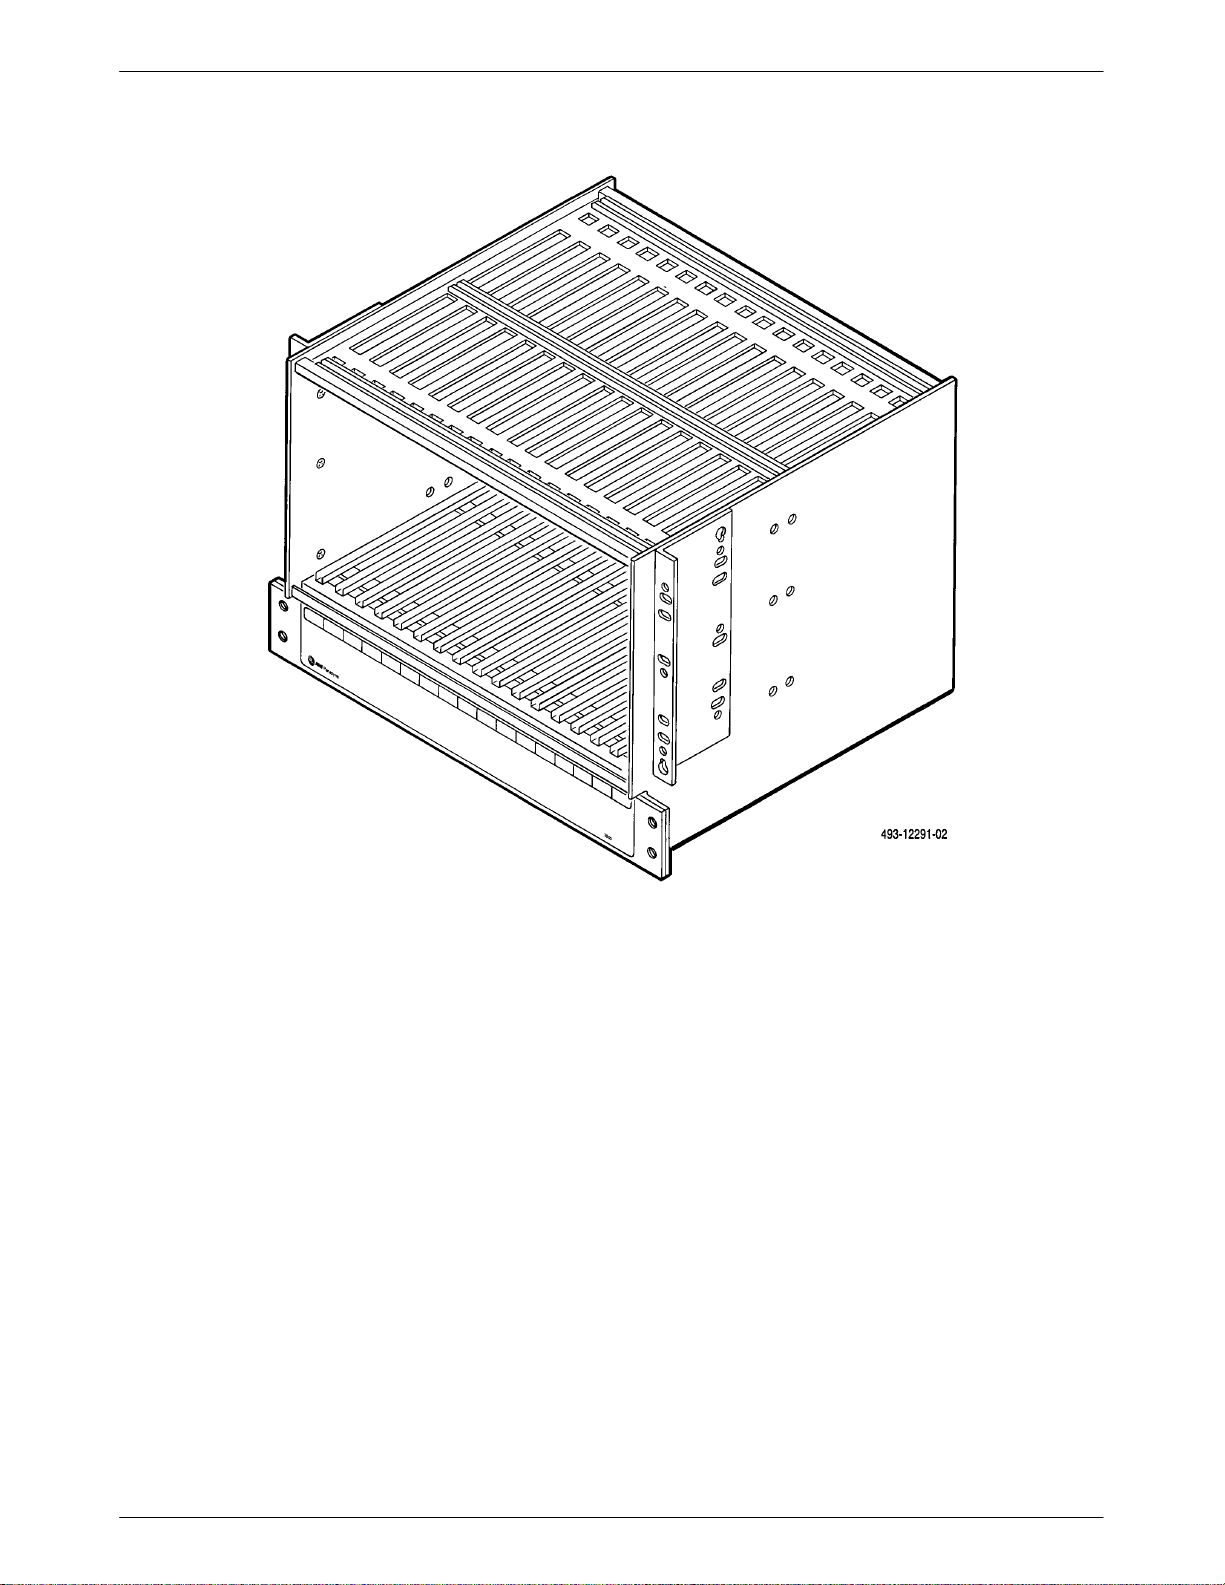
The COMSPHERE 3000 Series Carrier, Figure 3-1, is
designed to house T1 CSUs, T1 DSU/CSUs, DSUs,
DBM-Vs, DBM-Ss, DBM-Ds, TDMs, MCMPs, and
dial/lease modems. The carrier is a metal enclosure that
contains slots for installation of 17 circuit cards. The slot
labeled SDU (Slot 0) is reserved for the Shared Diagnostic
Unit (SDU); Slots 1 through 16 are for T1 CSUs, T1
DSU/CSUs, DSUs, DBM-Vs, DBM-Ss, DBM-Ds, TDMs,
MCMPs, or dial/lease modems. Under each slot number
(on the cover plate or SDCP) is a small area in which to
write the circuit channel identification numbers.
The carrier’s backplane contains connectors which
automatically engage mating connectors on the devices as
they are being installed. Filler panels (which must be
ordered separately) are required for unfilled slots.
Two 50-pin connectors (P21 and P22) at the rear of the
carrier (each serving eight carrier slots) provide an
interface between the carrier and the digital line for DSUs
and the carrier and the leased line for dial/lease modems.
Above these are connectors for the dial network
connections (P23 and P26). One or two network interface
modules (each serving eight carrier slots) can be ordered,
as needed, to establish dial network connections.
Figure 3-1. COMSPHERE 3000 Series Carrier Assembly
3-2 December 1994 3000-A2-GA31-80
Page 30

Installation
There are nine NIMs available. The following NIMs
are used with the 3600 Series DSUs/DBMs:
• Permissive NIM (for use with V.32 and 2-wire
Switched 56 DBMs)
• Programmable NIM (for use with V.32 DBMs)
• 4-wire Switched 56 NIM (for use with 4-wire
Switched 56 DBMs)
WARNING
Do not connect a 2-wire
switched 56 kbps plug into an
RJ11C jack. This type of jack is
intended for analog PSTN
devices. Failure to do this may
cause equipment damage and
harm to the telephone network.
The following NIMs are used with the dial/lease
modems, or a combination of DSUs with V.32 DBMs and
dial/lease modems in the same carrier half:
• Permissive NIM (3911 only)
• Permissive NIM with the Make Busy feature
• Programmable NIM with the Make Busy feature
(3811 only)
• Permissive NIM with the Service Line feature
• Programmable NIM with the Service Line feature
(3811 only)
• Permissive NIM with both the Make Busy and
Service Line features
• Programmable NIM with both the Make Busy and
Service Line features (3811 only)
NOTE
You cannot use a NIM on the side of
the carrier where an Auxiliary
Backplane is installed.
Programmable mode corrects any loss in the transmit
signal level between the modem and the central office by
permitting the modem to transmit at the optimum signal
level. This is accomplished by the local telephone
company installing a resistor into the network interface
and is usually identified by an RJ45S-type jack.
Permissive mode is a standard dial-line connection and
is identified by the use of an RJ11C- or SJA48-type jack.
(The carrier also supports RJ21X- and RJ27X-type mass
termination interfaces for Permissive and Programmable
modes, respectively.)
The DDD NIMs, programmable and permissive, may
have Make Busy and Service Line as additional
capabilities. The Make Busy feature is useful when
modems are used in a ‘‘hunt” or ‘‘rotary” group. This
feature ties the Tip and Ring signals together so that the
modem appears busy. Make Busy is not used by DSUs
with DBMs, but using a NIM with this feature will not
affect the DBM’s performance. The Service Line feature
permits an extra dial line to be connected to a
COMSPHERE 3000 Series Carrier. NIMs with this
feature are identified by the two modular connectors
mounted on the NIM.
WARNING
The Make Busy feature must
only be used behind a PBX.
Connecting a NIM with the Make
Busy capability directly to the
PSTN is a violation of FCC
Part 68 Rules and Canadian
DOC CS-03 Regulations.
Non-modular DSUs equipped with TDM or MCMP
circuit cards are supplied with time division multiplexer
interface cables. If you plan to use the digital bridge
function, you must order a digital bridge interface cable.
When modular DSUs or modems are to be installed in
the carrier, rear connector plates or connector modules
must be installed at the rear of the carrier. Modular DSUs
and dial/lease modems are circuit cards that can be
removed from the front of the carrier without disturbing
the DTE cables attached to the rear connector plate at the
rear of the carrier. Also, there are connector modules that
are supplied with the modular DSU-TDM (or
DSU-MCMP) circuit cards. These connector plates and
modules function as interfaces between the modular
circuit cards and the DTEs.
A power transformer unit provides low voltage
ac power to the carrier’s internal power distribution bus.
A carrier designed to operate from a –48 Vdc power unit
is also available. This power unit is called the Central
Office (CO) Power Unit and it consists of one dc power
module. Note that an optional second power module is
available. For more information on the CO Power Unit,
see the COMSPHERE –48 Vdc Central Office Power
Unit, Installation Guide.
3-33000-A2-GA31-80 December 1994
Page 31

COMSPHERE 3000 Series Carrier
Optional fan modules provide cooling to the devices in
the cabinets for operation at high ambient temperatures.
An optional speaker panel provides audio monitoring
of any one Model 3811 or 3911 dial/lease modem
installed in the carrier. This panel enables audio signals
(e.g., dial tone, busy signal, and ringing) to be heard
during normal operations.
DSUs, DBMs, DBM-Vs, DBM-Ss, DBM-Ds, TDMs,
MCMPs, and dial/lease modems can be managed from an
SDCP, a Network Management System (NMS), or both.
T1 CSUs and T1 DSU/CSUs are managed from an SDCP
or remote PC. An SDCP or NMS can manage up to eight
carriers and can control up to 128 compatible DSUs.
If more than one carrier is to be controlled by the
SDCP, and/or if an NMS is to control the carriers, an SDU
must be installed. The SDU then serves as the interface
that links the carriers together so that one NMS and/or one
SDCP can control the units in the cabinet(s).
NOTE
Although the SDCP is the last
piece of equipment installed in the
bottom of the carrier, the ribbon
cable should be installed before
installing the power transformer
unit; it must be plugged into the
backplane and run through the
built-in retainer clips to the SDCP
at the front of the carrier.
An alarm output is also available for connecting an
external alarm device to all 16 DSUs and/or dial/lease
modems in a carrier, or to an entire cabinet. It provides a
relay contact that reports device and network failures to
local alarm reporting networks in an equipment room. The
relay is capable of switching up to 30 watts (resistive
load), with a maximum voltage of 60 Vdc, and a
maximum current of 1 amp for switching and 2 amps for
the steady state.
Cabinet Unpacking and Setup
When shipped, COMSPHERE 72-inch cabinets are
packed in cardboard shipping containers secured to
wooden pallets. The shipping containers are bound with
plastic straps. Inside the shipping container, the cabinet
itself is strapped to the wooden pallet with plastic straps.
There is minimal clearance between the cabinet and the
shipping container, and the cabinet frame is not wrapped
in packing material.
Presetup Inspection
Before opening the shipping container, inspect it for
signs of damage. Specific signs to check for are major
tears or puncture holes on the sides of the container, splits
in the seams, corner damage or any additional signs of the
container having been dropped (badly damaged pallet,
etc.).
If the shipping container does show signs of damage,
report this immediately to your shipping representative
and also to your AT&T Paradyne representative.
Unpacking the Cabinet
Using a utility knife, cut all plastic straps surrounding
the container.
You will need to cut the container to unpack the
cabinet. When cutting the container, do not cut along the
container’s seams. Doing so may damage the cabinet
because of the lack of clearance.
Due to the bulk and weight of the cabinet, it is
recommended that you cut around the base of the
container to lift it off the cabinet. If your ceilings do not
provide enough clearance, you may have to tip the
container and cabinet sideways. You will need another
person to help you tip the container and cabinet, and pull
the container off.
Once the container is off, cut the plastic straps holding
the cabinet frame to the pallet. Remove the packing
material at the base of the cabinet and lift the cabinet to its
desired location. You will need a large dolly to help you
lift and move the cabinet to its planned location.
3-4 December 1994 3000-A2-GA31-80
Page 32

Installation
Cabinet Setup
The cabinet is shipped from the factory with doors,
mounting rails, and two factory-installed ac power strips.
Cabinet setup requirements are, therefore, minimal and
consist of leveling the cabinet once it is in place at your
site and, if needed, reversing the cabinet doors.
Leveling the Cabinet
There are four adjustable leveling screw feet at the
bottom of the cabinet; these screw up or down, enabling
you to adjust the cabinet to a level position on the floor.
You can use a level if desired, and you will need an
adjustable crescent wrench to rotate the feet to level the
cabinet.
To level the cabinet:
.
Procedure
1. Place the level against the front door and adjust
the leveling feet until the cabinet stands level
vertically from front to rear.
2. Place the level against one cabinet side and adjust
the leveling screws until the cabinet stands level
vertically from side to side.
Reversing the Cabinet Doors
The cabinet’s front and back hinged doors are installed
on the cabinet frame at the factory to open left-to-right.
You can use pre-drilled holes on the opposite side of the
frame to reverse the door, allowing the door to open
right-to-left.
To reverse a door:
.
Procedure
Carrier Installation
You will need a large, Phillips screwdriver to install the
carrier in the cabinet and to install the power transformer
unit under the carrier. A small, flat-blade screwdriver is
required to remove and replace the cover plate or SDCP,
and to install the 50-pin cable connectors.
Each carrier is shipped with the following associated
equipment:
• Six cable ties
• Two fuses (spares)
• Four #10-32 mounting screws
• Four cabinet (4000-B2-200) #12-24 mounting
screws and four speed nuts for use with other
cabinets
• One jumper wire for the frame ground/signal
ground
These items are bundled together in a plastic bag.
The carrier and its associated auxiliary equipment are
designed to be mounted in cabinets.
The carrier is equipped with reversible mounting
brackets (Figure 3-2) to allow installation in cabinets that
are either 19 inches or 23 inches wide. These brackets are
initially positioned to allow the carrier to be installed in a
cabinet on 19-inch centers.
Preinstallation Inspection
Remove the carrier from its shipping container and
check for physical damage. If the carrier shows signs of
shipping damage, report this immediately to your shipping
representative and also to your AT&T Paradyne
representative. Otherwise, proceed with the installation.
1. Supporting the door, use a flat-blade screwdriver
to remove the screws from the bottom hinge,
detaching the hinge from the cabinet frame.
2. Supporting the door, remove the screws from the
top hinge, detaching the hinge and the door from
the cabinet frame.
3. Flip the door end-over-end.
4. Holding the door in position on the opposite side,
align the hinge holes with the predrilled holes on
the cabinet frame provided for this purpose. Then
use the same screws to reattach the door by its
hinges to the cabinet.
The COMSPHERE 3000 Series Carrier, Figure 3-1, is
designed to house T1 CSUs, T1 DSU/CSUs, DSUs,
DBM-Vs, DBM-Ss, DBM-Ds, TDMs, MCMPs, and
dial/lease modems. The carrier is a metal enclosure that
contains slots for installation of 17 circuit cards. The slot
labeled SDU (Slot 0) is reserved for the Shared Diagnostic
Unit (SDU); Slots 1 through 16 are for T1 CSUs, T1
DSU/CSUs, DSUs, DBM-Vs, DBM-Ss, DBM-Ds, TDMs,
MCMPs, or dial/lease modems. Under each slot number
(on the cover plate or SDCP) is a small area in which to
write the circuit channel identification numbers.
3-53000-A2-GA31-80 December 1994
Page 33

COMSPHERE 3000 Series Carrier
Figure 3-2. COMSPHERE 3000 Series Carrier Mounting Brackets
Installation
The cabinet that the carrier will be installed in may or
may not have threaded screw holes.
• If the cabinet has threaded screw holes, use the
short Phillip-head screws included in the hardware
package and follow the first procedure in this
section.
• If the cabinet does not have threaded screw holes,
use the speed nuts and the longer Phillips-head
screws (that look like washers are molded onto
them) included in the hardware package and follow
the second procedure in this section.
NOTE
Installing the carrier may be a
2 person task; one person to hold
the carrier in proper alignment,
and one person to install the
screws.
3-6 December 1994 3000-A2-GA31-80
Page 34

Installation
To install the carrier in a cabinet that has threaded
screw holes:
.
Procedure
1. If the carrier is to be installed in a 23-inch cabinet,
you must reverse the mounting brackets. T o do
this, remove the screws that attach the mounting
brackets to the sides of the carrier, then reverse the
brackets and replace the screws.
2. Place the carrier against the front rails at the
bottom of the cabinet, as shown in Figure 3-3, to
determine where the two lower machine screws
should be installed, then set the carrier aside. Use
the larger screwdriver to install the two screws
loosely enough to allow the bracket keyholes to
drop under the screw heads during installation.
3. Place the carrier against the front rails of the
cabinet again, as shown in Figure 3-3, allowing
the installed machine screws to pass through the
keyholes. Lower the carrier into place, allowing
the keyholes to slide under the screw heads.
This action positions the carrier correctly for
installation of the two remaining machine screws
and helps support its weight during installation of
these screws.
4. Install the two remaining machine screws at the
top corners of the carrier and tighten all four.
Proceed to Step 5 of the following procedure.
Figure 3-3. Installation of First Carrier into Cabinet with Threaded Screw Holes
3-73000-A2-GA31-80 December 1994
Page 35

COMSPHERE 3000 Series Carrier
To install the carrier in a cabinet that does not have
threaded screw holes:
.
Procedure
1. If the carrier is to be installed in a 23-inch cabinet,
you must reverse the mounting brackets. T o do
this, remove the screws that attach the mounting
brackets to the sides of the carrier, then reverse the
brackets and replace the screws.
2. Position the carrier in the cabinet and determine
the front rail holes to be used.
3. Slip a speed nut onto each rail hole selected, as
shown in Figure 3-4, and align the hole of the
speed nut with the hole in the rail.
4. Line the carrier mounting bracket up with the
speed nut, and start to screw the speednut screw
into the carrier mounting bracket and the speed
nut. Start all four screws, then tighten all four until
the screw head is flush with the carrier and it is
securely mounted in the cabinet.
5. Install the next carrier in the same manner (from
the bottom up) using Steps 1 through 4. Up to six
carriers can be installed in a cabinet (Figure 3-5).
6. If installing a carrier below existing carriers in a
cabinet, it is possible that there will be insufficient
vertical space to align with the holes in the
mounting bracket. In this case, install the four
machine screws directly through the holes in the
mounting brackets and screw them firmly into the
tapped holes in the mounting rails.
Figure 3-4. Installation of First Carrier into Cabinet with No Threaded Screw Holes
3-8 December 1994 3000-A2-GA31-80
Page 36

Installation
Figure 3-5. 72-Inch Cabinet Fully Configured with Six COMSPHERE 3000 Series Carriers
3-93000-A2-GA31-80 December 1994
Page 37

COMSPHERE 3000 Series Carrier
Power Transformer Unit
Installation
The carrier derives its low voltage ac power from the
power transformer unit mounted at the bottom of the
carrier.
Preinstallation Inspection
Check the unit for physical damage. Ensure that the
unit has not been damaged, possibly causing a short
circuit of internal components. If the power transformer
unit shows signs of shipping damage, report this
immediately to your shipping representative and also to
your AT&T Paradyne representative. Otherwise, tighten
any screws that may have worked loose with a
screwdriver and proceed with the installation.
If an SDCP is to be installed in the carrier, inspect the
SDCP and its cable at this time, as well, and report any
damage.
Installation
If installing an SDCP in the carrier, the ribbon cable
that provides power to the SDCP must be installed before
the power transformer unit is installed.
SDCP Ribbon Cable Installation
To install the SDCP ribbon cable:
.
Procedure
1. Decide on the most convenient height for the
SDCP. This is usually at eye level (probably the
second or third carrier from the top of the cabinet).
2. Remove the cover plate from the selected carrier
by unscrewing the four captive screws
(Figure 3-1).
3. At the front of the carrier (Figure 3-6), slide the
fan module straight out and set it aside.
Figure 3-6. Power Transformer Unit Installation
3-10 December 1994 3000-A2-GA31-80
Page 38

Installation
4. At the rear of the carrier (Figure 3-7), disconnect
the ac power cord from the carrier.
NOTE
Removing power causes loss of
service to all 16 circuit card slots
in the carrier. It is therefore
recommended that this
procedure not be performed
during peak operating hours.
5. If this is a new installation, proceed to Step 6. If
the carrier has already been installed, you must
remove the fan module (if installed) and the power
transformer unit:
a. At the rear of the carrier, unscrew the two
captive screws securing the power unit.
Disconnect the two power connectors (P19
and P20) by pressing the catch on the bottom
of each and pull it free of its mating connector.
b. At the front of the carrier, slide the power
transformer unit straight out and set it aside.
You may need another person standing at the
rear to feed the transformer output wires
through the opening in the backplane.
6. Attach either end of the 16-pin ribbon cable
(delivered with the SDCP) to its connector on the
carrier backplane. Feed the ribbon cable through
the four built-in retainer clips provided in the
carrier, then proceed to install the power
transformer unit.
Power Transformer Unit Installation
To mount the power transformer unit in the carrier:
.
Procedure
1. If the SDCP ribbon cable has been installed,
proceed to Step 2.
Remove the cover plate by unscrewing the four
captive screws at the front of the carrier.
2. At the front of the carrier, place the power
transformer unit on the flanges at the bottom of
the carrier (Figure 3-6). Slide the power
transformer unit into place against the rear rail of
the enclosure, guiding the transformer output
wires through the opening in the backplane.
Figure 3-7. COMSPHERE 3000 Series Carrier (Rear)
3-113000-A2-GA31-80 December 1994
Page 39

COMSPHERE 3000 Series Carrier
NOTE
The power transformer unit
output wires are terminated with
plastic connectors. The power
transformer unit must be installed
so that the output wires protrude
through the backplane at the rear
of the carrier.
3. At the rear of the carrier (Figure 3-7), use the
larger screwdriver to engage and tighten the two
captive screws that fasten the power transformer
unit to the carrier.
4. Plug the power transformer output connectors into
the mating connectors on the backplane and latch
them.
CAUTION
In Step 5, the power cord
contains a 3-wire groundingtype plug which has a
grounding pin. This is a safety
feature. Grounding of the
carrier is vital to ensure safe
operation. Do not defeat the
purpose of the grounding plug
by modifying it or by using an
adapter.
NOTE
In Step 7, the cover plate is
installed at this time unless you
are planning to install a fan
module or SDCP.
7. If you are not installing a fan module or SDCP,
replace the cover plate, then use the smaller
screwdriver to engage and tighten the four captive
screws.
SGRD/FGRD Connection
If all the DSUs and modems in the carrier are to have
frame ground (FGRD) connected to signal ground
(SGRD), install a wire strap (provided) between the
SGRD and FGRD terminals at the rear of the carrier
(Figure 3-7). The terminals are an insulation displacement
type, with a slot designed to cut through the insulation on
the wire.
NOTE
Signal ground must not be
connected to frame ground
when 3900 Series Modems are
installed in the carrier.
Prior to installation, use an
outlet tester or voltmeter to
check the ac receptacle for
earth ground. If the power
source does not provide a
ground connection, consult an
electrician to determine
another method of grounding
the carrier before proceeding
with the installation.
5. Plug the appropriate end of the power cord into
the ac receptacle on the carrier.
6. Plug the other end of the power cord into one of
the convenience outlets inside the cabinet, or to an
external ac outlet if the cabinet does not provide
other outlets.
To install a wire strap between the SGRD and FGRD
terminals:
.
Procedure
1. Use pliers to pull the plastic caps off the SGRD
and FGRD terminals.
2. Insert one end of the strap into the SGRD
terminal. It is not necessary to strip the wire.
3. Fit the strap into the slot in the terminal. Replace
the plastic cap on the terminal, fitting the strap
into the matching slot cut lengthwise in the cap
(Figure 3-8).
4. Use a Phillips screwdriver to push the cap firmly
onto the terminal. As you seat the cap, the
terminal cuts through the insulation on the strap
and makes contact.
5. Insert the other end of the strap into the FGRD
terminal and repeat Steps 3 and 4.
3-12 December 1994 3000-A2-GA31-80
Page 40

Figure 3-8. Alarm Output or Ground Strap Terminal Installation
Installation
Alarm Output Connection
To connect the alarm output to an external light or
buzzer, install the alarm or buzzer and voltage source as
described in the instructions received with the light/buzzer
and voltage source. Then, use the two ALARM terminals
labeled E1 and E2 at the rear of the carrier to install two
external device leads:
.
Procedure
1. Use pliers to pull the plastic caps off the E1 and
E2 terminals (Figure 3-8, Step A).
2. Insert the end of the wire coming from the voltage
source and the end of a wire to be connected to the
next carrier into the E1 terminal. It is not
necessary to strip the wires (Figure 3-8, Step B).
3. Fit the wires into the slot in the terminal. Replace
the plastic cap on the terminal, fitting the wires
into the matching slot cut lengthwise in the cap
(Figure 3-8, Step C).
The last carrier to be connected only has one
incoming lead installed and no outgoing lead.
4. Use a Phillips screwdriver to push the cap firmly
onto the terminal. As you seat the cap, the
terminal cuts through the insulation on the wires
and makes contact (Figure 3-8, Step D).
5. Insert the other end of the wire to the next carrier’s
E1 terminal, if any, and repeat Steps 2 through 5
until all the carriers are linked together
(Figure 3-9).
6. Insert the end of the wire coming from the alarm
and the end of a wire to be connected to the next
carrier into the E2 terminal, as described in Step 2.
7. Repeat Steps 3 through 5, connecting the E2
terminals instead, until all the carriers are linked
together (Figure 3-9).
3-133000-A2-GA31-80 December 1994
Page 41

COMSPHERE 3000 Series Carrier
Figure 3-9. Alarm Output Contacts
3-14 December 1994 3000-A2-GA31-80
Page 42

Installation
T emperature
Ccu Cad
per carrier
Fan Module Installation
For installations where the ambient temperature is
likely to be near the upper limit of the acceptable range
(see T able 3-1), a fan module must be added to the carrier
to provide forced air cooling.
Preinstallation Inspection
Check the unit for physical damage, such as broken
blades. Spin fan blades manually to test for damage. If the
fan module shows signs of damage, report this
immediately to your shipping representative and also to
your AT&T Paradyne representative. Otherwise, install
the fan module.
Fan Module Cooling Requirements
Installation
transformer unit; therefore, this procedure assumes the
power transformer unit has been installed.
Table 3-1
The optional fan module is connected to the power
To install the fan module:
.
Procedure
1. If the fan module is being installed after the carrier
has been installed, loosen the four captive screws
(see Figure 3-10) that attach the cover plate to the
carrier and remove the cover plate. If an SDCP is
not being installed, set the cover plate aside for
reinstallation after the fan module has been
installed.
Ambient
Range
Circuit Card
Configuration
1
1 – 2 3 4 5 – 6
Number of Carriers
DSUs without
DBMs and Model
No Fan Modules
3151 CSUs
39_ – 86_F
(4_ – 30_C)
DSUs with DBM,
and Model 3811
and 3911 dial/
lease modems
Model 3161 DSU/
2
CSUs
86_– 122_F
(30_– 50_C)
1
Installing the TDM or MCMP option has no effect on this table.
2
Use the strictest cooling requirements when there is a mixture of units installed.
3
Allow 1.75″ (IU) spacing between carriers if more than 3 carriers are required.
Model 3161 DSU/
2
CSUs
No fan modules 1 fan module
(place in middle
carrier)
2
2 fan modules
(place in bottom
carrier and
second from top)
1 fan module per carrier or 1 fan module
per two carriers (placed in upper carrier)
1 fan module per carrier
(Limit of 3 carriers in a cabinet at temperatures above 40_C or 104_F)
1 fan module
(place in second
carrier from top)
1 fan module
per carrier
3
3-153000-A2-GA31-80 December 1994
Page 43

COMSPHERE 3000 Series Carrier
Figure 3-10. Fan Module Installation
2. Place the fan module on the flanges (Figure 3-10)
at the bottom of the carrier with the power
connector facing the mating power connector on
the installed power transformer unit. Slide the fan
module into the carrier until the power connectors
engage firmly.
3. If the carrier is connected to ac power, the fans in
the fan module will begin blowing air when the
power connectors are engaged. If the carrier is not
powered at this time, then provide power to it.
If the fan module does not operate, check the fuses
on the back of the power transformer unit
(Figure 3-7). If the fuses are blown, replace the
another powered carrier (if possible, one with a
working fan module).
If the fan module still does not work, replace the
fan module. If it works in a different carrier,
replace the power transformer unit of the first
carrier.
4. If you are not going to install an SDCP or speaker
panel, reposition the cover plate over the installed
fan module. Use the smaller screwdriver to engage
and tighten the four captive screws.
If you are going to install an SDCP, proceed to the
Shared Diagnostic Control Panel (SDCP)
Installation procedure.
fuses and determine the cause of the overload. If
the fuses are okay, install the fan module in
If you are going to install a speaker panel, proceed
to the Speaker Panel Installation procedure.
3-16 December 1994 3000-A2-GA31-80
Page 44

Installation
Shared Diagnostic Control
Panel (SDCP) Installation
A single Shared Diagnostic Control Panel (SDCP) can
control up to eight carriers containing up to 128
compatible T1 CSUs, T1 DSU/CSUs, DSUs, or dial/lease
modems. The number of devices that can be installed in a
carrier or cabinet is reduced when Time Division
Multiplexer (TDM) or Multichannel Multipoint (MCMP)
circuit cards are also installed. A TDM or MCMP circuit
card (functioning as a multiplexer or digital bridge) is
physically attached to Models 3551, 3611, and 3616
DSUs and occupies a separate slot in the carrier. In a
single carrier without an NMS connection, an SDU is not
required to provide the SDCP interface. In a cabinet
configuration of two or more carriers, however, an SDU is
required in each carrier to connect the SDCP interface
from carrier to carrier. Figure 3-11 shows the SDCP and
Table 3-2 defines the SDCP status indicators.
Figure 3-11. Shared Diagnostic Control Panel
Table 3-2
Shared Diagnostic Control Panel Status Indicators
Label
OK green Health and status indicator for the selected
Alarm red Health and status indicator for the selected
BckUp yellow Mirrors the Dial indicator on the selected 3551/3611/3616/3811/3911. Not
Test yellow Mirrors the Test indicator on the selected
EC green Error Correction indicator for use by 3811/3911 modems. Not used for the
Color Description
3151/3161/3551/3611/3616/3811/3911; mirrors the OK indicator on the
3151/3161/3551/3611/3616/3811/3911 faceplate and the power indicator on
the 3811/3911.
3151/3161/3551/3611/3616/3811/3911; mirrors the Alrm indicator on the
3151/3161/3551/3611/3616/3811/3911.
used for the 3151/3161.
3151/3161/3551/3611/3616/3811/3911.
3151/3161/3611/3616.
3-173000-A2-GA31-80 December 1994
Page 45

COMSPHERE 3000 Series Carrier
Preinstallation Inspection
Check the unit for physical damage. Ensure that the
SDCP and ribbon cable are not damaged. If the SDCP or
its cable shows signs of damage, report this immediately
to your shipping representative and also to your AT&T
Paradyne representative. Otherwise, install the ribbon
cable as described in the Power Transformer Unit
Installation section, then install the SDCP as described
here.
Installation
The optional SDCP ribbon cable shown in Figure 3-12
is connected to the carrier backplane before the power
transformer unit and optional fan module are installed.
Refer to the Power Transformer Unit Installation section
to connect the SDCP ribbon cable to the backplane, then
continue with the following installation procedure.
Figure 3-12. Shared Diagnostic Control Panel (SDCP) Installation
3-18 December 1994 3000-A2-GA31-80
Page 46

.
Procedure
1. Attach the other end of the SDCP ribbon cable to
the back of the SDCP, as shown in Figure 3-12.
2. Secure the panel to the front of the carrier with its
four captive screws, using the same screw holes
that held the blank cover plate.
3. The display on the SDCP should light up
immediately. If it does not, check the ac power
connections at the rear of the carrier and the two
fuses at the rear of the power transformer unit. If
necessary, make sure that both ends of the SDCP
ribbon cable are seated securely in their
connectors. If the SDCP still does not light up, call
your AT&T Paradyne representative.
4. For a cabinet configuration with multiple carriers,
install the SDUs in the appropriate carriers, then
connect all of the SDUs in a daisy chain. Use an
8-pin modular telephone cord to connect the
FP OUT jack at the rear of the SDU in this carrier
to the FP IN jack of the SDU in the next carrier
above or below it (see the Shared Diagnostic Unit
(SDU) Installation and NMS Connection sections
of this chapter). Use another cord to connect the
second SDU’s FP OUT jack to the next SDU’s
FP IN. Continue to the last carrier in the cabinet.
Once devices have been installed (refer to the Circuit
Card Installation section), test the SDCP’s ability to
address the devices.
.
Procedure
1. Press Select.
2. Enter a valid carrier and slot address.(Refer to the
Shared Diagnostic Unit (SDU) Installation section
of this chapter for information on carrier
addresses.) For Model 3151 CSUs and Model
3161 DSU/CSUs, the green OK indicator flashes.
It should be the only OK indicator flashing in the
cabinet. For all devices but T1 CSUs and T1
DSU/CSUs, the yellow Front Panel indicator on
the selected device should light. (It should be the
only Front Panel indicator lit in the cabinet.)
Installation
Speaker Panel Installation
An optional speaker panel can be installed to provide
audio monitoring of any Model 3811 or 3911 dial/lease
modem installed in a cabinet of COMSPHERE
3000 Series Carriers. If there is only one carrier in the
cabinet and no SDCP is installed, the speaker panel can be
mounted directly to the carrier in place of the cover plate
(as shown in Figure 3-10). If there is more than one
carrier in the cabinet, the speaker panel should be
mounted on a carrier without the SDCP. If there is only
one carrier in the cabinet and an SDCP is mounted on the
carrier, the speaker panel may be mounted directly to the
front rail, as shown in Figure 3-13.
Preinstallation Inspection
Check the speaker, speaker jack, and panel for physical
damage. If there are signs of damage, report this
immediately to your shipping representative and your
AT&T Paradyne representative.
Installation
If the carrier has a cover plate installed, use
Figure 3-10 and begin at Step 1 of the following
procedure. If the carrier has an SDCP installed, use
Figure 3-13 and begin with Step 2 of the following
procedure to mount the speaker panel to the cabinet’s
front rails.
.
Procedure
1. To install the speaker panel directly to the carrier,
remove the cover plate and then secure the speaker
panel to the front of the carrier using its four
captive screws. Use the same screw holes that held
the cover plate in place (see Figure 3-10).
Continue to Step 6.
3. Press Select again. The display on the SDCP
should show the last menu displayed, or in the
case of a new installation, the top-level menu on
the selected device.
3-193000-A2-GA31-80 December 1994
Page 47

COMSPHERE 3000 Series Carrier
2. To install the speaker to the cabinet’s front
mounting rails, first determine if you want to
mount the speaker panel above or below the
carrier. Then, fasten one of the speaker panel
mounting brackets to a front mounting rail with a
#10 Phillips-head screw (supplied). See
Figure 3-13.
NOTE
If your cabinet has unthreaded rails,
first attach a speed nut to the rail hole
you intend to use. Then, fasten a
bracket to the mounting rail using a
supplied #12 screw (the longer
Phillips-head screw).
3. Verify that this is the position in which you want
to mount the panel by holding the panel against
the bracket and aligning the panel’s captive screws
with the bracket’s screw post. (For appearance,
you can adjust the bracket’s position to eliminate
space between the speaker panel and carrier.)
If necessary , loosen the bracket and make any
necessary adjustments.
4. Fasten the second speaker panel bracket to the
other mounting rail to match the first bracket’s
position.
Figure 3-13. Models 3811/3911 Speaker Panel Installation Directly to Cabinet Rails
3-20 December 1994 3000-A2-GA31-80
Page 48

Installation
5. Once the brackets are installed, use a small
flathead screwdriver to tighten the speaker panel’s
four captive screws to the mounting brackets.
6. Once the speaker panel is installed, verify that the
speaker is working. Connect one end of the
supplied coiled cable into the speaker panel’s jack
labeled Spkr and the other end into any
Model 3811’s or 3911’s speaker jack labeled Spkr.
7. If the cabinet has an SDCP, press Select and enter
a valid carrier and slot address for the modem
used in Step 6. The Front Panel status indicator
on the Model 3811’s or 3911’s faceplate lights,
indicating that it is connected to the SDCP.
8. Using the SDCP, scroll the menu until the Control
branch appears on the LCD. Enter the Control
branch and select the Speaker function. Select a
speaker setting of Low, Medium, or High and then
place a call to hear the dialing sequence.
NOTE
This is only a temporary setting.
Upon a reset, the modem returns
to its default setting, Medium. To
change the default setting, refer
to the
COMSPHERE 3800 Series
Modems, Models 3810, 3811,
and 3820 User’s Guide
or the
COMSPHERE 3900 Series
Modems, Models 3910 and 3911,
Point-to-Point/Multipoint
Installation and Operation
Manual
.
If you do not have an SDCP installed and are using AT
commands, use the ATM command to turn the speaker
ON and the ATL command to adjust the speaker volume.
3-213000-A2-GA31-80 December 1994
Page 49

COMSPHERE 3000 Series Carrier
Shared Diagnostic Unit (SDU)
Installation
An SDU (Figure 3-14), which is a circuit card designed
to mount in the slot at the extreme left end of the carrier
(Slot 0), is required under either or both of the following
conditions:
• The DSUs or dial/lease modems in the carrier are to
be controlled by an NMS.
• Multiple carriers in a cabinet configuration are to
be controlled from a single SDCP.
The SDU is not required for a single carrier without an
NMS interface or a single carrier with an SDCP installed.
At the rear of the SDU circuit card are four modular
jacks (Figure 3-15). From the top down, these jacks are as
follows:
• CC IN (6-pin)
• CC OUT (6-pin)
• FP IN (8-pin)
• FP OUT (8-pin)
SDU status indicators are defined in T able 3-3.
Below these connectors are two sets of DIP switches:
S2 (The top DIP switch) is used to specify the
carrier address (1–8) so that each device in
a cabinet configuration has a unique identity. Only the first three switches (S2-1
through S2-3) are operational; the fourth
switch (S2-4) is reserved for future use.
S1 (The bottom DIP switch) is used to specify
the diagnostic protocol to be supported
(DPII, ADp, or DMC), and the CC or DC
operation to be supported for DPII and ADp
protocol modes.
Preinstallation Inspection
Check the SDU for physical damage. Ensure that the
circuit card and faceplate are not damaged. If the SDU
shows signs of damage, report it immediately to your
shipping representative and also to your AT&T Paradyne
representative. Otherwise, install the unit.
Figure 3-14. SDU Faceplate
3-22 December 1994 3000-A2-GA31-80
Page 50

Installation
Figure 3-15. Shared Diagnostic Unit Circuit Card, Rear View
Table 3-3
Shared Diagnostic Unit Status Indicators
Label
Color Description
OK green Normal operation.
Alrm red Fault in SDU.
Diag In yellow Incoming message from NMS (to a DSU, DBM, or Model 3811 or Model 3911
modem in the carrier).
Diag Out yellow Outgoing message to NMS (from a DSU, DBM, or Model 3811 or Model 3911
modem in the carrier).
3-233000-A2-GA31-80 December 1994
Page 51

COMSPHERE 3000 Series Carrier
Switch
Installation
To install the SDU in its dedicated slot in the carrier
(Slot 0):
.
Procedure
1. Set the carrier address DIP switches (S2-1, S2-2,
and S2-3) on the rear of the card, as specified in
Table 3-4. Note that each carrier in a cabinet
mounting must have a unique address (Switch S2).
a. For a single carrier, leave the switches set for
Carrier 1, which is the factory default.
b. To populate a new cabinet with an NMS
control channel dedicated to DSUs, use the
Carrier 1 setting for the first carrier, usually at
the bottom of the cabinet. Use the Carrier 2
setting for the next carrier up from the bottom.
Continue to the Carrier 6 setting, if necessary,
for the top carrier. If there are more than eight
carriers in a single installation, continue with
the Carrier 7 and Carrier 8 settings for the
second cabinet. The next COMSPHERE
3000 Series Carrier is numbered 1, but is on a
different control channel.
c. To add a COMSPHERE 3000 Series Carrier to
an existing control channel, use T able 3-5 to
determine the new carrier’s address provided
the DSU’s software version (DSU SW ver) is
less than 4.25. (When the DMC protocol is
used, the ANALYSIS system calculates the
carrier address automatically so you can enter
it.) The limitations shown in T able 3-5 do not
apply when the DSU SW version is 4.25 or
greater.
d. Write the carrier number on the slot label for
the SDU (slot labels are located under each
slot on the SDCP or cover plate).
2. Set the protocol DIP switches (S1-1 and S1-2) on
the rear of the circuit card to the protocol required
(Table 3-6). If connecting to a network control
channel, set the CC option. If connecting to the
diagnostic channel of an upstream device
(modem), set the DC option.
Table 3-4
Carrier Address DIP Switches
Carrier Address
1
1
S2 – 4 — — — — — — — —
S2 – 3 Off Off Off Off ON ON ON ON
S2 – 2 Off Off ON ON Off Off ON ON
S2 – 1 Off ON Off ON Off ON Off ON
1
Factory default setting:
ON is to the left as you face the rear of the carrier.
Off is to the right.
2 3 4 5 6 7 8
3-24 December 1994 3000-A2-GA31-80
Page 52

Table 3-5
First New Carrier Address
Switch
Carrier Address Assignment
Highest Existing Network Address*
DA TAPHONE II ADp
011 – 048 01 – 32 2
051 – 088 33 – 64 3
091 – 28 65 – 96 4
131 – 68 97 – 128 5
171 – 208 129 – 160 6
211 – 248 161 – 192 7
251 – 288 193 – 224 8
291 – 328 225 – 256 **
* For the DMC protocol, the carrier address is automatically calculated by ANALYSIS 6510 if the DSU
software version is less than 4.25. When the DSU software version is 4.25 or greater, devices are
addressable independent of the carrier.
** It is recommended that you start a new control channel when the carrier address reaches this limit.
Installation
Protocol DIP Switches
DPII/ADp, CC* DPII/ADp, DC DMC
S1 – 4 — — —
S1 – 3 — — —
S1 – 2 Off ON ON or Off
S1 – 1 Off Off ON
* Factory default setting:
ON is to the left as you face the rear of the carrier.
Off is to the right.
Table 3-6
Protocol
3-253000-A2-GA31-80 December 1994
Page 53

COMSPHERE 3000 Series Carrier
3. Using a Phillips screwdriver, loosen the screw
holding the circuit pack lock and rotate the lock to
the open position (Figure 3-16).
4. At the front of the carrier, hold the SDU vertically
with the faceplate latch in the open position, and
insert the circuit card into the top and bottom card
guides of the slot labeled SDU, to the left of
Slot 1. Slide the circuit card into the slot until the
backplane connector is seated firmly. Press the
latch to secure the SDU in the carrier, rotate the
circuit pack lock back into the closed position and
tighten the screw.
If the carrier’s power transformer unit is operating,
all indicators on the SDU’s faceplate light briefly
as the SDU performs a self-test routine. On
completion of the test, all indicators go off except
the green OK indicator. If there is an NMS
connection and DSUs in the carrier that are on the
NMS’ or modem’s poll list, the yellow Diag In
and Diag Out indicators also flicker periodically
as the NMS polls the devices in the carrier.
5. After at least one DSU or modem has been
installed in the carrier, check that the SDU is
functioning properly by polling selected DSUs or
modems for health and status.
• If there is an NMS connection, poll the DSUs
or modems for health and status (refer to the
NMS Connection section).
• If the SDCP is already installed, select each
DSU or modem in turn and request its health
and status (refer to the Shared Diagnostic
Control Panel (SDCP) Installation section).
Figure 3-16. Circuit Pack Lock
3-26 December 1994 3000-A2-GA31-80
Page 54

Installation
NMS Connection
A COMSPHERE 3000 Series Carrier can be connected
to a variety of Network Management Systems (6800
Series NMS, 6700 Series NMS, DATAPHONE II Level 4
System Controller, DATAPHONE II Diagnostic Console,
DATAPHONE II Network Controller, and ANALYSIS
6510 NMS) via the control channel interface on the SDU,
but all 16 slots in the carrier can only be controlled by one
Network Management System. One control channel can
manage up to eight COMSPHERE 3000 Series Carriers
by daisy chaining from the CC IN) to the CC OUT
interfaces on the SDU in each carrier.
NOTE
You cannot use the NMS
connected through the SDU with
either Model 3151 CSUs or 3161
DSU/CSUs.
The types of NMS that can connect to the
COMSPHERE 3000 Series Carrier have a variety of
physical and electrical interfaces. The control channel
CC IN interface on the SDU, where the NMS is
connected to the COMSPHERE 3000 Series Carrier, is a
6-pin modular jack. For each type of NMS, a specific
adapter is required to convert the control channel interface
from the NMS to the 6-pin modular plug required for the
SDU. The adapters required are described below.
• The COMSPHERE 6800 Series NMS, 6700 Series
NMS, ANALYSIS 6510 NMS, and later releases of
the DATAPHONE II Level 4 System Controller use
a 25-pin EIA-232 interface and a gender adapter.
The 25-pin to 6-pin adapter for a central site is
AT&T Paradyne feature number 4400-F1-594; for
the remote site, it is 6821-F1-518. The ANALYSIS
gender adapter is AT&T Paradyne part number
4951-031. In addition, a 6-conductor cord with
6-pin plugs on each end can be used to make this
connection. This cord is AT&T Paradyne feature
number 4400-F1-510 (3 feet).
You can also connect a remote NMS to a
COMSPHERE 3000 Series Carrier via a Modular
3551, 3611, or 3616 DSU and an NMS adapter
cable (feature number 3000-F2-510). For
information on how to install the NMS adapter
cable, refer to the appropriate user documentation.
• The DA TAPHONE II Diagnostic Console, Network
Controller, and older releases of a Level 4 System
Controller use a 10-pin interface for the Control
Channel. The 10-pin to 6-pin cable is AT&T
Paradyne feature number 4400-F1-577 (5 feet). Use
this adapter when the DSUs in the carrier are
controls on the backbone network.
To connect the local NMS to the COMSPHERE 3000
Series Carrier:
.
Procedure
1. Obtain the correct adapter, as described above, and
connect it to the network management port on the
NMS device (on the COMSPHERE and
DATAPHONE II systems, the port is labeled
CC OUT or DC OUT). (See Figure 3-17 for an
NMS to a COMSPHERE 3000 Series Carrier
connection, Figure 3-18 for a diagnostic channel
daisy chain of devices into a COMSPHERE 3000
Series Carrier, and Figure 3-19 for a diagnostic
channel daisy chain of devices from a
COMSPHERE 3000 Series Carrier.)
2. Use a 6-pin modular telephone cord to connect the
modular side of the adapter to the CC IN jack on
the rear of the SDU in the COMSPHERE 3000
Series Carrier (Figure 3-20).
3. For a cabinet configuration with multiple carriers,
connect all of the SDUs in a daisy chain, starting
with the SDU connected to the NMS. Use a 6-pin
modular telephone cord to connect the CC OUT
jack at the rear of this SDU to the CC IN jack of
the SDU in the next carrier above or below it. Use
another cord to connect the second SDU’s
CC OUT jack to the next SDU’s CC IN. Continue
to the last carrier in the cabinet.
4. After at least one DSU has been installed in the
carrier, check that the SDU is functioning properly
by polling the DSUs for health and status.
3-273000-A2-GA31-80 December 1994
Page 55

COMSPHERE 3000 Series Carrier
Figure 3-17. NMS to a COMSPHERE 3000 Series Carrier Connection
3-28 December 1994 3000-A2-GA31-80
Page 56

Installation
Figure 3-18. Daisy Chaining of Devices into a COMSPHERE 3000 Series Carrier
3-293000-A2-GA31-80 December 1994
Page 57

COMSPHERE 3000 Series Carrier
Figure 3-19. Daisy Chaining of Devices from a COMSPHERE 3000 Series Carrier
3-30 December 1994 3000-A2-GA31-80
Page 58

Installation
Figure 3-20. NMS and Shared Diagnostic Control Panel Interface Connections
3-313000-A2-GA31-80 December 1994
Page 59

COMSPHERE 3000 Series Carrier
Auxiliary Backplane
Installation
The Auxiliary Backplane assembly can be mounted on
either the left-hand side of the COMSPHERE 3000 Series
Carrier (as viewed from the front) to cover Slots 1–8, or it
can be placed on the right-hand side to cover Slots 9–16.
A single carrier can be equipped with two Auxiliary
Backplane assemblies. Figure 3-21 shows the Auxiliary
Backplane in position to be installed over Slots 9–16 of
the 3000 Series Carrier.
NOTE
If modular 3600 Series DSU or
dial/lease modem circuit cards
with ‘‘gold finger” contacts are
installed in the carrier, mount the
Auxiliary Backplane on the
right-hand side (over Slots
9–16), or Slot 9 will become
unusable.
Figure 3-21. Auxiliary Backplane Being Installed over
Slots 9–16 of the COMSPHERE 3000 Series Carrier
3-32 December 1994 3000-A2-GA31-80
Page 60

Installation
Figure 3-22 shows one Auxiliary Backplane installed
over Slots 9–16 and another being installed over
Slots 1–8 of the COMSPHERE 3000 Series Carrier.
When you install two auxiliary backplanes on a carrier,
you must use a diagnostic channel extension cable to
connect them together. For more information about this
cable, refer to Appendix B, Models 3151/3161 Interface
Connections.
NOTE
Once installed, the Auxiliary
Backplane extends down into
the Network Interface Module
(NIM) area of the 3000 Series
Carrier. The extension of the
backplane displaces a NIM card
in that part of the carrier and
prohibits the use of dial modems
in any slot covered by the
Auxiliary Backplane assembly .
Figure 3-22. COMSPHERE 3000 Series Carrier with T wo Auxiliary Backplanes
3-333000-A2-GA31-80 December 1994
Page 61

COMSPHERE 3000 Series Carrier
You need a Phillips screwdriver to install the Auxiliary
Backplane. Long-nose pliers, a 1/4″ nut driver, and a
5/16″ nut driver are also required.
WARNING
Turn off the power to the 3000
Series Carrier before you
install the Auxiliary Backplane.
To install the Auxiliary Backplane (Figure 3-24):
.
Procedure
1. Remove the power transformer unit from the front
of the 3000 Series Carrier.
2. Remove the NIM, if present, from the back of the
3000 Series Carrier.
3. If the carrier is already installed in a cabinet with
equipment located below, place a cardboard or
paper pad from the front perpendicular to the main
backplane at the bottom of the carrier to catch any
hardware that may fall below.
For the top row, use the same screw holes for
mounting on either side.
8. Align the backplane using the custom standoffs at
the bottom and the corresponding holes on the
bottom row of the backplane.
9. Insert and finger-tighten the two bottom row
screws (3/4″ length). If you are mounting the
backplane on the left side, you must insert the
small 3/8″ screw into the open slot at the lower
left side of the backplane.
10. Insert and finger-tighten the two top row screws
(1″ length).
11. Insert and finger-tighten the two center row
screws (1″ length).
12. Using a screwdriver, tighten all the screws. Be
careful not to use excessive force.
13. Ensure that the rubber pad is properly attached to
the black plastic T1 network cable retainer
(Figure 3-23).
This plastic cable retainer secures the T1
connecting cable once it is plugged in.
4. Use a 1/4″ nut driver to remove the two metal
hexagonal standoffs on either side of connectors
P23 and P24, if mounting the Auxiliary Backplane
on the right side, or P25 and P26 if mounting the
backplane on the left. Refer to Figure 3-7.
5. Insert the custom hexagonal standoffs into the
existing standoff holes from the rear, then use the
long-nose pliers and a 5/16″ nut driver to install
the nylon insulating washers and No. 5 nuts from
the front of the carrier.
6. Tighten the nuts with the 5/16″ and 1/4″ nut
drivers.
7. Determine which screw holes you need to use to
mount the Auxiliary Backplane using the six
screws provided.
The backplane has pointer symbols next to the
center and bottom rows of screw holes (refer to
the Figure 3-24). If you are mounting the
backplane on the right side of the rear of the
carrier, use the two screw holes with the pointers
facing to the right. If mounting the backplane on
the left side, use the holes with the pointers facing
left.
NOTE
Do not install the cable retainer if
you will be installing a Telco
connector cable with a straight
cable entry. Instead, secure this
cable using the screw lock
provided on each side of the T1
network connector.
Figure 3-23. T1 Network Cable Retainer
3-34 December 1994 3000-A2-GA31-80
Page 62

Installation
14. Install the T1 network cable retainer. To do so,
insert one slotted leg, with the grooved slot facing
outward, into the larger recessed slot at the bottom
of the T1 connector, then slide it toward the center.
Refer to Figures 3-21 and 3-24.
15. Insert the other leg of the cable retainer (with the
groove on top) into the larger recessed slot, then
slide it toward the left.
To open the cable retainer, insert a flathead
screwdriver into the slot on the top and pry it
open. The retainer unfolds, allowing connection of
the cable. T o lock the retainer in place, refold it
and snap it down over the top of the connector
cable.
Figure 3-24. Auxiliary Backplane
3-353000-A2-GA31-80 December 1994
Page 63

COMSPHERE 3000 Series Carrier
COM Port Connection – External PC
Communication between the Model 3151 CSUs and
Model 3161 DSU/CSUs in a 3000 Series Carrier and an
external PC (attached either locally or through an external
modem) occurs through a shared communication (COM)
port. Since the Models 3151 and 3161 do not have their
own COM port for external access, one unit in the carrier
must be selected as the master communication port. This
unit then provides the COM port for all Models 3151 and
3161 in the carrier.
Only one Model 3151 or 3161 unit in the carrier can be
configured as the master communication unit. By using
COM port configuration options for this unit, you can
configure Port 2 on the Auxiliary Backplane as the COM
port for the carrier. An attached PC can then access any
unit in that carrier through the shared COM port on the
master communication unit.
Figure 3-25. COM Port Adapter
Figure 3-25 shows the COM port adapter you use on
the Auxiliary Backplane to accomplish the COM port
connection for the master communication unit.
Figure 3-26 shows a PC attached to the Auxiliary
Backplane using the COM port adapter and cable.
Figure 3-26. PC Attached to Auxiliary Backplane Using COM Port Adapter and Cable
3-36 December 1994 3000-A2-GA31-80
Page 64

Installation
Network Interface Installation
Once the power transformer (and optional fan module
and/or SDCP) has been installed, go to the rear of the
cabinet to install the two 50-pin digital network or
leased-line interface connectors (see Figure 3-27), labeled
Network Cable for Slots 1–8 (P21) and Network Cable
for Slots 9–16 (P22). These connectors provide the
interface from the DSU or dial/lease modem in the carrier
to the DDS (Digital Data Service), LADS (Local Area
Data Set), analog leased-line networks, or switched
56 kbps digital service.
Located above the digital or leased network interface
connections are the connections used to install the
interfaces for dial backup devices and dial/lease modems.
In Figure 3-27, these connections are labeled P23 and P24
for Slots 1–8, and P25 and P26 for Slots 9–16. (These
slots are covered when Auxiliary Backplanes are
installed.) Network Interface Modules (NIMs) are
installed onto these connections to provide the interface to
the dial network, or switched 56 kbps digital service.
Two modules can be mounted onto the carrier and can
be different types of NIMs, independent of one another.
Each NIM serves eight contiguous slots in the carrier: one
for Slots 1–8 and one for Slots 9–16. Each module
determines the operating characteristics of the interfaces
to the eight slots it serves.
COMSPHERE 3000 Series Carriers can be populated
by the same devices (all T1 CSUs, all T1 DSU/CSUs, all
DSUs, or all dial/lease modems), split within the carrier
(all dial/lease modems in Slots 1–8 and all DSUs in
Slots 9–16), or mixed within the same half of the carrier
(e.g., five dial/lease modems and three DSUs).
NOTE
You can only install Model 3151
CSUs and Model 3161 DSU/
CSUs on the side of the carrier
that has an Auxiliary Backplane
installed.
Figure 3-27. Network Interface Cable Installation
3-373000-A2-GA31-80 December 1994
Page 65

COMSPHERE 3000 Series Carrier
Make sure that all devices installed in each half of the
carrier are configured with compatible digital/leased-line,
dial/dial backup, or switched 56 kbps backup interfaces.
All devices installed in a particular carrier half must be
capable of interfacing to the leased-line network, dial
network, or switched 56 kbps digital service using the
common interface connections on the rear of the carrier
(see Figure 3-27). The digital/leased-line interface is
provided through a 50-pin connector, while the dial/dial
backup and switched 56 kbps backup interfaces are
provided through Network Interface Modules (NIMs).
The dial/dial backup interface NIMs are available with
either Permissive or Programmable mode. The switched
56 kbps backup interface is provided through one of the
Switched 56 NIMs, either the 2-wire or 4-wire version. A
NIM must be selected for half a carrier if any devices in
that half of the carrier use the dial backup or switched
56 kbps backup interface. The NIM selected defines the
pinouts of the dial or switched 56 kbps connection for all
devices within that half of the carrier.
When devices are mixed, it is recommended that they
be clustered together, and that dial/lease modems be
installed from the left, starting with Slot 1.
• When dial/lease modems are mixed with DSUs in
the same half of the carrier (i.e., Slots 1–8 or
Slots 9–16), the dial/lease modem’s leased-line
connection may not occur on the proper pins;
therefore, cross-connection may be required at the
network interface.
capability , the DBM network interface module
(NIM) is used. When populating it with all
dial/lease modems or a combination of DSUs with
dial backup capability and dial/lease modems, the
DDD NIM must be used. Both NIMs are available
in permissive or programmable versions. In
addition, when populating it with all DSUs with
4-wire switched 56 kbps backup capability, the
4-wire Switched 56 NIM must be used.
The remainder of this section provides the following
information:
• Digital or analog leased-line network interfaces
• Dial network interface
• Switched 56 kbps network interface
• COMSPHERE 3811 control interface
A number of possible interconnection schemes are
available from the network interface connections to the
network interface.
Figure 3-28 illustrates the cabling connections for a
dial/lease modem, such as the Model 3811 or 391 1.
Figure 3-29 illustrates the cabling connections for a
DSU or a DSU with a V.32 or 2-wire Switched 56 DBM.
Figure 3-30 illustrates the cabling connections for a
DSU with a 4-wire Switched 56 DBM.
• When populating the same half of the carrier with
all DSUs with dial or 2-wire switched 56 backup
3-38 December 1994 3000-A2-GA31-80
Page 66

Installation
Figure 3-28. Dial/Lease Modem Interconnection Schemes
3-393000-A2-GA31-80 December 1994
Page 67

COMSPHERE 3000 Series Carrier
Figure 3-29. DSU, DBM, or DSU with V.32 or 2-Wire Switched 56 DBM Interconnection Schemes
3-40 December 1994 3000-A2-GA31-80
Page 68

Installation
Figure 3-30. DSU with 4-Wire Switched 56 DBM Interconnection Schemes
3-413000-A2-GA31-80 December 1994
Page 69

COMSPHERE 3000 Series Carrier
Digital or Analog Leased-Line Network
Interfaces
The digital or analog leased-line network interface is
provided by two 50-pin connectors (P21 and P22) on the
back of the carrier. Each connector serves eight
contiguous slots in the carrier: one for Slots 1–8 and one
for Slots 9–16.
Depending upon your configuration, use one of the
following schemes for the digital/analog leased-line
interfaces (Figure 3-29):
• The 50-pin cable can be attached to a
66A-punchdown block. With this scheme, the
circuits must be hard-wired to the block.
• The DDS provider installs the RJ48T-type network
interface that the 50-pin cable is plugged into. The
RJ48T is specified to allow from 1 to 12 DDS
circuits to be placed on a single 50-pin connector.
Be sure to specify to the service provider that only
the first eight circuit positions are used in each
50-pin connection at the carrier. Note that you
cannot use a leased-line modem in this half of the
carrier.
To install the digital network or analog leased-line
interfaces:
.
Procedure
1. Connect the network cables (50-pin mass
termination line cable – feature number
3600-F2-503) to the carrier and use the small
screwdriver to engage and tighten the screw. For
installation in Canada, a special network interface
adapter cable is provided (feature number
3000-F1-009). First, connect the cables to the
carrier and use the small screwdriver to engage
and tighten the screw.
2. Attach a cable tie to the cable near the hood at the
carrier’s cable-tie attachment point. (If a
“straight-in” cable is used, disconnect the cable
tie, remove the screw and cable tie mount, and
fasten the cable with two screws.)
3. Connect the individual cables with 8-pin modular
plugs into the adapter for each DDS line.
Dial Network Interface
• The 50-pin cable can be plugged into a
3600-F2-503 adapter cable. This adapter cable
provides 8 keyed modular connectors using Pins 1,
2, 7, and 8. These connect the DSU to a standard
DDS network interface (RJ48S) and also provide
the new JM8-style leased-line connection for the
leased-line modem. This interconnection scheme
allows mixing DSUs and leased-line modems only
if the analog leased-line network interface is a JM8.
• The 50-pin cable can be attached to the
3000-F1-009 adapter cable. This is a standard
DDS/leased-line connection in parts of Canada. It
provides eight 6-pin modular plugs. (This
interconnection scheme is not recommended for
U.S. application.)
The direct distance dialing (DDD) network interface is
provided by two optional network interface modules
(NIMs) on the back of the carrier (Figure 3-28): an RJ21X
(permissive) or an RJ27X (programmable) 50-pin
connector. When there are two modules, they can be
different types of NIMs independent of one another.
Appendix A provides the pin assignments for these
connectors.
Additional features available for both programmable
and permissive NIMs are Service Line and Make Busy.
The Service Line feature permits an extra dial line to be
connected to the carrier. NIMs with this feature are
identified by two Service Line modular connectors
mounted on the NIM. The two Service Line connectors
are connected in parallel on the NIM board and can be
used in daisy chaining (sharing) a single dial line between
the two halves of the carrier (Slots 1 through 8 and Slots 9
through 16) and also between multiple carriers.
3-42 December 1994 3000-A2-GA31-80
Page 70

Installation
Depending upon your configuration, use one of the
following interconnection schemes for a dial/dial backup
interface (Figure 3-28): the 50-pin cable can be attached
to a 66A-punchdown block. With this scheme, all dial
circuits must be hard-wired to the block. Note that the
connection type is defined by the NIM installed in that
half of the carrier.
• The 50-pin cable can be used to connect a
permissive DBM NIM to a 3600-F2-505 adapter
cable. This arrangement is only used for DSU/DBM
devices in the Permissive mode.
• The 50-pin cable can be used to connect a
programmable DDD NIM to a 3600-F2-504 adapter
cable. This requires that all devices in one half of
the carrier be configured as programmable
connections to the dial lines.
• The 50-pin cable can be used to connect a
programmable DBM NIM to a 3600-F2-504
adapter cable. This arrangement is only used for
DSU/DBM devices in the Programmable mode.
• The 50-pin cable can be plugged directly into an
RJ21X (permissive) or RJ27X (programmable) dial
network interface arrangement provided by the dial
service provider. Only the first eight lines are wired
in each 50-pin connector.
2-Wire Switched 56 kbps Network Interface
The 2-wire switched 56 kbps digital network interface
is provided by an optional 2-wire Switched 56 Network
Interface Module (NIM), which has a 50-pin connector,
on the back of the carrier. Appendix A provides the pin
assignments for this connector.
Depending upon your configuration, use one of the
following interconnection schemes available for a 2-wire
switched 56 kbps backup interface (Figure 3-29):
• The 50-pin cable from a permissive NIM can be
connected to a 3600-F2-505 adapter cable.
NOTE
Do not insert a 2-wire switched
56 kbps plug into an RJ11C jack.
This type of jack is intended for
analog PSTN devices. Plugging
into an RJ11C plug may cause
equipment damage and harm to
the telephone network.
4-Wire Switched 56 kbps Network Interface
The 4-wire switched 56 kbps digital network interface
is provided by an optional 4-wire Switched 56 Network
Interface Module (NIM), which has an SJA57-type
connector, on the back of the carrier. Appendix A
provides the pin assignments for this connector.
Depending upon your configuration, use one of the
following interconnection schemes available for a 4-wire
switched 56 kbps backup interface (Figure 3-30):
• The 50-pin cable can be attached to a
66A-punchdown block. With this scheme, the
circuits must be hard-wired to the block. Note that
the connection type is defined by the NIM installed
in that half of the carrier.
• The 50-pin cable can be plugged into a
3600-F2-503 adapter cable. This cable provides 8
keyed modular connectors using Pins 1, 2, 7, and 8.
These connect the DSU to a standard DDS network
interface and also provide the 4-wire switched
56 kbps digital service connection for the
DSU/4-wire Switched 56 DBM.
• The 50-pin cable from a permissive NIM can be
attached to a 66A-punchdown block. With this
scheme, the circuits must be hard-wired to the
block. Note that the connection type is defined by
the NIM installed in that half of the carrier.
3-433000-A2-GA31-80 December 1994
Page 71

COMSPHERE 3000 Series Carrier
NIM Installation
To install the NIM providing the dial interface for the
dial backup devices (DBMs), dial/lease modems, or the
switched 56 kbps network interface for either the 2-wire
or 4-wire Switched 56 DBM:
.
Procedure
1. For Slots 1–8, seat the NIM on connectors P23
and P24 on the rear of the carrier (Figure 3-31).
2. Use the four screws provided with the module to
secure it to the carrier.
3. Connect a 50-pin mass termination line cable to
the module. Secure the cable with the cable tie that
is provided.
4. For the dial interface, connect the line side of the
cable to the dial circuit terminations assigned to
the DBMs and dial/lease modems in carrier
Slots 1–8 (Figure 3-32).
For the switched 56 kbps network interface,
connect the line side of the cable to the switched
56 kbps circuit terminations assigned to the
Switched 56 DBM in carrier Slots 1–8
(Figure 3-32).
If the NIM is equipped with two 6-position
Service Line modular connectors (for use with
dial/lease modems), connect the line side of the
cable to the proper dial line or NIM modular
connector (refer to Figure 3-31). The modular
plugs are labeled 1 through 8, and they correspond
to the devices in those carrier slot positions. For
example, modular plug 1 is wired for the device in
Slot 1; for Slots 9 through 16, modular plug 1 is
wired for the device in Slot 9.
5. If any DBMs, DBM-Vs, DBM-Ss, DBM-Ds, or
dial/lease modems are to be installed in
Slots 9–16, repeat Steps 1 through 4 for a second
NIM, seating it on connectors P25 and P26 on the
rear of the carrier.
Figure 3-31. Network Interface Module
3-44 December 1994 3000-A2-GA31-80
Page 72

Figure 3-32. Dial Network Interface Module Installation
Installation
COMSPHERE 3811 Control Interface
Connectors J1 and J2 provide an interface that can be
used to support D-lead or MI/MIC control of the
COMSPHERE 3811 modems. These two control signal
methods are identical in function in that actuation causes
the associated modem to go off-hook in the Originate
mode.
With MI/MIC signaling, two leads are provided: Mode
Indicate and Mode Indicate Common (usually via Pins 3
and 6 of an 8-position modular VF connector). Actuation
of the signal is by momentary connection of these two
leads.
With D-lead control signaling, a single signal lead is
associated with each modem. Momentary connection of
this lead to a common ground actuates the signal.
The interface provided by Connectors J1 and J2
directly support a D-lead interface. (These connectors are
defined in Table A-12.) Applications where MI/MIC
signaling is provided can be accommodated by simply
connecting all MIC leads together and wiring them to
Pin 25 (Signal Ground) on the corresponding J1 or J2
connector. Each MI lead can then be treated as a D-lead
connection.
Models 3151 and 3161 Network Interface
The Models 3151 and 3161 network interface is
provided by one 50-pin connector on the Auxiliary
Backplane on the back of the carrier. This connector
serves eight contiguous slots in the carrier: either
Slots 1–8 or Slots 9–16.
3-453000-A2-GA31-80 December 1994
Page 73

COMSPHERE 3000 Series Carrier
Depending on your configuration, use one of the
following schemes for the Models 3151 and 3161 network
interface (Figure 3-33).
• The 50-pin cable can be attached to a
66A-punchdown block. With this scheme, the
circuits must be hard-wired to the block.
• The 50-pin cable can be plugged into a
3100-F1-930 adapter cable. This adapter cable
provides 8 non-keyed modular plugs using Pins 1,
2, 4, and 5. These connect the T1 CSU or T1
DSU/CSU to a standard DDS network interface
(RJ48C) and provide the new JM8-style leased-line
connection for the T1 interface.
To install the Models 3151 and 3161 network interface:
.
Procedure
1. Connect the network cable to the carrier.
2. If you are using the Telco connector cable, install
the black plastic network cable retainer. If you are
using a straight-in connector, use a small
screwdriver to engage and tighten the screws.
3. Connect the individual cables with 8-pin modular
plugs into the adapter for each T1 line.
Figure 3-33. Network Interface for Models 3151 and 3161 Using an Auxiliary Backplane
3-46 December 1994 3000-A2-GA31-80
Page 74

Installation
Circuit Card Installation
The COMSPHERE 3000 Series Carrier is now
properly installed and ready to accept modular and/or
non-modular T1 CSUs, T1 DSU/CSUs, DSUs, TDMs,
MCMPs, DBM-Vs, DBM-Ss, DBM-Ds, and modems.
Non-modular circuit cards are circuit cards with
on-board connectors (Figure 3-34). When non-modular
circuit cards are installed in the carrier, you must
disconnect the DTE cables before removing the circuit
cards from the carrier. However, a modular DSU or
dial/lease modem circuit card, a circuit card with ‘‘gold
finger” contacts on the rear edge of the card, can be
removed from the carrier without disturbing the DTE
cables at the rear of the carrier (Figure 3-34). Rear
connector plates that screw onto the rear of the
COMSPHERE 3000 Series Carrier are supplied with the
modular DSUs and dial/lease modems and provide the
DTE interfaces. Rear connector plates can also be ordered
separately.
The rear connector plate contains two 25-pin DTE
connectors, a 25-pin EIA-232-D/V.24 connector and a
25-pin CCITT V.35 connector, which is shipped with a
modular DSU V.35 interconnect cable (feature number
3000-F1-510). This version is supplied with the dial/lease
modem, as well. If you intend to use the V.35 interface,
you must use the cable provided to convert the 25-pin
V.35 interface to the standard 34-pin V.35 interface.
Modular DSUs and TDM or MCMP circuit cards,
hereafter referred to as modular DSU-TDM or
DSU-MCMP circuit cards, can also be removed from the
carrier without disconnecting the DTE cables from the
rear of the carrier (Figure 3-35). Connector modules that
screw onto the rear of the COMSPHERE 3000 Series
Carrier are supplied with the modular DSU-TDM or
DSU-MCMP, and provide the DTE interfaces
(Figure 3-35).
Figure 3-34. Modular DSU or Dial/Lease Modem, and Rear Connector Plate
3-473000-A2-GA31-80 December 1994
Page 75

COMSPHERE 3000 Series Carrier
Figure 3-35. Modular DSU-TDM or DSU-MCMP and Connector Module
Connector modules have six ports (labeled Port 1
through Port 6). Each port is a 25-pin connector which
provides the EIA-232 DTE interface. In addition, a 26-pin
high-density D-type connector is located at the top of the
connector module and provides the V.35 interface for
either Port 1 or an aggregate data path. This connector
requires a 6-port V.35 interconnect cable (supplied by the
customer), which converts the 26-pin high-density D-type
interface to the standard 34-pin V.35 interface. Connector
modules allow removal of a modular DSU-TDM or
DSU-MCMP circuit card without disconnecting the DTE
cables.
When non-modular DSUs are installed in the same
carrier with non-modular dial/lease modems, group
dial/lease modems together and install them starting from
the left (in Slot 1) before installing the DSUs. However, if
modular circuit cards are installed in the same carrier as
non-modular circuit cards, the modular circuit cards must
be installed to the left of all other devices in the carrier.
Before you install Model 3151 CSUs or Model 3161
DSU/CSUs in a carrier, you must first install an Auxiliary
Backplane, as described in the Auxiliary Backplane
Installation section earlier in this chapter. Figure 3-36
shows the Models 3151 and 3161 circuit cards.
The next five sections contain the following
information:
• Preinstallation information.
• Procedure for installing modular circuit cards and
DTE connectors (rear connector plates and
connector modules).
• Procedure for installing non-modular circuit cards.
• Procedure for installing 3151 and 3161 circuit
cards.
• Procedure for installing filler panels.
3-48 December 1994 3000-A2-GA31-80
Page 76

Installation
Figure 3-36. Model 3151 and 3161 Circuit Cards
3-493000-A2-GA31-80 December 1994
Page 77

COMSPHERE 3000 Series Carrier
The procedures are only for installing the modular and
non-modular DSU-TDM or DSU-MCMP circuit cards
that are physically attached. For information on adding the
TDM or MCMP option onto a modular or non-modular
DSU, see the COMSPHERE 3600 Series Data Service
Units, Models 3610 and 3611, Time Division Multiplexer,
Multichannel Multipoint, and Digital Bridge Options,
Applications Guide.
Preinstallation Inspection
Check the circuit card for physical damage. If you are
installing a modular circuit card, also check the rear
connector plate or connector module for damage. Ensure
that the connector pins are not damaged. If the circuit
card, rear connector plate, V.35 interconnect cable, or
connector module shows signs of damage, report it
immediately to your shipping representative and also to
your AT&T Paradyne representative.
Modular Circuit Card Installation
Before you begin the modular circuit card installation
procedure, you must install the Network Interface
Modules (NIMs), if required. For information on how to
install a NIM, see the Network Interface Installation
section earlier in this chapter.
NOTE
When a TDM or MCMP is
installed, there are two circuit
cards with two faceplates that
are physically attached. The
modular DSU-TDM or
DSU-MCMP circuit cards occupy
two slot positions in the carrier,
but they are installed as one.
Follow the instructions, keeping
in mind that there are two latches
and that a 6-port connector
module is used instead of a
2-port rear connector plate.
Also, when installing a TDM or
MCMP, make sure both modular
circuit cards are aligned in their
slots before sliding the cards into
place.
If installing a DDD NIM and a modular DSU-TDM or
DSU-MCMP circuit card, do not install the connector
module where it will interfere with the NIM’s J3 and J4
modular connectors.
To install a modular circuit card, proceed as follows,
referring to the appropriate Installation and Operation or
Applications Guide when necessary:
.
Procedure
1. At the rear of the carrier, set the tab on the rear
connector plate into the slotted groove on the
carrier’s backplane. If you are installing a
connector module, there are two tabs instead of
one. Make sure the connector plate uses the same
slot position intended for the modular circuit card.
2. Loosely fasten the screw attached to the rear
connector plate, allowing for slight adjustment
that may be needed when installing the modular
circuit card. If you are installing a connector
module, there are two screws (which must be
alternately fastened) instead of one.
3. Change any default hardware strap settings that
may be required before installing the modular
circuit card in the carrier. For example, straps that
determine:
• Permissive (default) or programmable DDD
interface switch.
• Enabled (default) or disabled test mode
indication jumper.
4. Using a Phillips screwdriver, loosen the screw
holding the circuit pack lock and rotate the lock to
the open position (refer to Figure 3-16). Open the
latch.
5. At the front of the carrier, hold the modular circuit
card vertically with the latch on its faceplate in the
open position. Then, insert the circuit card into the
top and bottom circuit card guides (Figure 3-37).
Slide the modular circuit card into the slot,
aligning the circuit card with the rear connector
plate, until the connectors seat firmly into the back
of the carrier. Remember, if you are installing a
TDM or MCMP, there are two modular circuit
cards and a connector module instead of one
modular circuit card and a rear connector plate.
Press the faceplate latch to secure the circuit card
into the rear connector plate, rotate the circuit
pack lock into the closed position (refer to
Figure 3-16), and tighten the screw.
If the carrier’s power transformer unit is operating,
the unit performs a self-test routine. After several
seconds, the modular circuit card completes its
power-up self-test in which all faceplate LEDs
light. If the circuit card fails the self-test, the Alrm
LED on the faceplate flashes.
3-50 December 1994 3000-A2-GA31-80
Page 78

Installation
Figure 3-37. Circuit Card Installation
NOTE
The following step (Step 6) is
only required during initial
installation of the modular circuit
card. This step ensures proper
alignment of the circuit card(s)
and rear connector plate or
connector module.
All subsequent installation and
removal of modular circuit cards
are performed from the front of
the carrier.
6. Return to the rear of the carrier and tighten the
rear connector plate screw. If you are installing a
connector module, there ar e two screws instead of
one.
7. Connect cabling, install ferrite chokes if supplied
(Figure 3-38), configure the unit, and perform
verification testing as described in the appropriate
Installation and Operation or Applications Guide.
If you are using a carrier assembly with an ac
power transformer unit, you must install the ferrite
choke supplied with the carrier assembly onto
your ac power cable.
3-513000-A2-GA31-80 December 1994
Page 79

COMSPHERE 3000 Series Carrier
Figure 3-38. Cabling and Ferrite Chokes
To install the ferrite choke, refer to Figure 3-38:
.
Procedure
1. Open the ferrite choke and place it around the ac
power cable as close to the cable connector as
possible.
2. Close the two halves around the cable and snap
the choke shut, pressing down on the plastic latch
to secure it in place.
3. Secure the ferrite choke in place with the cable tie
that is supplied.
Non-Modular Circuit Card Installation
To install each circuit card, proceed as follows,
referring to the appropriate Installation and Operation
Manual or Applications Guide when necessary:
.
Procedure
1. Change any default hardware strap settings that
may be required before installing the circuit card
in the carrier.
2. Using a Phillips screwdriver, loosen the screw
holding the circuit pack lock and rotate the lock to
the open position (refer to Figure 3-16). Open the
latch.
3-52 December 1994 3000-A2-GA31-80
Page 80

Installation
3. At the front of the carrier, hold the circuit card
vertically , with the latch on its faceplate in the
open position (Figure 3-37). Insert it into the top
and bottom card guides of one of the slots
numbered 1 through 16.
Slide the card into the slot until the power and
network connector seats firmly in the mating
connector on the backplane.
4. Press the latch to secure the circuit card in the
carrier, rotate the circuit pack lock back into the
closed position (refer to Figure 3-16) and tighten
the screw.
The carrier’s power transformer unit performs a
self-test routine. If the power transformer unit
passes the self-test routine, all indicators on the
faceplate light briefly.
If the LEDs on the circuit card do not light after
being installed in the carrier, there may be a
failure in the circuit card or in the carrier’s power
supply . Install the DSU or dial/lease modem in
another working carrier. If it works, or if a second
DSU or dial/lease modem installed in another slot
in the same carrier also does not light, check that
the power cable is properly attached and that the
ac outlet is active. If the power cable is properly
attached, the ac outlet is active, and the DSUs or
dial/lease modems still do not light up, check the
fuses on the power transformer unit (refer to
Figure 3-7). If the fuses are blown, replace the
fuses and determine the cause of the overload. If
the fuses are okay, replace the power transformer
unit.
5. Connect cabling, install ferrite chokes
(Figure 3-36), configure the unit, and perform
verification testing as described in the appropriate
Installation and Operation Manual or
Applications Guide.
To install the TDM (and MCMP) and digital
bridge interface cables:
a. Connect the 60-pin high-density interface
cable connector to the back of the installed
TDM or MCMP circuit card. The mating
connectors clip securely into place and cannot
be pulled free without squeezing the connector
clips together to release the cable.
b. Select the connector labeled Port 2, plug it
into the DTE that will communicate with the
TDM or MCMP circuit card over Port 2, and
use the small screwdriver to engage and
tighten the screws on either side of the
connector. Select the connector labeled Port 3
and attach it to the appropriate DTE as
described for Port 2, and so on, until all five
connectors are attached to DTEs.
If you are using a carrier assembly with an ac power
transformer unit, you must install the ferrite choke
supplied with the carrier assembly onto your ac power
cable. See Step 7 of the Modular Circuit Card Installation
section earlier in this chapter for instructions.
3-533000-A2-GA31-80 December 1994
Page 81

COMSPHERE 3000 Series Carrier
Models 3151 and 3161 Circuit Card
Installation
NOTE
Before you install a 3151 CSU
or 3161 DSU/CSU circuit card in
a carrier, you must first install an
Auxiliary Backplane.
To install a 3151 CSU or 3161 DSU/CSU circuit card
in the 3000 Series Carrier, with or without the –48 Vdc
Central Office Power Unit, use the following procedure.
.
Procedure
1. Using a Phillips screwdriver, loosen the screw
holding the circuit pack lock, rotate the lock to the
open position, and open the latch (refer to
Figure 3-16).
2. At the front of the carrier, hold the circuit card
vertically , with the latch on its faceplate in the
open position. Insert the card into the top and
bottom card guides of one of the slots
numbered 1–16.
Filler Panels
A filler panel must be ordered and installed for each
unfilled slot in the carrier to ensure compliance with
safety requirements. This filler panel is a blank faceplate
equipped with an abbreviated circuit card, a latch to
secure it to the carrier, and a circuit pack lock to prevent it
from being removed from the carrier without use of a tool.
To install the filler panel in an empty slot:
.
Procedure
1. Using a Phillips screwdriver, loosen the screw
holding the circuit pack lock and rotate the lock to
the open position (refer to Figure 3-16). Open the
latch.
2. Hold the filler panel vertically at the front of the
carrier, with the faceplate latch in the open
position. Insert the blank circuit card into the top
and bottom card guides of the empty slot
(Figure 3-37), and tighten the screw.
3. Slide the card into the slot. The ejector latch lifts
up as it engages the metal flange (refer to
Figure 3-37).
4. Press the latch up until it clicks into the locked
position to secure the circuit card in the carrier,
then rotate the circuit pack lock back into the
closed position and tighten the screw.
3-54 December 1994 3000-A2-GA31-80
Page 82

COMSPHERE Interface
Overview A-1. . . . . . . . . . . . . . . . . . . . . . . . . . . . . . . . . . . . . . . . . . . . . . . . . . . . . . . . . . . . . . . . . . . . . . . . . .
Overview
Two 50-pin connectors on the backplane provide an
interface between the carrier and the digital/lease network,
and one or two optional 50-pin network interface modules
provide the interface to the dial network or the switched
56 kbps digital network.
Figure A-1 is a diagram of the 50-pin digital or analog
leased-line network interface connector. Figure A-2 shows
the 50-pin modular plug conversion cable used for digital
and leased-line networks. Figure A-3 illustrates the
connectors on the COMSPHERE 3000 Series Carrier
backplane.
Table A-1 provides the digital or analog leasedline
network interface connector pin assignments. T able A-2
provides the permissive dial network interface module
(NIM) pin assignments that are used for dial and 2-wire
switched 56 kbps applications, while T able A-3 provides
the programmable NIM pin assignments. T able A-4
Connections
provides the pin assignments for the 4-wire Switched 56
NIM. T ables A-5 and A-6 provide the pin assignments
from the NMS and Shared Diagnostic Control Panel
(SDCP). T ables A-7 through A-10 list the pin assignments
for all 50-pin to modular plug conversion cables. T able
A-11 provides descriptions of the connectors on the
carrier’s backplane. Table A-12 provides the D-lead
control interface pin assignments.
The COMSPHERE 3811/3911 D-lead control interface
is used in modem-pooling applications to cause the
modem to go off-hook in the Originate mode. This
interface is provided on connector J1 for Slots 1 through 8
and connector J2 for Slots 9 through 16. T able A-12 lists
the D-lead control interface pin assignments.
Pin assignments vary from one product to another. For
information on a specific cable or connector, see the
appropriate Installation and Operation Manual or
Applications Guide for the product.
A
Figure A-1. 50-Pin Cable Connector
A-13000-A2-GA31-80 December 1994
Page 83

COMSPHERE 3000 Series Carrier
Slot
Table A-1
Digital or Analog Leased-Line Network Interface
Pin
Slot
Receive Circuits Transmit Circuits
T R T1 R1
1 or 9 26 1 27 2
2 or 10 28 3 29 4
3 or 11 30 5 31 6
4 or 12 32 7 33 8
5 or 13 34 9 35 10
6 or 14 36 11 37 12
7 or 15 38 13 39 14
8 or 16 40 15 41 16
Table A-2
RJ21X (Permissive) Dial and 2-Wire Switched 56 Network Interface Module
Pin
T R
1 or 9 26 1
2 or 10 27 2
3 or 11 28 3
4 or 12 29 4
5 or 13 30 5
6 or 14 31 6
7 or 15 32 7
8 or 16 33 8
A-2 December 1994 3000-A2-GA31-80
Page 84

COMSPHERE Interface Connections
Slot
Slot
Table A-3
RJ27X (Programmable) Dial Network Interface Module
Pin
T R PR PC
1 or 9 27 2 28 3
2 or 10 30 5 31 6
3 or 11 33 8 34 9
4 or 12 36 11 37 12
5 or 13 39 14 40 15
6 or 14 42 17 43 18
7 or 15 45 20 46 21
8 or 16 48 23 49 24
Table A-4
SJA57 4-Wire Switched 56 Network Interface Module
Receive Transmit
T R T1 R1
1 or 9 26 1 27 2
2 or 10 28 3 29 4
3 or 11 30 5 31 6
4 or 12 32 7 33 8
5 or 13 34 9 35 10
6 or 14 36 11 37 12
7 or 15 38 13 39 14
8 or 16 40 15 41 16
A-33000-A2-GA31-80 December 1994
Page 85

COMSPHERE 3000 Series Carrier
Pi
F
Pi
F
n
1 RSI RSO Request-to-Send
2 CSO CSI Clear-to-Send
3 RDO RDI Receive Data
4 SG SG Signal Ground
5 SDI SDO Transmit Data
6 +Vdc – +12 Vdc Output
Table A-5
SDU – NMS Interface
Circuit
unction
CC IN CC OUT
Table A-6
SDU – Shared Diagnostic Control Panel Interface
Circuit
n
unction
FP IN FP OUT
1 Ground Ground Ground
4 SG SG Signal Ground
5 FPRDO FPRDI Received Data
6 FPSDI FPSDO Send Data
7 FPAALM FPAALM Audible Alarm
8 FPLALMO FPLALMI LED Alarm
Figure A-2. 50-Pin to Modular Plug Digital/Lease Conversion Cable
A-4 December 1994 3000-A2-GA31-80
Page 86

COMSPHERE Interface Connections
Table A-7
Pinout for 3600-F2-503 (Digital and JM8 Leased) Network Interface Cables
50-Position Pin
Connector Pin #
2
27
26
1
4
29
28
3
6
31
30
5
8
33
32
7
10
35
34
9
12
37
36
11
14
39
38
13
16
41
40
15
Signal Name
R1 (transmit)
T1 (transmit)
T (receive)
R (receive)
R1 (transmit)
T1 (transmit)
T (receive)
R (receive)
R1 (transmit)
T1 (transmit)
T (receive)
R (receive)
R1 (transmit)
T1 (transmit)
T (receive)
R (receive)
R1 (transmit)
T1 (transmit)
T (receive)
R (receive)
R1 (transmit)
T1 (transmit)
T (receive)
R (receive)
R1 (transmit)
T1 (transmit)
T (receive)
R (receive)
R1 (transmit)
T1 (transmit)
T (receive)
R (receive)
Modular
Plug #
1
1
1
1
2
2
2
2
3
3
3
3
4
4
4
4
5
5
5
5
6
6
6
6
7
7
7
7
8
8
8
8
Modular
Pin #
1 of 8
2 of 8
7 of 8
8 of 8
1 of 8
2 of 8
7 of 8
8 of 8
1 of 8
2 of 8
7 of 8
8 of 8
1 of 8
2 of 8
7 of 8
8 of 8
1 of 8
2 of 8
7 of 8
8 of 8
1 of 8
2 of 8
7 of 8
8 of 8
1 of 8
2 of 8
7 of 8
8 of 8
1 of 8
2 of 8
7 of 8
8 of 8
A-53000-A2-GA31-80 December 1994
Page 87

COMSPHERE 3000 Series Carrier
Pinout for 3600-F2-504 (Dial Programmable – RJ45S) Network Interface Cable
Table A-8
50-Position Pin
Connector Pin #
2
27
28
3
5
30
31
6
8
33
34
9
11
36
37
12
14
39
40
15
17
42
43
18
20
45
46
21
23
48
49
24
Signal Name
Ring
Tip
PR
PC
Ring
Tip
PR
PC
Ring
Tip
PR
PC
Ring
Tip
PR
PC
Ring
Tip
PR
PC
Ring
Tip
PR
PC
Ring
Tip
PR
PC
Ring
Tip
PR
PC
Modular
Plug #
1
1
1
1
2
2
2
2
3
3
3
3
4
4
4
4
5
5
5
5
6
6
6
6
7
7
7
7
8
8
8
8
Modular
Pin #
4 of 8
5 of 8
7 of 8
8 of 8
4 of 8
5 of 8
7 of 8
8 of 8
4 of 8
5 of 8
7 of 8
8 of 8
4 of 8
5 of 8
7 of 8
8 of 8
4 of 8
5 of 8
7 of 8
8 of 8
4 of 8
5 of 8
7 of 8
8 of 8
4 of 8
5 of 8
7 of 8
8 of 8
4 of 8
5 of 8
7 of 8
8 of 8
A-6 December 1994 3000-A2-GA31-80
Page 88

COMSPHERE Interface Connections
Table A-9
Pinout for 3600-F1-505 (Dial Permissive – RJ11C) Network Interface Cable
50-Position Pin
Connector Pin #
1
26
2
27
3
28
4
29
5
30
6
31
7
32
8
33
Signal Name
Ring
Tip
Ring
Tip
Ring
Tip
Ring
Tip
Ring
Tip
Ring
Tip
Ring
Tip
Ring
Tip
Modular
Plug #
1
1
2
2
3
3
4
4
5
5
6
6
7
7
8
8
Modular
Pin #
3 of 6
4 of 6
3 of 6
4 of 6
3 of 6
4 of 6
3 of 6
4 of 6
3 of 6
4 of 6
3 of 6
4 of 6
3 of 6
4 of 6
3 of 6
4 of 6
A-73000-A2-GA31-80 December 1994
Page 89

COMSPHERE 3000 Series Carrier
Pinout for 3000-F1-009 (50-Pin to Eight 6-Pin Modular) Network Interface Cable
Table A-10
50-Position Pin
Connector Pin #
2
27
26
1
4
29
28
3
6
31
30
5
8
33
32
7
10
35
34
9
12
37
36
11
14
39
38
13
16
41
40
15
Signal Name
Transmit
Transmit
Receive
Receive
Transmit
Transmit
Receive
Receive
Transmit
Transmit
Receive
Receive
Transmit
Transmit
Receive
Receive
Transmit
Transmit
Receive
Receive
Transmit
Transmit
Receive
Receive
Transmit
Transmit
Receive
Receive
Transmit
Transmit
Receive
Receive
Modular
Plug #
1
1
1
1
2
2
2
2
3
3
3
3
4
4
4
4
5
5
5
5
6
6
6
6
7
7
7
7
8
8
8
8
Modular
Pin #
3 of 6
4 of 6
2 of 6
5 of 6
3 of 6
4 of 6
2 of 6
5 of 6
3 of 6
4 of 6
2 of 6
5 of 6
3 of 6
4 of 6
2 of 6
5 of 6
3 of 6
4 of 6
2 of 6
5 of 6
3 of 6
4 of 6
2 of 6
5 of 6
3 of 6
4 of 6
2 of 6
5 of 6
3 of 6
4 of 6
2 of 6
5 of 6
A-8 December 1994 3000-A2-GA31-80
Page 90

COMSPHERE Interface Connections
Table A-11
Connectors on the COMSPHERE 3000 Series Carrier’s Backplane
Connectors
Function
P19, P20 These connectors supply low voltage ac or low voltage dc from the power supply
unit onto the COMSPHERE 3000 Series Carrier’s backplane.
P21 This 50-pin connector provides the digital or 4-wire and 2-wire leased-line
interface for DCEs (DSUs and dial/lease modems) in Slots 1 through 8.
P22 This 50-pin connector provides the digital or 4-wire and 2-wire leased-line
interface for DCEs (DSUs and dial/lease modems) in Slots 9 through 16.
P23, P24 These connectors are used by the Network Interface Modules (NIMs) to provide
the dial interface through a 50-pin connector for dial/lease modems in Slots 1
through 8.
P25, P26 These connectors are used by the Network Interface Modules (NIMs) to provide
the dial interface through a 50-pin connector for dial/lease modems in Slots 9
through 16.
J1 This 26-pin high-density D-type connector provides the D-lead control interface
for dial/lease modems in Slots 1 through 8.
Figure A-3. Connectors on the COMSPHERE 3000 Series Carrier Backplane
A-93000-A2-GA31-80 December 1994
Page 91

COMSPHERE 3000 Series Carrier
Table A-12
(1 of 2)
D-Lead Control Interface
Slot
Connector Pin Number Signal Name
1 J1 16
2 J1 14
3 J1 2
4 J1 4
5 J1 6
6 J1 8
7 J1 10
8 J1 12
15
11
13
DLCTL
NC
DLCTL
1
NC
DLCTL
3
NC
DLCTL
5
NC
DLCTL
7
NC
DLCTL
9
NC
DLCTL
NC
DLCTL
NC
— J2 25 SIG GND
9 J2 16
10 J2 14
11 J2 2
12 J2 4
13 J2 6
14 J2 8
DLCTL = D-Lead Control
SIG GND = Signal Ground
NC = No Connection
15
DLCTL
NC
DLCTL
1
NC
DLCTL
3
NC
DLCTL
5
NC
DLCTL
7
NC
DLCTL
9
NC
A-10 December 1994 3000-A2-GA31-80
Page 92

D-Lead Control Interface
Slot Signal NamePin NumberConnector
COMSPHERE Interface Connections
Table A-12
(2 of 2)
15 J2 10
16 J2 12
— J2 25 SIG GND
DLCTL = D-Lead Control
SIG GND = Signal Ground
NC = No Connection
11
13
DLCTL
NC
DLCTL
NC
A-113000-A2-GA31-80 December 1994
Page 93

COMSPHERE 3000 Series Carrier
This page intentionally left blank.
A-12 December 1994 3000-A2-GA31-80
Page 94

Models 3151/3161 Interface
Overview B-1. . . . . . . . . . . . . . . . . . . . . . . . . . . . . . . . . . . . . . . . . . . . . . . . . . . . . . . . . . . . . . . . . . . . . . . . . .
Auxiliary Backplane Connectors B-1. . . . . . . . . . . . . . . . . . . . . . . . . . . . . . . . . . . . . . . . . . . . . . . . . . . . . . .
T1 Network Interface Connector B-4. . . . . . . . . . . . . . . . . . . . . . . . . . . . . . . . . . . . . . . . . . . . . . . . . . . . . . .
DSX-1 Port DTE Interface B-7. . . . . . . . . . . . . . . . . . . . . . . . . . . . . . . . . . . . . . . . . . . . . . . . . . . . . . . . . . . .
COM Port Interface B-8. . . . . . . . . . . . . . . . . . . . . . . . . . . . . . . . . . . . . . . . . . . . . . . . . . . . . . . . . . . . . . . . . .
Port Interfaces B-11. . . . . . . . . . . . . . . . . . . . . . . . . . . . . . . . . . . . . . . . . . . . . . . . . . . . . . . . . . . . . . . . . . . . . .
EIA-530A DB25 Port Interface Connector B-11. . . . . . . . . . . . . . . . . . . . . . . . . . . . . . . . . . . . . . . . . . . . .
RS449 Port Interface Connector B-12. . . . . . . . . . . . . . . . . . . . . . . . . . . . . . . . . . . . . . . . . . . . . . . . . . . . .
V.35 Port Interface Connector B-14. . . . . . . . . . . . . . . . . . . . . . . . . . . . . . . . . . . . . . . . . . . . . . . . . . . . . . .
External Clock Connector B-16. . . . . . . . . . . . . . . . . . . . . . . . . . . . . . . . . . . . . . . . . . . . . . . . . . . . . . . . . . . . .
Diagnostic Channel Extension Cable B-17. . . . . . . . . . . . . . . . . . . . . . . . . . . . . . . . . . . . . . . . . . . . . . . . . . . .
Overview
The ACCULINK Model 3151 CSU and Model 3161
DSU/CSU are shipped without cables. Various
interconnecting cables are available from AT&T
Paradyne. These cables have an AT&T Paradyne feature
number assigned to them (see Appendix C, Equipment
List). Cables that are listed, but have no feature number,
must be customer supplied. This appendix describes the
cable pin assignments for both AT&T Paradyne cables
and customer-supplied cables. You can use this
information should you need to build your own cables.
Connections
B
Auxiliary Backplane
Connectors
The Auxiliary Backplane provides the connectors
shown in Figure B-1 and described in T able B-1.
Unless otherwise noted, the interface connections
apply to both Models 3151 and 3161.
B-13000-A2-GA31-80 December 1994
Page 95

COMSPHERE 3000 Series Carrier
Figure B-1. Auxiliary Backplane Connectors
B-2 December 1994 3000-A2-GA31-80
Page 96

Table B-1
Auxiliary Backplane Connectors
Models 3151/3161 Interface Connections
Connector
Quantity Model Use
DTE 8 3151/3161 DB15 socket. Provides the connection to your T1
DSX-1 (DTE).
Network 1 3151/3161 50-pin RJ48H plug. Provides the connection to the T1
network for all eight slots supported by the Auxiliary
Backplane.
Clock In 1 3161 DB9 socket. Attaches an external clock. The external
clock provides timing for up to eight slots. Each
Auxiliary Backplane must have its own external clock
input.
Port 1 & 2 16 3151/3161 DB25 (EIA-530A) socket. Provides the connection from
a 3161 DSU/CSU to the synchronous data DTE.
The Port 2 DB25 socket connector allows one slot in
the carrier to be configured as the COM port, which
replaces the functionality of the second data port. The
COM port is a communications port that provides
access to the front panel from a locally connected PC.
Diag 2 3151/3161 8-pin modular jack. Provides diagnostic connectivity
between Auxiliary Backplanes in a carrier.
B-33000-A2-GA31-80 December 1994
Page 97

COMSPHERE 3000 Series Carrier
T1 Network Interface
Connector
The T1 line network interface breakout cable is a
2 1/2-foot octopus cable with a 50-pin T elco socket
(RJ48H) on one end and eight unkeyed 8-pin modular
plugs (RJ48C) on the other end (see Figures B-2 and B-3).
The conductors are paired, 24 AWG solid.
The T1 network interface connector is a 50-pin T elco
plug RJ48H connector (see T able B-2).
Figure B-2. T1 Line Interface Multiplug Adapter
with RJ48C Connector (Feature Number 3100-F1-930)
B-4 December 1994 3000-A2-GA31-80
Page 98

Models 3151/3161 Interface Connections
Figure B-3. T1 Network Interface Multiport Adapter with 50-pin RJ48H to
8-pin RJ48C Connectors (Feature Number 3100-F1-930)
B-53000-A2-GA31-80 December 1994
Page 99

COMSPHERE 3000 Series Carrier
Table B-2
T1 Network Interface Connector (RJ48H)
Signal
Slot Pin Number
Transmit Ring 1 or 9 14
Transmit Tip 1 or 9 39
Receive Ring 1 or 9 1
Receive Tip 1 or 9 26
Transmit Ring 2 or 10 15
Transmit Tip 2 or 10 40
Receive Ring 2 or 10 2
Receive Tip 2 or 10 27
Transmit Ring 3 or 11 16
Transmit Tip 3 or 11 41
Receive Ring 3 or 11 3
Receive Tip 3 or 11 28
Transmit Ring 4 or 12 17
Transmit Tip 4 or 12 42
Receive Ring 4 or 12 4
Receive Tip 4 or 12 29
Transmit Ring 5 or 13 18
Transmit Tip 5 or 13 43
Receive Ring 5 or 13 5
Receive Tip 5 or 13 30
Transmit Ring 6 or 14 19
Transmit Tip 6 or 14 44
Receive Ring 6 or 14 6
Receive Tip 6 or 14 31
Transmit Ring 7 or 15 20
Transmit Tip 7 or 15 45
Receive Ring 7 or 15 7
Receive Tip 7 or 15 32
Transmit Ring 8 or 16 21
Transmit Tip 8 or 16 46
Receive Ring 8 or 16 8
Receive Tip 8 or 16 33
B-6 December 1994 3000-A2-GA31-80
Page 100

Models 3151/3161 Interface Connections
DSX-1 Port DTE Interface
This cable is typically supplied by a DTE vendor and is
a 22 AWG solid, individually shielded twisted pair cable
with drain wire (see Figure B-4). The cable connector is a
DB15 plug. Be sure to connect the shield ground only at
the DSU/CSU end as shown in Figure B-4 to prevent
ground loops. The DTE (DSX-1) interface connector is a
DB15-type socket connector (see T able B-3). Refer to the
Extrn DLB configuration option in the DTE Interface
Options section in Appendix B of the ACCULINK 315x
Channel Service Unit Operator’s Guide or the
ACCULINK 316x Data Service Unit/Channel Service Unit
Operator’s Guide for more information.
Figure B-4. DTE (DSX-1) Cable
Table B-3
DTE (DSX-1) Interface Connector (J3)
Signal
Receiver Tip from DTE 1
Receiver Ring from DTE 9
Transmitter Tip to DTE 3
Transmitter Ring to DTE 11
Relay Contact Sense Return 12
Relay Contact Sense 14
Shield Ground 2, 4
Pin Number
B-73000-A2-GA31-80 December 1994
 Loading...