

Page 1

1752 and 1754 SHDSL Routers
User’s Guide
Document Number 1752-A2-GB20-00
June 2005
Page 2

1752 and 1754 SHDSL Router User’s Guide
Copyright 2005 Paradyne Corporation.
All rights reserved.
Printed in U.S.A.
Notice
This publication is protected by federal copyright law. No part of this publication may be
copied or distributed, transmitted, transcribed, stored in a retrieval system, or translated into
any human or computer language in any form or by any means, electronic, mechanical,
magnetic, manual or otherwise, or disclosed to third parties without the express written
permission of Paradyne Corporation, 8545 126th Ave. N., Largo, FL 33773.
Paradyne Corporation makes no representation or warranties with respect to the contents
hereof and specifically disclaims any implied warranties of merchantability or fitness for a
particular purpose. Further, Paradyne Corporation reserves the right to revise this publication
and to make changes from time to time in the contents hereof without obligation of Paradyne
Corporation to notify any person of such revision or changes.
Changes and enhancements to the product and to the information herein will be documented
and issued as a new release to this manual.
Warranty, Sales, Service, and Training Information
Contact your local sales representative, service representative, or distributor directly for any
help needed. For additional information concerning warranty, sales, service, repair,
installation, documentation, training, distributor locations, or Paradyne worldwide office
locations, use one of the following methods:
• Internet: Visit the Paradyne World Wide Web site at www.paradyne.com. (Be sure to register your
warranty at www.paradyne.com/warranty.)
• Telephone: Call our automated system to receive current information by fax or to speak with a
company representative.
• Within the U.S.A., call 1-800-870-2221
• Outside the U.S.A., call 1-727-530-2340
Document Feedback
We welcome your comments and suggestions about this document. Please mail them to
Technical Publications, Paradyne Corporation, 8545 126th Ave. N., Largo, FL 33773, or send
e-mail to userdoc@paradyne.com. Include the number and title of this document in your
correspondence. Please include your name and phone number if you are willing to provide
additional clarification.
Trademarks
Acculink, ADSL/R, Bitstorm, Comsphere, DSL the Easy Way, ETC, Etherloop, FrameSaver,
GranDSLAM, GrandVIEW, Hotwire, the Hotwire logo, Jetstream, MVL, NextEDGE, Net to Net
Technologies, OpenLane, Paradyne, the Paradyne logo, Paradyne Credit Corp., the
Paradyne Credit Corp. logo, Performance Wizard, ReachDSL, StormPort, and TruePut are
registered trademarks of Paradyne Corporation. Connect to Success, Hotwire Connected,
iMarc, JetFusion, JetVision, MicroBurst, PacketSurfer, Quick Channel, Reverse Gateway,
Spectrum Manager, and StormTracker are trademarks of Paradyne Corporation. All other
products and services mentioned herein are the trademarks, service marks, registered
trademarks, or registered service marks of their respective owners.
2 June 2005 1752-A2-GB20-00
Page 3

1752 and 1754 SHDSL Router User’s Guide
Important Safety Instructions
1. Read and follow all warning notices and instructions marked on the product or included in the manual.
2. Slots and openings in the cabinet are provided for ventilation. To ensure reliable operation of the
product and to protect it from overheating, these slots and openings must not be blocked or covered.
3. Do not allow anything to rest on the power cord and do not locate the product where persons will walk
on the power cord.
4. Do not attempt to service this product yourself, as opening or removing covers may expose you to
dangerous high voltage points or other risks. Refer all servicing to qualified service personnel.
5. When installed in the final configuration, the product must comply with the applicable Safety
Standards and regulatory requirements of the country in which it is installed. If necessary, consult
with the appropriate regulatory agencies and inspection authorities to ensure compliance.
6. A rare phenomenon can create a voltage potential between the earth grounds of two or more
buildings. If products installed in separate buildings are interconnected, the voltage potential may
cause a hazardous condition. Consult a qualified electrical consultant to determine whether or not this
phenomenon exists and, if necessary, implement corrective action prior to interconnecting the
products.
7. Input power to this product must be provided by one of the following: (1) a UL Listed/CSA certified
power source with a Class 2 or Limited Power Source (LPS) output for use in North America, or (2) a
certified transformer, with a Safety Extra Low Voltage (SELV) output having a maximum of 240 VA
available, for use in the country of installation.
8. General purpose cables are used with this product for connection to the network. Special cables,
which may be required by the regulatory inspection authority for the installation site, are the
responsibility of the customer. Use a UL Listed, CSA certified, minimum No. 26 AWG line cord for
connection to the Digital Subscriber Line (DSL) network.
9. In addition, since the equipment is to be used with telecommunications circuits, take the following
precautions:
— Never install telephone wiring during a lightning storm.
— Never install telephone jacks in wet locations unless the jack is specifically designed for wet
locations.
— Never touch uninsulated telephone wires or terminals unless the telephone line has been
disconnected at the network interface.
— Use caution when installing or modifying telephone lines.
— Avoid using a telephone (other than a cordless type) during an electrical storm. There may be a
remote risk of electric shock from lightning.
— Do not use the telephone to report a gas leak in the vicinity of the leak.
1752-A2-GB20-00 June 2005 3
Page 4
1752 and 1754 SHDSL Router User’s Guide
CE Marking
When the product is marked with the CE mark on the equipment label, a supporting Declaration of
Conformity may be downloaded from the Paradyne World Wide Web site at www.paradyne.com. Select
Library → Technical Manuals → CE Declarations of Conformity.
Japan
Class A ITE
This is a Class A product based on the standard of the Voluntary Control Council for interference by
Information Technology Equipment (VCCI). If this equipment is used in a domestic environment, radio
disturbance may arise. When such trouble occurs, the user may be required to take corrective actions.
EMI Notices
United States – EMI Notice
This equipment has been tested and found to comply with the limits for a Class A digital device, pursuant
to Part 15 of the FCC rules. These limits are designed to provide reasonable protection against harmful
interference when the equipment is operated in a commercial environment. This equipment generates,
uses, and can radiate radio frequency energy and, if not installed and used in accordance with the
instruction manual, may cause harmful interference to radio communications. Operation of this equipment
in a residential area is likely to cause harmful interference in which case the user will be required to
correct the interference at his own expense.
The authority to operate this equipment is conditioned by the requirements that no modifications will be
made to the equipment unless the changes or modifications are expressly approved by the responsible
party.
If the equipment includes a ferrite choke or chokes, they must be installed as described in the installation
instructions.
Canada – EMI Notice
This Class A digital apparatus complies with Canadian ICES-003.
Cet appareil numérique de la classe A est conforme à la norme NMB-003 du Canada.
4 June 2005 1752-A2-GB20-00
Page 5

1752 and 1754 SHDSL Router User’s Guide
ACTA Customer Information
This equipment complies with Part 68 of the FCC rules and the requirements adopted by the ACTA. On
the bottom of the network extender is a label that contains, among other information, a product identifier
in the format US:AAAEQ##TXXXX. If requested, this number must be provided to the telephone
company.
A plug and jack used to connect this equipment to the premises wiring and telephone network must
comply with the applicable FCC Part 68 rules and requirements adopted by the ACTA. See installation
instructions for details.
If the network extender causes harm to the telephone network, the telephone company will notify you in
advance that temporary discontinuance of service may be required. But if advance notice isn't practical,
the telephone company will notify the customer as soon as possible. Also, you will be advised of your
right to file a complaint with the FCC if you believe it is necessary.
The telephone company may make changes in its facilities, equipment, operations or procedures that
could affect the operation of the equipment. If this happens the telephone company will provide advance
notice in order for you to make necessary modifications to maintain uninterrupted service.
If trouble is experienced with this equipment, please contact your local sales representative, service
representative, or distributor directly for any help needed. For additional information concerning warranty,
sales, service, repair, installation, documentation, training, distributor locations, or Paradyne worldwide
office locations, use one of the following methods:
• Internet: Visit the Paradyne World Wide Web site at
warranty at
www.paradyne.com/warranty.)
www.paradyne.com. (Be sure to register your
• Telephone: Call our automated system to receive current information by fax or to speak with a
company representative.
— Within the U.S.A., call 1-800-870-2221
— Outside the U.S.A., call 1-727-530-2340
If the equipment is causing harm to the telephone network, the telephone company may request that you
disconnect the equipment until the problem is resolved.
The customer may make no repairs to the equipment.
Connection to party line service is subject to state tariffs. Contact the state public utility commission,
public service commission or corporation commission for information.
Notice to Users of the Canadian Telephone Network
NOTICE: This equipment meets the applicable Industry Canada Terminal Equipment Technical
Specifications. This is confirmed by the registration number. The abbreviation IC before the registration
number signifies that registration was performed based on a Declaration of Conformity indicating that
Industry Canada technical specifications were met. It does not imply that Industry Canada approved the
equipment.
NOTICE: The Ringer Equivalence Number (REN) for this terminal equipment is labeled on the equipment.
The REN assigned to each terminal equipment provides an indication of the maximum number of
terminals allowed to be connected to a telephone interface. The termination on an interface may consist
of any combination of devices subject only to the requirement that the sum of the Ringer Equivalence
Numbers of all the devices does not exceed five.
If your equipment is in need of repair, contact your local sales representative, service representative, or
distributor directly.
1752-A2-GB20-00 June 2005 5
Page 6

1752 and 1754 SHDSL Router User’s Guide
Contents
CE Marking....................................................................................................................4
Japan ........................................................................................................................................4
EMI Notices ..............................................................................................................................4
United States – EMI Notice.................................................................................................4
Canada – EMI Notice..........................................................................................................4
ACTA Customer Information..................................................................................................5
Notice to Users of the Canadian Telephone Network..........................................................5
Chapter 1 – Introduction..............................................................................................9
1750 Series Overview..............................................................................................................9
Features....................................................................................................................................9
Applications...........................................................................................................................10
Specifications ........................................................................................................................10
Chapter 2 – Hardware Setup and Startup .................................................................12
Front Panel LED and Rear Panel description.....................................................................12
DSL Connectors Description................................................................................................13
Restore Factory Defaults/Reboot Button............................................................................13
Parts check.............................................................................................................................14
Hardware Connection – Model 1752....................................................................................15
Hardware Connection – Model 1754....................................................................................16
Configuring Windows PCs ...................................................................................................17
Windows XP:.....................................................................................................................17
Windows 2000:..................................................................................................................19
Windows Me:.....................................................................................................................19
Windows 95, 98:................................................................................................................20
Windows NT 4.0:...............................................................................................................21
Configuring Apple PCs .........................................................................................................22
Mac OS X..........................................................................................................................22
6 June 2005 1752-A2-GB20-00
Page 7

1752 and 1754 SHDSL Router User’s Guide
Mac OS 8.x or 9.0.............................................................................................................23
Chapter 3 – Configuring the Router Using EmWeb.................................................24
Accessing EmWeb.................................................................................................................24
About EmWeb pages.............................................................................................................24
Status Pages ..........................................................................................................................25
System status page...........................................................................................................26
System information ...........................................................................................................32
Event Log..........................................................................................................................32
Setup pages ...........................................................................................................................33
WAN Connection...............................................................................................................33
LAN Setup ..............................................................................................................................35
LAN connections...............................................................................................................36
DHCP Server ....................................................................................................................38
DHCP Relay......................................................................................................................42
DNS Client ........................................................................................................................43
DNS Relay ........................................................................................................................43
SNTP Client ......................................................................................................................45
Quick Setup page..................................................................................................................48
System Pages ........................................................................................................................48
Firmware Update...............................................................................................................49
Backup/Restore.................................................................................................................49
Restoring your configuration.............................................................................................50
Restart Router...................................................................................................................50
Save configuration ............................................................................................................50
Authentication ...................................................................................................................51
Advanced Pages....................................................................................................................52
Security.............................................................................................................................52
IP Routes ..........................................................................................................................63
Bridge................................................................................................................................64
VPN...................................................................................................................................74
SNMP................................................................................................................................83
Ports..................................................................................................................................84
1752-A2-GB20-00 June 2005 7
Page 8

1752 and 1754 SHDSL Router User’s Guide
Chapter 4 – Diagnostic and Troubleshooting..........................................................86
8 June 2005 1752-A2-GB20-00
Page 9
Chapter 1 – Introduction
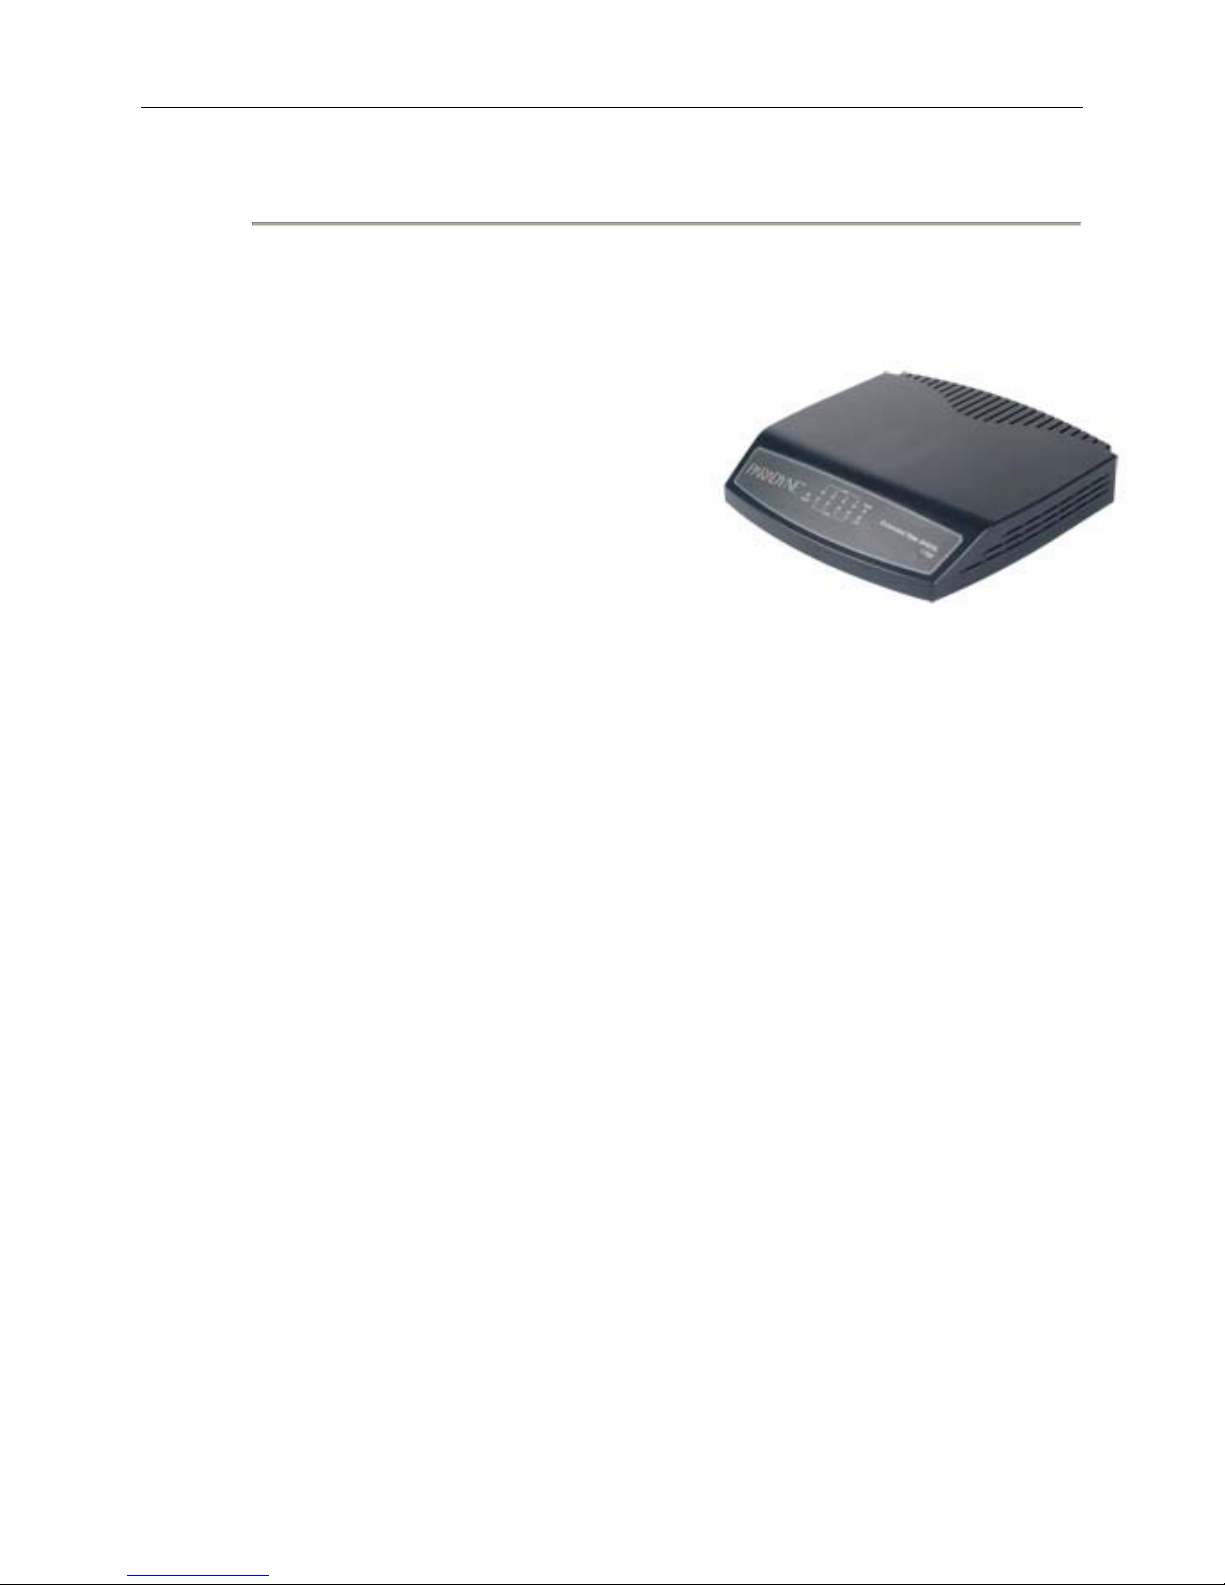
Thank you for choosing a 1750 Series SHDSL router as your broadband access solution. This
manual is designed to help you with the setup and configuration of your product.
1750 Series Overview
The 1750 Series G.SHDSL.bis standalone
routers take advantage of the latest
G.SHDSL.bis technology— Extended Rate
Bonded SHDSL— to provide unprecedented
possibilities for symmetric transmission.
Multi-pair bonding allows symmetric data rates
up to 5.69 Mbps, 11.38 Mbps, or 22.76 Mbps
over 2-wire, 4-wire, or 8-wire connections
respectively.
Features
• Rate and Reach Improvements
1752 and 1754 SHDSL Router User’s Guide
Symmetric transmission rate is up to 5704 kbps, 11408 kbps, 17112 kbps, and 22816 kbps
over 2-wire, 4-wire, 6-wire, or 8-wire telephone lines respectively, over a distance as great as
12,000 ft.
• CO and CPE Mode selectable
Selectable site mode provides point-to-point connectivity.
• 2-wire / 4-wire/ 8-wire M-Pair Mode selectable
Selectable wire pair mode offers flexible rate options.
• Easy Management
The routers support both a web-based GUI and CLI-based management.
• Backward Compatible to G.shdsl (G.991.2)
1752-A2-GB20-00 June 2005 9
Page 10
1752 and 1754 SHDSL Router User’s Guide
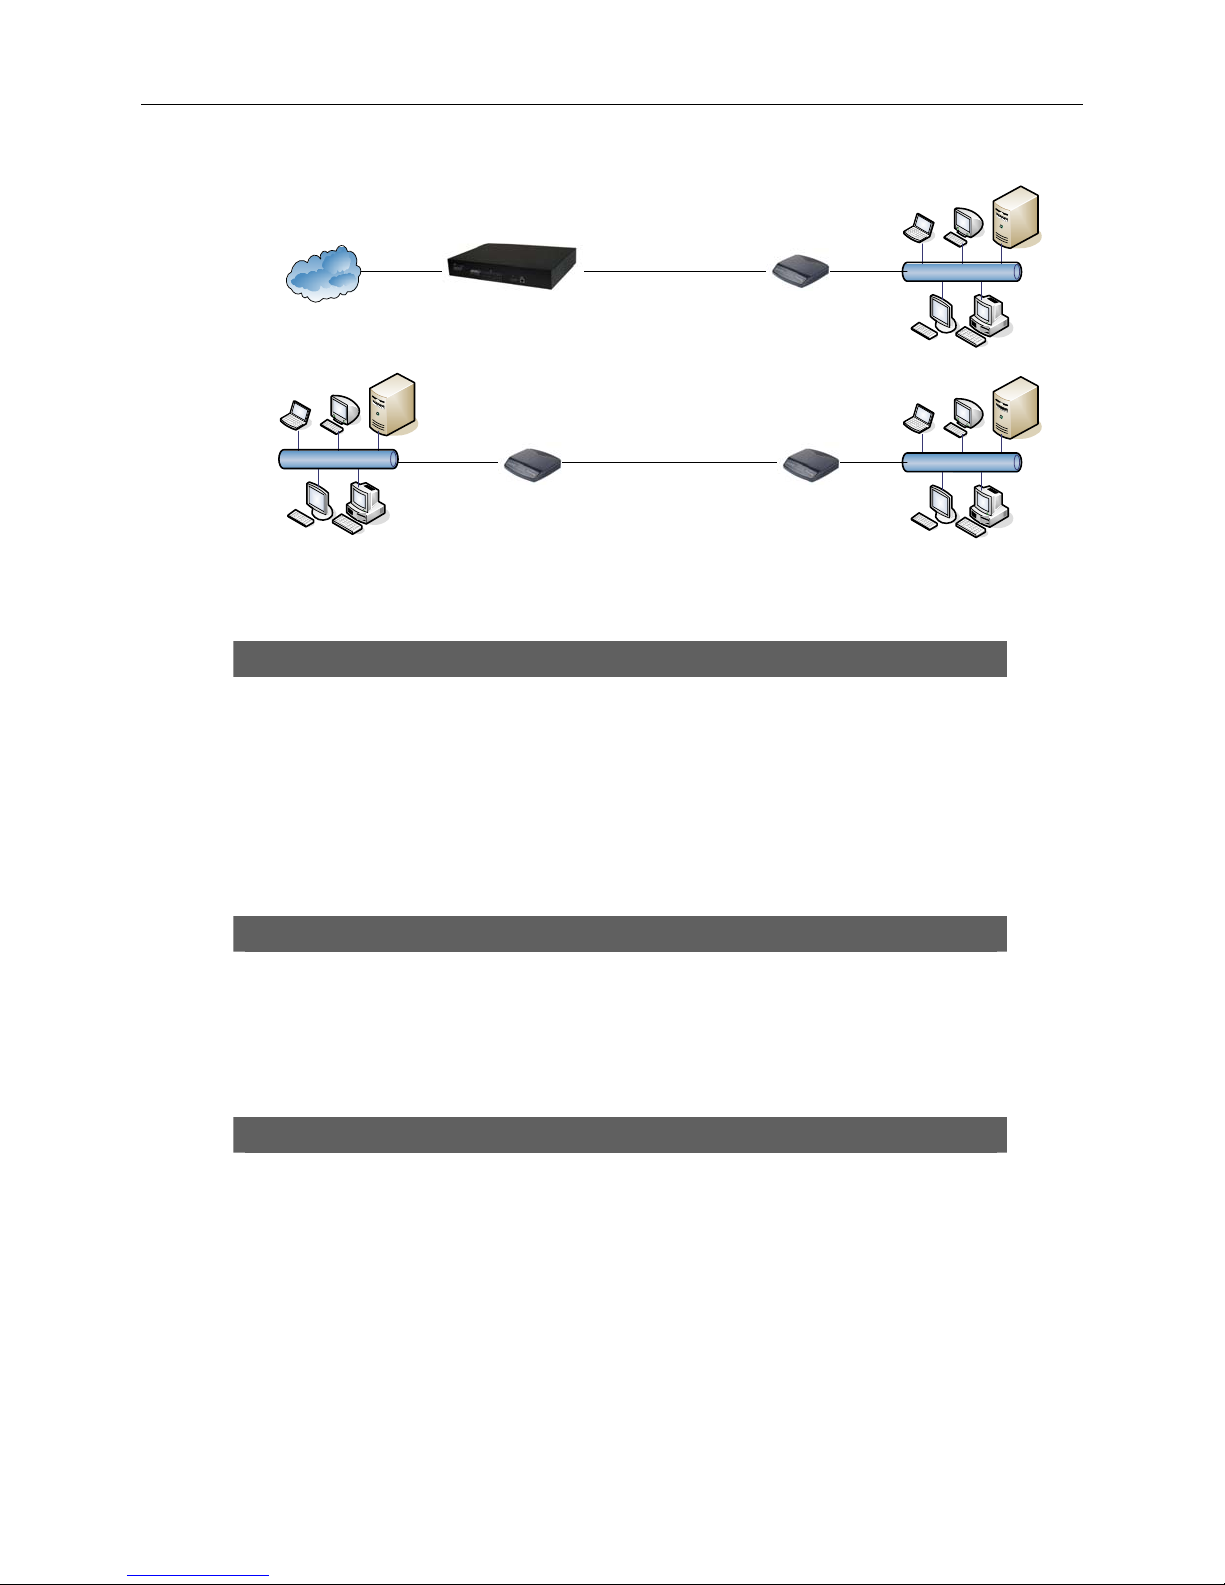
Applications
A. Connect to IP DSLAM
B. LAN Extension
Specifications
Standards Compliance
Auto load balancing with bonded pairs
ITU-T G.991.2
Supports Annex A, Annex B, Annex F, and Annex G
Supports point-to-point configuration
Transmission rate up to 5704 kbps on 2-wire
Transmission rate up to 11408 kbps on 4-wire
Transmission rate up to 17112 kbps on 6-wire
Transmission rate up to 22816 kbps on 8-wire
Internet
LAN
CO
G.SHDSL/G.SHDSL.bis I P DSLAM
CO
1752/1754 1752/1754
CPE
1752/1754
LAN
CPE
LAN
Maintenance
Firmware upgradeable via FTP, TFTP, or web interface
Statistics on DSL link and data ports
Supports ATM OAM F5 End to End and Segment loopbacks
Supports Telnet
System log
Management
Access Control
Attack Alert and log
Command Line Interface (CLI)
Denial of Service protection
Firewall Security
MIB-II (RFC 1213, RFC 1573)
Packet Filter
PAP and CHAP support
10 June 2005 1752-A2-GB20-00
Page 11

1752 and 1754 SHDSL Router User’s Guide
Password protection
Real time log
Remote access management via telnet
SNMPv1
Stateful Packet Inspection (SPI)
Web based GUI interface
Protocol
DHCP client/server and DHCP relay functionality
DMZ support
IEEE 802.1Q VLAN
IEEE802.1P Priority Output Queuing
IEEE802.3u Fast Ethernet 100BaseT
IP support: TCP, RIPv1, RIPv2, UDP, ICMP, ARP, RTP
IPSec VPN Support
MAC bridging(IEEE 802.3 and 802.1D)
MAC Filtering
NAT/PAT support
PPPoE (RFC 2416)
QoS support VBR-rt, VBR-nrt, CBR and UBR
RFC 1483/2684 Bridged encapsulation (routing mode optional)
Supports ATM over G.SHDSL.bis and G.SHDSL
Supports 8 PVCs
Supports IGMP Snooping
Supports Port-based VLAN
VPN pass-through IPSec and L2TP
LED
LED indicator; power, DSL links, Alarm, Ethernet ports and CO/CPE mode
Hardware Interface
4 - 10/100BaseT auto-sensing RJ45
1 - Serial connector for local console access
1 - RJ11 for 2-pair bonding on the 1752
2 - RJ11 for 4-pair bonding on the 1754
1 - AC power adapter (90–265 VAC, 47–63 Hz)
Dimensions & Weight
Dimensions: 35 mm (1.4 in) high × 210 mm (8.3 in) wide × 193 mm (7.6 in)
deep
Weight: 914 g (2 lb)
Operating Requirements
Storage temperature: –40° C to +70° C (–40° to 158° F)
Operating temperature: 0° C to +50° C (32° to 122° F)
Operating humidity: 5% to 90% Relative Humidity, Non-condensing
1752-A2-GB20-00 June 2005 11
Page 12
1752 and 1754 SHDSL Router User’s Guide
Chapter 2 – Hardware Setup and Startup
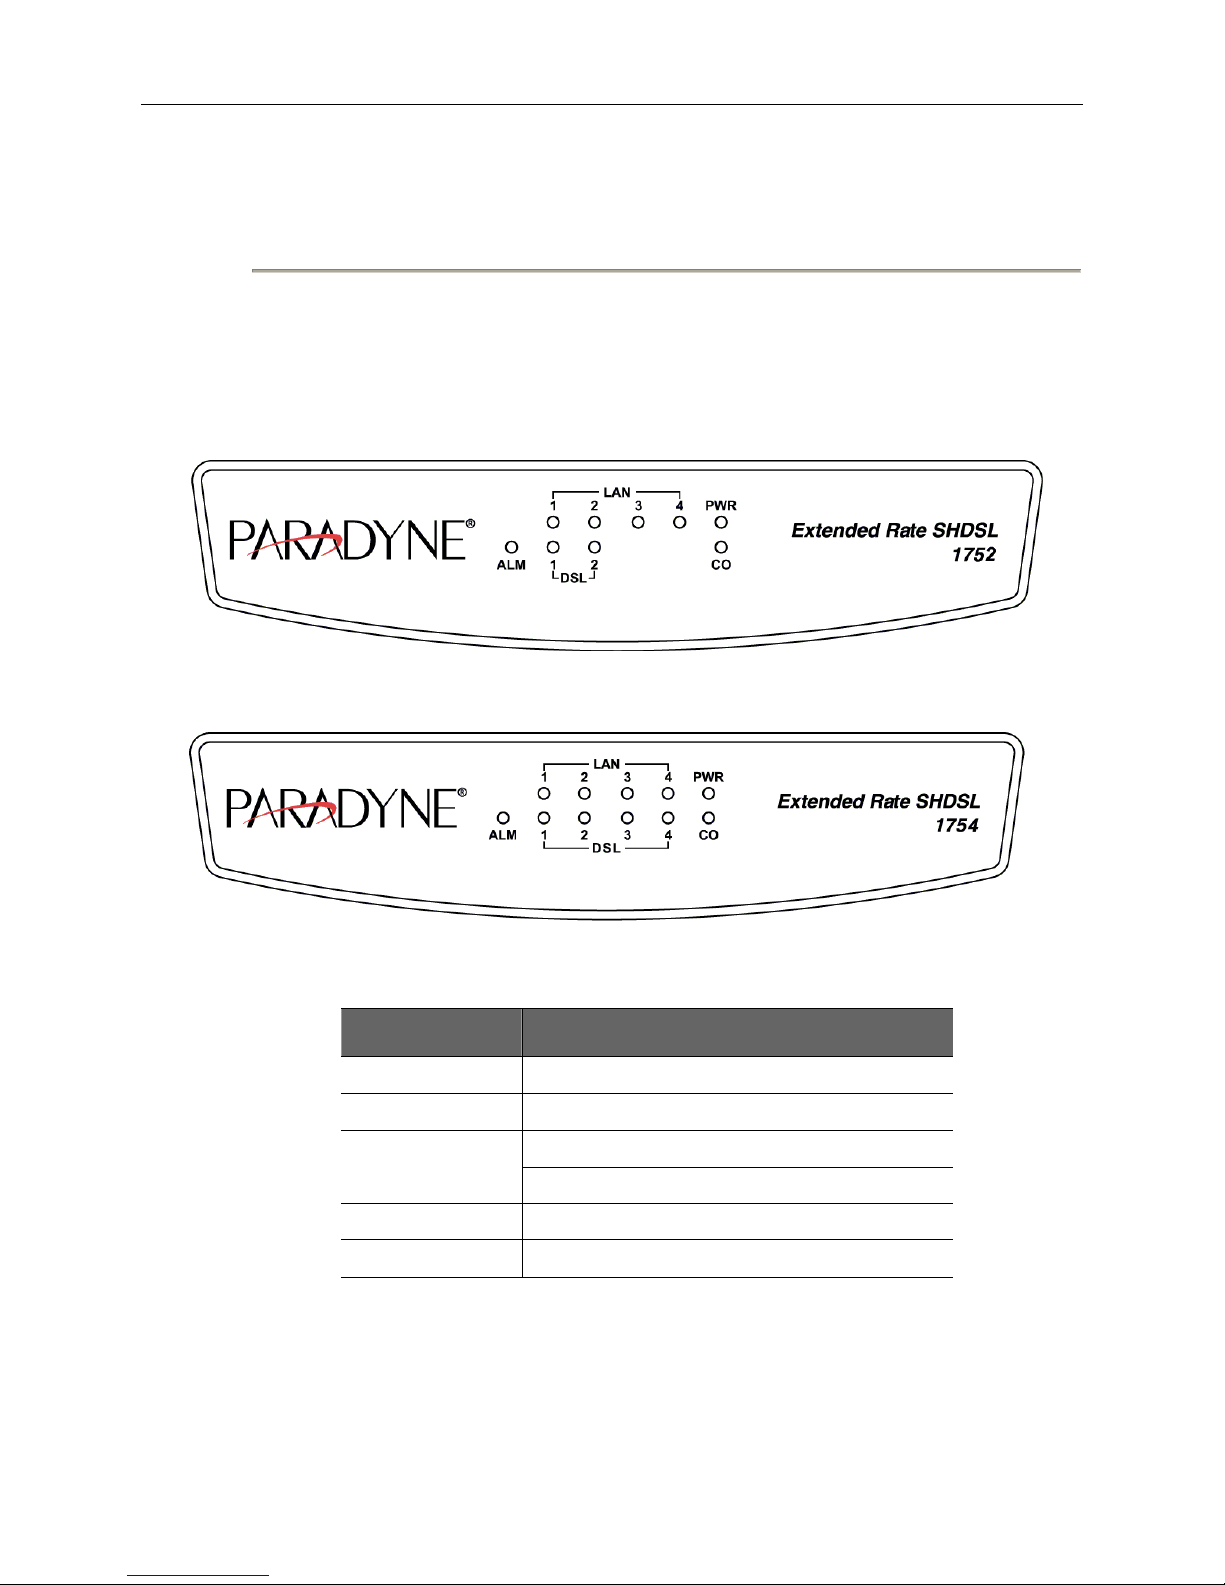
Front Panel LED and Rear Panel description
Following illustrations show the front panels of the 2-wire and 4-wire routers.
Figure 2-1. 2-Wire 1752 Front Panel LEDs
Figure 2-2. 4-wire 1754 Front Panel LED
LED Usage
PWR Power Indicator.
DSL DSL loop activity.
On: unit is in CO mode.
CO
Off: unit is in CPE mode.
ALM An error has been detected.
LAN On: The Ethernet Link is connected.
12 June 2005 1752-A2-GB20-00
Page 13
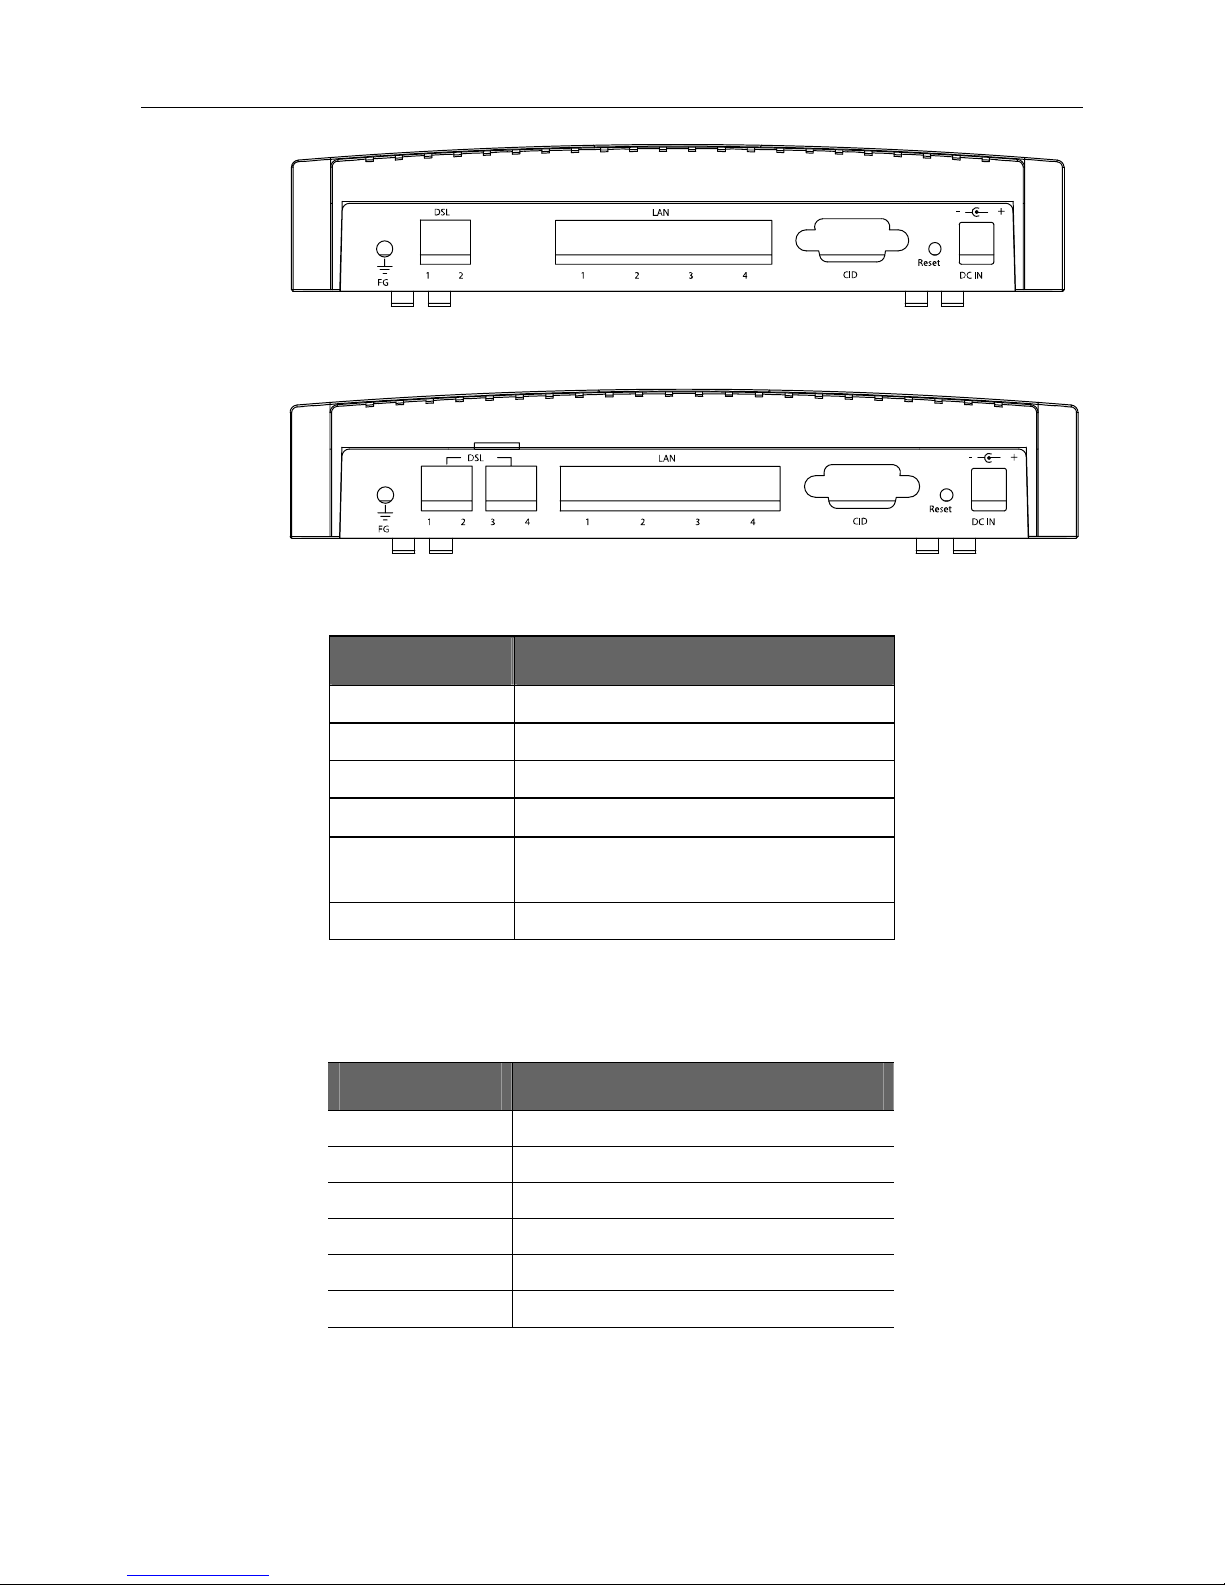
1752 and 1754 SHDSL Router User’s Guide
Figure 2-4. 2-wire 1752 rear view
Back Panel Feature Usage
DC IN Power Adapter Input
Reset Button Reset device to factory default setting
CID Connected to PC serial port for console
LAN Connected to Ethernet Port
DSL 1–2 (1752)
DSL 1–4 (1754)
FG Connected to ground wire
DSL Connectors Description
DSL Connectors on back of the unit are RJ11 sockets. RJ11 uses a 6-position connector and
cable. Two wire pairs are used for SHDSL.
Pin Purpose
Figure 2-3. 4-wire 1754 rear view
Connected to loops 1 through 2
Connected to loops 1 through 4
Pin 1 Not used.
Pin 2 Tip for DSL pair 2 or 4.
Pin 3 Tip for DSL pair 1 or 3
Pin 4 Ring for DSL pair 1 or 3
Pin 5 Ring for DSL pair 2 or 4
Pin 6 Not used.
Restore Factory Defaults/Reboot Button
Press the reset button to reset the 1750 Series router to its factory default settings. If you
1752-A2-GB20-00 June 2005 13
Page 14
1752 and 1754 SHDSL Router User’s Guide
forget your password or cannot access the device, reset the device to return it to the default
settings. Follow this procedure:
1. Power off the router.
2. Press the Reset button.
3. With the Reset button still depressed, power on the router, watching the front panel.
4. When the LEDs blink very quickly, release the Reset button. The reset fails if you hold the
button in too long.
5. Save the current configuration again to overwrite your previous user configuration. (This is
a so-called "one-time recall".)
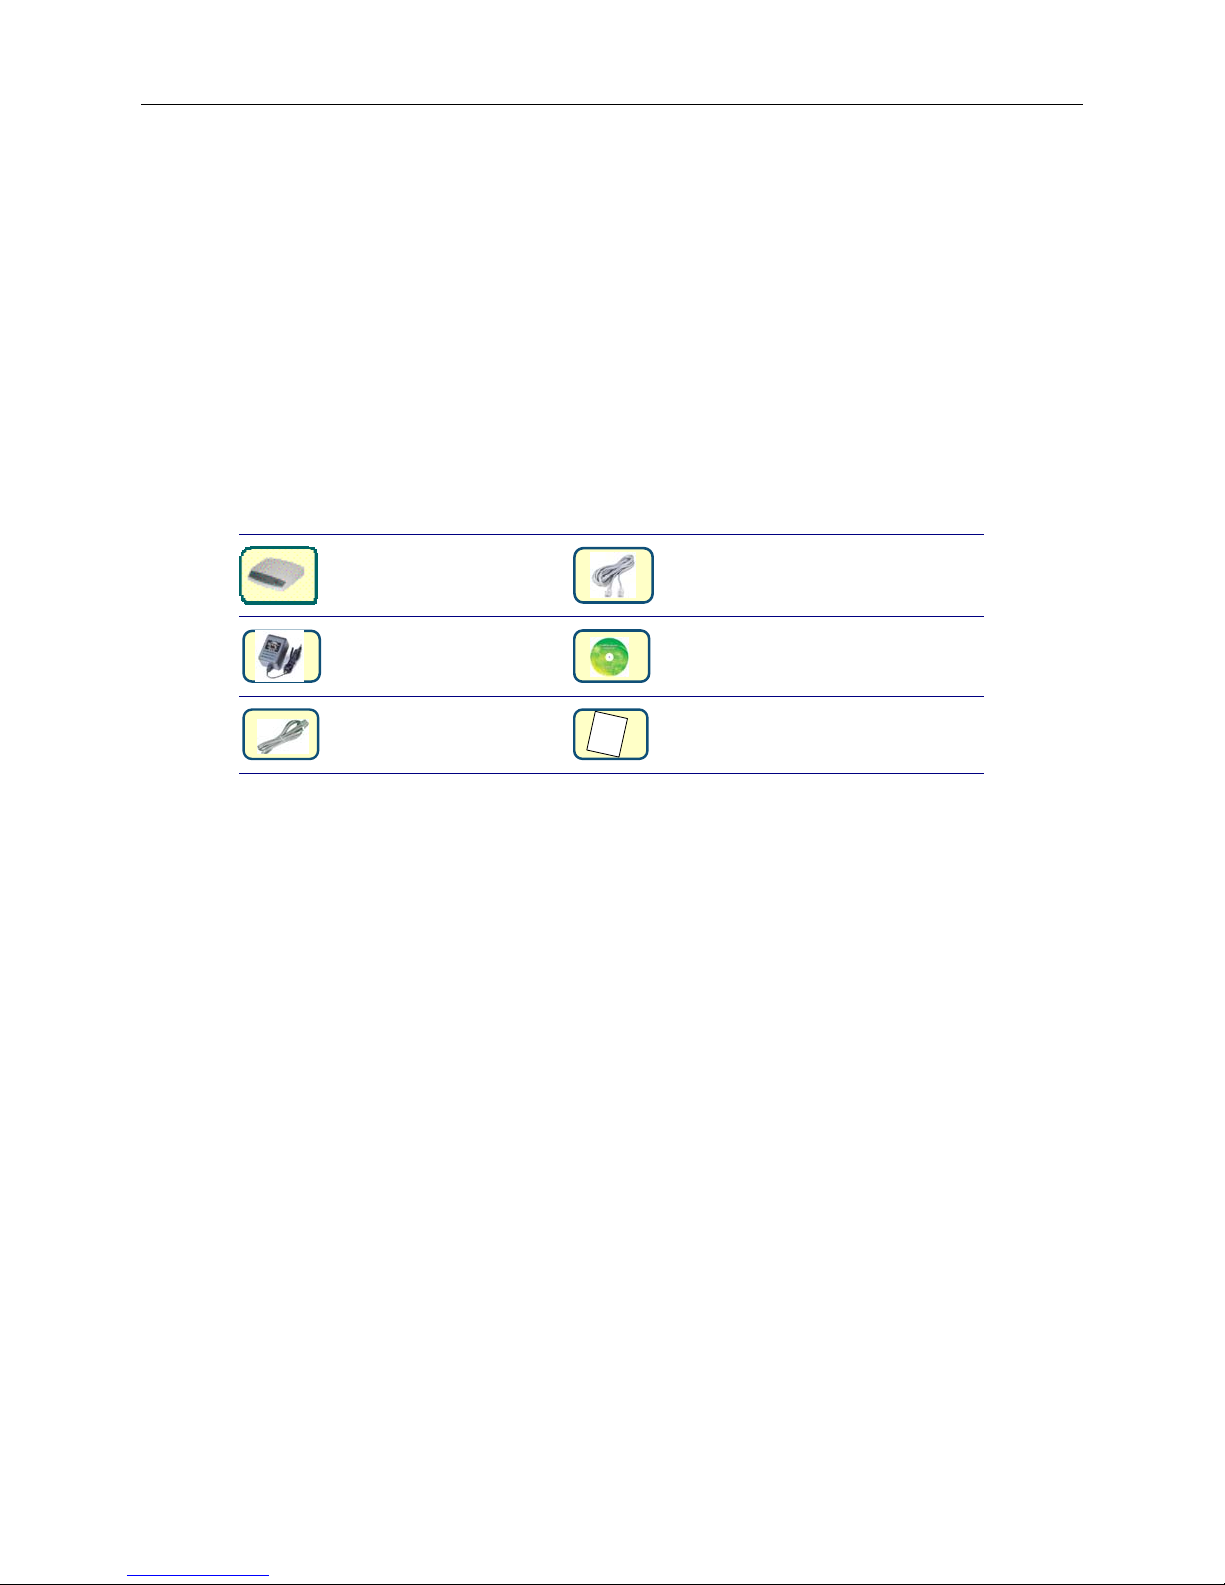
Parts check
Check the following items in your package. Contact your sales representative if any item is
missing or damaged.
Extended rate SHDSL
Router
Power Adapter
RJ45 Cable
I
Q.I.G
RJ11 Cable
(One with 1752, two with 1754)
Support CD
Quick Installation Instructions
14 June 2005 1752-A2-GB20-00
Page 15
1752 and 1754 SHDSL Router User’s Guide
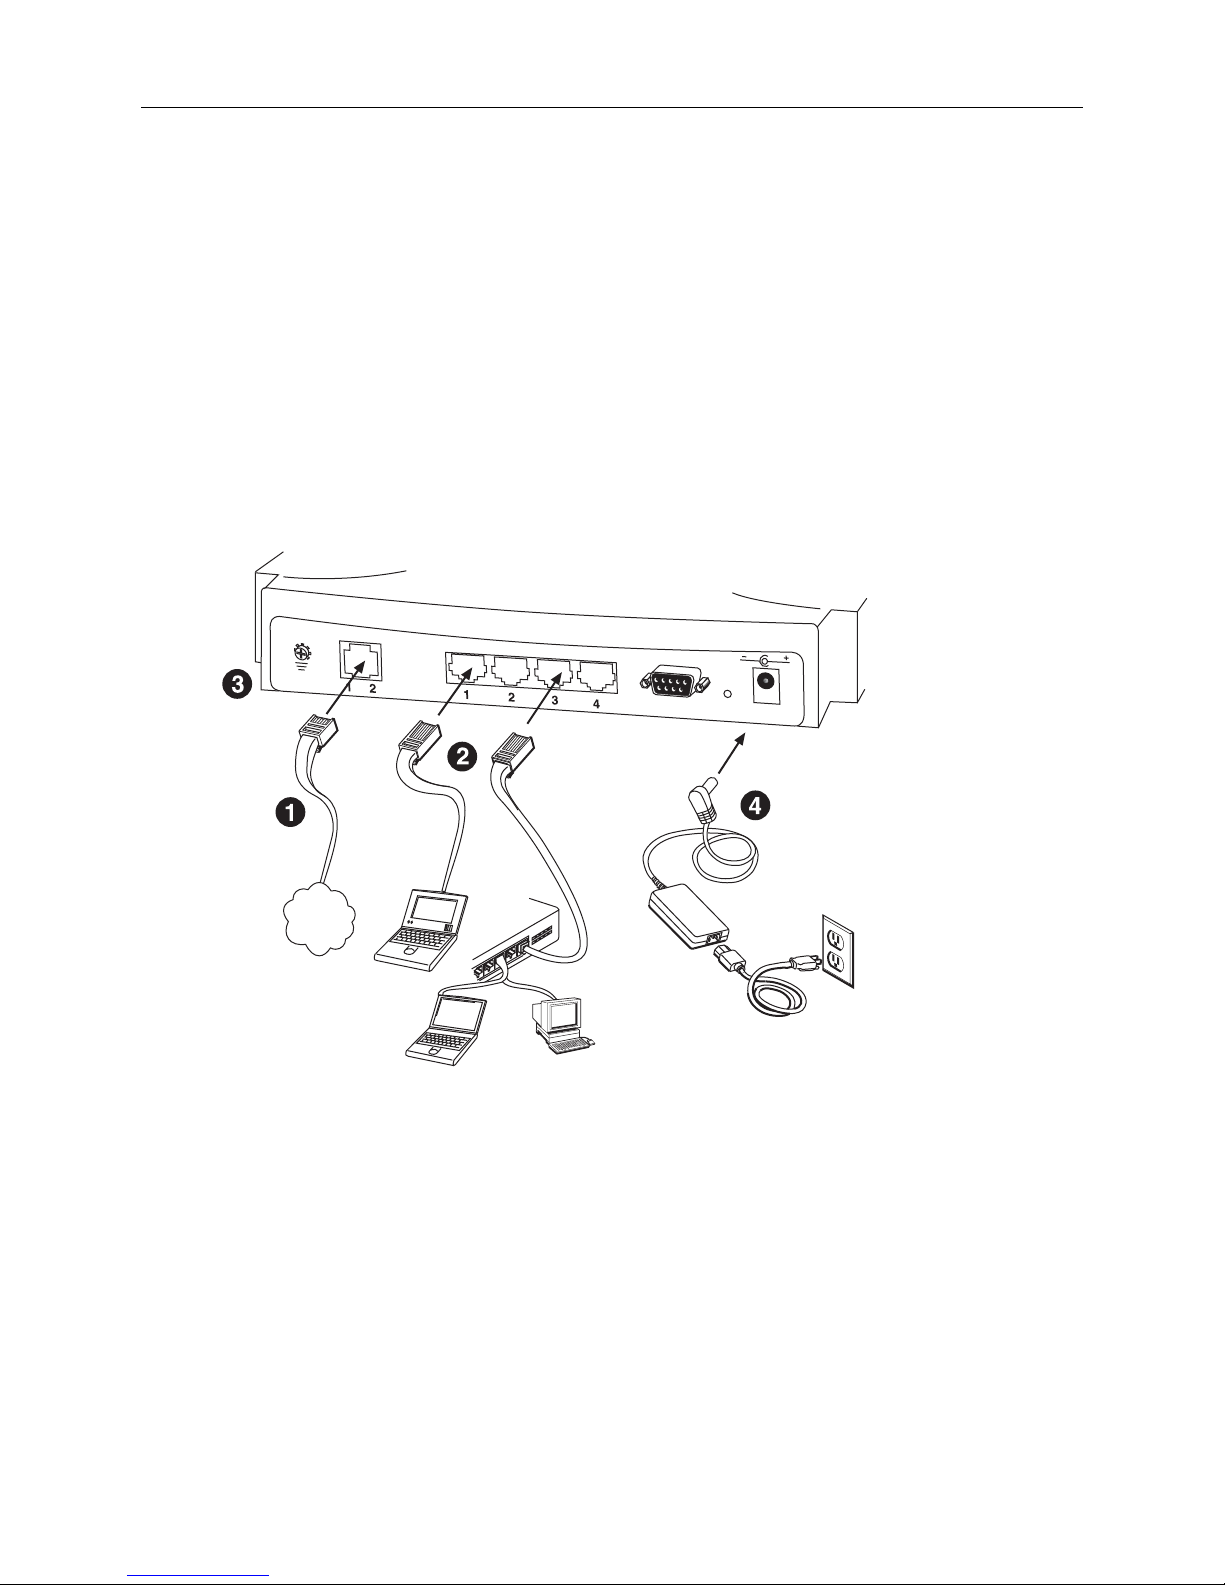
Hardware Connection – Model 1752
1. Connect the supplied RJ11 cable to the port marked DSL at the back of the SHDSL router.
Connect the other end of the cable to your SHDSL source.
2. Insert one end of the RJ45 Ethernet cable into one of the LAN ports marked LAN on the back of
the SHDSL router. Connect the other end of the cable into the Ethernet Network Interface Card
(NIC) in your PC. Connect up to four Ethernet devices to the router. Use a crossover cable for a
hub.
3. Connect an earth ground to the grounding terminal (marked FG).
4. Connect the supplied external AC adapter into the DC power outlet on the back of the router.
Connect the power supply into your wall outlet or surge protector.
FG
RJ11
Internet
DSL
LAN
Switch
or
Hub
RJ45
CID
Reset
DC IN
05-17665
1752-A2-GB20-00 June 2005 15
Page 16
1752 and 1754 SHDSL Router User’s Guide
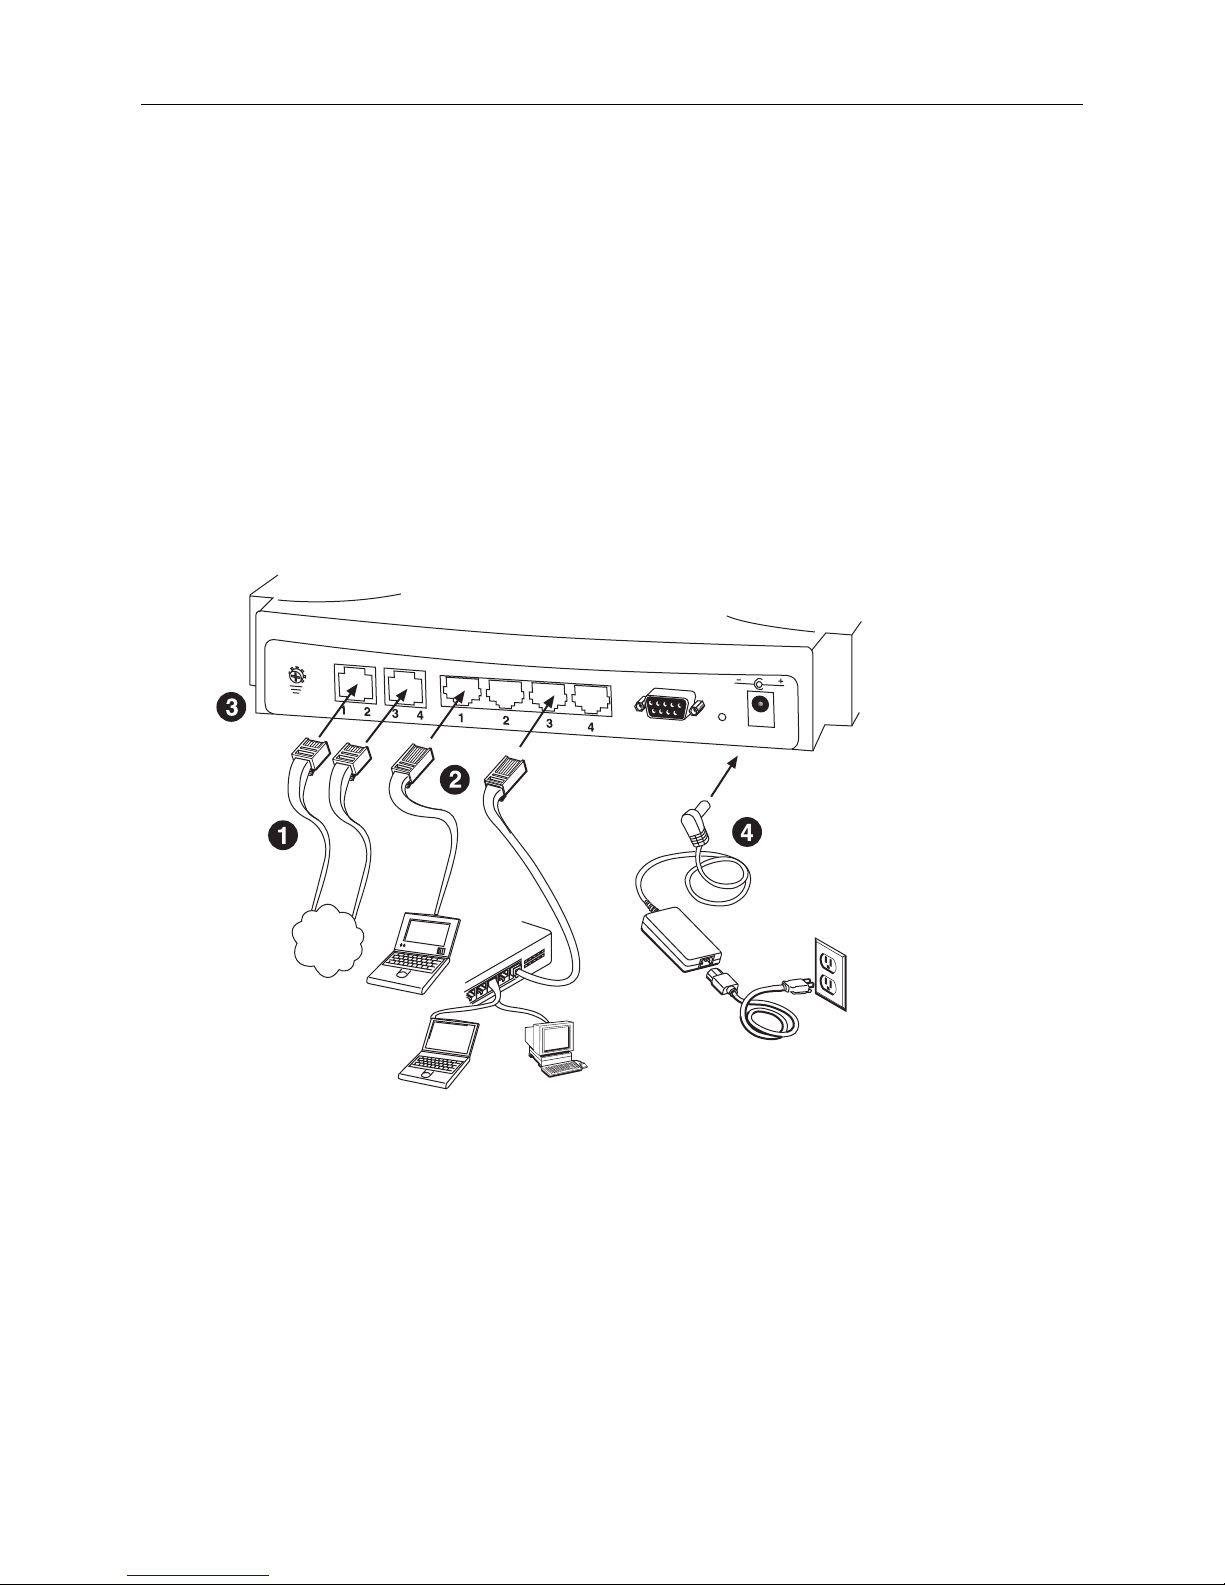
Hardware Connection – Model 1754
1. Connect one of the supplied RJ11 cables to the port marked DSL 1-2 at the back of the SHDSL
router. Connect the other end of the cable to the SHDSL source. Connect the other supplied
RJ11 cable to the port marked DSL 3-4. Connect the other end of the cable to the SHDSL source.
2. Insert one end of the RJ45 Ethernet cable into one of the LAN ports marked LAN on the back of
the SHDSL router. Connect the other end of the cable into the Ethernet Network Interface Card
(NIC) in your PC. Connect up to four Ethernet devices to the router. Use a crossover cable for a
hub.
3. Connect an earth ground to the grounding terminal (marked FG).
4. Connect the supplied external AC adapter into the DC power outlet on the back of the router.
Connect the power supply into your wall outlet or surge protector.
FG
RJ11
Internet
DSL
LAN
Switch
or
Hub
RJ45
CID
Reset
DC IN
05-17664
16 June 2005 1752-A2-GB20-00
Page 17
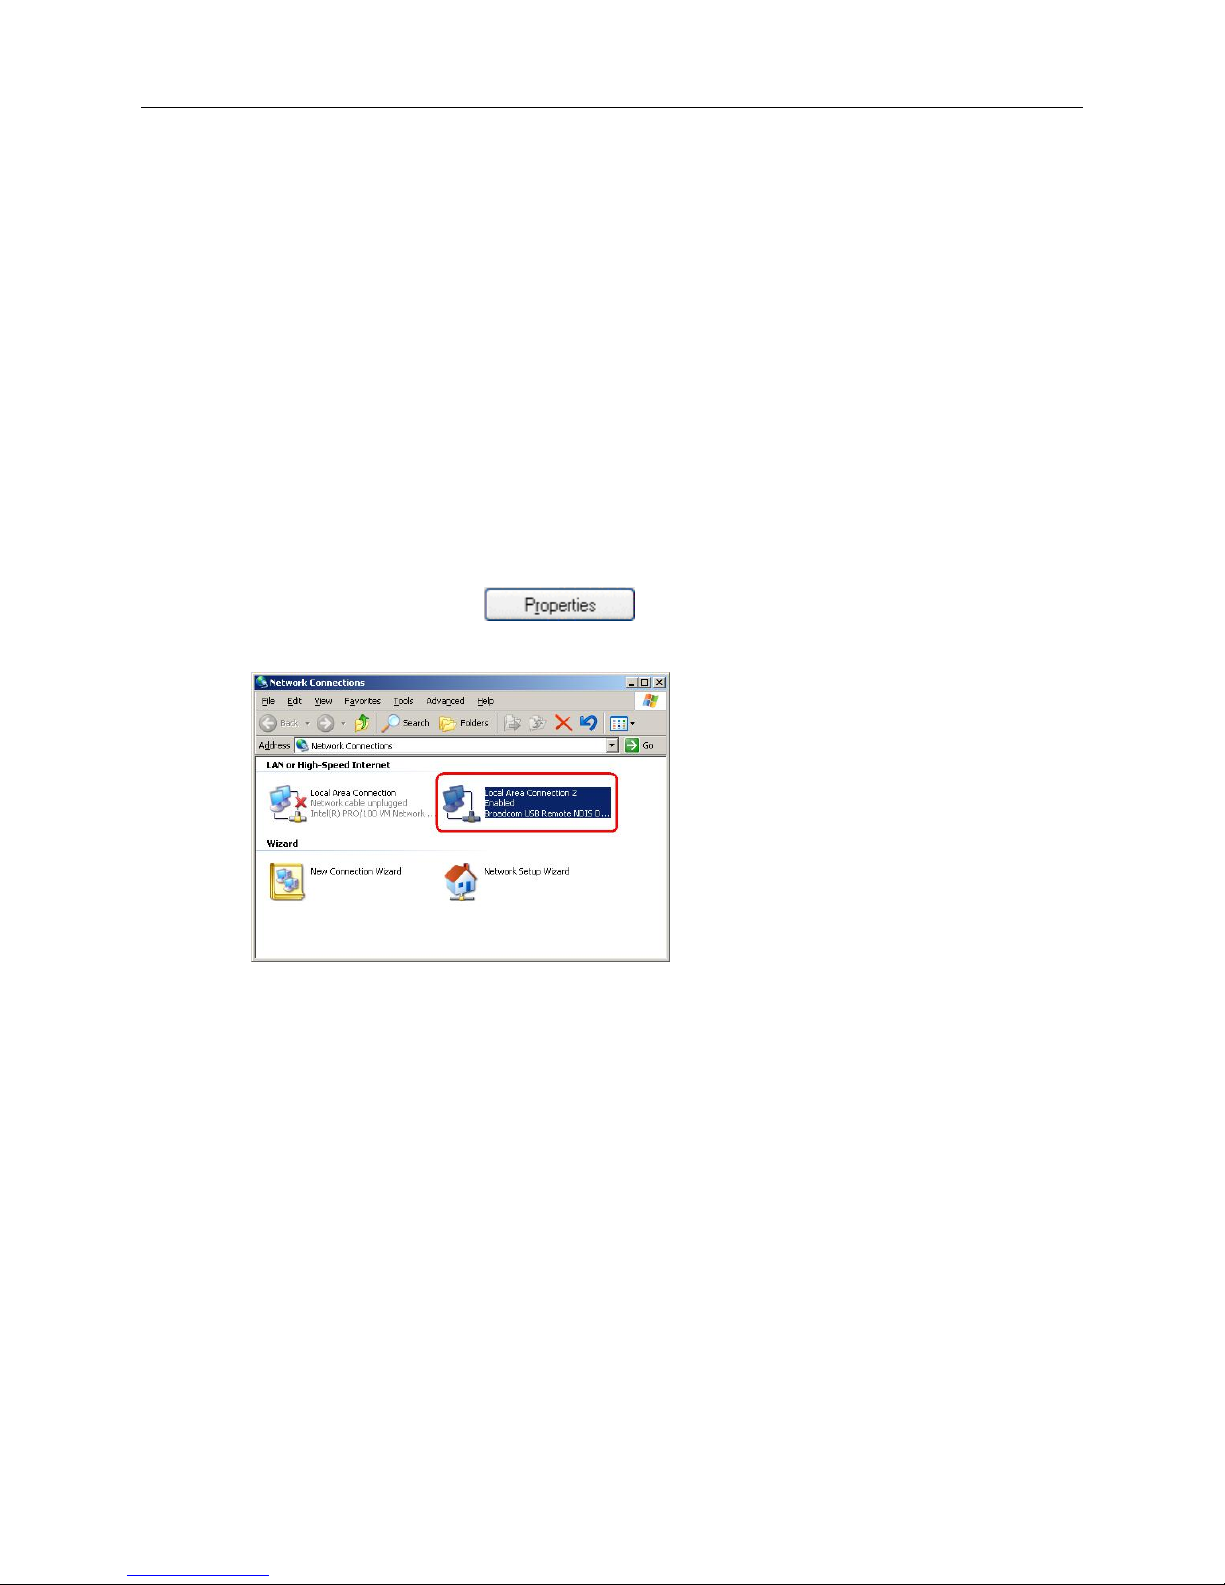
Configuring Windows PCs
To access the router using the web interface, you must configure your PC’s TCP/IP address
to be 192.168.1.x, where x is any number between 3 and 254. The subnet mask is
255.255.255.0.
Your router’s default IP address is 192.168.1.1.
Windows XP:
1. In the Windows task bar, click on the Start button, and then click on Control Panel.
2. Double-click on the Network Connections icon.
3. In the LAN or High-Speed Internet window, right-click on the icon corresponding to your
network interface card (NIC) and select Properties. (Often this icon is labeled Local Area
Connection). The Local Area Connection dialog box is displayed with a list of currently
installed network items.
4. Ensure that the check box to the left of the item labeled Internet Protocol (TCP/IP) is
1752 and 1754 SHDSL Router User’s Guide
checked, and click on
.
1752-A2-GB20-00 June 2005 17
Page 18
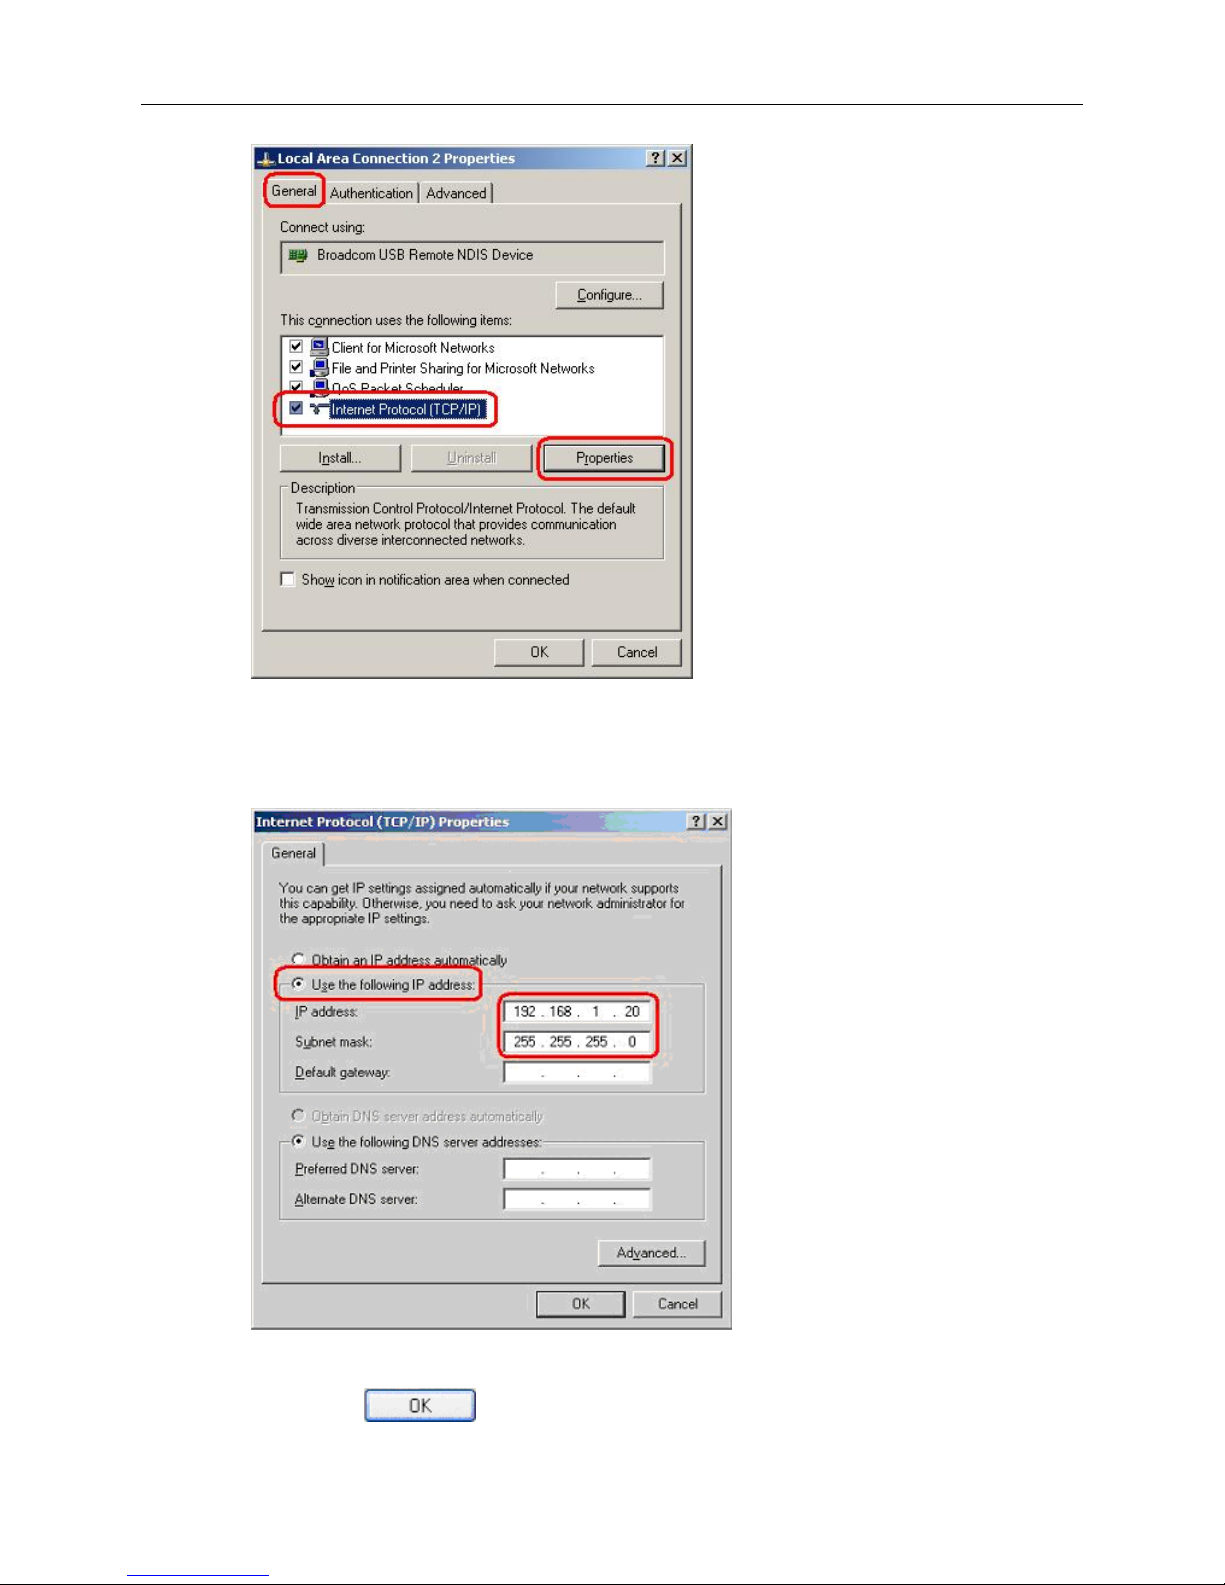
1752 and 1754 SHDSL Router User’s Guide
5. In the Internet Protocol (TCP/IP) Properties dialog box, click in the radio button labeled
Use the following IP address and type 192.168.1.x (where x is any number between 3
and 254) in the IP Address field. Type 255.255.255.0 in the Subnet Mask field.
6. Click on
18 June 2005 1752-A2-GB20-00
twice to confirm your changes, and close the Control Panel.
Page 19
Windows 2000:
1. In the Windows task bar, click on the Start button, point to Settings, and then select
Control Panel.
2. Double-click on the Network and Dial-up Connections icon.
3. In the Network and Dial-up Connections window, right-click on the Local Area
Connection icon, and then select Properties.
4. The Local Area Connection Properties dialog box is displayed with a list of currently
installed network components. If the list includes Internet Protocol (TCP/IP), the
protocol has already been enabled, in which case you can skip to Step 12.
5. If Internet Protocol (TCP/IP) does not appear as an installed component, click on
6. In the Select Network Component Type dialog box, select Protocol, and then click on
7. Select Internet Protocol (TCP/IP) in the Network Protocols list, and then click on
1752 and 1754 SHDSL Router User’s Guide
.
.
.
8. You may be prompted to install files from your Windows 2000 installation CD or other
9. If prompted, click on
10. After restarting your PC, double-click on the Network and Dial-up Connections icon in
11. In Network and Dial-up Connections window, right-click on the Local Area
12. In the Local Area Connection Properties dialog box, select Internet Protocol
13. In the Internet Protocol (TCP/IP) Properties dialog box, click in the radio button labeled
14. Click on
Windows Me:
1. In the Windows task bar, click on the Start button, point to Settings, and then click on
media. Follow the instructions to install the files.
to restart your computer with the new settings.
the Control Panel.
Connection icon, and then select Properties.
(TCP/IP), and then click on
.
Use the following IP address and type 192.168.1.x (where x is any number between 3
and 254) in the IP Address field. Type 255.255.255.0 in the Subnet Mask field.
twice to confirm and save your changes, and then close the
Control Panel.
Control Panel.
2. Double-click on the Network and Dial-up Connections icon.
3. In the Network and Dial-up Connections window, right-click on the Network icon, and
then select Properties.
4. The Network Properties dialog box is displayed with a list of currently installed network
components. If the list includes Internet Protocol (TCP/IP), the protocol has already
been enabled, in which case you can skip to Step 13.
1752-A2-GB20-00 June 2005 19
Page 20
1752 and 1754 SHDSL Router User’s Guide
5. If Internet Protocol (TCP/IP) does not appear as an installed component, click on
.
6. In the Select Network Component Type dialog box, select Protocol, and then click on
.
7. Select Microsoft in the Manufacturers box.
8. Select Internet Protocol (TCP/IP) in the Network Protocols list, and then click on
.
9. You may be prompted to install files from your Windows Me installation CD or other
media. Follow the instructions to install the files.
10. If prompted, click on
11. After restarting your PC, double-click on the Network and Dial-up Connections icon in
the Control Panel.
12. In Network and Dial-up Connections window, right-click on the Network icon, and then
select Properties.
13. In the Network Properties dialog box, select TCP/IP, and then click on
14. In the TCP/IP Settings dialog box, click in the radio button labeled Use the following IP
address and type 192.168.1.x (where x is any number between 3 and 254) in the IP
Address field. Type 255.255.255.0 in the Subnet Mask field.
15. Click on
Control Panel.
Windows 95, 98:
1. In the Windows task bar, click on the Start button, point to Settings, and then click on
Control Panel.
2. Double-click on the Network icon.
3. The Network dialog box is displayed with a list of currently installed network
components. If the list includes TCP/IP, the protocol has already been enabled, in which
case you can skip to Step 12.
to restart your computer with the new settings.
.
twice to confirm and save your changes, and then close the
4. If TCP/IP does not appear as an installed component, click on
Network Component Type dialog box appears.
5. Select Protocol, and then click
6. The Select Network Protocol dialog box appears.
7. Click on Microsoft in the Manufacturers list box, and then click TCP/IP in the Network
Protocols list box.
8. Click
9. You may be prompted to install files from your Windows 95/98 installation CD. Follow the
instructions to install the files.
20 June 2005 1752-A2-GB20-00
. The Select
.
to return to the Network dialog box, and then click again.
Page 21
1752 and 1754 SHDSL Router User’s Guide
10. Click on to restart the PC and complete the TCP/IP installation.
11. After restarting your PC, open the Control Panel window, and then click on the Network
icon.
12. Select the network component labeled TCP/IP, and then click on
13. If you have multiple TCP/IP listings, select the listing associated with your network card
or adapter.
14. In the TCP/IP Properties dialog box, click on the IP Address tab.
15. Click in the radio button labeled Use the following IP address and type 192.168.1.x
(where x is any number between 3 and 254) in the IP Address field. Type 255.255.255.0
in the Subnet Mask field.
16. Click on
restart Windows. Click on and restart your PC again.
Windows NT 4.0:
1. In the Windows NT task bar, click on the Start button, point to Settings, and then click on
Control Panel.
2. In the Control Panel window, double click on the Network icon.
3. In the Network dialog box, click on the Protocols tab.
4. The Protocols tab displays a list of currently installed network protocols. If the list includes
TCP/IP, the protocol has already been enabled, in which case you can skip to Step 12.
5. If TCP/IP does not appear as an installed component, click on
.
twice to confirm and save your changes. You will be prompted to
.
6. In the Select Network Protocol dialog box, select TCP/IP, and then click on
.
7. You may be prompted to install files from your Windows NT installation CD or other
media. Follow the instructions to install the files.
8. After all files are installed, a window displays to inform you that a TCP/IP service called
DHCP can be set up to dynamically assign IP information.
9. Click on
to continue, and then click on if prompted to restart your
computer.
10. After restarting your PC, open the Control Panel window, and then double-click on the
Network icon.
11. In the Network dialog box, click on the Protocols tab.
12. In the Protocols tab, select TCP/IP, and then click on
.
13. In the Microsoft TCP/IP Properties dialog box, click in the radio button labeled Use the
following IP address and type 192.168.1.x (where x is any number between 3 and 254)
in the IP Address field. Type 255.255.255.0 in the Subnet Mask field.
14. Click on
twice to confirm and save your changes, and then close the
Control Panel.
1752-A2-GB20-00 June 2005 21
Page 22
1752 and 1754 SHDSL Router User’s Guide
Configuring Apple PCs
To access the router using the web interface, you must configure your PC’s TCP/IP address
to be 192.168.1.x, where x is any number between 3 and 254. The subnet mask is
255.255.255.0.
Your router’s default IP address is 192.168.1.1.
Mac OS X
1. Under the Apple menu, select System Preferences.
2. Click on the Network icon.
3. In the Network window, choose the item that corresponds to your Ethernet interface
from the Show: drop-down list.
4. Select Manually from the Configure IPv4: drop-down list.
5. Type an address between 192.168.1.3 and 192.168.1.254 in the IP Address field
(192.168.1.30 is shown here as an example) and 255.255.255.0 in the Subnet Mask
field.
6. Click the Apply Now button to apply your changes and quit the System Preferences
application.
22 June 2005 1752-A2-GB20-00
Page 23

Mac OS 8.x or 9.0
1. Under the Apple menu, select Control Panels, then TCP/IP.
2. In the TCP/IP control panel, choose the item that corresponds to your Ethernet
3. Select Manually from the Configure: drop-down list.
4. Type an address between 192.168.1.3 and 192.168.1.254 in the IP Address field and
5. Close the control panel and save your changes when prompted.
1752 and 1754 SHDSL Router User’s Guide
interface from the Connect via: drop-down list.
255.255.255.0 in the Subnet Mask field.
1752-A2-GB20-00 June 2005 23
Page 24
1752 and 1754 SHDSL Router User’s Guide
Chapter 3 – Configuring the Router Using EmWeb
Accessing EmWeb
EmWeb is an application for configuring your router. It is accessed using a web browser such
as Internet Explorer version 5 or above.
To access EmWeb on a router set to the factory default configuration:
1. Attach a PC to one of the LAN interfaces. On the Address line of your web browser, enter
the URL: http://192.168.1.1
2. A login box is displayed. Enter the default User Name and Password:
User Name: admin
Password: admin
3. Click on
About EmWeb pages
EmWeb provides a series of web pages that you can use to set up and configure the router.
These pages are organized into six main topics.
. You are now ready to configure the router using EmWeb.
You can select the topics using the buttons at the top of the main window:
• Home: Returns you to the front page.
• Quick Setup: Guides you through the steps to configure your router.
• Setup: Allows you to configure WAN and LAN connections.
24 June 2005 1752-A2-GB20-00
Page 25
The exact information displayed on each web page depends on the specific configuration that
you are using. The following sections give you a general overview of the setup and
configuration details.
Status Pages
The Status home page has links to the following:
1752 and 1754 SHDSL Router User’s Guide
• Advanced: Lets you configure advanced features like Security, IP routes, and Bridge.
• System: Lets you execute system-level commands like Event Log, Firmware Update,
Backup/Restore, Save configuration, and Authentication.
• Status: Provides information about the current setup and status of the system.
• System status
• System information
• Event log
1752-A2-GB20-00 June 2005 25
Page 26

1752 and 1754 SHDSL Router User’s Guide
System status page
Click on System Status to invoke the system status page from which the status of the
bridge/router interfaces or routing table is displayed.
Physical port connection status:
If to view or change a physical port configuration, select a port to see configuration
information for that port.
The following figure shows basic port attributes under SHDSL port configuration page.
26 June 2005 1752-A2-GB20-00
Page 27

1752 and 1754 SHDSL Router User’s Guide
To view or change advanced configuration settings for the SHDSL port, click on View
advanced attributes. The SHDSL Port Configuration page is displayed. “Shdsl” is the default
port name. You can configure SHDSL parameters from this page.
1752-A2-GB20-00 June 2005 27
Page 28

1752 and 1754 SHDSL Router User’s Guide
28 June 2005 1752-A2-GB20-00
Page 29

1752 and 1754 SHDSL Router User’s Guide
1. In the Unit Id drop-down menu, set the device as CO or CPE, and then click on
to submit your setting.
2. To set the router’s Wire Pair mode, click on the Wire Mode drop-down list to select the
Wire Pair number needed. Click on
to submit your setting.
Wire Pair DSL Pair to Use Illustration
WirePair1 1
DSL
WirePair2 1,2
WirePair3 1,2,3
1 2 3 4
WirePair4 1,2,3,4
3. To set the maximum and minimum line rate, input the Max Line Rate and Min Line Rate
respectively (where values range from 192000 bps to 5696000 bps) and then click on
to submit your setting. After the handshaking between STU-R and STU-C
devices, the actual transmission rate will be presented in the Current Tx Rate attribute.
From the Port Configuration menu, click on eth1. The Eth1 Port Configuration page is
displayed:
1752-A2-GB20-00 June 2005 29
Page 30

1752 and 1754 SHDSL Router User’s Guide
1. The page displays basic port attributes for the Ethernet port on your router.
2. For advanced configuration of Ethernet port attributes, from the Eth1t Port Configuration
page, click on View advanced attributes. The Advanced Eth1 Port Configuration page is
displayed.
3. Update the port attributes that are available for editing, then click on
the advanced configuration, or
configuration settings. Click on the Return to basic attribute list to return to the Eth1 Port
Configuration page.
4. For routers with 4 LAN ports, you can configure eth1 to eth4.
30 June 2005 1752-A2-GB20-00
to update
to revert back to the default advanced
Page 31

Bridge/Router Interfaces:
To view the statistics on Bridge/Router Interfaces, select a specified interface to invoke the
status page.
The following figure shows the statistics on the interface, rfc1483-0, under SHDSL port
configuration page.
1752 and 1754 SHDSL Router User’s Guide
Click
the WAN connections section on Setup pages.
1752-A2-GB20-00 June 2005 31
to configure WAN connections. The procedure refers to
Page 32

1752 and 1754 SHDSL Router User’s Guide
System information
This page shows system information, including MAC address, Firmware version, hardware
version, IP address, and the amount of time the system has been up.
Event Log
Click on Event Log to display the Event Log screen:
This page displays a table containing all configuration errors experienced by the router during
the current session. The table also tells you:
All Events: Shows all events that have occurred
Config errors: Shows error messages regarding configuration errors
Syslog Messages: Shows all messages regarding system actions other then
Configuration errors
32 June 2005 1752-A2-GB20-00
Page 33

Setup pages
This page allows you to configure WAN and LAN connections.
1752 and 1754 SHDSL Router User’s Guide
The Setup page allows users to configure:
1. LAN connections
2. DHCP Server
3. DHCP Relay
4. DNS Client
5. DNS Relay
6. SNTP Client
WAN Connection
This screen allows you to create and configure WAN connections for your router. You can
also create virtual interfaces on routed services. Click on WAN connections to display the
WAN Connections screen:
1752-A2-GB20-00 June 2005 33
Page 34

1752 and 1754 SHDSL Router User’s Guide
Creating a WAN service
1. Click on Create a new service. A page is displayed containing a list of WAN service
options.
2. Select an option, and then click on Configure. You need to add detailed configuration
information about the WAN service that you are creating.
3. Click on
of the service that you have just created.
Editing a WAN service
1. Click on the Edit link for a specific service. The WAN connection:
edit page is displayed.
. The WAN connections page is displayed. The table now contains details
2. Change the values for the existing service. If you want to carry out advanced editing, click
on the links at the top of the edit page. The links that appear depend on the type of service
that you are configuring. For example, for a PPPoE routed service, you can choose from the
34 June 2005 1752-A2-GB20-00
Page 35

following advanced editing links:
Edit ‘Service’
Edit ‘PPPoE’
Edit ‘Atm Channel’
3. Click on Change. The edit page is displayed and changes are applied to the service.
Deleting a WAN service
1. At the WAN connections page, click on the Delete link for a specific service. The WAN
connection: delete page is displayed.
2. Check the details displayed, and then click on the Delete this connection button.
Creating a virtual interface (routed services only)
1. Click on the Virtual I/f link for a specific service. The Virtual interface page is displayed.
1752 and 1754 SHDSL Router User’s Guide
2. Click on the Create a new virtual interface... hyperlink. On the Create virtual interface page,
type the IP address and netmask of the virtual interface, and then click on the
3. The WAN connections page is displayed. If you click on the Virtual I/f link, the Virtual
interface page displays a table listing the names of existing virtual interfaces. Each virtual
interface is called item# by default.
LAN Setup
LAN Setup provides following options to configure:
button.
• LAN Connections
• DHCP Service
• DHCP Relay
1752-A2-GB20-00 June 2005 35
Page 36

1752 and 1754 SHDSL Router User’s Guide
• DNS Client
• DNS Relay
• SNTP client
LAN connections
This option allows you to:
• Configure the IP address and subnet of the default LAN connection to the Router.
• Configure a secondary IP address on the same subnet as the primary IP address.
• Create virtual interfaces. Multiple virtual interfaces can be associated with the existing
primary LAN interface.
From the Configuration menu, click on LAN connections. The following page is displayed:
Configuring primary and secondary LAN connections
1 The Default LAN Port section contains two subsections:
a. IP address and subnet mask details of your primary LAN connection. To edit these, click
on
and type new primary address details.
36 June 2005 1752-A2-GB20-00
Page 37

1752 and 1754 SHDSL Router User’s Guide
b. Secondary IP address details. To create/configure a secondary IP address, click in the
Secondary IP Address text box and type the new address details.
Once you have configured the IP address(es), click on the
displayed confirming that your address information is being updated. If you have changed the
primary IP address, you may need to enter the new address in your web browser Address
box.
Creating virtual interfaces
1. Click on the Create a new virtual interface... hyperlink at the bottom of the LAN
connections page. On the Create virtual interface page, type the IP address and netmask of
the virtual interface, and then click on the
2. The LAN connections page is displayed. The virtual interfaces section contains a table
listing the names of the virtual interface(s). Each virtual interface is called item# by default.
3. Each virtual interface name has an Edit and a Delete link associated with it. To edit a
service:
button. A message is
button.
a. Click on the Edit link.
1752-A2-GB20-00 June 2005 37
Page 38

1752 and 1754 SHDSL Router User’s Guide
b. Change the options for the existing virtual interface, then click on Change. The page is
reset and the new values are displayed.
To delete a service:
a. Click on the Delete link.
b. Check the details displayed, and then click on the Delete this connection button.
DHCP Server
This option allows you to enable or disable the DHCP server and create, configure, and
delete DHCP server subnets and DHCP fixed IP /MAC mappings.
From the Configuration menu, click on DHCP server. The following page is displayed:
Enabling/disabling the DHCP server
The DHCP server is enabled by default. If to disable the DHCP server, click on .
Note: If DHCP relay is enabled, DHCP server will be disabled by default. You can not
enable DHCP server unless you disable DHCP relay.
38 June 2005 1752-A2-GB20-00
Page 39

Creating a DHCP server subnet
Click on the Create new Subnet link. The following page is displayed:
1752 and 1754 SHDSL Router User’s Guide
2. This page allows you to:
• Set the value and netmask of the subnet (either manually or by selecting an IP
interface whose value and mask is used instead), and set the maximum and default
lease times.
• Set the DHCP address range (or use a default range of 20 addresses).
• Set the Primary and Secondary DNS Server addresses or set your System to give
out its own IP address as the DNS Server address.
•
Set your router to supply its own IP address as the default Gateway address.
3. Once you have entered new configuration details for your DHCP server, click on . The
DHCP Server page is displayed, containing details of your new subnet.
1752-A2-GB20-00 June 2005 39
Page 40

1752 and 1754 SHDSL Router User’s Guide
Editing a DHCP Subnet
Click on the Advanced Options link for a specific subnet. The Edit DHCP server subnet page
is displayed. This allows you to edit all of the values that were set when the subnet was
created.
2. This page also allows you to add additional option information. At the bottom of the page,
click on the Create new DHCP option link.
3. Click on the Option name drop-down list and select a name. Type a value that matches the
selected option name in the Option value text box. Click on
.
4. The Edit DHCP server subnet page is displayed, and details of you new option are
displayed under the sub-heading Additional option information. To delete an existing option,
check the Delete box for a specific option and click on
40 June 2005 1752-A2-GB20-00
.
Page 41

Creating a Fixed Host
1. Click on the Create new Fixed Host link. The following page is displayed:
2. Complete the following:
a. Type in the IP address that will be given to the host with the specified MAC address.
b. Type in the MAC address and the maximum lease time (default is 86400 seconds).
3. Click on OK. The DHCP Server page is displayed, and details of your new fixed host are
displayed under the sub-heading Existing DHCP fixed IP/MAC mappings. To edit a fixed
mapping, click on the IP address, MAC address, or max lease time, type a new entry, and
1752 and 1754 SHDSL Router User’s Guide
click on
click on
. To delete a fixed mapping, check the Delete box for a specific mapping and
.
1752-A2-GB20-00 June 2005 41
Page 42

1752 and 1754 SHDSL Router User’s Guide
DHCP Relay
This option allows you to:
• Enable and disable DHCP relay.
• Add DHCP servers to the DHCP relay list.
• Configure and delete server entries on the DHCP relay list.
From the Configuration menu, click on DHCP relay. The following page is displayed:
Enabling/disabling DHCP relay
This screen shows that the DHCP relay is currently disabled. If you click on the Enable button,
DHCP server is disabled and the button changes to Enable.
Note: If DHCP server is enabled, DHCP relay will be disabled by default. You can not enable
DHCP relay unless you disable DHCP server.
Adding a DHCP server to the DHCP relay list:
1. In the Add new DHCP server section, type an address in the New DHCP server IP address
text box.
2. Click on
42 June 2005 1752-A2-GB20-00
. The address is displayed in the Edit DHCP server list section.
Page 43

Editing/deleting entries in the DHCP relay list
1. To edit an entry, click on an IP address and type a new entry, then click on .
1752 and 1754 SHDSL Router User’s Guide
2. To delete an entry, check the Delete box for a specific IP address, then click on
DNS Client
This option allows you to:
• Create a list of server addresses. This enables you to retrieve a domain name for a given IP
address.
• Create a domain search list. DNS client uses this list when a user asks for the IP address
list for an incomplete domain name.
From the Configuration menu, click on DNS client. The following page is displayed:
Configuring DNS servers
1. Type the IP address of the unknown domain name in the DNS servers: text box.
.
2. Click on
. The IP address appears in the DNS servers table. You can add a
maximum of three server IP addresses. Each IP address entry has a Delete button
associated with it. Click on
Configuring DNS search domains:
1. Type a search string in the Domain search order: text box.
2. Click on
. The search string is displayed in the Domain search order table. You can
add a maximum of six search strings. Each search string entry has a Delete button
associated with it. Click on
DNS Relay
This option allows you to create, configure and delete DNS relay’s primary and secondary
DNS servers. DNS relay can forward DNS queries to the DNS servers on this list.
From the Configuration menu, click on DNS Relay. The following page is displayed:
1752-A2-GB20-00 June 2005 43
to remove an IP address from this list.
to remove a string from this list.
Page 44

1752 and 1754 SHDSL Router User’s Guide
Configuring the DNS relay list
1. In the Add new DNS server section, type an address in the New DNS server IP address
text box.
2. Click on
. The address is displayed in the Edit DHCP server list section. To edit an
entry, click on an IP address and type a new entry, then click on
check the Delete? Box for a IP address, then click on
.
. To delete an entry,
44 June 2005 1752-A2-GB20-00
Page 45

SNTP Client
The option allows you to:
From the Configuration menu, click on SNTP client. The following page is displayed:
1752 and 1754 SHDSL Router User’s Guide
• Synchronize Client with NTP Server
• Configure SNTP-NTP Server
• Set the system clock
Synchronize Client with NTP Server
Click on to force the SNTP client to immediately synchronize the local time with
the server located in the association list (if unicast) or, if anycast is enabled, initiate an
anycast sequence to the network.
Note: to Synchronize Client with NTP Server, NTP servers, SNTP client mode, and local time
1752-A2-GB20-00 June 2005 45
Page 46

1752 and 1754 SHDSL Router User’s Guide
zone should be pre-configured.
Configure SNTP-NTP Server
Type the NTP Server IP address in the text box of Add NTP Server IP Address, and then click
on
.
Type the NTP Server Hostname in the text box of Add NTP Sever Hostname, and then click
on
.
Configure SNTP Client Mode
Select SNTP Synchronization mode(s): This action enables/disables the STNP client in a
particular time synchronous access mode. There are three modes to choose from, and each
mode has enable and disable options:
Unicast mode:
• Enable - The mode uses a unicast server and the IP address or hostname in the SNTP
server association list is used to synchronize the client time with the server. The SNTP client
attempts to contact the specific server in the association in order to receive a timestamp
when the sntpclient sync command is issued.
• Disable - The unicast server is removed from the association list.
Broadcast mode:
• Enable - Allows the SNTP client to accept time synchronization broadcast packets from an
SNTP server located on the network, and update the local system time accordingly.
• Disable - Stops synchronization via broadcast mode.
Anycast Mode:
• Enable - The SNTP client sends time synchronized broadcast packets to the network and
subsequently expects a reply from a valid timeserver. The client then uses the first reply it
receives to establish a link for future sync operations in unicast mode. This server will then be
added to the server association list. The client ignores any later replies from servers after the
first one is received.
The enabled anycast mode takes precedence over any entries currently in the associations
list when the sntpclient sync command is issued. The entry will then be substituted for any
existing entry in the unicast association list.
• Disable - stops synchronization via anycast mode.
Click on
46 June 2005 1752-A2-GB20-00
to validate your setting after choosing the SNTP Synchronization mode.
Page 47

1752 and 1754 SHDSL Router User’s Guide
Select a time zone:
Click on the local timezone drop down list and select a time zone. And then click on
to validate your setting.
Enter SNTP transmit packet timeout value, SNTP transmit packet retries value, and SNTP
automatic resynchronization polling value in their respective text boxes. Click on
to validate your setting.
Setting the System Clock
Enter the date and time with yyyy:mm:dd:hh:mm:ss format in the text box to set the system
clock. Click on
Note: if using manual system clock setting, the local time will follow the internal clock that you
set.
to validate your setting.
1752-A2-GB20-00 June 2005 47
Page 48

1752 and 1754 SHDSL Router User’s Guide
Quick Setup page
The Quick Setup will guide you to configure virtual circuits in this device. To set VPI/VCI:
1. Enter the VPI and VCI for each service listed.
2. Click on
3. If to create or delete WAN services, click on the Click here to Add or Delete WAN
Services link.
System Pages
Click on System, and the following screen appears:
to submit your settings or to clear your settings.
The System menu includes Firmare Update, Backup/Restore, Restart Router, Save
configuration, and Authentication.
48 June 2005 1752-A2-GB20-00
Page 49

Firmware Update
This option allows you to upload firmware images to the router using HTTP.
1. From the System menu, click Firmware update. The following page is displayed:
2. Type in the location of the new firmware image that you want to upload, or use
3. Once the file has been uploaded to the RAM of your device, it is written to Flash ROM. A
status page is displayed confirming that the upload is complete and telling you how much of
the file (in bytes and as a percentage) has been written to Flash ROM.
4. Once the file has been written to Flash ROM, the Firmware Update page is refreshed. The
page confirms completion of the update and asks you to restart your router in order to use the
new firmware. Click on Restart Router from the System menu.
1752 and 1754 SHDSL Router User’s Guide
to browse and select the file. Click on .
Note: Do not power off the device while updating firmware or saving your configuration.
Powering off the router while updating the firmware might disable the router.
Backup/Restore
This page allows you to back up your configuration to, or restore it from, your PC.
Backing up your configuration:
1. From the System menu, click on Backup/restore. The following page is displayed:
2. From the Backup Configuration section, click on the
window is displayed. Click on
save your backup configuration. Click on
1752-A2-GB20-00 June 2005 49
button. The File Download
. In the Save As window, select a file in which to
.
Page 50

1752 and 1754 SHDSL Router User’s Guide
Restoring your configuration
1. From the System menu, click on Backup/restore.
2. In the Restore Configuration section, click in the Configuration File text box and type the
network path of the file that you wish to restore. If you do not know the path details, click on
and locate the file using the Choose file box.
3. Click on
details of the number of bytes uploaded.
Restart Router
This page allows you to restart your router. With the Reset box selected, it has the same
effect as resetting your router by pressing the Reset button on the hardware.
1. From the System menu, click on Restart Router. The following page is displayed:
2. Click on
of restarting and restoring the factory default settings. Click in the Reset to factory default
settings box to check it, and then click on the
check how the reset is progressing.
3. Once the login and password prompt is displayed at the console, you can login as usual
(with login = admin, password = admin), then refresh the browser that is running EmWeb.
The Status page is displayed when your router has been reset.
. The page is refreshed with a Configuration Restored message and
to reset your router. The Restart page also provides you with the option
. Read the console status output to
Save configuration
To save your current configuration to flash ROM:
1. From the System menu, click on Save configuration. The following page is displayed:
2. Click on
After a short time the configuration is saved and the following confirmation message is
displayed: Saved information model to file //flashfs/im.conf
50 June 2005 1752-A2-GB20-00
to save your current configuration in the device.
Page 51

Authentication
This option allows you to administer accounts for users who access the router. From the
Configuration menu, click on Authentication. The following page is displayed:
Creating a new login account
1. Click on the Create a new user. The following page is displayed:
1752 and 1754 SHDSL Router User’s Guide
2. Type details for the new user into the username, password and comment text boxes, and
select a May login? Option:
• true means that the user can login
• false means that the user can not login
3. Click on the button. The Authentication page is displayed. The table now contains
details for the user that you have just created.
Editing or Deleting a Login Account
1. The Authentication page table contains an Edit user hyperlink for each user account entry.
Click on a link. The following page is displayed:
1752-A2-GB20-00 June 2005 51
Page 52

1752 and 1754 SHDSL Router User’s Guide
This page allows you to:
• Update details for a specific user account. Modify the necessary text boxes then click on
the
• Delete a user account. Click on the Delete this user button.
2. Once you have edited or deleted a user account, the Authentication page is displayed and
the table reflects any changes that you have made on the edit user page.
Advanced Pages
The Advanced pages allow you to configure:
• Security
• IP Routes
• Bridge
• VPN
• SNMP
• Port
These options are introduced in the following pages.
Security
Security allows you to:
• Enable Security
button.
• Configure Security interfaces
• Configure triggers
NAT allows you to:
• Enable NAT between interfaces
• Configure global addresses
• Configure reserved mapping
Firewall allows you to:
• Enable Firewall and Firewall Intrusion Detection settings
• Set the Firewall security level
• Configure Firewall policies, portfilters and validators
52 June 2005 1752-A2-GB20-00
Page 53

1752 and 1754 SHDSL Router User’s Guide
• Configure Intrusion Detection settings
Via the Advanced menu, click on Security and then the following page is displayed:
Enabling Security
You must enable Security before you can enable Firewall and/or Intrusion Detection. In the
Security State section:
1. Click on the Security Enabled radio button.
2. Click on
Enabling Firewall and/or Intrusion Detection:
You must create a security interface before you can enable Firewall and/or Intrusion
Detection.
Once you have created a security interface:
1. Click on the Firewall Enabled and/or Intrusion Detection Enabled radio buttons.
2. Click on
Setting a default security level:
You must have Security and Firewall enabled in order to set a default Security level.
1. From the Security Level section, click on the Security Level drop-down list.
2. Click on the level that you want to set: none, high, medium or low.
to update the Security State section.
to update the Security State section.
1752-A2-GB20-00 June 2005 53
Page 54

1752 and 1754 SHDSL Router User’s Guide
3. Click on the
Configuring security interfaces
Security interfaces are based on existing LAN services. You must create a LAN service for
every security interface that you want to configure.
For details on how to create LAN services:
1. From the Security Interfaces section, click on Add Interface. Add Interface page is
displayed:
2. Click on the Name drop-down list and select the LAN service that you want to base your
security interface on.
3. Click on the Interface Type drop-down list and specify what kind of interface it is,
depending on how it connects to the network; external, internal or DMZ.
button.
4. Click on
. The Security page is displayed. The Security Interfaces section contains a
table that displays information about each security interface that you have created:
• Name - name of LAN service that the security interface is based on
• Type of network connection specified
• NAT setting. It contains hyperlinks that allow you to configure NAT. See Configuring
NAT
• Delete Interface... hyperlink. Click on this to display the Security: Delete Interface
54 June 2005 1752-A2-GB20-00
Page 55

Configuring NAT
To configure NAT, you need to:
1. Enable Security; see the Enabling Security section.
2. Create at least two different security interface types based on existing LAN services; see
the Configuring Security Interfaces section.
Once you have created more than one security interface, the NAT column in the Security
Interfaces table tells you that you can enable NAT between the existing security interface and
a network interface type. For example, if you create an external interface and an internal
interface, your table will look like this:
1752 and 1754 SHDSL Router User’s Guide
page. Check the interface details, then click on the Delete button.
The NAT column for the external interface tells you that you can enable NAT to internal
interfaces. If you also had a DMZ interface configured, this column would also include an
Enable NAT to DMZ interfaces button.
4. To enable NAT between the external interface and the internal interface type, click on
To disable NAT between these interfaces, click on
Once you have enabled NAT between interfaces, you can:
• Configure global addresses; see the Configuring NAT global addresses section.
• Configure reserved mapping; see the Configuring NAT reserved mapping section.
Configuring NAT Global Addresses
Global address pools allow you to create a pool of outside network addresses that is visible
outside your network. Before you can configure global addresses, you need to configure NAT.
See Configuring NAT Section
If you want to set up a global address pool on your existing NAT enabled interfaces:
1. From the NAT Security Interfaces table, click on the Advanced NAT Configuration
hyperlink for the interface that you want to add a global pool to. The following page is
displayed:
. The Security page is refreshed and NAT is enabled.
.
1752-A2-GB20-00 June 2005 55
Page 56

1752 and 1754 SHDSL Router User’s Guide
2. Click on Add Global Address Pool. The following page is displayed:
3. This page allows you to create a pool of network IP addresses that are visible outside your
network. Add values for the following table entries:
• Interface type. The internal address type that you want to map your external global IP
addresses to. Click on the drop-down list and select an interface type.
• Use Subnet Configuration. There are two ways to specify a range of IP addresses. You can
either Use Subnet Mask (specify the subnet mask address of the IP address) or Use IP
Address Range (specify the first and last IP address in the range). Click on the drop-down list
and select a method.
• Type in the IP Address that is visible outside the network
• Subnet Mask/IP Address 2. The value you specify here depends on the subnet
configuration that you are using. If you chose Use Subnet Mask, type in the subnet mask of
the IP address. If you chose Use IP Address Range, type in the last IP address in the range
of addresses that make up the global address pool.
4. Once you have configured the table, click on
. The table is
refreshed and the global address pool is added to your NAT configuration. To delete a global
address pool, click on the Delete hyperlink, then click on the Delete Global Address Pool
button.
56 June 2005 1752-A2-GB20-00
Page 57

Click on Return to Interface List to display the Security Interface Configuration page.
To create a reserved mapping, click on the Add Reserved Mapping hyperlink. See the
Configuring NAT Reserved Mapping section.
Configuring NAT Reserved Mapping
Reserved mapping allows you to map an outside security interface or an IP address from a
global pool to an individual IP address inside the network. Mapping is based on transport type
and port number. Before you can configure reserved mapping, you need to configure NAT.
See the Configuring NAT section.
If you want to set up a reserved mapping on your existing NAT enabled interfaces:
1. From the NAT Security Interfaces table, click on the Advanced NAT Configuration
hyperlink for the interface that you want to add reserved mapping to. The Advanced NAT
Configuration page is displayed. (See the Advanced NAT configuration section.)
2. Click on the Add Reserved Mapping hyperlink. The following page is displayed:
1752 and 1754 SHDSL Router User’s Guide
3. This page allows you to configure your reserved mapping. Add specific values for the
following table entries:
• Global IP Address. If you are mapping from a global IP address, type the address here. If
you are mapping from a security interface, type 0.0.0.0.
• Internal IP Address. Specify the IP address of an individual host inside your network.
• Transport Type. Specify the transport type that you want to map from the outside interface
to the inside.
• Port Number. Specify the port number that your transport uses.
4. Once you have configured the table, click on
. The table is
refreshed and the reserved mapping is added to your NAT configuration.
To delete a reserved mapping setup, click on the Delete hyperlink, and then click on
.
Click on Return to Interface List to display the Security Interface Configuration page.
1752-A2-GB20-00 June 2005 57
Page 58

1752 and 1754 SHDSL Router User’s Guide
Configuring Firewall Policies
To configure firewall policies, click on the Security Policy Configuration link under Policy,
Triggers and Intrusion Detection as shown.
A table is displayed containing details of each Firewall policy.
You can now configure the policies to include port filters and validators. See the Configuring
portfilters and Configuring Validators sections.
A port filter is an individual rule that determines what kind of traffic can pass between two
interfaces specified in an existing policy. This section assumes that you have followed the
instructions in Configuring Firewall Policies section.
To configure a port filter:
1. From the Current Firewall Policies table, click on the Port Filters link for the policy that you
want to configure. The page displayed contains three Add Filter hyperlinks that allow you to
create three different kinds of port filter.
• For a TCP/UDP port filter, click on Add TCP or UDP Filter. The following page is displayed:
58 June 2005 1752-A2-GB20-00
Page 59

1752 and 1754 SHDSL Router User’s Guide
Specify the start and end of the port range for the TCP/UDP protocol that you want to filter.
Then select TCP or UDP protocol from the Protocol drop-down list. After that, use the
Direction drop-down lists to specify whether you want to allow or block inbound traffic, and
allow or block outbound traffic. Click on
. The Firewall Port Filters page is displayed,
containing details of the TCP port filter that you have just added.
• For a non-TCP/UDP port filter click on Add Raw IP Filter. The following page is
displayed:
Specify the protocol number in the Transport Type text box. For example, for IGMP, enter
protocol number 2. Then use the Direction drop-down lists to specify whether you want to
allow or block inbound traffic, and allow or block outbound traffic. Click on
. The
Firewall Port Filters page is displayed, containing details of the IP port filter that you have just
added.
2. Each port filter displayed in the Firewall Port Filters page has a Delete hyperlink assigned
to it. To delete a port filter, click on this link, then at the confirmation page, click on .
The port filter is removed from the Firewall configuration.
Configuring validators
A validator allows or blocks traffic based on the source and destination IP address and
subnet mask. Traffic will be allowed or blocked depending on the validator configuration
specified when the policy was created. See the Configuring Firewall Policies section. This
section assumes that you have previously followed the instructions in that section.
To configure a validator:
1. From the Current Firewall Policies table, click on the Host Validators link for the policy that
1752-A2-GB20-00 June 2005 59
Page 60

1752 and 1754 SHDSL Router User’s Guide
you want to configure. The Configure Validators page is displayed. Click on the Add Host
Validator link. The following page is displayed:
2. In the Host IP Address text box, type the IP address that you want to allow/block.
3. In the Host Subnet Mask text box, type the IP mask address. If you want to filter a range of
addresses, you can specify a mask (for example, 255.255.255.0). If you want to filter a single
IP address, use the specific IP address mask (255.255.255.255).
4. Click on the Direction drop-down list and select the direction of traffic that you want the
validator to filter.
5. Click on
validator that you have just added.
6. Each port filter displayed in the Configure Validators page has a Delete Host Validator
hyperlink assigned to it. To delete a validator, click on this link, then at the confirmation page,
click on the Delete Host Validator button. The validator is removed from the Firewall
configuration.
Configuring Triggers
A trigger allows an application to open a secondary port in order to transport packets. Two
common applications that require secondary ports are FTP and NetMeeting. This section
assumes that you have followed the instructions in Enabling Security section.
To configure a trigger:
1. Go to the Policies, Triggers and Intrusion Detection section of the Security Interface
Configuration. Click on Trigger Configuration. The Firewall Trigger Configuration page is
displayed, at first with no triggers defined. Click on the New Trigger link. The following page is
displayed:
. The Configure Validators page is displayed, containing details of the host
2. Configure the trigger as follows:
60 June 2005 1752-A2-GB20-00
Page 61

1752 and 1754 SHDSL Router User’s Guide
a. Transport Type. Select a transport type from the drop-down list, depending on whether you
are adding a trigger for a TCP or a UDP application.
b. Port Number Start. Type the start of the trigger port range that the primary session uses.
c. Port Number End. Type the end of the trigger port range that the primary session uses.
d. Allow Multiple Hosts. Select allow if you want a secondary session to be initiated to or from
different remote hosts. Select block if you want a secondary session to be initiated only to or
from the same remote host.
e. Max Activity Interval. Type the maximum interval time (in milliseconds) between the use of
secondary port sessions.
f. Enable Session Chaining. Select Allow or Block depending on whether you want to allow
multi-level TCP session chaining.
g. Enable UDP Session Chaining. Select Allow or Block depending on whether you want to
allow multi-level UDP and TCP session chaining. Set Enable Session Chaining to Allow to
enable it.
h. Binary Address Replacement. Select Allow or Block depending on whether you want to
use binary address replacement on an existing trigger.
i. Address Translation Type. Specify what type of address replacement is set on a trigger. Set
Binary Address Replacement to Allow to enable it.
3. Once you have configured the trigger, click on
page is displayed, containing details of the trigger that you have just configured.
4. Each trigger displayed in the Firewall Trigger Configuration page has a Delete hyperlink
assigned to it. To delete a trigger, click on this link, then at the confirmation page, click on the
Delete button. The Firewall Trigger Configuration page is displayed with details of the deleted
trigger removed. There are two hyperlinks on the page:
a. To add a new trigger, click on New Trigger.
b. To display the Security Interface Configuration page, click on Return to Interface List.
Configuring Intrusion Detection Settings
Intrusion Detection settings allow you to protect your network from intrusions such as denial
of service (DOS) attacks, port scanning, and web spoofing. This section assumes that you
have followed the instructions in the Enabling Security section and the Enabling Firewall
and/or Intrusion Detection section.
To configure Intrusion Detection settings:
1. Go to the Policies, Triggers and Intrusion Detection section of the Security Interface
Configuration page. Click on Configure Intrusion Detection. The Firewall Configure Intrusion
Detection page is displayed:
. The Firewall Trigger Configuration
1752-A2-GB20-00 June 2005 61
Page 62

1752 and 1754 SHDSL Router User’s Guide
The values displayed on the Firewall Configure Intrusion Detection page are the default
values.
2 .Configure Intrusion Detection as follows:
a. Use Blacklist. Select true or false depending on whether you want external hosts to be
blacklisted if the Firewall detects an intrusion from that host. Click on the Clear Blacklist
button at the bottom of the page to clear blacklisting of an external host.
The Security Interface Configuration page is displayed.
b. Use Victim Protection. Select true or false depending on whether you want to protect a
victim from an attempted web spoofing attack.
c. DOS Attack Block Duration. Type the length of time (in seconds) that the Firewall blocks
suspicious hosts for once a DOS attack attempt has been detected.
d. Scan Attack Block Duration. Type the length of time (in seconds) that the Firewall blocks
suspicious hosts for after it has detected scan activity.
e. Victim Protection Block Duration. Type the length of time (in seconds) that the Firewall
blocks packets destined for the victim of a spoofing style attack.
f. Maximum TCP Open Handshaking Count. Type in the maximum number of unfinished TCP
handshaking sessions (per second) that are allowed by Firewall before a SYN Flood is
detected.
g. Maximum Ping Count. Type in the maximum number of pings (per second) that are
allowed before the Firewall detects an Echo Storm DOS attack.
h. Maximum ICMP Count. Type in the maximum number of ICMP packets (per second) that
are allowed by the Firewall before an ICMP Flood DOS is detected.
3. Once you have configured Intrusion Detection, click on
settings are applied to the Firewall, and the Security Interface Configuration page is displayed.
62 June 2005 1752-A2-GB20-00
. The Intrusion Detection
Page 63

IP Routes
1752 and 1754 SHDSL Router User’s Guide
This option allows you to create static IP routes to destination addresses via an IP interface
name or a Gateway address. From the Advanced menu, click on IP routes. The Edit Routes
page is displayed:
This page lists the following information about existing routes:
• Whether the route is valid or invalid
• Destination IP address
• Gateway address
• Netmask address
• Whether the route is advertised via RIP (true or false)
Editing a route
1. To edit the destination, gateway and netmask address of a route, Click in the relevant text
box, update the information then click on
2. To edit the cost, interface setting, or advertise status for the route, click on the Advanced
Options hyperlink for a specific route and update the relevant information. Click on
.
.
1752-A2-GB20-00 June 2005 63
Page 64

1752 and 1754 SHDSL Router User’s Guide
Deleting a route
1. To delete an existing route, check in the Delete box for a specific route.
2. Click on
Creating an IP V4 Route
1. Click on the Create new Ip V4 Route hyperlink. The following page is displayed.
2. Complete the Create IP v4 Route form in order to configure the route.
3. When you have typed the details, click on
now contains details of the route that you have just created.
.
. The Edit Routes page is displayed. The table
Bridge
From the Advanced menu, click on Bridge to display the Bridge page.
This page lists the following bridge information:
Global bridge configuration
VLAN configuration
Spanning tree configuration
64 June 2005 1752-A2-GB20-00
Page 65

Global Bridge Configuration
Following figure displays the global configuration settings for the bridge.
1752 and 1754 SHDSL Router User’s Guide
The following bridge information is displayed:
1. Bridge MAC Address
2. Number of bridge interfaces configured
3. Type of the Bridge
4. Unicast learning which is non-configurable, and always set to Hybrid, i.e. VLAN learning
is both “Independent” as well as “Shared” depending on the association of VLANS with
filtering databases.
5. Multicast Learning setting which is non-configurable and always set to HVM(Hybrid
VLAN Multicast Learning), i.e. if two VLANs are associated with the same FDB, the
filtering information for a multicast MAC address in one VLAN would be used in the
forwarding decision for the same MAC address in the other VLAN too.
6. Config Pvid Status which is non-configurable and is always true, i.e. the bridge supports
the ability to override the default PVID setting and its egress status (VLAN tagged or
untagged) on each bridge interface.
7. Tagging which is non-configurable and always enabled, i.e. each bridge interface
supports 802.1Q VLAN tagging of frames.
8. AcceptableFrameTypeCfg which is non-configurable and always enabled, i.e. each
bridge interface can be configured to accept all frames or only tagged frames.
9. IngressFilteringCfg which is non-configurable and is always enabled, i.e. each bridge
interface supports discarding of frames whose VLAN classification does not include that
interface in its member set.
10. Filter Age is the time (in seconds) after which MAC addresses are removed from the
filter table when there has been no activity. The time may be an integer value between
1752-A2-GB20-00 June 2005 65
Page 66

1752 and 1754 SHDSL Router User’s Guide
10 and 100,000 seconds. The default value is 300 seconds. If to change the filter age,
input the seconds desired in the filter age field, and then clock on
your setting.
11. Traffic Class setting which is the status of traffic class mapping. If to set traffic class,
select your option from the drop-down list and click on
setting. The following table gives the range of values for each option which can be
specified with this command and a default value.
enable Enable the mapping of regenerated
disable Disable the mapping of regenerated
prioritybased Traffic class mapping wou l d happen only if
VLAN configuration
Following figure displays the VLAN settings for the bridge.
to submit
to submit your
Option Description Default value
priority to its traffic class.
disable priority to its traffic class.
disable
traffic class has not been already set.
The following VLAN information is displayed:
1. VLAN version: IEEE 802.1q version number that this device supports, which is 1.
2. Max VLAN Id: The maximum VLAN Id for a VLAN in the bridge.
3. Max VLANs: The maximum number of VLANs supported in the bridge.
4. Current VLANs: The number of VLANs that are currently existing in the bridge.
Spanning bridge configuration
Following figure displays the spanning bridge settings for the bridge.
66 June 2005 1752-A2-GB20-00
Page 67

1752 and 1754 SHDSL Router User’s Guide
The following spanning bridge information is displayed and allows users to configure:
1. Spanning: spanning tree setting (true or false)
2. Priority: spanning tree priority value
3. Forward Delay: spanning tree forward delay time (seconds)
4. Hello time: spanning tree hello time (seconds)
5. Maximum Age: spanning tree maximum age (seconds)
Interface Configuration
Click on Interface configuration and then bridge interfaces page is displayed as shown in the
following figure.
The following table gives the range of values for each option which can be specified with this
command and a default value.
option Description
Name Interface name
PVID Port VLAN Id (PVID) associated with the interface. 1
Frame Access
type
Ingress filtering Ingress Filtering Setting. Accepts VLAN tagged
Acceptable Frame Type setting. Each bridge
interface can be configured to accept all frames or
only tagged frames.
frames, only if the VLAN Id in the frame has this
Default value
all
false
1752-A2-GB20-00 June 2005 67
Page 68

1752 and 1754 SHDSL Router User’s Guide
interface in its egress interface list.
User priority The user priority to regenerated user-priority
mapping for a bridge interface.
Transport Name of attached transport.
Priority map The mapping of user priority in the incoming
frames to the regenerated user priority that would
be used for traffic class mapping as well as set in
the VLAN tag of the outgoing frame. How to
configure is introduced in the following section.
Priority map configuration
Click on priority map for a specified bridge interface, and then the Priority Map for the bridge
interface page is displayed. In this page, number of traffic classes, user priority to
regenerated priority map and Regenerated Priority to Traffic Class Map are provided to
configure. The procedure is shown as follows:
1. Number of traffic classes, as shown in the following figure, specifies the number of traffic
classes supported by the bridge interface. It can be any value between 1 and 8.
0
2. User Priority to Regenerated Priority Map, as shown is the following figure, specifies the
mapping of user priority in the incoming frames to the regenerated user priority that would
be used for traffic class mapping as well as set in the VLAN tag of the outgoing frame.
The following table gives the range of values for each option which can be specified with this
command and a default value.
Option Description
Default value
Priority 0 The regenerated user-priority to which the user
priority with value 0 in the incoming frame should
be mapped.
68 June 2005 1752-A2-GB20-00
0
Page 69

1752 and 1754 SHDSL Router User’s Guide
Option Description
Priority 1 The regenerated user-priority to which the user
priority with value 1 in the incoming frame should
be mapped.
Priority 2 The regenerated user-priority to which the user
priority with value 2 in the incoming frame should
be mapped.
Priority 3 The regenerated user-priority to which the user
priority with value 3 in the incoming frame should
be mapped.
Priority 4 The regenerated user-priority to which the user
priority with value 4 in the incoming frame should
be mapped.
Priority 5 The regenerated user-priority to which the user
priority with value 5 in the incoming frame should
be mapped.
Priority 6 The regenerated user-priority to which the user
priority with value 6 in the incoming frame should
be mapped.
Priority 7 The regenerated user-priority to which the user
priority with value 7 in the incoming frame should
be mapped.
Default value
1
2
3
4
5
6
7
3. Regenerated Priority to traffic class map, as shown in the following figure, specifies the
mapping of regenerated priority to their traffic class values.
The following table gives the range of values for each option which can be specified with this
command and a default value.
Option Description
Priority 0 The traffic class to which the regenerated priority of
value 0 is mapped.
Priority 1 The traffic class to which the regenerated priority of
value 1 is mapped.
Priority 2 The traffic class to which the regenerated priority of
value 2 is mapped.
Priority 3 The traffic class to which the regenerated priority of
1752-A2-GB20-00 June 2005 69
Default value
0
1
2
3
Page 70

1752 and 1754 SHDSL Router User’s Guide
value 3 is mapped.
Priority 4 The traffic class to which the regenerated priority of
value 4 is mapped.
Priority 5 The traffic class to which the regenerated priority of
value 5 is mapped.
Priority 6 The traffic class to which the regenerated priority of
value 6 is mapped.
Priority 7 The traffic class to which the regenerated priority of
value 7 is mapped.
4
5
6
7
70 June 2005 1752-A2-GB20-00
Page 71

VLAN Configuration
Click on VLAN configuration and then VLAN interfaces page is displayed as shown in the
following figure. Users can configure the VLAN existing currently or create new VLAN via this
page.
The following table gives the range of values for each option, which can be specified with this
command and a default value.
1752 and 1754 SHDSL Router User’s Guide
option Description
Name An arbitrary name that identifies the VLAN. It can be
VLAN ID The VLAN Id that the user wants to assign to the
FDB Name The name of an existing Filtering Database with which
Tagged Ports the tagged port list of the named VLAN
User priority the untagged port list of the named VLAN
Edit Tagged Ports Allow users to edit tagged ports while clicking on Edit.
Edit untagged Ports Allow users to edit untagged ports while clicking on Edit
Edit Tagged Ports
As shown in the following figure, user can add a specified port to VLAN through name drop-
down list. Click on
return to previous page.
Default value
DefaultVlan
made up of one or more letters or a combination of
letters and digits, but it cannot start with a digit.
1
named VLAN. The valid values for the VLAN Id ranges
between 1 and 4094.
DefaultFdb
the user wants the VLAN to be associated. If the FDB
already exists, the VLAN becomes associated with that
FDB. If the FDB does not exist, it is created and the
VLAN becomes associated with it.
None
eth1,eth2,eth
3,eth4,pvc0
to submit your setting, to clear your setting and to
1752-A2-GB20-00 June 2005 71
Page 72

1752 and 1754 SHDSL Router User’s Guide
Edit untagged Ports
As shown in the following figure, user can add or delete a specified untagged port. Click on
to submit your setting, to clear your setting and to return to previous page.
Create a new VLAN
Click on Create a new VLAN, the Create a new VLAN page is displayed, as shown in the
following figure. In this page, user can create a new VLAN after configuring VLAN name, Vlan
Id and Fdb Name respectively. Click on
setting and
72 June 2005 1752-A2-GB20-00
to submit your setting, to clear your
to return to previous page.
Page 73

1752 and 1754 SHDSL Router User’s Guide
1752-A2-GB20-00 June 2005 73
Page 74

1752 and 1754 SHDSL Router User’s Guide
VPN
VPN (Virtual private network) is a private data network that makes use of the public
telecommunication infrastructure, maintaining privacy through the use of a tunneling protocol
and security procedures. To configure VPN, click on VPN via the Advanced menu to invoke
the VPN Settings screen.
To activate the VPN configuration, click on
currently enabled.
VPN Status
Click on Status to view current VPN status, including selector information, WAN service
information, policy information, and security association information:
1. Selector information allows users to view and delete a specified selector.
Following table shows the definition of each field.
. The VPN page then shows the VPN is
Field Description
Valid Created successfully
Selector name Name of the selector
Version IP version
src Type
dst Type
Source address type
Destination address type
Click on View to show advanced selector information or Delete the selector.
74 June 2005 1752-A2-GB20-00
Page 75

1752 and 1754 SHDSL Router User’s Guide
2. WAN services information allows users to view and delete a specified service.
Following table shows the definition of each field.
Field Description
Valid Created successfully
interface name Name of the interface
ikeport The IKE port value; the UDP port number on
which IKE daemon listens on all valid unicast IPv4
and IPv6 addresses of this interface. The default
value is 500.
Status The status of IPsec on this interface. The default
value is true.
Action To delete the interface
3. Policy Information allows users to view and delete a specified IPSec policy.
1752-A2-GB20-00 June 2005 75
Page 76

1752 and 1754 SHDSL Router User’s Guide
Following table shows the definition of each field.
Field Description
Valid Created successfully
interface name Name of the interface
policy name Name of the policy
Selector name Name of the selector
Action The action specified by the policy (deny, bypass or
applyipsec)
Click on View, and then IPSec Policy Port Configuration page is invoked as follows.
4. Security Associations Information: a security association (SA) provides security services
between IPsec peers for certain IP packets. SAs operate in a single direction; you would
usually create a pair of SAs for two-way traffic (inbound and outbound).
76 June 2005 1752-A2-GB20-00
Page 77

1752 and 1754 SHDSL Router User’s Guide
Following table shows the definition of each field.
Field Description
Valid Created successfully
Policy Name Name of the policy
First SA Name Name of 1st security association
Protocol Each SA supports a single security protocol - AH or ESP. If
you want to use both protocols simultaneously, you need to
create a bundle of one or more SA pairs.
Mode The SA mode - tunnel or transport:
• in tunnel mode you must also specify the source and
destination addresses (either IPv4 or IPv6) of the security
gateways that form the IPsec peers. You can also optionally
configure how IPsec deals with fragmentation and reassembly
of packets.
• in transport mode, the IPsec policy referenced in the
command provides the necessary source and destination
address information.
Direction
SPI
SA Name Name of security association
the direction of traffic that the SA will apply to
a unique identifier called the Security Parameter Index
Click on View, and the IPSec SA Port Configuration page is invoked as follows.
1752-A2-GB20-00 June 2005 77
Page 78

1752 and 1754 SHDSL Router User’s Guide
Edit IPSec Config
If to create a IPSec, the procedure is shown as follows:
Step 1: Create a new IPSec selector
Click on the Create a new selector link. The IPSec Selector page is displayed as follows:
Input the values on the fields respectively. The following table gives the range of values for
each option, which can be specified with this command and a default value.
Option Description
Ipversion
IPv4 only currently
Source IP Type Name of the selector
Start Source Address Start source address
End Source Address
Destination IP Type
Start Destination
End source address type
Destination address type
Start Destination Address
Address
Protocol
This option allows you to specify a protocol number
(protnum) value. The value 255 is interpreted as a
wild card entry.
Source Port
Destination Port
78 June 2005 1752-A2-GB20-00
Source TCP/UDP port
Destination TCP/UDP port
Page 79

Step 2: Create IPSec Interface
Click on the Create IPSec Interface link, the IPSec Interface page is displayed as follows:
Input the values on the fields respectively. The following table gives the range of values for
each option, which can be specified with this command and a default value.
field Description
interface name Name of the interface
ikeport The IKE port value; the UDP port number on
Status The status of IPsec on this interface. The default
Note: if to create a IPSec Interface successfully, a new WAN service should be created in
advance via WAN connection page.
1752 and 1754 SHDSL Router User’s Guide
which IKE daemon listens on all valid unicast IPv4
and IPv6 addresses of this interface. The default
value is 500.
value is disabled.
Step 3: Create IPSec Policy
If step1 and step 2 are successfully created, the Create IPSec Interface link will appear. Click
on the link, and then the IPSec Interface page is displayed as follows:
Input the values on the fields respectively. The following table gives the range of values for
each option, which can be specified with this command and a default value.
1752-A2-GB20-00 June 2005 79
Page 80

1752 and 1754 SHDSL Router User’s Guide
Option Description Default value
interface name Name of the interface
Selector name Name of the selector n/a
Policy log
Policy status
Policy priority
Policy action The action specified by the policy (deny, bypass or
IPsec Policy Stats
for policy
Complex SABundle
Prefer Old Flag
Enables or disables the status of the IPsec policy log.
Enables or disables the status of the IPsec policy. false
The priority for the policy lookup. A lower priority value
means that this policy will be searched before a policy
with a higher priority value. The priority value should be
between 1 and 65565 inclusive, but it cannot be set to
255 or 256. These values are reserved for dynamic
policies.
e.g. 1.
applyipsec)
statistics about the number of inbound and outbound
packets that match a specific IPsec policy.
This option is only relevant if applyipsec has been
selected. It is used to control the interpretation of
two tunnel mode SAs in an SA bundle as follows:
When two tunnel-mode SAs (SA1 and SA2) in a
bundle have the same local and peer end points and
complexsabundle is set to disable, then apart from
IPsec headers, only one new IP header is added on to
the original packet. For example, for an AH tunnel
- ESP tunnel SA bundle, the packet formed would
be as follows:
IP-AH-ESP-[IP_internal+Upper layer]
If complexsabundle is set to enable, the packet
formed would be as follows:
IP-AH-IP-ESP-[IP_internal+Upper layer]
When set to enable, this option specifies whether to
prefer the DYING SAs over MATURE SAs. When set to
disable, MATURE SAs are preferred instead. This
option is only applicable if your image supports IKE.
n/a
false
n/a
bypass
n/a
false
false
Step 4: Create IPSec SA
After successfully creating a new IPSec Policy, click on the Create IPSec SA link in step 4,
and then Create IPSec SA page is shown as follows:
80 June 2005 1752-A2-GB20-00
Page 81

1752 and 1754 SHDSL Router User’s Guide
Input the values on the fields respectively. The following table gives the range of values for
each option, which can be specified with this command.
Option Description
Interface name Name of the interface
Policy name Name of the IPsec policy previously created.
Encry Key
Auth Key
Direction Specifies the direction in which the SA is applicable.
Sa Mode Tunnel or transparent mode selectable
Protocol Specifies that this SA is being created for the authentication
Encry Key is a cryptographic key for an encryption.
algorithm.The key requirements for specific algorithms are as
follows:
DES - 64 bit(8 characters) e.g. conexant.
3DES - 192 bit(24 characters) e.g.
conexantconexantconexant
Auth Key is a cryptographic key for an authentication.
algorithm.algorithm.The key requirements for specific
algorithms are as follows:
SHA1 - 160 bit(20 characters) e.g.
conexantconexantconexantcone.
MD5 - 128 bit(16 characters) e.g. conexantconexant
header protocol. esp Specifies that this SA is being created for
the encapsulation security payload protocol.
1752-A2-GB20-00 June 2005 81
Page 82

1752 and 1754 SHDSL Router User’s Guide
Option Description
Df Bit
Bundle Id
Bundle Order
SPI
Self Ipv4Addr
Peer Ipv4Addr
Addr Ver
IPsec SA Stats for
SA
Aut Algo
Enc Algo
Df Bit indicates how the Don’t Fragment (DF) bit in the IP
header should be be handled in tunnel mode. You can
choose from the following dfbitcfg values:
If copy is set, the DF bit in the outer IP (tunnel) header is
copied from the inner IP header.
If set is set, the DF bit is always set to 1 in the tunnel IP
header. This should only be specified if the SA is a tunnel
mode SA.
If clear is set, the DF bit in the tunnel header will always be
reset.
A unique identifier for each SA that forms part of a bundle. All
SA bundles associated with a policy should have different
bundleids. By default, the bundleid is 0, signifying that the SA
is not part of any bundle or is a single SA.
e.g. 0.
The Bundle Order specifies the location of a particular SA in a
bundle. This is a mandatory parameter if bundleid is
specified. It can take positive integer values. The SA with the
lowest bundleorder value is applied first, followed by the
higher bundleorder value, irrespective of the direction of the
SA.
e.g. 0.
SPI specifies a unique value. If the SA is applicable to
inbound traffic (in), the SPI is assigned by the sender. If the
SA is applicable to outbound traffic (out), the SPI is assigned
by the receiver. This value must be greater than 255 and less
than 65536.
e.g. 300.
The source gateway addresses for IPv4 packets. These are
only specified in tunnel mode.
The destination gateway addresses for IPv4 packets. These
are only specified in tunnel mode.
IPv4 or IPv6. Only IPv4 is currently supported.
statistics about the number of inbound and outbound packets
that match a specific IPsec policy.
Indicates the authentication algorithm used for IPsec
processing. Supported values are md5 and sha1.
e.g. md5
Indicates the encryption algorithm used for IPsec processing.
It can only be specified if the IPsec protocol used is ESP.
Supported values are des and 3des.
e.g. 3des.
82 June 2005 1752-A2-GB20-00
Page 83

SNMP
1752 and 1754 SHDSL Router User’s Guide
Click on SNMP to invoke the Edit SNMP Config screen where you can edit SNMP (Simple
Network Management Protocol) configuration.
Enter or select the appropriate values. Click on
to submit your setting or to
clear your setting. The following table gives the range of values for each option.
Option Description Default value
Sys Descr A description of the SNMP agent system. The
description is represented by a string of up to 255
characters (no spaces).
Sys Object ID A series of non-negative integers that identifies
individual variables contained in the SNMP agent’s
database. You can refine OIDs by adding more
components at the end of the integer.
Sys Location A name that identifies the location of the SNMP agent
system. The location is represented by a string of up to
255 characters (no spaces).
Sys Contact Contact details (e.g., telephone number, email address)
for the person responsible for maintaining the SNMP
agent system. The details are represented by a string of
up to 255 characters (no spaces).
Sys Name A name that identifies the system that the SNMP agent
is running on. The name is a string of up to 255
characters (no spaces).
Snmp Enable
Authen Traps
Snmp Auto Save Save SNMP configuration in the device automatically true
Allows you to configure whether or not a trap is sent if a
request arrives from the SNMP manager with an invalid
community name.
True: A trap is generated when an SNMP request
with an unrecognized community name is received.
False: A trap is not generated when an SNMP
request with an unrecognized community name is
received.
N/A
N/A
N/A
N/A
N/A
true
1752-A2-GB20-00 June 2005 83
Page 84

1752 and 1754 SHDSL Router User’s Guide
Ports
This option allows you to configure the SHDSL port on your router.
1. From the Advanced menu, click on Port Configuration. The SHDSL port available on your
router is displayed.
From the Ports Configuration menu, click on SHDSL. The SHDSL Port Configuration page is
displayed:
“Shdsl” is the default port name. You can configure basic SHDSL parameters in this page.
1. In the Role drop-down list, select CPE or CO.
2. To set the router’s Wire mode, Click on the Wire Pair drop-down list to select the Wire
Pair number needed.
84 June 2005 1752-A2-GB20-00
Page 85

1752 and 1754 SHDSL Router User’s Guide
Wire Mode DSL Pair to Use Illustration
2-Wire Mode 1
4-Wire Mode 1,2
DSL
6-Wire Mode 1,2,3
8-Wire Mode 1,2,3,4
1 2 3 4
3. Click on the Line Probe drop-down list to set line probe as enable or disable.
4. Click on the Annex drop-down list to select the desired annex mode: A, B, A&B, F, G, or
F&G.
5. Click on the PSD drop-down list to set PSD as symmetric or asymmetric.
6. To set the maximum and minimum line rate, click on the Max Line Rate and Min Line
Rate drop-down list respectively (200 kbps to 5704 kbps).
7. To set the target margin, input the desired number in the target margin field (range: –6
to 21 dB).
8. Click on
to submit your setting or to clear your setting.
9. To view the advanced status of SHDSL and Ethernet ports, refer to the system status
screen:
1752-A2-GB20-00 June 2005 85
Page 86

1752 and 1754 SHDSL Router User’s Guide
Chapter 4 – Diagnostic and Troubleshooting
_____________________________________________________________________________________
Use the LEDs to determine the status of connections.
Description Suggestion
Power LED, Ethernet LED, or
DSL LED is not lit.
Ethernet LED blinks green
when the line is first plugged
in. It should turn solid green
when the connection is
established.
DSL LED blinks green when
the line is first plugged in. It
should turn solid green when
the connection is established.
Check the appropriate connection.
If your Ethernet LED does not light, make sure
the RJ45 cable you are using is connected
properly. Use a straight-through or crossover
cable, as appropriate, for devices without
autosensing.
If the DSL LED does not stop blinking, the
router is training and the connection is not
established. Verify that your ISP user name and
password are correct, and the DSL link is
connected properly.
86 June 2005 1752-A2-GB20-00
 Loading...