

Page 1

The
Esprit
's innovative keypads take a new approach to security features and functions. Each numeral
from 1 to 12 on the keypad represents an actual zone. When the zone light is "off", the status in the protected zone is normal. If the zone light is "on", this means the zone is open.
"CONF" confirmation beep: an intermittent series of beeps indicating a successful keypad entry.
"END/REJ" end/rejection beep: 1 long tone indicates that the operation was incorrectly entered on the keypad.
SYSTEM ARMING/DISARMING OPTIONS
Regular System Arming (default code 474747)
(Without partitioning - for information on partitioned system arming, see page 25-26)
The green "ready" light must be illuminated. This "ready" indicator will only illuminate if all zones are
closed. All door/window contacts must be closed, and any movement in motion detector-protected areas
must be halted. When the "ready" light illuminates, a valid access code should be entered.
Upon entry of this code, the red "armed" light will illuminate, followed by the keypad "CONF" beep. (If the
access code is entered incorrectly, the "END/REJ" beep will sound. If an incorrect entry is made at any time,
press [CLEAR] and re-enter the data.) The green "ready" light will flash for the period of the exit delay, and
the [STAY] and [AWAY] keys will flash.
Note: Keypad will beep on exit if programmed at address 208, key [12].
Force (Away) Arming [AWAY] + access code
To arm the system rapidly without waiting for the "ready" light, use the "away" force arming feature. The
[AWAY] key should be pressed, followed by a valid access code (address 202). Once the exit delay
expires, any open zones will not be considered “activated” by the panel. Open zones will not be protected,
and will not generate an alarm or prevent arming. These “away” zones will become active (and therefore,
protected) as soon as they are closed. Armed status is indicated by illumination of the [AWAY] key. A "partial arm" code will be sent if programmed.
Please note: This feature is not recommended for regular use because force arming with open zones can
reduce the efficiency of system protection.
Stay Arming [STAY] + access code
When "stay arming" is activated, the security installation is "partially" armed. This means that only selected
STAY zones are armed (address 240), so that users can remain in the protected area. This convenient
feature (programmed at address 200) offers individuals arming the system the choice to leave the premises
during an exit delay (without altering the "stay arm" status), or remain on the premises. A system user
returning to a protected area that is "stay" armed ([STAY] key is "on") can re-enter and disarm, as long as a
valid access code is keyed in during the entry delay.
Fast "Regular" Arming Key [10]
Fast arming is enabled at address 208 (key [7] "on"). If activated, when the ready light is on, pressing key
[10] for 2 seconds automatically arms the system. There's no need to enter an access code. This feature
can be used to permit selected individuals (i.e. maintenance workers, repair personnel) to full arm the system when leaving the protected area. (When partitioning is enabled, key [10] arms system "A" and "B".)
Fast "Stay" Arming key [11]
Fast "stay" arming is enabled at address 208 (
key [8]
"on"). When activated, no "ready" light is required,
however "stay" zones must be closed to arm the system. Pressing [STAY] (key [11]) for 2 seconds automatically "stay" arms the system. (See "stay" arming features.)
IM28-38EX
24
Page 2

Double "Stay" Arming
During the “stay” arming exit delay, pressing [STAY] (key [11]) again will switch any delay 1 or delay 2
zones to instant zones. (24 hour "stay" zones, follow "stay" zones, and instant "stay" zones are not
affected.) Full system arming cancels "double stay" arming.
Fast Exit
Exit while the system is armed in "stay" mode (key [11/STAY] is flashing):
A: Fast exit and Stay key [11]
To exit the premises and remain "stay armed": press key [11/STAY] for two seconds. The system switches
to "exit delay" mode ("ready" LED flashes). At the end of the "exit delay" period, the system will return to
"stay" arming mode.
B: Fast exit and Regular Arm key [10]
To exit the premises and "regular" arm: press key [10] for two seconds. The system switches to "regular"
arming (key [11] and [12] are flashing) with "exit delay" ( "ready" LED flashes). At the end of the "exit
delay" period, the system is "regular" armed.
System Disarming
The protected area should be entered through a designated entry/exit door. The keypad sounder will
beep to remind user to disarm the system. A valid access code should be entered on the keypad, before
the allotted entry time expires. If the access code is entered incorrectly, press [CLEAR] and re-enter it. The
"armed" light will extinguish and the sounder will change to the "CONF" beep (series of short beeps)
before silencing.
Alarm Memory
The memory light [MEM] on your keypad will illuminate if any alarm situations took place while your system was armed. A record of all alarm situations that occurred is stored in memory. After disarming the
system, pressing once on the [MEM] key causes it to flash and brings up, in the keypad display, the alarm
events that occured during the last alarm period. (Alarm events consist of all zones that generated
alarms.)
SYSTEM PARTITIONING
By activating the panel's "partitioning" feature, zones can be divided into two distinct systems, with a
shared fire zone (zone #3). Both systems are controlled by one panel, making partitioning a particularly
useful feature in installations where shared security systems are more practical (i.e. office/warehouse,
apartment/condo complexes).
Partitioning
Partition "on" (Address 206, key [8] "on")
Addresses 240 and 242:
Zones can be assigned to system “A” (address 240, zone key “ON”) and/or to system “B” (address 242, zone
key “ON”). A “common zone” is a zone that is not assigned to any system (it will be reported as a “System A”
zone). It is armed only when both systems are armed, and disarmed if system “A” or system “B” is disarmed.
A “dual zone” is a zone that is assigned to both systems (it will be reported as a “System B” zone). It is
armed if either system “A” or system “B” is armed, and disarmed only when both systems are disarmed.
Note: When partitioning is not activated (address 206, key [8] "off") any zones selected at address
240 will be armed upon "stay" arming.
Keypad display:
Both systems are displayed on the keypad at the same time. In partitioning mode, when System "A" is
armed, the [STAY] key illuminates. If System "B" is armed, the [AWAY] key illuminates. If both systems are
armed, both of these keys will illuminate.
IM28-38EX
25
Page 3
Arming/Disarming
Code definition:
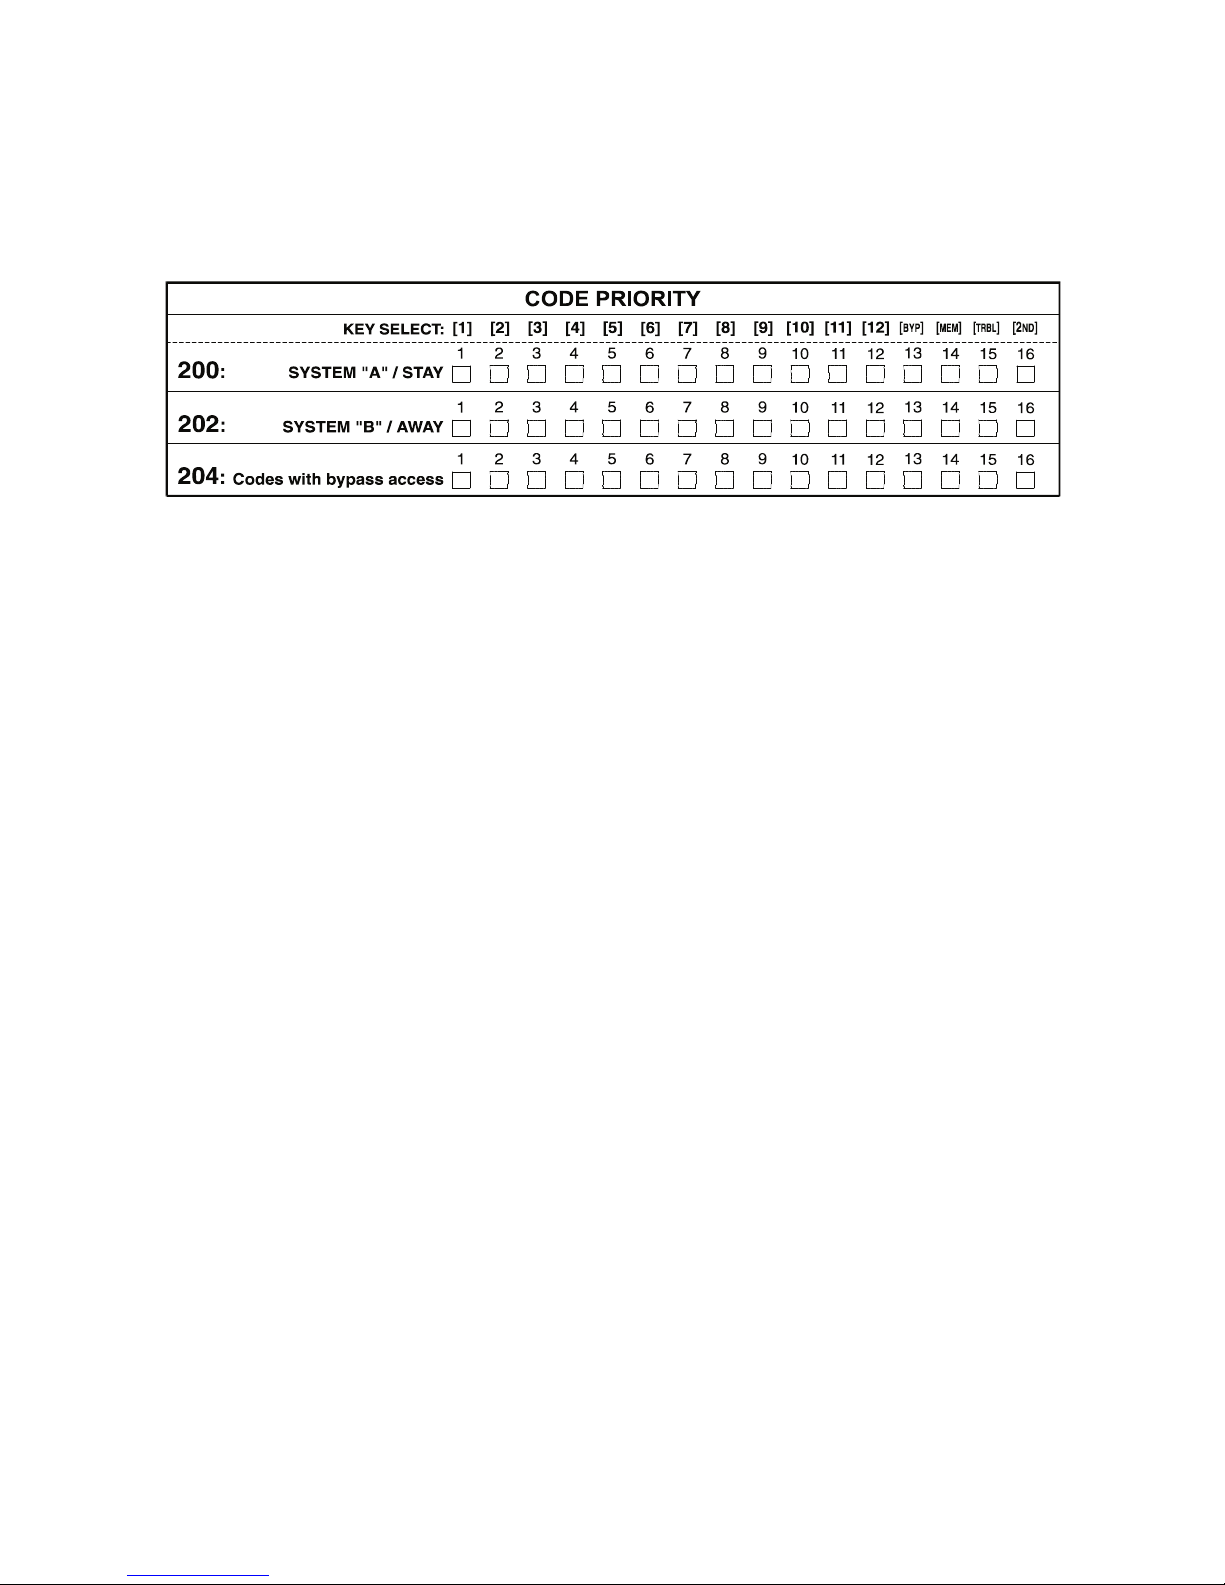
Partition "on" (Address 206, key [8] "on")
Address 200: Designates access codes that arm System "A" zones.
Address 202: Designates access codes that arm System "B" zones.
Address 204: Designates access codes that can "bypass" zones
When a code is activated at both addresses (200 and 202), it can do the following:
•The code can fully arm the system. If the code is entered when systems "A" and "B" are disarmed, it
will completely arm the system.
•The code can fully disarm the system. If the code is entered when system "A" and "B" zones are
armed, it will completely disarm the system.
•When the system is partially armed (i.e. only System "A" or "B" is armed) entering this code will arm
the other system.
•The code can be used to selectively arm/disarm System "A" or System "B" zones.
Enter [11] + code to arm/disarm System "A" zones.
Enter [12] + code to arm/disarm System "B" zones.
Note: Codes that are not selected at either address are disabled.
The master code can always access both systems and bypass zones.
•System "A" codes can stop sirens coming from System "B" zones (and vice versa), but will not
disarm the other system.
•It is not possible to arm one system during the other system's exit delay.
Note: When partitioning is not activated, (address 206, key [8] "off"):
Address 200 determines which access codes can activate "stay" arming.
Address 202 determines which access codes can activate "away" arming.
Address 204 determines which access codes can "bypass" zones.
Keyswitch/push-button arming/disarming (PS1)
In parallel to keypads, a keyswitch or push button can be used to arm/disarm the system. (The
Esprit
PS1 can be installed in bedrooms or any other desired location.) Keyswitch/push button operation is
enabled/disabled at address 206, key [3]. Keyswitch can activate "regular" or "stay" arming, based on the
definition assigned at address 206, key [2]. (key [2] "off" = "regular" arming, key [2] "on" = "stay" arming)
If "stay" arming is activated, the keyswitch/push button (PS1) cannot be used to disarm the system if it is
in entry delay or if an alarm has been generated. In this case, the system can only be disarmed from a
keypad. (When partitioning is activated, the keyswitch can be used to arm/disarm System "A" regardless
of System "B" status. Pressing key [11] will arm System "A".) Pressing two keys on the PS1 simultaneously for 2 seconds will generate a "panic 1" alarm. (See "Keypad (Panic) Alarms, pg. 27).
ZONE BYPASSING
Bypassed zones will not generate an alarm. Manual bypass arming is employed when a system user
chooses not to arm the entire protected area. Only zones that have been defined as "bypass enabled"
IM28-38EX
26
Page 4

IM28-38EX
(address 236) can be selected by the user (address 204) during manual bypass arming. To bypass
zones, enter [BYP] + a valid access code. [BYP] key will illuminate. When a zone light is on, it indicates
that the zone has been bypassed. Pressing [CLEAR] erases all bypass entries and currently bypassed
zones and exits the bypass mode. Zones to be bypassed should then be re-entered. If bypass information is correct, press [ENTER] to end and save bypass functions being programmed. [BYP] key will remain
illuminated, indicating that some zones have been bypassed. To cancel the zone bypass "status" just
entered, press [BYP] + a valid access code + [CLEAR]. Zone bypasses are automatically cancelled every
time the system is disarmed, except in "24 hour" zones. If a "24 hour" zone is bypassed and the system
is subsequently disarmed, the "24 hour" zone will remain bypassed.
Note: When partitioning is used, zones assigned to the other system cannot be bypassed if that system
is armed.
Bypass Recall
This feature permits system users to reinstate the latest zone bypass instructions saved in memory. By
pressing [BYP] while in bypass programming mode, previous bypass status is re-established. Even if a
user is in the process of entering new bypass information on keypad, one touch of the [BYP] key overrides new information and reinstates the preceding zone bypass instructions saved. (The fire zone cannot be bypassed.)
CHIME ZONES
Chime zones report a presence (movement or door opening) in selected zones by emitting a distinctive,
rapid intermittent beep. Each keypad is independently "chime" programmed and must be reprogrammed
in the event of total power loss. To enable a zone's chime feature, press the desired zone key from [1] to
[6] until a rapid intermittent beep is heard. To enable the chime feature of the keypad zone connected to
the particular keypad, use key [8]. To disable a zone's chime feature, press on the appropriate key until a
steady beep is heard. To disable keypad sounder (mute), press key [9].
KEYPAD (PANIC) ALARMS
The 728 EXPRESS and 738 EXPRESS provide three keypad “panic” zones. Keys must be pressed
simultaneously for 2 seconds in order to activate. (Pressing 2 keys on the PS1 for 2 seconds generates a
"panic 1" alarm.)
Alarm Press Alarm Code Silent/Audible Silent/Fire
keys Address Address Address
Panic 1 [1] & [3] 184 (SECTION 31) 208, Key [4]
Panic 2 [4] & [6] 185 (SECTION 31) 208, Key [5]
Panic 3 [7] & [9] 186 (SECTION 31) 208, Key [6]
TROUBLE DISPLAY/MONITORING
Trouble status is continuously monitored by the panel. It can recognize and display 10 different trouble
conditions on the keypad or in
Espload
, and report 8 to the central station. (To send "trouble status
reports" to the central, 2-digit trouble report codes should be programmed.)
When trouble conditions occur, the [TRBL] key illuminates and if "trouble warning" is enabled (address
210, key [9] “on”) the keypad will beep intermittently. Press [TRBL] to switch keypad to "trouble display"
mode. [TRBL] key flashes. Keys that are "on" indicate current trouble conditions. Press any key to return
keypad to normal display.
Key [1]
No battery/low battery
Panel battery is disconnected, capacity is low. Panel conducts dynamic battery test under load every
minute for a 4 sec. period. Key [1] "on" indicates battery is disconnected, or battery replacement is necessary because it won't provide adequate back-up current in event of AC loss. Trouble indicator [1]
also
comes "on" if battery voltage drops to 10.5 volts while panel is running on battery power (with no
AC).
27
Page 5

Key [2]
Power failure
Activates when inadequate AC power goes to panel OR the power supply is unable to charge battery OR
the power supply voltage exceeds 14.9V. Report can also be sent to central, and “power failure” report
delay time is programmable at address 252. Delay duration can be from 001 - 255 minutes; (factory
default = 30 min). To remove “power failure” from trouble display, key [2ND] should be “on” at address
210. When a “power supply failure” trouble occurs, the [TRBL] key flashes rapidly.
Key [4]
Bell disconnect
Bell is not connected to bell output. Note: When connecting bell to optional relay output, trouble indicator [4]
is "on" constantly. To avoid this, connect a 1KW EOL resistor on bell output. If an internal siren is connected
to bell output, and an external siren to relay, the panel will only recognize the existence of the internal siren.
Key [5]
Maximum bell current
The bell output is microprocessor-controlled and will automatically shut down if current exceeds 3 amps
upon an alarm. After opening the short or reducing the load, bell shutdown will end as soon as another
alarm is triggered.
Key [6]
Maximum auxiliary current
Processor has recognized that auxiliary output current exceeds 1A. This causes automatic shutdown of
auxiliary output. After opening the short or reducing the load, power will be automatically restored to the
auxiliary output after battery test has been conducted (within 60 seconds).
Key [7]
Communicator report failure
The control panel has unsuccessfully attempted to initiate communication with the central. Report failure
is stored in "event list" memory.
Key [8]
Timer loss
After total battery/AC power failure, the timer must be reprogrammed.
Press [ENTER] + installer/master/user 1 code + [MEM]. Key [MEM] flashes. Enter two digits (00 to 23) for
hours + 2 digits (00 to 59) for minutes. Press [ENTER] or [CLEAR] to exit.
Key [9]
Tamper/zone wiring failure
A zone line cut/line short has occurred. Tamper/wiring recognition must be activated at address 208 if
this feature is required. EOL resistors must also be used for zone connection.
Key [10]
Telephone line monitor
Telephone line cannot be found for 30 seconds. "Telephone line monitor" is enabled at address 206. This
trouble condition can also trigger an alarm if the system is armed. It will also be stored in "event list".
Restoration of telephone line can be reported by programming address 183.
Key [11]
Fire trouble
The zone wire has been cut on zone 3 (when its zone definition is "24 hour fire"). Fire zone key [3] also
flashes. If programmed at address 174, it will be reported to the central.
PROGRAMMING MASTER AND USER CODES
(factory default master 474747)
Press
[
ENTER
] + Master/user 1 code.
Enter 2 digit code number + new code (4 or 6 digits from 0 to 9) + [
ENTER
].
Press [2ND] to erase a code.
Master code = 00 ([10][10]) Full access to all system functions.
User codes = 01-16
(01 - can modify access codes. All user code priorities can be programmed
at addresses 200, 202, 204, using the installer code.)
Note: [2ND] key flashes if location is empty (no code programmed).
IM28-38EX
28
Page 6

KEY ACCESS PROGRAMMING
Programs features quickly, without entering addresses or section numbers.
To activate “key access programming”, press [ENTER], followed by installer, master or user code 1. (Code
required depends on the feature you wish to access - see below.) Then press the key corresponding to
the desired feature. Press [ENTER] or [CLEAR] to exit.
key
[9] "Auto arming" time program
(accessible to master and user 1 only)
Key [9] flashes. Enter two digits (00 to 23) for hours + 2 digits (00 to 59) for minutes.
[MEM] "Panel time" and clear "trouble 8"
(all 3 codes)
Key [MEM] flashes. Enter two digits (00 to 23) for hours + 2 digits (00 to 59) for minutes.
[BYP] Test report
(all 3 codes)
Reporting is enabled at address 206 keys [11], [12]. A value must be entered at address 175,
and both telephone and account numbers must be programmed.
[TRBL] Call Espload via telephone
(all 3 codes)
Panel identifier, PC password (addresses 001-004) and computer telephone number
(addresses 060-067) must be programmed.
[AWAY]Answer Espload
(all 3 codes)
This feature is available when using the ADP-1 adapter. In Espload, "blind dial" must be
activated in "modem setup" section, and panel phone number must be programmed (works also
without ADP-1).
[STAY] Cancel communication attempts
(master code and user 1 can only stop calls from/to Espload)
Until next reportable event
(installer code - all communications)
[2],[6] Installer test mode
(installer code only)
In installer test mode, a confirmation beep (intermittent) indicates test is "on", a "rejection" beep (long)
indicates test is "off". The bell will squawk during walk testing to indicate opened, functional zones.
[2],[9] “Auto arming” time program
(installer code only)
(Same as key [9] above)
When communicating with Espload, it is impossible to enter programming mode.
Paradox Security Systems - Graphic Dept. - PRINTED IN CANADA - 960607
IM28-38EX
29
WARRANTY
Warranty conditions for the
ESPRIT
may vary from country to country. Please consult your local
dealer for complete warranty information. In all cases, the warranty does not cover malfunctions
arising from installer error or failure to follow installation/operation instructions, nor does it apply to
damages due to causes beyond the control of Paradox Security Systems, such as lightning, excessive voltage, mechanical shock or water damage.
LIABILITY
Under no circumstances shall Paradox Security Systems be held liable for any direct or indirect
damages, loss of anticipated profits, loss of time, or any other losses incurred by the buyer in connection with the purchase, installation, operation or failure of this product.
WARNING
This security system should undergo frequent testing. However, despite regular testing, and due to,
but not limited to, criminal tampering or electrical disruption, it is possible for this product to fail to
perform as expected.
 Loading...