


THE ULTIMATE IN HIGH-END SOUND FOR MUSIC AND HOME THEATER™
OWNERS MANUAL OM-1000
STUDIO AND SIGNATURE SERIES:
FRONT AND CENTER-CHANNEL SPEAKERS
Thank you for choosing Paradigm® Reference speakers and congratulations!
You are about to experience the stunning difference that these state-of-the-art high-end speakers will make in your music and home theater system.
Comprehensive R&D, leading-edge design, use of the finest materials and sophisticated manufacturing and quality control techniques provide vastly superior performance for each component part and at every stage of design. Paradigm® Reference speakers will provide you with stunning high-end sound and unparalleled listening pleasure for many years to come.
To achieve all of the exceptional sound that these speakers are capable of providing requires care in installation and operation. Please take the time to read this manual and follow all instructions. If you have further questions, contact your Authorized Paradigm® Reference Dealer or visit the Q&A page in the Tech Support section of our website at www.paradigm.com.
Paradigm Electronics Inc. In Canada: 205 Annagem Blvd., Mississauga, ON L5T 2V1 • In the U.S.: MPO Box 2410, Niagara Falls, NY 14302 |
MAN0001000 061710 |
|
|

TABLE OF CONTENTS
Your New Speakers . . . . . . . . . . . . . . . . . . . . . . . . 2
Unpacking Instructions (Pictorial) . . . . . . . . . . . . 3
Speaker Placement and Connection (Pictorial) . . 4
Bracket Installation for On-Wall
Speakers (Pictorial) . . . . . . . . . . . . . . . . . . . . . . . . 8 Preventing Speaker Damage . . . . . . . . . . . . . . . 10 Room Acoustics. . . . . . . . . . . . . . . . . . . . . . . . . . . . 10
Speaker Placement . . . . . . . . . . . . . . . . . . . . . . . 11
Wall Mounting . . . . . . . . . . . . . . . . . . . . . . . . . . . 12
Speaker Connection . . . . . . . . . . . . . . . . . . . . . . 12
Fine Tuning . . . . . . . . . . . . . . . . . . . . . . . . . . . . . 13
Troubleshooting Guide . . . . . . . . . . . . . . . . . . . . 13
Limited Warranty . . . . . . . . . . . . . . . . . . . . . . . . 14
YOUR NEW SPEAKERS
Break-In
Although Paradigm® Reference speakers sound great “out of the carton,” they will sound even better once they are “broken in.” Allow them to play for several hours before you begin any critical listening.
High-frequency and midrange drivers use ferro-fluid that can thicken at temperatures below 10° C (50° F). Surround material used in the bass/midrange driver units is made of a compound that may stiffen in colder temperatures. If your speakers have been transported or stored in the cold, let them warm to room temperature before use.
Cleaning
Paradigm® Reference speakers have a durable premium finish. To clean, use a damp soft cloth. Do not use a strong or abrasive cleaner. Avoid getting any part of the speaker system wet. Do not place wet objects (drinking glasses, potted plants, etc.) on top of the speakers—if allowed to soak in, even a small amount of water may permanently damage the speaker enclosure.
Speaker Grilles
Paradigm® Reference speakers are meant to be played with their grilles on. These grilles are designed to eliminate edge diffraction—the sound reflections that occur at the outer edges of the front of the enclosure which interfere with the drivers’ primary sound output. The grille frames fit flush to each driver and have rounded outer edges to ensure that driver output does not encounter hard reflective edges.
Floorstanding Spikes
Isolation spikes are an option included with Paradigm® Reference floorstanding models. We highly recommend installing these spikes as they will improve the sound of your speakers by isolating them from the floor. The most convenient time to install spikes is during the unpacking process. Refer to the “Unpacking Instructions (pictorial).”
RECYCLING AND REUSE GUIDELINES FOR EUROPE
In accordance with the European Union WEEE (Waste Electrical and Electronic Equipment) directive effective August 13, 2005, we would like to notify you that this product may contain regulated materials which, upon disposal, according to the WEEE directive, require special reuse and recycling processing. For this reason Paradigm Electronics Inc. (manufacturers of Paradigm speakers and Anthem Electronics) has arranged with our distributors in European Union member nations to collect and recycle this product at no cost to you. To find your local distributor please contact the dealer from whom you purchased this product or go to our website at www.paradigm.com.
Please note that the product only falls under the WEEE directive. When disposing of packaging and other shipping material we encourage you to recycle through the normal channels.
2
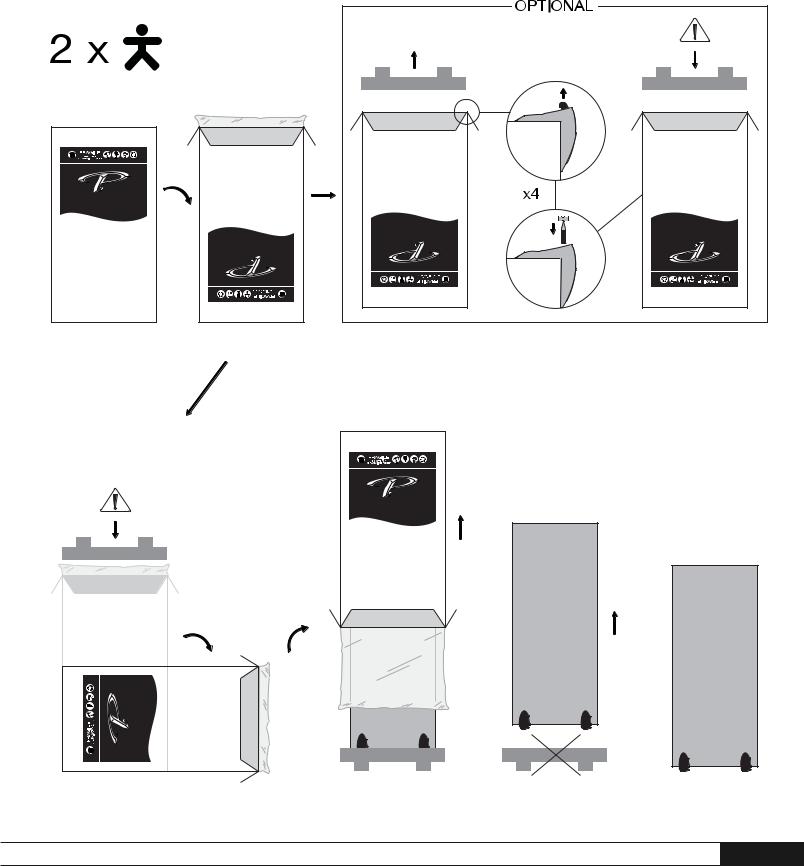
UNPACKING INSTRUCTIONS (pictorial)
(if included with your model)
3
SPEAKER PLACEMENT AND CONNECTION (pictorial)
Fig. 1
Fig. 1a
Fig. 1b
Fig. 3
|
|
|
|
|
|
|
|
|
|
|
|
|
|
|
|
|
|
|
|
|
|
|
|
|
|
|
|
Fig. 2 |
Fig. 4 |
|
|
|
|
|
4

Fig. 5a |
For Center Channels with Outrigger Feet |
Fig. 5b |
For Center Channels with Cradles |
USE OF THIS TILT BRACKET IS RECOMMENDED, BUT OPTIONAL
Note: Bracket not for use with a Paradigm Stand
STEP 1 |
STEP 3 |
Remove grille. To prevent scratching |
Push down firmly with both thumbs |
the finish, carefully lay the speaker |
where indicated (see inset) and bracket |
on a blanket or soft drop cloth with |
will snap into place. Repeat steps 1 |
cradles positioned for easy access, |
to 3 for second bracket. |
as shown. |
|
STEP 2 |
|
Position bracket over cradle, as |
|
shown. Align rear posts in bracket |
|
with rear holes in cradle (see inset). |
|
Press down firmly to engage posts. |
|
Front posts will automatically align. |
|
IMPORTANT! Should you wish to remove the tilt bracket at a later date, you must unscrew the entire cradle/tilt bracket assembly. DO NOT attempt to pry off the bracket as this will damage the cradle.
Fig. 5c Attaching the Tilt Bracket when the Center Channel is positioned below a Television/Display – included on models with cradles only
5
SPEAKER PLACEMENT AND CONNECTION (pictorial) cont’d. |
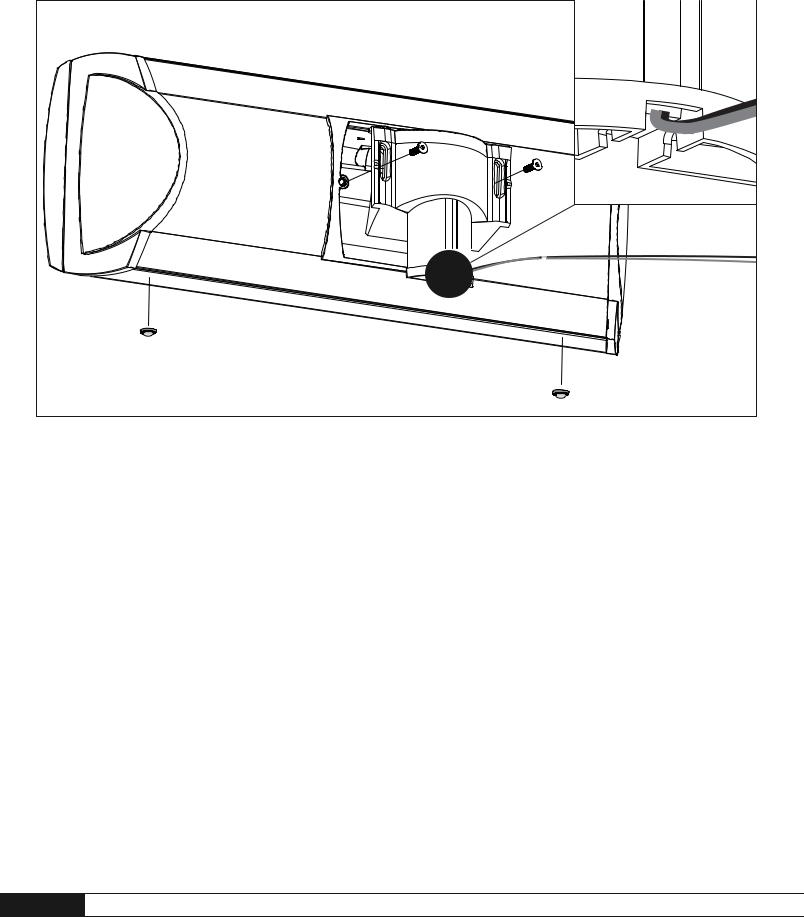
Hidden cable channel |
Fig. 6 Attaching the TV-Top/Shelf Support (selected models only)
6
|
|
|
|
|
|
|
|
|
|
|
|
|
|
|
|
|
|
|
|
|
|
|
|
|
|
|
|
|
|
|
|
|
|
|
|
|
|
|
|
|
|
|
|
|
|
|
|
|
|
|
|
|
|
|
|
|
|
|
|
|
|
|
|
|
|
|
|
|
|
|
|
|
|
|
|
|
|
|
|
|
|
|
|
|
|
|
|
|
|
|
|
|
|
|
|
|
|
|
|
|
|
|
|
|
|
|
|
|
|
|
|
|
|
|
|
|
|
|
|
|
|
|
|
|
|
|
|
|
|
|
|
|
|
|
|
|
|
|
|
|
|
|
|
|
|
|
|
|
|
|
|
|
|
|
|
|
|
|
|
|
|
|
|
|
|
|
|
|
|
|
|
|
|
|
|
|
|
|
|
|
|
|
|
|
|
|
|
|
|
|
|
|
|
|
|
|
|
|
|
|
|
|
|
|
|
|
|
|
|
|
|
|
|
|
|
|
|
|
|
|
|
|
|
|
|
|
|
|
|
|
|
|
|
|
|
|
|
|
|
|
|
|
|
|
|
|
|
|
|
|
|
|
|
|
|
|
|
|
|
|
|
|
|
|
|
|
|
|
|
|
|
|
|
|
|
|
|
|
|
|
|
|
|
|
|
|
|
|
|
|
|
|
|
|
|
|
|
|
|
|
|
|
|
|
|
|
|
|
|
|
|
|
|
|
|
|
|
|
|
|
|
|
|
|
|
|
|
|
|
|
|
|
|
|
|
|
|
|
|
|
|
|
|
|
|
|
|
|
|
|
|
|
|
|
|
|
|
|
|
|
|
|
|
|
|
|
|
|
|
|
|
|
|
|
|
|
|
|
|
|
|
|
|
|
|
|
|
|
|
|
|
|
|
|
|
|
|
|
|
|
|
|
|
|
|
|
|
|
|
|
|
|
|
|
|
|
|
|
|
|
|
|
|
|
|
|
|
|
|
|
|
|
|
|
|
|
|
|
|
|
|
|
|
|
|
|
|
|
|
|
|
|
|
|
|
|
|
|
|
|
|
|
|
|
|
|
|
|
|
|
|
|
|
|
|
|
|
|
|
|
|
|
|
|
|
|
|
|
|
|
|
|
|
|
|
|
|
|
|
|
|
|
|
|
|
|
|
|
|
|
|
|
|
|
|
|
|
|
|
|
|
|
|
|
|
|
|
|
|
|
|
|
|
|
|
|
|
|
|
|
|
|
|
|
|
|
|
|
|
|
|
|
|
|
|
|
|
|
|
|
|
|
|
|
|
|
|
|
|
|
|
|
|
|
|
|
|
|
|
|
|
|
|
|
|
|
|
|
|
|
|
|
|
|
|
|
|
|
|
|
|
|
|
|
|
|
|
|
|
|
|
|
|
|
|
|
|
|
|
|
|
|
|
|
|
|
|
|
|
|
|
|
|
|
|
|
|
|
|
|
|
|
|
|
|
|
|
|
|
|
|
|
|
|
|
|
|
|
|
|
|
|
|
|
|
|
|
|
|
|
|
|
|
|
|
|
|
|
|
|
|
|
|
|
|
|
|
|
|
|
|
|
|
|
|
|
|
|
|
|
|
|
|
|
|
|
|
|
|
|
|
|
|
|
|
|
|
|
|
|
|
|
|
|
|
|
|
|
|
|
|
|
|
|
|
|
|
|
|
|
|
|
|
|
|
|
|
|
|
|
|
|
|
|
|
|
|
|
|
|
|
|
|
|
|
|
|
|
|
|
|
|
|
|
|
|
|
|
|
|
|
|
|
|
|
|
|
|
|
|
|
|
|
|
|
|
|
|
|
|
|
|
|
|
|
|
|
|
|
|
|
|
|
|
|
|
|
|
|
|
|
|
|
|
|
|
|
|
|
|
|
|
|
|
|
|
|
|
|
|
|
|
|
|
|
|
|
|
|
|
|
|
|
|
|
|
|
|
|
|
|
|
|
|
|
|
|
|
|
|
|
|
|
|
|
|
|
|
|
|
|
|
|
|
|
|
|
|
|
|
|
|
|
|
|
|
|
|
|
|
|
|
|
|
|
|
|
|
|
|
|
|
|
|
|
|
|
|
|
|
|
|
|
|
|
|
|
|
|
|
|
|
|
|
|
|
|
|
|
|
|
|
|
|
|
|
|
|
|
|
|
|
|
|
|
|
|
|
|
|
|
|
|
|
|
|
|
|
|
|
|
|
|
|
|
|
|
|
|
|
|
|
|
|
|
|
|
|
|
|
|
|
|
|
|
|
|
|
|
|
|
|
|
|
|
|
|
|
|
|
|
|
|
|
|
|
|
|
|
|
|
|
|
|
|
|
|
|
|
|
|
|
|
|
|
|
|
|
|
|
|
|
|
|
|
|
|
|
|
|
|
|
|
|
|
|
|
|
|
|
|
|
|
|
|
|
|
|
|
|
|
|
|
|
|
|
|
|
|
|
|
|
|
|
|
|
|
|
|
|
|
|
|
|
|
|
|
|
|
|
|
|
|
|
|
|
|
|
|
|
|
|
|
|
|
|
|
|
|
|
|
|
|
|
|
|
|
|
|
|
|
|
|
|
|
|
|
|
|
|
|
|
|
|
|
|
|
|
|
|
|
|
|
|
|
|
|
|
|
|
|
|
|
|
|
|
|
|
|
|
|
|
|
|
|
|
|
|
|
|
|
|
|
|
|
|
|
|
|
|
|
|
|
|
|
|
|
|
|
|
|
|
|
|
|
|
|
|
|
|
|
|
|
|
|
|
|
|
|
|
|
|
|
|
|
|
|
|
|
|
|
|
|
|
|
|
|
|
|
|
|
|
|
|
|
|
|
|
|
|
|
|
|
|
|
|
|
|
|
|
|
|
|
|
|
|
|
|
|
|
|
|
|
|
|
|
|
|
|
|
|
|
|
|
|
|
|
|
|
|
|
|
|
|
|
|
|
|
|
|
|
|
|
|
|
|
|
|
|
|
|
|
|
|
|
|
|
|
|
|
|
|
|
|
|
|
|
|
|
|
|
|
|
|
|
|
|
|
|
|
|
|
|
|
|
|
|
|
|
|
|
|
|
|
|
|
|
|
|
Fig. 7a |
|
|
|
|
|
|
|
|
|
|
|
|
|
|
Fig. 7b |
|
|
|
|
|
|
|
|
Fig. 7c |
|
|
|
|
|
|
|
|
|
|
|
|
|
|
|
|
|
||||||||||||||||||||||||||
7
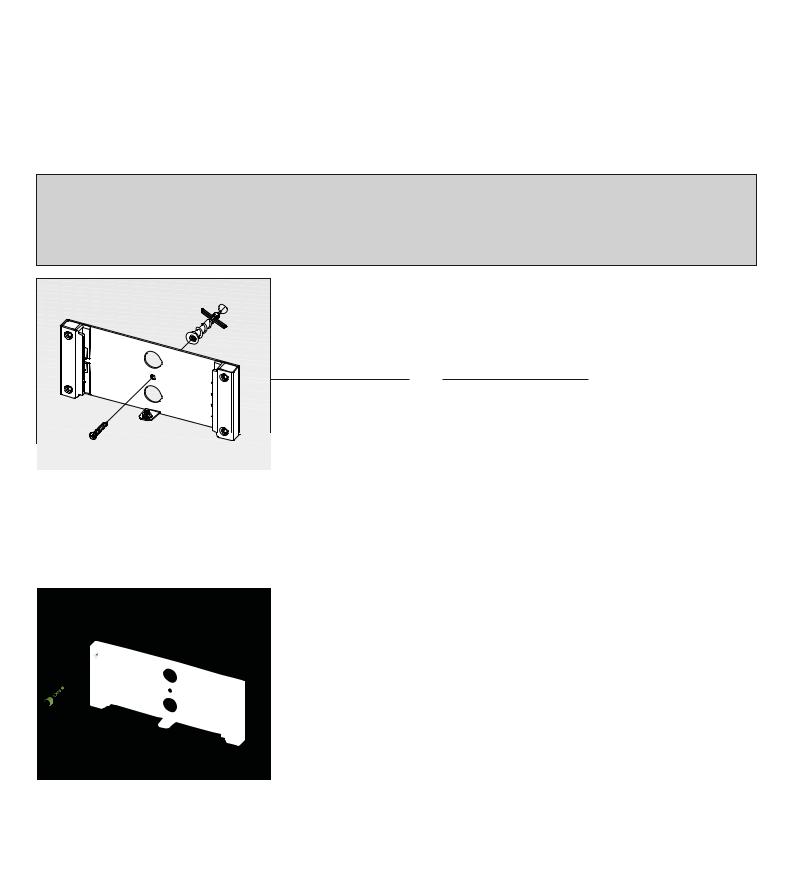
BRACKET INSTALLATION FOR ON-WALL SPEAKERS (pictorial)
IMPORTANT NOTES: Please read before installing brackets
Paradigm DOES NOT supply hardware for mounting brackets to the wall. Mounting hardware shown is an example only; hardware will vary depending on wall type.
If installing in drywall, thickness should be 1/2˝ (13 mm) or 5/8˝ (16 mm) only. Screws must be long enough to go through anchor bolts and firmly into drywall (see Inset 1).
A specific clearance is required when sliding on-wall speakers onto bracket. For more information see Fig. 8g.
PARTS INCLUDED (ONE SPEAKER):
• 1 – Wall-mounting bracket • 1 – Angle bracket with 2 screws • 1 – Hex key
REQUIRED, NOT INCLUDED (ONE SPEAKER):
• 5 – Anchor bolts (minimum load rate 25 lb / 11.3 kg) • 5 – Flathead (Countersunk) screws. (TIP: Paint to match Black speaker finish)
(Note position of metal tab)
Fig. 8a
Position bracket for horizontal or vertical (see Inset 2) placement and mark center hole. Press anchor bolt firmly into drywall and screw in. Follow with flathead screw (see ‘WARNING!’ at right).
Inset 1
WARNING! Screws must be inserted straight and fully tightened to ensure correct operation of bolts.
Inset 2
Metal tabs must sit at outer edges (as shown) when brackets are installed vertically.
Fig. 8b
Ensure bracket is level, then mark the holes for anchor bolts.
Fig. 8c
Allow bracket to rotate clockwise, then screw in anchor bolts.
Fig. 8d
Reposition bracket as shown. Align screw holes in bracket over anchor bolts. Insert screws.
8
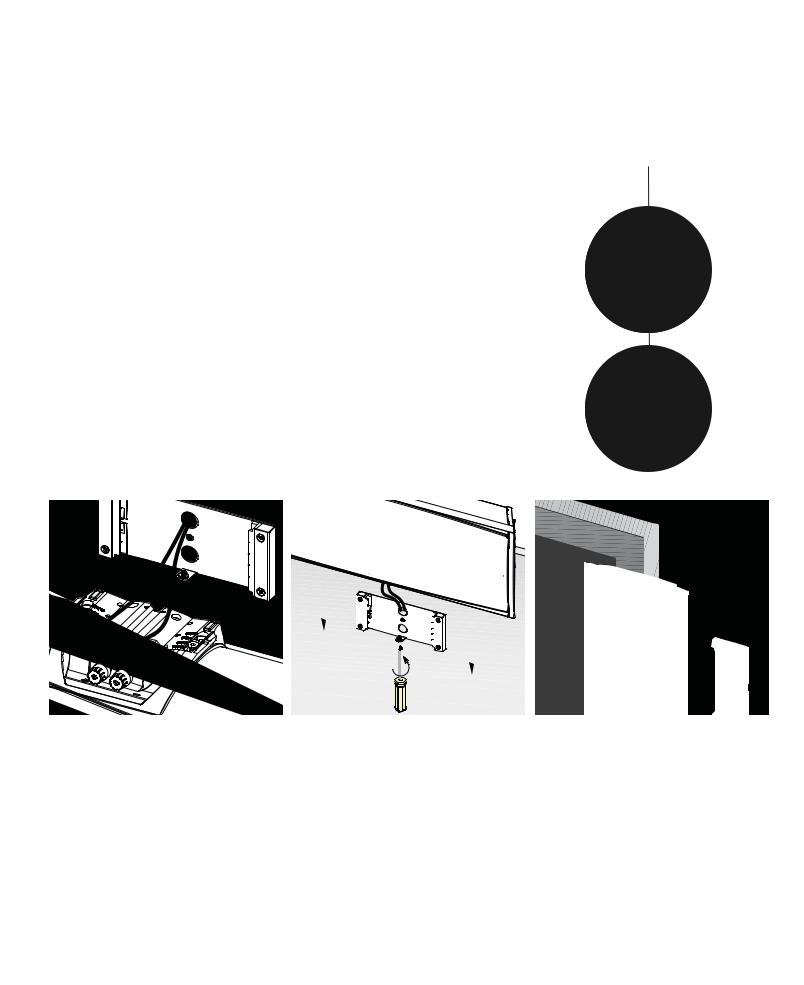
Fig. 8e
ADJUST BRACKETS TO ACHIEVE
DESIRED ANGLE OF TILT:
a)Tilt speakers inward for better imaging;
b)Tilt center speaker up or down to optimize clarity and intelligibility or;
c)Mount speaker parallel to the wall (horizontally or vertically), using bracket at the 0° position.
Align screws with desired angle position (refer to information at far right) and screw in.
Minimum clearance between edge of TV and
center of bracket is 6-7/8˝ (175 mm)
Minimum clearance 6-7/8˝ (175 mm)
Fig. 8f |
Fig. 8g (Horizontal Placement) |
(Vertical Placement) |
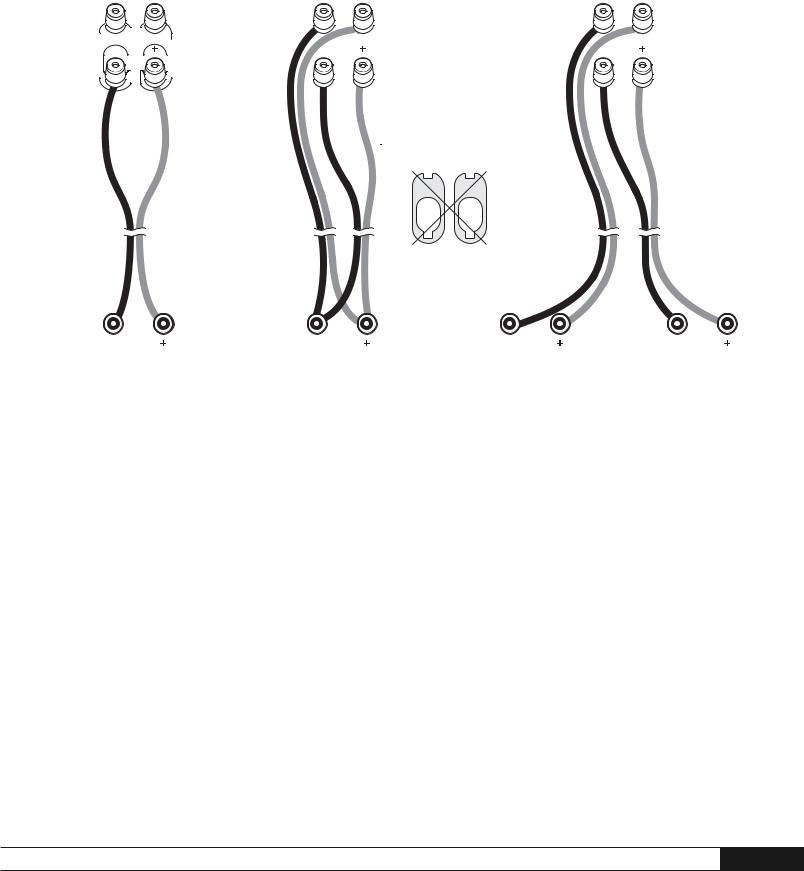
Connect speaker following the information included |
Using an "in and down" motion slide speaker onto |
Using an "in and sideways" motion slide speaker |
later in the manual. |
bracket; tighten assembly locking screw. |
onto bracket; tighten assembly locking screw. |
9

PREVENTING SPEAKER DAMAGE
Paradigm® Reference speakers are efficient and can be driven to loud listening levels with moderate amplifier power. They are also able to handle the output of very powerful amplifiers. To prevent damage to your speakers, please read the following guidelines before hooking them up.
Amplifier Distortion – The #1 Culprit!
Amplifier distortion is the principal cause of speaker damage. When listening at loud levels your amplifier may run out of clean power. It will then begin to produce distorted power several times greater than its rated output power. This will damage any brand of speaker very quickly! (See your Dealer for amplifier recommendations.)
More Powerful Amplifiers are Safer
A 40 watt/channel amplifier will have substantial distortion above 40 watts. If driven to 50 watts, this amplifier will deliver distorted power—which will damage the speaker! A 100 watt/channel amplifier will have substantial distortion above 100 watts, but very low distortion below 100 watts. Therefore, when the speaker requires 50 watts, this more powerful amplifier will deliver clean power and speaker damage is less likely to occur.
Volume Control
Do not be fooled by the Volume Control of your receiver/preamplifier. It only adjusts listening level—it is not a “power-output” dial. The amount of amplifier power actually used at a given Volume Control setting depends solely on the nature of the music you are listening to. At a given Volume Control setting a quiet section of music will use less amplifier power than a loud section. With typical pop-rock, jazz or large scale classical music, the rated output power of many receivers/amplifiers is often reached when the Volume Control
is between the “11 and 1 o’clock” settings (with bass/treble and loudness controls not used—otherwise rated power may be reached at even lower Volume Control settings).
Remember, all amplifiers produce distortion when operated beyond their rated output power. The resulting distortion will damage all speakers! Exercise caution! If you listen at loud levels, be careful to listen for the point of audible distortion—if the speakers begin to sound distressed turn the Volume Control down or your speakers and/or amplifier(s) will be damaged! This type of damage constitutes abuse and is not covered by the warranty. If louder volumes are desired, obtain a more powerful amplifier.
There is a Limit!
Although more powerful amplifiers are safer, there is a point at which you could have more power than the speaker can handle. At that point you will overpower the speaker and damage it. Exercise caution! At loud levels do not increase bass/treble controls from zero and ensure that all loudness/ contour/bass EQ buttons are off (otherwise rated output power will be reached at lower volume control settings). If you listen at loud levels, watch for excessive visible cone excursion (grille movement) from the woofer— then turn the Volume Control down.
The Right Amount of Power
A power-range rating is given as a guide to indicate the approximate minimum and maximum power input of your Paradigm® Reference speakers. Amplifiers that exceed your speaker’s power-range rating are recommended. Their greater power reserves provide better sound. However, exercise caution! Use the speakers within their power-range rating to prevent damage (keep listening levels below the point of excessive woofer cone excursion).
ROOM ACOUSTICS
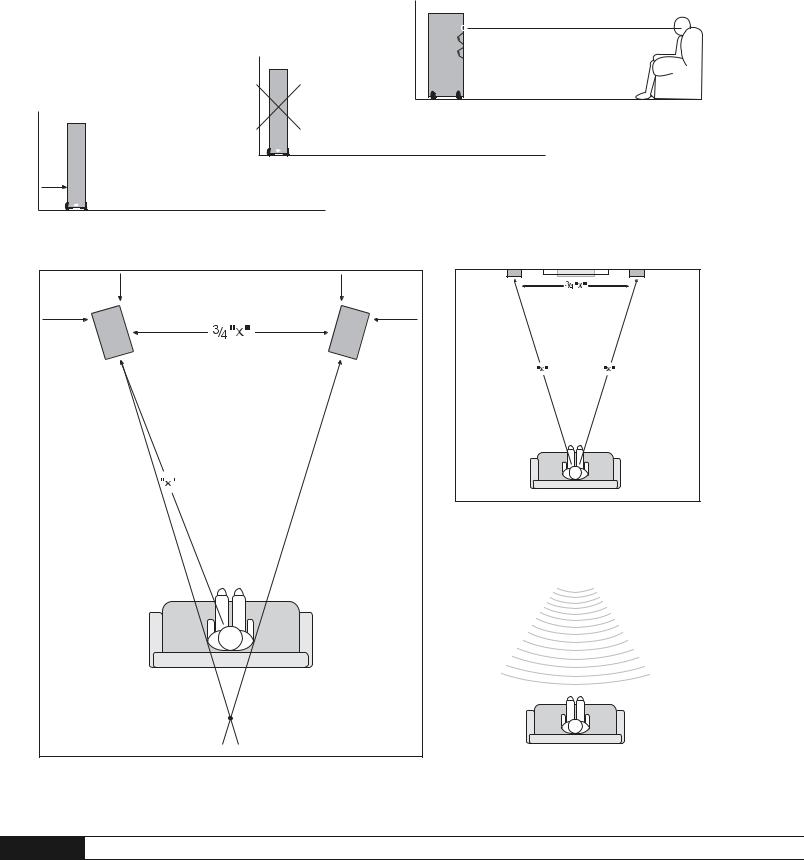
Paradigm® Reference speakers are designed to provide superior high-end sound in a wide variety of domestic settings. However, it is important to note that listening room construction, dimensions and furnishings all play a part in the quality of sound you will ultimately achieve. Your listening room will impose its own character on the performance capabilities of any speaker system. The extra care you take in correctly positioning the speakers will result in greater listening enjoyment. Keep the following guidelines in mind when deciding on the best speaker placement:
•Mid and high frequencies are affected by the amount of soft furnishings in your room—curtains, carpets, sofas, wall coverings, etc. An excess of such items can result in a somewhat dull sound.
The same room without any soft furnishings can produce a bright overall sound. The typical quantity of soft furnishings found in most living situations provides the right acoustic characteristics to allow the speakers to sound balanced;
•Concrete floors and walls tend to aggravate low-frequency standing wave problems and are less preferred;
•Rooms where height, width and length are similar should be avoided as they can exhibit significant low-frequency standing wave problems. This may result in reduced clarity. If no other room is possible, experiment with speaker placement to minimize acoustic problems.
10
 Loading...