

Page 1

OWNERS MANUAL OM-1000
Paradigm Electronics Inc. In Canada: 205 Annagem Blvd., Mississauga, ON L5T 2V1 • In the U.S.: MPO Box 2410, Niagara Falls, NY 14302
MAN0001000 061710
STUDIO AND SIGNATURE SERIES:
FRONT AND CENTER-CHANNEL SPEAKERS
Thank you for choosing Paradigm®Reference speakers and congratulations!
You are about to experience the stunning difference that these state-of-the-art high-end
speakers will make in your music and home theater system.
Comprehensive R&D, leading-edge design, use of the finest materials and sophisticated
manufacturing and quality control techniques provide vastly superior performance for
each component part and at every stage of design. Paradigm
®
Reference speakers will
provide you with stunning high-end sound and unparalleled listening pleasure for
many years to come.
To achieve all of the exceptional sound that these speakers are capable of providing
requires care in installation and operation. Please take the time to read this manual
and follow all instructions. If you have further questions, contact your Authorized
Paradigm®Reference Dealer or visit the Q&A page in the Tech Support section of
our website at www.paradigm.com.
THE ULTIMATE IN HIGH-END SOUND FOR MUSIC AND HOME THEATER
™
Page 2

Your New Speakers . . . . . . . . . . . . . . . . . . . . . . . . 2
Unpacking Instructions (Pictorial) . . . . . . . . . . . . 3
Speaker Placement and Connection (Pictorial) . . 4
Bracket Installation for On-Wall
Speakers (Pictorial) . . . . . . . . . . . . . . . . . . . . . . . . 8
Preventing Speaker Damage . . . . . . . . . . . . . . . 10
Room Acoustics. . . . . . . . . . . . . . . . . . . . . . . . . . . . 10
Speaker Placement . . . . . . . . . . . . . . . . . . . . . . . 11
Wall Mounting . . . . . . . . . . . . . . . . . . . . . . . . . . . 12
Speaker Connection . . . . . . . . . . . . . . . . . . . . . . 12
Fine Tuning . . . . . . . . . . . . . . . . . . . . . . . . . . . . . 13
Troubleshooting Guide. . . . . . . . . . . . . . . . . . . . 13
Limited Warranty . . . . . . . . . . . . . . . . . . . . . . . . 14
TABLE OF CONTENTS
Break-In
Although Paradigm
®
Reference speakers sound great “out of the carton,”
they will sound even better once they are “broken in.” Allow them to play for
several hours before you begin any critical listening.
High-frequency and midrange drivers use ferro-fluid that can thicken at temperatures below 10° C (50° F). Surround material used in the bass/midrange driver
units is made of a compound that may stiffen in colder temperatures. If your
speakers have been transported or stored in the cold, let them warm to room
temperature before use.
Cleaning
Paradigm
®
Reference speakers have a durable premium finish. To clean, use a
damp soft cloth. Do not use a strong or abrasive cleaner. Avoid getting any
part of the speaker system wet. Do not place wet objects (drinking glasses,
potted plants, etc.) on top of the speakers—if allowed to soak in, even a
small amount of water may permanently damage the speaker enclosure.
Speaker Grilles
Paradigm
®
Reference speakers are meant to be played with their grilles on.
These grilles are designed to eliminate edge diffraction—the sound reflections
that occur at the outer edges of the front of the enclosure which interfere with
the drivers’ primary sound output. The grille frames fit flush to each driver and
have rounded outer edges to ensure that driver output does not encounter
hard reflective edges.
Floorstanding Spikes
Isolation spikes are an option included with Paradigm
®
Reference floorstanding models. We highly recommend installing these spikes as they will
improve the sound of your speakers by isolating them from the floor. The most
convenient time to install spikes is during the unpacking process. Refer to the
“Unpacking Instructions
(pictorial).
”
YOUR NEW SPEAKERS
RECYCLING AND REUSE GUIDELINES FOR EUROPE
In accordance with the European Union WEEE (Waste Electrical and Electronic Equipment) directive effective
August 13, 2005, we would like to notify you that this product may contain regulated materials which, upon disposal,
according to the WEEE directive, require special reuse and recycling processing. For this reason Paradigm Electronics Inc.
(manufacturers of Paradigm speakers and Anthem Electronics) has arranged with our distributors in European Union
member nations to collect and recycle this product at no cost to you. To find your local distributor please contact
the dealer from whom you purchased this product or go to our website at www.paradigm.com.
Please note that the product only falls under the WEEE directive. When disposing of packaging and other shipping
material we encourage you to recycle through the normal channels.
2
Page 3
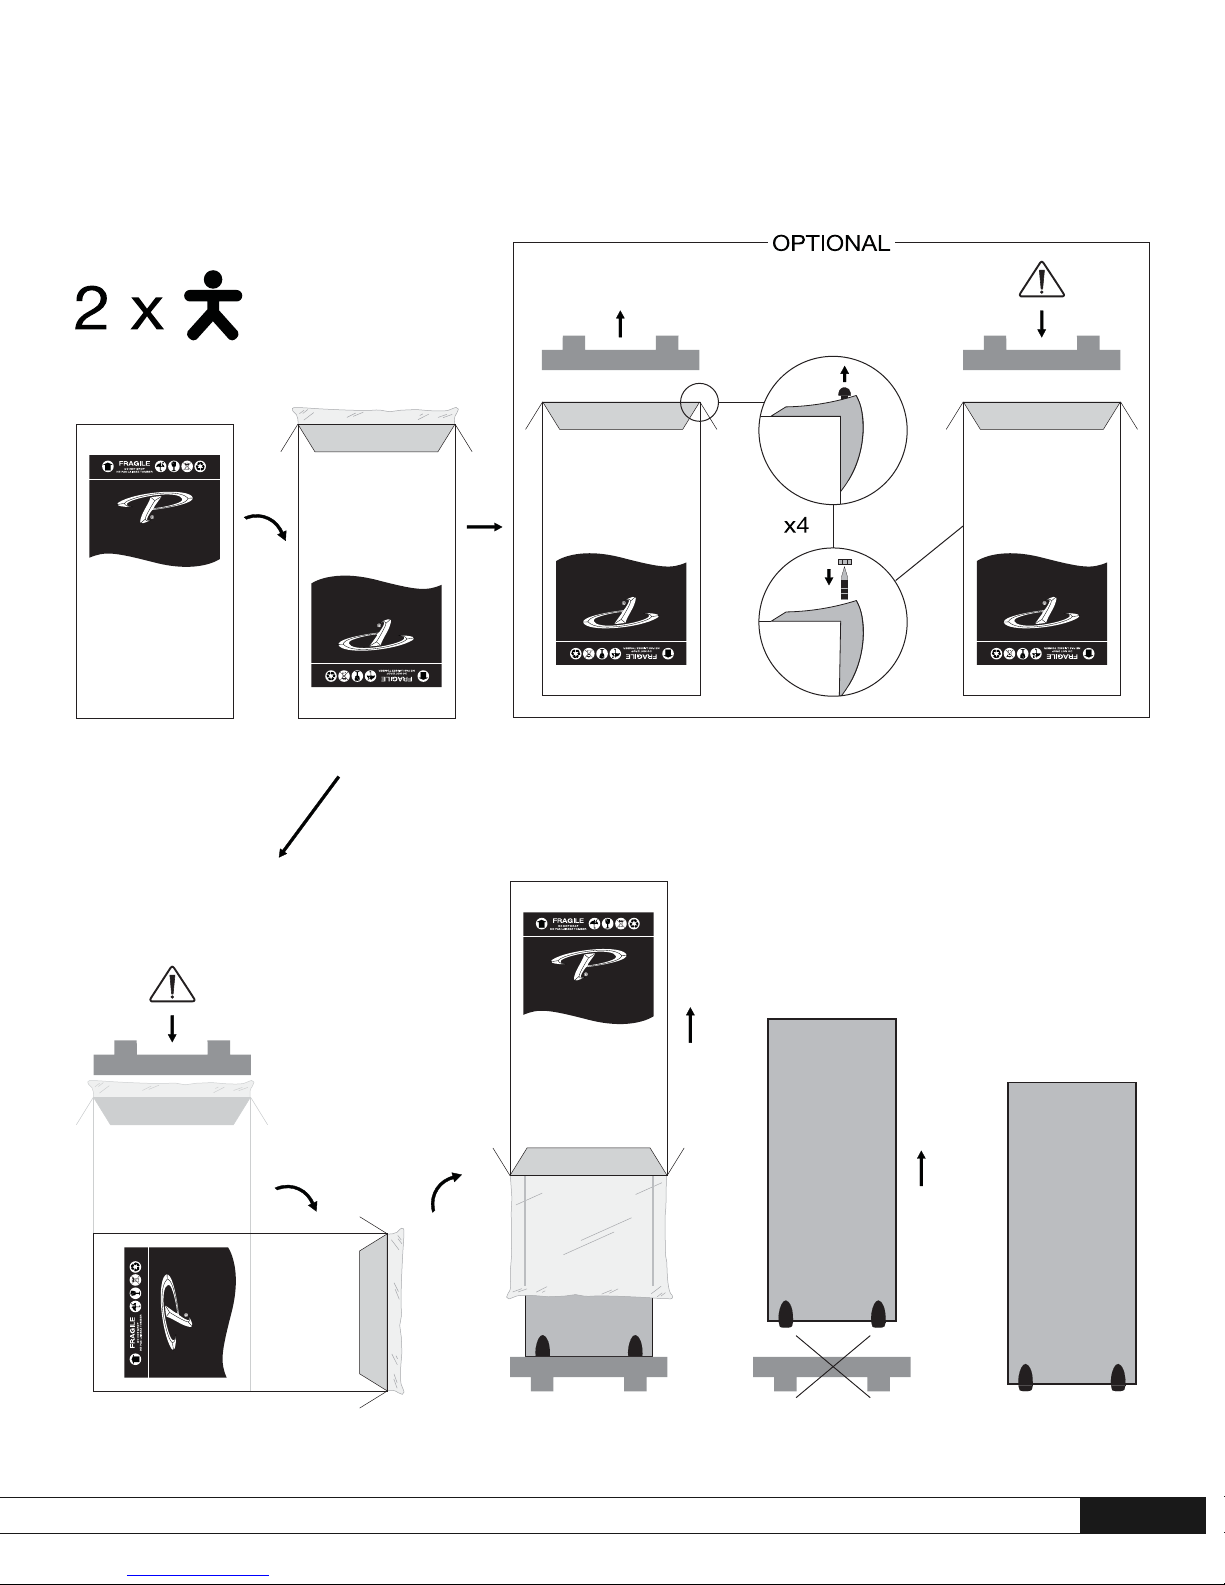
UNPACKING INSTRUCTIONS
(pictorial)
3
(if included with your model)
Page 4
4
Fig. 1
Fig. 1a
Fig. 1b
Fig. 2
SPEAKER PLACEMENT AND CONNECTION
(pictorial)
Fig. 3
Fig. 4
Page 5
5
Fig. 5a
For Center Channels with Outrigger Feet
Fig. 5c
Attaching the Tilt Bracket when the Center Channel is positioned
below
a Television/Display – included on models with cradles only
Fig. 5b
For Center Channels with Cradles
STEP 1
Remove grille. To prevent scratching
the finish, carefully lay the speaker
on a blanket or soft drop cloth with
cradles positioned for easy access,
as shown.
STEP 3
Push down firmly with both thumbs
where indicated (see inset) and bracket
will snap into place. Repeat steps 1
to 3 for second bracket.
IMPORTANT! Should you wish to remove the tilt bracket at a later
date, you must unscrew the entire cradle/tilt bracket assembly. DO NOT
attempt to pry off the bracket as this will damage the cradle.
Note: Bracket not for use with a Paradigm Stand
USE OF THIS TILT BRACKET IS RECOMMENDED, BUT OPTIONAL
STEP 2
Position bracket over cradle, as
shown. Align rear posts in bracket
with rear holes in cradle (see inset).
Press down firmly to engage posts.
Front posts will automatically align.
Page 6
6
Fig. 6
Attaching the TV-Top/Shelf Support
(selected models only)
Hidden cable channel
SPEAKER PLACEMENT AND CONNECTION
(pictorial) cont’d.
Page 7
7
Fig. 7a
Fig. 7b
Fig. 7c
Page 8
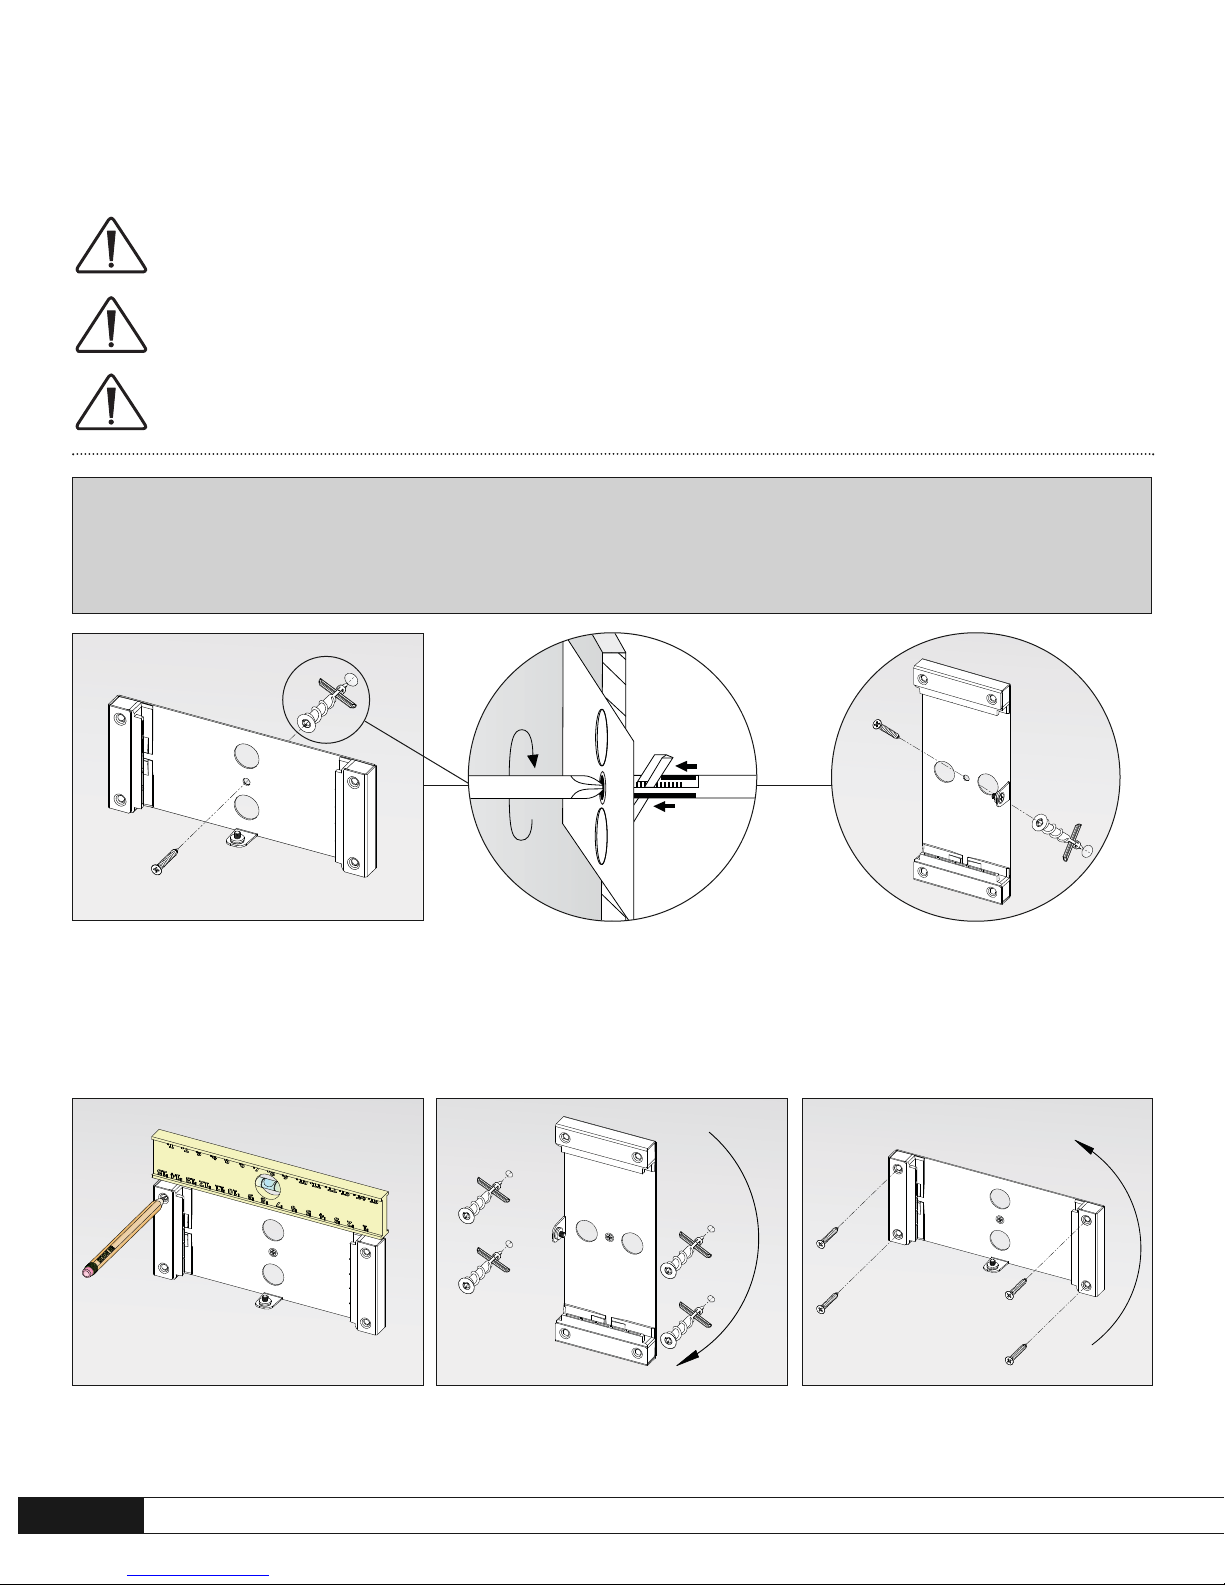
Fig. 8a
Position bracket for horizontal or vertical (see
Inset 2) placement and mark center hole. Press
anchor bolt firmly into drywall and screw in. Follow
with flathead screw
(see ‘WARNING!’ at right)
.
Fig. 8b
Ensure bracket is level, then mark the holes for
anchor bolts.
Fig. 8d
Reposition bracket as shown. Align screw holes in
bracket over anchor bolts. Insert screws.
Fig. 8c
Allow bracket to rotate clockwise, then screw in
anchor bolts.
IMPORTANT NOTES: Please read before installing brackets
Paradigm DOES NOT supply hardware for mounting brackets to the wall. Mounting hardware shown
is an example only; hardware will vary depending on wall type.
If installing in drywall, thickness should be 1/2˝ (13 mm) or 5/8˝ (16 mm) only. Screws must be long
enough to go through anchor bolts and firmly into drywall (see Inset 1).
A specific clearance is required when sliding on-wall speakers onto bracket. For more information
see Fig. 8g.
Inset 1
WARNING! Screws must be inserted straight and
fully tightened to ensure correct operation of bolts.
Inset 2
Metal tabs must sit at outer edges
(as shown)
when
brackets are installed vertically.
BRACKET INSTALLATION FOR ON-WALL SPEAKERS
(pictorial)
PARTS INCLUDED (ONE SPEAKER):
• 1 – Wall-mounting bracket • 1 – Angle bracket with 2 screws • 1 – Hex key
REQUIRED, NOT INCLUDED (ONE SPEAKER):
• 5 – Anchor bolts (minimum load rate 25 lb / 11.3 kg) • 5 – Flathead (Countersunk) screws. (TIP: Paint to match Black speaker finish)
(Note position of metal tab)
8
Page 9
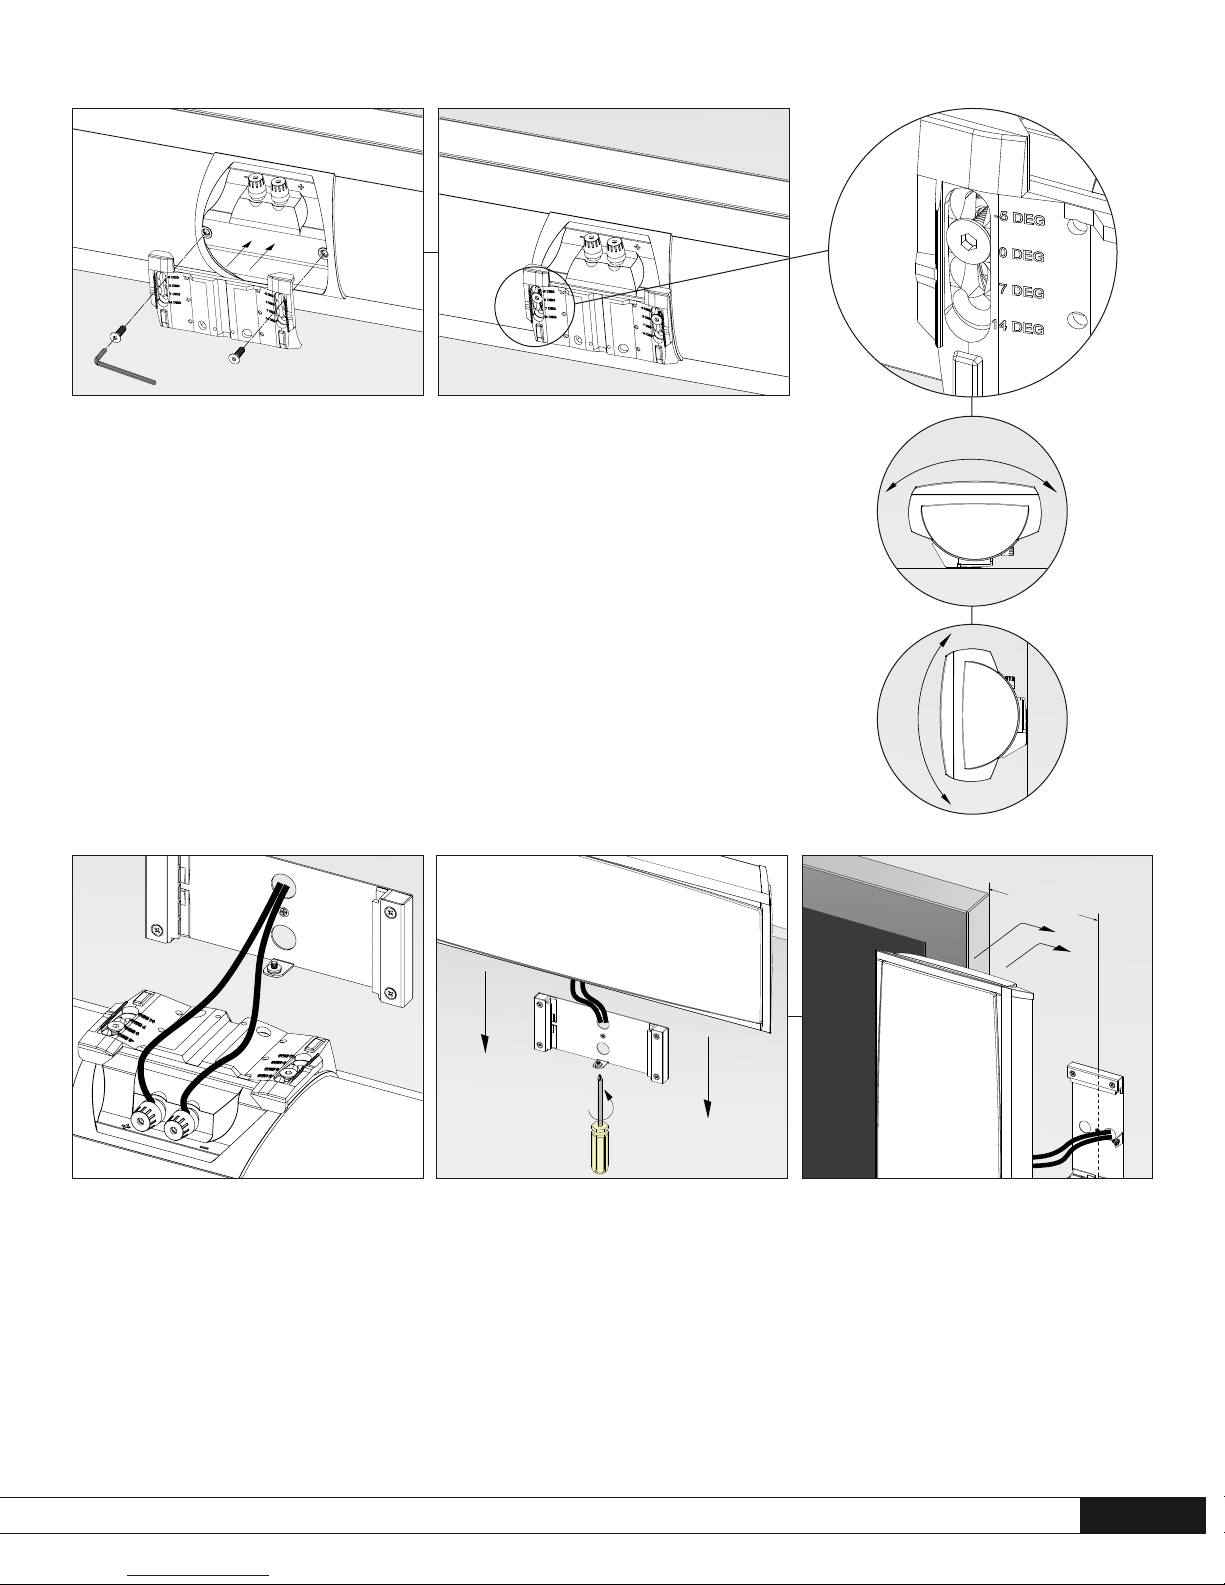
Fig. 8e
ADJUST BRACKETS TO ACHIEVE
DESIRED ANGLE OF TILT:
a) Tilt speakers inward for better imaging;
b) Tilt center speaker up or down to optimize clarity and
intelligibility or;
c) Mount speaker parallel to the wall
(horizontally or
vertically)
, using bracket at the 0° position.
Align screws with desired angle position
(refer to
information at far right)
and screw in.
Fig. 8f
Connect speaker following the information included
later in the manual.
(Vertical Placement)
Using an "in and sideways" motion slide speaker
onto bracket; tighten assembly locking screw.
Fig. 8g (Horizontal Placement)
Using an "in and down" motion slide speaker onto
bracket; tighten assembly locking screw.
Minimum clearance
between edge of TV and
center of bracket is 6-7/8˝ (175 mm)
Minimum clearance
6-7/8˝ (175 mm)
9
Page 10

10
Paradigm®Reference speakers are efficient and can be driven to loud
listening levels with moderate amplifier power. They are also able to handle
the output of very powerful amplifiers. To prevent damage to your speakers,
please read the following guidelines before hooking them up.
Amplifier Distortion – The #1 Culprit!
Amplifier distortion is the principal cause of speaker damage. When listening
at loud levels your amplifier may run out of clean power. It will then begin to
produce distorted power several times greater than its rated output power.
This will damage any brand of speaker very quickly!
(See your Dealer for
amplifier recommendations.)
More Powerful Amplifiers are Safer
A 40 watt/channel amplifier will have substantial distortion above 40 watts.
If driven to 50 watts, this amplifier will deliver distorted power—which will
damage the speaker! A 100 watt/channel amplifier will have substantial
distortion above 100 watts, but very low distortion below 100 watts. Therefore,
when the speaker requires 50 watts, this more powerful amplifier will deliver
clean power and speaker damage is less likely to occur.
Volume Control
Do not be fooled by the Volume Control of your receiver/preamplifier. It only
adjusts listening level—it is not a “power-output” dial. The amount of amplifier
power actually used at a given Volume Control setting depends solely on the
nature of the music you are listening to. At a given Volume Control setting
a quiet section of music will use less amplifier power than a loud section.
With typical pop-rock, jazz or large scale classical music, the rated output
power of many receivers/amplifiers is often reached when the Volume Control
is between the “11 and 1 o’clock” settings (with bass/treble and loudness
controls not used—otherwise rated power may be reached at even lower
Volume Control settings).
Remember, all amplifiers produce distortion when operated beyond their
rated output power. The resulting distortion will damage all speakers! Exercise
caution! If you listen at loud levels, be careful to listen for the point of audible
distortion—if the speakers begin to sound distressed turn the Volume Control
down or your speakers and/or amplifier(s) will be damaged! This type of
damage constitutes abuse and is not covered by the warranty. If
louder volumes are desired, obtain a more powerful amplifier.
There is a Limit!
Although more powerful amplifiers are safer, there is a point at which you
could have more power than the speaker can handle. At that point you will
overpower the speaker and damage it. Exercise caution! At loud levels do
not increase bass/treble controls from zero and ensure that all loudness/
contour/bass EQ buttons are off (otherwise rated output power will be
reached at lower volume control settings). If you listen at loud levels, watch
for excessive visible cone excursion (grille movement) from the woofer—
then turn the Volume Control down.
The Right Amount of Power
A power-range rating is given as a guide to indicate the approximate minimum
and maximum power input of your Paradigm
®
Reference speakers. Amplifiers
that exceed your speaker’s power-range rating are recommended. Their greater
power reserves provide better sound. However, exercise caution! Use the
speakers within their power-range rating to prevent damage (keep listening
levels below the point of excessive woofer cone excursion).
PREVENTING SPEAKER DAMAGE
Paradigm®Reference speakers are designed to provide superior high-end
sound in a wide variety of domestic settings. However, it is important to note
that listening room construction, dimensions and furnishings all play a part in
the quality of sound you will ultimately achieve. Your listening room will impose
its own character on the performance capabilities of any speaker system. The
extra care you take in correctly positioning the speakers will result in greater
listening enjoyment. Keep the following guidelines in mind when deciding
on the best speaker placement:
• Mid and high frequencies are affected by the amount of soft furnishings
in your room—curtains, carpets, sofas, wall coverings, etc. An excess
of such items can result in a somewhat dull sound.
The same room without any soft furnishings can produce a bright overall
sound. The typical quantity of soft furnishings found in most living situations provides the right acoustic characteristics to allow the speakers
to sound balanced;
• Concrete floors and walls tend to aggravate low-frequency standing
wave problems and are less preferred;
• Rooms where height, width and length are similar should be avoided as
they can exhibit significant low-frequency standing wave problems. This
may result in reduced clarity. If no other room is possible, experiment
with speaker placement to minimize acoustic problems.
ROOM ACOUSTICS
Page 11

11
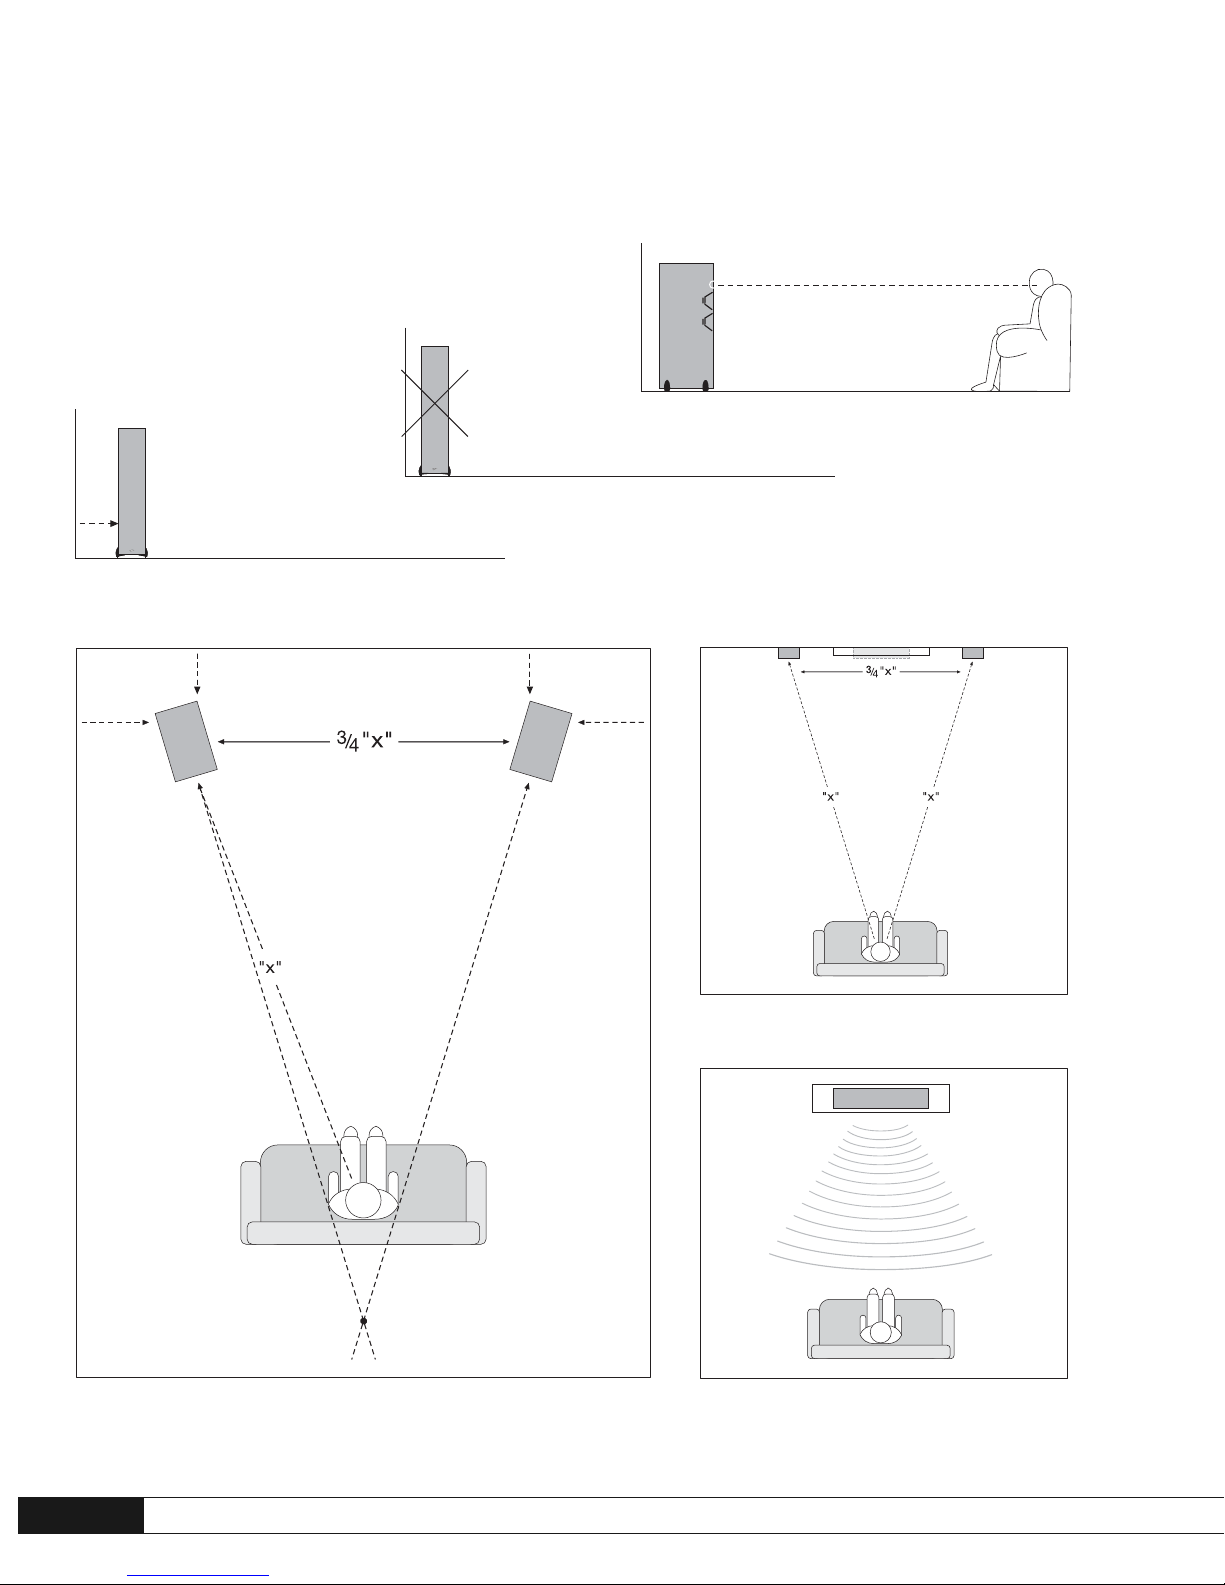
SPEAKER PLACEMENT
Paradigm®Reference front speakers are designed to allow flexible placement
while providing a very large window of sound throughout your listening
room. To ensure the best high-end performance possible however, we strongly
recommend that you observe the following placement guidelines:
Accurate Timbre (Fig. 1)
For the most accurate and natural timbre, place Paradigm
®
Reference Front
speakers so that their high-frequency drivers are approximately at ear level.
We recommend placing bookshelf models on Paradigm
®
speaker stands
(sold separately)
; however, they can also be placed on bookshelves so that
high-frequency drivers are approximately at ear level.
Balanced Bass Performance (Fig. 1a, 1b)
Placing front speakers in corners will over-emphasize bass and reduce overall
clarity. Avoid corner placement (Fig. 1a). Position the front speakers 8 in (20 cm)
or more from the wall behind the speaker, and as much as possible from either
side wall while still following the guideline in Fig. 1b. This will ensure better
bass performance and optimal midrange clarity.
Optimal Imaging (Fig. 2)
Measure the distance from your main listening area to the front speakers
(“X”). For best imaging, place speakers from three-quarters of that distance up
to that same distance from each other (3/4 of “X” to “X”). To further optimize
imaging, turn speakers slightly inward so they point toward the listening
position with their axes crossing just behind it.
ON-WALL FRONT SPEAKERS (Fig. 3)
Paradigm
®
Reference On-Wall Front Left and Right speakers allow higher
than usual placement of the high-frequency drivers, a particularly important
consideration when wall mounting. Mounting the speakers farther apart
on the wall than the width of your TV will promote an even wider, deeper
listening window.
Keeping this in mind, measure the distance from your main listening area
to the front speakers ("X"). For best imaging, mount speakers on the wall
from three quarters of that distance up to the same distance from each other
(3/4 of "X" to "X"). For more information see the section on wall mounting
later in the manual.
CENTER-CHANNEL SPEAKER (Figs. 4 and 5a, b, c)
Paradigm
®
Reference center-channel speakers are designed to provide a large,
wide listening window, allowing listeners throughout the room to hear centerchannel information with unprecedented clarity and intelligibility.
They can be placed on a shelf or directly on top of your TV (Fig. 4). Selected
models include outrigger feet for this purpose (Fig. 5a), other models include
stability cradles (Fig. 5b). Models with outrigger feet can also be used with the
small rubber feet
(included)
and the outrigger feet removed
(not shown)
. If
your model includes cradles, the rubber pads
(included)
must be used for
stability (Fig. 5b).
With a front-projection system, speakers can also be mounted on a matching
Paradigm
®
stand
(sold separately)
.
Make sure the center-channel speaker is approximately the same distance away
from the primary listening position as your front speakers. (Some AV receivers/
processors can electronically adjust for differences in distance.)
See section below for positioning models with cradles directly below
a
television/display.
POSITIONING YOUR CENTER CHANNEL BELOW
A
TELEVISION/DISPLAY
If your center channel is to be positioned below
a television or display we
highly recommend you use the tilt bracket supplied. By tilting the speaker up,
you will further optimize dialog clarity, intelligibility and timbre. For complete
details and tilt bracket assembly, refer to Fig. 5c earlier in this manual.
USING AN OPTIONAL PARADIGM
®
STAND
If your center channel features cradles (Fig. 5b) they must be removed
before
the speaker can be used on an optional Paradigm
®
speaker stand. To remove
cradles, use the hex key included in the hardware package that came with
your speaker. For more detailed information on removing cradles, refer to the
assembly instructions included with the stand.
ON-WALL CENTER-CHANNEL SPEAKER (Fig. 3)
Mount your Paradigm
®
Reference on-wall center-channel speaker on the
wall horizontally, directly above or below your TV, whichever position is
closer to ear level. This will ensure the most uniform timbral response with
the rest of your system. The speaker should be about the same distance
away from the primary listening area as your front Left and Right speakers.
(Some AV receivers/processors can electronically adjust for differences in
distance.) For more information see the section on wall mounting later in
this manual.
This on-wall speaker can also be placed on top of a television or shelf
(see the following section)
.
FRONT SPEAKERS (Left/Right)
Page 12

12
Turn all amplifier(s) OFF before connecting your speakers.
This will avoid damage which could result from accidental
shorting of speaker cables.
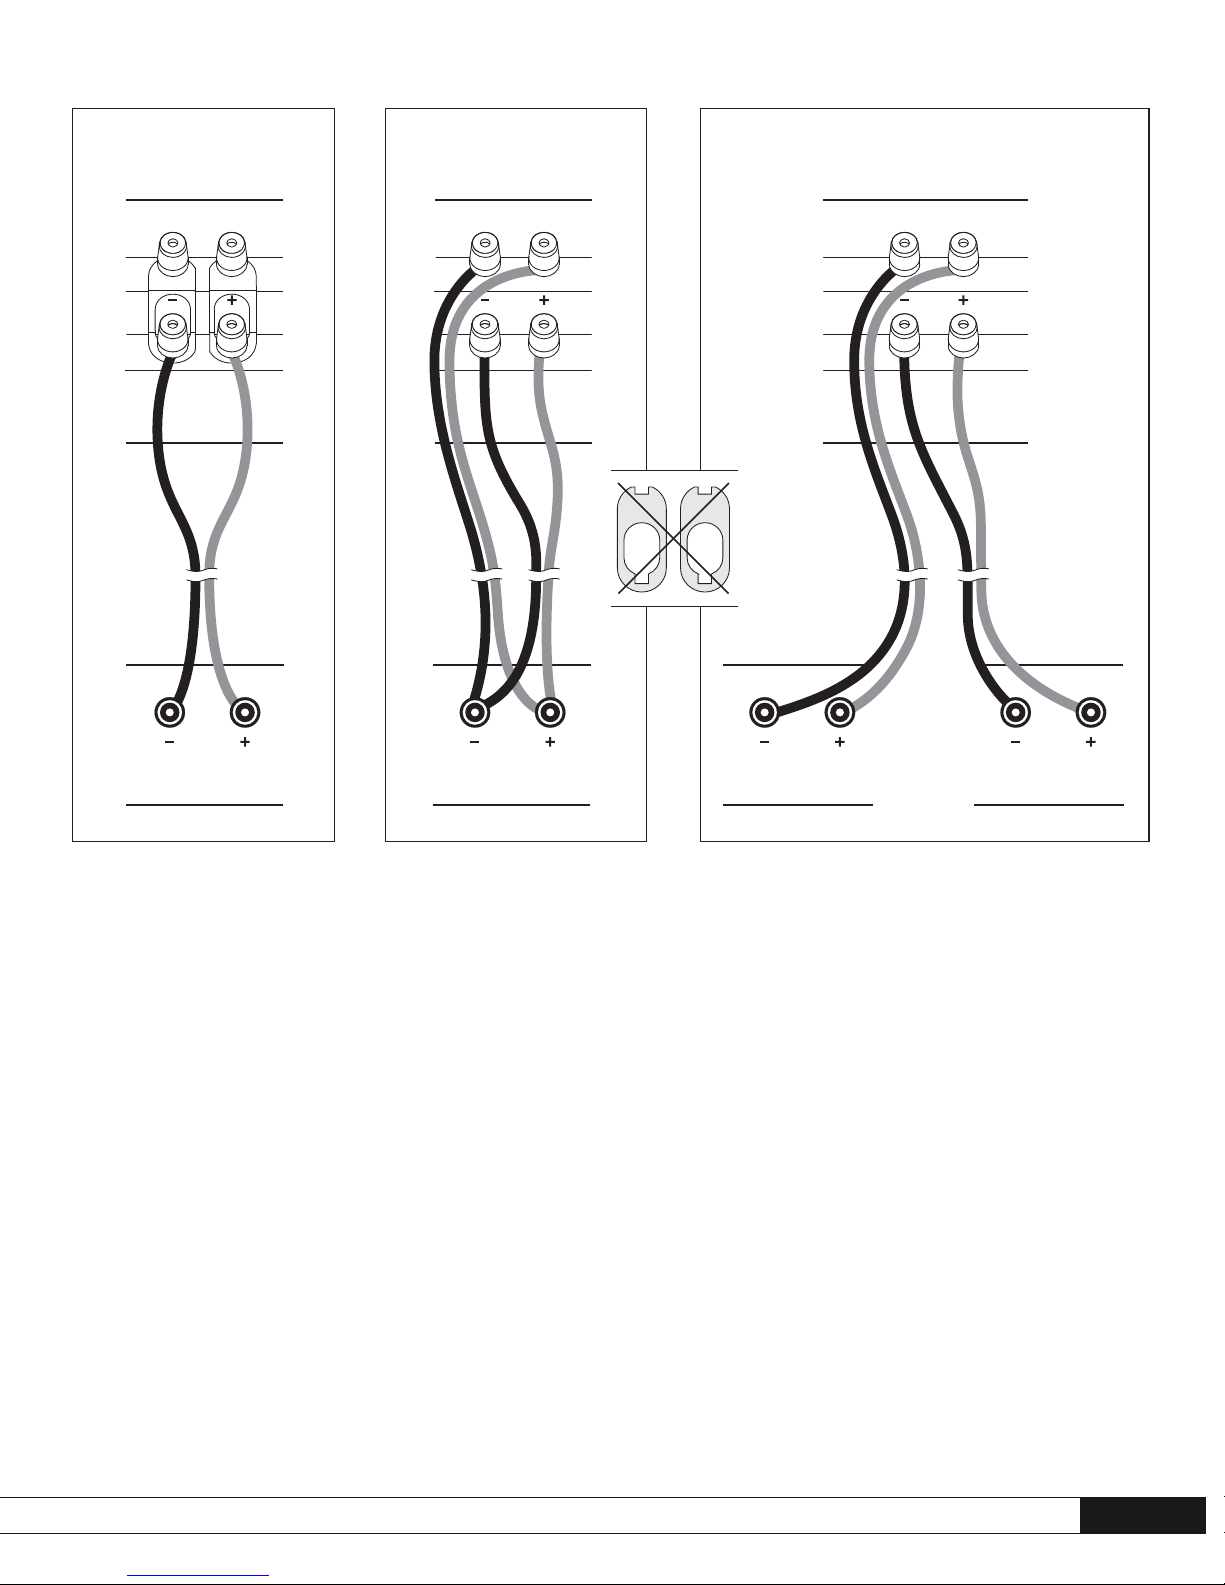
SPEAKER CONNECTION
Paradigm®Reference speakers have separate terminals for the high-frequency
input and low/mid-frequency input. These terminals are connected together
externally with jumper bars; the speaker cable (+) and (-) can then be connected
to either input terminal pair for standard connection. Removing the jumper
bars gives separate access to each frequency section of the speaker, which
then allows for two optional connection configurations, as outlined on the next
page—bi-wiring and bi-amplifying.
For optimum sound reproduction the use of high-quality speaker cable is
essential
(see Dealer for more information)
. The chart at right identifies the
minimum gauge requirements for various lengths.
Correct polarity (or phase), is critical for proper soundstage imaging and bass
performance. If you hear a distinct lack of bass and a dislocated stereo image
(from the front speakers), then one or more of your speakers may have been
connected out of phase (their polarity is reversed).
Connect one speaker at a time to ensure proper connection of every channel.
The red (+) amplifier terminal must be connected to the red (+) speaker terminal.
The same applies to the black (-) terminals. Make sure all wires are firmly
fastened. Repeat this connection procedure for each speaker in your system.
Standard Connection for Speakers with Two Input Teminals
(Fig. 7a)
Leave the jumper bars attached and connect using either set of input terminals.
Your speakers’ binding posts can be used with spade, banana or pin connectors,
as well as with bare wire. Tighten the posts firmly by hand—do not over tighten!
LENGTH DIAMETER GAUGE
Under 4.5 m (15 ft) 1.3 mm (0.05 in) 16 awg
Under 9 m (30 ft) 1.6 mm (0.06 in) 14 awg
Over 9 m (30 ft) 2.0 mm (0.08 in) 12 awg
MINIMUM GAUGE REQUIREMENTS
Paradigm DOES NOT supply hardware for mounting
brackets to the wall. If you are not comfortable performing
the on-wall mounting procedure, contact a professional
installer
(see Dealer)
.
A minimum amount of clearance is required to install
your speakers or remove them from the wall at a later date
(see Fig. 8g).
USING ADJUSTABLE ON-WALL BRACKETS
(included)
Brackets
(included)
must be used when mounting On-Wall Left and Right
speakers and On-Wall Center Channel.
If desired, for better imaging or to optimize clarity you can adjust the angle
at which your speakers sit on the wall. You can:
• Tilt front Left and Right speakers slightly inward for better imaging
(Fig. 8e, inset)
• Tilt the center speaker up or down to further optimize clarity and
intelligibility (Fig. 8e, inset)
For complete details on wall-mounting your speakers see Pictorial Illustrations.
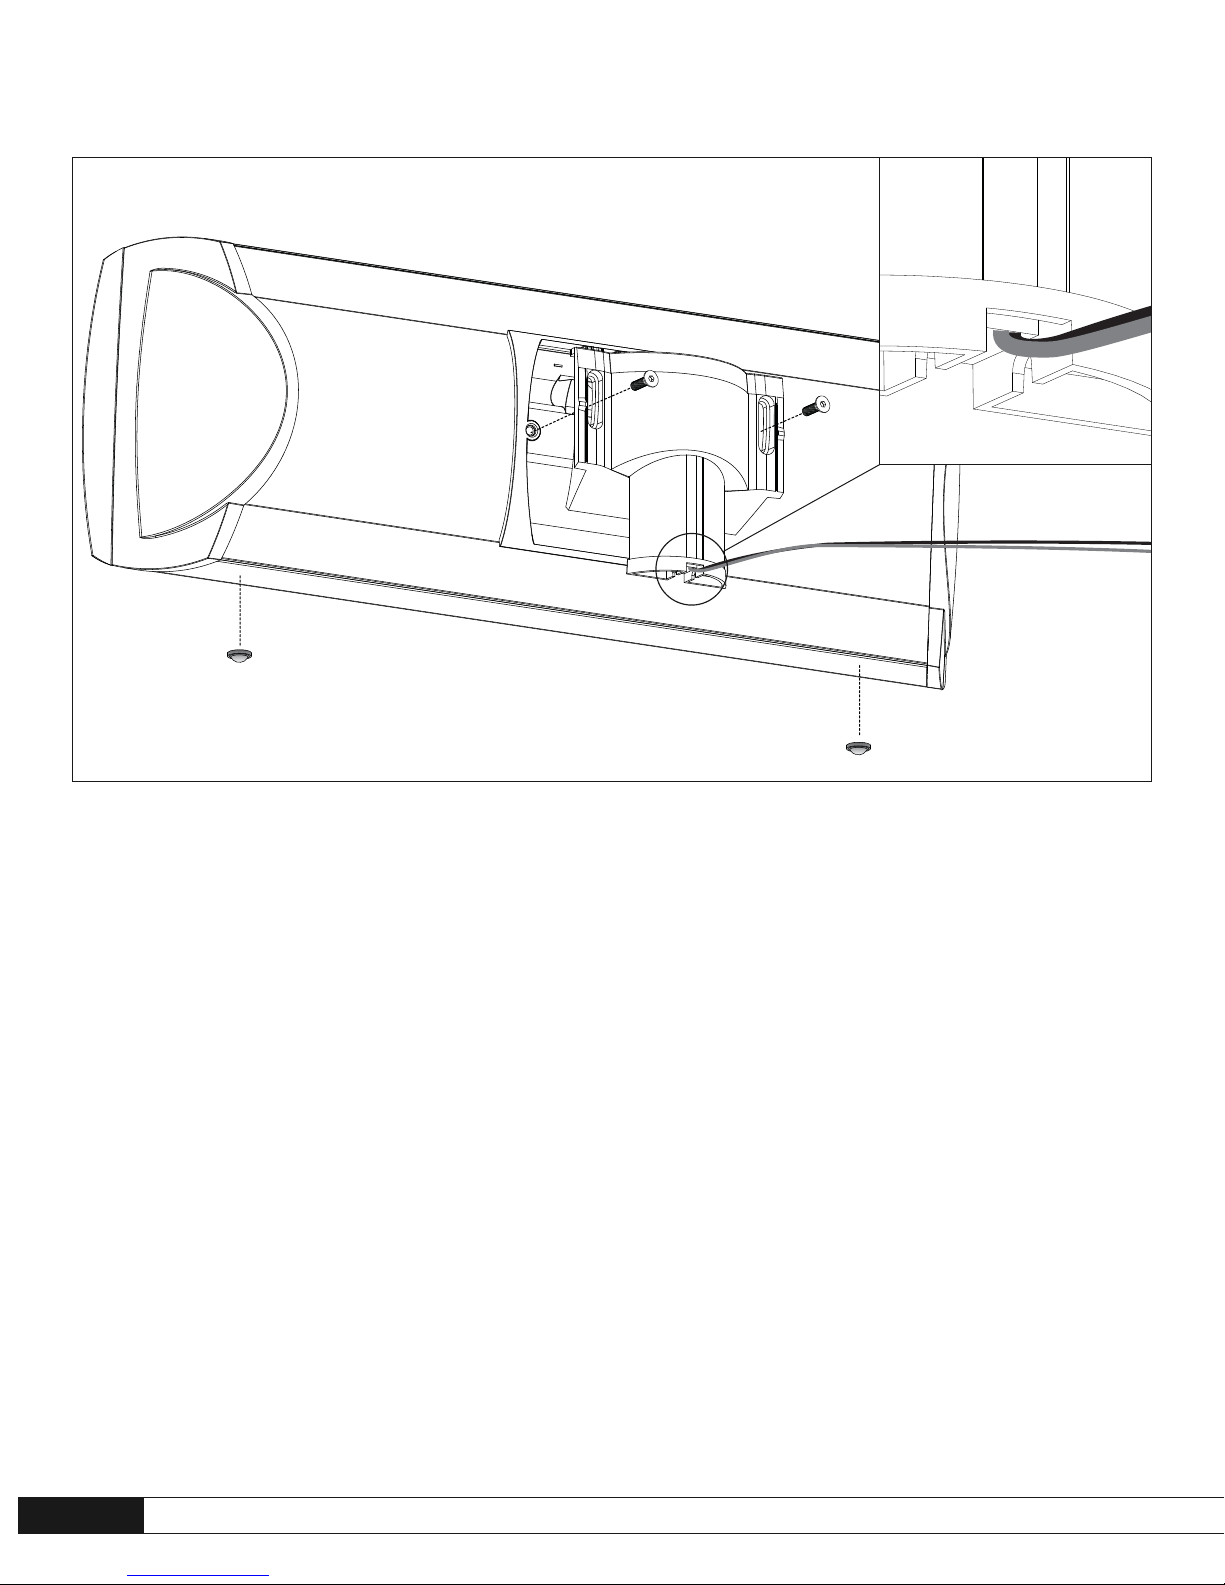
ATTACHING THE TV-TOP/SHELF SUPPORT (Fig. 6)
WALL MOUNTING (Figs. 8a-8g)
Your On-Wall Center-Channel speaker can also be placed on top of a TV, or on
a shelf using the TV-Top/Shelf Support included.
IMPORTANT! If you are placing your speaker on top of a TV or
shelf, for stability you must use the TV-Top/Shelf Support included.
Installation is as follows:
1. Connect speaker as outlined in “Speaker Connection” later in this manual;
run cable along channel visible on inside edge of the pre-assembled Support.
2. Using the two screws
(included)
attach Support to the back of the speaker.
3. Apply self-adhesive rubber pads
(included)
to bottom of speaker, as shown,
so that speaker sits securely and cannot slip.
4. To adjust the speaker’s angle of tilt
(if desired)
, loosen screws and rotate
bracket up or down to achieve desired angle
(not shown)
. Retighten screws.
Page 13

13
This section outlines other connection options.
DO NOT attempt to bi-wire or bi-amplify unless you have
removed the jumper bars.
Bi-wire Connection (Fig. 7b)
Bi-wiring can improve clarity and openness, with less grain and more solidity
to the bass. Two cables are required for each speaker that you bi-wire.
Bi-amp Connectio n (Fig. 7c)
Passive bi-amping offers a dramatic improvement in clarity, openness and
detail, with much better bass solidity and definition. The presentation of music
and movie soundtracks is simply more intelligible and transparent.
With passive bi-amping, the speaker’s internal passive crossovers remain
connected. An external electronic crossover is not required and cannot be
used (there is no direct electrical access to individual drive units). This saves
expense and setup difficulties. Passive bi-amping optimizes your speaker to
achieve the best possible high-end performance. To bi-amplify, two power
amplifiers are required. Connection can be either vertical or horizontal.
IMPORTANT!When bi-amping, always use amplifiers with identical gain.
If uniform amplifier gain is not maintained the speaker-to-speaker balance
will be incorrect when vertically bi-amped, or the speaker system’s frequency
balance will be incorrect when horizontally bi-amped. To prevent problems
use identical amplifiers (Brand and Model) and in identical operating modes
(single channel or bridged).
Vertical Bi-amplification dedicates one amplifier to each speaker. This
configuration provides complete channel separation, which optimizes your
system’s imaging ability. Connect your speakers to one amplifier at a time.
Horizontal Bi-amplification dedicates one amplifier to your speakers’ mid/
low-frequency inputs and another to their high-frequency inputs. This configuration can maintain better clarity when listening at loud levels—if lowfrequency demands cause amplifier clipping, distortion will still be kept away
from high-frequency drivers. Connect your speakers to one amplifier at a time.
Following the instructions in this Owner’s Manual, once you have your
speakers positioned in the room and have set speaker distances and
speaker level calibration with your Processor or A/V Receiver, it’s time for
a little fine tuning. Since Paradigm
®
Reference speakers are designed to
provide exceptional high-end performance in a variety of room settings, fine
tuning is simply a matter of making slight adjustments to their placement
in the room, if necessary.
Start with just the front speakers and listen to familiar music in stereo. The
soundstage will be both wide and deep, but this can be tuned to your personal
preference by adjusting the toe-in (the amount the speakers are turned
toward the listening area). More toe-in will increase image depth and
localization, less toe-in will increase image width. Adjust the toe-in in small
increments, listening each time, until you achieve the soundstage balance
you prefer.
Toe-in is not applicable to the other speakers in your system since their
position and sound distribution pattern is fixed.
Fine tuning for the center channel is simply a matter of making level adjustments that may be required for any particular multichannel music or movie
program. If required, adjust Processor or A/V Receiver levels to ensure that
there is always a cohesive overall soundstage.
FINE TUNING
SOLUTIONPROBLEM
TROUBLESHOOTING GUIDE
No Sound from One or
More Speakers
No Sound
Lack of Bass or
Dislocated Image
Make sure receiver, preamp or amplifier is plugged in and turned on. Check power outlet at the wall is working.
Are headphones plugged in, or is the system on Mute?
Re-check all connections.
Check your balance control or VC-150 Volume Control (if using).
Check that all power cords are properly plugged in and functioning.
Swap a non-working speaker with one that works to determine if the problem is with the speaker or something else (i.e. wiring, amplifier).
One or more speakers may be connected out of phase (their polarity is reversed).
Re-check to ensure that each speaker’s cable is connected with correct polarity: red (+) to red (+) and black (-) to black (-).
Page 14

14
Paradigm®Reference speakers covered in this manual are warranted to be
and remain free of manufacturing and/or material defects for a period of
five (5) years from the date of original purchase. Within the time period
specified, repair, replacement or adjustment of parts for manufacturing
and/or material defects will be free of charge to the original owner.
Thermal or mechanical abuse/misuse is not covered under warranty.
Limitations:
• Warranty begins on date of original retail purchase from an Authorized
Paradigm
®
Dealer only. It is not transferable;
• Warranty applies to product in normal home use only. If product is
subjected to any of the conditions outlined in the next section, warranty
is void;
• Warranty does not apply if the product is used in professional or
commercial applications.
Warranty is Void if:
• The product has been abused (intentionally or accidentally);
• The product has been used in conjunction with unsuitable or faulty
equipment;
• The product has been subjected to damaging signals, derangement in
transport, mechanical damage or any abnormal conditions;
• The product (including cabinet) has been tampered with or damaged by
an unauthorized service facility;
• The serial number has been removed or defaced.
Owner Responsibilities:
• Provide normal/reasonable operating care and maintenance;
• Provide or pay for transportation charges for product to service facility;
• Provide proof of purchase (your sales receipt given at time of purchase
from your Authorized Paradigm
®
Dealer must be retained for proof-of-
purchase date).
Should servicing be required, contact your nearest Authorized Paradigm
®
Dealer, Paradigm Electronics Inc. or Import Distributor (outside the U.S. and
Canada) to arrange, bring in or ship prepaid, any defective unit. Visit our
website, www.paradigm.com for more information.
Paradigm Electronics Inc. reserves the right to improve the design of any
product without assuming any obligation to modify any product previously
manufactured.
This warranty is in lieu of all other warranties expressed or implied, of
merchantability, fitness for any particular purpose and may not be extended or
enlarged by anyone. In no event shall Paradigm Electronics Inc., their agents
or representatives be responsible for any incidental or consequential damages.
Some jurisdictions do not allow limitation of incidental or consequential
damages, so this exclusion may not apply to you.
Retain this manual and your sales receipt for proof of warranty term
and proof of purchase.
LIMITED WARRANTY
Page 15

15
NOTES
Page 16

16
NOTES
Page 17

Paradigm Electronics Inc. Au Canada : 205, boul. Annagem, Mississauga (Ontario) L5T 2V1• Aux É.-U. : MPO Box 2410, Niagara Falls, NY 14302
SÉRIES STUDIO ET SIGNATURE : ENCEINTES AVANT
GAUCHE ET DROITE ET ENCEINTE CENTRALE
Félicitations! Nous vous remercions d'avoir choisi les enceintes de la série Paradigm
MD
Reference. Vous allez entendre la différence que confèrent ces enceintes de pointe haut de
gamme à votre système audio ou de cinéma maison.
Grâce à des travaux de R&D avancés, une conception d’avant-garde, l’utilisation des meilleurs
matériaux et la mise en œuvre des techniques de fabrication et contrôle de qualité les plus
sophistiquées, vous obtenez une performance très supérieure pour chaque composant et
chaque étage de votre ensemble. Les enceintes Paradigm
MD
Reference vous procureront un son
de qualité remarquable et un plaisir d’écoute musicale inégalé pendant de nombreuses années.
Pour profiter pleinement de l’excellence sonore de ces enceintes, il importe d’apporter un soin
particulier à leur installation et leur utilisation. Veuillez lire le présent manuel et suivre toutes les
instructions. Pour toute autre question, contactez un revendeur Paradigm
MD
Reference autorisé
ou consultez la page Questions-Réponses à la section du soutien technique de notre site Internet
au www.paradigm.com.
MODE D’ EMPLOI OM-1000
LE SUMMUM EN QUALITÉ SONORE HAUT DE GAMME POUR LA MUSIQUE ET LE CINÉMA MAISON
MC
MAN0001000 061710
Page 18

2
TABLE DES MATIÈRE
Vos nouvelles enceintes. . . . . . . . . . . . . . . . . . . . . 2
Instructions de déballage (figures) . . . . . . . . . . . . 3
Positionnement et raccordement des
enceintes (figures) . . . . . . . . . . . . . . . . . . . . . . . . . . 4
Installation du support pour les enceintes
murales (figures) . . . . . . . . . . . . . . . . . . . . . . . . . . . 8
Pour éviter d'endommager les enceintes. . . . . . 10
Acoustique de la pièce . . . . . . . . . . . . . . . . . . . . . 10
Positionnement des enceintes. . . . . . . . . . . . . . . 11
Installation au mur . . . . . . . . . . . . . . . . . . . . . . . . 12
Raccordement des enceintes . . . . . . . . . . . . . . . . 12
Réglage Fin . . . . . . . . . . . . . . . . . . . . . . . . . . . . . . 13
Guide de diagnostic . . . . . . . . . . . . . . . . . . . . . . . 14
Garantie limitée. . . . . . . . . . . . . . . . . . . . . . . . . . . 14
Rodage
Bien que les enceintes Paradigm
MD
Reference offrent un son excellent « en
sortant de la boîte », leur son sera encore meilleur après une période de
rodage. Les laisser fonctionner pendant quelques heures avant une première
écoute critique.
Les enceintes de hautes et moyennes fréquences contiennent un ferrofluide
dont la viscosité augmente à des températures inférieures à 10 °C (50 F). Les
enceintes de basses et moyennes fréquences sont entourés d’un matériau fait
d’un composé qui peut devenir rigide à basse température. Si les enceintes ont
été transportées ou entreposées au froid, les laisser réchauffer à la température
de la pièce avant de les utiliser.
Nettoyage
Les enceintes Paradigm
MD
Reference comportent une finition durable de première qualité. Pour le nettoyage, utiliser un linge doux humidifié. Ne jamais
utiliser un produit de nettoyage énergique ou abrasif. Éviter de mouiller une
partie quelconque des enceintes. Ne jamais placer un objet humide (verre,
plante en pot, etc.) sur une enceinte—même la plus petite quantité d’eau
qui pourrait s’infiltrer dans l’enceinte d’une enceinte peut lui faire subir des
dommages irréversibles.
Grilles
La grille de façade est censée être en place sur chaque haut-parleur Paradigm
MD
Reference lors de son utilisation. La fonction de la grille est d’éliminer la diffraction par les bords—les réflexions du son qui surviennent sur les bords
externes de la face avant de l’enceinte, et qui produisent des interférences
avec la source de son principale. Le cadre de la grille s’ajuste en affleurement
sur chaque élément et comporte des bords externes arrondis (ce qui élimine
les arêtes réflectives qui perturberaient le son émis par l’enceinte).
Pieds
Des pieds d’isolation sont disponibles en option pour les enceintes Paradigm
MD
Reference, destinés à reposer sur le sol. Nous recommandons fortement
l’installation de ces pieds, qui optimisent le son produit par les enceintes du fait
de l’isolation produite entre l’enceinte et le plancher. C’est lors du déballage
des enceintes qu’il est le plus pratique d’installer les pieds d’isolation; voir
les illustrations de la section «Instructions pour le déballage».
VOS NOUVELLES ENCEINTES
DIRECTIVES EUROPEENNES SUR LE RECYCLAGE ET LE TRAITEMENT DES DECHETS
Dans le respect de la directive WEEE (Waste Electrical & Electronic Equipment) mise en place par les institutions
Européennes à compter du 13 Août 2005, nous souhaitons vous informer que ce produit peut contenir des
matières devant faire l’objet d’une procédure de recyclage ou de traitement approprié des déchets. Dans cette
optique, Paradigm Electronics Inc (fabricant des enceintes Paradigm et des électroniques Anthem) avec ses Distributeurs
agréés dans l’Union Européenne, ont mis en place une procédure de collecte et de retraitement gratuite. Pour en
savoir davantage sur cette procédure veuillez contacter votre revendeur, ou notre Distributeur dans votre pays
(vous en obtiendrez les coordonnées sur simple demande ou en consultant notre site internet www.paradigm.com).
Notez que seul le produit fini est concerné par cette directive et ses obligations. S’agissant de son emballage et
de ses accessoires de transport nous vous recommandons de les recycler selon les procédures mises en place par
votre commune ou votre département.
Page 19

3
INSTRUCTIONS DE DÉBALLAGE
(figures)
(si compris avec votre modèle)
Page 20

4
Fig. 1
Fig. 1a
Fig. 1b
Fig. 2
POSITIONNEMENT ET RACCORDEMENT DES ENCEINTES
(figures)
Fig. 3
Fig. 4
Page 21

5
Fig. 5a
Pour canaux centraux avec pieds stabilisateurs
Fig. 5c
Fixation du support inclinable lorsque le canal central est placé
sous une télévision ou un écran – modèles avec socle uniquement
Fig. 5b
Pour canaux centraux avec supports
ÉTAPE 1
Enlevez la grille. Pour éviter d’égratigner le fini, placez l’enceinte
sur une couverture ou un linge doux,
en vous assurant d’obtenir un accès
facile aux socles, tel qu’illustré.
ÉTAPE 3
Appuyez fermement avec les deux pouces sur
l’endroit indiqué (voir l’encart – ‘PUSH HERE’)
et le support s’enclenchera fermement. Répétez
les étapes 1 à 3 pour le deuxième support.
IMPORTANT!Si vous souhaitez enlever le support inclinable plus tard,
vous devez dévisser le montage socle/support inclinable au complet.
N’ESSAYEZ PAS
de plier le support, car cela endommagera le socle.
Remarque : le support ne doit pas être utilisé avec un pied Paradigm
L’UTILISATION DU SUPPORT INCLINABLE EST RECOMMANDÉE, MAIS FACULTATIVE
ÉTAPE 2
Placez le support sur le socle, tel
qu’illustré. Alignez les tiges arrière
(voir l’encart) du support sur les trous
arrière du socle. Appuyez pour insérer
les tiges arrière. Les tiges avant
s’aligneront automatiquement.
Page 22

6
Fig. 6
Fixation du support pour Télé/Étagère
(certains modèles uniquement)
Conduit de câble caché
POSITIONNEMENT ET RACCORDEMENT DES ENCEINTES
(figures) suite
Page 23

7
Fig. 7a
Fig. 7b
Fig. 7c
Page 24

Fig. 8b
Assurez-vous que le support est au niveau, puis
marquez les trous pour les boulons d’ancrage.
Fig. 8d
Replacez le support. Alignez les trous dans le support
sur les boulons d’ancrage. Insérez les vis.
Fig. 8c
Laissez le support tourner dans le sens horaire,
puis vissez les boulons d’ancrage.
REMARQUES IMPORTANTES : Veuillez lire ces directives avant d’installer les enceintes murales
Paradigm NE FOURNIT PAS le matériel pour monter les supports sur le mur. Le matériel de montage illustré est
uniquement un exemple; il variera selon le type de mur.
Si vous effectuez l’installation dans une cloison sèche, l’épaisseur doit être de 1/2 po (13 mm) ou de 5/8 po (16 mm)
uniquement. Les vis doivent être assez longues pour traverser le boulon d’ancrage et se fixer fermement dans la
cloison sèche (voir médaillon 1).
Un dégagement particulier est nécessaire lorsque vous glissez les enceintes murales sur le support. Pour
obtenir de plus amples renseignements, voir la Fig. 8g.
Médaillon 1
MISE EN GARDE! Les vis doivent être insérées en
ligne droite et entièrement vissées pour assurer un
fonctionnement approprié des boulons d’ancrage.
Médaillon 2
Les onglets en métal sont placés sur les rebords
extérieurs
(tel qu’illustré)
lorsque les supports
sont installés à la verticale.
INSTALLATION DU SUPPORT POUR LES ENCEINTES MURALES
(figures)
PIÈCES COMPRISES (UNE ENCEINTE) :
• 1 – support mural • 1 – support réglables avec 2 vis • 1 – clé à écrou
NÉCESSAIRE, NON COMPRIS (UNE ENCEINTE) :
• 5 – boulons d’ancrage (taux de charge minimal de 25 lb / 11,3 kg) • 5 – vis à tête plate (fraisées) (Peindre les vis pour les agencer au fini noir de l’enceinte)
Fig. 8a
Placez le support pour un positionnement horizontal
ou vertical
(voir médaillon 2)
et indiquez le trou du
centre. Renfoncez fermement le boulon d’ancrage
dans la cloison sèche et vissez. Vissez ensuite la
vis à tête plate
(voir la « MISE EN GARDE » à droite)
.
(Notez la position de l'onglet en métal)
8
Page 25

Fig. 8e
RÉGLEZ LES SUPPORTS POUR OBTENIR
L’ANGLE D’INCLINAISON SOUHAITÉ :
a) Incliner les enceintes vers l’intérieur pour une
meilleure imagerie;
b) Incliner l’enceinte du centre vers le haut ou vers
le bas pour optimiser la clarté et l’intelligibilité;
c) Monter l’enceinte en parallèle au mur
(horizon-
talement ou verticalement)
; utilisez le support en
position 0°.
Alignez les vis selon l’angle souhaité
(consultez
les renseignements à droite)
et vissez.
Fig. 8f
Raccordez l'enceinte en suivant l'information fournie
plus loin dans ce manuel.
(positionnement vertical)
À l’aide d’un mouvement « intérieur vers les côtés »,
glissez l’enceinte dans le support. Serrez la vis de
blocage du montage.
Fig. 8g (positionnement horizontal)
À l’aide d’un mouvement de « haut en bas », glissez
l’enceinte dans le support. Serrez la vis de blocage
du montage.
Dégagement minimum
6-7/8 po (175 mm)
Un dégagement minimum de
6-7/8 po (175 mm) entre le rebord de la
TV et le centre du support est nécessaire
9
Page 26

10
Les enceintes ParadigmMDReference sont conçues pour offrir un son haut de
gamme dans divers milieux d'écoute intérieurs. Il importe toutefois de note
que la construction et les dimensions de la pièce, ainsi que son contenu ont
tous une incidence sur la qualité sonore qu'il sera possible d'obtenir. En général,
il est recommandé d'observer les directives suivantes en ce qui concerne le
positionnement des enceintes :
• La quantité d’objets « mous » (rideaux, moquettes, sofas, revêtements
muraux, etc.) que renferme la pièce aura une incidence sur les moyennes
et hautes fréquences. S’ils sont trop nombreux, ces objets peuvent
émousser le son produit par les enceintes. La même pièce sans aucun
objet mou offrira un son généralement clair. Une quantité normale de ces
objets dans la pièce offrira les caractéristiques acoustiques permettant
d’obtenir des enceintes un son équilibré;
• Les planchers et murs en béton ont tendance à amplifier les problèmes
liés aux ondes stationnaires des basses fréquences et ne sont donc
pas idéals;
• Les pièces de hauteur, largeur et longueur semblables ne sont pas recommandées puisqu’elles peuvent se traduire par d’importants problèmes
d’ondes stationnaires des basses fréquences qui réduisent la précision
du son. Si aucune autre pièce n’est disponible, essayer différentes
configurations du positionnement des enceintes afin de minimiser ces
problèmes.
ACOUSTIQUE DE LA PIÈCE
Les enceintes ParadigmMDReference sont efficaces et peuvent produire des
volumes élevés à des puissances de sortie modérées de l’amplificateur.
Elles peuvent également être jumelées à des amplificateurs haute puissance.
Pour éviter d’endommager les enceintes, lire les directives suivantes avant
de procéder à leur raccordement.
Distorsion de l’amplificateur – Le principal fautif!
La distorsion de la puissance provenant de l’amplificateur est la principale
cause de dommages aux enceintes. À volumes élevés, il peut arriver que la
puissance de l’amplificateur soit tout simplement insuffisante. L’amplificateur
produira alors un signal distordu dont la puissance est de plusieurs fois
supérieure à la puissance nominale. Cette puissance excessive endommagera
très rapidement toute enceinte, peu importe la marque!
(Consulter le revendeur
pour des recommandations en matière d’amplificateurs.)
Les amplificateurs plus puissants sont plus sûrs
Un amplificateur de 40 W/canal produira une importante distorsion à des
puissances supérieures à 40 W. Si la puissance sollicitée est de 50 W, il
produira un signal distordu qui endommagera l’enceinte! Un amplificateur
de 100 W/canal présentera une importante distorsion à plus de 100 W, mais
très peu de distorsion à des puissances moindres. Ainsi, si l’enceinte sollicite
50 W, cet amplificateur produira un signal non distordu, réduisant ainsi les
risques de dommages à l’enceinte.
Commande de volume
La commande de volume de l'amplificateur peut être trompeuse puisqu’elle
permet seulement d'ajuster le volume d'écoute, mais n'indique pas la puissance
de sortie. La puissance fournie par l’amplificateur à un réglage donné de la
commande de volume dépend uniquement de la musique écoutée.
À un réglage donné de la commande de volume, un passage de musique doux
sollicitera moins de puissance de l’amplificateur qu’un passage plus percutant.
Pour l’écoute de pop/rock, de jazz ou de musique classique symphonique, le
réglage de la commande de volume de la plupart des amplificateurs à une
position entre 11 h et 13 h sur le cadran fournit environ la puissance nominale
de l’amplificateur, à moins que les fonctions de compensation (bass/treble
ou loudness) ne soient utilisées, dans lequel cas la puissance nominale
pourrait être atteinte à un réglage plus faible de la commande de volume.
Il importe de se rappeler que tout amplificateur produira une distorsion si la
puissance sollicitée excède sa puissance de sortie nominale. Cette distorsion
endommagera les enceintes! Il faut donc faire attention! Pendant l’écoute à
volume élevé, il faut surveiller toute distorsion possible – si le son provenant
de l’enceinte semble distordu, réduire le volume pour ne pas endommager les
enceintes et/ou l’amplificateur! La garantie ne couvre pas ce type de
détérioration! Pour l’écoute à des volumes plus élevés, utiliser un amplificateur plus puissant.
Il y a une limite!
Bien qu’un amplificateur plus puissant soit plus sûr, il existe une limite à la
puissance que peut supporter l’enceinte. Au-delà de cette limite, l’enceinte
subira des dommages. Il faut donc faire attention! À volume élevé, les commandes des basses/aigues (bass/treble) devraient être en position « zéro »
et tous les boutons de compensation ou d’égalisation (loudness/contour/
bass EQ), désactivés, a défaut de quoi la puissance nominale sera atteinte à
un réglage moindre du volume. Lors de l’écoute à volume élevé, vérifier s’il y a
excursion excessive des cônes (mouvement de la grille) des haut-parleurs des
graves. Le cas échéant, réduire le volume.
La bonne puissance
La plage de puissance nominale donne une idée des puissances d’entrée
minimum et maximum des enceintes Millenia
MC
. Il est recommandé d’utiliser
un amplificateur dont la puissance nominale excède la plage de puissance des
enceintes. Cette puissance « de réserve » de l’amplificateur se traduira par
une meilleure qualité sonore. Toutefois, il faut faire attention! Les enceintes
doivent être utilisées dans leur plage de puissance pour ne pas les endommager
– le volume d’écoute doit toujours être inférieur à la limite d’excursion excessive
des cônes des haut-parleurs des graves.
POUR EVITER D'ENDOMMAGER LES ENCEINTES
Page 27

11
POSITIONNEMENT DES ENCEINTES
Les enceintes avant gauche/droite de ParadigmMDReference sont conçues
pour offrir une grande souplesse dans le choix de leur emplacement tout en
produisant une très vaste courverture sonore dans toute la salle d’écoute.
Pour la meilleure performance possible, il est toutefois recommandé de
suivre les directives suivantes sur le positionnement des enceintes.
Précision du timbre sonore (Fig. 1)
Pour le timbre le plus précis et le plus naturel, placer les enceintes avant
Paradigm
MD
Reference de sorte que leurs haut-parleurs de hautes fréquences
soient environ au niveau de l’oreille. Il est recommandé de placer les modèles
pour étagère sur des supports d’enceinte Paradigm
MD
(vendus séparément);
toutefois, ils peuvent aussi être placés sur des étagères de sorte que les
haut-parleurs de hautes fréquences soient environ au niveau de l’oreille.
Basses fréquences équilibrées (Fig. 1a, 1b)
Le positionnment des enceintes avant dans les coins de la pièce accentuera les
graves et réduira la clarté du son. Èviter de placer les enceintes dans les coins
(Fig. 1b). Positionner chaque enceinte à 20 cm (8 po) ou plus du mur situé derrière
elle et le plus loin possible des murs latéraux (Fig. 1b) pour une meilleure
performance des graves et une clarté maximum des fréquences moyennes.
Image optimale (Fig. 2)
Mesurer la distance de la principale aire d’ecoute aux enceintes (distance
« X »). Pour une image sonore optimale, installer les enceintes avant de sorte
qu’elles soient separees l’une de l’autre d’une distance allant des trois quarts
de « X » a « X ». Pour une image encore meilleure, orienter les enceintes vers
l’aire d’ecoute de sorte que leurs axes se croisent juste derriere cette derniere.
ENCEINTES AVANT AU MUR (Fig. 3)
Les haut-parleurs de hautes fréquences des enceintes Paradigm
MD
Reference
peuvent être placés plus haut que la normale, ce qui est particulièrement
important pour les enceintes au mur. Un espacement des enceintes supérieur
à la largeur de la télé permettra d’obtenir une couverture sonore plus vaste
et profonde.
Mesurer la distance de la principale aire d’écoute aux enceintes avant (distance
« X »). Pour une image optimale, placer les enceintes de sorte qu’elles soient
séparées l’une de l’autre d’une distance allant des trois quarts de « X » à
« X ». Pour plus d’information, consulter la section sur l’installation au mur
du présent manuel.
ENCEINTE DE CANAL CENTRAL (Fig. 4 et 5a, b, c)
Les enceintes de canal central Paradigm
MD
sont conçues pour fournir une
grande couverture sonore, permettant à des auditeurs dans toute la pièce
d’entendre un signal du canal central d’une clarté et d’une intelligibilité
sans précédent.
Ils peuvent être placés sur une étagère ou directement sur le dessus de
votre télévision (Fig. 4). Les modèles sélectionnés comprennent un pied en
saillie à cet effet (Fig. 5a), les autres modèles comprennent des socles
stabilisateurs (Fig. 5b). Les modèles avec pied en saillie peuvent également
être utilisés avec le petit pied en caoutchouc (compris) et le pied en saillie
enlevé (non illustré). Si votre modèle comprend des socles, les coussinets en
caoutchouc (compris) doivent être utilisés
à des fins de stabilisations (Fig. 5b).
Avec un système à téléprojecteur avant, les enceintes peuvent également
être montées sur un support Paradigm
MD
correspondant
(vendu séparément)
.
S’assurer que l’enceinte centrale soit environ à la même distance de la
principale aire d’écoute que les enceintes avant. (Certains processeurs et
syntoniseurs audiovisuels peuvent se régler électroniquement à des variations
de distance.)
Voir la section ci-dessous pour positionner les modèles avec socle directement
sous
une télévision ou un écran.
POSITIONNEMENT DE VOTRE CANAL CENTRAL SOUS
UNE TÉLÉVISION OU UN ÉCRAN
Si votre canal central est positionné sous
une télévision ou un écran, nous vous
recommandons fortement d’utiliser le support inclinable fourni. En inclinant
l’enceinte vers le haut, vous optimiserez la clarté, l’intelligibilité et le timbre
des dialogues. Pour obtenir tous les détails et le montage du support inclinable,
consultez la Fig. 5c.
UTILISATION D’UN SUPPORT PARADIGM
MD
FACULTATIF
Si votre canal central est doté de supports (Fig. 5b), ils doivent être enlevés
avant de pouvoir utiliser un support d’enceinte Paradigm
MD
facultatif. Pour
enlever les supports, utiliser la clé hexagonale comprise dans la trousse de
matériel fournie avec votre enceinte. Pour obtenir de plus amples renseignements sur la façon d’enlever les supports, consulter les directives de montage
comprises avec le support.
ENCEINTE CENTRALE AU MUR (Fig. 3)
Installer l’enceinte centrale Paradigm
MD
Reference horizontalement au mur,
directement au-dessus ou au-dessous de la télé, à la position se rapprochant
le plus du niveau de l’oreille, pour obtenir du système le timbre sonore le plus
uniforme possible. L'enceinte devrait se situer environ à la même distance de
l’aire d’écoute que les enceintes avant gauche et droite. (Certains processeurs
et récepteurs A/V compensent électroniquement la différence entre ces distances.) Pour plus d’information, consulter la section sur l’installation au mur
du présent manuel.
L’enceinte peut également être installée sur une télé ou une étagère
(consulter la section suivante).
ENCEINTES AVANT (gauche/droite)
Page 28

12
FIXATION DU SUPPORT POUR TÉLÉ/ÉTAGÈRE (Fig. 6)
L’enceinte centrale au mur peut aussi être placée sur une télévision ou une
étagère à l’aide du support pour télé/étagère inclus.
IMPORTANT! Pour l’installation de l’enceinte sur une télé ou
une étagère, utiliser le support pour télé/étagère inclus pour une
stabilité accrue.
L'installation de ce support s'effectue comme suite:
1. Raccorder l’enceinte comme le décrit la section sur le raccordement des
enceintes du présent manuel. Faire passer le câble le long du passage
visible sur la bordure intérieure du support préassemblé.
2. À l’aide des deux vis
(incluses)
, fixer le support au dos de l’enceinte.
3. Apposer des coussinets autoadhésifs
(inclus)
sur la base de l’enceinte,
tel qu’illustré, pour qu’elle ne glisse pas.
4. Pour ajuster l’inclinaison de l’enceinte
(si désiré)
, desserrer les vis et faire
tourner le support vers le haut ou le bas jusqu’à obtention de l’angle
voulu
(non illustré)
. Resserrer les vis
.
ÉTEINDRE tout amplificateur avant de raccorder les enceintes. Ceci évitera les dommages qui résulteraient d’une
mise en court-circuit accidentelle des câbles des enceintes.
RACCORDEMENT DES ENCEINTES
Calibre minimum nécessaire
Les enceintes ParadigmMDReference comportent des bornes de connexion
distinctes pour les entrées hautes fréquences et basses/moyennes fréquences.
Ces bornes sont connectées ensemble à l’extérieur par des barrettes de
connexion; les conducteurs (+) et (-) du câble peuvent alors être raccordés à
l’une ou l’autre des paires de bornes d’entrée pour une connexion standard.
La dépose des barrettes de connexion permet un accès séparé à chacune des
plages de fréquences de l’enceinte, ce qui permet alors les deux configurations
de connexion optionnelles décrites ci-dessous—bicâblage et bi-amplification.
Pour obtenir une reproduction optimale du son, il est essentiel d’utiliser du
câble de haute qualité pour les enceintes. Le tableau à droite ci-dessous
identifie le diamètre minimal des conducteurs à utiliser en fonction de la
longueur de câble
(pour d’autre information, consulter le revendeur agréé
ParadigmMD)
.
Il est essentiel de respecter la polarité correcte (phase) pour l’obtention de la
meilleure image spatiale et de la meilleure performance de reproduction des
graves. Si on perçoit un manque de graves et une dislocation de l’image
stéréophonique (produite par les enceintes avant), il est probable que les
enceintes ne sont pas connectés en phase. Il faut prendre le temps nécessaire,
et veiller à effectuer les raccordements corrects!
Connecter une seule enceinte à la fois pour garantir un raccordement correct
pour chaque canal. On doit raccorder le conducteur rouge (+) de l’amplificateur
à la borne rouge (+) de l’enceinte. De même pour le conducteur noir (-) et la
borne noire (-). Veiller à ce que chaque conducteur soit fermement fixé.
Répéter ce processus de raccordement pour chaque enceinte du système.
LONGUEUR DIAMÈTRE CALIBRE
Moins de 4,5 m (15 pi) 1,3 mm (0,05 in) 16 awg
Moins de m (30 pi) 1,6 mm (0,06 in) 14 awg
Plus de 9 m (30 pi) 2,0 mm (0,08 in) 12 awg
CALIBRE MINIMUM NÉCESSAIRE
Paradigm NE FOURNIT PAS le matériel pour monter les
supports sur le mur. Si vous n’êtes pas à l’aise avec la
procédure de montage sur le mur, communiquez avec un
installateur professionnel
(voir le revendeur)
.
Un dégagement particulier est nécessaire dans l’éventualité où vos enceintes ou votre TV à écran plat doivent
être enlevés du mur plus tard (voir Fig. 8g).
UTILISATION DE SUPPORTS MURAUX RÉGLABLES
(compris)
Les supports
(compris)
doivent être utilisés lorsque vous montez les enceintes
de droite et de gauche sur le mur et le canal central sur le mur.
Le cas échéant, pour obtenir une meilleure image ou pour optimiser la
clarté, vous pouvez régler l’angle auquel les enceintes sont fixées sur le mur.
Vous pouvez :
• Incliner légèrement les enceintes de gauche et de droite vers l’intérieur
pour obtenir une meilleure image (Fig. 8e, médaillon);
• Incliner l’enceinte du centre vers le haut ou le bas pour optimiser
davantage la clarté et l’intelligibilité (Fig. 8e, médaillon).
Pour obtenir tous les détails sur le montage mural des enceintes, voir la
Fig. 8a-8g dans les illustrations au début de ce manuel.
INSTALLATION AU MUR (Fig. 8a-8g)
Page 29

13
Raccordement standard des enceintes avec 2 bornes (Fig. 7a)
Laisser les barrettes de connexion en place et connecter les conducteurs du
câble sur l’une ou l’autre des paires de bornes. On peut effectuer le branchement sur les bornes de l’enceinte avec cosses en fourche, fiches banane ou
connecteurs à broche, ou même avec le fil nu. Serrer la vis de serrage de
chaque borne à la main, fermement mais sans excès.
Si on choisit une configuration de bicâblage ou biamplification, NE PAS oublier d’enlever les barrettes de
connexion des bornes.
Raccordement pour bicâblage (Fig. 7b)
Le bicâblage peut améliorer la clarté et la reproduction des aiguës, en apportant
moins de rugosité et plus de solidité des graves. Dans une configuration de
bicâblage, on doit utiliser deux câbles pour chaque enceinte.
Raccordement pour bi-amplification (Fig. 7c)
La bi-amplification passive améliore considérablement la clarté, les détails
et la reproduction des aiguës, avec un bien meilleur niveau de finition et de
solidité des graves. La reproduction d’une pièce musicale ou du canal son
d’un film est ainsi plus intelligible et transparente.
Dans le cadre de la bi-amplification passive, le réseau passif interne de
l’enceinte demeure connecté. Un réseau électronique externe n’est pas
nécessaire et ne peut être utilisé (il n’y a aucun accès électrique direct aux
éléments individuels installés dans l’enceinte). Ceci réduit le coût et la difficulté de configuration. La bi-amplification passive optimise l’enceinte pour
l’obtention de la meilleure performance possible. Pour une configuration
de bi-amplification, on doit utiliser deux amplificateurs de puissance; avec
raccordement vertical ou horizontal.
IMPORTANT!Dans une configuration de bi-amplification, on doit toujours
utiliser des amplificateurs de gain identique. S’il n’est pas possible de maintenir
un gain d’amplification uniforme, l’équilibre entre les enceintes sera incorrect
dans le cas de la bi-amplification verticale, ou bien l’équilibre des fréquences
produit par les enceintes sera incorrect dans le cas de la bi-amplication
horizontale. Pour éviter des problèmes, utiliser des amplificateurs identiques
(même marque et même modèle), au même mode de fonctionnement (canal
unique ou pontage).
Dans le cadre de la bi-amplification avec raccordement vertical, chaque
enceinte est alimentée par un amplificateur indépendant. Cette configuration
permet une séparation complète de canaux, ce qui optimise la capacité
stéréophonique du système. Raccorder les enceintes à un amplificateur
à la fois.
Dans une configuration de bi-amplification avec raccordement horizontal, un amplificateur alimente les entrées basses/moyennes fréquences
des enceintes, et un autre amplificateur alimente les entrées hautes fréquences.
Cette configuration permet de préserver une meilleure clarté aux niveaux de
volume élevés – si la demande de basses fréquences provoque un écrêtage
par l’amplificateur, les éléments hautes fréquences seront cependant préservés
de la distorsion. Raccorder les enceintes à un amplificateur à la fois.
Après avoir placé les enceintes dans la pièce d’audition, et vérifié les distances
de séparation des enceintes et le niveau d’étalonnage avec le processeur
ou récepteur A/V, conformément aux instructions présentées dans ce
manuel, il est temps d’effectuer quelques opérations de réglage fin. Comme
les enceintes Paradigm
MD
Reference sont conçus pour fournir une performance
exceptionnellement supérieure dans une variété d’environnements, le réglage
fin concerne simplement si nécessaire quelques ajustements de la position
des enceintes dans la pièce.
Commencer avec seulement les enceintes avant, et écouter un morceau de
musique familier en stéréo. L'image spatiale sera large et profonde, mais on
peut l’ajuster en fonction des préférences personnelles par un ajustement de
l’orientation des enceintes vers le point d’audition. Une augmentation de l’angle
augmente la profondeur spatiale et la localisation, tandis qu’une réduction
de l’angle augmente la largeur spatiale. Il convient d’ajuster cet angle par
petits intervalles et d’écouter de nouveau après chaque ajustement pour
l’obtention de l’équilibre désiré de l'image spatiale.
Aucun réglage de l’angle n'est nécessaire pour les autres les enceintes du
système, car leur position et leur champ de distribution sonique sont fixes.
Le réglage fin des enceintes arrière, du centre et d’ambiophonie consiste en un
réglage du niveau selon le besoin pour tout programme particulier à plusieurs
canaux (musique ou cinéma). Si nécessaire, ajuster processeur ou récepteur
A/V le niveau pour maintenir la cohérence globale de l'image spatiale.
RÉGLAGE FIN
La section suivante décrit les autres options de raccordement.
Page 30

14
SOLUTIONPROBLÉME
GUIDE DE DIAGNOSTIC
Aucun son d'une ou
plusieurs enceintes
Aucun son
Déficience des graves ou
image disloquée
S'assurer que le préamplificateur ou l'amplificateur est branché et allumé. Vérifier que la prise de courant fonctionne correctement.
Les écouteurs sont-ils branchés ou le système est-il en mode sourdine (mute)?
Vérifier tous les raccords.
Vérifier la commande de réglage d'équilibre (balance) ou la commande de volume VC-150 (si elle est utilisée).
Vérifier le branchement et le fonctionnement de tous les cordons d'alimentation.
Remplacer l'enceinte qui ne fonctionne pas par une enceinte qui fonctionne pour vérifier si le problème est au niveau de l'enceinte ou ailleurs
(c.-à-d. le filage, l'amplificateur).
Il se peut qu'une des enceintes soit déphasée (polarité inversée).
Vérifier de nouveau la polarité de chaque raccordement : rouge (+) à rouge (+) et noir (-) à noir (-)
Les enceintes ParadigmMDReference presentés dans ce manuel sont garanties
contre les défauts de matériaux et de fabrication pendant une période de
cinq (5) ans à compter de la date d’achat du matériel neuf. Durant cette
période, la réparation, le remplacement ou le réglage de pièces pour des
défauts de matériaux ou de fabrication ne seront pas à la charge du premier
acheteur.
Les dommages causés par l'exposition abusive à la chaleur ou
l'usage abusif ne sont pas couverts par la présente garantie.
Clauses spécifiques
• La garantie entre en vigueur à la date d'achat par le premier acheteur chez
un revendeur autorisé Paradigm
MD
. La garantie n'est pas transférable;
• La garantie s'applique aux enceintes pour une utilisation domestique
normale. Si les enceintes sont soumises à l'une des conditions définies
dans le paragraphe suivant, la garantie est nulle;
• La garantie ne s'applique pas à un usage commercial ou professionnel;
• La garantie exclue la détérioration normale de l’apparence causée par
les conditions environnementales.
La garantie est révoquée si :
• L'enceinte est soumise à un usage abusif (accidentel ou intentionnel);
• L'enceinte est utilisée avec un équipement défectueux ou non adéquat;
• L'enceinte est soumise à des signaux électriques dommageables, un
transport dangereux, des dommages matériels ou toute autre condition
anormale;
• L'enceinte (y compris le boîtier) sont altérés ou endommagés lors d'une
réparation non autorisée;
• La plaque du numéro de série du produit est enlevée ou défigurée.
Responsabilités du propriétaire
• Apporter un soin et un entretien normaux et raisonnables;
• Assumer les frais de transport jusqu'à l'atelier de réparation;
• Fournir une preuve d'achat (conserver le reçu fourni lors de l'achat par le
revendeur autorisé Paradigm
MD
comme preuve de la date d’acquisition).
Si une réparation est nécessaire, contacter le revendeur autorisé Paradigm
MD
,
Paradigm Electronics Inc. ou le distributeur à l'étranger (à l'extérieur du Canada
et des États-Unis) pour planifier l'envoi prépayé de l'enceinte défectueuse.
Consulter le site Web www.paradigm.com pour plus d'information.
Paradigm Electronics Inc. se réserve le droit d'améliorer ou de modifier ses
produits en tout temps sans responsabilité ou engagement envers les
produits existants.
La présente garantie de qualité marchande tient en lieu et place de toute
autre garantie explicite ou implicite et ne peut être modifiée, élargie ou
étendue à d'autres obligations par quiconque. Paradigm Electronics Inc. et
ses représentants ou agents ne peuvent pas être tenus responsables de
dommages découlant de l'utilisation de ces produits. Là où une réglementation
spécifique interdit une telle limitation de la responsabilité, cette exclusion
ne s'applique pas.
Conserver le présent manuel et le reçu comme preuves d'achat
jusqu'au terme de la garantie.
GARANTIE LIMITÉE
Page 31

15
NOTES
Page 32

16
NOTES
 Loading...