

Page 1

MC
Owners Manual
5.1 Powered Soundbar
Page 2
EN-1
RECYCLING AND REUSE GUIDELINES FOR EUROPE
In accordance with the European Union WEEE (Waste Electrical and Electronic Equipment) directive eective
August 13, 2005, we would like to notify you that this product may contain regulated materials which, upon
disposal, according to the WEEE directive, require special reuse and recycling processing. For this reason
Paradigm Electronics Inc. (manufacturers of Paradigm speakers and Anthem Electronics) has arranged with our
distributors in European Union member nations to collect and recycle this product at no cost to you. To nd
your local distributor please contact the dealer from whom you purchased this product or go to our website at
www.paradigm.com/shift. Please note that the product only falls under the WEEE directive. When disposing of
packing and other shipping material we encourage you to recycle through the normal channels.
This device contains ID: WUO-WBT1010 and ID: WUO-WTX1010 and IC: 7985A-WTX1010 and
7985A-WBT1010 This device complies with Part 15 of the FCC Rules. Operation is subject to the following
two conditions: (1) This device may not cause harmful interference, and (2) This device must accept any
interference received, including information that may cause undesired operation. Changes or modications
not expressly approved by the party responsible for compliance could void the user’s authority to operate
the equipment.
WIRELESS TRANSMITTER COMPLIANCE INFORMATION
The term “IC” before the radio certication number only signies that Industry Canada technical
specications were met. This equipment complies with FCC and IC radiation exposure limits set forth for an
uncontrolled environment. This equipment should be installed and operated with minimum distance 20cm
between the radiator and your body. This transmitter must not be co-located or operating in conjunction
with any other antenna or transmitter. To reduce potential radio interference to other users, the antenna
type and its gain should be so chosen that the equivalent isotropically radiated power (e.i.r.p.) is not more
than that permitted for successful communication.
Dolby and the double-D symbol are registered trademarks of Dolby Laboratories.
Manufactured under license from DTS, Inc. under one or more of the following U.S. Pat. No’s: 5,956,674; 5,974,380;
6,487,535 and other U.S. and world-wide patents issued and pending. DTS, the Symbol, & DTS and the Symbol
together are registered trademarks & DTS Digital Surround and the DTS logos are trademarks of DTS, Inc. © All
Rights Reserved.
The Bluetooth® word mark and logos are registered trademarks owned by Bluetooth SIG, Inc. and any use of such
marks by Paradigm Electronics Inc. is under license.
The “aptX® software is copyright CSR plc or its group companies. All rights reserved. The aptX® mark and the aptX
logo are trade marks of CSR plc or one of its group companies and may be registered in one or more jurisdictions.”
Page 3

EN-2
TABLE OF CONTENTS
SAFETY PRECAUTIONS ..........................3
IMPORTANT SAFETY INSTRUCTIONS .............4
SERIAL NUMBER ................................5
ABOUT PARADIGM ..............................5
ABOUT YOUR SOUNDSCAPE .....................5
BREAK-IN.......................................6
CLEANING ......................................6
PLACEMENT ....................................6
On a Flat Surface — Feet Attached ...............6
On a Wall........................................7
Wall-Mounting Instructions ......................7
CONNECTION ...................................9
Power Connection...............................9
Signal Connection . . . . . . . . . . . . . . . . . . . . . . . . . . . . . . .9
Where are Connections Made? ...................9
An Introduction to Audio Cables ............... 10
Routing Sources via Digital Connection with the
Television used to Switch Between ............. 10
Recommended Connection .................... 11
Alternate Connection .......................... 12
Bluetooth Connection ......................... 13
USING A SUBWOOFER ........................ 14
No Subwoofer.................................14
Adding an External Subwoofer ................. 14
Wired Subwoofer Connection .............. 14
Wireless Subwoofer Connection ............ 14
Syncing an External Subwoofer with
your Soundcape ........................... 14
SURROUND SOUND DECODING ............... 15
Digital Inputs (Optical, Coaxial) and Bluetooth . . 15
Analog Inputs (Left/Right RCA).................. 15
CONTROL OPTIONS........................... 15
Top-Panel Interface ............................ 15
Remote Control................................ 16
Changing the Remote’s Battery ............. 16
Programming a Second Remote ............ 16
MENU FLOW CHART........................... 17
THE MENU SYSTEM ........................... 19
Entering and Exiting the Menu ................. 19
From the Soundscape’s Top Panel ...........19
Via the Soundscape’s Remote ...............19
How to Use the Navigation Buttons..............20
MENU OPTIONS .............................. 19
MODE ......................................... 19
DISPLAY....................................... 20
INSTALL ....................................... 20
SUB .......................................... 20
SOURCE NAME ................................ 21
LEARN......................................... 21
RESET ......................................... 23
EXIT .......................................... 23
TROUBLESHOOTING
.......................... 23
TECHNICAL SPECIFICATIONS................... 24
LIMITED WARRANTY .......................... 24
Page 4
EN-3
SAFETY PRECAUTIONS
READ THIS SECTION CAREFULLY BEFORE PROCEEDING!
WARNING!
RISK OF ELECTRIC SHOCK
DO NOT OPEN
The lightning ash with arrowhead
symbol within an equilateral triangle, is
intended to alert the user to the presence
of uninsulated “Dangerous voltage” within
the product’s enclosure that may be of
sucient magnitude to constitute a risk
of electric shock to persons.
The exclamation point within an
equilateral triangle is intended to alert
the user to the presence of important
operating and maintenance (Servicing)
instructions in the literature accompanying
the product.
WARNING: TO REDUCE THE RISK OF FIRE OR ELECTRIC SHOCK, DO NOT EXPOSE THIS
APPARATUS TO RAIN OR MOISTURE, AND OBJECTS FILLED WITH LIQUIDS, SUCH AS
VASES, SHOULD NOT BE PLACED ON THIS APPARATUS.
CAUTION: TO PREVENT ELECTRIC SHOCK, MATCH WIDE BLADE OF PLUG TO WIDE SLOT,
FULLY INSERT.
CAUTION: FOR CONTINUED PROTECTION AGAINST RISK OF FIRE, REPLACE THE FUSE
ONLY WITH THE SAME AMPERAGE AND VOLTAGE TYPE. REFER REPLACEMENT TO
QUALIFIED SERVICE PERSONNEL.
WARNING: UNIT MAY BECOME HOT. ALWAYS PROVIDE ADEQUATE VENTILATION TO
ALLOW FOR COOLING. DO NOT PLACE NEAR A HEAT SOURCE, OR IN SPACES THAT CAN
RESTRICT VENTILATION
WARNING: TO REDUCE THE RISK OF ELECTRIC
SHOCK, DO NOT REMOVE COVER (OR BACK).
NO USER-SERVICEABLE PARTS INSIDE. REFER
SERVICING TO QUALIFIED SERVICE PERSONNEL.
Page 5

EN-4
IMPORTANT SAFETY INSTRUCTIONS
1 Read these instructions.
2 Keep these instructions.
3 Heed all warnings.
4 Follow all instructions.
5 Do not use this apparatus near water.
6 Clean with a dry cloth only.
7 Do not block any ventilation openings. Install in
accordance with the manufacturer’s instructions.
8 Do not install near any heat sources such as radiators,
heat registers, stoves, or other apparatus (including
ampliers) that produce heat.
9 Do not defeat the safety purpose of the polarized or
grounding type plug. A polarized plug has two blades
with one wider than the other. A grounding type plug
has two blades and a third grounding prong. The wide
blade or the third prong are provided for your safety. If
the provided plug does not t into your outlet, consult
an electrician for replacement of the obsolete outlet.
10 Protect the power cord from being walked on or
pinched, particularly at plugs, convenience receptacles
and the point where they exit from the apparatus.
11 Only use attachments/accessories specied by the
manufacturer.
12 Use only with the cart, stand, feet,
tripod, bracket, or table specied by the
manufacturer or sold with the apparatus.
When a cart is used, use caution when
moving the cart/ apparatus combination, to avoid injury
from tip-over.
13 Unplug this apparatus during lightning storms or when
unused for long periods of time.
14 Refer all servicing to qualied service personnel.
Servicing is required when the apparatus has been
damaged in any way, such as power-supply cord or plug
is damaged, liquid has been spilled or objects have fallen
into the apparatus, the apparatus has been exposed to
rain or moisture, does not operate normally, or has been
dropped.
15 Use the mains plug to disconnect the apparatus from
the mains or ”TO COMPLETELY DISCONNECT THIS
APPARATUS FROM THE AC MAINS, DISCONNECT THE
POWER SUPPLY CORD PLUG FROM THE AC RECEPTACLE.
16 “WARNING – TO REDUCE THE RISK OF FIRE OR ELECTRIC
– SHOCK, DO NOT EXPOSE THIS APPARATUS TO RAIN OR
MOISTURE”
17 “DO NOT EXPOSE THIS EQUIPMENT TO DRIPPING OR
SPLASHING AND ENSURE THAT NO OBJECTS FILLED
WITH LIQUIDS, SUCH AS VASES, ARE PLACED ON THE
EQUIPMENT.”
18 “THE MAINS PLUG OF THE POWER SUPPLY CORD SHALL
REMAIN READILY OPERABLE.
Page 6

EN-5
SERIAL NUMBER
The product’s serial number is located on the Soundscape’s
rear panel. In the event that you need to contact Paradigm
about your Soundscape, please have the following
information recorded:
Serial Number:
Retail Outlet or Website where Product was Purchased:
Retail Outlet Phone Number:
Purchase Date:
ABOUT PARADIGM
In the early 1980s Paradigm was just an idea in the minds of a
couple of twenty somethings who loved music. Unlike today,
there was no 225,000 square-foot factory, no 36,000-cu.-ft.
on-site anechoic measurement chamber, just a desire to
make really good sounding speakers and sell them at a down
to earth price. Today, Paradigm speakers are sold on six
continents. We’ve been voted #1 Best Price/Value 22 times*
and fans scour the web to buy used versions of our original
speakers. That should tell you something about Paradigm
quality. In SHIFT
™
Series, we’ve taken everything we’ve
learned about sound and adapted it for today’s wireless
world with an emphasis on great sound in an easy setup.
*Rated #1 Best Price/Value. Inside Track Dealer Survey. An annual independent
nationwide survey of consumer electronics specialist retailers and custom installers.
IMPORTANT: TURN OFF YOUR SOUNDSCAPE before
unplugging your Soundscape from the wall.
ABOUT YOUR SOUNDSCAPE
™
Your Soundscape is a high-performance design loaded with
Paradigm technology. In other words, it has loads of very cool
stu you won’t nd in any other soundbar system. It is a fullrange design delivering soaring high frequencies, an authentic
midrange with particularly natural dialog reproduction and
rich, deep bass frequencies. Although not required, if desired
an external Paradigm subwoofer (sold separately) may be
added in a wired or wireless capacity, to deliver even deeper
bass impact for movie special eects. Advanced digital signal
processing technology has allowed Paradigm to replace ve
dedicated home-theater speakers with a one piece solution
capable of reproducing multichannel recordings with
uninching accuracy, resolution, and detail—the inspiration
behind every Paradigm design. The Soundscape reproduces
front left, right, and center channels via the system’s dedicated
tweeters and woofers. Surround channels are simulated using
our sophisticated Paradigm Virtual Surround. Bluetooth
capability aligned with aptX coding ensures high-quality
streaming. For those who salivate over technical details, we’ve
also included a Tech Specs section in the back of the manual to
give you the skinny on why your Soundscape sounds so good!
The dierence the Soundscape will make to your TV, music
and movies can’t be put into words, but you’ll hear it and
you’ll feel it. It’s an experience that takes you beyond a high
performance system to a place where you’re absolutely
lost in the experience. It’s the Paradigm Dierence. We
guarantee you won’t be able to keep that dierence a secret
and we hope you don’t. Spread the word. Talk about your
Soundscape. BRAG about it. Play it and let others listen.
We’re all dierent and our sound should reect that. Some
of us like music, others love movies, others are gaming
enthusiasts, others enjoy it all. No matter who you are or
where you live, what you like or what you do, we want
to be The Ocial Sound of YOU
™
.
Read this manual and follow all instructions. If you still
have questions please visit the Q&A page on our website at
paradigm.com.
Page 7
EN-6
BREAKIN
Although your Soundscape will sound great right ‘out of the
carton’, it will sound even better when broken in. Allow it to
operate for several hours before you begin to listen critically.
CLEANING
Do not use strong or abrasive cleaners on your new
Soundscape. Simply wipe the cabinet gently with a
soft, damp cloth.
PLACEMENT
We recommend centering the Soundscape directly above
or below your TV/video display. The system’s menu options
allow you to optimize acoustic performance for flat surface
placement (i.e. shelf or credenza) or for wall mounting. Learn
more about these options below or refer to the later section,
‘The Menu System.’
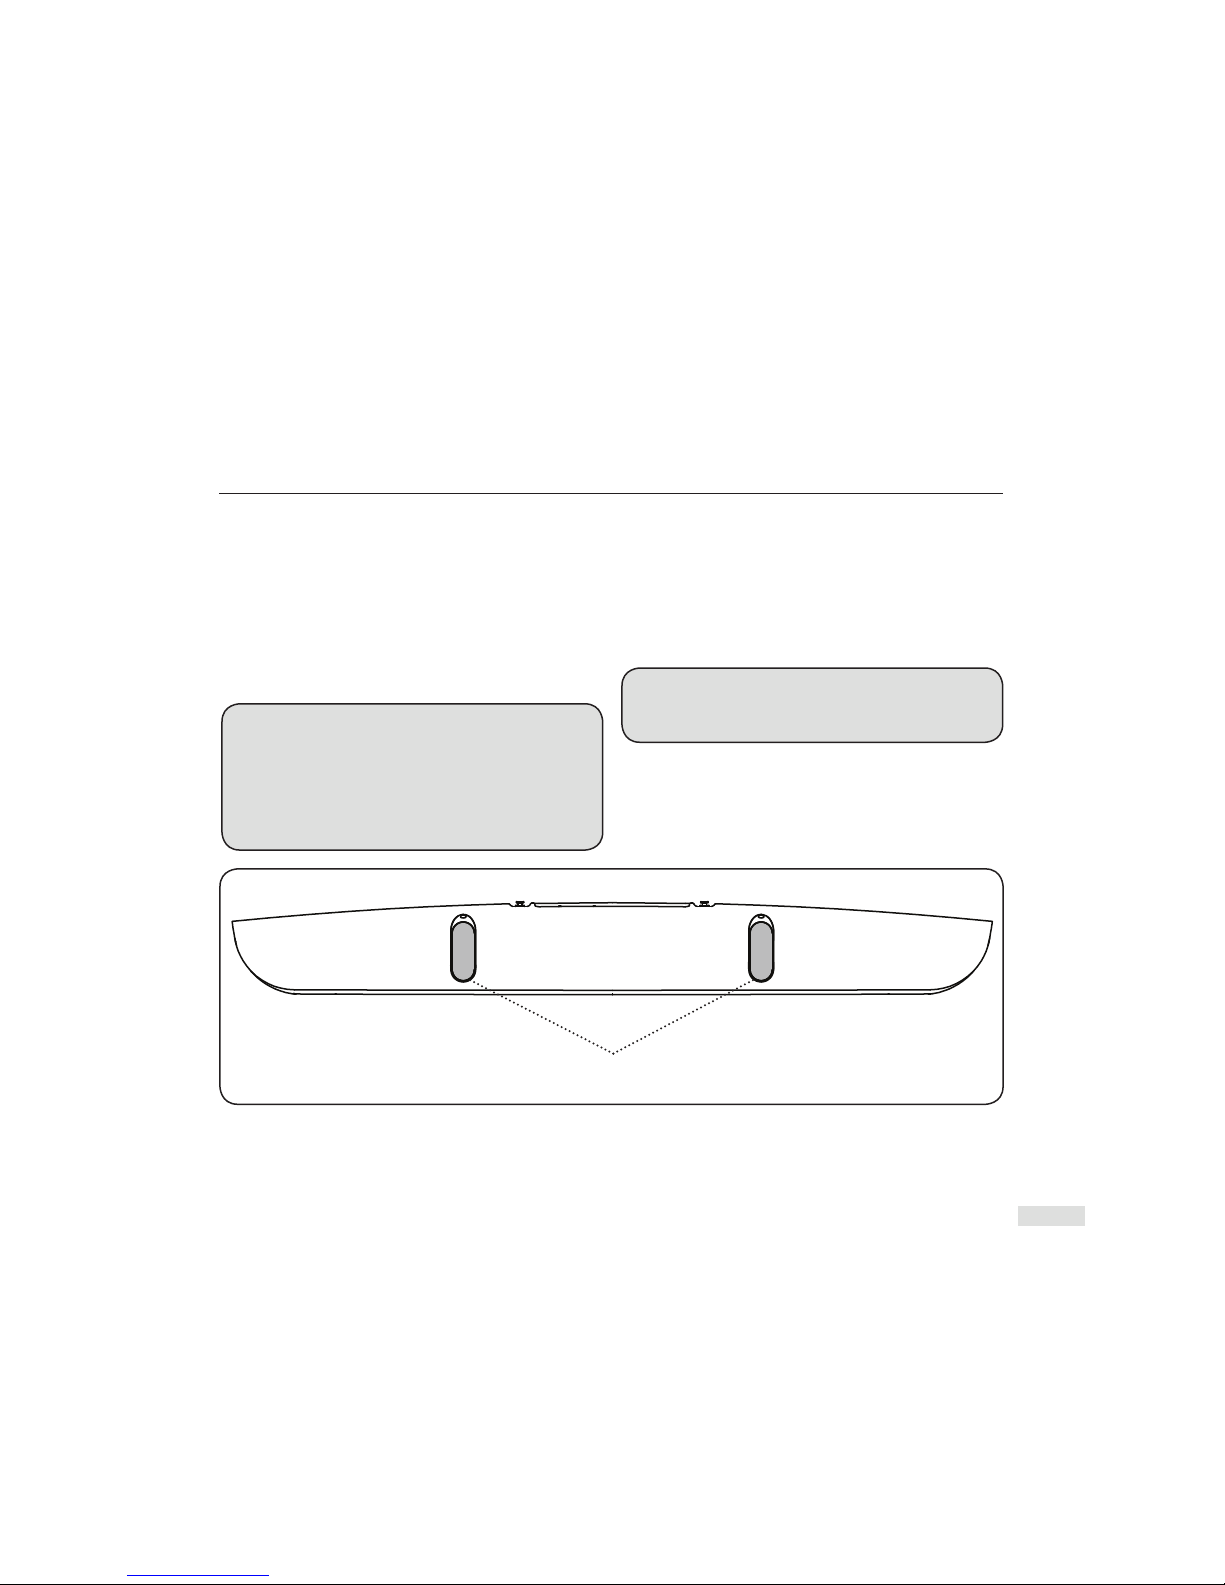
ON A FLAT SURFACE — FEET ATTACHED
ACTION REQUIRED! When installing your Soundscape
on a flat surface (shelf or credenza) you must leave the
feet attached for stability and for best results you should
adjust the unit’s equalization and voicing to make sure
you achieve the best sound possible for the location.
Use the Soundscape’s Menu System to choose:
INSTAL [INSTALL] > ON.SHELF [ON SHELF].
Stability Feet (Fig. 1)
For stability, on a at surface the Soundscape’s factoryinstalled rubber feet must remain attached.
If wall mounting Soundscape, use a screwdriver to remove the
feet and store them in a safe place for future use.
NOTE: Stability feet (Fig. 1) are recessed, so it is not
absolutely necessary to remove them before wall
mounting — it is more a matter of preference.
Stability Feet
Fig. 1
Page 8
EN-7
PLACEMENT Cont’d
ON A WALL
What’s included
1 x Wall-Mounting Bracket and 2 x Levelling Screws
Tools recommended (not included)
1 x Stud Finder
1 x Level
1 x Electric drill and appropriate drill bits
Hardware (not included)
5 x Screws appropriate to mounting surface
and weight of Soundscape.
5 x Wall anchors appropriate to mounting surface
and weight of Soundscape.
Paradigm does NOT supply
screws and anchor bolts to mount
Soundscape to a wall. Choose screws
and anchor bolts appropriate for size
and weight of Soundscape.
Dimensions of Soundscape (H x W x D):
5-1/2˝ x 42˝ x 5˝ / 14 cm x 106.7 x 12.7 cm.
Weight of Soundscape:
20 lb / 9.1 kg
We provide limited instructions for wall
mounting, please contact your Paradigm
Dealer for more detailed information.
The instructions that
follow assume the
mounting surface
is drywall with
standard wood studs. Should
you wish to mount to another
type of surface please consult
a certied contractor or your
Paradigm Dealer before you
begin the installation.
ACTION REQUIRED: When
mounting Soundcsape on a
wall for best results, adjust the
unit’s equalization and voicing
to make sure you are achieving
the best sound for the location.
Remove feet, if desired, before
wall mounting.
Use the Soundscape’s internal
menu system to choose:
INSTAL > ON WALL.
Wall-Mounting Instructions
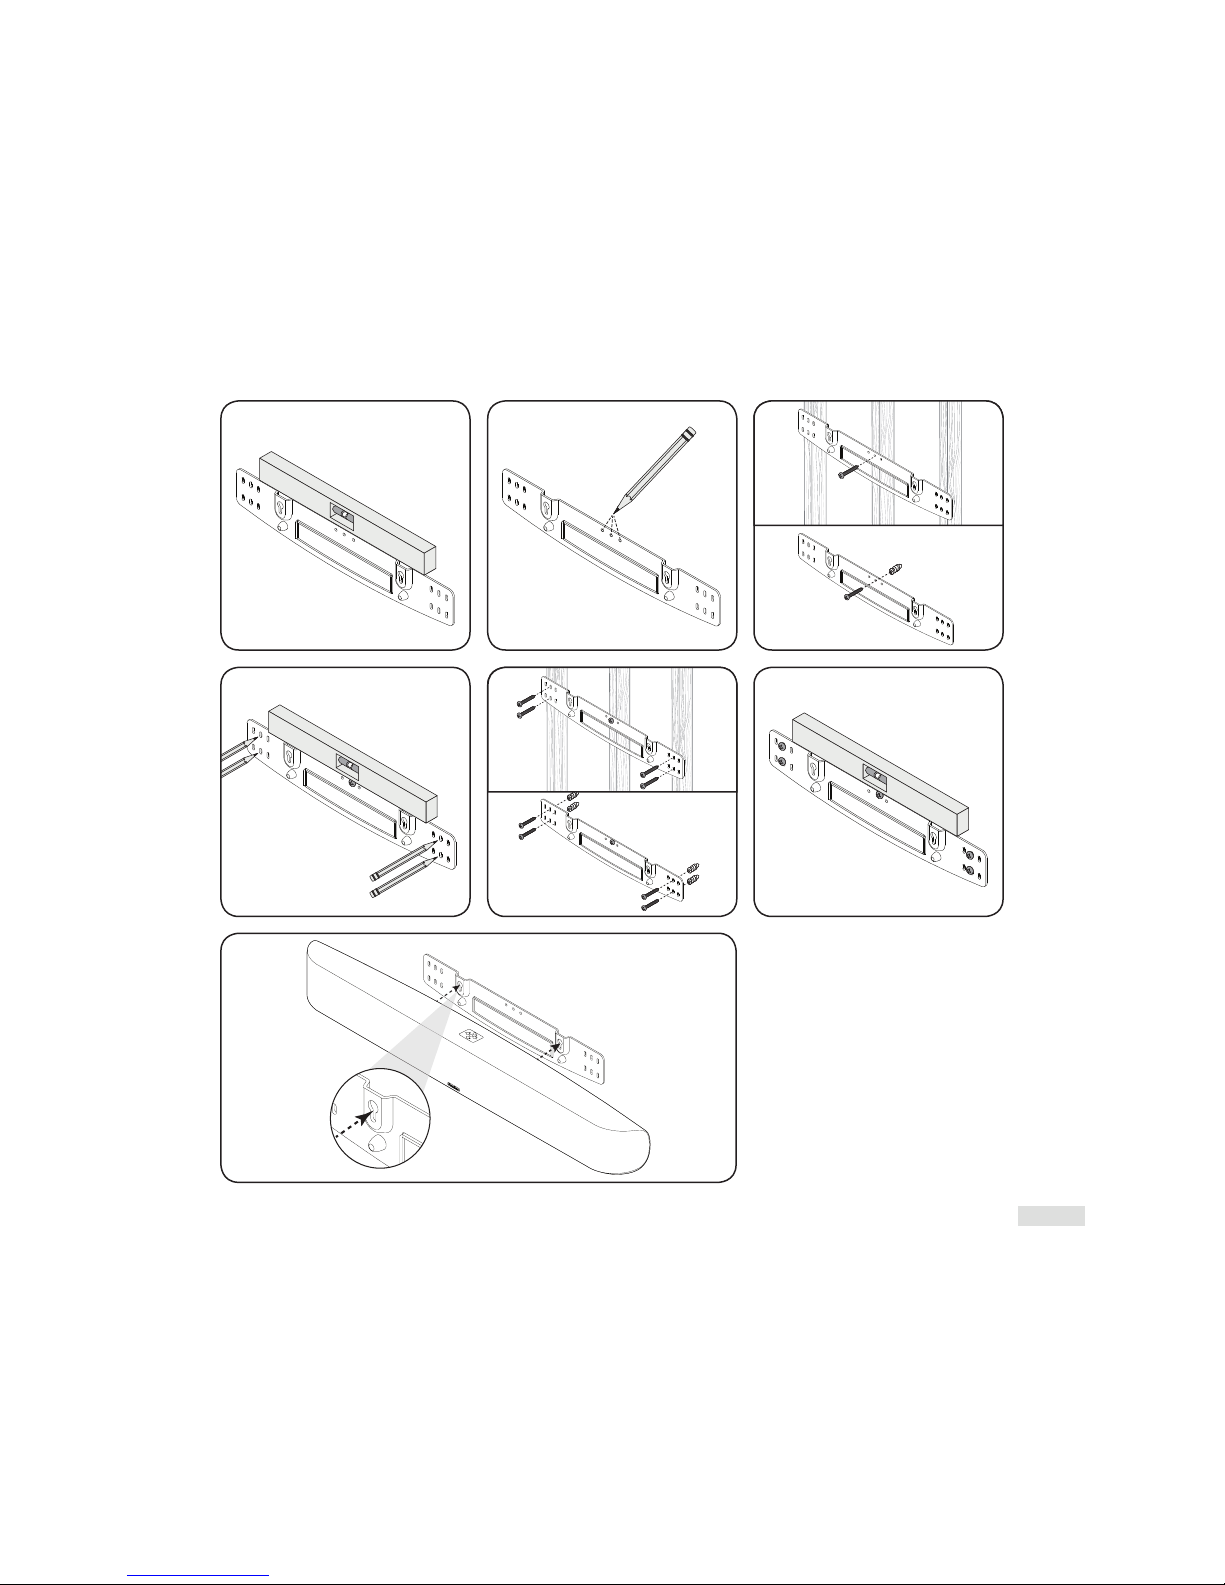
Follow the directions below and use the illustrations (Figs. 2 – 8)
provided on the following pages for guidance.
1 Decide on mounting location and use a level to make sure
Soundscape’s Wall-Mounting bracket sits level (Fig. 2).
2 Mark the three center pilot hole screw locations (Fig. 3).
3 Use a stud finder to determine if there is a stud behind
one of the three center screw locations (not shown).
If a stud is found drill a pilot hole. If no stud is found
use the centermost screw location and drill a pilot hole
for a wall anchor. Install wall anchor (not shown).
4 Using a screw, attach the bracket to the wall. DO NOT
tighten the screw at this point (Fig. 4).
5 Use a stud finder to determine if a stud lies behind any
of
the left and right screw locations. If a stud is found the
top and bottom screw holes with a stud behind them are
your screw locations. If no stud is found use the top
and bottom centermost screw locations as your screw
locations. Use a level to square the bracket and mark the
remaining pilot hole locations
(Fig. 5)
.
6 Remove the wall bracket or pivot bracket to allow access
to the remaining screw locations. a) If a stud is found,
drill pilot holes. b) If no stud is found drill pilot holes
and install wall anchors.
7 Using the screws, attach the wall bracket to the wall.
DO NOT fully tighten (Fig. 6).
8 Use a level to square the bracket, then tighten all screws
(Fig. 7).
9 Attach audio and power cables. Refer to ‘CONNECTION’
section of this manual for more information.
10 Move Soundscape into place. Drop the shoulder bolts
into the wall bracket keyholes (Fig. 8). Before releasing,
make sure the Soundscape has dropped fully into the
keyholes and is rmly in place (Fig. 8 Inset).
Page 9
EN-8
Fig. 2
Fig. 5
Fig. 8
Fig. 3
Fig. 6
Fig. 4
No Studs
No Studs
Studs
Studs
Fig. 7
Page 10

EN-9
POWER CONNECTION
The power cord should be inserted into the AC power
receptacle on the rear panel, then to a nearby AC wall outlet.
The Soundscape integrates a signal sensing power supply
that automatically switches to ‘Standby’ after 20 minutes.
Plugged into the wall, with no signal sensed, the Soundscape
will remain in standby mode.
SIGNAL CONNECTION
When using the Soundscape to reproduce TV audio, your
television’s audio output should be defeated. Some televisions
will allow you to turn off the internal speaker via the television’s
menu system. Others may require you to turn the television’s
volume to ‘zero’ or ‘mute’. Follow the instructions in your TV’s
Owners Manual to zero or mute the volume.
WHERE ARE CONNECTIONS MADE?
Audio connections are made at the signal input section on
the unit’s rear panel and wirelessly for Bluetooth. Five inputs
are available (Fig. 9):
VO@>@K8C)GK@:8C@EGLKJ
VO@>@K8CF8O@8C,@EGLK
V*8@IO&<=K,@>?KE8CF>,@EGLKJ
V Bluetooth (wireless)
WARNING! CUSTOMERS OUTSIDE OF
NORTH AMERICA: If you remove your
Soundscape from the region or country of
original sale, make certain the AC power
supplied inthe new area is suitable before connecting
and operating your Soundscape. Substantially
impaired performance or severe damage may occur
if operation is attempted from an incorrect AC power
source. Such damage is not covered under the
product’s warranty.
CONNECTION
WARNING! ACTION REQUIRED: Turn the Soundscape system OFF before making or breaking any signal
connections! The power cord should NOT be installed, removed or left detached while the other end is still
connected to an AC power source.
Analog In
AC Power In
Coax In
Sub Out
Optical In
1 2
Fig. 9
Page 11

EN-10
Digital Optical: Digital optical utilizes one cable to pass digital audio information (no video). A digital optical
cable offers a high-quality digital connection and passes multi-channel encoded audio between a source
component and an audio output device.
Digital Coaxial: Digital coaxial utilizes one cable to pass digital audio information (no video). A digital coaxial
cable offers a high-quality digital connection and passes multi-channel encoded audio between a source
component and an audio output device.
NOTE! The ‘RCA’ style end of a digital coaxial cable is identical to those found on common left/right analog
RCA cables. However, a cable designed specifically for digital coaxial connections should be employed—do
not use a standard left/right analog RCA style cable because it may not be up to the task of handling the high
bit-rate necessary for a reliable digital connection.
Left/Right Analog RCA: Left/right analog RCA cables are used to pass audio information (no video). An analog
RCA cable can only be used to pass a single channel of audio information between a source component and audio
output device. To achieve two-channels of audio (left/right) you will find that analog RCA cables come bundled as
a stereo pair (2 connectors on each end). Analog RCA connections are not capable of passing the digital encoding
required to reproduce multi-channel audio and thus should not be used with source components where you
desire surround sound output. Older gaming consoles, portable media player docks, VCRs and similar source
components (which are not capable of playing multi-channel encoded content) will often offer connection only
through left/right analog RCA cables. Additionally, users may find source components such as digital media player
docks that utilize a special cable with a 3.5mm ‘headphone style’ jack on one end, and two analog RCA connectors
on the opposite end.
AN INTRODUCTION TO AUDIO CABLES
ROUTING SOURCES VIA A DIGITAL (Optical or
Coaxial) CONNECTION, WITH THE TELEVISION
USED TO SWITCH BETWEEN INPUTS
Some users will choose to route all sources (ex. DVD player, cable
box, game console, media streamer, etc.) to their television via
a digital (optical or coaxial) connection and use the television
to switch between audio/video sources. The advantage of this
connection method is that only one audio cable (either a digital
optical or digital coaxial cable) needs to connect between
the television and the Soundscape. Changing the input on
your television will change the audio signal being sent to the
Soundscape (without having to change the input setting.
A few important points to remember when connecting your
Soundscape:
V Digital optical and digital coaxial connections will provide the
highest audio fidelity when connecting to the Soundscape.
V Your Soundscape has an advanced, built-in digital
decoder. However, if your Soundscape is not producing
sound or surround sound from your Blu-ray player, DVD
player, or other multi-channel audio-capable source
through your TV, you may need to set the player’s digital
audio output to “Bitstream” (also called “Raw”, “Direct
Digital”, or “High Bit Rate”). If “PCM” is selected you’ll lose
the multi-channel encoded sound. Some players only
require you to turn PCM off to configure for multi-channel
encoded sound. Please refer to your player’s owners
manual for more detailed information.
V Audio-only sources capable of only stereo output (such
as a portable media player docks or CD player) will often
connect directly to the Soundscape via the left/right
analog RCA inputs.
Page 12

EN-11
Audio & Video
Connections
Audio & Video
Connections
Audio
Connection
Audio
Connections
Only
Connect your external components (cable box, dvd player, etc.) audio and video connections to your to your TV.
Connect your TV’s audio connections to your Soundscape.
Optional
Subwoofer
[connect to Sub Out,
See Owners Manual
for details]
Single RCA Cable
Sold Seperately
Multi-Channel Audio/Video Sources:
Blu-ray, DVD, Game Console,
Cable Box, Satellite Receiver, Etc.
Digital Out
Power Cable
TV
TV
Câble RCA double (analogique)
Optical Cable
(Digital)
CONNECTION (Cont’d)
Choose your connections option …
RECOMMENDED
CONNECTION
(Fig. 10):
External Components: Connect
Audio & Video Connections to TV.
TV: Connect Audio Connections
to Soundscape.
Fig. 10
WARNING ABOUT
RF INTERFERENCE!
When operating
wirelessly, Soundscape
and subwoofer may be susceptible
to RF interference in the 2.4GHz
bandwidth from microwave ovens
and wireless devices such as WiFi
systems, video game consoles,
cordless telephones, bluetooth
devices and baby monitors.
Generally, this issue (intermittent
sound or slight popping noises)
is easily resolved by physically
separating problematic devices
from one another. A distance
as little as two feet will often
alleviate interference. In the case
of microwaves, interference only
occurs when the microwave is
operating.
Page 13

EN-12
Video
Connections
Only
Choose Audio
Connection:
Audio Connections
Only
Video Connections
Only
Multi-Channel Audio/Video Sources:
Blu-ray, DVD, Game Console,
Cable Box, Satellite Receiver, Etc.
Connect your external components (cable box, Blu-ray player, dvd player, etc.) audio connections to your
Soundscape and the video connections to your TV.
Optional
Subwoofer
Power Cable
Digital OutCoaxial OutAnalog Out
[connect to Sub Out,
See Owners Manual
for details]
Single RCA Cable
Sold Seperately
OROROR
Digital Out
R
Analog Out
L
TV
TV
Dual RCA Cable
(Analog)
Optical Cable
(Digital)
Optical Cable
(Digital)
Coaxial Cable (Digital)
Not Included
ALTERNATIVE CONNECTION
(Fig. 11):
External Components: Connect
Audio Connections to Soundscape
& Video Connections to TV.
Fig. 11
WARNING ABOUT
RF INTERFERENCE!
When operating
wirelessly, Soundscape
and subwoofer may be susceptible
to RF interference in the 2.4GHz
bandwidth from microwave ovens
and wireless devices such as WiFi
systems, video game consoles,
cordless telephones, bluetooth
devices and baby monitors.
Generally,
this issue (intermittent
sound or slight popping noises)
is easily resolved by physically
separating problematic devices
from one another. A distance
as little as two feet will often
alleviate interference. In the case
of microwaves, interference only
occurs when
the microwave is
operating.
Page 14

EN-13
CONNECTION Cont’d
BLUETOOTH CONNECTION
Prev Source Next Source
Top Panel Controls
Remote Control
Enable
Bluetooth
MODE
1 To connect a phone/tablet to the Soundscape, press
the ‘Enable Bluetooth’ button on your remote or
toggle through the source options using the ‘ Previous
Input’ and ‘Next Input’ on the top panel (Fig. 12).
Once the ‘BLUTTH’ [Bluetooth] source option appears
on
the LCD display a short audio notification will
be heard. NOTE: The connection process will take
approximately 1 minute. If your device has been
PREVIO USLY CONNECTED to your Soundscape via
Bluetooth, re - enable Bluetooth and skip step 2.
2 Enab
le Bluetooth on your phone/tablet and search
for “ Paradigm Soundscape” on your Bluetooth device
list. Select “ Paradigm Soundscape” to establish a
connection. Depending on phone/ tablet yo u may
need to change the playback device to “ Paradigm
Soundscape” or it may change
automatically.
WIRELESS RANGE: To ensure transmission between
your Bluetooth-enabled phone or device and the
Soundscape, there should be no more than 6 meters /
20 feet. Some situations may allow for more range.
Experiment with your equipment to determine
maximum range for desired placement.
Fig. 12
Page 15

EN-14
No Subwoofer
If you are not using an external subw oofer, use the ‘UP’
arrow on the Soundscape ’s menu panel to scroll to reach ‘SUB’
then use the ‘RIGHT’
arrow to choose ‘INTERNL’ [INTERNAL].
Activate by pressing the ‘Select’ button and the Soundscape
will respond with ‘SET’.
This sets the Soundscape to repr oduce
the entire frequency range when playing music and movie content.
Adding an External Subwoofer
If desired, an external subwoofer in a wired or wireless capacity
can be used to reinforce low-frequency channel information
in multichannel and stereo recordings. For seamless system
matching, we recommend a Paradigm subwoofer, however any
brand of subwoofer can be connected.
Wired Subwoofer Connection
Using a high-quality RCA style cable, connect the ‘ SUB Out’
on the the Soundscape’s back panel to the ‘ LFE In/Sub In’ on
the subwoofer’s back panel.
Using the ‘UP’
arrow on the Soundscape’s menu panel,
scroll through the options to reach ‘SUB’, then using the
‘RIGHT’
arrow scroll right, then ‘SCROLL UP’
to reach
‘WIRED’. Activate by pressing the ‘Select’ button and the
Soundscape will respond with ‘SET’.
TIP! Reference your subwoofer’s Owners Manual to learn
how to properly adjust the subwoofer’s level and phase
controls to achieve proper blending with the Soundscape.
Wireless Subwoofer Connection
Wireless Subwoofer Receiver
We have included
a wireless subwoofer receiver in the box
with your Soundscape. This receiver is compatible with any
external Paradigm or other brand of subwoofer.
Preparing the external subwoofer for wireless operation.
1 If your Soundscape is not turned on, turn it on at this point.
2 Plug the wireless receiver into the ‘LFE/SUB In’ on
subwoofer.
3 Plug in the external subwoofer.
Syncing an External Subwoofer with
your Soundcape
1 Plug the wireless subwoofer receiver into a wall outlet.
DO NOT PRESS THE SYNC BUTTON TO INITIATE
SYNCING AT THIS POINT.
2 Via the remote control or the top panel, access the
Soundscape’s menu by pressing the ‘MENU’ button.
3 Using the ‘UP’
arrow, scroll through the options to
reach ‘SUB’.
4 Press the ‘RIGHT’
arrow and THEN scroll ‘UP’ through
the options to reach ‘WIRELES’ [WIRELESS].
5 Using the ‘Select’ button, select ‘WIRELES’ [WIRELESS].
6 The Soundscape’s display will read ‘PAIRING STARTED’.
This means the Soundscape is transmitting a wireless
signal. WITHIN the next 30 seconds, you must …
7 Press and hold for 3 seconds,
the ‘Sync’ button on the rear
panel of the wireless receiver . Its blue light will blink rapidly
signalling it is r eady to receive the Soundscape’s signal.
8 The wireless receiver’s LED will glow solid blue once it
receives
the signal and the Soundscape’s display should
read ‘PAIRED’ (i.e. synced).
What to do if Pairing (syncing) Fails
If Pairing fails, it may be that too much time passed between
Steps 7 and 8 above. Repeat the pairing process by pressing
the ‘LEFT’
arrow. Scr o ll back through the menu to ‘WIRELES’
[WIRELESS] mode and repeat Steps 5 through 8 (above) until
PAIRING is achieved.
If pairing is not achieved on the next try, check to see that the
Soundscape and receiver are within 50’ (15 m) of each other
and that
there are no obstructions in this path. Check that
all equipment is plugged in and wall outlets ar e functional. If
pairing cannot be achieved, contact y our Paradigm Dealer.
50’50’
Wireless Range
or 15 Meters
USING A SUBWOOFER
Page 16

EN-15
Your Soundscape is capable of detecting and automatically
decoding multichannel audio formats, such as those found
on DVD and Blu-ray movies.
DIGITAL INPUTS (Optical and Coaxial)
When utilizing a digital connection, your Soundscape can
process the following formats:
V Dolby Digital
V DTS™ Digital Surround
V Digital PCM
V Digital Stereo
ANALOG INPUTS (Left/Right RCA)
Digitally encoded sound information cannot be transmitted
to an analog input. This connection method is adequate for
most devices that only offer two channels of audio output
(i.e. VCRs, CD players, older game consoles or portable media
player doc
ks). Although most surround-sound-capable
devices such as DVD and Blu-ray players offer analog and
digital connections, the digital connection should always be
employed. If a source device is connected via an analog left/
right RCA connection, the 5
.1-channel encoded audio
content will not correctly send to the Soundscape.
SURROUND SOUND DECODING
TOPPANEL CONTROLS
POWER ON/OFF & PREVIOUS SOURCE: Press and hold the
‘Power’ button for 3 seconds to turn unit on or off. Once
power is turned on, this button also controls navigation
to a ‘ Previous Source’ selection. See Fig. 13 for a more
visual description.
VOL+ / VOL–: Adjusts volume level up or down Fig.
13.
MENU / NEXT SOURCE: Press this button to enter the menu
system. Once power is turned on, this button also controls
navigation to a ‘Next Source’
selection. See Fig. 13 for a
more visual description.
PREVIOUS / NEXT SOURCE: Use the ‘Next Source’
and
‘Previous Source ’
buttons to cycle back and forth through
inputs (Fig . 13). The order of inputs is: Digital Optical 1
Digital
Optical 2
Digital Coaxial
Analog RCA Bluetooth.
ACCESSING THE MENU FROM THE TOP PANEL
To access the Menu, pr ess and hold the top-panel ‘Menu’ button
for 3 seconds (Fig. 13). After the menu has been activated, the fiv e
buttons on the top panel controls will function as ‘ Scroll Up’
/
’Scroll Down’
/ ’Scroll Left’ / ‘Scroll Right’ directional
buttons allowing you to na vigate the menu and press the
‘Select’ button to accept selections. Exit the menu by pressing
the ‘Left’
button or simply wait for the automatic time out.
MUTING THE SYSTEM: Cannot be done from the top
panel controls. Instead, use the remote control.
CONTROL OPTIONS
Power Control
Power On/O
Scroll Left
Prev Source Next Source
Select
Volume Up
Volume Down
Scroll Down
Scroll Up
Menu/
Scroll Right
Volume &
Source Controls
Menu Controls
Fig. 13
Page 17

EN-16
CAUTION! Danger of
explosion if battery is
incorrectly replaced.
Replace only with the
same or equivalent battery type.
REMOTE CONTROL
The Soundscape’s Remote (Fig. 14) controls the following:
‘POWER ON/OFF’: Turns the Soundscape on or off.
‘PREVIOUS SOURCE’ / ‘NEXT SOURCE’: Cycles through the
inputs. The order of the inputs is: Digital Optical 1
Digital
Optical2
Digital Coaxial Analog RCA Bluetooth.
‘VOL+’ / ’VOL–’: Adjusts volume level up or down.
‘MUTE’: Mutes the volume. When muted, the Soundscape will
display ‘MUTE’. Pressing this button a second time will restore
the previous volume setting. Additionally, you can turn mute
off by pressing either of the volume buttons.
‘MENU’: Allows you to enter the Soundscape Menu. Once
the menu is activated, use the ‘Scroll Up’
/ ‘Scroll Down’ /
‘Scroll Left’
/ ‘Scroll Right’ arrows to access menu features.
Press the ‘Select’ button to accept the various selections.
‘SOURCE’: Press to cycle through the inputs for playback:
Digital Optical > Digital Coaxial > Analog RCA > Bluetooth.
‘ENABLE BLUETOOTH’: Press to enable wireless music
streaming from your Bluetooth-enabled mobile phone or
other device. Device must be synced with the Soundscape
prior to listening. For syncing instructions and maximum
range for wireless streaming, see Wireless Bluetooth
Connection instructions, page 13.
‘PLAY’ / ‘PAUSE’: Press to play or pause Bluetooth wireless
music playback.
‘PREVIOUS TRACK’: Press to return to the previous track
during Bluetooth wireless music playback.
‘NEXT TRACK’: Press to move to the next track during
Bluetooth wireless music playback.
‘MUSIC MODE’: Press to enable 2-channel music listening
‘MOVIE MODE’: Press to activate Paradigm Virtual Surround
for a full 5.1 virtual surround sound listening experience.
PROGRAMMING A SECOND REMOTE: The Soundscape
can be programmed to respond to a second remote. See
the ‘IR Learning’ section of this manual for programming
instructions.
CHANGING THE REMOTE’S BATTERY
Your Soundscape’s remote control unit
uses two (2) AAA batteries. Access these
batteries by releasing the clip at the
bottom in the rear of the remote control.
Mute
Volume Down/
Scroll Down
Scroll Right/
Next Source
Menu
Volume Up/
Scroll Up
Play/Pause
Next Track Previous Track
Enable
Bluetooth
Source
Select
Power On/O
Music Mode*
* Sonic enhancements
to listening experience
according to mode
Movie Mode*
Scroll Left/
Prev Source
MODE
Fig. 14
Page 18

EN-17
MENU UP / DOWN (scrolling)
PAIRING STARTED (scrolling)
COAXIAL
OPTIC 2
OPTIC 1
CONFIRM
ONSHELF
ON WALL
AUTOOFF
DIM
BRIGHT
ANALOG
EXIT
RESET
LEARN
SOURCE NAME
SUB
INSTALL
DISPLAY
MODE
MUSIC
BLUETOOTH
PAIRED
FAILED
WIRELESS
WIRED
INTERNAL
MOVIE
MENU FLOW
CHART
The Menu system can
be reached by pressing
‘Menu‘ on the remote
control or by pressing and
holding the ‘Menu’ button
on the top-panel controls
for approximately three
seconds.
To navigate Soundscape’ s
menu system use the ‘Scroll
Up’
/ ’Scroll Down’ /
’Scroll Left’
/ ‘Scroll R ight’
directional buttons.
Use the ‘Select’ button to
choose a function.
Page 19

EN-18
ANALOG
COAXIAL
OPTIC 2
OPTIC 1
PREVIOUS INPUT
NEXT INPUT
MUTE
VOLUME -
VOLUME +
POWER OFF
ON
OFF
SURROUND
TREBLE
BASS
LOUDNESS
+6 dB
+4 dB
+2 dB
0 dB
-2 dB
-4 dB
-6 dB
POWER ON
POWER TOGGLE
MUSIC
MOVIE
SELECT
RIGHT
LEFT
DOWN
UP
MENU
NEXT TRACK
PLAY / PAUSE
PREVIOUS TRACK
BLUETOOTH
ON
OFF
+6 dB
+4 dB
+2 dB
0 dB
-2 dB
-4 dB
-6 dB
Page 20

EN-19
THE MENU SYSTEM
ENTERING AND EXITING THE MENU
SYSTEM
From the Soundscape’s Top Panel
To access the Menu System from the Soundscape’s top panel,
press and hold the ‘Menu’ button (Fig. 13).
Via the Soundscape Remote
To access the Menu System from the remote, press ‘Menu’
(Fig. 14). To exit, press ‘Menu’ again or select the ‘Left ’
button.
How to Use the Navigation Buttons
MENU OPTIONS
Menu Option: MODE
‘MUSIC’: Scroll to select ‘MUSIC’. To choose ‘MUSIC’, press
‘Select’ then ‘Scroll Up’
or ’Scroll Down’ to activate any/
all of the additional mode options.
‘MOVIE’: Scroll to select ‘MOVIE’. To choose Movie press
‘Select’ ‘Scroll Up’
or ’Scroll Down’ to activate any/all of
the additional mode options.
‘LOUDNES’ [LOUDNESS]: Enter the ‘SUROUND’ submenu
by pressing the ‘Scroll Right’
directional button. To activate
press ‘Select’ for ‘ON’, to deactivate press ‘Select’ for ‘OFF’.
‘BASS’: Enhance (+) or decrease (-) bass output in 2-dB
increments. Activate by pressing the ‘Scroll Right’
directional
button, find your desired setting, press ‘Select’ and the
Soundscape will respond with ‘SET’.
‘TREBLE’: This mode allows you to enhance (+) or decrease
(-) treble output in 2 dB increments. Activate by pressing the
‘Right’ directional button, find your desired setting, press
‘Select’ and the Soundscape will respond with ‘SET’.
‘SUROUND’ [SURROUND]: Enter the ‘SUROUND’ submenu to
engage Paradigm’s Virtual Surround Sound
by pressing the
‘Scroll Right’
directional button. This menu allows you to turn
Soundscape’s surround channels ‘ON’ or ‘OFF’.
‘SUROUND’ > ‘ON’ [SURROUND ON]: This option configures
the
Soundscape (when it detects 5.1-channel encoded content)
to fully reproduce all 5.1-channels of information including
simulated surround channels.
Activate the option by pressing
the ‘Select’ button and the Soundscape will respond with ‘SET ’.
‘SUROUND’ >‘OFF’ [SURROUND OFF]: This option configures
the
Soundscape (when it detects 5.1-channel encoded
content) to down-mix to 3.1-channel output (left/center/right
channels + external subwoofer) and does not use simulated
surround channels. All content originally intended for the
surround channels is routed to the left/center/right channels.
Activate the option by pressing the ‘Select’ button and the
Soundscape will respond with ‘SET’.
TIP! Both multichannel and stereo sound can be heard as
surround.
When not in Surround Mode, the Soundscape’s
default Mode is ‘Stereo’.
‘Menu’ button enters top
level menu or exits the
menu system.
‘Right’ arrow button goes
down deeper into a menu.
‘Left’ arrow button and
for exiting the menu.
‘Up’ button increases
the value of a setting
(i.e. volume) or scrolls up
through options
‘Down’ button decreases
the value of a setting (i.e.
volume) or scrolls down
through options
‘Select’ button chooses/
sets options and exits
menu level.
REMOTE
CONTROL
TOP PANEL
HOW TO USE THE
NAVIGATION BUT TONS
Page 21

EN-20
Menu Option: DISPLAY
DISPLY [DISPLAY]: Enter the ‘DISPLY’ submenu by pressing
the ‘Scroll R ight’
directional button. The settings in this
menu allow you to adjust the brightness of the Soundscape’s
display and configure the display to turn on and off
automatically.
DISPLY [DISPLAY] > BRIGHT: This option configures the
Soundscape’s display to be on at full brightness.
DISPLY [DISPLAY] > DIM: This option configures the
Soundscape’s display to be on at a reduced brightness when
the Soundscape is on. Activate the option by pressing the
‘Select’ button and the Soundscape will respond with ‘SET’.
DISPLY [DISPLAY] > AUTO OFF: This option configures the
Soundscape’s display to be on at a full brightness when a
setting (such as volume or input) is changed. After a few
seconds, the display will turn off. Activate by pressing the
‘Select’ button and the Soundscape will respond with ‘SET’.
Menu Option: INSTALL
‘INSTAL’ [INSTALL]: Enter the ‘INSTAL’ submenu by pressing
the ‘Scroll R ight’
directional button. The settings in this
menu will adjust the Soundscape’s equalization and voicing
for optimal performance on the wall or on a flat surface (i.e.
credenza or shelf) installation.
‘INSTAL’ [INSTALL > ‘ON WALL’: This option configures the
Soundscape’s audio output to sound best in an on-wall
installation. Activate the option by pressing the ‘Select’
button and the Soundscape will respond with ‘SET’.
‘INSTAL’ [INSTALL] > ‘ON.SHELF’ [ON SHELF]: This option
configures the Soundscape’s audio output to sound best on
a flat surface (credenzal or shelf) installation. Activate the
option by pressing the ‘Select’ button and the Soundscape
will respond with ‘SET’.
Menu Option: SUB
SUB: Enter the ‘SUB’ submenu by pressing the ‘Scroll Right’
directional button. Here you may configure the Soundscape for
external subwoofer integration.
PLEASE NOTE: When you select the ‘SUB’ ‘WIRED’
option in the Menu, a wireless connection is no longer
viable until the menu option for wireless is turned
back on. However, when you select ‘SUB’
‘WIRELES’
[WIRELESS] in the menu, the Soundscape will still
support a wired subwoofer connection.
It is possible to connect multiple wired subwoofers using
a ‘Y’ splitter attached to the subwoofer cable, wireless
receiver, or an output on the rear of your subwoofer that
is designed to daisy chaining multiple subs. See your
Paradigm dealer for more information.
‘SUB’ > INTERNL’ [INTERNAL]: This option allows the
Soundscape to handle all bass information. No external
subwoofer is required or allowed when this mode is
activated. Activate the option by pressing the ‘Select’ button
and the Soundscape will respond with ‘SET’.
‘SUB’ > ‘WIRED’ : This option configures the Soundscape
to use an external subwoofer connected with a cable to the
Soundscape’s Sub Out RCA connection. Activate by pressing
the ‘Select’ button and the Soundscape will respond with ‘SET ’.
TIP! Reference your external subwoofer’s Owners Manual
to learn how to correctly adjust level and phase control
to achieve seamless blending with the Soundscape.
‘SUB’ > ‘WIRELES’ [ WIRELESS]: Enter the ‘SUB’
‘WIRELES’
[WIRELESS] submenu by pressing the ‘Scroll Right’
directional button. Using the included wireless subwoofer
receiver you can sync the Soundscape with a Paradigm or
other brand of subwoofer.
Page 22

EN-21
‘SUB’ > ‘WIRELES’ [WIRELESS]> ‘PAIRING STARTED’ >
‘PAIRED’ OR ‘FAILED’: These messages, visible on the
Soundscape’s front-panel display, let you know that your
Soundscape is transmitting a signal that will be picked up by
the supplied wireless subwoofer receiver to initiate pairing
with the external subwoofer.
TIP! With all the options on the previous page, the
Soundscape will operate to approximately 80 Hz below
which the external subwoofer will reproduce lower bass
frequencies.
Menu Option: SOURCE NAME
‘SRC.NAM’ [SOURCE NAME]: Enter the ‘SRC.NAM’ submenu
by pressing the ‘Scroll Right’
directional button. The
settings in this menu will allow you to assign new names to
display on the soundbar when changing inputs. For example,
you can program the ‘OPTIC 1’ input to display ‘DVD’.
Using the ‘Scroll Up’
/ ‘Scroll Down’ directional buttons,
you can select and program the following input names:
V OPTIC 1 [DIGITAL OPTICAL 1]
V OPTIC 2 [DIGITAL OPTICAL 2]
V COAX [DIGITAL COAXIAL]
V ANALOG [LEFT/RIGHT RCA ANALOG]
V BLUTTH [BLUETOOTH]
Choose the input name you want to reprogram and press
the ‘Scroll R ight’
directional button. The Soundscape will
display the current name. Pressing the ‘Scroll Up’
/ ‘Scroll
Down’
directional buttons will cycle through the available
alpha-numeric characters. Pressing the ‘Scroll Left’
/ ‘Scroll
Right’
directional buttons will move to the next space.
You can use up to seven characters when inputting a new name.
To finish programming an input name, use the
‘Scroll
Left’ /
‘Scroll
Right’ directional buttons to move all the way to the
left or right.
Menu Option: LEARN
PLEASE NOTE: There may be remotes that the
Soundscape cannot learn or cannot learn correctly. Due
to the number of remotes on the market it is impossible
to advise which remotes will or will not work.
PLEASE NOTE:
When learning from a second remote, you
may find it does not have buttons that directly correspond
with all available soundbar commands. Not all commands
have to be programmed. Some remotes offer ‘Function’
buttons (F1, F2, etc.) that can be used to program unique
soundbar commands.
PLEASE NOTE:
Some remote controls offer discrete ‘Power
On’ and ‘Power Off’ buttons. Some offer a single button
to toggle power on and off. The learning function of the
soundbar allows you to program either scenario.
‘LEARN’: Enter the ‘LEARN’ submenu by pressing the
‘Scroll Right’
directional button. The settings in this menu
program the soundbar to respond to a second remote
control. Soundscape’s factory supplied remote control will
always work with the soundbar, even if the soundbar is
programmed to respond to a second remote.
Using the ‘Scroll Up’
/ ‘Scroll Down’ directional buttons,
you can ‘Select’ and program the following commands:
V PWR.TGL [POWER TOGGLE]
V PWR.ON [POWER ON]
V PWR.OFF [POWER OFF]
V VOL + [VOLUME +]
V VOL – [VOLUME –]
V MUTE [MUTE VOLUME]
V NX.INPT [NEXT INPUT]
V PR.INPT [PREVIOUS INPUT]
V OPTIC 1 [OPTICAL 1 INPUT]
V OPTIC 2 [OPTICAL 2 INPUT]
V COAX [COAXIAL INPUT]
V ANALOG [LEFT/RIGHT
RCA ANALOG INPUT]
V BLUTTH
[BLUETOOTH INPUT]
V BT PRV
[PREVIOUS TRACK]
V BT PLPS [PLAY/PAUSE]
V BT NXT [NEXT TRACK]
V UP
V DOWN
V LEFT
V RIGHT
V SELECT
V MENU
V MOVIE
V MUSIC
MENU OPTIONS Cont’d
Menu Option: SUB Cont’d
Page 23

EN-22
Menu Option: LEARN
TIP! Before beginning the ‘LEARN’ process make sure you
have the second remote (i.e. the one you wish to program)
nearby.
EXAMPLE GIVEN BELOW: Learning ‘Power On’ Function
= Soundscape Remote = 2nd Remote
User Action:
In the Menu ‘Scroll Up’’
to ‘LEARN’ (IR Learning)
Result:
User Action:
Press the ‘Scroll Right’
directional button to
enter the ‘LEARN’ sub-menu.
Press the ‘Scroll Up’
directional button to
‘PWR.ON’ (Power On).
User Action:
Press Select to choose ‘PWR.ON’.
Result:
User Action:
Immediately push Power Toggle button on 2nd remote.
Result:
User Action:
Wait for Soundscape to process new IR coding from
2nd remote.
Result:
User Action:
Again, immediately push the ‘Power Toggle’ button
on 2nd remote.
Result:
User Action:
Again, wait for Soundscape to process new IR coding
from 2nd remote.
OR
The LCD screen will read ‘SET’ if the ‘Power Toggle’
function has been learned by the Soundscape.
User Action:
If IR learning has failed, the LCD will read ‘ERROR’,
repeat the IR Learning process.
NOTE: an ‘ERROR’ warning may also indicate that
your Soundscape does not recognize your remote’s
IR coding (see note on page 21).
User Action:
To ensure the action was successful exit the menu
by pressing the ‘Scroll Left’
directional button
2 times. Now press the ‘Power Toggle’ on the 2nd
remote to check functionality
Result:
Option
Chosen
(Example):
Result:
2x
Page 24

EN-23
MENU OPTIONS Cont’d
TROUBLESHOOTING
Problem Solution
No Sound
No Surround
Sound
Menu Option: RESET
WARNING! RESET erases all user-configured presets and
restores settings to the factory defaults. It cannot be
undone without reconfiguring presets and settings.
‘RESET’: Enter the ‘RESET’ submenu by pressing the ‘Scroll
Right’
directional button. ‘CONFIRM’ will appear in the
LCD display. Press ‘Select’ to erase all user-configured presets.
Menu Option: EXIT
To exit the Menu, select the ‘EXIT’ option at the end of the
menu system and press the ‘Select’ button.
Check Soundscape is plugged in and turned
on at a wall outlet
Check wall outlet is working
Check connections
Check inputs
Check mode settings
Check internal or external subwoofer settings
Check Program Format
Resync for wireless
Resync for Bluetooth (if using Bluetooth)
Check format settings at source Check the surround mode is turned on in
menu options.
Page 25

EN-24
TECHNICAL SPECIFICATIONS
Design
Bass-reflex design housing seven high-performance drivers
each powered by its own amplifier channel. Three isolated
physical channels: Left channel and right channel each
feature a 2-driver complement. Center channel features 3
drivers. Paradigm Virtual Surround Sound is achieved through
sophisticated DSP digital signal processing algorithms.
The LFE/Sub channel harnesses the bass power of the four
woofers which work together as a subwoofer below 120 Hz.
Molded UV resistant ABS enclosure.
Crossover
Digital 3rd-order at 2 kHz; digital 2nd order at 80 Hz
High-Frequency Drivers
3 x 25-mm (1˝) PAL™ anodized pure aluminum tweeters
Bass / Midrange Drivers
4 x 102-mm (4˝) composite cones each with a 25 mm (1˝)
voice coil
Low-Frequency Extension
30 Hz (DIN*)
Frequency Response per Channel (L/C/R)
40 Hz – 20 kHz (±2 dB)
Sensitivity – Room / Anechoic
88 dB / 85 dB @ 0.1 Vrms input / Volume 88
Amplifier Power
7 x 50 watts Peak Power / 7 x 25 Watts RMS Sustained
Inputs
2 x digital optical; 1 x
digital coaxial; 1 x analog RCA;
1 x Bluetooth
H x W x D (including factory pre-attached feet)
5-1/2˝ x 42˝ x 5 in
14 cm x 106.7 cm 12.7 cm
Weight (unpacked)
20 lb / 9.1 kg each
Finish
High Gloss
Black
Accessories (included)
Wireless receiver with DC adaptor, remote control with 2 ‘AAA’
batteries, two pre-attached feet, 1 wall-mounting bracket with
levelling screws, 1 power cord, 1 analog RCA 1.8-m (6’) cable,
1 x digital optical cable
*DIN 45 500. Indicates - 3 dB in a typical listening room.
LIMITED WARRANTY
Paradigm warrants this product against defects in materials and workmanship under normal use and operation for a period of
one (1) year from the date of retail purchase by the original end-user purchaser. For warranty purposes you must retain your sales
receipt and this Owners Manual for warranty to be valid.
For additional product support, call Paradigm at 905-696-2868 or email service@paradigm.com.
Page 26

PRODUCT CONSUMES LESS
THAN 1 WATT IN STANDBY.
Paradigm, Soundscape and all associated proprietary and patented designs and technologies are registered trademarks of Paradigm
Electronics Inc. Copyright © Paradigm Electronics Inc. All rights reserved. All other trademarks are the property of their respective owner(s).
Paradigm Electronics reserves the right to change specifications and/or features without notice as design improvements are incorporated.
Paradigm Electronics Inc.
205 Annagem Blvd., Mississauga, ON Canada L5T 2V1
121213
For more information visit
paradigm.com
Page 27

Page 28

Page 29

Page 30

 Loading...