

Page 1
LTF/EN A
MANUAL
English • Rev. 1.5 Effective: July 2017
Please read this manual
before you y your new Papillon RAQOON
for the rst time.
Page 2
Page 3
PAPILLON RAQOON: LIGHTWEIGHT,
SAFE, HIGH PERFORMANCE
Congratulations, you have chosen the new lightweight A-Class glider PAPILLON RAQOON. We
would like to thank you for your condence in Papillon and see this as conrmation to continue to pursue and further develop our uncompromising quality standards. We wish you many
enjoyable ights and great moments in the air.
If you are preparing for the launch with your Raqoon, you know that it doesn’t take much to
start, because this is what the Raqoon was designed for. With its hybrid properties, it starts
with 30% less wind and running. The control phase becomes easier. Its properties in the air also
help you: with its lighter canopy it wants to lead you into the thermals.
The dialogue is important to us because we are always trying to optimize the products in terms
of “from pilots for pilots”. The exchange of experience at Papillon is a high priority. Therefore,
we are looking forward to active contributions in the form of suggestions and criticism. If questions remain open, we will gladly help you at any time.
See you UP in the sky!
Your Papillon Paragliders Team
This manual is an important part of the glider.
Please read it carefully, because there is an OBLIGATION to deal with the glider
and its special features. The manual is supposed to make the handling with the
PAPILLON RAQOON as easy and safe as possible.
PAPILLON PARAGLIDERS
Wasserkuppe 46
D-36129 GERSFELD
Fax: +49 (06654) 82 96
Tel. +49 (06654) 75 48
[email protected]
papillon-paragliders.com
Page 4

CONTENTS
Welcome to the PAPILLON WORLD OF PARAGLIDING! 6
PAPILLON RAQOON: Lightweight, safe, high performance 7
RAQOON 8
- Usage 8
- Motorised Paragliding 8
- Winching 9
- Base- and brakeline adjustment 9
- Safety precautions 10
Equipment Description 11
- Short description 11
- Risers 12
- Speed system 13
The Flight 14
- The Launch 14
- Reverse Launch 16
- Turning 16
- Active Flying 16
- Landing 17
- Strong Wind Landings 18
- Landing on Slopes 18
- Top Landings 18
Rapid descent 19
- „Big Ears“ 19
- B-Stall 19
Advanced Handling 21
- Spiral Dive 21
- Wingover 22
- Full Frontal 22
- Collapses 22
- How to avoid collapses 22
- Deep Stall 23
- Fullstall 24
- Partial Stall 24
- Negative Turn 24
- Emergency Piloting 25
- Transport and storage 25
- Repairs 25
Maintenance and Care 26
- Maintenance and care 26
- Nature and environment-friendly behaviour 26
Page 5

Flying Accessories 27
- Harness 27
- Suitable Rescue Systems 27
Presumption of risk 28
- Liability claim and renouncement of exclution 28
- Safety Advice and Liability 28
Release of liability, renouncement of entitlement 29
Technical data Papillon RAQOON 30
Color-Info Papillon RAQOON 31
Line Code RAQOON 32
Line Plan RAQOON 33
Requirement for LTF/EN A-Certication 39
Instruction leaet for repairs & 2-yearly-check 40
Line order form 41
Reply card 42
MAINTANANCE MANUAL 43
Topic of the inspection and reinspection intervals 44
- Who may inspect/test? 44
- Individual personal prerequisites for the inspections 44
- Necessary equipment and documentation 45
During the inspection the following steps are to be taken in: 45
- Positive identication of the device: 45
- Inspection of the reserve parachute 45
- Testing of the topsail, undersail, seams, reserve parachute of 45
- Holes and tears 45
- Abrasion and deformities 46
- Testing of the ribs 46
- Check of the tear resistance 46
- Porosity check of the canopy 46
- Connection parts 47
- Lines 47
- Check of the line length and line attachments 47
- Measuring the line lengths: 48
- Occasional check of trim and adjustment 48
- Description of the materials and technical data 48
- Miscellaneous 48
Completed check very important! 49
Page 6
WELCOME
TO THE PAPILLON WORLD OF PARAGLIDING!
Page 7

PAPILLON RAQOON
LIGHTWEIGHT, SAFE, HIGH PERFORMANCE
The RAQOON combines safety, low weight, performance and a direct sporty handling. This
makes it a perfect all-round glider. His forgiving behaviour not only ensures a good feeling for
beginners, but also for ambitious cross-country pilots and alpinists.
The RAQOON precisely applies control impulses and combines EN-A typical tolerance with
dynamics. The good-natured ight characteristics are additionally enhanced by the low canopy
weight. His reactions are correspondingly damped. Its excellent gliding and climbing ability
helps you to efciently convert even weak thermals into heights.
Its launch behaviour is extremely simple and good-natured. Even in zero wind, the lightweight
canopy reliably climbs above the pilot with little effort. In addition, the RAQOON’s excellent
low-speed ight characteristics allow a low take-off speed, allowing you to maintain a longer
control phase at take-off.
The RAQOON is based on the latest ndings of ow simulation. Complex calculations of the
High Pressure Crossport Design (HPCD) not only reduce weight, but also maximize cross-ventilation of the Crossports. The efciency of the system is already evident in the lifting phase. It
provides a very fast pressure build-up and gives the wing a balanced internal pressure during
ight. The 3D-shaping and optimized wing prestressing ensure perfect airow, while the Precision Prole Nose System (PPN) ensures optimum airow to the prole. Miniribs and the Brake
Gathering System (BGS) help the prole achieve greater shape delity at the rear edge and
transfer control impulses precisely to the wing. A very straightforward line concept with just a
few main lines ensures easy handling and a good overview for ground handling. The risers are
equipped with the Pilot Assistant (PAS) - in addition to the colour markings, icons provide a
better orientation of the line levels.
Only high-quality durable materials were used for the material mix. When it comes to porosity,
the lightweight material with double coating is clearly superior to heavy materials. This is now
conrmed by long-term results and thus refute the myth that heavier materials should achieve
better check results.
MANUAL | PAPILLON PARAGLIDERS | RAQOON 6 | 7
Page 8
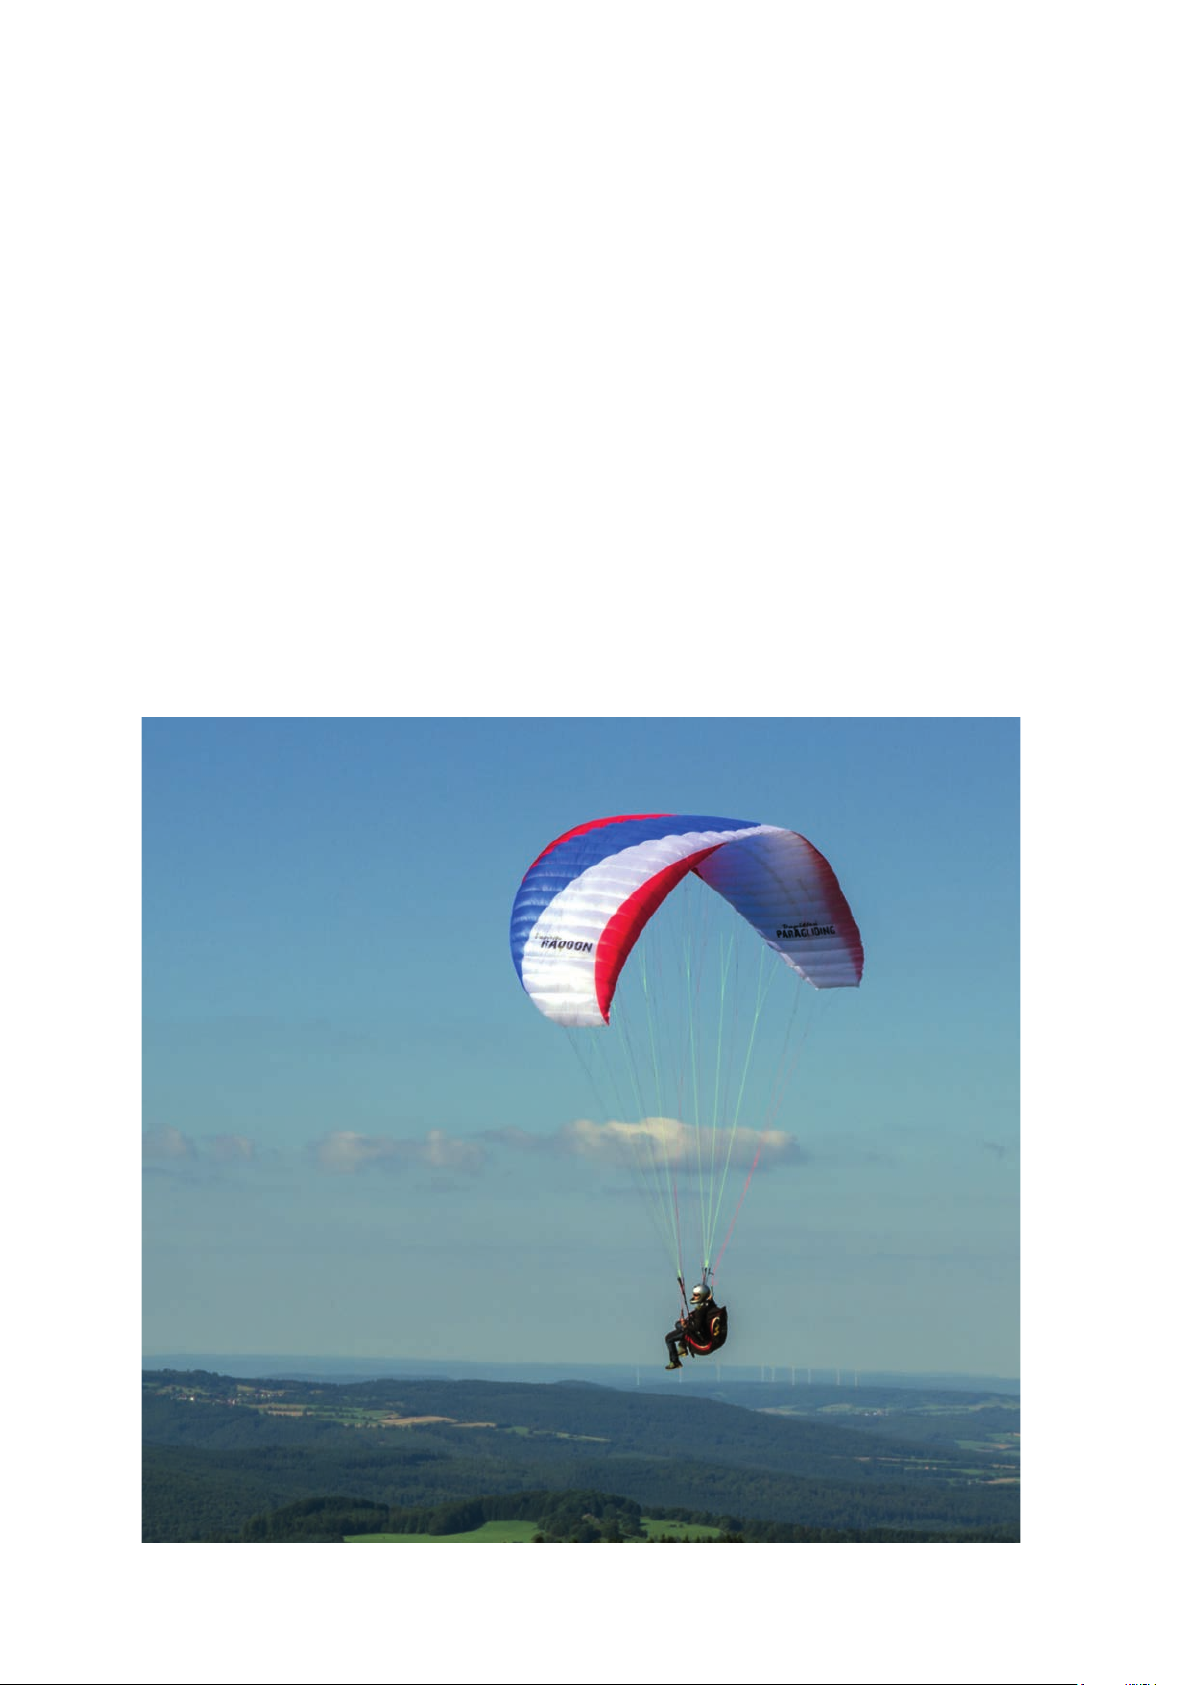
RAQOON
Usage
The RAQOON is suitable as a training glider and not only aimed at beginners, who want to y
with a small pack size and little weight, the modern wing also guarantees sustainable fun for
ambitioned pilots. The RAQOON is only designed for solo usage.
The RAQOON is a light aircraft with a mass of less than 120 kg in the class of paragliders. All
sizes are certied according to LTF/EN-A.
The size XL is additionally approved for double-seat operation.
Motorised Paragliding
The HIMALAYA is not certied for paramotor usage.
Page 9
Winching
Because of its excellent start characteristics and its high trimmed speed, the Papillon RAQOON
offers the best conditions for winching operations. Take the following points into account:
– Do not use a tow line tension over 100 kp with the Papillon RAQOON.
– If you are not operating at your usual winch, get aquainted with the local procedures. Every
visitor on unfamiliar ying grounds needs to get a good brieng by a local pilot.
– Never winch the Papillon RAQOON with loads outside the permitted weight range.
– All involved persons, machines and accessories need to have the appropriate licenses,
approvals or certication for winching. That applies to pilots, hoist operator, towing attach-
ment, attachment points as well as all further machines and accessories for wich a certi-
cate of competence is required.
Base- and brakeline adjustment
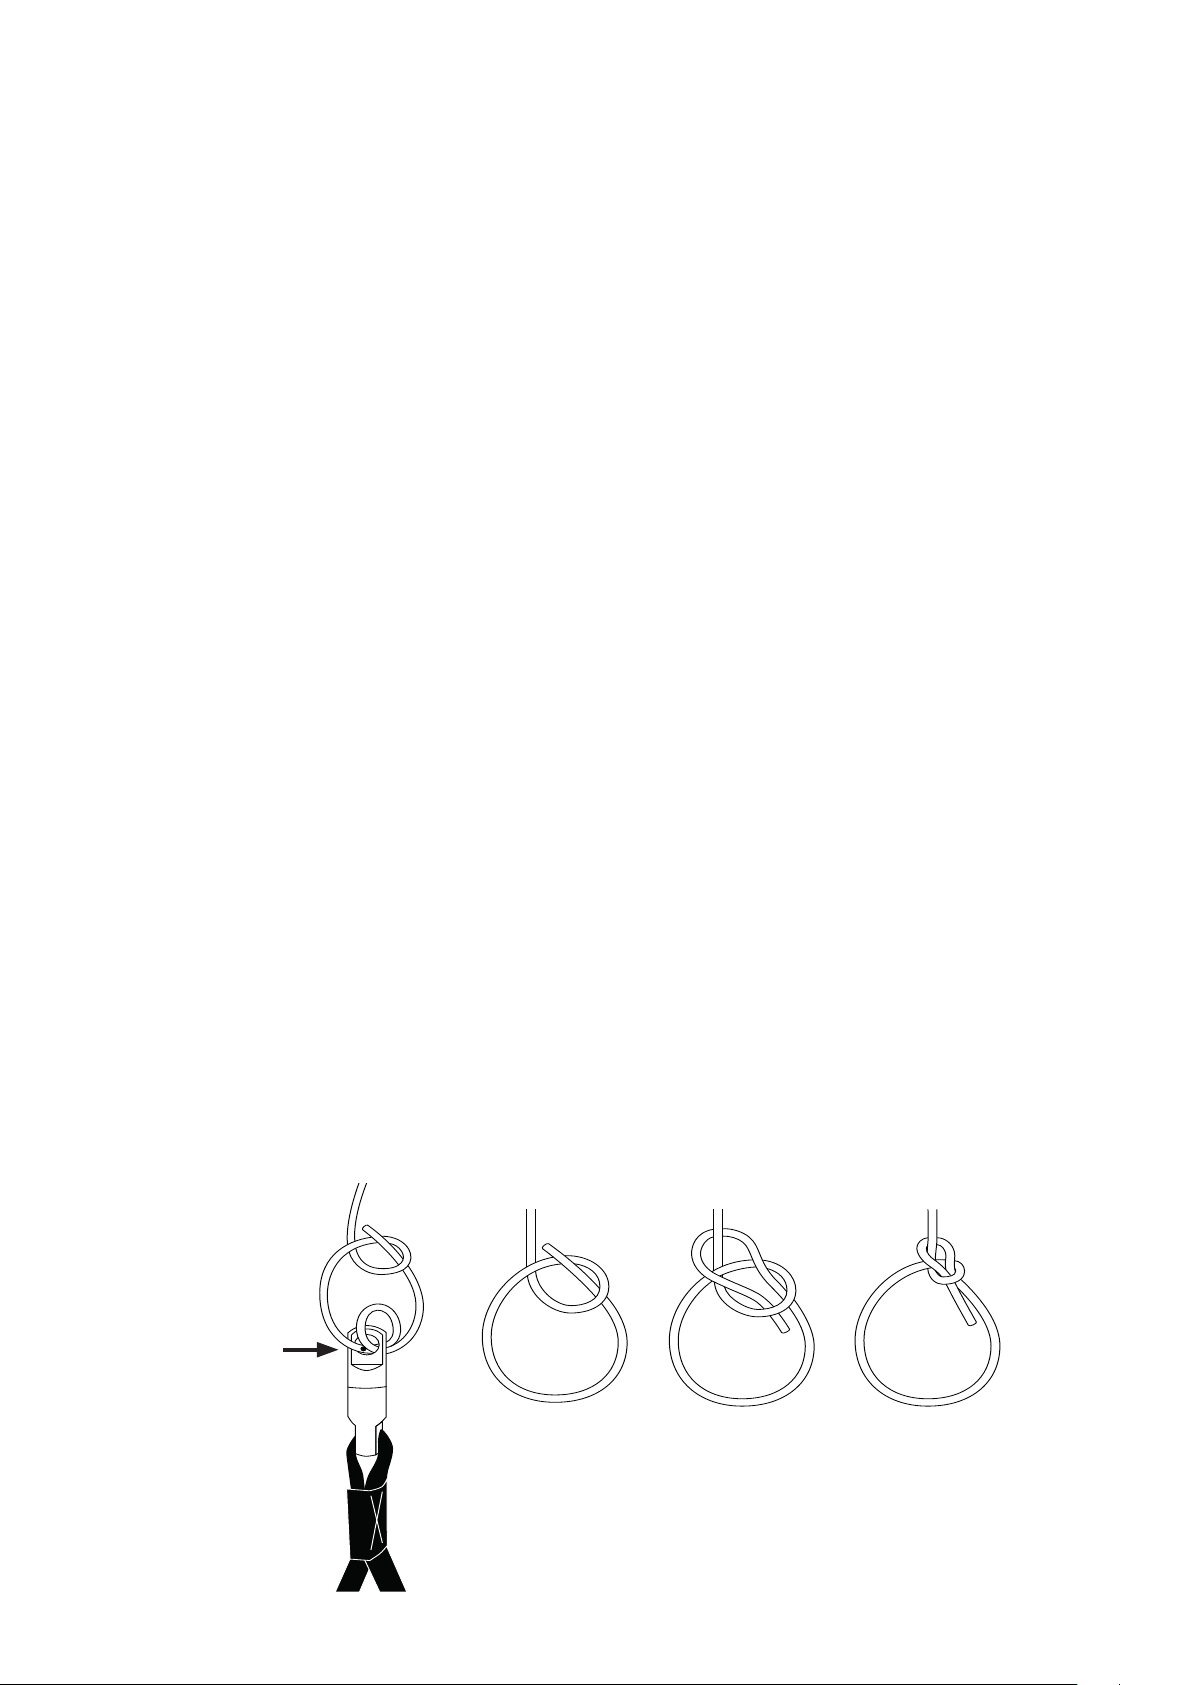
The factory brake-line setting corresponds to 0-free travel plus 5 cm. It is recommended to
adjust your brake line travel after the rst ight to your personal preferences. Be aware not
to adjust the brakes too short, otherwise the glider may y with a little, but continuous applied
brake pressure. This could be extremely dangerous during takeoff , ight and landing!
The afore mentioned factory brake setting allows for ample brake travel in extreme ight
situations as well as for landing. At the same time it enables during ight at trim-speed a
position of comfort for the pilots arms. In no case the setup A, B and C main lines should be
changed before the wing has been own in the original setup. Please also note that adjusting
the height of the suspension to the hangpoints on the harness, changes the relative braking
travel. When setting the adjustment it is to be made certain that both sides are symmetrical
and that a permanent knot is used. The bowline works particularly well because of the fact that
it weakens the lines the least with excellent slip resistance.
Pfahlstich
Markierung
Werkseinstellung
① ① ①
MANUAL | PAPILLON PARAGLIDERS | RAQOON 8 | 9
Page 10

Safety precautions
– Before the rst ight, the canopy, lines, all connections and sutures, the shackles and brake
lines, as well as any twisted lines must be checked by appropriately trained personnel and
conrmed in the type plate.
– Make your maiden ight in a familiar ying site and calm conditons.
– Test your Papillon RAQOON only over water.
– In a „dynamic ight“ not only you are exposed to Hike loads but also the glider. Do not
underestimate this!
– Only y the RAQOON with at least one reserve parachute.
– Observe and abide to the local aviation laws which rule in the respective country in ques-
tion.
– Successful completion of appropriate training/schooling, having the needed knowledge as
well as the actual ight experience are a prerequisite to operate your Papillon RAQOON.
– The use of suitable, certied and in the respective country approved accessories (helmet,
harness, reserve) is a requirement for the use of the Papillon RAQOON.
– Before every take off execute a thorough inspection of your equipment (top sail, bottom
sail, ribs, especially the lines, carabiners, buckles, cloth speed system etc.) A ight with a tear
in a glider or lines can be life threatening.
– Always make sure that your ying gear is in good condition and all checks are done.
– Be aware that you as a pilot have to be in a physical and mental state to control each ight
unimpaired. You have to concentrate completely on ying, in order to avoid potential distressing ight conditions. Most accidents are caused by pilot error.
– Never y in close proximity to high voltage power lines, airports or motorways, over people
or with lightning! You cold endanger your life and the physcial well being of yourself as well
as third parties and at the same time act reckless and negligent. At no circumstance should
the minimum distance fall below 50m at any given time. At airports this minimum distance
to maintain is 5km.
– Inform yourself on the weather forecast and/or the predominating local weather conditions.
Use the Papillon RAQOON only in wind strengths, in which you are able to control the wing
to 100%. Do not use the Papillon RAQOON, in wind with a great gust factor. Never use the
glider with approaching thunderstorms or if probability of those of the development of
thunderstorms is high. If a thunderstorm is approaching land immediately!
– The ying of aerobatics is generally forbidden and is dangerous. Unforeseen ight orienta-
tions can occur, which can spill out of control, arising the danger of overload on pilot and
equipment.
ATTENTION:
Ignoring one or several safety precautions can lead to a
leisurely fun ight turning into a fatal event!
Page 11
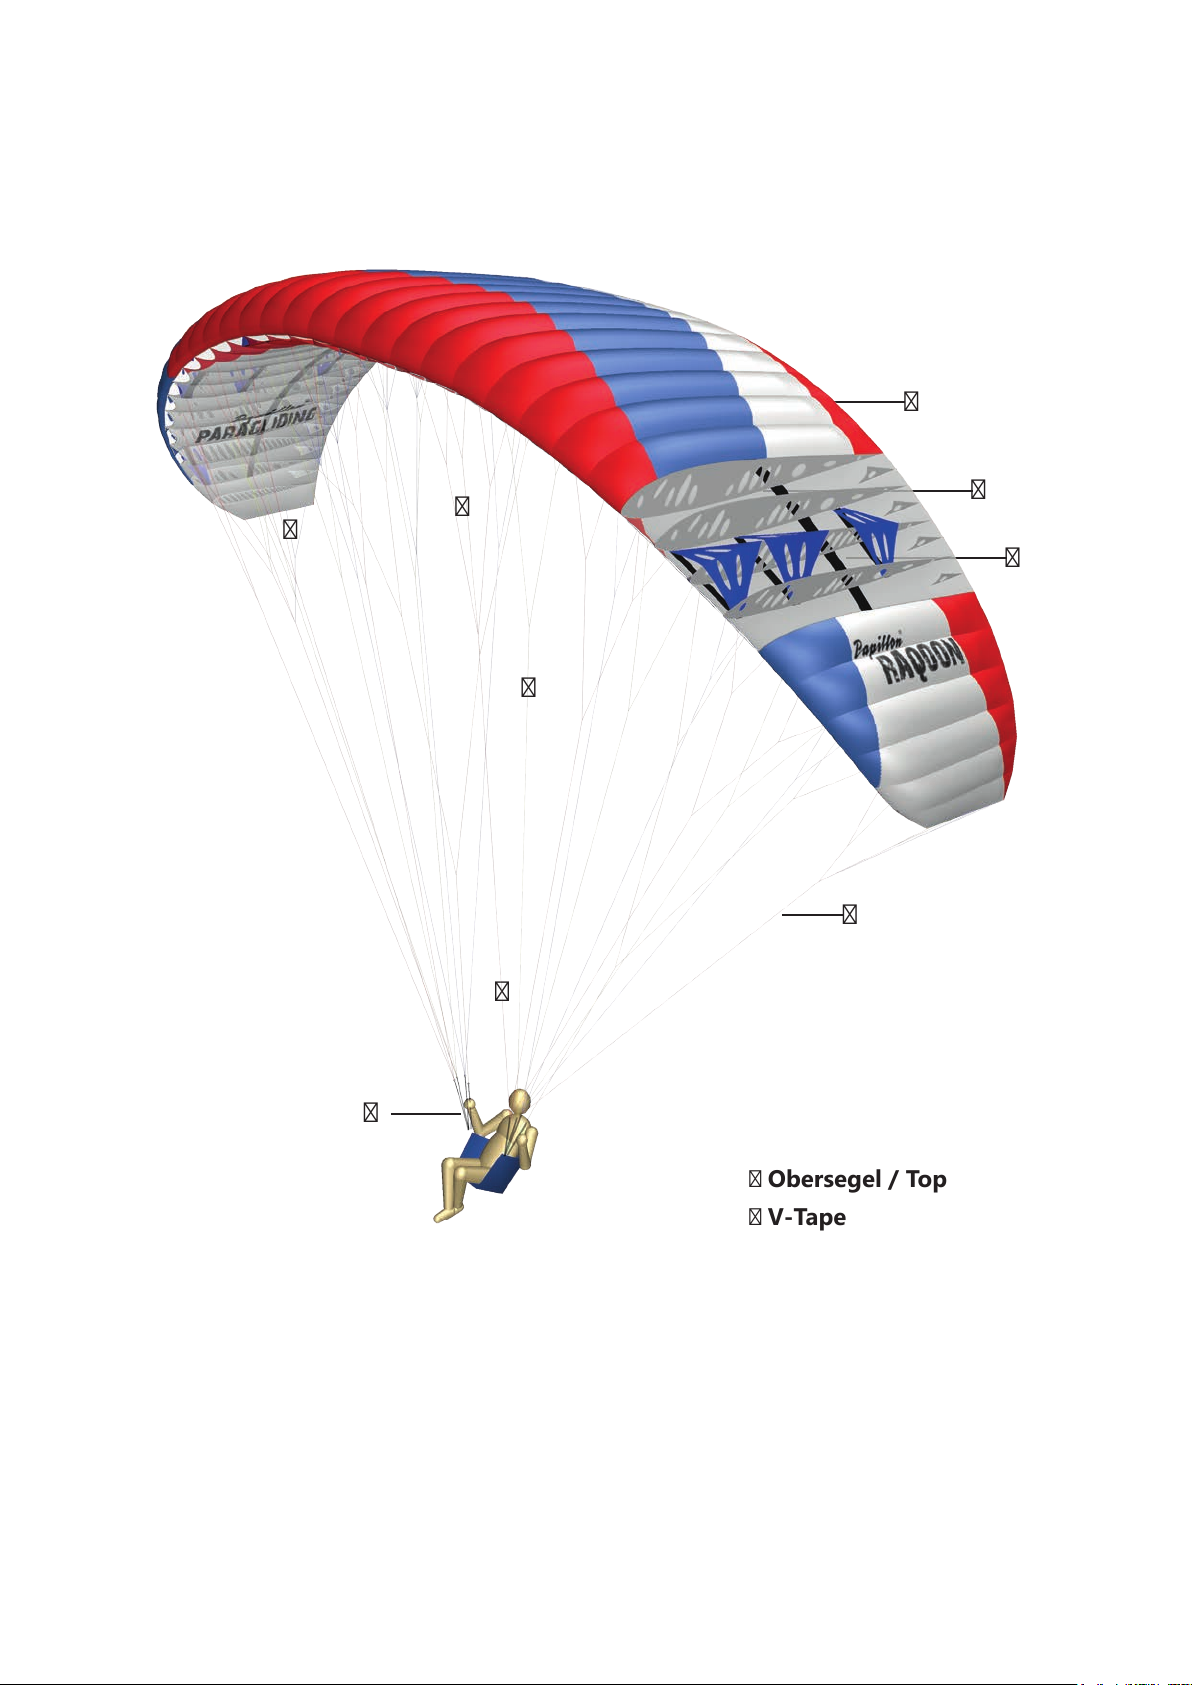
EQUIPMENT DESCRIPTION
Short description
①
①
①
①
①
①
①
①
①
① Obersegel / Top
① V-Tape
① Prolrippen / Prol rips
① Galerieleine / Galeryline
① Untersegel / Bottom
① Gabelleine / Gabelline
① Stabiloleine / Stabiloline
① Stammleine / Mainline
① Tragegurte / Riser
MANUAL | PAPILLON PARAGLIDERS | RAQOON 10 | 11
Page 12
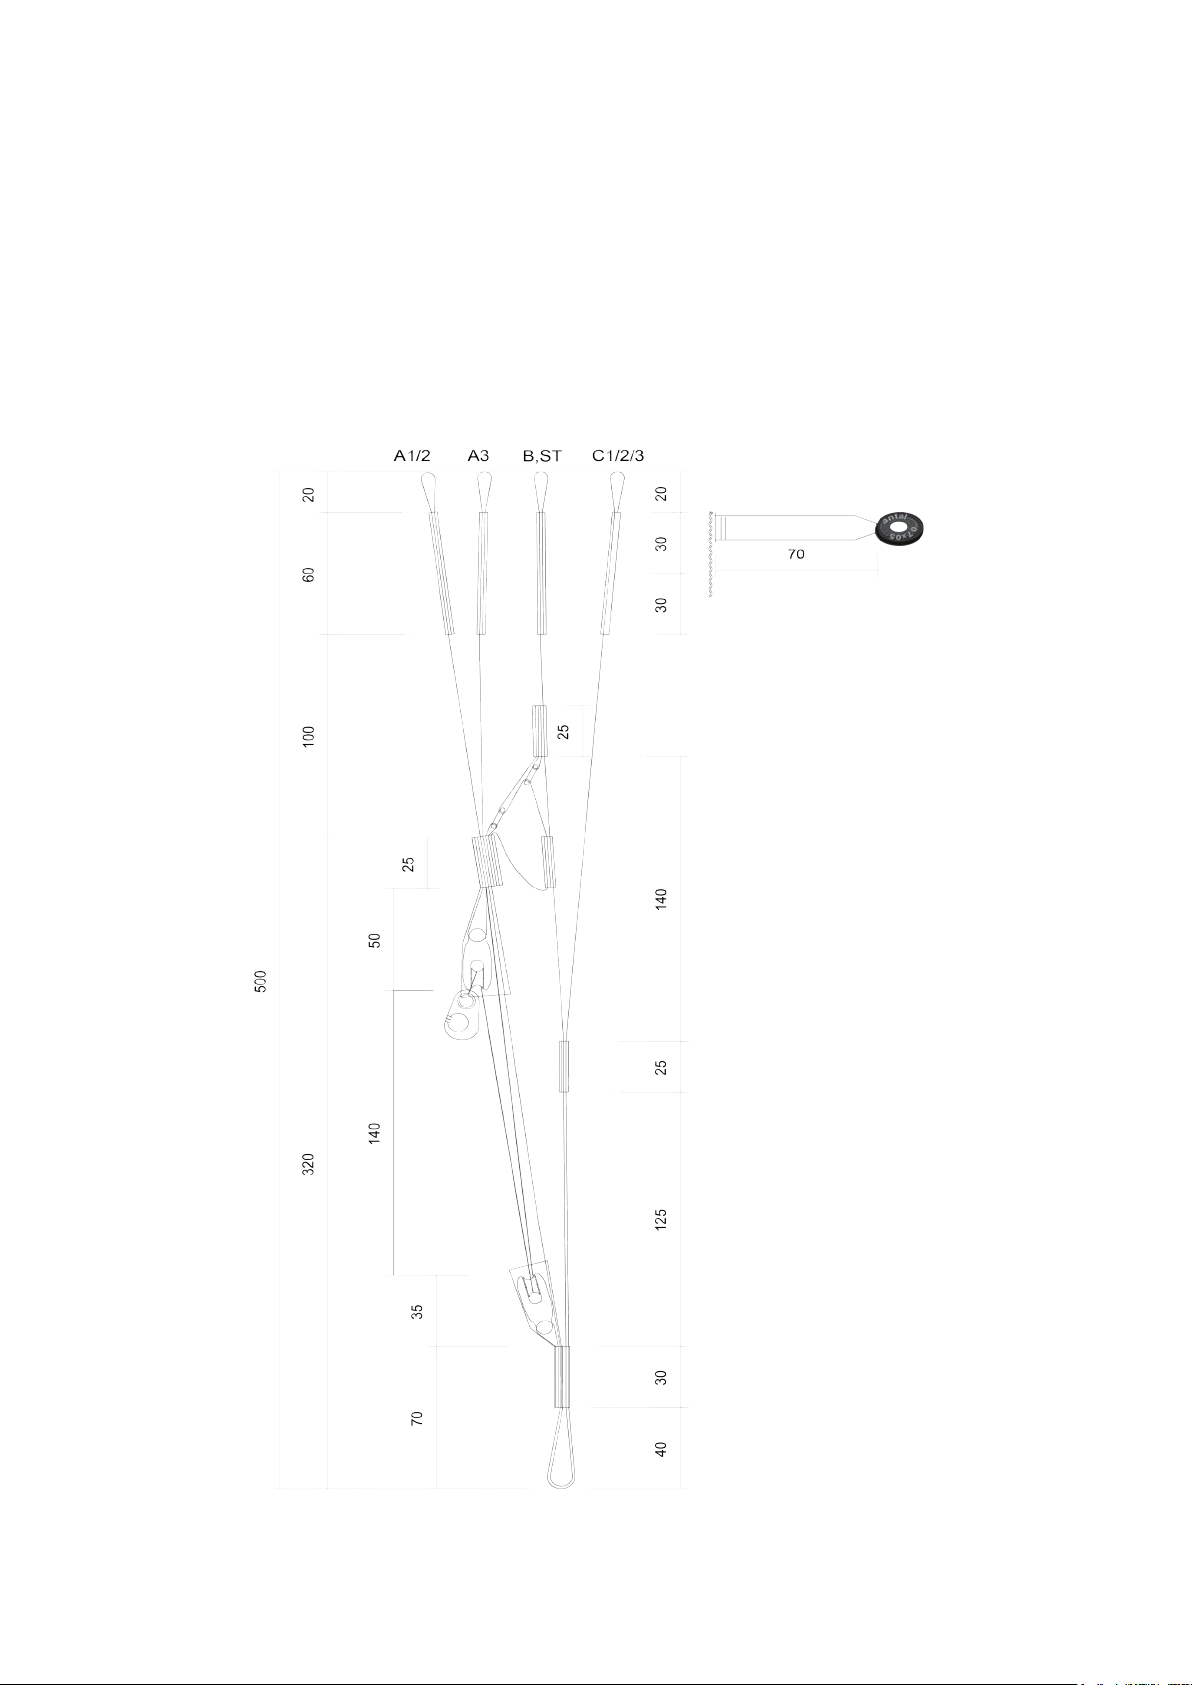
Risers
The A- and B-risers have different colors to ensure positive identication at take off and during
a B-stall decent. Other adjustable, removeable or variable mechanisms are nonexistent.
Number of risers: 3+1
The risers of the Papillon RAQOON consist of LIROS 13mm Kear webbing/Polyester cover.
Page 13

Speed system
The Papillon RAQOON is equipped with a very effective foot actutated speed system. It increases the speed when applied up to approx. 18 km/h, depending on the wing size and pilot
weight or surface loading.
Therefore it should not be activated in extreme ight situations or deactivated immediately when they are occuring. All extreme ight attitudes (e.g. collapses) happen at accelerated
speed more dynamically. Since the maximum acceleration is part of the safety behavior of the
glider, it can happen that with some harnesses the speed bar to full speed cannot be used.
The speed system needs to be adjusted before the rst ight. Therefore the connection lines of
the foot extensor are being connected through the Brummel hooks with the speed system on
the riser.
To be able to untertake the right adjustment the harness should be hung up so you can sit in
ying position. The attached risers are best held up by someone else.
It should be adjusted in a way so that the pulleys are on top of each other and you have your
legs stretched out. And you are also responsible to watch out that the speed system is adjusted
symmetrically and not too short so the glider is not pre-accelerated in the ight.
MANUAL | PAPILLON PARAGLIDERS | RAQOON 12 | 13
Page 14

THE FLIGHT
Flying experience
This manual is only focusing on the points of the technique of ying that are important for the Papillon BODYGUARD 7. It cannot and should not replace a profound ight training in an approved ying
school! Without ight training and according experience paragliding is life-endangering!
The Launch
The 5-point pre-launch check must be performed before each ight. It is helpful to have the
check conducted additionally by a second pilot (partner check).
1. PILOT: All buckles, straps and clips of the harness closed? Leg straps closed? Carabiner
untwisted and closed properly? Helmet on? Radio on?
2. LINES: Lines free? A–lines on top? Risers untwisted? Speed system attached and untwisted?
Control lines free and not twisted?
3. CANOPY: Laid out in an arch? All chambers open?
4. WIND: From the right direction? Is the wind speed right?
5. AIRSPACE: Free on all sides?
The paraglider is laid out symmetrically in an arch, so that the canopy behind you can ll evenly
from the centre. The center of the Papillon BODYGUARD 7 is marked on the leading edge.
You launch the wing by a metered pull on the front risers with your arms stretched back and down
and running against the wind.
NOTE:
Unlike other gliders, it is not necessary to inate the Papillon
BODYGUARD 7 with aggressive pulling or even fast running. That is
also true when there is little to zero wind. Measured pulling up is the
simplest and safest way to launch the Papillon BODYGUARD 7.
Once the canopy is above you, you let go of the risers and only keep the control lines in hand. Keep
running quickly, but not too fast, adapted to the wind situation. After a visual check of the canopy,
for which you possibly apply some brake pressure to stabilize the wing, the acceleration phase begins. With big, bold steps and still arms you reach take-off speed.
You take off the ground but remain ready to run in order to react to an unexpected drop. Only sit
down with sufcient ground clearance. The control lines are not released.
Page 15
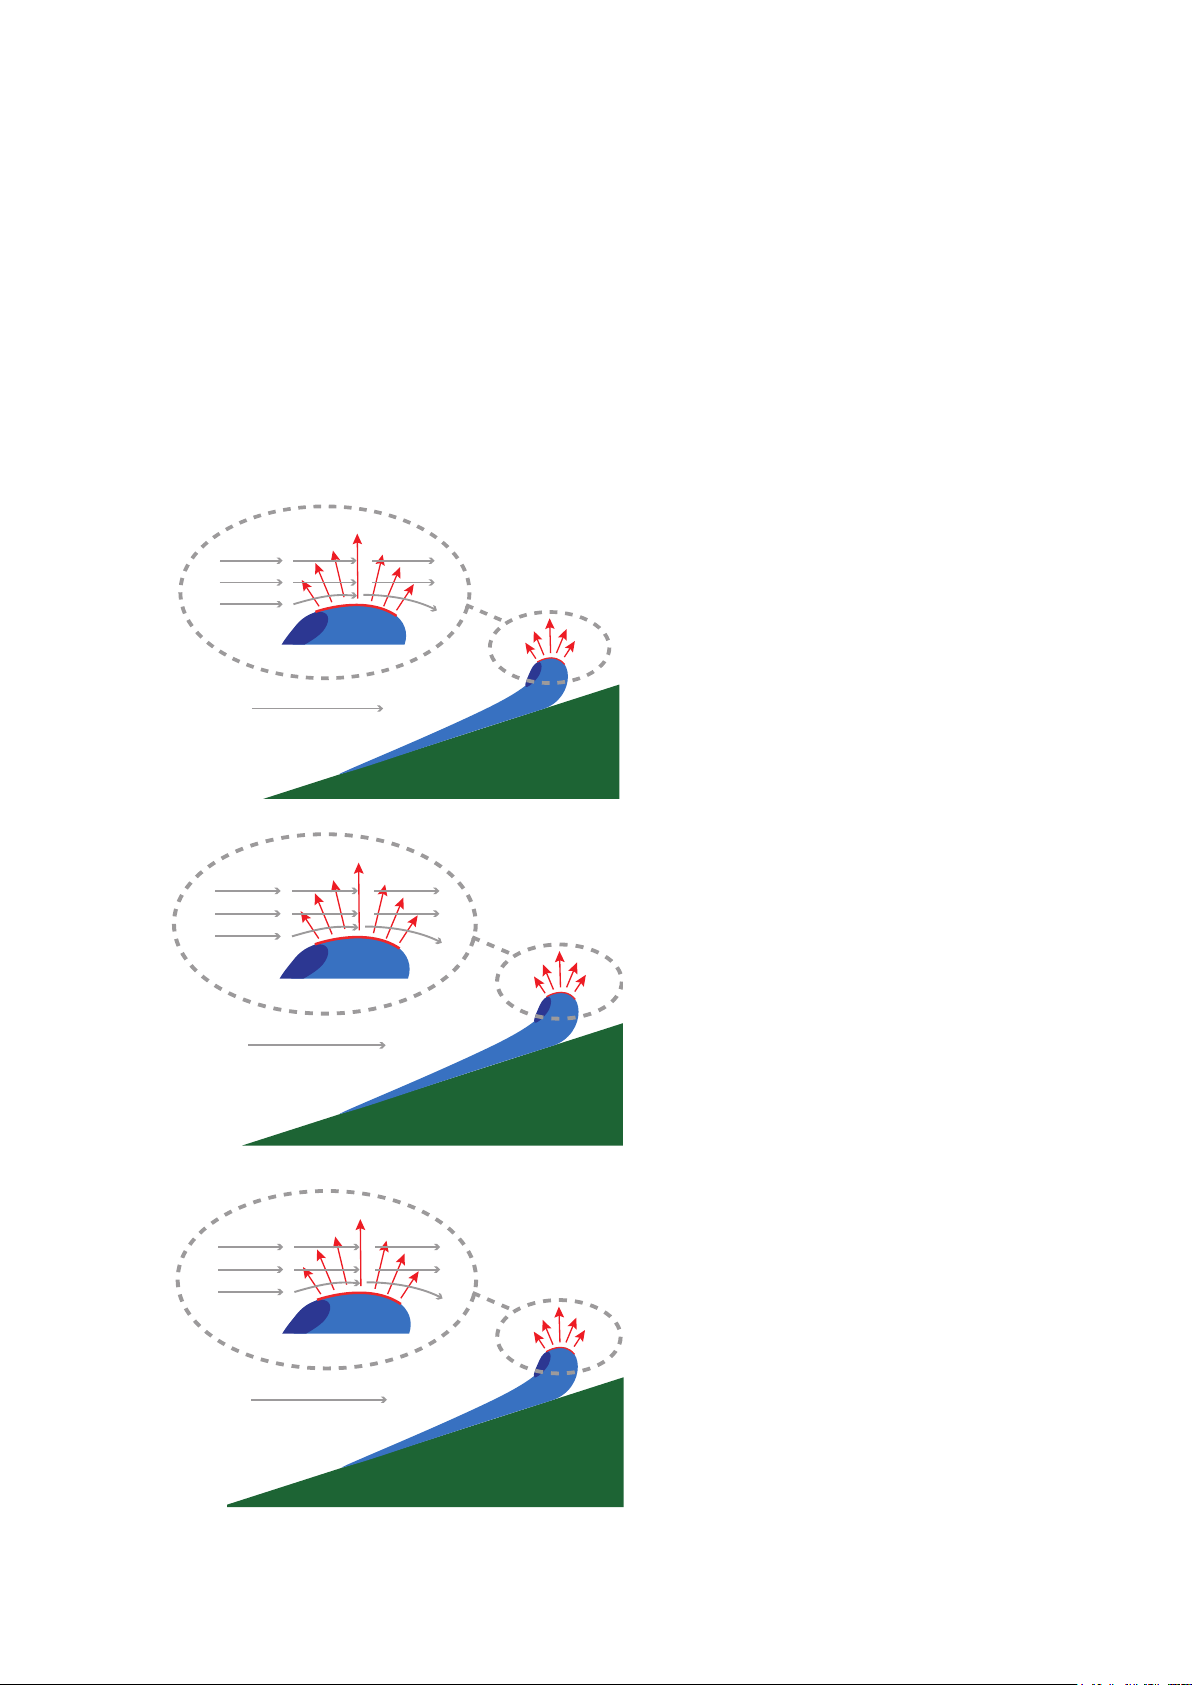
In at launch sites you pay attention to the acceleration phase. Large, long and expansive steps with
little brake are ideal here. In steep terrain, on the other hand, you pull gently and apply brake pressure to stabilize. The glider must not be allowed to over shoot as collapses in the lift-off phase on
steep slopes can become unpleasant. Since take off is very quick in steep terrain, it is a good idea to
have an experienced pilot friend who observes and checks the take-off during the lift-up phase.
In at terrain take-off may be more impulsive. After inating and lifting the paraglider, perform a detailed visual check of the canopy. The running speed is reduced and adapted to the wind situation.
In the steep launch site, the start is initiated with a small impulse and then a clear brake pull.
With an adequate launch impulse/input the
canopy lifts off. The lifting force caused by the
pronounced curvature of the prole at the
leading edge is sufcient to lift a portion of
the wing with its own weight.
As the canopy rises, the effective curved surface increases and with it the lifting force until
it is strong enough to lift off the entire weight
of the canopy.
Thereby and by the air entering the cell openings in the canopy’s leading edge the prole
becomes fully inated. The forward force of
the aerofoil prole accelerates the canopy
forward. In order to stabilize the wing above
the pilot a slight brake pull is used.
MANUAL | PAPILLON PARAGLIDERS | RAQOON 14 | 15
Page 16

Reverse Launch
In strong winds and challenging conditions a reverse launch is recommended, as this allows better
control of the canopy. Possible cravats and disorders of the canopy can be detected in the launch
phase already. Thus, the control phase is simpler and an asymmetric rising of the wing can be corrected early on.
To perform a reverse launch, face the canopy and cross the risers when clipping in. If you want to
turn to the right, turn the risers to the right before hooking-in and after sorting the lines. Make sure
that the green loop is hooked into the carabiner on the right and the red loop into the carabiner on
the left side.
Always untwist in the direction in which the upper riser is attached to the harness. Before lifting the
wing, hold the brake lines and make sure that they are not twisted or reversed! Then take all the
A-risers in one hand and step slightly out of the middle of the glider onto the side where you have
only the control loop in your hand. With this control loop the ascent of the canopy is controlled until
the canopy can be stabilized centrally above you.
Thereafter, take all A-risers in one hand. With the second hand, the rising of the canopy is controlled. To perfect the reverse launch technique, we recommend taking part in a reverse launch
training.
Turning
The Papillon BODYGUARD 7 has a high agility and reacts to steering inputs directly and instantly. You
can y at turns with little altitude loss by shifting your body weight. A combined steering technique
of appropriate pull on the inner brake line and shift of body weight is the best way for a coordinated
turn. The turn radius depends on the amount of pull on the brake line. At about 75 % of the brake
line travel, the Papillon BODYGUARD 7 increases bank signicantly and performs a fast steep turn
that can lead to a spiral dive.
ATTENTION:
A rapid pull on the brakeline may cause a negative spin!
Active Flying
The Papillon BODYGUARD 7 should be own with light braking on both sides when there is turbulent air. An increased angle of attack provides better stability. When entering heavy thermals or
strong turbulences be careful that the canopy does not get behind you. To avoid that, release the
brakes a bit to get an increase in speed when entering the updraft. If the canopy gets in front of
you when leaving an updraft or entering a downdraft, the brakes must be applied to counter that.
Accelerated ight, however, is advisable when ying through downdraft zones.
Page 17
The Papillon BODYGUARD 7 is naturally very stable due to its unique way of construction. Active
ying in turbulent air (as described above) signicantly increases safety. Collapsing and deforming of
the canopy can be avoided through active ying.
Landing
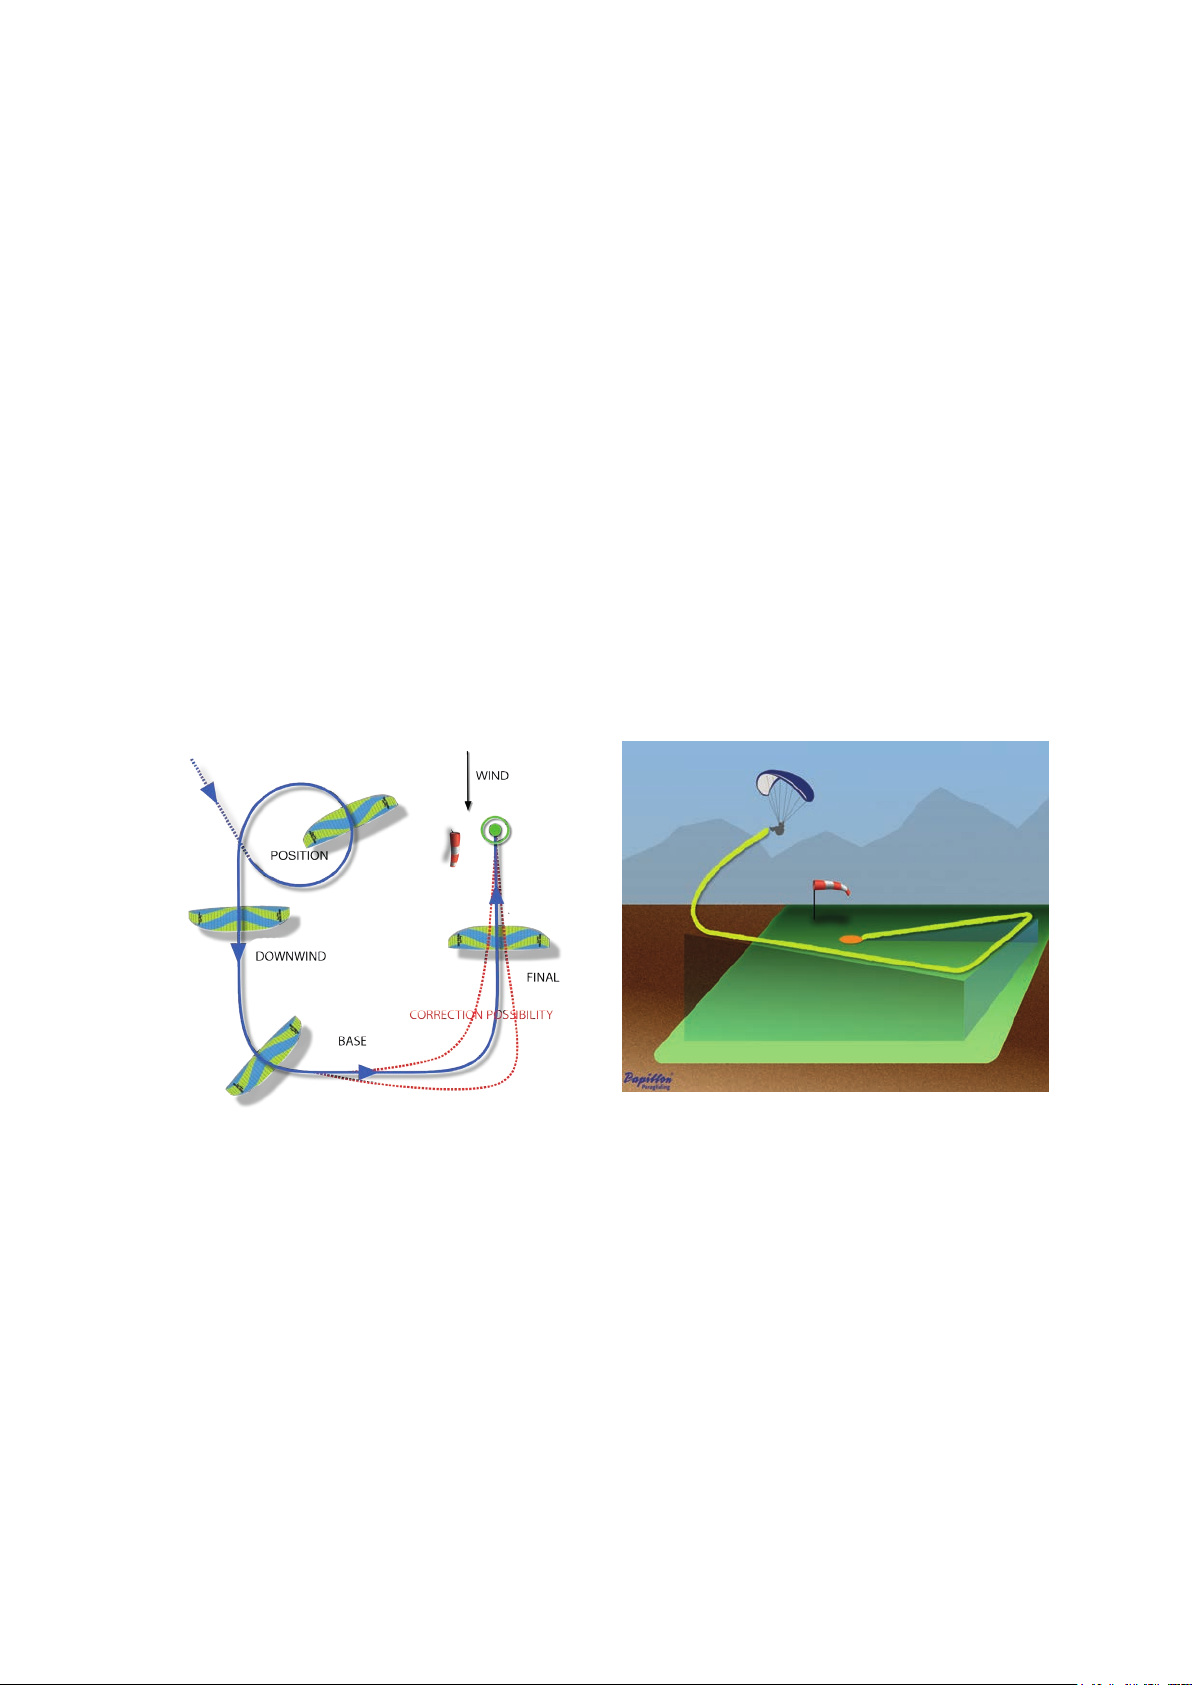
The landing should always be upwind. At a safe altitude the wind direction and strength are judged
and the landing pattern and approach are planned.
The normal landing pattern begins at the position, where any remaining excess altitude is decreased, in case of a left pattern by ying left circles. The downwind, base and nal legs follow. Final
approach is into the wind.
Throughout the entire pattern the paraglider is own with a slight brake pull for maximum canopy
stability. The landing spot serves as a reference point and is constantly observed.
On the approach legs you have good correction possibilities (dashed red lines).
Straighten up in the harness at least 5 metres above ground. In about one metre above ground pull
the brakes fully to perform a landing stall in order to reduce the rate of descent and airspeed. The
touchdown is simplied and standing landings are easily possible.
Don’t pull the brakes too early. Especially in the nal approach it would be dangerous if a stall occurred in 3, 4 or 5 metres already. The best landings are those with a nice are.
Due to its excellent aring characteristics the Papillon BODYGUARD 7 is very easy to land,
when the brake is applied at the right moment.
The nal approach is carried out in trim speed, if possible. In thermal conditions a nal approach
with maximum canopy stability (10-20% brake pull) is recommended.
MANUAL | PAPILLON PARAGLIDERS | RAQOON 16 | 17
Page 18

ATTENTION:
Remember that landing requires your highest concentration again. So plan your landing in such a way that you are safely on
the ground before your mental and physical performance diminishes.
Strong Wind Landings
In strong winds you y several base legs before the landing point with semicircles into the wind
(called an “eight setup”). Begin a short nal approach into the wind in about 10 to 20 metres above
ground using slight brake pressure.
Do not turn with the wind as airspeed and wind speed add up. A landing at a high ground speed
could be dangerous.
After touchdown turn around quickly and bring the canopy down by using the C-risers in order to
avoid being dragged across the ground.
Landing on Slopes
A landing on the slope is always done sideways to the slope and never against it due to the increasing risk of injury. Hang landings require some routine. At the beginning of the ying career areas
with large landing elds are recommended.
Top Landings
Landings at the launch site require wind or thermals. Therefore, they are recommended only for
experienced pilots with lots of groundhandling experience.
ATTENTION:
During a strong wind take off attempt, ground handling
and landing the leading edge can hit the ground with high speed. This
is to be avoided because otherwise the ribs, the sewing or the fabric
can be damaged!
Page 19
RAPID DESCENT
In any situation where you have to get down ASAP for different reasons (e.g. thunderstorms, extreme updraft or other dangers) there are a couple of techniques to do so:
ATTENTION:
than normal and should only be performed for practice or in a real
emergency situation!
„Big Ears“
Another important and in many cases recommended rapid descent method is called „Big Ears“. By
pulling on the outer A-lines, the „ears“ of the paraglider (usually two to four cells) are collapsed. The
sink rate increases, while the airspeed remains approximately constant. This can help, for example, to
escape cloud suck, whereas in a spiral the paraglider would still remain in the area of suction under
the cloud.
Both designated outer A2-risers (grab at or above the quick links) are being pulled down simultaneously for 15-20 cm to fold in the wing tips. The brake toggles are to be held in hand together with
the pulled down A-lines.
The described maneuvers stress your paraglider more
For additional stability and for an increased sink rate the speedsystem should be actuated. The
glider remains fully steerable by weightshifting and descends at an elevated sink rate (4-7m/sec,
depending on how many cells are folded in).
Once the A-risers are released, the folded wingtips re-inate automatically, if not, you may pump
the brakes gently.
Due to the high wingload “big earing” is a very stable ight condition even in turbulent conditions.
Please be aware that you reduce the trimspeed during “big ears”, but this can be compensated by
applying the speedbar.
Since the wing loading increases and the airspeed remains roughly the same due to the greater
drag, the stall speed increases.
The BODYGUARD 7 shows an unproblematic behaviour during this manoeuvre.
NOTE:
The BODYGUARD 7 facilitates big ears with a special big ear aid
(seperate riser with big ear icon).
B-Stall
This maneuvre offers the possibility to descend comfortably and safely: By pulling down the B-risers
the wing is folded along its lateral axis and thereby stalled, which causes a sink rate of about 6 to 9
metres per second.
MANUAL | PAPILLON PARAGLIDERS | RAQOON 18 | 19
Page 20

Entry
Keep the brake handles in your hands. Sit up and at the same time take the B-risers. Make sure that
really the B-risers are taken and not the C-risers. This could happen if a pilot incorrectly starts counting from the trailing edge instead of the leading edge of the wing.
NOTE:
The BODYGUARD 7 facilitates big ears with special big ear aid
(separate riser with big ear icon).
With the Papillon BODYGUARD 7 the B risers are labelled to avoid confusion.
The B-risers are pulled down slowly, thus slowing down the entire paraglider. After a pull of about
15-20 cm the stall occurs. Slowed down like this, the canopy barely falls behind the pilot with an
increasing sink rate.
The Manoeuvre
Look immediately upwards, if the desired B-stall occurred. Then look down to control the loss of
altitude and the area below you. Then alternately look upwards and downwards.
Should an atypical deformation of the canopy occur, immediately release the B-risers and recover
from the manoeuvre. A slight turning tendency is normal, because the manoeuvre often cannot be
initiated 100 percent symmetrical. The wind may also have an inuence. If the change in direction
feels unpleasant, just recover and repeat the manoeuvre.
Recovery
By a brisk - but most importantly symmetrical - release of the B-risers, the manoeuvre is terminated. The canopy dives forward to reattach the airow and end the stall. Do not prevent this pitching
forward by braking. Pilots with an active ying style tend to stop this desired pitching moment.
The difference of the forward pitching moment after a B-stall and the pitching moment after a
thermal ight is that the paraglider needs to accelerate after a B-stall while it simply swings back and
forth in the turbulences caused by thermals.
Page 21

ADVANCED HANDLING
Even though the Papillon BODYGUARD 7 has a very high aerodynamic stability it is possible that the
glider gets into an extreme ight situation due to pilot errors or turbulent air. The best method to
stay calm and react correctly is to take part in a ight safety course. The pilot will learn to manage
extreme ight situation under professional supervision. Extreme ight maneuvers may only be executed in calm air and in sufcient altitude under professional supervision (e.g. safety training). Once
again we mention that a rescue system is required by the law. The following extreme ight gures
and ight maneuvers can either be caused intentionally, through turbulences or through pilot errors.
Every pilot can get into these ight situations! All mentioned extreme ight gures and maneuvers
are dangerous if performed without the appropriate knowledge, enough altitude or necessary introduction. A wrong execution of these described gures and maneuvers may have fatal consequenc-
es!
Spiral Dive
Like a normal turn, initiating the spiral dive is easy with the Papillon BODYGUARD 7.
ATTENTION:
The spiral is considered an extreme manoeuvre and
should be own only under expert guidance above water. Owing to the
high physical stress the manoeuvre is only recommended for experienced pilots.
Entry
For a rst circle a turn is own tighter with body weight and inner brake. For the 2nd circle the bank
is increased. The outer brake line is also pulled with increasing speed. In the 3rd circle the wing
banks into the spiral and reaches sink rates of about 10 m/s.
Spiral phase
With the outer brake (10 to 30%) you can control the bank angle, the sink rate and the speed during
the manoeuvre. Thereby a G-load of about 2.5 to 4 acts on the body.
Note: The wing should not be forced into the spiral too quickly as this could cause a stall on one
side with extreme sink rates, the wing could even ip over.
Recovery
To recover from a spiral release the brake pressure on the inner brake, neutralize the body weight
and increase the pressure on the outer brake. Before being fully recovered, the paraglider will continue to turn for one or two more circles. The speed and bank angle will be reduced. The regulation
takes place via the outer brake.
MANUAL | PAPILLON PARAGLIDERS | RAQOON 20 | 21
Page 22

Note: Trying to recover too quickly can cause a collapse when the wing swings behind the pilot.
When recovering too slowly, a full recovery might not be achieved and the rapid loss of altitude may
continue. If that happens, the dynamic may be reduced by applying brakes on both sides. The brake
pressure increases during the manoeuvre because of the increased G-force. If the recovery is not
possible, deploy the rescue!
ATTENTION:
If the initiation is too fast there is a danger of a spin, in
this case release the brakes and try a smoother initiation.
Wingover
The pilot has to perform right and left turns with increasing bank until the desired angle is reached.
Collapsing wingtips are prevented by gently applying brake pressure in the up- and/or down-swing
of the wingover. Normally there is no danger of collapsing wing tips with the Papillon BODYGUARD
7 except for when there is a very high bank. With shifting the bodyweight while applying the brake it
is possible to y the highest possible wingovers.
Full Frontal
A negative AoA caused by turbulences or the simultaneous pull-down of the A-risers by the pilot, results in a frontal collapse of the leading edge. The Papillon BODYGUARD 7 recovers from a
frontstall by itself very quickly. Smooth and symmetric applying of the brake positively inuences the
re-opening of the canopy.
Collapses
Even with its high stability and very well responses in turbulences, strong turbulences can cause the
canopy of the Papillon BODYGUARD 7 to collapse. Usually that situation is not dangerous and resolves itself automatically without any further input. To support the recovery, rmly apply the brakes
on the affected side and simultaneously steer opposite to the open side. When a large part of the
canopy collapses the counter steering is to be exercised in moderation in order to avoid a complete
interruption of the airow.
How to avoid collapses
Single side collapses, especially close to the ground, are the number one reason for accidents with
paragliders. How to avoid them or how to handle the situation when it already happened, some tips
and tricks from test- and competition pilot Ernst Strobl:
The best way to avoid collapses upfront is the right choice of the paraglider. A lot of pilots y a glider that is a little too hot to handle for them. So why don`t you get a glider with a lower rating but in
the end y better and higher in the updrafts and have a lot more fun and by the way be safer, too.
To optimize the feeling for your glider on the ground, try the following:
Page 23

Practice on the ground with the right wind at a suitable location. Slowly pull up the canopy and try
to hold it up as long as possible without looking at it. That is a good way to improve the feeling for
your glider and is a prerequisite for „active ying“ (the key to avoid collapses). Very important is also
a close look at the terrain. Watch for obstacles that could cause turbulences (buildings, trees, ...). On
certain days, for example a freshly mowed meadow as landing eld, could cause a lot of thermal
activity.
Fly very alert on a thermally active day. Watch your canopy, collapses most of the time, announce
themselves. Light braking in turbulences mostly avoids a collapse. You should have already practiced
that on the ground. Should a collapse occur close to the ground don`t always try to prevent a turn
away. There is a danger when the braking on the open side is to strong, to lose the airow on this
side and stall the glider. Rather use the turn away motion to try to open the collapsed side.
Apply smooth braking on the open side, depending on the size of the collapse, and maybe a little
pumping action. Some canopies open a lot better when the brakes are fully applied once on the
according side, but that depends on the brakelines adjustment and your armlength.
Wrapped lines are cleared by braking the opposite side at enough altitude and pumping the affected side a couple of times. Watch out for a possible stall. If that does no clear the situation, try to
pull dow the outer lines as much as possible. If you are too low for that, stabilize the canopy on the
opposite side avoid turning away, and leave the lines like they are. Instead of any risky manoeuvres
rather concentrate on the landing. In the end one more advice in order to have all kinds of situations under control.
Visit a safety-training above water. There is no better way to practice the right behaviour than simulating a dangerous situation. Don`t get caught off guard by your rst collapse. In addition, during
safety-training you can familiarize yourself with the particulars of your equipment and you gain
condence in your gliders as well as your own abilities.
Thus far the expert advice concerning collapses by Ernst Strobl.
Deep Stall
If the wing stalls but is still lled with air, you are in a deep stall. Strictly speaking, this is not a ight
because no airow is attached to the canopy. Further brake pull leads to a full stall, a stall with partial emptying of the canopy, forward folded ears and backward ight.
The Papillon BODYGUARD 7 is not stall sensitive. If in a stall, caused by overpulling on the brakes or
rear risers or a delayed B-stall exit, the release of the brakes or rear risers, recovers the stall. Should
the stall be caused by an extreme ight condition or conguration (i.e. takeoff weight too low), a
symmetric forward push on the A-riser or use of the speed system recovers the stall.
ATTENTION:
Practicing stalls should be done with enough safe altitude. Never apply asymmetric brakes during a stall, it could cause a
spin.
MANUAL | PAPILLON PARAGLIDERS | RAQOON 22 | 23
Page 24

ATTENTION:
If the BODYGUARD 7 is in deep stall, the brake should
only be released after approx. 3 seconds if the height above ground is
sufcient. The glider will nish the manoeuvre on its own. In case of
low altitude or little ight experience we recommend deploying the
rescue system.
Fullstall
The stall is recognized by the decrease of wind noises and by a high rate of descent (5 - 20m/s).
There can be several causes: pilot errors (too much brake application, changing wind conditions or
deciencies of the canopy (high air permeability due to aging).
The pilot should allow the wing to re-establish airow. Modern paragliders like the Papillon BODYGUARD 7 recover independently. To do so, release the brakes (but keep them in your hands), so that
the wing can accelerate again.
Partial Stall
A stall can also occur on one side only by a rapid strong pull on one brake. The wing enters a
sudden, highly accelerated rotation around its vertical axis, with almost no bank. This uncontrollable
ight condition is called (at) spin. The pilot releases the brakes.
The secure paragliders of the new generation end a spin independently and immediately. In a stable
spin with sufcient altitude, the manoeuvre can be terminated with a full stall, at a lower altitude you
have to deploy the reserve.
Negative Turn
A negative turn/spin is initiated, when the pilot pulls the brake on one side fast and completely
through to the point of stall while letting the other brake partly free. With a negative turn the glider
turns relatively fast around its center, while the inside ies backwards.
In order to exit a negative spin, the applied brake is released, where the stalled side of the wing can
pick up speed or one exits though a full stall, by braking the ying side into a stall as well.
ATTENTION:
The Spin and the Fullstall and unpredictable and dan-
gerous ight gures and should only be executed in a safety training
under supervision and never be executed intentionally. There is danger
of a riser twist. With a riser twist the brake lines can get blocked.
Page 25

ATTENTION:
Fullstalls and negative turns/spins as a descent method
are dangerous, because a wrong exit, regardless of glider type, can
have fatal consequences.
Emergency Piloting
In any situation where normal steering is not possible, the Papillon BODYGUARD 7 can easily be
steered and landed with the back risers. Turns can be own with weightshift, however be careful that
the glider doesn`t lock into a spiral.
Transport and storage
When transporting the glider don’t expose it to any liquids. It has to be packed completely dry. Always store the BODYGUARD 7 away from UV radiation. Furthermore never store the wing together
with acids or similar goods. A dry storage is of utmost importance!
ATTENTION:
After a longer storage period the glider needs to be
checked.
Repairs
Basically only authorized service centers may execute repairs on paragliders. Small damages like
tears or small holes up to a size of 2 x 2 cm, where a repair without special equipment is possible,
the pilot may do by himself. The included self-sticky tape from the repair-kit is to be used for that.
Tears or holes need to be xed from both sides. Please take care that the repair tape sticks out at
least 2cm beyond the damaged area on all sides. The self-sticky tape can be cut into the right form.
Rounding off the corners prevents it from becoming detached.
MANUAL | PAPILLON PARAGLIDERS | RAQOON 24 | 25
Page 26

MAINTENANCE AND CARE
Maintenance and care
Since only high-quality material is used for the Papillon RAQOON it will be unrelievedely
airworthy for many years at good care and maintenance. The aging of your Papillon RAQOON
depends on the total ying time, the conditions in which you y in, the amount of UV radiation
it is exposed to and the intensity and quality of care. A couple of tips for maintenance and care:
Long lasting exposure to UV radiation and extreme acro maneuvers reduce the strength of
every material over time.
– Do not leave your Papillon RAQOON out in the sun more than necessary, but put it back
into the backpack after your ight.
– Consider the choice of terrain when choosing a take-off site to lay out your glider.
– Placing the opening reinforcements on top of each order prolongs the life time of your glider.
– Do not drag your glider on the ground and pack it on a patch of grass.
Please consider that:
– the lines need to be checked for damage regularly.
– the lines are not being bent unnecessarily and you don’t step on the lines when laying out
the glider.
– lines need to be checked after overloads (tree or water landings etc.) for their strength and
correct length and exchanged if necessary.
– lines need to be checked for their correct length in case of changing inight handling
characteristics.
– the main brake lines aren’t knotted too many times at the grip since every knot weakens the
line.
To clean the canopy only use warm water and a soft sponge. Never apply any chemicals for
cleaning, since they weaken the material and damage the coating. Store your glider at a dry
and dark location away from any chemicals. After 24 months or 150 ighthours, whichever
occurs rst, your Papillon RAQOON has to be inspected by the manufacturer or importeur. In
case of extreme use we are glad to do that earlier. You know best about the condition of your
glider.
Nature and environment-friendly behaviour
We ask you to perform our sport in a manner, that impacts nature and environment with minimum intensity. Please do not walk off marked paths, don`t leave any waste, don’t make noise
uselessly and respect the sensitive biological equilibrium in the mountains. Especially at takeoff areas maximum care for nature is necessary.
The synthetic materials your glider is build of must be depolluted appropriately. At the end of
its life-cycle please return your glider to us, we will take care of recycling and removal.
Page 27
FLYING ACCESSORIES
Harness
All certied harness systems with mounting at about breast height are compatible with the
Papillon RAQOON. The lower the mounting point of the harness, the better you can steer the
Papillon RAQOON by shifting your bodyweight.
Please keep in mind, that also your harness is exposed to extreme loads.
If you have any questions regarding the use of your harness with the Papillon RAQOON, please
contact us. We are happy to help!
Suitable Rescue Systems
It is required by law and absolutely neccessary for safe operation of your paraglider that you
always carry a rescue system.
When choosing your rescue system, watch out that it is approved and suitable for the intended
takeoff weight.
In the Papillon Shops we will be pleased to advise you personally and assist you with the
choice of the ight equipment, which best suits your needs and requirements.
MANUAL | PAPILLON PARAGLIDERS | RAQOON 26 | 27
Page 28

PRESUMPTION OF RISK
The usage of the Papillon RAQOON inherents certain dangers of bodily harm or even death
of the user of this product or a third party. With the use of the RAQOON you consent to all
known and unknown risks and accept probable and improbable risks of injury. The dangers
innate with the practice this kind of sport can be reduced by adhering to the warning notes in
the manual, as well as the required attention to detail on each ight. The risks inherent to the
sport can be reduced to a large degree, if one adheres to both the maintenance guidelines,
which are listed in this operating manual, as well as using common sense.
Liability claim and renouncement of exclution
With the completion of the purchase of a Papillon RAQOON you express your in consent with
the following points of legal specications:
THE RENOUNCEMENT EXCLUSION OF ALL LIABILITY CLAIMS,
deriving from the use of the Papillon RAQOON and or either compenents thereof, now or in
the future, against the PAPILLON PARAGLIDERS GLEITSCHIRM DIREKT GmbH and all other
contracting parties.
Releasing PAPILLON PARAGLIDERS GLEITSCHIRM DIREKT GmbH and all other contracting parties of all liability claims concerning loss, damage, injury or expenses that you, your next of kin,
relatives or any other user of the Papillon RAQOON could suffer as a result of the usage of the
RAQOON. This includes but is not limited to lawful or contractual liability on behalf of PAPILLON PARAGLIDERS GLEITSCHIRM DIREKT GmbH and all other contracting parties as a result of
the of production and processing the Papillon RAQOON and all its components. With the occurrence of death or disability, all directives stated here come into force and bind their beneciaries, next of kin, trustees, legal successors and/or representatives. The PAPILLON PARAGLIDERS GLEITSCHIRM DIREKT GmbH and all other contracting parties express no verbal or written
representation and deny assertively that this was done with exception of what is specied here
and in the manual of Papillon RAQOON.
Safety Advice and Liability
This glider complies with EAPR regulations, for the tested type, at time of delivery (see appendix). Any unauthorized alteration is followed by the expiration of the operating licence! The
operation of the glider is at your own risk and the pilot needs to make sure that the aircraft is
checked for its airworthyness before every ight. We also take it as a given that the pilot is in
posession of the required certicate of qualication and that the given legal requirements are
met. Use of the equipment is at your own risk! The manufacturer and the dealer don`t take any
liability for accidents and possible consequential damages. Please consider all safety notes,
cautions and warnings for safe ying.
Page 29

RELEASE OF LIABILITY,
RENOUNCEMENT OF ENTITLEMENT
Hereby you declare, that - prior to use of the Papillon RAQOON - you have read and understood
the Papillon RAQOON user manual in its entirety, including directions and warnings, which are
included in this user manual.
Moreover you declare to carry responsibility - prior to granting the use of Papillon RAQOON to a
third party - through transferring ownership temporary or permanently, for this other user to have
read and unterstood the Papillon RAQOON user manual in its entirety, including directions and
warnings, which are included in this user manual.
------------------------------------- --------------------------------------
Place and date Signature of the rst pilot
------------------------------------- --------------------------------------
Place and date Signature of the second pilot
------------------------------------- --------------------------------------
Place and date Signature of the third pilot
PAPILLON PARAGLIDERS - GLEITSCHIRM DIREKT GmbH does not take responsibility, li-
abiltiy and/or guarentee for inspections and repairs that are not porformed by Papillon.
MANUAL | PAPILLON PARAGLIDERS | RAQOON 28 | 29
Page 30

TECHNICAL DATA PAPILLON RAQOON
Recommended Start weight ****
55 60 80 85 100 120
Empfohlenes Startgewicht ****
Extended Start weight ***
Erweitertes Startgewicht ***
Flat area
Fläche ausgelegt
Projected area
Fläche projiziert
Flat wingspan
Spannweite ausgelegt
Projected wingspan
Spannweite projiziert
Flat AR
Streckung ausgelegt
Projected AR
Streckung projiziert
Chord: center / wingtip
Flügeltiefe: Mitte / Stabilo
V-trim
V-Trimm
V-max
V-Max.
Bridle height
Abstand Tragegurt-Kappe
Nr. of cells
Zellenanzahl
Glider weight
Gewicht
Bridle length
Gesamt Leinenlänge
Line diameter
Leinenduchmesser
Speed system / trimmer
Fuß Beschleuniger / Trimmer
Beschleunigerweg
max.way of accelaration
Certi cation
Zulassung
Certi ed standards and procedures
Angewandte Testverfahren
Folding lines used for certi cation
Faltleinen für Test üge benutzt
Number seats
Anzahl Sitze
Certi cation No.
Zulassungsnummer
Errors and omissions expected. Subject to change without notice. Reproduction in whole or in part without written permission of Papillon Paragliders is prohibited.
Irrtümer, Druckfehler und Änderungen bleiben vorbehalten. Nachdruck auch auszugsweise, nur mit schriftlicher Genehmigung von Papillon Paraglid.
**** Recommended Start weight *** Extended Start weight
**** Empfohlener Gewichtsbereich
60-70 kg 60-85 kg 80-95 kg 85-105 kg 100-120 kg 120-140 kg
60-80 kg 60-95 kg 80-110 kg 85-115 kg 100-130 kg 120-150 kg
23 m² 25,5 m² 28,5 m² 30 m² 31,5 m² 35 m²
19,119 m² 21,197 m² 23,691 m² 24,938 m² 26,184 m² 29,51 m²
10,724 m 11,292 m 11,937 m 12,247 m 12,55 m 13,323 m
8,273 m 8,711 m 9,209 m 9,449 m 9,682 m 10,278 m
5 5 5 5 5 5
3,58 3,58 3,58 3,58 3,58 3,58
2,550 m / 0,721 m 2,686 m / 0,769 m 2,849 m / 0,805 m 2,913 m / 0,823 m 3,008 m / 0,850 m 3,186 m / 0,901 m
~ 37-39 km/h ~ 37-39 km/h ~ 37-39 km/h ~ 37-39 km/h ~ 37-39 km/h ~ 37-39 km/h
52 + km/h 52 + km/h 52 + km/h 52 + km/h 52 + km/h 52 + km/h
6,649 m 7,001 m 7,401 m 7,593 m 7,781 m 8,26 m
36 36 36 36 36 36
3,45 kg 3,75kg 3,95 kg 4,25kg 4,55 kg 4,85 kg
243 m 256m 269m 279 m 286 m 304 m
0,95 / 1,2 / 1,65
1,8 / 2,0 mm
Yes / No
Ja / Nein
0,95 / 1,2 / 1,65
1,8 / 2,0 mm
Yes / No
Ja / Nein
0,95 / 1,2 / 1,65
1,8 / 2,0 mm
Yes / No
Ja / Nein
140 mm 140 mm 140 mm 140 mm 140 mm 140 mm
EN-A /LTF-A EN-A /LTF-A EN-A /LTF-A EN-A /LTF-A EN-A /LTF-A EN-A /LTF-A
LTF 91/09 & EN 9261:2006, 926-2:2013
No
Nein
LTF 91/09 & EN 9261:2006, 926-2:2013
No
Nein
LTF 91/09 & EN 9261:2006, 926-2:2013
No
Nein
1 1 1 1 1 1-2
EAPR-GS-0665/17 EAPR-GS-0666/17 EAPR-GS-0667/17 EAPR-GS-0668/17 EAPR-GS-0669/17 EAPR-GS-0670/17
1
für die Schulung *** Erweiterter Gewichtsbereich1 mit LTF/EN-A Zulassung 1. Pilot, Schirm, Ausrüstung.
1. pilot, glider, equipment
0,95 / 1,2 / 1,65
1,8 / 2,0 mm
Yes / No
Ja / Nein
LTF 91/09 & EN 9261:2006, 926-2:2013
No
Nein
0,95 / 1,2 / 1,65
1,8 / 2,0 mm
Yes / No
Ja / Nein
LTF 91/09 & EN 9261:2006, 926-2:2013
No
Nein
0,95 / 1,2 / 1,65
1,8 / 2,0 mm
Yes / No
Ja / Nein
LTF 91/09 & EN 9261:2006, 926-2:2013
No
Nein
Page 31
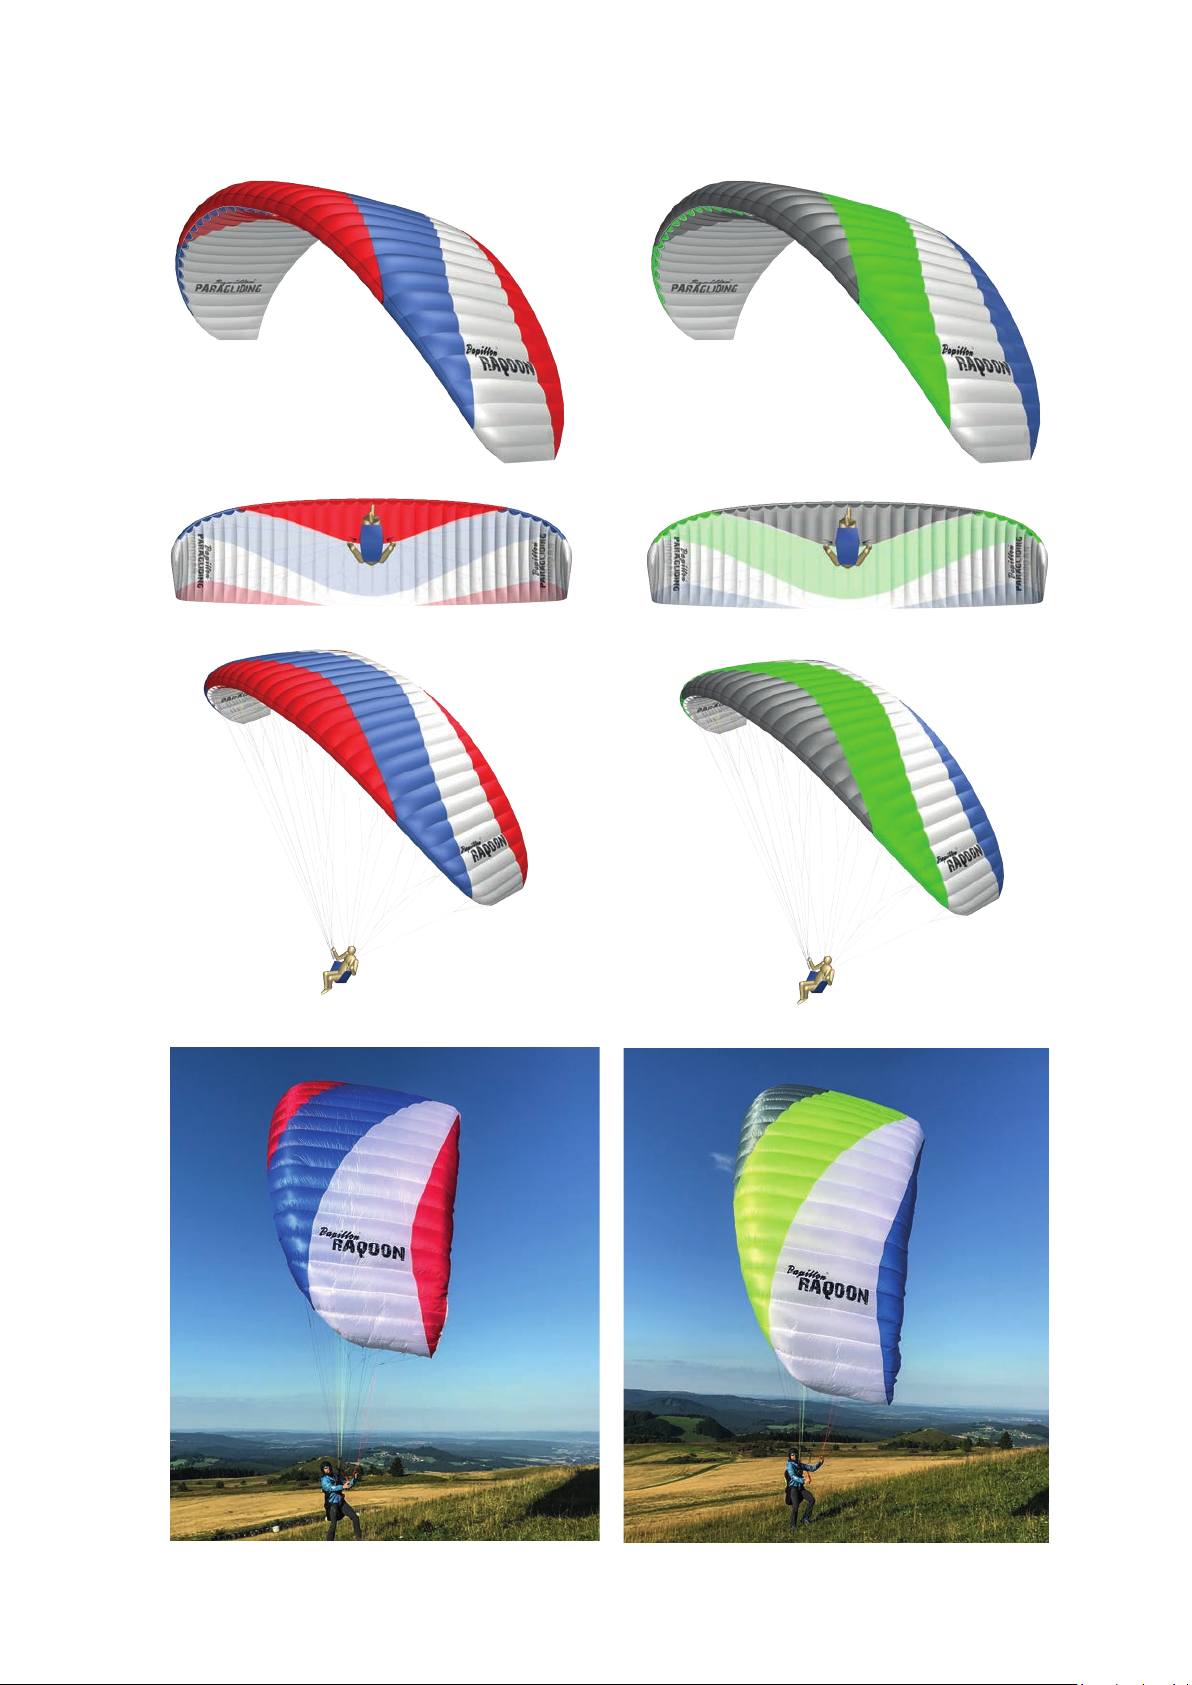
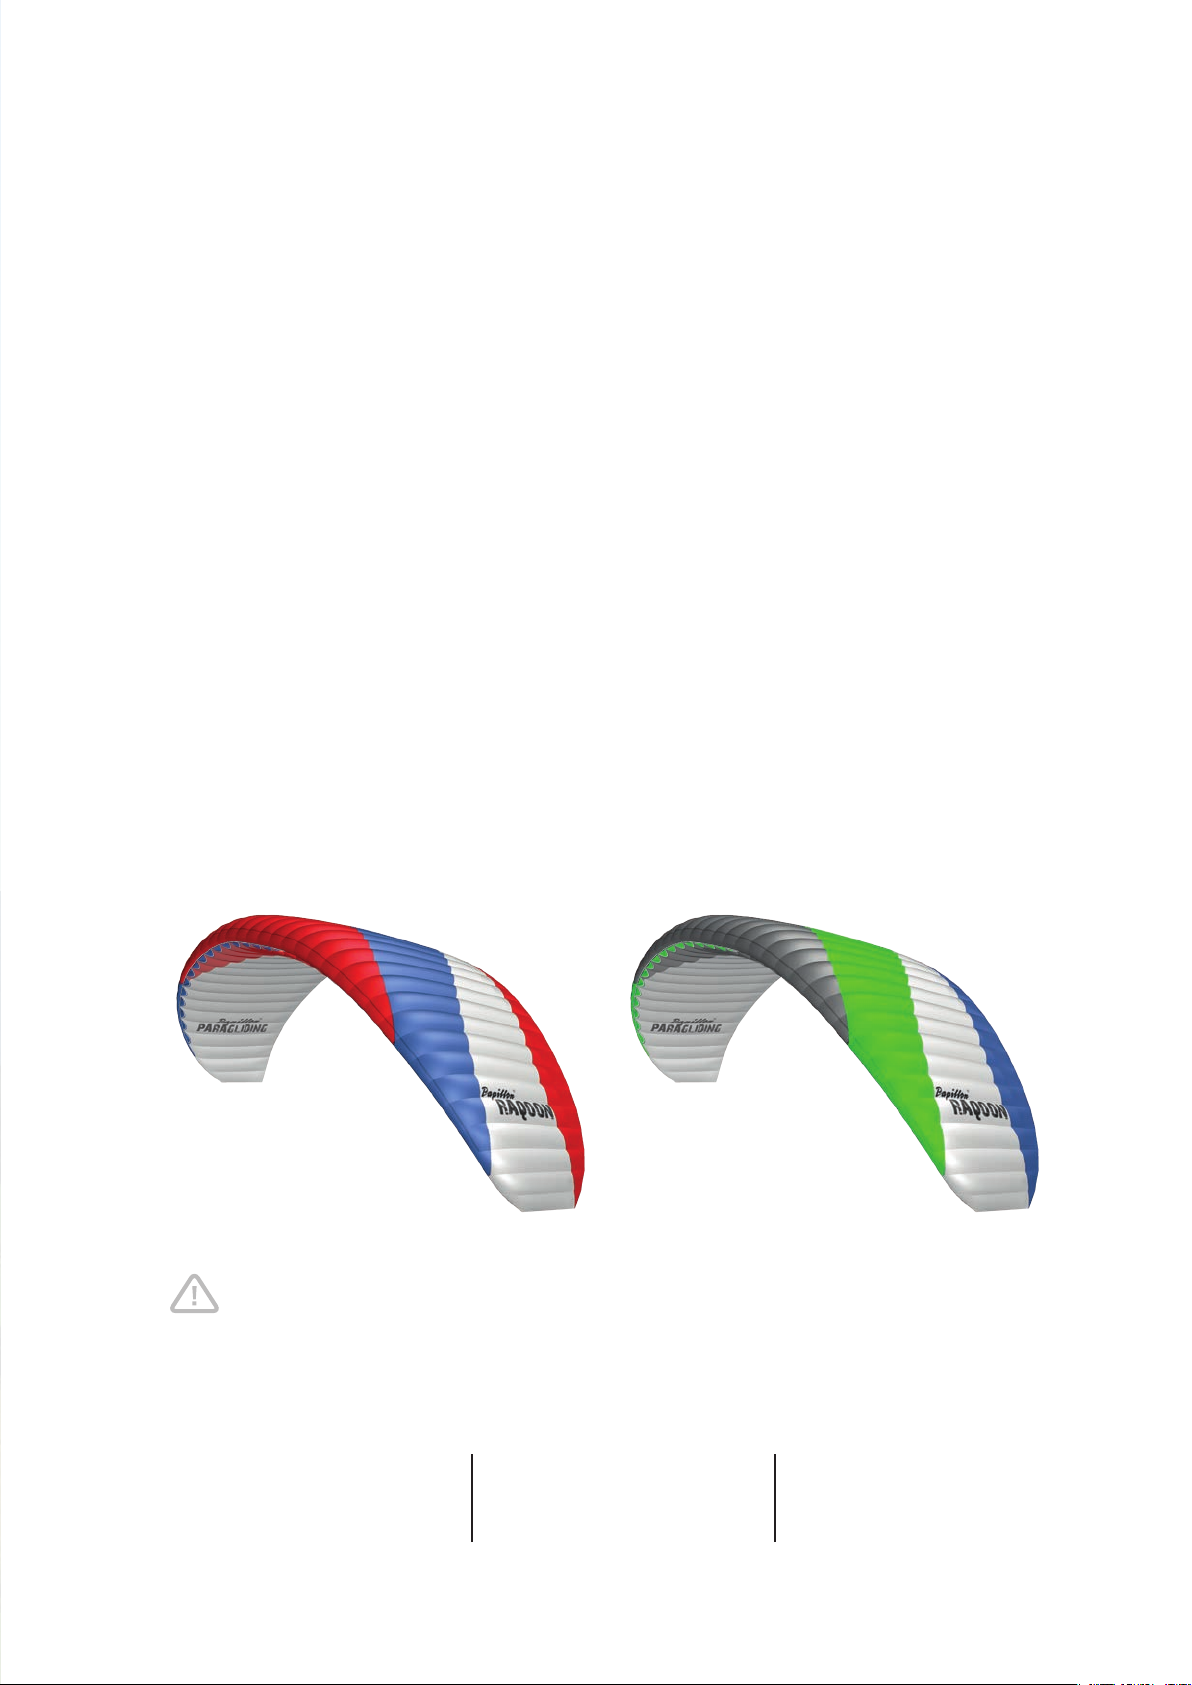
COLOR-INFO PAPILLON RAQOON
COLOR 1
COLOR 2
MANUAL | PAPILLON PARAGLIDERS | RAQOON 30 | 31
Page 32
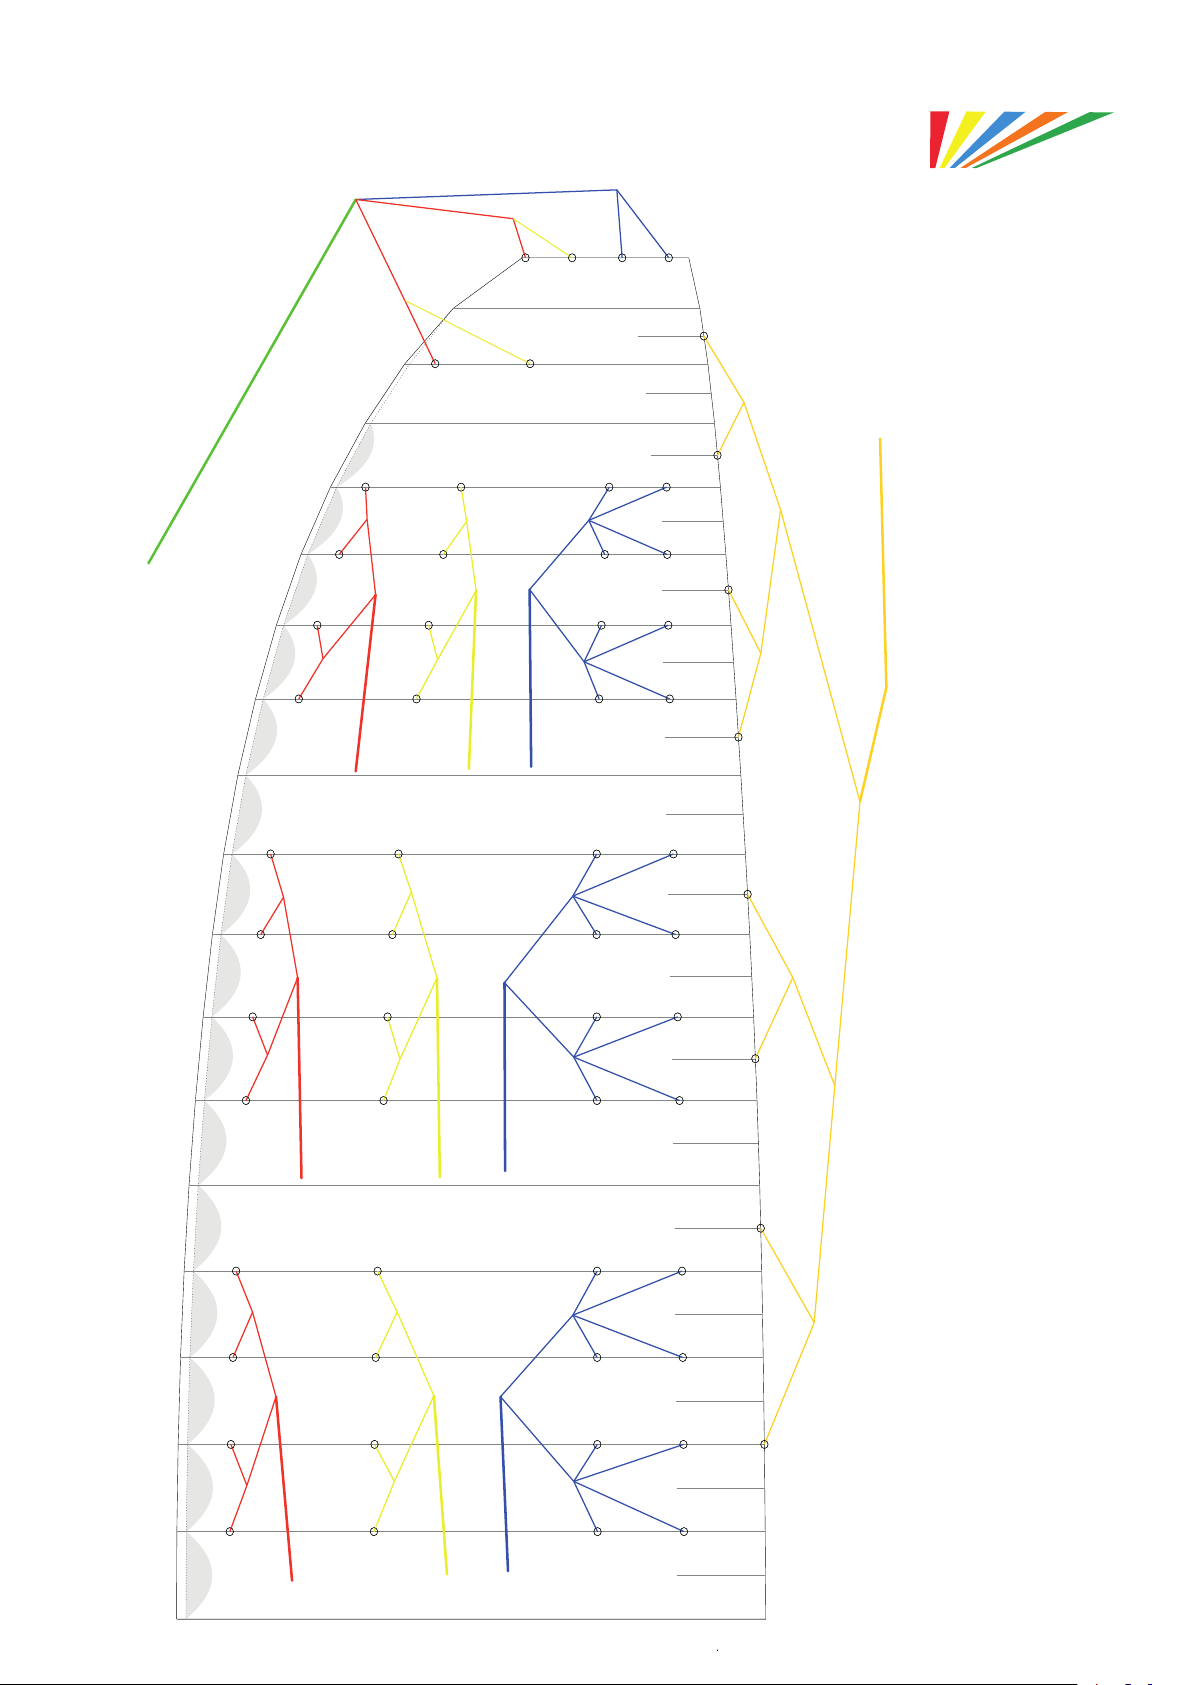
LINE CODE RAQOON
ST3
ST2
A B C+D
BR
ST
10
ST1
STA
STB
STC
STD
18
ST
17
AT16
BT16
Br17.5
16
Br15.5
Br13.5
BrM4
BL1
BrM3
BrL2
13
14
15
AT13
AT14
AM5
AT15
AM6
BT14
BT13
BT15
BM5
BM6
CM6
CM5
CT15
CT13
CT14
DT15
DT14
DT13
12
AT12
A3
BT12
B3
C3
CT12
DT12
BL2
Br11.5
11
AT10
BT10
CT10
DT10
Br10.5
9
8
AM4
AT9
AM3
AT8
BT9
BT8
BM4
BM3
7
AT7
A2
BT7
B2
CM4
CT9
CT8
CM3
2C
CT7
DT9
DT8
Br7.5
DT7
BrL1
BrM2
6
Br5.5
CM1
CT5
CT4
CT3
DT5
DT4
DT3
Br3.5
5
4
3
AT5
AM2
AT4
AT3
AM1
BT5
BT4
BT3
BM1
BM2
CM1
BrM1
2
AT2
A1
BT2
B1
C1
CT2
DT2
1
Page 33
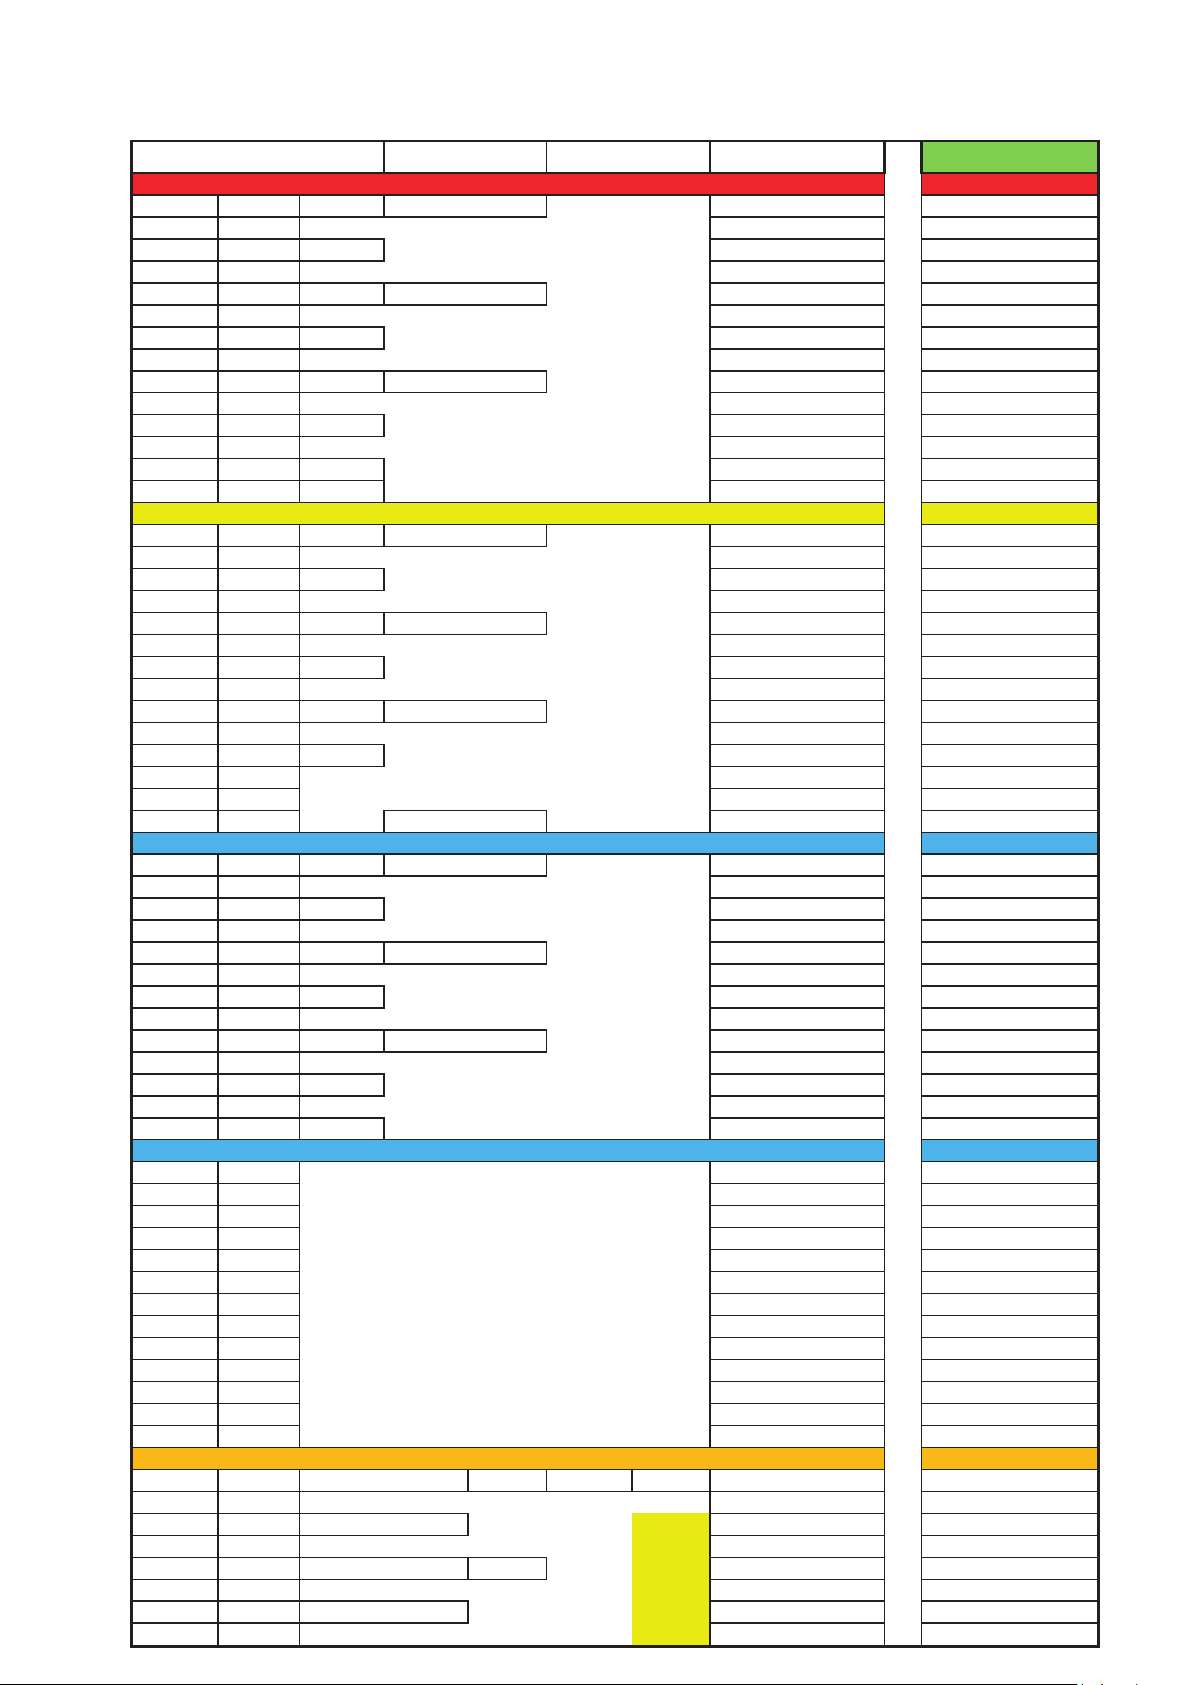
LINE PLAN RAQOON 55
Line plan length
EAPR Check Sheet
A-Lines
r 2
658 1253
6187
6167
r 3
627
6155
6135
r 4
627 1250
6152
6129
r 5
642
6167
6147
r 7
671 1253
6128
6108
r 8
627
6083
6061
r 9
627 1228
6058
6033
r 10
625
6056
6035
r 12
586 1164
5958
5934
r 13
531
5902
5876
r 14
531 1108
5847
5822
r 15
491
5806
5782
r 17
895 448
5550
5529
Stabilo
431 671
5310
5287
B-Lines
r 2
658 1253
6104
6080
r 3
627
6073
6050
r 4
627 1250
6069
6043
r 5
642
6085
6059
r 7
671 1253
6038
6015
r 8
627
5993
5968
r 9
627 1226
5966
5942
r 10
625
5964
5938
r 12
586 1164
5858
5836
r 13
536
5808
5783
r 14
546 1108
5762
5738
r 15
513
5729
5707
r 17
885
5540
5518
Stabilo
480
5359
5334
C-Lines
r 2
658 1253
6227
6202
r 3
627
6196
6173
r 4
627 1250
6192
6170
r 5
645
6211
6189
r 7
680 1253
6177
6152
r 8
627
6123
6099
r 9
627 1221
6091
6065
r 10
620
6085
6062
r 12
586 1164
5967
5946
r 13
531
5911
5887
r 14
534 1119
5870
5853
r 15
503
5839
5819
Stabilo
522 716
5446
5429
D-Lines
r 2
775
6344
6321
r 3
747
6316
6292
r 4
747
6312
6292
r 5
758
6324
6299
r 7
792
6289
6264
r 8
737
6233
6211
r 9
731
6196
6174
r 10
716
6181
6159
r 12
670
6050
6026
r 13
613
5993
5971
r 14
610
5945
5920
r 15
578
5914
5891
Stabilo
630
5554
5535
Brake
r 3
1555 1611 260 1650
6956
6933
r 5,5
1253
. + 150
6655
6632
r 7,5
1307
6440
6416
r 9,5
1249
6382
6361
r 11,5
1057 2063
6194
6172
r 13,5
1001
6138
6115
r 15,5
796
6094
6071
r 17,5
794
6092
6065
1880
1611
Complete length of main
brake line: 1800mm
Handle on: 1650mm
1164
1325
Brake
4207
B-Lines
4193
4113
4108
4207
C-Lines
4316
4243
4216
D-Lines
4203
RAQOON 55 Lineplan rev4
A-Lines
4276
MANUAL | PAPILLON PARAGLIDERS | RAQOON 32 | 33
Page 34
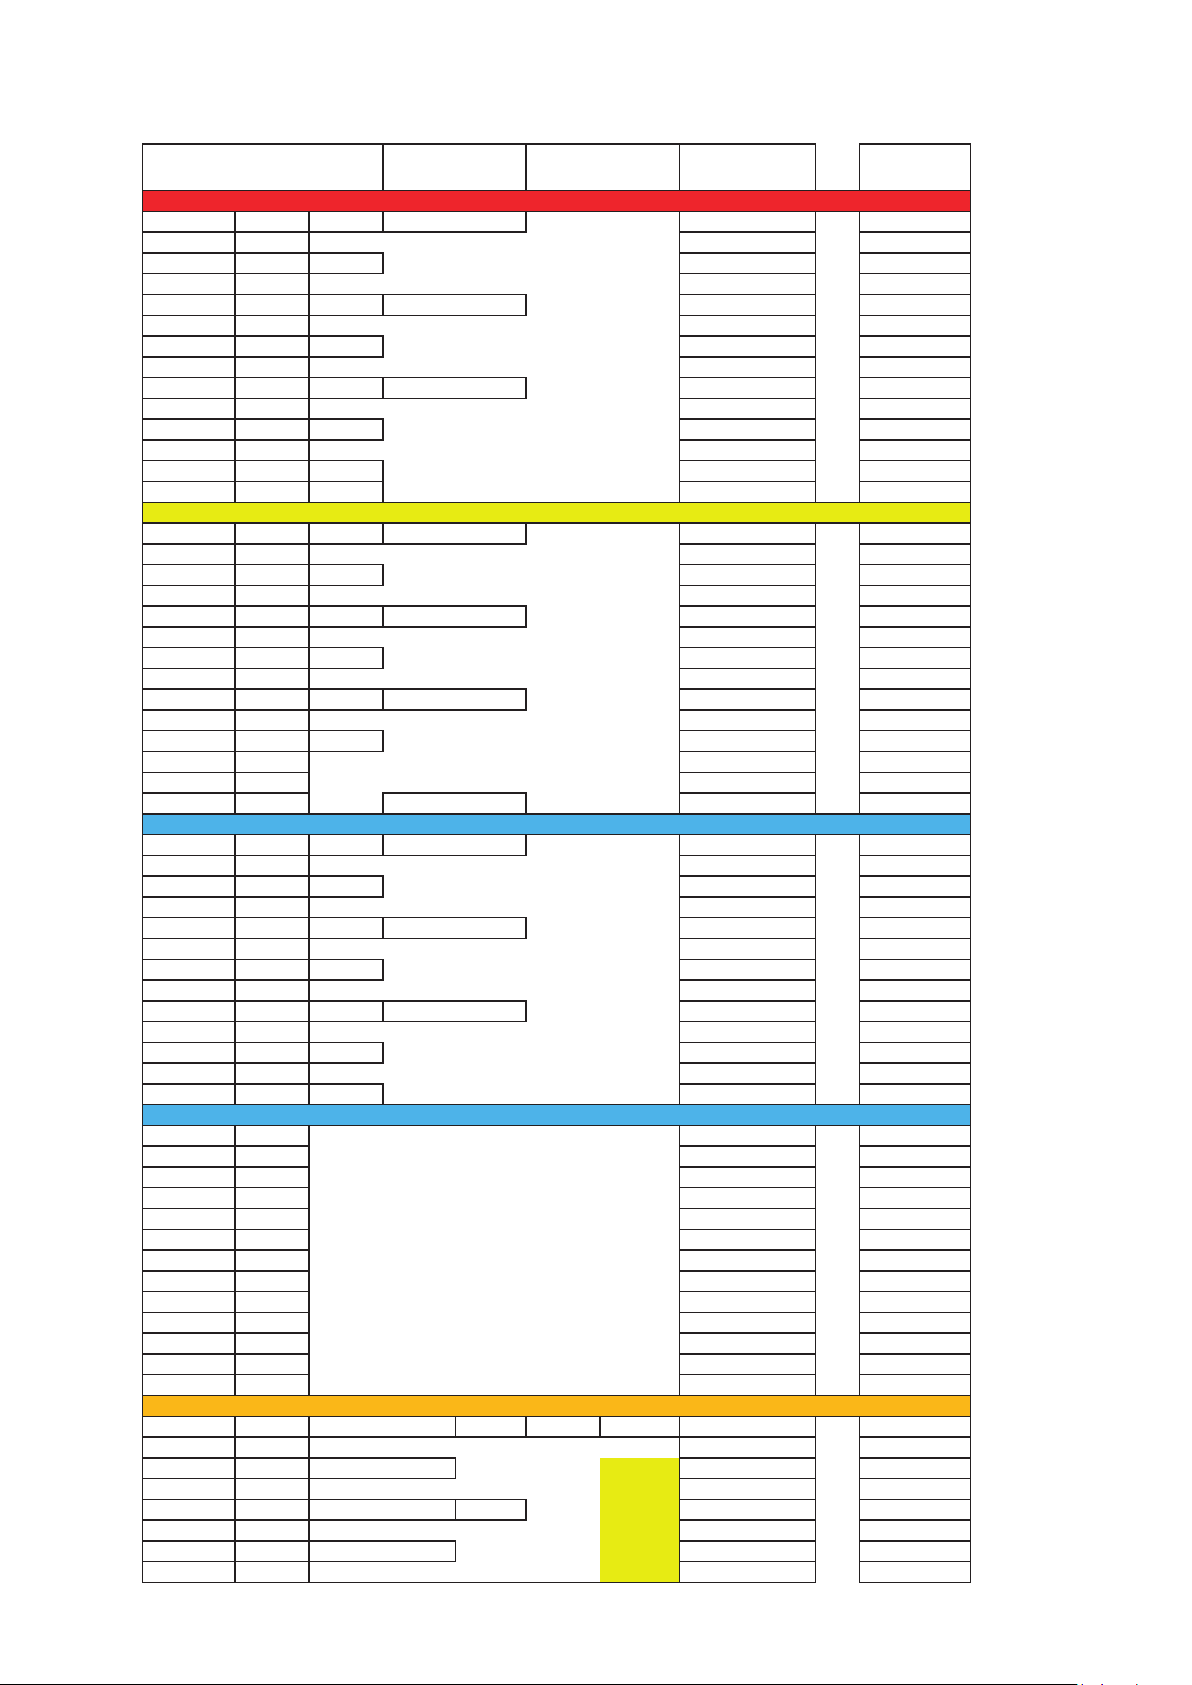
RAQOON 60
r 17,5 847 6514
6494
4551
2006
B-Lines
A-Lines
4529
4500
4486
4491
4467
1720
Complete length of main
brake line: 1800mm
Handle on: 1650mm
1242
1414
4391
4386
4490
4596
Brake
D-Lines
C-Lines
RAQOON 60 Lineplan rev5
r 2
r 3
r 4
r 5
r 7
r 8
r 9
r 10
r 12
r 13
r 14
r 15
r 17
Stabilo
r 2
r 3
r 4
r 5
r 7
r 8
r 9
r 10
r 12
r 13
r 14
r 15
r 17
Stabilo
702 1338
669 6557
669 1334 6554
685 6570
717 1338
669 6492
669 1311
667 6464
626 1242
567
567 1183
524 6197
955 478 5923
461 717 5667
702 1338 6507
669 6473
669 1334 6470
685
717 1338
669
669 1309
667 6367
626 1242
572 6200
583 1183 6152
547 6116
945 5913
512 5719
Lineplan length
6591
6540
6466
6359
6299
6240
6486
6445
6397
6369
6254
EAPR
Mesurements
6578
6543
6536
6555
6521
6472
6443
6442
6337
6279
6218
6174
5902
5646
6491
6455
6453
6470
6428
6383
6348
6350
6234
6180
6131
6095
5889
5694
r 2
r 3
r 4
r 5
r 7
r 8
r 9
r 10
r 12
r 13
r 14
r 15
Stabilo
r 2
r 3
r 4
r 5
r 7
r 8
r 9
r 10
r 12
r 13
r 14
r 15
Stabilo
704 1338 6638
671
671 1334 6601
691
728 1338 6595
671 6537
671 1303 6503
664 6496
628 1242 6370
569 6311
572 1194 6267
537 6231
557 764 5811
827 6761
797
797 6727
809 6739
846 6712
786 6653
781 6613
764
715
654 6397
651 6345
617 6312
673 5927
6604
6621
6730
6596
6457
6611
6579
6572
6592
6567
6511
6475
6465
6343
6283
6234
6202
5786
6735
6700
6695
6710
6685
6625
6585
6570
6430
6370
6320
6280
5900
r 3
r 5,5
r 7,5
r 9,5
r 11,5
r 13,5
r 15,5
1660 1720 400 1650 7436
1338
1395 6885
1333
1128 2202 6623
1068 6563
849
. + 150
7114
6822
6516
7416
7095
6866
6803
6603
6544
6496
Page 35
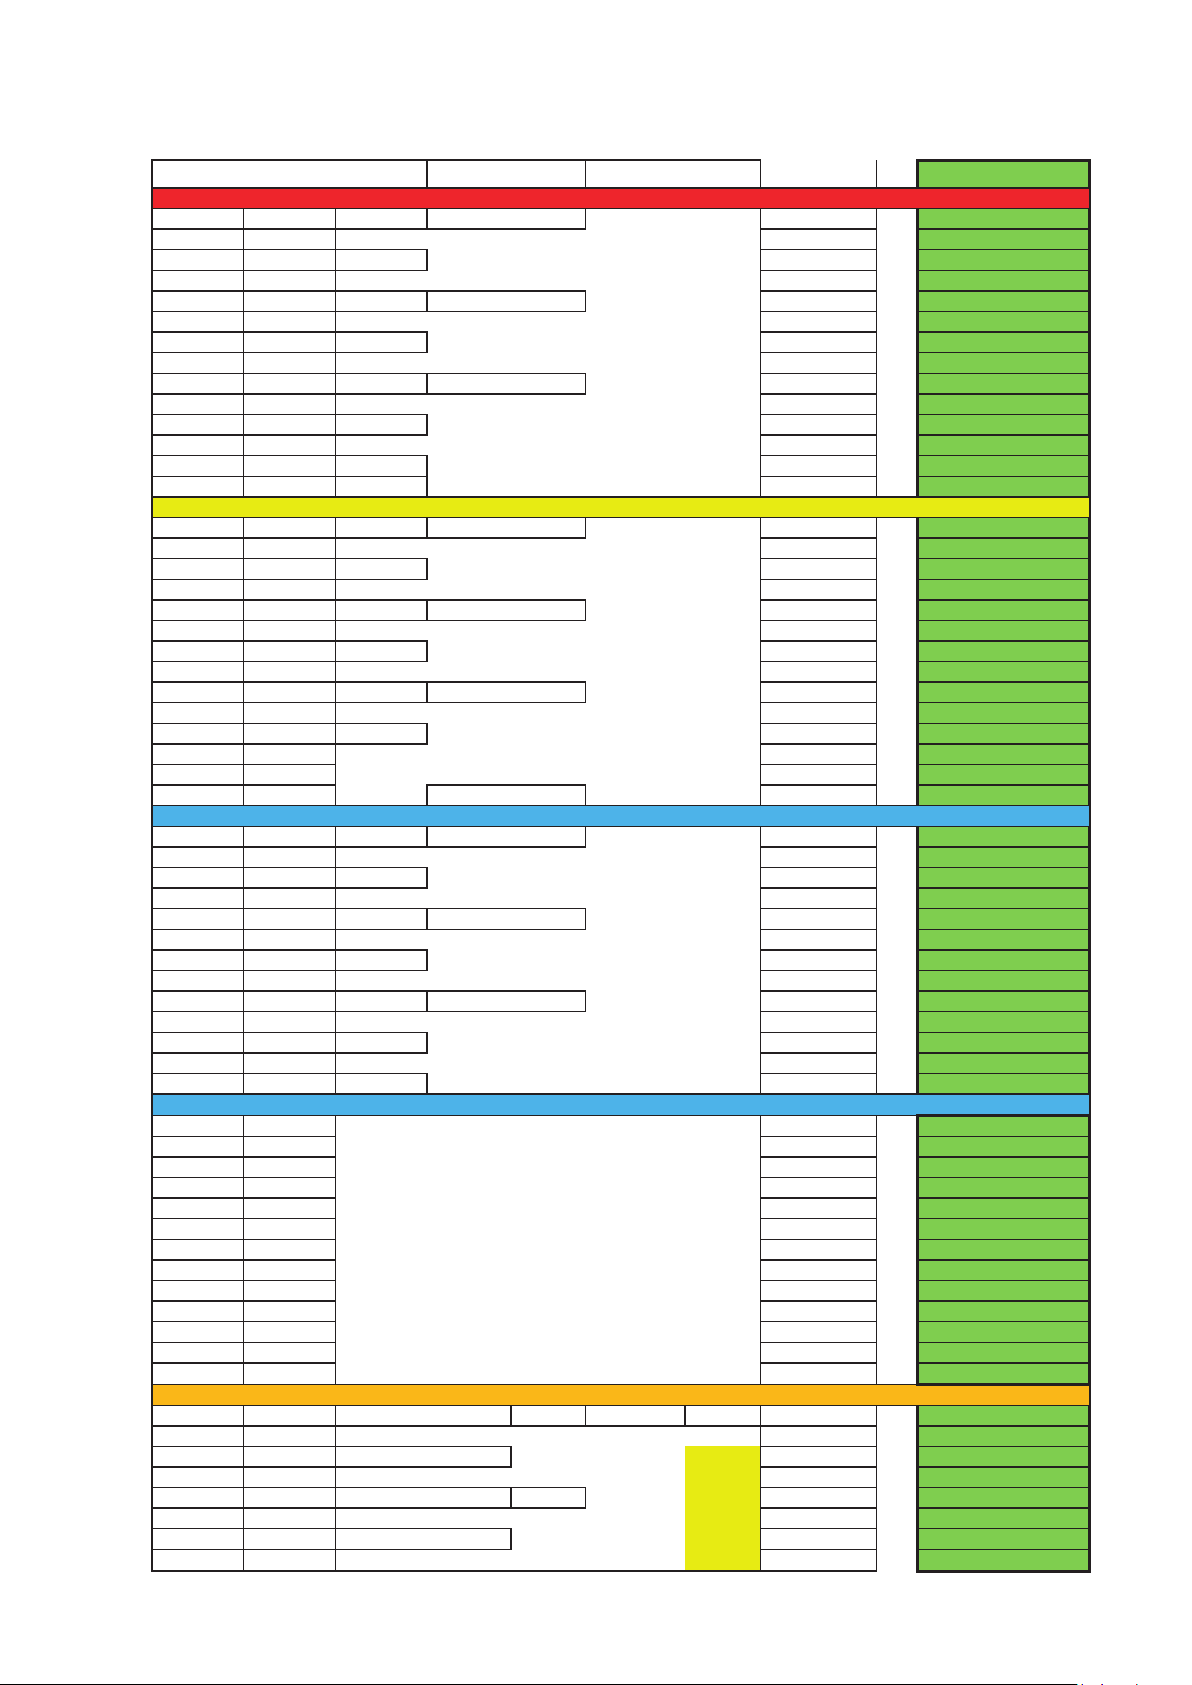
RAQOON 80
r 2
735 1400 6923 6922
r 3
700
6888 6888
r 4
700 1396 6884 6884
r 5
717 6901 6900
r 7
750 1400 6840 6838
r 8
700 6790 6787
r 9
700 1372 6762 6759
r 10
698 6760 6757
r 12
655 1300 6655 6654
r 13 593 6593 6592
r 14 593 1238 6531 6528
r 15 548 6486 6482
r 17 1000 500 6200 6198
Stabilo 482 750 5932 5930
r 2 735 1400 6835 6834
r 3 700 6800 6799
r 4 700 1396 6796 6795
r 5 717 6813 6812
r 7 750 1400 6755 6753
r 8 700 6705 6700
r 9 700 1370 6675 6669
r 10
698
6673 6667
r 12 655 1300 6565 6564
r 13 599 6509 6507
r 14 610 1238 6458 6454
r 15 573 6421 6420
r 17 989 6189
6188
Stabilo 536 5986
5985
r 2 735
1400
6970 6968
r 3 700 6935 6933
r 4 700
1396
6931 6922
r 5 721 6952 6944
r 7 760
1400
6895 6887
r 8 700 6835 6827
r 9 700
1364
6799 6791
r 10 693 6792 6785
r 12 655
1300
6665 6662
r 13 593 6603 6596
r 14 597
1250
6557 6548
r 15 562 6522
6516
Stabilo 583 800
6083 6078
r 2
866
7101
7097
r 3
834
7069
7063
r 4
834
7065 7059
r 5 847 7078 7071
r 7 885 7020 7013
r 8 823 6958 6952
r 9 817 6916 6910
r 10 800 6899 6892
r 12 748 6758 6751
r 13 685 6695 6688
r 14 681 6641 6634
r 15 646 6606 6599
Stabilo 704 6204 6197
r 3
1737
1800 500 1650
7787 7781
r 5,5
1400
. + 150 7450 7442
r 7,5
1460
7210 7205
r 9,5
1395
7145 7140
r 11,5
1181
2335
6966 6962
r 13,5
1118
6903 6901
r 15,5
889
6859 6857
r 17,5
887
6857 6855
4788
4690
A-Lines
4835
4735
4710
2100
1800
Brake
D-Lines
Complete length of main
brake line: 1800mm
Handle on: 1650mm
1300
1485
4700
4700
4605
4610
4700
C-Lines
B-Lines
RAQOON 80
Lineplan rev4
line plan
Check length EAPR
MANUAL | PAPILLON PARAGLIDERS | RAQOON 34 | 35
Page 36
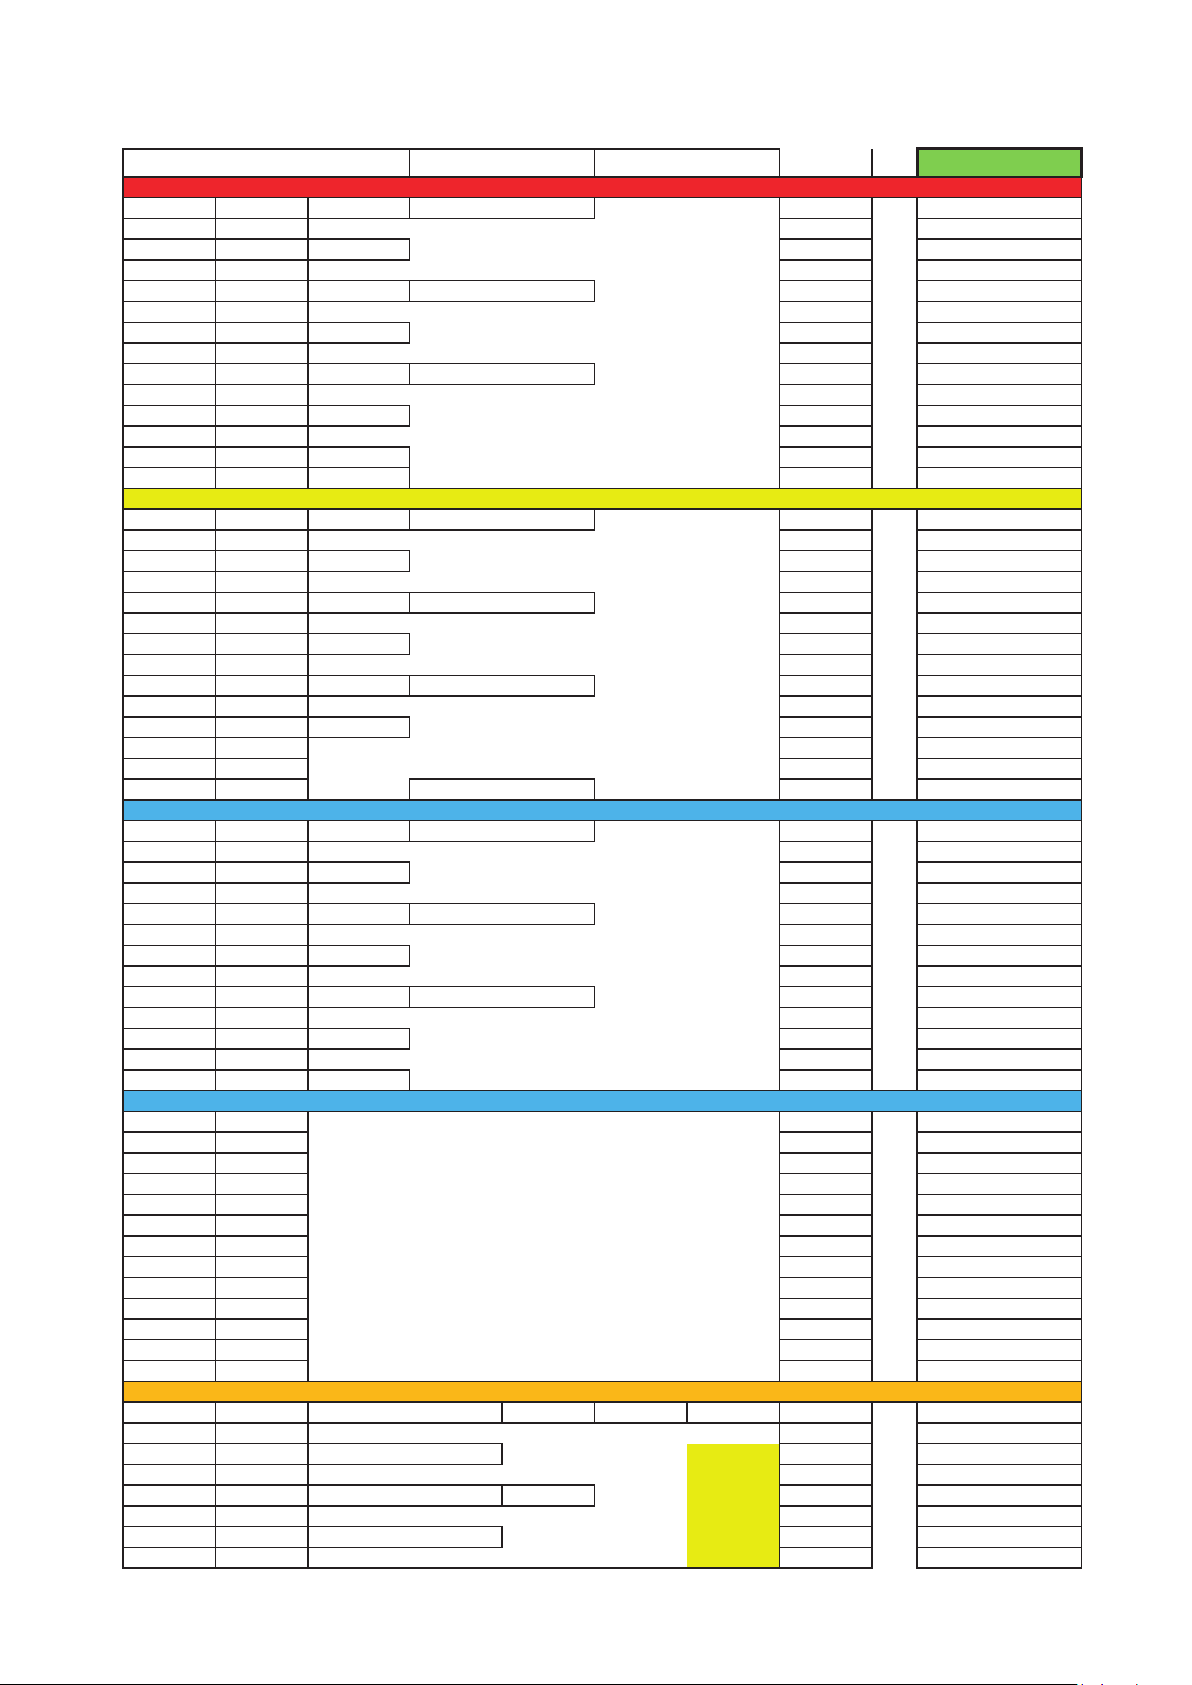
RAQOON 85
r 2
754 1436 7105 7088
r 3
718
7069 7050
r 4
718 1432 7065 7047
r 5
735 7083 7065
r 7
769 1436 7022 7005
r 8
718 6970 6953
r 9
718 1407
6942 6925
r 10
716 6940 6925
r 12
672 1334
6827 6809
r 13 608 6763 6746
r 14 608 1270 6699 6681
r 15 562 6653 6636
r 17 1026 513 6360 6341
Stabilo 494 769 6085 6069
r 2 754 1436 7010 6990
r 3 718 6974 6955
r 4 718 1432 6970 6951
r 5 735 6988 6970
r 7 769 1436 6934 6917
r 8 718 6883 6865
r 9 718 1405 6852 6835
r 10 716 6850 6833
r 12 672 1334 6734 6715
r 13 614 6677 6660
r 14 626 1270 6625 6605
r 15 588 6587 6568
r 17 1015 6349 6330
Stabilo 550 6140 6122
r 2 754 1436 7135 7115
r 3 718 7099 7080
r 4 718 1432 7095 7077
r 5 740 7117 7100
r 7 780 1436 7078 7060
r 8 718 7016 6997
r 9 718 1399 6980 6960
r 10 711 6972 6955
r 12 672 1334 6837 6820
r 13 608 6773 6755
r 14 612 1282 6726 6707
r 15 576 6690 6670
Stabilo 598 821
6240 6220
r 2 888 7269 7250
r 3 856 7237 7220
r 4 856 7233 7215
r 5 869 7246 7227
r 7 908 7206 7187
r 8 844 7143 7124
r 9 838 7100 7081
r 10 821 7082 7065
r 12 767 6932 6915
r 13 703 6868 6850
r 14 699 6812 6795
r 15 663 6776 6757
Stabilo 722 6364 6345
r 3 1782 1846 520 1650 7952 7925
r 5,5 1436 . + 150 7607 7586
r 7,5 1498 7361 7340
r 9,5 1431 7294 7270
r 11,5 1215 2395 7114 7093
r 13,5 1147 7046 7025
r 15,5 912 7000 6975
r 17,5 910 6998 6975
2154
4832
Brake
D-Lines
C-Lines
B-Lines
A-Lines
1846
Complete length of main
brake line: 1800mm
Handle on: 1650mm
1334
1523
4915
4816
4821
4820
4729
4729
4821
4945
4862
RAQOON 85 Lineplan rev7
line plan
Check length EAPR
Page 37
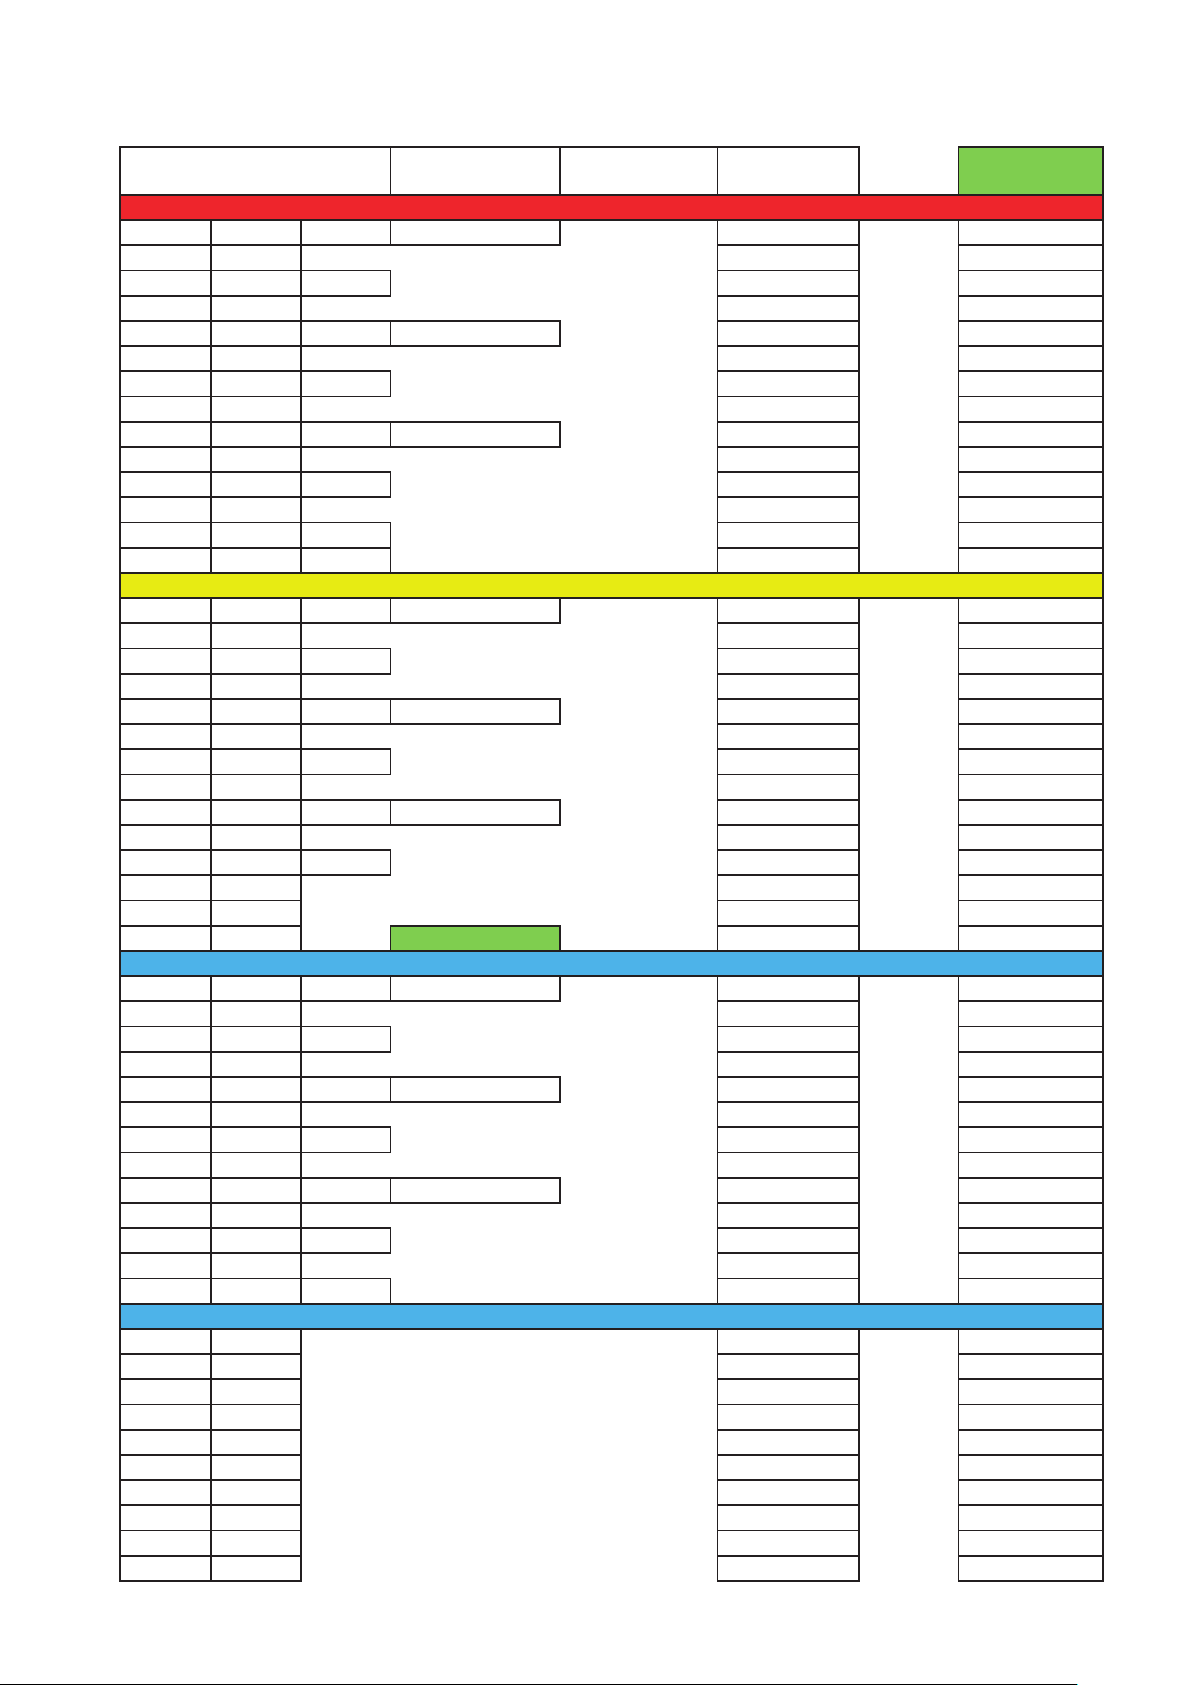
RAQOON 100
EAPR
r 2 776 1478 7273
7276
r 3
739 7236
7238
r 4 739 1474 7232
7230
r 5 757 7250
7253
r 7 792 1478 7228
7230
r 8 739 7175
7173
r 9
739 1449
7145
7146
r 10 737 7143
7142
r 12 692 1373
7027
7025
r 13 626 6962
6965
r 14 626 1307 6896
6899
r 15 579
6849
6853
r 17 1056 528 6547
6549
Stabilo 509 792
6264
6262
r 2 776 1478 7191
7197
r 3 739
7154
7157
r 4 739 1474 7150
7152
r 5 757 7168
7172
r 7 792 1478 7127
7129
r 8 739 7074
7072
r 9 739 1447
7043
7045
r 10 737 7041
7044
r 12 692 1373 6916
6918
r 13 633 6857
6859
r 14 644 1307 6803
6808
r 15 605 6764
6768
r 17 1044 6535
6535
Stabilo 566 6321
6318
r 2 776 1478
7323
7321
r 3 739 7286
7282
r 4 739 1474 7282
7278
r 5 761 7304
7299
r 7 803 1478 7277
7272
r 8 739 7213
7210
r 9
739 1440
7175
7170
r 10 732 7168
7164
r 12 692 1373 7027
7026
r 13 626 6962
6958
r 14 630 1320 6913
6908
r 15 593 6876
6873
Stabilo 616 845 6423
6418
r 2 914 7462
7456
r 3 881 7428
7423
r 4 881 7424
7418
r 5 894 7437
7434
r 7 934 7409
7403
r 8 869 7343
7339
r 9 863 7299
7296
r 10 845 7281
7275
r 12 790 7126
7120
r 13 723 7059
7055
5069
4996
4963
A-Lines
D-Lines
C-Lines
5019
4963
4958
4937
4857
4852
4963
B-Lines
RAQOON 100 Lineplan rev4
line plan length
Check length
MANUAL | PAPILLON PARAGLIDERS | RAQOON 36 | 37
Page 38
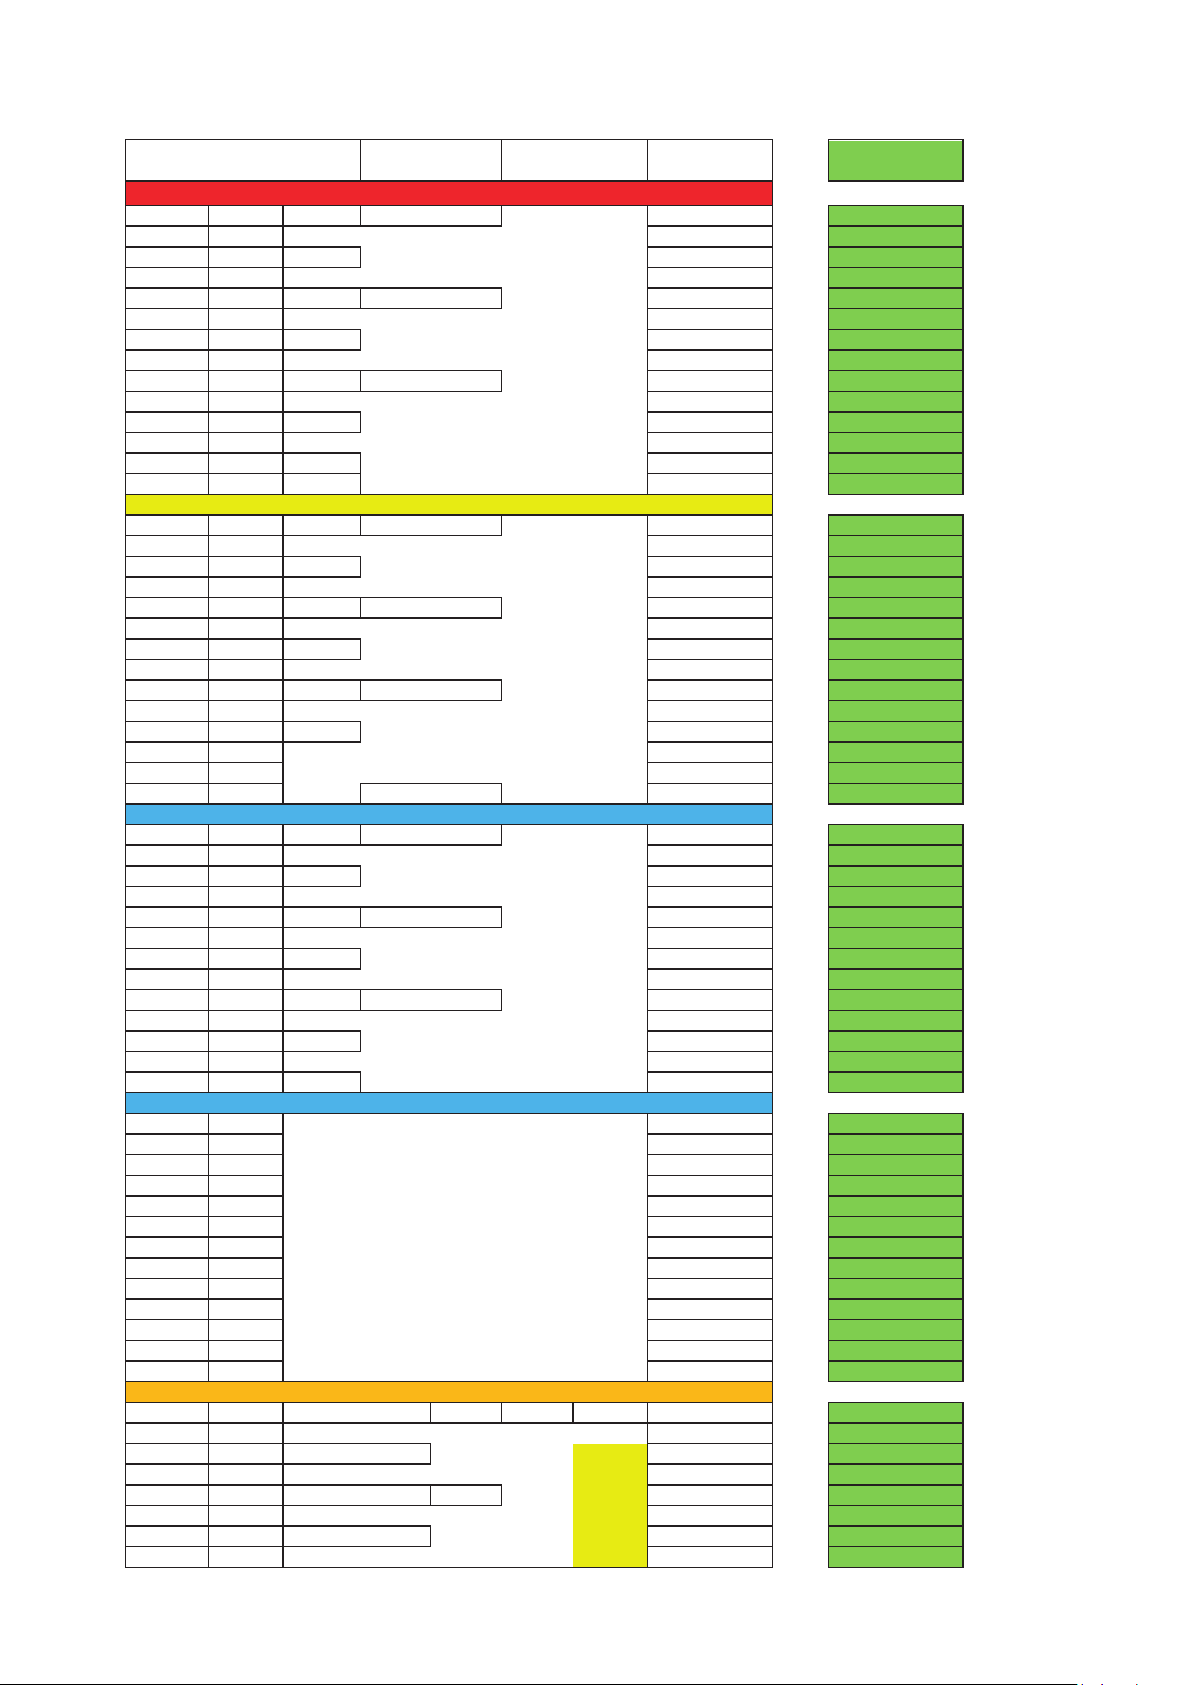
PAPILLON RAQOON 120
Lineplan length
EAPR
mesurements
r 2
822 1566
7728
7726
r 3
783
7689
7685
r 4
783 1561
7684
7680
r 5
802
7703
7700
r 7
839 1566
7656
7660
r 8
783
7600
7600
r 9
783 1534
7568
7565
r 10
781
7566
7564
r 12
733 1454
7443
7445
r 13
663
7374
7375
r 14
663 1385
7304
7305
r 15
613
7254
7260
r 17
1118 559
6934
6940
Stabilo
539 839
6634
6640
r 2
822 1566
7635
7635
r 3
783
7596
7596
r 4
783 1561
7591
7591
r 5
802
7610
7610
r 7
839 1566
7557
7555
r 8
783
7501
7500
r 9
783 1532
7467
7464
r 10
781
7465
7464
r 12
733 1454
7337
7340
r 13
670
7274
7278
r 14
682 1385
7217
7220
r 15
641
7176
7180
r 17
1106
6922
6925
Stabilo
599
6695
6695
r 2
822 1566
7778
7775
r 3
783
7739
7735
r 4
783 1561
7734
7730
r 5
806
7758
7754
r 7
850 1566
7716
7712
r 8
783
7649
7645
r 9
783 1526
7608
7605
r 10
775
7601
7596
r 12
733 1454
7454
7450
r 13
663
7385
7380
r 14
668 1398
7334
7330
r 15
629
7294
7290
Stabilo
652 895
6803
6805
r 2
969
7924
7920
r 3
933
7889
7885
r 4
933
7884
7880
r 5
947
7899
7895
r 7
990
7856
7854
r 8
920
7786
7784
r 9
914
7739
7736
r 10
895
7720
7717
r 12
837
7558
7555
r 13
766
7488
7485
r 14
762
7427
7425
r 15
723
7388
7385
Stabilo
787
6939
6940
r 3
1945 2013 690 1650
8647
8645
r 5,5
1566
. + 150
8268
8265
r 7,5
1633
7999
7995
r 9,5
1560
7927
7922
r 11,5
1321 2578
7693
7691
r 13,5
1250
7622
7620
r 15,5
994
7568
7563
r 17,5
992
7565
7560
2349
2013
Complete length of main
brake line: 1800mm
Handle on: 1650mm
1454
1655
Brake
5257
B-Lines
5247
5152
5150
5257
C-Lines
5390
5300
5268
D-Lines
5251
ETERNITY 120 Lineplan rev5
A-Lines
5340
Page 39
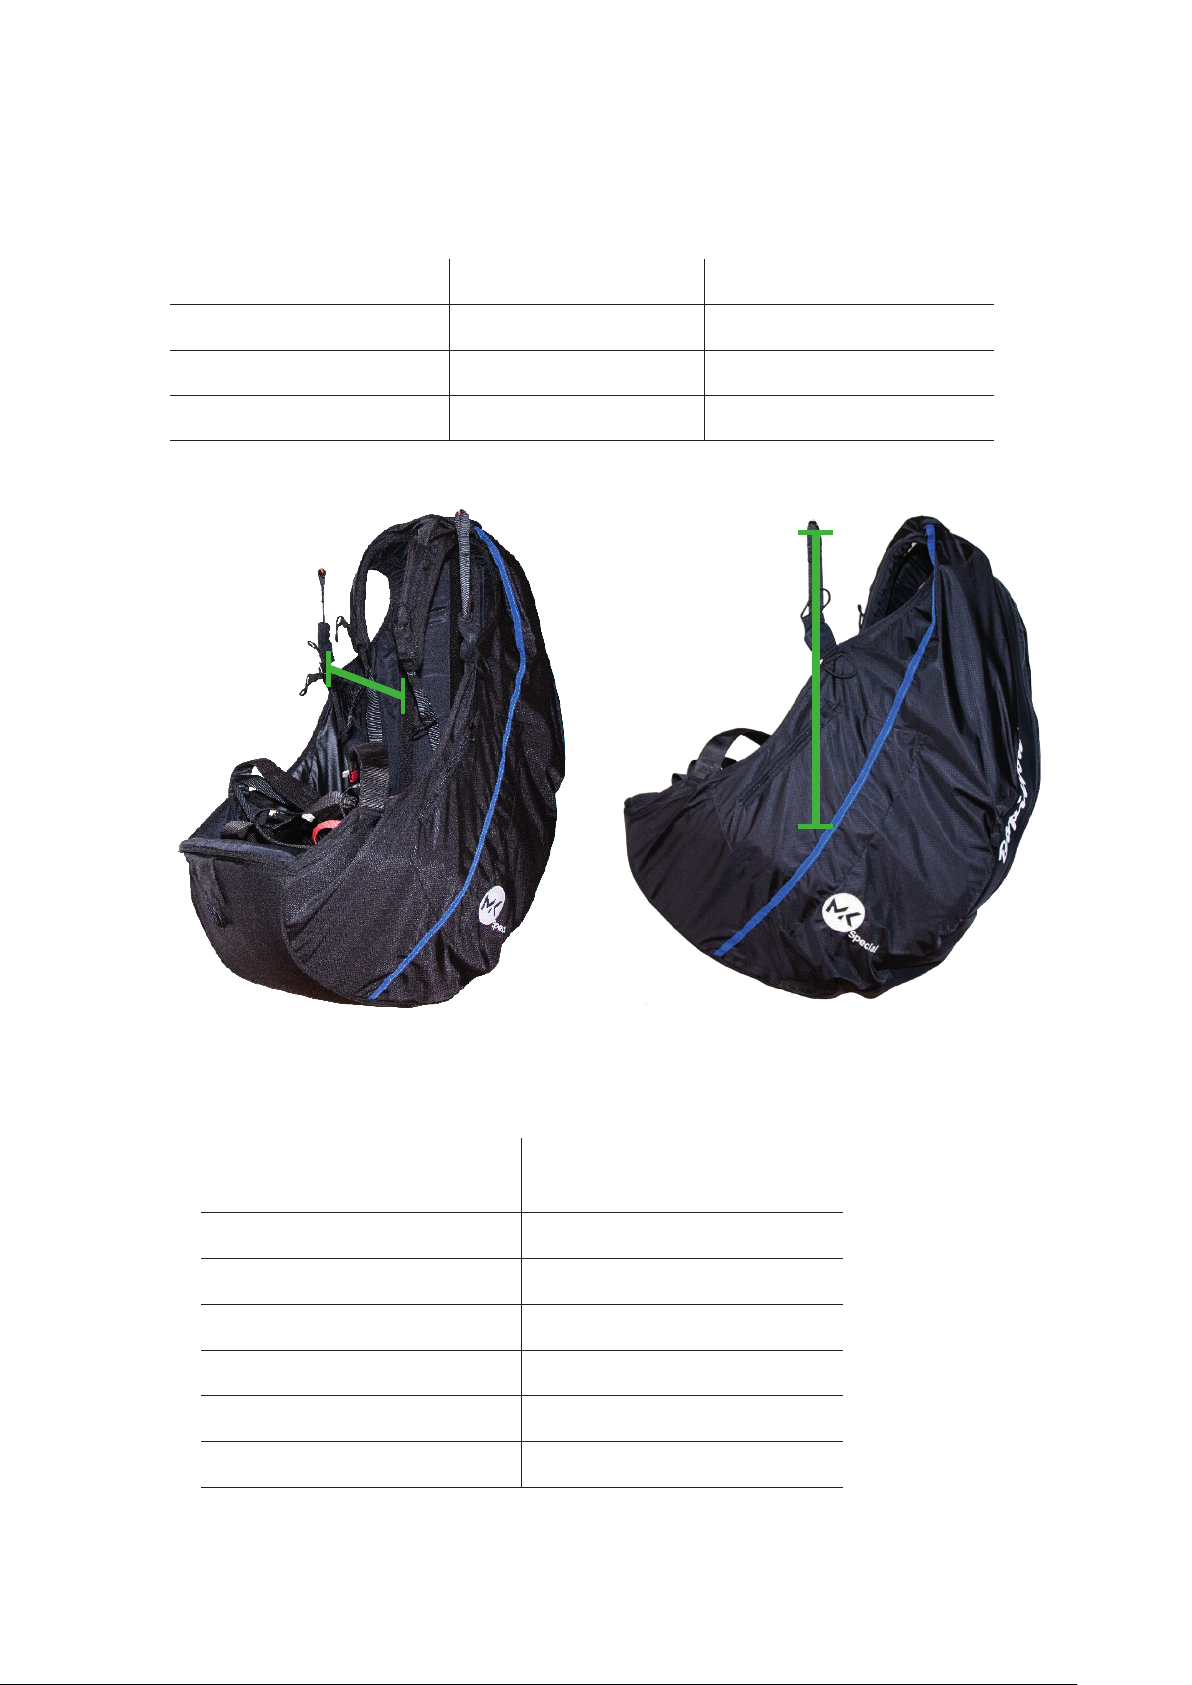
REQUIREMENT FOR LTF/EN A-CERTIFICATION
Harness-Dimensions
Weight A-dimension B-dimension
< 50 kg 38 cm 38 cm
50-80 kg 42 cm 42 cm
> 80 kg 46 cm 46 cm
Ⓑ
Ⓐ
Control Travel
RAQOON Size max. symmetrical
control travel at max. weight
55 > 55 cm
60 > 60 cm
80 > 60 cm
85 > 65 cm
100 > 65 cm
120 > 65 cm
MANUAL | PAPILLON PARAGLIDERS | RAQOON 38 | 39
Page 40
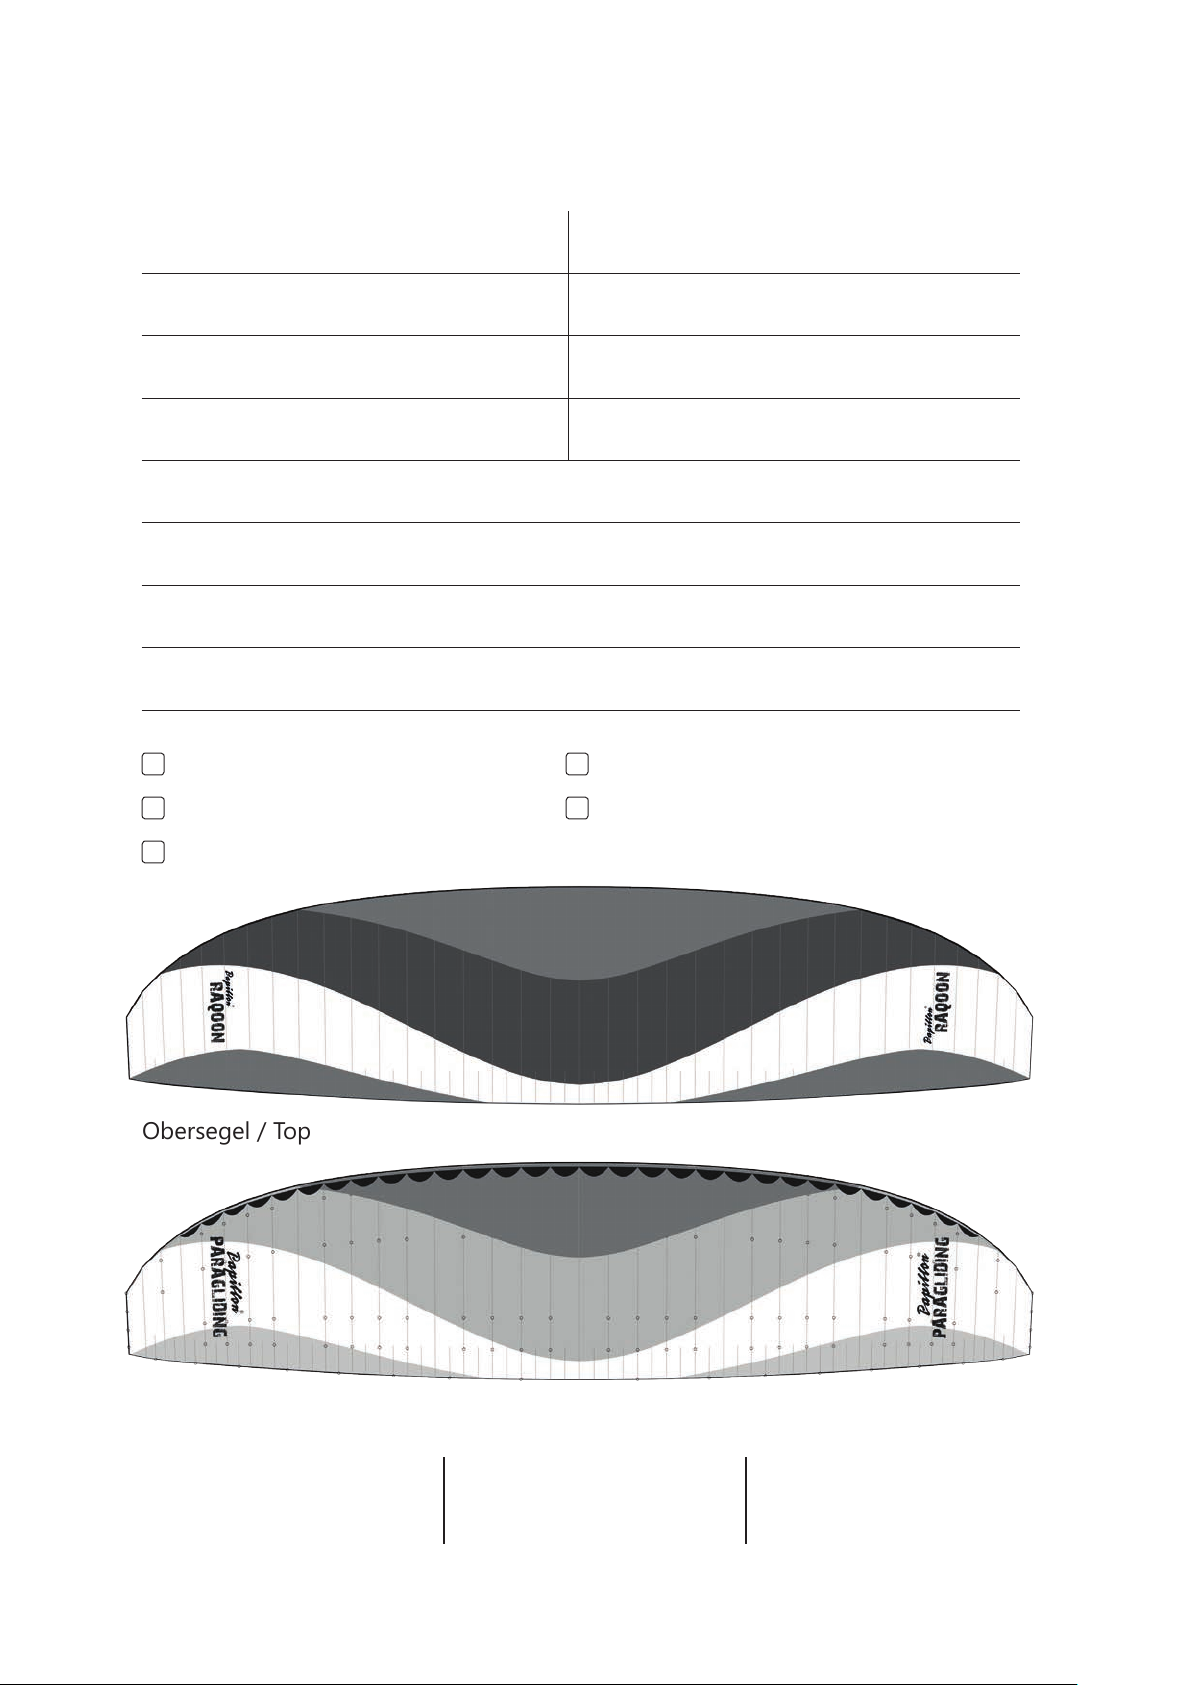
INSTRUCTION LEAFLET FOR REPAIRS &
2-YEARLY-CHECK
Last name: First name:
Street address: ZIP code, city:
Country: Phone number:
E-mail address:
Glider model and color:
Serialnumber:
Coments/notes:
2-yearly-check Line check inkl. strength test
Air permability check Repair of the marked damage
Call-back at sighting of the glider
Obersegel / Top
Untersegel / Bottom
PAPILLON PARAGLIDERS
Wasserkuppe 46
D-36129 GERSFELD
Fax: +49 (06654) 82 96
Tel. +49 (06654) 75 48
[email protected]
papillon-paragliders.com
Page 41
LINE ORDER FORM
Last name: First name:
Street address: ZIP code, city:
Country: Phone number:
E-mail address:
Glider model and color:
Size:
Serialnumber:
Comment/notes:
Line ID-code quantity
PAPILLON PARAGLIDERS
Wasserkuppe 46
D-36129 GERSFELD
Fax: +49 (06654) 82 96
Tel. +49 (06654) 75 48
MANUAL | PAPILLON PARAGLIDERS | RAQOON 40 | 41
[email protected]
papillon-paragliders.com
Page 42

REPLY CARD
Last name: First name:
Street address: ZIP code, city:
Country: Phone number:
E-mail address:
Product:
Serialnumber:
Date of purchase:
Purchased at:
Pilot since:
Number of ights per year:
Club:
Yes, I would liket to get informed on the newest activities and developments
of Papillon Paragliding.
PAPILLON PARAGLIDERS
Wasserkuppe 46
D-36129 GERSFELD
Fax: +49 (06654) 82 96
Tel. +49 (06654) 75 48
[email protected]
papillon-paragliders.com
Page 43
MAINTENANCE MANUAL
as developer and manufacturer for paragliders,
harnesses and rescue parachutes
English Rev. 1.2 Effective: June 2017
Copyright © 2017 by PAPILLON PARAGLIDERS – GLEITSCHIRM DIREKT GmbH, all rights preserved. No part of this publication
may be reproduced or developed further on in any way without written approval of the PAPILLON PARAGLIDERS GLEITSCHIRM
DIREKT GmbH. All technical details in this manual have been carfully checked by Papillon Paragliders. However we like to mention that we don‘t take any liability for possible mistakes, neither in legal responsibility, nor in liability cases that derive from
mistakable details. We preserve the right to change this manual in any way to achieve technical improvements.
MANUAL | PAPILLON PARAGLIDERS | RAQOON 42 | 43
Page 44

TOPIC OF THE INSPECTION AND
REINSPECTION INTERVALS
Regular inspection according to aircraft inspection ordinance for standardized evaluated gliders. For school gliders after 1 year, aircraft for recreational use after 2 years. Tandem gliders
for commercial purposes annually, non commercial use every 2 years to be inspected. The
inspection shall take place in the aforementioned intervals, or no later than 150 hours. Ground
handling needs to be included in the sum of ight hours.
ATTENTION:
should be informed and the canopy, if necessary, sent in for inspection.
Who may inspect/test?
Besides the manufacturer or the by him approved person or instance is authorized the owner
of the glider to warrant the bi-annual inspection and only if in compliance with pre-requisites
set forth.
Individual personal prerequisites for the inspections
in the case any abnormal ight behavior, the manufacturer
Personal prerequisites for the inspection of individually owned solo gliders for recreational use
only:
– Holder of a valid unrestricted license for paragliders or equivalent accredited license.
– An adequate orientation in the operation by the manufacturer. For this a 3 month formation
with the manufacturer is necessary.
– If a glider was tested for personal use exclusively, then its use by a third party is not allowed.
Individual personal prerequisites for the inspection of gliders, RG, GZ, used by third parties or
for tandem purpose:
– A for the testing prescribed professional training.
– A vocational activity in the production or maintenance of GS, RG, GZ or one of a technically
similar nature. Of which 6 month within the last 24 in a manufacturing operation recreational
free ight aircraft.
– An at least 2 week, subject to charge, relevant training course at the operation of the manufacturer.
– An applicable orientation for each type of device, which is to be refreshed annually.
Page 45

Necessary equipment and documentation
– Gauge, preferably Kretschmer (brand) with manual.
– Bettsometer with manual.
– Maintenance directions by manufacturer.
– Original materials and -spare parts, as well as original material-record for the device.
– Assertion of airworthiness for the device.
– Airsports device identication tag (see manual).
– Line length table (see manual).
– Line length logs (if available).
– Inspection log (collecting main) to the documentation.
– Lighttable for visual inspection of the reserve.
DURING THE INSPECTION THE FOLLOWING STEPS ARE TO
BE TAKEN IN:
Positive identication of the device:
Positive identication of the aircraft (Type, size, etc.) on the basis certication seal or placard.
– Are the pertinent manufacturer documents available?
– If certication seal and/or placard are in place, are they readable and correct?
– If not so: Please obtain from manufacturer or dealer in question.
The determined values/modications are to be noted in an inspection log!
Inspection of the reserve parachute
Before packing the reserve parachute this is to be checked by packer. If the parachute was
deployed for a rescue, then it is subject to an inspection. If a folded reserve parachute is repacked again a deployment check is to be staged, to be determined is if the force for deployment is between a minimum of 3kg and maximum of 6kg.
Testing of the topsail, undersail, seams, reserve parachute of
Holes and tears
The topsail and undersail of both paragliders as well as reserve parachutes must, for each cell
(paragliders) and each gore (parachutes), from the leading edge to the trailing edge, submitted to the following checks. If in one of the following attributes anomalies are discovered, the
glider is to be sent in to the manufacturer for inspection.
– Check for holes smaller or larger tears, deformations and abraded areas.
– Deciencies in the coating, other aberrations in the canopy like e.g. old repairs.
– With reserve parachutes a light-talbe is to be used for an inspection for holes, tears and
deformations.
MANUAL | PAPILLON PARAGLIDERS | RAQOON 44 | 45
Page 46

Abrasion and deformities
With large and critical abrasion and deformations, the entire cell panel in question must be
replaced by the manufacturer. The determined values/modications are to be noted in the
testing log!
Testing of the ribs
Visual inspection of the chambers (from the leading to the trailing edge) whether the stitching in the seams, cell partition ribs and reinforcements are in good shape, thus without tears,
deformations, abrasions or damage of the coating.
With torn ribs, defective, loose or missing stitching in the seams the glider must be returned to
the manufacturer or authorized inspection operation. The determined values/modications are
to be noted in the inspection log!
Check of the tear resistance
To be conducted with the Bettsometer at the following points (B.M.A.A. approved patent number GB2270768 Clive of bed Sails)
The test sequence is to be inferred from the operating instruction the Bettosometer.
– In both the top and undersail where the A-lines connect, push a needle-thick hole and
check the tear resistance.
– The limit value of the measurement is determined at 500g, and a tear width of fewer than
5mm.
The determined values/modications are to be noted in the inspection log!
Porosity check of the canopy
At all following measuring points the air porosity has to be more than at least 20 sec. (by Kretschmer).
At smaller air permeability values the paraglider must be returned to the manufacturer.
Measuring points: The porosity measurements by the Kretschmer measuring method (please
consider operating instruction) are to be conducted at the following points on the canopy
check on both under and upper sail.
– Center cell approx. 20-30cm back from leading edge
– 3rd Cell off center both to the left/right approx. 20-30cm back from leading edge
– 10th Cell off center both to the left/right approx. 20-30cm back from leading edge
The determined values/modications are to be noted in the inspection log!
Page 47

Connection parts
Check of the webbing and maillons
– are there abrasions, buckling, tears, strong signs of wear obvious?
– Is all the stitching fast and rm?
– Is the accelerator running free and intact?
– Are brake toggle attachments still rmly sewn on?
– Are the maillons corrosion free, are the sleeves of the gates free moving on the thread?
Measure under a load of 5 kg. The determined values are to be compared with the specications from the EAPR-Technical data sheet. Allowable variations are to be inferred from the
manufacturer directions. If the webbing or parts thereof are defective, spare parts are to be
ordered from the manufacturer and replace the defective parts with original parts. The determined values/modication are to be note in the inspection log!
Lines
Test of the line tensile strength:
Line selection: select a middle, lower cascade of the A, B and a C- lines as well as if available a
middle A and B upper cascade, and stress test for tensile strength testing device on their tensile strength. Tension velocity of the tension cylinder: v=30cm/min Tear/tensile strength values:
the determined values/modications are to be noted in the inspection!
ATTENTION:
Each size (line diameter) is to be assigned a xed value.
In case the lines cannot withstand the indicated load/stress or pass tensile
strength test, all other lines must also be changed. If the checked lines fulll
the test criteria, only those are replaced by new lines. All replaced lines are
to be marked in the proximity of the maillon (seam) with a black felt marker
pen and noted in the inspection log with the date of the exchange and the
logged of hours of ight time of the glider. During the next test for tensile
strength an original line, neighbouring the replaced line is to be sampled.
The various line diameters are allocated a minimal Sewing length!
Check of the line length and line attachments
Bottom cascade, upper cascades and brake lines for, breaks, abrasions, visual check. First the
A-lines, then B. etc.
– Are all lines adequately sewn and attached to the line attachments?
– Is the sheathing of the lines even are exactly?
– Are all loops, knots, seams in good shape?
– Are there any abrasions present?
MANUAL | PAPILLON PARAGLIDERS | RAQOON 46 | 47
Page 48

Measuring the line lengths:
– The lines must be measured with a load of 5 kg, in order to obtain comparable results. The
relevant line lengths are in the technical data sheet of the user manual.
– The measurement takes place in accordance with DHV method, from the maillon to the
canopy (inclusive attachment loop at the sail).
– The numbering takes place from the center toward the stabilo Measuring the opposite fac-
ing of the wing can under same conditions also be conducted by a symmetry comparison.
– The results are again noted the inspection log and should be compared side by side to line
lengths of the EAPR technical data sheet. The tolerance in deviation of these values should
not exceed more than + /- 1,5cm
– If a line is defective, it is to be exchanged immediately. Please acquire the identication
reference marking of the line from the line plan, order from the manufacturer and replace
accordingly or have it replaced.
The determined values/modications are to be noted in the inspection log!
Occasional check of trim and adjustment
Before a test ight a visual inspection of the canopy and lines is to be conducted with the glider laid out as well as pulled up inated.
In particular attention should be paid to the length of the brake lines with the canopy inated.
Only if all doubts are cleared concerning faulty adjustment of the brake lines, a check ight
may be conducted.
Description of the materials and technical data
See manual of your paraglider.
Miscellaneous
– All measurement and repair work at paraglider and rescue system must be documented
completely in the inspection log.
– When packing or repacking the reserve parachute, special attention is to be paid to the
particular packing directions of the manufacturer! See rescue/reserve equipment manual.
– With the exchange of parts or component modules only original materials or original re-
placement parts may be used!
– With sewing work the original sewing pattern is to be kept, patching and thread material of
same strength and quality as original!
– The inspection survey and/or test log must with be signed, complete with place and date!
– The period for recordkeeping is 4 years.
Page 49

COMPLETED CHECK VERY IMPORTANT!
Before you perform any checks and/or repairs yourself on your glider, we ask to read you the
following pages carefully. You inform yourself hereby about prerequisites and conditions of a
done in person bi-annual inspection.
– According to new DHV regulation, the customer (Glider-owner) can conduct the 2-yearly
check of the canopy with the help of the inspection directions and all necessary testing equip-
ment and documents in person on his own responsibility. In addition the wing does not have
to be sent in to the manufacturer.
– The 2-yearly check may only be conducted by the glider owner personally, if he fulls the
prerequisites, or an inspection station authorized by the manufacturer. Inquire therefore with
the manufacturer on authorized inspection stations.
– The owner of the canopy must be aware of the responsibility, which he takes with a self
conducted 2-yearly check of the glider. The self performed 2-yearly check is only legally effec-
tive, if this is acknowledged after the check with date, name (in capitals) and signature on or
beside the placard.
– Reserve equipment re-packing interval in accordance with DHV: Every 4 months a repack-
ing is required. Allowed period of operation: 8 years, afterwards up to 12 years with an annual
check
– About insurance-legal consequences of yourself performed 2-yearly inspection you should
inform with your insurer in a timely fashion.
– An inspection is valid only if the inspection log is completely lled out. Inform also about
possible revisions of the inspection directions with the manufacturer before the inspection.
– Important: If the necessary efforts for the maintenance inspection cannot be carried out
(required equipment and documents), should the canopy be sent in to the manufacturer.
– Any warranty and guarantee will be voided for paragliders, harnesses and reserve para-
chutes, which are checked, controlled, repaired, packed or repacked, test-own and/or have
other maintenance work done by personnel not authorized by Papillon Paragliders!
– All maintenance work must in be accordance with the maintenance specications of the
operation manual and the special maintenance directions of the manufacturer and the publica-
tions of the IHB to be conducted.
– With any abnormal appearances during the performance of maintenance is the technical
manager to be informed, who has to decide on how to proceed.
– With the replacement of parts or component modules only original materials or original
party may be used!
MANUAL | PAPILLON PARAGLIDERS | RAQOON 48 | 49
Page 50

PAPILLON PARAGLIDERS
Wasserkuppe 46
36129 Gersfeld
Fon: +49 (0)6654 - 75 48
Fax: +49 (0)6654 - 82 96
[email protected]
Further information: papillon-paragliders.com
Copyright © 2017 by PAPILLON PARAGLIDERS – GLEITSCHIRM DIREKT GmbH, all rights preserved. No part of this publication
may be reproduced or developed further on in any way without written approval of the PAPILLON PARAGLIDERS - GLEITSCHIRM DIREKT GmbH. All technical details in this manual have been carfully checked by Papillon Paragliders. However we
like to mention that we don‘t take any liability for possible mistakes, neither in legal responsibility, nor in liability cases that
derive from mistakable details. We preserve the right to change this manual in any way to achieve technical improvements.
 Loading...