


PaperCut ChargeBack 6.1 Advanced Print Tracking and Cost Recovery for Windows Networks
3DSHU&XW
&KDUJH%DFN
Advanced Print Tracking and Cost Recovery for Windows Networks
User Guide
ABOUT THIS USER GUIDE 5
1. PAPERCUT CHARGEBACK 6.1 6
Overview 6
Features 6
How it works 7
Components 7
2. ACCOUNTS, PRINT JOBS AND INVOICES 9
What is an account? 9
Main accounts and Subaccounts 9
Active and Inactive Accounts 10
Deleting accounts 10
Invoiceable and non-invoiceable print jobs 10
Comments for print jobs 11
Reporting and invoices 11
3. NAVIGATING THE ADMINISTRATION CONSOLE 12
4. ADMINISTRATION CONSOLE – BASIC OPERATIONS 14
Setting up Acco unt s 14
Viewing and Searching for Accounts 14
Adding and Editing an Account 15
Viewing Account Statistics 16
Advanced Account Operations 18
Setting Printer Cost 18
Assigning Funds to a User 19
Copyright © PaperCut Software Pty Ltd , 1999-2006. All rights reserved.
-1-

PaperCut ChargeBack 6.1 Advanced Print Tracking and Cost Recovery for Windows Networks
Setting User Privileges 21
Viewing a User’s Print History 21
5. ADMINISTRATION CONSOLE – ADVANCED OPERATIONS 23
Using Charge Rat e s 23
Setting the account defaults 23
Importing accounts 24
1. Text file importing 25
2. Directory structure importing 26
Charging different amounts for page size, color and duplex documents 27
Page Size Category Charging 28
Page Area Charging 30
Charging by specific page sizes ( grayscale and color) 30
Applying filter rules or restrictions on print queues 31
Providing uses with an “overdraft ” 34
Setting the initial credit assign e d to new users. 35
Scheduling Credit 36
Group Level Functions 37
Allocate Funds to Group Members 37
Query 38
Database Maintenance 39
Event Log 39
6. THE USER TOOLS 41
PaperCut ChargeBack Client 41
The Popup window 42
Client-side batch printing tools 44
User Inquiry Tool 44
Report Generator 45
7. REPORTS 47
Access and HTML Reports 47
The predefined reports 47
Custom reports (Access only) 49
8. POSSIBLE IMPLEMENTATION SCENARIOS 51
1. Track printing expenses and assigning them to accounts (jobs) 51
Example scenarios: 51
2. Track printing expenses by user, and optionally charging users 52
Example scenarios: 52
Copyright © PaperCut Software Pty Ltd , 1999-2006. All rights reserved.
-2-

PaperCut ChargeBack 6.1 Advanced Print Tracking and Cost Recovery for Windows Networks
3. A combination of account and user tracking 52
Example scenarios: 53
9. SETUP GUIDE 54
Configuring the Network 54
Connecting printers to the print server 55
Sharing pri nt ers on the print serve r 56
Configuri ng Network Clients 5 6
Installing the PaperCut Software on your Print Server 56
Setup Wizard 56
Primary Server setup tasks 57
Installing the PaperCut ChargeBack Software on Network Clients 59
Run the setup file from the client workstations 59
Testing the Installation 60
10. ADVANCED PAPERCUT SETUP 61
Domains with Multiple Print Servers 61
Sharing the Centralised Accounts and User database 61
Create the “PaperCut” user 62
Installing PaperCut o n the secondary servers 62
Automated installatio n of PaperCut ChargeBack Client 63
Silent Install (advanced) 63
Client setup file 64
Automatic a rchiving of print logs 65
Automatic importing of accou nts 66
11. INSTALLING WEB TOOLS & REMOTE ADMINISTRATION 67
System Requirements for Web Administration 67
Installation 67
1. Install the Internet Server So ftware 67
2. Adding a Virtual Directory to IIS 68
3. Configure File Permissions 70
4. Testing t he setup 71
Advanced Configurati on & Customi zation 72
12. USING THE WEB ADMINISTRATION 73
All Users 73
Administration Welcome Page 73
Account Administration 73
User Administration 75
Copyright © PaperCut Software Pty Ltd , 1999-2006. All rights reserved.
-3-

PaperCut ChargeBack 6.1 Advanced Print Tracking and Cost Recovery for Windows Networks
Viewing Recent Print Job Information 76
13. INSTALLATION TROUBLESHOOTING 77
14. FREQUENTLY ASKED QUESTIONS 79
General 79
Account Tracking (Pa perCut ChargeBack only) 81
Installation 81
Operation 82
Advanced Operation 83
APPENDIX I 85
Security settings 85
Network shares created during install 85
NTFS File permissions required for PaperCut ChargeBack Install 87
Technical Facts 87
PaperCut Service command line options 87
APPENDIX II - PRINTER CONFIGURATION & HARDWARE GUIDE 88
Page Descr i ption Languages (PD L’s) 88
Connection Methods 89
Unsupported Connection Methods 89
Notes on individual printer models and manufactures 89
APPENDIX III – BATCH PRINTING AND SCRIPT SUPPORT 92
The Comma n d-Line Interface 92
Documentation - batchtool.exe 93
The COM Interface 95
The PCCBClientTool.AccountSelector Interface Definition 95
Examples 100
The script will run under any W ind ows operating system with the “Windows Scripting Host”
support installed and enabled. Software License Agreement 100
Software License Agreement 101
Copyright © PaperCut Software Pty Ltd , 1999-2006. All rights reserved.
-4-

PaperCut ChargeBack 6.1 Advanced Print Tracking and Cost Recovery for Windows Networks
About This User Guide
The manual covers the use and installation of PaperCut ChargeBack. It is divided into a number
of sections:
x Section 1 – Overview of PaperCut ChargeBack - features, components, and how it
works. Introduction to accounts, and the data logged for each print job. Suitable for all
users of PaperCut ChargeBack (Chapters 1 & 2)
x Section 2 – Administrative tasks, suitable for the account and user administrator
(Chapters 3, 4 & 5)
x Section 3 – Client tools, suitable for all users of PaperCut ChargeBack (Chapter 6)
x Section 4 – Reports (Chapter 7)
x Section 5 – Implementation and installation, suitable for the system administrator /
network engineer. Assumes windows networking experience. (Chapters 8, 9 & 10)
x Section 6 – Web administration (Chapters 11 & 12)
x Section 7 – Troubleshooting, and Frequently asked questions (Chapter 13 & 14)
IMPORTANT: It is especially recommended that both Chapter 2 (Accounts, print jobs and
invoices) and Chapter 8 (Possible Implementation Scenarios) are read before installation, as they
explain the ways in which PaperCut ChargeBack can be used, and how it can be configured to
achieve different results.
Copyright © PaperCut Software Pty Ltd , 1999-2006. All rights reserved.
-5-

PaperCut ChargeBack 6.1 Advanced Print Tracking and Cost Recovery for Windows Networks
1. PaperCut Cha rgeBack 6.1
Overview
PaperCut ChargeBack provides advanced print tracking and cost recovery features by allowing
the tracking of print job costs by account (job number, client, project, department, etc) as well as
by user. It works by requesting the user to allocate each print job to an account or job number via
a mandatory Pop-Up window. This makes PaperCut ChargeBack especially suitable for
businesses and organizations that:
x Need to track costs by account (job number), such as:
o accounts for clients and their jobs/projects. (eg. for businesses that need to pass
on printing costs to their clients)
o accounts for the service, purpose or category of a printout. (eg. for organizations
that might provide multiple services and need to gather printing statistics)
o accounts for each department / faculty of an organization. (eg. a university or
school environment)
x Need to track costs by user:
o monitoring employees’ pr int usage and applying quotas.
x A combination of tracking by account and/or user
If your organization in tracking user printing only, we recommend our PaperCut Quota
application. More information on PaperCut Quota is available from the www.papercut.biz
website.
The installation and use of PaperCut ChargeBack will:
Provide accurate print job cost tracking
Enable easy cost recovery through powerful reports, such as the invoice report
Promote environmental and economic responsibility when printing.
Features
x Track print jobs by account and user
x Hierarchical account structure to allow grouping – especially useful for reporting purposes
x Full archiving of print job details
x Powerful reporting and statistics
x Reports are generated as HTML, or in Access 97, 2000, or later
x Reports may be customised to suit your needs
Copyright © PaperCut Software Pty Ltd , 1999-2006. All rights reserved.
-6-

PaperCut ChargeBack 6.1 Advanced Print Tracking and Cost Recovery for Windows Networks
x Support for large and small networks, with multiple print server capability
x Easy setup. No special drivers to install. No backend databases to configure
x Differential print charging allowing different costs for each printer
x Allows an appropriate cost to be set on Color Printers
x Works with common laser and inkjet printers
x Integrates into the network users and groups environment
x Easy account setup and simple administration
x Facility for the importing of accounts (which represent job numbers, cilents, departments,
etc)
x Optional integration with acc ounti ng pac kages
x Upgradeable Page Counting Machine allowing future printer/hardware support (similar to
virus protection “dat” updates)
x Ability to detect and delete duplicate print jobs and filter documents by type, cost or size.
x Client-side COM and command-line tools to assist with batch or scripted print tasks
How it works
PaperCut ChargeBack is a client-server application. Its core operation is described as follows:
x The PaperCut ChargeBack Server consists of a Windows Service runs on each print
server. It monitors and intercepts incoming print jobs, counting the number of pages in each
print job. It then performs the following tasks:
x Wait to be notified of the account for the print job (depending on configuration settings)
x Debits the cost of the print job from the appropriate user’s credit
x Increments the page and cost counters for the appropriate printer
x Increments the page and cost counters for the appropriate account (or job number)
x Stores the print job information in its internal database
x The PaperCut ChargeBack Client that runs on users’ workstations. It runs in the
background during users’ sessions, listening for print jobs that the user may print. When a
document is printed to a printer that requires account information, it pops up a window,
prompting the user to enter an account. The PaperCut ChargeBack Client runs
automatically when users log on.
Components
PaperCut ChargeBack consists of the following components:
x Server components:
Copyright © PaperCut Software Pty Ltd , 1999-2006. All rights reserved.
-7-

PaperCut ChargeBack 6.1 Advanced Print Tracking and Cost Recovery for Windows Networks
o The Windows Service whic h operat es as des c ribed a bov e.
o An Administration Console that runs on each print server. This allows the
administration of PaperCut, as explained in Chapters 2 to 4.
o An Archive facility, which is an application that is scheduled to run daily. It
archives the print job logs from the working-database to archives for longterm storage and reporting capability.
o An Automatic account import program, which enables system
administrators to schedule the bulk importing of accounts periodically. This
means that when new job numbers or clients are created, they can be
imported into PaperCut ChargeBack without the system administrator
manually entering in their details.
x Client components:
o The PaperCut ChargeBack Client which oper ates as des cr ibed abov e.
o The User Inquiry Tool, which is an application that shows users’ credit
o The Report Generator, a tool which collates account and job log information
from all the print servers on the network into a single database which can be
used for reporting purposes.
Copyright © PaperCut Software Pty Ltd , 1999-2006. All rights reserved.
-8-

PaperCut ChargeBack 6.1 Advanced Print Tracking and Cost Recovery for Windows Networks
2. Accounts, print jobs and invoices
This chapter explains in detail the structure of accounts, and the data that is captured by
PaperCut ChargeBack for each print job. It also explains how the data can be used for invoicing
purposes.
What is an account?
Accounts in PaperCut ChargeBack can be used to represent your clients, departments, job
numbers, projects and/or expense accounts. (Note: this should not be confused with users or
user accounts on your network). Each account has the following attributes:
x Main account, or subaccount
x Active or inactive
x Deleted or not deleted
x Whether to allow non-invoiceable print jobs to be assigned to the account
x Whether to require comments / descriptions for each print job assigned to the account
These are explained below.
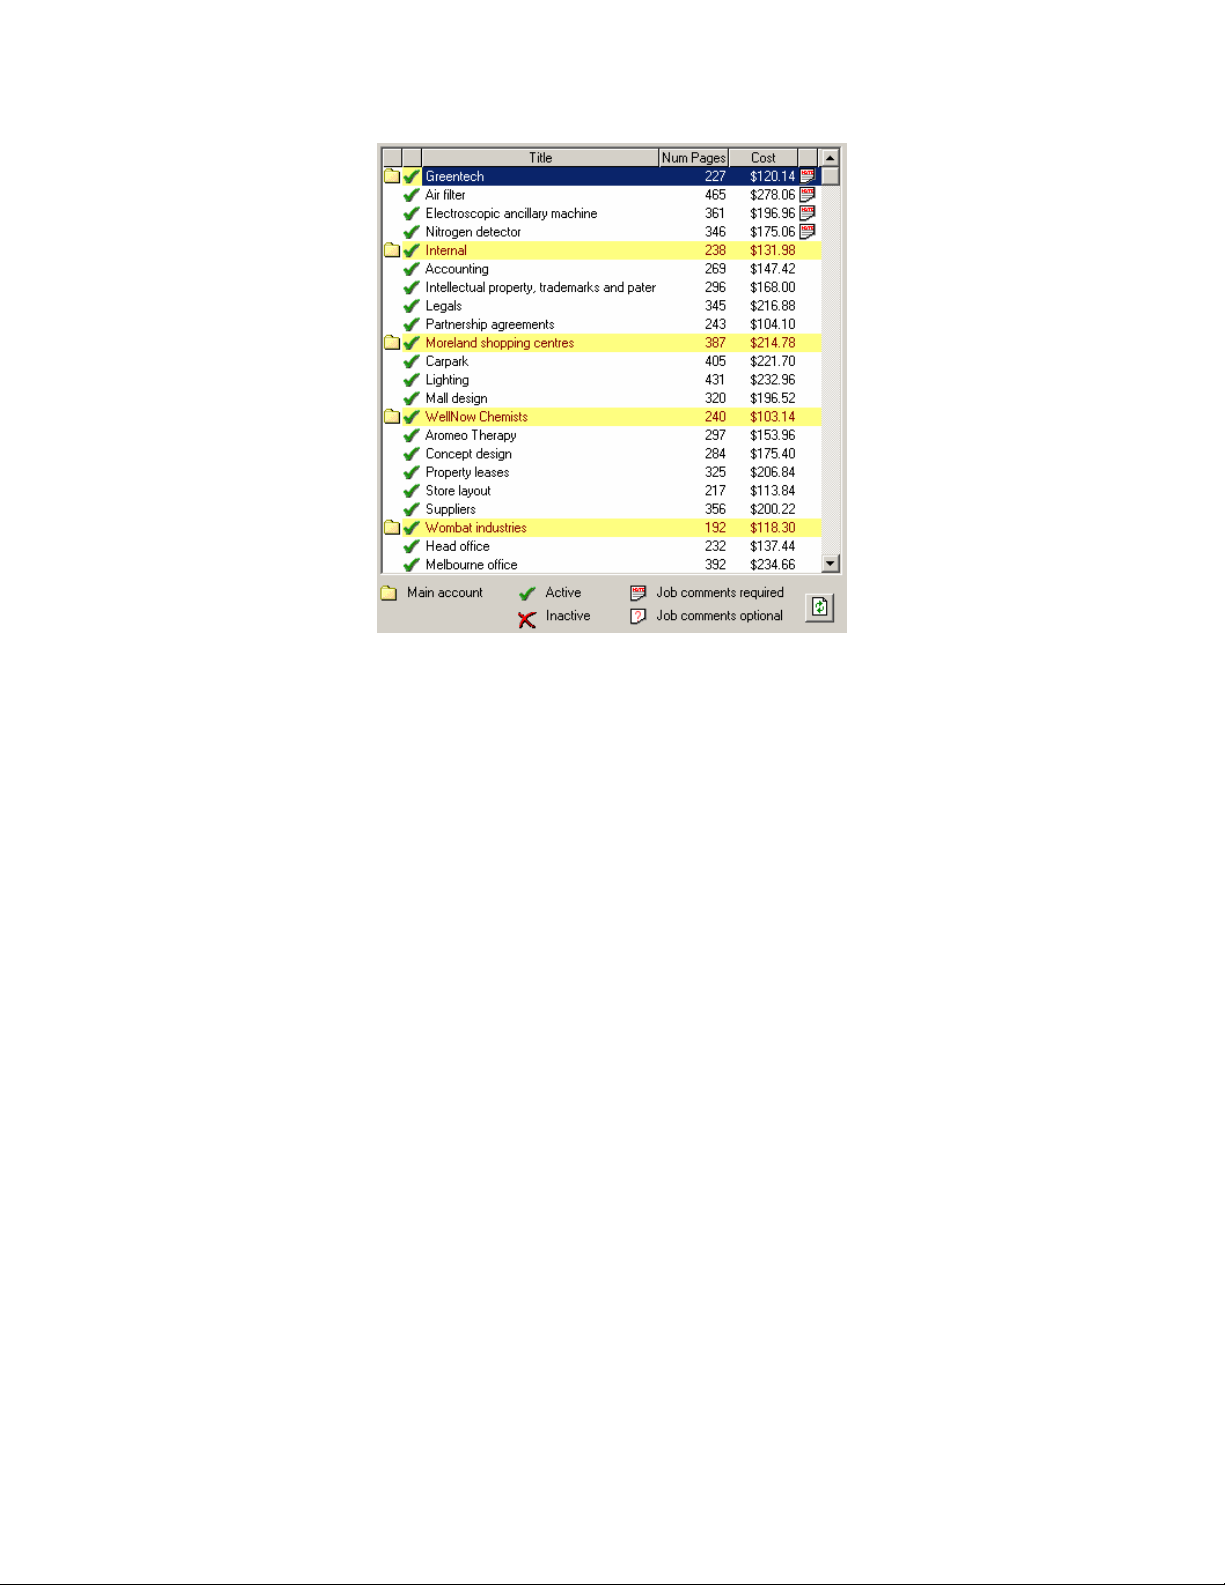
Main accounts and Subaccounts
Accounts in PaperCut ChargeBack are structured hierarchially. This means that there are two
types of account – main accounts and subaccounts. Each subaccount belongs to a main account,
and there are an unlimited number of main and subaccounts allowed in PaperCut ChargeBack.
This system allows you to group related accounts together for reporting and statistical purposes.
For example, main accounts can be created for clients, and subaccounts for each project/job for
each client. Alternatively, a main account can be created for each job number, and subaccounts
optionally created for sub-items within each job number.
This is shown in the following screenshot.
Copyright © PaperCut Software Pty Ltd , 1999-2006. All rights reserved.
-9-
PaperCut ChargeBack 6.1 Advanced Print Tracking and Cost Recovery for Windows Networks
Figure 1. Example of main an d su b - acc ou n ts
Active and Inactive Accounts
Over time, accounts may become redundant – for example, a project may be complete and no
further printing will occur. The account can then be marked as Inactive so that it does not appear
in the client-popup window. Thus, users will no longer be able to assign costs to it.
PaperCut archives all print jobs to allow for historical reporting. Active accounts are accounts that
may have costs assigned to them, whereas Inactive accounts may not.
Deleting accounts
When you delete an account from the PaperCu t Char geB ack Administration Console, it is
removed from view in the console. However, if costs are assigned to that account, the account
will still appear in the Report Generator.
Invoiceable and non-invoiceable print jobs
By default all print jobs are invoiceable. That is, once they are assigned to an account, they will
appear on the invoice report for that account, allowing for easy cost recovery.
However, some organizations require the ability to assign print jobs to accounts, but not all their
print jobs will be invoiceable.
Copyright © PaperCut Software Pty Ltd , 1999-2006. All rights reserved.
-10-

PaperCut ChargeBack 6.1 Advanced Print Tracking and Cost Recovery for Windows Networks
n such cases, the relevant accounts can be set to allow print jobs to be non-invoiceable. Then
I
when a user prints and selects the account, the user will also be able to choose whether to
include the print job in the invoice report, or not.
This gives organizations extra flexibility when tracking costs. Reports can also be run on
invoiceable, and non-invoiceable print jobs, thus allowing reporting of costs that are recoverable
and not recoverable from clients or departments.
Comments for print jobs
You may choose to allow or require users to enter in a comment whenever they assign a print job
to a given account. These comments can then show up in reports – such as showing a
breakdown of costs for a client, or allowing a project manager to review costs.
By default, comments are not required for print jobs. However, you can change this default setting
to make comments either mandatory, or optional.
Each account has its own setting for comments. For example, you may wish to enforce
comments for internal expense accounts, but not require them for one particular job number. This
flexibility is provided to suit your needs.
Reporting and invoices
Please note: the reporting process is further explained in Chapter 7.
All but one of the reports can be run to show data for invoiceable print jobs, non-invoiceable print
jobs, or both. (The exception is the Invoice report, which will only show invoiceable print jobs in
the report.)
This allows the reporting of cost recoverable, or non-cost recoverable, or all expenses for a given
account.
Copyright © PaperCut Software Pty Ltd , 1999-2006. All rights reserved.
-11-
PaperCut ChargeBack 6.1 Advanced Print Tracking and Cost Recovery for Windows Networks
3. Navigating the Administration Console
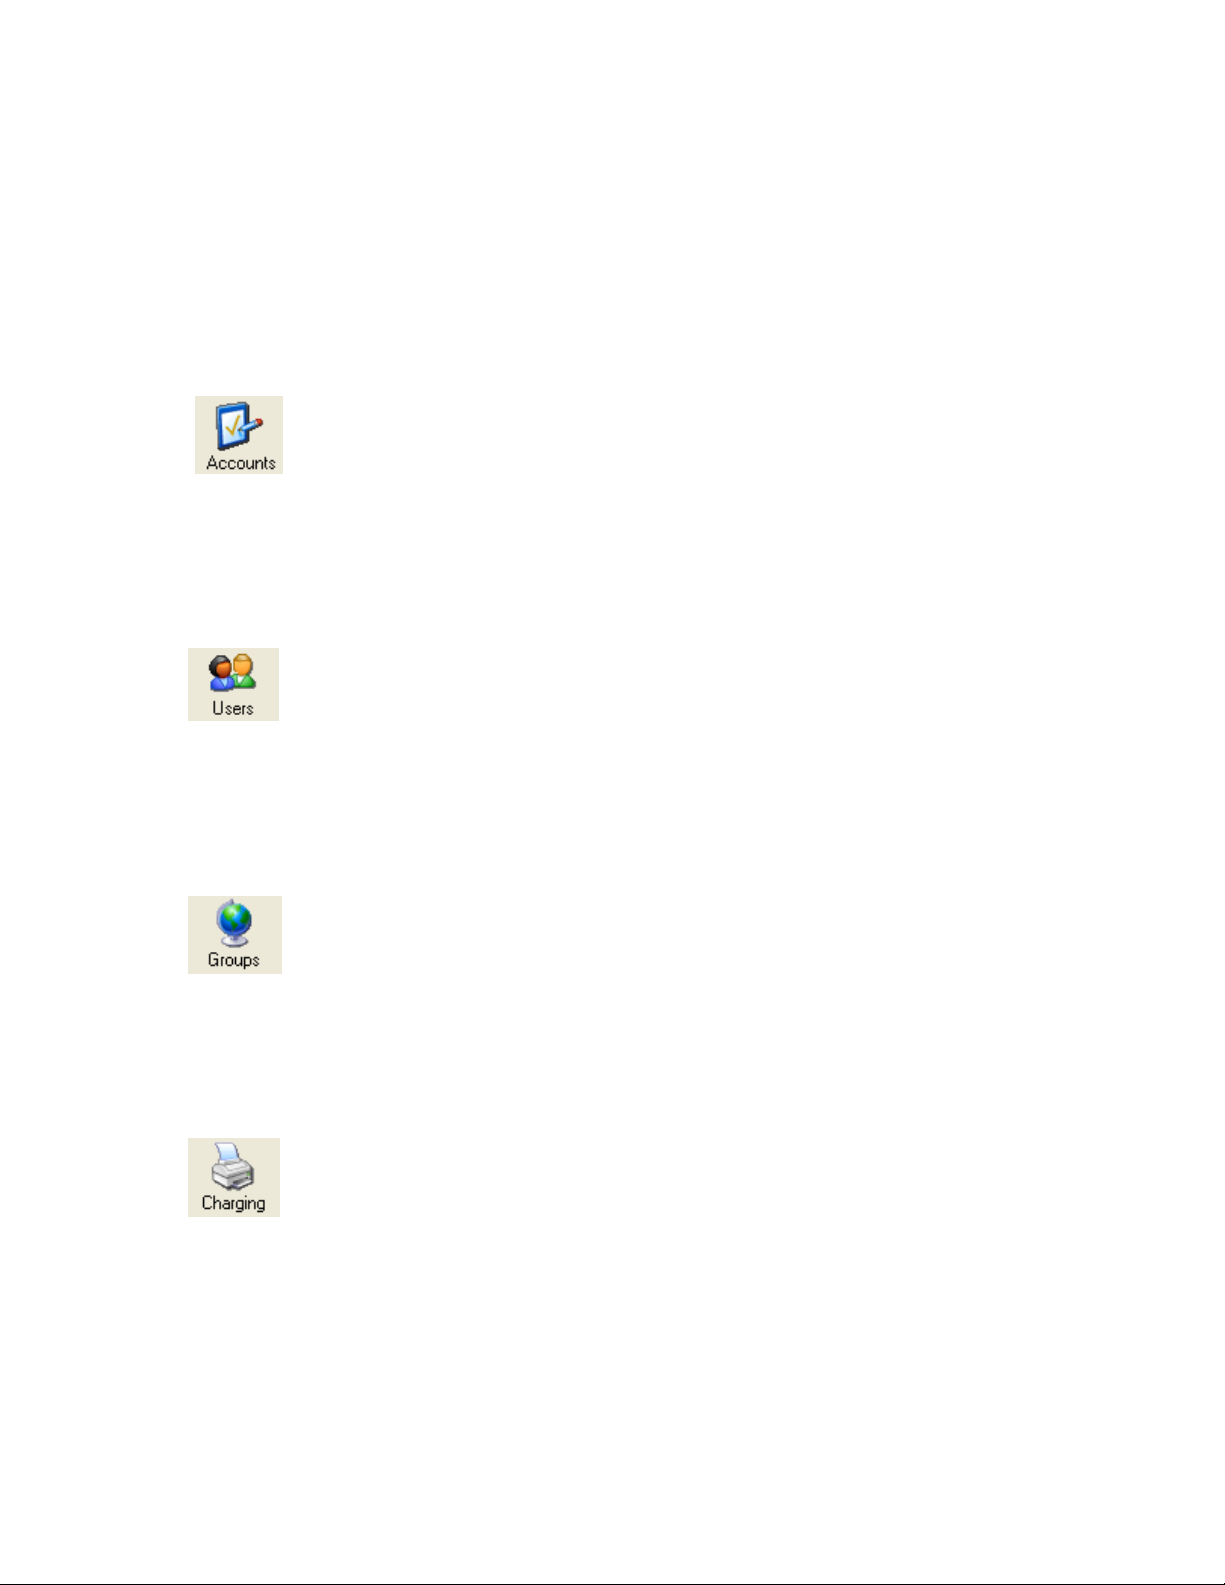
The PaperCut Administration Console is divided up into seven sections; Users, Groups,
Printers, Accounts, Options, Event Log, and About. Each section may be viewed by clicking on
the appropriate icon on the navigation bar located on the left hand side. The options available
under each section are as follows:
Accounts
x Create and edit accounts.
x Reset the account counters
x View statistics for accounts
x Import accounts using the Import Account Wizard
x Set default account settings
Users
x View credit in each user’s account
x View total pages printed by each user
x Assign or add funds to a user’s account
x Select whether a user has the privilege to continue printing after exceeding
their allocated funds
x View a users printing history
Groups
x Batch assign funds to members of a domain group
x Query information about group members, such as the number of pages
printed.
x Set rules which govern the initial credit assigned to any new user added to
the network in the future
x Schedule tasks to top-up user’s accounts up at regular intervals
Charging
x Select the cost users will be charged to use printers.
x Select your internet charging method, based on either time or data usage
x Set the cost per page for the selected printers.
x Set filter rules and restrictions on selected printers.
x Set Internet charging costs, either cost per Megabyte or cost per time period.
x View the total number of pages printed on each printer.
x List recent print jobs and printing history
Copyright © PaperCut Software Pty Ltd , 1999-2006. All rights reserved.
-12-

PaperCut ChargeBack 6.1 Advanced Print Tracking and Cost Recovery for Windows Networks
Options
x Set your printing and Internet charging configuration.
x Perform maintenance on the PaperCut user database.
x Set system defaults
x Customize “printing denied” WinPopup message
Event Log
x View detailed log of print jobs and Internet usage
x View detailed transaction logs to see a full audit trail credit changes
x View PaperCut application events and status
x Import, administer and track usage of TopUp cards
x Export detailed printing information to MS Access or MS Excel
x Run PaperCut’s customizable reports
About
x Licensing information
x Version information
x Enter license/registrati on k e y
Copyright © PaperCut Software Pty Ltd , 1999-2006. All rights reserved.
-13-

PaperCut ChargeBack 6.1 Advanced Print Tracking and Cost Recovery for Windows Networks
4. Administra tion Console – Basic Operatio ns
Setting up Accounts
Please ensure that you have an understanding of the concepts of main and sub accounts, active
and inactive accounts and invoiceable print jobs (refer to Chapter 2) before setting up accounts
on your system.
Accounts can be set up to suit different organizations’ needs, as explained in Chapter 8. It is
important that your organizations’ requirements are considered when deciding upon a structure
for accounts.
Each account may also be set to allow print jobs assigned to that account to have a comment
(description) associated with each job, and also whether to allow print jobs to be non-invoiceable.
These two features give organizations more control when reporting and invoicing.
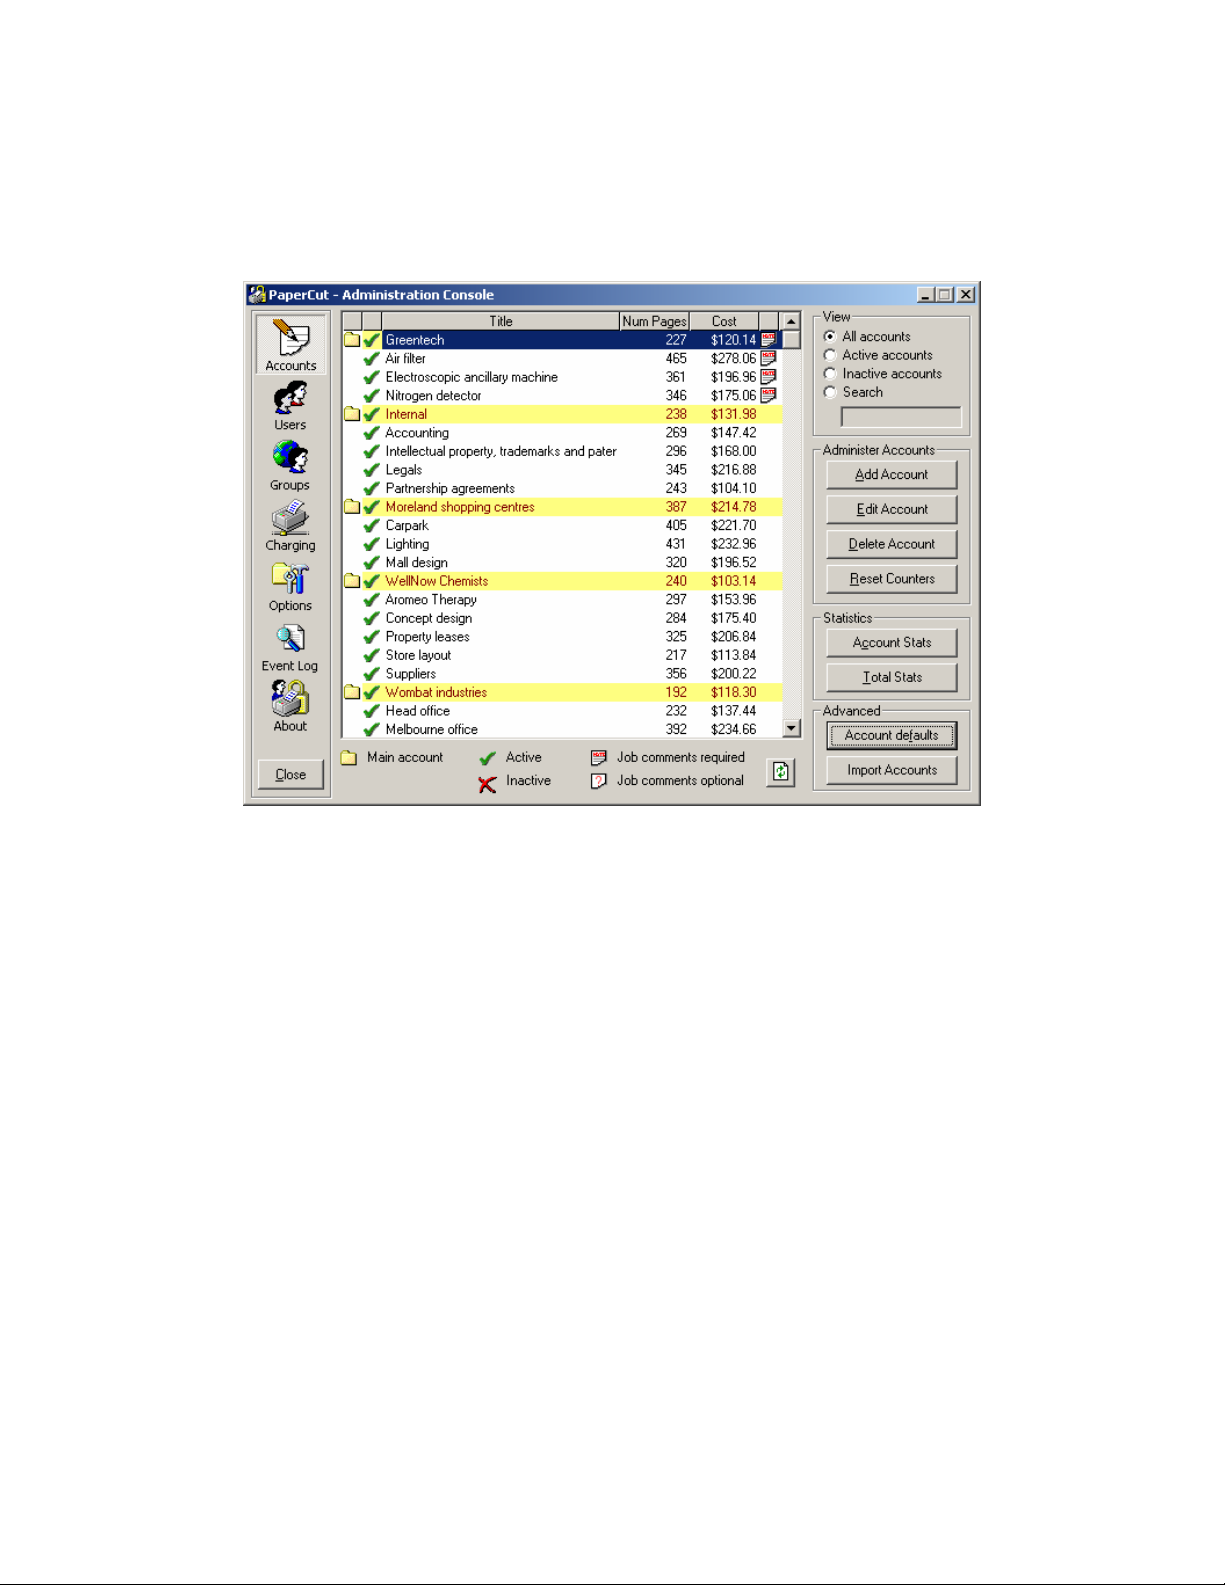
Viewing and Searching for Accounts
To viewing and searching for accounts:
1. Click on the Accounts icon on the left-hand side of the PaperCut
ChargeBack Administration Console. You will see a screen similar to that
shown in Figure 2.
2. Accounts are displayed, grouped by main account. The main accounts are
sorted alphabetically, and the subaccounts for each group are also sorted
alphabetically.
3. When the All Accounts option is selected, all accounts will appear in the
accounts list. When the Active Accounts option is selected, then active
main accounts and active subaccounts (together with their parent account)
are shown. The converse is true when the Inactive Accounts option is
selected.
4. When the Search option is selected, then accounts containing the search
string will be displayed, according to the following rules:
a. If a main account matches the search string, it and its subaccounts
will be displayed. For example, if main accounts are created for your
clients, then you can search for all accounts for a given client by
typing the client’s name in the search box.
Copyright © PaperCut Software Pty Ltd , 1999-2006. All rights reserved.
-14-
PaperCut ChargeBack 6.1 Advanced Print Tracking and Cost Recovery for Windows Networks
. If a subaccount matches the search string, it will be displayed
b
together with its main account, so you can at once see the
subaccount’s parent.
Figure 2. Account administration
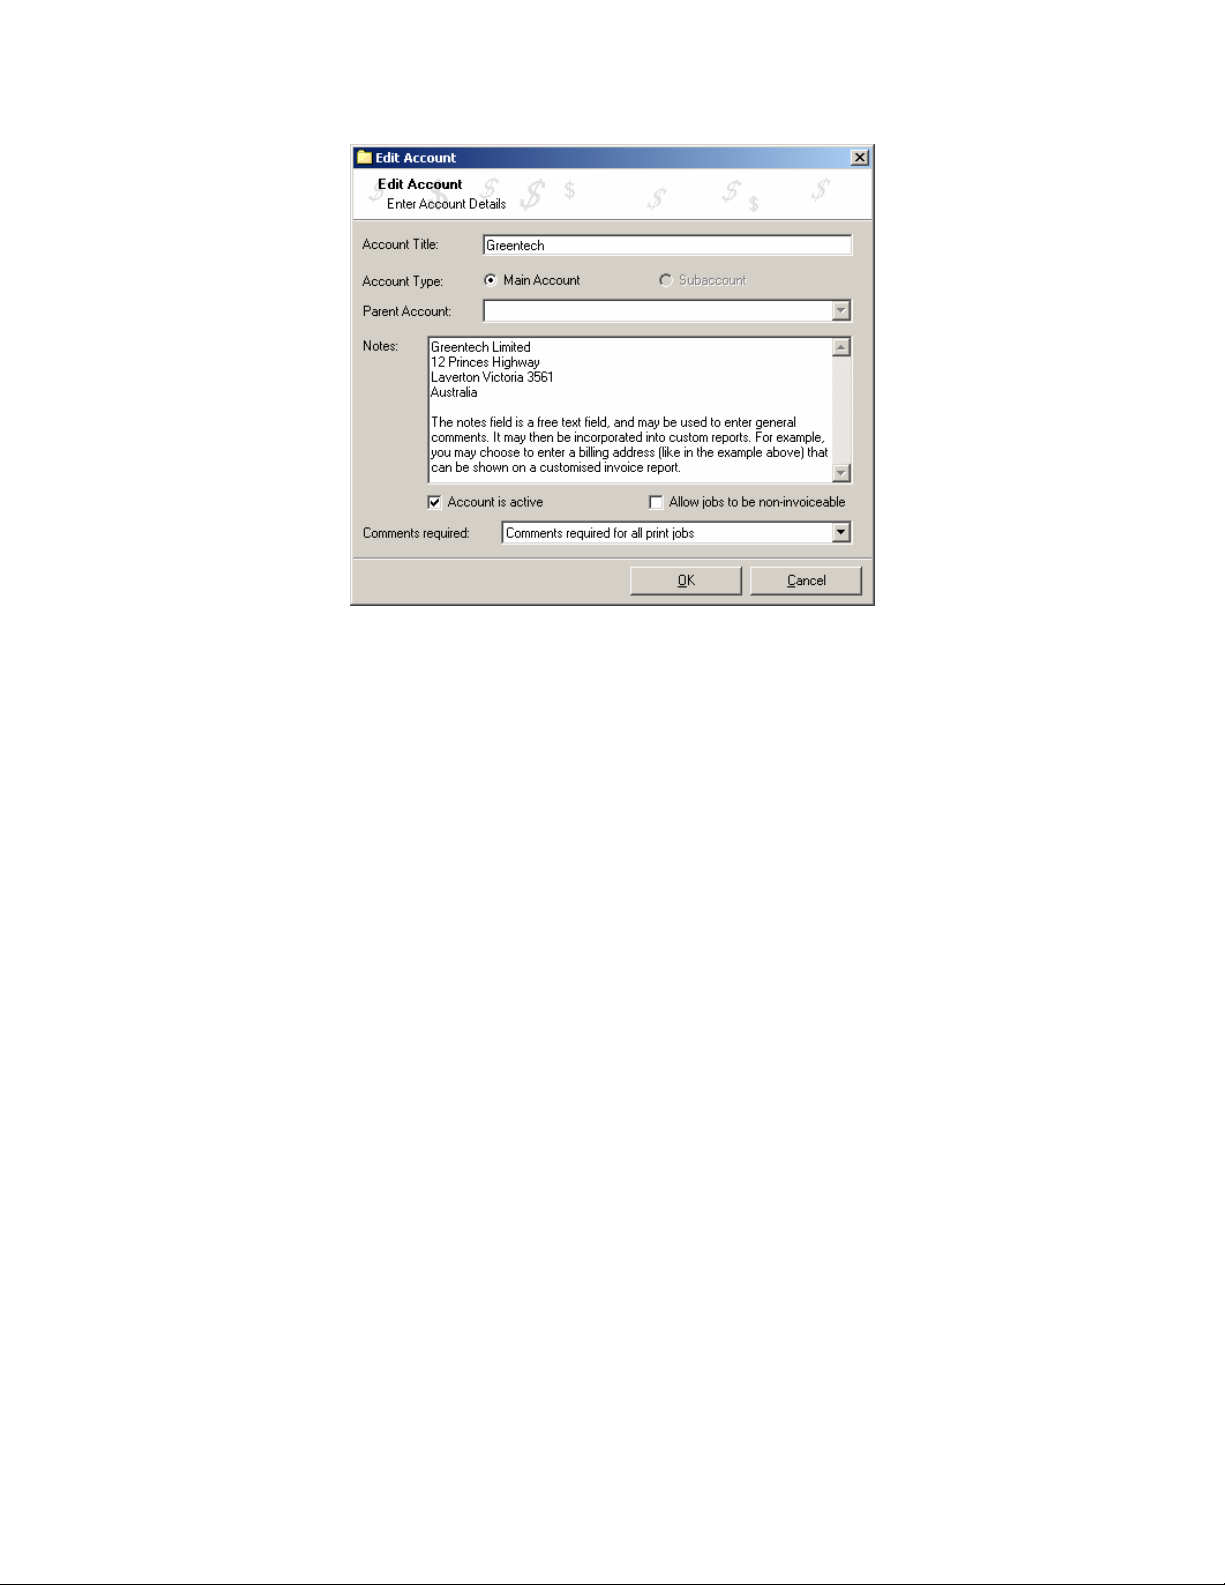
Adding and Editing an Account
To add an account:
1. Click the Add Account button.
2. Enter the det ai ls for your acc ount.
To edit an account:
1. Select the account you wish to edit from the list. Then double click the
account, or click the Edit Account button. This will bring up a screen similar
to Figure 3.
2. Modify the details for your account.
Copyright © PaperCut Software Pty Ltd , 1999-2006. All rights reserved.
-15-
PaperCut ChargeBack 6.1 Advanced Print Tracking and Cost Recovery for Windows Networks
Figure 3. Editing account details
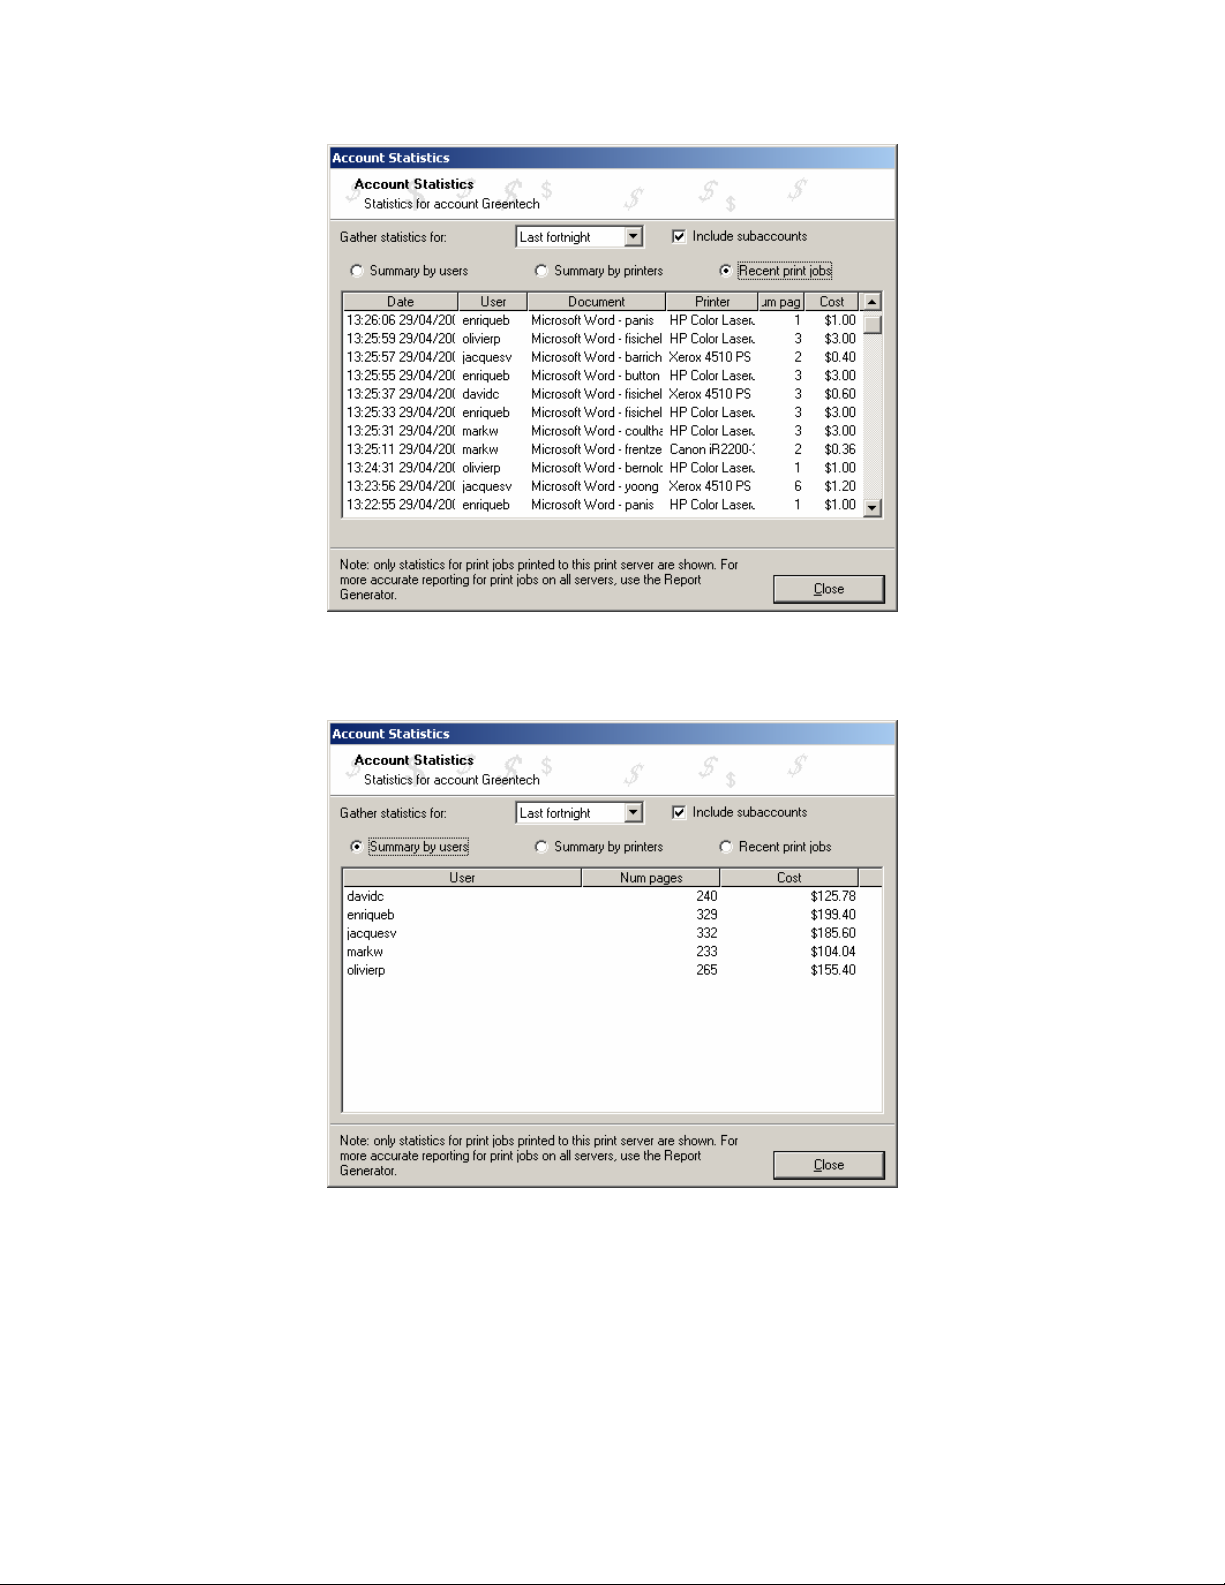
Viewing Account Statistics
PaperCut provides quick account statistics for print jobs that are printed to printers shared on the
server on which the administration console is running. This enables the quick viewing of statistics.
For more detailed information and statistics (and information that covers all print jobs across all
print servers), reports must be used (Chapter 7).
To view statistics for an account:
1. Select the account you wish to view statistics for, and click the Account
Stats button.
2. You may view statistics over a variety of time periods, grouped by users,
printers or view recent print jobs. If the selected account is a main account
that includes subaccounts, you also have to option of including subaccounts
in the statistics. (See Figures 4a and 4b.)
Copyright © PaperCut Software Pty Ltd , 1999-2006. All rights reserved.
-16-
PaperCut ChargeBack 6.1 Advanced Print Tracking and Cost Recovery for Windows Networks
Figure 4a. Account statistics – recent print jobs
Figure 4b. Account statistics – summary by users
To view statistics for all accounts:
1. Click the Total Stats button.
2. You may view statistics over a variety of time periods, grouped by users,
printers or view recent print jobs.
Copyright © PaperCut Software Pty Ltd , 1999-2006. All rights reserved.
-17-
PaperCut ChargeBack 6.1 Advanced Print Tracking and Cost Recovery for Windows Networks
Advanced Account Operations
The advanced operations of setting account defaults and importing accounts are explained in
Chapter 5.
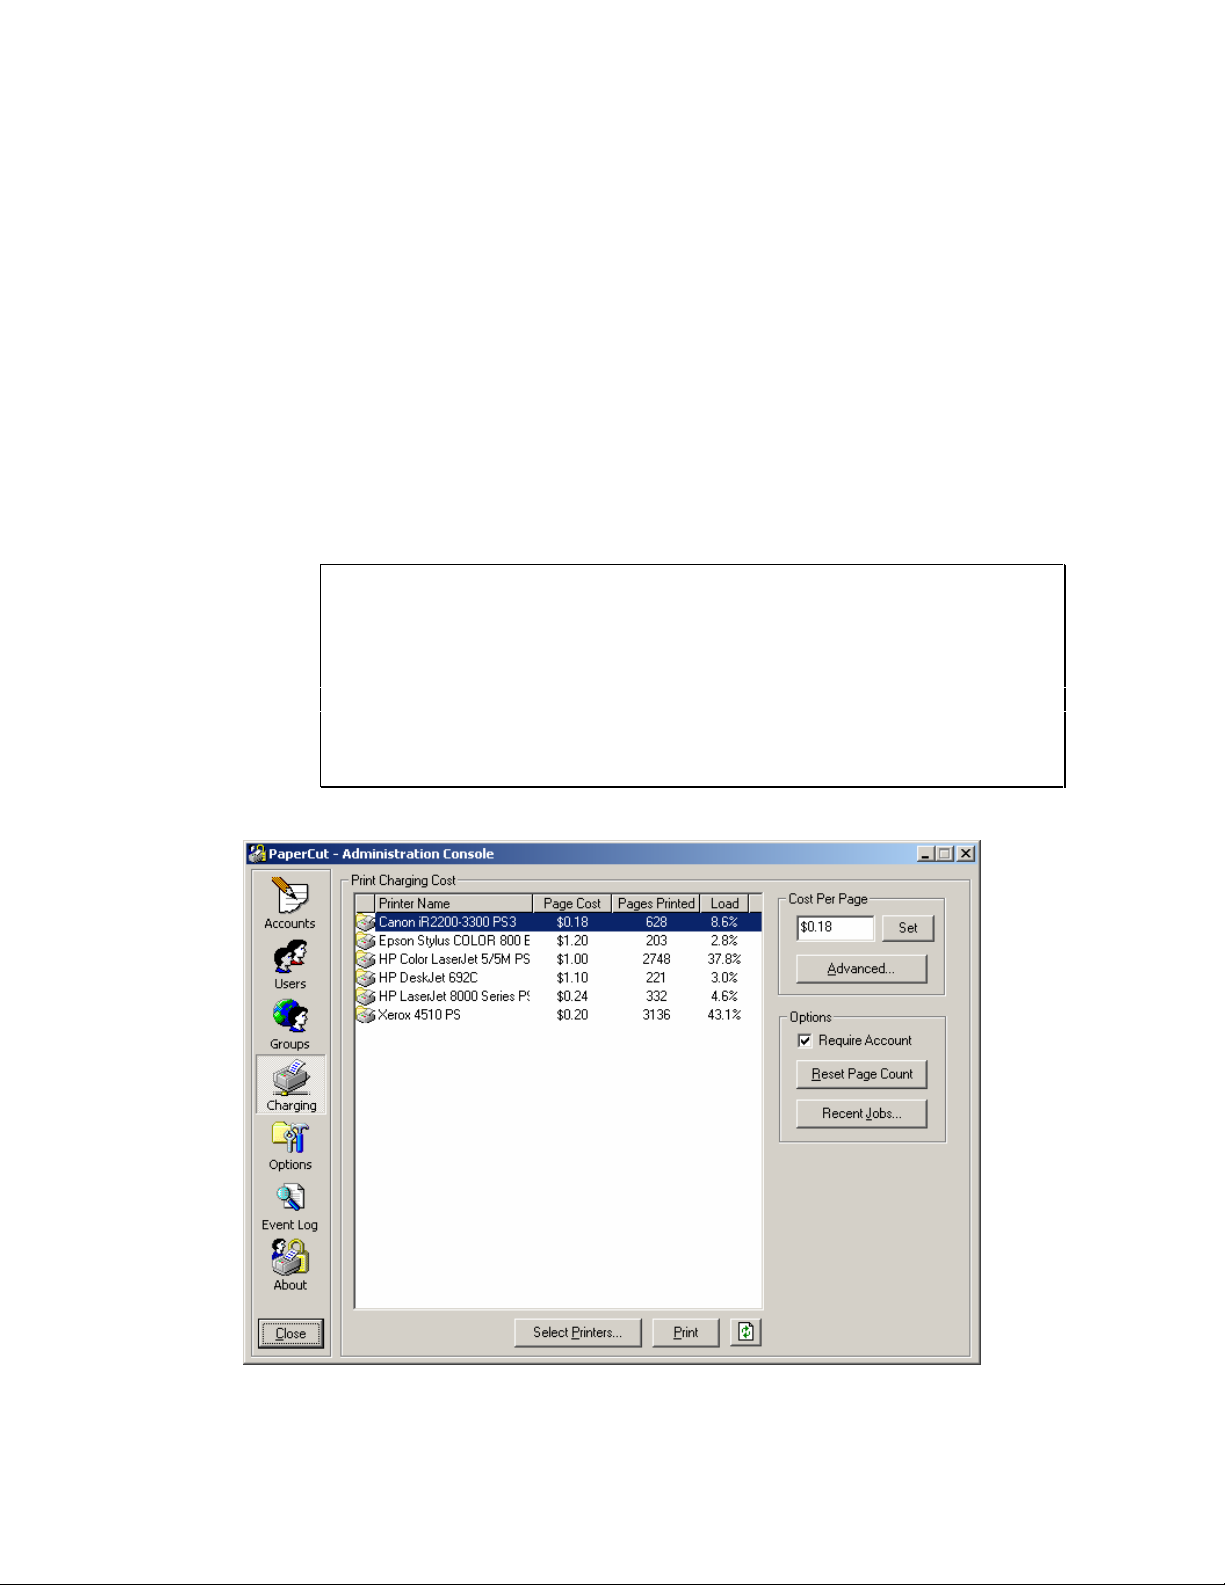
Setting Printer Cost
To begin charging for jobs printed on a particular printer:
x Add the printer to the charging list.
x Set the cost per page for the printer.
x Check the “Requires Account” checkbox according to your needs. Refer to
Chapter 8 for some examples where this feature is used.
([SODQDWLRQ³5HTXLUHV$FFRXQW´RSWLRQ
,I D SULQWHU ³5HTXLUHV $FFRXQW´ WKHQ WKH 3DSHU&XW &KDUJH%DFN SRSXS ZLOO
DSSHDURQWKHXVHUV¶ PDFKLQHZKHUHWKH SULQWRXW ZDVSULQWHGDQGWKHXVHU ZLOO
EH UHTXLUHGWR HQWHU DQ DFFRXQW 7KH FRVW RI SULQW MREV IRU WKLV SULQWHU ZLOO EH
WUDFNHGDJDLQVWWKHDFFRXQWDQGGHGXFWHGIURPXVHUV¶FUHGLW
,I ³5HTXLUHV $FFRXQW´ LV QRW VHOHFWHG WKHQ 3DSHU&XW ZLOO PRQLWRU SULQW MREV WR
WKDW SULQWHU VLOHQWO\ DQG SRSXS ZLOO QRWDSSHDU RQWKH XVHU¶VZRUNVWDWLRQV 7KH
FRVWRIWKHSULQWMREVWRWKHSULQWHUZLOOEHGHGXFWHGIURPWKHXVHUV¶DFFRXQW
To add a printer:
Figure 5. Printer section co n tr o ls th e cos t of pr i nting.
Copyright © PaperCut Software Pty Ltd , 1999-2006. All rights reserved.
-18-

PaperCut ChargeBack 6.1 Advanced Print Tracking and Cost Recovery for Windows Networks
1. Click on the Printers icon on the left-hand side of the PaperCut
Administration Console.
2. Click Select Printers… to display a list of printers available on the server.
3. In the Available column, select the printer(s) you wish to add.
4. Click the Add button followed by the OK butt on.
The printer will appear in the charging list with a cost of $0.00 per page printed. This cost
should be changed to a more appropriate value.
To set the cost per page:
1. Select the printer in the charging list. The printer name will be displayed in
the top right-hand corner.
2. Edit the cost in the cost per page edit box.
3. Click the Set button or press Enter to apply the change.
Tip: If you would like to track printed on a printer, but don’t wish to charge users for its
use, add the printer to the charging list and leave its cost per page at zero.
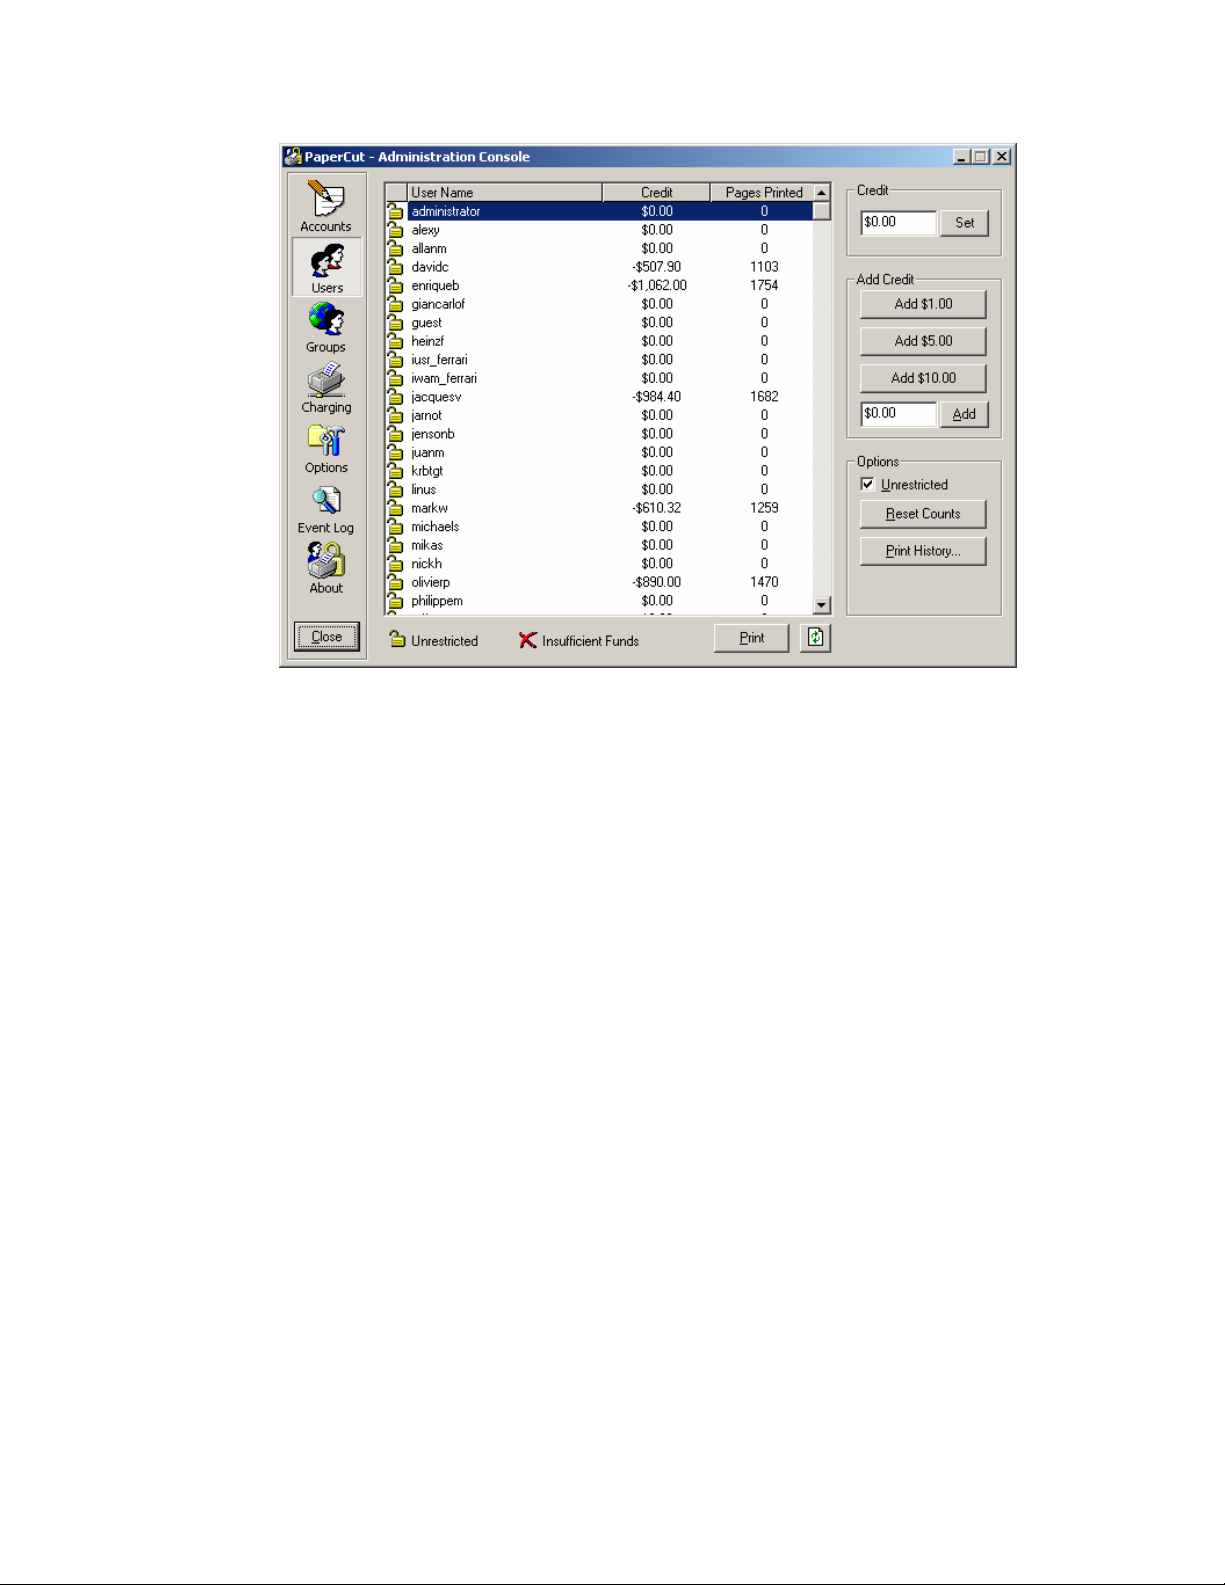
Assigning Funds to a User
The funds in a user’s account can be changed with any one of the following methods:
x Credit can be set to any value
x Funds can be added with the Quick Add buttons.
x Any value of credit can be added to the funds currently in the users account.
Copyright © PaperCut Software Pty Ltd , 1999-2006. All rights reserved.
-19-
PaperCut ChargeBack 6.1 Advanced Print Tracking and Cost Recovery for Windows Networks
Figure 6. The user sect io n lis ts users and their account bal a nce .
To set the funds in a users account to $50.00:
1. Select the user’s logon name in the user list. The user’s name should be
displayed in the top right-hand corner.
2. Click in the credit box and change the value to 50 .
3. Click the Set button or press Enter to apply the change.
To add $10.00 using the Quick Add buttons:
1. Select the user’s logon name in the user list. The user’s name should be
displayed in the top right-hand corner.
2. Click on the $10.00 Quick Add button.
To add $7.20 to a users account:
1. Select the user’s logon name in the user list. The user’s name should be
displayed in the top right-hand corner.
2. Click in the edit box immediately bellow the Quick Add buttons, and change
the value to 7.20 .
3. Click the Add button or simply press Enter.
Copyright © PaperCut Software Pty Ltd , 1999-2006. All rights reserved.
-20-

PaperCut ChargeBack 6.1 Advanced Print Tracking and Cost Recovery for Windows Networks
Setting User Privileges
PaperCut gives you the option of tracking expenses by account and user, as expla ine d in Chapter
8. Users should be assigned Unrestricted privileges according to the following guidelines:
x Use Unrestricted privileges if:
o You wish to charge for print jobs by account, and individual users have no
printing quotas
o You wish to monitor printer costs incurred by users silently
x Do not use Unrestricted privileges if:
o You wish to charge for print jobs by account whilst enforcing printing quotas for
individual users
o You wish to institute a user-pays policy
For users without the Unrestricted privilege, PaperCut determines if the user has sufficient funds
when they attempt to print documents. If the cost of printing the document is higher than the
credit in their account, printing will be denied.
Note: In PaperCut ChargeBack, users are set to Unrestricted by default.
To set a user to Unrestricted:
1. Select the user’s logon name in the user list. The user’s name should be displayed in
the top right-hand corner.
2. Check the Unrestricted option located below the Quick Add buttons.
3. The user’s icon in the user list will change to an unlocked padlock.
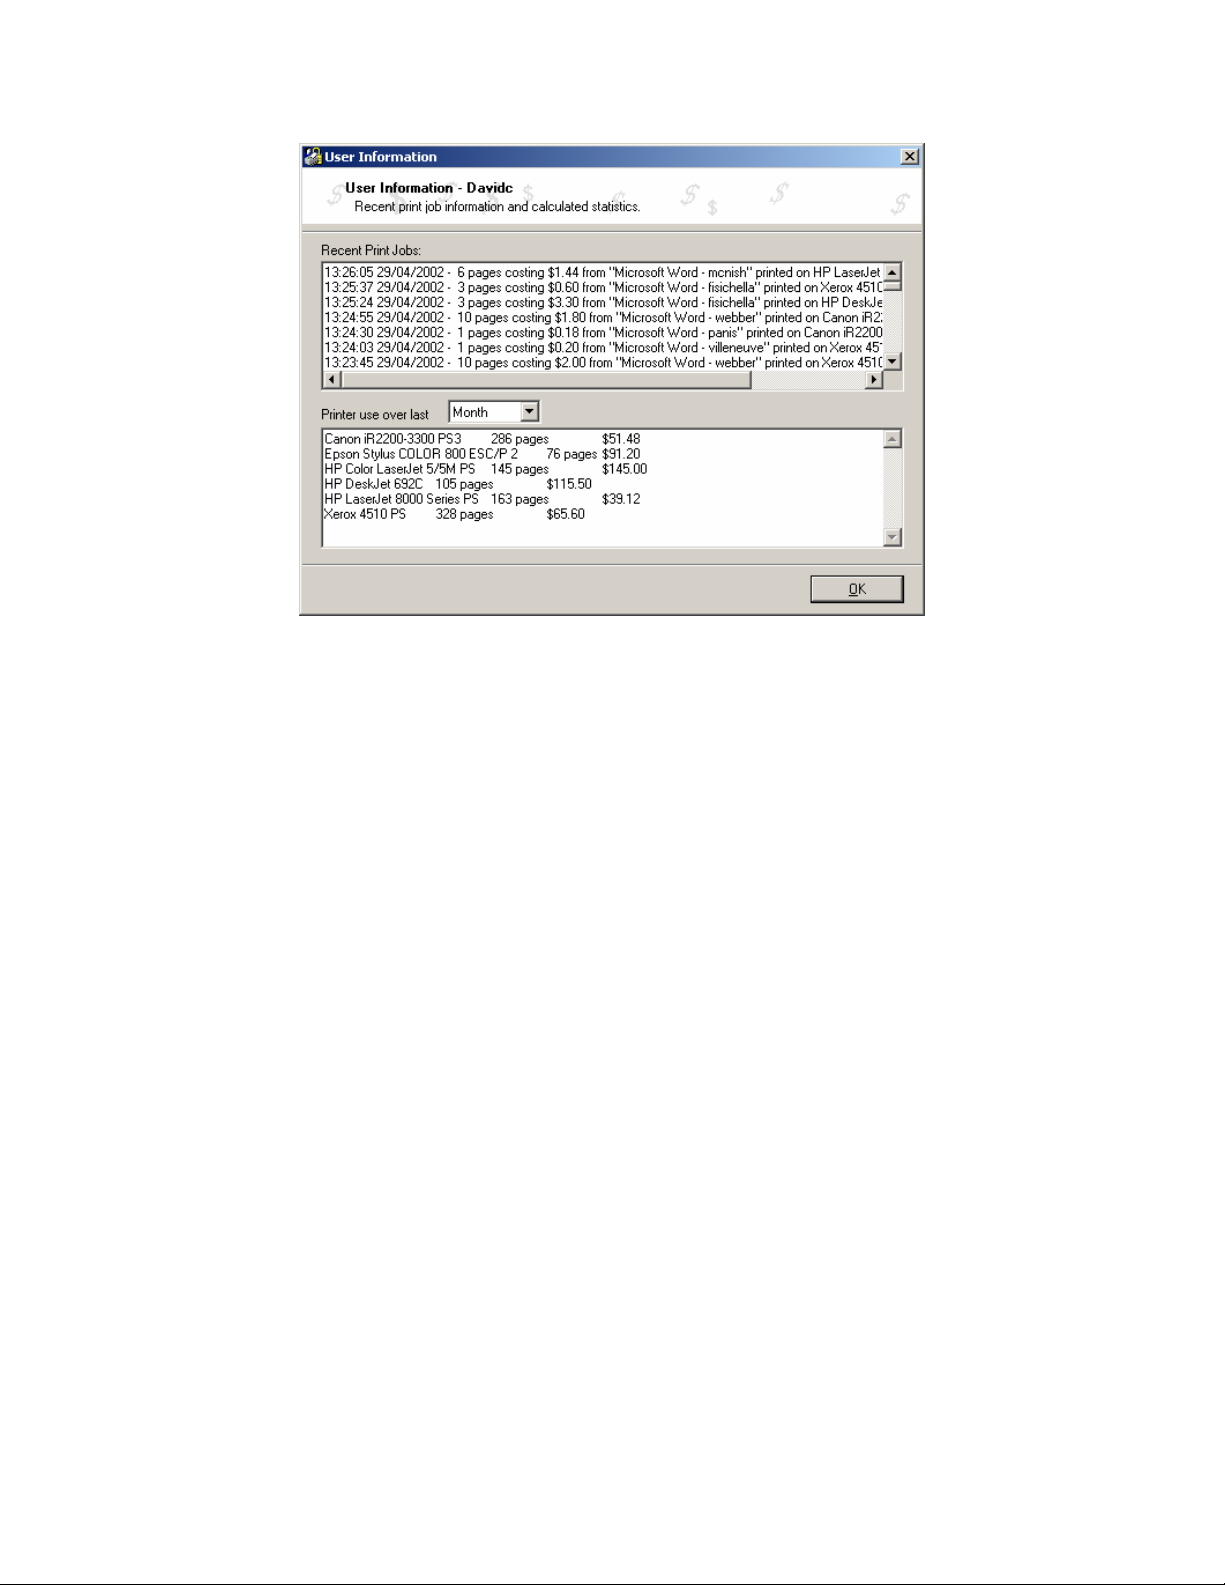
Viewing a User’s Print History
PaperCut ChargeBack maintains a detailed audit of each user’s print activity. All printing activity
is logged in the PaperCut event log. All print job information can be viewed in the Event Log
section. For convenience, a user’s print history can also be accessed via the Users section.
Copyright © PaperCut Software Pty Ltd , 1999-2006. All rights reserved.
-21-
PaperCut ChargeBack 6.1 Advanced Print Tracking and Cost Recovery for Windows Networks
Figure 7. Click Print History… to view a user’s recent print jobs.
To view a user’s print history:
1. Select the user’s logon name in the user list. The user’s name should be displayed in
the top right-hand corner.
2. Click the Print History… button. The User Information dialog box will appear.
To view recent print jobs printed on a particular printer:
1. Select the Printers section by clicking on the printer icon.
2. Select the appropriate printer from the printers list.
3. Click the Recent Jobs… button. The Recent Print Jobs dialog box will appear.
Note: the list of print jobs that are printed against accounts can also be accessed via
the PaperCut reports, explained in Chapter 7.
Copyright © PaperCut Software Pty Ltd , 1999-2006. All rights reserved.
-22-

PaperCut ChargeBack 6.1 Advanced Print Tracking and Cost Recovery for Windows Networks
5. Administra tion Console – Advanced Operations
Using Charge Rates
The Charge Rate button defined under the Global Options settings section provides a way for
Administrators to allow users to “discount” or “increase” the cost of a print job shown on an
account invoice or detailed report. By default, all print jobs are charged at 100%. Adding an
additional charge rate in addition to the “Default” (100%) will enable a drop-down box on the
Popup client.
Common uses of charge rates include:
x Discounting draft prints printed on low quality paper
x Charging full rate or increased rates for “final prints”
x Charging a premium if printing is performed on good quality drafting film
Charge rates are a global option – they are made available to all users and can be applied to all
accounts.
Figure 7.1. Editi n g Charge Rates
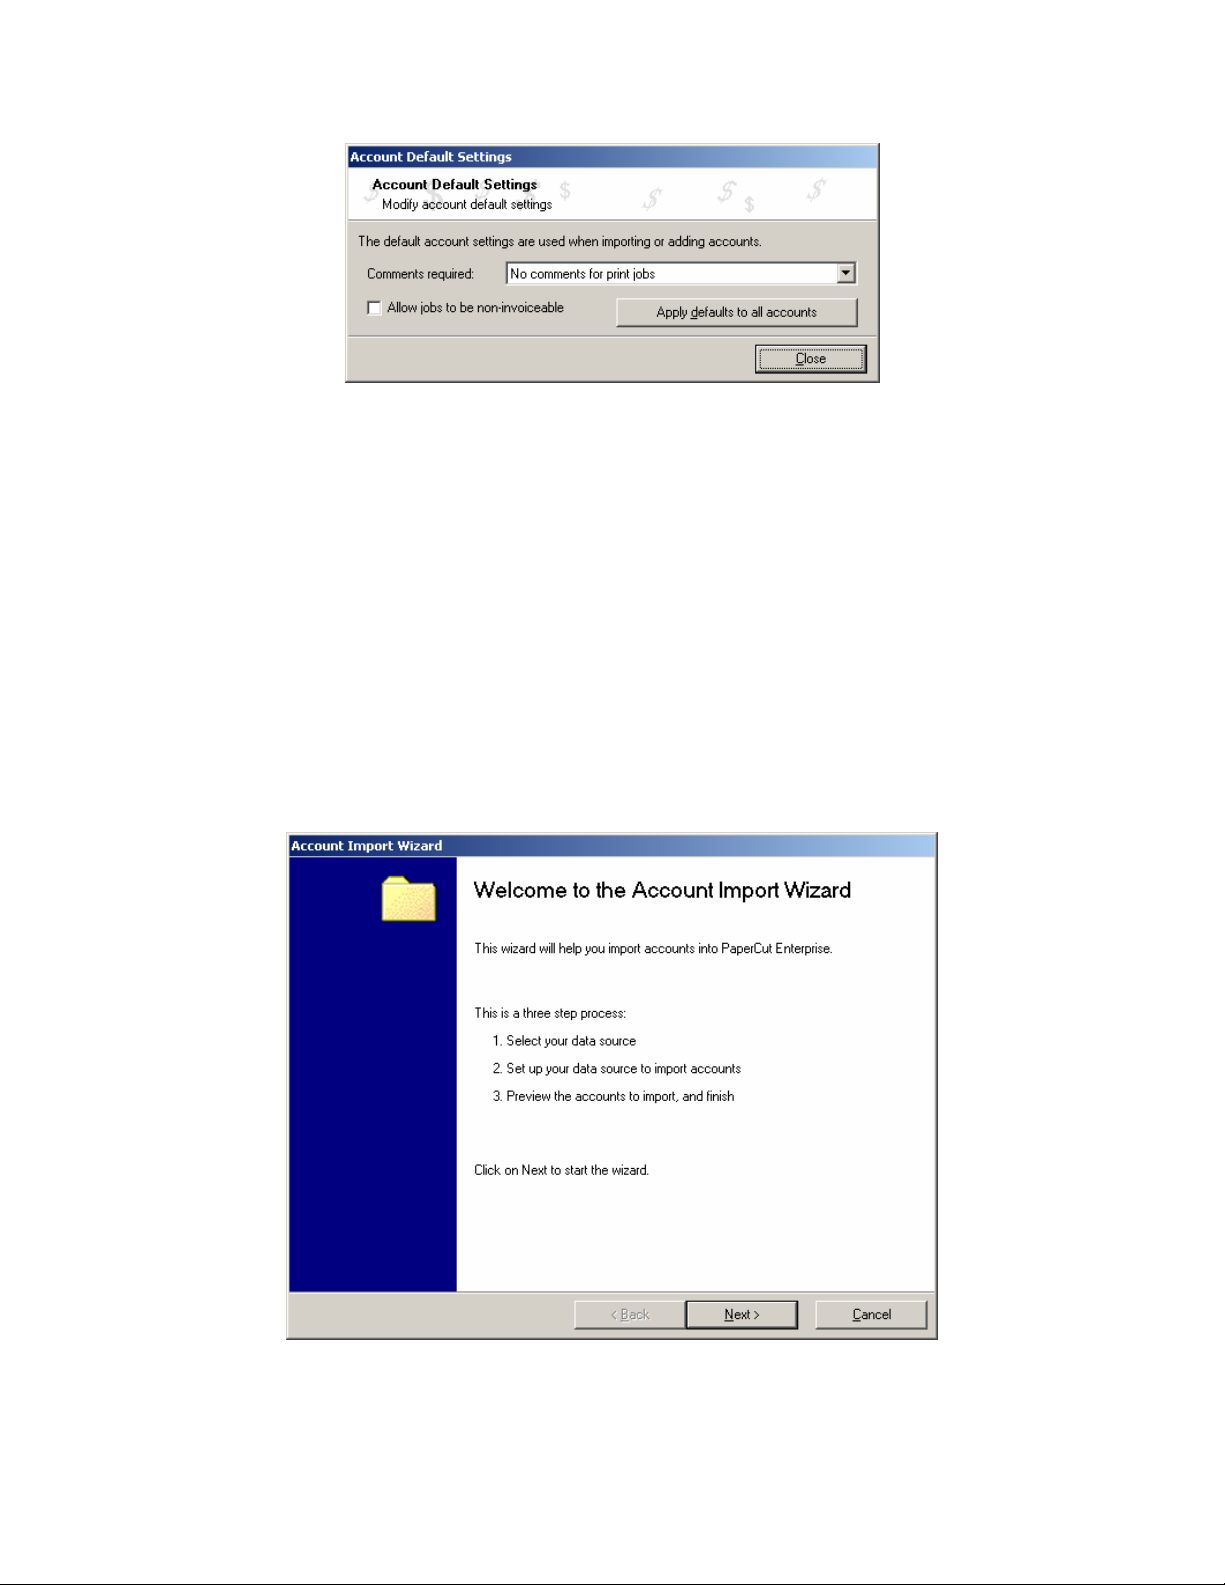
Setting the account defaults
Whenever a new account is created, whether through the administration console, web
administration or account importer, a number of fields are defaulted. To change these defaults,
click on the Account defaults button in the Accounts section of the Administration Console. This
will bring up the window shown in Figure 8.
Copyright © PaperCut Software Pty Ltd , 1999-2006. All rights reserved.
-23-
PaperCut ChargeBack 6.1 Advanced Print Tracking and Cost Recovery for Windows Networks
Figure 8. Account default settings
You can change the default policy for comments and non-invoiceable print jobs to suit your
organization’s needs. All new accounts will then default to these settings. You can also apply
these settings to all existing accounts by clicking the Apply defaults to all accounts button.
Importing accounts
Organizations with large numbers of clients or job numbers will find it necessary to import the list
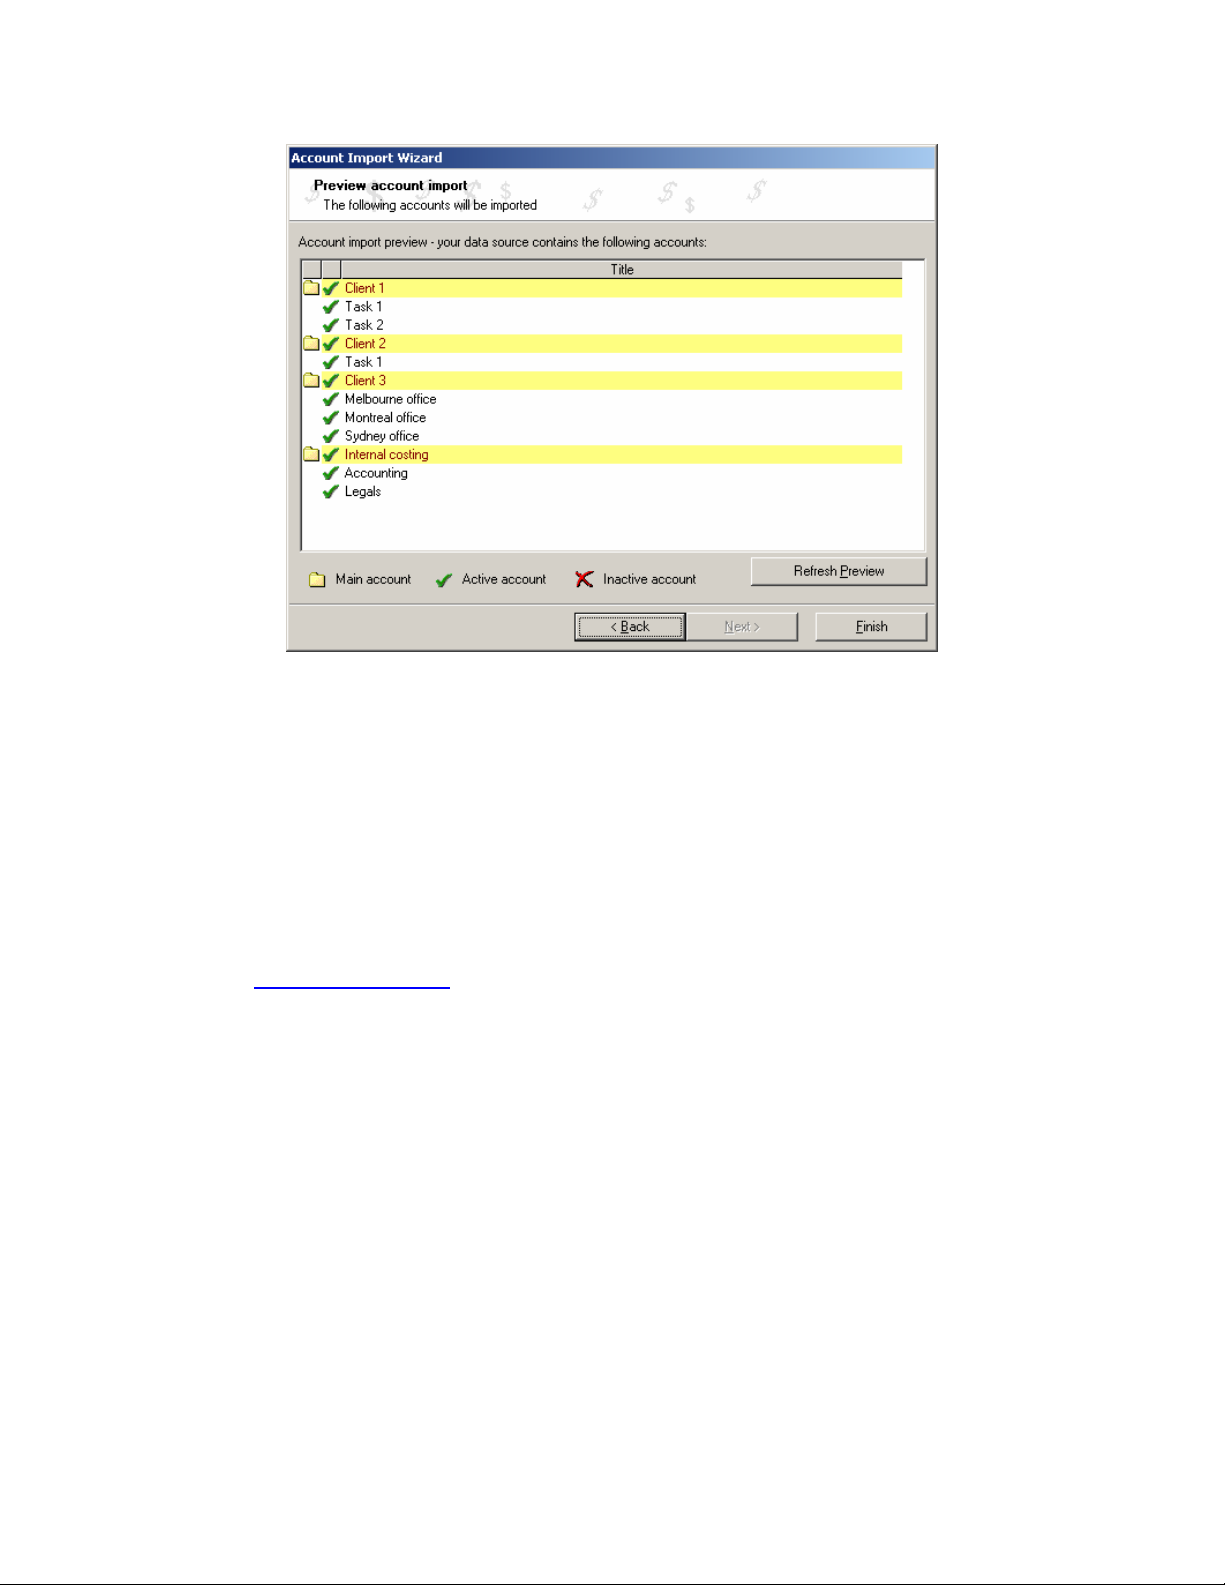
of accounts into PaperCut . This is achieved easily using the Account Import Wizard. To start this
wizard, click on the Impo rt Accounts button in the Accounts section of the Administration
Console. The wizard (Figure 9) will appear.
Figure 9. Account Import Wizard
Copyright © PaperCut Software Pty Ltd , 1999-2006. All rights reserved.
-24-

PaperCut ChargeBack 6.1 Advanced Print Tracking and Cost Recovery for Windows Networks
he wizard will guide you through the import process. Two different sources of data are available
T
in the standard PaperCut ChargeBack distribution:
1. Text file – the most versatile and flexible method of importing accounts
2. Directory structure – useful if your organization has a “clients” directory on your fileserver, and
you wish to synchronise accounts against that directory
Note: importing accounts will add accounts to your PaperCut database if they do not already
exist. It will not rename, remove or delete any existing accounts.
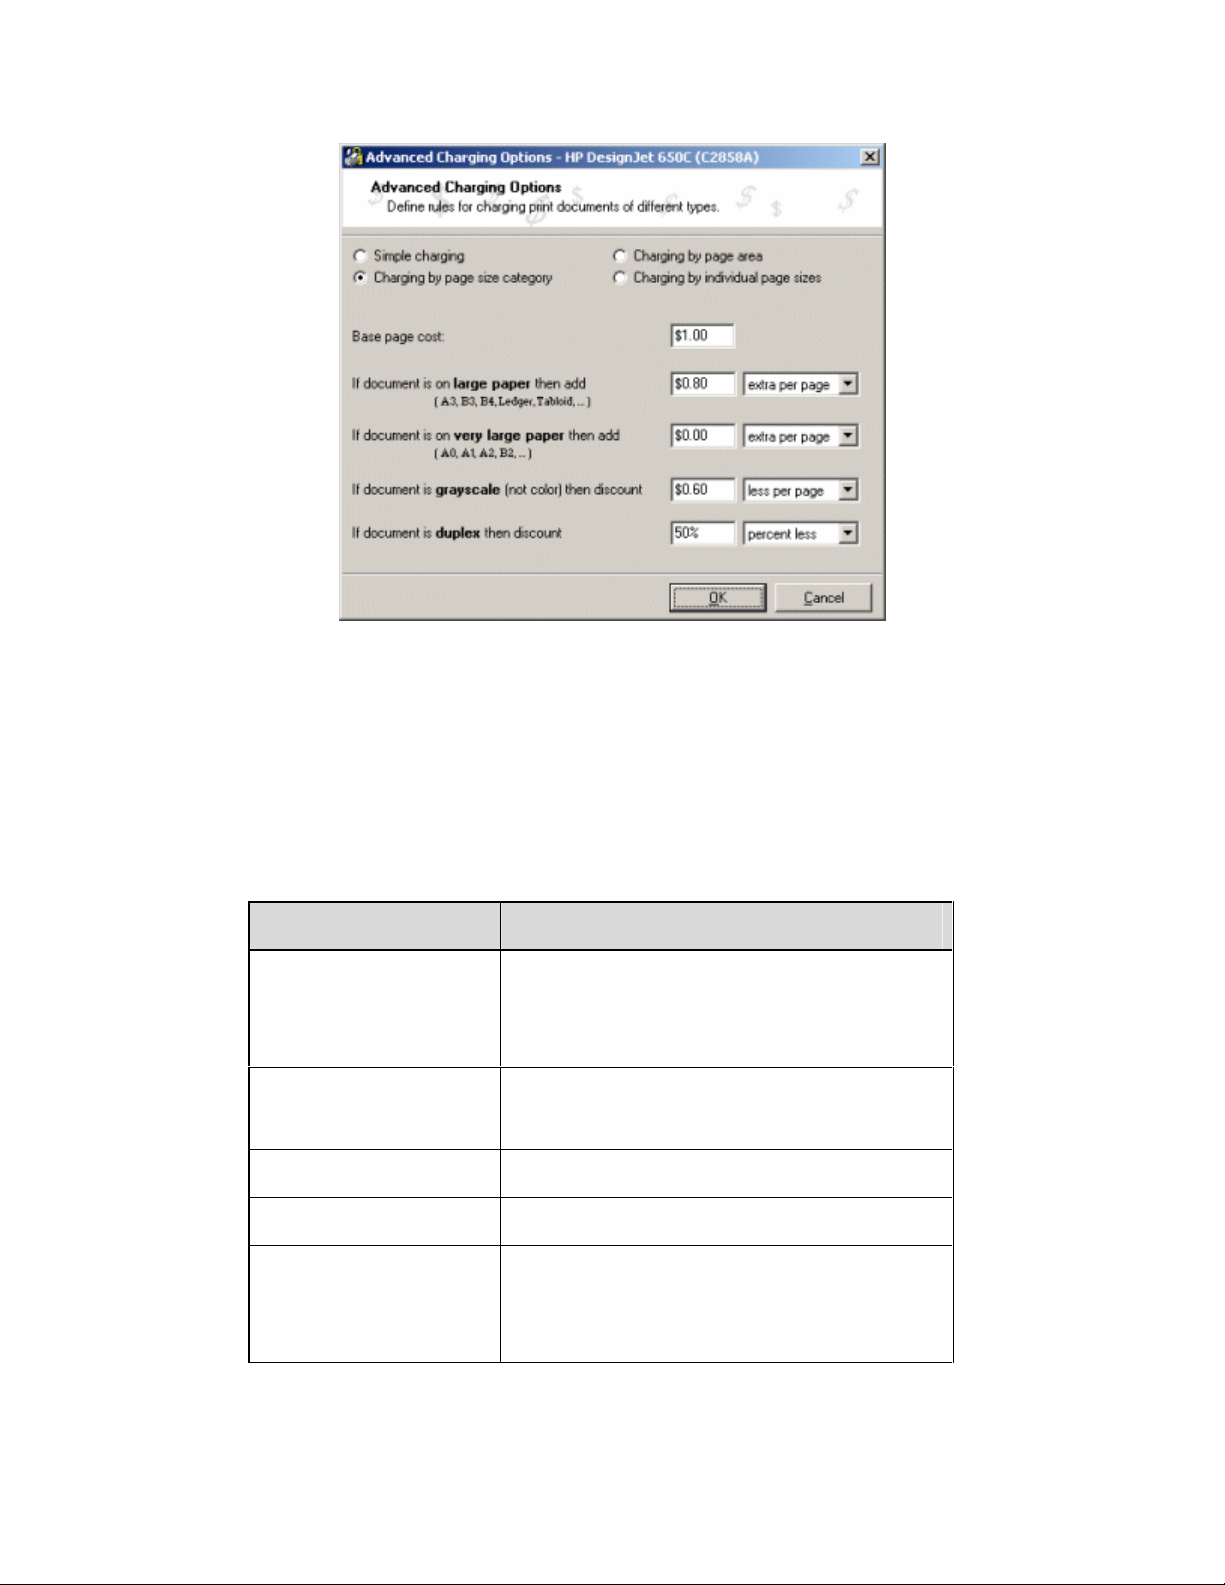
1. Text file importing
A text file can be used to represent the hierarchy of accounts, and inactive/active accounts. One
line is used per account, and a subaccount is represented by starting the line with a ~ character,
and an inactive account with a ^ character. This is best illustrated in the following example – the
following textfile gives the pr eview shown in Figure 10.
Project number 1
~^Task 1
~Task 2
~Task 3
Project number 2
~Task 1
~Task 2
Internal costing
~Legals
~Accounting
~Promotion and marketing
Copyright © PaperCut Software Pty Ltd , 1999-2006. All rights reserved.
-25-

PaperCut ChargeBack 6.1 Advanced Print Tracking and Cost Recovery for Windows Networks
Figure 10. Account importing from an example text file
2. Directory structure importing
All accounts imported via a directory structure are assumed to
be active. Importing the directory C:\Clients in the following
example will give the directory structure shown in Figure 11.
Note that you can also turn off the scanning of subdirectories so
that only main accounts, and not subaccounts, are imported.
Copyright © PaperCut Software Pty Ltd , 1999-2006. All rights reserved.
-26-
PaperCut ChargeBack 6.1 Advanced Print Tracking and Cost Recovery for Windows Networks
Figure 11. Account import ing from an example directory structure
Once you have run the wizard for the first time, PaperCut will remember your settings for
subsequent imports. You can also choose to schedule regular imports – for example, you may
choose to import from a text file that gets updated whenever a new job number is created. A daily
scheduled import will ensure that that new job number will be added automatically to the
PaperCut database without any manual intervention. For more details, refer to Chapter 10.
Custom interfaces to accounting packages can also be built to suit your organization’s needs.
Contact support@papercut.biz
for more details.
Charging different amounts for page size, color and duplex documents
PaperCut has the ability to set different costs for documents printed on different paper sizes,
reduced cost for grayscale documents, and reduced costs for using duplex (double side printing).
The cost per page for a given document is determined by the PaperCut Job Attribut e Detector
(jad.dll). The JAD will analyze each print job and determine the cost as defined by the advanced
printer charging rules.
Accessing the advanced prin t chargin g ru le s:
1. Select the Charging section by clicking on the printer icon.
2. Select the appropriate printer from the printers list.
3. Click the Advanced… button. The Advanced Printer Options dialog box will appear.
Copyright © PaperCut Software Pty Ltd , 1999-2006. All rights reserved.
-27-

PaperCut ChargeBack 6.1 Advanced Print Tracking and Cost Recovery for Windows Networks
NOTE: There is an Advanced Printer Options dialog for each printer in the charging list.
By default, the advanced options are disabled for each printer. The advanced options should
only be enabled for printers that support one of: duplex printing, different page size trays, or color.
There are three different ways of charging based on page size, duplex and color, which are
tailored to different scenarios:
1. Page size category charging – simple charging for printers with multiple paper trays
2. Page area charging – simple charging for printers and plotters with multiple paper trays
3. Charging by specific page sizes (grayscale and color), with a default cost set at a flat
rate, or by page area – the most powerful method suitable for design, architecture,
engineering firms with advanced pri n ters and plotters
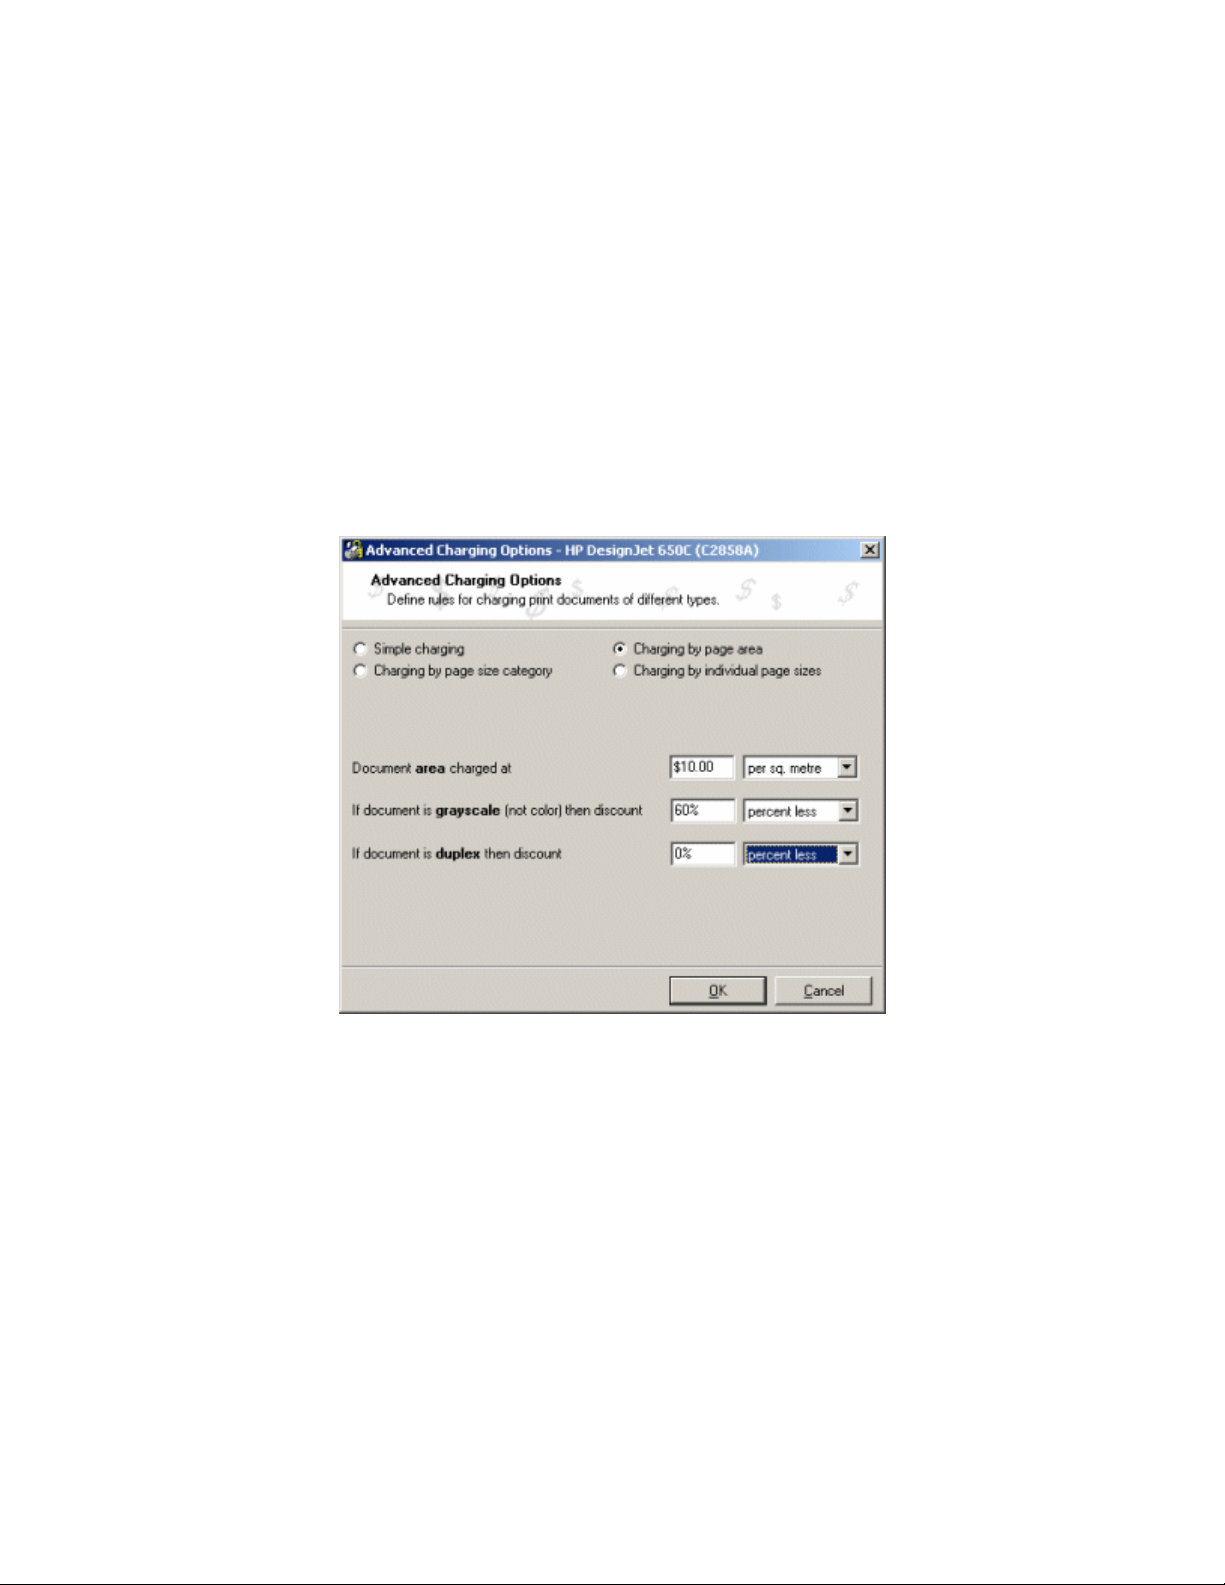
Page Size Category Charging
A practical example:
I have a color printer that supports A3/A4 printing and duplex. I would like to define rules
to:
x Charge $1.00 per page for A4 (standard size) color printing.
x Charge $0.40 per page if the users select grayscale (black & white) – a $0.60
discount for grayscale
x Charge an extra $0.80 if they use large A3 paper
x Offer a 50% discount for duplex to encourage double sided printing.
To accomplish this complex set of charging rules, the user should setup the Advanced
charging options for the particular printer as defined in the screenshot below:
Copyright © PaperCut Software Pty Ltd , 1999-2006. All rights reserved.
-28-
PaperCut ChargeBack 6.1 Advanced Print Tracking and Cost Recovery for Windows Networks
Note that in this example, the user’s printer does not support very large page size, so this option is
left at the default “zero”.
The PaperCut Advanced Printer Options offers a very powerful rule set to define a fair page cost.
Rules can be defined using fixed markups or discounts, or percentage based modifications. The
above example uses a mixture of fixed and percentage based modification of cost and should be
used as a guide for setting up appropriate cost.
Attribute Applies To
Grayscale
Documents printed with the “grayscale” or “black
& white” options selected from the printer
properties dialog box.
Standard Page Size
A4, A5, A6, A7, B5, Letter, Legal, Executive,
Foolscap, Envelopes
Large Page
Very Large Page
Duplex
A3, B3, B4, Ledger, Tabloid, etc.
A0, A1, A2, B2, etc
Documents printed with the “duplex” or “double
sided” options selected from the printer
properties dialog box.
Copyright © PaperCut Software Pty Ltd , 1999-2006. All rights reserved.
-29-
PaperCut ChargeBack 6.1 Advanced Print Tracking and Cost Recovery for Windows Networks
Page Area Charging
A practical example:
I have a color printer or plotter that supports a range of page sizes. I would like to define
rules to:
x Charge $10.00 per square metre of page size for color printing.
x Charge $4.00 per square metre of page size for grayscale
x The printer does not support duplex, so the duplex discount is set to 0%
To accomplish this complex set of charging rules, the user should setup the Advanced
charging options for the particular printer as defined in the screenshot below:
Note that in this example, the user’s printer does not support duplex, so this option is left at the
default “zero”.
Charging by specific page sizes (grayscale and color)
This method is most suitable for design, architecture and engineering firms.
A practical example:
I have a color plotter that supports a variety of page sizes. I would like to define rules to:
Copyright © PaperCut Software Pty Ltd , 1999-2006. All rights reserved.
-30-

PaperCut ChargeBack 6.1 Advanced Print Tracking and Cost Recovery for Windows Networks
x Charge a default rate of $10.00 per square metre of page size for color printing
x Charge a default rate of $4.00 per square metre of page size for grayscale
printing
x Override the default rates for grayscale and color for A2, A3 and A4 printing,
setting the grayscale and color costs for each size explicitly
x The printer does not support duplex, so the duplex discount is set to 0%
To accomplish this complex set of charging rules, the user should setup the Advanced
charging options for the particular printer as defined in the screenshot below:
Note: Once the default costs are assigned, they will appear in the grid cells with a gray
background. To override any of the default prices, simply click on the appropriate grid, and type in
the overriding cost. These costs will be shown with a white background, as shown above.
Applying filter rules or restrictions on print queues
PaperCut offers advanced network administrators the ability to filter, or restrict print jobs, on a per
printer basis. Options available include:
x Detect and delete duplicate print jobs
x Define the maximum cost of a single print job
x Define the maximum number of pages allowed in a single print job
x Filter documents based on the file extension or name
x Allow only selected paper sizes
Copyright © PaperCut Software Pty Ltd , 1999-2006. All rights reserved.
-31-

PaperCut ChargeBack 6.1 Advanced Print Tracking and Cost Recovery for Windows Networks
x Set a print to only allow color or black and white documents
Each printer has its own set of restrictions. The rules can either apply to all users or “restricted”
users only.
Figure: The restrictions screen with duplicate detection enabled with a 10 second
window, and a maximum page count of 50 pages per job.
The printer restrictions provide Network Administrator s with ad vance d control over printer usage.
Some common examples include:
Reduce printer jams
Many printers expect print jobs to be on single size of paper, or maybe two sizes if the
printer has multiple paper trays. A non-standard size will cause the printer to enter a
“manual load” state causing the queue to halt. PaperCut Restrictions… section allows
Administrators select the allowed sizes. Non-standard sizes are automatically deleted
before they’re sent to the printer. It’s an effective way of reducing one of the most
common causes of queue jams.
Copyright © PaperCut Software Pty Ltd , 1999-2006. All rights reserved.
-32-

PaperCut ChargeBack 6.1 Advanced Print Tracking and Cost Recovery for Windows Networks
Figure: Allowed sizes are A4 and Letter only.
Controlling documents on slow Inkjets
Inkjet printers have very low throughput rates. A large color document can hold up a
queue preventing other users from getting their “fair share” of print time. By setting an
upper page count via the printer’s Restr ict ions … section, network administrators can
prevent large print jobs, forcing uses to split up large documents allow other uses access
to the printer.
Automatically deleting duplicate jobs
PaperCut can also monitor the print queues and automatically delete duplicate print jobs.
This option is useful on networks with novice users. New users with often “double click”
an application’s printer icon causing two identical print jobs to be sent to the queue
wasting paper and their print quota. Network administrators can enable duplicate job
detection via the Restrictions… section. Duplicate jobs will automatically be removed
from the queue. The user will not be charged for the job and be warned via a popup
message.
Note: This option can affect multiple prints from Microsoft Excel and
some other applications. Users wishing to print multiple prints from
Excel may need to reprint the document 30 seconds apart.
Force sensible use
Restrictions can be set to define a maximum cost per job. This will prevent users from
“accidentally” spend all their credit in one print job.
Copyright © PaperCut Software Pty Ltd , 1999-2006. All rights reserved.
-33-

PaperCut ChargeBack 6.1 Advanced Print Tracking and Cost Recovery for Windows Networks
Automatically delete documents based on file extension or name
There are many reasons why users should not print certain files. For example, maybe a
report from the accounting application consists of 400 pages. Users may not be aware of
this and “accidentally” print the report expecting only a few pages. PaperCut can be
configured to match this document via its name and automatically deleted it from the
queue. Use the Restrictions… keyword filter to implement this functionality.
Additionally it’s also possible to filter documents based on file extension by entering a
keyword like “.htm” or “.pdf”.
Note: This is not a security option. It is easy to circumvent the filter
by simply renaming the document!
Control who can print in color (Advanced)
By combining PaperCut’s ability to restrict color printing (allow only grayscale), and
standard Windows sharing permissions, it’s possible to control which users have access
to color printing.
To implement:
1. On the print server, install the drivers for the printer twice. Call one printer
Grayscale Only and the other Color. You will no w hav e two print er ico ns (logical
printers) each connected to the same physical printer.
2. Share the printers as normal
3. Set Windows access permissions on eac h print er as requir e d. Uses who
require color access should be able to print to the color printer. Other uses
should only be provided access to the “black and white” only printer.
4. Add the printers to PaperCut and define appropriate costs
5. Select Restriction… for grayscale only printer. Ensure that restrictions only
allow black and white (grayscale) printing.
Providing uses with an “overdraft”
An overdraft allows restricted users to overdraw their account to a defined limit. PaperCut allows
a global overdraft limit to be defined. It is enforced for all users with “Restricted” privilege.
To defined the overdraft limit:
1. Select the Options section by clicking on the Options icon on the sidebar.
2. Click on the Print Charging Option tab
Copyright © PaperCut Software Pty Ltd , 1999-2006. All rights reserved.
-34-

PaperCut ChargeBack 6.1 Advanced Print Tracking and Cost Recovery for Windows Networks
3. Modify the Overdraft value to the appropriate overdraft limit.
Setting the initial credit assigned to new users.
It is inevitable that new users will be added to your network in the future. To streamline user
setup, PaperCut offers the option of having new users automatically assigned an init ial starti ng
credit the first time they print. This initial credit can be varied depending on the group(s) they
belong too. For example, you may wish to autom atic al ly assign Ma nag er s /Staf f $100, but on ly
$10.00 to all other users.
The initial credit assigned to a user depends on the local and global groups they belong to. To
set the initial credit given to members of a particular group:
x Add the group to the Groups List
x Set the initial credit to the amount you wish to automatically assign to new users
belonging to this group
Figure 14. The Groups section allows group level administration.
To add the group to group to the Groups List:
1. Click on the Groups i con on the left-hand side of the PaperCut Administrat ion
Console.
2. Click Select Groups … to displ a y a list of Global and Loc al Gro ups.
Copyright © PaperCut Software Pty Ltd , 1999-2006. All rights reserved.
-35-

PaperCut ChargeBack 6.1 Advanced Print Tracking and Cost Recovery for Windows Networks
3. In the Available column, select the group you wish to add.
4. Click the Add button followed by OK.
To set the initial credit:
1. Select the group in the Groups List. The group name will be displayed in the top
right-hand corner.
2. Edit the credit shown in the Initial Credit edit box.
3. Click the Set button or press Enter to apply.
4. If you wish for new users belonging to this group to also have “Unrestricted”
privileges, check the Unrestricted option.
If a new user belongs to two or more groups listed in the Groups List, they will be assigned the
highest initial credit. If any one of the groups has Unrestricted privilege, the user will inher it
unrestricted access. Any initial settings can be manual overridden in the user section at any time.
If a new user does not belong to any of the groups listed in the Groups Section, they will be
assigned the initial credit given to the DefaultGroup.
Scheduling Credit
The automatic scheduling of credit can be a useful mechanism to encourage “budgeting” in a
“user pays” environment. PaperCut can automatically add credit to members of a Domain group
on a Daily, Weekly or Monthly schedule. To configure scheduling:
x Add the required group to the Groups List, if not already listed.
x Set the Schedule Period to the desired in terv al.
x Change the Scheduled Credit to the amount of credit to be automatically added to
group members.
To set the Schedule Period:
1. Click on the Groups i con on the left-hand side of the PaperCut Administrat ion
Console.
2. Select the required local or global group in the Groups List. (If the group is not listed,
add the group under Select Groups … )
3. Set the schedule period by clicking on the appropriate daily, weekly or monthly
option.
To set the Scheduled Credit:
1. Click on the Groups i con on the left-hand side of the PaperCut Administrat ion
Console.
Copyright © PaperCut Software Pty Ltd , 1999-2006. All rights reserved.
-36-

PaperCut ChargeBack 6.1 Advanced Print Tracking and Cost Recovery for Windows Networks
. Select the required local or global group in the Groups List.
2
3. In the Scheduled Credit edit box, set the amount of credit to be added each interval.
Credit will be assigned to group members at 12:00am (midnight) on the day of the schedule, or
when the print server is first turned on during this day. Weekly schedules are rolled over Sunday
morning, and Monthly schedules are rolled over on the first day of the new month.
When a scheduled allocation is completed successfully, a message will appear in the PaperCut
Application Event Log.
Group Level Functions
In many network environments, working at group level is the most convenient method of
administering user accounts. PaperCut integrates into the Windows Domain Users and Groups
environment, and allows the manipulation of user accounts on a group level. For example you
may wish to reset all users who belong to a departm ental gr oup, back to an initial starting value
every quarter. This operation, along with basic group querying can be performed with the
PaperCut Group Level Functions. These options are found under the Groups section.
Allocate Funds to Group Members
With Allocate Funds, the following operations may be applied to all primary members of a
specified group:
x Set the credit to a specified value.
x Add credit to user’s accounts.
x Change all group members’ privilege to Restricted or Unrestricted.
Copyright © PaperCut Software Pty Ltd , 1999-2006. All rights reserved.
-37-

PaperCut ChargeBack 6.1 Advanced Print Tracking and Cost Recovery for Windows Networks
Figure 15. The Al lo c a te Funds secti on of Group Level Fu nctions allow s credit to be ass i g ned
to group membe rs
To set all members of the “Management” group to $50 and give “Unrestricted” privilege:
1. Click on the Groups icon on the left-hand side of the P aperCut Adminis trat ion
Console.
2. Click Allocate Funds…
3. Select the “Management” group in the group selection box.
4. Select the Set Credit option and change the value to 50.00
5. Select Change Privilege, and ensure Unrestricted is selected.
6. Click the OK button to apply the selection to the members of the Management
group. The changes can be seen in the user list, under the Users section.
Query
The Query option is useful for determining total page count and other usage information specific
to any Domain group.
Figure 16. Query information at Group Level.
To query the number of pages printed by members of the “Engineering” group:
1. Click on the Groups icon on the left-hand side of the P aperCut Adminis trat ion
Console.
2. Click Query…
3. Select the “Engineering” group in the group selection box.
4. Select the Sum Pages option.
Copyright © PaperCut Software Pty Ltd , 1999-2006. All rights reserved.
-38-

PaperCut ChargeBack 6.1 Advanced Print Tracking and Cost Recovery for Windows Networks
5. Click the Calculate button to display the number of pages printed by
“Engineering”.
Database Maintenance
The PaperCut database stores all the user account information. If a user account is removed
from the network domain, the username will continue to list in the PaperCut database. A
database Tune Up will remove these deleted names form the PaperCut database. The Tune Up
option will also:
x Add any new network users not yet listed in the database
x Optimize the database
x Create a backup and place it in the PaperCut Backup folder.
Although new users will be added automatically the first time they print, we rec om mended you
use the Tune Up after added a number of new uses. This will ensure the database is also
running efficiently. New users will be added using the Initial Credit rules set under the Groups
section. We encourage the Administrator to “Tune Up” every month or so for backup and
optimization purposes.
Figure 17. Use Tune Up in the Options section to clea n and optimize the databas e.
Event Log
The PaperCut event log is divided into two sections (on two tabs). The first section is the Job
Log. The Job Log provides a detailed history of all print jobs printed via the print server. The
Copyright © PaperCut Software Pty Ltd , 1999-2006. All rights reserved.
-39-

PaperCut ChargeBack 6.1 Advanced Print Tracking and Cost Recovery for Windows Networks
second section, called the Application Event Log, lists application specific events. Examples of
events include starting and stopping of the PaperCut service and the status of any schedules
allowances. After adding new printers to your network and printing test documents, the event log
should be investigated to ensure all is functioning correctly. Administrators should check the
event log on a weekly basis.
Copyright © PaperCut Software Pty Ltd , 1999-2006. All rights reserved.
-40-

PaperCut ChargeBack 6.1 Advanced Print Tracking and Cost Recovery for Windows Networks
6. The User Tools
There are three user tools supplied with PaperCut ChargeBack:
1. PaperCut ChargeBack Client – a background application that runs on users’
workstations, monitoring print jobs. When the user prints a document to one of the
PaperCut ChargeBack monitored printers on the network, an account notification
window pops up, prompting the user to select the account for the document.
2. User Inquiry tool – so users can check their printing balance
3. Reports Generator – collates the job log information from all the PaperCut servers
into a single database, from which reports can be obtained.
PaperCut ChargeBack Client
The PaperCut ChargeBack Client runs silently in the background. It is set to start when a user
logs in, and its icon (a folder with a printer in front of it) will appear in the system tray (Figure 11)
Figure 18 – the PaperCut ChargeBack Client icon in the system tray
The client can also be launched manually from the Start menu, under “Start menu Programs
PaperCut ChargeBack Client”.
When the application starts, it contacts the PaperCut primary server to obtain a list of printers and
secondary servers. The client then monitors each of these printers. Double clicking on the
PaperCut icon in the system tray will also display window in Figure 19.
Copyright © PaperCut Software Pty Ltd , 1999-2006. All rights reserved.
-41-

PaperCut ChargeBack 6.1 Advanced Print Tracking and Cost Recovery for Windows Networks
Figure 19 – the PaperCut Client
Pressing the Refresh Printers button forces the application to refresh the list of printers it’s
currently monitoring. The button should be pressed if a printer server has been rebooted or
turned on since the application was started. A printer list will automatically refresh every hour.
The Popup window
When a user prints a document to one of the monitored printers, the popup window shown in
Figure 20 will prompt the user to select an account for the print job. The application remembers
the last selected account, and highlights this account by default.
Figure 20 – the PaperCut ChargeBac k Client popup
Users are also able to search by typing in the Search textbox. The searching functionality allows
users to search for accounts in two ways:
1. By main account: typing a string that appears in any main account will cause that
main account and all its subaccounts to be displayed in the list. For instance, this
allows narrow the list to accounts belonging to a particular client by typing the client’s
name in the search textbox.
Copyright © PaperCut Software Pty Ltd , 1999-2006. All rights reserved.
-42-
PaperCut ChargeBack 6.1 Advanced Print Tracking and Cost Recovery for Windows Networks
. By account name directly: typing a string at appears in any account will cause the
2
account to be displayed. If it is a main account, then rule 1 applies. If it is a
subaccount, then both the subaccount and its main account will be displayed.
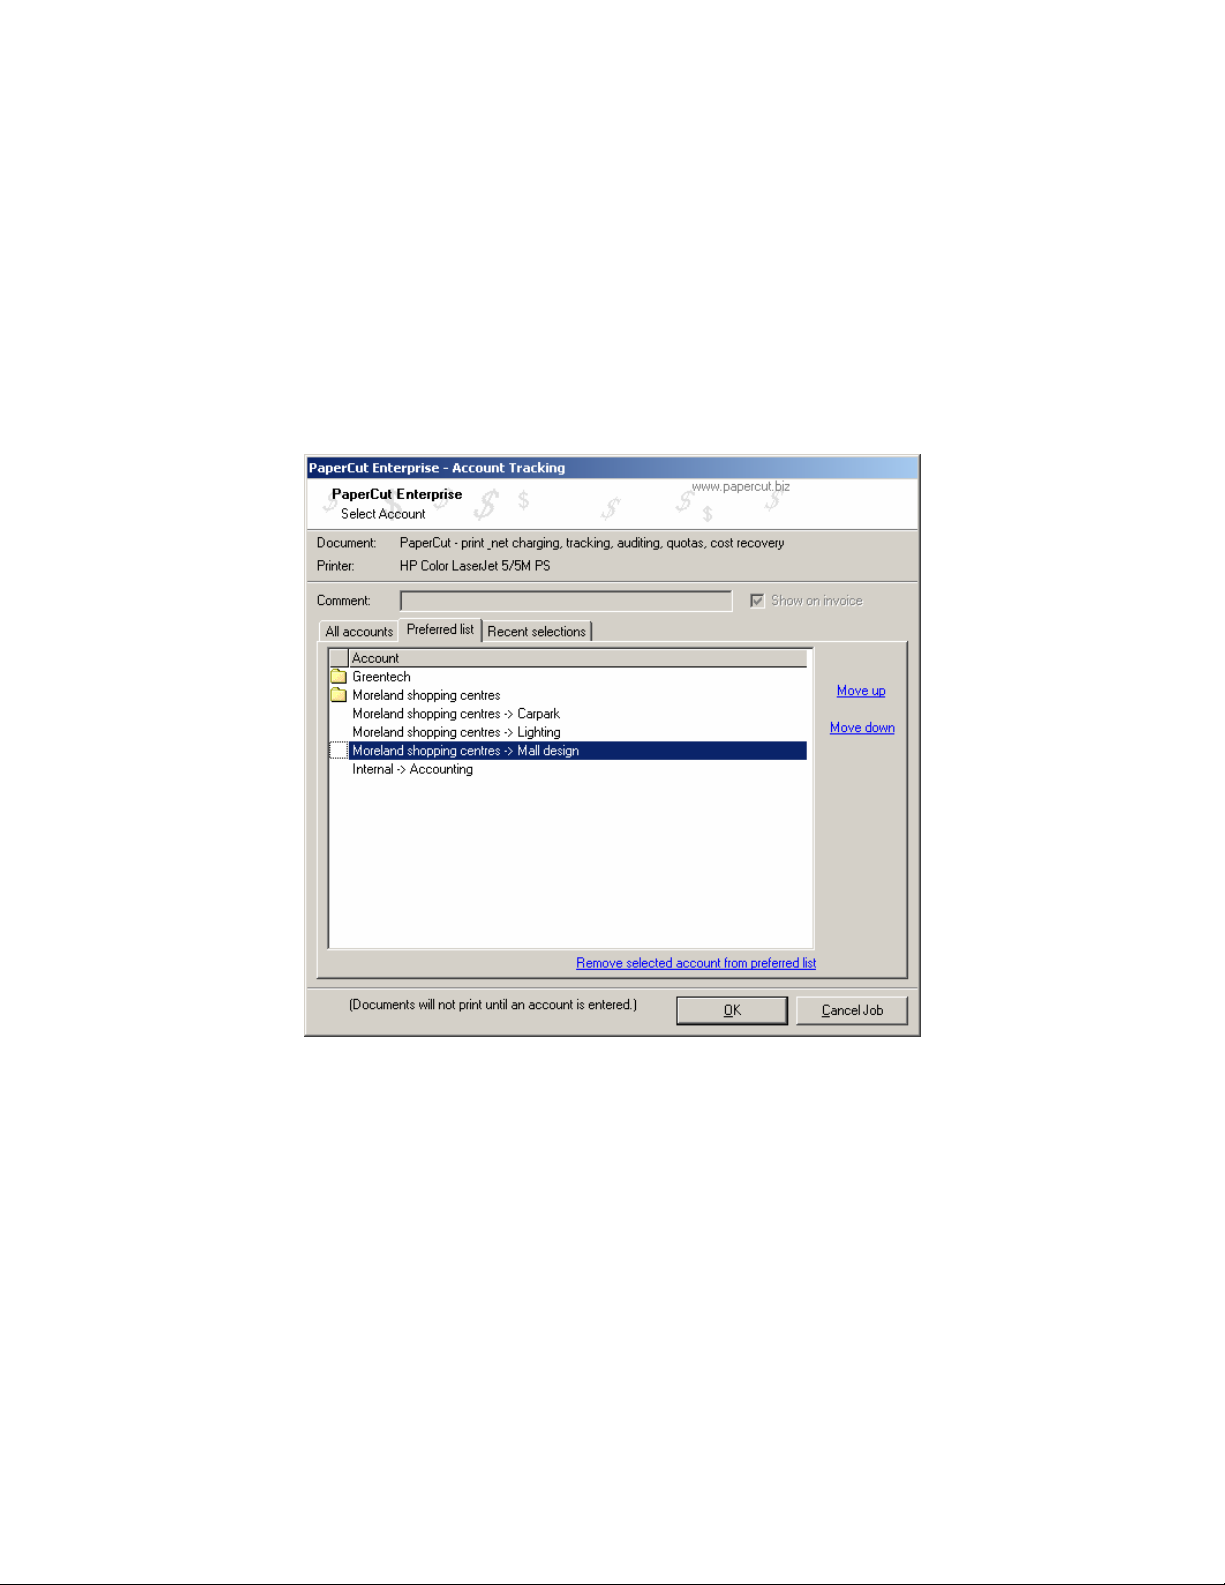
To make account selection faster, users can also set up their own personal list of perferred
accounts by selecting their preferred accounts (in the list on the All accounts tab) and clicking
Add selected account to preferred list. The accounts will then appear in the preferred list, as
shown in Figure 21. They can also be reordered and removed as need be.
Figure 21 – the PaperCut Clien t p opup pref er red account list
The user can also a history of the previously selected accounts in the Recent selections tab.
The user also has the option of cancelling the job by pressing the Cancel Job button.
If no account information is received within 5 minutes of the job being printed, the server
automatically deletes the job. This prevents situations where many users print documents without
selecting their account (which will cause congestion on the printer queues).
Copyright © PaperCut Software Pty Ltd , 1999-2006. All rights reserved.
-43-

PaperCut ChargeBack 6.1 Advanced Print Tracking and Cost Recovery for Windows Networks
Client-side batch printing tools
One of the “side-effects” of introducing manual per-print allocation to accounts is that the process
may interfere with automated, scripted or batch printing tasks. For example an advanced user
may have written a Macro or program to print hundreds of document. Or a system administrator
may schedule large print runs over night. In these situations manually allocating print jobs via a
popup is either excessively tedious or not possible. To assist with batch print automation,
PaperCut ChargeBack includes a set of tools to assist with automatic account selection. Two
interface types are provided:
1. A commend-line tool suitable for use by scripts, batch files, and other programs.
2. A COM object suitable for use with Visual Basic for Application Macros or other
programs.
To tools allow:
x The option to select an account to be applied to the all following print jobs (the batch)
until told otherwise.
x The option to select an account to be applied to all following print jobs (the batch) for a
given length of time (e.g. applied to account “Acme Inc.” for next 10 minutes)
x An option to revert back to normal popup mode.
x Helper function such as listing all valid account names
More information, including technical interface specifications and examples can be found in
Appendix III and also the directory C:\Program Files\PaperCut\Tools\ on each workstation.
User Inquiry Tool
Figure 22. The user Inquiry Tool for Windows.
The User Inquiry Tool is an optional program for use on network workstations. It’s usful if you
using PaperCut to enforce use quotas. The User Inquiry Tool can be started from the Start
menu Programs PaperCut menu. This gives the user an indication of their account status
Copyright © PaperCut Software Pty Ltd , 1999-2006. All rights reserved.
-44-

PaperCut ChargeBack 6.1 Advanced Print Tracking and Cost Recovery for Windows Networks
roviding the user with a warning when bal anc e is nea r ing zero. If the account cr edit disp lays
p
red, the user has inadequate funds for printing. In addition to the User Inquiry Tool, users are
also notified with a Winpopup message if they attempt to print with inadequate funds. The
manual refresh button located in the top right-hand corner will update the balance.
The User Inquiry Tool optional and is not required for the printing process. If PaperCut is set up
so that does not charge users for print jobs and print balances are not used, then the User Inqury
Tool will be of limited us.
Report Generator
The PaperCut ChargeBack Report Generator (Figure 23) is an application used to gather print job
information from each server’s archives into a single database that can be used for reporting.
Depending on your network topology, there may be multiple PaperCut servers on your network,
so job information will be spread across these servers. The Report Generator contacts each of
the servers and consolidates the relevant job logs from each server into a single database.
When started, the Report Generator prompts the user for the date range for reporting – print jobs
falling within the range will be included in the reports generated. The default date range is for the
previous month.
Figure 23. The PaperCut ChargeBack Report Generator.
Copyright © PaperCut Software Pty Ltd , 1999-2006. All rights reserved.
-45-

PaperCut ChargeBack 6.1 Advanced Print Tracking and Cost Recovery for Windows Networks
y default, the generated database will be saved to a temporary directory – you can modify this
B
by clicking on Change path. If you have MS Access installed on you computer, select the
relevant database version.
To generate the report database, click on the Collate Data button. Note: all PaperCut servers
must be available for report generation to succeed. (This safeguards against producing incorrect
reports – data must be collected from each of the PaperCut servers to ensure accurate reporting)
Once report generation has finished, the Report Generator will allow you to launch the reports in
MS Access (if it is installed on your system), run HTML Reports, or exit as shown in Figure 24.
More details about reports can be found in Chapter 7.
Figure 24. Launc h t h e r ep orts database in Ac ce ss, or run HTML R ep orts
The PaperCut ChargeBack reports are explained in the following chapter.
Copyright © PaperCut Software Pty Ltd , 1999-2006. All rights reserved.
-46-

PaperCut ChargeBack 6.1 Advanced Print Tracking and Cost Recovery for Windows Networks
7. Reports
The power behind PaperCut ChargeBack is its ability to report on printer usage in meaningful
and useful way. In order to run reports, the PaperCut reports database must be generated first.
The reasons for this, and instructions for doing so are explained in Chapter 6.
Access and HTML Reports
Since version 3.2, PaperCut ChargeBack allows you to generate reports in standard HTML,
viewable in a web browser, or in MS Access. The same reports are provided in both HTML and
Access format – so you do not require Access to view the reports, but if you do have Access
installed, you are able to customise the reports to suit your needs.
The predefined reports
A predefined set of reports comes standard with PaperCut ChargeBack. When the Reports
database is opened (in Access, or HTML format), a form appears (Figures 18a and 18b) which
allows these reports to be launched.
Figure 25a. The Pa perCut Report s – Access version
Copyright © PaperCut Software Pty Ltd , 1999-2006. All rights reserved.
-47-

PaperCut ChargeBack 6.1 Advanced Print Tracking and Cost Recovery for Windows Networks
Figure 25b. The PaperCut ChargeBack Reports – HTML version
The following predefined reports are provided:
Report Description Uses
Main accounts
summary
All accounts
summary
Invoice
Summary information for main
accounts – number of jobs, pages and
cost – plus totals
Summary information for all accounts –
number of jobs, pages and cost –
grouped by main account with
subtotals and grand totals
Invoice – number of jobs, pages and
See at quick glance the costs for
each main account and overall
costs.
See more detailed breakdown of
costs by main account and
subaccount, as well as overall
costs.
Cost recovery - invoice a client.
cost for a given main account (or
client), with itemised subaccounts (or
jobs)
Account print
jobs
List of all print jobs for a given account Shows all print jobs for a given
account across all printers and
servers.
Account
summary by
user
Summary information for a given
account – number of jobs, pages and
cost – for each user who printed to that
account
Shows users who printed to a
given account, plus shows each
users’ printing expenses for that
account.
Print Jobs by
user
Summary information – number of
jobs, pages and cost – for each user
across all accounts
User Print jobs
Copyright © PaperCut Software Pty Ltd , 1999-2006. All rights reserved.
Summary information – number of Shows a given user’s printing
-48-
Shows all users’ printing expense s.

PaperCut ChargeBack 6.1 Advanced Print Tracking and Cost Recovery for Windows Networks
jobs, pages and cost – for a given
expenses broken up by account.
user, grouped by main
account/subaccount, with totals
Custom reports (Access only)
Report customisation is possible if you have Microsoft Access installed. You may wish to
customise the reports in two ways:
1. Modify an existing report to use your organization’s logo, fonts and/or stationery
2. Create a new report to obtain information that is not available in the predefined
reports
In both cases the recommended method for creating custom reports is the same:
1. Generate the PaperCut report s datab ase as expl ained in Chap t er 6
2. Create your custom report in that database. This enables you to create the report
with real data collected form your system.
3. Export your new custom report to the reports template, which is found on the
PaperCut primary server, so that when future reports databases are generated using
the Report Generator, your custom report is included in the new database.
Step 3 is important if you wish to reuse your custom report. The Report Generator works by
copying a reports template database from the primary server to the local computer, and importing
account and job log data from each of the PaperCut servers. Thus, if you do not export your
custom report to the reports template database, it will not appear in furture generated report
databases.
The export process is outlined below. Your system administrator can help in this process.
1. Copy the file PCEActTrk_Reports.mdb from the PCEData$ share from the primary
server to a temporary directory your local hard drive.
2. Remove the read-only file permissions on the PCEActTrk_Reports.mdb file
3. From within Microsoft Access, open your database that contains the custom report.
Then select the report and export the report to the PCEActTrk_Reports file what was
copied to a temporary director y on your hard driv e in St ep 1
4. Repeat Step 3 for any other database objects (such as queries or forms) that your
custom report depends on
5. Copy back the PCEActTrk_Reports.mdb file to the primary server. This file will need
to be copied back to the PCEData directory under the PaperCut installation on the
primary server – usually c:\Program Files\PaperCut\PCEData. Your system
Copyright © PaperCut Software Pty Ltd , 1999-2006. All rights reserved.
-49-

PaperCut ChargeBack 6.1 Advanced Print Tracking and Cost Recovery for Windows Networks
dministrator can assist in this process. (Note that the PCEData$ share is shared as
a
read-only, so access to the primary server will be required.)
Tip: Be sure to create a backup of the PCEActTrk_Reports.mdb database so in
case your custom reports version doesn’t work, you can revert back to the
original version.
Copyright © PaperCut Software Pty Ltd , 1999-2006. All rights reserved.
-50-

PaperCut ChargeBack 6.1 Advanced Print Tracking and Cost Recovery for Windows Networks
8. Possible Implementation Scenarios
The following scenarios outline some of the many ways in which PaperCut ChargeBack can be
used in organizations. PaperCut is a very flexible program. It can be used to aid in cost recovery
for businesses, provide cost statistics, implement a 100% user pays system, used to promote
responsible use via budgeting, or just simply configured to silently audit printing activity. The
following explanations may assist you in finding the right model for your printing environment.
There are three main scenarios under which PaperCut ChargeBack can operate:
1. Track printing expenses and assigning them to accounts (jobs)
This allows an organization to track costs irrespective of the user who printed the documents.
Example scenarios:
o Services business such as accounting, legal, advertising, marketing and consulting firms:
many of these businesses will print out large volumes of documents for their clients. Many
businesses also work on a time-and-materials basis, but keeping track of the costs manually
of print jobs is rarely feasible. PaperCut ChargeBack allows for the tracking of print jobs by
client and project/job to automatically enable such businesses to easily recover printing
costs.
Configuration suggestions:
o Main accounts can be set up for each of the organization’s clients, and
subaccounts can be created for each project/job within each client. This
configuration allows costs for multiple projects/jobs to be grouped by client, and
invoices can be generated accordingly.
o Users are set up to have unrestricted credit, as the print jobs they print are
assigned against the client / project, instead of their own personal credit.
o The Invoice report may be customised to suit the business’ needs, such as the
use of the business’ fonts and logos, and accommodating printing on special
letterhead stationery.
o The PaperCut ChargeBack Client is installed on all client workstations
o Organizations that provide services:
the cost of providing different services. Such information may be important when the
organization next applies for funding, or simply just to budget for the upcoming year. For
Copyright © PaperCut Software Pty Ltd , 1999-2006. All rights reserved.
such organizations might require information such as
-51-

PaperCut ChargeBack 6.1 Advanced Print Tracking and Cost Recovery for Windows Networks
example, a non-profit organization or government department would benefit using PaperCut
ChargeBack.
Configuration suggestions:
o Main accounts can be set up for each of the organization’s services.
Subaccounts can be used for specialisations within a particular service.
o Users are set up to have unrestricted credit, as the print jobs they print are
assigned against the client / project, instead of their own personal credit.
o The PaperCut ChargeBack Client is installed on all client workstations
2. Track printing expenses by user, and optionally charging users
This allows an organization to track costs by user and charge the user directly.
Example scenarios:
o User pays systems: this scenario is common in schools and universities where a “user pays”
system is implemented. Users are assigned credit either manually or automatically, and each
the cost of each print job is deducted from the users’ credit.
Configuration suggestions:
o Accounts are not used in this scenario, and the PaperCut ChargeBack client
does not have to be installed.
o Users are set up in the PaperCut database and assigned a fixed amout of credit.
o The cost of each print job a user prints out will be subtracted from their credit.
The user will be unable to print when his/her credit reaches zero.
o Special users (such as staff members) may be assigned unlimited credit.
o Manual and automatic scheduling of credit can be used to top-up a user’s credit.
o Silent monitoring:
jobs, but might want to monitor usage silently.
Configuration suggestions:
o Accounts are not used in this scenario, and the PaperCut ChargeBack client
an institution or business might not wish to charge users directly for print
does not have to be installed.
o All users are set up in the PaperCut database to have unrestricted credit.
3. A combination of account and user tracking
In certain scenarios, it may be desired that some users may print to expense accounts, whereas
other users will have to pay for their print jobs themselves.
Copyright © PaperCut Software Pty Ltd , 1999-2006. All rights reserved.
-52-

PaperCut ChargeBack 6.1 Advanced Print Tracking and Cost Recovery for Windows Networks
Example scenarios:
o University: A university, where staff and lecturers might bill their print jobs against a faculty or
subject. Some lecturers and tutors may teach multiple subjects across different faculties, so
it is not possible to use the individual lecturer’s printing credit to gather information, but
information is required for the expenses of each subject. Students are required to pay for
their print jobs.
Configuration suggestions:
o Accounts are created for each faculty, and subaccounts for each subject taught
by each faculty.
o The PaperCut ChargeBack Client is installed on the workstations of lecturers and
tutors who need to assign costs to the faculty / subject
o A set of “logical” printers are created and shared for use by the lecturers and
tutors. These printers are marked as “Require Account” in the PaperCut
Administratation Cons ole. Staf f will print to these prin t er s .
o The PaperCut Client does not have to be installed on the student workstations
o A set of “logical” printers are created and shared for use by students. These
printers are not marked as “Require Account” in the PaperCut Administration
console. Students will print to these printers.
o Note: the one physical printer may be installed multiple times on a server, so it is
possible to have one logical instance of it requiring account information (lecturers
/ tutors print to this instance) and another instance not requiring account
information (students print to this instance)
Copyright © PaperCut Software Pty Ltd , 1999-2006. All rights reserved.
-53-

PaperCut ChargeBack 6.1 Advanced Print Tracking and Cost Recovery for Windows Networks
9. Setup Guide
This section covers the basic installation of PaperCut ChargeBack onto a network print server.
Complex installations, such as configuring multiple print servers on a domain, or automated
deployment of client tools, are covered in Chapter 10. A basic to intermediate knowledge of
Windows network is expected.
It is assumed that this is your first installation of PaperCut on your network, and as such, the
server you choose for the installation will be the designated PaperCut Primary Server.
([SODQDWLRQ3ULPDU\6HUYHU
2QODUJHUQHWZRUNVLWPD\EHQHFHVVDU\WRVSOLW\RXUSULQWHUVKDULQJDFURVV
PXOWLSOHSULQWVHUYHUV,QWKHVHVLWXDWLRQVRQHR I\RXUSULQWVHUYHUVZLOOEH
GHVLJQDWHGWKHSULPDU\VHUYHU DQGWKHRWKHUVHUYHUVDUHVHFRQGDU\VHUYHUV$
IXOOH[SODQDWLRQRIWKHUHODWLRQVKLSVEHWZHHQSULPDU\DQGVHFRQGDU\VHUYHUVLV
GHVFULEHGLQ&KDSWHU
:KHQVHOHFWLQJRQHRI\RXUVHUYHUVWREHW KHSULPDU\VHUYHU \RXVKRXOGWU\WR
VHOHFWWKHVHUYHUZKLFK
5HPDLQVXSIRUWKHORQJHVWSHULRGRIWLPHVIHZHVWUHERRWV
,VUHDGLO\DFFHVVLEOHI RUDFFRXQWDGPLQLVWUDWLRQ
If you only have one print server on your network, then this will be by default, the primary server.
Configuring the Network
For accurate tracking of print jobs, PaperCut requires network clients to be configured to use a
Windows print server. PaperCut will be installed on this print server. If your network currently
uses a Windows NT / Windows 2000 server or workstation as a print server, then chances are, no
modifications will be required.
The steps in configuring a network are as follows:
1. Connect (or Capture) all network printers on a Windows NT or Windows 2000 print
server.
2. Share the added printers.
3. Configure network clients to print to the shared printers on the print server.
This configuration will ensure all clients print via a Windows Print Server. Clients should NOT
configured to print directly to the printers.
Copyright © PaperCut Software Pty Ltd , 1999-2006. All rights reserved.
-54-
be

PaperCut ChargeBack 6.1 Advanced Print Tracking and Cost Recovery for Windows Networks
Figure 26. Network Diagram including clients, print server and printers.
Printing via a Windows Print Server allows PaperCut to intercept print jobs and gather the jobs’
statistics accordingly. Using a printer server as an intermediate step between network clients and
printers offers other advantages, including centralized queue management and increased load
capacity.
A Primary Domain Controller can be used as a print server, although we recommended that a
separate NT/2000 machine be configured for this job.
Connecting printers to the print server
Printers may be connected to the print server via the Parallel Port(s), on remote computers, or
network connected. Network connected printers may be either a printer with a built-in network
card (eg. HP JetDirect) or a Parallel Port Printer interfaced to the network with a “Print Server
Box” (eg. Netgear PrintServer). An old, or little used computer can also be used as a network
interface for a parallel printer, although this is less suitable as it is more prone to locking up due to
user interaction. For further information on connecting network printers to your print server,
consult the Windows help or your hardware documentation. TCP/IP networked printers such as
HP JetDirect are recommended.
Copyright © PaperCut Software Pty Ltd , 1999-2006. All rights reserved.
-55-

PaperCut ChargeBack 6.1 Advanced Print Tracking and Cost Recovery for Windows Networks
Sharing printers on the print server
The printers on the print server should now be shared with appropriate names. To share a
printer:
1. Right Click on the printer icon and select Sharing…
2. Select Shared and assign an appropriate name.
Configuring Network Clients
A printer can be configured on your network clients simply by adding a new network printer.
1. Open the Printers folder in the Control Panel.
2. Double-click on Add Printer.
3. Select Network Printer.
4. Click on Browse… and locate a shared printer on your print server.
5. The appropriate drivers will be downloaded and the printer installed.
Installing the PaperCut Software on your Print Server
x Before installing PaperCut ChargeBack ensure you are logged on as a user with
“Administrators” privileges.
x You may be requested to restart your computer after running the install program. Before
continuing, ensure that a restart is not going to upset your network users.
The setup program is straightforward to use. When asked to select components to install, select
“Print Server Installation”. Installation of the other client tools will be covered later.
Setup Wizard
After installing, and restarting if required, select “PaperCut ChargeBack” from the start menu.
You will be presented with the PaperC ut set up wi zard. T his wizard will ask a few questions about
your network configuration, and configure PaperCut accordingly.
Screen 1: Primary / Secondary Server
As this is your first installation of PaperCut, your server will be the Primary PaperCut Print Server.
Ensure that the Primary Server is selected.
Screen 2: Network Configuration
PaperCut must query information about your domain users. For normal network configurations,
select “Get user information from the Primary Domain Controller”. PaperCut will call the main
server on your network to request a network user list.
Copyright © PaperCut Software Pty Ltd , 1999-2006. All rights reserved.
-56-

PaperCut ChargeBack 6.1 Advanced Print Tracking and Cost Recovery for Windows Networks
f you are installing PaperCut on a standalone Windows NT (2000) system or a Peer-to-Peer
I
network, select “Get user information from this computer.”
If your print servers are trusted by a domain that contains all of your user accounts, you can
specify the trusted domain with the 3
rd
option.
PaperCut Security Wizard
The PaperCut security wizard will attempt to set up the necessary security settings (file
permissions and sharing) for PaperCut to function. If all goes will, the security wizard will run
(shown below), perform the necessary security changes, and close itself.
Figure 27. Network Diagram including clients, print server and printers.
Under normal setups, the wizard should be able to perform the necessary changes. However,
under some circumstances (such as a strict security policy for the Administrator account) it may
fail. If any of the steps fail, you will be notified of this. You should then check the security settings
as listed in the Appendix to ensure that PaperCut will work smoothly.
Primary Server setup tasks
At this point, the technical setup of PaperCut on the server is complete. There remain some
outstanding tasks:
Copyright © PaperCut Software Pty Ltd , 1999-2006. All rights reserved.
-57-

PaperCut ChargeBack 6.1 Advanced Print Tracking and Cost Recovery for Windows Networks
1. Add Printers to your charging list.
2. Assign a cost to each printer.
3. Add accounts to track print expenses against.
4. Install the client popup utility on your clients, where required.
These tasks are explained in Chapter 4. When adding accounts, you should bear in mind the
requirements of your organization. Refer to Chapter 8 for some sample strategies and uses of
accounts.
Please note: that when you add printers to the charging list and check the Requ ire Account
checkbox, that printer is marked as requiring account information in order to print. This means
that the PaperCut ChargeBack client software must be installed on the workstations of those who
which to print to that printer. This in turn will interrupt printing services for those without the client
software installed.
In some cases it is possible to deploy the PaperCut ChargeBack client to all your workstations via
automated techniques, or to install the software manually if you only have a small number of
workstations. However, on large networks with many clients, it may take some time to install the
clients, and as such to prevent printing interruption during that time, it is necessary to install
PaperCut ChargeBack according to a minimial impact strategy (described below).
The minimal impact strategy should also be used if you wish to trial PaperCut ChargeBack on
only some of your workstations, before deciding on an installation on all workstations.
Copyright © PaperCut Software Pty Ltd , 1999-2006. All rights reserved.
-58-

PaperCut ChargeBack 6.1 Advanced Print Tracking and Cost Recovery for Windows Networks
([SODQDWLRQ0LQLPDO,PSDFW6WUDWHJ\IRULQVWDOODWLRQ
$ PLQLPDOLPSDFWVWUDWHJ\IRULQVWDOOLQJ3DSHU&XW LVRQHWKDWGRHVQRWGLVUXSW
FXUUHQWSULQWLQJVHUYLFHV
,QWHUUXSWLRQVZLOORFFXULIDXVHUSULQWVWR DSULQWHU WKDWLVVHWWR5HTXLUH
$FFRXQW EXWWKH3DSHU&XW&KDUJH%DFNFOLHQWLVQRWLQVWDOOHGRQWKHXVHU¶V
ZRUNVWDWLRQ7KLVLVEHFDXVHWKHVHUYHUH[SHFWVWR EHQRWLILHG RIWKHSULQWMRE¶V
DFFRXQWEXWZLOOQHYHUUHFHLYHWKDWQRWLILFDWLR Q
,WLVSRVVLEOHWRDYRLGWKLVVLWXDWLRQE\WDNLQJWKHI ROORZLQJVWHSV
x 2QWKHSULQWVHUYHULQVWDOOWKHSULQWHUGULYHUVIRUWKHSULQWHUV\RXZLVKWR
PRQLWRUDJDLQEXWZLWKGLIIHUHQWQDPHV)RUH[DPSOH\RXPD\KDYHD³+3
'HVN-HW&´LQVWDOOHGRQ\RXUSULQWVHUYHUWKDWXVHUVDUHFXUUHQWO\SULQWLQJ
WR<RXFDQLQVWDOOWKHSULQWHUGULYHUIRUWKDWSULQWHUDJDLQEXWQDPHLW³+3
'HVN-HW&0RQ´WKH0RQSUHIL[VWDQGLQJIRU³0RQLWRUHG´7KXVWKH
VDPHSK\VLFDOSULQWHUKDVWZRORJLFDOLQVWDOODWLRQV
x :KHQDGGLQJSULQWHUVWRPRQLWRULQWKH3DSHU&XW$GPLQLVWUDWLRQ&RQVROH
VHOHFWWKHPRQLWRUHGSULQWHUVEXWQRWWKHXQPRQLWRUHGSULQWHUV,QWKH
H[DPSOHDERYH\RXZRXOGVHOHFW³+3'HVN-HW&0RQ´WRPRQLWRUEXWQRW
³+3'HVN-HW&´
x ,QVWDOOWKH3DSHU&XW&KDUJH%DFNFOLHQWRQ\RXUZRUN VWDWLRQVDQGLQVWUXFW
XVHUVRQWKHVHZRUNVWDWLRQVWRSULQWWRWKHPRQLWRUHGSULQWHUV)URPQRZRQ
ZKHQHYHUDSULQWMRELVVHQWWRWKHPRQLWRUHGSULQWHUVWKH3DSHU&XW
&KDUJH%DFNFOLHQWZLOOSRSXSSURPSWLQJWKHXVHUIRUWKHDFFRXQW
x ,I\RXZLVKWRHQIRUFHDFFRXQWWUDFNLQJIRUDOOSULQWMREVRQ\RXUQHWZRUNDQG
DOO\RXUZRUNVWDWLRQVKDYHWKHFOLHQWLQVWDOOHG\RX FDQUHPRYHWKHQRQ
PRQLWRUHGLQVWDOODWLRQVRIWKHSULQWHUVWRIRUFHDOOXVHUVWRSULQWWRWKH
PRQLWRUHGSULQWHUV
Installing the PaperCut ChargeBack Software on Network Clients
You may need to install the PaperCut ChargeBack Client on some or all of your workstations,
depending on your organization’s use of PaperCut ChargeBack (refer to Chapter 8 for more
details).
The setup may be done either manually or automatically. The manual installation process is
described here; the automatic version is described in Chapter 10. For installations of more than a
few workstations, it’s recommended to invest the time to test and use the “silent install” method.
Run the setup file from the client workstations
When the PaperCut server was being installed, a share called PCSetup was automatically
created. This share contains the client installation program.
Copyright © PaperCut Software Pty Ltd , 1999-2006. All rights reserved.
-59-

PaperCut ChargeBack 6.1 Advanced Print Tracking and Cost Recovery for Windows Networks
o run the program, simply connect to the share \\<primaryserver name>\PCSetup and run the
T
program pce-setup.exe. When prompted, select the installation component “Client Installation (for
Workstations)”.
Note that if you choose to use your PaperCut Pr imary Server as a workstation as well, you will
need to install the Client Installation on the server as well.
Tip: Try installing the PaperCut ChargeBack Client on one workstation at first
to familiarise yourself with the process and to perform some testing.
Testing the Installation
It is important that you take some time and do some testing. It is recommended that your print
test documents on all your printers from a number of different network clients. Ensure that the
“Page Count” in the user list, and printer list, and account list increase corresponding to the
number of test pages. Remember to press the Refresh button in the Administr at ion Cons o le (the
icon in the bottom right corner) after printing your test documents. We also recommend you
inspect the PaperCut Event Log after printing the test documents. If PaperCut ChargeBack does
not recognize the printer language for any one of the printers, a message will appear here.
Copyright © PaperCut Software Pty Ltd , 1999-2006. All rights reserved.
-60-

PaperCut ChargeBack 6.1 Advanced Print Tracking and Cost Recovery for Windows Networks
10. Advanced PaperCut Set up
An intermediate to advanced knowledge of Windows network is required.
Domains with Multiple Print Servers
On a large network it maybe necessary or desirable to split your printers among two or more
print-servers. PaperCut can be installed on all print servers, and configured to use one central
accounts and user database. The following diagram illustrates the communication that occurs
between servers and clients.
Figure 28. Network Diagram – interaction bettwen clients and server.
All communication is done through reading and writing to network shares. Thus, for multiple
servers some additional configuration is required.
Sharing the Centralised Accounts and User database
The accounts and user database is hosted on the primar y serv er, and accounts may only be
added or edited from that server.
As shown in the diagram, all secondary servers require access to the centralised accounts and
user database for two reasons:
Copyright © PaperCut Software Pty Ltd , 1999-2006. All rights reserved.
-61-

PaperCut ChargeBack 6.1 Advanced Print Tracking and Cost Recovery for Windows Networks
. The PaperCut ChargeBack service will increment the cost and page counters for the
1
relevant account when a print job is printed.
2. The Administration console, which runs on both Primary and Secondary servers, needs
access to the database to display user and account information
The centralised accounts and user database is placed in the Database directory under the
PaperCut installation direc t ory – usually c:\Program Files\PaperCut\Database. It is shared as
PCDB$ after installation with read permissions for everyone (Read-Only sharing permissions, not
NTFS permissions)
However, if you wish to install multipl e PaperC ut ser ve rs , you will need to add Full Permissions
on the PCDB$ share (Database Folder) to the Administrators group. (It is possible that on
Windows 2000 the Administrators group does not appear on the list of available groups – if so,
then set Full Permissions on the Domain Admins group instead.)
Create the “PaperCut” user
The PaperCut service on your secondary server will run as a dedicated user that has permissions
to access the shared Accounts and User database across the network. It’s recommend that a
user named PaperCut be added to the domain – this user will be the identity of the PaperCut
Service.
x Run User Manager.
x Add a new user named PaperCut and assign a pass wor d.
x Set the password to N ev er Expir e.
x Add the user to the Administrators Group. (Or if you assigned Full Permissions on the
PCDB$ share to the Domain Admins group, then add the PaperCut user to the
Domain Admins group.)
Installing PaperCut on the secondary servers
1. Ensure that the PCDB$ share on your primary server has Full Permissions for the
Administrator Group, and that you have created the PaperCut user, as explained
immediately above.
2. Follow the instructions as given in the section “Installing the PaperCut Software on your
Print Server” in Chapter 8 with the following exceptions:
a. When the Setup Wizard asks whether you are installing a Primary Server or
Secondary Server, select the latter.
Copyright © PaperCut Software Pty Ltd , 1999-2006. All rights reserved.
-62-

PaperCut ChargeBack 6.1 Advanced Print Tracking and Cost Recovery for Windows Networks
. You will be prompted to enter the name of the Primary Server. The Setup Wizard
b
will then check that you have access to the Primary Server.
c. When next screen prompts you for the System Service Setup - you will be
requested for a username and password for a user for the PaperCut service.
Enter PaperCut – this user was created previously for the identity of the process,
and its password.
If you experience difficulties with locating the PaperCut Database, and receive the message “The
PaperCut database could not be found in its set location”, this means that the shared accounts
and user database could not be opened. This could be due to:
x The database share name was entered incorrectly (should be PCDB$)
x Permissions have not been granted for you to read and write to the share. You should be
logged into the machine as a user with administrative rights, and the PCDB$ share
should have Full Permissions for the Administrators (or Domain Admins) group.
Double check these permissions.
After installing each secondary server, you must ensure that that server is registered with the
Primary PaperCut server. To register the server, run the Administration Console on the primary
print server, navigate to the Options section, and add it to the list in the Secondary print servers
tab.
Automated installation of PaperCut ChargeBack Client
If you have many clients, you may wish to automate the install process with SMS or logon scripts.
The PaperCut ChargeBack Client comes with a “Silent Install” mode which can be used for such
schemes.
Silent Install (advanced)
1. Use “logon scripts”, or equivalent, to map the share \\<primary server>\PCSetup
to a drive letter on each network workstation.
2. Edit the “client-silent-install.bat” script as required.
3. Execute the batch file “client-silent-install.bat” on the mapped drive. Again, this
can be automated with SMS, logon scripts, or custom install scripts.
Additional Command Line Options:
Additional command line options can be specified in the “client-silent-install.bat” batch file:
/VERYSILENT
The installation progress window is not displayed. Error messages are
shown.
Copyright © PaperCut Software Pty Ltd , 1999-2006. All rights reserved.
-63-

PaperCut ChargeBack 6.1 Advanced Print Tracking and Cost Recovery for Windows Networks
/NORESTART
Instructs Setup not to reboot even if it’s necessary.
/DIR="x:\dirname"
Overrides the default directory name displayed on the Select Destination
Directory wizard page. A fully qualified pathname must be specified.
/GROUP="folder name"
Overrides the default folder name displayed on the Select Start Menu
Folder wizard page.
Client setup file
The setup.txt file in the PCSetup share contains default parameters that PaperCut ChargeBack
client tools need. It was created automatically when the PaperCut server was installed – it is
found under the “PCSetup” directory under the PaperCut installation (usually c:\Program
Files\PaperCut\PC Set up).
This file may be customised to suit your preferences. You can modify the banner link that appears
in the client tools, and whether the client tools should be shown upon startup.
The parameters in the setup.txt file are placed on a line each, as shown in the following
example:
PCEPrimaryServer=KEATING
PaperCutUserDBPath=\\KEATING\PCDB$\PCUserDB.mdb
ShowOnStartup=0
ShowLink=1
LinkName=About printing…
LinkPath=http://myserver.com/printing.html
Parameter Description
PCEPrimaryServer
PaperCutUserDBPath
ShowOnStartup
The name of the primary PaperCut server
The path to the shared User and Accounts database
Relates to the User Enquiry Tool (Chapter 5) The first time it is run, the
ShowOnStartup parameter is read. If set to 1, the User Enquiry Tool
will then register itself to run every time a user logs in on the given
machine. If set to 0, the User Enquiry Tool will run only when started
explicitly from the Start menu. (This may be useful for implementations
where users are charged individually for printouts.) Default to 0.
ShowLink
Whether to show the link in the banner of the client tools (see Figure
22). Must be 0 or 1.
LinkName
The name of the link that appears in the client tools. Default is
“www.papercut.biz”
LinkPath
The url of the link displayed in the client tools. Default is
“http://www.papercut.biz”
Copyright © PaperCut Software Pty Ltd , 1999-2006. All rights reserved.
-64-

PaperCut ChargeBack 6.1 Advanced Print Tracking and Cost Recovery for Windows Networks
Figure 29. Paper Cu t Ch ar geBack Client – customizable link
For example, the link www.papercut.biz
in Figure 23 can be customised to point to your
company’s intranet page on printing procedures.
Whenever you install the PaperCut ChargeBack clients from the PCSetup share on your primary
print server, the setup.txt file is copied to the workstation and its parameters are used in the setup
of the client (changing the file has no effect on current installations). Thus it is recommended
that any customisations be performed before deploying the client on your workstations.
Automatic archiving of print logs
When PaperCut was installed, an “at” job was setup to schedule the automatic archiving of print
logs. This archiving process transfers logs older than 3 weeks from the main “working” database
(named PCEActTrk.mdb in the PCEData subdirectory of the PaperCut installation) into archives,
named (ATA_YYYY_MM.mdb where YYYY=year, MM=month). This improves PaperCut
performance on both the server and report generator.
The default scheduling of archiving was done with the following at job:
at 2:00 /every:M,T,W,Th,F,S,Su “c:\Program Files\PaperCut\ActTrkArchive.exe”
/silent
(Or the appropriate path for your installation of PaperCut ChargeBack.)
Thus, archiving is scheduled for 2:00am every day. If such a scheme is not suitable for your
network (eg. 2:00 am happens to be a high-load time for printing, or your network is shut down for
maintenance at that time) then you can modify the schedule. Try to pick a time when printing load
is either non-existent or light, and try to schedule archiving at least once a week (once a day is
even better).
Copyright © PaperCut Software Pty Ltd , 1999-2006. All rights reserved.
-65-

PaperCut ChargeBack 6.1 Advanced Print Tracking and Cost Recovery for Windows Networks
or example, if you need to change the schedule to 6:00pm every Friday, you should delete the
F
existing default at job, and use the command:
at 18:00 /every:F “c:\Program Files\PaperCut\ActTrkArchive.exe” /setup
Automatic importing of accounts
The account import feature in PaperCut ChargeBack allows the creation of new accounts, without
the manual intervention of the administrator. Therefore you might wish to schedule regular
imports – for example, you may choose to import from a text file that gets updated whenever a
new job number is created. A daily scheduled import will ensure that that new job number will be
added automatically to the PaperCut ChargeBack database without any manual intervention.
Once your settings are set up in the Account Import Wizard, you can repeat the import by running
the program “C:\Program Files\PaperCut\ActImport.exe”.
To achieve daily imports, use an “at” job such as:
at 2:00 /every:M,T,W,Th,F,S,Su “c:\Program Files\PaperCut\ActImport.exe”
The PaperCut event log will record the import process and detail any imported
accounts.
Copyright © PaperCut Software Pty Ltd , 1999-2006. All rights reserved.
-66-

PaperCut ChargeBack 6.1 Advanced Print Tracking and Cost Recovery for Windows Networks
11. Installing Web Tools & Remote Administration
The Optional Web Administration Add-On offers remote administration of PaperCut ChargeBack
accounts and users using a standard web browser. In addition, it can be used to browse recent
print jobs printed on a printer or by a user. It’s ideal for applications where remote access is
required for simple account management. For instance, the company financial officer might need
to add a new expense account for a new client, but does not have administrative privileges, or
login access to the PaperCut primary print server. The company financial officer can then use the
web administration console to add the account.
Changes to individual user credits can also be performed using the web administration module.
Note: The PaperCut Admin Console software offers more advanced
management features . The web based administration option offers easeof-use and has the advantage of not requiring the installation of additional
software. It is ideal for the day-to-day user management tasks. For
remote management of advanced features such as costs, filter rules and
other features, consider accessing the PaperCut Administration Console
using remote server access software such as VNC or Windows Terminal
Server.
System Requirements for Web Administration
Microsoft Internet Information Server (IIS)
A standard web browser (IE 5+, Mozilla, or Firefox)
Installation
Installing the Web Tools Add-On is optional. PaperCut will function fully without the Web Tools,
however all administration will have to be done using the main Administration Console. It is
strongly recommended that you take the time to configure the web tools.
1. Install the Internet Server Software
Microsoft Internet Information Server (IIS) with ASP extensions is required on the primary
PaperCut server, and can be installed either before or after the installation of PaperCut. IIS with
ASP is available with the NT Server Option Pack or comes as an optional component with
Windows 2000 Server/Pro and Windows 2003.
Copyright © PaperCut Software Pty Ltd , 1999-2006. All rights reserved.
-67-

PaperCut ChargeBack 6.1 Advanced Print Tracking and Cost Recovery for Windows Networks
OTE for Windows 2003: Windows 2003 Server does not run ASP pages by default, so
N
this must be enabled after installation. To do this, open Control Panel->Administrative
Tools->Internet Information Server. Select the “Web Service Extension” node, and
“Allow” the “Active Server Pages” extension.
Figure 1:Enablin g Activ e Se rv er Pa ges on Win dows 2003 Server
2. Adding a Virtual Directory to IIS
You need to create a virtual directory for the PaperCut Web Tools. To do this:
x Open the IIS console (Control Panel->Administrative Tools->Internet Information
Services)
x Right-click on the Web site you want to create the virtual directory under (the default is
“Default Web Site”)
Copyright © PaperCut Software Pty Ltd , 1999-2006. All rights reserved.
-68-

PaperCut ChargeBack 6.1 Advanced Print Tracking and Cost Recovery for Windows Networks
Figure 2:Creating an IIS virtual directory for PaperCut Web Tools
x Enter the name of the virtual directory in the “Alias” field. E.g. “papercut”. Then press
“Next”
x Select the directory where PaperCut Web tools are installed. i.e.
File\PaperCut\WebAdmin
. Then press “Next”.
C:\Program
x Ensure that the “Run scripts” option is enabled. Then press “Next”.
x Press the “Finish” button
The PaperCut web tools require users to authenticate with IIS. To configure IIS to force
user
authentication, you need to deny anonymous access on the PaperCut virtual directory. To do
this:
x Right-click the PaperCut virtual directory in the IIS console and select properties
x Select the “Directory Security” tab
x Press the “Edit” button in the “Anonymous Access and Authentication Control” section
x Disable anonymous access and make sure “Integrated Windows Authentication” is
enabled (see below)
Copyright © PaperCut Software Pty Ltd , 1999-2006. All rights reserved.
-69-

PaperCut ChargeBack 6.1 Advanced Print Tracking and Cost Recovery for Windows Networks
Figure 3:Configure IIS to require user auth en tication
3. Configure File Permissions
The PaperCut installer will set the file permission correctly for most organizations, so will not need
to be modified.
If you want people in addition to the Administrators group to have access to admin pages you will
need to modify the permissions. If you do not want to modify these permissions you can skip to
point 5: Testing the Setup.
File permissions must be carefully configured so to allow only users with adequate permissions
access to account management functions. Log on as Administrator and configure the file
permissions as follows:
Copyright © PaperCut Software Pty Ltd , 1999-2006. All rights reserved.
-70-

PaperCut ChargeBack 6.1 Advanced Print Tracking and Cost Recovery for Windows Networks
Administration Pages
The following Administrat io n pages should on l y be acces s ible to user s who are all o wed to
perform user administration (e.g. Administrators, Admin staff, etc). Normal users should be
allowed to access these pages otherwise they will be able to modify user credit, etc.
C:\Program Files\WebAdmin\Admin.asp
C:\Program Files\WebAdmin\UserList.asp
1. Read and Execute (or Full Control) permissions to Administrators (or other
administrative group)
2. No privileges to any other normal users
All Other pages and files under C:\Program Files\PaperCut\WebAdmin
All other files should be readable by all users (administrators and your other users)
1. Read and Execute permissions to Domain Users (or other group that your users
belong to)
PaperCut Databases
The PaperCut databases need to be readable and writable by all users.
C:\Program Files\PaperCut\Database\ &
C:\Program Files\PaperCut\Database\pcuserdb.mdb
C:\Program Files\PaperCut\Logs\ &
C:\Program Files\PaperCut\Logs\*.mdb
1. Ensure all users have full control (i.e. Users or ‘Domain Users’ have full control)
4. Testing the setup
Open a web browser on the print server (or another computer on the network) and connect to
http://PrintServerName/papercut/Admin.asp
associated with the print server running PaperCut. If requested, enter a username and password
of a user with printing account administration access (as configured in step 3). The PaperCut
. Where PrintServerName is the network name
Web Administration – Welcome page should appear (refer to Figure 24).
We recommended that you try and access the page while logged on as a non-privileged user.
Unprivileged users should be denied access to this page. If access is granted, check the
permissions allocated to the Admin.asp and UserList.asp file in the WebAdmin directory.
Copyright © PaperCut Software Pty Ltd , 1999-2006. All rights reserved.
-71-

PaperCut ChargeBack 6.1 Advanced Print Tracking and Cost Recovery for Windows Networks
Advanced Configuration & Customization
Often the options available in the Config.inc don’t cover the full range of customization required.
Many organization may want to fully integrate the PaperCut web tools interface into an existing
Intranet or portal website. PaperCut’s web tools interface is developed using Microsoft’s Active
Server Pages (ASP) technology. System Administrators with HTML experience should quickly be
able to modify the look-and-feel of the web tools pages. Most colors and fonts are controlled via
the PaperCut.css file and the header.inc file controls the header and logo layout. PaperCut
Software Pty. Ltd. is happy for customers to modify the pages and/or use any of the code for
customization purposes. Please remember to take a backup copy of the pages as future
PaperCut upgrades may overwrite the changes.
PaperCut Software Pty. Ltd. is also able to assist customers with custom page designs if
required.
Copyright © PaperCut Software Pty Ltd , 1999-2006. All rights reserved.
-72-

PaperCut ChargeBack 6.1 Advanced Print Tracking and Cost Recovery for Windows Networks
12. Using the Web Administration
All Users
All network users may use the page at http://PrintServerName/papercut/ (change
PrintServerName to the name of your print server). The Printing Account Query page gives
network users access to their current account balance and other information. Users simply enter
their logon ID in the Username field and press the show button. Users can only view their
account information. This web page replaces the functionality offered by the User Inquiry Tool.
Administration Welcome Page
The welcome page can be accessed at http://PrintServerName/papercut/Admin.asp, as shown in
Figure 30. From here you can perform account administration, user administration and view
recent print jobs on the primary print server.
Figure 30. The Web Administration – Welcome page.
Account Administration
Clicking on the Account Administration link will bring up the Account List, as shown in Figure 31.
This list is similar to the Account List in the Administration Console, shown in Figure 2.
Copyright © PaperCut Software Pty Ltd , 1999-2006. All rights reserved.
-73-

PaperCut ChargeBack 6.1 Advanced Print Tracking and Cost Recovery for Windows Networks
Figure 31. The Account List page.
To edit an account, simply click on its link. To add an account, click on the “Add an Account” link.
In both cases, the Account Details page will appear, as shown in Figure 32.
Copyright © PaperCut Software Pty Ltd , 1999-2006. All rights reserved.
-74-

PaperCut ChargeBack 6.1 Advanced Print Tracking and Cost Recovery for Windows Networks
Figure 32. The Account Det ails page.
Follow the instructions given to edit the account details. You may also reset an account’s
counters or delete the account by clicking on the appropriate links.
User Administration
Clicking on the “User Administration” link on the Welcome page will invoke the User List page.
This page displays a list of network users and their current account balance. Clicking on the
user’s name will open a page where account credit and other privileges can be altered. After
editing a user’s account balance, press the “Save” button to commit changes, as shown in Figure
33.
Copyright © PaperCut Software Pty Ltd , 1999-2006. All rights reserved.
-75-

PaperCut ChargeBack 6.1 Advanced Print Tracking and Cost Recovery for Windows Networks
Figure 33. After editing a user’s account balance, press the “Save” button to commit changes.
Viewing Recent Print Job Information
Account Administrators have access to the Log page at http://PrintServerName/papercut/Log.asp.
This page displays a list of recent print jobs. The URL
http://PrintServerName/papercut/Log.asp?strUserName=U SE RNAME (change <USERNAME> to
the user of interest) will display recent print jobs printed by <USERNAME>.
Copyright © PaperCut Software Pty Ltd , 1999-2006. All rights reserved.
-76-

PaperCut ChargeBack 6.1 Advanced Print Tracking and Cost Recovery for Windows Networks
13. Installation Troubleshooting
The share PCSetup is not visible on my primary print server
This indicates that the setup wizard was not able to share the PCSetup directory
properly. Please ensure that all the shares listed in Appendix are created on your primary
print server, with the relevant permissions.
There are communication problems between the print servers and the clients.
This is indicated when the client complains that it could not contact the primary print
server, or that it could not upload account notification information to the server. It is
caused by either:
x The user does not have permissions to access the required shares on the print
server.
x The print server shares are not correctly set up.
In both cases, you should check that the shares listed in the Appendix are created on
your primary print server, with the relevant permissions.
PaperCut ChargeBack is not detecting jobs printed from a network client.
There are two possible causes of this problem:
x Users are not correctly logging on to your network domain. If the domain server does
NOT authorize users, PaperCut ChargeBack has no way of knowing who submitted
the print job. With system policies login onto the domain can be made mandatory,
eliminating this problem. Alternatively printer permissions can be set on the print
server to ensure only valid domain users may print to the printers.
x Alternatively the client computer may be configured to print directly to the network
interface printer. Ensure all network clients are configured as outlined in the
PaperCut ChargeBack installation guide. All print jobs must pass through the print
server running PaperCut ChargeBack.
PaperCut ChargeBack is not working after the installation. What do I do?
Try restarting the print server. The PaperCut ChargeBack service will be Automatically
restarted and this resolves most installations issues.
Copyright © PaperCut Software Pty Ltd , 1999-2006. All rights reserved.
-77-

PaperCut ChargeBack 6.1 Advanced Print Tracking and Cost Recovery for Windows Networks
Every time I print to one of my printers, I get message in the PaperCut ChargeBack Event
Log informing me that the printer language is not recognized.
OR
rint is not counting pages correctly.
P
PaperCut currently supports Postscript, PCL, PCLXL and ESC/P2 printer languages.
Most printers on the market support one of these languages. Some printers support a
proprietary language, but also accept PCL or Postscript. In this case install PCL or
Postscript driver. We recommend you try the following problem resolution actions in this
order:
1. Install Postscript drivers if they’re available for the printer. Do this on both
the Print Server and all network clients. We recommend the Postscript
language over PCL.
2. Try the drivers included with the Windows CD. PaperCut supports the
majority of drivers distributed with recent Windows releases.
3. If you have an all Windows NT/2000 network (all network clients run
WinNT/2000) then disable the “Always Spool in RAW format” by reversing
the changes made in “Print Job Datatype” section of the Setup Guide.
If your printer does not support PCL or Postscript, then check the PaperCut web site for
an updated version of the “Page Counting Machine”. We may now have support for your
hardware and drivers. If you’re still having problems, contact us at support@papercut.biz
Copyright © PaperCut Software Pty Ltd , 1999-2006. All rights reserved.
-78-

PaperCut ChargeBack 6.1 Advanced Print Tracking and Cost Recovery for Windows Networks
14. Frequently Asked Questions
General
How do I turn off visible account monitoring for a given printer, and instead use PaperCut
ChargeBack in “silent monitoring” mode?
PaperCut ChargeBack will use account monitoring if a printer is marked as “Require
Account”. You can mark each individual printer to run in “silent monitoring mode” by
unchecking the “Require Account” checkbox. This is explained in Chapter 3 on page 9.
When users print to that printer they will no longer be prompted for an account.
PaperCut screen-shots show a “$” currency symbol. My country uses a different symbol?
PaperCut ChargeBack fetches the currency format from the Windows Operations system
“locale” settings. PaperCut will adapt to the regional settings configured under the
Windows Control Panel-> Regional Options.
What hardware is recommend?
Postscript, PCL or compati ble net worked printers are strongl y recommended. Most
printers now come with a built-in network card option. Printers without network cards can
be used with network interface boxes such as AXIS boxes or Netgear PrintServer boxes.
These can usually be purchases for under US$100 . Parallel Port connections direct to
either the print server or to network clients are also supported, however this is not the
preferred option.
Will PaperCut ChargeBack slow printing?
Users will experience no notable slowing of normal print jobs. Very large jobs may
experience a few seconds delay as the job spools to the printserver.
What printers are supported?
PaperCut ChargeBack works with PCL, Postscript, ESC/P2 and compatible printers.
PCL is a language supported by Hewlett Packard and many other printer manufactures
make their products compatible with PCL. We strongly recommend Postscript compatible
printers. ESC/P2 is a printer language used by Epson. We are currently compiling a list
Copyright © PaperCut Software Pty Ltd , 1999-2006. All rights reserved.
-79-

PaperCut ChargeBack 6.1 Advanced Print Tracking and Cost Recovery for Windows Networks
f printers that work with PaperCut, but in the meantime, we suggest you download the
o
evaluation version and make sure it meets your needs.
Does PaperCut support different charging prices for color, duplex and different page size printing?
Yes. PaperCut supports a variety of charing techniques, including charging by specific
page size (with different color and grayscale rates), page area charging, page size
category charging, and discounts for duplex printing to encourage paper conservation.
The powerful print charging capabilities of PaperCut make it suitable for both simple (eg.
schools) and complex (eg. design, architecture, engineering firms) applications.
I only want to monitor or charge a small number of users on my domain. Do I have to buy a license that supports all users?
PaperCut Quota: The license is based on the number of user logon accounts registered
on the domain. PaperCut counts the number of users within the domain, and will prompt
you if you exceed your license quota. If you onl y intend to m onitor a small percentage of
your users, email us with your situation and w e can ar r ange a speci al agre ement.
PaperCut ChargeBack: You’ll only need to purchase licenses for the users who will print
to monitored printers. (These are the users who will usually have the popup window
installed.) Only these users should be added to the PaperCut Database.
To achieve this, you should create a new group on your domain called PaperCu t U ser s,
and add in the users you wish to use PaperCut.
Then if you’re setting up PaperCut for the first time, in the Setup Wizard, when prompted
where to import the list of users from, select Get user information from network group
select the group Pape rCu t User s.
If you have an existing installation, and wish to only import users from the PaperCut
Users group, run the PaperCut Administration Console, navigate to the Options tab and
select Get user information from network group, and select the PaperCut Users
group. Now click on the Database Tuneup button near the bottom of the screen. This will
remove users that aren’t in the group, and add all the users in the group. Now only your
users from that group will be imported.
Copyright © PaperCut Software Pty Ltd , 1999-2006. All rights reserved.
-80-

PaperCut ChargeBack 6.1 Advanced Print Tracking and Cost Recovery for Windows Networks
Account Tracking (PaperCut ChargeBack only)
How do I turn off visible account monitoring for a given printer, and instead use PaperCut
ChargeBack in “silent monitoring” mode?
PaperCut ChargeBack will use account monitoring if a printer is marked as “Require
Account”. You can mark each individual printer to run in “silent monitoring mode” by
unchecking the “Require Account” checkbox. This is explained in Chapter 3 on page 9.
When users print to that printer they will no longer be prompted for an account.
Installation
Can I upgrade/reinstall PaperCut ChargeBack and retain my user account values?
Yes, we’re currently working on an automated update program to streamline the process, and this
will be made available on our website. In the meantime, if you wish to upgrade, contact
support@papercut.biz for instructions on a manual upgrade. (This involves backing up the user
and account databases, and inst al ling the new version.)
Why is it not recommended to use a PC as a network interface for a parallel port printer?
Any Windows computer maybe used as a network interface for a parallel port printer.
This printer can be shared and then recaptured on the Network print server, then shared
again. This arrangement works with PaperCut, as print jobs will pass via the print server.
However, this arrangement is less secure than using a network printer, as a client can be
quickly reconfigured to print directly to the interfacing computer, bypassing the print
server and PaperCut.
The chance of a user bypassing the print server can be minimized with the following
strategy (For Windows 9x Systems only):
1. Install the parallel port printer on the interfacing computer.
2. Share the printer with a secret invisible name such as cantseeme$
(The $ will make it invisible to network browsers.)
3. Capture the printer on the print server by adding a new network printer with
the UNC \\computername\cantseeme$
4. Share this printer on the print server to make it available to your network
users.
Copyright © PaperCut Software Pty Ltd , 1999-2006. All rights reserved.
-81-

PaperCut ChargeBack 6.1 Advanced Print Tracking and Cost Recovery for Windows Networks
ow a user can only reconfigure a client to bypass the print server if they know the
N
invisible name.
Note: Connecting a parallel port printer directly to the print server is a secure method,
and can’t be bypassed. Network printers, such as “Jet Direct” printers are recommended,
as Parallel Ports are very CPU intensive.
Operation
How do I assign credit to multiple users at once?
Try the Allocate Funds … button under Group Level Functions in the Groups section
of the Administrator Console. This offers powerful credit assignment and privilege setting
assignment on an NT group level basis.
How do I set all users to “unrestricted” ?
Try the Allocate Funds … button under Group Level Functions in the Groups section
of the Administrator Console.
Can I prevent a user, or a group of users from printing on a particular printer?
Yes. PaperCut ChargeBack does not interfere with Windows permissions. You may
restrict printing on any printer by setting share permissions in the printer properties.
Other printers will function and be charged as normal.
I don’t have MS Access installed on my Print Server . How do I use the reports option?
Try coping of the file “joblog.mdb” in the PaperCut ChargeBack program folder on the
print server to a network workstation with Access 2000 installed. The copy will contain a
snapshot of the data.
Copyright © PaperCut Software Pty Ltd , 1999-2006. All rights reserved.
-82-

PaperCut ChargeBack 6.1 Advanced Print Tracking and Cost Recovery for Windows Networks
Advanced Operation
My Windows Event Log is full of printer pause messages from “Print”. What is this?
PaperCut ChargeBack temporarily pauses all print jobs while they’re analyzed. A
message will appear in the event log if auditing of printer events is selected. To turn off
printer auditing:
x Open the Printers folder in the control panel.
x Select Server Propertie s from the file menu.
x Under the Advanced section, turn off Log spooler information.
How can I prevent uses from bypassing the print server?
The only way to bypass the print server is to configure a client to print directly to a
networked printer. Connecting to a network printer usually requires special setup
software supplied by the hardware manufacture, and other information such as the
printer’s IP address. You should ensure that this software and information is not readily
available to you network users. If “bullet-proof” security is required, investigate placing
your printers on a TCP/IP subnet and/or configure routers to only forward TCP/IP packets
from the designated Print Server(s).
The PaperCut ChargeBack database is corrupt. How do I restore a backup?
First, try the following:
x Stop the PaperCu t Serv ice on the print server under Start->Settings->C ontr o l
Panel->Services.
x Open each of the following files in MS Access 2000 and choose
Tools->Database Utilities->Compact and Repair Database… :
o PaperCut/joblog.mdb
o PaperCut /PrinterDB.mdb
o PaperCut /Database/PCUserDB.mdb
If the following actions do not fix the corrupt databases, PaperCut ChargeBack saves a
dated copy of the database in the PaperCut program folder during the TuneUp process
(Options section). To replace the corrupted database with the latest backup:
x Close PaperCut ChargeBa ck and stop the PaperCut service using the
Services console in the Control Panel
x Delete the corrupt database located at:
Program Files\PaperCut\Database\PCUserDB.mdb
Copyright © PaperCut Software Pty Ltd , 1999-2006. All rights reserved.
-83-

PaperCut ChargeBack 6.1 Advanced Print Tracking and Cost Recovery for Windows Networks
x Copy latest backup file at: Program Files\PaperCut\Backup*.mdb
To: Program Files\PaperCut\Database\
x Rename the database file to: PCUserDB.mdb
x Restart the PaperCut service
You may have other backup solutions operating on your print server and may wish to use
this option to replace the corrupt database. Ensure the PaperCut service is stopped
before
replacing any PaperCut*.mdb file.
How do I upgrade my Page Counting Machine?
Please see the FAQ on the www.papercut.biz
website.
Copyright © PaperCut Software Pty Ltd , 1999-2006. All rights reserved.
-84-

PaperCut ChargeBack 6.1 Advanced Print Tracking and Cost Recovery for Windows Networks
APPENDIX I
Security settings
In order for PaperCut ChargeBack to function fully, security settings must be set at a Share level,
and at a filesystem (NTFS) level. Both are explained in the following pages.
Network shares created during install
The PaperCut Security Wizard automatically sets up the following shares when the PaperCut
Administration Console is run for the first time. If this automatic process fails, or if you’re
experiencing problems with PaperCut, then check the following shares:
Share Name Physical Path Permissions
PCEData$
PCEActN$
PCEPrefs$
PCDB$
PCSetup
(present only on
Primary Server)
To verify that a particular share is created properly, locate the physical directory in
Windows Explorer, and right click on the directory, and select Sharing from the popup
menu. (See Figure 34a and 34b).
You can then view the sharing permissions by clicking on the Permissions button. (The
actual screenshots are for Windows 2000 machines and differ slightly for Windows NT.)
Advanced Setup: For security reasons, we recommend you place a “Disk Quota” of 50Mb
C:\Program Files\PaperCut\PCEData Read Only access for Everyone
C:\Program Files\PaperCut\PCEActN Full Access for Everyone
C:\Program Files\PaperCut\PCEPrefs Full Access for Everyone
C:\Program Files\PaperCut\Database Read Only access for Everyone
C:\Program Files\PaperCut\PCSetup Read Only access for Everyone
on the PCEActN$ and PCEPrefs$ share (c:\Program Files\PaperCut\PCEActN). This will
prevent malicious attacks from people uploading more than 50Mb of data to the share.
Copyright © PaperCut Software Pty Ltd , 1999-2006. All rights reserved.
-85-

PaperCut ChargeBack 6.1 Advanced Print Tracking and Cost Recovery for Windows Networks
Figure 34 (a) and (b). Viewing a directory’s sharing settings..
Copyright © PaperCut Software Pty Ltd , 1999-2006. All rights reserved.
-86-

PaperCut ChargeBack 6.1 Advanced Print Tracking and Cost Recovery for Windows Networks
NTFS File permissions required for PaperCut ChargeBack Install
The PaperCut Security Wizard automatically sets up file security when the PaperCut
Administration Console is run for the first time. If this automatic process fails, or if you’re
experiencing problems with PaperCut, then check the following permissions:
Physical Path Perm issions
C:\Program Files\PaperCut\PCEPrefs Read and write access for Everyone. Also known
as Change access.
C:\Program Files\PaperCut\PCEActN Read and write access for Everyone. Also known
as Change access.
The PaperCut ChargeBack client communicates to the server by writing files to the C:\Program
Files\PaperCut\PCEActN directory. (PCEActN stands for PaperCut ChargeBack Account
Notification.) Thus users must be able to write files to that directory.
The client will also save its preferences to the PCEPrefs share. This includes the preferred
list of accounts, account selection history, and last search information. Users must be able
to write files to that directory.
Technical Facts
x Database sharing between servers is done via standard Windows file sharing. This
avoids the need for configuring ODBC interfaces.
x Client–Server communications is via standard Windows file sharing. This avoids the
need to support and secure DCOM or other socket based communications protocols.
PaperCut Service command line options
The PCService.exe executables run as Windows Services. This Service maybe uninstalled from
the system services list with the following command line options:
Uninstall
x PCService.exe –uninsta ll
NOTE: Please ensure that service is stopped before uninstalling.
Install
x PCService.exe –instal l
Copyright © PaperCut Software Pty Ltd , 1999-2006. All rights reserved.
-87-

PaperCut ChargeBack 6.1 Advanced Print Tracking and Cost Recovery for Windows Networks
APPENDIX II - Printer Configuration & Hardware Guide
The following guide should be used if any problems are experienced with the page count
detection or checking hardware compatability. The most recent version of the appendix is always
available online at:
http://kb.papercutsoftware.com/Main/SupportedPrinters
Page Description Languages (PDL’s)
PaperCut will correctly handle printing for all printers that have drivers that conform to one or
more of the following standards:
x Postscript
x PCL (all versions)
x PCL-GUI
x PCLXL
x HPGL
x Epson languages ESC/P 2, ESC /P AGE and E SC/ PAGE-COLOR
x Ricoh RPCS
x Canon BubbleJet
x Some support for proprietary GDI printers (Minolta, QMS, Samsung)
PaperCut does experience some difficulties with the proprietary Epson ESC/PAGE, OKI, and
Brother page description languages (PDL’s). Many Brother printers however will work correctly if
the Postscript or PCL compatible dri vers are used.
Many printer hardware comes with a selection of print drivers. We recommend that only one
driver be installed. The recommended drivers listed in order of preference are:
1. Postscript
2. PCL 6
3. PCL 5, 4
4. Appropriate driver selected directly off the Windows CD
5. ESC/P2
Copyright © PaperCut Software Pty Ltd , 1999-2006. All rights reserved.
-88-

PaperCut ChargeBack 6.1 Advanced Print Tracking and Cost Recovery for Windows Networks
Connection Methods
Printers should be directly connected to the system running the PaperCut server software with
one of the following methods:
x Direct LPT port connection
x USB port connection
x JetDirect network connection
x LP over TCP/IP
x Standard TCP/IP port via build in network card
x Standard TCP/IP port via hardware “print server” network hub.
IMPORTANT: It’s important that network clients are NOT
printer using one of these methods. The network clients should print to the shared printer shared
from the server running the PaperCut software.
configured to connect directly to the
Unsupported Connection Methods
Some printers offer software that makes their systems interface with a Windows network using
the LanManager protocol. This connection method can cause problems when the printer is
“reshared” from the server. In most cases, hardware offering LanManager connectivity, also
support standard TCP/IP Port or LP over TCP. We recommend these connection methods over
LanManager. Please consult your hardware documentation. In most cases using TCP involves
adding a new “Local Printer” and selecting a standard TCP port.
Notes on individual printer models and manufactures
HP Laser Printers
PaperCut works with all HP Lasers produced over the last 7 years. Where possible, we
recommend the Postscript drivers or recent PCL drivers.
HP Ink Jets - Deskjet
Most Inkjets work with PaperCut. Some older printers such as Deskjet 640C use nonstandard
PCL and PaperCut can have problems analyzing documents printed from Windows 9X based
clients.
Epson
The current range of AcuLaser, AL, and EPL mono and color laser printers are fully supported by
PaperCut. Please ensure the very latest drivers are installed. The majority of inkjets produced
Copyright © PaperCut Software Pty Ltd , 1999-2006. All rights reserved.
-89-

PaperCut ChargeBack 6.1 Advanced Print Tracking and Cost Recovery for Windows Networks
ver the last 7 years supporting ESC/P 2, ESC /P AGE and ES C/P AGE- CO LOR will work.
o
PaperCut may not correctly detect paper size on some inkjet printers. The development team is
currently working to address this.
Canon
Canon laser printers and copiers work with PaperCut. Where possible we recommend Postscript
drivers. The majority of Canon BubbleJet printers are compatible. Users running PaperCut 5.1 or
earlier should install the latest Page Counting Machine
for a full BJ support.
Ricoh
PaperCut supports the current range of Ricoh laser and multi-function printers. Ricoh provide a
number of print driver options including PCL, Postscript and RPCS (Ricoh’s own language).
PaperCut supports all drivers.
Kyocera
Kyocera lasers have a Postscript driver range referred to as KPDL. These drivers are compatible
with PaperCut. The Kyocera PCL drivers occasionally use non-standard language extensions
(they claim to be PCL compatible). The Postscript (KPDL) drivers should be used in preference.
Lexmark
The current range of mono and color laser printers work with PaperCut. Postscript drivers are
recommended. The “budget” inkjet printers use a proprietary GDI printer language and depending
on the model, problems may be experienced.
Minolta-QMS
All high-end lasers work with PaperCut. Use the Postscript driver option if available. Some low to
mid-end Minolta lasers such as the Magicolor 2300 DL (Minolta 2300DL) use a host based GDI
driver based on technology from Zenographics. Users running PaperCut 5.1 or earlier should
install the latest Page Coun ting Mach ine
for a full support for this and other Minolta printers.
OKI
The OKI mono and color lasers support a number of print languages in compatibility mode. We
recommend the Postscript Level 2 driver option.
Xerox/Tektronix
The DocuPrint and Phaser Series accommodate PCL and Postscript. Use the Postscript drivers if
available. Some lower end DocuPrint systems only support PCL. We recommend the PCL6
drivers.
Copyright © PaperCut Software Pty Ltd , 1999-2006. All rights reserved.
-90-

PaperCut ChargeBack 6.1 Advanced Print Tracking and Cost Recovery for Windows Networks
OCE
OCE printers and copiers support Postscript. Some OCE drivers use a proprietary header to set
document attributes such as copy count, duplex, etc. The most recent Page Counting Machine
upports this header. Users running PaperCut version 5.1 or earlier may need to upgrade their
s
Page Counting Machine
. To ensure correct accounting, ensure the Enable Advanced Pr int ing
Features is turned off.
Samsung
PaperCut supports most Samsung Printers. Many recent Samsung (e.g. Samsung ML-1740,
CPL-550) printers are supplied with proprietary GDI based drivers (QPDL) with no option for
standard Postscript or PCL drivers. PaperCut Software has implemented support for most recent
Samsung GDI printers. Model numbers and driver versions are constantly changing. PaperCut
users are recommended to install the latest Page Counting Mach in e and contact PaperCut
support if any printers do not account as expected.
Copyright © PaperCut Software Pty Ltd , 1999-2006. All rights reserved.
-91-

PaperCut ChargeBack 6.1 Advanced Print Tracking and Cost Recovery for Windows Networks
APPENDIX III – Batch Printing and Script Support
To help facilitate batch printing or script based printing tasks, PaperCut ChargeBack provides a
set of client tools to assist script developers. Interfaces include:
x A command-line progra m suitable for use with batch file and many other scripting
methods.
x A COM object suitable for use with Visual Basic, VBScript and other Microsoft
scripting and programming languages supporting COM.
The tools provide the ability to:
x Allocate jobs automatically to a pre-defined account. For example, allocate all print
jobs sent in the next 60 minutes to account X.
x Revert to normal “popup” mode after the batch is printed
x Programmatically query a list of accounts/job numbers/matters
A developer would use the tools to script a batch print job using the following procedure:
1. Use the tools to instruct PaperCut to assign following print jobs to an account.
2. Perform the batch-printing task
3. Use the tools to instruct PaperCut to revert to normal popup mode.
Note: These tools are “client-side” tools and are designed to run on workstations or other servers
remote from the primary PaperCut serv er.
The Command-Line Interface
The command line batch printing tool included with PaperCut ChargeBack is located at on the
workstation/client under the directory:
C:\Program Files\PaperCut\Tools\
The program is called batchtool.exe. It’s a Windows console application suitable for use in batch
files or calling from other programs. The behavior of the application is controlled via command
line switches. These switches may be invoked using the standard windows /option syntax or the
Unix style –option style.
Copyright © PaperCut Software Pty Ltd , 1999-2006. All rights reserved.
-92-

PaperCut ChargeBack 6.1 Advanced Print Tracking and Cost Recovery for Windows Networks
Documentation - batchtool.exe
SYNOPSIS
batchtool [-popupmode] [-select <account name> [-timeout <time>] [comment <comment>] [-noinvoice]]
DESCRIPTION
batchtool instructs the PaperCut server to allocate print jobs to the
account <account_name>. This allows a batch of print jobs (or a single
print job) to be pre-assigned to accounts. It’s designed to help
facilitate non-attended printing or batch printing where a user would
normally have to tediously assign each print job to a PaperCut account.
Call the program with no arguments for a usage message.
-select
Allocated future print jobs automatically to PaperCut
-timeout
-comment
-noinvoice
<account_name>.
Optional. Used in conjunction with select to define that the
automatic account allocation should apply for <time>
minutes. After the time has expired, PaperCut will revert
to normal popup mode.
Optional. Used in conjunction with select to associate
<comment> with the following print job(s). This is
equivalent to the comment field in the PaperCut client popup
window.
Optional. Used in conjunction with select to define that an
account should not be invoiced. This is equivalent to
selecting disabling invoice checkbox in PaperCut client
popup window.
-popupmode
Enable normal popup mode. Called after the using the select
option to allocate jobs to an account to revert PaperCut
Copyright © PaperCut Software Pty Ltd , 1999-2006. All rights reserved.
-93-

PaperCut ChargeBack 6.1 Advanced Print Tracking and Cost Recovery for Windows Networks
back to normal interactive popup mode. This option should
not be combined with other options.
-list
List account names available for selection – one account per
line. Sub accounts are denoted with a “main account / sub
account” syntax. This option should not be combined with
other options.
EXAMPLES
To allocate the following print job to the “ACME inc” account:
batchtool –select “acme inc”
To allocate the following print jobs to the “ACME inc” account using DOS
syntax:
batchtool /select “acme inc”
To allocate print jobs printed during the next 20 minutes to “ACME inc”
account. After 20 minutes revert to normal popup mode.
batchtool –select “acme inc” –timeout 20
To allocate print jobs printed during the next 20 minutes to “ACME inc”
with a print job comment of “overnight batch”.
batchtool –select “acme inc” –timeout 20 –comment “overnight
batch”
To revert to normal interactive popup mode after printing an assigned
batch of print jobs.
batchtool –popupmode
To list accounts available for selection (sent to the console):
batchtool –list
An example batch file can be found the tools directory alongside the
batchtool command.
Copyright © PaperCut Software Pty Ltd , 1999-2006. All rights reserved.
-94-

PaperCut ChargeBack 6.1 Advanced Print Tracking and Cost Recovery for Windows Networks
The COM Interface
COM is a Microsoft language independent component technology. Many programming and script
languages on the Microsoft support COM. PaperCut ChargeBack registers a COM provider on
the client systems called PCCBClientTool. This exposes a COM object “AccountSelector”.
Methods and properties are detailed below:
The PCCBClientTool.AccountSelector Interface Definition
Method Summar y:
AllocateToAccount
AllocateToAccount2
AllocateToAccountWithTimeout
AllocateToAccountWithTimeout2
AllocateToAccountFull
AllocateToAccountFull2
EnableNormalPopUpMode
ListAccountsNames
Property Summar y:
ErrorMessage
Function Boolean AllocateToAccount(Account As String)
Allocated future print jobs automatically to a PaperCut account.
Parameters
Account
A String representing the PaperCut account to assign following print jobs to. This
string should be either the account name, or if a sub-account, in the format “main
account / sub account”.
Return Value
Copyright © PaperCut Software Pty Ltd , 1999-2006. All rights reserved.
-95-

PaperCut ChargeBack 6.1 Advanced Print Tracking and Cost Recovery for Windows Networks
Boolean value of true if the function successes. False on fail. If the method
A
fails, the ErrorMessage property will contain the error message as a text string.
Function Boolean AllocateToAccount2(MainAccount As String, SubAccount As
String)
Allocated future print jobs automatically to a PaperCut account.
Parameters
MainAccount
A String representing the PaperCut main-account name to assign print jobs to.
SubAccount
A String representing the PaperCut sub-account name to assign print jobs to.
Return Value
A Boolean value of true if the function successes. False on fail. If the method fails, the
ErrorMessage property will contain the error message as a text string.
Function Boolean AllocateToAccountWithTimeout (Account As
String, Timeout As Long)
Allocated future print jobs automatically to a PaperCut account/matter. This is an enhanced
version of AllocateToAccount with an addit ion al ti meout option.
Parameters
Account
A String representing the PaperCut account to assign following print jobs to. This
string should be either the account name, or if a sub-account, in the format “main
account / sub account”.
Timeout
A Long defining that the automatic account allocation should apply for Timeout
minutes. After the time has expired, PaperCut will revert to normal popup mode.
Copyright © PaperCut Software Pty Ltd , 1999-2006. All rights reserved.
-96-

PaperCut ChargeBack 6.1 Advanced Print Tracking and Cost Recovery for Windows Networks
Return Value
A Boolean value of true if the function successes. False on fail. If the method fails, the
ErrorMessage property will contain the error message as a text string.
Function Boolean AllocateToAccountWithTimeout2 (MainAccount
As String, SubAccount As String, Timeout As Long)
Allocated future print jobs automatically to a PaperCut account/matter. This is an enhanced
version of AllocateToAccount with an addit ion al ti meout option.
Parameters
MainAccount
A String representing the PaperCut main-account name to assign print jobs to.
SubAccount
A String representing the PaperCut sub-account name to assign print jobs to.
Timeout
A Long defining that the automatic account allocation should apply for Timeout
minutes. After the time has expired, PaperCut will revert to normal popup mode.
Return Value
A Boolean value of true if the function successes. False on fail. If the method fails, the
ErrorMessage property will contain the error message as a text string.
Function Boolean AllocateToAccountFull(Account As String,
Invoiceable As Boolean, Comment As String, Timeout As Long)
Allocated future print jobs automatically to a PaperCut account/matter. This is a full version of
this overloaded method allowing all definable attributes to be set.
Parameters
Account
Copyright © PaperCut Software Pty Ltd , 1999-2006. All rights reserved.
-97-

PaperCut ChargeBack 6.1 Advanced Print Tracking and Cost Recovery for Windows Networks
Invoiceable
Comment
Timeout
Return Value
A Boolean value of true if the function successes. False on fail. If the method fails, the
String representing the PaperCut account to assign following print jobs to. This
A
string should be either the account name, or if a sub-account, in the format “main
account / sub account”.
Define that the following jobs should be invoiced (true) or not (false). This is
equivalent to selecting the invoice checkbox in PaperCut client popup window.
A text string Associate a comment with all following print jobs allocated to the
defined account.
A Long defining that the automatic account allocation should apply for Timeout
minutes. After the time has expired, PaperCut will revert to normal popup mode.
ErrorMessage property will contain the error message as a text string.
Function Boolean AllocateToAccountFull2(MainAccount As
String, SubAccount As String, Invoiceable As
Boolean, Comment As String, Timeout As Long)
Allocated future print jobs automatically to a PaperCut account/matter. This is a full version of
this overloaded method allowing all definable attributes to be set.
Parameters
MainAccount
A String representing the PaperCut main-account name to assign print jobs to.
SubAccount
A String representing the PaperCut sub-account name to assign print jobs to.
Invoiceable
Define that the following jobs should be invoiced (true) or not (false). This is
equivalent to selecting the invoice checkbox in PaperCut client popup window.
Comment
A text string Associate a comment with all following print jobs allocated to the
defined account.
Copyright © PaperCut Software Pty Ltd , 1999-2006. All rights reserved.
-98-

PaperCut ChargeBack 6.1 Advanced Print Tracking and Cost Recovery for Windows Networks
Timeout
A Long defining that the automatic account allocation should apply for Timeout
minutes. After the time has expired, PaperCut will revert to normal popup mode.
Return Value
A Boolean value of true if the function successes. False on fail. If the method fails, the
ErrorMessage property will contain the error message as a text string.
Function Boolean EnableNormalPopUpMode()
This method should be called after the using an Allocation* method and all batch printing has
completed. It reverts PaperCut back to normal interactive popup mode.
Parameters
None
Return Value
A Boolean value of true if the function successes. False on fail. If the method fails, the
ErrorMessage property will contain the error message as a text string.
Function StringArray[] ListAccountsNames ()
This method returns an array of strings representing accounts/matters. This is equivalent to the
list of accounts seen in the PaperCut ChargeBack popup client window.
Parameters
None
Return Value
A variable length array of string values representing valid accounts/matters as defined on
the PaperCut ChargeBack server.
Copyright © PaperCut Software Pty Ltd , 1999-2006. All rights reserved.
-99-

PaperCut ChargeBack 6.1 Advanced Print Tracking and Cost Recovery for Windows Networks
Property ErrorMessage As String
This property is null by default (an empty string). If one of the above method calls fail as
indicated by a false return value, this property contains a string indicating the cause of the error.
Examples
And example VBScript batch printing program is included in the file:
C:\Program Files\PaperCut\Tools\Example - COM.vbs
This file is found under the Tools directory on each workstation (i.e. not located on the server).
The script will run under any Windows operating system with the “Windows Scripting Host”
support installed and enabled.
Copyright © PaperCut Software Pty Ltd , 1999-2006. All rights reserved.
-100-
 Loading...