

Page 1
User Manual
Page 2

Caution
● Do not install or operate the device with wet hands.
● Do not expose the device to high temperature inside a
sealed compartment for a long time.
● Do not disassemble the device and accessories.
● Use only the connection cable and power cable provided
by the manufacturer. This company assumes no
responsibility for any damage caused by the use of
non-genuine cables.
● Do not forcefully press the lens, and do not prick the
device or accessories with sharp object.
● If a foreign body
enters the machine please contact us, do
not disassemble the products, accessories or wire.
1
Page 3
● If the lens is attached to a foreign body, do not touch the
lens surface with your ngers to avoid aecting the lens.
● Please use a Class 10 Micro SD card with at least 16GB.
(Maximum 64GB)
● The functions and contents of this manual are subject to
change without notice.
2
Please follow the cable diagram for installation.
Make sure to have Ray installed by a professional vehicle
technician.
Page 4
Troubleshooting
● Device cannot boot
○ Check if the device has power.
○ Press the RESET button to reboot the device.
● SD Full
○ Delete unwanted videos from the device.
○ Format the Micro SD Card.
● No playback on the device
○ Check if the lename of the videos or the folder name
in the Micro SD have been modied from PC.
○ Check if the videos in the Micro SD have been modied
from a PC or the videos in the Micro SD are not
produced with the device.
○ Micro SD has crashed.
● Date Setting show up during the boot every times.
○ Please check with professional vehicle technician. A
power cable connection error can cause the device to
not save date properly.
3
Data is irrecoverable after deletion and formatting. Please make
a backup copy of the videos before formatting the Micro SD.
Page 5
● Electronic rearview mirror
● Rear Lens
● Connect Cable
● Power Cable
● Dedicated Bracket
● Quick Start Guide
● Warranty Card
● CLASS 10 64GB MicroSD Card
● Lens-Cleaning Cloth
4
Product package contents may change according to region in
which it is purchased without notice.
Package Contents
Page 6
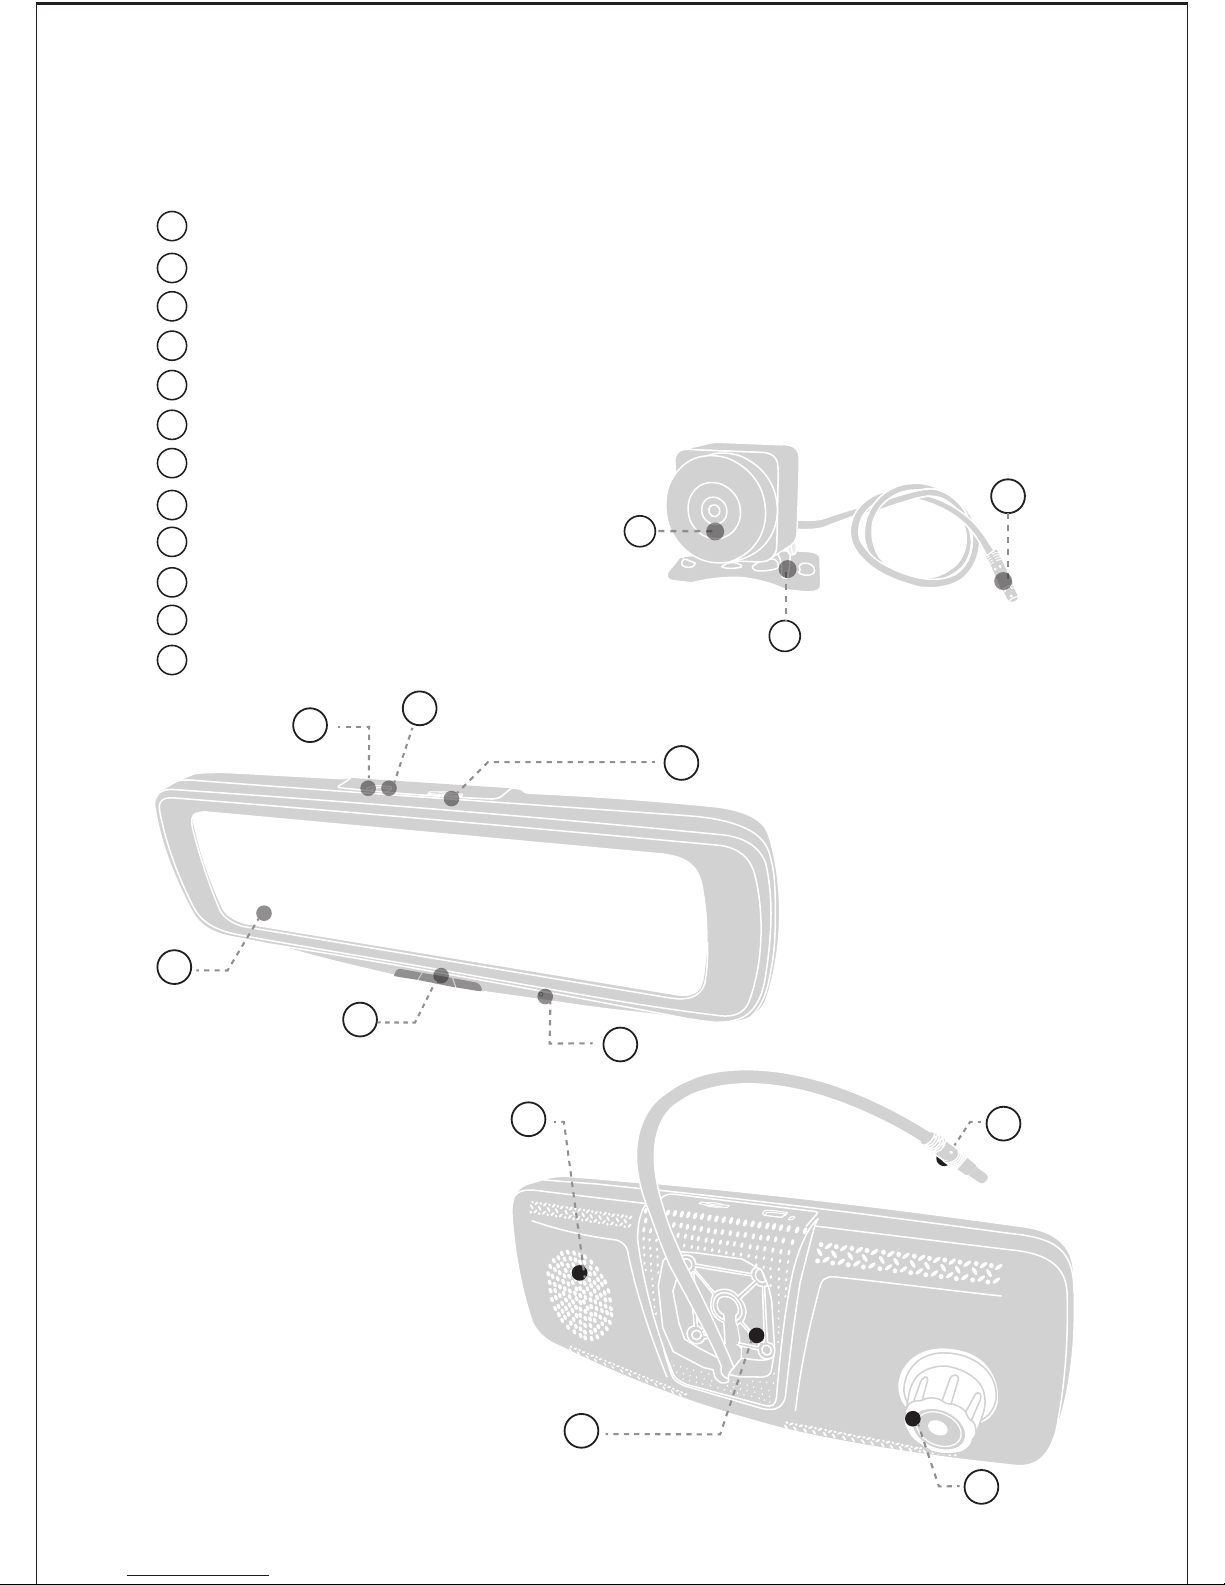
Reset
mini USB Slot
Micro SD Slot
Display
Buttons
Microphone
Speaker
Connect Cable
Lens
Mount Bracket
Rear Lens
Mount
1
2
3
4
5
6
7
8
9
10
11
12
1
2
3
4
5
6
7
8
10
8
12
9
5
11
Device Overview
Page 7
1
2
3
4
5
錄影中
1
2
3
4
5
6
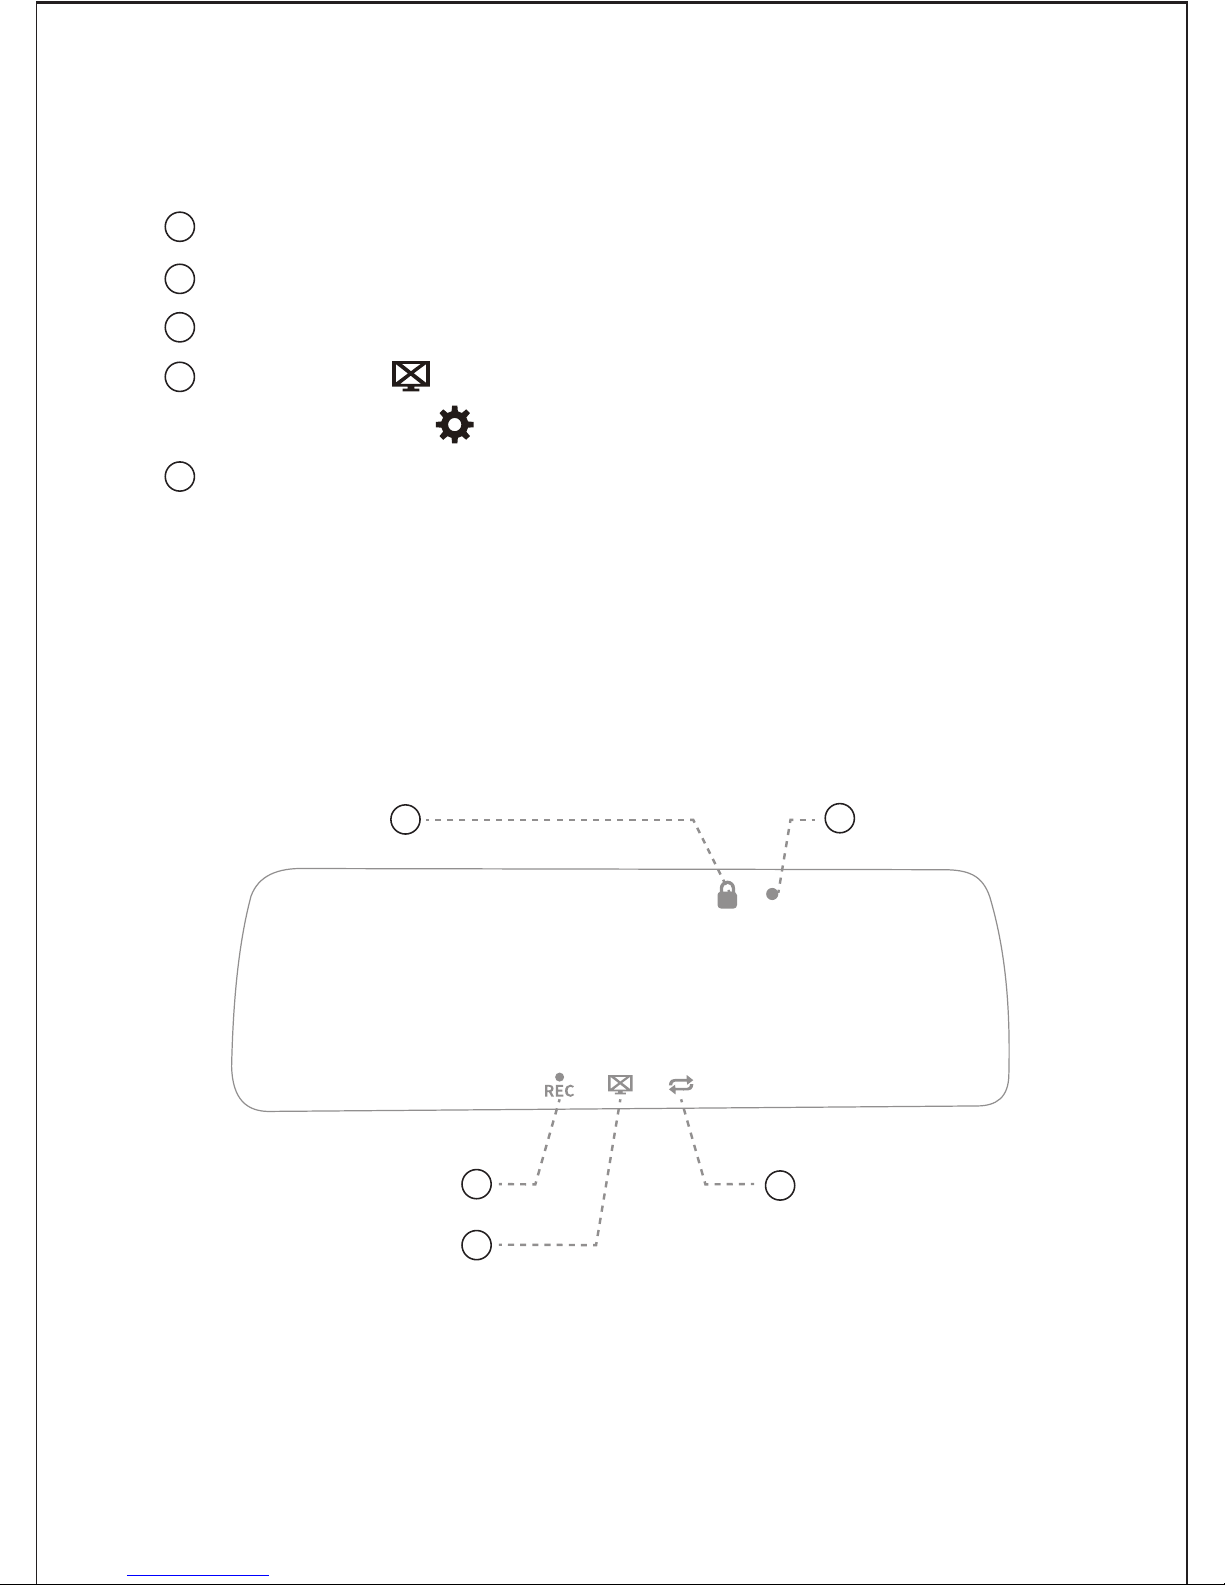
Emergency
Recording
Start/Stop Recording
Recording
:
” ” Turn On/O Screen Saver
Stop Recording: ” ”Setting Mode
Switch the display
(Front display、Rear display、Front & Rear display)
Screen Icons
Page 8
● Insert the Micro SD card into the Micro SD slot and switch
power on, the system will start recording automatically.
● The device will automatically Power OFF once car engine is off.
7
Before using the memory card for the first time, be sure to
format the memory card on the main unit to ensure that the
memory card is stable.
Do not disconnect power during system upgrade, the device
may be unable to boot afterwards.
During the shutdown process, do not remove the memory
card immediately to avoid damage to the file.
Power On
Power Off
Page 9
● Videos
○ It will start loop recording after powering on with the
Micro SD Card plugged in.
○ Each recorded le is 3 minutes long, with the old
footage being replaced when the Micro SD Card is full.
● Emergency
○ Once the G-Sensor is activated by a sudden impact the
device will automatically back up the le so that it is
not overwritten.
8
"Settings > Bump Recording"to adjust G-Sensor sensitivity.
Once the G-Sensor is activated by a sudden impact the
device will automatically back up the le. It will record for
3 seconds before and 12 seconds after the impact. For a
total of 15 seconds.
Recording
Page 10
9
Playback
Please Press to stop recording then Press
the button to enter“Settings”and choose
Playback .
Playback mode can be long pressed to return to each mode.
One long press and device will be back to
Recording Mode.
One long press and the device will turn
on/o.
One long press to enter playlist mode.
Page 11
10
Setting the sensitivity to "high" may result in too many video
files in the "emergency videos" folder when driving on
uneven roads. Please keep backup of emergency video files.
Settings
Please Press to stop recording then Press
the button to enter “Settings”.
● Playback:Enter playback.
● Date/Time:Set date, time, and date format.
● Microphone:Enable or disable voice recording.
● Language:Set display language.
● Bump Recording:Set the impact sensitivity of the G-Sensor.
Page 12
● Brightness:Adjust the screen's brightness. You can
choose day mode or night mode.
● Format memory Card:All data on the MicroSD will be deleted.
● Default:Reset all values to factory default.
● Version:Check the current firmware version.
11
Data is irrecoverable after formatting. Please backup
videos and photos before formatting the MicroSD.
Page 13
12
Before upgrading firmware from the Micro SD, please format
the Micro SD on the device to ensure read/write stability.
Do not power off during the system upgrade process.
Firmware Upgrade
① Visit the PAPAGO ocial website at us.papagoinc.com
② Go to the“Support”page
③ Download the latest version rmware and extract it in the
root directory of the Micro SD Card.
④ After copying, insert the Micro SD in the Micro SD slot.
⑤ Turn on the Device, you will see the upgrade info from
the display.
⑥ Finished upgrading.
⑦ Enter“Settings-version” to check if the rmware is
up-to-date.
Page 14
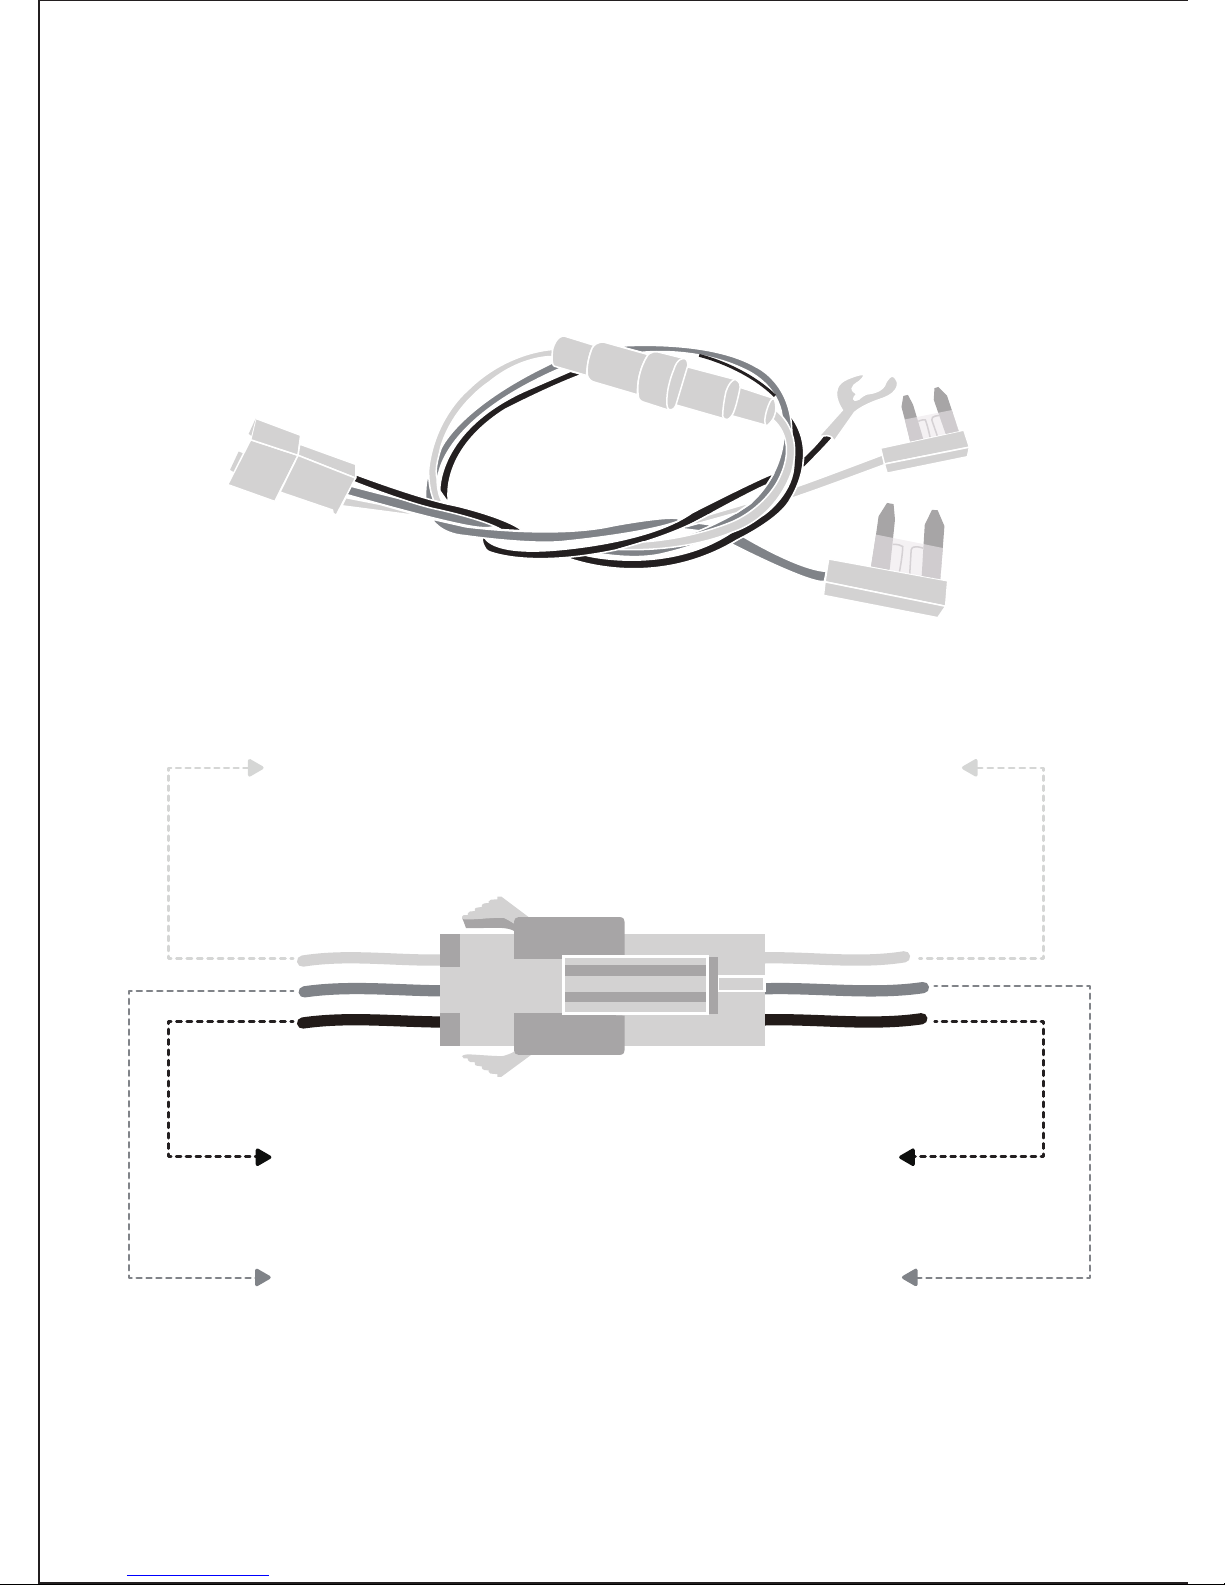
13
Power cable connect
BLACK GND ----Connect to BLACK cable
RED:Key ACC ----Connect to RED cable
YELLOW:POWER B+ ---- Connect to YELLOW cable
Page 15

V8.01.09
 Loading...