

Page 1

PAPAGO! X6 GPS Navigation System
PAPAGO! R6600 GPS Navigation
Please read and follow the instructions in this user manual before using the system.
Page 2

Table of Content
DISCLAIMER .............................................................. 3
COPYRIGHT AND TRADEMARKS ............................. 4
ABOUT HARDWARE .................................................. 5
HARDWARE SPECIFICATION ................................... 7
NAVIGATION SYSTEM OVERVIEW .......................... 8
1. OVERVIEW OF THE MAIN MENU .................... 9
2. DESTINATION ................................................. 10
2.1. HOME .............................................................. 12
2.2. OFFICE ............................................................ 12
2.3. FA VORITES ..................................................... 13
2.4. HISTORY ......................................................... 15
2.5. ROAD SEARCH............................................... 16
2.6. POI SEARCH ................................................... 17
2.7. ROUTE POIS ................................................... 17
2.8. COORDINATE INPUT ..................................... 18
3. ROUTING OPTIONS/ ROUTING ..................... 19
3.1. ROUTING OPTIONS ....................................... 19
3.2. ROUTING ........................................................ 19
4. ADVANCED SETTINGS .................................. 21
4.1. GENERAL ....................................................... 21
4.2. NAVI INFO ....................................................... 22
4.3. NAVI SCREEN ................................................. 23
4.4. LOCATION INFO ............................................. 23
4.5. SOFTWARE .................................................... 24
4.6. SYSTEM .......................................................... 24
5. PHOTO ............................................................ 24
6. VIDEO ............................................................. 25
7. DIALER ............................................................ 26
8. MAP VIEW ....................................................... 26
9. OVERVIEW OF NAVIGATION SCREEN ......... 28
9.1. WHEN THE DESTINATION IS NOT SET ........ 28
9.2. WHEN THE DESTINATION IS SET ................ 28
9.3. DESCRIPTION OF ICONS ON THE
NAVIGATION SCREEN ................................... 31
9.4. JUNCTION VIEW ............................................ 32
9.5. 3D LANDMARKS AND BUILDINGS ................ 33
APPENDIX POI LEGEND ON THE MAP ................. 33
INTRODUCTION FOR MACTION TECHNOLOGIES,
INC. ................................................................. 36
Page 3

Page 3
PAPAGO
Disclaimer
The map data provided by this system is for reference only. The
user must determine their current location based on the actual
conditions.
The route plan, voice indication and junction information offered
by this system are recommendations generated routing
algorithms with an electronic map database. They are provided
for reference only and the user must follow actual road
conditions.
The user is required to follow local laws and drive safely. Do not
operate this system when the vehicle is in motion.
The GPS positioning results are provided for the user's
reference only. They should not affect the actual driving
behavior as this system is unable to guarantee accuracy.
The accuracy of GPS positioning may vary due to weather and
location (tall buildings/tunnels/underpasses/trees). Most GPS
do not work indoors as the GPS signal cannot pass through
buildings or metallic solar film on car windows. The quality of
GPS reception varies depending on individual hardware
characteristics. This system is not capable of determining
variances in positioning results due to hardware differences.
This system is provided only for non-commercial use. Maction
Technologies will accept no liability for any loss or damage
caused by the use of this system to the extent permissible by
law.
Use of this system constitutes your
consent to the above disclaimer
Page 4

Page 4
PAPAGO
Copyright and Trademarks
The copyright of this software is owned by Maction
Technologies, Inc.
This software is designed in Taiwan and is protected by the
Copyright Law of the R.O.C. Infringement of any kind is
prohibited and is subject to compensation to the maximum
amount for damages according to the law
PAPAGO! ® Car Navigation System for all platforms, registered
trademark No. 1040327, R.O.C.
PAPAGO! ® is a registered trademark or trademark of Maction
Technologies in Taiwan and/or other countries.
Turn-By-Tu rn®, Turn-By-Turn® is a registered trademark or a
trademark of Maction Technologies in Taiwan and/or other
countries.
Microsoft® is a registered trademark or trademark of Microsoft
Corporation in the U.S.A and/or other countries.
Windows® XP/ 2000/ 98/ Me are the registered trademarks or
trademarks of Microsoft Corporation in the U.S.A and/or other
countries.
All trademarks not mentioned here belong to their respective
owners.
Once the software is registered, the username or the
identification code of the device and the software registration
code cannot be changed. Even if the device is resold,
transferred or lent to other users, or the username is changed,
the information of the original registered owner of the software
cannot be changed but used continuously unless a new license
is purchased. (http://www.mobuy.com.tw)
Copyright © 2001-2009,
Maction Technologies, Inc.
All Rights Reserved.
Page 5

Page 5
PAPAGO
About Hardware
Using your PAPAGO! R6600 in a vehicle
CAUTION
1. Select an appropriate location for mounting the PAPAGO!
R6600 in a vehicle. Never place the P APAGO! R6600 where
the driver’s field of vision is blocked.
2. If the car’s windscreen is tinted with a reflective coating, it
may be athermancy and impact the GPS reception. In this
instance, please mount your PAPAGO! R6600 where is a
“clear area.”
3. To protect your PAPAGO! R6600 against sudden surges in
current, connect the car charger only after the car engine
has been started.
Safety precautions
Prolonged listening of music in maximum volume can damage
the ears.
About charging
1. Use only the charger supplied with your device. Use of
another type of charger will result in malfunction and/ or
danger.
2. This product is intended to be supplied by a LISTED Power
Unit marked with “LPS”, “Limited Power Source” and output
rated +5V DC/ 1.0A.
3. Use a specified battery in the equipment.
About the charger
1. Do not use the charger in a high moisture environment.
Never touch the charger when your hands or feet are wet.
2. Allow adequate ventilation around the charger when using it
to operate the device or charge the battery. Do not cover the
charger with paper or other objects that will reduce cooling.
Do not use charger while it is inside a carrying case.
3. Connect the charger to a proper power source. The voltage
requirements are found on the product case and/ or
packaging.
4. Do not use the charger if the cord becomes damaged.
5. Do not attempt to service the unit. There are no serviceable
parts inside. Replace the unit if it is damaged or exposed to
excess moisture.
About the battery
1. Use a specified battery in the equipment.
2. CAUTION: This unit contains a non-replaceable internal
Lithium Ion battery. The battery can burst or explode,
releasing hazardous chemicals. To reduce the risk of fire or
Page 6

Page 6
PAPAGO
burns, do not disassemble, crush, puncture, or dispose of
fire or water.
3. Important instructions (for service personnel only)
¾ Caution: Risk of explosion if battery is replaced by an
incorrect type. Dispose of used batteries according to
the instructions.
¾ Replace only with the same or equivalent type
recommended by the manufacturer.
¾ The battery must be recycled or disposed of properly.
¾ Use the battery only in the specified equipment.
Home charger-specific safety information
1. To charge your PAPAGO! R6600 from the mains power, use
the home charger supplied by PAPAGO as an accessory.
Using other home chargers with your PAPAGO could result
in serious injury or property damage.
2. Never use the charger if the plug or cords are damaged.
3. Allow adequate ventilation around the charger when using it
to operate your PAPAGO! R6600 or charge the PAPAGO!
R6600 battery. Do not cover the charger with paper or other
objects that will reduce ventilation. Do not use the charger
whole it if inside a carrying case or other container.
4. Ensure that the charger is connected to power source with
the correct fitting and voltage requirements. The voltage
requirement can be found on the home charger casing and/
or packaging.
5. Do not attempt to service the charger as this could result in
personal injury. Replace the charger if it is damaged or
exposed to excess moisture.
Internal battery-specific safety information
WARNING
The PAPAGO! R6600 contains a non-replaceable internal
lithium-ion polymer battery. The battery may burst or explode if
mishandled, releasing hazardous chemicals. To reduce the risk
of fire or burns, do not disassemble, crush or puncture the
battery.
CAUTION
1. Only use the correct mains power charger (sold separately)
or in-vehicle charger supplied by PAPAGO! R6600 to charge
the PAPAGO! R6600 internal battery.
2. Only use the PAPAGO! R6600 internal battery with the
PAPAGO unit.
3. The PAPAGO! R6600 battery will stop charging when the
ambient temperature is less than -100C or more than 600C.
Page 7
Page 7
PAPAGO
Hardware specification
Processor
SiRF Atlas IV( ARM 1 136/500MHz)
128MB RAM, most to receive 32 GPS signals
Aerial
Internal patch aerial
Battery
Un-swappable rechargeable Li-Ion battery cell
Output 5V, 1A
Input 12~24V DC
USB
USB 2.0
Volume
13.3x8.8x1.75(cm)
Weight
200g
Display
5”TFT with Touchscreen
Contrast 400:1
Brightness 350 nits
Resolution
480x272 Pixels(WQVGA)
Memory
2GB moviNAND Flash
Card slot
SD-HC memory card slotx1(8GB max)
Operation
environment
Temperature -10~ +600C
Relative humidity 10%~ 90%
Bluetooth
Support BT connected
TMC
Sensitive chip
FM frequency: 87~108.5 MHz
Page 8

Page 8
PAPAGO
Navigation System Overview
Welcome to the "PAPAGO! X5 GPS Navigation System"
developed by Maction Technologies!
PAPAGO! X5 GPS Navigation System Features
★3D landmarks
Uses advanced drawing technologies in mapping major
landmarks and buildings to provide a vivid view while driving on
the road.
★3D Buildings display in urban areas
Uses virtual 3D technologies to display real environment of all
urban streets.
★Junction View of national freeway/ expressway entrance
Picture-clear display of exit ramps, clearly showing their actual
status.
★Graphical navigation interface
A user-friendly navigation interface that is easy to use for people
of any age.
★High performance X5 navigation engine
Smooth 3D navigation display that shows every junction in
detail.
★Simple voice navigation directions
The voice navigation feature has been re-designed based on
the long-term experience of 17 professional drivers to provide
simple and easy to understand directions.
★Alternative route planning
The advanced smart routing algorithm can generate 3 types of
alternative route suggestions on the fly.
PAPAGO! X5 GPS Navigation System's Navigation Engine
★Smooth stutter-free display updates
★All new perspective offers wider and longer-ranged view
★Plan routes with multiple via points
★Trip computer and mileage log display
★New high-speed search engine for fast text and road number
searches.
★Distance and bearing display for search results
PAPAGO! X5 GPS Navigation System's Intuitive Guidance
Interface
★Clear and easy to read navigation information display
★Alternative routes planning function
★Pre-recorded human voice announcements
★Fully-featured data search engine for smart full text search of
roads, POI, junctions and coordinates.
★Sorting user-defined favorites
★Comprehensive route planning options
★Complete full-screen handwriting/ keyboard input unit
Page 9
Page 9
PAPAGO
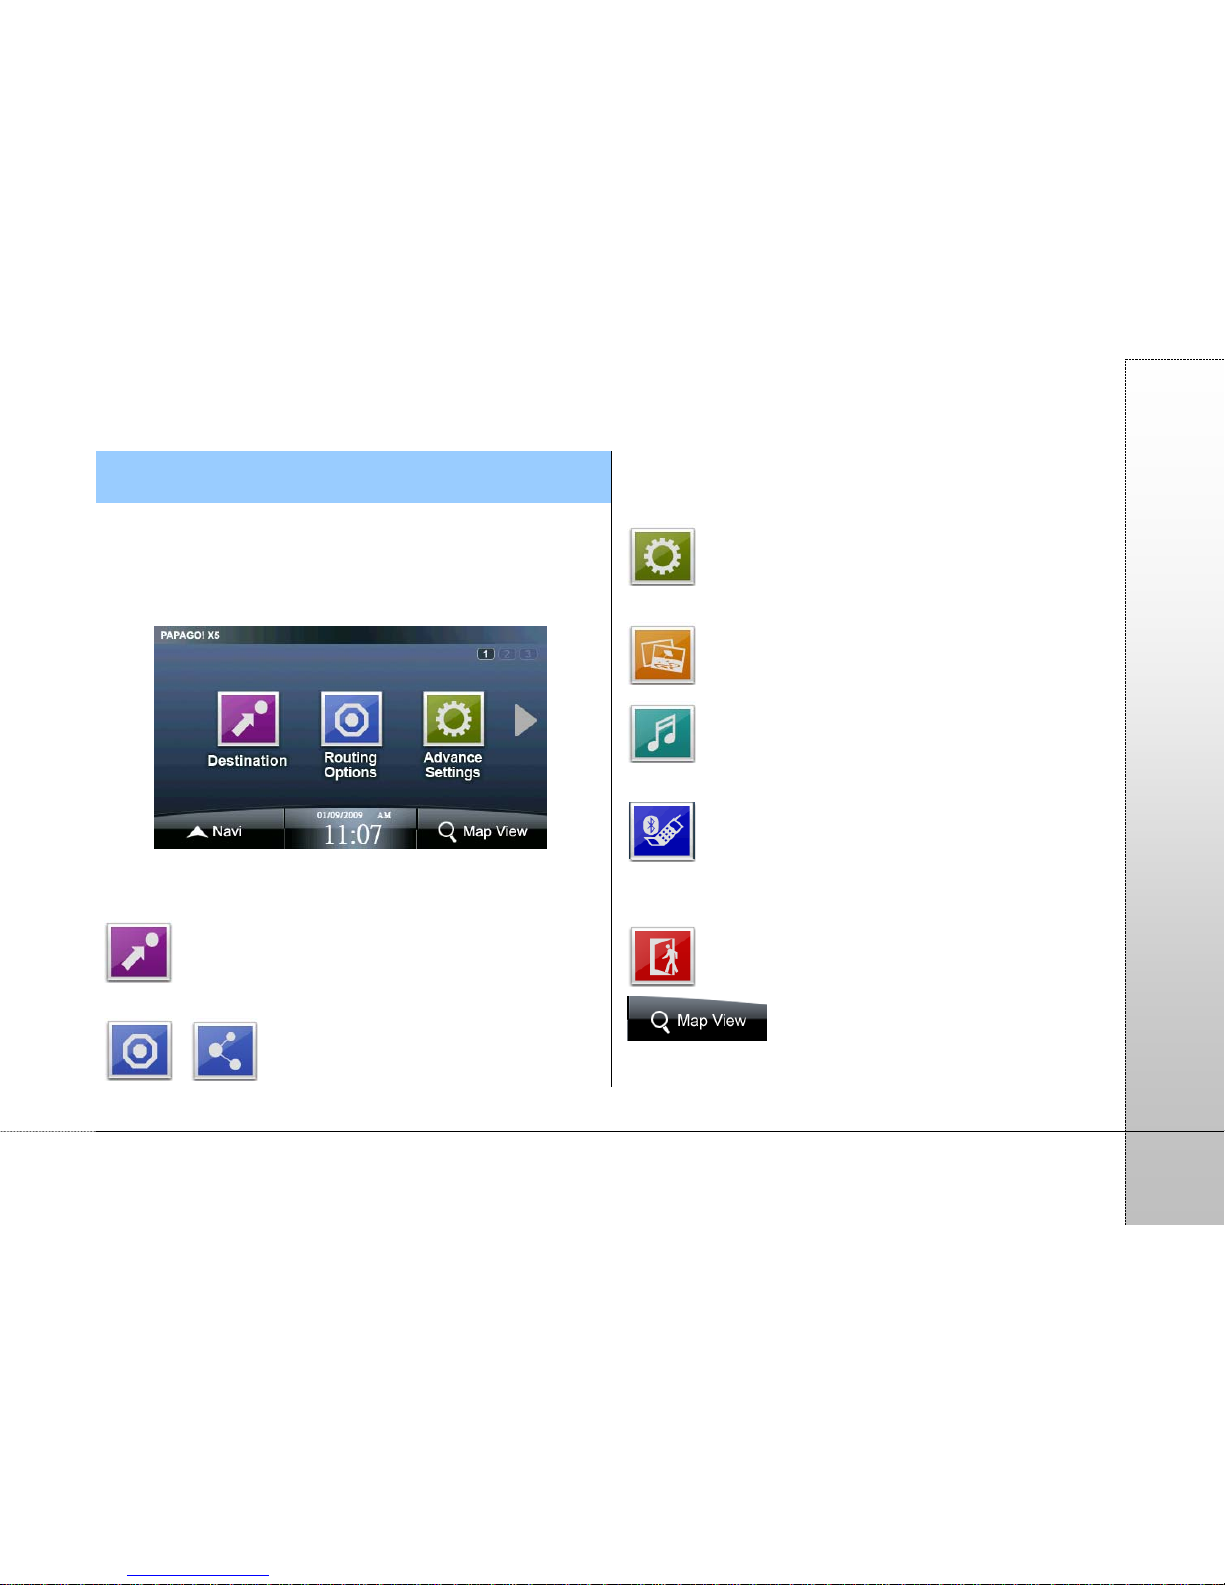
1. Overview of the Main Menu
When you enter the system, the main menu will display and you
can select the required function from here. The satellite time will
be displayed in the center of the main menu page. If the GPS is
not ready, the time will be displayed according to the system
time of the device.
Besides using the page through the main menu page, or you
can slide left and right turn pages in the way!
Destination: You could search for Destination by POI
or street/road name and set any Destination as Home or Office.
/ Routing options/ Routing: this option will
define the navigation route according to the selected
destinations and arrange the schedule for each destination. The
route planning methods can also be selected here.
Advanced: provides various settings of the system
and navigation functions.
Photo: Provides photo display features
Video: Supports a variety of audio and video outlets
play.
Dialer: The built-in Bluetooth on this device can be
connected with the mobile phone. The hands-free feature can
be enabled after the connection is ready.
Exit: Exit the PAPAGO! X5 GPS Navigation System.
Map View: set the destination or map related
settings from here.
Page 10
Page 10
PAPAGO
Navi: click here to enter the navigation
screen.
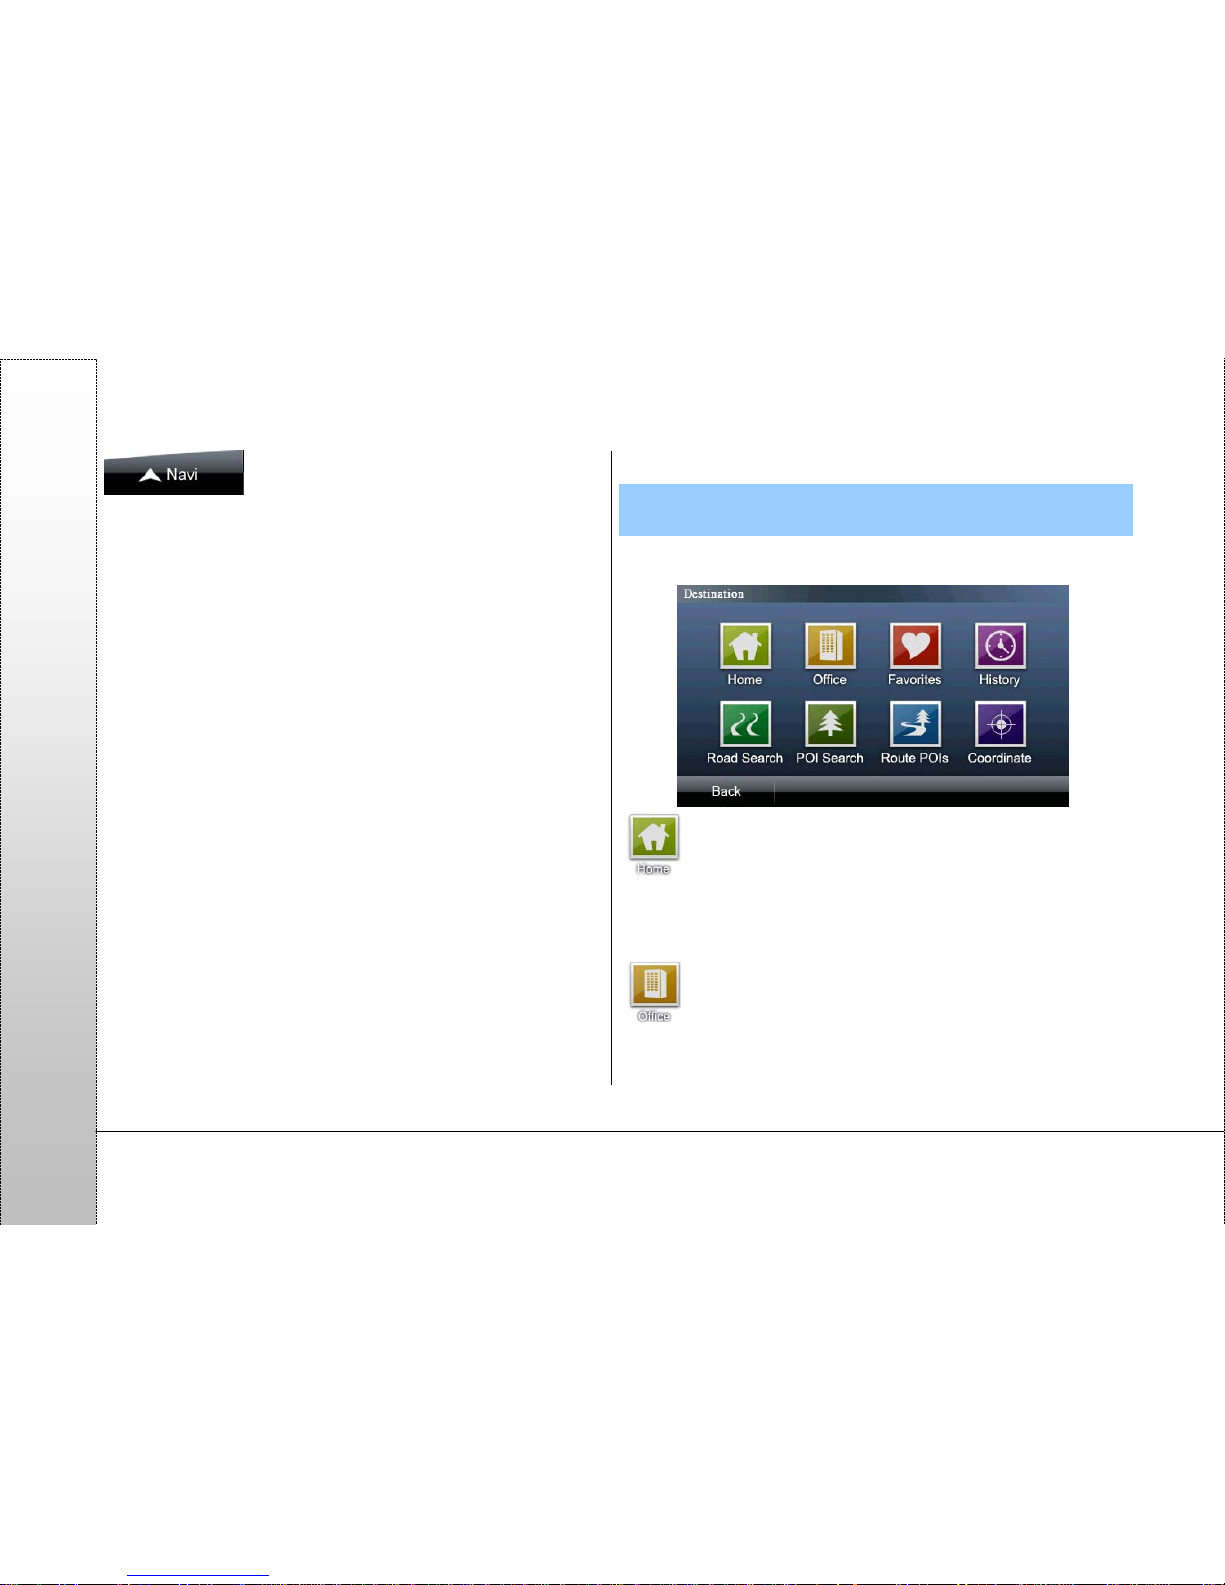
2. Destination
The following are some methods to find and set destinations.
Besides, you can set the destination via “Map View”.
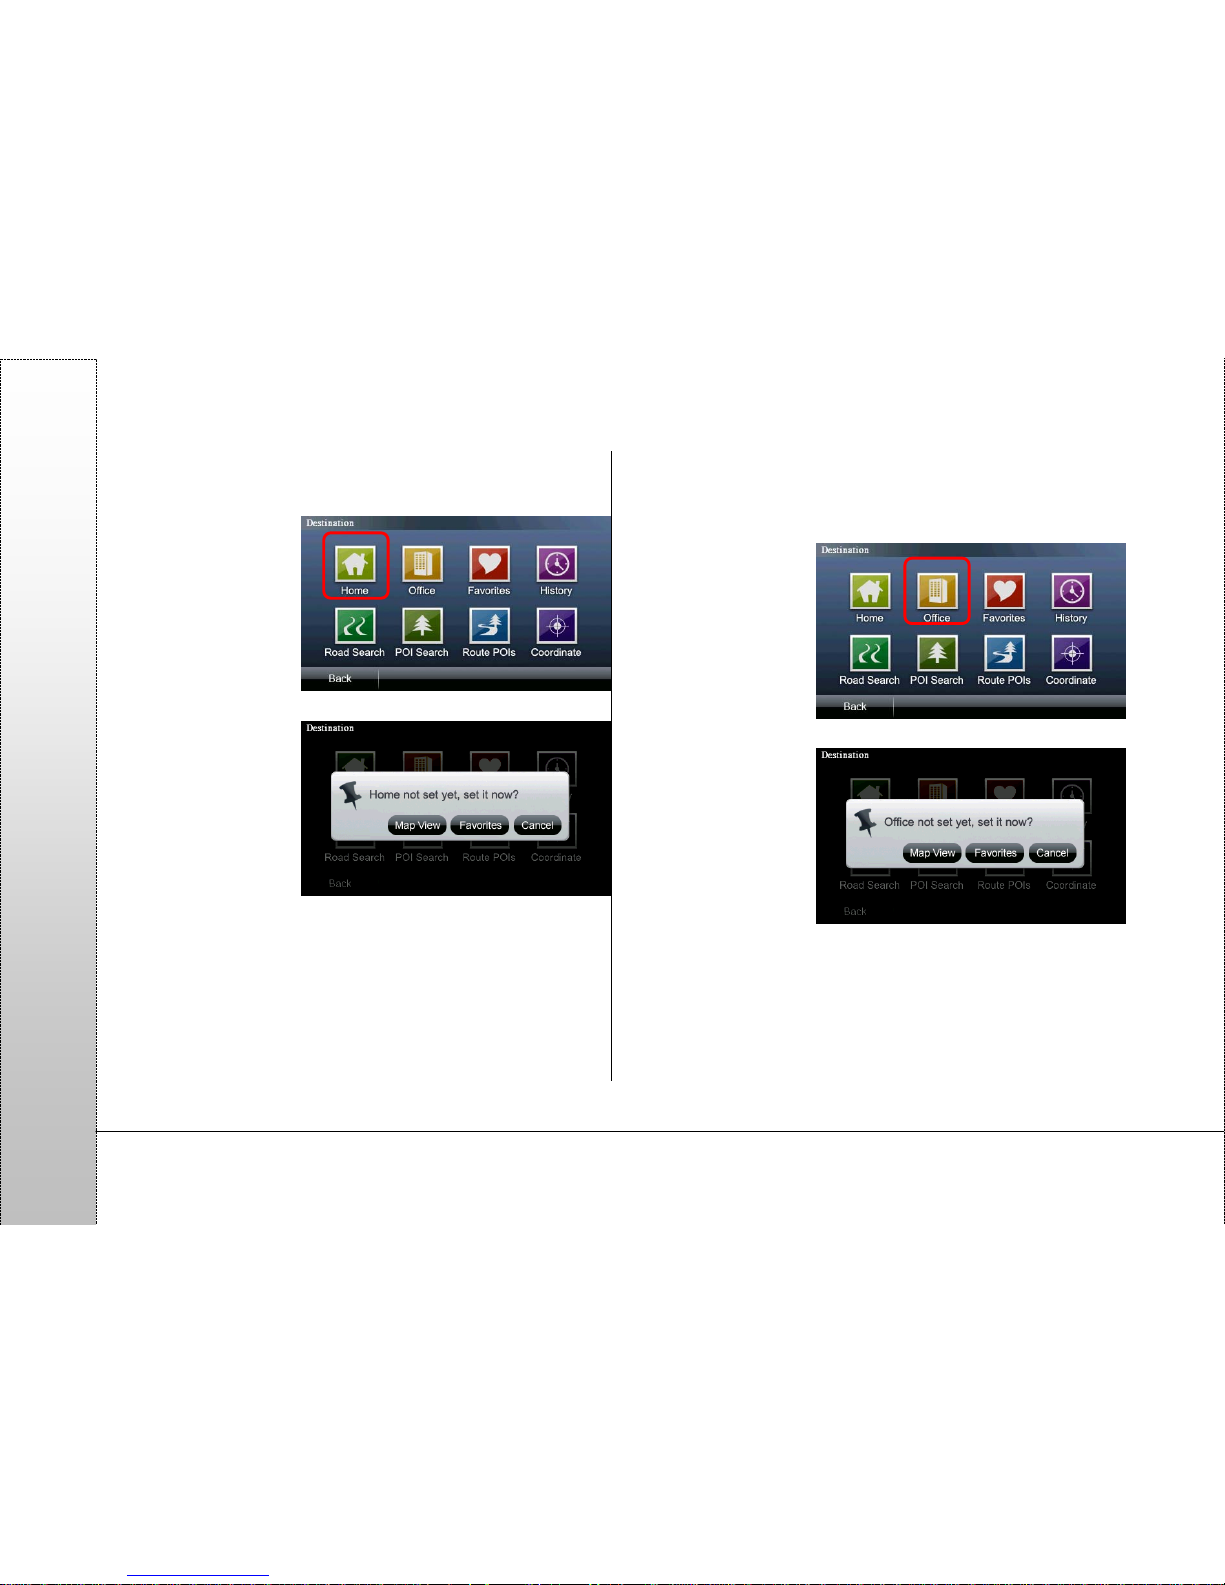
Home: when using this option for the first time, you need
to set your home location via “Map View” or “Favorites”. After
the initial setting, the system will define the route based on the
location you selected as the destination every time when you
click this button.
Office: when using this option for the first time, you need
to set your office location via “Map View” or “Favorites”. Af ter the
initial setting, the system will define the route based on the
location you selected as the destination every time when you
Page 11
Page 11
PAPAGO
click this button.
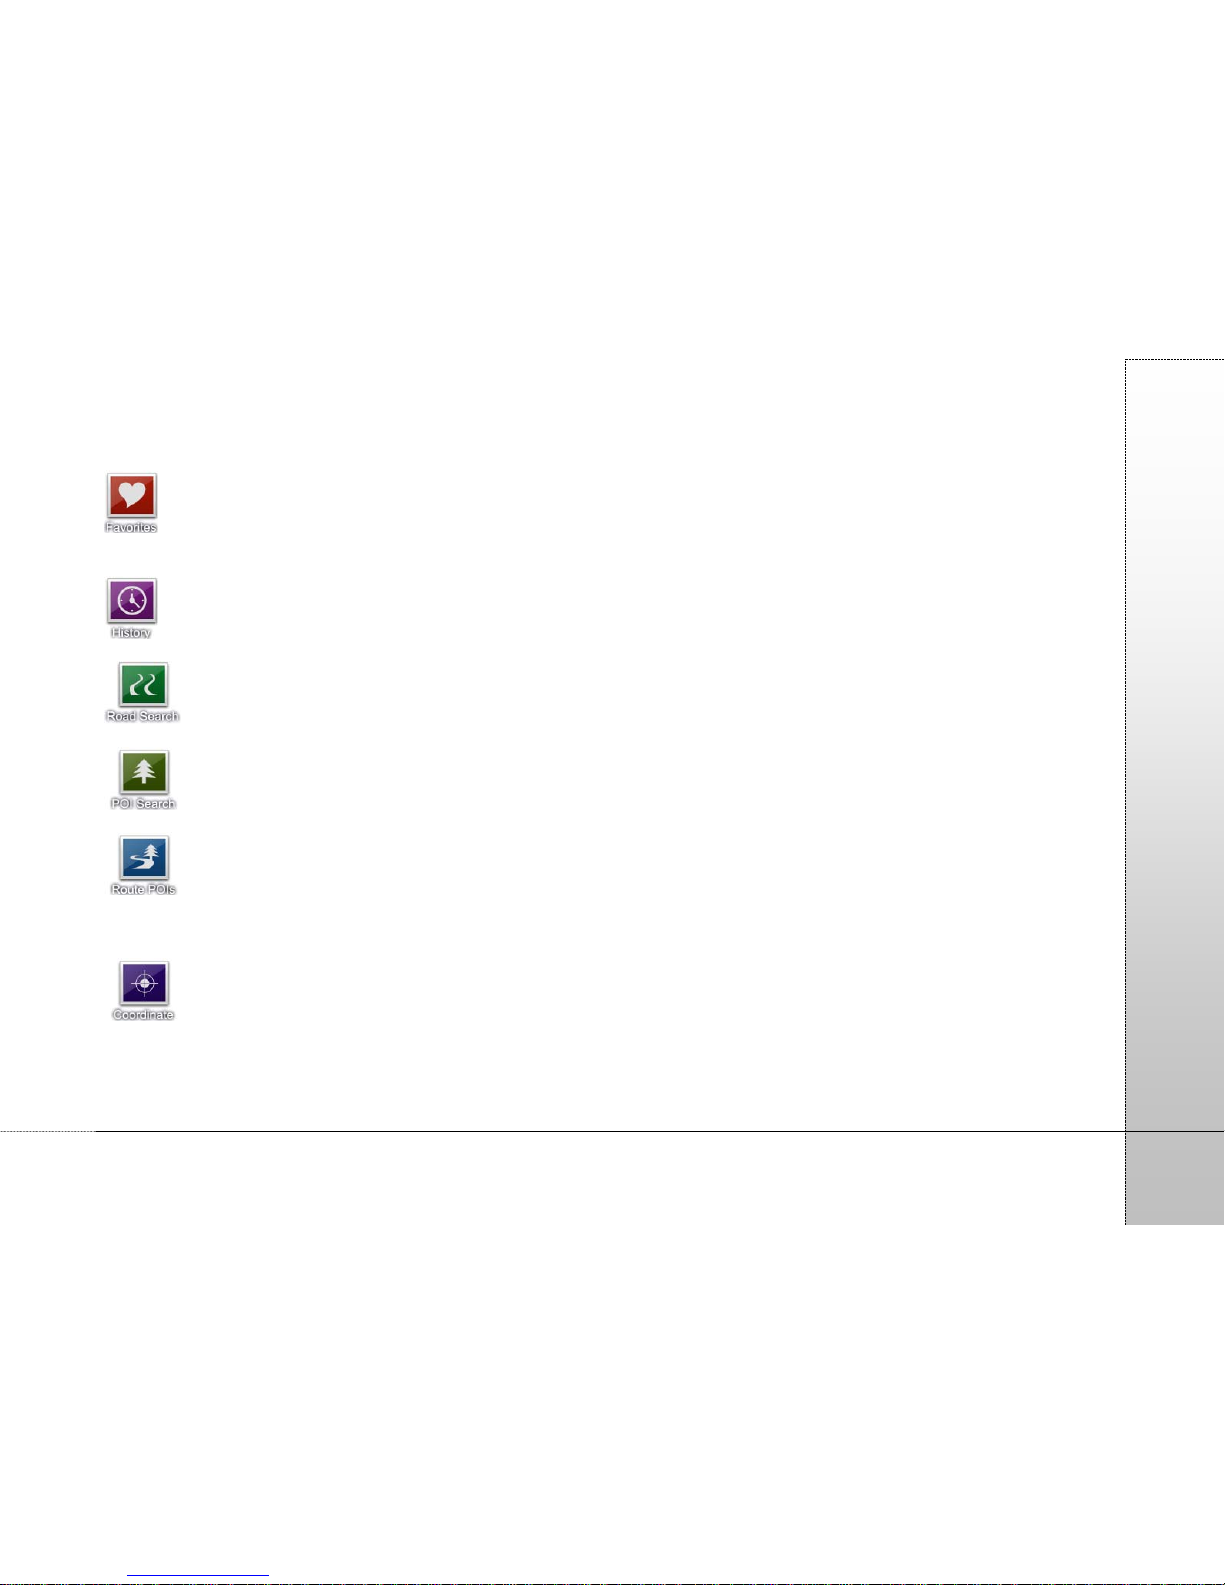
Favorites: POIs you frequently visit can be added to
"Favorites". They can then be quickly selected as the
destination next time.
History: the system will list the POIs or destinations that
were enquired previously.
Road Search: you can input the road or address data
and use it for destination setting.
POI Search: find the POI information using this option
and set it as the destination or make other settings.
Route POIs: after the destination is set, use this
option to search for the POIs between the start point and the
destination and make further settings of individual navigation
points.
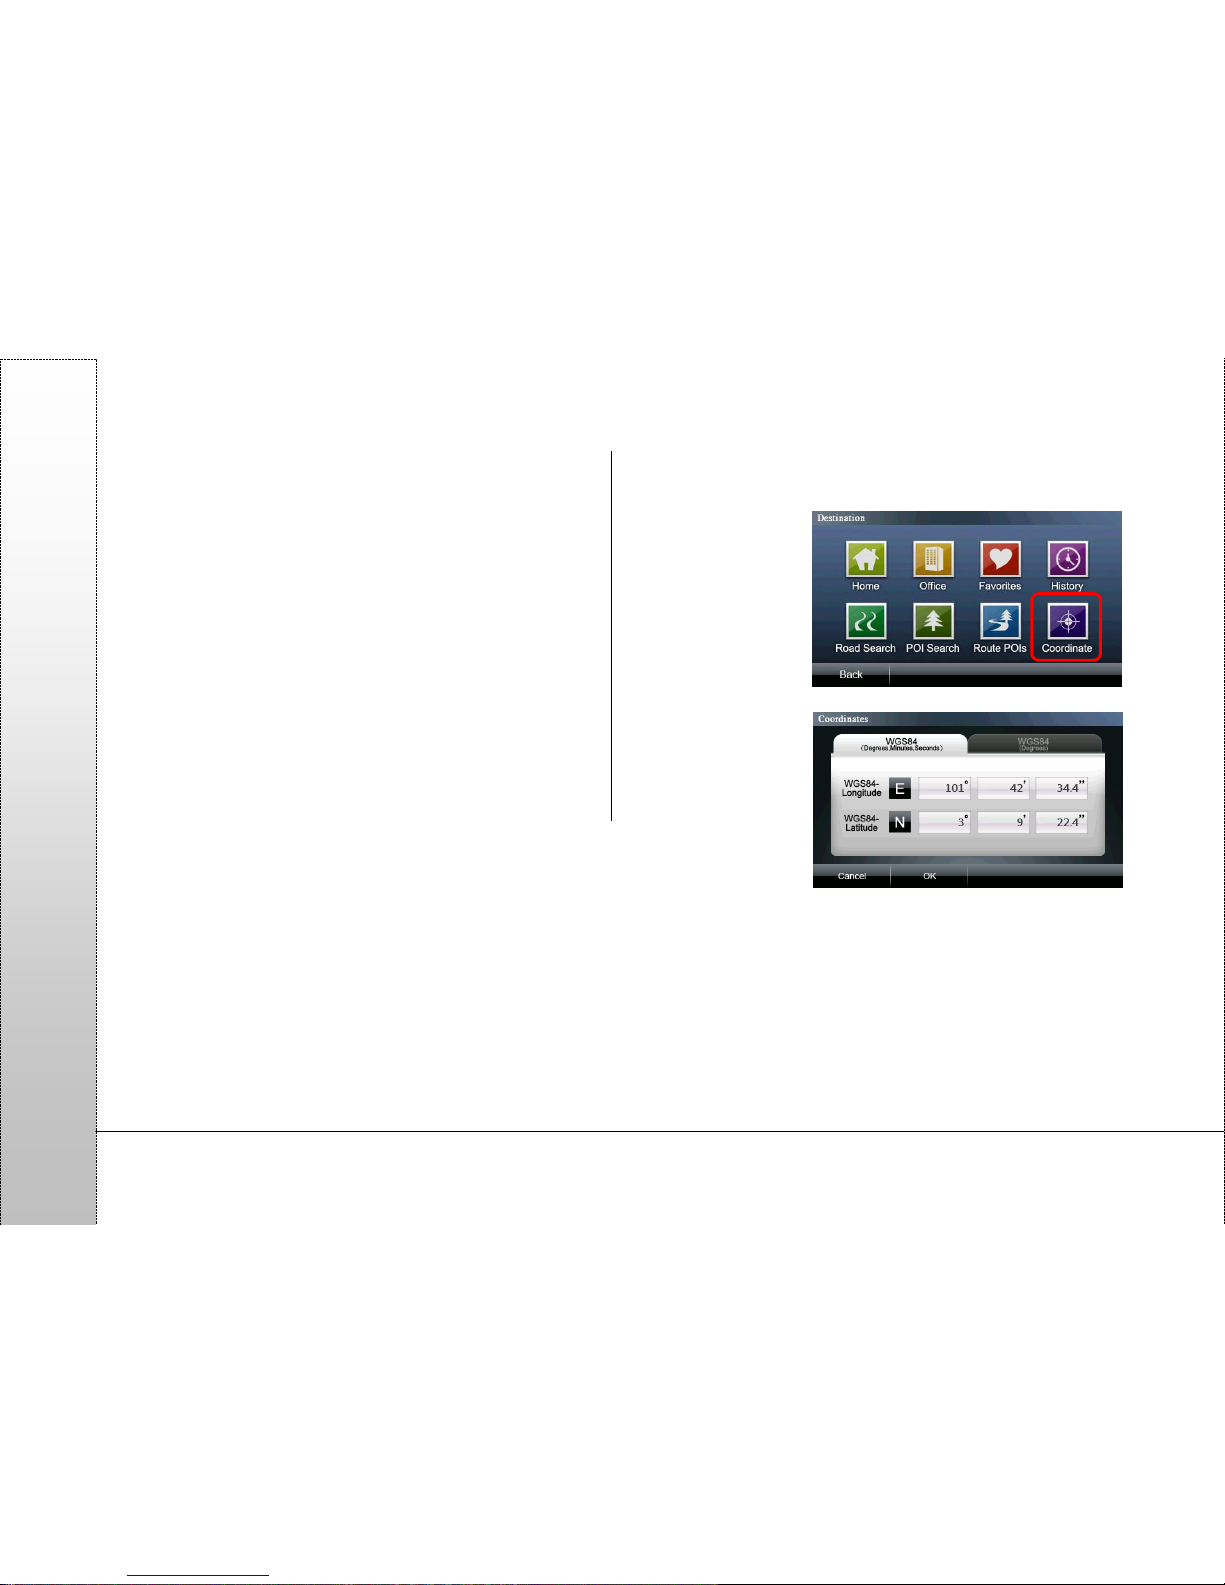
Coordinate: you can input the coordinates value to
move the center of the map to the location as indicated by the
value. Then you can make a setting of the destination.
Page 12
Page 12
PAPAGO
2.1. Home
(1) When clicking for
the first time, follow
the instructions to
set the location of
“Home”. Afterwards,
the system will
quickly navigate to
the location of your
“Home”.
(2) Use "Map View" or
"Favorites" to set
the location of
"Home".
2.2. Office
(1) When clicking for
the first time, follow
the instructions to
set the location of
“Office”. Afterwards,
the system will
quickly navigate to
the location of your
“Office”.
(2) Use "Map View" or
"Favorites" to set
the location of
"Office".
Page 13

Page 13
PAPAGO
2.3. Favorites
POIs that you
frequently visit can be
added to "Favorites", so
that they can be set
quickly as the
destination next time.
In the “Favorites” menu,
you can click the menu
option to view the
detailed map and set
the navigation
destination. Y ou can
use the functions such
as “Class”, “Sort”, “Add
photo POIs” and
“Delete All” in the “Management” option to manage the
“Favorites”.
(1) Clicking on the
menu content will
display a detailed
map showing the
location that you
need and start
the navigation.
(2) When entering
the map view
page in the menu, the selected POI or address location will
be indicated by the icon [
], and the location indicated by
this icon will be used as the base point for navigation or
advanced settings. If another location on the screen is
clicked, an animation icon [
] will be displayed, and the
location indicated by this icon will be used as the reference
point for navigation
or advanced
settings.
(3) In the map view
page, you can
make various
settings for the
reference point.
Details of the
reference point are
displayed on the upper left corner.
a. Delete: delete the data of a specified POI.
b. Edit: edit the telephone number, address, type and thumbnail
of a specified POI.
c. Set as Home: set the POI as “Home.”
d. Set as Office: set the POI as “Office”.
e. POIs Nearby: search for all types of POIs nearby a specified
POI.
《Tip》
Place the photos in the program folder, Navi\Photo, and you
can use the edit page of the POI map view in “Favorites” to
replace the thumbnail. The photo file should have a
thumbnail data field to display the thumbnail.
Page 14

Page 14
PAPAGO
Click “Management” to
manage or edit all POI
data.
a. Class: classify all
POI data in the
“Favorites”.
a-1 You can edit a
specific type or use
“Add” to add a new
type.
a-2 You can change the
“Icons List” here and
select whether to
display on the map or
notified by voice. You
can also delete the type
here.
b. Sort: If a lot of data
are displayed, you
can use the “Sort”
function to classify
the data you need.
Data can be sorted
by “Frequency”,
“Distance”, “Date”
and “Category.”
c. Add Photo POIs:
This option can add
the photos that
have GPS
coordinates in the
system to “Favorite”
and use the
coordinates to
navigate. Photo
files that have GPS coordinates can be placed in the program
folder Navi\Photo, so the system can read these photos in
this folder when you add photo POIs.
d. Delete All: Delete
all POI data in the
“Favorites.”
《Tip》
“Delete” option is not available to the types “Undefined” and
“Speed Camera.
Page 15

Page 15
PAPAGO
2.4. History
The system will display
a list of POIs or
destinations that were
searched, allowing the
user to quickly set the
destination.
When entering the
History menu, you can
select data content to
view the detailed map
and quickly set the
destination, find nearby
POIs, or add to
Favorites. You can also
use the “Sort” or
“Delete All” functions to manage the history data. The history
records will be marked differently according to search properties
so records can be classified or identified for easy search.
Even though you quit the search result view page without any
setting, the system will save the search result data in “History”
and mark it with “
.”
If the destination is set during data search, the data will be
saved in “History” and marked with “
.”
In addition, the data saved in the “Favorites” will be marked with
“
” in “History”.
When there are a
large number of data,
use the "Sort" function
to show the record
you need.
Class Options:
display history records
according to the
search methods, including 4 kinds of classification methods:
“All”, “Search Record”, “Find” and “Favorites”.
Sorting Method: sort the data further based on the selected
sorting method, including 4 methods: “Frequency", “Distance”,
“Date” and “Category”
<For example>
If “Search Record” is selected from <Class Options> and
“Frequency” is selected from <Sorting Method>, the system
will display the history records of “Search Record” first and
then sort the records by “Frequency”
Page 16

Page 16
PAPAGO
2.5. Road Search
You can use “Road
Name” and “Junction”
as search conditions to
find road information
and quickly set the
destination.
Alphanumeric input:
an input method using
alphabet letters and
numbers to search for
data. This input method
is embedded with an
intelligent search
function, which can
filter the road names
according to the
selected search conditions while inputting. Buttons that do not
meet the search conditions will be disabled so as to improve the
convenience of input.
Handwriting input:
the left area is used for
handwriting while the
right area is used to
compare the
recognition results.
After writing, you can
select the recognition
result in the
comparison area on
the right side.
Digital input:
an input method using
numbers to search for
data. This input
method is embedded
with an intelligent
search function, which
can filter the road
names according to
the selected search
conditions while inputting. Buttons that do not meet the search
conditions will be disabled so as to improve the convenience of
input.
Page 17

Page 17
PAPAGO
2.6. POI Search
You can use this option
to search for all types of
POIs. After you select
the search scope and
classify the searched
POIs, the system will
list the matched POIs
and you can quickly set
the destination.
Clicking a single entry
of POI data will display
the map view of that
POI. In addition,
clicking [
] switch to
the navigation
screen .
Keywords: search for
the POI data that matches the keywords.
2.7. Route POIs
After setting the
destination, you can
use “Route POIs” to
find the POIs along
the selected route.
Besides checking the
POIs along the route
in the menu, you can
also use the “POIs
Class” to make further
searching. The menu
also provides the map
view of a single POI
and switch to the
navigation screen.
Page 18
Page 18
PAPAGO
2.8. Coordinate Input
You can input the
coordinates value to
move the center of the
map to the location as
indicated by the value.
Then you can make
setting of the
destination.
Page 19

Page 19
PAPAGO
3. Routing Options/ Routing
3.1. Routing Options
When the destination is not set, the system provides the
function of “Routing Options” to enable the selection of
transportation and routing methods.
[Transportation]: allows you to select the transportation you use.
The [Routing Methods] will vary depending on the transportation
you select.
[Routing Methods]: including options of Recommended,
Shortest Distance and Highway Avoided.
[Tollway Avoidance]: while routing, the system will avoid using
tollways.
[Route Plan]: this page can be accessed while setting a single
or multiple destinations. You can adjust the sequence of each
navigation point in this page.
3.2. Routing
After setting the destination, you can enter the "Routing" page to
view the complete map of the planned route.
(1) Routing Result:
the system will
list all roads
from the start
point to the
destination and
use a
conspicuous
arrow to indicate
turning direction with a cue of remaining distance. You can
click on the road name to view the map of the road.
Page 20

Page 20
PAPAGO
(2) Stop Navi: if you
want to reset the
navigation route
or cancel the
routing before the
navigation is
completed, you
can select “Stop
Navi.”
(3) Tool: this option
provides functions
of “Alternative”,
“Routing Options”,
“Route Plan” and
“Simulation”. Y ou
can set and select
the navigation
routing functions
using this option.
a. Alternative: the system will use different methods to plan
three routes from the start point to the destination and each
of the routes is
displayed in
different color. You
can click the button
below to switch
routes. The route
displayed in blue is
the original route.
b. Route POIs: After setting the destination, you can use
“Route POIs” to find the POIs along the selected route.
c. Routing Options: the “Routing Options” provides the same
function as the “Routing Options” when the destination is
not yet set.
d. Route Plan: this
page may be
accessed while
setting a single
or multiple
destinations. Y ou
can adjust the
sequence of
each navigation
point in this page.【
] and [ ] indicate that the sequence
of the navigation points can be adjusted down or up. [ ]
means the navigation points may be deleted.
e. Simulation: a navigation simulation with 3D scenery will be
performed according to the planned route.
Page 21

Page 21
PAPAGO
4. Advanced Settings
You can make the setting of all navigation and system functions
in “Advanced Settings”.
4.1. General
(1)System Status
The top icon and the
center column show
the GSP reception
status. In this area,
you can check the
distribution of the GPS
signal, positioning
status and errors,
altitude, time and dates.
In the distribution map of the GPS signal, the red color indicates
that the signal is unstable and unlocked; the blue color indicates
that the satellite signal is locked.
Battery: display the device's current status of power reception.
Coordinates: display the GPS longitude and latitude.
(2)Voice Type
select “TTS(Eng)”,
“English”, “Malay(Male)
“Malay(Female)”,.”Ma
ndarin”, “Cantonese”,
“Hokkien”, ”Indonesia
n(Male), ”Indonesian(Female).
(3)Interface
select “English”,
“Melayu”, “Simplified
Chinese” or
《Tip》
For positioning after first time opening navigation system,
please wait 5 to 10 minutes to complete the positioning
process.
Page 22

Page 22
PAPAGO
“Traditional Chinese”, “Indonesia”.
(4)Track Log
File Name: While “New” is selected, the system will generate a
filename automatically.
Record Time: display
the accumulated time to
generate the track log.
File Size: display the
accumulated size of the
track log file.
Track Log List: all
track logs are stored
here and you can select
the track log displayed
on the map from here.
Kml: Provide export to
KML format, After you
can be exported to the
Navi\MagaNaviser
folder catch extraction
KML archives.
4.2. Navi Info
(1)Speed Camera
Warning
you can select from the
settings “Closed”,
“Voice Warning” and
“Alarm”.
(2)Speed W a rning
you can select from the
settings “Closed”,
“Voice Warning” and
“Alarm”.
(3)Junction View
set whether to On or Off the junction view function.
(4)Toll Gate Warning
set whether to On or Of the toll gate warning function.
《Tip》
Display of 3D buildings will affect the performance of the
navigation.
Page 23

Page 23
PAPAGO
4.3. Navi Screen
(1)Destination reference line
define whether to display a straight reference line from the
current position to the destination on the navigation screen.
(2)3D Building
define whether to display 3D buildings on the navigation screen,
no 3D buildings will be displayed on the navigation screen.
(3)Day/Night Mode
you can switch the brightness mode of the navigation screen
according to day or night, including three modes, "Auto", “Day”
and “Night.”
(4)North-Up in 2D
Navi Mode
the map is shown
north-up on the 2D
navigation.
(5)Auto Zooming
this option can
automatically zoom in
or out junctions in the
navigation mode.
(6)Icon T ype
this option can change GPS Icon in the navigation mode.
4.4. Location Info
(1)Time Zone
Provide time zone
change.
(2)Show Administrative Area Name
You can select whether to show the current location of the
status, such as Administrative Area Name at the bottom of the
navigation screen.
(3)Show Road Name
You can select whether to show the current location of the
status, such as Road Name at the bottom of the navigation
screen.
Page 24

Page 24
PAPAGO
4.5. Software
(1)Version
Provide version information..
(2)Map Switch
If there are multiple
map files in the system,
you can switch maps
here.
If the map is switched
when the routing is
completed, the
navigation route will be
cleared.
4.6. System
(1)BlueTooth
Provide Bluetooth
function turned on or
off.
(2)Calibration
Provide screen
calibration.
(3)Factory Default
Provide factory restore.
5. PHOTO
To view the SD card or SD\DCIM folder of the photos
information, if the photo no thumbnail information, only
display the date of the filename and photographs.
Click to select a folder
icon, you can retrieve
the folder。
Page 25

Page 25
PAPAGO
Select a photo with
the inspection of the
leaflet pictures
6. VIDEO
Supports MP3, WAV, WMV, audio and video outlets play, a
machine multipurpose, providing much more service!
Please insert the multimedia archive placed SD card or
SD\Media folder, to play.
Page 26
Page 26
PAPAGO
7. Dialer
The built-in Bluetooth on this device can be connected with the
mobile phone. The hands-free feature can be enabled after the
connection is ready.
Before you use BT, please check the option about BT in
Advanced Settings turn on.
Place select the Dialer icon, and operate this function step by
step.
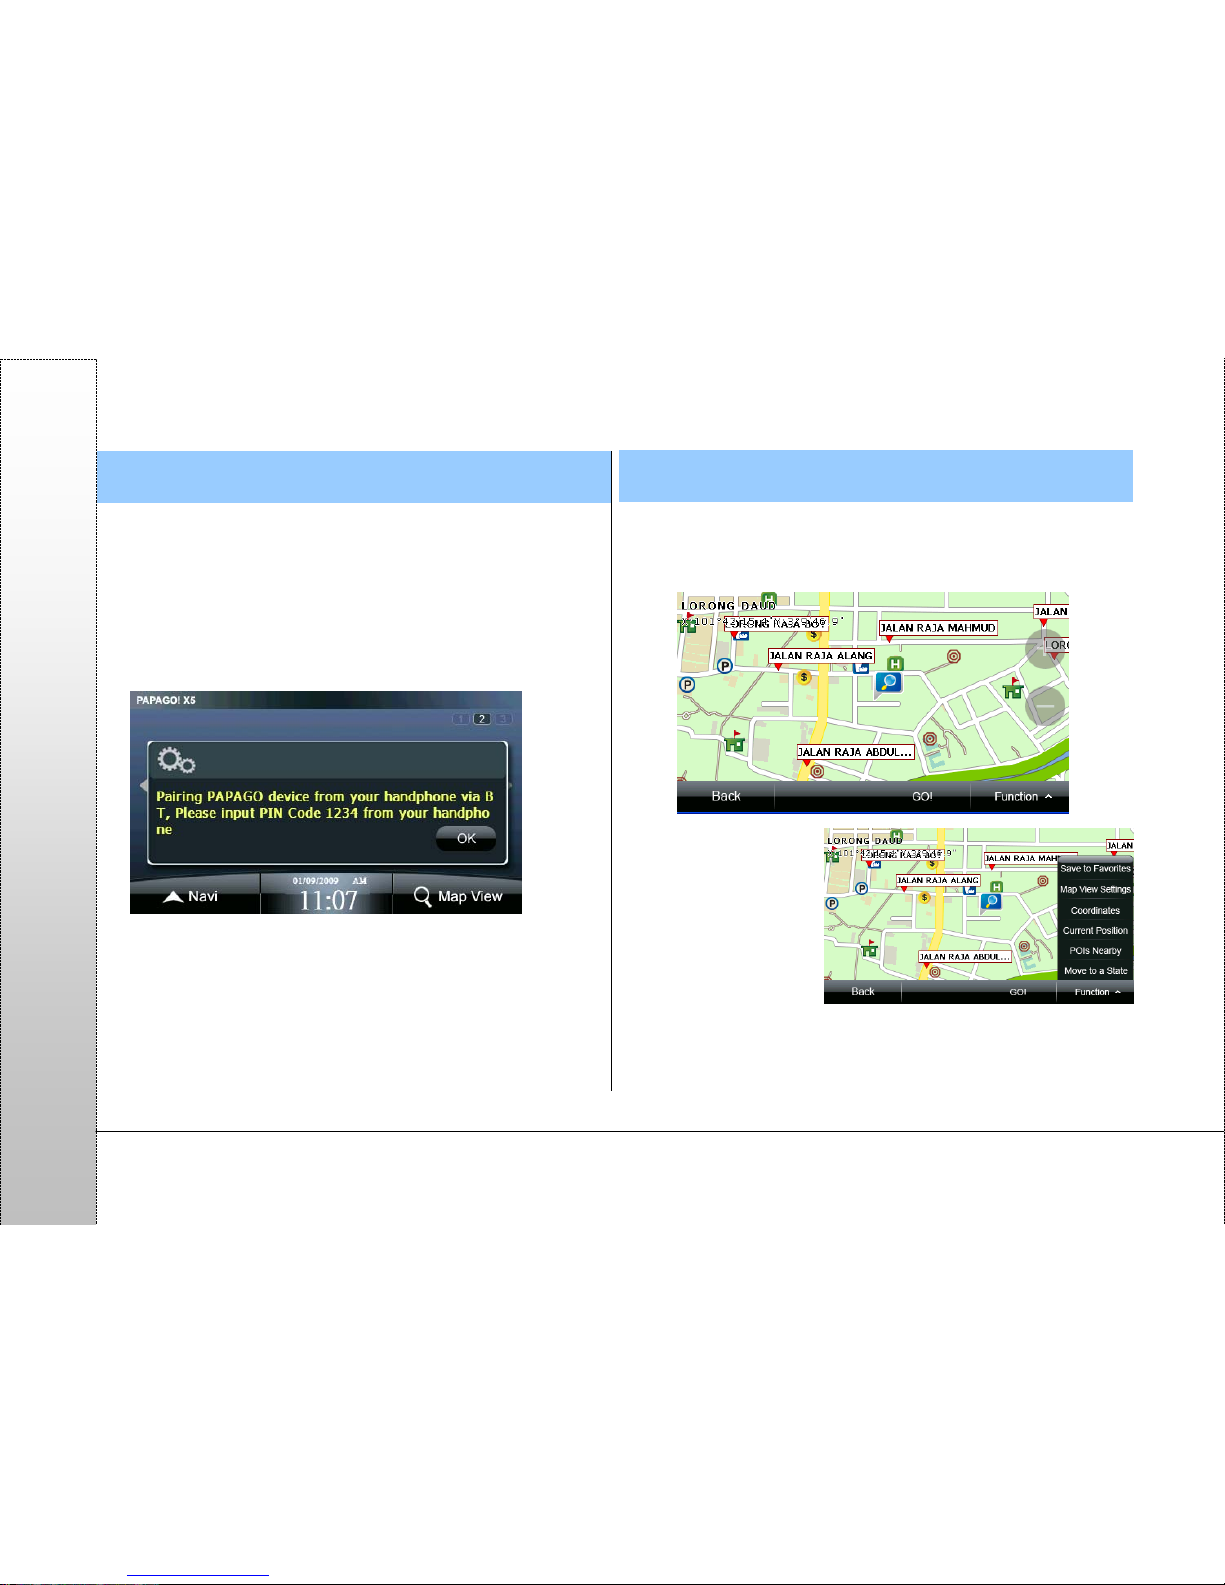
8. Map View
A detailed map browsing and easy to use search function is
provided. The user can freely drag the display or select any
location to set it as "Destination", search for "POIs Nearby" or
"Save to Favorites".
(1) Function: click this
option to select the
function you want
to perform. The
function setting
here will be
performed based
on the last selected
location on the
screen.
Page 27

Page 27
PAPAGO
a. Save to Favorites:
add the selected
location to
“Favorites”. Y ou can
also use the
coordinates position
to specify the POI to
be added.
b. Map View Settings:
set the display
method for the
coordinates on the
map and determine
whether to display
road names and
POI names in the
“Map View” mode. If
you want to set a specific type, select “Show User Defined
Name” and then select the type to be displayed from the
“Setting”.
c. Coordinates: you
can input the
coordinates to move
the center of the
map to the location
as indicated by the
value.
d. Current Position: if the GPS is ready, selecting this option
will move the center of the map to the current position.
e. POIs Nearby
:
access the “POIs
Nearby” page,
where you can
search for the POIs
nearby the
locations indicated
by the icons [
]
and [ ] on the
map.
f. Move to a state: quickly move center of the map to the
district you want to
enquire.
《Tip》
Refer to the Appendix for the information of the POI icons on
the map.
《Tip》
Utilize the “POIs Class” function to quickly find the POI
information you need.
Page 28
Page 28
PAPAGO
9. Overview of Navigation Screen
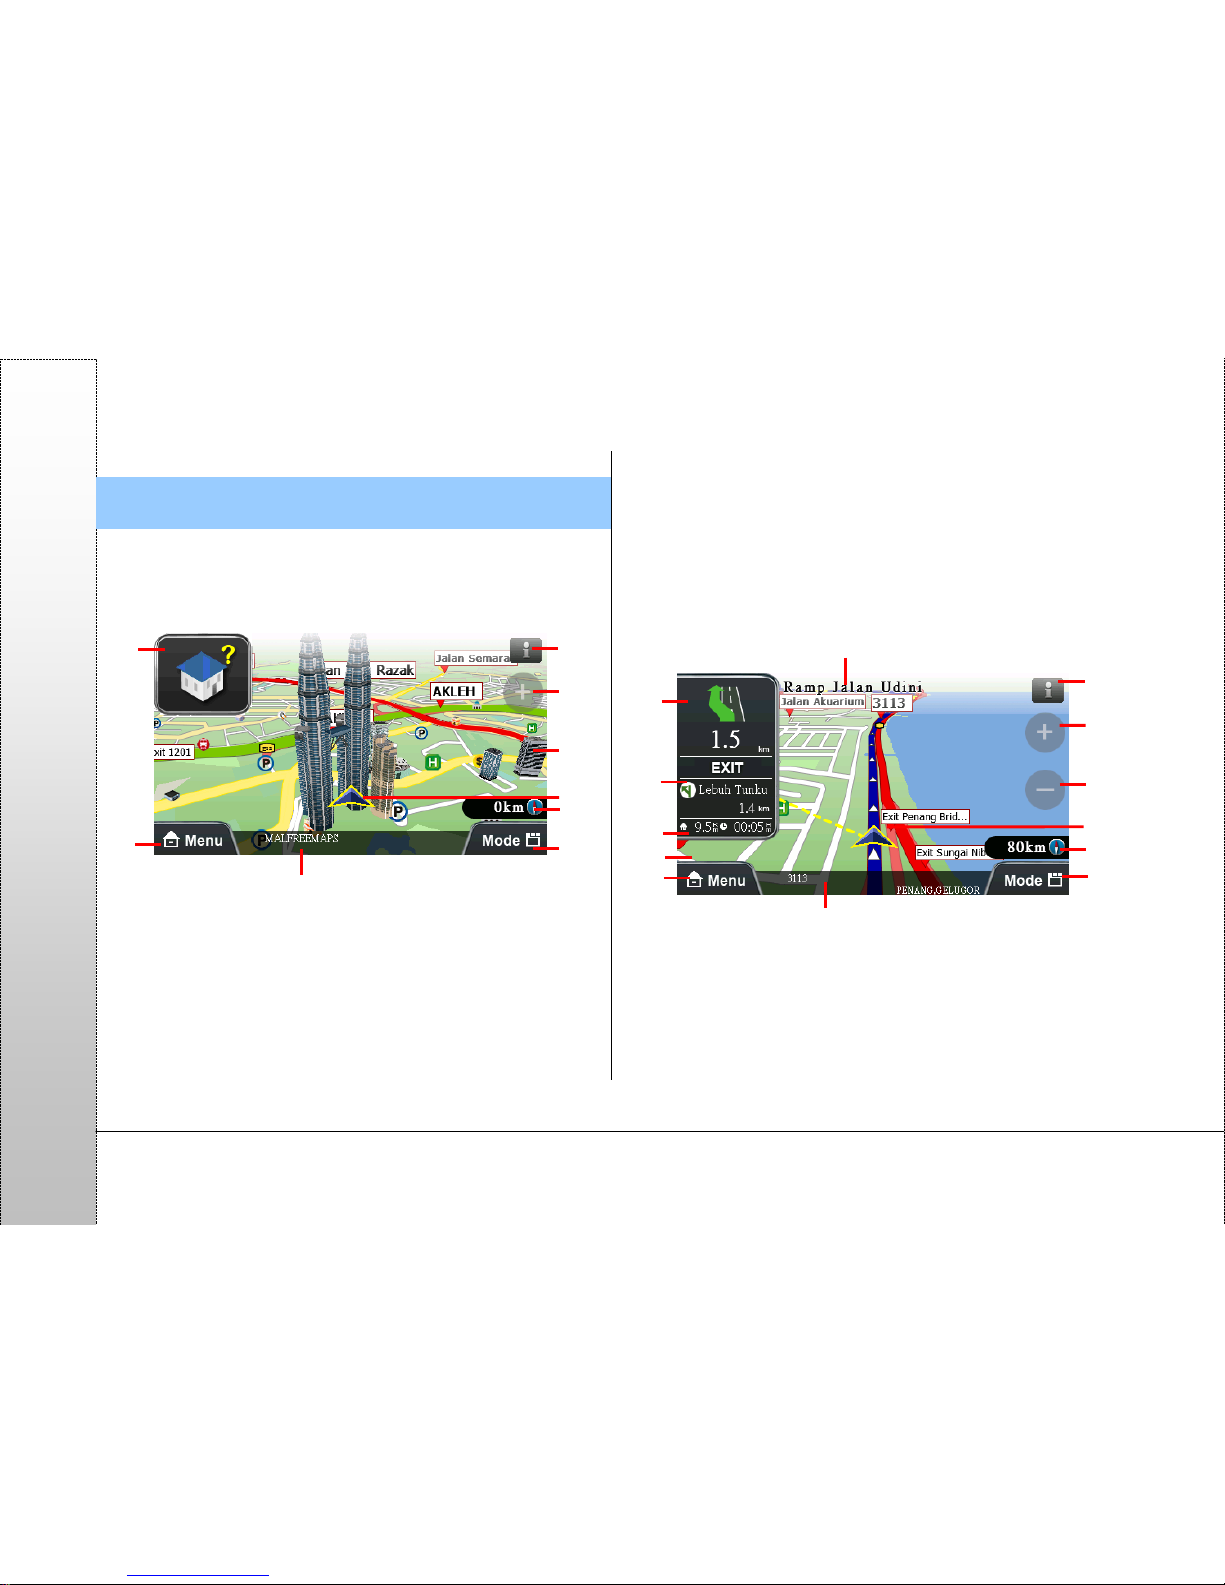
9.1. When the destination is not set
If the destination is not set yet, a icon will show at the upper left
corner as an indication (Refer to 9.3 for details of the icons).
1 System message area
2 Navigation status area
3 Main menu shortcut
4 Road name and administrative information of the current
location(while the navigation screen is clicked, the
corresponding road name or POI name will display).
5 Car speed, compass
6 Navigation mode switch button
7 GPS position
8, 9 Zoom in and out buttons of the navigation map scale
9.2. When the destination is set
(1) 3D navigation screen
After the destination has been set, a blue guidance line and a
flashing yellow arrow will appear on the navigation screen.
Please follow the guidance and instructions to move (Refer to
9.3 for details of icons).
1 System message area
2 Name of the next junction
3 Indicates turning direction at the next junction/ Indication of
road information/ Indication of remaining distance to the next
junction/ Indication of junction view
4 Indicates a freeway or expressway ramp exit/ indication of
3
7
6
8
9
3
4
6
5
9
8.10
11
12
13
14
5
12 421
7
Page 29

Page 29
PAPAGO
tollbooths / Indication of the turning direction and the
remaining distance to the junction following the next junction
5 Left: estimated total distance to the destination; Right:
estimated required time to arrive at the destination
6 Main menu shortcut
7 Road name and administrative information of the current
location(while the navigation screen is clicked, the
corresponding road name or POI name will display).
8 Car speed, compass
9 Navigation mode switch button
10 Shortcut to go back to the current location (while the
navigation screen is clicked, the shortcut [
] will
display).
11 GPS position
12, 13 Zoom buttons of the scale
14 Shortcut to rotate the navigation map (while the navigation
screen is clicked, the shortcut [
] will display.)
(2) 2D Navigation Screen
The 2D navigation mode will display the navigation screen at
depression angle. If the “North-up in 2D Navi Mode” option in
the “Navi Screen” of the “Advanced” is selected, the map will be
locked in north-up. Otherwise, the map will be displayed with
driving direction-up.
[Car head-up in 2D Navigation Mode]
[North-up in 2D Navigation Mode]
《Tip》
If the satellite signal is not received, the GPS status icon at
the upper left corner will flash as an indication. While driving
in tunnels and the satellite signal is lost, the system will
simulate the drivin
g
situation automatically.
Page 30

Page 30
PAPAGO
(3) Text Mode Navigation
You can use the “Mode” shortcut to switch to the text mode
navigation. The system will from top to bottom list the road
name, turning direction icon, distance and district information.
1 District
2 Remaining distance to the next junction, turning direction icon
3 Estimated total distance to the destination, estimated time
required to arrive at destination
(4) Route Computer Mode
The route computer mode provides information such as turning
direction, accumulated time of using the navigation system and
mileage.
1 Current speed
2 Turning direction icon and remaining distance to the junction
following the next junction (continuous junctions)
3 Turning direction icon and remaining distance to the next
junction
4 From left to right: GPS time, the longitude and latitude of the
current position, altitude
5 From left to right: the accumulated time of using the navigation
system, accumulated mileage, top speed and average speed
6 Reset all record data
7 Compass
123
1
3
4
6
5
7
2
Page 31

Page 31
PAPAGO
9.3. Description of icons on the navigation screen
Type Icon Name Description
System
messag
e area
(Upper
right
corner
on the
navigatio
n
screen)
System
Status
button
Check the information
of GPS, power and
etc.
When all system
statuses are normal,
this icon will display.
GPS status
If the GPS is not
ready, this icon will
flash. Click to check
details.
Power
status
If the power is not
sufficient, this icon will
flash. Click to check
details.
Charging
status
If the power is not
sufficient and the
charger is plug in, this
icon will flash Click to
check details.
Mute On
When the mute
function is enabled,
this icon will flash.
/ /
Bluetooth
status
Show Bluetooth
connection status,
Click to check details.
Navigati
on status
area
(Upper
left
corner
on the
navigatio
n
screen)
Record
tracks
If Record Tracks is
selected in
《Advanced》→
《Track Log》, this
icon will display on
the navigation screen
as an indication.
Destination
not set
If entering the
navigation screen
without setting the
destination, the
system will display
this icon as an
indication.
Satellite
positioning
If the satellite
positioning is still in
progress, this icon will
display as an
indication.
On an
unknown
road
If you drive on the
road whose
information is not
shown on the map,
this icon will display
as an indication.
Not on the
planned
route
If not driving on the
planned route, this
icon will display as an
indication.
Page 32

Page 32
PAPAGO
Via point
If multiple
destinations are set,
this icon will display
as an indication when
you are approaching
a via point.
Destination
While approaching
the destination, this
icon will display as an
indication.
Navigati
on
informati
on area
(Left
side of
the
navigatio
n
screen)
Interchange
This icon will display
as an indication when
you are approaching
an interchange.
Tollbooth
This icon will display
as an indication when
you are approaching
a tollbooth.
9.4. Junction View
If “Enable” display is selected for junction view in 《Advanced》
→《Navi Info》, the junction view will be displayed in a split
window.
Page 33

Page 33
PAPAGO
9.5. 3D landmarks and buildings
Adapting advanced drawing technologies in mapping major
landmarks and buildings to provide a vivid view while driving on
the road.
Appendix POI Legend on the map
Icon Name Icon Name
All POIs
HDB TOWN COUNCIL AND
BRANCH
FFICE/GOVERNMENT
OFFICE/COURT HOUSE
AREA
NAME/TOWN
POST OFFICE
AIRPORT
POLICE STATION/BEAT
PETROL STATION
HOSPITAL/CLINIC/POLYC
LINIC/PHARMACY
P ARKING AREA
HOTEL/RESORT
TRAIN STATION CONVENIENCE
FERRY TERMINAL
SHOPPING CENTRE
BUS STATION
SCHOOLS
BANK
LIBRARY
Page 34

Page 34
PAPAGO
Icon Name Icon Name
LIBRARY
CINEMA/
THEATRE; HALL
AND
AUDITORIUM
SPORT/STADIUM
TOLL
PARK/RECREATION
AREA
PUBLIC
BUILDING
SEAPORT/FERRY
TERMINAL
POSTAL
ZOO/ANIMAL PARK
TENNIS COURT
FIRE STATION
EMBASSY/HIGH
COMMISSION
GOLF COURSE
CHURCH
CASH
DISPENSER/ATM
TAXI STAND
TIRES &
BATTERY/WORKSHOP
UNIVERSITY/COL
LEGE
Icon Name Icon Name
COMMUNITY
CENTRES/CLUBS
STARBUCKS
BUSINESS
OLDTOWN WHITE
COFFEE
SUPERMARKET
SHELL
MACDONALD
PETRONAS
KFC
SPC
ADDRESS
DINING/ FOOD POI
REST AREA
ESSO
BUGERKING
MOBIL
4D/TOTO
BHP
PIZZA HUT
CALTEX
Page 35

Page 35
PAPAGO
Icon Name Icon Name
RECREATIONAL
INTERNATIONAL
CLUBS
VET
MAYBANK
CLINIC/POLYCLINI
C/PHARMACY/CHI
LDCARE CENTRE
CIMB
RHB
CHINESE TEMPLE
HONG LEONG
BANK
MONUMENT
UOB
MOSQUE
OCBC
SIKH
TEMPLES/INDIAN
TEMPLE
DBS
PUBLIC BANK
HSBC
HOSPICE
CONDOMINIUM &
PRIVATE HOUSING
Icon Name
CITIBANK
SYNAGOGUES
SPEED CAMERA
CHILDCARE CENTRE
/KINDERGARTEN
STUDENT CARE
CENTRE
Page 36

Page 36
PAPAGO
Introduction for Maction Technologies, Inc.
Maction Technologies, Inc., established in Taipei, Taiwan in
2001, is the largest developer of the e-map navigation software
in Taiwan and the top 3 developer of e-map software in the
world. PAPAGO! e-map has over 70% of market share in
Taiwan.
Mr. Leon Jian, the president of Maction, has extensive
experience in the GIS and Mobile software fields. With practical
technology and sincere business conceptions, we quickly
entered the international market. The navigation map software
of Maction Technologies are promoted in Taiwan, Hong Kong,
China, Southeast Asia, Singapore, Malaysia, Thailand, Europe,
and the U.S.A, and we have customers on 5 continents, 38
countries, and 4,731 cities, creating a sales volume of more
than 1 million e-map navigation software packages in the global
market. We established branches in Shanghai and Thailand in
2007 and became a partner of Nokia navigation systems. We
cooperate with all our partners in the world to boost the sale of
all product lines. Sincerity, reliability, resolve and stable financial
structures ensure our partners security against risks
.
In addition to e-map navigation systems, we also provide
PaPaGO! SDK map elements, PaPaGO! Online map, paper
maps, Smartphone products and PDA software. We also
operate an e-commerce website in Taiwan.
● [R&D]
.PAPAGO! Car Navigation System series (Symbian S60
platform)
.PAPAGO! Car Navigation System series (PC + all PDA
platforms)
.PAPAGO! Taiwan e-map series (PC only)
.PAPAGO! Online map service
.PAPAGO! SDK professional GIS map platform
.PAPAGO! Paper map series (Taiwan)
.
Taiwan National Tourism Electronic Map of Tourism Bureau, R.O.C. (PC)
.
KingMap Europe navigation e-map of 18 countries
.KingMap U.S.A navigation e-map of 50 states
.KingMap navigation e-map of Singapore
MapKing e-map of Asia for all platforms (cooperating with 7
technology companies in HK, China and Asia)
.MapHero e-map of China (cooperating with MEDIA Press/
SINOMAPS Press in Shanghai)
Landstar e-map of China
HandyMap e-map of South Africa for all platforms (cooperating
with MobiTrak)
.SmartMap map service for cell phones, Smartphone, Symbian,
LBS platforms
.RapidCodec professional portable GIS map platform
.Monster Chinese for all platforms of Windows CE Chinese
system
.PocketGenius, smartest mobile information platform of the
Chinese community
.Presentation DX, mobile presentation software (compatible
with Microsoft Power Point slides)
.MoneyTracer, best account book software for Picket PC
.Dung Cleanser, mobile entertainment software for Pocket PC
Page 37

Page 37
PAPAGO
● [Marketing]
. MoBuy Town Online Shopping: http://www.MoBuy.com.tw
Largest PDA e-commerce website in the Chinese community,
providing software and peripheral devices for PDA. A reliable
e-commerce website reviewed by the MOEA, R.O.C. A safe,
comfortable, convenient, fun and price-guaranteed online
shopping mall.
. International Partners
Maction's partners locate all over the world in Taiwan, Hong
Kong, China, Southeast Asia, North America and Europe.
Maction Technologies, Inc.
4F, No. 200 GangQi Road, NeiHu District, Taipei City, Taiwan
R.O.C.
Tel: +886-2-87510123
Fax:+886-2-87511323
Customer Service Hotline: +886-2-26593008
http://www.mactiontech.com
PAPAGO! ® GPS Navigation System
PAPAGO! R6600 Navigation
User Guide
Copyright © 2009, Maction Technologies, Inc., All Rights
Reserved.
Prepared by VIVI Tsai
User Guide © 2009, Maction Technologies, Inc., All Rights
Reserved.
Maction Technologies, Inc
.
Monday to Friday: 9:00 to 12:00, 13:30 to 17:30 (except for
weekends and national holidays)
Tel: +886 2-26593008
Fax: +886 2-87511323
http://www.mactiontech.com
http://www.papago.com.tw
Online Customer Support:
http://www.papago.com.tw/Service/
11/18/2009
Page 38

Regulatory Approvals
FCC Statement
This equipment has been tested and found to comply with the limits for a Class B digital
device, pursuant to Part 15 of the FCC Rules. These limits are designed to provide reasonable
protection against harmful interference in a residential installation.
This equipment generates, uses and can radiate radio frequency energy and, if not installed and
used in accordance with the instructions, may cause harmful interference to radio communications. However, there is no guarantee that interference will not occur in a particular installation.
If this equipment does cause harmful interference to radio or television reception, which can be
determined by turning the equipment off and on, the user is encouraged to try to correct the
interference by one of the following measures:
Reorient or relocate the receiving antenna.
Increase the separation between the equipment and receiver.
Connect the equipment into an outlet on a circuit different from that to which the receiver
is connected.
Consult the dealer or an experienced radio/TV technician for help.
To assure continued compliance, any changes or modifications not expressly approved by the
party responsible for compliance could void the user's authority to operate this equipment.
(Example - use only shielded interface cables when connecting to computer or peripheral
devices).
FCC Radiation Exposure Statement
This equipment complies with FCC RF radiation exposure limits set forth for an uncontrolled
environment. This equipment should be installed and operated with a minimum distance of 20
centimeters between the radiator and your body.
This device complies with Part 15 of the FCC Rules. Operation is subject to the following two
conditions:
(1) This device may not cause harmful interference, and
(2) This device must accept any interference received, including interference that may cause
undesired operation.
This transmitter must not be co-located or operating in conjunction with any other antenna or
transmitter.
The antennas used for this transmitter must be installed to provide a separation distance of at
least 20 cm from all persons and must not be co-located or operating in conjunction with any
other antenna or transmitter.
.
 Loading...