

Papago GoSafe S30 Quick Start Manual
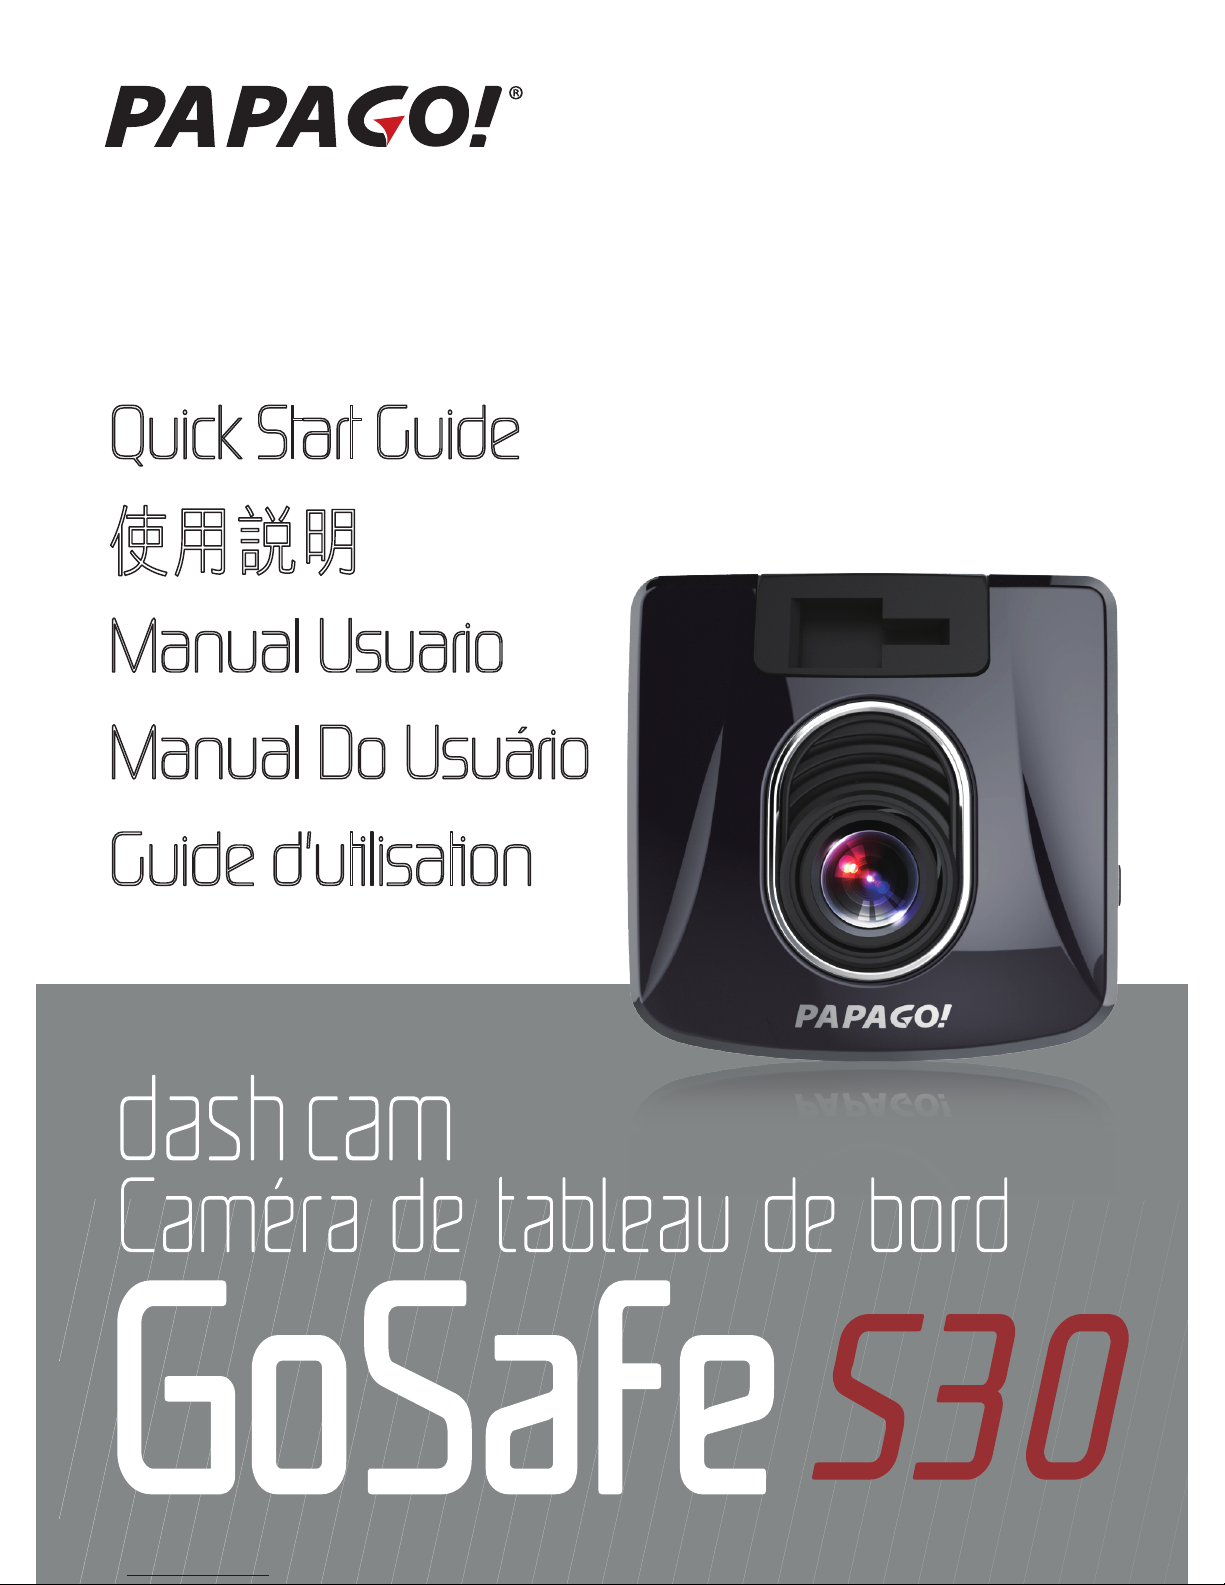
Quick Start Guide
使用說明
Manual Usuario
Manual Do Usuário
Guide d'utilisation

Disclaimer
1.Please follow the set-up and usage instructions in the print material that
came with this Dashboard Camera (dash cam) product.
2.You should not set/install this dash cam at a place that would obstruct or
reduce a driver’s view; make sure your usage comply with pertinent vehicle
codes of your state, province, territory or country.
3.You should post the required notices of recordation to occupants inside the
vehicle, if voices or other information/signal pertaining to in-vehicle
activities will be recorded.
4.You should not change the dash cam’s setting or mode of operation when
the vehicle is in motion.
5.The optional driving warning signals, including any visual or audible
reminder signals, should not replace your decision-making and judgment
that are needed for the proper operation of the vehicle.
6.You should not leave the dash cam in a visible spot when no one is inside
the vehicle, to avoid attracting break-ins to steal the unit, or other property.
7.You should avoid extended exposure of the dash cam to direct sunlight or
extreme temperatures (either high or low temperature) which tend to
degrade or damage the unit and its normal functionality.
8.You should examine, check and/or verify the dash cam at least every six
(6) months, including the associated memory cards, to ensure the video
reception and recording are working properly. For each use, you should
verify that the dash cam unit, the visible lights and the audible sounds are
working normally. If there are signs of non-operation or mal-function, you
should immediately seek to replace the product and check to see if the
product is covered under any applicable warranty.
9.The dash cam unit may have additional functionality, such as transmission
and recordation of audible or GPS signal or other identification information.
If you have privacy concerns about these functions, make sure you follow
the instruction to disable these functions.
10.You should use the dash cam unit in the way it is intended. You should
not use the dash cam unit in a way that would be illegal or that tends to
physically damage the unit, or tends to cause danger to the safe operation
of the vehicle or the occupants.
English 1
Attention please
【About Usage】
① If your vehicle still provides power to your cigarette 12 volt charger please
unplug the device when you turn off your vehicle and plan to have it
parked for a long period of time to avoid draining the power from your
vehicle's battery.
② The embedded Supercapacitors can help to save your recorded file even
if the power is off.
③ To avoid breaking down the file recorded, don’t eject the Micro SD Card
immediately after powering off.
④ We suggest using adapter provided.
⑤ To enable detecting and monitoring function, the power supplier must be
enabled.
【About Micro SD Card】
① Please use Micro SD card with the size / memory at least 8GB,Class 10
(up to 64GB).
② Be sure to format Micro SD card before usage.
To format card press once and you will get to settings----Format
SD Card------Confirm
③ The following information is the card capacity and recording time.
(reference only)
English 2
*Product features may change according to region in
which it is purchased without notice.
Micro SD Card 720P 30fps
8GB
16GB
32GB
64GB
140min
280min
560min
1180min
1. Product Introduction
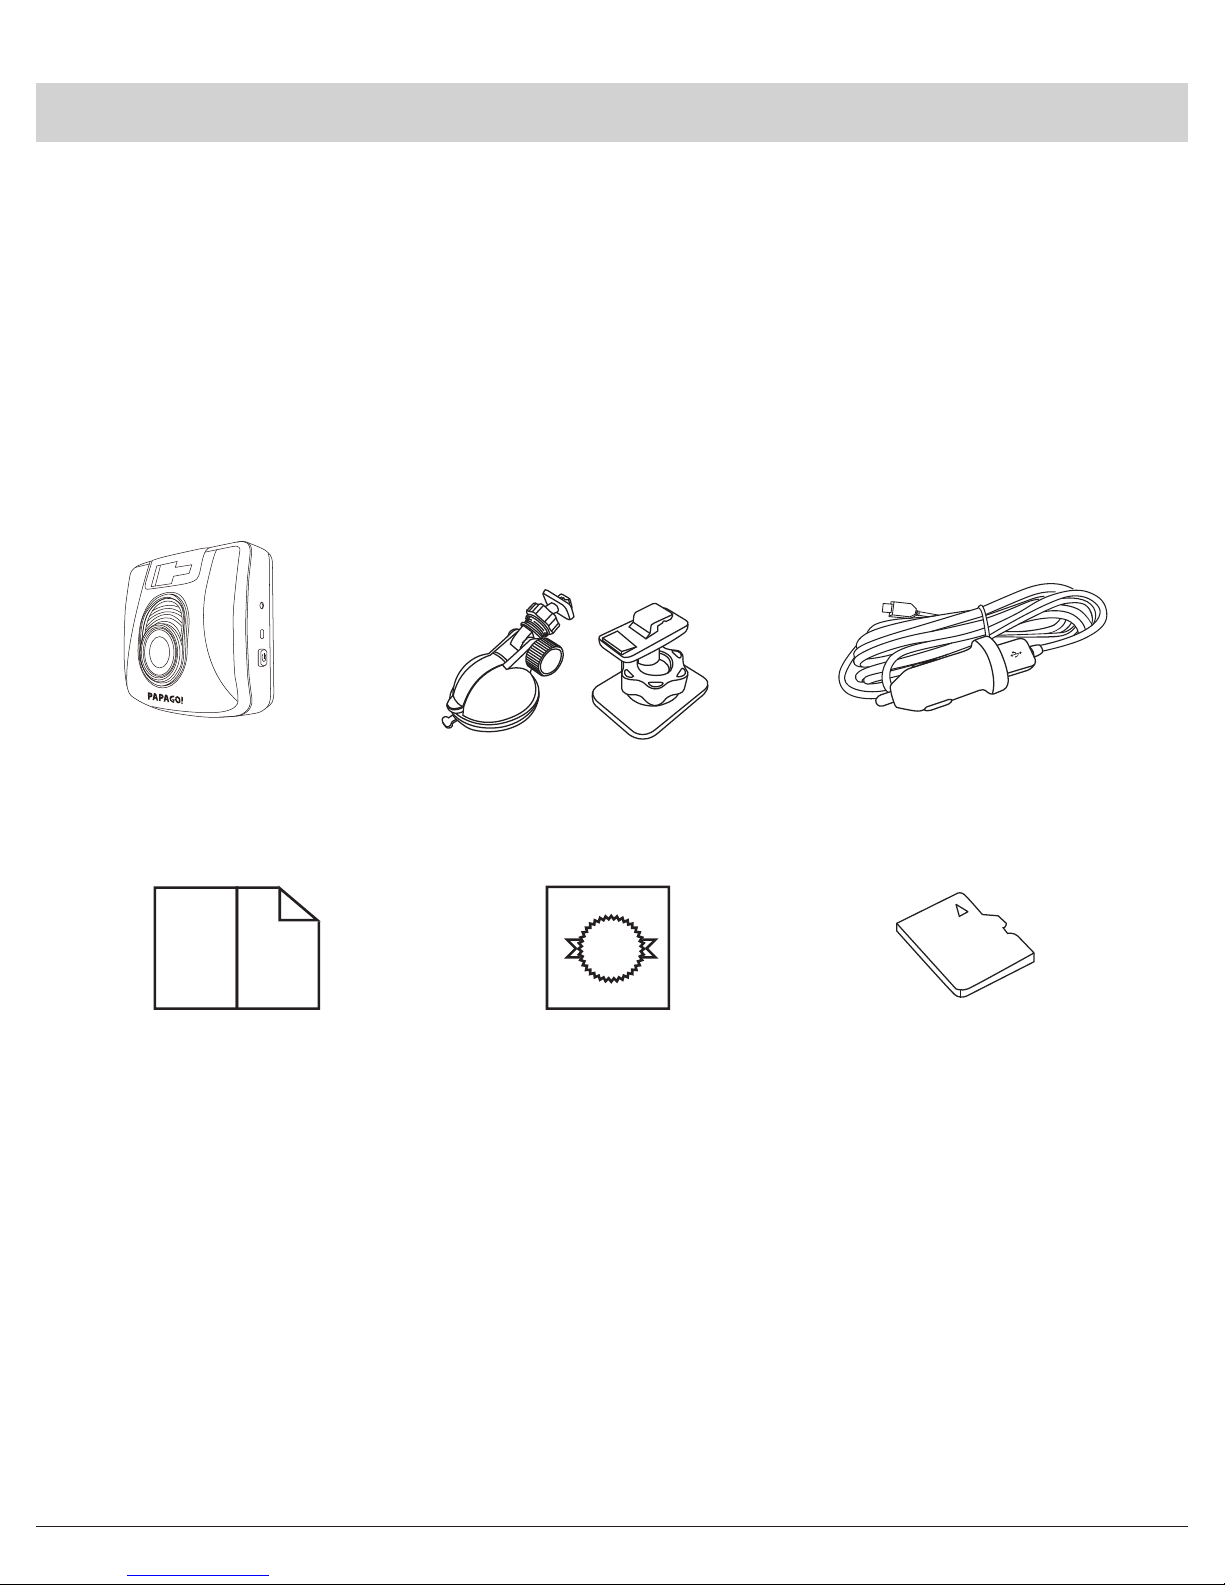
1.1 Package Contents
To check the items in your package with the list below. If any of the below
items is damaged or missing, contact your retailer.
English 3
① Device ② Suction Cup /
Sticker Mount
③ USB Car Charger
④ quick start guide ⑤ warranty card
⑥ 8GB MicroSD

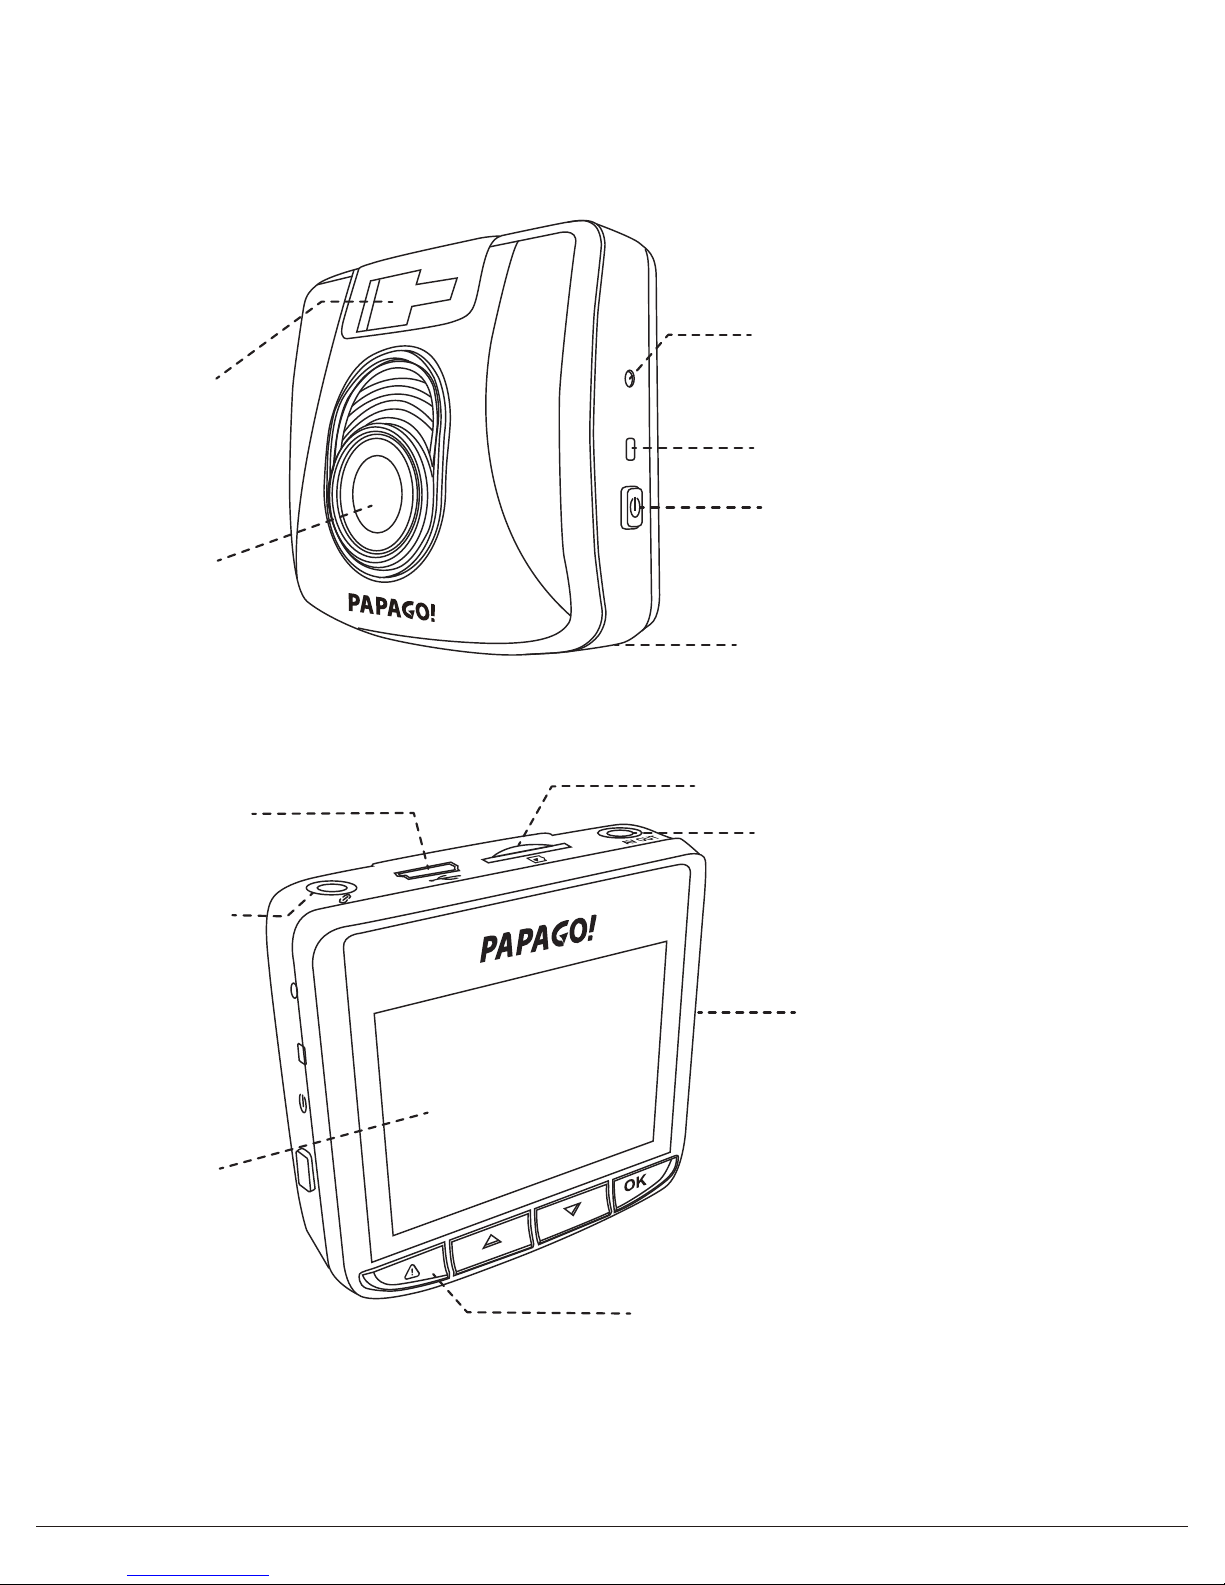
1.2 Driving Recorder Overview
① Cradle Locker
② Camera
③ LED
④ Speaker
⑤ Microphone
⑥ Display
⑦ Buttons
⑧ Power Switch
⑨ Reset
⑩
A, GPS Slot
B, Mini USB
C, Micro SD Slot
D, AV Out
①
②
③
④
⑧
⑨
⑤
⑥
⑦
A,
B,
C,
D,
⑩
⑩
⑩
⑩
English 4
2. Installation and removal
English 5
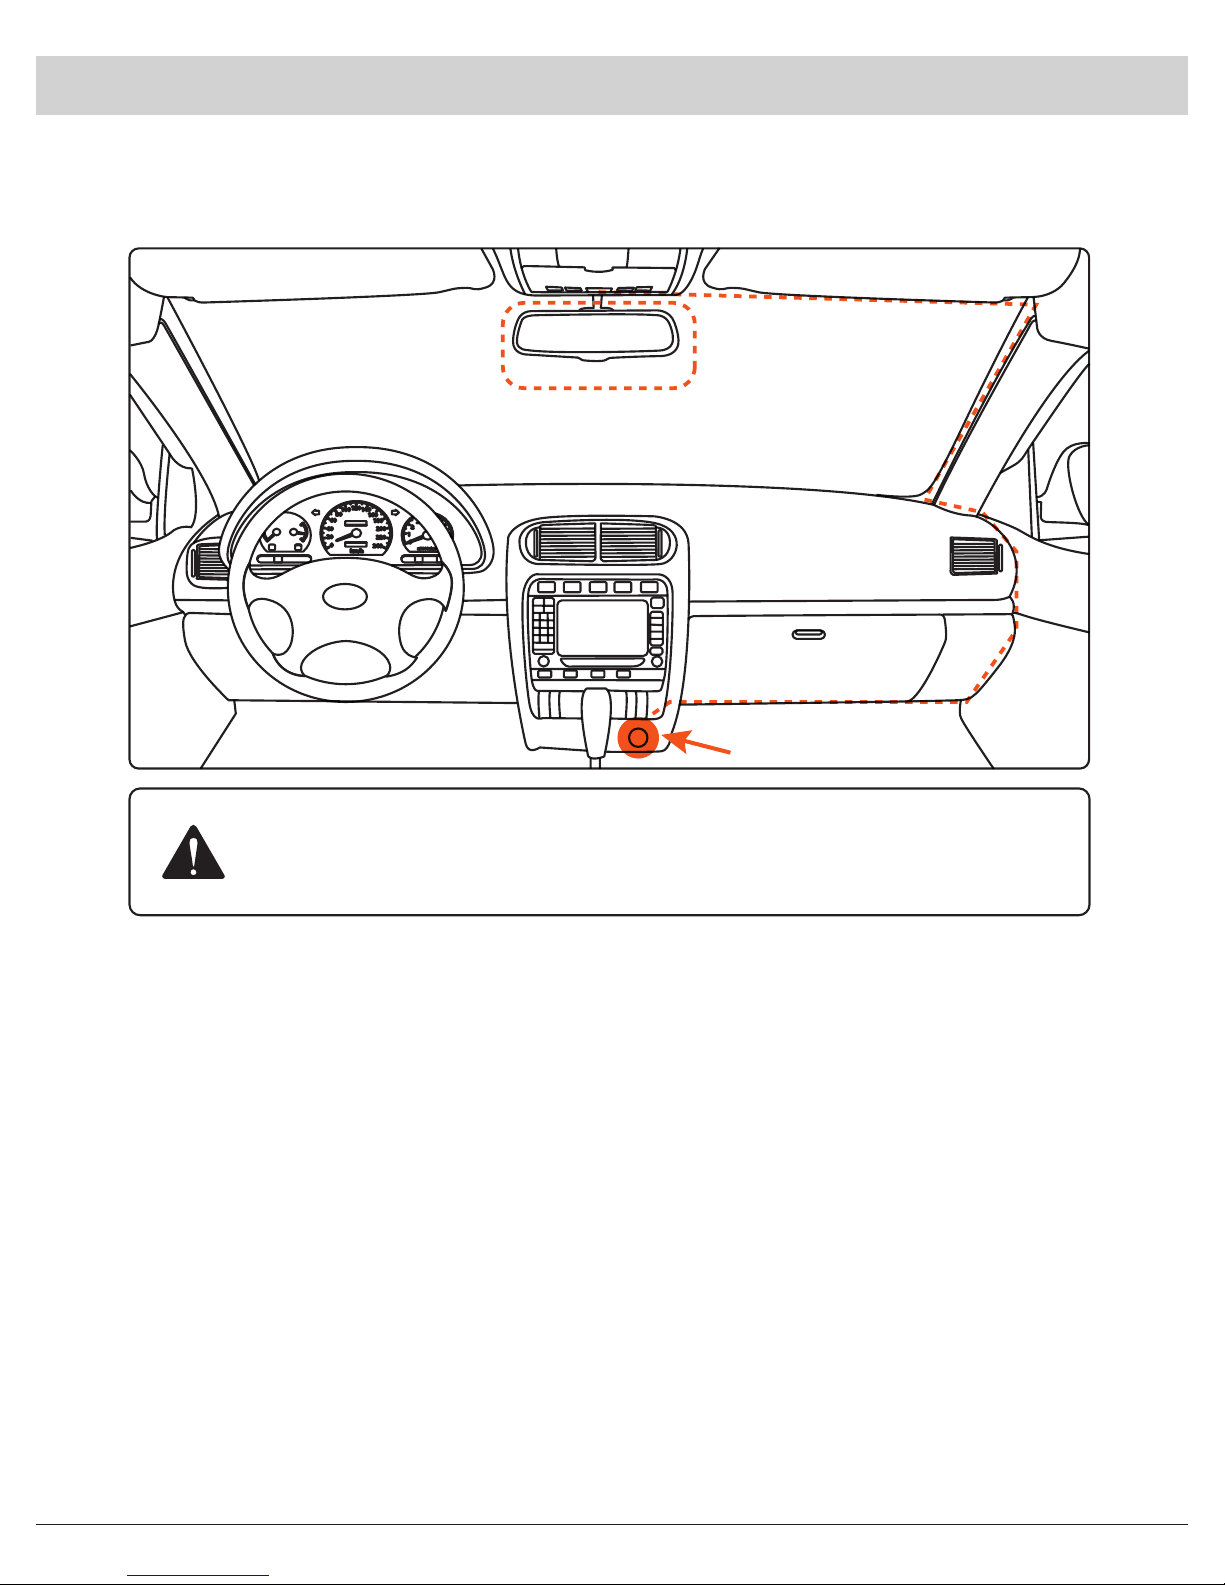
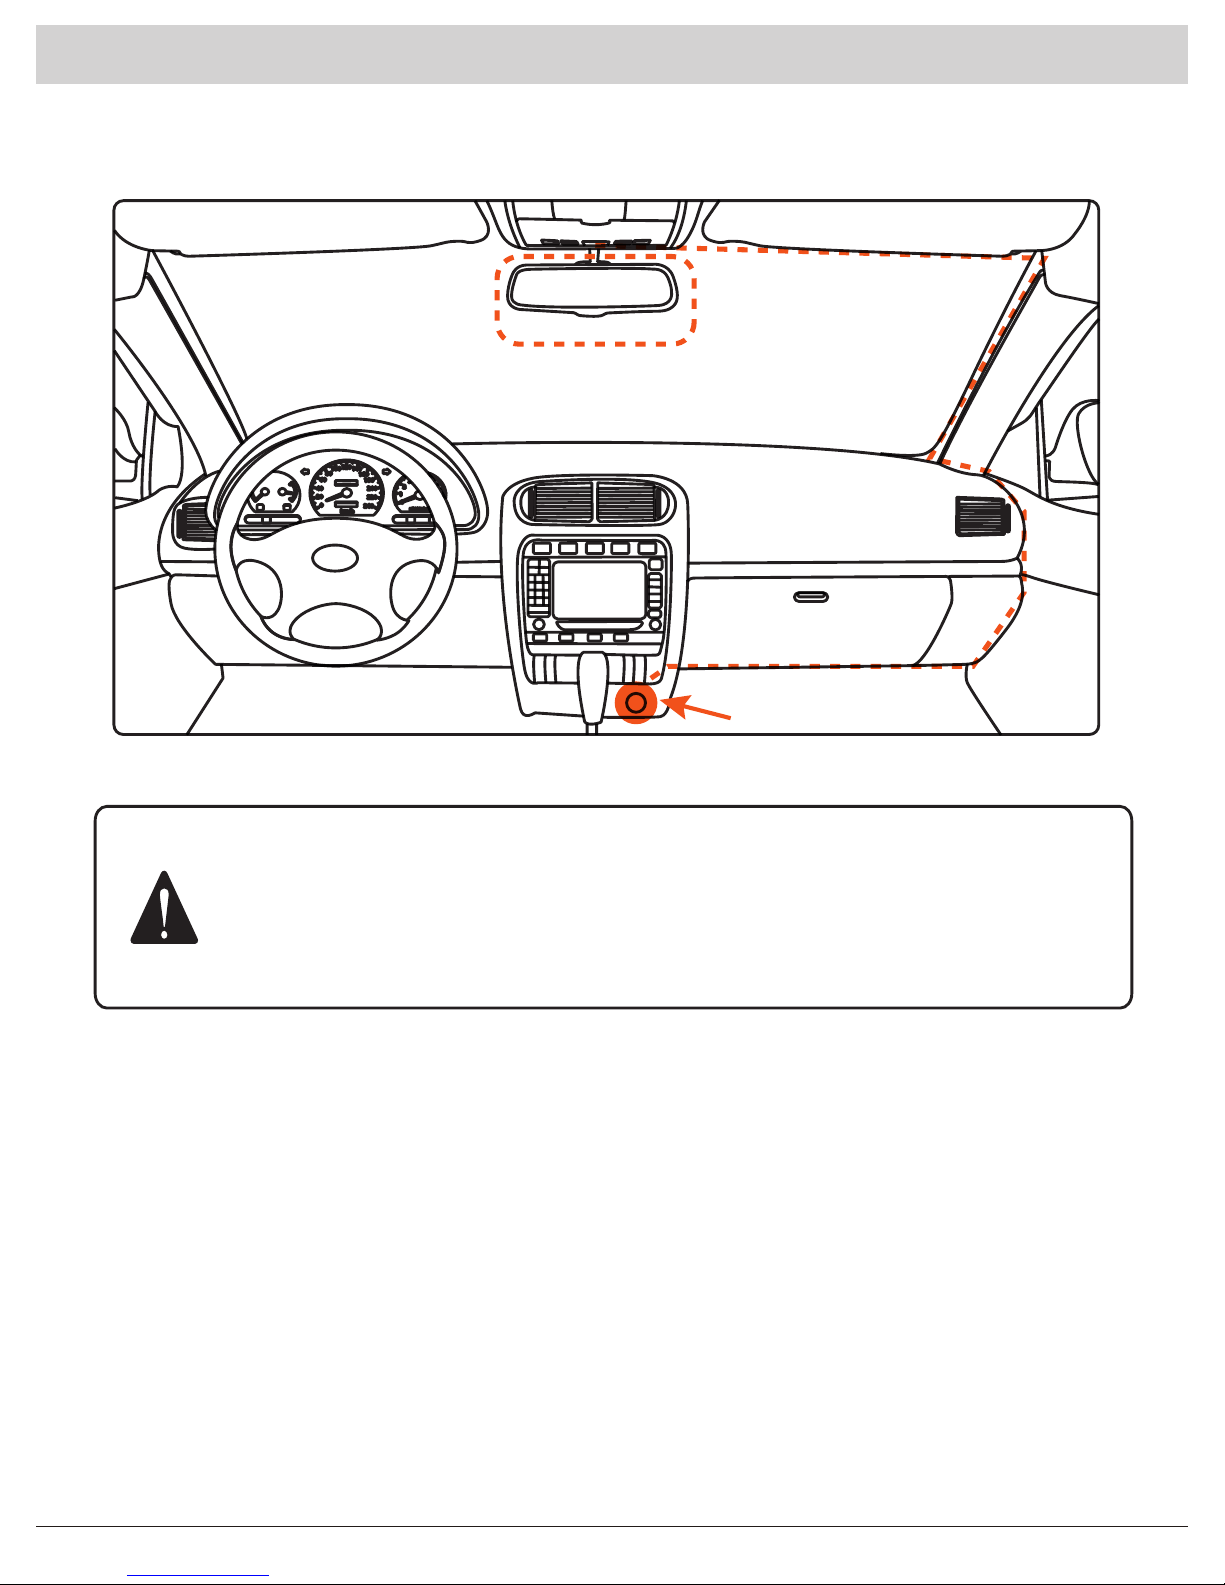
① To have a better view, try to install in the center of the windshield.
② Make sure the lens is located in a place where the windshield wiper can
clean the window to ensure view is clear.
③ Make sure the device is not installed in a place where it will interfere with
the safety bag.
④ Make sure the device will not be obstructed by the windshield’s sun
control film (window tint).
⑤ Clean the area you desire to have the dash cam placed before sticking
the device, and DO NOT move the device for a 24-hour period.
2.1 Location
Best mounting
location
Connect to
car charger
Windshield
Caution: We are not responsible for any damage caused to
or by the safety bag for incorrect placement of the device
within the range of the safety bag area.
English 6
3. Start and Go
Insert the car charger cable into the car’s cigarette lighter and the other end
into the mini USB port on the device. Make sure to install the Micro SD Card
into the Micro SD Card slot on device. After turning on, the system will start
recording automatically. The LED light will turn flashing when recording mode
has started.
*Reminder: Please format Micro SD card before you start recording. Please
refer to page 2 for instructions.
3.1 Power On
Hold down the power button at least 5 seconds to turn off device. To avoid
breaking down the last file recorded, do not eject the SD Card immediately
after powering off.
If you need to turn it back on simply hold the power button for at least 3 seconds.
3.2 Power Off
3.3 LED
LED Color
Green ON
Green Off
Behavior
Power ON, Recording
Power Off, not Recording
English 7
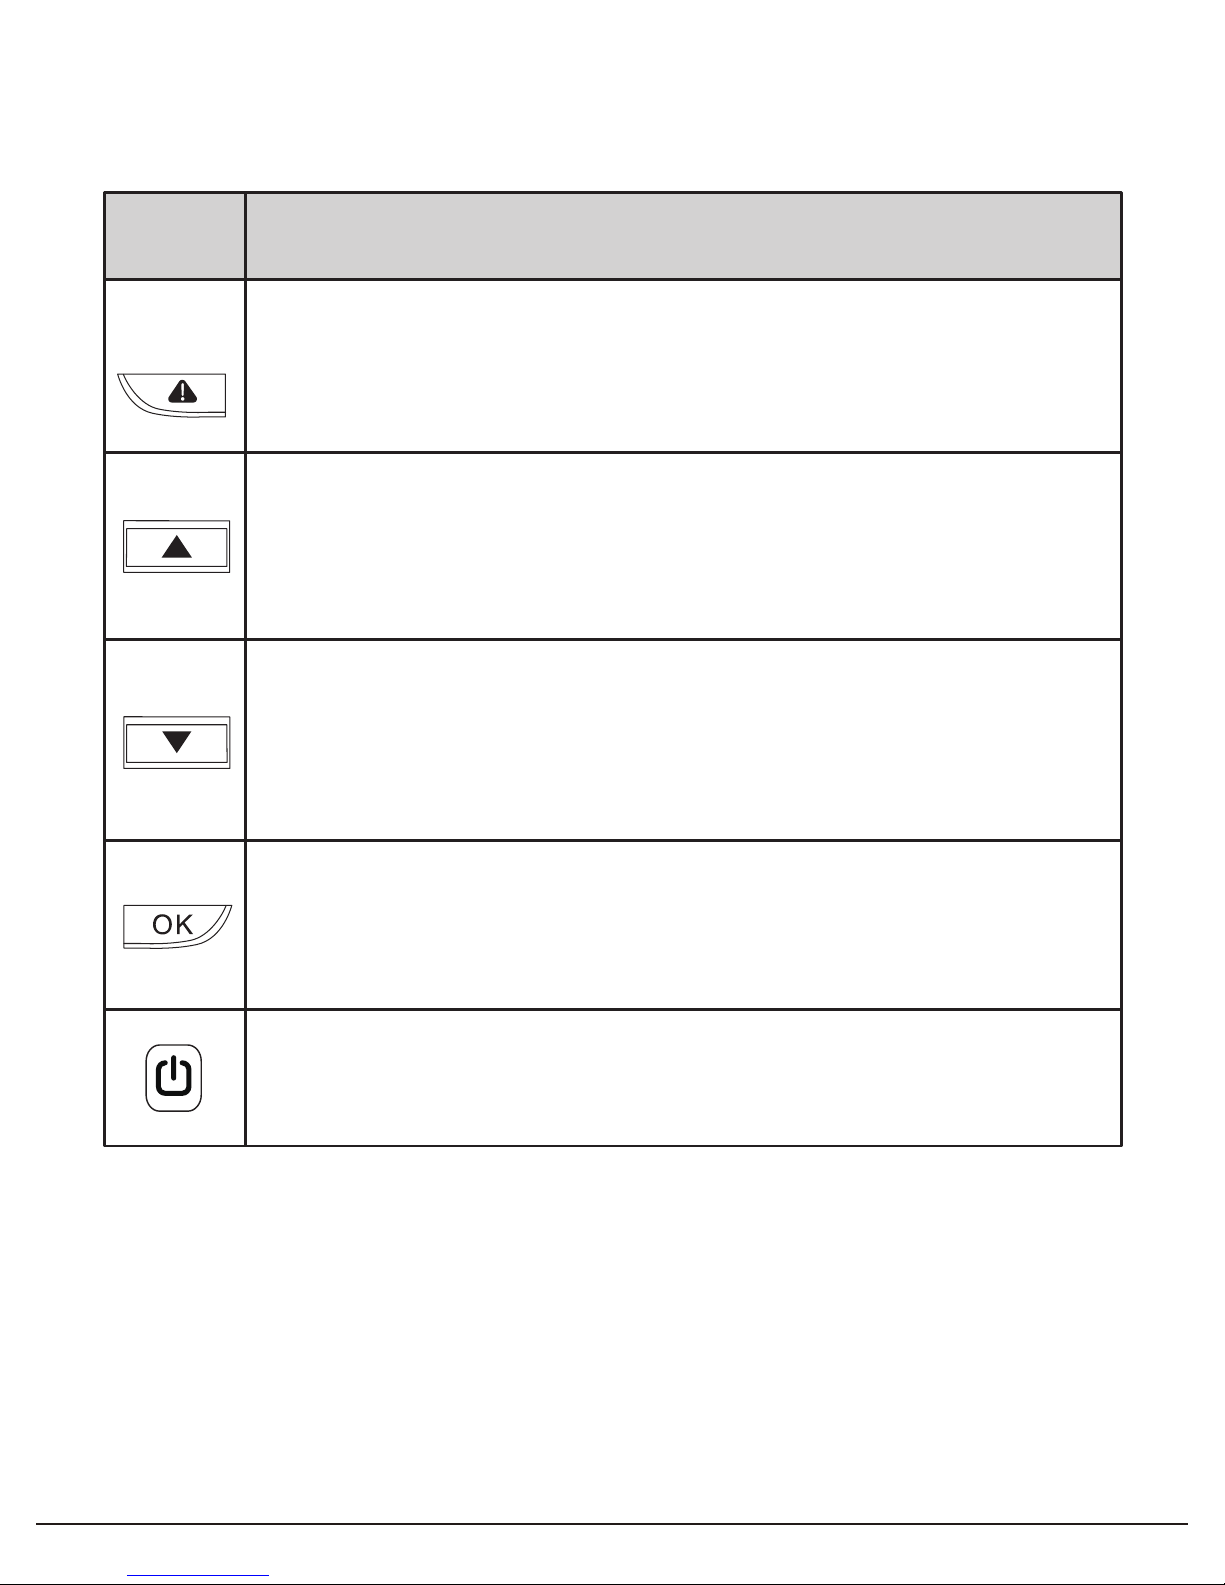
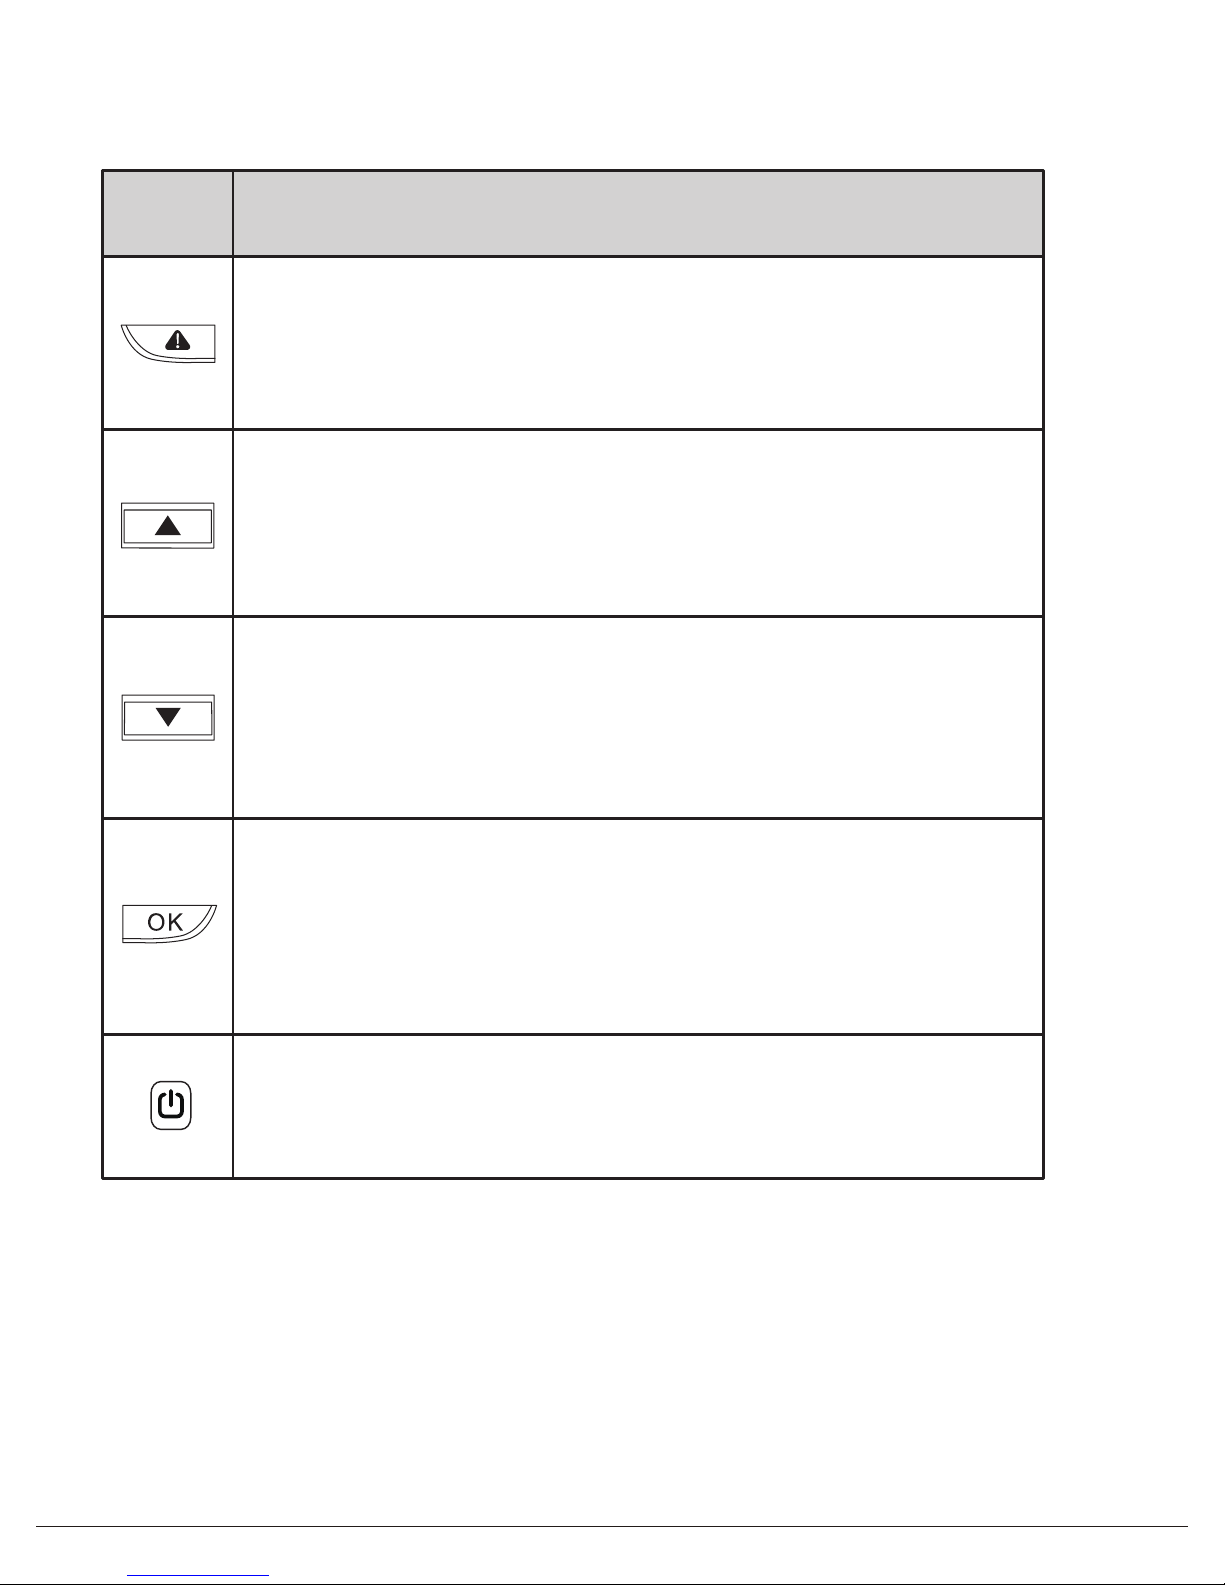
Buttons
Behavior
Recording mode: Enter Emergency mode
Playlist: Back to previous menu
Replay/Setting: Back to camera mode
Recording mode: Enter playlist
Playlist/Setting: Upward
Replay mode: Delete
Recording mode: One short click leads to setting menu
One long press and device will take a snapshot
Playlist/Setting: Downward
Replay mode: Lock / Unlock
Recording mode: One long press to turn on/off audio recording
Playlist/Setting: Confirm
Replay mode: Pause/Resume
Power button: To turn on/off device
3.4 Buttons
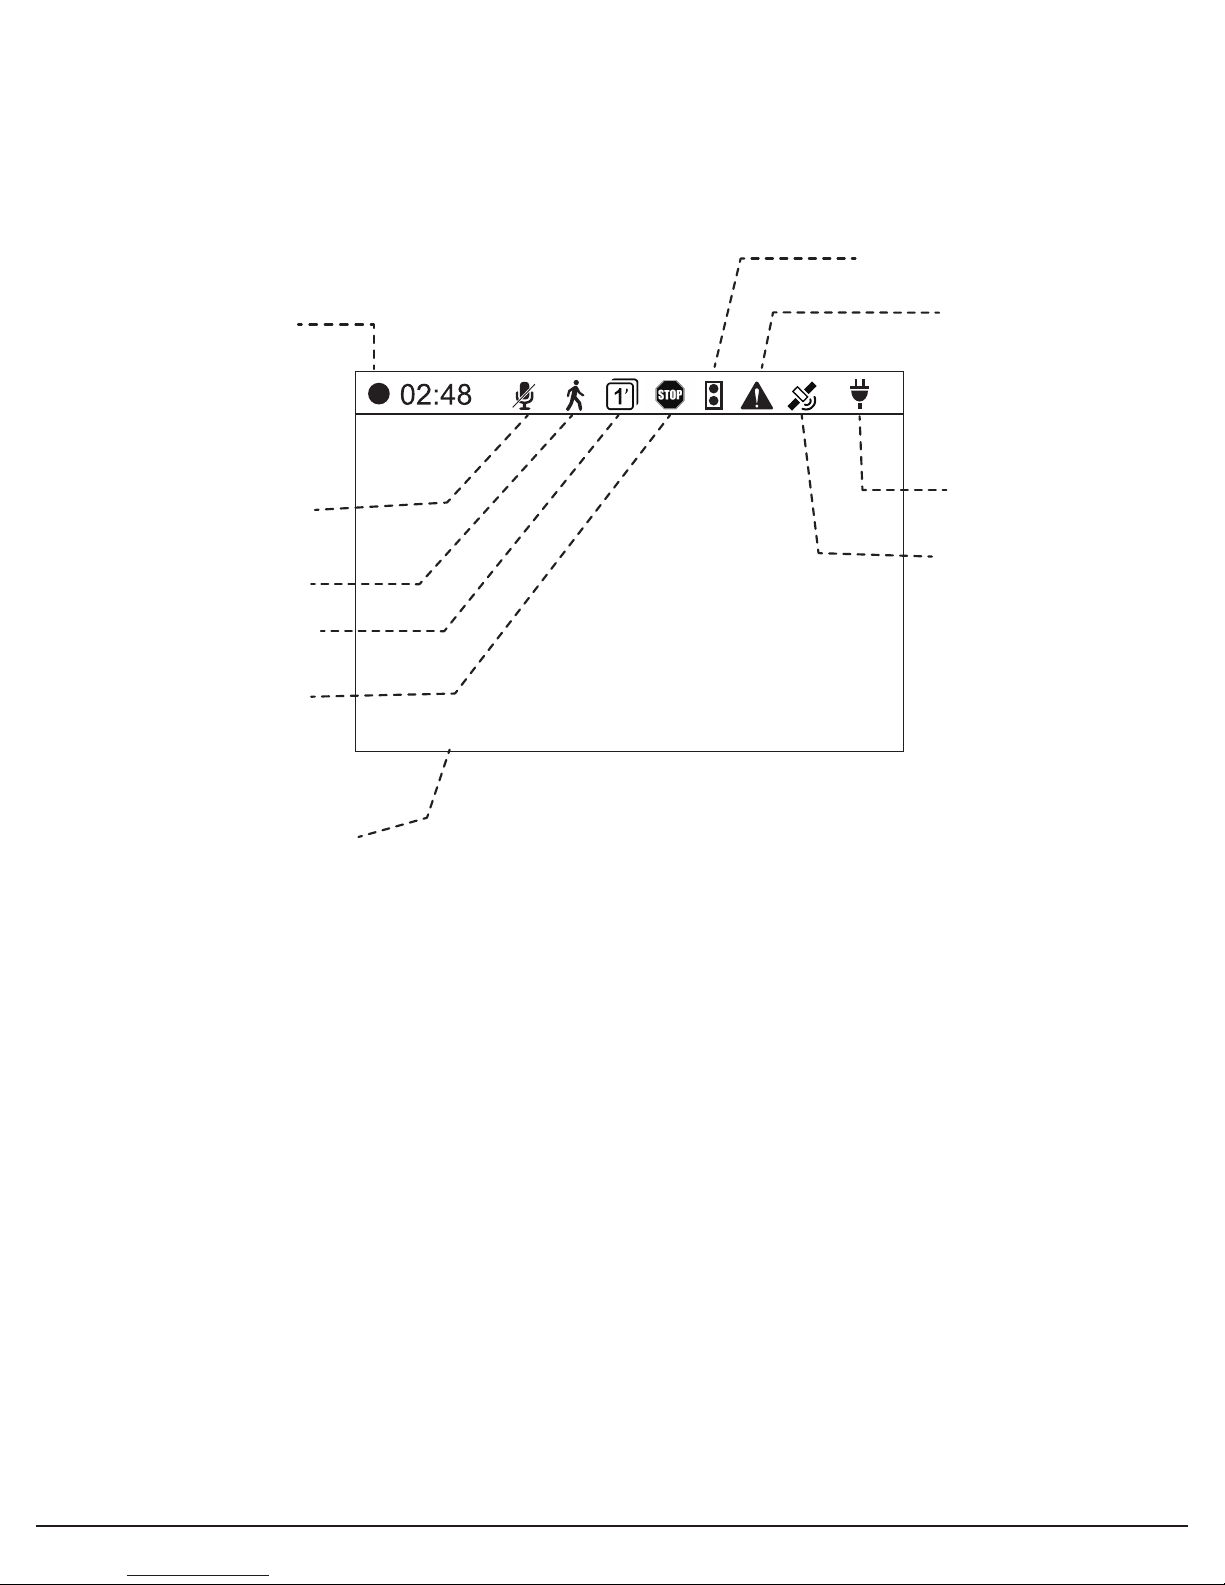
3.5 Recording
2015/08/26 11:31:202015/08/26 11:31:20
Emergency
Recording
(Option:
GPS connection
needed)
Current date/time
Audio record
indicator
Video recording
time
Stop & Go
Motion Detection
Monitor Mode
Stop Sign
Recognition
Battery
English 8
English 9
4. Settings
Press the button to enter “Settings”.
● Record Mode
a. Automatic Recording
b. Monitor Mode: recording will be started when function activated, in this
mode your device will take snapshots every second while video
recording.
c. Motion Detection: recording will be started when function activated. If
there is no movement for more than 60 seconds, recording will be
stopped and switched to detection mode. Recording restarts when
dash cam detects movement. The action is repetitive.
This function only works when the device has a continual power
source after the vehicle´s engine is turned off.
●Driving Safety
a. Stop Sign Recognition:The device will recognize any Stop Sign
Recognition and warn you when you are driving over that limit with a
beep.
b. Stop & Go: When activated, after the car is stopped for 10 seconds the
device will start to detect when the car in front has proceeded to go.
When the car in front is driving away, it will give an audio alert to remind
you to begin driving.
c. Driver Fatigue Alarm: When activated, the user can setup a defined
alarm clock, periodically reminding you to take a rest before continuing
to drive. Available options are : 30 minutes/1 hour/2 hours/4 hours/off.
d. Light Reminder : When activated, if driving in a dark environment (such
as tunnel or parking structure), it will have an audio alert and display
the light alert icon on the screen. The alert can be turned on/off.
● Microphone
Enable or disable voice recording.

English 10
● EV (Exposure Value)
Adjust EV for better effect in different lighting condition. Options include: -1.0,
-2/3, -1/3, +0.0, +1/3, +2/3, and +1.0.
● Resolution
Set recording resolution.
● Bump Auto Record
Set the impact sensitivity of the G-sensor. Options include: Low, Medium,
High, and OFF.
● Date/Time
Set date, time, and date format.
● Time/Zone
Set Time Zone.
● Daylight Saving Time
Enable or disable daylight saving time.
● Screen Saver
Set screen time-out.
● Power on/off Sound
Set Power sound on or off.
● Video Stamp
a. Date Stamp
Enable or disable date stamp on recordings.
b. GPS Stamp
Enable or disable coordinate stamp on recordings.
● Language
Set display language. Options include 简体中文, 繁體中文, English, Français,
Español, Deutsch, Italiano, 日本語, Português, and Русский.

● Format memory Card
All data on the MicroSD will be deleted.
Data is irrecoverable after formatting. Please make a backup copy of
the videos and photos before formatting the MicroSD.
● Format Warning
Set format prompt interval. Options include 15 days, 30 days, 60 days, or
OFF.
● Default
Reset all values to factory default.
● Version
Check the current firmware version.
English 11
5. Record/Play/Delete record Snapshot function
5.1 Video Recording Circulation
① It will start video recording circulation after powering on with the Micro SD Card
plugged in.
② Each recorded file is 5 minutes long, with the old footage being replaced when
the Micro SD Card is full.
5.2 Emergency Recording
① Manual File Backup
Hold down the button , to backup file so that it will not be
overwritten. You will see an icon at the top left of the LCD screen that
looks like this . This occurs when an emergency file is being
recorded.
② Auto Backup
Once the G-Sensor is activated by a sudden impact the device will
automatically back up the file so that it is not overwritten.
English 12

5.3 Snapshot
① Hold down for 3 seconds to take a snapshot while in
recording mode.
② The snapshot files are located in the folder on the Micro SD
Card:\
PHOTOS, this is also where you can find the video files
that are recorded.
③ The icon will be shown after you take a snapshot. This will
not disturb video recording mode.
5.4 Copying Files with USB Connection
① Connect device to your computer using a USB to mini-USB cable. It
should be recognized as a removable device or show up as an icon
titled “No Name” on your desktop.
② There are video recording files located in folder \PAPAGO
(circulating video recording files) and (emergency video recording
files) on the “removable device”.
③ Copy the files to your computer. Please follow the copy and paste
or drag and drop procedure for your computer model.
5.5 Copying Files from Micro SD Card
① Shut down the device and eject the Micro SD Card.
② Insert the Micro SD Card into the Micro SD Card reader and your
computer will automatically detect the SD Card.
③ There are video recording files located in folder \PAPAGO
(circulating video recording files) and (emergency video recording
files) on the “removable device”.
④ Copy the files to your computer. Please follow the copy and paste
or drag and drop procedure for your computer model.
English 13
5.6 Play/Delete Video or Photo
① Hold down to enter playlist mode and preview the recorded files.
② Choose Type: Emergency Record File or General Record File. All snapshots
can be found in the General Record File.
③ Choose which file you want to preview and press to browse the
files.
④ Click to delete the file.
English 14
720P 30fps
8GB
16GB
32GB
64GB
140min
280min
560min
1180min
記憶卡容量
本機使用注意事項
【使用相關】
① 車輛熄火後,點煙器仍供電的使用者,在離開車時務必關閉電源或將點煙器
插頭拔起,避免耗光電瓶內的電力,或造成其它意外狀況發生。
② 在車輛熄火、電源開關關閉或任何引發電源被切斷狀況發生時,內置超級電
容可將已錄製的影像儲存。
③ 在關機過程中勿立即將記憶卡取出,避免錄製的影像損毀 。
④ 請用本公司專用的車充線,以免規格不符。
⑤ 本機所具有的監控模式和移動偵測功能需要配合電瓶使用,無供電時無法實
現此功能。
【記憶卡相關】
① 建議使用 Class10、8GB 以上的記憶卡。
② 使用記憶卡前,請務必將記憶卡格式化。
③ 記憶卡容量和可錄製時間對應如下。(僅供參考)
* 產品功能因銷售地區不同而有所差異,請依實機為准。
繁體中文 1
1.產品介紹
1.1 包裝內容
包裝內應有下列所有配件,若有任何配件損壞或遺漏,請立即向您購買經銷商
反映。
① 行車記錄器 ② 吸盤/黏貼車架 ③ 車用變壓器
④ 使用說明 ⑤ 保固卡
繁體中文 2
⑥ 8GB MicroSD
1.2 主機介面
① 車架卡槽
② 鏡頭
③ LED 指示燈
④ 內置揚聲器
⑤ 內置麥克風
⑥ 2吋螢幕
⑦ 功能按鍵
⑧ 電源開關
⑨ 重置開關
⑩
繁體中文 3
A, GPS 介面
B, Mini USB 介面
C, 記憶卡插槽
D, AV Out
①
②
③
④
⑧
⑨
⑤
⑥
⑦
A,
B,
C,
D,
⑩
⑩
⑩
⑩
2.安裝與拆卸
2.1 安裝位置
切勿安裝在安全氣囊彈蓋上或安全氣囊的工作範圍內。
本公司對因車輛碰撞或汽車安全氣囊方面的問題而導
致的傷害或死亡不承擔任何責任。
① 盡可能安裝在靠近車內後視鏡附近、影像視野較佳處。
② 鏡頭拍攝位置處於雨刷清潔範圍內,確保雨天可以清晰拍攝。
③ 不要安裝在汽車安全氣囊活動範圍內。
④ 不要安裝在汽車隔熱紙上,以免損毀汽車隔熱紙。
⑤ 安裝位置不受汽車隔熱紙影響或者任何具有干擾性的電子產品周圍。
繁體中文 4
最佳安裝位置
連接車充
擋風玻璃
繁體中文 5
指示燈顏色
綠燈恆亮
綠燈關閉
定義
電源開啟,影像錄製中
非錄影模式 / 系統關閉
3. 開始使用
3.1 開機
車充連接汽車點煙器與主機 Mini USB 介面後,將記憶卡插入主機記憶卡
插槽,汽車發動,主機即開啟。
3.2 關機
開機狀態下,按下電源開關鍵至少 5 秒,主機關閉。
待電源完全關閉後再取出記憶卡,以免錄製的影像損毀。
再次開機時,按下電源開關鍵 3 秒,主機即可開啟。
3.3 LED指示燈
3.4 主機按鍵
按鍵 功能
錄影模式:進入緊急錄影
播放選單:返回
重播模式 / 設定選單:回錄影
錄影模式:進入播放選單
播放選單 / 設定選單:向上選單
重播模式:刪除
錄影模式:短按進入設定選單
長按拍照
播放選單 / 設定選單:向下選單
重播模式:鎖定 / 解鎖
錄影模式:短按螢幕關閉或開啟
長按錄音關閉或開啟
播放選單 / 設定選單:確認選項
重播模式:暫停或繼續
電源開關:開啟或關閉主機
繁體中文 6
 Loading...