

Papago GoSafe 318 Quick Start Manual
Quick Start Guide
使用手冊
Manual Usuario
Manual Do Usuário
Guide d'utilisation
318

Thank you for purchasing the PAPAGO! GoSafe Car Digital Dashcam.
Table of Contents
Disclaimer ......................................................................................................... 2
Safety Instructions ............................................................................................. 3
Warnings .................................................................................................................. 3
Caution ..................................................................................................................... 4
Product Overview ............................................................................................. 5
Packaging Contents ................................................................................................ 5
Dashcam Illustration ................................................................................................ 6
Installation Guide ............................................................................................. 7
Installation Position ................................................................................................... 7
Installation Method ................................................................................................... 8
MicroSD Installation ................................................................................................ 9
Operating the Dashcam .................................................................................... 10
Turning Dashcam On ................................................................................................ 10
Turning Dashcam Off ................................................................................................ 10
Button Functions ...................................................................................................... 11
Indicators .................................................................................................................. 12
Screen Icons ............................................................................................................ 12
Recording .................................................................................................................. 13
Snapshot .................................................................................................................. 13
Playback .................................................................................................................. 14
PC Mode .................................................................................................................. 14
HDMI Output ............................................................................................................ 15
Firware Upgrade ...................................................................................................... 15
Settings ............................................................................................................... 16
Useful Information ............................................................................................. 19
Cleaning .................................................................................................................. 19
Preservation ............................................................................................................ 19
Troubleshooting......................................................................................................... 19
English 1

Disclaimer
1.Please follow the set-up and usage instructions in the print material that came with this Dashboard
Camera (dashcam) product.
2.You should not set/install this dashcam at a place that would obstruct or reduce a driver’s view; make sure
your usage comply with pertinent vehicle codes of your state, province, territory or country.
3.You should post the required notices of recordation to occupants inside the vehicle, if voices or other
information/signal pertaining to in-vehicle activities will be recorded.
4.You should not change the dashcam’s setting or mode of operation when the vehicle is in motion.
5.The optional driving warning signals, including any visual or audible reminder signals, should not replace your
decision-making and judgment that are needed for the proper operation of the vehicle.
6.You should not leave the dashcam in a visible spot when no one is inside the vehicle, to avoid attracting
break-ins to steal the unit, or other property.
7.You should avoid extended exposure of the dashcam to direct sunlight or extreme temperatures (either high or
low temperature) which tend to degrade or damage the unit and its normal functionality.
8.You should examine, check and/or verify the dashcam at least every six (6) months, including the associated
memory cards, to ensure the video reception and recording are working properly. For each use, you should
verify that the dashcam unit, the visible lights and the audible sounds are working normally. If there are signs
of non-operation or mal-function, you should immediately seek to replace the product and check to see if the
product is covered under any applicable warranty.
9.The dashcam unit may have additional functionality, such as transmission and recordation of audible or
GPS signal or other identification information. If you have privacy concerns about these functions, make
sure you follow the instruction to disable these functions.
10.You should use the dashcam unit in the way it is intended. You should not use the dashcam unit in a
way that would be illegal or that tends to physically damage the unit, or tends to cause danger to the
safe operation of the vehicle or the occupants.
English 2
Safety Instructions
Warnings
● Do not install or operate the Dashcam with wet hands.
● Do not install the Dashcam in places with high humidity, flammable gases, liquids, and positions blocking
the sight of the driver or the safety area.
● Do not expose the Dashcam in high temperature inside a sealed compartment for a long time.
● Do not use the Dashcam in excess of the rated voltage.
● The cigarette lighter socket of your car continues to supply electricity after the engine is off, please
disconnect the Dashcam plug from the socket before leaving the car to prevent the automotive battery
from depletion or other accidents.
● Keep the Dashcam, accessories, and package away from children!
● Use only the charging cable provided by the manufacturer. This company assumes no responsibility for
any damage caused by the use of non-genuine charging cables.
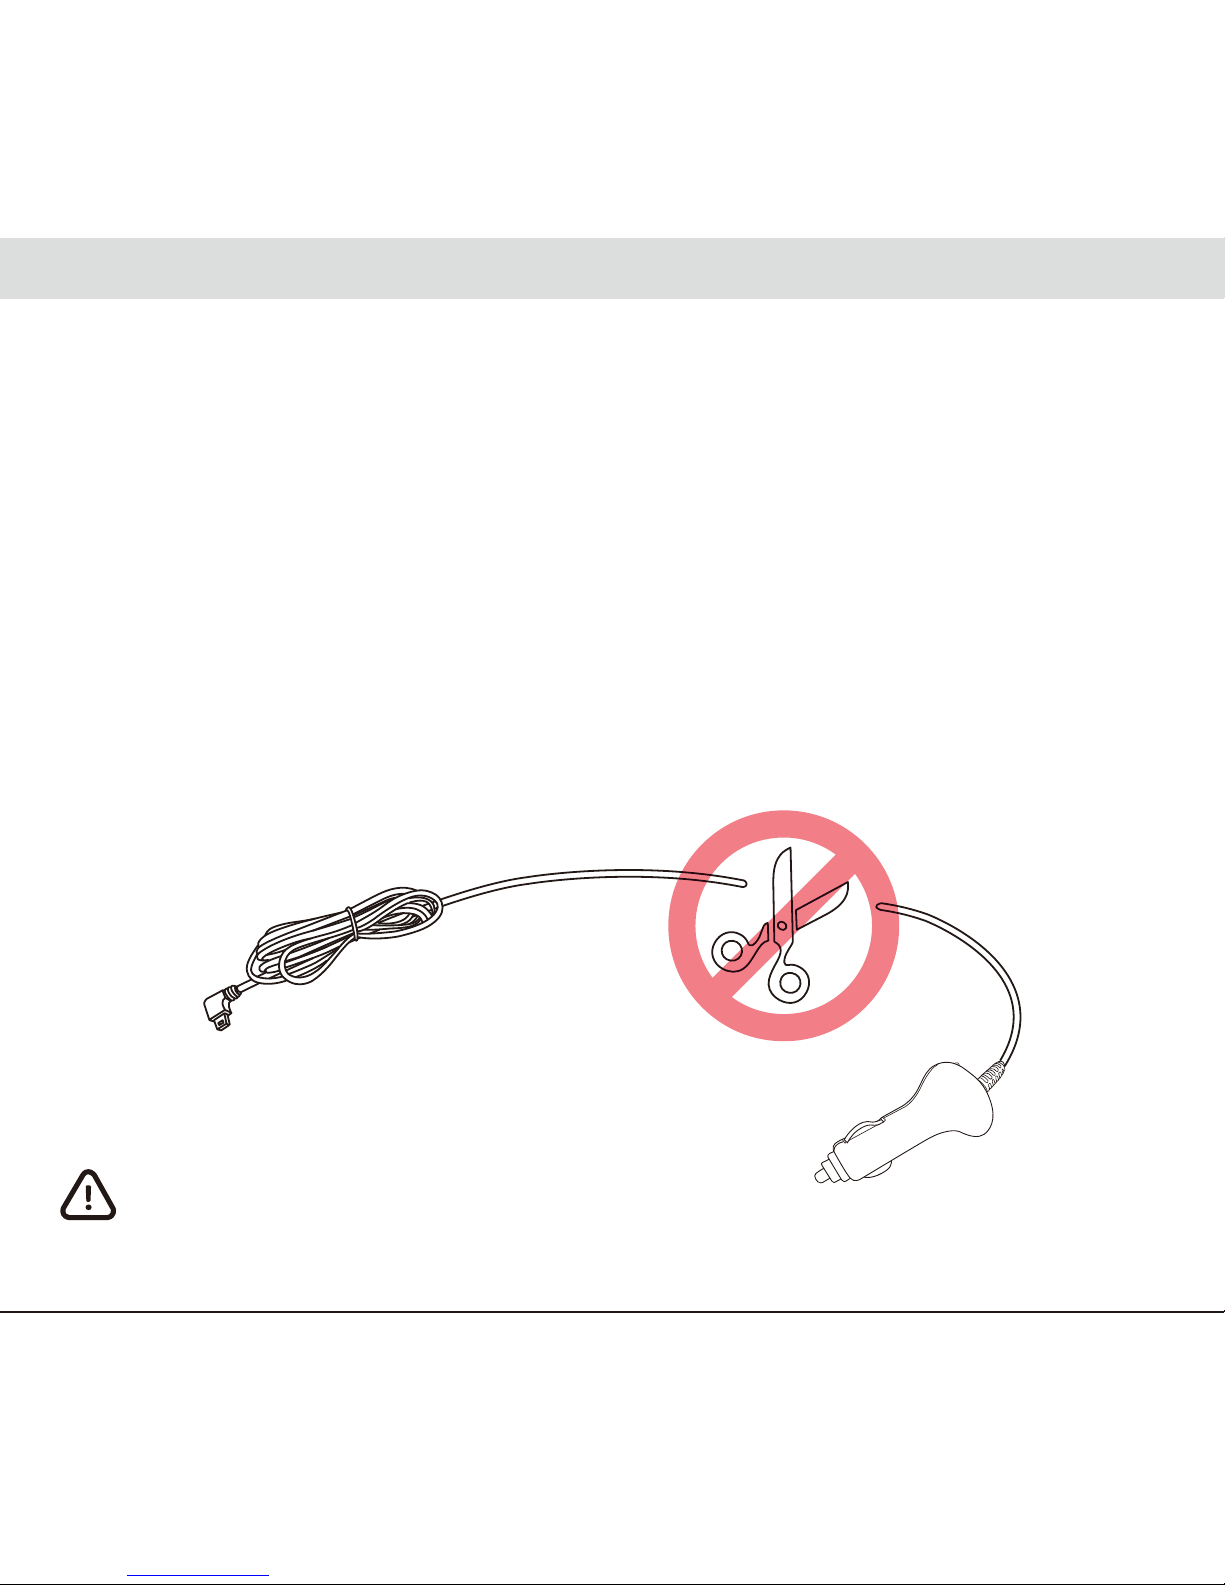
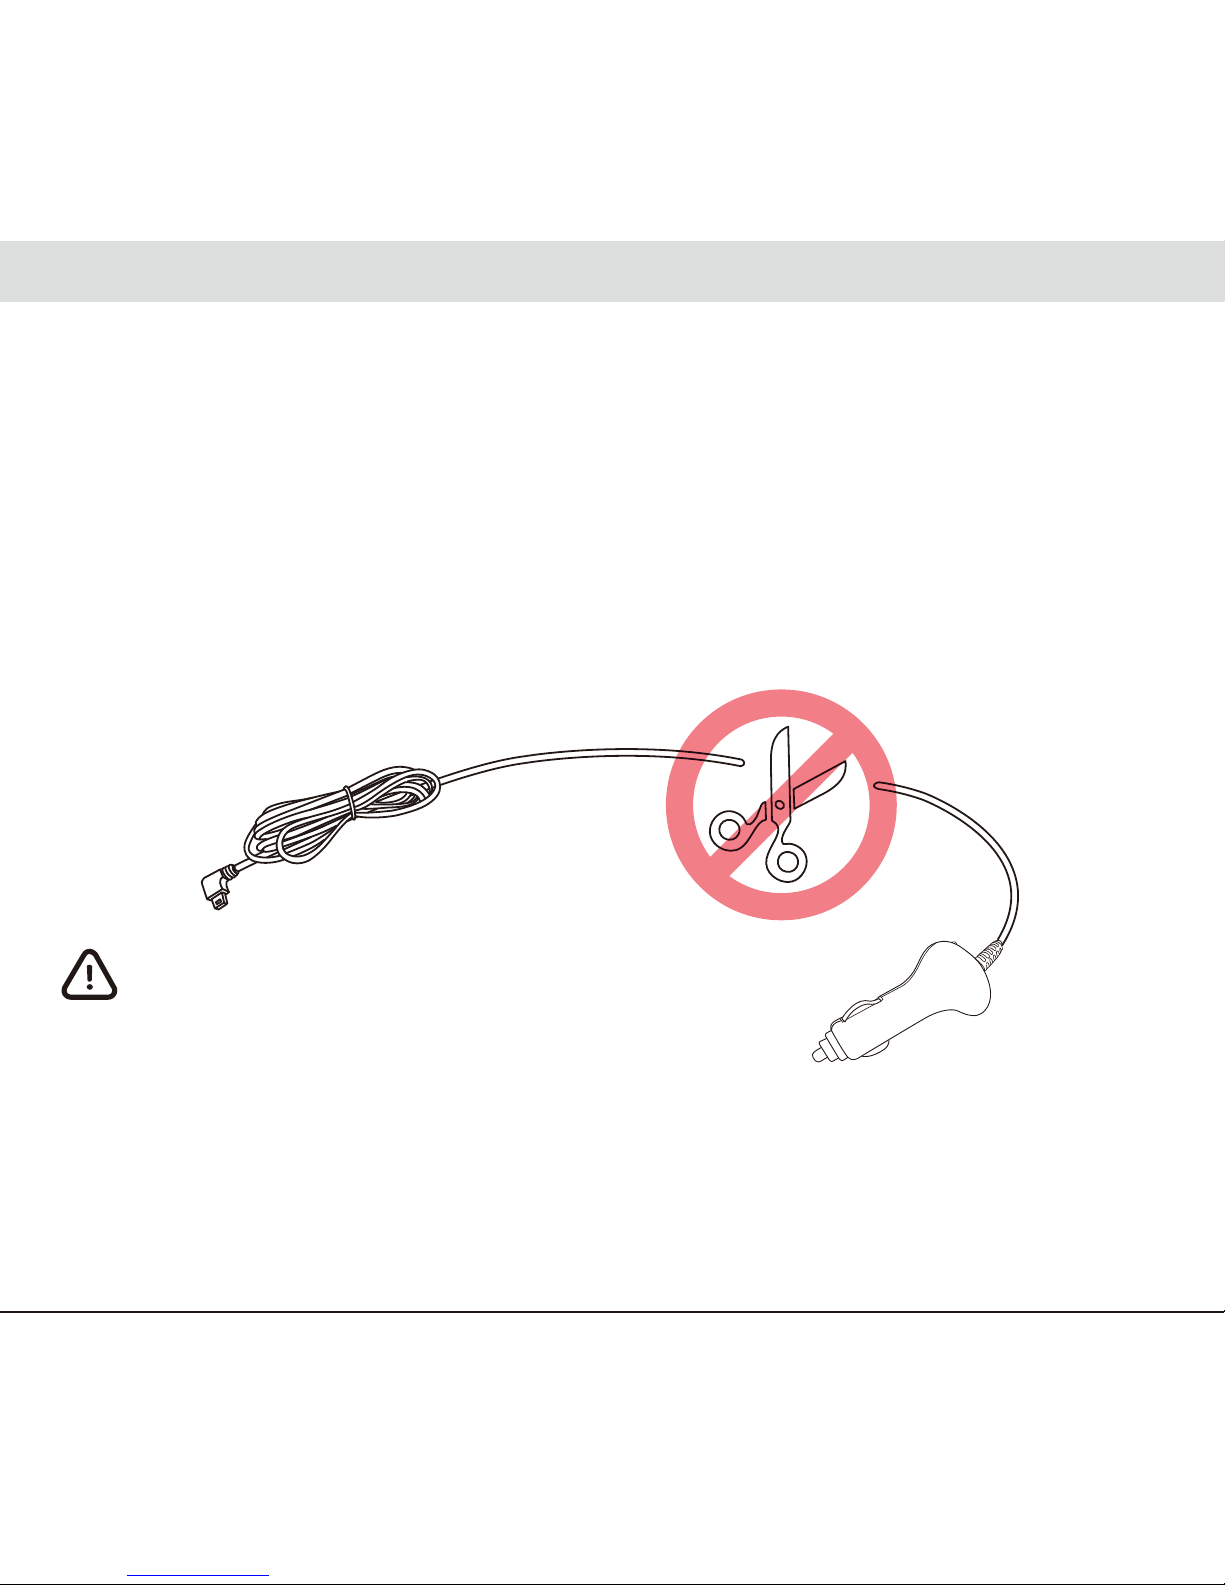
● Do not disassemble the Dashcam or the charging cable.
Do not cut the charging cable!
Damage caused to the Dashcam as a result is not covered by the warranty!
English 3

● Please recycle the battery in accordance with local laws and regulations.
● Please do not attempt to disassemble, modify or heat up the battery.
● Do not replace the battery by yourself. Improper battery replacement may result in explosion!
● Keep the battery away from water (e.g. seawater) and other liquids.
● Prevent short circuit on the battery.
● Keep the battery away from direct sunlight, a fire, or an environment with excessive heat to prevent
explosion.
● Do not throw the battery in a fire to prevent explosion.
Caution
● Do not forcefully press the lens.
● Do not prick the Dashcam or accessories with an awl or sharp object.
● Do not immediately remove the MicroSD from a shutting down Dashcam to prevent the file from damage.
● Please use a Class 6 or above MicroSD card with at least 8GB (maximum 32GB)
● Before using the MicroSD on the Dashcam for the first time, please format the MicroSD with the Dashcam
to ensure read/write stability.
● Do not disconnect power during system upgrade! The Dashcam may be unable to boot afterwards!
● Contents of this manual are subject to change without prior notice.
English 4
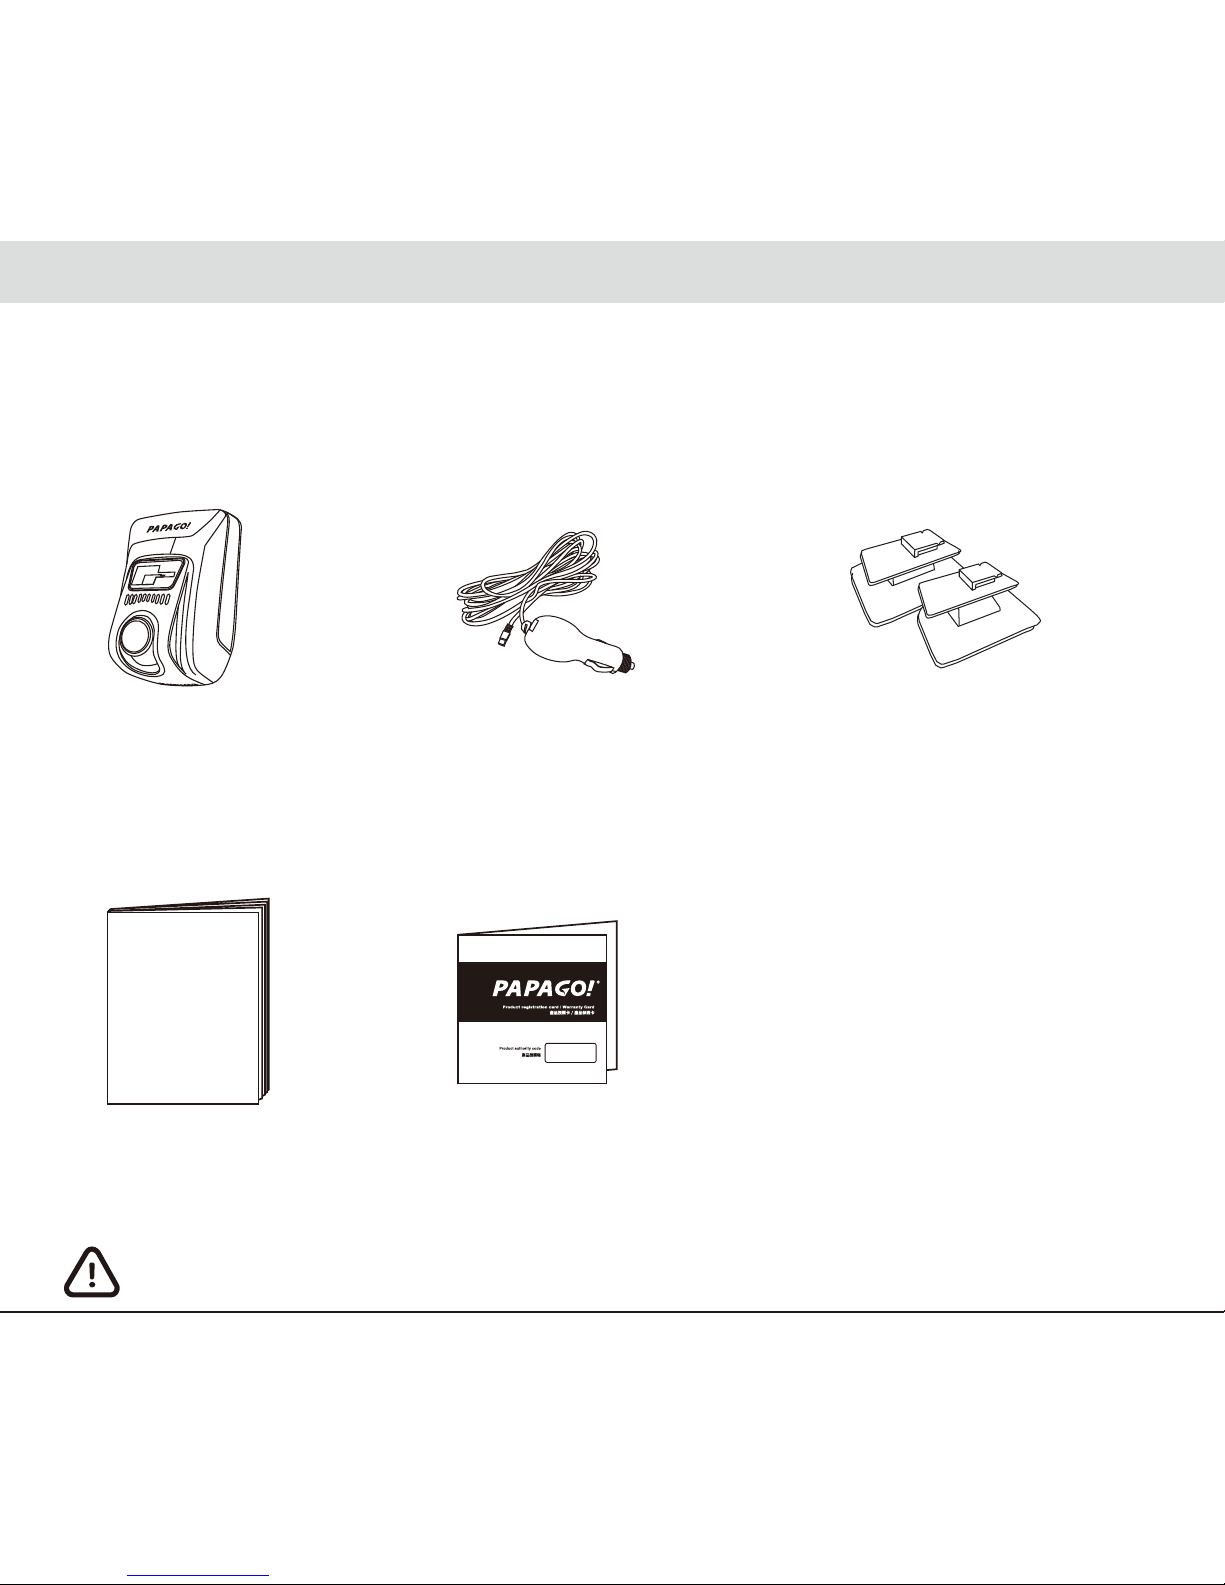
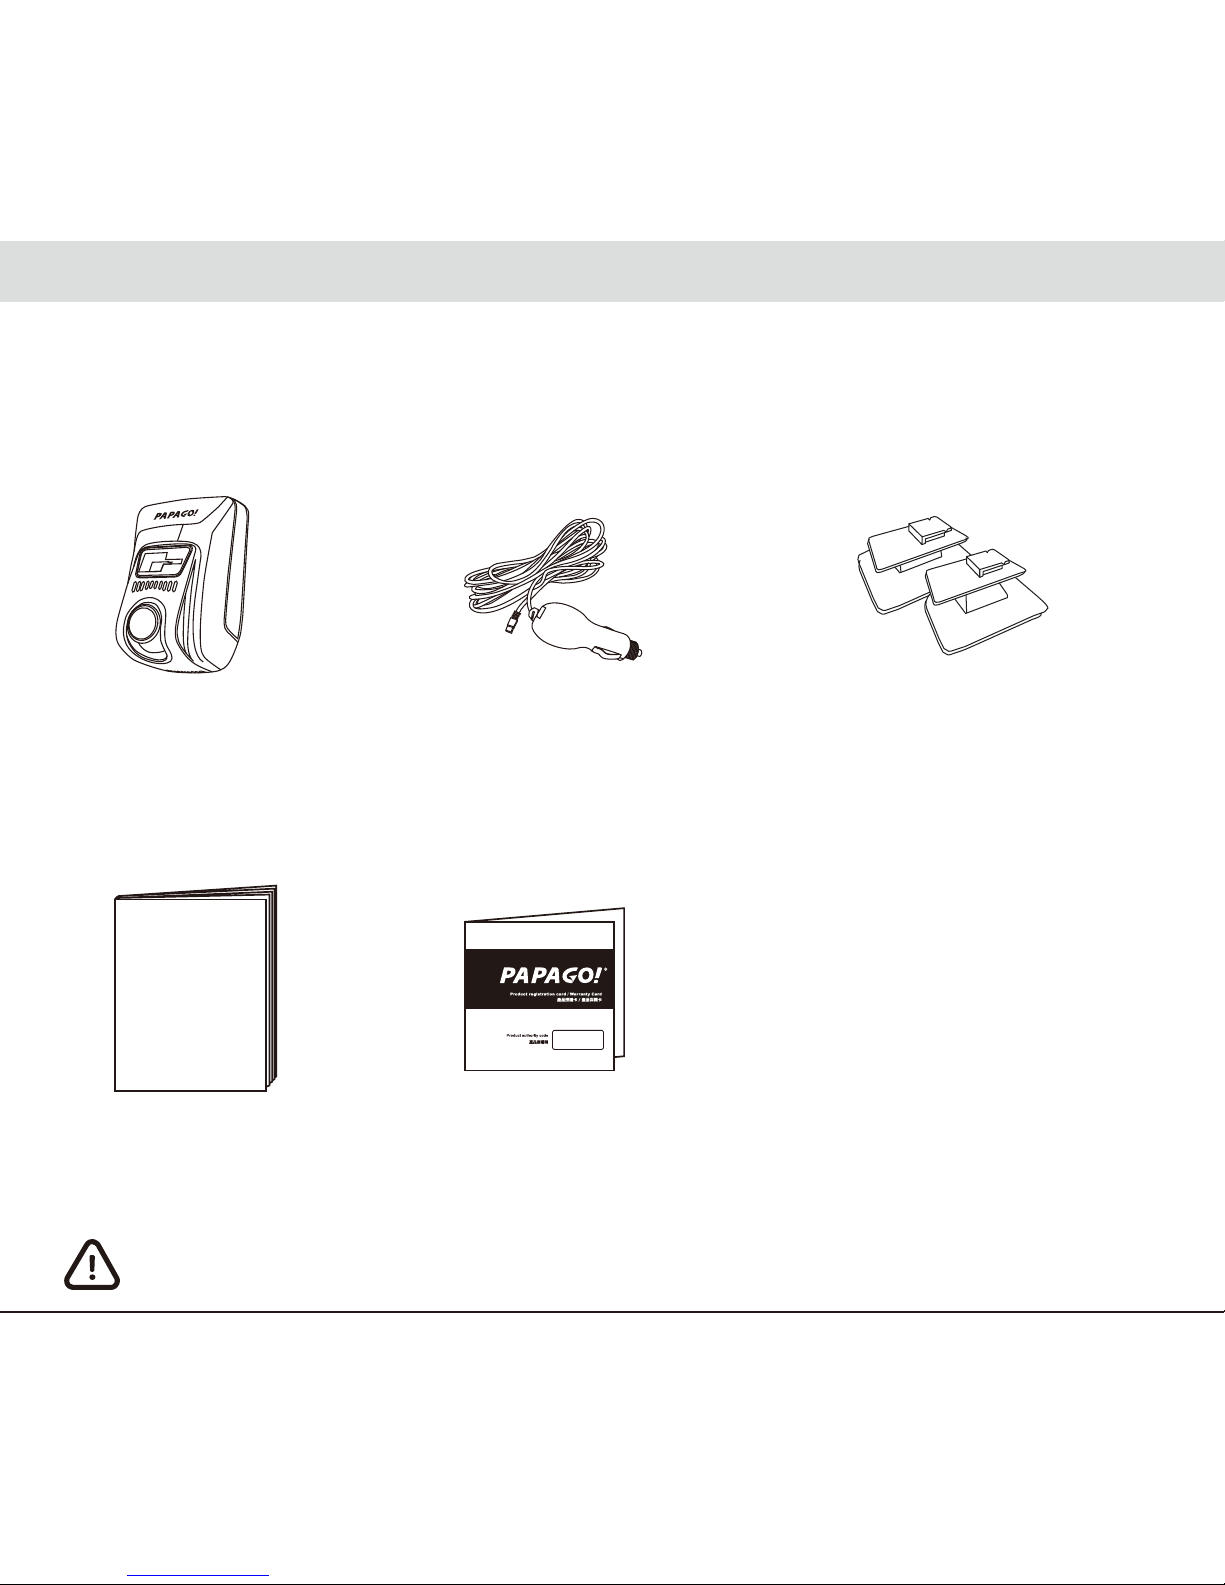
Product Overview
Package contents
● Dashcam ● Car Charger ● 3M Sticky Clip (Long/Short)
● Quick Start Guide ● Warranty Card
Packaging contents are subject to change without prior notice.
English 5
English 6
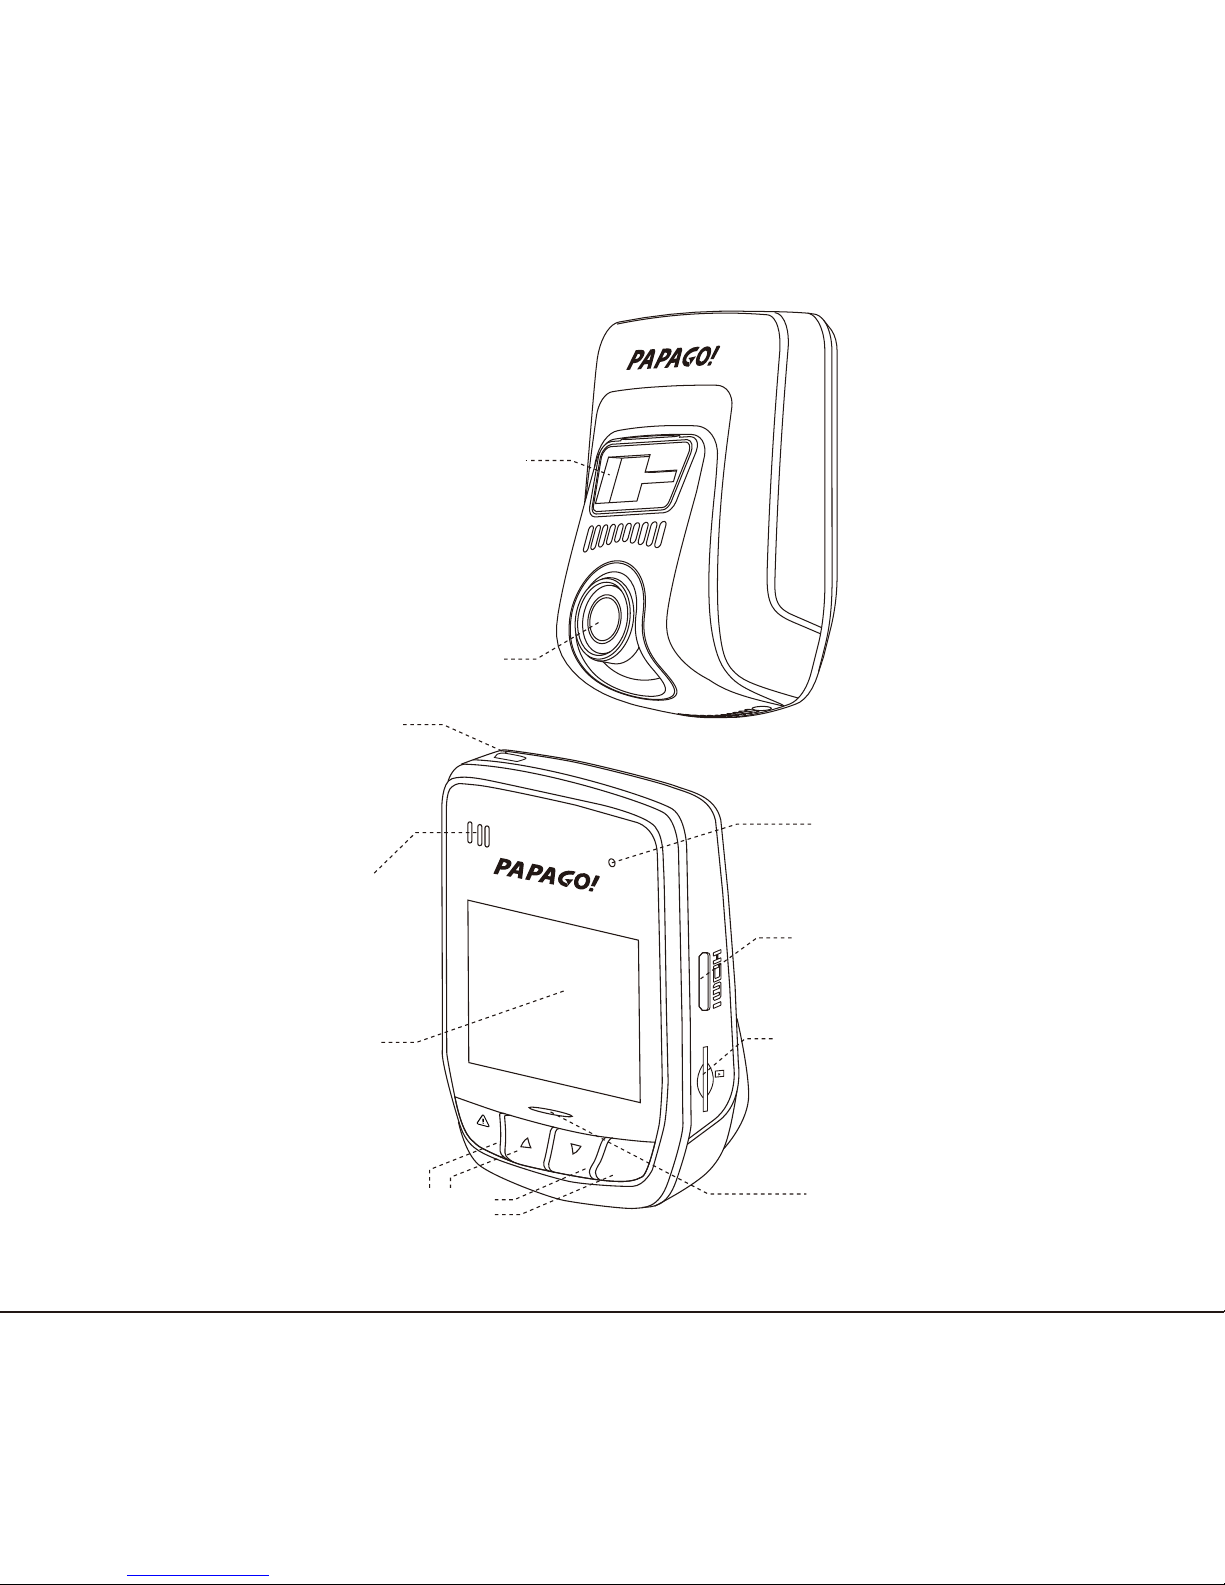
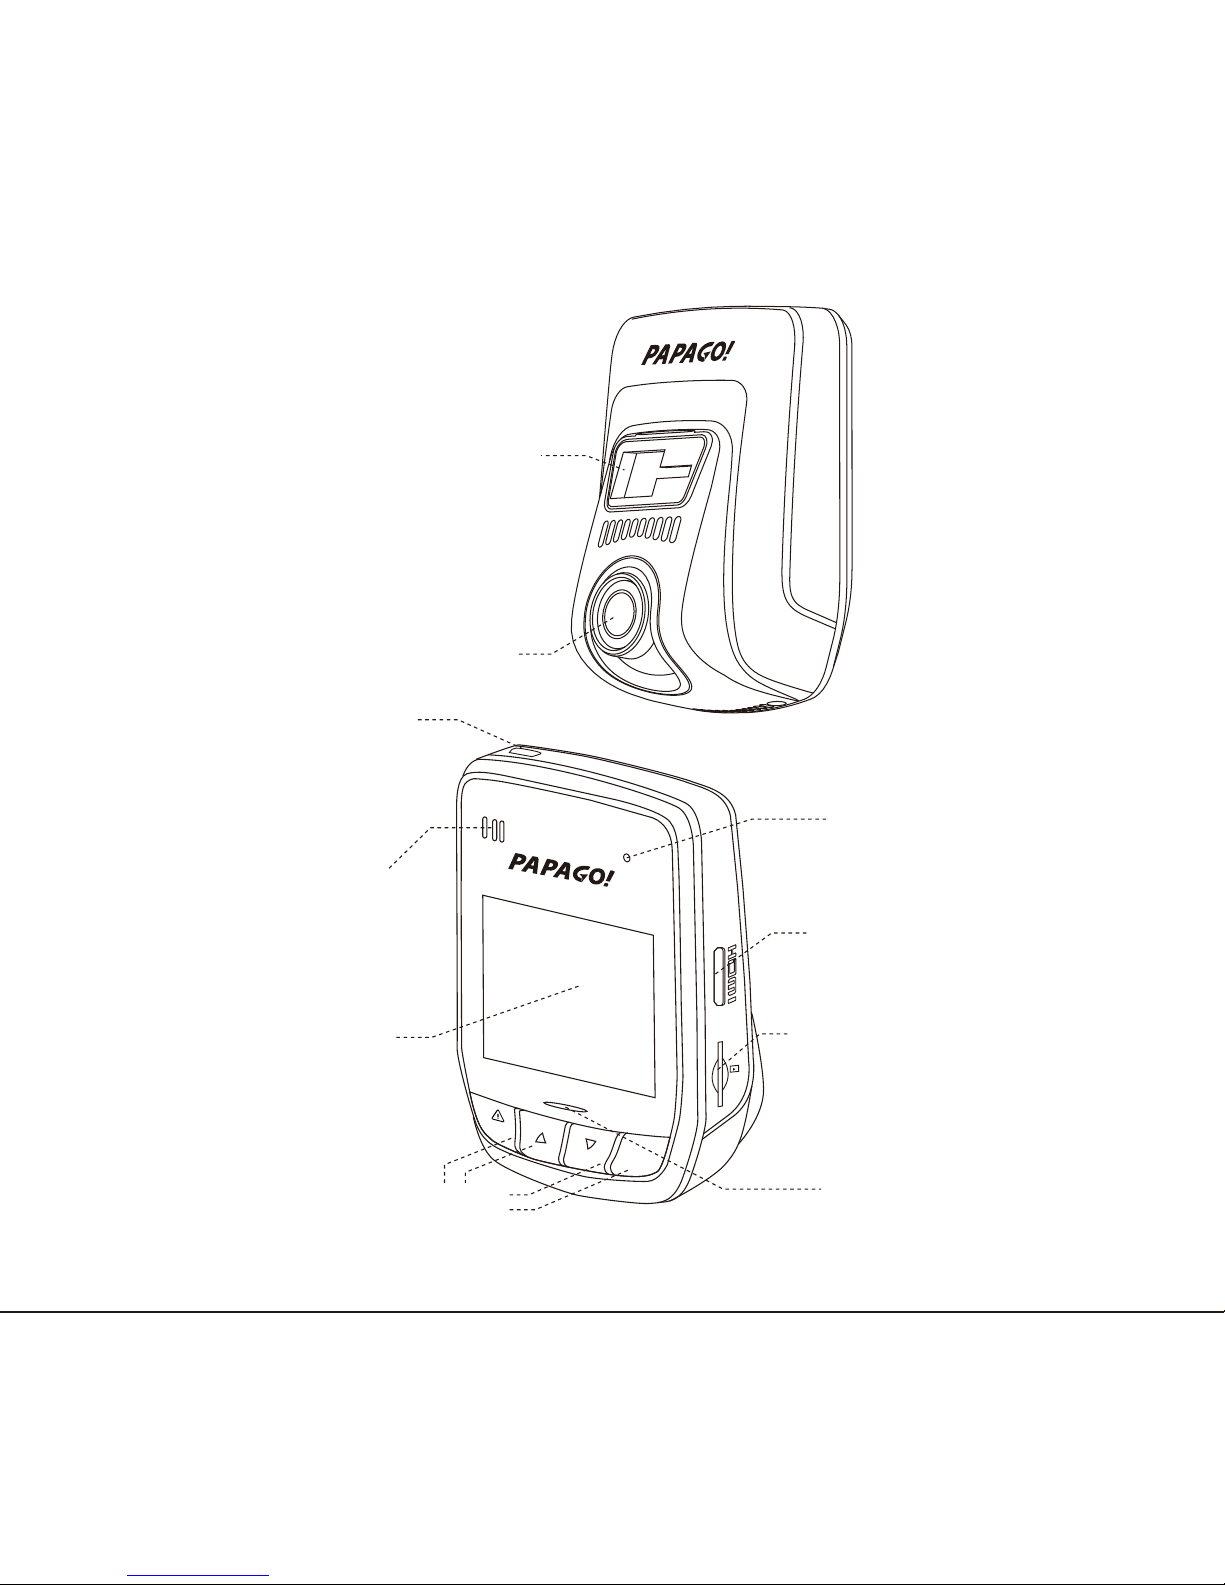
Lens
Mini USB Port
HDMI Port
Indicator
Speaker
MicroSD Socket
Reset
Holder Clip
DVR Button
LCD
Lens adjustment
REC
OK
Dashcam Illustration
Installation Guide
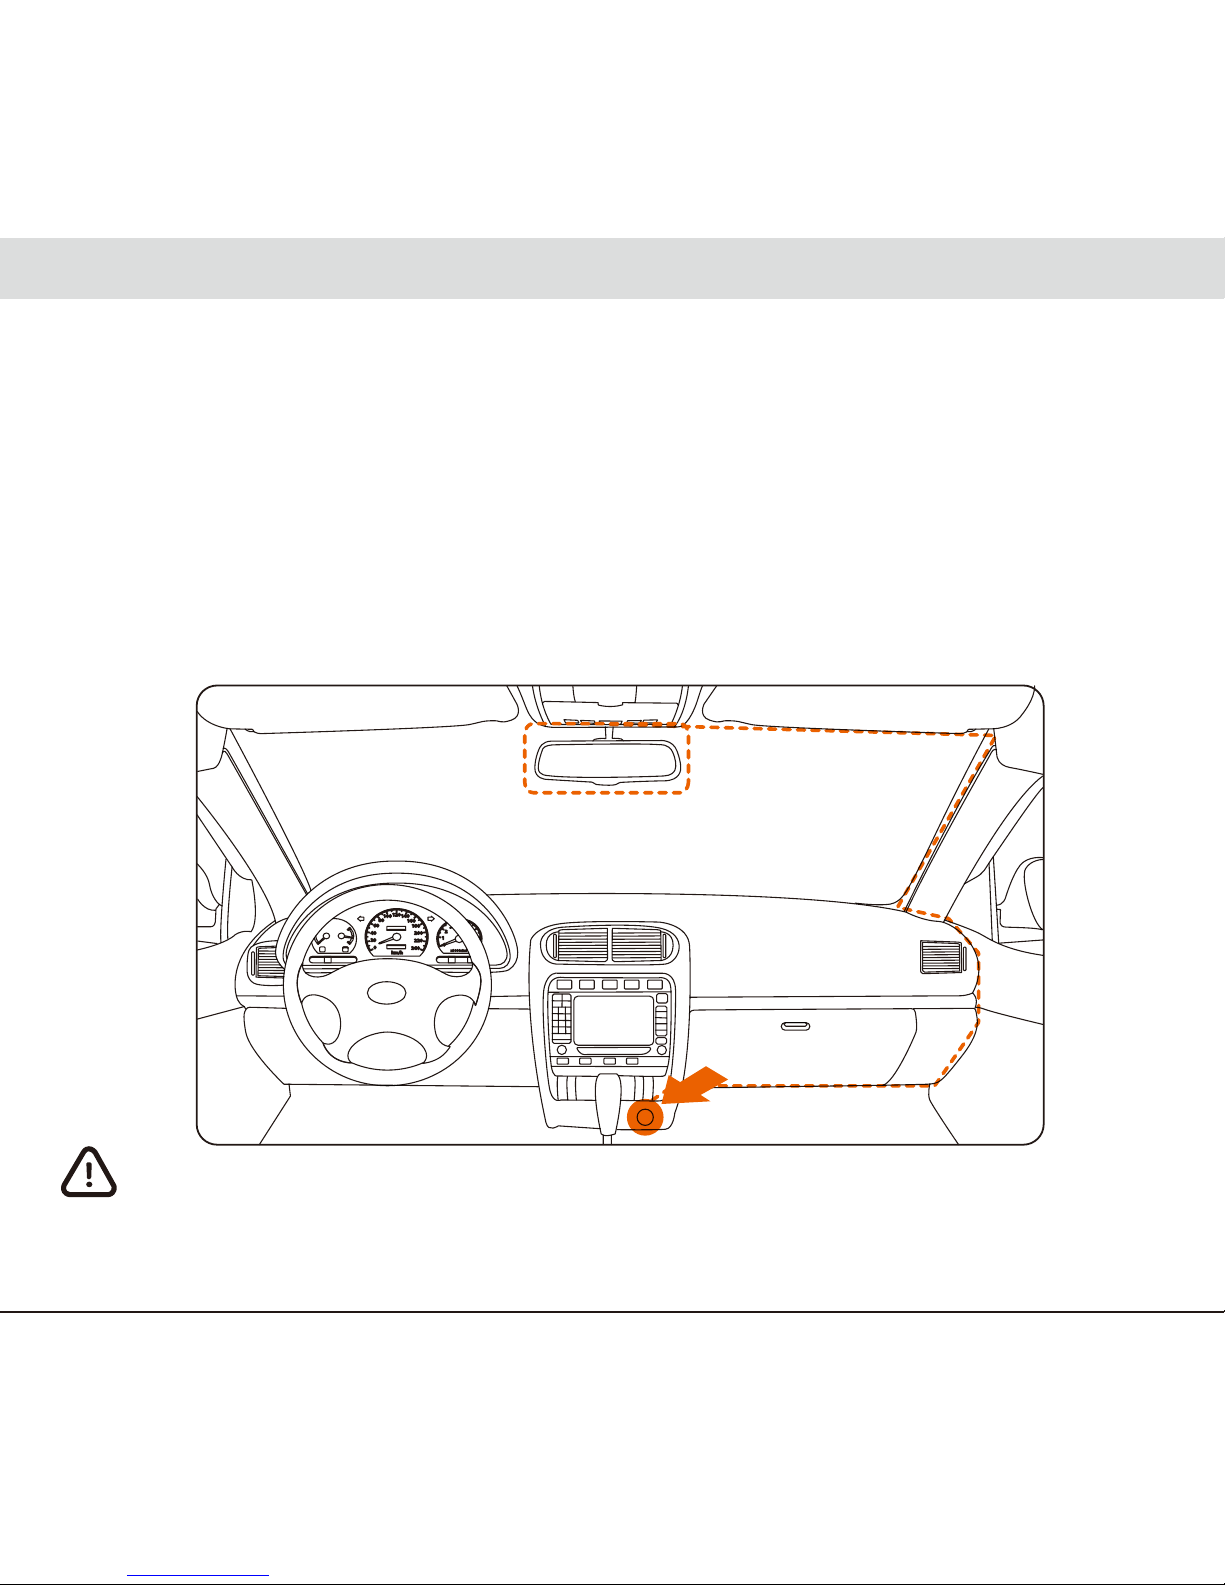
Installation Position
● Do not install the Dashcam in a position that will block the view of the driver or in an unsafe area.
● Install the Dashcam near the rearview mirror but not in a place that will block the vision of the driver.
● Install the Dashcam within the wiper blade area to ensure that the cameras lens will capture
clear video on a rainy day.
● Do not install the Dashcam near the airbag operating range.
● Do not install the Dashcam on the windscreen protection film to prevent damage to the
protection film
● Install the Dashcam in a position that will not affect any other electronic devices you may
have in your vehicle.
Do not install the Dashcam on top of the airbag cover or the airbag
operating range. This company assumes no responsibility for injury or
death caused by car impact or airbag problems.
English 7
Best Installation Position
Connect the DC Adaptor
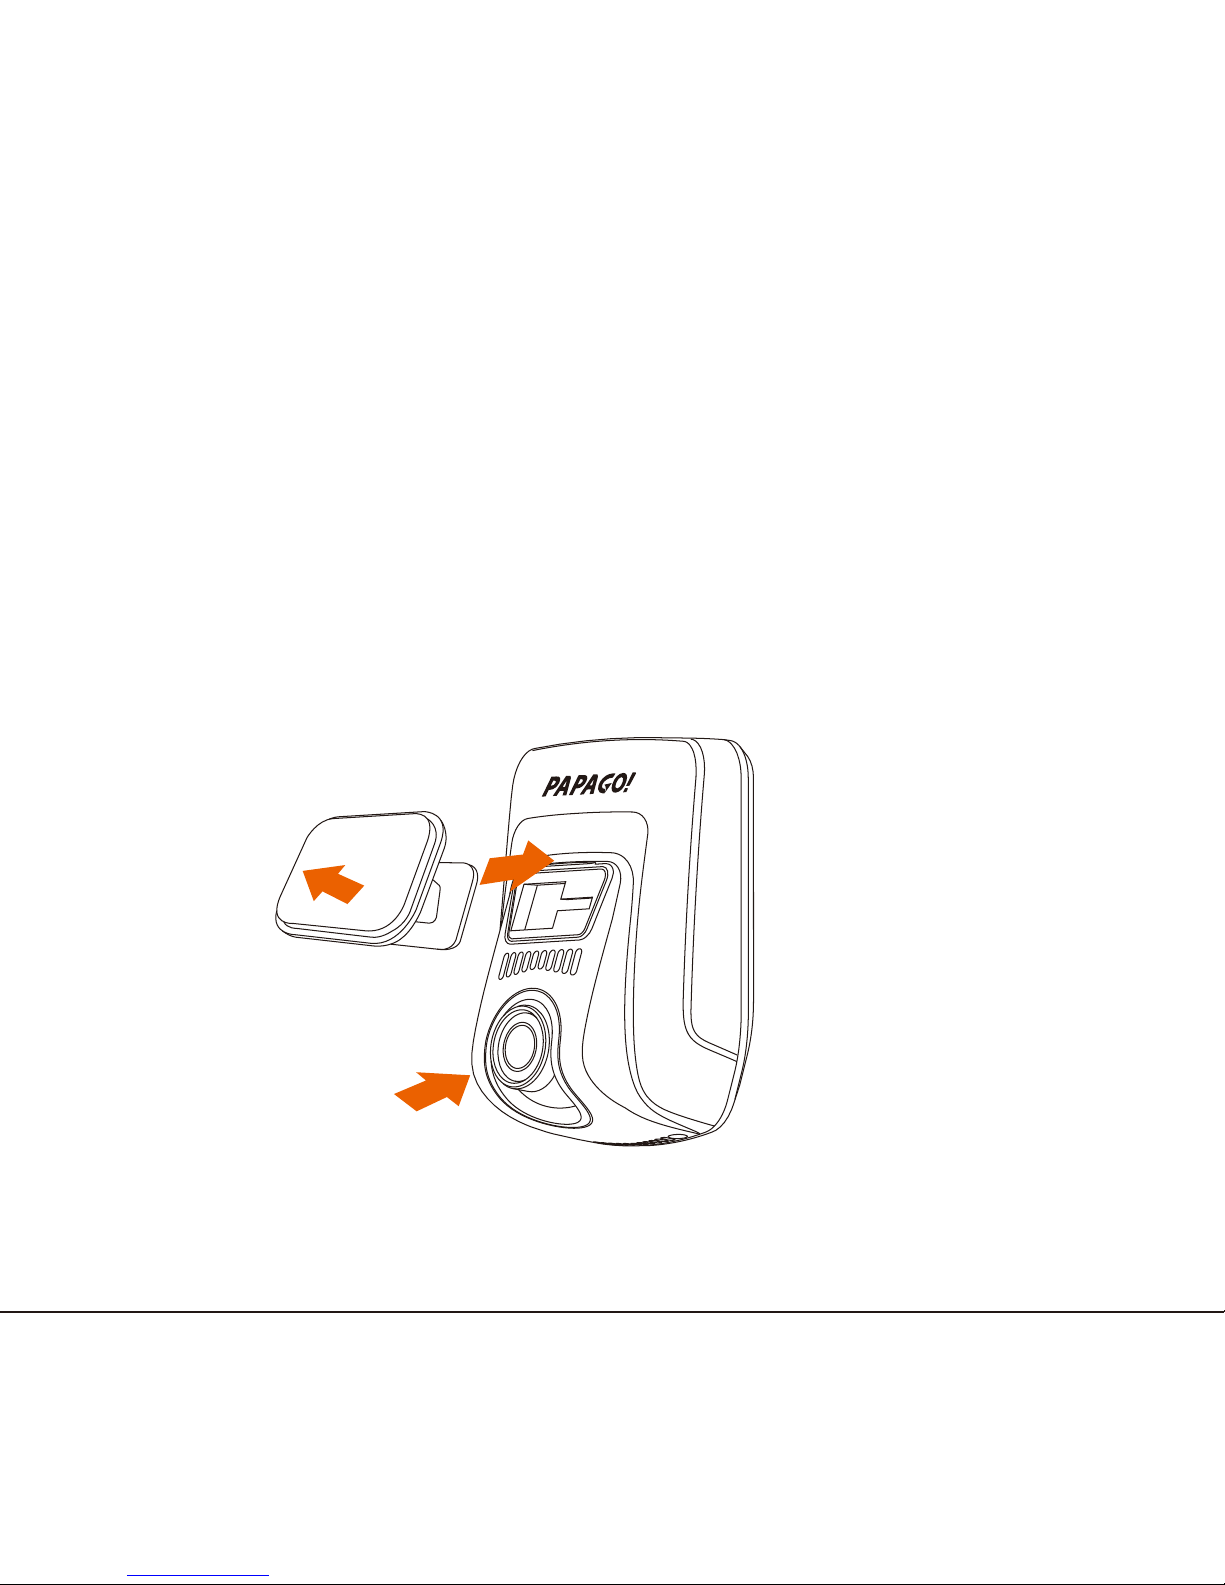
Installation Method
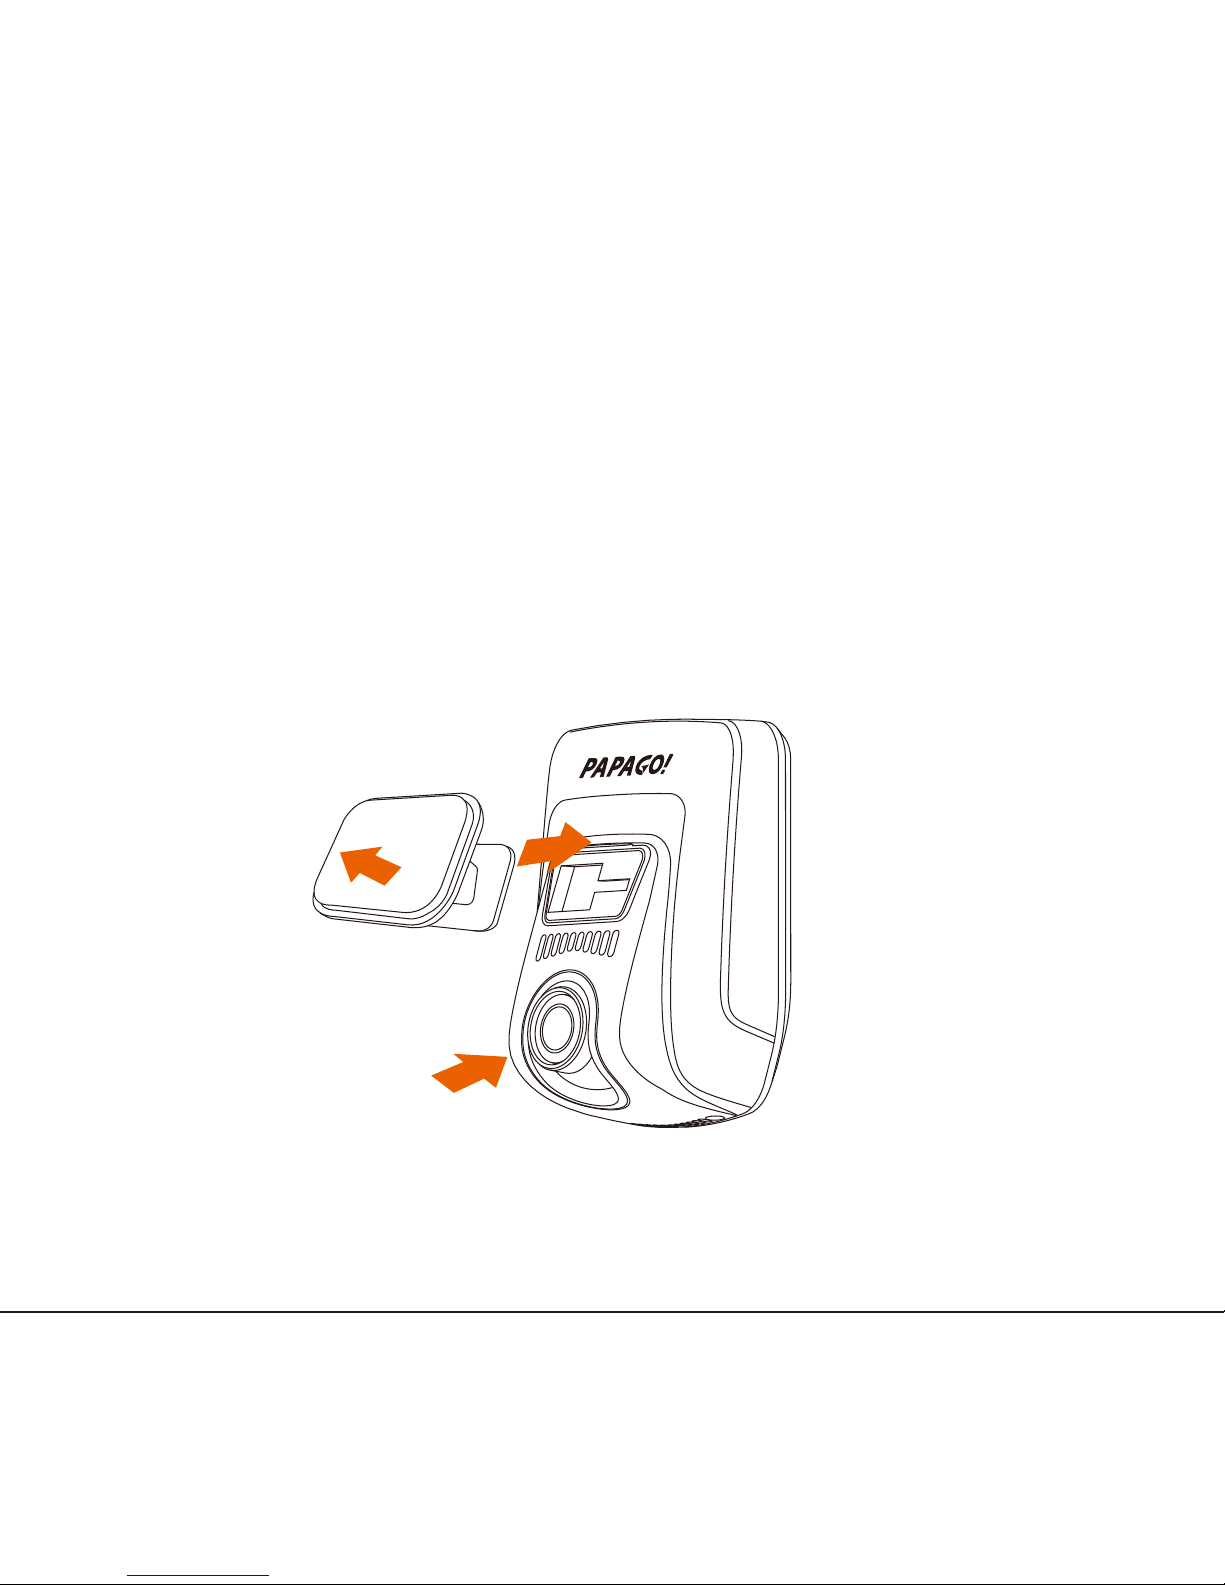
1.Connect the holder hooks with the holder clip. (Two options are provided: Short and long
holders for different angles of the windshield. Choice is yours)
2.It is best to place in the center of the windshield area behind the rearview mirror. You can
still easily adjust the capture angle.
3.Remove the red protective sticker. Affix the clip mount on the windshield in a suitable
position so that the lens is facing the windshield. (Do not move for at least 24 hours.)
4.Adjust the lens so that it is inline with the front of the car.
5.Connect one end of the DC adapter to the cigarette lighter socket and the other end to the
Mini USB port on the Dashcam.
English 8
①
②③
④
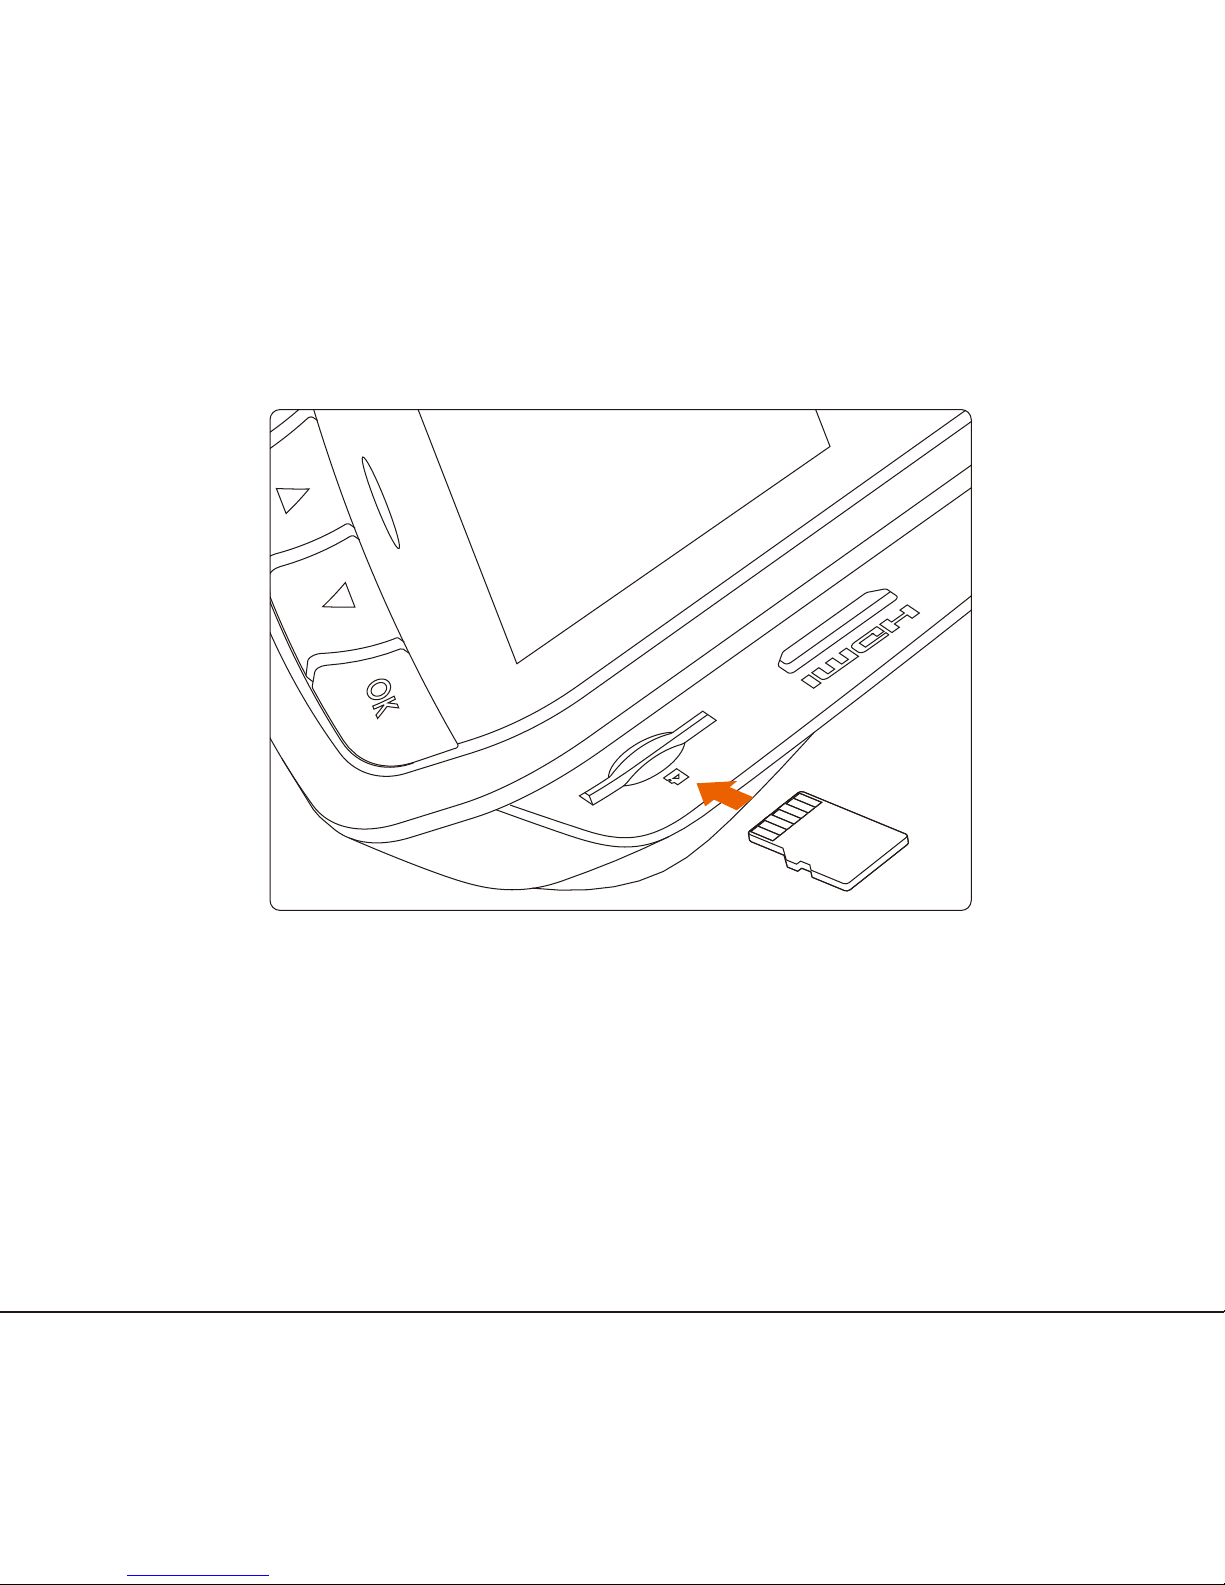
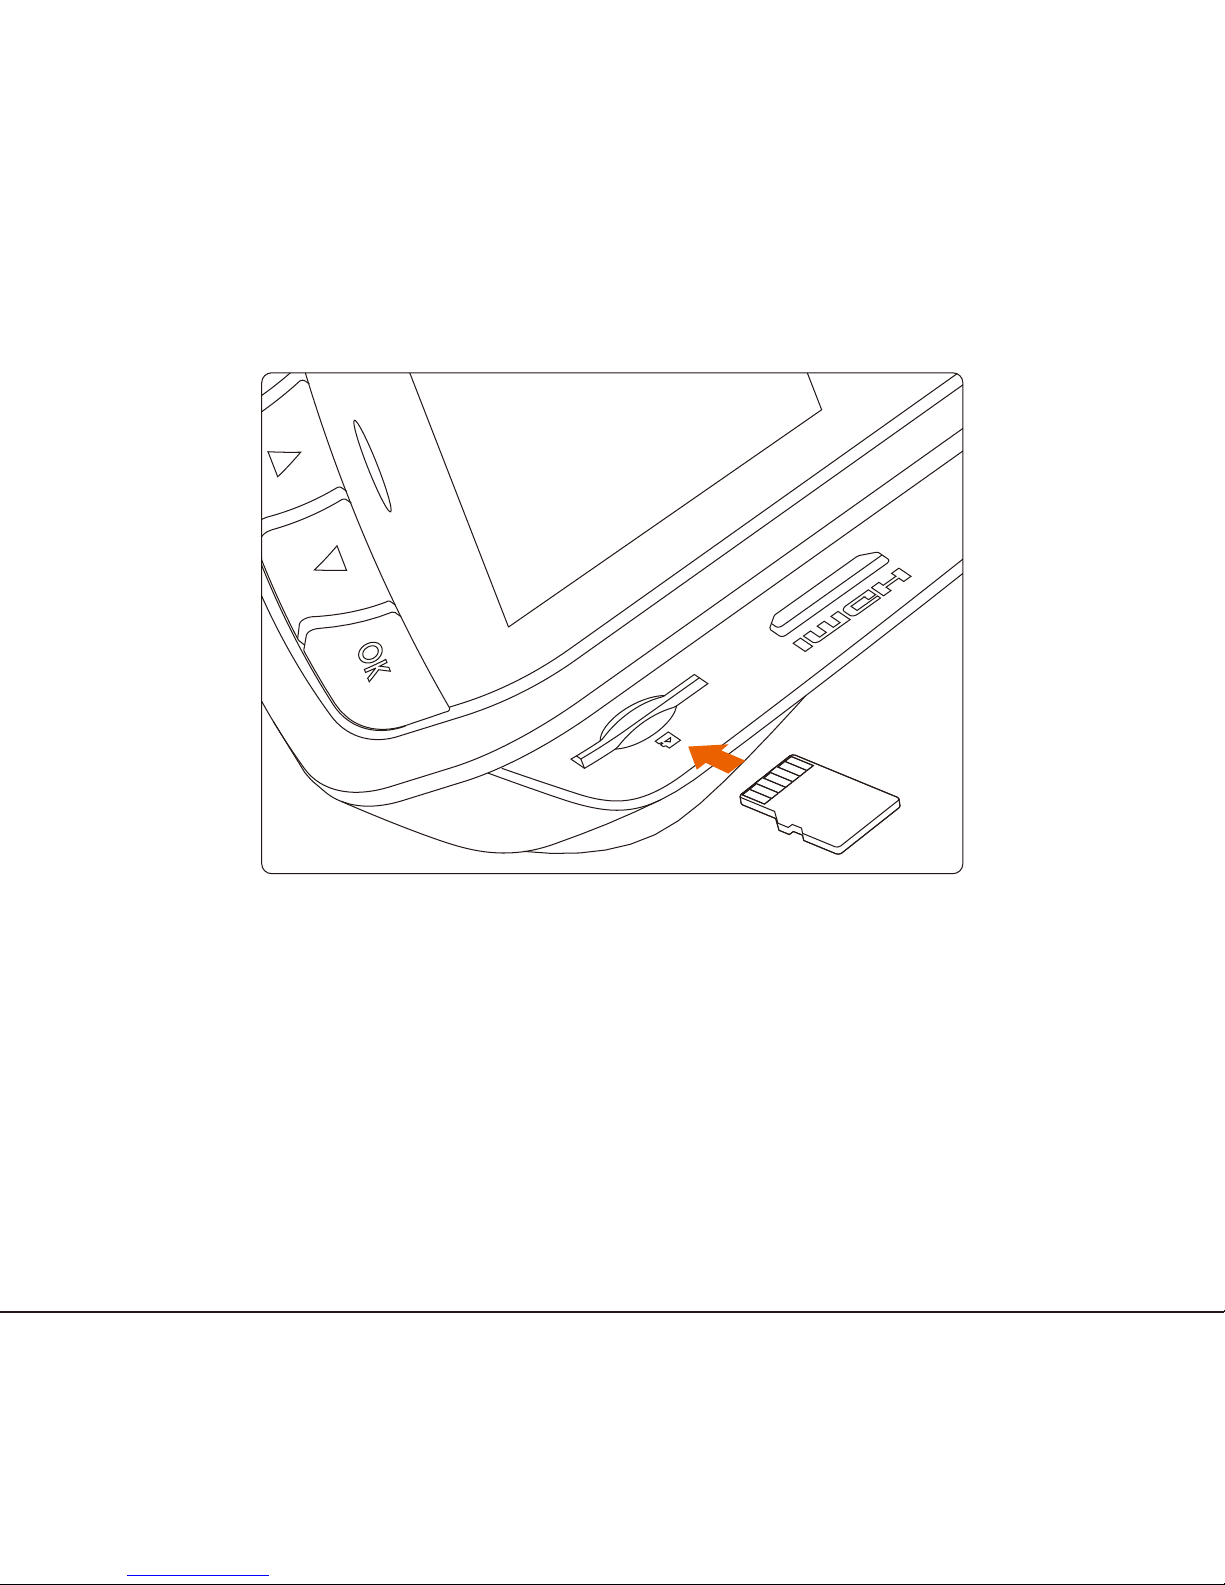
MicroSD Installation
Install the MicroSD in the MicroSD socket with the pins facing upwards.
English 9
Operating the Dashcam
Turning the Dashcam on
● Auto ON
Insert the MicroSD in the MicroSD socket on the Dashcam. Connect one end of the DC
adapter to the cigarette lighter socket and the other end to the Mini USB port on the
Dashcam. Start the car and the Dashcam will be turned on automatically.
Turning Dashcam Off
● Auto OFF
When the Dashcam is turned on, after turning off the engine and unplugging the adaptor,
the Dashcam will be turned off automatically (motion detection is disabled).
Remove the MicroSD from the Dashcam only after the Dashcam is turned off
completely to prevent files from becoming damaged. Do not remove the
MicroSD from an operating Dashcam to prevent system damage.
Unplug the adaptor manually on cars whose cigarette lighter socket contin-
ues to receive power even after the engine is off.
English 10

Button Functions
● Recording mode
Manual Emergency Recording Enter “Playlist”
Enter “Setup Mode” Turn OFF / ON LCD Screen
(press and hold: Photograph (press and hold: turn voice
the current scene) recording on/off)
● Playlist
Enter “Recording Mode” Previous Page
Next Page Select Video/Photo
● Playback mode
Enter “Playlist”(press and hold: Delete the selected video/photo
enter “Recording Mode”)
Lock/unlock the selected Pause/Play
video/photo
● Settings
Previous Menu Previous Page
Next Page Confirm
English 11
REC
OK
REC
OK
REC
OK
REC
OK

Indicators
Color Status Definition
Red On Charging in progress
Off Charging completed
Green On Non-recording mode
Blink Recording mode
Off System off
Screen Icons
English 12
:
Video recording Status / Time
: Silent
: Video resolution
: Emergency Recording
: Motion Detection
: Driver Fatigue Alarm
: Light Remind
1080P30
: Stop & Go
: Battery status
: date / time / model
318
Play
Set
Panel
: Emergency Recording
: Play List
: Enter Menu
: Screen Saver
318
Play
Set Panel
1080P30

Recording
● Repeat Recording
�○ Insert the MicroSD in the MicroSD socket. Loop recording begins after the Dashcam is
turned on.`
�○ The default length of each session is 5 minutes.
�○ When the MicroSD is full, new recordings will replace old recordings.
Remove the MicroSD from the Dashcam only after the Dashcam is turned off
completely to prevent files from becoming damaged. Do not remove the
MicroSD from an operating Dashcam to prevent system damage.
● Emergency Recording
�○ Auto Emergency Recording
When “G-Sensor” is enabled, the Dashcam will automatically write-protect the clip
recorded during the time when an impact is detected to prevent the footage from being
recorded over with the loop-recording mode.
Set the sensitivity of impact detection from “Settings—GSensor”.
�○ Manual Emergency Recording
While a clip is being recorded, press the “ “ to write-protect the current clip and protect
it from getting recorded over with the loop-recording mode.
Snapshot
● While a clip is recording, press “ “ to take a snapshot.
● The snapshot function will not affect video recording.
English 13
REC
Playback
In the recording mode, press the “ ” button to enter the “Playlist” After selecting a
video/photo, press the “ ” button to play the selected video/photo.
In the playback mode, press the “ ” button to select the video/photo you wish to delete.
Videos/photos indicated by the “ ” icon are locked (protected) videos/photos.
Locked videos/photos cannot be deleted. Please unlock them before deletion.
PC Mode
1.Connect the Dashcam to a PC over the Mini USB port.
2.The Dashcam will be detected by the PC as a “Removable Drive”.
3.Enter the “PAPAGO” folder.
4.Copy the required data to the PC.
Videos / Emergency Folder: Video files (including ordinary / emergency
recordings)
Photos Folder: Photo files
English 14
OK

HDMI Output
1.Connect the Dashcam to an output device with the HDMI port.
2.Set the signal source on the output device to HDMI.
3.Instead of the Dashcam LCD, image will be displayed on screen of the output device.
4.It supports video/photo recording, playback, and deletion.
Firmware Upgrade
1.Visit the PAPAGO official website at http://us.papagoinc.com.
2.Go to the Product Page—Support Tab”.
3.Download the latest version of the firmware and extract it in the root directory of the MicroSD.
4.After copying, insert the MicroSD in the MicroSD socket.
5.Turn on the Dashcam.
6.When the LED indicator begins to blink, this means that the firmware is uploading correctly.
7.After firmware upgrade, the Dashcam will reboot again.
8.Enter “Settings—Version” to check if the firmware is up-to-date.
Before upgrading firmware from the MicroSD, please format the MicroSD on
the Dashcam to ensure read/write stability.
Do not disconnect power supply during firmware upgrade! The Dashcam will
be unable to boot!
English 15
Settings
Press the “ ” button to enter “Settings”.
● GSENSOR
Set the impact sensitivity of the G-sensor. Options include: Low, Medium, High, and OFF.
● Driving Safety:
a. Stop and Go: When activated, after the car is stopped for 10 seconds the device will
start to detect when the car in front has proceeded to go. When the car in front is
driving away, it will give an audio alert to remind you to begin driving.
b. Fatigue Driver: When activated, the user can setup a defined alarm clock, periodically
reminding you to take a rest before continuing to drive. Available options are : 30
minutes/1 hour/2 hours/off.
c. Remind Light : When activated, if driving in a dark environment (such as tunnel or
parking structure), it will have an audio alert and display the light alert icon on the
screen. The alert can be turned on/off.
● Motion Detection:
Recording will start when the function is activated. If there is no movement for more than
60 seconds, recording will be stopped and switched to detection mode. Recording restarts
when dashcam detects movement. The action is repetitive.
This function only works when the device has a continual power source after
the vehicle´s engine is turned off.
English 16

● Date/Time
Set date, time, and date format.
● Record Audio
Enable or disable voice recording.
● Beep Sound
Enable or disable button sound.
● Date Stamp
Enable or disable date stamp on recordings.
● Loop recording
Set the recording length of each session. Options include 3 minutes, 5 minutes, 10 minutes.
● Resolution
Set recording resolution. Options include: 1080FHD 1920x1080,720P60 1280x720, 720P
1280x720, WVGA 848x480, and VGA 640x480.
● EV (Exposure Value)
Adjust EV for better effect in different lighting condition. Options include: -1.0, -2/3, -1/3, 0,
+1/3, +2/3, and +1.0.
● Screen Saver
Set screen time-out. Options include 1 minute, 3 minutes, and OFF.
● Frequency
Set the frequency of light source in the environment. Options include 50Hz and 60Hz.
● TV Mode
Set video output format. Options include NTSC or PAL. Usually NTSC is used in the North
America as well as most of South America.
English 17

● Language
Set display language. Options include English, 简体中文, 繁體中文, 日本語, Deutsch,
Français, Español, Italiano, Português, and Русский.
● Format
All data on the MicroSD will be deleted.
Data is irrecoverable after formatting. Please make a backup copy of the
videos and photos before formatting the MicroSD.
● Format Warning
Set format prompt interval. Options include 15 days, 30 days, 60 days, or OFF.
● Default
Reset all values to factory default.
● Version
Check the current firmware version.
English 18

Useful Information
Cleaning
● If there is dirt on the lens, do not remove it directly with fingers to prevent affecting the
recorded area.
● If foreign objects have entered the Dashcam, please contact us. Do not attempt to
disassemble the Dashcam or the adapter by yourself!
Preservation
● If you plan on leaving your car unused for a long time please remove the Dashcam and
unplug the adapter.
● Avoid storing the Dashcam in a humid or hot place.
● To ensure MicroSD functions, please remove the MicroSD from the socket if it is not used
for a long time.
Preservation
● Troubleshooting
�○ Check if the adapter is (properly) connected or the battery level is too low.
�○ Pres the “ ” button to reboot the DVR.
● No synchronous display during recording
�○ In the recording mode, check if the LCD is turned off. Press the “ ” button to turn on
the LCD.
�○ Check if the screen saver is activated. Change settings from “Settings—Screen Saver”.
English 19
OK
● SD Full
�○ Delete unwanted videos/photos from the Dashcam.
�○ Connect the MicroSD to a PC and delete unwanted videos/photos from the Dashcam.
�○ Format the MicroSD.
Locked videos/photos cannot be deleted. Please unlock them before deletion.
Data is irrecoverable after deletion and formatting. Please make a backup
copy of the videos and photos before formatting the MicroSD.
● No playback on the Dashcam
�○ Check if the filename of the videos/photos or the folder name in the MicroSD have been
modified from a PC.
�○ Check if the videos/photos in the MicroSD have been modified from a PC or the
videos/photos in the MicroSD are not produced with the Dashcam.
�○ MicroSD has crashed.
Please contact your dealer or our company if your problem persists.
English 20

感謝您購買 PAPAGO! GoSafe 行車記錄器
目錄
免責宣告 ............................................................................................................... 2
安全及注意事項 ................................................................................................... 3
警告 ........................................................................................................................... 3
注意 ........................................................................................................................... 4
產品介紹 ............................................................................................................... 5
包裝內容 .................................................................................................................. 5
主機介面 .................................................................................................................. 6
安裝指南 ............................................................................................................... 7
安裝位置 .................................................................................................................. 7
安裝方式 .................................................................................................................. 8
microSD 卡安裝......................................................................................................... 9
使用 ..................................................................................................................... 10
開機 ........................................................................................................................... 10
關機 ........................................................................................................................... 10
按鍵功能 .................................................................................................................. 11
指示燈 ..................................................................................................................... 12
畫面圖示 .................................................................................................................. 12
錄影功能 .................................................................................................................. 13
拍照功能 .................................................................................................................. 13
重播功能 .................................................................................................................. 14
PC 模式 ..................................................................................................................... 14
HDMI 輸出 ............................................................................................................... 14
韌體升級 .................................................................................................................. 15
設定 ..................................................................................................................... 16
實用資訊 ............................................................................................................... 18
清潔 ........................................................................................................................... 18
保存 ........................................................................................................................... 18
故障排除 .................................................................................................................. 18
繁體中文 1

繁體中文 2
免責宣告
1. 請按照說明文件的安裝和使用說明安裝於正確位置。
2. 您應不設置 / 安裝在會妨礙或降低駕駛員的視線的地方,請確保您的使用符合你的國家,省
,地區或國家的相關法規。
3. 您應該主動告知車內的乘客,有關車內的活動(聲音或影像)將會被記錄。
4. 當車輛行駛或移動中時,請勿於進行操作或設定。
5. 當設備顯示或提示任何警告信號或訊息是,包括任何影像或聲音及提醒訊號,都不應該違背
車輛所需的正常操作行為,也不應影響您的決策和判斷。
6. 當離開車輛時,請勿將設備放置在顯眼的位置,以避免裝置吸引小偷闖入竊取,損壞您的車
窗及財務。
7. 你應該避免裝置收到陽光直射或極端溫度(太高或太低的溫度),長期的暴露有可能減少或
損壞設備的正常功能及使用壽命。
8. 您應定期的檢查或確認設備的儲存卡(至少六個月內),確保聲音和影像的錄製工作儲存正
常。在每一次使用時,你應該確認設備工作正常,影像及聲音都有正常錄製及工作。如果有
無法正常操作或錄製的跡象,您應立即尋求替代產品,並檢查該產品是否仍在保修範圍之內
或有任何適用的保修條款。
9. 設備具有選擇的界面以啟用部份功能,例如 GPS 接收器或聲音記錄。如果您對這些功能的
隱私問題有疑慮,請您依照功能選單選項關閉這些功能。
10. 你應該正確的使用設備,並使用在正確的目的上,不應該使用在非法的目的或用途。或者
請勿使用在不合適的環境中,這些環境將有可能損壞設備,或容易造成車輛駕駛的危險並
且肯會危害駕駛員及乘客的安全。請正確並安全的操作設備。
繁體中文 3
安全及注意事項
警告
● 請勿濕手安裝或操作。
● 請勿安裝在高濕度、有易燃易爆氣體、液體處,以及干擾駕駛視線或安全的區域。
● 請勿長時間將主機暴露於高溫下的密閉車輛。
● 使用時請勿超過額定電壓。
● 當車輛熄火後,點煙器仍供電的使用者,在離開車子時,務必將點煙器插頭拔起,以避免耗
光電瓶內的電力,或造成其他意外狀況發生。
● 產品、配件及包裝請遠離兒童!
● 限用原廠車充線,本公司對他廠車充線造成的任何損害概不負責。
● 請勿自行拆卸主機與車充線。
請勿私自剪斷車充線!
因此造成的主機燒毀不在保固範圍內!
● 務必按照當地的法律法規來回收電池。
● 請勿嘗試拆解、改裝或加熱電池。
● 電池不可自行更換,更換不當會有爆炸危險!
● 請勿讓電池與水( 如海水) 或其他液體接觸。
● 請勿使電池短路。
● 電池不得暴露在如日照、火烤或類似過熱的環境中,以防爆炸。
● 請勿將電池投入火中,以防爆炸。

繁體中文 4
注意
● 不要用力按壓鏡頭。
● 不要用錐子等尖銳物體刺戳主機及配件。
● 在關機過程中,請勿立即將 MicroSD 卡取出,避免檔案損毀。
● 建議使用 Class6、8GB 以上的 MicroSD 卡。( 最大支持 32GB)
● 首次使用 MicroSD 卡前,請務必在主機上將 MicroSD 卡格式化以保證 MicroSD 卡的讀寫
穩定。
● 在系統升級過程中請勿斷電!以免造成無法開機等情況!
● 本手冊的產品功能及內容如有變更,恕不另行通知。
繁體中文 5
產品介紹
包裝內容
● 行車記錄器主機 ● 車用變壓器 ●
3M黏貼式長短支架
● 使用手册 ● 產品保固卡
本產品包裝内容如有變更,恕不另行通知。
使用手冊
主機介面
繁體中文 6
3M黏貼式
支架卡扣槽
可上下調式鏡頭
mini USB 介面
内置揚聲器
螢幕
Reset 插孔
HDMI 介面
MicroSD卡插槽
指示燈
按鍵鈕
REC
OK
安裝指南
安裝位置
● 不要安裝在干擾駕駛員視線或安全的區域內。
● 盡可能安裝在靠近車內後視鏡附近,影像視野較佳處。
● 鏡頭拍攝位置處於雨刷清潔範圍內,確保雨天可清晰拍攝。
● 不要安裝在汽車安全氣囊活動範圍內。
● 不要安裝在汽車隔熱紙上,以免損毀汽車隔熱紙。
● 安裝位置不受汽車隔熱紙影響,或任何具干擾性的電子產品周圍。
切勿把機器安裝在安全氣囊彈蓋上或安全氣囊的工作範圍內。本公司對因車輛碰撞
或汽車安全氣囊的問題而導致的傷害或死亡不承擔任何責任。
繁體中文 7
最佳安裝位置
連接車用變壓器
繁體中文 8
安裝方式
① 雙手分別扶住主機與支架,將支架滑入主機上的支架卡扣。
(長款支架與短款支架可針對不同角度的擋風玻璃,請自行選擇)
② 選擇合適的位置,如後視鏡右側後方或者正中間
③ 將支架上 的3M 紅色保護貼紙撕掉,貼在前擋玻璃上。
(黏貼24小時內不得移動。)
④ 調整鏡頭角度,以螢幕顯示車頭居中為最佳。
⑤ 車充連接主機 mini USB 介面和汽車點煙器。
①
②③
④
MicroSD 卡安裝
將 MicroSD 卡金屬面朝上,插入主機 MicroSD 卡插槽。
繁體中文 9
 Loading...