

Page 1
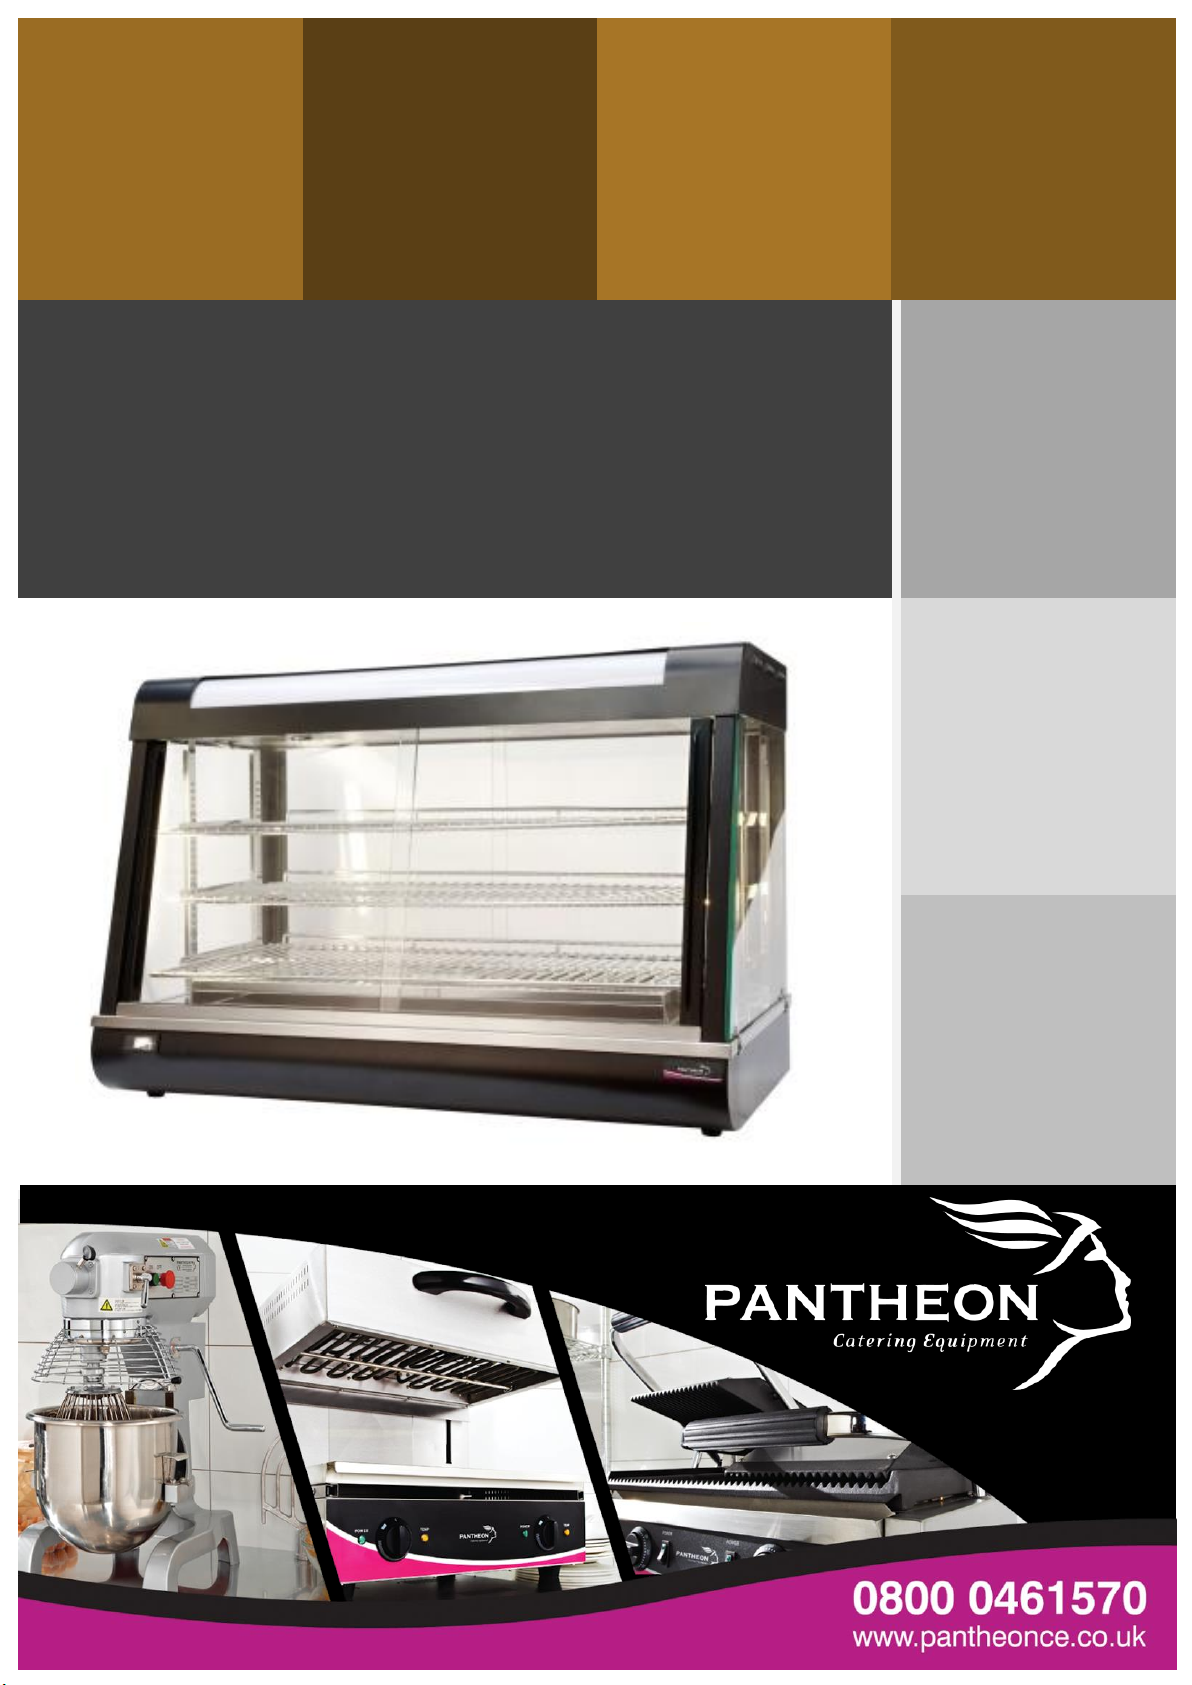
Operating Manual
Servery Range
Heated Collection
HC1, HC2, HD1, HDC1, HDC2, HDC3, HDL2, PW1, PW2
Product Range Also Includes:
Induction Hobs / Combination Ovens / Pizza Ovens / Mixers
Salamander Grills / Contact Grills / Pie Warmers / Fryers
Heated Displays / Veg Prep Machines / Bains Marie / Mincers and more
Page 2
Heated Collection Operating Manual – HC1, HC2, HD1, HDC1, HDC2, HDC3, HDL2, PL1, PW1, PW2
Tel: 0800 0461570
Fax: 0800 0461571
Web: www.pantheonce.co.uk
Email: Info@pantheonce.co.uk
Pantheon Catering Equipment
Vulcan Works, Dixon Street,
Bolton, BL6 7PH
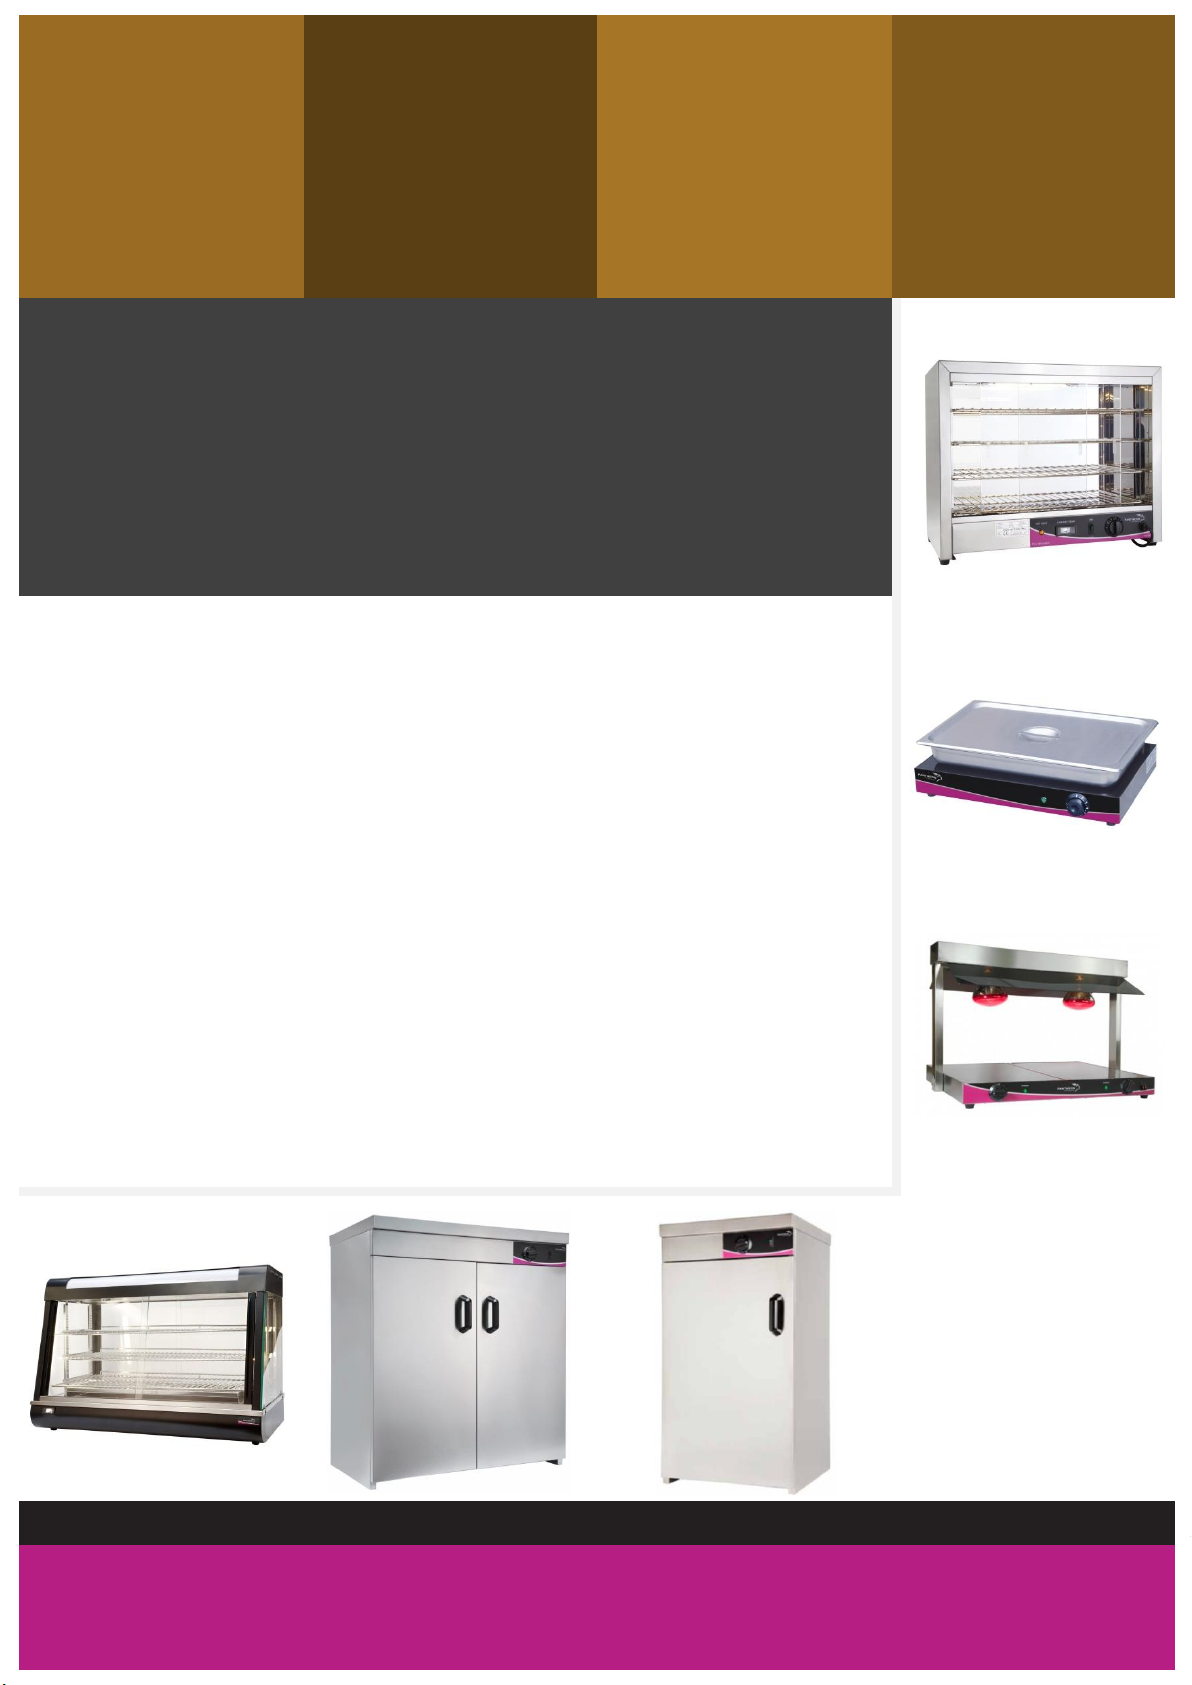
This Manual covers the following Devices from the Servery Range:
HC1, HC2 – Heated Cupboards
(Pictured below Middle Images)
HD1 – Heated Display
(Pictured Upper Right)
HDC1, HDC2, HDC3 – Heated Display Cabinets
(Pictured Bottom Left)
HDL2 – Heated Lamp Display
(Pictured Lower Right)
PW1, PW2 – Pie Warmer
(Pictured Top Right)
Featured Devices
Heated Collection
Page 3

Heated Collection Operating Manual – HC1, HC2, HD1, HDC1, HDC2, HDC3, HDL2, PL1, PW1, PW2
Tel: 0800 0461570
Fax: 0800 0461571
Web: www.pantheonce.co.uk
Email: Info@pantheonce.co.uk
Pantheon Catering Equipment
Vulcan Works, Dixon Street,
Bolton, BL6 7PH
Introduction………………………………………………………………………………………………………………………..………
Warnings and Precautions…………………………………………………………………………………………..………………
General…………………………………………………………………………………………................................
Heated Display…………………………………………………………………………………………....................
Heated lamp Display…………………………………………………………………………………………...........
Technical Data Specifications………………………………………………………………………………………………………
Heated Cabinets…………………………………………………………………………………………..................
Heated Display…………………………………………………………………………………………....................
Heated Display Cabinets………………………………………………………………………………………….....
Pie Warmers…..…………………………………………………………………………………….........................
Accessories………………………………………………………………………………………………………………………………….
HDC1, HDC2, HDC3………………………………………………………………………………………………………
PW1…………………………………………………………………………………………………………………………….
PW2…………………………………………………………………………………………………………………………….
Optional Extras…………………………………………………………………………………………………….........
Installation………………………………………………………………………………………………………………………………....
General…………………………………………………………………………………………................................
Heated Cabinets…………………………………………………………………………………………..................
Heated Display Cabinets………………………………………………………………………...……………….....
Glass Sliding Doors……………………………………………………………………………………….
Shelving System……………………………………………………………………………………………
Operating Instructions…………………………………………………………………………………………………………………
Heated Cabinets…………………………………………………………………………………………..................
Heated Display…………………………………………………………………………………………....................
Heated Display Cabinets………………………………………………………………………………………….....
Heated Lamp Display…………………………………………………………………………………………..........
Pie Warmers……………………………………………………………………………………….........................
Maintenance……………………………………………………………………………………………………………………………….
Cleaning………………………………………………………………………………………………………………………
Heated Cabinets…………………………………………………………………………………….......................
Heated Display & Heated Lamp Display……………………………………………………………………….
Heated Display Cabinets………………………………………………………………………………………….....
Pie Warmers…………………………………………………………………………………………........................
Troubleshooting…………………………………………………………………………………………..................................
Heated Cabinets…………………………………………………………………………………………………………..
Table of Contents
1
1
1
1
1
1
1
2
2
2
2
2
2
2
2
2
3
3
3
3
3
4
4
4
5
5
6
6
6
6
6
6
6
7
7
Page 4

Heated Collection Operating Manual – HC1, HC2, HD1, HDC1, HDC2, HDC3, HDL2, PL1, PW1, PW2
Tel: 0800 0461570
Fax: 0800 0461571
Web: www.pantheonce.co.uk
Email: [email protected]
Pantheon Catering Equipment
Vulcan Works, Dixon Street,
Bolton, BL6 7PH
Model
HC1
HC2
Voltage(V)
220-240V 50Hz
220-240V 50Hz
Power (W)
750
1200
Temperature Range (℃)
20-110
20-110
Weight (Kg)
32
46
Dimensions (mm)
450w x 485d x 850h
900w x 485d x 850h
1
Introduction
Thank you for purchasing a Pantheon Catering Equipment product. In this booklet you will find
instructions for the safe operation of the product so please read carefully and retain for future
reference.
Warnings and Precautions
General
The following warnings and precautions are important and must be observed:
Ensure voltage and frequency power requirements for the product match that of the supply.
The machine must be earthed when used. There is a danger of electric shock if it is not
earthed.
In case of emergency, please turn off the power switch and unplug the machine.
If the electric wire becomes damaged, a qualified engineer or the manufacturer must
replace it.
Heated Display
Do not touch the ceramic cooking areas, when in use or shortly after use, they will be hot!
Avoid concentrated loads on the ceramic cooking surface to prevent cracking or fracturing.
If the ceramic cooking surface becomes cracked, switch the machine off immediately and
contact your dealer or the manufacturer.
Ensure no products which will deform and melt are placed on the heated display, this
include plastics.
Heated lamp Display
Do not touch the ceramic cooking areas, when in use or shortly after use, they will be hot!
Avoid concentrated loads on the ceramic cooking surface to prevent cracking or fracturing.
If the ceramic cooking surface becomes cracked, switch the machine off immediately and
contact your dealer or the manufacturer.
Ensure no products which will deform and melt are placed on the heated display, this
include plastics.
Pantheon Catering Equipment is not responsible for any accidents or faults caused by amendments
made to the machine or improper use by the user.
Technical Data Specifications:
Heated Cabinets
Page 5
Heated Collection Operating Manual – HC1, HC2, HD1, HDC1, HDC2, HDC3, HDL2, PL1, PW1, PW2
Tel: 0800 0461570
Fax: 0800 0461571
Web: www.pantheonce.co.uk
Email: [email protected]
Pantheon Catering Equipment
Vulcan Works, Dixon Street,
Bolton, BL6 7PH
Model
HD1
HLD2
Voltage (V)
220-240V 50Hz
220-240V 50Hz
Power (w)
260
800
Temperature Range (℃)
0-85
0-85
Weight (Kg)
6
14
Dimensions (mm)
540w x 380d x 85h
730w x 580d x 550h
Model
HDC1
HDC2
HDC3
Voltage(V)
220-240V 50Hz
220-240V 50Hz
220-240V 50Hz
Power (W)
1840
1840
2200
Temp Range (℃)
30-90
30-90
30-90
Weight (Kg)
37
50
72
Dimensions (mm)
660w x 437d x 635h
900w x 480d x 590h
1200w x 480d x 810h
Model
PW1
PW2
Voltage(V)
220-240V 50Hz
220-240V 50Hz
Power (W)
1000
2 x 2900
Temperature Range (℃)
4 2 Weight (Kg)
21
15
Dimensions (mm)
640w x 335d x 530h
482w x 365d x 355h
2
Heated Displays
Heated Display Cabinets
Pie Warmers
Specifications are subject to change. Please check the rating label on the back of the machine.
Accessories
The following Devices come with the following accessories as standard:
HDC1, HDC2, HDC3:
4 x Stainless Steel Shelves
PW1
4 x Wire shelves
PW2
2 x Wire shelves
Extra shelves may be added as an optional extra, these can be purchased online
Page 6

Heated Collection Operating Manual – HC1, HC2, HD1, HDC1, HDC2, HDC3, HDL2, PL1, PW1, PW2
Tel: 0800 0461570
Fax: 0800 0461571
Web: www.pantheonce.co.uk
Email: [email protected]
Pantheon Catering Equipment
Vulcan Works, Dixon Street,
Bolton, BL6 7PH
3
Installation
General
The installation of the unit must be performed by a qualified technician only.
Ensure the unit is installed on a stable and level surface.
Ensure no flammable products are placed near the unit, as it will get hot.
Position the device appropriately so that the plug is always accessible.
Ensure the unit isn’t placed close to any water.
Ensure sufficient clearance so the unit can be opened and shut without affecting any
surrounding products
Heated Cabinets
Ensure sufficient clearance so the unit can be opened and shut without affecting any
surrounding products
Heated Display Cabinets
When you receive the product, the glass sliding doors are packed separately inside the
chamber. Be sure to remove these first and following the instructions below to fit them
correctly:
Glass sliding Doors
The unit has front and rear sliding doors. When unpacking, note that the longer doors fit at
the front sloped section.
The doors are fitted by placing the door into the channel in the top section of the unit first;
pushing the glass upwards, just enough to enable the bottom of the door to clear the
bottom channel and drop down into position.
There are two channels which allow the glass doors to slide past one another. Ensure that
the handles are towards the outside of the unit.
Fit the rear doors in the same manner. There are two plastic blocks supplied, which if placed
in the bottom channels in front of the glass, this will prevent the doors from opening.
Shelving system
There are four upright channels which locate into slots provided inside the unit.
The channels have a flat tab at each end; the top side is slightly longer.
Place the channel vertically into the slot provided in the top of the unit and then drop down
to fit through the corresponding slot in the bottom.
Ensure that flat sides are facing inside the unit.
The shelf support angles fit into the slots in the upright channel. They can be positioned level
or sloping forward according to preference.
The wire shelf is positioned on top of the support angle and fits against the securing tab at
the rear of the support angle which prevents the shelf from sliding forward.
Page 7
Heated Collection Operating Manual – HC1, HC2, HD1, HDC1, HDC2, HDC3, HDL2, PL1, PW1, PW2
Tel: 0800 0461570
Fax: 0800 0461571
Web: www.pantheonce.co.uk
Email: [email protected]
Pantheon Catering Equipment
Vulcan Works, Dixon Street,
Bolton, BL6 7PH
4
Operating Instructions
Heated Cabinets
Please follow the instructions below to ensure the Heated Cabinet is used correctly:
Plug the machine in and turn on the power switch.
The green indicator will illuminate to demonstrate that the unit is on.
There are two levels inside the hot cupboard, plates can be stacked according to the users
requirements.
Turn the temperature controller clockwise to set the required temperature
The temperature can be adjusted according to different dishes. The hot cupboard should
take about 35 minutes to warm from 0 to 80 C.
When the desired temperature is reached, the hot cupboard will continue to maintain this
temperature.
After working, turn the temperature controller to the off position, turn the power switch off,
and then turn the machine off at the mains.
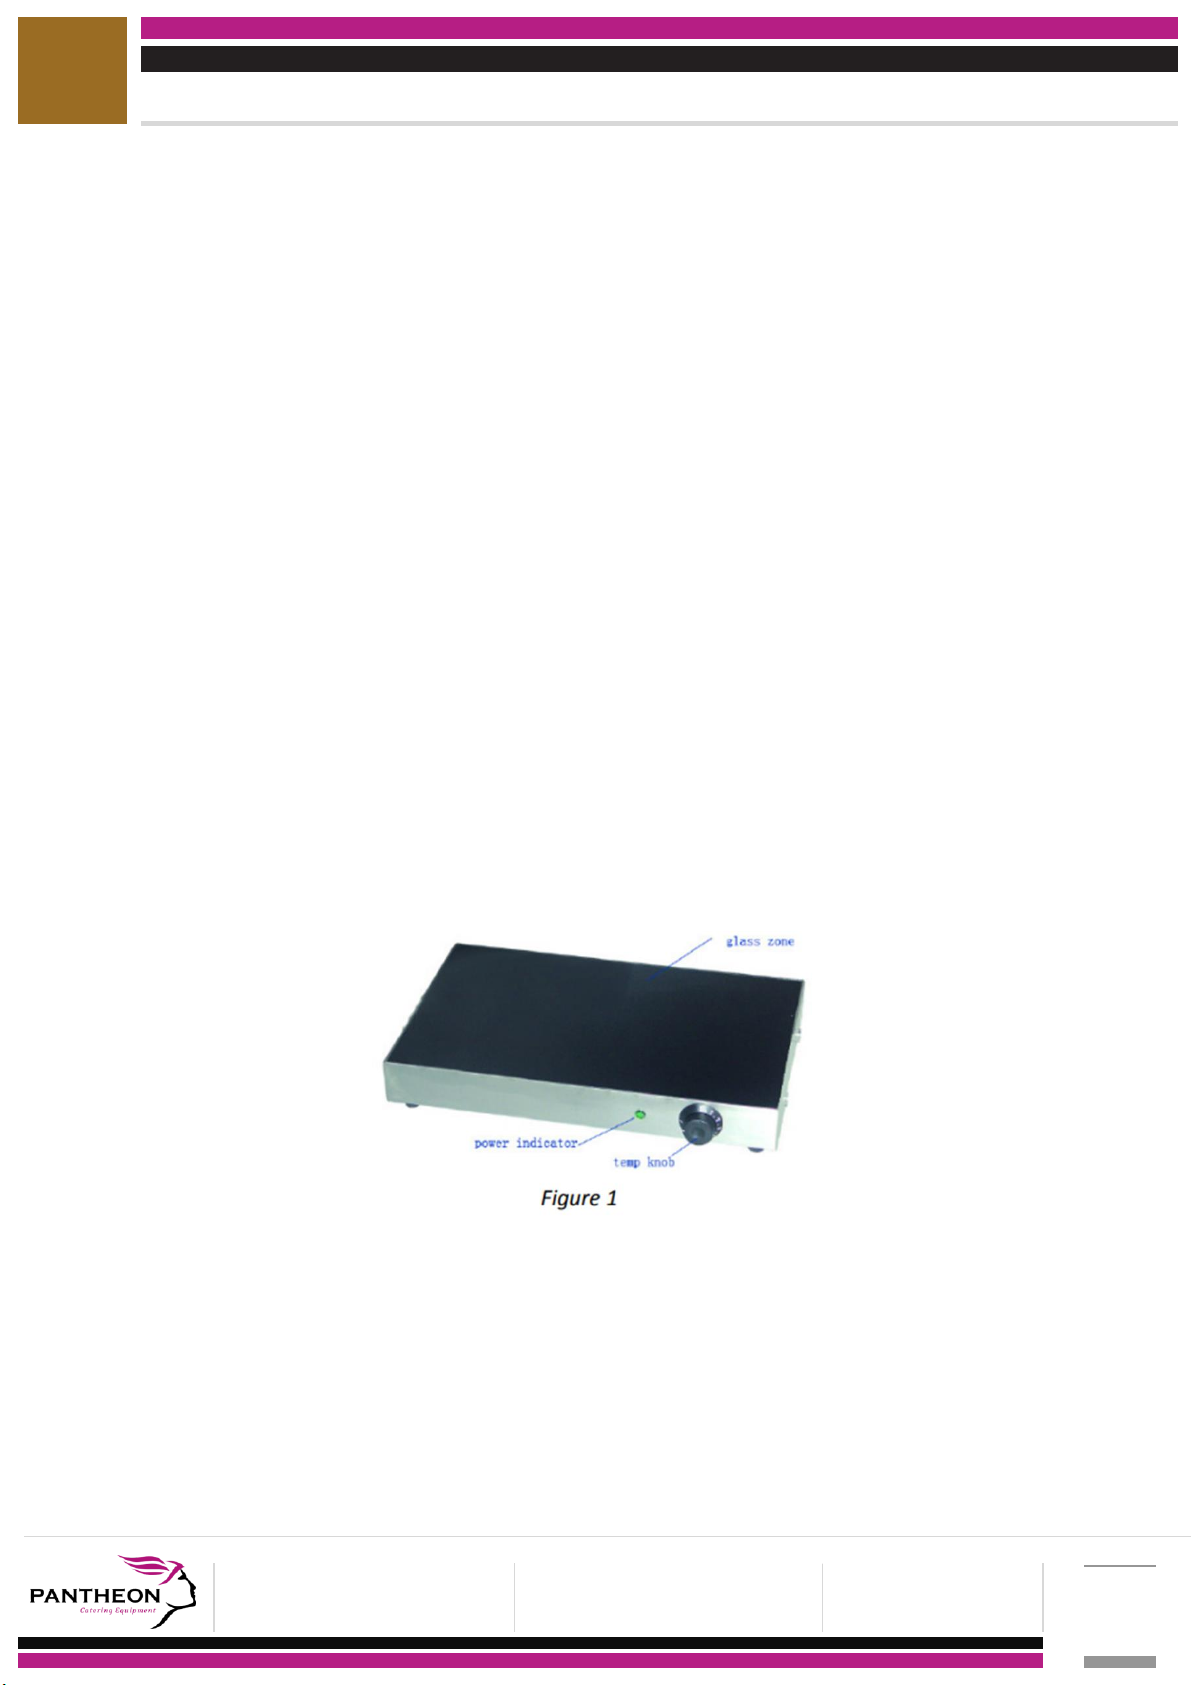
Heated Display
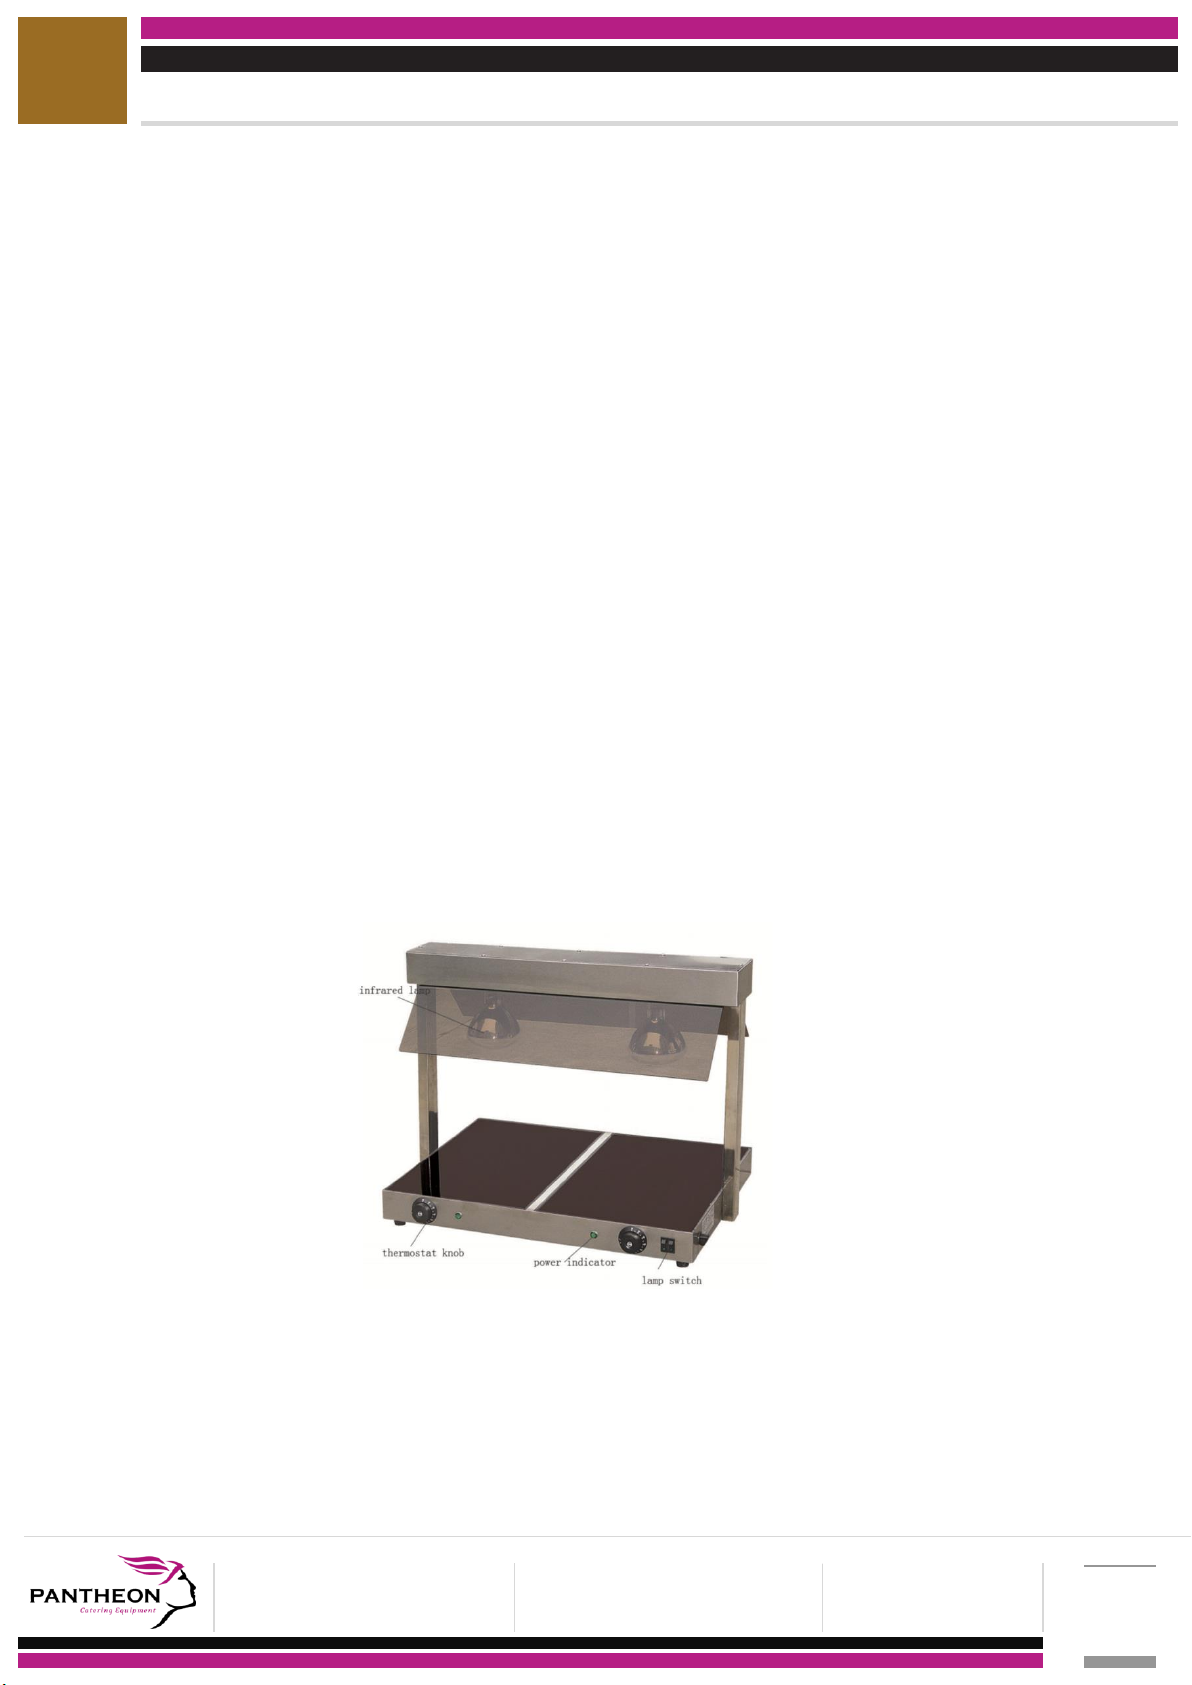
Please follow the instructions below and use ‘figure 1’ to operate the heated display correctly:
Ensure the unit is placed on a flat stable surface
Plug the unit into the mains and switch it on. The green power light will illuminate.
Select the desired temperature by rotating the temperature control knob.
The unit will take about 5 minutes to warm up
Different size gastronome pans can be placed on top of the unit to keep cooked food at the
correct temperature.
When you have finished with the unit, turn the temperature control knob to the off position
and switch the unit off at the mains.
Page 8
Heated Collection Operating Manual – HC1, HC2, HD1, HDC1, HDC2, HDC3, HDL2, PL1, PW1, PW2
Tel: 0800 0461570
Fax: 0800 0461571
Web: www.pantheonce.co.uk
Email: [email protected]
Pantheon Catering Equipment
Vulcan Works, Dixon Street,
Bolton, BL6 7PH
5
Heated Display Cabinets
Please follow the instructions below to ensure the Heated Display Cabinet is used correctly:
Before first use, clean the inside chamber and the tray grids with a damp cloth.
After cleaning, dry the unit thoroughly before use.
Take out the water pan inside the chamber and fill it sufficiently. The water pan is in place to
produce moisture to keep the inside environment warm throughout.
Connect the unit to a suitable power supply.
Rotate the thermostat clockwise to your required temperature, the yellow heating light will
illuminate.
The inside temperature of the unit is clearly displayed on the temperature display on the
front of the unit.
There is also a light switch, which is optional, to illuminate the content of the heated display
cabinet.
It is advised to that the water level in the water pan is checked on a daily basis, to ensure the unit
continues to function correctly
Heated lamp Display
Please follow the instructions below and use ‘figure 1’ to operate the heated display correctly:
Before use always ensure the cooking surface is clean, free of dust and food.
Plug the machine into the mains.
Turn the power switch/switches on for the required side (left/right) or sides.
The power light will illuminate.
Turn the temperature control knob to the desired temperature.
The unit will take 4-5 minutes to heat up.
After use, turn the temperature control knob to the off position, turn the power switches off
and also turn the power off at the mains.
Figure 1
Page 9

Heated Collection Operating Manual – HC1, HC2, HD1, HDC1, HDC2, HDC3, HDL2, PL1, PW1, PW2
Tel: 0800 0461570
Fax: 0800 0461571
Web: www.pantheonce.co.uk
Email: [email protected]
Pantheon Catering Equipment
Vulcan Works, Dixon Street,
Bolton, BL6 7PH
6
Pie Warmers
Please follow the instructions below and use to ensure the Pie Warmer is used correctly:
Before first use, clean the inside chamber and the tray grids with a damp cloth.
After cleaning, dry the unit thoroughly before use.
Connect the unit to a suitable power supply and turn the power switch on.
Rotate the thermostat clockwise to your required temperature, the yellow heating light will
illuminate.
The inside temperature of the unit is clearly displayed on the temperature display on the
front of the unit.
After use ensure unit is turned off both at the power switch and at the mains.
Maintenance
Cleaning
At least once every week, it is best to clean the machine.
Only when the unit has dried out, will it be safe to plug the machine back in and continue
use.
Heated Cabinets
Always turn the hot cupboard off and unplug from the mains prior to cleaning.
Using a damp cloth, be sure not to use and corrosive solutions, to clean the inside boards
and surfaces.
Heated Display & Heated lamp Display
To clean the ceramic cooking surface, use the provided cleaning scraper to remove all spilled
over cooked food.
Then use a damp cloth or a sponge to remove any remaining food residue or grease. A small
amount of detergent can be used however be sure to rinse and dry the unit thoroughly
before the next use.
To clean the front stainless steel parts of the unit simply use a damp cloth to wipe all grease
and food from the heated display.
Always ensure the unit is free of any spilled over cooked after every use.
Heated Display Cabinets
Also, allow sufficient time for the unit to cool if cleaning the cabinet shortly after use. A
Damp cloth can be used to wipe down the control panel, surface of the device and power
cord.
Be careful not to let water into the components of the unit, as it may cause the unit to
malfunction.
All parts must be dried thoroughly before reusing the unit.
Pie Warmers
Allow sufficient time for the unit to cool if cleaning the cabinet shortly after use.
A damp cloth can be used to wipe down the control panel, surface of the device and power
cord.
Be careful not to let water into the components of the unit, as it may cause the unit to
malfunction.
All parts must be dried thoroughly before reusing the unit.
Page 10
Heated Collection Operating Manual – HC1, HC2, HD1, HDC1, HDC2, HDC3, HDL2, PL1, PW1, PW2
Tel: 0800 0461570
Fax: 0800 0461571
Web: www.pantheonce.co.uk
Email: [email protected]
Pantheon Catering Equipment
Vulcan Works, Dixon Street,
Bolton, BL6 7PH
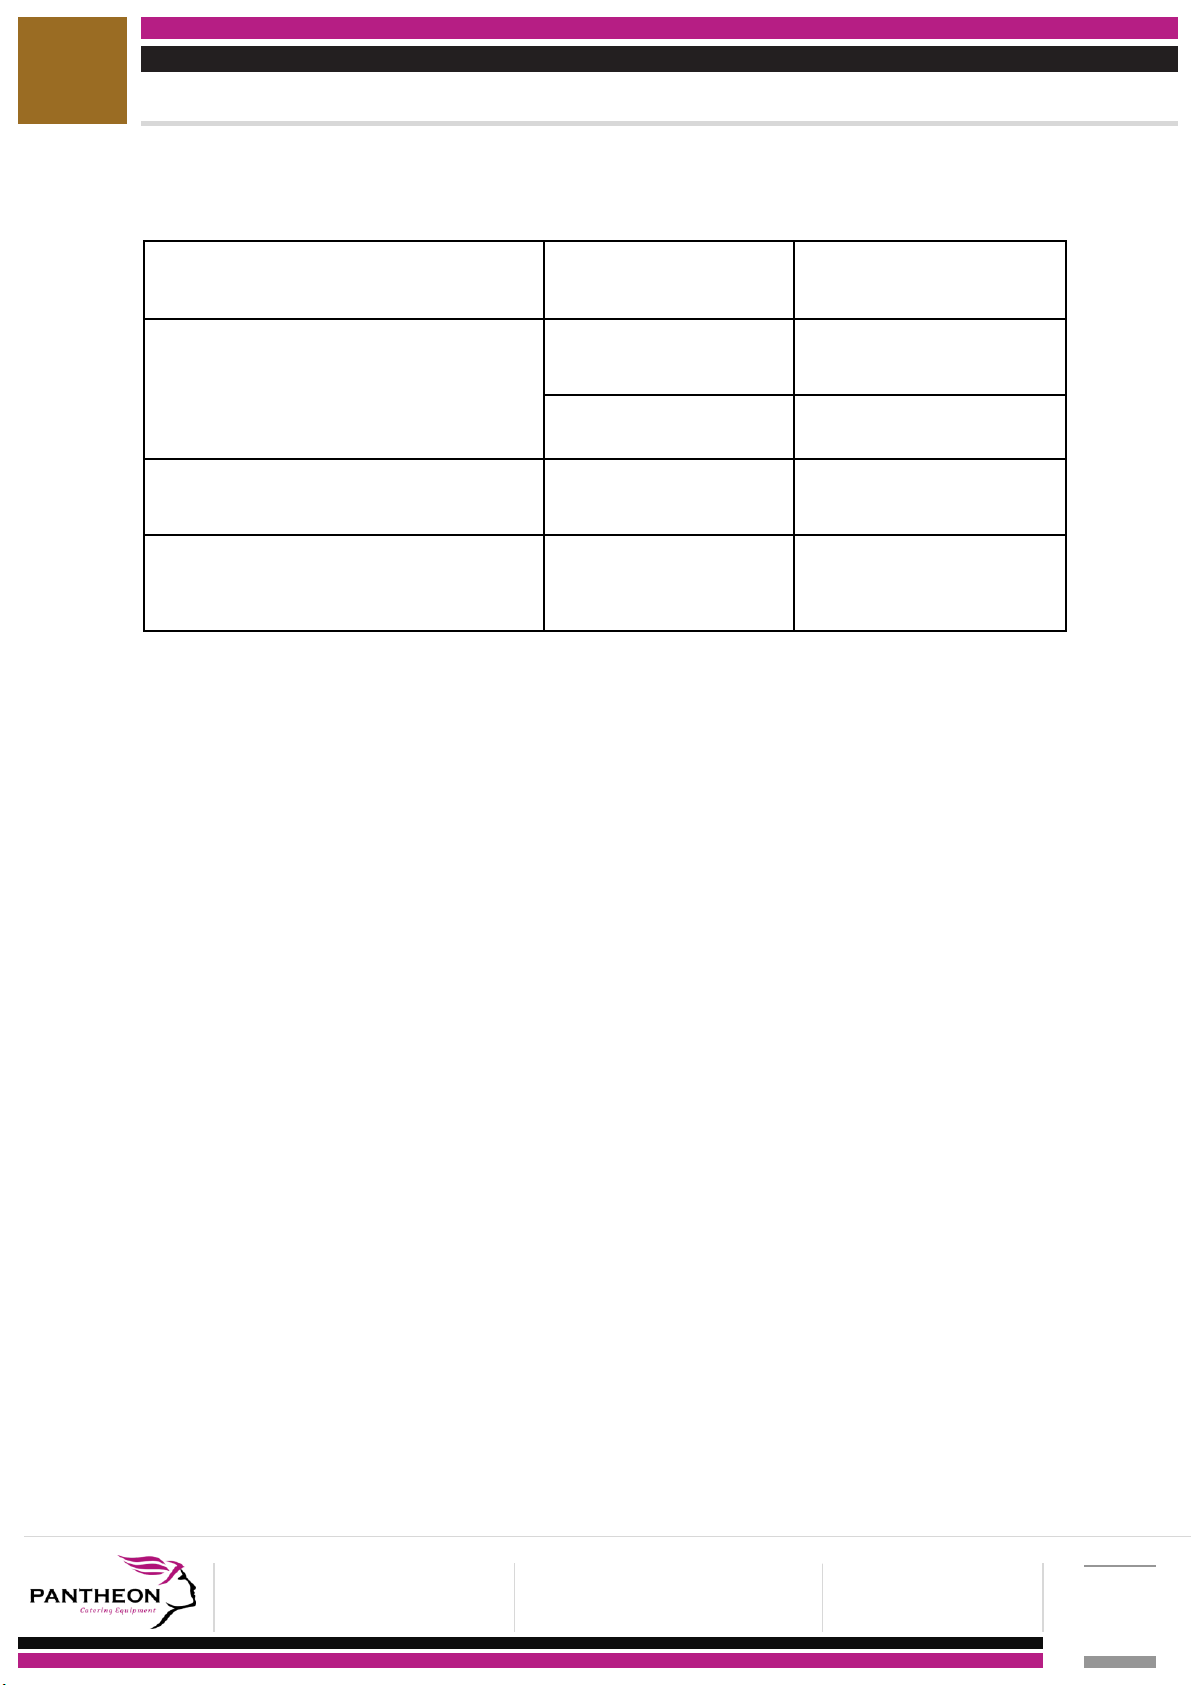
Problem
Possible Cause
Solution
The Power Light is on, however the
temperature doesn’t rise.
The Temperature Control
is broken
Change the Temperature
Control
The Element is broken
Change the Element
The temperature isn’t correct as to what i
is on the Temperature Control
The Temperature
Controller is broken
Replace the Temperature
Controller
The unit is functioning but the power light
doesn’t illuminate
The Power Indicator is
broken
Replace the Power
Indicator
7
Troubleshooting
Heated Cabinets
Please Note: If none of these are the case please cease use of the product and contact the
manufacturer
Page 11

Heated Collection Operating Manual – HC1, HC2, HD1, HDC1, HDC2, HDC3, HDL2, PL1, PW1, PW2
Tel: 0800 0461570
Fax: 0800 0461571
Web: www.pantheonce.co.uk
Email: Info@pantheonce.co.uk
Pantheon Catering Equipment
Vulcan Works, Dixon Street,
Bolton, BL6 7PH
Product Range:
Induction Hobs / Combination Ovens / Pizza Ovens / Mixers
Salamander Grills / Contact Grills / Pie Warmers / Fryers
Heated Displays / Veg Prep Machines / Bains Marie / Mincers and more
 Loading...