

Page 1

User Guide for ADR910L
Thank you for choosing the Pantech
ADR910L, our latest smartphone.
The Pantech ADR910L has many
features designed to enhance your
mobile experience. With its unique,
stylish design, you will enjoy the
entire ADR910L experience.
This User Guide contains important
and useful information that will
maximize your familiarity with all that
the Pantech ADR910L has to offer.
Page 2

IMPORTANT SAFETY INFORMATION
ABOUT BATTERY USAGE
Your phone is powered by a Lithium Ion (Li-Ion) battery. Therefore,
you can recharge the battery while some charge remains without
reducing your phone’s autonomy. For safe use of the battery:
x Do not use a damaged battery or charger.
x Do not disassemble, open, crush, bend, deform, puncture, or
shred the battery.
x Do not modify or remanufacture, insert foreign objects into the
battery, immerse or expose to water or other liquids, expose to
fire, explosion or other hazard.
x Do not put your battery in contact with conductive objects.
x Dispose of and recycle used batteries in accordance with local
regulations. Do not dispose of batteries by burning; they may
explode.
x Do not use an unauthorized charger or battery.
x Use the battery only for the device for which it is specified.
x Use the battery with a charging device that has been qualified
for the device per this standard. Use of an unqualified battery
or charger may present a risk of fire, explosion, leakage, or other
hazard.
x Do not short circuit a battery or allow metallic conduc tive
objects to contact battery terminals.
x Replace the battery only with another battery that has been
qualified with the device per this standard, IEEEStd-1725-2006.
x Children should be supervised when they use the battery.
2
Page 3

BASIC INSTRUCTIONS
x Avoid dropping the phone or the battery. If the phone or the
battery is dropped, especially on a hard surface, and the user
suspects damage, take it to a service center for inspection.
x Use your battery for the specified purpose only.
x The closer you move to your network’s base station, the longer
you can use your phone because less battery power is required
for connection.
x The battery recharging time varies depending on the remaining
battery capacity and the battery and charger type.
x Battery life inevitably shortens over time.
x Since overcharging may shorten battery life, remove the phone
from its charger once it is fully charged. Unplug the charger
once charging is complete. Leaving the battery in hot or cold
places, especially inside a car in summer or winter, may reduce
its capacity and life.
x To prevent injury or burns, ensure that no metal objects come
into contact with the + and – terminals of the battery.
BASIC INSTRUCTIONS
USEFUL TIPS TO UNDERSTAND USER GUIDE
To understand information contained in this user guide and activities
that you can do with the ADR910L, keep in mind the following tips:
x It is assumed that you start operating applications of the
ADR910L from the Applications screen.
1 Touch Menu from the Home screen to access the Applications
screen.
3
Page 4
BASIC INSTRUCTIONS
2 Swipe the screen left or right and run the application you want
to use. Applications are arranged by category. You can rearrange
them.
Accessing applications Navigating Applications
x Words in bold type refer to the relevant action on the screen.
For example, “Touch Gmail” means that you have to touch Gmail
below the Gmail icon
to an icon or included in the text.
x The symbol “>” refers to the next action. For example, “Touch
Settings > Language & input” means that you should touch
Settings first and then Language & input next.
x Applications screen refers to the screen where all applications of
the ADR910L appear.
x Home Screen refers to the screen that appears first when you
unlock the screen.
x Idle mode refers to the status where you stay on the Home
screen ready to run an application.
. Words might be placed below or next
4
Page 5
BASIC INSTRUCTIONS
x Launcher bar refers to the bar on the bottom of the Home
Screen where you can place favorite applications.
x Channels through which you can share items, e.g. contacts and
pictures, increase as you subscribe to services. For example, if you
sign up for Facebook or Twitter, you can also share information
through Facebook or Twitter.
x Captured images in this user guide might change according to
the relevant software upgrade.
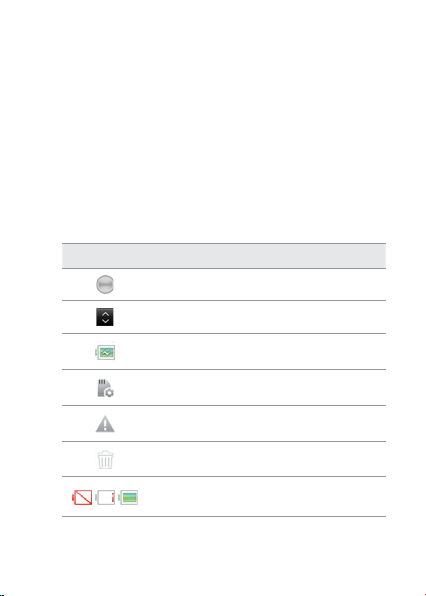
COMMON ICONS
Icon Selected to
Adjust value
Rearrange the selected item
The battery is charging
SD card prepared
There is an error
Delete the selected item
Strength of battery: The greener,
the more battery is charged
5
Page 6
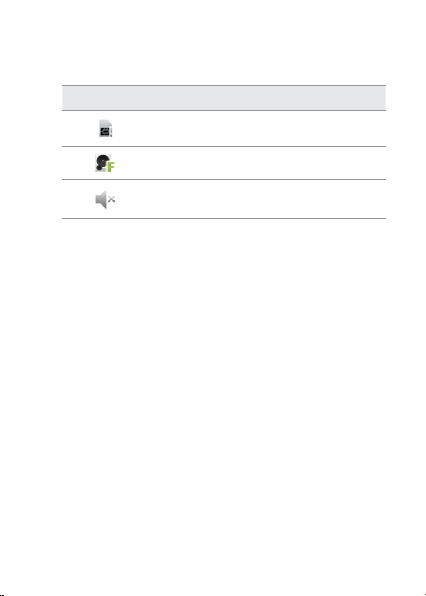
BASIC INSTRUCTIONS
Icon Selected to
6
There is no SIM/USIM card
The memory disk is full
The phone will not ring when there is an
incoming call
Page 7

TABLE OF CONTENTS
Important Safety Information .................................................. 2
BASIC INSTRUCTIONS .......................................................................................................3
TABLE OF CONTENTS ...................................................................7
1. GETTING STARTED
GETTING STARTED ......................................................................13
CHECKING PACKAGE .......................................................................................................13
REMOVING THE BATTERY COVER .............................................................................14
REPLACING THE BATTERY COVER ............................................................................14
INSTALLING THE 4G SIM CARD..................................................................................15
REMOVING THE 4G SIM CARD ...................................................................................15
INSTALLING THE microSD™ CARD...........................................................................16
REMOVING THE microSD™ CARD ............................................................................16
INSTALLING THE BATTERY ............................................................................................17
REMOVING THE BATTERY ..............................................................................................17
CHARGING THE BATTERY ..............................................................................................18
POWERING YOUR PHONE ON/OFF.........................................................................18
MANAGING SCREEN ........................................................................................................19
OVERVIEWING PRODUCT .............................................................................................22
GRIPPING ADR910L ..........................................................................................................26
ACTIVATING ADR910L.....................................................................................................27
7
Page 8

TABLE OF CONTENTS
BACKING-UP DATA ............................................................................................................30
UNDERSTANDING HOME SCREEN ..........................................................................32
CUSTOMIZING HOME SCREEN ..................................................................................37
MANAGING APPLICATIONS SCREEN ......................................................................43
2. CONNECTIVITY
CONNECTIVITY ............................................................................. 46
USING Wi-Fi NETWORK ..................................................................................................46
USING Wi-Fi Direct ............................................................................................................50
CONNECTING TO A 3G/4G NETWORK .................................................................50
USING Bluetooth ...............................................................................................................53
CONNECTING TO A PC ..................................................................................................57
3. CALLS AND MESSAGES
CALLS AND MESSAGES .............................................................59
CALLING ..................................................................................................................................59
MESSAGING ..........................................................................................................................67
CONTACTS .............................................................................................................................74
Google TALK .........................................................................................................................79
8
Page 9

TABLE OF CONTENTS
4. COMMUNICATION
COMMUNICATION ......................................................................82
EMAIL ........................................................................................................................................82
GMAIL .......................................................................................................................................85
GOOGLE+...............................................................................................................................87
SOCIAL ON WIDGET .........................................................................................................88
SOCIAL GALLERY ...............................................................................................................89
5. ENTERTAINMENT
ENTERTAINMENT .........................................................................91
LISTENING TO MUSIC ......................................................................................................91
USING CAMERA ..................................................................................................................97
USING CAMERA AS CAMCORDER ........................................................................104
USING GALLERY...............................................................................................................107
ENJOYING YOUTUBE .....................................................................................................109
USING VIDEO PLAYER ................................................................................................... 111
NET MEDIA .........................................................................................................................114
READING E-BOOKS (TBD) ..........................................................................................118
WEB SURFING ...................................................................................................................119
ANDROID MARKET ........................................................................................................124
USING Google MAPS ....................................................................................................126
Google SEARCH ..............................................................................................................128
VOICE SEARCH .................................................................................................................130
9
Page 10

TABLE OF CONTENTS
USING PLACES ..................................................................................................................131
USING LATITUDE .............................................................................................................132
NAVIGATION ......................................................................................................................135
NEWS & WEATHER..........................................................................................................137
6. TOOLS
TOOLS........................................................................................... 142
CALENDAR ..........................................................................................................................142
CALCULATOR ....................................................................................................................145
ALARM/CLOCK .................................................................................................................146
CLOCK TOOLS ................................................................................................................... 149
DOC VIEWER ......................................................................................................................151
SMARTNOTE ......................................................................................................................153
VOICE RECORDER ........................................................................................................... 155
DOWNLOADS ...................................................................................................................157
CONTENT TRANSFER ....................................................................................................158
WEATHER .............................................................................................................................159
7. SETTINGS
SETTINGS .................................................................................... 163
MODE CHANGE ............................................................................................................... 163
USER THEME ......................................................................................................................163
WIRELESS & NETWORKS .............................................................................................164
10
Page 11

TABLE OF CONTENTS
DEVICE...................................................................................................................................165
LOCATION SERVICES .....................................................................................................168
APPLICATIONS ..................................................................................................................173
ACCOUNTS & SYNC .......................................................................................................174
PRIVACY ................................................................................................................................175
STORAGE..............................................................................................................................176
LANGUAGE & KEYBOARD .......................................................................................... 176
VOICE INPUT & OUTPUT ............................................................................................. 177
ACCESSIBILITY ..................................................................................................................178
DATE & TIME .......................................................................................................................178
ABOUT PHONE .................................................................................................................179
8. APPENDIX
APPENDIX ................................................................................... 182
SAFETY AND WARRANTY ..........................................................................................182
UPnP AND DLNA ............................................................................................................207
SPECIFICATIONS ..............................................................................................................208
LOCATION-BASED SERVICES ....................................................................................210
END USER LICENSE AGREEMENT (EULA) .........................................................211
LEGAL NOTICE ..................................................................................................................211
TROUBLESHOOTING CHECKLIST ...........................................................................212
INDEX .....................................................................................................................................213
11
Page 12

1
GETTING STARTED
This chapter provides important information to know
before using the ADR910L, including:
CHECKING PACKAGE
REMOVING THE BATTERY COVER
REPLACING THE BATTERY COVER
INSTALLING THE 4G SIM CARD
REMOVING THE 4G SIM CARD
INSTALLING THE microSD™ CARD
REMOVING THE microSD™ CARD
INSTALLING THE BATTERY
REMOVING THE BATTERY
CHARGING THE BATTERY
POWERING YOUR PHONE ON/OFF
MANAGING SCREEN
OVERVIEWING PRODUC T
GRIPPING ADR910L
ACTIVATING ADR910L
BACKING-UP DATA
UNDERSTANDING HOME SCREEN
CUSTOMIZING HOME SCREEN
MANAGING APPLICATIONS SCREEN
Page 13

GETTING STARTED
CHECKING PACKAGE
Check if the package contains the following items:
x Handset
x Standard Lithium-Ion Battery
x Wall/USB Charger
x Quick Start Guide
x User Guide
x Product Safety & Warranty Brochure
Note You can purchase the Wireless Charging Inductive
Battery Cover from the Verizon stores. It must be used
with the Wireless Charging Pad certified by Wireless Power
Consortium (WPC).
It is recommended that you purchase the following accessories to use
the ADR910L in a safe and con
x LCD protective film
x External memory card adaptor
venient manner.
13
Page 14

GETTING STARTED
REMOVING THE BATTERY COVER
1 Turn off your phone and hold it securely with both hands with
the front facing out.
2 Place your finger nail in the groove at the bottom of the unit, and
then lift it up.
REPLACING THE BATTERY COVER
Place the battery cover over the battery compartment and press it
downward until it clicks into place.
14
Page 15
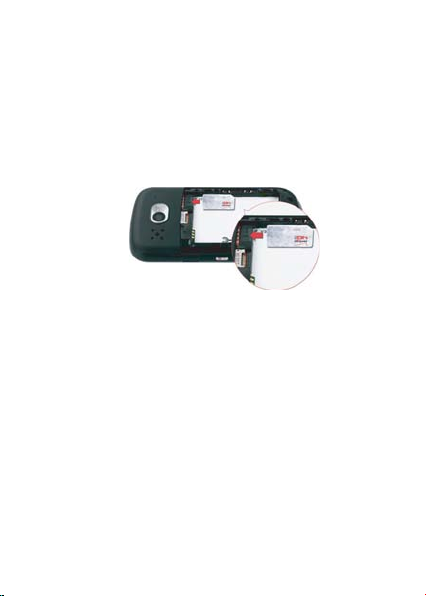
GETTING STARTED
INSTALLING THE 4G SIM CARD
1 Turn off your phone and remove the battery cover and battery.
2 Insert the 4G SIM card into the slot. Make sure that the gold
contacts of the card go against the metal contacts of your
phone.
REMOVING THE 4G SIM CARD
1 Turn off your phone and remove the battery cover and battery.
2 Hold the 4G SIM card carefully and slide it out from the slot.
ABOUT 4G SIM CARD
When you subscribe to your network operator, you receive the Subscriber
Identity Module (SIM) card or RUIM (Re-Usable Identification Module)
card that houses your registration information, PIN code, etc. Keep it
secure and handle carefully like a credit card. Do not bend, scratch or
expose it to moisture. Avoid static electricity.
15
Page 16
GETTING STARTED
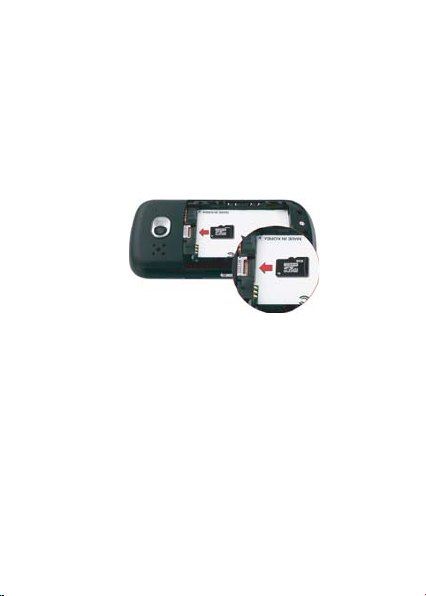
INSTALLING THE microSD™ CARD
1 Turn off your phone and remove the battery cover and battery.
2 Insert the microSD™ card into the slot. Ensure that the gold
contacts of the card go against the metal contacts of the phone.
3 Replace the battery cover by sliding it up until you hear “CLICK.”
REMOVING THE microSD™ CARD
1 Turn off your phone and remove the battery cover and battery.
2 Hold the microSD™ card carefully and slide it out from the slot.
ABOUT microSD™ CARD
A microSD™ card is a removable flash memory card where you can
save data. Save pictures and contacts, and download applications
to the card. You can expand the external memory up to 32GB. It is
recommended that you format the microSD™ card before using with
the ADR910L. For more information on erasing microSD™ card, refer
to page 197.
16
Page 17
GETTING STARTED
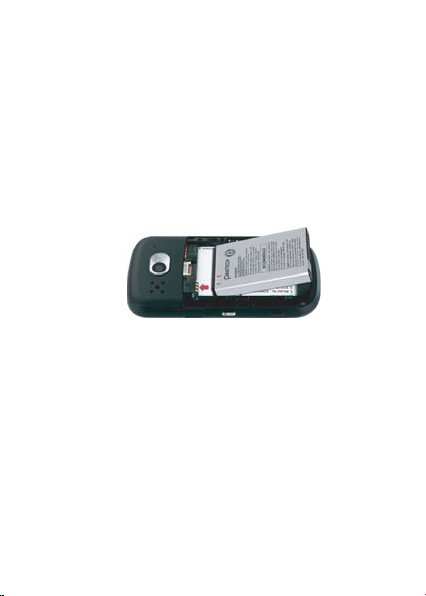
INSTALLING THE BATTERY
1 Hold your phone tightly after removing the battery cover.
2 Align the battery contacts (1) with the terminals in the battery
compartment.
3 Press the battery down (2) until it clicks into place.
4 Replace the battery cover over the battery compartment, slide it
upward until it clicks into place.
REMOVING THE BATTERY
1 Hold your phone tightly after removing the battery cover.
2 Remove the battery from the battery compartment by lifting the
top of the battery using the fingertip cutout.
ABOUT BATTERY
The ADR910L uses a Lithium Ion (Li-Ion) battery. Make sure to use
the authorized battery and charger only. Maximum hours to use the
battery might vary depending on service types offered by the service
provider and temperatures. For more details, contact your nearest
dealer.
17
Page 18
GETTING STARTED
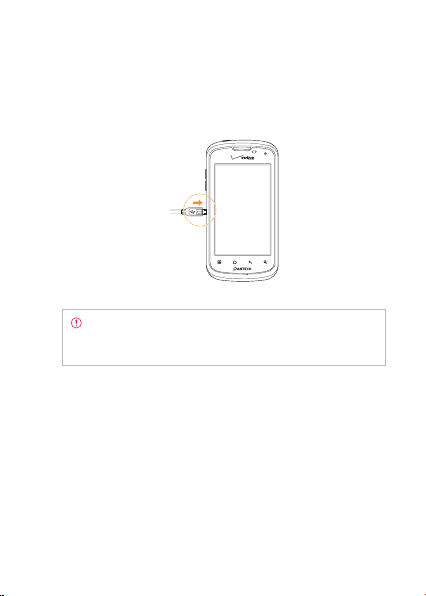
CHARGING THE BATTERY
1 Connect the USB cable into the Wall/USB Charger.
Note Make sure to align the connector as indicated in the
image. Otherwise, the charging connector will be damaged
and the battery will not be charged.
lug the USB cable into the phone’s charging port. Plug the Wall/
2 P
USB Char
3 Disconnect the charger when the battery is fully charged.
ger into an electrical outlet. The battery starts charging.
POWERING YOUR PHONE ON/OFF
It’s important to fully charge the battery before turning on your
phone.
1 Ensure that the 4G SIM card and the battery are safely installed
in your phone.
18
Page 19
GETTING STARTED
2 Press and hold the Power/Lock key at the top left of the
phone for a few seconds until the screen lights up.
3 To turn off the phone, press and hold the Power/Lock Key
until the pop-up menu appears.
4 Touch Power off in the pop-up menu.
5 Touch OK to confirm that you want to turn off the phone.
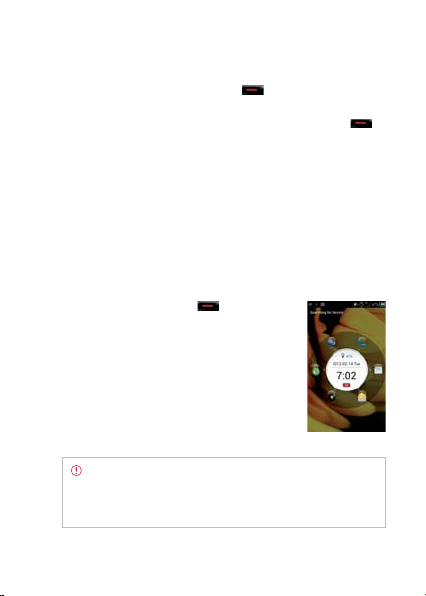
MANAGING SCREEN
UNLOCKING THE SCREEN
The screen is locked by default when you turn on power for the first
time. To unlock the screen:
1 Press the Power/Lock Key
2 Drag the lock to the right. Draw a pattern
if the screen is protected by a pattern
lock. Enter a PIN or a password if the
screen is locked by a PIN or a password.
You can also unlock the screen with your
face recognized.
Note You can check missed calls, messages or emails
quickly when the screen is locked: Drag the icon for call,
message or email to the clock located in the middle of the
screen.
.
19
Page 20
GETTING STARTED
UNLOCKING THE SCREEN WITH FACE
1 Press the Power/Lock Key .
2 Move your face and adjust it to the
circle in the screen. If you fail to unlock
the screen with face, draw a pattern or
enter the PIN. Refer to page xx for more
information.
LOCKING THE SCREEN
To lock the screen, press the Power/Lock Key . If you want to get
the ADR910L locked automatically in a predetermined time, refer to
page 189 for screen timeout.
It is recommended to lock the screen to protect information
contained in the ADR910L and to conserve battery power.
USING THE TOUCHSCREEN
Your touchscreen provides an excellent way to interact with and use
your Android phone. With the touch of your finger, you can download
and use available applications, make menu selections, and access
data saved to your phone.
The following terms are used for describing the different available
actions using the touchscreen:
x Touch: A single finger touch selects items. For example, touch
an icon (e.g., Application screen item), touch words (e.g., menu
selection or to answer an on-screen question), or touch letters
and numbers to type on the virtual QWERTY keypad.
20
Page 21
GETTING STARTED
x Touch and hold: Touch and hold an item on the screen by
touching it and not lifting your finger until an action occurs. For
example, to open a pop-up menu for customizing the Home
screen, touch and empty area on the Home screen until the
pop-up menu appears.
x Drag: Touch and hold an item for a moment and then, without
lifting your finger, move your finger on the screen until you reach
the target position. You can drag items on the Home screen to
reposition them.
x Pinch: Place two fingers on the screen and move them apart to
zoom in on a picture, a document or a web page, or move them
together to zoom out.
x Swipe or slide: Quickly move your finger across the surface of
the screen, without pausing when you first touch it (so you don’t
drag an item instead). For example, you can slide (move) the
screen up or down to scroll through a list, or browse through
the different Home screens by swiping from left to right (and
vice versa).
Note Use one finger at a time except when you deal with
a picture or a document. The ADR910L will not recognize
when you use more than two fingers.
CAUTION
x Do not use sharp tools that can scratch the touch screen.
x Do not allow the touch screen to come in contact with
water or chemicals. The touch screen may malfunction in
humid conditions or in chemicals.
x Do not sit on the ADR910L. The touch screen can be
damaged.
21
Page 22
GETTING STARTED
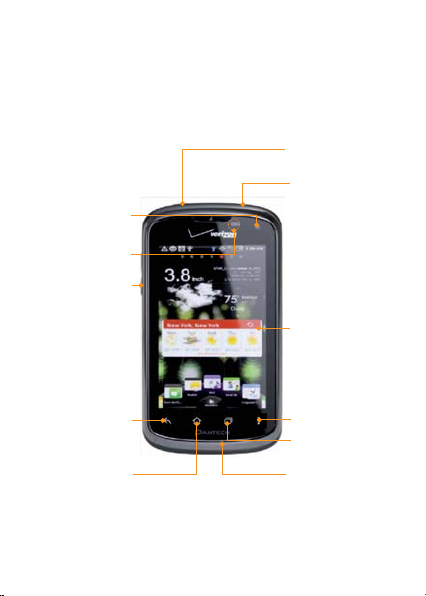
OVERVIEWING PRODUCT
FRONT VIEW
FRONT CAMERA
PROXIMITY
SENSOR
VOLUME
POWER/LOCK
EARPIECE
TOUCH SCREEN
BACK
HOME
MENU
MULTI-TASKING
MICROPHONE
22
Page 23
GETTING STARTED
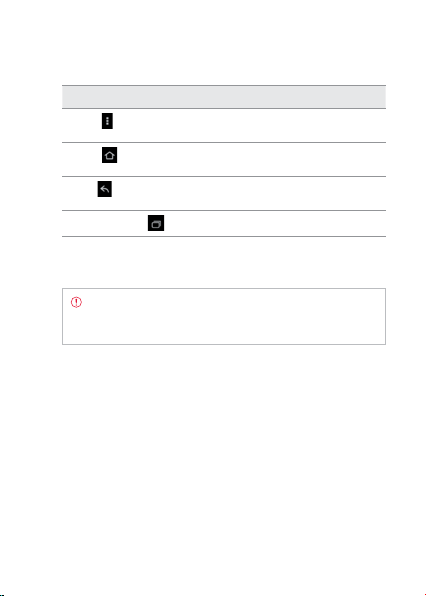
Key Function
MENU
HOME
BACK
MULTI-TASKING
Note Make sure not to cover the proximity sensor with
the LCD protection film. If the sensor is covered, you might
experience difficulties using the touch screen.
Displays options available; rearranges the
Home screen
Moves to the Home screen; runs the task
manager when you press and hold this key
Ends an application; returns to the
previous menu
Displays recent applications that you used
23
Page 24
GETTING STARTED
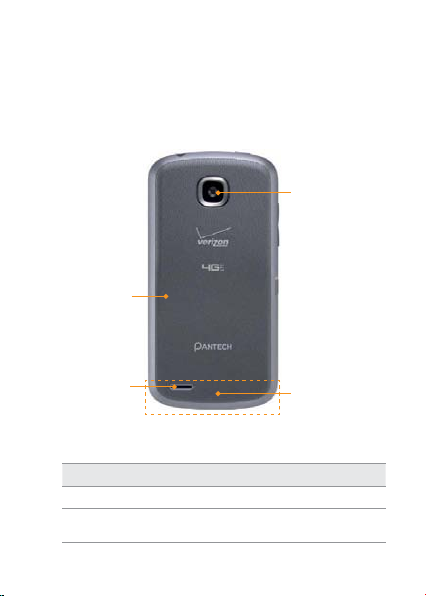
REAR VIEW
BATTERY COVER
CAMERA LENS
SPEAKER
Name Description
SPEAKER Sends sound
CAMERA LENS Takes pictures and records video through
this lens
24
INTERNAL
ANTENNA AREA
Page 25
GETTING STARTED
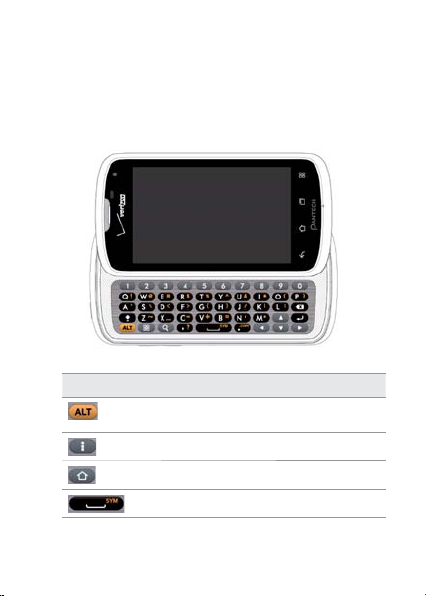
QWERTY KEYPAD
Key Function
Enters the secondary character on the right
of each key
Provides options available
Moves to the Home screen
Enters a space
For more information on using the QWERTY keypad, refer to page xx.
25
Page 26
GETTING STARTED
USING THE HEADSET JACK
You can control your device’s accessor ies by inserting the connector
into the 3.5mm Headset Jack on your phone.
Note Stereo earphones that support common call
management features including making and answering calls
may not have been standardized. Therefore, the phone may
not be compatible with some stereo earphones.
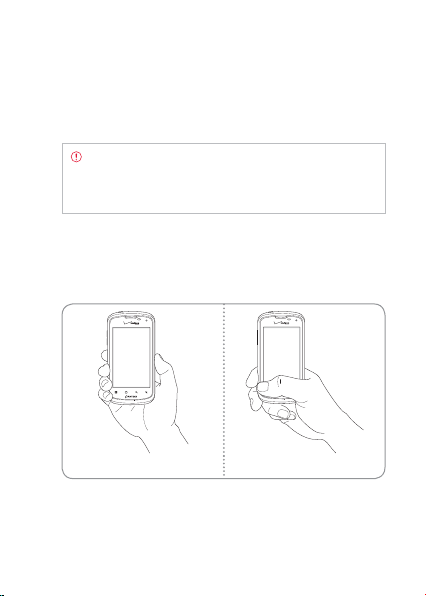
GRIPPING ADR910L
It is strongly recommended that you hold the ADR910L in the right
position for a call as indicated below:
Correct Incorrect
x Make sure not to block the antenna embedded in the ADR910L.
Check the location of the antenna on the illustration on page 24.
26
Page 27
GETTING STARTED
x Do not wear metal accessories on your hand: it can affect the
quality of calls.
ACTIVATING ADR910L
You will go through a few processes when you turn on the ADR910L
for the first time after inserting the battery.
INITIAL SET-UP
1 Press and hold the Power/Lock Key to turn on the ADR910L.
2 Select and touch the language for the ADR910L and touch Next.
3 In the Backup Assistant screen, touch Next if you want to register
your account with the Backup Assistant Plus. Touch Skip if you
want to register accounts later.
4 In the Setup email screen, select and touch an account that you
want to set up. Refer to page 77. Touch Skip if you want to set up
the email account later.
5 In the Setup Google account screen, touch Next and follow the
instructions or Sign In if you already have an account. Touch Skip
if you want to set up the a Google account later. For creating a
Google account, refer to page 28.
6 In the Privacy Caution screen, touch Next.
7 In the Location Consent screen,
x Touch VZW Location Services > Agree.
x Touch Standalone GPS Services > Agree.
x Touch Google Location Services > Agree.
Touch Next when you finish selecting the location consent
option.
27
Page 28
GETTING STARTED
8 Touch Basic Setup and Usage Videos and watch Guided Tours. If
you finish checking it, touch Done. Or you can touch My Verizon
Mobile and see the related video.
9 Touch Finish and the first process to set up the ADR910L is done.
Note You can do all of these steps later by touching Setup
Wizard from the Applications screen.
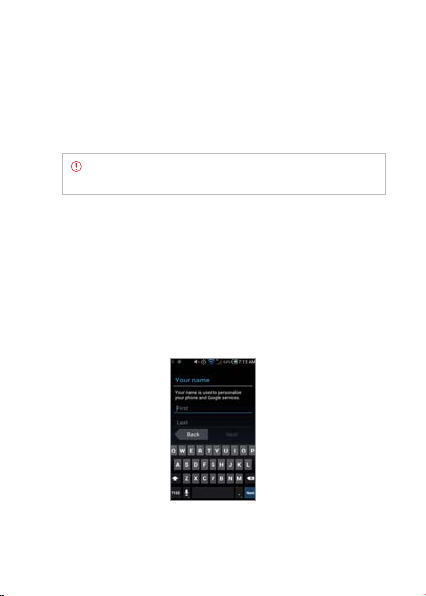
CREATING A Google ACCOUNT
It is recommended that you have a Google account to use a few
applications of the ADR910L.
1 From the Applications screen, touch Settings > Accounts & sync
> ADD ACCOUNT.
2 Touch Google > New.
3 Enter your first name and last name for the account, and touch
Next.
4 Enter the user name for Gmail, and touch Next. The user name
should be 6–30 characters long. You can select an alternative.
28
Page 29

GETTING STARTED
Touch Try again if you have entered another user name.
5 Enter a password and enter it again to confirm. You should enter
at least 8 characters.
6 Touch Next.
7 Enter an email address that you can use for recovery.
8 Select and touch a security question and enter an answer.
9 Touch Next.
10 Touch I agree, Next for the Google Terms of Service.
11 Touch Try again if your password is too weak for a password or
contains invalid characters.
12 Repeat the steps 5 to 9.
13 Type the characters that appear on screen and touch Next.
14 Touch Sync Contacts if you want to synchronize your contacts.
Touch Sync Gmail if you want to synchronize Gmail.
29
Page 30

GETTING STARTED
BACKING-UP DATA
Back-up important data saved in the ADR910L using Backup Assistant.
REGISTERING ACCOUNTS
1 Touch People from the Home screen.
2 Touch
3 Touch Next. Backup Assistant starts to connect to the server.
4 Type a 4-8 digit PIN, and touch Re-enter PIN.
5 Type the PIN again for confirmation and touch Next. It takes
BACKINGUP ACCOUNTS
1 Touch People from the Home screen.
2 Touch
3 Touch Backup Now. If you want to stop backing-up, touch Stop
RESTORING DATA
1 Touch People from the Home screen.
2 Touch and touch Backup Plus. Or from the Applications
3 Touch Restore.
30
and touch Backup Plus. Or from the Applications
screen you can touch Settings > Accounts & sync > Backup
Plus.
some time before registration is completed.
and touch Backup Plus.
Backup.
screen you can touch Settings > Accounts & sync > Backup
Assistant Plus.
Page 31

GETTING STARTED
RECURRING SYNC
1 Touch People from the Home screen.
2 Touch
3 Touch Recurring Sync.
4 Select and touch the time for sync and touch OK.
and touch Backup Plus. Or from the Applications
screen you can touch Settings > Accounts & sync > Backup
Assistant Plus.
CHANGING PIN NUMBER
1 Touch People from the Home Screen.
2 Touch and touch Backup Plus. Or from the Applications
screen you can touch Settings > Accounts & sync > Backup
Assistant Plus.
3 Touch PIN.
4 Type the current PIN.
5 Type a new PIN and type it again.
6 Touch Next.
CHECKING AT THE WEBSITE
1 Touch People from the Home Screen.
2 Touch
3 Touch www.verizonwireless.com/assistant on the bottom of
and touch Backup Plus. Or from the Applications
screen you can touch Settings > Accounts & sync > Backup
Assistant Plus.
the screen and check your data online.
31
Page 32

GETTING STARTED
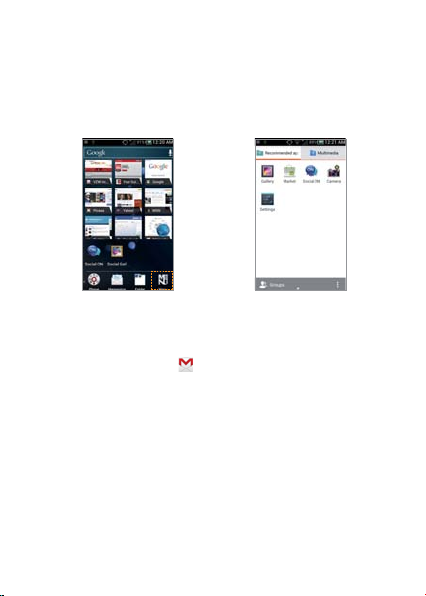
UNDERSTANDING HOME SCREEN
Home screen is the starting point to use applications on the ADR910L.
Navigate the Home screen and use the basic functions of the
ADR910L. Touch
time.
LAUNCHER BAR ICONS
The following icons represent applications that are placed in the three
launcher bars. Except Menu, Widget, Wallpaper, Home Theme, and
Settings, you can rearrange them or add applications that you want.
32
if you want to move to the Home Screen any
Sample Home screens
Icon Description
Makes calls
Send messages
Page 33
GETTING STARTED
Icon Description
Manages contact information
Opens the applications screen
Shows widgets available
Shows wallpaper available
Shows Home themes available
Shows Settings option
NAVIGATING HOME SCREEN
The ADR910L provides seven different screens where you can arrange
items for your preferences. Change the number of the Home screens
if you want. Refer to page 37 for more information.
1 Swipe the screen from the left to the right or vice versa.
2 Touch a desired application or widget to run.
33
Page 34
GETTING STARTED
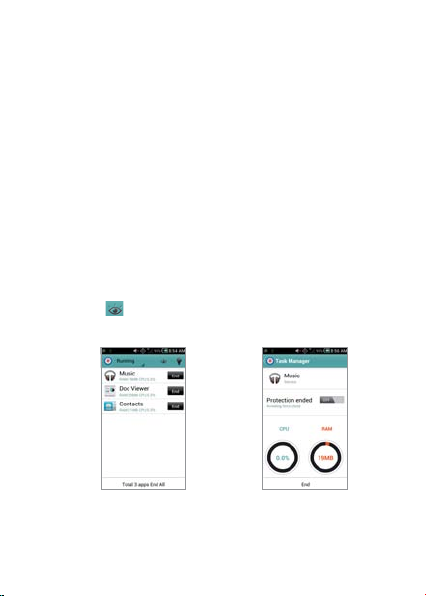
CHECKING APPLICATIONS WITH TASK MANAGER
Manage applications with Task Manager and enhance efficiency.
1 Touch Task Manager from the applications screen. You can see
applications that are running. Up to six applications appear on
the screen.
2 Touch End next to the application that you want to stop
running. Touch the bottom of the screen if you want to stop all
applications that are running at once.
3 Touch an application. You can see the CPU and the RAM that the
application is using currently.
4 Touch Running on the top of the screen and touch Systems.
You can see information on CPU, internal/external memory, and
Network.
5 Touch
34
and select a view type if you want to change the
default view type.
Running Task Manger Checking system information
Page 35

GETTING STARTED
Note Make sure to press the and move to the Home
Screen if you want to finish using an application. Otherwise,
the application continues to run and will use memory and
battery.
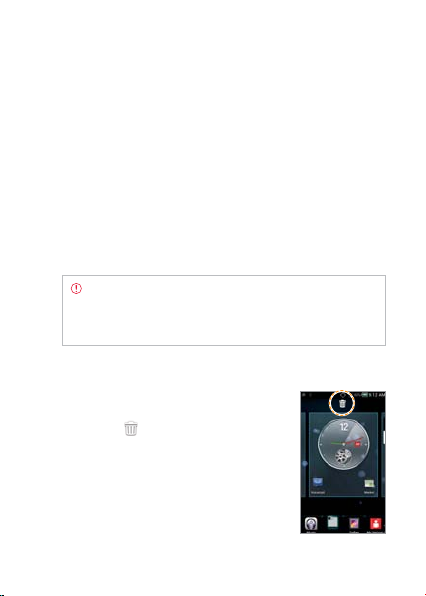
SETTING STATUS BAR AND EASYSETTING
The status bar offers quick access to Easy Setting and ongoing events.
1 Touch on the top of the Home screen and drag the status bar
down.
2 Touch an icon in Easy Setting that you want to run. The icon
turns to orange when the function is on. Flick the screen to the
right for more functions.
3 Touch Open on the top right of the screen if you want to check
settings in detail. Flick the screen to the right for more settings.
Opening Notifications Checking the status bar
35
Page 36

GETTING STARTED
EASYSETTING ICONS
Icon Description
36
Mutes the sound
Activates Wi-Fi
Activates data network
Activates GPS
Turns Airplane Mode on/off
Activates Bluetooth
Activates Auto Rotate
Activates Auto Answer
Activates Auto Sync
Adjusts Sound settings
Adjusts Wi-Fi settings
Adjusts Tethering settings
Page 37

GETTING STARTED
Icon Description
Adjusts Display settings
Adjusts Power Saver settings
Adjusts Bluetooth settings
Adjusts Lock settings
Adjusts Sync settings
Adjusts App Manage settings
CUSTOMIZING HOME SCREEN
Place shortcuts, widgets or folders, and create wallpaper for your
preferences. Make sure to secure enough space on the Home screen
before adding a shortcut or widget.
ADDING A SHORTCUT
1 Touch and hold an application from the applications screen.
2 Place the shortcut on the empty space of the Home screen. You
can also place the shortcut in the launcher bar.
37
Page 38

GETTING STARTED
ADDING A WIDGET
1 Press and hold on the empty space of the screen. Widgets
available on the bottom of the screen.
2 Flick the Home screen to the left or right where you can place
widgets.
3 Touch a widget. Default widget types may vary depending
on the application. Widget types may increase as you install
applications on the ADR910L. Refer to the relevant chapter for
more information about widgets.
SHORTCUTS LIST
Icon Description
38
Bookmark
Contact
Direct dial
Direct message
Direction & Navigation
Multi Wallpaper
Music playlist
Page 39

Icon Description
WIDGETS LIST
Icon Description
GETTING STARTED
Settings shortcut
Album
Calendar
Clock
Friends
Mini Camera
Music
Social Gallery
Social On
Task Manager
Weather
Bookmarks
39
Page 40
GETTING STARTED
Icon Description
Books
Contact
Data Usage
Google+
Maps
Photo Gallery
Power control
CREATING A FOLDER IN THE LAUNCHER BAR
Press and hold a shortcut in the Home screen and place it to another
shortcut in the launcher bar. If you add a shortcut to the existing
folder, touch the folder in the launcher bar, touch Add shortcut and
follow the necessary steps.
MANAGING A FOLDER IN THE LAUNCHER BAR
1 Touch a folder in the launcher bar that you want to manage.
2 Touch
3 Touch OK.
40
and enter the name of the folder. You can also change
the color of the folder.
Page 41
GETTING STARTED
CREATING WALLPAPER FOR HOME SCREEN
1 Touch Wallpaper in the launcher bar.
2 Touch Gallery, Wallpapers, Live Wallpapers, or Download
Wallpapers.
x If you have touched Gallery, select and touch a picture from
Gallery, adjust the size and touch Crop.
x If you have touched Wallpapers, select and touch wallpaper
and touch Set wallpaper.
x If you have touched Live Wallpapers, select and touch live
wallpaper and touch Set wallpaper.
x If you have touched Download Wallpapers, select and touch
wallpaper and touch Set wallpaper.
Note Remember that Maps among Live Wallpapers
consumes battery relatively quickly. If you want to save the
battery consumption, it is recommended to end the live
wallpaper by force (Settings > Apps > RUNNING).
DELETING ITEMS FROM HOME SCREEN
1 Press and hold a shortcut, widget or
folder you want to delete.
2 Drag it to
screen.
on the top of the Home
41
Page 42

GETTING STARTED
CHANGING HOME SCREEN THEME
1 Touch Home Theme in the launcher bar
2 Select and touch a theme for the Home screen.
x If you want to delete a theme, touch X on the top right side
of the theme and touch OK.
x If you want to 7change the theme name, touch
new name, and touch OK.
x If you want to add a new theme, touch
a theme in the list.
3 Touch Apply
, enter the
, select and touch
CHANGING HOME SCREEN MODE
1 Touch Settings from the applications screen.
2 Touch Mode Change.
3 Touch Simple Mode or Normal Mode. Remember that the
Home screen in the Simple Mode is quite different from Normal
Mode. Refer to page xx for more information on Simple Mode.
CLEARING HOME SCREEN
Touch on the Home screen and pinch out the screen. All items, except
the wallpaper disappear in a second. Touch any key if you want to
items on the Home screen again.
42
Page 43

GETTING STARTED
MANAGING APPLICATIONS SCREEN
The Applications screen is the screen where all applications of the
ADR910L are displayed. Search applications and personalize it with a
different background.
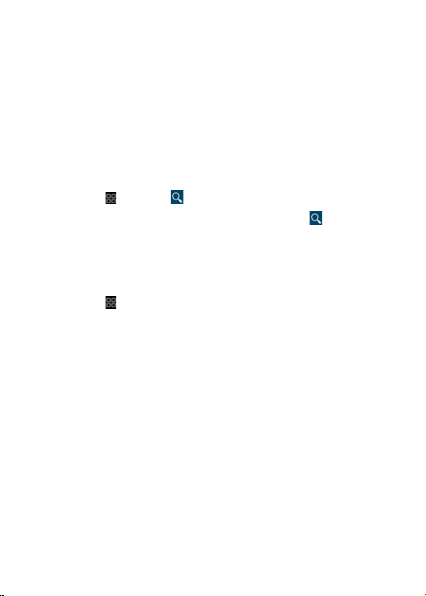
SEARCHING APPLICATIONS
1 Touch and touch Search in the applications screen.
2 Enter the name of the application and touch Done. Applications
that match your search appear in the screen.
3 Touch the application and run it.
SHARING APPLICATIONS
1 Touch in the applications screen.
2 Touch Share.
3 Touch the checkbox next to the application(s) that you want
to share.
4 Touch
HIDING APPLICATION SHORTUCT
1 Touch and touch Edit.
2 Press and hold the shortcut and drop it to Storage on the
and touch Bluetooth, Google+, Social ON, Gmail, or
Messaging.
bottom of the screen. The number next to Storage indicates the
number of applications that are hidden from the screen.
43
Page 44

GETTING STARTED
MANAING GROUPS
1 Touch in the applications screen.
2 Touch Manage groups.
3 Change the order of groups or change the group name.
4 Touch New Group if you want to add a new group.
REARRANGING APPLICATIONS BY NAME
1 Touch Groups in the applications screen.
2 Touch Alphabetical. You can see applications by name.
CHANGING APPLICATION ICONS
1 Touch in the applications screen.
2 Touch Change Icons.
3 Touch Classical theme or Style theme.
4 Touch Save. The Home screen restarts in a second with a new
set of icons.
44
Page 45
2
This chapter provides important information about getting
CONNECTIVITY
connected to network to use the ADR910L including:
USING Wi-Fi NETWORK
USING Wi-Fi Direct
CONNECTING TO A 3G/4G NETWORK
USING Bluetooth
CONNECTING TO A PC
Page 46
CONNECTIVITY
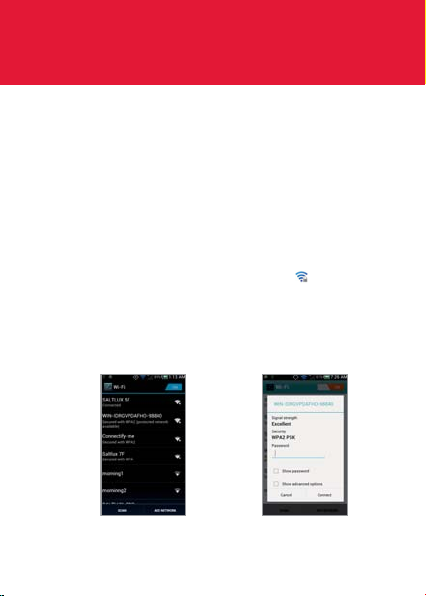
USING Wi-Fi NETWORK
Connect the ADR910L to a Wi-Fi network and enjoy the wireless
Internet connection. Depending on your data plan or the area where
you stay, you should pay for connection to the Wi-Fi network.
CONNECTING TO A Wi-Fi NETWORK
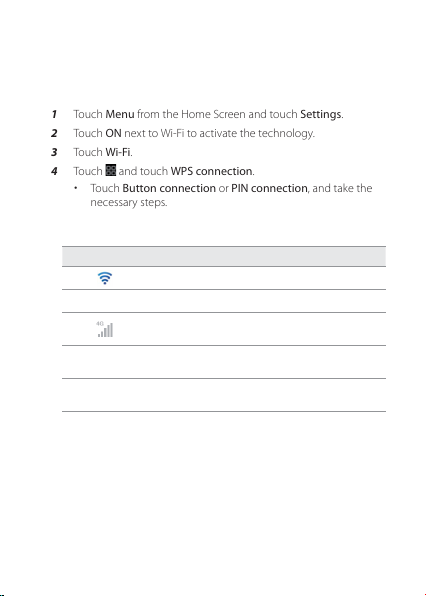
1 Touch Menu from the Home Screen and touch Settings.
2 Touch ON next to Wi-Fi to activate the technology.
3 Touch Wi-Fi.
4 Touch a network that you want to connect to. indicates a
secured network
5 Enter the password if the network is secured. Touch Show
password if you want the password to be displayed.
6 Touch Connect. Once the network is remembered, the ADR910L
will automatically connect to it when in range.
Activating Wi-Fi Connecting to a Wi-Fi network
46
Page 47
CONNECTIVITY
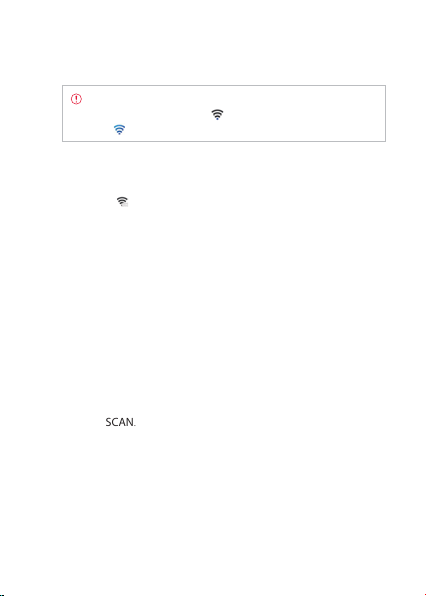
Note The icon next to each network indicates the strength
of the signal. For example, indicates the signal is poor
while indicates the signal is strong.
ABOUT NETWORK NOTIFICATIONS
You are informed by default when a Wi-Fi network is available around
you. The icon
Deselect Network notification in the Wi-Fi advanced setting if you do
not want to be informed the availability of network.
in the status bar indicates a network is available.
USING THE EASY SETTING
1 Touch on the top of the Home Screen and drag it down.
2 Touch Wi-Fi in Easy Setting. The icon turns orange when the
function is on.
SEARCHING FOR Wi-Fi NETWORKS
1 Touch Menu from the Home Screen and touch Settings.
2 Touch ON next to Wi-Fi to activate the technology.
3 Touch Wi-Fi.
4 Touch SCAN. The ADR910L scans networks automatically every
six second. The newly found networks appear on the bottom
of the list.
ADDING A Wi-Fi NETWORK
1 Touch Menu from the Home Screen and touch Settings.
2 Touch ON next to Wi-Fi to activate the technology.
3 Touch Wi-Fi.
47
Page 48
CONNECTIVITY
4 Touch ADD NETWORK.
5 Enter Network SSID and select the security type among None,
WEP, WPA/WPA2 PSK and 802.1x EAP. Aside from None, you
must enter a password for the network.
6 Touch Save.
DISCONNECTING TO A Wi-Fi NETWORK
1 Touch the network that is connected to the ADR910L.
2 Touch Forget to disconnect with the network.
Note You can also disconnect to the Wi-Fi network by
pressing and holding the network and touching Forget
network.
SETTING ADVANCED FEATURES
1 Touch Menu from the Home Screen and touch Settings.
2 Touch ON next to Wi-Fi to activate the technology.
3 Touch Wi-Fi.
4 Touch
48
and touch Advanced.
x Touch Network notification if you want to be notified when
an open network is available.
x Touch Regulatory domain, and select and touch channel for
the domain.
x Touch Keep Wi-Fi on during sleep and specify when the
ADR910L should switch from the Wi-Fi network to mobile
network.
Page 49
CONNECTIVITY
SETTING WPS CONNECTION
1 Touch Menu from the Home Screen and touch Settings.
2 Touch ON next to Wi-Fi to activate the technology.
3 Touch Wi-Fi.
4 Touch
and touch WPS connection.
x Touch Button connection or PIN connection, and take the
necessary steps.
ICONS FOR Wi-Fi AND 3G/4G
Icon Description
Connected to a Wi-Fi network
The GPS is active.
Data is being transferred through the 4G
network.
Data is being transferred through the 3G
network.
Data is being transferred through the 1xRTT
network.
49
Page 50

CONNECTIVITY
USING Wi-Fi Direct
Wi-Fi Direct function lets you connect directly to nearby peer devices
over Wi-Fi, for more reliable, higher-speed communication. Through
third-party apps, you can connect to compatible devices to take
advantage of new features such as instant sharing of files, photos.
CONNECTING TO OTHER DEVICES DIRECTLY
1 Touch Menu from the Home Screen and touch Settings.
2 Touch More.
3 Touch Wi-Fi direct to activate the technology, and touch OK.
4 Touch Wi-Fi direct settings.
5 Touch SEARCH on the bottom of the screen.
6 Touch a device and connect to it.
CONNECTING TO A 3G/4G NETWORK
Make sure to turn off the Wi-Fi network connection: Wi-Fi network
and the mobile hotspot cannot run at the same time.
CONNECTING TO MOBILE HOTSPOT FOR 3G NETWORK
1 Touch Menu from the Home Screen and touch Settings.
2 Touch More > Tethering & portable hotspot.
3 Touch Mobile Hotspot to activate the technology.
50
Page 51

CONNECTIVITY
CONNECTING TO MOBILE HOTSPOT FOR 4G NETWORK
1 Touch Menu from the Home Screen and touch Settings.
2 Touch More > Tethering & portable hotspot.
3 Touch Mobile Hotspot to activate the technology.
CONFIGURING AUTOMATIC CONNECTION
1 Touch Menu from the Home Screen and touch Settings.
2 Touch More > Tethering & portable hotspot.
3 Touch Mobile Hotspot to activate the technology.
CONFIGURING MANUAL CONNECTION
1 Touch Menu from the Home Screen and touch Settings.
2 Touch More > Tethering & portable hotspot.
3 Touch Mobile Hotspot to activate the technology.
4 Touch Mobile Hotspot settings.
5 Touch Configure Mobile Hotspot:
x Touch Network SSID and type the network name and touch
Done.
x Touch Security, select and touch a security type and take
necessary steps.
6 Touch Save:
51
Page 52

CONNECTIVITY
Mobile Hotspot for Open Mobile Hotspot for WPA2(AES)
Note Security type for Mobile Hotspot is WPA2 PSK and the
password is “MDN (Phone number)” by default.
MOBILE BROADBAND AND HOTSPOT ICONS
Icon Description
Mobile Hotspot is active
Mobile Broadband is active
52
Page 53
CONNECTIVITY
MANAGING DEVICES
1 Touch Menu from the Home Screen and touch Settings.
2 Touch More > Tethering & portable hotspot.
3 Touch Mobile Hotspot to activate the technology.
4 Touch Manage devices.
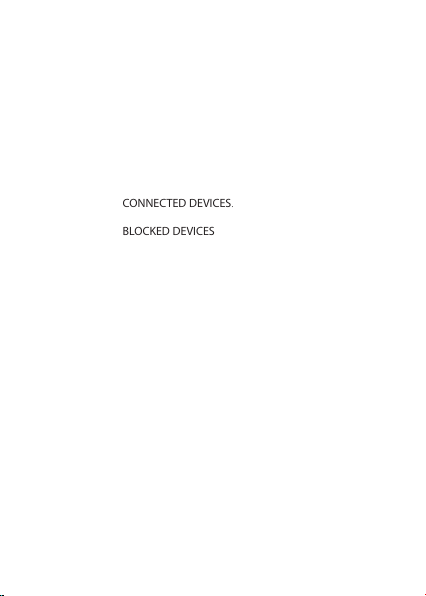
5 For each option:
x Touch CONNECTED DEVICES. You can see devices that are
connected to the ADR910L.
x Touch BLOCKED DEVICES if you want to see devices that are
blocked to connect to your phone.
MANAGING BATTERY
1 Touch Menu from the Home Screen and touch Settings.
2 Touch More > Tethering & portable hotspot.
3 Touch Mobile Hotspot to activate the technology.
4 Touch Battery Management and select the time when the
function is off.
USING Bluetooth
Bluetooth technology enables wireless connections between
electronic devices. Using this technology, you can send images, text,
and business cards.
With Bluetooth technology, the ADR910L provides:
x Connection to hands-free devices
x Connection to electronic devices
53
Page 54

CONNECTIVITY
PAIRING WITH DEVICES
1 Touch Menu from the Home Screen and touch Settings.
2 Touch Bluetooth
3 Touch On on the top of the screen to activate the technology
4 Touch SEARCH FOR DEVICES on the bottom of the screen.
5 Select and touch a device from the list.
6 Touch Pair to pair with and connect to the device.
the device indicates that it is connected via Bluetooth.
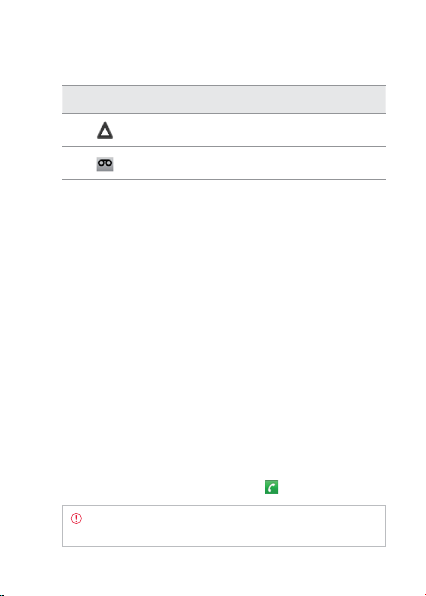
DEVICE ICONS
Phone Laptop PC Headset
Bluetooth STATUS ICONS
Icon Description
Bluetooth is connected
A file is ready to be delivered from other device
A file is ready to be delivered to other device
Bluetooth is active but not connected to other
device
54
next to
Page 55

CONNECTIVITY
USING BLUETOOTH WITH THE EASY SETTING
1 Touch on the top of the Home screen and drag it down.
2 Touch Bluetooth. The icon turns orange when the function is on.
Bluetooth SETTINGS
1 Touch Menu from the Home Screen and touch Settings.
2 Touch Bluetooth.
3 Touch On on the top of the screen to activate the technology.
4 Touch your device name on the top of the screen if you want to
let other people pair their devices with the ADR910L.
SETTING VISIBILITY TIMEOUT
1 Touch and touch Visibility timeout, while in the Bluetooth
setting screen.
2 Select and touch the time for timeout. Your device will not be
discovered by other device after the time.
SHARING A PICTURE USING Bluetooth
1 Touch Menu from the Home Screen and touch Gallery.
2 Select and touch a picture to share.
3 Touch
4 Select and touch a device among those paired with the ADR910L.
> Bluetooth.
The other party will receive a message to accept the file.
Note If you want to check received files through Bluetooth,
touch and touch Show received files, while in the
Bluetooth setting screen.
55
Page 56

CONNECTIVITY
RENAMING THE DEVICE
1 Touch Menu from the Home Screen and touch Settings.
2 Touch Bluetooth.
3 Touch On on the top of the screen to activate the technology.
4 Touch
5 Enter a new name and touch Rename.
and touch Rename Phone.
USING BLUETOOTH HDP
Bluetooth HDP is an Android OS’s built-in support for connecting to
Bluetooth Health Device Profile (HDP) devices. With support from
third-party apps, you can connect to wireless medical devices and
sensors in hospitals, fitness centers, homes, and elsewhere.
56
Page 57

CONNECTIVITY
CONNECTING TO A PC
Synchronize files and exchange data with a computer using the PC
data cable.
SELECTING THE USB MODE
1 Connect the USB cable to the ADR910L.
2 Connect the other end of the cable to
your computer.
3 Touch Menu from the Home Screen and
touch USB Connection Settings.
4 In order to select the USB mode:
x Touch Media device (MTP) if you
want to transfer media files to
your PC.
x Touch Camera (PTP) if you want to transfer photos using
camera software.
x Touch PC data mode if you want to transfer files via PC tools.
CHANGING THE USB MODE IN THE STATUS BAR
1 Connect the ADR910L to your computer using the USB cable.
2 Touch on the top of the screen and drag down the status bar.
3 Touch Connected as a media device, Connected as a camera.,
or Connected as a PC data mode. and change the USB
connection mode.
57
Page 58

3
CALLS AND MESSAGES
This chapter provides important information
about using key functions of the ADR910L including:
CALLING
MESSAGING
CONTACTS
Google TALK
Page 59

CALLS AND MESSAGES
CALLING
MAKING A CALL
1 Touch Phone from the Home Screen.
2 Enter the area code and the phone number. Touch
the previous number. Touch and hold
number.
3 Touch
to dial the number.
ANSWERING AND ENDING A CALL
1 Drag Accept to the center to answer
the call.
2 Drag Ignore to the center if you do not
want to answer the call.
3 Touch Send MSG and touch a message if
you want to send a message to the caller.
4 Touch End to end the call during the
conversation. After ending a call, a call
summary appears.
Note If you happen to move to the Home Screen, you can
end the call by dragging the status bar down and touch End
call.
to delete the whole
to delete
59
Page 60

CALLS AND MESSAGES
ADJUSTING VOLUME
1 During a call, press the volume key up to increase the speaker
volume. Press the volume key down to decrease the volume.
2 From idle mode, press the volume key up to increase the ringer
volume. Press the volume key down to decrease the volume.
If you want the ADR910L to make vibrations when there is an
incoming call or message, press the volume key all the way
down until the mode changes.
SENDING MY LOCATION TO THE CALLER
1 Touch Send Location after a call ended.
2 Touch Yes > OK. Your current location information on the Google
Maps will be sent to the caller .
MAKING A CALL USING SPEED DIALING
1 Touch Phone from the Home screen.
2 Touch and hold a number to which you have assigned a
telephone number as a speed dial entry. Note that 1 is preassigned as VoiceMail.
MAKING AN INTERNATIONAL CALL
1 Touch Phone from the Home screen.
2 Touch and touch Assisted dialing.
3 Touch the check box next to Assisted dialing status.
4 Touch Reference country and touch the country you want to
call.
5 Touch and touch Done.
60
Page 61

6 Enter the area code and the phone number.
7 Touch
to dial the number.
ICONS FOR CALLING
Icon Description
The speakerphone is active
Strength of signal: The bar becomes bigger
when the signal is stronger.
There is no signal.
A call is under way.
There is a call on hold.
There is a missed call.
TTY is active.
A privacy call is under way.
A call is under way through Bluetooth.
There is a privacy call on hold.
Strength of received signal: The bar becomes
bigger when the signal is stronger.
CALLS AND MESSAGES
61
Page 62
CALLS AND MESSAGES
Icon Description
Phone is in roaming mode.
New voicemail
SWAPPING A CALL FOR A MULTIPARTY CALL
1 Touch Accept when there is an incoming call while on call. The
first party will hear a waiting sound.
2 Touch Swap to change the calling party.
3 Touch End to finish the call.
MAKING A CONFERENCE CALL
1 Touch Phone from the Home Screen.
2 Enter the area code and the phone number.
3 Touch Add call to invite a third party to the call.
4 Touch Merge if you want to allow all the parties to participate in
the conversation.
ADDING A CALL
1 Touch Add call to make a call to another party during a call with
a party.
2 Enter the telephone number and touch
Note The current call is held when you make a call with
another party.
62
.
Page 63
CALLS AND MESSAGES
MAKING A CALL FROM THE ADDRESS BOOK
1 Touch Phone from the Home Screen.
2 Touch People, select and touch a contact to call.
3 Touch
next to the phone number.
MAKING AN EMERGENCY CALL
1 Touch Phone from the Home Screen.
2 Enter 911 and touch
.
CHECKING CALL HISTORY
1 Touch Phone from the Home Screen.
2 Touch Call log.
3 Touch the search box, and touch All Calls, Missed Calls, Received
Calls, or Dialed Calls.
x Touch All Calls if you want to see the whole calling history.
x Touch Missed Calls if you want to see the list of calls that you
have missed.
x Touch Received Calls if you want to see the list of calls that
you have received.
x Touch Dialed Calls if you want to see the list of contacts that
you have called.
Note You can also check if there is a missed call by dragging
the status bar down. Touch the contact if you want to make
a call back to the number.
63
Page 64

CALLS AND MESSAGES
MAKING A CALL TO FAVORITE CONTACT
1 Touch Phone from the Home Screen.
2 Touch Favori tes.
3 Select and touch a contact that you want to make a call.
4 Select and touch a phone number if there are many phone
numbers. You can touch Remember this choice first if you want
to make the number as main number for the contact.
RECEIVING VISUAL VOICEMAIL
1 Touch Voicemail from the Home Screen.
2 Touch the received visual voicemail in the inbox, then it plays
automatically.
x Touch *86 in the keypad if you have not subscribed to the
monthly Visual Voicemail service.
3 Touch Call Back if you want to make a call back to the contact.
4 Touch and hold a contact if you want to see details of the
contact and touch View Contact.
SENDING VISUAL VOICEMAIL
1 Touch Voicemail from the Home Screen.
2 Touch Menu > New Voicemail.
3 Enter the contact number.
4 Touch
5 Touch Urgent or Private, and touch Send.
64
. The voicemail starts to be recorded. You can record a
voicemail for up to three minutes.
Page 65

CALLS AND MESSAGES
Note If you have not subscribed to the voicemail service,
touch Call Voicemail and follow the next steps.
SAVING A NEW CONTACT
1 Touch Phone from the Home Screen.
2 Enter a telephone number and touch Save in the middle of the
screen. If there is contact for the number, it appears below.
3 Touch CREATE NEW CONTACT.
4 Enter additional information as needed for the contact.
5 Touch Done.
ADDING NEW INFORMAITON TO EXISTING CONTACT
1 Touch Phone from the Home screen.
2 Enter a telephone number and touch Save in the middle of the
screen.
3 Select and touch a contact to add information.
4 Enter additional information as needed for the contact:
5 Touch Add another field if you want to add the number that you
have entered, in an additional field.
6 Touch Done.
65
Page 66
CALLS AND MESSAGES
TALKING THROUGH THE SPEAKER
1 Touch Speaker during a call. A red bar appears under Speaker
when the function is on.
2 Touch Speaker again if you want to stop using the function.
Note If the proximity sensor is working, speakerphone
would run automatically when you take your face off from
the ADR910L for a few seconds.
TALKING WITH Bluetooth TECHNOLOGY
1 Touch Bluetooth during a call. A red bar appears under
Bluetooth when the function is on.
2 Touch Bluetooth if you want to stop using the function.
Note Refer to the relevant manual of the Bluetooth headset
for more information.
MUTING THE PHONE
1 Touch Mute during a call. A red bar appears under Mute when
the function is on.
2 Touch Mute again if you want to turn off the function.
ADDING SHORTCUTS TO FAVORITE CONTACTS
1 Touch and hold on the empty space on the Home screen.
2 Touch Shortcuts > Contact.
66
Page 67

CALLS AND MESSAGES
3 Select and touch your favorite shortcut that you want to add to
the Home screen.
MESSAGING
SENDING A NEW MESSAGE
1 Touch Messaging from the Home screen.
2 Touch
3 Enter a mobile phone number or email address in the To field. As
4 Enter a message in the Tap to compose field.
5 Touch Send.
ENTERING A MESSAGE USING VOICE
1 Touch Messaging from the Home Screen.
2 Touch and touch Voice mail.
3 Enter a mobile phone number or email address in the To field. As
4 Touch the Tap to compose field. Touch the Voice Commands Key
at the right top side of the screen.
you type, matching contacts appear. You can touch a suggested
contact or continue typing. Or touch
Call log, or Group.
Note A failed message remains in the list. If you want to
delete it, touch and hold the message and tap Delete.
you type, matching contacts appear. You can touch a suggested
contact or continue typing. Or touch
+ in the virtual keyboard and speak your message.
and touch Contacts,
, and touch a contact.
67
Page 68

CALLS AND MESSAGES
5 Touch Send.
ENTERING TEXT USING THE KEYBOARD
Use different keyboard settings for different characters. Swype is the
method for entering text by default.
1 Touch Messaging from the Home screen.
2 Touch
3 Enter a mobile phone number or email address in the To field. As
4 Touch the Tap to compose field. Touch
5 Touch
6 Touch Send.
at the right top side of the screen.
you type, matching contacts appear. You can touch a suggested
contact or continue typing. Or touch
letters for the message.
is selected, the next letter entered is capitalized.
x When
is selected, all letters entered are capitalized.
x When
to enter numbers, and touch to enter symbols.
, and touch a contact.
to select and enter
Capital letters Numbers and
68
common symbols
Complicated
symbols
Page 69
CALLS AND MESSAGES
Note
If you want to enter a number or/and common symbol
in between common letters for a message:
x Touch and hold a key for one second and you can enter
the secondary character on the right of each key.
For example, touch and hold y for one second and you
can enter the number “6.”
x Touch and hold a key for two seconds and you can enter
additional characters assigned for each key.
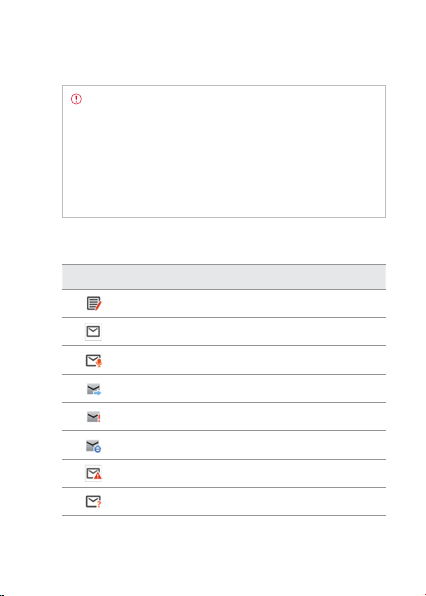
ICONS FOR MESSAGES
Icon Description
There is a message that is not sent
There is an incoming message
A new message with a recorded voice has arrived
Messages have been successfully sent
There is an urgent message
There is an incoming message from the email server
There is a CMAS message
There is a missed message
69
Page 70

CALLS AND MESSAGES
DELETING MESSAGES
1 Touch Messaging from the Home Screen.
2 Touch
3 Touch
4 Touch OK.
and touch Delete.
. next to the message(s) to delete. If you want to delete
all messages, touch
and touch Select all.
ADDING SHORTCUTS FOR DIRECT MESSAGES
1 Press and hold on the empty space of the Home screen, or
from idle mode, and touch Add.
2 Touch Shortcuts > Direct message.
3 Select and touch a contact in the list that you want to create a
shortcut on the Home Screen for a direct message.
USING A QUICK TEXT
1 Touch Messaging from the Home screen.
2 Touch and touch Quick text.
3 Select and touch a text.
4 Touch
5 Enter the contact of the recipient.
6 Touch Send.
70
and touch Send message.
touch
Page 71

CALLS AND MESSAGES
ADDING A QUICK TEXT
1 Touch Messaging from the Home screen.
2 Touch
3 Touch
4 Enter a quick text.
5 Touch
and touch Quick text.
and touch Add new.
.
ATTACHING PICTURES
1 Touch Messaging from the Home screen.
2 Touch
3 Enter a mobile phone number or email address in the To field. As
4 Touch the Tap to compose field to start entering your message.
5 Touch
6 Touch Take a picture or Galler y.
7 Take a picture to attach if you have selected Take a Picture. Or
8 Touch Send.
at the right top side of the screen.
you type, matching contacts appear. You can touch a suggested
contact or continue typing.
> Pictures.
select and touch a picture to attach from Gallery.
SETTING STORAGE LIMITS
1 Touch Messaging from the Home Screen.
2 Touch
and touch Settings.
x Touch Delete old messages if you want old messages to be
deleted when the storage limit is reached.
71
Page 72

CALLS AND MESSAGES
x Touch Text message limit, set the maximum number of
messages and touch Set.
x Touch Multimedia message limit, set the maximum
number of messages and touch Set. Make sure to delete old
messages before setting the maximum number of messages.
Note Make sure to secure enough internal memory space:
you might experience difficulties receiving or sending
messages when the memory space is low.
SETTING SIGNATURE
1 Touch Messaging from the Home Screen.
2 Touch and touch Settings.
3 Touch Signature auto-append if you want to add signature
automatically.
4 Type your signature and touch
.
CHECKING USED SPACE
1 Touch Messaging from the Home Screen.
2 Touch
3 Touch Used space. You can see the number of text messages
and touch Settings.
and multimedia messages.
SEARCHING FOR MESSAGES
1 Touch Messaging from the Home Screen.
2 Touch '.
3 Enter a word to search messages and touch
72
.
Page 73

CALLS AND MESSAGES
TEXT MESSAGE SETTINGS
1 Touch Messaging from the Home Screen.
2 Touch
3 Touch ON next to Delivery reports if you want to receive a
and touch Settings.
report from the recipient that your message has been delivered.
MULTIMEDIA MESSAGE SETTINGS
1 Touch Messaging from the Home screen.
2 Touch
3 Touch Auto-retrieve if you want to take back messages
4 Touch Roaming auto-retrieve if you want to take back messages
and touch Settings.
automatically.
automatically while roaming. The function will not run if the
Auto-retrieve function is not operating.
SETTING THE NOTIFICATIONS
1 Touch Messaging from the Home Screen.
2 Touch
3 Touch Notifications if you want to see in the status bar when a
4 Touch Select ringtone and select and touch a ringtone for the
5 Touch Vibrate and select Always, Only when silent or Never,
and touch Settings.
message is delivered.
message that you receive, and touch OK.
and touch OK.
73
Page 74

CALLS AND MESSAGES
CONTACTS
VIEWING CONTACTS INFORMATION
1 Touch People from the Home Screen.
2 Select and touch a contact for more information.
CREATING CONTACTS
1 Touch People from the Home Screen.
2 Touch
3 Enter related information, such as name, phone number, email
4 Touch Done when you finish entering information for the
CREATING GROUPS FOR CONTACTS
1 Touch People from the Home screen.
2 Touch Groups on the top of the screen and touch
74
.
address, postal address, organization, etc.
contact.
bottom of the screen.
, touch Take photo or Choose photo from Gallery
x Touch
and take the necessary steps if you want to assign a photo
for the contact.
x Touch Add organization and type the organization name.
Note You can create a contact by entering the telephone
number first. Touch Phone, enter a telephone number, and
touch Save in the middle of the screen. Refer to page 65 for
more information.
on the
Page 75

CALLS AND MESSAGES
3 Enter the group name and touch Save. The contacts will also be
saved through Backup Assistant. If you have not subscribed to
the Backup Assistant service, touch OK in the registration screen
and take necessary steps. Refer to page xx for more information.
ADDING MEMBERS FOR CONTACTS GROUP
1 Touch People from the Home screen.
2 Touch Groups on the top of the screen.
3 Press and hold the group that you want to add members.
4 Touch Edit Group:
5 Type the member’s name in the Type person’s name field.
6 Touch Save.
SETTING SPEED DIALS
1 Touch People from the Home Screen.
2 Touch
3 Touch a number from 2 to 100 and touch Add
4 Select and touch contacts and their desired number for the
on the bottom of the screen.
speed dial. The following speed dial entries are already assigned
to your Verizon Wireless Account Information:
x 1 - Voice mail
x 97 - Account Balance
x 98 - Calling minutes
x 99 - Payment
x 100 - Data usage
75
Page 76

CALLS AND MESSAGES
Note You cannot assign two speed dialing numbers for one
telephone number. In case you select the mobile phone
number of the contact, you can choose Voice call or Message
for the speed dialing number.
RESERVING CONTACTS WITH BACKUP PLUS
1 Touch People from the Home Screen.
2 Touch
and touch Backup Assistant Plus. You can check the
current status of saved contacts.
EDITING CONTACTS
1 Touch People from the Home Screen.
2 Touch and hold a contact to edit, and touch Edit contact.
3 Edit information and touch Done.
DELETING CONTACTS
1 Touch People from the Home Screen.
2 Touch and hold a contact to delete and touch Delete contact.
3 Touch OK to confirm deletion.
IMPORTING/EXPORTING CONTACTS INFORMATION
1 Touch People from the Home Screen.
2 Touch and touch Import/expor t.
x Touch Import from storage, then select and touch the
account to create your contact under.
76
Page 77
CALLS AND MESSAGES
x Touch Export to storage and touch OK if you want to export
contacts to SD card.
x Touch Share visible contacts and touch Bluetooth, Gmail, or
Messaging if you want to share visible contacts.
SEARCHING FOR CONTACTS INFORMATION
1 Touch People from the Home Screen.
2 Touch
3 Enter the name of the desired contact and touch
and touch .
result appears instantly.
. The search
SETTING DISPLAY OPTIONS
1 Touch People from the Home Screen.
2 Touch and touch Settings.
3 Touch Sort list by and touch First name or Last name.
4 Touch View contact names as and touch First name first or Last
name first.
SENDING CONTACT DETAILS
1 Touch People from the Home Screen.
2 Touch and hold a contact to share and touch Share contact.
3 Touch Bluetooth, Gmail, or Messaging.
77
Page 78

CALLS AND MESSAGES
ADDING CONTACT TO SPEED DIAL
1 Touch People from the Home Screen.
2 Touch and hold a contact to add to speed dial and touch Add
to Speed dial.
3 Touch the phone number and designate the speed dial number
for the contact.
SETTING CONTACT OPTIONS
1 Touch People from the Home screen.
2 Touch a contact that you want to adjust settings.
x Touch and touch Set ringtone, touch the ringtone for the
contact and touch OK.
x Touch All calls to voicemail if you want to send incoming
calls from the contact to voicemail directly.
MANAGING ACCOUNTS AND SYNC
1 Touch People from the Home screen.
2 Touch and touch Accounts.
3 Touch your account. Touch ADD ACCOUNT if you want to add an
account and follow the steps for creating accounts
4 Check the sync settings and deselect the checkbox if you do not
want to sync for the selected item.
and touch Remove account if you want to remove
x Touch
the account.
and touch Sync now if you want to sync contacts
x Touch
information right now.
78
Page 79

CALLS AND MESSAGES
ADDING FRIENNDS WIDGET
1 Touch and hold on the empty space of the screen.
2 Touch the Friends widget.
3 Select a style.
4 Touch the widget and assign a contact for the widget.
Note You cannot add two Friends widgets on the same
Home screen at the same time.
Google TALK
SETTING YOUR STATUS
1 Touch Menu from the Home Screen and touch Talk.
2 Touch your Gmail address.
3 Touch the status bar on the top of the screen.
4 Touch Available, Busy or Invisible.
Note The status message will not be displayed if your status
is Invisible.
er the status message.
5 Ent
6 T
ouch if you want to insert a photo and touch Select from
Gallery or Take with Camera, and take the necessary steps.
79
Page 80
CALLS AND MESSAGES
INVITING A FRIEND TO CHAT
1 Touch Menu from the Home Screen and touch Talk.
2 Touch
3 Enter the user name of the friend you want to add.
4 Touch Done.
.
CHATTING WITH FRIENDS
1 Touch Menu from the Home Screen and touch Talk.
2 Select and touch one of the friends that appear on the screen.
3 Enter a message and touch
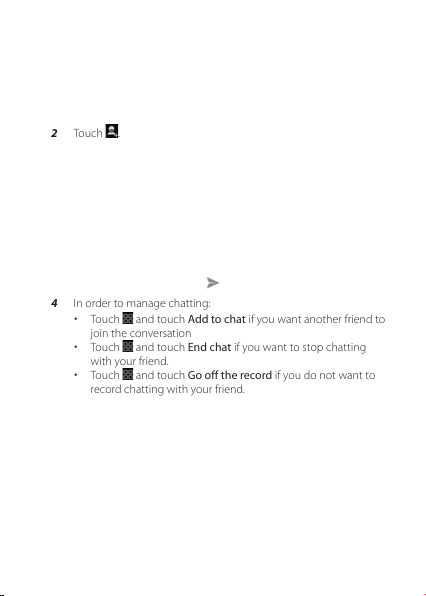
4 In order to manage chatting:
x Touch and touch Add to chat if you want another friend to
join the conversation
and touch End chat if you want to stop chatting
x Touch
with your friend.
and touch Go off the record if you do not want to
x Touch
record chatting with your friend.
80
.
Page 81

4
COMMUNICATION
This chapter provides important information
about using the ADR910L including:
EMAIL
GMAIL
GOOGLE+
SOCIAL ON WIDGET
SOCIAL GALLERY
Page 82

COMMUNICATION
EMAIL
SETTING UP AN EMAIL ACCOUNT
1 Touch Menu from the Home Screen and touch Email.
2 Touch an email service provider among Exchange, AOL, Yahoo,
Windows Live Hotmail, or Gmail.
3 Enter your email address and password, and touch Next.
4 Check the account settings and touch Next.
5 Enter a name for the account and touch Next.
Note The screen varies depending on the email service
provider.
ADDING A NEW EMAIL ACCOUNT
1 Touch Menu from the Home Screen and touch Email..
2 Touch and touch Settings in the Accounts screen.
3 Touch Add account on the right top side of the screen
4 Follow the steps to set up an email account.
VIEWING INCOMING MESSAGES
1 Touch Menu from the Home Screen and touch Email.
2 Select and touch an account, and touch a message you want
to check.
82
Page 83

COMMUNICATION
SENDING AN EMAIL
1 Touch Menu from the Home Screen and touch Email.
2 Touch
3 Enter the recipient’s email address, or touch
4 Enter the subject of the email and the message.
5 Touch
and touch Compose.
Note If you have added more than two email accounts, the
first one is designated as the primary account for sending an
email.
Recent address, Contacts, Group, or Favorite contacts, and
follow the instructions.
.
and touch
ADDING ATTACHMENTS TO AN EMAIL
1 Touch Menu from the Home Screen and touch Email.
2 Touch
3 Write an email and touch
4 Touch Picture, Take a picture, Video, Record a video,
5 Touch
and touch Compose.
email.
Document, Map, or Email, and take necessary steps.
when you are finished.
and touch Attach in the composed
DESIGNATING EMAILS AS FAVORITES
1 Touch Menu from the Home Screen and touch Email.
2 In the Inbox screen, touch the star next to the email(s). The star
icon turns orange.
83
Page 84

COMMUNICATION
g
MARKING EMAILS AS READ/UNREAD
1 Touch Menu from the Home Screen and touch Email.
2 In the Inbox screen:
x If you want to mark an email as read without checking it,
select the check box in front of the email and touch
if you want to mark the email as unread.
Touch
x If you want to check an email first, touch the email, touch
and touch Mark as unread.
REMOVING THE EMAIL ACCOUNT
1 Touch Menu from the Home Screen and touch Email.
2 Touch and hold the account that you want to remove.
3 Touch Remove account > OK.
ADJUSTING GENERAL EMAIL SETTINGS
1 Touch Menu from the Home Screen and touch Email.
2 Touch an account.
3 Touch
4 Touch General Settings and adjust settings.
84
and touch Settings.
x Touch Automatic picture view if you want to see pictures in
an email automatically.
x Touch Restore default for “Show pictures” if you want to
restore the default settings for those who send you emails.
x Touch Discard E-mail if you want to delete emails with no
confirmation pop-up window.
x Touch Font size, select and touch the size of message text.
.
Page 85

COMMUNICATION
ADDING EMAIL WIDGET
1 Touch and hold on the empty space on the Home screen.
2 Touch and hold Email on the bottom of the screen and place it on
the Home screen.
3 Select and touch the account that you want to display through
the widget.
4 Select and touch the folder that will be mainly displayed on the
Home Screen.
GMAIL
ADDING A GMAIL ACCOUNT
1 Touch Menu from the Home Screen and touch Gmail.
2 Touch Next.
3 Touch Sign in if you have a Gmail account.
4 Enter your user name and password.
5 Touch Sign in.
READING INCOMING MESSAGES
1 Touch Menu from the Home Screen and touch Gmail.
2 Select and touch the message to read.
3 Touch
4 Touch
on the bottom of the screen if you want to preserve the
message in a separate folder.
on the bottom of the screen if you want to delete the
message.
85
Page 86
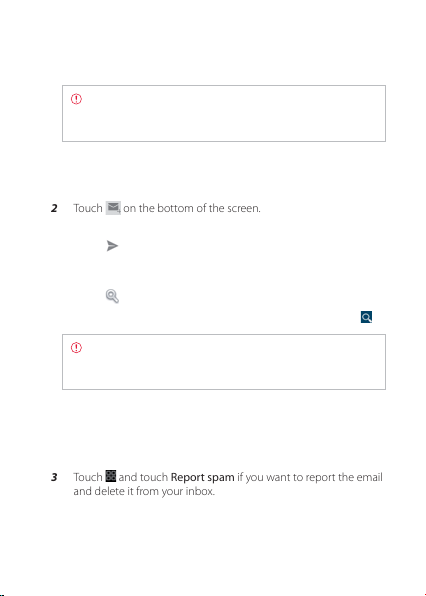
COMMUNICATION
Note If you have added more than two email accounts, the
first one is designated as the primary account for sending an
email.
SENDING AN EMAIL THROUGH GMAIL
1 Touch Menu from the Home Screen and touch Gmail.
2 Touch
3 Enter the recipient’s email address, the subject and the message.
4 Touch
on the bottom of the screen.
.
SEARCHING FOR EMAILS
1 Touch while in the inbox screen.
2 Type the keyword for the email in the search box and touch
Note Gmail stores emails on your device for thirty days
by default so that you can find and read them with no
connection to the Internet..
DESIGNATING EMAILS AS SPAM
1 Touch Menu from the Home Screen and touch Gmail.
2 Select and touch an email.
3 Touch
86
and touch Report spam if you want to report the email
and delete it from your inbox.
.
Page 87

COMMUNICATION
ADJUSTING GENERAL GMAIL SETTINGS
1 Touch Menu from the Home Screen and touch Gmail.
2 Touch
3 Touch General Settings.
and touch Settings.
x Touch Confirm before deleting if you want to see a message
before deleting a message.
x Touch Confirm before sending if you want to see a message
before sending a message.
x Touch Reply all if you want to make it default to reply all to
incoming messages.
GOOGLE+
Manage your social network using Google +. Remember that
Google+ is a beta-version application..
UPGRADING GOOGLE ACCOUNT
1 Touch Menu from the Home Screen and touch Google+.
2 Check your first and last name for the Google account. Select
your gender. If you want to add your photo, touch Add your
photo and follow the necessary steps.
3 Touch Upgrade.
87
Page 88

COMMUNICATION
SOCIAL ON WIDGET
Use Social Networking Services easily with the Social ON widget.
Check updates in Facebook, Twitter, or LinkedIn at a glance and post
your messages.
REGISTERING YOUR ACCOUNT
1 Touch Menu from the Home Screen and touch Soical On.
2 Touch next to Facebook, Twitter, or LinkedIn.
3 Follow the instructions to register your account.
ADDING THE SOCIAL ON WIDGET
1 Touch and hold on the empty space on the Home Screen.
2 Touch Social On and touch the list type or magazine type
widget.
3 Select a style. You can check updated news from the widget.
CHECKING UPDATES OF SOCIAL ON WIDGET
1 Touch in the Social ON widget.
2 Check the updated messages or videos..
ADJUSTING WIDGET SETTINGS
1 Touch in the Social ON widget.
2 Adjust settings as you prefer.
88
Page 89

COMMUNICATION
SOCIAL GALLERY
Share your gallery with your friends. Social Gallery is one of widgets
that you can place in the Home Screen.
REGISTERING SNS ACCOUNT
1 Touch Menu from the Home Screen and touch Social Gallery.
2 Touch
SHARING MEDIA FILES
1 Touch Menu from the Home Screen and touch Social Gallery.
2 Touch My gallery.
3 Select and touch photos or videos that you want to share via
ENJOYING FRIENDS’S PHOTOS
1 Touch Menu from the Home Screen and touch Social Gallery.
2 Touch Friends.
and take the necessary steps to register your SNS
accounts.
Social Gallery.
Note If you want to see favorite photos or places, touch
Favo rite or Place on the top of the screen.
89
Page 90

5
ENTERTAINMENT
This chapter provides important information
about using the ADR910L including:
LISTENING TO MUSIC
USING CAMERA AS CAMCORDER
USING CAMERA
USING GALLERY
ENJOYING YOUTUBE
USING VIDEO PLAYER
NET MEDIA
READING E-BOOKS (TBD)
WEB SURFING
ANDROID MARKET
USING Google MAPS
Google SEARCH
VOICE SEARCH
USING PLACES
USING LATITUDE
NAVIGATION
NEWS & WEATHER
Page 91
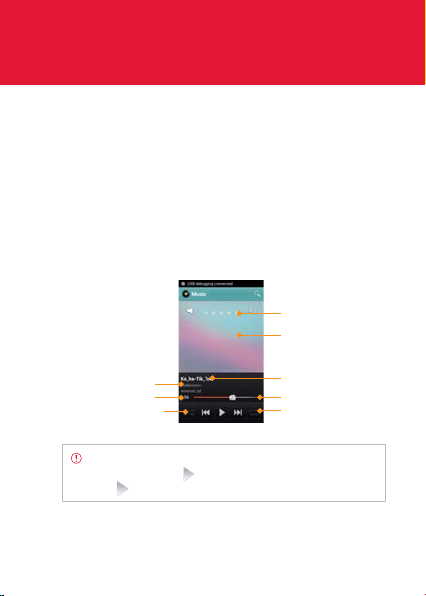
ENTERTAINMENT
LISTENING TO MUSIC
You can enjoy music on your ADR910L. Make sure to insert a
microSD™ card to transfer music files to the ADR910L and listen to
them.
PLAYING MUSIC
1 Touch Menu from the Home Screen and touch Music.
2 Select and touch a file from the list sorted by the alphabetic
order. Touch Play All if you want to listen to all files.
Song rating
Album cover
Album title
Current playing time
Shuffling options
Note Music would run in the background if you do not
end the application.
Touch if you want to stop it or listen to another music file.
indicates that music is being played.
Artist name
Progress bar
Repeating options
91
Page 92
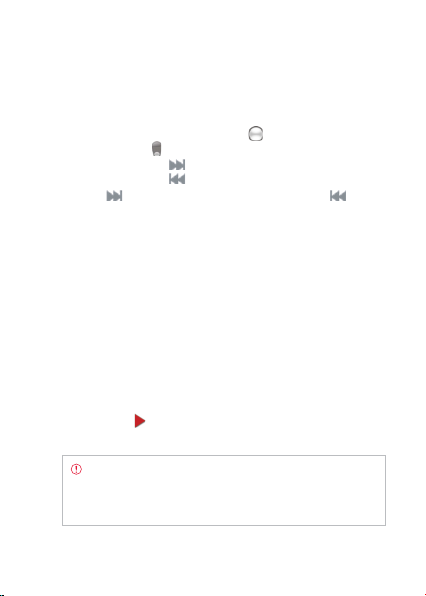
ENTERTAINMENT
NAVIGATING THE PLAYING SONG
1 Touch Menu from the Home Screen and touch Music.
2 Select a song or album to play. Drag
bar. Numbers in
x Touch and hold
x Touch and hold
3 Touch
want to move to the previous file. Or swipe the album cover to
the right or left to change the playing music.
indicates the current playing time.
if you want to fast-forward the file.
if you want to move to the next file. Touch if you
if you want to rewind the file.
to the right or left in the
ADJUSTING VOLUME
1 Touch Menu from the Home Screen and touch Music.
2 Press the Volume Keys up if you want to increase volume. Press
the Volume Keys down if you want to decrease volume. As you
adjust volume, the Media Volume on the screen changes its
color.
CHECKING SONGS’ INFORMATION
1 Touch Menu from the Home Screen and touch Music.
2 Touch and hold the song that you want to see the related
information.
3 Touch Properties and scroll up or down to view its information.
Note If you want to search for related information while a
song is playing, press and hold the artist name, album title
or song, and touch, Brower, YouTube or Music, and take
necessary actions.
92
in front of a file indicates that it is being played.
Page 93

ENTERTAINMENT
SETTING MUSIC FILE AS RINGTONE
1 Touch Menu from the Home Screen and touch Music.
2 Touch and hold the song that you want to set as ringtone of the
ADR910L.
3 Touch Set as ringtone.
ADDING A SONG TO A PLAYLIST
1 Touch Menu from the Home Screen and touch Music.
2 Touch and hold the song that you want to add to a playlist.
3 Touch Add to playlist.
CREATING A PLAYLIST
1 Touch Menu from the Home Screen and touch Music.
2 Touch Song in the top of the screen and touch Playlist.
3 Touch
4 Enter the name of the playlist and touch OK.
5 Touch the check box next to the song(s) that you want to add to
and touch New Playlist.
the playlist and touch Add.
MANAGING PLAYLISTS
1 Touch Menu from the Home Screen and touch Music.
2 Touch Song in the top of the screen and touch Playlist.
3 Touch and hold a playlist that you want to manage.
x If you want to listen to all songs of the playlist, touch Play all.
x If you want to delete the playlist, touch Delete.
93
Page 94

ENTERTAINMENT
x If you want to add tracks to the list, touch Add tracks, select
songs and touch Add.
x If you want to remove tracks from the list, touch Remove
tracks, touch
x If you want to create a new name for the playlist, touch
Rename, enter the new name and touch OK.
next to the song to remove and touch Done.
MUSIC PLAYER ICONS
Icon Description
Play: Plays a file
Pause: Pauses the song
Fast-forward: Fast-forwards the song (touch
and hold)
Next file: Moves to the next file (touch)
Rewind: Rewinds the song (touch and hold)
Previous file: Moves to the previous file (touch)
Shuffle: Shuffles songs (green); Shuffle is off
(white)
Repeat is off
Repeat: Repeats all songs
Repeats current song
94
Page 95
ENTERTAINMENT
Icon Description
Playing songs’ list: Shows the list of files that are
being played
Rate: Rates the file
Current time: Shows the current playing time
SORTING MUSIC FILES BY TYPE
1 Touch Menu from the Home Screen and touch Music.
2 Touch Song on the top of the screen, and select and touch Song,
Album, Artist, Genre, Playlist, Folder, Rating, Mood or Most
Played. A list of music files for the type appears.
LISTENING TO MUSIC FILES BY MOOD
1 Touch Menu from the Home Screen and touch Music.
2 Touch Song on the top of the screen and touch Mood. Songs are
automatically sorted by the metadata value of each file. Touch
Play All if you want to listen to all music files.
DELETING MUSIC FILES
1 Touch Menu from the Home Screen and touch Music.
2 Touch
3 Touch next to the song to delete. If you want to delete all
4 Touch Done. Selected files will be deleted from the ADR910L.
and touch and touch Delete.
music files, touch
and touch and touch Select All.
95
Page 96

ENTERTAINMENT
RATING MUSIC FILES
1 Touch Menu from the Home Screen and touch Music.
2 Select and touch a file to rate.
3 Touch
five stars.
while the file is playing and rate from one to
SHARING MUSIC FILES
1 Touch Menu from the Home Screen and touch Music.
2 Touch and hold a music file to share with your friends, and touch
Send.
3 Touch Bluetooth, Email, Gmail, Messaging, Net Media or
Verizon Media Manager and follow necessary steps.
MUSIC PLAYER SETTINGS
1 Touch Menu from the Home Screen and touch Music.
2 Touch
3 Touch Shuffle if you want to listen to music files randomly in the
and touch Settings.
playlist. If you want to change the repeat the repetition option,
touch 2 or 3 and select Repeat All, Repeat One or Repeat Off.
ADDING MUSIC PLAYER WIDGET
1 Touch and hold on the empty space on the Home screen, or
2 Touch Pantech Widgets.
3 Touch and hold Music on the bottom of the screen and place it
96
and from idle mode and touch Widget.
touch
on the Home screen.
Page 97
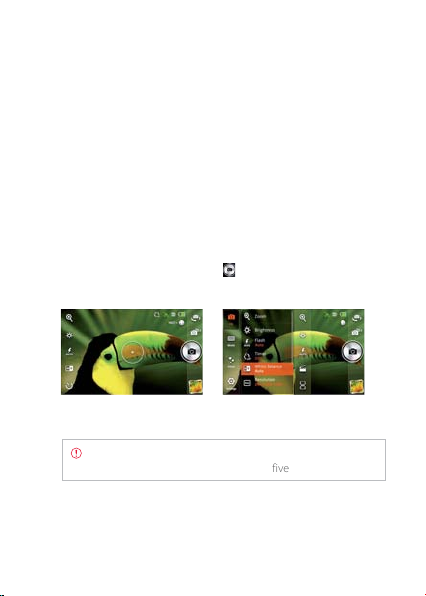
ENTERTAINMENT
4 Select a style. You can play songs with single touch.
USING CAMERA
Take pictures and record videos with the built-in camera. They can be
saved in the ADR910L and sent via multimedia messages.
TAKING PICTURES
1 Touch Menu from the Home Screen and touch Camera.
2 Touch on the screen and select options if necessary. Option
buttons disappear in a few seconds.
3 Focus on the object and touch
automatically.
Focusing on the object Selecting options
Note The screen moves to the Home Screen if you do not
touch the screen or use the camera for five minutes.
. The picture is saved
97
Page 98

ENTERTAINMENT
ZOOMING IN/OUT
1 Touch while in the camera mode.
2 Touch
3 Focus on the object and touch
to zoom out or touch to zoom in the screen. You
can just drag the red bar up or down.
.
ADJUSTING BRIGHTNESS
1 Touch while in the camera mode.
2 Touch
to increase brightness or touch to decrease
brightness of the screen.
ADDING COLOR EFFECTS
1 Touch while in the camera mode.
2 Effects > Color Effect.
3 Touch Grayscale or Sepia.
4 Touch on the screen and take a picture.
TAKING PICTURES USING TIMER
1 Touch while in the camera mode.
2 Touch Options > Timer.
3 Set the timer for 3, 5, or 10 seconds. After the camera focuses on
the object, a picture will be taken automatically in the set time.
98
Page 99
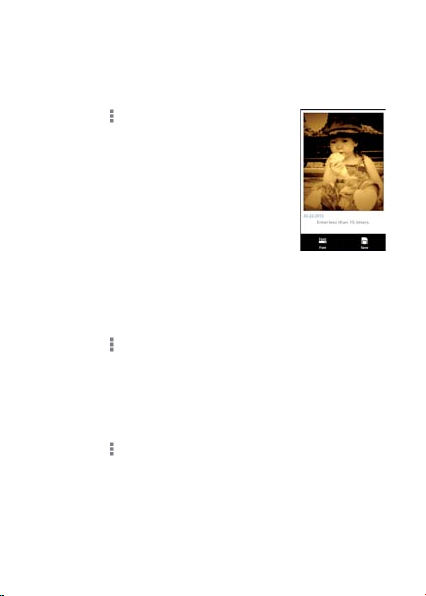
ENTERTAINMENT
TAKING INSTANT PICTURES
1 Touch
2 Touch Mode > Instant Film.
3 Touch on the screen and take a picture.
4 Type a memo for the picture and touch
5 Touch Save.
while in the camera mode.
After you touch the shutter, the picture
starts to appear in ten seconds. Touch on
the screen or shake the ADR910L if you
want to see the picture quickly.
Done if you leave a message with the
picture. You can touch Font and change
the font.
TAKING MULTISHOT
1 Touch and while in the camera mode.
2 Touch Mode > Multi.
3 Touch on the screen and take a picture. The camera will take four
pictures in a row for pre-assigned time interval.
TAKING DIVISION SHOT
1 Touch while in the camera mode.
2 Touch Mode >Division. You can take a pic ture in a four-cut
format.
99
Page 100

ENTERTAINMENT
USING FRONT/BACK CAMERA
1 Touch Menu from the Home Screen and touch Camera. The
camera placed in the back side is activated by default.
2 Touch
3 Touch
. Now you can take a picture using the front camera,
including yourself. Features for the front camera might differ from
those of the back camera.
if you want to take a picture using the back camera.
CHANGING RESOLUTION
1 Touch while in the camera mode.
2 Touch Options > Resolution.
3 Select and touch a resolution that you want to apply to the
picture. The maximum number of pictures that you can take will
increase as you reduce the resolution for pictures.
4 Touch on the screen and take a picture..
CHANGING SCENE MODE
1 Touch while in the camera mode.
2 Touch Options > Scene Mode.
3 Select and touch a scene mode that you want to apply to the
picture.
4 Touch on the screen and take a picture.
100
 Loading...