

Page 1

PG-1610
Welcome
USER MANUAL PG-1610
Thank you for choosing Pantech PG-1610 and welcome to the wireless
mobile communications with the PG-1610, our dual-band GSM mobile
phone.
Pantech is delighted to introduce this brand new portable phone which
will always keep you connected to the network.
This user manual explains in detail its unique features and how to use them.
※ Some of the contents in this User Manual could vary from your phone.
It may vary depending on the S/W version and the network provider you
subscribed to.
Page 2

2
Specification
1. Display
Single Candy-bar 65,536 STN LCD.
z 1.5” LCD
z Supports up to 65,536 colours within 128 x 128 pixels
z 6 lines for text in basic mode with 16-pixel font
z Two So ft k ey s( [
Left], [ Right]), and navigation key,
OK key.
z List and grid menu
2. Melody
64 poly sound
MP3 Ring tones(Support format: mpeg-1, mpeg-2 )
3. Camera
VGA CMOS built-in Camera.
z Resolution up to 640 x 480 (307,200 pixels)
z Self timer function (5 Secs or 10 Secs)
z
Photo album
4. Dimensions & Weight
z Weight: 80.5 g
z Dimensions: 89.8 mm x 43.5 mm x 18.55 mm
6. Operating Frequency
z GSM 850, and PCS 1900 networks in, North America, and South
America where these networks are supported
z DCS 1800 networks in Europe, Africa, Asia-Pacific where these
networks are supported
z Automatic band switching.
Page 3
3
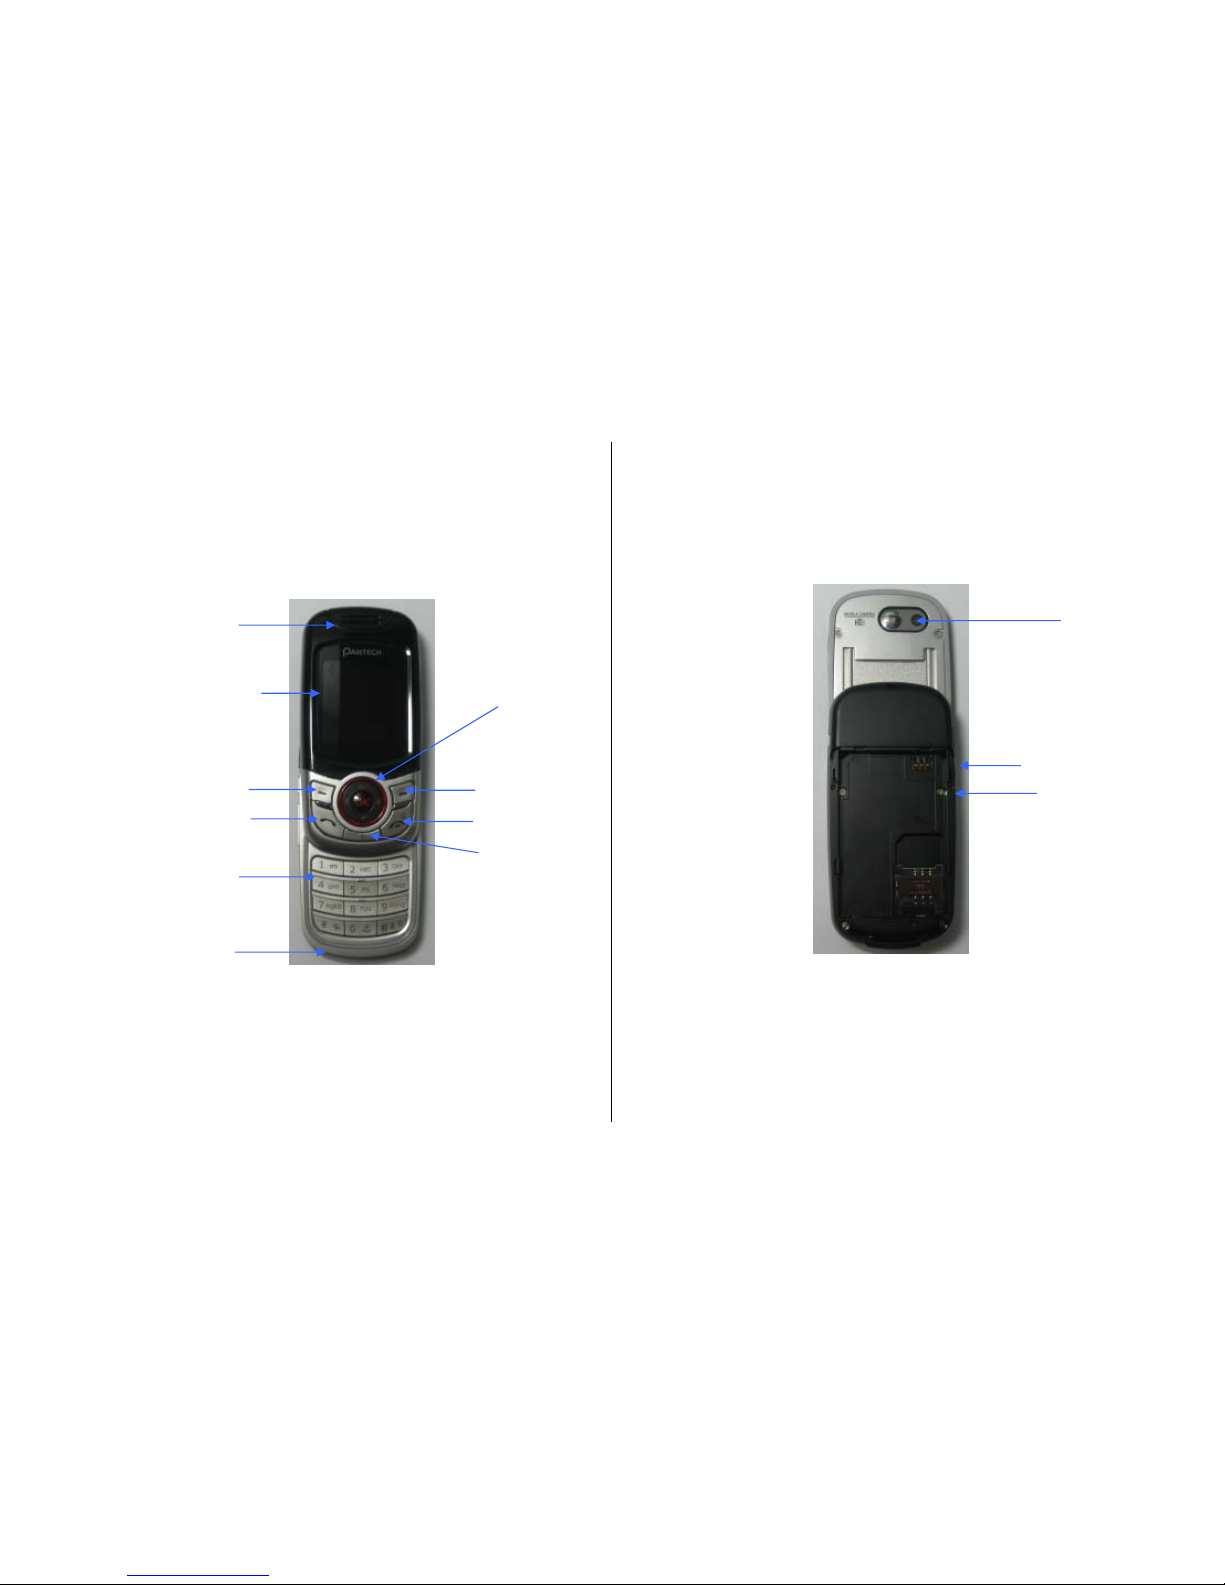
V
iews
Receiver / Speaker
1.5’ 65K CSTN
(128*128 pixels)
5 Way Menu Key
Numeric
Keypad
End/ Power on, off
MIC
Clear
Send Key
330K CMOS
Camera
Volume
up/down
Page 4

4
Quick & Easy ()
Keys Functions
Performs the functions shown at the bottom line of the
display(Soft Keys).
Scrolls through the menu options in Menu mode.
In standby mode, the default functions,
Push to Left: FM Radio
Right: Message menu
Up: Ring Tone
Down: Contacts
For details, see “Using the Shortcut Key in Standby
Mode”.
Press OK key Opens the WAP (Wireless Application Protocol) menu
list if pressed shortly in standby mode
Launches the WAP browser directly, if pressed and
held in standby mode.
Selects menu function or stores user input
information, such as names, SIM memory. Also used
for confirmation.
Deletes characters in text input mode, or returns
to the previous menu.
Opens Calendar view if pressed shortly in standby mode.
Makes or receives a call.
Shows the recent call lists in standby mode.
Re-dials the last call number if pressed and held, or
pressed twice in standby mode.
Completes the current call.
Turns on/off the phone if pressed and held.
Cancels user input and returns to the standby mode
while in Menu mode.
Quickly connects to the voice mail server, or inputs a
voice mail box number which you want to dial if
pressed and held in standby mode.
~
Enters numbers, characters, or symbols.
Goes to the dial number input mode if pressed in
standby mode.
Makes an emergency call if pressed 9 key and held
Enters or exits from etiquette mode if pressed and
held in standby mode.
Shows the symbol input screen if pressed and held in
text input mode.
Works in Word search mode if pressed in the
Predictive text input mode.
Enters an international dialling prefix(00, +).
Enters the space character in text input mode.
Locks the keypad if pressed and held in standby
mode. To unlock the keypad, press “#” shortly
when the unlock guidance is shown.
Enters a camera preview mode and takes a photo.
Enters a video recording mode if pressed and held in
standby mode.
Adjusts the earpiece volume level which you want
during a call, and moves the cursor upwards or
downwards in the menu mode.
Controls the key tone volume in standby mode
Page 5

5
Safety Precautions
Using a phone while driving is prohibited.
Please check local laws and regulations with regard to the prohibition of
phone usage while driving, and comply with them.
- Use of your mobile phone while you are driving may disturb your
concentration and consequently cause accidents. Please turn it off as soon
as possible.
- Should you use your phone in an emergency, please make use of the
hands free device built in your car, or pull your car over to a safe place for
your utmost safety.
- The electronic wave energy emitting from your phone may affect the
electronic devices built in your car. Please be aware of this characteristic.
Mobile Phone Use Restriction Area
Make sure to turn your phone off in a phone usage restricted area.
Using a Phone in an Explosive or Dangerous Area is not
Permitted
Please turn your phone off in areas with explosive or dangerous materials
(such as fuel, fuel stations, or places with chemical goods) and abide by
any instructions or signals. Never try to detach your mobile phone battery
from the phone in such areas.
Boarding an Aircraft
- Please turn your phone off when you are on the aircraft. The electronic
wave from your phone may affect the electronic navigation device in the
aircraft.
Using Medical Equipment
- Please turn your phone off while you are in a hospital.
- Please abide by the regulations or rules of the hospital.
- Please turn off your phone when using medical equipment for private
purposes if possible. You should consult with the manufacturer or an expert
regarding phone usage near medical equipment.
Installing a Vehicle Hands Free Device
- Please keep the vehicle hands free device away from the steering, and air
bag expansion range, or otherwise injury may result.
Effect of Mobile Phone and Electronic Devices
Some electronic devices may be affected by the electronic wave
emitting from the mobile phone in service. Please be careful.
Page 6

6
Access Code
The following section describes various security codes.
PIN code (4 to 8 digits)
The PIN (Personal Identification Number) code protects your SIM card
against unauthorised user(6. Settings>6. Security Settings>1. PIN
Check). The PIN code is usually supplied with the SIM card. If you input
the incorrect PIN code five times consecutively (trial time depends on
SIM card), the PIN code will be blocked. If the PIN code is blocked, you
need the PUK(Personal Unblocking Key) code before you can use the
SIM card again. See information on the PUK code.
PIN2 code (4 to 8 digits)
The PIN2 code, supplied with SIM card, is required to access functions,
such as call cost counters. (3. Call Logs>6. Call Cost>4. Max Cost>2.
Set Limit. Call Cost menu is SIM Dependent) and FDN(Fixed Dial
Number) (6. Settings>6. Security Settings>8. Fixed Dialling).
Phone Lock code (0 to 8 digits)
The lock code can be used to lock the phone and keypad to avoid
unauthorised use(6. Settings>6. Security Settings>3. Phone Lock).
Note: The factory setting for the lock code is 1234. To avoid
unauthorised user of your phone, change the lock code. Keep the new
code secret and in a safe place separate from your phone.
PUK and PUK2 codes (8 digits)
The PUK (Personal Unblocking Key) code is required to unblock and
change a disabled PIN code. The PUK2 code is required to unblock and
change a disabled PIN2 code. If the codes are not supplied with the SIM
card, contact the operator whose SIM card is in your phone for the codes.
Y ou can change the following codes: PIN code(6. Settings>6. Security
Settings>2. Change PIN), and PIN2 code(6. Settings>6. Security
Settings>9. Change PIN2). These codes can include the numbers from
0 to 9 only.
N/W Password (4 digits)
The N/W password is required when you use the N/W Barring function.
You obtain the password from your service provider when you subscribe
to this function.
You can change this password(6. Settings>6. Security Settings>6.
N/W Barring>7. Change password).
(For further details, see Applications Menu 6.6.6)
Page 7

7
Menu Tree
1 Messages
1.1 Write New
1.1.1 Text Msgs.
1.1.2 Multimedia Msgs.
1.2 Inbox
1.3 Outbox
1.4 Drafts
1.5 Sent
1.6 Templates
1.7 Settings
1.7.1 Common
1.7.1.1 Save Messages
1.7.1.2 Message Lifetime
1.7.1.3 Delivery Reports
1.7.2 Text Msgs.
1.7.2.1 Message Center
1.7.2.2 Message Format
1.7.2.3 Save to
1.7.3 Multimedia Msgs.
1.7.3.1 Profiles
1.7.3.2 Auto Download
1.7.3.3 Read Reports
1.7.4 Broadcast
1.7.4.1 Languages
1.7.4.2 Topic List
1.7.4.3 Receive
1.7.5 Voice Mail
1.8 Memory Info
2 Contacts
2.1 Search
2.2 Add Contact
2.3 Speed Dial
2.4 Groups
2.5 Memory in Use
2.5.1 Phone or SIM
2.5.2 SIM Card
2.5.3 Phone
2.6 Copy All
2.6.1 SIM to Phone
2.6.2 Phone to SIM
2.7 Delete All
2.7.1 Phone
2.7.2 SIM Card
2.8 Memory Info
2.9 Service Number
∗
3 Call Logs
3.1 Missed Calls
∗
SIM Dependent
Page 8

8
3.2 Received Calls
3.3 Dialled Calls
3.4 Delete Call Logs
3.4.1 Missed Calls
3.4.2 Received Calls
3.4.3 Dialled Calls
3.4.4 All Calls
3.5 Call Timer
3.5.1 Last Call Time
3.5.2 Received Call Time
3.5.3 Dialled Call Time
3.5.4 All Call Time
3.5.5 Reset Call Times
3.6 Call Cost
∗∗
3.6.1 Last Call Cost
3.6.2 All Call Cost
3.6.3 Delete Logs
3.6.4 Max Cost
3.6.5 Cost Unit
3.7 GPRS Info
3.7.1 Current Info
3.7.2 Last Info
3.7.3 All Info
3.7.4 Delete Logs
∗∗
Network Dependent
4 Media Gallery
4.1 Photo Gallery
4.2 Video Gallery
4.3 Image Gallery
4.4 Sound Gallery
4.5 Memory Info
5 Multimedia
5.1 Camera
5.1.1 Take a Photo
5.1.2 Take a Video
5.1.3 Photo Gallery
5.1.4 Video Gallery
5.1.5 Settings
5.2 Radio
5.3 Java
5.3.1 Games
5.3.2 Connection
5.3.3 Memory Info
6 Settings
6.1 Display Settings
6.1.1 Main Screen
6.1.1.1 Wallpaper
6.1.1.2 Wallpaper Type
6.1.2 Greeting
Page 9

9
6.1.2.1 Startup
6.1.2.2 Idle
6.1.3 Backlight
6.1.4 Software Version
6.2 Sound Settings
6.2.1 Ring Tone
6.2.2 Volume
6.2.3 Message Alert
6.2.4 Key Tone
6.2.5 Sound Effect
6.3 Call Settings
6.3.1 Call Forward
∗∗
6.3.1.1 All Calls
6.3.1.2 When Busy
6.3.1.3 On No Answer
6.3.1.4 When Not Found
6.3.1.5 Cancel All
6.3.2 Answer Type
6.3.3 Auto Answer
6.3.3.1 Auto Answer
6.3.3.2 Recorded Message
6.3.3.3 Response Message
6.3.3.4 Response Time
6.3.3.5 User Message
6.3.4 Auto Redial
∗∗
Network Dependent
6.3.5 Call Waiting**
6.3.5.1 Activate
6.3.5.2 Deactivate
6.3.5.3 Status
6.3.6 Send Caller ID
∗∗
6.3.7 Own Number
6.4 Phone Settings
6.4.1 Language
6.4.2 Time & Date
6.4.3 Favorites
6.4.4
6.5 Network Settings
6.5.1 Search now
6.5.2 Default setup
6.6 Security Settings
6.6.1 PIN Check∗
6.6.2 Change PIN*
6.6.3 Phone Lock
6.6.4 Change Lock
6.6.5 Phone Barring
6.6.5.1 Incoming
6.6.5.2 Outgoing
6.6.6 N/W Barring**
6.6.6.1 Outgoing Calls
∗∗
Network Dependent
∗
SIM Dependent
Page 10

10
6.6.6.2 International Calls
6.6.6.3 Only Local/Home Int. Call except to home country
6.6.6.4 Incoming Calls
6.6.6.5 Incoming Calls when Abroad
6.6.6.6 Delete All
6.6.6.7 Change password
6.6.7 CUG
∗∗
6.6.8 Fixed Dialling∗
6.6.9 Change PIN2*
6.7 Reset
7 Organizer
7.1 Alarm
7.2 Calendar
7.3 Memo
7.4 Voice Memo
7.5 World Time
7.6 Calculator
7.7 Converter
7.7.1-> Converter
7.7.2-> Currency Setting
7.8 Stopwatch
8 WAP
∗∗
Network Dependent
∗
SIM Dependent
8.1 Home
8.2 Resume
8.3 Bookmarks
8.4 Push Messages
8.4.1 Inbox
8.4.2 Receive
8.5 Go to URL
8.6 Profiles
8.7 Cache
8.7.1 Cache Mode
8.7.2 Clear Cache
8.8 Security Cert
8.9 Version
9 SIM Toolkit
∗
∗
SIM Dependent
Page 11

11
Table of Contents
Ⅰ. Getting Started
1 Package Contents
2 Displays
3 SIM Card
4 Using the battery
II. New Functions
1. OTA Settings Service
2. DRM/ Forward Lock
III. Basic Functions
1. Switching the Phone On or Off
1.1 Switching the Phone On
1.2 Switching the Phone Off
2. Making a Call
2.1 Making a Call
2.2 Ending a Call
2.3 Using Call Logs
2.4 Using Entry
2.5 Making an International Call
2.6 Speed-dialling from Entry
2.7 Making an Emergency Call
3. Answering a Call
3.1 Answering a Call
3.2 Viewing Missed Calls
3.3 Rejecting a Call
3.4 Adjusting the Calling Volume
3.5 Speaker Phone
4. Calling Options
4.1 Switching the Microphone off (Mute)
4.2 Holding a Call
4.3 Answering a Second Call
4.4 Making a Call
4.5 Searching for a Number in Contacts
4.6 Using DTMF Tones
4.7 Transferring a Call
4.8 Using the Message Service
4.9 Making a Multi-party Call
4.10 Ending a Call
5. Using the Headset
6. Selecting Menu Functions
6.1 Entering into Menu Functions
Page 12

12
6.2 Using the Shortcut key in Standby Mode
7. Entering Text
7.1 Input Mode
7.2 Changing Text Input Mode
7.3 Using T9 Mode
7.4 Using ABC Mode
7.5 Using 123 Mode
7.6 Using Symbol Mode
IV . Applications
1. Messages
1.1 Write New
1.2 Inbox
1.3 Outbox
1.4. Drafts
1.5 Sent
1.6 Templates
1.7 Settings
1.8 Memory Info
2. Contacts
2.1 Searching a Name
2.2 Adding a New Contact
2.3 Speed Dial Setting
2.4 Group Setting
2.5 Memory In Use
2.6 Copy All
2.7 Delete All
2.8 Memory Info
2.9 Service Number
3. Call Logs
3.1 Missed Calls
3.2 Received Calls
3.3
Dialled Calls
3.4 Delete Call Logs
3.5 Call Timer
3.6 Call Cost
3.7 GPRS Info
4. Media Gallery
4.1 Photo Gallery
4.2 Video Gallery
4.3 Image Gallery
4.4 Sound Gallery
4.5 Memory Info
5. Multimedia
5.1 Camera
5.2 Radio
Page 13

13
5.2 Java
6. Settings
6.1 Display Settings
6.2 Sound Settings
6.3 Call Settings
6.4 Phone Settings
6.5 Network Selection
6.6 Security Settings
6.7 Reset
7.Organizer
7.1 Alarm
7.2 Calendar
7.3 Memo
7.4 Voice Memo
7.5 World Time
7.6 Calculator
7.7 Converter
7.8 Stopwatch
Ⅳ. Advanced Functions
1. WAP
1.1 Navigating the WAP Browser
1.2 Entering Text in the WAP Browser
1.3 Home
1.4 Resume
1.5 Bookmarks
1.6 Push Messages
1.7 Go to URL
1.8 Profiles
1.9 Cache
1.10 Security Cert
1.11 Version
2. SIM Toolkit
Appendix
Check List
Performance and safety
Glossary
Warranty
Memo
Page 14
14
Ⅰ. Getting Started
1. Package Contents
2. Displays
3. SIM Card
4. Using the battery
Ⅰ. Getting Started
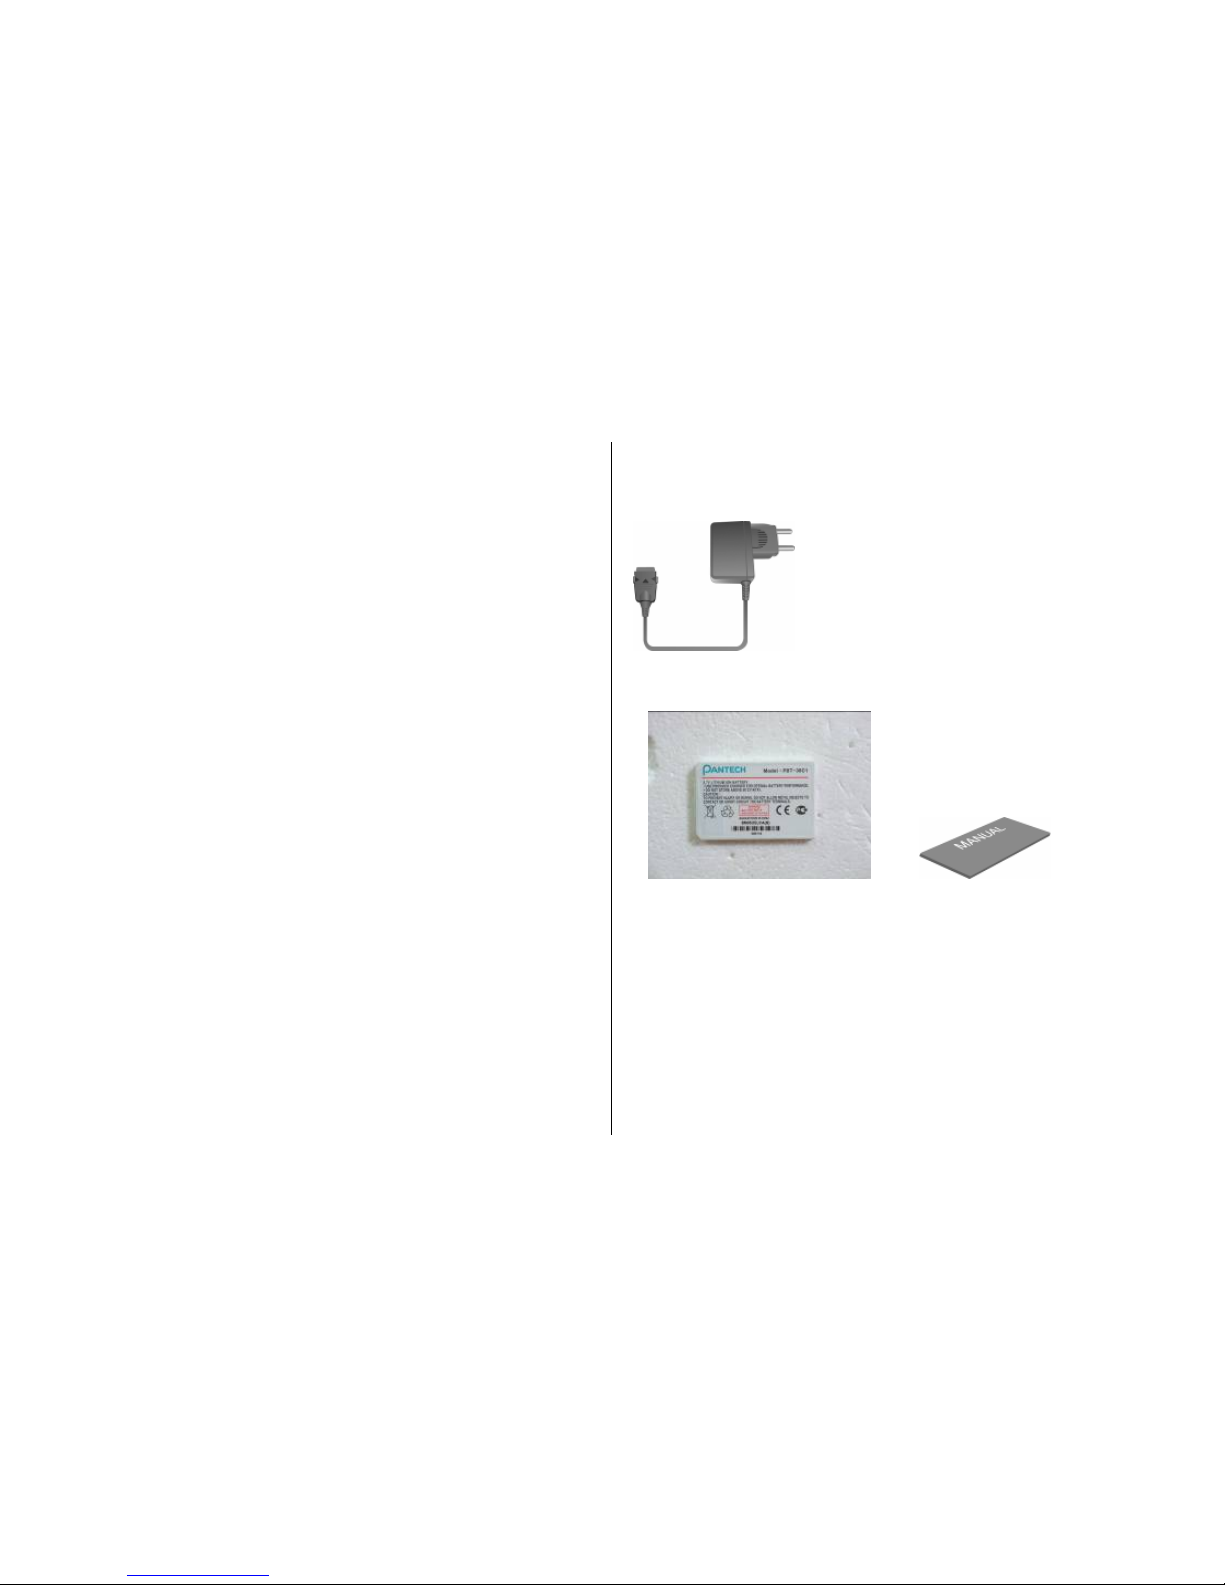
1. Package Contents
Phone Travel Charger
Battery User’s Manual
※ The contents can be vary by regions.
Page 15
15
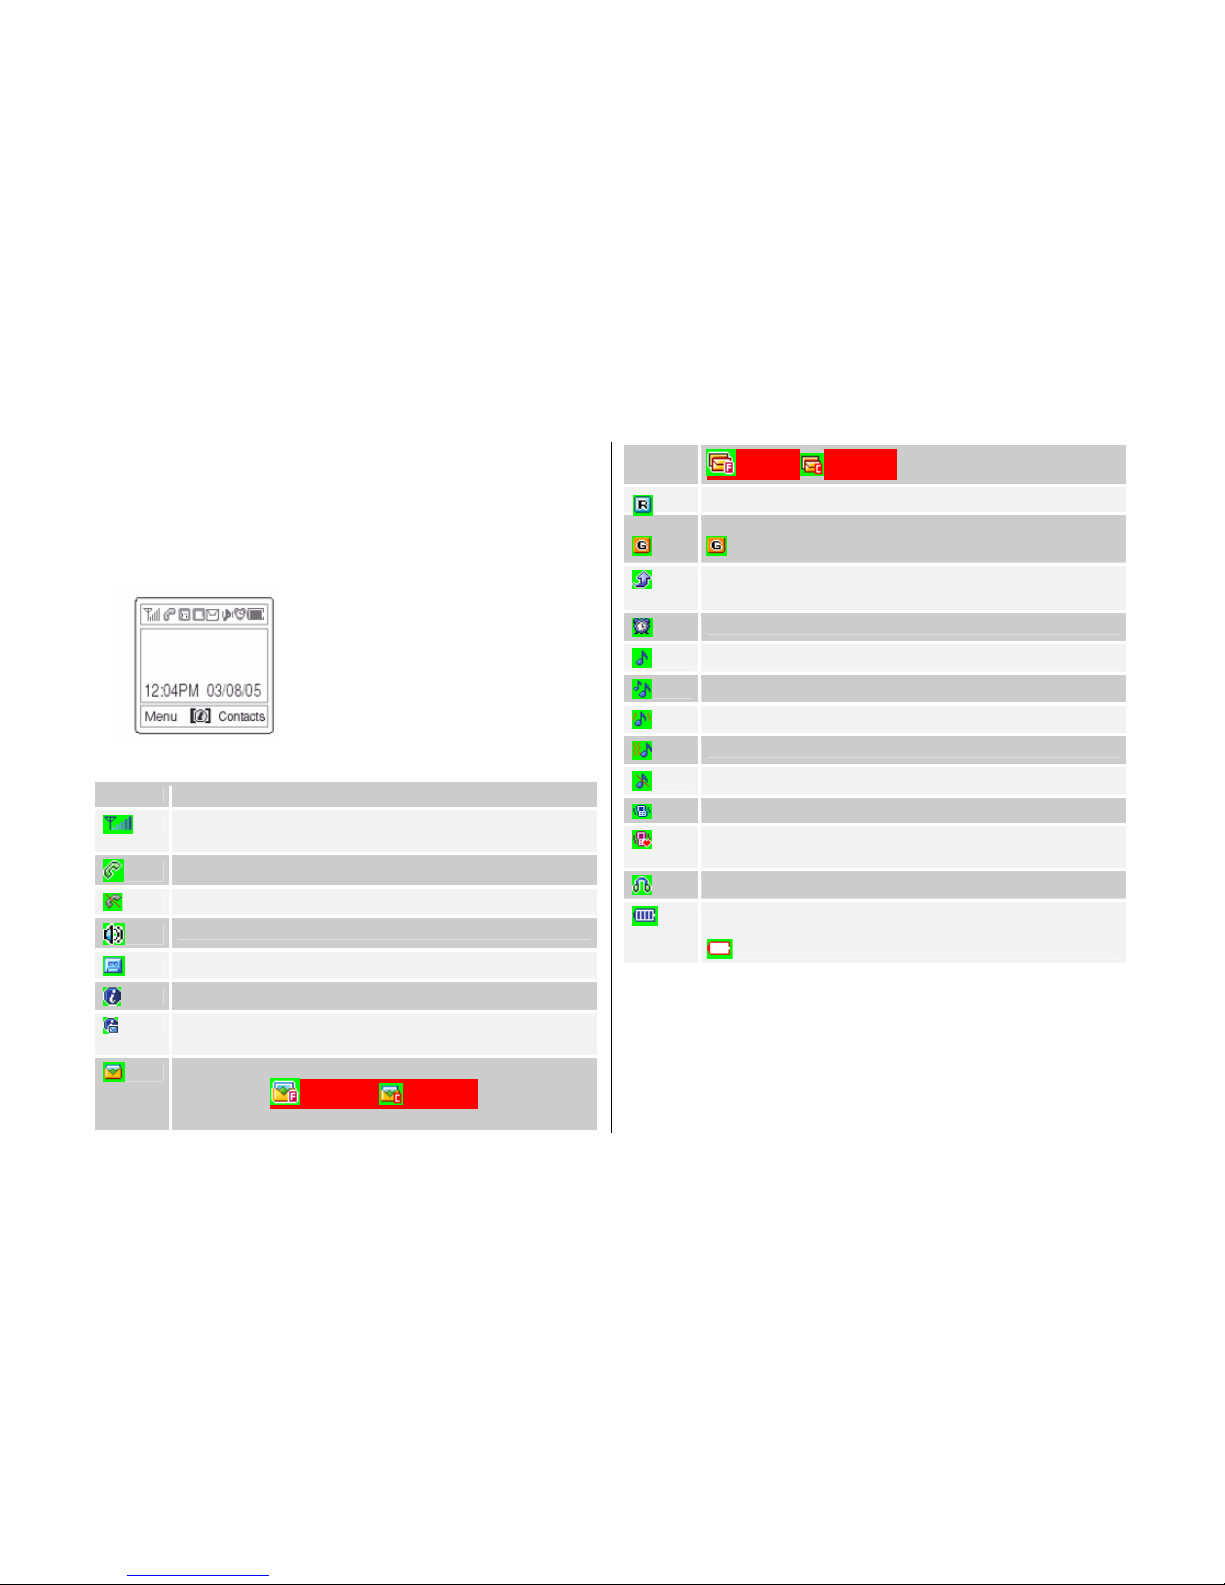
2. Displays
This phone has 1 display, and icons on the top of the display
indicate the phone status.
Icon(s) Description
Shows received signal strength.
The more the number of bars, the stronger the signal.
A call is being made.
Outside the coverage area, you cannot make or receive a call.
Speaker phone is enable during call state.
Y ou have a new voice mail.
WAP is connected
You have a new push message. Select and check a message
from the push message list to contact the WAP page concerned
You have a new message. If the inbox list is full, the icon
will look like .(Common) (In Mexico If the inbox list
and SIM memory are full, the icon will look like
.Common In Mexico
Out of the home network range.
When a GPRS session is in progress, the icon will look like
.
Call forwarding feature is activated,
Y ou have set the alarm.
Y ou have set the alert type for incoming call to ring only.
Y ou have set the alert type for incoming call to ring ascent.
Y ou have set the alert type for incoming call to ring and vibrate.
Y ou have set the alert type for incoming call to vibrate then ring.
Y ou have set the alert type for incoming call to quiet
Y ou have set the alert type for incoming call to vibrate only.
You have set the alert type for all tones to be quiet and for all
rings to vibrate only.
Headset is connected.
Battery level. The bar indicates the available battery
charge. If your battery charge is low, this icon will look like
Display Off Mode.
If you do not press any key within 10 secs while the display is dimmed,
the display goes into Off Mode to save power. Press any key to restore
the display.
Icons Area
Text and Graphic Area
In standby screen, displays textural and
graphical information showing Network
Name, Time & Date, or a Greeting put by the
user
Softkeys
Page 16

16
Selecting Functions and Options.
The phone provides several customized functions, which are arranged in
menus and sub-menus. You can access these functions using the two
Soft keys ([
Left], [ Right]) and Press OK key.
the menu related to a specific function allows you to view and change its
settings
The soft key function varies depending on the current context; the labels
or icons at the bottom line of the display indicate the current function.
To view various functions/options available or select the one that is
required:
1. Press the appropriate Soft key.
2. To select the function displayed or option highlighted, press the Soft
key [
Left or press the OK key
3. To highlight the next option on a list, Press up or down key.
4. To move back to the previous function or option on a list, press the
[
] key
5. To return to the Standby Mode, press the [
] key.
In some functions, you may be prompted for a password or PIN input.
Enter the required code and press OK key.
Page 17

17
3. SIM Card
3.1 SIM Card
When you subscribe to your network operator, you will get a SIM
(Subscriber Identity Module) card containing your registration information.
(PIN), the existence of additional service, etc.
Like a credit card, it should be kept secure
ly and handled carefully.
Do not bend, scratch or expose it to moisture.
Avoid static electricity.
To avoid memory corruption of your SIM card, always switch off your
phone before removing or inserting your SIM card.
3.2 Installing/Removing the SIM card
1. Remove the battery from the unit.
2. If the SIM slot is empty, insert the SIM card into the slot.
3. If you want to remove the SIM card, push the SIM card in the arrow
direction as shown in the picture.
Page 18

18
4. Using the battery
4.1 Installing the battery
Insert the locators of the battery into the hole located in the upper of the
unit and press the bottom of the battery.
Push the battery until the sound of a ‘click’ is heard.
4.2 Removing the battery[4.2]
Push the battery toward upside and remove the battery.
4.3 Charging the battery
z This phone uses a Li-ion battery. Make sure to use an
authorised battery and charger only. For more details, please
inquire at your nearest dealer.
z You can use the phone during battery recharging.
z When the battery is mounted within the phone, open the cover
located at the bottom of the phone and connect the adapter. An
adapter is provided with the phone.
z If recharging is completed, detach the adapter connection from
the outlet.
Tip
Y our phone is powered by a Lithium Ion (Li-ion) battery.
You can use the following Li-ion battery types for your phone. (Contact
your local dealer for more information.)
Page 19

19
4.4 Precautions while Using the Battery
- Do not use a damaged battery or charger.
- Use the battery for the specified purpose only.
- The closer you are to the base station, the longer the phone usage time
because less battery power is consumed for the connection.
- Battery charging time varies depending on the remaining battery
capacity and the battery and charger type in use.
- Battery life is shortened as time passes by.
- Use an authorised battery and charger only.
- Since overcharging may shorten battery life, remove the battery from its
charger once it is fully charged. Unplug the charger, once charging is
complete. Leaving the battery in hot or cold places, especially inside a
car in summer or winter, may reduce the capacity and life of the battery.
Always keep the battery within normal temperatures.
- Do not earth the battery. Earthing may occur when the battery is in
contact with a conductive object. An earthed phone may also damage
the battery.
- Dispose and recycle used batteries in accordance with local regulations.
- Do not dispose of the batteries in a fire.
- Do not use an unauthorised charger.
- In order to prevent injury or burns, ensure that metal objects do not
come into contact with the + and – terminals of the battery.
Page 20

20
II. New Functions
1. OTA Settings Service
2. DRM/ Forward Lock
1. OTA Settings Service
1.1 WAP/ OTA Provisioning
In order to use the WAP Browser, you need to have proper connection
settings on your phone. You may add or edit the WAP Profile
manually, or receive its settings information sent as a type of
configuration message by a operator and/or a service provider.
at the latter case, those wap setting information received unsolicitly
should be automatically stored on the phone.
Please note that there should be some on-screen steps you
need to follow to save and activate the settings.
2. DRM/ Forward Lock
Y our phone supports a Digital Rights Management (DRM) system
to protect acquired content. A piece of content, for example
ring tones, wall papers, etc. can be protected by Forward Lock,
which means the protected contents cannot be forwarded to other
devices including other phones and desktops.
Please note that you should and shall be informed by the service
provider before and/or when you try to download such protected
contents.
Page 21

21
III. Basic Functions
1 Switching the Phone On or Off
2. Making a Call
3. Answering a Call
4. Calling Options
5. Using the Headset
6 Selecting Menu Functions
7. Entering Text
1. Switching the Phone On or Off
1.1 Switching the Phone On
1. Press the [
] key until the phone switches on.
2. If the phone requests you to input a PIN, enter the PIN and
Press OK key. (For further details, see Applications Menu
6.6)
Your phone starts to search for an available network and the current date
and time will appear on the displays. Once connected to the network,
you can send or receive a call.
If a malfunction occurs while using the phone or it is not turned on,
remove the battery and install it again after 5 or 10 seconds.
Note: To change the language, use the Language menu option (For
further details, see Applications Menu 6.4.1)
1.2 Switching the Phone Off
To switch the phone off, press the [
] key until the power-off
animation displays.
Page 22

22
2. Making a Call
2.1 Making a Call
Enter the area code and the phone number to make a call in standby
mode, and press the [
] key.
Note: If you have set the [Auto Redial] option (For further details, see
Application Menu 6.3.3) to [On], the phone will attempt to make a
call automatically for up to 10 times if it is not answered.
To clear the last digit displayed, press the [
] key.
To clear the all digits displayed, press and hold the [
] or [ ]
key.
2.2 Ending a Call
When you want to finish your call, press the [
] key.
Once the call is completed, a call summary (Recipient Name or Number,
Service Time) will be displayed.
2.3 Using Call Logs
The phone stores up to 30 dialled, received or missed calls
chronologically. The last call is saved in the first position. If the same
number was dialled more than once, only the latest occurrence will be
saved.
① Press the
key to see the call log list aligned dialled,
chronologically.
② Press Up/Down keyto select a number.
③ Press the [
] key for dialling.
(For further details, see Applications Menu 3)
* Tip: Press and hold the [
] key to redial the last number in the call
log.
2.4 Using Entry
You can store frequently used names and phone numbers in the SIM
card or the phone memory, which are called Entry
. You therefore do not have to remember all your phone numbers; simply
select the name to recall the associated number.
① Press the [
Right] key ‘Contacts’ List
② Select a number from ‘Contacts’.
Page 23

23
③ Press the [
] key for dialling. (For further details, see
Applications Menu 2)
2.5 Making an International Call
① Press and hold the [0] key until the ‘+’ character appears on the
display for the international prefix or enter the outgoing national
code following after 00. (If network supported)
② Enter the country code, area code and phone number you want to
make a call to.
③ Press the [
] key.
2.6 Speed-dialling from Entry
Press and hold the ‘Speed Dial’ number to make a call using the number
you have saved. For example, press the “5” key longer to dial a number
which has been saved as “5” in Speed Dial List.
For speed dial numbers longer than 2 digits, press the first one and then
press and hold the second one.
(For further details, see Applications Menu 2.4)
2.7 Making an Emergency Call
You can make an emergency call without the SIM.
Enter 'Emergency Number'. Then press the [
] key,
or, press the [SOS] Soft key if no SIM Card is available.
Also, it is available to make an emergency call by [9] key
pressed and held.
Page 24

24
3. Answering a Call
3.1 Answering a Call
When you receive a call, the phone rings (or vibrates) and the screen will
display the name or the number of the caller (if the network supports the
function and you have subscribed to it).
If the caller can be identified, the caller’s phone number or name will be
displayed if it is stored in your entry
① press the [
] key.
Tip: If the answer type is set as [Any Key], you can answer a call by
pressing any key except the [
] key. Regardless of the answer
type,
3.2 Viewing Missed Calls
If the incoming call could not be answered, a missed call message will
appear on the screen to remind you of the call you have missed
To reply to the missed call;
① Press the [View] Soft key to display a list of missed calls.
② If necessary, scroll to the number you want by pressing up/down
key
③ Press the [
] key to call the missed call.
Press the [
] or [ ] key to close the missed call notification
message
3.3 Rejecting a Call
Press the [
] key or the [Reject] Soft key. If the [Reject] Soft key is
pressed, the caller will receive a busy line tone.
3.4 Adjusting the Calling Volume
If you wish to adjust the earpiece volume during a call, use the volume
keys on the left side of the phone.
Press the [Side Up] key to increase the volume level and the [Side
Down] key to decrease it.
The current volume level will be displayed on the screen.
In standby mode, you can adjust the key tone volume using the [Side
Up/Down] keys.
3.5 Speaker Phone
If you want to change to speaker phone mode, press the [Camera] key
while you have a call in progress. If you press the [Camera] key one more
time, you can deactivate the speaker phone function.
Page 25

25
NOTE:
1. Please use headset and speaker phone Carkit for your safe when driving.
2. Don’t move the phone close to your ear when the speaker phone mode.
It can cause damage to your ear.
4. Calling Options
During a call, press the Soft key [ Left] to show the call options.
4.1 Switching the Microphone Off (Mute)
You can temporarily switch your phone’s microphone off so that the
person you talk to on the phone cannot hear you.
For example, you may wish to say something to another person in the
room but do not want the person calling to hear you.
Select ‘Mute’ followed by Options to activ ate the Mute function.
To get the microphone back on, select ‘Unmute’ followed by
Options.
4.2 Holding a Call
You can place a current call on hold whenever you want. You can make
another call while you have a call in progress if your network service
provider supports this service. Of these two calls, one is active and the
other is on hold and you can switch between the calls.
To place a call on hold simply select ‘Hold’ followed by Options, or
press the [
] key.
You can reactivate the call whenever you want by selecting ‘Resume’
followed by Options
Once a call is held, the name and icon of the caller will fade to grey.
To make a call while you have a call in progress:
① Enter the phone number that you want to dial or look it up in Ph.
Book entry.
② Press the key to dial the second call.
The first call is automatically put on hold.
To switch between two calls, select [Swap] from the Options menu.
The current call is placed on hold and the call on hold is reactivated so
that you can continue your conversation with the other person.
If you want to finish, complete each call normally by pressing the
[
] key.
4.3 Answering a Second Call
You can answer an incoming call while you have a call in progress, if
your network service provider supports this service and you have
activated the [Call waiting] option (For further details, see Applications
Menu 6.3.4). You will be notified of an incoming call by a call waiting
tone.
Page 26

26
To answer a call while you have another call in progress:
① Press the [
] key to answer the incoming call.
② The first call is automatically put on hold.
③ To switch between two calls, select [Swap] from the Options menu.
To end the current call, press the [
] key.
The call on hold is automatically reconnected to you.
4.4 Making a Call
You can make another call while having a call in progress. To make
new call, select ‘New Call’ followed by Options, or press numeric
keys that you want to dial and then [
] key.
4.5 Searching for a Number in Contacts
You can search for a number in your Contacts during a call.
① Press the [Options] Soft key.
② If necessary, Press Up/Down keyto highlight the [Contacts] option.
③ Press OK key
④ The Entries are displayed.
⑤ Enter the first letters of the name for Name Search.
⑥ The Contact entries are displayed starting with the first entry
matching your input.
Note: You can also scroll through Entry from the beginning, by pressing
up/down key.
⑦ To view the highlighted entry, press OK key.
(For further details, see Applications Menu 2)
4.6 Using DTMF Tones
You can turn the DTMF key tones off or on during a call.
When the [DTMF Off] option is selected, your phone does not transmit
the key tones. It allows you to press keys without hearing annoying key
tones during a call.
To communicate with answering machines or computerised telephone
systems, the [DTMF On] option must be selected.
4.7 Transferring a Call
You can transfer the current call to the call on hold if your network
service provider supports this service, so that callers can talk to each
other. You will be disconnected from both of them.
① During a call, answer or make a call in the normal way, and press
the [Options] Soft key.
② Press Up/Down keyto select the [Transfer] option and Press OK
key.
The two people will be connected to each other.
4.8 Using the Message Service
You can read or write a new message during a call.
Page 27

27
① Press the [Options] Soft key.
② Press Up/Down key to highlight the [Messages] option. Press OK
key.
③ To read a received message, select the ‘Inbox’ submenu, and then
scroll to the message that you want to read.
④ To write a new message, select the ‘Write New’ submenu.
⑤ Press OK key.
(For further details, see Applications Menu 1.1)
4.9 Making a Multi-party Call
A multi-party call feature is a network service that allows up to six people
to take part in a multi-party or conference call simultaneously.
For more information, contact your service provider.
To make a multi-party call;
① Call the first participant in the normal way.
② Call the second participant in the normal way.
The first call is automatically put on hold.
③ To join the first participant to a multi-party call, press the [Options]
Soft key and select the [Join All] option.
④ Press OK key.
⑤ To add a new person to the multi-party call, call the person in the
normal way.
⑥ Then, press the [Options] Soft key and select the [Join All] option.
⑦ Press OK key. [
OK] key.
You can add incoming callers by answering the call and selecting the
[Join All] option. Repeat the above steps as needed.
Upon organising a multi-party call, you may view the people and their
status in Multiparty with pressing left or right key.
An icon indicates either Far Multiparty or Far Hold.
Having a Second Call During a Multi-party Call
To answer or make a call when you have the multiparty call:
① To place the multi-party call on hold, press the [Options] Soft key
and select the [Hold All Calls] option.
② Answer or make a call in the normal way.
③ You can reactivate the multi-party call on hold by pressing the
[Swap] Soft key.
④ To end the multi-party call, press the [
] key..
Having a Private Conversation with One Participant
① Press the [Options] Soft key and select the [Private] option.
Press OK key.
② Press Up/Down keyto highlight a participant and Press OK key.
③ Now you can talk privately with that person.
The other participants can continue the conversation with each other
④ To return to the multi-party call, press the [Options] Soft key and
select the [Join All] option.
Page 28

28
⑤ Press OK key.
All of the multi-party call participants can now hear each other.
Removing One Participant
① Press the [Options] Soft key and select the [Exclude] option.
② Press Up/Down keyto highlight a participant and Press OK key.
The call ends with that participant, but you can continue to talk with other
participants.
③ Complete the multi-party call by pressing the [
] key.
4.10 Ending a Call
To end the active call, press the pressing the [
] key. To
terminate all calls at a time while you are in multi-party call, select
‘End All Calls’ followed by Options.
5. Using the Headset
You can send or receive a call without touching the phone, using the
headset.
When you connect the headset to the jack located at the right side of the
phone, the button on the headset works as described below;
z To show the recent calls, press the button in standby mode
z To redial the last call, press the button twice in standby mode
z To answer a call, press the button when you receive a call
z To complete a call, press and hold the button when you have
finished a call
Page 29

29
6. Selecting Menu Functions
6.1 Entering into Menu Functions
Key Function
Soft key
[
Left]
Goes to the main menu in standby mode.
Soft key
[
Right]
Goes to the Searching View Names
[press left/right ]
key
Moves within the main menu.
[press up/down]
key
Searches for the sub-menu.
[press OK key] key
Goes to the sub-menu.
Goes to the WAP menu in standby mode
Side up/down key moves the cursor upwards or downwards in the
menu
Use the 4-way navigation key in the main menu to move the menu.
See the bottom of the Sub Menu List to check the current setting values
in the sub-menu.
Then, press the navigation [push left/right] key and then press the
[OK] key to change the preset menu value.
If you do not press the [press OK keyOK] key, the new value will be
cleared without saving..
Note: Press the [
] key to return to the previous menu.
Input the menu number to access the sub-menu quickly.
6.2 Using the Shortcut Key in Standby Mode
Key Menu selected if
pressed
If pressed and held
Soft Key
[
Left]
Menu Menu
Soft Key
[
Right
]
Contacts
[press Right ]
key
Messages
[press Left ]
key
FM radio
[pressUp] key
Ring Tone
[press Down
key] key
Contacts
[press OK
keypress OK
key] key
WAP Directly connect to WAP
browser
[ ] key
Calendar Monthly View
[ ] key
Recent Calls Redial last call
[ ] key
PWR On/Off
Page 30

30
[1] Key Connects to the voice mail
server
[9] Key Emergency Call
[*] Key Enters or exits form Ettiquette
Mode
[#] Key Locks the keypad
Camera Key Photo capture mode Video recording mode
7. Entering Text
7.1 Input Mode
On many occasions you need to input text while you are using your
phone, (e.g., storing a name in the Ph. Book, writing a new message,
creating your greeting or scheduling events on your Scheduler).
The available text input modes include.
T9 mode
You can input a letter using only one keystroke. The keypad has more
than one letter on it – when you press the 5 key once, J, K or L may be
displayed.
The T9 mode automatically compares your keystrokes with an internal
linguistic dictionary to determine the correct word, thus requiring far
fewer keystrokes than the conventional Multi-tap mode.
ABC mode
In this mode, you can input the letter you want by pressing the keypad
once, twice, three or more times until the target letter appears.
123 mode
You can input numbers in this mode.
Symbol mode
You can input the special characters, such as a period mark or currency
units in this mode.
Page 31

31
7.2 Changing Text Input Mode
When you are in the area where you can input the text, the text input
mode indicator will be displayed at the bottom of the display.
Example: Entering a memo.
To switch to other text input modes:
① Press the Soft key [
Right] indicating the current text input
mode.
② Toggle to the mode you want to use by pressing the Soft key
[
Right].
The ‘Lang.’ option allows you to change the text input language.
Inserting a Space
To insert a space between words, press the [0] key. If in 123 mode or
Symbol mode, press and hold the [0] key to input space.
Scrolling
To move the cursor to the left or right within the text, press left or right
key. And also, to move the cursor to the up or down among the lines,
press up or down key
Note: By pressing the [Side Up/Down] key, the cursor can be moved
very quickly to the beginning or the end of the text.
Clearing Letters and Words
To clear the letter to the left of the cursor, press the [
] key.
You can clear all of the letters on the editor box, press and hold the
[
] key.
Returning to the Previous Screen
When the text input field is empty, press the [
] key to return to the
previous screen..
TIP: To change the text input mode quickly
Press and hold [*] Shows symbol mode..
Returns to the previous screen in Symbol mode
Press [0] Enters a space Character
Press [C] Deletes characters one by one.
Returns to previous screen after deleting all
characters.
Press and hold [C] Deletes a ll characters and moves the cursor to
the beginning of the input screen.
The number of remaining characters you can
enter.
Editing area
The current text input mode and language.
Page 32

32
7.3 Using T9 Mode
In the T9 alphabet Editor, each word is composed completely as you
input the text.
① Press the keys numbered [2] to [9] to input text. For example, press
[4][3][5][5][6] in sequence to input ‘hello’.
The word you are typing appears on the display. It may change with
each key you press.
② Enter the whole word before editing or deleting any keystrokes.
③ Upon searching a word, input the next text.
④ If the search fails, press the [
] key to search which text can be
typed in. The phone displays the most commonly used choices first.
⑤ Continue entering the next word.
7.4 Using ABC Mode
When typing in ABC(Multi-tap) mode, press the key labelled with the
target letter:
- Press the key once for the first letter.
- Press twice for the second letter.
Example: To display the letter “C”, quickly press the [2] k ey three times.
To display the letter “K”, press the [5] key twice. This method is called
Multi-tap typing.
Note: The cursor moves to the right when you press a different key.
When entering the same letter twice or a different letter on the same key,
just press the Right key or wait a few seconds for the cursor to move to
the right automatically, and then enter the next letter.
Refer to the table for more information about the characters available.
The characters vary, depending on the text input language.
Changing Case
To change the case of the next letter(s) that you type, press the [#] key.
There are three cases:
- Lower case (no indicator)
- Initial capital (
)
- Capital lock (
)
[English]
KEY Characters in displayed order
Page 33

33
1 . , - ? ! ' @: 1
2 a b c 2
3 d e f 3
4 g h i 4
5 j k l 5
6 m n o 6
7 p q r s 7
8 t u v 8
9 w x y z 9
0 Space 0
[Spanish]
KEY Characters in displayed order
1 . , - ¿ ? ¡ ! @ 1
2 a b c á 2
3 d e f é 3
4 g h i í 4
5 j k l 5
6 m n o ó ñ 6
7 p q r s 7
8 t u v ú ü 8
9 w x y z 9
0 Space 0
[Portuguese]
KEY Characters in displayed order
1 . , - ? ! ' @ : 1
2 a b c ç ã á à â 2
3 d e f é ê 3
4 g h i í 4
5 j k l 5
6 m n o õ ó ô ñ 6
7 p q r s 7
8 t u v ú ü 8
9 w x y z 9
0 Space 0
7.5 Using 123 Mode
The number mode allows you to enter numbers into the text. Press the
key corresponding to the digit you want to enter.
7.6 Using Symbol Mode
The symbol mode allows you to enter symbols into your text.
To display more symbols, press up or down key.
Page 34

34
To input a symbol, press the number for a symbol, and the text will
appear in the input screen.
Press the Soft key [
Right] to proceed to a mode next to the
Symbol mode.
Page 35

35
Ⅲ. Applications
1. Messages
2. Contacts
3. Call Logs
4. Media Gallery
5. Multimedia
6. Settings
7. Organizer
Page 36

36
1.
Messages
Select ‘Menu>1.Messages’.
This menu allows you to create, send, read and save a message
using Short Message Service (SMS: Text message), Cell Broadcast
Service, Multimedia Message Service (MMS: Message supporting
presentation of various media types, such as full colour images and
polyphonic ring tones).
Voice mails are also available.
Note: These features are available only if your service provider’s network
supports it. Contact your service provider for more information.
(The detail of editing and writing message text, see Basic Functions
Menu 7)
Multimedia Messages
Multimedia Message Service (MMS) is a messaging service quite
similar to Short Message Service (SMS). It provides asynchronous
delivery of personal multimedia messages.
Adding to the familiar text content of the text message, the multimedia
message can contain an image, graphic, sound.
The MMS message is a separate multimedia presentation in a single
entry, not an attachment to the text file.
Using the MMS feature, your phone can receive and/or send a
multimedia message, depending on MMS availability from your service
provider. Only the phone that supports the multimedia message feature
can receive or display the multimedia message.
When viewing a MMS message, if it has an unsupported format,
then the unsupported format's icon is displayed such as "Not
support image icon(
)" or "Not Support Sound icon( )".
Short Message Service
Short message service (SMS) allows you to send and receive a
short text message to and from other GSM phones.
To send a text message by phone, you must obtain the number of the
SMS message center from your service provider.
Cell Broadcast Service and Voice mail
Broadcast message service allows you to receive a broadcasting
information as Newsflashes, Weather, …from GSM network. Voice mail
message also can be received.
Receiving a new message
When you receive a new message, the New Message icon (
)
and a notification showing the caller number or phonebook name will
appear on the display. You will also hear an alert, depending on the
message sound setting. (For further details, see Applications Menu 6.2)
To read the new message(s) immediately, press the [Read] Soft key or
Press OK key.
Page 37

37
Note: To clear the new message notification on the display, press the
[Cancel] Soft key, [End] or [CLR] key.
Managing memory
The Inbox, Outbox, Drafts, Sent and Templates share a given
amount of memory on phone. In case of the Inbox, Text messages
(SMS) can be saved on a phone or SIM, depending on the text message
settings. Even though “Save to” in the text message settings set to “SIM”,
received messages will be saved in the phone memory if SIM capacity is
full. Also, Even though “Save to” in the text message settings set to
“Phone”, received messages will be saved in the SIM if phone memory
capacity is full.
In case of the Inbox, received messages can be saved 50 messages to
phone memory. The other mailboxes can be saved up to 30 entries. The
Inbox, Sent and Drafts are able to use the SIM memory but Outbox and
Templates can’t. When over 50 messages are saved at phone memory
in the Inbox, message full icon (
) will be appeared and then Only SIM
memory is available. If SIM capacity is also full, Message full icon (
)
appears. When the Message full icon is displayed, you cannot receive
any new message. You must delete one or more old messages to free
memory for new messages, using the [Delete] option within the each
mailbox or the [Delete All] option which deletes the All list.
- Write New: Writes a new Multimedia message (MMS) or Text
message (SMS)
- Inbox: Displays the received messages in the SIM and Phone memory.
You can save 50 messages to the phone memory and more messages
are received if SIM capacity is available. So you can see over 50
messages in the Inbox.‘10’ in [10/20] represents the number of unread
messages, whereas ‘20’ represents the number of saved messages in
the Inbox.
- Outbox: Displays the list of messages stored when sending message.
30 messages can be saved to phone memory.
[10] represents the total number of messages saved in the Outbox.
- Drafts : Displays the list of messages stored during writing message.
You can save 30 messages to phone memory. But if some messages
are saved in the SIM, the messages appear in the list. So you can see
over 30 messages in Drafts.
[10] represents the total number messages saved in the Drafts.
- Sent : Stores messages in the phone memory after sending message,
depending on Save message in the common setting.
But if some messages are saved in the SIM, the messages are
appeared in the list. So Sent is able to display over 30 messages.
[10] represents the total number messages in the Sent.
- Templates: Displays the default and your saved templates.
You can save 30 messages to phone memory (include default
template).
- Settings: Sets up the messages environment.
- Memory Info: Displays the free space of the SIM or phone memory.
1.1 Write New
1.1.1 Text Msgs.
Page 38

38
Select ‘Menu>1.Messages>1.Write New>1. Text Msgs.’ and Press OK
key
.
(1) Creating a text message.
At the top of the display, you can see the number of remaining
characters and you can write into the current page of the message
as the icon (
).
(2) While entering your message, press the [Options] Soft key
[
Left] to use the following options.
When you press up or down keyto select an item and press OK key
using the following option;
Add template : Obtains the template message from the
Templates
Save : Saves messages in the phone memory
Language:The selected language will be displayed at the
bottom of the right corner.
(3) When you have finished creating the message, Press OK key
to send the message out.
If the phone number entry is empty, input the recipient’s phone
numbers. You can also search for a number in Ph. Book or Recent
Call List by pressing the [Options].
All Contacts : search for a number in phonebook
Recent Call List : search for a number in recent call list
When you finish entering the recipient, Press OK key or press the
[SEND] key.
1.1.2 Multimedia Msgs.
Select ‘Menu>1.Messages>1.Write New>2. Multimedia Msgs.’ and Press
OK key.
(1) [Editor Options] page will be displayed, and you can write a message
composed of some kinds of item format (image, sound, photo, and
template) as well as just only text using this menu. Select one of the
following options using the Up/Down key.
①
Add Text : Adds a new text.
② Edit Subject : Edits the subject.
③ Add Image : Adds an image to the Image Box. Press OK key to
select the image when the image list appears. (For further details,
see Application Menu 4.3)
④ Add Sound : Adds a sound to the Sound Box. Press OK key to
select the sound when the sound list appears. (For further details,
see Application Menu 4.4)
⑤ Add Photo : Adds a photo to Photo Album. Press OK key to select
the phone when the photo list in each folder appears. (For further
details, see Applications Menu 4.1)
⑥ Add Template : Adds a
multimedia message template. This
feature is available only when no item is in the slide. With more than
Page 39

39
one slide, Add Template will not be available.
(2) After writing message, Press OK key. Press the [Options] Soft key
[
Left] to use the following options.
① Delete Text/Image/Sound/Slide : Deletes the selected text,
image, sound or slide from the slide page.
② Delete Object : Deletes the selected object from the slide page.
③ Add Objects : Add image, photo, sound, and slide objects
④ Preview : Shows the message as it appears on the recipient’s
phone.
⑤ Save as Draft : Saves messages in the phone memory
⑥ Slide Timing : Set the time duration that the received message is
displayed. The display automatically scrolls to the next slide page
after the specified time.
⑦ Edit Subject : Edits or modifies the subject.
⑧ Edit Text : Edits the selected tex t.
⑨ Page Layout : Arranges the image and text display position in the
slide page.
You can set ‘Image at Top’ or ‘Text at Top’.
(3) Sending and saving a message
When you finish creating the message, press OK key.
If the phone number entry is empty, input the recipient’s number or
e-mail address. You can also search for a number in phonebook
or
Recent Call List by pressing the [Options].
All Contacts : search for a number or e-mail address in
phonebook
Recent Call List : search for a number in recent call list
When you finish entering the recipient, press OK key or [SEND] key.
Note: If the size of the
Multimedia message exceeds the transmission
limit,
a warning information message will be appeared. It will be
automatically saved in the Sent if transmission is success.
1.2 Inbox
Select ‘Menu>1.Messages>2. Inbox’ and press OK key.
Select Inbox and press OK key to display the received messages one by
one. Press the [Reply] Soft key at the bottom right corner to write a new
message.
You can receive a
multimedia message notification through the
network and read only the downloaded multimedia message.
If ‘Auto Download’ in multimedia
message settings is set to ‘On’,
notification will not be displayed but the message will be downloaded and
saved in the Inbox as unread.
You can also receive a text message, voice mail and cell
broadcast message.
In the case of text message, if available in the Ph. Book, the sender’s
phone number is displayed with the list of messages. In the case of
multimedia message, the list of messages displays with message subject.
According to message type, the list of messages displays following icons.
Page 40

40
unread Text message in SIM
read Text message in SIM
unread Text message in phone
read Text message in phone
notification multimedia message
unread multimedia message
read multimedia message
Select [Options] Soft key [
Left] on the bottom of the message list
to select one of the following options.
Call Sender : Sends the call to the Message Sender
Forward: Sends the received message to another recipient.
Delete: Deletes the selected message.
Delete All: Deletes all messages in Inbox.
Reply: Answer the message to sender
Move to Phone (SIM): Saves the message in the phone memory (in
the SIM) if message saved in the phone (in the SIM).
Only text
message is available.
Select [Options] Soft key [
Left] on the bottom of the message
view to select one of the following options.
Cut Number : Extract a number from the message text . You can
save it as a Ph.Book Entry.
Cut Urls: Extract a Url address from the message text. You can
save it in WAP bookmark. (Shown only on the text message)
Cut Objects: Extract an object from the multimedia message. You
can save it in one of categories of Fun & Tools. (Shown only on the
multimedia message)
1.3 Outbox
Select ‘Menu>1.Messages>3.Outbox’. and press OK key.
The message that failed to send is stored in the Outbox.
Press the [Send] Soft key at the bottom right corner to send the failed
message again.
Press the [Options] Soft key [
Left] at the left of Total Message List
to select the following menu.
Delete: Deletes the message.
Delete All: Deletes all messages in the Outbox.
Edit: Edits and sends a failed message using the recipient’s number.
Send : Send the message out with OK key
1.4 Drafts
Select ‘Menu>1 Messages>4.Drafts’ an d press OK key.
The message to be saved before sending will be saved in the Drafts.
Press the [Options] Soft key [
Left] at the left of Total Message
List to select the following menu.
Delete: Deletes the message.
Page 41

41
Delete All: Deletes all messages in the Drafts.
Edit: edit Draft message.
1.5 Sent
Select ‘Menu>1. Messages>5.Sent”
The message that you sent is stored in the Sent.
Press the [Edit] Soft key at the bottom right corner to Edit and send
a sent message using the recipient’s number.
Select [Options] Soft key on the bottom of the message list to select
one of the following options.
Forward: Sends the sent message to another recipient.
Delete: Deletes the selected message.
Delete All: Deletes all messages in Sent.
Edit: Edits and sends a sent message using the recipient’s number.
1.6 Templates
Select ‘Menu>1.Messages>6 Templates’.
Select a text template menu and press the [Options] Soft key
[
Left] at the left for associated options.
Create New: Makes a new template. Not available if the template
space is full.
Delete: Deletes a template you have defined. Default template is not
appeared.
Delete all : Deletes all messages in Templates box. Default template
is not appeared.
Edit: Edits the Templates.
Send: Edits and Sends the Templates.
1.7 Settings
Select ‘Menu>1.Messages>7.Settings’.
1.7.1 Common
Select ‘Menu->1. Message>7. Settings>1.Common’ and press OK key.
You can set up common settings about Message using this menu with
the following options.
Save messages : If set as on, the messages sent will be
stored in the [Sent].
Message lifetime: Allows you to set the duration of time your
message is stored at the message center while attempting to
deliver it. You can select one of 1Hour, 2 Hours, 6Hours, 1
Day, 2Days, 1 W ee k, 4 Weeks, 6 Months, or Maximum.
Delivery Reports : When this option is set to [On], the
network informs you whether or not your message has been
delivered successfully.
1.7.2 Text Msgs.
Select ‘Menu>1. Message>7.Settings>2.Text Msgs.’ and press OK key.
You can set up default
text message information using this menu with
Page 42

42
the following options.
Message Center: Allows you to store or change the number
of your message center required when sending a message.
You must obtain this number from your service provider.
Message Format: Allows you to set the message type to
Normal, Fax, Voicemail, ERMES, National Paging, X.400, or
Internet. The network will convert the messages into the
selected format
Save to: Allows you to set the text message storage to SIM
or phone.
1.7.3 Multimedia Msgs.
Select ‘Menu->1. Message>7 Settings>3.Multimedia Msgs.’ and press
OK key.
You can set up default multimedia message information using this menu
with the following options.
Profiles : You can set up multimedia messages profile
settings (For further details, see Advanced functions 1.8).
Auto Download : Allows you to set how you receive a
message when messages is stored in your home network
system. You can select either On or Off
Read Reports : When this option is set to [On], the recipient’s
phone sends a reply to let you know when your message was
read by her/him.
1.7.4 Broadcast
Select ‘Menu>1. Message>7.Settings>4.Broadcast’ and press OK key.
You can set up default CB information using this menu with the following
options.
-Languages : You can specify the language of a
message. You may also add new languages or delete
existing ones.
-Topic List : You may choose up to 2 topics from the
current list. For more information, contact your network
service provider.
-Receive : You can decide whether the Cell Broadcast
service is active or not. When this option is set to [Enable],
cell broadcast service is activated.
1.7.5 Voice Mail
Select ‘Menu>1. Message>7.Settings>5.Voice Mail’ and press OK key.
You can set up default Voice Mail number
1.8 Memory Info
Select ‘Menu>1.Messages>8.Memory Info’.
Select Memory Info and press OK key to display the free Text message
and Multimedia message memory space.
Page 43

43
2. Contacts
You can store your personal Entries, which can be added or deleted at
any time. You can save up to 800 Entries on the phone memory. Entries
that can be stored on SIM differ with SIM’s storage capacity, and
maximum 254 Entries can be saved on SIM
.
(The detail method of editing Contact, see Basic Functions Menu 7)
2.1 Searching a Name
Select ‘Menu>2.Contacts>1. Search>1. Name Search’.
Searches for the phone number from Contacts using the following
procedure.
1. Input a name. The entry list is shown and the cursor is placed on
an item that matches your input data.
2. Press [L eft/Right] key to view the recorded numbers
3. Press OK key, the [OK] soft key to view all.
Press the [Options] Soft key [
Left] to;
Add Contact : Creates a new entry.
Edit: Edits and saves the entry.
Delete: Deletes the selected item.
Copy : Copy Memory to SIM or Phone.
Send Message: Sends a message to a selected recipient.
Add to Speed Dial: Adds the selected number to Speed dial.
Language: Change the language
Group Search : Searches for the phone number of each group
2.2 Adding a New Entry
Select ‘Menu>2. Contacts >2.Add Contact’.
Adds the Entry information of other people. Initially, an empty field with a
grey colour will appear until you input a text.
Depending on the ‘Memory in Use’ setup, the following fields will be
displayed.
- Phone or SIM: Select the saving location – SIM card or Phone.
- SIM Card: Name, Mobile, Group, Picture, Melody
- Phone: Name, Mobile, Home, Office, Group, Picture, Melody,
Email1, Email2, and Memo.
2.3 Speed Dial Setting
Press a speed dial number in standby mode for Speed Dialling.
The Speed Dial number ranges from 2 to 99, totalling 98 Speed Dial
numbers. ([9] key is reserved for the emergency call)
Note: press and hold the [0] or the [1] key is for the prefix for international
call or the Voice Mail respectively.
2.3.1 To Set the S peed Dial
Select ‘Menu>2.Contacts>3.Speed Dial’.
1. Press [Up/Down] keyPush [Up/Down] keyto move to an Empty Entry
and press the [Add] key.
2. Press [Up/Down] keyPush [Up/Down] keyto choose a person and
Page 44

44
press [Left/Right] keyto select his number.
3. Press OK key, the [OK] soft key to save an item in the Speed Dial list.
4. If you want to remove or edit particular item in the speed dial list, move
cursor to the item and press the Soft key [
] to;
Remove: Remove an item.
Edit : Update another item
2.3.2 To Set the Speed Dial in Search
Select ‘Menu>2. Contacts >1. Search>1. Name Search’.
1. Press [Up/Down] keyPush [Up/Down] keyto choose a person and
Press [Left/Right] keyto select his number.
2. To add Speed Dial, u se [Add to Speed Dial] option
3. Press [Up/Down] keyPush [Up/Down] keyto move to an Empty Entry
4. Press OK key, the [OK] soft key to save an item in the Speed Dial list.
2.4 Group Setting
Select ‘Menu>2. Contacts >4.Groups’.
Changes the settings for the five predefined caller groups.
Default Groups: No Group, Family, Friends, Business, and VIP
Press the [Options] Soft key [
Left] to;
Group Ring Tones : Set a Group, Melody, Picture.
Rename : Renames a group name.
Delete : : Deletes the selected Groups.
New : Set a new groups.
You can also add your preferred new groups by pressing the [New] key,
on top of the predefined 5 groups.
2.5 Memory in use
Select ‘Menu>2. Contacts >5. Memory in Use’.
Allows you to set the storage to Phone or SIM., SIM Card, Phone,
2.6 Copy All
Select ‘Menu>2. Contacts >6. Copy All’.
Copy all information saved on the Phone/SIM card to SIM or Phone
2.7 Delete All
Select ‘Menu>2. Contacts >7. Delete All’.
Press OK key, the [OK] soft key and input the phone password
Deletes all information saved on the Phone/SIM Card.
2.8 Memory Info
Select ‘Menu>2. Contacts >8.Memory Info’.
Select Memory Info and
Press OK key, the [OK] soft key to display the use and free memory
space in Phone and SIM memory
2.9 Service Number
Page 45

45
Select ‘Menu > 2. Contacts > 9.Service Number’.
This feature may not be available depending on your SIM card.
The list of the numbers in the SDN (Service Dial Number) will be
displayed.
If necessary, scroll to a number by pressing the [Up] or [Down key]
and press the [
] key to dial the number.
Page 46

46
3. Call Logs
Press the [
] key to see the recent calls in standby mode or select
‘Menu>3.Call Logs’.
This function displays missed calls, received calls, and dialled calls. You
can delete a call log and see the information for the call timer, call cost,
and GPRS info in this menu.
Note: If Contacts contains the phone number that you want to dial,
the name will be displayed, or phone number, date, and time will be
displayed alternatively on the Screen.
Press SEND when the cursor is placed on the number or name to dial
the number.
3.1 Missed Calls
Select ‘Menu>3.Call Logs>1.Missed Calls’.
Displays the missed calls list accompanied by the time and date of a
missed call as well as the number or name of the caller.
Press [Up/Down] keyPush [Up/Down] keyfor selection.
Press the [Options] Soft key [
Left] to;
Call : Calls with the selected Number.
Edit : Edits selected Number.
Sa ve Number: If the selected number is not saved on the SIM or
the phone, this option will be shown. Saves the selected
Number to the SIM or the phone.
Delete : Deletes the selected Number.
Delete All: Deletes all missed call records from the list.
Send Message: Sends a message to the person you missed the
call.
When the call is not found in Contacts, the [Save Number] option will be
created.
3.2 Received Calls
Select ‘Menu>3.Call Logs>2.Received Calls’.
Displays the received call list accompanied by the time and date of a
received call as well as the number or name of the caller. Press
[Up/Down] keyPush [Up/Down] keyto select.
Press the [Options] Soft key [
Left] to;
Call : Calls selected Number.
Edit : Edits selected Number.
Sa ve Number: If the selected number is not saved on the SIM or
the phone, this option will be shown. Saves the selected
Number to the SIM or the phone.
Delete : Deletes selected Number.
Delete All: Deletes all received call records from the list.
Send Message: Sends a message to the person you received a call.
Page 47

47
When the number of the caller is not found in Contacts, the [Save
Number] option will be created.
3.3 Dialled Calls
Select ‘Menu>3.Call Logs>3.
Dialled Calls’
Displays the Dialled calls list accompanied by the time and date of a
dialled call as well as the number or name of the recipient. Press
[Up/Down] keyPush [Up/Down] keyfor selection.
Press the [Options] Soft key [
Left] to;
Call : Calls selected Number.
Edit : Edits selected Number.
Sa ve Number: If the selected number is not saved on the SIM or
the phone, this option will be shown. Saves the selected
Number to the SIM or the phone.
Delete : Deletes selected Number
Delete All: Deletes all the dialled call records from the list.
Send Message: Sends a message to the person you made a call to.
When the number of the caller is not found in Contacts Menu, the [Save
Number] option will be created.
3.4 Delete Call Logs
Select ‘Menu>3.Call Logs>4.Delete Call Logs’.
It deletes the missed, received, or dialled calls or deletes all the call
records with ‘All Calls’.
Press the [Yes] Soft key [
Left] or [No] Soft key [ Right] to
execute or cancel this function.
3.5 Call Timer
Select ‘Menu>3.Call Logs>5.Call Timer’.
Indicates information on call time.
- Last Call Time: Date and Time.
- Received, Dialled, All Call Time: Call Time only.
-
Reset Call Times: Initialises the call timer. Press OK key, the
[OK] soft key and input the phone password. And then press
OK key, the [OK] soft key one more time.
3.6 Call Cost
Select ‘Menu>3.Call Logs>6.Call Cost’.
This feature may not be available depending on your SIM card.
Records information on call cost, and limits the call charge to prevent
overcharges.
- Last Call Cost: Displays the cost of the last call.
- All Call Cost: Displays the cost of all calls.
- Delete Logs: Inputs PIN2 to delete all the logs of call cost.
- Max Cost: Reads or sets up the maximum value of the call cost
Page 48

48
unit in the service area.
- Read Limit
: Reads the maximum unit value.
- Set Limit
: Sets up the maximum units.
- Cost Unit: Reads or sets up the unit defined in a service area.
This function has the following sub options.
This function has the following sub options.
- Read Unit
: Reads the cost unit.
- Set Unit
: Sets up the current cost unit and the cost per unit
3.7 GPRS Info
Select ‘Menu>3.Call Logs>7.GPRS Info’.
This displays the GPRS data transmission capacity.
- Current Info: Displays the total transmitted Kbytes at the
moment.
- Last Info: Displays the total transmitted Kbytes in the past.
- All Info: Displays the total transmitted Kbytes since connected.
- Delete Logs: Deletes the log related to GPRS.
Page 49

49
4. Media Gallery
4.1 Photo Gallery
see Applications Menu 5.1.3
4.2 Video Gallery
see Applications Menu 5.1.4
4.3 Image Gallery
You can view or edit the image or information recorded in your phone in
this menu.
The image formats supported here are “JPEG, GIF, BMP, WBMP,
PNG”
1. Select ‘Menu>4.Media Gallery>3.Images’ to the list of images saved in
your phone.
2. Press the [Large] Soft key or press the [OK] key to zoom in the image
selected from the list.
3. Press [Left/Right] key to view other images in the list.
Press the [List] Soft key to return to the list.
Press the [Options] Soft key [
Left] to apply the options to the
image concerned.
- Options: Set as Wallpaper, Send as Multimedia Msgs., Rename,
Delete, Delete All, Details
Set as Wallpaper
Adds an image to ‘Wallpaper’ in ‘Display settings’ The image is set
as the background image of the main screen.
Send as Multimedia Msgs.
Sends the selected sound to the Multimedia Messages(This option
is available only for a non-forward locked sound or image)
Rename
Renames an Image
(for further details about rename a file, see Basic Functions
Menu 7)
Delete
Deletes an Image
Delete All
Deletes all Images in the list of image
Details
Views the information on an image
With a respect to the DRM, a forward locked image will be displayed
with an icon like
in the list of images.
4.4 Sound Gallery
Plays back sound in your phone or edits information.
The sound formats supported here are “MMF, MIDI, iMelody, MP3,
AMR”.
Select ‘Menu>4.Media Gallery>4. Sound Gallery’ to display the list of
sounds recorded in your phone.
The selected melody will be automatically played back once.
Page 50

50
Press the [Options] Soft key [
Left] to apply the options to the
sound concerned.
- Options: Set as Ring Tone(can not used in AMR file), Send as
Multimedia Msgs, Rename, Delete, Delete All, Details
Set as Ringtone
Sets the selected sound as a preferred Ringtone
(For further details about Options, see Applications Menu 4.3)
With a respect to the DRM, a forward locked sound will be
displayed with an icon like
in the list of sounds.
Note: MP3 ringtone support (maximum file size: 500kb) and MP3
files may be subject to the relevant copyright law, so refrain from
distributing those files illegally.
4.5
Memory Info
Displays information on the memory usage status for Video, Photo, Image,
Sound, Voice, Java, and Message and System used.
Note: The 'System' memory information means the total used memory for
the reserved objects, user-defined wallpapers, etc.
Page 51

51
5 Multimedia
5.1 Camera
Y ou can take a photo in various ways using the built-in camera.
The photo can be saved and sent with a multimedia message..
5.1.1 Taking a Photo
5.1.1.1 snapshot mode
1. Select ‘Menu->5.Multimedia->1.Camera->1.Take a Photo’ in the menu
in sequence
* Tip: Press camera key to enter into the photo capture mode
2. Adjust the image by focusing the camera at the subject.
Press the Soft key [
Right] to change the shooting mode.
Shooting Mode Icon Description
Single Capture Take a single photo.
Multi Capture
Take multiple photos. Number of photos to be
taken set by the [Multi-shot] option.
Sticker Capture
Take a photo with a built-in frame.
Image size is fixed as 128X128
3
Press OK key [ ] to take the picture in the current preview.
Press the Side [
Up / Down] key to zoom in/out of the image.
Press [
] key to return to the camera preview screen.
In Multi Capture mode
, select [Mark]/[Unmark] to check the image that
you want to save.
4. Press OK key [
]
to save the photo taken. You can select a photo
album and edit the photo name.
In Multi Capture mode,
the photo will be named automatically. You can
edit the photo name, if only one photo is set as ‘Marked’.
Camera Specific Functions
Function Description Key
Brightness
Control the brightness of 7 levels (from
0 to 6)
[Left / Right
key
Zoom change the zoom levels
Side [up/
down] key
5.1.1.2 Using the Camera Options
Press the [Options] Soft key [
Left] in Capture mode to select the
following information which will be applied to the image. Its setting value
is temporary, so if you want to save its value, go to 5. Multimedia ->5.1
Camera ->5.1.5 Settings
Goto Album: Moves to the Photo Album.
Image Size: Displays the size of image that you want to shoot
LCD(128X128), QVGA (320X240), VGA(640X480).
Note: this option will not appear in ‘Sticker Capture’ mode
Self Timer: select one of 5 Secs or 10 Secs. When the selected
Page 52

52
time has lapsed, a photo is taken.
Multi shot : select multishot number you want. 4/6/9
Note: this option will appear in ‘Multi Capture’ mode
Sticker : selects the frame (10 frames)
Note: this option will appear in ‘Sticker Capture’ mode
Effect: Applies an effect to the picture. Normal/ Sepia/Antipue/
Cool/ Moonlight/ Fog/ Negative/ B&W/ Embossing
OSD : On/Off
5.1.2 Taking a Video
5.1.2.1 Video shot
1. Select ‘Menu->5.Multimedia->1.Camera->2.Take a Video’ in the menu
in sequence
* Tip: Size of the video image is fixed to LCD (128X128).
Press and hold camera key to enter into the video recording mode
2. Press OK key [
[
[
]
]
]
to record in the current preview..
Press the Side [
Up / Down] key to zoom in/out of the image.
Press [
] key to return to the camera preview screen.
Press OK key [
] to stop recording.
3. If you Press OK key
[
[
[
]
]
]
,
,
,
you can select an album to save the video.
When ‘Auto Save’ is selected from the camera setting, the set name and
album will be automatically saved without any Save Option screen.
Press the [
] key to return to the Preview screen without saving
video images.
Press the [play] Soft key [
Left ] to play the recorded video
images.
5.1.1.2 Using the Camera Options
Press the [Options] Soft key [
Left] in Capture mode to select the
following information which will be applied to the image. Its setting value
is temporary, so if you want to save its value, go to 5. Multimedia ->5.1
Camera ->5.1.5 Settings
Goto Album: Moves to the Video Gallery.
Effect: Applies an effect to the video. Normal/ Sepia/ Antique/
Cool/ Moonlight/ Fog/ Negative/ B&W/ Embossing
5.1.3 Photo Gallery
Allows you to view or edit the photos saved in your phone.
Page 53

53
5.1.3.1 Views the Saved Picture.
1.Select the ‘Menu->5.Multimedia->1.Camera->1.Photo Gallery’ or
‘Menu->5.Media Gallery->2.Photo Gallery’ in the menu in this order to
access the Photo Album List.
2. Press the [New] Soft key to add an album to Photo Albums.
Y ou can add up to 7 albums (including the default album ‘My Photo’)
(For further details about making directory name, see Basic Functions
Menu 7)
. Press the [Options] Soft key [Left]
to apply the following options to the
selected album
- New : add a album
- Rename : Rename a album.
- Delete : Deletes a album.
Album directories, but default directory ‘My Photo’, can be renamed and
deleted only when there is no file in the directory.
3. Select an album from the list and Press OK key to display the photo
list in the album.
Use the [Small] or [List] Soft key to change the list type (Small/List).
4. Select a photo and Press OK key to enlarge the photo view. Press
the [Left/Right] key to view other photos in the album.
5.1.3.2 Using the Photo Options
Press the [Options] Soft key [
Left] to apply the following options
to a selected photo from the album.
Set As:
1. Wallpaper – Adds a photo to ‘Wallpaper’ in ‘Display Settings’. The
photo is set as the background image of the main screen.
2. Contacts – Assigns a specific photo image to Contacts.
* Tip: Press the [Right] Soft key [
Right] to apply the
following options to a selected photo from the albu
u
u
m
m
m
.
.
.
Send as Multimedia Msgs.: Sends the selected photo with to
the
Multimedia Messages.
Rename: Renames a photo.
(For further details about rename a photo, see Basic Functions
Menu 7)
Delete: Deletes a photo.
Delete All: Deletes all photos in the album.
Details: Views the information on a photo.
5.1.4 Video Gallery
Page 54

54
Views or edits the video image saved in your.
5.1.4.1 Views the Saved Video
1.Select ‘Menu->5.Multimedia->1.Camera->1.Video Gallery’ or ‘Menu >5.Media Gallery->2.Video Gallery’ in the menu in this order to access
the Video Album List.
2.Select the [New] Soft key [
Left] to add an album to Video
Gallery. You can add up to 7 albums (including default album (‘My
Video’))
. Press the [Options] Soft key [
Left] to apply the following options
to the selected album
- New : add a album
- Rename : Rename a album.
-
Delete : Deletes a album.
* Tip: Album directories, but default directory ‘My Video’, can be renamed
and deleted only when there is no file in the directory.
3. Select an album from the list and Press OK key [OK] to display the
video list in the album.
Select the [Small] or [List] Soft key to change the list type
4. Select a video and Press OK key [OK]
to play the video image
automatically.
.
.
Use [
] / [ ] to p ause or play a video image.
Turn back to the list if video image ended.
Use the [stop] Soft key [
Right] to pause the play and go
back to the list.
5. Press the [mute] Soft key [
Left] while play the video image,
can do it as is not sonant
5.1.4.2 Using the Video Options
Press the [Options] Soft key [
Left] to apply the following options to
a selected video from the album.
Rename: Renames a video file
Delete: Deletes a video file
Delete All: Deletes all video files in the album.
Details : Views the information on a photo.
5.1.5 Settings
Changes the default camera option value.
- Image Size: Size of the image to be shot
LCD (128X128), QVGA (320X240), VGA (640X480).
- Shutter Sound: Shutter/Cheese/Smile/321/ Whisky/Off
Page 55

55
- Self Timer: select one of 5 Secs or 10 Secs. When the selected
time has lapsed, a photo is taken
- Auto Save: When Auto Save is on, the taken picture or video
will be automatically saved with a default name in the default
album ‘My Photo’ or ‘My Video’.
- Multi-Shot : select multishot number you want. 4/6/9
5.2 Radio (OPTION)
From the Radio menu, you can only listen to FM broadcasting, and
you cannot access the Radio menu without the headset installed. In
addition, if the headset cord is pulled off while listening to the music,
the Radio menu will be deactivated.
5.2.1 Radio Playing
1. Select Menu>5.Multimedia>2.Radio..
5.2.2 Radio Screen Configuration
1. At the top is an area where frequency view area, channel display
area, channel name area, and current time display area exist.
2. The icons at the bottom display (Headset), Hold On(Hold Off), and
Mute On(Mute Off), while the icon on the far right of the bottom
displays volume.
3. [Option] Allows you to move to PopList with soft keys.
4. [Ok] Allows you to move to the Save Channel menu with soft keys.
5. [Set] Allows you to move to the Set Frequency menu with soft keys
5.2.3 Radio Operation
Press the [Option] Soft key [[
] to:
Channel List: Displays the Channel List.
Speaker/Headset: Allows you to change Speaker/Headset
status with the [*]key..
Hold On/Off: Changes Hold On/Hold Off status.
Mute On/Off: Allows you to change Mute On/Mute Off status
with the [#]key.
5.3 Java
You can download and execute a java game on your phone. Use the
WAP browser to search for a java game and downlo ad it for installation.
5.3.1 View of Java Game List
Select ‘Menu>5. Multimedia>3.Java>1.Games’ in the menu to view the
Java Game list stored in your phone.
Press the Navigation key to select a game.
The Menu has an option to control the game.
Page 56

56
5.3.2 Java Game Execution/Deletion/Information Search
Select ‘Menu>5. Multimedia>3.Java’ in the menu to select a Java menu.
Select ‘1. Games’ to view the Java Game list stored in your phone.
Press the Navigation key to select a game.
To: Press:
Run the Game
Press the [Option] Soft key [ Left]
and select the [Run] Soft key, or press the
[OK] key
View Detail Information
Press the [Option] Soft key [ Left]
and select the [Info] Soft key, or press the
[ Right] Soft key.
Delete the Game
Press the [Option] Soft key [ Left]
and select the [Delete] Soft key.
5.3.3 Java Network Settings
For downloading Java Game, the correct parameter settings are
necessary for Internet connection. The parameter settings have been
adjusted to the Internet parameter settings for a service provider
corresponding to the currently selected WAP profile. Depending on your
service provider, if necessary, you can directly establish the settings
using the following method.
Select ‘Menu>5. Multimedia>3.Java‘in the menu to select a Java menu.
Select ‘2. Connection’ to view the parameter screen.
Select a parameter item and press the [OK] key for setup.
- DNS1: Inputs the IP address of the Domain Name Server1. A
comma will be added every 3 digits.
- DNS2: Inputs the IP address of the Domain Name Server2. A
comma will be added every 3 digits.
- Internet APN: Inputs the Internet Access Point Name for
yourself.
- Login ID: Inputs the ID to sign into the gateway.
- Password: Inputs the password to sign into the gateway.
- Proxy: Inputs the address of the proxy server if it is used.
- Proxy port: Inputs the proxy port if the proxy server is used.
If necessary, please contact your service provider for the correct
parameter settings.
6. Settings
Select ‘Menu>6.Settings’.
Y ou can set up various phone functions in the settings menu.
6.1 Display Settings
Page 57

57
Select ‘Menu>6.Settings>1.Display Settings’.
You can change the outlook of LCD display .
6.1.1 Main Screen
Select ‘Menu>6.Settings>1.Display Settings>1.Main Screen’
Y ou can change the idle screen image.
- Wallpaper: One of 3 defaut images and 1 user image can be
selected as idle screen image. Only user wallpaper can be
deleted with the [Delete] Soft key [
Left], but the
default one cannot be deleted.
- Wallpaper Type: Digital Clock /Greeting/D-day
6.1.2 Greeting
Select ‘Menu>6.Settings>1.Display Settings>2.Greeting’
You can type up your own greeting phrase to be shown on start up
or Idle screen.
(For further details about using editor, see Basic Functions Menu 7)
6.1.3 Backlight
Select ‘Menu>6.Settings>1.Display Settings>4.Backlight’.
You can adjust the LCD backlight duration to one of 5 Secs/10
Secs/20 Secs/1 Min/10 Mins.
Press [Left/Right] keyto change the duration value that you want
and press the OK key.
6.1.4 Software Version
This menu is for viewing the software version.
6.2 Sound Settings
Select ‘Menu>6. Settings> 2. Sound Settings’
Sound Settings define how your phone reacts when you receive a call or
a message, how your keypad sounds when you press a key, and more.
Ring tone, key tone, and other settings can also be customised to your
needs.
6.2.1 Ring Tone
Select ‘Menu>6. Settings>2. Sound Settings>1.Ring Tone’
* You can choose the preferred ring type, melody to ring.
- Ring Type: Ringing Tone, Vibration, Vib then Ring, Vib and Ring,
Ascending, None(Quiet)
Sound: Sound is composed of several groups such as Melody
Sound, MP3 Sound, Bell Sound and User Sound and each
Group has multiple tones. User Sound presents the melody of
‘Menu>4.Media Gallery>4.Sound Gallery’ as a consequence
(For further details about User Sound, see Applications
Page 58

58
Menu 4.4).
6.2.2 Volume
Select ‘Menu>6. Settings>2. Sound Settings >2. Volume’
-
Ringing Volume : Controls the volume in 8 levels.
- Key Volume : There are 8 different volume levels (0~7)
available for volume adjustment
6.2.3 Message Alert
Select ‘Menu>6. Settings>2. Sound Settings >3.Message Alert’
Y ou can select the preferred alert melody, its volume and reminder period
when you have new messages.
- Alerting: Use the Press Left/Right keyto select one out of Off,
Once, Every 2 Mins, Every 5 Mins.
- Ring Volume: Controls the volume in 8 levels.
- Sound: Use the Press Left/Right keykey to set Message Alert
Tone to Bell1, Bell2, Bell3.
6.2.4 Key Tone
Select ‘Menu>6. Settings>2. Sound Settings >4.Key Tone’
You can select the keypad sound to be used for dialling or in the menu
screen.
- Tone Type: You can turn the key tone on or off.
- Sound: Selects a key tone.
6.2.5 Sound Effect
Select ‘Menu>6. Settings>2. Sound Settings >5.Sound Effect’
Turns the default sound effect on or off.
Press the [Mark] Soft key, and then press the Press OK key to save.
- Power On/Off: When you turn the power on or off.
- WAP Connection: When you connect or terminate WAP
- Minute Minder: A sound effect every minute while making a
phone call.
6.3 Call Settings
Select ‘Menu>6.Settings>3.Call Settings’.
6.3.1 Call Forward
Select ‘Menu>6.Settings>3..Call Settings>1.Call Forward’.
You can divert a receiving call to another phone number with this menu.
It’s one of network services, so please contact your service
provider to check its availability.
You may choose one from All Calls, When Busy, On No Answer, When
Not Found, or Cancel All, all of which divert as required.
6.3.2 Answer Type
Page 59

59
Select ‘Menu>6.Settings>3.Call Settings>2.Answer Type’.
Y ou can set up the call receiving method.
Use pressing left or right key to set the call receiving method.Press OK
key.
- SEND key: You can answer the incoming call by pressing the
[
] key.
- Any Key: You can answer incoming calls by pressing any key,
except the [
] key and the [Reject] Soft key.
- Auto Answer: Your phone automatically answers calls after 10
seconds.
6.3.3 Auto Answer
Select ‘Menu>6.Settings>3.Call Settings>3.Auto Answer’.
The Auto Answer function works like an automatic answering
machine. It relays the recorded message to the caller if you do not
answer the call for a specified period of time.
- Auto Answer : Set Auto Answer to [On/Off]. If set to [On], the
Auto Answer function will be enabled.
- Recorded Message: Displays a list of recorded messages
during call active (In call). Each list displays the recorded
date & time of the file and the message caller ID as well.
Press the [Delete] Soft key to delete the message in the
View list, and press the [Send] key to make a call while
confirming recorded messages.
- Response Message: Depending on your current situation, a
different answering message will be played, including.
[Absent/Meeting/Driving/User Message]. The User Message
is the voice message of the local user that will be answered
in the standby mode.
- Response Time: Sets the automatic answering time (After 3
Secs/5 Secs/10 Secs/20 Secs). When the response time
elapses without answering the incoming call, the recorded
message will be relayed to the caller. If the caller decides to
leave a voice message, recording will be started with a beep
sound.
- User Message: Displays your voice message set for the
response message. Press the [
] key for playback. If no
message is recorded, only the recorder function will 6.3.3
Auto Answer.
6.3.4 Auto Redial
Select ‘Menu>6.Settings>3.Call Settings>4.Auto Redial’.
This function automatically redials the number the call is made to.
- On: Sets up Auto Redial.
- Off: Cancels Auto Redial.
Page 60

60
6.3.5 Call Waiting
Select ‘Menu>6.Settings>3.Call Settings>5.Call Waiting’.
It’s one of network services, so please contact your service
provider to check its availability.
The call waiting function informs you that a second call is waiting
during a call
- Activate: Sets up Call Waiting.
- Deactivate: Cancels the preset Call Waiting.
- Status: Informs the setup condition.
6.3.6 Send Caller ID
Select ‘Menu>6.Settings>3.Call Settings>6.Send Caller ID’.
You can prevent your phone number from being displayed on the phone
of the person being called. This service is dependent on the network.
Please ask the network provider.
6.3.7 Own Number
Select ‘Menu>6.Settings>3.Call Settings>7.Own Number’.
The number for Own Number can vary depending on the SIM.
Press the [Options] Soft key [
Left] to:
Add: Adds a Own Number.
Delete: Deletes a Own Number.
Edit: Edits a Own Number.
6.4 Phone Settings
6.4.1
Language
Select ‘Menu>6.Settings>4.Phone Settings->1.Language’.
Y ou can select a language to be displayed on the phone.
6.4.2
Time & Date
Select ‘Menu>6.Settings>4. Phone Settings->2.Time & Date’.
You can set up Time,Time Format .,Date, Date Format and Auto Update.
When Auto update sets as on, time and date will be updated automatically
by the network signal which contains time and date information.
6.4.3
Favorites
Select ‘Menu>6.Settings>3.Phone Settings>3.Favorites.
The Favorites menu is, so called, the collection of items frequently
Note: ‘Automatic’ selects the language previously stored in
your SIM.
Page 61

61
used, and can be made up by your own sake. To add an item to the
Favorites, browse to the item which you want and press the
[Favorite] Soft key [
Right] .
Press OK keyin one of the registered Favorie items to access the item
directly.
Press the [Add] Soft key [
Right] or Press OK key in Empty
record to add a menu
Press the [Options] Soft key [
Left] to:
Delete: Deletes a Favorite from the list..
Delete All : Deletes all Favorites from the list
Edit: Edits a Favorite.
Add: Adds a Favorite.
6.4.4 (슬라이드 모델에서 기능 제외됩니다.)
6.5 Network Settings
Select ‘Menu>6.Settings>5.Network Settings’.
6.5.1 Search now
Y ou can search a network in the way you would set in the Default Setup
6.5.2 Default setup
You can set the network searching way as “Automatic” or “Manual”
6.6 Security Settings
Set ‘Menu>6.Settings>6.Security Settings’.
The security settings enable you to restrict the use of your phone to other
people and types of calls of your choice.
Various codes and passwords are used to protect these features of your
phone. They are described in the following sections. See also ‘Access
Code’ 6
The Security feature keeps your phone and SIM Card safe from
unauthorised users. You may set up a password for your phone or use
the Call Barring service and Fixed Dialling mode.
6.6.1 PIN Check
Press [Left/Right] keyand Press OK keyfor setup.
.
If you fail to input the correct PIN and PIN2 number 3 times(Trial time
depends on the SIM) continuously, you will be prompted to input the
PUK number.
- Enabled: You should input PIN to access to the main menu after
power on.
- Disabled: You don’t have to input PIN to access to the main
menu after power on.
6.6.2 Change PIN
Page 62

62
Changes the PIN number.
6.6.3 Phone Lock
Once selected, this option locks your phone until you input the right
password to unlock. Press OK keyafter you input the password.
6.6.4 Change Lock
Changes a password. Default Password is 1234.
6.6.5 Phone Barring
This function offers multiple methods to limit incoming or outgoing
calls. In general, the barring service becomes activated by
interoperating with the network, but Phone barring is made by the
phone itself. Major functions are as follows:
- Incoming Calls: Limits all incoming calls.
- Outgoing Calls: Limits all Outgoing calls.
6.6.6 N/W Barring
This function is available only if the service provider provides such a
function and you have subscribed to it.
You can set limitations for making certain types of calls:
- Outgoing Calls: Limits all Outgoing calls.
- International Calls: Limits an outgoing and incoming
international call.
- Only Local/Home Int. Call except to home country: Limits
other international calls except home country.
- Incoming Calls: Limits all incoming calls.
- Incoming Calls When Abroad: Limits all international incoming
calls.
- Clear All: Cancels all the barring settings.
- Change Password: Replaces the old password with a new one.
6.6.7 CUG (Closed User Group)
Sets up a group of numbers that you want to dial or receive. Select CUG
name and Press OK keyto see the CUG name list as you input.
Press the [Options] Soft key [
Left] to:
Delete: Deletes the preset CUG Identifier.
Edit: Edits the CUG Identifier .
Add: Adds the CUG Identifier.
6.6.8 Fixed Dialling (Fixed Dialling Numbers)
Fixed Dialling is a service that limits your access to specific numbers in
Note: In Empty record, the Soft key [ Right] will turn into the
[Add] Soft key and move to the name input screen for a new CUG
registration.
Page 63

63
the Phonebook list recorded on the SIM. Input PIN2 to set up or cancel
this service. (trial attempt depends on SIM)
- On
- Off
- Fixed Dial List: Displays the numbers recorded in the Fixed
Dialling list.
6.6.9 Change PIN2
Changes PIN2.
6.7 Reset
Select ‘Menu>6.Settings>7.
Reset’
Deletes all user settings and data from your phone and returns to factory
default settings.
Input the phone password and Press OK keyto reset.
The default password is 1234.
7. Organizer
Select ‘Menu>7.Organizer’.
Organizer provides Alarm, Scheduler, Memo, Voice Memo, World Time,
Calculator, Converter, and Stopwatch.
7.1 Alarm
Select ‘Menu>7.Organizer>1.Alarm’.
You can set up to 5 alarms (Once you set the On Morning Call, then
an icon appears on the display)
7.1.1 To set an alarm
Select ‘Menu>7.Organizer>1.Alarm’ to display the current alarm list.
Press the [New] Soft key [
Right], and compose a new one in the
alarm edit screen.
Press the [Options] Soft key [
Left] to:
Delete: Deletes an Alarm from the list.
Delete All : Deletes all Alarms from the list.
Morning Call On/Off : Notifies by ring a matter foreign to the Ring
Type settings
Snooze On/Off: The alarm that is set to Snooze rings every 5
minutes for 3 times. Only one alarm can be set to Snooze On.
New: Set a new alarm
Page 64

64
Press OK key, the [OK] soft key to edit the Alarm, and then Press
[Up/Down] keyin the ‘Edit Alarm’ screen to set on Set, Time, or Melody.
Press the [AM]/[PM] key
Soft key [ Left] to select AM or PM
time format for setup.
7.2 Calendar
Select ‘Menu>7.Organizer>2.Calendar’.
The Calendar helps you managing your schedule. On time of the day,
Calendar alerts you that you have something to do by alarming. The
Scheduler consists of Monthly View, Daily View, and Event View & Edit.
(For further details about using editor, Basic Functions Menu 7)
7.2.1 Monthly View
To: Key Action:
Move to another day
Push [Left] key
Previous Day
Push [Right] key Next
Day
Move to another week
Push [Up] key Previous
Week
Push [Down] key Next
Week
Move to the previous or next month
Press the [Side Up] or
[1] key Previous
Month
Press the [Side Down]
or [3] key Next Month
Select ‘Menu>7.Organizer>2. Calendar’ from the menu to display the
Monthly View.
Press the [New] Soft key [
Right] to add a new event.
Press the [Options] Soft key [
Left] to;
Goto Date: Moves to the set date.
Goto Today: Moves to today for selection.
View All Events: Shows all of your scheduled events
Del Past Events: Deletes your past scheduled events.
Del All Events: Deletes all of your scheduled events.
Memor y Info: Displays the number of stored events, not more than
50.
New : Set a new schedule
Use the Navigation key to select the date and
Press OK key, the [OK] soft
key.
On a date with any schedule registered, move to Daily View to check the
schedule.
On a date with no registered schedule, add a new schedule.
Any event registered on a date will be displayed at the bottom of the
display in form of an icon.
Page 65

65
7.2.2 Daily View
Shows the schedule registered for a date. Select a schedule and press
the [OK] key to view or edit the details of an event.
Press the [Options] Soft key [
Left] to;
Delete: Deletes an event
Delete All: Deletes all events.
D-day On/ D-day Off: Sets up or cancels D-Day.
Save Number: This option shows when an event have a phone
number item. Add a phone number item of an event to the
phone book.
New: Set a new schedule
Note: When you select D-Day from Screen Control, ‘D-Date, Event Memo
Content Part’ will not appear in the standby screen.
Upon setup of a new D-Day, the existing D-Day is automatically deleted.
7.2.3 Event View & Edit
Shows the registered schedule item by item and edits the schedule or
creates a new schedule.
Create New Event (by View & Edit)
① Select a day from Monthly View and press the [New] Soft key
[
Right]
② Upon appearance of the New Event screen, select and input an
event item by item for registration.
③ After input,
Press OK key, the [OK] soft key to save the event.
Note: Maximum Quantity of Schedule for Registration: 50
Maximum Daily Quantity of Schedule for Registration: 5
Period of Registration: 01/01/1950 ~31/12/2043
7.3 Memo
Select ‘Menu>7.Organizer>3.Memo’.
Saves short notes in your phone.
Press the [Options] Soft key [
Left] to;
Edit: Retrieve existing memos, edit the parts of your choice, and
Press OK key, the [OK] soft key for save.
* Tip:
Press OK key, the [OK] soft key and [Edit] Soft key [ Right]
to return to the editing screen.
Delete/Delete All: Deletes any or all items.
New: Input texts to create a new memo.
(For further details about using editor, Basic Functions Menu 7)
7.4 Voice Memo
Select ‘Menu>7. Organizer>4. Voice Memo’
Page 66

66
The Voice Memo function records your voice message. You can use
Record, Stop, Play, and Save for voice recording and playback. You can
use the Text Editor for a message title.
(For further details about using editor, Basic Functions Menu 7)
Record
①
Press the [New] Soft key [ Right] to start record
immediately.
②
Press OK key, the [ ] key to terminate the recording process
and press the [Preview] Soft key to hear the recorded data
before saving the voice data.
③ Press the [Re-rec] key to re-record a voice message
④
Press OK key, the [ ] key, input a name, and Press OK key, the
[OK] soft key
to save the data.
* Tip: When the memory is full, the “Not Enough Memory” message will
appear and returns to the menu.
In the Voice Memo list, Press the [Options] Soft key [
Left] to;
Send as Multimedia Msgs.: Attach AMR file, and Sends as MMS
Rename: Renames the voice memo
Delete: Deletes the selected voice memo.
Delete All: Deletes all voice memos.
Details : Views the information on a file
Play
1. Select an item and
Press OK key, the [OK] soft key to start play
immediately.
① Select an item in the voice memo list, and
Press OK key, the [OK] soft
key to start play immediately.
② Press[Left /Right]key, the [
] key or [ ] key to rewind or
fast forward to position about 5seconds.
③
Press OK key, the [ ] key to play or pause a voice memo
④ Press [Down] key,the [
] key to stop a voice memo.
7.5 World Time
Select ‘Menu>7.Organizer>5.World Time’.
This function informs you of world time.
Press the [Options] Soft key [
Left] to:
Da ylight-saving On/Off: The Daylight-saving function fits the time
of the countries in summer who enforce Summer Time. Select
Daylight-saving from the Options menu for setup. The icon for the
country with Summer Time will be activated
Shows that the Summer Time Saving function is on.
* Tip: Summer Time sets the clock one hour ahead.
Page 67

67
Set as Local: Press the [Set] Soft key [
Right] or select [Set
as Local] from the Options menu and Target Area will be replaced
with Home Area.
7.6 Calculator
Select ‘Menu>7.Organizer>6.Calculator’.
Your phone has a Calculator function. Calculator provides 4 basic
operations +, -, x, and /.
Press the number keys and direction keys to input a formula and press
the [=] Soft key to display the result.
* Tip: Press the Soft key [
Left] to input a decimal point.
Press the [
] Soft key [ Right] to reset the formula.
Press the [
] key short to delete the text of a formula and press
and briefly hold the [
] key to delete the whole formula.
7.7 Converter
Select ‘Menu>7.Organizer>7.Converter’.
7.7.1 Converter
Converter converts a figure between different units i.e. Length, Area,
Volume, Weight, and Temperature.
Select one from Length, Area, Volume, Weight, or Temperature.
Press [Down] key to move to the next line, Press [Left/Right] keyto
select a target unit, and press the number keys to input numbers.
Press [Down] key again to move to the next line and select a result unit
and you will get the correct answer.
* Tip: The result is automatically recalculated upon a change of unit or
value.
Press the Soft key [
Left] to input a decimal point.
7.7.2 Currency Setting
-It is possible to modify standard currency in this menu.
Press the number keys to input numbers.
Press the Soft key [
Left] to input a decimal point.
Press the [Reset] Soft key [
Right ] to initialise all.
7.8 Stop Watch
Select ‘Menu>7.Organizer>8 Stopwatch’.
The Stopwatch measures time for all sorts of sports..
Press OK key , the [ ] key to operate the Stopwatch.
Press OK key , the [ ] key to pause the Stopwatch and Press OK key , the
[
] key to restart the Stopwatch.
Page 68

68
Whenever you select the [Lap] Soft key [
Left], the 2 lap times as
a maximum are displayed and when you select the second [Lap] Soft
key [
Left], the Stop watch stops.
Press the [Reset] Soft key [
Right ] to initialise all.
Page 69

69
V . Advanced Functions
1. WAP
2. SIM Toolkit
Page 70

70
1. WAP
You can access the Internet with a WAP (Wireless Application Protocol)
browser.
That means you can connect to the Internet anywhere and anytime
where you have network coverage.
The descriptions below can vary according to your Network provider .
Therefore, ask your Network provider for detailed information.
Note: Press the [Press OK key] key short to access the WAP menu
directly. Press and briefly hold the [Press OK key] key during standby to
proceed to the WAP homepage.
(For further details about using editor, Basic Functions Menu 7)
1.1 Navigating the WAP Browser
To scroll through and select browser items, press the [push Up/Down
key] key until the item you want is highlighted, and then press the
[Select] Soft key.
To return to the previous page, press the [
] key.
To return to the startup homepage, select [Options]> Home.
1.2 Entering Text in the WAP Browser
When you are prompted to enter text, the current text input mode
appears above the Soft key [
Right].
(For further details, see Basic Functions Menu 7)
1.3 Home
This menu contacts the network to load the Wireless Web service
provider homepage.
1.4 Resume
Y ou can reconnect to the latest web site.
1.5 Bookmarks
You can bookmark an Internet address using the WAP browser just as
you do with a PC Internet browser.
To register an URL and Name in the closest empty number of the
Bookmark List, press the [Add] Soft key on the right.
Press the [Option] Soft key [
Left] to;
Edit: Edits the URL and name of a bookmark
Page 71

71
Note: this feature will not be available if the manufacturer provides a
default bookmark..
Delete: Deletes a bookmark from the List.
Note: this feature will not be available if the manufacturer provides a
default bookmark.
Go: Goes to the related site
1.6 Push Messages
The phone can receive Push Messages from the Service Provider.
1.6.1 Inbox
The Push message is stored in Inbox. Select and check a message from
the message list of Inbox to contact the WAP page concerned.
Press the [Option] Soft key [
Left] to;
Delete: Deletes a message.
Delete All: Deletes all the messages in Inbox.
Go to: Goes to related site.
1.6.2 Receive
Sets up Push Message receiving.
-
Accept All: Receives all Push messages.
- Accept None: Rejects all messages.
1.7 Go to URL
This menu leads you to an URL that you have visited before.
1.8 Profiles
(Note: The parameter settings are already entered as required by the
service provider. Care should be taken when you make any modification to
a profile since it may cause WAP to be inoperative.)
Selects or edits the Connection Profile supplied by the phone.
Select the Profile List and press the [Press OK key] key for setup.
The Unedited Profile will not be selected.
Select the Profile List and press the [Edit] Soft key to edit a profile.
- Profile Name: Pressing the [Press OK key] key allows you to
enter the edit mode to change a profile name.
- Home URL: Pressing the [Press OK key] key allows you to
enter the edit mode to edit the Homepage URL provided by the
service provider.
- Connection Type: Select either WAP or HTTP.
- GSM Settings: This menu allows you to set the GSM network
proxy, and has the following sub-menus:
- Gateway
: Pressing the [Press OK key] key allows you to access
the submenus such as IP Address, IP Port, Login ID and
Page 72

72
Password. For each submenu, pressing the OK button lets you
enter edit mode to edit every item provided by the service provider.
- Data Call Type
: Use the left or right navigation key to select from
the two modes: ISDN and Analogue.
- Dial Number
: Pressing the [Press OK key] key allows you to
enter the edit mode to change this item.
- Login ID
: Pressing the [Press OK key] key allows you to enter
the edit mode to change this item.
- Password
: Pressing the [Press OK key] key allows you to enter
the edit mode to change this item.
- GPRS Settings: This menu allows you to set the GPRS network
proxy, and it has the following sub-menus:
- Gateway
: Pressing the [Press OK key] key allows you to access
the submenus such as IP Address, IP Port, Login ID and
Password. For each submenu, pressing the [Press OK key] key
lets you enter edit mode to edit every item provided by the service
provider.
- APN
: It stands for Access Point Name. Pressing the [Press OK
key] key lets you enter the edit mode to change this item.
- Login ID
: Pressing the [Press OK key] key lets you enter the edit
mode to change this item.
- Password
: Pressing the [Press OK key] key lets you enter edit
mode to change this item.
-
DNS Settings : Enter the IP address for the Domain Name Server.
Y ou may enter primary and secondary DNS. This function is
available only when you are connected to HTTP.
- Bearer: This lets you select the bearer type for each type of
network access. Using the left or right navigation key allows you
to select from the two modes: GSM Only and GPRS Only.
- Delete Profile: Press the [Press OK key] key to delete the
parameter settings of a profile. Choose Yes or No.
1.9 Cache
1.9.1 Cache Mode
Sets up the Cache memory check.
- Always Check: The Cache is always checked whenever a URL
is loaded.
- Never Check: The Cache is never checked.
1.9.2 Clear Cache: This menu provides a function to clean the data
stored in the Cache (recently visited WAP p ages).
1.10 Security Cert
Y ou can see the saved security certificate.
Press the [Option] Soft key [
Left] to;
Delete: Deletes a security certificate.
Delete All: Deletes all security certificates.
Page 73

73
1.11 Version
This function is for viewing the software version of the WAP browser
2. SIM ToolKit
Refer to the service provider.,
Page 74

74
VI.
Appendix
Check List
Performance and safety
Glossary
Page 75

75
1. Check List
If you experience any problem while using your mobile phone, please refer
to the following checklist. If the problem still persists, contact your dealer or
nearest service centre.
When the “Insert SIM Card” message appears:
Make sure the SIM card is correctly installed. Check to see if the SIM card
is working properly. If it does not work, try to clean the contact points of the
card. If it is out of order, take it to the nearest service centre.
When the “Password” message appears in Phone locked state:
Enter the phone password. The default password is “1234”. If you cannot
remember the password, contact the nearest service centre.
When the “Enter PIN” message appears:
Input PIN. If you cannot remember it, contact the nearest service centre.
You can still receive calls even if your mobile phone becomes locked after
entering the incorrect PIN on 3 times (trial time depends on the SIM)
consecutive attempts.
When the “No Service” or “Network Failure” appears in standby
mode:
Check the RSSI (Received Signal Strength Indicator i.e., Antenna Bar)
state. If you cannot making/receiving a call when you are indoors or
undergrounds where the signal strength is poor, move toward a
window or go out open area. If you still cannot make a connection,
contact the nearest service centre.
When audio quality is poor:
End a call and try again.
When the other party cannot hear you speaking:
Y our phone may be set to MUTE. Disable the MUTE function.
When battery lifetime is shorter than usual:
This may happen when you are in the lower signal strength area. Turn
off your phone when it is not in use. Change the battery when battery
energy is exhausted.
When your mobile phone does not turn on:
Make sure your battery is charged. Check to see if your phone works while
recharging the battery.
When you are unable to send a message:
Either you are not registered to receive a message service, or you may be
in an area where your network service provider cannot provide such a
service.
When you are unable to make a call:
Y our phone may be set to “fixed dial.” Cancel the “fixed dial” function.
Page 76

76
When you are unable to charge the battery:
This may be the result of one of the following cases.
1. Your charger may be out of order. Contact your nearest dealer.
2. You may be attempting to use the phone in an overly hot/cold
temperature. Try changing the charging environment.
3. Your battery may have not been connected to the charger properly.
Check the connector.
When you are unable to input data into the Phone Book:
Your Phone Book memory may be full. Try deleting some entries from your
Phone Book.
When you are unable to select a certain function:
You may not have subscribed to that function, or your network service
provider may be in an area where such service cannot be provided.
Contact your local service provider.
2. Performance and safety
The following list shows how to maintain your mobile phone, together with
precautions to take.
- Keep your mobile phone and its accessories out of the reach of children.
- Maintain your mobilephone in dry condition and keep it within normal
operating temperatures. Temperatures higher than 55 C (131 F) or lower
than -20 C (-4 F) may damage your phone.
- Do not use or store your mobile phone in dusty, dirty areas.
- Do not attempt to disassemble your mobile phone.
- Do not drop or cause severe impact to the phone.
- Do not use chemical products, cleaning solvents or detergents to clean
your mobile phone.
- If your mobile phone does not work properly, contact your dealer
immediately.
- Use only authorised batteries, battery chargers and accessories. Any
malfunction or damage caused by the use of unauthorised batteries,
battery chargers and accessories will void the limited product warranty.
- Ensure that the earthing points of the battery and battery charger are not
in direct contact with conductive objects.
Page 77

77
3.Glossary
To help you understand the main technical terms and abbreviations used in
this booklet and take full advantage of the features of your mobile phone,
here are a few definitions.
Call Barring
Ability to restrict outgoing and incoming calls.
Call Forwarding
Ability to re-route calls to another number.
Call Holding
Ability to put one call on standby while answering or making another call;
you can then swap between the two calls, as required.
Call Waiting
A Network service to inform users that the user has another call
during a call.
CLI (Caller Line Identification) Services
Services allowing subscribers to view or block the telephone numbers of
callers.
GPRS (General Packet Radio Service)
New non-voice value-added service that allows information to be sent and
received across a mobile telephone network. GPRS guarantees continuous
connection to the Internet for mobile phone and computer users. It is based
on the Global System for Mobile Communication (GSM) circuit-switched
mobile phone connections and the Short Message Service (SMS).
GSM (Global System for Mobile Communication)
International standard for mobile phone communication, guaranteeing
compatibility between the various network operators. GSM covers most
European countries and many other parts of the world.
Multiparty Calling
Ability to establish a conference call involving up to five additional parties.
PIN (Personal Identification Number)
Security code that protects the phone/SIM against unauthorised use. The
PIN is supplied by the service provider with the SIM card. It may be a four
to eight-digit number and can be changed, as required.
PUK (PIN Unblocking Key)
Security code used to unlock the phone when an incorrect PIN has been
entered three times in succession. The eight-digit number is supplied by
the service provider with the SIM card.
Roaming
Use of your phone when you are outside your home area (when travelling
for example).
Page 78

78
SIM (Subscriber Identification Module)
Card containing a chip with all the information required to operate the
phone (network and memory information, as well as the subscriber’s
personal data).
The SIM card fits into a small slot on the back of the phone and is
protected by the battery.
SMS (Short Message Service)
Network service sending and receiving messages to and from another
subscriber without having to speak to the correspondent. The message
created or received can be displayed, received, edited or sent.
Multimedia Message Service
Network service sending and receiving messages to and from another
subscriber without having to speak to the correspondent. The Message
supporting presentation of various media types, such as full color images
and polyphonic ringtones.
Soft Keys
Two keys([
], [ ]) marked on the phone, that:
• vary according to the function that you are currently using
• are indicated on the bottom line of the display just above the
corresponding key.
Voice Mail
Computerised answering service that automatically answers your calls
when you are not available, plays a greeting (optionally in your own voice)
and records a message.
FCC & Industry Canada Regulatory Compliance
This device complies with Part 15 of the FCC Rules. Operation is subject to
the following two conditions: (1) this device may not cause harmful
interference, and (2) this device must accept any interference received,
including interference that may cause undesired operation.
Your mobile device is a low power radio transmitter and receiver. When it is
ON, it receives and also sends out radio frequency (RF) signals. In August
1996, the Federal Communications Commission (FCC) adopted RF
exposure guidelines with safety levels for mobile device. Those guidelines
are consistent with safety standards previously set by both U.S. and
international standards bodies: American National Standard Institute
(ANSI), National Council of Radiation Protection and Measurements
(NCRP), and International Commission on Non-Ionizing Radiation
Protection (ICNRP). Those standards were based on comprehensive and
periodic evaluations of the relevant scientific literature. The design of your
Module complies with the FCC guidelines and applicable
Statement according to FCC part 15.105
NOTE: This equipment has been tested and found to comply with the limits
for a Class B digital device, pursuant to Part 15 of the FCC Rules. These
limits are designed to provide reasonable protection against harmful
interference in a residential installation. This equipment generates, uses
Page 79

79
and can radiate radio frequency energy and, if not installed and used in
accordance with the instructions, may cause harmful interference to radio
communications. However, there is no guarantee that interference will not
occur in a particular installation. If this equipment does cause harmful
interference to radio or television reception, which can be determined by
turning the equipment off and on, the user is encouraged to try to correct
the interference by one or more of the following measures:
. Reorient or relocate the receiving antenna.
. Increase the separation between the equipment and receiver.
. Connect the equipment into an outlet on a circuit different from that to
77
which the receiver is connected.
. Consult the dealer or an experienced radio/TV technician for help.
Statement according to FCC part 15.21
Modifications not expressly approved by this company could void the user's
authority to operate the equipment.
RF exposure FCC
For body worn operation, to maintain compliance with FCC RF exposure
guidelines, use only accessories that contain no metallic components and
provide a separation distance of 5mm (0.2 inches) to the body. Use of
other accessories may violate FCC RF exposure guidelines and should be
avoided.
This device and its antenna must not be co-located or operating in
conjunction with any other antenna or transmitter.
Health and Safety Information FCC
This EUT has been shown to be capable of compliance for localized
specific absorption rate (SAR) for uncontrolled environment/general
population exposure limits specified in ANSI/IEEE Std. C95.1-1992 and
had been tested in accordance with the measurement procedures specified
in FCC/OET Bulletin 65 Supplement C (2001) and IEEE Std. 1528-2003
Ministry of Health (Canada), Safety Code 6. The standards include a
substantial safety margin designed to assure the safety of all persons,
regardless of age and health. The exposure standard for wireless mobile
phones employs a unit of measurement known as the Specific Absorption
Rate, or SAR. The SAR limit set by the FCC is 1.6W/kg *.
* In the U.S. and Canada, the SAR limit for mobile phones used by the
public is 1.6 watts/kg (W/kg) averaged over one gram of tissue. The
standard incorporates a substantial margin of safety to give additional
protection for the public and to account for any variations in.
***This device contains 1800 MHz GSM functions that are not operational
in U.S. Territories; this filing is applicable only for 850 MHz GSM and 1900
MHz PCS operations.
 Loading...