

Page 1

Pantech Perception User Guide
5U000692C0A REV.01
Page 2

Pantech Perception™
User Guide
This smartphone’s stylish design and
careful craftsmanship showcase a
vast range of advanced, convenient
and cutting-edge features. Our
state-of-the-art technology turns an
otherwise simple smartphone into a
comprehensive communication and
lifestyle tool.
This user guide has important
information to help maximize your
Perception experience.
1
Page 3

Table of Contents
Read This First 9
Legal Notices ..........................................................................................................................9
Getting Started 11
Overview .............................................................................................................................. 11
Inserting the SIM card, microSD Card and Battery
Charging the Battery
Elementary Controls
Turning the Smartphone On and Off
Initial Setup
Locking and unlocking the Smartphone
Securing the Smartphone
On-screen Buttons .................................................................................................... 20
Finger Gestures
Hand Motions
Rotating the Screen
Using the Speed Dialpad
Geomagnetic Compass
Signing Up for a Google Account
........................................................................................................ 15
......................................................................................................... 16
.................................................................................................................16
...................................................................................... 18
.......................................................................................................... 21
............................................................................................................. 23
.................................................................................................. 25
........................................................................................ 26
........................................................................................... 27
............................................................................... 28
................................................ 13
................................................................. 16
.......................................................... 18
2
Page 4

Basic Operations 29
Status Icons..........................................................................................................................29
Mode change
Standard Mode...................................................................................................................35
Home Screen
Apps Screen
Notifications
Starter Mode
Home Screen
Apps Screen
Notifications
Networking
Connecting to a Wi-Fi Network
Tethering or Mobile Hotspot
Pairing with a Bluetooth Device
Wi-Fi Direct
Transferring Files via USB Connection
Exchanging Data via NFC
Net Media
Location-Based Services
Emergency Call .................................................................................................................58
Capturing a Screenshot
...................................................................................................................... 34
...............................................................................................................35
................................................................................................................38
................................................................................................................ 41
....................................................................................................................... 43
...............................................................................................................43
................................................................................................................45
................................................................................................................ 46
.......................................................................................................................... 47
............................................................................ 47
.................................................................................48
..........................................................................49
.................................................................................................................. 51
............................................................... 52
....................................................................................... 53
..................................................................................................................... 54
................................................................................................. 57
..................................................................................................58
3
Page 5

Calling & Messaging 59
Phone .....................................................................................................................................59
Phone Calls
Phone Settings
Voice Dialer
People
.................................................................................................................................... 63
Messaging
Entering Text
.................................................................................................................. 59
........................................................................................................... 61
.......................................................................................................................... 62
............................................................................................................................ 65
....................................................................................................................... 67
Internet 69
Browser .................................................................................................................................69
Browser Interface
Viewing Webpages
Bookmarks
Browser Settings
Email.......................................................................................................................................77
Gmail
...................................................................................................................................... 80
Talk
.......................................................................................................................................... 83
Google+
................................................................................................................................ 86
...................................................................................................... 69
................................................................................................... 71
................................................................................................................... 73
........................................................................................................ 74
4
Page 6

Media Center 88
Camera .................................................................................................................................. 88
Taking Photos
Taking Videos
Videos
.................................................................................................................................... 95
Playing Videos
Managing Videos
Gallery
................................................................................................................................... 99
Viewing Pictures
Managing Pictures
Editing Pictures
Music
....................................................................................................................................103
Playing Music
Managing Songs
Playlists........................................................................................................................108
Sleep Mode
Music Settings
Mini App
Play Music...........................................................................................................................111
Playing Music
YouTube
IMDb.....................................................................................................................................113
..............................................................................................................................113
............................................................................................................. 88
.............................................................................................................. 92
............................................................................................................95
....................................................................................................... 98
........................................................................................................ 99
..................................................................................................100
........................................................................................................101
............................................................................................................103
......................................................................................................106
................................................................................................................109
..........................................................................................................109
.....................................................................................................................110
............................................................................................................111
5
Page 7

Menu Functions 114
Amazon ..............................................................................................................................114
Amazon Kindle
Purchasing Books
Reading Books
Alarm/Clock
Alarm
World Time
Timer
Stopwatch
Audible
Purchasing Audiobooks
Listening to Audiobooks
Camnote
Finger Gestures
Camnote Settings
Taking a Picture
Editing a Picture
Managing Pictures
Calculator
Calendar
Managing Events
Calendar Settings
Tasks
....................................................................................................................................129
Document Viewer
Viewing Documents
Managing Documents
Downloads
Maps
.....................................................................................................................................133
Play Store
.................................................................................................................115
....................................................................................................116
..........................................................................................................116
.......................................................................................................................118
...........................................................................................................................118
.................................................................................................................119
............................................................................................................................120
..................................................................................................................120
................................................................................................................................121
........................................................................................121
......................................................................................121
.............................................................................................................................123
........................................................................................................123
....................................................................................................123
........................................................................................................124
.......................................................................................................124
..................................................................................................125
...........................................................................................................................126
..............................................................................................................................127
.....................................................................................................127
....................................................................................................128
............................................................................................................130
...............................................................................................130
...........................................................................................131
.........................................................................................................................132
............................................................................................................................134
6
Page 8

Google ................................................................................................................................135
Smart Voice
Task Manager
Voice Recorder
Weather
........................................................................................................................136
....................................................................................................................137
..................................................................................................................138
...............................................................................................................................140
Settings 141
Mode change ............................................................................................................141
Personalization
Wireless & Networks
Airplane mode
Wi-Fi..............................................................................................................................144
Bluetooth....................................................................................................................144
Data usage
Call settings
More
.............................................................................................................................145
Device
..................................................................................................................................147
Sound
..........................................................................................................................147
Display
Motion recognition
Storage
Battery and Power saver
Applications manager
Personal
..............................................................................................................................153
Location access
Security
Language & input
Backup & reset
Accounts
.............................................................................................................................156
Backup Assistant Plus
.........................................................................................................141
.......................................................................................................144
..........................................................................................................144
.................................................................................................................144
...............................................................................................................145
.........................................................................................................................148
.................................................................................................148
........................................................................................................................149
.......................................................................................150
...........................................................................................151
........................................................................................................153
.......................................................................................................................153
....................................................................................................154
..........................................................................................................155
............................................................................................156
7
Page 9

Accounts & sync .......................................................................................................156
System
.................................................................................................................................157
Date & time
Accessibility
Developer options
About phone
................................................................................................................157
...............................................................................................................157
..................................................................................................159
.............................................................................................................159
Appendix 160
Maintenance .....................................................................................................................160
Cautions when Using External Memory Cards
Updating the Software
End User License Agreement (EULA)
Safety Information
Safety Information for Wireless Handheld Phones..............................................168
Safety Information for FCC RF Exposure
SAR Information
Hearing Aid Compatibility (HAC) for wireless telecommunication devices......
Teletypewriter (TTY) Devices
FDA Consumer Updates................................................................................................178
FCC compliance information
12-month limited warranty
...............................................................................................................174
..........................................................................................165
........................................................................166
..........................................................................................................166
................................................................173
......................................................................................177
......................................................................................187
.........................................................................................188
.............................................163
175
Note
The smartphone is under continuous development. Due to changes or
improvements, some description in this guide may differ slightly from
the actual product.
8
Page 10

Read This First
Legal Notices
Bluetooth® is a registered trademark of Bluetooth SIG, Inc.
Wi-Fi® is a registered trademark of the Wi-Fi Alliance.
Google™, YouTube™, Picasa™, Gmail™, Google Maps™ and Play Store™ are
trademarks of Google, Inc.
Universal Plug and Play (UPnP)
Universal Plug and Play (UPnP) technology targets
home networks, proximity networks and networks
in small businesses and commercial buildings. It
enables data communication between any two
devices under the command of any control device
on the network. UPnP technology is independent
of any particular operating system, programming
language, or network technology.
Digital Living Network Alliance (DLNA)
You will find the DLNA Certified™ logo on all kinds
of new digital devices for your home and on the
go—TVs, PCs, mobile phones, you name it. But
they aren’t the same TVs, PCs and mobile phones
you’re used to. They may look familiar, but they
have new capabilities of DLNA Device Classes.
High-Definition Multimedia Interface (HDMI)
HDMI, the HDMI Logo, and High-Definition
Multimedia Interface are trademarks or registered
trademarks of HDMI Licensing LLC in the United
States and other countries.
Read This First 9
Page 11

Dolby® Digital Plus
Dolby® Digital Plus is a trademark of Dolby
Laboratories. It is an advanced surround sound
audio codec. From home theaters and PCs to
mobile phones and online streaming, Dolby
Digital Plus defines high-fidelity audio.
Visit www.dolby.com for more information.
About DivX video
DivX® is a digital video format created by DivX,
LLC, a subsidiary of Rovi Corporation. This is an
official DivX Certified® device that plays DivX
video. Visit www.divx.com for more information
and software tools to convert your files into DivX
videos.
About DivX Video-On-Demand
This DivX Certified® device must be registered in order to play purchased
DivX Video-on-Demand (VOD) movies. To obtain your registration code,
locate the DivX VOD section in your device setup menu. Go to vod.divx.com
for more information on how to complete your registration.
DivX Certified® to play DivX® video up to HD 720p, including premium
content.
DivX®, DivX Certified®, and associated logos are trademarks of Rovi
Corporation or its subsidiaries and are used under licence.
Covered by one or more of the following U.S. patents:
7,295,673; 7,460,668; 7,515,710; 7,519,274
10 Read This First
Page 12
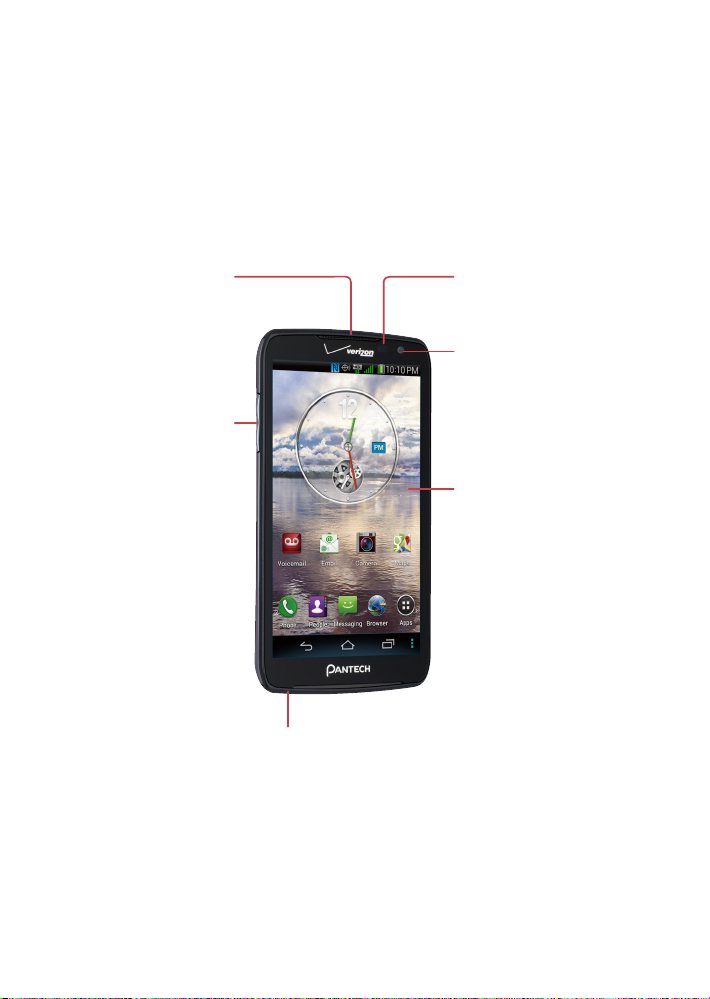
Getting Started
Overview
Earpiece
Volume keys
Proximity Sensor
Front camera
Touchscreen
Microphone
Getting Started 11
Page 13

Micro USB/
Charger port
Power/Lock key
Headset jack
Rear cameraSpeaker
Flash
NFC touch point
SIM Card Slot
12 Getting Started
microSD Card Slot
Page 14

Inserting the SIM card, microSD Card and
Battery
Insert the SIM card provided by the wireless carrier and the battery.
Use a microSD card to expand available file storage. The microSD card is sold
separately.
1. If the smartphone is on, press and hold the Power/Lock key and choose
Power off to turn it off.
2. Remove the battery cover. Use the groove at the bottom of the
smartphone to lift the cover from the smartphone.
3. Position the microSD a nd SIM cards wi th the logos facing up and slid e
them into place until they are full y inserted.
Getting Started 13
Page 15

4. Insert the battery into the battery compartment with the contacts
aligned.
5. Replace the cover. Insert the top of the cover, press the sides into place,
and then press the bottom into place.
Removing the SIM Card
1. Turn off the phone and remove the battery cover and battery.
2. Locate the SIM Card slot and gently pull the SIM Card out to remove it.
Note
A Subscriber Identity Module (SIM Card) is a “smartcard” that houses
personal information, such as your mobile phone number, calling plan,
and account information, such as contacts, text messages, and call
history. The Verizon Wireless 4G LTE SIM Card is compatible with any
Verizon Wireless 4G LTE certified device. The 4G LTE SIM Card can move
from one device to another and your wireless service will support the
services that are compatible with your new device. To see which devices
are compatible with the Verizon Wireless 4G LTE SIM Card, visit
http://www.verizonwireless.com/certifieddevice.
14 Getting Started
Page 16

Removing the microSD card
Before removing the microSD card, first unmount it for safe removal.
Go to Apps > Settings > Storage > Unmount SD card.
In Starter mode: Apps > Settings > System > Storage > Unmount SD card
Push the microSD card until it is disengaged from the slot, and pull it out.
Charging the Battery
1. Insert the small end of the USB cable into the Micro USB/Charger port.
2. Insert the other end of the USB cable into the power adapter.
3. Plug the power adapter into an electrical outlet to begin charging.
A computer can be also used to charge the smartphone by connecting via
the USB cable.
Caution
Avoid acts that may cause the battery to explode or catch fire.
• Do not disassemble, bend, crush, puncture or shred the battery.
• Do not dip the battery in water or other liquids.
• Do not short (connect) the contacts on the battery with a metallic
object.
Getting Started 15
Page 17

Elementary Controls
Turning the Smartphone On and Off
Press and hold the Power/Lock key for a few seconds until the screen lights
up. To turn the Smartphone off, press and hold the Power/Lock key, then tap
Power off in the pop-up menu that appears.
Initial Setup
When the smartphone is activated for the first time, the setup wizard guides
users through the initial setup process. At each step, make a choice or skip
the step:
• Interface language: Select a language for the interface. This can be
changed later under Apps > Settings > Language & input > Language.
In Starter mode: Apps > Settings > System > Language & input >
Language
• Backup service: Subscribe to Verizon’s Backup Assistant Plus service. This
service keeps a copy of the smartphone’s contacts on Verizon’s server, in
case the phone is lost or stolen. If skipped during setup, this service can
be activated later under Apps > Settings > Backup Assistant Plus.
In Starter mode: Apps > Settings > System > Backup Assistant Plus
• Email: Enter the relevant email service provider and other login data
necessary to open an account using the Email app. If skipped during
setup, this can be performed later under Apps > Settings >
Accounts & sync > ADD ACCOUNT.
In Starter mode: Apps > Settings > System > Accounts & sync >
ADD ACCOUNT
• Location services: This feature requires user consent. Location services
keep track of the precise location of the smartphone and allow certain
apps to access this data. This presents some security risks. If skipped
during setup, this can be activated later under Apps > Settings >
Location access.
16 Getting Started
Page 18

In Starter mode: Apps > Settings > Wireless & network > GPS or Apps
> Settings > System > Location access
• Interface mode: Select Starter mode or Standard mode. Standard
mode is selected by default. This can be changed under Apps > Settings
> Mode change. See "Mode change" on page 34 for details about
interface modes.
In Starter mode: Apps > Settings > Mode & application > Mode
change or Apps > Settings > System > Mode change
• Help: A couple of help videos are available. Watch the videos for easier
understanding about the smartphone’s basics.
• Google account: A Google account is necessary to maximize the
utility of this phone’s many features. If skipped during setup, this can
be activated later under Apps > Settings > Accounts & sync > ADD
ACCOUNT.
In Starter mode: Apps > Settings > System > Accounts & sync > ADD
ACCOUNT
• Google location: You can set to use Wi-Fi location or let Google apps
access your location. If skipped during setup, this can be activated later
under Apps > Settings > Location access.
In Starter mode: Apps > Settings > System > Location access
The Setup Wizard app can be run any time to initialize this process again.
This app can be also found under Apps.
Getting Started 17
Page 19

Locking and unlocking the Smartphone
When not in use, lock the smartphone to prevent unwanted operation.
Pressing the Power/Lock key turns the screen off and puts the smartphone
in lock mode.
The smartphone automatically locks if it is not used for a specified period.
Go to Apps > Settings > Display > Screen timeout, then set the length of
time that the smartphone waits before locking.
In Starter mode: Apps > Settings > Display > Brightness > Screen timeout
or Apps > Settings > System > Display > Screen timeout
To unlock the Smartphone, press the Power/Lock key to turn the screen on,
then swipe the lock icon
Note
The direction in which to drag the lock icon varies depending on the
lock screen type. Several types of lock screens are available. Refer to
"Screen lock" on page 141 for details.
.
Securing the Smartphone
Prevent others from using or accessing personal data and information
stored in the smartphone by using the available security features.
Go to Apps > Settings > Security > Screen lock or Apps > Settings >
Personalization > Screen lock > Select screen lock.
In Starter mode: Apps > Settings > Mode & application > Screen lock
> Select screen lock or Apps > Settings > System >
Personalization > Screen lock > Select screen lock
Unlocking with the Slide
Choose Slide.
18 Getting Started
Page 20

Unlocking with the Visual lock
Choose Visual lock. It is set by default.
Unlocking with the Modern lock
Choose Modern.
Unlocking with the Simple lock
Choose Simple lock. The lock option is available only in Starter mode.
Unlocking with the User’s Face
Choose Face unlock. Stare at the front camera and put the user’s face in the
dotted oval on screen. The oval turns green when the face is successfully
recognized. Set a pattern or PIN in case the phone fails to recognize the face.
Unlocking with a Pattern
Choose Pattern, draw a pattern by connecting four or more dots, and then
redraw the pattern for confirmation.
Unlocking with a PIN
Choose PIN
, enter at least four numbers, and then re-enter the password for
confirmation.
Unlocking with a Password
Choose Password, enter at least four letters, including numbers and
symbols, and then enter the password again for confirmation.
Getting Started 19
Page 21

On-screen Buttons
Use the three permanent on-screen buttons that appear at the bottom of
the screen to navigate between screens.
A
Back Return to the previous screen.
B
Home Return to the Home screen
Recent
C
Apps
Menu Icon
The Menu icon D appears on the top or bottom of the screen when a menu
is available. Each application and screen has a different set of menu options,
and they can only be viewed using the Menu icon.
Display recently-used apps. Scroll through the list to see
more apps, and tap an app entry to reactivate it. To clear
an app entry from the list, slide it left or right.
Menu icon
20 Getting Started
Menu icon
Page 22

Finger Gestures
Tapping
To open an app, to select a menu item, to press an on-screen button, or to
type a letter using the on-screen keyboard, tap it with a finger.
Tapping and Holding
Actions such as dragging or scrolling requires a tap-and-hold action. To
perform this action, touch the screen with a finger and keep touching the
screen until the action is complete.
Dragging
To move an icon or thumbnail to a new location, tap and hold it, then drag it
to the target position.
Getting Started 21
Page 23

Double-tapping
Double-tap quickly on a webpage, map or picture to zoom in. Double-tap
again to return.
Flicking
Swipe quickly left, right, up, or down to navigate on many screens or within
many apps.
Pinching
Spread two fingers apart on a webpage, map or picture to zoom in. Pinch
together to zoom out.
22 Getting Started
Page 24

Hand Motions
Simple hand motions allow easy control of the smartphone when your
hands are busy, such as driving or wearing gloves. Before using hand
motions, make sure the option for this feature is enabled.
Go to Apps > Settings, then tap the OFF switch to turn on Motion
recognition. Tap Motion recognition to view and select sub-options to use
by checking the box beside each item.
It is also possible to turn on and off the motion recognition feature using the
Notifications panel when in Standard mode.
In Starter mode: Apps > Settings > System > Motion recognition.
Note
• The front camera is used to sense motions.
• The interval between a hand and the lens should be under 2 to 8
inches.
• Using the motion recognition feature might drain significant amounts
of power.
• A hand motion may not be properly recognized depending on the
user’s hand size and ambient brightness.
• When the screen is off, motions cannot be recognized.
Front camera
Getting Started 23
Page 25

Sweeping
When using the Messaging, Music or Gallery app, sweep a hand to the left or
right over the screen to view the previous or next message, song or picture.
Motion recognition is disabled in interactive message screens.
Waving
Wave a hand twice or more over the screen to answer a call.
Go to Apps > Settings > Motion recognition > Receive voice call.
To use the speakerphone, select Speakerphone usage then Use speaker
phone.
In Starter mode: Apps > Settings > System > Motion recognition >
Receive voice call
24 Getting Started
Page 26

Covering
When using the Music app, cover the screen with a palm to pause or resume
playback.
When using Gallery, cover the screen for a second to start or stop the
slideshow.
Rotating the Screen
Many apps allow display in either portrait or landscape orientation. Rotating
the smartphone causes the display to automatically adjust to fit to the new
screen orientation.
To prevent the display from rotating automatically, open the Notifications
panel and turn off Auto rotate. Alternatively, go to Apps > Settings >
Display > Auto-rotate screen.
In Starter mode: Apps > Settings > Display > > Auto-rotate screen or
Apps > Settings > System > Display >
Auto-rotate screen
Getting Started 25
Page 27

Using the Speed Dialpad
The normal dialpad can transform into the speed dialpad by simply tilting or
flipping the smartphone. To activate this feature, open Phone, tap D > Call
Settings > Dialpad gesture, and then choose Motion-tilt or Motion-flip.
• Motion-tilt: With this option chosen, tilt the smartphone back to display
the speed dialpad, and tilt forward to return to the normal dialpad.
• Motion-flip: With this option chosen, shake the smartphone back and
forth to switch between the normal dialpad and the speed dialpad.
Open Phone and tilt or flip the smartphone to view the speed dialpad. To
set a speed-dial number, tap a blank key and select a phone number from
the contacts list. Tapping a key makes a call to the contact associated with
the key.
26 Getting Started
Page 28

Geomagnetic Compass
Many apps, including Maps and user-installed games, use the built-in
geomagnetic compass for accurate directions. If it seems not to work
properly, wave the smartphone in a figure 8 pattern. There is no setting
menu associated with this. Just follow the on-screen instruction to fix the
geomagnetic compass’ occasional malfunctions.
Getting Started 27
Page 29

Signing Up for a Google Account
A Google account is necessary to maximize this smartphone’s usefulness.
• Google services rely on a Google account for contacts, and email and
the calendar.
• An account is necessary to buy free or paid apps from Play Store.
To sign up for a new account, go to Apps > Settings > Accounts & sync >
ADD ACCOUNT > Google > New. Otherwise, choose Existing instead of
New to sign in with an existing account.
In Starter mode: Apps > Settings > System > Accounts & sync > ADD
ACCOUNT > Google > New
Enter the account information:
• Provide a first and last name for the account user.
• Add a username, which will also be used as a Gmail address. If the
username is already taken, select one of the alternates suggested or
enter a new one.
• Enter a password of 8 letters or more.
• Add an email address and a security question, used to recover the
password if the password is lost.
• Agree to the terms.
• Tap Sync Contacts to sync the smartphone’s contacts list with the
Google account’s contacts. This provides a convenient backup if the
smartphone is lost or stolen.
Note
The menu items for Google applications may be changed after the
automatic application update.
28 Getting Started
Page 30

Basic Operations
Status Icons
The icons displayed in the status bar at the top of the screen provide
information about the smartphone’s status.
Status bar
Go to Apps > Settings > About phone > Icon glossary to get more
information about and to see other status icons.
In Starter mode: Apps > Settings > System > About phone > Icon glossary
Error
Gmail has arrived
Updates available in Play Store
Screen shot is saved
Battery status: Charging
Battery status: Fully charged
Battery status: Empty
Battery status: Remaining battery life
Battery status: Connected to an unknown power supply
Connected to a Wi-Fi network
Connected to Wi-Fi Direct
Verizon Wi-Fi AP connected and authentication succeeded
Basic Operations 29
Page 31

Verizon Wi-Fi AP detected
Verizon Wi-Fi AP connected but authentication failed
GPS active
Mobile Hotspot active
Mobile Hotspot paused
Mobile Broadband active
Bluetooth on and device connected with a paired device
Bluetooth on but device not connected with any other device
Speakerphone on
Signal Strength
Signal Strength: No signal
Transferring through 4G network
Transferring through 3G network
Transferring through CDMA, 1XRTT
Transferring through EDGE
Transferring through GPRS
Transferring through HSDPA/HSUPA/HSPA
Wi-Fi off
Wi-Fi on but no Wi-Fi network detected
Wi-Fi on and Wi-Fi networks available
Wi-Fi error
Airplane mode active
Headset is connected
USB connected
30 Basic Operations
Page 32

Updating App
Data service available
Firmware upgrade available
More notifications
Text input mode: English uppercase letters
Text input mode: English lowercase letters
Text input mode: Numeric
Text input mode: Symbols
Text input mode: Korean
Sync active
Error during synchronization
Sound effect: Mute
Sound effect: Vibrate
Power saver active
Femtocell active
Call in process
Call in process via Bluetooth
Forwarding Call
Call on hold
Missed call
TTY mode active
Privacy call in process
Privacy call in process via Bluetooth
Privacy call on hold
Basic Operations 31
Page 33

Emergency callback mode
Calendar event notification
UICC activation
Unrecognized UICC
No UICC recognized
Loading SIM card contacts
Roaming
Synchronizing Backup Assistant Plus contacts
Data usage exceeded the limit
Data usage about to exceed the limit
Continued data usage after exceeding the limit
Data restricted
Alarm set
Alarm snoozing
Timer on
Incoming SMS has arrived
High priority SMS has arrived
Incoming MMS has arrived
High priority MMS has arrived
WAP has arrived
High priority WAP has arrived
Message not sent
CMAS has arrived
New voicemail has arrived
32 Basic Operations
Page 34

High priority voicemail has arrived
Visual Voice Mail has arrived
On-going download
On-going upload
Requesting to render media files from other devices
Music currently playing (including BGM)
NFC on
Email to AOL accounts has arrived
Email to Exchange accounts has arrived
Email to Verizon accounts has arrived
Email to Hotmail accounts has arrived
Email to Yahoo accounts has arrived
Email to Other accounts has arrived
Safe-reader on
AmazonMP3: On-going download
AmazonMP3: download completed
AmazonMP3: loading contents
AmazonMP3: Playing content
AmazonMP3: Error
Slacker Radio: Play Radio
SwiftKey for Pantech notification
Basic Operations 33
Page 35

Mode change
This smartphone provides two interface modes: Standard mode and Starter
mode.
In Standard mode, which is the default, the smartphone’s appearance looks
similar to most other kinds of smartphones.
To change Starter mode, go to Apps > Settings > Mode change, then tap
Starter mode. To get back to Standard mode, go to Apps > Settings > Mode
& application > Mode change, then tap Standard mode.
Starter mode provides a simplified, easy-to-use interface for users who are
not familiar with smartphones.
Refer to “Standard Mode” on page 35 and “Starter Mode” on page 43 for
details about each mode.
34 Basic Operations
Page 36

Standard Mode
Home Screen
The Home screen is the starting point for accessing this smartphone’s
features. It displays widgets with useful functions and shortcuts to apps.
The Home screen has multiple pages. To see the other pages, flick the screen
left or right or, alternatively, tap the bar on the bottom of the screen.
Bars for Home screen pages
Launcher
Launcher
The Launcher, which is on the lower part of the Home screen, provides
immediate access to the most frequently used apps. Tap an app shortcut to
open the app.
To see more app shorcuts in the Launcher, flick the Launcher left or right.
Basic Operations 35
Page 37

Moving Items
Tap and hold an item, and drag it to a new location. To move it to another
page, drag it to the side of the screen until the desired page appears and lift
your finger to set in place.
Adding App Shortcuts
Open Apps, tap and hold the desired app icon, and then drag it onto a
Home-screen page preview and lift your finger to set.
Adding Widgets
A number of widgets such as calendars and clocks are available for the
Home screen. To add a widget, tap and hold an empty area on the Home
screen or, alternatively, tap the Menu icon D. Tap Widgets, and then drag
one of the widgets that appear onto a Home-screen page preview.
Removing Shortcuts and Widgets
Tap and hold a shortcut or widget, then drag it to the Delete icon G at the
top of the screen.
Creating Folders
Tap and hold a shortcut, then drag it onto another shortcut. A folder is
created to contain them. Create a folder in the Launcher in the same way.
To change a folder’s name, tap the folder, tap the Settings icon E, and then
enter a new name.
Adding Home-screen pages
Pinch the Home screen. Previews of the Home-screen pages are displayed.
Tapping New Panel produces a new page. Tap the Home button B to finish.
36 Basic Operations
Page 38

Rearranging Home-screen pages
Pinch the Home screen, tap and hold a page preview, and then drag it to a
new location.
Removing Home-screen pages
Pinch the Home screen, tap and hold a page preview, and then drag it to the
delete icon G that appears.
Setting Wallpaper
To change wallpaper, tap and hold an empty area on the Home screen or,
alternatively, tap D > Wallpapers. Wallpaper thumbnails are displayed in
four tabs.
• Live Wallpapers: animated images
• Wallpapers: still images
• Gallery: photos taken by the smartphone’s camera and pictures stored
on the memory card
• Downloaded Wallpapers: wallpaper applications downloaded from
Play Store
Tap a wallpaper thumbnail to preview it, then tap Set wallpaper to finish.
Basic Operations 37
Page 39

Apps Screen
Tap Apps in the Launcher to open the Apps screen. The Apps Screen
displays icons for all apps, including any new apps installed.
The Apps screen has multiple pages. Flick the screen left or right to see
other pages.
Changing Display Modes
Tap the pop-up list on the bottom left of the screen to change display
modes.
• Groups: Display apps by group.
• Alphabetical: Display apps by name in alphabetical order.
• Downloads: Display only downloaded apps.
Searching for Apps
Tap D > Search, then enter a keyword into the search field. As letters are
entered, a list populates with matches. Further typing refines the search.
38 Basic Operations
Page 40

Rearranging Apps
Tap EDIT on the bottom right of the screen. Every app becomes movable
and marked with a pencil icon Ž. Tap and hold an app, then drag it to a new
location.
Viewing an App’s Information
Tap EDIT, tap the pencil icon Ž on an app, and then tap Info.
Hiding Apps
Tap EDIT, tap the pencil icon Ž on an app, and then tap Hide. To reveal a
hidden app, tap D > View hidden apps. Hidden apps are displayed. Tap the
pencil icon Ž on an app, then tap Unhide.
Uninstalling Apps
Default apps that come preloaded on the smartphone cannot be
uninstalled. Only user-installed apps can be uninstalled.
Tap EDIT, tap the pencil icon Ž on an app, and then tap Uninstall.
Creating Groups
Create groups to more easily manage apps.
Tap the pop-up list on the bottom left of the screen and choose Groups to
change the display mode. Tap the plus icon W or, alternatively, pinch the
Apps screen, then tap New group. Enter a group title. A tab is created with
the specified title for the new group.
To change the group’s title, tap the Settings icon E next to the title, then
enter a new title.
To move an app to another group, tap EDIT, tap and hold an app, then drag
it to a group tab.
Basic Operations 39
Page 41

Rearranging Groups
Pinch the Apps screen. Tap and hold a group preview, then drag it to a new
location. Tap any group preview to finish.
Removing Groups
Pinch the Apps screen. Tap and hold the preview of an empty group, then
drag it to the delete icon G that appears.
Changing App Icons
Two groups of app icons are available.
Tap D > Change Icons, select one of two icon groups that appear, and tap
Save.
Sharing Apps
User-installed apps can be shared with others. Tap D >Share, select an app
from the list of user-installed apps that appears, and then choose a sharing
method.
Going to Google Play Store
To directly go to Google Play Store for purchasing apps, tap D > Play Store.
40 Basic Operations
Page 42

Notifications
Notification icons appear on the status bar at the top of the screen to report
missed calls, new messages, calendar events, and more.
Drag down from the status bar to open the Notifications panel. To close the
Notifications panel, drag up from the bottom of the screen.
Scroll down the list to see more alerts. Tap an alert entry to see the details.
To clear an alert entry, slide it left or right.
In addition, the Notifications panel provides quick access to the most
frequently changed settings.
• Vibrate: Mute the phone and enable vibration.
• Data: Allow data communication over mobile network.
• GPS: Activate the GPS to get the current location.
• Bluetooth: Activate the Bluetooth to connect to a Bluetooth device such
as a Bluetooth headset.
• Motion recognition: Activate the motion recognition feature.
• Airplane mode: Disable all wireless functions.
Basic Operations 41
Page 43

• Auto rotate: Allow applications such as Gallery or Calculator to
automatically change the interface to fit to the smartphone’s direction,
portrait or landscape.
• Auto sync: Allow applications such as People or Calendar to sync
contacts, events or other data with Google services.
Extend Settings shortcuts by tapping the extend icon Z to see more
configurations, such as about Sound or Display. See “Settings” on page 141
for details about each configuration.
42 Basic Operations
Page 44

Starter Mode
Home Screen
The Home screen is the starting point for accessing the smartphone’s
features. It displays shortcuts for favorite contacts and apps, and thumbnails
for web bookmarks.
The Home screen has multiple pages. To see the other pages, flick the screen
left or right, or tap one of the page icons on the top of the screen.
Icons for Home screen pages
Launcher
¿ : Favorite Apps page À :
Favorite Contacts page
j : Dialer page Á : Bookmarks page
Basic Operations 43
Page 45

Launcher
The Launcher, which is on the lower part of the Home screen, provides
immediate access to the most frequently used apps. Tap an app shortcut to
open the app.
Setting Wallpaper
See “Setting Wallpaper” on page 37.
Making a Call to a Favorite Contact
Go to the Favorite Contacts page À, then tap a contact.
To add a contact, tap a blank shortcut Y that is marked with a plus symbol,
then select a contact from the contacts list or tap Create new contact to
add a new contact.
To delete a contact, tap Edit, next to the contact shortcuts, tap a contact
which is marked with a minus symbol X, and then tap Done.
Dialing Manually
Go to the Dialer page j, enter a phone number, and then tap the handset
icon j on the dialpad. To send a message, tap the messaging icon k.
Launching Favorite Apps
Go to the Favorite Apps page ¿, then tap an app.
To add an app, tap a blank shortcut Y, and then select an app.
To delete an app, tap Edit, tap an app which is marked with a minus symbol
X, then tap Done.
44 Basic Operations
Page 46

Opening Bookmarked Webpages
Go to the Bookmarks page Á, then tap a bookmark thumbnail.
To add a bookmark, tap a blank shortcut Y, and then select a bookmark.
To delete a bookmark, tap Edit, tap a bookmark which is marked with a
minus symbol X, then tap Done.
Tap the search field to open the Google app. See “Google” on page 135 for
details.
Apps Screen
Tap Apps in the Launcher to open the Apps screen.
The Apps screen displays icons for the most frequently-used apps and a few
folders that contain similar kinds of apps.
Tap All apps to access the rest of the apps, including any new apps installed.
Basic Operations 45
Page 47

Notifications
Notification icons appear on the status bar at the top of the screen to report
missed calls, new messages, calendar events, and more.
Drag down from the status bar to open the Notifications panel. To close the
Notifications panel, drag up from the bottom of the screen.
Scroll down the list to see more alerts. Tap an alert entry to see the details.
To clear an alert entry, slide it left or right.
In addition, the Notifications panel provides quick access to the most
frequently changed settings.
• Vibrate: Mute the phone and enable vibration.
• Data: Allow data communication over mobile network.
• GPS: Activate the GPS to get the current location.
• Bluetooth: Activate the Bluetooth to connect to a Bluetooth device,
such as a Bluetooth headset.
• Airplane mode: Disable all wireless functions.
46 Basic Operations
Page 48

Networking
A number of applications, such as Browser and YouTube, need to access the
Internet for proper operation. Data transfer over regular mobile service can
use up bandwidth and rack up substantial charges. The best idea is to use
Wi-Fi networks for data transfer.
Connecting to a Wi-Fi Network
Open Apps > Settings and turn on Wi-Fi.
In Starter mode: Apps > Settings > Wireless & network > Wi-Fi
Note
It is also possible to access the Wi-Fi settings from the Notifications
panel.
Joining a Wi-Fi Network
Tap Wi-Fi, select a network from the list of detected Wi-Fi networks, enter
a password if necessary, and then tap Connect. Networks that require a
password appear with a lock symbol.
After the smartphone connects to a Wi-Fi network, the smartphone
automatically connects to the Wi-Fi network any time it is available.
Adding Wi-Fi Networks
Tap SCAN to rescan for available networks. If a desired network does not
appear in the networks list, tap ADD NETWORK. Enter the network name,
specify the security type, enter the password if it is not an open network,
and then tap Save to finish.
Forgetting Wi-Fi Networks
Any network that has ever been used, including the current network, can be
forgotten so that the smartphone will not automatically connect to it. Tap
an undesired network and tap Forget.
Basic Operations 47
Page 49

Tethering or Mobile Hotspot
Use Tethering or Mobile hotspot to convert the smartphone into a
combination of modem and wireless router, if there is no available Wi-Fi
network. A computer and any other device connected to the smartphone
can access the Internet via the regular mobile service.
Note
If the smartphone is using regular mobile service to access the internet,
significant data use charges may occur.
Go to Apps > Settings > More > Tethering & portable hotspot.
In Starter mode: Apps > Settings > System > More > Tethering & portable
hotspot
The network that the smartphone creates is available via three methods:
• USB tethering: Connect a computer to the smartphone via the USB
cable.
• Mobile hotspot: On a device, choose the smartphone’s network from
the list of available Wi-Fi networks.
• Bluetooth tethering: Pair a Bluetooth device with the smartphone.
Note
To quickly launch Mobile Hotspot, use one of the following methods:
• Open the Mobile hotspot app from the Apps screen, then tap Mobile
hotspot.
• In Standard mode, open the Notifications panel, extend Settings
shortcuts, and then tap Mobile hotspot.
48 Basic Operations
Page 50

Mobile Hotspot Settings
From the Tethering & portable hotspot screen, tap Mobile hotspot
settings > Configure mobile hotspot.
• Network SSID: Enter a network name for the network that the smartphone
creates. Other devices use this name to connect to the network.
• Hide SSID: Prevent other devices from detecting the smartphone’s
network.
• Security: Choose a security type.
• Password: Enter a password to be suitable for the security type chosen.
Pairing with a Bluetooth Device
The smartphone is compatible with Bluetooth devices, such as headsets,
earphones, and keyboards. Bluetooth can also be used to transfer files with
another Bluetooth-enabled device.
Open Apps > Settings, turn on Bluetooth, and then tap Bluetooth.
In Starter mode: Apps > Settings > Wireless & network > Bluetooth
A list of available Bluetooth devices appears after scanning.
To manually scan for Bluetooth devices again, tap SEARCH FOR DEVICES.
Select a desired device, and then accept the auto-generated passkey on
both devices for confirmation.
Changing the Bluetooth Device Name
Tap D > Rename phone, then enter a new name. The new name is used for
other Bluetooth devices to recognize the smartphone.
Changing Bluetooth Visibility
Tap the smartphone entry at the top of the Bluetooth devices list to make
the smartphone visible to other Bluetooth devices, so that they can detect
the smartphone. To make the smartphone invisible or only visible to the
device paired with the smartphone, tap the smartphone entry again.
To change the visibility time, tap D > Visibility timeout.
Basic Operations 49
Page 51

Sending and Receiving Data
Many applications support data transfer via Bluetooth. One example is the
Gallery.
1. Open the Gallery, select a picture, tap the share icon ¶, choose
Bluetooth, and then select one of the detected Bluetooth devices.
2. Accept the authorization request on the other device to receive the
picture.
3. The transferred file is saved in the Bluetooth folder.
Pairing Using NFC
NFC makes it easier to pair the smartphone with an NFC-enabled Bluetooth
device. Slightly put the smartphone to a Bluetooth device for pairing.
Make sure NFC is active before using this feature.
See “Exchanging Data via NFC” on page 53 for details about NFC.
1. With NFC enabled, place your smartphone next to the NFC compatible
Bluetooth device to pair.
2. Tap OK when you are asked to confirm to pair with the device.
3. Tap OK to finish the pairing process.
50 Basic Operations
Page 52

Wi-Fi Direct
The Wi-Fi Direct feature allows two Wi-Fi devices to directly connect to each
other with no need for a wireless router.
1. Activate Wi-Fi Direct on the target device.
Go to Apps > Settings > Wi-Fi > D > Wi-Fi Direct.
In Starter mode: Apps > Settings > Wireless & network > Wi-Fi > D >
Wi-Fi Direct
2. A list of available devices appears after scanning. To manually scan for
Wi-Fi Direct devices again, tap SEARCHING.... Select a target device and
tap Connect.
3. To rename Wi-Fi Direct device, tap RENAME DEVICE. Enter the new
name and tap OK.
Basic Operations 51
Page 53

Transferring Files via USB Connection
A USB connection between the smartphone and a computer allows them
to transfer files. Download the USB driver for this smartphone from the
Pantech website and install it on a computer to enable the computer to
recognize the smartphone.
1. Connect the smartphone to the computer via the USB cable.
2. Go to Apps > Settings > Storage > USB connection options.
In Starter mode: Apps > Settings > System > Storage > USB
connection options
3. Choose one of these connection modes:
- Media device (MTP): The computer recognizes both the smartphone’s
internal memory and the memory card on it.
- Camera (PTP): The computer recognizes only picture files. Whereas
Windows XP recognizes only the smartphone’s internal memory,
Windows 7 recognizes both the internal memory and memory card.
- External memory (SD card): The computer recognizes only the
smartphone’s memory card. Tap Turn on USB storage to activate this
connection mode.
- PC data mode: Under this mode, you can manage files on your phone
storage using a provided PC tool.
When the Ask on plug option is disabled, the smartphone re-uses
the connection mode that was used last for new connections. When
enabled, the smartphone displays this screen in order for the user to
choose a different connection mode.
4. Copy files from the computer to the smartphone’s memory card, or vice
versa.
To release the External memory connection, tap Turn off USB storage. If
the screen in question is closed, open the Notifications panel and tap Turn
off USB storage to get back to the screen.
Note
While the External memory connection is active, some apps cannot
access the memory card.
52 Basic Operations
Page 54

Exchanging Data via NFC
Near Field Communication technology allows users to exchange data, such
as a contact or webpage, between NFC-enabled smartphones. An example
is the Browser.
1. Go to Apps > Settings > More, then turn on both NFC and Android
Beam.
In Starter mode: Apps > Settings > System > More > NFC and Android
Beam
2. Launch the Browser and open a webpage.
3. Bring the smartphone into contact with another smartphone back to
back.
4. Tap anywhere on the webpage. The same webpage is opened on the
other smartphone.
Note
The NFC antenna is located on the lower half of the back cover. Use the
center of the area to get the best performance.
NFC touch point
Align this point with an NFC device.
Basic Operations 53
Page 55

Net Media
Net Media allows users to share and stream many kinds of media, including
image, music and video, between DLNA-enabled devices. Make sure DLNA
devices are connected to the smartphone via Wi-Fi Direct or on the same
Wi-Fi network.
Tap Net Media from the Apps screen to open.
In Starter mode: Apps > All apps > Net Media
Key Features
The smartphone can play three roles: a media server, a media player, or a
media controller.
• When acting as a media server, the smartphone allows other devices to
access the smartphone for media content sharing. Configure the media
server using the setting menu.
• When acting as a media player, the smartphone can play media files
from other devices as well as itself.
• When acting as media controller, the smartphone can command a
device to play media files from another device.
54 Basic Operations
Page 56

Connecting Devices
As Net Media is launched, any available linkable devices are displayed on
the screen.
• The screen’s upper panel shows devices which are ready to send media
files to another device.
• The screen’s lower panel shows devices which are ready to accept and
play media files from another device.
Flick the panel to move between devices if more than one is available.
To rescan for available DLNA devices and detect them, tap the refresh icon
O on the top right of the screen.
The following active data transfer actions are available:
• Push a media file from the smartphone to another device for playing.
• Push a media file from another device to the smartphone for playing.
• Let the smartphone push a media file from a device to another device
for playing.
Follow this procedure:
1. Select the smartphone or a device in the upper panel to push a media
file.
2. Select the smartphone or a device in the lower panel to play the pushed
media file.
3. Tap Next. If an approach request is made on any side, allow it.
4. Select a file category.
5. Tapping a file starts to push the file for playing.
To merely send or fetch a file without playing it, tap and hold a file,
choose Upload or Download, and then follow the instructions.
It is possible to send a picture file to a DLNA-enabled printer via a Wi-Fi
network for printing. Choose Print, and then follow the instructions.
Basic Operations 55
Page 57

Playing Media Files
When devices are successfully connected, the source device’s media files are
listed on the smartphone. This networked media file access can be applied
to several situations, including:
• The smartphone allowing a TV to play the smartphone’s media files
• The smartphone playing media files from a tablet
• The smartphone allowing a TV to play media files from a tablet
In every case, the smartphone controls playback. Net Media has a variety of
built-in media players to play different types of media file. For these media
players, refer to “Gallery”, “Music”, and “Videos”, though Net Media’s media
player interfaces differ.
The smartphone can also be put under the control of another device, as
well.
Net Media Settings
Tap the settings icon F.
• Phone name: Enter a unique name for the smartphone. The name is
used for identification by other devices.
• Network info: This shows the Wi-Fi network to which the smartphone is
currently connected.
• Net Media server on: When activated, this setting allows other devices
to search my smartphone.
• Contents share: When activated, this setting allows other devices to
access and control media files in the smartphone.
• Sharing device management: Determine whether to permit or forbid a
device to share media files with the smartphone.
• Contents position: Select the storage where the media files are stored.
• Contents share folder: Choose a folder to keep files for sharing. Only
files from this folder are visible over the network.
• Download directory: Select a directory to download media files.
• Upload directory: Select a directory to upload media files.
56 Basic Operations
Page 58

Location-Based Services
Use the smartphone’s GPS features to get directions, to identify locations,
to keep track of weather conditions, and to tag messages and photographs
with location details.
This smartphone provides several location-based applications, including
Latitude, Maps, Places, and more. To use these apps properly, make sure the
following prerequisites are met.
• Go to Apps > Settings > Location access to active the GPS features.
Check Access to my location to allow applications to use the user’s
current location for better search results. Check Standalone GPS
services to activate GPS. Check Verizon location services and Google’s
location service to pinpoint the current location more precisely.
In Starter mode: Apps > Settings > Wireless & network > GPS or Apps
> Settings > System > Location access
• Make sure the smartphone is connected to the Internet via either Wi-Fi
or mobile service.
Note
Your wireless device can determine its physical and geographical
location (Location Information). Certain applications and services access,
collect and use Location Information and disclose the information to
others. Use caution and discretion when you make Location Information
available to them.
To limit potential unauthorized access to your Location Information,
Verizon Wireless devices are preset to E911 which only allows authorized
emergency response personnel to locate you when you dial 9-1-1 from
your wireless device.
When you select Verizon location services, Standalone GPS services,
or Google location services, you allow third party access to Location
Information. Any software, widget or peripheral components or
service you choose to download, add or attach to your wireless device
or otherwise access or use can use this information. Check your
wireless device periodically and only use software, widgets, peripheral
components and services from reliable sources.
Basic Operations 57
Page 59

Verizon Wireless makes no representation of accuracy, completeness
or timeliness of any location data, product or service. When you use
your mobile Browser or other services and applications, you authorize
Verizon Wireless to collect, use and disclose your Location Information
to provide you with any location services. Verizon Wireless does
not retain Location Information longer than necessary to provide
the services to you. We will not knowingly disclose your Location
Information to third parties without your consent, except as required by
law.
Carefully review the privacy policies of application providers and third
parties who have access to your Location Information. Significant risks
can be associated with disclosing your Location Information to others.
Emergency Call
Dialing 911 for emergency services does not require a subscription to a
mobile phone service. It is even possible to dial 911 without a SIM card. No
charges are made for 911 calls.
Capturing a Screenshot
Any screen displayed on the smartphone can be captured for future
reference.
Press and hold the Volume-Down key and the Power/Lock key at the same
time to create a screen capture. The screen capture image is saved in the
Screenshots folder.
58 Basic Operations
Page 60

Calling & Messaging
Phone
Tap Phone from the Launcher to open.
Phone Calls
Making Calls
Several methods are available for calling, as follows:
• Enter a phone number using the dialpad, then tap the handset icon j. As
the number is entered, previously dialed numbers that match appear in
a list. Choose one, if appropriate.
• Tap Recent, then select a call from the history of incoming and outgoing
call.
• Tap Favorites, then select a contact from the list of favorite contacts.
• Tap the contacts icon p, then select a contact from the contacts list.
Answering Calls
Tap Answer to receive an incoming call, or tap Ignore to decline it. To
decline a call and send a message to the caller, tap Send MSG.
If a call comes in when the screen is off, drag the green handset icon to the
center to answer it. To decline it, drag the yellow handset icon to the center.
o send a message to the caller, tap Send MSG
T
A waving action can also be used to answer a call. See ”Waving” on page
24 for details.
.
Calling & Messaging 59
Page 61

While on a Call
Tap Mute to turn the microphone off so that the phone doesn’t transmit
sound to the other party.
Tap Speaker to turn the speakerphone on.
When a Bluetooth headset is connected to the smartphone, tap Bluetooth
to switch to the headset.
Speed Dialing
To set speed-dial numbers, tap D > Speed dial setting, choose a blank
speed number, and then select a phone number from the contacts list.
Tap and hold a number on the keypad to place a call using a speed-dial
number. Then, tap Call to call or Message to send a message for the speed
dialing number.
There is more convenient way for speed dialing. See “Using the Speed
Dialpad” on page 26 for details.
International Roaming Call
Tap D > Assisted dialing, and then turn Assisted dialing status on. Tap
Reference country and select a country as home location.
Making a call in a current country connects to the specified country.
Call Waiting
Call waiting is a service provided by wireless carriers. A user can use this
service to suspend a current call and switch to an incoming call.
While on a call, tap Accept to answer another call. To switch between the
two calling parties, tap Swap.
Conference Call
Make a call, then tap Add call to make more calls. When two or more calls
are made, the Add call button changes to Merge. Tap Merge to combine the
calls into a conference.
60 Calling & Messaging
Page 62

Phone Settings
On the Dialpad screen, tap D > Call settings.
• Receive call by vol.up key: Allow pressing and holding the Volume-up
button to answer a call.
• Dialpad style: Choose a dialpad style.
• Dialpad gesture: Check a speed dial by tilting or flipping the device.
• Voicemail: Sets the voice mail settings options.
• Auto answer: With this activated, incoming calls are automatically
picked up if a headset is connected.
• Assisted dialing: Check the Assisted dialing status box to allow
international roaming calls. Tap Reference country and select a country
as the home location.
• Always on top: Check the Display call status window box to allow the
Home button B to display the call status window while on a call.
• Edit reject message: Set to edit text messages to send to callers when
rejecting incoming calls.
• Lock screen: Even when the smartphone is locked with a screen lock
such as PIN, Password, or Pattern, users can open the dialpad by tapping
Emergency call.
• Auto-retry: Set the interval to automatically redial after a call failure.
• TTY mode: Select teletypewriter mode.
• DTMF tones: Select touch tone for dialing. This is used for a variety of
call services.
• Voice privacy: Enable voice encryption for improved security.
• Show dialpad: Allow the dialpad to display service numbers and custom
numbers.
Calling & Messaging 61
Page 63

Voice Dialer
Use Voice Dialer to dial by voice.
Tap Voice Dialer from the Apps screen to open.
In Starter mode: Apps > All apps > Voice Dialer
Speak a command, similar to these examples:
• “Call John Doe at home”
• “Dial 555-1234”
• “Dial 911”
• “Redial”
Select one of suggested words that appear after speaking.
62 Calling & Messaging
Page 64

People
Use People to manage contacts, including phone numbers and email
addresses.
Tap People from the Launcher to open.
Adding Contacts
Tap the plus icon W. Either select an account to sync the new contact to or
select Phone to avoid synchronizing. Enter the contact’s name, information
and any other desired information. Tap the W icon if you have more than
one number or email address for the icon. Tap the figure icon m to add
a picture. Tap Add another field to add more information such as the
contact’s organization or website address. Tap Save to finish.
Editing Contacts
Select a contact and tap the pencil icon ƒ.
To add to favorite contacts, tap the Star icon ®.
Deleting Contacts
Select a contact, tap D > Delete contact.
Calling Contacts
Select a contact, and tap the handset icon j next to a phone number.
Messaging Contacts
Select a contact, and tap the messaging icon k next to a phone number.
Calling & Messaging 63
Page 65

Searching for Contacts
Use one of the following methods:
• In the Groups tab, enter a contact name, phone number, email address,
or any other search criteria.
• In the Favorites tab, tap the search icon ¼ and enter a contact name,
phone number, email address, or any other search criteria.
• In the People tab, enter search criteria into the search field on the upper
part of the screen.
As letters are typed, a list appears with potential matches, any one of which
can be selected.
Sharing Contacts
Select a contact, tap D > Share contacts, and then choose a sharing
method.
Backing Up Contacts
Export the contacts to the SIM Card or a memory card for backup.
Tap D > Import/Export, then choose Export to SIM card or Export to SD
card.
The Export to SD card option exports contacts from the phone to the SD
card.
There are two options for exporting to the SIM card. The Export to SIM card
(Copy) option is better to use than the Export to SIM card (Move) because
copying leaves the data in the internal memory while moving deletes it.
To import the contacts from the SIM card or the memory card, choose SIM
card contacts or Import from SD card.
Backup Assistant Plus
Backup Assistant Plus is Verizon’s backup and sync service. To back up the
contacts to the Verizon online storage, tap D > Backup Assistant Plus.
64 Calling & Messaging
Page 66

Messaging
Use Messaging to send text or multimedia messages.
Tap Messaging from the Launcher to open.
Sending Messages
Tap the plus icon W, then compose a message.
• Type phone numbers, emails, or names to add recipients. To select
recipients from the contacts list, recent calls, or a group of contacts, tap
the figure icon n.
• If there are two or more recipients, either choose Individual messages
to send the message to each recipient separately or choose Group
conversation.
• To send the message to online album, tap D > To online album.
• To insert a contact, web bookmark, or ready-made text such as “on my
way”, tap D > Insert text.
• To add more messages, tap D > Add slide.
• To insert an emoticon, tap D > Insert smiley.
• To add a subject, tap D > Add subject.
• To add a slide for a message, tap D > Slide manager >
• To set priority, tap Set priority(Normal) > Normal or High.
• To attach pictures, videos or other files, tap Attach.
• Finally, tap Send to send the message.
.
Viewing Messages
Incoming messages are grouped into message threads by contact. Select a
contact to view that contact’s messages.
• Tap j to call the contact in the message.
•
Tap D to select a message compose option, to reply for the message, or
delete it.
Calling & Messaging 65
Page 67

Searching for Messages
Tap D > Search and enter a search criteria.
Deleting Messages
Use one of the following methods:
• Tap and hold a message, select more messages by tapping, and then tap
the delete icon H > OK.
• Tap D > Delete, select messages by tapping, and then tap the delete
icon H > OK.
66 Calling & Messaging
Page 68

Entering Text
Changing the Keyboard
This phone supports several different language keyboards.
Go to Apps > Settings > Language & input > Default, then choose
keyboard type.
In Starter mode: Apps > Settings > System > Language & input > Default
• Pantech keyboard allows to type symbol and emoticon characters
easily.
• SwiftKey for Pantech allows to type multiple languages.
To switch from the Pantech keyboard to SwiftKey for Pantech, tap and hold
the key and choose Select input method > SwiftKey for Pantech.
To switch from the SwiftKey for Pantech to the Pantech keyboard, tap
and hold the microphone key
keyboard.
and choose Input method > Pantech
Typing Uppercase
Tap the Shift key before typing a letter. For all caps, tap it twice.
Calling & Messaging 67
Page 69

Typing Extra Letters
Tap the
key to type numerals, symbols, and punctuation marks. There is
another way to type them more easily. A key has one or more extra letters.
To type an extra letter, tap and hold the key corresponding to the letter.
Speech to Text
Tap the microphone key and speak into the microphone. Select one of the
suggested words that appear.
Adding Language Keyboards to SwiftKey for Pantech
Go to Apps > Settings > Language & input, then tap the equalizer icon
F next to SwiftKey for Pantech. Tap Languages & layouts and select a
language to add it.
In Starter mode: Apps > Settings > System > Language & input
Changing Language Keyboards on SwiftKey for Pantech
Tap and hold the space key, and slide it left or right.
Copying and Pasting
Tap and hold over text, drag the opening marker º or the closing marker »
to the left and right or up and down to select more or less text, and then tap
the copy icon ~ or the cut icon .
To paste the text into a text input field, tap and hold at the place where it
will be inserted until PASTE appears, then tap it.
68 Calling & Messaging
Page 70

Internet
Browser
Browser is an all-purpose web and internet reader. Use it to search for
information on the Internet and read webpages. Many of its functions are
fully customizable by configuring its security and other settings.
Notes
• An active internet connection is required, either via Wi-Fi or mobile
service.
• Data transfer fees may be very high if the Browser downloads
significant amounts of information over the regular mobile service.
Tap Browser from the Apps screen to open.
In Starter mode: Apps > Browser
Viewing a Website
To view a website, enter the website address into the address field at the top
of the page, then tap the enter key.
Browser Interface
Navigating between Webpages on a Tab
To navigate between pages that have already been viewed on the same tab,
tap the Back button A or tap D > Forward.
Adjusting Brightness
Tap D > Brightness and adjust the brightness of the Browser screen for easy
reading. Check Automatic brightness to allow the phone to determine how
much light is required.
Internet 69
Page 71

Scrolling
Scroll through long webpages by flicking the screen.
Zooming in often magnifies pages so that they are wider than the display
screen.
Standard versus Mobile Websites
Many websites offer a limited or smaller version when they detect a Browser
used on a smartphone or mobile device. Sometimes, the simpler versions
of these websites have reduced functionality. For example, simplified
sites often make it more difficult to enter information into forms or use
interactive services.
To see the regular version of the website, tap D > Request desktop site, and
the normal version appears, if it is available.
Full Screen Mode
Full screen mode allows more of a webpage to be visible on one screen.
Tap D > Settings > Labs.
• Quick controls: This hides the Browser’s status bar.
• Fullscreen: This hides the smartphone’s status bar
• WebGL: This enables web graphics library.
When the Quick controls option is on, to access the screen’s controls,
hold a finger or thumb over the left or right screen edge with a very slight
outward-inward motion. The regular menu options appear as icons in a
hemispherical menu. Slide the finger to the desired item.
70 Internet
Quick controls
Page 72

Viewing Webpages
The Homepage
Tap D > Homepage to return to the Browser’s homepage.
To set an open website as the Browser’s homepage, tap D > Settings >
General > Set new tab homepage > Current page.
Opening New Tabs
Tap the plus icon W on the top of the screen. A new page tab opens.
Switching Between Multiple Pages
The Browser can maintain many open webpages at the same time, stored on
different tabs. Tapping the tabs at the top of the Browser switches between
them.
When several pages are open in different tabs, tap D > Tab management to
view a preview of all of the available tabs and to choose between them.
Viewing Webpages while Incognito
Any pages viewed incognito are not preserved in the Browser’s history
and behind-the-scenes identifiers like cookies are deleted after the session
closes. Only downloaded files and bookmarks remain.
Tap D > New incognito tab to browse without saving any search or
browsing history.
Refreshing Webpages
Many webpages have live material that must be refreshed. Refresh
webpages by tapping the refresh icon P beside the webpage address at the
top of the Browser.
Halting Page Loading
Stopping page loading is useful when a link has been selected accidentally,
when a page has too much information to load. To stop loading, tap the ×
icon beside the address at the top of the Browser.
Internet 71
Page 73

Searching the Web Using Google
Enter search criteria into the address field and tap the enter. Tap D >
Settings > Advanced > Set search engine to change the default search
engine.
A Google search page returns search results. Tap any of the search results to
open the relevant page. Google search results typically open on a new tab
when selected.
For Google Maps and other location services, enable the Browser’s location
services so the searching webpage can use the smartphone’s current
location to return accurate results. Location services are found under
Settings.
Searching by Voice
Tap the address field, tap Œ, speak search criteria, and then select one of the
suggested words that appear.
Searching Within a Webpage
To search for specific text on a webpage, Tap D > Find on page and enter
words into the search field. Any matching words are highlighted on the
page.
Tap the up icon S or down icon T to move to the previous or next matching
word, and tap the close icon × when finished.
Saving Webpages
To save a webpage for later off-line viewing, tap D > Save for offline
reading. To view saved pages, tap D > Bookmarks, tap the Saved pages tab,
then select a webpage.
Sharing Webpages
To share a webpage with contacts, tap D > Share page, then choose a
method to use to send the web address.
72 Internet
Page 74

Bookmarks
Saving Bookmarks
Tap D > Save to bookmarks to save a webpage’s address for future
reference. Among the options, enter a label, modify the web address if
necessary, specify the Google account which will store the bookmark, and
choose a bookmark folder to save the bookmark.
Note
If a bookmark is saved to Local instead of a Google account, and if the
phone is lost or stolen, the bookmark is not recoverable.
Opening Bookmarks
To open a bookmarked webpage, tap ˆ or tap D > Bookmarks, then select a
bookmark. To keep the current page open but also open the bookmark on a
new tab, tap and hold the bookmark and choose Open in new tab.
Managing Bookmarks
Tap D > Bookmarks and tap and hold a bookmark.
• To alter the bookmark, tap Edit Bookmark and change its information.
• To create a shortcut for the bookmark on the Home screen for easy
access, tap Add shortcut to home.
• To send the bookmark, tap Share link and choose a sharing method.
• To copy the web address of the bookmark, tap Copy link URL and paste
it into any other app.
• To delete the bookmark from the list, tap Delete bookmark.
• To set the bookmark as the homepage, tap Set as homepage.
Internet 73
Page 75

Browser Settings
Tap D > Settings.
General
• Set new tab homepage: Select what page appears when a new tab
opens.
- Current page: With this selected, the currently-viewed page appears.
- Blank page: With this selected, no page appears.
- Default page: With this selected, the Google search page appears.
- Most visited sites: With this selected, the most-visited page appears.
- Other: Select this and enter a web address to make it appear.
• Form auto-fill: Online forms are filled with data already entered with the
Auto-fill text settings by simply touching the forms. This makes entering
often-repeated data into forms much easier.
• Auto-fill text: Enter standard text used to auto-fill fields on webpages.
Privacy & security
• Clear all data: Clear all browsing information stored by the browser. This
data includes the cache, the history and all other forms of saved web
data. To erase not all data but only individual data, use other functions
like clear cache, clear history, clear all cookie data, etc.
• Clear cache: Empty locally cached content and databases stored while
visiting websites.
• Clear history: Empty the Browser’s internet surfing records.
• Show security warnings: Allow the Browser to display security warnings
if there is a problem with a site’s security, such as outdated or invalid
certificates.
• Accept cookies: Allow the Browser to accept cookies from websites for
your convenience. Be aware that some cookies may be associated with
malicious or dangerous code that can breach privacy.
• Clear all cookie data: Delete all cookie information stored by web
browsing sessions.
74 Internet
Page 76

• Remember form data: Allow the Browser to preserve some data in
some form fields for the next time you use that form. This is especially
useful when repeatedly filling out online forms.
• Clear form data: Delete all stored from data you have entered in forms.
• Enable location: Allow websites to request access to your location.
This can assist websites to provide service that you may need based on
where you are.
• Clear location access: Clear the permission you have granted to all
websites which requested location access.
• Remember passwords: Allow the Browser to remember usernames and
passwords for specific sites. You will be asked “Remember, Not now, and
Never” on a website before the Browser stores passwords.
• Clear passwords: Clear all saved passwords.
Accessibility
• Force enable zoom: Some websites do not allow zooming in or out. This
option overrides the website’s limitations.
• Text scaling: Move the slider to increase or decrease the text size
• Zoom on double-tap: Move the slider to increase or decrease the zoom
scale when zooming in or out by a simple double-tap.
• Minimum font size: Specify the minimum font size.
• Inverted rendering: Activate to decolorize webpages with inverted
black and white colors. Move the slider to adjust the Contrast.
Advanced
• Set search engine: Choose one of the listed search engines to use as the
default search engine.
• Open in background: When a new tab opens, it stays behind the
current tab, not in front.
• Enable JavaScript: When JavaScript is enabled, the display of some
websites will be improved, but security and performance may suffer.
• Allow multiple tabs per app: Set to open the link in a new tab with the
first tab in browser leaving as it is when you click a link.
Internet 75
Page 77

• Enable plug-ins: Enable downloading and installation of Browser plug-
ins to access some more advanced features of various websites. Some
plug-ins may alter Browser behavior and affect performance.
• Website settings: Adjust specific settings for various websites.
• Default zoom: Set the default zoom level when zooming in and out on
webpages.
• Open pages in overview: Show overview of newly-opened webpages
zooming out.
• Auto-fit pages: Newly opened pages are automatically fitted to the
screen, regardless of the actual size.
• Block pop-ups: Allow the Browser to block pop-ups.
• Text encoding: Choose a character encoding system to use for
webpages.
• Reset to default: Restore all of the Browser’s settings to their original
values.
Bandwidth management
• Search result preloading: With this option active, by predicting where
the user is likely to go next, the Browser can download page data in the
background and open those pages immediately if the user chooses to
view them.
• Web page preloading: Allow browser to preload linked web pages in
the background.
• Video preloading: Allow browser to preload video when server allows.
• Load images: Allow the Browser to display images if web pages have
images. With this option inactive, Browser displays only text without
images.
Labs
See “Full Screen Mode” on page 70.
76 Internet
Page 78

Email
Tap Email from the Apps screen to open.
In Starter mode: Apps > All apps > Email
Setting Up Email Account
Set up an email account when opening Email for the first time. Tap an email
service provider and enter an email address and password. Follow on-screen
instructions to complete the setup.
To set up another email account, tap D and choose Accounts or Settings,
then tap D > Add account.
Removing Email Accounts
Tap D > Accounts, then tap D > Remove account(s). Select accounts, then
tap Done.
Sending Messages
Tap the plus icon W to compose a message.
• Type email addresses or names to add recipients. To select recipients
from the contacts list or recently-used email addresses, tap the figure
icon n.
• To add more recipients, tap D > Add Cc/Bcc.
• To attach pictures, videos or other files, tap Attach.
• To exit without sending the message, tap D > Discard.
• To save the message for future sending, tap D > Reservation setting.
• To leave a reminder about the message on the calendar, tap D > Save to
calendar on.
• To give a priority to the message, tap D > Set priority, then select one
from among Priority high, Priority normal, and Priority low.
• Finally, tap Send to send the message.
Internet 77
Page 79

Reading Messages
To switch to another email account, tap Inbox. Selecting an email account
retrieves new messages. To manually retrieve new messages, tap D >
Refresh. To view another mailbox, tap the briefcase icon }.
Select a message to read it.
• To see attached contents, tap Attachment.
• To see details about the message, tap the corner symbol next to the
subject. To mark the message as a reminder, tap the star symbol next to
the sender.
• To reply to the message, tap t > Reply.
• To reply to all recipients, tap t > Reply all.
• To forward the message to others, tap t > Forward.
• To save the message as an event, tap D > Save calendar.
• To mark the message as a reminder, tap D > Mark as unread.
• To view the previous or next message, tap the previous icon
Q or next
icon R.
• To view other messages, tap the list icon c.
• To get back to the Inbox, tap the back icon
Q
on the top left corner of
the screen.
• To delete the message, tap the delete icon H.
Searching for Messages
Tap D > Search, then enter a search criteria.
78 Internet
Page 80

General Email Settings
Tap D > Settings > General settings.
• Automatic picture view: Display images embedded in a message
immediately.
• Clear sender cache of “Show pictures”: Empty the list of senders from
whom messages are allowed to display embedded pictures.
• Ask before deleting: Set to display the confirmation pop-up window
before deleting emails.
• Message text size: Select a font size for message text.
• Clear auto-complete email address cache: Empty the list of all entered
email addresses.
Internet 79
Page 81

Gmail
Use Gmail to quickly and directly access the Google mail service.
Tap Gmail from the Apps screen to open.
In Starter mode: Apps > All apps > Gmail
Though it appears that it does, Gmail does not actually use separate folders.
Instead, it attaches labels to each email. Deleting a message simply removes
the Inbox label from the email and adds a Trash label. When the trash is
emptied, Gmail purges all emails with the Trash label. Gmail stores all emails
until the trash is emptied.
This is important to remember because there are other labels that can
attach to emails, such as “Important” or “Sent”.
Sending Messages
Tap the mail icon w to compose a message.
• Type email addresses or names to add recipients.
• To add more recipients, tap D > Add Cc/Bcc.
• Enter a subject and compose a message.
• To attach pictures or videos, tap D > Attach picture or Attach video.
• To exit without sending the message, tap D > Discard.
• To save the message for future editing, tap D > Save draft.
• To read the online help, tap D > Help.
• To configure Gmail settings, tap D > Settings.
• To report a bug or suggest an idea on Gmail, tap D > Send feedback.
• Finally, tap the Send icon x to send the message.
80 Internet
Page 82

Reading Messages
To switch to another Gmail account, tap Inbox. Selecting a Gmail account
retrieves new messages. To manually retrieve new messages, tap the refresh
icon N. To view another mailbox, tap the label icon u.
Select a message to read it.
• To view the previous or next message, flick the screen left or right.
• To mark the message as a reminder, tap the star icon ® next to the
sender.
• To reply to the message, tap the reply icon y next to the sender.
• To reply to all recipients, tap the menu icon D next to the sender and
choose Reply all. When in landscape view, tap the reply-to-all icon z.
• To forward the message to contacts, tap the menu icon D next to the
sender and choose Forward. When in landscape view, tap the forward
icon {.
• To mark the message as important, tap D > Mark important.
• To report the message as spam, tap D > Report spam.
• To hide the message, tap D > Mute. A muted message, including the
entire thread of the message, stays archived until a new message is
posted to the thread.
• To archive the message, tap the file cabinet icon
. Archived messages
are labeled as All Mail.
• To get back to the Inbox, tap the back icon Q at the top of the screen.
• To delete the message, tap the delete icon I.
Note
Two menu icons D are available on this screen. One is on the bottom
right of the screen, and the other is on the upper right. “Next to the
sender” in this section refers to the menu icon D on the upper part of
the screen. For the rest of this section, it refers to the one on the bottom.
Searching for Messages
In a mailbox, tap the Search icon ¼ and enter search criteria.
Internet 81
Page 83

General Gmail Settings
In a mailbox, tap D > Settings > General settings.
• Confirm before deleting: Prevent a message from being deleted
without permission.
• Confirm before archiving: Prevent a message from being archived
without permission.
• Confirm before sending: Prevent a message from being sent without
permission.
• Swiping conversation list: Archive message in inbox, remove label in
custom labels, or deletes in system labels.
• Reply all: Replace the reply icon y next to the sender name with the
reply-to-all icon z.
• Auto-fit messages: Shrink messages to fit the screen.
• Auto-advance: Choose what is displayed after deleting or archiving a
message.
- Newer: The next unread message is displayed in sequence.
- Older: The previous read message is displayed in sequence.
- Conversation list: The list of messages is displayed in sequence.
• Hide checkboxes: Hide checkboxes in the list of messages to prevent
unintended changes to messages.
• Message actions: Choose how to display message action icons,
including the reply icon y.
- Always show: They are displayed at the top of the screen all the time
even when scrolling down a message.
- Only show in portrait: They are displayed only when in portrait
direction.
- Don’t show: They are displayed at the top of the page as part of a
message, so can be scrolled out of sight.
82 Internet
Page 84

Talk
Use Talk to chat with contacts via Google Talk.
Tap Talk from the Apps screen to open.
In Starter mode: Apps > All apps > Talk
To switch to another Google account, tap the account ID next to the Talk
icon and select a Google account.
Public Profile
Tap the account ID at the top of the friends list to change the availability
status, photo or status message.
To insert a photo, tap the figure image.
To change the availability status, tap the text next to the figure image.
To enter a status message, tap below the figure image.
Adding Friends
Add a friend to the friends list. Tap the figure icon r, enter a Gmail address,
and then tap Done. A chat invitation is sent to the friend. After the friend
accepts the invitation, the friend appears in the friends list.
Chatting with Friends
While chatting, tap the menu icon D to use the following actions:
• End chat: Select this to quit the chat.
• Go off the record: Chat histories are saved to the user’s Google account
for future reference. Select this to chat off the record.
• Friend info: Select this to view the friend information.
• Add to chat: Select this to invite a friend to the current chat.
• Clear chat history: Select this to delete the chat’s history.
To quit all the chats, on the friends list, tap D > End all chats.
Internet 83
Page 85

Searching Friends
Tap the search icon ¼, then enter a friend’s name or email address.
To sign out of Google Talk
You can sign out of Google Talk. For example, if you want to limit Google
Talk conversations to your computer. Also, signing out can extend your
battery life.
From your Friends list, tap D > Sign out.
You will no longer receive chat notifications or see others’ Google Talk status
in other applications, such as Gmail™.
Help
To read the online help, tap D > Help.
To see the software information about Talk, tap D > Settings > About Talk.
To report a bug or suggest an idea on Talk, tap D > Send feedback.
Talk Settings
Tap D > Settings, then tap the user’s account.
• Mobile indicator: With this option on, the user’s status is displayed to
friends.
• Away when screen off: With this option chosen, the user’s status
changes to away when the screen is locked.
• Invitation notifications: With this option on, invitations from friends are
notified.
• IM notifications: Choose how to display when an IM arrives.
- Open dialog: With this chosen, chats are immediately begun when an
IM arrives.
- Show notification: With this chosen, IMs are simply notified.
• Notification ringtone: Select a ringtone for chat notifications.
• Vibrate: Choose when chat notifications cause to vibrate.
84 Internet
Page 86

• Video chat notifications: Choose how to display when a video chat
invitation arrives.
• Video chat ringtone: Select a ringtone for video chat notifications.
• Vibrate: Choose when video chat notifications cause to vibrate.
• Default video effect: Choose which resolution to use for video chats.
• Blocked friends: Select friends to block.
• Clear search history: Empty the list of all the search criteria entered.
• Manage account: This opens the Settings app’s Accounts & sync menu.
• Terms & privacy: This shows Talk’s terms and privacy policy.
Internet 85
Page 87

Google+
Google Plus unites many Google services under one comprehensive
account. It conveniently marries messaging and social networking.
Note
Google Plus is an active service which is subject to frequent changes
and improvements. This section provides only fundamental concepts
and general descriptions.
For more detailed information, refer to Google’s online help.
Tap Google+ from the Apps screen to open.
In Starter mode: Apps > All apps > Google+
Navigating within Google Plus
Tap the function icon on the upper left of the screen to open Google Plus’
function menu. Tap a function to select it. Tapping the name of the function
beside the icon opens up a sub-menu for that function, if one is available.
The Home Page
The user’s Google+ Home page shows posts shared by people who are in
the user’s circles, including text, pictures, videos, links, location marks, or
mood.
Profile
The user profile functions as the calling card that identifies the user to
others. The profile includes the user’s image, bio, and more.
Photos
Users can upload or post photos, or view instantly uploaded or posted
photos.
86 Internet
Page 88

Communities
Communities are places for people to get together and talk about the
interests they share. It shows suggested communities and allows you to join
there.
Hangouts
A user can do video chat with up to 10 people simultaneously using this
function.
Events
Users can create and manage events.
Messenger
Google Messenger functions as an independent internet chatting platform.
Text or chat with Google users anywhere else in the world.
Local
Users find places or views suggested places by categories.
Apps
Apps functions shows all applications that you signed in with Google +.
Search
Users can search for posts.
Internet 87
Page 89

Media Center
Camera
Camera can take both photographs and video.
Tap the Camera from the Apps screen to open.
In Starter mode: Apps > Camera
While the camera functions are very similar to those found on point-andshoot cameras, many more advanced options are available to help create
better images. Note that the options for the still and video camera are
very similar, but there are some differences. Most of these differences are
intuitive. For example, it is impossible to record sound on a still image, so
the record option is not available for pictures.
The actual storage space taken up by still images and video varies by the
resolution of the images and by the length and quality of the video.
Taking Photos
Switch between the front
and rear lenses.
Switch between camera,
video and panorama
modes.
Tap this shutter button to
take photos.
Switch between normal
and HDR modes.
Open the Gallery to
display photos.
88 Media Center
Page 90

Select any options, if necessary. Focus on the object by tapping the screen,
and tap the shutter button. The picture is automatically saved in the Camera
folder.
Zooming In and Out
Use the slider to zoom in and out. Spread and pinch gestures are also
available to zoom in and out.
Front and Rear Camera
By default, the camera uses the rear lens. To switch between the front and
rear camera lens, tap the lens switch icon ™.
High Dynamic Range Pictures
The HDR format combines photos taken at different exposures into one
optimal photo by enhancing multiple exposure control and compensating
for backlight.
Switch to HDR mode by tapping Normal œ. It turns to HDR ›.
Camera Options
Several different kinds of camera options are available. Tap Ä > Options.
• Exposure: The options range from -4 to +4. Select one of them. Use
higher values in darker situations.
• Timer: The options range from Off to 10 sec. Select one of them. After
the specified time elapses, the camera automatically takes the picture.
• Flash: Choose one from among Auto, On, and Off.
• Resolution: The options range from 0.3M(640x480) to 8M(3264x2448).
Select one of them. Higher resolutions result in larger file sizes, which
take up more memory and reduce the total number of pictures that can
be stored.
• White Balance: This is designed for specific lighting situations. Choose
one from among Auto, Daylight, Cloudy, Fluorescent, and Tungsten.
Media Center 89
Page 91

Instant Pictures
Tap Ä > Mode > Instant Film. Tap the shutter button to take a picture. The
picture appears in several seconds. Type a memo for the picture, adjust the
font if necessary, and then tap Save.
Division Shots
Tap Ä > Mode > Division. Tapping the shutter button takes four shots in
sequence. The photos are combined into one, divided horizontally and
vertically.
Color Effects
To apply a color effect to the photo, tap Ä > Effects > Color Effect, then
choose one from among None, Grayscale, Sepia, and Aqua.
Art Filter
To apply an art filter to the photo, tap Ä > Effects > Art Filter, then choose
one from among None, Candy, Cartoon, Classic, Toy , and Vignette.
Shortcuts
To create a shortcut to any of the options, tap Ä and tap and hold an option.
When it changes color to orange, drag it to one of the shortcut slots.
To remove a shortcut, tap and hold a shortcut, drag it out of place until the
à symbol appears, and then release it.
90 Media Center
Page 92

Camera Settings
Tap Ä > Settings. Tap the box to toggle between options.
• Review Screen: The options range from Off to 5 sec. If this is set to
anything other than off, the picture is displayed on the screen for the
specified length of time once it is taken.
• Photometry: Light is measured either Wide or Center. Center measures
light only in the middle of the image, and Wide averages it over the
entire image. Use Center for well-lit objects against a brighter or darker
background.
• Voice Recognition: Choose between On and Off. Users can control the
camera using voice commands.
• Geotag: Choose between On and Off. When this is activated,
geolocation information attaches to the image file.
• Shutter Sound: Choose between On and Off. The shutter makes a click
sound or is silent.
• Grid: Choose between On and Off. Activating this setting displays a grid
on the screen.
• Save Location: Choose the internal memory or the memory card and
select a folder to which pictures will be saved.
Panoramic Pictures
To create a wide, panoramic picture, switch to panorama mode by tapping
the camera mode icon
and selecting Â. Tap the shutter button, then
move the camera horizontally to the right or left. As the camera takes shots,
the bar on the bottom of the screen indicates the progress.
Media Center 91
Page 93

Taking Videos
Switch between the front
and rear lenses.
Switch between camera,
video and panorama
modes.
Tap this shutter button to
begin recording.
Open the Gallery to
display photos.
The video camera operates using almost the same options as the camera.
However, some options are unavailable, and there are additional options
available.
Tap the camera mode icon
shutter button to begin recording, and tap it again to stop recording.
Video Options
Several different kinds of options are available. Tap Ä > Options.
• Exposure: The options range from -4 to +4. Select one of them. Use
higher values in darker situations.
• Time Lapse: The options range from Off to 5 sec. Select one of them.
This records a video at the specified intervals.
• Flash: Choose between On and Off.
• Focus Mode: Choose between Auto and Touch to set a focus mode.
• Resolution: The options range from MMS(320x240) to FHD(1920x1080).
Select one of them. Higher resolutions result in larger file sizes, which
take up more memory and reduce the total number of videos that can
be stored.
• White Balance: This is designed for specific lighting situations. Choose
one from among Auto, Daylight, Cloudy, Fluorescent, and Tungsten.
and select š to switch to video mode. Tap the
92 Media Center
Page 94

Video Effects
Tap Ä > Effects.
• Color Effect: To apply a color effect to the video, choose one from
among None, Grayscale, Sepia, and Aqua.
• Time Lapse Effect: To make a time-lapse video, select Tilt-shift.
Otherwise, select None.
• Face Effect: To apply a face effect to the video, choose one from among
None, Squeeze, Big Eyes, Small Eyes, Big Mouth, Small Mouth, and Big
Nose.
• Background: To apply a background effect to the video, choose one
from among None, Sunset, Disco, and Custom.
Video Settings
Tap Ä > Settings. Tap the box to toggle between options.
• Review Screen: The options range from Off to 5 sec. If this is set to
anything other than off, the video is displayed on the screen for the
specified length of time once it is taken.
• Voice Rec.: Choose between On and Off. Either activate or deactivate
sound recording while taking video.
• Geotag: Choose between On and Off. When this is activated,
geolocation information attaches to the video file.
• Shutter Sound: Choose between On and Off. The shutter makes a click
sound or is silent.
• Grid: Choose between On and Off. With this enabled, a grid is displayed
on the screen.
• Save Location: Choose the internal memory or the memory card and
select a folder to which pictures will be saved.
Media Center 93
Page 95

Time-Lapse Videos
Time-lapse videos condense the filming period to make it seem as if people
and objects are moving faster.
Tap Ä > Options > Time Lapse and set an interval. To produce a video with
extremely limited depth of field, tap Ä > Effects > Time Lapse Effect > Tilt-
shift. In a video created with these two options, people moving with surreal
speed also look smaller.
Capturing a Frame
Tap the capture icon Ÿ to capture a frame while taking video.
94 Media Center
Page 96

Videos
Tap Videos from the Apps screen to open.
In Starter mode: Apps > Media > Videos
Playing Videos
Tap a video to watch it. To watch several videos in sequence, tap D > Play
selected items, select a number of videos, and then tap the play icon ^.
Adjust the volume.
Pause and resume
playback.
Skip to the previous video.
Tap and hold to scan backwards.
Select a scene to jump to it.
Activates a mini video
screen.
Activate 3D surround
sound effect when a
headset is connected.
Drag to scan forwards
or backwards within
a video.
Change the display mode.
Skip to the next video.
Tap and hold to scan
forwards.
Tap the pause icon M to pause playing. This icon alternates with the play
icon L, so tap it again to resume playback.
Media Center 95
Page 97

Activating the mini video screen
Return to the full video screen.
Skip to the previous video.
Pause and resume playback.
Skip to the next video.
Close the mini video
screen.
Drag to scan forwards or
backwards within a video.
Scanning
To scan the currently playing video, use one of the following methods:
• Tap and hold the forward icon K to scan forwards within a video.
• Tap and hold the back icon J to scan backwards within a video.
• Tap on the progress bar and drag it to the left or right to scan backwards
or forwards.
If the video is stopped or paused and resumed at a later time, the Videos
app remembers and resumes from the point where playback stopped.
Skipping
Tap the forward icon K to move to the next video. Tap the back icon J to
play the previous video.
96 Media Center
Page 98

Repeating
On the play screen, tap D > Settings.
• Set the Repeat option to Off to deactivate.
• Set the Repeat option to One to repeat the selected video.
• Set the Repeat option to All to repeat all of the selected videos in
sequence.
Changing Display Modes
Tap the display icon to change the display size and aspect ratio.
• ª : Full view: Turns the screen to full view.
• ¬
: Magnifies the screen size with the original horizontal or vertical ratio
kept.
• « : Original view: Turns the screen to the original view.
Sorting Videos
On the list screen, tap D > Change order and choose a category. The videos
are sorted by the chosen category.
Captions
If captions are available, tap D > Caption settings and turn on Caption.
To adjust caption delay time, tap D > Caption settings > Sync. Plus and
minus icons appear on the right side of the screen. Tap the plus icon W to
to make captions slower by 0.5 second, or tap the minus icon X to make
captions faster by 0.5 second.
Media Center 97
Page 99

Managing Videos
Viewing Video Information
On the list screen, tap and hold a video and choose Properties.
Deleting Videos
On the list screen, tap and hold a video and choose Delete. To delete
multiple videos, tap D > Delete, select videos to delete, and then tap the
delete icon G.
Searching for Videos
On the list screen, tap the search icon ¼ and enter search criteria. Select one
of the search results to watch it.
Sharing Videos
To share videos with contacts, use one of the following methods:
• On the list screen, tap and hold a video and choose Share.
• To send multiple videos, tap D > Share on the list screen, select videos
to share, and then tap the share icon ¶.
• On the play screen, tap D > Share.
98 Media Center
Page 100

Gallery
Gallery keeps a record of images and videos taken by the smartphone,
as well as any image or video files loaded onto the phone’s memory and
memory card.
Tap Gallery from the Apps screen to open.
In Starter mode: Apps > Media > Gallery
Viewing Pictures
Select an album, then select a picture to view it. Swipe the screen to the left
or right to see other pictures.
The action icons, disappear after a few seconds for a better viewing
experience. Touch the screen to get them back.
Sorting Pictures
Use one of the following methods:
• On a group list, tap the drop-down list on the top left of the screen and
choose a category.
• On a pictures list, tap D > Group by and choose a category.
The pictures are sorted by the chosen category.
Slideshow
Use one of the following methods:
• On a pictures list, tap the slideshow icon È.
• When a picture is open, tap D > Slideshow.
To stop the slideshow, tap anywhere on the screen.
Media Center 99
 Loading...